the cadet training manual volume i - webnodefiles.srmsccf.webnode.com/200000166-250c72605e/training...
TRANSCRIPT
THE CADET TRAINING MANUAL
VOLUME I
Army Code No. 71462D/HQDT/18/35/38
1990
Reprinted incorporating Amendments 1 – 6June 2001
PROTECT
PROTECT
ii
SECURITY WARNING NOTICETHIS DOCUMENT IS THE PROPERTY OF HER BRITANNIC MAJESTY’SGOVERNMENT, and is issued for the information of such persons only asneed to know its contents in the course of their official duties. Any personfinding this document should hand it into a British Forces unit or to a policestation for its safe return to the MINISTRY OF DEFENCE, D MOD SY,LONDON SW1 2HB, with particulars of how and where found. THEUNAUTHORIZED RETENTION OR DESTRUCTION OF THE DOCUMENT ISAN OFFENCE UNDER THE OFFICIAL SECRETS ACTS OF 1911 – 1989.(When released to persons outside Government service, this document isissued on a personal basis and the recipient to whom it is entrusted, inconfidence, within the provisions of the Official Secrets Acts 1911 – 1989, ispersonally responsible for its safe custody and for seeing that its contentsare disclosed only to authorized persons.)
DISTRIBUTION(See page v)
CONDITIONS OF RELEASE(Applicable to copies supplied with Ministry of Defence approval toCommonwealth and Foreign Governments)
1. This information is released by the United Kingdom Government to therecipient Government for Defence purposes only.
2. This information must be accorded the same degree of security protectionas that accorded thereto by the United Kingdom Government.
3. This information may be disclosed only within the Defence Department ofthe recipient Government, except as otherwise authorized by the Ministry ofDefence (Army).
4. This information may be subject to privately owned rights.
AMENDMENTSAmdt No Date Amdt No Date Amdt No Date
1 – 6 June 2001
PROTECT
PROTECT
Army Code No. 71462D/DAT/13/35/38
1990
THE CADET TRAINING MANUALVOLUME I
Prepared under the direction
of the Chief of the General Staff
Ministry of Defence
1990
Crown Copyright Reserved
Reprinted incorporating Amendments 1 – 6June 2001
PROTECT
PROTECT
iv
COPYRIGHTThis work is Crown copyright and the intellectual property rights for this publi-cation belong exclusively to the Ministry of Defence (MOD). No material orinformation contained in this publication should be reproduced, stored in aretrieval system or transmitted in any form outside MOD establishmentsexcept as authorized by both the sponsor and the MOD where appropriate.
AUTHORITYThis publication is issued under the overall direction of the CGS. It is an MODApproved Code of Practice (ACOP). Where issues of health and safety areconcerned it takes into account the provisions of the Health and Safety atWork Act 1974.
STATUSThe contents provide clear military information concerning the most up to dateexperience and best practice available for cadets to use in their training. If youare prosecuted for a breach of health and safety law, and it is proved that youhave not followed the relevant provisions of the ACOP, a court may find youcriminally liable unless you can show that you have complied with the require-ments of health and safety legislation since it is a breach of this legislationwhich renders a person criminally liable. Breaches or omissions of the ACOPcould result in disciplinary action under the provisions of the Army Act.
PROTECT
PROTECT
FOREWORD
Any person wishing to propose amendments to this pamphlet is invited to write to theChief Instructor at The Cadet Training Centre, Frimley Park, Camberley, SurreyGU16 5HD. Such proposals will be given consideration and, if considered necessary,appropriate amendments will be prepared and submitted for approval and publica-tion.
This pamphlet supersedes Cadet Training Manual (CCF Army Sections) Army CodeNo. 71295 and Cadet Training Manual (ACF) Army Code No. 71113.
This reprinted pamphlet incorporates Amendments 1 – 6; it does not replace theoriginal 1990 version. Subsequent amendments, beginning with Amendment 7, willtherefore be applicable to both versions.
However, due to the introduction of IT, some of the line endings on each page maydiffer slightly from the 1990 version. The top and bottom of each page and the con-tent does not.
SCALING TO PRINCIPAL USERS
CCF (thru AAs CCF) 3 copies eachCont HQs and OsC Conts plus 5% of Army Section estb
ACF (thru County HQs) 10 copies eachCounty & equivalent HQs 5 copies eachCompany & equivalent HQs 4 copies eachDetachments
DRFC, HQ LAND (G3 Res)HQs Districts, Division & Brigadewith SO (Cdts) on estb,TAVRAs and AAs CCF 1 copy each
CTTs 10 copies
CTC 10 copies
FOR THE ATTENTION OF ALL SCALE HOLDERS
Units requiring amendments to their scales should apply to SO2 (Publications),Cadet Training Centre, Frimley Park, Camberley, Surrey, GU16 5HD, who willarrange for a revised distribution.
v
PROTECT
PROTECT

vi
PROTECT
PROTECT
CONTENTS
Page
Foreword and Distribution ............................................................................ vContents ...................................................................................................... viiIllustrations ................................................................................................... xiiAssociated Publications and Posters ........................................................... xviiiAbbreviations ............................................................................................... xviiiIntroduction .................................................................................................. xix
CHAPTER 1. — TURNOUT
Section 1. — Introduction .................................................................... 1–1Section 2. — Inspection of Appearance and Dress ............................. 1–3Section 3. — Inspection of Arms ......................................................... 1–7Section 4. — Preparation and Packing of the 58 Pattern Equipment .. 1–9Annex A — Notes for Inspecting Officers .......................................... 1A–1
CHAPTER 2. — DRILL
FOOT DRILL
Section 1. — The Aim and Purpose of Drill ........................................... 2–1Section 2. — Positions of Attention, Stand at Ease and Stand Easy..... 2–3Section 3. — Turnings at the Halt ......................................................... 2–7Section 4. — Compliments: Reason, Origin and Information ................ 2–11Section 5. — Saluting to the Front ........................................................ 2–15Section 6. — Introduction to Marching .................................................. 2–17Section 7. — Marching and Halting In Quick Time ............................... 2–21Section 8. — Forming Up in Three Ranks and Getting on Parade ....... 2–23Section 9. — Open and Close Order .................................................... 2–29Section 10. — Dismissing and Falling Out .............................................. 2–31Section 11. — Wheeling in Quick Time ................................................... 2–33Section 12. — Changing Step in Quick Time .......................................... 2–35Section 13. — About Turn in Quick Time ................................................ 2–37Section 14. — Left and Right Turns on the March .................................. 2–39Section 15. — Saluting on the March Eyes Right and Left ..................... 2–41Section 16. — Marking Time in Quick Time ............................................ 2–47Section 17. — Parading and Inspecting a Squad, Moving it Off and
Falling it Out .................................................................... 2–49
RIFLE DRILL
Section 18. — The Position of Attention, Stand at Ease and Stand Easy 2–51Section 19. — Change Arms at the Shoulder ......................................... 2–55
vii
PROTECT
PROTECT
Page
Section 20. — Slope Arms from the Shoulder/Shoulder Arms from theSlope .............................................................................. 2–61
Section 21. — Ground Arms from the Slope/Take Up Arms from theGround Arms .................................................................. 2–71
Section 22. — Present Arms from the Slope/Slope Arms from thePresent ........................................................................... 2–77
Section 23. — Saluting at the Halt (Slope Position)/Saluting on theMarch (Slope Position) ................................................... 2–85
Section 24. — Definitions, Words of Command and Directing Flanks ... 2–91
CANE AND BANNER DRILL
Section 25. — Position of Attention and Stand at Ease ......................... 2–95Section 26. — Marching and Dismissing................................................ 2–99Section 27. — Halting............................................................................. 2–105Section 28. — Saluting at the Halt.......................................................... 2–109Section 29. — Saluting on the March..................................................... 2–115Section 30. — Banner Drill ..................................................................... 2–117
CHAPTER 3. — MILITARY KNOWLEDGE CCF AND ACF
Section 1. — Ranks and Badges of Rank ........................................... 3–1Section 2. — Army Structure — Arms and Services ........................... 3–2Section 3. — CCF Chain of Command ................................................ 3–3Section 4. — CCF — Selection and Initial Training in the Regular
Army ............................................................................... 3–5Section 5. — ACF — History of the Army Cadet Force ....................... 3–6Section 6. — Reserved ........................................................................Section 7. — ACF — Organization at County/Battalion Level ............. 3–10Section 8. — ACF — The Cadet’s Progress ....................................... 3–11Section 9. — ACF — Familiarization of the Cadet with the History of
the Regiment or Corps to which he is Badged .............. 3–12Annex A — The Arms and Services of the British Army ................... 3A–1
CHAPTER 4. — SKILL AT ARMS
Section 1. — Introduction .................................................................... 4–1Section 2. — Safety with Weapons ..................................................... 4–2Section 3. — The Air Rifle Safety, Loading, Firing and Unloading ...... 4–11Section 4. — The No. 8 (.22) Rifle Safety Precautions, Care and
Cleaning, Sight Setting, Loading, Unloading andAmmunition Safeguards ................................................. 4–19
Section 5. — The L98A1 Cadet General Purpose (GP) Rifle:General Description, Safety and the Sight System ........ 4–27
Section 6. — Cadet GP Rifle: Stripping, Assembling and Cleaning .... 4–45
viii
PROTECT
PROTECT
Page
Section 7. — Cadet GP Rifle: Magazine Filling, Sight Setting, Load,Unload, Make Safe and Safe Handling .......................... 4–63
Section 8. — Cadet GP Rifle: Holding and Aiming in the PronePosition .......................................................................... 4–71
Section 9. — Cadet GP Rifle: Firing in the Prone Position .................. 4–81Section 10. — Cadet GP Rifle: Firing Drills ........................................... 4–85Section 11. — Cadet GP Rifle: Mechanism of the Weapon, Immediate
Action and Possible Stoppages ..................................... 4–91Section 12. — Cadet GP Rifle: Aiming Off and Miss Drill ...................... 4–97Section 13. — Cadet GP Rifle: Firing from Other Positions .................. 4–103Section 14. — Cadet GP Rifle: Use of Cover, Carriage of the Weapon
and Reaction to Effective Enemy Fire ............................ 4–115Section 15. — Training Tests: No. 8 (.22 Rifle), Cadet GP Rifle and
Light Support Weapon ................................................... 4–127Section 16. — Visual Training and Judging Distance ............................ 4–129Lesson 1. — Visibility .......................................................................... 4–129Lesson 2. — Unit of Measure Method ................................................. 4–132Lesson 3. — Appearance Method ....................................................... 4–134Lesson 4. — Aids to Judging Distance ............................................... 4–137
Section 17. — Elementary Observation ................................................ 4–141Section 18. — Recognition of Targets ................................................... 4–145Section 19. — Fire Control Orders ........................................................ 4–151Section 20. — Introduction to the Light Support Weapon (LSW),
General Description, Safety and Iron Sight .................... 4–155Section 21. — The Sight Unit Small Arms TRILUX (SUSAT)................. 4–167Section 22. — Stripping, Assembling and Cleaning the LSW and
Sightsetting with the SUSAT ......................................... 4–173Section 23. — LSW Practice 1 — Lessons 1–3 ................................... 4–181Section 24. — The Load and Unload ................................................... 4–185Section 25. — Holding and Firing the LSW .......................................... 4–193Section 26. — Mechanism, Immediate Action and Possible Stoppages 4–203Section 27. — LSW Practice 2 — Lessons 4–6 ................................... 4–213Annex A — Cadet GP Rifle Technical Details ................................. 4A–1Annex B — Training Tests: No. 8 Rifle ............................................ 4B–1Annex C — Training Tests: Cadet GP Rifle ..................................... 4C–1Annex D — Training Tests: Light Support Weapon .......................... 4D–1Annex E — Practice Periods — Introduction ................................... 4E–1
CHAPTER 5. — USE OF MAP AND COMPASS
Section 1. — Introduction, Types of Maps, Reliability and Care ......... 5–1Section 2. — Making a Simple Map and Local Street Plans .............. 5–5Section 3. — Introduction to Ordnance Survey (OS) Maps ................ 5–11Section 4. — Relief and Vertical Interval............................................. 5–19
ix
PROTECT
PROTECT
Page
Section 5. — The Lightweight Compass ............................................ 5–25Section 6. — Map and Compass ........................................................ 5–33Section 7. — Basic Night Navigation .................................................. 5–41Section 8. — Preparation of a Route Card ......................................... 5–45
CHAPTER 6. — FIELDCRAFT
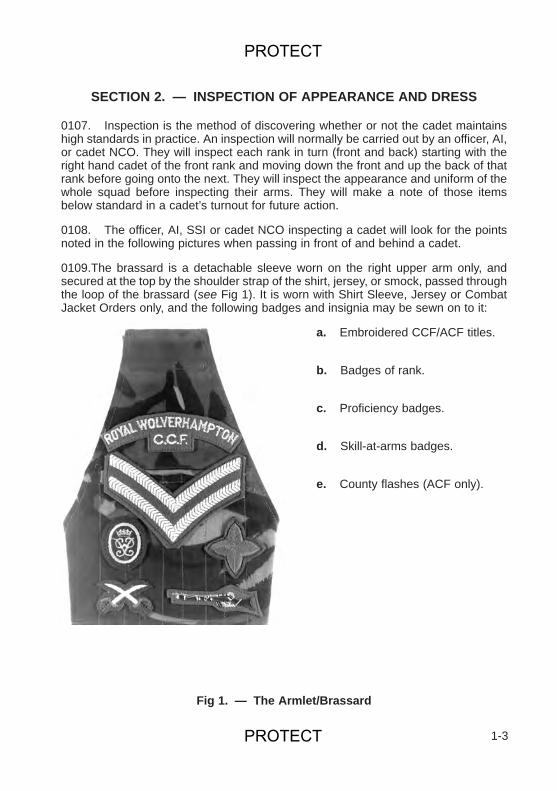
Section 1. — Introduction ................................................................... 6–1Section 2. — Personal Camouflage and Concealment ...................... 6–3Section 3. — Personal Camouflage and Concealment — Practice ... 6–9Section 4. — Moving With and Without Rifle ...................................... 6–11Section 5. — Movement and Observation — Practice ....................... 6–17Section 6. — Elementary Obstacle Crossing ..................................... 6–19Section 7. — Crossing Obstacles — Practice .................................... 6–21Section 8. — Introduction to Night Work ............................................ 6–23Section 9. — Elementary Night Movement ........................................ 6–29Section 10. — Elementary Night Movement — Practice ...................... 6–33Section 11. — Observation at Night — Practice .................................. 6–35Section 12. — Identifying Sounds at Night — Practice ........................ 6–39Section 13. — Sentries: Introduction .................................................... 6–41Lesson 1. — Duties of a Sentry at Night ............................................ 6–43Lesson 2. — Sentries at Night — Practice ......................................... 6–47
Section 14. — Ground and Cover ........................................................ 6–49Section 15. — Safety Precautions with Blank Ammunition Including
its Use at Night ............................................................. 6–55Section 16. — Section Organization and Place in the Battalion ........... 6–59Section 17. — Section Formation and Field Signals ............................ 6–65Lesson 1. — Section Formations ....................................................... 6–65Lesson 2. — Field Signals ................................................................. 6–73Lesson 3. — Section Formations and Field Signals — Practice ........ 6–79
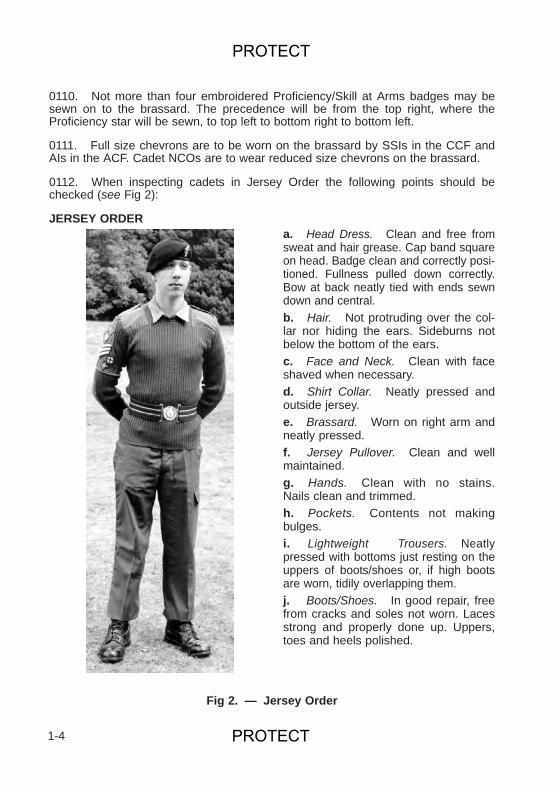
Section 18. — Orders ........................................................................... 6–81Section 19. — Patrols ........................................................................... 6–91Lesson 1. — Aims and Types of Patrol .............................................. 6–91Lesson 2. — Patrols: Mounting, Conducting and Debriefing ............ 6–95Lesson 3. — Patrolling — Practice .................................................... 6–101
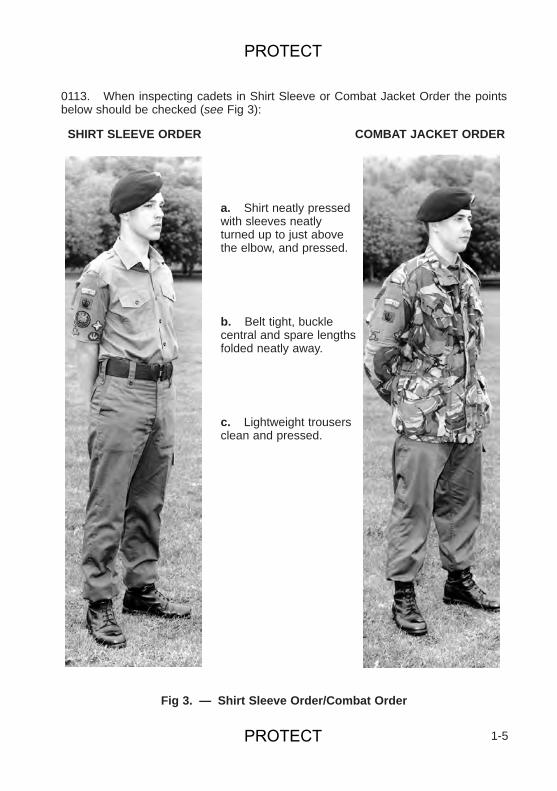
Section 20. — Ambushes ..................................................................... 6–103Lesson 1. — The Deliberate Ambush ................................................ 6–105
Section 21. — Patrol Harbour .............................................................. 6–113Section 22. — Fire and Movement ....................................................... 6–121Lesson 1. — Explanation ................................................................... 6–121Lesson 2. — Fire and Movement — Practice .................................... 6–127
Section 23. — Section Battle Drills ....................................................... 6–129Section Battle Drill 1. — Battle Preparations ................ 6–130Section Battle Drill 2. — Reaction to Effective EnemyFire ................................................................................ 6–131
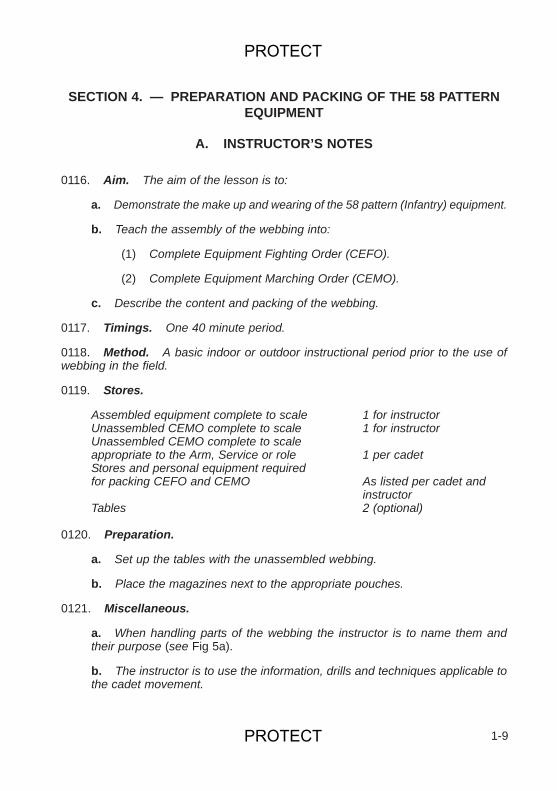
x
PROTECT
PROTECT
Page
Section Battle Drill 3. — Location of Enemy ................. 6–132Section Battle Drill 4. — Winning the Fire Fight ............ 6–133Section Battle Drill 5. — The Attack .............................. 6–133Section Battle Drill 6. — Reorganization ....................... 6–138Section Battle Drills — Summary .................................. 6–139
Section 24. — Operations in Woods and Forests ................................ 6–141Annex A — Orders Headings ........................................................... 6A–1Annex B — Orders Extraction .......................................................... 6B–1Annex C — Patrol Orders ................................................................ 6C–1Annex D — Patrol Report ................................................................. 6D–1
CHAPTER 7. — FIRST AID
Section 1. — Introduction ................................................................... 7–1Section 2. — Emergency Action ......................................................... 7–3Section 3. — CASAID ........................................................................ 7–11Lesson 1. — The Aims of First Aid, Incident Action Plan, Initial
Assessment and the Recovery Position ....................... 7–11Lesson 2. — Resuscitation ................................................................. 7–19Lesson 3. — Stopping Bleeding, How to Apply a Dressing and
Treatment for Shock, Cuts and Grazes ........................ 7–25Lesson 4. — Fractures and How to Treat Them and Other Injuries .. 7–31
CHAPTER 8. — EXPEDITION TRAINING
Section 1. — Introduction ................................................................... 8–1Section 2. — The Country Code ........................................................ 8–5Section 3. — Campcraft ..................................................................... 8–9
CHAPTER 9. — PHYSICAL ACHIEVEMENT TRAINING IN THE ARMYCADET FORCE
Section 1. — Introduction ................................................................... 9–1Section 2. — The Weekly Training Programme System .................... 9–1Annex A — Physical Achievement Training in the ACF
Weekly Training Programme: Lesson Plan .................. 9A–1Appendix 1 — Arm and Shoulder Exercises ........................................ 9A1–1Appendix 2 — Trunk Exercises ............................................................. 9A2–1Appendix 3 — Leg Exercises ............................................................... 9A3–1Appendix 4 — Weekly Training Programme Physical Achievement
Tests (Boys) .................................................................. 9A4–1Appendix 5 — Weekly Training Programme Physical Achievement
Tests (Girls) .................................................................. 9A5–1Appendix 6 — Lesson Plan .................................................................. 9A6–1Appendix 7 — Physical Achievement Tests: Record Score Sheet ..... 9A7–1
xi
PROTECT
PROTECT
Page
CHAPTER 10. — THE ACF CADET AND THE COMMUNITY
Section 1. — Introductory Talk and Outline Syllabus ......................... 10–1Section 2. — The Emergency Services (1–Star Level) ...................... 10–3Section 3. — Responsibility Training (1–Star Level) .......................... 10–5Section 4. — Visit to One of the Local Services (2–Star Level) ......... 10–6Section 5. — Local Services Locations Street Map (2–Star Level) .... 10–7Section 6. — Involvement in Community Activities (2–Star Level) ..... 10–8Section 7. — Community Activities and Projects (3–Star Level) ........ 10–9Section 8. — Community Activities and Projects (4–Star Level) ........ 10–11
CHAPTER 11. — CADET INSTRUCTORS’ CADRES
Section 1. — CCF Methods of Instruction Cadre ............................... 11–1Section 2. — ACF Junior Cadet Instructors’ Cadre (JCIC) ................ 11–2Section 3. — ACF Senior Cadet Instructors’ Cadre (SCIC) ............... 11–3
ILLUSTRATIONS
Page
Chapter 1. — Turnout
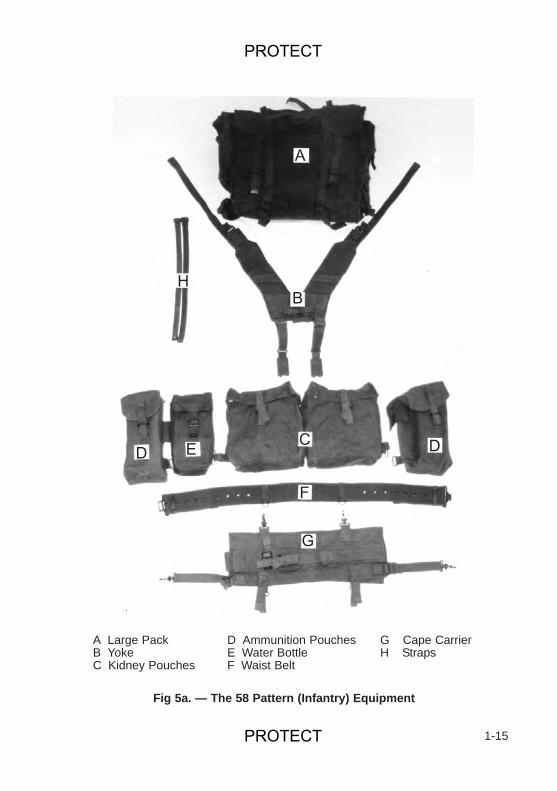
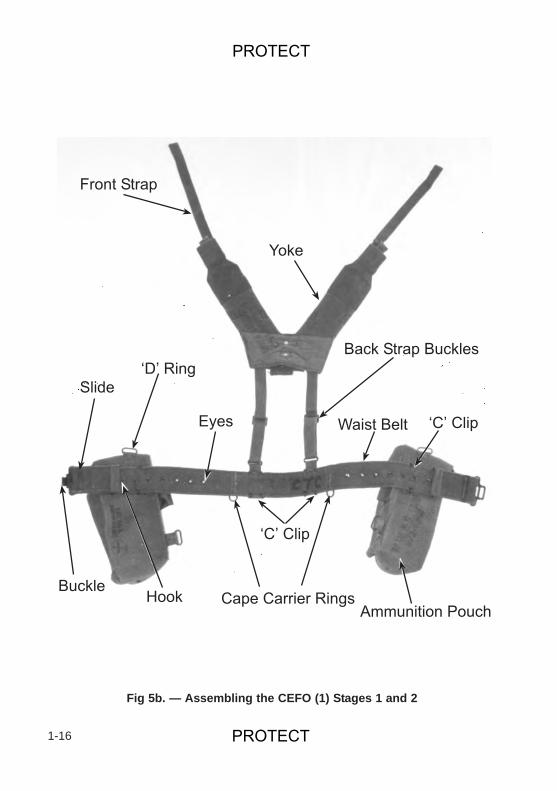
Fig 1. — The Armlet/Brassard ......................................................... 1–3Fig 2. — Jersey Order ...................................................................... 1–4Fig 3. — Shirt Sleeve Order/Combat Order ..................................... 1–5Fig 4 — Reserved ........................................................................... 1–6Fig 5a. — The 58 Pattern (Infantry) Equipment ................................. 1–15Fig 5b. — Assembling the CEFO (1) ................................................. 1–16Fig 5c. — Assembling the CEFO (2) ................................................. 1–17Fig 5d. — Assembling the CEMO ...................................................... 1–18Fig 5e. — The 58 Pattern CEFO Assembled ..................................... 1–19Fig 5f. — The 58 Pattern CEMO Assembled .................................... 1–20
Chapter 2. — Drill
Fig 6. — Position of Attention ........................................................... 2–4Fig 7. — Stand at Ease ..................................................................... 2–5Fig 8. — Right Turn, First Position .................................................... 2–9Fig 9. — About Turn, First Position ................................................... 2–10Fig 10. — Saluting to the Front ........................................................... 2–16Fig 11. — Marching in Quick Time ...................................................... 2–18
xii
PROTECT
PROTECT
Page
Fig 12. — Interval of One Arm’s Length between Cadets ................... 2–24Fig 13. — Interval of One Arm’s Length between Ranks .................... 2–25Fig 14. — Diagram of a Squad Correctly Dressed and Covered ........ 2–27Fig 15. — Right Wheel ........................................................................ 2–34Fig 16. — Saluting on the March ........................................................ 2–43Fig 17. — The Position of Attention .................................................... 2–52Fig 18. — The Stand at Ease .............................................................. 2–53Fig 18a. — Stand Easy ......................................................................... 2–54Fig 19. — Change Arms — One ......................................................... 2–57Fig 20. — Change Arms — Two ......................................................... 2–58Fig 21. — Change Arms — Three ...................................................... 2–59Fig 22. — Change Arms — Four ........................................................ 2–60Fig 23. — Slope Arms — One ............................................................ 2–63Fig 24. — Slope Arms — Two ............................................................ 2–64Fig 25. — Slope Arms — Three .......................................................... 2–65Fig 26. — Shoulder Arms — One ....................................................... 2–66Fig 27. — Shoulder Arms — Two ....................................................... 2–67Fig 28. — Shoulder Arms — Three ..................................................... 2–68Fig 29. — Shoulder Arms — Four ....................................................... 2–69Fig 30. — Ground Arms — One .......................................................... 2–73Fig 31. — Ground Arms — Two .......................................................... 2–74Fig 32 — Ground Arms — Three ....................................................... 2–75Fig 33. — Ground Arms — Four ......................................................... 2–76Fig 34. — Present Arms — One .......................................................... 2–79Fig 35. — Present Arms — Two ......................................................... 2–80Fig 36. — Present Arms — Three ....................................................... 2–81Fig 37. — Slope Arms — One ............................................................ 2–82Fig 38. — Slope Arms — Two ............................................................ 2–83Fig 39. — Salute to the Front — One ................................................. 2–87Fig 40. — Salute to the Front — Two ................................................. 2–88Fig 41. — Salute to the Right — One ................................................. 2–89Fig 42. — Salute to the Left — One .................................................... 2–90Fig 43. — Directing Flanks................................................................... 2–94Fig 44. — Position of Attention ............................................................ 2–97Fig 45. — Stand at Ease...................................................................... 2–98Fig 46. — Quick March ........................................................................ 2–102Fig 47. — Quick March — Third Position............................................. 2–103Fig 48. — The Halt ............................................................................... 2–107Fig 49. — Salute at the Halt ................................................................. 2–113Fig 50. — The Order ............................................................................ 2–119Fig 51. — The Stand at Ease............................................................... 2–119Fig 52. — Carry — from the Order....................................................... 2–120Fig 53. — Order — from the Carry....................................................... 2–121Figs 54 and 55. — Reserved ...................................................................
xiii
PROTECT
PROTECT
Page
Chapter 3. — Military Knowledge
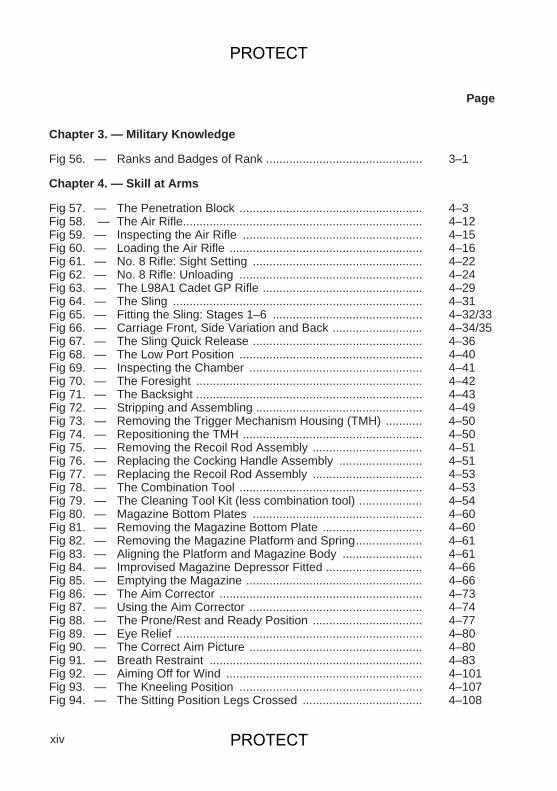
Fig 56. — Ranks and Badges of Rank ............................................... 3–1
Chapter 4. — Skill at Arms
Fig 57. — The Penetration Block ....................................................... 4–3Fig 58. — The Air Rifle........................................................................ 4–12Fig 59. — Inspecting the Air Rifle ...................................................... 4–15Fig 60. — Loading the Air Rifle .......................................................... 4–16Fig 61. — No. 8 Rifle: Sight Setting ................................................... 4–22Fig 62. — No. 8 Rifle: Unloading ....................................................... 4–24Fig 63. — The L98A1 Cadet GP Rifle ................................................ 4–29Fig 64. — The Sling ........................................................................... 4–31Fig 65. — Fitting the Sling: Stages 1–6 ............................................. 4–32/33Fig 66. — Carriage Front, Side Variation and Back ........................... 4–34/35Fig 67. — The Sling Quick Release ................................................... 4–36Fig 68. — The Low Port Position ....................................................... 4–40Fig 69. — Inspecting the Chamber .................................................... 4–41Fig 70. — The Foresight .................................................................... 4–42Fig 71. — The Backsight .................................................................... 4–43Fig 72. — Stripping and Assembling .................................................. 4–49Fig 73. — Removing the Trigger Mechanism Housing (TMH) ........... 4–50Fig 74. — Repositioning the TMH ...................................................... 4–50Fig 75. — Removing the Recoil Rod Assembly ................................. 4–51Fig 76. — Replacing the Cocking Handle Assembly ......................... 4–51Fig 77. — Replacing the Recoil Rod Assembly ................................. 4–53Fig 78. — The Combination Tool ....................................................... 4–53Fig 79. — The Cleaning Tool Kit (less combination tool) ................... 4–54Fig 80. — Magazine Bottom Plates ................................................... 4–60Fig 81. — Removing the Magazine Bottom Plate .............................. 4–60Fig 82. — Removing the Magazine Platform and Spring.................... 4–61Fig 83. — Aligning the Platform and Magazine Body ........................ 4–61Fig 84. — Improvised Magazine Depressor Fitted ............................. 4–66Fig 85. — Emptying the Magazine ..................................................... 4–66Fig 86. — The Aim Corrector ............................................................. 4–73Fig 87. — Using the Aim Corrector .................................................... 4–74Fig 88. — The Prone/Rest and Ready Position ................................. 4–77Fig 89. — Eye Relief .......................................................................... 4–80Fig 90. — The Correct Aim Picture .................................................... 4–80Fig 91. — Breath Restraint ................................................................ 4–83Fig 92. — Aiming Off for Wind ........................................................... 4–101Fig 93. — The Kneeling Position ....................................................... 4–107Fig 94. — The Sitting Position Legs Crossed .................................... 4–108
xiv
PROTECT
PROTECT
Page
Fig 95. — The Sitting Position Legs Apart ................................. 4–109Fig 96. — Reserved ...................................................................Fig 97. — Reserved ...................................................................Fig 98. — Firing Round Cover ................................................... 4–118Fig 99. — Resting Back of the Hand on Cover .......................... 4–119Fig 100. — Firing from a Trench .................................................. 4–121Fig 101. — Firing from Behind a Low Bank ................................. 4–121Fig 102. — The High Port ............................................................ 4–123Fig 103. — The Direct Method ..................................................... 4–147Fig 104. — The Clock Ray Method .............................................. 4–149Fig 105. — The Light Support Weapon (LSW) ............................ 4–161Fig 106. — The Sight Unit Small Arms Trilux (SUSAT) ............... 4–162Fig 107. — The Central and Correct Aim Picture ........................ 4–163Fig 108. — Bipod and Butt Strap ................................................. 4–164Fig 109. — The Iron Sight ............................................................ 4–165Fig 110. — The Tool Roll ............................................................. 4–177Fig 111. — Replacing the Cocking Handle .................................. 4–178Fig 111a. — Removing the Piston ................................................. 4–179Fig 111b. — Removing the Gas Cylinder ...................................... 4–180Fig 111c. — Removing the Gas Plug ............................................ 4–180Fig 112. — Reserved ....................................................................Fig 113. — Reserved ....................................................................Fig 114. — Holding, Prone Position – Single Rounds ................. 4–196Fig 114a. — Holding, Prone Position – Bursts ............................... 4–197Fig 115. — Mechanical Safety ..................................................... 4–209Fig 116a-d.— Mechanism ................................................................ 4–210/211Fig 117. — Reserved.
Chapter 5. — Use of Map and Compass
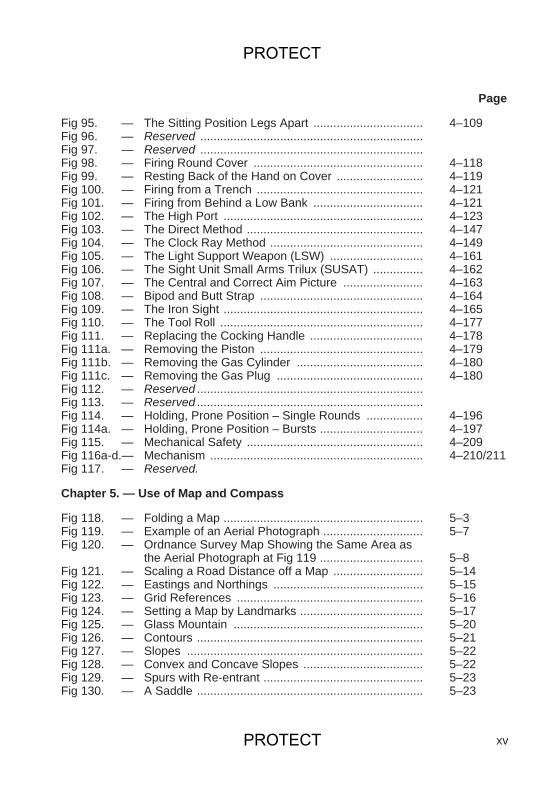
Fig 118. — Folding a Map ............................................................ 5–3Fig 119. — Example of an Aerial Photograph .............................. 5–7Fig 120. — Ordnance Survey Map Showing the Same Area as
the Aerial Photograph at Fig 119 ............................... 5–8Fig 121. — Scaling a Road Distance off a Map ........................... 5–14Fig 122. — Eastings and Northings ............................................. 5–15Fig 123. — Grid References ........................................................ 5–16Fig 124. — Setting a Map by Landmarks ..................................... 5–17Fig 125. — Glass Mountain ......................................................... 5–20Fig 126. — Contours .................................................................... 5–21Fig 127. — Slopes ....................................................................... 5–22Fig 128. — Convex and Concave Slopes .................................... 5–22Fig 129. — Spurs with Re-entrant ................................................ 5–23Fig 130. — A Saddle .................................................................... 5–23
xv
PROTECT
PROTECT
Page
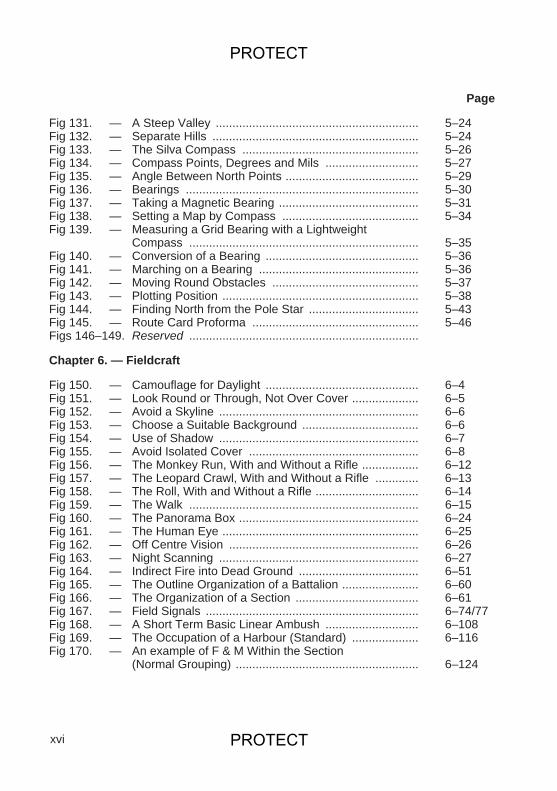
Fig 131. — A Steep Valley ............................................................. 5–24Fig 132. — Separate Hills .............................................................. 5–24Fig 133. — The Silva Compass ..................................................... 5–26Fig 134. — Compass Points, Degrees and Mils ............................ 5–27Fig 135. — Angle Between North Points ........................................ 5–29Fig 136. — Bearings ...................................................................... 5–30Fig 137. — Taking a Magnetic Bearing .......................................... 5–31Fig 138. — Setting a Map by Compass ......................................... 5–34Fig 139. — Measuring a Grid Bearing with a Lightweight
Compass ..................................................................... 5–35Fig 140. — Conversion of a Bearing .............................................. 5–36Fig 141. — Marching on a Bearing ................................................ 5–36Fig 142. — Moving Round Obstacles ............................................ 5–37Fig 143. — Plotting Position ........................................................... 5–38Fig 144. — Finding North from the Pole Star ................................. 5–43Fig 145. — Route Card Proforma .................................................. 5–46Figs 146–149. Reserved .....................................................................
Chapter 6. — Fieldcraft
Fig 150. — Camouflage for Daylight .............................................. 6–4Fig 151. — Look Round or Through, Not Over Cover .................... 6–5Fig 152. — Avoid a Skyline ............................................................ 6–6Fig 153. — Choose a Suitable Background ................................... 6–6Fig 154. — Use of Shadow ............................................................ 6–7Fig 155. — Avoid Isolated Cover ................................................... 6–8Fig 156. — The Monkey Run, With and Without a Rifle ................. 6–12Fig 157. — The Leopard Crawl, With and Without a Rifle ............. 6–13Fig 158. — The Roll, With and Without a Rifle ............................... 6–14Fig 159. — The Walk ..................................................................... 6–15Fig 160. — The Panorama Box ...................................................... 6–24Fig 161. — The Human Eye ........................................................... 6–25Fig 162. — Off Centre Vision ......................................................... 6–26Fig 163. — Night Scanning ............................................................ 6–27Fig 164. — Indirect Fire into Dead Ground .................................... 6–51Fig 165. — The Outline Organization of a Battalion ....................... 6–60Fig 166. — The Organization of a Section ..................................... 6–61Fig 167. — Field Signals ................................................................ 6–74/77Fig 168. — A Short Term Basic Linear Ambush ............................ 6–108Fig 169. — The Occupation of a Harbour (Standard) .................... 6–116Fig 170. — An example of F & M Within the Section
(Normal Grouping) ....................................................... 6–124
xvi
PROTECT
PROTECT

Page
Fig 171. — An Example of F & M Within the Section(Support and Assault Teams) ....................................... 6–125
Fig 172. — One Phase — Right Flanking ....................................... 6–133Fig 173. — Two Phase — Attack .................................................... 6–134Fig 174. — Three Phase — Attack .................................................. 6–135Fig 175. — Assault Using Extra Men from Fire Team D ................. 6–136
Chapter 7. — First Aid
Fig 176. — Opening the Airway — Jaw Lift/Head Tilt ..................... 7–13Fig 177. — Checking for Breathing ................................................. 7–14Fig 178. — Checking for a Pulse ..................................................... 7–15Fig 179. — The Recovery Position .................................................. 7–17Fig 180. — Pinch Nose and Seal Mouth ......................................... 7–21Fig 181. — Maintain Jaw Lift/Head Tilt ............................................ 7–21Fig 182. — External Chest Compression ........................................ 7–22Fig 183. — Applying a Dressing ...................................................... 7–27Fig 184. — Arm Elevated in an Elevation Sling ............................... 7–27Fig 185. — Taking a Pulse ............................................................... 7–29Fig 186. — Steady and Support a Fractured Leg ............................ 7–34Fig 187. — Apply Gentle Traction ................................................... 7–34Fig 188. — Immobilise the Fractured Leg ....................................... 7–35Fig 189. — Immobilise Using Triangular Bandages ........................ 7–35Fig 190. — Immobilisation of Fractured Leg for a Delay or Journey 7–36Fig 191 — Support for a Fractured Arm.......................................... 7–37Fig 192 — Immobilisation and Support for a Fractured Arm........... 7–37
Chapter 8. — Expedition Training
Fig 193. — The Country Code ........................................................ 8–5/8Fig 194. — Correctly Packed Load ................................................. 8–13Fig 195. — Principles of Laying Out a Camp Site ........................... 8–13Fig 196. — Activities on a Group Basis ........................................... 8–14Fig 197. — Improvised Tent Construction ....................................... 8–15Fig 198. — Camp Fires and Stoves ................................................ 8–17Fig 199. — Construction of a Latrine ............................................... 8–17Fig 200. — A Well Pitched Tent on a Sheltered Site ....................... 8–22Fig 201. — Securing the Guys ........................................................ 8–22
xvii
PROTECT
PROTECT
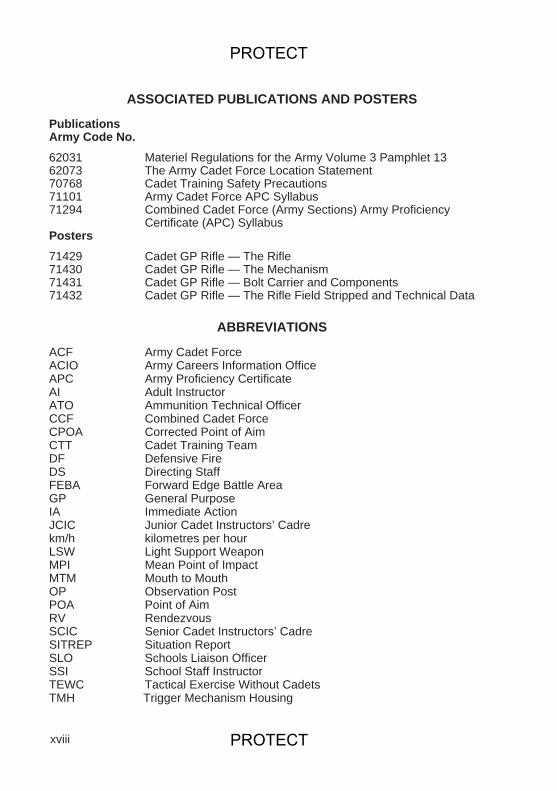
ASSOCIATED PUBLICATIONS AND POSTERS
PublicationsArmy Code No. 62031 Materiel Regulations for the Army Volume 3 Pamphlet 1362073 The Army Cadet Force Location Statement70768 Cadet Training Safety Precautions71101 Army Cadet Force APC Syllabus71294 Combined Cadet Force (Army Sections) Army Proficiency
Certificate (APC) SyllabusPosters71429 Cadet GP Rifle — The Rifle71430 Cadet GP Rifle — The Mechanism71431 Cadet GP Rifle — Bolt Carrier and Components 71432 Cadet GP Rifle — The Rifle Field Stripped and Technical Data
ABBREVIATIONS
ACF Army Cadet ForceACIO Army Careers Information OfficeAPC Army Proficiency CertificateAI Adult InstructorATO Ammunition Technical OfficerCCF Combined Cadet ForceCPOA Corrected Point of AimCTT Cadet Training TeamDF Defensive FireDS Directing StaffFEBA Forward Edge Battle AreaGP General PurposeIA Immediate ActionJCIC Junior Cadet Instructors’ Cadrekm/h kilometres per hourLSW Light Support WeaponMPI Mean Point of ImpactMTM Mouth to MouthOP Observation PostPOA Point of AimRV RendezvousSCIC Senior Cadet Instructors’ CadreSITREP Situation ReportSLO Schools Liaison OfficerSSI School Staff InstructorTEWC Tactical Exercise Without CadetsTMH Trigger Mechanism Housing
xviii
PROTECT
PROTECT
CADET TRAINING MANUAL: VOLUME I
INTRODUCTION
General
1. In 1987 the decision was taken to replace the Cadet Training Manual (CCFArmy Sections) and the Cadet Training Manual (ACF) with a single manual for theuse of both Cadet Forces.
2. The Cadet Training Manual 1989/1990 consists of two volumes. This volumecontains all the instructional matter on military subjects (apart from Special to Armtraining) which the cadet in the CCF requires to master in order to qualify for hisArmy Proficiency Certificate (APC) and Advanced APC, and which the cadet in theACF needs for the award of his Proficiency Stars 1 to 4.
3. In general terms Volume II (Army Code No. 71463) is the Instructor’s Handbookwhich contains additional information, instructions and advice which the instructorneeds to assist him to train cadets.
Layout
4. Format. This volume is laid out in eleven chapters by subjects, each dividedinto a number of sections. Where appropriate, the format adopted is that of the LessonPlan with each section/lesson divided into two parts, ‘Instructor’s Notes’ and ‘Conductof the Lesson’. The aim of the Instructor’s Notes is to assist the instructor, especiallythe inexperienced instructor, with the preparation and conduct of the lesson.
5. Chapter 1 — Turnout.
a. This chapter, which is largely pictorial includes instructions for achieving ahigh standard of appearance and dress at all times. In practice, this is mainlytaught by the advice given and the example set by officers, adult instructors(AI), school staff instructors (SSI) and cadet NCO’s.
b. The complete preparation and packing of 58 pattern webbing is included,as the items of stores and equipment listed, which are not issued to cadets,may be available on loan or purchased by individuals.
c. Dedicated periods in this subject are not allocated in the APC (CCF) syl-labus.
6. Chapter 2 — Drill.
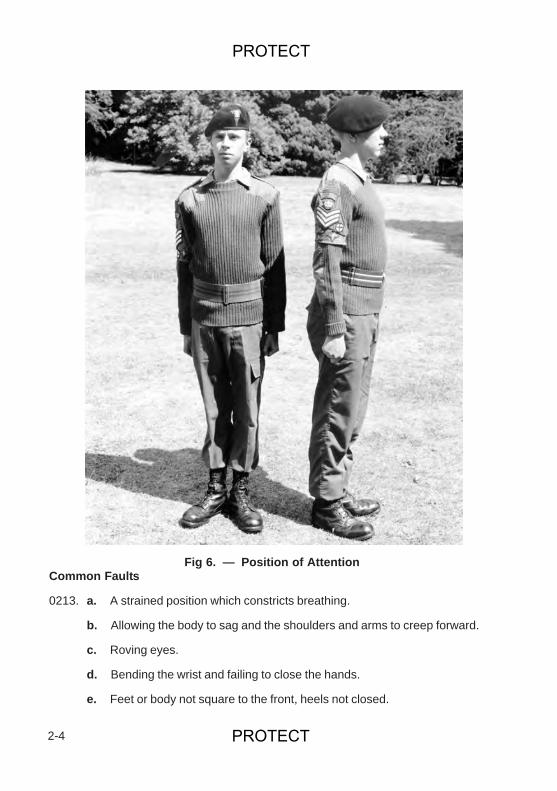
a. Foot drill is taught in quick time only and is confined to movements usedon routine detachment parades. More advanced drill may be taught to selected
xix
PROTECT
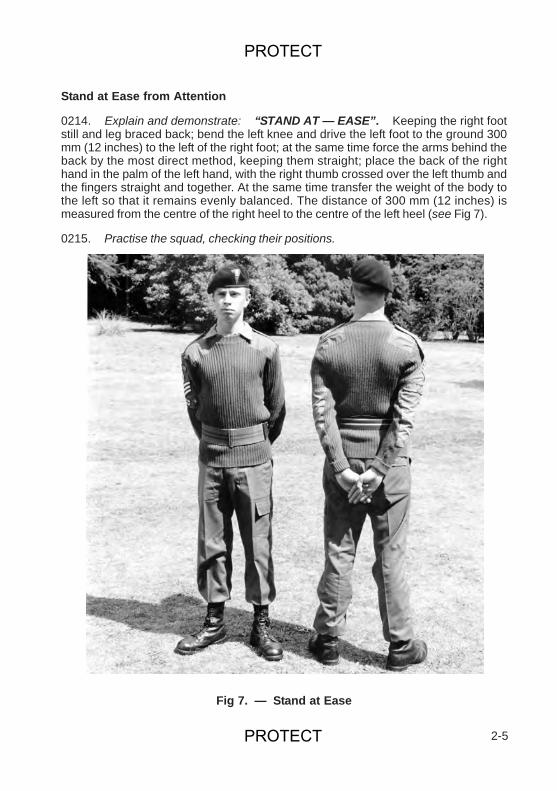
PROTECT
cadets comparatively quickly by a good instructor with the assistance of TheDrill Manual (AC 70166) (Revised 1990).
b. Following the introduction of the Cadet GP Rifle, rifle drill now includesthe Ground Arms/Take Up Arms.
c. Cane and banner drill are included for ceremonial and other special occa-sions.
7. Chapter 3 — Military Knowledge. In the case of the CCF the aim of thischapter is to give the cadet a general background knowledge of the structure of theRegular Army in the broadest outline. For the ACF the main features covered arethe history and present organisation of the ACF itself.
8. Chapter 4 — Skill at Arms. This is much the longest and most detailedchapter in the volume, covering as it does the Air Rifle, the No. 8 Rifle, the CadetGP Rifle and the Light Support Weapon (LSW), plus sections on such subjects asAids to Judging Distance and Fire Control Orders.
9. Chapter 5 — Use of Map and Compass. This chapter explains the skillsrequired by a cadet to find his way across country with the aid of his map and com-pass to a standard similar to that included in the GCSE geography syllabus.
10. Chapter 6 — Fieldcraft.
a. This chapter explains the skills required by a cadet to work with maximumefficiency when training on field exercises. The subject is dealt with only up tosection level, but the chapter includes an explanation of how the section fitsinto the organization of the platoon, company and battalion.
b. When training cadets in fieldcraft Regular Army instructors (e.g., mem-bers of Cadet Training Teams (CTT)) should note that because of weapon dif-ferences between the Army and the Cadet Forces, there are differences in theorganization of the section and in section battle drills.
11. Chapter 7 — First Aid. This chapter covers management of an incident(Emergency Action) and the emergency aid given to a casualty (Casaid). Trainingfor a first aid qualification i.e., a recognised first aid certificate, is dealt with inVolume II.
12. Chapter 8 — Expedition Training. This chapter covers the Country Codeand Campcraft. However, it should be noted that ‘Self Reliance Training’ in the APC(CCF) syllabus includes first aid as well. In the APC (ACF) syllabus First Aid andExpedition Training appear as separate subjects.
xx
PROTECT
PROTECT

13. Chapter 9 — Physical Achievement Training in the ACF.
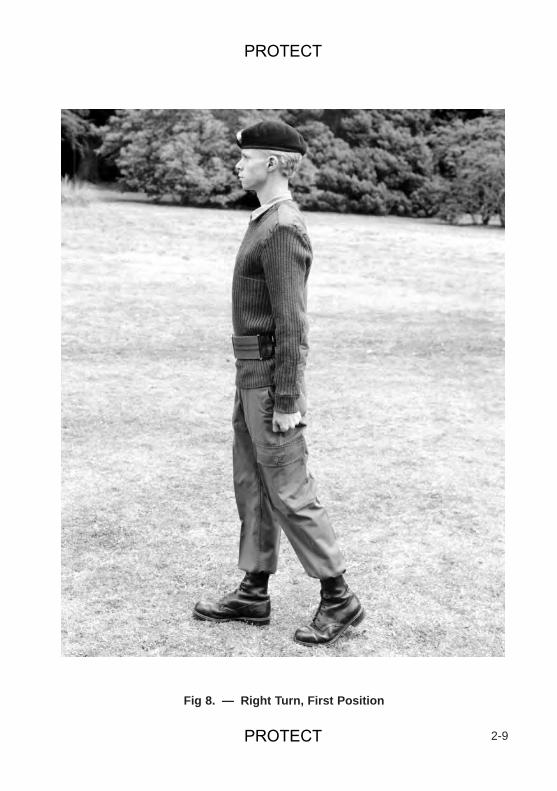
a. As implied by the title, this chapter applies only to the ACF.
b. The flexible training programme outlined is designed to improve cadet’sfitness progressively in order to pass the Physical Achievement Test at eachStar level.
c. The tests at all Star levels are the same as those included in the PhysicalRecreation Section of The Duke of Edinburgh’s Award.
14. Chapter 10 — The ACF Cadet and the Community. Again, this chapteronly applies to the ACF. Those instructors concerned with planning and supervisingthis subject should also refer to Volume II (Army Code No. 71463).
15. Chapter 11 — Cadet Instructors’ Cadres. This short final chapter explainsthe purpose of the Methods of Instruction Cadre in the CCF and the Junior andSenior Cadet Instructors’ Cadres in the ACF.
Exclusions
16. The following subjects are NOT specifically covered in detail in this volume ofthe manual, for the reasons given below:
a. Shooting. Whilst training for shooting is covered in Chapter 4, Skill atArms, the details of shooting practices are given in the CCF and ACF trainingsyllabi. Coaching techniques are covered in Volume II, Chapter 3 TheConduct of Range Firing.
b. Adventurous Training (AT). AT is currently covered in Cadet TrainingSafety Precautions (Army Code No. 70768) and AGAIs Volume 1 Chapter 11.
c. Orienteering. Orienteering is included in both the CCF Advanced APCand ACF 4-Star syllabi. Reference is to be made to ‘Orienteering — a MilitaryTraining Guide (AC 71341)’ as necessary.
d. Duke of Edinburgh’s Award Scheme. The detail of the activities avail-able, the standards to be achieved, and the conditions under which the AwardScheme is run, are all included in the Duke of Edinburgh’s Award Handbook.
e. Safety Rules. The safety rules, to be strictly complied with throughoutcadet force training, are set out in the booklet Cadet Training SafetyPrecautions (Army Code No. 70768), a copy of which must be carried by allinstructors when in charge of cadets on training.
xxi
PROTECT
PROTECT
Duration of Training Periods
17. Although both the APC (CCF – Army Sections) and (ACF) syllabi are bothbased on training periods of 30 minutes of actual instruction, exclusive of prepara-tion and packing-up time, these timings are only intended as a general guide toplanning training. The actual time taken over a lesson will vary according to thelearning ability of the cadets under instruction.
xxii
PROTECT
PROTECT

Chapter 1
TURNOUT
SECTION 1. — INTRODUCTION
General
0101. The subject of Turnout covers the wearing of both uniform and personalequipment. Teaching the correct and smart wearing of uniform is not suitable fordivision into formal lesson plans, but is covered in the first three sections of thischapter. The preparation and packing of personal webbing does need formalinstruction.
Uniform
0102. APC Syllabus.
a. CCF. In the CCF no specific periods are allocated to uniform in the APCsyllabus. The cadet is shown how to wear his uniform before wearing it onparade, and subsequently he is inspected at the beginning of each drill period inaccordance with the standards laid down in this chapter. Faults must beexplained, and further improvement expected.
b. ACF. In the ACF four 30 minute Demonstration and Practice periods areincluded in the APC syllabus at Recruit level. Having seen these the cadet mustcontinually practise in order to reach the high standard required to qualify in thissubject. Although no further instruction is given he is expected to maintain thisstandard.
0103. Care. The cadet has the privilege of wearing the Queen’s uniform. It istherefore very important that he learns to wear it with dignity and pride. The uniformmust be given the same care as is given to their best clothes. When not in use it mustbe hung up out of harm’s way. It must be washed or dry-cleaned from time to time asnecessary. Boots (particularly soles) must be kept in good repair and the upper partscleaned regularly with either polish or dubbin.
0104. Smartness in turnout includes both appearance and dress. Smartness inCadet Force uniform, which includes training dress, is achieved by keeping it clean,correctly pressed and in good repair. This will ensure also that the maximum wear isextracted from it. Extreme methods, such as sewing creases and inserting weights introusers are unnecessary and reduce the life of the uniform. Cadet Force uniform isnot to be used for other than Cadet Force training.
1-1
PROTECT
PROTECT
Personal Equipment
0105. Equipment must be kept clean by dry brushing. It must not be wet scrubbed,blancoed or bleached. Brasses will not be polished but will be kept free of dirt. Whennot in use equipment should be placed in the small pack, which should be stored in acupboard or on a shelf. The preparation and packing of 58 pattern webbing is coveredin detail in Section 4.
References
0106. Detailed instructions for the wearing of uniform and the scales of clothing andpersonal equipment for both CCF (Army Sections) and the ACF are contained inMateriel Regulations for the Army Volume 3 Pamphlet No. 13 (Army Code No. 62031).
1-2
PROTECT
PROTECT
SECTION 2. — INSPECTION OF APPEARANCE AND DRESS
0107. Inspection is the method of discovering whether or not the cadet maintainshigh standards in practice. An inspection will normally be carried out by an officer, AI,or cadet NCO. They will inspect each rank in turn (front and back) starting with theright hand cadet of the front rank and moving down the front and up the back of thatrank before going onto the next. They will inspect the appearance and uniform of thewhole squad before inspecting their arms. They will make a note of those itemsbelow standard in a cadet’s turnout for future action.
0108. The officer, AI, SSI or cadet NCO inspecting a cadet will look for the pointsnoted in the following pictures when passing in front of and behind a cadet.
0109.The brassard is a detachable sleeve worn on the right upper arm only, andsecured at the top by the shoulder strap of the shirt, jersey, or smock, passed throughthe loop of the brassard (see Fig 1). It is worn with Shirt Sleeve, Jersey or CombatJacket Orders only, and the following badges and insignia may be sewn on to it:
a. Embroidered CCF/ACF titles.
b. Badges of rank.
c. Proficiency badges.
d. Skill-at-arms badges.
e. County flashes (ACF only).
1-3
Fig 1. — The Armlet/Brassard
PROTECT
PROTECT
0110. Not more than four embroidered Proficiency/Skill at Arms badges may besewn on to the brassard. The precedence will be from the top right, where theProficiency star will be sewn, to top left to bottom right to bottom left.
0111. Full size chevrons are to be worn on the brassard by SSIs in the CCF andAIs in the ACF. Cadet NCOs are to wear reduced size chevrons on the brassard.
0112. When inspecting cadets in Jersey Order the following points should bechecked (see Fig 2):
JERSEY ORDER
1-4
a. Head Dress. Clean and free fromsweat and hair grease. Cap band squareon head. Badge clean and correctly posi-tioned. Fullness pulled down correctly.Bow at back neatly tied with ends sewndown and central.b. Hair. Not protruding over the col-lar nor hiding the ears. Sideburns notbelow the bottom of the ears.c. Face and Neck. Clean with faceshaved when necessary.d. Shirt Collar. Neatly pressed andoutside jersey.e. Brassard. Worn on right arm andneatly pressed.f. Jersey Pullover. Clean and wellmaintained.g. Hands. Clean with no stains.Nails clean and trimmed.h. Pockets. Contents not makingbulges.i. Lightweight Trousers. Neatlypressed with bottoms just resting on theuppers of boots/shoes or, if high bootsare worn, tidily overlapping them.j. Boots/Shoes. In good repair, freefrom cracks and soles not worn. Lacesstrong and properly done up. Uppers,toes and heels polished.
Fig 2. — Jersey Order
PROTECT
PROTECT
0113. When inspecting cadets in Shirt Sleeve or Combat Jacket Order the pointsbelow should be checked (see Fig 3):
SHIRT SLEEVE ORDER COMBAT JACKET ORDER
a. Shirt neatly pressed with sleeves neatly turned up to just above the elbow, and pressed.
b. Belt tight, buckle central and spare lengthsfolded neatly away.
c. Lightweight trousers clean and pressed.
1-5
Fig 3. — Shirt Sleeve Order/Combat Order
PROTECT
PROTECT

1-6
Fig 4. — Reserved
PROTECT
PROTECT
SECTION 3. — INSPECTION OF ARMS
0115. Officers, SSIs, AIs or cadet NCOs should look for the following points:
a. Weapons to be clean and dry, apart from the moving parts which should belightly oiled.
b. Rifle slings to be clean (not fitted when cadets are on drill or formalparades).
c. Barrels to be clean and free from rust.
1-7
PROTECT
PROTECT

1-8
PROTECT
PROTECT
SECTION 4. — PREPARATION AND PACKING OF THE 58 PATTERNEQUIPMENT
A. INSTRUCTOR’S NOTES
0116. Aim. The aim of the lesson is to:
a. Demonstrate the make up and wearing of the 58 pattern (Infantry) equipment.
b. Teach the assembly of the webbing into:
(1) Complete Equipment Fighting Order (CEFO).
(2) Complete Equipment Marching Order (CEMO).
c. Describe the content and packing of the webbing.
0117. Timings. One 40 minute period.
0118. Method. A basic indoor or outdoor instructional period prior to the use ofwebbing in the field.
0119. Stores.
Assembled equipment complete to scale 1 for instructorUnassembled CEMO complete to scale 1 for instructorUnassembled CEMO complete to scaleappropriate to the Arm, Service or role 1 per cadetStores and personal equipment requiredfor packing CEFO and CEMO As listed per cadet and
instructorTables 2 (optional)
0120. Preparation.
a. Set up the tables with the unassembled webbing.
b. Place the magazines next to the appropriate pouches.
0121. Miscellaneous.
a. When handling parts of the webbing the instructor is to name them andtheir purpose (see Fig 5a).
b. The instructor is to use the information, drills and techniques applicable tothe cadet movement.
1-9
PROTECT
PROTECT
B. CONDUCT OF THE LESSON
Preliminaries
0122. Ensure the squad have their complete issue of equipment.
0123. Form the squad in a semi-circle around the tables.
0124. Revision. Nil.
Introduction
0125. Explain: Every cadet must be fit to take part in training. This fitness can beimpaired by incorrectly assembled and ill fitting webbing. It is essential that the web-bing stays together and is comfortable to wear.
58 Pattern Infantry Equipment (See Fig 5a)
0126. CEFO. Explain: This consists of a waist belt, yoke, left and right ammu-nition pouches, water bottle carrier, kidney pouches and a cape carrier. This orderwhen packed enables a cadet to be self sufficient in the field for 24 hours.
0127. CEMO. Explain: This consists of CEFO plus a large pack. The large packhas a central compartment, side pouches, two utility straps (on the top), and two util-ity straps which cross over on the front.
0128. Confirm by questions on the parts of the equipment.
Assembly of CEFO
0129. Explain: To assemble the CEFO: (see Figs 5b and 5c)
a. The Waist Belt (Stage 1). Explain and demonstrate, the squad following:
(1) Adjust the waist belt by undoing the hook and eye at each end of thebelt.
(2) Adjust both sides of the belt evenly to your waist measurement, refitthe hook and eye at each end of the belt, and slide the runners up to thebuckles.
b. The Yoke (Stage 1). Explain and demonstrate, the squad to follow:
(1) To attach the yoke to the belt, insert the four ‘C’ clips on the two backstraps into the pockets on the belt, ensuring that they are upright andinside the two metal rings on the belt which take the cape carrier.
1-10
PROTECT
PROTECT

(2) Do not adjust the back straps at this stage.
(3) The front straps will in due course be attached to the ‘D’ rings at thetop of the ammunition pouches.
c. The Ammunition Pouches (Stage 2). Explain and demonstrate, thesquad to follow:
(1) The left and right ammunition pouches are attached to the belt byusing the ‘C’ clips and inserting these into suitable pockets on the belt.
(2) The ammunition pouches need to be situated on the front portion ofthe belt for easy access to the magazines.
(3) Attach the front yoke straps to the ammunition pouches by insertingthe straps into the ‘D’ rings on the top of the ammunition pouches (seeStage 3). Do not adjust these straps at this stage.
d. The Water Bottle Carrier (Stage 3). Explain and demonstrate, the squadto follow:
(1) The water carrier is attached to the left side of the belt by using the‘C’ clips and inserting them into suitable pockets on the belt.
(2) It must be situated behind and as close as possible to the left ammu-nition pouch.
e. The Kidney Pouches (Stage 3). Explain and demonstrate, the squad tofollow:
(1) These are attached to the back of the belt in a central position by theuse of the four flap over loops, with metal fasteners. The fasteners havea slot, that fits over a staple and is secured by one of the webbing pinswhich are already attached to the kidney pouches.
(2) The other webbing pin, secures the upper two staples on each of thekidney pouches to the rear yoke straps. This pin must come over the beltbefore being secured.
f. The Cape Carrier (Stage 4). Explain and demonstrate, the squad to follow:
(1) The cape carrier is attached to the back of the belt by the use of twospring loaded clips. These fasten to the metal loops at the bottom of thebelt.
(2) The cape carrier has two side spring loaded clips on extendingstraps, these are attached to the bottom metal clips on each of the ammu-nition pouches. These straps are not adjusted at this stage.
1-11
PROTECT
PROTECT

g. Explain: The equipment now assembled is CEFO, and when put on thefollowing straps can be adjusted to suit each individual:
(1) The rear yoke straps.
(2) The front yoke straps.
(3) The side cape carrier straps.
(4) The straps when adjusted should ensure that the top of the yoke atthe rear is situated at the base of the neck.
0130. Confirm that the equipment fits by making the squad wear its own assembledCEFO leaving the CEFO assembled after confirmation.
Assembly of CEMO
0131. Explain and demonstrate, with the squad following in stages the assemblyand fitting of the marching order (see Fig 5d):
a. Thread the shoulder straps on the large pack through the shoulder loopson the yoke.
b. Adjust the shoulder straps to ensure that the large pack is worn as high onthe back as possible.
c. The hooks on the shoulder straps are then inserted into the ‘D’ rings on thefront of the yoke.
d. The spring loaded catches on either side of the large pack are thenattached to the rings on top of the ammunition pouches and adjusted as nec-essary.
0132. Confirm that the equipment fits by making the squad wear its own assembledCEMO (see Fig 5f).
Packing of CEFO
0133. Explain and demonstrate, the squad following: In order to pack CEFO:
a. Insert:
(1) The water bottle and canteen cup into its carrier and secure.
(2) Magazines into the ammunition pouches if they are carried, and thetool roll, then secure the pouches.
1-12
PROTECT
PROTECT
b. Kidney pouches are packed as follows:
(1) The left pouch will take:
(a) The large mess tin with two meals from the 24 hour rationpack.
(b) The knife, fork and spoon (KFS), wrapped in headover (if notworn).
(c) The hexamine, and the hexamine cooker.
(d) The contents are to be wrapped in either the camouflage net,a sandbag or a plastic bag.
(2) The right pouch will take:
(a) The small mess tin containing washing and shaving kit andfoot powder.
(b) Polish and boot brush and spare laces.
(c) Spare socks in a polythene bag.
(d) Gloves (if not worn).
(e) 30 metres of dark coloured communication cord.
(f) The remainder of the 24 hour ration pack.
(g) The contents to be wrapped in a small towel.
c. The cape carrier using extra utility straps will carry the poncho.
d. It may be necessary to adjust the front and rear yoke straps and the sidecape carrier straps when CEFO is packed.
0134. Confirm by practice and questions.
Packing of CEMO
0135. Explain that the following packing for CEMO is that used by the RegularArmy and TA and is given here as a guide only as some of the items listed are notissued to cadets.
0136. Demonstrate, the squad following: In order to pack CEMO:
a. In a waterproof carrier the main compartment will take:
1-13
PROTECT
PROTECT
(1) Waterproof trousers and jacket (these could be part of CEFO if roomallows).
(2) Pullover (if not worn).
(3) Spare boots and laces.
(4) Spare shirt.
(5) Two pairs of spare underpants.
(6) Cold weather (CW) vest.
(7) CW liner and trouser liner.
b. Between the two side pouches:
(1) Spare towel.
(2) Spare socks.
(3) Any other personal effects (if room allows).
c. Strapped to the top/front:
(1) Sleeping bag.
(2) Sleeping mat.
d. It may be necessary to readjust the shoulder and side straps when CEMOis packed.
0137. Confirm by practice and questions.
Conclusion
0138. End of Lesson Drill.
a. Questions from and to the squad on the lesson.
b. Inspection of the assembled CEFO and CEMO by the instructor.
c. Summary. To include the following:
(1) The limited amount of space in CEFO, against that of CEMO, andthe importance of only carrying essential items.
(2) The securing of pouches to prevent items falling out.
(3) The correct adjustment of straps to ensure CEFO/CEMO is com-fortable and worn correctly.
1-14
PROTECT
PROTECT
1-15
�
��
� �� �
�
�
Fig 5a. — The 58 Pattern (Infantry) Equipment
A Large Pack D Ammunition Pouches G Cape CarrierB Yoke E Water Bottle H StrapsC Kidney Pouches F Waist Belt
PROTECT
PROTECT
1-16
��� ����
���
���� ���� �������
����� ���� ��� ����
��� ����
��������
����
��� ���������
���� ���� ������ ������ !��"
Fig 5b. — Assembling the CEFO (1) Stages 1 and 2
PROTECT
PROTECT
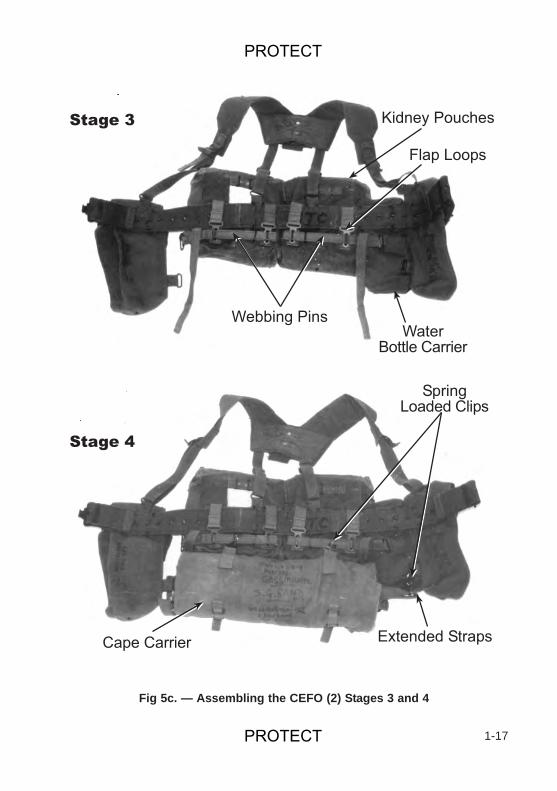
1-17
Fig 5c. — Assembling the CEFO (2) Stages 3 and 4
#����� !��"���������
�������
���� $��
��������� ����
��%%��� !���
�����$���� �����
���� ���� �&������ �����
PROTECT
PROTECT
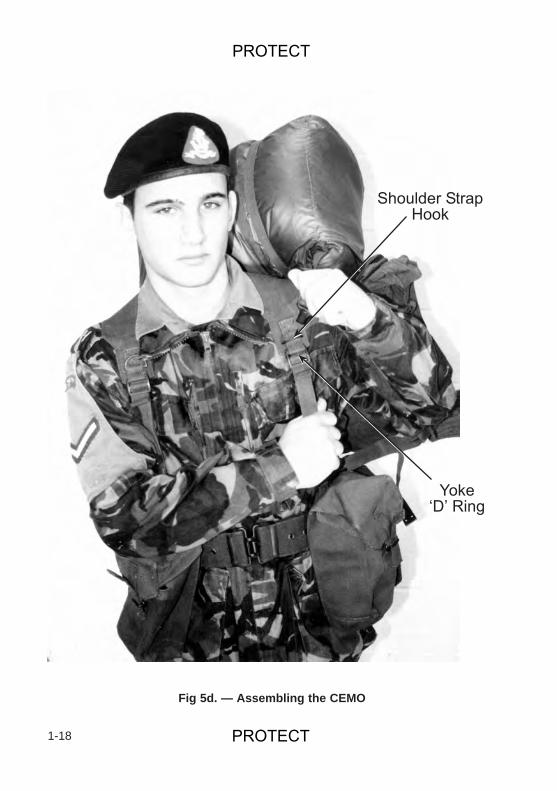
1-18
�"���� ������
������ ����
Fig 5d. — Assembling the CEMO
PROTECT
PROTECT
1-19
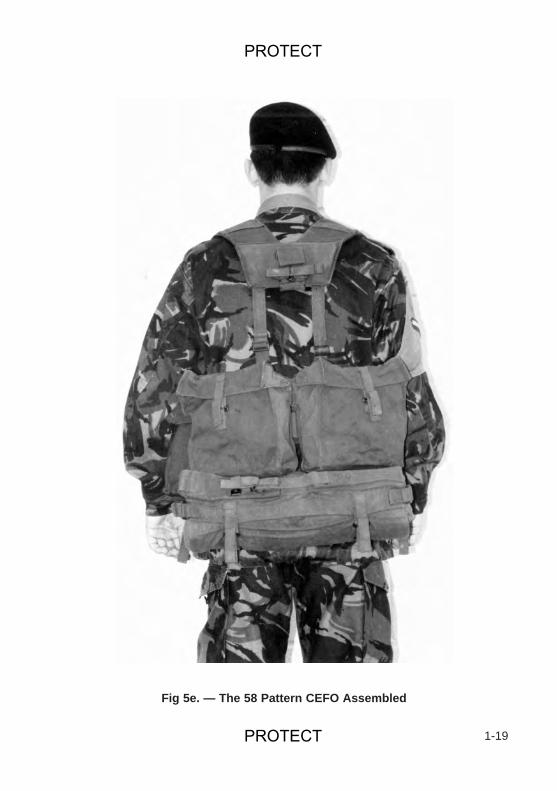
Fig 5e. — The 58 Pattern CEFO Assembled
PROTECT
PROTECT
1-20
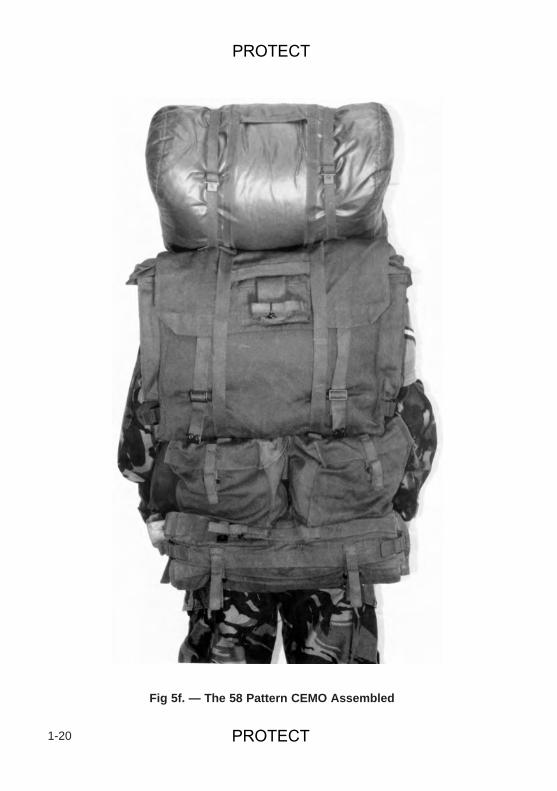
Fig 5f. — The 58 Pattern CEMO Assembled
PROTECT
PROTECT
ANNEX A TOCHAPTER 1
NOTES FOR INSPECTING OFFICERS
Introduction
1. Before drill cadets should be inspected to ensure that:
a. They are dressed correctly.
b. Their clothing and equipment is serviceable and clean.
c. Their weapons are clean (and cared for).
d. They are alert and healthy.
2. Cadets should be at Attention when inspected, though whether they slope theirrifles depends on regimental custom.
3. The inspecting officer, adult instructor should be accompanied by the next senioradult instructor who should note down anything that he is told. The next senior adultinstructor should be posted in front of the squad to see that the squad stand still andlook to their front.
General Inspection
4. Look at the squad first:
a. Are they standing correctly to Attention?
b. Is their dressing and covering off good?
5. Take a quick look at each cadet when you come to him:
a. Is he clean and shaved?
b. Is he standing well?
c. Is his uniform clean and pressed? Does it fit him?
Detail
6. Head.
a. Cap or other regimental headdress — clean and brushed.
1A-1
PROTECT
PROTECT
b. Badge — clean and in correct place.
c. No 1 Dress Cap — set up correctly.
d. Beret — bow sewn down neatly.
e. Hair — tidy and of a reasonable length.
7. Body.
a. Collar — clean.
b. Tie — correctly tied, central and not tucked into shirt.
c. Uniform — well fitted, clean and pressed.
d. Pockets — emptied of bulky objects.
e. Medals — clean and sewn on correctly.
f. Buttons — sewn on and fastened, with no stray ends of cotton.
8. Waistbelt.
a. Fitted so that it will not allow the jacket to ride up underneath it during aparade.
b. Fitted so that the buckle is in the centre of the body and the belt.
c. Correctly fastened and polished where brass.
9. Trousers.
a. Braced up so that they break on the instep in front when shoes are worn.
b. Pressed correctly and not excessively worn on the inside.
10. Boots.
a. Serviceable and polished.
b. Tightly laced with the laces so tied that they cannot come undone during aparade.
11. Weapons. Clean and dry.
1A-2
PROTECT
PROTECT
Some Don’ts
12. Don’t:
a. Make it a battle between you and them.
b. Touch them.
c. Ridicule or humiliate individual members of the squad.
d. Spend a long time in front of each cadet.
e. Allow those accompanying you to inspect for you.
f. Point vaguely at things and expect them to vanish or change colour.
Some Do’s
13. Do:
a. Be consistent and impersonal.
b. Be decisive and tell the warrant or non commissioned officer who isaccompanying you the action that you require.
c. Give praise readily.
1A-3
PROTECT
PROTECT

1A-4
PROTECT
PROTECT
Chapter 2 — DRILL
FOOT DRILL
SECTION 1. — THE AIM AND PURPOSE OF DRILL
INSTRUCTOR’S NOTES
Aim
0201. The aim of this section is to explain the purpose of drill and turnout and toteach the basic movements.
Introduction
0202. The aim of drill is to produce a cadet who is alert and obedient and to providethe basis of teamwork.
0203. Drill has evolved over a long period of time and is now accepted as thefoundation of military discipline. The main purpose of formal parade ground drill is toenable bodies of cadets to be moved easily and quickly from point to point in anorderly manner. In doing so, it has particular value for cadets in making them alert andteaching them to hold themselves properly, to develop their lungs and muscles andimprove the awkwardness of gait which is so often present in adolescents.
Miscellaneous
0204. Foot drill is confined to those movements in quick time used on normalparades, while rifle drill is confined to movements concerned primarily with cadetceremonial parades. This short drill syllabus should result in a high standard of drillbeing attained, provided the instructors prepare beforehand what they are going toteach and ensure that they know their subject by reference to the manual.
0205. The more advanced drill required for ceremonial and other special occasionsis not included in this manual. It can be learnt by selected cadets comparativelyquickly, if the basic movements have been well taught under a good drill instructorwho has brushed up his knowledge by reference to The Drill Manual (Revised 1990)Army Code No 70166.
0206. As with all other subjects it is of vital importance that the instructor should notonly have the knowledge and ability to instruct but should be able to set an example ofsmartness in his bearing and movements, as well as in his turnout. Slovenliness ofany sort cannot be tolerated, for this will lead to poor drill, which is worse than no drillat all.
2-1
PROTECT
PROTECT

2-2
PROTECT
PROTECT
SECTION 2. — POSITIONS OF ATTENTION, STAND AT EASE,AND STAND EASY
A. INSTRUCTOR’S NOTES
Aim
0207. To teach cadets the positions of Attention, Stand at Ease, and Stand Easy.
Timings
0208. One 30 minute period.
B. CONDUCT OF THE LESSON
Preliminaries
0209. Form the squad into a straight line and inspect turnout and cleanliness.
Introduction
0210. Explain: The three movements constantly used on parades are:
a. Attention.
b. Stand at Ease.
c. Stand Easy.
Attention
0211. Explain and demonstrate: Stand with heels together, the feet turned out atan angle of 540 mils (30 degrees); the knees braced; the body erect; the weightbalanced evenly between the ball of the foot and the heel; the arms straight and heldto the sides with the forearm tucked in behind the hip bone and the wrists straight; thehand closed with the thumbs vertical and facing to the front and the backs of thefingers touching the thigh just behind the seam of the trousers; the shoulders helddown and back to bring the chest to a normal position without straining or stiffening.The head held up with the neck touching the back of the collar and the eyes open andstill, and looking just above their own height, the chin tucked in and the mouth closed(see Fig 6).
0212. Practise the squad, checking their positions.
2-3
PROTECT
PROTECT
Common Faults
0213. a. A strained position which constricts breathing.
b. Allowing the body to sag and the shoulders and arms to creep forward.
c. Roving eyes.
d. Bending the wrist and failing to close the hands.
e. Feet or body not square to the front, heels not closed.
2-4
Fig 6. — Position of Attention
PROTECT
PROTECT
Stand at Ease from Attention
0214. Explain and demonstrate: “STAND AT — EASE”. Keeping the right footstill and leg braced back; bend the left knee and drive the left foot to the ground 300mm (12 inches) to the left of the right foot; at the same time force the arms behind theback by the most direct method, keeping them straight; place the back of the righthand in the palm of the left hand, with the right thumb crossed over the left thumb andthe fingers straight and together. At the same time transfer the weight of the body tothe left so that it remains evenly balanced. The distance of 300 mm (12 inches) ismeasured from the centre of the right heel to the centre of the left heel (see Fig 7).
0215. Practise the squad, checking their positions.
2-5
Fig 7. — Stand at Ease
PROTECT
PROTECT
Common Faults
0216. a. Bending at the waist when moving.
b. Allowing the arms to bend or to leave the body when going behind the back.
c. Moving the right foot.
d. Left foot less than 300 mm (12 inches) from the right foot and not at thecorrect angle.
Stand Easy from At Ease
0217. Explain and demonstrate: “STAND — EASY”. Relax whilst in the ‘At Ease’position.
0218. Practise the squad.
Common Faults
0219. a. Moving the feet.
b. Adjusting clothing without an order.
Stand At Ease from Easy
0220. Explain and demonstrate: “SQUAD”. Resume the ‘At Ease’ position.
Attention from At Ease
0221. Explain and demonstrate: “SQUAD — SHUN”. Keep the right foot still andthe leg braced back; bend the left knee, pull the arms to the sides by the most directmethod. Assume the position of attention.
0222. Practise the squad.
Common Faults
0223. a. Allowing the arms to bend or to leave the body when coming to the sides.
b. Bending at the waist when moving.
c. Moving the right foot.
0224. Reserved.
2-6
PROTECT
PROTECT
SECTION 3. — TURNINGS AT THE HALT
A. INSTRUCTOR’S NOTES
Aim
0225. To teach cadets Turnings at the Halt.
Timings
0226. One 30 minute period.
Miscellaneous
0227. In this and other sections the method of teaching drill movements by numbersis introduced. This method breaks a movement down into stages or smallermovements which are easier for the instructor to teach and the cadet to master. Aftercompletion of a movement in these stages, instruction is continued ‘Judging theTime’, i.e., the order is given and the movement is then carried out as a whole.(Volume II Chapter 1 Section 8 paragraphs 0161-0166).
B. CONDUCT OF THE LESSON
Preliminaries
0228. Form the squad into a straight line and inspect turnout and cleanliness.
Introduction
0229. Explain: Cadets must be able to turn quickly at a word of command in anydirection.
Turning Right By Numbers
0230. Explain and demonstrate:
a. “TURNINGS BY NUMBERS, RIGHT TURN — ONE”. Turn through 1600mils (90 degrees) to the right, using the right heel and left toe and keeping theweight of the body on the right foot. Throughout the movement both knees arebraced back and the body is erect. At the end of the movement the right foot isflat on the ground and the left leg is to the rear with the heel raised (see Fig 8).
2-7
PROTECT
PROTECT
b. “SQUAD — TWO”. Bend the left knee and resume the position of attention.
0231. Practise the squad, checking their positions.
Turning Left By Numbers
0232. a. Turning to the left requires action on the opposite heel, toe and foot.
b. The introductory “TURNINGS BY NUMBERS” should not be repeated foreach successive turn by numbers.
0233. Practise the squad, checking their positions.
Common Faults
0234. a. The weight not being on the forward foot in the first movement.
b. Not making a full turn with body and shoulders in the first movement.
c. Moving the arms, particularly during the second movement.
d. Bending at the waist during the second movement.
Turning About By Numbers
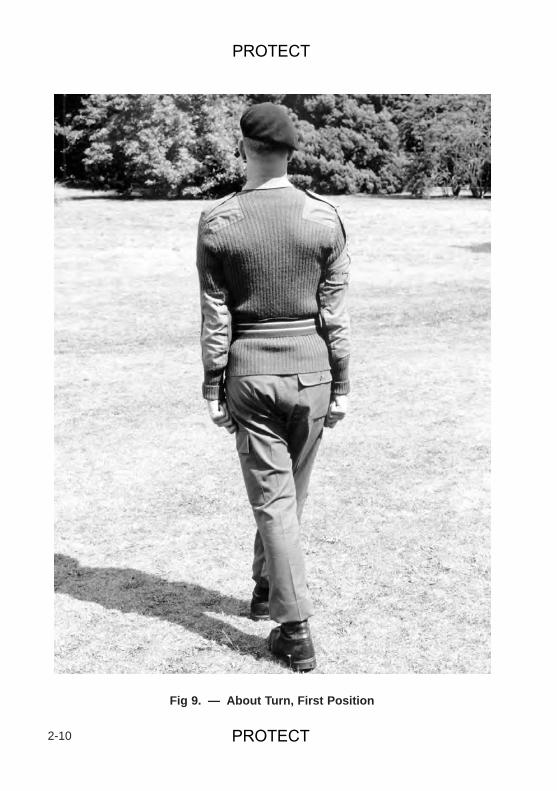
0235. a. “ABOUT TURN — ONE”. As for “Right Turn — One” but turn clockwisethrough 3200 mils (180 degrees). To maintain balance lock the thighs together(see Fig 9).
b. “SQUAD ...... TWO”. As for “Squad Two” of the Right Turn.
0236. Practise the squad, checking their positions.
Turnings Judging The Time
0237. The recruit will then practise all turnings judging the regulation pausebetween movements.
0238. Reserved.
2-8
PROTECT
PROTECT
2-9
Fig 8. — Right Turn, First Position
PROTECT
PROTECT
2-10
Fig 9. — About Turn, First Position
PROTECT
PROTECT
SECTION 4. — COMPLIMENTS: REASON, ORIGIN ANDINFORMATION
A. INSTRUCTOR’S NOTES
Aim
0239. To teach the cadet why and when compliments are paid.
Timings
0240. One 30 minute period.
Method
0241. Lecture, or alternatively the information can be given to the cadet whilstinstructing the period on Saluting.
B. CONDUCT OF THE LESSON
Preliminaries
0242. Inspect cadets before beginning the period.
Reason and Origin
0243. The salute with the hand, the present arms and the salute with the swordwere methods by which the person paying a compliment could show the person towhom the compliment was paid that no offence was meant. They are all gesturessymbolic of loyalty and trust. A salute is, in fact, the normal greeting betweencomrades in arms. That a salute is given when a cadet meets an officer is a basicmatter of discipline. That the salute is properly and smartly given is a matter oftraining. Failure by an officer in uniform to insist on being saluted is a breach ofdiscipline. Failure by an officer to return a salute shows a lack of courtesy on his part.All compliments derive their origin from the Sovereign, to whom the highestcompliment, the Royal Salute, is paid. Because of their link with the Sovereign thefollowing are also paid some form of compliment:
a. Members of the Royal Family.
b. Governors and Ministers to whom the Sovereign delegates authority.
2-11
PROTECT
PROTECT
c. Formed bodies of troops on the Sovereign’s business.
d. All Standards, Guidons and Colours of Regiments of the Army and theirequivalent in the Royal Navy, Royal Marines and Royal Air Force.
e. All officers, as holders of the Sovereign’s commission.
When Compliments Are Paid
0244. a. National Anthem.
(1) When on parade or in an organized party, all ranks will stand toattention, but only officers and warrant officers will salute. NCOs will onlysalute if they are in charge of an organized party.
(2) When not on parade, but in uniform, all ranks will salute.
(3) When not on parade, and in plain clothes, all ranks will stand toattention.
b. Military Funerals. All cadets in uniform, when passing a military funeral,will salute the bier.
c. When Riding a Bicycle. The rider of a bicycle (motor or pedal) will notsalute or look to his flank when the bicycle is moving. When stationary he willsalute by giving ‘Eyes Right’ or ‘Eyes Left’ but will not take his hands from thehandlebars.
d. Standards, Guidons and Colours. These are entitled to the highestcompliments.
(1) Formed bodies on the march will give ‘Eyes Right’ or ‘Left’.
(2) Individuals will halt, face passing Standards, Guidons or Colours andsalute, or if passing will salute to the right or left. The same complimentswill be paid to the Colours of the other two Services.
e. When Boarding Her Majesty’s Ships. All ranks boarding any of HerMajesty’s ships are to salute the quarterdeck.
The CCF Banner
0245. a. The original Banner was presented by the President of the CombinedCadet Force in 1960 as a symbol which acknowledged a hundred years ofdevoted service to the nation. A new Banner was presented in 1982 and is an
2-12
PROTECT
PROTECT

expression of confidence that this service will continue whatever changes incircumstances the future may bring.
b. The rules for the Banner are shown in CCF Regulations (1980) Section 16Annex B.
c. The main rules are as follows:
(1) The Banner is not consecrated but dedicated and does not rank as aColour, Standard or Guidon. It will not therefore be ‘trooped’ in theceremonial sense.
(2) Within the CCF it will be treated with ‘due ceremony’ i.e., it will begiven the respect accorded to a Colour except that:
(a) When marched on parade arms will be shouldered and notpresented.
(b) It will not be saluted by individuals or parties of cadets passingit.
(3) When the Banner passes individuals or formed parties of cadets theywill stand to attention.
(4) When the Banner is actually handed to an individual he will first of allsalute before accepting it.
(5) When on a parade, except a church parade, the Banner will beescorted by an armed escort.
The ACF Banner
0246. a. The first ACF Banner was presented by the Colonel in Chief HRH TheDuke of Edinburgh in 1960. A new Banner was presented by the Duke in 1982.
b. The rules pertaining to the Banner are set out in the ACF Manual 1984Chapter 18 Part 4 and Annex B. The rules are the same as those applying tothe CCF Banner detailed in paragraph 0245. c.
2-13
PROTECT
PROTECT

2-14
PROTECT
PROTECT
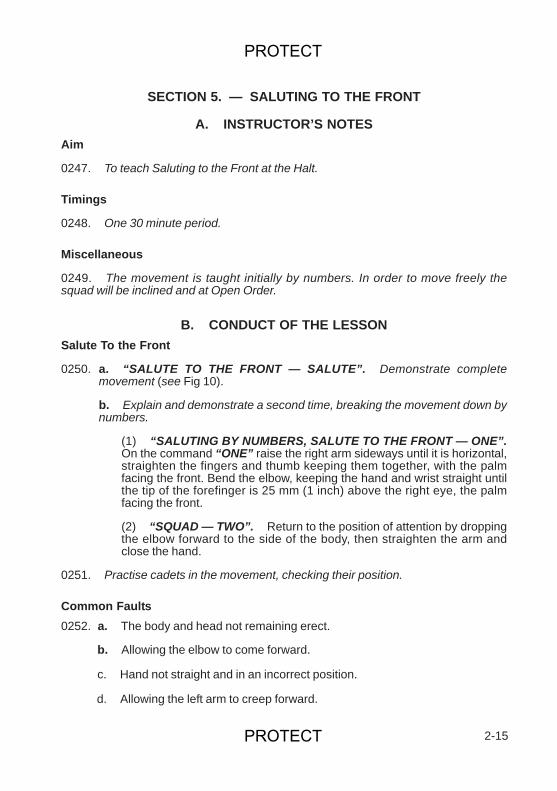
SECTION 5. — SALUTING TO THE FRONT
A. INSTRUCTOR’S NOTESAim
0247. To teach Saluting to the Front at the Halt.
Timings
0248. One 30 minute period.
Miscellaneous
0249. The movement is taught initially by numbers. In order to move freely thesquad will be inclined and at Open Order.
B. CONDUCT OF THE LESSONSalute To the Front
0250. a. “SALUTE TO THE FRONT — SALUTE”. Demonstrate completemovement (see Fig 10).
b. Explain and demonstrate a second time, breaking the movement down bynumbers.
(1) “SALUTING BY NUMBERS, SALUTE TO THE FRONT — ONE”.On the command “ONE” raise the right arm sideways until it is horizontal,straighten the fingers and thumb keeping them together, with the palmfacing the front. Bend the elbow, keeping the hand and wrist straight untilthe tip of the forefinger is 25 mm (1 inch) above the right eye, the palmfacing the front.
(2) “SQUAD — TWO”. Return to the position of attention by droppingthe elbow forward to the side of the body, then straighten the arm andclose the hand.
0251. Practise cadets in the movement, checking their position.
Common Faults0252. a. The body and head not remaining erect.
b. Allowing the elbow to come forward.
c. Hand not straight and in an incorrect position.
d. Allowing the left arm to creep forward.
2-15
PROTECT
PROTECT
2-16
Fig 10. — Saluting to the Front
PROTECT
PROTECT
SECTION 6. — INTRODUCTION TO MARCHING
A. INSTRUCTOR’S NOTES
Aim
0253. To introduce cadets to marching.
Timings
0254. One 30 minute period.
Miscellaneous
0255. Cadets will carry out this period marching individually at the rate of up to 120paces per minute. “Quick March” is given at the rate at which the squad is to march.
B. CONDUCT OF THE LESSON
Preliminaries
0256. Inspect the squad.
Approach
0257. This period introduces the cadet to marching. There is nothing difficult indoing this movement, but in order that each cadet can get the feel of it the drillmovement will be carried out individually.
Marching
0258. Demonstrate the complete movement (see Fig 11) and explain: On thecommand “QUICK MARCH” take a pace of 750 mm (30 inches) with the left foot,swinging the right arm forward and the left arm backwards, then continue with the rightfoot and left alternately.
a. The pace of 750 mm (30 inches) is measured from heel to heel.
b. The heel will strike the ground first, with the knee braced on impact.
c. The leg must go forward naturally in a straight line, with the knee sufficientlybent for the toe to clear the ground.
2-17
PROTECT
PROTECT
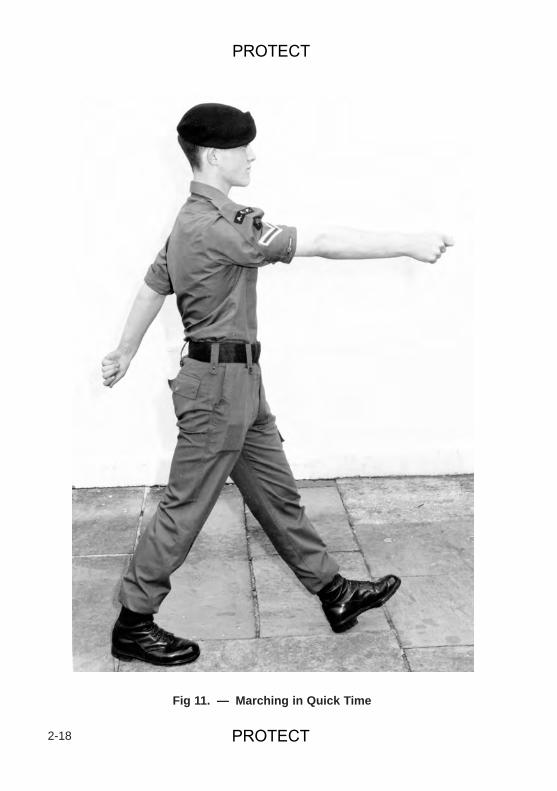
2-18
Fig 11. — Marching in Quick Time
PROTECT
PROTECT
d. The arms will be freely swung forward until the bottom of the hand is in linewith the top of the waist belt and backwards as far as they will go. They will reachthese points as each heel strikes the ground.
0259. Practise the squad.
Common Faults
0260. a. Stepping a pace of more or less than 750 mm (30 inches).
b. Not keeping the arms, wrists and hands straight.
c. Not pulling the arm hard enough backwards.
d. Allowing the foot to come to the ground with the knee bent.
e. Not swinging the arm in a straight line from front to rear.
Halting
0261. “SQUAD — HALT”. Given as the left foot is on the ground. Demonstratethe complete movement.
0262. Explain and demonstrate doing the movement by numbers.
a. “SQUAD HALT — ONE”. Complete the pace of 750 mm (30 inches) withthe right foot, and freeze with the right foot flat on the ground, the left heel raised,the left arm at the top of its swing forward and the right arm full to the rear.
b. “SQUAD — TWO”. “Shoot the left foot forward” a pace of 375 mm (15inches) placing the foot flat on the ground. Reverse the position of the arms.
c. “SQUAD — THREE”. Bend the right knee, bring the arms to the sidesand assume the position of attention.
0263. Practise the squad first by numbers and then combined, and completed atspeed.
Common Faults
0264. a. Bending at the waist when bending the right knee.
b. Exaggerating the movement of the right arm when bending the right knee.
c. Incorrect balance on completion of the halt.
2-19
PROTECT
PROTECT

d. Not bracing the left knee when shooting the left foot forward.
0265 – 0266. Reserved.
2-20
PROTECT
PROTECT
SECTION 7. — MARCHING AND HALTING IN QUICK TIME
A. INSTRUCTOR’S NOTES
Aim
0267. To practise marching and halting in quick time.
Timings
0268. One 30 minute period.
Miscellaneous
0269. Taken as a practice period to revise all that has been taught so far, and forfurther practice in marching and halting. Squads to be split into two teams andindividual drill movements carried out by the cadets competing for their team.
B. CONDUCT OF THE LESSON
Preliminaries
0270. Inspect the squad.
Introduction
0271. During this period the cadets will be revised on all the drill movements thathave been taught to date.
Revision
0272. Cadets to practise the following:
a. Positions of Attention and Stand at Ease.
b. Turnings at the Halt.
c. Saluting to the Front.
d. Marching and Halting in Quick Time.
0273. Reserved.
2-21
PROTECT

2-22
PROTECT
PROTECT
SECTION 8. — FORMING UP IN THREE RANKS AND GETTING ONPARADE
A. INSTRUCTOR’S NOTES
Aim
0274. To teach cadets how to form up in Three Ranks and Get on Parade.
Timings
0275. One 30 minute period.
Miscellaneous
0276. To adopt this formation cadets will be placed in close order in three ranks(front, centre, rear). There will be an interval of one arm’s length (with the handsclosed) between each cadet, and a distance of 750 mm (30 inches) between ranks(measured from the heels of one rank to the toes of the rank behind it). The distance inclose order may be measured by the cadets in the right hand file raising their right armin line with their breast pocket. The knuckles of the closed hand should just fail toreach the shoulder of the cadet in front.
B. CONDUCT OF THE LESSON
Preliminaries0277. Inspect the squad.
Introduction
0278. Explain: Now that you have completed your recruit training being drilled asan individual, you are going to be introduced to squad drill. Before you can drill as asquad you must understand how to form up in three ranks, and how to get on parade.
Interval Between Cadets in a Rank
0279. a. Explain with the aid of two assistants (see Fig 12): When forming up inthree ranks there must be a regulation distance between each cadet in theranks. This is achieved by each cadet in the front rank putting his right arm upand moving to the left until he is one arm’s length away from the cadet on hisright. The measurement will be made with clenched fists. Those in the ranksbehind will cover.
2-23
PROTECT
PROTECT
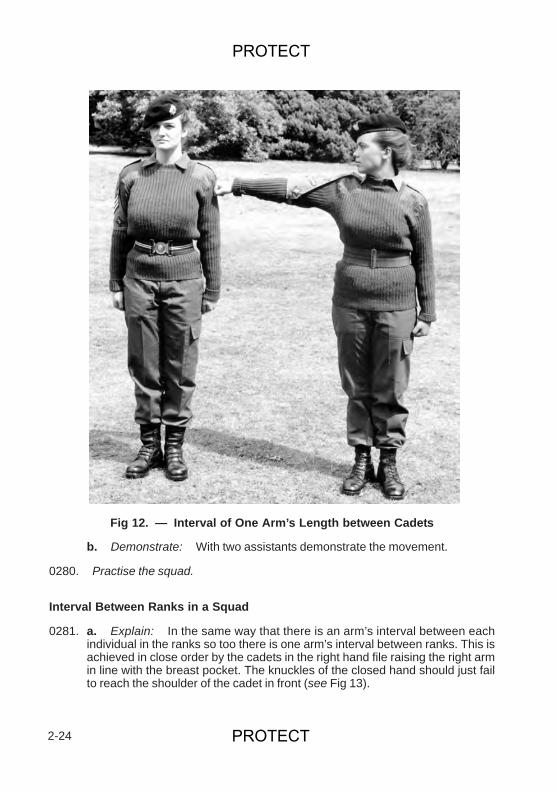
b. Demonstrate: With two assistants demonstrate the movement.
0280. Practise the squad.
Interval Between Ranks in a Squad
0281. a. Explain: In the same way that there is an arm’s interval between eachindividual in the ranks so too there is one arm’s interval between ranks. This isachieved in close order by the cadets in the right hand file raising the right armin line with the breast pocket. The knuckles of the closed hand should just failto reach the shoulder of the cadet in front (see Fig 13).
2-24
Fig 12. — Interval of One Arm’s Length between Cadets
PROTECT
PROTECT
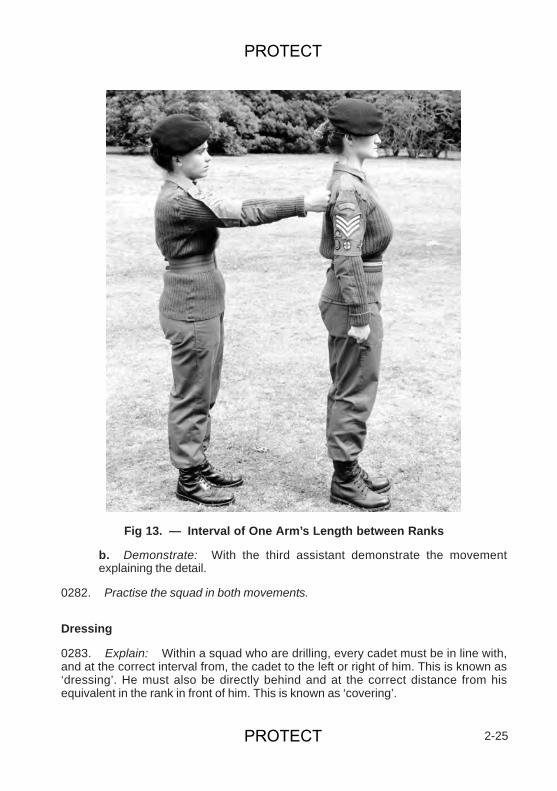
b. Demonstrate: With the third assistant demonstrate the movementexplaining the detail.
0282. Practise the squad in both movements.
Dressing
0283. Explain: Within a squad who are drilling, every cadet must be in line with,and at the correct interval from, the cadet to the left or right of him. This is known as‘dressing’. He must also be directly behind and at the correct distance from hisequivalent in the rank in front of him. This is known as ‘covering’.
2-25
Fig 13. — Interval of One Arm’s Length between Ranks
PROTECT
PROTECT
2-26
“Dressing — Right Dress”
0284. a. Explain and demonstrate the complete movement.
b. Demonstrate again by numbers.
“Dressing By Numbers, Right Dress — One”
0285. Explain: On the command “ONE” all except the right hand cadet of eachrank turn their heads to the right; those in the front rank extend the right arm with thehand closed, the back of the hand uppermost and the knuckles touching the point ofthe shoulder of the cadet to the right. The right hand file raise the right arm forward inline with their breast pocket with the knuckles of the closed hand just failing to reachthe shoulder of the cadet in front.
Common Faults
0286. a. A sluggish movement of the arm or head.
b. Not looking up or square to the right.
“Squad — Two”
0287. Explain: Everyone except the right hand cadet of the front rank corrects hisdressing by taking short, quick steps until, whilst remaining erect, he can just see thelower part of the face of the cadet two away from him. At the same time those in thecentre and rear rank ensure that they are directly behind their equivalent in the rank infront by glancing out of the corner of their left eye.
Common Faults
0288. a. Craning forward.
b. Not keeping the shoulders square to the front.
c. Shuffling.
d. Unnecessary movement.
0289. Practise the squad.
PROTECT
PROTECT
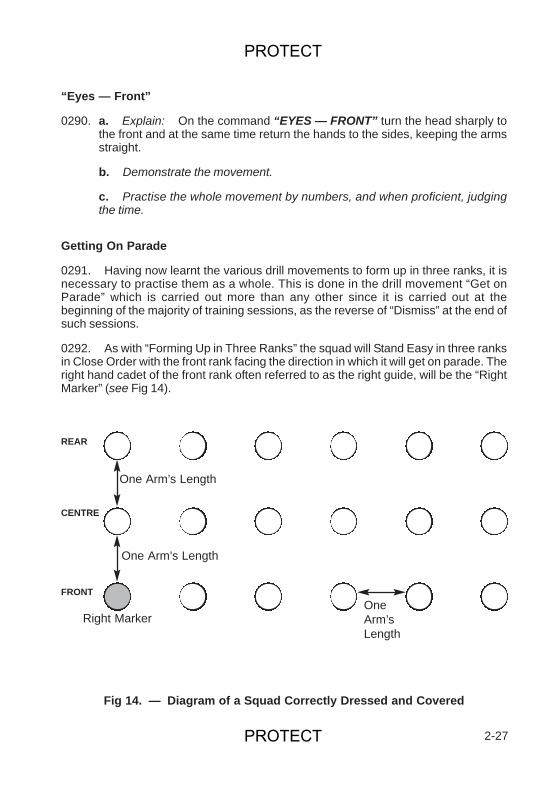
“Eyes — Front”
0290. a. Explain: On the command “EYES — FRONT” turn the head sharply tothe front and at the same time return the hands to the sides, keeping the armsstraight.
b. Demonstrate the movement.
c. Practise the whole movement by numbers, and when proficient, judgingthe time.
Getting On Parade
0291. Having now learnt the various drill movements to form up in three ranks, it isnecessary to practise them as a whole. This is done in the drill movement “Get onParade” which is carried out more than any other since it is carried out at thebeginning of the majority of training sessions, as the reverse of “Dismiss” at the end ofsuch sessions.
0292. As with “Forming Up in Three Ranks” the squad will Stand Easy in three ranksin Close Order with the front rank facing the direction in which it will get on parade. Theright hand cadet of the front rank often referred to as the right guide, will be the “RightMarker” (see Fig 14).
2-27
OneArm’sLength
Fig 14. — Diagram of a Squad Correctly Dressed and Covered
REAR
CENTRE
FRONT
One Arm’s Length
One Arm’s Length
Right Marker
PROTECT
PROTECT
0293. The instructor will demonstrate using the squad:
a. “RIGHT — MARKER”.
(1) On the command “RIGHT” the whole squad comes “AT EASE”.
(2) On the command “MARKER” the right marker springs to attention,marches forward, halts on the fifteenth pace (or less if space does notallow) and stands at ease.
b. “GET ON — PARADE”.
(1) Both the right marker and cadets in the squad spring to attention.They march forward, halt on the fifteenth (or less) pace, look to their rightand pick up their dressing. All these movements have the regulationpause between them.
(2) When the cadets in the squad are dressed correctly they will look totheir front and stand at ease in succession from the right.
0294. Practise the squad.
0295. Reserved.
2-28
PROTECT
PROTECT
SECTION 9. — OPEN AND CLOSE ORDER
A. INSTRUCTOR’S NOTES
Aim
0296. To teach cadets the Open and Close Order.
Timings
0297. One 30 minute period.
Miscellaneous
0298. To teach this movement the instructor should make the squad act first as thefront rank and then as the rear rank. In two ranks only the rear rank acts on the OpenOrder and Close order.
B. CONDUCT OF THE LESSON
Preliminaries
0299. Inspect the squad.
Introduction
02100. Explain: A squad is always inspected and often drilled in Open Order, i.e.,with a distance of 1500 mm (60 inches) between ranks, measured from the heels ofone rank to the toes of the rank behind it. To attain Open Order the front rank movesforward one pace of 750 mm (30 inches) and the rear rank moves back one pace of750 mm (30 inches); the centre rank remains still.
Open and Close Order
02101.a. With the aid of three assistants, demonstrate the complete movement:
“IN OPEN ORDER RIGHT DRESS”“EYES FRONT”
b. Repeat the demonstration, this time breaking the movement down bynumbers:
(1) “IN OPEN ORDER RIGHT DRESS, ONE”. On the command“ONE”.
2-29
PROTECT
PROTECT
(a) The front rank take a full 750 mm (30 inches) pace forward,bending the right knee and keeping the arms to the sides.
(b) The rear rank take a full 750 mm (30 inches) pace backward,bending the right knee and keeping the arms to the sides.
(2) “SQUAD — TWO”. On the command “TWO” all except the righthand cadet of each rank turn their heads to the right: those in the front rankextend the right arm with the hand closed, the back of the hand uppermostand the knuckles touching the point of the shoulder of the cadet on theirright.
(3) “SQUAD — THREE”. Everyone except the right hand cadet of thefront rank corrects his dressing by taking short, quick steps until, whilstremaining erect, he can just see the lower part of the face of the cadet twoaway from him. At the same time those in the centre and rear rank ensurethat they are directly behind their equivalent in the rank in front by glancingout of the corner of their eye.
(4) “EYES FRONT”. Turn the head sharply to the front and at thesame time return the hands to the sides, keeping the arms straight.
02102. Explain: “IN CLOSE ORDER, RIGHT DRESS”. The reverse sequenceof movements is carried out.
02103. Practise the squad by numbers.
02104. Practise the squad judging the time.
Common Faults
02105.a. Allowing the left knee to bend when stepping forward a pace of 750 mm(30 inches).
b. Arms not kept still to the side.
02106. Reserved.
2-30
PROTECT
PROTECT
SECTION 10. — DISMISSING AND FALLING OUT
A. INSTRUCTOR’S NOTES
Aim
02107. To teach cadets how to Dismiss and Fall Out.
Timings
02108. One 30 minute period.
Miscellaneous
02109.a. The squad will be practised as a formed body.
b. The instructor must tell the squad whether to salute or not.
c. The regulation pause must be judged by the cadets.
d. The Fall Out differs from the Dismiss in that it does not signify the end of aparade, only a break in it. The salute is never given on the Fall Out, and thosewho fall out do not leave the parade ground.
B. CONDUCT ON THE LESSON
Preliminaries
02110. Inspect the squad.
02111. Revise Saluting at the Halt.
Introduction
02112. Explain: At the end of a drill parade or during a break in it, there is a setsequence of drill movements to be followed. The squad will either be ‘Dismissed’ or‘Fallen Out’.
Dismiss
02113. Explain and demonstrate: On the command “DISMISS” turn to the rightand if an officer is present, salute. Step off and march forward three paces, then break
2-31
PROTECT
PROTECT
off and remain in step in quick time within individual groups until clear of the paradeground.
02114. Practise squad, calling out the time.
Fall Out
02115. Explain and demonstrate: On the command “FALL OUT” turn to the right,march forward three paces and break off, the only difference from the “Dismiss’ being:
a. You do not salute.
b. You only march forward three paces and break off; you do not leave theparade ground.
02116. Practise the squad.
Common Faults
02117. A tendency to relax before getting clear of the parade ground on the‘Dismiss’.
02118. Reserved.
2-32
PROTECT
PROTECT
SECTION 11. — WHEELING IN QUICK TIME
A. INSTRUCTOR’S NOTES
Aim
02119. To teach cadets how to wheel when marching in a squad.
Timings
02120. One 30 minute period.
Miscellaneous
02121.a. Cadets will be practised as a squad.
b. If the body of cadets is halted or ordered to mark time when only part of itsnumber have wheeled, those who have not wheeled will immediately cover offthose who have.
c. If the wheel is to be through more than 1600 mils (90 degrees), the word ofcommand will be given a second time; if through less than 1600 mils (90degrees) the word of command “Forward” will be given at the appropriatemoment.
d. The command “Right — Wheel” is given over one complete pace.
B. CONDUCT OF THE LESSON
Preliminaries
02122. Inspect the squad.
Introduction
02123. Explain: Wheeling is a method by which a body of men with a frontage ofnot more than six ranks or files may change direction whilst retaining dressing withinthose ranks or files.
Right Wheel
02124. With three assistants demonstrate the complete movement “RIGHTWHEEL” (see Fig 15). Demonstrate the movement again with explanation: On thecommand “RIGHT WHEEL” the right hand cadet of the leading rank or file will change
2-33
PROTECT
PROTECT
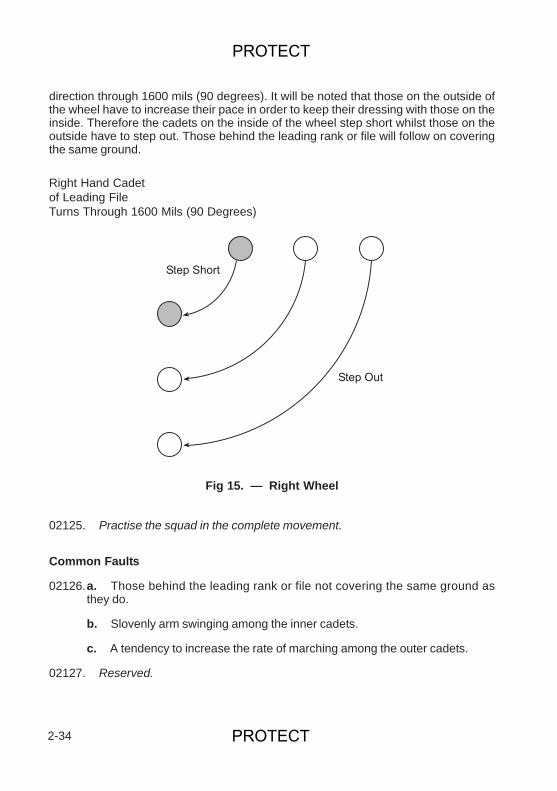
direction through 1600 mils (90 degrees). It will be noted that those on the outside ofthe wheel have to increase their pace in order to keep their dressing with those on theinside. Therefore the cadets on the inside of the wheel step short whilst those on theoutside have to step out. Those behind the leading rank or file will follow on coveringthe same ground.
02125. Practise the squad in the complete movement.
Common Faults
02126.a. Those behind the leading rank or file not covering the same ground asthey do.
b. Slovenly arm swinging among the inner cadets.
c. A tendency to increase the rate of marching among the outer cadets.
02127. Reserved.
2-34
Right Hand Cadetof Leading FileTurns Through 1600 Mils (90 Degrees)
Fig 15. — Right Wheel
����������
������
PROTECT
PROTECT
SECTION 12. — CHANGING STEP IN QUICK TIME
A. INSTRUCTOR’S NOTES
Aim
02128. To teach cadets Changing Step on the March.
Timings
02129. One 30 minute period.
Miscellaneous
02130. The squad will initially be taught the movement as individuals; once thecadet has mastered it he will be practised in it as a member of a squad. The squad willbe formed up in line.
B. CONDUCT OF THE LESSON
Preliminaries
02131. Inspect the squad.
Introduction
02132. Explain: This is a simple drill movement which enables a squad orindividual to regain the correct step when it has been lost.
Change Step
02133. Demonstrate and explain “Change Step”. The word of command is givenon the left and right foot respectively, the second movement being done in doubletime.
02134. Demonstrate the movement again by numbers and explain:
a. “CHANGE STEP — ONE”. Given as the right heel strikes the ground.Take a pace of 750 mm (30 inches) with the left foot and freeze with the left footflat on the ground, the right heel raised, the right arm at the top of its swingforward and the left arm fully to the rear.
2-35
PROTECT
PROTECT
b. “SQUAD — TWO”. Bend the right knee and move the right leg forwardso that the instep of the right foot is behind and touching the heel of the left foot.Return the arms to a position of attention.
c. “SQUAD — THREE”. Step off a pace of 750 mm (30 inches) with the leftfoot, swinging the right arm forward and the left backward.
02135. Practise the squad individually by numbers.
02136. Practise the squad individually judging the time.
02137. Practise as a squad.
Common Faults
02138. Not returning the arms to the side in the second movement.
02139. Reserved.
2-36
PROTECT
PROTECT
SECTION 13. — ABOUT TURN IN QUICK TIME
A. INSTRUCTOR'S NOTES
Aim
02140. To teach cadets to Turn About in Quick Time.
Timings
02141. One 30 minute period.
Miscellaneous
02142. The squad will be formed up in line. When the squad have mastered theAbout Turn by numbers they will combine the movements initially calling out IN, LEFT,RIGHT, LEFT, FORWARD, and later judging the time at the rate at which the squadwas marching before the About Turn.
B. CONDUCT OF THE LESSON
Preliminaries
02143. Inspect the squad.
Introduction
02144. Explain: Rather than carry out a series of wheels to get a squad to marchin the opposite direction to which it is travelling, it is more convenient to give the order“About Turn”.
About Turn
02145.a. Demonstrate the complete movement “About Turn”
b. Demonstrate the movement by numbers and explain.
02146.a. “TURNINGS BY NUMBERS, ABOUT TURN — ONE”. Given as theright heel strikes the ground:
(1) Take a further full marching pace of 750 mm (30 inches) with the leftfoot, at the same time alternating the arms. A short pace of 375 mm (15inches) is then taken with the right foot, at the same time forcing the arms
2-37
PROTECT
PROTECT
into the side of the body in a sharp, scissor-like movement. On theexecution of this movement call out “IN”.
(2) “SQUAD — TWO”. Turn the head, shoulders, body and right footthrough 1600 mils (90 degrees) to the right; at the same time ‘bend the leftknee’ to assume the position of attention facing a new direction. Call out“LEFT".
b. “TURNINGS BY NUMBERS, ABOUT TURN — ONE”. Combine theabove two movements and call out “IN — LEFT”.
c. “SQUAD — TWO”. Turn the head, shoulders, body and left foot through90 degrees to the right; at the same time ‘bend the right knee’ to assume theposition of attention, facing the new direction. Call out “RIGHT’.
d. “SQUAD — THREE”. ‘Bend the left knee’. Call out “LEFT”.
e. “SQUAD — FORWARD”. Step off with a pace of 750 mm (30 inches)with the right foot, swinging the left arm forward and the right arm backwards.Call out “FORWARD”.
02147. Practise the squad by numbers.
02148. Practise the squad judging the time.
Common Faults
02149.a. Scraping the right foot on the ground in the first movement.
b. Not turning on the same piece of ground.
c. Not stepping off with a pace of 750 mm (30 inches) in the last movement.
02150. Reserved.
2-38
PROTECT
PROTECT
SECTION 14. — LEFT AND RIGHT TURNS ON THE MARCH
A. INSTRUCTOR'S NOTES
Aim
02151. To teach cadets Turnings on the March.
Timings
02152. One 30 minute period.
Miscellaneous
02153.a. In this section the method of teaching drill movements by numbers isused. This method breaks a movement down into smaller stages.
b. When revising turnings with a squad of trained cadets the instructorshould combine the first three movements into one.
c. When the squad have mastered turnings to the left and right by numbersthey will combine the movements.
B. CONDUCT OF THE LESSON
Preliminaries
02154.a. Inspect the squad.
b. Form the squad into a straight line.
Introduction
02155. Explain that cadets must be able to turn quickly at a word of command in anydirection on the march.
Turnings To the Left by Numbers
02156.a. “TURNINGS BY NUMBERS, LEFT TURN — ONE”. Given as the rightheel strikes the ground. Take a further full marching pace of 750 mm (30inches) with the left foot, and freeze with the left foot flat on the ground, theright heel raised, the right arm at the top of its swing forward and left arm fully tothe rear.
2-39
PROTECT
PROTECT
b. “SQUAD — TWO”. Raise the right knee and remain balanced on the leftfoot, with the right thigh horizontal, the foot hanging naturally with the toe directlyunder the knee. At the same time return the arms to the position of attention.
c. “SQUAD — THREE”. Turn the head, shoulders, body and left footthrough 1600 mils (90 degrees) to the left, at the same time drive the right foot tothe ground in the new direction and “shoot the left foot forward’ 375 mm (15inches) so that it is clear of the ground.
d. “SQUAD — FORWARD”. Complete the pace with the left foot so that theheel strikes the ground, swing the arms and continue to quick march.
02157. Practise the squad.
Turnings To the Right
02158. The word of command for the right turn is given as the left heel strikes theground. The turn is completed in the same way as the left turn but with opposite feet.
Common Faults
02159.a. Arms not returned to the position of attention in the second movement.
b. Not completing a 750 mm (30 inches) pace in the third movement.
02160. Reserved.
2-40
PROTECT
PROTECT
SECTION 15. — SALUTING ON THE MARCH EYES RIGHT AND LEFT
A. INSTRUCTOR’S NOTES
Aim
02161. To teach the cadet to salute and give an Eyes Right and Eyes Left on themarch.
Timings
02162. One 30 minute period.
Miscellaneous
02163. The instructor will first revise the Salute to the Front, At the Halt, and will thenteach the squad how to Salute to the Right and Left from the position of Attention.
B. CONDUCT OF THE LESSON
Preliminaries
02164. Inspect the squad.
Introduction
02165. Explain: Saluting to the Front has already been covered in a previouslesson. It is also necessary to know how to Salute on the March, both to the left andright as an individual, and how to give an Eyes Right or Eyes Left as a member of asquad. Before teaching these new movements it is necessary to revise the mainpoints of Saluting to the Front.
Saluting To the Right
02166.a. Demonstrate the complete movement “Salute to the Right, Salute”.
b. Demonstrate and explain by numbers (see Fig 16):
(1) “SALUTE TO THE RIGHT — SALUTE”. Take a 750 mm (30inches) pace with the left foot, at the same time bring the right hand andarm to the salute and turn the head through 1600 mils (90 degrees) to theright. Freeze with the left heel and right foot on the ground and the weight
2-41
PROTECT
PROTECT
of the body evenly balanced between them. As the left heel strikes theground, call out “ONE!”.
(2) “AS YOU WERE”. Return to the position of Attention.
c. The following points must be noted and checked individually.
(1) In the salute to both right and left the tip of the forefinger remains 25mm (1 inch) above the right eye.
(2) In the salute to the right the eyes can see the whole of the palm of theright hand.
(3) In the salute the left hand must be clenched and in line with the seamof the trousers as at the position of Attention.
02167. Practise the squad.
Common Faults
02168.a. Not keeping the body and shoulders to the front and the head at an angleof 1600 mils (90 degrees) to them.
b. Not moving the left foot, right arm and the head at the same time.
Saluting On the March
02169. After the squad has mastered the salute to the right and left from the positionof Attention they will be taught the Salute to the Right and the Salute to the Left on theMarch by numbers.
a. Demonstrate complete movement.
b. Demonstrate and explain again by numbers.
(1) “SALUTING BY NUMBERS, SALUTE TO THE RIGHT — ONE”.Given as the left heel strikes the ground. Continue a 750 mm (30 inches)pace with the right foot, take a 750 mm (30 inches) pace with the left footand at the same time bring the right hand and arm from the rear to thesalute, the left arm from the front to the position of Attention and turn thehead through 1600 mils (90 degrees) to the right. Freeze with the left heeland right foot on the ground and the weight evenly balanced betweenthem. As the left heel strikes the ground call out “ONE”.
(2) “SQUAD — TWO”. Take a 750 mm (30 inches) pace with the rightfoot, remaining at the salute with the left arm at the position of attention.
2-42
PROTECT
PROTECT
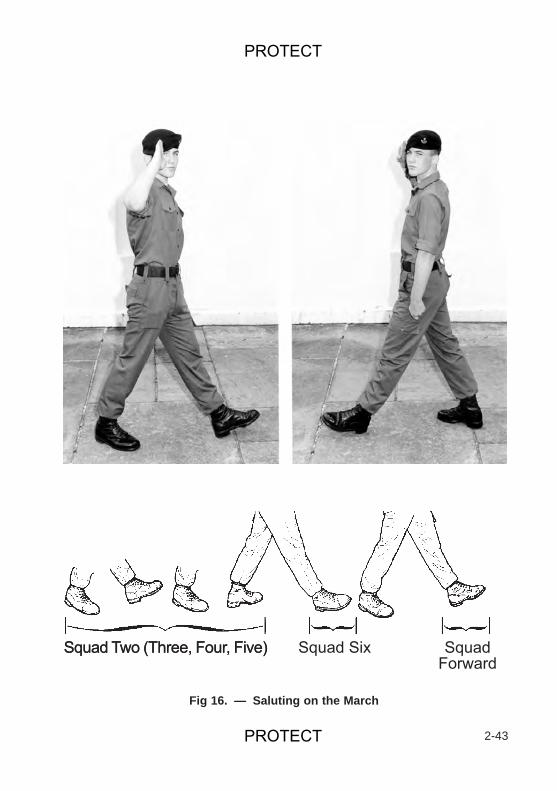
2-43
������������ ���������� � ��������������������� ���������� � �����������
Fig 16. — Saluting on the March
PROTECT
PROTECT

Freeze with the right heel and left foot on the ground and the weight evenlybalanced. Call out “TWO”.
(3) “SQUAD —THREE!””SQUAD — FOUR!””SQUAD — FIVE” (seeFig 13). These words of command may be given in quick succession.The squad take a further pace on each word of command, call out“THREE, FOUR, FIVE”.
(4) “SQUAD — SIX” (see Fig 16). Take a 750 mm (30 inches) pacewith the right foot. As the heel strikes the ground, turn the head to the front,return the right arm to the position of Attention and freeze with the rightheel and left foot on the ground and the weight evenly balanced. Call out“DOWN”.
(5) “SQUAD — FORWARD”. Take a 750 mm (30 inches) pace withthe left foot, swinging the right arm forward and the left arm backward. Callout “SWING” and continue marching.
02170. After practising the salute to the right and left by numbers the squad shouldcombine the movements.“SALUTING, SALUTE TO THE RIGHT — SALUTE”. Givenas the left heel strikes the ground.
Saluting an Officer
02171. The instructor will now practise the squad in saluting when passing anofficer; for this they should be split up into files.“UP”. Given as the left heel strikes theground by the cadet who is nearest the officer. The file react as if they have been giventhe executive word of command “SALUTE”. “UP” should be called out five pacesbefore the officer is reached and must be loud enough for the file to hear it.
Saluting To the Front
02172. When a cadet delivers a message or speaks to an officer, he approachescarrying the message in his left hand, halts, salutes, delivers the message with his lefthand or speaks, salutes, turns in the direction in which he is to move and marchesaway. The order “SALUTE TO THE FRONT — SALUTE” is given as the right footpasses the left.
a. Halt.
b. Salute to the Front.
c. Salute to the Front.
d. Turn about.
2-44
PROTECT
PROTECT
e. Step off in quick time.
Judge the regulation pause between each movement.
02173. Practise the squad.
Eyes Right and Left
02174. Explain: A formed party of cadets on the march pays compliments to theleft or right as described in paragraph 02169. This method, which is ordered by theofficer or NCO in charge of the party, is the equivalent of a salute and is substituted inthese circumstances for the sake of ease and speed. The direction is dictated by theside of the party on which the recipient of the compliment passes.
02175. “BY THE RIGHT, EYES — RIGHT”. Given as the left heel strikes theground. Take a 750 mm (30 inches) pace with the left foot and as it touches theground, turn the head through 1600 mils (90 degrees) to the right and continuemarching in this position.
02176. Explain and demonstrate the remaining movements of this section: “EYES— FRONT”. Given as the left heel strikes the ground when the body of men is pastthe recipient of the ‘Eyes Right’. Take a 750 mm (30 inches) pace with the left foot andas it touches the ground turn the head to the front and continue marching.
02177. The right hand cadet or right guide will look to his front throughout. Officers,AIs, SSIs and Cadet NCOs in command of cadets will salute.
Common Faults
02178.a. Shortening the length of pace and losing balance and thus direction.
b. Leaning back.
c. Not looking upwards and at the recipient of the eyes right.
Saluting Without Headdress
02179. A cadet without headdress, in uniform, salutes an officer in the following way.
a. When he passes an officer he will return his arms to the position of Attentionand turn his head in the direction of the officer on the left foot. He will take fivepaces in this position and return his head to the front on the sixth pace.
b. When he meets an officer or is passed by one when stationary he will standto Attention facing that officer.
02180. Practise the squad.
2-45
PROTECT
Saluting With the Left Hand
02181. A cadet who has injured his right hand or arm will salute with the left hand.
02182. Reserved.
2-46
PROTECT
PROTECT
SECTION 16. — MARKING TIME IN QUICK TIME
A. INSTRUCTOR’S NOTES
Aim
02183. To teach marching cadets to remain in the same position without actuallyhalting.
Timings
02184. One 30 minute period.
Miscellaneous
02185. This is not taught by numbers initially as with other drill movements.
B. CONDUCT OF THE LESSON
Preliminaries
02186. Inspect the squad.
Introduction
02187. Explain: This movement although not often used, is useful and quickerthan halting and stepping off again when there is a temporary hold-up.
Quick Mark Time From the Halt
02188.a. Demonstrate the complete movement.
b. Demonstrate and explain: “QUICK MARK — TIME”. Raise the leftknee and remain balanced on the right foot, with the left thigh horizontal, thefoot hanging naturally, with the toe directly under the knee. Immediately lowerthe left foot to the ground, with it still hanging naturally and without driv- ing it tothe ground. As the left toe comes to the ground, start to raise the right knee in asimilar manner.
02189. Practise the squad.
2-47
PROTECT

Common Faults
02190.a. Not marking time on the same ground.
b. Increasing the rate of marching.
c. Stamping.
Halt From Quick Mark Time
02191.a. Demonstrate the complete movement.
b. Demonstrate and explain: “SQUAD — HALT”. Given when the leftknee is at its highest point. Replace the left foot and ‘bend the right knee’.
02192. Practise the squad.
Quick March From Quick Mark Time
02193.a. Demonstrate the complete movement.
b. Demonstrate and explain: “FORWARD”. Given when the left knee isat its highest point. Replace the left foot,‘bend the right knee’, ‘Shoot the leftfoot forward’, and march a pace of 750 mm (30 inches) swinging the right armforward and left arm backwards.
02194. Practise the squad.
Quick Mark Time From Quick March
02195.a. Demonstrate the complete movement.
b. Demonstrate and explain: “MARK TIME”. Given the executive wordof command drawn out over the left pace. Complete the pace with the left foot,take a short pace with the right foot which finishes flat on the ground and 150mm (6 inches) in front of the left foot, return the arms to the position of attentionand mark time with the left foot.
02196. Practise the squad.
Common Fault
02197. Increasing the rate of marching.
02198. Reserved.
2-48
PROTECT
PROTECT
SECTION 17. — PARADING AND INSPECTING A SQUAD,MOVING IT OFF AND FALLING IT OUT
A. INSTRUCTOR’S NOTES
Aim
02199. To teach a cadet to parade a squad, ensure that cadets are properly dressedand equipped for the occasion, march them away, halt them and fall them out.
Timings
02200. Two 30 minute periods.
Miscellaneous
02201. These are practice periods for the cadet placed in charge of a squad, whohas already learnt the appropriate drill movements, and is now required to drill it in afew elementary movements.
02202. The instructor must concentrate on the following aspects of the cadet incharge of the squad.
a. His personal smartness in drill and dress.
b. The clarity and timing of his words of command.
c. His knowledge.
d. His observance when inspecting the squad.
B. CONDUCT OF THE LESSON
Preliminaries
02203. Ensure that a squad of not less than six cadets is available.
Introduction
02204. Explain: Having now completed the drill syllabus the purpose of theseperiods is to learn how to drill other cadets in a few elementary movements.
2-49
PROTECT
PROTECT
Getting on Parade
02205. To practise this movement the cadets in the squad will be standing easy inthree ranks in Close Order with the front facing the direction in which they will get onparade. The right guide or right hand cadet of the front rank acts as a right marker.
02206. The instructor will demonstrate, using the squad:
a. “RIGHT — MARKER”.
(1) On the command “RIGHT” the whole squad comes “AT EASE”.
(2) On the command “MARKER” the right marker springs to attention,marches forward, halts on the fifteenth pace, or less if space does notpermit, and stands at ease.
b. “GET ON — PARADE”.
(1) Both the right marker and the cadets in the squad spring to attention.The squad march forward, halt on the fifteenth pace, look to their right andpick up their dressing. All these movements have the regulation pausebetween them.
(2) When the cadets in the squad are dressed correctly they will look totheir front and stand at ease in succession from the right.
Further Movements
02207. Having got the squad on parade the cadet in charge must then make surethat cadets are:
a. Correctly dressed and covered (Chapter 2 Section 8).
b. Properly dressed and equipped (Chapter 1 Section 2) after which he:
c. Marches the squad away and halts it (Chapter 2 Section 7).
d. Falls the squad out (Chapter 2 Section 10).
02208. Cadets practise.
02209. Reserved.
2-50
PROTECT
PROTECT
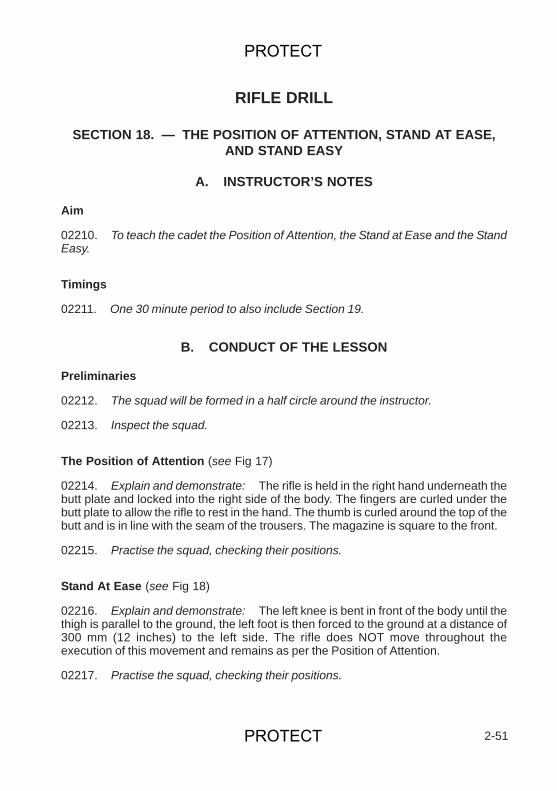
RIFLE DRILL
SECTION 18. — THE POSITION OF ATTENTION, STAND AT EASE,AND STAND EASY
A. INSTRUCTOR’S NOTES
Aim
02210. To teach the cadet the Position of Attention, the Stand at Ease and the StandEasy.
Timings
02211. One 30 minute period to also include Section 19.
B. CONDUCT OF THE LESSON
Preliminaries
02212. The squad will be formed in a half circle around the instructor.
02213. Inspect the squad.
The Position of Attention (see Fig 17)
02214. Explain and demonstrate: The rifle is held in the right hand underneath thebutt plate and locked into the right side of the body. The fingers are curled under thebutt plate to allow the rifle to rest in the hand. The thumb is curled around the top of thebutt and is in line with the seam of the trousers. The magazine is square to the front.
02215. Practise the squad, checking their positions.
Stand At Ease (see Fig 18)
02216. Explain and demonstrate: The left knee is bent in front of the body until thethigh is parallel to the ground, the left foot is then forced to the ground at a distance of300 mm (12 inches) to the left side. The rifle does NOT move throughout theexecution of this movement and remains as per the Position of Attention.
02217. Practise the squad, checking their positions.
2-51
PROTECT
PROTECT
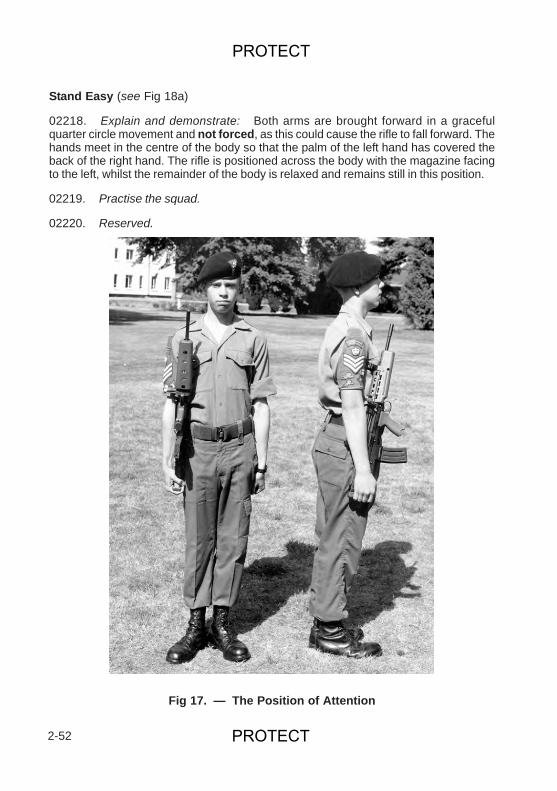
Stand Easy (see Fig 18a)
02218. Explain and demonstrate: Both arms are brought forward in a gracefulquarter circle movement and not forced, as this could cause the rifle to fall forward. Thehands meet in the centre of the body so that the palm of the left hand has covered theback of the right hand. The rifle is positioned across the body with the magazine facingto the left, whilst the remainder of the body is relaxed and remains still in this position.
02219. Practise the squad.
02220. Reserved.
2-52
Fig 17. — The Position of Attention
PROTECT
PROTECT

2-53
Fig 18. — The Stand at Ease
PROTECT
PROTECT
2-54
Fig 18a. — Stand Easy
PROTECT
PROTECT
SECTION 19. — CHANGE ARMS AT THE SHOULDER
A. INSTRUCTOR’S NOTES
Aim
02221. To teach the cadet to change arms when at the Shoulder. (This movement isexecuted in order to rest the right arm when standing with the rifle at the shoulder forlong periods.)
Timings
02222. One 30 minute period to also include Section 18.
B. CONDUCT OF THE LESSON
Preliminaries
02223. Inspect the squad.
02224. Revise Section 18.
Change Arms at the Shoulder
02225. Explain and demonstrate, first showing all four movements in sequence,and then taking the squad through each movement separately.
a. “CHANGE ARMS — ONE” (see Fig 19). Force the rifle into the verticalposition 100 mm (4 inches) in front centre of the body under control of the righthand. The magazine is square to the front with the right arm at its fullest extent.At the same time the left hand comes across the body by the shortest possibleroute to strike, seize and grasp the stock just above the trigger guard.
b. “SQUAD — TWO” (see Fig 20). Release the grip with the right hand andforce it up the side of the rifle to strike, seize and grasp the stock just above theleft hand.
c. “SQUAD — THREE” (see Fig 21). Release the grip with the left hand, atthe same time force the rifle to a vertical position at the left side of the bodyunder control of the right hand, ensuring the rifle is touching the shoulder. At thesame time strike, seize and grasp the base of the butt plate with the left hand ina cup-like grip with the thumb curled around the toe of the butt.
d. “SQUAD — FOUR” (see Fig 22). Release the grip with the right handand force it across the body by the shortest possible route to resume the
2-55
PROTECT
PROTECT
position of attention. At the same time force the rifle back so that the thumb is inline with the seam of the trousers.
02226. Practise the squad.
Note: To Change Arms back to the right side of the body, the above process isreversed.
02227. Reserved.
2-56
PROTECT
PROTECT
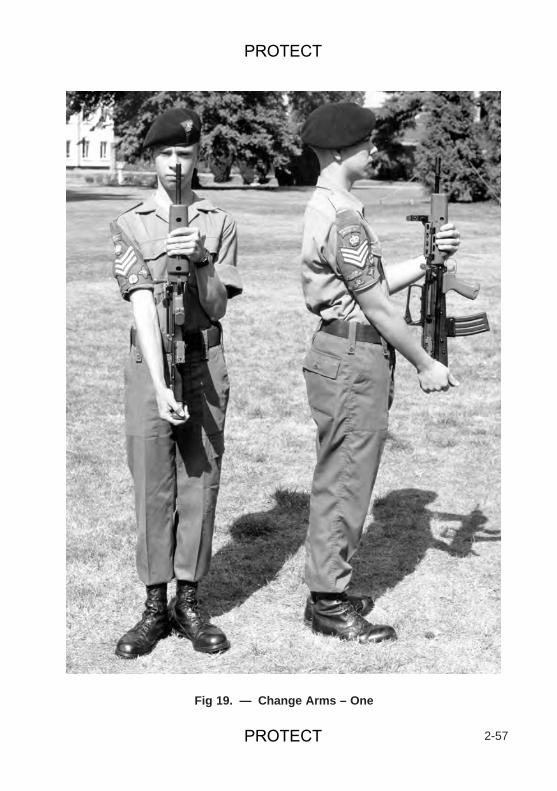
2-57
Fig 19. — Change Arms – One
PROTECT
PROTECT
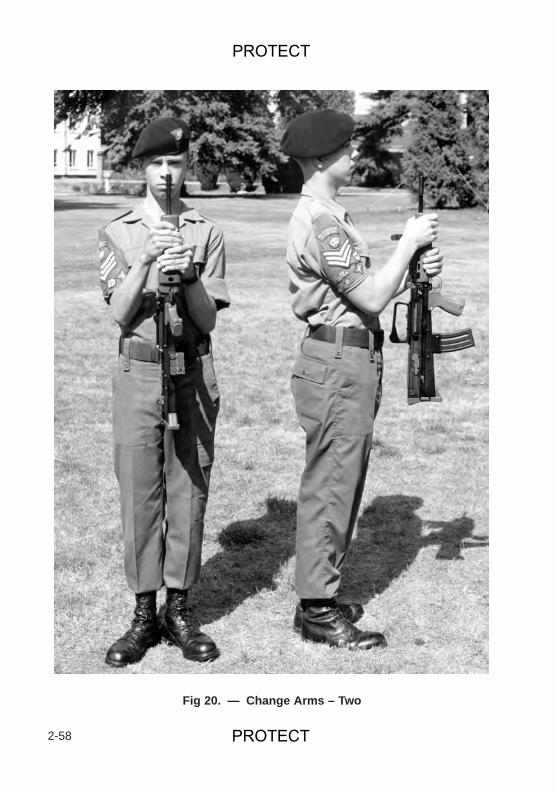
2-58
Fig 20. — Change Arms – Two
PROTECT
PROTECT

2-59
Fig 21. — Change Arms – Three
PROTECT
PROTECT
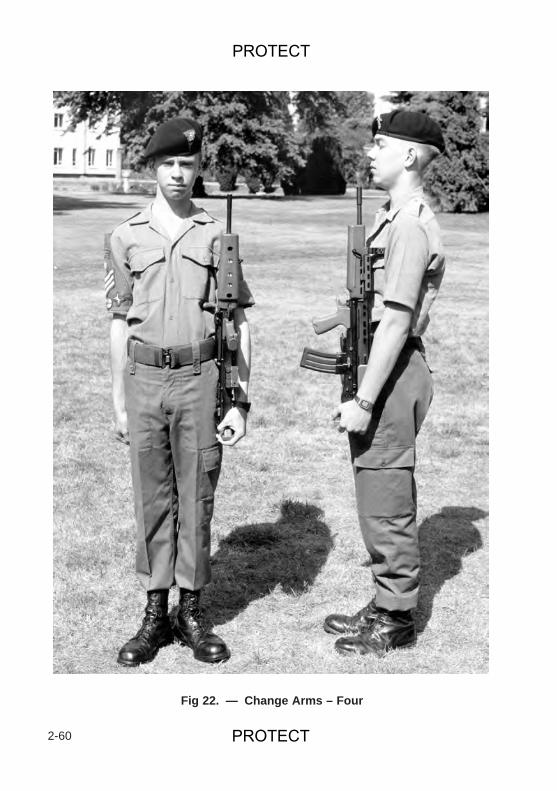
2-60
Fig 22. — Change Arms – Four
PROTECT
PROTECT
SECTION 20. — SLOPE ARMS FROM THE SHOULDER/SHOULDER ARMS FROM THE SLOPE
A. INSTRUCTOR’S NOTES
Aim
02228. To teach the cadet to Slope Arms from the Shoulder Arms and ShoulderArms from the Slope.
Timings
02229. One 30 minute period.
B. CONDUCT OF THE LESSON
Preliminaries
02230. Inspect the squad.
02231. Revise Sections 18 and 19.
Slope Arms from the Shoulder
02232. Explain and demonstrate, first showing the three movements in sequenceand then taking the squad through each movement separately.
a. “SLOPE ARMS — ONE” (see Fig 23). Force the butt forward andupward so that the rifle is vertical. Immediately force the left hand across thebody by the shortest possible route to strike, seize and grasp the stock justabove the trigger guard. At the same time release the right hand from the buttplate to strike, seize and grip the small of the butt in a Y-like grip.
b. “SQUAD — TWO” (see Fig 24). Force the rifle up and across the body bythe shortest possible route, placing the rifle on the left shoulder under control ofthe right hand, at the same time changing the grip of the right hand to a full grip.At the same time release the grip with the left hand and force it down the rifle bythe shortest possible route to strike, seize and grasp the butt plate with a cup-like grip, with the exception of the thumb which is curled around the toe of thebutt. Ensure that the left forearm is kept parallel to the ground.
c. “SQUAD — THREE” (see Fig 25). Force the right arm down by theshortest possible route to assume the correct position of the Slope Arms.
2-61
PROTECT
PROTECT
02233. Practise the squad.
Shoulder Arms from the Slope
02234. Explain and demonstrate, first showing all four movements in sequence,and then demonstrate each movement separately, the squad executing themovements at the same time.
a. “SHOULDER ARMS — ONE” (see Fig 26). Force the right hand acrossthe body by the shortest possible route to strike, seize and grasp the area of thesmall of the butt with a full grip.
b. “SQUAD — TWO” (see Fig 27). Force the rifle down by the shortestpossible route to a vertical position on the right side of the body under control ofthe right hand. At the same time change the grip of the right hand to a Y-like gripon the small of the butt, whilst the left hand, released from its grip on the buttplate, is forced up the rifle by the shortest possible route to strike, seize andgrasp the stock with a full grip just above the trigger guard.
c. “SQUAD — THREE” (see Fig 28). Release the Y-like grip of the righthand and force it down to strike, seize and grasp the butt plate with a cup-likegrip.
d. “SQUAD — FOUR” (see Fig 29). Force the rifle back into the correctposition of the Shoulder Arms with the thumb in line with the seam of thetrousers. At the same time release the grip of the left hand and force it across thebody by the shortest possible route to resume the correct position of theShoulder Arms.
02235. Practise the squad.
02236. Reserved.
2-62
PROTECT
PROTECT

2-63
Fig 23. — Slope Arms – One
PROTECT
PROTECT

2-64
Fig 24. — Slope Arms – Two
PROTECT
PROTECT

2-65
Fig 25. — Slope Arms – Three
PROTECT
PROTECT
2-66
Fig 26. — Shoulder Arms – One
PROTECT
PROTECT
2-67
Fig 27. — Shoulder Arms – Two
PROTECT
PROTECT
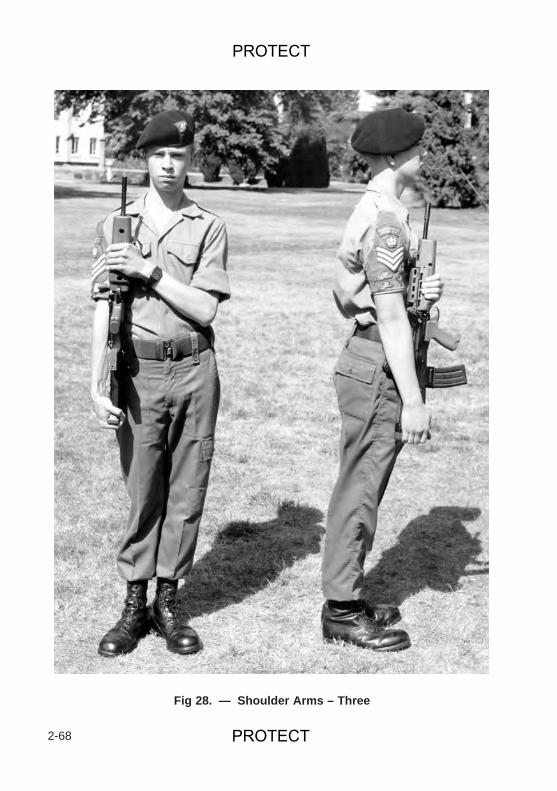
2-68
Fig 28. — Shoulder Arms – Three
PROTECT
PROTECT
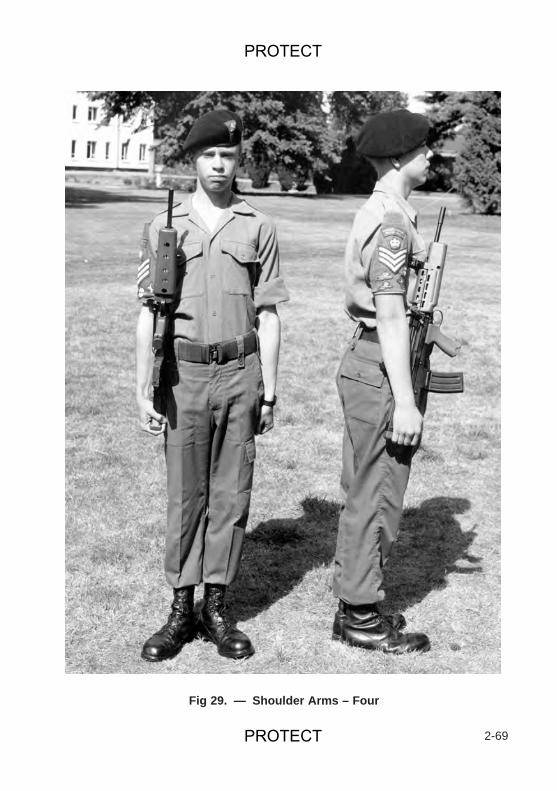
2-69
Fig 29. — Shoulder Arms – Four
PROTECT
PROTECT

2-70
PROTECT
PROTECT
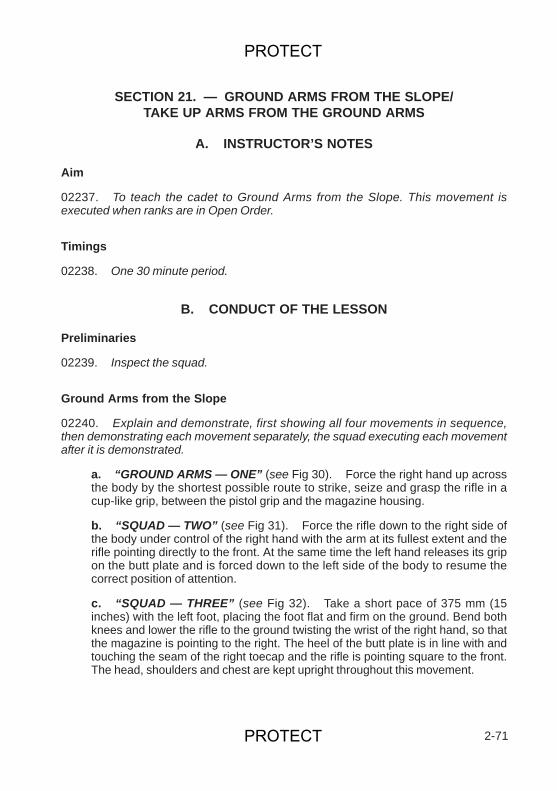
SECTION 21. — GROUND ARMS FROM THE SLOPE/TAKE UP ARMS FROM THE GROUND ARMS
A. INSTRUCTOR’S NOTES
Aim
02237. To teach the cadet to Ground Arms from the Slope. This movement isexecuted when ranks are in Open Order.
Timings
02238. One 30 minute period.
B. CONDUCT OF THE LESSON
Preliminaries
02239. Inspect the squad.
Ground Arms from the Slope
02240. Explain and demonstrate, first showing all four movements in sequence,then demonstrating each movement separately, the squad executing each movementafter it is demonstrated.
a. “GROUND ARMS — ONE” (see Fig 30). Force the right hand up acrossthe body by the shortest possible route to strike, seize and grasp the rifle in acup-like grip, between the pistol grip and the magazine housing.
b. “SQUAD — TWO” (see Fig 31). Force the rifle down to the right side ofthe body under control of the right hand with the arm at its fullest extent and therifle pointing directly to the front. At the same time the left hand releases its gripon the butt plate and is forced down to the left side of the body to resume thecorrect position of attention.
c. “SQUAD — THREE” (see Fig 32). Take a short pace of 375 mm (15inches) with the left foot, placing the foot flat and firm on the ground. Bend bothknees and lower the rifle to the ground twisting the wrist of the right hand, so thatthe magazine is pointing to the right. The heel of the butt plate is in line with andtouching the seam of the right toecap and the rifle is pointing square to the front.The head, shoulders and chest are kept upright throughout this movement.
2-71
PROTECT
PROTECT

d. “SQUAD — FOUR” (see Fig 33). Release the grip on the rifle with theright hand and force the body upright, at the same time forcing the left foot backto assume the correct position of attention.
02241. Practise the squad.
Take Up Arms from the Ground Arms
02242. Explain and demonstrate, first showing all four movements in sequence,then taking each movement separately, the squad executing each movement after it isdemonstrated.
a. “TAKE UP ARMS — ONE” (see Fig 32). Take a short pace of 375 mm(15 inches) with the left foot, placing the foot flat and firm on the ground. Bendboth knees and take control of the rifle with a cup-like grip with the right handbetween the pistol grip and the magazine housing. The head, shoulders andchest should be kept upright during the execution of this movement.
b. “SQUAD — TWO” (see Fig 31). Straighten the legs ensuring the rifle isturned clockwise and kept in line with the right shoulder and is parallel to theground. Bring the left foot back to the correct position of attention.
c. “SQUAD — THREE” (see Fig 30). Force the rifle across and up the bodyby the shortest possible route on to the left shoulder, under control of the righthand. At the same time bend the left arm parallel to the ground to strike, seizeand grasp the butt plate in a cup-like grip. The magazine is now square to the leftwith the right arm close to the body.
d. “SQUAD — FOUR” (see Fig 25). Force the right hand down and acrossthe body by the shortest possible route to resume the correct position of theSlope Arms.
02243. Practise the squad.
02244. Reserved.
2-72
PROTECT
PROTECT
2-73
Fig 30. — Ground Arms – One
PROTECT
PROTECT
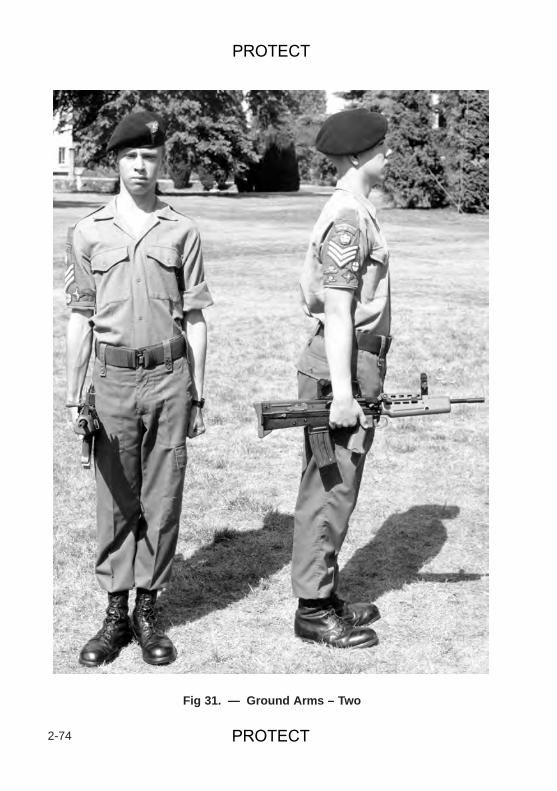
2-74
Fig 31. — Ground Arms – Two
PROTECT
PROTECT

2-75
Fig
32.
—G
roun
d A
rms
– Th
ree
PROTECT
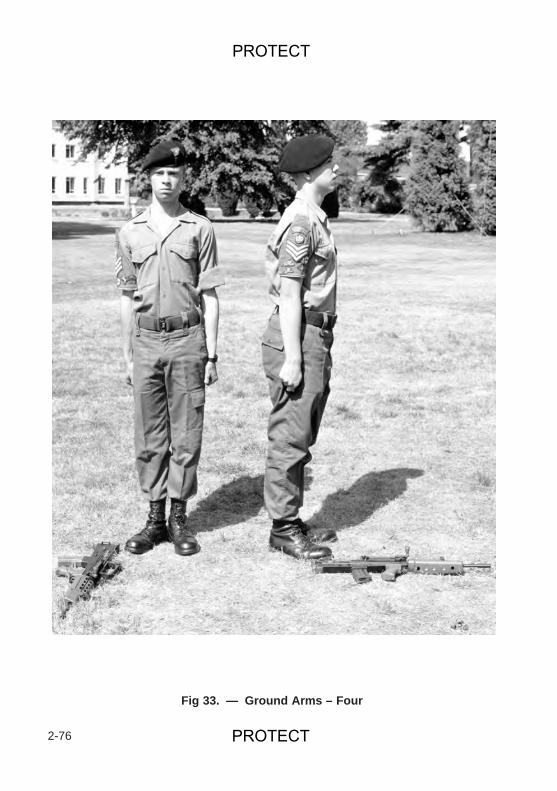
2-76
Fig 33. — Ground Arms – Four
PROTECT
PROTECT

SECTION 22. — PRESENT ARMS FROM THE SLOPE/SLOPE ARMS FROM THE PRESENT
A. INSTRUCTOR’S NOTES
Aim
02245. To teach the cadet to Present Arms from the Slope and to Slope Arms fromthe Present.
Timings
02246. One 30 minute period.
B. CONDUCT OF THE LESSON
Preliminaries
02247. Inspect the squad.
02248. Revise Section 20.
Present Arms from the Slope
02249. Explain and demonstrate, first showing the three movements in sequence,then taking each movement separately, the squad executing each movement after it isdemonstrated.
a. “PRESENT ARMS — ONE” (see Fig 34). Force the right hand across thebody by the shortest possible route to strike, seize and grasp the area of thesmall of the butt with a full grip. The right arm is kept parallel to the ground.
b. “SQUAD — TWO” (see Fig 35). Force the rifle across and up to the frontcentre of the body under control of the right hand, ensuring that the base of thestock is in line with the mouth, and approximately 100 to 150 mm (four to sixinches) away from the chest. At the same time release the grip with the lefthand, straighten the fingers and thumb and force the forearm, wrist, palm andfingers to strike the rifle from a position 150 mm (six inches) to its left, ensuringthat the wrist is in line with the pistol grip. The left wrist, forearm and elbow areforced well in to the rifle, which is in front centre of the body.
c. “SQUAD — THREE” (see Fig 36). Force the rifle down the front centre ofthe body under control of the right hand so that the right arm is at its fullestextent. At the same time change the grip of the right hand to a Y-like grip on the
2-77
PROTECT
PROTECT
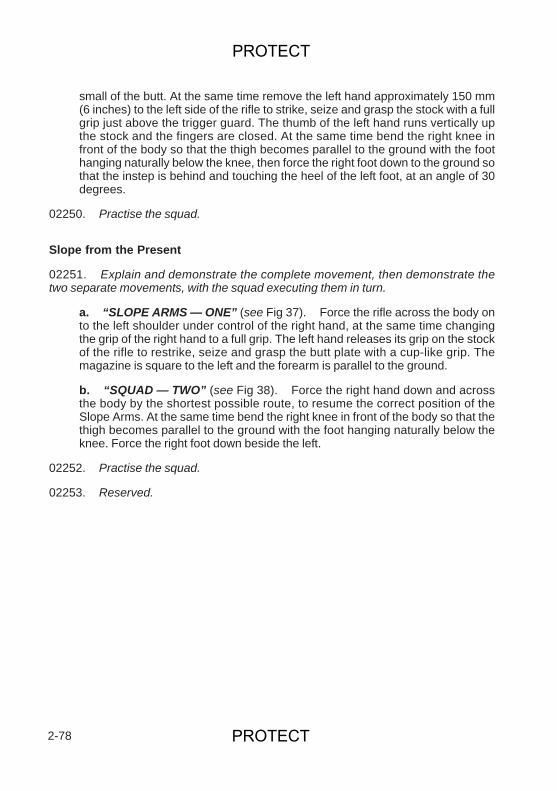
small of the butt. At the same time remove the left hand approximately 150 mm(6 inches) to the left side of the rifle to strike, seize and grasp the stock with a fullgrip just above the trigger guard. The thumb of the left hand runs vertically upthe stock and the fingers are closed. At the same time bend the right knee infront of the body so that the thigh becomes parallel to the ground with the foothanging naturally below the knee, then force the right foot down to the ground sothat the instep is behind and touching the heel of the left foot, at an angle of 30degrees.
02250. Practise the squad.
Slope from the Present
02251. Explain and demonstrate the complete movement, then demonstrate thetwo separate movements, with the squad executing them in turn.
a. “SLOPE ARMS — ONE” (see Fig 37). Force the rifle across the body onto the left shoulder under control of the right hand, at the same time changingthe grip of the right hand to a full grip. The left hand releases its grip on the stockof the rifle to restrike, seize and grasp the butt plate with a cup-like grip. Themagazine is square to the left and the forearm is parallel to the ground.
b. “SQUAD — TWO” (see Fig 38). Force the right hand down and acrossthe body by the shortest possible route, to resume the correct position of theSlope Arms. At the same time bend the right knee in front of the body so that thethigh becomes parallel to the ground with the foot hanging naturally below theknee. Force the right foot down beside the left.
02252. Practise the squad.
02253. Reserved.
2-78
PROTECT
PROTECT
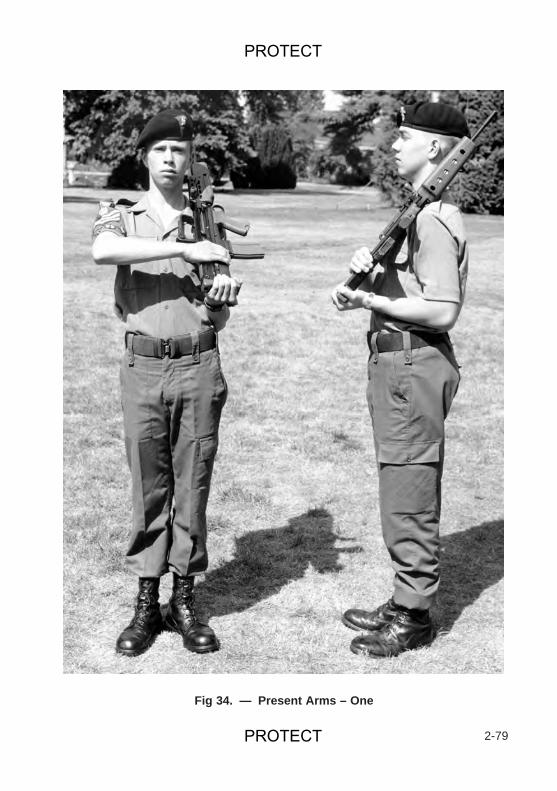
2-79
Fig 34. — Present Arms – One
PROTECT
PROTECT
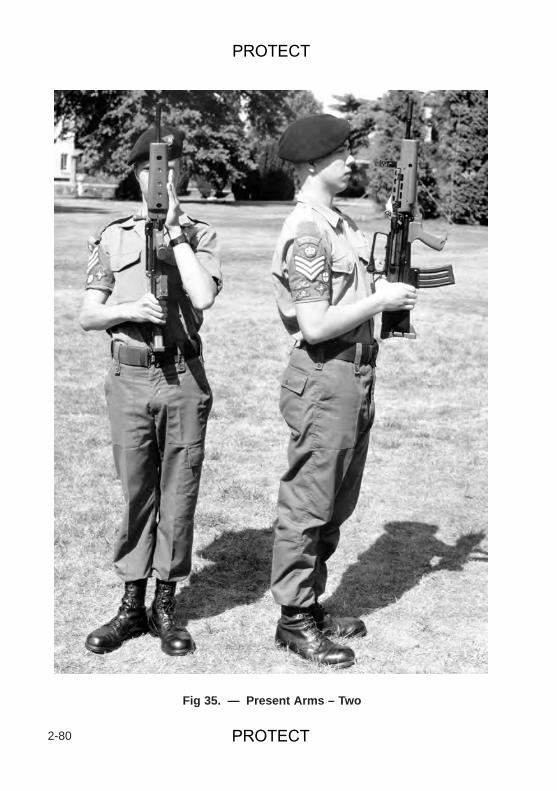
2-80
Fig 35. — Present Arms – Two
PROTECT
PROTECT
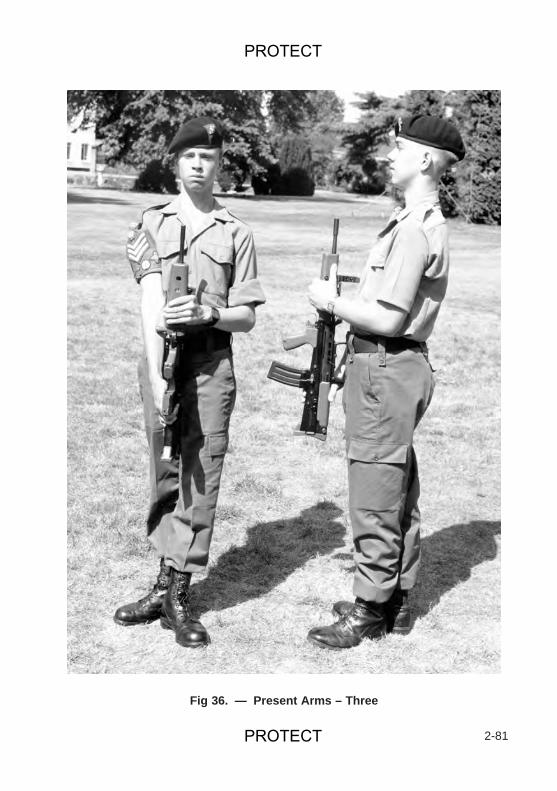
2-81
Fig 36. — Present Arms – Three
PROTECT
PROTECT
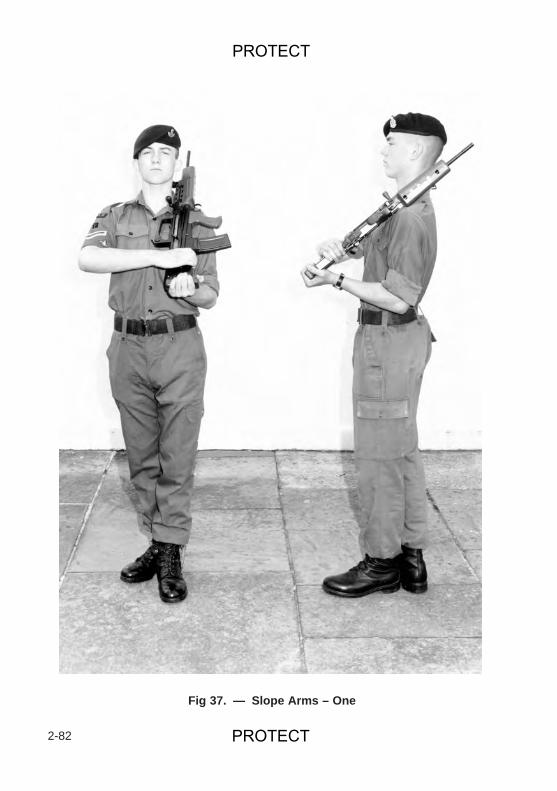
2-82
Fig 37. — Slope Arms – One
PROTECT
PROTECT
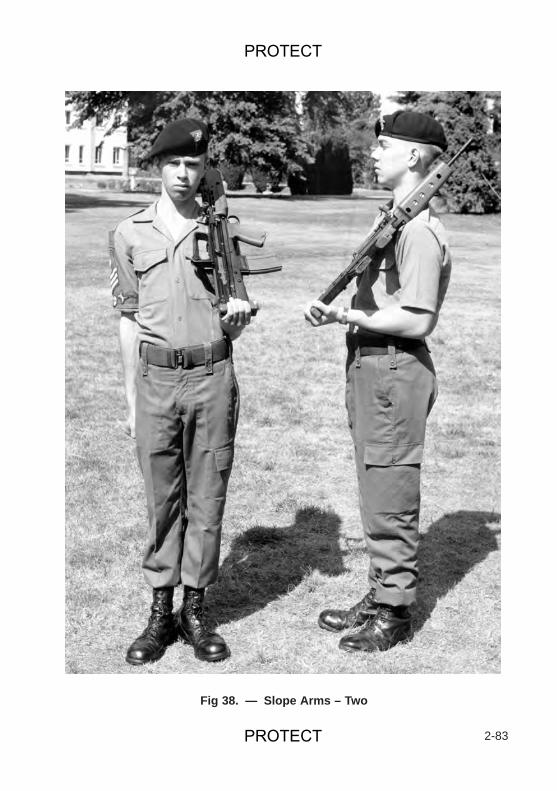
2-83
Fig 38. — Slope Arms – Two
PROTECT
PROTECT

2-84
PROTECT
PROTECT
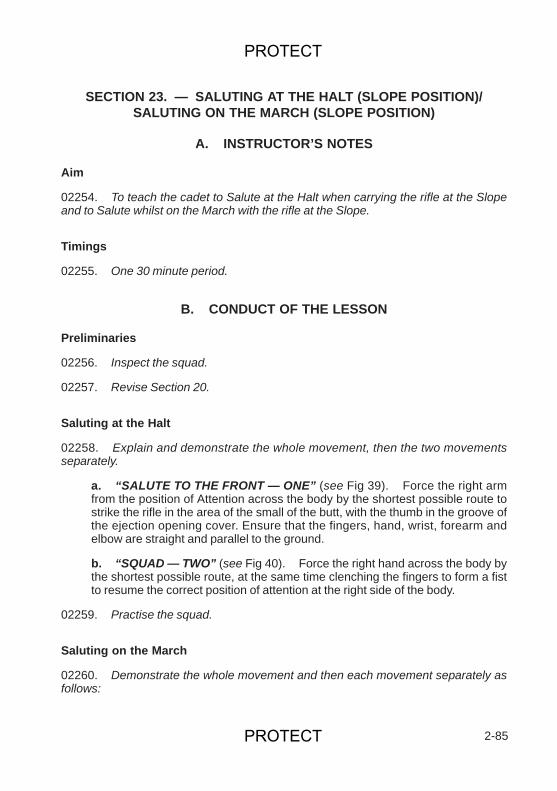
SECTION 23. — SALUTING AT THE HALT (SLOPE POSITION)/SALUTING ON THE MARCH (SLOPE POSITION)
A. INSTRUCTOR’S NOTES
Aim
02254. To teach the cadet to Salute at the Halt when carrying the rifle at the Slopeand to Salute whilst on the March with the rifle at the Slope.
Timings
02255. One 30 minute period.
B. CONDUCT OF THE LESSON
Preliminaries
02256. Inspect the squad.
02257. Revise Section 20.
Saluting at the Halt
02258. Explain and demonstrate the whole movement, then the two movementsseparately.
a. “SALUTE TO THE FRONT — ONE” (see Fig 39). Force the right armfrom the position of Attention across the body by the shortest possible route tostrike the rifle in the area of the small of the butt, with the thumb in the groove ofthe ejection opening cover. Ensure that the fingers, hand, wrist, forearm andelbow are straight and parallel to the ground.
b. “SQUAD — TWO” (see Fig 40). Force the right hand across the body bythe shortest possible route, at the same time clenching the fingers to form a fistto resume the correct position of attention at the right side of the body.
02259. Practise the squad.
Saluting on the March
02260. Demonstrate the whole movement and then each movement separately asfollows:
2-85
PROTECT
PROTECT

a. “SALUTE TO THE RIGHT — ONE” (see Fig 41). On receiving the wordof command as the left heel strikes the ground, take a full marching pace of 750mm (30 inches) with the right foot, at the same time forcing the arm to the rear.Take a further marching pace of 750 mm (30 inches) with the left foot. As the leftheel strikes the ground, force the right arm from the rear through the position ofAttention and across the body by the shortest possible route, to the position ofthe salute. At the same time force the head and eyes square over the rightshoulder.
b. “SQUAD — TWO — (THREE — FOUR — FIVE)” (see Fig 16). Take afurther four full marching paces of 750 mm (30 inches) whilst retaining theposition of the salute. Ensure that the forearm remains parallel to the ground,the rifle remains square to the front, and the head and eyes remain square overthe right shoulder and looking above shoulder height.
c. “SQUAD — SIX” (see Fig 16). Take a further full marching pace of 750mm (30 inches) with the right foot. As the heel strikes the ground force the righthand across the body by the shortest possible route to the right side. At thesame time force the head and eyes square to the front.
d. “SQUAD — FORWARD”. Take a further full marching pace of 750 mm(30 inches) with the left foot, at the same time forcing the right arm forward, andcontinue to march in quick time at the regulation rate.
02261. Practise the squad.
Note: For the Salute to the Left, the head and eyes are forced over the left shoulderas in paragraph 02260. a. above. All other movements are identical (see Fig 42).
02262. Reserved.
2-86
PROTECT
PROTECT
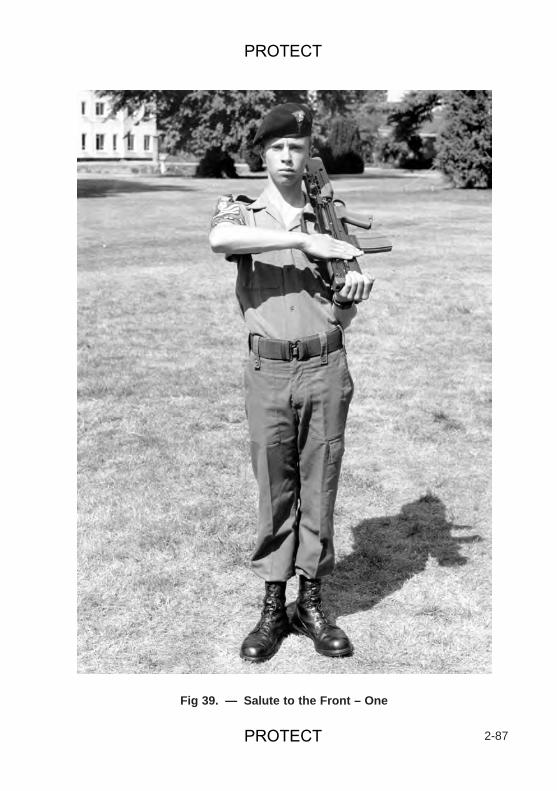
2-87
Fig 39. — Salute to the Front – One
PROTECT
PROTECT
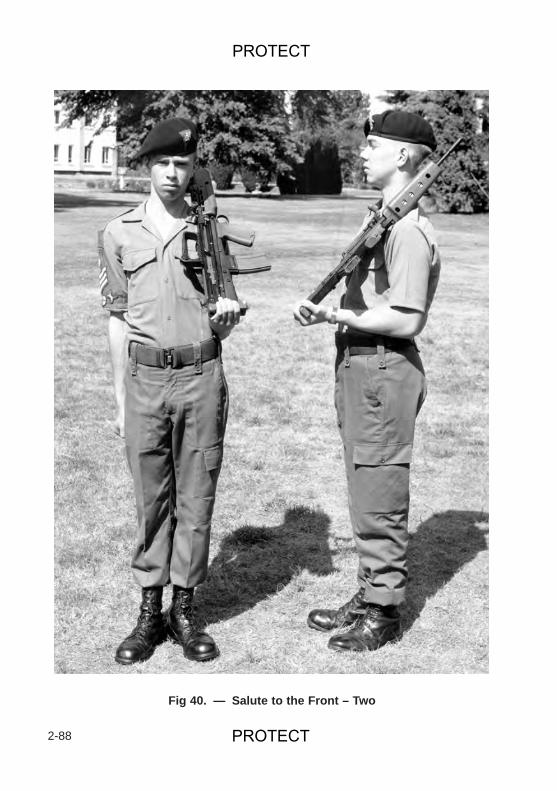
2-88
Fig 40. — Salute to the Front – Two
PROTECT
PROTECT
2-89
Fig 41. — Salute to the Right – One
PROTECT
PROTECT
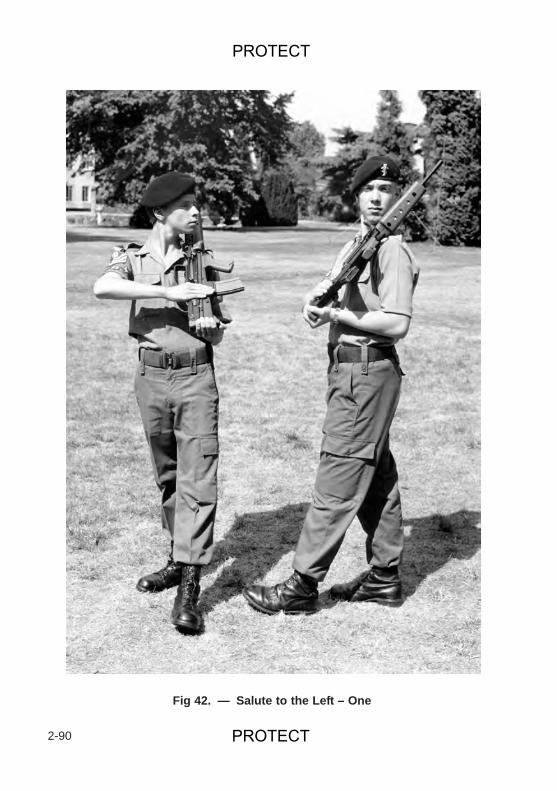
2-90
Fig 42. — Salute to the Left – One
PROTECT
PROTECT
SECTION 24. — DEFINITIONS, WORDS OF COMMAND ANDDIRECTING FLANKS
Aim
02263. To teach senior cadets definitions, parts of a word of command and directingflanks.
Definitions
02264.a. Covering — the act of placing oneself directly behind another body.
b. Dressing — aligning oneself with and covering others within a body ofcadets.
c. Rank — a line of cadets side by side.
d. Single File — cadets one behind another on a frontage of one at normalmarching distance.
e. Blank File — a file in which there is no centre or rear cadet, or no centrecadet, due to the inequality of numbers within a body of cadets. This file issecond from the left in three ranks and third from the left in two ranks.
f. Flank — either side of a body as opposed to its front or rear.
g. Directing Flank — the flank by which a body of cadets takes its dressing.
Words of Command
02265. There are three parts to a word of command — Introductory, Cautionary andExecutive.
02266. Introductory Word of Command. Before a squad is turned in anydirection whether at the halt or on the march, the direction is indicated by anintroductory word of command. This word of command will vary depending on thedirection that the squad is facing when the command is given. The constant factors indetermining the direction that the squad is facing and the direction that it is to face willbe the front rank and the right hand cadet of the squad. Fig 43 shows the introductorywords of command required for any given situation.
02267. Cautionary Word of Command. The cautionary word of commandshould be consistently drawn out over about the equivalent of four paces in quick time.There should be a pause between it and the executive word of command of:
a. At the Halt — the regulation pause.
2-91
PROTECT
PROTECT
b. In Quick Time — about four paces.
c. In Slow Time — about three paces.
02268. Executive Word of Command. The executive word of command shouldbe given as a high pitched, short, sharp command to inspire instant reaction from thesquad. Correct timing for this word of command is essential. The timing of variousexecutive words of command on the march is given below:
Word of In Quick Time In Slow Time Squad Call OutCommand
HALT On Left foot Left foot ONE TWOpassing right
RIGHT TURN On Left foot Right foot about to touch ground
ABOUT TURN On Right foot Right foot about (1) QT: IN LEFT,to touch ground RIGHT, LEFT,
FORWARD.(2) ST: ON STOP,TWO STOP,THREE STOP,FORWARD
MARK TIME On Right foot Over complete IN (QT ONLY)right pace
HALT/FORWARD Left Knee at Highest Right Knee at (While marking time) Point Highest Point
CHANGE STEP Consecutive Left As in Quick LEFT, RIGHT–and Right feet Time LEFT
BREAK INTOQUICK TIME. (Pauseof four paces)
QUICK MARCH QUICK on Leftfoot. MARCH on Right foot
BREAK INTO On Right footSLOW TIME,SLOW MARCH
2-92
PROTECT
PROTECT
Word of In Quick Time In Slow Time Squad Call OutCommand
SALUTE (to the On Left foot MISS, UP, TWOleft, right or to THREE, FOUR,the front) FIVE
EYES RIGHT, On Left foot On Right foot MISS, UP orLEFT or FRONT MISS, FORWARD
Time and Pace
02269. Every instructor should know the rates of marching, lengths of pace andtimings of foot and arms drill that are laid out below:
a. Rates of Marching.
(1) Quick Time (normal) ..................... 116 paces to the minute.
(2) Quick Time (Recruits) ................... up to 140 paces to the minute.
(3) Quick Time (Light Infantry andGreen Jacket Regiments) ..................... 140 paces to the minute.
(4) Slow Time (normal) ....................... 65 paces to the minute.
(5) Slow Time (LIght Infantry andGreen Jacket Regiments) ..................... 70 paces to the minute.
(6) Double Time ................................. 180 paces to the minute.
b. Lengths of Pace.
(1) Quick and Slow Time ..................... 750 mm (30 inches).
(2) Stepping Out ................................. 830 mm (33 inches).
(3) Stepping Short .............................. 530 mm (21 inches).
(4) Double Time ................................. 1000 mm (40 inches).
(5) Side Pace ..................................... 300 mm (12 inches).
02270. Timing of Foot and Arms Drill. A pause is judged between movementsof foot and arms drill which would allow 40 movements to be completed in a minute;this is called the regulation pause.
02271. Reserved.
2-93
PROTECT
PROTECT
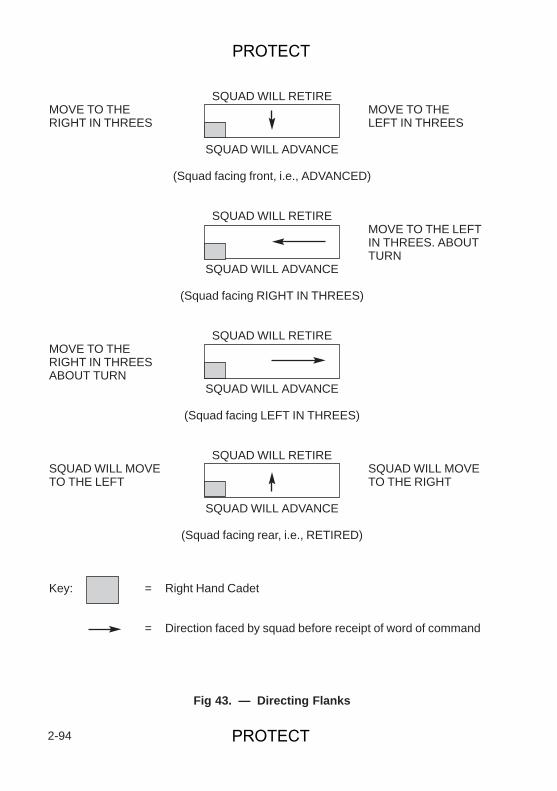
SQUAD WILL RETIREMOVE TO THE MOVE TO THERIGHT IN THREES LEFT IN THREES
SQUAD WILL ADVANCE
(Squad facing front, i.e., ADVANCED)
SQUAD WILL RETIREMOVE TO THE LEFTIN THREES. ABOUTTURN
SQUAD WILL ADVANCE
(Squad facing RIGHT IN THREES)
SQUAD WILL RETIREMOVE TO THERIGHT IN THREESABOUT TURN
SQUAD WILL ADVANCE
(Squad facing LEFT IN THREES)
SQUAD WILL RETIRESQUAD WILL MOVE SQUAD WILL MOVETO THE LEFT TO THE RIGHT
SQUAD WILL ADVANCE
(Squad facing rear, i.e., RETIRED)
Key: = Right Hand Cadet
= Direction faced by squad before receipt of word of command
2-94
Fig 43. — Directing Flanks
PROTECT
PROTECT
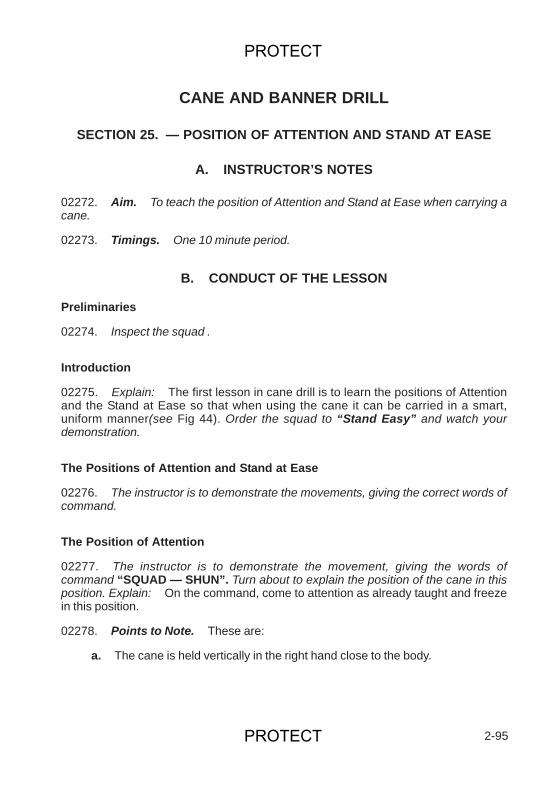
CANE AND BANNER DRILL
SECTION 25. — POSITION OF ATTENTION AND STAND AT EASE
A. INSTRUCTOR’S NOTES
02272. Aim. To teach the position of Attention and Stand at Ease when carrying acane.
02273. Timings. One 10 minute period.
B. CONDUCT OF THE LESSON
Preliminaries
02274. Inspect the squad .
Introduction
02275. Explain: The first lesson in cane drill is to learn the positions of Attentionand the Stand at Ease so that when using the cane it can be carried in a smart,uniform manner(see Fig 44). Order the squad to “Stand Easy” and watch yourdemonstration.
The Positions of Attention and Stand at Ease
02276. The instructor is to demonstrate the movements, giving the correct words ofcommand.
The Position of Attention
02277. The instructor is to demonstrate the movement, giving the words ofcommand “SQUAD — SHUN”. Turn about to explain the position of the cane in thisposition. Explain: On the command, come to attention as already taught and freezein this position.
02278. Points to Note. These are:
a. The cane is held vertically in the right hand close to the body.
2-95
PROTECT
PROTECT
b. The joint of the first forefinger of the right hand is positioned under the knobof the cane and pointing towards the thigh. The thumb is down and to the front— the remaining three fingers grasping the cane.
c. The ferrule of the cane is in front of the right shoulder.
d. The remainder of the body is erect and square to the front.
e. Do not call out the time.
02279. Order the squad into the position of Attention and confirm by practice.
The Stand at Ease (see Fig 45)
02280. The instructor is to demonstrate the movement, giving the words ofcommand “STAND AT — EASE”. Turn about to explain the position of the cane in thisposition. Explain: On the command, stand at ease as already taught and freeze inthis position.
02281. Points to Note. These are:
a. The back of the right hand is in the palm of the left hand.
b. The cane is held in the right hand as for the position of Attention, the caneitself being between the crook of the right arm and the body.
c. The remainder of the body is erect and square to the front.
02282. Practise the squad.
02283. Reserved.
2-96
PROTECT
PROTECT
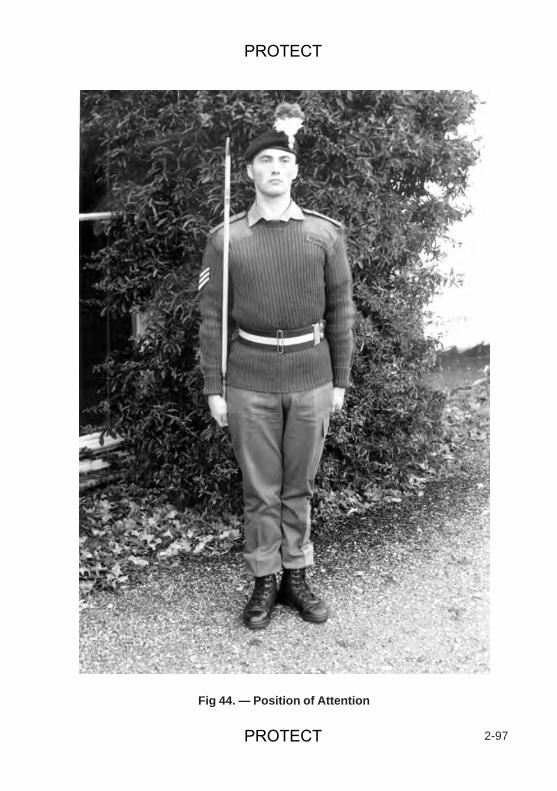
2-97
Fig 44. — Position of Attention
PROTECT
PROTECT
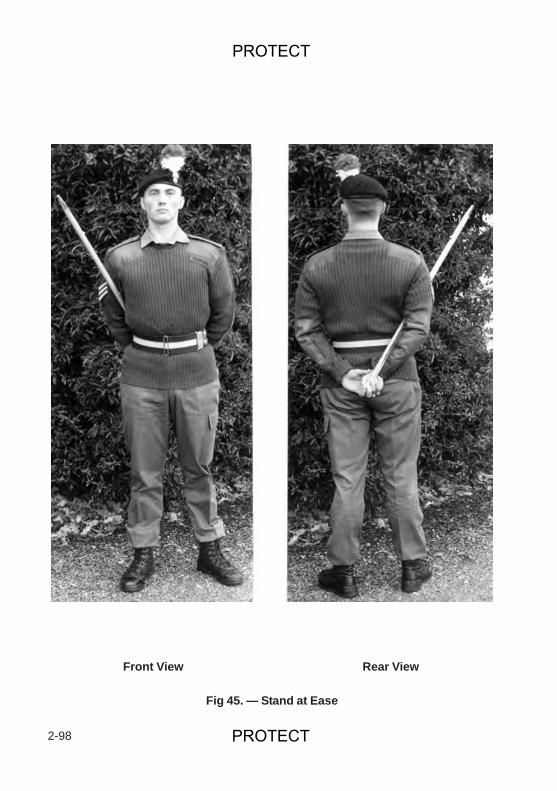
2-98
Front View Rear View
Fig 45. — Stand at Ease
PROTECT
PROTECT
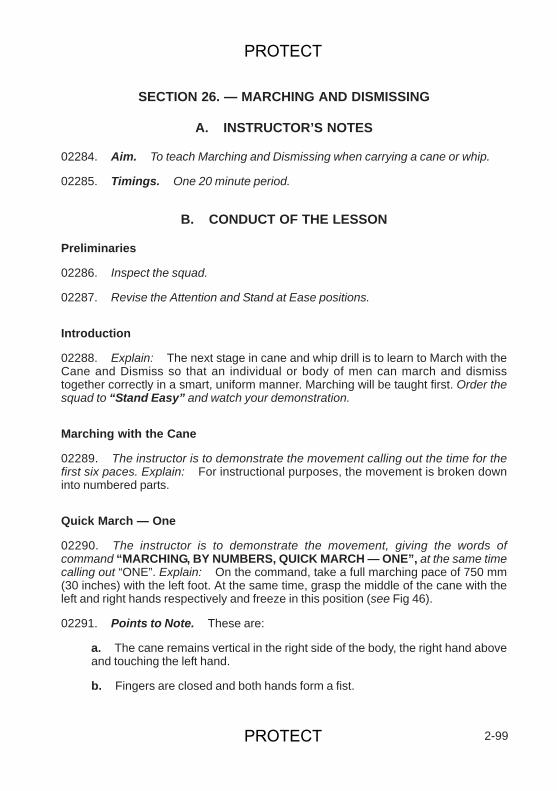
SECTION 26. — MARCHING AND DISMISSING
A. INSTRUCTOR’S NOTES
02284. Aim. To teach Marching and Dismissing when carrying a cane or whip.
02285. Timings. One 20 minute period.
B. CONDUCT OF THE LESSON
Preliminaries
02286. Inspect the squad.
02287. Revise the Attention and Stand at Ease positions.
Introduction
02288. Explain: The next stage in cane and whip drill is to learn to March with theCane and Dismiss so that an individual or body of men can march and dismisstogether correctly in a smart, uniform manner. Marching will be taught first. Order thesquad to “Stand Easy” and watch your demonstration.
Marching with the Cane
02289. The instructor is to demonstrate the movement calling out the time for thefirst six paces. Explain: For instructional purposes, the movement is broken downinto numbered parts.
Quick March — One
02290. The instructor is to demonstrate the movement, giving the words ofcommand “MARCHING, BY NUMBERS, QUICK MARCH — ONE”, at the same timecalling out “ONE”. Explain: On the command, take a full marching pace of 750 mm(30 inches) with the left foot. At the same time, grasp the middle of the cane with theleft and right hands respectively and freeze in this position (see Fig 46).
02291. Points to Note. These are:
a. The cane remains vertical in the right side of the body, the right hand aboveand touching the left hand.
b. Fingers are closed and both hands form a fist.
2-99
PROTECT
PROTECT
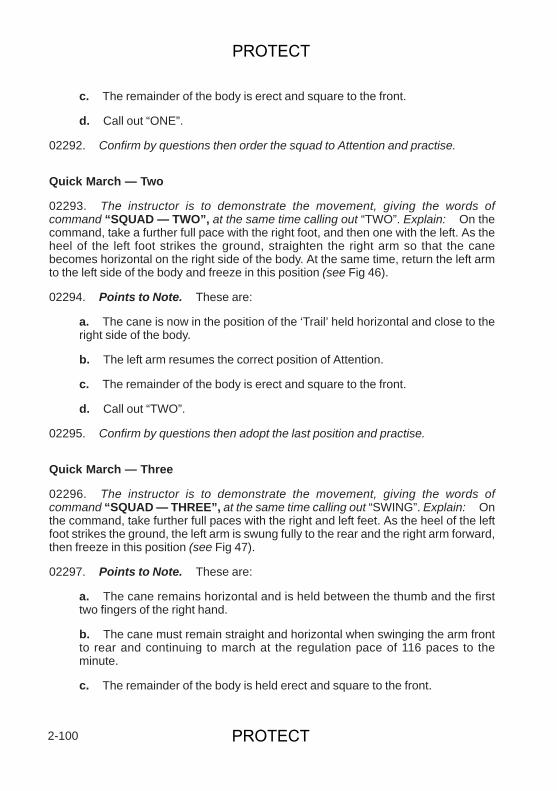
c. The remainder of the body is erect and square to the front.
d. Call out “ONE”.
02292. Confirm by questions then order the squad to Attention and practise.
Quick March — Two
02293. The instructor is to demonstrate the movement, giving the words ofcommand “SQUAD — TWO”, at the same time calling out “TWO”. Explain: On thecommand, take a further full pace with the right foot, and then one with the left. As theheel of the left foot strikes the ground, straighten the right arm so that the canebecomes horizontal on the right side of the body. At the same time, return the left armto the left side of the body and freeze in this position (see Fig 46).
02294. Points to Note. These are:
a. The cane is now in the position of the ‘Trail’ held horizontal and close to theright side of the body.
b. The left arm resumes the correct position of Attention.
c. The remainder of the body is erect and square to the front.
d. Call out “TWO”.
02295. Confirm by questions then adopt the last position and practise.
Quick March — Three
02296. The instructor is to demonstrate the movement, giving the words ofcommand “SQUAD — THREE”, at the same time calling out “SWING”. Explain: Onthe command, take further full paces with the right and left feet. As the heel of the leftfoot strikes the ground, the left arm is swung fully to the rear and the right arm forward,then freeze in this position (see Fig 47).
02297. Points to Note. These are:
a. The cane remains horizontal and is held between the thumb and the firsttwo fingers of the right hand.
b. The cane must remain straight and horizontal when swinging the arm frontto rear and continuing to march at the regulation pace of 116 paces to theminute.
c. The remainder of the body is held erect and square to the front.
2-100
PROTECT
PROTECT
d. Call out “SWING”.
02298. Confirm by questions then adopt the last position and practise.
Final Demonstration of the Complete Movement
02299. The instructor is to give a final demonstration of the movement then practisethe squad, who do not now call out the timing. Explain: Should the squad bedressed at less than an arm’s interval and moved to a flank, the cane will be kept at theposition of Attention and both arms will be swung. Practise the squad.
The Dismiss
02300. The instructor is to give a complete demonstration of the completemovement giving the order “DISMISS”. Explain:
a. When an officer is present, the squad will carry out the followingmovements, judging the pause between them: Turn to the right, place the caneunder the arm, hand away, salute, hand away and march off bringing the cane tothe Trail working from the first left foot.
b. When no officer is present, the squad will turn to the right, judge the pauseand march off, bringing the cane to the Trail.
02301. Confirm by questions then order the squad to Attention and practise.
02302. Reserved.
2-101
PROTECT
PROTECT
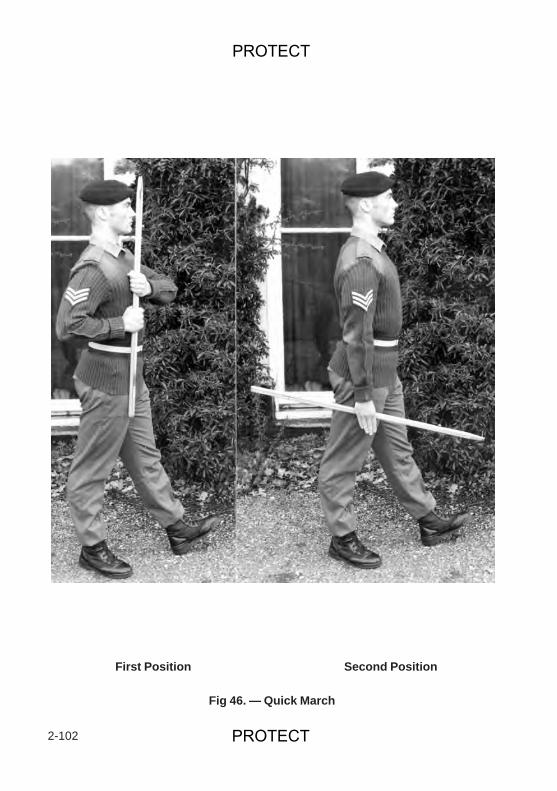
2-102
First Position Second Position
Fig 46. — Quick March
PROTECT
PROTECT
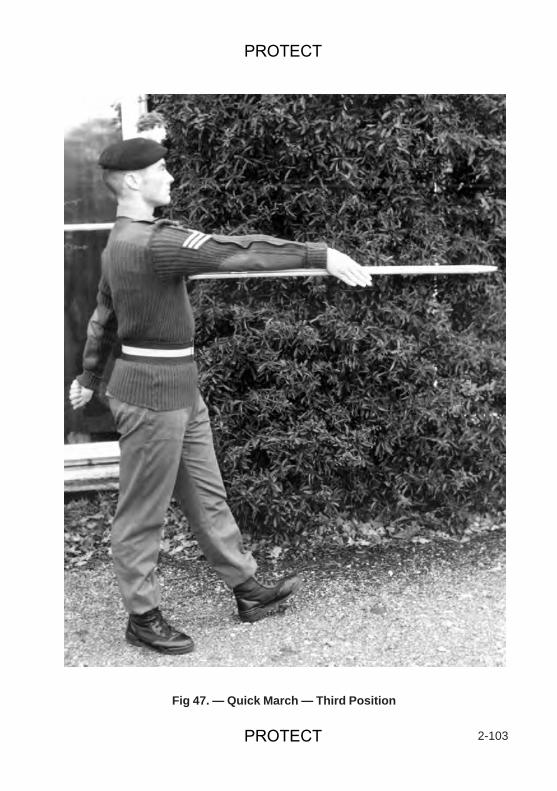
2-103
Fig 47. — Quick March — Third Position
PROTECT
PROTECT

2-104
PROTECT
PROTECT
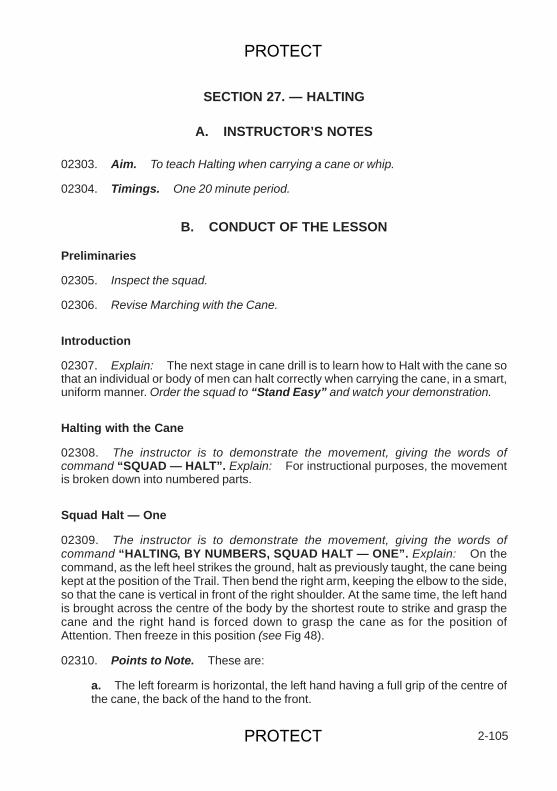
SECTION 27. — HALTING
A. INSTRUCTOR’S NOTES
02303. Aim. To teach Halting when carrying a cane or whip.
02304. Timings. One 20 minute period.
B. CONDUCT OF THE LESSON
Preliminaries
02305. Inspect the squad.
02306. Revise Marching with the Cane.
Introduction
02307. Explain: The next stage in cane drill is to learn how to Halt with the cane sothat an individual or body of men can halt correctly when carrying the cane, in a smart,uniform manner. Order the squad to “Stand Easy” and watch your demonstration.
Halting with the Cane
02308. The instructor is to demonstrate the movement, giving the words ofcommand “SQUAD — HALT”. Explain: For instructional purposes, the movementis broken down into numbered parts.
Squad Halt — One
02309. The instructor is to demonstrate the movement, giving the words ofcommand “HALTING, BY NUMBERS, SQUAD HALT — ONE”. Explain: On thecommand, as the left heel strikes the ground, halt as previously taught, the cane beingkept at the position of the Trail. Then bend the right arm, keeping the elbow to the side,so that the cane is vertical in front of the right shoulder. At the same time, the left handis brought across the centre of the body by the shortest route to strike and grasp thecane and the right hand is forced down to grasp the cane as for the position ofAttention. Then freeze in this position (see Fig 48).
02310. Points to Note. These are:
a. The left forearm is horizontal, the left hand having a full grip of the centre ofthe cane, the back of the hand to the front.
2-105
PROTECT
PROTECT
b. The cane is forced back into the right shoulder by the left hand.
c. The right hand grasps the cane as for the position of Attention.
d. The remainder of the body is erect and square to the front.
e. Call out the timing — “ONE TWO — TWO THREE — ONE — TWO THREE— ONE”.
02311. Confirm by questions then order the squad to Attention, quick march andpractise the squad.
Squad Halt — Two
02312. The instructor is to demonstrate the movement, giving the words ofcommand “SQUAD — TWO”, at the same time calling out “TWO”. Explain: On thecommand, return the left arm to the side of the body by the shortest possible route andpull the cane back with the right hand to resume the correct position of Attention, thenfreeze in this position (see Fig 48).
02313. Points to Note. These are:
a. The joint on the first finger of the right hand is underneath the knob of thecane and pointing towards the thigh.
b. The thumb is down and to the front, the remaining three fingers graspingthe cane.
c. The ferrule of the cane is in front of the right shoulder.
d. The remainder of the body is erect and square to the front.
e. Call out the time — “TWO”.
02314. Confirm by questions then adopt the last position and practise.
Final Demonstration of the Complete Movement
02315. The instructor is to give a final demonstration of the movement then practisethe squad, who should continue to call out the timing “ONE TWO — TWO THREE —ONE — TWO THREE — ONE”.
02316. Reserved.
2-106
PROTECT
PROTECT
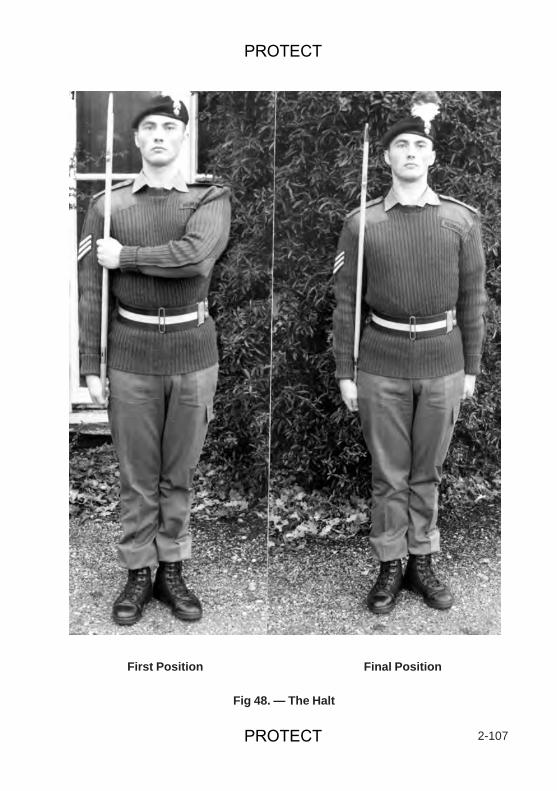
2-107
First Position Final Position
Fig 48. — The Halt
PROTECT
PROTECT

2-108
PROTECT
PROTECT
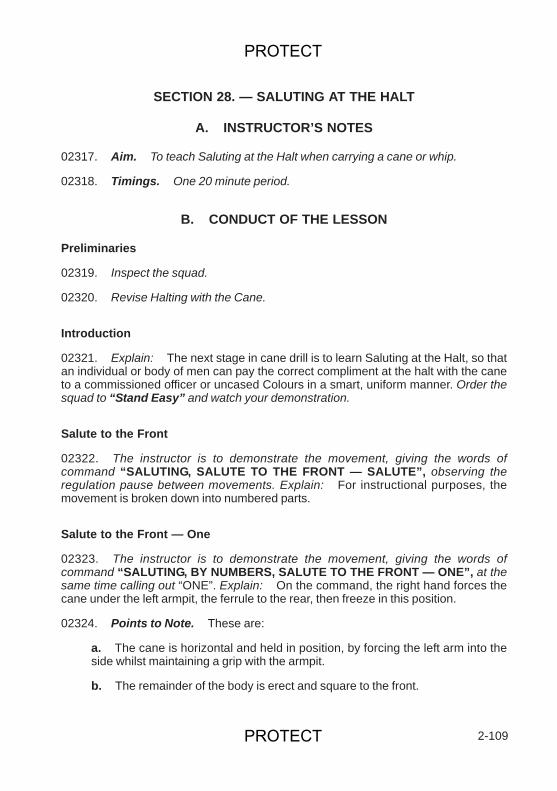
SECTION 28. — SALUTING AT THE HALT
A. INSTRUCTOR’S NOTES
02317. Aim. To teach Saluting at the Halt when carrying a cane or whip.
02318. Timings. One 20 minute period.
B. CONDUCT OF THE LESSON
Preliminaries
02319. Inspect the squad.
02320. Revise Halting with the Cane.
Introduction
02321. Explain: The next stage in cane drill is to learn Saluting at the Halt, so thatan individual or body of men can pay the correct compliment at the halt with the caneto a commissioned officer or uncased Colours in a smart, uniform manner. Order thesquad to “Stand Easy” and watch your demonstration.
Salute to the Front
02322. The instructor is to demonstrate the movement, giving the words ofcommand “SALUTING, SALUTE TO THE FRONT — SALUTE”, observing theregulation pause between movements. Explain: For instructional purposes, themovement is broken down into numbered parts.
Salute to the Front — One
02323. The instructor is to demonstrate the movement, giving the words ofcommand “SALUTING, BY NUMBERS, SALUTE TO THE FRONT — ONE”, at thesame time calling out “ONE”. Explain: On the command, the right hand forces thecane under the left armpit, the ferrule to the rear, then freeze in this position.
02324. Points to Note. These are:
a. The cane is horizontal and held in position, by forcing the left arm into theside whilst maintaining a grip with the armpit.
b. The remainder of the body is erect and square to the front.
2-109
PROTECT
PROTECT
c. Call out the time — “ONE”.
02325. Confirm by questions then order the squad to Attention and practise.
Salute to the Front — Two
02326. The instructor is to demonstrate the movement, giving the words ofcommand “SQUAD — TWO”, at the same time calling out “TWO”. Explain: On thecommand, return the right hand to the side of the body, and freeze in this position.
02327. Points to Note. These are:
a. The cane remains horizontal under the left armpit, the ferrule to the rear.
b. The right arm is in the correct position of Attention.
c. The remainder of the body is held erect and square to the front.
d. Call out the time — “TWO”.
02328. Confirm by questions then adopt the last position and practise.
Salute to the Front — Three
02329. The instructor is to demonstrate the movement, giving the words ofcommand “SQUAD — THREE”, at the same time calling out “THREE”. Explain: Onthe command, bring the right hand by the shortest route to assume the position of theSalute, then freeze in this position (see Fig 49).
02330. Points to Note. These are:
a. The hand and wrist are straight, the forefinger is 25 mm (one inch) abovethe right eye and the palm facing the front.
b. The cane remains horizontal and the remainder of the body is erect andsquare to the front.
c. Call out the time — “THREE”.
02331. Confirm by questions then adopt the last position and practise.
Salute to the Front — Four
02332. The instructor is to demonstrate the movement, giving the words ofcommand “SQUAD — FOUR!”, at the same time calling out “FOUR”. Explain: Onthe command, the right hand returns to the side, then freeze in this position.
2-110
PROTECT
PROTECT
02333. Points to Note. These are:
a. The cane remains horizontal under the left armpit.
b. The right arm assumes the correct position of Attention.
c. The remainder of the body is erect and square to the front.
d. Call out the time — “FOUR”.
02334. Confirm by questions then adopt the last position and practise.
Salute to the Front — Five
02335. The instructor is to demonstrate the movement, giving the words ofcommand “SQUAD — FIVE”, at the same time calling out “FIVE”. Explain: On thecommand, seize the cane with the right hand close to the left arm with the back of thehand uppermost, then freeze in this position.
02336. Points to Note. These are:
a. The right hand is brought across the body by the shortest route to seize thecane as close to the left arm as possible.
b. The cane remains in the horizontal position.
c. The remainder of the body is held erect and square to the front.
d. Call out the time — “FIVE”.
02337. Confirm by questions then adopt the last position and practise.
Salute to the Front — Six
02338. The instructor is to demonstrate the movement, giving the words ofcommand “SQUAD — SIX”, at the same time calling out “SIX”. Explain: On thecommand, the cane is brought to a vertical position in front of the right shoulder, theright elbow close to the body. At the same time, the left hand is brought across thebody to seize the cane in the centre. The right hand is then moved to the knob of thecane as for the position of Attention. The body is then frozen in this position.
02339. Points to Note. These are:
a. The cane remains vertical on the right side of the body, the right elbow closeto it.
2-111
PROTECT
PROTECT
b. The left forearm is horizontal as it moves across the body, the back of thehand to the front.
c. The cane is vertical and forced back to the shoulder by the left hand.
d. Call out the time — “SIX”.
02340. Confirm by questions then adopt the last position and practise.
Salute to the Front — Seven
02341. The instructor is to demonstrate the movement, giving the words ofcommand “SQUAD — SEVEN”, at the same time calling out “SEVEN”. Explain: Onthe command, the left arm is returned to the side and the right arm is pulled to the rearto the correct position of Attention, then freeze in this position.
02342. Points to Note. These are:
a. The left arm is returned by the shortest route across the body.
b. The right hand resumes its grip on the cane and the remainder of the bodyis erect and square to the front.
c. Call out the time — “SEVEN”.
Final Demonstration of the Complete Movement
02343. The instructor is to give a final demonstration of the movement giving thetiming, and then practise the squad with them calling out the timing, and whenproficient working silently.
02344. Reserved.
2-112
PROTECT
PROTECT

2-113
Fig 49. — Salute at the Halt
PROTECT
PROTECT

2-114
PROTECT
PROTECT
SECTION 29. — SALUTING ON THE MARCH
INSTRUCTOR’S NOTES
General
02345. The following movements with the cane should be practised for saluting tothe right or left flank on the march and to the front.
Saluting to a Flank — Right or Left — On the March
02346. The following are the detailed actions for these movements:
a. “SALUTING, BY NUMBERS, SALUTE TO THE RIGHT — ONE”. Thisorder is given as the left heel strikes the ground. On the next left foot place thecane under the left arm and freeze.
b. “SQUAD — TWO”. On this order, take a further pace with the right footand on the next left foot return the right hand to the side and freeze.
c. “SQUAD — THREE”. On this order, take a further pace with the right footand on the next left foot salute to the right and freeze.
d. “SQUAD — FOUR, FIVE, SIX, SEVEN”. On this order, take a furtherpace on each word of command, remaining at the salute.
e. “SQUAD — EIGHT”. On this order, return the right arm to the side andthe head to the front as the right heel strikes the ground and freeze.
f. “SQUAD — NINE”. On this order given as the left heel strikes theground, with the right hand seize the cane close to the left arm and freeze.
g. “SQUAD — TEN”. On this order, take a further pace with the right footand on the next left foot, bring the cane to the Trail, adjusting the hand to thepoint of balance and freeze.
h. “SQUAD — ELEVEN”. On the order, take a further pace with the rightfoot and on the next left foot swing both arms and continue marching.
Saluting to the Front
02347. For this movement, the order “SALUTE TO THE FRONT — SALUTE” isgiven as for the “HALT!”. The squad should halt, with the cane at the Trail, place thecane under the left arm; return the right arm to the side; salute, salute again; turnabout and step off, bringing the cane to the Trail — working from the first left foot.
02348. Reserved.
2-115
PROTECT
PROTECT

2-116
PROTECT
PROTECT
SECTION 30. — BANNER DRILL
General
02349. Banner drill will be performed in the same time as rifle drill movements.
The Order (see Fig 50)
02350. The Banner pike and the Banner will be held with the right hand at that partof the pike where the lowest corner of the Banner reaches. The pike will beperpendicular, the bottom of the pike resting on the ground in line with and against theright toe, the elbow close to the body. The Banner should not be stretched tight downthe pike, but allowed to hang naturally.
The Stand at Ease (see Fig 51)
02351. The movements will be normal, except that the left hand will remain at theside and the Banner will be kept perpendicularly at the right side.
The Carry — from the Order (see Fig 52)
02352. To Carry from the Order:
a. Raise the Banner to a perpendicular position in front of the body, guiding thebase of the pike into the socket of the Banner belt with the left hand and keepingthe right forearm on the pike for control.
b. Force the left hand smartly to the side and at the same time raise the rightforearm to a horizontal position. The right hand will be opposite the centre of themouth, back of the hand to the front, wrist and forearm horizontal, i.e., at rightangles to the pike, which will be held perpendicularly.
The Slope — from the Carry
02353. To Slope from the Carry:
a. Raise the Banner just clear of the socket of the Banner belt, controlling thebase of the pike with the left hand.
b. Lower the Banner sharply onto the right shoulder, at the same time forcethe left arm up to assist in controlling the Banner onto the right shoulder.
c. Once the Banner is on the right shoulder, return the left arm to the left side.
2-117
PROTECT
PROTECT
02354. The angle of the Banner at the slope will be 45 degrees, the right elbowclose to the side, the right forearm parallel with the ground. The Banner should hangover and cover the right shoulder and arm. The pike should not show between thehand and shoulder, but should be covered by the end of the Banner.
To Change the Banner from the Right to the Left Shoulder
02355. To change the Banner from right to left:
a. Grasp the Banner and pike with the left hand close above the right.
b. Carry the Banner across the body and place it on the left shoulder in thesame position as detailed in the second motion of the ‘Slope’ from the ‘Carry’.
c. Force the right hand smartly to the side.
To Change the Banner from the Left to the Right Shoulder
02356. The converse of paragraph 02355 above.
Carry — from the Slope
02357. To Carry from the Slope:
a. Raise the Banner off the right shoulder with the right hand to the position ofthe ‘Carry’, guiding the base of the pike into the socket of the Banner belt withthe left hand keeping the right forearm running along the pike for control.
b. Force the left hand smartly to the side and at the same time raise the rightforearm to a horizontal position.
Order — from the Carry
02358. To Order from the Carry:
a. Raise the Banner and pike just clear of the socket of the Banner belt,controlling the base of the pike with the left hand and dropping the right forearmonto the pike, as for the first position of the ‘Carry’ - from the ‘Order’ (see Fig 52).
b. Lower the Banner to the position of the ‘Order’, catching the pike with theleft hand, the forearm to be parallel to the ground.
c. Force the left hand to the side. (See Fig 53)
02359. Reserved.
2-118
PROTECT
PROTECT
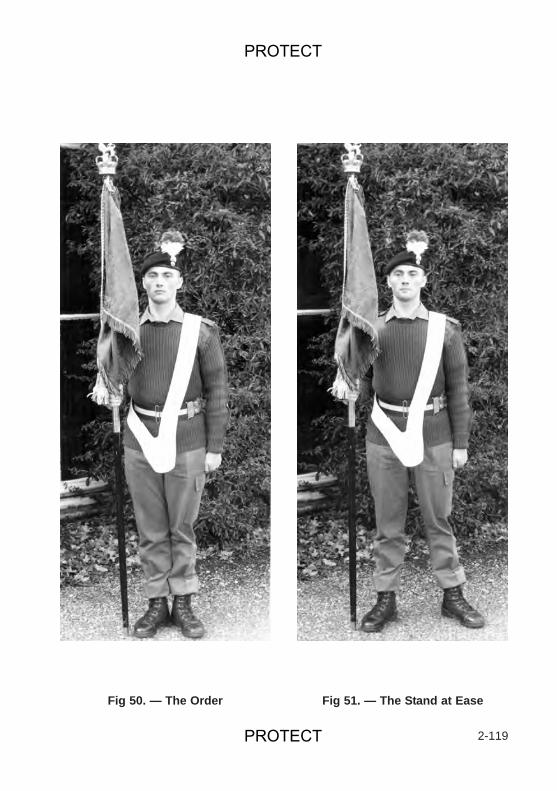
2-119
Fig 50. — The Order Fig 51. — The Stand at Ease
PROTECT
PROTECT

2-120
First Position Final Position
Fig 52. — Carry - from the Order
PROTECT
PROTECT
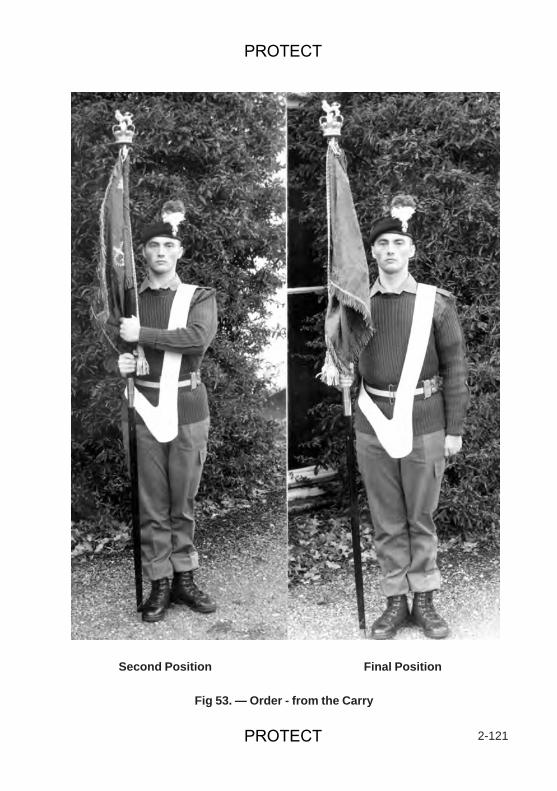
2-121
Second Position Final Position
Fig 53. — Order - from the Carry
PROTECT
PROTECT

2-122
Figs 54 and 55. — Reserved
PROTECT
PROTECT
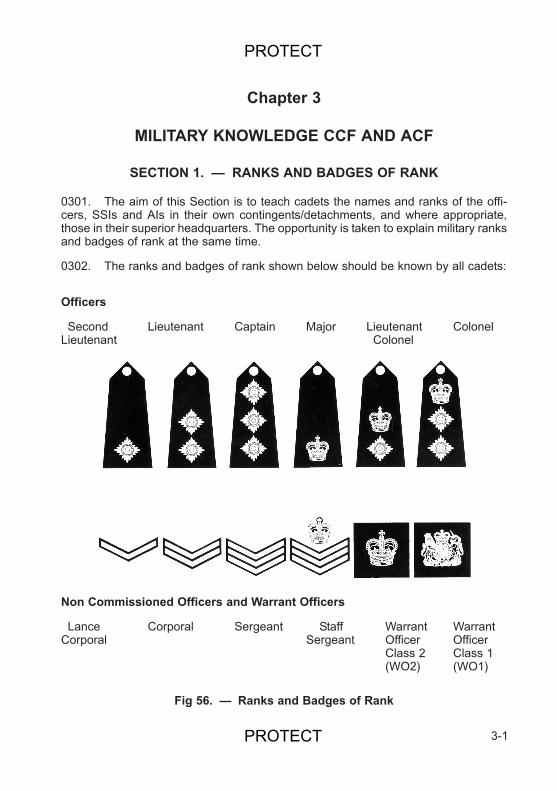
Chapter 3
MILITARY KNOWLEDGE CCF AND ACF
SECTION 1. — RANKS AND BADGES OF RANK
0301. The aim of this Section is to teach cadets the names and ranks of the offi-cers, SSIs and AIs in their own contingents/detachments, and where appropriate,those in their superior headquarters. The opportunity is taken to explain military ranksand badges of rank at the same time.
0302. The ranks and badges of rank shown below should be known by all cadets:
Officers
Second Lieutenant Captain Major Lieutenant ColonelLieutenant Colonel
Non Commissioned Officers and Warrant Officers
Lance Corporal Sergeant Staff Warrant WarrantCorporal Sergeant Officer Officer
Class 2 Class 1 (WO2) (WO1)
3-1
Fig 56. — Ranks and Badges of Rank
PROTECT
PROTECT
SECTION 2. — ARMY STRUCTURE — ARMS AND SERVICES
0303. As cadets gain a knowledge of basic military training by working their waythrough the APC syllabus, it is desirable that they gain a more general knowledge ofhow the Army is organized into Regiments and Corps. Any cadet who requires fur-ther information about the Army can obtain it from his own contingent or detachmentofficer, from the schools liaison officer or from the nearest Job Centre.
0304. The people of Britain live in freedom, but only because we have alwaysfought to keep that freedom whenever it was attacked. Our Armed Forces stand inconstant readiness to defend the United Kingdom in time of war or world tension. TheCold War has ended but the world today is still unstable. The rise of nationalism, eth-nic strife, religious fundamentalism, terrorism and threat to the world environment areall increasing. Consequently, the efforts of the United Nations and NATO become allthe more important to impose order into and through the 21st Century. To play its parton the world stage, Britain still needs an effective Army.
0305. The Army was restructured in 1995 to meet the changing needs of the new,post Cold War situation. Each element is organised into a number of small units,allowing every soldier to count as an individual; thus, to each of them, the Army hasa very human face. The British Army is organised into ARMS and SERVICES. TheARMS are the Regiments and Corps who are trained and equipped to do the actualfighting; while the SERVICES, although always prepared for combat, provide essen-tial administrative support.
0306. Details of the various ARMS and SERVICES can be seen at Annex A toChapter 3.
3-2
PROTECT
PROTECT
SECTION 3. — CCF — CHAIN OF COMMAND
Command at National Level
0307. The command of each of the fighting Services is vested in Her Majesty TheQueen, who has charged the Secretary of State for Defence with general responsi-bility for the defence of the country. A Defence Council controls the command andadministration of the Armed Forces.
The Army Board
0308. Subordinate to the Defence Council, which is responsible for the DefenceServices as a whole, is the Army Board which is responsible for the Army. The ArmyBoard executes its policies through the Land Command Chain of Command andthrough other Commands outside the United Kingdom.
Headquarters Land Command (HQ LAND)
0309. This HQ in the command structure consists of the Commander-in-Chief (C inC) and his staff at HQ Land Command who execute policy through General OfficersCommanding Divisions and Districts and their respective staffs.
Other Commands Outside UK
0310. Other commanders such as those in Hong Kong (until Jun 97), Cyprus,Falkland Islands and Northern Ireland are directly responsible to the Ministry ofDefence (MOD).
3-3
PROTECT
PROTECT

3-4
PROTECT
PROTECT
SECTION 4. — CCF — SELECTION AND INITIAL TRAINING INTHE REGULAR ARMY
0311. Officers. Young people who wish to join the Army as officers must firstattend the Regular Commissions Board (RCB). If selected they then go to the RoyalMilitary Academy Sandhurst (RMAS) where they attend the course appropriate totheir requirements and ability. After completing the RMAS course successfully theyoung officer is posted to his Regiment or Corps where his training continues.
0312. Soldiers. Young people who wish to join the Army as soldiers apply to theirnearest Army Careers Information Office (ACIO), where selection takes place to fillvacancies in the various Arms or Corps, having due regard to the applicants’ wishesand abilities. After basic military training they attend a course of specialist trainingappropriate to their Arm or Corps, on completion of which they are posted to a unitas trained soldiers.
0313. Reserved.
3-5
PROTECT
PROTECT

SECTION 5. — ACF — HISTORY OF THE ARMY CADET FORCE
0314. The ACF can trace its beginnings to 1859 when there was a threat of inva-sion by the French. The British Army was still heavily involved abroad after the Indianmutiny and there were very few units in this country. The Volunteers were formed torepel the possible invasion. History was to repeat itself in 1940 during the SecondWorld War when the Home Guard was formed to help counter a threatened invasionby the German Army.
0315. Immediately following the formation of the Volunteers came the start of thecadets. In 1860 at least eight schools had formed Volunteer Companies for theirsenior boys and masters and a number of Volunteer units had started their ownCadet Companies. Typical of these were the Queen’s Westministers who placed their35 cadets at their head when they marched past Queen Victoria at her Hyde Parkreview of the Volunteers in 1860.
0316. As in 1940, the 1859 invasion did not materialize. The cadet movement con-tinued, however, because many social workers and teachers saw in it great value asan organization for the benefit of boys, particularly bearing in mind the appalling con-ditions in which so many of them then lived. Among these pioneer workers was MissOctavia Hill who had done a great deal to establish the National Trust. She realisedthat cadet training was important for character training and although she was cer-tainly not a militarist, she formed the Southwark Cadet Company in order to introducethe boys of the slums of that area to the virtues of order, cleanliness, teamwork andself-reliance. The present conception of the Army Cadet Force as a voluntary youthorganization, helped and inspired by the Army, really stems from that time and hascontinued throughout the ACF’s history.
0317. At the start of the Boer War, about 50 schools had cadet corps (the forerun-ners of the present Combined Cadet Force) and open units (forbears of the presentACF) were flourishing in all the large cities.
0318. After the conversion of the Volunteers to the Territorial Army (TA) by LordHaldane in 1908, Public Schools and Universities were asked to produce units of theOfficers Training Corps and other Cadet Corps were formed into school units and“open” units for boys who had left school. The title “Cadet Force” was introduced andthe administration of the Force was taken over by the newly formed TerritorialAssociations.
0319. In the First World War a big expansion of the Cadet Force took place and theWar Office reassumed responsibility for its administration up until 1923 when theTerritorial Associations again took over. In 1930 the Government ceased to recognizethe Cadet Force and withdrew financial support from it. Everything had to be provid-ed by privately raised money and even the wearing of Regimental badges and but-tons was forbidden. A body known as the British National Cadet Association (BNCA)was formed with the aim of getting official recognition restored. They achieved thisaim at least to a limited degree in 1932 and by 1936 certain services and small grantswere provided. The BNCA had the responsibility of running the Cadet Force.
3-6
PROTECT
PROTECT
0320. During the Second World War a big expansion of the Cadet Force took placein January 1942. The War Office took over the organization, equipment and accom-modation and increased grants and free uniforms were authorized. The BNCA con-tinued to deal with such matters as sport, competition shooting, the general welfareof cadets and many other aspects of cadet work. The BNCA became the Army CadetForce Association (ACFA) in 1945 and continues to be responsible for those aspectsof cadet training and activities which are not the direct concern of the MOD. In addi-tion, the ACFA are advisers to the MOD and other Government bodies on all mattersconnected with the ACF.
0321. As a result of the recommendations of a Government committee in 1957, theCadet Training Centre at Frimley Park, Surrey was opened in 1959. This centre pro-vides courses for officers and adult instructors of the ACF and the CCF and alsoleadership courses in the summer for a limited number of senior cadets.
0322. The centenary of the ACF was celebrated in 1960. The chief event was thepresentation of a Banner to the Force by HRH The Duke of Edinburgh at a ceremo-ny at the Tower of London. During the year, this Banner was passed from unit to unitand county to county throughout the whole of the United Kingdom. It was trooped inmany places before various distinguished people and was laid on the altar of numer-ous parish churches and cathedrals at special Centenary Year Services. The Banneris now housed at the Cadet Training Centre, Frimley Park. Another highlight of theCentenary Year was the review of a large representative parade of the ACF and CCFby HM The Queen and HRH The Duke of Edinburgh in the grounds of BuckinghamPalace. This was followed by an impressive thanksgiving service in WestminsterAbbey.
0323. Recent changes in the ACF have resulted in the provision of a more modernand workmanlike uniform and the introduction of the Army Proficiency Certificate(ACF) which replaced Certificate A. Certificate A had been in use in the Cadet Forcesin various forms since 1910.
0324. There are about 40,000 cadets in some 1,600 detachments which are to befound in every part of the United Kingdom. The ACF continues to play its part as theArmy’s own voluntary youth organization and is a valuable recruiting source for theRegular Army.
3-7
PROTECT
PROTECT

SECTION 6. — RESERVED
3-8
PROTECT
PROTECT

3-9
PROTECT
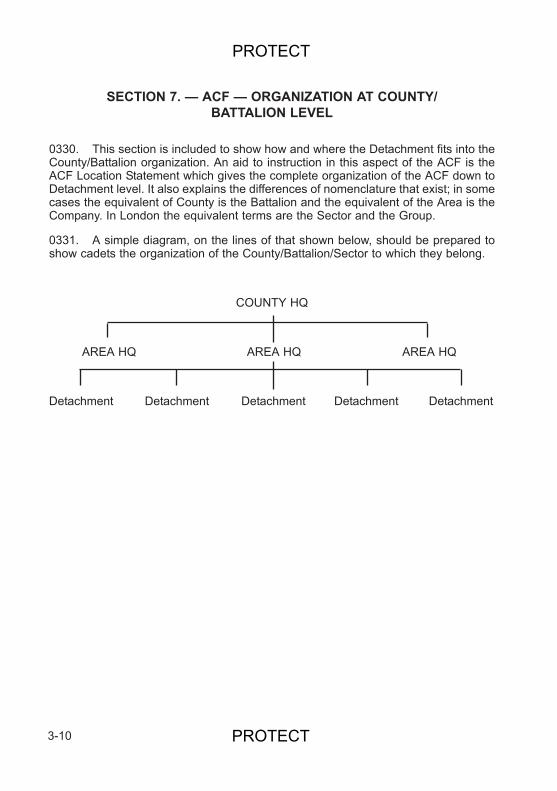
SECTION 7. — ACF — ORGANIZATION AT COUNTY/BATTALION LEVEL
0330. This section is included to show how and where the Detachment fits into theCounty/Battalion organization. An aid to instruction in this aspect of the ACF is theACF Location Statement which gives the complete organization of the ACF down toDetachment level. It also explains the differences of nomenclature that exist; in somecases the equivalent of County is the Battalion and the equivalent of the Area is theCompany. In London the equivalent terms are the Sector and the Group.
0331. A simple diagram, on the lines of that shown below, should be prepared toshow cadets the organization of the County/Battalion/Sector to which they belong.
COUNTY HQ
AREA HQ AREA HQ AREA HQ
Detachment Detachment Detachment Detachment Detachment
3-10
PROTECT
PROTECT
SECTION 8. — ACF — THE CADET’S PROGRESS
0332. The purpose of the one training period on this subject in the syllabus at 1 Starlevel is to give the cadet, early in his career in the ACF, a general idea of the scopeof the whole Army Proficiency Certificate (APC) syllabus right through to the attain-ment of the 4 Star award, and indeed beyond it to include certain aspects after 4 Startraining and employment.
0333. The three and a half year APC course aimed towards the 4 Star qualificationshould be presented to the young cadet as a major challenge, which indeed it is. Thecadet who has achieved the 4 Star award has had to show qualities of character,such as determination, perseverance, and self-discipline, which will be valued by anyprospective employer. Because the training awards system in the ACF is not so wellknown by the general public as, for example, that of the Duke of Edinburgh’s AwardScheme, brief details of what the Star ACF cadet has achieved have been insertedinto the Cadets Record of Service book (AB 84). The details relate the standardsachieved during APC training, to achievement awards made by non-military organi-zations such as the First Aid societies, the British Orienteering Federation, or theNational Smallbore Rifle Association. The cadet can show his completed AB 84 to aprospective employer when being interviewed for a job.
0334. A point to be stressed to cadets is the high proportion of the ACF APC syl-labus that covers activities also included in the Duke of Edinburgh’s Award Scheme.A cadet who decides to enrol in the latter will find that much of the training he under-goes in the ACF will count towards a Duke of Edinburgh’s Award at the appropriatelevel, whether it be Bronze, Silver or Gold. The general relationship between the ACFAPC and the Duke of Edinburgh’s Award Scheme is shown by a glance at the out-line syllabus given in the syllabus pamphlet (Army Code No. 71101 — Revised1988), where activities included in both training schemes are printed in green.Reference should also be made to the notes on the page before the outline syllabusand to the separate publications:
a. The Duke of Edinburgh’s Award Scheme in the Army Cadet Force (revisedEdition 1985).
b. The Duke of Edinburgh’s Award Handbook (revised 5th Edition June1988).
0335. The ACF APC is a large subject to cover in a 30 minute lesson. Instructionshould be concentrated on describing the outline syllabus in the pamphlet supportedby the Introductory Notes on pages 5-11 of that pamphlet.
3-11
PROTECT
PROTECT
SECTION 9. — ACF — FAMILIARIZATION OF THE CADET WITH THEHISTORY OF THE REGIMENT OR CORPS TO WHICH HE IS BADGED
0336. Each Detachment in the ACF is affiliated to a Regiment or Corps of theRegular Army and the cadets normally wear the badge of the Regiment or Corps towhich they are affiliated. The purpose of this section is to ensure that the cadetknows about this affiliation and has some knowledge of the Regular Army Regimentor Corps concerned. An essential aid to teaching this subject is a short Regimentalor Corps history which can always be obtained either from the local ACIO, or aRegimental or Corps magazine or periodical newsletter which can usually beobtained from the same sources. When teaching this subject it will be necessary torefer to Regimental or Corps history. This should not, however, be over-emphasizedto the exclusion of contemporary activities which are just as important and may wellinterest cadets more then events of the past.
0337. It must be constantly borne in mind that teaching this subject with all recom-mended training aids is not a satisfactory substitute for a visit by a representative ofthe Regiment or Corps concerned who can give a talk and answer questions fromfirst hand experience. Every effort, therefore, should be made to arrange such visits.
3-12
PROTECT
PROTECT
ANNEX A TOCHAPTER 3
THE ARMS AND SERVICES OF THE BRITISH ARMY
The Arms
1. The Household Cavalry consists of the two senior Regiments of the BritishArmy — the Life Guards and the Blues and Royals. Between them they provide anArmoured Reconnaissance Regiment, and the Mounted Regiment in London whichis well known for its ceremonial duties.
2. The Royal Armoured Corps consists of the old Cavalry Regiments of the Lineand the Royal Tank Regiment. These Regiments are either roled as Armoured orArmoured Reconnaissance Regiments. The Armoured Regiments are equipped withmain battle tanks and take the main part in any armoured battle, using their longrange heavy direct fire weapons. The Armoured Reconnaissance Regiments areequipped with fast armoured recce vehicles. They are the “eyes” and “ears” right outin front.
3. The Royal Regiment of Artillery, or the Gunners, provide both ground fire sup-port and defence for the Army. In the ground fire support role, the Gunners have animpressive array of indirect fire weapons, ranging from the towed or helicopter-lifted105 mm Light Gun to the self-propelled 155 mm AS90 Gun; and the firepower of thesurface to surface missiles fired by the Multi Launch Rocket System (MLRS). For airdefence the Artillery operates shoulder-controlled missile systems such as JAVELIN,as well as the longer range systems, which include Rapier.
4. The Royal Engineers, or the Sappers, are tasked with helping the Army to live,move and fight while preventing the enemy from doing so. They build bridges, roadsand airfields, construct camps and port facilities, erect water and bulk fuel installa-tions and generate electric power. They also lay minefields, blow up bridges and cre-ate obstacles, as well as clearing lanes through enemy minefields and removingenemy-built obstacles and booby traps.
5. The Royal Corps of Signals provide communications to the Army. Its techni-cians operate and maintain the most modern field communications system of anyarmy in the world, using both voice and data transmissions. They provide satellitecommunications worldwide, operate in electronic warfare and eavesdrop on enemytransmissions. They need technically minded people to man and operate theirsophisticated hardware, who are also good at languages.
6. The Infantry accounts for a quarter of the Army and consists of the Regiments ofFoot Guards, the former Regiments of Foot, the Parachute Regiment and the GurkhaRegiments. It is the Infantry who bear the brunt of any fighting as their role is to closewith the enemy and defeat him. The Infanteer is skilled at operating on his feet, though
3A-1
PROTECT
PROTECT
he may go into battle by aircraft, parachute, helicopter, assault boats, on skis, or in spe-cially designed armoured vehicles. The firepower at his disposal is formidable, basedon the most modern machine guns and rifles, anti-tank missiles and mortars.
7. The Army Air Corps flies and operates all the Army’s helicopters. Their mainrole is to launch missile attacks on enemy armour, using air-to-surface missilesmounted on Lynx helicopters. Another version of the Lynx is used to transport men,stores and equipment around the battlefield at short notice. The Gazelle helicopter isused for reconnaissance, directing artillery fire or fighter ground attack aircraft, or asan airborne command post for a particular operation.
8. The Intelligence Corps has the primary task to collect, collate and analyseinformation to answer the questions: “What is the enemy going to do; when, where,how and in what strength?” In addition to providing combat intelligence, the Corps isresponsible for security intelligence and protective security to counter espionage,subversion and sabotage; signal intelligence; specialist intelligence; and photo-graphic interpretation. Languages are an important part of the Corps’ activities.
The Services
9. Royal Army Chaplains’ Department is responsible for the spiritual and moralneeds of the Army. It has chaplains of all denominations who serve both soldiers andtheir families in a worldwide ministry.
10. The Royal Logistic Corps sustains the soldier in peace and war. The Corps isresponsible for providing, storing and distributing all stores and equipments used bythe Army; for the transportation of men and freight by rail, road, sea and air; for allcatering and food supplies; and for providing postal and courier facilities for all threeServices. These operations are worldwide and the RLC has over 750,000 differentitems on its store ledgers. The RLC require people to specialise in a large number ofdiffering trades, particularly drivers, supply specialists, chefs, movement specialists,and even seamen, navigators and railwaymen.
11. The Royal Army Medical Corps, together with the Royal Army Dental Corpsand Queen Alexandra’s Royal Army Nursing Corps, offers a complete medical health-care service to Army personnel. RAMC officers are in the main qualified medical prac-titioners. Some are trained as field surgeons. RAMC soldiers provide medical support,not only as combat medical technicians providing assistance in surgeries or first aidon the battlefield, but also as fully qualified radiographers, operating theatre techni-cians, environmental health technicians and other medical specialisations.
12. The Royal Electrical and Mechanical Engineers (REME) has the role to keepoperational and, if necessary, to repair the Army’s immense range of technical equip-ment. This range includes tanks, vehicles of every kind, guns, guided weapons, radar,radio and aircraft. REME personnel are deployed well forward with the leading com-bat elements as well as in large base workshops to the rear.
3A-2
PROTECT
PROTECT
13. The Adjutant General’s Corps (AG Corps) consists of four branches. The Staffand Personnel Support (SPS) Branch provides personnel administration in the Army.SPS officers specialise in personnel management, management accountancy, infor-mation technology, and a wide range of other administrative skills. SPS soldiers con-centrate on clerical aspects, including accountancy and information technology. Theuse of computers is widespread. The second branch is the Provost Branch who arethe Army’s Police Force and operate on similar lines to the civilian police, with its ownequivalent of the CID. The Educational and Training Service (ETS) Branch is the thirdbranch and they are responsible for education in all its forms including language train-ing; the development of training and training systems; and the provision of resettle-ment advice and training for those leaving the Army. The last branch is the Army LegalServices (ALS) Branch who provide legal advice and prepare and prosecute casesbefore Courts Martial. The ETS and ALS Branches are open only to professionallyqualified officers.
14. The Royal Army Veterinary Corps (RAVC) is responsible for the provision,care and training of the Army’s animals — mainly horses and dogs. The officers arequalified Veterinary Surgeons, whilst the soldiers provide the specialist supportingservices such as Veterinary technicians, dog and horse trainers and farriers.
15. The Royal Army Dental Corps (RADC) looks after the dental health of servingpersonnel, and overseas, their families. The officers are qualified dental surgeonswhilst RADC soldiers provide the specialist dental support.
16. The Army Physical Training Corps (APTC) is responsible for all physical train-ing. It draws its instructors from those already serving in the Army who have qualifiedas Regimental Physical Training Instructors in their units.
17. The Queen Alexandra’s Royal Army Nursing Corps (QARANC) offers a com-plete professional nursing service to the Army and works very closely with the RAMC.In addition to qualified nurses, the QARANC have healthcare assistants who carry outnon-nursing duties on the wards and assist the nurses as required.
3A-3
PROTECT
PROTECT

3A-4
PROTECT
PROTECT
Chapter 4
SKILL AT ARMS
SECTION 1. — INTRODUCTION
0401. A cadet will shoot on the range at various times during the course of his train-ing. He will not shoot well and safely unless he understands the weapons which heis going to fire — the Air Rifle, the No. 8 (.22 inch) Rifle, the Cadet General Purpose(GP) Rifle and the Light Support Weapon (LSW). The contents of this chapter explainhow these weapons work, how to look after them, and how to handle them with effi-ciency and safety. The chapter incorporates the contents of the provisional pamphleton the Cadet GP Rifle, amended in several instances in the light of experiencegained since the introduction of this new weapon in the Cadet Forces. The chapteralso covers subjects directly related to shooting, including Judging Distance,Recognition of Targets and Fire Control Orders.
4-1
PROTECT
PROTECT
SECTION 2. — SAFETY WITH WEAPONS
A. INSTRUCTOR’S NOTES
Aim
0402. To introduce recruits to the need for safety when handling or firing the AirRifle, No. 8 (.22 inch) and Cadet GP rifles.
Timings
0403. Two 30 minute periods.
Method
0404. An indoor lecture/demonstration.
Stores
0405.
Air Rifle 1No. 8 Rifle 2Cadet GP Rifle 15mm plywood 230 mm x 230 mm (9 x 9 inches)
(or Fig 11A veneer) 1Aim Corrector 1Penetration Block 1Copy of Cadet Training Safety Precautions
(Army Code No. 70768) 1.22 inch ammunition 5 roundsAir Rifle Pellets 5Ear Defenders 1 pair per instructor
and cadet
Preparation
0406. a. Lay both No. 8 rifles on the firing point, muzzles pointing towards the bul-let catcher; one with cocking piece to the rear; both with the safety catch setat safe.
b. Lay the Cadet GP rifle on the firing point, with the cocking handle facingupwards, safety catch set at safe. Muzzle pointing towards the bullet catcher.Magazine by the rifle.
4-2
PROTECT
PROTECT
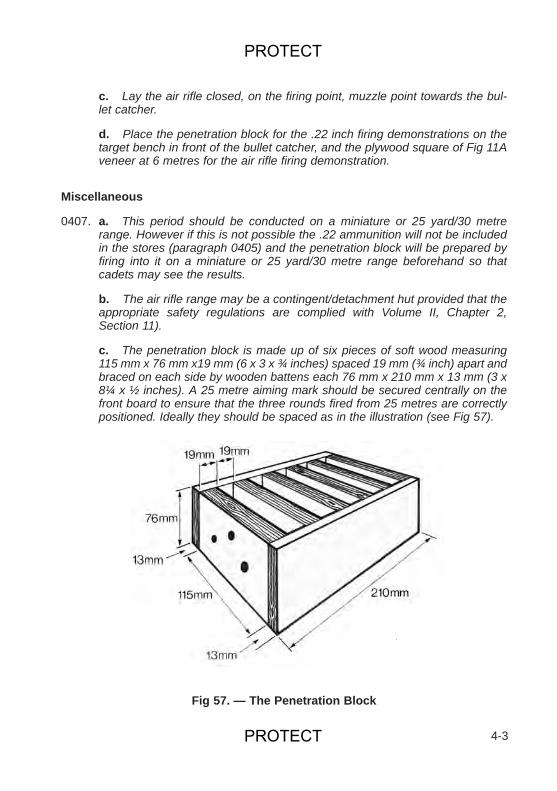
c. Lay the air rifle closed, on the firing point, muzzle point towards the bul-let catcher.
d. Place the penetration block for the .22 inch firing demonstrations on thetarget bench in front of the bullet catcher, and the plywood square of Fig 11Aveneer at 6 metres for the air rifle firing demonstration.
Miscellaneous
0407. a. This period should be conducted on a miniature or 25 yard/30 metrerange. However if this is not possible the .22 ammunition will not be includedin the stores (paragraph 0405) and the penetration block will be prepared byfiring into it on a miniature or 25 yard/30 metre range beforehand so thatcadets may see the results.
b. The air rifle range may be a contingent/detachment hut provided that theappropriate safety regulations are complied with Volume II, Chapter 2,Section 11).
c. The penetration block is made up of six pieces of soft wood measuring115 mm x 76 mm x19 mm (6 x 3 x ¾ inches) spaced 19 mm (¾ inch) apart andbraced on each side by wooden battens each 76 mm x 210 mm x 13 mm (3 x8¼ x ½ inches). A 25 metre aiming mark should be secured centrally on thefront board to ensure that the three rounds fired from 25 metres are correctlypositioned. Ideally they should be spaced as in the illustration (see Fig 57).
4-3
Fig 57. — The Penetration Block
PROTECT
PROTECT
B. CONDUCT OF THE LESSON
Preliminaries
0408. Safety precautions will be carried out, leaving the weapons prepared asdescribed under “Preparation” at paragraph 0406.
Introduction
0409. a. Safety is of paramount importance whenever weapons are being handledor fired.
b. It is essential that Skill at Arms training should promote the instinctiveability to handle all weapons with due regard to personal safety and to thesafety of others.
c. Accidents are generally caused by faulty or careless handling of weaponsand ammunition. They can be minimized by skilful handling and strict compli-ance with the rules which are now to be explained. These rules are to berigidly adhered to at all times by all members of the CCF and ACF.
Rules for Handling Weapons at All Times
0410. Explain and demonstrate where necessary:
a. A WEAPON MUST NEVER BE POINTED AT ANYONE IN FUN.
b. A WEAPON MUST ALWAYS BE HANDLED SO THAT IT POINTS INSUCH A DIRECTION THAT THERE IS NO DANGER IF A ROUND IS ACCI-DENTALLY FIRED.
c. WHENEVER A WEAPON IS PICKED UP WHICH HAS NOT BEENUNDER AN INDIVIDUAL’S DIRECT SUPERVISION IT MUST BE EXAMINEDTO MAKE SURE IT IS NOT LOADED.
d. WHENEVER A WEAPON IS HANDED TO SOMEONE ELSE HE MUSTFIRST BE SHOWN THAT IT IS UNLOADED. WHEN ANYONE ELSE HANDSA WEAPON TO HIM HE MUST INSIST THAT THE SAME ACTION IS TAKEN.
e. THE MUZZLE OF A WEAPON MUST NEVER BE RESTED AGAINSTANY PART OF THE BODY.
f. A WEAPON MUST BE IN THE UNLOADED STATE PRIOR TO TRAVEL-LING IN A VEHICLE OR DURING NON-TACTICAL MOVES ON FOOT.
4-4
PROTECT
PROTECT
g. A CADET MUST NEVER BE ALLOWED TO FIRE A WEAPON UNLESSHE HAS BEEN INSTRUCTED AND PRACTISED IN ITS USE UNDERSUPERVISION.
0411. Questions from and to the squad.
0412. Explain and demonstrate:
a. Rule 0410. c.
(1) Pick up the “fired” No. 8 rifle. The cocking piece is forward but tomake absolutely sure it is unloaded, point it in a safe direction, push for-ward the safety catch, open the breech and look into the chamber toensure there is no round in it. When you are satisfied it is empty, close thebreech, squeeze the trigger and put the safety catch to safe.
(2) Replace the rifle on the firing point.
(3) Pick up the Cadet GP rifle and ensure that the chamber is clear bycarrying out the normal safety precautions. Take particular care to inspectthe body, chamber and face of the bolt to ensure that they are clear.When satisfied that the rifle is empty operate the bolt release, put thesafety catch to fire and squeeze the trigger. Put the safety catch to safeand close the dust cover. Inspect the rifle magazine and place it by theweapon.
(4) Pick up the second No. 8 rifle. Draw attention to the cocking piecewhich is to the rear and the safety catch which is set at safe. (The safetycatch could equally well NOT have been set at safe). You would not justpick it up and operate the trigger — it may be loaded. Open the breechand examine the rifle in the same manner as the others were dealt with.When you are satisfied that there are no rounds in it, close the breech,squeeze the trigger and put the safety catch to safe.
(5) Pick up the air rifle. Point it in a safe direction and break open therifle without fully cocking the action. Look into the breech and ensure nopellet is loaded and through the bore to ensure it is clear. When satisfiedthat the rifle is not loaded, close it, operate the trigger and lay it on the fir-ing point.
b. Rule 0410. d.
(1) Pick up the Cadet GP rifle and using a cadet as an assistant, openthe breech and invite him to examine the chamber.
(2) Also inspect the magazine.
4-5
PROTECT
PROTECT
(3) When he is satisfied that there are no rounds in them, hand it to himand get him to close the breech, operate the trigger and put the safetycatch to safe.
(4) Return the rifle to the firing point.
c. The No. 8 and air rifle will be treated in the same way.
0413. Questions from and to the squad.
0414. Sum Up.
a. Those are the rules and procedures for the safe handling of rifles and theymust be rigidly adhered to at all times.
b. It is your responsibility to check that a rifle is safe to handle at all times.
c. You will be taught in more detail and exercised on each type of weapon youare allowed to handle and fire in the appropriate stages of your training.
0415. Explain: Because of the small calibre of the .22 inch round there is a mis-taken impression that it is not lethal. The types of ammunition made by different man-ufacturing firms vary considerably in power. The long .22 inch service ammunitiongenerally used contains 4 to 7 grains of powder and a bullet weighing 40 to 50 grainswith a muzzle velocity of 328 metres per second, plus or minus 7.5 metres per sec-ond. It has considerable power and a maximum range of up to 1550 metres whenfired at an angle of about 33 degrees.
0416. In order to give some idea of its penetrative capability, three rounds will befired at the target to the front.
a. Demonstrate — Fire three rounds from the prone supported position.
b. Unload and check that the weapon is clear.
c. Bring the penetration block to the firing point for examination by the squad.
Note: THIS DEMONSTRATION WILL ONLY TAKE PLACE IN A MINIATUREOR ON A 25 YARD/30 METRE RANGE.
0417. Explain: Because of the small calibre of the air rifle, its relatively low muz-zle velocity as compared with a .22 inch rifle and the fact that it fires an uncartridgedpellet, there is a mistaken impression that it is not lethal. Most .177 calibre air rifleshave a muzzle velocity in excess of 182 metres per second and the pellet is capableof penetrating 5 mm plywood at a range of 25 metres.
0418. In order to confirm the penetrative capability, three pellets will be fired at theplywood target to the front.
4-6
PROTECT
PROTECT
a. Demonstrate by firing three pellets from the prone supported position.Space the shots on the target.
b. Break open the rifle and ensure it is unloaded, the bore is clear and lay iton the firing point open.
c. Bring the target to the firing point for examination by the squad.
0419. Questions from the squad.
Rules for Firing on Miniature Ranges
0420. Explain and demonstrate where necessary: There are certain rules andregulations which apply to the use of the miniature range. At this stage you are notrequired to commit them to memory. You will be reminded of them again during theappropriate stages of training.
0421. The rules are:
a. The .22 inch rifle and air rifle are the only weapons which a cadet may fireon a miniature range. For air rifle firing see also Section 3.
b. Firing will only take place under the personal supervision of an “authorized”officer in accordance with Cadet Training Safety Precautions Section 2, whowill be responsible for seeing that the following safety regulations are compliedwith:
(1) The following only will be allowed on the firing point:
(a) Firing Point Officer in charge.
(b) Supervising Officers in charge of groups of firers.
(c) Coaches to individual cadets.
(d) Cadets actually firing.
(2) Ammunition will be issued only on the firing point by an officer.
(3) No weapon will be loaded without orders from the Firing PointOfficer.
(4) Indiscriminate snapping is forbidden.
(5) Drill rounds will not be taken on the range.
(6) The muzzle of a weapon will at all times be pointed towards the bul-let catcher. This includes loading, firing, unloading and inspecting.
4-7
PROTECT
PROTECT
(7) At the conclusion of any firing when it is necessary to examine thetargets, rifles will be unloaded and laid on the firing point with breechesopen. The firers will stand up and behind the firing point. No individual willmove forward of the firing point until the Firing Point Officer has inspect-ed all weapons to ensure that they are clear.
(8) As each detail finishes firing and after the weapons have beeninspected (see (7) above), live rounds and empty cases will be collectedand separated under the orders of the Firing Point Officer. When this hasbeen completed, he may order the firers forward to examine their targets,or have them brought to the firing point.
(9) No one will be allowed to fire or spectate unless they are wearingproper ear protection.
c. With regard to air rifles:
(1) Air rifle shooting in the Cadet Forces is restricted to the calibre andtype of air rifle not requiring a firearms certificate under the Firearms Act.When cadets under the age of 14 years are using air rifles in range prac-tice they must be supervised by someone aged 21 years or over.
(2) In no circumstances should any unofficial means be employed toincrease the power or velocity of air weapons.
(3) Air rifles may only be fired in a miniature range, or in a placeapproved by the Contingent Commander/County Commandant aspremises or land suitable as a range, and then only under supervision ofan authorized adult as stated in Cadet Training Safety Precautions (ArmyCode No. 70768).
(4) Safety regulations for air rifle ranges will be complied with.
d. The Firing Point Officer will, at the conclusion of all firing, inspect allweapons and equipment before anyone is allowed to leave the range, toensure that the weapons are unloaded and clear and that the firers are not inpossession of any live ammunition or empty cases.
e. The Firing Point Officer will warn all present at the range that it is anoffence to take live ammunition, empty cases or air rifle pellets away from anyrange and he will personally take a declaration to this effect from each individ-ual present.
f. Each individual will declare:
(1) “I have no live rounds or empty cases in my possession” OR
(2) “I have no pellets in my possession”.
4-8
PROTECT
PROTECT
0422. Confirm by questions.
Conclusion
0423. End of Lesson Drill.
a. Questions from the squad on the entire lesson.
b. Confirm by questions.
c. Safety precautions.
d. Pack kit.
e. Summary. To include the following:
(1) The importance of safe handling.
(2) A forecast of the squad’s next lesson in this subject.
0424. Reserved.
4-9
PROTECT

4-10
PROTECT
PROTECT
SECTION 3. — THE AIR RIFLE
General Introduction
0425. For the cadet the air rifle is the ideal weapon for his introduction to shooting,without undue strain or fear from recoil and noise until he has mastered the princi-ples of marksmanship (see Fig 58).
Training Value
0426. The advantages of the air rifle are:
a. Economics. After the initial capital expenditure, training can be run quitecheaply. Pellets are inexpensive and readily available.
b. Minimum Safety Limitations. Because of the small danger area, the riflescan be used almost anywhere and relatively light protection is needed aroundthe target area. However, the importance of correct procedures for the safehandling of weapons must be insisted upon at all times.
c. Security and Ease of Organization. Shooting training can easily be orga-nized because weapons are readily to hand with few security problems.Provided a substantial wooden cupboard or preferably a metal locker with asound lock is available, weapons can be safely stored. Pellets should be keptin a separate store. The success of air rifle shooting is related closely to rangeaccessibility and the minimum restrictions.
d. Development of Skills. The basic skills of shooting — holding, aiming,breath control, trigger operation and follow through — are common to all hand-held, shoulder controlled weapons and can be further developed through airrifle shooting.
Shooting Standards
0427. Rifle shooting in the APC is based on grouping. Firing with the air rifle at5.5m (6 yards) the group sizes to be achieved are:
6.3mm (¼ inch) 12.7mm (½ inch) 19mm (¾ inch) 25.4mm (1 inch)
Safe Handling
0428. Air rifles can cause serious wounds if handled without due care. Safe han-dling is a question of instilling good habits into a cadet and for this reason, air riflesmust be handled in accordance with the normal rules for service weapons.
0429. Reserved.
4-11
PROTECT
PROTECT
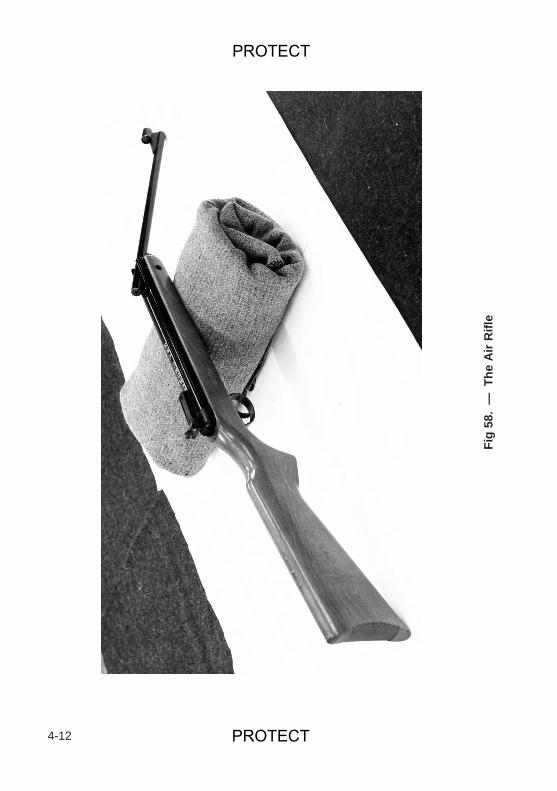
4-12
Fig
58.
—Th
e A
ir R
ifle
PROTECT
PROTECT
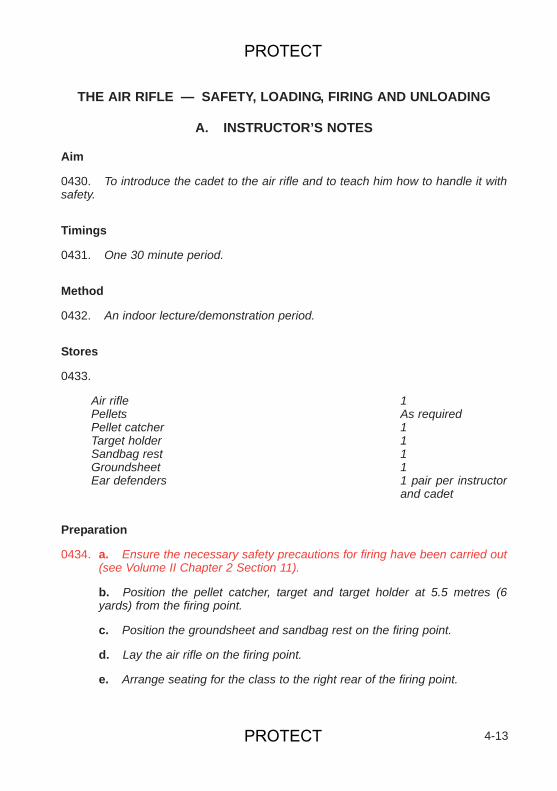
THE AIR RIFLE — SAFETY, LOADING, FIRING AND UNLOADING
A. INSTRUCTOR’S NOTES
Aim
0430. To introduce the cadet to the air rifle and to teach him how to handle it withsafety.
Timings
0431. One 30 minute period.
Method
0432. An indoor lecture/demonstration period.
Stores
0433.
Air rifle 1Pellets As requiredPellet catcher 1Target holder 1Sandbag rest 1Groundsheet 1Ear defenders 1 pair per instructor
and cadet
Preparation
0434. a. Ensure the necessary safety precautions for firing have been carried out(see Volume II Chapter 2 Section 11).
b. Position the pellet catcher, target and target holder at 5.5 metres (6yards) from the firing point.
c. Position the groundsheet and sandbag rest on the firing point.
d. Lay the air rifle on the firing point.
e. Arrange seating for the class to the right rear of the firing point.
4-13
PROTECT
PROTECT
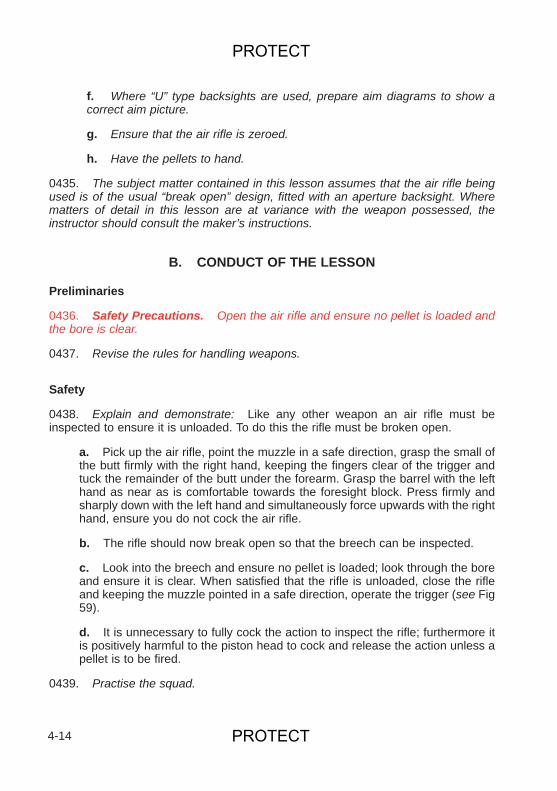
f. Where “U” type backsights are used, prepare aim diagrams to show acorrect aim picture.
g. Ensure that the air rifle is zeroed.
h. Have the pellets to hand.
0435. The subject matter contained in this lesson assumes that the air rifle beingused is of the usual “break open” design, fitted with an aperture backsight. Wherematters of detail in this lesson are at variance with the weapon possessed, theinstructor should consult the maker’s instructions.
B. CONDUCT OF THE LESSON
Preliminaries
0436. Safety Precautions. Open the air rifle and ensure no pellet is loaded andthe bore is clear.
0437. Revise the rules for handling weapons.
Safety
0438. Explain and demonstrate: Like any other weapon an air rifle must beinspected to ensure it is unloaded. To do this the rifle must be broken open.
a. Pick up the air rifle, point the muzzle in a safe direction, grasp the small ofthe butt firmly with the right hand, keeping the fingers clear of the trigger andtuck the remainder of the butt under the forearm. Grasp the barrel with the lefthand as near as is comfortable towards the foresight block. Press firmly andsharply down with the left hand and simultaneously force upwards with the righthand, ensure you do not cock the air rifle.
b. The rifle should now break open so that the breech can be inspected.
c. Look into the breech and ensure no pellet is loaded; look through the boreand ensure it is clear. When satisfied that the rifle is unloaded, close the rifleand keeping the muzzle pointed in a safe direction, operate the trigger (see Fig59).
d. It is unnecessary to fully cock the action to inspect the rifle; furthermore itis positively harmful to the piston head to cock and release the action unless apellet is to be fired.
0439. Practise the squad.
4-14
PROTECT
PROTECT
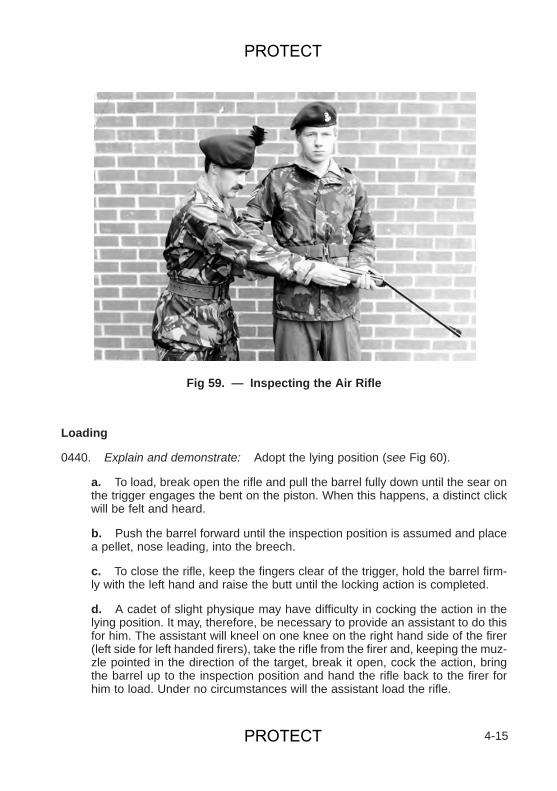
Loading
0440. Explain and demonstrate: Adopt the lying position (see Fig 60).
a. To load, break open the rifle and pull the barrel fully down until the sear onthe trigger engages the bent on the piston. When this happens, a distinct clickwill be felt and heard.
b. Push the barrel forward until the inspection position is assumed and placea pellet, nose leading, into the breech.
c. To close the rifle, keep the fingers clear of the trigger, hold the barrel firm-ly with the left hand and raise the butt until the locking action is completed.
d. A cadet of slight physique may have difficulty in cocking the action in thelying position. It may, therefore, be necessary to provide an assistant to do thisfor him. The assistant will kneel on one knee on the right hand side of the firer(left side for left handed firers), take the rifle from the firer and, keeping the muz-zle pointed in the direction of the target, break it open, cock the action, bringthe barrel up to the inspection position and hand the rifle back to the firer forhim to load. Under no circumstances will the assistant load the rifle.
4-15
Fig 59. — Inspecting the Air Rifle
PROTECT
PROTECT
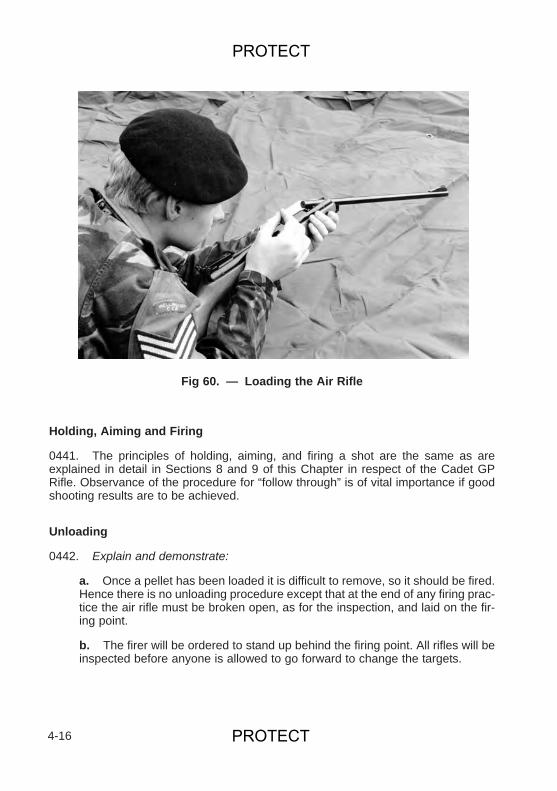
Holding, Aiming and Firing
0441. The principles of holding, aiming, and firing a shot are the same as areexplained in detail in Sections 8 and 9 of this Chapter in respect of the Cadet GPRifle. Observance of the procedure for “follow through” is of vital importance if goodshooting results are to be achieved.
Unloading
0442. Explain and demonstrate:
a. Once a pellet has been loaded it is difficult to remove, so it should be fired.Hence there is no unloading procedure except that at the end of any firing prac-tice the air rifle must be broken open, as for the inspection, and laid on the fir-ing point.
b. The firer will be ordered to stand up behind the firing point. All rifles will beinspected before anyone is allowed to go forward to change the targets.
4-16
Fig 60. — Loading the Air Rifle
PROTECT
PROTECT

Conclusion
0443. End of Lesson Drill.
a. Questions from the squad.
b. Practise the squad.
0444 – 0445. Reserved.
4-17
PROTECT

4-18
PROTECT
PROTECT
SECTION 4 — THE NO. 8 (.22) RIFLE —SAFETY PRECAUTIONS, CARE AND CLEANING, SIGHT SETTING,
LOADING, UNLOADING AND AMMUNITION SAFEGUARDS
A. INSTRUCTOR’S NOTES
Aim
0446. a. To confirm that the cadet knows the regulations for the safe handling ofthe rifle and the rules of conduct in the miniature range.
b. To instruct him in the care and cleaning of the No. 8 (.22 inch) rifle andthe safe handling of the ammunition.
c. To instruct him in sight setting and how to load and unload the rifle.
Timings
0447. Two 30 minute periods.
Method
0448. A practical instructional period in the miniature range. Alternatively the periodmay be taken outdoors on a 25 yd/30 m range.
Stores
0449.
No. 8 rifles 1 per cadet if possibleNo. 6 cleaning rod with brush and cleaner 1 completeFlannelette cleaning rag and oil As requiredRepresentative range target 1Ammunition .22 inch As requiredTable 1Chairs (if range seating not provided) 1 per cadetEar defenders 1 pair per cadet
Preparation
0450. a. Examine all rifles to ensure that they are unloaded and bores are clear.Place them on the table with breeches open, muzzles pointing down therange, together with all other stores. Put the ammunition on the firing point inits box until required.
4-19
PROTECT
PROTECT
b. Place the representative range target in the target holder in front of thebullet catcher.
c. Prepare pieces of flannelette 50 mm by 30 mm (2 inches by 1¼ inches).
d. If it is not possible to conduct the lesson on a range, the representativerange target and ammunition will NOT be included in the stores (see para-graph 0449) and the correct sequence of actions, detailed in paragraph 0462,will be demonstrated “dry” only.
Miscellaneous
0451. a. Revise the rules for the safe handling of weapons and firing on a minia-ture range at Section 2.
b. The principles of holding, aiming and firing a shot are the same as areexplained in detail in Sections 8 and 9 of this Chapter in respect of the CadetGP Rifle, but instructors must adapt them to this weapon.
B. CONDUCT OF THE LESSON
Preliminaries
0452. Safety precautions will be carried out, leaving the rifles prepared as in para-graph 0450. a. Check that the ammunition is in its closed container, separated fromthe rifles on the firing point, until required.
Introduction
0453. The No. 8 (.22 inch) rifle is to be maintained in a serviceable condition at alltimes. The bore of the rifle is to be dry cleaned before firing and cleaned and lightlyoiled afterwards when particular attention is to be paid to the chamber, breech areaand the face of the bolt to ensure that all wax deposits are removed.
0454. Bulges in the barrels of rifles are caused by a bullet failing to clear the bar-rel before being struck by the next one fired. To minimize the risk of this occurring:
a. The bores of .22 inch rifles will be inspected:
(1) Before and on the conclusion of firing.
4-20
PROTECT
PROTECT
(2) Whenever the noise made by the explosion of the charge is lessthan usual.
(3) Whenever the bullet is not heard or seen to strike the target or bul-let catcher.
b. After firing, or whenever excessive fouling is noticed, the bore will be thor-oughly cleaned and inspected before firing is resumed. This should only bedone by an adult instructor to ensure that damage to the bore is not caused bymisuse of the cleaning rod.
c. If a bullet becomes lodged in the barrel the rifle will be handed in for inspec-tion and repair and a Defect Report (AFG 3600) forwarded to DistrictHeadquarters. This report will include the batch and/or lot number and date ofmanufacture of the ammunition which will be found on the ammunition container.
Cleaning
0455. Explain and demonstrate: To clean the barrel and breech:
a. Raise the backsight, push forward the safety catch and press down the bolthead catch. Lift the bolt lever and pull the bolt fully to the rear. Release the bolthead catch, raise the bolt head and withdraw the bolt from the rifle.
b. Attach the cleaning brush to the cleaning rod and lightly oil the brush.
c. Lay the rifle on a table, insert the cleaning rod from the breech end andclean the barrel and breech. Do not use undue pressure and avoid the rodscraping the wall of the barrel or breech.
d. Attach the cleaner to the cleaning rod and with a piece of flannelette 50mm by 30 mm (2 inches by 11¼4 inches) dry out the barrel. To do this push therod from the breech end fully through the bore and remove the flannelette.Carefully remove the cleaning rod.
e. Examine the barrel and breech for cleanliness.
f. If firing is to follow leave the barrel and breech dry. If not, lightly oil andstore.
g. Ensure that the cartridge platform, breech and ejector are clean.
h. With an oiled rag clean the face of the bolt and extractor, taking care notto damage the extractor. Should there be excessive grease on the face of thebolt which, when wiped, tends to gather in the firing pin hole, this can bepushed out by turning the cocking piece anti-clockwise allowing the firing pin toprotrude and push the grease out. Wipe the face of the bolt clean. Pull the cock-
4-21
PROTECT
PROTECT
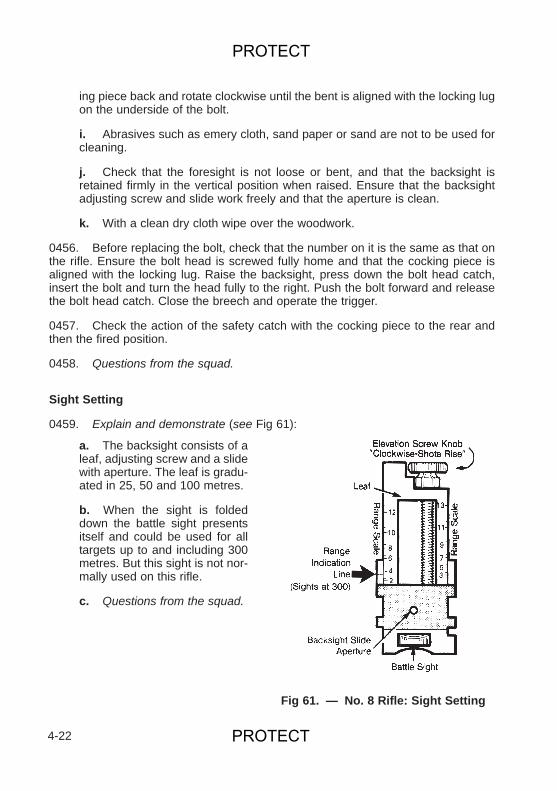
ing piece back and rotate clockwise until the bent is aligned with the locking lugon the underside of the bolt.
i. Abrasives such as emery cloth, sand paper or sand are not to be used forcleaning.
j. Check that the foresight is not loose or bent, and that the backsight isretained firmly in the vertical position when raised. Ensure that the backsightadjusting screw and slide work freely and that the aperture is clean.
k. With a clean dry cloth wipe over the woodwork.
0456. Before replacing the bolt, check that the number on it is the same as that onthe rifle. Ensure the bolt head is screwed fully home and that the cocking piece isaligned with the locking lug. Raise the backsight, press down the bolt head catch,insert the bolt and turn the head fully to the right. Push the bolt forward and releasethe bolt head catch. Close the breech and operate the trigger.
0457. Check the action of the safety catch with the cocking piece to the rear andthen the fired position.
0458. Questions from the squad.
Sight Setting
0459. Explain and demonstrate (see Fig 61):
4-22
a. The backsight consists of aleaf, adjusting screw and a slidewith aperture. The leaf is gradu-ated in 25, 50 and 100 metres.
b. When the sight is foldeddown the battle sight presentsitself and could be used for alltargets up to and including 300metres. But this sight is not nor-mally used on this rifle.
c. Questions from the squad.
Fig 61. — No. 8 Rifle: Sight Setting
PROTECT
PROTECT
Ammunition, Loading and Unloading
0460. Move to the firing point and arrange the squad behind the firer’s position butwhere all actions can clearly be seen. With a large squad, it may be necessary torepeat the procedures.
0461. Explain: The No. 8 rifle requires each round to be hand fed into the cham-ber until resistance is felt. Failure to do this could result in the rim of the .22 inch car-tridge being struck with sufficient force by the extractor as to cause a prematureexplosion and possible injury to the firer.
Loading
0462. Explain and demonstrate:
a. Loading the rifle will be carried out in the prone position.
b. On the command “Adopt the prone position — Down”:
(1) Get down, breaking the fall with the hands. Take command of therifle by placing the left hand around the forestock and the right hand grip-ping the small of the butt. Ensure that the trigger finger is pointed forwardand outside the trigger guard.
(2) The body should be relaxed and slightly angled to the line of fire.The left leg should be on the same line as the body, the leg musclesrelaxed and toes turned outwards. The right leg is positioned to form acontinuation of the line of fire, the right foot pointing outwards with theheel on the ground.
c. On the command “With one round load”:
(1) Push the safety catch fully forward with the thumb of the right handand open the breech by lifting up the bolt and pulling it to the rear usingthe right hand.
(2) Hand feed the round into the chamber as previously explained andclose the breech. Apply the safety catch and return the right hand to thesmall of the butt, forefinger pointed forward and outside the trigger guard.
Unloading
0463. Explain and demonstrate:
a. On the command “Unload”:
4-23
PROTECT
PROTECT
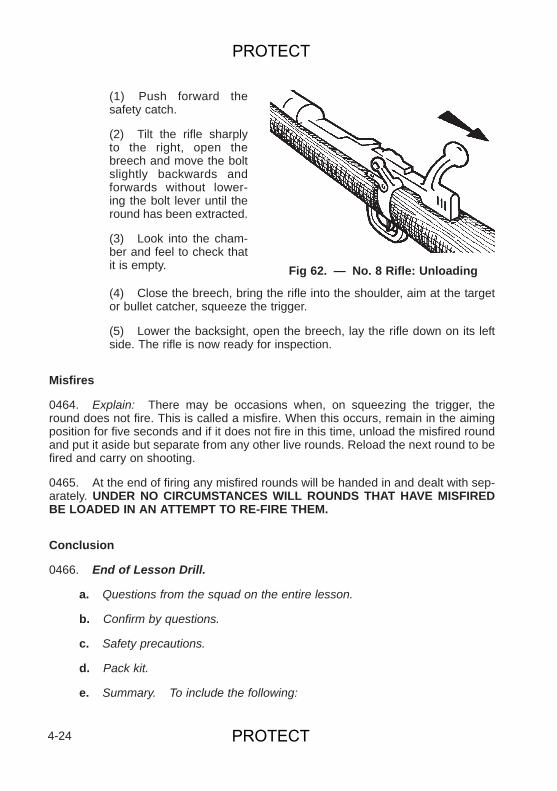
(4) Close the breech, bring the rifle into the shoulder, aim at the targetor bullet catcher, squeeze the trigger.
(5) Lower the backsight, open the breech, lay the rifle down on its leftside. The rifle is now ready for inspection.
Misfires
0464. Explain: There may be occasions when, on squeezing the trigger, theround does not fire. This is called a misfire. When this occurs, remain in the aimingposition for five seconds and if it does not fire in this time, unload the misfired roundand put it aside but separate from any other live rounds. Reload the next round to befired and carry on shooting.
0465. At the end of firing any misfired rounds will be handed in and dealt with sep-arately. UNDER NO CIRCUMSTANCES WILL ROUNDS THAT HAVE MISFIREDBE LOADED IN AN ATTEMPT TO RE-FIRE THEM.
Conclusion
0466. End of Lesson Drill.
a. Questions from the squad on the entire lesson.
b. Confirm by questions.
c. Safety precautions.
d. Pack kit.
e. Summary. To include the following:
4-24
(1) Push forward thesafety catch.
(2) Tilt the rifle sharplyto the right, open thebreech and move the boltslightly backwards andforwards without lower-ing the bolt lever until theround has been extracted.
(3) Look into the cham-ber and feel to check thatit is empty. Fig 62. — No. 8 Rifle: Unloading
PROTECT
PROTECT
(1) The importance of safe handling.
(2) How to deal with misfired rounds.
(3) A forecast of the squad’s next lesson on this subject.
0467 – 0468. Reserved.
4-25
PROTECT

4-26
PROTECT
PROTECT
SECTION 16. — VISUAL TRAINING AND JUDGING DISTANCE
Introduction
04328. The subject is covered in four lessons as follows:Visibility, Unit of MeasureMethod, Appearance Method and Aids to Judging Distance.
LESSON 1. — VISIBILITY
A. INSTRUCTOR’S NOTES
Aim
04329. To show the various factors which affect the degree of visibility of anyobject.
Timings
04330. One 30 minute period.
Method
04331. A basic instructional outdoor period.
Stores
04332.
Webbing 1 set per cadetVarious pieces of military equipment See Miscellaneous
paragraph below Loud hailer As availableSignal flag 1Demonstrators As necessary
Preparation
04333.a. Reconnoitre the training area and position the equipment in such a wayas to demonstrate clearly one of the factors (shape, silhouette, etc). This isbest done immediately prior to the lesson so that there is less chance of day-light conditions changing and the demonstration losing effect.
b. Rehearse the demonstrators involved.
4-129
PROTECT
PROTECT
Miscellaneous
04334.a. Where possible there should be at least two of each item of equipment;one to be used at the squad position to explain the factor (shape, shine, etc),and the other located in the open at a suitable range to demonstrate it.
b. If using a signal flag to control demonstrators, rehearse them in the sig-nals and actions before sending them to their demonstration positions.
B. CONDUCT OF THE LESSON
Preliminaries
04335. Safety Precautions. Normal as applicable to the equipment being used.
04336. Revision. Nil. Indicate the area to be used for the demonstration.
Approach
04337. Explain:
a. Visual training is training in observation and concealment.
b. To OBSERVE is to see through the enemy’s CONCEALMENT; to CON-CEAL yourself is to defeat his OBSERVATION. Once you are trained in bothyou can find and engage the enemy without being seen.
c. You can find out a lot about the enemy by watching him; by concealingyourself you can deceive him and, if he attacks, you can meet him with shortrange fire where he least expects it.
d. The important things are:
(1) See without being seen.
(2) Notice details.
(3) Learn to understand the meaning of what you see, and make theright deductions.
Demonstration
04338. Explain, as a commentary to the demonstration, the various factors whichaffect the visibility of a person or object:
4-130
PROTECT
PROTECT
a. Shape. You can recognize some things instantly by their shape, particu-larly if it contrasts with the surroundings; for instance, the clear cut shape of acadet’s outline.
b. Shadow. In sunlight an object may cast a shadow that gives it away.Always keep in shade if you can; the shade itself affords cover and there is notelltale shadow. Remember that as the sun moves so do the shadows.
c. Silhouette. Anything silhouetted against a contrasting background is con-spicuous. Any smooth, flat background, like water, a field or, worst of all, thesky is dangerous. Always try to put yourself against an uneven backgroundsuch as a hedge, trees, a bush or broken ground. A thing may be silhouetted ifit is against a background of another colour.
d. Surface. If anything has a surface that contrasts with its surroundings, itis conspicuous. White skin contrasts violently with most backgrounds andneeds disguising.
e. Spacing. In nature things are never regularly spaced. Regular spacingmeans man-made objects.
f. Movement. Nothing catches the eye quicker than sudden movement.However well you are concealed you will give yourself away when you moveunless you are careful.
Conclusion
04339. End of Lesson Drill.
a. Questions from the squad on the entire lesson.
b. Confirm by questions and practice.
c. Normal safety precautions.
d. Pack kit.
e. Summary. To include the following:
(1) The importance of knowing why things are seen and what to do toassist in concealment.
(2) A forecast of the squad’s next lesson in this subject.
04340. Reserved.
4-131
PROTECT
LESSON 2. — UNIT OF MEASURE METHOD
A. INSTRUCTOR’S NOTES
Aim
04341. To teach cadets to judge distance by the unit of measure method.
Timings
04342. One 30 minute period.
Method
04343. A basic instructional outdoor period.
Stores
04344.
Loud hailer As availableLarge flags on sticks 4Small flags on sticks 12100 metre measuring tape As availableSignal flag 1Demonstrators 3 (minimum requirement)Rifles 1 per demonstrator
Preparation
04345.a. Put out the large flags at various places 100 metres from a central view-point so that they can be seen across different types of ground, rising, fallingor flat, and open or broken.
b. Choose a number of objects up to 400 metres from the viewpoint and laya small flag every 100 metres between viewpoint and objects, but so that acadet cannot see them from the viewpoint. Distances must be accurate.
c. Rehearse the demonstrators, preferably immediately prior to the squadarriving. If using a signal flag to control demonstrators, rehearse the signalsand actions before sending the demonstrators to their positions.
d. When the cadets have judged a range, always make them set their sightsat it; they get practice in sight setting and they are not influenced by othercadets’ answers.
4-132
PROTECT
PROTECT
B. CONDUCT OF THE LESSON
Preliminaries
04346. Safety Precautions. Normal.
04347. Revision. Nil. Indicate area of observation for the demonstration.
Approach
04348. Explain: It is important to be able to judge distances correctly, so that firemay be fully effective and observers’ reports accurate on this point.
04349. Explain: There are several ways to judge distance; this lesson deals witha way known as the Unit of Measure.
The Unit of Measure
04350. Explain:
a. Take 100 metres, or any smaller better recognized distance as your unitand see how many units you can fit in between yourself and an object.
b. This method is no good unless you can see all the ground between your-self and the object, nor for distances over 400 metres.
04351. Get the cadets to look at the large flags from all firing positions, and try toremember what 100 metres looks like. Show them how difficult it is if there is anydead ground between them and the object.
04352. For practice make the cadets put themselves 100 metres from a givenobject. Discuss each cadet’s error with him and go on until the cadets get consistentresults. Some may consistently overestimate or underestimate; they must rememberthis when fitting in their 100 metre units.
04353. Get the cadets to judge the distance to the objects that you chose beforethe lesson and to show how they fitted in their units. Then get someone to put up thesmall 100 metres flags and discuss the cadets’ results with them.
Conclusion
04354. End of Lesson Drill.
a. Questions from the squad on the entire lesson.
b. Confirm by questions and practice.
4-133
PROTECT
PROTECT
c. Normal safety precautions.
d. Pack kit.
e. Summary. To include the following:
(1) The importance of remembering individual tendency to under/overestimate when using this method.
(2) A forecast of the squad’s next lesson in this subject.
04355. Reserved.
LESSON 3. — APPEARANCE METHOD
A. INSTRUCTOR’S NOTES
Aim
04356. To teach cadets how to judge distances by the Appearance method.
Timings
04357. One 30 minute period.
Method
04358. A basic instructional outdoor period.
Stores
04359.
Loud hailer As availableSignal flag 1100 metre measuring tape 1List of known ranges 1Military equipment As necessaryChalkboard 1Demonstrators 6 (minimum requirement)Rifles 1 for demonstrator
4-134
PROTECT
PROTECT
Preparation
04360.a. Before the lesson starts, station cadets up to 600 metres away andchoose or put out other things — trees, bushes, vehicles etc up to 1000metres and measure the distance to each.
b. If an open range is available put the objects on, or in line with, the firingpoints.
c. Rehearse the demonstrators, preferably immediately prior to the squadarriving. If using a signal flag to control demonstrators, rehearse the signalsand actions before sending the demonstrators to their positions.
Miscellaneous
04361. By using demonstrators show what an individual cadet looks like at rangesup to 600 metres in the standing, kneeling and prone positions.
B. CONDUCT OF THE LESSON
Preliminaries
04362. Safety Precautions. Normal.
04363. Revision. Revise Unit of Measure.
Approach
04364. Another way to judge the distance to an object is to study what it looks likecompared with its surroundings; this is called the appearance method. It takes a lotof practice under varying conditions to become good at it.
Appearance Method
04365. Explain and demonstrate:
a. The amount of visible detail of a cadet at various ranges gives a good indi-cation of the distance he is away:
(1) At 100 metres — clear in all detail.
(2) At 200 metres — clear in all detail, colour of skin and equipmentidentifiable.
4-135
PROTECT
PROTECT
(3) At 300 metres — clear body outline, face colour good, remainingdetail blurred.
(4) At 400 metres — body outline clear, remaining detail blurred.
(5) At 500 metres — body begins to taper, head becomes indistinct.
(6) At 600 metres — body now wedge shaped, no head apparent.
b. What other objects look like up to 1000 metres away and how the prevail-ing conditions affect their appearance.
04366. Things seem closer than they are when:
a. The light is bright or the sun is shining from behind you.
b. They are bigger than other things around them.
c. There is dead ground between them and you.
d. They are higher up than you are.
04367. Things seem further away than they are when:
a. The light is bad or the sun is in your eyes.
b. They are smaller than other things around them.
c. You are looking across a valley or down a street or a ride in a wood.
d. You are lying down.
Practice
04368. Make the squad judge the range to various cadets and objects. Set a timelimit for each problem and tell the cadets to set their sights at the estimated range.
Conclusion
04369. End of Lesson Drill.
a. Questions from the squad on the entire lesson.
b. Confirm by questions and practice.
c. Normal safety precautions.
d. Pack kit.
4-136
PROTECT
PROTECT

e. Summary. To include the following:
(1) The importance of the factors affecting appearance when judgingdistance using this method.
(2) A forecast of the squad’s next lesson in this subject.
04370. Reserved.
LESSON 4. — AIDS TO JUDGING DISTANCE
A. INSTRUCTOR’S NOTES
Aim
04371. To teach and practise the use of aids to judging distance.
Timings
04372. One 30 minute period.
Method
04373. A basic instructional outdoor period.
Stores
04374. Rifles and a list of known ranges.
Preparation
04375.a. Reconnoitre the training area and select an area with prominent featuresboth natural and artificial, the true ranges of which are known to the instruc-tor and recorded on a card.
b. Select the objects to be used and the sequence of use during practice.
Miscellaneous
04376.a. All your ranges must be accurately measured.
b. Make the cadets practise in proper firing positions.
4-137
PROTECT
PROTECT
B. CONDUCT OF THE LESSON
Preliminaries
04377. Safety Precautions. Normal.
04378. Revision. Revise judging distance by Unit of Measure and AppearanceMethods.
Approach
04379. Explain: You already know the two main ways of judging distance butthere are several other devices to help you.
Method
04380. Explain and demonstrate each aid and then make the cadets practise it.
04381. Halving. Choose a point that you think is halfway to your target; estimatethe distance to that point and double it.
04382. Bracketing. Say to yourself “The target could not be more than x metres,nor less than y metres away”, add x to y and halve the result; the answer is the range.For instance, if x is 300 and y is 100, the range is about 200. The farther the targetis away the wider should be your bracket.
04383. Key Ranges. If you know the range to any point in your arc you can esti-mate the distance to other objects from it.
04384. Practise the two methods and the aids, checking one against another.
Conclusion
04385. End of Lesson Drill.
a. Questions from the squad on the entire lesson.
b. Confirm by questions and further practice.
c. Normal safety precautions.
d. Pack kit.
e. Summary. To include the following:
4-138
PROTECT
PROTECT

(1) The importance of being able to use the appearance and unit ofmeasure methods skillfully.
(2) The value of being able to improve accuracy through the use of theaids to judging distance.
(3) A forecast of the next lesson in this subject.
04386. Reserved.
4-139
PROTECT

4-140
PROTECT
PROTECT
SECTION 17. — ELEMENTARY OBSERVATION
A. INSTRUCTOR’S NOTES
Aim
04387. To teach how to systematically search an area of ground.
Timings
04388. One 30 minute period.
Method
04389. A basic outdoor instructional period.
Stores
04390. Pieces of military equipment — boots, weapons and clothing.Demonstrators — as necessary
Preparation
04391.a. Reconnoitre the training area and select an area of ground to divide intoforeground, middle distance and distance.
b. Position demonstrators and equipment so that they provide varyingdegrees of contrast in colour, tone, surface, shape and shadow. This is bestdone as close to the lesson start time as is possible.
Miscellaneous
04392.a. Rehearse the demonstrators in their actions prior to sending them to theirlocations.
b. Some equipment need not be too well concealed but all demonstratorsshould provide realistic battle type targets.
4-141
PROTECT
PROTECT
B. CONDUCT OF THE LESSON
Preliminaries
04393. Question the cadets on why things are seen.
How to Search Ground
04394. Explain: The normal way to search ground is to divide it into foreground,middle distance and distance, and search each of them, in that order, from right toleft. In that way you are sure that you do not leave out any of the ground; but thereare other ways of dividing the ground up which may sometimes be better, particular-ly if the ground is very broken. The ground may be divided into arcs, left or right of aspecified centre line. Areas that are likely to be occupied by the enemy may be spe-cially indicated for thorough searching.
Scanning and Searching
04395. Explain and demonstrate: Scanning is a general and systematic exami-nation of an area to detect any unusual or significant object or movement. Searchingis a thorough examination of certain features in the area. Both require complete con-centration combined with a knowledge of why things are seen and the principles ofcamouflage and concealment.
a. Scanning.
(1) Divide the area into foreground, middle distance and distance.
(2) Scan each area horizontally starting with the foreground. To obtainmaximum efficiency, move the eyes in short overlapping movements.Moving the head will minimize eye fatigue. The speed at which scanningis carried out will depend upon the type of country being observed andthe amount of cover it affords to possible targets.
(3) When horizontal scanning is completed, scan along the line of anyfeatures which are angled away from the observation position.
b. Searching.
(1) Searching may take place at any stage during scanning i.e., if thecadet’s position is dominated by a piece of ground, he should search thatarea thoroughly before continuing with scanning. Furthermore, any sig-nificant movement or object, suspected camouflage, etc., spotted duringscanning would require an immediate search of that area.
4-142
PROTECT
PROTECT
(2) Search for each of the factors of why things are seen in turn. Theweather may assist, i.e., frost will reveal tracks made during the night ora hot sun will alter the tone and colour of foliage used for camouflage bywithering its leaves.
(3) Search across hedgerows or a row of trees, not along them.
Practice
04396. Get the cadets to divide the ground into foreground, middle distance anddistance. Discuss their answers.
04397. Tell the cadets to search the area and write down the bits of military equip-ment that they see.
04398. Ask the cadets what they have seen, why some things were easier to seethan others, and how they identified things of which they could only see part.
Conclusion
04399. End of Lesson Drill.
a. Questions to and from the squad.
b. Sum up and point out how observation and concealment are related.
04400. Reserved.
4-143
PROTECT

4-144
PROTECT
PROTECT
SECTION 18. — RECOGNITION OF TARGETS
A. INSTRUCTOR’S NOTES
Aim
04401. To teach cadets how to recognize targets.
Timings
04402. Two 30 minute periods.
Method
04403. A basic outdoor instructional period.
Stores
04404.
RiflesAiming restsLandscape targetsDiagramsChalkboardA list of known ranges
Miscellaneous
04405. Cadets get false impressions about direction from landscape targets, soteach the lesson in the open if you can. If you have to use landscape targets remem-ber that:
a. It is impossible to judge distances.
b. The landscape is so narrow that no target on it can be more than slightlyleft or right. Three adjoining landscape panels give better results if the cadetsare not more than ten metres away from them.
04406. Choose your ground carefully, and pick the sort of target that might have tobe recognized in battle, and at realistic ranges.
04407. Have a diagram of the clock ray to use on the landscape target; the bestsort of diagram is black figures on talc.
4-145
PROTECT
PROTECT
04408. The sequence for instruction in recognition is:
a. Indicate the target.
b. Order “Aim”.
c. Check the aims and discuss them.
04409. Examples are given but it is always better to choose your own examples onthe ground.
Preliminaries
04410. Safety Precautions. Carry out normal safety precautions. Fit rifles inaiming rests.
B. CONDUCT OF THE LESSON
Approach
04411. Explain: When your section commander indicates a target you must beable to recognize it so that you can shoot at it. To make it easier there are certainmethods of indication that everyone uses.
Arcs of Fire
04412. Explain and demonstrate: It is easier to recognize a target if you know thearea in which it is likely to be; such an area is known as an arc of fire. When yoursection commander shows you the arc of fire he:
a. Points out the axis or middle of the arc.
b. Shows you its left and right boundaries.
c. Points out a number of prominent objects, or reference points which mustbe easy to identify and a reasonable distance apart, gives each one a name,and tells you the range of it; and if any object is large, like a copse, tells youwhat bit of it he is using as a reference point.
Methods of Indication
04413. Direct Method (see Fig 103). Explain and demonstrate:
a. Obvious targets are indicated by what is known as the direct method.
4-146
PROTECT
PROTECT
b. The section commander tells you the range and where to look anddescribes the target; the terms he uses are:
(1) “Axis of arc” for targets on or very near the axis.
(2) “Left” or “Right” for targets 90 degrees from the axis.
(3) “Slightly”, “quarter”, “half” or “three quarters”, and “left” or “right” fortargets between the axis and “left” and “right”.
c. An example might be “300 — half right — lone bush”.
04414. Reference Points. Explain and demonstrate:
a. For less obvious targets the section commander may use reference pointsand the direct method together, and perhaps “above” or “below” as well.
b. Examples are:
(1) “300 — bushy topped tree (reference point) — slightly right — smallbush (the target)”.
(2) “200 — corner of copse — slightly right and below — small bush”.
4-147
����������
���� ��
���������
�����������
��������
�����
�������
����������
��������
����
�������������
������������
�������
�������
��������
���������
Fig 103. — The Direct Method
PROTECT
PROTECT
04415. For practice indicate some targets to the squad by the direct and referencepoint methods.
04416. Clock Ray (see Fig 104). Explain and demonstrate:
a. For more difficult targets the section commander may use a reference pointand a clock ray.
b. Imagine a clock face standing up on the landscape with its centre on thereference point. If you have a talc clock face, put it against the landscape target.
c. To indicate a target the section commander tells you the range, the refer-ence point and whether the target is to be the left or right of it, and the appro-priate hour on the clock face to give you the direction to look in from the refer-ence point.
d. An example which refers to the picture which follows: “300 — windmill —right 4 o’clock — small bush”.
04417. The observer must never think of himself as the centre of the clock.
04418. Give the squad some clock ray indications for practice.
04419. Further practice in all methods if there is time.
Conclusion
04420. End of Lesson Drill.
a. Questions to and from the squad.
b. Sum up.
04421 – 04422. Reserved.
4-148
PROTECT
PROTECT

4-149
��
�
�
�
�
�
��
�
�
��
������
���� ��
Fig 104. — The Clock Ray Method
PROTECT
PROTECT

4-150
PROTECT
PROTECT
SECTION 19. — FIRE CONTROL ORDERS
A. INSTRUCTOR’S NOTES
Aim
04423. To teach cadets what to do when they are given fire control orders.
Timings
04424. Two 30 minute periods.
Method
04425. A basic outdoor instructional period.
Stores
04426.
RiflesAiming restsLandscape targetsA list of known ranges
Miscellaneous
04427. This section may also be used to train NCOs in giving fire control orders.
B. CONDUCT OF THE LESSON
Preliminaries
04428. Safety Precautions. Carry out normal safety precautions. Fit rifles inaiming rests.
04429. Revision. Organize an arc of fire and revise Recognition of Targets.
Approach
04430. Explain: Your section commander gives you a fire control order so thatyou may recognize the target and fire at it effectively. Your duty is to obey the order.
4-151
PROTECT
PROTECT
Sequence
04431. Explain: There is an unvarying sequence when giving out fire controlorders based on the mnemonic GRIT and that the method of giving them out is basedon the mnemonic CLAP as below:
G GROUP “No 1 Section”, “Rifle Group” CLEAR Cor “Fire Support Group” so that allconcerned know to whom the orderis being given.
R RANGE The range is given to enable those LOUD Lconcerned to know how far away tostart looking for the target. Therifle sight should remain at the rangeordered for all targets indicated upto and including this range.
I INDICATION So that all concerned know what to AS AN ORDER A look for and in what direction to look.
T TYPE OF So that all concerned know whether WITH PAUSES PFIRE to fire slow or rapid with the rifle
and single rounds or bursts with theLSW.
Types of Fire Control Orders
04432. Explain each type and give an example on the ground or on the landscapetarget, rather than the one given here. Then practise the cadets at acting on each type.
04433. Full Fire Control Orders. These orders are only given if there is time.Example — “Gun group — 300 — ruined house — left end — enemy machine gun— bursts — fire”.
04434. Brief Fire Control Orders. These orders are given when there is littletime and the target is obvious. Example — “Quarter left — rapid — fire”.
04435. Delayed Fire Control Orders. These orders are used when the sectioncommander can guess what either our own attacking troops or the enemy are goingto do; he gets his men ready to open fire, but waits till the right moment to order“Fire”. Examples:
a. “No 2 Section — 300 farm house — immediately below — enemy inhedgerow — No 1 Section is moving through the copse on our right; we aregoing to cover their advance when they get into the open — rapid await myorder” — then when No 1 Section is about to come into the open, “Fire”.
4-152
PROTECT
PROTECT
b. “No 3 Section — 200 — quarter right — small wood — when the enemycomes out this side — rapid — then, when the enemy are in a suitable position“Fire”.
04436. Individual Fire Control Orders. These orders give you a chance to firequickly when a target appears. Example: “No 3 Section — 200 — slightly left — farmbuildings — enemy in that area — watch and shoot”.
04437. Tracer. Explain:
a. Tracer may be used to indicate an extremely difficult target, or to indicatea target to a tank.
b. An example is “300 — watch this tracer — where it hits — enemy”.
Conclusion
04438. End of Lesson Drill.
a. Questions to and from the squad.
b. Sum up.
04439 – 04440. Reserved.
4-153
PROTECT

4-154
PROTECT
PROTECT
ANNEX E TOCHAPTER 4
PRACTICE PERIODS
INTRODUCTION
General
1. Training must be progressive, unnecessary repetition is bad instructional prac-tice. A cadet learns skills and facts in the basic lesson which should be taught onlyonce. The cadet then needs practice to speed up his or her actions and establishthe facts firmly in their minds. This is achieved by practice periods.
2. The sequence of a practice period is:
a. Remind — by explanation.
b. Assess Weakness — by practice or test.
c. Improve on Weakness — by practice.
d. Progressive Practice — by competitions.
3. The practice periods are intended to reinforce and confirm basic instruction, byproviding progressive, interesting practice, leading to training tests pass standardsand as a guide to the best way of exercising cadets during basic and continuationtraining. The instructor should plan the period on an assessment of the cadet’sweak points.
4. Faults should be brought to the notice of the cadet and corrected immediatelyotherwise the cadet will go on making the same mistakes.
5. It may become obvious during a practice period that the cadets have failed tograsp a particular skill or fact. The instructor will therefore have to teach that part ofthe basic lesson again.
Competition
6. The incentive of competition will always help to make practice more interesting,provided cadets can achieve acceptable skills standards. If not, additional practicewill be necessary before competition is worthwhile. Some points on framing compe-titions are:
a. They may be on an individual or on a team basis.
4E-1
PROTECT
PROTECT

b. If run on a team basis the instructor must ensure that selected teams areall fairly equal as regards performance. The more advanced members of theteam will help along the weaker members.
c. Marks can be earned up to a given total, or a total started with and markslost for mistakes as the competition progresses.
d. A chart drawn on a chalk board or a sheet of paper on which to mark upresults should always be used.
e. Further interest can be developed by making one team or individualmatch another, criticising and awarding or deducting marks.
f. Above all the instructor must make certain that competitions are simple,realistic and relevant i.e., that they exercise the cadets in the facts and skillsrelated to their basic instruction and appropriate to their stage of training.
Master and Pupil
7. The master and pupil method of practice, in its simplest form is for one cadet(the pupil) to work under the supervision of another (the master); the instructorkeeps an eye on both.
8. At all stages of training it stimulates interest, keenness and attention to detail. Itis particularly useful with large squads and in competitions. Used regularly, it alsodevelops initiative and leadership, and potential leaders may well be discovered bymatching the masters at work.
4E-2
PROTECT
PROTECT
Chapter 5
USE OF MAP AND COMPASS
SECTION 1. — INTRODUCTION, TYPES OF MAPS, RELIABILITY ANDCARE
A. INSTRUCTOR’S NOTES
Introduction
0501. At home and at school, the cadet finds his way around through familiaritywith the streets and roads which he uses constantly. Further afield he usually findshis way by looking at signposts or asking someone who lives in the locality. His train-ing in the Cadet Forces, however, requires him to move across unfamiliar countrywhere there may be only tracks and there are no signposts or people to ask the way.In these circumstances he has only his map and compass to rely on if he is to arrivewhere he wishes to go.
0502. This chapter deals with the basic information required to know what a mapand a compass are and how to make the best use of them to qualify in the APCSyllabus. This subject is no more difficult than any other if the basic information istaught in the correct sequence and the cadet is not confused by more advanced mapwork or navigation.
0503. The attention of adults and senior cadets who wish to study the subject ingreater detail, should refer to the Manual of Map Reading and Land Navigation 1988.
Aim
0504. The aim of this section is to explain how a map is made, how it should belooked after, how to understand the basic information on it and how to use a simplemap to find your way about.
Timings
0505. One 30 minute period.
Preparation
0506. Ensure that the following is prepared for use during the lesson:
5-1
PROTECT
PROTECT
a. One street map of the local area and one Ordnance Survey map (1:50,000scale) per every two cadets. One creased and torn map, aerial photographs andlarger scale maps for demonstration.
b. The maps used in these lessons must be clean and easy to read and, inorder to keep them so, ensure that they are always collected and stored awaytidily at the end of each lesson. Any damaged or badly marked maps should bedestroyed.
c. Ensure that there are sufficient maps, that they are the same and that thereis sufficient space to allow cadets to spread out. Paper and pencils for cadetsshould be available as required.
Approach
0507. The basic skill required of a cadet in order to read a map is to understand theinformation shown on it. This includes the signs and symbols drawn on it and alsothe information given on the top, bottom and sides. In addition, he must be able togive grid references, understand scales, find his position and describe and followroutes. When a cadet really understands the subject and has had sufficient experi-ence he will, by reading a map, be able to see a picture of his surroundings in hismind’s eye.
B. CONDUCT OF THE LESSON
Types of Map
0508. Explain: A map is a plan of an area showing roads and local landmarks toenable people to find their way about.
0509. There are many different types of maps that are important for different uses. Asimple street plan to find your way round the local area, Ordnance Survey maps atdifferent scales for longer distance travel and military maps showing training areas,etc.
0510. Discuss the various uses to which maps may be put.
Reliability
0511. Explain: A map is like a ‘bird’s eye view’. It is absolutely accurate only atthe time it is drawn. If it is old, much may have changed — towns and villages grow,roads and railways are added and buildings such as churches get demolished orbuilt. For practical map reading purposes in the cadet forces, however, the accuracyof any map provided may be relied upon unless specifically stated otherwise.
5-2
PROTECT
PROTECT
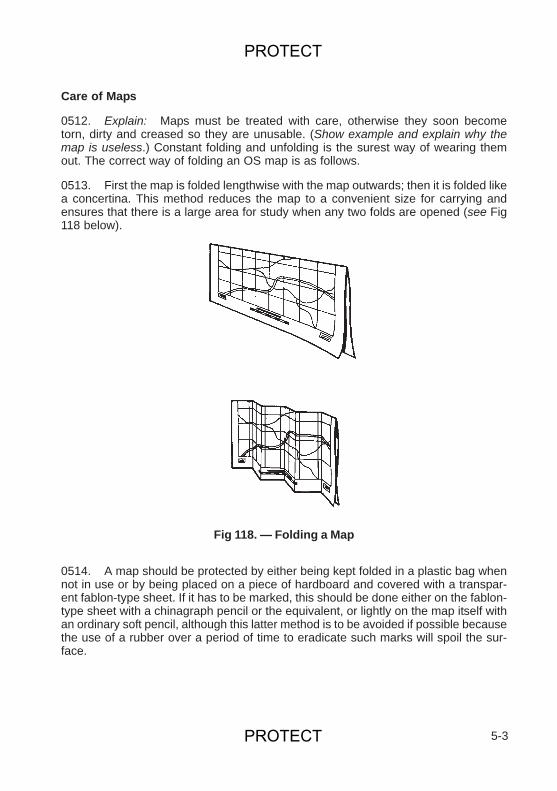
Care of Maps
0512. Explain: Maps must be treated with care, otherwise they soon becometorn, dirty and creased so they are unusable. (Show example and explain why themap is useless.) Constant folding and unfolding is the surest way of wearing themout. The correct way of folding an OS map is as follows.
0513. First the map is folded lengthwise with the map outwards; then it is folded likea concertina. This method reduces the map to a convenient size for carrying andensures that there is a large area for study when any two folds are opened (see Fig118 below).
0514. A map should be protected by either being kept folded in a plastic bag whennot in use or by being placed on a piece of hardboard and covered with a transpar-ent fablon-type sheet. If it has to be marked, this should be done either on the fablon-type sheet with a chinagraph pencil or the equivalent, or lightly on the map itself withan ordinary soft pencil, although this latter method is to be avoided if possible becausethe use of a rubber over a period of time to eradicate such marks will spoil the sur-face.
5-3
Fig 118. — Folding a Map
PROTECT
PROTECT
Conclusion
0515. End of Lesson Drill.
a. Questions to and from the squad.
b. Sum up.
c. Look forward to the next lesson.
0516 – 0520. Reserved.
5-4
PROTECT
PROTECT
SECTION 2. — MAKING A SIMPLE MAP ANDLOCAL STREET PLANS
A. INSTRUCTOR’S NOTES
Introduction
0521. Before going into the details and use of Ordnance Survey maps, cadetsshould be introduced to more basic maps, the simple theory behind them and theiruse.
Aim
0522. The aim of this lesson is to teach cadets the basic theory behind maps ,usingsimple street plans of their local area, which they can use to follow simple routes.
Timings
0523. Two 30 minute periods in the classroom followed by a simple navigationexercise in the local area for equivalent to three periods.
Stores
0524. Pencil and paper for each cadet and a copy of a local area street mapbetween two cadets.
Preparation
0525. From a local street map, prepare a safe route round which cadets can navi-gate in pairs.
Approach
0526. A map is virtually a bird’s eye view of the ground drawn in a reduced size onpaper. Maps are drawn to a scale to give a sense of proportion and distance. A cadetmust be able to relate a map to the ground and navigate using a map.
5-5
PROTECT
PROTECT
B. CONDUCT OF THE LESSON
Bird’s Eye View
0527. Explain: Maps today are created from aerial photographs which ensuresgreater accuracy than if compiled at ground level. Hence a map can be comparedwith a bird’s eye view but is only accurate on the day it is drawn (see Figs 119 and120).
0528. By using the map and the photograph, the cadet can see how the land isused. The area can be divided into uses — housing, leisure, transport and industry.However, for local use, a simple street plan is of more use to show points of localinterest. Show examples of local area maps, identify your own ACF hut from the localstreet plan and ask the cadets to describe routes to local landmarks — police station,telephone box, etc.
Scales
0529. Explain: Because it is impossible to make a map the same size as thecountry which it represents, everything on the map has to be reduced, i.e., scaleddown in a fixed proportion. The scale of a map is the proportion which the distancebetween two points on it bears to the distance between the same two points on theground. Thus, when comparing two map sheets, each of exactly the same size, onemight show the whole of England and Wales while the other might show only a smalldistrict. In other words, the scales of the two maps would be different.
0530. The method of expressing a scale is as a representative fraction (RF). Forexample, the representative fraction 1:50,000 (the scale of the map most frequentlyused) means that one centimetre on the map represents 50,000 centimetres on theground, and one metre on the map represents 50,000 metres (50 kilometres) on theground. The representative fraction 1:25,000 (the scale of the map sometimes used)means that one centimetre on the map represents 25,000 centimetres on the groundand one metre on the map represents 25,000 (25 kilometres) on the ground.
Grids
0531. Explain: To describe an exact position on a map can be lengthy and inac-curate unless a logical and precise method is used. The method most usually usedis a grid.
0532. A grid is formed on a map by vertical and horizontal equidistant lines. Onlocal street maps and road maps, the squares formed by the grid lines are usuallynumbered or lettered (see Fig 120). Deanwood Farm can be referred to as in squareA2 and this is known as a grid reference.
5-6
PROTECT
PROTECT
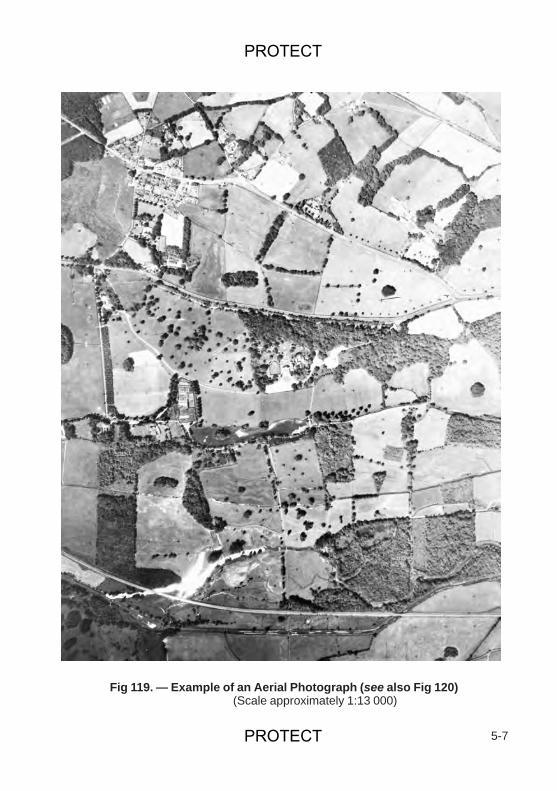
5-7
Fig 119. — Example of an Aerial Photograph (see also Fig 120)(Scale approximately 1:13 000)
PROTECT
PROTECT

5-8
Fig 120. — Ordnance Survey Map Showing the Same Area as the AerialPhotograph at Fig 119 (Scale 1:10 000)
PROTECT
PROTECT
0533. On larger scale maps, the grid lines themselves (rather than the squares) arenumbered, making for more accurate grid references. This is the case with OS maps(see Section 4).
Preparation and Use of Local Street Plans
0534. Cadets are to individually prepare their own street plans of locality showingdifferent routes to various landmarks. Ensure that plans contain identifiable points onroute.
Practical Basic Navigation (Route Following)
0535. Cadets are to practise following given routes in local areas making use oflocal street plans — this can be a simple treasure hunt with markers.
0536. Cadets should always be in pairs and never sent out on their own. Checktimes out and how long taken. Discuss afterwards and identify errors made.
Conclusion
0537. End of Lesson Drill.
a. Questions to and from the squad.
b. Sum up.
c. Look forward to next lesson.
0538 – 0540. Reserved.
5-9
PROTECT

5-10
PROTECT
PROTECT
SECTION 3. — INTRODUCTION TO ORDNANCE SURVEY (OS) MAPS
A. INSTRUCTOR’S NOTES
Introduction
0541. OS maps are those most commonly used by cadets, usually at 1:50,000 or1:25,000 scales (revise previous lesson if necessary). The detail shown on them isvery accurate and this is particularly relevant when moving on foot across countryusing a compass.
0542. This lesson will cover the layout of an OS map, the information shown on itand in the margins and introduce six-figure grid references.
Aim
0543. The aim of this lesson is to introduce cadets to the use of OS maps.
Timings
0544. Three 30 minute periods.
Stores
0545. One map and a pencil and paper for each cadet.
Preparation
0546. Prepare some large scale pictures of the most common conventional signsand a chalk board with grid lines.
Approach
0547. The basic skill to be acquired by cadets in order to read a map is under-standing the information shown on it. This includes the signs and symbols drawn onit and the information given in the margins. In addition, he must be able to read andgive grid references, understand scales and how to measure distance off a map andto find his position on the ground by using a map.
5-11
PROTECT
PROTECT
B. CONDUCT OF THE LESSON
Preliminaries
0548 Reiterate.
a. The basic skill required of a cadet in order to read a map is to understandthe information shown on it. This includes the signs and symbols drawn on it andalso the information given in the margin of the map. In addition to this skill he isrequired to be able to read and give map references, to understand scales andmeasurements from them, to be able to find his position and to describe andfollow routes by day and night.
b. When a cadet really understands this subject and has had sufficientexperience he will, by reading a map, be able to see in his mind’s eye a pictureof the shape of the ground, as indicated by the contours and spot heights, inaddition to the more obvious things indicated by signs and symbols such asroads, rivers, woods and buildings.
c. A map is virtually a bird’s eye view of the ground drawn on paper. It isabsolutely accurate only at the time it is drawn. If it is old much may havechanged; towns and villages grow, woods grow up and are cut down, roads arebuilt and railways demolished. For practical map reading purposes in the CadetForces, however, the accuracy of any map provided may be relied upon unlessspecifically stated otherwise.
Marginal Information
0549. Explain and demonstrate: Before using a map, the first thing to do is to lookat the information in the margins — the area of paper surrounding the map. On theOrdnance Survey 1:50,000 map — most commonly used by cadets — the majorityof the information is in the right hand margin with the remainder in the top and bot-tom margins. This information is often overlooked in the desire to start reading themap, but it is to be clearly understood that initial careful study, even if some of theterms are not wholly understood, will save time later on. (Explanations of informationnot immediately understood are given in the sections which follow.)
0550. Start at the top of the right hand margin, and take the cadets round the marginclockwise, explaining as you go, i.e., title, Sheet No., RF, conventional signs (dealtwith in detail below) then along the bottom edge where the scale of the map is shownin kilometres, statute miles and nautical miles. There is also the Ringed GridIntersection. A line from this point to the arrows indicating magnetic north at the top ofthe map is the direction of magnetic north. Finally along the top margin where in thecentre are the following:
a. An arrow indicating magnetic north.
5-12
PROTECT
PROTECT
b. A star indicating true north.
c. A line indicating grid north together with a statement about the gridmagnetic angle and its annual change.
Conventional Signs
0551. Explain and demonstrate: The map maker tries to represent the objects onthe ground in the clearest possible way, but he cannot exactly depict each object, anduses instead a simple symbol or conventional sign. Most conventional signs are quiteobvious. Rivers, windmills, woods, roads, railways, towns and buildings can be easilyidentified. With practice all the conventional signs will be readily interpreted. Where asymbolic form of representation is not possible the best substitute is used; a letter ‘P’for a post office or a circle for a railway station. Colours and hachures are also used asa means of showing and distinguishing detail on a map.
0552. Do not try to learn the signs parrot fashion or they will soon be forgotten.They should be learned by map reading in the field. Allow time to go through the keyto the signs in the right hand margin of the map in detail.
Measuring Distances on a Map
0553. Explain and demonstrate: To measure a straight line distance between twopoints lay the straight edge of a piece of paper against the two points and at eachpoint mark the paper with a dash. Then lay the paper along the scale line at the bot-tom of the map with the right hand dash against one of the major divisions so that theleft hand dash lies against the sub-divisions to the left of the zero mark. The total dis-tance is then the number of major divisions plus the distance to the left of the zeromark (see Fig 121).
0554. To measure the distance along a road or a river which is not straight, lay apiece of paper along the first section and mark it with a dash at the start and end ofthat section. Then pivot the paper about the second dash until it lies along the sec-ond section and repeat the process, and so on, until the last point is marked. Thetotal distance along the road is then recorded as a straight line on the piece of paperand can be read off against the scale as in paragraph 0553 above (see Fig 121).
Grid References
0555. Reiterate (from Lesson 2): To describe an exact position on a map is bothlengthy and may not be either clear or accurate unless a logical method is used. Tothis end, a map sheet is covered with a series of parallel lines which run horizontallyand vertically. These lines are known as grid lines and they form the smallest squaresall over the map. The vertical ones are numbered progressively from the west to eastand are known as ‘eastings’ whilst the horizontal ones are numbered progressively
5-13
PROTECT
PROTECT
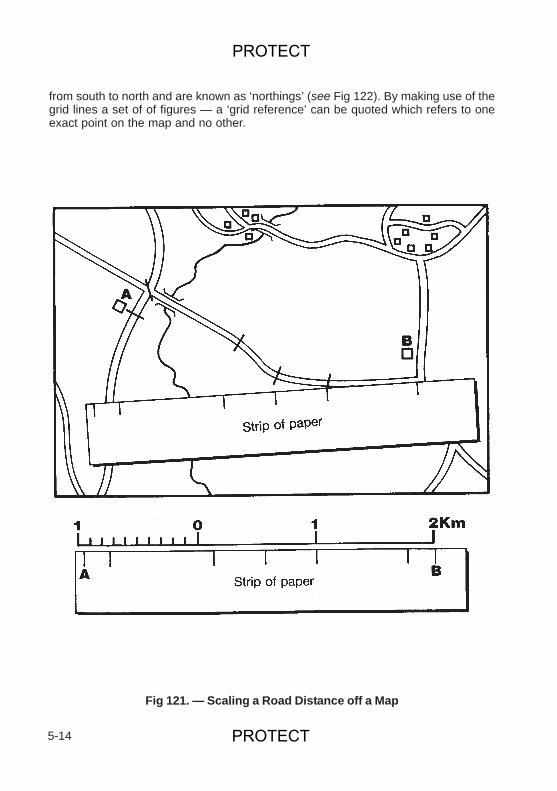
from south to north and are known as ‘northings’ (see Fig 122). By making use of thegrid lines a set of of figures — a ‘grid reference’ can be quoted which refers to oneexact point on the map and no other.
5-14
Fig 121. — Scaling a Road Distance off a Map
PROTECT
PROTECT
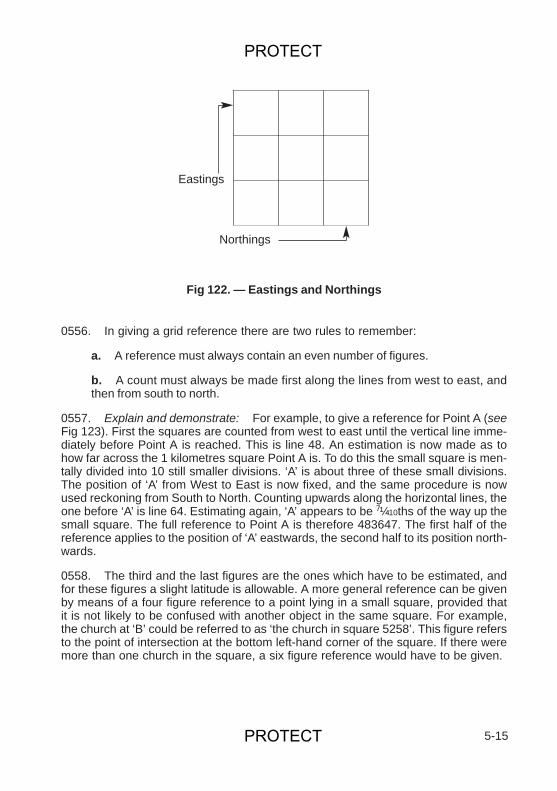
0556. In giving a grid reference there are two rules to remember:
a. A reference must always contain an even number of figures.
b. A count must always be made first along the lines from west to east, andthen from south to north.
0557. Explain and demonstrate: For example, to give a reference for Point A (seeFig 123). First the squares are counted from west to east until the vertical line imme-diately before Point A is reached. This is line 48. An estimation is now made as tohow far across the 1 kilometres square Point A is. To do this the small square is men-tally divided into 10 still smaller divisions. ‘A’ is about three of these small divisions.The position of ‘A’ from West to East is now fixed, and the same procedure is nowused reckoning from South to North. Counting upwards along the horizontal lines, theone before ‘A’ is line 64. Estimating again, ‘A’ appears to be 7¼10ths of the way up thesmall square. The full reference to Point A is therefore 483647. The first half of thereference applies to the position of ‘A’ eastwards, the second half to its position north-wards.
0558. The third and the last figures are the ones which have to be estimated, andfor these figures a slight latitude is allowable. A more general reference can be givenby means of a four figure reference to a point lying in a small square, provided thatit is not likely to be confused with another object in the same square. For example,the church at ‘B’ could be referred to as ‘the church in square 5258’. This figure refersto the point of intersection at the bottom left-hand corner of the square. If there weremore than one church in the square, a six figure reference would have to be given.
5-15
Eastings
Northings
Fig 122. — Eastings and Northings
PROTECT
PROTECT
0559. For measurement and grid reference purposes the correct positions are nor-mally as follows:
a. For double line symbols — halfway between the lines.
b. For circular or rectangular symbols — the centre.
5-16
Fig 123. — Grid References
PROTECT
PROTECT
c. For vertical symbols, e.g., lighthouse — the centre of the base.
0560. Romers may be used to measure, rather than estimate, the third and sixthfigures. A romer is described in Section 5.
Setting the Map and Position Finding Using Landmarks
0561. Setting a Map by Landmarks.
a. Draw a line on the mapbetween your present position (A)and a landmark on the map whichcan also be seen on the ground(see Fig 124).
b. Rotate the map until the pencilline points at the landmark.
c. The map is now set but not soaccurately as if a compass wereused. For greater accuracy use thismethod with two landmarks.
Fig 124. — Setting a Map by Landmarks
Position Finding Using a Map Only
0562. Provided that the scale of the map is not too small, and that a reasonableamount of detail is shown, it is generally a simple matter to pinpoint one’s position onthe map. This is done first by setting the map, and then by noting the respectivepositions of various prominent objects or natural features in the vicinity. If there is arailway nearby, for instance, it can probably be identified on the map and so give anapproximate idea of one’s position. This can be further narrowed down or fixed by thepositions of other features such as woods, road junctions, etc. The art of finding one’sposition on the map requires practice, but it should not in normal circumstances bedifficult provided that common sense and a process of elimination is applied.
5-17
PROTECT
PROTECT

Conclusion
0563. End of Lesson Drill.
a. Questions to and from the squad.
b. Sum up.
c. Look forward to the next lesson.
0564 – 0570. Reserved.
5-18
PROTECT
PROTECT
SECTION 4. — RELIEF AND VERTICAL INTERVAL
A. INSTRUCTOR’S NOTES
Aim
0571. To teach cadets how to understand the shape of the ground in terms of hillsand valleys.
Timings
0572. Three 30 minute periods.
Stores
0573. One map between two cadets.
Miscellaneous
0574. The understanding of contours, with which this section is chiefly concerned,is not easy without a training aid. A good one is the ‘Glass Mountain’. This explainscontours clearly and simply in their two dimensions and can be made by drawingcontour lines onto a piece of paper. Four or five contour lines are sufficient. Traceeach contour line onto a separate sheet of glass or some kind of perspex. Smallpieces of wood or other material should then be glued to each corner of the sheetsto show the vertical interval (height between contour lines) (see Fig 125).
Preparation
0575. Make a ‘Glass Mountain’ or other suitable aid and prepare some large scaledrawings on a blackboard to illustrate contours in plan and elevation.
Approach
0576. This is perhaps the most important section because if the cadet can masterit he can put his map to practical use in the future not only by being able to read thesigns and symbols on it denoting such things as roads, railways, rivers and woods,but also the shape of the ground — the hills and valleys, the spurs and re-entrants,the steepness or otherwise of hilly country — and to make the appropriate deduc-tions.
5-19
PROTECT
PROTECT
B. CONDUCT OF THE LESSON
Relief
0577. Explain: The term ‘Relief’ describes the rise and fall of the ground — hillsand valleys. It is difficult to show on a map which is a flat surface. Various methodsare used to show relief and the most important is the contour.
Vertical Interval
0578. Contours. Explain anddemonstrate using the ‘GlassMountain’: These are thin linesdrawn on the map, usually in red ororange colours, each one of whichjoins up points of the same height.Against these lines are written fig-ures which indicate their heights.The figures are written so that theycan be read the correct way upwhen looking up the slope. The‘Glass Mountain’ illustration showsfour contours on a piece of paper at‘A’ representing 100, 200, 300 and400 metres (see Fig 125). At ‘B’ thesame contours are shown, eachone on a separate piece of paper orperspex and separated by blocksof wood to show the vertical inter-val between them. On the 1:50,000map contour markings are to thenearest metre with a vertical inter-val of ten metres.
Fig 125. — Glass Mountain
0579. Other Methods. Other ways of showing relief are:
a. Hachures. Hachures are short disconnected lines drawn down a slope.They are short and close together on steeper slopes, longer and more spacedon gentler slopes. They are normally used to depict cuttings, embankments andsteep slopes and are shown in black.
5-20
PROTECT
PROTECT
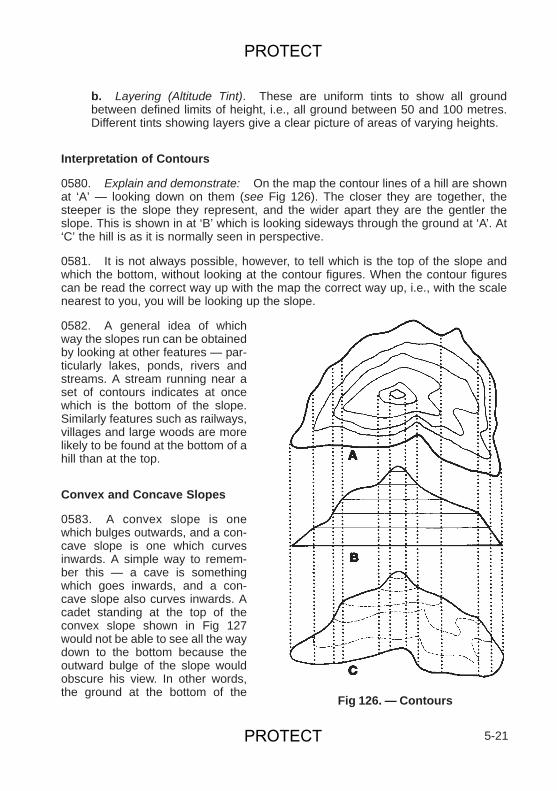
b. Layering (Altitude Tint). These are uniform tints to show all groundbetween defined limits of height, i.e., all ground between 50 and 100 metres.Different tints showing layers give a clear picture of areas of varying heights.
Interpretation of Contours
0580. Explain and demonstrate: On the map the contour lines of a hill are shownat ‘A’ — looking down on them (see Fig 126). The closer they are together, thesteeper is the slope they represent, and the wider apart they are the gentler theslope. This is shown in at ‘B’ which is looking sideways through the ground at ‘A’. At‘C’ the hill is as it is normally seen in perspective.
0581. It is not always possible, however, to tell which is the top of the slope andwhich the bottom, without looking at the contour figures. When the contour figurescan be read the correct way up with the map the correct way up, i.e., with the scalenearest to you, you will be looking up the slope.
0582. A general idea of whichway the slopes run can be obtainedby looking at other features — par-ticularly lakes, ponds, rivers andstreams. A stream running near aset of contours indicates at oncewhich is the bottom of the slope.Similarly features such as railways,villages and large woods are morelikely to be found at the bottom of ahill than at the top.
Convex and Concave Slopes
0583. A convex slope is onewhich bulges outwards, and a con-cave slope is one which curvesinwards. A simple way to remem-ber this — a cave is somethingwhich goes inwards, and a con-cave slope also curves inwards. Acadet standing at the top of theconvex slope shown in Fig 127would not be able to see all the waydown to the bottom because theoutward bulge of the slope wouldobscure his view. In other words,the ground at the bottom of the
5-21
Fig 126. — Contours
PROTECT
PROTECT
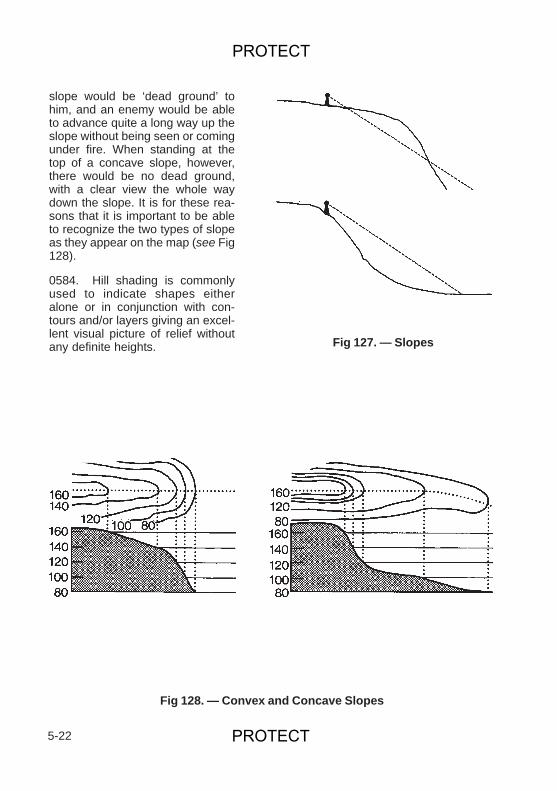
slope would be ‘dead ground’ tohim, and an enemy would be ableto advance quite a long way up theslope without being seen or comingunder fire. When standing at thetop of a concave slope, however,there would be no dead ground,with a clear view the whole waydown the slope. It is for these rea-sons that it is important to be ableto recognize the two types of slopeas they appear on the map (see Fig128).
0584. Hill shading is commonlyused to indicate shapes eitheralone or in conjunction with con-tours and/or layers giving an excel-lent visual picture of relief withoutany definite heights.
5-22
Fig 127. — Slopes
Fig 128. — Convex and Concave Slopes
PROTECT
PROTECT
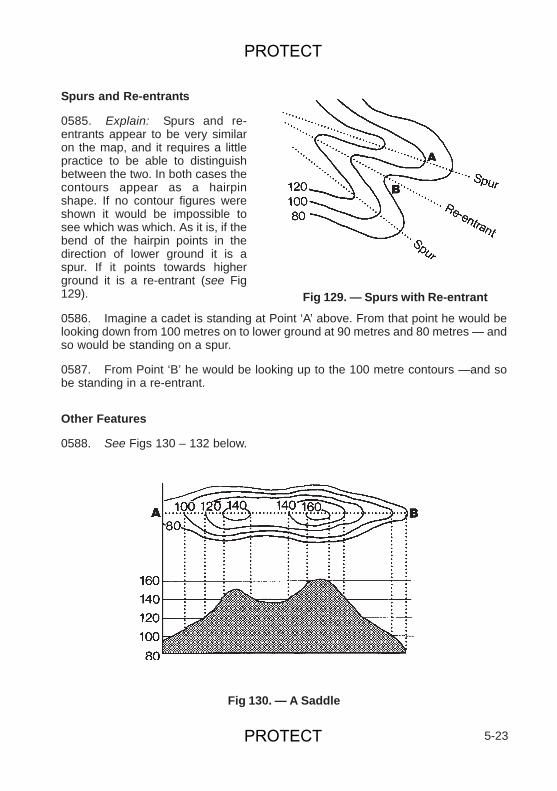
Spurs and Re-entrants
0585. Explain: Spurs and re-entrants appear to be very similaron the map, and it requires a littlepractice to be able to distinguishbetween the two. In both cases thecontours appear as a hairpinshape. If no contour figures wereshown it would be impossible tosee which was which. As it is, if thebend of the hairpin points in thedirection of lower ground it is aspur. If it points towards higherground it is a re-entrant (see Fig129).
0586. Imagine a cadet is standing at Point ‘A’ above. From that point he would belooking down from 100 metres on to lower ground at 90 metres and 80 metres — andso would be standing on a spur.
0587. From Point ‘B’ he would be looking up to the 100 metre contours —and sobe standing in a re-entrant.
Other Features
0588. See Figs 130 – 132 below.
5-23
Fig 129. — Spurs with Re-entrant
Fig 130. — A Saddle
PROTECT
PROTECT
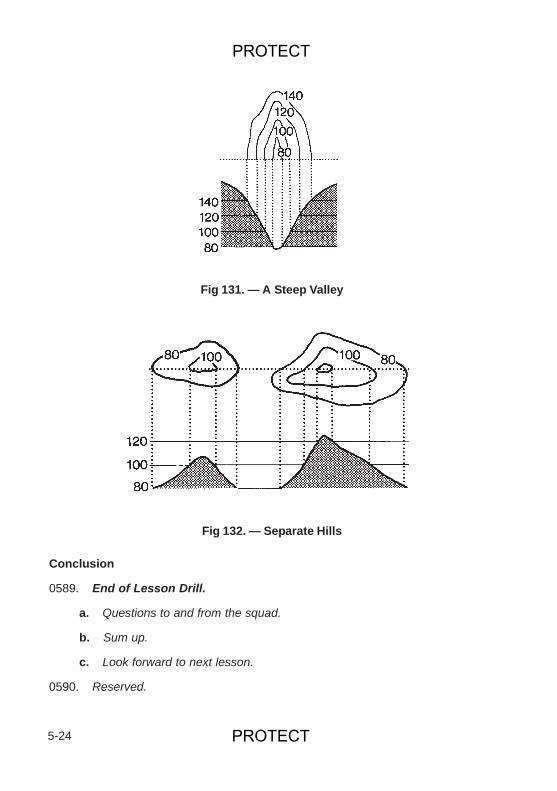
Conclusion
0589. End of Lesson Drill.
a. Questions to and from the squad.
b. Sum up.
c. Look forward to next lesson.
0590. Reserved.
5-24
Fig 131. — A Steep Valley
Fig 132. — Separate Hills
PROTECT
PROTECT
SECTION 5. — THE LIGHTWEIGHT COMPASS
A. INSTRUCTOR’S NOTES
Aim
0591. To introduce cadets to the lightweight compass, its functions and basic uses.
Timings
0592 Three 30 minute periods.
Stores
0593. One compass to each cadet.
Preparation
0594. Prepare a large scale drawing of a lightweight compass showing the com-ponent parts (see paragraphs 0597 – 05102 below, and Fig 133) clearly and of acompass rose showing the cardinal points (N, S, E, W) and principal intermediatepoints (NE, SE, SW, NW) (see Fig 134). Blackboard drawings may be used if nec-essary.
Approach
0595. To successfully navigate cross country, map and compass are complemen-tary: it is essential that cadets are fully conversant with both.
0596. The compass is the most accurate, lightweight instrument in common use fornavigation: it never lies and familiarity breeds confidence.
B. CONDUCT OF THE LESSON
Description of the Compass
0597. Explain and demonstrate: The Compass Magnetic Unmounted Lightweight,calibrated in mils and degrees, is the current official issue lightweight compass. Thetwo makes of lightweight compass in most common use in the Cadet Forces are theSuunto and the Silva compasses. The Silva is the compass illustrated in this chap-ter; the Suunto is very similar in design, but has the following differences:
5-25
PROTECT
PROTECT

a. Housing. The Suunto’s housing is raised more, and is black in colour.
b. Calibration. Whereas on the Silva compass the calibration in mils is givenon the circle at the top of the housing, on the Suunto it is within the housing butoutermost to the calibration in degrees.
c. Compass Needle. The Silva needle is red (N)/white (S), the Suunto nee-dle is red (N)/black (S).
d. Luminosity. The Suunto has a longer luminous strip on the north pointingend of the needle.
0598. The compass is mounted atone end of a transparent plasticplate about 126 x 60 mm (5 x 21¼2
inches). The short end of the plate,furthest from the compass, is bev-elled; a scale in millimetres isshown along one of the long sidesat ‘A’, and a short scale in inches onthe opposite side is shown at ‘B’.
0599. A magnifying lens is at ‘C’.
05100. Romers, which are themeans of measuring the position ofan exact point within a grid squaremore accurately than estimatingthe tenths explained in Section 2,for scales 1:25,000 1:50,000 and1:63,360, are shown at ‘D’, ‘E’ and‘F’.
05101. The compass needle at ‘G’is white at the south end and red witha luminous patch at the north end.The inner circle (‘H’) is graduated intwo degree divisions from 0°–360°and the outer circle (‘J’) in 50 mil divi-sions from 0–6400. The circles canbe rotated by hand taking with thema series of lines parallel to the0–3200 mils (0°–180°) axis of thegraduated circles (‘K’). An arrow (‘L’)made from the two central parallellines always points to 0 on the cir-cles. It is referred to as the NorthArrow.
5-26
Fig 133. — The Silva Compass
PROTECT
PROTECT
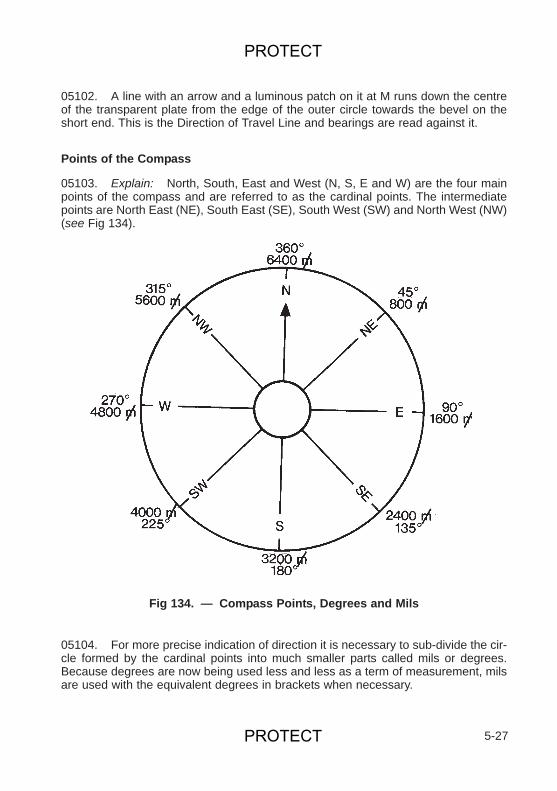
05102. A line with an arrow and a luminous patch on it at M runs down the centreof the transparent plate from the edge of the outer circle towards the bevel on theshort end. This is the Direction of Travel Line and bearings are read against it.
Points of the Compass
05103. Explain: North, South, East and West (N, S, E and W) are the four mainpoints of the compass and are referred to as the cardinal points. The intermediatepoints are North East (NE), South East (SE), South West (SW) and North West (NW)(see Fig 134).
05104. For more precise indication of direction it is necessary to sub-divide the cir-cle formed by the cardinal points into much smaller parts called mils or degrees.Because degrees are now being used less and less as a term of measurement, milsare used with the equivalent degrees in brackets when necessary.
5-27
Fig 134. — Compass Points, Degrees and Mils
PROTECT
PROTECT

The Mil System
05105. Explain: The standard military system is to divide the circle of the com-pass into 6400 mils (360°), the zero being at the North Point. The four quadrants ofthe circle are each 1600 mils (90°), so the East, South and West points are at 1600mils (90°), 3200 mils (180°) and 4800 mils (270°) respectively.
a. If it should be necessary to convert from mils to degrees or vice versa, thefollowing is a conversion table:
1° = 17.8 mils (18 mils approximately)1' = 0.3 mils 1 mil = 3.4'
b. The sign for a degree is ° (360° in a circle), a minute is ' (60 minutes in adegree) and a mil is m.
North Points
05106. Explain: There are three North points:
a. True North — The actual direction of the geographical North Pole.
b. Grid North — The direction of the vertical grid lines on a map. Forall practical purposes True and Grid North are thesame.
c. Magnetic North — The direction towards which the compass needlepoints which is the Magnetic North Pole.
05107. Angles Between North Points. Explain and demonstrate: The termsused in compass work are (see Fig 135).
a. Grid Magnetic Angle. This is the new name for what used to be calledMagnetic Variation. It is still the angle between Grid North and Magnetic Northand it depends on two factors:
(1) Time. As the position of the Magnetic North Pole moves slightlyeastwards, so the Grid Magnetic Angle changes. This is called the AnnualMagnetic Change and must be taken into account when converting mag-netic bearings to Grid bearings and vice versa.
(2) Place. The Grid Magnetic Angle also varies from one part of thecountry to another.
These two factors are included in the margin information on the map.
5-28
/
PROTECT
PROTECT
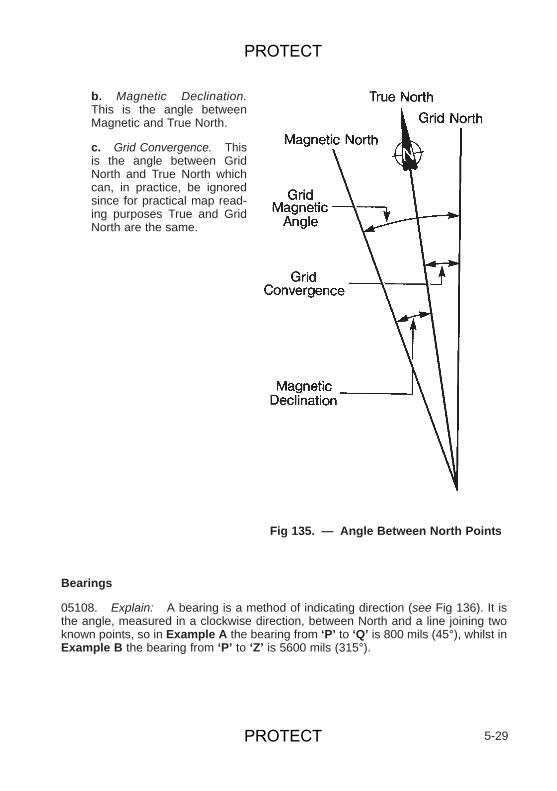
b. Magnetic Declination.This is the angle betweenMagnetic and True North.
c. Grid Convergence. Thisis the angle between GridNorth and True North whichcan, in practice, be ignoredsince for practical map read-ing purposes True and GridNorth are the same.
Bearings
05108. Explain: A bearing is a method of indicating direction (see Fig 136). It isthe angle, measured in a clockwise direction, between North and a line joining twoknown points, so in Example A the bearing from ‘P’ to ‘Q’ is 800 mils (45°), whilst inExample B the bearing from ‘P’ to ‘Z’ is 5600 mils (315°).
5-29
Fig 135. — Angle Between North Points
PROTECT
PROTECT
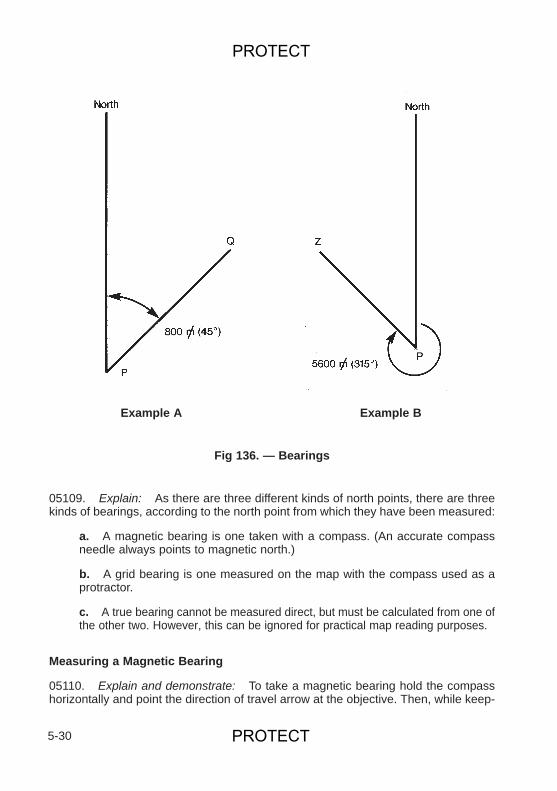
05109. Explain: As there are three different kinds of north points, there are threekinds of bearings, according to the north point from which they have been measured:
a. A magnetic bearing is one taken with a compass. (An accurate compassneedle always points to magnetic north.)
b. A grid bearing is one measured on the map with the compass used as aprotractor.
c. A true bearing cannot be measured direct, but must be calculated from one ofthe other two. However, this can be ignored for practical map reading purposes.
Measuring a Magnetic Bearing
05110. Explain and demonstrate: To take a magnetic bearing hold the compasshorizontally and point the direction of travel arrow at the objective. Then, while keep-
5-30
Example A Example B
Fig 136. — Bearings
PROTECT
PROTECT
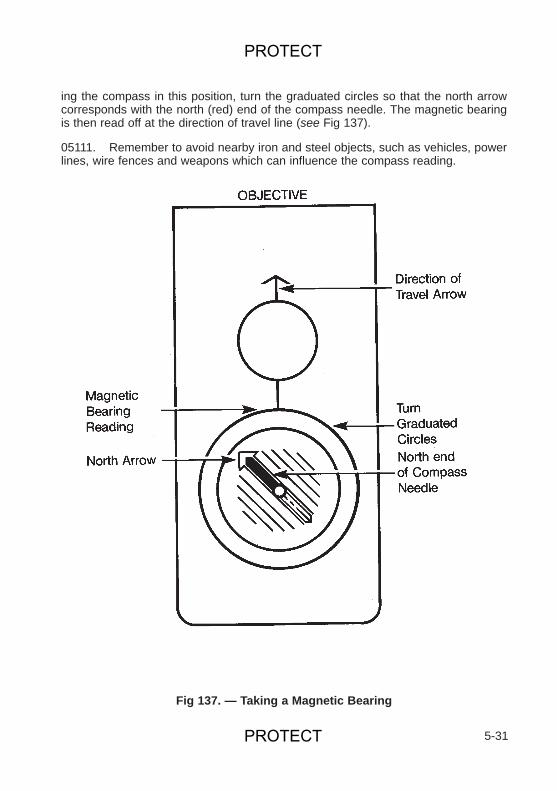
ing the compass in this position, turn the graduated circles so that the north arrowcorresponds with the north (red) end of the compass needle. The magnetic bearingis then read off at the direction of travel line (see Fig 137).
05111. Remember to avoid nearby iron and steel objects, such as vehicles, powerlines, wire fences and weapons which can influence the compass reading.
5-31
Fig 137. — Taking a Magnetic Bearing
PROTECT
PROTECT

Conclusion
05112. End of Lesson Drill.
a. Questions to from the squad.
b. Sum up.
c. Look forward to next lesson.
05113 – 05120. Reserved.
5-32
PROTECT
PROTECT
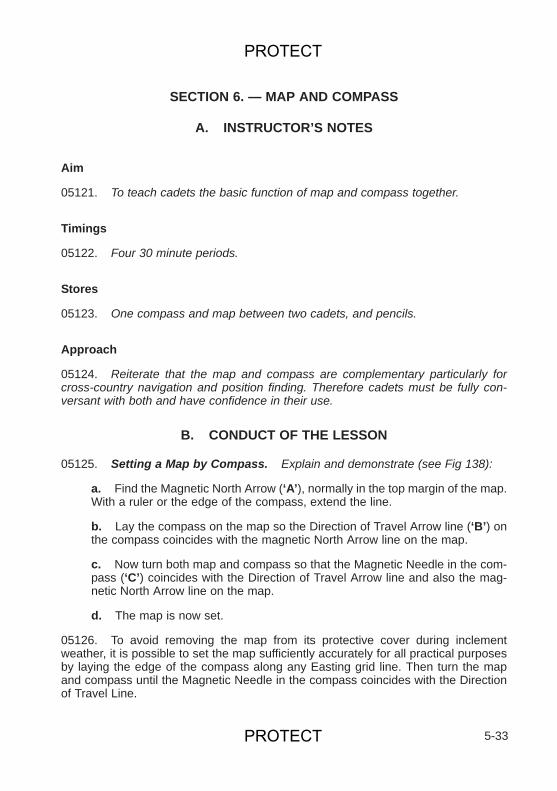
SECTION 6. — MAP AND COMPASS
A. INSTRUCTOR’S NOTES
Aim
05121. To teach cadets the basic function of map and compass together.
Timings
05122. Four 30 minute periods.
Stores
05123. One compass and map between two cadets, and pencils.
Approach
05124. Reiterate that the map and compass are complementary particularly forcross-country navigation and position finding. Therefore cadets must be fully con-versant with both and have confidence in their use.
B. CONDUCT OF THE LESSON
05125. Setting a Map by Compass. Explain and demonstrate (see Fig 138):
a. Find the Magnetic North Arrow (‘A’), normally in the top margin of the map.With a ruler or the edge of the compass, extend the line.
b. Lay the compass on the map so the Direction of Travel Arrow line (‘B’) onthe compass coincides with the magnetic North Arrow line on the map.
c. Now turn both map and compass so that the Magnetic Needle in the com-pass (‘C’) coincides with the Direction of Travel Arrow line and also the mag-netic North Arrow line on the map.
d. The map is now set.
05126. To avoid removing the map from its protective cover during inclementweather, it is possible to set the map sufficiently accurately for all practical purposesby laying the edge of the compass along any Easting grid line. Then turn the mapand compass until the Magnetic Needle in the compass coincides with the Directionof Travel Line.
5-33
PROTECT
PROTECT
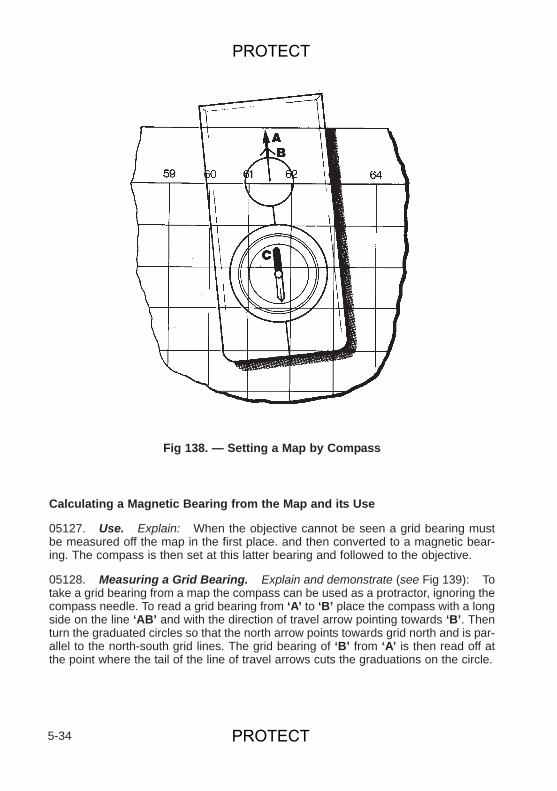
Calculating a Magnetic Bearing from the Map and its Use
05127. Use. Explain: When the objective cannot be seen a grid bearing mustbe measured off the map in the first place. and then converted to a magnetic bear-ing. The compass is then set at this latter bearing and followed to the objective.
05128. Measuring a Grid Bearing. Explain and demonstrate (see Fig 139): Totake a grid bearing from a map the compass can be used as a protractor, ignoring thecompass needle. To read a grid bearing from ‘A’ to ‘B’ place the compass with a longside on the line ‘AB’ and with the direction of travel arrow pointing towards ‘B’. Thenturn the graduated circles so that the north arrow points towards grid north and is par-allel to the north-south grid lines. The grid bearing of ‘B’ from ‘A’ is then read off atthe point where the tail of the line of travel arrows cuts the graduations on the circle.
5-34
Fig 138. — Setting a Map by Compass
PROTECT
PROTECT
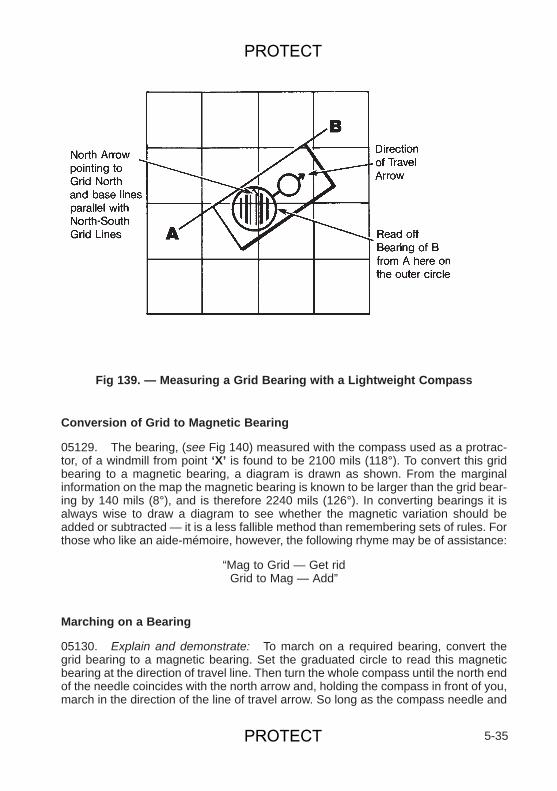
Conversion of Grid to Magnetic Bearing
05129. The bearing, (see Fig 140) measured with the compass used as a protrac-tor, of a windmill from point ‘X’ is found to be 2100 mils (118°). To convert this gridbearing to a magnetic bearing, a diagram is drawn as shown. From the marginalinformation on the map the magnetic bearing is known to be larger than the grid bear-ing by 140 mils (8°), and is therefore 2240 mils (126°). In converting bearings it isalways wise to draw a diagram to see whether the magnetic variation should beadded or subtracted — it is a less fallible method than remembering sets of rules. Forthose who like an aide-mémoire, however, the following rhyme may be of assistance:
“Mag to Grid — Get ridGrid to Mag — Add”
Marching on a Bearing
05130. Explain and demonstrate: To march on a required bearing, convert thegrid bearing to a magnetic bearing. Set the graduated circle to read this magneticbearing at the direction of travel line. Then turn the whole compass until the north endof the needle coincides with the north arrow and, holding the compass in front of you,march in the direction of the line of travel arrow. So long as the compass needle and
5-35
Fig 139. — Measuring a Grid Bearing with a Lightweight Compass
PROTECT
PROTECT
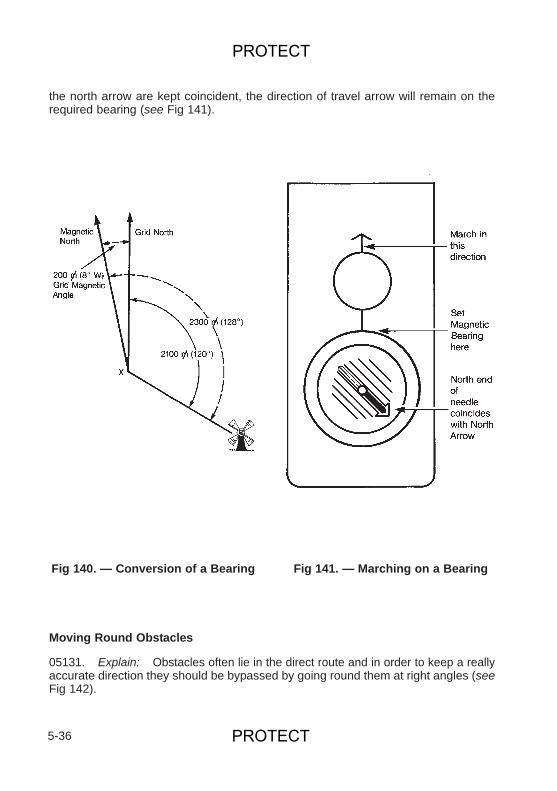
the north arrow are kept coincident, the direction of travel arrow will remain on therequired bearing (see Fig 141).
Moving Round Obstacles
05131. Explain: Obstacles often lie in the direct route and in order to keep a reallyaccurate direction they should be bypassed by going round them at right angles (seeFig 142).
5-36
Fig 140. — Conversion of a Bearing Fig 141. — Marching on a Bearing
PROTECT
PROTECT
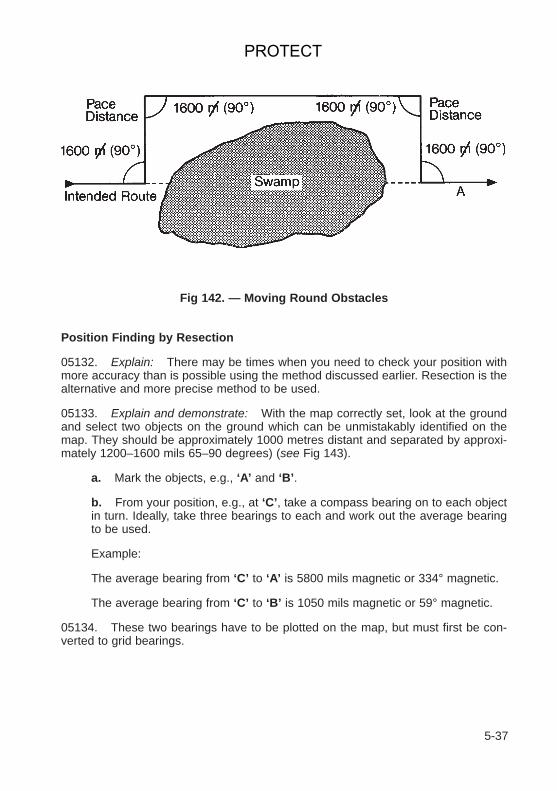
Position Finding by Resection
05132. Explain: There may be times when you need to check your position withmore accuracy than is possible using the method discussed earlier. Resection is thealternative and more precise method to be used.
05133. Explain and demonstrate: With the map correctly set, look at the groundand select two objects on the ground which can be unmistakably identified on themap. They should be approximately 1000 metres distant and separated by approxi-mately 1200–1600 mils 65–90 degrees) (see Fig 143).
a. Mark the objects, e.g., ‘A’ and ‘B’.
b. From your position, e.g., at ‘C’, take a compass bearing on to each objectin turn. Ideally, take three bearings to each and work out the average bearingto be used.
Example:
The average bearing from ‘C’ to ‘A’ is 5800 mils magnetic or 334° magnetic.
The average bearing from ‘C’ to ‘B’ is 1050 mils magnetic or 59° magnetic.
05134. These two bearings have to be plotted on the map, but must first be con-verted to grid bearings.
5-37
Fig 142. — Moving Round Obstacles
PROTECT
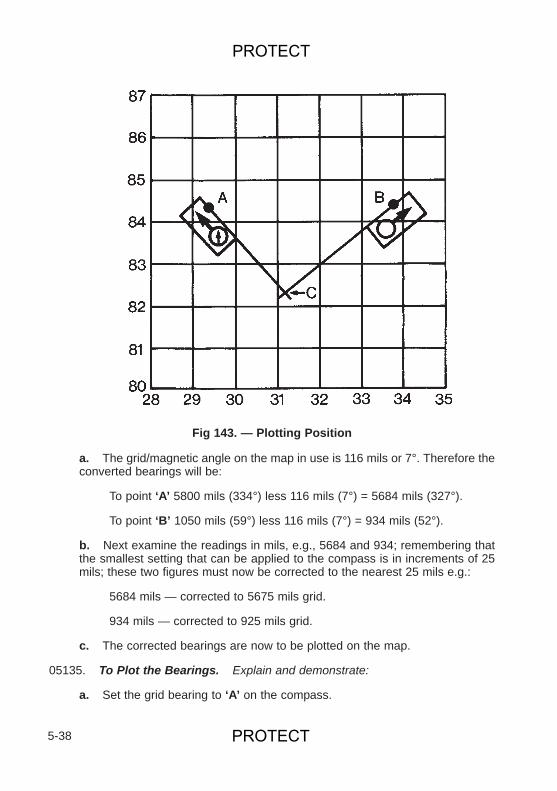
a. The grid/magnetic angle on the map in use is 116 mils or 7°. Therefore theconverted bearings will be:
To point ‘A’ 5800 mils (334°) less 116 mils (7°) = 5684 mils (327°).
To point ‘B’ 1050 mils (59°) less 116 mils (7°) = 934 mils (52°).
b. Next examine the readings in mils, e.g., 5684 and 934; remembering thatthe smallest setting that can be applied to the compass is in increments of 25mils; these two figures must now be corrected to the nearest 25 mils e.g.:
5684 mils — corrected to 5675 mils grid.
934 mils — corrected to 925 mils grid.
c. The corrected bearings are now to be plotted on the map.
05135. To Plot the Bearings. Explain and demonstrate:
a. Set the grid bearing to ‘A’ on the compass.
5-38
Fig 143. — Plotting Position
PROTECT
PROTECT
b. With a fine pencil point put the pencil on ‘A’ and hold it vertically; place along edge of the compass against the pencil with the direction of travel arrowpointed in the general direction of ‘A’ (see diagram), with the North arrow point-ing approximately towards the top of the map.
c. Without moving the dial, pivot the compass about the pencil point until theNorth arrow points precisely towards the top of the map with its sides or anyone of the lines on either side of it parallel to the nearest grid line.
d. Hold the compass firmly and lightly draw a line along the long side.
e. Set the grid bearing to ‘B’ on the compass and repeat the procedure frompoint ‘B’.
f. Where the lines from ‘A’ and ‘B’ meet, is your position at ‘C’. Take the gridreference.
Conclusion
05136. End of Lesson Drill.
a. Confirm by questions and another problem if time permits.
b. Sum up.
c. Look forward to map reading exercises.
05137 – 05140. Reserved.
5-39
PROTECT

5-40
PROTECT
PROTECT
SECTION 7. — BASIC NIGHT NAVIGATION
A. INSTRUCTOR’S NOTES
Aim
05141. To teach cadets to set a compass for night marching and to find north bythe Pole Star method.
Timings
05142. Two 30 minute periods.
Stores
05143. One compass between two cadets.
Miscellaneous
05144. The first part of this lesson should be taken in the classroom followed by apractical period after dark on a clear night.
Preparation
05145. The following preparations should be carried out:
a. Set out a number of short legs to practise marching by compass at night.
b. Make a chalkboard drawing or ‘drop’ of the Great Bear and Pole Star (seeFig 144).
c. Study the sky beforehand and make sure that you can not only pick out thePole Star but that you can indicate it to the cadets.
B. CONDUCT OF THE LESSON
Introduction
05146. Explain:
5-41
PROTECT
a. The importance of being able to march with confidence on a compassbearing at night as a lot of movement in the military environment is done undercover of darkness.
b. On occasions when a compass is not available you must be able to findthe direction of north (and therefore the other cardinal points).
Setting a Compass for Night Marching
05147. Explain and demonstrate: The method is the same as that explained ear-lier, that is to take a magnetic bearing by daylight, or a grid bearing from the map,and convert it to a magnetic bearing. Now set the graduated circle to the appropriatebearing at the Line of Travel and turn the whole compass until the north end of thecompass needle coincides with the letter N. Hold the compass in front of you andmarch in the direction of the Line of Travel Arrow. So long as the needle and theNorth Arrow coincide the Direction of Travel Arrow will remain on the required bear-ing.
05148. Practise this in daylight so as to gain confidence in the skill before doing itafter dark.
Pole Star Method
05149. Explain, using the drawing: In the northern hemisphere the North Star(Polaris) indicates the position of True North to within 2°. It is a bright star and canbe found by producing a line from the two end stars, or ‘pointers’ of the Plough orGreat Bear. The North Star will be found slightly off this line on the side furthest fromthe remaining stars of the Great Bear and at about five times the distance betweenthe two pointers (see Fig 144).
Conclusion
05150. End of Lesson Drill.
a. Questions to and from the squad.
b. Sum up.
c. Look forward to next lesson.
5-42
PROTECT
PROTECT
5-43
Fig 144. — Finding North from the Pole Star
PROTECT
PROTECT

5-44
PROTECT
PROTECT
SECTION 8. — PREPARATION OF A ROUTE CARD
A. INSTRUCTOR’S NOTES
Aim
05151. To teach cadets how to prepare a route card and use it.
Timings
05152. Two 30 minute periods.
Stores
05153. One map and one compass between two cadets.
Miscellaneous
05154. Ensure that cadets have pencils and paper.
Preparation
05155. Draw a large scale route card on the chalkboard or prepare a drop fordemonstration purposes.
Approach
05156. Explain: The construction of a route card is not only a necessity for patroltraining and adventurous training but, at the same time, is a method of putting intopractice the measurement of distances and bearings which have already beentaught.
B. CONDUCT OF THE LESSON
Preparation of a Route Card
05157. The purpose of a route card is to assist in navigation when moving acrosscountry. A route card should be used for map reading exercises, patrol exercises andAdventurous Training expeditions, and a copy should always be given to the adult incharge so that he knows the route selected by cadets if he is not moving with them.
05158. Routes must be divided into ‘legs’. A ‘leg’ is a route between two landmarkseasily identifiable on the map and ground.
5-45
PROTECT
PROTECT
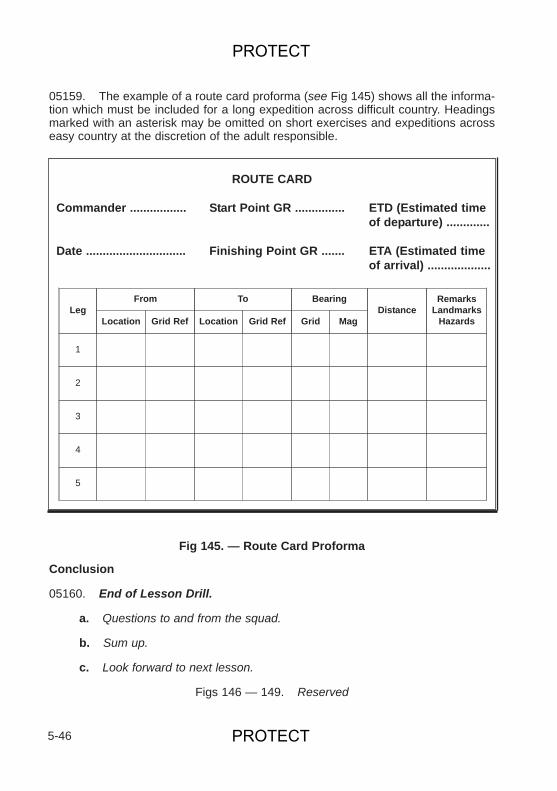
05159. The example of a route card proforma (see Fig 145) shows all the informa-tion which must be included for a long expedition across difficult country. Headingsmarked with an asterisk may be omitted on short exercises and expeditions acrosseasy country at the discretion of the adult responsible.
Conclusion
05160. End of Lesson Drill.
a. Questions to and from the squad.
b. Sum up.
c. Look forward to next lesson.
Figs 146 — 149. Reserved
5-46
ROUTE CARD
Commander ................. Start Point GR ............... ETD (Estimated timeof departure) .............
Date .............................. Finishing Point GR ....... ETA (Estimated timeof arrival) ...................
LegFrom To Bearing
DistanceRemarks
LandmarksHazardsLocation Grid Ref Location Grid Ref Grid Mag
1
2
3
4
5
Fig 145. — Route Card Proforma
PROTECT
PROTECT
Chapter 6
FIELDCRAFT
SECTION 1. — INTRODUCTION
General
0601. Fieldcraft is the name given to the skill which enables a cadet to carry out avariety of military activities with maximum efficiency whilst moving across country byday and by night. The standard which a cadet achieves must partly depend on hisability in Skill at Arms and Use of Map and Compass.
0602. In order to achieve the aim of training as stated in the syllabus it is neces-sary to study and practise basic military tactics only at section level and no higher.For this reason and because of the limited time available for training, the contents ofthis chapter include only section drills for the attack and patrol’s roles. Defence andwithdrawal are omitted. However Volume II Chapter 5 covers ‘Platoon Battle Drills’and ‘The Platoon in Defence’.
0603. Section 21 — The Organization of the Section and Its Place in the Battalion,is included to give cadets a glimpse of the “whole” whilst studying the details of sec-tion training.
0604. The dress for Fieldcraft lessons will always be uniform with web equipmentfor those done outside and usually for those done inside except when they are of aclassroom nature, i.e., such lessons as Section 8. — Introduction to Night Work.
Organization of Instruction
0605. Instructors are allowed latitude in the method they adopt to teach the variouslessons provided they do not deviate from the facts and drills laid down. Fieldcraft,properly presented is an interesting subject and presents a challenge to the cadet.
0606. Fieldcraft is best taught by means of demonstrations, including films, explain-ing to the cadets what they are seeing and then confirming by practice as soon aspossible.
0607. Demonstrations must be carefully prepared and rehearsed whether they areon a big scale, or just the instructor showing his squad how to crawl. Poor demon-strations are of little value.
0608. Practice periods can be repeated according to progress made.
0609. Fieldcraft does not lend itself to strict 30 minute periods. Some lessons andpractices need far longer and others are best combined into a day and night exercise.
6-1
PROTECT
PROTECT

Safety Precautions
0610. Before every lesson, all weapons, magazines, drill cartridges, spare partswallets, containers and cadets’ pouches must be inspected to ensure that no liveammunition is present.
0611. Reserved.
6-2
PROTECT
PROTECT
SECTION 2. — PERSONAL CAMOUFLAGE AND CONCEALMENT
A. INSTRUCTOR’S NOTES
Aim0612. To demonstrate and practise personal camouflage and concealment.
Timings0613. One 30 minute period.
Method0614. A basic instructional outdoor period.
Stores0615.
RiflesCamouflage cream or burnt corkImprovised camouflage materials such as sacking,
foliage and grassSignal flagWhistle
Preparation0616. a. Group several squads together for the demonstration, and use cadet
NCOs as demonstrators.
b. Choose ground with all types of cover on it — hedgerows, walls, bushes,folds, banks etc.
c. The demonstration, which must be rehearsed beforehand, should bearranged to illustrate situations such as those shown in the pictures in thisSection. The wrong and the right way should be shown and cadets should bemade to search the area to discover them.
d. It is possible to demonstrate and practise personal camouflage indoorsbut not the rest of the lesson.
B. CONDUCT OF THE LESSON
Preliminaries
0617. Safety Precautions.
6-3
PROTECT
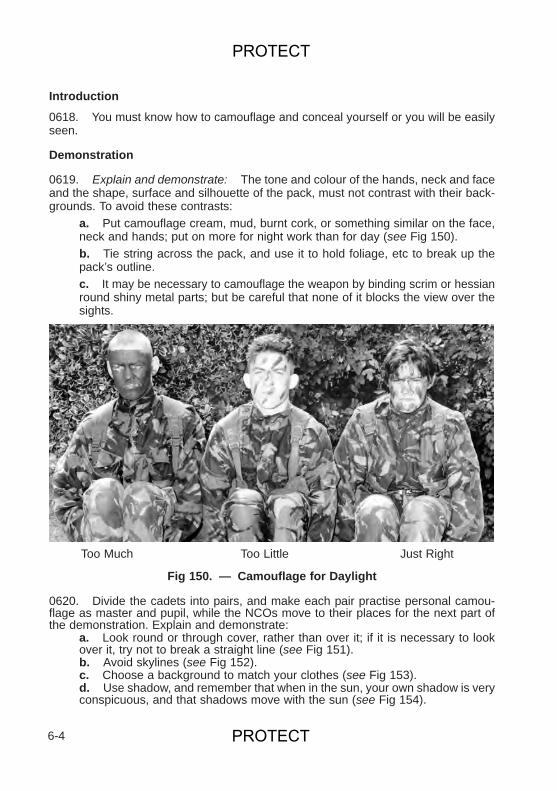
Introduction0618. You must know how to camouflage and conceal yourself or you will be easilyseen.
Demonstration
0619. Explain and demonstrate: The tone and colour of the hands, neck and faceand the shape, surface and silhouette of the pack, must not contrast with their back-grounds. To avoid these contrasts:
a. Put camouflage cream, mud, burnt cork, or something similar on the face,neck and hands; put on more for night work than for day (see Fig 150).b. Tie string across the pack, and use it to hold foliage, etc to break up thepack’s outline.c. It may be necessary to camouflage the weapon by binding scrim or hessianround shiny metal parts; but be careful that none of it blocks the view over thesights.
Too Much Too Little Just Right
0620. Divide the cadets into pairs, and make each pair practise personal camou-flage as master and pupil, while the NCOs move to their places for the next part ofthe demonstration. Explain and demonstrate:
a. Look round or through cover, rather than over it; if it is necessary to lookover it, try not to break a straight line (see Fig 151).b. Avoid skylines (see Fig 152).c. Choose a background to match your clothes (see Fig 153).d. Use shadow, and remember that when in the sun, your own shadow is veryconspicuous, and that shadows move with the sun (see Fig 154).
6-4
Fig 150. — Camouflage for Daylight
PROTECT
PROTECT
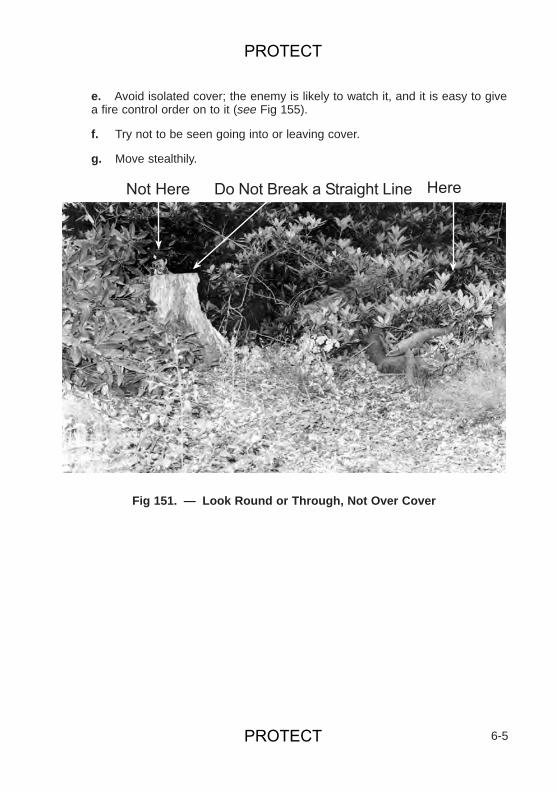
e. Avoid isolated cover; the enemy is likely to watch it, and it is easy to givea fire control order on to it (see Fig 155).
f. Try not to be seen going into or leaving cover.
g. Move stealthily.
6-5
Fig 151. — Look Round or Through, Not Over Cover
�������� ������������������� ����� ��
PROTECT
PROTECT

6-6
������������
��������
����
Fig 152. — Avoid a Skyline
Fig 153. — Choose a Suitable Background
PROTECT
PROTECT
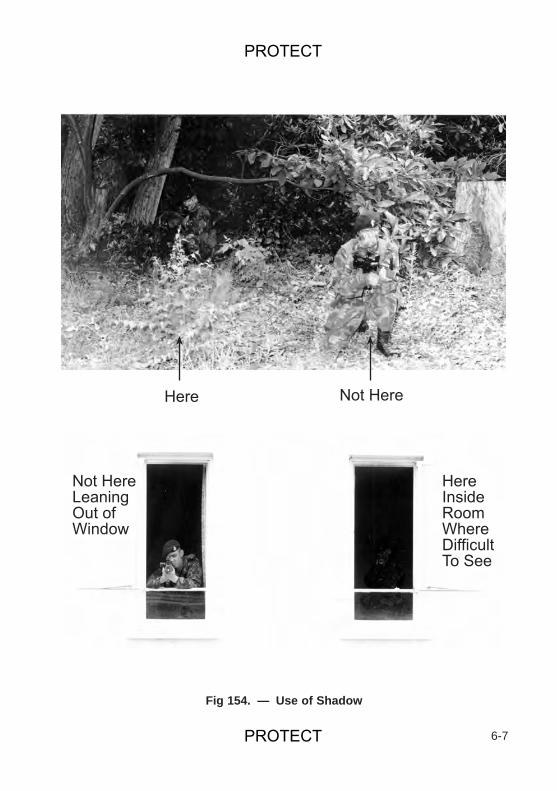
6-7
Fig 154. — Use of Shadow
������������
������� ������������ �� ����������
����������� ��������� ����
PROTECT
PROTECT
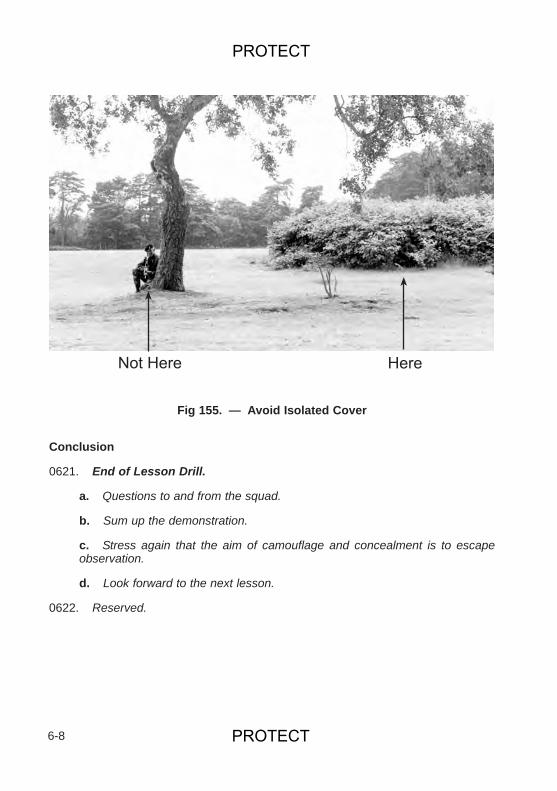
Conclusion
0621. End of Lesson Drill.
a. Questions to and from the squad.
b. Sum up the demonstration.
c. Stress again that the aim of camouflage and concealment is to escapeobservation.
d. Look forward to the next lesson.
0622. Reserved.
6-8
�������� ����
Fig 155. — Avoid Isolated Cover
PROTECT
PROTECT

SECTION 3. — PERSONAL CAMOUFLAGE AND CONCEALMENT —PRACTICE
A. INSTRUCTOR’S NOTES
Aim
0623. To practise personal camouflage and concealment.
Timings
0624. One 30 minute period.
Stores
0625.
Camouflage equipmentPointer staffRifles Rifle rests
Miscellaneous
0626. Choose a piece of ground with all sorts of cover on it.
B. CONDUCT OF THE LESSONPreliminaries
0627. Safety Precautions.
Approach
0628. This is a period to practise camouflage, concealment and observation.
Practice
0629. Tell the cadets to camouflage themselves working in pairs.
0630. Divide the cadets into two teams; give the first team five minutes to concealthemselves in positions from which they can observe the second team; give them apiece of ground to work in, and tell them that their position must be between 50 and100 metres away.
6-9
PROTECT
PROTECT
0631. At the end of five minutes, get the second team to search the ground wherethe first team is concealed. When one of them spots a cadet of the first team, heshould tell you and his teammates, and say what it was that gave him away.
0632. If any members of the first team are not spotted after a reasonable time, sig-nal them to move about until they are.
0633. Collect all the cadets together, discuss results, and repeat the practice withthe teams changed around, and on different ground.
Conclusion
0634. End of Lesson Drill.
a. Questions to and from the squad.
b. Sum up.
c. Look forward to the next lesson.
0635. Reserved.
6-10
PROTECT
PROTECT
SECTION 4. — MOVING WITH AND WITHOUT RIFLE
A. INSTRUCTOR’S NOTES
Aim
0636. To teach cadets how to move with and without rifles.
Timings
0637. One 30 minute period.
Stores
0638.
Rifles
Miscellaneous
0639. A stretch of hard road is needed for the cadets to practise walking on silently.
B. CONDUCT OF THE LESSON
Preliminaries
0640. Safety Precautions.
Introduction
0641. It is necessary to know the best way to move making maximum use of coverso that it is possible to get close to your objective without being detected. Select themost suitable method of movement according to the type of cover encountered.
Methods of Movement
0642. Explain and demonstrate each method: Divide the cadets into pairs, andmake them practise the method that they have just seen as master and pupil, firstwithout equipment and later, if time permits, wearing equipment.
0643. The Monkey Run (see Fig 156).a. It is simply crawling on hands and knees.b. It is useful behind cover about 600 mm (2 feet) high.c. It is possible to go quite fast but only at the risk of noise.d. To be quiet, always choose a place where there are no twigs to crack. Put thehands on the ground and then the knees exactly where the hands have been.
6-11
PROTECT
PROTECT
e. Keep the backside and head down, but observe.
f. With a rifle, hold it at the point of balance with one hand and see that nodirt gets into the muzzle.
6-12
Fig 156. — The Monkey Run, With and Without a Rifle
PROTECT
PROTECT
6-13
Fig 157. — The Leopard Crawl, With and Without a Rifle
PROTECT
PROTECT
0644. The Leopard Crawl (see Fig 157).
a. It is crawling on elbows and the inside of the knees.
b. It is useful behind very low cover.
c. Propel yourself along by alternative elbows and knees, and roll the body alittle as you bend each knee; or let one leg trail behind, and use only one knee.Keep the heels, head, body and elbows down, but observe.
d. With a rifle, hold it with the right hand on the pistol grip and the left handon the hand guard.
0645. The Roll (see Fig 158).
a. It is often the quickest way of getting away from a spot, such as a crest line,when seen by the enemy.
b. Roll with the arms and the rifle, close in to the side.
6-14
Fig 158. — The Roll, With and Without a Rifle
PROTECT
PROTECT
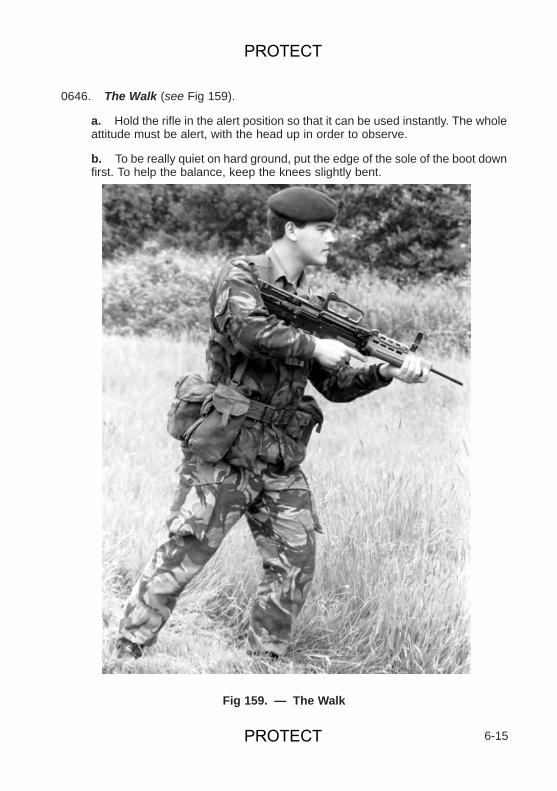
0646. The Walk (see Fig 159).
a. Hold the rifle in the alert position so that it can be used instantly. The wholeattitude must be alert, with the head up in order to observe.
b. To be really quiet on hard ground, put the edge of the sole of the boot downfirst. To help the balance, keep the knees slightly bent.
6-15
Fig 159. — The Walk
PROTECT
PROTECT

Conclusion
0647. End of Lesson Drill.
a. Questions to and from the squad.
b. Sum up.
c. Look forward to the next lesson.
0648. Reserved.
6-16
PROTECT
PROTECT
SECTION 5. — MOVEMENT AND OBSERVATION — PRACTICE
A. INSTRUCTOR’S NOTES
Aim
0649. To give practice in movement and observation.
Timings
0650. Four 30 minute periods.
Stores
0651.
RiflesFlagsCamouflage materialsRifle rests
Miscellaneous
0652. a. The practice can be run as a competition.
b. Choose a course about 50 metres long, and divide it into four equal sec-tions; mark the end of each section with a flag. The course should entail crawl-ing on hands and knees, and on elbows and knees, and crossing a small gap.A skilful, agile cadet should be able to complete it in ten minutes without beingseen.
B. CONDUCT OF THE LESSON
Preliminaries
0653. Safety precautions and personal camouflage.
Approach
0654. The aim of this period is to give realistic practice at moving and observing.
Explanation of the Practice
0655. Paint a simple tactical picture and point out the route and the flags, and thata NCO is observing from the last flag.
6-17
PROTECT
PROTECT

0656. Explain the marking, how the competition will work, and the time limit.
0657. Start the cadets off one by one at intervals. If a cadet is seen, tell him why,and let him try again. Cadets who succeed should stay near the last flag and observe.
Conclusion
0658. End of Lesson Drill.
a. Tell the cadets who won.
b. Questions to and from the squad.
c. Sum up.
d. Look forward to the next lesson.
0659. Reserved.
6-18
PROTECT
PROTECT
SECTION 6. — ELEMENTARY OBSTACLE CROSSING
A. INSTRUCTOR’S NOTES
Aim
0660. To teach cadets how to get over obstacles.
Timings
0661. One 30 minute period.
Stores
0662.
RiflesWire cutters or pliersHessianWood
Miscellaneous
0663. Choose a piece of ground which has as many of the obstacles at paragraphs0667 – 0670 below as possible. If this is not possible use initiative to make up some-thing similar.
B. CONDUCT OF THE LESSON
Preliminaries
0664. Safety Precautions.
Approach
0665. It may be necessary to cross obstacles when moving across country.Providing the cadet has been trained and practised in this skill and he works as amember of a team this will present no great problem.
How to Cross Obstacles
0666. Move from obstacle to obstacle, explaining and demonstrating at each; thenmake the cadets try for themselves.
6-19
PROTECT
PROTECT
0667. Wire.
a. Crawl under it if possible.
b. It may be possible for someone to lie on the wire and flatten it down a bit,and for the others to climb over his body.
c. To cut wire, get someone to hold it on both sides of the cutter, to prevent itflying apart, making a noise and possibly hitting the face.
0668. Gates and Wooden Fences. The best way is to crawl under them; thenext best thing is to vault over them.
0669. Walls. Help one another up and roll across the top, keeping flat. Be care-ful of weapons; do not drop them over the wall.
0670. Ditches, Streams, Hedges and Gaps. These are likely to be covered byfire; cross them as fast as possible.
0671. Give the cadets practice over the whole course. They should work on theirown, or in teams of two or more, according to the obstacle. See that they get into firepositions and observe when they have crossed an obstacle.
Conclusion
0672. End of Lesson Drill.
a. Questions to and from the squad.
b. Sum up what the cadets have achieved.
c. Look forward to the next lesson.
0673. Reserved.
6-20
PROTECT
PROTECT
SECTION 7. — CROSSING OBSTACLES — PRACTICE
A. INSTRUCTOR’S NOTES
Aim
0674. To practise teamwork over obstacles.
Timings
0675. Four 30 minute periods.
Stores
0676.
RiflesCamouflage materials and those for Section 6 above
Miscellaneous
0677. a. This practice is not the same as an assault course.
b. Prepare a course with various types of obstacles on it.
B. CONDUCT OF THE LESSON
Preliminaries
0678. Safety precautions and personal camouflage.
Approach
0679. Obstacles will not be crossed without confidence and determination.Constant practice gives confidence.
Practice
0680. Practise the cadets either in:
a. Groups.
b. Sections, teams or patrols.
c. Competitions, which should be non-tactical, and judge results by speedand care of arms.
6-21
PROTECT
PROTECT
Conclusion
0681. End of Lesson Drill. Sum up what has been achieved.
0682. Reserved.
6-22
PROTECT
PROTECT
SECTION 8. — INTRODUCTION TO NIGHT WORK
A. INSTRUCTOR’S NOTES
Aim
0683. To provide a basic introduction to night work by teaching the facts of nightvision.
Timings
0684. Two 30 minute periods.
Method
0685. A basic instructional period to be taught in a room with a total blackout facil-ity, with normal lighting replaced by red light bulbs of 60 watts or less.
Stores
0686. This lesson is taught in a darkroom equipped with a panorama box. At theback of the box there is a 6-watt bulb, connected in series to a 10-ohm rheostat anda battery, all of which is enclosed except for a pin hole at the front. Against the frontof the box is a panorama. The light throws silhouettes of the panorama onto a wall4.5-6 metres (15-20 feet) away (see Fig 160).
0687. Red light bulbs replace the normal lighting of the darkroom. The power of thebulbs should not exceed 60 watts. Blackboards or drops will be required. If a black-board is used, yellow and red chalk will show well under light. If a drop is made onwhite paper, black ink only should be used. A torch showing a pin hole of red light. Asimple stand to hold the torch will be found to be a useful aid.
Instructional Knowledge
0688. It is essential that this period is taught before any night training. In teachingcadets it may be necessary to allow an extra period for the subject. If an extra peri-od is allowed, all the teaching should take place in the first period, following the les-son as it is written. The second period should be devoted to confirmation of the factstaught. For this a new panorama must be used.
0689. The lesson has been designed to be taught under red light to allow theinstructor to make full use of diagrams and the class to take notes. It will also impressupon cadets the value of red light as a means towards adaptation and as a methodof preserving night adaptation when having to work under light.
6-23
PROTECT
PROTECT
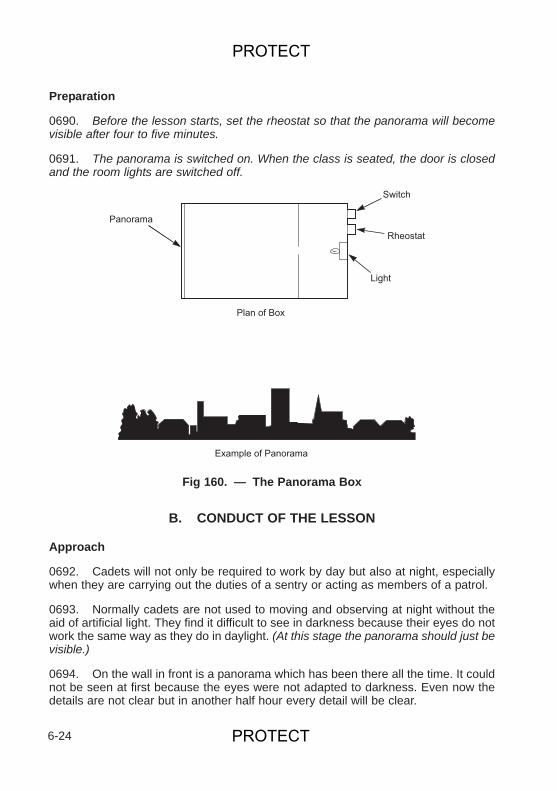
Preparation
0690. Before the lesson starts, set the rheostat so that the panorama will becomevisible after four to five minutes.
0691. The panorama is switched on. When the class is seated, the door is closedand the room lights are switched off.
B. CONDUCT OF THE LESSON
Approach
0692. Cadets will not only be required to work by day but also at night, especiallywhen they are carrying out the duties of a sentry or acting as members of a patrol.
0693. Normally cadets are not used to moving and observing at night without theaid of artificial light. They find it difficult to see in darkness because their eyes do notwork the same way as they do in daylight. (At this stage the panorama should just bevisible.)
0694. On the wall in front is a panorama which has been there all the time. It couldnot be seen at first because the eyes were not adapted to darkness. Even now thedetails are not clear but in another half hour every detail will be clear.
6-24
��������
! �"�����������
�����
�� ���
�������
� ���
Fig 160. — The Panorama Box
PROTECT
PROTECT
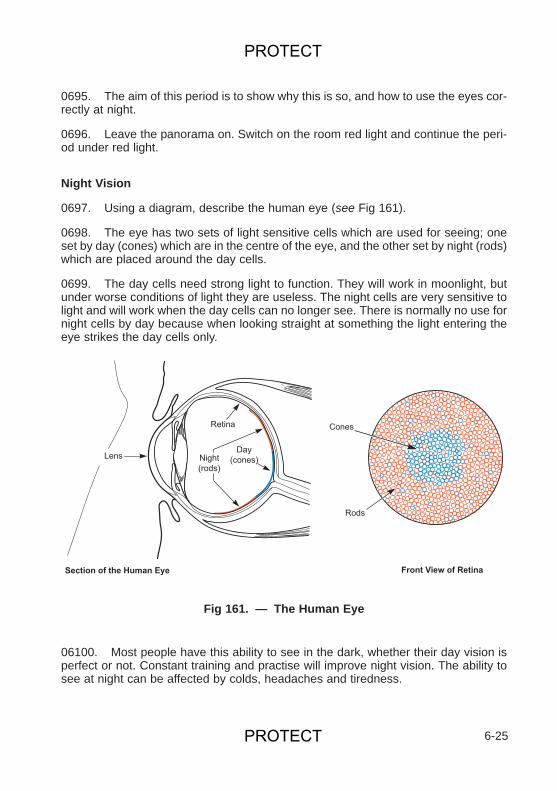
0695. The aim of this period is to show why this is so, and how to use the eyes cor-rectly at night.
0696. Leave the panorama on. Switch on the room red light and continue the peri-od under red light.
Night Vision
0697. Using a diagram, describe the human eye (see Fig 161).
0698. The eye has two sets of light sensitive cells which are used for seeing; oneset by day (cones) which are in the centre of the eye, and the other set by night (rods)which are placed around the day cells.
0699. The day cells need strong light to function. They will work in moonlight, butunder worse conditions of light they are useless. The night cells are very sensitive tolight and will work when the day cells can no longer see. There is normally no use fornight cells by day because when looking straight at something the light entering theeye strikes the day cells only.
06100. Most people have this ability to see in the dark, whether their day vision isperfect or not. Constant training and practise will improve night vision. The ability tosee at night can be affected by colds, headaches and tiredness.
6-25
Fig 161. — The Human Eye
����������������
#����
����
��� �
���� � ���$����%
�&$�����%
���������������� ����
PROTECT
PROTECT

Adaptation
06101. The change-over from seeing with day cells in strong light to seeing with thenight cells in darkness is known as night adaptation. It is a slow process for the nightcells take about 30 minutes to become completely efficient. There is no short cut tothis. An alternative to sitting in darkness for 30 minutes waiting for adaptation is toremain under red light for the same period of time. This will produce almost completeadaptation, and will allow work to be done during the waiting period. This will be seenfor yourself during this period.
06102. The night cells are weak and tire quickly. Once adaptation has taken place,it is not possible to stare at an object without vision becoming blurred for longer than4- 10 seconds. The angle of sight must be changed to allow the cells to rest.
Off-Centre Vision
06103. The day cells are in the centre of the eye. At night when looking at an objectvery little will be seen because these cells cannot work in poor light. The night cells mustbe used to see at night. They are around the day cells so this means looking at an angle(6-10 degrees) away from the object. This is called off-centre vision (see Fig 162).
06104. Having identified an object using off-centre vision, it is possible to lookdirectly at it for a few seconds before its image disappears. This is a useful aid toshooting at night.
06105. When observing at night it is possible to scan the ground using the methodused in daylight. In order to study an object or piece of ground in greater detail, it isbetter to scan using a “figure of eight” technique, which makes full use of off-centrevision (see Fig 163).
6-26
������������� ����
����������������������
Fig 162. — Off-Centre Vision
PROTECT
PROTECT
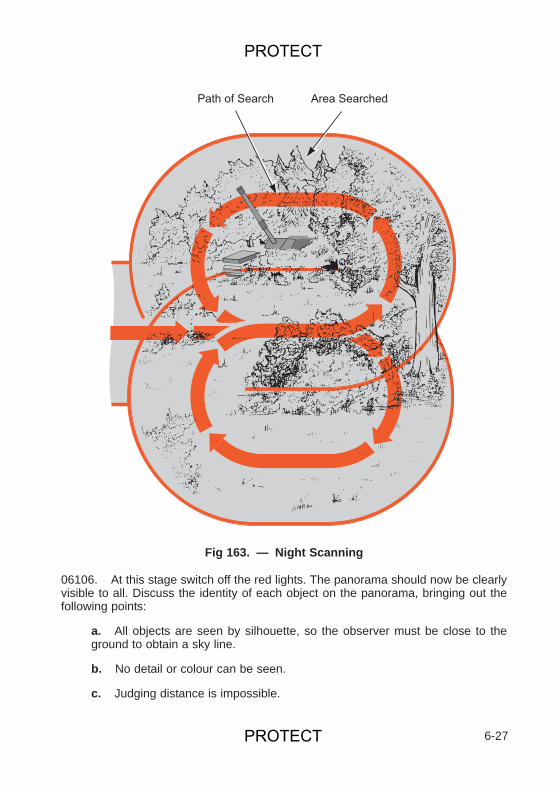
06106. At this stage switch off the red lights. The panorama should now be clearlyvisible to all. Discuss the identity of each object on the panorama, bringing out thefollowing points:
a. All objects are seen by silhouette, so the observer must be close to theground to obtain a sky line.
b. No detail or colour can be seen.
c. Judging distance is impossible.
6-27
Fig 163. — Night Scanning
������������ '����������
PROTECT
PROTECT
Protection 06107. Any bright lights will spoil night adaptation. A match flame or a muzzle flashwill spoil it for several seconds. An illuminating flare will ruin night vision. It mustbecome an instinctive reaction to cover one eye when faced with any light at night.This will preserve part of the night vision.
06108. Make every cadet cover one eye. When they have done so, send them out-side into daylight for a minute or two to spoil the night adaptation to the uncovered eye.When the class is back in the dark room do not allow them to uncover their protectedeye until they have discovered that their unprotected eye has lost its night adaptation.
06109. By switching the red lights on and off, show that red light does not affectnight vision.
06110. Switch off the red lights and the panorama.
Staring06111. Switch on the red torch and place it on a stand facing the class. Go quietlyto the room switch, and when they describe the light as moving, prove by turning onthe lights that it never moved.
06112. If any single point of light or a prominent object is stared at for too long, itwill seem to move. This is the reason why a sentry imagines that he is being stalkedat night and sometimes fires without apparent reason. This can be prevented by“placing” the object against something else, such as a finger at arm’s length.
Conclusion06113. End of Lesson Drill.
a. Questions to and from the class.
b. Sum up on four main points:
(1) Adaptation.
(2) Off-centre vision.
(3) Protection.
(4) Staring.
c. Mention that while night vision will never be as good as day vision, it is pos-sible to see at night; it is vital for a cadet and that it is essentially a matter ofpractice.
06114 – 06118. Reserved.
6-28
PROTECT
PROTECT
SECTION 9. — ELEMENTARY NIGHT MOVEMENT
A. INSTRUCTOR’S NOTESAim
06119. To teach cadets in daylight how to move at night, what to do when caughtin the open by flares or Verey lights or any white light, and how to keep direction atnight.
Timings
06120. One 30 minute period.
Method
06121. A basic instructional outdoor period.
Stores
06122.
RiflesDarkened glasses or goggles, or something with
which to blindfold the cadets Landscape targetsChalkboard
B. CONDUCT OF THE LESSONPreliminaries
06123. Safety Precautions.
Approach
06124.a. At night people hear more than they see, so silence is vital. To movesilently at night movement must be slow. Rubber soled shoes are a help onhard ground.
b. A night patrol must be silent on the move and must stop frequently to lookand listen. It must halt in cover or shadow and, if there is none, the membersof the patrol must lie down. By lying down they are not silhouetted against thesky but, on the other hand, other things will be silhouetted from their point ofview. When lying down members will be able to keep their ears to the groundthus being able to hear any other movement. When hearing a noise whilst onthe move members of a patrol should freeze whilst looking and listening andthen, if necessary, slowly and silently lie down or take cover.
6-29
PROTECT
PROTECT
Moving at Night
06125. Explain and demonstrate the three ways of moving silently at night; makethe cadets practise each way in turn.
06126. The Ghost Walk. Lift your legs high to avoid long grass, and sweep themoutwards. Feel gently with your toes for a safe place to put the feet. Make sure onefoot is safe before moving the other. Keep the knees a bit bent. Carry the weapon inthe alert position in open country. In close country carry it in the front slung carriageposition using the sling, leaving the hands free to feel for obstacles in front abovewaist height.
06127. The Cat Walk. Crawl on hands and knees; search the ground ahead fortwigs with the right hand. The weapon is supported by the sling and held in the righthand.
06128. The Kitten Crawl. Often the only way to get accurate information is to getclose to the enemy, which means keeping low and quiet. The leopard crawl is toonoisy, but the kitten crawl is very quiet, though it is slow and tiring and needs a lot ofpractice. Lie on the stomach, search the ground ahead for twigs with the right hand,lift the body on forearms and toes, press it forward, and lower it on to the ground; theweapon is supported by the sling and held in the right hand.
06129. Practise all three movements.
Action When Caught by Enemy Lights
06130. When a Verey light flare is used to light up an area a cadet who is a mem-ber of a patrol may be caught in the light. He must take the following action:
a. If there is little cover about it is usually best to take cover or lie down themoment you see the light.
b. In close country it is best to freeze. If still the background makes it hard tosee. If spotted get to cover quickly.
06131. When a trip flare is set off by a member of a patrol the action to be takenby those in its light is to move away as quickly as possible out of the lighted area.
06132. Practise the squad.
Aids to Keeping Direction
06133. Explain: It is often hard to keep direction at night, in fog or in close coun-try. Some of the aids to keeping direction are:
a. The compass, map and air photographs.b. A rough sketch copied from a map or air photograph.c. Keeping two prominent objects in view.
6-30
PROTECT
PROTECT
d. Using a series of easily recognizable landmarks, each visible from the pre-vious one.
e. The stars and also the sun and moon if the nature of their movement in thesky is understood.
f. Memorizing the route from a map or air photograph. Helpful details are thedirection of streams, distances between recognizable features coupled withpacing, and the course of contours.
g. Trees in exposed country tend to grow away from the direction of the pre-vailing wind. Moss may grow on the leeward side of the tree trunks.
h. Remembering the back view; patrols and others who may have to find theirway back should look behind from time to time and pick up landmarks toremember for the return journey.
i. Leaving direction marks on the outward journey; these may be pegs, smallheaps of stones or blazed trees.
j. If the route is being walked by day by cadets who are to guide along it bynight, they must take note of skylines and objects or features which they will beable to recognize in the dark.
Conclusion
06134. End of Lesson Drill.a. Questions to and from the squad.
b. Sum up.
c. Look forward to the next lesson.
06135. Reserved.
6-31
PROTECT

6-32
PROTECT
PROTECT
SECTION 10. — ELEMENTARY NIGHT MOVEMENT — PRACTICE
A. INSTRUCTOR’S NOTES
Aim
06136. To practise cadets in moving at night and in taking the correct action whencaught in the open by enemy flares.
Timings
06137. Two 30 minute periods.
Method
06138. A practical outdoor night period on a training area.
Stores
06139.
Rifles Rubber soled shoesTrip flares16 mm mini flaresCamouflage materialsWhite tape or stringTorch
Miscellaneous
06140. Mark out with white tape or string a simple flare course, about 250 metreslong across long and short grass, and road or hard ground.
B. CONDUCT OF THE LESSON
Preliminaries
06141. Safety precautions and personal camouflage.
06142. Revise night movements, and action when caught in the open by a flare orwhite light (Section 9).
6-33
PROTECT
PROTECT
Practice
06143. Start the cadets on the flare course, with two in the lead, the rest 10 or 15metres behind with the instructor. Send up a light or flash a torch from time to time.Change the leaders often enough to give everyone a turn.
Conclusion
06144. End of Lesson Drill.
a. Questions to and from the squad.
b. Sum up.
c. Look forward to the next lesson.
06145. Reserved.
6-34
PROTECT
PROTECT
SECTION 11. — OBSERVATION AT NIGHT — PRACTICE
A. INSTRUCTOR’S NOTES
Aim
06146. To give cadets practice at observing at night.
Timings
06147. Two 30 minute periods.
Stores
06148.
RiflesRange card for instructor
Miscellaneous
06149.a. Start the period just before sunset.
b. Choose an area with undulating ground, trees on a skyline, and all typesof going.
c. Organize an enemy party on the following lines:
(1) Dress. Equipment and rifles, berets, rubber soled shoes if available.
(2) Rehearse the enemy and the instructors, and make plans for differ-ent weather and light.
(3) Instructors should have accurate range cards for use in Phase 1.
B. CONDUCT OF THE LESSON
Preliminaries
06150. Safety Precautions.
06151. Put the enemy in position against varied backgrounds.
Approach
06152. Explain the aim.
6-35
PROTECT
Phase I (for combined squads)
06153. Give the cadets a simple tactical picture, and tell them to observe and findthe enemy. Point out any prominent objects.
06154. As it gets darker, let the cadets discuss how different everything looks andget the enemy to move about; every now and then make the cadets take aim so thatthey find out how difficult it becomes.
06155. Practise judging distance as the light goes.
06156. Stress how difficult it is to see things in the distance, except against the sky.
Phase II (for separate squads)
06157. As soon as it is really dark, get one cadet to walk normally away from thesquad, and to count his paces. As soon as no one can see him, stop him and askhim how many paces he has taken. Then send him another 50 metres or so away,and get him to walk towards the squad. Stop him as soon as anyone sees him, thencall him back to the squad, and make him count his paces again.
06158. Stress the distance you can see at night, and the way things show up bestagainst the skyline. Point out how easy it is to mistake bushes etc., for men at night,and how important it is, therefore, to study the ground carefully in daylight.
Phase III (for combined squads)
06159. Explain: Ears take the place of eyes at night, and you must learn to inter-pret night noises. If you want to hear better at night:
a. Keep quite still, lean forward a bit, half open your mouth and turn one eartowards the sound.
b. If you think there are people about, keep one ear close to the ground.
c. Never cover your ears; it is like blindfolding yourself by day.
06160. Get the enemy to act appropriately, and point out how well a lighted matchor cigarette shows up, what a noise a weapon can make, how the noise of talkingand coughing carries, and how easy it is to underestimate distances and overesti-mate numbers.
Phase IV (for combined squads)
06161. Get the enemy, camouflaged and wearing berets and, if necessary, rubbersoled shoes to try to approach unseen from a new direction. Warn the cadets toexpect them.
6-36
PROTECT
PROTECT
06162. Every time a cadet says he sees an enemy, order “Stop”, send him out withan NCO to investigate, and to bring the enemy in if he is there. Start the enemy offagain, and go on until they have all been spotted.
Conclusion
06163. End of Lesson Drill.
a. Questions to and from the squads.
b. Sum up.
c. Look forward to the next lesson.
06164. Reserved.
6-37
PROTECT

6-38
PROTECT
PROTECT
SECTION 12. — IDENTIFYING SOUNDS AT NIGHT — PRACTICE
A. INSTRUCTOR’S NOTES
Aim
06165. To give cadets practice at identifying noises at night.
Timings
06166. Two 30 minute periods.
Stores
06167. According to the list of noises chosen.
Miscellaneous
06168.a. Use ground that cadets do not know.
b. Rehearse the enemy and arrange how you will control them.
c. If necessary use half the squad as enemy for half the time, then the restfor the other half of the time.
d. The enemy must be out of sight of the observers.
Approach
06169. Explain the aim of the practice.
B. CONDUCT OF THE LESSON
Practice
06170. Signal to the enemy to make each noise when you are ready for it; then askthe observers what the noise was, how far away, and in what direction.
06171. To make noises the enemy can do many things; for example, dig, rivet,knock in pickets, change magazines, open and close a rifle breech, load and unloadvarious weapons, post sentries, talk and whisper, blow their noses, cough, cracktwigs, knock a rifle against a steel helmet, cut wire, walk over all sorts of ground, fillsandbags, load a truck with jerricans, etc., and finally, after a period of silence, creepup on the observers.
6-39
PROTECT
PROTECT
Conclusion
06172. End of Lesson Drill.
a. Questions to and from the squad.
b. Sum up.
c. Look forward to the next lesson.
06173. Reserved.
6-40
PROTECT
PROTECT
SECTION 13. — SENTRIES
INTRODUCTION
06174. Arrangements must be made in every unit and sub-unit down to and includ-ing the section for its own protection at all times. When a section is on the move thispresents few problems because every cadet is alert and ready for an emergency.When static in a temporary position, which may be for as little as five minutes, or ina patrol base, protection is more of a problem because cadets are likely to be lessalert and ready for a surprise attack which may come from any direction. It is this lat-ter situation that this section deals with.
06175. There are three principles which apply in ensuring that protection at rest isadequate:
a. The correct positioning of the section.
b. The location of an Alarm Post(s).
c. The posting of sentries.
06176. A quick reconnaissance by the Section Commander will disclose which arethe most likely enemy approaches into the position so that the rifle and gun groupscan be sited to cover them by fire.
06177. There will normally be one Alarm Post in a section and it is the area towhich cadets will move automatically at a signal if danger threatens. In practice, ascadets will be resting or sleeping near the Alarm Post they will be at their positionsin the Alarm Post almost at once. It must be sited so that, as stated above, enemyapproaches into the position can be covered by fire, and it must be concealed fromthe air. Immediately on arrival in the position a practice manning of the Alarm Postmust be carried out.
06178. Because it is wasteful in numbers and unnecessarily saps cadets’ energy,not all cadets need be alert all the time. The majority should be resting or sleepingwhilst sentries are watching and listening, ready for instant action. There is usuallyone sentry by day and two by night in a section position, and the Alarm Post to whichthey are posted is normally adjacent to the LSW covering the most likely approachinto the position. They are posted by an officer or NCO who will ensure that theyknow:
a. The direction of the enemy.
b. The ground they have to watch.
c. The position of flanking posts.
6-41
PROTECT
PROTECT

d. The name of landmarks in front.
e. The procedure for challenging.
f. Particulars of returning patrols.
g. The password.
h. Length of duty.
6179. A sentry’s duty may be for half an hour and never more than two hours, andrelief times of sentries at night will be staggered so that there is always one fresh sen-try and one adapted to night vision.
6180. Reserved.
6-42
PROTECT
PROTECT
LESSON 1. — DUTIES OF A SENTRY AT NIGHT
A. INSTRUCTOR’S NOTES
Aim
06181. To teach a sentry’s duties at night and subsequently to give cadets practiceat moving, observing and acting as sentries at night.
Timings
06182. Two 30 minute periods.
Stores
06183.
RiflesBlank ammunitionCamouflage materials
Miscellaneous
06184. Lay out a section post in front of the spectator’s stand, and rehearse ademonstration party.
B. CONDUCT OF THE LESSON
Approach
06185. Explain: Everyone will be a night sentry at some time and the safety ofthose in a section will depend on him. The duties are the same as those required tobe carried out by day but under more difficult conditions.
Duties
06186. Explain: Sentries are always posted in pairs at night and their times ofrelief must be staggered so that there is always one fresh sentry on duty. These arethe things they must know:
a. All Sentries:
(1) What ground to watch.
6-43
PROTECT
PROTECT
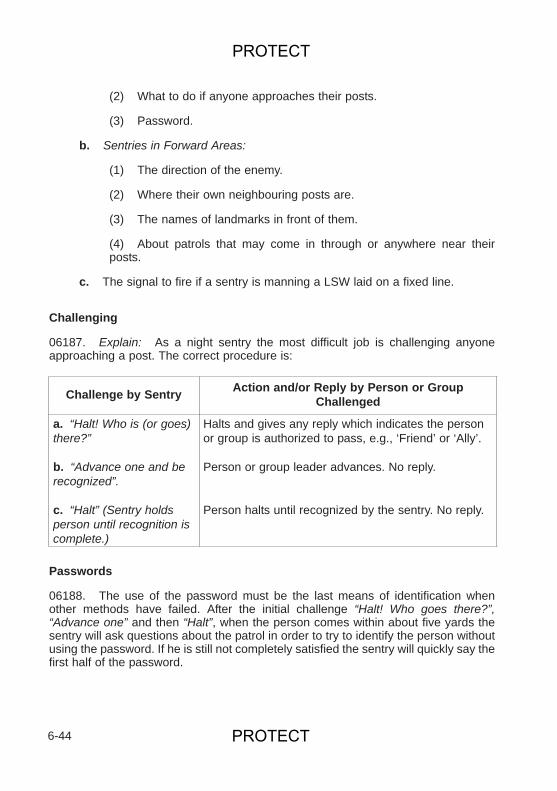
(2) What to do if anyone approaches their posts.
(3) Password.
b. Sentries in Forward Areas:
(1) The direction of the enemy.
(2) Where their own neighbouring posts are.
(3) The names of landmarks in front of them.
(4) About patrols that may come in through or anywhere near theirposts.
c. The signal to fire if a sentry is manning a LSW laid on a fixed line.
Challenging
06187. Explain: As a night sentry the most difficult job is challenging anyoneapproaching a post. The correct procedure is:
Passwords
06188. The use of the password must be the last means of identification whenother methods have failed. After the initial challenge “Halt! Who goes there?”,“Advance one” and then “Halt”, when the person comes within about five yards thesentry will ask questions about the patrol in order to try to identify the person withoutusing the password. If he is still not completely satisfied the sentry will quickly say thefirst half of the password.
6-44
Challenge by Sentry Action and/or Reply by Person or GroupChallenged
a. “Halt! Who is (or goes)there?”
b. “Advance one and berecognized”.
c. “Halt” (Sentry holdsperson until recognition iscomplete.)
Halts and gives any reply which indicates the personor group is authorized to pass, e.g., ‘Friend’ or ‘Ally’.
Person or group leader advances. No reply.
Person halts until recognized by the sentry. No reply.
PROTECT
PROTECT
06189. The password will always be in two parts each of two letters, for example:
Challenge — Sierra NovemberCountersign — Oscar Whisky
If the two parts have some connection, as in the example given above, they will beeasier to remember but this connection must not be so obvious that an enemy mayguess the countersign. Passwords are changed daily at noon.
Demonstration
06190. Give a simple tactical picture and stage a series of demonstrations, withcommentaries, to show how sentries should not and should behave.
06191. First Demonstration (wrong).
a. A friendly patrol approaches the post. Without challenging the sentryopens fire and wounds a man. The patrol goes to ground.
b. Question the squad and explain. Even if the patrol had been enemy the sen-try would have been wrong; he would have given his position away unnecessarily.
06192. Second Demonstration (right). The same friendly patrol approaches.The sentry has a string with the ends tied to his own and the section commander’swrists. As soon as he sees a patrol he tugs the string to wake the section comman-der, who rouses the section in the same sort of way. The section stands to and sen-tries and section cover the patrol; one sentry challenges.
06193. Third Demonstration (wrong).
a. An enemy patrol approaches the post. As soon as the sentry sees them heshouts a challenge; the enemy get down, crawl to the position of observationand watch the post.
b. Question the squad and explain. The sentry challenged too loud and at toolong a range, and simply gave away the position of the post.
06194. Fourth Demonstration (wrong).
a. The same enemy approach. The sentry challenges quietly at a sensiblerange but does not wake the section commander; the enemy rush the post andmop it up.
b. Question the squad and explain the sentry’s mistake.
06195. Fifth Demonstration (right). The same enemy approach. As soon as hesees them the sentry rouses the section commander, who stands the section to. The
6-45
PROTECT
PROTECT
sentry challenges quietly at a sensible range. The enemy turn and run; the sectionopens fire.
Practice
06196. Give the squad practice at challenging.
Conclusion
06197. End of Lesson Drill. Question the squad on the things sentries mustknow. Sum up:
a. Always challenge just loud enough to be heard.
b. If in doubt, give the alarm quietly before challenging.
c. Do not do anything to enable the enemy to find out where the post is andthen get away to report it or overrun it.
06198. Reserved.
6-46
PROTECT
PROTECT
LESSON 2. — SENTRIES AT NIGHT — PRACTICE
A. INSTRUCTOR’S NOTES
Aim
06199. To give cadets practice at moving, observing, and acting as sentries atnight.
Timings
06200. Four 30 minute periods.
Stores
06201.
RiflesCamouflage materials
Miscellaneous
06202. Choose ground with a variety of cover, background and going, and withsome place where, if the stalkers stand up, the sentries can see them against theskyline or they are silhouetted.
Preliminaries (daylight)
06203. Safety Precautions.
06204. Divide the cadets into two teams and each team into pairs.
B. CONDUCT OF THE LESSON
Practice
06205. Post the pairs of one team as double sentries; and get the pairs of the otherteam to stalk their posts.
06206. Change the teams over at half time.
6-47
PROTECT
PROTECT

Conclusion
06207. End of Lesson Drill.
a. Questions to and from the squad.
b. Sum up.
c. Look forward to the next lesson.
06208. Reserved.
6-48
PROTECT
PROTECT
SECTION 14. — GROUND AND COVER
A. INSTRUCTOR’S NOTES
Aim
06209. To teach cadets about ground and cover so as to enable them to make thebest use of it in practice.
Timings
06210. Two 30 minute periods.
Stores
06211. Landscape target if necessary (see paragraph 06212 below).
Miscellaneous
06212. This subject is best taught on a suitable convenient piece of ground but maybe taught with the aid of a landscape target.
Preparation
06213. Choose a suitable piece of undulating ground with trees, hedges andundergrowth. If it does not exist, arrange for a landscape target.
B. CONDUCT OF THE LESSON
Approach
06214. Explain: The success of all military operations at section level depends onthe principle of fire and movement being applied to the particular type of country overwhich the operation is to take place.
Ground Appreciation
06215. Explain: In open country the problem is how to find cover; in close coun-try there is the difficulty of finding positions with good observation and fields of fire.In attack or defence, the skilful use of ground can help to gain surprise and savelives. Much practice is therefore needed in developing an eye for ground. Groundshould be considered from the enemy’s point of view as well as your own. It shouldbe appreciated under the following headings:
6-49
PROTECT
PROTECT
a. Fire and observation positions.
b. Cover from fire and view.
c. Obstacles.
Fire Positions and Observation Positions
06216. Explain:
a. Fire Position. A fire position is one which allows the firer to observe thewhole area over which he is required to fire from an aimed position. It is toprovide cover from view, but in the event of it being seen it must also providecover from enemy fire.
b. Observation Position. An observation position is one from which theobserver must be able to see, but from which it may not be possible to fire for thereason in a. above.
Cover From Fire and View
06217. Explain: Cover from view is often not cover from fire, especially if themove to cover has been seen by the enemy. Concealment from enemy air andground observation is the chief means of gaining surprise. Some of the main typesof cover are:
a. Undulating ground which is the least obvious form of cover; when skilfullyused it protects from direct fire and gives no ranging marks to the enemy.
b. Sunken roads, beds of streams and ditches which give good cover fromview and often from fire as well. However there is always a danger that theenemy may pay special attention to them; they may be mined or booby trappedand precautions against ambush must be taken. If the roads or ditches arestraight, the enemy will be able to fire down them in enfilade.
c. Hedges and bushes which give cover from view but not from fire. In opencountry they may make good ranging marks for the enemy.
d. Standing crops which give cover from view but movement through themcan generally be detected.
e. Woods which give cover to men and vehicles from enemy air and groundobservation. They give some protection from small arms fire but the bombs andshells will explode in the branches of trees and will cause heavy casualtiesunless troops are dug in and have overhead protection.
f. Buildings and walls which afford concealment and protection from smallarms fire and shell splinters. When isolated they make good ranging marks forthe enemy.
6-50
PROTECT
PROTECT
Dead Ground
06218. Ground which a cadet cannot see from his position is called dead ground.Section commanders should be able to recognize ground which is likely to be deadto the enemy. Ground can only be described as dead in relation to the position of anobserver as in the example, “the track junction is dead to the enemy in the farmhouse”. Cadets under cover or in dead ground are safe from enemy observed fire butnot from indirect fire. These areas are always likely to be selected by the enemy asdefensive fire tasks for his artillery and mortars (see Fig 164).
Obstacles
06219. When deciding how to deal with an obstacle it is necessary to plan on thebasis that it will be under constant enemy surveillance and that enemy fire can bedirected on to it instantly in an emergency. It ceases to be a serious obstacle whenthere is the time and opportunity to cross it without interference.
Common Mistakes
06220. Explain: The wrong use of ground may lead to casualties and loss of sur-prise; some common mistakes are:
6-51
Fig 164. — Indirect Fire Into Dead Ground
PROTECT
PROTECT
a. Carelessness by officers or NCOs while making a reconnaissance, suchas unfolding a map in the open or not using a covered approach to an OP.
b. Unnecessary movements in a position overlooked by the enemy.
c. Using conspicuous landmarks such as isolated trees, bushes or cottages.
d. Halting cadets near road or track junctions or other mapped features whichare always registered as targets by the enemy.
e. Bad track discipline.
f. Failure to guard against enemy air observation.
Maps and Air Photographs
06221. Maps and air photographs should be used together to obtain the best pic-ture of the ground. The two aids are complementary as is shown by listing the advan-tages and limitations of air photographs.
a. Advantages.
(1) Should be more up to date.
(2) Give more detail.
(3) Show the size and shape of features accurately.
(4) Allow gradients to be seen in relief with a stereoscope.
b. Limitations.
(1) Complete geographical cover almost impossible.
(2) Expensive to produce.
(3) Scales vary.
(4) Details of heights not given.
Conclusion
06222. End of Lesson Drill.
a. Questions to and from cadets.
b. Sum up.
6-52
PROTECT
PROTECT

c. Look forward to the next lesson.
06223 – 06229. Reserved.
6-53
PROTECT

6-54
PROTECT
PROTECT
SECTION 15. — SAFETY PRECAUTIONS WITH BLANK AMMUNITIONINCLUDING ITS USE AT NIGHT
A. INSTRUCTOR’S NOTES
Aim
06230. To teach cadets the safety rules and drills when using blank ammunition,including its use at night.
Timings
06231. One 30 minute period.
Stores
06232.
Rifles with slingsBlank ammunition Two Cadet 11 targets Tape to locate spectators’ enclosureContainer of red fluidPaper bag approximately 150 mm x 25 mm (6 inches by 10 inches)
Preparation
06233.a. Reconnoitre a demonstration area outdoors.
b. Prepare a Cadet 11 target for demonstration with a container full of redfluid behind a hole cut out of the face of the target and covered by paper.
c. Set out a spectators’ enclosure. Place a Cadet 11 target at 50 metresfrom it.
d. Have a rifle and blank round available for the demonstration, NOTLOADED.
e. Before the demonstration begins:
(1) Normal safety precautions.
(2) Revise the rules for the safe handling of weapons Chapter 4,Section 2.
6-55
PROTECT
PROTECT
(3) Refer to the booklet Cadet Training Safety Precautions (AC 70768).
B. CONDUCT OF THE LESSON
Introduction
06234. Explain: Blank ammunition, if mishandled, can be dangerous and, if firedat very close range, can result in serious or even fatal injuries to any individual in theline of fire. The most common avoidable accidents are due to carelessness in han-dling.
Safety Rules
06235. Explain: In addition to the normal rules for the safe handling of weaponsthe following rules will apply to the use of blank ammunition.
a. Blank ammunition will never be fired at an individual at a range of less than50 metres.
b. Care must be taken to ensure that the muzzle of the weapon is free fromobstruction, e.g., earth, as this would considerably increase the lethal effect.
c. Only 5.56 mm blank ammunition is authorized to be fired by the CadetForces.
d. Great care must be taken at night. Indiscriminate firing is forbidden and fir-ing will only take place on direct orders and under the personal supervision ofan officer, SSI or AI. Aim is never to be taken directly at an individual.
e. On marches or on journeys in transport rifles will be UNLOADED.
Lethality of Blank
06236. Explain: On exercises, noise and enemy movements attract attention,particularly at close range. The automatic reaction is to aim and fire into movingundergrowth without determining whether it is a live enemy or considering the range.NO target of any kind, whether it can be clearly seen or not, may be engaged withblank ammunition unless it is 50 metres or more distant.
06237. Explain and demonstrate:
a. Look at the Cadet 11 target in the open at 50 metres. Emphasize thathuman targets below this distance will not be engaged with blank ammunition.
6-56
PROTECT
PROTECT
b. Point out the Cadet 11 target partially concealed in a bush (group of bush-es or hedgerow). You are moving through close country when you hear move-ment but you cannot clearly determine what it is. You stop, load a blank round,aim into the moving bushes or undergrowth and fire. (Note: The muzzle of therifle will be about 80 mm to 160 mm (3 – 6 inches) from the figure target con-taining red fluid at the moment of firing.)
c. The result, if this were a live enemy target, could well be fatal.
d. Even if the muzzle of the weapon had been a little further from the targetat the moment of firing, there is always the danger of small particles of brassfrom the cartridge case penetrating unprotected parts, e.g., the face or theeyes.
06238. Questions from the squad.
Drill For the Use of Blank Ammunition
06239. At the start of the exercise:
a. The officer, SSI or AI will:
(1) Carry out normal safety precautions with the section in single rank.
(2) Order the section to adopt the prone position.
(3) Issue five rounds of blank ammunition per cadet.
(4) Order: “Fill the magazine with five blank rounds”.
(5) Order: “Load” (The rifle is now in a ‘Made Safe’ state.)
b. The officer, SSI or AI will:
(1) Satisfy himself that all actions for making safe have been correctlycarried out and that safety catches are applied.
(2) Order “Stand up”.
06240. During the exercise:
a. Rifles will NOT be fired unless correctly aimed and NOT then at a live tar-get if closer than 50 metres.
b. Safety catches will be kept applied when not actually firing.
c. Should a cadet fall down and dig his rifle into the ground, under NO CIR-CUMSTANCES will his rifle be fired until it has been unloaded, cleaned andreloaded. This must be done under supervision.
6-57
PROTECT
PROTECT
06241. At the end of the exercise:
a. The officer, SSI or AI in charge, standing to a flank will order:
(1) “In single rank, fall in.”
(2) “Check your safety catch is applied.”
(3) “Adopt the prone position.”
(4) “Unload.”
(5) “Stand up.”
b. The officer, SSI or AI in charge will:
(1) Carry out normal safety precautions, to include emptying of maga-zines.
(2) Collect any unfired blank ammunition and empty cases.
(3) Take an individual declaration from everyone who has been on theexercise to the effect: “I have no blank rounds or empty cases in my pos-session.”
(4) Correctly dispose of the remaining unfired blank ammunition andempty cases.
(5) Sign the Declaration Certificate AF B159.
Conclusion
06242. End of Lesson Drill.
a. Questions from the squad.
b. Question the squad on:
(1) The importance of safe handling.
(2) The minimum safety distance for firing at live enemy with blankammunition.
06243 – 06250. Reserved.
6-58
PROTECT
PROTECT

SECTION 16. — SECTION ORGANIZATION AND PLACE IN THE BATTALION
A. INSTRUCTOR’S NOTES
Aim
06251. To explain the composition of a section and to show how it fits into theplatoon, company and battalion.
Timings
06252. One 30 minute period.
Stores
06253.
Diagram of the outline organization of the infantry battalionDiagram of the organization of a section
Miscellaneous
06254. This is the only occasion on which reference is made to sub-units and unitslarger than the section. It is important, therefore, that cadets clearly understand howthe section fits into the whole — platoon, company and battalion.
06255. The organization of a section is best taught by means of a demonstration,but if a demonstration section and equipment are not available it may be taught withthe aid of a chalkboard or with models.
Preparation
06256. Arrange a demonstration section as in paragraph 06259, or draw arepresentation on a chalkboard.
6-59
PROTECT
PROTECT
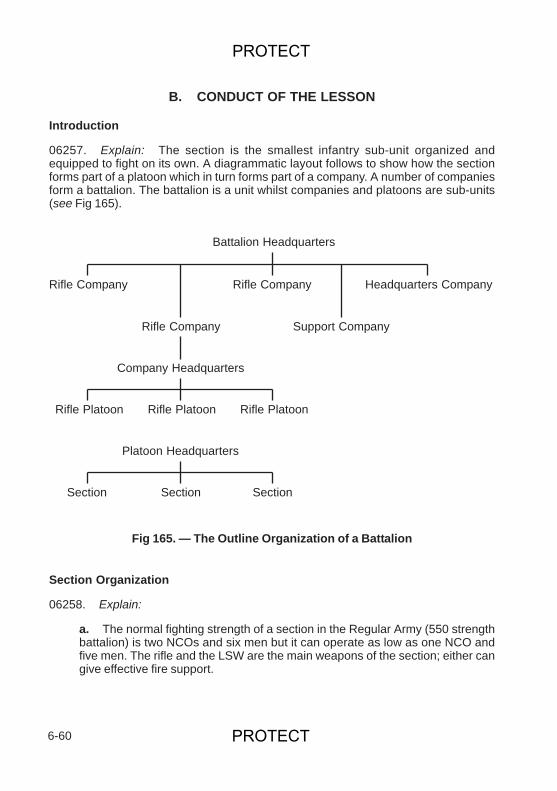
B. CONDUCT OF THE LESSON
Introduction
06257. Explain: The section is the smallest infantry sub-unit organized andequipped to fight on its own. A diagrammatic layout follows to show how the sectionforms part of a platoon which in turn forms part of a company. A number of companiesform a battalion. The battalion is a unit whilst companies and platoons are sub-units(see Fig 165).
Section Organization
06258. Explain:
a. The normal fighting strength of a section in the Regular Army (550 strengthbattalion) is two NCOs and six men but it can operate as low as one NCO andfive men. The rifle and the LSW are the main weapons of the section; either cangive effective fire support.
6-60
Battalion Headquarters
Rifle Company Rifle Company
Support CompanyRifle Company
Headquarters Company
Company Headquarters
Platoon Headquarters
Rifle Platoon Rifle Platoon Rifle Platoon
Section Section Section
Fig 165. — The Outline Organization of a Battalion
PROTECT
PROTECT
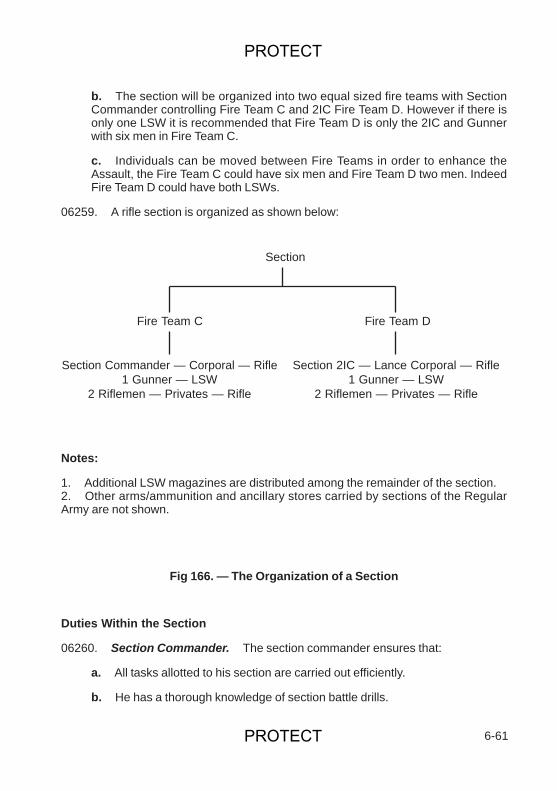
b. The section will be organized into two equal sized fire teams with SectionCommander controlling Fire Team C and 2IC Fire Team D. However if there isonly one LSW it is recommended that Fire Team D is only the 2IC and Gunnerwith six men in Fire Team C.
c. Individuals can be moved between Fire Teams in order to enhance theAssault, the Fire Team C could have six men and Fire Team D two men. IndeedFire Team D could have both LSWs.
06259. A rifle section is organized as shown below:
Duties Within the Section
06260. Section Commander. The section commander ensures that:
a. All tasks allotted to his section are carried out efficiently.
b. He has a thorough knowledge of section battle drills.
6-61
Fire Team C
Section Commander — Corporal — Rifle1 Gunner — LSW
2 Riflemen — Privates — Rifle
Section 2IC — Lance Corporal — Rifle1 Gunner — LSW
2 Riflemen — Privates — Rifle
Fire Team D
Section
Notes:
1. Additional LSW magazines are distributed among the remainder of the section. 2. Other arms/ammunition and ancillary stores carried by sections of the RegularArmy are not shown.
Fig 166. — The Organization of a Section
PROTECT
PROTECT
c. The highest standard of discipline is maintained within his section.
d. He knows the strengths and weaknesses of each individual in his section.
e. He commands Fire Team C.
f. His section maintains arms, ammunition, clothing and equipment in goodorder.
g. The section duty roster is properly kept and carried out.
06261. Fire Team D Commander (Section 2IC). The 2IC will:
a. Command the section in the absence of the section commander.
b. Deploy Fire Team D as ordered.
06262. Gunners. The gunners will:
a. Ensure that the gun is properly maintained.
b. Carry the gun and ammunition as ordered.
c. Fire the gun as ordered.
06263. Rifleman. A rifleman will:
a. Carry out all tasks allotted to him.
b. Be proficient at:
(1) Weapon handling.
(2) Fieldcraft.
(3) Navigation.
c. Keep his arms and ammunition clean and in good working order.
d. See that his clothing and equipment are clean and in good repair.
e. Be alert at all times and keep an eye on his section commander for furtherorders.
06264. Scouts. Scouts, who are riflemen specially nominated for a particularoperation, are normally used in pairs to move ahead of a section moving in closeproximity to the enemy, to give warning of enemy positions to the section commanderso that he can deploy his section whilst under cover. They move in bounds fromfeature to feature keeping an interval between them sufficient to avoid both being fired
6-62
PROTECT
PROTECT
on at once, and they move sufficiently far ahead of the section to prevent it being firedon at the same time as themselves. The distance will depend on the type of countrybeing crossed, but they should not move so far ahead of the section that the sectioncommander cannot control them. They are not normally deployed during Advance toContact. They are normally deployed in close country.
Conclusion
06265. End of Lesson Drill.
a. Questions to and from cadets.
b. Sum up.
c. Look forward to the next lesson.
06266 – 06270. Reserved.
6-63
PROTECT

6-64
PROTECT
PROTECT

SECTION 17. — SECTION FORMATIONS AND FIELD SIGNALS
LESSON 1. — SECTION FORMATIONS
A. INSTRUCTOR’S NOTES
Aim
06271. To explain the basic formations in which the section can move.
Timings
06272. One 30 minute period.
Stores
06273.
ChalkboardEasel and chalk or model soldiers
Miscellaneous
06274. Cadets must be practised in these formations after they have been explained.
Preparation
06275. Arrange seating so that each cadet can see the training aids.
B. CONDUCT OF THE LESSON
Introduction
06276. Explain: A section must be able to function at maximum efficiency inaccordance with the section commander’s orders at all times. This is more difficultwhen on the move, particularly when in contact with the enemy.
Movement
06277. Explain: A section must always move so that the section commander cancontrol it instantly by word of mouth or signal, and the members of the section must beable to react to his orders instantly. This will not be possible if the members move asindividuals having no regard for the other members of the section. There are,
6-65
PROTECT
PROTECT
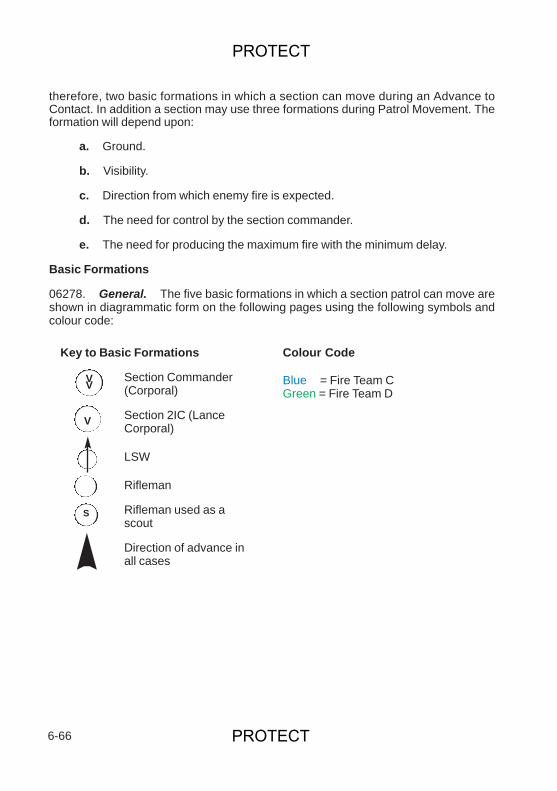
therefore, two basic formations in which a section can move during an Advance toContact. In addition a section may use three formations during Patrol Movement. Theformation will depend upon:
a. Ground.
b. Visibility.
c. Direction from which enemy fire is expected.
d. The need for control by the section commander.
e. The need for producing the maximum fire with the minimum delay.
Basic Formations
06278. General. The five basic formations in which a section patrol can move areshown in diagrammatic form on the following pages using the following symbols andcolour code:
6-66
Key to Basic Formations
Section Commander (Corporal)
Section 2IC (LanceCorporal)
LSW
Rifleman
Rifleman used as ascout
Direction of advance inall cases
Colour Code
Blue = Fire Team CGreen = Fire Team D
VV
V
S
PROTECT
PROTECT
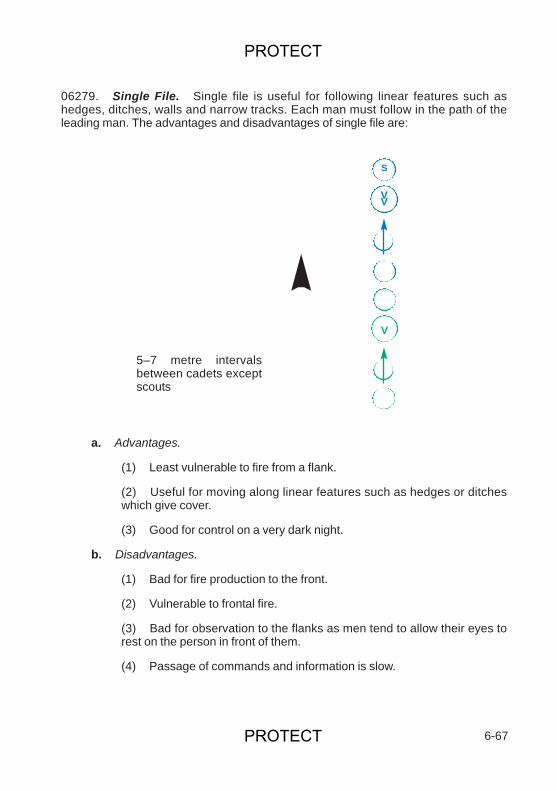
06279. Single File. Single file is useful for following linear features such ashedges, ditches, walls and narrow tracks. Each man must follow in the path of theleading man. The advantages and disadvantages of single file are:
a. Advantages.
(1) Least vulnerable to fire from a flank.
(2) Useful for moving along linear features such as hedges or ditcheswhich give cover.
(3) Good for control on a very dark night.
b. Disadvantages.
(1) Bad for fire production to the front.
(2) Vulnerable to frontal fire.
(3) Bad for observation to the flanks as men tend to allow their eyes torest on the person in front of them.
(4) Passage of commands and information is slow.
6-67
VV
V
S
5–7 metre intervalsbetween cadets exceptscouts
PROTECT
PROTECT
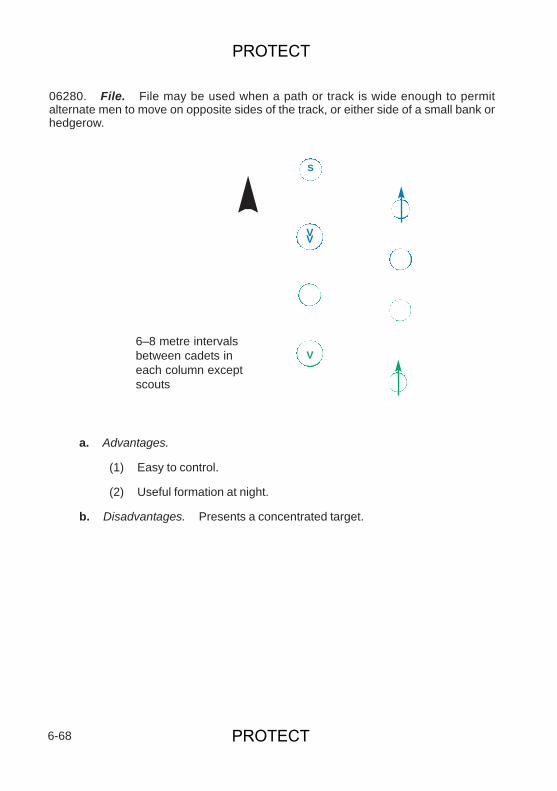
06280. File. File may be used when a path or track is wide enough to permitalternate men to move on opposite sides of the track, or either side of a small bank orhedgerow.
a. Advantages.
(1) Easy to control.
(2) Useful formation at night.
b. Disadvantages. Presents a concentrated target.
6-68
6–8 metre intervalsbetween cadets ineach column exceptscouts
VV
V
S
PROTECT
PROTECT
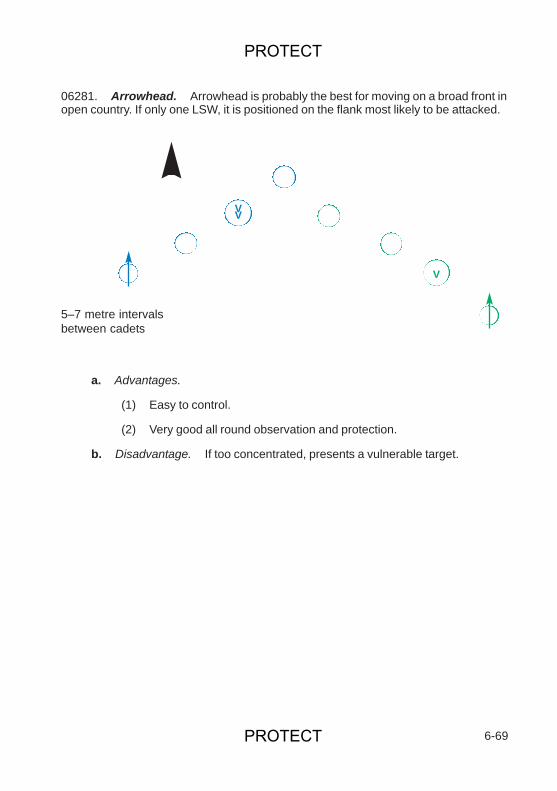
06281. Arrowhead. Arrowhead is probably the best for moving on a broad front inopen country. If only one LSW, it is positioned on the flank most likely to be attacked.
a. Advantages.
(1) Easy to control.
(2) Very good all round observation and protection.
b. Disadvantage. If too concentrated, presents a vulnerable target.
6-69
5–7 metre intervalsbetween cadets
VV
V
PROTECT
PROTECT
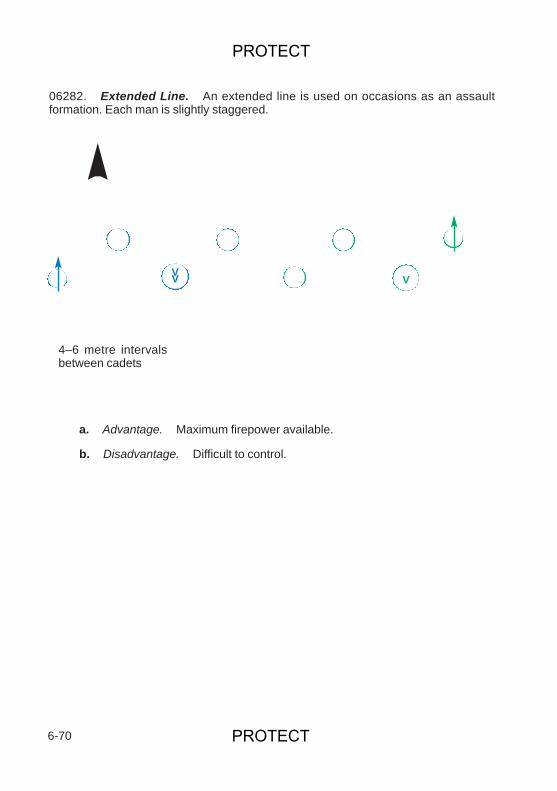
06282. Extended Line. An extended line is used on occasions as an assaultformation. Each man is slightly staggered.
a. Advantage. Maximum firepower available.
b. Disadvantage. Difficult to control.
6-70
4–6 metre intervalsbetween cadets
VV V
PROTECT
PROTECT
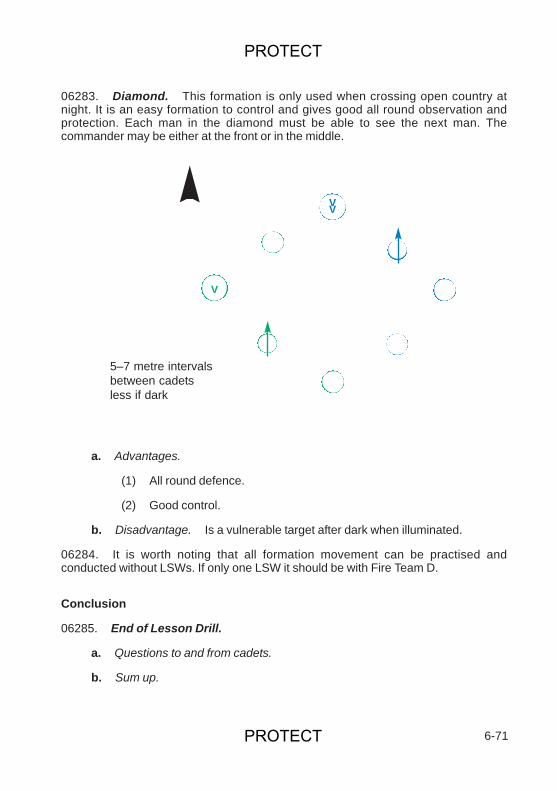
06283. Diamond. This formation is only used when crossing open country atnight. It is an easy formation to control and gives good all round observation andprotection. Each man in the diamond must be able to see the next man. Thecommander may be either at the front or in the middle.
a. Advantages.
(1) All round defence.
(2) Good control.
b. Disadvantage. Is a vulnerable target after dark when illuminated.
06284. It is worth noting that all formation movement can be practised andconducted without LSWs. If only one LSW it should be with Fire Team D.
Conclusion
06285. End of Lesson Drill.
a. Questions to and from cadets.
b. Sum up.
6-71
5–7 metre intervalsbetween cadetsless if dark
VV
V
PROTECT
PROTECT

c. Look forward to the next lesson.
06286 – 06290. Reserved.
6-72
PROTECT
PROTECT

LESSON 2. — FIELD SIGNALS
A. INSTRUCTOR’S NOTES
Aim
06291. To teach the cadets the more important field signals.
Timings
06292. One 30 minute period.
Stores
06293. Rifles.
Miscellaneous
06294. Cadets will not be able to remember this large number of signals all at once.They might start by learning those for the various formations which they have justlearnt in the previous section.
B. CONDUCT OF THE LESSON
Preliminaries
06295. Safety Precautions. Normal.
Introduction
06296. Explain: A section commander can always save time and effort by usingfield signals to control the section. When in close proximity to the enemy a sectioncommander must use them in order to avoid any unnecessary movement and also toavoid shouting, both of which could give away the section’s position to the enemy.
06297. The members of the section must always be alert and ready to receive asection commander’s signals and act upon them at once.
6-73
PROTECT
PROTECT
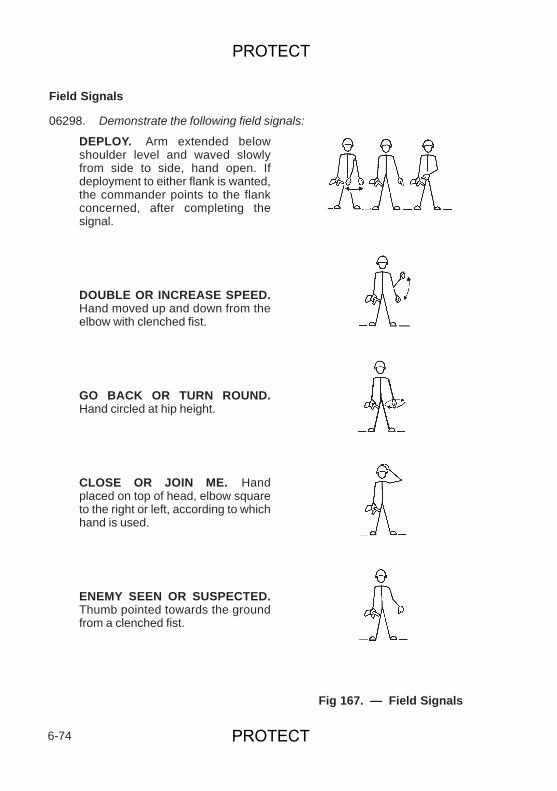
Field Signals
06298. Demonstrate the following field signals:
6-74
Fig 167. — Field Signals
DEPLOY. Arm extended belowshoulder level and waved slowlyfrom side to side, hand open. Ifdeployment to either flank is wanted,the commander points to the flankconcerned, after completing thesignal.
DOUBLE OR INCREASE SPEED.Hand moved up and down from theelbow with clenched fist.
GO BACK OR TURN ROUND.Hand circled at hip height.
CLOSE OR JOIN ME. Handplaced on top of head, elbow squareto the right or left, according to whichhand is used.
ENEMY SEEN OR SUSPECTED.Thumb pointed towards the groundfrom a clenched fist.
PROTECT
PROTECT
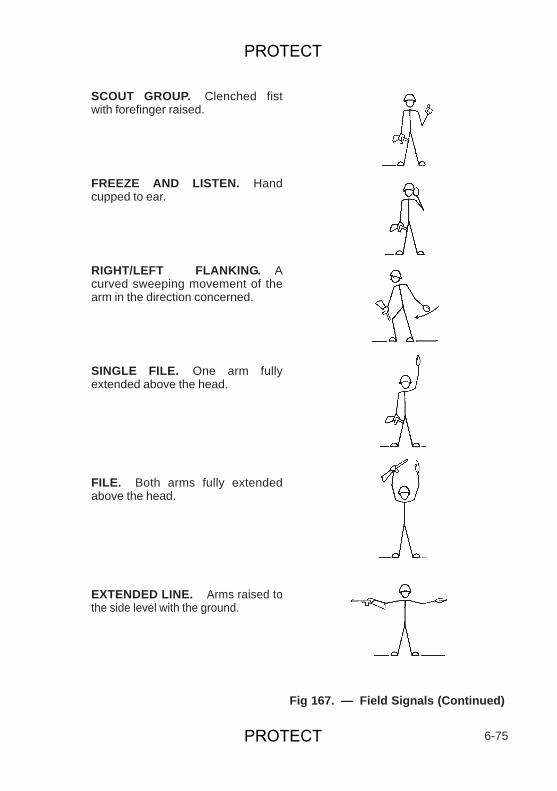
6-75
SCOUT GROUP. Clenched fistwith forefinger raised.
FREEZE AND LISTEN. Handcupped to ear.
RIGHT/LEFT FLANKING. Acurved sweeping movement of thearm in the direction concerned.
SINGLE FILE. One arm fullyextended above the head.
FILE. Both arms fully extendedabove the head.
EXTENDED LINE. Arms raised tothe side level with the ground.
Fig 167. — Field Signals (Continued)
PROTECT
PROTECT
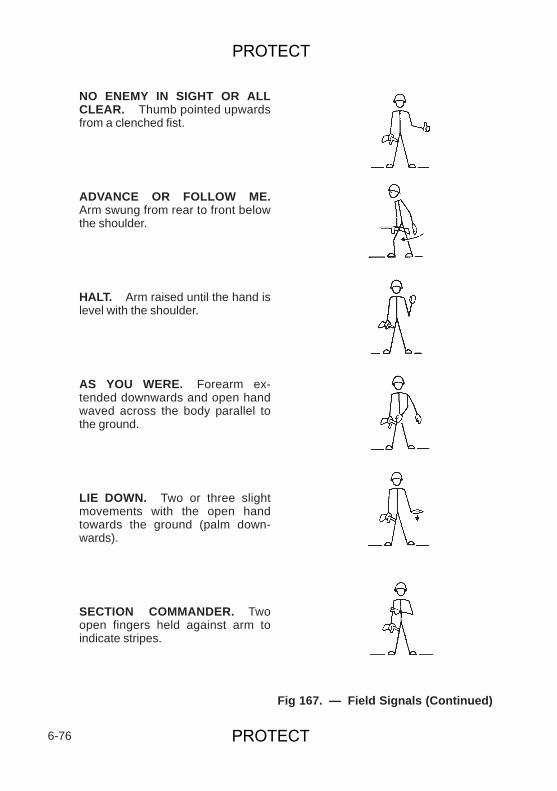
6-76
NO ENEMY IN SIGHT OR ALLCLEAR. Thumb pointed upwardsfrom a clenched fist.
ADVANCE OR FOLLOW ME.Arm swung from rear to front belowthe shoulder.
HALT. Arm raised until the hand islevel with the shoulder.
AS YOU WERE. Forearm ex-tended downwards and open handwaved across the body parallel tothe ground.
LIE DOWN. Two or three slightmovements with the open handtowards the ground (palm down-wards).
SECTION COMMANDER. Twoopen fingers held against arm toindicate stripes.
Fig 167. — Field Signals (Continued)
PROTECT
PROTECT
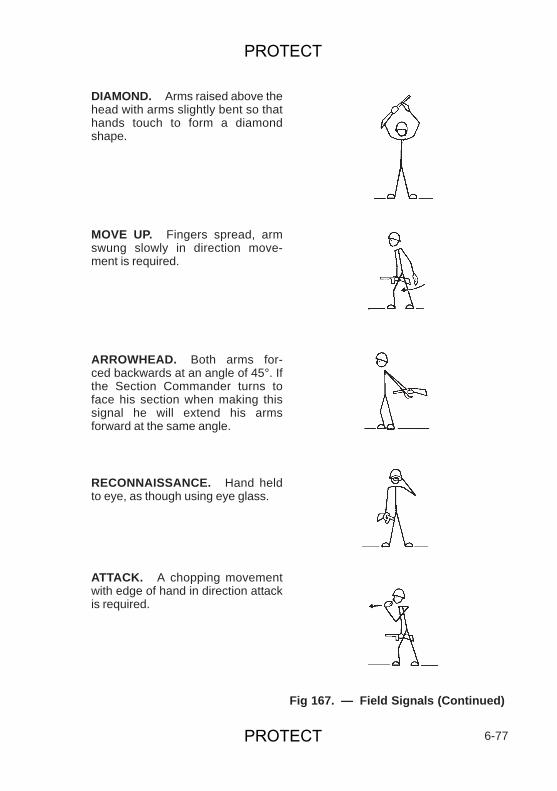
6-77
DIAMOND. Arms raised above thehead with arms slightly bent so thathands touch to form a diamondshape.
MOVE UP. Fingers spread, armswung slowly in direction move-ment is required.
ARROWHEAD. Both arms for-ced backwards at an angle of 45°. Ifthe Section Commander turns toface his section when making thissignal he will extend his armsforward at the same angle.
RECONNAISSANCE. Hand heldto eye, as though using eye glass.
ATTACK. A chopping movementwith edge of hand in direction attackis required.
Fig 167. — Field Signals (Continued)
PROTECT
PROTECT

Conclusion
06299. End of Lesson Drill.
a. Questions to and from the cadets.
b. Sum up.
c. Look forward to next lesson.
06300. Reserved.
6-78
PROTECT
PROTECT
LESSON 3. — SECTION FORMATIONS AND FIELD SIGNALS —PRACTICE
A. INSTRUCTOR’S NOTES
Aim
06301. To practise cadets moving in a section in the five basic formations, usingfield signals.
Timings06302. Two 30 minute periods.
Stores
06303. Rifles and LSWs.
Miscellaneous
06304. This practice should be carried out in the open where there is sufficientspace. A section commander may be nominated who may be the instructor himself.
B. CONDUCT OF THE LESSON
Preliminaries
06305. Safety Precautions. Normal.
06306. Practise cadets in forming up and moving in the five basic formations. Thenpractise changing from one formation to another whilst on the move, using theappropriate field signal. Changing from one formation to another should be done atthe double.
Conclusion06307. End of Lesson Drill.
a. Questions to and from the cadets.
b. Sum up.
c. Look forward to the next lesson.
06308 – 06310. Reserved.
6-79
PROTECT

6-80
PROTECT
PROTECT
SECTION 18. — ORDERS
A. INSTRUCTOR’S NOTES
Aim
06311. To teach cadets the orders process and extraction of orders.
Timings
06312. Eight 30 minute periods (two theory and six practical).
Stores
06313.
Notebooks and pencilsMapsHandout of the Orders headings.
Preparation
06314. Cover the theory of the orders in two lessons by first explaining OrdersLesson 1 and the Extraction of Orders as Lesson 2. Practice the cadets receivingorders and planning their own orders. Once the cadets have understood the processthe procedures can be produced live during exercises, e.g., Patrols, Ambushes,Section and Platoon Attacks. The cadet should never give orders above sectionlevel.
B. CONDUCT OF THE LESSON
Approach
06315. The main types of tactical orders are:
a. Warning Orders. These are orders providing early warning of futureintentions issued to allow timely preparation for the future task.
b. Formal Orders. These are given personally by the commander and givehim the opportunity to put his wishes to all his subordinates at once and dealwith their questions immediately.
6-81
PROTECT
PROTECT
c. Radio Orders. These are brief orders given over the radio. (This will notnormally be used by cadets.)
d. Operation Orders. These are detailed, comprehensive orders usuallyissued either in writing or as a map overlay. (This would not normally be used bycadets).
e. Quick Battle Orders. This is when a section commander/platooncommander has to give quick orders to solve a plan.
06316. Finally, there are briefings which are given to an entire sub-unit rather thanorders given only to subordinate commanders. Held in a secure area, these arenormally given at platoon level or higher. They enable a commander to talk to all hismen and can save much time. Subordinate commanders must then issue theparagraphs and details which concern them specifically. Briefings must not be used asan excuse for orders not to be extracted.
Warning Orders
06317. This allows commanders to give early warnings to his subordinates offorthcoming operations. The minimum requirement should include:
a. Scope of Operation.
b. Time and location of O Group.
c. No move before.
This allows planning to start and various lists of administration can be sorted out.
The Sequence of Orders
06318. Orders are always given in a standard sequence and whenever possiblewith the aid of a model. This helps everyone to understand because the pattern isfamiliar. It also helps to prevent important matters being forgotten and aidsubordinates in their extraction of orders.
06319. The main headings for formal orders are:
TASK ORGGROUNDSITUATIONMISSIONEXECUTIONSERVICE SUPPORTCOMMAND AND SIGNAL
6-82
PROTECT
PROTECT
Extraction of Orders
06320. Commanders at all levels have to extract the relevant information fromorders issued by their superior commanders. They will then conduct their ownestimate of the situation and finally produce their own orders. These orders shouldfollow a similar sequence having added their own concept and the detail needed bytheir subordinates. A diagrammatic representation of the process is at Annex A. Thekey element is the extraction of tasks both from the Mission and a consideration of thefactors. These tasks form the components of the Mission issued to his subordinates,the grouping and sequence of tasks in combination with the selection of routes whichforms the basis of the plan.
Preliminaries
06321. Before issuing formal orders a commander must ensure that certainpreliminaries are carried out. He must ensure that his ‘O’ group is seated in theformation required for the task. He should also issue map coordinates so that mapsmay be folded correctly and issue any air photographs if they are available. If a modelis used he must describe it and give the scale and the direction of north. He shouldthen issue any relevant meteorological information such as first and last light timings,moonstate, etc., if the situation permits. This function should be carried out by theplatoon sergeant. He should also ensure that the ‘O’ group knows what to do in theevent of it being attacked.
Task Organization
06322. The task organization of the platoon for the operation in hand should bedescribed by the platoon commander. This should include any attachments anddetachments.
Ground
06323. The ground should be described in relation to the operation about to becarried out. Prominent objects and features to which reference will be made in theorders should be pointed out. All reference points must be named with the reason fortheir significance, e.g., ‘Hill Wood (Grid 123456) — our assembly area’. In mostoperations it will be impossible to describe the ground from an OP. To give troops anidea of the ground over which they are going to move and fight, a model should beconstructed.
Situation
06324. The following must be included:
6-83
PROTECT
PROTECT
a. Enemy Forces. Known or estimated enemy strengths, locations andactions which might affect the completion of the platoon mission; as much detailas possible should be included. Also, the ground in relation to the enemy mustbe considered. This reflects the close relationship between enemy forces andground which should always be considered together.
b. Friendly Forces. The key to the friendly forces paragraph is ensuring thatsubordinates understand the commander’s intent at least two levels up. Inplatoon orders, the battlegroup commander’s intention and plan must be givenin outline, followed by the company plan in detail including the Main Effort (ME).In addition, the tasks of flanking platoons, supporting arms, support weaponsand the fire plan may be covered here. In section orders the company plan isgiven in outline (including ME) followed by the detailed platoon plan and thetasks of flanking sections. Depending on the operation a platoon ME may ormay not be appropriate. Sufficient detail of supporting troops and the fire planshould be given for the sections to visualise exactly how the task is to becompleted and what fire support is available.
c. Attachments and Detachments. If the platoon commander has notincluded a Task Org then he may include atts and dets in his orders. Where aTask Org is possible it should include them at that stage.
Mission
06325. General. The mission is a clear, concise statement of the task to beachieved and its purpose. The mission stated by a platoon commander in his orders isthat given to him by his superior, it should not be modified or changed withoutreference to his company commander. The context of this mission is made clear bythe company commander’s statement of his Concept of Operations, which includeshis Intent, Scheme of Manoeuvre (how the company will achieve its mission and MainEffort. The key to subordinates understanding of orders is the clarity of the Concept ofOperations and their individual mission statements and the details in CoordinatingInstructions.
06326. A commander should strive to give a minimum number of tasks to eachsubordinate. Therefore, the simplest type of mission statement and the one foundmost commonly at platoon level, contains a single task and purpose. An examplewould be:
1 Section is to destroy the enemy in the left hand trench in order to allowthe platoon to secure Saddle A.
Execution
06327. The following headings should be included in the Execution paragraph:
6-84
PROTECT
PROTECT
a. Concept of Operations (TELLING THE STORY). This paragraph is anaccount of how the platoon commander intends to achieve his mission. It willconsist of three elements:
(1) Commander’s Intent (WHAT). The purpose of the action and thedesired result.
(2) Scheme of Manoeuvre (HOW). How the platoon commanderintends to fight the battle and how his subordinates fit into his plan.
(3) Main Effort (WHERE). The Main Effort is expressed as the activitywhich the platoon commander considers to the success of the mission atthat time. A Main Effort will not always be appropriate but, if it is, it shouldconform to that of the higher commander. A true Main Effort will thuscascade downwards, reflecting one Main Effort. A platoon commandershould not include his own Main Effort if it does not conform with that of hiscompany commander.
The Concept of Operations paragraph is an account of the platoon’s chosencourse (telling the story) and should not merely be a list of tasks. Phases shouldbe used only if a critical timing or reorganization of the task organization isrequired (e.g., a patrol). Phases are not prescribed, but they should not be usedwhen their effect would be to slow the tempo or break the continuity of theoperation. The Concept of Operations gives the section commanders, whenfaced with the unexpected, a better idea of what they should do to meet theplatoon commander’s intent.
b. Mission Statements. The task or tasks of each section under commandmust be given under this subheading. At platoon level an example for an attackmight be:
(1) 1 Section:
Mission. To destroy the enemy in the right-hand trench in order toallow the platoon to secure the right side of the enemy position.
(2) 2 Section:
Mission. To destroy the enemy in the left-hand trench in order toallow the platoon to secure the right side of the enemy position.
A platoon commander must strive to give a simple mission statement to each ofhis section commanders. The norm will be a single task mission statement, withany supporting tasks being covered under the Concept of Operations paragraphand Coordinating Instructions, or in the Coordinating Instruction paragraphalone. Additional tasks to be carried out by sections, not central to the plan,should be included in the Execution paragraph. At section level, specific tasks
6-85
PROTECT
PROTECT
should be given to each fire team and sometimes to individuals or pairs of men;these are to appear in the Execution paragraph.
c. Coordinating Instructions. These are essential details which affect everysub-unit in the operation. What is required under this heading comes from athorough understanding of battle procedure and application of logical thought. Afull list of possible headings under this sub-paragraph for all types of operationcan be found at Annex B. Some examples are:
(1) Timings. These must be listed chronologically from the beginningof the operation.
(2) Actions On. This asks the question “What happens if . . . ”. It cancover such subjects as:
(a) Air attack.
(b) Action on being ambushed.
(c) Action on becoming lost.
Note: Actions on casualties, prisoners, etc., is covered in ServiceSupport.
(3) Fire Plan. The detailed fire plan must be given. The fire supportavailable for the operation is covered under Friendly Forces.
d. Summary. This is where the commander can emphasize the main pointsof the Execution paragraph. It is not a repeat of the Concept of Operations sub-paragraph. Critical areas of concern, to the commander, should be highlightedhere.
Service Support
06328. The Service Support paragraph gives the administrative arrangementsrequired to ensure the accomplishment of the mission. Standard items covered are:
a. Dress.
b. Equipment and Tools.
c. Weapons.
d. Ammunition.
e. Rations and Water.
f. Medical arrangements, including location of the Company Aid Post (CAP).
6-86
PROTECT
PROTECT
g. Prisoners of War (PW).
h. Transport location, loading, release point.
Note: These headings can easily be remembered by the mnemonic DEWARMPT.
Command and Signal
06329. Command. The location and moves of HQs and commanders must begiven one up, i.e., at section level give the position of platoon HQ and the location ofthe section commander both in the assault and on reorganization. Alternativecommanders must be nominated in the event of casualties.
06330. Signal. This will include all necessary radio information, i.e., frequencies,additional callsigns on the net, codewords, etc., plus any other signals to be used, i.e.,lights and whistle blasts.
06331. Password. This is also given under this paragraph.
Questions
06332. After issuing orders, time must be given for consideration, then eachmember of the ‘O’ group must be allowed to ask questions in his turn. Finally,questions from the commander will ensure that individuals have correctly understoodthe orders. For a complicated operation, such as a patrol, it is often best to give theopportunity for questions at the end of each part of the order.
Synchronization of Watches
06333. Before an ‘O’ group disperses all watches must be synchronised to ‘gunnertime’, thus ensuring accurate coordination with the supporting artillery for the FirePlan.
Issuing Orders
06334. “No plan survives contact with the enemy” so said Field Marshal CountHelmuth von Moltke. The need for conciseness, clarity and simplicity in the issue oforders is paramount. If procedures and drills are well known, the need for detailedinstructions covering such matters as grouping, order of march, assaulting formationand reorganization can be largely eliminated, with only variations to normalprocedures being given as necessary.
06335. The following points should be remembered when issuing orders:
a. Protection. The need to post a sentry.
6-87
PROTECT
PROTECT
b. Distractions. The need to keep away from vehicles and radios.
c. Concealment. Particular care is required if maps are to be spread out or ifit is dark when lights are required.
d. Comfort. Some form of shelter and warmth is required whenever possible.
e. Brevity. Remember, the longer commanders are concentrated togetherthe more vulnerable they are.
f. Do:
(1) Make your orders concise, clear and simple.
(2) Give subordinates a thorough understanding of your intentions, andexplain the outline concept of your immediate commander.
(3) Integrate all subordinate elements in coordinated action.
(4) Allow subordinates the maximum freedom of action consistent withthe need for coordination.
g. Do Not:
(1) Try to give detailed instructions covering every possible contingency.
(2) Slavishly use every heading in the boxes; they are provided as areminder of what you MIGHT need to cover.
06336. When giving orders all commanders must impart confidence and illustratetheir intentions by using a model whenever possible.
06337. Members of the ‘O’ group should sit in their order of precedence, or in theformation to be used on the operation. For example, if the platoon is attacking with 2Section as left assault section and 3 Section as right assault section, place 2 Sectioncommander on the right and 3 Section commander on the left, as they face you.
Method of Delivery
06338. Orders should be delivered clearly and fluently. The delivery should not betoo fast and should be in a logical sequence, following the standard format.
06339. The platoon commander may have to adjust his manner to take account ofthe following factors:
a. The standard of training of his section commanders.
b. How well he knows them.
6-88
PROTECT
PROTECT
c. How long they have worked with him as a team.
d. How tired his men are.
Battle Orders
06340. There will be many occasions in battle when very quick action is demandedand it will be necessary to issue immediate orders. They contain essential informationonly. For example, a section commander can limit his orders for a quick dismountedattack to:
a. Task Org (any alteration to original task org). )
b. Situation; enemy/ground, friendly forces. )
c. Mission. )
d. Left or right flanking. )
e. Route to FUP. (Possible just “Follow me”.) )
f. Order of march. ) Only if variationsto standard battle drills
g. Assault tasks. )
h. Details of fire and movement )
i. Limit of exploitation. )
j. Fire Plan. )
k. H Hour )
The Orders Process
06341. A commander has to:
a. Receive orders himself.
b. Extract from them what concerns his own command.
c. Estimate how best to achieve the mission given to him.
d. Prepare orders for his own subordinates.
e. Issue orders to his subordinates.
6-89
PROTECT
PROTECT
Receiving Orders
06342. Before receiving orders a commander should:
a. Study the company warning order, relating it to the map, and if possible theground.
b. Issue a warning order, having made a time appreciation. (If time allows.)
c. Arrive early at the ‘O’ group to study maps, air photographs and models ofthe ground, and to mark his own maps. He must find out exactly where he is onthe map and use any spare time to study the map and the ground.
d. He must take with him to the ‘O’ group:
(1) A map.
(2) A notebook (prepared with standard orders headings for theforthcoming operation).
(3) An Aide-Mémoire.
(4) A pencil and chinagraph.
(5) His binoculars.
(6) His compass.
(7) A torch (if applicable).
06343. At Annex A is the layout of Battle Orders. While receiving orders, as muchdetail as possible should be map marked and notes only taken on matters affecting hisown platoon. The remainder of the orders must be listened to carefully andunderstood.
06344. Similarly, section commanders have to extract and reshape the orders theyreceive from their platoon commander before passing them on. An example of thisreshaping of orders is given at Annex B.
06345 – 06350. Reserved.
6-90
PROTECT
PROTECT
SECTION 19. — PATROLS
LESSON 1. — AIMS AND TYPES OF PATROLS
A. INSTRUCTOR’S NOTES
Aim
06351. To teach cadets about the purpose of patrolling and the types of patrols.
Timings
06352. One 30 minute period.
Stores
06353. Chalkboard.
Preparation
06354. Draw on the chalkboard two diagrams to illustrate a reconnaissance and afighting patrol.
B. CONDUCT OF THE LESSONIntroduction
06355. Explain: Patrolling is probably the most important operation in war so faras the infantry is concerned.
Aims of Patrolling
06356. Explain: There are three aims of patrolling:
a. To obtain up-to-date and accurate information as a result of which a com-mander can plan an operation.
b. To dominate the ground between a commander’s own unit and that of theenemy, thus making it easier and safer for his own patrols to gather informationand more difficult for the enemy patrols to achieve similar results.
c. To destroy and disrupt enemy forces, particularly those which may try toinfiltrate the commander’s own positions or between neighbouring positions.
6-91
PROTECT
PROTECT
06357. Patrolling is carried out by both sides by day and night in all the phases ofwar. Successful patrolling calls for a high standard of individual training, good teamwork and initiative and determination on the part of the patrol leader. Successfulpatrolling has a beneficial effect on unit morale and will adversely affect the enemy’smorale.
06358. Patrolling enables the defence to be conducted in an aggressive manner.In peacetime it is an excellent stimulant to training because it creates keen interestand can so easily be made realistic. The foundation of successful patrolling is thor-ough preparation.
Types
06359. General. All patrols have the task of providing information. They mustalso be prepared to fight, either to gain information required or to protect themselvesif necessary. There are three main types of dismounted patrols:
a. Reconnaissance patrols.
b. Standing patrols.
c. Fighting patrols.
06360. Reconnaissance Patrols. These are patrols of a minimum strength forthe task, usually one NCO and three cadets, which gain information by observationand operate generally by stealth. They avoid combat except for self-protection or totake advantage of an unusual opportunity.
06361. The roles in which reconnaissance patrols may be employed include:
a. Collecting topographical information on features, tracks and the state ofthe ground.
b. Obtaining details of enemy minefields and the extent of enemy positions.
c. Locating enemy machine guns and defensive fire (DF) areas, where fire isimmediately directed on call in case of emergency.
d. Investigating noises made by the enemy, their habits and patrol routes.
e. Checking our wire and/or minefields at first or last light.
f. Acting as listening posts to give early warning of enemy approach and withthe ability to call down fire.
06362. Standing Patrols. These are patrols of a minimum strength of one NCOand three cadets which gain information of enemy movement and prevent or disrupt
6-92
PROTECT
PROTECT
enemy infiltration. They move into position as quietly as possible and try to remainconcealed and gain their information until they are required to withdraw or, if discov-ered, fight their way out. Their main tasks are to:
a. Watch and listen on likely enemy approaches.
b. Watch over dead ground in front of and between friendly localities.
c. Watch over minefields and obstacles.
For these tasks they should have good communications so that they can inform themain body.
06363. Fighting Patrols. These are patrols organized with sufficient strength andarmament (usually a minimum of two NCOs and nine cadets) to accept combat in orderto fulfil their role, e.g.,:
a. Denying enemy patrols freedom of action in No Man’s land.
b. Driving in enemy protective patrols.
c. Interfering with enemy working parties.
d. Distracting enemy attention from other activities.
e. Carrying out raids.
f. Capturing prisoners for identification purposes.
g. Tank hunting.
h. Laying ambushes.
i. Protecting reconnaissance and working parties of other arms.
j. Escorting stretcher parties.
Conclusion
06364. End of Lesson Drill.
a. Questions to and from cadets.
b. Sum up.
c. Look forward to the next lesson.
06365 – 06370. Reserved.
6-93
PROTECT

6-94
PROTECT
PROTECT
LESSON 2. — PATROLS: MOUNTING, CONDUCTING ANDDEBRIEFING
A. INSTRUCTOR’S NOTES
Aim
06371. To teach cadets the action to be taken by all those concerned with a patroloperation from the time it is first ordered until the completion of the task.
Timings
06372. Two 30 minute periods.
Stores
06373.
Chalkboard Sand or cloth model Models
Miscellaneous
06374. The syllabus (both CCF and ACF) includes 12 periods on practical instruc-tion on patrolling.
Preparation
06375. Prepare sand or cloth model (see Volume II, Chapter 5, Section 24).
B. CONDUCT OF THE LESSON
Approach
06376. Explain: The success of a patrol depends on good planning beforehandas well as good action during the actual patrol. Compliance with the following para-graphs by the officer responsible for mounting and debriefing the patrol and the patrolcommander ensures that nothing is forgotten.
6-95
PROTECT
PROTECT
Action by Officer Responsible for Mounting and Debriefing Patrol
06377. Warning Order. Sends out a warning order well in advance to includebrief outline of patrol task, name of commander with rendezvous (RV) and time forhis briefing.
06378. Brief. Briefs patrol commander on the following lines:
a. Ground. Shown from observation post (OP), air photographs, fieldsketch or map. Includes hills, valleys, woods and natural obstacles such asrivers, bridges and waterlogged ground.
b. Situation.
(1) Enemy: All available information.
(2) Friendly Forces: Forward disposition and activities and details ofother patrols out.
c. Mission. The specific task of the patrol. It may be possible to add to thisspecific task others, such as obtaining additional information, provided they canbe carried out without detriment to the main task.
d. Execution.
(1) Time out and where.
(2) Time back and where.
(3) Limitations on choice of route.
(4) Fire support.
e. Service Support. Administrative arrangements before, during and afterthe patrol.
f. Command and Signal.
(1) Radio including any restrictions.
(2) Any special signals.
(3) Recognition — password.
(4) Debriefing instructions.
06379. Debrief. Debriefs patrol commander on his return by reading his report(see paragraph 06387).
6-96
PROTECT
PROTECT
Action by Patrol Commander
06380. Warning Order. Issues a warning order to include brief outline of patroltask, members of patrol including second-in-command, time and place for briefingand any special administrative arrangements including weapons and equipment.Normally dress and equipment should be as light as possible but must include waterand emergency rations in case the patrol is cut off and has to lie up for a periodbefore returning to base.
06381. Also:
a. Studies air photos, maps, previous patrol reports.
b. Selects observation posts for his reconnaissance.
c. Carries out reconnaissance from OPs during which he looks for:
(1) Routes to and from objective (to be different).
(2) Landmarks.
(3) OPs.
(4) Dead ground and covered approaches.
(5) Obstacles.
(6) Likely places for ambush — by us or by enemy.
(7) Enemy positions, likely positions and defensive fire (DF) areas.
d. Considers light and weather conditions, moon etc.
e. Makes his appreciation and plan, keeping them as simple as possible.
f. Draws field sketch showing distances (in paces), bearing and timings ofbounds.
g. Prepares model for briefing the patrol.
h. Prepares his orders.
i. Meets patrol at RV.
06382. Briefs the patrol by showing members the ground from an OP (individuallyif necessary) and points out minefields, lanes and gaps in wire, etc.
06383. Gives out his orders to the patrol, in the format given at Annex C with theaid of a cloth or sand model of the ground:
6-97
PROTECT
PROTECT
06384. Rehearsals. Carries out noisy or silent rehearsals which must include:
a. Route. Moving out and returning through own FEBA.
b. Formations. Formations and drill for changing formations. One or moreof the three formations — single file, file or diamond — is adopted during apatrol depending on ground and visibility. A fighting patrol of two NCOs andnine cadets might move in diamond formation as illustrated in Section 17,Lesson 1.
c. Use of Scouts. Move by bounds ahead and are followed by the remain-der of the patrol.
d. Movement. Every member of the patrol is allotted his specific task andarc of observation. All movements must be silent with frequent halts to observeand listen, particularly when approaching the enemy position and also at night.When halted sink down to the ground level, avoiding a jerky movement, andmake use of the skyline. Make use of the previously prepared signal to move— a silent ‘touch’ signal — to ensure that no one is left behind.
e. Action on Objective. Final RV. This is an RV to which the patrol goes aftercompleting the task if there was contact at that stage with the enemy. It mustbe easy to find and is pointed out to all members of the patrol during theapproach to the objective.
f. Action on Lights.
(1) If time allows, get away — otherwise freeze.
(2) At night close one eye to preserve night vision.
(3) If a trip flare move away from the area as quickly as possible, thenget down and observe.
g. Encounter Drill.
(1) The action will depend on the task and circumstances. It may bedesirable to avoid action and move away as quickly as possible. If this isimpossible an immediate assault is the only alternative as explained inSection 23.
(2) If ambushed, the only solution is to scatter and move individually tothe previously arranged RV.
h. Crossing Obstacles.
(1) On encountering an obstacle, the patrol halts and the commandergoes forward to reconnaissance it. He then decides whether to cross or
6-98
PROTECT
PROTECT
go round the obstacle. If he decides to cross, he selects where the cross-ing is to be made.
(2) The basic requirements of any obstacle crossing drill are:
(a) Silent movement.
(b) Posting a cadet by the obstacle to guide the others over.
(c) At all times at least one cadet must be ready to fire his weaponor throw a grenade if the patrol is surprised by the enemy.
i. Casualty Evacuation.
(1) All casualties must be brought back.
(2) If on the way out the patrol may have to pick up the casualty on itsreturn; alternatively it may be possible to summon another patrol by radioto bring him in.
j. Prisoners.
(1) If a fighting patrol takes a prisoner he must be brought back alivewhether or not this was the task of the patrol — prisoners are valuablesources of information.
(2) If a prisoner cannot be taken with the patrol, he may be tied up andgagged, put under guard and collected later either by the same patrol orby another one detailed or summoned by radio for this purpose.
06385. Inspection. Carries out final inspection of dress, weapons, ammunitionand equipment. In particular:
a. Dress and equipment to be as light as possible but to include emergencyrations and water.
b. Dress and equipment to be properly fitted and silent. Jumping up and downwill show whether it is satisfactory.
c. No documents will be taken which can afford useful information to theenemy if captured.
06386. Conduct of Patrol.
a. Navigation.
(1) Previous study of air photos and maps etc.
(2) Make full use of landmarks.
6-99
PROTECT
PROTECT
(3) By compass bearing and counting paces — especially at night.‘Legs’ to be measured to the nearest 50 paces from map. If the patrolbecomes dispersed, RV at the end of the previous leg.
(4) Avoid prominent cover, e.g., edges of woods, tracks, hedges, defiles— these are likely places for enemy ambushes or standing patrols.
b. Fire Support. Pre-arranged or called for by radio:
(1) To distract enemy whilst obstacle is crossed or objective isapproached.
(2) For support on the objective.
(3) To help the patrol extricate itself in case of emergency.
06387. Debrief on Return. Verbal report followed by a written report (see AnnexD) under the following headings as applicable:
DateDestination of patrolMapsSize and composition of patrolTaskTime of departureTime of returnRoutes out and back Type of ground — vegetation, surface, bridges — suitability for armoured orwheeled vehicles.
Conclusion
06388. End of Lesson Drill.
a. Questions to and from cadets.
b. Sum up.
c. Look forward to the next lesson.
06389 – 06390. Reserved.
6-100
PROTECT
PROTECT
LESSON 3. — PATROLLING — PRACTICE
A. INSTRUCTOR’S NOTES
Aim
06391. To practise cadets in patrolling in Single File, File and Diamond formations,using Field Signals.
Timings
06392. One 30 minute period.
Stores
06393.
RiflesLSW
Miscellaneous
06394. This practice should be carried out in the open where there is sufficientspace. A patrol commander must be nominated who may be the instructor himself.
B. CONDUCT OF THE LESSON
Preliminaries
06395. Safety Precautions.
06396. Practise the cadets in forming up and moving in the three patrol formationsalready taught. Then practise changing from one formation to another on the move,using the appropriate Field Signal. Changing from one formation to the next shouldbe done at the double.
Conclusion
062397. End of Lesson Drill. Sum up.
06398 – 06400. Reserved.
6-101
PROTECT
PROTECT

6-102
PROTECT
PROTECT
SECTION 20. — AMBUSHES
INTRODUCTION
06401. General. Of the roles of fighting patrols, the ambush is amongst the mostchallenging for the cadet to take part in; it involves teamwork, skill, intelligence,fitness, cunning and discipline. It is not difficult for instructors to organize, but requiresfrom them imagination, together with close control, to ensure that training is realisticbut safe. For these reasons the ambush has been given a section to itself. It shouldnot be forgotten however that patrols with alternative aims, such as reconnoiteringenemy positions, manning OPs, and carrying out raids and snatches, should also betaught and practised; thus it is essential to read this section in conjunction with Section19.
06402. Types of Ambush. There are two types of ambush:
a. Deliberate. When the task is given well in advance, allowing sufficienttime for deliberate planning and preparation. Only the Deliberate Ambush isdealt with in this section, and the training of cadets should always commencewith this type of ambush, though the same principles apply to both types.
b. Immediate. In response to ‘hot’ information, or as a contact drill, with littleor no time for reconnaissance (recce) or planning. Deliberate ambushes onlyare included in the APC (ACF) syllabus.
06403. Ambush Sites. Suitable places for ambushes include:
a. Known enemy routes.
b. Administration areas and supply/water points. In counterinsurgencyoperations the approaches to villages, cultivated areas, known arms cachesand food dumps are particularly suitable.
c. Places where vegitational change occurs (e.g., at the junction of forest andgrassland).
d. Approaches to own bases and defensive positions, and the withdrawalroute from own ambush sites to catch an enemy follow-up.
06404. Principles of Ambushing. Instructors should bear the followingprinciples in mind when teaching cadets and planning exercises:
a. Good Intelligence. Ambushes should only be set when there is a goodchance of a contact with the enemy based on good intelligence.
6-103
PROTECT
PROTECT
b. Thorough Planning and Preparation. Reconnaissance must be carefullyplanned and thorough. All the main actions of an ambush must be wellrehearsed.
c. Security. Thoughtless reconnaissance will betray the position of theambush. The ambush site must be chosen to minimize the chances of beingsurprised, and those carrying out the ambush must themselves be able to meetan enemy attack if necessary.
d. Concealment. Avoid leaving signs within the ambush area. Excellentcamouflage is required both by day and night.
e. Good Control. All members of the ambush must know the plan in detail.All signals, together with the plan for springing the ambush, must be kept simple,and be thoroughly rehearsed.
f. Discipline. The ambush will only be successful if all members are alert,make no noise and restrict all movement. Reaction to signals must be fast andweapons ready to fire at a moment’s notice.
g. Safety. The following safety points must be complied with:
(1) The Cadet Training Safety Precautions booklet (AC 70768) must beconsulted BEFORE ambush training starts.
(2) All movement must be conducted with weapons MADE SAFE.
(3) Uncontrolled firing must not be allowed. At night aim must not betaken directly at an individual, but to ensure complete safety there shouldalways be a minimum distance of 50 metres between muzzles and theenemy.
(4) A high ratio of Directing Staff (DS) is required during ambush trainingwith blank ammunition/pyrotechnics, especially at night.
06405 – 06410. Reserved.
6-104
PROTECT
PROTECT
LESSON 1. — THE DELIBERATE AMBUSH
A. INSTRUCTOR’S NOTES
Aim
06411. To teach and practise cadets in the preparation for, and conduct of theDeliberate Ambush.
Timings
06412. Two periods should be allocated as follows:
a. Period 1. In the classroom using chalkboard/vufoil/model. Confirmationby a short demonstration, preferably outside.
b. Period 2. Practising the cadet as a member of an ambush in detail and inslow time. This must be done outside.
Stores
06413.
Prepared chalkboard diagram/model with symbols/vufoil diagramsRifles LSWCommunication cord
Miscellaneous
06414. Reconnaissance. DS must do a detailed daylight reconnaissance andalso one by night if a night ambush is planned. Points to note are:
a. The 50 metre clearance obligatory before blank ammunition can be fired ata live target is often difficult to find on a track, or in a woodland clearing, so othersites may have to be found. The 50 metre distance must be physically measuredduring the reconnaissance.
b. Mark positions for Cut Off Groups, etc., (small pieces of white tape may beused) so that you can find your way back to them, especially at night.
06415. Conduct.
a. Cadets will start to fidget if kept in position much more than 15 minutes.Time seems to pass very slowly, particularly at night.
6-105
PROTECT
PROTECT
b. Safety DS. You need one or two members of the DS with the KillingGroup and one with each Cut Off Group. Beware of having a large ‘gaggle’ ofDS with the patrol; this is unnecessary and very off-putting for the cadets. Withthought extra DS can meet up with the patrol at a pre-arranged point (e.g., theambush site).
c. Safety — Weapons. Weapons need to be made ready for firing in theambush positions, so that the ambush can be effectively and realisticallysprung, and must be ‘MADE SAFE’ before withdrawing. With a little thought thisneed not destroy realism. Suggested action is as follows:
(1) The ‘ambush set’ signal automatically indicates ‘cock weapons’.Cadets should be practised in slowly and quietly operating bolts/cockinghandles avoiding unnecessary noise. DS movement need only be minimal.
(2) The ‘withdrawal’ signal or the ‘search party prepare to move’ signalautomatically indicate ‘MAKE SAFE’. At night only the LSW needs to bechecked with a torch (red); the other weapons can be checked by DS by‘feel’. Be especially careful to check that cocking pieces are forward andsafety catches on. This takes a little time but can be done remarkablyquietly.
d. Rehearsals. The ambush party must rehearse everything, in the correctsequence, before departing on the patrol. This may seem boring, but is the keyto the smooth running of the exercise, and to the cadets’ enjoyment. Each cadetmust know exactly what is happening at all times; a cadet who is confused oruninformed will derive little benefit or enjoyment from any exercise, especially ifit is a night exercise.
e. Anticlimax. There is a tendency for cadets to ‘switch off’ after withdrawalfrom the ambush position. The instructor must use his imagination to ensurethat this feeling of anticlimax is kept to a minimum on the return route; use flaresetc to keep the patrol on its toes.
B. CONDUCT OF THE LESSON
Approach
06416. An ambush is a surprise attack, by a force lying in wait, on a moving ortemporarily halted enemy. It is usually a brief encounter, conducted at comparativelyclose quarters. When well prepared and executed it can cause heavy casualties andserious loss of morale amongst the enemy; however poor planning, preparation andexecution may result in failure, and serious losses to the ambush party.
6-106
PROTECT
PROTECT
Grouping
06417. All ambush parties are sub-divided into smaller groups, each with their ownleaders. Normally the grouping is as follows:
a. Killing Group. Covers the chosen killing ground and springs the ambush.It contains the Ambush Commander and the LSW(s). Size varies, but normallythe group will number four men in a section ambush, and will consist of onesection and platoon HQ in a platoon ambush.
b. Cut-off/Stop Groups. Serve to give warning of enemy approach, cut offhis line of retreat or help to defeat an enemy counterattack from a flank. In asection ambush the group will consist of two men, and in a platoon ambush eachgroup will be of section strength.
Layout
06418. Although various alternatives exist, in the interests of safety and ease ofcontrol, it is suggested that teaching is limited to the Short Term Basic Linear Ambush(see Fig 168).
Planning
06419. Sequence. Actions prior to occupying the ambush position are carried outin the following sequence:
a. Reconnaissance.
b. Issue preliminary orders in the base camp.
c. Preparation and rehearsal in the base camp.
d. Move to ambush area.
e. Final reconnaissance by Ambush Commander and Cut Off GroupCommanders.
f. Final orders of Ambush Commander (if necessary).
g. Occupy position.
06420. Reconnaissance. The Ambush Commander should if possible carry outa reconnaissance of the ambush site prior to giving preliminary orders. Sometimes,however, he will be limited simply to a study of air photographs, maps, patrol reports,etc. If possible he should try to observe the ground from the enemy point of view, andhe should select/ confirm the following:
6-107
PROTECT
PROTECT
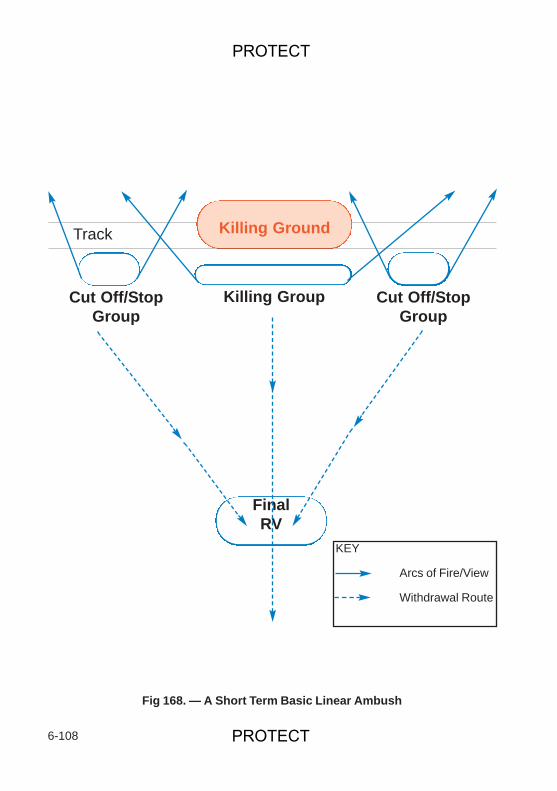
6-108
Fig 168. — A Short Term Basic Linear Ambush
Killing Ground
FinalRV
Track
Killing GroupCut Off/StopGroup
Cut Off/StopGroup
KEY
Arcs of Fire/View
Withdrawal Route
PROTECT
PROTECT
a. The killing area and positions of the Killing Group and Cut Off Groups,including the detailed siting of LSW, booby traps, trip flares, etc.
b. That the position of each group offers:
(1) Concealment, including the group’s approach route and
(2) A good view of the killing area and/or the enemy approaches.
c. The final RV, and routes to and from it.
d. The withdrawal route.
Orders, Preparation, Rehearsal and Move Out
06421. Orders. The Ambush Commander should be very thorough in briefing hisparty, using a model to assist him. This should be phased to leave enough time forpreparation and rehearsals. Orders are similar to those for a normal patrol (see AnnexC) but with the following extra detail in the Execution paragraph:
a. Action on Arrival at Final RV/Firm Base.
(1) Entry order of march.
(2) Positions and arcs (describe these, but also cover in rehearsals).
(3) Sentries (if necessary).
(4) Action if surprised.
(5) Action if reconnaissance party does not return within ........ minutes.
(6) Confirmatory orders (location/time, if necessary).
b. Action in Ambush Area.
(1) Order of march.
(2) Method of entry.
(3) Positions.
(4) Laying of communication cord.
(5) Arcs of fire.
(6) Signal for ‘ambush set’.
(7) Ambush to be set by ........ hours.
6-109
PROTECT
PROTECT
c. Action on Approach of Enemy.
(1) Warning signals from Cut Off Groups.
(2) Signal to fire/stop firing.
(3) Search party (if necessary).
d. Withdrawal to RV/Firm Base.
(1) Signal.
(2) Order of march.
(3) Action in Final RV/Firm Base (reorganize, check numbers, weapons,etc., — move out).
06422. Preparation. Thorough preparation is essential for success, and shouldinclude:
a. The thorough cleaning and testing of all weapons.
b. The testing of special equipment, e.g., ropes and night viewing aids.
c. The careful preparation and testing of all radio/communications equipment.New batteries should be fitted, and spare batteries carried if possible.
d. The camouflage of cadets, clothing and equipment.
06423. Rehearsal. If for a night ambush, then rehearsals should be by day andnight. They must:
a. Show where each group (and those within them) are in relation to eachother.
b. Test signals/communications.
c. Cover alerting, and springing of the ambush.
d. Practise withdrawal to Firm Base/Final RV.
06424. Move to Ambush Area. The ambush party do not move directly intoposition, but stop short at a Final RV/Firm Base, form a tight defensive perimeter, andwait whilst the Ambush Commander and the Cut Off Group Commanders do their finalreconnaissances.
06425. Final Orders. There should only be a need for brief confirmatory orderswhen some last minute changes are necessary as a result of the final reconnaissance.This is more likely (and important) by night than by day, and could include:
6-110
PROTECT
PROTECT
a. Description of the ambush killing area, enemy approaches and counter-attack routes.
b. Individual tasks if these vary from rehearsals.
Occupation Sequence
06426. Occupation. Having completed his reconnaissance unless he has toreturn to the Final RV/Firm Base to give confirmatory orders, the AmbushCommander will normally remain on the position, sending the Cut Off GroupCommanders back to bring up the remainder of his command. In the case of a platoonoperation, sentries from both the Cut Off and Killing Groups are taken forward andplaced in their respective positions during the reconnaissance and they remain therethroughout the move forward to the ambush area. Cut Off Groups, followed by theKilling Group, enter the area on the same axis, and move into their positions. TheAmbush Commander is normally positioned in the centre of the Killing Group, next tothe LSW.
06427. Setting Up. Once all the groups are in position, cadets from the Cut OffGroups start laying a communications cord/cable to the Ambush Commander. Any tripflares, booby traps, etc., are set.
06428. Ambush Set. When the commander receives the signal from each groupthat all cadets are back in their position, he gives the signal for ‘ambush set’. After thistime no one leaves their position. Care must be taken not to give the ambush away;cadets must be taught to select a comfortable position and to remain in it withoutundue movement, noise, smoking, eating, etc., for the whole of the duration of theambush.
Springing the Ambush
06429. On sighting the enemy, the Cut Off Group will alert the Ambush Commanderof their approach and direction by using the communications cord. The AmbushCommander will alert the remainder of his force. Weapons are carefully brought up tothe aim, taking care not to rustle the undergrowth.
06430. The Ambush Commander springs the ambush when as many enemy aspossible are in the killing area. The signal for springing will always be either:
a. A burst from the LSW OR
b. A shot from the commander’s weapon OR
c. Ignition of a trip flare, in conjunction with a burst from the LSW (only used ifit is too dark for any other method).
The signal is NEVER the commander shouting ‘FIRE’.
6-111
PROTECT
PROTECT
After Springing
06431. Fire Fight. This is very short and sharp. The commander then regainscontrol by shouting ‘STOP’ or ‘CEASE FIRE’. There is a pause whilst everyone listensfor:
a. Movement of enemy not killed or wounded.
b. An enemy counterattack.
c. The enemy moving back to collect casualties, thinking the ambush haswithdrawn.
06432. Search Party. The Ambush Commander may have detailed a searchparty in his orders. Usually led by the ambush second-in-command, and consisting ofcadets from the Killing Group, the search party go forward to check for enemyprisoners/documents etc. This is normally done by day only, since at night allmovement forward of the ambush is deemed enemy. Careful control regarding safetyis absolutely essential.
Withdrawal
06433. On receiving the signal (as practised in rehearsals) all groups withdraw tothe final RV. Minimum time is spent here to ensure that everyone is present, and thatthere is no enemy follow-up, before moving off by the return route. The order ofwithdrawal to the Final RV is normally the Killing Group leading, followed by the CutOff Groups.
Action on Lights/Trip Flares
06434. If time allows, get away — otherwise freeze. At night close one eye topreserve night vision. If a trip flare move away from the area as quickly as possible,then get down and observe.
Encounter Drill
06435. If the ambush patrol is itself ambushed the only solution is to scatter andmove individually to the previously arranged RV.
06436 – 06440. Reserved.
6-112
PROTECT
PROTECT
SECTION 21. — PATROL HARBOUR
A. INSTRUCTOR’S NOTES
Aim
06441. To teach the occupation of a patrol harbour at section and platoon level.
Timings
06442. One 30 minute period followed by the practical periods.
Stores
06443.
Diagram of the occupation of a harbourRiflesFull webbing including ponchos, string, etc.
Preparation
06444. Draw on a chalkboard a diagrammatical occupation of a harbour (see Fig169) or prepare a series of vufoils.
B. CONDUCT OF THE LESSON
Approach
06445. A patrol harbour is a position established to provide security when a patrolhalts for an extended period. Possible reasons for the establishment of the harbourare:
a. To avoid detection.
b. To lie up whilst a detailed reconnaissance of an objective is made prior tothe formation of a final plan and issue of detailed orders.
c. To form a base from which operations can be mounted, e.g., attack,ambush, reconnaissance, or establishing OPs.
d. To provide an RV after infiltration into an enemy area by small groups, orafter withdrawing from such an area.
6-113
PROTECT
PROTECT
e. To provide security for an administrative halt after long periods ofmovement or close contact.
Triangular Harbour Drills
06446. The most common application of the patrol harbour is the establishment of atriangular harbour by a platoon. The drill can be adapted by a smaller patrol.
06447. The triangular harbour at platoon level ensures the following:
a. All round defence with an LSW at each corner of the triangle.
b. Mutual support, in that an attack from any side is covered by two LSWs.
c. Ease of command and control with platoon HQ in the centre.
d. Ease of administration with a simple, compact layout.
06448. The procedure for moving into a triangular harbour at platoon level is dividedinto five stages:
a. Stage 1 — Selection. The selection of a possible harbour area can be donefrom a map, an air photograph, aerial reconnaissance, or on the ground. Thedetailed siting must be confirmed by reconnaissance and the area secured beforeoccupation. In selecting an area, the following points must be considered:
(1) Mission. The harbour must be located so that it best enables thepatrol to accomplish its task.
(2) Location. Choose an area:
(a) Which can be easily defended.
(b) Where there is dense vegetation, to provide cover from theground and from the air.
(c) Away from human habitation and areas regularly used bycivilians.
(d) With access to a source of water.
(e) With reasonable routes in and out.
(f) Where communications are good.
(3) Avoid.
(a) An obvious position.
6-114
PROTECT
PROTECT
(b) Ridge lines or crests which may be used as routes.
(c) Roads, tracks, etc.
(d) Wet areas, steep slopes and small valleys.
b. Stage 2 — Occupation. For the swift and efficient occupation of a patrolharbour a well understood drill is essential. It should be carried out using handsignals with a minimum of noise. Variations are numerous, but a suggested drillis as follows:
(1) The platoon halts short of the selected area. It should break trackand lay an ambush (preferably triangular) on its previous route to engageany enemy patrol following or tracking the platoon.
(2) The platoon commander and his reconnaissance party (sectioncommanders and at least one guide) go forward to site the harbour indetail. The platoon sergeant remains in command of the main body.
(3) On arrival at the site of the harbour, tasks are as follows:
(a) The platoon commander points out the platoon HQ positionand the location of the 6 and 12 o’clock positions.
(b) The platoon commander and section commanders site thesection areas, particularly the LSW positions.
(c) The perimeter wire is laid to ensure that the sides of the triangleare straight when the platoon occupies the harbour.
(4) On completion of the reconnaissance, a section commander and atleast one guide are sent back to bring forward the main body. The platoonis led to the harbour area in single file.
(5) Sections are met by their section commanders at the apex of thesection’s location and each man is shown his position and given his arc(see Fig 169).
(6) This method of occupation should ensure that there is an LSW ateach corner of the triangle, noise is kept to a minimum and the track plan isidentified.
(7) Once positioned by his section commander, each man removes hispack and adopts a fire position covering his arcs of fire.
(8) Section commanders should site their own positions centrally so thatthey can see the platoon commander and their own 2IC.
6-115
PROTECT
PROTECT

6-116
Fig 169. — The Occupation of a Harbour (Standard)
Stage 1
Stage 2
Stage 3
PlHQ
Section
Section
Snap Ambush
Section
PlHQ
Section
Section
Sect
ion
PROTECT
PROTECT
(9) The platoon commander should check the perimeter to ensurecohesion between sections. Each section commander meets him at hiscorner LSW position; any minor adjustments to the layout of the harbourcan be made at this stage.
c. Stage 3 — Clearance Patrols.
(1) On a signal from the platoon commander, each section sends out aclearance patrol to cover their own section’s arc. The rest of the sectionremain ‘stood to’.
(2) The section commander or 2IC and one or two men move outthrough the neighbouring section’s LSW position. They go out to the limitof visibility and sound, then turn and move along their own section’sfrontage. This drill ensures that the section arc is fully covered. Theclearance patrol then returns through their own section’s LSW position. Inthis way all tracks into the position are covered by an LSW position.
(3) Clearance patrols should detect and report to the platoon commander:
(a) Signs of recent enemy activity.
(b) Possible enemy approach routes.
(c) Unexpected obstacles (i.e., mines and ravines).
(d) Streams and dominating ground.
(e) Possible ERV locations.
(4) If a thorough initial reconnaissance has been conducted, it mayoccasionally not be necessary to send out clearance patrols immediatelyafter the occupation, particularly at night.
(5) If there is not much time between occupation and last light, platooncommanders may consider dispensing with clearance patrols. However, ifthe patrol is to remain in its harbour during the following day, clearancepatrols must be sent out at first light.
d. Stage 4 — Sentries. Once clearance patrols have been completed,sentries should be posted. Points to note are:
(1) Sentries should be posted beyond the limit of noise from the harbour(to avoid distraction and to alert the platoon before any enemy hear theharbour).
(2) One sentry per section posted in depth will normally suffice.
6-117
PROTECT
PROTECT
(3) The sentries are to act as early warning of any enemy approach.They should be armed with rifles but fire only in self defence. Theirwithdrawal route back to the harbour should be via the LSW position andbe clearly understood by all.
(4) Communication between sentries and the LSW positions must beestablished. This should include use of communication cord.
(5) The sentries are located outside the harbour only during work routine.
(6) By night, sentries will normally consist of staggered double manningof the corner LSWs. The double manning provides continuity at the sentryposition, allows one sentry to fetch the relief and reduces the chances of asleeping sentry.
e. Stage 5 — Work Routine. Once sentries are posted, work begins tostrengthen the harbour. Tasks include:
(1) Preparation of stand-to positions and fields of fire, construction ofshell scrapes and the positioning of warning devices (e.g., trip flares).
(2) Preparation of a path to allow silent movement round the position.Shell scrapes should be on the outside edge of the path. Soldiers shouldlive in and fight from their shell scrapes. Wire should be laid just inside theshell scrapes to mark the path and prevent accidental movement outsidethe harbour at night. This is lowered during daylight hours.
(3) Laying of communications cord from sentries to LSW positionsand/or section commanders, and from section commanders to platooncommander.
(4) Positioning of shelters. These are erected over shell scrapes at lastlight and taken down before first light. They may be erected in poorweather at the platoon commander’s discretion.
(5) Confirmatory orders by the platoon commander to establish anoperational and administrative routine. The points are as for routine indefence and include:
(a) Future operations (i.e., patrols).
(b) Alarm and stand-to system (and its rehearsal).
(c) Orders for opening fire and defence of the harbour. Location ofplatoon ERV.
(d) Sentry roster.
6-118
PROTECT
PROTECT
(e) Resupply.
(f) Sleeping and feeding.
(g) Track discipline.
(h) Staggered cleaning of weapons.
(i) Latrines these should be within the perimeter of the harbour oroutside within the sentries arcs.
Security
06449. The platoon commander must ensure:
a. Sentries are correctly posted and briefed.
b. Good communications with sentries to ensure early warning of enemyapproach.
c. All round defence is maintained.
d. Good battle discipline is maintained. Points to include:
(1) Correct camouflage.
(2) No lights, smells or unnecessary noise.
(3) Webbing worn and weapons carried at all times. Kit not in use to bepacked away.
e. The harbour is as compact as possible.
f. Clearance patrols are sent out at first and last light.
g. All movement into the harbour is done through 6 o’clock or along the routetaken during the occupation. Precautions must be taken to counter possibleenemy follow up of own patrols.
06450 – 06460. Reserved.
6-119
PROTECT

6-120
PROTECT
PROTECT
SECTION 22. — FIRE AND MOVEMENT
LESSON 1. — EXPLANATION
A. INSTRUCTOR’S NOTES
Aim
06461. To explain Fire and Movement.
Timings
06462. One 30 minute period.
Stores
06463.
Diagram to show organization of a rifle section ChalkboardModels
Miscellaneous
06464. If there is a demonstration section, see that it is well rehearsed. Sectionhandling is the link between individual weapon training and tactics, in which the cadetlearns to work in a section team. Each cadet must be practised in the duties of theothers within the section.
B. CONDUCT OF THE LESSON
Preliminaries
06465. Safety Precautions. Normal (if weapons used).
Approach
06466. Explain: Now that the capabilities of the section are known in terms of firepower and movement, it is time to learn how to combine them to support one anotherin order to overcome enemy opposition.
6-121
PROTECT
PROTECT
Fire and Movement
06467. Explain: The infantry can seldom get to within assaulting distance of theenemy without the enemy being in a position to shoot at them. In order to reduce theeffect of this fire it must be returned as quickly as possible. This return fire can take theform of an artillery bombardment, mortars, tanks or machine guns. However, the mostquickly produced accurate fire support is provided from the section itself.
06468. Question the cadets with the aid of the diagram, chalkboard or models toillustrate the answer:
“If you were section commander when your section was fired on what weapon inyour section would most effectively deal with the enemy?” The answer shouldbe the LSW, which is capable of producing a very high rate of fire. Although theLSW produces a high rate of fire, the weapon does not act on its own. Thesystem is reliant on the other weapons (i.e., rifles) in the Fire Team.
06469. Explain: Whilst the LSW and the remainder of Fire Team D is firing at theenemy (known as covering fire) the other part of the section, Fire Team C, can moveinto a better position closer to the enemy or even into a position to attack. In additionFire Team C can take two extra men from Fire Team D to assist with the attack.
06470. Question the cadets with the aid of the diagram, chalkboard or models toillustrate the answer:
“If the section commander at any time wanted to move a Fire Team, who wouldprovide covering fire?” This time the answer should be the other Fire Team.
06471. Explain: When a Fire Team provides covering fire the other Fire Teammoves, and this will continue until the section commander is in a position to attack theenemy. This is known as FIRE and MOVEMENT and is the basis of all tactics. In theAssault a Fire Team breaks down into two pairs (left half and right half). One pairsimulates covering fire whilst the other pair moves 5–10 metres. However duringcadet training safety considerations mean all movement must be conducted withweapons MADE SAFE. This results in the moving elements only being covered byobservation.
06472. If a demonstration section is used cadets should now be given ademonstration of FIRE and MOVEMENT, or they can be split up into two Fire Teamsand practised in FIRE and MOVEMENT. They can also practise their pairs within FireTeams.
06473. Remember all movement must be conducted with weapons MADE SAFE.
6-122
PROTECT
PROTECT
Conclusion
06474. End of Lesson Drill.
a. Remember the main points:
(1) Before one group moves the other is in a firing position ready to openfire at once or is actually firing.
(2) Both groups must make the best use of ground and cover.
b. Questions from and to the squad.
c. Sum up.
d. Look forward to the next lesson.
06475 – 06480. Reserved.
6-123
PROTECT
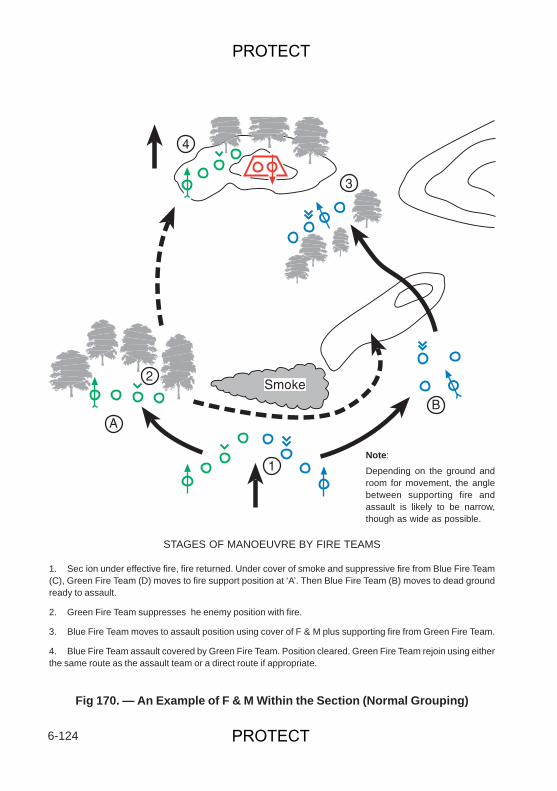
6-124
�
�
�
�
�
���
�
Fig 170. — An Example of F & M Within the Section (Normal Grouping)
STAGES OF MANOEUVRE BY FIRE TEAMS
1. Sec ion under effective fire, fire returned. Under cover of smoke and suppressive fire from Blue Fire Team(C), Green Fire Team (D) moves to fire support position at ‘A’. Then Blue Fire Team (B) moves to dead groundready to assault.
2. Green Fire Team suppresses he enemy position with fire.
3. Blue Fire Team moves to assault position using cover of F & M plus supporting fire from Green Fire Team.
4. Blue Fire Team assault covered by Green Fire Team. Position cleared. Green Fire Team rejoin using eitherthe same route as the assault team or a direct route if appropriate.
Note:Depending on the ground androom for movement, the anglebetween supporting fire andassault is likely to be narrow,though as wide as possible.
PROTECT
PROTECT
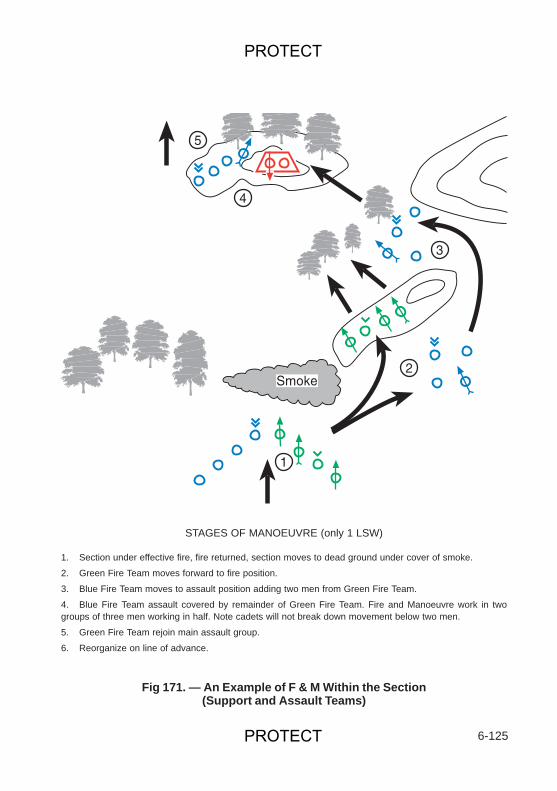
6-125
Fig 171. — An Example of F & M Within the Section(Support and Assault Teams)
STAGES OF MANOEUVRE (only 1 LSW)
1. Section under effective fire, fire returned, section moves to dead ground under cover of smoke.2. Green Fire Team moves forward to fire position.3. Blue Fire Team moves to assault position adding two men from Green Fire Team.4. Blue Fire Team assault covered by remainder of Green Fire Team. Fire and Manoeuvre work in twogroups of three men working in half. Note cadets will not break down movement below two men.5. Green Fire Team rejoin main assault group.6. Reorganize on line of advance.
�
�
�
�
���
�
PROTECT
PROTECT

6-126
PROTECT
PROTECT
LESSON 2. — FIRE AND MOVEMENT — PRACTICE
A. INSTRUCTOR’S NOTES
Aim
06481. To practise cadets in fire and movement as a section.
Timings
06482. Two 30 minute periods.
Stores
06483. Rifles and LSWs.
Miscellaneous
06484. This practice should be carried out in the open on a piece of ground whichhas previously been checked for suitability. A section commander must be nominatedwho may be the instructor himself.
B. CONDUCT OF THE LESSON
Preliminaries
06485. Safety Precautions. Normal.
Practice
06486. Point out a clearly marked enemy position and then practise the sectionmoving on to it in two groups — Fire Team C and D.
Conclusion
06487. End of Lesson Drill.
a. Sum up.
b. Look forward to the next lesson.
06488 – 06490. Reserved.
6-127
PROTECT

6-128
PROTECT
PROTECT
SECTION 23. — SECTION BATTLE DRILLS
A. INSTRUCTOR’S NOTES
Aim
06491. To teach cadets the six Battle Drills.
Timings
06492. Ten 30 minute periods (total time of six drills).
Stores
06493.
RiflesLSW
Preparation
06494. Choose a piece of ground suitable for teaching and practising the drills.Initially a flat piece of ground is required but when a drill has been learnt it should beapplied to ground with features such as hills and woods or undergrowth providingcover from view or fire.
B. CONDUCT OF THE LESSON
Preliminaries
06495. Safety Precautions. Normal.
Approach
06496. Experience has shown that it is an advantage to have a recognized and wellunderstood method of tackling minor tactical problems when rapid action is essentialfor success. The section attack has therefore been broken down into six basic drills;each can be taught as a separate lesson and the drills together form the logicalsequence of action to enable a section to overcome minor opposition using fire andmovement. As soon as they are understood they should be applied to properlyconducted tactical exercises.
6-129
PROTECT
PROTECT
SECTION BATTLE DRILL 1. — BATTLE PREPARATIONS
Preparation for Battle
06497.
a. Personal camouflage; break up the outline of the webbing and shouldersusing local foliage typical of the country over which the section is to operate.
b. Check that weapons are clean and serviceable. Set sights at 300.
c. Check that ammunition is clean and that magazines are properly distributed.
06498. The section commander will number off the cadets before giving themorders under the following headings:
a. Ground. To include reference points if possible.
b. Situation.
(1) Enemy forces.
(2) Friendly forces. Details of platoon formation and task.
c. Mission. The section mission.
d. Execution.
(1) Route, if applicable.
(2) Section formations.
e. Service Support. Any necessary information from the platooncommander’s orders.
f. Command and Signal. Any necessary information from the platooncommander’s orders.
Reference Points and Anticipatory Orders
06499. In the advance to contact, the section commander will be on the lookout asthe section moves for:
a. New reference points for fire orders. The section commander will usuallypick two or three within about 400 metres range in a wide arc on the sectionfront. The section commander will describe these to the section as theyadvance; each cadet will acknowledge by a hand signal or say “Not seen”.
6-130
PROTECT
PROTECT
b. Position where the section can take cover if it comes under effective enemyfire. Whenever possible, the section commander will point out such positions byanticipatory orders, such as “If we come under effective fire, Fire Team D takecover in scrub, Fire Team C line that bank”. Some such indication will certainlybe necessary in country where there is little cover, or on a steep forward slope.
06500. Unnecessary shouting should be avoided at this stage; it only serves to alertthe enemy.
SECTION BATTLE DRILL 2. — REACTION TO EFFECTIVE ENEMYFIRE
06501. Sections must be trained to continue the advance in spite of the noise of firedirected at someone else and regardless of stray rounds amongst them.
06502. Effective enemy fire in this situation is enemy small arms fire which wouldcause heavy casualties if the section continued on its course. Most cadets wouldinstinctively drop to the ground when under effective fire. This action is generallywrong because the enemy usually opens fire when his target is in a place offering littleor no cover. The best course is to increase speed, thereby making a difficult target.This action would lead to loss of control by the section commander unless carried outas a drill as follows:
a. The executive order to take cover will be given by the section commanderas “Take cover”.
b. On the command “Take cover”, every cadet will run to the nearest cover orthat pointed out by the section commander in the anticipatory order. No cadetwill run more than 15 metres unless running to cover pointed out by the sectioncommander.
c. Every cadet will dive or drop into cover and at once crawl some way,preferably to a flank, so that the enemy cannot have his sights directly on himwhen the cadet reappears.
d. Every cadet will move up to a position of observation; any cadet out ofearshot of the section commander must crawl close enough to be able to hearthe section commander’s voice, or receive relayed orders.
e. Any cadet who actually spots the enemy will return the fire without waitingfor an order from the section commander.
f. In principle, when contact has been made, no cadet in the section should beidle. Everyone should be doing one or more of the following:
(1) Observing.
6-131
PROTECT
(2) Firing if the enemy is seen.
(3) Moving to a new position of observation.
(4) Moving to a new fire position.
g. Bunching must not be allowed. No cadet should ever be less than fourmetres from his nearest neighbour.
06503. This drill may be summarized as follows:
a. “Take Cover” ordered by the section commander.
b. DASH — DOWN — CRAWL — OBSERVE —SIGHTS — FIRE.
SECTION BATTLE DRILL 3. — LOCATION OF ENEMY
06504. Location of enemy fire is usually difficult. Failure to locate the enemy mayprevent the section moving without suffering heavy casualties. It may lead rapidly toloss of initiative by the section and the halting of the platoon advance.
06505. There are three stages in this drill:
a. Observation. Look in the area from which the thump came. The timebetween the crack and the thump gives a clue to the range (each secondrepresents 600 metres). Look for movement, smoke, radio antennae or anythingunusual. If nothing is seen after about 30 seconds or so, it is unlikely that theenemy will be located by looking.
b. Fire. The section commander will give a fire order to two riflemen to firetwo shots into likely cover. The rest of the section will keep a careful watch ontheir arcs of observation. If there is no answering fire the section commandershould try some other likely target.
c. Movement. If there is still no reaction by the enemy the sectioncommander will order two riflemen to get up and double forward about tenmetres to different cover. The section commander may do this again if no fire isdrawn the first time. A cadet getting up and dashing ten metres is a very difficulttarget to hit. If there is still no enemy reaction the section commander must carryon with the advance.
06506. Target Indication. If a cadet should locate the enemy before the sectioncommander, the cadet will indicate the enemy position to the section commander byusing one of the methods for target indication described in Chapter 4, Section 18.
6-132
PROTECT
PROTECT
SECTION BATTLE DRILL 4. — WINNING THE FIRE FIGHT
06507. As soon as the section commander knows the enemy’s position, the sectioncommander must give a fire order to bring sufficient weight of fire on the enemy toneutralize them. If one or more cadets, who have spotted the enemy, have begunfiring the section commander regains control by shouting “Stop” before giving the fireorder.
06508. While winning the fire fight, the section commander must make a battleappreciation. Having won the fire fight, the section commander must keep theinitiative by continuing to bring fire down on the enemy while the section closes for theassault.
SECTION BATTLE DRILL 5. — THE ATTACK
06509. Battle Orders. Battle orders will be as brief as possible. There is no needto mention the enemy position if this is known to all concerned. The mission will havebeen given out before the attack began but may need modifying. The battle order willalways be one of the following, depending on the number of stages in the attack (seeFig 172).
a. For a one stage attack, that is when the rifle group goes straight into theassault:
“Left (or right) flanking”“Fire Team C prepare to assault”
“Fire Team D — Fire”“Fire Team C — Move”
6-133
Fig 172. — One Phase — Right Flanking
VV
V
ENEMY
Fire
Move
PROTECT
PROTECT
b. For a two stage attack, that is when Fire Team D must move to anotherposition before Fire Team C assaults:
“Left (or right) flanking”“Fire Team D move first to .... “
“Prepare to move”“Fire Team C — Fire”
“Fire Team D — Move”“Fire Team C Prepare to Assault”
“Fire Team D — Fire”“Fire Team C — Move”
6-134
Fig 173. — Two Phase — Attack
V
ENEMY
Fire 1
Fire 2
VVV
Move 1
Move 2
PROTECT
PROTECT
c. The Assault can be developed in which Fire Team C moves, followed byFire Team D and finally Fire Team C assaults:
“Fire Team C moves first to ....”“Prepare to move (Fire Team D fire)”
“Fire Team D move to .... prepare to move (Fire Team C fire)”“Fire Team C prepare to assault (Fire Team D fire)”
6-135
Fig 174. — Three Phase — Attack
ENEMY
Fire 1
Fire 2
Fire 3
V
V
VV
V V
Move 1
Move 2
Move 3
PROTECT
PROTECT
d. For an attack when section commander decides Fire Team C needs twomen from Fire Team D.
“Fire Team D move two men to Fire Team C remainder Fire Team D fire”
06510. When a section is really well trained the orders for a two and three stageattack can be reduced as each Fire Team will know what to do. Left or right flankingmerely indicates which side of the enemy the Assault Fire Team is to work.
Movement During the Attack
06511. Usually cadets advancing into action will move at a brisk pace until the finalstages of the assault when they will break down to half Fire Team Movement. Thismeans a pair dashing to 10 metres then getting down. The other half will then move.Cadets must be MADE SAFE before any movement.
06512. Running and crawling are tiring and should only be used to gain surprise byan unexpected approach, to get out of a critical situation, or for the final assault.
06513. When subjected to enemy fire cadets must get through it as quickly aspossible. To halt and try and find cover is ineffective and can be suicidal.
6-136
ENEMY
Fire 1
V VV
V V
Move 1
Move 2
Assault usingF & M in two x
three cadetgroups
Fig 175. — Assault Using Extra Men from Fire Team D
PROTECT
PROTECT
06514. When relatively small spaces have to be crossed it is often best for the wholesection or group to run across together before the enemy has time to spot them andfire.
06515. Cadets advancing under these conditions must be aggressive anddetermined, with the will to overcome all opposition.
The Advance
06516. The section commander will lead Fire Team C in the assault.
a. At the same time the section commander will keep Fire Team D undercontrol throughout this phase of the attack. The 2IC (D Commander) must begiven clear initial orders and must then act on with initiative keeping an eye onthe section commander for signals in case of a change in plan. Cadets must beMADE SAFE before any movement.
b. All movement in the open by either group must be covered by the other. Theangle between the two groups will be as near a right angle as possible to get theclosest possible fire support.
c. When Fire Team C gets into their individual fire positions, Fire Team D mustmove forward automatically unless it has already reached a position from whichit can effectively support the assault.
d. The section 2IC, who is in Fire Team D, is responsible for watching thesection commander and listening for orders and also for watching themovement of Fire Team D so that covering fire can be given at critical momentsand can be varied from slow to rapid as necessary. This helps to conserveammunition and ensures that covering fire is given when it is most needed. Theremainder of the Fire Team will fire their rifles when the LSW has a stoppage ormagazines are being changed as fire must be maintained while Fire Team C ismoving in the open.
The Assault and Fighting Through the Objective
06517. On arrival in the area of the final assault position, the section commandermust quickly get his section together for the assault on the enemy position.
a. The section commander will give out any orders for the assault and regainstrict control which may have been lost during the approach to the final assaultposition. All this must be done in a matter of seconds by a combination of ordersand signals.
b. Whatever the numbers assaulting, the assault must go in as quickly aspossible, under the supporting fire of the rest of the section.
6-137
PROTECT
PROTECT
c. The section commander will give a silent order to start the assault. FireTeams will break down into two pairs using F & M in bounds of five to tenmetres.
06518. As the assault goes in Fire Team D will increase the rate of fire to the rapidrate and will fire as long as possible and then switch its fire across the objective just infront of the rifle group.
06519. When the assaulting Fire Team has arrived on the objective it has toovercome all remaining enemy resistance. This phase of the attack is known asfighting through the objective.
06520. It is a difficult and crucial stage of the battle. Fire and manoeuvre will benecessary to overcome individual enemy posts. The section commander again mustdisplay courage and initiative and inspire cadets with aggressive determination.
06521. The scope for movement will be limited and much of the fighting will be atclose quarters.
06522. As each individual post is tackled, fire support from a flank must cover eachassault and any open flank likely to be exposed to enemy fire.
SECTION BATTLE DRILL 6. — REORGANIZATION
06523. When the objective has been cleared of the enemy, the section commandermust regain close control over the section and position them ready to beat off any enemycounterattack. Over-exuberance must be firmly checked. The drill for reorganizationmust be swift and efficient. If it is not, all ground gained will be quickly lost.
a. The section commander is to:
(1) Swing back on to the axis.
(2) Allot arcs to each cadet within the section arc.
(3) Detail and post sentries.
(4) Check on casualties and ammunition.
(5) Arrange for redistribution of ammunition.
(6) Supervise digging of shell scrapes.
(7) Despatch prisoners and captured equipment to the rear.
(8) Report to platoon officer for further orders.
b. Fire Team D will:
6-138
PROTECT
PROTECT
(1) Rejoin Fire Team C as quickly as possible along the route taken byFire Team D if the situation permits.
(2) Check and refill magazines.
c. The riflemen will check weapons, ammunition and equipment.
06524 – 06530. Reserved.
SECTION BATTLE DRILLS — SUMMARY
6-139
Situation Battle Drill Orders by SectionCommander Action by Section
(a) (b) (c) (d)
Before moving
Advancing
1. Battlepreparations
Prepare for battle Arrowhead:Fire Team C left, D Right“Reference point – 200 – quarter right – dead tree –known as tree. If we comeunder effec ive fire, line thatbank.”
Carries out details of drill andforms up ready to move. Cadetsacknowledge.
Under effectiveenemy fire
2. Reaction toeffective enemyfire
“Take cover”. Dash – down – crawl – observe– sights – fire.
Enemy firecontinues
3. Location of theenemy
(If no rifleman fires)“1 and 2 riflemen – 200 – areatree – two rounds each – fire”.(If no enemy reaction)“3 and 4 riflemen – five yards toyour left double”.
Observe and report.
Enemy fire diesdown
4. Winning thefire fight
“Stop”“Section – 200 – tree – threeo’clock – bushes – sniper – fire”.
Controlled fire by the wholesection.
Enemy fireceases
Battle orders
5. The Attack Whistle“Stop”“4 and 5 riflemen carry on”.
“Left flanking – Fire Team D firstto bank ahead on right. FireTeam D prepare to move. FireTeam C – fire”.
Two riflemen firing discouragesenemy reac ion.
2IC relays orders to Fire TeamD.
Fire andmovement begins
Fire and movement continues
Fire Team D moves covered byFire Team C. Fire Team D getsinto action and begins firingimmediately – 2IC hand signalssection commander to move.
The assault “Fire Team C stop. Prepare toassault – move.”
Fire Team C moves into assaultcovered by Fire Team D.
PROTECT
PROTECT

6-140
(a) (b) (c) (d)
Enemy positionoverrun
6. Reorganization Orders for:Searching the position.Arcs of observa ion.Reference points.Checking casualties.Check ammunition.Refilling LSW magazines.
Fire Team D rejoins Fire TeamC automatically.
Figh ing through This is a difficult and crucial stage of the battle during which fireand movement by the section and by groups within the sectionwill be necessary to overcome individual enemy posts. Fightingwill be at close quarters and any orders by the section comman-der must depend on he situation at a particular post. As eachindividual post is tackled fire support from a flank must cover theassault and any open flank likely to be exposed to enemy fire.
PROTECT
PROTECT
SECTION 24. — OPERATIONS IN WOODS AND FORESTS
A. INSTRUCTOR’S NOTES
Aim
06531. To teach 4-Star Cadets operations in woods and forests. (This is not forcadets below 4-Star.)
Timings
06532. Two theory periods and six practical periods.
Preparation
06533. Choose a piece of ground where there is an obvious wood to practise thedrills. It is advised that you walk through first before practising.
B. CONDUCT OF THE LESSON
Preliminaries
06534. Safety Precautions. Normal.
Approach
06535. Extensively forested areas are often associated with mountainous or tropicalcountries.
06536. This section is concerned only with operations which may take place inenvironment much of which is densely forested. Fighting in woodland is primarily aninfantry function. The tactical emphasis will fall on sections and platoons operatingwithin the frame of a company operation.
Types of Woodland
06537. Woods may vary in size from a small copse to a large forest which extendsfor several kilometres in all directions. These large forested areas have a profoundeffect on tactical planning.
06538. Woods and forests will vary considerably, depending on the type and size ofthe trees. Deciduous trees will obviously offer less concealment in winter than
6-141
PROTECT
PROTECT
conifers. Young woods will often be dense, affording accessible cover from view forinfantry but not for vehicles. They will also give little cover from fire and visibility will bepoor. Mature woods will be an obstacle to vehicles but will give cover from the air.Visibility, however, will be greater at ground level, and infantry will be able to moverelatively freely.
The Effect of Woods on Tactics
06539. General. Woods and forests have three main effects on tactics; theyreduce visibility and fields of fire, they affect mobility and they provide some measureof concealment from the air.
06540. Reduced Visibility and Fields of Fire.
a. The extent of reduced visibility and of fields of fire will vary according to thedensity of growth. Additionally, high ground will have reduced value forobservation. Clearings and rides will be important for observation and fields offire and ride junctions will be particularly significant.
b. In a wood the density of trees and undergrowth will reduce the area aplatoon can hold. Good fields of fire and mutual support will be difficult toachieve and in dense woodland a platoon’s frontage may only be some 100metres.
c. Forests have a major effect on radio communications. Radios will have tooperate on increased power or alternative means of communication, e.g., line orrunners, will have to be considered. The siting of platoon headquarters maytherefore be dictated by communications.
d. The movement of infantry will also be impeded by forests. Navigation inparticular may become more difficult and progress on foot will be determined bythe nature of the terrain.
06541. Cover from the Air. Cover afforded by the canopy of foliage will varyaccording to the types of trees and the season; nevertheless it will usually provide asignificant measure of protection from view. Accordingly, infantry moving on foot canexploit the advantage of surprise which this cover gives them. Tree cover also providesconcealment from surveillance.
06542. Obstacles. Woods and forest provide good scope for the construction ofobstacles by means of tree felling and use of log piles.
Wood Clearing Operations
06543. General. Operations in large wooded areas tend to favour the defender.An attack through forests will be a slow operation and advance to contact techniques
6-142
PROTECT
PROTECT
will usually have to be employed. The commander will have to keep a strong reserveto go to the point of main effort.The direction of the attack is likely to be governed bythe existence of routes, but this is exactly the area where the enemy is likely to havehis strongest defences; the indirect approach should not be ignored. Gaps betweenthe defenders’ positions should be found and their positions bypassed. Quick attacksfrom an unexpected direction will be the norm and deliberate attacks will only bemounted if it is vital to dislodge the enemy from the area after the failure of a quickattack.
06544. Scale of Operations. No further consideration will be given here to largescale offensive operations in woods. Platoon and section tasks in such operations willbe varied and will be very demanding both physically and mentally.
06545. Smaller Scale Platoon Tasks. Smaller scale tasks for infantry platoonswill be the clearing of small woods and isolated areas of close, natural cover such asare found in mixed terrain in the following circumstances:
a. In an advance to contact.
b. To clear a planned hide or battle position before occupation.
c. To search for saboteurs or infiltrators who may have been parachuted intorear areas.
d. During counterinsurgency operations.
06546. Enemy Strength. The level of enemy that may be anticipated in thiscontext is:
a. A standing patrol.
b. A reconnaissance patrol lying up.
c. A patrol base.
d. A small enemy force which has been cut off.
e. Part of a larger enemy force which is attempting to infiltrate.
Such enemy may well be dug in and very well concealed, or may be in hastilyprepared positions. Their aim may be to remain concealed, or to defend themselvesaggressively. Especially in the latter case, deployment throughout the wood/naturalcover could range from single snipers to section ambushes/positions concealed at,under or above ground level.
06547. Principles. Once the general position of the enemy is located, speed andthoroughness of searching are essential to destroy him or prevent him from escaping.
6-143
PROTECT
PROTECT
a. Speed. This is vital both in planning and in execution. A well rehearseddrill which requires the minimum of orders and reorganization of sections mustbe used to achieve it. This drill will include the preliminary action of covering allpossible enemy lines of withdrawal.
b. Thoroughness. The thickness of the wood or natural cover will dictatehow close the men clearing it must be to ensure that they do not miss anyenemy. Six metres between men will be the maximum in a thick wood. For manywoods this means that the troops available are insufficient to clear it in onesweep. Then, some adaptation is necessary such as clearing it along its length,so that the frontage matches the troops available. It may even be necessary toclear it in more than one sweep, but this is undesirable. In this circumstancearrangements will have to be made to ensure that the enemy do not move froman uncleared to a cleared area of the wood.
06548. Planning Considerations.
a. Direction. If the choice is not dictated by the location of the enemy or theshape of the wood, it is easier to clear downhill and also to make the enemyretreat in the direction of his own lines or along his chosen withdrawal route.
b. Killing Area. Try to drive the enemy into a good area outside the wood sothat they can be destroyed. This should be an open area.
06549. Organization of the Platoon. The platoon could be organized severalways; this is just one suggestion:
a. Stops.
(1) Commanders . . . . . . . . . . . . . . . . . Section 2ICs.
(2) Personnel . . . . . . . . . . . . . . . . . . . . 1 and 2 Section’s LSWs.
b. Sweeps.
(1) Commander . . . . . . . . . . . . . . . . . . Platoon Commander.
(2) Personnel 1 and 2 Sections (less LSWs), Platoon Headquarters (lessPlatoon Sergeant).
c. Assault (follow up) Group.
(1) Commander Platoon Sergeant/Section Commander.
(2) Personnel . . . . . . . . . . . . . . . . . . . . No 3 Section.
6-144
PROTECT
PROTECT
If the frontage requires more than two sections, sweeps may have to be augmented atthe expense of the assault group or the clearance conducted in phases using smallerclearance areas.
06550. Stages. The drill for clearing the wood can be broken down into sixstages:
a. Planning and preparation.
b. Deployment of stops.
c. Gaining a foothold.
d. Sweeping the wood.
e. Action on meeting enemy.
f. Reorganization.
06551. Planning and Preparation. The platoon commander must first completea quick reconnaissance from a position where he can see the wood. In making hisplan he should consider the following factors:
a. Strength and disposition of the enemy.
b. Likely enemy lines of withdrawal.
c. Shape of the wood and in which direction to clear it.
d. Killing area.
e. Positions for stops.
f. Wind, if smoke is to be used.
g. Fire team grouping within the platoon.
Whilst he is doing this, the platoon sergeant should be reorganizing the platoon asdescribed in the platoon commander’s task organization.
06552. Deployment of Stops. The stops will move into concealed positions viathe best covered approaches and using the fastest means available consistent withsecurity. Providing all stops can be positioned quickly and more or lesssimultaneously, loss of surprise may not be critical. Helicopters may be useful to insertand as an airborne OP and vehicles should also be considered. The stops shouldshoot anyone emerging from the wood before the success signal is given.
6-145
PROTECT
PROTECT
06553. Gaining a Foothold.
a. The sweeps deploy to a FUP under cover at the same time as thedeployment of stops. If the enemy has an OP or is holding the edge of a wood,the sweeps will have to gain a foothold by fire and movement from the FUP; theassault group should be positioned to give covering fire.
b. The sweeps should spread out from the centre on either side of the platooncommander remaining in visual contact with the man on their inside flank. Oncethe sweeps are in position the assault group moves forward and forms up in thecentre rear with the commander close to the platoon commander and his groupclose behind him.
06554. Sweeping the Wood. When the order to advance is given, sweepsadvance in extended line with men working in half fire teams, one covering the otherforward. Movement should be from tree to tree to cover to cover. The leading manshould search the ground in front of him carefully, paying particular attention to thickundergrowth; the man covering him should observe and listen intently looking up intothe trees as well as forward and sideways. Men in the assault group should observeforwards and upwards, and also check backwards. It is important that all move assilently as possible, no less for the purpose of detecting the enemy as for control bythe platoon and section commanders. Particular points to note are:
a. The pace must be that of the slowest pair, which will probably be thosemoving through the thickest undergrowth.
b. If the sweeps have to halt, all should take up fire positions to observe andlisten. The ground already cleared should be kept under observation by theassault group.
c. The sweep on the two flanks must indicate progress to the stops by handsignal, taking care not to expose themselves outside the wood.
d. When the sweeps reach the far end of the wood they must not under anycircumstances emerge from it until the success or all-clear signal is given to thestops.
e. The assault group should follow as close behind the sweeps as theundergrowth dictates.
06555. Action on Meeting Enemy.
a. The enemy will have a wide variety of options and each contact will bedifferent. In all cases the platoon commander must make a quick estimate anddeal with the enemy using F & M. Two important factors are range and control.
b. Once in contact, the platoon commander must not permit the line of hissweeps to be disrupted. Assault on the enemy must be controlled to avoid the
6-146
PROTECT
PROTECT

platoon becoming separated and unbalanced, and to ensure that all areas of thewood are cleared. Two situations are likely, offering different contact drills.
(1) The enemy may be detected or may engage one pair of the wholeline of sweeps at close range (50 metres).
(2) Alternatively, the enemy may be seen or may engage at longerranges (50–100 metres) depending on the density of the wood andundergrowth, thereby halting further progress until their position iscleared.
In either case, prior orders and rehearsal must have made it clear to all which contactdrill should be carried out. The enemy must be overcome by effective F & M tominimize casualties. Speed, coordinated suppressive fire and control will be vital.
c. Two simple examples of possible contact drills are described below,although action to be taken will always depend on initial casualties, the groundand the enemy situation.
(1) If only one half fire team in the line of sweeps is engaged at veryclose range by a small group of enemy (two to three men), all in viewshould immediately take cover and return fire. It may then be possible forthe closest pair to rush the enemy position using F & M. Before moving,the assault group must ‘Make Safe’. Once the position is cleared, theassault pair take cover on the enemy position, shout “Clear” and continueto observe. Meanwhile the assault group and those not in contact willautomatically have taken cover and be observing their allotted arcs. Onhearing “Clear” the platoon commander orders the advance to becontinued and the line of sweeps will then pick up the pair who dealt withthe enemy as they pass through. The assault group will then clearthoroughly the enemy position dealing with any casualties or PW. Beforemoving everyone must be ‘Made Safe’.
(2) More frequently it will not be possible to rush the enemy position, dueto casualties or the number of enemy. It is likely that the enemy will openfire at longer ranges (50 to 100 metres). In these circumstances, the wholeline of sweeps should take cover and those who can see the enemyshould return fire. NCOs may need to give Fire Control Orders, to pinpointthe enemy and conserve ammunition. The assault group commandershould always move with the platoon headquarters; the platooncommander and he should then move to a position where they can seeand make a plan. Quick battle orders are issued giving the commander anobjective, a limit of exploitation and what fire support he will receive. Theassault group will then mount a quick attack whilst the platoon commandercoordinates additional suppressive fire from those of the sweeps who cansee. Sweeps not in contact should take cover and observe their allottedarcs. On capturing the enemy position, the assault group go firm on a line
6-147
PROTECT
PROTECT
with it; at this stage they do not pursue any enemy escaping from theposition. On hearing the report “Clear”, the platoon commander ordersthe sweeps to continue the advance through the assault group, which thenreorganizes and resumes its former position in centre rear. (All groupsbefore commencing movement to assault must be ‘Made Safe’.)
d. These examples represent two possible options and there are many othersituations which could arise. In all cases the platoon commander must:
(1) Exert effective command and control, whilst ensuring that thesweeps maintain a continuous line.
(2) Limit each objective.
(3) Employ the assault group against longer range enemy positions.
(4) Ensure that constant observation is maintained.
e. Other points to note are:
(1) When advancing, the direction(s) in which the sweeps and assaultgroup may fire must be controlled to minimize the chance of hitting owntroops.
(2) Wounded and prisoners should be made the responsibility of theassault group.
(3) Casualties at the contact and reorganization stage of the actionshould be the responsibility of the assault group. The temptation to movesweeps not in contact to positions where they can provide moresuppressive fire for the assault group should be resisted, since this couldcreate gaps through which other enemy might escape or infiltrate behindthe sweep line. At all stages of the attack, the platoon commander mustensure that those sweeps providing suppressive fire know where theassault group are, to avoid engaging them as enemy by mistake.
Reorganization
06556. When the sweeps reach the far end of the wood, it should be cleared and thesuccess signal given. The platoon will reorganize as follows:
a. The platoon takes up an all round defensive position at the LOE.
b. The platoon sergeant checks on casualties and on ammunition which willbe redistributed if necessary.
c. A report will be sent to the higher commander by radio.
6-148
PROTECT
PROTECT
d. The reorganization should be as silent as possible. This will allow enemymoving within the woods to be heard.
Summary
06557. The successful wood-clearing operation will be based on a number ofimportant factors.
a. Proper reconnaissance, plan and orders by the platoon commander.
b. Efficient regrouping and contact drills by the platoons.
c. Rehearsal, so that all know the plan and their role.
d. Speed, with efficient command and control at all levels.
e. Contingency plans for casualties and PW.
f. Good snap-shooting and F & M to minimize casualties.
6-149
PROTECT
PROTECT

6-150
PROTECT
PROTECT
ANNEX A TOCHAPTER 6
ORDERS HEADINGS
PRELIMS (ensure ‘O’ group is in right order/issue map coordinates and describe anymodel).
TASK ORG (this is the org of units taking part).
GROUND (relevant to Operation)
1. SITUATION
a. Enemy Forces. Know or estimated strengths, location and how theymight operate.
b. Friendly Forces. Subordinates to understand what is happening twolevels up, i.e., at sea level the Cadets need to know the Coy Plan and Pl Plan.
(1) Coy Pl in outline.
(2) Pl Plan in detail.
2. MISSION
3. EXECUTION
a. Concept of Operations
(1) Commander”s Intent (What)
(2) Scheme of Manoeuvre (How)
(3) Main Effort (Where)
b. Mission/Tasks
(1) 1 Sect(1) C F/Team
(2) 2 Sect or(2) D F/Team
(3) 3 Sect
c. Coordinating Instructions
(1) Timings ) Dependent upon what has to be
(2) Moves ) covered
6A-1
PROTECT
PROTECT
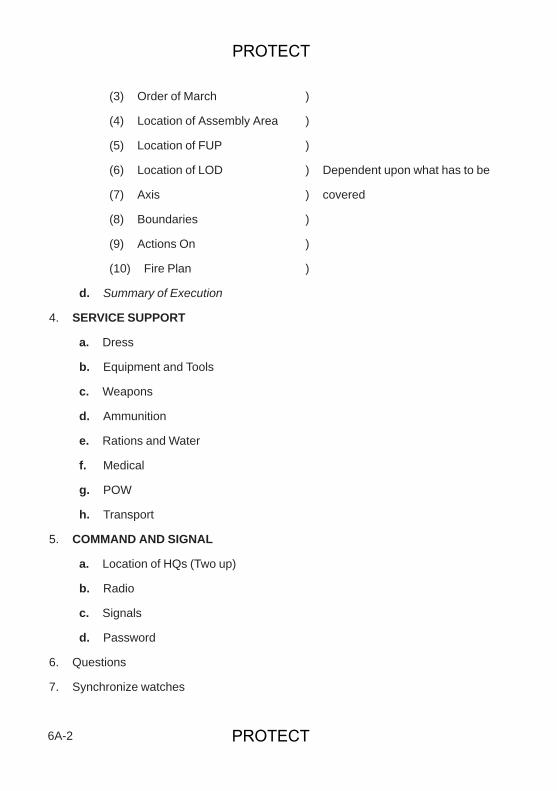
(3) Order of March )
(4) Location of Assembly Area )
(5) Location of FUP )
(6) Location of LOD ) Dependent upon what has to be
(7) Axis ) covered
(8) Boundaries )
(9) Actions On )
(10) Fire Plan )
d. Summary of Execution
4. SERVICE SUPPORT
a. Dress
b. Equipment and Tools
c. Weapons
d. Ammunition
e. Rations and Water
f. Medical
g. POW
h. Transport
5. COMMAND AND SIGNAL
a. Location of HQs (Two up)
b. Radio
c. Signals
d. Password
6. Questions
7. Synchronize watches
6A-2
PROTECT
PROTECT
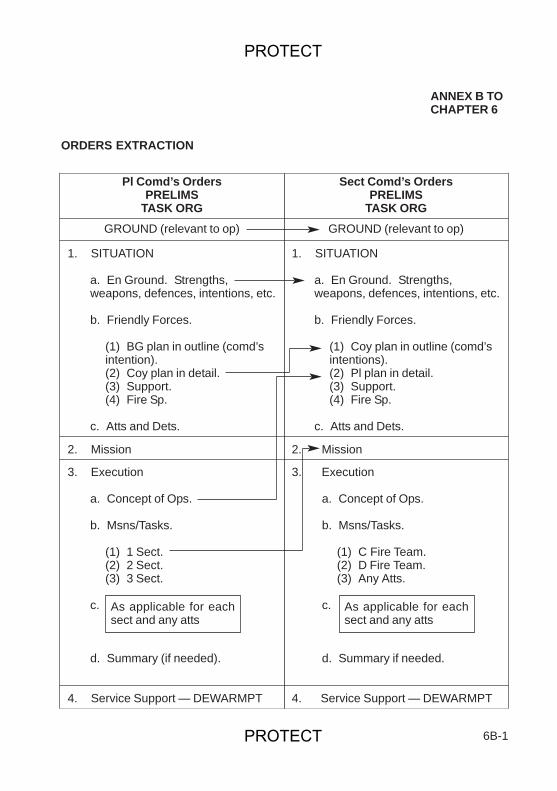
ANNEX B TOCHAPTER 6
ORDERS EXTRACTION
6B-1
Pl Comd’s OrdersPRELIMS
TASK ORG
Sect Comd’s OrdersPRELIMS
TASK ORGGROUND (relevant to op) GROUND (relevant to op)
1. SITUATION
a. En Ground. Strengths,weapons, defences, intentions, etc.
b. Friendly Forces.
(1) BG plan in outline (comd’sintention).(2) Coy plan in detail.(3) Support.(4) Fire Sp.
c. Atts and Dets.
1. SITUATION
a. En Ground. Strengths,weapons, defences, intentions, etc.
b. Friendly Forces.
(1) Coy plan in outline (comd’sintentions).(2) Pl plan in detail.(3) Support.(4) Fire Sp.
c. Atts and Dets.
2. Mission 2. Mission
3. Execution
a. Concept of Ops.
b. Msns/Tasks.
(1) 1 Sect.(2) 2 Sect.(3) 3 Sect.
c.
d. Summary (if needed).
3. Execution
a. Concept of Ops.
b. Msns/Tasks.
(1) C Fire Team.(2) D Fire Team.(3) Any Atts.
c.
d. Summary if needed.
4. Service Support — DEWARMPT 4. Service Support — DEWARMPT
As applicable for eachsect and any atts
As applicable for eachsect and any atts
PROTECT
PROTECT
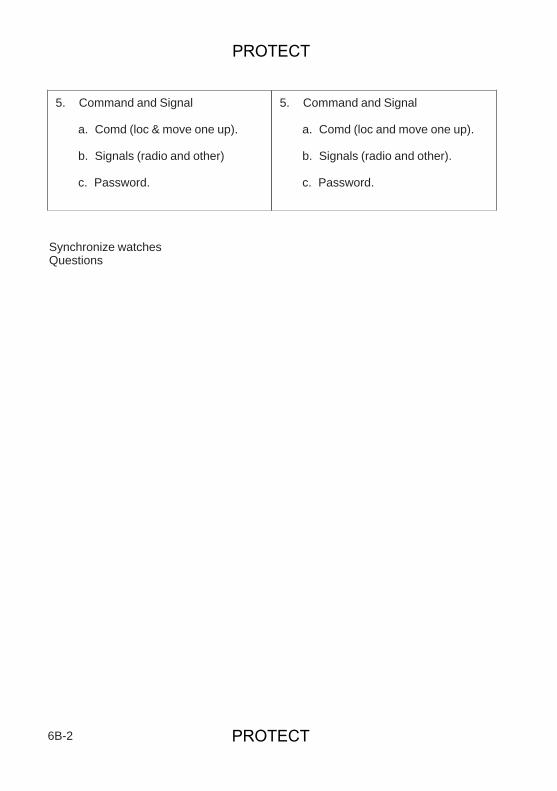
6B-2
5. Command and Signal
a. Comd (loc & move one up).
b. Signals (radio and other)
c. Password.
5. Command and Signal
a. Comd (loc and move one up).
b. Signals (radio and other).
c. Password.
Synchronize watchesQuestions
PROTECT
PROTECT
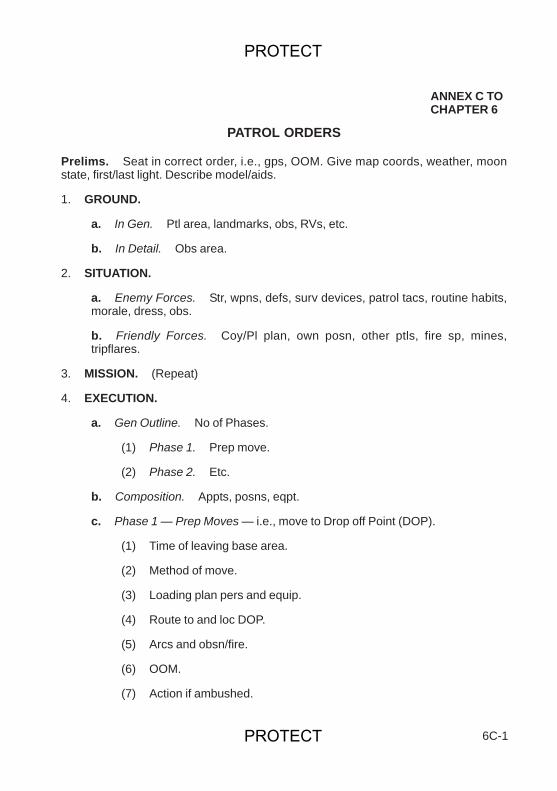
ANNEX C TOCHAPTER 6
PATROL ORDERS
Prelims. Seat in correct order, i.e., gps, OOM. Give map coords, weather, moonstate, first/last light. Describe model/aids.
1. GROUND.
a. In Gen. Ptl area, landmarks, obs, RVs, etc.
b. In Detail. Obs area.
2. SITUATION.
a. Enemy Forces. Str, wpns, defs, surv devices, patrol tacs, routine habits,morale, dress, obs.
b. Friendly Forces. Coy/Pl plan, own posn, other ptls, fire sp, mines,tripflares.
3. MISSION. (Repeat)
4. EXECUTION.
a. Gen Outline. No of Phases.
(1) Phase 1. Prep move.
(2) Phase 2. Etc.
b. Composition. Appts, posns, eqpt.
c. Phase 1 — Prep Moves — i.e., move to Drop off Point (DOP).
(1) Time of leaving base area.
(2) Method of move.
(3) Loading plan pers and equip.
(4) Route to and loc DOP.
(5) Arcs and obsn/fire.
(6) OOM.
(7) Action if ambushed.
6C-1
PROTECT
PROTECT
(8) Action at DOP.
(9) Time out.
d. Phase 2 — Route Out.
(1) To FRV.
(2) Fmn.
(3) RVs.
(4) Obs drills. Action on mines, tripflares.
(5) Action on en pre-seen and ambush. Sig to open fire.
(6) Action on POW.
(7) Action on Cas.
(8) Action if separated from ptl.
(9) Action if lost.
(10) Confirmation of FRV loc.
CONFIRM
e. Phase 3 — Action in FRV (Initial Recce).
(1) Occupation in FRV, move in, secure, fmns, posns of gps, sig for FRV.
(2) Recce Gp.
(a) Composition.
(b) Tasks.
(c) Route.
6C-2
Leg From To Mag Bearing Distance Ground in Detail
PROTECT
PROTECT
(d) OOM, fmns, arcs.
(e) Action on en (pre-seen and ambush) and sig to open fire.
(f) Action if FRV gp loc by en.
(3) Remainder.
(a) Composition.
(b) Tasks.
(c) Arcs.
(d) Action on en (pre-seen ambush) and sig to open fire.
(e) Action if recce gp loc by en.
(f) Action on return of recce gp.
(g) Action on cas.
CONFIRM
f. Phase 4 — Action on Obj.
(1) Cover/Fire Gp.
(a) Composition.
(b) Task.
(c) Posn.
(d) Route.
(e) Fmn.
(f) Arcs.
(g) Sigs to open fire.
(h) Action if located by en.
(i) Action if separated from gp.
(2) Close Recce/Asslt Gp.
(a) Composition.
6C-3
PROTECT
PROTECT
(b) Tasks.
(c) Posn.
(d) Route.
(e) Fmn.
(f) Arcs.
(g) Sig for opening fire.
(h) Action if loc by en.
(i) Action if separated from gp.
(j) Action on asslt.
(k) Illum.
(l) PW.
(m) Action of recce gp fails to return.
(n) Action on cas.
(o) Fire Plan.
(3) FRV Protection Gp.
(a) Composition.
(b) Tasks.
(c) Arcs.
(d) Action if loc by en.
(e) Action if recce gp fails to return.
(f) Action if recce gp engaged.
(g) Action on return of recce/asslt fire gps.
CONFIRM
g. Phase 5 — Wdr. (To and action in FRV)
(1) Sig to Wdr.
6C-4
PROTECT
PROTECT
(2) OOM (sequence of gp wdr, arcs, fmns).
(3) Action posns in FRV. (Pack kit.)
(4) Headchecks and sig to move out.
(5) Action if in contact.
(6) Action with PWs.
(7) Action if gp fails to return.
(8) Action if FRV gp has moved.
(9) Action if surprised by bn (e.g., fol up).
CONFIRM
h. Phase 6 — Route Back. (home run).
(1) Route.
(2) Fmns.
(3) RVs.
(4) Obs.
(5) Action on en (pre-seen and ambush) sig to open fire.
(6) Action on cas.
(7) Action if lost.
(8) Action if separated.
(9) Action on arrival at PUP/base loc.
(10) Time in.
CONFIRM
6C-5
Leg From To Mag Bearing Distance Ground in Detail
PROTECT
PROTECT
i. Coord Instr.
(1) Timings, meals, rest, rehearsals, day/night, wpns test, insp, timein/out debrief.
(2) Action on halts.
(3) Fire Plan.
(4) Rehearsal locs and details.
CONFIRM
5. SERVICE SUPPORT.
DressEquipment (specials)WpnsAmmoRatsMedPWTpt
CONFIRM
6. COMD AND SIGS.
a. Comd — loc of HQs— loc ptl comd— chain of comd
b. Sigs radios, btys, sigs instr.
c. Debrief.
d. Password.
6C-6
PROTECT
PROTECT
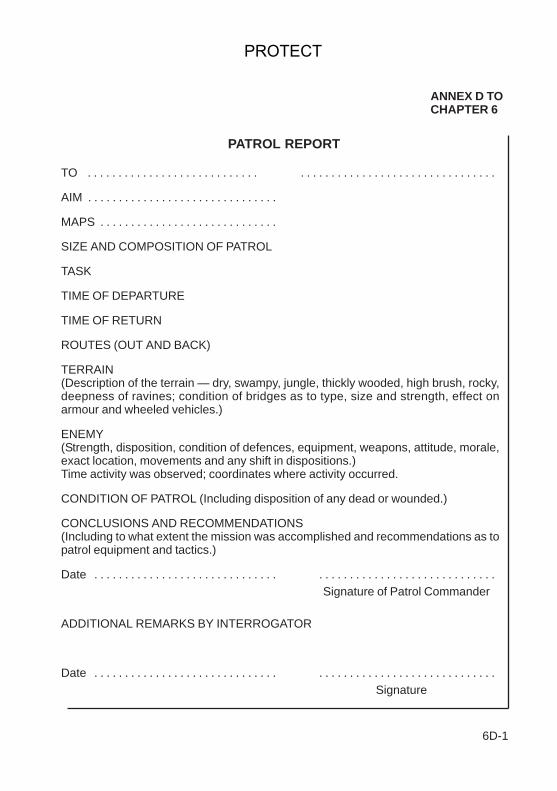
ANNEX D TOCHAPTER 6
PATROL REPORT
TO . . . . . . . . . . . . . . . . . . . . . . . . . . . . . . . . . . . . . . . . . . . . . . . . . . . . . . . . . . . .
AIM . . . . . . . . . . . . . . . . . . . . . . . . . . . . . . .
MAPS . . . . . . . . . . . . . . . . . . . . . . . . . . . . .
SIZE AND COMPOSITION OF PATROL
TASK
TIME OF DEPARTURE
TIME OF RETURN
ROUTES (OUT AND BACK)
TERRAIN(Description of the terrain — dry, swampy, jungle, thickly wooded, high brush, rocky,deepness of ravines; condition of bridges as to type, size and strength, effect onarmour and wheeled vehicles.)
ENEMY(Strength, disposition, condition of defences, equipment, weapons, attitude, morale,exact location, movements and any shift in dispositions.)Time activity was observed; coordinates where activity occurred.
CONDITION OF PATROL (Including disposition of any dead or wounded.)
CONCLUSIONS AND RECOMMENDATIONS(Including to what extent the mission was accomplished and recommendations as topatrol equipment and tactics.)
Date . . . . . . . . . . . . . . . . . . . . . . . . . . . . . . . . . . . . . . . . . . . . . . . . . . . . . . . . . . .Signature of Patrol Commander
ADDITIONAL REMARKS BY INTERROGATOR
Date . . . . . . . . . . . . . . . . . . . . . . . . . . . . . . . . . . . . . . . . . . . . . . . . . . . . . . . . . . .Signature
6D-1
PROTECT

6D-2
PROTECT
PROTECT
Chapter 7
FIRST AID
SECTION 1. — INTRODUCTION
General
0701. APC first aid training consists of:
a. Emergency Action (managing an incident and getting help).
b. The emergency aid given to a casualty (Casaid).
c. First Aid Qualification (for a recognized youth or adult first aid certificate).
0702. Emergency Action and Casaid comprise the ACF First Aid Syllabus at BasicTraining and 1–Star and the First Aid content in the APC (CCF) Basic Syllabus. Firstaid qualification comprises the ACF syllabus at 2– to 4–Star and the APC (CCF)Advanced Syllabus.
0703. This volume deals only with Emergency Action and Casaid. First aidqualification is dealt with in Volume 2.
0704. First aid must be taught in the CCF and ACF to accepted civilian standards.However, it is also a core military skill and can therefore be taught and tested bysuitable adult leaders in a similar way to other APC subjects.
Emergency Action
0705. Emergency Action is the first period of first aid which is included in ACF BasicTraining and revised at 1–Star. In the CCF it will be taught as the first period of Casaidfor self reliance training for APC (CCF) Basic Syllabus. Emergency Action can betaught and tested by any suitable person, including cadets.
Casaid
0706. Casaid must be completed before a 1–Star pass can be obtained or the APC(CCF) Basic Syllabus completed. This is essential because of the need for cadets tohave adequate training for the other activities in which they will be involved at 2–Star,APC (CCF) Advanced Syllabus and for the Duke of Edinburgh’s Bronze Awardexpedition training (for which Casaid is the required basic first aid trainingrequirement).
7-1
PROTECT
PROTECT
0707. Casaid training should not extend beyond four hours and the theory elementmust be restricted to what is necessary for adequate performance of simple andeffective practical skills. Casaid will be revised at 2–Star/APC (CCF) AdvancedSyllabus level as part of first aid qualification training. Casaid will ideally be taught atdetachment level over four evenings plus testing, or in the CCF in one day or twoafternoons including testing. Testing should be restricted to safe, prompt and effectivetreatment leaving more detailed knowledge to be tested at 2–Star and APC (CCF)Advanced Syllabus levels.
0708. Casaid does not provide recognized first aid skills or qualification. It is thelevel of emergency aid which should be provided by any individual and not merely byqualified first aiders. Consequently, Casaid does not need to be registered, does notlead to a certificate or badge and involves no cost.
0709. Cadets who have already obtained comparable training at school orelsewhere (for example, through the Three Cross Award or Young Lifesaver) can betested in Casaid with appropriate revision if necessary.
0710. Casaid may be taught by any suitable person, including cadets who have afirst aid qualification and methods of instruction skills, and be tested by any personwith a first aid qualification or any other suitable person approved by the ACF CountyFirst Aid Training Officer or Contingent Commander.
0711 – 0720. Reserved.
7-2
PROTECT
PROTECT
SECTION 2. — EMERGENCY ACTION
A. INSTRUCTOR’S NOTES
Aim
0721. The aim of the lesson is to teach cadets emergency action comprising:
a. Managing an Incident Stage 1.
b. Getting help Stage 2.
c. Aftercare Stage 3.
Timings
0722. One 30 minute period.
Stores
0723. Telephone.
B. CONDUCT OF THE LESSON
0724. Revision. Nil.
Stage 1 — Managing an Incident
0725. Explain: A clear plan of action is needed to deal with an incident. This iscalled the Incident Action Plan. The Incident Action Plan is:
a. ASSESS.
b. MAKE SAFE.
c. EMERGENCY AID.
d. GET HELP.
e. AFTERCARE.
7-3
PROTECT
0726. Assess. Explain: Assess the situation. STOP/LOOK/THINK. Identify anydanger first to yourself and then to the casualty. Use your eyes, ears and nose to lookfor clues, for example, the hiss of gas or the smell of petrol. Decide what hashappened, how many casualties there are and where they are (beware of casualtieswho may be hidden behind hedges, in wreckage or who may have wandered awayfrom the immediate vicinity of the incident). Decide what resources you haveavailable. Be calm and take charge unless there is anyone better qualified, in whichcase offer your assistance.
0727. Make Safe. Explain: Make the area safe. Put your own safety first. Notonly will you not be able to help the casualty if you also become a casualty, but you willincrease the problem for others. If the danger which caused the incident is stillpresent, remove it from the casualty if you can do so safely. If this is not possible, youmay have to remove the casualty from the danger. Particular points to consider whenmaking the area safe are detailed in the following paragraphs.
0728. Road Accidents. Explain:
a. Do not run across a motorway or busy road — if casualties are still on thecarriageway, make no attempt to deal with them until traffic has stopped andthere is no danger of further collision. Take equal care when dealing withcasualties on the hard shoulder. Apply similar rules on other busy roads.
b. If in a vehicle yourself, ensure the driver parks safely and uses hazardlights.
c. Wear high visibility/reflective jacket or vest — improvise if possible.
d. Send bystanders in both directions (except possibly motorways) to warnother drivers but ensure they do so safely. Get other bystanders to set upwarning triangles/lights 200 metres in each direction.
e. Apply handbrake. Put blocks on wheels. Switch off ignition/fuel supply.Disconnect battery if possible.
f. Do not attempt to right upturned vehicle — try to prevent it from rolling over.
g. Ensure no smoking.
h. Look for other dangers — damaged power lines, spilt fuel, Hazchem/radiation warnings.
0729. Fires. Explain:
a. Keep calm while you assess the situation. Do not rush in.
b. Activate fire alarm.
7-4
PROTECT
PROTECT
c. Warn people at risk. Calm people down to stop spread of panic. Do not run.
d. If any danger to you, await emergency services.
e. Be aware of other dangers — gas/flammable or explosive substances/electrocution, etc.
f. Never enter a burning building — leave it to the emergency services.
g. Break the triangle of fire — oxygen/ignition/fuel — if possible and safe todo so.
h. Only fight the fire if emergency services have been called and you are notputting yourself in danger.
i. If leaving the building help everyone out if you can do so safely. Look for fireexits. Shut all doors behind you. Do not use lifts. Look for assembly points.
0730. Clothing on Fire. Explain:
a. Follow this drill when dealing with a casualty whose clothing is on fire:
STOPDROPWRAPROLL
b. Stop the casualty panicking or running around, particularly outside wherethe breeze will fan the flame.
c. Drop the casualty to the ground.
d. Wrap the casualty if possible tightly in coat, curtain, blanket, rug, etc. Donot use nylon.
e. Roll the casualty along the ground until the flames have been extinguished.If water is available, lay the casualty flames uppermost and douse with water.
0731. Smoke and Fumes. Explain:
a. Never enter a fume filled building, pit or other enclosed area — wait for theemergency services.
b. If you must pass through a smoke filled room keep low down — the air atfloor level is the cleanest.
c. If trapped, go into a room with a window and shut the door. Put blanket, etc.,against bottom of door to keep out smoke and fumes.
7-5
PROTECT
PROTECT
d. Keep by window. Keep low. Wait for emergency services.
e. If you have to escape through a window, go feet first, lower yourself to thefull length of your arms before dropping to the ground.
0732. High Voltage Electricity. Explain: High voltage electricity may jump upto 20 metres. Normally insulating materials such as wood will not protect you. Do notapproach railway overhead power lines, other power lines or high tension cables untilyou are told officially that the power has been cut off and isolated. Keep bystandersaway.
0733. Low Voltage Current. Explain: Low voltage current such as used inhomes, in offices, workshops, etc., can cause serious injury and death:
a. Do not touch the casualty if in contact with the electrical current.
b. Switch off the current at the mains or meter if possible.
c. Remove the plug or pull the cable free.
d. If unable to break contact with a source of electricity:
(1) Avoid contact with water, wet floor and ensure hands are not wet.
(2) Stand on dry insulating material (e.g., wooden box, rubber or plasticmat, telephone directory, thick pile of paper).
(3) Push casualty’s limbs away from source with broom, wooden chair,stool, etc., or push the source away from the casualty.
(4) Without touching the casualty loop rope around feet or under armsand pull away from source.
(5) As a last resort pull casualty free by pulling at his loose dry clothing.
0734. Drowning. Explain: Rescue the casualty. REACH AND THROW, DONOT GO. Do not enter the water yourself unless it is absolutely necessary. Stay onland and reach out with your hand, stick, branch, etc., or throw lifebelt, float rope, etc.If you are a trained lifesaver, you may have to swim/wade to the casualty and tow himto dry land. If the casualty is unconscious carry with head lower than chest once clearof the water to minimise risk of vomiting. Shield the casualty from the wind to preventwind chill.
0735. Emergency Aid. Explain: Emergency aid is the immediate life savingtreatment given to a casualty. This is taught as part of casaid and is not dealt with inthis lesson.
0736. Confirm Stage 1 by questions from and to the cadets.
7-6
PROTECT
PROTECT
Stage 2 — Getting Help
0737. Depending on the situation you may already have called for the assistance ofthe emergency services, or ensured that someone else has done so. The emergencyaid a casualty requires may often take precedence however, particularly when on yourown. As soon as is practicable ensure that the emergency services are called.
0738. Telephoning for help — consider means of making an emergency call, e.g.,mobile and car phones, emergency motorway phones, public call box. Emergencyphones are located at every mile on motorways with marker posts between to indicatedirection and distance of the nearest phone. These phones have only to be picked upto be answered. On other phones the emergency services can be obtained free ofcharge by entering the number 999 or 112 (the European Union emergency number).
0739. Decide which emergency services are required. The emergency serviceswhich can be obtained by 999 or 112 include:
a. Police.
b. Fire.
c. Ambulance.
d. Mountain, moor and fell rescue.
e. Coastguard.
f. Mines rescue.
0740. Consider whether other forms of help may be needed and ask the Police tonotify them. Some examples of help which may be appropriate are:
a. Utilities — gas, electricity, rail, water.
b. Health Services — doctor, dentist, nurse, midwife.
0741. Get help from other people to:
a. Make the area safe.
b. Telephone for assistance.
c. Find and fetch first aid equipment.
d. Control traffic and onlookers.
e. Control bleeding, support the casualty, support a limb.
f. Maintain the casualty’s privacy.
7-7
PROTECT
PROTECT

g. Move the casualty, e.g., into the recovery position.
h. Move the casualty to safety.
0742. If using bystanders to phone for help give clear instructions, ensure theyreport back with any messages and so you obtain confirmation that help has beencalled, and send several people in opposite directions. Prevent other people fromusing mobile phones to call for help once you are sure this has been done. Speak withfirmness and confidence to helpers and onlookers who may well feel frightened andhelpless.
Stage 3 — Aftercare
0743. Your job is not ended when the emergency services arrive. Yourresponsibilities may include:
a. Taking care of the casualty’s personal belongings and ensuring they go withthe casualty, or are returned to the casualty, or are put in the care of a reliablefriend or relative.
b. Making a report to the ambulance crew, doctor, etc., to include:
(1) The casualty’s name and address.
(2) History of the accident or illness.
(3) Brief description of injuries.
(4) Unusual behaviour.
(5) Treatment given.
(6) Observations made of breathing, pulse, levels of response.
c. In minor cases arranging transport home and accompanying the casualty orarranging this, and arranging to let someone at home know what has happened.You may need to advise or arrange for the casualty to see their doctor.
d. Watch for indications of stress (delayed reaction) or even post traumaticstress disorder (PTSD) not only in casualties but in others involved in anaccident, including first aiders.
0744. Those involved in an accident or in giving first aid may experience a delayedreaction due to stress. Seek or obtain help from a doctor, medical officer or nurse ifpossible, or at least talk over the situation with a friend. It may help to make a writtenaccount of the incident, including the positive action taken.
7-8
PROTECT
PROTECT

0745. Symptoms of stress which appear or continue more than a month after anincident involving loss of or serious threat to life may indicate PTSD. Seek help from adoctor or trained counsellor.
0746. Confirm Stages 2 and 3 by questions from and to the cadets, and by askingcadets to give practical examples of making a telephone call to get help.
Conclusion
0747. End of Lesson Drill.
a. Questions to and from the class on the lesson.
b. Confirm by practical test.
c. Summary. To include the Incident Action Plan:
(1) ASSESS.
(2) MAKE SAFE.
(3) EMERGENCY AID.
(4) GET HELP.
(5) AFTERCARE.
d. Pack Up.
e. Look forward. Emergency aid to be dealt with in casaid.
0748 – 0750. Reserved.
7-9
PROTECT

7-10
PROTECT
PROTECT
SECTION 3. — CASAID
LESSON 1 (PERIODS 1 AND 2). — THE AIMS OF FIRST AID,INCIDENT ACTION PLAN, INITIAL ASSESSMENT AND
THE RECOVERY POSITION
A. INSTRUCTOR’S NOTES
Aim
0751. The aim of the lesson is to teach cadets:
a. The Aims of First Aid Stage 1.
b. Emergency Aid Stage 2.
c. The Recovery Position Stage 3.
Timings
0752. Two 30 minute periods.
Stores
0753. Nil.
B. CONDUCT OF THE LESSON
0754. Revision. Nil.
0755. Incident Action Plan.
a. ASSESS.
b. MAKE SAFE.
c. EMERGENCY AID.
d. GET HELP.
e. AFTERCARE.
7-11
PROTECT
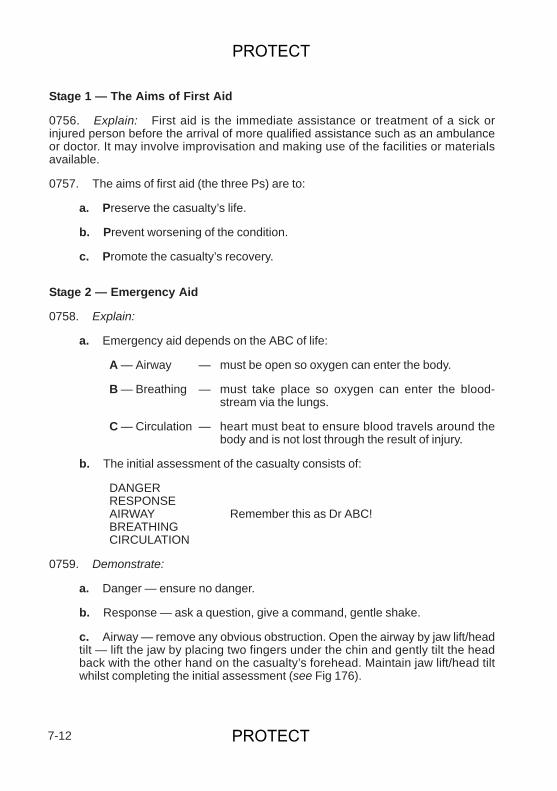
Stage 1 — The Aims of First Aid
0756. Explain: First aid is the immediate assistance or treatment of a sick orinjured person before the arrival of more qualified assistance such as an ambulanceor doctor. It may involve improvisation and making use of the facilities or materialsavailable.
0757. The aims of first aid (the three Ps) are to:
a. Preserve the casualty’s life.
b. Prevent worsening of the condition.
c. Promote the casualty’s recovery.
Stage 2 — Emergency Aid
0758. Explain:
a. Emergency aid depends on the ABC of life:
A — Airway — must be open so oxygen can enter the body.
B — Breathing — must take place so oxygen can enter the blood-stream via the lungs.
C — Circulation — heart must beat to ensure blood travels around thebody and is not lost through the result of injury.
b. The initial assessment of the casualty consists of:
DANGERRESPONSEAIRWAY Remember this as Dr ABC!BREATHINGCIRCULATION
0759. Demonstrate:
a. Danger — ensure no danger.
b. Response — ask a question, give a command, gentle shake.
c. Airway — remove any obvious obstruction. Open the airway by jaw lift/headtilt — lift the jaw by placing two fingers under the chin and gently tilt the headback with the other hand on the casualty’s forehead. Maintain jaw lift/head tiltwhilst completing the initial assessment (see Fig 176).
7-12
PROTECT
PROTECT
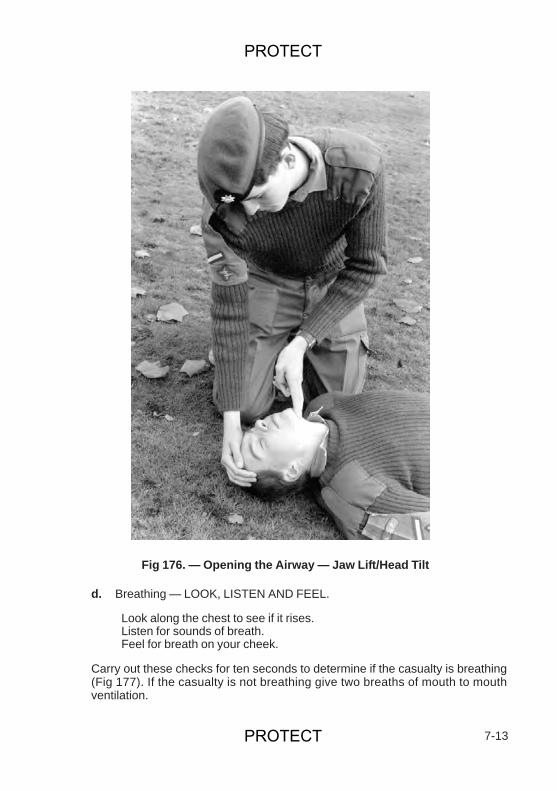
d. Breathing — LOOK, LISTEN AND FEEL.
Look along the chest to see if it rises.Listen for sounds of breath.Feel for breath on your cheek.
Carry out these checks for ten seconds to determine if the casualty is breathing(Fig 177). If the casualty is not breathing give two breaths of mouth to mouthventilation.
7-13
Fig 176. — Opening the Airway — Jaw Lift/Head Tilt
PROTECT
PROTECT
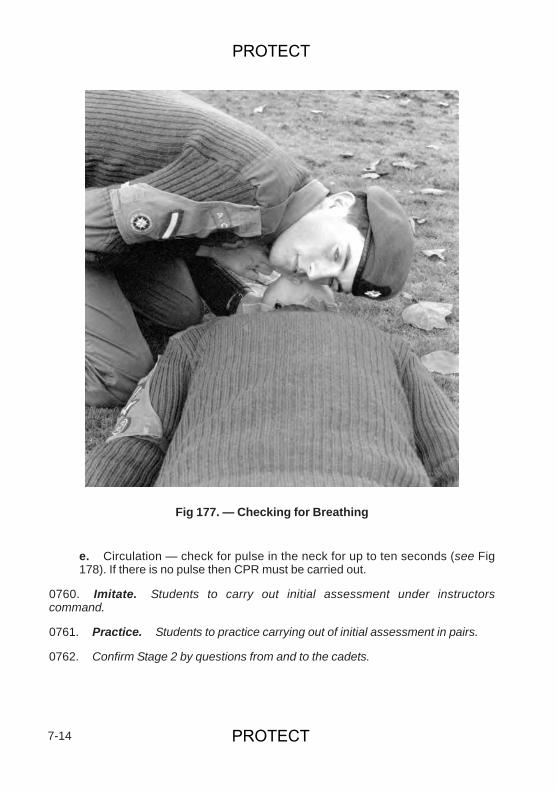
e. Circulation — check for pulse in the neck for up to ten seconds (see Fig178). If there is no pulse then CPR must be carried out.
0760. Imitate. Students to carry out initial assessment under instructorscommand.
0761. Practice. Students to practice carrying out of initial assessment in pairs.
0762. Confirm Stage 2 by questions from and to the cadets.
7-14
Fig 177. — Checking for Breathing
PROTECT
PROTECT
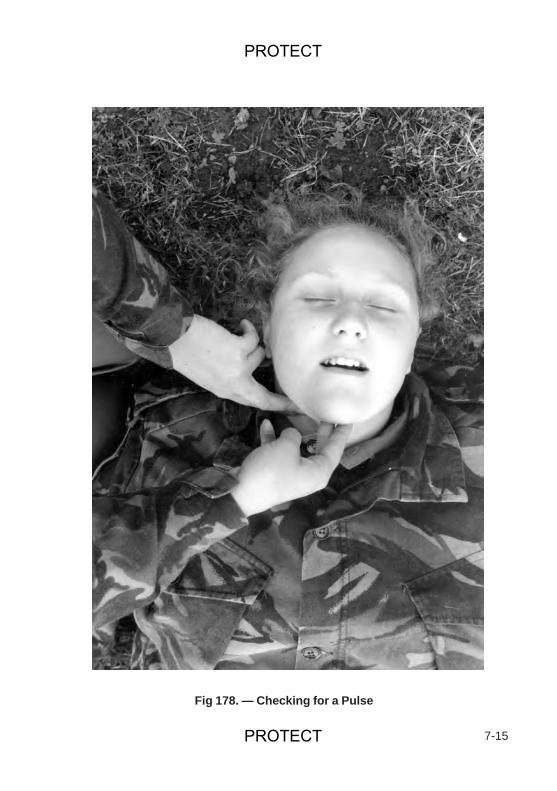
7-15
Fig 178. — Checking for a Pulse
PROTECT
PROTECT
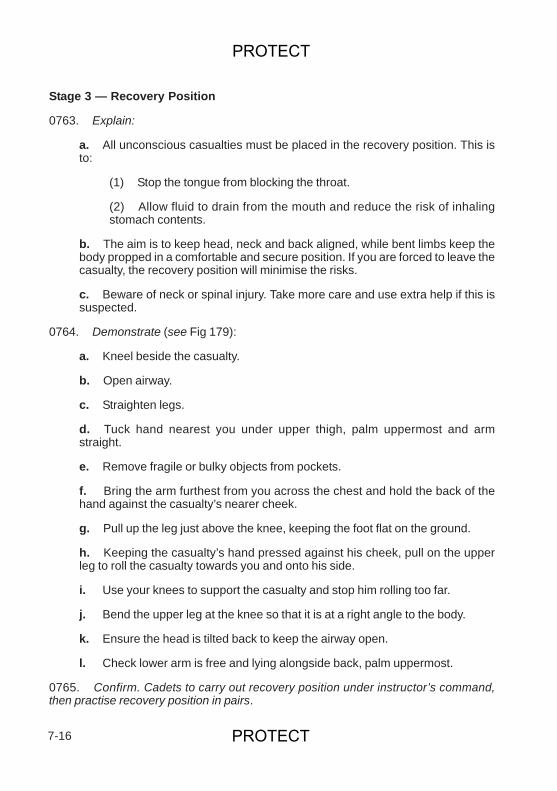
Stage 3 — Recovery Position
0763. Explain:
a. All unconscious casualties must be placed in the recovery position. This isto:
(1) Stop the tongue from blocking the throat.
(2) Allow fluid to drain from the mouth and reduce the risk of inhalingstomach contents.
b. The aim is to keep head, neck and back aligned, while bent limbs keep thebody propped in a comfortable and secure position. If you are forced to leave thecasualty, the recovery position will minimise the risks.
c. Beware of neck or spinal injury. Take more care and use extra help if this issuspected.
0764. Demonstrate (see Fig 179):
a. Kneel beside the casualty.
b. Open airway.
c. Straighten legs.
d. Tuck hand nearest you under upper thigh, palm uppermost and armstraight.
e. Remove fragile or bulky objects from pockets.
f. Bring the arm furthest from you across the chest and hold the back of thehand against the casualty’s nearer cheek.
g. Pull up the leg just above the knee, keeping the foot flat on the ground.
h. Keeping the casualty’s hand pressed against his cheek, pull on the upperleg to roll the casualty towards you and onto his side.
i. Use your knees to support the casualty and stop him rolling too far.
j. Bend the upper leg at the knee so that it is at a right angle to the body.
k. Ensure the head is tilted back to keep the airway open.
l. Check lower arm is free and lying alongside back, palm uppermost.
0765. Confirm. Cadets to carry out recovery position under instructor’s command,then practise recovery position in pairs.
7-16
PROTECT
PROTECT
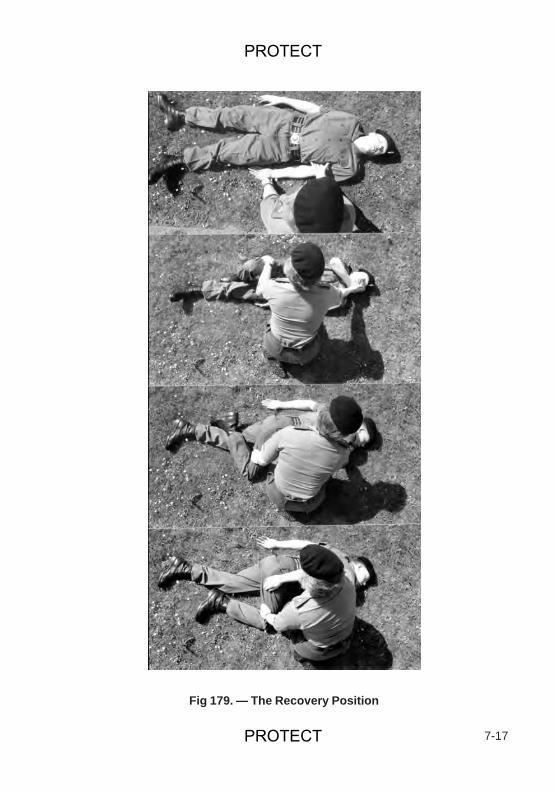
7-17
Fig 179. — The Recovery Position
PROTECT
PROTECT
Conclusion
0766. End of Lesson Drill.
a. Questions to and from the class on the lesson.
b. Confirm by practical test — initial assessment and recovery position.
c. Summary. To include the following:
(1) The aims of first aid.
(2) Initial assessment.
(3) Recovery position.
d. Look forward. Action to be taken when no breathing/pulse.
0767 – 0769. Reserved.
7-18
PROTECT
PROTECT
LESSON 2 (PERIODS 3 AND 4). — RESUSCITATION
A. INSTRUCTOR’S NOTES
Aim
0770. The aim of the lesson is to teach cadets resuscitation techniques:
a. Mouth to mouth ventilation.
b. Cardio-pulmonary resuscitation (CPR).
Timings
0771. Two 30 minute periods. This lesson is taught in three stages which may besplit between the two periods at the discretion of the instructor.
Stores
0772. Resuscitation mannikins.
Miscellaneous
0773. This short Casaid lesson does not deal with the unusual case of airwayobstruction, or with children and babies under eight years. These topics are coveredat 2–Star/CCF Advanced Syllabus.
0774. When teaching this lesson explain and demonstrate each method, then talkthrough the cadets, and finally practise the cadets whilst fault checking.
B. CONDUCT OF THE LESSON
0775. Revision.
a. ABC of life — A — AirwayB — BreathingC — Circulation
b. Initial Assessment — Dr ABC.
7-19
PROTECT
PROTECT
D — Check for dangerR — Check responseA — Open airway jaw lift/head tiltB — Check breathing for 10 secondsC — Check pulse for 10 seconds
Stage 1 — Mouth to Mouth Ventilation
0776. Explain: Air breathed in contains 21% oxygen and air breathed out contains16% oxygen. This is sufficient to ensure that the cells of the body, especially the brain,obtain sufficient oxygen to stay alive when air is blown into the casualty’s lungs.
0777. Explain and demonstrate:
a. Carry out initial assessment as far as breathing check.
b. Close the casualty’s nose by pinching it, and seal around casualty’s mouthwith your lips (see Fig 180).
c. Blow into casualty’s mouth for two seconds until chest rises, maintainingjaw lift/head tilt and nose seal (see Fig 181).
d. Remove your lips and take a fresh breath for four seconds while chest falls.
e. Repeat c. and d. once more.
f. Check pulse (at neck) for circulation.
g. If circulation present continue c. and d., checking pulse every 10 breaths/1minute.
h. If breathing returns, place casualty into recovery position.
i. If pulse absent begin CPR.
0778. Confirm Stage 1 by questions from and to cadets, then cadets to carry outmouth to mouth ventilation on resuscitation mannikins under instructor’s command fortwo breaths and pulse check. Practice mouth to mouth ventilation of resuscitationmannikins for at least a full minute including second pulse check.
Stage 2 — Cardio-Pulmonary Resuscitation
0779. Explain: If there is no pulse this indicates that the heart is not beating.Oxygen which is air breathed into the lungs cannot be circulated around the body andto the brain cells in particular unless the heart is able to pump the oxygenated bloodaround the body. You will have to provide an artificial circulation by means of chestcompressions. Chest compressions must be combined with mouth to mouth ventilationto maintain both the circulation and the supply of oxygen to the brain.
7-20
PROTECT
PROTECT
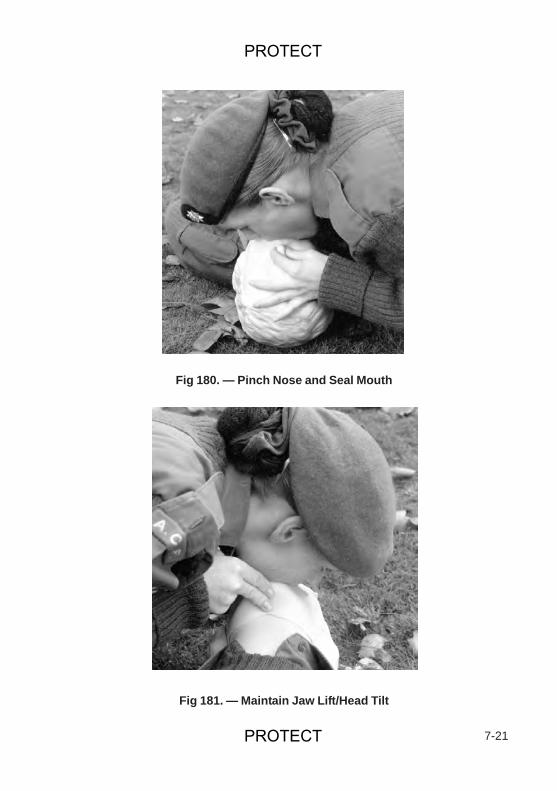
7-21
Fig 180. — Pinch Nose and Seal Mouth
Fig 181. — Maintain Jaw Lift/Head Tilt
PROTECT
PROTECT
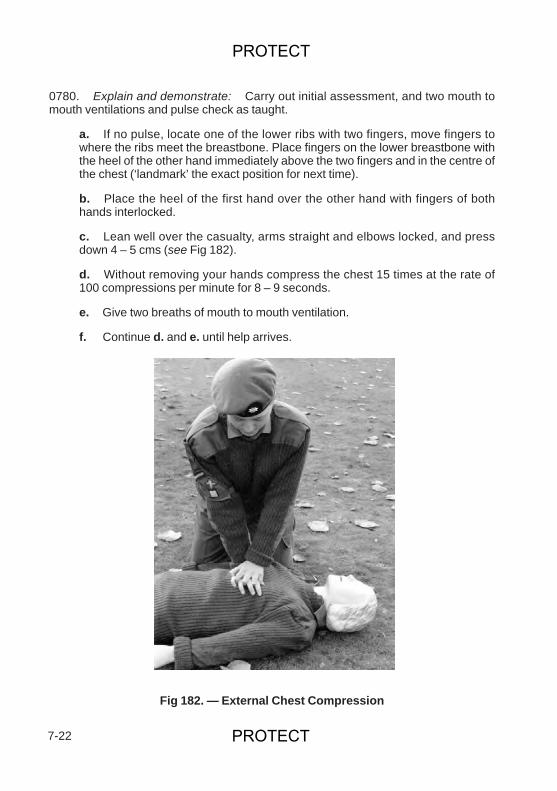
0780. Explain and demonstrate: Carry out initial assessment, and two mouth tomouth ventilations and pulse check as taught.
a. If no pulse, locate one of the lower ribs with two fingers, move fingers towhere the ribs meet the breastbone. Place fingers on the lower breastbone withthe heel of the other hand immediately above the two fingers and in the centre ofthe chest (‘landmark’ the exact position for next time).
b. Place the heel of the first hand over the other hand with fingers of bothhands interlocked.
c. Lean well over the casualty, arms straight and elbows locked, and pressdown 4 – 5 cms (see Fig 182).
d. Without removing your hands compress the chest 15 times at the rate of100 compressions per minute for 8 – 9 seconds.
e. Give two breaths of mouth to mouth ventilation.
f. Continue d. and e. until help arrives.
7-22
Fig 182. — External Chest Compression
PROTECT
PROTECT
0781. Confirm Stage 2 by questions from and to cadets. Cadets to carry out CPR onresuscitation mannikins under instructor’s command for ten compressions. PracticeCPR on resuscitation mannikins for at least one minute.
Stage 3 — Getting Help
0782. Explain: The rules for deciding when to leave your casualty and get helpdepend on whether you have someone to help or are alone, and whether the absenceof breathing is due to injury or drowning, or some other condition such as a heartattack. If breathing/pulse fails as a result of a heart attack the one single factor whichwill save the casualty is the early arrival of an ambulance with a defibrillator (nowcarried on all front line emergency ambulances) preferably within eight minutes. Inthese circumstances get help on the way as soon as it is detected that there is nobreathing.
0783. The possible drills are:
a. No breathing — helper available
(1) Send helper for ambulance as soon as it is detected casualty is notbreathing.
(2) Commence resuscitation.
b. No breathing — alone — condition not due to injury or drowning.
(1) Call for ambulance.
(2) Commence resuscitation.
c. No breathing — alone — condition is due to injury or drowning.
(1) Carry out resuscitation for one minute.
(2) Call for ambulance.
(3) Continue resuscitation.
0784. Confirm Stage 3 by questions from and to cadets.
Conclusion
0785. End of Lesson Drill.
a. Confirm whole lesson.
b. Questions to and from the cadets on the whole of the lesson.
7-23
PROTECT
PROTECT
c. Cadets to carry out further practice under test conditions on varyingscenarios involving:
(1) No breathing/pulse present.
(2) No breathing/pulse absent.
(3) Student alone.
(4) Helper available.
(5) Conditions due to injury/drowning.
(6) Condition not due to injury/drowning.
d. Pack up. Resuscitation mannikins to be cleaned and put away.
e. Look forward. More casualties will involve wounds and bleeding than CPR,and the next lesson will deal with these.
0786 – 0789. Reserved.
7-24
PROTECT
PROTECT
LESSON 3 (PERIODS 5 AND 6). — STOPPING BLEEDING, HOW TOAPPLY A DRESSING AND TREATMENT FOR SHOCK,
CUTS AND GRAZES
A. INSTRUCTOR’S NOTES
Aim
0790. The aim of the lesson is to teach cadets:
a. How to stop bleeding using direct and indirect pressure.
b. The application of a dressing.
c. The treatment for shock.
d. The treatment for cuts and grazes and cleaning of affected parts.
Timings
0791. Two 30 minute periods.
Stores
0792. Sterile/field dressings.
B. CONDUCT OF THE LESSON
0793. Revision. Revise points from Lesson 2 and practise Resuscitation.
Severe Bleeding
0794. Explain: Controlling severe bleeding will help ensure adequateCIRCULATION. Check the AIRWAY and BREATHING first.
0795. Uncover the Wound. Explain and demonstrate: Look for foreign bodiesembedded in the wound. Small foreign bodies on the surface of the wound should becarefully removed if they can be wiped off easily. If there are no embedded foreignbodies the treatment is to:
a. Apply direct pressure to control the bleeding by pressing with fingers or thepalm of the hand on the wound. Press over a clean dressing if one is
7-25
PROTECT
PROTECT
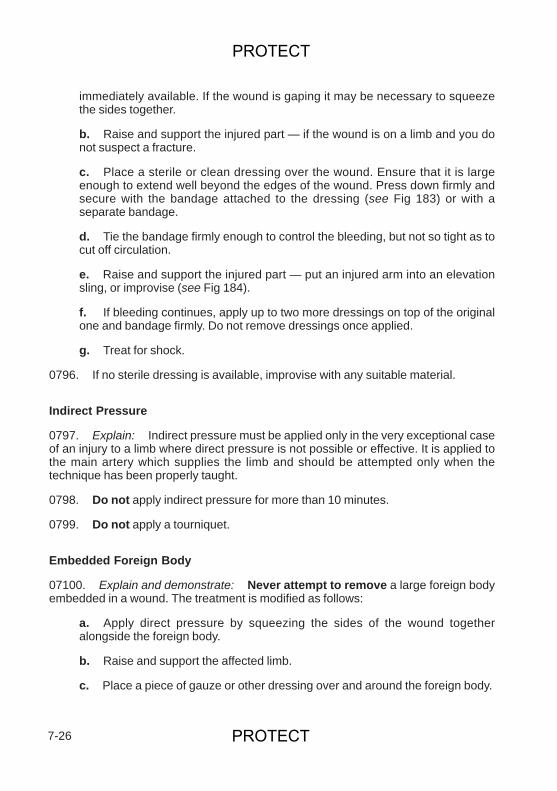
immediately available. If the wound is gaping it may be necessary to squeezethe sides together.
b. Raise and support the injured part — if the wound is on a limb and you donot suspect a fracture.
c. Place a sterile or clean dressing over the wound. Ensure that it is largeenough to extend well beyond the edges of the wound. Press down firmly andsecure with the bandage attached to the dressing (see Fig 183) or with aseparate bandage.
d. Tie the bandage firmly enough to control the bleeding, but not so tight as tocut off circulation.
e. Raise and support the injured part — put an injured arm into an elevationsling, or improvise (see Fig 184).
f. If bleeding continues, apply up to two more dressings on top of the originalone and bandage firmly. Do not remove dressings once applied.
g. Treat for shock.
0796. If no sterile dressing is available, improvise with any suitable material.
Indirect Pressure
0797. Explain: Indirect pressure must be applied only in the very exceptional caseof an injury to a limb where direct pressure is not possible or effective. It is applied tothe main artery which supplies the limb and should be attempted only when thetechnique has been properly taught.
0798. Do not apply indirect pressure for more than 10 minutes.
0799. Do not apply a tourniquet.
Embedded Foreign Body
07100. Explain and demonstrate: Never attempt to remove a large foreign bodyembedded in a wound. The treatment is modified as follows:
a. Apply direct pressure by squeezing the sides of the wound togetheralongside the foreign body.
b. Raise and support the affected limb.
c. Place a piece of gauze or other dressing over and around the foreign body.
7-26
PROTECT
PROTECT
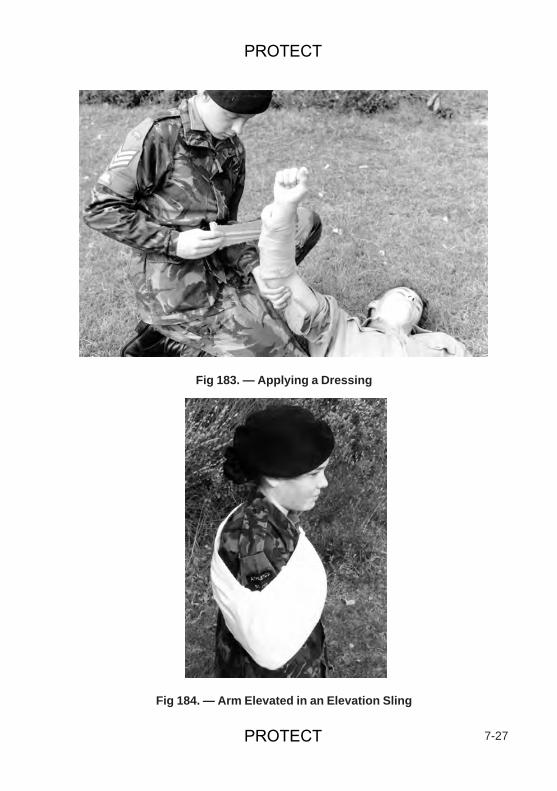
7-27
Fig 183. — Applying a Dressing
Fig 184. — Arm Elevated in an Elevation Sling
PROTECT
PROTECT
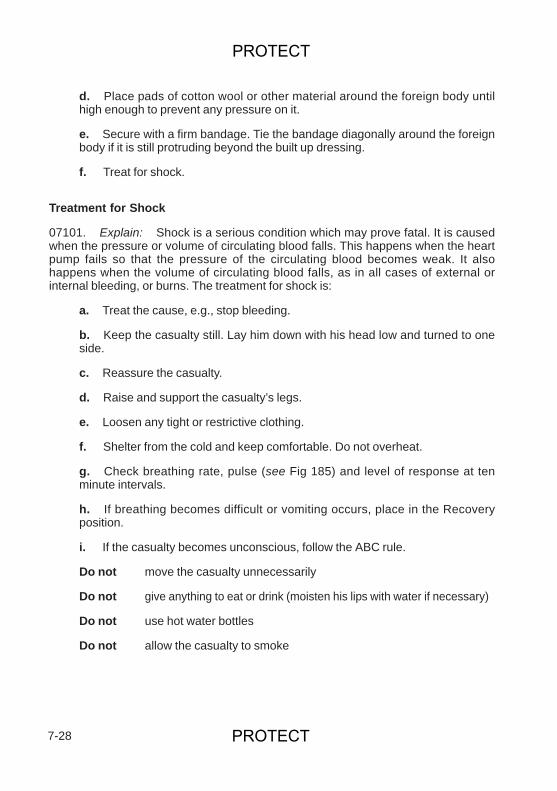
d. Place pads of cotton wool or other material around the foreign body untilhigh enough to prevent any pressure on it.
e. Secure with a firm bandage. Tie the bandage diagonally around the foreignbody if it is still protruding beyond the built up dressing.
f. Treat for shock.
Treatment for Shock
07101. Explain: Shock is a serious condition which may prove fatal. It is causedwhen the pressure or volume of circulating blood falls. This happens when the heartpump fails so that the pressure of the circulating blood becomes weak. It alsohappens when the volume of circulating blood falls, as in all cases of external orinternal bleeding, or burns. The treatment for shock is:
a. Treat the cause, e.g., stop bleeding.
b. Keep the casualty still. Lay him down with his head low and turned to oneside.
c. Reassure the casualty.
d. Raise and support the casualty’s legs.
e. Loosen any tight or restrictive clothing.
f. Shelter from the cold and keep comfortable. Do not overheat.
g. Check breathing rate, pulse (see Fig 185) and level of response at tenminute intervals.
h. If breathing becomes difficult or vomiting occurs, place in the Recoveryposition.
i. If the casualty becomes unconscious, follow the ABC rule.
Do not move the casualty unnecessarily
Do not give anything to eat or drink (moisten his lips with water if necessary)
Do not use hot water bottles
Do not allow the casualty to smoke
7-28
PROTECT
PROTECT
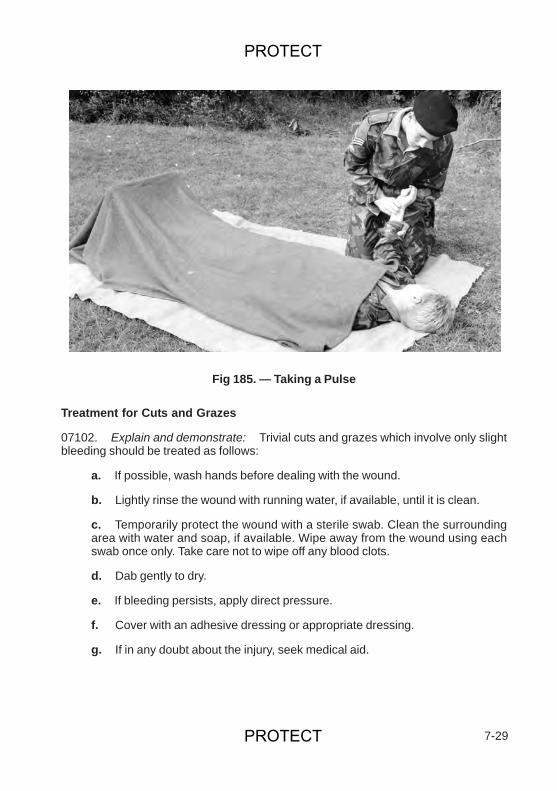
Treatment for Cuts and Grazes
07102. Explain and demonstrate: Trivial cuts and grazes which involve only slightbleeding should be treated as follows:
a. If possible, wash hands before dealing with the wound.
b. Lightly rinse the wound with running water, if available, until it is clean.
c. Temporarily protect the wound with a sterile swab. Clean the surroundingarea with water and soap, if available. Wipe away from the wound using eachswab once only. Take care not to wipe off any blood clots.
d. Dab gently to dry.
e. If bleeding persists, apply direct pressure.
f. Cover with an adhesive dressing or appropriate dressing.
g. If in any doubt about the injury, seek medical aid.
7-29
Fig 185. — Taking a Pulse
PROTECT
PROTECT
Tetanus Infection
07103. Explain: Every wound carries the risk of tetanus infection. Any casualtywith a wound who has not had an anti-tetanus injection or whose last injection wasmore than five years ago should be referred for medical advice.
Conclusion
07104. End of Lesson Drill.
a. Questions to and from the class on the lesson.
b. Confirm actions by practice.
c. Summary. To include the following:
(1) How to stop bleeding.
(2) Treatment for shock.
(3) How to treat small wounds.
07105 – 07109. Reserved.
7-30
PROTECT
PROTECT
LESSON 4 (PERIODS 7 AND 8). — FRACTURES ANDHOW TO TREAT THEM AND OTHER INJURIES
A. INSTRUCTOR’S NOTES
Aim
07110. The aim of the lesson is to teach cadets:
a. Recognition of fractures and immediate treatment.
b. Immobilisation of fractures of ankle, leg and arm.
c. Treatment of blisters, stings and burns.
d. Recognition of injury to joints or muscles.
e. Treatment for dislocation and sprains.
f. Dealing with foreign bodies in the eye, ear or nose.
Timings
07111. Two 30 minute periods.
Stores
07112.
Blankets/clothing for supportSoft paddingTriangular bandages
B. CONDUCT OF THE LESSON
07113. Revision. Treatment for shock and how to stop bleeding.
Fractures
07114. Explain: A fracture is a broken or cracked bone. It can be caused by directforce such as a violent injury to that part of the body, or indirect force. Indirect forcemay result in a fracture away from the point of impact, such as landing heavily on thefeet resulting in damage to the spine, or a fall on the outstretched arm breaking the
7-31
PROTECT
PROTECT
collar bone. Another kind of indirect force is a fracture caused by violent jerking of themuscles or ligaments breaking a bone, such as the kneecap.
07115. Fractures may be either:
a. Closed. This is where there is no external injury.
b. Open. This is where there is a wound leading to the fracture site. Thebone may protrude through the skin.
07116. A closed or open fracture may also be complicated, when associated withanother injury to nerves, large blood vessels, organs or a dislocation.
Signs and Symptoms
07117. Explain: Not all the signs and symptoms will be present. Some maydevelop later. Those which may be seen or described by the casualty are:
a. The casualty may have felt or heard the bone snap.
b. Pain, increased by movement.
c. Inability to move the injured part normally.
d. Tenderness on gentle pressure at or near the fracture site, with swellingand/or bruising in that area.
e. Deformity, such as a limb at an unusual angle or other abnormality,especially when comparing one side of the body with the other.
f. Signs and symptoms of shock, particularly in the case of closed fractures.
General Treatment
07118. Explain: The general treatment of fractures is to steady and support theinjured part, whilst dealing with more important priorities first. The immediate action isto check and deal with:
a. AIRWAY.
b. BREATHING.
c. CIRCULATION.
d. SEVERE BLEEDING.
e. UNCONSCIOUSNESS.
7-32
PROTECT
PROTECT
07119. Open wounds with severe bleeding must be treated as in paragraphs 0794 –0799, treating a bone protruding outside the wound as for an embedded foreign body.
07120. The injured part should be steadied and supported whilst dealing with themore important priorities, if this is possible without hindering the immediate treatment.This applies particularly to putting the casualty into the Recovery position whichshould be done with regard for the other injuries.
07121. Steady and support the injured part with your hands above and below thefracture site until it is immobilised. Rolled up blankets or clothing should be used tosupport the injured part. No attempt should be made to effect more permanentimmobilisation unless the casualty needs to be moved, or removal by ambulance isdelayed by more than 30 minutes.
07122. If it is essential for first aiders to move the casualty or the ambulance is likelyto be delayed, immobilise the injured part by fixing it to another part of the body withpadding and bandages.
Immobilisation of Fractures of Ankle and Leg
07123. Explain and demonstrate: If the ambulance is likely to be delayed:
a. Lay the casualty down and steady and support the injured leg with yourhands above and below the fracture site until it is immobilised (see Fig 186).
b. Straighten the limb by applying gentle traction (see Fig 187).
c. Place broad bandages under the feet and knees avoiding the fracture site.
d. Put adequate soft padding between the ankles and knees.
e. Move the good leg to the injured leg. Steady and support (see Fig 188).
f. If likely to be a delay, tie the bandage round the feet in a figure of eight.
g. Tie the bandage round the knees (see Figs 189 and 190).
07124. If the casualty needs to be moved by first aiders more padding andbandages will be needed:
a. Complete as in paragraph above.
b. Place two extra broad bandages above and below the fracture site.
c. Tie off.
07125. Explain: Splints are to be used only by fully trained and qualified firstaiders and are not appropriate to first aid at 1–Star level.
7-33
PROTECT
PROTECT

7-34
Fig 186. — Steady and Support a Fractured Leg
Fig 187. — Apply Gentle Traction
PROTECT
PROTECT
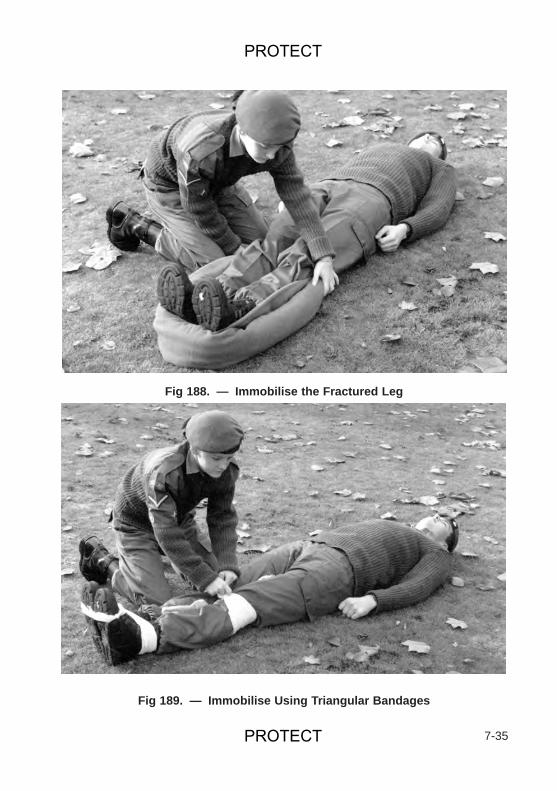
7-35
Fig 188. — Immobilise the Fractured Leg
Fig 189. — Immobilise Using Triangular Bandages
PROTECT
PROTECT
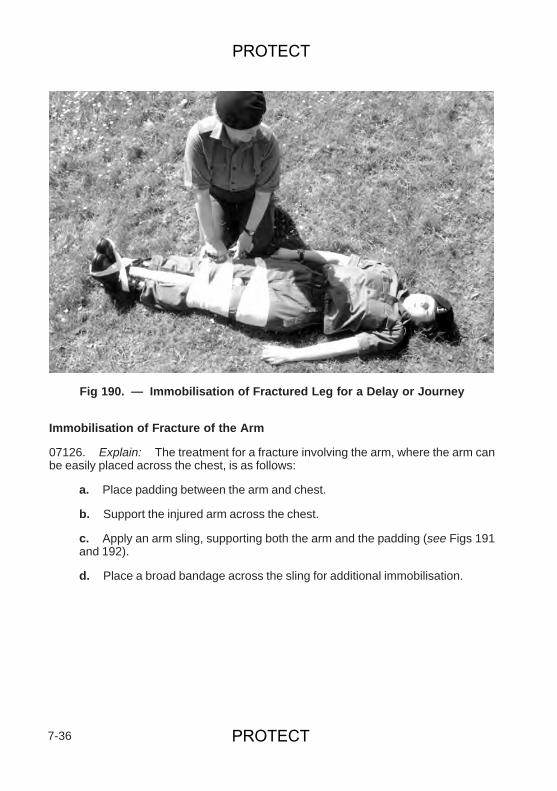
Immobilisation of Fracture of the Arm
07126. Explain: The treatment for a fracture involving the arm, where the arm canbe easily placed across the chest, is as follows:
a. Place padding between the arm and chest.
b. Support the injured arm across the chest.
c. Apply an arm sling, supporting both the arm and the padding (see Figs 191and 192).
d. Place a broad bandage across the sling for additional immobilisation.
7-36
Fig 190. — Immobilisation of Fractured Leg for a Delay or Journey
PROTECT
PROTECT
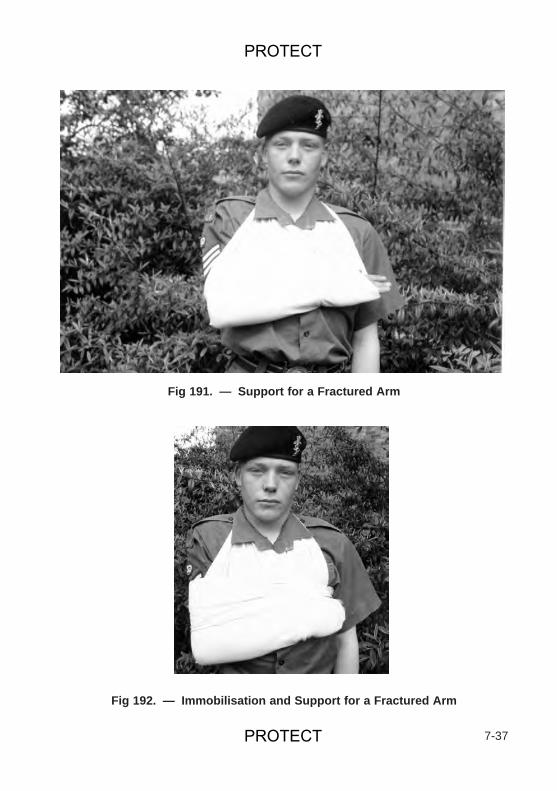
7-37
Fig 191. — Support for a Fractured Arm
Fig 192. — Immobilisation and Support for a Fractured Arm
PROTECT
PROTECT
Blisters
07127. Explain: Blisters are caused by friction or heat. Unless a blister breaks oris likely to be further damaged it requires no treatment. If it does break or is likely to befurther damaged apply a dressing large enough to extend well beyond the blisteredarea — do not break a blister.
Stings
07128. Explain: Insect stings may be painful but do not usually require first aidtreatment. They may cause a problem in people who are allergic to the poison in thesting, in the case of multiple stings from a swarm of insects or where stings in themouth have caused swelling. The general treatment is to:
a. If the sting is embedded in the skin, grasp the sting with tweezers as near aspossible to the skin surface and remove.
b. Relieve pain and swelling by applying a cold compress.
c. If pain or swelling increases over the next day, seek medical aid.
Stings in the Mouth or Throat
07129. Explain: The treatment for stings in the mouth or throat resulting inswelling is to:
a. Give the casualty ice to suck, or rinse the mouth with cold water.
b. If breathing is difficult place in Recovery position.
c. Arrange removal to hospital.
Burns
07130. Explain: Burns are injuries to the body tissues which may be caused in thefollowing ways:
a. Dry Burns. Caused by contact with flames, hot objects and friction.
b. Scalds. Caused by wet heat such as steam, hot water or fat.
c. Cold Burns. Caused by contact with a very cold object.
d. Chemical Burns. Caused by contact with chemicals (including somehousehold items).
7-38
PROTECT
PROTECT
e. Electrical Burns. Caused by electric current or lightning.
f. Radiation Burns. Caused by rays from the sun.
07131. Most burns need medical attention, including:
a. Any burn more than 25 mm (1 inch) square in area.
b. All burns resulting from electrical contact.
c. Any deep burn involving all layers of the skin.
Treatment
07132. Explain: If clothing is on fire, put out the flames by wrapping the casualtytightly in a coat or heavy material that will not catch fire — not nylon or other materialwhich will melt. Roll the casualty along the ground until the flames have beenextinguished. If water is available, lay the casualty flames uppermost and douse withwater. The general treatment is to:
a. Check — AIRWAY — BREATHING — CIRCULATION
and continue to check and deal with ABC whilst carrying out other treatment.
b. Cool as quickly as possible by flooding the affected area with cold water.For minor burns and scalds place the injured part under slowly running coldwater or immerse in cold water for at least ten minutes, but longer if the painpersists.
c. Carefully remove any clothing soaked in boiling fluid, such as hot tea orcoffee. Do not remove burnt clothing or anything that is sticking to the burn.
d. Reassure the casualty.
e. Remove rings, watches etc., before the affected area begins to swell.
f. Cover the burn with a sterile dressing.
g. Immobilise a badly burnt limb.
h. Treat for shock.
i. If the casualty is conscious — give frequent sips of cold water.
07133. Explain: Do not:
a. Use plasters or adhesive materials.
7-39
PROTECT
PROTECT
b. Use any creams or lotions.
c. Break blisters.
d. Remove loose skin or otherwise interfere with the injury in any way.
Injury to Joints and Muscles
07134. Sprains and Strains. Explain: A sprain occurs when ligaments andtissues at a joint are wrenched or torn, causing pain and tenderness at the joint,increased by movement. Swelling will occur and later, bruising.
07135. Explain: A strain is the overstretching and possible tearing of a muscle,causing pain at the site of the injury with stiffness and cramp.
07136. Treatment. Explain: Remember to use the mnemonic: R I C E
a. R — rest and support the joint in the most comfortable position.
b. I — ice bag, or cold compress, applied for 30 minutes if the sprain is recent.
c. C — compress, by applying a firm bandage over a good layer of cotton wool.
d. E — elevate the injured limb.
Note: If in doubt, treat as a fracture.
Dislocation
07137. Explain: A dislocation is the displacement of a bone at a joint, usuallyshoulder, elbow, thumb, finger or jaw. Symptoms and signs include severe andsickening pain at the joint with immobility of the joint. The joint will appear misshapenand swelling will occur.
07138. Treatment. Explain: To treat a dislocation:
a. Do not attempt to ‘reduce’ the dislocation by moving the bones to theirnormal position.
b. Support and secure the injured part in the most comfortable position usingpadding, bandages and slings.
c. Remove to hospital.
Note: If in doubt, treat as a fracture.
7-40
PROTECT
PROTECT
Foreign Bodies in the Eye
07139. Explain and demonstrate: Particles of dust, grit, etc., may lodge in theeyeball or under the eyelid causing considerable discomfort if not removed quickly.Attempt to remove as follows:
a. Tilt the head towards the injured side.
b. Wash away using an eye irrigator, jug of water or running tap water.
c. If it does not wash away or water is not available lift off with a moist swab orthe damp corner of a clean handkerchief.
07140. Explain: Do not attempt to remove a foreign body which is:
a. On the coloured part of the eye.
b. Embedded in the eye.
c. Stuck to the eye.
07141. If the foreign body cannot be removed, treat as follows:
a. Tell the casualty not to move the eye.
b. Cover with an eye pad.
c. Remove to hospital.
Foreign Body in the Ear or Nose
07142. Explain: An insect in the ear may be removed by tilting the casualties headand flooding the ear with tepid water. Otherwise do not attempt to remove foreignbodies from the ear or nose — seek medical aid or remove to hospital.
Conclusion
07143. End of Lesson Drill.
a. Questions to and from the class on the lesson.
b. Confirm actions by practice.
c. Summary. To include the following:
(1) Types of fracture.
(2) General treatment.
7-41
PROTECT
PROTECT

(3) How to immobilise.
(4) Treatment of burns.
(5) Treatment of sprains and strains.
(6) Eye injuries.
07144 – 07145. Reserved.
7-42
PROTECT
PROTECT
AC 714 62
To be incorporated into Amendment 7 8-1
Chapter 8
EXPEDITION TRAINING
SECTION 1. INTRODUCTION
General 0801. Expedition Training involves potentially dangerous situations where errors of judgement can lead to accidents. It is therefore essential that a cadet has received sufficient training in the subjects below, so that the risks are reduced to a minimum. The standard reached will vary according to the standard of the expedition to be undertaken. A short expedition in lowland country will require less training than a long and exhausting expedition in mountainous or moorland country, demanding a high standard of mental and physical effort. Knowledge will be required of the following in all cases:
a. The Countryside Code – so that the cadet understands how to treat land and property with respect.
b. Building the Team – so that the cadet is able work as a member of a team and support other team members.
c. Expedition Equipment – so that the cadet has the correct clothing and equipment to ensure the expedition is carried out in comfort and safety.
d. Load Carrying – so that the cadet carries the required load without causing exhaustion or injury.
e. The Camp Site – so that the cadet understands how to live outdoors in safety and comfort.
f. Food and Cooking – so that the Cadet is able to prepare and eat a nourishing meal.
g. Debriefing – so that the cadet is able to reflect on the expedition and learn lessons from the experience. 0802. Cadets will also require knowledge of Emergency Aid and Use of map & Compass. These subjects are dealt with in other chapters. Safety 0803. The safety rules which must be adhered to during this type of training are given in the appropriate section of the pamphlet Cadet Training Safety Precautions JSP535, a copy of which is to be carried by all instructors when in charge of cadets on training. References 0804. This Chapter contains enough detail to train Cadets up to One Star. At the more advanced stages, the skills must be practised to a higher level. The following references give more detail on planning and conducting more demanding expeditions and should be used freely and extensively by instructors:
a. Cadet Training Manual Volume 2 (“The Instructors Handbook”) – Chapter 8
b. Expedition Guide – The Duke of Edinburgh’s Award c. The Army Cadet Adventurous Training Website – www.armycadetadventure.info
d. Mountaincraft and Leadership - Eric Langmuir
e. Hill Walking – Mountain Leader Training UK
f. Safety on Mountains – British Mountaineering Council
g. Weather for Hill Walkers and Climbers – Malcolm Thomas
h. Tread Lightly – British Mountaineering Council
i. New Hill Walkers – British Mountaineering Council
j. The Countryside Code & Moorland Visitors’ Code – Countryside Agency Publications (0870 1206466 for free
copies)
AC 714 62
To be incorporated into Amendment 7 8-2
SECTION 2 – THE COUNTRYSIDE CODE
A. INSTRUCTORS NOTES
Aim 0811. To ensure the cadet understands how to behave responsibly and safely in the Countryside. Timings 0812. One lecture/discussion period. Further training while conducting outdoor training sessions. Miscellaneous 0813. The Instructor should obtain copies of the two codes for issue during the lecture/discussion (Obtainable free from the Countryside Agency). Each heading should be discussed, with practical examples of good and bad behaviour for each. The points can be reinforced during practical sessions outdoors.
B. CONDUCT OF THE LESSON 0814. Explain. The Countryside Code, and its companion code, the Moorland Visitors’ Code have replaced the former Country Code. Both Codes are sponsored by the Countryside Agency. There are five headings common to both codes, and a sixth relating to Moorland. The main points on each heading are as follows.
a. Be safe – plan ahead and follow any signs. (1) Use up to date maps and guidebooks. (2) Be prepared for changes in weather and other events. (3) Check weather forecasts before you leave. (4) Let someone know where you are going and when you expect to return. (5) Get to know footpath marking signs.
b. Leave gates and property as you find them. (1) A farmer will normally leave a gate closed to keep stock in, but may sometimes leave it open so they can reach food and water. Leave gates as you find them. (2) Follow paths across land that has crops. (3) Use gates and stiles, climbing over walls and fences can cause damage and allow farm animals to escape. (4) Do not disturb ruins and historic sites. (5) Leave machinery and livestock alone.
c. Protect plants and animals and take your litter home. (1) Litter and leftover food spoils the beauty of the countryside and can be dangerous to wildlife and farm animals and may spread disease. Take your litter home with you. (2) Take care not to damage rocks, plants and trees. (3) Animals can behave unpredictably; don’t get too close, especially if they are with young. (4) Fires can be devastating to wildlife and habitat as well as people and property. Take care not to drop a match or smouldering cigarette.
d. Keep dogs under close control (1) By law dog owners must control their dog. (2) Farmers are entitled to destroy a dog that worries or injures their animals. (3) Dogs may be excluded from some areas of open land at certain times. (4) Clean up after your dog. (5) Cadets should not take dogs on expeditions.
e. Consider other people. (1) Respect the needs of local people. (2) Keep out of the way when farm animals are being gathered or moved, and follow directions given by the farmer. (3) When riding a bike slow down for horses, walkers and livestock. (4) Support the rural economy by using local shops if you can.
f. Prevent uncontrolled moorland fires. (Moorland Code only) (1) Never light fires on open moorland – even cooking stoves or barbecues. (2) When the fire risk is high respect all warning signs. (3) Controlled fires for heather burning is sometimes carried out between October and April. Report any moorland fires you see, especially outside those dates.
AC 714 62
To be incorporated into Amendment 7 8-3
SECTION 3 – BUILDING THE TEAM
A. INSTRUCTORS NOTES
Aim 0821. To help the cadet work as a member of a team Timings 0822. One short formal period, further guidance during all parts of the Expedition Training syllabus Miscellaneous 0823. This not a subject which can be taught, other than by a short introductory talk on the benefits of teamwork (see below), but at all stages of the planning and conduct of the expedition the opportunity should be taken to promote team building. Specific steps which can be taken are:
a. Establish the team at the earliest possible opportunity
b. Give tasks to the team as whole rather than individuals in the team
c. Allow leadership to develop from within the team rather than appoint a leader
d. If an individual has a problem allow the rest of the team to help resolve it.
e. Ensure that all team members contribute their own skills to the team
f. Use regular reviews to assess how well the team is working.
B. CONDUCT OF THE LESSON
0824. Explain. The expedition requires cadets to work as a member of a team. Good teamwork brings a number of benefits, and contributes significantly to the successful outcome of the Venture. [The Cadets may be invited to state what they consider to be the benefits of teamwork at this point]. Some of the benefits of teamwork are:
a. Effective achievement of tasks. By working together and sharing work a task can be completed more quickly and effectively than if each individual operated on their own e.g. Setting up the campsite.
b. Shared responsibility. The expedition requires teams to make decisions and accept the consequences of those decisions. If the whole team are involved in the decision making process it is more likely that correct decisions will be made, and recriminations will not follow if the decision is wrong.
c. Pooling of knowledge, skills and experience. Most teams will have a range of skills and experience. By working together the full range will be available to the team.
d. Support for less experienced members. Inevitably some members of the team may have less knowledge, ability or fitness than others. The stronger team members can support these individuals by help and encouragement. In the expedition setting all members of the team should complete the venture to ensure a successful outcome.
e. Tolerance and understanding of others. During the expedition team members will be required to be in close proximity, especially tent groups. They will have to overcome possible antipathy or even hostility to others, and learn to be tolerant of the actions of others. By the same token team members will have to understand that their own actions may be a source of discomfort to others.
f. Opportunity to trust and be trusted. Expeditions carry an element of risk, and the potential for accidents and injury is often present. Team members must place their trust in each other not to undertake actions which may place the group in jeopardy.
The Instructor should illustrate these benefits by practical examples. A discussion could then follow as to how team
building may be achieved. The session could be rounded off by one or more team building exercises.
AC 714 62
To be incorporated into Amendment 7 8-4
SECTION 4 – EXPEDITION EQUIPMENT
A. INSTRUCTORS NOTES
Aim 0831. To train the cadet in clothing and equipment for expeditions Timings 0832. One formal period, further instruction during the planning stages of the expedition Miscellaneous 0833. For the formal session the instructor should have a sample of every item of clothing and equipment to show the cadet. Where possible the instructor should show a number of examples giving the pros and cons of each. The specialised clothing and equipment required for expeditions in the countryside or the wilderness are almost always significantly different from those required for fieldcraft training in the APC.
B. CONDUCT OF THE LESSON
0834. Explain. Adequate clothing and appropriate equipment is the key to the success of any expedition. Cadets may find it difficult to obtain some high cost items, so any advice given should recognise this and avoid recommending high cost specialist items. Some items of equipment are necessarily expensive and consideration should be given to building up pools of equipment for loan when required. 0835. Equipment can be divided into three categories:
a. Clothing
b. Personal and emergency equipment
c. Group Camping equipment Clothing 0836. Feet.
a. Walking boots, with plenty of tread left on sole, and uppers in good condition. They should be well fitting, and broken in if new. Military pattern "high-leg" boots are not ideal – they have poor grip, are restricting round ankle and let in water quickly.
b. Socks should be fairly thick for cushioning of feet, with a high wool content, loop-stitch if possible. If using new socks wash them a few times before the expedition. Take a couple of spare pairs on the expedition.
0837. Body clothing
a. Underwear. Material should be capable of wicking away perspiration rather than retaining it. Cotton, polypropylene or other specialist material is fine, nylon should be avoided. Thermal underwear is only a necessity in very cold conditions
b. Outerwear. Take shorts for good weather, tracksuit bottoms or light walking trousers if colder. Military pattern combat trousers are too heavy. Wear a cotton T-shirt (avoid nylon at all costs) with fleece or sweater for colder days.
c. Shell clothing. Wind/waterproof jacket or anorak, (not combat jacket) and lightweight waterproof trousers. 0838. Hands and Head
a. Sun hat or cap. Take a wool or fleece hat for cold days.
b. Woollen gloves or mitts should be taken even in summer. 0839. Spare Clothing. On the expedition you should carry spare socks & underwear, and one change of clothing for the tent and to sleep in - to be kept dry at all times. A light T-shirt and thin tracksuit bottoms are sufficient.
AC 714 62
To be incorporated into Amendment 7 8-5
Personal and emergency equipment. 0840. Rucksack: Make sure it fits, not all are the same size. The straps should be properly adjusted so it sits high on your back and the hip belt should be in the right place to take weight onto your hips. It should be big enough to take all your kit without having to tie things on the outside, but not so large you are tempted to put too much in it! 50 - 55 litres should be enough for a two day expedition. It should have pockets in the sides and top. It is unlikely that your rucksack will be waterproof, and you should try to line it with a heavy duty waterproof bag. 0841. Sleeping Bag. The filling should be of down if possible, otherwise a good quality man-made filling. A 3-season bag is quite adequate for expeditions in the normal season (Apr-Oct). It should be light (2 Kg max.) and compressible - should fit into rucksack without using up all the space. Make sure it's wrapped in something waterproof. 0842. First Aid: Personal kit - plasters, antiseptic, insect bite/sting relief, compeed or similar blister care, 1 - 2 small bandages, sun block, medication for personal use only. Bring just enough to last for the duration of the expedition. Keep wrapped in poly bag not heavy box. 0843. Emergency Rations: Small bulk/high energy items - Mars, "Energy Bars", Kendal mint cake, makings of hot drink. Wrap in poly bag and tape up. 0844. Wash Kit: Small piece of soap, small or near empty tube toothpaste, small hand towel. Wrap soap separately, and wrap together in hand towel. 0845. Bivvy Bag: A heavy-duty polythene bag which will take a person, a lifesaver if anyone is suffering from hypothermia. Can also be used at night for storing packs outside the tent. 0846. Other items:
a. Notebook & pencil,
b. Camera & film or picture card,
c. Light slippers or flip-flops (optional),
d. Small torch (head torch or maglight best) with new batteries and spare bulb,
e. Matches - kept in watertight container (35 mm film container or similar)
f. KFS, plates & mug - plastic, water bottle - light plastic - 1 litre, a small flask (optional).
g. Small container (35mm film container again) of washing-up liquid and sponge-scourer, small tea towel. Group Camping equipment 0847. Tent: Lightweight 2-person tent with sewn-in groundsheet. Should have an adequate bell-end to accommodate wet kit, boots etc. 0848. Stove: There are a number of different types, recommended ones are:
a. Gas – many types available. Probably the cheapest and most widely used. Easy to light and use, controllable, fuel easy to obtain and quite cheap. Needs shelter in windy weather. Models taking self-sealing gas containers should be used.
b. Methylated Spirits – best known is the Trangia. Easy to operate, works well in windy conditions, has its own cooking pots and kettle. Expensive to buy, and the fuel is also expensive and may be difficult to obtain. There have been accidents when refilling the fuel reservoir when it is not realised that the stove is still lit. Sigg have developed a safety fuel container to overcome the problem and these should be used. A gas converter (quite expensive) is available for Trangias.
There are other types in use but are not recommended for Cadet use:
c. Paraffin – best known is the Primus. Requires a separate fuel to prime it, and works by a pressure pump on the fuel container. Expensive to buy and fairly heavy.
d. Petrol – volatile fuel, not suitable for cadet use.

AC 714 62
To be incorporated into Amendment 7 8-6
e. Multi-fuel – will work with any type of liquid fuel. They are difficult to use, and expensive to buy.
f. Petroleum jelly – very cheap and easy to use. Slow, not ideal for cooking a full meal.
g. Hexamine cooker – may be supplied with Operational Ration Packs (ORPs) through military sources. Very light. Designed to heat a meal from the ORP in the field quickly. Fuel has a strong smell which may spread to other items, not good in the wind, makes a mess of pans, very inflexible for simmering, and slow for heating water.
0849. Fuel Bottles: If a liquid fuel stove is carried a bottle with a secure top, made for the purpose should be used. There should be no risk of mixing up fuel and water bottles. Modern bottles designed for fuel have a safety cap which cuts off the flow if the bottle is dropped. These should always be used with methylated spirits. 0850. Canteen/Cooking set. Each cooking group will require suitable cooking pans. Nesting type where two or three pans fit together are ideal. Mess tins may be used but are heavy. Groups using Trangia stoves will not require pans as they are an integral part of the stove.
AC 714 62
To be incorporated into Amendment 7 8-7
SECTION 5 – LOADCARRYING
A. INSTRUCTORS NOTES
Aim 0851. To train the cadet in packing and carrying equipment for expeditions Timings 0852. One formal period, further instruction during the planning stages of the expedition Miscellaneous 0853. For the formal session the instructor should have a rucksack and all the items required for the expedition, which can be packed during the lesson. During practice walks carrying the rucksack the instructor should check each pack at the beginning of the journey, and at intervals en route to ensure that the rucksack is adjusted for the individual cadet to give the most comfortable carry.
B. CONDUCT OF THE LESSON
Weight of pack 0854. Explain. The weight of the rucksack must always be kept to a minimum, in order to ensure that exhaustion or even injury is not sustained by carrying an over-heavy load. As a general rule the load should not exceed a quarter of the body weight. Packs should always be weighed prior to starting out. The lighter the pack the greater the enjoyment. 0855. Cadets must be discouraged from taking items not necessary for safety and survival on the expedition. Regard should also be given to the type and size of items of equipment taken. Two-day expeditions do not require a family size bar of soap or a jumbo toothpaste tube …. or a bath towel. A small head torch or “Maglite” is preferable to a large rubber covered flashlight. There is no need to take a heavy “all seasons” sleeping bag for a low level expedition in August. Packing 0856. Demonstrate. Packing the rucksack is a critical factor in comfortable load carrying. All gear should be carried inside the pack, with the possible exception of the camp mat. If anything is carried outside the pack it must be well secured and wrapped. As a rule heavy items should be carried at the top of the pack, with lighter items low down. Consideration should also be paid to convenience. Items likely to be required en route – lunch meal, first aid kit, water bottle, compass – should be quickly accessible. Carrying the load 0857. Explain. Loads should be carried as high on the back as possible, so that the weight is as straight as possible on the shoulders. Straps should be adjusted so that the pack does not wobble about. If a hip belt is fitted (most modern packs have these) the weight can be distributed between the hips and the shoulders, and varied to give a comfortable carry. Spend time experimenting the with different strap settings to find the most comfortable.
AC 714 62
To be incorporated into Amendment 7 8-8
SECTION 6 – THE CAMPSITE
A. INSTRUCTORS NOTES
Aim 0861. To train the cadet in campcraft Timings 0862. One formal period, further instruction during the planning stages of the expedition Miscellaneous 0863. The formal session should take place out of doors, preferably at a suitable campsite, or area where tents can be erected. Cadets should be given the opportunity to practise erecting and striking tents. Clearance for Training on Private Land (TOPL) must be obtained from the local Brigade/District HQ.
B. CONDUCT OF THE LESSON
Selecting the Site 0864. Explain. Finding a suitable campsite is important not only for a comfortable stay, but also for safety. In some areas it may be necessary to use established sites, but where possible “wild sites” should be used. These must be identified well in advance of the expedition and permission obtained from the landowner. 0865. The campsite should be selected bearing in mind the following points:
a. Sheltered from the prevailing wind
b. Free from obvious dangers such as flooding, animals, falling trees etc.
c. Away from habitation
d. Within easy reach of water
e. Reasonably level
f. Ground suitable to take tent pegs and offer comfortable sleep.
g. Toilet facilities within reach if possible Setting up camp 0866. On arrival at the campsite tents should be erected as quickly as possible in case of the onset of bad weather. Cadets should work together in erecting the tents, and making a hot drink. Tents should be erected with the door away from the wind direction, and well guyed in case of windy weather. Tent pegs should be driven in at an angle and as far as possible into the ground without causing damage to the peg. Tents should not be pitched under trees. 0867. Once the tents are erected all gear should be stowed inside. Items not needed quickly should stay in the pack. Other items should be stowed tidily so that they can be found quickly when needed. A hot meal should be started as soon as possible. Cadets should work in tent groups for cooking. Living in the tent 0868. Living in a tent requires good organisation, tolerance and cooperation. The inside of the tent should be kept as tidy as possible. If wet weather prevails, wet kit should be left at the entrance of the tent. Every effort should be made to keep the inside of the tent dry. Boots should not be worn inside the tent. Naked flames should not be allowed inside the tent. Cooking 0869. If the weather is good, cooking should take place away from the door of the tent so that there is no danger of the stove and pans being knocked over by someone entering the tent. In bad weather all Cadets should be inside the tent. The stove may be placed at the door of the tent, but not underneath any part of it. The cadet who is cooking can
AC 714 62
To be incorporated into Amendment 7 8-9
then sit inside the tent keeping dry while cooking. No one should attempt to go in or out of the tent while cooking is taking place. Hygiene and litter 0869. Hygiene is an important aspect of camp craft. Hands face and feet should be washed at the end of the day, and hands washed whenever food is handled, or the toilet has been visited. Every effort should be made to use proper toilet facilities. If these are not available the following guidelines for solid human waste should be followed.
a. Find a discreet spot at least 30 metres from water and paths and 200 metres from huts, campsites, crags and areas likely to be frequented by other people.
b. Dig a 6-inch hole and bury your waste. A small trowel should be used.
c. Use biodegradable paper, or burn the paper.
d. If digging a hole is impossible spread the waste discreetly and cover it with soil, vegetation or rocks.
e. Don’t squash waste under large rocks, it will slow down the decomposition. 0870. Litter including food waste, must be carried away from the campsite, and deposited when possible in a litterbin or container. It must never be buried. 0871. Before leaving a camp site, when the tents have been taken down and rucksacks packed, a thorough clean up of the site must be made. All litter, including any left by previous tenants, down to the last matchstick must be removed. Any stones moved to avoid scorching the grass, or to secure guys should be replaced.
AC 714 62
To be incorporated into Amendment 7 8-10
SECTION 7 – FOOD AND COOKING
A. INSTRUCTORS NOTES
Aim 0881. To train the cadet to produce nutritious meals Timings 0882. One formal period, further instruction during the planning stages of the expedition Miscellaneous 0883. For the formal session the instructor and cadets should have the makings of a hot meal. The cadets should imitate the instructor during the cooking of the meal.
B. CONDUCT OF THE LESSON
Expedition food requirements 0884. Explain. Most Cadets will use considerably more energy during expeditions than they would normally. It is important that this is replaced to guard against the onset of exhaustion and/or exposure. The morale boosting properties of a hot, tasty meal after a long day are significant. 0885. Expedition food is a compromise between weight, energy, taste and convenience. The following guidelines should be followed when planning a menu. Take foods which:
a. Contain the greatest amount of energy for the lowest weight and volume (usually freeze-dried or dehydrated)
b. You and your “buddy” will enjoy
c. Are simple to prepare – one pot if possible.
d. Have a short cooking time to save fuel.
e. Will keep in hot weather. Expedition menus 0886. The following notes are suggestions only. Practise cooking dehydrated food in the comfort of your kitchen at home – don’t wait until you are on your expedition to experiment
a. Breakfast: Porridge is ideal - light & nutritious. Use water, or milk if available. Read the instructions on the packet carefully and measure out right amount before expedition. There are "instant porridge" meals. Alternatives - tin of sausage & beans (heavy), freeze-dried breakfast meal (expensive), cereals (lack nutrition). Bacon & eggs are to be avoided – they are messy, may not keep in hot weather, and are awkward to carry.
b. Lunch: Do not plan to cook at lunchtime – it is too time consuming, and difficult in poor weather. Take
whole-wheat crackers, pitta bread or similar with various toppings - cheese spread, meat/fish paste, tuna, sardines or pilchards. Include a packet of nuts/nuts & raisins/dried fruit. Chocolate bar - Snickers or similar for energy. Have a fruit drink – you could take concentrate and mix with water from water bottle.
c. Main Meal: This must be a hot meal. Use freeze-dried main courses – available from most supermarkets.
Look for ones with short cooking times. Avoid 2-pan meals. Boil-in-the-Bag meals are widely available at Camping shops. They are more expensive and heavier than dehydrated food, but very easy to prepare. Be sure to follow the instructions when cooking. Make sure any fresh foods you take are thoroughly heated through. Puddings - fruit yoghurts, milk based puddings, dried fruit, cake are all suitable. Pot noodles and the like do not constitute a main meal – they provide insufficient nutrition for expedition work.
d. Sundries: cup soups, salt & pepper, tea/coffee, sugar, whitener (the small packets found in cafes are
ideal), poly bags.
AC 714 62
To be incorporated into Amendment 7 8-11
0887. Operational Ration Packs (ORP) can often be drawn from Service sources, and provide a suitable and balanced menu. However cadets should still be instructed in the value of other foods, and the ORP should broken down into its component parts for this instruction. Packing the food 0888. Explain & demonstrate. Just take the amount of each item you need, measure out quantities where necessary, discard unnecessary wrappings (but keep cooking instructions if needed). Use small containers or polythene bags to keep things dry and to prevent spills in the rucksack. Sort and pack food into daily quantities and label accordingly i.e. Mon Breakfast, Mon. lunch etc. Cooking 0889. Explain & demonstrate. At least one hot meal per day must be cooked and eaten. The instructions on freeze dried or dehydrated meals should be followed closely, and added water measured as carefully as possible. The stove should not be lit until ready to cook. Use a lid on pans to conserve heat. When food has come to the boil, the heat should be lowered so as to prevent burning and sticking. All hot meals should be heated thoroughly to kill off bacteria. When finished cooking the stove should be turned off. 0890. After the meal has been eaten all plates and cooking pans must be cleaned of waste food. Do not wash dishes directly in a stream. Fuel must be secured and stored safely. Fill water bottles ready for the next meal or for the day’s walk.
AC 714 62
To be incorporated into Amendment 7 8-12
SECTION 8 – DEBRIEFING
A. INSTRUCTORS NOTES
Aim 0891. To train the cadet in reviewing their experiences Timings 0892. To be carried out at the end of each training period, and at the end of each expedition throughout the syllabus. Miscellaneous 0893. The Instructor should have a list of structured questions which will bring out the lessons learned, and help the cadet to appreciate what they have achieved.
B. CONDUCT OF THE LESSON
0894. Explain. After an expedition is over, it is important that the Cadet has an opportunity to review the experience, and his own contribution to the team. Lessons learned for use on future expeditions need to be brought out, and administrative arrangements for the expedition reviewed. This can be achieved by means of a post exercise debrief. 0895. An important principle of the debrief is that the Cadet must be given the maximum opportunity to contribute, without the process developing into a negative “moaning session”. This requires the session to be structured, and the person conducting the session encouraging the cadet to present views without attracting critical remarks. 0896. Note. The following headings are suggested to bring out the main areas, it is not exhaustive or intended to be prescriptive, and instructors should develop their own format, with which they are comfortable.
a. Overall view – how do think it went?
b. Do you feel you achieved the aim of the expedition?
c. What did you as an individual contribute to the team effort?
d. What, with hindsight, would you do differently in terms of:
1. The route you planned 2. The equipment and clothing you took 3. The food you ate
d. How did you work as a team? Were there any problems with teamwork?
e. Was there a “leader”? If so who?
f. Did you feel ownership of the expedition in terms of its planning and conduct?
g. What was your personal high point during the expedition?
h. What was your personal low point?
i. Give one lesson you have learnt from the experience
j. Any other comments?
Each individual should be asked to contribute a view on every item. Following each answer take the opportunity to develop the discussion by asking why things went as they did, what they could have done to prevent problems, what they will do in the future to make the experience better etc.
Chapter 9
PHYSICAL ACHIEVEMENT TRAINING IN THE ARMYCADET FORCE
SECTION 1. — INTRODUCTION
General
0901. As part of the APC syllabus cadets are required to pass simple physicalachievement tests at 1-, 2-, 3- and 4-Star levels. These tests are the same as thoseincluded in the Physical Recreation Section of the Duke of Edinburgh’s AwardScheme and details of the tests are given in the syllabus pamphlet under the headingPhysical Activity.
Aim
0902. The aim of this Section is to detail and explain the system of progressivephysical training that the ACF Counties and Battalions are to carry out to enable theircadets to gradually improve their standard and eventually pass the tests. The intentionhas been to allow the maximum flexibility to enable training officers and detachmentcommanders to fit this extra commitment into their training programmes.
SECTION 2. — THE WEEKLY TRAINING PROGRAMME SYSTEM
Programme
0903. The weekly training programme system is based on a 15 minute session ofphysical training, seven minutes being allocated to limbering-up exercises, sevenminutes to practising one of the tests and one minute to cooling down. A Lesson Planfor a training session, summarising the system is shown at Annex A to this chapter.Details of the various exercises of the progressive standards to be aimed at during thetraining and of the detachment record sheet are shown at Appendices 1 to 7 of AnnexA.
0904 The Limbering Up part of the session consists of an Arm and Shoulderexercise (selected from the choice of 19 exercises detailed in Appendix 1, followed bya Trunk exercise (from the 12 given in Appendix 2) and by a Leg exercise (12 arelisted in Appendix 3). The sequence of Arm and Shoulder, Trunk and Leg exercises isthen repeated, but with different exercises being selected from the respective lists.
9-1
PROTECT
PROTECT
0905. For the second half of the session cadets practise one of the achievementtests, the details of which are given in the syllabus pamphlet. However they shouldonly be encouraged to reach the standards given in Appendices 4 and 5 (separatestandards for girl cadets) for the appropriate Star level. The whole principle of thesystem is that of progressive improvement after practice.
0906. The weekly PT sessions are programmed to cover 15 weeks, or approximatelyone school term. Each achievement test is practised twice during the 15 weeks, aslightly higher standard being expected the second time round.
0907. Cadets should start PT as early as possible during their recruit training, eventhough they are not tested in Physical Activity at the end of recruit training. Separatestandards for recruits are included in the Weekly Training Programme tables.
0908. Before taking their Physical Achievement tests at 1-, 2-, 3- or 4-Star levelcadets should have completed at least one 15 week training programme during theprevious year. At what stage during the year the PT programme is done is left totraining officers/detachment commanders.
0909. Points are to be awarded for participation on the basis (as in the Duke ofEdinburgh’s Award Scheme) of two points for each hour of training, i.e., half a point foreach 15 minute session.
Safety
0910. Great care should be taken by supervisors of this training that cadets are notoverstrained by being excessively or over-enthusiastically urged to reach the targetsset in the tests. Cadets who are weak and below standard should be encouraged toattend extra training sessions, thereby increasing their chances of success insubsequent tests, both by actually raising the standard of their own performances bypractice, and, through being awarded participation points, reducing the number ofpoints they require on the test themselves. Note: Cadets should wear trainingshoes when taking the tests.
Documentation
0911. A blank Lesson Plan to be completed by the detachment commander orinstructor for each session, is shown at Appendix 6. A detachment Record ScoreSheet is shown at Appendix 7.
9-2
PROTECT
PROTECT
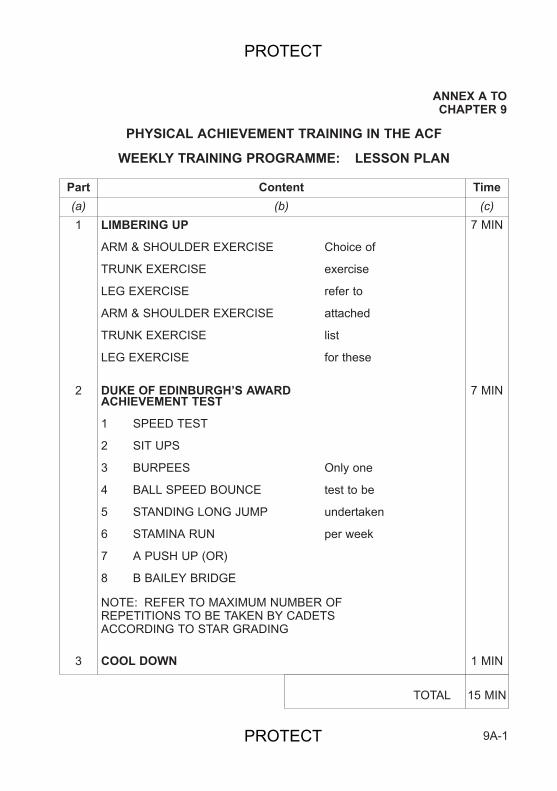
ANNEX A TOCHAPTER 9
PHYSICAL ACHIEVEMENT TRAINING IN THE ACF
WEEKLY TRAINING PROGRAMME: LESSON PLAN
9A-1
Part Content Time(a) (b) (c)1
2
3
LIMBERING UP
ARM & SHOULDER EXERCISE Choice of
TRUNK EXERCISE exercise
LEG EXERCISE refer to
ARM & SHOULDER EXERCISE attached
TRUNK EXERCISE list
LEG EXERCISE for these
DUKE OF EDINBURGH’S AWARDACHIEVEMENT TEST
1 SPEED TEST
2 SIT UPS
3 BURPEES Only one
4 BALL SPEED BOUNCE test to be
5 STANDING LONG JUMP undertaken
6 STAMINA RUN per week
7 A PUSH UP (OR)
8 B BAILEY BRIDGE
NOTE: REFER TO MAXIMUM NUMBER OFREPETITIONS TO BE TAKEN BY CADETSACCORDING TO STAR GRADING
COOL DOWN
7 MIN
7 MIN
1 MIN
TOTAL 15 MIN
PROTECT
PROTECT

9A-2
PROTECT
PROTECT
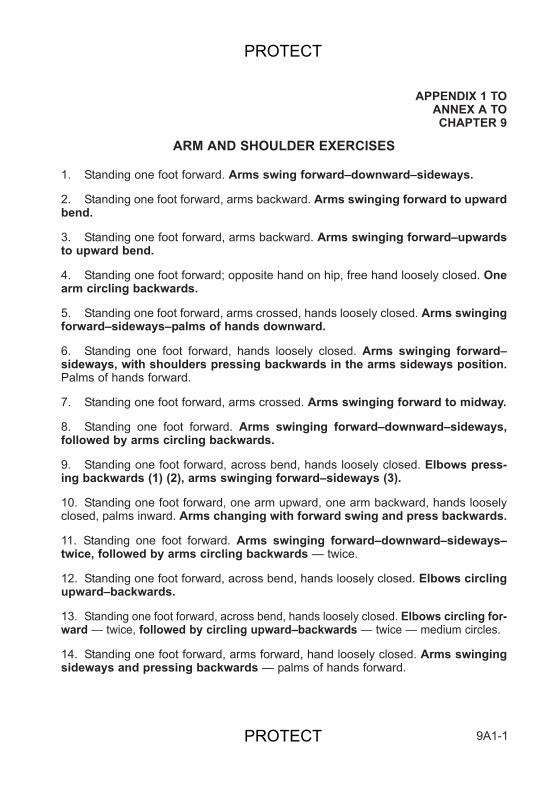
APPENDIX 1 TOANNEX A TOCHAPTER 9
ARM AND SHOULDER EXERCISES
1. Standing one foot forward. Arms swing forward–downward–sideways.
2. Standing one foot forward, arms backward. Arms swinging forward to upwardbend.
3. Standing one foot forward, arms backward. Arms swinging forward–upwardsto upward bend.
4. Standing one foot forward; opposite hand on hip, free hand loosely closed. Onearm circling backwards.
5. Standing one foot forward, arms crossed, hands loosely closed. Arms swingingforward–sideways–palms of hands downward.
6. Standing one foot forward, hands loosely closed. Arms swinging forward–sideways, with shoulders pressing backwards in the arms sideways position.Palms of hands forward.
7. Standing one foot forward, arms crossed. Arms swinging forward to midway.
8. Standing one foot forward. Arms swinging forward–downward–sideways,followed by arms circling backwards.
9. Standing one foot forward, across bend, hands loosely closed. Elbows press-ing backwards (1) (2), arms swinging forward–sideways (3).
10. Standing one foot forward, one arm upward, one arm backward, hands looselyclosed, palms inward. Arms changing with forward swing and press backwards.
11. Standing one foot forward. Arms swinging forward–downward–sideways–twice, followed by arms circling backwards — twice.
12. Standing one foot forward, across bend, hands loosely closed. Elbows circlingupward–backwards.
13. Standing one foot forward, across bend, hands loosely closed. Elbows circling for-ward — twice, followed by circling upward–backwards — twice — medium circles.
14. Standing one foot forward, arms forward, hand loosely closed. Arms swingingsideways and pressing backwards — palms of hands forward.
9A1-1
PROTECT
PROTECT

15. Standing one foot forward, arms backwards, hands loosely closed, palms facinginwards. Arms swinging forward (1), followed by arms swinging forward–upwards (2) (3).
16. Standing one foot forward, arms sideways, hands loosely closed, palms down-ward. Arms swinging downward–forward, downward–sideways to armscrossed, followed by arms swinging to midway–sideway–upward, followed byarms circling in front of body to arms sideways.
17. Standing one foot forward, arms forward, hands loosely closed, palms inward.Arms swinging sideways and pressing backwards (1) (2), followed by armsswinging forward–upwards and pressing upwards–backwards (3) (4).
18. Standing one foot forward, arms backward, hands loosely closed, palms inward.Arms swinging forward (1), forward–midway–forward–upwards (2), forward–upwards (3), followed by arms circling backwards three times.
19. Standing one foot forward. Arms circling backwards.
9A1-2
PROTECT
PROTECT
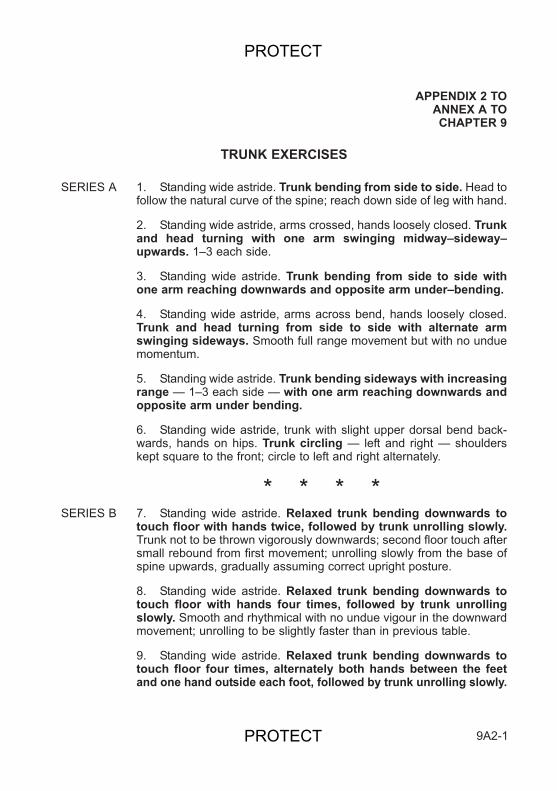
APPENDIX 2 TOANNEX A TOCHAPTER 9
TRUNK EXERCISES
SERIES A 1. Standing wide astride. Trunk bending from side to side. Head tofollow the natural curve of the spine; reach down side of leg with hand.
2. Standing wide astride, arms crossed, hands loosely closed. Trunkand head turning with one arm swinging midway–sideway–upwards. 1–3 each side.
3. Standing wide astride. Trunk bending from side to side withone arm reaching downwards and opposite arm under–bending.
4. Standing wide astride, arms across bend, hands loosely closed.Trunk and head turning from side to side with alternate armswinging sideways. Smooth full range movement but with no unduemomentum.
5. Standing wide astride. Trunk bending sideways with increasingrange — 1–3 each side — with one arm reaching downwards andopposite arm under bending.
6. Standing wide astride, trunk with slight upper dorsal bend back-wards, hands on hips. Trunk circling — left and right — shoulderskept square to the front; circle to left and right alternately.
* * * *SERIES B 7. Standing wide astride. Relaxed trunk bending downwards to
touch floor with hands twice, followed by trunk unrolling slowly.Trunk not to be thrown vigorously downwards; second floor touch aftersmall rebound from first movement; unrolling slowly from the base ofspine upwards, gradually assuming correct upright posture.
8. Standing wide astride. Relaxed trunk bending downwards totouch floor with hands four times, followed by trunk unrollingslowly. Smooth and rhythmical with no undue vigour in the downwardmovement; unrolling to be slightly faster than in previous table.
9. Standing wide astride. Relaxed trunk bending downwards totouch floor four times, alternately both hands between the feetand one hand outside each foot, followed by trunk unrolling slowly.
9A2-1
PROTECT
PROTECT
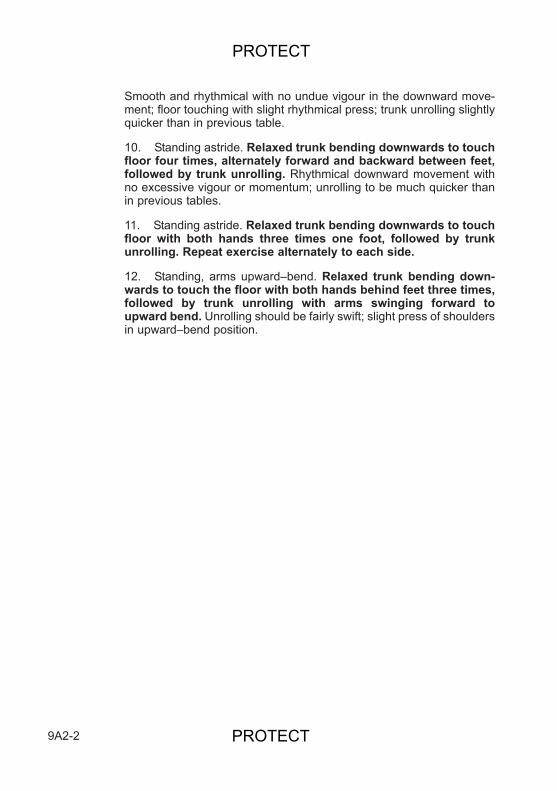
Smooth and rhythmical with no undue vigour in the downward move-ment; floor touching with slight rhythmical press; trunk unrolling slightlyquicker than in previous table.
10. Standing astride. Relaxed trunk bending downwards to touchfloor four times, alternately forward and backward between feet,followed by trunk unrolling. Rhythmical downward movement withno excessive vigour or momentum; unrolling to be much quicker thanin previous tables.
11. Standing astride. Relaxed trunk bending downwards to touchfloor with both hands three times one foot, followed by trunkunrolling. Repeat exercise alternately to each side.
12. Standing, arms upward–bend. Relaxed trunk bending down-wards to touch the floor with both hands behind feet three times,followed by trunk unrolling with arms swinging forward toupward bend. Unrolling should be fairly swift; slight press of shouldersin upward–bend position.
9A2-2
PROTECT
PROTECT
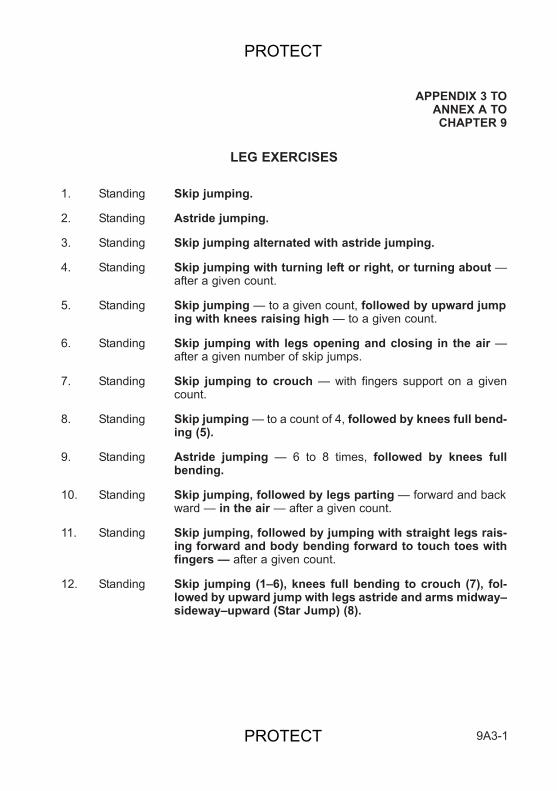
APPENDIX 3 TOANNEX A TOCHAPTER 9
LEG EXERCISES
1. Standing Skip jumping.
2. Standing Astride jumping.
3. Standing Skip jumping alternated with astride jumping.
4. Standing Skip jumping with turning left or right, or turning about —after a given count.
5. Standing Skip jumping — to a given count, followed by upward jumping with knees raising high — to a given count.
6. Standing Skip jumping with legs opening and closing in the air —after a given number of skip jumps.
7. Standing Skip jumping to crouch — with fingers support on a givencount.
8. Standing Skip jumping — to a count of 4, followed by knees full bend-ing (5).
9. Standing Astride jumping — 6 to 8 times, followed by knees fullbending.
10. Standing Skip jumping, followed by legs parting — forward and backward — in the air — after a given count.
11. Standing Skip jumping, followed by jumping with straight legs rais-ing forward and body bending forward to touch toes withfingers — after a given count.
12. Standing Skip jumping (1–6), knees full bending to crouch (7), fol-lowed by upward jump with legs astride and arms midway–sideway–upward (Star Jump) (8).
9A3-1
PROTECT
PROTECT

9A3-2
PROTECT
PROTECT

APPENDIX 4 TOANNEX A TOCHAPTER 9
WEEKLY TRAINING PROGRAMMEPHYSICAL ACHIEVEMENT TESTS (BOYS)
9A4-1
Week School Test RCT 1 2 3 4 TimeMinutes
ParticipationPoints
1 1 SPEEDTEST
50 45 40 35 30 15 ½
2 2 SIT UPS 5 10 15 20 25 15 ½
3 3 BURPEES 5 8 10 12 14 15 ½
4 4 BALLSPEEDBOUNCE
10 15 20 25 30 15 ½
5 5 STANDINGLONG JUMP
.9 1.0 1.10 1.20 1.30 15 ½
6 6 PUSH UPSORBAL BDG
5
5
10
10
15
15
20
20
25
25
15 ½
7 MIDTERM
STAMINARUN
5 MIN 4.50 4.40 4.30 4.20 15 ½
8 7 SPEEDTEST
45 40 35 30 28 15 ½
9 8 SIT UPS 10 15 20 25 30 15 ½
10 9 BURPEES 8 10 12 14 16 15 ½
11 10 BALLSPEEDBOUNCE
15 20 25 30 35 15 ½
12 11 STANDINGLONGJUMP
1.0 1.10 1.20 1.30 1.40 15 ½
13 12 PUSH UPSORBAL BDG
10
10
15
15
20
20
25
25
30
30
15
15
½
14 END OFTERM
STAMINA 4.50 4.40 4.30 4.20 4.10 15 ½
15 END OFTERM
TESTING 15 ½
TOTAL 7½
PROTECT
PROTECT

9A4-2
PROTECT
PROTECT
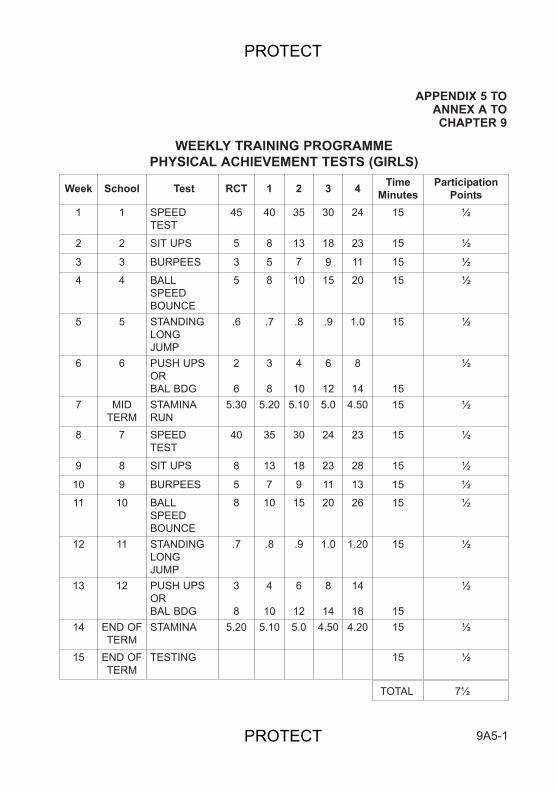
APPENDIX 5 TOANNEX A TOCHAPTER 9
WEEKLY TRAINING PROGRAMMEPHYSICAL ACHIEVEMENT TESTS (GIRLS)
9A5-1
Week School Test RCT 1 2 3 4 TimeMinutes
ParticipationPoints
1 1 SPEEDTEST
45 40 35 30 24 15 ½
2 2 SIT UPS 5 8 13 18 23 15 ½
3 3 BURPEES 3 5 7 9 11 15 ½
4 4 BALLSPEEDBOUNCE
5 8 10 15 20 15 ½
5 5 STANDINGLONG JUMP
.6 .7 .8 .9 1.0 15 ½
6 6 PUSH UPSORBAL BDG
2
6
3
8
4
10
6
12
8
14 15
½
7 MIDTERM
STAMINARUN
5.30 5.20 5.10 5.0 4.50 15 ½
8 7 SPEEDTEST
40 35 30 24 23 15 ½
9 8 SIT UPS 8 13 18 23 28 15 ½
10 9 BURPEES 5 7 9 11 13 15 ½
11 10 BALLSPEEDBOUNCE
8 10 15 20 26 15 ½
12 11 STANDINGLONGJUMP
.7 .8 .9 1.0 1.20 15 ½
13 12 PUSH UPSORBAL BDG
3
8
4
10
6
12
8
14
14
18 15
½
14 END OFTERM
STAMINA 5.20 5.10 5.0 4.50 4.20 15 ½
15 END OFTERM
TESTING 15 ½
TOTAL 7½
PROTECT
PROTECT

9A5-2
PROTECT
PROTECT
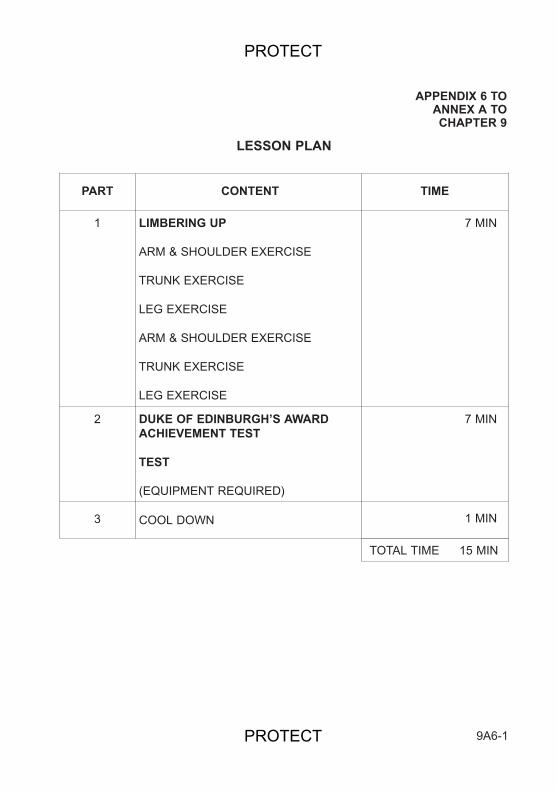
APPENDIX 6 TOANNEX A TOCHAPTER 9
LESSON PLAN
9A6-1
PART CONTENT TIME
1 LIMBERING UP
ARM & SHOULDER EXERCISE
TRUNK EXERCISE
LEG EXERCISE
ARM & SHOULDER EXERCISE
TRUNK EXERCISE
LEG EXERCISE
7 MIN
2 DUKE OF EDINBURGH’S AWARDACHIEVEMENT TEST
TEST
(EQUIPMENT REQUIRED)
7 MIN
3 COOL DOWN 1 MIN
TOTAL TIME 15 MIN
PROTECT
PROTECT

9A6-2
PROTECT
PROTECT
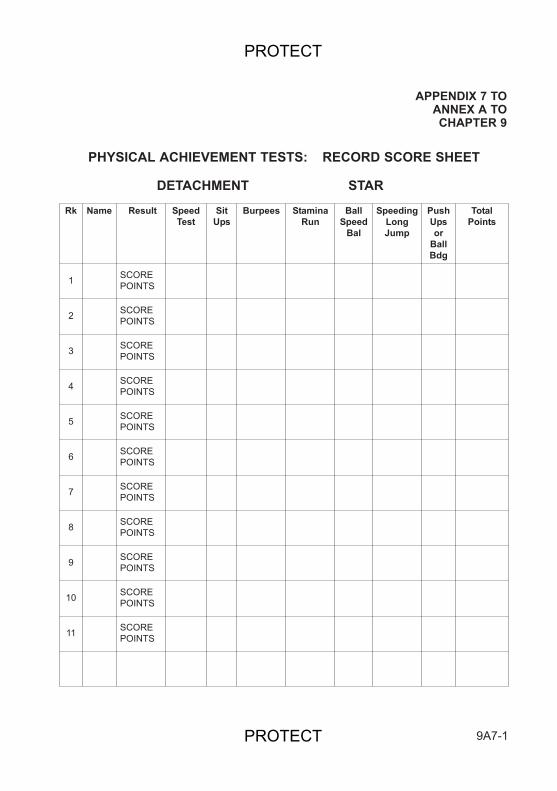
APPENDIX 7 TOANNEX A TOCHAPTER 9
PHYSICAL ACHIEVEMENT TESTS: RECORD SCORE SHEET
DETACHMENT STAR
9A7-1
Rk Name Result SpeedTest
SitUps
Burpees StaminaRun
BallSpeed
Bal
SpeedingLong Jump
PushUpsor
BallBdg
TotalPoints
1 SCOREPOINTS
2 SCOREPOINTS
3 SCOREPOINTS
4 SCOREPOINTS
5 SCOREPOINTS
6 SCOREPOINTS
7 SCOREPOINTS
8 SCOREPOINTS
9 SCOREPOINTS
10 SCOREPOINTS
11 SCOREPOINTS
PROTECT
PROTECT

9A7-2
PROTECT
PROTECT
Chapter 10
THE ACF CADET AND THE COMMUNITY
SECTION 1. — INTRODUCTORY TALK AND OUTLINE SYLLABUS
Aim
1001. To introduce the cadet to the meaning of the subject ‘The Cadet and theCommunity’ and to outline the requirement to qualify at the various Star levels.
Timings
1002. One 30 minute period.
Approach
1003. Just because a member of the Armed Forces puts on a uniform, it does notmean he ceases to be a citizen. Many examples of the military helping the commu-nity can be found where there are concentrations of Servicemen, and on a largerscale the Services can be called upon to assist the civil authorities in major disasterssuch as flooding, fighting heath and forest fires, providing First Aid and medical sup-port, mountain and air sea rescue.
1004. In the same way a young person who joins the Army Cadet Force and putson a uniform does not cease to be a citizen; on the contrary it should be seen as rein-forcing this position.
The ACF Charter
1005. This is born out by the Charter of the Army Cadet Force which states: “TheArmy Cadet Force is a voluntary organization sponsored by the Army and taking partin both military and community activities. Its purpose is to develop amongst its mem-bers the qualities of good citizenship . . .” The aim of the training states: “The aimof Army Cadet Force training is to produce a self reliant fit young man with an under-standing of basic military subjects . . . aware of his responsibilities as a citizen.”Citizenship is therefore an important subject in ACF training and is included in thesyllabus at all Star levels.
10-1
PROTECT
PROTECT
Outline of the Syllabus
1006. 1-Star. After this talk there will be a period about the statutory services.These are:
The PoliceThe Ambulance ServiceFire ServiceCoastguard (as applicable)Hospital
It is important to know how these can be contacted in an emergency not only for yourown use but sometimes to help others. In order to help develop a responsible andreliable attitude you will also be given small tasks to carry out whilst you are with thedetachment.
1007. 2-Star. You will visit one of these services and later you will be required toproduce a street plan and mark the location of the statutory services on it, so that youwill become knowledgeable about the whereabouts of these organizations. You willalso be required to take part in assisting with two local functions.
1008. 3-Star. At 3-Star level you can either spend 30 hours spread over sixmonths working on a community activity or you can take part in a detachment project.
1009. 4-Star. You will be required to either assist in the planning, organization,and leading of a 3-Star project, or you can make a study of the social welfare needsin the local community and provide at least 30 hours service spread over a period ofthree months on the selected project. You will be required to give a lecture to thedetachment on the option you select.
Conclusion
1010. You will see that by serving the ACF you will also be serving the local com-munity and by so doing you will not only be fulfilling the requirement of the Charterand the aim of training, but will become a more responsible citizen and cadet, whowill greatly assist the ACF by creating a good image.
1011. Reserved.
10-2
PROTECT
PROTECT
SECTION 2. — THE EMERGENCY SERVICES (1-STAR LEVEL)
Aim
1012. To give cadets knowledge of the emergency services and to train them inmaking an emergency telephone call.
Timings
1013. One 30 minute period.
Approach
1014. A good citizen is one who can react to an emergency because he has beentrained in what to do. As a member of the ACF you will find you will receive this train-ing and it is likely you will have to take the lead should you be present when the emer-gency services are required. The aim of this period is to inform you of the servicesavailable and how to summon assistance.
The Emergency Services
1015. Within the district there are the following services:
PoliceFire BrigadeAmbulance ServiceCoastguards (if you live by the coast)
These services are well known and are seen each day carrying out their role. Cadetsshould be questioned on what they think the role of each service is and to which typeof incident each should be summoned.
How to Make an Emergency Call
1016. Should you be present at an incident you must act quickly. By doing this youmay save life or property.
One of the quickest ways to summon the service required is by telephone. Youshould therefore follow this procedure:
Sum up the situation.Get to the nearest telephone. Dial 999 (this is a free call; you need not put money in the telephone).
10-3
PROTECT
PROTECT
You will be asked what service you require. State the one you want. When the ser-vice answers state:
Your name and the telephone number of the phone from which you are calling.
This is the most important as your call could be mistaken for a hoax if this is not done.
State the exact location of the incident. If you can, indicate nearby road junc-tions or other land marks.
If it is a traffic accident state number of vehicles involved. If a fire state on which floorof the building the fire is (ground, first, second floor, etc).
State the number injured if possible, the sex and approximate age of the casu-alties involved and if possible the nature of the injuries. Request special aid ifyou suspect a heart attack or childbirth.
When you have telephoned, go back to see what you can do (i.e., making the injuredcomfortable, directing traffic).
Do not replace the receiver before the operator does so.
When the service arrives tell them what you have done and ask if you can be ofassistance. Never try to move an injured person unless there is danger of fire or anexplosion.
Practice
1017. Having gone through the procedure, question the cadets and then practisethem in giving a 999 call.
1018. Should cadets have already received instruction on this subject in their FirstAid Instruction, the period should be conducted as a practice period.
1019. Reserved.
10-4
PROTECT
PROTECT
SECTION 3. — RESPONSIBILITY TRAINING (1-STAR LEVEL)
Aim
1020. To promote the cadet’s sense of responsibility by training him to play his partin the running of the detachment by carrying out simple tasks under supervision inthe detachment.
Requirement
1021. During the period the cadet is training for 1-Star, in addition to being giventhe talks on the outline syllabus and emergency services, he must be given threesimple tasks to carry out in the detachment. These could include:
Room cleaning duty Preparation of lecture rooms Reporting of damageWelcoming visitors and explaining, in outline, what the ACF isCleaning outside areasShowing new recruits round the detachment
Note: The aim of the selected tasks must be that the cadet is providing a service tothe detachment outside his military training. Knowledge of the contents of the ACFGeneral Information Booklet may be of value when welcoming visitors to the detach-ment.
1022. Reserved.
10-5
PROTECT
SECTION 4. — VISIT TO ONE OF THE LOCAL SERVICES(2-STAR LEVEL)
Aim
1023. To gain increased knowledge of the function of the selected services visited.
Timings
1024. Three 30 minute periods.
Requirement
1025. A visit to one of the following services:
PoliceAmbulance ServiceFire ServiceCoastguard ServiceHospital
A talk on the function of one of these services to be arranged during the visit.
10-6
PROTECT
PROTECT
SECTION 5. — LOCAL SERVICES LOCATIONS STREET MAP(2-STAR LEVEL)
Aim
1026. To gain a detailed knowledge of the location of the services in the local area.
Requirement
1027. The cadet is required to produce a street plan marking on it the location ofthe following:
Police Station (and HQ if possible)Ambulance StationsFire StationCoastguard Station (if applicable)HospitalPublic Telephones
Note: Cadets can work either individually or in pairs on the project. Good plansshould be displayed on the detachment notice board for general information. Onlyoriginal work should be accepted.
10-7
PROTECT
PROTECT
SECTION 6. — INVOLVEMENT IN COMMUNITY ACTIVITIES(2-STAR LEVEL)
Aim
1028. To involve the cadet in community activity.
Requirement
1029. These could include taking part in activities such as:
Sponsored walk or swim Band performances at fetesActing as programme sellers or stewards at a local eventAssisting with snow and flood clearanceMaintenance of war memorials and other public memorialsAssisting other young people, particularly disabled ones
1030. Reserved.
10-8
PROTECT
PROTECT
SECTION 7. — COMMUNITY ACTIVITIES AND PROJECTS(3-STAR LEVEL)
Aim
1031. To develop further the involvement of the cadet in community activity as amember of a group or as an individual.
Requirement
1032. Either 30 hours spread over six months
OR
take part in a project organized by the detachment of at least15 hours during the period of working for 3-Star.
Forms of Community Service
1033. Some suggested forms of practical service and the local contacts who mightbe approached to give brief talks and arrange the actual service are given below. Itis stressed, however, that the list is by no means exhaustive.
Environment Conservation.
Fund Raising Through local orNational charities byorganizing events.
Old People Old people’s ClubsDelivering meals onwheels, Gardening,Shopping, Organizingentertainments.
The Sick or Hospital work (trolleyPhysically shops, hospitalHandicapped canteens, etc.). Care
10-9
Civic Trust; Local Conservation Corps of theBritish Trust for Conservation Volunteers;Nature Conservancy Council; NationalTrust; Commons, Open Spaces andFootpaths; Preservation Society ForestryCommission (see also Park RangeService).
Cancer Research Campaign; Children’sSociety; Local Council for Social Services;Oxfam, etc.
Local Old People’s Welfare Officer; BritishRed Cross Society; Women’s RoyalVoluntary Service.
Hospital Voluntary Help Organizer; Women’sRoyal Voluntary Service; St John AmbulanceAssociation or British Red Cross Society,
PROTECT
PROTECT
of the crippled orbedridden, the blind orthe deaf and dumb.
Other Service Organizing collectionsof magazines for
Other Service Organizing collectionof salvage.Voluntary help withanimals.
Note: The services listed below can also provide information on local needs:
Citizens Advice BureauRoyal British LegionRotary ClubsRound Table ClubsLion Clubs
1034. Reserved.
10-10
Local Authority Welfare Officer or VoluntaryOrganization, e.g., British Red Cross Society.
St John and Red Cross Hospital Libraries;Women’s Royal Voluntary Service.
Women’s Royal Voluntary Service
RSPCA.
PROTECT
PROTECT
SECTION 8. — COMMUNITY ACTIVITIES AND PROJECTS(4-STAR LEVEL)
Aim
1035. To encourage the senior cadet to play his part as a leader in communityactivities.
Requirement
1036. The senior cadet can assist with the planning, organization and leading of acommunity project. This can take the form of assisting with the training of the juniorcadet at the lower Star levels in this subject over a period of three months
OR
Make a study of the welfare needs in the local community and provide assistanceeither individually or with other members of the detachment where he considers helpcan be provided.
Give a lecture on the selected subject.
Note: The list provided for the 3-Star activities might be useful for this work.
10-11
PROTECT
PROTECT

10-12
PROTECT
PROTECT
Chapter 11
CADET INSTRUCTORS’ CADRES
SECTION 1. — CCF METHODS OF INSTRUCTION CADRE
Aim
1101. The aim of the cadre is to enable Cadet NCOs to further their leadershiptraining by learning the skills of how to instruct junior cadets in military subjects.
Qualifications
1102. In accordance with the CCF Continuation Training Syllabus, to be selectedfor the Cadre, Cadet NCOs must have passed all tests in the APC (CCF ArmySections) and they must be suitable in all respects and willing to be instructors.
1103. To qualify in this subject for the award of his Advanced APC the Cadet NCOmust obtain an average or above average report (assessment will be continuousthroughout the cadre and will be based on knowledge and the ability to instruct). Heis also required to instruct to a satisfactory standard for a minimum of one term ontwo out of the four following basic APC subjects; Drill, Skill at Arms, Use of Map andCompass and Fieldcraft.
The Place of the Cadre in the CCF Training Syllabus
1104. The cadre is normally part of the Advanced APC Syllabus, but in those con-tingents where no Continuation Training is undertaken Cadet NCOs who have suc-cessfully qualified in the APC, and are selected to undertake the cadre, may com-plete it in parallel with other cadets still undergoing their APC training.
1105. The Cadet Training Team is responsible for conducting the cadre as mutuallyarranged within the Army Section training programme.
Cadre Syllabus
1106. The cadre syllabus consists of four periods on the study of the Technique ofInstruction as given in Volume II, Chapter 1 and 8 periods of teaching practice on thebasic APC subjects, Drill, Skill at Arms, Use of Map and Compass and Fieldcraft.
1107. Reserved.
11-1
PROTECT
PROTECT
SECTION 2. — ACF JUNIOR CADET INSTRUCTORS’ CADRE (JCIC)
Aim
1108. JCIC has two purposes. Firstly to initiate the senior cadet into the Techniqueof Instruction, as given in Volume II, Chapter 1, and secondly to assess the cadet’sability as a potential instructor, with particular reference to his possible subsequentselection to undertake the Senior Cadet Instructors Cadre at 4-Star level.
Subjects
1109. The JCIC is an integral part of 3-Star training and all cadets at this level takethe course, which is designed to teach the Senior Cadet how to instruct up to andincluding 1-Star level in the following subjects:
Drill, Turnout and Military KnowledgeSkill at ArmsUse of Map and CompassFieldcraft
Responsibility for JCIC
1110. The JCIC is the responsibility of the County ACF, with the assistance, whennecessary, and when available, of the Cadet Training Team.
Testing
1111. There will be no formal testing at this level, and no ‘Pass’ or ‘Fail’ will beawarded. A cadet who shows little or no aptitude as a potential instructor will notthereby be debarred from achieving 3-Star level. However the cadet will be assessedthroughout the course and a report written on his ability as a potential instructor atthe end of it. This assessment could influence the cadet’s choice of subject it he con-tinues training at 4-Star level, in particular his selection for the Senior Cadet InstructorsCadre.
1112. Reserved.
11-2
PROTECT
PROTECT
SECTION 3. — ACF SENIOR CADET INSTRUCTORS’ CADRE (SCIC)
Aim
1113. The SCIC is a 4-Star optional subject designed to increase the cadet’s knowl-edge of the Technique of Instruction which he was first introduced to on the JCIC, andto give him early experience of the art of leadership.
Selection for SCIC
1114. Senior Cadet NCOs selected to attend the cadre must have a sound knowl-edge of all subjects up to and including 3-Star level, and they must have proved, bytheir performance on the JCIC, that they are potential instructors.
Subjects
1115. Students on the SCIC will be taught how to instruct up to and including 2-Starstandard in the following subjects:
Drill, Turnout and Military KnowledgeSkill at ArmsUse of Map and CompassFieldcraft
1116. Teaching practice in the subjects listed in paragraph 1115 above, which arelargely skills, will be in the form of the Lesson, the Demonstration or the Exercise asdefined in Volume II Chapter 1 Section 4.
Responsibility for SCIC
1117. The responsibility for organizing, instructing and testing on the SCIC will bethat of the Cadet Training Team, assisted as appropriate by ACF instructors.
11-3
PROTECT
PROTECT

11-4
PROTECT
PROTECT