the audacity of it- a quick guide to how to make a podcast
TRANSCRIPT

The Audacity of it-
a quick guide to how to make a Podcast

Task:
1) to record a description of how to form the future tense in a language of your choice, without scripting
NOTE: the explanation is to be given IN ENGLISH2) to edit the description3) to add backing music – there are 3 tracks saved in P:4) to export the recording as an .mp35) to repeat the process HAVING scripted the description6) to explore a number of further websites

Audacity can be found by pressing Start, All Programs
Look for
There is no right or wrong in this process- just be creative, press buttons and see what happens!

The Audacity Work Area Window

Skip to Start - moves the cursor to time 0. If you press Play at this point, you project will play from the beginning.
Play - starts playing audio at the cursor position. If some audio is selected, only the selection is played.
Loop - if you hold down the Shift key, the Play button changes to a Loop button, which lets you keep playing the selection over and over again.
Record - starts recording audio at the project sample rate (the sample rate in the lower-left corner of the window).
Pause - temporarily stops playback or recording until you press pause again.
Stop - stops recording or playing. You must do this before applying effects, saving or exporting.
Skip to End - moves the cursor to the end of the last track.
The Audacity Control Buttons

How to… record
1) Press on the record button
How to… delete sections
1) Highlight the unwanted section with the cursor
2) Click on the Cut button or press Delete on the keyboard

Selection tool - for selecting the range of audio you want to edit or listen to.
Envelope tool - for changing the volume over time.
Draw tool - for modifying individual samples.
Zoom tool - for zooming in and out.
Timeshift tool - for sliding tracks left or right.
Multi tool - lets you access all of these tools at once depending on the location of the mouse and the keys you are holding down.
The Audacity Editing Tools

How to… amplify
1) Press Effect, Amplify…
2) Slide the bar to the right to increase volume, to the left to decrease
3) Click Allow clipping
4) Press OK

How to… begin recording more material
1) Ensure the cursor is at the end of the recorded section
2) Press record as per normal
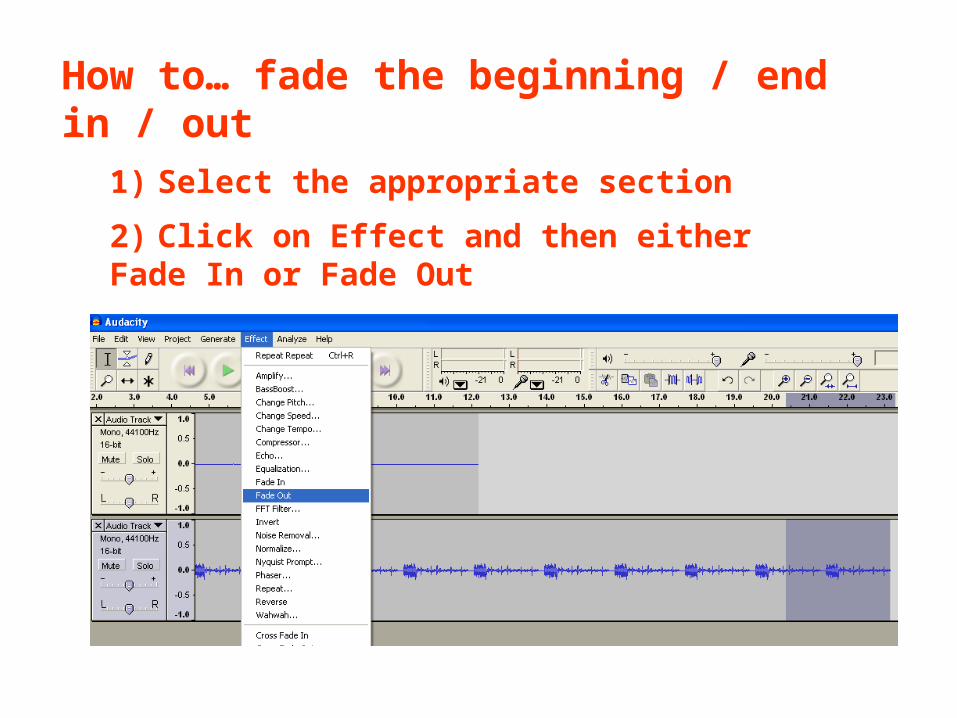
How to… fade the beginning / end in / out
1) Select the appropriate section
2) Click on Effect and then either Fade In or Fade Out

How to… repeat a section1) Select the appropriate section
2) Click On Effect, Repeat…
3) Set to repeat for the appropriate length
4) Click OK

How to… add a musical background
1) Click Project, Import Audio…
2) Find the appropriate track saved on your computer
3) Use the sound bar on the left to increase / decrease the volume to appropriate levels
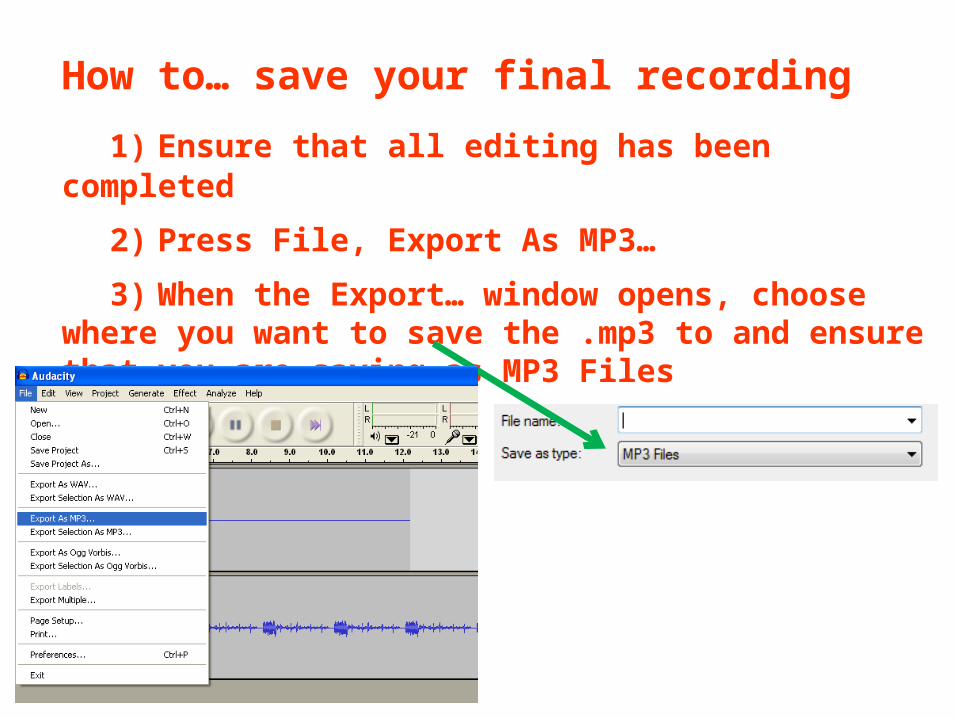
How to… save your final recording
1) Ensure that all editing has been completed
2) Press File, Export As MP3…
3) When the Export… window opens, choose where you want to save the .mp3 to and ensure that you are saving as MP3 Files

In order to be able to Export as .MP3 you will need to have the Lame Encoder installed.
If you do not have this, you can download it for free from www.download.com
The first time you Export as .MP3 you will be asked to tell Audacity where the file (.dll) is saved. Simply follow the Audacity steps and you will not have to do this again.
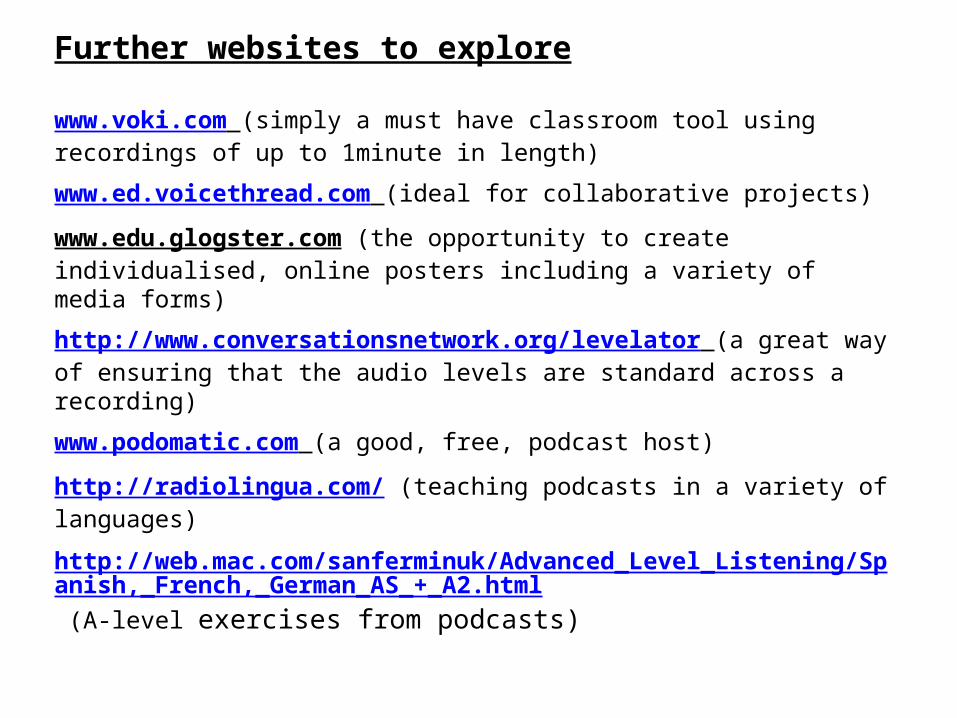
Further websites to explore
www.voki.com (simply a must have classroom tool using recordings of up to 1minute in length)
www.ed.voicethread.com (ideal for collaborative projects)
www.edu.glogster.com (the opportunity to create individualised, online posters including a variety of media forms)
http://www.conversationsnetwork.org/levelator (a great way of ensuring that the audio levels are standard across a recording)
www.podomatic.com (a good, free, podcast host)
http://radiolingua.com/ (teaching podcasts in a variety of languages)
http://web.mac.com/sanferminuk/Advanced_Level_Listening/Spanish,_French,_German_AS_+_A2.html (A-level exercises from podcasts)

Audacity version 1.3
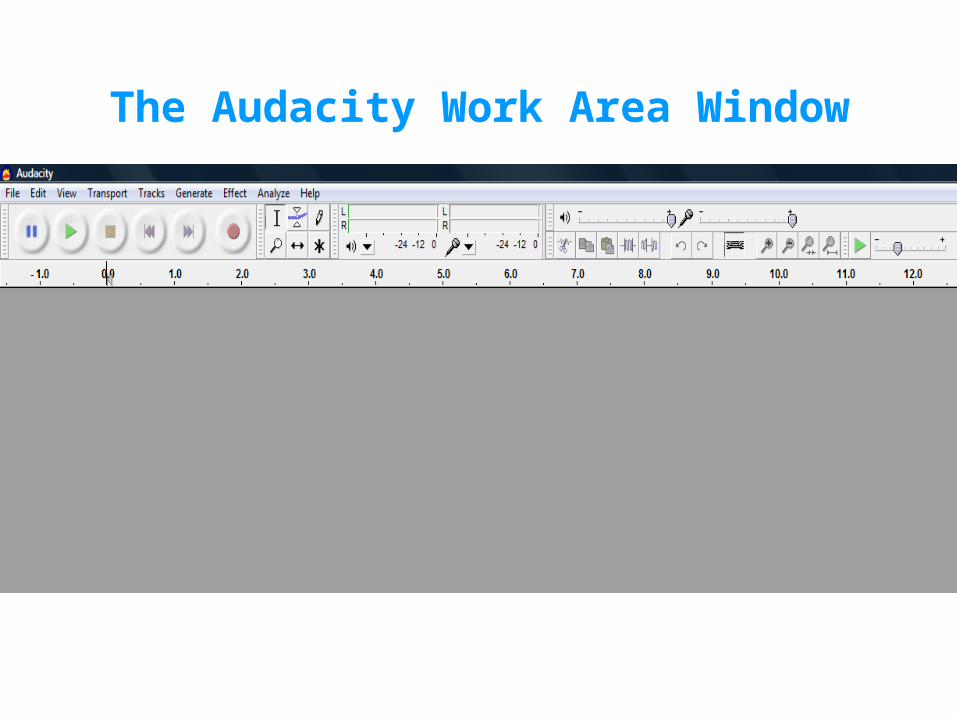
The Audacity Work Area Window

Skip to Start - moves the cursor to time 0. If you press Play at this point, you project will play from the beginning.
Play - starts playing audio at the cursor position. If some audio is selected, only the selection is played.
Loop - if you hold down the Shift key, the Play button changes to a Loop button, which lets you keep playing the selection over and over again.
Record - starts recording audio at the project sample rate (the sample rate in the lower-left corner of the window).
Pause - temporarily stops playback or recording until you press pause again.
Stop - stops recording or playing. You must do this before applying effects, saving or exporting.
Skip to End - moves the cursor to the end of the last track.
The Audacity Control Buttons

How to… record
1) Press on the record button
How to… delete sections
1) Highlight the unwanted section with the cursor
2) Click on the Cut button or press Delete on the keyboard

Selection tool - for selecting the range of audio you want to edit or listen to.
Envelope tool - for changing the volume over time.
Draw tool - for modifying individual samples.
Zoom tool - for zooming in and out.
Timeshift tool - for sliding tracks left or right.
Multi tool - lets you access all of these tools at once depending on the location of the mouse and the keys you are holding down.
The Audacity Editing Tools
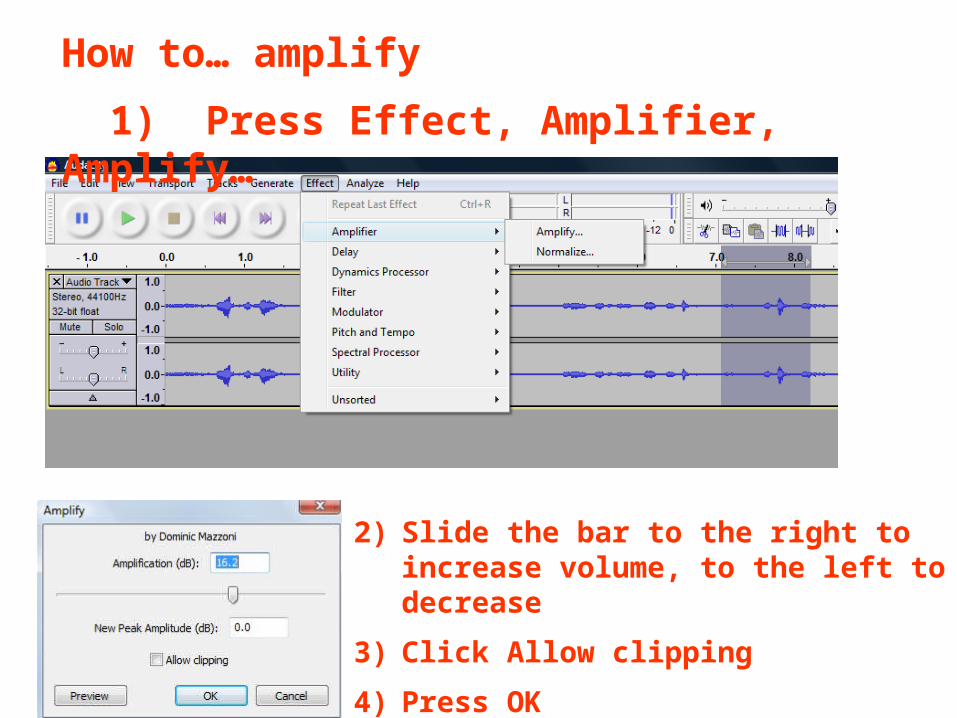
How to… amplify
1) Press Effect, Amplifier, Amplify…
2) Slide the bar to the right to increase volume, to the left to decrease
3) Click Allow clipping
4) Press OK
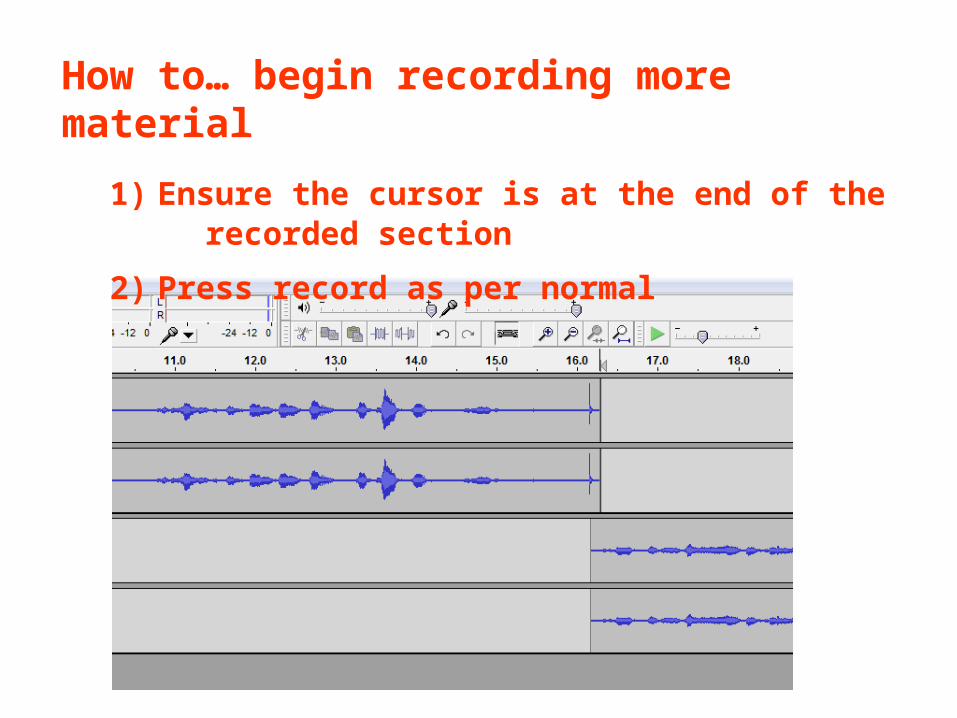
How to… begin recording more material
1) Ensure the cursor is at the end of the recorded section
2) Press record as per normal

How to… fade the beginning / end in / out
1) Select the appropriate section
2) Click ON Effect, Utility and then either Fade In or Fade Out
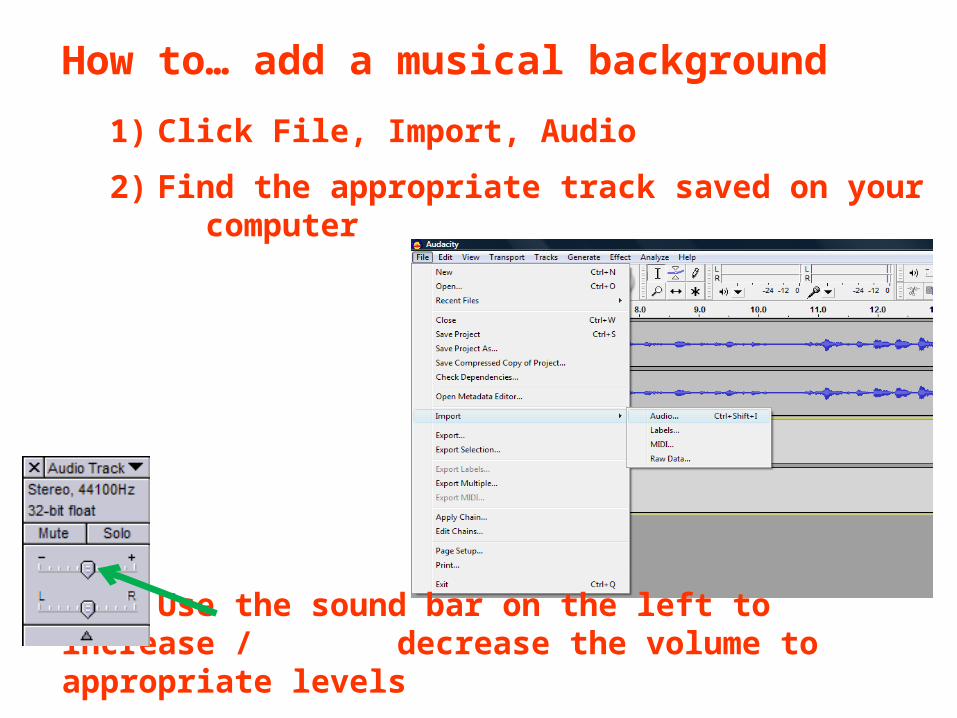
How to… add a musical background
1) Click File, Import, Audio
2) Find the appropriate track saved on your computer
3) Use the sound bar on the left to increase / decrease the volume to appropriate levels
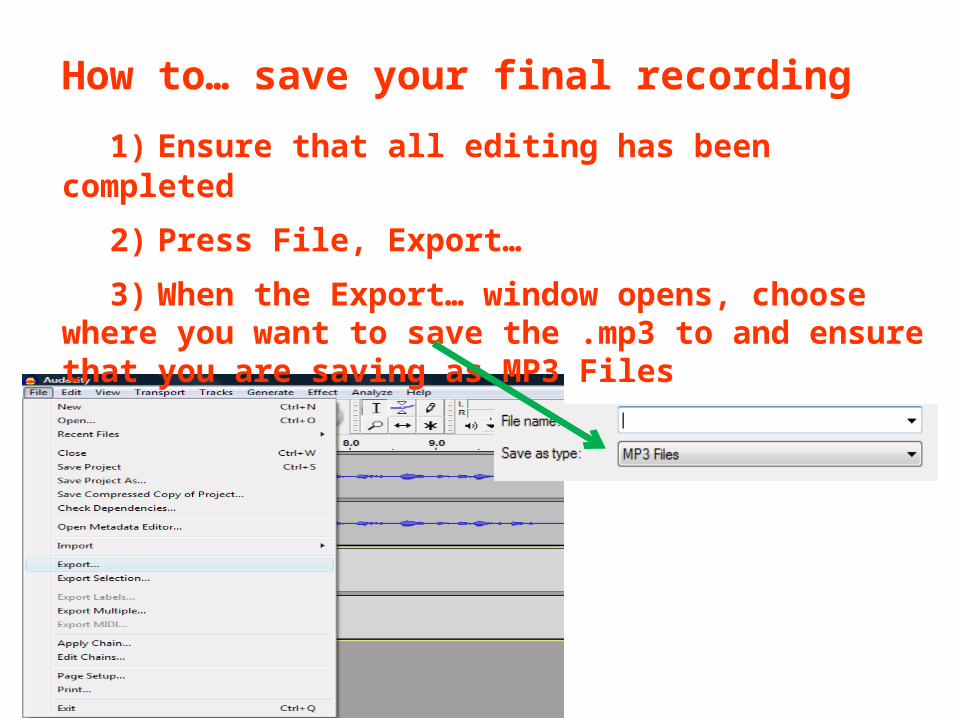
How to… save your final recording
1) Ensure that all editing has been completed
2) Press File, Export…
3) When the Export… window opens, choose where you want to save the .mp3 to and ensure that you are saving as MP3 Files