the apache web server - springer · 604 chapter 16 the apache web server apache installation and...
TRANSCRIPT

603
■ ■ ■
C H A P T E R 1 6
The Apache Web Server
Novell has a rich history of web servers. The very first web server came into existence with NetWare 4.11, which was called Intra NetWare. This web server’s capabilities were woefully limited, however. In NetWare 5, Novell came up with the NetScape Enterprise web server, which was tailor-made for Novell environments by a company called Novonyx, a joint effort of Novell and Netscape. This was the first serious web server to come with NetWare, offering, for example, advanced possibilities for integration of the web server with eDirectory. Since NetWare 6.0, however, its Internet capabilities have taken great leaps forward, with Apache being included as NetWare’s default web server.
Apache is by far the most widely used web server on the Internet, and one of the most powerful. Almost anything is possible using the Apache web server, thanks to its capability to extend its functionality using different modules. To make it easier for OES administrators, management of the Apache web server can be performed using eDirectory objects rather than having to go into the Apache httpd.conf configuration file and mess around with code lines. Most of this chapter is, in fact, dedicated to the Apache web server, but other important open-source services that work closely with the Apache web server are discussed as well, such as the Tomcat Servlet Engine, which is used by important services like iManager, the QuickFinder Web Search Server, and the MySQL database server.
Managing the Apache Web ServerThe Apache web server is a very powerful web server. Indeed, it has so much functionality it can’t all be possibly covered in this book. This chapter offers an overview of the most important aspects of Apache web server management. To start with, the tools used to manage the Apache Web Server are discussed—for instance, it’s possible to access the configuration file httpd.conf directly, but in an OES environment, Apache Manager can also be used to manage multiple instances of the Apache web server from one browser-based interface. This section teaches you how to manage Apache Web Server parameters, content, modules, and security.

604 C H A P T E R 1 6 ■ T H E A P A C H E W E B S E R V E R
Apache Installation and ConfigurationIn all default installations for OES - NetWare and OES - Linux, the Apache server is installed by default. Only in customized installations is it possible not to select the Apache server for installa-tion. This isn’t necessarily a good idea, however, since you’ll need it for many of the services running on OES - NetWare. Therefore, make sure the Apache server is always listed when performing an installation. After installation of OES, you’ll find yourself with a brand new copy of Apache 2.0 on your server as well, which is used by many services on OES. For instance, iFolder and iPrint won’t operate without it. In rare cases where the Apache web server isn’t installed by default, it’s possible to install the Apache web server from the Product installation option on the OES - NetWare console, or with YaST on OES - Linux. Chapter 13 has more on this procedure.
After installation, it’s possible to fine-tune your Apache web server. The central configuration of this web server is stored in a configuration file called httpd.conf. If you’re a long-term Apache administrator, you’ve probably already started worrying about httpd.conf and directives. Never fear! It’s possible to change this file directly on both editions of OES. If, however, several Apache web servers in your network must be managed this way, Apache configuration can become cumbersome very fast. As an alternative, use the Apache Manager. This web-based interface can be used to manage the Apache configuration as it’s stored in eDirectory. From the Apache Manager, use the Single Server Administration Interface to manage parameters on one single server, or use the Multiple Server Administration interface to manage multiple servers from one interface.
Installing Apache Manager on NetWare
Apache Manager is not installed by default on the OES - Linux platform. On OES - NetWare, it’s installed when you select Apache for installation and you can access it on port 2200 (see Figure 16-1).

C H A P T E R 1 6 ■ T H E A P A C H E W E B S E R V E R 605
Figure 16-1. On OES - NetWare, the generic management program that can be reached on HTTPS port 2200 also gives access to Apache Manager.
Installing Apache Manager on Linux
Apache Manager is not installed by default on OES - Linux. If you want to use it, you can down-load and install the Apache Manager daemon from the Novell Forge Web site. Visit http:// forge.novell.com/modules/xfmod/project/?apache_manager (see Figure 16-2) to download the file apacheadmin.tar to the computer where you want to run the daemon. You must meet the following minimum requirements to install the Apache Administration module:
• Java 2 version 1.3.1 or later must already be installed.
• The LDAP server must be running and accepting connections.
• Apache web server 2.0 or later is installed and running.

606 C H A P T E R 1 6 ■ T H E A P A C H E W E B S E R V E R
Figure 16-2. Before you can manage Apache with Apache Manager on OES - Linux, you must download the program file from forge.novell.com.
■Tip On OES - Linux, the structure of the configuration files used by the Apache server are rather different than other Linux distributions. A main configuration file, default-server.conf, is used, and from this main configuration file a lot of other configuration files are called. Some of them are created dynamically when the Apache server is started. This structure is not developed to be managed by hand. Thus, it’s best you also use Apache Manager for management of Apache on OES - Linux. Limited management of the Apache web server can be performed from YaST as well.
1. Click the file apacheadmin.tar and download it. After downloading, copy the file to the directory where the Apache web server is installed. Normally, this is /usr/share/apache2.

C H A P T E R 1 6 ■ T H E A P A C H E W E B S E R V E R 607
■Note The procedure described here is based on an open-source project to implement an Apache Manager daemon for OES - Linux. Currently, people are still working on this project. It could be that by the time you read this, the procedure will have already changed. Most likely, though, the configuration will still be stored in the file startup.properties.
2. As root, run the command tar xvf apacheadmin.tar to extract the tarball. (“Tarball” is Linux slang for an archive that’s created with the tar utility.) This generates a subdi-rectory apacheadmin in the Apache program directory where you’ve copied the tarball. In this directory, under the subdirectory conf, create a file with the name startup.prop-erties. By default, this file already exists, but is empty. An easy way to create a new startup.properties file is to copy the entire contents of the file startup.properties.back to startup.properties. After that, you can modify the contents of startup.properties (see Figure 16-3). On several lines in this file, you can define the workings of Apache Manager using parameters shown in Table 16-1.
Figure 16-3. The file startup.properties is used to specify how Apache Manager should work

608 C H A P T E R 1 6 ■ T H E A P A C H E W E B S E R V E R
Table 16-1. Parameters in /usr/share/apache2/apacheadmin/conf/startup.properties
Parameter Used For
InitialContextFactory Specifies the name of the Java class used to generate the initial LDAP context. This line should read InitialContextFactory = com.sun.kndi.ldap.LdapCtxFactory.
ProviderURL The DNS name or IP address of the LDAP server
Port The listen port for the LDAP server. Use 636 for secure communications.
UseSSL Specifies whether or not to use SSL for the LDAP connection. Select yes to use it.
SecurityAuthentication The Authentication type for the LDAP connection. Default is simple and this is fine.
UserID The user used for LDAP authentication by the daemon. This user must be a member of the eDirectory group apchadmn-Administrators. It’s sufficient if you create a dummy user with no rights for this purpose.
ServerDN The LDAP distinguished name for the Apache server object associated with this instance of the daemon. This should be a name like cn=Https Server – oes-linux,o=oes.
ServerName The primary DNS name or IP address of the Apache server.
ConfigFile Specifies the Apache configuration file for the main Apache daemon. Usually this is the httpd.conf file on your server.
BackupDir An optional directory in the file system used by the daemon to save backup configurations.
StartApacheCmd The command required to start Apache. On OES - Linux, this should refer to the apachectl script followed by start. On OES - NetWare, this should refer to the file ap2webup.ncf.
StopApacheCmd The command required to stop Apache. On Linux this would be the complete name of the apachectl script, followed by stop. On OES - NetWare, the file ap2webdn.ncf should be referred to.
RestartApacheCmd The command required to restart Apache. On OES - Linux, the Apache startup script apachectl should be referred to with the parameter restart. On OES - NetWare, refer to ap2webrs.ncf
RestartDelay The polling delay that specifies how often the daemon checks for configu-ration changes. The default value is 10000, which is 10 seconds.
StartupErrorLog If Apache is started with the option –E <file>, a filename can be specified where errors can be logged that occur on Apache startup.
StorageMode This parameter specifies whether to get the Apache configuration from the configuration file as listed in the ConfigFile property, or from LDAP by connecting to the object listed in the ServerDN property. For daemon configuration, this property is always set to Directory.
UseGUILogin Tells the daemon whether to prompt for the password using a command-line prompt or a GUI prompt. Can have the values yes and no.
GUIInForeground Specifies whether the GUI should run in the foreground, or disappear after getting the password.

C H A P T E R 1 6 ■ T H E A P A C H E W E B S E R V E R 609
3. To start the Apache Manager daemon, run the file daemoninstall.bat from the directory /usr/share/apache2/apacheadmin.
■Caution It sometimes happens that the daemon refuses to start. This is because in the script daemonin-stall.bat where the Java code is executed to start the script, there is a reference that starts with <PATH>. Replace <PATH> with the directory where the Apache2 binaries are installed (/usr/share/apache2 on OES - Linux) and execute the file again. You should now be able to run the installation script.
4. Fill in the Enter The Base Path For The apacheadmin Directory field with the name of the directory /usr/share/apache2. Press Enter to continue.
5. Now you’re asked what password to use. Use a blank password, otherwise the script will always ask for a password when you start it. After entering the password, start the Apache Manager daemon by executing the script ap2webman.bat. Before you can execute it, use the command chmod +x ap2webman.bat to make the script executable.
■Tip It’s possible to start, stop, and restart the Apache server from the Apache Manager interface. You can also start and stop it from your server’s console by doing the following:
• Use AP2WEBUP from the OES - NetWare console to start Apache.
• Use AP2WEBDN from the OES - NetWare console to stop Apache.
• Use /etc/init.d/apache2 start from the OES - Linux console to start Apache.
• Use /etc/init.d/apache2 stop from the OES - Linux console to stop Apache.
610 C H A P T E R 1 6 ■ T H E A P A C H E W E B S E R V E R
Managing Apache Configuration
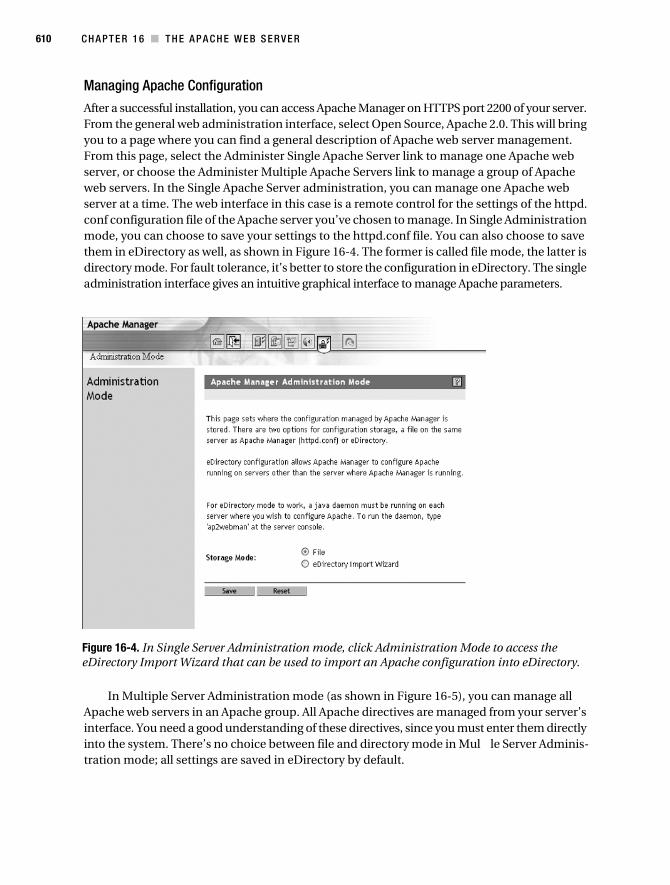
After a successful installation, you can access Apache Manager on HTTPS port 2200 of your server. From the general web administration interface, select Open Source, Apache 2.0. This will bring you to a page where you can find a general description of Apache web server management. From this page, select the Administer Single Apache Server link to manage one Apache web server, or choose the Administer Multiple Apache Servers link to manage a group of Apache web servers. In the Single Apache Server administration, you can manage one Apache web server at a time. The web interface in this case is a remote control for the settings of the httpd.conf configuration file of the Apache server you’ve chosen to manage. In Single Administration mode, you can choose to save your settings to the httpd.conf file. You can also choose to save them in eDirectory as well, as shown in Figure 16-4. The former is called file mode, the latter is directory mode. For fault tolerance, it’s better to store the configuration in eDirectory. The single administration interface gives an intuitive graphical interface to manage Apache parameters.
Figure 16-4. In Single Server Administration mode, click Administration Mode to access the eDirectory Import Wizard that can be used to import an Apache configuration into eDirectory.
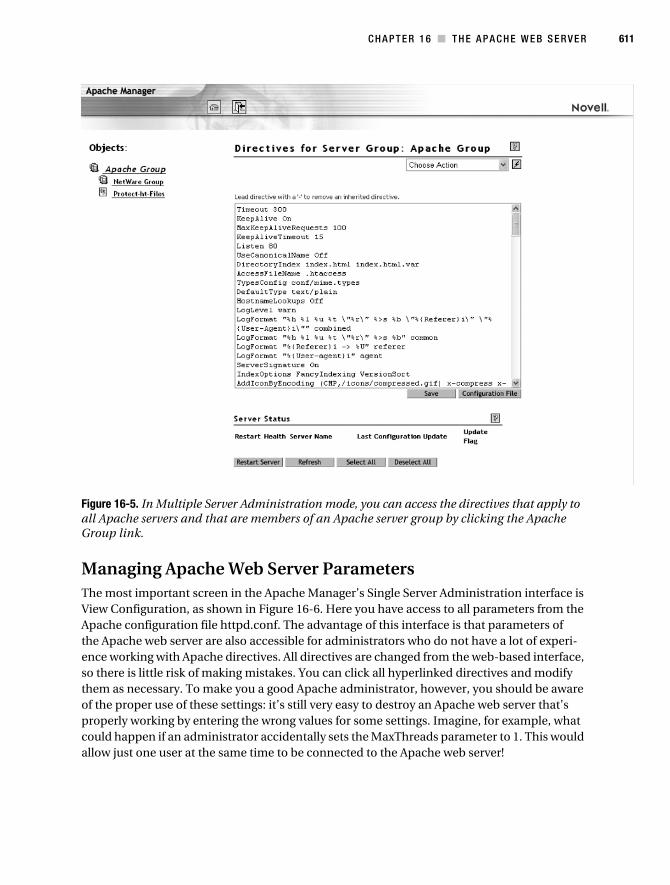
In Multiple Server Administration mode (as shown in Figure 16-5), you can manage all Apache web servers in an Apache group. All Apache directives are managed from your server’s interface. You need a good understanding of these directives, since you must enter them directly into the system. There’s no choice between file and directory mode in Mul le Server Adminis-tration mode; all settings are saved in eDirectory by default.
C H A P T E R 1 6 ■ T H E A P A C H E W E B S E R V E R 611
Figure 16-5. In Multiple Server Administration mode, you can access the directives that apply to all Apache servers and that are members of an Apache server group by clicking the Apache Group link.
Managing Apache Web Server ParametersThe most important screen in the Apache Manager’s Single Server Administration interface is View Configuration, as shown in Figure 16-6. Here you have access to all parameters from the Apache configuration file httpd.conf. The advantage of this interface is that parameters of the Apache web server are also accessible for administrators who do not have a lot of experi-ence working with Apache directives. All directives are changed from the web-based interface, so there is little risk of making mistakes. You can click all hyperlinked directives and modify them as necessary. To make you a good Apache administrator, however, you should be aware of the proper use of these settings: it’s still very easy to destroy an Apache web server that’s properly working by entering the wrong values for some settings. Imagine, for example, what could happen if an administrator accidentally sets the MaxThreads parameter to 1. This would allow just one user at the same time to be connected to the Apache web server!

612 C H A P T E R 1 6 ■ T H E A P A C H E W E B S E R V E R
Figure 16-6. In Single Server Administration mode, all directives can easily be changed from the web interface.
In the left bar of the Apache Manager in Single Server Administration mode, you’ll see an overview of all available settings that can be used to tune the Apache server. These settings are divided into different groups. The most important of these groups is the Performance Tuning link. Here you’ll find all the settings related to the performance of your Apache server. An over-view of these performance-related parameters is shown in Table 16-2.
More settings for your web server are available from the Server Preferences page. These include the following:
• Click MIME Types to define file associations that your server can work with. These asso-ciations allow the Apache server to open the right application when a file with a given extension is accessed. Use the New button found under this link to define a new default type of file and extension used for that file.

C H A P T E R 1 6 ■ T H E A P A C H E W E B S E R V E R 613
Table 16-2. Performance-Related Apache Parameters
Parameter Default value Use
Thread stack size 65536 Defines the amount of memory available for the thread stack. This is RAM that’s avail-able to run processes. Normally, the default value is fine, but this parameter may be increased if your Apache web server works with a lot of modules.
Start threads 25 The amount of threads started automati-cally. The default of 25 works fine for most environments. New threads are allocated automatically if needed. On a very busy server, it can be useful to increment the default number of threads started automati-cally in order to increase Apache web server performance since it takes a good deal of performance to allocate a new thread.
Minimum spare threads 10 A spare thread is a thread that is allocated automatically for new incoming connections. Increase this number on a heavily used Apache web server to improve performance. This number of spare Apache threads will always be available for new client connections.
Maximum spare threads 50 The maximum amount of spare threads. Don’t make this number too big because all threads allocate system resources.
Maximum total threads 1024 The maximum amount of active threads on this server. This parameter only needs to be changed on heavily used web servers.
Enable keep alive Yes Allows a virtual connection to remain open if a user hasn’t sent data for some time. This is good because it prevents your server from establishing a new connection every time a user has been disconnected for a short period.
Maximum keep alive requests 100 The maximum number of keep alive requests that can be handled. For almost any circum-stances, the default of 100 is good.
Keep alive timeout 15 Number of seconds that a keep alive connection remains open. 15 seconds is reasonable—if a user doesn’t send new data for longer than 15 seconds, he is probably gone anyway.
Enable DNS Lookups No Do you want Apache to do a reverse DNS lookup for logging-in purposes so that the DNS name of a client can be logged instead of the IP-address (which is meaningless in most cases)? Only enable this parameter if you really need it for troubleshooting purposes since your server will take a large performance hit as a result.
614 C H A P T E R 1 6 ■ T H E A P A C H E W E B S E R V E R
• Click Network Settings to specify the mail address of the administrator. Here, you can also decide if you want to use server-side includes (SSI) to update information on a web page based upon information queried from the server. On this page, you can also specify the name of the extension to use when working with SSI. By default, server-side includes are not allowed because they pose a limited security risk.
• On the Listen Ports link, you can specify the ports on which your web server listens for incoming connections. Here you can also enable or disable the use of encryption. By default, the web server is configured to listen for incoming connections on port 80 (non-secure) and on port 443 for secured incoming connections.
Managing Web Server ContentAll documents offered by the Apache web server are created in the Apache web server document root. This is a directory specified in the Apache configuration file that can be used to store all documents offered by the Apache web server. This document root is also the default directory that will be presented to all users accessing the Apache web server. All other directories where content is stored on the Apache web server are related to this document root as well. In the Apache configuration, you’ll only see the partial name of such a directory, as in TypesConfig = conf/mime.types. On OES - NetWare, this document root is on the SYS volume, by default. Since it’s a very bad idea to put documents on the SYS volume, you might want to change that, as listed in the following procedure. Before you apply these steps, make sure you’ve created the new documentroot and that you’ve copied all files from the old document root to the new one.
1. Start the Apache Single Server Manager interface.
2. Select View Configuration and then DocumentRoot. This opens a pop-up window.
3. In this pop-up window, enter the name of the directory in quotes that you want to use as the new document root. Click Save to save your changes.
4. In the left column of the Apache Manager interface, select Server Status. From the Server Status interface, choose Restart Server. The Apache web server will not detect changes made to the configuration automatically; you must restart it to apply all changes.
■Note On SUSE Linux, the Apache configuration is stored in many files. The file /etc/apache2/default-server.conf is used as the main configuration file, and from this file other configuration files are included using include directives. If you want to change the default DocumentRoot directive on OES - Linux by editing the Apache configuration files manually, you must edit the file default-server.conf.

C H A P T E R 1 6 ■ T H E A P A C H E W E B S E R V E R 615
If you want to include additional document directories, activate the Content Management interface by clicking the Content Management button in the button bar. From this interface, you can change several parameters, like those listed next.
• The location of the primary document directory.
• The location of additional document directories. These are other directories on the Apache web server where HTML documents can be stored. These directories can be located anywhere in your server and can be reached at their own URL. While creating these additional document directories, specify the URL prefix and the location in the file system where the directory is created.
• Whether or not you want to allow users to create their own home directories. You can also define the name of a default directory that must be created in the user’s home directory for the user to store his HTML documents inside.
• Document preferences. With this option, you can specify the name of the default index file names (normally index.html or home.html).
• URL-forwarding. Use this option to define a URL that can be used on your local web server to forward to a location on another web server.
• Virtual hosts. Use this option to define virtual hosts hosted by your Apache web server. A virtual host is a web server that can be reached at its own name and IP address.
Extending Apache Functionality with ModulesThe Apache server itself only provides basic functionality, but this functionality can be extended through the use of modules. If, for example, your Apache server must be able to handle PHP-scripts, you can install PHP as a module to provide this functionality. These modules can be included with the LoadModule directive in the Apache configuration. Some of these modules, and the directives that point to them, are already present in the default configuration. You can view them from the View Configuration option in the Single Server Management interface. Some modules can also be managed from the Modules interface. You can activate this interface from the Modules button at the top of the screen (shown in Figure 16-7). In an OES environment, some specific modules are used to enhance the Apache capabilities, including the following:
• mod_jk: Provides access to the Tomcat servlet container (see the section “Managing the Tomcat Servlet Engine” later in this chapter for more on this).
• mod_auth_ldap: Enables the Apache server to communicate with an LDAP server for user authentication.
• mod_edir: Allows the Apache server to work with information from eDirectory.

616 C H A P T E R 1 6 ■ T H E A P A C H E W E B S E R V E R
Figure 16-7. Some modules can be activated from the special modules interface.
Enabling Directory ModeAs stated before, there are two different modes in which the Apache web server can be managed if you work from the Single Server Administration module. If you choose to work in File mode, all modifications are stored in the default Apache configuration files. If you specify to work in Directory mode, all changes are stored in eDirectory. You can use the Administration Mode button from the button bar to specify which of these modes must be deployed—by default, your Apache server will work in file mode. There are, however, some advantages if you store the information in eDirectory. The most important being that the data is stored in a fault-tolerant database and is no longer in one single file. To store the information in eDirectory, perform the following steps.
1. To activate Directory mode storage, from the Administration Mode interface select the eDirectory Import Wizard option and click Save to start the wizard (this sounds illogical, but it’s really the way it works).
2. On the next screen, click Next to continue.
3. Now select the option Create A New Server Object and click Next to continue. This creates a new server object in eDirectory.
4. If there is more than one Apache group object in eDirectory, you can specify the group to which your server must become a member. Also enter the server eDirectory object name and server DNS name for your Apache web server. Click Next to continue.
5. Now, specify how directives on your newly created Apache server object in eDirectory must be managed. There are two options: the first is to import the current settings from httpd.conf on your Apache web server. You can also choose to work with an inherited eDirectory configuration. If your Apache server is imported in eDirectory, you can specify properties for the server to be used at the Apache group level. These properties can be inherited by all Apache server objects that are members of this group. If you already have an Apache group object that is completely configured, choose Use Inherited eDirectory Configuration (as shown in Figure 16-8) and click Next to continue.

C H A P T E R 1 6 ■ T H E A P A C H E W E B S E R V E R 617
Figure 16-8. If an Apache configuration is already present in eDirectory, new Apache servers can inherit its properties from this configuration.
6. All information needed to create the Apache server object in eDirectory is now present. Review it, and if you’re happy with it, click Finish to close the wizard and create the eDirectory object.
7. You’ll now see a message that the Apache configuration has been changed in eDirectory. Click Refresh to change the appearance of Apache manager. A screen appears in which you see a list of all available Apache servers stored in eDirectory. From this screen, select the server you want to manage.
Connecting Apache to eDirectory UsersSince the Apache server is used in OES on an eDirectory platform, it might as well use informa-tion from eDirectory. Two kinds of information are especially important. First, there are the home directories of eDirectory users. If users have permission to create a personal web page in their home directory, the Apache web server must be able to read the eDirectory property homedirectory for the users. Second, eDirectory information can be used to restrict access to certain directories. On a normal Apache web server, a specific Apache user database must be created for this purpose with the command htpasswd. However, since Apache can get infor-mation from eDirectory, eDirectory users can be utilized for this purpose in an Apache OES environment. To do all this, the following two Apache modules must be loaded:
• mod_edir
• mod_auth_ldap
Use the LoadModule directive to include these modules in the Apache configuration. You can input these lines directly into the Apache configuration file. If you’re using mod_edir, always make sure that mod_auth_ldap is also used, since mod_edir depends on it, as shown in the following:
618 C H A P T E R 1 6 ■ T H E A P A C H E W E B S E R V E R
LoadModule mod_auth_ldapLoadModule mod_edir
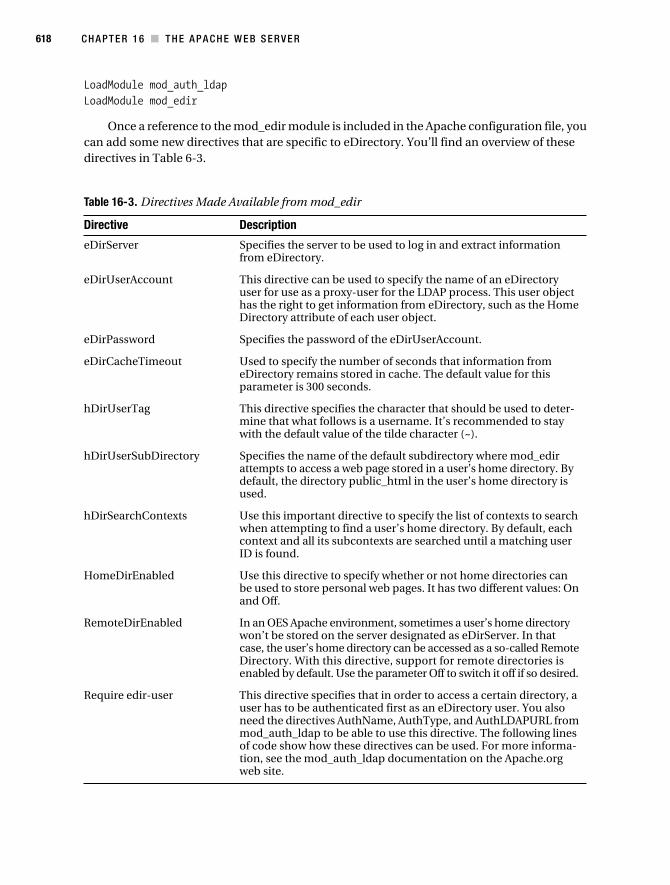
Once a reference to the mod_edir module is included in the Apache configuration file, you can add some new directives that are specific to eDirectory. You’ll find an overview of these directives in Table 6-3.
Table 16-3. Directives Made Available from mod_edir
Directive Description
eDirServer Specifies the server to be used to log in and extract information from eDirectory.
eDirUserAccount This directive can be used to specify the name of an eDirectory user for use as a proxy-user for the LDAP process. This user object has the right to get information from eDirectory, such as the Home Directory attribute of each user object.
eDirPassword Specifies the password of the eDirUserAccount.
eDirCacheTimeout Used to specify the number of seconds that information from eDirectory remains stored in cache. The default value for this parameter is 300 seconds.
hDirUserTag This directive specifies the character that should be used to deter-mine that what follows is a username. It’s recommended to stay with the default value of the tilde character (~).
hDirUserSubDirectory Specifies the name of the default subdirectory where mod_edir attempts to access a web page stored in a user’s home directory. By default, the directory public_html in the user’s home directory is used.
hDirSearchContexts Use this important directive to specify the list of contexts to search when attempting to find a user’s home directory. By default, each context and all its subcontexts are searched until a matching user ID is found.
HomeDirEnabled Use this directive to specify whether or not home directories can be used to store personal web pages. It has two different values: On and Off.
RemoteDirEnabled In an OES Apache environment, sometimes a user’s home directory won’t be stored on the server designated as eDirServer. In that case, the user’s home directory can be accessed as a so-called Remote Directory. With this directive, support for remote directories is enabled by default. Use the parameter Off to switch it off if so desired.
Require edir-user This directive specifies that in order to access a certain directory, a user has to be authenticated first as an eDirectory user. You also need the directives AuthName, AuthType, and AuthLDAPURL from mod_auth_ldap to be able to use this directive. The following lines of code show how these directives can be used. For more informa-tion, see the mod_auth_ldap documentation on the Apache.org web site.

C H A P T E R 1 6 ■ T H E A P A C H E W E B S E R V E R 619
In the following code sample from SYS:\APACHE2\CONF\HTTPD.CONF on OES - NetWare, notice how the directives from mod_edir can be used to limit access to a given directory only to users defined in eDirectory in the container o=oes or below.
LoadModule ldap_module <IfModule util_ldap.c> LoadModule auth_ldap_module LoadModule edir_module Alias /secure /srv/www/htdocs/Corpdata <Directory secure> Order deny,allow Allow from all AuthType Basic AuthName LDAP_Protected_Site AuthLDAPURL ldap://oes-netware.oes.com/o=oes require edir-user </Directory></IfModule>
Managing the Tomcat Servlet EngineThe Tomcat Servlet Engine is one of the most important services running on top of the Apache server. Tomcat is needed to access and administer many of the Java-based components running on OES. Without Tomcat, it’s impossible to access or manage typical OES services like iFolder or iPrint, for example.
Tomcat Servlet Container OverviewTomcat is a servlet container. This is a runtime shell that runs on top of a web server and manages and invokes servlets when they are requested by any kind of client. As such, the Tomcat servlet container is, in fact, a small application server. It’s also a part of Jakarta, an open-source project in which different people work together to make a Java-based application server. You can find more information about this project at jakarta.apache.org/tomcat/index.html.
On your server, two different instances of Tomcat are configured: an administration server and a public server. Both use the same configuration, which is in the default Tomcat directory: sys:tomcat on OES - NetWare or /srv/www/tomcat on OES - Linux. The administration instance of the Tomcat servlet container is always installed on OES - NetWare, if OES services are used on OES - Linux, it’s installed by default as well. The public instance is only installed if you choose to install it during installation. Both instances are started from the same script: autoexec.ncf on OES - NetWare and /etc/init.d/tomcat on OES - Linux. In the following listing, you can see how both instances are started from autoexec.ncf on OES - NetWare:
#tc4admin beginSEARCH ADD SYS:/tomcat/4/bintcadmup.ncf# tc4admin end# tomcat 4 beginsys:/tomcat/4/bin/tomcat4.ncf# tomcat 4 end

620 C H A P T E R 1 6 ■ T H E A P A C H E W E B S E R V E R
The Administrative instance of the Tomcat Servlet Container is used by OES to host and manage typical Novell services such as iManager, Apache Manager, and the OES welcome screen. Requests to these specific products are passed through the Apache module mod_jk to the Tomcat server. Tomcat processes the request and forms a response in HTTP which is passed back to the Apache server.
The public instance of Tomcat functions as your own application server, which can be used to work with servlet applications. Tomcat, however, is developed only to work with very basic Java servlets and JSPs. If you don’t need to implement a complete application server, it’s a good choice. If, however, you need Java API support beyond servlets and other advanced Java features, the Novell exteNd Application Server may be a better choice. To manage the extend application server properly, however, you need experience with Java programming as well.
Tomcat ConfigurationTwo web-based tools can be used to manage Tomcat:
• The Tomcat Administration Tool, also known as Tomcat Admin
• Tomcat Web Application Manager, also known as Tomcat Manager
The difference between the two is that the Tomcat Manager is used to manage the Tomcat content: the servlets and applications offered by the Tomcat server. The Tomcat Administration Tool is used to manage the Tomcat environment itself. Both tools run perfectly on OES - NetWare and OES - Linux.
Using the Tomcat Administration Tool
You can start the Tomcat Web Server Administration tool at the URL https://yourserver/tomcat/admin/index.jsp (see Figure 16-9). After logging in with your eDirectory credentials, you’ll be able to manage all aspects of the Tomcat environment. You can find extensive docu-mentation on this tool at Sun’s web site: http://java.sun.com/webservices/docs/1.0/tutorial/doc/Admintool.html. I recommend using this excellent administration tool if you need to change anything on your Tomcat environment. It can save you the hassle of manually editing the XML configuration files used by the Tomcat server. However, you’ll find that it’s not really necessary to work with this tool if you’re only running Tomcat to provide access to the OES tools using it. The default configuration is fine since it’s designed for this purpose. In this regard, only the following two parameters are important to a network administrator:
• On the Tomcat Server page, you can enter the default port number for the Tomcat server. Here, you can also specify the debug level. By default, debug level 0 is used for a minimum amount of debugging information. You can set this as high as 9 for the maximum amount of debugging information.
• Select Tomcat Server ➤ Service to specify the default hostname that Tomcat uses. This is important on a server that can be reached on multiple names to specify the name of the host that Tomcat should bind to.

C H A P T E R 1 6 ■ T H E A P A C H E W E B S E R V E R 621
Figure 16-9. You can manage all aspects of thse Tomcat environment from the Tomcat Administration Tool.
Using the Tomcat Web Application Manager
To start the Tomcat Web Application Manager, you can access it from your browser at the URL https://yourserver/tomcat/manager/html (see Figure 16-10). After logging in to the application, the Tomcat Manager allows you to add and remove Java components that should be made accessible by the Tomcat servlet container. This tool is really useful to manage applications currently running on your server. Imagine, for example, a situation where eGuide is not performing well and you consider it necessary to restart just eGuide. Without this tool, the only way to do so is by restarting the entire Tomcat servlet container. With Tomcat Manager, you can select the service you want to restart and click Reload from the web-based interface. The Tomcat Web Application Manager offers other useful functions as well, like the following:
• It allows you to see if an application is running or not.
• It allows you to monitor the current number of sessions that are open to a given application.
• It allows you to install new applications that use the Tomcat servlet container. All you need is a WAR file that’s provided with the application to install it.
• By clicking the links for the applications that are currently active, you can get easy access to all the applications.

622 C H A P T E R 1 6 ■ T H E A P A C H E W E B S E R V E R
Figure 16-10. The Tomcat Manager provides some management possibilities for applications that use Tomcat.
■Note If for any reason you have problems accessing the Tomcat server, first make sure that it’s started. On OES - NetWare, type tomcat4 at the console to start the server and tcadmdn to stop it. On OES - Linux, use /etc/init.d/tomcat start to start the server and /etc/init.d/tomcat stop to stop it. After a default instal-lation, Tomcat will be started automatically on OES - NetWare. You might be required to use the runlevel editor to start it automatically on OES - Linux as well. Use /etc/init.d/tomcat status to check the status of your Tomcat server after system initialization. If it appears that the Tomcat server has not started automatically, use chkconfig tomcat 235 to add it to all important runlevels on your server.

C H A P T E R 1 6 ■ T H E A P A C H E W E B S E R V E R 623
Searching the Web with QuickFinderThe QuickFinder server (formerly known as NetWare Web Search) allows you to create your own web search server—very useful if you’re hosting a large web site. QuickFinder can be used to find information on public or private web sites and any attached file systems or servers. It works on the basis of indexes. These indexes can be made of HTML, XML, PDF, Word, and OpenOffice.org documents, and you can manage them from the QuickFinder’s web-based administration module.
QuickFinder BenefitsGeneric search engines such as Google are able to locate some of the information on your site, but a much better result can be reached if you maintain your own web search server.
The use of the QuickFinder server offers many beneficial features, some of which are mentioned next:
• Hosting search services for more than one organization
• Defining as many indexes as you like to increase search performance
• Working with access restrictions so that only authorized people can work with sensitive documents
• Adjusting the relevance of documents to ensure a user gets the best possible results
• Generating reports of all search activity so you can learn what your customers are looking for and optimize the web search server as a result
• Looking up information within your own organization
• Customizing the look and feel of the QuickFinder server
QuickFinder’s ArchitectureThe QuickFinder server is composed of four major components:
• Virtual search servers
• Indexes
• Templates
• Configuration settings
To manage the QuickFinder server efficiently, you need to know how these four compo-nents are deployed.
Virtual Search Servers
A virtual search server is a collection of one or more indexes and their related configuration files that allows you to search for information within a specific context. It’s common that several virtual search servers are hosted on a dedicated QuickFinder server. You can install, for example, a virtual search server for the Sales department of your company and another one for

624 C H A P T E R 1 6 ■ T H E A P A C H E W E B S E R V E R
its IT support branch. There’s no limitation to the number of virtual search servers hosted on a QuickFinder server.
Every virtual search server works with its own environment, which consists of a name, a set of indexes, scheduled indexing events, log files, configuration settings, reports, and an administration interface. Although all virtual search servers work with their own environment, it’s possible to share resources between virtual search servers. For instance, you can create an index that’s used by more than one virtual search server. If you want to do that, you must create a duplicate index on each of the virtual search servers that points to the same shared index directory.
Indexes
The index is more or less the key component that QuickFinder works with. It’s a file generated by the QuickFinder server that contains keywords and matching URLs. Every virtual search server has at least one index. Two different types of indexes can be created: the file system index and the crawled index. If you want to index the contents of a file server, you need a file system index. When you want to index the contents of a web server, a crawled index is needed.
Templates
The QuickFinder server uses templates as interfaces to communicate with users. A template generates a search form, prints results, and allows users to provide feedback. Essentially, it’s an HTML document that contains one or more QuickFinder server variables. With these variables, a dynamic result can be created. It’s possible to provide each virtual search server with its own templates, but it’s also possible to share templates across the network. Some default templates are included with QuickFinder.
Configuration Settings
Finally, each QuickFinder server has its own set of configuration settings. These settings define how the QuickFinder server will perform and what virtual servers, indexes, and templates are used by this server. Configuration settings exist that apply to all virtual servers defined on your QuickFinder server—you configure them on the QuickFinder server from the Global Settings page of the QuickFinder Server Manager. You’ll read more about configuring QuickFinder in the following sections.
Managing QuickFinderTo manage all virtual servers and their indexes on your QuickFinder server, the QuickFinder Server Manager is used. It can create default settings that are applied to all the virtual servers you later generate. In order to use QuickFinder Server Manager, start the browser-based inter-face, and log in as a user that has enough rights to access the QuickFinder directory: /var/lib/qfsearch on Linux and /qfsearch on NetWare. If you’re using QuickFinder server on OES - Linux, use LUM so you can log in as an eDirectory user with enough rights to manage files in the directory /var/lib/qfsearch on the local Linux file system. (Chapter 9 has more on the configuration of LUM.) If LUM is not configured, log in to the QuickFinder Server Manager as a local Linux user with enough rights. To start the QuickFinder Server Manager, browse to http://yourserver/qfsearch/admin to get to the screen shown in Figure 16-11.

C H A P T E R 1 6 ■ T H E A P A C H E W E B S E R V E R 625
■Tip In most situations, eDirectory rights are needed to administer the different components of OES. With QuickFinder, you just need rights to the local file system. This means that in many cases you must log in as root (not as your eDirectory admin user) to be able to administer the QuickFinder server. All you’re doing as a QuickFinder administrator is creating an index file.
Figure 16-11. The QuickFinder server has its own management interface.
Immediately after installation, users can start using the QuickFinder server. Some of your server’s content is automatically indexed and appears on the default search form. If you want to create your own indexes and virtual search servers, it’s best to read the online documenta-tion of the QuickFinder server at http://www.novell.com/documentation.
Without even configuring anything, it’s possible to get a quick impression of how the QuickFinder server can be used:
1. Access the main web page of your OES server at http://yourserver:2200.
2. From End User Software in the left column on your screen, select QuickFinder 4.0. This opens a default QuickFinder page where you can find specific items on your server (as shown in Figure 16-12).

626 C H A P T E R 1 6 ■ T H E A P A C H E W E B S E R V E R
Figure 16-12. Without any configuration, you can start using the QuickFinder server immediately after installation.
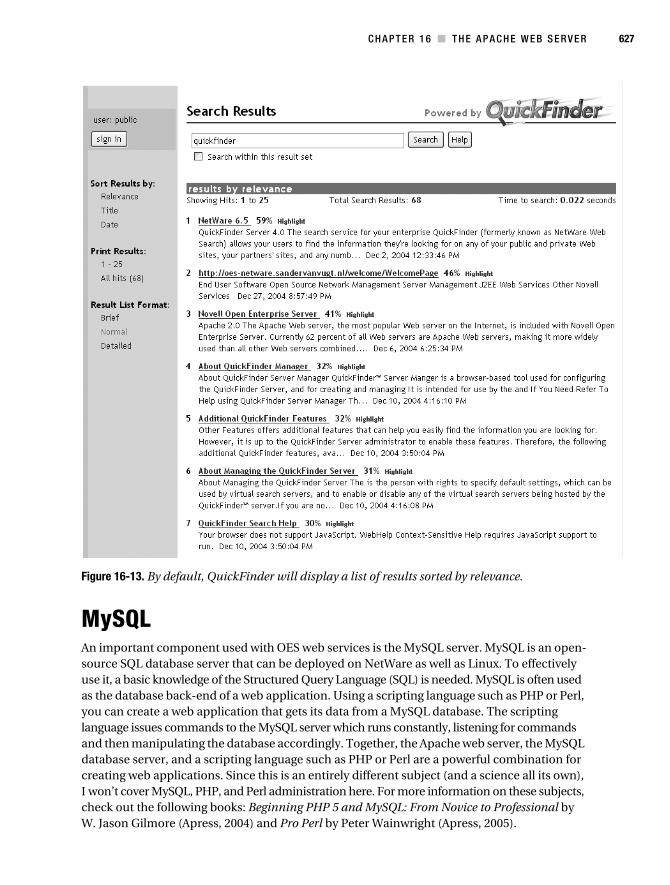
3. In the search bar, enter the word you want to search for (QuickFinder, for example) and click Search.
4. A list of all search hits will be displayed (see Figure 16-13 for an example). The most rel-evant hits displayed at the top of the list. It’s possible, however, to modify the way the results window is displayed. You can search results by Relevance (default), Title, or Date.
C H A P T E R 1 6 ■ T H E A P A C H E W E B S E R V E R 627
Figure 16-13. By default, QuickFinder will display a list of results sorted by relevance.
MySQLAn important component used with OES web services is the MySQL server. MySQL is an open-source SQL database server that can be deployed on NetWare as well as Linux. To effectively use it, a basic knowledge of the Structured Query Language (SQL) is needed. MySQL is often used as the database back-end of a web application. Using a scripting language such as PHP or Perl, you can create a web application that gets its data from a MySQL database. The scripting language issues commands to the MySQL server which runs constantly, listening for commands and then manipulating the database accordingly. Together, the Apache web server, the MySQL database server, and a scripting language such as PHP or Perl are a powerful combination for creating web applications. Since this is an entirely different subject (and a science all its own), I won’t cover MySQL, PHP, and Perl administration here. For more information on these subjects, check out the following books: Beginning PHP 5 and MySQL: From Novice to Professional by W. Jason Gilmore (Apress, 2004) and Pro Perl by Peter Wainwright (Apress, 2005).
628 C H A P T E R 1 6 ■ T H E A P A C H E W E B S E R V E R
SummaryThere are two sides to the Web components of Open Enterprise Server. First, the combination of the Apache web server and the Tomcat servlet engine is essential to run most web-based administration tools and products provided by Open Enterprise Server. For this reason, you’ll find that both Apache and Tomcat are part of any installation of OES. Second, OES can be used as a web server as well. Although this is not the primary purpose, some rather advanced possi-bilities are available in OES, of which the most important is the combination of Apache, MySQL, and PHP/Perl, which can be used to create powerful web applications.
In this chapter, you learned how Apache and Tomcat can be managed in an OES environ-ment. You also got an introduction to the QuickFinder Web Search Server and the MySQL database server.
In the next chapter you’ll read about an end-user product that runs on top of the OES web infrastructure: Virtual Office.