the american revolution in the...
TRANSCRIPT

S&T 304 | MAY – JUN 2017 R1
NOTE: To remove the rules from this magazine, carefully and slowly peel them from the subscription card they are attached to by peeling from the top and then the bottom meeting in the middle. The card is not intended to be removed.
These rules use the following color system: Red for critical points such as errata and exceptions, Blue for examples of play. Check for E-rules updates to this game @ www.strategyandtacticsmagazine.com.
1.0 INTRODUCTIONThe American Revolution in the South is a single map game that simulates historic campaigns in North and South Carolina during the American Revolutionary War (from 1776 to 1781). The game system emphasizes the importance of individual leaders, and especially historical leaders from the time period, and highlights the relative skills, circumstances, and luck that could vary considerably, often within short periods of time. Throughout the game, leader skills will be tested as their units maneuver and fight. Every leader has the capacity to prove himself as either inept, capable, or in some cases exceptional during various incidents throughout the game.
This game includes the map and charts necessary for play as well as a single counter sheet of 280 units and markers. All game mechanisms use a 10-sided or 6-sided die, which players must provide.
1.1 Rule PrecedenceInasmuch as these rules are a modified version of the foregoing Ticonderoga rules (S&T #277), the improved combat system (see 11.0 to 14.2) in these rules take precedence over those in the Ticonderoga rules.
2.0 GAME SCALESEach hex represents approximately eight miles. Individual units represent from 50 to 1500 men, and leader chits each represent a single commander, sometimes a famous, historical figure. An example of each type of unit is featured below:
CONTeNTs 1.0 Introduction 2.0 Game Scales 3.0 Sequence of Play 4.0 Weather, Seasons and Time of Day 5.0 Council of War and Couriers 6.0 Stacking 7.0 Movement 8.0 Night and Becoming Lost 9.0 Disease and Attrition 10.0 Supply Wagons 11.0 Attacking 12.0 Retreating 13.0 Advance After Combat 14.0 Surprise Attack 15.0 Bombardment 16.0 Scenarios
CReDITsDesign: Eric R. Harvey & William NesterDevelopment: Eric R. HarveyFinal Rules Editing: Eric R. Harvey & Doug JohnsonPlaytesters: Eric R. Harvey, David Moseley, Joseph Pilkus, Brian Mosley, E.R. Wytrykus, John Teixeira Game Maps: Joseph YoustCounters: Trevor HolmanProduction: Lise´ Patterson, Callie Cummins & Chris CumminsSpecial Thanks: David Moseley
© 2017 Decision GamesBakersfield, CA.Made & Printed in the USA.
The American Revolution in the South
The Battles for North & South Carolina, 1776-81
ST304_American Revolution in the South_Rules[EHv9]-v5.indd 1 2/9/17 9:21 AM

R2 S&T 304 | MAY – JUN 2017
The American Revolution in the South
Regular Infantry (Front, full strength)
Nationality
Unit Symbol
Strength Number
Movement Number
Unit ID
Elite Unit Modifier Regular Infantry
(Back, reduced)
Note: Nationalities are denoted by flags representing the side or country a unit is a part of. French and American units represent one side, while all units marked with a “Union Jack” are either British or Colonial loyalist (Tory) units.
Note: There are multiple counters with the same unit name. They are for different scenarios (see 16.0 Scenarios for instructions).
Militia/Provincial Infantry
Note: The designation “Regular” or “Militia/Provincial” have no effect on game play.
Dragoons
Artillery (Front, full strength)
TypeBombardment
Modifier
Artillery (Back, reduced)
Movement Number
Note: Artillery may be referred to as “cannon” in the body of the rules.
Leader (Front)
NameCapable
Seniority Number
IneptLeader (Back)
Initiative Number
Exceptional
Note: Some Leader counters state “Leader” only, they are generic lower level leaders.
Transport (Front)
Type
Transport (Back)
Sea Movement (unlimited)
BombardmentModifier
Naval Modifier
Warship (Front)
Type
Warship (Back)
Sea Movement (unlimited)
BombardmentModifier
Naval Modifier
Note: The modifiers on the back of Warship and Transport counters are not used in the enclosed set of scenarios.
Senior Commander Stack Weather
MARKERS
Night Turn (front) Day Turn (back)
American Game Turn (front)
British Game Turn (back)
Patrol (front) Ambush (back)
Inept
Fort (front) Fort (back)
Fort Modifier
Note: Some markers are provided for use by the players as they desire, they are not required for play.
ST304_American Revolution in the South_Rules[EHv9]-v5.indd 2 2/9/17 9:21 AM

S&T 304 | MAY – JUN 2017 R3
3.0 seQUeNCe OF PLAY
Each scenario is comprised of a number of specific daily turns known as Date Turns. Each Date Turn comprises two Activation Turns (Day and Night). Weather and Council of War is conducted at the beginning of each Date Turn and players activate their units to move and/or fight during each Activation Turn of each Date Turn.
Note: The Date Turn Record Track is the large track on the map with boxes labeled 1 through 60. The number of Date Turns for each individual scenario is listed in the scenario set-up (see 16.0).
Each Activation Turn involves a first player and a second player activation in which that player conducts movement and/or combat with his units. The first and second player is determined by the current scenario and indicated by the scenario chart (see 16.0).
Date Turn:
Weather Phase (see 4.0)Council of War Phase (see 5.0)Rebel Desertion Check Phase (on-line optional rules)
Activation Turn (Day):
First Player Activation:Movement Phase (see 7.0)Combat Phase (see 11.0)
Second Player Activation:Movement Phase (see 7.0)Combat Phase (see 11.0)
Activation Turn (Night):
First Player Activation:Movement Phase (see 7.0)Combat Phase (see 11.0)
Second Player Activation:Movement Phase (see 7.0)Combat Phase (see 11.0)
4.0 WeATHeR, seAsONs, AND TIMe OF DAYPlayers must determine the current weather at the beginning of each scenario by first determining the current season. Consult the scenario’s title to find the present date and season and then consult the Scenario Date Table on the map.
Next consult the Season Chart on the map and roll one 10-sided die to determine the current weather for the scenario being played, tabulated as follows:
Errata: The "Die Roll: 0" column on the map chart has Snow and Rain transposed.
After the current weather has been determined, the following effects must be implemented for the current Date Turn. Weather is then rolled anew at the beginning of each Date Turn, during the Weather Phase, and applied for that turn only.
Note: Weather markers are provided as a mnemonic. After determining the weather for the current Date Turn, place the appropriate weather marker on the Game Turn Track as a reminder of the current weather.
Rain = All units’ movement is reduced by one movement point unless moving entirely along a road. Fleeing (see 13.1) is not possible.
Note: During Rainstorm turns, a +2 die roll penalty applies to all "lost" die roll determinations, additionally ships may not move.
Rainstorm (printed "Storm" on the back of the Rain counter) = one hex maximum movement, regardless of a unit’s movement number and type, unless moving entirely along a road (in which case, two hexes are the maximum movement). Fleeing is not possible.
Note: During Rainstorm turns, a +2 die roll penalty applies to all "lost" die roll determinations, additionally ships may not move.
Snow = All units’ movement is reduced by two movement points, unless moving entirely along a road (in which case, all unit’s movement is reduced by one during snow). Fleeing is not possible.
Note: During Snow game turns a +2 die roll penalty applies to all "lost" die roll determinations, additionally ships and cannon may not move.
5.0 COUNCIL OF WAR AND COURIeRsThe commanding officer of each army in the era often made decisions by convening a council of war among his officers and allied commanders. Thereafter, any changes to the plan required couriers to reach subordinate leaders, oftentimes through inhospitable and hostile terrain. As such, during the Council of War Phase of each Date Turn, both players must demonstrate a path of connected land hexes* from each and every leader present in the game to the senior-most leader present on the map. This path of hexes may not enter any enemy unit’s or fortification’s hex.
*Such a path may not cross any water depiction, including any river depictions coursing along a hexside, unless crossed by a bridge symbol.
5.1 Leader Ability Effects if no Courier Path:If any particular leader cannot demonstrate a path of unobstructed hexes to his own senior-most leader during the Council of War Phase, that subordinate leader is then immediately subject to a leader ability die roll to determine that leader’s ability (see the die roll range printed on the back of that leader chit), regardless of any previous ability die roll results for that leader. The top-most row indicates an Inept leader, the middle row indicates a Capable leader, and the bottom-most row indicates an Exceptional leader, explained as follows:
Exceptional Leader: If that leader’s current die roll is “Exceptional” that leader and any game pieces it is stacked with suffers no consequences as a result of being isolated; that leader and his units may be activated normally without restriction.
Capable Leader: If that leader’s die roll is “Capable” any game pieces stacked with that leader may not be activated during the current Date Turn (that leader and any game pieces it is stacked with may not move or conduct any attack).
ST304_American Revolution in the South_Rules[EHv9]-v5.indd 3 2/9/17 9:21 AM

R4 S&T 304 | MAY – JUN 2017
The American Revolution in the South
Inept Leader: If that leader’s die roll is “Inept” one game piece stacked with that leader (of the owning player’s choice) becomes reduced (flipped to its back side), or eliminated if already a reduced unit or a cannon. If that leader is not stacked with any game piece, that leader must be eliminated instead.
Note: If there is more than one senior-most leader present in a hex that is isolated, the owning player may choose any one leader during each Council of War Phase to act as the senior-most leader for that Date Turn.
6.0 sTACKINGStacking is limited to fifteen (15) friendly strength points (including cannons) that may stack together in any land hex on the map, disregarding units that are also aboard a transport or warship in the same hex at that same time.
Leader game pieces are ignored during stacking and are never exclusively assigned to any particular unit; leaders may enter hexes containing other friendly units, and even command such units without restriction (except for seniority limitations).
Opposing game pieces may never stack together, of course.
Ships and their cargo are never subject to any stacking limits.
6.1 Set-up Stacking ExemptionStacking is ignored during any scenario’s initial set-up, although no hex may ever remain over-stacked after that side’s first Movement Phase.
6.2 Fog of WarA player may only examine his opponent's stack(s) of units (notwithstanding the topmost unit, which he can always see) whenever any of his own game pieces (of any type) are adjacent to the stack(s). However, any game action that occurs within a stack (such as the utilization of a leader) requires the player to reveal any game piece associated with that action, whether adjacent or not.
7.0 MOVeMeNTEach scenario indicates which side moves first during the first game turn (during each Activation Turn of every Date Turn). The first player thus completes the movement of any of his own units and then resolves any attacks that they initiate during the ensuing Combat Phase of that turn, followed by the second player, thus completing an Activation Turn.
During each player’s Movement Phase, he may move as many or as few of his own game pieces as he desires (unless unreachable by courier; see 5.1), but each game piece’s movement must be completed before another game piece begins movement during that Movement Phase.
The active player may move his game pieces in any direction of linked hexes that he chooses, but an amount of movement points (MPs) must be paid from each game piece’s movement number (the number printed within the yellow hexagon icon) as it enters each hex. Each type of hex requires a unique MP cost, as depicted on the map Terrain Symbols (lower left corner).
Errata: The terrain symbol for "Road" incorrectly shows 1/2 MP. It should read "1 MP
Also, some hexsides are printed with a river depiction which costs +1 additional movement points (MPs) to cross even before entering into the hex on the other side of that river (although this does not apply if that river is spanned by a “bridge” symbol). Example: If the attacking player wants to move his game piece across a river hexside into a clear hex, that unit must pay a total of 2 MPs (1 MP +1 MP). However, some river hexsides have a road symbol and a “bridge” printed over the river depiction; these river bridge hexsides do not cost any extra movement points to cross.
Furthermore, if any game piece is moved from a hex with a road symbol directly into an adjacent hex with a road symbol (which is also connected across the same hexside), the cost is always one movement point regardless of the other terrain type in either of the two connected road hexes. This bonus does not apply if merely entering a road hex from a non-road hex, however.
Note: Roads are beneficial when moving during rain, rainstorms, or snow (see 4.0).
If any game piece lacks enough MPs to be moved into a hex or across a hexside, it may not enter that hex, although any game piece may always be moved into at least one hex during its own Movement Phase (regardless of the MP cost in that hex) if it has not moved during that activation.
Exception: Cannons cannot move during Snow weather turns. No game piece may ever move off of the map, into any non-hex area of the map, into any enemy game piece’s hex, or into any enemy fort hex (unless unoccupied).
Each game piece must end its movement for the rest of the current Movement Phase when it lacks enough leftover MPs to continue moving. Of course, a player may choose to end any game piece’s movement before then, but unused movement is not saved from one turn to the next. Also, a game piece’s unused movement may not be transferred to any other game piece.
Note: Advance after combat, retreat and fleeing are never considered movement and thus do not ever cost any MPs.
7.1 Forest MovementForest hexes represent particularly thick areas of trees (as differentiated from wooded areas that are not actually depicted on the map). As such, each “Forest” type terrain hex requires 2 MPs to enter, except when moving via a forest road hex (from a connected forest road hex).
Note: The forest movement cost applies even in hexes that are only partly printed with a forest depiction. A moving unit may not "skirt" a forest depiction within a hex it enters to avoid the forest MP cost.
7.2 Zones of ControlThere are no so-called Zones of Control in this game. 7.3 Sea MovementA unit may only ever enter a sea hex via a transport chit or a warship chit.
ST304_American Revolution in the South_Rules[EHv9]-v5.indd 4 2/9/17 9:21 AM

S&T 304 | MAY – JUN 2017 R5
Note: Sea hexes are distinguished from river hexes as dark blue hexes.
Each transport chit in a coastal hex (but never a river hex) can embark any quantity of friendly units that are present in that hex provided that the total strength number of those units is no more than “20.” Each warship chit in a coastal hex (but never a river hex) can embark any quantity of friendly units that are present in that hex provided that the total strength number of those units is no more than “5.” The capacity of ships in the same hex is cumulative, such that multiple ships in a hex can have their embarkation numbers combined.
Example: Two warships can embark two units, even if one is a strength number of “7,” and the other is a strength number of “3,” or any combination thereof if not exceeding the combined capacity of two warships (10), not simply five strength points per warship.
Note: Embarkation aboard any ship requires the embarking unit to expend one additional movement point. Disembarkation requires no additional movement, however.
A transport (but never any warship) can embark any quantity of cannon and/or supply chits (in addition to the normal embarkation capacity), but never any other ship.
Any quantity of leaders can be embarked aboard any ship with any other friendly units that are embarking aboard at the same time. There is no restriction as to the quantity of leaders that may be embarked aboard any ship, although leaders have no ability while so embarked.
In the case of a lone leader, it may also embark aboard a ship normally, but it must expend one additional MP to do so (unlike when it is simply stacked with a friendly unit that is embarking; see 7.6).
When embarked, a ship may be moved into any hex featuring a sea depiction (ships have unlimited movement, as signified by the printed “U” number on each ship chit). In the case of coastal movement, the ship and any embarked chits are not considered to be occupying the land portion of that hex, but are considered to be occupying the water portion of that hex where the sea artwork is depicted (which is printed as a darker blue than rivers, where ships may never travel). Any such embarked units may be disembarked per the normal rules into a coastal hex only.
Any ship may be moved individually, without embarking any unit, if the owning player prefers, in which case it moves normally. Obviously a ship cannot be moved individually over land.
During their own Movement Phase, ships possess an unlimited movement, and, moreover, their movement is never reduced or increased by any map considerations while they are moving (embarking units do not cause any ship to expend additional MPs). However, ships cannot ever be moved during any Rainstorm or snow weather (see 7.5).
A ship may end its movement in any sea hex with a land depiction (a coastal hex) and then be considered anchored there, the only purpose being the embarkation and/or the disembarkation of any friendly units onto/from that ship. It is permitted for a ship to embark and disembark at the same time, if not in excess of its capacity when doing so (which
often requires a ship to disembark first before it embarks any other units).
No unit may ever be disembarked into a hex that is already occupied by an enemy unit (except lone enemy Leaders or Supply chits, which are simply eliminated in such a case, or an unoccupied enemy fort which is simply captured in that case), nor into any hex that would become over-stacked because of that disembarkation. A ship can never advance after combat with any attacking unit. In such instances, a ship may be left behind in its present hex while its transported unit advances after combat normally, if the owning player desires, in which case that ship will remain there until the next Movement Phase.
7.4 Capturing ShipsNeither transports nor warships may ever be captured.
7.5 Rainstorm and SnowEven if a ship is already present in a coastal hex, no unit may be embarked or disembarked during a Rainstorm or Snow.
7.6 Leader MovementNo leader is printed with a movement number, but may simply move with any unit it is stacked with. However, a leader may move without any unit, but to do so the owning player must roll one 10-sided die at the beginning of that leader’s intended movement (before that leader begins to move), if that die roll is equal to or less than that leader’s initiative number, that leader is then assumed to possess a movement number (for that Movement Phase only) equal to that same die roll. After the die is rolled, the owning player may (but is not required to) roll another die roll to determine that leader’s ability (see the die roll range printed on the back of that leader chit), regardless of any previous ability die roll results for that leader.
Design Note: The wide variance of die rolls can represent anything from leaders with horses (vis-à-vis leaders on foot) to leaders who are simply delayed or somehow encumbered, etc.
The top-most row indicates an Inept leader, the middle row indicates a Capable leader, and the bottom-most row indicates an Exceptional leader. Use that ability result to add to or subtract from the leader’s movement, tabulated as follows:
Inept -2 Movement Points
Capable +1 Movement Point
Exceptional +2 Movement Points
Example: The British player intends to move Clinton without a unit and so he must first roll one die: He rolls a “2,” which is below Clinton’s initiative number (which is “7”), thereby allowing Clinton to move alone as if he possessed two movement points during that Movement Phase. However, the British player would like Clinton to have more movement, and so he chooses to roll for Clinton’s ability to possibly continue moving. Unfortunately for the British player, the die roll for Clinton’s ability is “0”, meaning that he is an “Inept” leader (per the back of the Clinton chit) for purposes of leader movement during that Movement Phase (only).
ST304_American Revolution in the South_Rules[EHv9]-v5.indd 5 2/9/17 9:22 AM

R6 S&T 304 | MAY – JUN 2017
The American Revolution in the South
As such, the Clinton leader must suffer a -2 movement point loss, per the chart above. In this case, therefore, Clinton cannot be moved alone during that movement phase (although Clinton may still be moved with a friendly unit normally, however).
If any lone leader fails his movement roll, he may not move without a unit during that Movement Phase (that leader is also not entitled to an ability roll to move, since he failed its movement roll in the first place). However, that leader may still move with any friendly unit he is stacked with normally (i.e., even after failing his movement roll).
A leader moving with a unit moves exactly as that unit does and per the normal terrain movement costs in all respects.
8.0 NIGHT AND BeCOMING LOsTAny game piece that is stacked with a leader may possibly move during a “Night” Activation Turn (unless aboard a ship), but may become lost as a result, unless moving into a hex with a road symbol from an adjacent hex with a connected road symbol. A game piece that is not stacked with a leader may never move at night.
To move at night, the owning player must roll one 10-sided die at the beginning of that game piece’s intended movement (before that game piece begins to move) to determine its leader’s initiative (see the number printed next to an arrow symbol on the front of that leader chit). If there is more than one leader in the same hex, the owning player must choose the senior-most leader chit (the leader with the lowest Seniority Number). If multiple leaders in the same hex share the same seniority, the owning player may choose which leader to use to attempt a night move.
If the die roll is equal to or less than that leader’s initiative number (the bottom number), that leader and any other game pieces stacked with him may move during that night per the normal movement rules. However, if the roll is greater than that leader’s initiative number, that leader and all other game pieces stacked with him (including any other leaders) are considered to be lost, and are subject to a “lost” placement roll, explained as follows:
Note: A leader’s abilities have no effect upon night movement or becoming lost.
When a game piece (or stack) is lost, that game piece is moved automatically to another random hex, disregarding terrain and movement costs per the Lost Diagram shown on the map. On a roll of 1-4, the game piece remains in its present hex as if it has not moved; on any other roll, place that game piece in the hex indicated using the compass arrow to determine the north hexside. Units that are printed with a “-1” elite modifier automatically apply their -1 die roll modifier to a "lost" die roll. In any case, all units in a hex are lost together, per one die roll, and are randomly placed into the same hex.
Note: If the current weather is Rain, a +1 die roll penalty applies to any “lost” die roll. If the current weather is Rainstorm or Snow, a +2 die roll penalty applies to any “lost” die roll.
If any game piece becomes randomly placed in a hex that is occupied by any enemy unit, any all-water sea hex, or off of the map, that game piece is eliminated (they’re never heard from again).
A game piece that becomes lost in an all-water sea hex where a friendly ship is already present may be considered to be occupying that vessel, if not already occupied by other units to maximum capacity. A ship using water movement does not ever become lost, however.
If a game piece becomes lost, place a coin or die or some other convenient marker to indicate that game piece is lost and use that marker as a lost chit. It will remain lost during each successive Activation Turn thereafter until the owning player successfully rolls equal to or less than the present senior-most leader’s initiative number during the Movement Phase of that Activation Turn. The owning player may roll once per each Activation Turn (during his own Movement Phase), and, if successful, the lost unit or stack may then move again normally immediately (they have found their way).
If that die roll is higher than the present senior-most leader’s initiative number, that unit or stack therefore becomes lost again, and is subject to another random placement die roll, per the diagram. As such, it remains lost during each successive Activation Turn thereafter until the owning player successfully rolls equal to or less than the present senior-most leader’s initiative number as explained above.
If there is no leader present after a unit has become lost, all lost units in that hex are eliminated instead (victims of a cryptid, perhaps).
8.1 Sound of GunsDuring his own Movement Phase, a player may attempt to remove a “Lost” designation from the senior-most leader before rolling an initiative roll per 8.0. To do so, the owning player may roll (but is not required to) one 10-sided die to determine that leader’s ability (see the die roll range printed on the back of that leader chit), regardless of any previous ability die roll results for that leader. Next, consult that leader’s ability die roll range printed on the back of that leader chit: The top-most row indicates an Inept leader, the middle row indicates a Capable leader, and the bottom-most row indicates an Exceptional leader.
If that leader’s die roll is “Exceptional,” the “Lost“ designation in that hex is immediately removed, and that leader and his unit(s) in that hex are no longer considered lost (and may move immediately and normally); no die roll per 8.0 is necessary. However, if that leader’s die roll is “Inept,” that leader and his unit(s) in that hex are removed from the map, never to be heard from again. If that leader’s die roll is “Capable,” there is no additional effect and that leader may then simply roll an initiative die roll per 8.0 normally.
9.0 DIseAse AND ATTRITIONNon-combat losses from desertion and disease, known as attrition, far exceeded combat losses during the era. Armies often wasted away without firing a shot, especially in the malarial lowlands of the southern states.
To represent the effects of overexerting troops in the field, any non-ship unit (except cannons, wagons, and leaders) that moves or engages in combat during any Night Activation Turn may become reduced (flipped to its back side) or eliminated (if already reduced). For each unit that moves and/or conducts an attack (but not when merely defending against an attack or when retreating), the owning player must roll one 10-sided die. If that die roll is less than that unit’s printed strength number, it suffers
ST304_American Revolution in the South_Rules[EHv9]-v5.indd 6 2/9/17 9:22 AM

S&T 304 | MAY – JUN 2017 R7
an immediate reduction because of exhaustion, desertion, disease, or whatever.
Note: An actual die roll of “0” is always no effect, regardless of the unit’s printed strength number.
Any leader who is in the same hex may possibly nullify the attrition of one unit in his own hex. To do so, the owning player must roll one 10-sided die. If that die roll is equal to or less than that leader’s initiative rating, then no attrition occurs to that unit after all.
A unit is only eligible to benefit from one leader’s initiative die roll (although it may be any leader of the owning player’s choice, if more than one leader is present in that same hex). Likewise, a leader may only ever nullify the attrition of one unit (in his own present hex) per game turn.
10.0 sUPPLY WAGONsThere are no lines of supply or such in the game, but supply wagons can be used during a turn to rebuild any reduced unit in its same hex, even while aboard a ship, or even a unit that began the game reduced. However, a supply wagon may never be used to resurrect a unit that has been eliminated.
Note: Supply wagons have no inherent ability to move, but rather are only ever moved with a friendly ship, unit, or stack (up to the limit of one unit’s maximum movement during its Movement Phase).
To do so, during his own Movement Phase, a player must simply eliminate one of his own supply wagons in a hex where a friendly unit is currently reduced (even if that unit had begun the current scenario already reduced). That reduced unit is therefore immediately flipped back (rebuilt) to its front side, although that unit is not eligible to move or attack during that same activation.
Exception: A supply wagon may never be used to rebuild any unit during Rain, Rainstorm, or Snow weather conditions.
Once a supply wagon has been eliminated (and a reduced unit has been rebuilt), that supply wagon is removed from play permanently. A supply wagon is never eligible to be rebuilt or brought back onto the map once it has been eliminated.
Supply wagons can never be attacked, nor do they ever defend whenever stacked with any unit. However, supply wagons are permitted to advance after combat and pursue (with a friendly, eligible unit) and may retreat with any retreating unit.
If any lone supply wagon’s hex is ever occupied by any enemy unit (except a lone leader), that supply wagon then becomes immediately owned by the enemy side and may be used exactly as if it was a friendly supply wagon.
11.0 ATTACKINGWhenever a unit is adjacent to any enemy-occupied hex(es), it may conduct one attack against any one enemy-occupied hex during its own Activation Turn. If a friendly cannon and/or warship is stacked with that unit, it may (but is not required to) participate in that one attack (only)
by contributing a single die roll modifier to the attacking unit’s attack die roll (per friendly cannon and/or warship).
Note: No attack is ever permitted across any sea hexside and units embarked aboard any ship can never attack nor be attacked while aboard that ship.
When attacking any enemy-occupied hex, the attacking unit does not select any specific target in that hex, but rather simply rolls one 10-sided die. That die roll is then possibly modified by the type of terrain in that hex (or in between the attacker’s and defender’s hex, such as when attacking across a river). The modifier for each type of terrain is printed as a “+” number on the map’s terrain chart, within each terrain type hex. The modifier for each type of fort is +3 (this is printed on the back side of the fort counter as a reminder).
Note: The forest “+2” number applies even to hexes that are only partly printed with a forest depiction. The attacking player may not disregard the forest terrain modifier in a hex that is mostly clear, for example, so long as there is any forest artwork in that hex at all.
Only one terrain modifier ever applies during an attack. If there is more than one type of terrain (for example, a river around hill terrain) between and/or in the enemy’s hex, only the highest modifier is added to the attack die roll. Terrain in an attacking unit’s hex never affects any battle.
Exception: Any hex containing a fort applies both the terrain’s and the fort’s modifier during an enemy attack.
After adding any terrain modifiers, the attacking player may (but is not required to) now subtract the “-” (minus) number(s) of any cannon(s) and/or warship(s) that are stacked with that attacking unit as well as a maximum of one leader (see 11.1). Additionally, some units are considered elite and will also modify the die roll (see 11.3).
Thus, if that attacking unit’s final (modified) die roll result is equal to or less than the attacking unit’s printed strength number, the attack is successful and the enemy (defending) player must reduce (flip to its reverse side) one defending unit or cannon of the defending player’s choice* that is present in that enemy-occupied hex (or eliminate a defending unit that was already reduced, instead), though only after he has rolled to defend (see 11.5).
*A warship, wagon, or leader may never be chosen to be reduced or eliminated as a result of a successful attack.
However, if the final (modified) die roll result is higher than the attacking unit’s strength number, it is no effect and that attacking unit may not conduct any additional attacks during that same Activation Turn, nor may it advance after combat.
Note: An actual die roll of “0” is always a successful attack and an actual die roll of “9” is always an unsuccessful attack regardless of the attacking unit’s modified die roll result.
11.1 Stack AttacksTwo or more attacking units may never combine or share their combat strength as a single attack, but a stack of units in the same hex may conduct multiple attacks, one attack per unit, against the same or
ST304_American Revolution in the South_Rules[EHv9]-v5.indd 7 2/9/17 9:22 AM

R8 S&T 304 | MAY – JUN 2017
The American Revolution in the South
different enemy-occupied hexes. Each cannon, warship, or leader in a stack only ever contributes to a single attacking unit’s attack (which the attacking player must decide before he rolls for that unit’s attack). Whether attacking the same enemy-occupied hex or different enemy-occupied hexes, the enemy player must reduce or eliminate one defending unit (of the defending player’s choice) per successful attack.
11.2 Leading the AttackThe first attack conducted by a unit in a hex that is stacked with a leader of any kind must apply a battle die roll modifier when it conducts an attack (cumulative with any other modifiers such as terrain). To determine this modifier (which could be good or bad), the attacking player must choose any one leader, if any, in that attacking unit’s same hex and first roll to determine that leader’s ability (see the die roll range printed on the back of that leader chit regardless of any previous ability die roll results for that leader). If there is more than one leader in the same hex, the player must choose the senior-most leader chit (the leader with the lowest printed Seniority Number). If there are multiple leaders in the same hex that are printed with the same seniority, the owning player may choose which leader to use (presumably the leader with the best abilities).
Next, consult that leader’s ability die roll range (printed on the back of that leader chit) and roll one 10-sided die. The top-most row indicates an Inept leader, the middle row indicates a Capable leader, and the bottom-most row indicates an Exceptional leader. Use that ability result to determine the attack die roll modifier for that attack, tabulated as follows:
Inept +2 Battle Die Roll Modifier (attack)
Capable -1 Battle Die Roll Modifier (attack)
Exceptional -2 Battle Die Roll Modifier (attack)
A leader die roll modifier, assuming any leader is present in the attacking unit’s hex, must be applied to the attack die roll, in addition to any other applicable modifier(s) such as a terrain. If no leader is present in an attacking unit’s hex, then no leader modifier is applied to that attack roll.
11.3 Elite Unit Modifiers (Attacking)In addition to terrain, cannons, warships, and leaders, “Elite” units also contribute an attack die roll bonus to the attacker’s die roll. Any unit printed with a “-1” encompassed within a square applies a -1 die roll modifier to its attack die roll, except when attacking in an open type of terrain hex.
Note: Most elite units that become reduced lose their elite capability (unless rebuilt to full strength) and thus are not printed with any minus modifier on their reverse side.
11.4 Fort ModifierA fort is simply an additional type of terrain and therefore functions exactly like defensive terrain in a hex where it is present, applying a “+3” die roll penalty to any unit that is attacking that fort hex. If any hex contains defensive terrain and a fort chit, both “+” modifiers apply cumulatively in that case.
If unoccupied, a fort has no ability to defend itself, but rather is only captured if occupied by any unit.
A fort counter can only be destroyed by a successful bombardment (see 15.0) or voluntarily by a player during his own Movement Phase, provided that he has at least one friendly unit (of any type) presently occupying that fort hex. In either case, when a fort is destroyed, it is destroyed permanently (remove that fort chit from the map) and that hex immediately ceases to be fortified. No other units that occupy a fort hex are ever affected when a fort is destroyed (whether by bombardment or voluntarily), aside from the immediate loss of that fort's defensive benefit.
11.5 DefendingAfter any attacking unit has attacked an enemy-occupied hex (whether it was successful or not), the defending player is entitled to defend with one unit during each attack* that was conducted against that unit’s hex (regardless of how many defending units are in that hex).
*Unless it retreated before the other pending attacks against it are resolved.
If the foregoing attack had been a successful die roll, the defending player must defend with the unit that he chose to be reduced or eliminated (except in the case of a cannon) as a result of that attack.
Note: A defending unit always defends with its printed strength number as it was before an attack roll (not its reduced strength if it was successfully attacked).
If, however, the foregoing attack had not been a successful die roll (or if the defender had chosen to reduce/eliminate a cannon instead of a normal unit), the defending player may choose to defend with any single unit of his choice that is in that hex.
Design Note: The defender’s choice to reduce a cannon instead of a regular unit represents the idea that the cannons, in this particular battle, had been deployed more forward and thus have taken the brunt of the losses.
Of course, the defending player may not choose to defend with any wagon, leader, or ship (even if embarked with regular units).
In any case, once a defending unit has been determined, a defense is exactly like an attack (the enemy player rolls one 10-sided die) except that no terrain penalty modifiers are ever added to a defending unit’s die roll. However, exactly like an attack, the defending player may then also subtract the “-” (minus) number(s) of his own cannon(s) and/or warship(s), if any, that are stacked with his same defending unit, as well as a maximum of one leader (see 11.6). Additionally, some units are considered elite and may also modify the die roll (see 11.7).
If the defending unit’s final (modified) die roll result is equal to or less than the defending unit’s printed strength number, the defense is successful, and the attacking unit that had just attacked that hex must be reduced (flipped) or eliminated if already reduced.
However, if the final (modified) die roll result is higher than the defending unit’s strength number, it is no effect.
ST304_American Revolution in the South_Rules[EHv9]-v5.indd 8 2/9/17 9:22 AM

S&T 304 | MAY – JUN 2017 R9
Note: An actual die roll of “0” is always a successful defense and an actual die roll of “9” is always an unsuccessful defense regardless of any modifiers.
Lone cannons, wagons, and/or leaders cannot ever defend themselves when attacked, but are eliminated automatically after being attacked. Warships can never be attacked.
11.6 Leading the DefenseThe first defense conducted by a unit in a hex that is stacked with a leader of any kind must apply a battle die roll modifier when it conducts a defensive die roll (cumulative with any other modifiers, such as cannons). To determine this modifier (which could be good or bad), the defending player must choose any one leader, if any, in that defending unit’s same hex and first roll to determine that leader’s ability (see the die roll range printed on the back of that leader chit, and regardless of any previous ability die roll results for that leader). If there is more than one leader in the same hex, the player must choose the senior-most leader chit (the leader with the lowest printed Seniority Number). If there are multiple leaders in the same hex that are printed with the same seniority, the owning player may choose which leader to use (presumably the leader with the best abilities).
Next, consult that leader’s ability die roll range (printed on the back of that leader chit) and roll one 10-sided die. The top-most row indicates an Inept leader, the middle row indicates a Capable leader, and the bottom-most row indicates an Exceptional leader. Use that ability result to determine the attack die roll modifier for that defense, tabulated as follows:
Inept +2 Battle Die Roll Modifier (defense)
Capable -1 Battle Die Roll Modifier (defense)
Exceptional -2 Battle Die Roll Modifier (defense)
A leader die roll modifier, assuming any leader is present in the defending unit’s hex, must be applied to the defense die roll in addition to any other applicable modifier(s) such as a terrain. If no leader is present in an attacking unit’s hex, then no leader modifier is applied to that attack roll.
11.7 Elite Unit Modifiers (Defending)In addition to cannons, warships, and leaders, “Elite” units also contribute a defense die roll bonus to the defender’s die roll. Any unit printed with a “-1” encompassed within a square applies a -1 die roll modifier to its defense die roll, except when defending in an open type of terrain hex (open ground is where regular units were trained and expected to do combat, and were thus accustomed to fighting in that type of terrain).
Note: Most elite units that become reduced lose their elite capability (unless rebuilt to full strength) and thus, are not printed with any minus modifier on their reverse side.
11.8 Casualties When any unit is reduced, it is flipped to its back side which features a lower strength number. A flipped unit operates identically (except for its
lower strength number), although if any flipped unit is reduced again, it is immediately removed from the map.
Note: Some units do not feature a depiction on the back side; if they become reduced, they become eliminated immediately instead.
No leader may ever be purposefully chosen to be reduced or eliminated unless no other unit or cannon is in the same hex. A lone leader that is successfully attacked is simply eliminated. 11.9 Leader DeathIf a successful attack has occurred against a leader’s hex, but the defending unit in that hex did not successfully defend, the most senior leader in that hex is automatically eliminated (even if that leader contributed nothing to his own stack's defense). This can occur after each such attack against that same hex so long as there is a leader present in that hex.
Note: This may represent his death, wounding, or dismissal from command.
If there are two equally senior leaders in a hex after such an attack, the owning player may choose which one is eliminated.
A leader is never automatically eliminated simply because his attack was unsuccessful. Only an unsuccessful defense ever eliminates a leader.
12.0 ReTReATINGWhenever an attacker’s die roll is successful, but the defender’s die roll is not successful, the defending player must then immediately move all units, cannons, wagons, and leaders in that same hex, if any, further from that same hex exactly two hexes away (to any hex of his choice) except into or across impassible terrain; into any hex already occupied by an enemy unit, cannon, wagon, or leader (even if a lone unit, cannon, wagon, or leader); or into a hex that would become over-stacked as a result of that retreat.
Note: Insofar as a lone cannon, wagon, or leader cannot defend, it is eliminated instead whenever successfully attacked (if not stacked with a unit); it does not retreat in such a case.
All other units, cannons, wagons, and leaders in that same hex that cannot retreat must be eliminated instead. Otherwise, a retreating unit, cannon, wagon, or leader may retreat in any direction, so long as the last retreat hex is two hexes distant from the battle hex (i.e., there must be two hexes between the retreating game piece and the enemy unit that caused its retreat). Retreats always ignore terrain costs and weather effects, however.
Note: Units may retreat to a friendly ship, if present in the same or an adjacent coastal hex, and thus are assumed to automatically be aboard any such ship in that case (assuming that ship has enough capacity, per 7.3, to embark them). This may not always necessarily represent the entire force to be literally aboard ship, but within range of the ship’s guns.
If a hex contains multiple chits that are required to retreat, each may be retreated in a different direction if each retreat hex is at least two hexes distant from the enemy unit that caused its retreat.
ST304_American Revolution in the South_Rules[EHv9]-v5.indd 9 2/9/17 9:22 AM

R10 S&T 304 | MAY – JUN 2017
The American Revolution in the South
Note: Retreating chits never become “lost.”
Ships themselves never retreat.
13.0 ADVANCe AFTeR COMBATIf every enemy unit is eliminated or is retreated from a particular hex, the attacking unit (only) that caused that elimination or retreat may move into that hex immediately (except into a coastal hex where an enemy ship is present). An Advance After Combat is never mandatory, although the attacking player must decide to Advance After Combat or not immediately after each such battle.
Exception: Cannons and wagons cannot ever advance after combat even if stacked with a non-cannon unit that caused the elimination or retreat.
Only the attacking unit and any leader(s) stacked with that unit (if any) that caused the elimination or retreat may Advance After Combat into that battle hex (and only into that hex). Advance After Combat never requires the advancing unit to expend any movement points; it is a free move.
A ship can never Advance After Combat along with any successfully attacking unit, even into a hex that is accessible by water.
13.1 Fleeing and PursuitAfter any chit or stack has retreated, it is possible for that chit/stack to continue its retreat (known as “fleeing”) one additional hex if there is a leader stacked in that same hex. To do so, the owning player must first roll to determine that leader’s initiative (see the number printed within an arrow symbol on the front of that leader chit). If there is more than one leader in the same hex, the owning player must choose the senior-most leader chit (the leader with the lowest Seniority Number). If multiple leaders that are in the same hex as the defending unit share the same seniority, the owning player may choose which leader to use. Next, roll one 10-sided die. If the die roll is equal to or less than that leader’s initiative number (the bottom number), that leader and any other chits stacked with him may continue the mandated retreat (per 12.0) up to one more hex (to any eligible and accessible hex adjacent to the last hex occupied after completing the mandated retreat per 12.0).
Note: Unlike a retreat, weather can indeed nullify an attempt to flee. If the weather is anything other than “Clear,” a unit may not flee.
After a retreat is complete, the attacking player may declare a “Pursuit” attempt if there is a leader stacked in the same hex as the attacking unit(s) that caused the retreat (in this case, the pursuing player may use any leader in that same hex that he prefers; it does not have to be the senior-most leader there). A pursuit allows the attacking unit (and its leader) that caused the retreat to also move one additional hex (only after advancing after combat into the battle hex) immediately after the defending chit or stack has completed its retreat (regardless of terrain movement costs). To pursue, the owning player must roll one 10-sided. If that die roll is equal to or less than the most senior (in that same hex) leader’s initiative number, any of those attacking unit(s) may also move one additional hex (but only after having already advanced after combat) in any direction (even if not literally in pursuit of the retreating enemy), regardless of terrain costs.
Only the attacking unit that caused a retreat may pursue, but the leader that implemented that pursuit must accompany the pursuing unit. In any case, a pursuing unit may pursue in any direction; it does not literally have to be closer to any fleeing unit.
Pursuits always ignore terrain, and may only be a maximum of only one hex (after an advance after combat); a pursuit is never mandatory even after a leader has rolled a successful initiative roll. It is even permissible for a player to postpone his decision to pursue until after he has rolled for each leader’s initiative, if there is more than one leader stacked in that same hex, and then decide to pursue or not based upon the results of the initiative die roll results.
Note: Unlike a retreat, weather can indeed nullify an attempt to pursue. If the weather is anything other than “Clear”, a unit may not pursue.
Design Note: The requirement of a unit to advance after combat before pursuit is an intentional change from the original game system (Ticonderoga); this represents the more realistic idea that a pursuing unit must be “hot on the trail” of his fleeing adversary to pursue him (as opposed to running off in some other direction). Only after an advance after combat has occurred can a pursuing unit opt to change directions (say, to “cut ‘em off at the pass” or whatever).
14.0 sURPRIse ATTACKThough normally any attack die roll is followed by a defense die roll, it is possible to conduct an attack whereby the defending player may not be permitted to conduct a defensive die roll, known as a “surprise attack.” However, a failed surprise attack can result in an “ambush” (see 14.1 below). A surprise attack may only ever be attempted in a forest, hill, or swamp type terrain hex and only by a unit that is accompanied by a leader.
Note: Cannons and warships may never participate in a surprise attack.
To attempt a surprise attack, the attacking player must first declare a surprise attack and then roll one 10-sided die. If that roll is equal to or less than the most senior (in that same hex) leader’s initiative number, the attacking unit may conduct a surprise attack. A surprise attack is conducted exactly like a normal attack (see 11.0) except that the defending player is not eligible to roll a defensive die roll as would normally be the procedure. In such a case, it is to be considered as if the defending player had rolled an unsuccessful defensive die roll for purposes of casualties and retreats.
14.1 AmbushIf a surprise attack is not successful (i.e., the defending enemy unit is not reduced), then the defending unit is eligible to defend normally per 11.5 nonetheless (and may include cannons and/or warships, if any, in that defending hex). However, because a surprise attack attempt was unsuccessful, a -2 die roll bonus is therefore applied to the defending unit’s die roll.
14.2 Preventing Surprise Attacks (Patrols)Prior to resolving any surprise attack (before rolling the die per 14.0 above), the defending player may announce that his defending unit(s) in the battle hex have deployed “patrols,” but only if stacked with at least one leader. The deployment of any patrol simply prevents the attacking
ST304_American Revolution in the South_Rules[EHv9]-v5.indd 10 2/9/17 9:22 AM

S&T 304 | MAY – JUN 2017 R11
player from conducting any surprise attack against that hex (and thus no ambush is possible, either). However, if any patrol is deployed, that unit’s strength number is temporarily reduced by one point during that pending attack. Units that are printed with a “0” strength number may not deploy patrols (they are the patrol in a manner of speaking!)
Note: Units that are not stacked with a leader may not deploy patrols.
After the resolution of that attack, that defending unit’s strength is assumed to be its currently printed strength normally once again.
15.0 BOMBARDMeNTCannons and warships may conduct a bombardment instead of participating in an attack during the Combat Phase of a friendly Activation Turn, but only for the purposes of targeting a fort chit (to attempt to remove that fort from the map). To do so, a bombarding cannon or warship must be adjacent to the targeted fort (even if across a sea hexside), and each cannon or warship may only target a single fort chit during the Combat Phase of the owning player’s Activation Turn.
To conduct a bombardment, the owning player must simply roll one 10-sided die during the Combat Phase (if that bombarding cannon or warship did not participate in any other attack during that same Combat Phase). That bombardment die roll is then modified by -2 (or -1 in the case of a reduced cannon), as well as whatever terrain combat effect is applicable in that bombarded hex (to include the fort's own +3). If the modified die roll is "3" or less the fort is eliminated.
If a fort is destroyed, it is removed from the map immediately and that chit no longer imparts any benefit to any unit in that hex.
Note: Forts cannot be constructed in the context of the game.
If the bombardment's net die roll is higher than "3," that bombardment is considered a miss and no effects are incurred.
A bombardment never has any effect upon any unit in a targeted hex, but nor is the bombarding cannon or warship ever subject to a defense die roll. A cannon conducting a bombardment is immune to any enemy unit(s) during that same Combat Phase (although a bombarding cannon unit can be attacked normally during the enemy player’s Combat Phase).
Note: It is a perfectly legitimate tactic for a player to conduct a bombardment before resolving a normal attack upon that same hex for the purpose of potentially eliminating the fort there prior to his intended attack.
15.1 Naval CombatWarships never engage each other in combat, even when present in the same hex together. Opposing warships can exist together in the same hex without effect (it is to be assumed that they are appearing in that location during different days before sailing off).
Note: Warships in the game are printed with combat ratings for bombardment purposes only.
16.0 sCeNARIOs
There are five scenarios included with the game, the first of which is an introductory scenario that will allow players to get used to the system. There are five more scenerios included with the e-rules. Each scenario lists the historical name, the dates (length of the scenario), the victory conditions, set-ups, and reinforcements (if any). Each game turn (each Date Turn) is played as a series of two Activation Turns (Day and Night), each Activation Turn comprising an American and British activation.
Each scenario begins during the Day Activation Turn and ends during the Night Activation Turn on the last game turn and is always played in the order of Day and then Night. Various units and leaders will be specified as “random,” indicating that the owning player must select that exact type of unit blindly from a draw cup.
Note: References to “random leader” always refers to an unnamed leader only. No named leader is ever placed into the leader draw cup.
The charts on the following pages indicate what units are to be used for that scenario. Wherever a unit is listed with a single parenthetical number, such as “(4),” that number indicates the printed combat strength of the unit to be used for that scenario. In some cases, this may refer to the reverse side of that unit, in which case that unit must be set up reduced (flipped to its back side).
Note: Remember there are multiple counters for some individual units, ensure that you select the correct strength for each unit as shown in the scenario set-up.
ST304_American Revolution in the South_Rules[EHv9]-v5.indd 11 2/9/17 9:22 AM

16.1 1776 North Carolina Campaign
The 1776 North Carolina Campaign (this is an introductory scenario that simulates the struggle between Loyalist and Patriot militia for North Carolina).
Turn Start Turn 1 (February 1, 1776)
Turn End Turn 29 (March 1, 1776)
Victory The British player wins if his forces were the last to have occupied hex 1903 (Wilmington) by the last game turn; otherwise the game is an American victory. However, a victory by either side will be downgraded to a draw if that side’s Senior Commander is killed.
American Set-up:
Hex 0903 (Wilmington)
1 x random Leader (Senior Commander), 1 x Supply
Hex 0618 (Hillsborough)
1 x random Leader, 1 x Supply
Hex 0104 (New Bern)
1 x random Leader, 1 x Supply
British Set-up (The British side moves first):
Hex 0812 1 x random Leader (Senior Commander), 1 x Cannon (reduced), 1 x Supply
Hex 0917 1 x random Leader, 1 x Cannon, 1 x Supply
Any Sea or Coast Hex
1 x Warship, 1 x Transport, 1st Marine, 1 x Supply
Special:
First, place the following American units in a draw cup (any American unit printed with “N. Carolina”): 1st North Carolina (3), 3rd North Carolina (4), 3rd North Carolina (2), 5th North Carolina (2), 1st North Carolina Light Infantry (2), 2nd North Carolina Rifle (3), 6th North Carolina Rifle (1), 1st North Carolina Militia (8), 1st North Carolina Provisionals (2), 2nd North Carolina Militia (10), 1st North Carolina Militia (2), 1st North Carolina Militia (10).
Second, randomly draw three American units from that draw cup and place one with each of the American Leaders listed under the American Set-up.
Third, place the following British units in a separate draw cup: North Carolina Volunteers (1), Loyal Americans (4), 1st Provincials (2), 2nd Provincials (2), 3rd Provincials (2), 4th Provincials (2), 5th Provincials (2), 6th Provincials (2), 7th Provincials (2), 8th Provincials (2), 9th Provincials (2).
Fourth, randomly draw two British units from their draw cup and place one with each of the British Leaders listed under the British Set-up.
Whenever any unit is present in any city (including a city it starts in) at any time during its own Movement Phase, the owning player may randomly draw one compatriot unit from his own draw cup and then place that unit in that city at the end of that same Movement Phase (this unit therefore represents recruits from that city; for purposes of this rule, the actual unit’s name or designation is unimportant). A player may only do this once per each city on the map and only during his own Movement Phase (assuming a friendly unit had entered that city at some time during its movement). As a mnemonic, it is recommended that both players keep a written list of each city that has yielded a recruit for his own side.
Note: It doesn’t matter if an enemy unit had already recruited a unit from a city previously. Each side is entitled to a maximum of one random recruit from each city per game, so long as that city has been entered by a compatriot unit at some time during the same Movement Phase.
However, once a player’s draw cup is empty (once all of his own side’s units have been recruited), no more units may be recruited for that side.
Scenario 1
R12 S&T 304 | MAY – JUN 2017
ST304_American Revolution in the South_Rules[EHv9]-v5.indd 12 2/9/17 9:22 AM

16.2 1779 Savannah Campaign
The 1779 Savannah Campaign (this scenario recalls the American-French attempt
to retake the strategically important city of Savannah).
Turn Start Turn 1 (September 3, 1779)
Turn End Turn 36 (October 9, 1779)
Victory The player wins if his forces were the last to have occupied hex 4703(Savannah). However, a victory by either side will be downgraded to a draw if at least one enemy cannon unit presently occupies any of the six hexes (4702, 4802, 4803, 4704, 4603, 4602) surrounding Savannah.
American Set-up (The American side moves first):
Hex 4403 (Purrysburg)
Lincoln (Senior Commander), 5 x random Leaders, Light Corps (2), 2nd South Carolina (1), 3rd South Carolina (2), 1st Virginia (1), 1st South Carolina Militia (1), 2 x Cannon, 1 x Supply
Hex 1103 1st Georgia Militia (1), 5th North Carolina (1), 6th North Carolina Rifle (1), 1 x Supply
Hex 4407 Pulaski, 2 x random Leaders, Pulaski Legion (1), 1st Virginia Dragoons (1), 1st South Carolina Dragoons (2), 1 x Supply
Hex 3401 (Charleston)
1 x random Leader, 1st South Carolina Militia (12)
Hex 4508 1 x random Leader, 1st Georgia Militia (4)
American (French) Reinforcements:
Off map 1 x French Warship, 2 x French Transports, d’Estaing, Bethisy Elites (4), Dillon Elites (1st Bn) (4), Dillon Elites (2nd Bn) (3), Steding Fusiliers (1st Bn) (8), Steding Fusiliers (2nd Bn) (6), Noailles (4), San Dominique (6), Marines (4), 2 x Cannon (French), 2 x Supply
British Set-up:
Hex 4502 or hex 4601 (all)
2 x Warship, 4 x Transport, Prevost (Senior Commander), 9 x random Leaders, 60th (1st Bn) (3), 71st (1st Bn) (2), 71st (2nd Bn) (4), 1st Light Infantry (3), 1st Dragoons (2), New York Volunteers (2), Delancy’s New York (3), Florida Rangers (1), 1st Provincials (2), 5th Provincials (2), 6th Provincials (1), Trumbach (3), 2 x Cannon, 3 x Supply. Note that these forces are assumed to be on land (not aboard ship).
Hex 4604 (Ebenezar)
Fort, 2nd Provincials (2)
Hex 5001 (Sunbury)
Fort, 3rd Provincials (2)
Hex 4103 (Beaufort)
Fort, 4th Provincials (2)
Special:
The American off map forces must be organized as one fleet comprising one warship and two transports and it must contain all of the off map units listed (while also in compliance with 7.3). The fleet may appear on the map in any non-swamp, unoccupied coastal hex of the American player’s choice during any American Movement Phase, at which time the transported units of that fleet must be disembarked into that same coastal hex. Those units may not move for the remainder of that game turn, but operate normally thereafter.
Scenario 2
S&T 304 | MAY – JUN 2017 R13
ST304_American Revolution in the South_Rules[EHv9]-v5.indd 13 2/9/17 9:22 AM

16.3 1780 Overmountain Campaign
The 1780 Overmountain Campaign (this scenario recalls when over a thousand hardened American frontiersmen came east over the mountains, decimated a British army, and turned the tide of the war in the South).
Turn Start Turn 1 (September 5, 1780)
Turn End Turn 28 (October 3, 1780)
Victory The British player wins if he eliminates every American unit on the map. The American player wins if he eliminates Ferguson. Any other outcome is a draw game.
American Set-up (The American side moves first):
Hex 4806 Shelby (Senior Commander), Sevier, 1 x random Leader, 2nd North Carolina Rifle (5), 1st North Carolina Militia (8), 2 x Supply
Hex 3321 (Musgrove Mill)
1 x random Leader, 2nd North Carolina Militia (10)
British Set-up:
Hex 2428 (Gilbertown) Ferguson (Senior Commander), 3 x random Leaders, 1st Provincials (2), 2nd Provincials (2), 3rd Provincials (2), 4th Provincials (2), 1 x Supply
Hex 3821 (Ninety Six) Fort, 4 x random Leader, 5th Provincials (2), 6th Provincials (2), 7th Provincials (2), 8th Provincials (2)
Hex 2321 (Charlotte) Cornwallis (may not move)
Hex 4215 Brown (may not move)
Special:
British Leaders Cornwallis and Brown may not be moved from their current hexes, although they may command in their hexes normally.
Scenario 3
R14 S&T 304 | MAY – JUN 2017
ST304_American Revolution in the South_Rules[EHv9]-v5.indd 14 2/9/17 9:22 AM

Scenario 416.5 1781 Greene versus Cornwallis Campaign (the Battle of Guilford Courthouse)
The 1781 Greene versus Cornwallis Campaign (This scenario pits two of the outstanding generals of the war against each other during the final stages of the conflict).
Turn Start Turn 1 (January 17, 1781)
Turn End Turn 60 (March 18, 1781)
Victory The British player wins if British units occupy hexes 0104, 0111, 0120, and 0123 during the last game turn of the scenario. The American player wins if British units only occupy two of the aforementioned hexes or less during the last game turn of the scenario. If British units only occupy three of the aforementioned hexes during the last game turn of the scenario, the scenario ends as a draw. Alternatively, the American player wins immediately if he can successfully burn down some of the forts that begin the scenario occupied by British units. At any one time during the scenario (during his own Movement Phase), the American player may declare a single victory die roll by rolling one six-sided die. If that die roll is less than the quantity of forts that he had already burned down up to that time, the American player wins the game immediately. Only one die roll attempt is ever permitted throughout this scenario.
American Set-up (The American side moves first):
Hex 3224 Morgan, 4 x random Leaders, 1st Maryland (2), 1st Delaware (1), 1st Virginia Rifles (2), Washington, 1st Dragoons (1), 1 x Supply
Hex 3022 Pickens, 2 x random Leaders, 1st North Carolina Militia (2), 1st South Carolina Militia (1), 1st Georgia Militia (1)
Hex 2321 (Charlotte) Greene (Senior Commander), 3 x random Leaders, 2nd Maryland (3), 5th Virginia (3), 2nd North Carolina Militia (10), 1st Virginia Militia (10), 1 x Cannon, 2 x Supply
Hex 3113 Marion, 1st Legion (2)
Hex 3123 Sumter, 2nd Legion (2)
Hex 0618 (Hillsborough)
Lee (Lighthorse), 1st Dragoons (2)
Hex 1224 (Winslow) 1st North Carolina Militia (7)
Hex 0120 4th Virginia (3)
American Reinforcements:
Turn 19(Hex 0120)
1 x Supply
British Set-up:
Hex 3017 (Winnsboro) Tarleton, 5 x random Leaders, 7th (1), 16th (1), 71st (1st Bn) (2), British Legion Dragoons (1), 17th Dragoons (1), 8th Provincials (2), Cornwallis (Senior Commander), 23rd (2), 33rd (2), 64th (2), 71st (2nd Bn) (3), 1 x Supply
Hex 3401 (Charleston) Leslie, 2 x random Leaders, 1st Grenadiers (6), Bose (3), Jaegers (3), 1 x Supply
Hex 2813 (Camden) Rawdon, 63rd (2), 1 x Cannon,
Hex 3821 (Ninety Six) Fort, 1st Provincials (1)
Hex 3210 (Ft. Motte) Fort, 2nd Provincials (2)
Hex 2013 (Colson) Fort, 3rd Provincials (1)
Hex 5001 (Sunbury) Fort, 4th Provincials (1)
Hex 3314 (Ft. Granby) Fort, 5th Provincials (2)
Hex 2602 (Georgetown) Fort, 6th Provincials (1)
Hex 4316 (Augusta) Fort, 7th Provincials (2)
Special:
Per 11.4, forts cannot normally be destroyed (except by bombardment) but in this scenario, however, if any American unit occupies any fort hex(es) during any American Movement Phase, the American player may declare the fort(s) there to be burnt down. Each fort burnt by the American player will increase the chances of an automatic and immediate victory per above.
S&T 304 | MAY – JUN 2017 R15
ST304_American Revolution in the South_Rules[EHv9]-v5.indd 15 2/9/17 9:22 AM

Scenario 516.6 1781 Greene versus Rawdon Campaign
The 1781 Greene versus Rawdon Campaign (This was one of the final campaigns in the South as the Americans began to drive the British out of Piedmont back to the coast).
Turn Start Turn 1 (April 6, 1781)
Turn End Turn 57 (June 2, 1781)
Victory The American player wins immediately if he can successfully occupy some of the forts that begin the scenario occupied by British units. At any one time during the scenario (during his own Movement Phase), the American player may declare a single victory die roll by rolling one 10-sided die. If that die roll is less than the quantity of forts that American units currently occupy up to that time, the American player wins the game immediately. Only one die roll attempt is ever permitted throughout this scenario. If the die roll is equal to or higher than the quantity of forts currently occupied (at the time of the die roll), the British player has won the game.
American Set-up (The American side moves first):
Hex 2517 (Lancaster) Greene (Senior Commander), 5 x random Leaders, 2nd Virginia (2), 1st Maryland (2), 2nd Maryland (3), Light Corps (1), 1st North Carolina Militia (2), Washington, 1st Dragoons (1), 1 x Cannon, 1 x Supply
Hex 1008 (Elizabethtown)
Lighthorse Lee, 2nd Dragoons (2)
Hex 3521 Pickens, 1st Legion (2)
Hex 2206 Marion, 2nd Legion (2)
Hex 3011 Sumter, 3rd Legion (2)
Hex 4126 1 x random Leader, 1st North Carolina Provincials (2)
American Reinforcements:
Turn 2 & Turn 28(Hex 1721)
1 x Supply (each of these game turns)
British Set-up:
Hex 3401 (Charleston)
Rawdon, 63rd (3 [-1]), New York Volunteers (2), Irish Volunteers (2), Loyal Americans (3), South Carolina Loyalists (2), 1st Dragoons (1)
Hex 3821 (Ninety Six)
Fort, 1 x random Leader, 1st Provincials (2)
Hex 3314 (Ft. Granby) Fort, 1 x random Leader, 2nd Provincials (2)
Hex 4215 Fort, 1 x random Leader, 3rd Provincials (2)
Hex 3210 (Ft. Motte) Fort, 1 x random Leader, 4th Provincials (2)
Hex 2013 (Colson) Fort, 1 x random Leader, 5th Provincials (1)
Hex 5001 (Sunbury) Fort, 1 x random Leader, 6th Provincials (1)
Hex 3204 1 x random Leader, 7th Provincials (1)
Hex 2502 Fort, 1 x random Leader, 8th Provincials (1)
British Reinforcements:
Turn 25 & Turn 29(Hex 3401)
1 x Supply (each of these game turns)
Special:
None
R16 S&T 304 | MAY – JUN 2017
ST304_American Revolution in the South_Rules[EHv9]-v5.indd 16 2/9/17 9:22 AM

Scenario 616.7 1780 Camden Campaign
The 1780 Camden Campaign (a scenario recreating another American defeat after Gates impetuously pushed his outnumbered men on a long march in an attempt to overwhelm the British fortifications at Camden).
Turn Start Turn 1 (July 8, 1780)
Turn End Turn 31 (August 8, 1780)
Victory The American player wins if his forces were the last to have occupied hex 2813 (Camden) by the last game turn. The British player wins if his forces were the last to have occupied Charlotte (2321). If both or neither of these conditions occur, the game ends as a draw.
American Set-up (The American side moves first):
Hex 1721 Gates (Senior Commander), 4 x random Leaders, 1st Delaware (3), 1st Maryland (4), 2nd Maryland (4), 1st Virginia Militia (10), 1st North Carolina Militia (10), 1st Dragoons (1), 1 x Supply
Hex 2519 Sumter, 1st Legion (7)
Hex 2927 1 x random Leader, 1st South Carolina Provincials (2)
Hex 3308 Marion, 2nd Legion (2)
Hex 3417 Pickens, 3rd Legion (2)
Hex 2321 1 x random Leader, 3rd Virginia (3)
British Set-up:
Hex 3401 Cornwallis (Senior Commander), 71st (1st Bn) (2), 71st (2nd Bn) (3), 1 x Cannon, 2 x Supply
Hex 2602 (Georgetown)
Fort, 1 x random Leader, 1st Provincials (1)
Hex 2824 (Thickety) Fort, 1 x random Leader, 2nd Provincials (1)
Hex 3314 (Ft. Granby) Fort, 1 x random Leader, 3rd Provincials (1)
Hex 3210 (Ft. Motte) Fort, 1 x random Leader, 4th Provincials (1)
Hex 2716 1 x random Leader, 5th Provincials (2)
Hex 2813 (Camden) Rawdon, 2 x random Leaders, 23rd (4), 33rd (3), Irish Volunteers (4)
Hex 2013 (Colson) Tarleton, 17th Dragoons (1), Tarleton Legion (3)
Hex 2619 (Rock Mtn) 1 x random Leader, New York Volunteers (2)
Hex 3821 (Ninety Six) Fort, 2 x random Leader, 6th Provincials (1), 1st Light Infantry (2)
Hex 4215 Brown, 7th Provincials (2), Ferguson
Special:
If any British unit ever enters Charlotte (2321), remove Gates from the scenario.
S&T 304 | MAY – JUN 2017 R17
ST304_American Revolution in the South_Rules[EHv9]-v5.indd 17 2/9/17 9:22 AM
R18 S&T 304 | MAY – JUN 2017
The American Revolution in the South
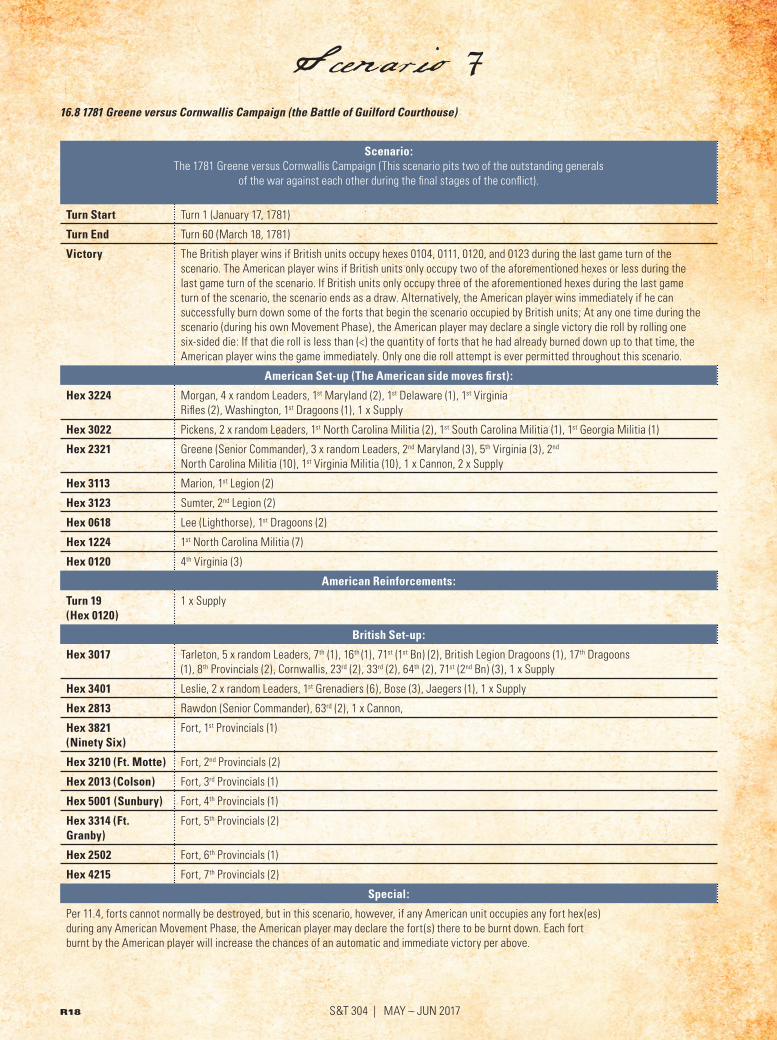
16.8 1781 Greene versus Cornwallis Campaign (the Battle of Guilford Courthouse)
Scenario:The 1781 Greene versus Cornwallis Campaign (This scenario pits two of the outstanding generals
of the war against each other during the final stages of the conflict).
Turn Start Turn 1 (January 17, 1781)
Turn End Turn 60 (March 18, 1781)
Victory The British player wins if British units occupy hexes 0104, 0111, 0120, and 0123 during the last game turn of the scenario. The American player wins if British units only occupy two of the aforementioned hexes or less during the last game turn of the scenario. If British units only occupy three of the aforementioned hexes during the last game turn of the scenario, the scenario ends as a draw. Alternatively, the American player wins immediately if he can successfully burn down some of the forts that begin the scenario occupied by British units; At any one time during the scenario (during his own Movement Phase), the American player may declare a single victory die roll by rolling one six-sided die: If that die roll is less than (<) the quantity of forts that he had already burned down up to that time, the American player wins the game immediately. Only one die roll attempt is ever permitted throughout this scenario.
American Set-up (The American side moves first):
Hex 3224 Morgan, 4 x random Leaders, 1st Maryland (2), 1st Delaware (1), 1st Virginia Rifles (2), Washington, 1st Dragoons (1), 1 x Supply
Hex 3022 Pickens, 2 x random Leaders, 1st North Carolina Militia (2), 1st South Carolina Militia (1), 1st Georgia Militia (1)
Hex 2321 Greene (Senior Commander), 3 x random Leaders, 2nd Maryland (3), 5th Virginia (3), 2nd North Carolina Militia (10), 1st Virginia Militia (10), 1 x Cannon, 2 x Supply
Hex 3113 Marion, 1st Legion (2)
Hex 3123 Sumter, 2nd Legion (2)
Hex 0618 Lee (Lighthorse), 1st Dragoons (2)
Hex 1224 1st North Carolina Militia (7)
Hex 0120 4th Virginia (3)
American Reinforcements:
Turn 19(Hex 0120)
1 x Supply
British Set-up:
Hex 3017 Tarleton, 5 x random Leaders, 7th (1), 16th (1), 71st (1st Bn) (2), British Legion Dragoons (1), 17th Dragoons (1), 8th Provincials (2), Cornwallis, 23rd (2), 33rd (2), 64th (2), 71st (2nd Bn) (3), 1 x Supply
Hex 3401 Leslie, 2 x random Leaders, 1st Grenadiers (6), Bose (3), Jaegers (1), 1 x Supply
Hex 2813 Rawdon (Senior Commander), 63rd (2), 1 x Cannon,
Hex 3821 (Ninety Six)
Fort, 1st Provincials (1)
Hex 3210 (Ft. Motte) Fort, 2nd Provincials (2)
Hex 2013 (Colson) Fort, 3rd Provincials (1)
Hex 5001 (Sunbury) Fort, 4th Provincials (1)
Hex 3314 (Ft. Granby)
Fort, 5th Provincials (2)
Hex 2502 Fort, 6th Provincials (1)
Hex 4215 Fort, 7th Provincials (2)
Special:
Per 11.4, forts cannot normally be destroyed, but in this scenario, however, if any American unit occupies any fort hex(es) during any American Movement Phase, the American player may declare the fort(s) there to be burnt down. Each fort burnt by the American player will increase the chances of an automatic and immediate victory per above.
R18 S&T 304 | MAY – JUN 2017
Scenario 7
ST304_American Revolution in the South_Rules[EHv9]-v5.indd 18 2/9/17 9:22 AM

S&T 304 | MAY – JUN 2017 R19
16.9 1781 Greene versus Rawdon Campaign
Scenario:The 1781 Greene versus Rawdon Campaign (This was one of the final campaigns in the South as
the Americans began to drive the British out of Piedmont back to the coast).
Turn Start Turn 1 (April 6, 1781)
Turn End Turn 57 (June 2, 1781)
Victory The American player wins immediately if he can successfully occupy some of the forts that begin the scenario occupied by British units; At any one time during the scenario (during his own Movement Phase), the American player may declare a single victory die roll by rolling one six-sided die: If that die roll is less than (<) the quantity of forts that American units currently occupy up to that time, the American player wins the game immediately. Only one die roll attempt is ever permitted throughout this scenario. If the die roll is equal to or higher than the quantity of forts currently occupied (at the time of the die roll), the British player has won the game.
American Set-up (The American side moves first):
Hex 2517 Greene (Senior Commander), 5 x random Leaders, 2nd Virginia (2), 1st Maryland (2), 2nd Maryland (3), Light Corps (1), 1st North Carolina Militia (2), Washington, 1st Dragoons (1), 1 x Cannon, 1 x Supply
Hex 1008 Lee, 2nd Dragoons (2)
Hex 3521 Pickens, 1st Legion (2)
Hex 2206 Marion, 2nd Legion (2)
Hex 3011 Sumter, 3rd Legion (2)
Hex 4126 1 x random Leader, 1st North Carolina Provincials (2)
American Reinforcements:
Turn 2 & Turn 28(Hex 1721)
1 x Supply
British Set-up:
Hex 3401 (Charleston) Rawdon, 63rd (3), New York Volunteers (2), Irish Volunteers (2), Loyal Americans (3), South Carolina Loyalists (2), 1st Dragoons (1)
Hex 3821 (Ninety Six) Fort, 1 x random Leader, 1st Provincials (2)
Hex 3314 (Ft. Granby) Fort, 1 x random Leader, 2nd Provincials (2)
Hex 4215 Fort, 1 x random Leader, 3rd Provincials (2)
Hex 3210 (Ft. Motte) Fort, 1 x random Leader, 4th Provincials (2)
Hex 2013 (Colson) Fort, 1 x random Leader, 5th Provincials (1)
Hex 5001 (Sunbury) Fort, 1 x random Leader, 6th Provincials (1)
Hex 3204 1 x random Leader, 7th Provincials (1)
Hex 2502 Fort, 1 x random Leader, 8th Provincials (1)
British Reinforcements:
Turn 25 & Turn 29(Hex 3401)
1 x Supply
Special:
None
S&T 304 | MAY – JUN 2017 R19
Scenario 8
ST304_American Revolution in the South_Rules[EHv9]-v5.indd 19 2/9/17 9:22 AM

R20 S&T 304 | MAY – JUN 2017
The American Revolution in the South
16.10 1782 Last Campaign
Scenario:The 1782 Last Campaign (This scenario presents the efforts of brilliant American leaders like Nathaniel Greene,
Francis Marion, and Lighthorse Harry Lee to eliminate the British from the South once and for all).
Turn Start Turn 1 (August 7, 1782)
Turn End Turn 27 (September 3, 1782)
Victory Either player wins if his forces were the last to have occupied the road junction hex at hex 3403 by the last game turn. However, an American victory will be downgraded to a draw if Greene is eliminated.
American Set-up (The American side moves first):
Hex 3110 Greene (Senior Commander), 5 x random Leaders, 1st Virginia Provincials (2), 2nd Virginia (2), 1st Maryland (1), 2nd Maryland (1), 1st South Carolina Militia (1), 1st North Carolina Provincials (2), 1 x Cannon, 2 x Supply
Hex 3306 Marion, 1st Legion (1), Lighthorse Lee, 1st Dragoons (1), Washington, 2nd Dragoons (1)
Hex 3506 Pickens, 2nd Legion (2)
British Set-up:
Hex 3401 6 x random Leaders (the first one drawn is the Senior Commander), 3rd (4), 63rd (3), 64th (3), New York Volunteers (3), New Jersey Volunteers (3), 1st Dragoons (2), 1 x Supply
Hex 3304 Fort, 1 x random Leader, 1st Provincials (2)
Hex 3505 (Dorcester) Fort, 1 x random Leader, 2nd Provincials (2)
Hex 4602 1 x random Leader
Hex 0903 (Wilmington) 1 x random Leader
Special:
None
Note:
The British leaders in Savannah and Wilmington are present merely to show the other remaining British positions in the three southernmost states at the time, but they are not to be used in the scenario since both were covered by other American forces not featured in the scenario.
R20 S&T 304 | MAY – JUN 2017
Scenario 9
ST304_American Revolution in the South_Rules[EHv9]-v5.indd 20 2/9/17 9:22 AM

S&T 304 | MAY – JUN 2017 R21
Leader Manifest (American):
Leader Seniority Initiative Inept Capable Exceptional
Campbell 3 8 0-1 2-9
Clarke 3 8 1-2 3-8 9
Dekalb 3 6 0-2 3-8 9
Greene 1 8 0 1-7 8-9
Gates 1 6 0-4 5-9
Charles Lee 2 6 0-3 4-8 9
Lighthorse Lee 3 8 0-2 3-8 9
Lincoln 2 6 0-4 5-9
Marion 3 8 0 1-7 8-9
Morgan 2 8 0 1-7 8-9
Pulaksi 3 8 0-1 2-7 8-9
Moultrie 3 8 0-1 2-8 9
Pickens 3 8 0 1-8 9
Sevier 3 8 0 1-7 9
Shelby 3 8 0 1-7 9
Sumter 3 8 0-2 3-8 9
Bill Washington 3 7 0-2 3-8 9
Howe 2 8 0 1-7 8-9
Leader 4 8 0-2 3-9
Leader 4 7 0-3 4-9
Leader Manifest (British):
Leader Seniority Initiative Inept Capable Exceptional
Arbuthnot 1 6 0-4 5-9
Brown 3 8 0 1-8 9
Campbell 2 7 0 1-9
Clinton 1 7 0-1 2-7 8-9
Cornwallis 2 8 0-1 2-8 9
Ferguson 3 8 0-1 2-8 9
Leslie 3 7 0-1 2-9
Parker 1 7 0-1 2-9
Prevost 2 7 0-1 2-8 9
Rawdon 2 7 0 1-7 8-9
Tarleton 3 8 0-1 2-8 9
Stewert 3 7 0-1 2-9
Leader 5 4 5 0-4 5-9
Leader 6 4 6 0-3 4-9
Leader 7 4 7 0-2 3-8 9
S&T 304 | MAY – JUN 2017 R21
ST304_American Revolution in the South_Rules[EHv9]-v5.indd 21 2/9/17 9:22 AM