thank you for your order! - kalmbach media · thank you for your order! ... that the foil doesn’t...
TRANSCRIPT

Thank you for your order! Enjoy your Scale Auto Direct–Downloadable Article.
Please remember that this copyrighted material is for your use only. It’s unlawful to share or distribute this file to others in any way including e-mailing it, posting it online, or sharing paper copies with others.
Sincerely,
The staff of Scale Auto
Troubleshooting Guide:
Please note: Packages are color intensive. To save color ink in your printer, change your printer setting to grayscale.
SavinG packaGeSave the package when you download the PDF. Click on the computer disk icon in Adobe Acrobat, or go to File, Save.
My prinTer won’T prinT The TexT correcTlyClose all other programs/applications and print directly out of the Acrobat Reader program, not your Web browser. Printing problems are caused by not enough free system memory.
paGeS are noT prinTinG full SizeSet your printer to print 100% and make sure “print to fit” is not checked under printer setup or printer options.
If you have suggestions on how we can improve this product or have topics you’d like to see in future Information Station packages, please contact us at [email protected]
SCPDF007
8
www.scaleautomag.com
P R O D U C T S

P R O D U C T SScale Auto Direct – Downloadable Articles
Kustov Collection:Tutorials

AIRCRAFT AND ARMOR modelers have darkened the panel lines on their models for years, butuntil recently the technique wasn’t used much on car models. Many times the effect is donewith black markers, and the result looks toylike – especially on light paints such as yellow or
white. Here’s how to darken the trunk lid of a yellow Ferrari 250 GTO so it looks realistic.
by ALEX KUSTOV
Add realism with thiseasy-to-learn technique
Wash thosepanel lines!
You’ll need flat acrylic paint (I prefer Tamiya,but other brands will work too), acrylic thin-ner, cotton swabs, a fine brush, model waxsuch as Last Detail’s "The Treatment" orTamiya wax, and a cotton cloth.
1
Be sure the paint has cured, and if the bodyis polished and waxed, that’s even better.Otherwise, the panel lines can clog with pol-ish and wax, and the paint may come off whenyou remove the polish residue. Likewise,apply decals after the wash is complete.
2 3
Choosing the proper wash color is importantfor realistic-looking panel lines. Dark bodycolors such as gray, gunmetal, or brownshould have a black wash; for red, use a darkmaroon wash; for yellow, mix dark yellow andorange, or yellow and brown.

I mix paint on old CDs; it works great andthere’s no need to clean up! If you need tomix two or more colors, do so before addingthinner.
Thin the mixed paint until it’s almost theconsistency of the thinner itself – four orfive parts thinner to one part paint. Nowyou’re ready to apply the wash.
4 5
Darkening panel lines is asimple, effective way tomake your models lookmore realistic, as Alex
Kustov did on this Ferrari250 GTO.
6
Dip the tip of fine brush into the wash, and touch it to the panel line. Capillary action will drawsome paint into the line.
7 8
Continue in the same fashion until all panellines are filled with wash. Don’t worry if youget paint on the panels; you can remove it.
If the paint hasn’t dried, dip a cotton swabinto acrylic thinner and gently rub the excesspaint from the panels. Don’t press hard oryou’ll remove paint from the panel line too,and you’ll have to start over.
If the paint is dry and you can’t remove it with a cotton swab, put asmall amount of wax onto a cotton cloth and gently rub the paint untilit comes off. Repeat these steps for the other body panels.
When the excess paint is gone, give the body a light coat of wax toget rid of the fingerprints and bring back the shine.
9 10

Realisticrotors
Simple steps to makingvented disc brakes
by ALEX KUSTOV
MOST MODERN CARS have vented brake rotors, but most modelkits only include solid ones; vented rotors are more difficultand more expensive to mold. Scratchbuilding your own real-
istic-looking vented brake rotors is easy, and I’ll show you how.
To complete this project, you’ll need a pack of .020" and .040"sheet styrene, plastic cement, scissors, a small drafting compass,tweezers, a sanding stick (or sandpaper wrapped around a block), ahobby knife, a pin vise, a ruler, a pencil, and a small round file.
1Using the compass, draw two identical cir-cles on the .040" sheet styrene in the size
you want your rotor. Divide one circle intoequal sections. Make lines for the number ofribs you want. Most rotors have 15-25 ribs.Cut out the circles.
2Drill holes in the middle of both circlesusing a small drill bit in a pin vise. 3Cut several .8mm (or bigger, if you want
thicker rotors) strips of .020" styrene.You can also use square styrene rod; it’s abit more expensive, but will save time.

4Cut styrene strips into pieces the length ofthe rotor. Glue each strip with plastic
cement. Make sure the gaps between the stripsare identical. After the glue dries, sand the ribsto make the surface is flat.
5Finish the inside of the rotor with metallicpaint; I used Testor’s Steel Metalizer (no.
1420). Before you glue the halves together,sand off the paint to enhance adhesion.
6When you glue the parts together, use adrill bit, a toothpick, or a suitable diame-
ter wire to align the pieces. After the glue isdry, sand the rotor’s edge to ensure that therotor stays round.
7Before painting the rotor, cut a smaller-diameter circle from .020" styrene and drill
a hole in the center the same size as the rotor’shole. Glue the circle to the middle of the rotor.When the glue dries, use a small round file toenlarge the holes so they fit the model’s axle.
8To add realism, scratch the rotor’s sur-face with a sanding stick to imitate brake
pad marks. Mount the rotor on a piece ofsprue and rotate it while you press againstthe sanding stick.
9Here’s a completed rotor. I didn’t smooththe surfaces and edges of this rotor
enough. If you take your time, work carefully,and remove sanding marks, your rotors willlook terrific.
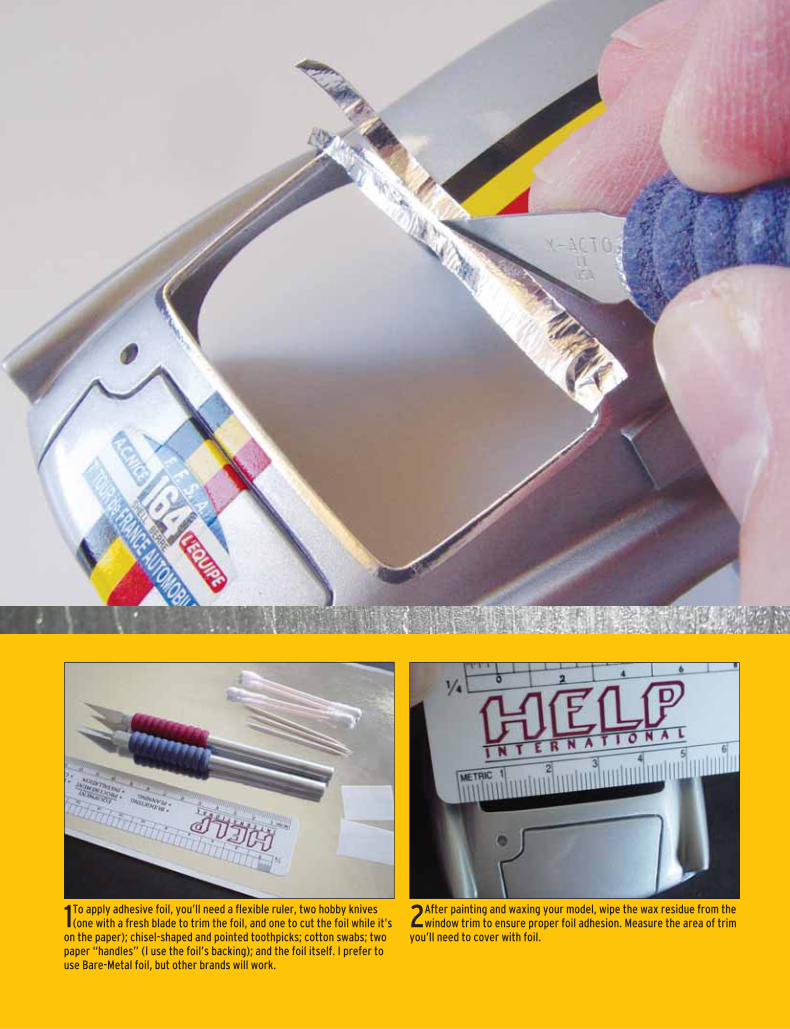
1To apply adhesive foil, you’ll need a flexible ruler, two hobby knives(one with a fresh blade to trim the foil, and one to cut the foil while it’s
on the paper); chisel-shaped and pointed toothpicks; cotton swabs; twopaper “handles” (I use the foil’s backing); and the foil itself. I prefer touse Bare-Metal foil, but other brands will work.
2After painting and waxing your model, wipe the wax residue from thewindow trim to ensure proper foil adhesion. Measure the area of trim
you’ll need to cover with foil.

How to use foil to enhance window trim by ALEX KUSTOV
3Measure the foil, and using a ruler as a guide, cut a wider-than-needed strip of foil with your knife (but don’t cut through the backing
paper). Don’t use your new blade for this process – foil quickly dullsblades, and you’ll need a sharp one to trim the foil later.
4Lift one end of the foil about 5mm off its backing with a knife blade ortoothpick, then slide a paper “handle” underneath the foil.
FearlessFearless
Me
MODELERS HAVE SEVERAL options for replicating chromeparts on scale cars, including painting, sending parts out toplating services, or applying adhesive foil.
Applying metal foil is often the quickest and easiest route, becauseno painting is necessary and there’s no waiting for parts to arrive.
Molded-in items such as door handles and trim pieces are perfectcandidates for foil, because they often can’t be detached and sent
away for plating, and painting them requires an extremely steadyhand and plenty of drying time.
Some people consider foiling a tedious and difficult process,but it doesn’t have to be that way. In this article, I’ll demonstrate howto apply self-adhesive chrome foil, and hopefully take away someof the fear that often seems to be associated with its use. You’ll beon your way to first-rate foiling before you know it!

9Gently fold the foil inside the body. Firmly press the edges to ensurethat the foil doesn’t wrinkle.
13Use your new blade to trim the foil. Don’t press the blade too hardagainst the paint (this is why you need a new blade) or it may chip.
If the blade is sharp, it’ll cut the foil easily. Be patient, and work slowly.14After all trimming is done, use a chisel-shaped toothpick to lift the
foil at the edge. If the foil isn’t burnished well, all of the foil willcome off. Gently pull the excess foil off with your fingers or a handle.
5Press the foil down firmly, making sure it sticks to the handle. Usethe handle to pull the foil off of the backing paper. Repeat the proce-
dure from the other end. 6Holding the strip by the handles, transfer it to the model and position
the strip. Starting from the center edge, use a cotton swab to lightlyrub down the foil on the edge only.
10This is how the trim should look. The rest of the foil isn’t burnished tothe body, making it easier to remove the excess foil after trimming.

7When the foil has adhered to the model, gently pull the handles downto remove them. Continue pressing the foil with the swab – again,
only at the edge.8Use your new blade to make several cuts from inside. This will pre-
vent the foil from wrinkling when you wrap it around the window.
11Burnish the foil from the inside, again using the cotton swab. 12Now burnish the foil from the outside with a round toothpick. Don’tpress hard, or the foil might tear.
15Again, burnish the foil with the pointed toothpick, being careful notto tear the foil. 16Rub the foil down with a cotton swab to remove the adhesive residue
and to polish the trim. Repeat the steps for the rest of the window. Nowyou have realistic-looking chrome window trim, without messy painting.

ADDING SEATBELTS is one of the best ways to increase the realism of
a model car’s interior. However,the problem with adding front seatbeltsis that in most modern cars, the belts aremounted on the B-pillar between the frontand rear doors, and most kits don’t haveinterior panels on which to attach seat-belt brackets.
I have a way to solve this problem; fol-low along as I explain how to add good-looking seatbelts for the front seats ofyour model car.
You’ll need strong, thin sheet styrene, scis-sors, wire cutters, needle-nosed pliers,tweezers, thin wire, belt ribbon (or other beltmaterial), photoetched buckles, super glue,the paint you used for the interior, and acouple of fine brushes.
I used thin wire from Radio Shack to makethe belt’s bracket. Cut about 1⁄2" of wire andstrip the insulation. With your pliers, squeeze1⁄16" of the wire to a flat end. When you’redone, the bracket should look like this.
Wrap the wire around some flat tweezers,making sure the flat end is on the inside.When you remove the wire, you should havesomething similar to this shape; this is thebelt bracket.
Use scissors to cut a thin strip of sheetstyrene, slightly thinner than the model’s B-pillar, and trim the top at an angle. Attach theflat part of the bracket to the outside of thestyrene strip with super glue. Once dry, applymore glue to the joint with a toothpick.
Buckleup!1
Building realistic-looking seatbelts for your models by ALEX KUSTOV
2 3 4

Trim the wire with wire cutters and file thecut with a needle file or a sanding stick. Becareful not to break the joint.
Thread some seatbelt material (I used 1⁄16"craft-store ribbon) into a photoetchedbuckle. Leave some of the ribbon from bothends – you’ll see why later.
Thread the upper portion of the ribbon intothe bracket, making sure that the ribbonmoves freely.
Use a fine brush to paint the visible portionof the belt panel with the same paint youused for the interior door panels. Make sureyou paint both sides, but leave the bottomarea paint-free – you’ll use it to glue thebracket to the door panel.
Thread the ribbon back into the bracket. Before gluing it, check theangle of the B-pillar on the body to make sure the bracket and the“belt pillar” are aligned. Glue the bracket and the ribbon to thestyrene strip. If the fit between the new belt panel and the body istight you may have to cut a groove in the back of the door panel. Gluethe rest of the ribbon to the panel and trim the ribbon.
Here’s the completed assembly. When you insert the interior tub intothe body, you might want to glue the bracket to the B-pillar forgreater realism. Now you have great-looking front seatbelts!
Hold the assembly with the flat-end tweez-ers and check the ribbon’s length; it shouldreach the end of the door panel. Trim theribbon and remove it from the bracket.
5 6 7
8 9
10 11

Shockvalue
by ALEX KUSTOV
Simple steps to scratchbuilding
realistic shock absorbers
MORE OFTEN THAN NOT, it’s the little itemsthat can make the difference between adetailed model and a superdetailed show-
stopper. Enhancing things such as shock absorberscan give your model that extra bit of dazzle.
Follow along as I show how to add some “shockvalue” to your model.
1
You’ll need sheet styrene, a round file or a suitable-diameter rod (likea brush handle), model knife, pin vise, tweezers, cutters, super glue,aluminum tubing (two pieces that almost fit flush into each other),and thin steel wire of appropriate color (or you can paint the wire).
Glue the smaller-diameter aluminum tubing into the bigger tube. Thiswill be the body of the new shock absorber.
2

Cut the tubes so they are the same length as the plastic kit part.Depending on the shock absorber, see which section of the plasticpart you need to keep; in this case, all I needed was the tiny piece pic-tured at the bottom.
Wind some thin wire onto a round file or other suitable-diameter rod(I used a paintbrush handle). Try to maintain even spacing betweenthe coils.
Cut four small sheet styrene circles of slightly larger diameter thanthe brush handle you used to make the spring. Drill a hole in the mid-dle of each circle. Two circles must fit the lower part of the shock,and two must fit the upper part, so the diameter of the holes will bedifferent.
Glue one of the circles to the lower part of the shock, put the spring ontop of it, and place the second plastic circle on top of the spring. Securethe second circle with super glue, and smooth the edges with a sandingstick. Attach the small part from the plastic shock, and you are done.Paint according to the kit instructions. Repeat for the other shocks.
It’s even easier to perform this operation with newer-style shocks,since they already have the small circles molded in. Just cut the plas-tic spring, substitute the shock with aluminum tubes and the plasticspring with wire, and assemble.
When properly painted, this shock absorber looks far superior to thekit part and dramatically enhances your model. Give it a try!
3 4
5 6
7 8

Fantasticfloor mats
HAVE YOU EVER LOOKED at a great model interior andthought, “something is missing”? Maybe it’s the floormats! Floor mats are a great way to add more realism to
your model’s interior. To make realistic floor mats, you’ll need sheet styrene (the
thinnest you can find; I used .010"), thin coated wire, flocking,super glue, paint, a hobby knife, tweezers, a sanding stick, andpliers with jagged jaws.
In just a few minutes, you can add a classy feature that’srarely seen on our models. Let’s get started!
Add realism to your model’s interiorwith this simple technique
by ALEX KUSTOV
1 2 3
Cut the shape of your floor mats from sheetstyrene. Test-fit them on your model and bendthe plastic to shape. When the shapes are cor-rect, round the corners with a sanding stick.
Using super glue applied with a toothpick,glue the coated wire around the mat’s edge;this will be the trim.
Don’t worry if you get some glue on the mats orif the trim isn’t perfectly aligned; simply makesure the trim is glued securely to the plastic.When the glue is dry, sand the imperfections.

4 5 6
7 8 9
10 11 12
13 14 15
When finished, test-fit both mats in thefoot wells, checking for proper alignmentand curvature.
Paint the mats using the appropriate color.Flocking will cover small paint imperfections,so the mats can be brush-painted.
Using a fine brush, cover both mats withwater-diluted white glue. Be careful not toget glue on the trim, though.
For the next step you’ll need a pair of pliersthat look similar to these; the jagged jawsare the key.
Hold the plastic plate between the plier jawsand squeeze gently to emboss the plastic. Mypliers weren’t wide enough to cover entireplastic plate, so I had to squeeze it threetimes, which resulted in some problems withgroove alignment.
Paint the plastic flat or semigloss black andglue it to the driver’s-side mat. Now it lookseven more real!
Sift some flocking over the floor mat andlet it dry for 30 minutes. After the glue isvisibly dry, lightly press the flocking downwith your finger.
Almost done! Shake the flocking off the floormats, and let them dry overnight. Now theylook realistic! You may leave your mats as-isand they’ll greatly enhance the interior, or …
… you can make them even more realistic!Cut a small rectangular piece from thesame sheet styrene (or thin leather), andround the corners.
If the driver’s-side mat interferes with thepedal assembly, trim it to fit around the ped-als. Test-fit the mat and use a pencil or mark-er to indicate the pedal locations.
Use a sharp hobby blade to carefully cut theholes for the pedals. You’re almost done!
Glue the mat to the floor and then install thepedals. Now you have the ultimate floor mats!

Add style and realism tointeriors with these easyenhancements
by ALEX KUSTOV
VIPseatsM
ANY BUILDERS PUT lots of effort into making amodel’s interior look great, but when it comes todetailing, the kit-supplied seats are often over-
looked. With a little extra effort, the seats can becomemuch more realistic. If you’re building a convertible or open-top model, this added detail is even more noticeable.
To perform these enhancements, you’ll need regular and chisel-tipped hobby knives, a pin vise and drill bits, tweezers, scissors, sand-paper (or sanding sticks), and cutters. You’ll also need primer, paints,super glue, and .015" steel rod or wire.
“Take a seat” and let’s get to work.
Remove the headrests by making several cuts with a sharp blade,then break the headrest loose from the back. Smooth the pieces witha sanding stick; make sure they are the same height and shape.
If the seats don’t have backs, cut some .010" sheet styrene and glueit to the open areas. When the glue is dry, trim the excess plastic andsand the edges. If a gap is still noticeable, fill it with putty.
This Hasegawa Ferrari 328GTS seat is typical of many kit-supplied units.Although it looks good straight from the box, it’ll look much more accu-rate when the enhancements are complete.
1 2
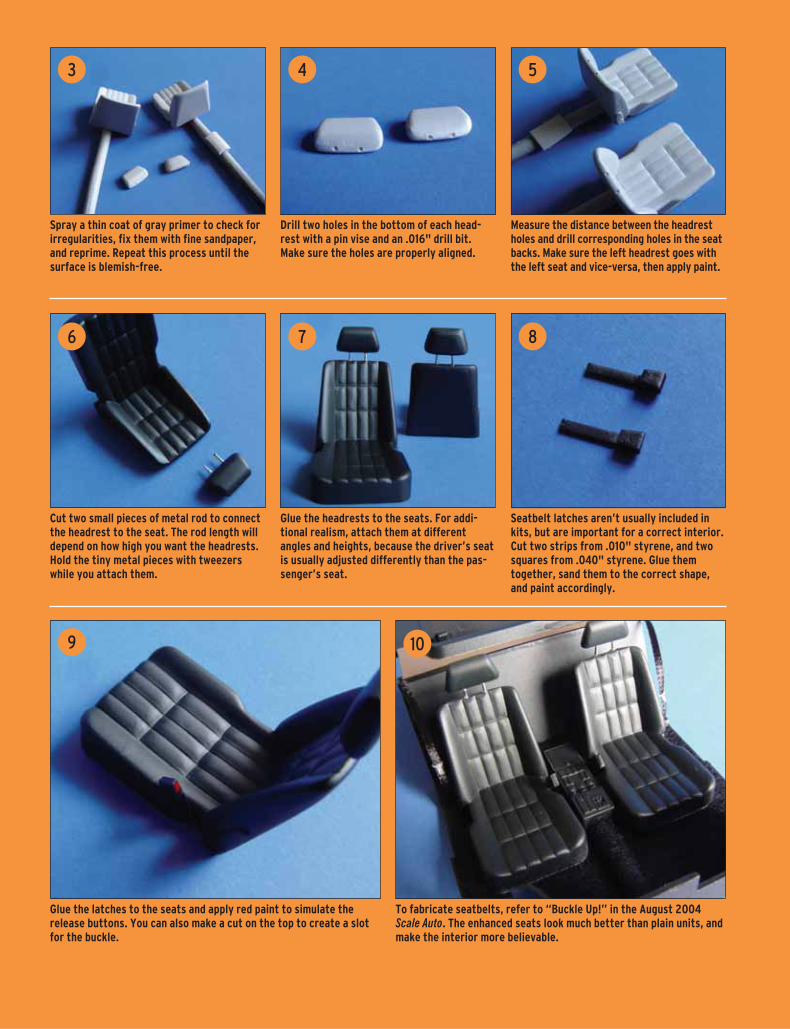
Spray a thin coat of gray primer to check forirregularities, fix them with fine sandpaper,and reprime. Repeat this process until thesurface is blemish-free.
Drill two holes in the bottom of each head-rest with a pin vise and an .016" drill bit.Make sure the holes are properly aligned.
Measure the distance between the headrestholes and drill corresponding holes in the seatbacks. Make sure the left headrest goes withthe left seat and vice-versa, then apply paint.
Cut two small pieces of metal rod to connectthe headrest to the seat. The rod length willdepend on how high you want the headrests.Hold the tiny metal pieces with tweezerswhile you attach them.
Glue the headrests to the seats. For addi-tional realism, attach them at differentangles and heights, because the driver’s seatis usually adjusted differently than the pas-senger’s seat.
Seatbelt latches aren’t usually included inkits, but are important for a correct interior.Cut two strips from .010" styrene, and twosquares from .040" styrene. Glue themtogether, sand them to the correct shape,and paint accordingly.
Glue the latches to the seats and apply red paint to simulate therelease buttons. You can also make a cut on the top to create a slotfor the buckle.
To fabricate seatbelts, refer to “Buckle Up!” in the August 2004Scale Auto. The enhanced seats look much better than plain units, andmake the interior more believable.
3 4 5
6 7 8
9 10

1 2 3
4 5 6
Upholster your model’s interior
using the real thing
When recreating a leather inte-rior in scale, nothing looks more realistic than bona fide
leather, and upholstering a model kit’s interior isn’t as difficult as you may think.
You don’t need much leather for a typical 1/24 scale kit. Depending on the amount of upholstery, a 4 x 6 swatch should suffice. This will
also give you enough material in case you make an mistake or two.
There are some things to take into consideration: Light-colored leathers tend to get darker during application, and softer material will be more difficult to “skive” (a process of cutting off thin layers of leather). However, virtually any leather can be used.
In this article I will demonstrate some basic leather-working meth-ods and some ways to create realis-tic leather panels for scale interiors.
Thanks to Mike Walter for giving me a detailed explanation of the dia-mond-pattern technique.
This leather is thick and would be nearly impossible to use in its current form. We need to make it really thin.
Using a fresh hobby blade, cut a piece of leather a bit larger than you’ll need to cover the panel. Find a hard surface and start skiving thin layers. When the leather becomes thin, slow down and frequently check the thickness.
This is the leather before and after the skiving process – quite a difference. It’s possible to make it even thinner, but this will do.
Before gluing, plan how you’ll fold the leather. To attach it, I use Elmer’s white glue. You can use thick super glue, but be very careful because it can soak through the leather.
Apply glue into every crease, or the leather will bubble. Stretch the material as much as possible to make it uniform and to eliminate out-of-scale grain. When possible, cover the kit part with one big leather piece rather than with several small pieces.
It’s easier to work with flat parts, such as door panels and seat backs. Seats can be upholstered in leather, but that can be a com-plicated affair if they have curvy surfaces. Although this door panel is simple, it’ll look better than painted plastic. The upper black trim is also covered in leather.
BASIC TECHNIQUES
by ALEX KUSTOVLessons inleather

7 8 9
10 11
12 13 14
15 16
PATTERNED LEATHERNow that you know the basics, let’s look at how to emboss
leather to create patterns. With this technique, you will be
able to effectively replicate diamond- or tuck-and-roll-pat-terned leather upholstery.
For this technique, you’ll need a wet cloth, a small metal ruler, a cutting board, and a small hammer (I misplaced my hammer and used pli-ers instead).
Let’s make a diamond pattern on the uphol-stery. Cut the leather to the shape you need, and wet it with a damp cloth until the water has soaked almost all the way through.
Turn the leather over and lightly wet it from the other side. This won’t help the embossing process, but will help the leather stay in place during embossing.
Left: Place the metal ruler edge-down on the leather. Tap it with the hammer two or three times; don’t hit too hard or you can cut the hide. Make sure the lines are evenly spaced.
Right: When the embossing is finished, dry the leather – a hair dryer will speed up the pro-cess. It should return to its original color, but the embossed lines will be darker. Other tools can be used to emboss different patterns.
ASSEMBLY
Test-fit each panel several times before glu-ing it in place – gaps will mar the interior’s appearance.
Find or mix a color that matches your model’s leather and paint the entire interior with it. The hue pictured here is similar to the color of the leather I used.
Working from the bottom up helps conceal gaps. I covered the driveshaft tunnel first, then applied flocking, which covers the seams between the leather and the floor. The leather that will go on the rear seat will hide the tunnel’s rear seam.
Left: After the panels are installed, burnish the seams with a fine burnishing tool or a smooth, round toothpick. If needed, make pip-ing from thin wire and run it over the seams. The more leather detail you add, the better your model’s interior will look.
Right: Using real leather in a model interior not only enhances the look of the completed kit, it also smells like a 1:1 leather interior!

Subscribe today! Call 800-533-6644
Monday-Friday, 8:30 a.m. – 5 p.m. Central Time.
Outside the U.S. and Canada, call 262-796-8776, ext. 661.
Or order online at ScaleAutoMag.com
to Your
Modeling Skills
Subscribe to Scale Auto and you’ll get loads of fantastic hands-on pointers for giving your modeling skills more punch. With our new Scale Auto Roundtable, where modeling experts tackle problems and offer easy solutions, and our new Tuner column, you’ll find more of the topics you love in every issue.
Each issue is packed with• Expert model-building tips
• Complete and accurate product reviews
• Painting and detailing know-how
• All types of autos – from muscle cars to tuners
• Crisp photography of finished models
• And much more!
Add MuscleC
IR-A
DW
-06X
1041
RH
Subscribe today! Call 800-533-6644
Monday-Friday, 8:30 a.m. – 5 p.m. Central Time.
Outside the U.S. and Canada, call 262-796-8776, ext. 661.
Or order online at ScaleAutoMag.com/promo Enter code: IK63S