test dovetail saws latest gorilla glue • atc rider block
TRANSCRIPT
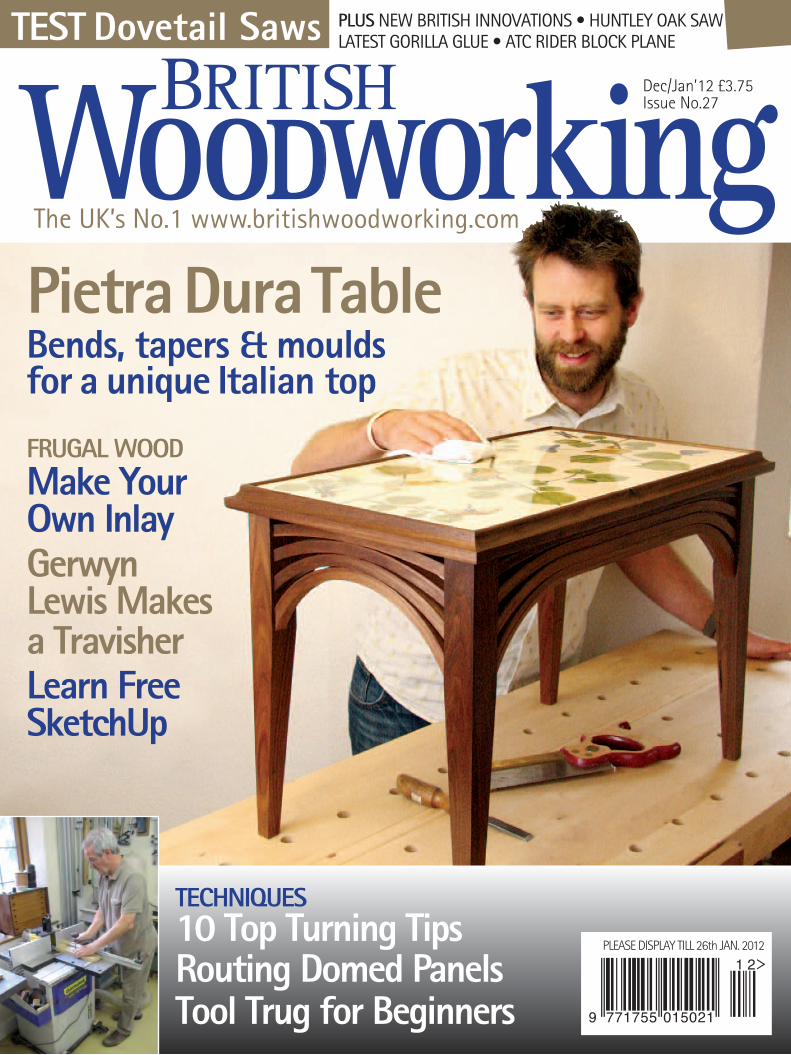
a?Dec/Jan’12 £3.75Issue No.27WooDworkingBRITISH
The UK’s No.1 www.britishwoodworking.com
Pietra Dura TableBends, tapers & moulds for a unique Italian top
FRUGAL WOODMake Your Own InlayGerwyn Lewis Makes a TravisherLearn Free SketchUp
TECHNIQUES10 Top Turning TipsRouting Domed Panels Tool Trug for Beginners
PLUS NEW BRITISH INNOVATIONS • HUNTLEY OAK SAWLATEST GORILLA GLUE • ATC RIDER BLOCK PLANETEST Dovetail Saws
PLEASE DISPLAY TILL 26th JAN. 2012

Pro Project
10 British Woodworking December/January 2011/12 British Woodworking December/January 2011/12 11
Pietra Dura table
The Pietra Dura Table
Britain practising pietra dura, is himself a furniture maker, having trained at the Chippendale International School of Furniture in Scotland. So committed is he to stonework that he was very happy to share the commission with Steve, which brought three heads and hearts together to come up with a design.
Working togetherThat was more than a year ago, which fortunately gave Steve and Thomas time to work on other projects together while the table commission was finalised. Steve made the first of five boxes earlier this year for Thomas, on which is mounted a small pietra dura panels a pair of tui birds. Steve had the delicate task of designing the table to meet Bryony Cohen’s vision, whilst incorporating some of Thomas’s own ideas. The only guidance he’d been given was that
Commissions can come from the most obscure directions. Last year, someone, and he still doesn’t know who, recommended Steve Prescott’s
work to a lady who imports furniture. She then mentioned him to a friend, Bryony Cohen, who was looking to have a table made as a birthday present for her husband. It wasn’t just any old table. Bryony, who works at Barts Hospital in London, was planning to have a piece of stone marquetry, known as pietra dura, as the table top. “It was designed by Nelly Pecheva,” Bryony explains, “who is our senior graphic designer. She’s Bulgarian and a talented artist as well as designer. It was actually quite a difficult project as we didn’t want anything too female (ie. flowers), as it was a present for a man, or too three dimensional, which would have entailed a lot more work for Thomas [Greenaway, who made the mosaic] in the shading. So we fixed on leaves and a few animals. It also had to be a pattern that could be seen from any angle as, of course, it was no use producing something which could be viewed from one side only. Ironically, Thomas Greenaway, who is probably the only full-time craftsman in
Bryony had a photo of a table she liked, with a small fretwork bracket bracing the legs and top (Pic.2). Steve tried to build in cabriole legs (Fig.2), which Thomas favoured, but in the end they agreed on tapering for a more contemporary look. Bryony also wanted the table to be dark, so Steve chose American black walnut, which doesn’t have a strong grain patterning that might otherwise distract the eye from the stonework. To reproduce fretwork in a more modern style, Steve devised an apron of thin curved fingers. These touch at the centre, where they are dowelled and glued, and are dowelled into the legs. One of the most challenging issues was how to decide on the differing radii of the four fingers. “Does anyone know how to work out the radius of each finger so that they are spaced out consistently where they meet the legs, but touch at the centre?” Steve asks. “It had me foxed, and in the end I had to resort to trial and error to produce four templates for bending and laminating the fingers.”
Asked to design and make a table to display marquetry in stone, Steve Prescott mimics fretwork with bent ‘fingers’ According to Thomas Greenaway, the
marbles and semi-precious stones used for pietra dura are sliced into 2-5mm thicknesses. Thomas uses paper templates from the original drawing to mark up the pieces and the holes to be cut out. He uses a bow saw to cut the pieces out by hand, with a moistened abrasive applied to the wire held in the saw to cut through the stone. You then have to file the pieces to fit, making sure there is no daylight showing. A leaf, for instance, might take 40 minutes to position. When the pieces are inserted they have to be as close to level as you can imagine, so there is the least possible finishing needed later, which is done largely by hand with a series of abrasive powders. Thomas learnt pietra dura in Florence, studying there for four years. The ‘craft’ originates from that part of Italy, where it has been practised since the 16th Century, though it was influenced by Roman Opus Sectile mosaics. Even earlier, mosaics comprising shell, lapiz lazuli and limestone were being made by Sumerians in Southern Mesopotamia (now Iraq), with an example of that being the Standard of Ur, dating from 2600-2400BC, can be found in the British Museum. Francisco de Medici helped establish pietra dura in Florence, where the court workshops were known as the Opificio delle Pietre Dure.
Details Visit greenawaymosaics.co.uk.
Pietra dura
The legs are tapered on their inside faces and are 40mm square in section at the top, and 20mm at the foot
Fig.1 Perspective view of table
Fig.2 Alternative designs
Cabriole legs give the table a traditional look
Curved legs are more contemporary, and give a lighter feel to the table
432
315
580
135
Pic.3 The curved fingers are glued together to create panels for the apron, and are dowelled into the legs
Pic.3 Thomas Greenaway has learnt how to use different shades of stone to create a three-dimensional effects
Pic.2 The only guidance Steve was given, was a photo of an older table the client liked. His steam-bent and laminated ‘fingers’ are designed to mimic the fretwork brackets
Pic.1 The key techniques are bending, tapering and making the moulding for the top frame

Pro Project
12 British Woodworking December/January 2011/12 British Woodworking December/January 2011/12 13
Pietra Dura table
W ith the apron panels glued up, Steve moved on to the legs,
which are tapered on their inner faces. The leg components are 40mm square at the top, tapering down to 20mm square at the floor. Steve made a jig for tapering the legs, first removing the waste on the bandsaw and then smoothing the faces with a spiral cutter on the spindle moulder. As you can see the jig comprises a baseboard, on which is fixed two end stops, two back stops and a block to take a toggle clamp. The leg overhangs the baseboard at an angle for tapering on the bandsaw. To rough within 1mm of the line, Steve ran the back edge of the baseboard against the rip fence on the bandsaw. He had to confess to having made a mistake with the toggle clamp block, which overhangs the back edge of the baseboard (Pic.6). So he had to insert a
shallow fillet against the rip fence so that the block doesn’t foul the bandsaw fence.
Spindle mouldingOnce the waste has been removed Steve moves to his Rojek spindle moulder (which he bought from eBay recently). This has a Spiral Planer Block from Wealden, with a guide bearing against the leading edge of the baseboard (Pic.6). This works just like a trimming cutter on a router table, with a bearing on the shank of the cutter, rather than on the end of the cutter. The only difference is that the cutterblock on the spindle moulder is much larger and produces a much finer finish. Because the legs are only tapered on two faces, it’s an easy job to spin the leg through 90° to machine the other taper once the first one is done. The tapered face will be pointing skywards, so there’s no problem with the leg wobbling in the jig.
To produce the curved fingers, Steve produced four formers (one for each radii). He steamed the 3mm-thick black walnut laminates for 20 minutes in a steam box to make them more pliable, and inserted them in the former. “They felt quite brittle,” Steve explains. There are two of each curve, so he bent and then laminated them double width (Pic.4), and ripped them on the bandsaw once the glue had set, then put them across the planer and through the thicknesser. To create the apron the curved fingers are then Dominoed together, with three on the long ones and one Domino per end curve.
Pic.4 The fingers are about 12mm in section, but each is a different radius, so Steve had to make four different formers. He created the formers for the front and back (above) and for the ends. By laminating the fingers double width (above) Steve saved gluing time, and ripped them on a bandsaw later, followed by planing and thicknessing
Pic.6 Steve made a jig to hold the leg blanks for tapering. Initially he removed the bulk of the waste on the bandsaw (top left), with the jig running against the rip fence. The end stops ensure the leg doesn’t move. The same jig is then used on the spindle moulder against a ring fence below the cutter (left and right). The same technique could be used with a router table & bottom bearing
Tapering LegsUsing a bandsaw and spindle moulder for speed
Bending & GluingHow to make curved fingers for the apron
Fig.4 End elevation
395
315
275
355
Fig.3 Front elevation of table660
540
620
Pic.5 The long and short fingers being glued up in formers

Pro Project
14 British Woodworking December/January 2011/12 British Woodworking December/January 2011/12 00
Pietra Dura table
The final job for the table is to fix the pietra dura top to the underframe. This isn’t as simple as it might seem because the moulding has to hold the stonework done with a rounded ‘nose’. So Steve rebated the moulding on the lower and inside faces (Pic.9), but did not shape the moulding before cutting the mitres. This makes it easier to hold the rebated moulding against the fence of a mitresaw and assemble with frame cramps. The rebate on the inside face is to hold the stonework. The rebate on the bottom face of the moulding (B in Fig.5) is for a 5mm-thick, 50mm-wide mitred frame (C in Fig.5) that is screwed down into the apron, and up into the moulding. Though you can’t see it in the drawings and photos, the legs are actually 2.5mm proud of the top edge of the apron. Steve routed and pared out a 2.5mm deep recess from the corners of the supporting frame (C in Fig.5) to locate over the tops of the legs (A). This isn’t absolutely necessary but provides a tidier finish to the joint. Also, before shaping the profile, Steve added a Domino to each mitre to strengthen that joint (Pic.11). It was a close thing getting the Domino to fit into the mitre without breaking through, and Steve had to cut a notch out of each Domino for it to fit. He then cut the mitres and assembled the moulded part of the frame
with West’s epoxy. Once the glue was set Steve used a Trend 1/2in cove cutter to produce them main part of the profile (Pic.11). He then rounded over the lower part of the moulding with a rounding over cutter in his router table. The shaped ‘nose’ was more difficult because it is stopped, up against internal corners of the mitres. Having done almost everything else with machines and power tools, Steve picked up his Record 66 beading tool, though this won’t reach right into the corners because the fence runs against the inside of the frame. He had to pare the bullnose moulding by hand right into the mitred corners. Then he sanded it all and finished with Liberon Danish oil.
The important thing with the curved fingers is to consider them a single panel once they are glued together. Steve produced a holding jig from the templates he used to make the formers, so that the aprons can be held for jointing and drilling. The jig can be used with the sliding fence on a tablesaw to cut the ends of the aprons square. Steve then screwed a dowel drilling jig to the end of the holding jig to ‘drill’ holes for the dowels that fix the apron to the legs (Pic.7) with a router. The 6mm fluted dowels had to be cut down to fit into the ends of the curved fingers. He used a tip he learnt at David Savage’s to compress the beech dowels to make dry assemblies easier (Pic8).
Pic.7 Steve routed out jigs for holding the fingers so that the ends could be cut off square on the tablesaw (top). The same jig was used to line up the dowel holes for the legs with a dowel plate
Pic.9 The frame for the stone top comprises two parts. The rebated moulding holds the stone down, while the flat plate screws down into the table’s underframe and up into the moulding
Pic.10 Steve mitred the mouldings on a Festool Kapex mitresaw we’ve been testing. “It was absolutely spot on,” Steve explains. The rebated moulding (below) is formed with a Trend ogee cutter first, to create the main curve
Pic.12 The completed table
Pic.11 Steve meets Thomas Greenaway (top left) to fix the stone mosaic into the frame on the table. The rounded nose on the moulding that holds down the stone top was formed with a Record No.66 beading tool after assembly. The mitres are reinforced with 4x20mm Festool Dominos
Pic.8 Dry assembling dowel joints can be risky because the dowels can get stuck in the holes, and you can damage the joint trying to extract them. “I learnt this tip from Darren at David Savage’s,” Steve explains. “By rolling the dowel with a file you squash the fibres and it goes in and out of the drilled holes more easily. You have to press down quite hard.”
Joints for the table
Mitred frameCreating you own moulding to hold the stone mosaic in place on the table
FOUNDATIONS
TIPFig.5 Moulding (B) cut away to reveal supporting frame (C)
C B
A