test case gfe grid manager (gm 001-024) - national weather ... cases/grid_manager_gm... · hardcopy...
TRANSCRIPT

HARDCOPY UNCONTROLLED
Contract DG133W-05-CQ-1067; GFE Grid Manager (gm001-024) Use or disclosure of data contained on this sheet is subject to the restriction on the title page of this document.
Test Case GFE Grid Manager (gm 001-024) for the AWIPS
Contract DG133W-05-CQ-1067
Prepared for:
U.S. Department of Commerce NOAA/NWS Acquisition Management Division
SSMC2, Room 17364 1325 East-West Highway Silver Spring, MD 20910
Prepared by:
Raytheon Company STC Office
6825 Pine Street Omaha, NE 68106

HARDCOPY UNCONTROLLED
Contract DG133W-05-CQ-1067; Test Case GFE Grid Manager (gm001-024) Use or disclosure of data contained on this sheet is subject to the restriction on the title page of this document.
i
Submitted By:
___________________________________________________________ ___________ Test Engineer Date Approved By:
___________________________________________________________ __________ Program Manager Date ___________________________________________________________ __________ Mission Assurance Quality Date

HARDCOPY UNCONTROLLED
Contract DG133W-05-CQ-1067; Test Case GFE Grid Manager (gm001-024) Use or disclosure of data contained on this sheet is subject to the restriction on the title page of this document.
ii
Revision History
Revision Date Affected Pages Explanation of Change
1.0 11 July 2008 ALL Initial Draft
2.0 8 August 2008 6-26 Redlines per PDT
3.0 4 September 2008 ALL Redlines per DT

HARDCOPY UNCONTROLLED
Contract DG133W-05-CQ-1067; Test Case GFE Grid Manager (gm001-024) Use or disclosure of data contained on this sheet is subject to the restriction on the title page of this document.
iii
Table of Contents
1.0 SCOPE ........................................................................................................................... 4 2.0 APPLICABLE DOCUMENTS.......................................................................................... 5
2.1 Source Documents...................................................................................................... 5 2.2 Reference Documents................................................................................................. 5
3.0 TEST CASE DESCRIPTION .......................................................................................... 6 3.1 Assumptions, Constraints and Preconditions .............................................................. 6 3.2 Recommended Hardware ........................................................................................... 6 3.3 Test Inputs .................................................................................................................. 6 3.4 Test Outputs................................................................................................................ 6
3.4.1 GFE GUIs Tested................................................................................................................ 6 4.0 TEST SCENARIO........................................................................................................... 7 5.0 REQUIREMENTS VERIFICATION TRACEABILITY MATRIX (RVTM)......................... 28

HARDCOPY UNCONTROLLED
Contract DG133W-05-CQ-1067; Test Case GFE Grid Manager (gm001-024) Use or disclosure of data contained on this sheet is subject to the restriction on the title page of this document.
4
1.0 SCOPE
See Software Test Plan.

HARDCOPY UNCONTROLLED
Contract DG133W-05-CQ-1067; Test Case GFE Grid Manager (gm001-024) Use or disclosure of data contained on this sheet is subject to the restriction on the title page of this document.
5
2.0 APPLICABLE DOCUMENTS
2.1 Source Documents • None
2.2 Reference Documents
• Legacy NWS GFE Acceptance Test Case ID Numbers: gm001 – gm024. • Legacy NWS GFE Test Cases for Test Areas AC – VP. • Section 3.1.3 of the AWIPS D-2D User’s Manual Build 8.1. • Software Test Plan for the Advanced Weather Information Processing System
Project, Contract #DG133W-05-CQ-1067, August 2008. • The Silver Spring NWS AWIPS 1 test bed application. • Release OB8.1 and OB8.2 of the Weather Event Simulator (WES). • Rational RequisitePro.
HARDCOPY UNCONTROLLED
Contract DG133W-05-CQ-1067; Test Case GFE Grid Manager (gm001-024) Use or disclosure of data contained on this sheet is subject to the restriction on the title page of this document.
6
3.0 TEST CASE DESCRIPTION This test case verifies that the edit area NWS test cases.
3.1 Assumptions, Constraints and Preconditions • Several weather elements are loaded. • There are multiple grids available for the weather elements (at minimum T, Td, Wind,
Wx, and Hazards weather elements). • TO9 software has been installed successfully. • CAVE, EDEX and pgAdmin III are running. • Data has been ingested. • Actions, Results, and Requirements highlighted in yellow indicate requirements
and/or capabilities to be included in the scope of future task orders. They are included here for purposes of continuity and traceability with the original AWIPS I test case documents.
3.2 Recommended Hardware
See Software Test Plan.
3.3 Test Inputs Section 4.0 below contains the test procedures for this test case. Sections 2.2 – 2.9 of the Software Test Plan contain general test inputs applicable to all TO9 test cases.
3.4 Test Outputs The results outlined in section 4.0 are met. 3.4.1 GFE GUIs Tested
• TBD

HARDCOPY UNCONTROLLED
Contract DG133W-05-CQ-1067; Test Case GFE Grid Manager (gm001-024) Use or disclosure of data contained on this sheet is subject to the restriction on the title page of this document.
7
4.0 TEST SCENARIO
Step # Action Result Pass/Failgm001 – Create grid from scratch
1. MB3 popup on a shadow block for a SCALAR Fcst weather element in the Grid Manager (GM), and select ‘Create From Scratch’ on the menu item.
A new grid appears. The data values in the grid are the default values, usually the weather element's minimum possible value. Shadow Blocks in the GM:
2. MB1 drag across several shadow blocks to select a time range for a Fcst SCALAR weather element in the GM. MB1 click ‘Grids’ -> ‘Create Grids From Scratch’ to bring up the Create Grids From Scratch dialog. MB1 click ‘Default Value’. Then set the Creation Interval and Duration to any value and MB1 click ‘OK’.
The Create From Scratch dialog opens. The Create From Scratch dialog closes. New grids appear. The data values in the grid are the default values, usually the weather element's minimum possible value.
3. MB3 popup on a grid for a SCALAR Fcst weather element in the GM. Verify that Create From Scratch is not available from the popup menu.
Verified.
4. MB3 popup on a shadow block for a VECTOR Fcst weather element in the GM and select ‘Create From Scratch’ on the menu item.
A new grid appears. The data values in the grid are the default values, usually 0 for vector data.
5. MB1 drag across several shadow blocks to select a time range for a VECTOR Fcst weather element in the GM. MB1 click ‘Grids’ -> ‘Create Grids From Scratch’ to bring up the Create Grids From Scratch dialog. MB1 click ‘Default Value’. Then set the Creation Interval and Duration to any value and MB1 click ‘OK’.
The Create From Scratch dialog opens. The Create From Scratch dialog closes. New grids appear. The data values in the grid are the default values, usually 0 for vector data.
6. MB3 popup on a grid for a VECTOR Fcst weather element in the GM. Verify that Create From Scratch is not available from the popup menu.
Verified.
7. MB3 popup on a shadow block for a WEATHER Fcst weather element in the GM, and select ‘Create From Scratch’ on the menu item.
A new grid appears. The data values in the grid are the default values, usually ‘<NoWx>’ for weather data.

HARDCOPY UNCONTROLLED
Contract DG133W-05-CQ-1067; Test Case GFE Grid Manager (gm001-024) Use or disclosure of data contained on this sheet is subject to the restriction on the title page of this document.
8
Step # Action Result Pass/Fail
8. MB1 drag across several shadow blocks to select a time range for a WEATHER Fcst weather element in the GM. MB1 click ‘Grids’ -> ‘Create Grids From Scratch’ to bring up the Create Grids From Scratch dialog. MB1 click ‘Default Value’. Then set the Creation Interval and Duration to any value and MB1 click ‘OK’.
The Create From Scratch dialog opens. The Create From Scratch dialog closes. New grids appear. The data values in the grid are the default values, usually ‘<NoWx>‘ for weather data.
9. MB3 popup on a grid for a WEATHER Fcst weather element in the GM. Verify that Create From Scratch is not available from the popup menu.
Verified.
10. MB3 popup on a shadow block for a DISCRETE Fcst weather element in the GM, and select ‘Create From Scratch’ on the menu item.
A new grid appears. The data values in the grid are the default values, usually the first defined discrete value in the serverConfig.py file.
11. MB1 drag across several shadow blocks to select a time range for a DISCRETE Fcst weather element in the GM. MB1 click ‘Grids’ -> ‘Create Grids From Scratch’ to bring up the Create Grids From Scratch dialog. MB1 click ‘Default Value’. Then set the Creation Interval and Duration to any value and MB1 click ‘OK’.
The Create From Scratch dialog opens. The Create From Scratch dialog closes. New grids appear. The data values in the grid are the default values, the first defined discrete value in the serverConfig.py file.
12. MB3 popup on a grid for a DISCRETE Fcst weather element in the GM. Verify that Create From Scratch is not available from the popup menu.
Verified.
13. MB3 popup on a grid for a non-Fcst weather element in the GM. Verify that Create From Scratch is not available from the popup menu.
Verified.
14. MB3 popup on a grid for a Fcst weather element that is locked by another user, as shown by the ‘red’ lock indicator, in the GM. If there are no ‘red’ locks, start a second GFE session and modify some data without saving it. Verify that Create From Scratch is not available from the popup menu.
Verified.

HARDCOPY UNCONTROLLED
Contract DG133W-05-CQ-1067; Test Case GFE Grid Manager (gm001-024) Use or disclosure of data contained on this sheet is subject to the restriction on the title page of this document.
9
Step # Action Result Pass/Failgm002 – Time Shift Grids using Copy option.
15. MB1 click on an isolated ‘T’ grid in the GM. Edit it as necessary to make it recognizable during the test. An isolated grid is one that has shadow blocks around it, as shown:
The temperature grid is created.
16. Save the modified grid using the button in the toolbar.
The grid is saved as indicated by the removal of the green lock
17. MB1 click ‘Grids’ -> ‘Time Shift...’ to bring up the Time Shift dialog. Select the ‘Copy’ option if not already selected. Set the time shift slider to a positive amount that will correspond to a shadow block within the weather element. MB1 click ‘OK’.
A new grid, which is a copy of the selected grid, appears the selected number of hours away from the original grid. A green lock confirms the change.
18. Save the modified grid using the button in the toolbar.
The grid is saved as indicated by the removal of the green lock.
19. Edit the grid from step #15 to make it look different than the previous grid.
Then save the modified grid using the button in the toolbar.
The grid is modified. The grid is saved as indicated by the removal of the green lock.
20. MB1 click ‘Grids’ -> ‘Time Shift...’ to bring up the Time Shift dialog. Select the ‘Copy’ option if not already selected. Set the time shift slider to a negative amount that will correspond to an existing grid, such as the value last chosen, within the weather element. MB1 click ‘OK’.
A new grid, which is a copy of the selected grid, appears the selected number of hours away from the original grid. A green lock confirms the change. To verify, you should MB1 click on the destination grid to make sure it has the changes made in step #19.
21. Save the modified grid using the button in the toolbar.
The grid is saved as indicated by the removal of the green lock.

HARDCOPY UNCONTROLLED
Contract DG133W-05-CQ-1067; Test Case GFE Grid Manager (gm001-024) Use or disclosure of data contained on this sheet is subject to the restriction on the title page of this document.
10
Step # Action Result Pass/Fail
22. Select a time range of multiple contiguous grids in the GM using MB1 drag, as shown:
The time range is selected.
23. MB1 click ‘Grids’ -> ‘Time Shift...’ to bring up the Time Shift dialog. Select the ‘Copy’ option if not already selected. Set the time to a positive amount that will correspond to only shadow blocks within the same Weather Element. MB1 click ‘OK’.
The pattern of selected grids appears in the appropriate shadow blocks. Make sure that the Spatial Editor (SE) shows that these newly created grids have the same values as the originally selected grids. A green lock confirms the change.
24. MB1 click ‘Grids’ -> ‘Time Shift...’ to bring up the Time Shift dialog. Select the ‘Copy’ option if not already selected. Set the time shift slider to a negative amount that will correspond to a shadow block within the weather element. MB1 click ‘OK’.
The pattern of selected grids appears in the appropriate shadow blocks. A green lock confirms the change.
25. Save the modified grid using the button in the toolbar.
The grid is saved as indicated by the removal of the green lock
26. Select the Grids -> Time Shift... menu option to bring up the Time Shift Dialog. Select the ‘Copy’ option if not already selected. Set the time to +1 hour. MB1 click ‘OK’.
The pattern of selected grids appears in the appropriate locations. Make sure that the SE shows that these newly created grids have the same values as the originally selected grids. A green lock confirms the change.
27. Save the modified grid using the button in the toolbar.
The grid is saved as indicated by the removal of the green lock
28. Select a time range of multiple non-contiguous grids in the GM using MB1 drag, as shown:
The time range is selected.
29. MB1 click ‘Grids’ -> ‘Time Shift...’ to bring up the Time Shift dialog. Select the ‘Copy’ option if not already selected. Set the time to many hours into the future. MB1 click ‘OK’.
The pattern of selected grids appears in the appropriate locations. A green lock confirms the change.
HARDCOPY UNCONTROLLED
Contract DG133W-05-CQ-1067; Test Case GFE Grid Manager (gm001-024) Use or disclosure of data contained on this sheet is subject to the restriction on the title page of this document.
11
Step # Action Result Pass/Fail
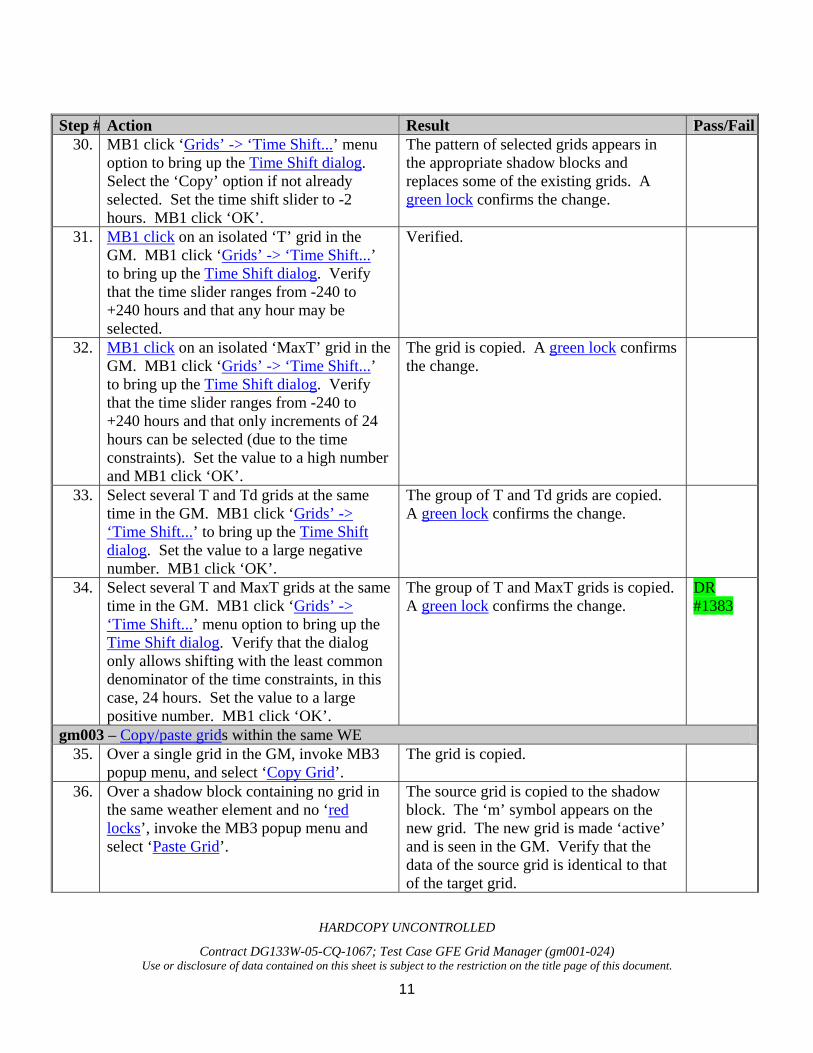
30. MB1 click ‘Grids’ -> ‘Time Shift...’ menu option to bring up the Time Shift dialog. Select the ‘Copy’ option if not already selected. Set the time shift slider to -2 hours. MB1 click ‘OK’.
The pattern of selected grids appears in the appropriate shadow blocks and replaces some of the existing grids. A green lock confirms the change.
31. MB1 click on an isolated ‘T’ grid in the GM. MB1 click ‘Grids’ -> ‘Time Shift...’ to bring up the Time Shift dialog. Verify that the time slider ranges from -240 to +240 hours and that any hour may be selected.
Verified.
32. MB1 click on an isolated ‘MaxT’ grid in the GM. MB1 click ‘Grids’ -> ‘Time Shift...’ to bring up the Time Shift dialog. Verify that the time slider ranges from -240 to +240 hours and that only increments of 24 hours can be selected (due to the time constraints). Set the value to a high number and MB1 click ‘OK’.
The grid is copied. A green lock confirms the change.
33. Select several T and Td grids at the same time in the GM. MB1 click ‘Grids’ -> ‘Time Shift...’ to bring up the Time Shift dialog. Set the value to a large negative number. MB1 click ‘OK’.
The group of T and Td grids are copied. A green lock confirms the change.
34. Select several T and MaxT grids at the same time in the GM. MB1 click ‘Grids’ -> ‘Time Shift...’ menu option to bring up the Time Shift dialog. Verify that the dialog only allows shifting with the least common denominator of the time constraints, in this case, 24 hours. Set the value to a large positive number. MB1 click ‘OK’.
The group of T and MaxT grids is copied. A green lock confirms the change.
DR #1383
gm003 – Copy/paste grids within the same WE 35. Over a single grid in the GM, invoke MB3
popup menu, and select ‘Copy Grid’. The grid is copied.
36. Over a shadow block containing no grid in the same weather element and no ‘red locks’, invoke the MB3 popup menu and select ‘Paste Grid’.
The source grid is copied to the shadow block. The ‘m’ symbol appears on the new grid. The new grid is made ‘active’ and is seen in the GM. Verify that the data of the source grid is identical to that of the target grid.

HARDCOPY UNCONTROLLED
Contract DG133W-05-CQ-1067; Test Case GFE Grid Manager (gm001-024) Use or disclosure of data contained on this sheet is subject to the restriction on the title page of this document.
12
Step # Action Result Pass/Fail
37. Over a single grid in the GM, invoke MB3 popup menu, and select ‘Copy Grid’. Over an existing grid in the same weather element and no ‘red locks’, invoke MB3 popup menu and select ‘Paste Grid’.
The source grid replaces the existing grid. The ‘m’ symbol appears on the new grid. The new grid is made ‘active’ and is seen in the GM. Verify that the data of the source grid is identical to that of the target grid.
38. Over a single grid in the GM, invoke MB3 popup menu, and select ‘Copy Grid’. Over a ‘red lock’ in the same weather element, invoke MB3 popup menu.
The ‘Paste Grid’ option is not available since the grid is locked by ‘someone else’. Note: If there are no ‘red locks’, start a second GFE and edit some data.
gm004 – Copy/paste grids from mutable WEs 39. Over a ‘T’ in the GM, invoke MB3 popup
menu, and select ‘Copy Grid’. The grid is copied.
40. Over a shadow block for ‘Td’, invoke MB3 popup menu. Select ‘Paste Grid’.
The source grid is copied to the shadow block. The ‘m’ symbol appears on the new grid. The new grid is made ‘active’ and is shown in the SE. Verify that the data of the Td destination grid is identical to that of the ‘T’ source grid.
41. Over another shadow block for ‘Td’, invoke MB3 popup menu. Select ‘Paste Grid’.
The source grid is copied to the shadow block. The ‘m’ symbol appears on the new grid. The new grid is made ‘active’ and is shown in the SE. Verify that the data of the Td destination grid is identical to that of the ‘T’ source grid. (This tests duplicate copies.)
42. Over a ‘Td’ grid in the GM, invoke MB3 popup menu and select ‘Copy Grid’.
The grid is copied.
43. Over an existing ‘T’ grid in the GM, invoke MB3 popup menu and select ‘Paste Grid’.
The source grid replaces the existing grid. The ‘m’ symbol appears on the new grid. The new grid is made ‘active’ and is shown in the SE. Verify that the data of the Td source grid is identical to that of the T target grid.
Copy/Paste between weather elements of different units, but convertable 44. MB1 click ‘Weather Element’ -> ‘Weather
Element Browser’ to bring up the Weather Element dialog. Add the NAM ‘T’ grid into the GFE.
The NAM ‘T’ grid is added to the GM.
45. Over a ‘T’ in the GM, invoke MB3 popup menu, and select ‘Copy Grid’.
The grid is copied.

HARDCOPY UNCONTROLLED
Contract DG133W-05-CQ-1067; Test Case GFE Grid Manager (gm001-024) Use or disclosure of data contained on this sheet is subject to the restriction on the title page of this document.
13
Step # Action Result Pass/Fail
46. Over a shadow block for ‘Td’, invoke MB3 popup menu. Select ‘Paste Grid’.
The source grid is copied to the shadow block. The ‘m’ symbol appears on the new grid. The new grid is made ‘active’ and is shown in the SE. Verify that the data of the Td destination grid is identical to that of the ‘T’ source grid.
Copy/Paste between weather elements of different units, not convertable 47. MB1 click ‘Weather Element’ -> ‘Weather
Element Browser’ to bring up the Weather Element dialog. Add the NAM ‘Sky’ grid into the GM.
The NAM ‘Sky’ grid is added to the GM.
48. Over the NAM ‘Sky’ grid, invoke MB3 popup menu, and select ‘Copy Grid’.
The grid is copied.
49. Over a shadow block for ‘T’, invoke the MB3 popup menu.
No ‘Paste Grid’ entry exists since the units for T and Sky are different and are not convertible.
gm005 50. Note: gm005 does not exist
gm006 –Copy/paste grids from non-mutable WEs 51. Over a NAM ‘T’ in the GM, invoke MB3
popup menu, and select ‘Copy Grid’. The grid is copied.
52. Over a shadow block or grid for NAM ‘T’, invoke the MB3 popup menu.
No ‘Paste Grid’ entry exists since NAM ‘T’ is not mutable.
gm007 – Delete Grids 53. Over a single grid in a mutable weather
element, and where there are no ‘red locks‘, in the GM, invoke MB3 popup menu. Select ‘Delete Grid’.
The grid is removed from the GM.
54. MB1 click over a single grid in a mutable weather element in the GM (to select this grid). MB1 click ‘Grids’ -> ‘Delete Grids’.
The grid is removed from the GM.
55. MB1 drag over several grids in a mutable weather element in the GM (to select those grids). MB1 click ‘Grids’ -> ‘Delete Grids’.
The grids are removed from the GM.
56. MB1 drag over several grids in multiple mutable weather elements in the GM (to select those grids). MB1 click ‘Grids’ -> ‘Delete Grids’.
The grids are removed from the GM.
57. Save or MB1 click ‘Edit’ -> ‘Revert Forecast’ to remove the locks.
All locks are removed from the GM.

HARDCOPY UNCONTROLLED
Contract DG133W-05-CQ-1067; Test Case GFE Grid Manager (gm001-024) Use or disclosure of data contained on this sheet is subject to the restriction on the title page of this document.
14
Step # Action Result Pass/Failgm008 – Split Grids
58. Locate a mutable grid in the GM that spans at least four shadow blocks. Select the first two shadow blocks of that grid with a MB1 drag. MB1 click ‘Grids’ -> ‘Split Grids’.
The original grid is split into two grids: the first grid of length of two shadow blocks, the second grid of length that is two less than that of the original grid. Verify that the data in both resulting grids are identical.
59. Locate a mutable grid in the GM that spans at least four shadow blocks. Select the second and third shadow blocks of that grid with a MB1 drag. MB1 click ‘Grids’ -> ‘Split Grids’.
The original grid is split into three grids: the first grid of length of one shadow blocks, the second grid of length of two shadow blocks, and the third grid length is three less than that of the original grid. Verify that the data in all resulting grids are identical.
60. Save or MB1 click ‘Edit’ -> ‘Revert Forecast’ to remove the locks.
The locks are removed from the GM.
gm009 – Fragment Grids 61. Locate a mutable grid in the GM that spans
four shadow blocks. Select the first two shadow blocks of that grid with a MB1 drag. MB1 click ‘Grids’ -> ‘Fragment Grids’.
The original grid is now three grids: Two grids occupying the first two shadow blocks, and the third grid occupying the third and fourth shadow block. Verify that the data in all resulting grids are identical.
62. Locate a mutable grid in the GM that spans four shadow blocks. Select all of the shadow blocks of that grid with a MB1 drag. MB1 click ‘Grids’ -> ‘Fragment Grids’.
The original grid is fragmented into four grids. Verify that the data in all resulting grids are identical.
63. Locate a mutable grid in the GM that spans four shadow blocks. Select a region of time in that WE that contains all of the shadow blocks of that grid as well as time before and after the grid (MB1 drag). MB1 click ‘Grids’ -> ‘Fragment Grids’.
The original grid is fragmented into four grids. Verify that the data in all resulting grids are identical.
64. Locate a mutable grid in the GM that spans four shadow blocks. From the MB3 popup menu, select ‘Fragment Grid’.
The original grid is fragmented into four grids. Verify that the data in all resulting grids are identical.
65. Save or MB1 click ‘Edit’ -> ‘Revert Forecast’ to remove the locks.
The locks are removed from the GM.

HARDCOPY UNCONTROLLED
Contract DG133W-05-CQ-1067; Test Case GFE Grid Manager (gm001-024) Use or disclosure of data contained on this sheet is subject to the restriction on the title page of this document.
15
Step # Action Result Pass/Failgm010 – Try to Split or Fragment single-quanta grids or gaps
66. Locate a mutable grid in the GM that spans only one shadow block and isn't locked by another user. Select that grid with a MB1 click. MB1 click ‘Grids’ -> ‘Split Grids’.
The original grid remains as it was before the operation.
67. Locate a mutable grid in the GM that spans only one shadow block and isn't locked by another user. Select that grid with a MB1 click. MB1 click ‘Grids’ -> ‘Fragment Grids’.
The original grid remains as it was before the operation.
68. Locate a mutable grid in the GM that spans only one shadow block and isn't locked from another user. From the MB3 popup menu, verify that ‘Fragment Grid’ is not an available option.
The original grid remains as it was before the operation.
gm011 – Stretch Grids into Time Containing no Grid 69. Locate a mutable grid in the GM that has
only shadow blocks (no grid) to its right. Stretch the grid to the right with a MB2 drag.
The original grid is stretched to the right at the time the drag was terminated.
70. Locate a mutable grid in the GM that has only shadow blocks (no grid) to its left. Stretch the grid to the left with a MB2 drag.
The original grid is stretched to the left at the time the drag was terminated.
71. Save or MB1 click ‘Edit’ -> ‘Revert Forecast’ to remove the locks.
The locks are removed from the GM.
gm012 – Stretch Grids into Time Containing a Grid 72. Locate a mutable grid in the GM that has a
grid to its right. Stretch the grid to the right with a MB2 drag so it extends over the other grid.
The original grid is stretched to the right, the other grid is gone. Verify that the data in the stretched grid is identical to that in the original grid.
73. Locate a mutable grid that has a grid to its left. Stretch the grid to the left with a MB2 drag so it extends over the other grid.
The original grid is stretched to the left, the other grid is gone. Verify that the data in the stretched grid is identical to that in the original grid.
74. Save or MB1 click ‘Edit’ -> ‘Revert Forecast’ to remove the locks.
The locks are removed from the GM.

HARDCOPY UNCONTROLLED
Contract DG133W-05-CQ-1067; Test Case GFE Grid Manager (gm001-024) Use or disclosure of data contained on this sheet is subject to the restriction on the title page of this document.
16
Step # Action Result Pass/Failgm013 – Stretch Grid
75. Locate a mutable grid in the GM that has only shadow blocks (no grid) to its right. Stretch the grid to the right over several shadow blocks with a MB2 drag, but before releasing the mouse button, MB2 drag to the left one shadow block (to reduce the length of the grid from its maximum length).
The original grid is stretched to the right at the time all drags were terminated.
76. Locate a mutable grid that has only shadow blocks (no grid) to its left. Stretch the grid to the left over several shadow blocks with a MB2 drag, but before releasing the mouse button, MB2 drag to the right one shadow block (to reduce the length of the grid from its maximum length).
The original grid is stretched to the left at the time all drags were terminated.
77. Save or MB1 click ‘Edit’ -> ‘Revert Forecast’ to remove the locks.
The locks are removed from the GM.
gm014 – Stretch Grids into Time that is a Gap (no grid or shadow block) 78. Locate a mutable grid in the GM that has a
gap (no grid or shadow block, such as MaxT) to its right. Try to stretch the grid into the gap to the right with a MB2 drag.
The original grid remains as is.
79. Locate a mutable grid in the GM that has a gap (no grid or shadow block, such as MaxT) to its left. Try to stretch the grid into the gap to the left with a MB2 drag.
The original grid remains as is.
80. Save or MB1 click ‘Edit’ -> ‘Revert Forecast’ to remove the locks.
The locks are removed from the GM.
gm015 – Time Shift Grids using Move option. 81. MB1 click on an isolated ‘T’ grid in the
GM. Edit it as necessary to make it recognizable during the test. An isolated grid is one that has shadow blocks around it, as shown:
A temperature grid is modified.

HARDCOPY UNCONTROLLED
Contract DG133W-05-CQ-1067; Test Case GFE Grid Manager (gm001-024) Use or disclosure of data contained on this sheet is subject to the restriction on the title page of this document.
17
Step # Action Result Pass/Fail
82. Save the modified grid using the button in the toolbar.
The grid is saved as indicated by the removal of the green lock.
83. MB1 click on an isolated ‘T’ grid in the GM. MB1 click ‘Grids’ -> ‘Time Shift...’ to bring up the Time Shift dialog. Select the ‘Move’ option if not already selected. Set the time shift slider to a negative amount that will correspond to a shadow block within the weather element. MB1 click ‘OK’.
A new grid, which is a copy of the selected grid, appears the selected number of hours away from the original grid. The original grid is removed. A green lock confirms the change.
84. Save the modified grid using the button in the toolbar.
The grid is saved as indicated by the removal of the green lock.
85. Edit a grid to make it look different than the last grid moved.
The grid is modified.
86. MB1 click ‘Grids’ -> ‘Time Shift...’ to bring up the Time Shift dialog. Select the ‘Move’ option if not already selected. Set the time shift slider to a negative amount that will to an existing grid, such as the value last chosen, within the weather element. MB1 click ‘OK’.
A new grid, which is a copy of the selected grid, appears the selected number of hours away from the original grid. The original grid is removed. A green lock confirms the change. To verify, you should MB1 click on the destination grid to make sure it has the changes made in step #85.
87. Save the modified grid using the button in the toolbar.
The grid is saved as indicated by the removal of the green lock.
88. Select a time range of multiple contiguous grids in the GM using MB1 drag, as shown:
The time range is selected.
89. MB1 click ‘Grids’ -> ‘Time Shift...’ to bring up the Time Shift dialog. Select the ‘Move’ option if not already selected. Set the time to a positive amount that will correspond to only shadow blocks within the same Weather Element. MB1 click ‘OK’.
The pattern of selected grids appears in the appropriate shadow blocks. Make sure that the SE shows that these newly created grids have the same values as the originally selected grid and that the original grids are removed. A green lock confirms the change.
HARDCOPY UNCONTROLLED
Contract DG133W-05-CQ-1067; Test Case GFE Grid Manager (gm001-024) Use or disclosure of data contained on this sheet is subject to the restriction on the title page of this document.
18
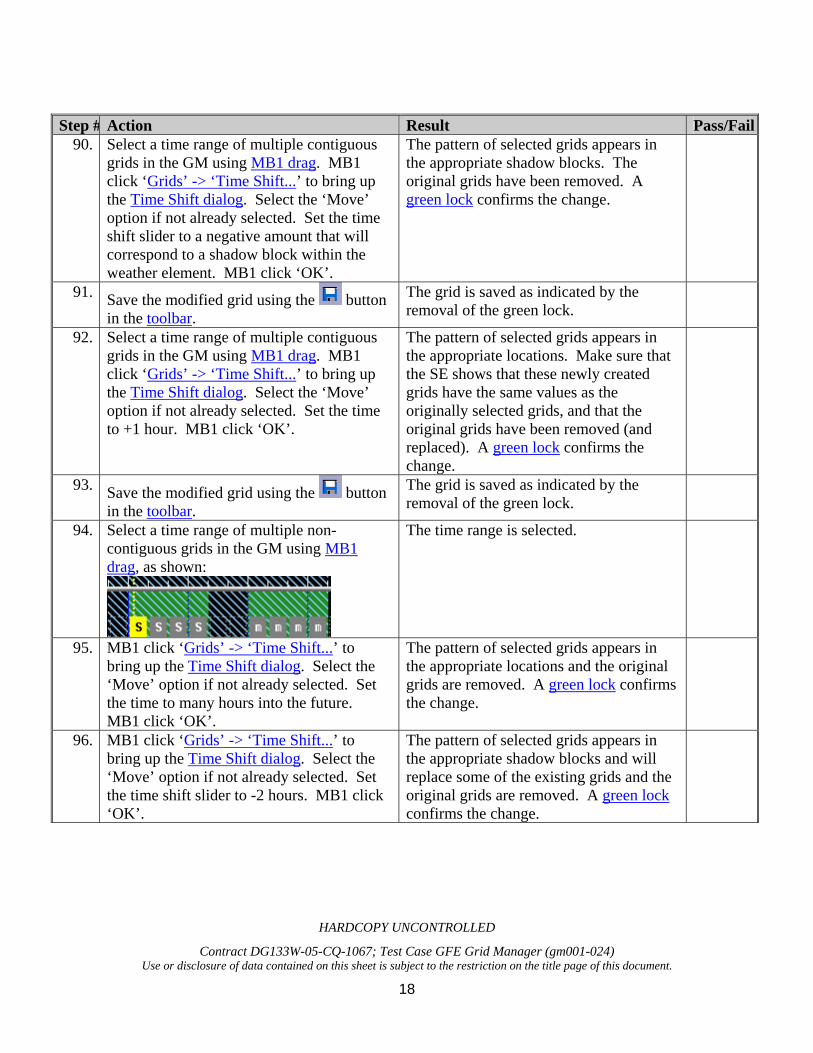
Step # Action Result Pass/Fail
90. Select a time range of multiple contiguous grids in the GM using MB1 drag. MB1 click ‘Grids’ -> ‘Time Shift...’ to bring up the Time Shift dialog. Select the ‘Move’ option if not already selected. Set the time shift slider to a negative amount that will correspond to a shadow block within the weather element. MB1 click ‘OK’.
The pattern of selected grids appears in the appropriate shadow blocks. The original grids have been removed. A green lock confirms the change.
91. Save the modified grid using the button in the toolbar.
The grid is saved as indicated by the removal of the green lock.
92. Select a time range of multiple contiguous grids in the GM using MB1 drag. MB1 click ‘Grids’ -> ‘Time Shift...’ to bring up the Time Shift dialog. Select the ‘Move’ option if not already selected. Set the time to +1 hour. MB1 click ‘OK’.
The pattern of selected grids appears in the appropriate locations. Make sure that the SE shows that these newly created grids have the same values as the originally selected grids, and that the original grids have been removed (and replaced). A green lock confirms the change.
93. Save the modified grid using the button in the toolbar.
The grid is saved as indicated by the removal of the green lock.
94. Select a time range of multiple non-contiguous grids in the GM using MB1 drag, as shown:
The time range is selected.
95. MB1 click ‘Grids’ -> ‘Time Shift...’ to bring up the Time Shift dialog. Select the ‘Move’ option if not already selected. Set the time to many hours into the future. MB1 click ‘OK’.
The pattern of selected grids appears in the appropriate locations and the original grids are removed. A green lock confirms the change.
96. MB1 click ‘Grids’ -> ‘Time Shift...’ to bring up the Time Shift dialog. Select the ‘Move’ option if not already selected. Set the time shift slider to -2 hours. MB1 click ‘OK’.
The pattern of selected grids appears in the appropriate shadow blocks and will replace some of the existing grids and the original grids are removed. A green lock confirms the change.
HARDCOPY UNCONTROLLED
Contract DG133W-05-CQ-1067; Test Case GFE Grid Manager (gm001-024) Use or disclosure of data contained on this sheet is subject to the restriction on the title page of this document.
19
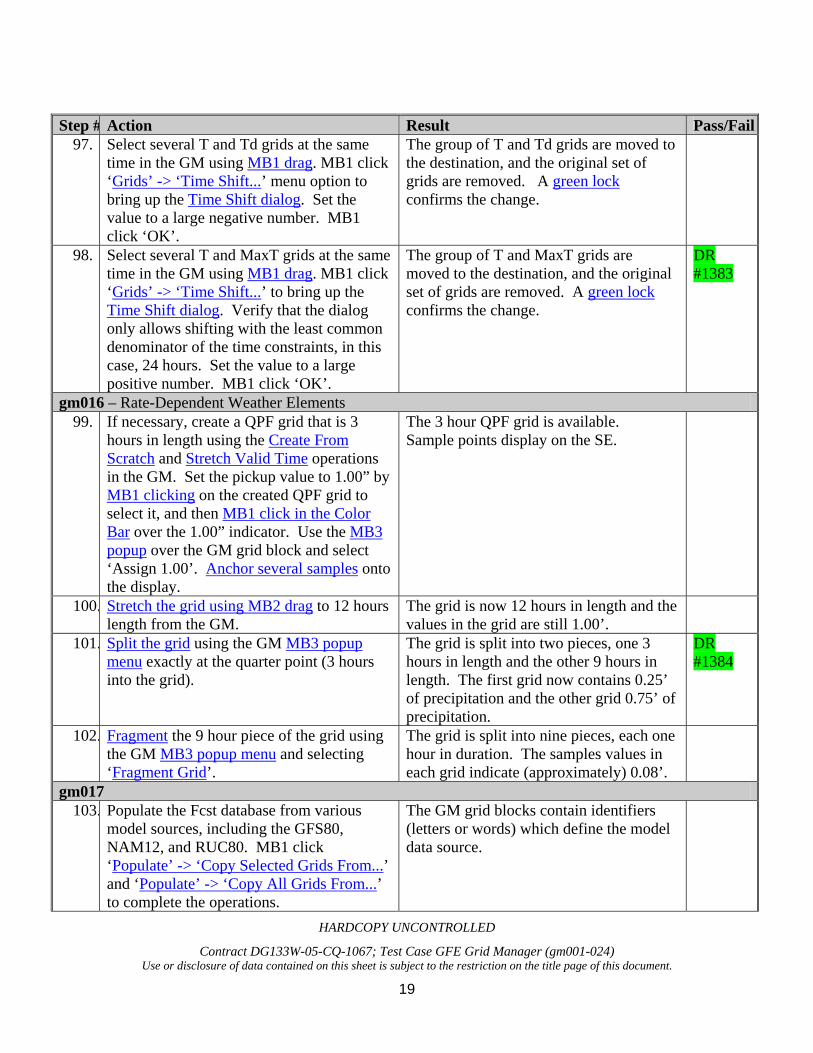
Step # Action Result Pass/Fail
97. Select several T and Td grids at the same time in the GM using MB1 drag. MB1 click ‘Grids’ -> ‘Time Shift...’ menu option to bring up the Time Shift dialog. Set the value to a large negative number. MB1 click ‘OK’.
The group of T and Td grids are moved to the destination, and the original set of grids are removed. A green lock confirms the change.
98. Select several T and MaxT grids at the same time in the GM using MB1 drag. MB1 click ‘Grids’ -> ‘Time Shift...’ to bring up the Time Shift dialog. Verify that the dialog only allows shifting with the least common denominator of the time constraints, in this case, 24 hours. Set the value to a large positive number. MB1 click ‘OK’.
The group of T and MaxT grids are moved to the destination, and the original set of grids are removed. A green lock confirms the change.
DR #1383
gm016 – Rate-Dependent Weather Elements 99. If necessary, create a QPF grid that is 3
hours in length using the Create From Scratch and Stretch Valid Time operations in the GM. Set the pickup value to 1.00” by MB1 clicking on the created QPF grid to select it, and then MB1 click in the Color Bar over the 1.00” indicator. Use the MB3 popup over the GM grid block and select ‘Assign 1.00’. Anchor several samples onto the display.
The 3 hour QPF grid is available. Sample points display on the SE.
100. Stretch the grid using MB2 drag to 12 hours length from the GM.
The grid is now 12 hours in length and the values in the grid are still 1.00’.
101. Split the grid using the GM MB3 popup menu exactly at the quarter point (3 hours into the grid).
The grid is split into two pieces, one 3 hours in length and the other 9 hours in length. The first grid now contains 0.25’ of precipitation and the other grid 0.75’ of precipitation.
DR #1384
102. Fragment the 9 hour piece of the grid using the GM MB3 popup menu and selecting ‘Fragment Grid’.
The grid is split into nine pieces, each one hour in duration. The samples values in each grid indicate (approximately) 0.08’.
gm017 103. Populate the Fcst database from various
model sources, including the GFS80, NAM12, and RUC80. MB1 click ‘Populate’ -> ‘Copy Selected Grids From...’ and ‘Populate’ -> ‘Copy All Grids From...’ to complete the operations.
The GM grid blocks contain identifiers (letters or words) which define the model data source.

HARDCOPY UNCONTROLLED
Contract DG133W-05-CQ-1067; Test Case GFE Grid Manager (gm001-024) Use or disclosure of data contained on this sheet is subject to the restriction on the title page of this document.
20
Step # Action Result Pass/Fail
104. Expand (zoom) the GM using the toolbar button, so that the grid blocks become larger.
More of the data source characters can be seen. The default characters are:
Model Source Characters GFS80 GFS NAM12 E12 RUC80 RUC
105. Toggle on ‘Grid Data History’ mode using
the toolbar button.
Various colors are used for the various models. The colors indicate the model data source. The default colors are:
DR #1365
Model Source Color GFS80 pink NAM12 #ffcaa0 (salmon) RUC80 #00ffff (magenta)
106. Save any modified data using the toolbar button.
The grids are saved as indicated by the removal of the green locks.
107. Over one of the populated grids in the GM, MB3 popup and select the ‘Display Info’ entry. When the Display Info dialog is presented, select ‘Grid History’. Verify the last save time is listed.
The last save time is very recent.
108. Over the same grid, MB3 popup and select ‘Copy Grid’. Select the same weather element and another time period where there is a gap, and select ‘Paste Grid’.
The grid block appears with an ‘m’ in it to indicate modified, the color of the grid block matches the source color (since it is denoting the original model source), and a hatching pattern appears to indicate that this grid has been modified.
DR #1365
109. Over the ‘pasted grid’, MB3 popup and select the ‘Display Info’ entry. Select ‘Grid History’ when the dialog is presented.
The last save time is not mentioned in the dialog, since it hasn't been saved before.
DR #1367
110. Select a time period between two grids using the MB1 drag over the weather element pane in the GM. MB1 click ‘Grids’ -> ‘Interpolate’. Accept the defaults from the Interpolation dialog.
The grids are interpolated, the grid block color is ‘blue’, and an ‘I’ appears in the grid block.
DR #1385
111. MB3 popup over a gap and select ‘Create From Scratch‘.
A grid appears, it is ‘magenta’ in color, and contains the ‘S’ indicator to indicate it has been created from scratch.
DR #1365

HARDCOPY UNCONTROLLED
Contract DG133W-05-CQ-1067; Test Case GFE Grid Manager (gm001-024) Use or disclosure of data contained on this sheet is subject to the restriction on the title page of this document.
21
112. Save all data using the toolbar button. The grids are saved as indicated by the removal of the green locks.
113. MB3 popup over the grid you ‘created from scratch’ and select ‘Display Info’. Choose ‘Grid History’.
The last publish time is not listed, but the last save time is listed.
114. Publish all data by MB1 clicking ‘Products’ -> ‘Publish To Official’. Then MB1 click ‘Weather Element’ -> ‘Weather Element Browser’ to bring up the Weather Element Browser. Load the Official database into the GFE. MB3 popup over the ‘Official’ grid that resulted from the save of the ‘created from scratch’ grid and select ‘Display Info’. Select ‘Grid History’.
The last publish time and the last save time is listed.
gm018 – GM - Editing Tools limited to mutable database 115. Create a GFE configuration file that
contains the following, and save it as gm018:
from gfeConfig import * GridManagerEditActions = ['Assign_Value']
The GFE configuration file is created.
116. Restart the GFE using this new configuration file (gm018).
GFE is restarted using the new configuration file.
117. MB1 click ‘Weather Element’ -> ‘Weather Element Browser’ to bring up the Weather Element Browser. Load several Fcst, NAM, and ISC weather elements.
The Weather Element Browser opens. The Weather Element Browser closes. Several Fcst, NAM, and ISC weather elements are loaded into the GM.
118. Edit the ‘T’ Fcst grid to radically change the data values, e.g., assign -30 to the entire grid.
The temperature Fcst grid is modified.
119. MB1 click ‘Consistency’ -> ‘ISC_Discrepancies’ and run the ISC_Discrepancies procedure, selecting just ‘T’. This will ensure that some grids will be highlighted. Use the Show_ISC_Grid tool on one of the ‘red’ grids to force the loading of a new weather element.
ISC grids, Fcst, NAM, and discrepancy weather elements are loaded into the GFE.
120. Verify that Assign xx, Show_ISC_Grid, Show_ISC_Area, Show_ISC_Info, and Show_ISC_Highlights tools are available off the MB3 popup menu over a grid block in the Fcst database.
Verified.

HARDCOPY UNCONTROLLED
Contract DG133W-05-CQ-1067; Test Case GFE Grid Manager (gm001-024) Use or disclosure of data contained on this sheet is subject to the restriction on the title page of this document.
22
Step # Action Result Pass/Fail
121. Verify that Assign xx is the only tool that is available off the MB3 popup menu over a grid block in the discrepancy weather element.
Verified.
122. Verify that none of the ISC tools or the Assign xx tool are available off the MB3 popup menu over a grid block for the ISC or NAM weather elements.
Verified.
123. Delete the created (gm018) configuration file.
The configuration file is deleted.
gm019 – Time Range Selection on the GM 124. MB1 click on a grid in the GM. The selected time range matches the
duration of the grid.
125. Shift MB1 click on a different location within the same weather element on the GM.
The selected time range is extended to include the click time.
126. Shift MB1 click on a different location within another weather element (that is NOT selected on) on the GM.
The selected time range is extended to include the click time, but only appears in the time scale and the weather elements that are selected on.
127. Clear the selected time range with the toolbar button.
The selected time range is undefined. DR #1368
128. Shift MB1 click on the Time Scale. Nothing is selected, since you can't extend the selected time range if one hasn't been defined.
129. Draw a selection time range on the time scale using MB1 drag.
A selection time range appears.
130. Shift MB1 click on the Time Scale. The selection time range is extended to include the click time.
131. Shift MB2 click on the Time Scale. The selection time range is extended to include the click time.
DR #1368
132. Shift MB2 click on a selected weather element in the GM.
The selection time range is extended to include the click time.
133. Clear the selected time range with the toolbar button.
The selected time range is now undefined. DR #1368
134. Shift MB1 click on a weather element in the GM.
Nothing is selected, since you can't extend the selected time range if one hasn't been defined.
HARDCOPY UNCONTROLLED
Contract DG133W-05-CQ-1067; Test Case GFE Grid Manager (gm001-024) Use or disclosure of data contained on this sheet is subject to the restriction on the title page of this document.
23
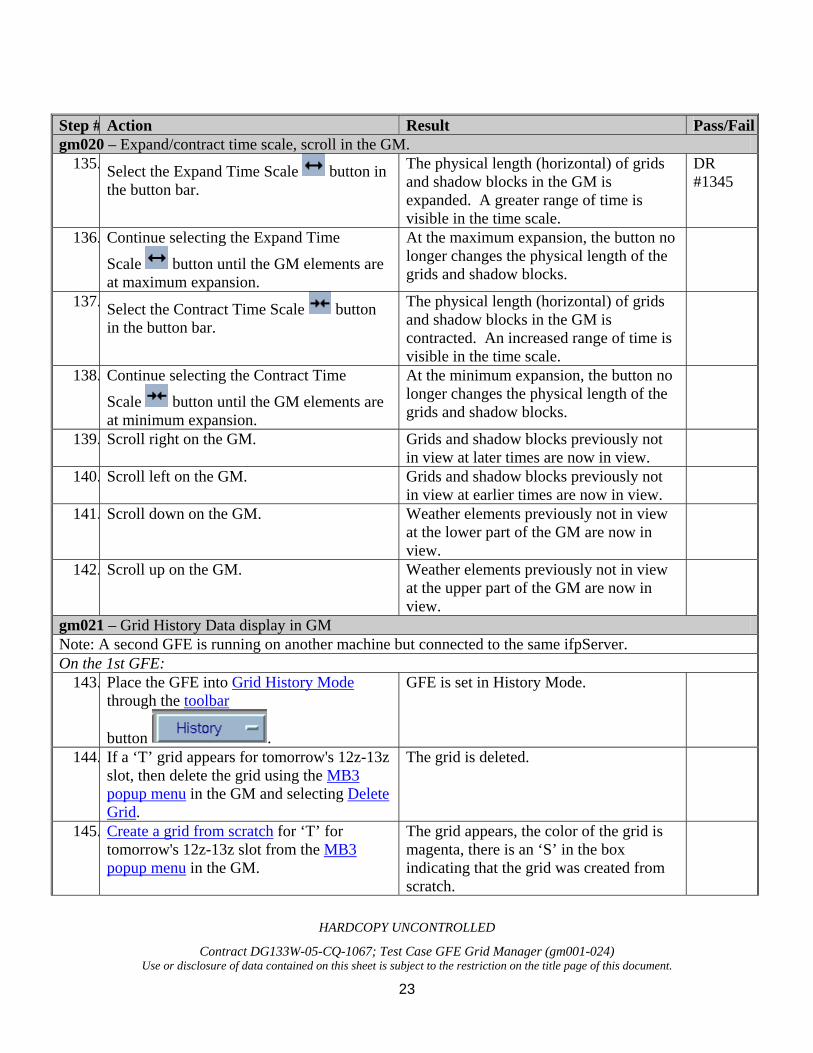
Step # Action Result Pass/Failgm020 – Expand/contract time scale, scroll in the GM.
135. Select the Expand Time Scale button in the button bar.
The physical length (horizontal) of grids and shadow blocks in the GM is expanded. A greater range of time is visible in the time scale.
DR #1345
136. Continue selecting the Expand Time
Scale button until the GM elements are at maximum expansion.
At the maximum expansion, the button no longer changes the physical length of the grids and shadow blocks.
137. Select the Contract Time Scale button in the button bar.
The physical length (horizontal) of grids and shadow blocks in the GM is contracted. An increased range of time is visible in the time scale.
138. Continue selecting the Contract Time
Scale button until the GM elements are at minimum expansion.
At the minimum expansion, the button no longer changes the physical length of the grids and shadow blocks.
139. Scroll right on the GM. Grids and shadow blocks previously not in view at later times are now in view.
140. Scroll left on the GM. Grids and shadow blocks previously not in view at earlier times are now in view.
141. Scroll down on the GM. Weather elements previously not in view at the lower part of the GM are now in view.
142. Scroll up on the GM. Weather elements previously not in view at the upper part of the GM are now in view.
gm021 – Grid History Data display in GM Note: A second GFE is running on another machine but connected to the same ifpServer. On the 1st GFE:
143. Place the GFE into Grid History Mode through the toolbar
button .
GFE is set in History Mode.
144. If a ‘T’ grid appears for tomorrow's 12z-13z slot, then delete the grid using the MB3 popup menu in the GM and selecting Delete Grid.
The grid is deleted.
145. Create a grid from scratch for ‘T’ for tomorrow's 12z-13z slot from the MB3 popup menu in the GM.
The grid appears, the color of the grid is magenta, there is an ‘S’ in the box indicating that the grid was created from scratch.

HARDCOPY UNCONTROLLED
Contract DG133W-05-CQ-1067; Test Case GFE Grid Manager (gm001-024) Use or disclosure of data contained on this sheet is subject to the restriction on the title page of this document.
24
Step # Action Result Pass/Fail
146. MB1 click ‘Grids’ -> ‘Copy Selected Grids From...’ to bring up the Copy Selected Grids From dialog. Select one of the GFS80 models and MB1 click ‘OK’.
The color of the grid changes to that configured for the GFS80 model (normally a pink color) and the hatching pattern in the grid block is removed, since the grid is no longer modified.
DR #1365
147. Save the data using the toolbar button. The grids are saved as indicated by the removal of the green locks.
On the 2nd GFE: 148. Use the MB3 popup menu over the
tomorrow's 12z-13z ‘T’ grid and select ‘Assign <value>‘. Save the data using
the toolbar button.
The grid is modified. The grid is saved as indicated by the removal of the green locks.
On the 1st GFE: 149. Examine tomorrow's ‘T’ 12z-13z grid in the
GM. The grid appearance in the GM displays the ‘modified by other’ visual (normally ‘m’ character, 45 degree hatch pattern from lower-left to upper-right). Note that it might look like a crosshatch if you also have the selection pattern overlaid with the pattern. You can clear the selection
pattern with the toolbar button.
150. Select a time period using MB1 drags in the GM that encompasses two Fcst grids and has gaps between the grids, such as:
The time period is selected.
151. MB1 click ‘Grids’ -> ‘Interpolate’ to bring up the Interpolation dialog. Select ‘Gaps’ and MB1 click ‘OK’.
Grids are interpolated. The interpolated grids display the ‘interpolated’ visual (normally ‘I’ character, blue color)
152. Toggle off the Grid History
Data display button.
All grids appear gray (except for visible/active grids), only distinguishable by lettering appearing within the grid.
153. Save the data using the toolbar button. The grids are saved as indicated by the removal of the green locks.
gm022 – Quick View Mode in GM 154. MB1 on a grid in the GM to make it visible
in the SE. The grid is visible in the SE. DR
#1231 155. MB1 on the SE legend on a weather
element to make it also visible in the SE. The 2nd grid is also visible and displayed as a graphic.

HARDCOPY UNCONTROLLED
Contract DG133W-05-CQ-1067; Test Case GFE Grid Manager (gm001-024) Use or disclosure of data contained on this sheet is subject to the restriction on the title page of this document.
25
Step # Action Result Pass/Fail
156. Toggle on the Quick View Mode display button.
The Quick View Mode is activated.
157. Move the cursor (no buttons pressed) over several grids in the GM.
When the cursor is over a grid in the GM, the SE displays, as image, only that grid. The SE legend also changes to reflect the currently displayed grid in the window. When in the cursor is between grids, the SE display reverts to displaying the visuals of the visible grids aligned with the current GFE time indicator, and the legend also reverts back to the original value.
158. Toggle off the Quick View Mode display button.
The Quick View Mode is deactivated.
159. Move the cursor (no buttons pressed) over several grids in the GM.
No changes occur in the SE.
160. MB1 click ‘GFE’ -> ‘Viewing Preferences’ -> ‘Quick View Mode’ and examine the current state of the menu item.
The state of the menu item is off.
161. MB1 click ‘GFE’ -> ‘Viewing Preferences’ -> ‘Quick View Mode’ and activate the option.
The Quick View Mode display button shows that it is on.
162. MB1 click ‘GFE’ -> ‘Viewing Preferences’ -> ‘Quick View Mode’ and examine the current state of the menu item.
The state of the menu item is on.
163. MB1 click ‘GFE’ -> ‘Viewing Preferences’ -> ‘Quick View Mode’ and deactivate the option.
The Quick View Mode display button shows that it is off.
gm023 – Toggle ISC Mode button On affects loading of WEs. 164. MB1 click ‘Weather Element’ -> ‘Weather
Element Browser’ to bring up the Weather Element Browser. Ensure that only Fcst weather elements are loaded and displayed in the GFE.
Verified.
165. Switch the GM to the Temporal Editor
mode using the toolbar button.
The set of Fcst weather elements appear in the temporal editor. Note that since there may not be any edit area defined, there might be no data shown in the temporal editor; however, there will be temporal editor panes with labels.
DR #944

HARDCOPY UNCONTROLLED
Contract DG133W-05-CQ-1067; Test Case GFE Grid Manager (gm001-024) Use or disclosure of data contained on this sheet is subject to the restriction on the title page of this document.
26
Step # Action Result Pass/Fail
166. Switch back to GM mode using the toolbar button.
GFE is switched back to the GM mode.
167. MB1 click ‘Weather Element’ -> ‘Weather Element Browser’ to bring up the Weather Element Browser. Select ‘ISC’ from the source menu.
In the GM, there are ISC weather elements that are present. In the Temporal Editor the same ISC weather elements are present, most likely plotted in the same panes as the Fcst weather elements.
168. MB1 click ‘GFE’ -> ‘Viewing Preferences’ -> ‘Temporal Editor Weather Element Mode’ -> ‘All Weather Elements’. Then switch the GM to the Temporal Editor
mode using the toolbar button.
The set of ISC weather elements appear with the set of Fcst weather elements. Note that since there may not be any edit area defined, there might be no data shown in the temporal editor; however, there will be temporal editor panes with labels.
169. Switch back to GM mode using the toolbar button.
GFE is switched back to the GM mode.
170. Draw an edit area using MB1 drag which is contained within an ISC area (as shown by data in the SE), but outside the Fcst WFO (as shown by data in the SE). MB1 click on the legend of a combined weather element (for which Fcst and ISC grids exist) to make it visible.
In the SE, the weather element displays with Fcst values in the home WFO region, and ISC values in surrounding regions. In the GM, only the Fcst weather element appears with the ‘visible’ visual, typically the ‘yellow’ highlighting. In the temporal editor, there is the underlying Fcst value and ISC values as separate weather elements.
171. Toggle off the ‘Show ISC Grid’ toolbar button.
In the SE, legends have now been expanded into separate Fcst and separate ISC legends. Only the single legend which reflects the Fcst elements is visible. ISC legends are not available.
gm024 – Order of Legends, Samples, and GM Entries 172. MB1 click ‘Weather Element’ -> ‘Weather
Element Browser’ to bring up the Weather Element Browser. Ensure that only Fcst weather elements are loaded and displayed in the GFE. Anchor a sample using the
Sample Tool MB1 clicks on the SE.
The Weather Element Browser opens. The Weather Element Browser closes. Verified. Sample points are displayed in the SE.
173. Turn on the visibility of several weather elements by MB1 clicking the legend in the SE.
Weather elements display in the SE.

HARDCOPY UNCONTROLLED
Contract DG133W-05-CQ-1067; Test Case GFE Grid Manager (gm001-024) Use or disclosure of data contained on this sheet is subject to the restriction on the title page of this document.
27
Step # Action Result Pass/Fail
174. Verify that the order of the elements in the GM, SE Legends and the ordering of the samples are all matched.
Verified.
End of test.
HARDCOPY UNCONTROLLED
Contract DG133W-05-CQ-1067; Test Case GFE Grid Manager (gm001-024) Use or disclosure of data contained on this sheet is subject to the restriction on the title page of this document.
28
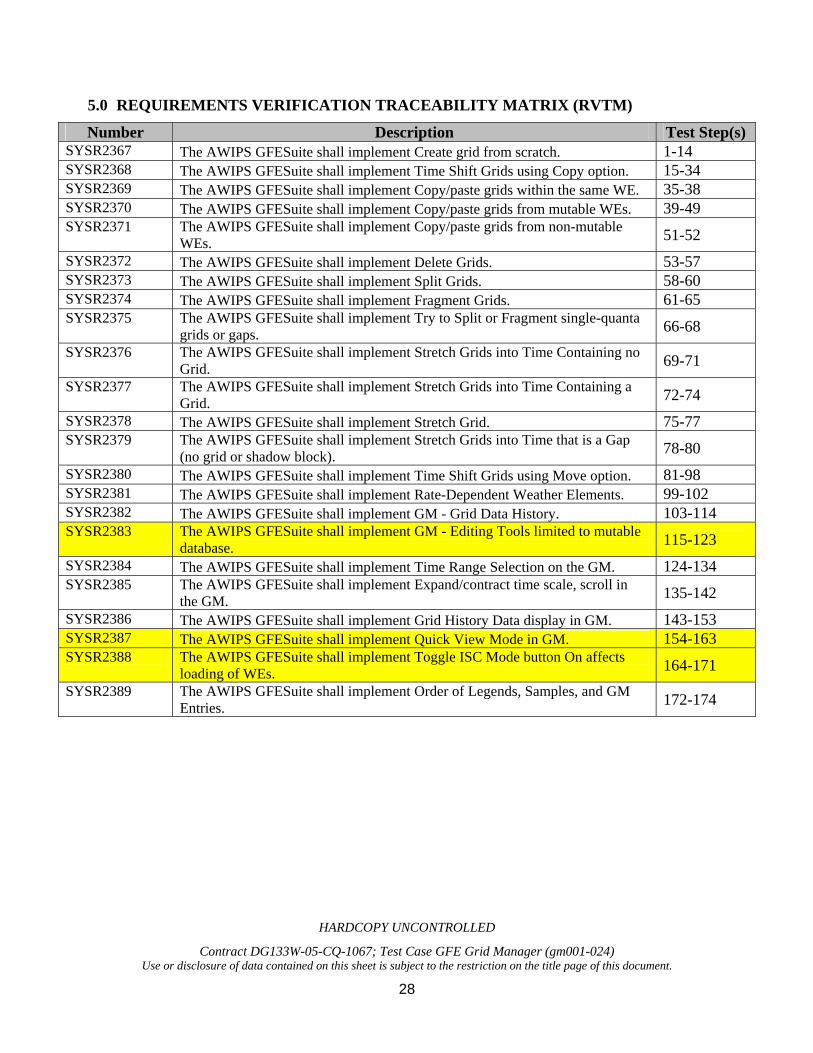
5.0 REQUIREMENTS VERIFICATION TRACEABILITY MATRIX (RVTM)
Number Description Test Step(s) SYSR2367 The AWIPS GFESuite shall implement Create grid from scratch. 1-14 SYSR2368 The AWIPS GFESuite shall implement Time Shift Grids using Copy option. 15-34 SYSR2369 The AWIPS GFESuite shall implement Copy/paste grids within the same WE. 35-38 SYSR2370 The AWIPS GFESuite shall implement Copy/paste grids from mutable WEs. 39-49 SYSR2371 The AWIPS GFESuite shall implement Copy/paste grids from non-mutable
WEs. 51-52 SYSR2372 The AWIPS GFESuite shall implement Delete Grids. 53-57 SYSR2373 The AWIPS GFESuite shall implement Split Grids. 58-60 SYSR2374 The AWIPS GFESuite shall implement Fragment Grids. 61-65 SYSR2375 The AWIPS GFESuite shall implement Try to Split or Fragment single-quanta
grids or gaps. 66-68 SYSR2376 The AWIPS GFESuite shall implement Stretch Grids into Time Containing no
Grid. 69-71 SYSR2377 The AWIPS GFESuite shall implement Stretch Grids into Time Containing a
Grid. 72-74 SYSR2378 The AWIPS GFESuite shall implement Stretch Grid. 75-77 SYSR2379 The AWIPS GFESuite shall implement Stretch Grids into Time that is a Gap
(no grid or shadow block). 78-80 SYSR2380 The AWIPS GFESuite shall implement Time Shift Grids using Move option. 81-98 SYSR2381 The AWIPS GFESuite shall implement Rate-Dependent Weather Elements. 99-102 SYSR2382 The AWIPS GFESuite shall implement GM - Grid Data History. 103-114 SYSR2383 The AWIPS GFESuite shall implement GM - Editing Tools limited to mutable
database. 115-123 SYSR2384 The AWIPS GFESuite shall implement Time Range Selection on the GM. 124-134 SYSR2385 The AWIPS GFESuite shall implement Expand/contract time scale, scroll in
the GM. 135-142 SYSR2386 The AWIPS GFESuite shall implement Grid History Data display in GM. 143-153 SYSR2387 The AWIPS GFESuite shall implement Quick View Mode in GM. 154-163 SYSR2388 The AWIPS GFESuite shall implement Toggle ISC Mode button On affects
loading of WEs. 164-171 SYSR2389 The AWIPS GFESuite shall implement Order of Legends, Samples, and GM
Entries. 172-174