telephone operating instructions
TRANSCRIPT

Converged Communications Platform
Telephone Operating Instructions
Section 32-112-460 Issue 5, July 2008

© eOn Communications Corporation, 1998, 200 8. All rights reserved. 185 Martinvale Lane
San Jose, CA 95119(800) 955-5321 • Fax (408) 694-9600
•••••www.eoncommunications.com
•••••This document is for use by authorized eOn customers only and may not be reproduced
in any manner without specific written permission.
1Telephone Operating Instructions
ContentsIntroduction .......................................................................................... 4
Related Documents ................................................................................. 4Conventions .............................................................................................. 4
General Operating Information ........................................................... 5Common Terms ......................................................................................... 5Feature Access ......................................................................................... 5Audible Call Indications ........................................................................... 5
Resource Queuing ............................................................................... 6Line Selection ............................................................................................ 6
Telephone Descriptions....................................................................... 9Millennium Digital Telephones .......................................................................9
Pushbutton Dial ......................................................................................... 9Feature Buttons ......................................................................................... 9Display Module ......................................................................................... 9Button Expansion Module ...................................................................... 16Recorder Jack ......................................................................................... 16Personal Preferences Setup ................................................................... 18
Music Source Selection ....................................................................... 18Ringer Adjustment ............................................................................... 18Display Contrast Adjustment .............................................................. 19Handset Volume Adjustment ............................................................. 19All Call Announce Volume Adjustment ............................................ 19Handsfree Speaker Volume Adjustment .......................................... 19Sidetone Level Adjustment ................................................................. 20
Handsfree Operation ............................................................................. 21Multibutton Electronic Telephones ............................................................... 21
Visual Call Indications ............................................................................ 21Call Announcer and Controls ............................................................... 21Background Music .................................................................................. 21Display Module ....................................................................................... 22
Single-Line Telephones ............................................................................... 24Feature Access ....................................................................................... 24Multibutton Access ................................................................................. 24Second Call Indication .......................................................................... 24Resource Queuing .................................................................................. 24
Basic Operating Procedures ............................................................. 25Originating a Call .................................................................................... 25Answering a Call ..................................................................................... 25Making Inside Calls ................................................................................. 26Making Outside Calls .............................................................................. 26
Without Sender-Receiver .................................................................... 26With Sender-Receiver .......................................................................... 26
Handsfree Operation ............................................................................. 27Headset/Handset Operation ................................................................ 27Data Port Dialing ..................................................................................... 28
2 Telephone Operating Instructions
Feature Operating Instructions......................................................... 29Alarm Clock ............................................................................................. 29
Remote ................................................................................................. 29Local ...................................................................................................... 29
Answer...................................................................................................... 30Auto Answer ............................................................................................ 31Auto Transfer ............................................................................................ 31Busy Prime Line Indication ..................................................................... 31Button Change ....................................................................................... 32Call Announce ........................................................................................ 32All Call Announce ................................................................................... 34Call Forward ............................................................................................ 35
Local Call Forward .............................................................................. 35Call Forward Outside System ............................................................. 35Remote Call Forward .......................................................................... 36
Call Intrusion ............................................................................................ 37Break-In ................................................................................................. 37Override ................................................................................................ 38
Call Park ................................................................................................... 39Call Transfer ............................................................................................. 40Caller ID Blocking/Unblocking............................................................... 40Camp-On ................................................................................................ 41
Station Camp-On ................................................................................ 41Trunk Route Camp-On ........................................................................ 41Automatic Callback............................................................................ 42Trunk Auto Camp-On .......................................................................... 42Answer Hold ......................................................................................... 42
Clear Features ......................................................................................... 42Clock Set .................................................................................................. 43
Hours and Minutes ............................................................................... 43Year, Month, and Date ....................................................................... 43
Conference ............................................................................................. 43Broker's Hold ............................................................................................ 45COS Change ........................................................................................... 45Directed Call Pickup............................................................................... 46Direct Extension Selection ...................................................................... 47Direct Ring Prime..................................................................................... 49Do-Not-Disturb ......................................................................................... 50Ground Recall/Hookswitch Flash .......................................................... 51Hold .......................................................................................................... 51Hot Line .................................................................................................... 52Last Number Redial ................................................................................ 52Least Cost Routing .................................................................................. 52LCR Special Day...................................................................................... 52Meet Me Conference ............................................................................ 53Message Send/Message Retrieve ........................................................ 53
Message Waiting Service ................................................................... 53Message Center Operation ............................................................... 54Voice Mail Service ............................................................................... 55
Monitor ..................................................................................................... 55Music-On-Page ....................................................................................... 56
3Telephone Operating Instructions
Night Service ........................................................................................... 56Night Answer ........................................................................................ 56Night Transfer ........................................................................................ 56
Paging ...................................................................................................... 57Park to Station ......................................................................................... 57Personal Repertory Dialing..................................................................... 58Plan Override........................................................................................... 60Privacy...................................................................................................... 61Problem Circuit Tagging......................................................................... 62Remote Call Pickup ................................................................................ 62General Remote Call Pickup................................................................. 62Ring Again ............................................................................................... 62Secretarial Intercom ............................................................................... 63Station Message Detail Recording (SMDR).......................................... 63
Account Code ..................................................................................... 64Authorization Code ............................................................................. 64Account/Authorization Code ............................................................ 65
System Repertory Store .......................................................................... 65
4 Telephone Operating Instructions
IntroductionThis document describes the telephones that can be used with the Millennium Conv-erged Communications Platform and provides instructions for placing / answering callsand accessing the features available with the system. The instructions in this documentapply to the Millennium-style digital, 3100 electronic, and single-line telephones.
This document is being reissued to update company information and the telephonedrawings. Whenever this document is reissued, the reason for reissue will be given inthis paragraph.
For additional information about the Millennium Converged Communications Platform, refer to the list of related documents in Section 32-112-100.
� This symbol indicates a special condition or other important information.
❖ This symbol indicates a first-level subparagraph.
� This symbol indicates a second-level subparagraph.
Conventions
Related Documents
5Telephone Operating Instructions
The following paragraphs provide general information concerning terminology, systemtimeouts, user programmable features, and basic telephone operating procedures.
The following terms apply to the telephone operating procedures in this section.
Extension: This refers to an extension number and may correspond to a single-linetelephone, or a button on a digital telephone or Type 3100 telephone.
Prime Extension: When an extension number has more than one appearance in thesystem, one appearance can be programmed as the primary extension number. Thisappearance can be a button on a digital telephone or BEM, or a Type 3100 telephone orType 3100 DSS/BLF console, the principal line on a single-line telephone, or a logicalbutton on a telephone. When a feature such as call announce, station hunt, or directedcall pickup is used, this primary appearance of the extension number is the only locationthat responds. When the primary appearance is ringing, all other appearances willindicate busy. When the telephone with the primary appearance is in the do-not-disturbmode, all other appearances will indicate ACTIVE.
Second Dial Tone: Second dial tone, also called transfer hold or distinctive hold dialtone, consists of three alternations of system dial tone, followed by a steady system dialtone. You hear second dial tone when you press the TRANSFER HOLD (XFER) orCONFERENCE HOLD (CONF) button. Depending on system programming, it may alsobe used to indicate a waiting message.
Hookswitch Flash: Holding the hookswitch down for approximately one second, thenreleasing it sends a signal to the Central Office to get dial tone after a call has beenterminated by the far end or to initiate a feature. Some telephones have a FLASH buttonwhich can be used instead of pressing the hookswitch. It is much more reliable since itrequires no guessing on the part of the user of the length of time to operate it.
Most system features can be accessed either by dial access code or feature button. Afeature for which a telephone has no button programmed can be accessed by dial code,provided it is allowed by the telephone’s class-of-service. Table A lists the system defaultdial access codes.
Dial access codes are programmable and may be any combination of the digits 0 through9, #, ✱, A, B, C, and D. If the digits A, B, C, and D are used, buttons for these functionsmust be programmed on the multibutton telephones from which the codes will be dialed.Digits other than 0 through 9 should only be used if all telephones using dial codes usetone (DTMF) dialing.
All features are assigned time limits to aid in system efficiency. A feature operation mustbe completed within the specified time limit. or the selected button or feature is releasedfor someone else to use or, in a feature such as call forward or hold, the next step in thesequence begins. If the button or feature is released, the system returns reorder tone.
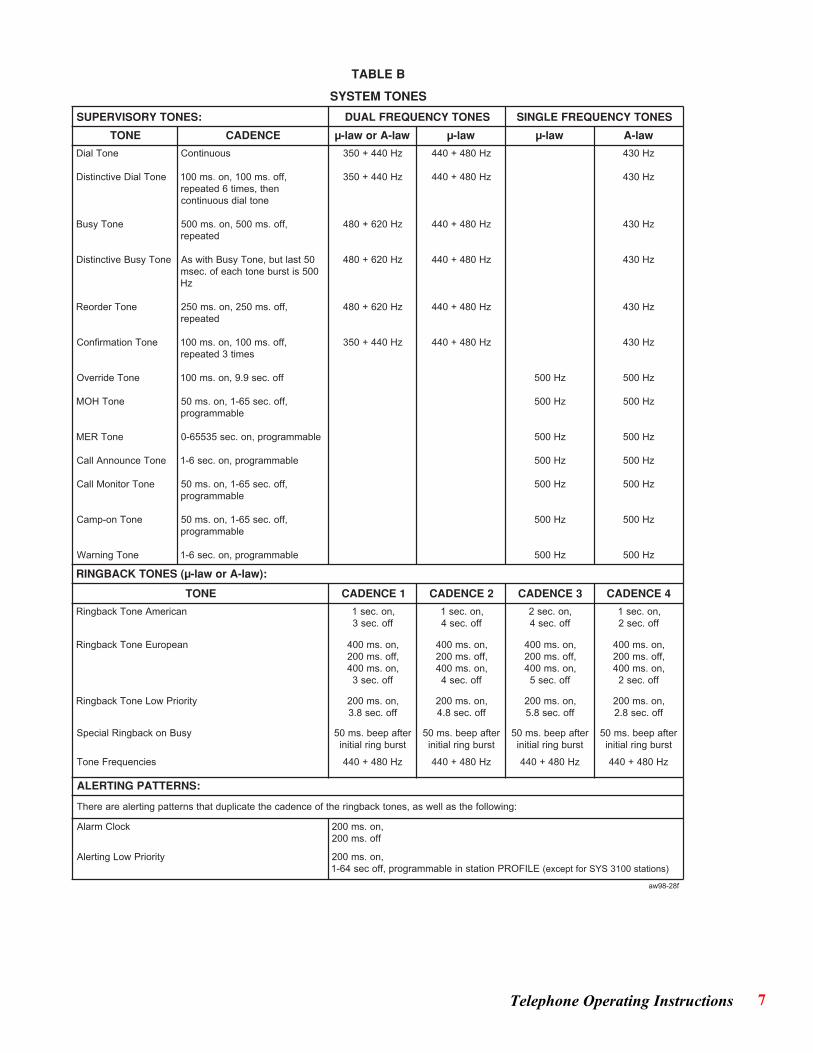
The tones and signals heard during telephone operation are described in Table B.
General Operating Information
Common Terms
Feature Access
Audible Call Indications
6 Telephone Operating Instructions
When an outside call is originated, or a feature that returns dial tone or confirmation toneis accessed, all the required system resources may not be available. If a resource is notavailable, the extension is queued on that resource, and the system returns an alertingtone repeated at intervals.
When all the necessary resources are available, the the system returns dial tone orconfirmation tone, as appropriate. If the extension is hung up while queued for a resource,it is taken out of the queue.
A call into the system on a trunk may put the call in the trunk extension queue if the trunkcannot ring the destination specified in the routing plan. The system gives no indicationthat the queue is full; the caller just hears ringback tone.
There are three ways to originate a call with a digital or Type 3100 telephone: manual lineselection, automatic line selection, and preselection. Programming determines how eachtelephone functions and which method to use to originate a call. With a single-linetelephone, line selection is always automatic.
� Preselection puts a digital or Type 3100 telephone with a SPEAKER buttonin the handsfree mode.
Resource Queuing
Line Selection
7Telephone Operating Instructions
BELBAT
SENOTMETSYS
:SENOTYROSIVREPUS SENOTYCNEUQERFLAUD SENOTYCNEUQERFELGNIS
ENOT ECNEDAC µ wal-Arowal- wal-µ µ wal- wal-A
enoTlaiD
enoTlaiDevitcnitsiD
enoTysuB
enoTysuBevitcnitsiD
enoTredroeR
enoTnoitamrifnoC
enoTedirrevO
enoTHOM
enoTREM
enoTecnuonnAllaC
enoTrotinoMllaC
enoTno-pmaC
enoTgninraW
suounitnoC
,ffo.sm001,no.sm001neht,semit6detaeper
enotlaidsuounitnoc
,ffo.sm005,no.sm005detaeper
05tsaltub,enoTysuBhtiwsA005sitsrubenothcaefo.cesm
zH
,ffo.sm052,no.sm052detaeper
,ffo.sm001,no.sm001semit3detaeper
ffo.ces9.9,no.sm001
,ffo.ces56-1,no.sm05elbammargorp
elbammargorp,no.ces53556-0
elbammargorp,no.ces6-1
,ffo.ces56-1,no.sm05elbammargorp
,ffo.ces56-1,no.sm05elbammargorp
elbammargorp,no.ces6-1
zH044+053
zH044+053
zH026+084
zH026+084
zH026+084
zH044+053
zH084+044
zH084+044
zH084+044
zH084+044
zH084+044
zH084+044
zH005
zH005
zH005
zH005
zH005
zH005
zH005
zH034
zH034
zH034
zH034
zH034
zH034
zH005
zH005
zH005
zH005
zH005
zH005
zH005
(SENOTKCABGNIR )wal-Arowal-µ :
ENOT 1ECNEDAC 2ECNEDAC 3ECNEDAC 4ECNEDAC
naciremAenoTkcabgniR ,no.ces1ffo.ces3
,no.ces1ffo.ces4
,no.ces2ffo.ces4
,no.ces1ffo.ces2
naeporuEenoTkcabgniR ,no.sm004,ffo.sm002,no.sm004
ffo.ces3
,no.sm004,ffo.sm002,no.sm004
ffo.ces4
,no.sm004,ffo.sm002,no.sm004
ffo.ces5
,no.sm004,ffo.sm002,no.sm004
ffo.ces2
ytiroirPwoLenoTkcabgniR ,no.sm002ffo.ces8.3
,no.sm002ffo.ces8.4
,no.sm002ffo.ces8.5
,no.sm002ffo.ces8.2
ysuBnokcabgniRlaicepS retfapeeb.sm05tsrubgnirlaitini
retfapeeb.sm05tsrubgnirlaitini
retfapeeb.sm05tsrubgnirlaitini
retfapeeb.sm05tsrubgnirlaitini
seicneuqerFenoT zH084+044 zH084+044 zH084+044 zH084+044
:SNRETTAPGNITRELA
:gniwollofehtsallewsa,senotkcabgnirehtfoecnedacehtetacilpudtahtsnrettapgnitrelaeraerehT
kcolCmralA ,no.sm002ffo.sm002
ytiroirPwoLgnitrelA ,no.sm002ELIFORPnoitatsnielbammargorp,ffoces46-1 )snoitats0013SYSroftpecxe(
f82-89wa

8 Telephone Operating Instructions
9Telephone Operating Instructions
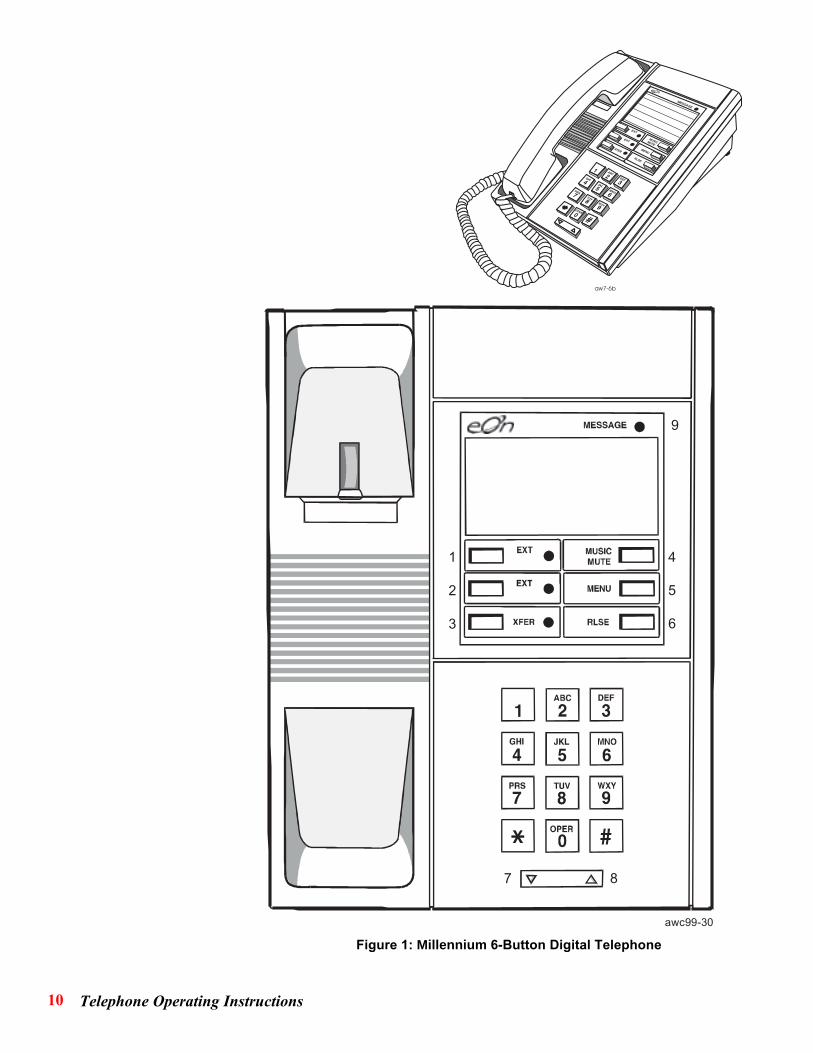
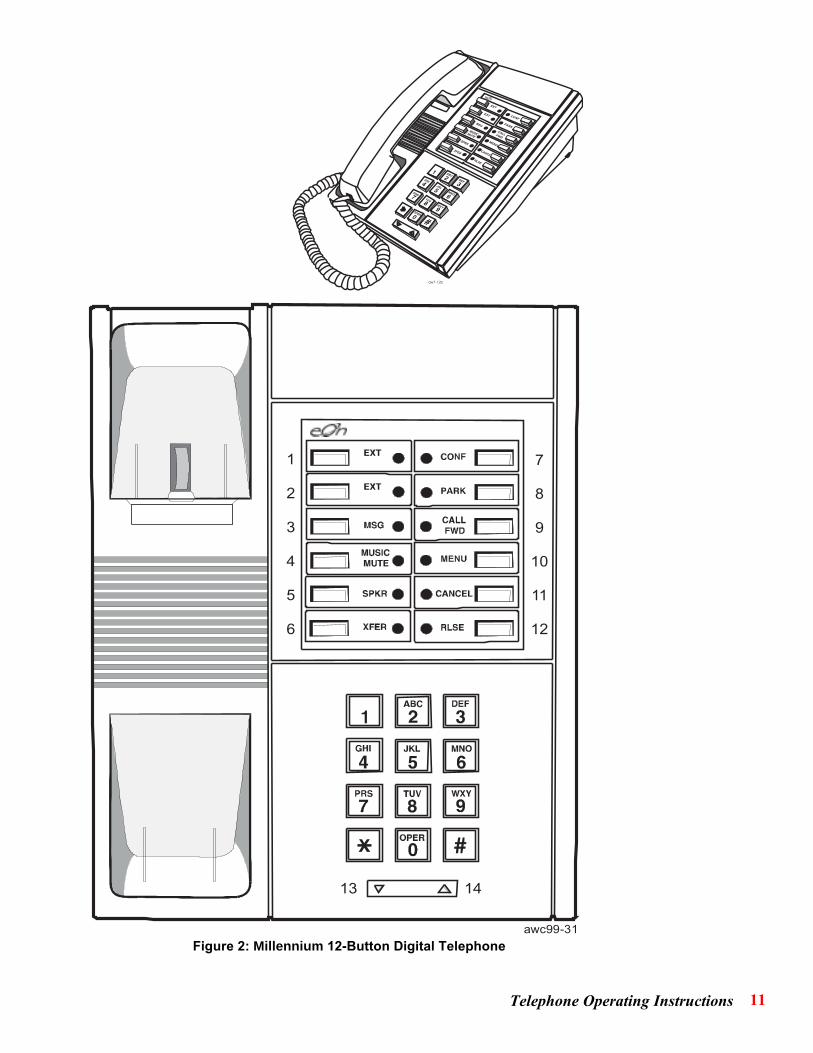
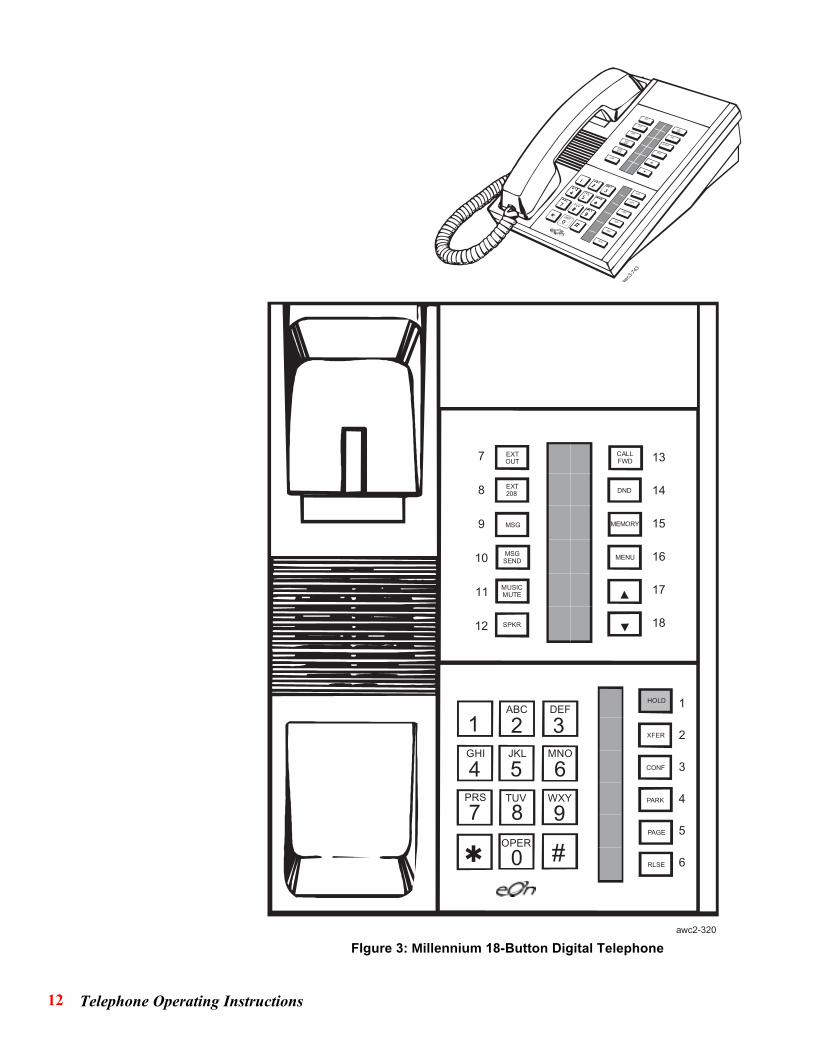
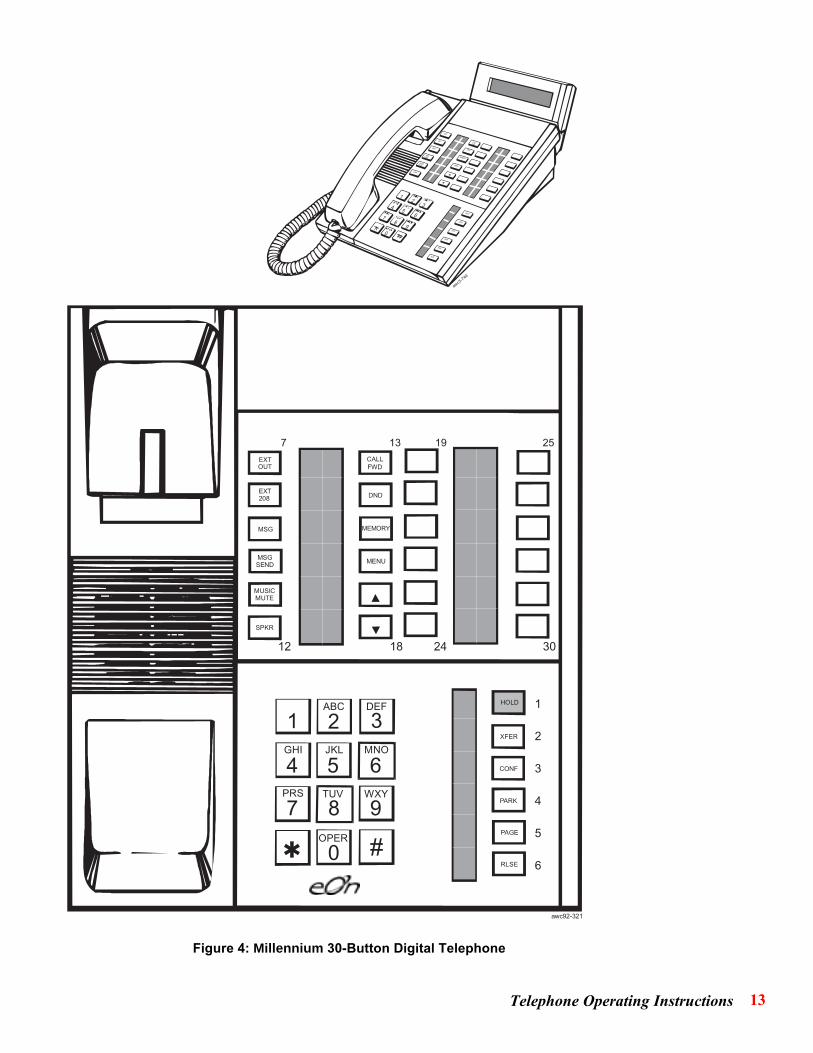
The Millennium digital phones are available in 6-, 12-, 18-, and 30-button models. (SeeFigures 1 through 4 respectively.) All models include a 12-button dial pad, an electronicringer, and, except the 6-button model, a built-in speaker and microphone. All modelsmay have an optional 2-line by 24-character message display module; the 30-buttontelephone can have either a 2-line by 24-character display module or a 4-line by 48-character display module. The 18- and 30-button models may also have an optional dataadapter, and support a Button Expansion Module (BEM).
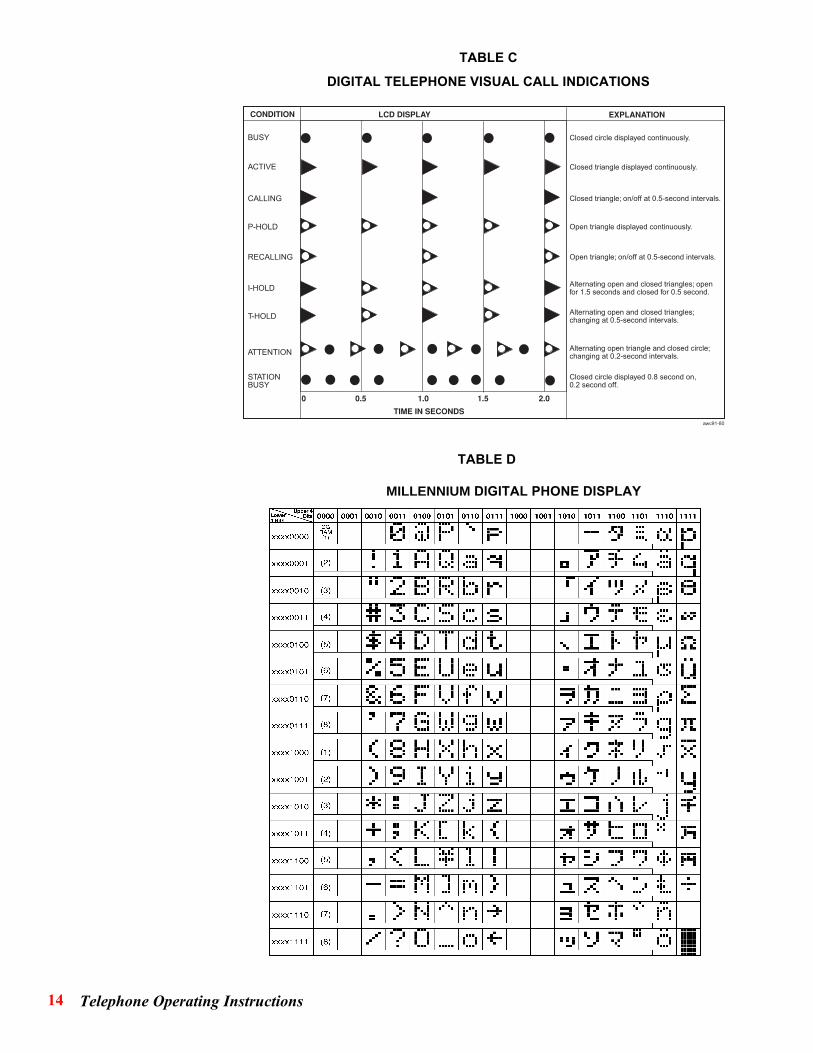
The 18- and 30-button telephones have liquid crystal displays (LCDs) next to the featurebuttons to indicate the status of the button. Visual call indications and their meanings areshown in Table C.
The 6-button telephone supports the Group Listen feature and on-hook dialing, but doesnot support handsfree speakerphone operation. The 12-button telephone does supporthandsfree operation. Both telephones support off-hook call announce; the announce-ment is mixed in the receiver with the existing call.
The pushbutton dial on all models of Millennium digital phones is programmed for hot keypadoperation. Any time the telephone is off-hook, the 12 keypad buttons can be used to sendtones (DTMF signals) to the system or to a distant office.
All feature buttons on the digital telephones are programmable, except on the 6-buttonmodel, which has only three programmable buttons. Button functions are determined bysystem programming. When the telephone is first plugged in, the software that deter-mines the function of each button is downloaded from the system.
Digital telephones can have several logical buttons programmed on each physical button,greatly expanding the button capability at each telephone. Up to 10 banks of buttons canbe programmed, with up to 254 buttons in each bank.
Two models of display modules are available: a 2-line, 24-character-per-line display, anda 4-line, 40-character-per-line display. The 2-line model shows the top two lines of a 4-line message. The 4-line model shows all four lines. When the telephone is idle, eitherdisplay shows the date/time on the top line and the company logo on the second line.When the telephone is in use, the display scrolls downward allowing call progressinformation to be shown.
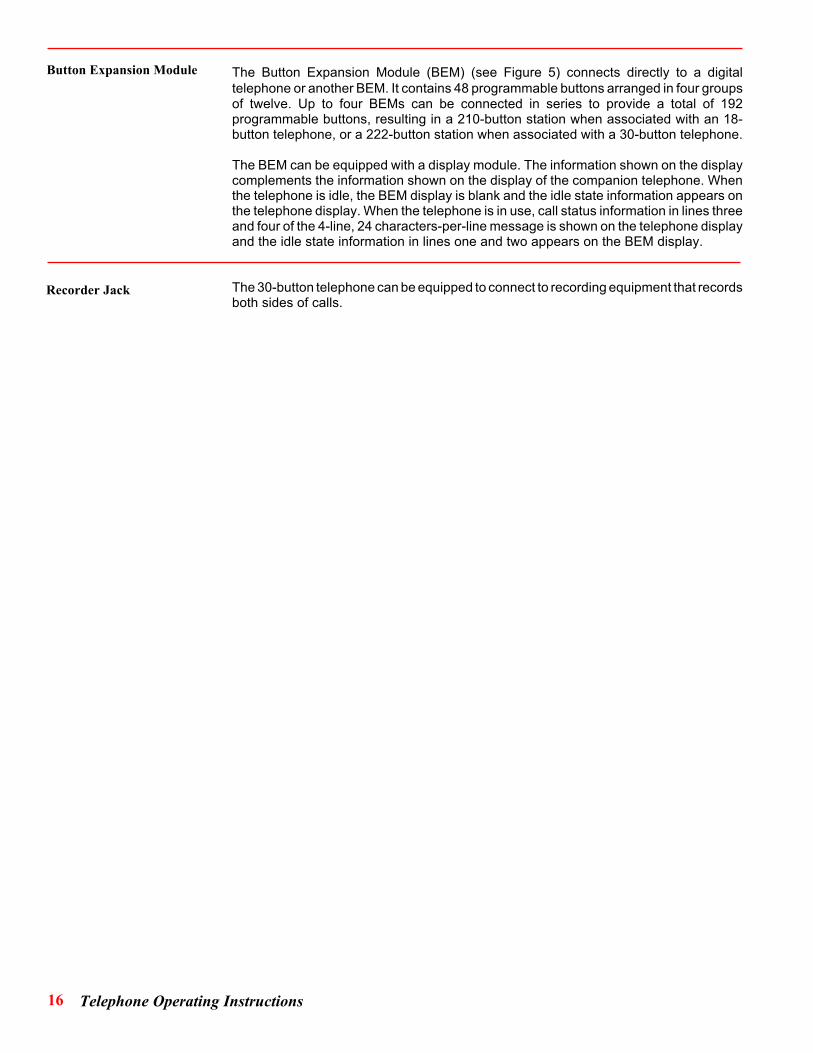
The display modules can display additional characters not represented on most key-boards. All displays use the character patterns shown in Table D. The character setshown in Table D will be replaced in the future with the character set shown in Table E.
Depending on system programming, call duration may be displayed on the right end ofthe display line. A running count is displayed up to 999 minutes and 59 seconds, afterwhich the timer resets to 999 minutes and 00 seconds and continues counting. When atrunk call is answered or retrieved, an additional display message is posted for 10seconds. This message indicates the total time the trunk call has been in the system.
Digital Telephones
Telephone Descriptions
Pushbutton Dial
Feature Buttons
Display Module
10 Telephone Operating Instructions
Figure 1: Millennium 6-Button Digital Telephone
1
3
4
6
awc99-30
2 5
7 8
9
11Telephone Operating Instructions
Figure 2: Millennium 12-Button Digital Telephone
1
6
7
12
awc99-31
2
3
4
5
13 14
8
9
10
11
12 Telephone Operating Instructions
FIgure 3: Millennium 18-Button Digital Telephone
1 2 3
4 5 6
7
0 #
8 9
✱
ABC DEF
GHI JKL MNO
PRS TUV WXY
OPER
1
6
7 EXTOUT
EXT208
MSG
MSGSEND
MUSICMUTE
SPKR
CALLFWD
DND
MEMORY
MENU
HOLD
XFER
CONF
PARK
PAGE
RLSE
awc2-320
2
3
4
5
8
9
10
11
12
13
14
15
16
17
18
EXT
EXT
MSG
MSGSEND
MUSICMUTE
HOLD
XFER
CONF
PARK
PAGE
RLSE
CALLFWD
DND
MEMORY
MENU
SPKR
awc3
-743
13Telephone Operating Instructions
Figure 4: Millennium 30-Button Digital Telephone
1 2 3
4 5 6
7
0 #
8 9
✱
ABC DEF
GHI JKL MNO
PRS TUV WXY
OPER
7
12
13
18
EXTOUT
EXT208
MSG
MSGSEND
MUSICMUTE
SPKR
DND
MEMORY
MENU
1
6
HOLD
XFER
CONF
PARK
PAGE
RLSE
CALLFWD
19
24
25
30
awc92-321
2
3
4
5
awc3-744
12
0 11X
78
9
4 56
3
EXT
EXT
MENU
HOLD
CONF
PARK
PAGE
RLSE
XFER
MEMORY
DND
CALLFWD
SPKR
MUSICMUTE
MSGSEND
MSG
14 Telephone Operating Instructions
TABLE D
MILLENNIUM DIGITAL PHONE DISPLAY
CONDITION
BUSY
ACTIVE
CALLING
P-HOLD
RECALLING
I-HOLD
T-HOLD
ATTENTION
STATIONBUSY
Closed circle displayed continuously.
Closed triangle displayed continuously.
Closed triangle; on/off at 0.5-second intervals.
Open triangle displayed continuously.
Open triangle; on/off at 0.5-second intervals.
Alternating open and closed triangles; openfor 1.5 seconds and closed for 0.5 second.
Alternating open and closed triangles;changing at 0.5-second intervals.
Alternating open triangle and closed circle;changing at 0.2-second intervals.
Closed circle displayed 0.8 second on,0.2 second off.
LCD DISPLAY EXPLANATION
TIME IN SECONDS
0 0.5 1.51.0 2.0
awc91-80
TABLE C
DIGITAL TELEPHONE VISUAL CALL INDICATIONS

15Telephone Operating Instructions
TABLE E
FORTHCOMING DIGITAL TELEPHONE DISPLAY
16 Telephone Operating Instructions
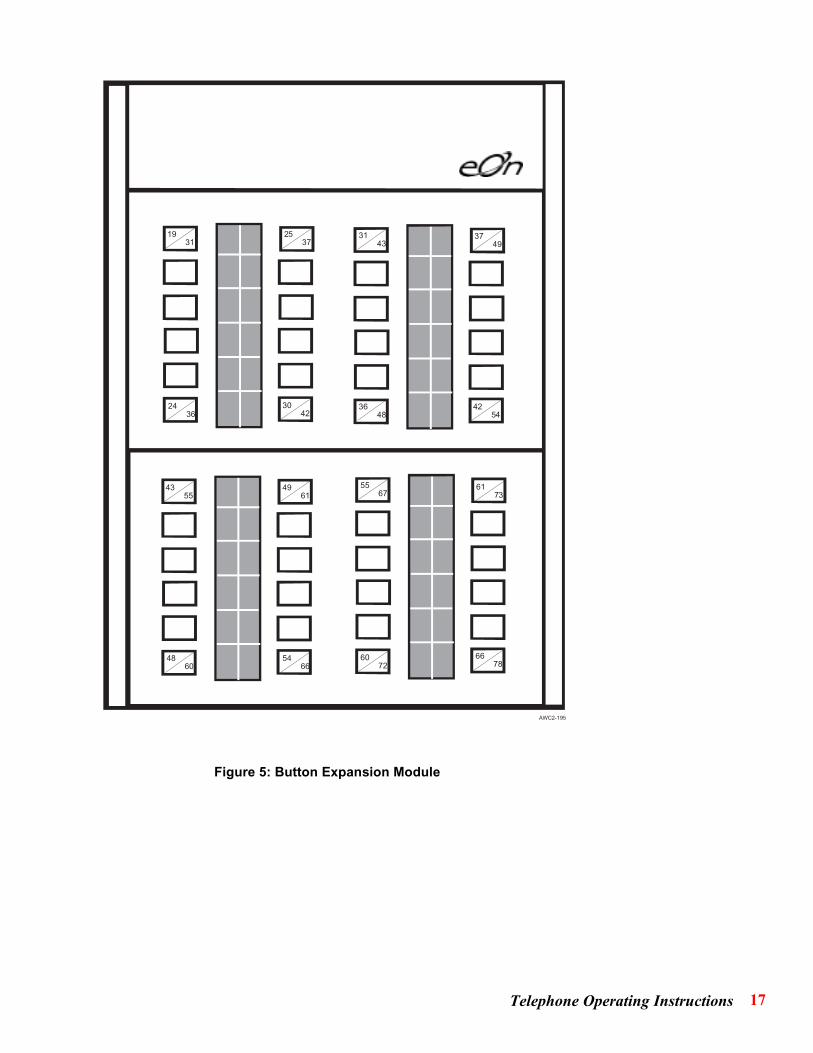
The Button Expansion Module (BEM) (see Figure 5) connects directly to a digitaltelephone or another BEM. It contains 48 programmable buttons arranged in four groupsof twelve. Up to four BEMs can be connected in series to provide a total of 192programmable buttons, resulting in a 210-button station when associated with an 18-button telephone, or a 222-button station when associated with a 30-button telephone.
The BEM can be equipped with a display module. The information shown on the displaycomplements the information shown on the display of the companion telephone. Whenthe telephone is idle, the BEM display is blank and the idle state information appears onthe telephone display. When the telephone is in use, call status information in lines threeand four of the 4-line, 24 characters-per-line message is shown on the telephone displayand the idle state information in lines one and two appears on the BEM display.
The 30-button telephone can be equipped to connect to recording equipment that recordsboth sides of calls.
Button Expansion Module
Recorder Jack
17Telephone Operating Instructions
Figure 5: Button Expansion Module
19 31
24 36
25 37
30 42
31 43
36 48
42 54
61 73
55 67
49 61
43 55
48 60
54 66
60 72
66 78
37 49
AWC2-195
18 Telephone Operating Instructions
The following items can be programmed at each telephone:
❖ Background music source and volume level.
❖ Ringer volume level and ring type.
❖ Display module contrast.
❖ Handset receiver volume level.
❖ Speaker volume level (handsfree and call announce).
❖ Sidetone level.
To select the background music source and adjust the volume level:
❖ With the handset on-hook, press the MUSIC/MUTE button one or more times toselect music source 1 or 2, or no music.
❖ Press the UP ARROW or DOWN ARROW button to adjust the volume level.
For about 3 seconds after pressing the MENU button, you can use the UP ARROW orDOWN ARROW button to scroll through the modes. At the end of that time, the telephonewill go into the selected mode for about 10 seconds. Afterward, the display will changeand the telephone will return to its idle state. If the telephone goes into one of the selectionmodes, the UP ARROW and DOWN ARROW button indicators will change to ACTIVEor BUSY, indicating that the buttons can now be used to set the ring level, ring type, ordisplay contrast. In either of the two ring modes, the ringer will ring.
To set the ringer volume level and ring type:
❖ With the telephone on-hook and idle (even the MUSIC button displays nothing),press the MENU button.
❖ Within about 3 seconds, if necessary, press the UP ARROW or DOWN ARROWbutton one or more times until the message Mode = ring level select is displayed.Wait for the UP ARROW and DOWN ARROW button indicators to change toACTIVE and for the ringer to ring.
❖ Press the UP ARROW or DOWN ARROW button to increase or decrease theringer volume level. When the maximum or minimum volume is reached, therelated button indicator changes to BUSY.
❖ When the ringer volume is satisfactory, press the MENU button or wait for the 10-second timeout to save the choice and exit the ring level select mode. The ringeris silenced and the UP ARROW and DOWN ARROW button indicators change toIDLE.
❖ Press the MENU button again.
❖ Within about 3 seconds, if necessary, press the UP ARROW or DOWN ARROWbutton one or more times until the message Mode = ring type select is displayed.Wait for the UP ARROW and DOWN ARROW button indicators to change toACTIVE and for the ringer to ring.
❖ Press the UP ARROW or DOWN ARROW button to change the ring type.
Personal Preferences Setup
Music Source Selection
Ringer Adjustment
19Telephone Operating Instructions
❖ When you hear the ring type you want, press the MENU button or wait for the 10-second timeout to save the choice and exit the ring type select mode. The ringeris silenced and the UP ARROW and DOWN ARROW button indicators change toIDLE.
When the MENU button is pressed on a telephone that does not have a display module,the telephone will go into either the ring level select mode, the ring type select mode, orthe sidetone select mode. To set the ring type and ringer volume level:
❖ Press the MENU button.
❖ Wait for about 3 seconds for the telephone to start ringing and the UP ARROW andDOWN ARROW button indicators to change to ACTIVE.
❖ Press the UP ARROW or DOWN ARROW button. Either the ringer volume levelor the ring type will change.
❖ When you hear the volume level or ring type you want, press the MENU button tosave the choice and exit.
❖ Press the MENU button again, and before the 3-second timeout ends, press eitherthe UP ARROW or DOWN ARROW button once to change to the other selectmode.
❖ When the telephone starts to ring, use the UP ARROW or DOWN ARROW buttonto set the other ringer function.
❖ Press the MENU button to save the choice and exit.
When a telephone with a display module is on-hook and idle, the MENU button and theUP and DOWN buttons can be used to adjust the display contrast. To adjust the contrast:
❖ Press the MENU button. The display shows the adjusting mode.
❖ If necessary, press either the UP ARROW or DOWN ARROW button one or moretimes until the message Mode = LCD contrast select is displayed.
❖ Wait for the UP ARROW and DOWN ARROW button indicators to change toACTIVE, then press the buttons to adjust the display contrast.
❖ When you are satisfied with the contrast, press the MENU button to save thechange and exit the adjustment mode. The UP ARROW and DOWN ARROWbutton indicators change to IDLE.
To adjust the loudness of the voice you hear in the handset receiver, press the UPARROW or DOWN ARROW button during a call to increase or decrease handset volume.Each time you press and release the button, the handset volume increases or decreasesuntil the limit is reached.
The all call announce level setting is separate from the handsfree level. To adjust it, pressthe UP or DOWN button during an incoming all call announce call.
To adjust the volume of the voice you hear over the speaker during handsfree calls, pressthe UP ARROW button or DOWN ARROW button during a handsfree call to increase ordecrease the speaker volume. Each time you press and release the button, the speakervolume increases or decreases until the limit is reached.
Display Contrast Adjustment
Handset Volume Adjustment
All Call Announce VolumeAdjustment
Handsfree Speaker VolumeAdjustment
20 Telephone Operating Instructions
Each time you press the UP or DOWN ARROW button, the indicators of both buttons lightmomentarily to indicate if the minimum or minimum limit has been reached.
To adjust the amount of sidetone (the portion of the transmitted signal that is fed back tothe receiver to make conversation more normal) that you prefer:
❖ Press the MENU button.
❖ If necessary, press the UP or DOWN ARROW button one or more times until themessage Mode = Side Tone Select is displayed.
❖ Press the MENU button again, and use the UP or DOWN ARROW button to selectthe level you wnat of the three available.
� At the lowest level, no sidetone is generated. This allows full duplex audio inend-to-end calls. This setting is normally used only when audio equipment isattached to the telephone.
Sidetone Level Adjustment

21Telephone Operating Instructions
Multibutton ElectronicTelephones
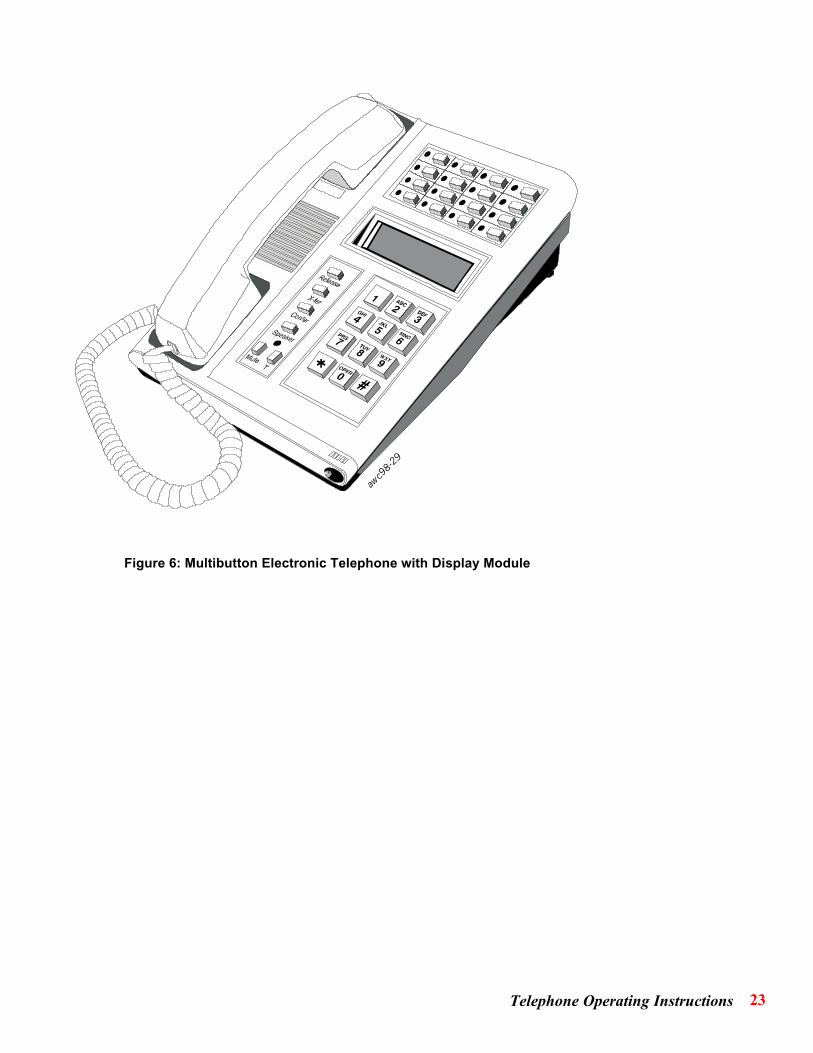
There are four models of Multibutton Electronic Telephones (Type 3100 telephones) thatcan be used with the Millennium: the Basic 8- and 16-button sets; and the Executive 8-and 16-button sets. All models are available with or without a display module. Figure 6shows a 16-button Executive model telephone with a display module.
All Multibutton Electronic Telephone models have a 12-button Tel-Touch dial, 8 or 16programmable feature buttons, and 3 fixed function buttons: RELEASE, CONF (confer-ence), and X-FER (transfer). The telephones include modular jacks for line and handsetconnections, an electronic ringer with a 4-position volume control which can also turn theringer off.
System programming determines the function of each feature button. Each telephone ina system can be programmed to fit the user's needs. Access to system features can beallowed or denied by system programming.
The function of the three fixed function buttons (RELEASE, CONF, and X-FER) is set inhardware. The RELEASE button is used to disconnect from a call (hang up). This buttonis typically used to disconnect from a handsfree call or to complete a call transfer.
By design, the CONF and X-FER buttons both act as conference hold buttons. Eitherbutton can be used to put a call on hold to transfer it or to set up a conference. Once asecond call has been established, pressing either button creates a multiparty conference.
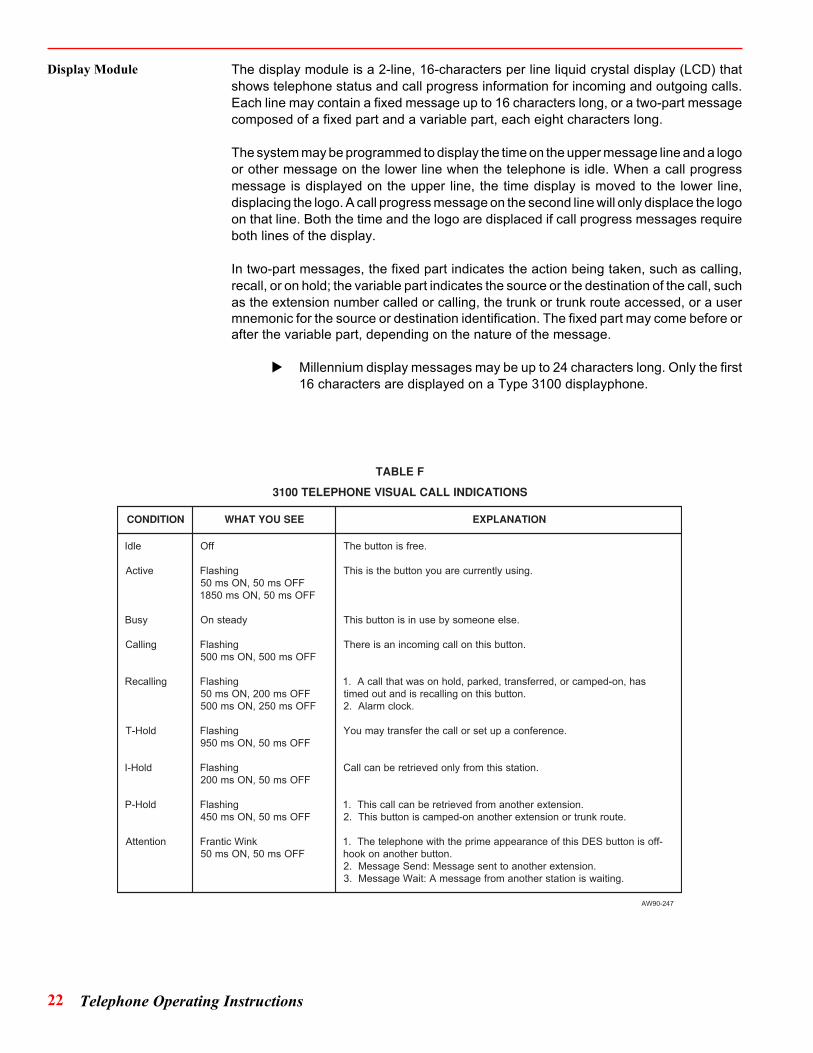
The indicator next to each feature button on the telephone displays the state of the button.Visual call indications and their meanings are shown in Table F.
The Executive model telephones also include a speaker and microphone for handsfreecalling, call announcing, and background music. These telephones have 3 additionalfixed function buttons: SPEAKER, MUSIC, and MUTE. These telephones also have arotary handset and speaker volume control.
The SPEAKER button controls handsfree operation. Pressing the button once turns thespeaker on; pressing it again turns the speaker off. When the speaker is on, the indicatornext to the button lights and handsfree operation is enabled.
The speaker and microphone in the Executive model telephones can be configured toprovide background music and call announcing, all-call paging, and handsfree operation.These features and services can be allowed or denied at individual telephones by systemprogramming.
To turn off the microphone while in the handsfree mode, in order to prevent the telephoneparty from hearing a private conversation, press the MUTE button. The SPEAKER buttonindicator flashes when the microphone is off.
To turn background music on or off, press the MUSIC button. You can adjust the musicvolume level with the speaker/handset volume control. When you receive a call an-nouncer call or go off-hook to place a call, the music stops.
Visual Call Indications
Call Announcer and Controls
Handsfree Operation
Background Music
22 Telephone Operating Instructions
The display module is a 2-line, 16-characters per line liquid crystal display (LCD) thatshows telephone status and call progress information for incoming and outgoing calls.Each line may contain a fixed message up to 16 characters long, or a two-part messagecomposed of a fixed part and a variable part, each eight characters long.
The system may be programmed to display the time on the upper message line and a logoor other message on the lower line when the telephone is idle. When a call progressmessage is displayed on the upper line, the time display is moved to the lower line,displacing the logo. A call progress message on the second line will only displace the logoon that line. Both the time and the logo are displaced if call progress messages requireboth lines of the display.
In two-part messages, the fixed part indicates the action being taken, such as calling,recall, or on hold; the variable part indicates the source or the destination of the call, suchas the extension number called or calling, the trunk or trunk route accessed, or a usermnemonic for the source or destination identification. The fixed part may come before orafter the variable part, depending on the nature of the message.
� Millennium display messages may be up to 24 characters long. Only the first16 characters are displayed on a Type 3100 displayphone.
Display Module
FELBAT
SNOITACIDNILLACLAUSIVENOHPELET0013
NOITIDNOC EESUOYTAHW NOITANALPXE
eldI
evitcA
ysuB
gnillaC
gnillaceR
dloH-T
dloH-I
dloH-P
noitnettA
ffO
gnihsalFFFOsm05,NOsm05
FFOsm05,NOsm0581
ydaetsnO
gnihsalFFFOsm005,NOsm005
gnihsalFFFOsm002,NOsm05
FFOsm052,NOsm005
gnihsalFFFOsm05,NOsm059
gnihsalFFFOsm05,NOsm002
gnihsalFFFOsm05,NOsm054
kniWcitnarFFFOsm05,NOsm05
.eerfsinottubehT
.gnisuyltnerrucerauoynottubehtsisihT
.esleenoemosybesunisinottubsihT
.nottubsihtnollacgnimocninasierehT
sah,no-depmacro,derrefsnart,dekrap,dlohnosawtahtllacA.1.nottubsihtnognillacersidnatuodemit
.kcolcmralA.2
.ecnerefnocaputesrollacehtrefsnartyamuoY
.noitatssihtmorfylnodeveirterebnacllaC
.noisnetxerehtonamorfdeveirterebnacllacsihT.1.etuorknurtronoisnetxerehtonano-depmacsinottubsihT.2
-ffosinottubSEDsihtfoecnaraeppaemirpehthtiwenohpeletehT.1.nottubrehtonanokooh
.noisnetxerehtonaottnesegasseM:dneSegasseM.2.gnitiawsinoitatsrehtonamorfegassemA:tiaWegasseM.3
742-09WA
23Telephone Operating Instructions
Figure 6: Multibutton Electronic Telephone with Display Module
24 Telephone Operating Instructions
Dial access codes are generally used to access available features at single-linetelephones, but up to 255 logical line and feature access buttons can be programmed ona single-line telephone. Any button may be assigned any of the allowable features or lineaccess types.
Any logical button can be accessed by using either the button change dial access codeor the answer dial access code. The auto call line selection mode for incoming callsautomatically applies to all buttons, regardless of button programming when more thantwo buttons are programmed on a single-line telephone. Also, the auto free line selectionmode for outgoing calls applies if specified in button and profile programming. When yougo off-hook, priority is given to recalls, incoming trunk calls, incoming internal calls, andoutgoing calls, in that order.
When a single-line telephone is neither idle nor on-hook, and an incoming call is directedto a button on that telephone, the telephone cannot ring. The system indicates a secondcall with a tone in the handset receiver repeated at five-second intervals.
When an outside call is originated, or a feature that returns dial tone or confirmation toneis accessed, all the required system resources may not be available. If a resource is notavailable, the extension is queued on that resource, and an alerting tone is heard,repeated at intervals.
When all the necessary resources are available, dial tone or confirmation tone is heard,as appropriate. If a user hangs up while queued for a resource, the user is taken out ofthe queue.
A call into the system on a trunk may be put in the trunk extension queue if the trunk cannotring the destination specified in the routing plan. The system gives no indication that thequeue is full; the caller just hears ringback tone.
Single-Line TelephonesFeature Access
Second Call Indication
Resource Queuing
Multibutton Access
25Telephone Operating Instructions
There are three ways to originate a call with a digital or Type 3100 telephone: manual lineselection, automatic line selection, and preselection. Programming determines how eachtelephone functions and which method to use to originate a call. With single-linetelephones, line selection is always automatic.
To manually select a line to make a call:
❖ Lift the handset.
❖ Press an extension, trunk route, or direct-in line button.
❖ You hear dial tone, and the selected button's indicator changes to ACTIVE.
To automatically select a line to make a call:
❖ Lift the handset.
❖ You hear dial tone, and the automatically selected button's indicator changes toACTIVE.
To preselect a line to make a call:
❖ Press an idle extension, trunk route, or direct-in line button.
❖ Lift the handset.
❖ You hear dial tone, and the selected button's indicator changes to ACTIVE.
When an incoming call rings your telephone, the associated button indicator changes toCALLING. Three methods are available for answering a call: manual call pickup,automatic call pickup, and preselection. Again, programming determines how eachtelephone functions and which method to use to answer a call. With a single-linetelephone, only automatic call pickup is available.
To answer a call on a line programmed for manual pickup:
❖ Lift the handset.
❖ Press the button next to the indicator indicating CALLING. The indicator changesto ACTIVE.
❖ You are connected with the caller.
To answer a call on a line programmed for automatic pickup:
❖ Lift the handset.
❖ The calling button indicator changes to ACTIVE. You are automatically connectedwith the caller.
Basic Operating ProceduresOriginating a Call
Answering a Call
26 Telephone Operating Instructions
To answer a call using preselection:
❖ Press the button next to the indicator showing the calling symbol.
❖ Lift the handset.
❖ You are connected with the caller. The indicator changes to ACTIVE.
� The following operations assume that your telephone is programmed forautomatic call pickup. If it is programmed for manual call pickup or preselec-tion, adjust the procedures accordingly.
To make an inside call:
❖ Lift the handset.
❖ Dial the extension number.
To make an outside call using an EXT button with the Sender-Receiver option notprogrammed:
❖ Lift the handset.
❖ Dial the trunk access code.
❖ When you hear CO dial tone, dial the outside number.
To make an outside call using a trunk route button with the Sender-Receiver option notprogrammed:
❖ Lift the handset.
❖ Press an idle TRA button. If a trunk is idle, you hear CO dial tone.
❖ Dial the outside number.
If there are no free trunks in the selected route and your telephone is programmed for autocamp-on, it is automatically camped on the trunk route. Otherwise, the system returnsbusy tone, and you can camp on manually.
To make an outside call using an EXT button with the Sender-Receiver option pro-grammed:
❖ Lift the handset.
❖ Dial the trunk access code. You do not hear CO dial tone. Depending onprogramming, you may or may not hear system dial tone.
❖ Dial the outside number, then dial # to indicate the end of dialing, or wait for thetimeout before the system begins to dial the digits.
Making Inside Calls
Making Outside CallsWithout Sender-Receiver
With Sender-Receiver
27Telephone Operating Instructions
To make an outside call using a trunk route button with the Sender-Receiver optionprogrammed:
❖ Lift the handset.
❖ Press an idle TRA button. You do not hear CO dial tone. Depending onprogramming, you may or may not hear system dial tone.
❖ Dial the outside number, then dial # to indicate the end of dialing, or wait for thetimeout before the system begins to dial the digits.
If a trunk cannot be seized, your telephone is automatically camped on the trunk or trunkroute, and the dialed digits are saved. When a trunk becomes available, your telephonerings. When you answer, the system dials out the saved digits.
� If the trunk and the system are both programmed for overlap dialing, the callednumber will be dialed while you are still dialing. You may or may not heardialing, depending on programming.
To call handsfree:
❖ With the handset is on-hook, dial the number you want to call; the speaker andmicrophone are enabled when the first digit is dialed. The SPEAKER buttonindicator changes to CALLING.
❖ Alternatively, you can press an idle extension or trunk button or the SPEAKERbutton and, when you hear system dial tone, dial the number. The associatedbutton indicator changes to CALLING.
To answer a call handsfree:
❖ Press the SPEAKER button or the calling extension or trunk button when thetelephone rings.
❖ The SPEAKER button indicator changes to BUSY, and the speaker and microphoneare enabled so that you can talk with the caller without lifting the handset.
To adjust the speaker volume, press the UP ARROW and DOWN ARROW buttons duringa call.
To turn off the microphone while on a handsfree call, press the MUSIC/MUTE button. Withthe microphone disabled, the distant party cannot hear conversation near the telephone.You can hear the distant party, but the distant party cannot hear you. To resume 2-waycommunication with the distant party, press the MUSIC/MUTE button again.
To transfer a call from handsfree to the handset, lift the handset. The SPEAKER buttonindicator changes to IDLE and the microphone and speaker are disabled. You can talkinto the handset.
To transfer a call in progress from the handset to handsfree, first press the SPEAKERbutton, then place the handset in the cradle.
To hang up when talking handsfree, press the SPEAKER button.
Digital telephones can be programmed for headset operation, or can be put in theheadset operating mode by pressing the HEADSET/HANDSET button. When the buttonis pressed, the associated indicator changes to BUSY.
Handsfree Operation
Headset/Handset Operation
28 Telephone Operating Instructions
To answer calls in the headset operating mode, press the ANSWER button or the callingbutton.
To originate calls in the headset operating mode, press an idle button or dial a number.Handsfree operation will not be invoked as long as the handset is in the cradle.
To put the telephone in the group listen mode during a headset call, press the SPEAKERbutton.
For data port dialing, the system recognizes the Hayes protocol prefix ATDP. When theserial port of a personal computer is connected via a data terminal adapter to a 30-buttontelephone, the prefix can be used to dial from the computer.
Data Port Dialing
29Telephone Operating Instructions
To set the alarm clock from the telephone where the alarm will ring:
❖ Press the ALARM CLOCK button or dial the Alarm Clock access code. You hearsystem dial tone. The SPEAKER button indicator changes to BUSY; if you usedan ALARM CLOCK button, the indicator changes to ACTIVE.
❖ If the system is programmed for a 24-hour clock, dial four digits to set the time. Thefirst two digits represent the hour, while the second two digits represent theminutes (for example, 11:15 PM = 2315; 6:45 AM = 0645).
❖ If the system is programmed for a 12-hour clock, dial five digits to set the time. Thefirst two digits represent the hour, while the second two digits represent theminutes. The fifth digit is either 1 for AM or 2 for PM (for example, 11:15 AM =11151; 11:15 PM = 11152).
❖ If your telephone has a display, dial the number (0-9) of the alarm clock messageto be displayed when you hear dial tone. Consult your system administrator for thetext of the alarm clock messages. If your telephone does not have a display, pressthe RELEASE or SPEAKER button when you hear dial tone to release yourtelephone.
❖ If your telephone has a display, you hear confirmation tone and the ALARMCLOCK button indicator changes to BUSY. (If you dial an invalid digit, you hearreorder tone.) Your telephone releases automatically and the SPEAKER buttonindicator changes to IDLE.
❖ When the time you set equals that of the system clock, the ALARM CLOCK buttonindicator changes to RECALLING and, if applicable, your telephone rings at thealarm clock ring rate. If your telephone has a display module, the selectedmessage or message number 0 will be displayed.
❖ Press the ALARM CLOCK button to acknowledge. The ALARM CLOCK buttonindicator changes to IDLE. If applicable, ringing stops and the alarm clockmessage is cleared from the display.
� If you do not answer an alarm clock call within a programmed time, theALARM CLOCK button indicator will continue to show RECALLING and thedisplay will continue to show the alarm clock message but ringing will stop.
To cancel the alarm clock from a telephone with an ALARM CLOCK button, press theALARM CLOCK button. The ALARM CLOCK button indicator changes to idle.
To cancel the alarm clock from a telephone without an ALARM CLOCK button:
❖ Dial the local Alarm Clock access code. The alarm is canceled, and after a shortdelay, you hear system dial tone over the telephone speaker.
❖ Press the RELEASE button to release.
To set an alarm clock on one or more other telephones from your telephone:
❖ Press the REMOTE ALARM CLOCK SET button or dial the Remote Alarm Clockaccess code followed by the digit 1. You hear system dial tone. The SPEAKERbutton indicator changes to BUSY; if you use a REMOTE ALARM CLOCK SETbutton, the indicator changes to ACTIVE.
Feature Operating InstructionsAlarm Clock
Local
Remote
30 Telephone Operating Instructions
❖ Dial the time as described for Local Alarm Set. If you dial an invalid digit, you hearreorder tone.
❖ When you hear dial tone again, dial the number (0-9) of the alarm clock messageyou want.
❖ When you hear dial tone again, dial the extension number that the alarm will ring.Listen for dial tone.
❖ Dial any other extension numbers, waiting for dial tone before dialing each one.As you dial each extension number, the ALARM CLOCK button indicator at theselected telephone changes to BUSY. If an extension is protected from remotealarm clock set, you hear reorder tone.
❖ When you have entered the last number, press the RELEASE button or theSPEAKER button. The SPEAKER button indicator changes to IDLE and, ifapplicable, the REMOTE ALARM CLOCK SET button indicator changes to IDLE.
To cancel the remote alarm clock from a telephone with a REMOTE ALARM CLOCKCANCEL button:
❖ Press the REMOTE ALARM CLOCK CANCEL button or dial the Remote AlarmClock access code followed by the digit 0. You hear system dial tone. TheSPEAKER button indicator changes to BUSY; if applicable, the REMOTE ALARMCLOCK CANCEL button indicator changes to ACTIVE.
❖ Dial the first extension number you are canceling the alarm for.
❖ Dial any other extension numbers, waiting for dial tone before dialing each one.At each telephone, the ALARM CLOCK button indicator changes to IDLE when theextension number is dialed.
❖ When you have entered the last number, press the RELEASE button or theSPEAKER button. The SPEAKER button indicator and, if applicable, the REMOTEALARM CLOCK CANCEL button indicator change to idle.
To answer an incoming call from an idle telephone:
❖ Lift the handset.
❖ Press the ANSWER button, or dial the Answer access code. The call is answered.The button indicator associated with the incoming call changes to ACTIVE.
To answer an incoming call while busy on a call:
❖ Press the ANSWER button, or press the TRANSFER HOLD button and dial theAnswer access code. The current call is put on hold. The incoming call isanswered. The button indicator associated with the call on hold changes to T-HOLD or I-HOLD. The button indicator associated with the incoming call changesto ACTIVE.
❖ To return to the call on hold, press the associated button.
Answer
31Telephone Operating Instructions
To automatically answer a call in either the handset or headset mode:
❖ Press the AUTO ANSWER button. The button indicator changes to ACTIVE.
❖ Calls directed to your telephone when it is idle will ring for the programmed delaytime (0-15 seconds), or, if no delay time is programmed, for the 4-second defaultdelay time. If you put your telephone in Do Not Disturb mode during the answerdelay time, the call will not be answered.
❖ Depending on programming, both you and the caller may hear confirmation tone.
To turn Auto Answer off, press the AUTO ANSWER button again. The button indicatorchanges to IDLE.
To put your telephone in the auto transfer mode:
❖ Press the AUTO TRANSFER button. The AUTO TRANSFER button indicatorchanges to BUSY.
❖ Incoming calls will be automatically put on hold when you use a direct extensionselection (DES) button to transfer them. If the called extension is idle, the call istransferred and your telephone is released.
To take your telephone out of auto transfer mode, press the AUTO TRANSFER buttonagain. The AUTO TRANSFER button indicator changes to IDLE.
To call a prime extension using the busy prime line indication feature:
❖ Press the BUSY PRIME button to put your telephone in the busy prime lineindication operating mode. The BUSY PRIME button indicator changes to BUSY.
❖ Lift the handset.
❖ Dial a prime extension number. If the target telephone is on-hook, all appearancesof the called extension number will ring as usual. If the target telephone is off-hook,the BUSY PRIME button indicator changes to ATTENTION; the system returnsbusy tone. There is no indication of the call attempt at any appearance of the callednumber.
❖ You can either complete or terminate the call.
� To complete the call, press the BUSY PRIME button. You hear ringback toneand the BUSY PRIME button indicator changes to BUSY. The target tele-phone receives second call indication, and any other appearances of thecalled number ring.
� To terminate the call, hang up.
To transfer a call to a prime extension using the busy prime line indication feature:
❖ Put the incoming call on hold.
❖ Press the BUSY PRIME button. The BUSY PRIME button indicator changes toBUSY.
Auto Answer
Auto Transfer
Busy Prime Line Indication
32 Telephone Operating Instructions
❖ Dial a prime extension number. If the telephone with the prime appearance of theextension number is on-hook, all appearances of the extension number ring asusual. If the telephone is off-hook on another button, the BUSY PRIME buttonindicator changes to ATTENTION; the system returns busy tone. There is noindication of the call at any prime or nonprime appearances.
❖ You can transfer the call or cancel the call attempt and return to the call on hold.
� To transfer the call, press the BUSY PRIME button and then press theRELEASE button or hang up. The call is automatically transferred, the targettelephone receives second call indication and any other appearances of thecalled number will ring.
� To cancel the call and return to the party on hold, press the button associatedwith the call on hold.
To access a feature programmed on a logical button:
❖ Lift the handset.
❖ Press the BUTTON CHANGE button, or dial the Button Change access code.
❖ When you hear system dial tone, dial the button number for the feature to beaccessed.
� The button number must be within the range specified by the telephone'slocation programming. For example, on a telephone programmed as a TYPEMET18, only buttons 01 through 18 will be recognized. Button 0 and buttons19 and up would not be recognized.
A single-line telephone user can flash the hookswitch to put a call on hold then dial thebutton change code to select a CANCEL button. This is useful in an interactive voiceresponse (IVR) system to set up a conference between several parties, then, based oninput from the parties, drop them from the conference by pressing the CANCEL button.
Call announce uses tone and voice signaling on internal calls instead of the usual ringingand allows the called party to reply without picking up the handset. If a telephone cannotbe call-announced for any reason, the call is handled as a normal station-to-station call.All appearances ring as usual, and you hear ringback tone.
A telephone that has a CALL ANNOUNCE button will remain in the call announceoperating mode until the access code is dialed or the button is pressed a second time.A telephone that does not have a CALL ANNOUNCE button will automatically return tothe normal operating mode when a call announce call is completed.
To put your telephone in the call announce mode:
❖ Press the CALL ANNOUNCE button or dial the Call Announce access code. TheCALL ANNOUNCE and SPEAKER button indicators change to BUSY. If you usethe dial access code, the EXT button indicator changes to ACTIVE.
� You can put your telephone in the call announce mode only if it is programmedfor it and it has a CALL ANNOUNCE button.
Button Change
Call Announce
33Telephone Operating Instructions
❖ Press the SPEAKER button. The SPEAKER button indicator and, if applicable,the EXT button indicator change to IDLE. The CALL ANNOUNCE button indicatorcontinues to show BUSY.
To return the telephone from the call announce operating mode to the normal operatingmode:
❖ Press the CALL ANNOUNCE button or dial the Call Announce access code.
❖ The CALL ANNOUNCE button indicator changes to IDLE. If applicable, the EXTbutton indicator changes to ACTIVE. The SPEAKER button indicator changes toBUSY. You hear system dial tone.
❖ To hang up, press the SPEAKER button. The SPEAKER button indicator and, ifapplicable, the EXT button indicator change to IDLE.
To make a call announce call in the call announce operating mode:
❖ Press the SPEAKER button or lift the handset.
❖ The button CALL ANNOUNCE indicator and, if applicable, the SPEAKER buttonindicator change to BUSY. The EXT button indicator changes to ACTIVE. Youhear system dial tone.
❖ Dial the extension number you want to call.
❖ If call announce is allowed, you hear confirmation tone; both you and the partyyou are calling hear warning tone. A two-way call announce communication pathis established.
❖ To hang up, press the SPEAKER button or place the handset in the cradle.
❖ The EXT and SPEAKER button indicators change to IDLE. The CALL ANNOUNCEbutton indicator continues to show BUSY if the telephone is in call announcemode; otherwise, the indicator changes to IDLE.
To make a call announce call in the normal operating mode:
❖ Press the SPEAKER button or lift the handset.
❖ Press the CALL ANNOUNCE button or dial the Call Announce access code. Youhear system dial tone. The CALL ANNOUNCE button indicator changes to BUSY.
❖ Dial the extension number you want to call. If call announce is allowed, you hearconfirmation tone; both you and the party you are calling hear warning tone. A two-way call announce communication path is established.
❖ When your call is finished, hang up. The EXT and CALL ANNOUNCE buttonindicators change to IDLE.
To make a call announce call from a telephone in the call announce operating mode:
❖ Lift the handset.
34 Telephone Operating Instructions
❖ Dial the extension number of the telephone you want to call. The EXT buttonindicator changes to ACTIVE. If call announce is allowed, you hear confirmationtone. Both you and the called station hear warning tone. A two-way call announcecommunication path is established.
❖ When your call is finished, hang up. The EXT button indicator changes to idle. TheCALL ANNOUNCE button indicator continues to indicate BUSY.
� If the called telephone is busy on another button and is programmed asprotected from off-hook call announce, the call will not be completed and thesystem will return busy tone.
A telephone that is not protected from off-hook call announce can receivecall-announced calls while off-hook on another line. The announcement isheard over the speaker only. The active call continues to be heard over thehandset receiver. To answer the announcement, the called party mayterminate the active call, or put it on hold, or press and hold the MUSIC-MUTE button to talk to the announcing party. The called party can also togglebetween the handset call and the call-announce call, alternately speakingwith one party or the other over the handset transmitter. The called party canmute the handset transmitter by pressing the MUSIC-MUTE button for lessthan one second. The MUSIC-MUTE button indicator changes to FLASH-ING.
All call announce simultaneously calls all call announcer telephones in a specified zoneor zones. A telephone may have more than one button for this feature. Each button canrepresent one or more all call announce zones. All call announce feature access issubject to a programmable timeout.
To make an all call announce call:
❖ Lift the handset.
❖ Dial the All Call Announce access code, followed by a zone number if applicable,or press the ALL CALL ANNOUNCE button. The the EXT and ALL CALLANNOUCE button indicators change to ACTIVE. You hear confirmation tone; bothyou and the called parties hear warning tone.
� Up to three All Call Announce calls can be made at a time, as long as the calledzones are mutually exclusive. For example, Party A can direct a call to zones1 and 4, Party B to zone 3, and Party C to zone 5, all at the same time. If afourth call is attempted, the system will return busy tone. If a call is attemptedto a zone that is already busy, the system will return busy tone.
❖ When your call is completed, hang up. The EXT and ALL CALL ANNOUNCEbutton indicators change to IDLE.
� If the All Call Announce timer expires while you are talking, you will be cut offand you will hear reorder tone.
To answer an all call announce call:
❖ Lift the handset.
All Call Announce
35Telephone Operating Instructions
❖ Press the DIRECTED CALL PICKUP button or dial the Directed Call Pickupaccess code. The DIRECTED CALL PICKUP button indicator changes to BUSY;the EXT button indicator changes to ACTIVE. You hear system dial tone.
❖ Dial the All Call Announce access code plus the zone number. The DIRECTEDCALL PICKUP button indicator changes to IDLE; the call is transferred to theanswering telephone and a private two-party call is established. The speakers onthe other telephones in the zones return to their previous state.
� If the all call announce call is in several zones, you can dial any active zonenumber to answer.
To forward calls from to a specified extension:
❖ Lift the handset.
❖ Press the feature button for the call forward mode you want, or dial the Local CallForward access code plus the trailing digit specifying the mode (CFFM = 1,CFBDA = 2, or CFDA = 3). The selected CALL FORWARD button indicatorchanges to ACTIVE. You hear system dial tone.
❖ Dial the prime extension number of the telephone your calls will be forwarded to.You hear confirmation tone. The selected CALL FORWARD button indicatorchanges to BUSY.
To forward calls to an outside destination:
❖ Lift the handset.
❖ Press the CFOS button, or dial the Local Call Forward access code followed bythe digit 4. The CFOS button indicator changes to ACTIVE. You hear system dialtone.
❖ Dial the system repertory number corresponding to the outside number to whichcalls are to be forwarded. You hear system dial tone. The CFOS button indicatorchanges to BUSY.
❖ To keep CFOS active until you cancel it, hang up.
❖ To keep CFOS active for a specific time, dial a two-digit number (01 to 60)representing the time in hours, listen for confirmation tone, and then hang up.
To change the call forward operating mode:
❖ Lift the handset.
❖ Press the feature button for the call forward mode you want, or dial the Local CallForward access code plus the trailing digit specifying the mode (CFFM = 1,CFBDA = 2, or CFDA = 3). The selected CALL FORWARD button indicatorchanges to ACTIVE. The button indicator of the previously selected modechanges to IDLE. You hear system dial tone.
❖ Dial the prime extension number of the telephone your calls will be forwarded to.
Call Forward
Call Forward Outside System
Local Call Forward
36 Telephone Operating Instructions
You hear confirmation tone. The selected CALL FORWARD button indicatorchanges to BUSY.
❖ Hang up.
To cancel call forward:
❖ Lift the handset.
❖ Press the busy CALL FORWARD feature button, or dial the Local Call Forwardaccess code followed by the digit 0. The CALL FORWARD feature button indicatorchanges to idle. You hear confirmation tone.
❖ Hang up.
� You can also cancel any mode of call forward from any telephone by dialingthe Clear Active Features dial access code.
To check if your telephone is in a call forward mode:
❖ Lift the handset.
❖ Dial the Local Call Forward access code followed by the digit 9. If your telephoneis in a call forward mode, you hear confirmation tone. If not, you hear reorder tone.
❖ Hang up.
To put a telephone in the CFFM, CFBDA, or CFDA mode from another telephone:
❖ Lift the handset.
❖ Dial the Remote Call Forward access code plus the trailing digit specifying themode (CFFM = 1, CFBDA = 2, or CFDA = 3). Listen for system dial tone.
❖ Dial the prime extension number of the telephone the calls will be forwarded from.Listen for system dial tone.
❖ Dial the number of the telephone the calls will be forwarded to.
❖ When you hear confirmation tone, hang up.
To put a telephone in the CFOS mode from another telephone:
❖ Lift the handset.
❖ Dial the Remote Call Forward access code followed by the digit 4. Listen forsystem dial tone.
❖ Dial the prime extension number of the telephone the calls will be forwarded from.Listen for system dial tone.
❖ Dial the system repertory number corresponding to the outside number the callswill be forwarded to. You hear system dial tone.
❖ To keep CFOS active until you cancel it, hang up.
Remote Call Forward
37Telephone Operating Instructions
❖ To keep CFOS active for a specific time, dial a two-digit number (01 to 60)representing the time in hours, listen for confirmation tone, and then hang up.
To change a telephone’s call forward mode from another telephone:
❖ Lift the handset.
❖ Dial the Remote Call Forward access code plus the digit specifying the mode(CFFM = 1, CFBDA = 2, or CFDA = 3). Listen for system dial tone.
❖ Dial the prime extension number of the telephone the calls will be forwarded from.Listen for system dial tone.
❖ Dial the number of the telephone the calls will be forwarded to.
❖ When you hear confirmation tone, hang up.
To cancel call forward from another telephone:
❖ Lift the handset.
❖ Dial the Remote Call Forward access code followed by the digit 0. Listen forsystem dial tone.
❖ Dial the prime extension number of the telephone to be taken out of the call forwardmode.
❖ When you hear confirmation tone, hang up.
� If the extension is not in the call forward mode, you hear reorder tone.
To check if a telephone is in a call forward mode from another telephone:
❖ Lift the handset.
❖ Dial the Remote Call Forward access code followed by the digit 9. Listen forsystem dial tone.
❖ Dial the prime extension number of the telephone you want to check.
❖ If the telephone is in the call forward mode, you hear confirmation tone. If not, youhear reorder tone.
❖ Hang up.
To break in on a two-party call or multiparty conference in progress:
❖ Lift the handset.
❖ Press the DES button for one of the busy circuits. The selected button indicatorchanges to ACTIVE. You hear confirmation tone; the busy parties may hearwarning tone and interrupted override tone. A conference connection is established.
❖ Hang up to exit the call. The original call is reestablished, and the associatedbutton indicator changes to BUSY.
Call IntrusionBreak-In
38 Telephone Operating Instructions
� If break-in is denied, you hear reorder tone.
To put your telephone in the override operating mode:
❖ Press the OVERRIDE button.
❖ The OVERRIDE button indicator changes to BUSY.
To put your telephone in the override operating mode using the dial access code:
❖ Dial the Override access code. You hear system dial tone. The SPEAKER andOVERRIDE button indicators change to BUSY; the EXT button indicator changesto ACTIVE.
❖ Press the SPEAKER button to hang up. The EXT and SPEAKER button indicatorschange to idle.
To return your telephone from override to the normal operating mode:
❖ Press the OVERRIDE button.
❖ The OVERRIDE button indicator changes to IDLE.
To return your telephone from override to the normal operating mode using the dialaccess code:
❖ Dial the Override access code. You hear system dial tone. The EXT buttonindicator changes to ACTIVE; the SPEAKER button indicator changes to BUSY;the OVERRIDE button indicator changes to idle.
❖ Press the SPEAKER button to hang up. The EXT and SPEAKER button indicatorschange to IDLE.
To override a busy station, trunk, or conference in the normal operating mode:
❖ When you hear busy tone, press the OVERRIDE button, or press the TRANSFERHOLD or CONFERENCE HOLD button.
❖ When you hear second dial tone, dial the Override access code. The OVERRIDEbutton indicator changes to BUSY. You and the busy parties may hear a warningtone. After the warning tone, you hear confirmation tone. A conference connectionis established. You can talk with both parties. All parties may hear override toneevery 10 seconds.
❖ When you hang up, Override is canceled, and the original connection isreestablished. Your telephone remains in the override operating mode; theOVERRIDE button indicator continues to indicate BUSY.
❖ To exit the override operating mode, press the OVERRIDE button. The OVERRIDEbutton indicator changes to idle.
� If override is denied for any reason, you hear reorder tone.
Override
39Telephone Operating Instructions
To override a busy station, trunk, or conference in the override mode:
❖ Lift the handset.
❖ Press the busy DES button or dial the busy extension number. The DES buttonindicator or EXT button indicator changes to ACTIVE. You and the busy partiesmay hear a warning tone. After the warning tone, you hear confirmation tone. Aconference connection is established. You can talk with both parties. All partiesmay hear override tone every 10 seconds.
❖ When you hang up, Override is canceled, and the original connection isreestablished. Your telephone remains in the override operating mode; theOVERRIDE button indicator continues to show BUSY.
�If override is denied for any reason, you hear reorder tone.
To park a call in one specific park zone:
❖ Press an idle CALL PARK button while connected to the calling party, or press theTRANSFER HOLD button.
❖ When you hear transfer dial tone, dial the Call Park access code plus the numberof the park zone (00-15).
❖ The incoming call's button indicator changes to BUSY. The CALL PARK buttonindicator changes to ACTIVE. All other appearances of the PARK button changeto P-HOLD. You hear dial tone as confirmation that the call has been parked.
❖ Hang up. The CALL PARK button indicator changes to P-HOLD.
� If the park zone is not free, you hear busy tone.
To park a call in any park zone:
❖ Press the GENERAL CALL PARK button while connected to the calling party, orpress the TRANSFER HOLD button.
❖ Listen for transfer dial tone, and then dial the Call Park access code plus ✱.
❖ The incoming call's button indicator changes from ACTIVE, to HOLD, to BUSY.The GENERAL CALL PARK button indicator changes to ACTIVE. The displayshows the zone the call is parked in. Any button appearance of the zone the callis parked in indicates P-HOLD. You hear dial tone as confirmation that the call hasbeen parked.
❖ Hang up. The GENERAL CALL PARK button indicator changes to IDLE.
To answer a parked call:
❖ Lift the handset.
❖ Press the CALL PARK button for the park zone, or dial the Call Park Answeraccess code plus the number of the park zone (00-15).
❖ You hear confirmation tone. You are automatically connected to the parked call,and the park zone is freed. The CALL PARK button indicator changes to ACTIVE;all other appearances of the park button change to IDLE.
Call Park
40 Telephone Operating Instructions
To determine the identity of a parked caller:
❖ Lift the handset.
❖ Dial the Call Park Query access code plus the number of the park zone. Thedisplay shows the identity of the parked caller, if available.
❖ Dial # to answer the call, or hang up to disregard the call, or use the UP and DOWNarrow keys to scroll through a directory of parked calls.
To transfer a call to another extension, to a trunk, to a hot line, or to a destination specifiedin a routing plan:
❖ Press the TRANSFER HOLD button to put the call on hold. The TRANSFER HOLDbutton indicator changes to ACTIVE; the button indicator associated with the heldcall changes to T-HOLD.
❖ When you hear transfer dial tone, dial the destination number or press a DESbutton or trunk button.
❖ Before or after the call is answered, press the RELEASE button or hang up tocomplete the transfer. The TRANSFER HOLD button indicator changes to IDLE;the button indicator associated with the transferred call changes to BUSY or IDLE.
❖ If the called party is busy, does not wish to accept the call, or does not answer,press the CANCEL button or the button associated with the held call to return tothe calling party.
� 1. If you use a DES button to call the destination, the DES button indicatorwill monitor the call. If you dial the destination, the TRANSFER HOLD buttonindicator will monitor the call.
2. If your telephone is programmed for automatic transfer hold and you usea button to call the transfer destination, the incoming call will automaticallyput on hold when you press the button.
3. If your telephone is in the auto transfer operating mode, your call will beautomatically transferred and your telephone released if the called extensionis idle.
To block your telephone from sending caller ID information:
❖ Lift the handset.
❖ Press the CALLER ID BLOCKING/UNBLOCKING button (the button indicatorchanges to BUSY), or dial the Caller ID Blocking access code.
To unblock caller ID:
❖ Lift the handset.
❖ Press the CALLER ID BLOCKING/UNBLOCKING button again (the button indicatorchanges to IDLE), or dial the Caller ID Unblocking access code.
Call Transfer
Caller ID Blocking/Unblocking
41Telephone Operating Instructions
To camp on a busy extension:
❖ When you hear busy tone, press the CAMP-ON button. The CAMP-ON buttonindicator changes to BUSY. Or, press the TRANSFER HOLD or CONFERENCEHOLD button, and when you hear second dial tone, dial the Camp-On accesscode.
❖ You hear confirmation tone. The CAMP-ON button indicator changes to BUSY.The EXT button indicator continues to indicate ACTIVE. Both you and the camped-on party may hear a camp-on alerting tone, repeated at timed intervals.
❖ Hang up. The EXT button indicator changes to IDLE. The camp-on tone isstopped.
❖ When the camped-on telephone becomes idle, your telephone rings.
❖ Answer the call. The EXT button indicator changes to ACTIVE; the CAMP-ONbutton indicator changes to IDLE. You hear ringback tone while the system ringsthe camped-on station.
To camp a trunk call on a busy extension:
❖ When you hear busy tone, press the CAMP-ON button. The CAMP-ON buttonindicator changes to BUSY. Or, press the TRANSFER HOLD or CONFERENCEHOLD button, and when you hear second dial tone, dial the Camp-On accesscode.
❖ You hear confirmation tone. The CAMP-ON button indicator changes to BUSY.Both you and the camped-on party may hear a camp-on alerting tone, repeatedat timed intervals.
❖ Hang up, or press the RELEASE button. The CAMP-ON button indicator and theTRA or EXT button indicator change to IDLE. The trunk party may hear the camp-on alerting tone.
❖ When the camped-on telephone becomes idle, the system rings the telephone.
� 1. If the called extension is already camped on, is protected from camp-on,is in the Do-Not-Disturb mode, or is receiving ROH tone, you hear reordertone.
2. If you stay off-hook, the camped-on telephone rings as soon as itbecomes idle, you hear ringback tone, and the trunk stays on hold.
To camp on a busy trunk route:
❖ When you hear busy tone, press the CAMP-ON button. The CAMP-ON buttonindicator changes to BUSY. Or, press the TRANSFER HOLD button, and whenyou hear transfer dial tone, dial the Camp-On access code. You hear confirmationtone.
❖ Hang up.
❖ When a trunk becomes available, your telephone rings, and the CAMP-ON buttonindicator changes to IDLE.
❖ Answer the call. You hear trunk dial tone.
� If you stay off-hook, you will hear dial tone as soon as a trunk is assigned tothe call.
Camp-OnStation Camp-On
Trunk Route Camp-On
42 Telephone Operating Instructions
To set up an automatic callback:
❖ Camp on a busy extension or trunk route.
❖ Hang up. The CAMP-ON button indicator changes to BUSY. The extension buttonindicator changes to IDLE; a trunk button indicator changes to BUSY. You canmake and answer other calls while you are camped on.
❖ When your telephone is on-hook and the camped-on extension or a trunk in thecamped-on trunk route becomes idle, your telephone will ring and the extensionor trunk button indicator will change to CALLING.
❖ Answer the call. You are automatically connected to the trunk or ringing telephone.The CAMP-ON button indicator changes to IDLE; the trunk or extension buttonindicator changes to ACTIVE.
If your telephone programmed for auto camp-on and you attempt to access a busy trunkroute, you will be automatically camped on the trunk route. You hear confirmation toneand the CAMP-ON button indicator changes to BUSY. When a trunk becomes available,the system will connect the trunk, or ring your telephone and connect the trunk when thecall is answered.
� If your telephone is programmed for sender-receiver operation, the dialeddigits are saved and automatically dialed when the callback is answered.
To answer a camped-on call when active on another call:
❖ Put the first call on hold by pressing the TRANSFER HOLD button. The TRANSFERHOLD button indicator changes to ACTIVE; the button indicator associated withthe held call changes to T-HOLD.
❖ Following a brief pause, the camped-on call is connected.
❖ To return to the held call without dropping the active call, press the TRANSFERHOLD button again. The TRANSFER HOLD button indicator changes to T-HOLD; the extension or trunk button indicator changes to ACTIVE.
To drop the active call and return to the held call, press the CANCEL button.
To transfer the call and release your telephone, hang up or press the RELEASE button.
To set up a conference, press the CONFERENCE HOLD button after you answer thecamped-on call.
To clear any active features:
❖ Lift the handset.
❖ Dial the Clear Features dial access code. Any active features are deactivated andyou hear confirmation tone.
❖ Hang up.
Automatic Callback
Trunk Auto Camp-On
Answer Hold
Clear Features
43Telephone Operating Instructions
To set the hours and minutes:
❖ Lift the handset.
❖ Press the SYSTEM CLOCK button. You hear system dial tone, and the SYSTEMCLOCK button indicator changes to ACTIVE.
❖ If the system is programmed for a 24-hour clock, dial four digits to set the time. Thefirst two digits represent the hour, while the second two digits represent theminutes (for example, 11:15 PM = 2315; 6:45 AM = 0645).
❖ If the system is programmed for a 12-hour clock, dial five digits to set the time. Thefirst two digits represent the hour, while the second two digits represent theminutes. The fifth digit is either 1 for AM or 2 for PM (for example, 11:15 AM =11151; 11:15 PM = 11152).
❖ When you hear system dial tone, hang up. The SYSTEM CLOCK button indicatorchanges to IDLE. The clock display is updated on all telephones with a displaymodule.
To set the YEAR, MONTH, and DATE:
❖ When you hear dial tone after having set the clock, dial two digits for the year.
❖ Dial two digits for the month (for example, 02 = February, 06 = June, 11 =November).
❖ Dial two digits for the day of the month. The only acceptable day entries are: 01-29 for February (02), 01-30 for April (04), June (06), September (09), andNovember (11), and 01-31 for all other months.
❖ When you hear confirmation tone, hang up. The SYSTEM CLOCK button indicatorchanges to IDLE. If the dialed digits are not valid, you hear reorder tone.
To set up a multiparty conference:
❖ While talking to a trunk party or inside party, press the CONFERENCE HOLDbutton or TRANSFER HOLD button to put the trunk or extension on hold. TheCONFERENCE HOLD or TRANSFER HOLD button indicator changes to ACTIVE;the button indicator of the call on hold changes to T-HOLD. You hear second dialtone.
❖ Dial the number of the next (inside or outside) conference member.
❖ After the party answers, press the CONFERENCE HOLD button to establish theconference. The trunk or extension button indicator changes to IDLE. If applicable,the TRANSFER HOLD button indicator also changes to IDLE.
❖ To add another party to the conference, repeat the procedure, using theCONFERENCE HOLD button to put the conference on hold and to rejoin theconference with a new conference member.
� 1.If a called party is busy, does not answer, or does not wish to confer, pressthe CANCEL button to release the call and return to the conference.
2.To answer or originate a call during a conference, use the TRANSFERHOLD button to put the conference on hold.
Clock SetHours and Minutes
Year, Month, and Date
Conference
44 Telephone Operating Instructions
If no other conference is currently in effect, as many as 32 parties can be included in aconference. Otherwise, only enough parties can be added to reach the 32-party systemlimit. For example, if conferences in effect involve 28 parties, this conference can onlysupport 4 parties (32 minus 28).
To leave the conference:
❖ Hang up.
❖ The CONFERENCE HOLD button indicator changes to IDLE.
The conference will continue as long as there are three or more members and onemember is an inside party whose COS allows trunk-to-trunk transfer. When the last insidemember hangs up, the conference is terminated and any remaining outside parties aredisconnected.
To join an ongoing conference, refer to BREAK-IN or OVERRIDE.
To release a party from a conference (you must be the conference controller):
❖ Press the CANCEL button.
❖ The last party that was added to the conference will be released. The CONFERENCEHOLD button indicator will continue to indicate ACTIVE as long as one stationremains in the conference.
To leave a conference:
❖ Hang up or press the RELEASE button.
❖ The CONFERENCE HOLD button indicator changes to IDLE.
If you are the controller of a regular conference or an executive override, or a member ofa Meet-Me Conference, you can use the Query Conference mode to scroll through themembers of the conference. The members' identities are displayed on the conferenceline of your telephone's display. While in the Query Conference mode, you can select aconference member and establish a private conversation with a selected member.
To scroll through the members:
❖ Press the QUERY CONFERENCE button. The button indicator changes toACTIVE.
❖ Use the UP and DOWN ARROWS to scroll forward or backward through themember list.
To drop a selected member from the conference while in the Query Conference mode:
❖ Use the UP and DOWN ARROW buttons until the member you want is displayed.
❖ Press the CANCEL button.
This method of dropping a member from a conference is especially useful when droppinga trunk party. Without it, the trunk would remain in the conference until the clearing signalmade it back from the far end to the local PBX.
45Telephone Operating Instructions
To establish a private two-way conversation with the member displayed on yourtelephone:
❖ Press the ISOLATE CONFERENCE button.
❖ You and the selected member are temporarily dropped from the conference anda two-way connection is established.
❖ To rejoin the conference, press the ISOLATE CONFERENCE button again.
To leave a conference:
❖ Hang up or press the RELEASE button.
❖ The CONFERENCE HOLD button indicator changes to IDLE.
To establish a broker’s conference while talking to a trunk party or inside party:
❖ Press the TRANSFER HOLD button to put the first party on hold. The TRANSFERHOLD button indicator changes to ACTIVE; the held call's button indicatorchanges to T-HOLD.
❖ When you hear transfer dial tone, call the second party. You can talk privately withthis party. The first party is on hold and cannot hear.
❖ To put the second party on hold and return to the first party, press theTRANSFER HOLD button. Each time you press the TRANSFER HOLD button,the active party is put on hold and you are connected to the held party. Theindicator associated with the extension or trunk button supervises the first call;the indicator for the TRANSFER HOLD button supervises the second call. Theheld call's button indicator changes to T-HOLD; the active call's buttonindicator changes to ACTIVE.
To transfer the original call to the second party, press the RELEASE button or hang up.
To release the active party from the conference and return to the party on hold, press theCANCEL button.
To establish a three-party conference, press the CONFERENCE HOLD button.
� If you use a trunk, DES, or DIL button to call the second party, you cannot usethe TRANSFER HOLD button to toggle between the two calls. You can usethe EXT, DES, DIL, or trunk button instead, but only if your telephone isprogrammed for AUTO_TRANSFER_HOLD.
To temporarily change a telephone’s class-of-service:
❖ Lift the handset.
❖ Dial the COS Change access code, followed by the digit 1.
❖ When you hear system dial tone, dial the COS Change password. If the passwordis valid, the telephone’s COS is changed, and you hear system dial tone.
❖ Dial the extension or trunk number you want to call, or the feature access code forthe feature you want to activate.
Broker's Hold
COS Change
46 Telephone Operating Instructions
❖ When the call is finished or you no longer need the feature, hang up. The originalCOS is restored.
To change a telephone's COS for more than one call:
❖ Dial the COS Change access code, followed by the digit 2.
❖ When you hear system dial tone, dial the COS Change password. If the passwordis valid, the telephone’s COS is changed and you hear confirmation tone. Releaseis automatic. The new COS will remain in effect until you change or cancel it.
To cancel COS Change and restore the COS assigned to the location:
❖ Dial the COS Change access code, followed by the digit 0.
❖ When you hear system dial tone, dial the COS Change password. If the passwordis valid, the telephone's original COS is restored and you hear confirmation tone.Release is automatic.
You can use Directed Call Pickup (DCP) to answer a park-to-station call, an all callannounce call, a paging access call, or a call to an unattended ringing telephone fromanother telephone. The ringing telephone must have a prime extension number.
To answer a park-to-station call:
❖ Lift the handset.
❖ Press the DIRECTED CALL PICKUP button or dial the Directed Call Pickupaccess code. The DIRECTED CALL PICKUP button indicator changes to BUSY;the EXT button indicator changes to ACTIVE.
❖ When you hear system dial tone, dial the extension number of the destinationstation. The DIRECTED CALL PICKUP button indicator changes to IDLE; the callis transferred to your telephone.
To answer an all call announce call:
❖ Lift the handset.
❖ Press the DIRECTED CALL PICKUP button or dial the Directed Call Pickupaccess code. The DIRECTED CALL PICKUP button indicator changes to BUSY;the EXT button indicator changes to ACTIVE. You hear system dial tone.
❖ Dial the All Call Announce access code plus one or more zone numbers. TheDIRECTED CALL PICKUP button indicator changes to IDLE; the call is transferredto your telephone. A private call is established with the calling party; the callannouncers on the other telephones in the zones are idled.
� If the call is to several zones, you can dial any active zone number to answer.
To answer a paging access call:
❖ Lift the handset.
❖ Press the DIRECTED CALL PICKUP button or dial the Directed Call Pickupaccess code. The DIRECTED CALL PICKUP button indicator changes to BUSY;the EXT button indicator changes to ACTIVE.
Directed Call Pickup
47Telephone Operating Instructions
❖ When you hear system dial tone, dial the Paging access code for the active pagingzone. The DIRECTED CALL PICKUP button indicator changes to IDLE. Thepaging equipment is released and you are connected with the paging party.
To answer a call to an unattended ringing telephone:
❖ Lift the handset.
❖ Press the DIRECTED CALL PICKUP button, or dial the Directed Call Pickupaccess code. The DIRECTED CALL PICKUP button indicator changes to BUSY;the EXT button indicator changes to ACTIVE.
❖ When you hear system dial tone, dial the prime extension number of the ringingtelephone, or press the associated DES button. The DIRECTED CALL PICKUPbutton indicator changes to IDLE; the call is transferred to your telephone.
To call an extension using a DES button:
❖ Lift the handset.
❖ Check the status of the DES button.
❖ If the DES button indicator is IDLE or FLASHING (extension is idle or busy onanother line), press the DES button. The DES button indicator changes toACTIVE. All appearances of the extension ring and you hear ringback tone.
To transfer a call to an extension using a DES button if your telephone is programmedfor manual hold or automatic hold:
❖ Check the status of the DES button.
❖ If the indicator for the DES button is IDLE or FLASHING (extension is idle or busyon another line), press the TRANSFER HOLD button to put the incoming call onhold. The TRANSFER HOLD button indicator changes to ACTIVE; the buttonindicator associated with the held call changes to T-HOLD.
❖ When you hear second dial tone, press the DES button. The DES button indicatorchanges to ACTIVE; the TRANSFER HOLD button indicator changes to IDLE.You hear ringback tone.
❖ To complete the transfer, press the RELEASE button or hang up either before orafter the call is answered. The button indicator associated with the held callchanges to BUSY or IDLE. The indicator for the DES button changes to BUSY.
� If the called party does not accept the call, or does not answer, press theCANCEL button or the button associated with the held call to return to thecaller.
To transfer a call to an extension using a DES button if your telephone is programmedfor automatic transfer hold:
❖ Check the status of the DES button.
❖ If the indicator for the DES button is IDLE or FLASHING (extension is idle or busyon another line), press the DES button. The incoming call is put on hold. The buttonindicator associated with the held call changes to T-HOLD. The DES buttonindicator changes to ACTIVE. You hear ringback tone and the called extensionrings.
Direct Extension Selection
48 Telephone Operating Instructions
❖ To complete the transfer, press the RELEASE button or hang up either before orafter the call is answered. The button indicator associated with the held callchanges to BUSY or IDLE. The DES button indicator changes to BUSY.
❖ If the DES station does not answer before you release, press the CANCEL buttonor the button associated with the call on hold to drop the DES connection andreturn to the caller.
❖ If the DES station answers before release but does not accept the call, press theCANCEL button to drop the DES connection and return to the caller.
To transfer a call to an extension using a DES button on a telephone in the automatictransfer operating mode (AUTO TRANSFER button operated):
❖ Check the status of the DES button.
❖ If the DES button indicator is IDLE or FLASHING (extension is idle or busy onanother line), press the DES button. The call is automatically transferred and yourtelephone is released. The transferred call's button indicator changes to IDLE orBUSY. The DES button changes to BUSY.
� If the DES extension does not answer, the call will be redirected in accor-dance with the trunk's class-of-service programming, or the DES extension'sbusy/don't answer intercept programming.
To camp on a busy extension using a DES button:
❖ Lift the handset.
❖ Press the busy DES button. You hear busy tone. The DES button indicatorchanges to ACTIVE.
❖ Press the CAMP-ON button or the TRANSFER HOLD button.
❖ When you hear second dial tone, dial the Camp-On access code. You hearconfirmation tone. The CAMP-ON button indicator changes to BUSY.
❖ To set up automatic callback, hang up. The DES button indicator changes toBUSY.
To camp a trunk call on a busy extension using a DES button:
❖ Press the busy DES button. You hear confirmation tone. The trunk is camped onthe busy extension and your telephone is released. The trunk call's buttonindicator changes to IDLE. The DES button indicator changes to P-HOLD. Boththe trunk party and the camped-on party may hear camp-on tone.
❖ When the camped-on extension becomes idle, it rings and the trunk party hearsringback tone. The DES button indicator changes to BUSY.
� A trunk call can be camped on a busy extension with a DES button only ifallowed by the station's COS programming.
To break in on a busy extension using a DES button:
❖ Lift the handset.
49Telephone Operating Instructions
❖ Press the busy DES button. You hear confirmation tone and a conference isestablished with the busy extension and any associated station or trunk parties.The DES button indicator changes from BUSY to ACTIVE. You and all stations andtrunks involved in the call may hear a warning tone followed by interrupted overridetone.
❖ Hang up to exit the conference. The DES button indicator changes to BUSY.
� Break-in with a DES button can be done only if allowed by the station's COSprogramming.
To override a busy extension using a DES button:
❖ Lift the handset.
❖ Press the busy DES button. You hear busy tone. The DES button indicatorchanges to ACTIVE.
❖ Press the OVERRIDE button. The OVERRIDE button indicator changes to BUSY.You hear confirmation tone and a conference is established with the busyextension and any associated station or trunk parties. You and all stations andtrunks involved in the call may hear a warning tone, followed by interruptedoverride tone.
❖ Hang up to exit the conference. The DES button indicator changes to BUSY.
❖ To exit the override mode, press the OVERRIDE button. The OVERRIDE buttonindicator changes to IDLE.
For use of the DES button in a message center application, refer to MESSAGE SEND/MESSAGE RETRIEVE.
In the direct ring prime operating mode, the system will treat any call from your telephoneas a direct ring prime call. Your telephone must have a DIRECT RING PRIME button tooperate in this mode. Alternatively, your telephone can be programmed to enable directring prime as needed.
To put your telephone in the direct ring prime operating mode using the feature button:
❖ Press the DIRECT RING PRIME button.
❖ The DIRECT RING PRIME button indicator changes to BUSY.
To return your telephone to the normal operating mode using the feature button:
❖ Press the busy DIRECT RING PRIME button.
❖ The DIRECT RING PRIME button indicator changes to IDLE.
To put a telephone in the direct ring prime operating mode using the the dial access code:
❖ Lift the handset.
❖ Dial the Direct Ring Prime access code. The EXT button indicator changes toACTIVE. The DIRECT RING PRIME button indicator changes to BUSY. You hearsystem dial tone.
❖ To terminate the call, hang up. The EXT button indicator changes to IDLE; theDIRECT RING PRIME button indicator continues to indicate BUSY. The telephoneremains in the direct ring prime operating mode.
Direct Ring Prime
50 Telephone Operating Instructions
To return a telephone to the normal operating mode using the dial access code:
❖ Lift the handset.
❖ Dial the Direct Ring Prime access code. The DIRECT RING PRIME buttonindicator changes to IDLE. The EXT button indicator changes to ACTIVE. Youhear system dial tone.
❖ Hang up. The EXT button indicator changes to IDLE.
To make a direct ring prime call from a telephone in the normal operating mode:
❖ Lift the handset.
❖ Press the DIRECT RING PRIME button, or dial the Direct Ring Prime access code.The DIRECT RING PRIME button indicator changes to BUSY. You hear systemdial tone.
❖ Dial the extension number or press the associated DES button. You hear ringbacktone. A communication path is established when the call is answered.
❖ Hang up when the call is completed. The DIRECT RING PRIME button indicatorcontinues to indicate BUSY.
❖ To exit the direct ring prime operating mode, press the DIRECT RING PRIMEbutton or dial the Direct Ring Prime access code. The indicator for the DIRECTRING PRIME button changes to idle.
To make a direct ring prime call from a telephone in the direct ring prime operating mode:
❖ Lift the handset.
❖ Dial the extension number or press the associated DES button. You hear ringbacktone. A communication path is established when the call is answered.
❖ Hang up when the call is completed. The DIRECT RING PRIME button indicatorcontinues to indicate BUSY.
� If any appearance of the called extension number is busy, you hear busy tone.If the called extension cannot be rung for any other reason, you hear reordertone.
To put your telephone in the Do-Not-Disturb operating mode while it is idle:
❖ Lift the handset.
❖ Press the DO-NOT-DISTURB button. The DO-NOT-DISTURB button indicatorchanges to ACTIVE and you hear system dial tone.
❖ Dial a message number (0-9) or hang up. The DO-NOT-DISTURB button indicatorchanges to BUSY. If your telephone has a display, message 0 or the do-not-disturbmessage you selected will appear. Your telephone is aautomatically released andthe SPEAKER button indicator changes to IDLE. Any duplicate appearance of thetelephone's prime extension number will change to ACTIVE.
Do-Not-Disturb

51Telephone Operating Instructions
❖ If internal calls are denied, anyone calling from a local telephone will hear Do-Not-Disturb tone. If the calling telephone has a display, the calling party will seeDo-Not-Disturb message 0 or the message you selected.
To put a telephone in the Do-Not-Disturb operating mode during a call:
❖ Press the DO-NOT-DISTURB button. The DO-NOT-DISTURB button indicatorchanges to BUSY. If the telephone has a display module, Do-Not-Disturb message0 will appear. Any duplicate appearance of the telephone's prime extensionnumber will change to ACTIVE.
❖ Complete the call. The telephone will remain in the do-not-disturb mode.
❖ If internal calls are denied, anyone calling from a local telephone will hear do-not-disturb tone. If the calling telephone has a display, the calling party will see do-not-disturb message 0.
To disable Do-Not-Disturb and return the telephone to normal operation, press any busyDO-NOT-DISTURB button. The DO-NOT-DISTURB button indicator changes to IDLE.The do-not-disturb message is cleared from the display.
� A telephone may have more than one DO-NOT-DISTURB button, eachprogrammed to exclude a specific type of incoming call. More than one DO-NOT-DISTURB button can be operated at the same time. When more thanone DO-NOT-DISTURB button is operated, the message selected after youpress the last button will be displayed.
To send a hookswitch flash to the system, or apply a ground to the ring lead of the trunkyour telephone is connected to, or send a hookswitch flash over the trunk to the systemat the far end, press the GROUND RECALL/ ELECTRONIC FLASH button.
The action of the GROUND RECALL/ ELECTRONIC FLASH button depends on the typeof call and the call status at the time the button is pressed.
� A hookswitch flash cannot be sent to a digital trunk programmed for ISDNservice.
To put a call on hold:
❖ Press the HOLD button. There is no visual or audible indication of the HOLDbutton’s selection. The button indicator of the line or trunk put on hold changes toI-HOLD.
❖ Hang up.
To return to a call on hold, lift the handset and press the button associated with the heldcall. The associated button indicator changes to ACTIVE.
� If you leave a call on hold for longer than the programmed hold time limit, thesystem will ring your telephone and you will be reconnected when you lift thehandset.
Ground Recall/Hookswitch Flash
Hold
52 Telephone Operating Instructions
To originate a hot line call:
❖ Lift the handset.
❖ Press the HOT LINE button. You hear ringback tone; the HOT LINE buttonindicator changes to ACTIVE. All telephones in the intercom network ring at theprogrammed ring rate.
❖ When the call is answered, the HOT LINE button indicator continues to indicateACTIVE.
To answer a hot line call:
❖ Lift the handset.
❖ Press the calling HOT LINE button. A communication path is established. TheHOT LINE button indicator changes to ACTIVE. At all other appearances, the HOTLINE button indicator changes to BUSY.
To redial the the last outside number dialed:
❖ Lift the handset.
❖ Press the REDIAL button, or dial the Last Number Redial access code. Theindicator for the REDIAL button briefly displays the ACTIVE symbol while thestored number is being dialed.
To make a least cost routing (LCR) call:
❖ Lift the handset.
❖ Press the LCR button, or dial the LCR access code. You may or may not hearsystem dial tone. The LCR button indicator changes to ACTIVE.
❖ Dial the destination number or the system repertory number for the destination.Depending on system programming, you may or may not hear dialing sounds.
❖ You hear ringback tone until the called party answers.
� 1.If LCR is not allowed, you hear reorder tone; if LCR is allowed but all therequired resources are not available, you hear queue tone.
2.Repertory numbers may include LCR access codes, in which case LCR isautomatically accessed when you access the repertory number.
To set LCR special day type:
❖ Lift the handset.
❖ Press the LCR SPECIAL DAY button and dial 1, or dial the LCR Special Dayaccess code plus 1. You hear system dial tone. The LCR SPECIAL DAY buttonindicator changes to ACTIVE.
Last Number Redial
Least Cost Routing
LCR Special Day
Hot Line
53Telephone Operating Instructions
❖ When you hear system dial tone, dial the digits for the date and day type in thefollowing order: month (00-12), start day (01-31), end day (01-31), and daytype (0-3).
❖ When you hear confirmation tone, hang up. The LCR SPECIAL DAY buttonindicator changes to IDLE.
To cancel LCR special day type:
❖ Lift the handset.
❖ Press the LCR SPECIAL DAY button and dial 0, or dial the LCR Special Dayaccess code plus 0.
❖ When you hear confirmation tone, hang up.
To join a conference or transfer a held call to a conference:
❖ Lift the handset.
❖ When you hear dial tone, dial the Meet Me Conference access code plus theconference number.
❖ To transfer a held call to the conference, press the RELEASE button or hang upwhen you join the conference.
When the MESSAGE RETRIEVE button indicator indicates ATTENTION, or when youhear transfer dial tone when you go off-hook, there are one or more messages waiting.
� Depending on programming, message waiting indications may appear onlyon the button indicators and not on the display module. This is useful if yourtelephone has many MSGRB buttons, and you do not want the displayoccupied with message waiting information.
To answer a message waiting call:
❖ Lift the handset.
❖ Press the MESSAGE RETRIEVE button, or dial the Message Retrieve accesscode. The MESSAGE RETRIEVE button indicator changes to ACTIVE. Thetelephone that left the first message is called. You hear ringback tone until the callis answered.
❖ Hang up when finished. If there are no more messages waiting, the MESSAGERETRIEVE button indicator changes to IDLE. If there are other messages waiting,the MESSAGE RETRIEVE button indicator changes to ATTENTION.
� If you press an idle MSGRB button, the system will invoke repertory number0. This is useful at remote systems in networks configured for centralizedvoice mail or when the system is equipped with nonintegrated voice mail.
Meet Me Conference
Message Send/Message Retrieve
Message Waiting Service
54 Telephone Operating Instructions
To turn on the message waiting indicator at a selected telephone:
❖ Lift the handset.
❖ Dial the prime extension number of the target telephone.
❖ When you hear ringback tone or busy tone, press the MESSAGE SEND button.The MESSAGE SEND button indicator changes to ATTENTION. On the targettelephone, the message waiting indicator lights.
❖ Hang up. The MESSAGE SEND button indicator changes to IDLE.
To cancel a message previously set at another extension:
❖ Lift the handset.
❖ Dial the extension number of the target telephone. You hear ringback tone or busytone and the MESSAGE SEND button indicator changes to ATTENTION.
❖ Press the MESSAGE SEND button. The MESSAGE SEND button indicatorchanges to IDLE. The message waiting indication on the target telephone iscanceled.
❖ Hang up.
To cancel a message left by another station user:
❖ Lift the handset.
❖ When you hear system dial tone, dial the Message Send access code followed by4.
❖ When you hear system dial tone again, dial the telephone's prime extensionnumber. You hear confirmation tone. The message that has been waiting thelongest is canceled and the MESSAGE RETRIEVE button indicator changes toIDLE if there are no other waiting messages.
To operate the telephone as a message center:
❖ Press the MESSAGE SEND button. The MESSAGE SEND button indicatorchanges to BUSY. DES button indicators identify telephones with messages:IDLE indicates no messages waiting, BUSY indicates a message waiting fromanother telephone, ATTENTION indicates at least one message waiting from themessage center.
❖ To set a message waiting indication at a telephone, press the DES button for theselected telephone. The DES button indicator changes to ATTENTION. On thetarget telephone, the message waiting indicator lights.
❖ To cancel a message previously set at another extension, press the DES buttonfor the selected telephone. The DES button indicator changes to IDLE if there areno other messages waiting. It changes to BUSY if there is one or more messagewaiting from another telephone.
Message Center Operation
55Telephone Operating Instructions
❖ To return the telephone to normal operation, press the MESSAGE SEND button.The MESSAGE SEND button indicator changes to idle.
If the MESSAGE RETRIEVE button indicator indicates ATTENTION, or if you heartransfer dial tone when you go off-hook, you have one or more voice messages waiting.
To retrieve a voice message:
❖ Lift the handset.
❖ Press the MESSAGE RETRIEVE button, or dial the Message Retrieve accesscode, or dial the Message Send access code followed by the digit 2 if you arecalling from the telephone for which the message was left, or the digit 0 if you arecalling from any other telephone.
❖ Follow the voice prompts to retrieve, review, and/or clear any voice messages.
❖ Hang up when finished.
❖ When the mailbox has been cleared of all messages, the MESSAGE RETRIEVEbutton indicator changes to IDLE.
� If you press an idle MSGRB button in a system equipped with voice mail, youaccess your own mailbox.
To leave a voice message:
❖ Lift the handset.
❖ Press the MESSAGE SEND button, or dial the Message Send access code plus 0.
❖ Follow the voice prompts to access the proper mailbox and leave a message.
❖ Exit the mailbox as instructed.
❖ Hang up.
� When several Millennium systems are networked, the systems can beprogrammed to allow a call to a station in a remote system to be redirectedto a voice mailbox in one of the other systems by using call forward, DND/busy intercept routing, or no answer routing. To leave a message in a mailboxin a remote system, dial the Message Send access code plus 5. This featureapplies to the Millennium only.
To monitor a busy station or line:
❖ Lift the handset.
❖ Press the MONITOR button, or dial the Monitor access code. The MONITORbutton indicator changes to ACTIVE.
❖ When you hear system dial tone, dial the number (extension number, locationaccess code plus a location number, or ACD Agent access code plus an agentnumber), or press a busy agent, trunk, or extension button.
❖ If monitoring is allowed, you hear confirmation tone. You or the monitored partiesor both may hear call monitor tone. The MUSIC/MUTE button indicator changesto T-HOLD.
Voice Mail Service
Monitor
56 Telephone Operating Instructions
❖ To talk to the monitored parties, press the MUSIC/MUTE button. The MUSIC/MUTE button indicator changes to IDLE.
❖ Hang up when finished. The MONITOR button indicator changes to IDLE.
To turn paging background music on:
❖ Lift the handset.
❖ Dial the Music-On-Page access code.
❖ When you hear system dial tone, dial 1 plus the number of the paging zone orzones you want to play music. Use 0-7 for individual zones, 8 for zones 0-3, 9 forzones 4-7, or ✱ for all zones.
❖ When you hear confirmation tone, hang up. Music is heard in the specified pagingzones.
To turn paging background music off:
❖ Lift the handset.
❖ Dial the Music-On-Page access code.
❖ When you hear system dial tone, dial 0 plus the number of the paging zone or zonesto turn the music off. Use 0-7 for individual zones, 8 for zones 0-3, 9 for zones 4-7, or✱ for all zones.
❖ When you hear confirmation tone, hang up.
To answer a night call:
❖ Lift the handset.
❖ Dial the Night Answer access code, followed by the night zone number (0-5).
❖ The call is automatically connected to the answering telephone.
A NIGHT ZONE (NZ0-5) button is used to put a telephone in night transfer mode.
To put your telephone in night transfer mode:
❖ Press a NIGHT ZONE button (0-5).
❖ The NIGHT ZONE button indicator changes to BUSY and the programmed nighttransfer message is displayed.
❖ Depending upon trunk programming, incoming trunk calls will either be directedto a night answer station, or ring the night bell for the associated night answer zone.
Music-On-Page
Night ServiceNight Answer
Night Transfer
57Telephone Operating Instructions
To take your telephone out of night transfer mode:
❖ Press the NIGHT ZONE button.
❖ The NIGHT ZONE button indicator changes to IDLE and the programmed nighttransfer message is removed from the display.
To page in a specific zone or zones:
❖ Lift the handset.
❖ Press the PAGE button for the zone or zones, or dial the Paging access code,followed by the digit 0-7 for the specific zone, 8 for zones 0-3, or 9 for zones 4-7.If you use a PAGE button, the indicator changes to ACTIVE. If applicable, musicis turned off in the selected zone or zones and you hear a warning tone.
❖ When you hear confirmation tone, speak into the handset.
❖ Hang up to release the paging equipment. The PAGE button indicator changes toIDLE. If applicable, music is turned on in the selected zone or zones.
� 1. The paging system can be accessed by only one user at a time. If pagingis not available, you hear busy tone.
2. If you do not finish a page within the programmed time limit, you will bedisconnected and the paging system will be released and made available toother users.
To page in all zones:
❖ Lift the handset.
❖ Press the ALL PAGE button, or dial the All Page access code, or dial the Pagingaccess code, followed by ✱. The ALL PAGE button indicator changes to ACTIVEif a button was used. If applicable, music is turned off in all paging zones and youhear a warning tone.
❖ When you hear confirmation tone, speak into the handset.
❖ Hang up to release the paging equipment. The ALL PAGE button indicatorchanges to IDLE. If applicable, music is turned on in the appropriate zones.
A trunk or station call can be parked to a station. The parked call can be retrieved at thedestination station, or, using Directed Call Pickup, from any other station in the system.Trunks and stations parked to a station and left unretrieved will recall the parking stationafter a programmed timeout interval.
To park a trunk or station call to a station using transfer hold:
❖ Put the call on transfer hold.
❖ When you hear transfer dial tone , press the PARK TO STATION button or dial thePark To Station access code.
Paging
Park to Station
58 Telephone Operating Instructions
❖ When you hear dial tone, dial the destination extension. The incoming call will betransferred immediately and parked at the destination station.
❖ Page the destination party to inform them of the call parked at their station.
To park a call to a station if the destination party choose not to take the call immediately:
❖ After you have put the call on transfer hold, call the destination station to announcethe call.
❖ If the destination cannot take the call immediately, press the PARK TO STATIONbutton. The held call will be put on hold at the destination party's telephone.
❖ Your telephone is released from the call, and the destination party can retrieve thecall when ready.
To park yourself to a station:
❖ Lift the handset.
❖ When you hear dial tone, press the PARK TO STATION button or dial the Park ToStation access code.
❖ When you hear dial tone, dial the destination extension.
To retrieve a park to station call:
❖ Lift the handset.
❖ Press the button associated with the held call. The button indicator changes toACTIVE.
� If a call is left on hold for longer than the programmed hold time limit, it recallsthe station that put it on hold.
To store a personal repertory number:
❖ Lift the handset.
❖ Dial the Rering access code plus the digit 2. The EXT button indicator changes toACTIVE. You hear system dial tone. The top line of the display module shows theRering dial access code and the digit 2, followed by a period.
❖ Dial the personal repertory number (0-9), or press the PERSONAL REPERTORYbutton for the personal repertory number.
❖ Dial the number to be stored. The number can consist of a maximum of 48 digits,including the control codes shown in Table G. The dialed digits and control codesappear in the top line of the display. If you dial an invalid digit or control code, youhear reorder tone
� If there is a number already stored at the selected location, that number willbe automatically erased when you dial the first digit of the new number.
Personal Repertory Dialing
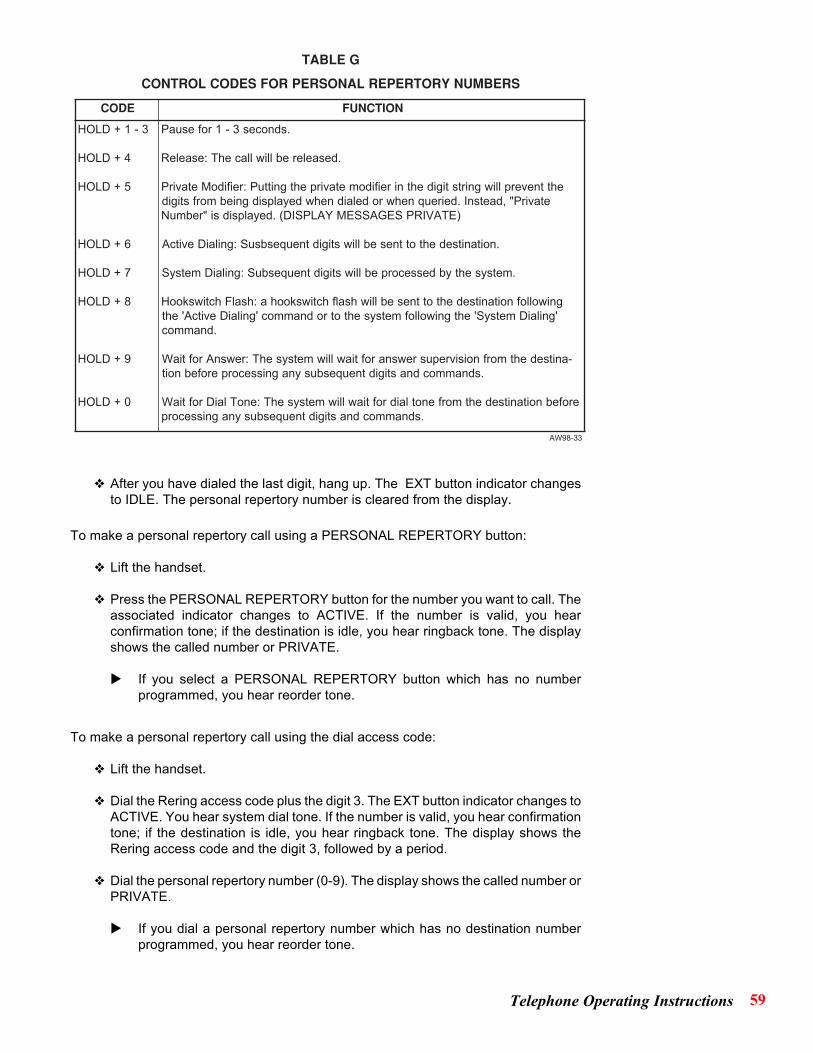
59Telephone Operating Instructions
❖ After you have dialed the last digit, hang up. The EXT button indicator changesto IDLE. The personal repertory number is cleared from the display.
To make a personal repertory call using a PERSONAL REPERTORY button:
❖ Lift the handset.
❖ Press the PERSONAL REPERTORY button for the number you want to call. Theassociated indicator changes to ACTIVE. If the number is valid, you hearconfirmation tone; if the destination is idle, you hear ringback tone. The displayshows the called number or PRIVATE.
� If you select a PERSONAL REPERTORY button which has no numberprogrammed, you hear reorder tone.
To make a personal repertory call using the dial access code:
❖ Lift the handset.
❖ Dial the Rering access code plus the digit 3. The EXT button indicator changes toACTIVE. You hear system dial tone. If the number is valid, you hear confirmationtone; if the destination is idle, you hear ringback tone. The display shows theRering access code and the digit 3, followed by a period.
❖ Dial the personal repertory number (0-9). The display shows the called number orPRIVATE.
� If you dial a personal repertory number which has no destination numberprogrammed, you hear reorder tone.
GELBAT
SREBMUNYROTREPERLANOSREPROFSEDOCLORTNOC
EDOC NOITCNUF
3-1+DLOH
4+DLOH
5+DLOH
6+DLOH
7+DLOH
8+DLOH
9+DLOH
0+DLOH
.sdnoces3-1rofesuaP
.desaelereblliwllacehT:esaeleR
ehttneverplliwgnirtstigidehtnireifidometavirpehtgnittuP:reifidoMetavirPetavirP",daetsnI.deireuqnehwrodelaidnehwdeyalpsidgniebmorfstigid
)ETAVIRPSEGASSEMYALPSID(.deyalpsidsi"rebmuN
.noitanitsedehtottneseblliwstigidtneuqesbsuS:gnilaiDevitcA
.metsysehtybdessecorpeblliwstigidtneuqesbuS:gnilaiDmetsyS
gniwollofnoitanitsedehtottneseblliwhsalfhctiwskooha:hsalFhctiwskooH'gnilaiDmetsyS'ehtgniwollofmetsysehtotrodnammoc'gnilaiDevitcA'eht
.dnammoc
-anitsedehtmorfnoisivrepusrewsnaroftiawlliwmetsysehT:rewsnAroftiaW.sdnammocdnastigidtneuqesbusynagnissecorperofebnoit
erofebnoitanitsedehtmorfenotlaidroftiawlliwmetsysehT:enoTlaiDroftiaW.sdnammocdnastigidtneuqesbusynagnissecorp
33-89WA
60 Telephone Operating Instructions
To make a personal repertory call using a PERSONAL REPERTORY button:
❖ Lift the handset.
❖ Press the PERSONAL REPERTORY button. The associated button indicatorchanges to ACTIVE. You hear system dial tone. If the number is valid, you hearconfirmation tone; if the destination is idle, you hear ringback tone.
❖ Dial the personal repertory number (0-9). The display shows the called numberor PRIVATE.
� If you dial a personal repertory number which has no destination numberprogrammed, you hear reorder tone.
To view your station’s personal repertory entries:
❖ Dial the Rering access code plus the digit 9. The EXT button indicator changes toACTIVE and you hear system dial tone. The top line of the display shows theRering access code and the digit 9, followed by a period.
❖ Dial a personal repertory number (0-9), or press an assigned PERSONALREPERTORY button, or press the UP or DOWN arrow button. The top line of thedisplay changes to show the personal repertory number (0-254) and the associateddigit string or PRIVATE.
❖ To view another entry, use the UP or DOWN arrow button to scroll through thedirectory of personal repertory numbers.
❖ Press the RELEASE button to clear the display. The EXT button indicator changesto IDLE.
To use the display to select and dial a personal repertory number:
❖ Dial the Rering access code plus the digit 9. The EXT button indicator changes toACTIVE and you hear system dial tone. The top line of the display shows theRering access code and the digit 9, followed by a period.
❖ Dial a personal repertory number (0-9), or press a PERSONAL REPERTORYbutton, or press the UP or DOWN arrow button. The top line of the display changesto show the personal repertory number (0-254) and the associated digit string orPRIVATE.
❖ To view another repertory number, use the UP or DOWN arrow button to scrollthrough the directory of personal repertory numbers.
❖ To automatically dial the displayed repertory number, dial #.
To put all routing plans into override mode:
❖ Lift the handset.
❖ Dial the Plan Override access code followed by ✱.
❖ When you hear confirmation tone, hang up.
Plan Override
61Telephone Operating Instructions
To put one or more plans into override mode:
❖ Lift the handset.
❖ Dial the Plan Override access code followed by the digit 1.
❖ When you hear dial tone, dial the number of the plan to be put into override mode.When you hear dial tone again, dial the number of a second plan, if any, to be putinto override mode. Repeat this procedure to identify all selected plans.
❖ Hang up. The PLAN OVERRIDE button indicator changes to ATTENTION if atleast one plan is in override mode; it changes to ACTIVE if all plans are in overridemode.
To put all plans that are in override mode back in standard mode:
❖ Lift the handset.
❖ Dial the Plan Override access code followed by ✱.
❖ When you hear confirmation tone, hang up.
To take one or more plans out of override mode:
❖ Lift the handset.
❖ Dial the Plan Override access code followed by the digit 0.
❖ When you hear dial tone, dial the number of the plan to be taken out of overridemode. When you hear dial tone again, dial the number of a second plan, if any, tobe taken out of override mode. Repeat this procedure to identify all selected plans.
❖ Hang up. The PLAN OVERRIDE button indicator changes to ATTENTION if atleast one plan is still in override mode; it changes to IDLE if all plans are returnedto normal mode.
To determine the status of a specific routing plan:
❖ Lift the handset.
❖ Dial the Plan Override access code followed by the digit 9.
❖ Listen for system dial tone and then dial the number of the routing plan you wantto check. If the routing plan is in override mode, you hear confirmation tone.Otherwise you hear reorder tone.
❖ Hang up.
A telephone can be put in the privacy operating mode to protect it from break-in oroverride, and to prevent a called or calling outside number to be displayed at a telephonewith a duplicate appearance.
To put a telephone in the privacy operating mode, press the PRIVACY button. ThePRIVACY button indicator changes to BUSY.
To disable privacy and return the telephone to normal operation, press the PRIVACYbutton again. The PRIVACY button indicator changes to IDLE.
Privacy
62 Telephone Operating Instructions
The Problem Tagging access code is used to mark a location that is suspected of failure.Use of the code is not restricted and can be dialed from any station.
To tag a problem location:
❖ Press the TRANSFER HOLD button to put the station or trunk on hold. TheTRANSFER HOLD button indicator changes to ACTIVE; the button indicatorassociated with the held call changes to T-HOLD.
❖ When you hear transfer dial tone, dial the Problem Tagging access code. You hearconfirmation tone. The TRANSFER HOLD button indicator changes to IDLE.
❖ Hang up.
A call to a telephone that is a member of a remote call pickup group can be answered fromany telephone by using an assigned REMOTE CALL PICKUP button or by dialing theassigned dial access code. The answering telephone may or may not be a member of thesame group.
To answer a call ringing in a remote call pickup group:
❖ Lift the handset.
❖ Press the REMOTE CALL PICKUP button, or dial the Remote Call Pickup accesscode plus the number (0-63) of the desired zone. The REMOTE CALL PICKUPbutton indicator changes to ACTIVE. The call is transferred to the answeringstation. You hear confirmation tone, if programmed.
� If a group has more than one call ringing in, the system selects the first callto be answered.
General remote call pickup is a dial-accessed feature that allows calls to a remote callpickup group to be answered from any telephone by dialing a common dial access code.Depending on programming, the same code may access different remote call pickupgroups when dialed from different telephones.
To answer a call ringing in a remote call pickup group using general remote call pickup:
❖ Lift the handset.
❖ Dial the Remote Call Pickup access code, plus ✱.
❖ The call is transferred to your telephone. You hear confirmation tone, if programmed.
Ring again allows a station user to save the last outside number dialed so that it does notget overwritten when another outside number is dialed. The saved number can then beredialed at any time.
To save the last number dialed, press the RERING button while still active on the call orafter going on hook. The RERING button indicator briefly changes to ACTIVE to confirmthat the number has been saved.
Problem Circuit Tagging
Remote Call Pickup
General Remote CallPickup
Ring Again
63Telephone Operating Instructions
To redial the saved number:
❖ Lift the handset.
❖ Press the RERING button or dial the Ring Again dial access code plus the digit 1. TheRERING button indicator briefly changes to ACTIVE while the saved number isautomatically dialed.
Secretarial intercom allows telephones to signal a secretarial position and the secretarialposition to signal back. The secretarial position requires a separate SECRETARIALINTERCOM button for each secretarial intercom network. Each network may have morethan one member.
To originate a secretarial intercom call:
❖ Lift the handset.
❖ Press the SECRETARIAL INTERCOM button. The SECRETARIAL INTERCOMbutton indicator changes to ACTIVE.
❖ The called telephones ring as long as the SECRETARIAL INTERCOM button ispressed. Coded signals can be sent by alternately pressing and releasing theSECRETARIAL INTERCOM button.
❖ A communication path is established when the call is answered.
To answer a secretarial intercom call:
❖ Lift the handset.
❖ Press the calling SECRETARIAL INTERCOM button. A communication path isestablished. The SECRETARIAL INTERCOM button indicator changes to ACTIVE.At all other appearances, the SECRETARIAL INTERCOM button indicatorchanges to BUSY.
Station Message Detail Recording (SMDR) produces a record of incoming and outgoingcalls on trunk routes specified by system programming. When enabled, SMDR is invokedautomatically; no action is necessary on the part of the user.
For accounting and control, account and authorization codes may be assigned to users.Entry of these codes may be optional or forced. If forced, the codes must be enteredbefore access to a trunk will be granted. If optional, they may be entered at any time duringan outgoing or incoming call.
The authorization code can be entered alone or directly following the account code. Thesystem checks the account and authorization access codes for an exact match. If anincorrect access code, account code, or authorization code is dialed, the system returnsreorder tone immediately.
Trailing digit values ranging from 0 to 4 provide control of the Personal IdentificationNumber (PIN) dialed. This is useful in trunk-to-trunk calls to control whether the PINinformation appears in the incoming or outgoing trunk SMDR records. If programmingspecifies no trailing digit, then the PIN will apply to the next trunk that is accessed orreaccepted. If programming specifies one trailing digit, the trailing digit specifies thefollowing actions:
Secretarial Intercom
Station Message DetailRecording (SMDR)
64 Telephone Operating Instructions
❖ Digit 0 revokes a previously stored PIN.
❖ Digit 1 applies the PIN to the next trunk accessed or reaccepted. The PIN will berevoked at end of call.
❖ Digit 2 applies the PIN to the next trunk accessed or reaccepted. The PIN ispermanently stored for use on all later trunk calls.
❖ Digit 3 applies the PIN to the trunk currently on transfer hold. The PIN will berevoked at end of call.
❖ Digit 4 applies the PIN to the trunk currently on transfer hold. The PIN ispermanently stored for use on all later trunk calls.
To enter the account code and access a trunk to make an outgoing call:
❖ Lift the handset.
❖ When you hear system dial tone, press the ACCOUNT CODE button, or dial theAccount Code access code.
❖ When you hear system dial tone again, dial the account number.
❖ If you used the ACCOUNT CODE button, you hear confirmation tone; if you usedthe dial access code, you hear system dial tone.
❖ Dial a trunk access code.
❖ When you hear CO dial tone, dial the outside number.
To enter the account code during an incoming or outgoing trunk call:
❖ Press the TRANSFER HOLD button to put the call on hold. The TRANSFER HOLDbutton indicator changes to ACTIVE. The held call button indicator changes to T-HOLD.
❖ When you hear system dial tone, press the ACCOUNT CODE button or dial theAccount Code access code.
❖ When you hear system dial tone again, dial the account number.
❖ Press the button associated with the held call to return to the trunk. TheTRANSFER HOLD button indicator changes to IDLE; the held call button indicatorchanges to ACTIVE.
� If you dial an incorrect account number, you hear reorder tone after you dialthe last digit.
The procedure for entering the authorization code is the same as that for entering theaccount code, except that the AUTHORIZATION CODE button or the Authorization Codeaccess code is used.
Authorization Code
Account Code
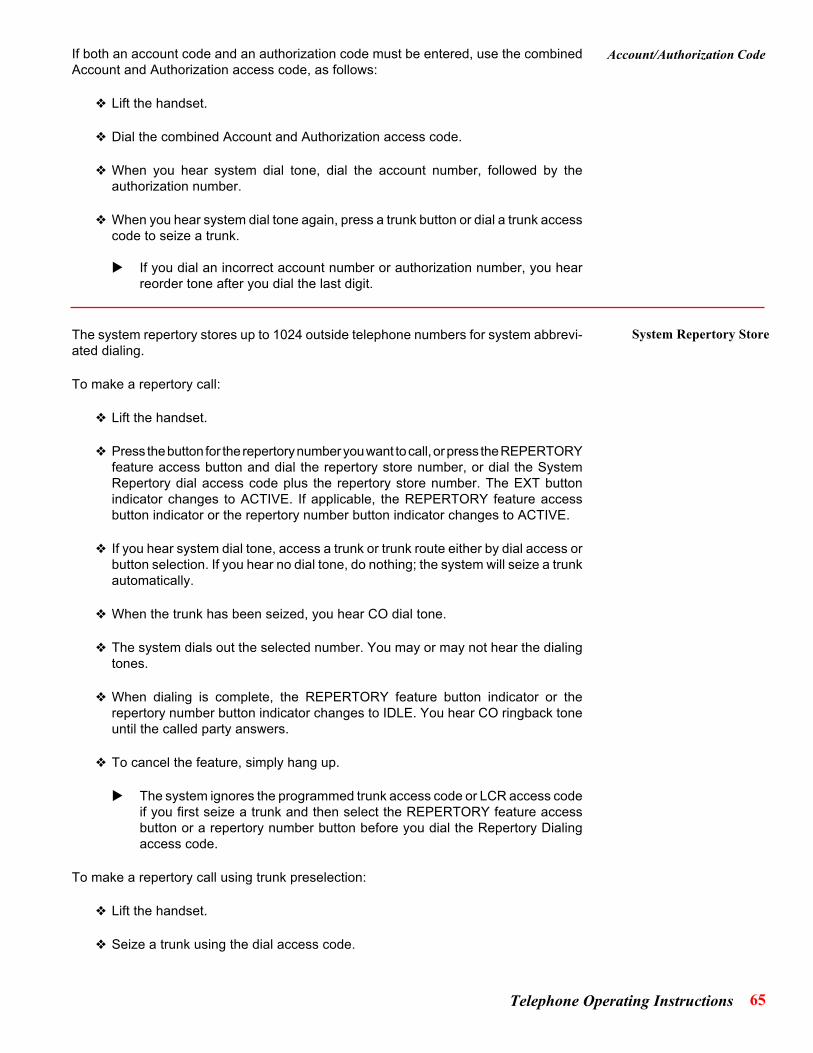
65Telephone Operating Instructions
If both an account code and an authorization code must be entered, use the combinedAccount and Authorization access code, as follows:
❖ Lift the handset.
❖ Dial the combined Account and Authorization access code.
❖ When you hear system dial tone, dial the account number, followed by theauthorization number.
❖ When you hear system dial tone again, press a trunk button or dial a trunk accesscode to seize a trunk.
� If you dial an incorrect account number or authorization number, you hearreorder tone after you dial the last digit.
The system repertory stores up to 1024 outside telephone numbers for system abbrevi-ated dialing.
To make a repertory call:
❖ Lift the handset.
❖ Press the button for the repertory number you want to call, or press the REPERTORYfeature access button and dial the repertory store number, or dial the SystemRepertory dial access code plus the repertory store number. The EXT buttonindicator changes to ACTIVE. If applicable, the REPERTORY feature accessbutton indicator or the repertory number button indicator changes to ACTIVE.
❖ If you hear system dial tone, access a trunk or trunk route either by dial access orbutton selection. If you hear no dial tone, do nothing; the system will seize a trunkautomatically.
❖ When the trunk has been seized, you hear CO dial tone.
❖ The system dials out the selected number. You may or may not hear the dialingtones.
❖ When dialing is complete, the REPERTORY feature button indicator or therepertory number button indicator changes to IDLE. You hear CO ringback toneuntil the called party answers.
❖ To cancel the feature, simply hang up.
� The system ignores the programmed trunk access code or LCR access codeif you first seize a trunk and then select the REPERTORY feature accessbutton or a repertory number button before you dial the Repertory Dialingaccess code.
To make a repertory call using trunk preselection:
❖ Lift the handset.
❖ Seize a trunk using the dial access code.
Account/Authorization Code
System Repertory Store
66 Telephone Operating Instructions
❖ When you hear CO dial tone, press the button for the repertory number you wantto call; or press the REPERTORY feature access button and dial the repertorystore number; or press the TRANSFER HOLD button, and you hear transfer dialtone, dial the Repertory Dialing access code plus the repertory store number. Thesystem returns dial tone and the applicable button indicator changes to ACTIVE.
❖ The system starts to dial out the selected number. Depending upon programming,you may or may not hear dialing sounds.
❖ When dialing is complete, the REPERTORY feature access button indicator,REPERTORY NUMBER button indicator, or TRANSFER HOLD button indicatorchanges to IDLE. You hear CO ringback tone until the called party answers. TheEXT button indicator changes to show the status of the call.