telematic v3 user guide - acousticsamples.net
TRANSCRIPT

Telematic V3 User Guide
1 / 13

Welcome to Acousticsamples
Thank you for using the Telematic V3 library. We hope you enjoy playing the instrument and wish itsupports your musical ideas or even better: inspire new ones.In this User Guide we will provide you with an overview of how to use the Telematic V3 library.
If you have any questions, feel free to email us at:[email protected]
or use the contact form on our websitewww.acousticsamples.net
The Telematic V3 library, produced byAcousticsamples
All Rights not expressly granted are reserved.Copyright © 2021 by Acousticsamples
2 / 13

Requirements and Installation
Step 1 - Authorize your library
The first thing to do is make sure you have an iLok ID and that it is the correct one. If you never used iLok, just go to theilok.com website and create a free account.
You will be asked to enter a user ID, this is what you will need to enter later on the authorization page. This will also bethe ID you will need to get connected to the iLok license manager.
On the download/serials page, you can find the serial number associated with your library, it should look like this:PROASXX-XXXXXXX.
You can click on the authorize button or copy it and go to thispage: http://acousticsamples.net/index.php?route=account/authorizeIlok you can find the link in the top menu underaccount as well as on the "my account" page. Of course you need to be logged in to view this page.
Now enter the serial number in the serial number box (it will be filled already if you used the authorize button) as well asyour iLok id. The iLok id is the username you use to log into your iLok account, don't confuse it with the number writtenon the key.
Then simply hit the authorize button and wait a little. At the end of this process, you will see a message telling you if theauthorization was successful. You will also get a confirmation email.
Sometimes the iLok servers will not respond and you will get a blank page, in this case, please contact us and we willproceed to the authorization for you manually.
Step 2 - Download and extract your libraries
Registering your serial number will generate your download links, they will be create and available on thedownloads/serials page.
The files are delivered in RAR format and sometimes these files are split (for the large libraries).
You need to use winrar on windows or UnrarX on mac (www.unrarx.com or directly here) to extract them, othersoftwares will probably not extract the files properly, we use the recovery functions of Rar (to avoid download corruption)and these two softwares are are the only ones to handle it properly. If there are multiple parts (part01.rar, part02.rar),you need to put them all in the same folder before extracting. If the extraction gives you errors, then your download didnot complete or got corrupted, you need to download it again.
Step 3 - Download and install UVI Workstation
Download and install the UVI workstation (our free sample player) from here:http://www.acousticsamples.net/uviworkstation.
3 / 13

Make sure you download the right version for your system, if you are on windows 64, but use a daw that only allows for32bits plugins, you need to install the 32bits version of UVI Workstation.
Follow the step 4 to learn how to load a library into UVI Workstation.
Step 4 - Transfer the license to your iLok key/computer
The license manager is installed with UVI Workstation, so you just need to launch it from you applications.
Now make sure that your iLok key is plugged into your computer if you want to use it or just ignore this if you want touse the computer based authorization.
Click on Sign in and enter your iLok information, you will see the list of available licenses and your computer and iLokkeys on the left panel.
Now all you need to do is just drag and drop the license to your iLok key or your computer to authorize one or the other.
Step 5 - Load your library and start playing
Now just open UVI Workstation in Standalone or one of the plugin formats in your sequencer. There are two ways ofloading the library.
You can open the browser and navigate to the ufs file manually.You can place the UFS in the default UVI folder: [Startup disk]:Library:Application Support:UVISoundBanks (onMac) and C:\Program Files\UVISoundBanks (on Windows). You can also drop a shortcut to this file in thislocation, provided it has the same name.The best practice is to have all of your UFS in a folder and let UVI workstation index it. Simply go into thepreferences/soundbanks and then add your UFS folder. If the authorization has been done, it will mount theUFS automatically (if automount is selected) or index it in the search (if index is selected). The recursuve is forsubfolders, but too many subfolders can lead to a long indexation/mounting time.
After this, when you start UVI Workstation, you will see the UFS under soundbanks, select it and just double click on them5p file, it will load the library and you will be able to start playing.
4 / 13

Interface and Parameters
The Telematic V3 is a deeply sampled Fender Telecaster guitar.
We recorded both pickup separately to give you access to the variety of sounds of this famous guitar model.We sampled it very deeply, all frets of all strings with upstrokes, downstrokes, round robins, releases, staccatos, mutes,slides, hammer ons, pull offs, retriggers, fretnoises, and other articulations. All of these details allow us to reproduce thereal playing of a guitar player, and easily.There are basically 4 modes, the solo mode that allows to play melodies, the chord mode that helps playing strums orpicking very easily, the patterns mode that does all of the strumming or picking for you and the MIDI mode that allowsyou to use your preffered midi guitar controler.
It is now in V2 and the script was updated to contain the same features as the Sunbird library. Make sure thatyou check the Sunbird library videos to get an idea of how it works. Since many users already own the Telematic V1 and V2, we kept the patches and functions and just added the V3 as aseparate patch.
All of these details allow us to reproduce the real playing of a guitar player, and easily.There are basically 4 modes (that you can choose using keyswitches, G5 to C6), the solo mode that allows to playmelodies, the chord mode that helps playing strums or picking very easily, the patterns mode that does all of thestrumming or picking for you and the MIDI mode that allows you to use your preffered midi guitar controler.
Strumming machine
The Telematic can strum, in various ways, up, down,muted, in legato and allows finger picking.Everything is modeled after meticulously analyzingthousands of real chords played by guitarist. Everyaspect of the strumming engine can be tweaked toachieve the sound you want.
The chord recognition engine helps convertingany chord you play on your keyboard to a real guitarvoicing. Recognizing a chord is made through adatabase of thousands of standard chords, and youcan edit every chord or even add new ones.
The chord hammers feature lets you play left handhammer ons and pull offs while strumming orpicking.
The triggers are set from C4 to C5.
C4 is the strum down,C#4 is the strum down muted,D4 is the strum up,
5 / 13

D#4 is the strum up muted,E4, F4, G4, A4, B4 and C5 (the white keys) are for the 6 different strings,F#4 triggers the chord but shifted from the Chord Slide value,G#4 stops the chord and play a hand mute sample,
A small chord panel displays the chord that you are playing as well as the octave it is in. Right under it, youhave access to a voicing menu that contains all of the possible voicings of that chord on a guitar, and you canselect one for each octave.In this panel, you can edit the chord you are currently playing, so just click on the edit button, then change thechord and hit apply to override that chord voicing, or press insert to add that chord to the list of available vicingsfor that chord.You can even export and load a chord configuration using the export and load buttons. The chord configurationwill also contain the information present in the chord builder if you used it.
The Chord Mode can be set in two positions,
the Guitar mode that separates the notes selection from the triggers. So pressing a chord with the lefthand with only make the soft sounds that your left hand would make on a real guitar and you need totrigger the chords or the single strings with the right hand.The Piano mode will trigger the chords as soon as you press a chord, the upstrokes and downstrokesare automatic depending on the position in the current bar. Repeating a chord can be done by releasingand replaying any of the notes contained in the chord. It can be more intuitive, but does not allow for asmuch detail and realism when you play the chords.
The UP/DOWN Trigger controls if the automatic strum up and down is engaged. If set to manual, C4 is thestrum down and D4 is the strum up. If set to Auto, C4 acts as a strum up or down depending on the position inthe current bar.
The Let Ring controls wether the chord stops when you release your right hand. This can be handy forfast/complex chord progressions.
The Mixed Mode is as its name implies a mix of the solo mode and the chord mode. If you play chords aregular melody with one note at a time or two as a legato, it will play single notes or hammers and slides asselected in the solo mode If you play 3 notes or more or play two notes simultaneously, the chord mode isengaged and it will strum that chord just like in the piano mode.
The Accent, Strum Speed and Strum Center are all linked to the chord simulation. We extracted the datafrom hundreds of real guitar strums and allow you to control these parameters.
Accent controls how hard it is to trigger all of the 6 strings with velocity, the min strum number definesthe minimum number of strings that are played in a strum at the lowest velocity.Strum Speed controls the oversall time needed to strum all 6 strings.Strum Center is basically your right hand vertical position over the strings, if it is at the top (position 1),then you will hear more of the first and second string and if you are at the bottom (position 6), you willhear more of the last two strings.
The Clean Play controls how dirty and precise you want the playing to be, if set at 6, the engine will always useclean samples, but if at 1, it will mostly use samples of "not pressed well" notes.
The Chord Hammers is probably whatmakes the library the most realistic. It allows you to go from one chordto another and play the hammer ons and pull offs between them.
The Capo simulates a real capo, you can choose to make it transpose the chords or not, transposing can beuseful if you want to play chords high on the neck.The Transpose is related to the Capo function. And it will decide if the Capo actually transposes the chord ornot. For example an E chord with the Capo at fret one will sound like an F chord without the transpose function,if you enable it, the E chord will stay an E chord, but the engine will look for an alternate position to play it
6 / 13

starting from the capo.
The Auto Voicing feature enables the different guitar chord positions depending on the octave in which it isplayed. You can disable it if you play on a small controller or just want to play the first position.
Realistic patternsThe patterns mode is very similar to the chord mode,the chord recognition engine works the same way,but this time the triggers are not simple strumsanymore, they are a set of patterns that you canloop, adapt to the tempo or the metrics, change thevelocity in real time using a controller, synch to yourhost, add groove to.
You can choose from a large selection of patterns orcreate your using the pattern maker and assign themto each trigger to create a full song in a few clicks.
You can assign 13 different patterns of your choice to 13 different notes. Clicking on one of the keys on theinterface will launch the pattern, triggering another one will stop the first one and start the new one. You canalso trigger the patterns from the keyboard using the notes from C4 to C5. By default releasing the keys willstop the pattern. The velocity at which you press the key will determine the velocity of the whole pattern.
The Parameters can change a few aspects of the current pattern.
Let Ring determines if the "off" events contained in the pattern will be played or not,Length controls the length of the pattern, it can be anything from 1 to the length of the pattern and canbe adapted the metrics of your song (even odd numbers),Speed you can play the pattern at different speeds, half or double speed for example,Link makes the let ring, length and speed values of the patterns global for all patterns or only for theselected pattern. If it is on, then changing the let ring will affect all of the patterns, and when it is off,only the currently selected one,Average Vel is the center velocity or the pattern, it starts at the velocity of the trigger you played, butcan also be modulated over time using a midi controller. By default, we use the modulation wheel tocontrol it,Deviation is the difference between the lowest and the highest velocity of the MIDI events composingthe pattern, it can also be modulated in real time,Shuffle adds groove to the pattern, we created a complex algorithm to allow for shuffle withoutquantizing, so you keep the realism and are still able to add some groove,Latch determines if releasing a key will stop the pattern or not, when turned on, pressing a key willlaunch the pattern and you will need to press it again to stop it,Bar Sync will sync your playing to the bars, meaning that whenever you play a key, the pattern will notstart until the next bar starts, this is useful only when working in a sequencer,
Pattern MakerCreating realistic guitar patterns has never beeneasier. You can create strumming and pickingpatterns in seconds and even make them of aninfinite size.
7 / 13
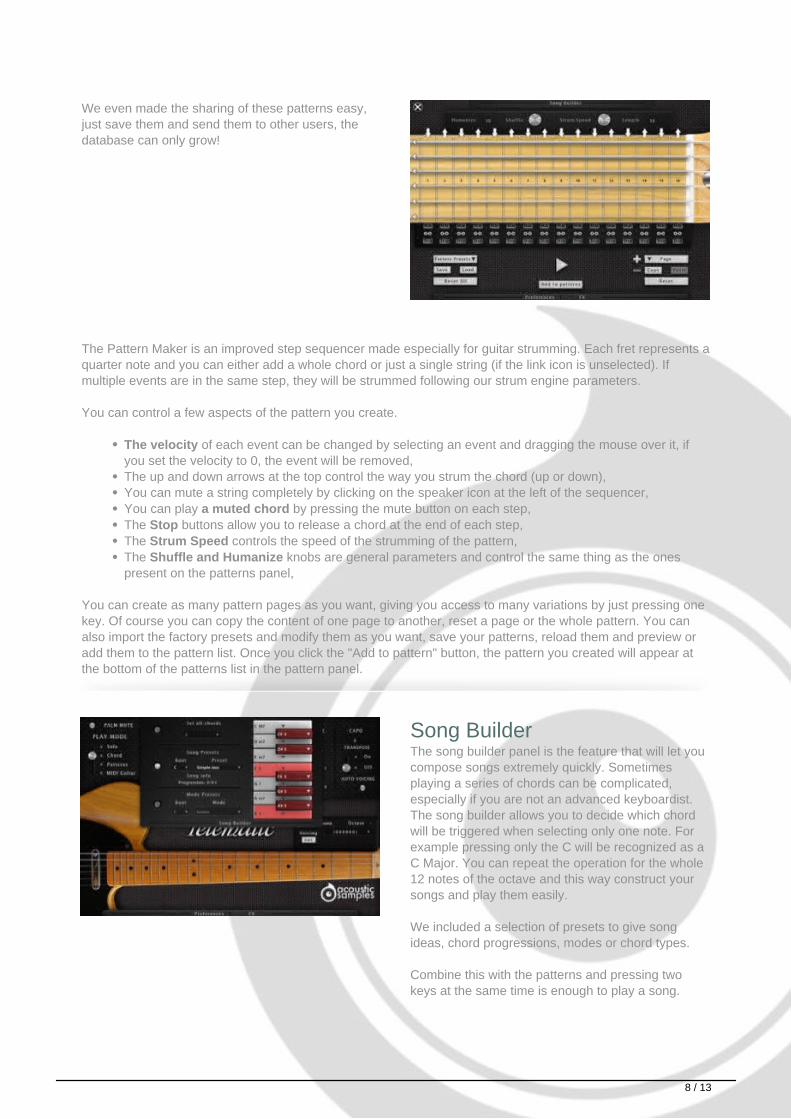
We even made the sharing of these patterns easy,just save them and send them to other users, thedatabase can only grow!
The Pattern Maker is an improved step sequencer made especially for guitar strumming. Each fret represents aquarter note and you can either add a whole chord or just a single string (if the link icon is unselected). Ifmultiple events are in the same step, they will be strummed following our strum engine parameters.
You can control a few aspects of the pattern you create.
The velocity of each event can be changed by selecting an event and dragging the mouse over it, ifyou set the velocity to 0, the event will be removed,The up and down arrows at the top control the way you strum the chord (up or down),You can mute a string completely by clicking on the speaker icon at the left of the sequencer,You can play a muted chord by pressing the mute button on each step,The Stop buttons allow you to release a chord at the end of each step,The Strum Speed controls the speed of the strumming of the pattern,The Shuffle and Humanize knobs are general parameters and control the same thing as the onespresent on the patterns panel,
You can create as many pattern pages as you want, giving you access to many variations by just pressing onekey. Of course you can copy the content of one page to another, reset a page or the whole pattern. You canalso import the factory presets and modify them as you want, save your patterns, reload them and preview oradd them to the pattern list. Once you click the "Add to pattern" button, the pattern you created will appear atthe bottom of the patterns list in the pattern panel.
Song BuilderThe song builder panel is the feature that will let youcompose songs extremely quickly. Sometimesplaying a series of chords can be complicated,especially if you are not an advanced keyboardist.The song builder allows you to decide which chordwill be triggered when selecting only one note. Forexample pressing only the C will be recognized as aC Major. You can repeat the operation for the whole12 notes of the octave and this way construct yoursongs and play them easily.
We included a selection of presets to give songideas, chord progressions, modes or chord types.
Combine this with the patterns and pressing twokeys at the same time is enough to play a song.
8 / 13

The song builder is available in chord mode or in patterns mode.
You can use set all chords using the first menu, it will put the same chord on all of the 12 notes.
The song presets are a set of predefined songs with the right chord progressions, you can change the root ifneeded and the progression is detailed under song info.
The mode presets is a list of most music modes and their corresponding chord progressions, you can changethe root of needed.
You can now change the type of each chord along with its root. So it makes it easy to play songs that havedifferent chords for the same root note.
When selecting one of the presets, some keys will appear in red and the corresponding chord will be a "5th".This means that there is no "valid" chord for this note in the selected song or scale. You can of course set eachchord manually by clicking on them and selecting its kind, even starting from a preset.
Solo mode, automatic handposition
The solo mode is very simple, and is suited to playmelodies. It uses a smart hand position system thatdecides for you where a real guitarist would put hishand and which string he would play. A piano onlyhas one middle C for example, but a guitar offers afew different options and our script will decide it foryou. You can of course deactivate it and use only thefirst hand position if you want.
The Telematic features our powerful legato enginethat will automatically trigger legato, hammer ons,pull offs, or slides and the legato distance will definethe maximum interval in which the legato will apply.
You also have access to key switches to play palmmutes, harmonics (flageolets) or even percussionsounds and control the legato engine.
The legato mode controls which sample will be triggered when you play legato notes on your keyboard, forexample press C2 and then C#2 without depressing C2.
Hammer , hammer on and pull-off samples will be triggered.Slide will trigger slide up and slide down samples.Legato will trigger regular sustain samples but will still stop the first played note.Off deactivates the legato function.
The legato distance controls the interval in which the legato function is active.
The slide speed is active only when the Slide legato mode is selected and controls the speed of the slide.
The string selection enables the automatic string and fret selection or constrains the hand to the first position
9 / 13

or the position of your choice.
Here is a list of the keyswitches.
F0 will enable the Palm mutes when you press it and disable it when it is depressed. You can alsotoggle between palm and regular notes by pressing F#5.F#0 enabled the Slide legato mode.G0 enabled the simple legato legato mode.G#0 completely disables the legato mode.A0 plays fret noises.A#0 plays a right hand hit on the strings.B0 to D1 play the percussions sounds.D#1 enables the harmonics (flageolets) sounds, if you press it and play, it will trigger only harmonicsand release them when you release the D#1 note.
Preferences / FXThe Telematic library comes with 2 pickupperspectives, the bridge and the neck pickups andyou can adjust the volume of each of them.Every aspect of the library can be tweaked, therelease, fret and pre-notes volumes, as well as themidi response of your keyboard.
A few usual effects like spring reverb distortion andAMP/cabinet modeling can be added and adjustedfrom the FX panel.
The Preferences panel / FX panel can be opened by clicking at the bottom of the interface, in there you haveaccess to all of the different parameters of the library.
The Release Vol controls the volume of the release samples,The Auto Fret noise vol controls the volume of the automatically generated fret noises, they happenwhen the left hand moves in solo mode and when you change chord in the chord mode,The Pre Notes Vol controls the volume of the soft noises your left hand makes when selecting a chordin chord/Guitar mode,The Dynamics controls the volume of the lowest velocity,The Velocity Curve controls the volume response of the library to velocity,The Midi Sensitivity is some kind of a midi remapper, and it controls how hard you need to press a keyfor it to trigger a certain velocity,The Palm Length controls how long the palm mutes last,The Neck / Bridge Vol controls the volume of the Pickups, we recorded both and you can load and mixthem as you like,
By clicking on the FX button, you get access to an effect panel in which you can change a few effects.
The amount of distortionThe chorus and a control over the speed and amountThe Amp simulation with different cabinets to choose fromA tape delay and a spring reverb
10 / 13

MIDI guitarIf you own a MIDI guitar and want to expand itssound capabilities, then the MIDI mode is for you, allyou need to do is select the 7 different MIDI chanelsyour guitar outputs and you are ready to play.
The MIDI guitar mode allows you to play the Telematic using a midi guitar controller, all you need to do isselect the 6 midi channels. You maybe have to use the set patch as omni to allow the plugin to respond to allmidi channels.
11 / 13
Features
8.28Gb uncompressed, 1.3Gb compressed in lossless flac format, around 9562 samples.
Strumming engine (features chord recognition and a smart strumming technique to produce guitar-like chords) andcomplete control of all its parameters.
Legato script to play natural hammer ons pull offs and slides.
Natural hand placement simulation.
5 velocity layersfor the sustain up.
5 velocity layersfor the sustain down.
5 velocity layersfor the sustain up retriggered.
5 velocity layersfor the sustain down retriggered.
10 release samples per note.
Multi velocity Hammer on, pull off, slides up, slides down, mutes, ghost notes, pre notes.
Cabinet simulation.
Multieffect chain (expandable in the FX tab).
Control over the different pickups.
Advanced bend control.
Advanced UVI scripting giving you access to a simple yet powerfull interface and advanced features.
and more...
12 / 13

Terms & Conditions. EULA(End User License Agreement)
Acousticsamples Copyright, Terms and conditions.
Please read the terms of the following License Agreement before using any of these audio samples. By using any ofthese audio samples, you agree to become bound by the terms of the License Agreement. If you do not agree with the
terms of the License Agreement, do not use any of these audio samples.
You may use these Samples provided on this website, on a royalty-free basis, to create your own original musiccompositions or audio projects. You may broadcast and/or distribute your own music compositions or audio projects thatwere created using the Audio Content, however, individual audio loops may not be commercially or otherwise distributedon a standalone basis, nor may they be repackaged in whole or in part as audio samples, sound effects or music beds.
No orders will be refundable given the numerical nature of our products. We stay at your disposal for any help orsupport.
If you have any queries please do not hesitate to contat us
ALL RIGHTS NOT EXPRESSLY GRANTED ARE RESERVED.
Powered by TCPDF (www.tcpdf.org)
13 / 13