technology papercut student guide services of contents: 1.0 sending a print job directly from...
TRANSCRIPT

[Type text] [Type text] [Type text]
5/2/2011
Administrative Office | Isaac Barbosa
Technology Services
PaperCut Student Guide
Table of Contents:
1.0 Sending a Print Job directly from student workstations (Direct Printing)
2.0 Sending a Print Job to a holding queue for later release (PRS Printing)
3.0 Adding Value using cash to print accounts via the Add Value Station (AVS)
4.0 Releasing a Print Job at the Print Release Station (PRS)
5.0 User’s Web interface in PaperCut
6.0 Account Summary Overview
7.0 User’s Rates Overview
8.0 Transaction History Overview
9.0 Recent Print Jobs Overview
10.0 Jobs Pending Release
11.0 Guest Account Registration for guest users (Community users)
12.0 Web Print
13.0 Print Station

1.0 Sending a Print Job directly from student workstations (Direct Printing)
Students or Guest Users click the Printer icon on the standard toolbar or select the Print Command from the File Menu or press Ctrl+P on their keyboard to select the specific printer.
Click Print
Default Printer will be
in the classroom or lab.
Step 3
Step 2
Step 1
Step 6
*Guest users with a
P2P account select this option and enter their
print account info.
FYI
Click Print
User confirmation Pop‐up
Step 5

2.0 Sending a Print Job to a holding queue for later release (PRS Printing)
Step 1
Students or Guest Users click the Printer icon on the standard toolbar or select the Print Command from the File Menu or press Ctrl+P on their keyboard to select the specific printer.
Kiosk printers allow
for later release via
a release station Step 2
Step 3
Click Print
Note: A confirmation message appears in the middle of the computer desktop displaying that the print job was sent directly to a
specific printer, the remaining balance in the user’s account.
User receives Delivery
Notification Message
Step 1

Step 4
Click Print
User confirmation Pop‐up
*Guest users with a
P2P account select this option and enter their
print account info.
FYI
User receives Delivery
Notification Message
Note: A confirmation message appears in the middle of the computer desktop displaying that the print job was stored in a Print
Release Station (Pay‐Station) Queue for later release, also indicating that the Print Job will remain in a holding queue for 24 hrs.
Students log in by entering
EAGLE account “Username
and Password.” FYI

3.0 Adding Value using cash to print accounts via the Add Value Station (Pay Station)
Step 1
At the Pay Station / Print Release Station (Kiosk), screen users log in by entering their EAGLE
account “Username and Password”.
Guests log in by
entering their P2P‐
Print Account Information previously created via the
PaperCut User Web
Guest users must create a permanent print account before adding funds in the PaperCut System, funds added to any account
the system will remain in the account balance for future use. See section “How to create a P2P guest account for printing”
Click Ok
Step 2
Users may select
‘Done’ to exit this
screen.
Click Add Value User’s current balance
is displayed in real
time.

Step 3
When pressing the ‘Add Value’ button, users are prompted to insert bills in the Bill Acceptor Unit located at the base of the
PRS/AVS and the amount added by the unit is displayed in real time as the User’s Balance is increased.
Click Done
After pressing ‘Done’ users are automatically logged out, unless there are pending print jobs to be released in their print
queue in which case they are returned to the Print Job Window.
The Bill Unit lights
will flash green
indicating a ready
status to accept
funds.
FYI

4.0 Releasing a Print Job at the Pay Station / Print Release Station (Kiosk)
At the Pay Station / Print Release Station (Kiosk) screen users log in by entering their EAGLE account “Username and Password.”
Step 1
Students log in by entering
EAGLE account “Username and
Password.”
FYI
Guests log in by
entering their P2P‐
Print Account Information previously created via the
PaperCut User Web
Guest users MUST send their print jobs from their workstations using their registered P2P print account the PaperCut System;
consequently when they log in at the Pay Station / Print Release Station (Kiosk) and their print job appears under said account.
See section “How to send a print job to the PRS for later release”
Click Ok
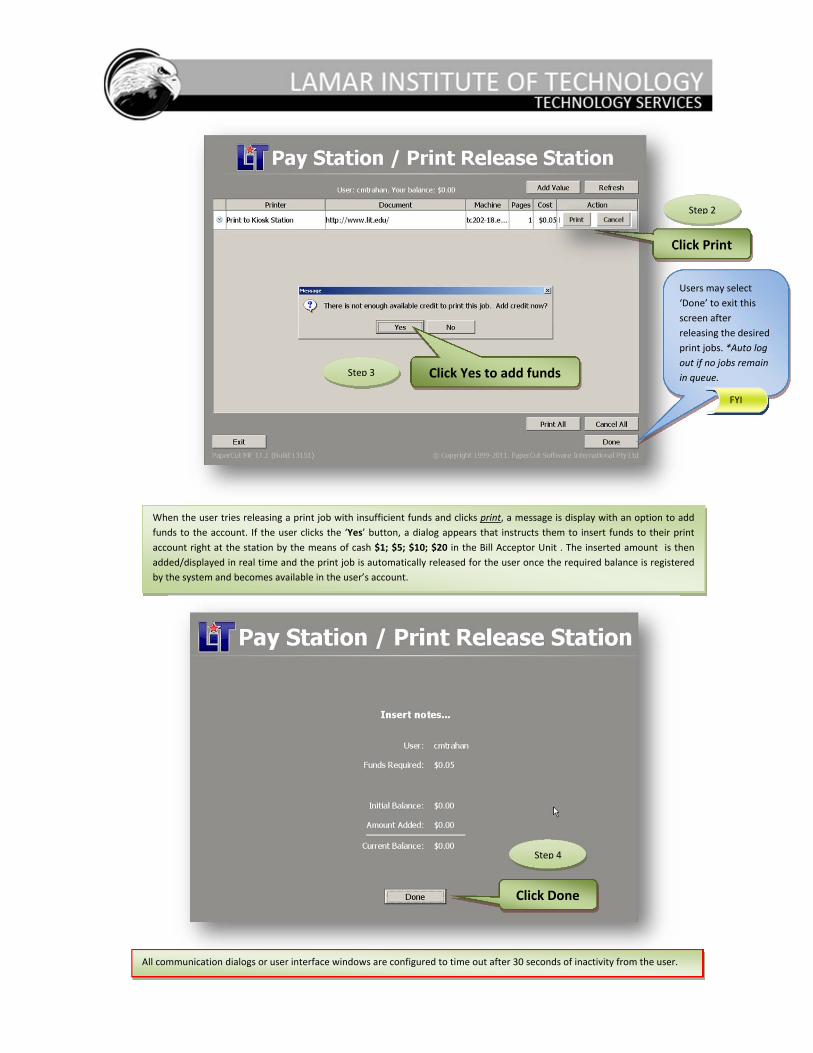
When the user tries releasing a print job with insufficient funds and clicks print, a message is display with an option to add
funds to the account. If the user clicks the ‘Yes’ button, a dialog appears that instructs them to insert funds to their print
account right at the station by the means of cash $1; $5; $10; $20 in the Bill Acceptor Unit . The inserted amount is then
added/displayed in real time and the print job is automatically released for the user once the required balance is registered
by the system and becomes available in the user’s account.
Step 4
Click Done
All communication dialogs or user interface windows are configured to time out after 30 seconds of inactivity from the user.
Step 2
Step 3
Users may select
‘Done’ to exit this
screen after
releasing the desired
print jobs. *Auto log
out if no jobs remain
in queue. Click Yes to add funds
Click Print
FYI
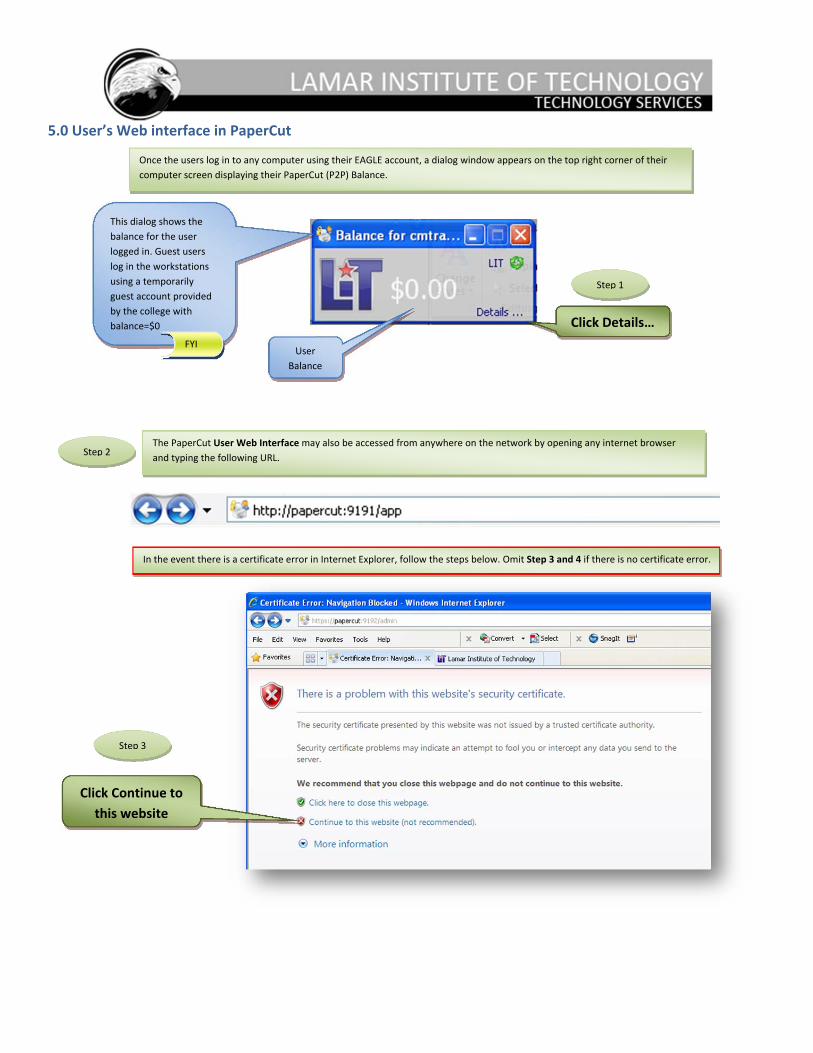
5.0 User’s Web interface in PaperCut
Once the users log in to any computer using their EAGLE account, a dialog window appears on the top right corner of their
computer screen displaying their PaperCut (P2P) Balance.
Step 1
Click Details…
User
Balance
This dialog shows the
balance for the user
logged in. Guest users
log in the workstations
using a temporarily
guest account provided
by the college with
balance=$0
FYI
Click Continue to
this website
Step 3
The PaperCut User Web Interface may also be accessed from anywhere on the network by opening any internet browser
and typing the following URL. Step 2
In the event there is a certificate error in Internet Explorer, follow the steps below. Omit Step 3 and 4 if there is no certificate error.

Click Yes
Step 4
Step 5
Click Log in
Students log in using their
EAGLE account “Username
and Password.”
Guest users with a registered
print account in the PaperCut
System may log in to their
user web interface or register
a permanent print account via
this web registration link.
The PaperCut Guest Registration Interface may also be accessed from anywhere on the network by opening any internet
browser and typing the following URL
FYI
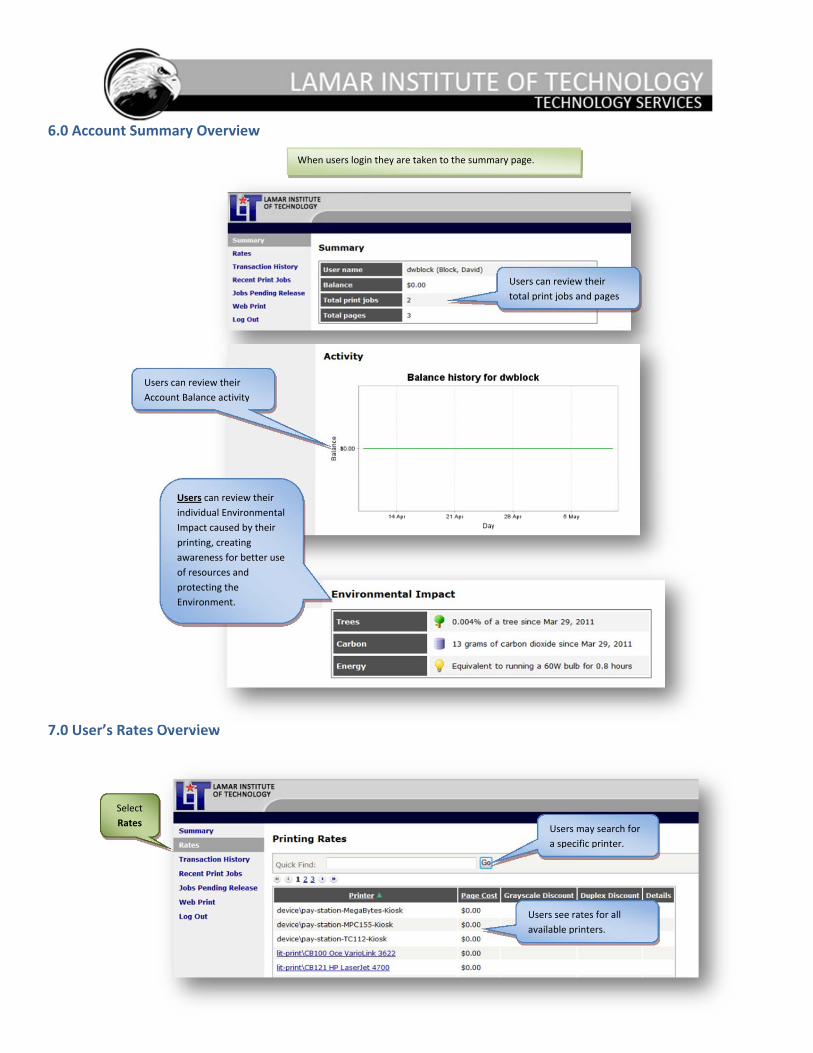
6.0 Account Summary Overview
7.0 User’s Rates Overview
Users may search for
a specific printer.
Users see rates for all
available printers.
Select
Rates
When users login they are taken to the summary page.
Users can review their
total print jobs and pages
Users can review their
Account Balance activity
Users can review their
individual Environmental
Impact caused by their
printing, creating
awareness for better use
of resources and
protecting the
Environment.

8.0 Trasaction HistoryOveriew
9.0 Recent Print Jobs Overview
Print job status
with specific
information for
every print job.
Printer where job was sent.
Users may export data
into different formats:
PDF or HTTP or Excel
Print job was
cancelled and
never charge,
funds are
automatically
refunded to
Print job total pages,
cost and document
name information
Select
Recent
Print Jobs
Start Balance before
each transaction
Affected balance after each
transaction is completed
Describes the type of transaction.
Identifies the staff member who
performed the operation
Select
Transaction
History
Date when user
transaction occurred
Users may export data
into different formats:
PDF or HTTP or Excel
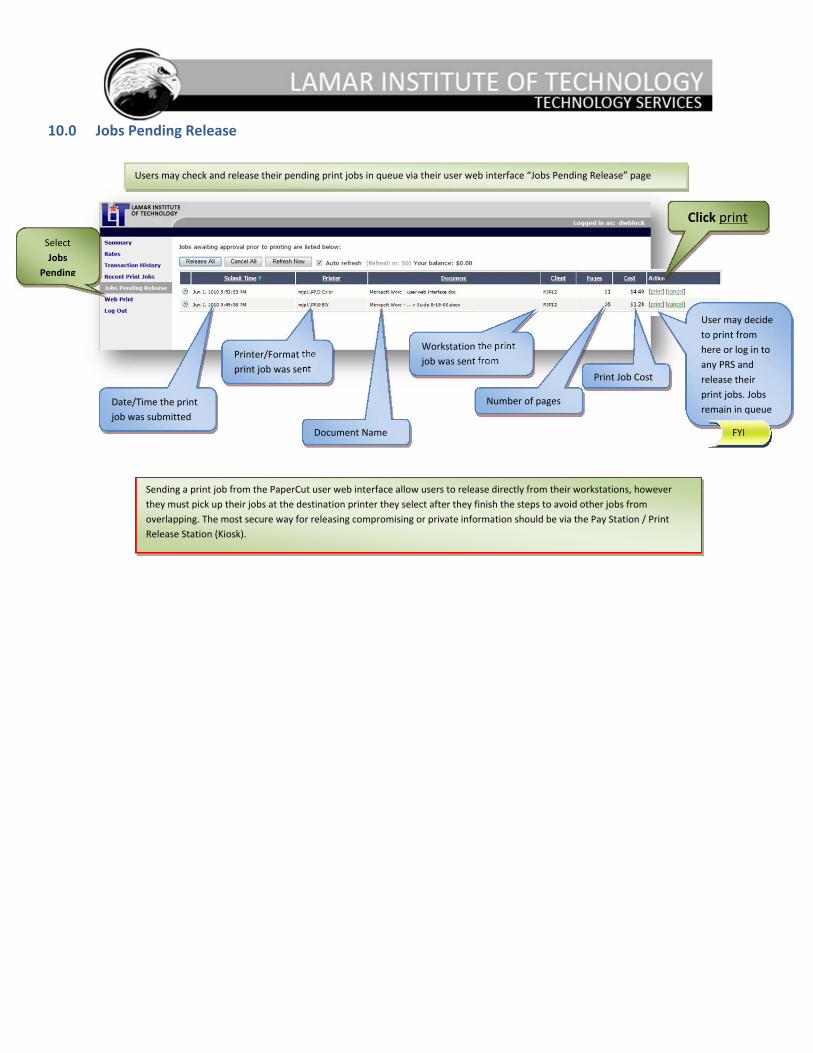
10.0 Jobs Pending Release
Users may check and release their pending print jobs in queue via their user web interface “Jobs Pending Release” page
Select
Jobs
Pending
Date/Time the print
job was submitted
Printer/Format the
print job was sent
Document Name
Workstation the print
job was sent from
Number of pages
Print Job Cost
Click print
Sending a print job from the PaperCut user web interface allow users to release directly from their workstations, however
they must pick up their jobs at the destination printer they select after they finish the steps to avoid other jobs from
overlapping. The most secure way for releasing compromising or private information should be via the Pay Station / Print
Release Station (Kiosk).
User may decide
to print from
here or log in to
any PRS and
release their
print jobs. Jobs
remain in queue
FYI

11.0 Guest Account Registration for guest users (Community users)
Creating a Guest Account
Step 2
Click on this
Link
Guest users with a registered
print account in the PaperCut
System may log in to their
user web interface or register
a permanent print account via
this web registration link.
Guests or community users are provided a temporarily account to use the PaperCut system and it is only good for 24.
Once the Users logs in to any college computer using their Guest Account , a dialog window appears in the top right corner of the
computer screen displaying the PaperCut (P2P) Balance and a ‘Details…’ link where user may access to create this permanent
print account.
Guest may also create a print account directly via the following URL http://papercut9191/app
This dialog shows the
balance for the user
logged in. In the case of
guest users is the
Balance for the
temporarily guest
account provided by the
college with balance=$0
FYI
Click Details…
Step 1

Click on
Register
Step 3
Step 2
Guest users
enter required
information
*Prefix LIT added
*Unique field
* No minimum
*Alphanumeric
*4 characters
minimum
Username in PaperCut is unique; user is required to
select another if one has been used.
Password in PaperCut is required to be four (4)
characters long. User is advice to enter the correct
minimum

12.0 Web Print
User Interface Account creation displays a confirmation window with the User New Print Account created.
Guest user receives this confirmation via e‐mail to the registered e‐mail address.
Guest user may
now log in to their
user web interface
Password is protected
here but in the
confirmation receipt
user gets via e‐mail it
is visible so they can
always refer back if
forget password.
FYI
The Web Print function is currently unavailable at this time.
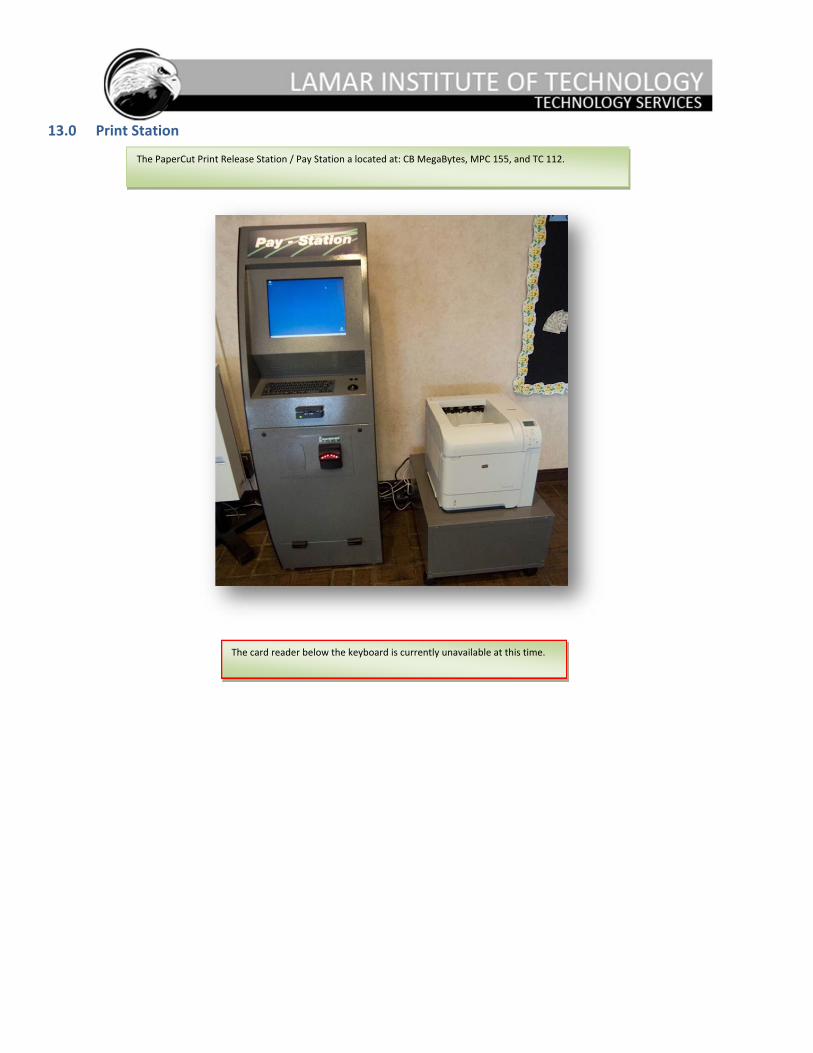
13.0 Print Station
The PaperCut Print Release Station / Pay Station a located at: CB MegaBytes, MPC 155, and TC 112.
The card reader below the keyboard is currently unavailable at this time.