technical requirementsfuture-time-traveller.eu/.../future-platform-manual-v2.docx · web viewthis...
TRANSCRIPT

FUTURE TIME TRAVELLER OPENSIMULATOR PLATFORM
MANUAL
1
FUTURE TIME TRAVELLER – Transforming career guidance on future skills, jobs and career prospects of Generation Z through a game based virtual reality platform (FUTURE)
Project N° 590221-EPP-1-2017-1-BG-EPPKA3-PI-FORWARD
This publication (communication) reflects the views only of the author, and the
Commission cannot be held responsible for any use which may be made of the
information contained therein.
2
Table of ContentsTechnical Requirements..................................................................................................4
Viewer Requirements.......................................................................................................4
Viewer Installation........................................................................................................5
Setting up the viewer for the first time..........................................................................6
Login to the platform.....................................................................................................9
Communication..............................................................................................................10
Avatar Functionalities.....................................................................................................11
Inventory.....................................................................................................................12
Movement...................................................................................................................13
General movement.................................................................................................13
Basic world navigation................................................................................................15
3
Technical Requirements
This section describes the technical requirements of the platform and provides a list with
the most common viewers. Viewers are software programs needed to access the virtual
world. To be able to log in a virtual world, firstly you have to download and install one of
the suggested viewers to your computer.
Viewer Requirements
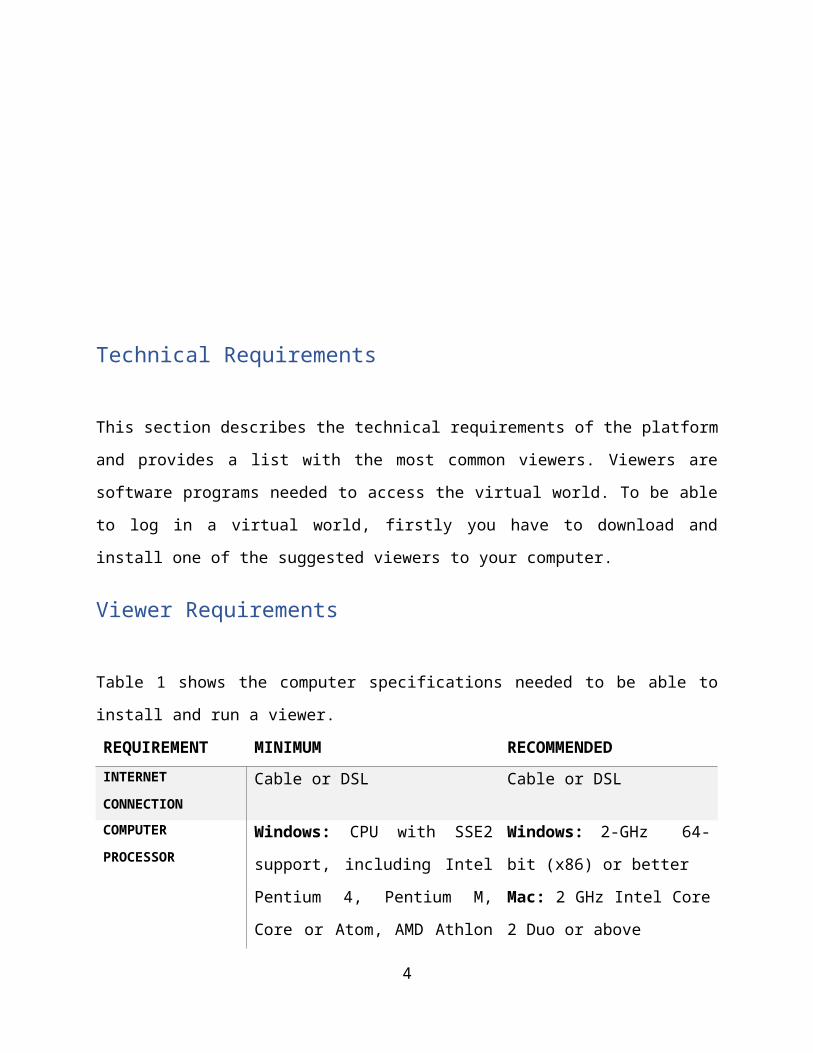
Table 1 shows the computer specifications needed to be able to install and run a
viewer.
REQUIREMENT MINIMUM RECOMMENDEDINTERNET CONNECTION
Cable or DSL Cable or DSL
COMPUTER PROCESSOR
Windows: CPU with SSE2
support, including Intel Pentium
4, Pentium M, Core or Atom,
AMD Athlon 64 or later.
Mac: 1.5 GHz Intel based
Windows: 2-GHz 64-bit
(x86) or better
Mac: 2 GHz Intel Core 2
Duo or above
COMPUTER MEMORY
1 GB or more 4 GB or more
GRAPHICS CARD(REQUIRES LATEST DRIVERS):
Windows: NVIDIA GeForce
6600 or better OR ATI Radeon
9500 or better OR Intel 945
chipset
Mac: ATI Radeon 9200 and
above OR NVIDIA GeForce 2,
GeForce 4
NVIDIA Graphics cards9000 Series
200 Series
ATI Graphics Cards4000 Series
5000 Series
4

Table 1 Computer Requirements
Viewer Installation
Firstly, you have to download a viewer from its website. In order to ensure maximum
compatibility, the suggested viewer is Firestorm viewer (the platform was built using
Firestorm). Open or copy and paste this url in your browser to open the download page:
https://www.firestormviewer.org/downloads/
Select the appropriate distribution depending on your operating system (Windows, Mac
or Linux)(Figure 1).
Figure 1: Firestorm download page, select operating system.
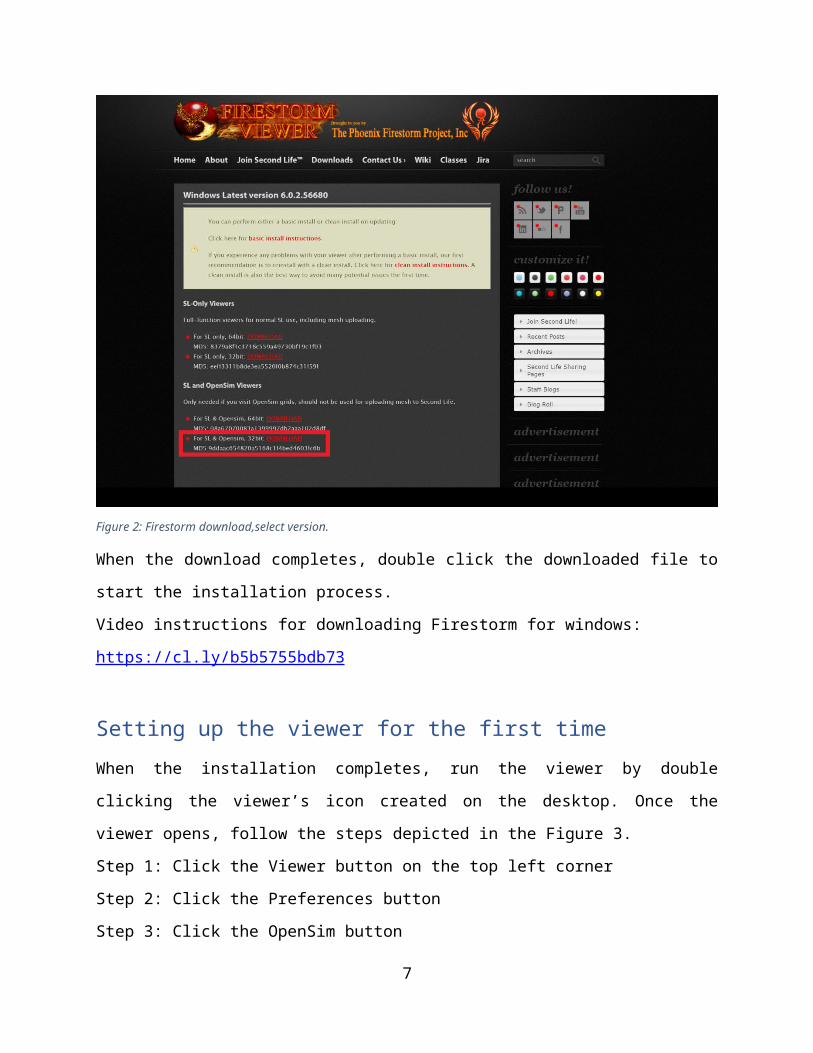
In the next page there will be 4 download buttons, click on the last one called
For SL & Opensim, 32bit: DOWNLOAD ( Figure 2 )
5
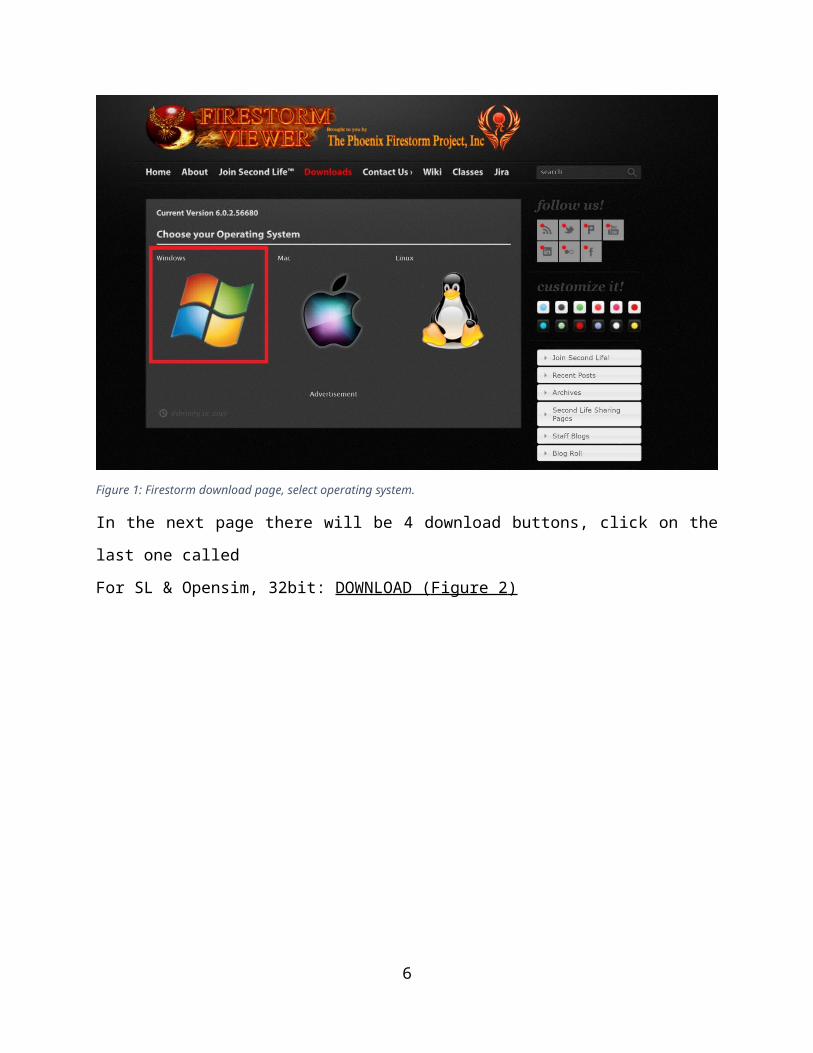
Figure 2: Firestorm download,select version.
When the download completes, double click the downloaded file to start the installation
process.
Video instructions for downloading Firestorm for windows:
https://cl.ly/b5b5755bdb73
Setting up the viewer for the first timeWhen the installation completes, run the viewer by double clicking the viewer’s icon
created on the desktop. Once the viewer opens, follow the steps depicted in the Figure
3.
Step 1: Click the Viewer button on the top left corner
Step 2: Click the Preferences button
Step 3: Click the OpenSim button
Step 4: Enter the Future Time Traveller login URI:
http://opensim.westgate.gr:9000
6
Step 5: Click the Apply button
Figure 3: setting up the viewer
If all the steps were followed correctly your settings will be similar to Figure 4
7
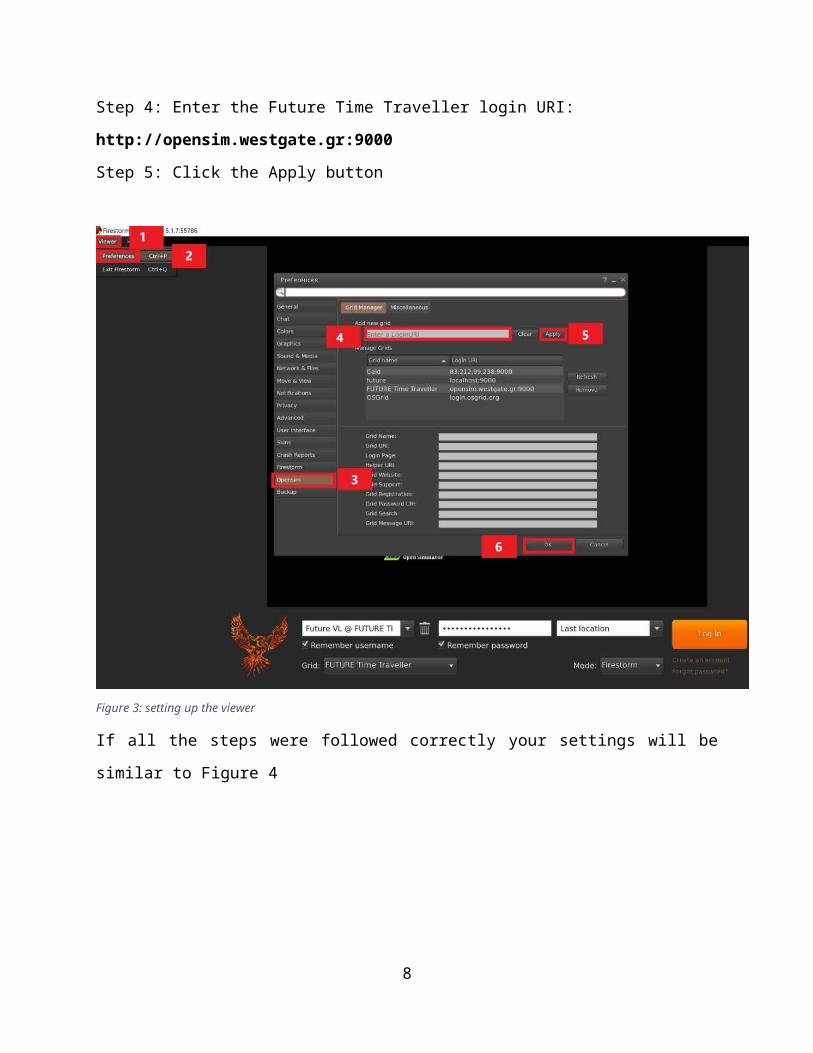
Figure 4
Step 6: Click the Ok button
Next select FUTURE Time Traveller from the Grid menu (Figure 5):
8
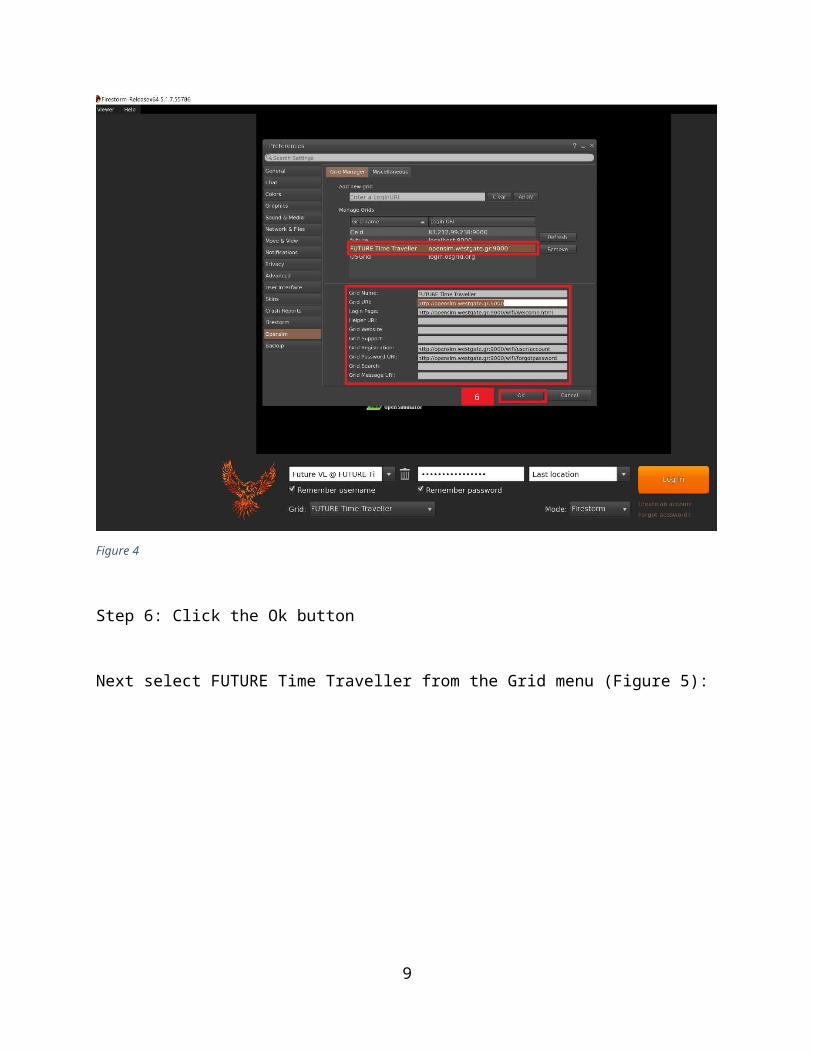
Figure 5
After successfully selecting the grid, the FUTURE Time Traveller logo will appear in the
central section of the screen.
Login to the platformFollow the steps of Figure 6:
Step 1: Enter your username (usernames are two words for example: simple user)
Step 2: Enter your password
(You can check remember username and password)
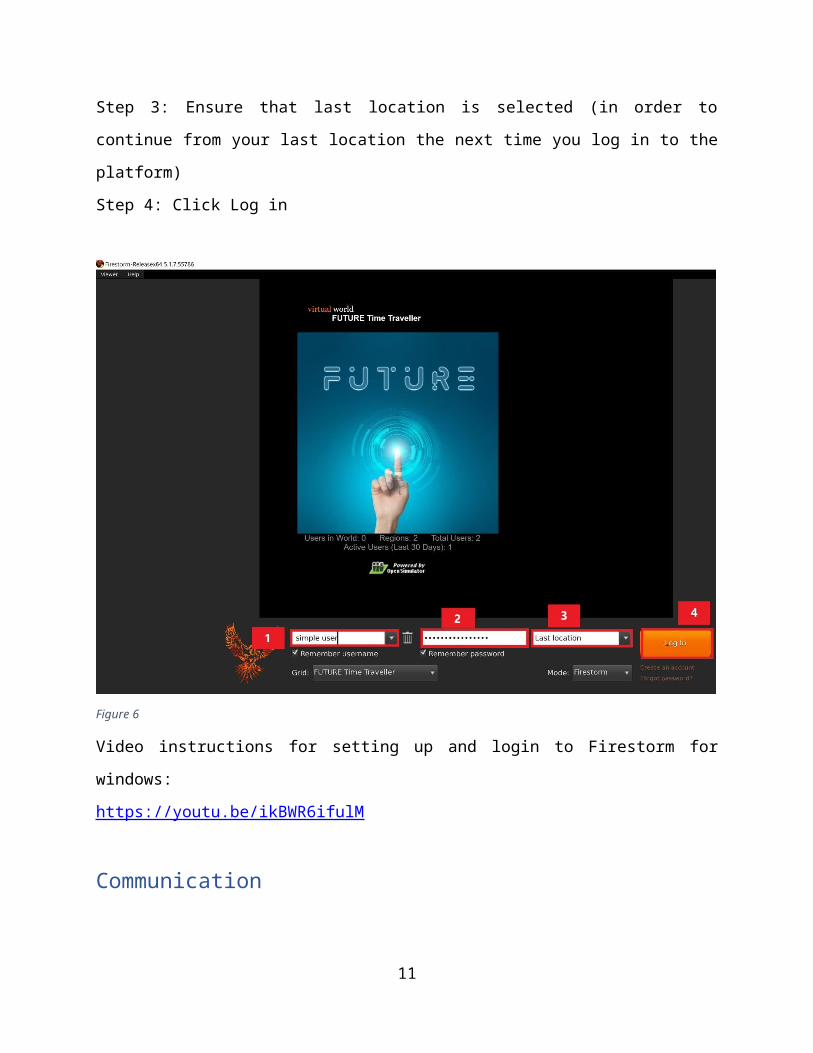
Step 3: Ensure that last location is selected (in order to continue from your last location
the next time you log in to the platform)
Step 4: Click Log in
9
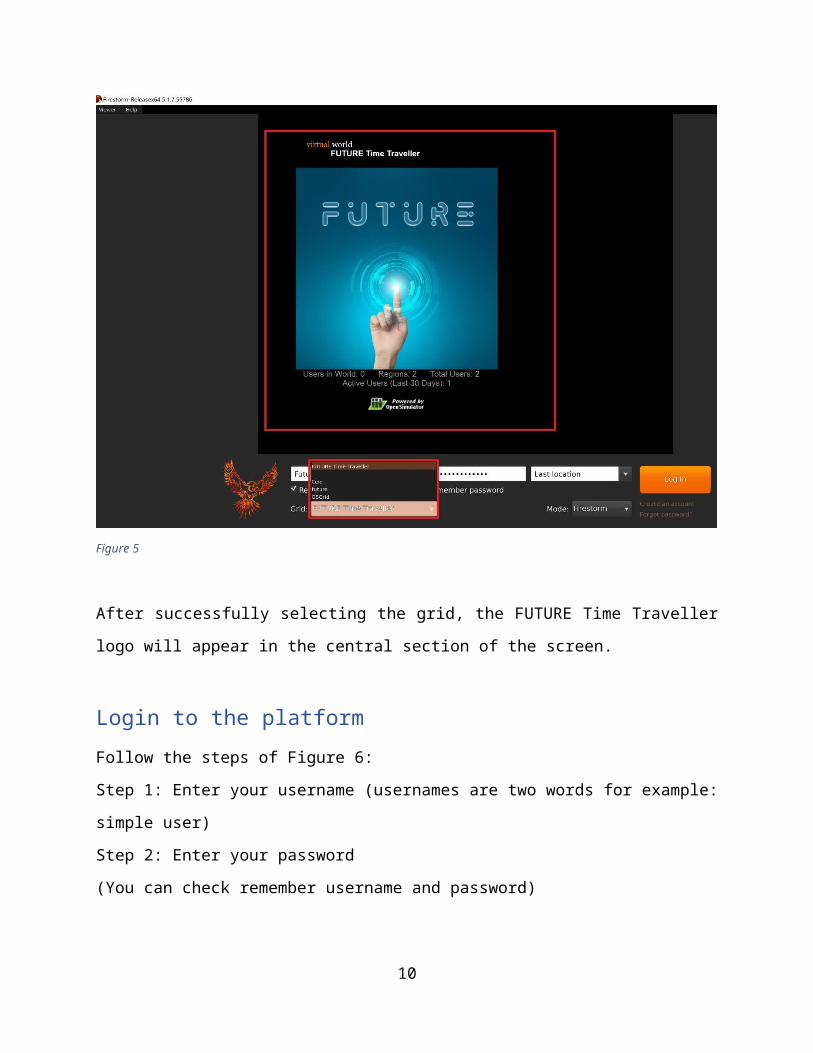
Figure 6
Video instructions for setting up and login to Firestorm for windows:
https://youtu.be/ikBWR6ifulM
Communication
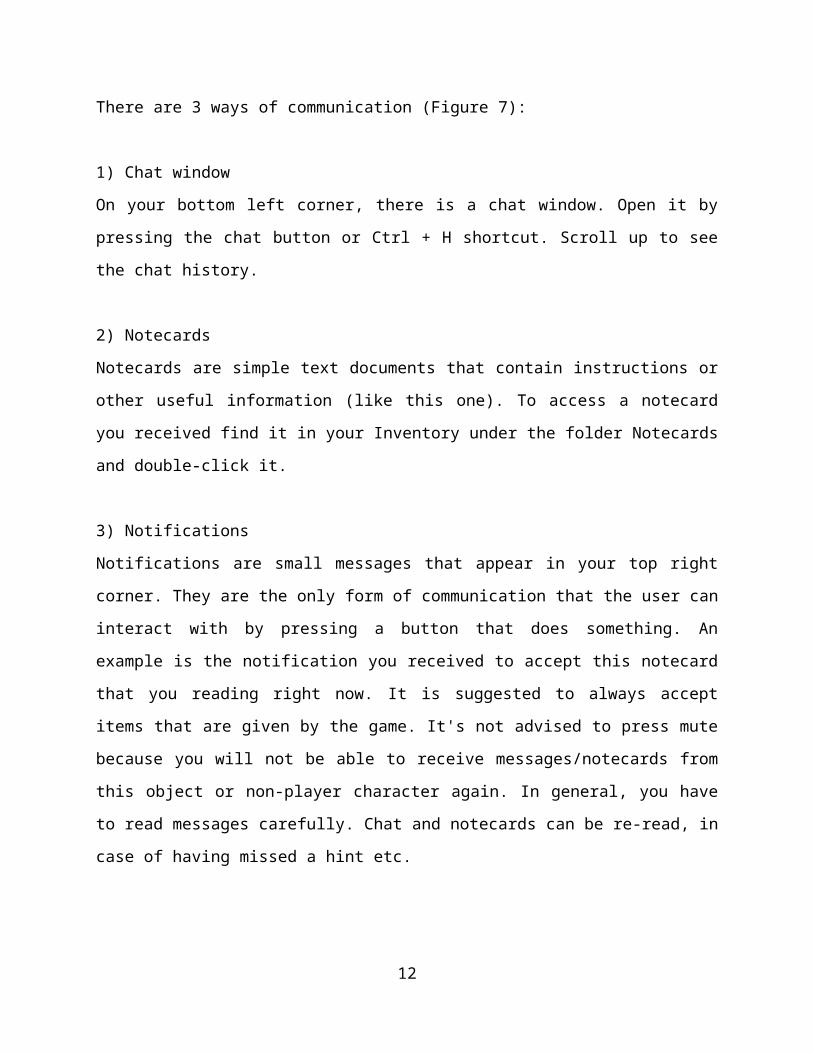
There are 3 ways of communication (Figure 7):
1) Chat window
On your bottom left corner, there is a chat window. Open it by pressing the chat button
or Ctrl + H shortcut. Scroll up to see the chat history.
2) Notecards
10
Notecards are simple text documents that contain instructions or other useful
information (like this one). To access a notecard you received find it in your Inventory
under the folder Notecards and double-click it.
3) Notifications
Notifications are small messages that appear in your top right corner. They are the only
form of communication that the user can interact with by pressing a button that does
something. An example is the notification you received to accept this notecard that you
reading right now. It is suggested to always accept items that are given by the game. It's
not advised to press mute because you will not be able to receive messages/notecards
from this object or non-player character again. In general, you have to read messages
carefully. Chat and notecards can be re-read, in case of having missed a hint etc.
Figure 7
Avatar FunctionalitiesA user can have access to the avatar’s functionalities either from the action menu which
can be shown by right clicking anywhere (i.e. on objects, virtual world in general) or
using the viewer’s bottom bar(figure 5 highlighted in red). Different actions can be found
11
on each menu. The bottom bar gives access to the conversation (Nearby chat), camera
controls, map controls, appearance controls etc. While, right clicking anywhere can give
access to sitting/standing, going to the selected location, editing, and getting more
information about the selected object. It is suggested to have always the Nearby chat open (click on nearby chat, Figure 8 red arrow).
Figure 8: Nearby chat highlighted in blue and the bottom bar highlighted in red.
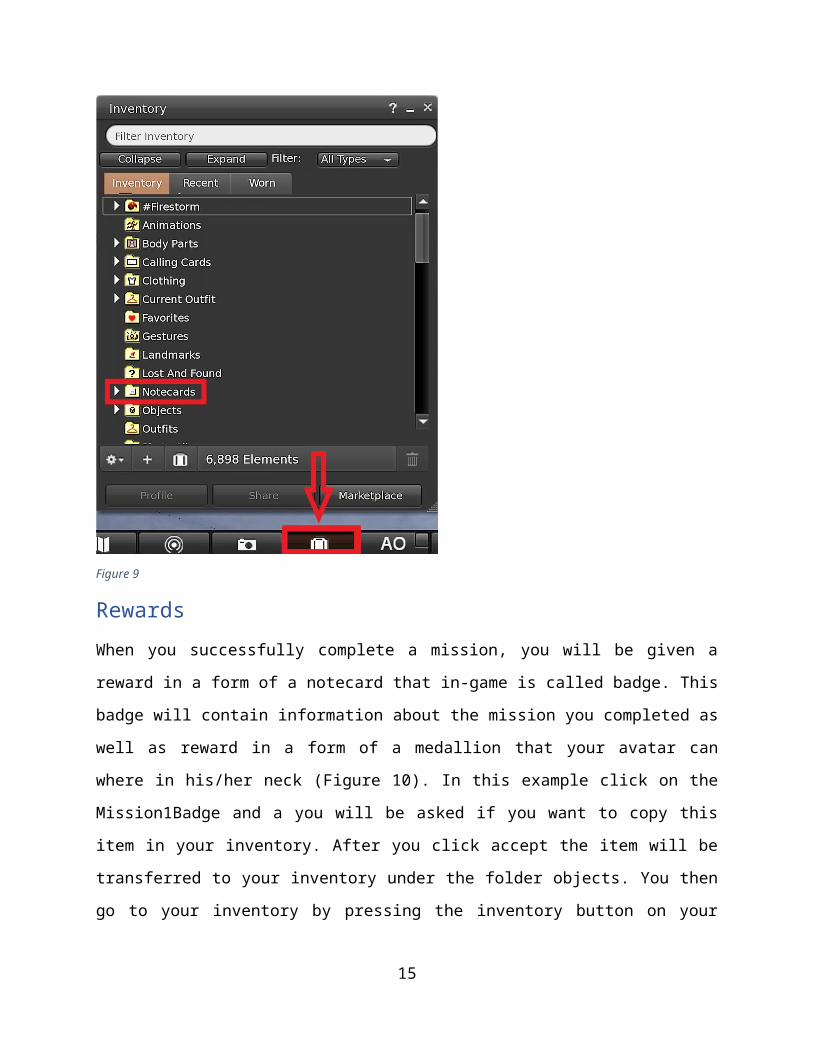
InventoryYou can have access to various material (such as costumes, clothing, notes, general
equipment etc.) from the inventory. This material belongs to the current logged in user
(avatar) and can be viewed or used any time. To open the inventory window, you have
to select the “Inventory” button from the bottom bar of the viewer’s window or press Ctrl
+ i (see Figure 9 Red arrow). This will show the inventory window. From the inventory,
you can change current outfit, you can read notecards (notecards are saved under
Notecards directory) and more. The inventory and its directories will provide useful
material during the missions.
12
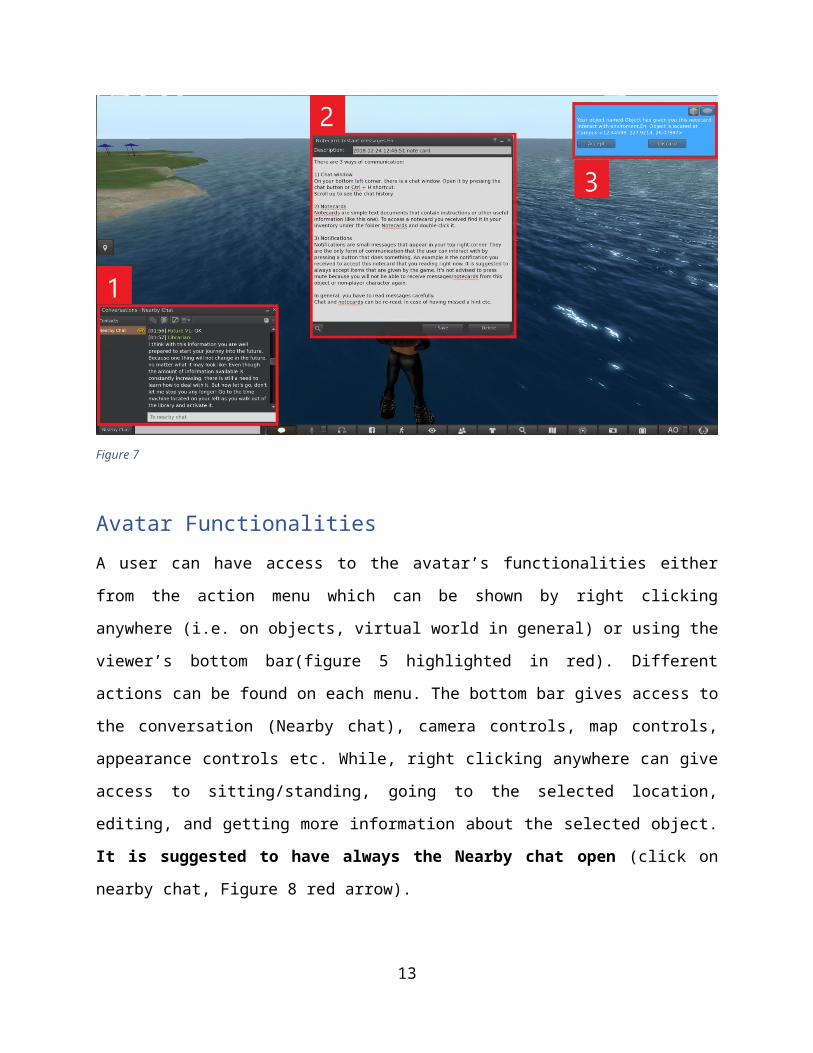
Figure 9
RewardsWhen you successfully complete a mission, you will be given a reward in a form of a
notecard that in-game is called badge. This badge will contain information about the
mission you completed as well as reward in a form of a medallion that your avatar can
where in his/her neck (Figure 10). In this example click on the Mission1Badge and a you
will be asked if you want to copy this item in your inventory. After you click accept the
item will be transferred to your inventory under the folder objects. You then go to your
inventory by pressing the inventory button on your screen or ctrl+I shortcut, find the
Mission1Badge, right click it and choose wear, to wear the medallion (Figure 11).
13
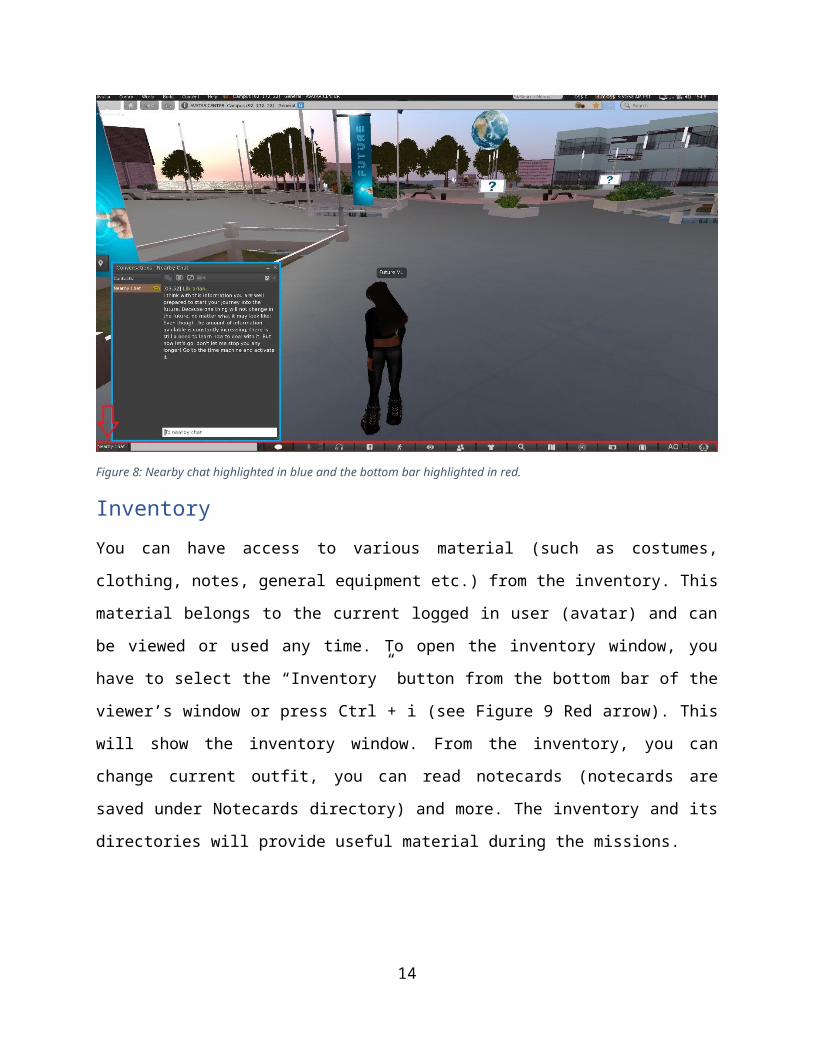
Figure 10: An example of a badge, it contains a reward (red rectangle)
Figure 11: A screenshot of how to wear an item
14
MovementGeneral movement
Walk forward/backward: ↑/↓
Turn left/right: ←/→
Run: Double-tap walk forward/backward key (some viewers: ctrl-R to turn run
on/off)
Jump or fly up: page up
Crouch or fly down: page down
Sit: Right-click on self/object/ground and select "Sit" (some viewers: ctrl-S to
sit/stand)
Stand: Right-click on self and select "Stand"
Players familiar with WASD controls:
Walk forward/backward: W/S
Turn left/right: A/D
Toggle fly on/off: F
Jump or fly up: E
Crouch or fly down: C
can enable this alternative functionality by following the 5 steps of Figure 12.
15
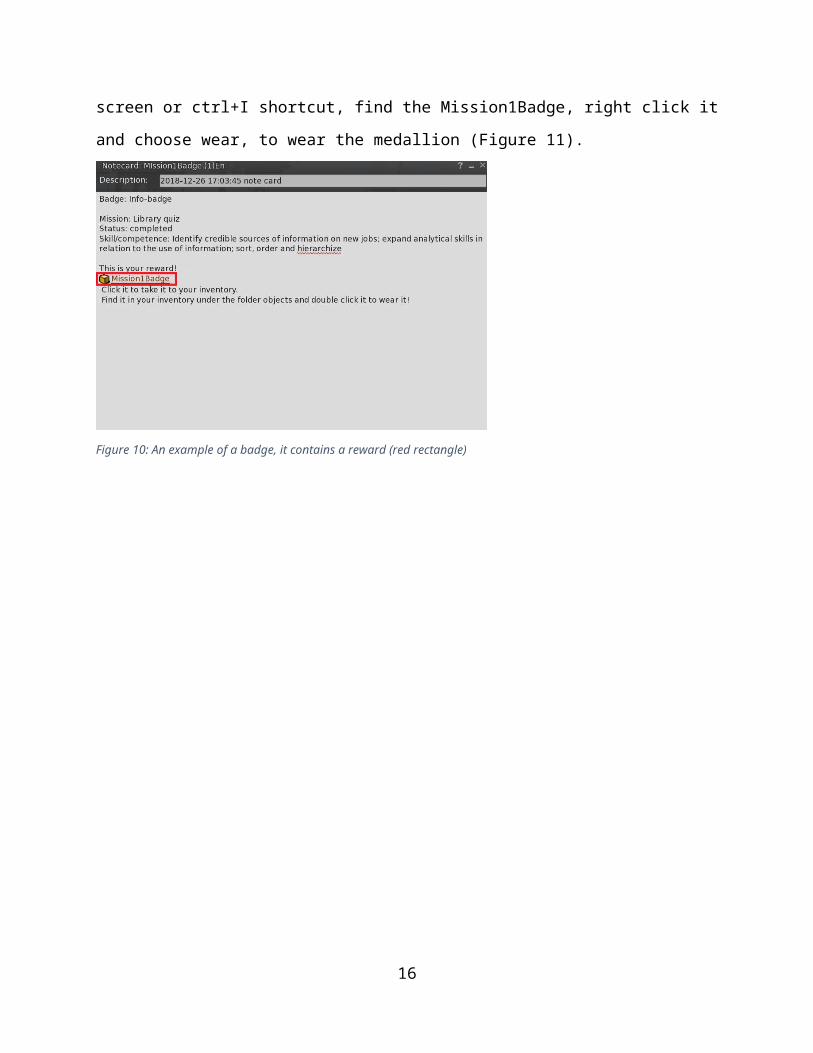
Figure 12
Clicking the movement button (red arrow Figure 13) a pop-up dialog will appear
showing the camera’s controls (red box) where you can choose to walk run or fly.
16
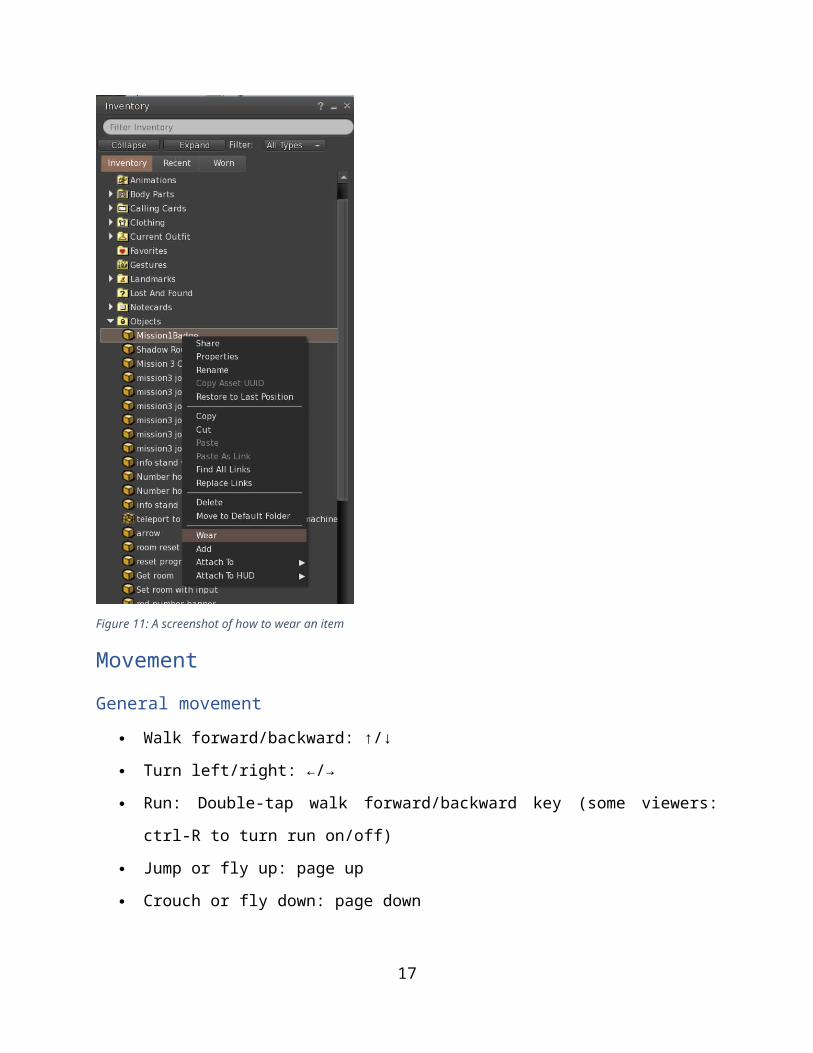
Figure 13
Basic world navigationCameraThe camera can be rotated using the left and right (←/→) arrows on the keyboard. You
can also change the camera angle by clicking the camera button located on the bottom
toolbar on the viewers window as the red arrow shows in Figure 14. A pop-up dialog will
appear showing the camera’s controls (red box). Scrolling the mouse wheel will change
the zoom level. Zoom in completely and the camera will become first person.
17
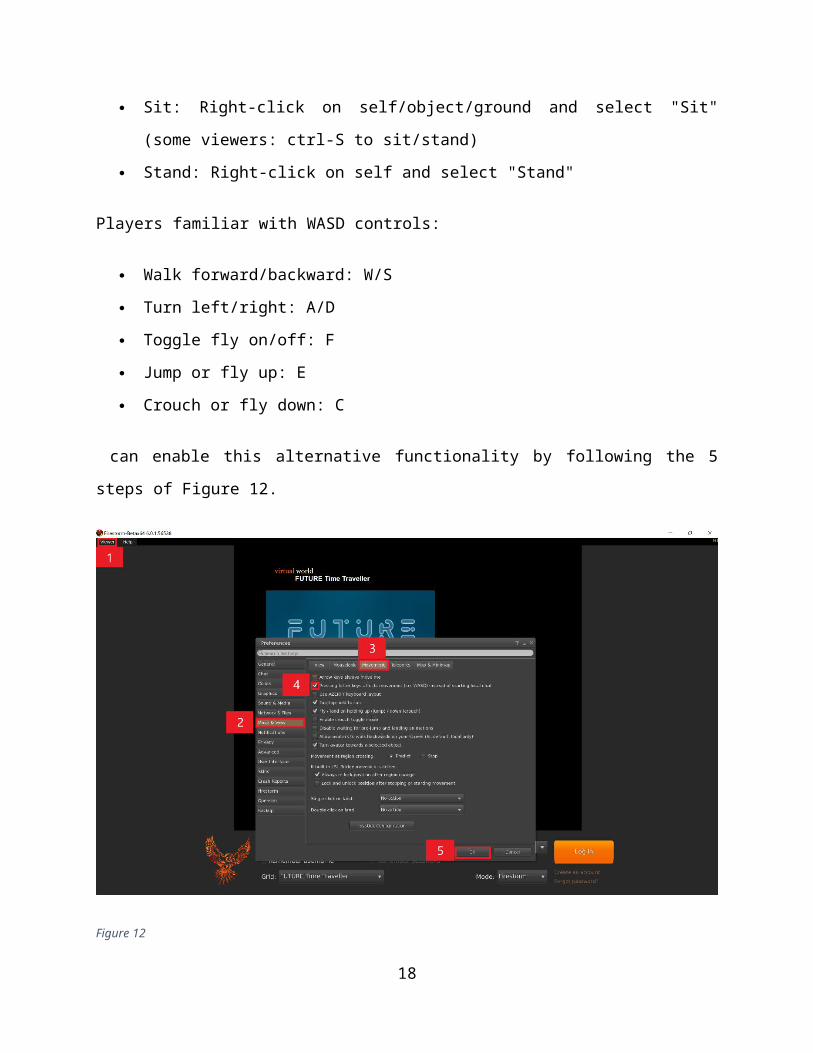
Figure 14
18