technical manual & parts book - atlatt.com · a list of recommended spare parts . ... oil level...
TRANSCRIPT

Atlanta Attachment Company
362 Industrial Park Drive
Lawrenceville, GA 30046
770-963-7369 • www.atlatt.com
Technical Manual & Parts Lists
Model 1345-5P Rev 4.1 Updated May 20, 2016

1345-5P
2 Technical Manual & Parts Book

1345-5P
3 Technical Manual & Parts Book
Contents
Atlanta Attachment Company, Inc.
Confidential and Proprietary Information
The materials contained herein are confidential and proprietary information of Atlanta Attachment Company. In addition to any confidentiality and non-disclosure obligations that currently exist between you and Atlanta Attachment Company, your use of these materials serves as an acknowledgment of the confidential and proprietary nature of these materials and your duty not to make any unauthorized use or disclosure of these materials. All materials contained herein are additionally protected by United States Copyright law and may not be used, disclosed, reproduced, distributed, published or sold without the express written consent of Atlanta Attachment Company, which consent may be withheld in Atlanta Attachment Company’s sole discretion. You may not alter or remove any copyright, trademark or other notice from copies of these materials.
Important It is important to read and understand the information contained within this manual before attempting to operate the machine. Atlanta Attachment Co., Inc. shall not be held liable for damage resulting from misuse of the information presented within, and reserves the right to change the information contained within, without prior notification.
Atlanta Attachment Company, Inc.
Información Confidencial y Propietaria
Los materiales contenidos adjuntos son información confidencial y propiedad de Atlanta Attachment Company. Además de cualquier obligación confidencial y de no divulgación que exista actual entre usted y Atlanta Attachment Company, el uso de estos materiales sirve como reconocimiento de la naturaleza confidencial y propietaria de estos materiales y de su deber de no hacer ningún uso desautorizado o acceso de estos materiales.Todos los materiales contenidos adjunto son protegidos además por la ley de Derechos de Autor de Estados Unidos y no se pueden utilizar, divulgar, reproducir, distribuir, publicar o vender sin el consentimiento escrito expreso de Atlanta Attachment Company, El consentimiento se puede retener en discreción única de Atlanta Attachment Company. Usted no puede alterar o quitar los derechos reservados, la marca registrada o cualquier otro aviso de las copias de estos materiales.
Importante Es importante leer y entender la información contenida dentro de este manual antes de intentar hacer funcionar la máquina. Atlanta Attachment Co., Inc. no será responsable por el daño resultado del uso erróneo de la información presentada dentro de este manual, y se reserva el derecho de cambiar la información contenida sin notificación previa.

1345-5P
4 Technical Manual & Parts Book
Contents Atlanta Attachment Company, Inc. ............................................................................................................ 3
Información Confidencial y Propietaria .................................................................................................. 3
Atlanta Attachment Company, Inc. ............................................................................................................ 3
Confidential and Proprietary Information ............................................................................................... 3
Contents ...................................................................................................................................................... 3
Safety Instructions ...................................................................................................................................... 8
Mandatory Information ........................................................................................................................... 8
Scope of the instruction Material ............................................................................................................ 8
Intended Use ............................................................................................................................................ 9
Exclusion of Misuse ................................................................................................................................ 9
Liability ................................................................................................................................................... 9
Choice and Qualification of Personnel.................................................................................................. 10
Training ................................................................................................................................................. 11
Responsibilities ..................................................................................................................................... 11
A Word to the Operator ......................................................................................................................... 12
Safety Equipment on the Machines ....................................................................................................... 12
Damage.................................................................................................................................................. 13
Faults and Errors ................................................................................................................................... 13
Signs on the Machine ............................................................................................................................ 13
Clothing, Jewelry, Protective Equipment .............................................................................................. 14
Protective Eyewear ................................................................................................................................... 14
Tools ...................................................................................................................................................... 14
Oils, Lubricants, Chemicals .................................................................................................................. 14
No Smoking, Fire, Explosion Hazard ................................................................................................... 14
Workplace ............................................................................................................................................. 15
Emergency STOP .................................................................................................................................. 15
First Aid................................................................................................................................................. 15
\ ................................................................................................................................................................. 15
IMPORTANT NOTICES ......................................................................................................................... 16

1345-5P
5 Technical Manual & Parts Book
Reporting and Fighting Fires................................................................................................................. 16
Electrical Power Supply ........................................................................................................................ 17
Delivery of the Machine/Packaging ...................................................................................................... 18
Transport Damage ................................................................................................................................. 18
Interim Storage ...................................................................................................................................... 18
Transporting the Machine ..................................................................................................................... 19
Work Place Environment ...................................................................................................................... 20
Local Regulations .................................................................................................................................. 20
MAINTENANCE ..................................................................................................................................... 21
General Safety Instructions ................................................................................................................... 21
Maintenance, Care, Adjustmen ............................................................................................................. 21
Waste, Disassembly, Disposal .............................................................................................................. 22
REPAIR .................................................................................................................................................... 22
Replacement Parts ................................................................................................................................. 22
Repair, Electrical ................................................................................................................................... 22
Starting Machine Movements ............................................................................................................... 24
A Word to the End User............................................................................................................................ 24
Safety Precautions ..................................................................................................................................... 24
Machine Specifications ............................................................................................................................. 26
Parameter Settings for Efka Controller ..................................................................................................... 27
Instructions for the FP220 with three digit display ............................................................................... 27
Instructions for the AB221 with four digit display ............................................................................... 30
Gear Box Manintenance ........................................................................................................................... 33
Instrucciones de Seguridad ......................................................................................................................... 8
Información Obligatoria .......................................................................................................................... 8
Alcance del Material de Instrucción........................................................................................................ 8
Uso Previsto ............................................................................................................................................ 9
Exclusión por Mal Uso ............................................................................................................................ 9
Riesgos .................................................................................................................................................... 9
Escogencia y calificación del personal.................................................................................................. 10
Entrenamiento ....................................................................................................................................... 11
Responsabilidades ................................................................................................................................. 11

1345-5P
6 Technical Manual & Parts Book
Un Consejo al Operador ........................................................................................................................ 11
Equipo de Seguridad en las Máquinas .................................................................................................. 12
Daños ..................................................................................................................................................... 12
Fallos y Errores ..................................................................................................................................... 13
Avisos en la Máquina ............................................................................................................................ 13
Ropa, Joyas, Equipos de Protección ..................................................................................................... 13
Gafas de Protección .................................................................................................................................. 14
Herramientas ......................................................................................................................................... 14
Aceites, Lubricantes, Químicos ............................................................................................................ 14
No Fumar, Incendio, Riesgo de Explosión ........................................................................................... 14
Area de Trabajo ..................................................................................................................................... 14
Parada de Emergencia ........................................................................................................................... 15
Primeros Auxilios .................................................................................................................................. 15
AVISOS IMPORTANTES ....................................................................................................................... 15
Reporte y control de Incendios.............................................................................................................. 16
Suministro de Corriente Elécrica .......................................................................................................... 17
Envío de la Máquina/Empaque ............................................................................................................. 18
Daño en el Transporte ........................................................................................................................... 18
Almacenamiento Temporal ................................................................................................................... 18
Transportando la Máquina .................................................................................................................... 19
Condiciones Ambientales en el Lugar de Trabajo ................................................................................ 20
Regulaciones Locales ............................................................................................................................ 20
MANTENIMIENTO................................................................................................................................. 21
Instrucciones Regulares de Seguridad................................................................................................... 21
Mantenimiento, Cuidados y Ajustes ..................................................................................................... 21
Desechos, Desmontaje, Disposición ..................................................................................................... 22
REPARACION ......................................................................................................................................... 22
Piezas de Repuesto ................................................................................................................................ 22
Reparación, Electricidad ....................................................................................................................... 22
Comenzando a Mover la Máquina ........................................................................................................ 24
Una Palabra al Usario Final ...................................................................................................................... 24
Precauciones de Seguridad ....................................................................................................................... 24

1345-5P
7 Technical Manual & Parts Book
Especificaciones de la Máquina ................................................................................................................ 26
Parámetros Establecidos para Controladores Efka ................................................................................... 27
Instrucciones para el FP220 con display de tres dígitos....................................................................... 27
Instrucciones para la AB221 con pantalla de cuatro dígitos ................................................................. 30
Mantenimiento Caja de Cambios .............................................................................................................. 33
ASSEMBLY / ADJUSTMENT INSTRUCTIONS .................................................................................. 34
Assembly Drawings & Parts Lists ............................................................................................................ 35
11345-5P Tape Edge Machine .................................................................................................................. 36
13452500A Table Assembly..................................................................................................................... 37
13451000 Table Base Assembly ............................................................................................................... 38
13453800 Gear Lock Assembly................................................................................................................ 39
13459500 Control Box .............................................................................................................................. 41
13452000D Column Lift Assembly .......................................................................................................... 43
134553000A Carriage Assembly .............................................................................................................. 45
134533300A Top Carriage Assembly ...................................................................................................... 47
1345100 Knee Switch Assembly .............................................................................................................. 49
13453400A Carriage Guide Assembly ..................................................................................................... 51
134539000B Control Box Assembly ........................................................................................................ 53
13453500E Gear Box Assembly ............................................................................................................... 55
SPF5625-657-02M Sewing Head ............................................................................................................. 57
SPF5625-65702A Head, Pfaff Tape Edge ................................................................................................ 58
134539300A Control Button Panel ........................................................................................................... 59
1345-5WD1 Wiring Diagram ................................................................................................................... 61

1345-5P
8 Technical Manual & Parts Book
Safety Instructions
This part of the Instruction Material is provided for the safe use of your equipment. It contains important information to help work safely with the unit and describes the dangers inherent in machinery. Some of these dangers are obvious, while others are less evident.
Mandatory Information
All persons operating and/or working on the 1345-2B Tape Edge Machine should read and understand all parts of the safety Instructions. This applies, in particular, for persons who only operate and/or work on the unit occasionally (e.g. for maintenance and repair). Persons who have difficulty reading must receive particularly thorough instruction.
Scope of the instruction Material
. The Instruction Material comprises:
. Safety Information
. Operator Instructions
. Electrical and Pneumatic diagrams
And may also Include:
. A list of recommended spare parts
. Instruction Manual(s) for components
Made by other manufacturers
. The layout and installation diagram
containing information for installation.
Instrucciones de Seguridad
Esta parte del Material de Instrucción está prevista para el uso adecuado de su equipo. Contiene importante información para ayudarlo a trabajar de una forma segura con la unidad y describe los peligros que pueden existir en el uso de ella. Algunos de estos peligros son obvios, mientras que otros son menos evidentes.
Información Obligatoria
Todas las personas operando y/o trabajando en la máquina Cerradora 1345-2B, deben leer y entender todas las partes de las instrucciones de seguridad. Esto aplica, en particular, a personas quienes solamente operan y/o trabajan en esta unidad ocasionalmente (ej.para mantenimiento y reparación). Personas que tengan dificultad leyendo deben particularmente recibir instrucciones cuidadosas.
Alcance del Material de Instrucción
. El Material de Instrucción comprende:
. Información de Seguridad
. Instrucciones para el Operador
. Diagrama Eléctrico y Neumático Puede también incluir:
. Una lista recomendada de partes de repuesto
. Manual(es) de instrucciónes para componentes fabricados por otras compañías.
. Diagramas y planos conteniendo Información para instalación.
nt Plug & Oil Fill
Oil Level Check

1345-5P
9 Technical Manual & Parts Book
Intended Use
Our machines are designed and built in line with the state of the art and the accepted safety rules. However, all machines may endanger the life and limb of their users and/or third parties and be damaged or cause damage to other property, particularly if they are operated incorrectly or used for purposes other than those specified in the Instruction Manual
Exclusion of Misuse
Non-conforming uses include, for example, using the equipment for something other thn it was designed for, as well as operation without duly installed safety equipment. The
risk rests exclusively with the end user. Conforming use of the machine includes compliance with the technical data, information and regulations in all parts of the complete Instruction Manual, as well as compliance with the maintenance regulations. All local safety and accident prevention regulations must also be observed.
Liability
The machine should only be operated when in perfect working order, with due regard for safety and the potential dangers, as well as in accordance with the Instruction Material. Faults and malfunctions capable of impairing safety should be remedied immediately. We cannot accept any liability for personal injury or property damage due to operator errors or non-compliance with the safety instructions contained in this booklet. The risk rests exclusively with the end user.
The instruction Material should always be kept near the machine so that it is accessible to all concerned.
Uso Previsto
Nuestras máquinas estan diseñadas y construidas bajo estrictas normas de calidad y seguridad. Sin embargo toda máquina puede ser peligrosa para la vida o alguna parte del cuerpo de los usuarios y se puede dañar o causar daño a otra propiedad, particularmente si es operada incorrectamente o es usada para propósitos diferentes a aquellos especificados en el Manual de Intrucción.
Exclusión por Mal Uso
Mal uso incluye, por ejemplo, uso del equipo para algo diferente a lo que fue diseñado, como también operarlo sin el debido equipo de seguridad. El riesgo recae exclusivamente en el usuario final. El debido uso de la
máquina comprende estar en conformidad con la información técnica y regulaciones en todas las partes del Material de Instrucción, como también en conformidad con las regulaciones de mantenimiento. Toda la seguridad local y regulaciones en la prevención de accidentes debe ser observada
Riesgos
La máquina debe ser operada estando en perfectas condiciones de trabajo, con especial atención en seguridad y en potenciales peligros, como también en perfecto acuerdo con el Material de Instrucción. Fallas y mal funcionamiento capaces de menoscabar la seguridad deben ser corregidas inmediatamente. Nosotros no podemos aceptar ninguna responsabilidad por lesiones personales o daño a la propiedad debido a errores del operador o por no estar de acuerdo con las instrucciones de seguridad contenidas en este manual. El riesgo recae en el usuario final.
El Material de Instrucción debe ser siempre mantenido cerca de la máquina y accessible a

1345-5P
10 Technical Manual & Parts Book
The local, general statutory and other binding regulations on accident prevention and environmental protection must be observed in addition to the Instruction Material. The operating staff must be instructed accordingly. This obligation also includes the handling of dangerous substances and provision/use of personal protective equipment.
The Instruction Material should be supplemented by instructions, including supervisory and notification duties with due regard for special operational features, such as the organization of work, work sequences, the personnel deployed, etc.
The personnel’s awareness of the dangers and compliance with the safety regulations should be checked at irregular intervals.
Choice and Qualification of Personnel
Ensure that work on the machine is only carried out by reliable persons who have been appropriately trained for such work - either within the company, by our field staff or at our office - and who have not only been duly appointed and authorized, but are also fully familiar with the local regulations. Work on the machine should only be carried out by skilled personnel, under the management and supervision of a duly qualified
engineer. This not only applies when the machine is used for production, but also for
todos aquellos a quienes les concierne.
Los estatutos locales, generales y otras regulaciones que haya que cumplir en la prevención de accidentes y protección ambiental deben también tenidas en cuenta además del Material de Instrucción. El personal de operaciones debe ser instruido de acuerdo a esto. Esta obligación también incluye el manejo de sustancias peligrosas y la provision y uso de equipos de protección personal.
El Material de Instrucción debe ser suplementado con instrucciones que incluyan supervision y notificación de deberes que tomen debidamente en cuenta las características operacionales, tales como la organización y secuencia del trabajo y el personal asignado,etc.
El conocimiento que el personal tenga de los peligros existentes y la conformidad con las regulaciones de seguridad deben ser chequeados a intervalos irregulares.
Escogencia y calificación del personal
Asegurese de que el trabajo con la máquina sea llevado a cabo por personas debidamente entrenadas para ese trabajo específico- ya sea dentro de la compañía, por nuestro personal de campo o en nuestras oficinas-y quienes no solamente hayan sido escogidos y autorizados sino que también esten completamente familiarizados con las regulaciones locales.
Trabajar con la máquina debe ser solamente llevado a cabo por personal capacitado, bajo administración y supervision de un ingeniero debidamente calificado.Esto no solamente aplica cuando la máquina es usada para producción, sino también para trabajos especiales asociados con su operación (puesta en marcha y mantenimiento)

1345-5P
11 Technical Manual & Parts Book
special work associated with its operation (start-up and maintenance), especially when it concerns work on the hydraulic or electrical systems, as well as on the software/serial bus system
Training
Everyone working on or with the machine should be duly trained and informed with regard to correct use of the safety equipment, the foreseeable dangers which may arise during operation of the machine and the safety precautions to be taken. In addition, the personnel should be instructed to check all safety mechanisms at regular intervals.
Responsibilities
Clearly define exactly who is responsible for operating, setting-up, servicing and repairing the machine. Define the responsibilities of the machine operator and authorize him to refuse any instructions by third parties y they run contrary to the machine’s safety. This applies in particular for the operators of machines linked to other equipment. Persons receiving training of any kind may only work on or with thw machine under the constant supervision of an experienced operator. Note the minimum age limits permitted by law.
especialmente en lo concerniente a trabajo en la parte hidráulica o en el Sistema eléctrico, como también en el programa/sistema serial bus.
Entrenamiento
Cada persona que trabaje con/ o en la máquina debe ser debidamente entrenado e informado en relación con el uso del equipo de seguridad; los posibles peligros que pueden surgir durante la operación de la máquina y las precauciones de seguridad que deben ser adoptadas. En adición, el personal debe ser instruido en como chequear todos los mecanismos de seguridad a intervalos regulares.
Responsabilidades
Claramente definir quién va a ser el responsable de operar, instalar, chequear y reparar la máquina. Definir las responsabilidades del operador de la máquina y autorizarlo a rechazar cualquier instrucción de terceras personas que atente contra la seguridad de la máquina. Esto aplica en particular para operadores de máquinas vinculadas a otros equipos. Las personas que reciban entrenamiento de cualquier tipo deben trabajar solamente en/o con la máquina bajo la supervision de un operador experimentado. Es Bueno tener en cuenta los límites mínimos de edad permitidos por la ley.
Un Consejo al Operador

1345-5P
12 Technical Manual & Parts Book
A Word to the Operator
The greatest danger inherent in our machines is that of fingers, hands or loose clothing being drawn into a machine by live, coasting or rotating tools or assemblies or of being cut by sharp tools or burned by hot elements
ALWAYS BE CONSCIOUS OF THESE DANGERS!
Safety Equipment on the Machines
All machines are delivered with safety equipment, which shall not be removed or bypassed during operation
The correct functioning of safety equipment on machines and systems should be checked every day and before every new shift starts; after maintenance and repair work, when starting up for the first time and when restating (e.g. after prolonged shutdowns).
If safety equipment has to be dismantled for setting-up, maintenance or repair work, such safety equipment shall be replaced and checked immediately upon completing the maintenance or repair work. All protective mechanisms shall be fitted and fully operational whenever the machine is at a standstill or if it has been shut down for a longer period of time.
El peligro inherente mas grande en nuestras máquinas es la posibilidad de que los dedos de las manos o la ropa muy ancha sean atrapados por las piezas en movimiento, rotando o en ensamblaje, o ser cortado por piezas afiladas o quemado por elementos que pueden estar muy calientes.
SIEMPRE ESTE CONCIENTE DE ESTOS PELIGROS!
Equipo de Seguridad en las Máquinas
Todas las máquinas son despachadas con equipo de seguridad, que no debe ser removido o evitado durante su operación.
El correcto funcionamiento del equipo de seguridad en máquinas y sistemas debe ser chequeado todos los días y ante de que cualquier nuevo turno comience; después de mantenimiento y trabajo de reparación; cuando comienza a trabajar por primera vez y en las siguientes reiniciadas (por ejemplo después de un prolongado tiempo de estar apagada)
Si el equipo de seguridad tiene que ser desmantelado por instalación, mantenimiento o trabajo de reparación, ese equipo debe ser reemplazado y chequeado inmediatamente terminen estos trabajos. Todos los mecanismos de protección deben ser ajustados y quedar completamente operacionales donde sea que la máquina este situada o si ha sido paralizada por un período largo de tiempo.
Daños
Si algún cambio es observado que sea capaz de afectar la seguridad de la máquina o su modo de

1345-5P
13 Technical Manual & Parts Book
Damage
If any changes capable of impairing safety are observed in the machine or its mode of operation, such as malfunctions, faults or changes in the machine or tools, appropriate steps must be taken immediately, the machine switch off and a proper lockout tag out procedure followed. The machine should be examined for obvious damage and defects at least once per shift. Damage found shall be immediately remedied by a duly authorized person before resuming operation of the machine.The machine should only be operated when in perfect working order and when all protective mechanisms and safety equipment, such as detachable protective mechanisms, emergency STOP systems, etc. are in place and operational.
Faults and Errors
The machine must be switched off and all moving or rotating parts allowed to come to a standstill and secured against accidental restart before starting to remedy any fault or errors.
Signs on the Machine
Safety and danger signs on the machine should be observed and checked at regular intervals to ensure that they are complete and undamaged. They should be clearly visible and legible at all times.
operación, tales como mal funcionamiento, fallas o cambios en la máquina o en sus instrumentos, los pasos apropiados deben ser tomados inmediatamente tales como, apagar la máquina y seguir el apropiado procedimiento de cerrado y etiqueteado de ella. La máquina debe ser exáminada por daños obvios y defectos por lo menos una vez por cada turno. El daño encontrado debe ser remediado inmediatamente por una persona debidamente autorizada antes de reanudar la operación de la máquina.La máquina debe ser operada estando en perfectas condiciones de trabajo y cuando todos los mecanismos de protección y equipos de seguridad, tales como el mecanismo de protección de Desmonte, el Sistema de Detención de emergencia, etc.,esten en su lugar y operacionales.
Fallos y Errores
La máquina debe ser apagada y todas sus partes móviles o rotatorias permitirles parar completamente y asegurarlas contra una reiniciada accidental antes de comenzar a remediar cualquier falla o error.
Avisos en la Máquina
Los avisos de Seguridad y Peligro deben ser observados y chequeados a intervalos regulares para asegurarse de que esten completes y sin daño. Ellos deben estar todo el tiempo claramente visibles y legibles.
Ropa, Joyas, Equipos de Protección
Cabello largo suelto, ropa muy amplia, guantes y

1345-5P
14 Technical Manual & Parts Book
Clothing, Jewelry, Protective Equipment
Long loose hair, loose-fitting clothes, gloves and jewelry, including rings, should be avoided in order to avoid injuries due to being caught, drawn in and wound up inside the machine.
Protective
Eyewear
Protective eyewear that has been tested by the local authorities should be worn whenever there is a possibility of loose or flying objects or particles such as when cleaning the machine with compressed air.
Tools
Always count the number of tools in your possession before starting work on the machine. This will allow you to check that no tools have been left behind inside the machine. Never leave a tool in the machine while working
Oils, Lubricants, Chemicals
Note the applicable safety regulations for the product
No Smoking, Fire, Explosion Hazard
Smoking and open flame (e.g. welding work) should be prohibited in the production area due to the risk of fire and explosions.
joyas, incluyendo anillos, deben ser evitados para prevenir lesiones debido a que pueden ser atrapados y halados hacia dentro de la máquina.
Gafas de Protección
Gafas de protección que hayan sido debidamente probadas y aprobadas por las autoridades locales deben ser usadas cada vez que exista la posibilidad de objetos o particulas volando debido a la limpieza de la máquina o al uso de aire comprimido.
Herramientas
Siempre cuente con un número de herramientas en su posesión antes de comenzar a trabajar en la máquina. Esto le permitira chequear que ninguna herramienta haya sido dejada dentro de la máquina. Nunca deje una herramienta en la máquina mientras trabaja
Aceites, Lubricantes, Químicos
Fíjese en las regulaciones de seguridad para con el producto que este usando
No Fumar, Incendio, Riesgo de Explosión
Fumar y llama abierta (ej. Trabajo de soldadura)deben ser prohibidos en el area de producción debido al riesgo de incendio y explosiones
Area de Trabajo

1345-5P
15 Technical Manual & Parts Book
Workplace
A clear working area without any obstructions whatsoever is essential for safe operation of the machine. The floor should be level and clean, without any waste.The workplace should be well lit, either by the general lighting or by local lights.
Emergency STOP
The emergency STOP buttons bring all machine movements to a standstill. Make sure you know exactly where they are located and how they work. Try them out. Always ensure easy access to the nearest emergency STOP button while working on the machine.
First Aid
1. Keep calm even when injured. 2. Clear the operator from the danger
zone. To seek additional assistance rests entirely with you, particularly if someone has been trapped.
3. Give First Aid. Special courses are offered by such organizations as the employers' liability insurance association. Your colleagues should be able to rely on you and vice versa.
4. Call an ambulance. Do you know the telephone numbers for the ambulance service, police and fire service?
\
Un área de trabajo limpia sin ninguna obstrucción es esencial para una operación segura de la máquina. El piso de debajo de la máquina debe estar limpio, sin nada de basura.El área de trabajo debe estar bien iluminada ya sea por iluminación general o iluminación local.
Parada de Emergencia
Los botones de parada de emergencia llevan a todos los movimientos de la máquina a una paralización total. Asegúrese donde estan localizados y como trabajan. Ensáyelos. Siempre busque el rápido acceso al mas cercano de ellos cuando esté trabajando en la máquina.
Primeros Auxilios
1. Mantenga la calma aun cuando esté lesionado.
2. Mover al operador de la zona de peligro. La decisión de que hacer o de buscar ayuda adicional depende totalmente de Ud., particularmente si alguien ha sido atrapado
3. Dele primeros auxilios. Cursos especiales son ofrecidos por organizaciones tales como la compañía de seguros de su empleador. Sus colegas deben poder depender de Ud. Y viciversa.
4. Llame a la ambulancia. Sabe Ud. Los números teléfonicos del Servicio de Ambulancias, Policía y Bomberos?
AVISOS IMPORTANTES

1345-5P
16 Technical Manual & Parts Book
IMPORTANT NOTICES
Reporting and Fighting Fires
Read the instructions posted in the factory with regard to reporting fires and the emergency exits. Make sure you know exactly where the fire extinguishers and sprinkler systems are located and how they are operated. Pass on the corresponding information to the firemen when they arrive. Ensure there are enough signs to avoid fire hazards.
The following fire extinguishers may be used:
- Dry powder extinguishers, ABC fire-extinguishing powder.
-Carbon dioxide fire extinguishers to DIN 14461 for electronic components. Great care must be exercised when using carbon dioxide fire extinguishers in confined, badly ventilated rooms (see DIN 14406 and 14270).
Isolate the machine from the power supply if a fire breaks out. Do not use water on burning electrical parts until it is absolutely certain that they have been completely disconnected from the power supply. Burning oils, lubricants, plastics and coatings on the machine can give off gases and vapors that may be harmful to your health. A qualified person should be consulted to repair the damage after a fire.
Reporte y control de Incendios
Lea las instrucciones colocadas en la fábrica en relación con el reporte de incendios y las salidas de emergencia. Asegurese de saber exáctamente donde estan localizados los extinguidores de incendio y los y el sistema de aspersion y como se deben operar. Comunicar esta información a los bomberos cuando ellos lleguen. Asegures de que hay suficientes aviso previniendo los peligros de incendio.
Los siguiente extinguidores de incendio pueden ser usados:
-Extinguidores de polvo seco, ABC polvo extinguidor de incendio.
-Extinguidores de Dióxido de Carbono DIN 14461
para componentes electrónicos. Especial cuidado debe ejercitarse cuando se usen extinguidores de dióxido de carbono en cuartos confinados y mal ventilados (chequear DIN 14406 y 14270).
Aislar la máquina de la corriente eléctrica si un incendio estalla. No use agua en las partes eléctricas quemadas hasta que no esté seguro de que la máquina ha sido totalmente desconectada de la fuente elécrica. Aceites quemados, lubricantes, plásticos y revestimientos en la máquina pueden soltar gases y vapores que pueden ser peligrosos para su salud. Una persona calificada debe ser consultada para reparar el daño
después del incendio.

1345-5P
17 Technical Manual & Parts Book
Electrical Power Supply
Before undertaking any maintenance or repair work on the machine, switch off the electrical power to the machine at the main source
and secure it with a padlock so that it cannot be switched on again without authorization.
In practice, this may mean that the technician, electrician and operator all attach their own padlock to the master switch simultaneously so that they can carry out their work safely. Locking extension plates should be available for multiple locks if required. The primary purpose for a lockout/tagout procedure is to protect workers from injury caused by unexpected energizing or start-up of equipment.
Caution: The machine is still not completely de-energized even when the master switch is off
- Electricity - The machine is always isolated from the electrical power supply whenever the master switch has been switched off. However, this does not apply for the power supply in the control cabinet, nor for equipment that does not draw its power via the master switch.
- Pneumatic / hydraulic energy - Almost all our machines carry compressed air. In addition to switching off the master switch, the air supply must also be disconnected and the machine checked to ensure it is depressurized before starting any work on the machine; otherwise the machine may execute uncontrolled movements.
Suministro de Corriente Elécrica
Antes de emprender cualquier mantenimiento o trabajo de reparación en la máquina. Desconecte la fuente eléctrica principal de la máquina y
asegúrela con un candado para que no pueda ser encendida nuevamente sin autorización. En la práctica, esto significa que el técnico, el electricista y el operador deben tener su propio candado conectado con el interruptor principal simultáneamente para poder asi llevar a cabo su trabajo de una forma segura. Placas de seguridad para bloqueo de corriente eléctrica deben estar disponibles para multiples candados si se require.El propósito principal del procedimiento de bloqueo/etiquetado es proteger a los trabajadores de lesiones por causa de una energización o arranque inesperado de la máquina.
Precaución: La máquina no está todavía
completamente des-energizada aún
cuando el interruptor principal esté
desconectado.
-Electricidad- La máquina estará siempre aislada de la fuente eléctrica cada vez que el interruptor principal haya sido desconectado. Sin embargo,esto no aplica para la fuente de alimentación en el gabinete de control, ni para los equipos que reciben energía que no proviene del interruptor principal.
--Energía Neumática/Hidráulica- Casi todas nuestras máquinas transportan aire comprimido. Además de cerrar el interruptor principal, el suministro de aire debe ser desconectado y la máquina chequeada para asegurarse de su
despresuración antes de comenzar a trabajar en la máquina; de otra manera la máquina podría

1345-5P
18 Technical Manual & Parts Book
- Kinetic energy - Note that some motors or spindles, for example, may continue to run or coast run on after being switched off.
- Potential energy - Individual assemblies may need to be secured if necessary for repair work.
Delivery of the Machine/Packaging
Note any markings on the packaging, such as weights, lifting points and special information. Avoid temperature fluctuations. Condensation may damage the machine.
Transport Damage
The packaging and machine must immediately be examined for signs of damage in transit. Such damage must be reported to the shipper/transporter within the applicable time limits. Contact Atlanta Attachment Company and/or your transport insurer immediately, if signs of damage are visible. Never operate a damaged machine.
Interim Storage
If the machine has to be stored temporarily, it must be oiled or greased and stored in a dry place where it is protected from the weather in order to avoid damage. A corrosion-inhibiting coating should be applied if the machine has to be stored for a longer period of time andadditional precautions taken to avoid corrosion.
ejecutar movimientos descontrolados.
-Energía Kinética-Cabe anotar que algunos motores o ejes, por ejemplo, pueden continuar corriendo aún después de haber sido apagados.
-Energía Potential-Ensamblajes individuales pueden necesitar ser asegurados si es necesario para trabajos de reparación.
Envío de la Máquina/Empaque
Note cualquier información en el empaque, tales como peso, los sitios por donde debe ser levantado, e información especial. Evite las fluctuaciones de temperatura. La condensación puede dañar la máquina.
Daño en el Transporte
El empaque y la máquina deben ser examinados inmediatamente por posibles signos de daño en su tránsito. Estos daños deben ser reportados al despachador/transportador dentro de los límites estipulados. Contactar a la Copañía Atlanta Attachment y/o a su aseguradora de transportes inmediatamente, si los daños son visibles. Nunca trate de operar una máquina dañada.
Almacenamiento Temporal
Si la máquina tiene que ser almacenada temporalmente, debe ser aceitada ó engrasada y almacenada en un lugar seco donde esté protegida del clima para evitar daños. Un revestimiento anti-corrosivo debe ser aplicado si la máquina va a ser almacenada por largo tiempo y precauciones adicionales deben ser tomadas para evitar corrosion.

1345-5P
19 Technical Manual & Parts Book
Transporting the Machine
Disconnect the machine from all external connections and secure any loose assemblies or parts. Never step under a suspended load. When transporting the machine or assemblies in a crate, ensure that the ropes or arms of a forklift truck are positioned as close to the edge of the crate as possible. The center of gravity is not necessarily in the middle of the crate. Note the accident prevention regulations, safety instructions and local regulations governing transport of the machine and its assemblies.
Only use suitable transport vehicles, hoisting gear and load suspension devices that are in perfect working order and of adequate carrying capacity. Transport should only be entrusted to duly qualified personnel.
Never allow the straps to rest against the machine enclosure and never push or pull sensitive parts of the machine. Ensure that the load is always properly secured. Before or immediately after loading the machine, secure it properly and affix corresponding warnings.
All transport guards and lifting devices must be removed before the machine is started up again. Any parts that are to be removed for transport must be carefully refitted and secured before the machine is started up again.
Transportando la Máquina
Desconecte la máquina de cualquier conección externa y asegure cualquier parte o ensamblado sueltos. Nunca se pare debaje de una carga suspendida. Cuando transporte la máquina ó ensamblajes en una caja de madera, asegúrese de que las cuerdas o brazos de un elevador esten posicionados lo mas cerca possible del borde de la caja. El centro de gravedad no está posicionado necesariamente en la mitad de la caja. Note las regulaciones para prevención de accidentes, instrucciones de seguridad y las regulaciones locales que gobiernan el transporte de máquinas y ensamblajes.
Solamente use vehículos de transporte adecuados, mecanismos de elevación y dispositivos de suspension de carga que esten en perfectas condiciones de trabajo y con capacidad adecuada. El Transporte debe ser confiado solamente a personas debidamente capacitadas. Nunca permita que las correas descansen contra el cerramiento de la máquina y nunca hale sus partes delicadas. Asegúrese que la carga este siempre adecuadamente asegurada. Antes o inmediatamente después de que la máquina ha sido cargada, asegúrela apropiadamente y fije las advertencias correspondientes.Todas las guías de transportes y dispositivos de elevación deben ser removidos antes de que la máquina comienze a trabajar nuevamente. Todas las partes que tienen que ser removidas debido al transporte deben ser cuidadosamente colocadasy reajustadas antes de encender la máquina nuevamente.

1345-5P
20 Technical Manual & Parts Book
Work Place Environment
Our machines are designed for use in enclosed rooms: Permissible ambient temperature approx. 5 - 40 °C (40 - 104 °F). Malfunctions of the control systems and uncontrolled machine movements may occur at temperatures outside this range.
Protect against climatic influences, such as electrostatic charges, lightning strikes, hail, storm damage, high humidity, salinity of the air in coastal regions.
Protect against influences from the surroundings: no structure-borne vibrations, no grinding dust, or chemical vapors.
Protect against unauthorized access.
Ensure that the machine and accessories are set up in a stable position.
Ensure easy access for operation and maintenance (Instruction Manual and layout diagram); also verify that the floor is strong enough to carry the weight of the machine.
Local Regulations
Particular attention must be paid to local and statutory regulations, etc. when installing machines and the plant (e.g. with regard to the specified escape routes). Note the safety zones in relation to adjacent machines
Condiciones Ambientales en el Lugar de
Trabajo
Nuestras máquinas estan diseñadas para trabajar en cuartos cerrados: Temperaturas ambiente permitidas aprox. 5-40 °C (40-104 °F). Mal funcionamiento en los sistemas de control y movimientos descontrolados de la máquina pueden ocurrir en temperaturas que esten fuera de este rango.
Deben protegerse contra influencias climáticas como cargas electrostáticas, centellas, granizo, daños por tormentas, humedad my alta y salinidad en el aire en regiones costeras.
Proteger contra las influencias de los alrededores: no estructuras con vibración, no polvo molido o vapores químicos.
Proteger contra accesos no autorizados.
Asegurarse de que la máquina y sus accesorios hayan sido colocados en una posición estable.
Asegurarse que exista un fácil acceso para operación y mantenimiento (Manual de Instrucción y diagrama de planos ); también verificar si el piso es suficientemente sólido para soportar el peso de la máquina.
Regulaciones Locales
Particular atención debe ser puesta en las regulaciones locales y estatutorias, etc. cuando se instalan máquinas en la planta (ej.especialmente con las rutas de escape especificadas). Chequear las zonas de seguridad en relación las máquinas adyacentes.

1345-5P
21 Technical Manual & Parts Book
MAINTENANCE
General Safety Instructions
The machine shall be switched off, come to a standstill and be secured so that it cannot be switched on again inadvertently before starting any maintenance work whatsoever. Use proper lockout/tagout procedures to secure the machine against inadvertent startup.
Remove any oil, grease, dirt and waste from the machine, particularly from the connections and screws, when starting the maintenance and/or repair work. Do not use any corrosive-cleaning agents. Use lint-free rags.
Retighten all screw connections that have to be loosened for the maintenance and repair work. Any safety mechanisms that have to be dismantled for setting-up, maintenance or repair purposes must be refitted and checked immediately after completing the work.
Maintenance, Care, Adjustment
The activities and intervals specified in the Instruction Manual for carrying out adjustments, maintenance and inspections must be observed and parts replaced as specified. All hydraulic and pneumatic lines should be examined for leaks, loose connections, rubbing and damage whenever the machine is serviced. Any defects found must be remedied immediately.
MANTENIMIENTO
Instrucciones Regulares de Seguridad
La máquina debe ser apagada, llevada a una total quietud y tener la seguridad de que no podría ser reconectada inadvertidamente antes de comenzar cualquier trabajo de mantenimiento.Usar el correcto procedimiento de bloqueo/etiqueteado para asegurar la máquina contra iniciadas indvertidas.
Remover cualquier aceite, grasa, basura y deshechos, particularmente de lsa conecciones y tornillos, cuando comienza el mantenimiento y/o trabajo de reparación. No utilize ningún agente corrosivo de limpieza. Use trapos libres de pelusa.
Apriete todos los tornillos de las conecciones que tuvieron que ser aflojados por el mantenimiento y el trabajo de reparación. Cualquier mecanismo de seguridad que tuvo que ser desmantelado por instalación, mantenimiento ó reparación debe ser reajustado y chequeado inmediatamente después
de completar el trabajo.
Mantenimiento, Cuidados y Ajustes
Las actividades e intervalos especificados en el Manual de Instrucción para llevar acabo los ajustes, mantenimiento e inspecciones debe ser observado y algunas partes reemplazadas como se específica.Todas las lineas hidráulicas y neumáticas deben ser exáminadas por fugas, conecciones sueltas, fricción y daños en el momento en que se le está dando servicio a la máquina. Cualquier defecto encontrado debe ser reparado inmediatamente.

1345-5P
22 Technical Manual & Parts Book
Waste, Disassembly, Disposal
Waste products should be cleared from the machine as soon as possible as not to create a fire hazard.
Ensure that fuels and operating lubricants, as well as replacement parts are disposed of in a safe and ecologically acceptable manner. Note the local regulations on pollution control.
When scrapping (disassembling) the machine and its assemblies, ensure that these materials are disposed of safely. Either commission a specialist company familiar with the local regulations or note the local regulations when disposing of these materials yourself. Materials should be sorted properly.
REPAIR
Replacement Parts
We cannot accept any liability whatsoever for damage due to the use of parts made by other manufacturers or due to unqualified repair or modification of the machine
Repair, Electrical
The power supply must be switched off (master switch off) and secured so that it cannot be switched on again inadvertently before starting any work on live parts.
Those parts of the machine and plant on which inspection, maintenance or repair work is to be carried out must be isolated from the power
Desechos, Desmontaje, Disposición
Los productos de desecho deben ser limpiados de la máquina lo más pronto posible para evitar cuaquier peligro de incendio.
Asegúrese de que los combustibles y lubricantes operantes, como también las partes reemplazadas sean dispuestas de una manera segura y ecológicamnete acceptable. Chequear las regulaciones locales en control de polución.
Cuando se desmomta la máquina y sus ensamblajes, asegúrese de que estos materiales sean descartados de una forma segura. Ya sea que comisione a una compañía de especialistas que esten familiarizados con las regulaciones locales ó averigue las regulaciones locales si va a descartar estos materiales usted mismo.. Los materiales deben ser ordenados apropiadamente.
REPARACION
Piezas de Repuesto
No podemos aceptar ninguna responsabilidad por daños producidos por partes fabricadas por otras manufacturas ó debido a reparaciones no calificadas ó modificaciones a la máquina.
Reparación, Electricidad
La fuente de alimentación debe ser apagada ( el interruptor maestro apagado) y asegurado de tal forma que no pueda ser encendido inadvertidamente antes de reiniciar o antes de enpezar a trabajar en la partes movibles.
Esas partes de la máquina y planta en las cuales un mantenimiento o trabajo de reparación se va a

1345-5P
23 Technical Manual & Parts Book
supply, if specified. The isolated parts must first be checked to determine that they are truly de-energized before being grounded and short-circuited. Adjacent live parts must also be isolated.
The protective measures implemented (e.g. grounding resistance) must be tested before restarting the machine after all assembly or repair work on electric parts.
Signal generators (limit switches) and other electrical parts on the safety mechanisms must not be removed or bypassed. Only use original fuses or circuit overloads with the specified current rating. The machine must be switched off immediately if a fault develops in the electrical power supply.
The electrical equipment of our machines must be checked at regular intervals and any defects found must be remedied immediately.
If it is necessary to carry out work on live parts, a second person should be on hand to operate the emergency OFF switch or master switch with voltage release in the event of an emergency. The working area should be cordoned off and marked by a warning sign. Only use electrically insulated tools.
llevar a cabo, deben estar aisladas de la fuente de alimentación, si se especifica.Las partes aisladas deben ser primero chequeadas para determina si estan verdaderamente des-energizadas antes de ser conectadas a tierra o cortocircuitadas. Las partes movibles adjacentes deben tambien ser aisladas.Las medidas de protección implementadas (ej.resistencia a tierra) deben ser probadas antes de reiniciar la máquina después del ensamblaje ó trabajos de reparación en las partes eléctricas.
Los Generadores de señales (interruptores de límites) y otras partes eléctricas del mecanismo de seguridad no deben ser removidas o sobrepasadas. Solamente use fusibles originales o circuitos de sobrecarga con la clasificación específica de corriente. La máquina debe ser apagada inmediatamente si una falla empieza a desarrollarse en la fuente de alimentación eléctrica.
El equipo eléctrico de nuestras máquinas debe ser chequeado en intervalos regulares y si algún defecto es encontrado debe ser reparado inmediatamente.
Y si fuera necesario trabajar en las partes movibles de la máquina, una segunda persona debe estar a mano para que pueda apagar el interruptor de emergencia o interruptor maestro con liberación de voltaje en el evento de una emergencia. El área de trabajo debe ser acordonada y marcada con señales de advertencia. Solamente use herramientas con insulación eléctrica.

1345-5P
24 Technical Manual & Parts Book
Starting Machine Movements
Read the Instruction Manual carefully to establish which keys and functions start machine movements.
A Word to the End User
The end user has sole responsibility to enforce the use of safety procedures and guards on the machine. Any other safety devices or procedures due to local regulations should be retrofitted in accordance to these regulations and/or the EC Directive on the safety of machines.
Operator’s position must always be readily accessible. Escape routes must always be kept clear and safety areas should be identified.
Safety Precautions Safety should be a constant concern for everyone. Always be careful when working with this equipment. While normal safety precautions were taken in the design and manufacture of this equipment, there are some potential safety hazards.Everyone involved with the operation and maintenance of this equipment should read and follow the instructions in this manual.Operate the equipment only as stated in this manual. Incorrect use could cause damage to the equipment or personal injury.It is the owner’s responsibility to make certain that the operator reads and understands this manual before operating this equipment. It is also the owner’s responsibility to make certain that the operator is a qualified and
Comenzando a Mover la Máquina
Lea el manual de Instrucciones cuidadosamente para establecer que botones y funciones hacen que la máquina empieze a moverse.
Una Palabra al Usario Final
El usuario final tiene la exclusiva responsabilidad de hacer cumplir los procedimientos de seguridad y protección de la máquina. Cualquier otro mecanismo de seguridad o procedimiento debido a regulaciones locales debe ser acomodado para estar de acuerdo con estas regulaciones y/ó las directrices de la EC en la seguridad de las máquinas. La posición del operador debe ser siempre accessible. Las rutas de escape deben mantenerse libres y las áreas de seguridad bien identificadas.
Precauciones de Seguridad La seguridad debe ser una preocupación constant para todos. Tenga siempre cuidado cuando trabaje con estos equipos. Aunque las precauciones normales de seguridad fueron tomadas en el diseño y manufactura de estos equipos, existen ciertos peligros potenciales de seguridad. Todas aquellas personas involucradas en la operación y manejo de estos equipos deben leer y seguir las instrucciones de este manual. Operar el equipo de la forma que está especificada en este manual solamente. El uso incorrecto puede causar daños al equipo y lesions personales. Es responsabilidad del dueño asegurarse que el operador lea y comprenda este manual antes de operar el equipo. Como también asegurarse de que el operador esté calificado, físicamente apto y apropiadamente entrenado en la
operación de este equipo.Calcomanías

1345-5P
25 Technical Manual & Parts Book
physically able individual, properly trained in the operation of this equipment. Specific safety warning decals are located on the equipment near the immediate areas of potential hazards. These decals should not be removed or obliterated. Replace them if they become non-readable.
• ALWAYS keep safety shields and covers in place, except for servicing.
• ALWAYS operate equipment in daylight or with adequate working lights.
• Follow daily and weekly checklists, making sure hoses are tightly secured and bolts are tightened.
• ALWAYS watch and avoid holes or deep depressions.
• ALWAYS wear adequate eye protection when servicing the hydraulic system and battery.
• NEVER operate a poorly maintained machine.
• NEVER allow persons to operate this machine without proper instruction.
• NEVER put hands or feet under any part of the machine while it is running.
• NEVER attempt to make any adjustments or repairs to the machine while running. Repairs or maintenance should be performed by trained personnel only.
• NEVER work under the machine unless it is safely supported with stands, blocks or a hoist and blocks.
específicas de prevención y seguridad estan localizadas en el equipo cerca de las áreas inmediatas de potenciales peligros. Estas calcomanías no deben ser removidas u obliteradas. Reemplázelas si se tornan ilegibles.
SIEMPRE mantenga los escudos de seguridad y cubiertas en su lugar, excepto en servicio.
SIEMPRE opere los equipos en luz día o con luces adecuadas para trabajo.
Consulte diaria y semanalmente la lista de verificación, asegurándose de que las mangueras esten herméticamente aseguradas y los tornillos apretados.
SIEMPRE esté atento y evite huecos ó depresiones profundas.
SIEMPRE use protección adecuada para los ojos cuando le de servicio al sistema hidráulico y batería.
NUNCA opere una máquina póbremente mantenida.
NUNCA permita que personas sin la adecuada instrucción manejen la máquina.
NUNCA ponga las manos ó los pies debajo de cualquier parte de la máquina cuando esta esté funcionando.
NUNCA intente hacer algún ajuste a la máquina cuando esta esté funcionando. Reparaciones y mantenimiento deben ser ejecutados por personal debidamente entrenado sólamente.
NUNCA trabaje debajo de la máquina a menos que esté soportada por bloques ó una grua ó motacargas y bloques.
NUNCA toque las parte calientes de la máquina.

1345-5P
26 Technical Manual & Parts Book
Voltage 220V / 1PH / 60Hz
Max Speed Sewing 3000 RPMs
Needle System SN62X5924
Needle Size 24/180
Shipping Weight 2100 lbs
Machine Dimensions 120" x 102"
Machine Specifications
Especificaciones de la Máquina

1345-5P
27 Technical Manual & Parts Book
Parameter Settings for Efka
Controller There are two models of Efka controllers. The older FP220 had a three digit display. The newer AB221 has a four digit display. Depending on the Efka Controller model, differentinstructions apply.
Instructions for the FP220 with three
digit display
When replacing or installing a new Efka Controller, perform a master reset of the parameters using the following instructions.
***Master Reset of parameters if the Efka Controller has a three digit display:
1. Power on holding down the "P" button till the "COD" is displayed. 2. Press ">>" once and enter the number "591". 3. Press "E" twice and "093" is displayed. 4. Press "+" once and "094" is displayed 5. Press "P" to exit programming mode. 6. Wait till the "ORE" message disappears. 7. Press "E" twice to turn off LED 1 and 2. 8. Press "+" twice to turn off LED 3 and 4. 9. Press ">>" once to turn on LED 7 and off LED 8 so the head stops needle down. 10. The new parameters must be saved before turning off power. See instructions below for saving parameters. ***Save Parameters: To save parameters after modifying parameters or doing a MasterReset, the motor should be run at least one revolution. It is normal that sometimes the Sew or Carriage motor rotates the wrong direction. When power is cycled off and back on, the motors will behave correctly. For the Sew Efka, the first few stitches will be very slow because the Efka is detecting the pulley ratio and adjusting automatically.
While the default values of the parameters
Parámetros Establecidos para
Controladores Efka Hay dos modelos de Controladores Efka. El anterior, FP220, tiene un display de tres digitos. El mas Nuevo, AB221, tiene un display de cuatro dígitos. Dependiendo de que modelo se trata diferente instrucciones se aplican.
Instrucciones para el FP220 con display de
tres dígitos
Cuando se reemplaza ó se instala un nuevo Conrolador Efka, ejecute un reinicio general de los parámetros usando las siguientes instrucciones.
***Reinicio General de parámetros si el Controlador Efka tiene una pantalla de tres dígitos:
1. Enciéndalo manteniendo hundido el botón “P” hasta que “COD” aparezca en la pantalla. 2. Presione “>>” una vez e ingrese el número “591”. 3. Presione “E” dos veces y “093” es mostrado. 4. Presione “+” una vez y “094” es mostrado. 5. Presione “P” para salir del modo de programación. 6. Espere hasta que el mensaje “ORE” desaparezca. 7. Presione “E” dos veces para apagar LED 1 y 2. 8. Presione “+” dos veces para apagar LED 3 y 4. 9. Presione “>>” una vez para encender LED 7 y apagar LED 8 de este modo la cabeza detiene la aguja abajo. 10. El nuevo parámetro debe ser guardado antes de apagar. Mire las instrucciones abajo de como guardar los parámetros. ***Guardar Parámetros: Para guardar parámetros después de modificarlos ó cuando se hace un reinicio general, el motor debe estar corriendo por lo menos a una revolución. Es normal que algunas veces el motor del cabezal ó el motor del carruaje roten en una dirección equivocada. Cuando el ciclo de la energía es apagada y regresa, los motores se comportarán correctamente. Para el cabezal Efka, las primeras puntadas serán muy lentas porque el controlador Efka está detectando

1345-5P
28 Technical Manual & Parts Book
cause the machine handle most mattresses well, certain parameters may be adjusted to improve performance in special cases.
***Parameters for Sew Efka Controller that has a three digit display: Parameter 111 sets the max straight sew head speed in RPM. Min is 200, max is 9900,default is 2700 (270 displayed). Parameter 701 sets the acceleration speed step in RPM / sec which limits the speed up of the sew motor independent of how fast the knee pad is let out. Min is 1000, max is 9990, default is 3300 (330 displayed). Parameter 702 sets the deceleration speed step in RPM / sec which limits the slowdown of the sew motor independent of how fast the knee pad is pushed in. Min is 1000, max is 9990, default is 9990 (999 displayed). Parameter 703 sets the max corner sew head speed in RPM. Min is 200, max is parameter 111, default is 1500 (150 displayed). Parameter 712 holds the software revision number. Do not manually change this value. ***Parameters for Carriage Efka Controller that has a three digit display: Parameter 111 sets the max normal straight carriage speed in RPM. Min is 200, max is 9900, default is 2700 (270 displayed). Parameter 701 sets the acceleration speed step in RPM / sec which limits the speed up of the carriage motor independent of how fast the knee pad is let out. Min is 1000, max is 9990, default is 3300 (330 displayed). Parameter 702 sets the deceleration speed step in RPM / sec which controls the slowdown of the motor independent of how fast the knee pad is pushed in. Min is 1000, max is 9990, default is 9990 (999 displayed). Parameter 703 sets the max normal corner carriage speed in RPM. Min is 200, max isparameter 111, default is 1300 (130
el radio de la polea y ajustándolo automáticamente. Aunque los valores predeterminados de los parámetros logran que la máquina maneje más colchone s bien, ciertos parámetros pueden ser ajustados para mejorar el rendimiento en casos especiales. ***Parámetros para el Cabezal del Controlador Efka que tenga una pantalla de tres dígitos: Parámetro 111 ajusta la máxima velocidad en línea recta del cabezal en RPM. Min es 200, Max es 9900, valor predeterminado es 2700 ( 270 es mostrado). Parámetro 701 ajusta el paso de la aceleración de la velocidad en RPM/seg lo que limita el incremento de la velocidad del motor del cabezal, independientemente de cuán rápido el operador suelte la almohadilla de rodilla. Min es 1000, max es 9990, el valor predeterminado es 3300 ( 330 es mostrado ). Parámetro 702 ajusta el paso de la desaceleración de la velocidad en RPM/seg lo que limita la reducción de la velocidad del motor del cabezal independientemente de cuán rápido la almohadilla de rodilla sea presionada. Min es 1000, max es 9990, valor predeterminado 9990 (999 es mostrado). Parámetrp 703 ajusta la máxima velocidad del cabezal en las esquinas en RPM. Min es 200, max es parámetro 111, valor predeterminado es 1500 (150 es mostrado). Parámetro 712 contiene el número de revision del software. No cambie manualmente este valor. ***Parámetros para el carruaje del controlador Efka que tenga una pantalla de tres dígitos: Parámetro 111 ajusta la máxima velocidad normal en línea recta en RPM. Min es 200, max es 9900, valor predeterminado es 2700 es mostrado). Parámetro 701ajusta el paso de aceleración de velocidad en RPM/seg el cual límita el aumento de velocidad del motor del carruaje independientemente de que tan rápido la almohadilla de rodilla sea soltada. Min es 1000,

1345-5P
29 Technical Manual & Parts Book
displayed). Parameter 704 sets the max glide straight carriage speed in RPM. Min is 200, max isparameter 111, default is 3000 (300 displayed). This parameter is effective only in machines with the "Power Glide" feature. Parameter 705 sets the max glide corner carriage speed in RPM. Min is 200, max is/parameter 111, default is 800 (80 displayed). This parameter is effective only in machines with the "Power Glide" feature. Parameter 712 holds the software revision number. Do not manually change this value. ***Modify Parameters if the Efka Controller has a three digit display: 1. Power on holding down the "P" button till the "COD" is displayed. 2. Press ">>" once and enter the number "311". 3. Press "E" once and "2.0.0" is displayed. This is the current parameter number. 4. Proceed to the desired parameter and press "E" to display the parameter value. 5. Adjust the value and press "E" to return to the parameter number. 6. Repeat steps 4 and 5 until all the desired parameters have been modified 7. Press "P" to exit programming mode. 8. The new parameters must be saved before turning off power. See instructions above for saving parameters.
max es 9990, valor predeterminado es 3300(330 es mostrado). Parámetro 702 ajusta el paso de la desaceleración de la velocidad en RPM/seg, lo cual controla el atraso del motor independientemente de cuán rápido la almohadilla de rodilla sea presionada. Min is 1000, max is 9990, establecido es 9990 (999 es mostrado). Parámetro 703 ajusta la velocidad max normal del carruaje en las esquinas en RPM. Min es 200, max es parámetro 111, establecido es 1300 (130 es mostrado) Parámetro 704 la máxima velocidad de deslizamiento en línea recta del carruaje en RPM. Min es 200, max es parámetro 111, establecido es 3000 (300 es mostrado), Este parámetro es efectivo solamente en máquinas con la característica de “Deslizamiento Motorizado”. Parámetro 705 ajusta la máxima velocidad del carruaje en las esquinas en RPM. Min es 200, Max es parámetro 111, establecido es 800 (80) es mostrado. Este parámetro es efectivo solamente en máquinas con la carcterística de “Delizamiento motorizado”. Parámetro 712 contiene el número de revision del software. No cambie manualmente este valor. ***Modifique los Parámetros si el Controlador Efka tiene una pantalla de tres dígitos: 1. Encendido mantenga presionado el botón “P”hasta que “COD” sea mostrado. 2. Presione “>>” una vez e ingrese el número “311”. 3. Presione “E” una vez y “2.0.0” es mostrado. Este es el número actual del parámetro. 4. Proceda hasta el parámetro deseado y presione”E” para mostrar el valor del parámetro. 5. Ajuste el valor y presione “E” para volver al número del parámetro. 6. Repita pasos 4 y 5 hasta que el parámerto deseado haya sido modificado. 7. Presione “P” para salir del modo programmable. 8. El nuevo parámetro debe ser guardado anter de desconectar la energía.Mire las instrucciones arriba de como guardar los parámetros.

1345-5P
30 Technical Manual & Parts Book
Instructions for the AB221 with four digit display When replacing or installing a new Efka Controller, perform a master reset of the parameters using the following instructions.
***Master Reset of parameters if the Efka Controller has a four digit display: 1. Power on holding down the "P" button till the "CODE" is displayed 2. Press ">>" once and enter the number "5913" 3. Press "E" twice and "093" is displayed 4. Press "+" once and "094" is displayed 5. Press "P" to exit programming mode 6. Wait till the "RES" message is replaced by LED indicators 1, 3, and 5 7. Press "E" twice to turn off LED 1 and 2 8. Press "+" twice to turn off LED 3 and 4 9. Press ">>" once to turn on LED 4 and off LED 5 so the head stops needle down 10. The new parameters must be saved before turning off power. See instructions below for saving parameters. ***Save Parameters: To save parameters after modifying parameters or doing a Master Reset, the motor should be run at least one revolution. It is normal that sometimes the Sew or Carriage motor rotates the wrong direction. When power is cycled off and back on, the motors will behave correctly. For the Sew Efka, the first few stitches will be very slow because the Efka is detecting the pulley ratio and adjusting automatically.
While the default values of the parameters cause the machine handle most mattresses well, certain parameters may be adjusted to improve performance in special cases.
***Parameters for Sew Efka Controller that has a four digit display:
Instrucciones para la AB221 con pantalla de
cuatro dígitos
Cuando reemplazamos o instalamos un Nuevo Controlador Efka, ejecute un reinicio general de los parámetros usando las siguientes instrucciones.
***Reinicio General de parámetros si el Controlador Efka tiene una pantalla de cuatro dígitos: 1. Enciéndalo presionando el botón “P” hasta que “CODE” sea mostrado. 2. Presione “>>” una vez e ingrese el número “5913”. 3. Presione “E” dos veces y “093” es mostrado. 4. Presione “+” una vez y “094” es mostrado. 5. Presione “P” para salir del modo programmable. 6. Espere hasta que el mensaje “RES” sea reemplazado por los indicadores LED 1,3 y 5 7. Presione “E” dos veces para apagar LED 1 y 2. 8. Presione “+” dos veces para apagar LED 3 y 4 9. Presione “>>” uma vez para encender LED 4 y apagar LED 5 para que el cabezal detenga la aguja abajo. 10. Los nuevos parámetros deben ser guardados antes de desconectar la energía. Mire la instrucciones abajo de como guardar los parámetros. ***Guardar Parámetros: Para guardar parámetros después de modificarlos o cuando se hace un Reinicio General, el motor debe estar corriendo a por lo menos una revolución. Es normal que algunas veces el Cabezal ó el motor del Carruaje roten en una dirección equivocada. Cuando el ciclo de la energía es apagada y regresa, los motores se comportarán correctamente. Para el cabezal Efka, las primeras puntadas seran lentas porque la Efka está detectando el radio de la polea y ajustándolo automáticamente. Aún cuando los valores establecidos de los parámetros permiten que la máquina maneje la

1345-5P
31 Technical Manual & Parts Book
Parameter 111 sets the max straight sew head speed in RPM. Min is 200, max is 9900, default is 2700. Parameter 701 sets the acceleration speed step in RPM / sec which limits the speed up of the sew motor independent of how fast the knee pad is let out. Min is 1000, max is 9990, default is 3300. Parameter 702 sets the deceleration speed step in RPM / sec which limits the slowdown of the sew motor independent of how fast the knee pad is pushed in. Min is 1000, max is 9990, default is 9990. Parameter 703 sets the max corner sew head speed in RPM. Min is 200, max is parameter111, default is 1500. Parameter 706 set enables or disables the corner speed pot. Min is 0 (disable), max is 1(enable), default is 1. If the machine does not have a corner speed pot, this value must be set to 0. Parameter 712 holds the software revision number. Do not manually change this value. ***Parameters for Carriage Efka Controller that has a four digit display: Parameter 111 sets the max normal straight carriage speed in RPM. Min is 200, max is 9900, default is 2700. Parameter 701 sets the acceleration speed step in RPM / sec which limits the speed up of the carriage motor independent of how fast the knee pad is let out. Min is 1000, max is 9990, default is 3300. Parameter 702 sets the deceleration speed step in RPM / sec which controls the slowdown of the motor independent of how fast the knee pad is pushed in. Min is 1000, max is 9990, default is 9990. Parameter 703 sets the max normal corner carriage speed in RPM. Min is 200, max is parameter 111, default is 1300. Parameter 704 sets the max glide straight
mayoría de los colchones muy bien, ciertos parámetros deben ser ajustados para mejorar su rendimiento en casos especiales. ***Parámetros para el Cabezal del Controlador Efka con pantalla de 4 dígitos: Parámetro 111 ajusta la velocidad en línea recta del cabezal en RPM. Min es 200, max es 9900, establecido es 2700. Parámetro 701 ajusta el paso de aceleración de velocidad en RPM/seg lo que límita el aumento de velocidad del motor del cabezal independientemente de que tan rápido la almohadilla de rodilla sea soltada. Min es 1000, max es 9990, establecido es 3300. Parámetro 702 el paso de desaceleración de la velocidad en RPM/seg, lo que limita el atraso del motor independientemente de cúan rápido la almohadilla de rodilla sea presionada. Min es 1000, max es 9990, establecido es 9990. Parámetro 703 ajusta la máxima velocidad del cabezal en las esquinas en RPM. Min es 200, max es parámetro 111, establecido es 1500. Parámetro 706, su ajuste habilita o deshabilita la velocidad pot en las esquinas. Min es 0 (inhabiltada), max es 1 (habilitada),establecida es 1.Si la máquina no tiene una velocidad pot en las esquinas,este valor debe ser ajustado a 0. Parámetro 712 contiene el número de revisión del software. No cambie manualmente este valor. ***Parámetros para el Carruaje del Controlador Efka con pantalla de cuatro dígitos: Parámetro 111 ajusta la velocidad max normal en línea recta del carruaje en RPM. Min es 200, max es 9900, establecida es 2700. Parámetro 701 ajusta el paso de la velocidad de acelaración en RPM/seg lo que limita el incremento de la velocidad del carruaje independientemente de cuán rápido la almohadilla de rodilla sea soltada. Min es 1000, max es 9990, establecida es 3300. Parámetro 702 ajusta el paso de la desaceleración de la velocidad en RPM/seg lo cual controla el

1345-5P
32 Technical Manual & Parts Book
carriage speed in RPM. Min is 200, max is parameter 111, default is 3000. This parameter is effective only in machines with the "Power Glide" feature. Parameter 705 sets the max glide corner carriage speed in RPM. Min is 200, max is/parameter 111, default is 800. This parameter is effective only in machines with the "Power Glide" feature. Parameter 712 holds the software revision number. Do not manually change this value. ***Modify Parameters if the Efka Controller has a four digit display: 1. Power on holding down the "P" button till the "CODE" is displayed. 2. Press ">>" once and enter the number "3112". 3. Press "E" once and "2.0.0" is displayed. This is the current parameter number. 4. Proceed to the desired parameter and press "E" to display the parameter value. 5. Adjust the value and press "E" to return to the parameter number. 6. Repeat steps 4 and 5 until all the desired parameters have been modified. 7. Press "P" to exit programming mode. 8. The new parameters must be saved before turning off power. See instructions above for saving parameters.
atraso del motor independientemente de que tan rápido la almohadilla de rodilla sea presionada. Min es 1000, max es 9990, establecida es 9990. Parámetro 703 ajusta la máxima velocidad normal en las orillas en RPM. Min es 200, max es parámetro 111, establecida es 1300. Parámetro 704 ajusta la max velocidad de deslizamiento en línea recta en RPM. Min es 200, max es parámetro 111, establecida es 3000. Este parámetro es efectivo solamente en máquinas con la característica de “Deslizamiento Motorizado”. Parámetro 705 ajusta la max velocidad de deslizamiento del carruaje en las esquinas en RPM. Min es 200, max es parámetro 111, establecida es 800. Este parámetro es efectivo solamente en máquinas con la carecterística de “Delizamiento Motorizado”. Parámetro 712 contiene el número de revision del software. No cambie maualmente este valor. ***Modificar Parámetros si el Controlador Efka tiene pantalla de cuatro dígitos: 1. Enciéndalo con el botón “P” presionado hasta que “CODE” sea mostrado. 2. Presione “>>” una vez e ingrese el número ”3112”. 3. Presione “E” uma vez y “2.0.0” es mostrado. Este es el número actual del Parámetro. 4. Proceda hasta el parámetro deseado y presione “E” para desplegar el valor del parámetro. 5. Ajuste el valor y presione “E” para retornar al número del Parámetro. 6. Repita los pasos 4 y 5 hasta que los parámetros hayan sido modificados. 7. Presione “P” para salir del modo programable. 8. El nuevo parámetro debe ser guardado antes de desconectar la energía . Mire las instruccione arriba para guadar parámetros.
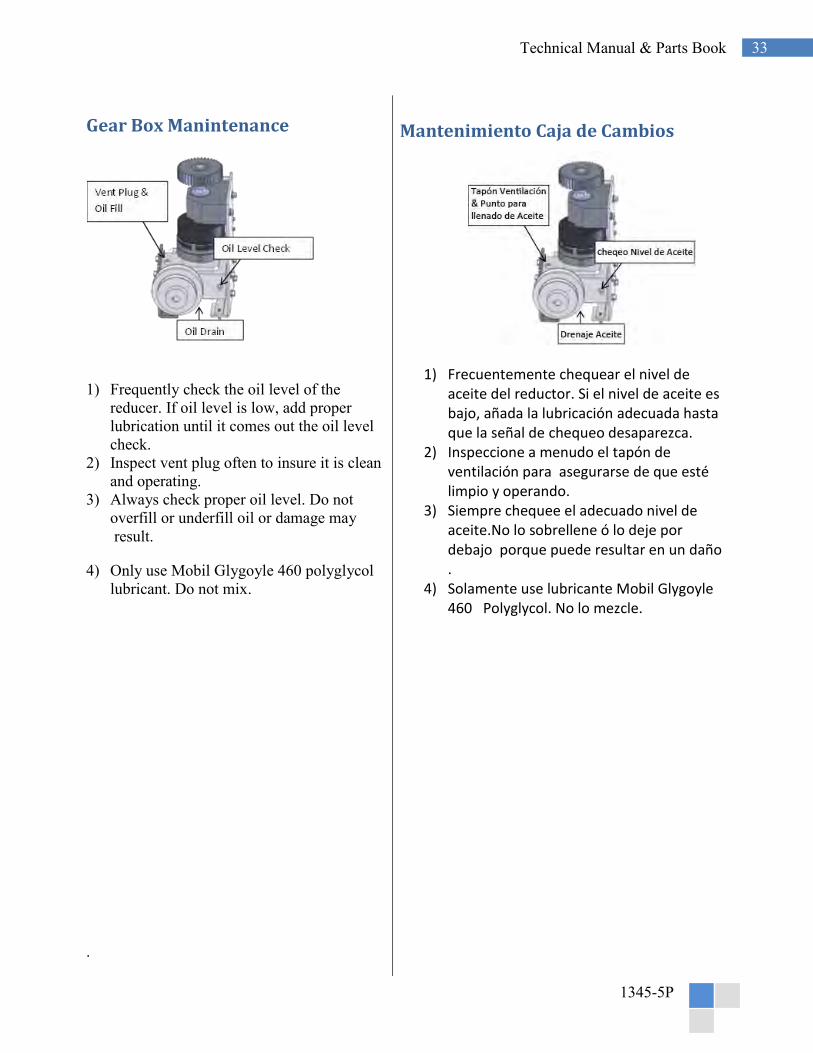
1345-5P
33 Technical Manual & Parts Book
Gear Box Manintenance
1) Frequently check the oil level of the reducer. If oil level is low, add proper lubrication until it comes out the oil level check.
2) Inspect vent plug often to insure it is clean and operating.
3) Always check proper oil level. Do not overfill or underfill oil or damage may
result.
4) Only use Mobil Glygoyle 460 polyglycol lubricant. Do not mix.
.
Mantenimiento Caja de Cambios
1) Frecuentemente chequear el nivel de aceite del reductor. Si el nivel de aceite es bajo, añada la lubricación adecuada hasta que la señal de chequeo desaparezca.
2) Inspeccione a menudo el tapón de ventilación para asegurarse de que esté limpio y operando.
3) Siempre chequee el adecuado nivel de aceite.No lo sobrellene ó lo deje por debajo porque puede resultar en un daño .
4) Solamente use lubricante Mobil Glygoyle 460 Polyglycol. No lo mezcle.

1345-5P
34 Technical Manual & Parts Book
ASSEMBLY / ADJUSTMENT INSTRUCTIONS
1. Position the column assy (item A) with the lower edge
below the bottom of the slide support bracket (item B).
DO NOT ADJUST WITHT THE COLUMN OR TABLE IN THE
"UP" POSITION.
2. Loosen the (8) screws (item C) holding the slide support
bracket (item B) and the jam nuts (item D) for the top and
bottom adjustment screws (item E).
3. Tighten or loosen the (4) upper and (4) lower adjustment
screws (item E) as required to put pressure on the column
assembly (item A) and align it in the support column.
NOTE: EXCESSIVE PRESSURE WILL CAUSE BINDING AND
PREMATURE FAILURE OR WEARING OF PARTS. Apply only
the minimun ammount of pressure required to reduce the
rotational movement of the table to an acceptable level.
4. Tighten the (8) top and (8) bottom support screws (item C).
5. Bolt the table top to the column and add shims if
necessary to level the table parallel to the frame.

1345-5P
35 Technical Manual & Parts Book
Assembly Drawings & Parts Lists
The materials contained herein are confidential and proprietary information of Atlanta Attachment Company. In addition to any confidentiality and non-disclosure obligations that currently exist between you and Atlanta Attachment Company, your use of these materials serves as an acknowledgment of the confidential and proprietary nature of these materials and your duty not to make any unauthorized use or disclosure of these materials.

1345-5P
36 Technical Manual & Parts Book
11345-5P Tape Edge Machine AAC Drawing Number 9004204 Rev 0
NO. QTY PART# DESCRIPTION NO. QTY PART# DESCRIPTION
1 1 311-129 SLEEVE TAPE 8 1 134553000A CARRIAGE
2 *1 1345-5WD1 DIAGRAM 9 1 MMCCF3/4SB CAM FOLLOWER
3 *AR 1345LAB2 LABEL,TABLE 10 1 SPF5625-657-02M HEAD,MOD,GEN,TAPE
4 1 1345152 SUPPORT 11 3 SSHC01048GR8 1/4-20 X 3/4 HEX CAP
5 1 13452500A TABLE ASSY 12 3 SSSC70040 4-40 X 5/8, SCREW
6 1 13453428 MOUNT, CAM 13 3 WWFS1/4 WASHER,FLAT,SAE,1/4
7 1 13453646 TAPE MOUNT 14 3 WWL1/4 WASHER,LOCK,1/4

1345-5P
37 Technical Manual & Parts Book
13452500A Table Assembly AAC Drawing Number 9001366 Rev 11
NO. QTY PART # DESCRIPTION
1 1 13451000 BASE ASSY LIFT TABLE TAPE
2 1 13451200 TABLE TOP ASSY,QUEEN
3 1 13452000D COLUMN, LIFT ASSY
4 1 13452027 LINK, CABLE ASSY,TWIN
5 2 BBTRA613 WASHER,THRUST,STL, .375B
6 1 NNJ5/16-18 NUT,JAM,5/16-18
7 4 PPP2217 WIRE CLAMP, .337I.D.
8 1 SSFC10056S 10-32 x 2 FLAT ALLEN
9 4 SSFC45064 1/2-13 X 1 SOC FLAT CAP
10 2 SSHC10048 5/16-18 X 3/4 HHCS
11 4 SSHC45080 1/2-13X1-1/4 HEX CAP
12 4 SSSC98032 10-32X1/2, SOC CAP
13 2 WWF5/16 WASHER,FLAT,5/16
14 4 WWFS1/2 WASHER,FLAT,SAE,1/2
15 4 WWFS10 WASHER, FLAT, #10, SAE
16 4 WWL1/2 1/2 LOCK WASHER
17 2 WWL5/16 WASHER, LOCK, 5/16

1345-5P
38 Technical Manual & Parts Book
13451000 Table Base Assembly AAC Drawing Number 9001365 Rev 7
NO. QTY PART # DESCRIPTION
1 4 0411-1063 ROD, THREADED, 5/8-11 X 5
2 1 1345027 FRAME, WELDMENT TAPE EDGE
3 2 13451019 GEAR RACK, SHORT
4 2 13451020 GEAR RACK, LONG
5 4 13451021 GEAR RACK, CORNER
6 4 13451029 PAD, RUBBER
7 1 13459500 CONTROL BOX
8 8 IIS016X112 ROLL PIN 1/8 DIA X 1 1/2 SS
9 4 MML-2 LEVELING PAD, 5/8-11
10 8 NNSH5/8-11 NUT, SQUARE, 5/8-11
11 40 SSHC10112 SCREW,HEX,5/16-18X1-3/4
12 8 SSSC10080 5/16-18 X 1-1/4 SOC CAP
13 4 SSSC98032 10-32X1/2, SOC CAP
14 4 WWFS10 WASHER, FLAT, #10, SAE
15 4 WWL10 WASHER,LOCK,#10,S/S
16 40 WWL5/16 WASHER, LOCK, 5/16
Page 41
Page

1345-5P
39 Technical Manual & Parts Book
13453800 Gear Lock Assembly AAC Drawing Number 9001130 Rev 1
NO. QTY PART # DESCRIPTION
1 1 13453801 SUPPORT GEAR LOCK ASSY.
2 1 IIS012X096 SPRING PIN, 3/16X1.5
3 1 MM61095K53 KNOB, BALL,3/8-16 TAP
4 1 RRLC0742HJ SPRING, COMP. .072X.66X3
5 1 13453804 MANDREL,GEAR LOCK

1345-5P
40 Technical Manual & Parts Book
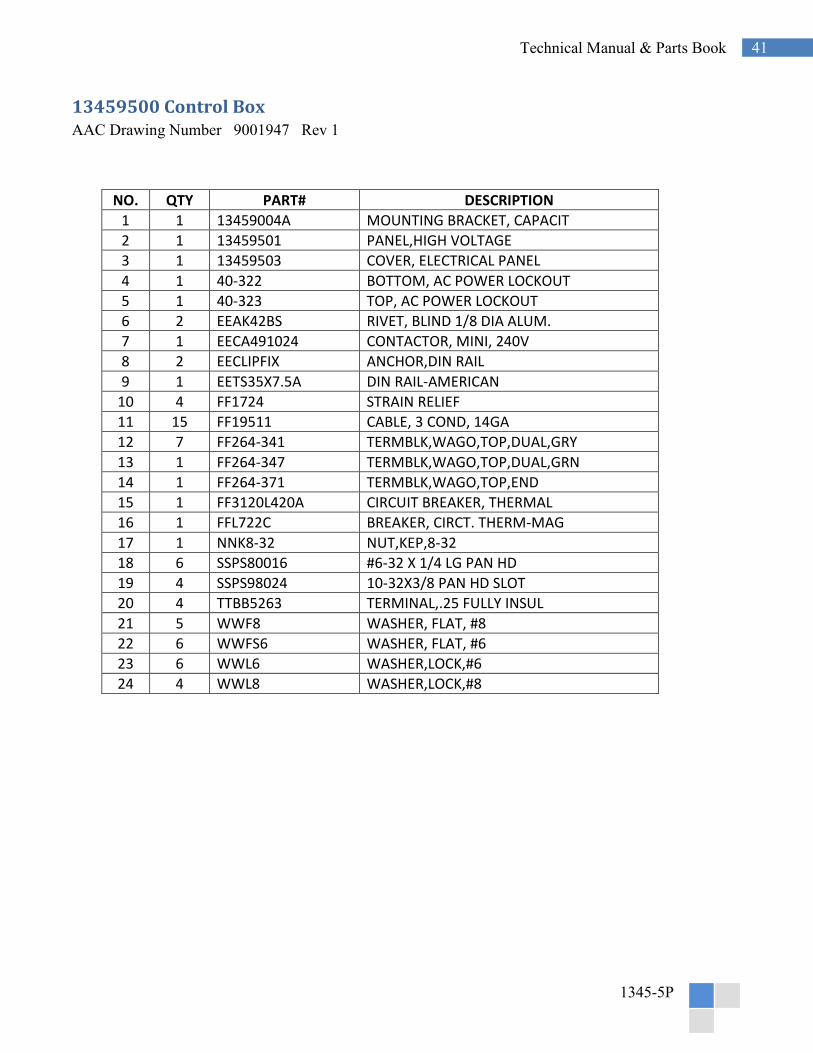
1345-5P
41 Technical Manual & Parts Book
13459500 Control Box AAC Drawing Number 9001947 Rev 1
NO. QTY PART# DESCRIPTION
1 1 13459004A MOUNTING BRACKET, CAPACIT
2 1 13459501 PANEL,HIGH VOLTAGE
3 1 13459503 COVER, ELECTRICAL PANEL
4 1 40-322 BOTTOM, AC POWER LOCKOUT
5 1 40-323 TOP, AC POWER LOCKOUT
6 2 EEAK42BS RIVET, BLIND 1/8 DIA ALUM.
7 1 EECA491024 CONTACTOR, MINI, 240V
8 2 EECLIPFIX ANCHOR,DIN RAIL
9 1 EETS35X7.5A DIN RAIL-AMERICAN
10 4 FF1724 STRAIN RELIEF
11 15 FF19511 CABLE, 3 COND, 14GA
12 7 FF264-341 TERMBLK,WAGO,TOP,DUAL,GRY
13 1 FF264-347 TERMBLK,WAGO,TOP,DUAL,GRN
14 1 FF264-371 TERMBLK,WAGO,TOP,END
15 1 FF3120L420A CIRCUIT BREAKER, THERMAL
16 1 FFL722C BREAKER, CIRCT. THERM-MAG
17 1 NNK8-32 NUT,KEP,8-32
18 6 SSPS80016 #6-32 X 1/4 LG PAN HD
19 4 SSPS98024 10-32X3/8 PAN HD SLOT
20 4 TTBB5263 TERMINAL,.25 FULLY INSUL
21 5 WWF8 WASHER, FLAT, #8
22 6 WWFS6 WASHER, FLAT, #6
23 6 WWL6 WASHER,LOCK,#6
24 4 WWL8 WASHER,LOCK,#8

1345-5P
42 Technical Manual & Parts Book

1345-5P
43 Technical Manual & Parts Book
13452000D Column Lift Assembly AAC Drawing Number 9002809 Rev 4
ITEM NO. QTY. PART NUMBER DESCRIPTION
1 1 1345093 BKT,EDGE GUIDE
2 1 1345130 TOP MOD.,SLIP RING
3 2 1345131 PLATE,SLIDE, ADJ
4 2 1345132 BAR, BRACE,.25 THK
5 2 1345134 SPACER,COLUMN CONCAVE
6 4 1345135 PLATE, SLIDE
7 1 1345136 BKT,LOWER GIB STOP
8 1 1345231 COLUMN ASSY
9 2 1345234 PLATE,ACTUATOR MNTNG,UPR
10 2 13452004A PIN, COLUMN
11 1 13452006B PLATE, ACTUATOR
12 1 13452020B COLUMN, HUB ASSY.
13 1 13452023A COVER, ACTUATOR
14 1 13452024 GUIDE ASSY,CABLE, SLIP RING 11345
15 2 13452040 BAR, BRACE
16 2 13452044A PLATE,SLIDE SUPPORT
17 1 EERHU-B08 SLIP RING ASSY,15A,8 COND
18 1 MM85200-12.5 ACTUATOR,ELEC,220V,12.5"
19 1 MM98306A289 PIN,CLEVIS,3/8X3-1/2
20 1 MM98338A445 COTTER PIN, 1/8 X 2 1/2
21 4 NNH1/4-20 NUT,HEX,1/4-20
22 4 NNK1/4-20 NUT,KEP,1/4-20
23 2 NNK10-32 KEP NUT, 10-32
24 1 PPP2217 WIRE CLAMP, .337I.D.
25 2 SSAS020048 SCREW,ALLEN SHOULDER
26 20 SSFC01032 1/4-20 X 1/2 FLAT ALN CAP
27 4 SSFC01040 1/4-20 X 5/8 FLAT ALN CAP
28 24 SSFC98032 10-32 X 1/2 FLAT ALLEN CAP
29 8 SSHC01040 1/4-20 X 5/8 HHCS
30 4 SSHC25064 3/8-16 X 1 HHCS
31 3 SSHC98032 10-32X1/2 HEX HD
32 2 SSHC98080 #10-32 X 1-1/4 HEX CAP
33 9 SSSC01024 1/4-20 X 3/8 SOC CAP SC
34 4 SSSC01096F 1/4-20 X 1-1/2 SOC CAP
35 4 SSSC01224T SCR,HEX CAP 1/4-20X3-1/2
36 8 WWF1/4 WASHER, FLAT, 1/4", COM
37 4 WWFS3/8 WASHER,FLAT,SAE,3/8
38 7 WWFS10 WASHER, FLAT, #10, SAE
39 8 WWL1/4 WASHER,LOCK,1/4
40 4 WWL3/8 WASHER,LOCK, 3/8
41 2 WWL10 WASHER,LOCK,#10
42 1 ZTH1/2B HEAT SHRINK TUBE,1/2"DIA

1345-5P
44 Technical Manual & Parts Book

1345-5P
45 Technical Manual & Parts Book
134553000A Carriage Assembly AAC Drawing Number 9001641 Rev 6
NO. QTY PART# DESCRIPTION NO. QTY PART# DESCRIPTION
1 *AR 1345-5WD1 DIAGRAM, WIRING 24 1 MMSH-98 RING,SNAP,EXTERNAL
2 1 13453003A COVER,CARRIAGE 25 4 MMSLD-ECH 1/2" DIA RUBBER
3 1 13453037 SPACER, 7/16 OD 26 4 NNH3/8-16 NUT,HEX,3/8-16
4 1 13453060C DOOR, CARRIAGE 27 1 NNH5/8-18 NUT,HEX,5/8-18
5 1 13453061A DOOR CARRIAGE 28 6 NNK1/4-20 NUT,HEX,KEP,1/4-20
6 1 13453062A COVER,CARRIAGE 29 4 SSBC90016 8-32 X 1/4 BUTTON
7 1 13453303 KNEE PAD ASSY. 30 6 SSBC98032 10-32 X 1/2 BUTTON
8 1 13453304 BRKT ,MNT, KNEE 31 2 SSFC01048 1/4-20 X 3/4 FLAT
9 1 13453330A PANEL, CARRIAGE 32 4 SSHC01144 HEX HEAD BOLTS
10 1 13453400A CARRAGE GUIDE 33 4 SSHC10048 5/16-18 X 3/4 HHCS
11 1 13453420A BEARING STUD 34 4 SSHC10064 5/16-18 X 1 HHCS
12 1 13453800 GEAR LOCK ASSY. 35 2 SSHC25352 3/8-16X5-1/2,HEX
13 1 33005110A HANDLE 9.25 L 36 4 SSSC01096 1/4-20 X 1-1/2 SOC
14 1 33005116B SPACER, HANDLE 37 2 SSSC98096 10-32 X 1-1/2 SOC
15 1 134533300A TOP CARRIAGE 38 20 SSZS93032 SCREW, SHT.METAL
16 1 134539000B CONTROL BOX 39 1 WWF5/8 WASHER,FLAT,5/8
17 1 134539300A CONTROL BUTTON 40 12 WWFS1/4 WASHER,FLAT,SAE,1/4
18 1 134553500E GEAR BOX 41 8 WWFS3/8 WASHER,FLAT,SAE,3/8
19 1 134559400 CABLE PACKAGE 42 8 WWFS5/16 WASHER,FLAT,SAE,5/16
20 1 BB305705C BEARING,CAM 43 6 WWFS10 WASHER, FLAT, #10
21 1 EE49111AS PUSH BUTTON 44 2 WWL1/4 WASHER,LOCK,1/4
22 2 MM40450010 FASTENER,SLIDE 45 4 WWL3/8 WASHER, LOCK, 3/8
23 1 MMGP-105 GRIP HANDLE 46 8 WWL5/16 WASHER, LOCK, 5/16

1345-5P
46 Technical Manual & Parts Book

1345-5P
47 Technical Manual & Parts Book
134533300A Top Carriage Assembly AAC Drawing Number 9001479 Rev 17
ITEM
NO.QTY
PART
NUMBERDESCRIPTION
ITEM
NO.QTY
PART
NUMBERDESCRIPTION
1 2 029-003A PLATE, NUT, 1/4-20 @ 1.50 39 1 FFUZP101 PROX. SWITCH
2 2 0211-209 PLATE,NUT,[email protected] CTC 40 4 K-235 CONNECTOR,ROMEX,1/2"
3 1 1961-126 PLATE, NUT, 6-32, 1PL 41 1 MM9307K69 GROMMET,5/8,1.125,.125GV
4 1 1975-412A PLATE,NUT,4-40,.95CTC 42 1 MM85151-2M1 ACTUATOR, MOD
5 1 4059-DC1500ABA1 MOTOR,W/DC CONTROLLER 43 2 MM98330A245 CLEVIS PIN 2.25LG STL
6 1 1345100 KNEE SWITCH ASSEMBLY 44 2 MM98335A064 SPRING CLIP
7 1 13453301 MOUNT, SHOCK ABSORBER 45 4 MMB6002 MOUNT,VIBRATION,MOTOR
8 1 13453313 MOUNT, CARRIAGE GUIDE, LO 46 1 MMCYR114S FOLLOWER, CAM
9 2 13453324 BRKT, CONTROL BOX MOUNT 47 2 NNJ3/4-16 3/4-10 JAM NUT
10 1 13453341 TOOL TRAY, 2 X 3.38 X 11 48 8 NNK1/4-20 NUT,KEP,1/4-20
11 1 13453354 BRKT, THREAD GUIDE 49 1 PP10LF050M3 PULLEY, GEAR, 3/8P, 10T,
12 1 13453379 HOLDER, PROX SWITCH, BTM 50 8 SSBC01040 1/4-20 X 3/4 BUT CAP SC
13 1 13453380 HOLDER, PROX. SWITCH 51 4 SSBC80024 6-32 X 3/8 BUTTON HEAD
14 1 13453385 HOLDER, SCISSOR 52 4 SSBC98016 10-32 X 1/4 BUTTON CAP SC
15 1 13453602 PLATE, SEWING HEAD MOUNT 53 8 SSBC98032 10-32 X 1/2 BUTTON CAP SC
16 1 13453603A SHAFT 60C 1/2 X 6.91L 54 2 SSBC98064 10-32 X 1.0 BUTTON CAP SC
17 1 13453604 PIVOT, SUPPORT, ACTUATOR 55 2 SSFC01064 1/4-20 X 1 FLAT CAP
18 1 13453608 BRKT, MOTOR MOUNT 56 2 SSFC10056 5/16-18 X 7/8 FLAT HD CAP
19 1 13453610 BRKT, EYE 57 4 SSHC01040 1/4-20 X 5/8 HHCS
20 2 13453611 MOUNT, BEARING BLOCK BRKT 58 2 SSHC01064 1/4-20 X 1 HHCS
21 1 13453615A COLUMN, SEWING HEAD 59 1 SSHC25080 3/8-16 X 1-1/4 HHCS
22 1 13453623 BRKT, BEARING BLOCK MOUNT 60 2 SSPS70048 4-40 X 3/4 PAN HD SLOTTED
23 1 13453642 CLEVIS, ACTUATOR, 2" STRO 61 4 SSSC01032 1/4-20X1/2 SOC CAP
24 1 13453645 SPACER, RAIL 62 9 SSSC01048 1/4-20 X 3/4" SOC CAP SC
25 1 13453648A. COVER, COLUMN 63 16 SSSC01064 1/4-20 X 1 SOC CAP
26 2 13453653 SPACER, COLUMN 64 2 SSSC01096 1/4-20 X 1-1/2 SOC CAP
27 1 13453655 SPACER, COLUMN REAR 65 10 SSSC98032 10-32X1/2, SOC CAP
28 1 13453656 COVER, COLUMN REAR 66 8 SSSCM4X10 SCREW,SOC CAP,M4-0.7X8
29 1 13453657 COVER, COLUMN FRONT 67 4 SSSS01032 SCREW, SET, 1/4-20 X 1/2
30 1 134543100 CARRIAGE FRAME ASSY 68 2 WWF4 WASHER, FLAT, #4
31 1 AAF1/8 CLAMP, BLACK PLASTIC 69 12 WWF10 WASHER, FLAT, #10, COM
30 1 AAF3/8 CLAMP, BLACK PLASTIC 70 8 WWFM4.3 WASHER, FLAT, M4
33 1 AAOEM.5BSAL SHOCK, 3/4-18 X 3.5 71 37 WWFS1/4 WASHER,FLAT,SAE,1/4
34 *1.4 FF2226 EDGING,GROMMET 72 8 WWFS10 WASHER, FLAT, #10, SAE
35 *1.4 FF2230 EDGING,GROMMET,.25" 73 27 WWL1/4 WASHER,LOCK,1/4
36 1 FF3234 STRAIN RELIEF,3/4NPT 74 1 WWL3/8 WASHER,LOCK, 3/8
37 1 FF8465 NUT,LOCK,3/4NPT,NYLON,BLK 75 8 WWL8 WASHER,LOCK,#8
38 1 FFSM312LVQ EYE,ELECTRIC,10-30VDC 76 12 WWL10 WASHER,LOCK,#10

1345-5P
48 Technical Manual & Parts Book

1345-5P
49 Technical Manual & Parts Book
1345100 Knee Switch Assembly AAC Drawing Number 1345100 Rev 5
NO. QTY PART # DESCRIPTION
1 1 1345101 PLATE,TRANSDUCER END
2 1 1345102 MOUNT, TRANSDUCER
3 1 1345103 PLATE,SPRING,TRANSDUCER
4 2 1345104 CLAMP,TRANSDUCER
5 2 13453306 BLOCK,RAIL STOP
6 1 13453309 RAIL BKT ASBLY
7 1 13453337 BRACKET,RAIL SUPPORT
8 1 13453361 BRKT, SPRING TENSION
9 1 FF002304A LINEAR TRANSDUCER ASBY
10 5 MM9540K53 BUMPER, 3/4 DIA
11 1 MMAGH25CAN LINEAR BEARING
12 1 MMAGR25360M1 RAIL,LINEAR,MODIFIED
13 5 NNK8-32 KEP NUT, 8-32
14 4 RRLE018B1 SPRING,EXT .020X.19X1.5
15 1 RRLE055E10 SPRING,EXT .020X.19X1.5
16 2 SSHC01040 1/4-20 X 5/8 HHCS
17 2 SSHC01080 1/4-20 X 1-1/4 HHCS
18 4 SSHC90032S #8-32 X 1/2 HEX CAP
19 2 SSSC01048 1/4-20 X 3/4" SOC CAP SC
20 6 SSHC98032 10-32X1/2 HEX HD
21 4 WWL1/4 WASHER,LOCK,1/4
22 5 WWL8 WASHER,LOCK,#8
23 5 SSSC90032 #8-32 X 1/2 SOC CAP SC
24 4 SSSCM6X20 SCREW, SOCKET CAP
25 2 WWFS1/4 WASHER,FLAT,SAE,1/4
26 6 WWFS10 WASHER, FLAT, #10, SAE
27 6 WWL10 WASHER,LOCK,#10,S/S

1345-5P
50 Technical Manual & Parts Book

1345-5P
51 Technical Manual & Parts Book
13453400A Carriage Guide Assembly AAC Drawing Number 9001193 Rev 6
NO. QTY PART # DESCRIPTION
1 1 13453401A CARRIAGE GUIDE FRAME ASSY
2 2 13453404 ROLLER YOKE ASSY
3 2 13453408 GUIDE ARM ASSY.
4 2 13453411 STUD, ROLLER BEARING
5 2 13453413 ROLLER, GUIDE
6 4 13453414 HUB, ROLLER GUIDE
7 1 13453415 PLATE, CABLE HOLDER
8 1 13453416 MOUNT, CABLE GUIDE
9 1 13453418 MOUNT, BEARING BLOCK, REA
10 4 BB1L017 BEARING,BALL,.787B
11 2 BB305702C BEARING,CAMROLLER
12 1 FF3460 STRAIN RELIEF,LIQ TIGHT
13 1 FF8465 NUT,LOCK,3/4NPT,NYLON,BLK
14 2 MM1095K44 GREASE FITTING, 1/4-28
15 4 MMH0-185 CLIP RING INT,1.962 OD
16 2 MMSH-59 CLIP RING EXT, .546 ID
17 2 NNE1/2-13 NUT,NYLOCK,1/2-13
18 2 NNH1/2-13 NUT,HEX,1/2-13
19 1 NNH3/8-16 3/8-16 HEX NUT
20 2 SSBC98032 #10-32 X 1/2 BUT HEAD
21 1 SSHC25080 3/8-16 X 1-1/4 HEX HEAD
22 2 SSHC25128 3/8-16 X 2 HEX HEAD
23 2 SSHC45192 1/2-13 X 3 HEX HEAD
24 2 SSSS01040 SCREW, SET, 1/4-20 X 5/8
25 2 WWFS1/2 WASHER,FLAT,SAE,1/2
26 2 WWFS10 WASHER, FLAT, #10, SAE
27 2 WWFS3/8 WASHER,FLAT,SAE,3/8
28 2 WWL10 #10 LW
29 2 WWL3/8 WASHER, LOCK, 3/8

1345-5P
52 Technical Manual & Parts Book

1345-5P
53 Technical Manual & Parts Book
134539000B Control Box Assembly AAC Drawing Number 9001397 Rev 3
NO. QTY PART# DESCRIPTION
1 1 1345-5WD1 DIAGRAM, WIRING
2 1 1345LAB1 LABEL
3 1 13459001B SUB PANEL, CARRIAGE -3&4B
4 1 13459004A MOUNTING BRACKET, CAPACIT
3 1 13459006 CONTROL BOX 11345
6 6 AAF3/16 CLAMP, BLACK PLASTIC
7 1 FF1N4937 DIODE,FAST 200NS,1A
8 54 FF264-341 TERMBLK,WAGO,TOP,DUAL,GRY
9 2 FF264-347 TERMBLK,WAGO,TOP,DUAL,GRN
10 5 FF264-371 TERMBLK,WAGO,TOP,END
11 10'* FF7439A CABLE, 9 COND, 14GA
12 1 FFL722C BREAKER, CIRCT. THERM-MAG
13 1 FFR4.7K RESISTOR, 4.7K, 1/4W.5%
14 3 FFR47 RESISTOR, 47, 1/4W
15 1 MM1770A12 DOOR LATCH, CAM, KEYED
16 6 MM9376K141 ISOLATOR, URETHANE
17 1 MM40450010 FASTENER,SLIDE LOCK
18 10 NNK8-32 NUT,KEP,8-32
19 8 SSPP90024 8-32X3/8 PAN PHLPS
20 1 SSPP90032 SCREW,8-32 PAN HD PHIL
21 6 SSSC90056 #8-32 X 7/8 SOC CAP SC
22 2 TTSRBS82908 TERMINAL,STAR RING,#8,14-18
23 6 WWF8 WASHER, FLAT, #8
24 8 WWL8 WASHER,LOCK,#8

1345-5P
54 Technical Manual & Parts Book
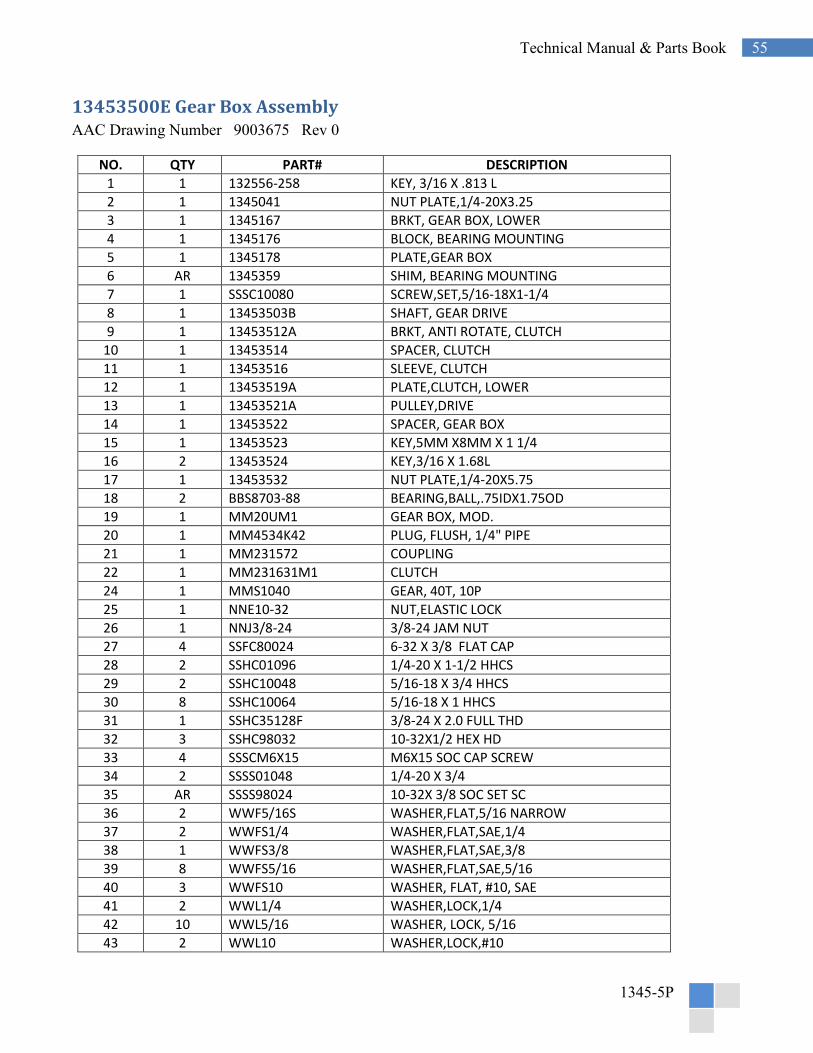
1345-5P
55 Technical Manual & Parts Book
13453500E Gear Box Assembly AAC Drawing Number 9003675 Rev 0
NO. QTY PART# DESCRIPTION
1 1 132556-258 KEY, 3/16 X .813 L
2 1 1345041 NUT PLATE,1/4-20X3.25
3 1 1345167 BRKT, GEAR BOX, LOWER
4 1 1345176 BLOCK, BEARING MOUNTING
5 1 1345178 PLATE,GEAR BOX
6 AR 1345359 SHIM, BEARING MOUNTING
7 1 SSSC10080 SCREW,SET,5/16-18X1-1/4
8 1 13453503B SHAFT, GEAR DRIVE
9 1 13453512A BRKT, ANTI ROTATE, CLUTCH
10 1 13453514 SPACER, CLUTCH
11 1 13453516 SLEEVE, CLUTCH
12 1 13453519A PLATE,CLUTCH, LOWER
13 1 13453521A PULLEY,DRIVE
14 1 13453522 SPACER, GEAR BOX
15 1 13453523 KEY,5MM X8MM X 1 1/4
16 2 13453524 KEY,3/16 X 1.68L
17 1 13453532 NUT PLATE,1/4-20X5.75
18 2 BBS8703-88 BEARING,BALL,.75IDX1.75OD
19 1 MM20UM1 GEAR BOX, MOD.
20 1 MM4534K42 PLUG, FLUSH, 1/4" PIPE
21 1 MM231572 COUPLING
22 1 MM231631M1 CLUTCH
24 1 MMS1040 GEAR, 40T, 10P
25 1 NNE10-32 NUT,ELASTIC LOCK
26 1 NNJ3/8-24 3/8-24 JAM NUT
27 4 SSFC80024 6-32 X 3/8 FLAT CAP
28 2 SSHC01096 1/4-20 X 1-1/2 HHCS
29 2 SSHC10048 5/16-18 X 3/4 HHCS
30 8 SSHC10064 5/16-18 X 1 HHCS
31 1 SSHC35128F 3/8-24 X 2.0 FULL THD
32 3 SSHC98032 10-32X1/2 HEX HD
33 4 SSSCM6X15 M6X15 SOC CAP SCREW
34 2 SSSS01048 1/4-20 X 3/4
35 AR SSSS98024 10-32X 3/8 SOC SET SC
36 2 WWF5/16S WASHER,FLAT,5/16 NARROW
37 2 WWFS1/4 WASHER,FLAT,SAE,1/4
38 1 WWFS3/8 WASHER,FLAT,SAE,3/8
39 8 WWFS5/16 WASHER,FLAT,SAE,5/16
40 3 WWFS10 WASHER, FLAT, #10, SAE
41 2 WWL1/4 WASHER,LOCK,1/4
42 10 WWL5/16 WASHER, LOCK, 5/16
43 2 WWL10 WASHER,LOCK,#10

1345-5P
56 Technical Manual & Parts Book

1345-5P
57 Technical Manual & Parts Book
SPF5625-657-02M Sewing Head AAC Drawing Number 9002943 Rev 4
NO QTY PART # DESCRIPTION
1 1* 91-149-219- FOOT,PRESSER,LIFTING,MOD
2 1 311-129 SLEEVE TAPE MOUNT ADJUST
3 1 1278-7055D PROX SWITCH W/PLUG,12"
4 1 1345-004 BLOCK, STOP FOR BINDER
5 1 1345-009B SLEEVE,.25 ODX.19 IDX.5LS
6 1 1345-025 TAPE ROLL HOLDER ASSY
7 1 1345-505 BLOCK, FOOT UP SENSOR
8 1 1345137 BRKT, MOTOR MOUNT
9 1 1345138 PLATE,BASE PFAFF 5625
10 1 1345139 ANGLE, STOP, HEAD MOUNT
11 1 1345140 BELT, GUARD, PFAFF 5625
12 1 1345141 PLATE,ADAPTER
13 1 1345142 PLATE,ADAPTER,SWING OUT
14 1 1345147 PLATE,TOP MOD.
15 1 1345412 TAKE-UP GUARD, PFAFF
16 1 1366099 BRACKET, EYE MOUNT
17 1 13453646 TAPE MOUNT, PULLEY
18 1 GG150L050 BELT, 3/8P, 40T, 1/2W
19 3 NNH1/4-20 NUT,HEX,1/4-20
20 1 PP20LB050M5 PULLEY,GEAR,3/8P,15MM B
21 1 RRBEEHIVEH SPRING,HEAVY BEEHIVE
22 1 SPF5625-65702A HEAD,PFAFF TAPE EDGE,
23 2 SSFC01024 1/4-20 X 3/8 FLAT CAP
24 3 SSFC01064 1/4-20 X 1 FLAT CAP
25 2 SSHC01040 1/4-20 X 5/8 HHCS
26 4 SSHC98032 10-32X1/2 HEX HD
27 1 SSPS50024 2-56 X 3/8 PAN HD SC
28 6 SSSC01064 1/4-20 X 1 SOC CAP
29 3 SSSC70032 4-40 X 1/2 SOCKET CAP
30 2 SSSC90040 8-32 X 5/8 SOC CAP SC
31 1 SSSC98032 10-32X1/2, SOC CAP
32 1 TTCL1APPK1 PLASTIC KNOB, #10-32
33 2 WWB5/32 WASHER, FLAT, 5/32", BRAS
34 9 WWFS1/4 WASHER,FLAT,SAE,1/4
35 5 WWFS10 WASHER, FLAT, #10, SAE
36 9 WWL1/4 WASHER,LOCK, 1/4
37 5 WWL10 WASHER,LOCK,#10
38 2 WWSI8 WASHER,INT. TOOTH,8

1345-5P
58 Technical Manual & Parts Book
SPF5625-65702A Head, Pfaff Tape Edge AAC Drawing Number 9004887 Rev 1
NO QTY PART # DESCRIPTION
1 1 91-149-219-91M1 FOOT,PRESSER,LIFTING,MOD
2 1 1345-004 BLOCK, STOP FOR BINDER
3 1 1345-009B SLEEVE,.25 ODX.19 IDX.5LS
4 1 1345142 PLATE,ADAPTER,SWING OUT
5 1 1345147 PLATE,TOP MOD.
6 1 RRBEEHIVEH SPRING,HEAVY BEEHIVE
7 1 SPF5625-657/02 SEWING HEAD,PFAFF
8 2 SSFC01024 1/4-20 X 3/8 FLAT CAP
9 1 SSSC98032 10-32X1/2, SOC CAP
10 1 TTCL1APPK1 PLASTIC KNOB, #10-32
11 1 WWFS10 WASHER, FLAT, #10, SAE
12 1 WWL10 WASHER,LOCK,#10

1345-5P
59 Technical Manual & Parts Book
134539300A Control Button Panel AAC Drawing Number 9001396 Rev 2
NO. QTY PART # DESCRIPTION
1 1 13453LAB1 LABEL,SWITCH PANEL
2 2 13459008A CABLE, POT, IK, 4 FT.
3 1 13459301E PANEL, CONTROL BUTTON 2
4 1 EE15Y PLATE, LEGEND, YELLOW
5 1 EE3X01 BLOCK,P.B. CONTACT, N.C.
6 8 EE3X10 BLOCK,P.B. CONTACT, N.O.
7 7 EEA3L LATCH,PUSH BUTTON
8 3 EED5N157 LAMP, INCONDECENT, BAYONET
9 1 EEPFA6 BUTTON, PUSH, BLU, FLUSH
10 2 EEPLE3 BUTTON, PUSH, GRN, ILLUM
11 1 EEPLE4 BUTTON, PUSH, RED, ILLUM
12 1 EEPMTS44 E-STOP BUTTON, TWIST REL.
13 2 EEPU2A3 BUTTON, PUSH 22MM, 2X,G MOM FLUSH
14 2 EESL110B SHAFT LOCK,NYLON,1/4"
15 2 FF274-416 KNOB,SPEED CONTROL
16 3 EED53D0 BLOCK, LAMP, 22MM P.B.

1345-5P
60 Technical Manual & Parts Book

1345-5P
61 Technical Manual & Parts Book
1345-5WD1 Wiring Diagram

1345-5P
62 Technical Manual & Parts Book

1345-5P
63 Technical Manual & Parts Book
Atlanta Attachment Company (AAC) Statement of Warranty
Manufactured Products
Atlanta Attachment Company warrants manufactured products to be free from defects in material and workmanship for a period of eight hundred (800) hours of operation or one hundred (100) days whichever comes first. Atlanta Attachment Company warrants all electrical components of the Serial Bus System to be free from defects in material or workmanship for a period of thirty six (36) months.
Terms and Conditions:
AAC Limited Warranty becomes effective on the date of shipment. AAC Warranty claims may be made by telephone, letter, fax or e-mail. All verbal claims must be con-
firmed in writing. AAC reserves the right to require the return of all claimed defective parts with a completed warranty
claim form. AAC will, at its option, repair or replace the defective machine and parts upon return to AAC. AAC reserves the right to make the final decision on all warranty coverage questions. AAC warranty periods as stated are for eight hundred (800) hours or one hundred (100) days whichever
comes first. AAC guarantees satisfactory operation of the machines on the basis of generally accepted industry
standards, contingent upon proper application, installation and maintenance. AAC Limited Warranty may not be changed or modified and is not subject to any other warranty
expressed or implied by any other agent, dealer, or distributor unless approved in writing by AAC in advance of any claim being filed.
What Is Covered
Electrical components that are not included within the Serial Bus System that fail due to defects in material or workmanship, which are manufactured by AAC are covered for a period of eight hundred (800) hours.
Mechanical parts or components that fail due to defects in material or workmanship, which are manufactured by AAC.
Purchased items (sewing heads, motors, etc.) will be covered by the manufacturers (OEM) warranty. AAC will assist in the procurement and handling of the manufacturers (OEM) claim.
What Is Not Covered
Parts that fail due to improper usage, lack of proper maintenance, lubrication and/or modification. Damages caused by; improper freight handling, accidents, fire and issues resulting from unauthorized
service and/or personnel, improper electrical, plumbing connections. Normal wear of machine and parts such as Conveyor belts, "O" rings, gauge parts, cutters, needles, etc. Machine adjustments related to sewing applications and/or general machine operation. Charges for field service. Loss of time, potential revenue, and/or profits. Personal injury and/or property damage resulting from the operation of this equipment.

1345-5P
64 Technical Manual & Parts Book
Declaración de Garantía
Productos Manufacturados
Atlanta Attachment Company garantiza que los productos de fabricación son libres de defectos de material y de mano de obra durante un periodo de ochocientos (800) horas de operación o cien (100) días cual llegue primero. Atlanta Attachment Company garantiza que todos los componentes del Serial bus son libres de defectos de material y de mano de obra durante un periodo de treinta y seis (36) meses.
Términos y Condiciones:
La Garantía Limitada de AAC entra en efecto el día de transporte. Reclamos de la Garantía de AAC pueden ser realizados por teléfono, carta, fax o correo electrónico. Todo
reclamo verbal tiene que ser confirmado vía escrito. AAC reserva el derecho para exigir el retorno de cada pieza defectuosa con un formulario de reclamo de
garantía. AAC va, según su criterio, reparar o reemplazar las máquinas o piezas defectuosas devueltas para AAC. AAC reserva el derecho para tomar la decisión final sobre toda cuestión de garantía. Las garantías de AAC tiene una validez de ochocientas (800) horas o cien (100) días cual llega primero. AAC garantiza la operación satisfactoria de sus máquinas en base de las normas aceptadas de la industria
siempre y cuando se instale use y mantenga de forma apropiada. La garantía de AAC no puede ser cambiado o modificado y no está sujeto a cualquier otra garantía
implicada por otro agente o distribuidor menos al menos que sea autorizado por AAC antes de cual-quier reclamo.
Lo Que Está Garantizado
Componentes eléctricos que no están incluidos dentro del sistema Serial Bus que fallen por defectos de materiales o de fabricación que han sido manufacturados por AAC son garantizados por un período de ochocientas (800) horas.
Componentes mecánicos que fallen por defectos de materiales o de fabricación que han sido manu-facturados por AAC son garantizados por un periodo de ochocientas (800) horas.
Componentes comprados (Motores, Cabezales,) son protegidos debajo de la garantía del fabricante. AAC asistirá con el manejo de todo reclamo de garantía bajo la garantía del fabricante.
Lo Que No Está Garantizado
Falla de repuestos al raíz de uso incorrecto, falta de mantenimiento, lubricación o modificación. Daños ocurridos a raíz de mal transporte, accidentes, incendios o cualquier daño como resultado de
servicio por personas no autorizados o instalaciones incorrectas de conexiones eléctricas o neumáticas. Desgaste normal de piezas como correas, anillos de goma, cuchillas, agujas, etc. Ajustes de la máquina en relación a las aplicaciones de costura y/o la operación en general de la máquina. Gastos de Reparaciones fuera de las instalaciones de AAC Pérdida de tiempo, ingresos potenciales, y/o ganancias. Daños personales y/o daños a la propiedad como resultado de la operación de este equipo.

1345-5P
65 Technical Manual & Parts Book

Atlanta Attachment Company
362 Industrial Park Drive
Lawrenceville, GA 30046
770-963-7369
www.atlatt.com Printed in the USA