technical manual - punctureseal manual . contents ... preparing the tyre for retreading ... outside...
TRANSCRIPT
TECHNICAL MANUAL
Contents WHAT IS PUNCTURESEAL ........................................................................................................................ 4
A TYRE PRESERVATIVE & LONGEVITY ENHANCER .............................................................................. 4
DESCRIPTION ....................................................................................................................................... 4
SEALING CAPABILITIES ........................................................................................................................ 5
COATING AND CONDITIONING ........................................................................................................... 5
STANDS ON GUARD ............................................................................................................................ 6
PERMANENT REPAIR (safe secure repair) ........................................................................................... 6
WHAT IS RUBBER RECOVERY? ............................................................................................................ 6
WHAT IS TYRE FLEXING? ..................................................................................................................... 6
PUNCTURESEAL WILL NOT CURE OR HARDEN INSIDE OF THE TYRE .................................................. 7
INSTALLATION EQUIPMENT .................................................................................................................... 8
MANUAL PUMP KIT ............................................................................................................................. 8
PUMP MAINTENANCE AND REPAIR .................................................................................................... 8
AUTOMATIC AIR OPERATED PUMP KIT ............................................................................................... 9
PRIMING THE PUMP ........................................................................................................................... 9
INSTALLING PUNCTURESEAL ............................................................................................................... 9
ROUTINE MAINTENANCE .................................................................................................................. 10
CLEARING RESTRICTIONS IN OUTPUT HOSE ..................................................................................... 10
CLEANING THE PUMP CHECK VALVE ................................................................................................ 10
VALVE CORE REMOVER (VCR) ........................................................................................................... 11
DUAL WHEEL APPLICATION TOOL KIT ............................................................................................... 11
PUNTURESEAL INSTALLATION .............................................................................................................. 12
PROCEDURES ..................................................................................................................................... 12
INSTALLATION TECH TIPS .................................................................................................................. 13
INSTALLATION ON EQUIPMENT WITH DUAL WHEELS ...................................................................... 14
INSTALLATION EQUIPMENT FOR LARGE BORE VALVES .................................................................... 15
INSTALLATION WITH QUICK CHUCK ................................................................................................. 15
INSTALLATION AMOUNTS ................................................................................................................. 15
INSTALLATION TIPS ............................................................................................................................... 17
TYRES OR TUBES FITTED WITH LONG (spring type) VALVE CORES ................................................... 17
ZIPPERS, the radial tyre phenomenon .............................................................................................. 17
TUBES ................................................................................................................................................ 17
USING PUNCTURESEAL TO REPAIR A FLAT (tubeless tyre) ............................................................... 18
UNABLE TO PUSH PUMP HANDLE DOWN ........................................................................................ 18
VALVE CORE RECOMMENDATIONS .................................................................................................. 19
VALVE CORE WILL NOT UNSCREW .................................................................................................... 19
AIR SOURCE REQUIREMENTS ............................................................................................................ 19
CLEARING THE VALVE CORE .............................................................................................................. 19
CHECKING AIR PRESSURE .................................................................................................................. 19
TYRE BALANCE .................................................................................................................................. 20
REBALANCING TYRES containing Punctureseal ................................................................................ 20
MAINTENANCE REQUIREMENTS ........................................................................................................... 22
AIR PRESSURE CHECK ........................................................................................................................ 22
TYRE INSPECTION .............................................................................................................................. 22
TUBE TYPE TYRES .......................................................................................................................... 22
TUBELESS TYRES ............................................................................................................................ 22
PROBLEMS AND REMEDIES ................................................................................................................... 23
TYRE UNABLE TO HOLD AIR PRESSURE ............................................................................................. 23
ONLY AIR IS ESCAPING .................................................................................................................. 23
AIR AND PUNCTURESEAL BLEEDING ............................................................................................. 23
AIR LOSS DUE TO AIR MIGRATION ................................................................................................ 23
SIDEWALL PUNCTURE ................................................................................................................... 23
MAJOR DAMAGE ........................................................................................................................... 23
UNABLE TO ADD AIR TO THE TYRE .................................................................................................... 24
VALVE CORE BLOCKAGE ................................................................................................................ 24
HOW TO REPAIR A TYRE CONTAINING PUNCTURESEAL ................................................................... 24
TUBELESS TYRES ............................................................................................................................ 24
TUBE TYPE TYRES .......................................................................................................................... 24
RETREADING TYRES CONTAINING PUNCTURESEAL .......................................................................... 25
PREPARING THE TYRE FOR RETREADING ...................................................................................... 25
TYRE INSPECTION .......................................................................................................................... 25
RETREAD COMPATIBILITY ............................................................................................................. 25
INFLATON OF TYRES .............................................................................................................................. 26
OVERINFLATION leads to: ................................................................................................................. 26
UNDERINFLATION leads to: .............................................................................................................. 26
PROPER INFLATION ........................................................................................................................... 26
WHAT IS PUNCTURESEAL
A TYRE PRESERVATIVE & LONGEVITY ENHANCER Through Punctureseal‘s extensive research and development efforts, our proprietary formulation
has progressed far beyond the parameters of what is commonly known as a tyre sealant. Our
chemists have developed an unrivalled concept: a preservative for increasing tyre longevity and
safety. Punctureseal will convert any pneumatic tyre into a self-sealing tyre that will maintain air
pressure and coat the entire inner surface of a spinning tyre without succumbing to the shear and
stress, associated with centrifugal force created within a rotating tyre. Punctureseal’s attributes are
unparalleled in the history of the pneumatic tyre.
DESCRIPTION Once Punctureseal has been installed, it will lay dormant at the bottom of the tyre until the vehicle is
driven. Once driven a minimum of three to five miles, Punctureseal disperses throughout the inner
air cavity and forms a coating on the entire inner surface of the tyre/wheel. The flexing of the tyre
and the normal heat build-up will allow Punctureseal to seek out and eliminate common air loss
problems (referred to as air migration and bead leaks). Punctureseal then transforms the tyre/wheel
into a sealed air chamber, capable of maintaining proper air pressure. Thereafter, Punctureseal
conditions the rubber in order to retard dry rot and hardening of the casing. One treatment will
provide additional longevity and cooler running tyres.
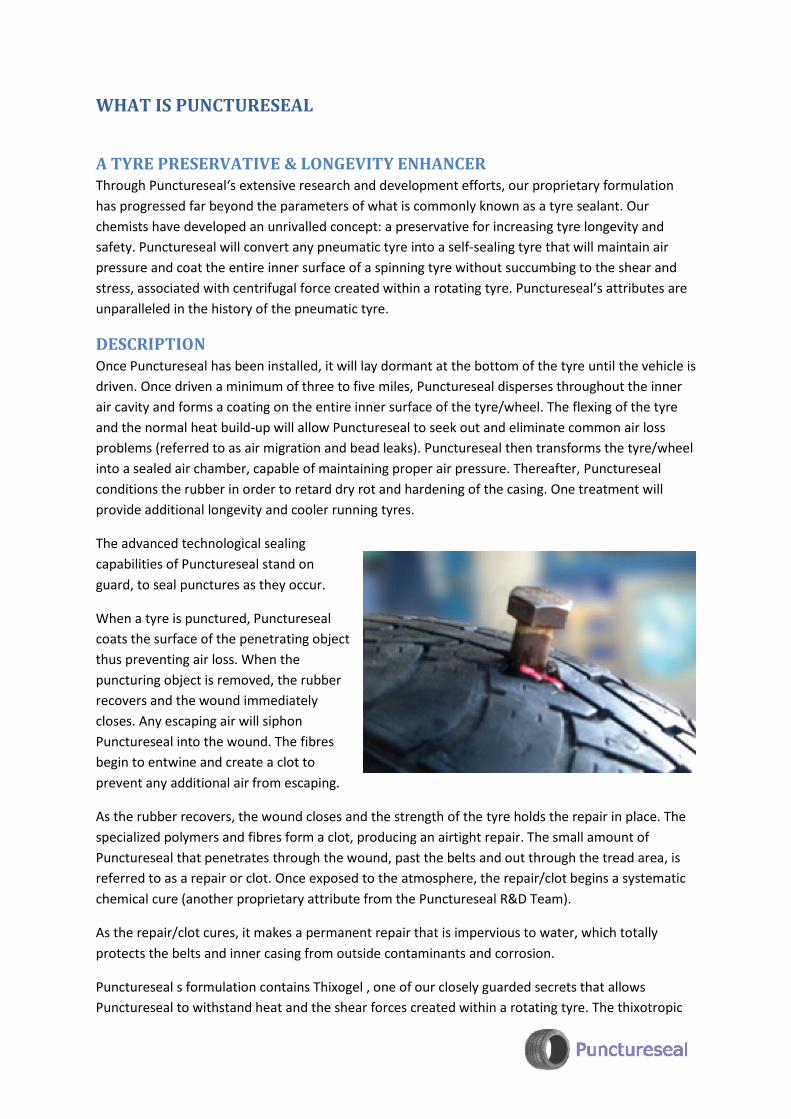
The advanced technological sealing
capabilities of Punctureseal stand on
guard, to seal punctures as they occur.
When a tyre is punctured, Punctureseal
coats the surface of the penetrating object
thus preventing air loss. When the
puncturing object is removed, the rubber
recovers and the wound immediately
closes. Any escaping air will siphon
Punctureseal into the wound. The fibres
begin to entwine and create a clot to
prevent any additional air from escaping.
As the rubber recovers, the wound closes and the strength of the tyre holds the repair in place. The
specialized polymers and fibres form a clot, producing an airtight repair. The small amount of
Punctureseal that penetrates through the wound, past the belts and out through the tread area, is
referred to as a repair or clot. Once exposed to the atmosphere, the repair/clot begins a systematic
chemical cure (another proprietary attribute from the Punctureseal R&D Team).
As the repair/clot cures, it makes a permanent repair that is impervious to water, which totally
protects the belts and inner casing from outside contaminants and corrosion.
Punctureseal s formulation contains Thixogel , one of our closely guarded secrets that allows
Punctureseal to withstand heat and the shear forces created within a rotating tyre. The thixotropic
emulsion stretches and recovers under mild to severe exposure of the adverse forces and
continuously clings to the inner surface of the tyre/wheel. The ability to evenly coat the inner
surface against adverse conditions and centrifugal force is the reason that Punctureseal Tyre Life
Extender/sealer will not adversely affect a balanced tyre/wheel and will not lose the ability to
provide protection for the tread life of the tyre. Punctureseal’s operating temperatures under
normal conditions range from -40°F to + 140°F. (-40°C to +60°C)
SEALING CAPABILITIES Punctureseal manufactures four grades of Punctureseal Tyre Life Extender/sealer:
1. Road use grade is Designed for everyday car and van use. Speeds of up to 100mph. (160 kph)
2. Commercial vehicle grade is formulated for any vehicle with pneumatic tyres, tube or
tubeless, high or low air pressure and used in highway speed vehicles or slow off road
equipment tyres. This formula will seal wounds caused by puncturing objects up to ¼"
(6.3mm) in diameter. Punctureseal is designed to bleed and slowly release air pressure, if
the wound has damaged the inner structure and the tyre has been rendered unsafe.
Punctureseal will not hide or mask a dangerous wound regardless of how small it may be.
3. Extra Heavy Duty grade is formulated for large commercial vehicles (Trucks, lorries and
commercial transport) and for standard off road use.
4. Extreme heavy duty is formulated for extreme off road conditions such as quarries and for is
formulated for Military combat vehicles, armoured vehicles and off road equipment. It will
seal wounds caused by puncturing objects up to 1/2" (13mm) in diameter. Used in combat
vehicle tyres where bullet wounds would prevent any vehicle from completing its mission,
Punctureseal is capable of sealing large wounds, allowing the vehicle to remain mobile. Once
again, Punctureseal provides that extra reliability and very important uptime on mining and
construction equipment, where downtime is extremely costly. This grade is not designed for
regular passenger vehicles.
COATING AND CONDITIONING It is imperative that the proper amount of Punctureseal be installed in a tyre (see application chart)
and the vehicle driven approximately 3 to 5 miles (5-8km), Punctureseal coats and clings to the tyre’s
entire inner air cavity, conditioning the inner surface, eliminating porosity and bead leaks. Thixogel
prevents Punctureseal from migrating to the tread area at high speeds.
AIR MIGRATION are the multitude of porous passage ways that allow air to penetrate and migrate through the tyre’s inner structure. It is next to impossible to produce a new or re-treaded tyre without some air migration existing. As the vehicle is driven, tyre temperature increases, the air inside the tyre expands and air bubbles are forced into the porous passage ways. Once the air bubbles migrate into the inner structure they will continue to expand from heat. If the migrating air cannot escape through the tyre’s various ply’s and into the atmosphere, it will eventually cause tread separation and/or a bubble on the sidewall. If the migrating air does escape the tyre is left underinflated, either way, premature tyre failure is inevitable. Under inflation is the #1 cause of Zipper ruptures (blowouts).
STANDS ON GUARD Once the initial driving/usage period has been attained, Punctureseal will be thoroughly distributed
throughout the entire inner surface of the tyre/wheel. Punctureseal is a proprietary liquid coating
that will continuously stand on guard to protect tyres against air loss for the legal tread life of the
tyre.
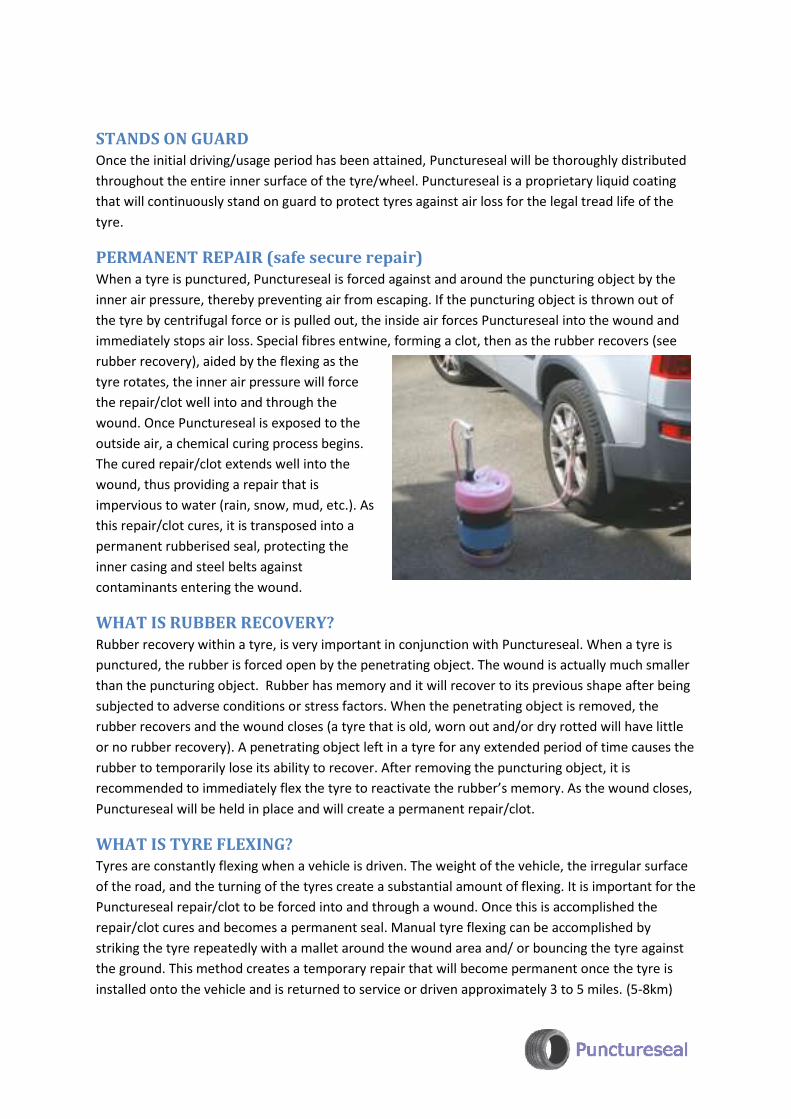
PERMANENT REPAIR (safe secure repair) When a tyre is punctured, Punctureseal is forced against and around the puncturing object by the
inner air pressure, thereby preventing air from escaping. If the puncturing object is thrown out of
the tyre by centrifugal force or is pulled out, the inside air forces Punctureseal into the wound and
immediately stops air loss. Special fibres entwine, forming a clot, then as the rubber recovers (see
rubber recovery), aided by the flexing as the
tyre rotates, the inner air pressure will force
the repair/clot well into and through the
wound. Once Punctureseal is exposed to the
outside air, a chemical curing process begins.
The cured repair/clot extends well into the
wound, thus providing a repair that is
impervious to water (rain, snow, mud, etc.). As
this repair/clot cures, it is transposed into a
permanent rubberised seal, protecting the
inner casing and steel belts against
contaminants entering the wound.
WHAT IS RUBBER RECOVERY? Rubber recovery within a tyre, is very important in conjunction with Punctureseal. When a tyre is
punctured, the rubber is forced open by the penetrating object. The wound is actually much smaller
than the puncturing object. Rubber has memory and it will recover to its previous shape after being
subjected to adverse conditions or stress factors. When the penetrating object is removed, the
rubber recovers and the wound closes (a tyre that is old, worn out and/or dry rotted will have little
or no rubber recovery). A penetrating object left in a tyre for any extended period of time causes the
rubber to temporarily lose its ability to recover. After removing the puncturing object, it is
recommended to immediately flex the tyre to reactivate the rubber’s memory. As the wound closes,
Punctureseal will be held in place and will create a permanent repair/clot.
WHAT IS TYRE FLEXING? Tyres are constantly flexing when a vehicle is driven. The weight of the vehicle, the irregular surface
of the road, and the turning of the tyres create a substantial amount of flexing. It is important for the
Punctureseal repair/clot to be forced into and through a wound. Once this is accomplished the
repair/clot cures and becomes a permanent seal. Manual tyre flexing can be accomplished by
striking the tyre repeatedly with a mallet around the wound area and/ or bouncing the tyre against
the ground. This method creates a temporary repair that will become permanent once the tyre is
installed onto the vehicle and is returned to service or driven approximately 3 to 5 miles. (5-8km)
PUNCTURESEAL WILL NOT CURE OR HARDEN INSIDE OF THE TYRE People often ask "If Punctureseal cures from exposure to outside air, then why doesn’t it cure by the
air inside of the tyre?" As the vehicle is driven and the temperature of the tyre increases, a portion
of the liquid base evaporates within the tyre’s inner air cavity, as the tyre cools, the liquid
condensates back into the formula. The inside air actually becomes part of the system. The sealed air
chamber prevents outside air from entering or inside air from escaping. Constant air pressure re-
settings are not required. Tyres and air pressure should be inspected during routine Preventative
Maintenance program.
INSTALLATION EQUIPMENT
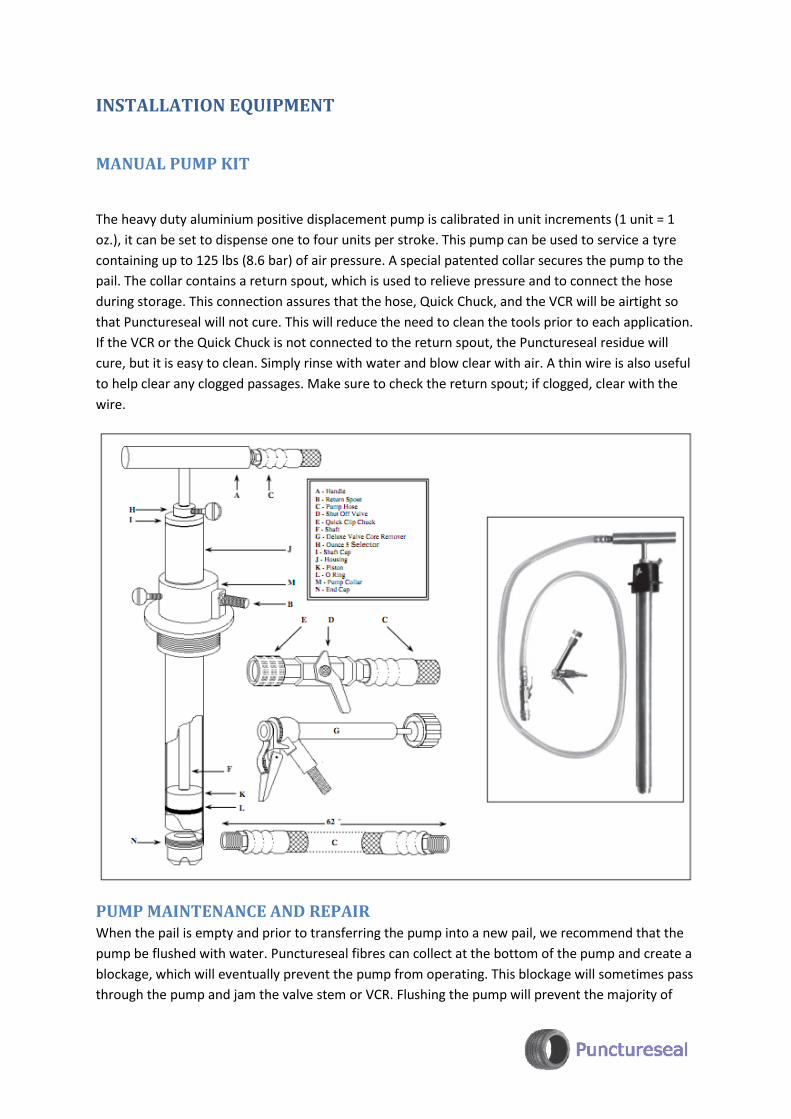
MANUAL PUMP KIT
The heavy duty aluminium positive displacement pump is calibrated in unit increments (1 unit = 1
oz.), it can be set to dispense one to four units per stroke. This pump can be used to service a tyre
containing up to 125 lbs (8.6 bar) of air pressure. A special patented collar secures the pump to the
pail. The collar contains a return spout, which is used to relieve pressure and to connect the hose
during storage. This connection assures that the hose, Quick Chuck, and the VCR will be airtight so
that Punctureseal will not cure. This will reduce the need to clean the tools prior to each application.
If the VCR or the Quick Chuck is not connected to the return spout, the Punctureseal residue will
cure, but it is easy to clean. Simply rinse with water and blow clear with air. A thin wire is also useful
to help clear any clogged passages. Make sure to check the return spout; if clogged, clear with the
wire.
PUMP MAINTENANCE AND REPAIR When the pail is empty and prior to transferring the pump into a new pail, we recommend that the
pump be flushed with water. Punctureseal fibres can collect at the bottom of the pump and create a
blockage, which will eventually prevent the pump from operating. This blockage will sometimes pass
through the pump and jam the valve stem or VCR. Flushing the pump will prevent the majority of
clogging problems. The procedure is simple; remove the pump from pail and place it into a bucket of
water. Pump the handle up and down several times. Then remove the pump from the water and
continue to pump until the pump is completely drained of water. Pump the handle up and down
several times. Then remove the pump from the water and continue to pump until the pump is
completely drained of water. The accessory tools such as the VCR and the Dual Wheel Tools should
be flushed after each use. Punctureseal pumps can be completely dismantled for servicing.
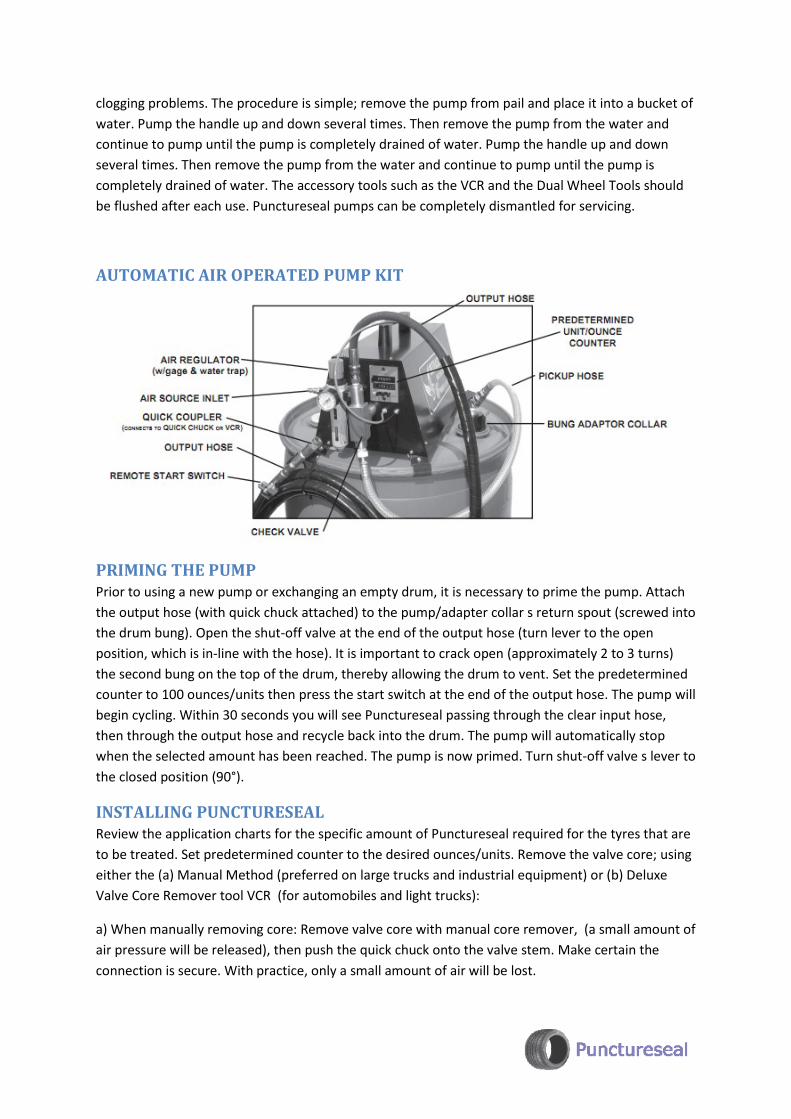
AUTOMATIC AIR OPERATED PUMP KIT
PRIMING THE PUMP Prior to using a new pump or exchanging an empty drum, it is necessary to prime the pump. Attach
the output hose (with quick chuck attached) to the pump/adapter collar s return spout (screwed into
the drum bung). Open the shut-off valve at the end of the output hose (turn lever to the open
position, which is in-line with the hose). It is important to crack open (approximately 2 to 3 turns)
the second bung on the top of the drum, thereby allowing the drum to vent. Set the predetermined
counter to 100 ounces/units then press the start switch at the end of the output hose. The pump will
begin cycling. Within 30 seconds you will see Punctureseal passing through the clear input hose,
then through the output hose and recycle back into the drum. The pump will automatically stop
when the selected amount has been reached. The pump is now primed. Turn shut-off valve s lever to
the closed position (90°).
INSTALLING PUNCTURESEAL Review the application charts for the specific amount of Punctureseal required for the tyres that are
to be treated. Set predetermined counter to the desired ounces/units. Remove the valve core; using
either the (a) Manual Method (preferred on large trucks and industrial equipment) or (b) Deluxe
Valve Core Remover tool VCR (for automobiles and light trucks):
a) When manually removing core: Remove valve core with manual core remover, (a small amount of
air pressure will be released), then push the quick chuck onto the valve stem. Make certain the
connection is secure. With practice, only a small amount of air will be lost.
b) When using the VCR , attach the tool to the quick chuck on the output hose, then clip onto the
tyre s valve stem, remove the core as described in the installation procedures (in this manual). The
air pressure will remain in the tyre.
Open the shut-off valve (lever in-line with hose). Push the start switch. The pump will begin cycling.
The counter will progress as Punctureseal is being pumped into the tyre. When the desired amount
is reached the pump will automatically stop and reset. Close the shut-off valve, reinstall valve core,
remove tool/hose from tyre.
ROUTINE MAINTENANCE Flushing the pump and hose assembly after daily use is recommended, especially if the pump is
removed from service for more than two days. Set the counter to 100 ounces/units and release the
suction hose from the quick disconnect coupler from the pickup tube. Connect the output hose to
the return spout on the bung adapter. Open the shut off valve and press the start switch. This will
expel all of the Punctureseal from the system and into the drum. Next, Set a small water bucket next
to the drum and drop in the ends of the input and output hoses, press the start switch. This will flush
the system. Finally, remove the input hose from the water and press the start switch. This will purge
the water from the system. Reconnect the input hose, rollup the output hose and disconnect the air
source. Pump will need re-priming when returned to service.
CLEARING RESTRICTIONS IN OUTPUT HOSE Attach output hose/quick chuck to Adapter Collar S return spout and start pump. This allows the
system to work without back pressure clearing any restrictions.
CLEANING THE PUMP CHECK VALVE Remove the input and output hoses from the check valve housing. Loosen the two Barrels (which
have been machined with wrench flats to facilitate dismantling) that are attached to the top and
bottom of the check valve housing using a 7/8" wrench. There is one stainless steel ball resting in the
top of the housing and one resting in the top of the lower barrel. Carefully remove the lower barrel
to avoid dropping the ball. The upper ball may be pushed up and out of the housing from the bottom
using the flat end of a pencil or wooden dowel (do not use metal objects). Metal objects may
damage the barrels. Clear any remaining residue with a small blast of air or water. This will clear any
restriction that may have developed. Carefully reassemble the check valve (do not over tighten).
Re-prime pump.
NOTE: This is an infrequent procedure and is only required if “Routine Maintenance” is not
performed as recommended.
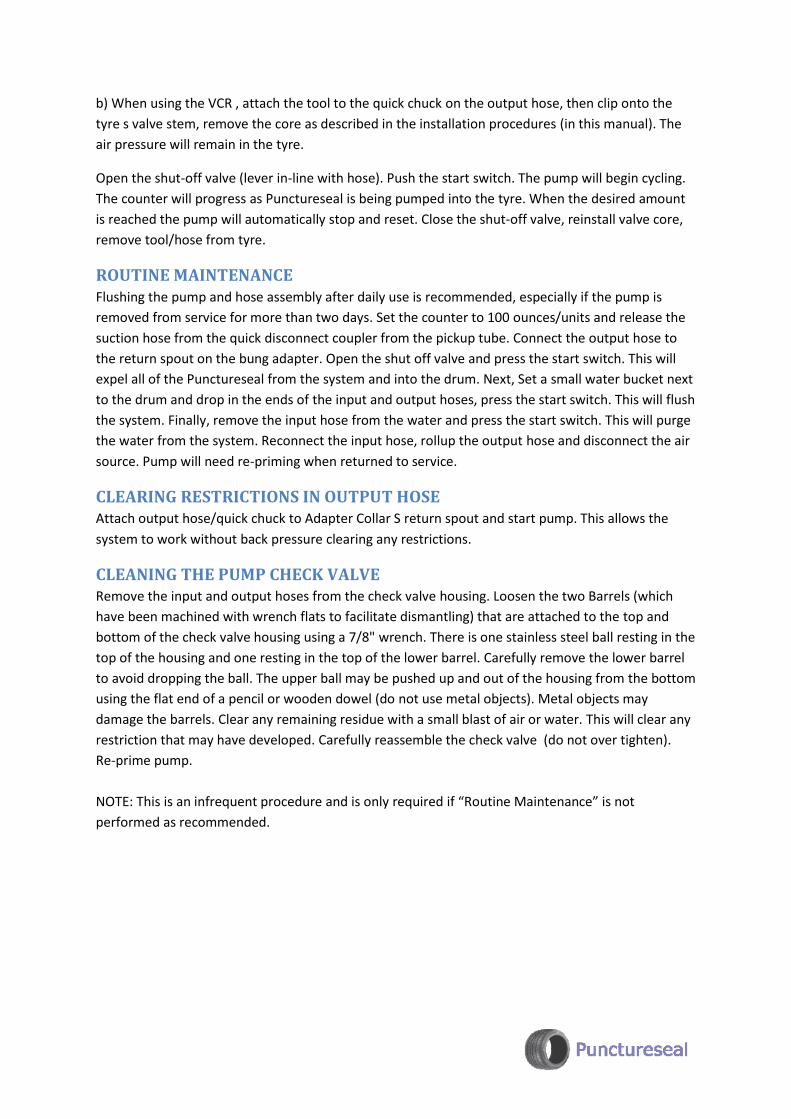
VALVE CORE REMOVER (VCR) This specially designed patented tool is indispensable when
servicing fleets. The ability to install Punctureseal without
having to let the air out of the tyre saves a tremendous
amount of labour and equipment downtime. An average
passenger car or light truck tyre can be serviced in less than
two minutes and a large truck tyre can be serviced in less
than five minutes, wherever the vehicle may be located. The
VCR quickly connects to the Quick Chuck on the end of the
hose. To remove the valve core, place the VCR onto the
valve stem, push the knob/shaft downwards, when it is
aligned, additional downward action will snap and lock it
onto the valve core. Unscrew the core, when completely
unscrewed it will slip back into the air tight chamber (the
tyre will not lose air pressure during installation), this clears
the valve stem passage for the installation of Punctureseal.
After installing the required amount, push the knob/shaft down and reinsert the valve core into the
valve stem and tighten. No air is lost during this procedure and it is accomplished very quickly.
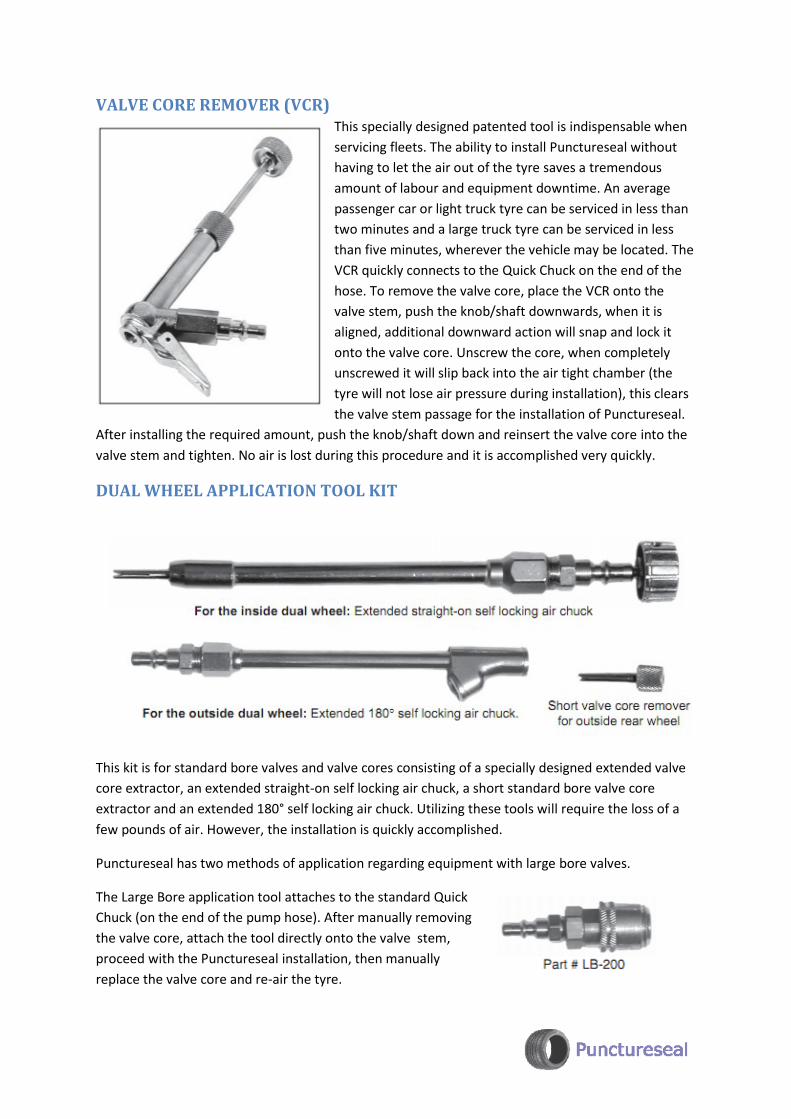
DUAL WHEEL APPLICATION TOOL KIT
This kit is for standard bore valves and valve cores consisting of a specially designed extended valve
core extractor, an extended straight-on self locking air chuck, a short standard bore valve core
extractor and an extended 180° self locking air chuck. Utilizing these tools will require the loss of a
few pounds of air. However, the installation is quickly accomplished.
Punctureseal has two methods of application regarding equipment with large bore valves.
The Large Bore application tool attaches to the standard Quick
Chuck (on the end of the pump hose). After manually removing
the valve core, attach the tool directly onto the valve stem,
proceed with the Punctureseal installation, then manually
replace the valve core and re-air the tyre.
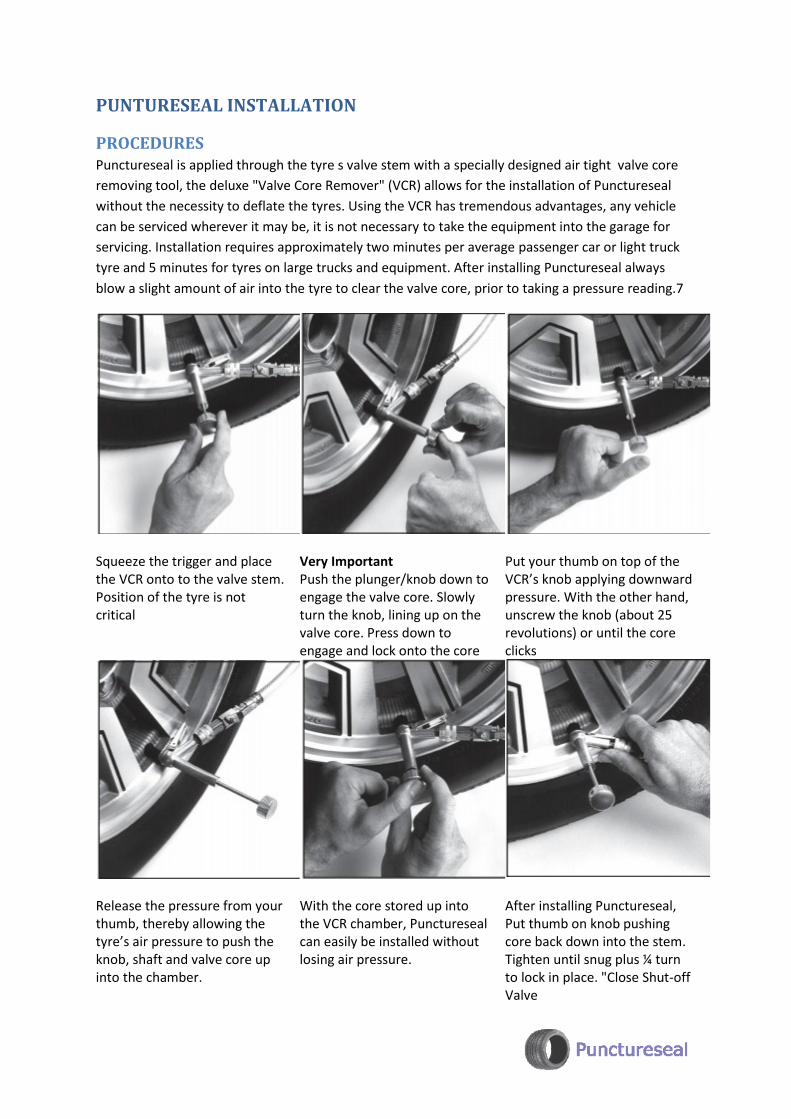
PUNTURESEAL INSTALLATION
PROCEDURES Punctureseal is applied through the tyre s valve stem with a specially designed air tight valve core
removing tool, the deluxe "Valve Core Remover" (VCR) allows for the installation of Punctureseal
without the necessity to deflate the tyres. Using the VCR has tremendous advantages, any vehicle
can be serviced wherever it may be, it is not necessary to take the equipment into the garage for
servicing. Installation requires approximately two minutes per average passenger car or light truck
tyre and 5 minutes for tyres on large trucks and equipment. After installing Punctureseal always
blow a slight amount of air into the tyre to clear the valve core, prior to taking a pressure reading.7
Squeeze the trigger and place the VCR onto to the valve stem. Position of the tyre is not critical
Very Important Push the plunger/knob down to engage the valve core. Slowly turn the knob, lining up on the valve core. Press down to engage and lock onto the core
Put your thumb on top of the VCR’s knob applying downward pressure. With the other hand, unscrew the knob (about 25 revolutions) or until the core clicks
Release the pressure from your thumb, thereby allowing the tyre’s air pressure to push the knob, shaft and valve core up into the chamber.
With the core stored up into the VCR chamber, Punctureseal can easily be installed without losing air pressure.
After installing Punctureseal, Put thumb on knob pushing core back down into the stem. Tighten until snug plus ¼ turn to lock in place. "Close Shut-off Valve
VERY IMPORTANT - TECH TIP
As shown in figure 2 (above), Once the shaft has been aligned to the valve core, with your other
hand, use your thumb to push down on the knob/shaft. Applying firm pressure will engage (down
approximately 1/8" (3.175mm)) the locking shaft onto the valve core. As the shaft locks onto the
valve core, you will feel and/or hear a definite snap.
The pump hose is equipped with a shut off valve and "Quick Chuck" onto which the VCR attaches.
This "Quick Chuck" is used for installing Punctureseal while mounting tyres or when tyres are
deflated (remove valve core prior to using the Quick Chuck). Simply push the Quick Chuck onto the
valve stem (it is self locking), After installation of Punctureseal, pull knurled ring on the Quick Chuck
back, to disengage. Special tools have been designed to service vehicles with dual wheels.
INSTALLATION TECH TIPS 1. When utilizing the VCR, maintain constant thumb pressure on the knob until you are certain that
the valve core is free of the stem (turn knob to the left, at least 25 to 30 revolutions).
2. If the pump does not operate freely, do not force the handle down. Check to make sure that the
shut off valve is in the open position and/or the core may be hung up in the valve stem or VCR
chamber and will prevent pumping. Tighten the valve core and restart the valve core removal
procedure.
3. Check the application chart for the proper amount of Punctureseal to be installed, as per vehicle’s
mission profile. The pump shaft is calibrated in nine unit ounce increments, this allows for installing
the exact amount required.
4. When installation is complete, reverse the procedure, by putting thumb pressure on the knob and
pushing down to reinsert the valve core. Do not over tighten the core. When the core is snug, then,
only tighten an additional ¼ turn. This will lock the core in place. Pull up/out on the knob to free it
from the core, turn the shut off valve to the OFF position and remove the VCR.
5. Always return the VCR/hose to the pail and reattach it to the return spout. Open the shut off
valve, releasing the pressure and excess Punctureseal into the pail with the knob in the up position
and the shut off valve in the open position, the unit is ready for the next installation.
6. Clean the valve stem/core outer surface by the following procedures; Blowing air through the
valve, spraying with water or wiping clear with a rag and pointed object.
7. It is recommended to check and set air pressure one week after installation. This allows the
Punctureseal to locate and eliminate the porosity during the interim. Once this is completed it
should be necessary to check air pressures only during normal routine PM schedules. It is not
necessary, for tyres that have been treated with Punctureseal to be immediately returned to service;
they may be stored for future use. Punctureseal will not cure inside of a tyre (sealed air chamber).
The Application Chart specifies the amount of Punctureseal required per tyre size and tyre usage
(mission profile). Punctureseal Tyre Life Extender/sealer is available in two distinctly different
formulas:
The Industrial/Commercial grade is used in high speed vehicle tyres and in all types and sizes of
commercial equipment tyres. The Application Chart specifies two separate application amounts per
tyre size. A specific size tyre, when used on passenger or light truck type vehicles at highway speeds
requires the amount indicated in the "Standard" column, whereas the same size tyre if used on/off
highway will require a different amount. If the same size tyre is used for construction or other
extreme exposure situations, use the amount specified in the "Off Road" column. The reason for
installing different amounts is quite simple; in order to coat and penetrate (to eliminate porosity and
preserve the casing) the entyre inner surface of a tyre and wheel (inner air cavity s total square
inches) requires a specific amount of Punctureseal, plus a reserve is needed. The reserve provides
additional protection for the tyre, each time a tyre receives a puncture, a small amount of
Punctureseal is used. Vehicles or equipment being used off road will sustain many additional
punctures during its lifetime, therefore additional reserve is required. The "XHD" grade is for
commercial off road equipment, military combat vehicles and law enforcement SWAT teams where
tyres are exposed to severe service and may experience large punctures.
INSTALLATION ON EQUIPMENT WITH DUAL WHEELS
For most vehicles equipped with dual wheels, it is impossible to attach the VCR onto the outer tyre
since the valve stem is pointed inward and the inner tyre’s valve stem is recessed much to far for the
VCR to reach. Air supply tools have been redesigned and modified by Punctureseal Engineers in
order to easily install Punctureseal for vehicles with dual wheels. The application is quite simple and
can be used on any hard to reach valve stem. The Dual Wheel application service kit contains; a long
valve core extractor and a lock-on extension that attaches straight onto the inner tyre’s recessed
valve stem. For the outer tyre, where the valve stem points inward, a short valve core extractor is
supplied with a 180° lock-on extension.
Inner tyre - attach the straight lock-on extension to the inner valve stem. Slide extended valve core
extractor into the straight lock-on extension. When it comes in contact with the valve core, align
and snap onto core remove valve core and extractor, this begins to release air, quickly attach the
Quick Chuck/hose to the extension tool and install Punctureseal. After installation turn shut off valve
to off, remove Quick Chuck/hose and reinsert extractor and valve core (tighten as per VCR
instructions), remove tools and reset air pressure.
Outer tyre - manually remove the valve core, this begins to release air, attach the 180° tool (which
has been previously connected to the Quick Chuck/hose) onto the valve stem. Install the required
amount of Punctureseal, turn shut off valve to off, remove the 180° tool from the valve stem,
manually replace the valve core and reset air pressure. After completing the application, flush the
tools with water or blow out with air pressure to assure that the inside is clear of Punctureseal
residue. Prior to taking an air pressure reading (see installation tips), always blow a slight amount of
air into the tyre to clear the valve core. An alternative procedure to service dual wheeled vehicles in
the shop, is to run the equipment’s rear inner tyres onto blocks. This will leave the outer rear tyres
free. Remove the outer tyres, laying them down with the valve stem pointing up. The VCR can be
used to service both the inner and outer tyres with Punctureseal. Reinstall the outer rear tyres,
service the front tyres and drive off the blocks. This procedure will eliminate the need to jack the
equipment up. Set the brakes and block all tyres.
INSTALLATION EQUIPMENT FOR LARGE BORE VALVES Punctureseal has two methods of application regarding equipment with large bore valves (see
Installation Equipment section). Attach the LB-200 tool to the Quick Chuck located on the end of the
pump hose. Manually remove the valve core, releasing some of the tyres air pressure. Attach the
tool to the valve stem and install the required amount of Punctureseal. Turn the shut off valve
(located on the pump hose) to the off position, remove the tool from the valve stem and replace the
valve core. Re-inflate the tyre to proper air pressure. After completing the applications the tool
should be flushed with water or blown out with air pressure to assure the inside is clear of
Punctureseal residue.
An alternative is the valve core reducer. To install, remove the large bore valve core, screw the tool
onto the valve stem and your tyres are now equipped with a standard size valve core. This valve core
reducer allows the tyre to be serviced with standard air fittings and gauges. The Punctureseal can
now be installed with our conventional application tools.
INSTALLATION WITH QUICK CHUCK Some installations may be difficult to complete with the VCR due to the valve stems being
inaccessible. This is the primary reason for the Quick Chuck, located at the end of the pump hose
(connected to the hose with a shut off valve). The Quick Chuck fits over the valve stem, push down
on it to make the connection. To release, pull the Quick Chuck’s knurled outer ring back, releasing
the locking mechanism.
The Quick Chuck is used for tyres or tubes that are deflated and/or have the valve cores removed. It
is not necessary to release all of the air pressure to install Punctureseal. Simply attach the Quick
Chuck as soon as the valve core has been removed. Put a finger over the valve stem to prevent
pressure from escaping during the interim of attaching the Quick Chuck onto the valve stem.
INSTALLATION AMOUNTS There are various application amounts listed with each tyre size (with the exception of passenger
type tyres). Therequired amounts are determined by mission profile and exposure to which tyres are
subjected. Punctureseal’s thixotropic formulation requires that a specific amount of Punctureseal be
installed to effectively provide a sufficient coating in the total area of the tyre/wheel inner surface. A
small amount of Punctureseal is designed to absorb into the tyre’s inner structure, to protect and
retard the aging of the casings. Each tyre manufacturers’ casings are different and the absorption
rate may vary. Older tyre casings will absorb more Punctureseal than new tyres. It is impossible to
prejudge all of the variables in the vast array of tyres and the adverse conditions or situations to
which the tyres may be exposed to. Therefore some circumstances may require additional attention
from the installer. Punctureseal is designed to extend tyre life and protect against flats, the
formulation will not fail to perform if proper procedures are followed. Foreign substances can ruin
the formulation, such as water. Punctureseal is a balanced formula and the addition of water can
prevent the product from performing properly. Contamination of grease or oil in the tyre will
prevent Punctureseal from clinging to the inner surface of the tyre and will also prevent it from
making a permanent repair. Heat is a major factor that causes premature tyre failure.
Punctureseal is formulated to reduce and dissipate heat in normal tyre exposure. When a tyre is
exposed to extreme heat for extended periods of time, not only will the tyre eventually disintegrate,
it will effect the performance of Punctureseal. To enhance Punctureseal’s performance when
exposed to extended extreme adverse heat and overloading (which increases the heat factor)
situations, always increase the application amount of Punctureseal (at the time of the initial
application) by 10% to 20%, this will allow additional protection against long term excessive heat
exposure.
INSTALLATION TIPS
TYRES OR TUBES FITTED WITH LONG (spring type) VALVE CORES We recommend that spring type valve cores be discarded and replaced with short valve cores. If you
use the long spring type cores, we recommend that you install Punctureseal manually with the Quick
Chuck or dual wheel application service tools. The VCR is not designed for spring type cores.
SPLIT RIMS - CAN BE DANGEROUS KILLERS!!!
Caution must always be taken when using split rims which are infamous for maiming or killing many
tyre personnel. It is best to discontinue the use of all known dangerous style split rims as soon as
possible. In the interim, if you are going to deflate tyres to install Punctureseal, utilize all precautions
recommended by tyre/rim manufacturers and always use the tyre cage when re-airing the tyres. If
you are going to install Punctureseal into inflated tyres with problematic type split rims while
mounted on the vehicle, we suggest using the "alternate installation method" (see Installation on
equipment with dual wheels section).
ZIPPERS, the radial tyre phenomenon A "Zipper" is a circumferential sidewall rupture that occurs in steel belted radial tyres. The rupture
normally occurs in the flex area of the sidewall, releasing a blast of air that has caused serious
damage and/or injury. Under inflation causes sidewalls to become over stressed by excessive flexing
and the tyre temperature increases dramatically.
The steel belts are being over flexed from under inflation and structurally the steel deteriorates. The
deterioration accumulates each time the tyre is run underinflated, causing irreversible degradation.
Heat is an accompanying factor that increases to a point where rubber and various tyre components
will actually melt and/or delaminate.
Eventually the tyre self-destructs. The premature tyre failure can happen at any time and it could
happen months after the tyre had been run underinflated. The only known and proven preventative
is Punctureseal Tyre Life Extender/sealer, preferably applied at the time the tyres are new; thereby
preventing most under inflation and air/moisture from migrating. This attribute has never been
duplicated by any other tyre additive/sealant (all Punctureseal testing is proven and documented).
TUBES Tubes are not considered one of man’s most ingenious inventions. In fact, the only reason tubes
were invented was because tyres and rims would not hold air. Even though the tubeless tyre has
been around for many years, there still remains a great deal of equipment out there that utilizes
tubes. There are tyre personnel that will insert a tube into any tyre that will not hold air pressure,
this idea is only a temporarily stop gap, not a true solution.
A tube’s thickness, strength, elasticity and reliability is unpredictable. If your equipment should
require tubes in the tyres, be sure to use radial tubes. The initial cost may be slightly more, however
the savings and reliability is greatly increased.
Punctureseal is formulated to reduce and dissipate heat in normal tyre exposure. When a tyre is
exposed to extreme heat for extended periods of time, not only will the tyre eventually disintegrate,
it will affect the performance of Punctureseal. To enhance Punctureseal’s performance when
exposed to extended extreme adverse heat and overloading (which increases the heat factor)
situations, always increase the application amount of Punctureseal (at the time of the initial
application) by 10% to 20%, this will allow additional protection against long term excessive heat
exposure.
By installing Punctureseal into a tube, the problem can be reduced as Punctureseal will act as a
puncture sealer at a cost less than that of a tube. Tubes squirm inside of a tyre at higher speeds, if
the puncturing object is left in, it may rip the tube, at which point even Punctureseal cannot help.
We recommend that nails be removed on a routine basis and the tyre’s air pressure maintained at
maximum tyre PSI (recommended by tyre manufacturer.) to reduce tube squirming.
WE DO NOT RECOMMEND PUNCTURESEAL TO ’REPAIR DAMAGED TUBES’
It is impossible to know how badly the tube may be damaged in a tyre that has been run flat. Since
Punctureseal inception , experienced tyre men have stated that Punctureseal has eliminated
approximately 75% of their flats in tube-type tyres. Tubes are extremely unpredictable. A small
puncturing object may cut a tube far beyond Punctureseal s ability to seal. A tube squirms inside of
a tyre that is used on a high speed vehicle (35 mph/50kph and up). The squirming action may cause a
puncturing object to rip the tube. To obtain a 75% reliability factor, it is recommended that a tyre
inspection program be established, to remove the puncturing objects and immediately drive the
vehicle, assuring that Punctureseal’s clot/repair is forced well into the wound as the tyre and tube
flex (maintain maximum tyre air pressure to further increase reliability).
USING PUNCTURESEAL TO REPAIR A FLAT (tubeless tyre) Punctureseal can be used as a repair method on tubeless tyres. If the tyre personnel inspects the
damage and is assured that the wound was caused by a puncturing object that is less than ¼ "/ 6mm
diameter, the cords are not severely damaged, the tyre has not been run flat (which causes a badly
damaged inner casing with no visible outer damage) and the wound is free of any foreign substance
(grease, oil, etc.), then the proper amount of Punctureseal can be installed. After installation, pull
the puncturing object out and rotate the tyre or drive the vehicle allowing the tyre to flex. Re-air the
tyre to the proper air pressure. It is important to remember that in order to check air pressure after
the installation of Punctureseal, it is necessary to blow some air into the valve stem. This will clear
any Punctureseal residue that may be in the valve stem (see Maintenance Requirements section).
UNABLE TO PUSH PUMP HANDLE DOWN Never try to force the pump handle down. If the handle will not move, make sure that the shut-off
valve is in the open position or that the valve core is in fact out of the valve stem. Since the core
extraction is done by "feel", it can sometimes be left only partially removed. Push the knob down
and completely retighten the valve core. Be sure that the VCR is snapped onto the valve core before
unscrewing the knob. Holding the knob with a firm downward action, undo the core, making sure
that the clicking (back-threading) sound is felt, then let the knob and core recede into the chamber.
If this procedure doesn’t work, remove the VCR from the Quick Chuck. Then remove the core by
hand, place a finger over the valve stem to minimize the air loss, attach the Quick Chuck directly on
to the valve stem and install the proper amount of Punctureseal. Reverse the procedure to replace
the core by hand (you may lose 2 to 3 lbs of air using this method). If the valve core becomes
clogged, it is important to clean the Punctureseal fibres and residue off before reinstalling into the
valve stem.
VALVE CORE RECOMMENDATIONS There are two commonly used valve core styles. The most modern preferred style is the core
without a visible spring. While the other contains a spring on the bottom and is regarded as the old
style, the Deluxe Valve Core Remover (VCR) is designed to accommodate the short modern valve
cores. The spring type cores are notorious for hanging up in the valve stem or the VCR. It is our
recommendation that all valve cores used be of the short style without the visible spring.
VALVE CORE WILL NOT UNSCREW If the valve core will not unscrew easily, then you must inspect the valve stem making sure it is
round. Look at the threads to be assured that they are not damaged or clogged with mud or debris.
Unscrew the core by hand to free it and clean out the threads. Once the core unscrews easily, you
can then commence with installation.
AIR SOURCE REQUIREMENTS Punctureseal will never fail to perform as claimed, providing you follow the guidelines noted
throughout this installation manual. Punctureseal’s formulation is designed to withstand many
adversaries with one major exception, "WATER".
It is imperative that the compressors be drained daily to assure that water is not introduced into the
tyre along with the air. Install water traps and/or air dryers. The Punctureseal formulation can
tolerate a small amount of water, however, an excessive amount will break down the Thixotropic
properties and render the composition useless.
Some compressors blow oil; always check for this problem. Oil or grease will contaminate the
formulation.
CLEARING THE VALVE CORE After installing Punctureseal, clear the excess Punctureseal from the outer portion of the valve stem.
There are several ways to effectively accomplish this. Blow air into the tyre, this will clear
Punctureseal from the valve stem and core, then set the tyre to proper pressure. If air is not readily
available, a squirt bottle can be used. Just squirt water on the end of the valve stem, this will wash
out the Punctureseal that is on the outside of the valve core. Another way is to get a small sharp
object (stick or wire) and a rag to wipe out the excess from the inner edge of the valve stem.
Since Punctureseal does not contain harmful or corrosive chemicals, it will not harm the valve stem
or core if they are not immediately cleaned. The worst thing that can happen will be that
Punctureseal will cure on the outside portion of the valve core and may prohibit adding or checking
air pressure at a future date. If this happens, simply remove the valve core, rinse with water and
reinsert.
CHECKING AIR PRESSURE After the tyre has been serviced with Punctureseal, it is imperative to blow a slight amount of air
through the valve stem, prior to checking air pressure. The reason being, is that Punctureseal coats
the inside of the valve stem and valve core, as air escapes out of the valve stem, past the valve core,
Punctureseal cannot differentiate between checking air pressure or a defective valve core.
Punctureseal is designed to stop or hinder any escaping air. After a tyre has been treated with
Punctureseal, the need to have an air pressure check and inflation program is virtually eliminated.
The tyre inspection and pressure checking can be accomplished during the routine Preventative
Maintenance program (PM). This labour saving factor alone will subsidize the installation of
Punctureseal Tyre Life Extender/sealer.
TYRE BALANCE Punctureseal cannot cause a balance problem. Tyres must be balanced prior to installing
Punctureseal. It is recommended that these procedures be followed, prior to installing Punctureseal:
Replace any unapproved outside-in repair (plugs or string repairs), then repair properly.
Check for out-of-round rims
Check for out-of-round tyres
Check suspension for worn and/or loose parts
Spin balance tyres
If there is an existing problem in the front suspension, wheels and/or tyres that is not corrected prior
to installing Punctureseal, the adverse effects may not allow Punctureseal to coat the inner surfaces
of the tyre/wheel thereby aggravating the situation.
There are two known tyre problems that can affect Punctureseal's performance:
1. Improper repairs and string plugs, which often add excessive weight to a portion of the tyre
creating an adverse effect in balance, thereby causing problems with Punctureseal’s ability to evenly
coat the interior of the tyre.
2. All tyres have some sort of rib or pebble pattern on the inner liner of the tyre. This pattern is a
result of the blatter mould during the manufacturing process. These patterns have no function in
the performance of the tyre.
A problem normally occurs from large ribs in a V shaped pattern and are located on the entire inner
surface of the tyre. If these ribs are tall enough they will prevent Punctureseal from flowing evenly
within the tyre. As the Punctureseal is trapped and collects in the V shaped ribs there may be
enough mass to cause temporary vibrations. Large ribs have been found in only a few tyres, for
example a 31X10.5-15 Highway type tyre on a light truck/sports utility vehicle. Check with
Punctureseal’s Technical Team on tyres containing large V shaped ribs.
REBALANCING TYRES containing Punctureseal The centrifugal force inside of a tyre traveling at speeds over 30 mph / 50 kph will cause any regular
tyre sealant (with the exception of Punctureseal) to migrate and concentrate at the centre of the
tread area. This will definitely create a balance problem.
It is extremely important to understand how Punctureseal’s Thixogel performs (a proprietary
process not found in any other tyre sealant). Thixogel allows Punctureseal to cling to the inner
sidewalls and the entire inner surface of a properly balanced and true (round) tyre/rim. The
centrifugal force which is created within a high speed tyre actually stretches the Punctureseal much
like a rubber band, however, it will not pull the Punctureseal off the inner surface of a properly
balanced tyre/rim. An out of round or extremely out of balance tyre/rim can create enough adverse
forces to pull Punctureseal off the sidewalls.
On passenger type vehicles (where balance is critical), if a tyre/rim requires in excess of 3 ounces of
weight, the tyre/rim should be inspected for defects and corrected prior to installing Punctureseal.
Punctureseal cannot correct an existing problem and may aggravate the situation.
The proper amount of Punctureseal for highway speed vehicles has been calculated to provide a
complete coating to the inner surface of the tyre/rim, allowing for absorption into an average casing
and still maintain a reserve. The reserve (approximately 20% of the installed amount) is extra
Punctureseal that will shift/move and eventually settle to the bottom of the tyre after the vehicle is
stopped. Each time a puncture occurs, a small amount of reserve is used and the balance of the
reserve constantly redistributes as the tyre rotates, thereby providing and even coating.
Any high quality speed balancer may be used to rebalance a tyre containing Punctureseal.
It is imperative to distribute the reserve that has settled, prior to taking a reading.
1. To distribute the reserve, mount the tyre/rim onto the balance machine and start the machine to
spin. It is very important, when tightening the balance machine spinner against the tyre/rim, that
the cone is cantered, as the slightest misalignment causes an inaccurate reading.
2. Take a wooden stick (similar to a small baseball bat) or a light hammer/mallet and tap the tread
area as the tyre spins (the balancer’s speed and short spin duration does not allow the reserve to
disperse without repeated spin cycles and constant tapping).
3. To disperse the reserve thoroughly, repeat the spin cycle at least 3 times in rapid succession while
tapping constantly.
4. At the completion of the third spin cycle, take a reading and place the weights as indicated.
DO NOT RE-SPIN THE TYRE, the tyre is now balanced and can be mounted on the vehicle.
Any time the balance machine is re-spun after the reserve has settled will result in an inaccurate
reading and will indicate that weights are needed in different locations. This movement of the
reserve is the reason you will not get a 00 reading, unless the tyre/rim was in-balance initially and
the reserve was properly distributed.
MAINTENANCE REQUIREMENTS
AIR PRESSURE CHECK Once a tyre has been treated with Punctureseal, frequent air pressure checks will not be necessary,
although visual tyre inspections are still very important. Air pressure checks can be accomplished
during the routine vehicle Preventative Maintenance (PM) schedules. In order to check air pressure,
remember that Punctureseal is standing on guard to prevent air loss. If you check air pressure
without first blowing a slight amount of air into the valve, Punctureseal will most likely seal off the
valve core. It is important to clear the valve core and stem of any Punctureseal prior to checking air
pressure. This is accomplished by simply blowing a small amount of air through the valve and into
the tyre, this will clear the passage and allow for proper air pressure reading. Punctureseal will not
ruin the valve core. If the core gets clogged, remove and rinse with water and reinstall (see
installation tips).
TYRE INSPECTION
TUBE TYPE TYRES
For tyres that are fitted with tubes, it is recommended that a tyre inspection program be instigated
for high speed vehicles (over 35 m.p.h.). Tubes are notoriously unreliable, and squirm inside the tyre,
especially around corners. As the speed increases, a nail in the tyre has the potential to rip the tube,
therefore, Punctureseal will be of no help. It is always best to pull nails, rotate the tyre and drive the
vehicle forcing Punctureseal well into the wound. If a large object has punctured the tyre and it is
not losing air, leave it in, and have the tyre repaired as soon as possible. Punctureseal will normally
seal around a puncturing object holding the air in the tyre. If the wound is dangerous, the tyre will
lose air pressure.
TUBELESS TYRES
A driver should continue performing routine visual tyre inspections to spot potential tyre problems.
Nails can be pulled, then rotate the tyre or drive the vehicle. The most cost effective time for this
may be during routine PM inspections.
PROBLEMS AND REMEDIES
TYRE UNABLE TO HOLD AIR PRESSURE
ONLY AIR IS ESCAPING
This is a positive indication that there is an insufficient amount of Punctureseal in the tyre, or the
tyre may have internal damage. Re-enter the wound with a pointed object (ice pick) and move it
back and forth. As it is extracted, it will draw Punctureseal through the wound. If no Punctureseal
can be drawn through the wound, then definitely there is not enough sealant in the tyre to create a
coating and provide a reserve. Perhaps not enough Punctureseal was initially installed or the tyre
has received numerous punctures or a dangerous puncture that has left an insufficient amount of
Punctureseal in the tyre.
AIR AND PUNCTURESEAL BLEEDING
(Punctureseal can not mask or hide a dangerous wound)
Air and Punctureseal will bleed out of a wound, only if the wound is too large or the puncturing
object has sufficiently damaged the tyres inner structure, this is a potentially dangerous tyre.
Dismount the tyre and inspect, do not plug or repair by any external method! The bleeding effect is a
major proprietary function of Punctureseal, providing an unparalleled safety factor.
AIR LOSS DUE TO AIR MIGRATION
Due to the various locations of air migration, it may take more than 3 to 5 miles (5-8 km) of driving
for Punctureseal to eliminate the problem air leaks. If air migration persists, increase air pressure
10% to 15% (do not exceed maximum allowable tyre pressure as recommended by the tyre
manufacturer) and drive vehicle approximately two days, then reduce air pressure to normal setting.
By increasing air pressure, it opens the pores and forces Punctureseal into the problem area,
eliminating air migration.
SIDEWALL PUNCTURE
Punctureseal s warranty is for the tread area of the tyre only. The tread area has sufficient rubber
and ply’s for adequate flexing and recovery. Sidewall construction is extremely thin, especially in
radial tyres. Punctureseal is capable of providing minor repairs to the sidewall/crown areas. But due
to vast variance in tyre manufacturing and subsequent wounds that may severely damage the tyres
structural integrity, Punctureseal does not consider sidewall/crown repairs as positive repairs.
MAJOR DAMAGE
If a tyre serviced with Punctureseal receives major damage, it cannot hold air pressure. Punctureseal
is designed to slowly release air pressure, providing a safety factor that is not found in any tyre.
Regardless of how small or how large the wound may be, Punctureseal cannot mask or hide a
dangerous wound. Depending on the severity of the wound, Punctureseal and air will bleed, until all
of the air and Punctureseal have been exhausted. This safety feature assists the driver in executing a
controlled and safe stop. Punctureseal is used in emergency and law enforcement vehicles primarily
for safety.
UNABLE TO ADD AIR TO THE TYRE
VALVE CORE BLOCKAGE
If air will not go into the tyre, check the valve core, it may be clogged. This will occur if air pressure
was checked without first clearing the Punctureseal from the valve stem, or if there is a defective
valve core (see installation tips). If the core is known to be in good condition, then simply rinse it
with water and reinstall. It may be more cost effective to replace a valve core.
HOW TO REPAIR A TYRE CONTAINING PUNCTURESEAL
TUBELESS TYRES
Dismount the tyre and wipe the Punctureseal away from the damaged area with a damp rag, dry the
area that is to be repaired, buff and repair as normal. If the repairs (including mounting and
dismounting) are completed within 2 hours, it is not necessary to remove the remaining
Punctureseal from the tyre. Remount and add any additional Punctureseal that may have been lost
through the wound or that was removed to perform the repair.
TUBE TYPE TYRES
Tubes can be easily repaired. Punctureseal will not cause a problem, simply spread the tube over an
anvil or other work area. Move the Punctureseal away from the damaged area by applying finger
pressure on the tube and pressing away from the damage, thereby forcing the Punctureseal away
from the wound. Wipe the area with a damp rag, dry thoroughly and repair as normal. We
recommend using a hot patch. If you do use cold patches, be aware that some adhesives are
affected by Ethylene Glycol (a chemical used in the Punctureseal formulation). This type of adhesive
is not common, however it is not compatible. To check for compatibility, rub Punctureseal on a dry
sample of the adhesive. If the adhesive does not soften or dissolve, then there should not be any
adverse reaction. Make sure after repairing the tube to replace any Punctureseal that has been lost.
We recommend that radial tubes be used due to their superiority (see installation tips).
RETREADING TYRES CONTAINING PUNCTURESEAL
PREPARING THE TYRE FOR RETREADING Vacuum the Punctureseal out of the casing and dispose of as per MSDS requirements, then wipe the tyre with a damp rag (plain water), wipe dry. Punctureseal leaves no residue. Leave puncturing objects in for the inspector to pull out and mark for repair. All punctures that have been previously sealed and repaired by Punctureseal are considered a positive/secure repair and require no special attention; however, at the discretion of the inspector the Punctureseal repair can be removed without any problem and a standard repair can be performed. If the tyre has been left open and the Punctureseal has cured, it can be removed with an air hose, simply blow air into the tyre. Punctureseal has no adhesive characteristics.
TYRE INSPECTION The re-tread inspector should repair all wounds that have not been repaired by Punctureseal, no special repair procedure is necessary. Wounds that have been repaired by Punctureseal may not show up on NDI equipment or other such diagnostic equipment, but will show up as a small clot of fibres protruding from the inner casing, which is not necessary to disturb unless an additional repair is required or the re-treader wishes to do a repair. The Punctureseal that is embedded in the wound is fully compatible with all re-tread methods and will assist in providing a sound casing to enhance the re-tread.
RETREAD COMPATIBILITY All components of the Punctureseal formulation have been tested and are fully compatible with all tyre compositions and re-treading methods. Since Punctureseal International, Inc.’s inception in 1969, actual in-field use in the real world and countless re-treaded casings have provided sufficient data to ensure that Punctureseal does not have a compatibility problem. For the very best results, we recommend that Punctureseal be installed into a newly re-treaded tyre prior to the first full air inflation. Air the tyre to approximately 20 lbs. and rotate, allowing the Punctureseal to coat the inner surface of the tyre casing. The air pressure will force Punctureseal into any missed nail holes, improper repairs, damaged Punctureseal repair/clots and imperfections that may be in the casing. Then continue to re-air the tyre to its proper air pressure. After the tyre is removed from the cage it should be rotated, allowing the Punctureseal to continue coating and eliminating any additional imperfections opened by the additional air pressure. Once the tyre is installed onto the vehicle, the weight of the vehicle and heat generated from rolling friction, plus the flexing of the tyre will force Punctureseal deep into the casing, sealing the entire casing from migrating air.
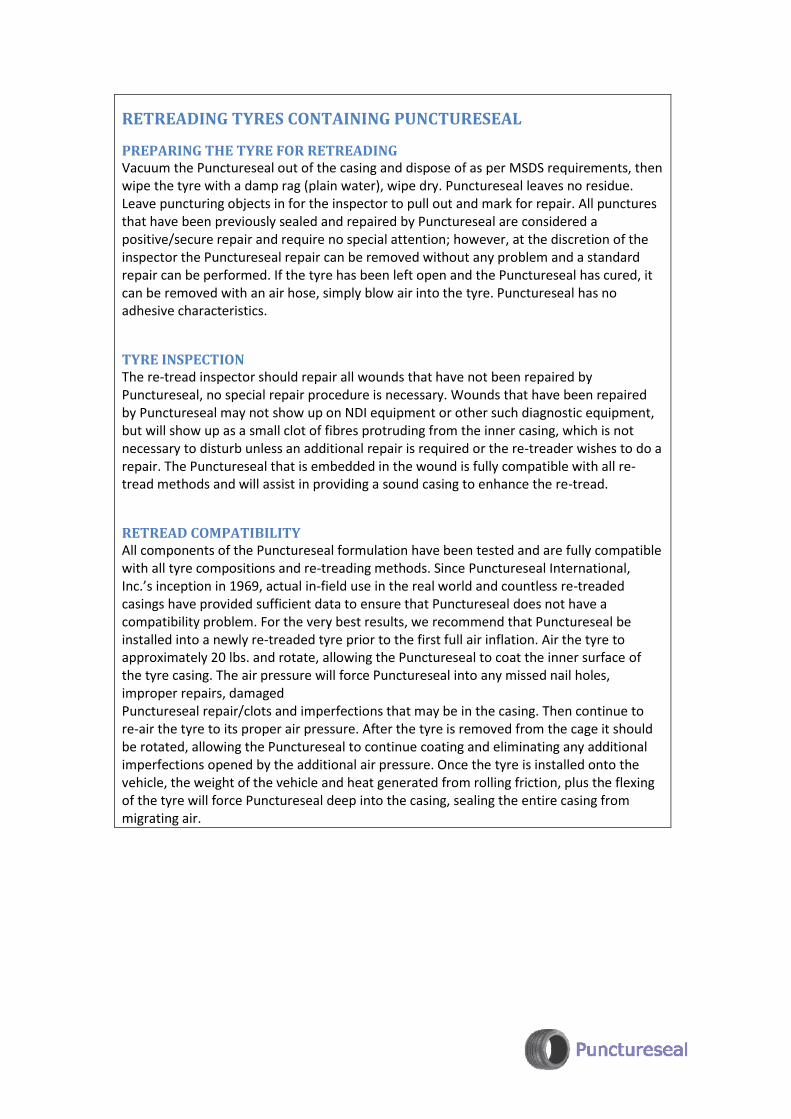
INFLATON OF TYRES
OVERINFLATION leads to: 1. Increased tendency toward bruises and impact breaks.
2. More cuts and snags.
3. Rapid wear in the centre portion of the tread.
4. Excessive strain on bead and rim.
5. Abnormal tyre growth, causing tread stretching and tread cracking.
6. Abnormal stresses and strains in the tread, leading to tread separation.
7. Harder riding, reduced cushioning and increased equipment maintenance costs.
8. Reduced traction and skid resistance.
UNDERINFLATION leads to: 1. Excessive heat, causing ply separation.
2. Tread separation.
3. Irregular tread wear.
4. Premature tyre failure.
PROPER INFLATION It’s the air that carries the load, not the tyre. When tyres are inflated to the recommended air
pressures, the cord body is able to do its job of flexing without injury. When tyres are either over-
inflated or underinflated, satisfactory service cannot be obtained. Premature tyre failure is eminent.
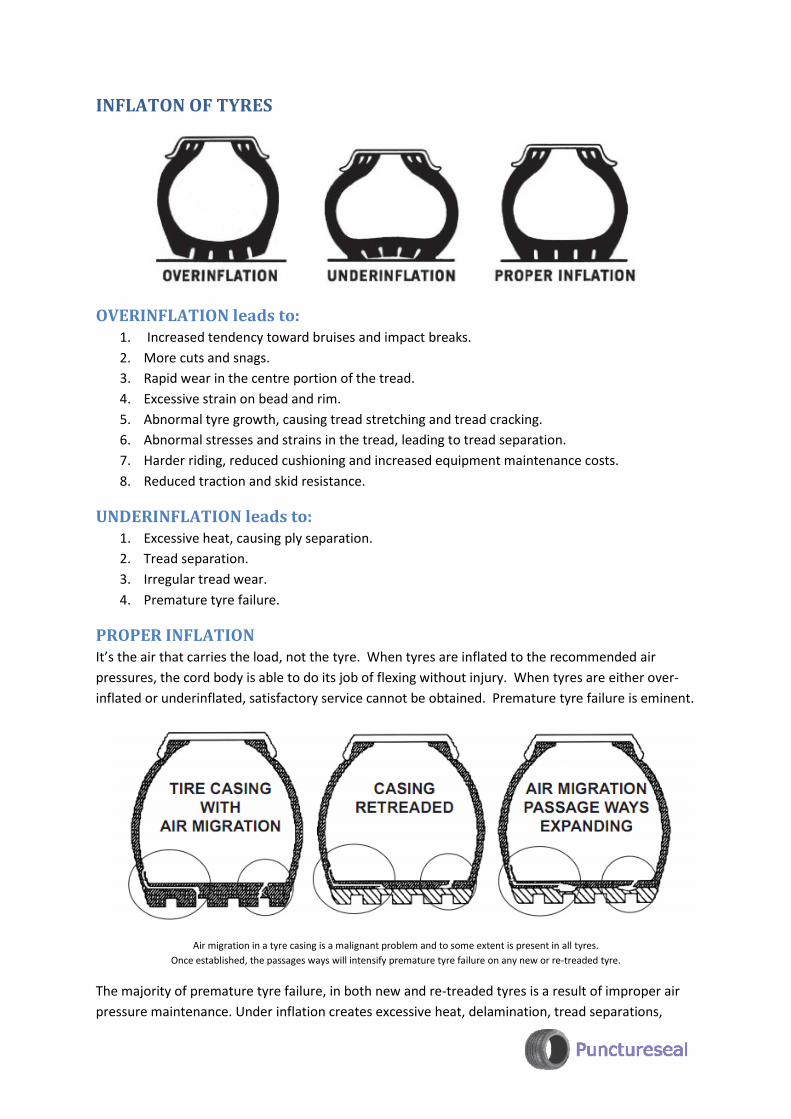
Air migration in a tyre casing is a malignant problem and to some extent is present in all tyres.
Once established, the passages ways will intensify premature tyre failure on any new or re-treaded tyre.
The majority of premature tyre failure, in both new and re-treaded tyres is a result of improper air
pressure maintenance. Under inflation creates excessive heat, delamination, tread separations,
blowouts and Zipper ruptures. Every time the tyre is driven underinflated the hidden internal
damage increases. The damage accumulates until the tyre eventually disintegrates. The constant
resetting of air pressure is merely a bandage and does not cure the malignant problem. To cure the
problem one must eliminate the source, the only known and proven way to eliminate porosity and
air migration is to install Punctureseal Tyre Life Extender/sealer.