team hybrid handcycles installation manual and … · team hybrid handcycles installation manual...
TRANSCRIPT

TEAM HYBRID HANDCYCLES
INSTALLATION MANUAL AND OWNER’S GUIDE
July 2015

2
INTRODUCTION
Thank you for purchasing your Team Hybrid Handcycle. Since 2002 our hancycles have transformed the lives of hundreds of people like you around the world, and we remain committed to the excellence and reliability of our product. This manual is designed to assist you in installing and operating your Handcycle. To get the most out of your handcycle and for your safety, it is important for you first to thoroughly read and understand all of the information contained in this manual. If you have any questions or concerns that are not addressed here, please contact your dealer, or feel free to contact us direct.
Team Hybrid, Unit F3, Knowle Village Business Park, Mayles Lane, Knowle, Fareham, Hampshire, PO17 5DY
Tel: +44 (0)1329 832 068 Email: [email protected] Web: www.teamhybrid.co.uk

3
CONTENTS
1 SPECIFICATION.
2 RELIABILITY FEATURES
3 IMPORTANT SAFETY WARNINGS
4 INSTALLATIONS
4.1 Installation Requirements
4.2 Included Parts List
4.3 Installing the Docking Tube
4.4 Adjusting the Upright Position
5 OPERATIONS
5.1 Safety Checklist
5.2 Operation
5.3 Safe Operation Guide
5.4 Docking your Handcycle
5.5 Undocking your Handcycle
6 BATTERY CHARGING & MAINTENANCE
6.1 Battery Overview
6.2 Battery Life
6.3 Battery Care
6.4 Battery Charging
6.5 Battery Disposal
7 MAINTENANCE
7.1 Adjusting Top Derailleur (Cougar S24, Coyote S24
7.2 Adjusting Bottom Derailleur (Cougar S24, S8, Coyote S24, S7
7.3 Adjusting Nexus Hub Gears (Coyote S8)
7.4 Adjusting V Brakes
7.5 Adjusting Cable Operated Disc Brakes
7.6 Tyres & Tubes
7.7 Cleaning your Handcycle
8 CONSOLE INSTRUCTIONS (COUGAR-VIPER SPORT)
9 FAULT FINDING (COUGAR-VIPER SPORT)
10 TRAVELLING BY AIR WITH YOUR COUGAR-VIPER

4
1 SPECIFICATION
Undocked weight (w/o batteries)
Viper Classic-Sport
Cougar S8-S24
Coyote S7-S8-S24
Kiddy Coyote
Kiddy Viper
Docking Tube & Hardware
Single Battery
12.5kg
15.35kg-15.55kg
9.3kgs-10kg-10.45kg
9.65kg
11.85
1.7kg
2.5kg
Drive Wheel
Viper Classic, Kiddy Viper (Motor)
Viper S200 (Motor)
Cougar (Motor)
Coyote S24 (Cassette)
Coyote, Kiddy Coyote S8 (IGH)
Coyote S7 (Freewheel)
200rpm 36V 33A Brushed
200rpm 36V/48V 20A Brushless
250rpm 36V/48V 20A Brushless
24 Speed Triple Chainset
8 Speed Internal Geared Hub
7 Speed Single chainwheel
Battery Specification Lithium ion 11.5Ah (414Wh)
Lithium ion 8Ah (288Wh)
Approximate range (11.5Ah battery)
Viper Classic, Sport, Kiddy
Cougar
10-15 miles (16-24km)
10-40miles (16-64km)
Maximum tested speed (flat terrain)
Viper Classic, Viper Sport
Kiddy Viper
Cougar
Coyote
10mph (16kph)
4mph
15mph (24kph)
As fast as you can pedal
Wheel size
Adult
Kiddy
20”
16”
Brakes V-Brakes/Disc
Team Hybrid’s policy is that of continuous improvement we therefore reserve the right to modify or change components without prior notice given.

5
2 RELIABILITY FEATURES
Our Viper and Cougar hub motors are renowned for their reliability, ruggedness as well as numerous safety features, which protect against damage in the event of electronic malfunction or inappropriate use.
Viper Classic
• Automatic shutdown in the event of battery under-voltage.
• Automatic shutdown in the event of overheating.
• Motor activation only after the twist grip is turned beyond a certain angle.
• The throttle automatically returns to the zero position when released.
• Button operated on/off battery switch.
• On/off key switch mounted on the controller.
• Quick release batteries.
• Hi quality Panasonic battery cells with BMS (Battery Management System).
• Docking system fatigue testing including drop testing over 6,500 times and multi drum (rolling road) test of 200,000 cycles.
• Stalled condition protection test & maximum thermal drive test.
• Slime puncture resistant inner tubes.
Viper S200-Cougar S8, S24
• Overload protection at 20A
• Controller circuit board waterproofed with silicone potting compound.
• The throttle automatically returns to the zero position when released.
• Quick release batteries.
• Brake lever cut out switch.
• Hi quality Panasonic battery cells with BMS (Battery Management System).
• Button operated on/off battery switch.
• Docking system fatigue testing including drop testing over 6,500 times and multi drum (rolling road) test of 200,000 cycles.
• Slime puncture resistant inner tubes.

6
3 IMPORTANT SAFETY WARNINGS
Please read and understand this entire manual before using your handcycle. If you do not understand any portion of this manual, please contact your dealer or Team Hybrid for assistance.
Riding a wheeled vehicle contains certain inherent risks and if not operated with care they can be dangerous. This manual contains many cautions and warnings. It is important that you read and understand all of them. In particular, read and understand the SAFETY CHECKLIST and SAFE OPERATION GUIDE that are found in the OPERATIONS section of this manual.
• Unless you are mechanically minded, we strongly recommend that a qualified technician, such as a bicycle mechanic or wheelchair dealer, perform the initial setup and installation of this product.
• Your new handcycle (Viper/Cougar) features a powerful hub motor. As with any vehicle, powered or otherwise, serious injury to the rider or bystanders could result if the handcycle is not operated in a safe and controlled manner at all times.
• Three-wheeled vehicles can become unstable on slopes or when turning at high speeds if not operated in a safe and controlled manner.
• Your handcycle is intended for use during daylight hours, if riding after daylight hours you are advised to attach the appropriate rear and front lighting (not supplied).
• The maintenance of your machine is your responsibility. Poor maintenance can greatly increase the risks involved in operating your cycle. We recommend periodic safety inspections and maintenance by a qualified bicycle mechanic or by a wheelchair dealer.
• If you have to alter the position of your brake levers, handlebars, or stem, it is necessary to check that your brakes work properly. It is possible to stretch the cables, or clamp the cables in suck a way that the brakes will no longer work. Your brakes may need to be re-adjusted after adjusting the height of your handlebars or stem. Failure to do this could result in a loss of control of your cycle, which could lead to injury or death.
• The stem expander bolt and handlebar binder bolt must be securely fastened. If they are not, you may lose control of your cycle. There should be no movement of the handlebars or the stem relative to the front wheel, and no up or down movement of the handlebar possible.
• Cut or damaged tires, loose nuts, or other damage may result in losing control of your cycle. Have the condition of your brakes and wheels checked by your dealer.
• If your tires are under or over inflated, you may lose control of your handcycle. Always measure the air pressure with an accurate tire pressure gauge.
• Your powered handcycle is equipped with various saftey mechanisms to prevent damage to the motor or electronics. Modifying or disabling these mechanisms can result in damage or failure of the system, and may result in injury to the rider.
The single most important safety item that you can do to avoid accident or injury is to be an alert rider. Being alert means that while you are riding, you should not focus on talking to someone, but should be watching the road or environment in order to avoid potholes, pedestrians, other riders, etc. If you stay alert, you can avoid many of the common causes of injury. The next most important safety tip is to ride safely. Obviously engaging in risky riding behaviour can increase your chances of getting in an accident or of getting hurt. Riders that attempt to do tricks or to go over dangerous terrain are more likely to get injured than other riders all things being equal. If you are a parent, you should also be sure that your child can handle riding a manual or electric handcycle and is familiar with the safety tips. If a child is not ready or capable of riding a manual or electric handcycle, then this can be classified as risky behaviour. Also, make sure that the handcycle that you have selected is appropriate for your child's abilities.
Another preventive safety procedure deals with riding habits and visibility. Make sure that when you are riding that you obey all applicable traffic rules and regulations. Often, if you do something that drivers or pedestrians do not expect on a handcycle you can get into trouble. Also be sure to wear visible clothing so that other riders and drivers can see you and adjust their driving style accordingly. Moreover, riding at dusk, after dark, or at times of poor visibility is dangerous do not ride your handcycle at night without lights.
Wearing a helmet is essential; the helmet protects a rider against the worst kind of injury, an injury to the head. Helmets protect against collision type accidents where a rider collides with a car, truck or standing object. The helmet helps to cushion the blow.
7 IMPORTANT
IMPORTANT
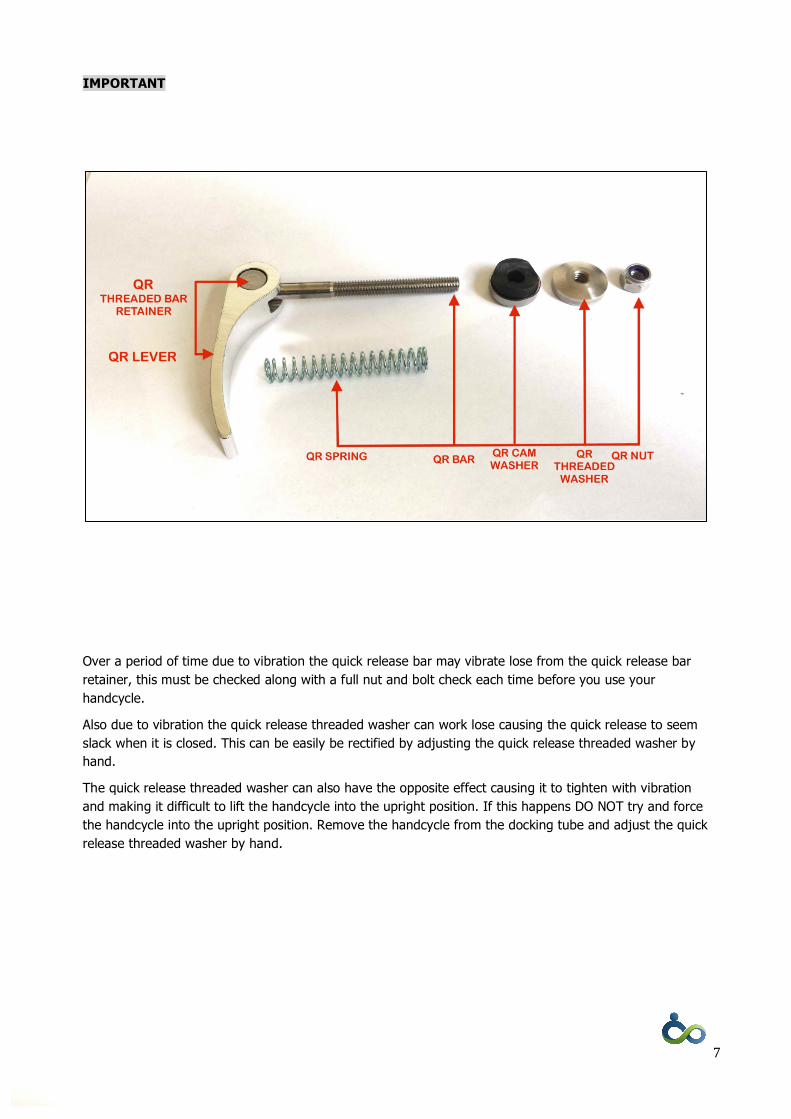
Over a period of time due to vibration the quick release bar may vibrate lose from the quick release bar retainer, this must be checked along with a full nut and bolt check each time before you use your handcycle.
Also due to vibration the quick release threaded washer can work lose causing the quick release to seem slack when it is closed. This can be easily be rectified by adjusting the quick release threaded washer by hand.
The quick release threaded washer can also have the opposite effect causing it to tighten with vibration and making it difficult to lift the handcycle into the upright position. If this happens DO NOT try and force the handcycle into the upright position. Remove the handcycle from the docking tube and adjust the quick release threaded washer by hand.

8
4 INSTALLATION
Although a competent handyman with the appropriate experience can install your handcycle, we strongly recommend that a qualified technician, such as a bicycle mechanic or wheelchair dealer, perform the initial setup and installation of this product.
The primary factor to keep in mind during installation and adjustment of your handcycle is the distance the cycle raises the wheelchair casters above the ground when in the correct mounted position. In most cases, this distance should be approximately 5cm (2”). If this distance is much less than 5cm (2”), you may have difficulties crossing obstacles such as ramps or bumps without touching the wheelchair casters on the ground and lifting the front wheel off the ground (resulting in a temporary loss of power and ability to brake). If this distance is much more than 5cm (2”), on the other hand, you may encounter difficulties rotating the Viper™ into its fully upright position without assistance.
On the other hand if you know that the terrain is going to be fairly flat, the distance of the wheelchair casters can be lower than 5cm (2”).

9
4.1 Installation tool requirements
Tools required: 13mm and 10mm spanners, Allen Keys, Hacksaw, File.
4.2 Included parts list
Viper Power Cycle
Docking Tube with Plastic Liner.
Docking Tube Rear Fixing Brackets/Bolts/Nuts/Washers.
Docking Tube Front Fixing Brackets/Bolts.
Docking Tube Fixing Band.
Docking Tube Fixing Band Spacers/Bolt/Nut/Washers.
Docking Clamp Female complete assembled.
Docking Clamp Male complete assembled & pre fitted to the handcycle.
10
4.3 INSTALLING THE DOCKING TUBE
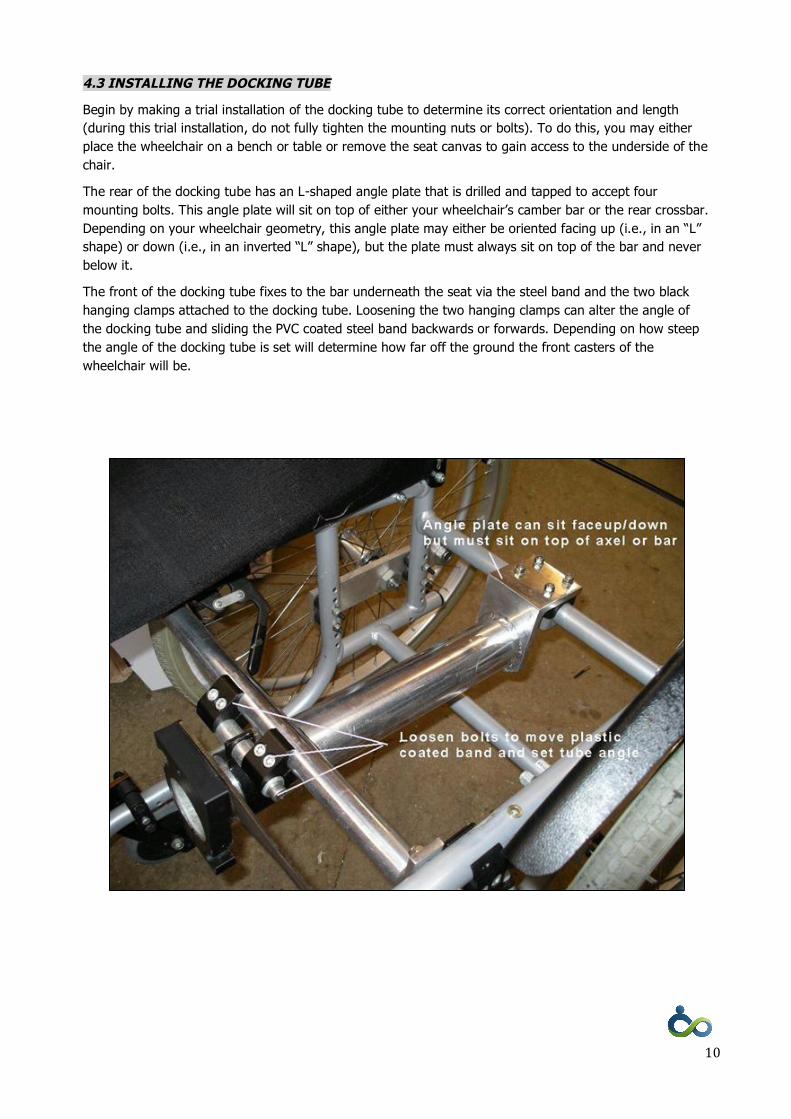
Begin by making a trial installation of the docking tube to determine its correct orientation and length (during this trial installation, do not fully tighten the mounting nuts or bolts). To do this, you may either place the wheelchair on a bench or table or remove the seat canvas to gain access to the underside of the chair.
The rear of the docking tube has an L-shaped angle plate that is drilled and tapped to accept four mounting bolts. This angle plate will sit on top of either your wheelchair’s camber bar or the rear crossbar. Depending on your wheelchair geometry, this angle plate may either be oriented facing up (i.e., in an “L” shape) or down (i.e., in an inverted “L” shape), but the plate must always sit on top of the bar and never below it.
The front of the docking tube fixes to the bar underneath the seat via the steel band and the two black hanging clamps attached to the docking tube. Loosening the two hanging clamps can alter the angle of the docking tube and sliding the PVC coated steel band backwards or forwards. Depending on how steep the angle of the docking tube is set will determine how far off the ground the front casters of the wheelchair will be.

11
Unless prearranged you will have to cut the docking tube to the correct length. This can be done with a hacksaw but it must be a straight and accurate cut, otherwise it is best done by an engineer with a chop saw. The docking tube should finish level or just behind the front of the seat canvas. If you are using a hacksaw to cut the docking tube to the correct length a straight accurate can be achieved using the following method.
First of all work out the length of the docking tube (best place is approximately 10mm behind the end of the seat canvas) then tightly mount the docking clamp. You can now use the face edge of the docking clamp as a straight edge and cut the docking tube. Finish off by chamfering the inner edges of the docking tube and liner also removing any burrs from the outer edges with a file.
Remount the docking clamp to the end of the docking tube, it is important that the docking clamp is fitted flush to the end of the docking tube. Make sure that the clamp is fitted with the sprung handle to the rear.
When the docking tube has been fitted replace the seat canvas.

12
The docking tube can be fitted in various positions, the only rule being that the angled plate should sit on top the rear tube or axle.
4.4 ADJUSTING INTO THE UP-RIGHT POSITION
At this point the handcycle will need to be adjusted so that it is in a perfect upright position and close enough for you to achieve proper reach. This is achieved by first docking the handcycle to your wheelchair. Tighten the two quick-release levers on either side of the frame to lock the clamps together. Ensure that both levers close securely, without any play or looseness. If there is any play, tighten them.
With the two QR levers securely tightened loosen the 8mmbolt on the male docking clamp, this will allow the handcycle to be positioned perfectly upright and/or towards or away from the wheelchair. When you are satisfied that the handcycle is positioned correctly tighten the 8mm bolt and the two 3mm grub screws.

13
5 OPERATION
5.1 Safety Checklist
Please run through the following safety checklist every time you operate your handcycle.
þ Ensure that the tyres on your wheelchair and on the handcycle are fully inflated to the pressures recommended by the tire manufacturers (the recommended maximum inflation pressure is usually printed on the side of the tire).
þ Ensure that the tyres on your wheelchair and on the handcycle have sufficient tread remaining and are not “bald” or damaged.
þ Ensure that your wheelchair wheels are securely attached to your wheelchair, and that there is no play in the wheels.
þ Ensure that there is no play or looseness in the docking tube, the steering column, or the handlebars, and that the handlebars are aligned perpendicularly to the front wheel.
þ Ensure that both brakes are working correctly and close securely on the wheel rim, particularly after the cycle has encountered water or after any handlebar or stem adjustments.
þ Ensure that your wheelchair maintenance is up-to-date, that there are no loose or missing parts, and that all necessary repairs have been completed. Ensure that your wheelchair rolls smoothly.
5.2 Operation
Ensure that both batteries are fully charged before use. Turn the active battery on and turn the power switch on the handlebars to the “On” position. Ensure that the wheelchair and handcycle brakes are disengaged ensure that your environment is safe, and slowly rotate the throttle towards you. Read the SAFE OPERATION GUIDE below before using your handcycle for the first time.
14
5.3 Safe operations guide
Your new handcycle features a powerful hub motor. As with any powered vehicle, serious injury to the rider or bystanders could result if the handcycle is not operated in a safe and controlled manner at all times. In addition, three-wheeled vehicles can become unstable on slopes or when traveling at high speeds if not operated in a safe and controlled manner.
• We recommend using an approved helmet at all times when using your handcycle. • If fitted, do not remove reflectors or other safety equipment from the handcycle. • Test your handcycle in a safe and flat environment away from vehicles, pedestrians, and
obstacles. • Do not spin the front tyre by abruptly turning the throttle to the fully on position, as this can result
in both excessive tire wear and premature battery discharge. • Be aware of your environment at all times when using your handcycle. • Never use earphones or other items, which may impede your ability to perceive or react to
danger. • When turning, reduce your speed and do not abruptly turn the handlebars. • Never perform stunts, race, or perform other intentionally unsafe activities in your handcycle. • Obey all laws pertaining to electric vehicles, electric mobility products, and electric bicycles that
apply in your jurisdiction. • If your jurisdiction permits travel on roadways, obey all traffic laws that may apply and treat other
roadway users with courtesy and respect. Because the handcycle has no electrical turn signals, use appropriate hand signals to indicate your intentions to other roadway users.
• When travelling on sidewalks and pathways, always give the right of way to pedestrians. • Use caution when travelling at night, in low light conditions, or if visibility is reduced for any
reason. We recommend against travelling using the handcycle during such times even when using lights.
• Approach and travel over ramps, curbs, and other sloping terrain at low speeds. Where possible, travel on sloping terrain perpendicular to the slope (i.e., pointing straight up or straight down the slope). If you have to travel on sloping terrain parallel to the slope, try to keep your center of gravity shifted towards the slope by leaning your body into the slope.
• Although all electrical connections on your cycle are weatherproofed (including the motor, controller, throttle, and all wiring), do not intentionally travel through puddles or other standing water with your handcycle and avoid travelling in the rain.
• Wet weather decreases brake performance. You will need more distance to safely stop in the rain, or on a wet or icy street. Rain also decreases visibility for the rider and for other vehicle operators. For these reasons, accidents are more likely in wet weather, and we recommend against using your handcycle in wet weather.

15
5.4 Docking your handcycle
The method for docking your handcycle will vary to some extent depending on factors such as your physical strength, balance, and coordination. You may require help the first few times you attempt docking until you learn the method that works best for you (see also our instructional videos located on YouTube).
Locate
Place the handcycle on its right side on the ground, either immediately in front of you or just to the right of you, within reach. Ensuring that the batteries are not mounted on the frame, lift the end of the frame so that the angled tip enters the docking tube that is mounted underneath your chair. The wheel of the cycle should be pointing towards the left. You may decide to use either one or both hands to do this (try grasping the steering tube underneath the handlebars with your right hand, with your left hand either stabilizing you in the wheelchair or guiding the handcycle frame into the docking tube). You may find it useful to engage your wheelchair brakes while locating the handcycle.
VIDEO http://www.teamhybrid.co.uk/pages/videos-latest.php
PULL HOME
Slide the handcycle frame fully into the docking tube until the two clamps meet (the easiest way to do this is to pull the frame towards you with your right hand grasping the frame underneath the handlebars). Make sure no loose items of clothing are caught between the two clamps.
LIFT INTO THE UPRIGHT POSITION
Lift the cycle into position make sure that the right hand side brake of your wheelchair is on and the left hand brake is off. Place your right hand onto the handle bar of the cycle and your left hand onto the left wheel of your chair. In one smooth movement lift the cycle into the upright position and at the same time wheel back with the left wheel of your chair. You will hear an audible click, which tells you that the two clamps have locked together.
SECURE THE QUICK-RELEASE LEVERS
Tighten the two quick-release levers on either side of the frame to lock the clamps together. Ensure that both levers close securely, without any play or looseness. If there is any play, tighten them.
ATTACH THE BATTERY/BATTERIES
Slide the batteries into their holders above the front wheel (the battery closest to you is the active battery, and is connected to the controller; the front battery is inactive, and is used only when the first battery is depleted). Ensure that the batteries are oriented correctly, with the male and female electrical contacts of the active battery and its holder oriented in the same direction. Lock both batteries into their holders with the supplied keys (this prevents battery movement during operation). Do not turn on the batteries or attempt to start the motor until you have run through the safety checklist below.
5.5 Undocking your handcycle
Undocking your Cougar™ follows the steps outlined for docking above, only in reverse. Begin by turning off the power switch on the battery, unlock the battery from the holder, and remove it. Then release the two quick-release levers on either side of the frame. With your right hand grasping the handlebar, push down on the large sprung release lever with your left hand until the lock releases and rotate the Cougar™ to the right until your wheelchair casters rest on the ground. Now pull the Cougar™ out of the docking tube and lay it flat on the ground (the easiest way to do this is with your right hand grasping the frame just underneath the handlebars).

16
6 BATTERY CHARGING & MAINTENANCE
6.1 Battery overview
Our Lithium Ion Rechargeable 36V 11.5Ah 414Wh Flat Pack Battery using Panasonic cells weighs only 2.5 kg. Maximum discharge current is 15A continuous, 20A for 10 seconds and 35A for 5 seconds. Maximum charge voltage is 42.5V.
The BMS (Battery Management System) technology protects packs from heat, voltage imbalance, under-voltage and over-current. The BMS dramatically improves cycle life and prevents battery fires and explosions.
6.2 Battery life
A batteries power is reflected in (Wh) Watt hours. The more Wh there are the greater the potential power boost and likely range of the battery. Battery and electric bike manufacturers do tend to exaggerate when giving mileage per battery charge calculations but through experience we can say that our batteries give a minimum of 1 mile per 35Wh, this works out at 11.5 miles with our 11.5Ah flat pack 36V batteries.
Most manufacturers will give much higher mileage per charge figures than we have stated for a number of reasons. Tests carried out in a laboratory are under controlled conditions of constant temperature and at a constant discharge rate with each cycle being repeated immediately after the last one. Field-testing is carried out using two wheeled electric bikes whilst the user is utilising pedal assist.
A three-wheeled cycle is always going to be less efficient than a two-wheeled bicycle as the batteries have to work much harder to haul three wheels. The Viper battery has extra stress as it has to do all of the work whereas power assisted handcycles and bicycle batteries generally have a much easier life.
Other factures that dilute the battery packs miles per charge are varying types of terrain, headwinds, hills, rider weight, tire pressures, speed, temperature stopping/starting and more.
From the information above it can be seen that it is virtually impossible to give an accurate guide on mileage per charge or an accurate guide to the number of cycles a battery can achieve. But as a general rule our batteries should return 500-600 cycles.
6.3 Battery care
The maintenance of your handcycle is your responsibility. Poor maintenance can greatly increase the risks of operating your cycle.
Read and understand these battery-charging instructions. Do not use any battery charger other than the one supplied to charge your batteries; doing so may result in fire or damage to your batteries.
The batteries supplied with your handcycle are Lithium ion. This type of battery combines lightness in weight with a very high charge capacity.
The reasonable use and above all correct charging of the battery as well as protection from deep discharge and overheating will greatly help to prolong it’s life. A suitable charging controller, which takes all of these requirements into account, is already incorporated into the battery box to ensure optimum, safe operation.
There is always a certain amount of self-discharge (typically 1% per day at room temperature) the battery should always be charged up before being used for the first time.

17
6.4 Battery charging
The charge status is shown on the display. To check the charge status, briefly press the button on top of the battery. Up to four LEDs will light up for a few seconds to indicate the charge status.
• Make sure that the switch on the side of battery control unit is set to OFF. • Plug the mains adapter into the mains socket outlet and switch on. • Gain access to the charging socket on the battery box by lifting the protective cover. • Connect the plug on the lead of the battery charger to the socket on the battery. • The Red light on the charger will show red when charging and will turn Green when fully charged.
You may charge your batteries after every use, whether fully depleted or not (lithium ion batteries do not suffer from so-called “memory effects” if they are charged when not fully depleted; similarly, partially charging a lithium ion battery has no detrimental effects). Allow the battery to come to room temperature before charging (do not charge the battery when it is below 0°C/32°F or above 50°C/122°F). During charging, an LED light on top of the charger will change from red (indicating the battery is actively being charged) to green (indicating the battery is fully charged). The charger and/or battery may get warm to the touch during charging. Unplug the charger from the wall following charging. A full charge when the battery is fully depleted should take about five (5) hours.
When your batteries are not in use (for instance, during winter), make sure to fully charge them at least once every three months. Store your batteries when not in use in a cool, dry environment. Never leave your batteries in a hot environment, such as in a closed vehicle exposed to the sun.
Your battery capacity will decrease over time, depending on how many full cycles it has experienced (e.g., how many times it has been fully recharged). You should expect to get at least 500 or more full cycles from each new battery.
Your batteries are sealed and do not require any internal maintenance. Do not attempt to open them or modify them in any way; doing so may result in fire, injury or damage to the batteries.
Although protected by the BMS (Battery Management System) the danger of lithium battery fires has been widely reported. An electric bike sized lithium battery pack contains sufficient stored energy and volatile material that significant heat release and damage occurs if something goes wrong.
Always assume the worst could happen and only charge the battery when you are around, or at the very least where any incident would be contained such as in a garage.
18
WARNING
• Use only the main adapter supplied to charge the battery. • Before connecting the mains adapter to the mains, you must check whether the mains voltage
matches the supply voltage of the adapter. The adapters supply voltage is indicated on the nameplate on the back of the adapter.
• The adapter is designed for indoor use only. • The lithium-ion battery may only be charged in a dry, non-flammable environment. • A mains adapter with a damaged mains plug or mains lead must not be connected to the
mains and must be repaired immediately by a specialist dealer. The same applies to extension cables that are not technically perfect.
• Water and moisture must not be allowed to penetrate the mains adapter under any circumstances. If water has entered the adapter, disconnect it from the mains supply immediately and have it checked by a specialist dealer.
• Condensation may form on the mains adapter if there is a sudden change in temperature from cool to warm. If this happens, wait until the adapter has come up to the temperature of the warm room before connecting to the mains. This situation is best avoided by storing the mains adapter where you use it.
• The mains adapter may only be used to charge up the battery supplied. Other uses of the adapter are not permitted.
• Any tampering of any kind with the mains adapter or battery box is strictly prohibited!
Mechanical damage to the battery must be avoided at all cost (explosion hazard!)
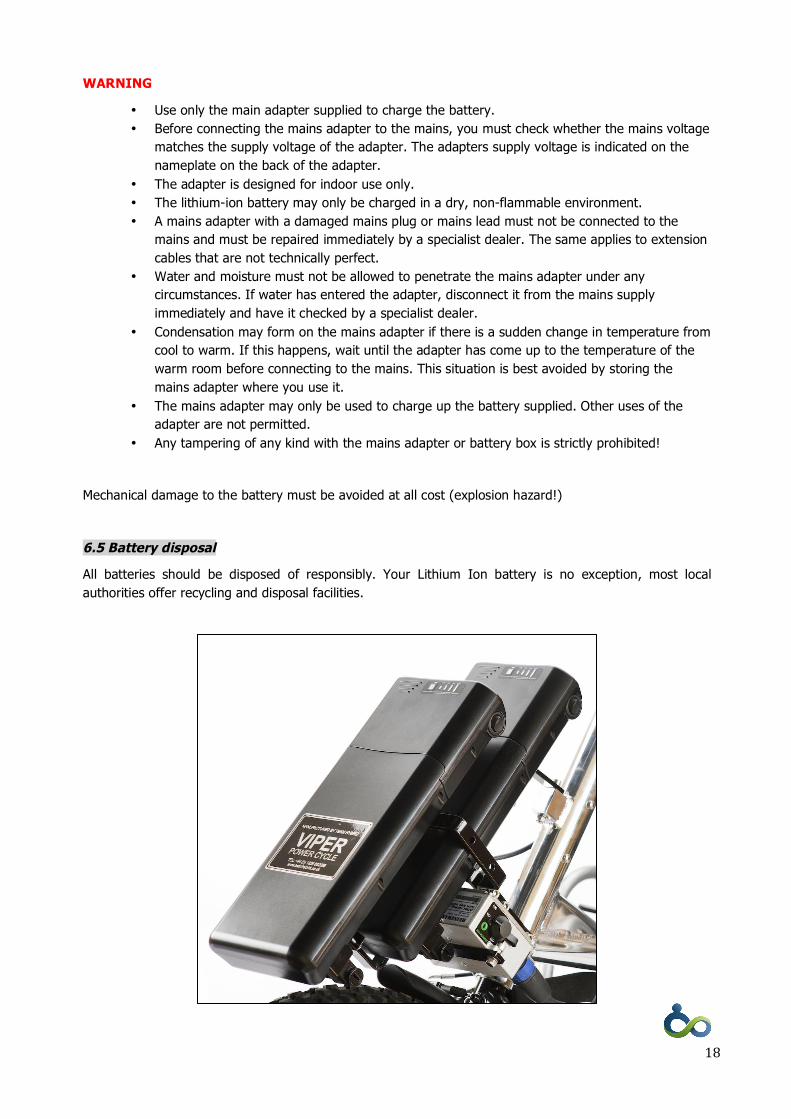
6.5 Battery disposal
All batteries should be disposed of responsibly. Your Lithium Ion battery is no exception, most local authorities offer recycling and disposal facilities.

19
7 MAINTENANCE
7.1 Adjusting top derailleur (Cougar S24, Coyote S24)
Once a month, or after any adjustment, check the top derailleur. Change gears to all the gear combinations and check these items:
• The chain should not come off. • The chain should line up smoothly with each chainring and not rub the chain.
With handcycles that have more than one chainring, the top derailleur moves the chain to change gears.
To adjust the small chainring position
1. Move the chain to the smallest front chainring and the largest bottom cog (drive wheel). 2. Loosen the cable-clamp bolt (figure 1.3) until the cable is free. 3. Turn the low-gear limit screw (figure 1.2 identified with an L) until the inner chain-guide of the
derailleur is approximately 0.5mm from the chain. 4. Turn the barrel adjuster on the shift lever fully clockwise. 5. Pull on the cable end, and move the shift lever to the small chainring position. 6. Put the cable in the groove found near the cable clamp bolt. Pull the cable tight and tighten the
clamp bolt. 7. Put the cable in the groove found near the cable clamp bolt. Pull the cable tight and tighten.
To adjust the large chainring position
1. Move the rear derailleur to the smallest bottom cog (drive wheel). 2. Turn the high gear limit screw (figure 1.2 identified with an H) counterclockwise until it can not
stop the movement of the derailleur. 3. Turn the crankarms. Use the shift lever to carefully move the chain to the outside ring. 4. Move the outer chain guide so that it is approximately 0.5mm for the chain. 5. Tighten the high gear limit screw until it resists. If you have turned the screw too far, the front
derailleur will rub on the chain or move the chain to a smaller chainring.
To adjust the middle gear position
1. Move the chain to the largest front chainring and the smallest bottom cog (drive wheel). 2. Turn the cable barrel adjuster on the shifter to change the cable tension and align the inner cage
of the derailleur until it touches the chain.
FIGURE 1
Front Derailleur
1. Cable
2. Limit Screws
3. Cable Clamp Bolt

20
7.2 Adjusting bottom derailleur (Cougar S24, S8 Coyote S24, S7)
With handcycles that have more than one cog on the drive wheel, the bottom derailleur moves the chain to change gears. Once a month, or after any adjustment, check the bottom derailleur. Change gears to all the gear combinations to make sure the chain does not come off.
To adjust the small cog position
1. Move the chain to the smallest rear cog and the largest top chainring. 2. Loosen the cable clamp bolt (Figure 2.3) until the cable is free. 3. Look down from the top of the handcycle to see that the smallest bottom cog, the chain, and both
derailleur pulleys are in alignment. 4. If they are not in alignment, turn the high gear limit screw (figure 2.1 identified with an H) until
they are in alignment. 5. Wile you pull on the cable, move the shifter to the small cog position (on the drive wheel). 6. On the shifter, turn the barrel adjuster fully clockwise. On the bottom derailleur, turn the barrel
adjuster fully clockwise (figure 2.2), and then turn it one turn anticlockwise. 7. Put the cable into the clamp bolt groove on the bottom derailleur, pull the derailleur cable tight,
and then tighten the clamp bolt.
To adjust the large cog position
1. Turn the low gear limit screw on the bottom derailleur (figure 2.1 identified with an L) anti clockwise until the derailleur can move freely.
2. Carefully move the chain to the smallest top chainring and the largest bottom cog. Do not move the bottom derailleur too far. The chain can be caught between the large cog and the spokes.
3. Move the bottom derailleur pulleys in alignment with the largest cog. 4. Turn the low gear limit screw (figure 2.1 identified with an L) until it does not turn easily. If you
have turned the screw too far, the derailleur will move to the outside of the handcycle.
To align the index system
1. Move the chain to the largest top chainring and the smallest bottom cog. 2. Move the shifter for one click. 3. Make sure the chain moves smoothly to the second smallest gear. If the chain makes too much
noise or does not change gears, slightly turn the barrel adjuster. Change the gear again and make sure the change is smooth. If the chain moves to the third smallest gear, turn the barrel adjuster clockwise until the derailleur pulleys align with the second smallest gear.
FIGURE 2
Rear Derailleur
1. Limit Screws
2. Barrel Adjuster
3. Cable Clamp
4. Cable

21
7.3 Adjusting Nexus Hub Gears (Coyote S8)
Internal Gear Hub Systems change gears with a mechanism that is inside the hub. Each month check the internal gear system.
To adjust the Shimano Nexus 8 speed IGH (Internal Geared Hub)
1. Turn the shifter to the fourth gear position 2. Check the indicator on the cassette joint pulley (figure 3) with the cassette joint bracket. If the red
lines are not in alignment, turn the barrel adjuster until they are in alignment. 3. Move the shifter to the first gear. Then move the shifter to fourth gear. Check the adjustment.
Figure 3

22
7.4 Adjusting V brakes
How V-Brakes work
V brakes have two pivot points, each attached to the fork. They use a single cable coming in from the side. V brakes typically have a very high mechanical advantage, meaning that you need to pull a lot of cable to get the brake pads to move just a little bit. This means that on a perfectly adjusted bike, V brakes are incredibly powerful.
A brake lever allows you to control a brake. The position of the lever should allow you to use the brake with a minimum amount of movement. When you pull the brake lever, the force is transferred down the cable and into the brake arms, moving the brake arms and applying the brake pad onto the rim. The pads clamp onto the rim, stopping the wheel from spinning.
Brakes need adjusting every now and again, because brake cable stretches and brake pads wear down or need replacing.
WARNING: A brake system that has damage or is not adjusted correctly could decrease your control and cause you to fall. Make a full inspection of the brakes before each ride. If your brakes do not operate correctly, do not ride your handcycle. Adjust the brakes or take your handcycle to your dealer for service.
Each month check all the brake bolts, and check the brake pads for worn areas.
Alignment
To get the maximum braking effectiveness and to make the brake pads last longer it is important that the brake pads touch the rims in the right place when the brake is applied.
The brake pads should be at the centre of your rim. Not partially or wholly above the rim where you risk them rubbing against the tyre, or hanging below the rim. The pads should be parallel to the rim not pointing downwards or upwards.
Adjust the position of the Brake Pads
The brake pads are secured to the brake arms with a bolt that requires an allen key.
1. Loosen the nut holding the brake pad in place. 2. With brake applied (it helps to get a second person to hold on the brake while you are
adjusting), ensure the brake pads are in the correct place. 3. Hold the brake pad firmly in place and tighten the nut in a series of short movements, rather
than a long one, this makes it easier to keep the brake pad in position.
Centering Brakes
Ideally there should be an equal amount of space between the brake pad and the rim on each side of the wheel. This way the wheel should spin freely without the brake pads rubbing on one side. You can check this by looking down on the brake pads from above.
V-Brakes have a spring tension adjuster screw which you can turn using a crosshead screw drive. Tightening this screw increases the tension on the spring inside the brake arm, moving the brake pad away from the rim. Loosening the centering screw, decreases the tension on the spring, and moves the brake pad closer to the rim.
This can sometimes be a little bit difficult to set up although it sounds simple. This is because both sides of the brake have these adjusters, so doing one thing to one side will have the opposite effect on the other side. For instance, if you tighten one side to pull the pads away from the rim, then it will pull the opposite pad towards the rim.
Adjust the screw on each brake, turning it slowly and carefully until you have an equal gap between the rim and the brake pad on each side. Ideally you will want enough tension on the brakes to make the lever return back after it’s been pulled in.

23
Replacing Brake pads
Brake pads usually have a wear line indicator, but a good guide for knowing to replace them is when the grip has worn out and definitely before you get down to the metal.
To replace your brake pads
1. Release the brake cable tension. 2. Push both brake arms together and release the L shaped noodle from the housing stop, the
brakes should spring open. 3. Once you have released the brakes, unscrew the brake pad fixing bolt and remove the brake pad. 4. Replace the rake pad (ensuring you keep the nuts and washers in the same order as they were on
the old pads), reconnect the brake cable, then adjust and tighten as explained previously.
Brake Cable Adjustment
Brakes need to be effective! You should be able to fully apply the brake, stopping the bike; long before the brake levers meet the handlebars.
Brake can be made more effective by shortening the brake cable, this increases the cable tension.
There are two ways to adjust the cable length.
Adjusting the cable using the Barrel Adjuster
The Barrel Adjuster is found on the brake lever, unscrewing the adjuster increases the cable tension and makes the brakes more responsive. If the brakes are too close to the rims you can screw in the adjuster, this decreases the cable tension.
The barrel adjuster only allows for a limited amount of adjustment, often you need to take up more slack from the cable.
Adjusting the cable from the cable clamp bolt
1. Loosen the cable clamp bolt. 2. Unscrew the barrel adjuster on the brake lever half way. 3. Pull the cable nice and tight. 4. Hold the cable tight whilst tightening the fixing bolt back up again. 5. Then screw the barrel adjuster all the way in.
This should leave the brake pads a few millimeters away from the rim. Don’t worry if you follow these instructions and the adjustment is not perfect. This is not an exact science and sometimes you will have to loosen or tighten the cable a bit more to get things just right.
Figure 4
24
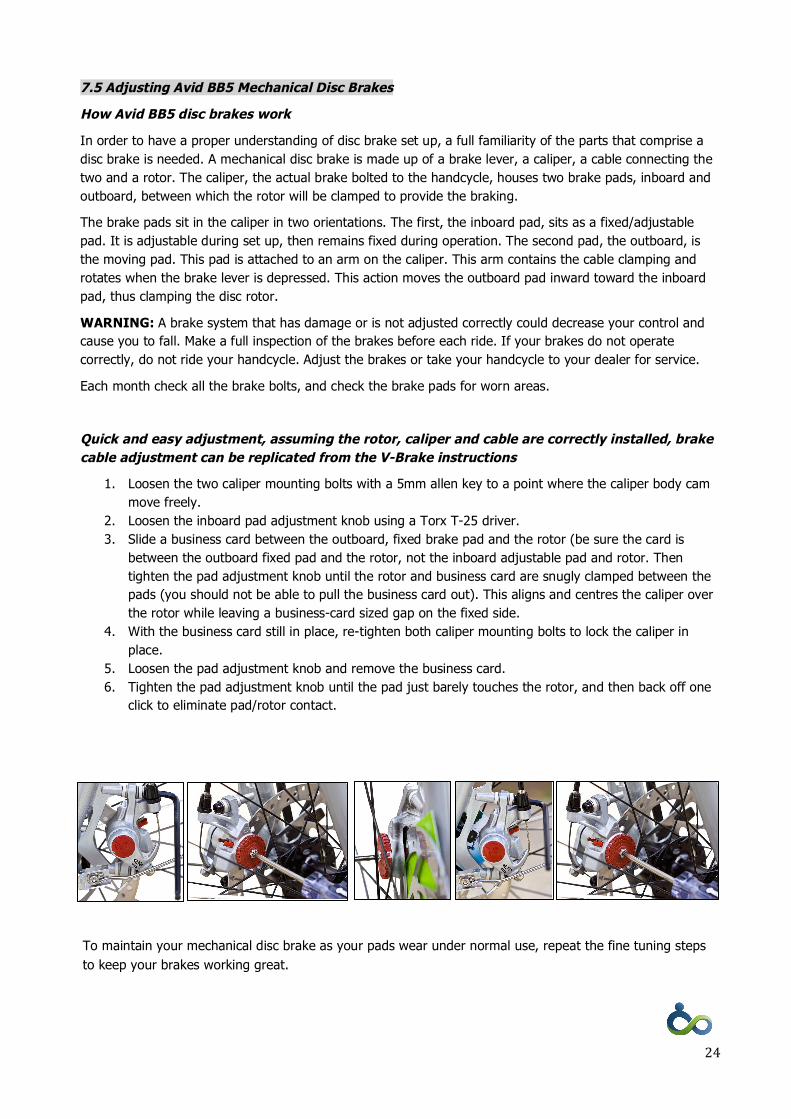
7.5 Adjusting Avid BB5 Mechanical Disc Brakes
How Avid BB5 disc brakes work
In order to have a proper understanding of disc brake set up, a full familiarity of the parts that comprise a disc brake is needed. A mechanical disc brake is made up of a brake lever, a caliper, a cable connecting the two and a rotor. The caliper, the actual brake bolted to the handcycle, houses two brake pads, inboard and outboard, between which the rotor will be clamped to provide the braking.
The brake pads sit in the caliper in two orientations. The first, the inboard pad, sits as a fixed/adjustable pad. It is adjustable during set up, then remains fixed during operation. The second pad, the outboard, is the moving pad. This pad is attached to an arm on the caliper. This arm contains the cable clamping and rotates when the brake lever is depressed. This action moves the outboard pad inward toward the inboard pad, thus clamping the disc rotor.
WARNING: A brake system that has damage or is not adjusted correctly could decrease your control and cause you to fall. Make a full inspection of the brakes before each ride. If your brakes do not operate correctly, do not ride your handcycle. Adjust the brakes or take your handcycle to your dealer for service.
Each month check all the brake bolts, and check the brake pads for worn areas.
Quick and easy adjustment, assuming the rotor, caliper and cable are correctly installed, brake cable adjustment can be replicated from the V-Brake instructions
1. Loosen the two caliper mounting bolts with a 5mm allen key to a point where the caliper body cam move freely.
2. Loosen the inboard pad adjustment knob using a Torx T-25 driver. 3. Slide a business card between the outboard, fixed brake pad and the rotor (be sure the card is
between the outboard fixed pad and the rotor, not the inboard adjustable pad and rotor. Then tighten the pad adjustment knob until the rotor and business card are snugly clamped between the pads (you should not be able to pull the business card out). This aligns and centres the caliper over the rotor while leaving a business-card sized gap on the fixed side.
4. With the business card still in place, re-tighten both caliper mounting bolts to lock the caliper in place.
5. Loosen the pad adjustment knob and remove the business card. 6. Tighten the pad adjustment knob until the pad just barely touches the rotor, and then back off one
click to eliminate pad/rotor contact.
To maintain your mechanical disc brake as your pads wear under normal use, repeat the fine tuning steps to keep your brakes working great.

25
7.6 Tyres & tubes
Your handcycle front wheel comes with a Slime puncture-resistant inner tube installed. This tube will automatically seal small punctures. When a puncture occurs, the tyre may deflate and will need to be re-inflated to the tire manufacturer’s recommended maximum pressure (printed on the side of the tyre). From time to time, the tyre will also need to be topped up with air (as with any pneumatic tyre, a small amount of air leakage is normal).
Should you need to replace either the tube or the tyre, we recommend taking the handcycle to a qualified bicycle mechanic, who may have to cut and replace several of the plastic zip-ties which secure the motor electrical cords to the front fork. Use only quality replacement tyres and tubes designed to fit a 20” (406mm) x 2.125” wheel.
7.7 Cleaning your hancycle
Clean your handcycle with a soft lint-free rag using water and mild detergent only (REMOVE BATTERIES FIRST). Do not use harsh abrasives or chemical cleaners. When cleaning, do not use a hose, immerse the cycle in water, or heavily wet the motor, controller, or any electrical part. Ensure that the handcycle is thoroughly dry following cleaning before using again, and make sure to check that the brakes are not wet or soapy before use.

26
8 CONSOLE INSTRUCTIONS (COUGAR-VIPER SPORT)
Power On
During power on, the battery gauge will do an initialization with all the LEDs light up for 2 seconds before entering normal operation. If all the LEDs fail to light up, there is a fault in the battery gauge. Try to switch On/Off the ignition key again to initialize.
Basic Operation
Battery level shows the state of charge of the battery. As you continue to cycle and the battery power drops, the level gauge will correspond to the state of charge remaining. If the battery level shows ‘red’, it is nearly empty and need to recharge.
Power level shows the level of electric assistance in pedelec mode. There are 5 levels of assistance and zero assistance. Use Up▲ or Down▼ button to increase or decrease the level of electric assistance needed.
Setup Menu
Hold the ‘Down▼’ button for about 5 seconds to enter setup menu. Use Up▲ or Down▼ button to select the appropriate settings. In menu setup, hold the ‘Down▼’ button for about 3 seconds to save.
Menu 1: Mode Selection
Mode 1 (Default): Pedelec / EBike (US): Power Led Bar shows the assist power level. When throttling, it switches to EBike mode.
Mode 2: Pedelec (EU): Power Led Bar shows the assist power level. Throttling will be in 6km EBike mode.
Mode 3: Not in used. For future development.
Mode 4: Pedelec (EAF): Responds to throttle/EAF. Power Led Bar Bar shows the current (amps) level.
Mode 5: EBike (Cruise): Responds to throttle (from gauge). Power Led Bar shows the current (amps) level. ‘Up▲’ button set cruise.

27
9 FAULT FINDING (COUGAR-VIPER SPORT)
When the handcycle is functioning correctly, the red LED that is situated on the controller is lit continually.
In the case of an electronic malfunction, the controller comes programmed with diagnostic capabilities to determine where the fault lies. The red LED will emit a series of blinks, count them and refer to the table below for explanation and solutions.
The faults listed may not cover every possible failure. In the event of moisture or water entering the controller, haphazard signals might appear. The controller has been designed to repel water as much as possible, encapsulating circuit boards with silicone resins.
This manual simply cannot cover every detail that might occur during the lifetime of your handcycle. Please contact your dealer if you have any questions regarding your handcycle.
Number of Blinks Explanation Solution
2 Brake lever cut off in contact
Check brake lever spring, brake levers shoul return to position
3 Brake lever cut off in contact
Check wiring connection, inspect for damage to battery level gauge
4 Throttle not in position Check if throttle spring is faulty
5 Throttle failure Check throttle connections or replace
6 Low voltage Recharge battery or check for lose battery connection
7 Excessively high voltage Measure battery voltage, contact your dealer
8 Sensor fault Contact your dealer
9 Motor incompatibility Contact your dealer
10 Overheate, thermastat activated
Allow to cool, reboot system
11 Thermostat failure Replace controller
12 Amps control/controller failure
Replace controller
No Light Power failure Check battery fuse, power cables or replace controller
Two 15A fuses (in parallel) can be found on the bottom face of the battery.
28
10 TRAVELLING BY AIR WITH YOUR COUGAR-VIPER
Currently Li-ion battery packs with a capacity exceeding 300Wh are classified as Hazardous Material, Hazmat Class 9 and will not be allowed on aircraft. Our 11.5Ah 414Ah battery packs do exceed this limit, however 8Ah 288Wh battery packs are available to purchase from us if you intend to fly with your Cougar or Viper.
When planning your trip abroad the first thing to do at the earliest opportunity is to contact the airlines Special Assistance team and explain that you will be travelling with an electric powered wheelchair attachment that uses Lithium ion batteries. You will be asked some technical questions regarding the Cougar or Viper, we have answered these for you below and on page two.
Our batteries comply with all dangerous / hazardous goods regulations and meet the requirements of each test in the UN Manual of Test and Criteria. We can provide you with an MSDS (Material Safety Data Sheet) showing that the battery has passed all necessary tests and is safe to be taken on board aircraft.
The Cougar and Viper can fall into both of the next categories and it will be at the airlines staff discretion how it is handled.
Wheelchair or mobility aid with a lithium battery
This category is if the airline asks for the battery to remain locked to the cycle.
• The batteries must be of a type that meets the requirements of each test in the UN Manual of Tests and Criteria, Part III subsection 38.3. Yes, the MSDS we can provide has this information.
• The battery terminals are protected from short circuit e.g. by being enclosed within a battery carrier. Yes the battery is in the lockable cassette.
• Electrical circuits have been isolated and there is no chance of unintentional operation (i.e. all motors must be rendered inoperative). If this is not possible and as an absolute last step, the battery cables must be disconnected and the battery terminals must be insulated to prevent short circuits. Yes the battery terminals can be isolated and as an additional precaution we supply a blanking plug.
Where a battery powered wheelchair or mobility aid is specifically designed to allow its battery to be removed by the user (e.g. collapsible).
• This category is if the airline asks for the battery to be removed from the device and kept by the user.
• The battery must be removed. The device may then be carried as checked baggage without restriction. The battery must be protected from short circuit by insulating the terminals (e.g. by taping over exposed terminals.
• The battery must be protected from damage (by placing the battery in a protective pouch). The battery must be carried in the passenger cabin.
• Removal of the battery from the device should be performed by following the instructions of the manufacturer or device owner.
• The battery must not exceed 300Wh. • A maximum of one spare battery not exceeding 300Wh may be carried. The batteries must be
carried in the passenger cabin.
The pilot in command must be informed of the location of the mobility aid with an installed battery or the location of the lithium battery when removed and carried in the cabin.
Spare Batteries
If you want to take a spare battery you must inform the Special Assistance team at the time of booking.

29
Cougar Power Assisted Handcycle
Manufacturers name
Product name
Length
Width
Height
Weight
Controller type
Lithium battery Wh rating
IATA battery type code
Freewheel fitted
Lifting handles fitted
Airsafe plug compatible
Means of inhibiting circuits
Viper Power Cycle
Manufacturers name
Product name
Length
Width 1
Width 2 (with handlebars turned)
Height
Weight
Controller type
Lithium battery Wh rating
IATA battery type code
Freewheel fitted
Lifting handles fitted
Airsafe plug compatible
Means of inhibiting circuits
Team Hybrid Ltd
Cougar
1040mm
610mm
1120mm
15.5kg
Digital
288 (8Ah)
UN3480
Yes
N/A
We supply a battery cable shut off blank
Yes disconnect battery from motor
Team Hybrid Ltd
Viper
1040mm
650mm
170mm
1000mm
13kg
Digital
288 (8Ah)
UN3480
Yes
N/A
We supply a battery cable shut off blank
Yes disconnect battery from motor