teaching assistant: roi yehoshua roiyeho@gmail · 2016-11-06 · navigation stack main components...
TRANSCRIPT

Agenda
• ROS navigation stack
• Navigation planners
• Costmaps
• Running ROS navigation with Stage and rviz
• Sending goal commands
(C)2015 Roi Yehoshua

ROS Navigation Stack
• http://wiki.ros.org/navigation
• The goal of the navigation stack is to move a robot from one position to another position safely (without crashing or getting lost)
• It takes in information from the odometry and sensors, and a goal pose and outputs safe velocity commands that are sent to the robot
• ROS Navigation Introductory Video
(C)2015 Roi Yehoshua

ROS Navigation Stack
(C)2015 Roi Yehoshua

Navigation Stack Main Components
(C)2015 Roi Yehoshua
Description Package/Component
offers map data as a ROS Service map_server
provides laser-based SLAM gmapping
a probabilistic localization system amcl
implementation of a fast global planner for navigation
global_planner
implementations of the Trajectory Rollout and Dynamic Window approaches to local robot navigation
local_planner
links together the global and local planner to accomplish the navigation task
move_base

Navigation Main Steps
(C)2015 Roi Yehoshua
Goal
AMCL
Path Planner
move_base
Base Controller
/cmd_vel +
/odom

Install Navigation Stack
• The navigation stack is not part of the standard ROS Indigo installation
• To install the navigation stack type:
• In addition, download the tutorials from git:
(C)2015 Roi Yehoshua
$ sudo apt-get install ros-indigo-navigation
$ cd ~/ros/stacks $ git clone https://github.com/ros-planning/navigation_tutorials.git

Navigation Stack Requirements
Three main hardware requirements
• The navigation stack can only handle a differential drive and holonomic wheeled robots
– It can also do certain things with biped robots, such as localization, as long as the robot does not move sideways
• A planar laser must be mounted on the mobile base of the robot to create the map and localization
– Alternatively, you can generate something equivalent to laser scans from other sensors (Kinect for example)
• Its performance will be best on robots that are nearly square or circular
(C)2015 Roi Yehoshua
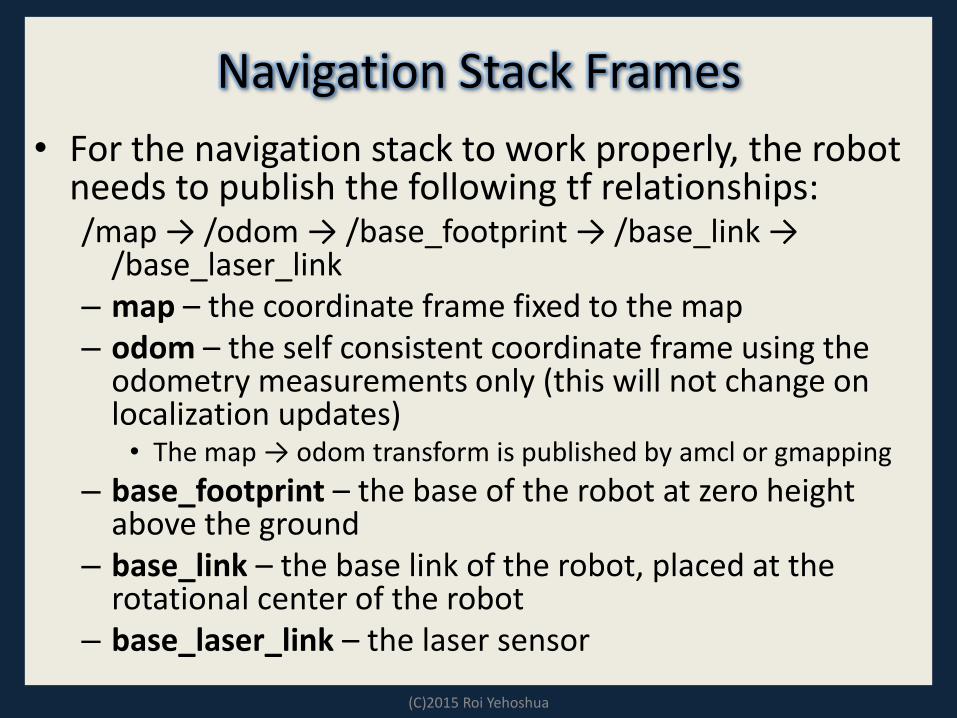
Navigation Stack Frames
• For the navigation stack to work properly, the robot needs to publish the following tf relationships: /map → /odom → /base_footprint → /base_link →
/base_laser_link – map – the coordinate frame fixed to the map – odom – the self consistent coordinate frame using the
odometry measurements only (this will not change on localization updates)
• The map → odom transform is published by amcl or gmapping
– base_footprint – the base of the robot at zero height above the ground
– base_link – the base link of the robot, placed at the rotational center of the robot
– base_laser_link – the laser sensor
(C)2015 Roi Yehoshua

Navigation Types
• Our robot will move through the map using two types of navigation—global and local
• The global navigation is used to create paths for a goal in the map or a far-off distance
• The local navigation is used to create paths in the nearby distances and avoid obstacles
(C)2015 Roi Yehoshua

Global Planner
• NavFn provides a fast interpolated navigation function that creates plans for a mobile base
• The global plan is computed before the robot starts moving toward the next destination
• The planner operates on a costmap to find a minimum cost plan from a start point to an end point in a grid, using Dijkstra’s algorithm
• The global planner generates a series of waypoints for the local planner to follow
(C)2015 Roi Yehoshua

Local Planner
• Chooses appropriate velocity commands for the robot to traverse the current segment of the global path
• Combines sensory and odometry data with both global and local cost maps
• Can recompute the robot's path on the fly to keep the robot from striking objects yet still allowing it to reach its destination
• Implements the Trajectory Rollout and Dynamic Window algorithm
(C)2015 Roi Yehoshua
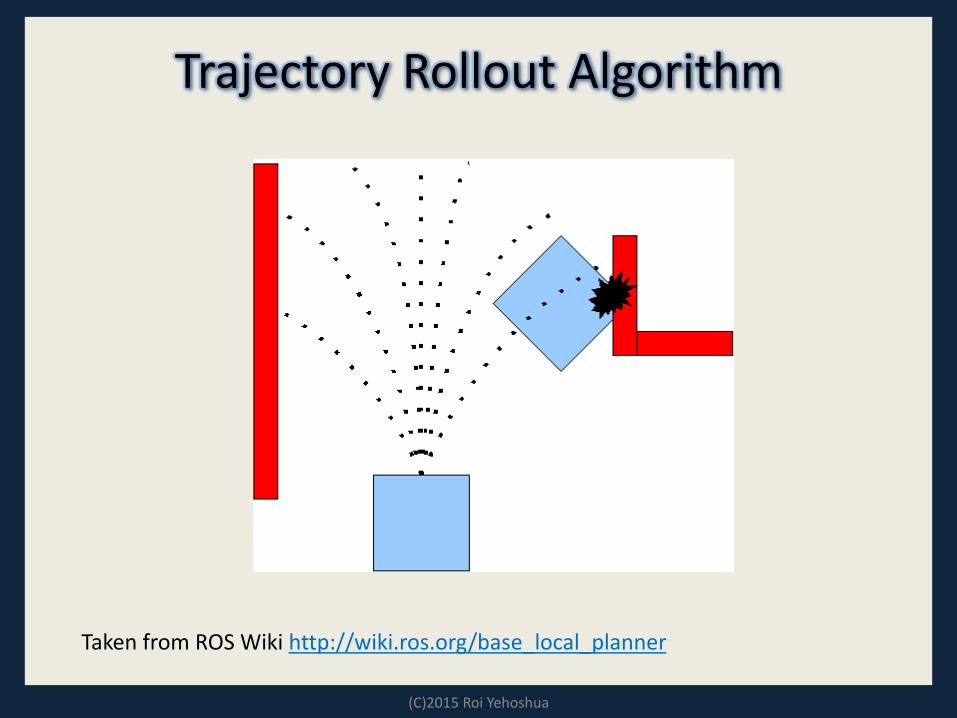
Trajectory Rollout Algorithm
(C)2015 Roi Yehoshua
Taken from ROS Wiki http://wiki.ros.org/base_local_planner

Trajectory Rollout Algorithm
1. Discretely sample in the robot's control space (dx,dy,dθ) 2. For each sampled velocity, perform forward simulation
from the robot's current state to predict what would happen if the sampled velocity were applied for some (short) period of time
3. Evaluate each trajectory resulting from the forward simulation, using a metric that incorporates characteristics such as: proximity to obstacles, proximity to the goal, proximity to the global path, and speed
4. Discard illegal trajectories (those that collide with obstacles)
5. Pick the highest-scoring trajectory and send the associated velocity to the mobile base
6. Rinse and repeat
(C)2015 Roi Yehoshua

Local Planner Parameters
• The file base_local_planner.yaml contains a large number of ROS Parameters that can be set to customize the behavior of the base local planner
• Grouped into several categories:
– robot configuration
– goal tolerance
– forward simulation
– trajectory scoring
– oscillation prevention
– global plan
(C)2015 Roi Yehoshua

base_local_planner.yaml (1)
(C)2015 Roi Yehoshua
#For full documentation of the parameters in this file, and a list of all the #parameters available for TrajectoryPlannerROS, please see #http://www.ros.org/wiki/base_local_planner TrajectoryPlannerROS: #Set the acceleration limits of the robot acc_lim_th: 3.2 acc_lim_x: 2.5 acc_lim_y: 2.5 #Set the velocity limits of the robot max_vel_x: 0.65 min_vel_x: 0.1 max_rotational_vel: 1.0 min_in_place_rotational_vel: 0.4 #The velocity the robot will command when trying to escape from a stuck situation escape_vel: -0.1 #For this example, we'll use a holonomic robot holonomic_robot: true #Since we're using a holonomic robot, we'll set the set of y velocities it will sample y_vels: [-0.3, -0.1, 0.1, -0.3]

base_local_planner.yaml (2)
(C)2015 Roi Yehoshua
#Set the tolerance on achieving a goal xy_goal_tolerance: 0.1 yaw_goal_tolerance: 0.05 #We'll configure how long and with what granularity we'll forward simulate trajectories sim_time: 1.7 sim_granularity: 0.025 vx_samples: 3 vtheta_samples: 20 #Parameters for scoring trajectories goal_distance_bias: 0.8 path_distance_bias: 0.6 occdist_scale: 0.01 heading_lookahead: 0.325 #We'll use the Dynamic Window Approach to control instead of Trajectory Rollout for this example dwa: true #How far the robot must travel before oscillation flags are reset oscillation_reset_dist: 0.05 #Eat up the plan as the robot moves along it prune_plan: true

Costmap
• A data structure that represents places that are safe for the robot to be in a grid of cells
• It is based on the occupancy grid map of the environment and user specified inflation radius
• There are two types of costmaps in ROS:
– Global costmap is used for global navigation
– Local costmap is used for local navigation
• Each cell in the costmap has an integer value in the range [0 (FREE_SPACE), 255 (UNKNOWN)]
• Managed by the costmap_2d package
(C)2015 Roi Yehoshua

Costmap Example
(C)2015 Roi Yehoshua
Taken from ROS Wiki http://wiki.ros.org/costmap_2d
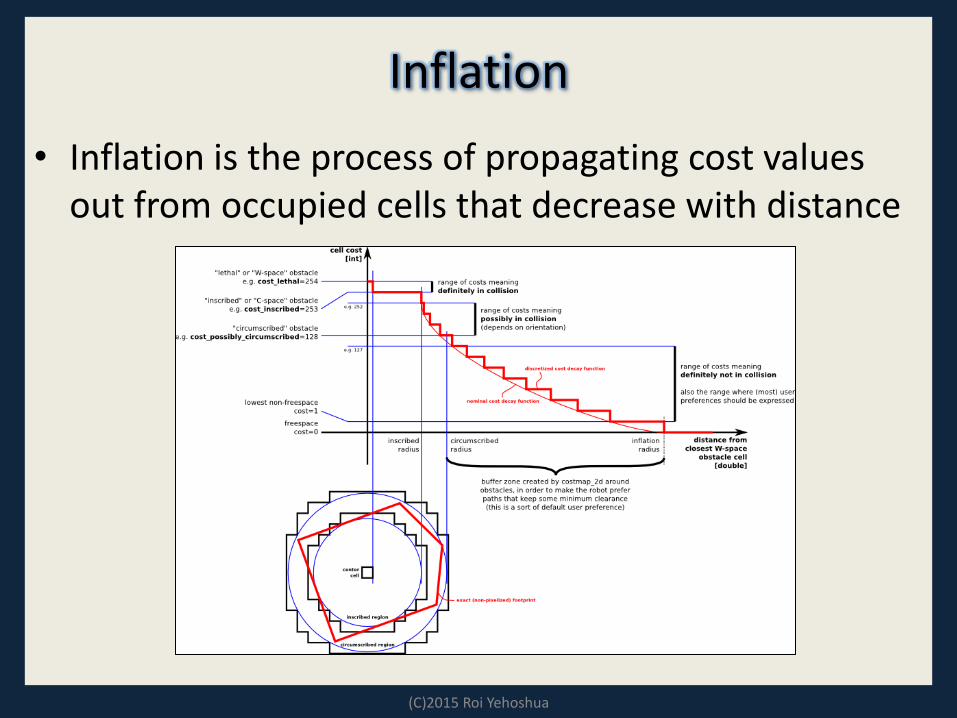
• Inflation is the process of propagating cost values out from occupied cells that decrease with distance
Inflation
(C)2015 Roi Yehoshua

Map Updates
• The costmap performs map update cycles at the rate specified by the update_frequency parameter
• In each cycle: – sensor data comes in
– marking and clearing operations are perfomed in the underlying occupancy structure of the costmap
– this structure is projected into the costmap where the appropriate cost values are assigned as described above
– obstacle inflation is performed on each cell with a LETHAL_OBSTACLE value
• This consists of propagating cost values outwards from each occupied cell out to a user-specified inflation radius
(C)2015 Roi Yehoshua

Costmap Parameters Files
• Configuration of the costmaps consists of three files:
– costmap_common_params.yaml
– global_costmap_params.yaml
– local_costmap_params.yaml
• http://wiki.ros.org/costmap_2d/hydro/obstacles
(C)2015 Roi Yehoshua

costmap_common_params.yaml (1)
(C)2015 Roi Yehoshua
#This file contains common configuration options for the two costmaps used in the navigation stack for more details on the parameters in this file, and a full list of the parameters used by the costmaps, please see http://www.ros.org/wiki/costmap_2d #For this example we'll configure the costmap in voxel-grid mode map_type: voxel #Voxel grid specific parameters origin_z: 0.0 z_resolution: 0.2 z_voxels: 10 unknown_threshold: 9 mark_threshold: 0 #Set the tolerance we're willing to have for tf transforms transform_tolerance: 0.3 #Obstacle marking parameters obstacle_range: 2.5 max_obstacle_height: 2.0 raytrace_range: 3.0 #The footprint of the robot and associated padding footprint: [[-0.325, -0.325], [-0.325, 0.325], [0.325, 0.325], [0.46, 0.0], [0.325, -0.325]] footprint_padding: 0.01

costmap_common_params.yaml (2)
(C)2015 Roi Yehoshua
#Cost function parameters inflation_radius: 0.55 cost_scaling_factor: 10.0 #The cost at which a cell is considered an obstacle when a map is read from the map_server lethal_cost_threshold: 100 #Configuration for the sensors that the costmap will use to update a map observation_sources: base_scan base_scan: {data_type: LaserScan, expected_update_rate: 0.4, observation_persistence: 0.0, marking: true, clearing: true, max_obstacle_height: 0.4, min_obstacle_height: 0.08}

global_costmap_params.yaml
(C)2015 Roi Yehoshua
#Independent settings for the global planner's costmap. Detailed descriptions of these parameters can be found at http://www.ros.org/wiki/costmap_2d global_costmap: #Set the global and robot frames for the costmap global_frame: /map robot_base_frame: base_link #Set the update and publish frequency of the costmap update_frequency: 5.0 publish_frequency: 0.0 #We'll use a map served by the map_server to initialize this costmap static_map: true rolling_window: false footprint_padding: 0.02

local_costmap_params.yaml
(C)2015 Roi Yehoshua
#Independent settings for the local planner's costmap. Detailed descriptions of these parameters can be found at http://www.ros.org/wiki/costmap_2d local_costmap: #We'll publish the voxel grid used by this costmap publish_voxel_map: true #Set the global and robot frames for the costmap global_frame: odom robot_base_frame: base_link #Set the update and publish frequency of the costmap update_frequency: 5.0 publish_frequency: 2.0 #We'll configure this costmap to be a rolling window... meaning it is always #centered at the robot static_map: false rolling_window: true width: 6.0 height: 6.0 resolution: 0.025 origin_x: 0.0 origin_y: 0.0

move_base
• The move_base package lets you move a robot to desired positions using the navigation stack
• The move_base node links together a global and local planner to accomplish its navigation task
• It may optionally perform recovery behaviors when the robot perceives itself as stuck
(C)2015 Roi Yehoshua

move_base.xml
(C)2015 Roi Yehoshua
<launch> <!-- Example move_base configuration. Descriptions of parameters, as well as a full list of all amcl parameters, can be found at http://www.ros.org/wiki/move_base. --> <node pkg="move_base" type="move_base" respawn="false" name="move_base_node" output="screen"> <param name="footprint_padding" value="0.01" /> <param name="controller_frequency" value="10.0" /> <param name="controller_patience" value="3.0" /> <param name="oscillation_timeout" value="30.0" /> <param name="oscillation_distance" value="0.5" /> <!-- <param name="base_local_planner" value="dwa_local_planner/DWAPlannerROS" /> --> <rosparam file="$(find navigation_stage)/move_base_config/costmap_common_params.yaml" command="load" ns="global_costmap" /> <rosparam file="$(find navigation_stage)/move_base_config/costmap_common_params.yaml" command="load" ns="local_costmap" /> <rosparam file="$(find navigation_stage)/move_base_config/local_costmap_params.yaml" command="load" /> <rosparam file="$(find navigation_stage)/move_base_config/global_costmap_params.yaml" command="load" /> <rosparam file="$(find navigation_stage)/move_base_config/base_local_planner_params.yaml" command="load" /> <!-- <rosparam file="$(find navigation_stage)/move_base_config/dwa_local_planner_params.yaml" command="load" /> --> </node> </launch>

navigation_stage
• The navigation_stage package in navigation_tutorials holds example launch files for running the ROS navigation stack in stage
(C)2015 Roi Yehoshua
Description Launch File
Example launch file for running the navigation stack with amcl at a map resolution of 5cm
launch/move_base_amcl_5cm
Example launch file for running the navigation stack with fake_localization at a map resolution of 10cm
launch/move_base_fake_localization_10cm.launch
Example launch file for running the navigation stack with multiple robots in stage.
launch/move_base_multi_robot.launch
Example launch file for running the navigation stack with gmapping at a map resolution of 5cm
launch/move_base_gmapping_5cm.launch

move_base_gmapping_5cm.launch
(C)2015 Roi Yehoshua
<launch> <master auto="start"/> <param name="/use_sim_time" value="true"/> <include file="$(find navigation_stage)/move_base_config/move_base.xml"/> <node pkg="stage_ros" type="stageros" name="stageros" args="$(find navigation_stage)/stage_config/worlds/willow-pr2-5cm.world" respawn="false" > <param name="base_watchdog_timeout" value="0.2"/> </node> <include file="$(find navigation_stage)/move_base_config/slam_gmapping.xml"/> <node name="rviz" pkg="rviz" type="rviz" args="-d $(find navigation_stage)/single_robot.rviz" /> </launch>
• To run this launch file type:
$ roscd navigation_stage/launch $ roslaunch move_base_gmapping_5cm.launch

Running the Launch File
(C)2015 Roi Yehoshua

Using rviz with Navigation Stack
• You can use rviz for:
– Setting the pose of the robot for a localization system like amcl
– Displaying all the visualization information that the navigation stack provides
– Sending goals to the navigation stack with rviz
• Tutorial on using rviz with the navigation stack
(C)2015 Roi Yehoshua

Robot Footprint
• Shows the footprint of the robot
• In our case, the robot has a pentagon-shape
– Configured in costmap_common_params
• Topic: move_base_node/local_costmap/footprint_layer/footprint_stamped
• Type: geometry_msgs/PolygonStamped
(C)2015 Roi Yehoshua

Robot Footprint
(C)2015 Roi Yehoshua

2D Nav Goal
• The 2D nav goal button (G shortcut) allows the user to send a goal to the navigation by setting a desired pose for the robot to achieve
• Click on the 2D Nav Goal button and select the map and the goal for your robot
• You can select the x and y position and the end orientation for the robot
• Note: for the "2D Nav Goal" button to work, the Fixed Frame must be set to "map"
(C)2015 Roi Yehoshua

2D Nav Goal
(C)2015 Roi Yehoshua

Robot Moves to Destination
(C)2015 Roi Yehoshua

Final Pose
(C)2015 Roi Yehoshua

Current Goal
• To show the goal pose that the navigation stack is attempting to achieve add a Pose Display
• Set its topic to /move_base_simple/goal
(C)2015 Roi Yehoshua

Navigation Plans in rviz
• NavFn Plan – Displays the full plan for the robot computed by the global
planner
– Topic: /move_base_node/NavfnROS/plan
• Global Plan – Shows the portion of the global plan that the local planner is
currently pursuing
– Topic: /move_base_node/TrajectoryPlannerROS/global_plan
• Local Plan – Shows the trajectory associated with the velocity commands
currently being commanded to the base by the local planner
– Topic: /move_base_node/TrajectoryPlannerROS/local_plan
(C)2015 Roi Yehoshua

Navigation Plans in rviz
(C)2015 Roi Yehoshua
NavFn Plan
Global Plan
Local Plan

Costmaps in rviz
• To see the costmap add a Map display
• To see the local costmap set the topic to:
/move_base_node/local_costmap/costmap
• To see the global costmap set the topic to:
/move_base_node/global_costmap/costmap
(C)2015 Roi Yehoshua

Local Costmap
(C)2015 Roi Yehoshua

Global Costmap
(C)2015 Roi Yehoshua

Cost Grid
• To see the cost grid used for navigation planning add a PointCloud2 display
• Set its topic to:
/move_base_node/TrajectoryPlannerROS/cost_cloud
(C)2015 Roi Yehoshua

Cost Grid
(C)2015 Roi Yehoshua

rqt_reconfigure
(C)2015 Roi Yehoshua
• A tool for changing dynamic configuration values
• To launch rqt_reconfigure, run:
• The navigation stack parameters will appear under move_base_node
$ rosrun rqt_reconfigure rqt_reconfigure

rqt_reconfigure
(C)2015 Roi Yehoshua

Homework (not for submission)
• Install the navigation stack
• Test the different launch files in the navigation_tutorials package
• Send goals to the robot via rviz and examine the costmaps created
• Play with different configuration parameters of the navigation stack
(C)2015 Roi Yehoshua