teachers - studyladder, an online learning resource for ... · step 1 create a class 1. log into...
TRANSCRIPT

This guide is designed to help teachers start their students on the Studyladder program.
Contents: GettingStarted Step 1. Create a class
Step 2. Add students & print passwords
Step 3. Easy class login
Step 4. Students’ Smiley Face Progress Charts
Step 5. View results & monitor progress
Extras
1
TeachersGetting Started Guide

Step1 Createaclass
1. Log into your Studyladder Teachers
Admin using your Username and Password.
2. Click on ‘Classes’ then click
on ‘Add a class’.
3. Type in the ‘Class name’ and select
the Grade, you can then CUT & PASTE
the complete class roll or type in
students’ names. Classes can have
as many students as you wish.
4. Once you are finished entering student
names click on ‘Create class’.
5. You will then be taken to the
‘Class Details’ section where you can
add more students or amend any
mistakes.
6. You may add as many classes as you
wish.
2

Step2 Addstudents&printpasswords
1. To add individual students to a class,
click on the ‘Classes’ tab to bring you
to the ‘Manage Classes’ page. Then click
on the ‘More’ button to expand more options.
2. Click on ‘add student’.
3. Type in the new students name and select
‘Save Changes’ or to add more students
click ‘Add Another Student’.
4. The page will reload and the new student
will appear in alphabetical order with a
username and password.
While you are still on the ‘Edit Class’page remember to print your students’ usernames and passwords so they can sign in themselves at school or home.
5. Click on the button ‘Print Student Logins’
You will then be directed to a print
friendy version of all your students’
usernames and passwords.
3

Step3 Easyclasslogin
To make it easier for the younger students to access the site, we have developed a new system where they can simply click on a link to access their class roll. These can be placed on the school website or preloaded onto computers at your school.
1. Click on ‘Classes’ to bring you to the
‘Manage Classes’ page. Click on ‘Easy login’.
You can use the link supplied as a bookmark
by dragging it onto the desktop. This link
will take students directly to their class roll.
Each “easy link” is exclusive to that class.
2. For younger students, you can choose not
to use passwords. To choose this option go
to ‘Easy Login’ and then down the bottom make
your selection from the ‘Set your access level’
dropdown menu. (choose “Open Access” if no
passwords are needed)
3. This is what the class will see. >>>>>> Students will be able to find their name on the class list and click ‘go’ to begin learning.
4

Step4 Students’SmileyFaceProgressCharts
1. When teachers first start they do not need do anything except give students access. Students are automatically guided through each course from the top down by using their “Smiley Face” progress chart. They all want to turn their “Smiley Faces” green.
2. Students login either via the easy class
roll link or by using their individual access
code, which you have printed and given
to them. They can choose their subject
“Mathematics, Literacy, Music... etc” then
work down their smiley chart. Remember
to check they are working on the appropriate grade
for their level of learning as our system automatically
takes them back to where they last worked
even if it isn’t the level you want.
3. Students will only be shown activities for the
grade they are working on.
If you do not have access to computers
in your classroom, use our printable
activities in class and students can login
at home for online activities.5
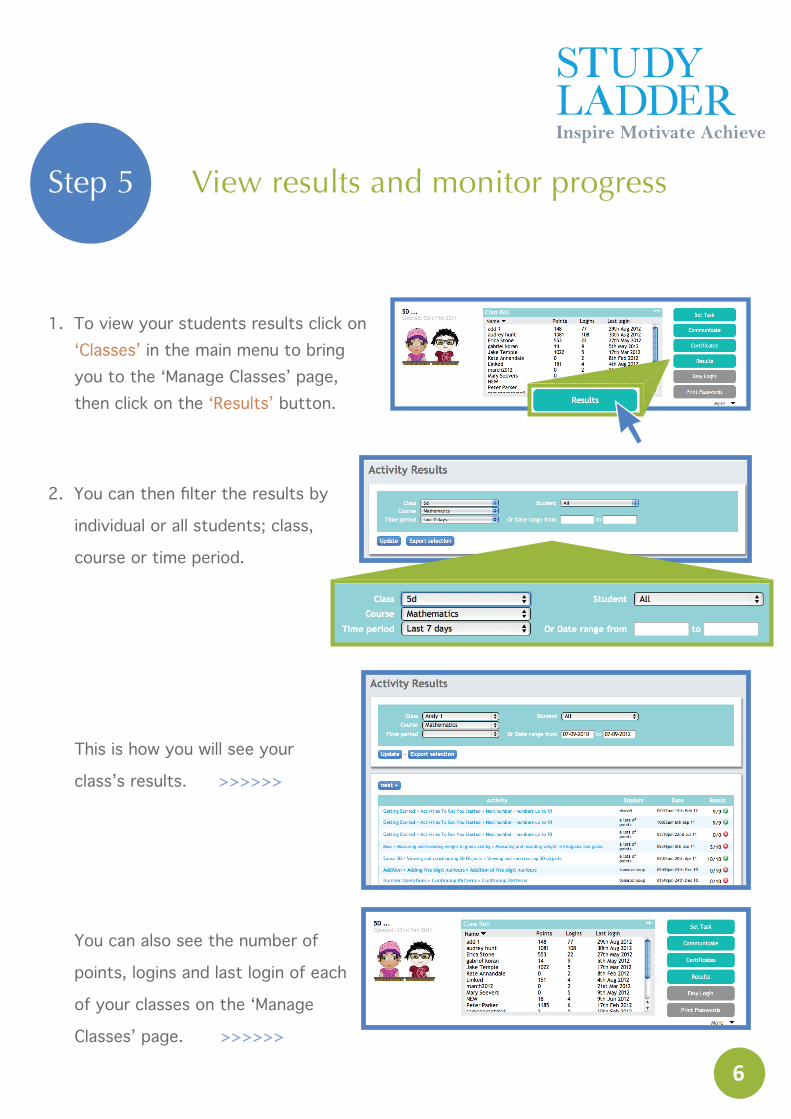
Step5 Viewresultsandmonitorprogress
1. To view your students results click on ‘Classes’ in the main menu to bring you to the ‘Manage Classes’ page, then click on the ‘Results’ button.
2. You can then filter the results by
individual or all students; class,
course or time period.
This is how you will see your
class’s results. >>>>>>
You can also see the number of
points, logins and last login of each
of your classes on the ‘Manage
Classes’ page. >>>>>>
6

Extras
This is just a glimpse of what Studyladder has to offer teachers and students. We have
also created an ‘Ideas for Best Use’ guide which gives a more in depth view on how to get
the most out of Studyladder. It includes instructions on:
Sending messages to your class.
Setting Tasks that target the skills needed by your students.
Assessments, Exams and Naplan practice.
Rapid Recall numeracy program.
World Series competitions.
Homework.
10 minute, filler activities.
Our extensive educational resources with over 10 subjects to enjoy.
And there is still more so click HERE to view the ‘Ideas for Best Use’ guide.
7