teachers edition 2016 - glenmorecc.comglenmorecc.com/clubs/208/docs/teacher manual.pdf · teachers...
TRANSCRIPT

Glenmore Cricket Club
CRICKET COACHING MANUAL
Teachers Edition 2016
Skills Focus
BASIC BATTING
Batting
Pick up the bat by first cocking at the wrists
Batting grip
V’s formed by thumb and forefinger aligned
down front of bat
Hands together in middle of handle
Batting stance
Side on
Feet shoulder width apart
Head upright, eyes level
BASIC BOWLING
Grip
Grip the ball with thumb underneath and first two
fingers on top
Bowl the ball with seam upright pointing toward
the batter
When at the bowling crease beginners should be:
Side on to the target
Non-bowling hand reaches up high and bowling
hand moves down low
Non-bowling hand pulls straight down as bowling
hand moves over the top (arm straight) to bowl
Follow through with bowling hand across the
body
Bowling with a run up
To teach bowling with a run-up only progress to
next point when the previous skill is mastered
Revise: basic bowling action (arm action, including
release of the ball)
LIFT front knee and at the same time, perform the
initial stretching movement of the arms. STAMP
on front foot in a straight line towards the target
and BOWL
STEP THROUGH with back foot towards the target
by taking it across the front foot. LIFT front foot,
STAMP and BOWL
Then, build run-up one step at a time. That is, one
STEP back foot STEP THROUGH across front foot,
LIFT front foot, STAMP and BOWL
FIELDING THROWING & CATCHING
Ground Fielding
Stay front on to the ball
Bend knees and move into a low position
Throwing
Body side on to target
Step towards target
Throwing hand moves back and up fingers on top
of ball
Non-throwing hand points toward the target
Throw the ball keeping the elbow high
Throwing arm follows through across the body
Catching
Move into position quickly
Keep head still, eyes on ball
Fingers point down, up or to side
Giving with the ball
Underarm throwing
Extend throwing hand back with arm straight
Step towards target
Swing arm through, release the ball and allow
palm to continue through towards the target
Have body weight moving towards target

Activities
Use these structured and progressive schemes of work as a guideline to plan a unit of striking and fielding within
the overall curriculum games requirement for that key stage.
Each lesson includes a suggested warm up, main activity and a game. It is assumed that the lesson is 45-60 minutes
long.
Warm Up
Fun Physical Activities
Jogging with Imaginary Fielding
Running with the Bat
Running, Throwing & Catching
Creating Space & Catching
Running & Stopping the Ball
Stretching
Snowball Tag
Ball Handling Routine
Batting Relays
Red Rover
Locomotion Relays
Under and Over
`10 Game' Catchers v Runners
Fielding
Low Catch
Shoulder High Catch
High Catch
Stopping the Ball with Two
Hands
Throwing
Target Throwing
Roll-a-Ball
Tower Game
Run Out
Fielding Races
Picking up One Handed &
Throwing
Chasing & Throwing
Wicketkeeping
Batting
The Basics of Batting
How to Choose Which Shot to
Play
Blocking the Ball
Leaning Forward to Strike the
Ball
Stepping Back to Strike the Ball
Target Batting
Bowling
Underarm Bowling
Bowling Overarm from Standing
Bowling with a Run-Up
Spinning the Ball
Target Bowling
Bowl Out
Team Games
Continuous Cricket
Racing Cricket
Caterpillar Cricket
Conveyor Belt Cricket
Match Cricket
Pairs Cricket
Fielding Soccer
Rapid Fire

Activities
Activity
Essentials
Fundamentals Cricket Skills Game Sense Body Awareness Travelling Sending Receiving Fitness Batting Bowling Fielding Attack Defence
Bala
nce
Read
y P
osi
tio
n
Falli
ng
Sto
pp
ing
Do
dg
ing
Runnin
g
Jum
pin
g
Leap
ing
Gallo
pin
g
Ho
pp
ing
Ski
pp
ing
Ove
rarm
Thro
w
Und
era
rm T
hro
w
Hitting
Catc
hin
g
Sto
pp
ing
Tra
pp
ing
Card
iova
scula
r End
ura
nce
Str
eng
th
Sp
eed
Ag
ility
Str
aig
ht
Bat
Sho
ts
Cro
ss B
at
Sho
ts
Runnin
g B
etw
een W
icke
ts
Pro
tect
Stu
mp
s
Hit B
all
Alo
ng
Gro
und
Bo
wl w
ith S
traig
ht
Arm
Bo
wl A
ccura
tely
Bo
wl w
ith R
un U
p
Thro
win
g
Catc
hin
g
Sto
pp
ing
The B
all
Sco
re R
uns
Pla
cem
ent
and
Dis
tance
Avo
id G
ett
ing
Out
Sto
p R
un S
coring
Make
Hitting
Ball
Difficu
lt
Get
Batt
er
Ou
t
Ball Handling Routine
Basic Catching
Batting Relays
Continuous Cricket
Fielding Soccer
Locomotion Relays
Pairs Cricket
Rapid Fire
Red Rover
Snowball Tag
Target Batting
Target Bowling
Target Hitting
Target Throwing
Under and Over

5 Lesson Plan Session
Warm Up Main Activity Main Activity Game
1 Snowball Tag Stopping the Ball with 2 Hands Target Batting Rapid Fire
2 Batting Relays Target Bowling Target Batting Continuous Cricket
3 Locomotion Relay Target Throwing Fielding Soccer Caterpillar Cricket
4 Snowball Tag Target Batting Target Bowling Conveyor Belt Cricket
5 Under and Over Rapid Fire Fielding Soccer Pairs Cricket
10 Lesson Plan Session
Warm Up Main Activity Main Activity Game
1 Fun Physical Activities Low catch The Basics of Batting Continuous Cricket
2 Snowball Tag Underarm Bowling Shoulder High Catch Roll a Ball
3 Batting Relay Blocking the Ball
Bowling Overarm from
Standing Rapid Fire
4 Running & Stopping The Ball High Catch
Leaning Forward to Strike
the Ball Racing Cricket
5 Red Rover Bowl Out
Stopping the Ball with Two
Hands Pairs Cricket
6 Jogging with Imaginary
Fielding Stepping Back to Strike the Ball Target Bowling Caterpillar Cricket
7 Locomotion Relays Tower Game
How to Choose Which
Shot to Play Continuous Cricket
8 “10 Game” Bowling with a Run-Up
Picking up One Handed &
Throwing Conveyor Belt Cricket
9 Match Cricket
10 Match Cricket

15 Lesson Plan Session
Warm Up Main Activity Main Activity Game
1 Fun Physical Activities Low catch Target Batting Continuous Cricket
2 Snowball Tag Underarm Bowling Shoulder High Catch Roll a Ball
3 Jogging with Imaginary
Fielding Blocking the Ball
Bowling Overarm from
Standing Tower Game
4 Ball Handling Routine High Catch Leaning Forward to Strike
the Ball Racing Cricket
5 Running with The Bat Bowling Overarm from
Standing
Stopping the Ball with Two
Hands 10 Game
6 Batting Relays Stepping Back to Strike the Ball Bowling with a Run-Up Caterpillar Cricket
7 Running Throwing & Catching Throwing How to Choose Which
Shot to Play Bowl Out
8 Red Rover Bowling with a Run-Up Picking up One Handed &
Throwing Conveyor Belt Cricket
9 Creating Space & Catching Leaning Forward to Strike the
Ball Bowling with a Run-Up Continuous Cricket
10 Locomotion relays Chasing & Throwing Stepping Back to Strike the
Ball Racing Cricket
11 Running & Stopping The Ball Target Bowling Wicket Keeping Caterpillar Cricket
12 “10 Game” Leaning Forward to Strike the
Ball Target Bowling Conveyor belt Cricket
13 T20 Blast Game
14 T20 Blast Game
15 T20 Blast Game

Practical Tips
USE EXISTING LINES/MARKINGS where possible (e.g. playground or running track).
Distances stated are safety guidelines, but ADAPT TO DIFFERENTIATE between abilities where necessary.
DIFFERENTIATE for lesser abilities by:
(i) breaking skills down further,
(ii) using different types and sizes of balls and equipment,
(iii) altering times and turns.
DEMONSTRATE WHENEVER POSSIBLE using the pictures to help you. “A picture tells a 1000 words”.
Safety
The players should always be at least 10m away from the batter.
Cool Down
At the end of each lesson, COOL and CALM the players down by jogging 20 paces, striding 20 paces, walking 20
paces and 20 seconds silence to “Think about the lesson”.
N.B. This is also an ideal time for the children to evaluate their performance and to discuss and plan with the
teacher ways that they can improve.

Useful Equipment

Warm Up

Warm Up Activities
Fun Physical Activities Time: 5 mins
Aim: To use a variety of physical activities to increase body temperature Equipment: 4 cones, existing lines
Organisation Instructions Teaching Points
1. Children spread out along the start line.
2. Give instructions of various ways for all to move from the start line to
line A and back again. e.g. jogging, hopping and side striding (star
shape).
3. See ideas for progression for further ideas.
Remain balanced at all times.
Be aware of the people around you.
Move in a straight line.
Progression
Walking/sprinting, arms can be by sides, above head or touching the ground.
On all fours, either facing down hands first or facing up feet first (crab).
Whilst jogging, pick knees up high in front or kick heels up behind.
Pretend cricket skills, e.g. picking a ball off the ground in one or both hands, taking a catch, bowling a ball or
hitting runs.
Increase or decrease the distance of line A.
Work in pairs, e.g. leap frog or wheelbarrow. Race other pairs.
Suggestions for discussion on health education
TASK Put your hand on your forehead. What do you feel?
Q Why do we sweat? A When you exercise, your body temperature rises. Moisture comes through the skin surface to cool you down.
Q How can you replace the liquid in your body lost due to sweating? A By drinking cold water.
Warm Up Activities
SNOWBALL TAG Time: 5 mins
Aim: To use a variety of physical activities to increase body temperature Equipment: One ball per member of the group
Organisation Instructions Teaching Points
1. Mark out a square approximately 10m x 10m
2. Place balls together at edge of square
3. One player begins with a ball and is the tagger
4. The tagger attempts to catch other players by tagging
them with the ball or hitting below the shoulders with an
underarm throw
5. All caught players collect a ball and become taggers
6. Last player caught wins
Number of Players
Group activity
Area size
10m X 10m square or larger with a
bigger group
Progression
Restrict/increase playing area
Impose time limits
Warm Up Activities
BALL HANDLING ROUTINE Time: 5 mins
Aim: To use a variety of physical activities to increase body temperature Equipment: One ball per member of the group
Organisation Instructions
1. Around head/waist/knees/ankles (several times in
each direction)
2. Figure 8 around knees.
3. “Switch” – ball between knees with 1 hand in front &
the other behind. Drop the ball & switch hands to
catch (with or without bounce). Add ‘Gorilla Walk’ by
taking a step forward with each switch
4. ‘Yo-Yo’ – hold ball in one hand out in front. Drop ball
& catch before it hits the ground with hand on top of
ball. Try non-preferred hand. Alternate hands to drop
& catch
5. ‘Circle & catch’ - hold ball in one hand out in front.
Drop ball & circle hand around the ball before
catching it again. Try non-preferred hand
6. Throw ball under one leg & catch with other hand.
Repeat with opposite hand & leg
7. Bounce & catch with one hand. Try non-preferred
hand. Alternate hands to bounce & catch
8. Dribble like a basketball. Try non-preferred hand
9. Hit the ball on an open hand to self. Try non-
preferred hand
10. Throw ball in the air to self & clap/touch ground/spin
around etc. before catching
11. Stand side on, step & throw overarm to get maximum
bounce. Catch ball & repeat
12. Add ‘Colour Catching’ if time permits

Warm Up Activities
BATTING RELAYS Time: 5 mins
Aim: To use a variety of physical activities to increase body temperature Equipment: One bat, bat & tee per group.
Organisation Instructions Teaching Points
1. ‘Dribble’ the ball up & back around a tee like their playing
hockey
2. Hit the ball to self in air and walk/run up & back around tee
3. Run up and hit ball off tee to team member who repeats
the action.
Teach technique as appropriate,
otherwise ask questions to get
children to guide their own learning
about, ‘What is the best way to do it?’
Progression
Restrict/increase playing area
Impose time limits

Warm Up Activities
RED ROVER Time: 5 mins
Aim: To use a variety of physical activities to increase body temperature Equipment: 4 markers set up in a large square
Organisation Instructions
1. Select a few kids to start in the middle of the the square,
making a line. They are the catchers
2. Start the rest of the children on one side of the square facing
the catchers. They are the runners
3. Coordinator calls ‘All Over Red Rover’
4. All the runners try to get past all the catchers to get the ‘safe
zone’ which is the other side of the square
5. Catchers must try to tag the children as the run past
6. Any runner that is tagged then becomes one of the catchers
7. Coordinator continues to call out “all over Red Rover” until
there is just one runner left that hasn’t been tagged by the
catchers. They are the winner

Warm Up Activities
LOCOMOTION RELAYS Time: 5 mins
Aim: To use a variety of physical activities to increase body temperature Equipment: Marker cones at each end of space
and across ‘halfway’ as start/finish
Organisation
Instructions
1. Children Line up across ‘halfway’ line in pairs facing each other – half are #1’s & half and #2’s
2. Take it in turns to go Up & Back to own end using various forms of locomotion: Eg. Running, Skipping, Hopping, Jumping, Leaping, Side Stepping, Grapevine
3. #1’s go first & then tag #2’s who copy what #1’s do & the n rep eat process

Warm Up Activities
UNDER & OVER Time: 5 mins
Aim: To use a variety of physical activities to increase body temperature Equipment: None
Organisation
Instructions
1. Pairs (numbered off #1 & #2)
2. #1 holds body in ‘Bridge’ position
3. #2 crawls under #1, who then lowers to Push Up position
4. #1 returns to ‘Bridge’ position & so on
5. Repeat 5 times & swap roles. Perform 2-3 ‘sets’
Warm Up Activities
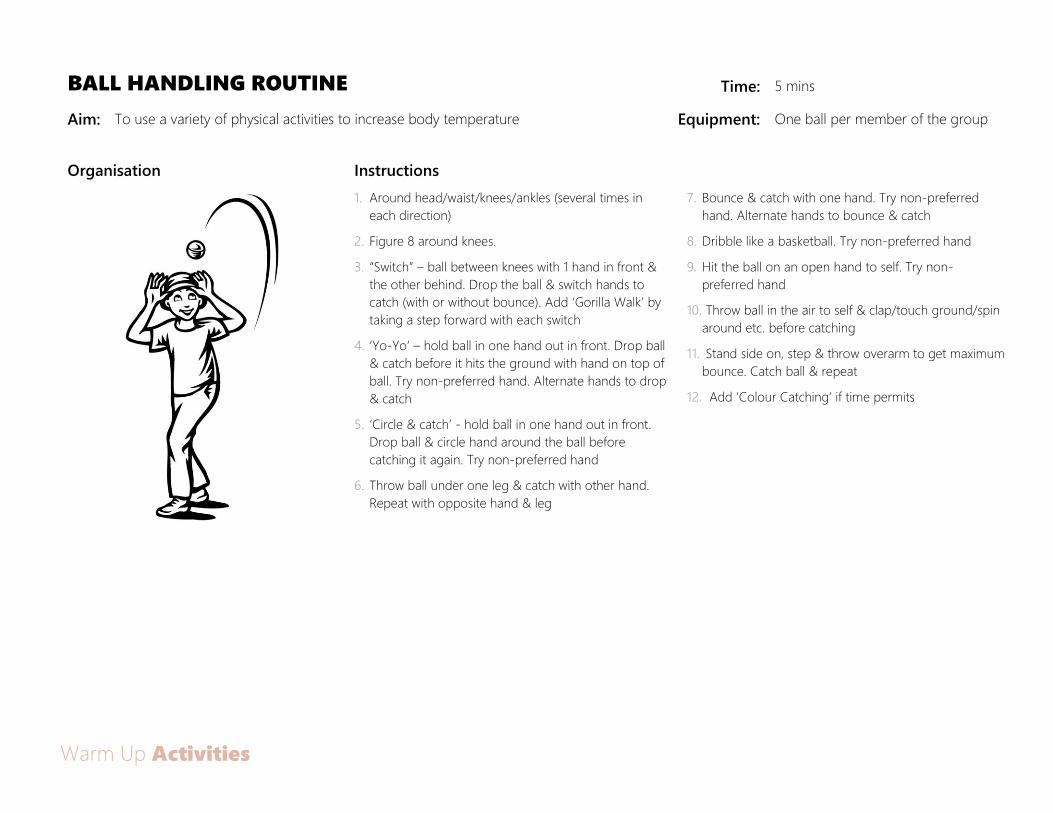
JOGGING WITH IMAGINARY FIELDING Time: 5 mins
Aim: To combine continuous movement with fielding skills Equipment: 4 cones, 1 whistle
Organisation Instructions Teaching Points
1. Children continuously jog round a square cornered by cones.
2. When the teacher calls either `left' or `right,' the children pretend
to pick up the ball in that particular hand.
3. On the call of `both,' the imaginary ball is picked up in two hands.
4. When the whistle blows, children change direction.
Get down and touch the floor when
picking up the imaginary ball.
Progression
Increase or decrease the size of the square as appropriate.
Teacher calls `jump' for the children to pretend to jump and catch.
Teacher calls `throw' for the children to pretend to throw the ball at the stumps for a run out.
Suggestions for discussion on health education
TASK Think about how much air you are breathing in now, compared to before you started warming up?
Q Why do we breathe faster and more
deeply during and after exercise?
A To breathe in more oxygen from the air. This is then carried by the blood to feed our
muscles as we work them harder.
Q How can we increase the amount of
oxygen that our body can take in?
A By playing sport and exercising regularly, we can train our lungs to take in more
oxygen.

Warm Up Activities
RUNNING WITH THE BAT Time: 10 mins
Aim: To increase knowledge of how to run with the bat by means of a relay race Equipment: 2 bats per team, 4 cones / existing lines
Organisation Instructions Teaching Points
1. Divide into equal teams according to the number of bats, e.g. 2
per team.
2. First member of each team runs to line A and back again.
3. As they pass the start line next member repeats and so on.
4. First team to finish wins.
Grip bat at the end of the handle
When waiting to run, you are allowed to
stand in front of the start line, as long as
your bat is touching the ground behind
it.
When approaching the lines, reach out
using the full length of the bat to touch
down over the line.
Progression
Teams run through twice before finishing.
Give a time limit (i.e. 2 minutes) ± teams count how many runs they can complete in the given time.
Suggestions for discussion on health education
TASK Run 20 metres as quickly as possible.
Q At the beginning of your run which
muscles worked the hardest?
A Your leg muscles.
Q How can you improve your speed? A By strengthening your muscles. You can do this by exercising regularly.

Warm Up Activities
RUNNING, THROWING & CATCHING Time: 10 mins
Aim: To improve fielding skills by means of a relay race Equipment: 4 tennis/soft balls, 4 stumps, chalked
circles, 2 cones / existing lines
Organisation Instructions Teaching Points
1. Split class into 4 equal teams.
2. First person in each team starts with a ball and runs placing it in the
circle and continues forward round the skittle.
3. On the way back they stop, pick up the ball and gently throw
underarm for next person to catch.
4. Catcher repeats.
5. First team to finish wins.
Place the ball so that it remains in the
circle.
Stay low when you throw the ball so that
it arrives at waist height.
Progression
Increase distances apart.
If distance allows encourage an overarm throw.
Using the same lesson format, set a time limit (i.e. 3 mins), teams count the number of clean catches
achieved.
Suggestions for discussion on health education
TASK Feel the warmth on your arms and legs ± They will feel warmer due to exercise.
Q Why do sports people warm up? A (i) To avoid injury.
(ii) To get their body ready for further exercise.
(iii) To feed their muscles with more blood which carries oxygen.
(iv) To get themselves ready mentally as well as physically for exercise.
Warm Up Activities
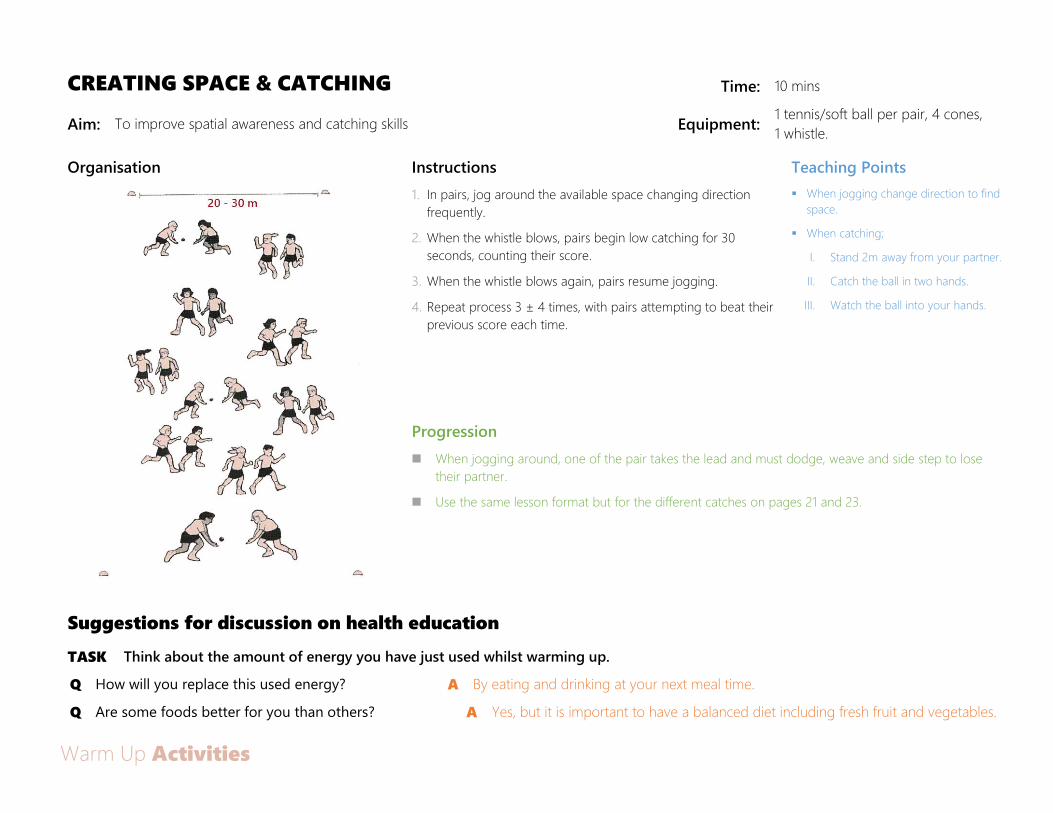
CREATING SPACE & CATCHING Time: 10 mins
Aim: To improve spatial awareness and catching skills Equipment: 1 tennis/soft ball per pair, 4 cones,
1 whistle.
Organisation Instructions Teaching Points
1. In pairs, jog around the available space changing direction
frequently.
2. When the whistle blows, pairs begin low catching for 30
seconds, counting their score.
3. When the whistle blows again, pairs resume jogging.
4. Repeat process 3 ± 4 times, with pairs attempting to beat their
previous score each time.
When jogging change direction to find
space.
When catching;
I. Stand 2m away from your partner.
II. Catch the ball in two hands.
III. Watch the ball into your hands.
Progression
When jogging around, one of the pair takes the lead and must dodge, weave and side step to lose
their partner.
Use the same lesson format but for the different catches on pages 21 and 23.
Suggestions for discussion on health education
TASK Think about the amount of energy you have just used whilst warming up.
Q How will you replace this used energy? A By eating and drinking at your next meal time.
Q Are some foods better for you than others? A Yes, but it is important to have a balanced diet including fresh fruit and vegetables.

Warm Up Activities
RUNNING & STOPPING THE BALL Time: 5 mins
Aim: To increase the heart rate, using continuous movement and incorporating a fielding skill Equipment: Minimum 10 tennis/soft balls,
4 cones, 1 bucket/box
Organisation Instructions Teaching Points
1. Children in a straight line between cones 1 & 4.
2. Teacher continuously rolls out balls to be stopped with hands
between cones 1 & 2.
3. Children individually stop and collect a ball and continue
round the square.
4. Place the ball in the bucket/box and join the back of the line.
Repeat.
Run fast to get close to the ball.
Use two hands to stop the ball.
Place the ball in the bucket/box.
Progression
Roll the ball out slower to make it easier, or faster to make it more difficult.
Change the size of the square to increase or decrease the distance that has to be run.
Loop the ball in the air for the children to take a high catch
Suggestions for discussion on health education
TASK Feel your heart... is it beating faster than when you started?
Q Why? What does your heart do? A When you are active, your muscles need more blood, so your heart has to work harder
to pump it around your body.

Warm Up Activities
STRETCHING Time: 10 mins
Aim: To encourage safe stretching exercises to increase flexibility and to avoid injury Equipment: Nil
Organisation Instructions Teaching Points
1. Class jog around gently for 2 minutes, then spread out and find a
space facing the teacher.
2. Work on muscles and joints from head to toe. See the teaching points
for different instructions.
3. When stretching, hold for 10 seconds, then slowly release. `No
bouncing'.
4. When mobilising, rotate the joint slowly three times.
Stretching Exercises ´ Neck: Look over
right shoulder, hold. Look over left
shoulder, hold. ´ Sides: Feet shoulder width
apart, right arm stretched above head,
push up and hold. Repeat left arm.
Mobilising Exercises ´ Arms: Arms above
head, rotate forwards (3 times slowly), then
backwards. ´ Legs: Lift up right knee, rotate
to the side then down to the floor. Repeat
left knee. ´ Ankles & Wrists: In turn rotate
clockwise and anti-clockwise.
Progression
Further stretching exercises.
(i) Arms above head palms touching, push hard against each other. (Upper body).
(ii) Left foot in front of the other, bend left leg at the knee and straighten right leg, keeping the heel on the floor.
Repeat, right leg in front. (Calves).
(iii) Left foot forward one pace, bend right knee, keep left one straight and push back slightly. Repeat, right leg in
front. (Hamstrings).
Suggestions for discussion on health education
TASK Clench your fist and bring your fist towards your shoulder.
Q Why are your muscles so important and what
do they do?
A They hold the bones together (stability) and they produce movement.
Q When you bent your arm at the elbow, what happened to the muscle to
make your arm bend?
A It shortened (contracted).

Warm Up Activities
“10 GAME” CATCHERS V RUNNERS Time: 10 mins
Aim: To practice catching and running between the wickets in a
competitive game. Equipment: 1 tennis/soft ball, 2 bats 4 cones/existing creases
Organisation Instructions Rules
1. Split into 2 teams.
2. Running team in a straight line, catchers in a circle.
(As diagram).
Catchers:
3. Throw the ball to each player clockwise around the
circle.
4. Each clean catch counts as one point.
Batters:
5. In turn, runners run to the batting line (crease) and
back, as in a relay.
6. Rules:
7. When all the batters have run once, the catchers
stop. Record the catchers' score.
8. Teams change over.
9. The team with the most catches wins.
Catchers:
Hands together, catch in two
hands.
Runners:
Run fast in a straight line.
Reach out and touch the bat
down over the line at each end.

Fielding

Fielding
TARGET THROWING Time: 10 mins
Aim: Throw the ball accurately hitting a target Equipment: 1 tennis/soft ball per pair
Organisation Instructions Teaching Points
1. Throwing overarm at a marker
2. 5 year olds are 5 steps back from the marker, 6 year olds are
3. 6 steps back from the marker etc
4. Partner is on the opposite side, also throwing at the marker.
5. 1 point for hitting the cone
6. 10 points for getting the marker to do the Super Flip
Feet, shoulder width apart.
Bend your knees and keep your bottom
high.
Watch the ball into your hands.
Progression
Increase distance between partners
Twenty throws with right hand
Twenty throws with left hand
Fielding
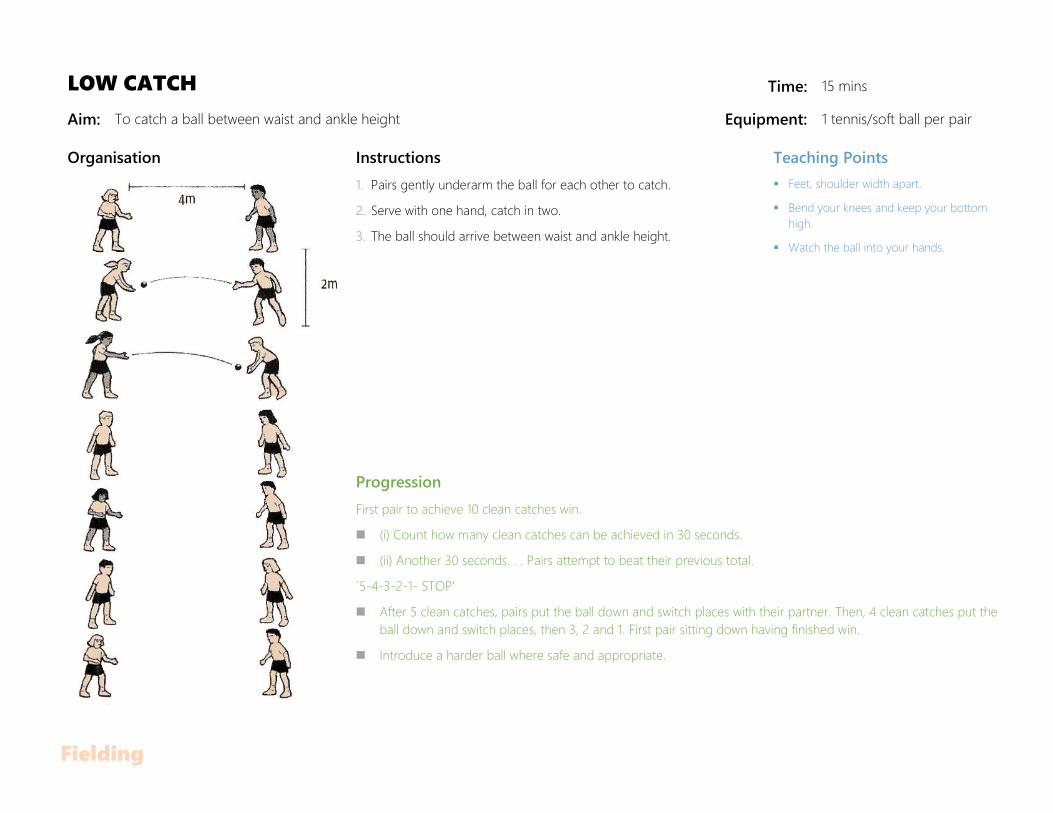
LOW CATCH Time: 15 mins
Aim: To catch a ball between waist and ankle height Equipment: 1 tennis/soft ball per pair
Organisation Instructions Teaching Points
1. Pairs gently underarm the ball for each other to catch.
2. Serve with one hand, catch in two.
3. The ball should arrive between waist and ankle height.
Feet, shoulder width apart.
Bend your knees and keep your bottom
high.
Watch the ball into your hands.
Progression
First pair to achieve 10 clean catches win.
(i) Count how many clean catches can be achieved in 30 seconds.
(ii) Another 30 seconds. . . Pairs attempt to beat their previous total.
`5-4-3-2-1- STOP'
After 5 clean catches, pairs put the ball down and switch places with their partner. Then, 4 clean catches put the
ball down and switch places, then 3, 2 and 1. First pair sitting down having finished win.
Introduce a harder ball where safe and appropriate.

Fielding
SHOULDER HIGH CATCH Time: 15 mins
Aim: To catch a ball at shoulder/head height Equipment: 1 tennis/soft ball per pair
Organisation Instructions Teaching Points
1. Pairs gently underarm the ball for each other to catch.
2. Ball should arrive at shoulder/head height.
Hands up, palms facing forwards.
Thumbs crossed, fingers pointing up.
Catch, letting hands go with the ball over
one shoulder.
Progression
First pair to achieve 10 clean catches win.
(i) Count how many clean catches can be achieved in 30 seconds.
(ii) Another 30 seconds. . . Pairs attempt to beat their previous total.
`5-4-3-2-1- STOP'
After 5 clean catches, pairs put the ball down and switch places with their partner. Then, 4 clean catches put the
ball down and switch places, then 3, 2 and 1. First pair sitting down having finished win.
Introduce a harder ball where safe and appropriate.

Fielding
HIGH CATCH Time: 15 mins
Aim: To catch a ball dropping from above head height Equipment: 1 tennis/soft ball per pair
Organisation Instructions Teaching Points
1. Pairs loop the ball underarm for each other to catch.
2. Try to make the ball drop near partner's head.
Watching the ball all the time, move to
where it is dropping.
Cup hands together, little fingers
touching.
Hands up early, palms facing upwards
Catch at eye level, then relax arms.
Progression
Increase/decrease the height of catches.
Before catching the ball:
(i) Clap once, twice, etc.
(ii) Perform a skill, e.g. call your name or touch the ground with 2 hands, etc.
Make the catcher move by looping the ball slightly to the right or left.
Introduce a harder ball where safe and appropriate.

Fielding
STOPPING THE BALL WITH TWO HANDS Time: 15 mins
Aim: To stop a fast moving ball using two hands and the body as a barrier Equipment: 1 tennis/soft ball per pair
Organisation Instructions Teaching Points
1. Pairs roll the ball in a straight line for partner to stop
using two hands.
2. Having stopped the ball, they stand up and roll the ball
back for partner to repeat.
3. The ball must be rolled underarm, not bounced along
the ground.
Stand side on, so the arm you roll
the ball with is furthest from your
partner.
As the ball approaches get down
on the knee nearest your partner.
Stop the ball alongside your knee,
with hands together and fingers
pointing down.
Progression
Children should move into the line of the rolling ball before going down on their knee. To
practice this, pairs
roll the ball very slightly to the left or right of their partner.
Stopping the ball and then throwing to partner:
(i) One of the pair rolls the ball out, the other stops the ball using 2 hands and body as a
barrier, then quickly stands up and throws gently overarm one bounce to partner. Repeat 3
times each, then change.
(ii) If space is available, allow for a harder throw by increasing the distance apart.
(iii) Throw to partner without bouncing, (i.e. for partner to catch).
Pairs roll the ball faster to test if their partner can stop it cleanly.

Fielding
PICKING UP ONE HANDED & THROWING Time: 15 mins
Aim: To pick up and throw a ball underarm on the run Equipment: 1 tennis/soft ball per pair, 6 cones / existing lines
Organisation Instructions Teaching Points
1. Pairs stand opposite each other.
2. Person on the start line has the ball and runs out
placing it on the middle line and then returns quickly to
the start line.
3. Now, person on the fielding line runs towards the ball
and picks it up one handed, then throws it underarm for
person on the start line to catch.
4. While fielder runs back to fielding line, person on start
line repeats for next turn.
5. Change after 3 turns each.
Shape throwing hand like a
`scooper'.
Pick the ball up by the outside of
your foot.
Staying low, throw the ball
underarm keeping your head still
and arm straight.
Progression
Set a time limit, (i.e. 2 minutes). 1 point is scored for each successful pick up and throw. The
point only counts if the ball is caught. Highest pair score wins.
Person on start line gently rolls the ball out for fielder to run, pick up and throw the
`moving' ball back to the person on the start line. Person on the start line rolls again only
when the fielder has returned to fielding line. First pair to have 3 successful turns each win.

Fielding
THROWING Time: 15 mins
Aim: To throw a ball overarm with power and accuracy Equipment: 1 tennis/soft ball per pair
Organisation Instructions Teaching Points
1. Pairs throw the ball powerfully overarm one
bounce to each other.
2. The ball should be bounced so that it arrives at
waist height.
Point non-throwing arm at
partner.
Lift your throwing arm up and
bend it at the elbow.
Rock back then forward,
releasing the ball quickly to your
partner.
Keep your eyes fixed on the
target.
Progression
Increase distance apart.
Use a hoop 2m in front of partner as a target. 5 attempts each. 1 point for each
successful one bounce attempt. Highest pair score wins.
Throw the ball directly for partner to catch without bouncing.
Fielding
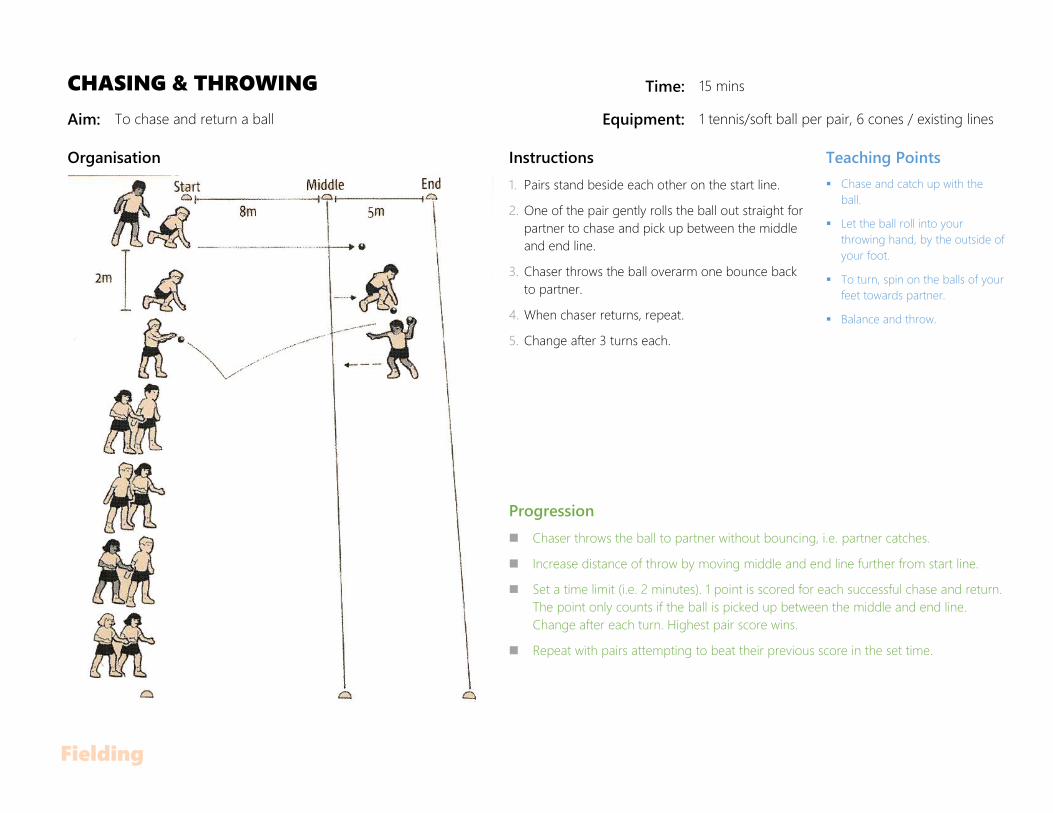
CHASING & THROWING Time: 15 mins
Aim: To chase and return a ball Equipment: 1 tennis/soft ball per pair, 6 cones / existing lines
Organisation Instructions Teaching Points
1. Pairs stand beside each other on the start line.
2. One of the pair gently rolls the ball out straight for
partner to chase and pick up between the middle
and end line.
3. Chaser throws the ball overarm one bounce back
to partner.
4. When chaser returns, repeat.
5. Change after 3 turns each.
Chase and catch up with the
ball.
Let the ball roll into your
throwing hand, by the outside of
your foot.
To turn, spin on the balls of your
feet towards partner.
Balance and throw.
Progression
Chaser throws the ball to partner without bouncing, i.e. partner catches.
Increase distance of throw by moving middle and end line further from start line.
Set a time limit (i.e. 2 minutes). 1 point is scored for each successful chase and return.
The point only counts if the ball is picked up between the middle and end line.
Change after each turn. Highest pair score wins.
Repeat with pairs attempting to beat their previous score in the set time.
Fielding
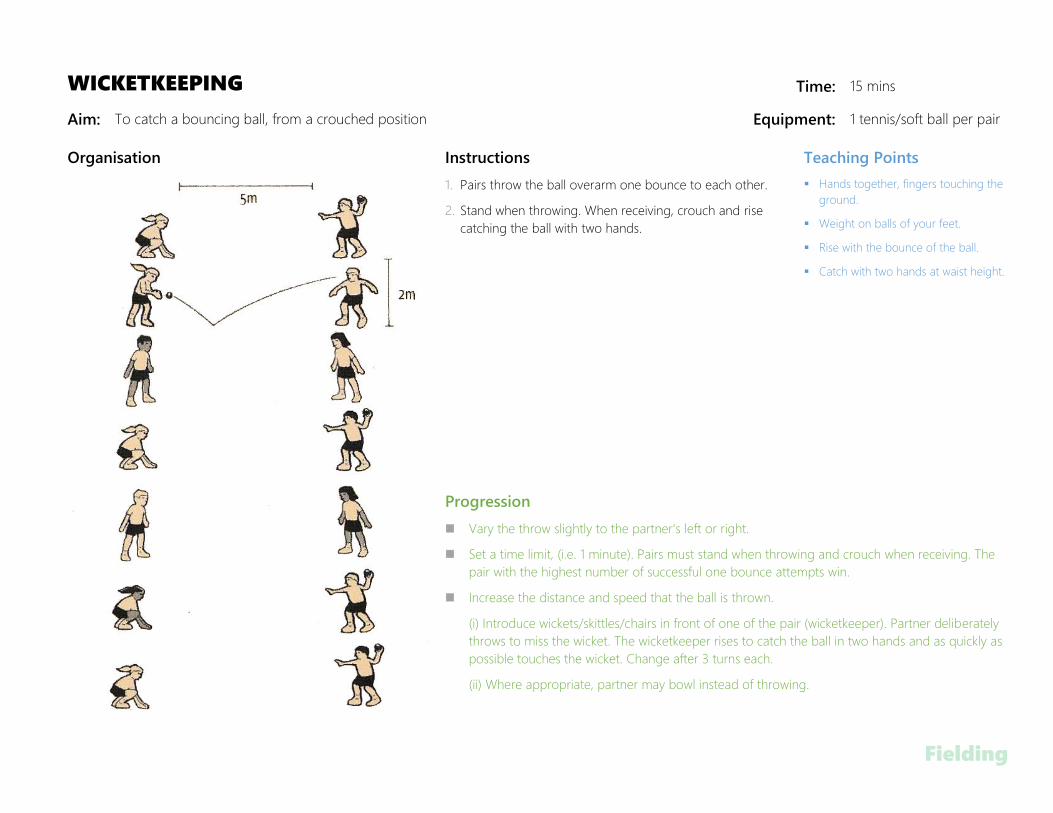
WICKETKEEPING Time: 15 mins
Aim: To catch a bouncing ball, from a crouched position Equipment: 1 tennis/soft ball per pair
Organisation Instructions Teaching Points
1. Pairs throw the ball overarm one bounce to each other.
2. Stand when throwing. When receiving, crouch and rise
catching the ball with two hands.
Hands together, fingers touching the
ground.
Weight on balls of your feet.
Rise with the bounce of the ball.
Catch with two hands at waist height.
Progression
Vary the throw slightly to the partner's left or right.
Set a time limit, (i.e. 1 minute). Pairs must stand when throwing and crouch when receiving. The
pair with the highest number of successful one bounce attempts win.
Increase the distance and speed that the ball is thrown.
(i) Introduce wickets/skittles/chairs in front of one of the pair (wicketkeeper). Partner deliberately
throws to miss the wicket. The wicketkeeper rises to catch the ball in two hands and as quickly as
possible touches the wicket. Change after 3 turns each.
(ii) Where appropriate, partner may bowl instead of throwing.

Fielding
ROLL-A-BALL Time: 10 mins
Aim: To practice stopping a ball with two hands, in a competitive game Equipment: Tennis/soft balls approx 1 per 3 players, 4 cones
Organisation Instructions Rules
1. Split into 2 teams. Same number of balls per
team.
2. Each team spread out just in front of their goal
line.
3. Teams continuously roll the ball underarm,
attempting to cross the other team's goal line.
4. A goal is scored each time a ball crosses the goal
line. First team to 10 goals wins.
5. The ball must be rolled underarm from just in
front of the goal line.
Get your body into line with the
ball and stop it using two
hands.
Roll the ball by placing your
hand close to the ground.
Roll the ball into the spaces in
the other team's goal.

Fielding
TOWER GAME Time: 10 mins
Aim: To improve throwing by use of a target Equipment: 2 cricket bases and 3 stumps. Tennis balls approx 1 per 3 players, 4 cones.
Organisation Instructions Rules
1. Split into 2 teams. Same number of balls per
team.
2. Each team spread out just behind their throwing
line.
3. Tower assembled as picture and placed in the
centre.
4. Teams throw continuously until tower is knocked
over.
5. First team to knock down the tower 5 times wins.
6. Teams must not throw from in front of the
throwing line.
Stand side on and aim at the
target with non throwing arm.
Use two hands to gather misses
by the other side.
Work as a team, everyone
should have a turn.

Fielding
RUN OUT Time: 15 mins
Aim: To improve throwing and running between the wickets Equipment: 2 bats, 1 tennis/soft ball, 2 sets of stumps/skittles, 7 cones
Organisation Instructions Rules
1. Split into 2 teams, decide which team bats.
2. One of fielding team acts as wicketkeeper (w/k).
3. When teacher calls `Yes':
1st batter runs to the other batting line
(crease) and back.
1st fielder runs to the stationary ball and
throws for the w/k to catch and then touch
against the stumps.
4. The batter is `run out' if they do not cross the line
in time.
5. One point is awarded to the fielding team for
every run out.
6. Replace ball to repeat with next member of each
team.
7. Teams change when each member has had a
turn.
8. 7 The fielding team with the most run outs wins.
Batters:
Use the bat as an extension of
your arm. stretch it out to touch
over the line at each end.
Fielders:
Turn and balance before
throwing.
Point non throwing arm at the
target and throw the ball without
bouncing to the wicketkeeper.

Fielding
FIELDING RACES Time: 15 mins
Aim: To practice fielding skills in a race Equipment: 1 tennis/soft ball per group. 4 cones/existing lines
Organisation Instructions Rules
1. This example uses picking up one handed and
throwing, for other skills see ideas for progression.
2. Divide into groups of 6.
3. Half of the group on the serving line, other 3 opposite
on the fielding line.
4. First person on the serving line very gently rolls the
ball out and runs to join the back of the fielding
group.
5. First person on the fielding line runs out, picks up and
underarms the ball for the next server to catch and
then continues to the back of the serving group.
6. Repeat until every person is back to their original
position.
Serving: Roll the ball out
gently.
Fielding: Underarm the ball at
waist height.
Progressions
Using the same lesson format practice these fielding skills:
(i) Running towards the ball ± picking it up with two hands and throwing overarm.
Serving and fielding line = 15m apart.
Server rolls the ball out a little bit harder.
(ii) Stopping the ball with two hands and throwing overarm.
Serving and fielding line = 15-20m apart.
Server rolls the ball much harder.

Batting

Batting
TARGET BATTING Time: 10 mins
Aim: Throw the ball accurately hitting a target Equipment: One Tee, One Ball, Two Cones or markers and One Bat per pair
Organisation Instructions Teaching Points
1. Set up a batting tee, with two cones set up in goal formation ten
metres from batting tee.
2. Students, in pairs take turns trying to hit the ball through the goals.
3. The partner will field the ball and return it back to the batter.
4. Once the ball has been hit 5-10 times, the batter will rotate with the
fielder
Feet, shoulder width apart.
Bend your knees and keep your bottom
high.
Watch the ball into your hands.
Progression
Vary the distance of the batting tee depending on ability/age.
The size of the goals can vary depending on the ability/age.
Remove the goals, and leave one cone for the batter to aim at.
Have the fielder standing between the goals acting as a goalie.

Batting
BLOCKING THE BALL Time: 20 mins
Aim: To block a ball that will hit the stumps Equipment: Each group has a bat, tennis/soft ball (foam for indoors), set of
stumps/skittle & a cone. Use an existing line to divide areas.
Organisation Instructions Teaching Points
1. Split into equal groups, according to the number of
bats. Groups of 5/6 are ideal.
2. Each group has a batter, server & wicketkeeper (w/k).
Others act as fielders.
3. When the batter calls `ready', the server underarms
the ball to reach the batter on the 3rd or 4th bounce.
4. Batter leans forward to block the ball with the bat next
to front leg.
5. Safety. The ball must be blocked, not hit with power.
6. Safety. Only the w/k & batter are allowed in batting
area.
7. Each batter has 3 attempts, the wicketkeeper
becomes the next batter and everyone in the group
rotates position clockwise.
Dip head and shoulders over the
ball.
Front foot moves near to the ball
and the knee bends.
Bat is brought straight down
(vertical) next to the front leg to
block the ball.
Progression
Batters attempt to block the ball softly enough so that it does not reach the server.
Server underarms the ball one bounce for the batter to stop.
Each team has 2 attempts per person: 1 point for stopping the ball, 2 points for stopping
the ball and keeping it in the batting area. Teams keep their own score. Highest team
score wins.

Batting
LEANING FORWARD TO STRIKE THE BALL Time: 30 mins
Aim: To lean forward and strike a ball that is bouncing one pace in
front of the batter. Equipment: Each group has a bat, tennis ball, set of stumps & a cone.
Organisation Instructions Teaching Points
1. When outside, use a flat surface, e.g. a playground.
2. Split into equal groups, according to the number of
bats. Groups of 5/6 are ideal.
3. Each group has a batter, server & wicketkeeper (w/k).
Others act as fielders.
4. When the batter calls `ready', the server underarms the
ball to reach the batter on the 3rd or 4th bounce.
5. Batter leans forward to strike the ball along the ground.
6. Safety. The ball must be blocked, not hit with
power.
7. Safety. Only the w/k & batter are allowed in
batting area.
8. Each batter has 3 attempts, the wicketkeeper becomes
the next batter and everyone in the group rotates
position clockwise.
Dip head and shoulders over the
ball.
Front foot moves near to the ball
and the knee bends.
Keep head down and swing the
bat straight through (vertical) to
strike the ball.
Progression
For each group create a 5m wide target by using 2 cones, placing them 3m behind the
server. 1 point every time a batter gets the ball through the target having bounced at least
once. Each group member has 3 attempts. Highest team score wins.
Narrow the width of the target or increase its distance behind the server.
Decrease the number of bounces before it reaches the batter, e.g. 2.

Batting
STEPPING BACK TO STRIKE THE BALL Time: 30 mins
Aim: To step back towards the stumps, to strike a ball bouncing
up at waist height. Equipment: Each group has a bat, tennis/soft ball, set of stumps & a cone.
Organisation Instructions Teaching Points
1. For safety reasons this skill is usually only possible
outside on a playground or field.
2. Split into equal groups, according to the number of
bats. Groups of 5/6 are ideal.
3. Each group has a batter, server, wicketkeeper (w/k).
Others act as fielders.
4. Groups occupy their own large area. No fielder closer
than 10m to the bat.
5. When the batter calls `ready', the server throws the
ball hard (overarm), one bounce to reach the batter
at waist height.
6. The batter steps back and attempts to hit the ball by
swinging the bat across their body.
7. Each batter has 5 attempts, the wicketkeeper
becomes the next batter and everyone in the group
rotates position clockwise.
As the ball is thrown, take a step
back towards the stumps.
Now bring your other foot back,
so that both feet are apart facing
the bowler.
Keep your head still and watch
the ball.
Swing the bat across your body,
hitting the ball with arms at full
length.
Progression
Using the same lesson format, create a game situation: Having hit the ball, the batter
scores runs by running to the server's cone and back (2 runs). This is done as many
times as possible whilst the fielders collect the ball and return it to the server by the
cone. Each batter has 3 attempts. No runs are scored if the batter is bowled, run out,
caught or hit wicket. Total the 3 attempts and the highest individual score wins. Safety:
Take great care when retrieving the ball from other areas.
Using the same lesson format. The players bat in pairs, one at each end. Each pair has 6
attempts between them. The highest pair score wins.

Bowling

Bowling
TARGET BOWLING Time: 10 mins
Aim: Throw the ball accurately hitting a target Equipment: One ball, one set of stumps and two markers per pair
Organisation Instructions Teaching Points
1. Bowling at stumps from the marker approximately 6m apart
2. Partner is the Wicket Keeper
3. 1 point for hitting the stumps
4. 10 points for knocking the stumps over
5. 100 points for a ‘hat trick’
6. 3 turns each then swap
Student steps up to cone, turns side on to
target, feet comfortably apart, bowling arm
at the side (with ball) & other arm raised
above their head.
Rock from back foot to front foot, bend
their trunk forward and swing bowling arm
over, ensuring it is kept straight.
Momentum carries the bowler over their
front foot and toward the target as the ball
is released.
Progression
Remove a stump for each hit until no stumps are left
Remove middle stump and award points for the number of ‘goals’ scored by bowling the ball through the
stumps.
Place a tee on top of a stump and award points each time the bowler hits the tee.
Place a hoop or cone in front of stumps and award points each time the ball lands in the hoop or hits the cone.

Bowling
UNDERARM BOWLING Time: 10 mins
Aim: To bowl underarm accurately one bounce to a partner Equipment: 1 tennis/soft ball per pair
Organisation Instructions Teaching Points
1. Pairs bowl the ball underarm one bounce to each
other.
Face your partner.
Swing your bowling arm back.
Take a pace forward with your
opposite foot.
Swing your bowling arm straight
through and release the ball as
you step forward.
Progression
Place a hoop or chalk a circle as a target 2m in front of each person:
(i) Aim to hit partner's target on the first bounce.
(ii) Award 5 points for each successful attempt. First pair to 25 points win.
(iii) Add a wicket/skittle in front of one of the pair. Maximum per bowl is now 10 points. 5
for bouncing in target + 5 for hitting the wicket. Change after 3 attempts each. First pair
to 50 points win.

Bowling
BOWLING OVERARM FROM STANDING Time: 20 mins
Aim: To bowl accurately overarm (with a straight bowling arm), one bounce to a partner Equipment: 1 tennis/soft ball per pair
Organisation Instructions Teaching Points
1. Pairs bowl overarm one bounce to each other.
2. Suggested grip (see picture).
3. It is best to encourage bowling as a sideways on
activity, (in relation to the batter).
Stand side on.
Arms outstretched to the sides.
Pull your front arm up high
towards you and look over your
shoulder at your partner.
Rock away from your partner by
lifting up your front leg.
Rock forward keeping both arms
straight and release the ball
quickly one bounce to your
partner.
After release take a step forward.
Progression
Place a hoop or chalk a circle as a target 2m in front of each person:
(i) Aim to hit partner's target on the first bounce.
(ii) Award 5 points for each successful attempt. First pair to 25 points win.
(iii) Add a wicket/skittle in front of one of the pair. Maximum per bowl is now 10 points.
5 for bouncing in target + 5 for hitting the wicket. Change after 3 attempts each. First
pair to 50 points win.

Bowling
BOWLING WITH A RUN-UP Time: 10 mins
Aim: To link overarm bowling with a run-up Equipment: 1 tennis/soft ball per pair 4 cones/existing lines
Organisation Instructions Teaching Points
1. Pairs run up to bowl overarm one
bounce to each other.
2. No more than 4 steps are required.
3. After bowling return to the line.
Walk 4 paces forward, starting on the same
foot as the side you hold the ball in.
On the 4th step jump from that foot.
Whilst in the air turn sideways on. (Pic 1)
Land on your other foot and bowl. (Pic 2)
After releasing take a few steps forward.
(Pic3)
Jog the 4 paces to bowl.
Run the paces to bowl.
Progression
Place a hoop or chalk a circle as a target 2m in front of each person:
If space permits, allow a longer run which should be no longer than 10 paces. Ensure
bowlers jump off the correct foot (the opposite one to the arm they release the ball
with).
Place another line 1m behind both existing lines:
(i) Measure a run to allow gradual increase in running speed, aim to bowl the ball
when you are between the two lines that are 1m apart.
(ii) Try to make the ball bounce first time in between your partner's lines.
(iii) Award 5 points for each successful one bounce attempt. First pair to 25 points win.
Test for a side on bowling position by creating (or using existing) straight lines
between partners. Bowlers try not to fall either side of the line throughout the run up,
jump, release or step through after release.

Bowling
BOWL OUT Time: 15 mins
Aim: To practice basic bowling skills in a continuous game Equipment: Each group has a tennis/soft ball, set of stumps and a cone
Organisation Instructions Rules
1. Split into groups, between 4-6 is ideal.
2. Team members bowl in turn at the stumps and then
join the back of the team to await their next turn.
3. One member of each team acts as a wicketkeeper
(w/k) and returns the ball to the next bowler.
4. After each member has bowled the front person swaps
with the w/k.
5. Five points are scored each time the wicket is hit. The
ball must only bounce once.
6. Highest team score after 3 minutes’ win.
Bowl from standing still.
Aim with your front arm.
Focus on your target.
Release with a straight bowling arm.
Take a step forwards after release.
(Follow through).
Progressions
Using the same lesson format:
(i) Decrease difficulty by allowing underarm bowling. (ii) Where space permits, allow
overarm bowling with a run up.
Using either underarm or overarm only:
(i) Chalk or use cones to mark a target 5m long x 2m wide in front of the wicket. One bounce
in the target = 5 points, hit the wicket = 5 points. Maximum per bowl = 10 points. First team to
40 points, wins.
(ii) Set a longer time limit (i.e. 5 minutes). (iii) A ball each if available.
(iv) Decrease the size of the above target.

Bowling
SPINNING THE BALL Time: 15 mins
Aim: To make a ball spin on landing Equipment: 1 tennis/soft ball per pair
Organisation Instructions Teaching Points
1. Pairs underarm the ball one bounce to each other.
2. Pairs try to make the ball spin on landing.
Flick your wrist clockwise on release.
Now try anti-clockwise.
Try different ways of gripping the
ball.
Flick the wrist as hard as you can to
increase the spin.
Progression
Pairs experiment to discover how many different ways they can spin the ball.
Test the amount of spin.
(i) Pairs find a straight line on the floor. Stand 4-8m apart, pairs underarm the ball to each other
attempting to spin it across the line.
(ii) Pairs repeat attempting to spin the ball across the line on the other side.
Pairs bowl to their partner trying to spin the ball.
(i) From standing 12 ± 15m apart.
(ii) With a short run up 16 ± 20m apart.
Have a `bowl out' spinning the ball.

Team Games

Team Games
CONTINUOUS CRICKET TIME: 30 MINS
Aim: To improve basic striking, fielding and decision making skills Equipment: 2 bats, 1 tennis/soft ball, 2 sets of stumps & 2 cones
Organisation Instructions Teaching Points
1. Split into 2 teams, decide which team bats.
2. Batting team line up as in diagram.
3. Fielding team spread out in front of the stumps,
minimum 10m away for safety.
4. One fielder acts as wicketkeeper (see w/k).
5. Teacher serves ball one bounce underarm at the
stumps. Batter attempts to hit it.
6. Whether they hit it or not the batter has to run.
7. Batter scores one run each time they travel round the
cone and back. More than one run at a time can be
scored.
8. Fielders return the ball every time to the teacher who
continuously serves.
9. Each batter keeps going until they are bowled, caught
or hit wicket.
10. Highest team score wins.
Batters:
(i) Do not stand so
close that you hit your
own stumps.
(ii) Stand side on and
watch the ball.
Fielders:
(i) Be ready every ball.
(ii) Aim your throw
straight to the teacher
as quickly as possible.
(iii) Catch in two
hands.
Progression
Fielders change positions by moving clockwise each time a batter is out. Only one w/k at a time and all other fielders should be a minimum 10m away for safety.
Fielders take it in turn to serve the ball.
Inside: batters can be caught out off the walls and the ceiling.
Outside:
(i) Introduce a harder ball where safe and appropriate. (Not a cricket ball).
(ii) Have a boundary line (approx 40m from stumps), if the ball crosses having bounced first = 4 runs, without bouncing = 6 runs.
Two innings per team.
Set a time limit, (i.e. 10 mins per batting team). Batters continuously rotate whether they are Out or Not Out.

Team Games
PAIRS CRICKET Time: 30 mins
Aim: To improve basic striking, fielding and decision making skills Equipment: 2 Bats, 2 Balls, 2 Stumps, 1 Tee
Organisation
Instructions
1. Matches should consist of no more than 6-8 players (3-4 pairs)
2. Players compete in pairs against the other pairs
3. Batters can be out bowled caught or run out
4. If batters get out they simply swap ends and continue to bat
5. After two overs the batting pair retire and the next pair have their turn to bat
6. Each player bowls one over of 6 balls while their partner wicketkeeps
7. After they have completed their over they swap
8. If a ball is bowled ‘wide’ the batter can place the ball on the Tee for a ‘Free Hit’
9. The ball must be bowled with a straight arm
10. If a pair is not batting or bowling, they are fielding, so that everyone is
involved
11. You do not have to run when you hit the ball.
12. If the ball is missed, batters may still run

Team Games
FIELDING SOCCER Time: 20 - 30 mins
Aim: Throw the ball accurately hitting a target Equipment: Tennis Balls, Cones/Markers and 4 x Single Stumps
Organisation Instructions
1. Groups are divided into equal team, with
no more than 10 players per team.
2. 2 sets of goals 5m apart at opposite ends
3. Playing field 20 – 30m max long
4. Aim to score a goal by rolling ball from
outside goal zone through the goal
5. Players may underarm the ball to team
mates
6. Players cannot run with the ball but can
run to receive it
One goal keeper inside goal zone per
team
Progression
Only allow throwing with non-preferred
hand
Increase/Decrease playing area
Remove the goals and goalkeeper and
make players throw to a team mate
inside the goal zone who must catch the
ball to score
Team Games
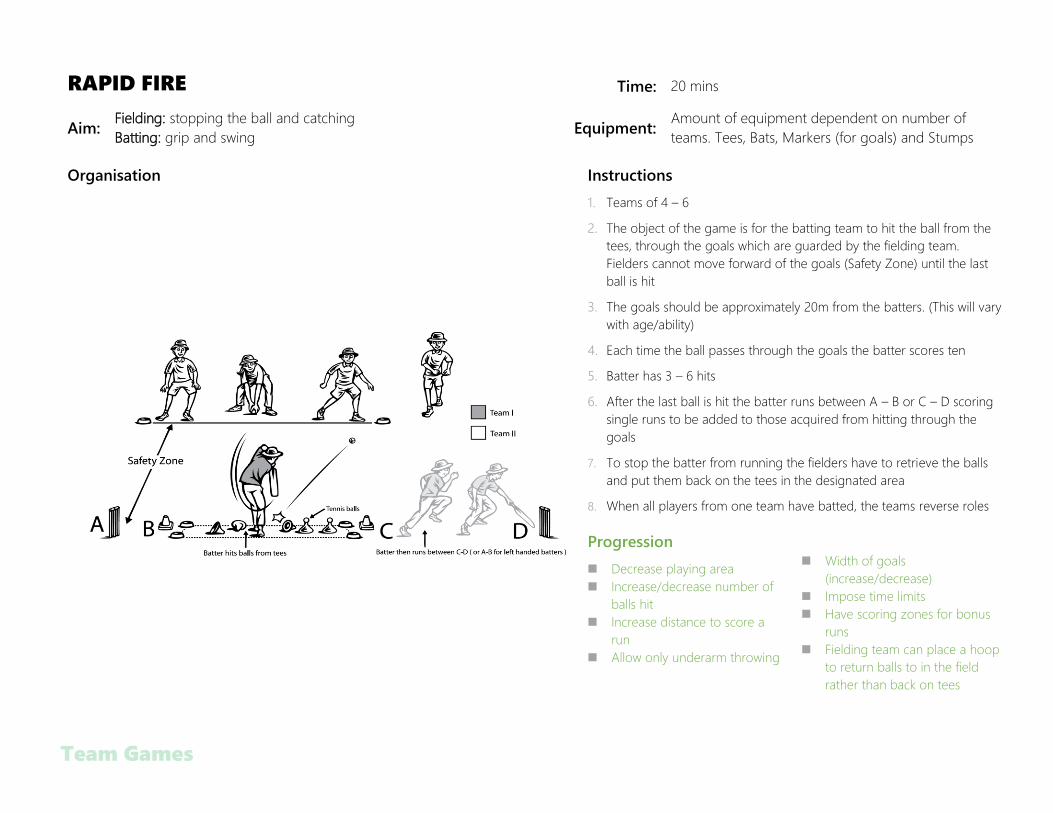
RAPID FIRE Time: 20 mins
Aim: Fielding: stopping the ball and catching
Batting: grip and swing Equipment:
Amount of equipment dependent on number of
teams. Tees, Bats, Markers (for goals) and Stumps
Organisation Instructions
1. Teams of 4 – 6
2. The object of the game is for the batting team to hit the ball from the
tees, through the goals which are guarded by the fielding team.
Fielders cannot move forward of the goals (Safety Zone) until the last
ball is hit
3. The goals should be approximately 20m from the batters. (This will vary
with age/ability)
4. Each time the ball passes through the goals the batter scores ten
5. Batter has 3 – 6 hits
6. After the last ball is hit the batter runs between A – B or C – D scoring
single runs to be added to those acquired from hitting through the
goals
7. To stop the batter from running the fielders have to retrieve the balls
and put them back on the tees in the designated area
8. When all players from one team have batted, the teams reverse roles
Progression
Decrease playing area
Increase/decrease number of
balls hit
Increase distance to score a
run
Allow only underarm throwing
Width of goals
(increase/decrease)
Impose time limits
Have scoring zones for bonus
runs
Fielding team can place a hoop
to return balls to in the field
rather than back on tees

Team Games
RACING CRICKET Time: 30 mins
Aim: To improve basic striking, fielding and decision making skills Equipment: 3 bats, 1 tennis/soft ball (foam indoors), 2
sets of stumps/chairs (together) & 4 cones
Organisation Instructions Teaching Points
1. Split into 2 teams, decide which team bats.
2. Batting team line up as in diagram.
3. Fielding team spread out in front of the stumps, minimum 10m away for
safety.
4. One fielder acts as wicketkeeper (see w/k).
5. Teacher serves ball underarm at the stumps, the batter attempts to hit it.
6. Whatever happens, even if out, the batter has to then run immediately
around the three running cones, to return the bat to the team. They then
join the back of the team to await their next turn.
7. One run is scored each time the ball is hit in front of the stumps.
8. If the ball is missed or hit behind the stumps, no run is scored.
9. If Out (caught, bowled or hit wicket), one run is deducted.
10. Fielders return the ball every time to the teacher who continuously serves,
even if the bats have not been returned!
11. Each team bats for 10 minutes. Highest score wins.
Batters:
(i) Watch the ball closely and
attempt to hit the ball
between the fielders.
(ii) Run with the bat as fast as
possible to make sure your
team does not run out of
bats.
Fielders:
(i) Spread out to cover the
whole area.
(ii) Return the ball to the
teacher as quickly as possible
to try to make the batters run
out of bats.
Progression
Make it harder or easier for the batters to receive a bat for their turn by:
(i) Increasing or decreasing the number of bats. (ii) Increasing distance of running cones from the stumps. For safety reasons do not decrease the distance.
If the fielders waste time then add one run.
Have an out zone. After returning the bat to the team, if the batter was out they sit in a designated zone a minimum of 20m behind the stumps. The team bat until
they are all out. Highest team score wins.
Two innings of 5 minutes per team. Introduce a harder ball where safe and appropriate. (Not a cricket ball).

Team Games
CATERPILLAR CRICKET Time: 10 mins
Aim: To encourage teamwork and improve basic striking and fielding skills Equipment: 1 bat, 1 tennis/soft ball, 2 cricket bases
and 4 stumps 1 hoop & 8 cones
Organisation Instructions Teaching Points
1. Split into 2 teams, decide which team bats.
2. Fielding team spread out behind target line.
3. Batting team line up as in diagram.
4. In turn a batter strikes the ball from the top of the ball stand
(placed in front of them) towards the target line.
5. That batter then runs around the box and through the gate
followed in a straight line by the whole batting team.
6. On return, that batter joins the back of the line for the next
batter to repeat.
7. The batting team do not run if the ball does not cross the
target line or if the batter is caught.
8. Left handed batters strike the ball from the other side of the
ball stand. See L/H.
9. Once the ball has crossed the target line and been stopped by
a fielder, the rest of the fielding team must form a line behind
them. The ball is passed overhead in a straight line until it
reaches the 5th fielder who then runs to touch the ball on the
set of stumps.
Each team bats until each
batter has had an attempt at
hitting the ball.
The number of batters who
have run through the gate
before the ball is touched on
the stumps determines the
number of runs scored that
turn.
No runs are scored if the ball
does not cross the target line
or if the batter is caught.
Highest team score wins.
Progression
Increase or decrease the number of fielders in the line who have to handle the ball before it is touched onto the stumps.
Increase the distance run by extending the size of the box.
Involve all the fielders regularly, by naming specific fielders who must handle the ball on a particular turn.
Instead of hitting from a ball stand, the teacher serves the ball overarm one bounce to reach the batter at waist height.
Using the same principle a similar game can be played involving `leaning forward to strike the ball', but using a smaller batting tee.

Team Games
CONVEYOR BELT CRICKET Time: 30 mins
Aim: To encourage good communication between batters in a match situation Equipment: 3 bats, 1 tennis, 2 sets of stumps, 5 cones
Organisation Instructions Teaching Points
1. Split into 2 teams, decide which team bats.
Fielders:
2. One acts as wicketkeeper (w/k), the rest spread out in front of the
stumps (minimum 10m away for safety).
3. Each fielder in turn bowls two balls, under or overarm. Rotate
clockwise.
Batters:
4. Line up as in diagram.
5. There must always be a batter at each end.
6. One run is scored each time the batters switch ends. No boundary, so
no limit on the amount of runs scored on each turn.
7. If either batter is out no runs are scored for that turn.
8. After each ball the batter at the striking end joins the back of the line
to be replaced by the next batter.
Each team bats for 10 mins.
The fielding team bowl as many
balls as possible in that 10 mins.
Batters can be out: bowled,
caught, run out or hit wicket.
Wide = the ball is unreachable
or No Ball = it rolls. For these 2
runs are added, the batter stays
to receive the next ball.
The highest team score wins.
Progression
Use cones to create a boundary, 30-40m distance from the stumps. A ball crossing the boundary having
bounced first = 4 runs, without bouncing = 6 runs. A boundary counts as that batter's turn.
Increase the time per innings and bowls per bowler.
Include the following ways of being Out:
(i) Stumped ± the wicketkeeper touches the ball on the wicket when the batter is in front of the crease .
(ii) L.B.W. (Leg Before Wicket) ± if any part of the body intercepts the ball that would have hit the wicket.
The above decisions must be judged by an umpire, usually a teacher.
Introduce a harder ball where safe and appropriate. (Not a cricket ball).

Team Games
MATCH CRICKET Time: 10 mins
Aim: A match requiring batters to co-operate in pairs. Equipment: 2 bats, 1 tennis, 2 sets of stumps, 5 cones.
Organisation Instructions Rules
1. Due to the waiting time for the batters, this is best used as an after
school practice (class size 12-20).
2. Split into 2 teams, decide which team bats.
Fielders:
3. One acts as wicketkeeper (w/k), the rest spread out in front of the
stumps (minimum 10m away for safety).
4. Each fielder in turn bowls one ball, under or overarm. Rotate
clockwise. See page 64 for how many balls in an over.
Batters:
5. Line up in pairs as in diagram.
6. In turn each pair bat for two overs. Even if they are out.
7. One run is scored each time the batters switch ends. No boundary,
so no limit on the number of runs scored on each turn.
8. Batters do not have to run each ball.
9. To communicate, batters call `yes' or `no' to decide whether to run
or not.
Each team starts with 200 runs.
Each team bats until every pair
has had 2 overs.
Batters can be out: bowled,
caught, run out or hit wicket.
If a batter is out the pair switch
ends and the team lose 5 runs.
Wide = the ball is unreachable or
No Ball = it rolls. For these 2 runs
are added, the batter stays to
receive the next ball.
The highest team score wins.
Progression
Use cones to create a boundary 30-40m distance from the stumps. A ball crossing the boundary having bounced first = 4 runs, without bouncing = 6 runs.
Include the following ways of being Out:
(i) Stumped ± the wicketkeeper touches the ball on the wicket when the batter is in front of the crease (line).
(ii) L.B.W. (Leg Before Wicket) ± if any part of the body intercepts the ball that would have hit the wicket.
Have a `Test Match'. Two innings per team (perhaps over two sessions). Highest grand total wins.
Use a harder ball where safe and appropriate. (Not a cricket ball).