teacher webpages welcome back let’s make 2007-2008 our most creative year yet!
TRANSCRIPT
Teacher WebPages
Welcome Back
Let’s make 2007-2008
Our most creative year yet!
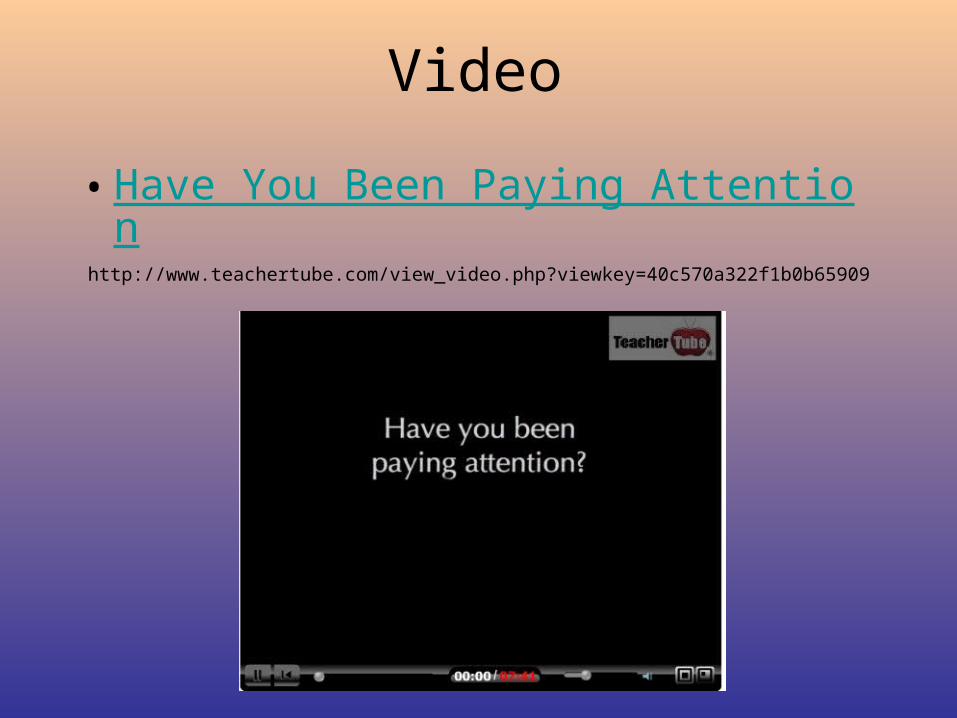
Video
• Have You Been Paying Attentionhttp://www.teachertube.com/view_video.php?viewkey=40c570a322f1b0b65909
Do’sWhat is the goal for your site. Stick to it.Short lines, short paragraphs Keep pages to a manageable size. All underlined text should be a linkIf highlighting - do just the most important contentLimit topics per page to three or less. Keep fonts consistent - no more than 2 different fonts per page. . Commonly used fontsLight background, dark copy, leave white space. Images must not be over used and pertain to contentMaintain student privacy concerning pictures. Understand Board policy concerning use of
pictures.
Don’tsToo many pagesToo many links, outdated links and links that do not work. Content that is out of datePage header too long or too wideAnimations are out of date and take time to load. Page Background - wallpaper - that is too busy.Pages that are too dark or too much fluff.All caps.
WebSite Do’s and Don’ts
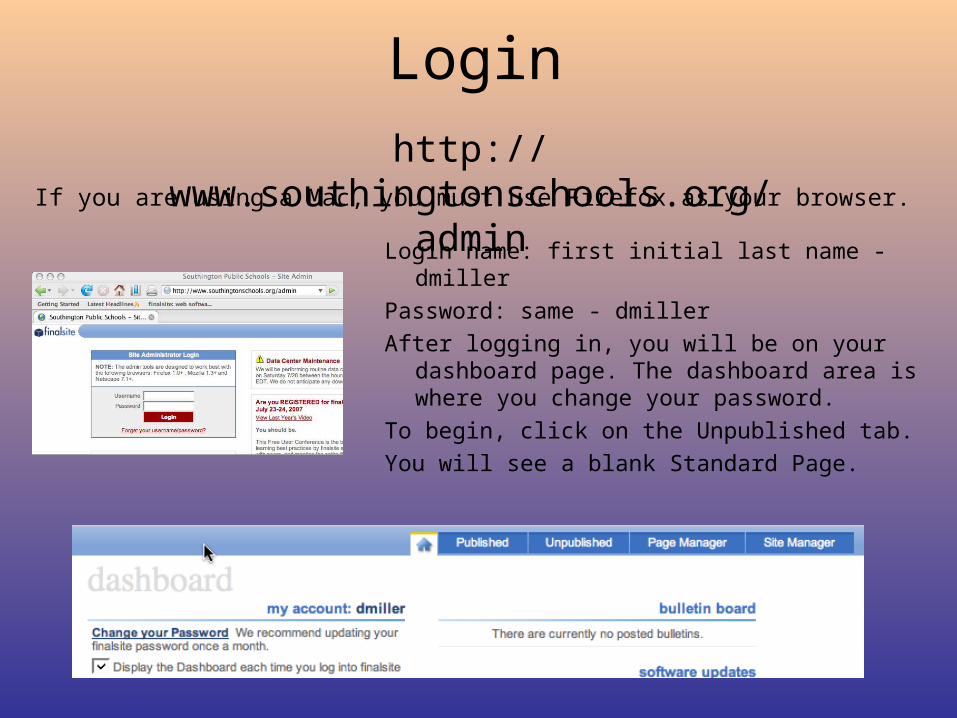
Login
Login name: first initial last name - dmiller
Password: same - dmiller
After logging in, you will be on your dashboard page. The dashboard area is where you change your password.
To begin, click on the Unpublished tab.
You will see a blank Standard Page.
http://www.southingtonschools.org/adminIf you are using a Mac, you must use Firefox as your browser.
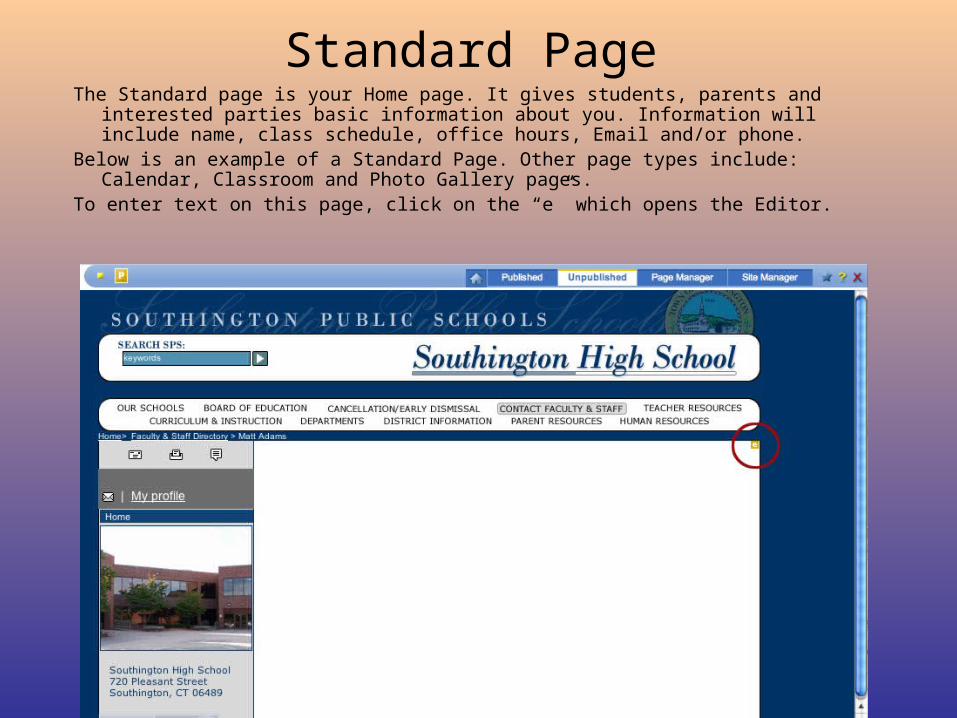
The Standard page is your Home page. It gives students, parents and interested parties basic information about you. Information will include name, class schedule, office hours, Email and/or phone.
Below is an example of a Standard Page. Other page types include: Calendar, Classroom and Photo Gallery pages.
To enter text on this page, click on the “e” which opens the Editor.
Standard Page
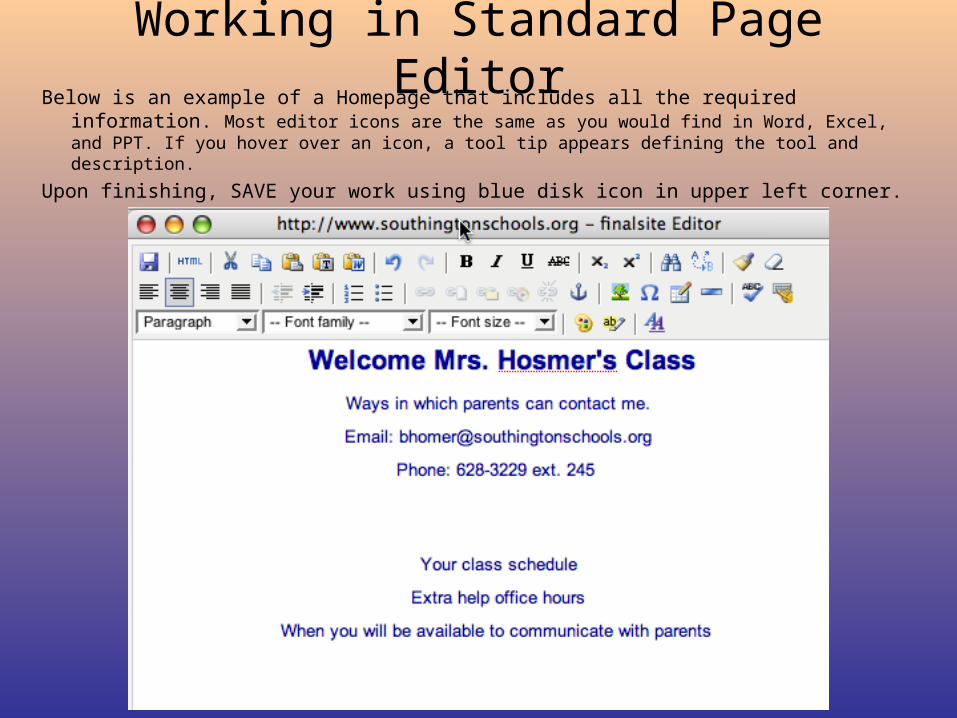
Working in Standard Page EditorBelow is an example of a Homepage that includes all the required information.
Most editor icons are the same as you would find in Word, Excel, and PPT. If you hover over an icon, a tool tip appears defining the tool and description.
Upon finishing, SAVE your work using blue disk icon in upper left corner.
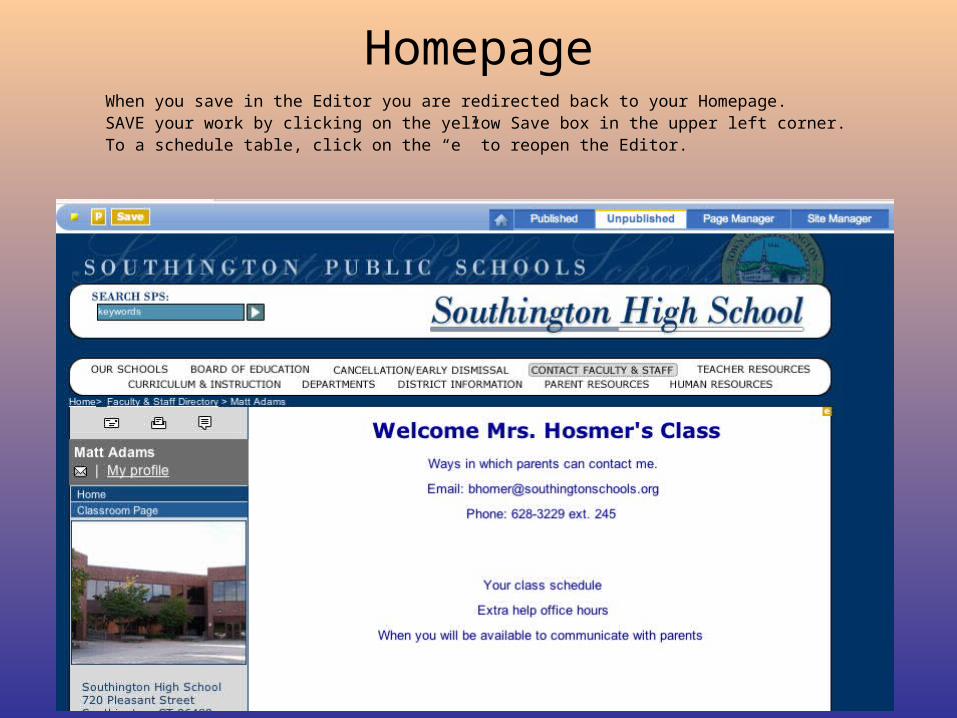
HomepageWhen you save in the Editor you are redirected back to your Homepage. SAVE your work by clicking on the yellow Save box in the upper left corner.To a schedule table, click on the “e” to reopen the Editor.
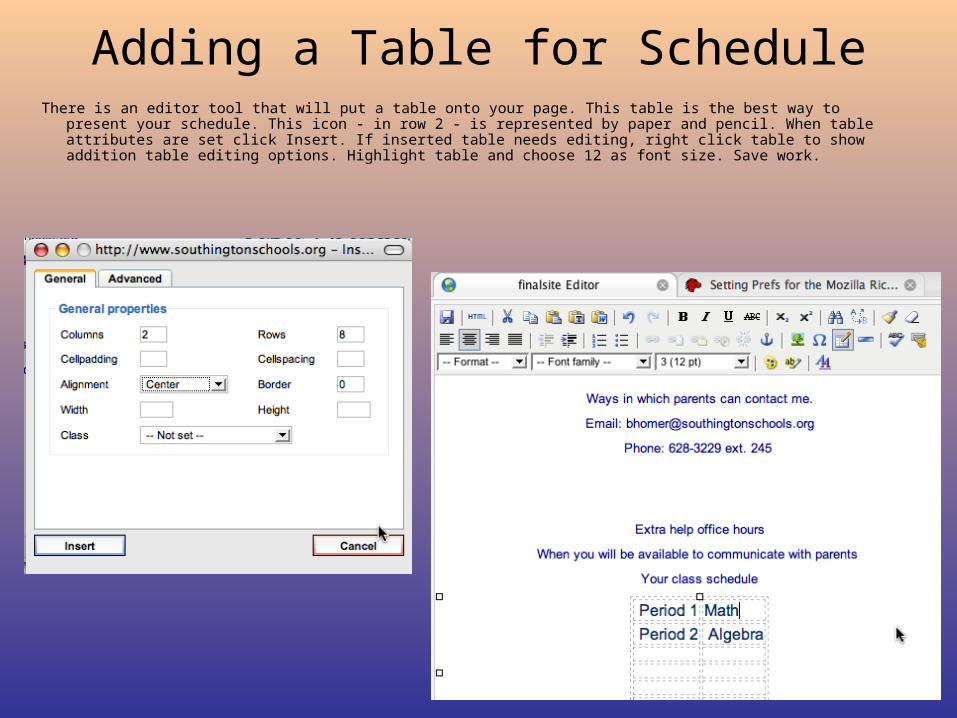
Adding a Table for ScheduleThere is an editor tool that will put a table onto your page. This table is the best way to present your
schedule. This icon - in row 2 - is represented by paper and pencil. When table attributes are set click Insert. If inserted table needs editing, right click table to show addition table editing options. Highlight table and choose 12 as font size. Save work.
Homepage
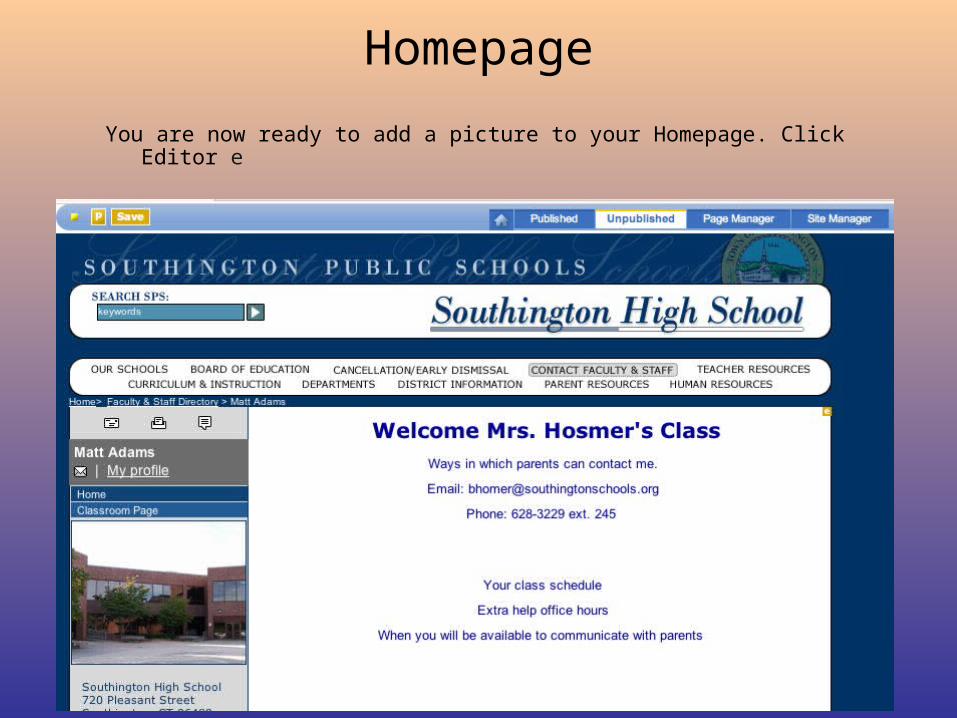
You are now ready to add a picture to your Homepage. Click Editor e
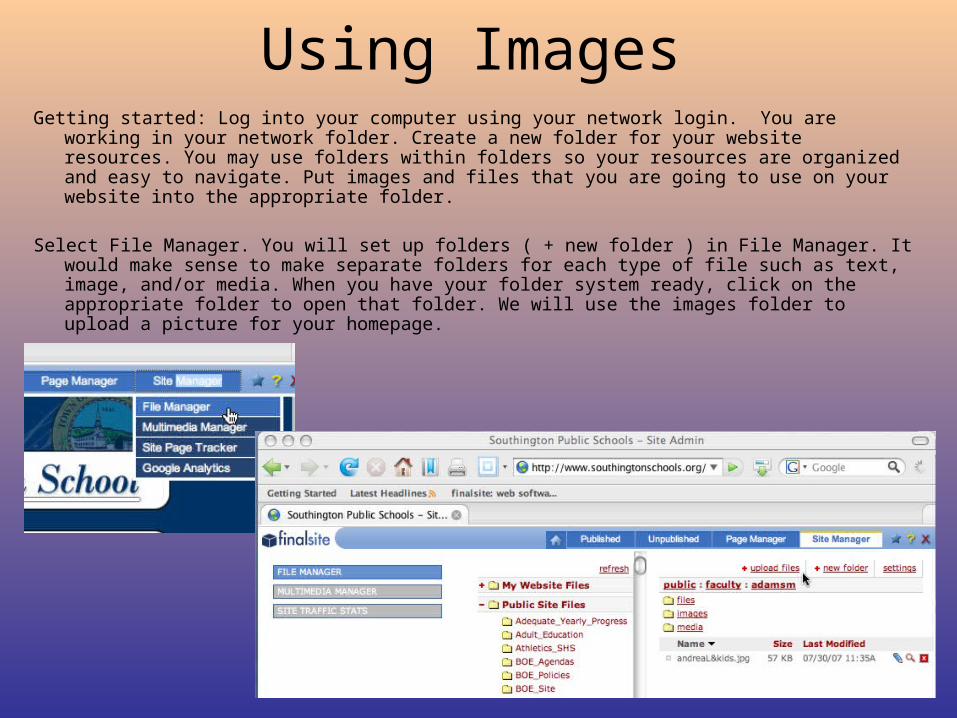
Getting started: Log into your computer using your network login. You are working in your network folder. Create a new folder for your website resources. You may use folders within folders so your resources are organized and easy to navigate. Put images and files that you are going to use on your website into the appropriate folder.
Select File Manager. You will set up folders ( + new folder ) in File Manager. It would make sense to make separate folders for each type of file such as text, image, and/or media. When you have your folder system ready, click on the appropriate folder to open that folder. We will use the images folder to upload a picture for your homepage.
Using Images
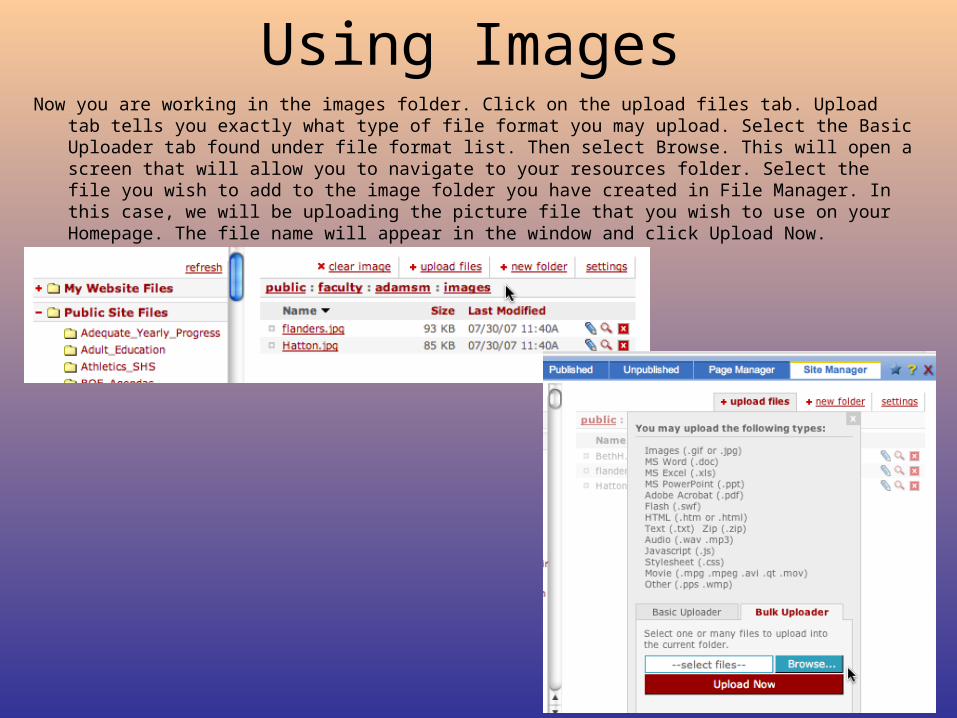
Now you are working in the images folder. Click on the upload files tab. Upload tab tells you exactly what type of file format you may upload. Select the Basic Uploader tab found under file format list. Then select Browse. This will open a screen that will allow you to navigate to your resources folder. Select the file you wish to add to the image folder you have created in File Manager. In this case, we will be uploading the picture file that you wish to use on your Homepage. The file name will appear in the window and click Upload Now.
Using Images
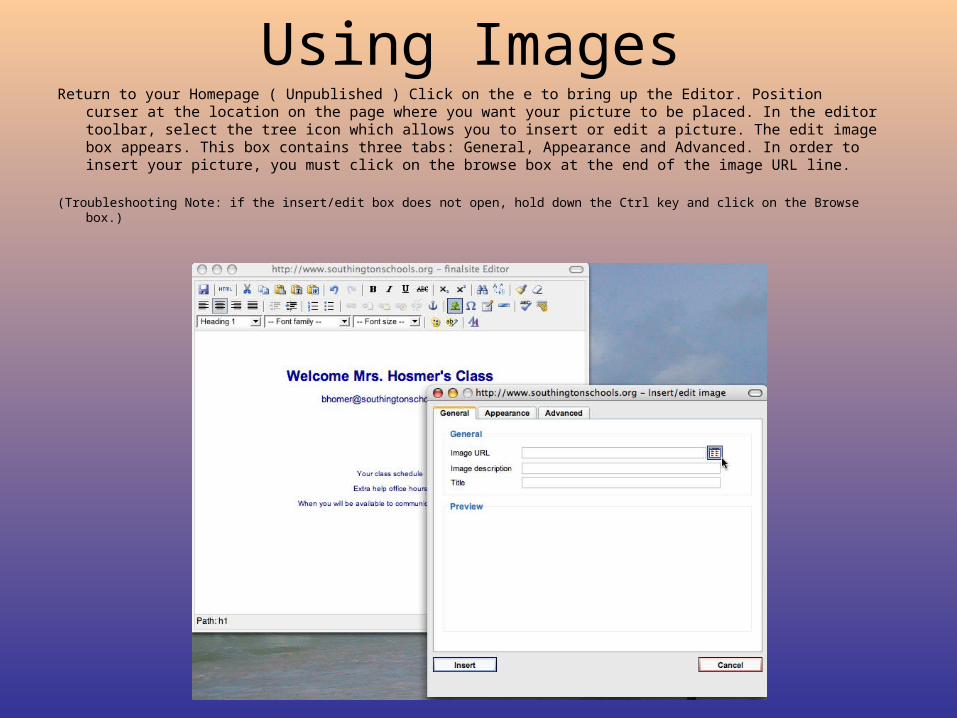
Return to your Homepage ( Unpublished ) Click on the e to bring up the Editor. Position curser at the location on the page where you want your picture to be placed. In the editor toolbar, select the tree icon which allows you to insert or edit a picture. The edit image box appears. This box contains three tabs: General, Appearance and Advanced. In order to insert your picture, you must click on the browse box at the end of the image URL line.
(Troubleshooting Note: if the insert/edit box does not open, hold down the Ctrl key and click on the Browse box.)
Using Images
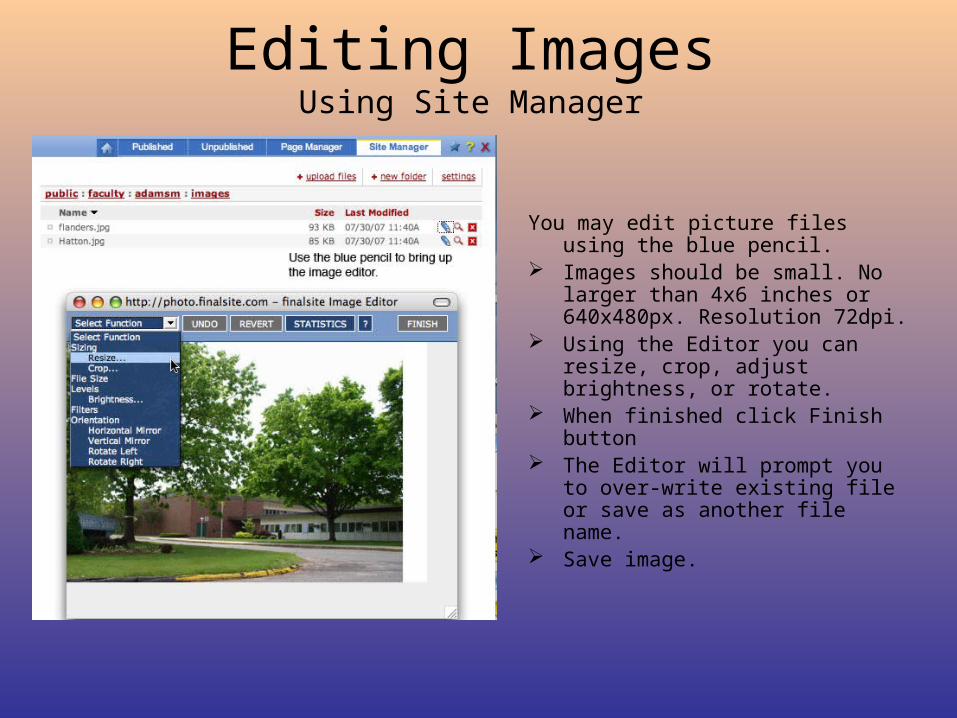
You may edit picture files using the blue pencil.
Images should be small. No larger than 4x6 inches or 640x480px. Resolution 72dpi.
Using the Editor you can resize, crop, adjust brightness, or rotate.
When finished click Finish button The Editor will prompt you to over-
write existing file or save as another file name.
Save image.
Editing ImagesUsing Site Manager
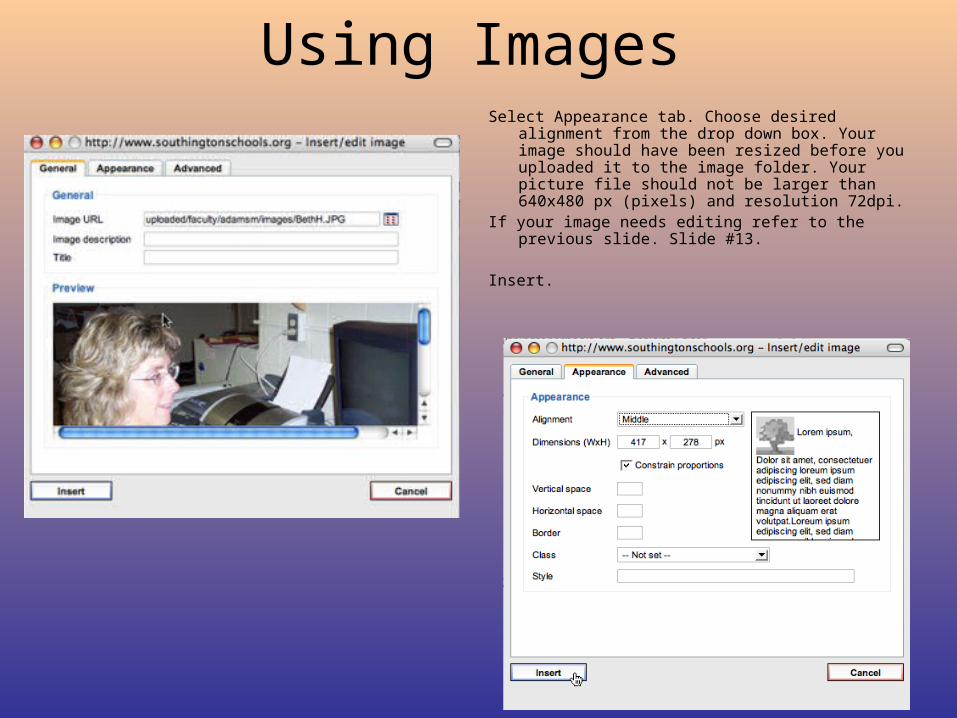
Select Appearance tab. Choose desired alignment from the drop down box. Your image should have been resized before you uploaded it to the image folder. Your picture file should not be larger than 640x480 px (pixels) and resolution 72dpi.
If your image needs editing refer to the previous slide. Slide #13.
Insert.
Using Images
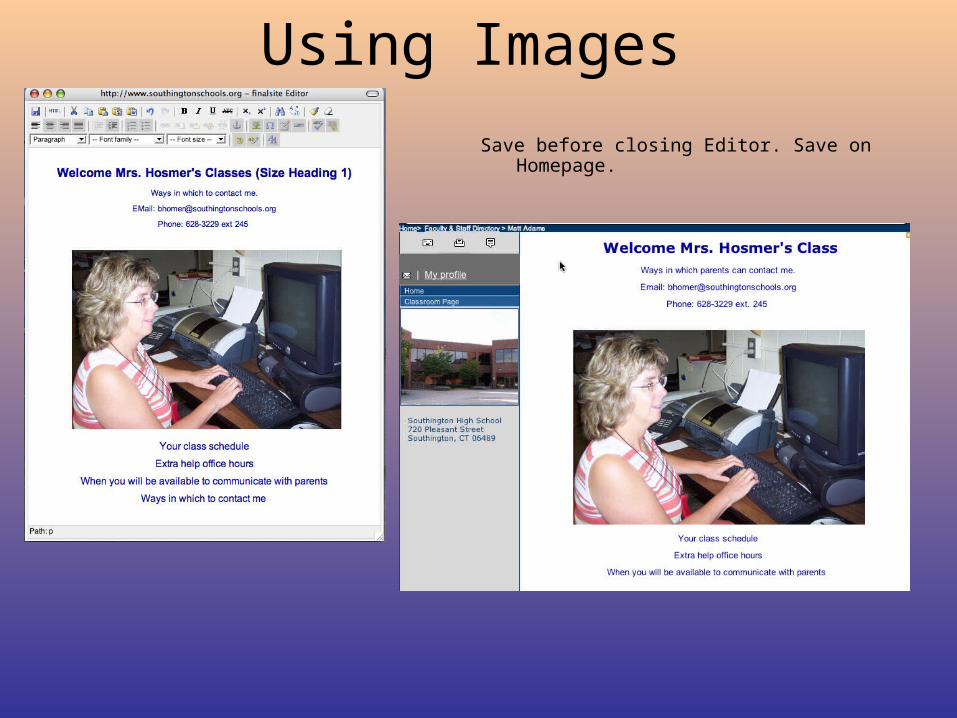
Save before closing Editor. Save on Homepage.
Using Images
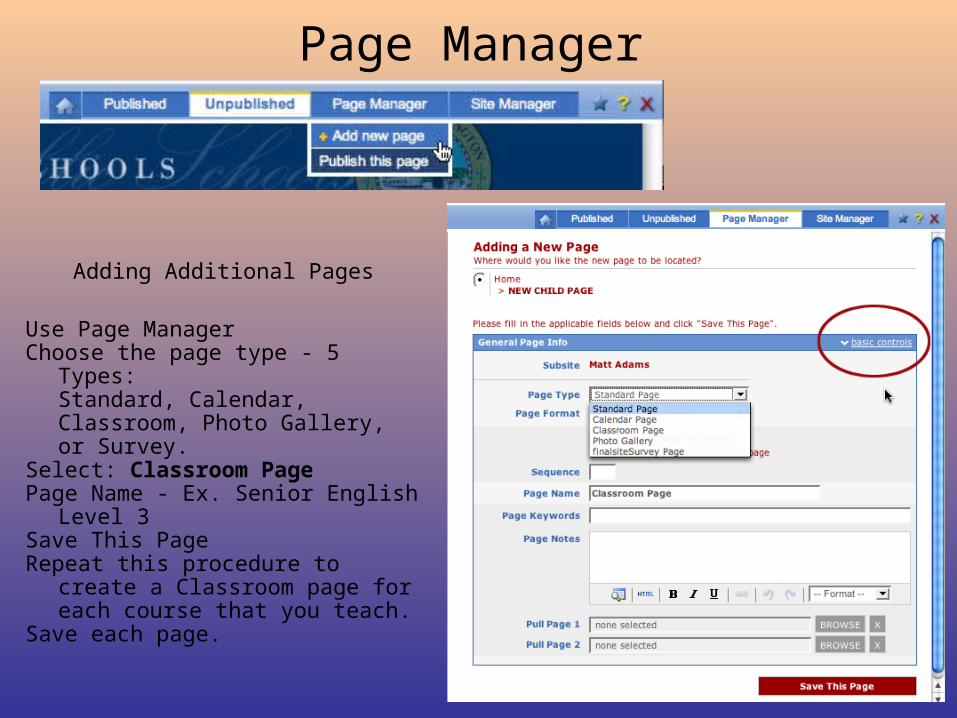
Adding Additional Pages
Use Page Manager Choose the page type - 5 Types:
Standard, Calendar, Classroom, Photo Gallery, or Survey.
Select: Classroom PagePage Name - Ex. Senior English
Level 3Save This PageRepeat this procedure to create a
Classroom page for each course that you teach.
Save each page.
Page Manager
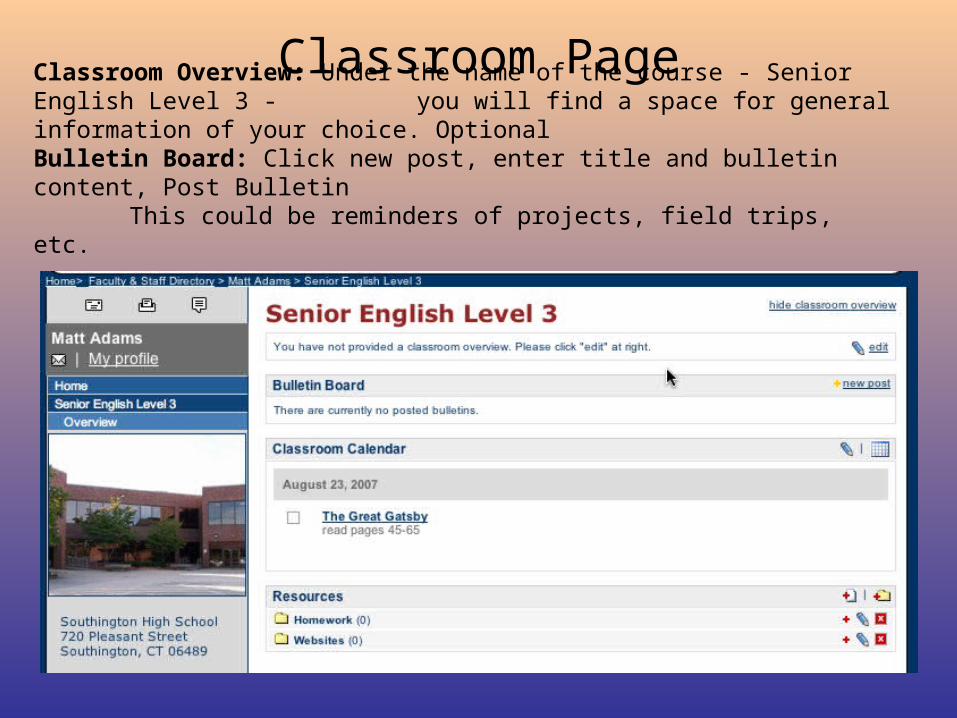
Classroom Overview: Under the name of the course - Senior English Level 3 - you will find a space for general information of your choice. Optional
Bulletin Board: Click new post, enter title and bulletin content, Post BulletinThis could be reminders of projects, field trips, etc.
Classroom Page
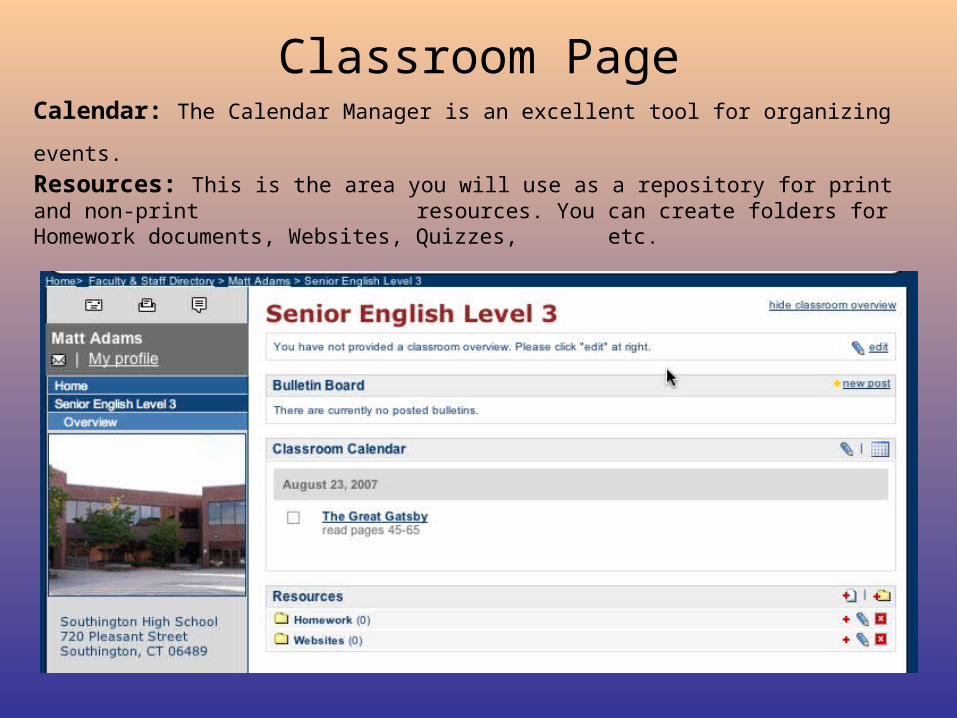
Calendar: The Calendar Manager is an excellent tool for organizing events. Resources: This is the area you will use as a repository for print and non-print
resources. You can create folders for Homework documents, Websites, Quizzes, etc.
Classroom Page
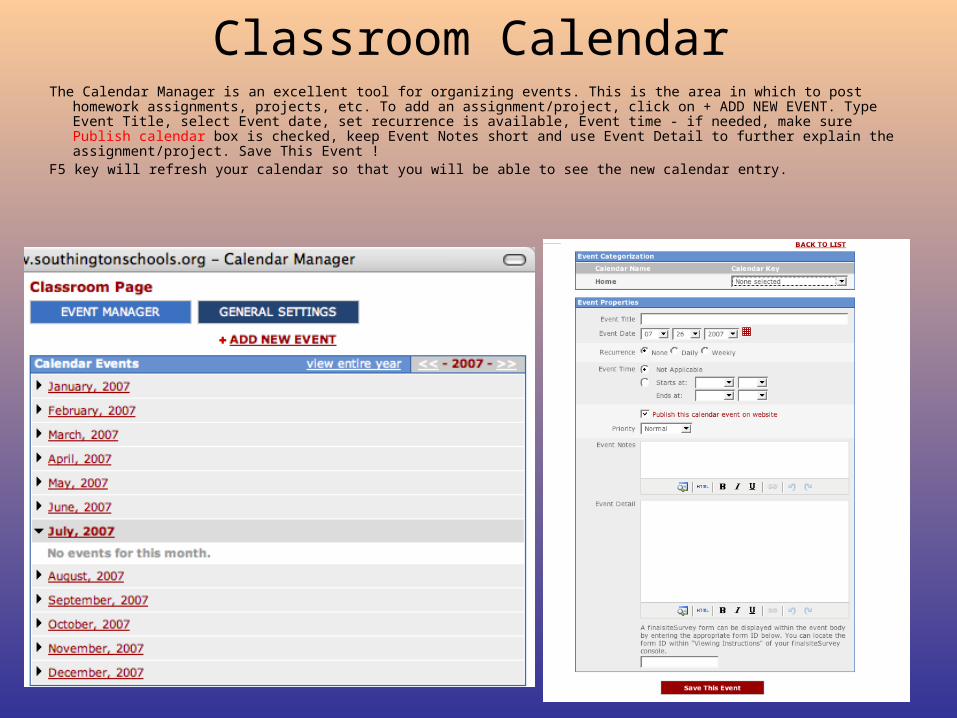
The Calendar Manager is an excellent tool for organizing events. This is the area in which to post homework assignments, projects, etc. To add an assignment/project, click on + ADD NEW EVENT. Type Event Title, select Event date, set recurrence is available, Event time - if needed, make sure Publish calendar box is checked, keep Event Notes short and use Event Detail to further explain the assignment/project. Save This Event !
F5 key will refresh your calendar so that you will be able to see the new calendar entry.
Classroom Calendar
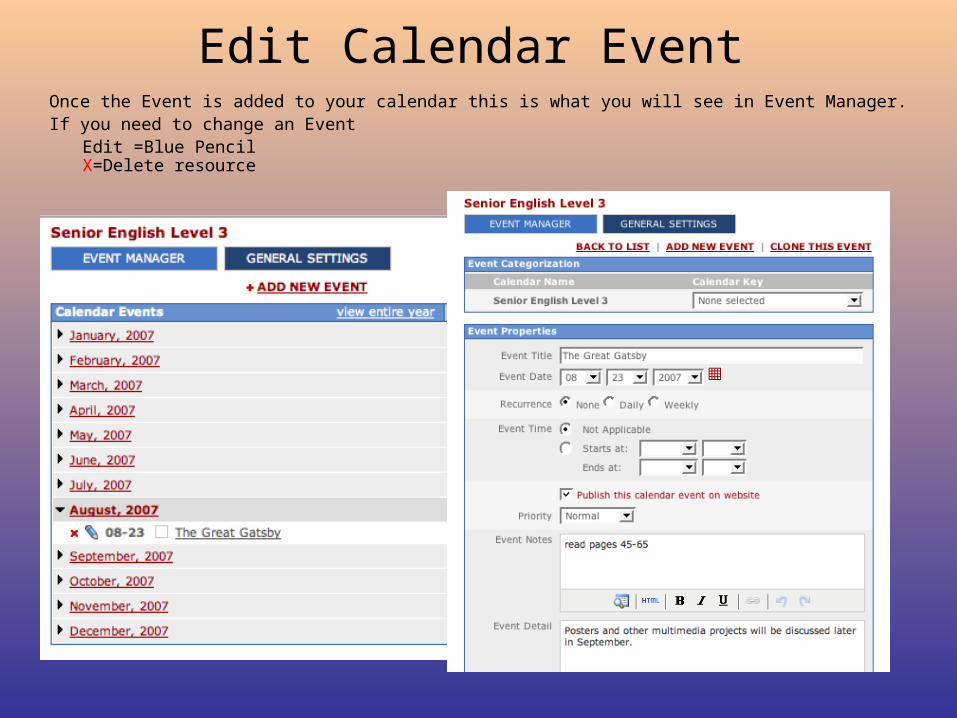
Once the Event is added to your calendar this is what you will see in Event Manager. If you need to change an Event
Edit =Blue PencilX=Delete resource
Edit Calendar Event
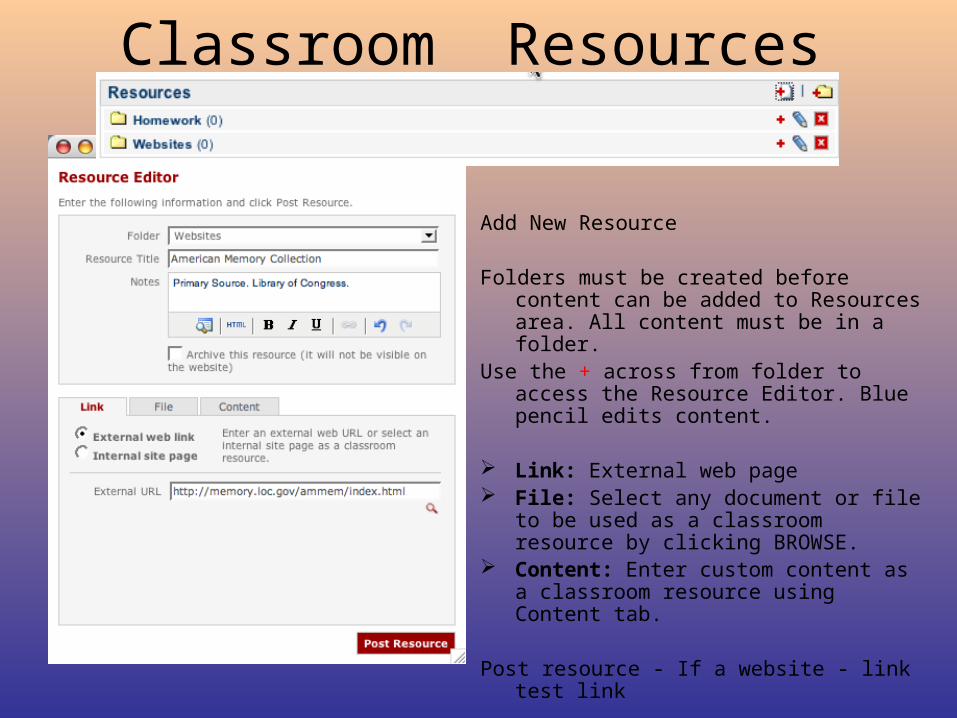
Add New Resource
Folders must be created before content can be added to Resources area. All content must be in a folder.
Use the + across from folder to access the Resource Editor. Blue pencil edits content.
Link: External web page File: Select any document or file to be used
as a classroom resource by clicking BROWSE.
Content: Enter custom content as a classroom resource using Content tab.
Post resource - If a website - link test link
Classroom Resources
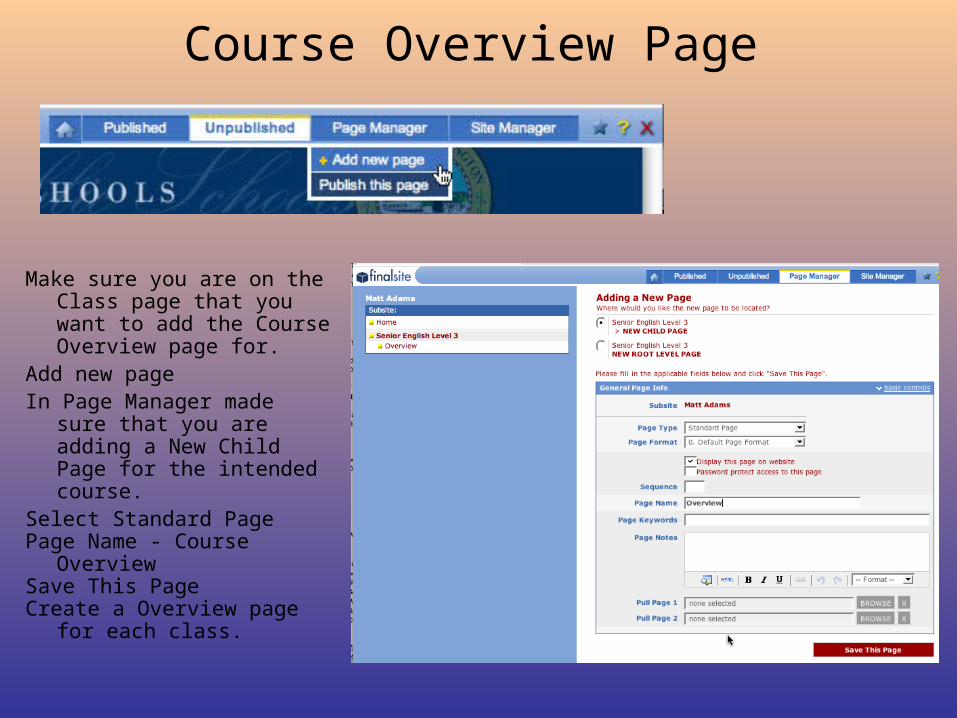
Make sure you are on the Class page that you want to add the Course Overview page for.
Add new pageIn Page Manager made sure
that you are adding a New Child Page for the intended course.
Select Standard PagePage Name - Course
OverviewSave This PageCreate a Overview page for
each class.
Course Overview Page
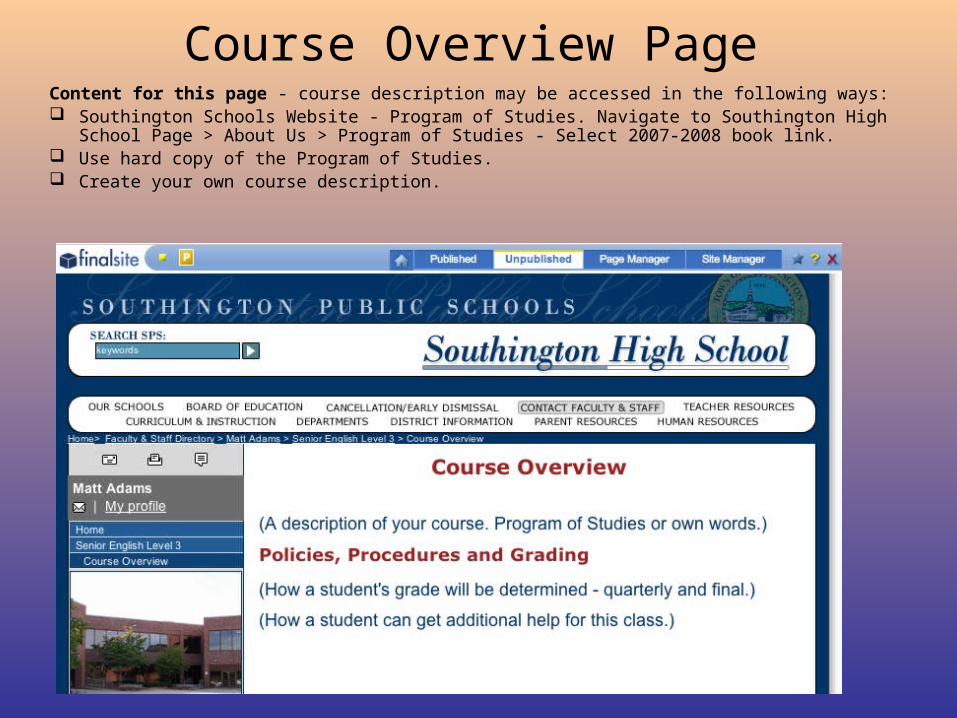
Course Overview PageContent for this page - course description may be accessed in the following ways: Southington Schools Website - Program of Studies. Navigate to Southington High School Page >
About Us > Program of Studies - Select 2007-2008 book link. Use hard copy of the Program of Studies. Create your own course description.
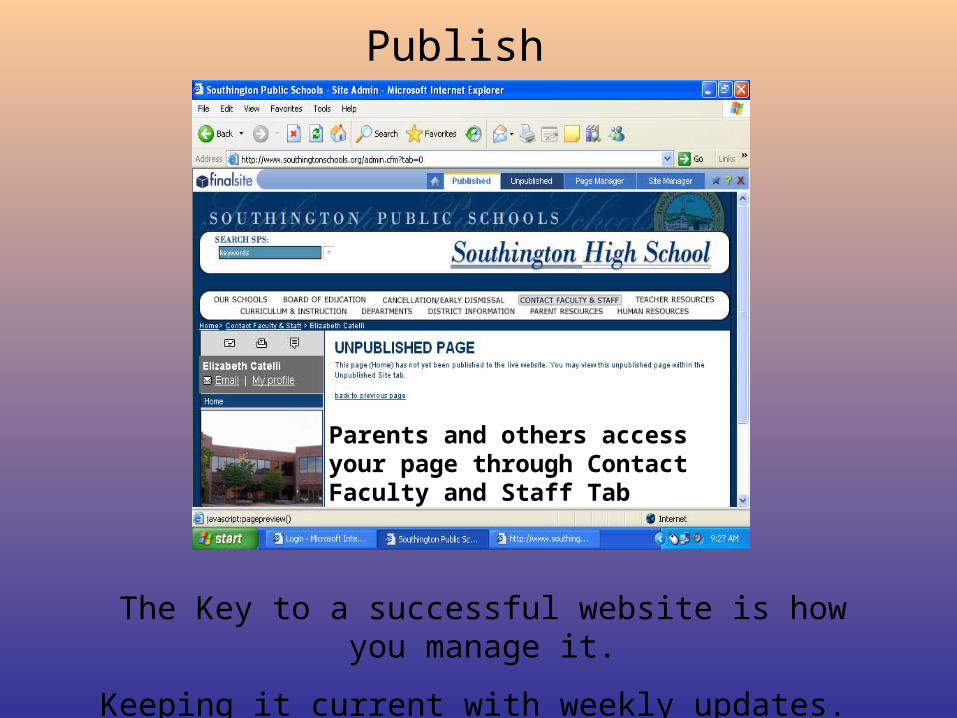
Parents and others access your page through Contact Faculty and Staff Tab
The Key to a successful website is how you manage it.
Keeping it current with weekly updates.
Publish

Text Editor:The default spacing in Text Editor is double spaced. To achieve a single space, hold down the shift key then click the enter button.
Help:
To access the Finalsite Knowledge base - help files - click on the yellow ?
The Calendar Manager User Manual is available through the yellow star to the left of the Site Manager tab. Choose Knowledge Base.
Saving:After you finish working on a page in a Finalsite editor, save your work. You are then returned to the unpublished page. Click save in the upper left hand corner. If you do not save here, your work will be lost!!
Calendar Reminder: After entering an event in your calendar and saving the event you must refresh your screen ( F5 ) in order to see the new event or updated event.
WebSite Tips and Tricks