teacher training module - clover sitesstorage.cloversites.com... · · 2011-08-30children while...
TRANSCRIPT


2

3
Developing and Maintaining a
Special Needs Classroom
CCDM wants to meet the needs of persons with disabilities and their families. One of the ways we seek to accomplish this is by providing booklets such as this for congregations and individuals to use. However, we ask that you contact us for permission to reproduce any portion of this publication.
CCDM, 2011 PO Box 310
Louisville, Tennessee 37777 865.984.5178
[email protected] www.ccdmonline.org

4

1
Developing and Maintaining a Special Needs Classroom Overview: Dedicating a space in the church building to serve as the hub of a disability ministry is a good idea. As a matter of fact, it is becoming a cutting edge approach to providing Christian education to students with disabilities. More and more directors of children’s ministries find it a practical, efficient, and easy approach to including learners with special needs. It is not a segregated classroom. If, however, some children would learn better in a more secluded environment, the space would serve that function. The information on the pages that follow is meant to plan, develop, and maintain a special needs room. Introduction: A special needs room is a growing trend in churches. It is an area designed to meet the needs of children with disabilities. It is not necessarily a segregated classroom. Sometimes called a therapeutic classroom, it is the hub of a congregation’s disability ministry. Purposes: The room can serve a variety of purposes. Having the space available offers creative staff members a lot of options for its use. Some ideas follow: • It can serve as an observation area for teachers to determine a child’s placement in
the regular Christian education program. For example, a new couple arrives at the welcome center with their son who has autism. He is taken to the special needs room where he participates in a well-planned program. The staff uses the time to determine if he should be in a class with his peers, part time in a special setting, or some other plan for including the child in a Bible School class.
• It can serve as a behavior modification area. If the child’s disruptive behavior
creates a negative learning environment, she can be referred to the special needs room. With the support and involvement of the parents or guardians, the staff arranges a plan for assisting the child in getting her behavior under control. During her time in the special needs room, she is a part of a regular Bible School class.
• It can be the classroom for a child who’s physical and behavioral needs are so
extensive that he is best served in a self-contained classroom. • It can serve as a “cooling off” area for a student who overloads in his inclusive
classroom. • It can serve as a respite area when the church offers respite services for parents.
The design of the room and the equipment in it provides an ideal area for caring for children while the parents shop, eat out, attend sports events, or attend church functions.

2
• It can serve as the meeting place of a weekday program for children with special needs.
• It can be the sight of weekday support groups.

3
Make the classroom physically inviting.
The classroom should be: • attractive and clean • uncluttered • bright (Use as much natural light as possible.) • well-ventilated • as noise-free as possible • safe and accessible for students of all abilities
Some general features would include the following: A welcoming entrance/center: The first impression as a student enters the room should be a positive, happy, colorful
one. Choosing a theme or a name for the room will make the decoration of the entry
easier. Give the room a name. Select a positive, up beat name that communicates the purpose of the area. Have a grand opening. Spread the word. Make it a festive occasion.
Examples:
*Have fun with it. *Make naming the room a project for youth or even an entire congregation. Give a prize for
the winning name. A parking area for wheelchairs, walkers, and other large equipment should be located near the entrance. A cubby area is needed as a storage area for children’s belongings. Developing an identification system will assist in keeping belongings with the rightful owner. A lockable supply closet is a must. Store items needed to operate the special needs room but that should be kept secure when not in use. A one-way mirror allows parents and caregivers to observe their children without interfering with activities in the room. It is also an excellent safeguard in these days of special sensitivity toward the possible abuse of children.
The Rainbow Room Helping Hearts

4
Restrooms should be handicap-accessible. A shower or bathtub should be included especially if the space will be used for respite care. At a minimum, there must be clear floor space to accommodate a 5-foot turning radius.
Recommended Minimum Toilet Room Source Removing Barriers to Health Care Univ. N. C. Center for Universal Design
Water fountains should be placed at appropriate heights for use by people with disabilities. Check the local code. A locked medical and first aid area—any medical supplies for a student’s well-being and emergencies should be stored here. Safety Doors: All doors in the area should have the capability of being locked or otherwise secured. Students with disabilities are often “runners.” Snack central – A dedicated area where food is served. A refrigerator will keep items coo l — juice, milk, medications, for example. A list of specific allergies of children should be posted here for the staff. A “theatre-like” area for projecting videos, DVD’s, and movies. The “stage” part of this section could serve as a puppet stage. An administrative area contains the teacher’s desk, information about the children, and other equipment and materials necessary to operating the special needs room. Specific components of the special needs room will be determined by the needs of the children who use it initially. The following suggestions are universal in working with children with disabilities. Art area: Fill this space with all kinds of art supplies—crayons, markers, water paint, two-handed scissors, table easels, play dough, clay, paper Maché, and other materials that will allow the children to creatively use their senses.

5
Music/Listening Area: This area can have a two-fold purpose to give children a place to listen to music and to offer them a time to play the musical instruments kept here. Relaxation area: This area should be partially enclosed. It is a place where a child can get away from too much activity. Use pillows, bean bags, and rocking chairs. Decorate the area with clouds and restful murals. Soft music adds to the atmosphere. Motor area one: Suspend a variety of swings from the ceiling—some go back and forth, others go around, still others go sideways. A hammock would make a nice addition. This section is meant to stimulate the child’s vestibular system. Motor area two: Include more traditional “motor” activities in this section. A basketball goal, hopscotch pad, mats, and other items that encourage motor activities. A modified climbing wall would be a good component. Interactive Play Center: Offer an area where children can play. Fill the shelves in this area with safe, manipulative toys, dolls, puppets, dress-up clothes, and any item that will encourage play, creativity, and imagination. Sensory area—vision, auditory, tactile, smell, and taste—put items in this area that cause the child to use his senses. A visit to a Montessori school will give some good ideas. Cognitive (formal learning area): This area should have a “school atmosphere.” A table and chairs or desks should be provided. A white board and other items of teaching are basic items. It might be useful to provide a low wall to reduce distractions. Cognitive (informal learning area): A rug can provide an area for listening to instructions, reading a story, or learning a lesson. A nature area is a fun addition. It can display pictures of trees, actual cones and seeds, vases for flowers, an aquarium, and birds. Children can be encouraged to bring their pets. Invite guests, members of the church or other people in the community, come to the class to share their animals. A reading area should have shelves for the books, chairs and tables. Book holders, page turners, and similar items can be provided for children who have motor problems. A computer area is a must. Children have them at home and at school. Having them available in the church setting enhances the learning experience. Switches can be adapted to the unique needs of children with disabilities. “Me” area is for personal items. Display grouping of pictures of people with a variety of disabilities to aid the children in accepting themselves as they are—wonderful kids. Using the specific disabilities of the children who use the room will make it a more meaningful experience. Framed pictures of families in the group will add a warm touch.

6
Deluxe: For churches designing layouts for a new building, consider smaller spots off the main room for one-on-one instruction, a “time-out” area, and a place for parents to observe their children. Since there is never enough room for storage, incorporate shelving and cabinets for bulk supplies or seldom used items for the disability ministry.
Or, incorporate storage and ministry equipment in a cleaning room. The sketches above and the ones on the following page depict examples of how areas may be set up to accommodate students with special needs. Please know that accommodations are important but, informed, caring teachers are the most essential factor in effective disability ministry.
Toy Washing Room

7
This example uses a classroom 23 feet by 25 feet. Not all elements discussed are included in this illustration. In your plan, some areas may need to serve a dual purpose. Try to use stackable chairs that are size appropriate and can be easily moved to make more room as necessary. Be thorough in your planning. Some things are easily added after implementation. Others, due to space, electrical, plumbing or mechanical restrictions may not be feasible or convenient to include after your room is finished.

8
The Universal Design Concept The Center for Universal Design and The North Carolina Office on Disability and Health offer a booklet entitled Removing Barriers to Health Care – A Guide for Health Professionals. Though formulated for health care services, much of the information may apply to other environments, such as a special needs room or church facilities in general. This document many be accessed through the University of N. C. Website, http://www.fpg.unc.edu/~ncodh/RemovingBarriers/index.cfm. This publication gives helpful advice on designing a setting that will accommodate individuals with particular requirements due to physical or mental conditions. It gives examples of room layouts, suggestions for furnishings, toilet facilities, and other features.
Expand Your Horizons Before we continue to develop a layout and choose materials and equipment, the articles on the following pages will be useful. It is one of the tip sheets from Child Care Plus, The Center of Inclusion in Early Childhood (www.ccplus.org), and provides valuable insight that will aid in planning.
Think about the ideas in terms of teaching in the Sunday school. Remember tried and true methods usually work the best. Most resources used in child care settings can be adapted to a church school situation.

9

10

11
Now Back to Planning…… Our goal is to have a room where everything exists to make the learning and caring experience at our church complete. However, due to spatial and monetary considerations, this is not always possible. We must take a realistic look at our available space and budget before we begin to plan. Proceed systematically. Establish a planning group The group should include:
Members of your special needs ministry team. At least one person who has a strong knowledge
of the construction, layout and maintenance of the building in which the room will be located. (Remember this group is for physically planning your room.)
A youth, if one is not on your ministry team. A person with general construction experience.
Prepare Make copies and have each member of the group read pages 1-9 of this booklet prior to the meeting. Establish a budget. Make sure you obtain financial information prior to the meeting. Know where the room will be located. Walk the area with your planning group, view entrances, exits, restrooms, outside areas to be used, etc. Brainstorm
Assign one person to act as record keeper. You may use a note pad but, a flip chart or board will be better so that everyone can see.
Make a list of items that are wanted in the room. Remember these considerations:
Lighting (type and location) Floor covering Furnishings Recreational or educational items Storage Food preparation and handling Direct access to toilet facilities, if not, what is the plan?
If it does, is there adequate room to maneuver a wheel chair and for a changing area that can accommodate an infant and beyond.
Ventilation (Brainstorm continued on next page)

12
Go through the list and determine which items should not be considered at this time and if it is due to cost or space.
Post or read the two separate lists. Take a second look at your cost prohibited list.
Do we have the expertise to fabricate the item in-house? To furnish it ask craftsmen among your membership to design and build the equipment. Obtaining the toys can be accomplished by having a “toy shower” or asking groups in the church to provide toys for a specific section of the room.
If it is a matter of space, we can take another look as we layout our room to see if some areas can serve more than one purpose.
Once we have an idea of what we want to put in the room, we can proceed to the layout phase.
A person in the world of real estate will tell us that it is location, location, location. Well, in establishing a special needs room it will be layout, layout, layout. If our layout is good, everything else will fall in to place. Layout
The driving forces in our layout will be
Special Needs Programming ADA
Safety Factors Building Codes
Much of the time, the mandates of the first two factors will be the same. The items are listed in the above order because; first, we seek to target the convenience, edification, and comfort of members of the disability community in our setting; and second, we must be certain that all possible consideration is given to safety. Review ADA regulations and local health and safety, and building codes to be sure that your plans will be in compliance. Prepare a drawing similar to the one on page 6 which shows where you plan to place the elements in your room. Seek the assistance of someone in your congregation who has floor planning software so that the drawing is done in proper proportion. Using a computer program will allow you to try out different scenarios relatively easily. Low costs programs which give you basic options are available. Remember to consider placement of art and bulletin boards in your layout.

13
Agree on the layout and complete your room. Solicit labor, materials, and needed items from members of your congregation. As we mentioned before, a “toy shower” is an excellent event. Make up invitations, “register” at two or three affordable stores or send a “needs” list so that you will get the specific items you require. Gift cards allow you to get the items on your list. Celebrate Have a grand opening. Spread the word. Make it a special occasion.

14
Create a Health and Safety Conscious Environment - As your room is put in to use, be sure it is well maintained, sanitary and safe. The following is from the Centers for Disease Control and Prevention: Hand washing
When should you wash your hands? You should wash your hands often. Probably more often than you do now because you can't see germs with the naked eye or smell them, so you do not really know where they are hiding.
What is the correct way to wash your hands?
• First wet your hands and apply liquid or clean bar soap. If using bar soap, place the bar soap on a rack and allow it to drain.
• Next rub your hands vigorously together and scrub all surfaces.
• Continue for 10 - 15 seconds or about the length of a little tune (Happy Birthday to You or Row Your Boat). It is the soap combined with the scrubbing action that helps dislodge and remove germs.
• Rinse well and dry your hands.
Clean and Disinfect Surfaces What is the difference between cleaning and disinfecting? Cleaning and disinfecting is not the same thing. In most cases, cleaning with soap and water is adequate. It removes dirt and most of the germs. However, in other situations disinfecting provides an extra margin of safety. You should disinfect areas where there are both high concentrations of dangerous germs and a possibility that they will be spread to others. That is because disinfectants, including solutions of household bleach,
have ingredients that destroy bacteria and other germs. While surfaces may look clean, many infectious germs may be lurking around. Given the right conditions some germs can live on surfaces for hours and even for days. Give special attention to food preparation areas, bathrooms, changing areas, and avoid contact with body fluids. Have a supply of rubber gloves on hand — use them as necessary.

15
Follow Basic Safety, Fire Prevention and Emergency Evacuation Rules • Your facility must be in compliance with all applicable safety codes. • Post an evacuation diagram in a prominent place. • Have evacuation drills at regular intervals. • Make sure that there adequate competent staff members on hand to assist in
case of an emergency.
Your special needs room may be constantly filled with activity or it may be used only a few hours a week. The amount of time it is occupied has no bearing on how well prepared you should be for an emergency. When you are planning your room, it is a good idea to have a local safety expert review your plans and speak to your group about the practical aspects of fire prevention and emergency evacuation. Put Prevention First Make sure that all tradesmen putting your room together are knowledgeable about what they are doing. Plumbers and electricians should have the proper credentials. It is good to have volunteers do some of the work, but copies of their licenses and certifications should still be obtained and kept in your construction work file. It is important that furniture and/or fixtures are assembled properly. If they have weight limitations, that information should be placed prominently. For example, if your room has a ceiling mounted swing with a maximum weight limitation of 150 pounds, that should be prominently posted on the swing itself. Do not assume that no one weighing over that amount will attempt to use it. Doorways, hallways, and passageways should always be kept free of obstructions and clutter. Carefully contain small items that may roll or fall from tables. Try not to permit use of candles, open flames, or auxiliary heating/cooling units. But, if you must, do so only under extremely controlled conditions. Make sure that fire retardant materials are used wherever possible. Study to show thyself approved unto God, a workman that needeth not to be ashamed, rightly dividing the word of Truth.
II Timothy 2:15 KJV
This verse should indeed by our guiding light as we work in disability ministry. Nowhere is it more important than in this phase of your planning. You must research, study, and plan to be sure that a safe and healthy environment is provided for worship and learning.

16
The following information was prepared by Nick McNabb, a student in Disability Ministry at Johnson University, Knoxville, Tennessee.
Think about having an accessible playground. It is common knowledge that human interaction is crucial for our sociological growth. We grow as a result of our interaction with others. If our children are to grow up to be well-rounded adults, they too need this fellowship with others, and what better place for children to interact than a playground? What is even more important, however, is that children of all abilities be given the same opportunities to take part in this important opportunity for growth. While religious entities are not required to abide by the Americans with Disabilities Act Accessibility Guidelines for Play Areas (ADAAG), this is one area where we should strive to go above and beyond what is required of us to provide these children with the most accommodating play area imaginable. It should be noted that these are “Guidelines.” They are, as of this moment, not requirements. The Access Board has developed these minimum guidelines and is currently waiting on the Department of Justice to set enforced standards that meet these minimums set forth by the ADA. However, as mentioned above, this is no reason for us to neglect creating environments in which children of all ages and abilities are able to enjoy. Outdoor play area: An exit from the special needs room into an outside playground would be an excellent idea. The usual slides, swings, jungle gyms, and see-saws would offer a lot of fun for children of all abilities. Special attention should be given to make the equipment accessible to students with disabilities.
Before planning your outdoor play area, read Playgrounds for All Kids on line at http://www.ncaonline.org/ncpad/play4all.shtml - This article addresses all phases of
accessible playground implementation and gives advice on some things to watch out for.

17
Breakdown of the ADAAG for Play Area There are two basic types of play components: Ground Level Components and Elevated Components. Ground Level Components – These are any play component that is entered and exited from ground level. This term can also refer to swings, panels, spring rockers and even freestanding slides. These are all components that are entered, exited, or utilized from a ground level.
Ground Level Components can include (from left) panels, spring rockers, swings, and water tables, just to
name a few.
At least one of each type of Ground Level Component is required to be on an accessible route. For instance, if the play area consists of two spring rockers, three panels and a freestanding slide, one panel and one spring rocker would all need to be on an accessible route. There is also a minimum order of Ground Level Components required depending on the number of Elevated Play Components.
Number of Elevated Provided Ground Level Components Required
2-4 1
5-7
2 types minimum
8-10
3 types minimum
11-13
4 types minimum
14-16
5 types minimum
17-19
6 types minimum
20-22
7 types minimum
23-25
8 types minimum
25+
8 +1 for each additional 3
components over 25, or fraction thereof (5 types minimum)
18
One of the goals of a play area is interaction between children. Do not confine the accessible Ground Level Components to one area and thus detract from their interaction with other children. Normally, a 3 to 4 year old child in a wheelchair has a range of 20 to 36 inches from the ground. A 5 to 8 year old child, 18 to 40 inches from the ground, and 9 to 12 year old, 16-44 inches. Play tables, like the water table, are required to be 24 inches high by 30 inches wide and 17 inches deep.
Elevated Play Components – These are any type of play component that is entered OR exited from a grade above or below ground level and part of a composite structure. Even if there is ground level access a play component that is attached to a composite structure and is accessible from above or below ground level is considered an Elevated Play Component. At least one-half of the elevated play components provided must be accessible by means of ramp or transfer platform. This is in addition to the number of ground level components required. A ramp is not necessary unless more than 20 Elevated Play Components are present. In that case, a minimum of 25% would have to be accessible by ramp, and a minimum of 25% accessible by transfer platform. Accessible Routes – An accessible route is a route that provides access for disabled individuals who may need to use wheelchairs or other devices. As with the Play Components, there are two types of Accessible Routes: Elevated and Ground Level. The surfaces used in these Accessible Routes must conform to the American Society for Testing and Materials (ASTM) F 1951-99 Standard Specification for Determination of Accessibility to Surface Systems Under and Around Playground Equipment. This standard assures that the force needed to propel a wheelchair across the surface is no more than that needed to propel a wheelchair up a ramp with a slope of no more than 1:14. Ground Level Routes – Ground Level Routes must be at least 60 inches wide to allow space for two wheelchairs to pass each other. (Right) The Route may narrow to a width of 36 inches for distance of no more than 60 inches to allow for flexibility in design. The maximum slope allowed on Ground Level Routes is 1:16, or one foot of rise for every 16 feet of distance. The Ground Level Accessible Route must also be clear at least 80 inches above the route. This means that any covering over the route must be at least this far above the ground. Accessible Ground Surfaces – Obviously, the ideal design for an accessible play area is one in which the entire ground surface is traversable by children with
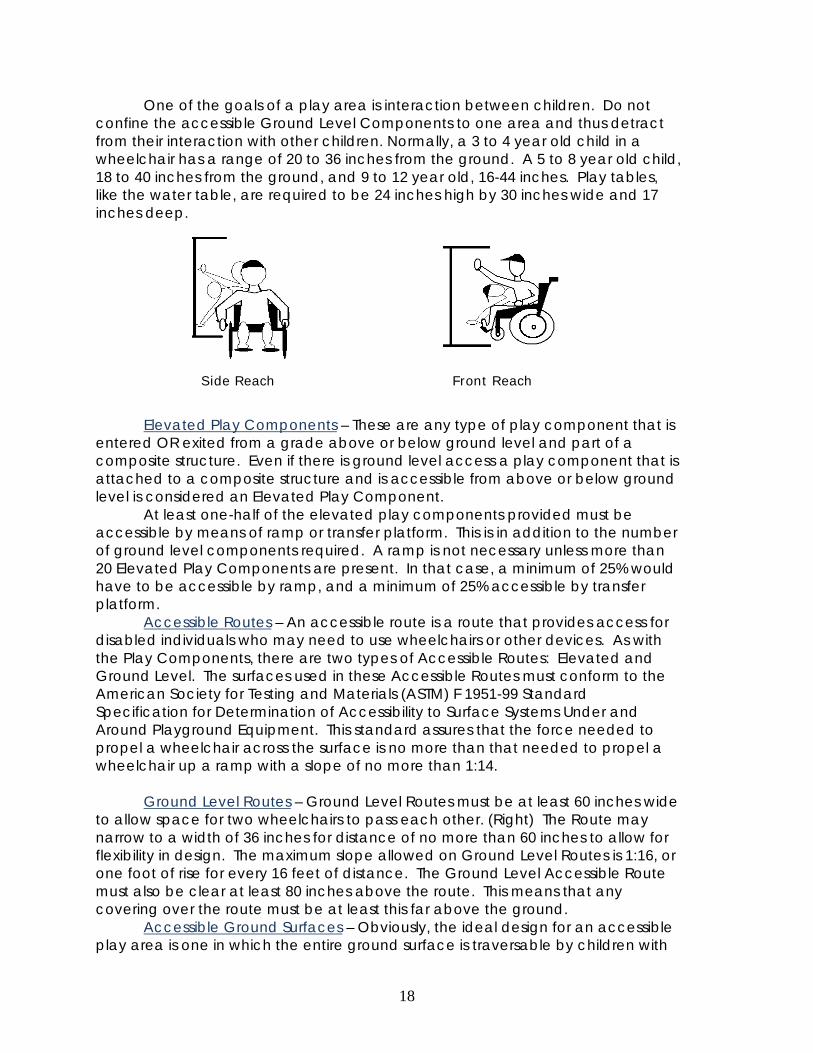
Side Reach Front Reach

19
disabilities. When this is the case, the surface of the ground must also meet the ASTM F 1292-99 Standard Specification for Impact Attenuation of Surface Systems Under and Around Playground Equipment. This surface my include rubber tiles, shredded rubber, or even certain wood mulches. Check with the suppliers to ensure that their specific products meet both requirements. Elevated Accessible Routes – These are the requirements for paths used in a composite structure to connect the components. Remember, at least 50% of the components in a composite structure must be connected by these routes. The routes must be at least 36 inches wide, have no more than 12 inches rise, and have a handrail present between 20 and 28 inches above the route. The width of the route may drop to 32 inches for a length of no more than 24 inches. When Ramps are Required – Ramps are required to be present when there are 20 or more elevated components. Remember, as mentioned above, that at least 25% of the number of elevated play components must be accessible by ramp, and another 25% by transfer system. These ramps are also required to have a rise of no more than 12 inches and an incline of no more than 1:12. This means that for every ramp that rises the maximum 12 inches, the ramps need a run of at least 12 feet of more. Ramps are also required to be 39 inches in width. When landings are used, the landing must be as wide as the ramp it connects and no shorter than 60 inches. If the landing is on a ramp that changes direction, the landing must be at least 60 inches wide as well to provide ample space for wheelchairs to turn. Handrails are required on all ramps connecting elevated play components. The handrails must be 20 to 28 inches above the ramp and .95 inches to 1.55 inches in diameter. Transfer Platforms – These are platforms that allow children to easily exit wheelchairs and enter into a component play system. The platforms must be 11 to 18 inches above the ground and be at least 24 inches wide and 14 inches deep. It must also have one unobstructed side.
Transfer steps are steps that connect different levels of components in a composite play structure. The steps need to be at least 24 inches wide and 14 inches deep. They should also not be taller than 8 inches. Transfer supports are also needed to assist youth in entering and exiting the play structure as well as entering and exiting their wheelchairs if need be. Clear Ground Space – This space is also sometimes referred to as “wheelchair parking space.” It is an area of ground providing an unobstructed area for one wheelchair and its occupant at a play component or at a transfer

20
station. This space needs to be a level area, no more than a 1:48 slope in any direction, and also needs to be at least 30 inches by 48 inches. This area may overlap accessible routes and maneuvering areas. Maneuvering Space – When ramps are provided for composite play structures, ample maneuvering space needs to be provided for children with wheelchairs to easily get around. This space should allow a child to make a complete 180-degree turn without a huge hassle. A circular area 60 inches in diameter is sufficient space for a wheelchair to complete this turn. Another option is an area in a “T” shape that allows the child to complete a three-point turn. Obviously the circular option is the most accommodating for the children. Design Tips – It is good to keep in mind that the number one goal of a playground is to encourage interaction between children and thus aid in their social development. A playground must appear inviting to those with disabilities. If not, they will not be comfortable leaving their comfort zone to play and interact with others. When designing a new playground, go out of your way to make mobility within the play area as easy as possible. Provide transfer systems close to popular play components. Some children will need to use a lot of effort just to move from one component to another. Get creative! Make getting to the next component as much fun as components themselves. Use crawl tubes as a means of routing. This will not only make getting to the next component fun, but also allow the same experience for both typical children and those with disabilities.

21
RESOURCES: Visit http://www.access-board.gov/news/ada-aba.htm for a copy of the guidelines. Playground Equipment Suppliers with Accessible Equipment List of Accessible Playground Suppliers: http://www.world-playground.com/
REFERENCES:
Food
The U.S. Government – Gateway to Food Safety Information contains alerts and advice about food borne illness prevention for educators, trainers, and organizations developing education and training materials for food workers and consumers. http://www.foodsafety.gov/
Hand washing The importance of washing hands to prevent the spread of germs is discussed.
http://www.cdc.gov/ncidod/op/handwashing.htm Disinfection: Clorox® website gives information about germs and disinfecting. http://www.clorox.com/clorox-cleaning-and-laundry-advisor/healthier-home-and-
family/disinfecting-facts/ Fire Prevention and Safety These sites contain information on fire prevention education and fire safety for those with
disabilities. http://www.usfa.fema.gov/subjects/fireprev/ Emergency Evacuation How should you approach an evacuation plan? This site will lead you through the
process. http://www.easterseals.com/site/PageServer?pagename=ntl_tenants_safe Universal Design Concept www.fpg.unc.edu - Select North Carolina Office of Disability. Health, Publications,
Removing Barriers Expand Your Horizons www.ccplus.org – The Center of Inclusion in Early Childhood (Tip Sheets) ADA Accessibility Guidelines (ADAAG) for Playgrounds http://www.access-board.gov/ada/

22