taxact professional client xchange user guide · pdf file1 taxact professional client xchange...
TRANSCRIPT
1
TaxAct Professional Client Xchange User Guide
For tax year 2015
V 1.4
Thank you for purchasing Client Xchange, a convenient and secure website portal that enables you
and your clients to safely exchange tax information.
Use this guide to help set up your website, invite clients and manage files.
Table of Contents
1. Setting up
Accessing your Client Xchange website
Adding/editing your practice name and logo
Your website URL
Enabling/disabling email notifications
Creating/editing default client folders
2. Creating accounts for other professionals in your practice and for your clients
Inviting other professionals in your practice
Assigning clients to professionals
Inviting clients
3. Managing folders and files
Adding/editing/deleting folders
Uploading/editing/deleting files
Downloading files
Moving files
4. Instructions for your clients
5. FAQs

2
1. Setting up
Accessing your Client Xchange website
1. Go to taxactprofessional.com and click the blue Sign In button in the upper right.
2. Sign in to your secure TaxAct Account.
3. Click the Client Xchange tile on your Practice Manager home page.
4. Your Client Xchange home screen will appear. Your home screen is your client list. To
navigate back to this page at any time, click the house in the upper left corner or the first
icon for Clients in the Navigation menu (see below).
Adding/editing your practice name and logo
If you would like your practice name and logo to appear on your website:
1. From your home screen, click the Profile icon in the
Navigation menu and select Branding (see right).
2. Enter your or your practice name in “Company Name” (see
below).
3. To add a logo, select your logo’s dimensions in the drop
down. Then click the Upload Logo button and browse to the
logo file.
4. Click the Update Profile button to save.

3
If you don’t upload a logo, the logo at right will appear by default on
your website (it cannot be removed).
Your website URL
The Branding page of your Profile also provides the URL (begins with https://www.mytaxdocs.com
in above screenshot) for your Client Xchange website where your clients sign in to their Client
Xchange account. You can add this link to your practice’s website and email this URL to clients if
they didn’t bookmark the sign in page when they activated their account.
Enabling/disabling email notifications
In order to receive an email when a client uploads a file, you must
enable email notifications. (Notification emails are turned off by
default.)
To enable or disable notifications:
1. From your home screen, click the Profile icon in the Navigation
menu and select Alerts (see right).
2. Click the On/Off toggle to enable or disable.
3. Click the Save button.

4
On this screen, you can also manage email address(es) at which you want to receive notifications
whenever clients upload a file on this screen. Click to add or to delete
Your clients’ accounts will be set to receive email notifications when you upload a file by default.
The email will include your or your practice’s name, the file name, and the folder in which the file
was uploaded.
Creating/editing default client folders
The following four folders will be automatically created for each client unless you modify the
default folders: Bank Statements, Financial Reports, Miscellaneous and Tax Related Documents.
To edit the default folders:
1. From your home screen, click the Profile icon in the Navigation menu and select Default
Client Folders.
2. To add a new default folder, click , or click to remove an
existing folder.
Changes to client default folders will only apply to new client accounts. The folders for existing
client accounts will not change.
2. Creating accounts for other professionals in your practice
and for your clients
Inviting other professionals in your practice
After the practice owner has purchased Client Xchange, any professionals who have joined the
practice’s TaxAct Professional Account will automatically have access. They simply need to sign in
to their secure TaxAct Account at taxactprofessional.com and click the Client Xchange tile on their
Practice Manager home page.
To invite a professional to join your practice by creating a TaxAct Professional Account (so they can
access Client Xchange):
1. Go to taxactprofessional.com and click the blue Sign In button in the upper right.
2. Sign in to your secure TaxAct Account.
3. Click the Practice Administration tile on your Practice Manager home page.
4. Click Preparer Invitation. Complete the email form and click .

5
After the invited professionals have joined your practice (by creating a TaxAct Account through the
link in the invitation email), they can access Client Xchange by clicking on the tile on their Practice
Manager home page.
Assigning clients to professionals
If multiple professionals in your office have Client Xchange accounts, only the practice owner (aka
professional who purchased Client Xchange) can view and access all clients. Professionals in your
practice will only be able to view and access client accounts that have been assigned to him/her by
the practice owner.
Similarly, only the preparer assigned to that client will receive an email notification when a client
uploads a file.
To assign clients to a preparer:
1. From your home screen, click the Preparer icon in the Navigation menu and select Assign
Clients to Preparers.
2. Select the preparer in the drop down.
3. Select the client and click to move to the “Clients Assigned” column.
4. Click .
To reassign clients to a different preparer:
1. From your home screen, click the Preparer icon in the Navigation menu and select Assign
Clients to Preparers.
2. Select the current preparer in the drop down.
3. Select the client and click to move to the “All Clients in Organization” column.
4. Follow steps 2-4 in the above section to assign the client to a different preparer.
6
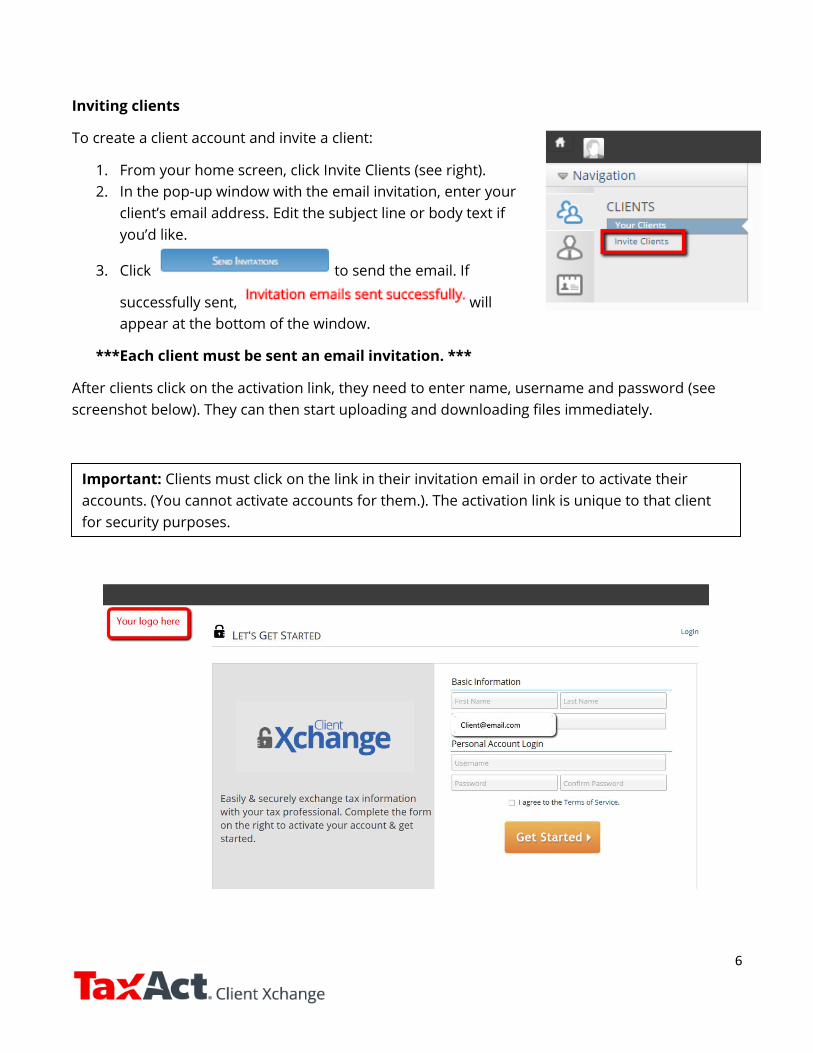
Inviting clients
To create a client account and invite a client:
1. From your home screen, click Invite Clients (see right).
2. In the pop-up window with the email invitation, enter your
client’s email address. Edit the subject line or body text if
you’d like.
3. Click to send the email. If
successfully sent, will
appear at the bottom of the window.
***Each client must be sent an email invitation. ***
After clients click on the activation link, they need to enter name, username and password (see
screenshot below). They can then start uploading and downloading files immediately.
Important: Clients must click on the link in their invitation email in order to activate their
accounts. (You cannot activate accounts for them.). The activation link is unique to that client
for security purposes.

7
Hint: What you see in a client’s File Cabinet is identical to what your client sees, so that you can
easily help clients navigate their accounts if needed. (Clients can only see their own File Cabinet,
not your home screen or other clients’ File Cabinets.)
If you use TaxAct Enterprise Editions AND network online (your data is saved on TaxAct’s
secure servers):
We’ll automatically import your Client Manager list into Client Xchange. To send an
invitation email, go to your home screen and click the “Invite” button next to a client.
Do NOT upload files until a client’s account has been activated i.e., client created a
username and password. Client accounts that have been activated will appear on the
“Active” tab on your client list. Files uploaded before accounts are activated aren’t visible to
clients.
3. Managing folders and files
Adding/editing/deleting folders
To add folders:
1. Go to your client list and click next to the
client.
2. You’ll see the client’s Filing Cabinet of folders. Click
.
3. Enter a folder name and click Save (see right). (To
cancel, click .)
Hint: Note you can create folders within folders.
To edit folder names:
1. Go to your client list and click next to the client.
2. Click on the folder for which you want to edit the name.
3. Click , edit the name, then click . (To cancel editing, click .)

8
To delete a folder (and all the files within the folder):
1. Go to your client list and click next to the client.
2. Click on the folder you want to delete.
3. Click on “Delete Folder” at the bottom of the folder screen (see below). When you delete
the folder, you will also delete any files within the folder.
Uploading/editing/deleting files
You can upload just about any file type into Client Xchange. For example:
Forms received such as W-2s, 1099s, 1098s (electronic file or photo)
Client organizers, instruction letters, forms for signature, invoices
.csv files of stock transactions (that can be imported into TaxAct Preparer’s Editions)
Microsoft Office (Word, Excel, etc.) files
PDFs of final tax returns (print returns from TaxAct Preparer’s Editions as a PDF)
Scanned documents
To upload a file:
1. Go to your client list and click next to the client.
2. Select the folder in which you want to save the file.
3. Click on the far right.
4. Browse to the file location, select the file, then click Open.
Note: If you have a file (such as an informational flyer) that you want to upload to multiple client
accounts, you will need to upload the file to each client account.
9
To edit a file name:
1. Go to your client list and click next to the client.
2. Select the folder where the file is saved.
3. Locate the file and click on the right.
4. Edit the file name and click . (To cancel editing, click .) Note: modifying or
removing the extension (e.g., .pdf) will NOT change the file type.
To delete a file:
1. Go to your client list and click next to the client.
2. Select the folder where the file is saved.
3. Locate the file and click on the right. Click OK to permanently delete the file.
Downloading files
1. Go to your client list and click next to the client.
2. Select the folder where the file is saved.
3. Click on the file name.
4. After the file is finished downloading, double click on the download file to open.
Moving files
Files should be re-uploaded into the desired folder. If the file is not saved locally and you opt to
delete it from the original location, be sure to download it first to save to the new location.
4. Instructions for your clients
Below are instructions to provide your clients. (Copy and paste into an email or a document
printed on your letterhead.)

10
Activating your Client Xchange account
You will receive an email invitation from [email protected] that contains a link unique to
you for security purposes. You must click on the link in your email in order to activate your
account.
Simply enter your name, a username and a password (see screenshot below) to get started. You
can create your security questions and answers now or the next time you sign in.
Hint: Bookmark that webpage so you can easily access the website in the future.
After your account is activated, you can start uploading and downloading files immediately.
You will receive an email from [email protected] whenever I have uploaded a file to your
File Cabinet. Similarly, I will receive an email whenever you have uploaded a file.
If you need assistance, please contact me directly (do not reply to your invitation email, as it is a
no reply address).

11
Uploading/editing/deleting files
You can upload just about any file type into Client Xchange. For example:
Tax forms you’ve received such as Forms W-2, 1099 and 1098
Microsoft Office files (Word, Excel, etc.)
.csv files of stock transactions
Any scanned documents (including .pdf and .tif)
Photos of documents, receipts, statements, etc. (including .jpg and .gif)
To upload a file:
1. Select the folder in which you want to save the file.
2. Click on the far right.
3. Browse to the file location, select the file, then click Open.
To edit a file name:
1. Select the folder where the file is saved.
2. Locate the file and click on the right.
3. Edit the file name and click . (To cancel editing, click .) Note: modifying or
removing the extension (e.g., .pdf) will NOT change the file type.
To delete a file:
1. Select the folder where the file is saved.
2. Locate the file and click on the right. Click OK to permanently delete the file.
Downloading files
1. Select the folder where the file is saved.
2. Click on the file name.
3. After the file is finished downloading, double click on the download file to open.
Moving files
Files should be re-uploaded into the desired folder. If the file is not saved locally and you opt to
delete it from the original location, be sure to download it first to save to the new location.

12
Adding/editing/deleting folders
To add a folder:
1. Click .
2. Enter a folder name and click Save (see right).
(To cancel, click .)
Hint: Note you can create folders within folders.
To edit a folder name:
1. Click on the folder for which you want to edit the name.
2. Click , edit the name, then click . (To cancel editing, click .)
To delete a folder (and all the files within the folder):
1. Click on the folder you want to delete.
2. Click on “Delete Folder” at the bottom of the folder screen (see below). When you delete
the folder, you will also delete any files within the folder.

13
Change password
1. Click the Profile icon in the Navigation menu, then click (see below).
2. Enter your old and new passwords. (If you have not yet created your security questions and
answers, you will need to do so now in order to change your password.)
3. Click .
Forgot password
1. Go to your Client Xchange sign in page.
2. Click “Reset password here” (see screenshot below) and follow the easy instructions.

14
5. FAQs
Can I import my Client Manager list from TaxAct into Client Xchange?
If you use TaxAct’s Enterprise Editions AND use our online networking feature (meaning your data
is saved on TaxAct’s secure servers), we’ll automatically import your Client Manager list into Client
Xchange so you don’t have to set up any client accounts. If you have more than one preparer in
your office, verify that clients are assigned to the correct preparers. (From your home screen, click
the Preparer icon in the Navigation menu and select Assign Clients to Preparers to review.)
Reminder: Do NOT upload files until a client’s account has been activated i.e., client created a
username and password. Client accounts that have been activated will appear on the “Active” tab
on your client list. Files uploaded before accounts are activated aren’t visible to clients.
If you are not utilizing Enterprise Edition online networking, you cannot import your Client
Manager list at this time (we’re working on this for tax year 2016).
How do I import files from Client Xchange into TaxAct Preparer’s Editions?
You can import the following file types into TaxAct 2015 Preparer’s Editions:
PDFs of last year’s 1040 returns prepared by ATX™, CrossLink®, Drake®, Intuit® Tax
Online, Lacerte®, ProSeries®, TaxSlayer Pro™, and TaxWise®
Comma Separated Values (CSV) file provided by a brokerage or TradeLog®
How to import one of the above files into TaxAct:
1. Download the file by clicking on the file in Client Xchange.
2. Click on the downloaded file and save on your local drive or to your network.
3. Repeat the steps above for each file you want to import.
4. Open the TaxAct program.
a. To import PDFs of last year’s 1040 returns:
i. Click File > Import > Prior Year 1040 PDF Data.
ii. Locate the file on your hard drive. Select the PDF files you’d like to import.
iii. Use the “Select All” button to import all of last year’s returns.
iv. Click Import. The client’s Basic Information is shown. Review the information and
make any necessary corrections, then click OK. You will receive confirmation when the
import process is complete. The return(s) will appear in Client Manager with a status
of “Imported.”

15
b. To import a CSV file of transactions:
i. Open the client’s return.
ii. Click File > Import > Stock Data (see right).
iii. Click the blue CSV Import button.
iv. Browse to your saved file, then click Open.
v. Use the drop down menus to match the
column headings from your file to the
appropriate column headings allowed in the
program, then click Next.
vi. Select any entries you want imported into your tax file. Note: To select all of the
transactions, use the checkbox next to the Import column heading. Click Next to
continue.
vii. Review the transaction information on the screen. If everything is correct, click Import.
If you need to make changes, click Previous to repeat prior CSV import steps.
viii. Close the Import Successful notification window.
ix. When you return to the CSV File Import screen, click Continue to review, modify, or
delete any of the Form 1099-B data imported into your return.
If you import more than one .CSV file or brokerage statement, the transactions will be added to
the list of Form 1099-Bs previously created (up to 2,000 total).
How long will my practice and my clients have access to Client Xchange?
You and your clients will have access to their accounts for all of tax year 2015 through October 31,
2016.
If you decide to renew your use of Client Xchange at any point before or during tax year 2016, all
of your and your clients’ files will remain as is.
Can I reset a client’s password?
For security purposes, only a client can reset his/her password. If a client cannot remember
his/her password, simply create another account for him or her and send an invitation email. The
client’s new username will need to be different than the original username.

16
Can I disable or delete a client account?
We will be adding the ability to disable client accounts in a future product release. In the
meantime, you can delete all or some of the files from your client’s account. (Reminder: if you
want copies of the files, you must download and save the files before deleting.)
I need help / I have questions. Where can I find answers?
TaxAct’s dedicated Professional Support Team is here for you every step of the way.
TaxAct’s Online Help Center: Get immediate answers to common questions at
taxactprofessional.com/support
Email: Can’t find the answer? Email your question. Go to taxactprofessional.com/support and
click Email Us
Phone: New for 2015! Dedicated tax, technical, & customer service help via phone. Call
319-731-2682 during business hours:
Tax Season Off Season
Monday – Friday 7:30 a.m. – 7:30 p.m. (CT) 8 a.m. – 5 p.m.
Saturday 9 a.m. – 4 p.m. Closed
Sunday 11 a.m. – 4 p.m. Closed