talkswitch 24-ca v3
TRANSCRIPT

USER GUIDETALKSWITCH 24-CA
v3.21

Copyright Information
TalkSwitch. Copyright 2005. All Rights Reserved.
Reproduction, adaptation or translation without prior written permission isprohibited, except as allowed under the copyright laws.
Information in this user guide is subject to change without notice and does notrepresent any commitment on the part of TalkSwitch. No part of this user guide maybe reproduced or transmitted in any form or by any means, electronic or mechanical,including photocopying, recording, or information storage and retrieval systems, ortranslated to another language, for any purpose other than the licensee’s personaluse and, as specifically allowed in the licensing agreement, without the expresswritten permission of TalkSwitch.
Second Edition, May 2005.CT.TS005.021.EN
TalkSwitch is a division of Centrepoint Technologies Inc.
Table of Contents
1.0 Installing TalkSwitch
1.1 What’s included with TalkSwitch . . . . . . . . . . . . . . . . . . . . . . . . . . . . . . . . . .1
1.2 Front Panel Descriptions . . . . . . . . . . . . . . . . . . . . . . . . . . . . . . . . . . . . . . . .2
1.3 Back Panel Descriptions . . . . . . . . . . . . . . . . . . . . . . . . . . . . . . . . . . . . . . . .31.4 Plugging into the Back Panel . . . . . . . . . . . . . . . . . . . . . . . . . . . . . . . . . . . .4
1.4.1 Attaching telephone lines to TalkSwitch line jacks . . . . . . . . . . . .41.4.2 Attaching phones to TalkSwitch extension jacks . . . . . . . . . . . . . .41.4.3 Connecting Devices to the Music and PA Jacks . . . . . . . . . . . . . .51.4.4 Connecting TalkSwitch to a PC . . . . . . . . . . . . . . . . . . . . . . . . .6
1.4.4.1 USB connection . . . . . . . . . . . . . . . . . . . . . . . . . . .61.4.4.2 Serial connection . . . . . . . . . . . . . . . . . . . . . . . . . .6
2.0 Configuring TalkSwitch
2.1 Installing the TalkSwitch Configuration Software . . . . . . . . . . . . . . . . . . . . . . .7
2.2 Running the TalkSwitch Configuration Software . . . . . . . . . . . . . . . . . . . . . . .8
2.3 Configuration . . . . . . . . . . . . . . . . . . . . . . . . . . . . . . . . . . . . . . . . . . . . . . .9
2.3.1 System Information . . . . . . . . . . . . . . . . . . . . . . . . . . . . . . . . .122.3.1.1 Administration . . . . . . . . . . . . . . . . . . . . . . . . . . .122.3.1.2 Telephone Lines . . . . . . . . . . . . . . . . . . . . . . . . . .132.3.1.3 Line Hunt Groups . . . . . . . . . . . . . . . . . . . . . . . .152.3.1.4 Fax Information . . . . . . . . . . . . . . . . . . . . . . . . . .162.3.1.5 Local Extensions . . . . . . . . . . . . . . . . . . . . . . . . . .172.3.1.6 Remote Extensions . . . . . . . . . . . . . . . . . . . . . . . .182.3.1.7 Extension Ring Groups . . . . . . . . . . . . . . . . . . . . .202.3.1.8 On-hold/Ringback . . . . . . . . . . . . . . . . . . . . . . . .22
2.3.2 Voicemail . . . . . . . . . . . . . . . . . . . . . . . . . . . . . . . . . . . . . . . .232.3.2.1 Local Extension Voicemail . . . . . . . . . . . . . . . . . . .232.3.2.2 Remote Extension Voicemail . . . . . . . . . . . . . . . . .252.3.2.3 General Voicemail . . . . . . . . . . . . . . . . . . . . . . . .282.3.2.4 Global Settings . . . . . . . . . . . . . . . . . . . . . . . . . .31
2.3.3 Call Handling . . . . . . . . . . . . . . . . . . . . . . . . . . . . . . . . . . . . .332.3.3.1 Modes . . . . . . . . . . . . . . . . . . . . . . . . . . . . . . . .332.3.3.2 Auto Attendant . . . . . . . . . . . . . . . . . . . . . . . . . . .342.3.3.3 Telephone Lines . . . . . . . . . . . . . . . . . . . . . . . . . .392.3.3.4 Local Extensions — Call Cascade . . . . . . . . . . . . .422.3.3.5 Remote Extensions — Call Cascade . . . . . . . . . . .442.3.3.6 Extension Ring Groups — Call Cascade . . . . . . . .46

2.3.4 Call Back/Call Bridge . . . . . . . . . . . . . . . . . . . . . . . . . . . . . . .472.3.4.1 Auto Call Back . . . . . . . . . . . . . . . . . . . . . . . . . .502.3.4.2 Prompted Call Back . . . . . . . . . . . . . . . . . . . . . . .532.3.4.3 Call Bridge . . . . . . . . . . . . . . . . . . . . . . . . . . . . .56
2.3.5 Options . . . . . . . . . . . . . . . . . . . . . . . . . . . . . . . . . . . . . . . . .572.3.5.1 Audio Controls . . . . . . . . . . . . . . . . . . . . . . . . . .572.3.5.2 Manual Transfer . . . . . . . . . . . . . . . . . . . . . . . . . .582.3.5.3 Miscellaneous . . . . . . . . . . . . . . . . . . . . . . . . . . .592.3.5.4 Troubleshooting . . . . . . . . . . . . . . . . . . . . . . . . . .62
3.0 Using TalkSwitch
3.1 In the Office — Receiving calls with or without the Auto Attendant . . . . . . . .673.1.1 Receiving calls using the Auto Attendant . . . . . . . . . . . . . . . . . .673.1.2 Receiving calls without the Auto Attendant . . . . . . . . . . . . . . . .68
3.2 In the Office — Making and Receiving Calls . . . . . . . . . . . . . . . . . . . . . . . .683.2.1 Making calls from a Local Extension . . . . . . . . . . . . . . . . . . . . .683.2.2 Receiving calls at a Local Extension . . . . . . . . . . . . . . . . . . . . .683.2.3 Placing calls on Hold at a Local Extension . . . . . . . . . . . . . . . .693.2.4 Transferring calls . . . . . . . . . . . . . . . . . . . . . . . . . . . . . . . . . . .693.2.5 Call Park — Parking and retrieving callers . . . . . . . . . . . . . . . .70
3.2.5.1 Parking a caller . . . . . . . . . . . . . . . . . . . . . . . . . .703.2.5.2 Parking a caller using Auto Park . . . . . . . . . . . . . .713.2.5.3 Retrieving a parked call . . . . . . . . . . . . . . . . . . . .713.2.5.4 Using Call Park with the External Paging option . . .71
3.2.6 Call Queue — Queuing and retrieving callers . . . . . . . . . . . . .713.2.6.1 Queuing calls to a single extension . . . . . . . . . . . .713.2.6.2 Queuing callers to an Extension Ring Group . . . . .72
3.2.7 Using the TalkSwitch Call Waiting feature . . . . . . . . . . . . . . . . .723.2.8 Conference calling with TalkSwitch . . . . . . . . . . . . . . . . . . . . . .733.2.9 Using Phones connected in parallel to TalkSwitch . . . . . . . . . . .743.2.10 External modem telephone line access . . . . . . . . . . . . . . . . . . .75
3.3 Out of the Office — Receiving Calls through Call Forwarding . . . . . . . . . . .753.3.1 The three ways to forward calls . . . . . . . . . . . . . . . . . . . . . . . .753.3.2 Transferring calls from a Remote Extension . . . . . . . . . . . . . . . .763.3.3 Screening options for forwarded calls . . . . . . . . . . . . . . . . . . . .76
3.4 Using the TalkSwitch Voicemail System . . . . . . . . . . . . . . . . . . . . . . . . . . . .773.4.1 Activating Voice mailboxes . . . . . . . . . . . . . . . . . . . . . . . . . . . .783.4.2 Retrieving Messages/Accessing a Voice mailbox . . . . . . . . . . . .783.4.3 Pager and Cell Phone notification . . . . . . . . . . . . . . . . . . . . . .80
3.5 Music-on-Hold . . . . . . . . . . . . . . . . . . . . . . . . . . . . . . . . . . . . . . . . . . . . .80
3.6 Mode Switching Options . . . . . . . . . . . . . . . . . . . . . . . . . . . . . . . . . . . . . .81
3.7 Out of the Office — Making Calls with Call Back and Call Bridge . . . . . . . .823.7.1 Using Call Bridge . . . . . . . . . . . . . . . . . . . . . . . . . . . . . . . . . .823.7.2 Using Call Back . . . . . . . . . . . . . . . . . . . . . . . . . . . . . . . . . . .83
3.8 Upgrading the TalkSwitch Firmware . . . . . . . . . . . . . . . . . . . . . . . . . . . . . . .84

Appendices
Appendix A — Help & Troubleshooting . . . . . . . . . . . . . . . . . . . . . . . . . . . . . . .89
Appendix B — Using TalkSwitch with Telephone Company Calling Services . . . . .97
Appendix C — Quick Commands and DTMF Functions . . . . . . . . . . . . . . . . . .101
Appendix D — Safety Precautions and Regulatory Information . . . . . . . . . . . . .105
Appendix E — TalkSwitch One Year Warranty . . . . . . . . . . . . . . . . . . . . . . . . .109
Appendix F — Return Policy . . . . . . . . . . . . . . . . . . . . . . . . . . . . . . . . . . . . . .113
Appendix G — Specifications . . . . . . . . . . . . . . . . . . . . . . . . . . . . . . . . . . . . .115
Appendix H — TalkSwitch and Power Interruptions . . . . . . . . . . . . . . . . . . . . . .117
Glossary . . . . . . . . . . . . . . . . . . . . . . . . . . . . . . . . . . . . . . . . . . . . . . . . . . . . . . . . . . .119


1.1 What’s included with TalkSwitch
The TalkSwitch products come shipped with the following items:
1. The TalkSwitch Unit
2. AC Power Adapter (Warning: never use any other Power Adapter other thanthe one provided with the TalkSwitch.)
3. USB cable
4. 6' RJ-11 Telephone Cable – (2)
5. Software CD (This contains the configuration software and documentation)
6. Quick Reference Cards – (Local Extension Use)
7. TalkSwitch Start Guide
8. TalkSwitch Memory Card (optional purchase)
If any of these items are missing, please contact your reseller.
The TalkSwitch Line jacks are sensitive to high voltage spikes from lightning. If you livein an area where electrical storms occur regularly, we recommend that you protectTalkSwitch by plugging the telephone cords coming from the TalkSwitch line jacks to asurge protection device connected to the incoming telephone lines.
When you first receive TalkSwitch and live in an area with cold temperatures, do notplug TalkSwitch into a power outlet until the system has warmed to room temperature.Otherwise condensation could build up on the electronics and cause damage whenpowered up.
1
11.0 Installing TalkSwitch
InstallingTalkSwitch

1.2 Front Panel Descriptions
TalkSwitch’s front panel consists of a power button (“Power”) and 5 LED lights thatdo more than let you know TalkSwitch is plugged in and turned on.
What do the LED lights tell you?
LED light State Description
Line 1 On Solid Line 1 is currently in use.Pulsing Slowly The Line 1 caller is on hold.Flickering Line 1 is ringing.Quick Pulse Line 1 is engaged by another device on the line.
Line 2 On Solid Line 2 is currently in use.Pulsing Slowly The Line 2 caller is on hold.Flickering Line 2 is ringing.Quick Pulse Line 2 is engaged by another device on the line.
Power / Data On Solid TalkSwitch is powered on.Flickering The PC connected (via Serial or USB) to
TalkSwitch is either sending or retrievinginformation from TalkSwitch.
Pulsing Slowly Global Message Waiting Indicator (optional).
Line 3* On Solid Line 3 is currently in use.Pulsing Slowly The Line 3 caller is on hold.Flickering Line 3 is ringing.Quick Pulse Line 3 is engaged by another device on the line.
Line 4* On Solid Line 4 is currently in use.Pulsing Slowly The Line 4 caller is on hold.Flickering Line 4 is ringing.Quick Pulse Line 4 is engaged by another device on the line.
For more details on Line LED Error codes, see Troubleshooting — Appendix A
* Line 3 and 4 lights apply to TalkSwitch 48 models
2 TalkSwitch User Guide
1.3 Back Panel Descriptions
Before connecting all your phones and lines to TalkSwitch, you may want toproceed with configuring the unit first. (See section 2.1) This will minimize thedisruption time for your telephone lines while setting up the system.
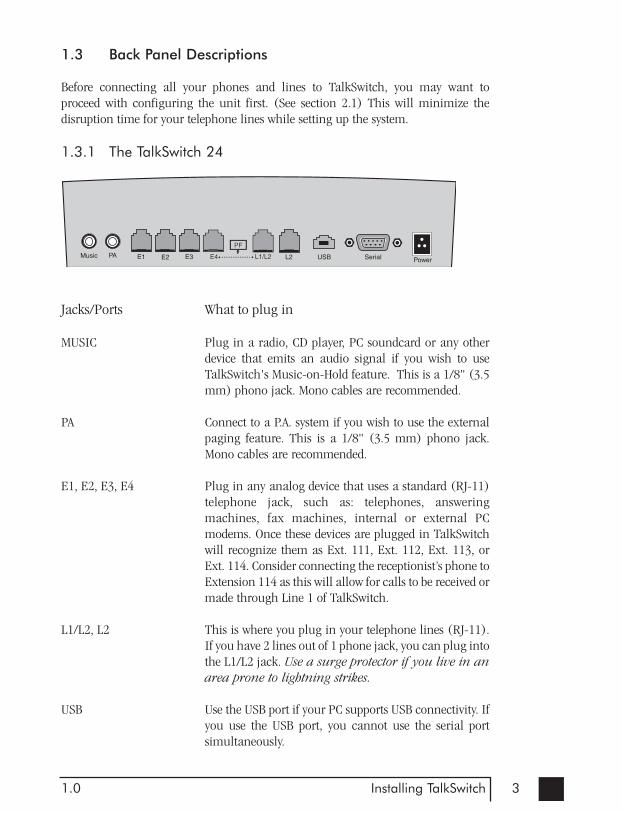
1.3.1 The TalkSwitch 24
Jacks/Ports What to plug in
MUSIC Plug in a radio, CD player, PC soundcard or any otherdevice that emits an audio signal if you wish to useTalkSwitch's Music-on-Hold feature. This is a 1/8" (3.5mm) phono jack. Mono cables are recommended.
PA Connect to a P.A. system if you wish to use the externalpaging feature. This is a 1/8" (3.5 mm) phono jack.Mono cables are recommended.
E1, E2, E3, E4 Plug in any analog device that uses a standard (RJ-11)telephone jack, such as: telephones, answeringmachines, fax machines, internal or external PCmodems. Once these devices are plugged in TalkSwitchwill recognize them as Ext. 111, Ext. 112, Ext. 113, orExt. 114. Consider connecting the receptionist’s phone toExtension 114 as this will allow for calls to be received ormade through Line 1 of TalkSwitch.
L1/L2, L2 This is where you plug in your telephone lines (RJ-11).If you have 2 lines out of 1 phone jack, you can plug intothe L1/L2 jack. Use a surge protector if you live in anarea prone to lightning strikes.
USB Use the USB port if your PC supports USB connectivity. Ifyou use the USB port, you cannot use the serial portsimultaneously.
31.0 Installing TalkSwitch
SERIAL* You can use a serial cable (RS232) that connects TalkSwitch to your PC. If you use the serial port you cannot use the USB port simultaneously. *Serial cables are not supplied with the TalkSwitch unit.
POWER Plug the supplied AC Power Adapter in here. Rating: 16VAC 1.1 A output. Do not use any other power adapteras this may cause damage.
MEMORY SLOT Memory expansion slot (located on side). Used toexpand internal memory for voicemail and AutoAttendant messages. TalkSwitch Memory cards can bepurchased from your local TalkSwitch reseller. Simplyplace the memory card in the slot and TalkSwitch willautomatically detect and start using the extra memorywithin 20 seconds.
The ‘PF’ box in between E4 and L1/L2 represents power failure support. In the eventof a power failure or loss of power to TalkSwitch, Extension 114 will be able to receivecalls and make calls on Line 1.
1.4 Plugging into the Back Panel
1.4.1 Attaching telephone lines to TalkSwitch line jacks
You can connect your telephone lines from the wall jack(s) to the TalkSwitch Linejacks with the phone cables provided. Take note of which telephone line is connectedto which Line Jack on TalkSwitch - this information will be used in the configurationsection. In order to minimize disruption to your business, you may want to configureTalkSwitch first before connecting it to your lines and phones.
We recommend that you connect surge protectors between TalkSwitch and yourtelephone lines to protect against lightning damage.
1.4.2 Attaching phones to TalkSwitch extension jacks
You can connect any analog device (regular telephone, cordless phone, fax machine,answering machine, modem) to TalkSwitch's extension jacks. Multiple devices can beconnected to each extension jack by ‘chaining’ them together or using a line splitter.
4 TalkSwitch User Guide
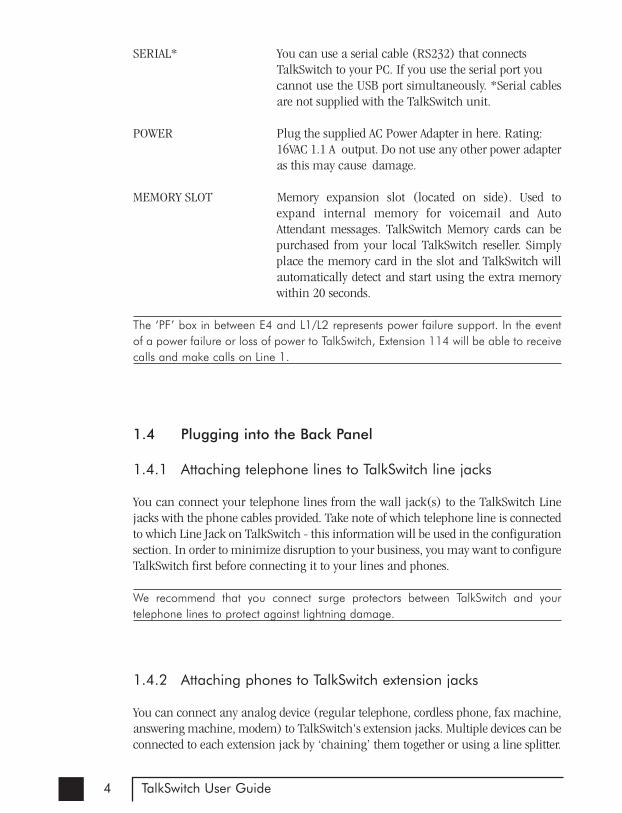
To Attach a Single Line Corded or Cordless Telephone, Fax Machine or AnsweringMachine:
Connect your single line analog telephone or fax machine to one of TalkSwitch’sextension jacks E1 to E4 just as you would if you were plugging them into astandard telephone wall jack.
To Attach a Two-line Telephone:
Option #1 (Use it as one TalkSwitch extension.)
Disregard the telephone’s Line 2 jack (plug-in). Connect the telephone’s Line 1plug-in to any one of TalkSwitch’s extension jacks. You will still be able to accessboth telephone lines in the same manner as if you were using a single linetelephone attached to TalkSwitch.
Option #2 (Use it as two TalkSwitch extensions.)
You could use your two-line telephone as two separate TalkSwitch extensions.Connect the telephone’s Line 1 and Line 2 plug-ins to two separate extensionjacks.
Most two-line phones have separate plug-ins for two incoming telephone lines (Line 1and Line 2). If your two-line telephone does not have separate plug-ins, you can usea “Line 1/Line 2” line splitter to separate the two lines. DDoowwnnllooaadd tthhee QQuuiicckk GGuuiiddee aattwwwwww..ttaallkksswwiittcchh..ccoomm ffoorr mmoorree ddeettaaiilleedd eexxaammpplleess oonn ccoonnnneeccttiinngg mmuullttii--lliinnee pphhoonneess..
To Attach an Internal or External Modem:
Simply plug the modem’s telephone cable into one of TalkSwitch’s extensionjacks. Your modem is now a TalkSwitch extension and will be able to access alllines and take advantage of TalkSwitch’s call routing features.
If you don’t want to change your dial up settings for the modem, you will needto enable Direct Line Access for the extension associated to the modem. Seesection 2.3.1.4 for more details on configuring Direct Line Access.
1.4.3 Connecting Devices to the Music and PA Jacks
The Music jack is designed to support any audio source (CD player, radio, tape player,sound card etc.) for playing music or messages to callers while on hold. Simplyconnect the audio source via its headphone output to the Music jack. The Music jackrequires a 1/8'' (3.5mm) phono connector. If you have more than one TalkSwitchconnected to a LAN, you will need to provide audio to all the Music jacks on eachTalkSwitch.
51.0 Installing TalkSwitch

The PA jack can be connected to a PA System for external paging or to anamplification system to screen voicemail or to use as a line simulator. The PA jackrequires a 1/8'' (3.5mm) phono connector. If you have more than one TalkSwitchconnected to a LAN, you will need to provide a connection from each TalkSwitch tothe PA system.
1.4.4 Connecting TalkSwitch to a PC
There are two ways to connect TalkSwitch 24CA directly to your PC for configuration— USB or Serial
USB: Use the provided USB cable to connect TalkSwitch to an available USBport on your PC or USB hub.
Serial*: Use a serial cable (RS232) to connect TalkSwitch to an open COM porton your PC. *Serial cables are not provided with TalkSwitch units.
1.4.4.1 Connecting TalkSwitch to a PC using a USB cable
If you have an available USB port then connect TalkSwitch to the PC using the USBcable. When you run the TalkSwitch software, you will need to select ‘USB’ as theconnection type then press connect.
1.4.4.2 Connecting TalkSwitch to a PC using a Serial cable
If you have an available Serial port, then connect TalkSwitch to your PC using anoptional Serial cable.
When you run the TalkSwitch software, you will need to select ‘Serial’ as theconnection then select the Serial Port associated to this physical Serial port on your PC.
Make sure you do not have any other communications programs running at the sametime you want to use the TalkSwitch configuration software. These may include PalmPilot, Hot Sync, TalkWorks, Digital Camera software. These programs tend to ‘hold’onto COM ports and not make them available for any other programs.
If you are having problems communicating with TalkSwitch, please check theTroubleshooting section of the manual.
6 TalkSwitch User Guide

72.0 Configuring TalkSwitch
ConfiguringTalkSwitch2
2.1 Installing the TalkSwitch Configuration Software
Insert the TalkSwitch CD into your CD drive. The Install program will automaticallylaunch. If the software does not launch automatically, you can use Windows Explorerto explore your CD-ROM drive. Double-click the Setup.exe file, then follow theinstructions on the screen. If you are installing on a Windows XP machine, do notenable Windows 98 compatibility mode for the TalkSwitch software. The TalkSwitchsoftware can also be downloaded from the TalkSwitch website (www.talkswitch.com).
Configuration software system requirements:
PC running Windows XP/2000
120 MB free hard disk space
128 MB RAM
800 x 600 minimum video resolution
If you are having problems retrieving the settings from TalkSwitch, please check theTroubleshooting section of the manual.

8 TalkSwitch User Guide
2.2 Running the TalkSwitch software
After installation is complete, double-click the TalkSwitch icon. The following screenprovides different connection options.
Connection Type: USB
If TalkSwitch is connected to the PC via a USB cable, then select this option andpress ‘Connect’ to continue.
Connection Type: Serial
If TalkSwitch is connected to the PC via a Serial cable, then select this option andchoose the Serial Port associated to the connection. Press ‘Connect’ to continue.
Connection Type: Ethernet
Ethernet is not a supported connection type for the TalkSwitch 24CA. Only USBand Serial are supported.
Connection Type: Internet
Internet is not a supported connection type for the TalkSwitch 24CA since it doesnot have an Ethernet port. Only USB and Serial are supported.
Connection Type: File
If you wish to work offline on a configuration file, select this option then pressthe Browse button to select the file you wish to view/edit.
Restore Firmware:
This activates the TalkSwitch Firmware Update procedure in the event a firmwareupdate has failed. Follow the instructions accordingly.

92.0 Configuring TalkSwitch
2.3 Configuration
The configuration screen consists of 4 parts:
1. Menu Items
2. Configuration Navigation
Controls what is displayed in the configuration window.
3. Configuration Window
Displays configuration information.
4. View System Information
Click this button to view each TalkSwitch unit’s MAC address, IPaddress, hardware version and firmware version.
5. Resize
Grabbing this corner by left-clicking on the mouse allows you toincrease or decrease the window size.
There is context sensitive help information available for each option in theconfiguration software. Simply rest your mouse cursor over any control for a secondor two and then information related to that control will appear.
1
2
3
4
5

10 TalkSwitch User Guide
Menu Items - File
Open File...
Opens existing configuration files from the PC. Default configuration files are included with the software. TalkSwitch also backs up to a file called“LastSavedConfig.dat” every time you save settings to TalkSwitch.
Save to TalkSwitch
Saves the current configuration to TalkSwitch.
Save to file...
Saves the current configuration to a file.
Exit
Closes the Configuration.
Retrieve settings:
Retrieves settings from TalkSwitch connected to the PC.
Update Firmware:This action locks the system down and then proceeds with updating thefirmware once all calls have terminated. For more details on upgrading theTalkSwitch Firmware, see Section 4.8.
Menu Items — View
Toolbar
Toggles the toolbar on/off.
Status Bar
Toggles the status bar on/off.
Menu Items — Tools
Memory Usage:
Displays a dialog box showing internal memory usage for Voicemail or AutoAttendant messages.
Voicemail Manager:
Displays a dialog box giving you options to check the status of all voicemail,delete a mailbox password, and reset mailboxes to factory default.
112.0 Configuring TalkSwitch
Terminal Window:
Displays a command line interface to enter commands. Useful for troubleshootingin conjunction with technical support.
Defaults:
Select this option to reset the current page or the entire configuration back to defaults.
Menu Items — Help
Support on the Web:
Launches your browser and directs you to our support site.
About TalkSwitch:
Displays the TalkSwitch software version number, TalkSwitch firmware versionnumber and Copyright information.
Additional PDF help documents can be located in the Start Menu> TalkSwitch folder.
Configuration Navigation
The Configuration Navigation organizes all the configuration topics within folders.The following is a brief description of each configuration folder:
About TalkSwitch
This tab displays version information about the TalkSwitch software, firmwareand hardware. It also displays memory usage with details about voicemailmessages and Auto Attendants.
System Information
This folder allows you to configure the system setup. This includes activatinglines, extensions, VoIP and music-on-hold.
Voicemail
This folder allows you to configure each individual voice mailbox and also someglobal settings for the voicemail system.
Call Handling
This folder allows you to configure how you want incoming calls to be handled.It allows you to setup your Auto Attendants and individual call handling for eachline and distinctive ring number for both operating modes.

12 TalkSwitch User Guide
2.3.1 System Information
2.3.1.1 Administration
It is recommended that you enter an Administrator password to prevent tamperingwith the system configuration.
System Name:
The system name is for informational purposes to confirm the identity of thesystem when connected.
Administrator password:
To activate the use of an administrator password, enter a 4 to 8 digit password.The password can only contain numbers since it is also used to gain access to thesystem using a touch tone phone.
If the administrator forgets their password, the only option to gain access to theconfiguration settings is to contact TalkSwitch.

132.0 Configuring TalkSwitch
2.3.1.2 Telephone Lines
This section is used to inform TalkSwitch about the lines or VoIP ports plugged intoits back panel. Simply select a line and fill in the information. For each line there isa status message (“Line detected at initialization”) indicating if TalkSwitch detecteda line plugged into the associated line port. If a line is plugged into a line port andis not detected, check your telephone line, and then choose File>Retrieve settings toupdate the screen.
Connection type:Select what’s connected to the Line jack on TalkSwitch. Selecting VoIP means that you have a VoIP device plugged into the jack. This will now enable callers to select 250-299 from a local extension or auto attendant to speed dial a VoIP location.
In the “Phone numbers” section:
Enter the ‘main’ telephone number for the appropriate line connected toTalkSwitch. Enable the Distinctive Ring Numbers 1 and/or 2 if you have thisservice on the current line and wish to have incoming calls handled 'differently'on the basis of the distinctive ring. If you want Distinctive Ring numbers handledthe same way as your 'Main' number, do not place a check mark in the box.
Next, enter the ‘Distinctive Ring’ telephone number for each of the DistinctiveRing numbers associated to this line. Distinctive Ring 1 corresponds to anydouble ring pattern. Distinctive Ring 2 corresponds to any triple ring pattern.
14 TalkSwitch User Guide
In the “Telephone company services” section:
Select any of the Telephone Company Services that you currently have for eachline. The following is an explanation of each service and the impact of selectingeach option with respect to how TalkSwitch handles calls. For definitions anddetails on how to use these features with TalkSwitch, see Appendix B.
3-Way Calling/Conference:TalkSwitch can work with either service to forward calls to RemoteExtensions or other external phone numbers while using the sameline (Same Line Connect). You can also use this service as an optionfor bridging calls to external numbers when calling into TalkSwitchfrom the outside. If you find that you are having difficulties with linelevels when forwarding calls to Remote Extensions or using CallBridge, you should use 3-way calling to forward calls as a solution.
Transfer and Clear (Centrex/Plexar transfer):TalkSwitch can clear the line after forwarding a call to a RemoteExtension if your telephone line supports this feature. If you enablethis feature without actually having the service, callers will bedisconnected after the call is forwarded to the Remote Extension.
Call Waiting:Check this box if you have Call Waiting service on the current line. Itis recommended that you remove this service from your line(s) sincethere is no way for TalkSwitch to handle a second call on the sameline while it is handling the first call. You may want to instead consider adding the Hunt/Rollover service to your lines.
Caller ID:Check this box if the current line provides Caller ID information.TalkSwitch will pass along the Caller ID information to selectedextensions. Also, TalkSwitch can use the time information provided byCaller ID to update TalkSwitch’s internal clock. (see section 2.3.5.4).
Telephone Company Voicemail:Check this box if you are subscribed to a Telephone CompanyVoicemail service.
Hunt/Rollover/Busy Forwarding: Check this box if the current line is associated with a Line Hunt orLine Rollover service from the Telephone Company. In general, anylines that belong to a Hunt/Rollover group should be configured tohandle calls the same way.
In the “Calibration” section:
After you have configured the lines, it is recommended that you calibrate thelines. Completing this procedure optimizes your telephone line volume levels forthe Call Bridge and Call Forwarding (with Remote Extensions) features.
152.0 Configuring TalkSwitch
Note: Only lines that are detected can be calibrated.
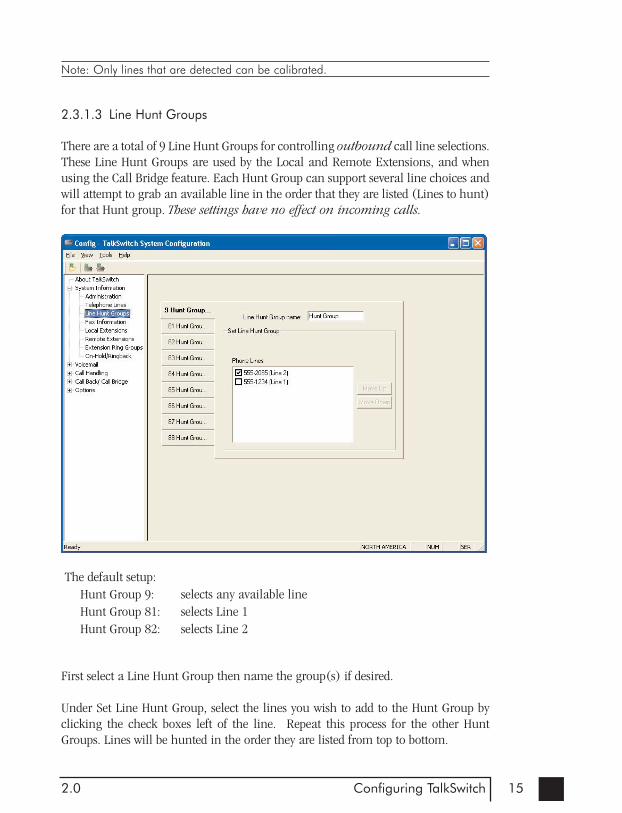
2.3.1.3 Line Hunt Groups
There are a total of 9 Line Hunt Groups for controlling outbound call line selections.These Line Hunt Groups are used by the Local and Remote Extensions, and whenusing the Call Bridge feature. Each Hunt Group can support several line choices andwill attempt to grab an available line in the order that they are listed (Lines to hunt)for that Hunt group. These settings have no effect on incoming calls.
The default setup: Hunt Group 9: selects any available lineHunt Group 81: selects Line 1Hunt Group 82: selects Line 2
First select a Line Hunt Group then name the group(s) if desired.
Under Set Line Hunt Group, select the lines you wish to add to the Hunt Group byclicking the check boxes left of the line. Repeat this process for the other HuntGroups. Lines will be hunted in the order they are listed from top to bottom.

16 TalkSwitch User Guide
2.3.1.4 Fax Information
The information in this tab helps configure TalkSwitch to handle faxes.
If you have a dedicated fax line or a Distinctive Ring number for faxing associated toa line, please choose this ‘Fax number’ in the list. If you don’t have a line dedicatedfor inbound faxing, select ‘none’.
If you do not see your fax number in the list, make sure you have activated theappropriate line or Distinctive Ring number in the Telephone Lines section underSystem Information.
Next, select the extension number where you have your fax device connected. Forexample if you have your fax machine connected to E3 on the rear of the TalkSwitch,then select extension number 113.
By default, when both a dedicated line and fax extension have been selected for thefirst time, the software automatically configures the incoming call handlingproperties for that line to ring only the fax extension you specified on this page.

172.0 Configuring TalkSwitch
2.3.1.5 Local Extensions
Local Extensions are phones or devices connected to any of the extension jacks at theback of TalkSwitch. See sections 1.3 and 1.4 for more details on connectivity.
Select any of the extensions that you wish to configure.
Local Extensions are by default activated with the associated Voice mailbox. Voicemailboxes for each Local Extension can be de-activated in the Voicemail section inthe System Information folder.
Last Name/First Name:
Enter the first and last name of the person associated to the extension. The lastname is required if the person is to be included in the ‘Dial by Name’ directorylisting used at the Auto Attendant level. The person using that extension mustalso record their name for the directory. Instructions for recording the name arelisted in the interface. Whatever name is entered will appear on the Caller ID ofanother Local Extension during an intercom call.

18 TalkSwitch User Guide
Direct Line Access:
Direct line access allows you to configure the extension to access a specific HuntGroup automatically for outbound calls when the extension goes off hook. Forexample, you may have a fax machine connected to this extension and don’twant to reprogram the speed dial phone numbers. In this case you would select‘Direct line access’ and choose the appropriate Hunt Group. As soon as the faxgoes off hook, TalkSwitch will hunt the specified lines for an available line. Thisfeature is also useful if you want to avoid dialing any digits for accessing a line.
Warning: When using Direct Line Access, telephone company line dialtone is firstavailable when picking up the handset. The following features are only available fromTalkSwitch internal dialtone: Intercom Calling, Hold Retrieve, Line Hunt Groups,Voicemail Retrieval/Access, Call Pick Up, P.A. Access, Parked Call Retrieval, Do NotDisturb functions and entering Command Mode. TToo oobbttaaiinn iinntteerrnnaall ddiiaallttoonnee ffrroomm aanneexxtteennssiioonn wwhhiicchh hhaass DDiirreecctt LLiinnee AAcccceessss eennaabblleedd,, ddiiaall FFllaasshh aafftteerr ggooiinngg ooffff hhooookk..
Hunt Group Access:
This is used if you want to permit or restrict specific Hunt Group access to theextension. Click the button and simply organize the appropriate Line HuntGroups that are permitted for this extension. (All extensions are defaulted to haveno restrictions.)
2.3.1.6 Remote Extensions
With TalkSwitch’s Remote Extensions, you can have calls forwarded directly fromyour home/office to any phone number you choose. Your cell phone, pager or anyout-of-office number becomes a ‘Remote Extension’ of your office system.
You can have calls forwarded directly or screen callers. If you are unavailable orchoose not to accept calls, they can be transferred back to your office (e.g. tovoicemail or another extension) or forwarded to another out-of-office telephonenumber (e.g. to a business partner’s cell phone) depending upon the Cascadeconfiguration.
For details on how to use Remote Extensions, see section 3.3.
TalkSwitch assigns a Remote Extension number to each call forwarding telephonenumber. Calls can then be forwarded by the Auto Attendant or transferred by someonein your office simply by dialing the Remote Extension number. There are 8 RemoteExtensions available per TalkSwitch unit.

192.0 Configuring TalkSwitch
Choose a Remote Extension to configure. After you have activated a RemoteExtension, you must enter a phone number in order for the extension to beconsidered active and usable by the system.
Remote phone number:Enter the phone number of the Remote Extension (note: no specific prefixes arerequired - put the number in just as though you were dialing it from a regularphone). You may use the following in the space provided: digits 0 – 9, space,comma, dash, # and *.
Last Name/First Name:Enter the first and last name of the person associated to the extension. The lastname is required if the person is to be included in the ‘Dial by Name’ directorylisting used at the Auto Attendant level. The person using that extension mustalso record their name for the directory. Instructions for recording the name arelisted in the interface.
Connect using:Select the Line Hunt Group that TalkSwitch will use to connect to that RemoteExtension. For example if you have an inexpensive long distance carrier setup forthe lines in Hunt Group 84, you may want to use this Hunt Group for your longdistance Remote Extensions.

20 TalkSwitch User Guide
Use Same Line Connect
Enabling this option allows incoming calls, when forwarded to the RemoteExtension, to use the same line in which the originating call came in. Using thisfeature allows only one line to be used when forwarding incoming calls to aRemote Extension. This feature can only be used when the line that theoriginating call came in on has the 3-Way Calling/Conference or Transfer service(Centrex/Plexar). If the line does not have any of these services, the call will beforwarded using the Hunt Group chosen in the “Connect using:” section.
If you have a ‘Transfer and clear’ service on your line(s) and want to haveTalkSwitch clear lines after forwarding calls to Remote Extensions, you will needto enable ‘Centrex/Plexar transfer’ on the Miscellaneous tab under ‘Options’. Ifyour service requires the remote end to answer the call before the transfer can bemade, then you should use ‘play accept/reject prompt’ or ‘play caller’s name first’screening option set on the ‘Answered at ext.’ in the Remote Extension sectionunder Call Handling.
Note: Remote Extensions do not have the ability to manually transfer callswhen using ‘Same Line Connect’.
When using Same Line Connect, callers will hear silence while they are on hold sincethe callers are on hold at the Telephone Company and not at TalkSwitch. If you wantcallers to hear music while they are on hold for calls forwarded to Remote Extensions,do not use Same Line Connect. It’s best to experiment with different settings in orderto decide what works best for your configuration.
2.3.1.7 Extension Ring Group
There are a total of 10 Extension Ring Groups available for your use. Ring Groups areextensions 300 to 309. By default, extension 300 is configured to ring all extensions.
Different uses for Extension Ring Groups:
Example 1: You are the president of a company and you don't want to handlecalls from the general public, yet you want to be alerted when your importantcolleagues try to contact you. Your regular Local Extension may be 111 for mostpeople, but you can also configure a Ring Group such as extension Ring Group300 to ring your extension with a different ring pattern. You then tell yourcolleagues to always choose extension 300 at the Auto Attendant or ask to betransferred to extension 300 when speaking to someone in the office. Nowwithout being subscribed to Caller ID, you can tell just by how your phone ringsif you consider the caller to be important or not.
212.0 Configuring TalkSwitch
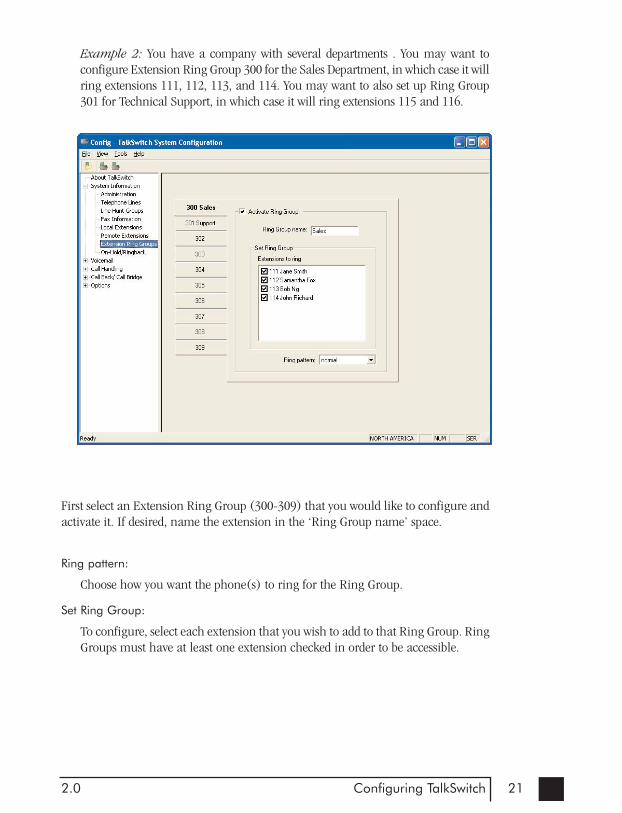
Example 2: You have a company with several departments . You may want toconfigure Extension Ring Group 300 for the Sales Department, in which case it willring extensions 111, 112, 113, and 114. You may want to also set up Ring Group301 for Technical Support, in which case it will ring extensions 115 and 116.
First select an Extension Ring Group (300-309) that you would like to configure andactivate it. If desired, name the extension in the ‘Ring Group name’ space.
Ring pattern:
Choose how you want the phone(s) to ring for the Ring Group.
Set Ring Group:
To configure, select each extension that you wish to add to that Ring Group. RingGroups must have at least one extension checked in order to be accessible.

22 TalkSwitch User Guide
2.3.1.8 On-hold/ Ringback
If you wish to have callers listen to music or advertising while they are on hold, youwill need to enable Music-on-hold in this tab.
On-Hold Settings:If you have a music source connected to the MUSIC jack, then you can select the‘play music’ option. Otherwise leave the option set to play a ‘double beep’ whencallers are placed on hold.
Transfer Settings:Select the option that best suits your environment and system configuration.
Note: If you connect a music source to the Music jack and do not enable Music-on-hold, the caller will hear both music and a beep sound when on hold. Also when thecaller makes a selection at the Auto Attendant to go to an extension that has callscreening enabled, they will hear both ringing and music.

232.0 Configuring TalkSwitch
2.3.2 Voicemail
This section deals with the internal voicemail system included with TalkSwitch. Itallows you to activate Local, Remote and General mailboxes and change globalsettings to the voicemail system. For details on how to use voicemail, see section 3.4.
2.3.2.1 Local Extension Voicemail
By default, all Local Extensions are activated with the associated voice mailbox.
Play announcement only:
If you want to use this mailbox for informational purposes only and prevent callersfrom recording messages, then check the 'Play announcement only' box.
If a caller presses ‘0’:
Select what action to take when a caller presses “0” during the different modes whilein a voice mailbox:
go to voice mailbox: Callers will be transferred to the specified mailbox.go to local extension: Callers will be transferred to the specified local extension.go to remote extension: Callers will be transferred to the specified remote extension.go to ring groups: Callers will be transferred to the specified ring group.
24 TalkSwitch User Guide
play announcements: Callers will be transferred to the specified announcement.go to auto attendant: Callers will be transferred to the Auto Attendant. perform no action: No action will be performed when ‘0’ is pressed.
Load Greeting:
You can load a pre-recorded voicemail greeting from your PC to TalkSwitch.The file must be an 8khz, 8-bit, mono µ-law .wav file.
Voicemail Notification Settings:
Set the manner in which you want to be notified when new messages arrive.
Remote Phone Notification:
If you want to be notified at another location when new messages arrive, youcan use Remote Phone Notification. Simply enter the phone number of thecell phone or location where you want to be notified.
Notification Settings:
Detailed instructions are provided for how you may want TalkSwitch tohandle notification calls being considered successful or requiring anotherattempt.
Pager Notification:
Use Pager Notification if you want to be notified by pager when new messagesarrive. Simply activate the feature then enter the pager phone number andthe numeric message to be displayed on the pager.
Message Waiting Light:
Click on this option to set a message waiting light to indicate when a messagehas been received for an extension. You can select on which local extensionsin your system the light will be activated when a message is received. Bydefault, the message waiting light will turn on at the extension associatedwith a local mailbox.
Configuration Notification Options:
Define how TalkSwitch will dial out of your office when notifying you of avoicemail. If the first connection is not successful, define how many times, andat what intervals TalkSwitch will continue to attempt to reconnect.
Under the conditions where you choose to be notified by both pager and remotephone, TalkSwitch makes sure that both locations have been contacted beforefinishing the notification process.
252.0 Configuring TalkSwitch
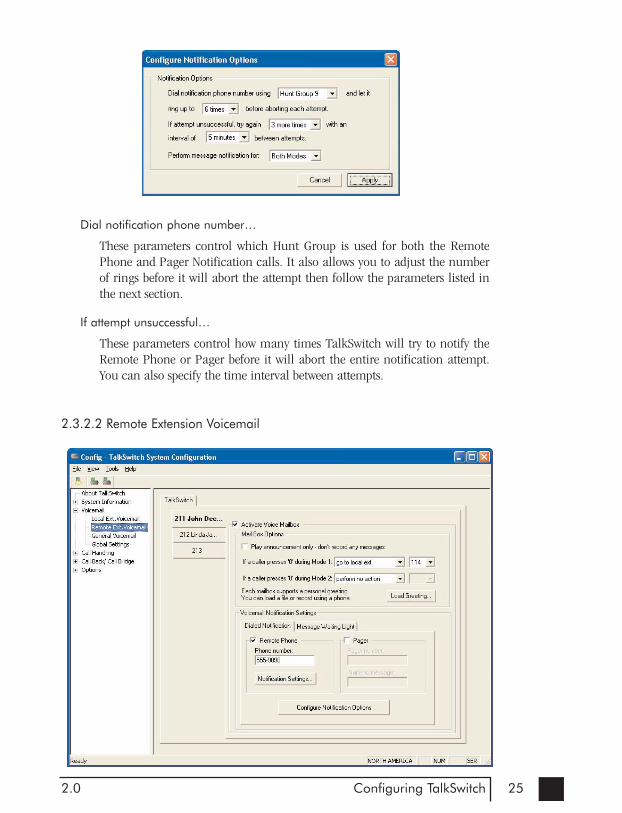
Dial notification phone number…
These parameters control which Hunt Group is used for both the RemotePhone and Pager Notification calls. It also allows you to adjust the numberof rings before it will abort the attempt then follow the parameters listed inthe next section.
If attempt unsuccessful…
These parameters control how many times TalkSwitch will try to notify theRemote Phone or Pager before it will abort the entire notification attempt.You can also specify the time interval between attempts.
2.3.2.2 Remote Extension Voicemail

26 TalkSwitch User Guide
Remote Extension voicemail is similar in features to the Local Extension voicemail.Ensure that the remote extension has been enabled, otherwise you will not be able toactivate its voicemail.
Play announcement only:
If you want to use this mailbox for informational purposes only and prevent callersfrom recording messages, then check the 'Play announcement only' box.
If caller presses ‘0’:
Select what action to take when a caller presses “0” during the different modes whilein a voice mailbox:
go to voice mailbox: Callers will be transferred to the specified mailbox.go to local extension: Callers will be transferred to the specified local extension.go to remote extension: Callers will be transferred to the specified remote extension.go to ring groups: Callers will be transferred to the specified ring group.play announcements: Callers will be transferred to the specified announcement.go to auto attendant: Callers will be transferred to the Auto Attendant. perform no action: No action will be performed when ‘0’ is pressed.
Load Greeting:
You can load a pre-recorded voicemail greeting from your PC to TalkSwitch.The file must be an 8khz, 8-bit, mono µ-law .wav file.
Voicemail Notification Settings:
Set the manner in which you want to be notified when new messages arrive:
Remote Phone Notification:
If you want to be notified at another location when new messages arrive, youcan use Remote Phone Notification. Simply enter the phone number of thecell phone or location where you want to be notified.
Notification Settings:
Detailed instructions are provided for how you may want TalkSwitch to handlenotification calls being considered successful or requiring another attempt.
Pager Notification:
Use Pager Notification if you want to be notified by pager when new messagesarrive. Simply activate the feature then enter the pager phone number andthe numeric message to be displayed on the pager. See following page forscreen shot of the pager notification options.

272.0 Configuring TalkSwitch
Message Waiting Light:
Click on this option to set a message waiting light to indicate when a messagehas been received for an extension. You can select on which local extensionsin your system the light will be activated when a message is received. Thisoption can be useful since remote voice mailboxes are not associated with anylocal extensions.
Configuration Notification Options:
Define how TalkSwitch will dial out of your office when notifying you of avoicemail. If the first connection is not successful, define how many times, andat what intervals TalkSwitch will continue to attempt to reconnect.
Under the conditions where you choose to be notified by both pager and remotephone, TalkSwitch makes sure that both locations have been contacted beforefinishing the notification process.
Dial notification phone number…
These parameters control which Hunt Group is used for both the RemotePhone and Pager Notification calls. It also allows you to adjust the numberof rings before it will abort the attempt then follow the parameters listed inthe next section.
If attempt unsuccessful…
These parameters control how many times TalkSwitch will try to notify theRemote Phone or Pager before it will abort the entire notification attempt.You can also specify the time interval between attempts.

28 TalkSwitch User Guide
2.3.2.3 General Voicemail
General Voicemail is similar in features to both Local and Remote ExtensionVoicemail. These are generic mailboxes used for general purposes, such as messagesfor a sales team, or technical support group.
Play announcement only:
If you want to use this mailbox for informational purposes only and prevent callersfrom recording messages, then check the 'Play announcement only' box.
If a caller presses ‘0’:
Select what action to take when a caller presses “0” during the different modes whilein a voice mailbox:
go to voice mailbox: Callers will be transferred to the specified mailbox.go to local extension: Callers will be transferred to the specified local extension.go to remote extension: Callers will be transferred to the specified remote extension.go to ring groups: Callers will be transferred to the specified ring group.play announcements: Callers will be transferred to the specified announcement.go to auto attendant: Callers will be transferred to the Auto Attendant. perform no action: No action will be performed when ‘0’ is pressed.

292.0 Configuring TalkSwitch
Load Greeting:
You can load a pre-recorded voicemail greeting from your PC to TalkSwitch.The file must be an 8khz, 8-bit, mono µ-law .wav file.
Voicemail Notification Settings:
Set the manner in which to be notified when new messages arrive.
Remote Phone Notification:
If you want to be notified at another location when new messages arrive, youcan use Remote Phone Notification. Simply enter the phone number of thecell phone or location where you want to be notified.
Notification Settings:
Detailed instructions are provided for how you may want TalkSwitch tohandle notification calls being considered successful or requiring anotherattempt.
Pager Notification:
Use Pager Notification if you want to be notified by pager when new messagesarrive. Simply activate the feature then enter the pager phone number andthe numeric message to be displayed on the pager. See following page forscreen shot of the pager notification options.
Message Waiting Light:
Click on this option to set a message waiting light to indicate when a messagehas been received for an extension. You can select on which local extensionsin your system the light will be activated when a message is received. Thisoption can be useful since general voice mailboxes are not associated withany local extensions.
Configuration Notification Options:
Define how TalkSwitch will dial out of your office when notifying you of avoicemail. If the first connection is not successful, define how many times, andat what intervals TalkSwitch will continue to attempt to reconnect.
Under the conditions where you choose to be notified by both pager and remotephone, TalkSwitch makes sure that both locations have been contacted beforefinishing the notification process.

30 TalkSwitch User Guide
Dial notification phone number…These parameters control which Hunt Group is used for both the RemotePhone and Pager Notification calls. It also allows you to adjust the numberof rings before it will abort the attempt then follow the parameters listed inthe next section.
If attempt unsuccessful…These parameters control how many times TalkSwitch will try to notify theRemote Phone or Pager before it will abort the entire notification attempt.You can also specify the time interval between attempts.

312.0 Configuring TalkSwitch
2.3.2.4 Global Settings
Any changes made to Global Settings will affect all system voice mailboxes.
Global Message Waiting Indicator:This option can be useful if you only use one or a couple of voice mailboxes.Anytime a new message is left in any active voice mailbox, the Power/Datalight will pulse very slowly to indicate that there is at least one new messagein one of the mailboxes. Once all new messages have been heard, this lightwill return to the default state of being on solid.
Mailbox Settings:The first option controls the order that messages are played back whenlistening to voicemail. The default setting plays messages back starting withthe newest message and working back to the oldest messages. This setting isconvenient since many people store several saved messages and don't want toskip through these messages every time they want to listen to newer messages.
The second control can be adjusted so that you can have the system page orcall your remote phone for every new message received in voicemail or onlythe 1st new message received in voicemail.
32 TalkSwitch User Guide
Automatically remove blank and short messages:Enable this option if you tend to get several messages where callers hang uprather than leave messages. The advantage of not clearing the short messagesis that employees can listen to the Caller ID information played at the end ofthe message to identify callers*.
*Caller ID service required from your telephone company.
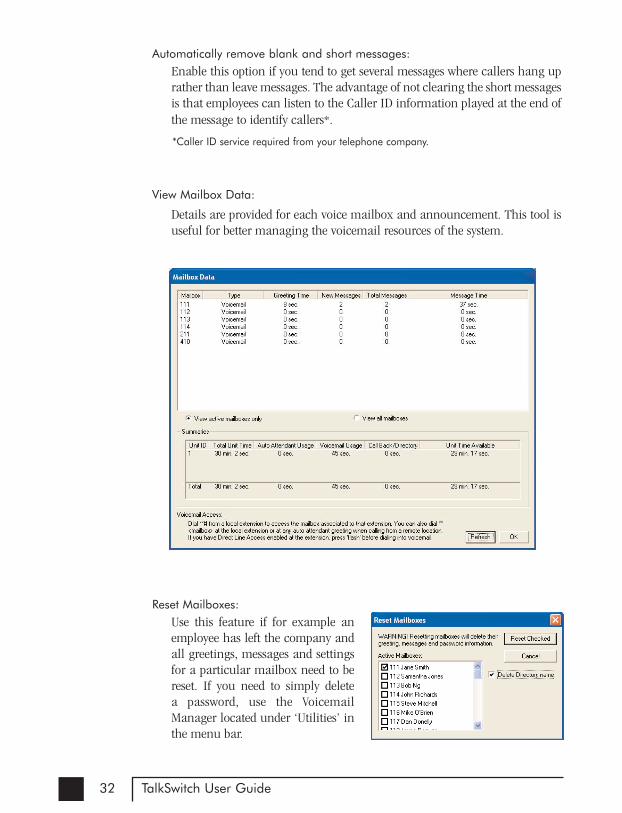
View Mailbox Data:
Details are provided for each voice mailbox and announcement. This tool isuseful for better managing the voicemail resources of the system.
Reset Mailboxes:Use this feature if for example anemployee has left the company andall greetings, messages and settingsfor a particular mailbox need to bereset. If you need to simply delete a password, use the VoicemailManager located under ‘Utilities’ inthe menu bar.
332.0 Configuring TalkSwitch
2.3.3 Call Handling
2.3.3.1 Modes
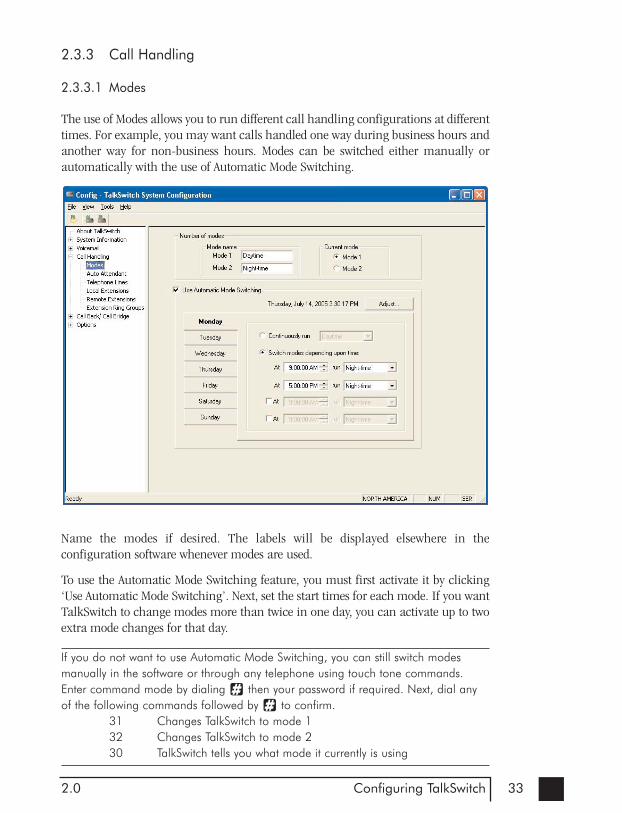
The use of Modes allows you to run different call handling configurations at differenttimes. For example, you may want calls handled one way during business hours andanother way for non-business hours. Modes can be switched either manually orautomatically with the use of Automatic Mode Switching.
Name the modes if desired. The labels will be displayed elsewhere in theconfiguration software whenever modes are used.
To use the Automatic Mode Switching feature, you must first activate it by clicking‘Use Automatic Mode Switching’. Next, set the start times for each mode. If you wantTalkSwitch to change modes more than twice in one day, you can activate up to twoextra mode changes for that day.
If you do not want to use Automatic Mode Switching, you can still switch modesmanually in the software or through any telephone using touch tone commands.Enter command mode by dialing then your password if required. Next, dial anyof the following commands followed by to confirm.
31 Changes TalkSwitch to mode 132 Changes TalkSwitch to mode 230 TalkSwitch tells you what mode it currently is using

34 TalkSwitch User Guide
2.3.3.2 Auto Attendant
The purpose of the Auto Attendant is to greet callers and instruct them as to whichnumber(s) they should press on their telephone keypad to reach a particularextension, person, message, or department. Callers can also directly dial LocalExtensions (1xx), Remote Extensions (2xx), Extension Ring Groups (300-309),Voicemail (both leave messages and access messages), access Call Back, access CallBridge and enter Command mode for making changes to the system configuration.
*400 series mailboxes can be dialed at the Auto Attendant without having to press first. This can be useful for providing ‘virtual’ extensions associated to a mailbox fortelecommuters or other part-time staff.
A total of 9 different Auto Attendants can be recorded or loaded with a combined totaltime of 30 minutes (shared with voicemail, but can be expanded using TalkSwitchMemory cards). You do not have to use or record all 9 Auto Attendants. The Auto Attendants can be recorded from any Local Extension or remotely usingtouch tone commands.

352.0 Configuring TalkSwitch
Recording Auto Attendant messages using touch tone commands:
Pick up any Local Extension or dial into TalkSwitch and at the Auto Attendantenter command mode by pressing . If you have the Administrator passwordenabled, you need to enter this password. Next, begin entering the propertouch tone commands listed on the next page. After entering a command, youwill need to press to confirm the entry before entering another commandor exiting command mode. To exit command mode, press or hang up.
Auto Attendant Record message Playback message Erase message
1 41 51 041 2 42 52 042 3 43 53 043 4 44 54 044 5 45 55 045 6 46 56 046 7 47 57 047 8 48 58 048 9 49 59 049
Example: Recording and playing back Auto Attendant
1. Press to enter command mode, then dial 4 1 .2. After the tone, record your Auto Attendant message. Press when you
have finished.3. Press 5 1 to listen to your recording.
Note: If you have the Administrator password enabled, you will need to enter thispassword after you hit the first time to enter command mode.
Recording Auto Attendants from an out-of-office phone:
1. Dial into TalkSwitch and wait for the Auto Attendant message.
2. Once the Auto Attendant is playing, use the same keypad commands as youwould from a TalkSwitch extension (in the ‘Recording Auto Attendantsusing touch tone commands:’ section). If you have Password Protectionenabled, you will be prompted for your password.
36 TalkSwitch User Guide
In the “At the Auto Attendant, perform the following actions:” section:
If the caller selects ‘0’:
In general, the ‘0’ option is used to direct callers to a receptionist. You maywant to configure this option to ring a Local Extension. For an after hoursauto attendant, you might want to use this option for forwarding to a RemoteExtension for emergency purposes or simply direct callers to a voice mailbox.
If the caller selects ‘1’, ‘2’, ‘3’, ‘4’ or ‘5’:
If the caller presses ‘1’, ‘2’, ‘3’, ‘4’ or ‘5’ at the specified Auto Attendant,TalkSwitch can perform one of several actions. You may wonder how a callercan press just a single digit like ‘1’ or dial extension ‘111’ at the AutoAttendant and the system understand what it is supposed to do. TalkSwitchwaits 1.5 seconds for another digit after receiving the first digit. If anotherdigit is not received, then TalkSwitch will follow the action set for the digit ‘1’.
If a caller selects one of the single digit options, you can configure to directthe call to one of the following options:
–– ppeerrffoorrmm nnoo aaccttiioonn:: If you don’t want to use a particular option, then setit to perform no action.
–– ggoo ttoo vvooiiccee mmaaiillbbooxx:: You can configure any single digit option to send acaller immediately to voicemail. Select the appropriate mailbox or ‘new’to create a new mailbox if required.
–– ggoo ttoo llooccaall eexxtteennssiioonn:: If you are a small company, sometimes it is usefulto provide a single digit option to ring an extension as opposed to 3 digits.
–– ggoo ttoo rreemmoottee eexxtt..:: If you are a small company, sometimes it is useful toprovide a single digit option to ring an extension as opposed to 3 digits.
–– ggoo ttoo rriinngg ggrroouupp:: If you are a small company, sometimes it is useful toprovide a single digit option to ring an extension as opposed to 3 digits.
–– ggoo ttoo aauuttoo aatttteennddaanntt:: TalkSwitch can direct callers to multiple levels ofauto attendants. For example, you might want to use your main autoattendant to provide language options such as “press 1 for english, 2 forspanish.” Then you configure option 1 to go to auto attendant 2 (englishversion) and option 2 to go to auto attendant 3 (spanish version).
–– qquueeuuee aatt rriinngg ggrroouupp:: Some might consider this feature to be equivalentto ACD. It can be useful for businesses that want to direct calls to a groupof employees and keep callers on hold until a member of the ring group isfree to take the call.
–– ppllaayy aannnnoouunncceemmeenntt:: Announcements are useful for providing directions,business hours or other information. You can inform callers that they canpress to return to the previous greeting.
–– ggoo ttoo ddiirreeccttoorryy:: If you want callers to be able to locate employee extensionnumbers by last name, then enable this option for one of the selections.

372.0 Configuring TalkSwitch
If a fax call is detected:
If TalkSwitch detects a fax call (by CNG detection), it has the ability to routeit to a Local or Remote Extension or if you do not want to use fax detection,you can have TalkSwitch perform no action when detecting a fax call.
After the Auto Attendant has finished playing and no selection has beenmade within x seconds:
If no selection is detected at the specified Auto Attendant, TalkSwitch canroute the call to any Local or Remote Extension, Ring Group, Voice mailbox, Auto Attendant, Announcement, dial by name directory, queue thecaller or simply hang up. This feature is included in case someone does nothave a touch-tone phone or if it is a fax call where the calling fax machinedoes not emit a CNG tone. It can also be used to forward calls immediatelyafter the Auto Attendant answers the call. You will notice that you can speci-fy the length of time after the Auto Attendant has finished playing before itperforms the ‘no selection’ action.
Fax calls are detected by what's called a CNG tone. If a fax machine sends this tonewhile trying to establish a connection to a fax machine connected to TalkSwitch,TalkSwitch will handle the call accordingly. Not all fax machines emit a CNG tone, andas a result TalkSwitch will not be able to detect the fax call and route it to the faxmachine. To guarantee the reception of every fax, we recommend the use of a‘Distinctive Ring Number’ added to one of your lines for fax calls. TalkSwitch can thenhandle every fax call consistently.
The digits 6, 7, 8 and 9 are not available as programmable options since they areused for other system features:
If 6 is dialed:
If you press ‘6’ at the Auto Attendant, you will be able to configure and useAuto and Prompted Call Back. See section 2.3.4 for more details about con-figuring Call Back and section 3.7.2 for details on how to use Call Back.
If 7 is dialed:
This digit is used to precede PBX extensions of another Centrex or PBX system. If TalkSwitch is not connected to another system, then you need notworry about this setting. If TalkSwitch is connected to a PBX system, then seesection 2.3.5.4 for more details.
If 80 - 88, or 9 is dialed:
If you press ‘80 – 88 or 9’ at the Auto Attendant, you will access Call Bridgeif it has been permitted. See section 2.3.4.3 for more details on configuringCall Bridge and section 3.7.1 for details on how to use Call Bridge.

38 TalkSwitch User Guide
Utilities for Auto Attendants:
Record Instructions
Selecting this button displays a dialog box showingthe instructions on how to record and playback anAuto Attendant using a telephone. No adjustmentsare required for the recording volume asTalkSwitch automatically adjusts the recordingvolume for optimal recordings. If you find that theplayback of your Auto Attendant messages are toolow, you can adjust the playback volume on theAudio Controls page located under ‘Options’.
Load Auto Attendant
Selecting this buttondisplays a dialog box withinstructions on how to loadan Auto Attendant using apre-recorded wav file. Ifyou want to have AutoAttendants professionallyrecorded, make sure youspecify that the files need tobe 8KHz, 8bit, mono, andsaved as a mu-law formatwav file.
Erase Instructions
Selecting this button displays a dialog box showingthe instructions on how to erase an Auto Attendantusing a telephone. It is a good idea to erase anyunused Auto Attendants since they share the samememory as voicemail.

392.0 Configuring TalkSwitch
View Auto Attendant Memory Usage
Selecting this button displays the amount oftime used by all of the Auto Attendants. Thisfeature helps you keep track of memory usageas you may have unused Auto Attendantmessages that can be deleted to free up morememory.
2.3.3.3 Telephone Lines
This section deals with how TalkSwitch will handle incoming calls based on theincoming line and ring cadence (distinctive ring numbers).
First select a line to configure then the appropriate mode you want TalkSwitch to usethese settings. If you entered the phone number in the Telephone Lines section underSystem Information, then the number will appear on the corresponding button.

40 TalkSwitch User Guide
Ring extensions only (no Auto Attendant is played)
If you don’t want the Auto Attendant to answer calls on this line, then select thisoption. By default all the Local Extensions are set to ring immediately during aninbound call. If you select this option, no Call Cascade actions (such asvoicemail) can be performed. If you require a ‘fall through’ sequence such asgoing to a voice mailbox, you can configure this line to have an Auto Attendantanswer after x rings then perform an action configured for that Auto Attendant.
If you call in on any line, TalkSwitch will answer after 15 rings with a genericAuto Attendant so that you can still access the system to make configurationchanges, change modes, access voicemail, or dial extensions.
Play auto attendant...
If you wish to have the Auto Attendant answer calls to give callers options, selectthe appropriate Auto Attendant and number of rings before the Auto Attendantanswers . The caller will always hear one more ring than the number of rings youselect since TalkSwitch uses the first ring to determine the ring type and supportCaller ID information.
Go to voice mailbox...
If you don’t need to provide dialable options for callers and simply need to recordmessages (for example after hours), then you can configure TalkSwitch to sendcallers straight to a voice mailbox. Select the appropriate mailbox and numberof rings before voicemail is engaged. Select the extension(s) you want to ringbefore voicemail is engaged.
The next section controls how the extensions will ring before the Auto Attendantanswers the call.
• If you have chosen the Auto Attendant to answer calls immediately, this section does not require configuration and will be greyed out.
• If the Auto Attendant is set to answer after 1 or more rings, then you can con-figure when specific extensions will ring before the Auto Attendant answers.
• If no Auto Attendant is chosen to answer on the specified line, then you canconfigure when specific extensions will ring (up to 9 rings).
Extensions to ring on an incoming call...
Select the Local Extensions you would like to ring — including before the AutoAttendant answers or voicemail is engaged. By default, all activated LocalExtensions will ring. If you require certain extensions to ring in a sequence, i.e.one extension rings first, then another on the 2nd ring, click the “AdjustSequence” button to configure.

412.0 Configuring TalkSwitch
Remember: Callers can only be directed with the aid of an Auto Attendant. Calls willnot follow the Call Cascade settings of any of the Local Extensions programmed to ringon any incoming call.
Adjust Sequence:
This section controls how the extensions will ring before the Auto Attendantanswers the call.
• If you have chosen the Auto Attendant to answer calls immediately, this section does not require configuration and will be greyed out.
• If the Auto Attendant is set to answer after 1 or more rings, you can then con-figure when specific extensions will ring before the Auto Attendant answers.
• If no Auto Attendant is chosen to answer on the specified line, then you canconfigure when specific extensions will ring up to 9 rings. Remember that nocalls will go to voicemail unless you first have an Auto Attendant answer.

42 TalkSwitch User Guide
2.3.3.4 Local Extensions — Call Cascade
This section configures the incoming Call Cascade options for the Local Extensions.The Call Cascade routing options are only engaged if the extension is chosen fromthe Auto Attendant or if a call is manually transferred to the extension. Once a callenters an extension’s Call Cascade sequence, the extension “owns” the call. It will notfollow any other extension’s options even if chosen in the Cascade sequence — whatyou see in an extension’s Cascade sequence is exactly what you will get. You can setup the Call Cascade sequences differently for both scheduling modes (the schedulingfor these modes are set up on the Modes tab).
Even if a call is manually transferred to a Local Extension and that extension is busy,TalkSwitch will follow the Call Cascade options for that extension.
For Local Extensions, there are 4 different ‘Call Cascade’ situations; Busy atextension, No answer at extension, Answer at extension(routing when a call isrejected) and Do not Disturb (when turned on at an extension). For each of thesesituations, you can control how and where you want the incoming call to theextension handled with up to 3 ‘cascade’ destinations available.
1. Busy at extension — routing options when this extension is busyCascade options include forwarding calls to a Local Extension, RemoteExtension, Extension Ring Group, built in Voicemail, Announcement, invokeCall Waiting, Auto Attendant, play busy tone (for example: used if a fax

432.0 Configuring TalkSwitch
machine is at the extension), queue caller, or hang up. For more informationon these features, see chapter 3.0 — Using TalkSwitch.
2. No answer at ext. — routing options when this extension does notanswer after a specified number of rings.
Cascade options include forwarding calls to a Local Extension, RemoteExtension, Extension Ring Group, built in Voicemail, Announcement, Auto Attendant or keep ringing.
3. Answered at ext. — routing options when this extension ‘rejects’ ascreened call.
Selecting ‘play caller’s name first’ will prompt callers, when they choose thisextension at the Auto Attendant, to record their name. When you answer thecall at the extension, it will announce the caller (by playing their recording),at which time you can choose to accept the call by pressing or reroute thecall to the Cascade options on this tab by either hanging up or pressing .Routing options include forwarding calls to a Local Extension, RemoteExtension, Extension Ring Group, built in Voicemail, Announcement, AutoAttendant or hang up. In the case where ‘hang up’ is selected, TalkSwitch willfirst play the following prompt before hanging up: “I’m sorry, that extensionis unavailable at this time. Please try again later.”
4. Do not Disturb — routing options when this extension has engaged the‘Do not Disturb’ feature.
The Do not Disturb feature is toggled on or off by dialing 62 from a LocalExtension handset. Cascade options include forwarding calls to a LocalExtension, Remote Extension, Extension Ring Group, built in Voicemail,Announcement, Auto Attendant or hang up. When Do not Disturb is enabled,you will hear “Do not disturb on” before the dialtone as a reminder since nocalls will ring through to your extension. You may still dial any digits duringthis prompt.
In the Cascade sequence, only choosing an extension (Local, Remote or Ring Group)will allow you to choose an option in the next line. Any other selection is consideredan end-of-call option. Note as well that the last line in the Cascade sequence onlyallows the choice of an 'end-of-call' option. This is done so the chance of a caller being“looped” within the system is removed.
Adding selections to a Call Cascade that are not yet configured:
If while configuring the Cascade sequence you require a Local Extension, RemoteExtension, Ring Group, Voice mailbox or Announcement that has not beenactivated as yet, you can easily add the required selection by choosing ‘new’. Ifchosen, a screen will appear (depending upon which type is chosen). Simply fillin the required information to add the new option to the selectable list.

44 TalkSwitch User Guide
2.3.3.5 Remote Extensions — Call Cascade
This section allows you to configure the incoming Call Cascade options for theRemote Extensions. The Call Cascade routing options are only engaged if theextension is chosen from the Auto Attendant or if a call is manually transferred to theextension. Once a call enters an extension’s Call Cascade sequence, the extension“owns” the call. It will not follow any other extension’s options even if chosen in theCall Cascade sequence — what you see in an extension’s Call Cascade sequence isexactly what you will get. You can set up the Call Cascade sequences for both modes(the scheduling for these modes are set up in the Modes tab).
For Remote Extensions, there are 3 different ‘Call Cascade’ options. For each of theseoptions, you can control how and where you want the incoming call to the extensionhandled with up to 3 ‘cascade’ destinations available.
1. Busy at extension — routing options when this extension is busyCascade options include forwarding calls to a Local Extension, RemoteExtension, Extension Ring Group, built in Voicemail, Announcement, Auto Attendant, play busy tone or hang up. If voicemail or a phone companyprompt answers calls when your cell phone is busy, you may want toconsider using the ‘Play accept/reject prompt’ option under the Answered atext. tab.

452.0 Configuring TalkSwitch
2. No answer at ext. — routing options when this extension does notanswer after a specified number of rings.
Cascade options include forwarding calls to a Local Extension, RemoteExtension, Extension Ring Group, built in Voicemail, Announcement or AutoAttendant, keep ringing or hang up. If you have cell phone voicemail or aphone company message that answers after a specified number of rings, andyou want the calls redirected to TalkSwitch voicemail, please ensure you setthe number of rings for this extension to a number less than the cell phonecompany voicemail or system prompt.
3. Answered at ext. — routing options when this extension ‘rejects’ a call.
With Remote Extensions you have the choice between two different CallScreening methods, ‘play accept/reject prompt’ and ‘play caller’s name first’.‘Stay connected’ is the default setting which means that as soon as theremote phone number is dialed, the call is connected. Selecting ‘playaccept/reject prompt’ will prompt the Remote Extension when answered bystating “This is call forward”. Selecting ‘play caller’s name first’ will promptcallers to announce their name. When you answer the call at the extension,it will announce the caller (by playing the recorded name). After hearingeither message, the Remote Extension can choose to accept the call by press-ing or reroute the call to the Call Cascade options on this tab by eitherhanging up or pressing . Routing options include forwarding calls to aLocal Extension, Remote Extension, Extension Ring Group, built inVoicemail, Announcement, Auto Attendant or hang up.
If you select ‘stay connected’ you will notice that the Call Cascade options aregreyed out. TalkSwitch can only control forwarded calls when prompting isenabled. Also, if you use one of the prompted methods for this RemoteExtension, have Music-on-hold enabled, and are not using 3-way calling toforward calls to this Remote Extension, the Call Cascade will be seamless tothe caller as they will only hear music throughout the entire process of trying to locate you.
If a call is forwarded to a Remote Extension from a Call Cascade sequence and haseither ‘play caller’s name first’ or ‘play accept/reject prompt’ enabled, the RemoteExtension will hear “This is Call Cascade...” instead of “This is Call Forward...”. This isdone so that you know when the call is rejected, it will send the caller to the next CallCascade option of the extension that forwarded the call and not follow the RemoteExtension’s ‘Answer at ext.’ Call Cascade options.

46 TalkSwitch User Guide
2.3.3.6 Extension Ring Groups — Call Cascade
The following section configures the incoming call routing options for Ring Groups.The Call Cascade routing options are only engaged if the Ring Group has beenchosen from the Auto Attendant or if a call has been manually transferred to the RingGroup. Once a call enters a Ring Group’s Call Cascade sequence, the Ring Group“owns” the call. It will not follow any other extensions options even if chosen in theCall Cascade sequence — what you see in a Ring Group’s Call Cascade sequence isexactly what you’ll get.
For Ring Groups, there are 3 different Call Cascade options. For each of these options,you can control how and where you want the incoming call handled with up to 3‘cascade’ destinations available. You can set up the Call Cascade sequences for both Modes (the scheduling for these modes are set up on the Modes tab).

472.0 Configuring TalkSwitch
1. Busy at extension — routing options when all the extensions in the RingGroup are busy
Cascade options include forwarding calls to a Local Extension, RemoteExtension, Extension Ring Group, built in Voicemail, Announcement, Auto Attendant, play busy tone, queue caller or hang up.
2. No answer at ext. — routing options when all the extensions in the RingGroup do not answer after a specified number of rings.Cascade options include forwarding calls to a Local Extension, RemoteExtension, Extension Ring Group, built in Voicemail, Announcement, Auto Attendant, keep ringing or hang up.
3. Answer at ext. — routing options when any of the extensions in the RingGroup ‘rejects’ a screened call.
Selecting ‘play caller’s name first’ will prompt callers (when they choose thisRing Group at the Auto Attendant) to record their name. When you answerthe call at a Ring Group extension, it will announce the caller (by playingtheir recording), at which time you can choose to accept the call by pressing
or reroute the call to the Cascade options on this tab by either hanging upor pressing . Routing options include forwarding calls to a Local exten-sion, Remote Extension, Extension Ring Group, built in Voicemail,Announcement, Auto Attendant or hang up.
2.3.4 Call Back/Call Bridge
Working together, Call Back and Call Bridge act as your personal long distanceoperator. Whether you are across town or around the world, you can place calls fromyour home/office telephone line(s) accessing your long distance savings plan. CallBridge allows you to place calls from your office telephone lines when you are not inthe office.
You can make a direct call to TalkSwitch, activate Call Bridge and enter the telephonenumber you want to dial. TalkSwitch dials the number from your home/officetelephone lines and connects the two calls together (the call you made to TalkSwitchand the call TalkSwitch made from your home/office to the dialed party).

48 TalkSwitch User Guide
Here is how it works:
SStteepp 11:: Call your TalkSwitchtelephone number to activateCall Back, then hang up.
SStteepp 22:: TalkSwitch calls youback within 10 seconds.You answer and acceptCall Back. Your AutoAttendant will play or if youhave none recorded, theTalkSwitch message willplay.
SStteepp 33: You can now accessany TalkSwitch extension,voice mailbox or use CallBridge to make callsaround the globe just as ifyou were sitting in yourown office.
There are two ways to activate Call Back:
1. Auto Call Back — Auto Call Back is immediate and eliminates the initiallong distance call charge required to activate Call Back. When using Auto CallBack, all the Call Back settings must be pre-configured before Call Back is activated. To use Auto Call Back activation, simply dial your home/officetelephone number, let the call ring twice and then hang up. Call Back isinstantly activated!

492.0 Configuring TalkSwitch
2. Prompted Call Back — Prompted Call Back offers the convenience of entering or changing your Call Back telephone number and message eachtime Call Back is activated. To use Prompted Call Back activation, simply dialyour home/office telephone number. When the Auto Attendant answers yourcall, you dial ‘6’ to access the Call Back settings through a series of promptswhich allow you to:
a) Enter the telephone number where you would like TalkSwitch tocall you.
b) Record an ‘Announced’ message if required. Call Back will beactivated right after you initiate Prompted Call Back and hang up.It is important to remember that a small initial long distance charge will be incurred at your current location whenactivating Prompted Call Back.
By default, Prompted Call Back is not activated in the TalkSwitch configuration. You willneed to activate Prompted Call Back before you can use this feature.
The call back out of the system to the number programmed always uses the same linethat was dialed.

50 TalkSwitch User Guide
2.3.4.1 Auto Call Back
There are 4 Auto Call Back numbers that can be configured. Choose an Auto CallBack to configure and then activate it.
Number to call back:
Enter the Call Back number. This phone number should be entered exactly as youwould normally have to dial the number from this line (i.e. do not enter a LineHunt Group in the dialing string).
Use dialing prefix:
If you usually have to dial the same prefix when using Auto Call Back (forexample a long distance calling card number), you may want to enable ‘Usedialing prefix with Call Back number’. Enter the dialing prefix including anyrequired pauses or feature keys such as or . The corresponding key forinserting a 2-second pause is the comma. For example, if you want to disable CallWaiting and want to dial a long distance prefix before dialing the long distancenumber you could enter the following:
*70,1010555,, This corresponds to 70 for disabling the Call Waiting feature, a 2 second pause to wait for the new dialtone,then 1010555 for the long distance prefix, and a 4 second pause towait for the new dialtone before dialing the actual long distancephone number.

512.0 Configuring TalkSwitch
In essence this saves you the hassle of having to always enter the same prefixevery time you want to set up an Auto Call Back phone number.
Number used to trigger Auto Call Back:
Select the line/phone number when out of the office that you will be dialing totrigger this Auto Call Back. TalkSwitch will initiate the Call Back using the sameline you initially called. You can make configuration changes to this Auto CallBack by dialing into this phone number only.
Use Password on Call Back:
This option is designed to give you security and to restrict who can use thisparticular Call Back number. Simply fill in a 4 to 8 digit password for the CallBack. When TalkSwitch calls you back, you will be prompted to input thepassword to accept Call Back to access Call Bridge or any TalkSwitch extension.
Use Announced Message:
This option is recommended if the number TalkSwitch will be calling backcorresponds to a hotel or a location where somebody else will be answering thecall. The Announced Message option allows you to record a message that will beplayed when the call is initially answered during a Call Back. For example, youmay want to say “Please transfer this call to Bob in room 307”. When the hotelreceptionist gets the Call Back and hears this message, they will know to transferthe call to your room.
The Announced Message can be recorded using an extension handset or remotelywhen you access Call Back from the Auto Attendant. The Record message buttongives the instructions to record the message. They are as follows:
Pick up a telephone handset connected to the TalkSwitch and use thefollowing keypad commands to record the specific Auto Call BackAnnounced Message:
1) Press to enter command mode. If required, enter the password.
2) Next, enter the appropriate command as listed below. After each command, press to confirm the entry.
Auto Call Back Recording Playback
1 61 71
2 62 72
3 63 73
4 64 74
52 TalkSwitch User Guide
There are 4 Auto Call Back accounts per TalkSwitch. If you need to record anAnnounced Message for a particular Auto Call Back account, this needs to be doneon the same TalkSwitch unit as the account.
If you need to configure and/or record an Announced Message from a remote locationand do not have the Auto Attendant set to answer this Call Back line, you can call yourCall Back number and let it ring 15 times. A generic Auto Attendant will answer andyou can configure Call Back by pressing 6.
Allow Call Bridge:
To allow Call Bridge after a Call Back has been accepted, check the Allow CallBridge box. You may also restrict the Hunt Group access using Call Bridge fromthis Call Back by choosing the Hunt Group Access button. By default, CallBridge is enabled when Call Back is activated. You will not be prompted foranother password when you choose a Hunt Group at the Auto Attendant.
When entering a Call Back phone number using a telephone, you can enter specialcharacters using a special prefix. The default prefix is the key. To enter a in adialing string you will need to dial , for a 2 second pause dial 0, and for a
, dial . When you have completed the entire dial string you need to dial .
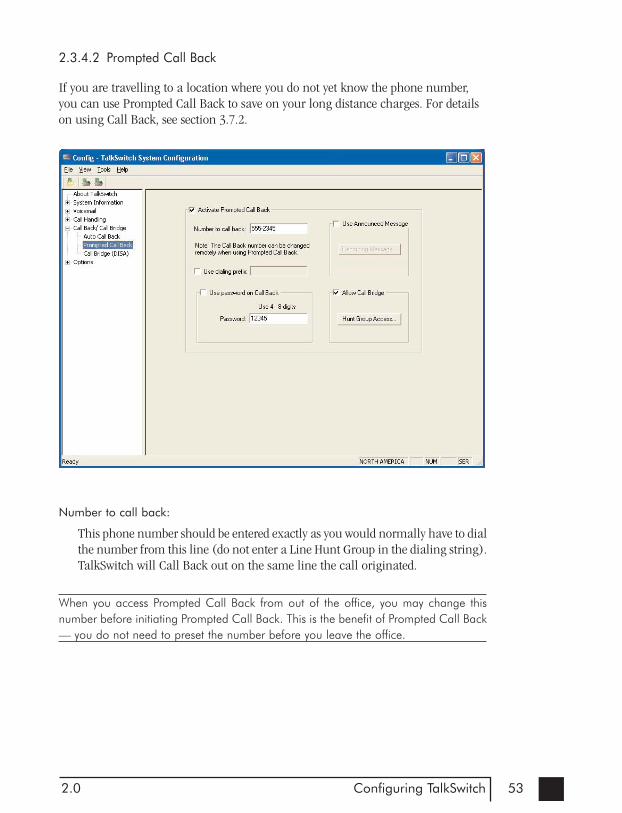
532.0 Configuring TalkSwitch
2.3.4.2 Prompted Call Back
If you are travelling to a location where you do not yet know the phone number,you can use Prompted Call Back to save on your long distance charges. For detailson using Call Back, see section 3.7.2.
Number to call back:
This phone number should be entered exactly as you would normally have to dialthe number from this line (do not enter a Line Hunt Group in the dialing string).TalkSwitch will Call Back out on the same line the call originated.
When you access Prompted Call Back from out of the office, you may change thisnumber before initiating Prompted Call Back. This is the benefit of Prompted Call Back— you do not need to preset the number before you leave the office.

54 TalkSwitch User Guide
Use dialing prefix with Call Back number:
If you usually have to dial the same prefix when using Prompted Call Back (forexample a long distance calling card number), you may want to enable ‘Usedialing prefix with Call Back number’. Enter the dialing prefix including anyrequired pauses or feature keys such as * or #. The corresponding key forinserting a 2-second pause is the comma. For example, if you want to disable CallWaiting and want to dial a long distance prefix before dialing the long distancenumber you could enter the following:
*70,1010555,, This corresponds to 70 for disabling the Call Waitingfeature, a 2 second pause to wait for the new dialtone, then 1010555for the long distance prefix, and a 4 second pause to wait for the new dialtone before dialing the actual long distance phone number.
In essence this saves you the hassle of having to always enter the same prefixevery time you want to set up a Prompted Call Back phone number.
When entering a Call Back phone number using a telephone, you can enter specialcharacters using a special prefix. The default prefix is the key. To enter a in adialing string you will need to dial , for a 2 second pause dial 0, and for a
, dial . When you have completed the entire dial string you need to dial .
Use password on Call Back:
This option is designed to give you security and to restrict who can use PromptedCall Back. Simply fill in a 4 to 8 digit password and when TalkSwitch calls youback, you will be prompted to input the password to accept Call Back to accessCall Bridge or any TalkSwitch extension.
Use Announced message:
As was described in the Auto Call Back section, this option is recommended if thenumber TalkSwitch will be calling back corresponds to a hotel or a locationwhere somebody else will be answering the call. The Announced message optionallows you to record a message that will be played when the call is initiallyanswered during a Call Back. For example, you may want to say “Please transferthis call to Bob in room 307”. When the hotel receptionist gets the call and hearsthis message, they will know to transfer the call to Bob’s room.
The Announced Message can be recorded using an extension handset or remotelywhen you access Call Back from the Auto Attendant. The Record message buttongives the instructions to record the message. They are as follows:

552.0 Configuring TalkSwitch
Pick up a telephone handset connected to the TalkSwitch and use thefollowing keypad commands to record the Prompted Call BackAnnounced Message:
1) Press to enter command mode. If required, enter the password.
2) Next, enter the appropriate command as listed below. After eachcommand, press to confirm the entry.
To record message: 65
To playback message: 75
Allow Call Bridge:
To allow Call Bridge after a Call Back has been accepted, check the Allow CallBridge box. You may also restrict the Hunt Group access using Call Bridge fromthis Call Back by choosing the Hunt Group Access button.
The call back number shown will always be the last number TalkSwitch dialed in thelast Prompted Call Back session.

56 TalkSwitch User Guide
2.3.4.3 Call Bridge
Call Bridge is a useful feature for saving money while using Call Back or on it’sown to avoid inflated long distance rates such as with cell phones.
How to use Call Bridge:
1. Call into TalkSwitch from any out-of-office telephone.
2. At the Auto Attendant message, dial the Hunt Group you know you have theaccount password for, (let’s say it’s 9 —- the default) you will then be promptedfor the account password.
3. You dial the password and then the key to access a TalkSwitch telephone line.
4. At this point you can dial a number as though you were sitting in the office.
There are four Call Bridge accounts activated by passwords. Each account can beconfigured to allow access to certain Hunt Group(s) when using Call Bridge. Toactivate an account, check the ‘Activate Call Bridge’ box and fill in a 4 to 8 digitpassword. Next, select ‘Hunt Group Access’ and assign the Hunt Groups you want tomake available for this account.
Call Bridge account passwords are only valid when using Call Bridge by itself, not whenused in conjunction with Call Back.

572.0 Configuring TalkSwitch
2.3.5 Options
2.3.5.1 Audio Controls
This section deals with the adjustment of volume and system gain controls. All thecontrols on this page update TalkSwitch in ‘real time’. This allows you to adjustlevels during a conversation without having to first save the configuration toTalkSwitch.
Line Controls:
If callers complain prompts and conversations sound too loud, then levels can bedecreased to a suitable level. Click on ‘Calibrate Lines’ to calibrate lines whenevera line is added or changed.
Extension Controls:
If you need to increase the volume of conversations through the system toextensions, you can adjust the gain for each extension individually.

58 TalkSwitch User Guide
2.3.5.2 Transfer Options
This section deals with actions TalkSwitch makes when calls are transferred manually.
Transferring a caller to a Local Extension:
When performing this action, in the case of the extension not answering or beingbusy, you have the choice of TalkSwitch either ringing back the extension thattransferred the call or performing the “no answer” or “busy” action of theextension that the call was intended for.
You also have the choice to adjust this setting for both the Remote Extensions andExtension Ring Groups. Any changes made in this section affect the entire system.
Transferring from a Home phone:
You can transfer a call from a phone connected in parallel to one of the incomingTalkSwitch lines (Home phone) to a Local or Remote Extension, Extension RingGroup, an Announcement, or a Voice mailbox. This section allows you to choosewhich transfer prefix you would like to use to perform the action. The transferprefix ‘wakes up’ TalkSwitch and can be considered the equivalent of the Flash orLink action at a Local Extension. By default the prefix is .

592.0 Configuring TalkSwitch
Example: Let’s say you receive a call on a phone in your home that is not anextension of TalkSwitch and you want to transfer the caller to RemoteExtension 215. You would then dial , wait for the ‘double beep’ then dial215 and hang up. TalkSwitch will now handle the call. For more details, seesection 3.2.8.
Transfer and clear:
TalkSwitch has the ability to clear lines after a call has been transferred. Ensureyou have this service/feature activated on your line(s).
Remote Transfer:
When calls are transferred to a Remote or VoIP Extension, calls can be transferredback to another extension or voice mailbox by dialing to place the calleron hold then enter the extension or mailbox. If this is set to Allow screening ofcalls, then you would dial 4 to complete the transfer. If you want to cancelthe transfer, then dial 5. If you have selected ‘Perform a blind transfer’,then the call will be automatically transferred and the line released once theextension or mailbox has been entered.
2.3.5.3 Miscellaneous
All of the following options affect TalkSwitch as a system. Adjust them according toyour needs.

Caller in queue reminder
When a caller is in queue at an extension already in use, a reminder tone isplayed at the extension to let them know they have a caller in their queue. Thisoption allows you to turn off this function.
Call Back ring return
You can adjust the number of rings during a Call Back session before TalkSwitchdisengages the Call Back (i.e. hangs up). Depending upon the situation you maywant to give yourself more time to pick up and accept the Call Back by increasingthe number of rings.
If being used with another PBX
This feature can only work with PBXs that use “flash-hook” as a transfer method. Pleasecontact your PBX manufacturer for transfer details.
PBX extension length:
If TalkSwitch is being used as an Auto Attendant with another PBX, you can set the number of digits the PBX uses for its extensions. This allowsTalkSwitch to know what digits to pass on to the PBX to complete the transfer.
Setting up TalkSwitch behind an existing PBX:
1. Connect the PBX extension to one of TalkSwitch’s Line jacks. You may do thiswith all your TalkSwitch lines (1 PBX extension per line) depending uponhow many Auto Attendant ports you would like on the PBX.
2. Configure your PBX on incoming calls to ring the extensions you have allocated to the TalkSwitch Lines.
3. Configure TalkSwitch’s Auto Attendants to answer at which ring (answerimmediately is used most commonly).
4. Record your Auto Attendants. The Auto Attendants should indicate that thedigit ‘7’ with the PBX extension should be dialed.
Example: If you have chosen the PBX extension length to be 3 digits (and let'ssay John Doe's extension is 111 on the PBX), the Auto Attendant should say “Tospeak with John Doe, press 7111…”. Now when 7111 is dialed, TalkSwitch putsthe caller on hold and transfers the caller to extension 111.
Internal clock setting:
TalkSwitch can obtain time information from Caller ID for it’s internal clock. Ifyou have indicated that you do have Caller ID on any of the lines, this optiondefaults to the active position. If it is de-activated, TalkSwitch can obtain it’s timeinformation from the time and date set in the ‘Mode’ tab under Automatic ModeSwitching. TalkSwitch’s clock information is used for Automatic ModeScheduling and for internal Caller ID information when intercom calls areplaced in the office.
60 TalkSwitch User Guide

Internal Caller ID options:
TalkSwitch has the ability to generate name and number Caller ID to eachextension during intercom calls. If your Caller ID unit/telephone does not supportthe name option, you can choose to have TalkSwitch send the number only.
Prompt function key options:
Some phone cards and phone services use different keypad digits for some of theirfeatures. Four options are given to allow flexibility with other systems. If required,choose an option that best suits working with your phone card or phone service.You can use these prefixes for entering phone numbers when calling intoTalkSwitch and using Call Back and Call Bridge using 3-way calling.
The following describes how to input special prefixes depending upon whichkey is used.
When using the key: When using the key:
= = 0 = 2 second pause 0 = 2 second pause1 = Wait for dial tone 1 = Wait for dial tone
= =
Example: You want to change the Prompted Call Back phone number remotelyand the special prefix key is the key. After you dial into TalkSwitch and press‘6’ for Call Back, you go into the options for Prompted Call Back and select tochange the phone number. When prompted to enter the phone number, youenter:
70 018005551212
This tells TalkSwitch that you want it to dial:
70 (2 second pause) 1-800-555-1212Audio output options:
The following controls can be used for various reasons including demonstratingTalkSwitch and screening callers using Voicemail. By default the system is set toplay only PA announcements through the PA output when 0 is dialed at aLocal Extension.
If you are a single person operation and would like to screen all voicemailmessages being left on TalkSwitch, you can connect a speaker to the PA output andselect ‘Play Voicemail prompts and recordings through PA’. When a caller goes tovoicemail, you will hear your greeting and the caller leaving a message. If youwish to interrupt and speak to the caller, dial 9 from any Local Extension.
612.0 Configuring TalkSwitch

2.3.5.4 Troubleshooting
The following controls should not be changed unless you are familiar with the effectthey will have on TalkSwitch’s operation. If your system does not appear to befunctioning properly, please contact your reseller for assistance.
Flash Lengths
Accepted Flash Length:
These options control the allowable Flash length from a Local Extension thatTalkSwitch will consider to be an intentional Flash. The range can be adjust-ed to accept anything from 50ms to 1 second. The default range for accept-ing a Flash signal at a Local Extension is between 200 ms and 800 ms. Mostphones emit a 500 ms Flash signal when the ‘Flash’ or ‘Link’ button ispressed.
Transmitted Flash Length:
This option controls the transmitted Flash length from TalkSwitch to theTelephone Company lines. TalkSwitch emits a Flash when forwarding orbridging calls using the 3-Way Calling/Conference or Centrex Transfer serv-ice, or when transferring calls through an existing PBX system. The value canbe adjusted from 50 ms to 900 ms. The default setting is 400 ms. If you noticethat you are having problems with any of the TalkSwitch features that use 3-way calling, you may want to experiment with this value.
62 TalkSwitch User Guide

Double Flash time:
When two flashes are detected, TalkSwitch needs to calculate the time between theflashes to establish if they were intended to propagate a flash at the CO or if it wasthe intention to place a caller on hold then quickly retrieve them. The DoubleFlash time values signify the maximum time between two flashes that TalkSwitchwill recognize as an intended flash to the CO. When two flashes are detected witha time gap larger than the value displayed, no flash will be propagated at the CO.The value can be adjusted from 200ms to 2000ms with the default set at 1200ms.
3-Way Calling wait time:
This option adjusts the time required between flash hook and a dial string. Sometelephone company 3-Way Calling/Conference services require different timeallowances after the flash signal to re-establish dial tone. The default time is 2seconds so that TalkSwitch can let the lines settle after going off hook beforesending the DTMF digits.
Non-detection of disconnect-clear:
This option controls the length of time when TalkSwitch will "drop" a line whensilence is heard. This safeguard is very useful when a telephone line does not sendout the disconnect-clear signal that tells TalkSwitch the call is finished.
Auto Attendant Adjustments:
Since TalkSwitch allows callers to dial 100, 200, 300 series extensions and 400series mailboxes, and also allows fall through options for the single digits 1, 2and 3 at the Auto Attendant, there needs to be a time limit placed on how muchlonger after the first digit is pressed that TalkSwitch will wait for another digitbefore following the single digit option configured for that particular AutoAttendant. There are 3 ways to make use of this control. You should be careful notto isolate your callers from having both choices as listed in (1).
1) With the current setting, callers can dial any Local Extension (1xx), RemoteExtension (2xx), or Ring Group (3xx) as long as the second digit is pressedwithin 1.5 seconds of pressing the first digit. Callers can also press just 1, 2, or 3for options and when TalkSwitch detects no second digit within 1.5 seconds, it willfollow the programmed option for that Auto Attendant.
2) If you don’t want to use the options 1, 2, and 3 for any of the Auto Attendants,you can set the option to ‘4 seconds’. This pretty much guarantees that callerswill have more than enough time to dial all 3 digits of any extension withoutaccidentally falling through to one of the Auto Attendant options.
3) If you don’t want to give callers the ability to dial any of the extensions andonly permit them to access single digit options, set this value to ‘immediately’. Assoon as TalkSwitch detects the first digit, it will follow the specified option for thatAuto Attendant.
631.0 Configuring TalkSwitch

Troubleshooting — Advanced
DTMF Detection:
If callers are complaining of being misdirected when they select options at theAuto Attendant, then these values might need to be adjusted.
Minimum time: The default setting of 45ms should be adequate for mostenvironments. It may however be necessary to lower this value if TalkSwitchappears to have trouble ‘hearing’ digits when dialed at the auto attendant. Itmight need to be increased in cases where the system is ‘hearing’ ghost DTMFsand accidentally misdirecting callers.
Maximum time: The default setting of 65ms should be adequate for mostenvironments. In most cases this value only needs to be bumped up a bit to helpthe system deal with echoed digits seen from cell phones. For example: calls keepbeing misdirected to extension 111. This usually indicates that even though thecaller may have dialed 113, TalkSwitch sees 1113 because the ‘1’ was echoed bythe cell phone network. Once TalkSwitch captures 3 digits, it will ignore the rest,hence the digits ‘111’ will be accepted and the ‘3’ ignored.
64 TalkSwitch User Guide

Line CPC/ Disconnect Clear:
If calls are being disconnected accidentally in mid conversation, this usuallyindicates a problem with the telephone line. TalkSwitch is always looking for a‘hangup’ signal from the phone company called a CPC or Disconnect Clearsignal. If the line has ‘shorts’ or even the line card at the central office is defective,then CPC signals in the 250ms range might come down the line and causeTalkSwitch to hangup. Try bumping up this value if this seems to be occurring.
Ringback Control:
If an extension seems to ring back as if a caller was on hold, but when answered,no one is there, this could indicate a debounce problem with the phonehookswitch. When someone at the extension hangs up, the handset bouncesslightly to cause a flash signal to be seen by TalkSwitch before the hang up. As aresult TalkSwitch puts the line on hold. To help with this problem, this value canbe increased to the point where it will stop the ringbacks.
Line Impedance:
This setting should not be adjusted unless you understand the impact. Lineimpedance is set to match as best as possible the line interface from the telephonecompany. A good match ensures good levels and low echo.
Fax Detection:
If fax calls are not being directed properly to the fax machine, then you may needto set this option to detect 1 tone. If it’s set to detect 1 tone and people complainthey have been accidentally routed to the fax machine, then set this value todetect 2 tones.
652.0 Configuring TalkSwitch


673.0 Using TalkSwitch
3UsingTalkSwitch
3.1 In the Office — Receiving Calls with or without the Auto Attendant
3.1.1 Receiving calls using the Auto Attendant
If you don’t have a receptionist, then using the Auto Attendant will help you handleall your inbound calls and help improve your corporate image. Once it has beenconfigured and its messages have been recorded, that's it! The Auto Attendant takescare of the rest. It will follow whatever instructions (configuration) it was given. Fordetails on configuring the Auto Attendants, see section 2.3.2.2. For details onconfiguring TalkSwitch to answer calls using Auto Attendants, see section 2.3.2.3.
When calls are answered by an Auto Attendant, callers can dial any Local Extension(1xx), Remote Extension (2xx), Extension Ring Group (300 – 309), choose options0, 1, 2, 3, 4, 5 if configured to perform specific actions, dial voicemail direct ( +mailbox), send faxes, or remain on the line to follow an action programmed for thatAuto Attendant. TalkSwitch owners and employees can also access other options atthe Auto Attendant including Call Back (dial 6), Call Bridge (dial 80 – 88, 9),retrieve voicemail (dial + mailbox), enter command mode to make systemchanges (dial ). All of these features can be password protected to eliminate systemtampering from outside users.
If you subscribe to Caller ID service, you may want to set the Auto Attendant to answerafter at least 1 ring to give TalkSwitch a chance to capture the Caller ID information.All calls ring at least one more time than what’s listed for the configuration in theTelephone Lines section under Call Handling. TalkSwitch ‘absorbs’ this first ring todetermine the ring pattern of the inbound calls so that this same ring pattern can beduplicated to the Local Extensions.

68 TalkSwitch User Guide
3.1.2 Receiving calls without the Auto Attendant
If you choose not to use the Auto Attendant to answer calls, please note that the CallCascade options for the Local Extensions will not be engaged. IInn oorrddeerr ffoorr ccaallllss ttoo ggoottoo aann eexxtteennssiioonn’’ss mmaaiillbbooxx,, tthhee AAuuttoo AAtttteennddaanntt mmuusstt ffiirrsstt aannsswweerr tthhee ccaallll oorr ssoommeeoonneeiinn tthhee ooffffiiccee aannsswweerr tthheenn ttrraannssffeerr tthhee ccaallll.. For details on configuring TalkSwitch toring specific extensions during inbound calls, see section 2.3.2.3. Once calls havebeen answered at a Local Extension, they can be transferred to any extension or voicemailbox. See section 3.2 for more details.
3.2 In the Office — Making and Receiving Calls
3.2.1 Making calls from a Local Extension
Placing Intercom calls from one Local Extension to another Local Extension,Remote Extension or Extension Ring Group:
You can place intercom calls from one Local Extension to another LocalExtension, Remote Extension, VoIP Extension or Extension Ring Group bysimply picking up the extension's handset and dialing the number of theextension with which you wish to intercom. An Intercom call can be identified bya unique ring cadence (2 short rings) except in the case of a Remote ExtensionIntercom call where the phone will ring as usual or if a Ring Group has selecteda different ring cadence other than ‘normal’. IInntteerrccoomm ccaallllss ddoo nnoott ffoollllooww CCaallllCCaassccaaddee sseeqquueenncceess ooff tthhee eexxtteennssiioonnss.. CCaallll CCaassccaaddee iiss oonnllyy ffoolllloowweedd aafftteerr tthhee ccaallllhhaass bbeeeenn ttrraannssffeerrrreedd..
Placing ‘out-of-office’ calls from a Local Extension:To place a call to an out-of-office telephone number from a Local Extension youmust first access an available line by choosing a Hunt Group (9, 81 – 88) at theinternal dial tone. Restrictions to specific Line Hunt Groups can be configured perextension. Your extension can also be configured to Directly Access a specific line(i.e. when a handset is picked up, you will hear the Telephone Company dial tone(not TalkSwitch’s) and can dial an outside telephone number as usual).
If you have Direct Line Access enabled for a Local Extension, you will need to dial‘Flash’ before dialing any extensions, accessing voicemail or other system features.
3.2.2 Receiving calls at a Local Extension
To receive calls at a Local Extension, simply pick up the extension's handset whenthe extension rings. If the call went through the Auto Attendant to the extension andit has call screening enabled (configured on the Local extension and Ring Grouppages), you have the choice of accepting the call by pressing or, re-routing the callto it’s ‘Answer at ext.’ Call Cascade options by pressing or hanging up.

693.0 Using TalkSwitch
Call Pick Up/Call Grab:
To intercept a call that is ringing on any other Local Extension before or after theAuto Attendant has engaged, pick up your handset and at the TalkSwitch internaldial tone, dial 9. This will route the call to your Local Extension.
To “Grab” a call ringing specifically at another extension before or after the AutoAttendant has answered, dial 7 + the extension number (ie. 7112 to grab acall ringing at extension 112). If you are in the middle of a call and want toconnect to another caller calling in, press ‘flash’ to place the first caller on hold,then dial 9 or 7 + <ext.> to connect to the second caller. Once you arefinished the second call or you would like to return to the first caller, press ‘flash’ ‘7’.
3.2.3 Placing calls on Hold at a Local Extension
To Place calls on hold:
To place callers on hold, press ‘flash’. Follow the same procedure to take callersoff immediate hold. If you have multiple callers on hold or in queue at yourextension, you can press ‘flash’ ‘7’ to retrieve callers on a first in/first out basis.
If you use the ‘Hold’ button on a regular phone, you will not be able to access any ofthe TalkSwitch features while the caller is on hold. Also, if you have Music-on-holdenabled, the caller will not hear music while they are on hold.
3.2.4 Transferring calls
From a Local Extension to another Local Extension, Remote Extension orExtension Ring Group:
To initiate an Unscreened Transfer — Put the caller on hold (by dialing ‘flash’),dial the appropriate extension number and hang up. The caller will be taken offhold when the receiving extension is answered. If the transferred call is notanswered after the number of rings specified in the No Answer setting for thedestination extension or, if the extension is busy, either of the following willhappen:
Default: The transferred call will be handled according to the destination extension's No Answer or, Busy at extension settings.
Option: The call will be transferred back to the transferringextension.
The option is chosen in the Manual Transfer tab in the Options folder.

70 TalkSwitch User Guide
To announce calls before transferring (Screened Transfer) — Put the caller on holdand dial the appropriate extension number. If the person at the receiving extensionanswers and wishes to take the call, simply hang up or dial ‘flash’ ‘4’ to complete thetransfer and get internal dialtone. The caller will immediately be taken off hold andconnected with the receiving extension. If the person at the receiving extension doesnot wish to take the call, you can press ‘flash’ ‘5’ to return to the caller.
Keep in mind that if you dial an extension and it is busy or not answered, you canstill complete the transfer so that the caller will be directed according to thatextensions’ Call Cascade settings.
If you tend to handle many calls, you may want to complete or cancel a transfer withouthanging up. Flash ‘4’ will complete the transfer and then provide internal dialtonewhile flash ‘5’ will cancel the transfer and connect you back to the caller.
From a Local Extension to any outside telephone number:
To initiate an Unscreened Transfer — Put the caller on hold, select a Line HuntGroup (dial 80 for Same Line Connect), then dial the outside telephone numberthen press ‘flash’ ‘4’ to complete the transfer. YYoouu ccaannnnoott ssiimmppllyy hhaanngg uupp ttooccoommpplleettee tthhee ttrraannssffeerr ootthheerrwwiissee tthhee ccaallllss wwiillll bbee ddiissccoonnnneecctteedd..
If the person at the receiving extension does not wish to take the call, you canpress ‘flash’ ‘5’ to return to the caller.
If you have the 3-Way Calling/Conference or Centrex Transfer feature enabled on thecurrent line, you can select the Same Line Connect (80) to make use of these features.Everything proceeds as outlined above other than the fact that you are using the sameline to transfer the call.
3.2.5 Call Park — Parking and retrieving callers
Call Park is a useful feature for placing a caller on hold and then being able toretrieve them from any other Local Extension. TalkSwitch has 10 Park Orbits for all models.
3.2.5.1 Parking a caller
To place a caller in a Park Orbit, press ‘flash’ then and choose a Park Orbit (500to 509). You will hear a confirmation after parking the caller that indicates the callerhas been parked successfully. If the Park Orbit is already occupied, you will hear “I’msorry, that extension is unavailable at this time.” then dialtone. Once again pressand choose a new Park Orbit.
713.0 Using TalkSwitch
3.2.5.2 Parking a caller using Auto Park
To place a caller in the next available Park Orbit, press ‘flash’ then 510. You willhear a confirmation that indicates the caller has been parked successfully and intowhich Park Orbit.
3.2.5.3 Retrieving a parked call
Once the caller is parked, you can retrieve the caller at another Local Extension bypressing and the appropriate Park Orbit. If Direct Line Access is enabled atthe extension, then you must press ‘flash’ first.
3.2.5.4 Using Call Park with the External Paging option
If you have the External Paging option enabled on TalkSwitch, you may choose toannounce over the P.A. system (by pressing 0) that there is a call parked in aspecific Park Orbit for a co-worker. For example: “Bob, please pick up 501.” —which tells Bob that he can retrieve the parked call from any extension by getting dialtone and pressing 501. The caller will now be connected to Bob at thatextension. If you have Direct Line Access enabled at your extension, you will needto press ‘flash’ first before retrieving the parked call.
3.2.6 Call Queue/ACD — Queuing and retrieving callers
3.2.6.1 Queuing calls to a single extension
Call Queue is a useful feature for placing multiple callers on hold at your extensionwhile you are on an existing call. Call Queue is enabled in the Call Cascade sectionin the Call Handling folder for Local Extensions and Extension Ring Groups. Callerswill get queued at your extension if you set the first level in the ‘Busy at extension’Call Cascade to ‘queue caller’.
If an extension is chosen at the Auto Attendant or the caller is transferred fromanother extension and the extension is currently busy and has ‘queue caller’ set forthe ‘Busy at extension’ Call Cascade, the caller will hear one of the following promptsthen music (if enabled) while they are on hold:
If the call came from the Auto Attendant and the extension has a voice mailbox:
“The extension you have reached is currently busy. If you wish to continueholding, please remain on the line. To leave a voicemail message, press 1, and to return to the main menu, press ”

72 TalkSwitch User Guide
If the call came from the Auto Attendant and the extension has nnoo voice mailbox:
“The extension you have reached is currently busy. If you wish to continueholding, please remain on the line and to return to the main menu, press .”
If the call was transferred from another extension, there is no Auto Attendanton this line and the extension has a voice mailbox:
“The extension you have reached is currently busy. If you wish to continueholding, please remain on the line. To leave a voicemail message, press 1.”
If the call was transferred from another extension,there is no Auto Attendanton this line and the extension has nnoo voice mailbox:
“The extension you have reached is currently busy. If you wish to continueholding, please remain on the line.”
While the caller is on hold at your extension you will hear a ‘Call Waiting’ beep inyour ear every 60 seconds. If you want to rotate through queued callers, dial ‘flash’then ‘7’. The caller you are speaking to will be placed on hold, and the first caller inthe queue will be retrieved. If you have multiple callers queued up, pressing ‘flash’then ‘7’ will retrieve callers on a first in/first out basis.
3.2.6.2 Queuing callers to an Extension Ring Group
If you want to queue callers for a Ring Group, you can configure this actionusing an Auto Attendant. This feature is sometimes referred to as Automatic CallDistribution.
Example: Configure Auto Attendant 1 so that if callers press ‘5’ they will bequeued to ring group 301 for technical support. Now when a caller presses ‘5’ fortech support, they will immediately enter the queue. Every 60 seconds the callerwill hear the following prompt: “Your call is important to us, please remain onthe line. To return to the previous menu, press star.” Extensions that are part ofthe ring group and are available will start ringing within 5 seconds of hangingup the phone from a previous call. The 5 second delay gives you time to make anew call or activate ‘Do not Disturb’ as a log out option. After your extensionrings 5 times, it will ring once every 16 seconds and when picked up, you havethe option to take the call or make a new call.
3.2.7 Using the TalkSwitch Call Waiting feature
The Call Waiting feature can be activated as a ‘busy’ option for the Call Cascaderouting for any local extension. When activated, and the extension dialed is in use,the caller will hear ringing or music depending on the music-on-hold settings. Theperson at the extension will hear the following:
1. If the phone supports Call Waiting Caller ID (Type II signaling), then youwill hear a beep followed by a short blip then depending on your phone,you may hear something similar to a modem noise. This is normal. During

733.0 Using TalkSwitch
this notification, the Caller ID information will be displayed on the phone.The caller will not hear the beep as the phone mutes the other side.
2. If the phone does not support Call Waiting Caller ID, then you will hear abeep. When the Call Waiting notification beep is heard, the person at theextension can dial ‘flash’ ‘7’ to put the current caller on hold, then grab thenew caller. They also have the option to terminate the current call and connectto the new caller by dialing ‘flash’ ‘7’. If the person at the extension does notwant to take the new call, they can simply ignore the Call Waiting beeps andthen TalkSwitch will direct the caller to the next level of the Call Cascade forthat extension (for example send the caller to the associated voice mailbox).
3.2.8 Conference calling with TalkSwitch
2 TalkSwitch Local Extensions and 1 outside caller:
You do not require access to the telephone company's 3-WayCalling/Conference service to use TalkSwitch's conference calling capabilities.
1. Establish a call with an outside party.
2. Place the outside caller on hold by pressing ‘flash’ and dial the number ofthe Local Extension you wish to conference with.
3. When the extension is picked up, you can establish the 3-way call at anytime by pressing ‘flash’ then ‘6’.
2 outside callers and 1 Local Extension (eg: Line 1 and Line 2):
You can do this type of conference call using two different methods.
The first method is similar to above, using only TalkSwitch for the conferencefunction.
1. Establish a call with an outside party.
2. Place the outside caller on hold and dial the number of the other outsideparty you wish to conference with. If you have ‘Direct Line Access’ enabledat your extension, you will first need to dial ‘9’ or another Hunt Groupbefore dialing the second phone number.
3. When the call is answered, you can establish the 3-way call at anytime bypressing ‘flash’ ‘6’.
When using the telephone company's 3-Way Calling/Conference service youcan conference by following the instructions below:
1. Establish a call with an outside party.
2. Place the outside caller on hold by pressing ‘flash’ twice and then dial thenumber of the other outside party you wish to conference with.
3. When the call is answered, you can establish the 3-way call at anytime bypressing ‘flash’ twice.

74 TalkSwitch User Guide
If you are experiencing problems with pressing the flash key twice in a rapidsuccession (ie. pressing the flash key twice within 1.5 seconds), then you canmake changes in the software that will make it easier to accomplish this task.See section 2.3.5.5 for details on setting the Double Flash Time.
3.2.9 Using Phones connected in parallel to TalkSwitch
Phones connected in parallel (not connected to TalkSwitch but connected to thesame line) with TalkSwitch will always ring at least once before TalkSwitch startsringing its extensions or the Auto Attendant answers the call. This occurs becauseTalkSwitch uses the first ring to identify the incoming ring pattern before passing iton to the extensions or the Auto Attendant (e.g. TalkSwitch determines if the call is aDistinctive Ring and detects any Caller ID information). A parallel phone can ‘bargein’ on any telephone call on any of TalkSwitch’s Lines.
Making and receiving calls on phones connected in parallel with TalkSwitch:
Making Calls: Make calls on parallel connected phones just as you would ifTalkSwitch were not sharing the telephone line with them.
Answering Calls: If a call is answered on a parallel connected phone before theAuto Attendant engages, simply continue with the call as per usual, TalkSwitchwill take no further action. If a call is answered on a parallel connected phoneafter the Auto Attendant engages, you can turn off the recorded Auto Attendantmessage by using the phone’s touchtone keypad to dial ‘ 0’. You may thencontinue the call on the parallel connected phone.
Transferring calls on parallel connected phones:
Calls answered on a parallel connected phone can be transferred to anyTalkSwitch extension or voice mailbox. If you want to transfer the caller, simplykey in the ‘Transfer Prefix ’, after you hear 2 ‘beeps’ enter the extension orvoice mailbox number then hang up. You cannot announce a caller to thetransferred extension, but if you do stay on the line, you will be in a ‘conferencecall’ state. You can hang up at any time.
If you transfer a call from a parallel connected phone and then hang up, theextension will ring the number of times selected for that extension. If theextension is not answered within the specified number of rings, the call will behandled according to that extension’s Call Cascade actions.
When a phone in parallel with TalkSwitch is off-hook, you will notice that thecorresponding line light will flicker to indicate the line is occupied. TalkSwitchwill not allow extensions to barge in on a call when that line is in use.

753.0 Using TalkSwitch
3.2.10 Modems and telephone line access
If your modem is attached to TalkSwitch as an extension, you can configure it toaccess your telephone lines in one of two ways:
1. Direct Line Access: You can give the extension to which your modem isattached ‘Direct Access’ to one of your telephone lines (i.e. you don’t have todial 9, or any other Hunt Group to access an outside line). This can be a use-ful option if you don’t want to change your dial-up options for the modem.See section 2.3.1.4 for more details on configuring Direct Line Access.
2. Hunt Groups: If you have decided to use a telephone and modem on thesame extension, Direct Line Access may not be the best solution. TalkSwitchextensions with Direct Line Access immediately connect to one of your lineswhen you pick up the telephone’s handset. Therefore, you are unable to selecta specific telephone line or access voicemail, intercom or access other systemfeatures without first pressing ‘flash’.
To have your modem access a specific line using a Hunt Group:
Change your modem's ‘Dial Properties’ to include the intended Hunt Group(81–88 or 9) followed by the letter ‘w’, before the ‘Dial up Networking’ telephonenumber (e.g. 9w555-5555). Including the letter ‘w’ after your ‘Dial out Access’number instructs your modem to a) dial the access number 81-88 or 9, b) waituntil it detects a dialtone, and then c) dial your ‘Dial up Networking’ number.
If your modem is having problems dialing out, you may have to use a comma ‘,’which represents a 2 second pause, instead of the ‘w’ for ‘wait for dialtone’.
If you use Direct Line Access, you do not need to put the Hunt Group in the dialing string.
3.3 Out of the Office — Receiving Calls through Call Forwarding
3.3.1 The three ways to forward calls
1. Automatic call forwarding — The Auto Attendant can automatically forwardoffice calls to your call forwarding telephone number(s) (Remote Extensions).This is done by using the Auto Attendant message to prompt callers to selectyour Remote Extension number(s). (e.g. “To speak to John Doe, press 211.”)
2. Manual call forwarding — If someone in your office has answered a call at aLocal Extension, the call can be ‘transferred’ to one of the call forwarding(Remote Extension) numbers. Simply put the call on hold at the LocalExtension, dial the Remote Extension number (e.g. 211) to which you wantthe call forwarded and then hang-up. The call will be handled according tothe Call Cascade options of that Remote Extension.
76 TalkSwitch User Guide
3. Conditional call forwarding — If the Auto Attendant answers a call and thecaller selects an extension or Ring Group number that is already busy or isnot answered, the Auto Attendant can forward the call to a Remote (out ofoffice) extension number. Conditional call forwarding is configured using theCall Cascade’s ‘No answer’ or ‘Busy at extension’ settings configurable foreach Local Extension, Remote Extension and Ring Group.
3.3.2 Transferring calls from a Remote Extension
Remote Extension Call Transfer is a new feature introduced in version 2.39 of theTalkSwitch firmware. Calls forwarded to a Remote Extension (not using Centrex or3-Way Calling services) can be transferred to any local or remote extension, ringgroup or voice mailbox. This feature also applies to VoIP Extensions 250-299.
Transferring calls:
Calls can be placed on hold at a Remote Extension by dialing anytimeduring a conversation. You will then hear dialtone as you would hear at a LocalExtension. At that time, you can perform any of the following actions:
1) Press again to retrieve the call placed on hold.
2) Dial any Local Extension, Remote Extension or Ring Group.
3) Dial + mailbox to transfer a caller to a voice mailbox.
If the system is configured in the Troubleshooting2 tab to perform blind transfersonly, then the system will then play the prompt “Call Transferred. Goodbye.” andhangup after the extension or mailbox is dialed.
If the system is configured in the Troubleshooting2 tab to allow screening of calls,then you need to dial **4 to complete a transfer or **5 to cancel the transfer andreturn to the caller.
3.3.3 Screening options for forwarded calls
The screening options for Call Forwarding are configured using the Call Cascade’s‘Answer at ext.’ options available in the ‘Remote Extension’ tab, see section 2.3.3.5
Forwarding calls with screening:
When ‘play accept/reject prompt’ is configured in the ‘Answer at ext.’ Call Cascadeoption, TalkSwitch plays a pre-recorded prompt to the caller asking them to hold,and then dials your call forwarding telephone number. When you answer theforwarded call, TalkSwitch plays a pre-recorded prompt to you that identifies thecall as having been forwarded from your home/office (“This is Call Forward”). Youthen have the choice of accepting the forwarded call by pressing on yourtelephone keypad or, re-routing the call to it’s call screening Call Cascade optionsby pressing or hanging up.

773.0 Using TalkSwitch
When ‘play caller’s name first’ is configured in the ‘Answer at ext.’ Call Cascadeoption, TalkSwitch plays a pre-recorded prompt to the caller asking them torecord their name at the sound of the tone. TalkSwitch then asks the caller tohold and dials your call forwarding telephone number. When you answer theforwarded call, TalkSwitch plays a pre-recorded prompt identifying the call ashaving been forwarded from your home/office (“This is Call Forward, you havea call from...”) and then plays the recording of the callers name. You have thechoice of accepting the forwarded call by pressing on your telephone keypador, re-routing the call to it’s call screening Call Cascade options by pressing orhanging up.
When either screening option is used, and you have music on hold enabled and youare not using the 3-way calling feature (Same Line Connect) to forward calls, thenthe caller will hear music while TalkSwitch is waiting for the Remote Extension toaccept the call.
If a forwarded call is not answered or the line is busy, TalkSwitch will perform thefollowing based upon how the call was originally forwarded:
If the call was automatically forwarded: the call will follow the RemoteExtension’s ‘No answer at ext.’ or ‘Busy at extension’ Call Cascade action.
If the call was manually forwarded: The call will follow the Remote Extension’s‘No answer at ext.’ or ‘Busy at extension’ Call Cascade action. This action can bechanged to ring the extension back who performed the transfer in theOptions>Manual Transfer tab.
If the call was conditionally forwarded: The call will follow the following CallCascade action in the ‘No answer at ext.’ or 'Busy at extension' for the originalextension chosen.
3.4 Using the TalkSwitch Voicemail System
Your TalkSwitch system comes with 30 minutes of voicemail recording capacityshared with Auto Attendant greetings. This capacity can be increased with theaddition of TalkSwitch memory cards. You can add another 1/2, 1, 2 or 4.5 morehours of storage. Contact your reseller to purchase memory cards. When a TalkSwitchmemory card is inserted in the memory slot, the system will automatically configurethe card within 20 seconds to make it fully functional.

78 TalkSwitch User Guide
3.4.1 Activating Voice mailboxes
A Voice mailbox is activated from the TalkSwitch configuration software. There are 3 seriesof Voice mailboxes that can be activated in the Voicemail section of the configuration:
Local Extension mailboxes:
These mailboxes are generally associated to the Local Extensions. By default,all Local Extensions are activated with their respective mailbox.
Remote Extension mailboxes:
The Remote mailboxes are associated with the Remote Extensions. If youactivate a Remote Extension and want a voice mailbox associated with thatextension, you can activate that mailbox in the Voicemail tab.
General mailboxes:
These mailboxes are activated in the Voicemail tab. They are not associatedto any particular extension.
If you want inbound calls to go straight to a voice mailbox after x number of rings, thenyou need to program an Auto Attendant to answer first, then provide a fall through tovoicemail. See section 2.3.3.3 for an example of this configuration.
Callers can reach voicemail or announcements via the Auto Attendant, Call Cascade,or transferred from a Local Extension. If an employee wants to leave a message in aparticular mailbox, they can pick up a Local Extension and dial + <mailboxnumber>. To transfer a caller to voicemail, press ‘flash’ then + <mailboxnumber>.
When a caller presses after leaving a message or 2 minutes has elapsed (timeoutperiod), TalkSwitch will play a prompt asking the caller if they wish to keep themessage, listen to the message or record a new message.
3.4.2 Retrieving Messages/Accessing a Voice mailbox
When a new message is left at a Local Extension mailbox, TalkSwitch will playstutter dial tone to that extension when the handset is picked up. It can also light upthe message waiting light on a phone if it supports FSK Message Waiting Indicator.
To access a mailbox to retrieve messages or change mailbox options, dial from a Local Extension or +<mailbox number> from a Local Extension or atthe Auto Attendant if dialing from an outside location. Employees can also transferother employees to access voicemail by pressing ‘flash’ then dialing +<mailbox number>. If you have Direct Line Access enabled, be sure to press‘flash’ before accessing your mailbox.
793.0 Using TalkSwitch
If you have a line configured to go straight to voicemail, then you can dial ‘8’ duringthe greeting to access messages.
The first time you access your voicemail, you will be prompted to setup your mailboxby optionally assigning a password, recording a greeting and recording your namefor the dial by name directory. Since there are no directory listings for the generalmailboxes, you will not be prompted to record a name for the directory. Keep in mindthat you should always use the mailbox associated to the same extension since thedirectory is related to the extension and voice mailbox.
Once your mailbox has been setup and you access your mailbox, through promptinstructions you may do the following:
Listen to messages (press 1):
If there are any messages in your mailbox, you will be able to access them bypressing 1. TalkSwitch will always start with new messages before playingback any older messages. You have the ability to perform the followingactions while listening to a message and after listening to the message:
Dial 1: Rewind 10 seconds
Dial 11: Rewind to beginning of message
Dial 3: Skip ahead 10 seconds
Dial 33: Skip to end of message
Dial 5: Listen to time and date stamp
Dial 6: Forward the message
Dial 7: Delete message
Dial 9: Save message
Dial : Back up one level
Dial : Skip to next message — New messages left as new.
Change greeting options (press 2):
This section allows you to record a new personal voicemail greeting. Thedefault greeting is “The extension you have reached is unavailable at thistime. Please leave a message after the tone”.
Keep in mind while recording your greeting or announcement that callers can press
to return to the previous Auto Attendant (if the call came from the Auto Attendant) whilelistening to your greeting and can press when they are done recording for moreoptions. You may want to give your callers these options for their convenience.
80 TalkSwitch User Guide
Change personal options (press 3):
This section allows you to change your current password, turn auto date andtime stamp + phone number on or off and setup or change Pager andRemote Phone Notification for new messages. By default, auto date and timestamp is on and this information is played at the end of each message. If youhave Caller ID service, then the phone number is also included with the timeand date.
Record name for Dial by Name Directory (press 4):
If you have not already recorded your name for the directory or wish tochange the recording, you can do so here. The dial by name directory isaccessed at the Auto Attendant according to your configuration. Callers aredirected to enter the first 3 letters of the employee’s last name. The system willfind the exact or closest match then play the recorded name + the extensionnumber, then give them the option to connect to that extension.
3.4.3 Pager and Cell Phone notification
When a new message is left in a voice mailbox, it can notify a pager, cell phone orany remote number if the mailbox has been configured to do so. Each mailbox canbe configured to notify you for every new message or for only the first new messagereceived since the last time new messages were accessed.
If using Remote Phone Notification, you have the option to accept or reject thenotification call once you answer. To listen to messages, press and to put offlistening to messages, press .
For details on configuring Pager and Remote Phone Notification, please see section 2.3.2.
3.5 Music-on-Hold
TalkSwitch can play music to callers when they are on hold, parked or queued. Themusic played to the callers will be provided by whatever source you have connectedto the MUSIC jack.
If you ENABLE Music-on-Hold and have an audio device plugged into theback of TalkSwitch:
1. When callers are put on hold at an extension, callers will hear your musicinstead of TalkSwitch’s default on-hold beeping tone.

813.0 Using TalkSwitch
2. When the Auto Attendant answers a call and transfers the caller to an extension; the caller will hear a pre-recorded message saying “One momentplease”, and then hear your music.
Music-on-Hold and Call Forwarding to Remote Extensions:
If you are using the telephone company’s 3-Way Calling/Conference service(Same Line Connect) to activate TalkSwitch’s Call Forwarding, callers will nothear your ‘music’ when being forwarded to a Remote Extension. When calls areforwarded, the caller is put on hold by the telephone company central officeswitch rather than at TalkSwitch. Therefore, the caller hears silence while beingtransferred.
A system prompt will indicate that callers will hear silence while the system triesto locate their party. This prompt helps explain to callers why all of a sudden theymay hear silence for an extended period of time before possibly connecting to theRemote Extension. This prompt cannot be disabled.
3.6 Mode Switching Options
Manual Mode Switching:
You can use Telephone Keypad Commands at either a Local Extension or at theAuto Attendant to have TalkSwitch switch Modes.
At Local Extension dialtone or at the Auto Attendant, dial to enter commandmode, then enter a password if necessary. Next, dial any of the following QuickCommands followed by the sign:
Activate Mode 1: 3 1
Activate Mode 2: 3 2
Check Current Mode: 3 0
Automatic Mode Switching using the Time Scheduler:
Use the Configuration software or Telephone Keypad Commands to activateTalkSwitch’s Time Scheduler feature. You can configure TalkSwitch toautomatically switch between Modes by configuring the times for Mode changesin the ‘Modes’ tab located under Call Handling in the configuration software.
If at anytime you switch modes manually, TalkSwitch will automatically switchto the proper mode during the next scheduled mode change.

82 TalkSwitch User Guide
3.7 Out of the Office — Making Calls with Call Back and Call Bridge
Working together, Call Back and Call Bridge act as your personal long distanceoperator. Whether you are across town or around the world, these two features allowyou to place calls from your home/office telephone line(s).
3.7.1 Using Call Bridge
Call Bridge allows you to place calls using your office telephone lines when you arenot in the office. You can make a direct call to TalkSwitch, access a telephone lineconnected to TalkSwitch and enter the number you want to dial. This is especiallyuseful when you are out of the office with your cell phone and need to dial a longdistance number. To avoid the inflated long distance cell rates all you need to do ismake the local call to TalkSwitch to access Call Bridge, then make the long distancecall — accessing your office savings plan.
How to use Call Bridge:
Dial into one of TalkSwitch's Lines (Main or Distinctive Ring). When the AutoAttendant answers, select a Hunt Group (81-88 or 9) or Same Line Connect (80).You will then be asked to supply your Account password to receive dial tone. If youare using Same Line Connect 80, and the line you are on supports the 3-WayCalling/Conference service, you will be prompted to enter the phone number.
When you have completed your call or if the telephone number dialed was busy,you can do one of the following:
A) Make another call: Press . TalkSwitch will disconnect you from the callin progress and you can dial another number or redial the same number.
B) Activate the Auto Attendant: Press . TalkSwitch will end the Call Bridgesession and activate the Auto Attendant. Once the Auto Attendant messagebegins playing, you have the following options:
• Dial (and enter a password if applicable) to enterCommand Mode.
• Dial '6' to change/enter Call Back settings.
• Dial one of your extension numbers (Local, Remote or RingGroup). This option allows you to use Call Back to contactsomeone in your office, check your voicemail, etc.
C) End the Call Bridge Session: Simply Hang up. This will end your CallBridge session and disconnect you from TalkSwitch. If you want to guarantee that TalkSwitch disconnects at the end of a Call Bridge session,dial , then hang up.

833.0 Using TalkSwitch
If you changed the ‘Special Prefix’ to instead of , you will need to dial tomake another call, and dial to return to the Auto Attendant. To enter commandmode, you will still need to enter .
The Call Bridge telephone number dialed can be any telephone number: local, long distance, toll free (800 and 888) or international. Simply enter the telephonenumber as you would if you were sitting in your office. For long distance calls, do notforget to include the ‘1’, country code, and area code if applicable.
3.7.2 Using Call Back
The Call Back feature allows you to initiate TalkSwitch to call you at a specifiedtelephone number. This gives you access to any of the following:
• Call Bridge
• Local Extensions, Remote Extensions and Extension Ring Groups
• Voicemail
• Configuration settings
Using Call Back involves ‘3’ easy steps:
1. You call your TalkSwitch telephone number to activate Call Back.
2. You answer and accept the Call Back. (TalkSwitch calls you back within 30 seconds.)
3. At the Auto Attendant you can: choose to perform Call Bridge, dial anyextension, access and retrieve voicemail or configure TalkSwitch.
Activating Call Back:
There are two ways to activate Call Back, Prompted and Auto activation:
1. Using ‘Prompted Call Back’ Activation: From your out-of-office location,dial a TalkSwitch telephone number (‘Main’ or ‘Distinctive Ring’). Let theline ring until the Auto Attendant answers your call and then dial ‘6’ on thetelephone keypad. If you have enabled password protection you will be askedto supply your password and TalkSwitch will then offer a series of prompts.Now you can either enter 1 and hang up to initiate the Call Back or, if youneed to enter a new Prompted Call Back number, enter 2 to access thePrompted Call Back settings then follow the prompts.
For Prompted Call Back, TalkSwitch always dials the last Prompted Call Back numberentered. If you do not have the Auto Attendant set to answer a line, a generic TalkSwitchAuto Attendant will answer after 15 rings and you can then dial 6 to access the CallBack settings.

84 TalkSwitch User Guide
2. Using ‘Auto Call Back’ Activation: From your out-of-office location, dial oneof the Call Back telephone numbers that has been pre-configured for AutoCall Back activation. Let the line ring at least once, but no more than threetimes and then hang-up (before the call is answered). Within 20 seconds,TalkSwitch will dial your Auto Call Back number.
It is important to remember that all the Call Back settings must be pre-configuredbefore using Auto Call Back. Please be sure that the Auto Attendant for the line usingCall Back does not answer before 4 rings.
Accepting the Call Back:
There are two ways to accept a Call Back from TalkSwitch.
1. Call Back is normally accepted by answering the call and pressing , thenif required, entering your password. This option is used when you have adirect line to your Call Back telephone number.
2. The ‘Use Announced message’ option allows the Call Back from TalkSwitchto reach you even when you are staying at a hotel or are in an office wherecalls are intercepted by a receptionist or switchboard operator. When the CallBack is answered, TalkSwitch will begin playing your pre-recorded message (e.g. “Please forward this call to Jane Doe in room 312”). The message will be played repeatedly for ‘2’ minutes. When the call is forwarded to you, press , then enter your password on the telephone keypad to accept the Call Back. (If the Call Back is not accepted within theinitial ‘2’ minute period, TalkSwitch will disconnect the Call Back.) After youaccept the call, you will hear the Auto Attendant, and you can now make yourselection to check your voicemail, ring an extension, use Call Bridge, or entercommand mode.
3.8 Upgrading the TalkSwitch Software and Firmware
We are continually looking for ways to enhance your communications capabilities.When new features are added, we want TalkSwitch users to have immediate access tothe update.
TalkSwitch supports firmware updates for adding new features. Because of thisability, you can easily update your TalkSwitch by visiting our website at: www.talkswitch.com/support

853.0 Using TalkSwitch
Step #1 — Check current version
To identify the appropriate update file, you must first determine your TalkSwitchfirmware and software versions. You can find your TalkSwitch version numbers byselecting ‘About’ from the Help menu in the configuration software.
Write down the software and firmware version numbers and then go to the TalkSwitchwebsite at www.talkswitch.com/support. You will find instructions there to help you toselect and download the appropriate upgrade. Follow the instructions on the site, asthey will take precedence over any instructions in this manual.
Step #2 — Download new software and firmware
When you select and click on the appropriate version for download, a screen willappear asking you what you would like to name the file you are about to download,and in which folder/directory you would like to save it. We suggest leaving the filename as is (eg. install.exe) and saving it on your Desktop. Once the download iscomplete, you can begin your upgrade by double clicking on the install file or usingthe ‘Run’ option on your Windows ‘Start’ menu. A series of windows will guide youthrough the installation process.
This process updates your configuration software to a newer version. You still need toupdate the firmware to take advantage of new features. The new firmware file willhave been placed in the TalkSwitch directory after running the install program.
Step #3 — Updating the firmware
The final step in the upgrade process is to update the firmware. Follow theinstructions listed on the website carefully for performing the update.

The actual update process will take approximately 1 to 5 minutes, depending on howmany files are needed for the update. During the update, the LED lights onTalkSwitch’s front panel will show diagnostic indicators for the update.
In the event the firmware update was unsuccessful, please follow the instructionsthrough the update process again. If you continue to have problems, please contactyour reseller or TalkSwitch.
Firmware updates will not alter your system configuration. In the event of a majorsystem update, it may be necessary for the configuration file to be reset to defaultvalues. In this case you will need to reconfigure the entire system. In the case of a majorsystem update, TalkSwitch will mention any issues involved with the firmware update.
If you replaced your computer with a new one, please use the software that matchesthe latest version of firmware running on TalkSwitch. If obtained from our website,you can once again download the install file. All install files found on the websitehave both the entire software program and the latest firmware.
86 TalkSwitch User Guide

87Appendices
AppendicesAppendix A — Help & Troubleshooting
Appendix B — Using TalkSwitch with Telephone
Company Calling Services
Appendix C — Quick Commands and
DTMF Functions
Appendix D — Safety Precautions and
Regulatory Information
Appendix E — TalkSwitch One Year Warranty
Appendix F — Return Policy
Appendix G — Specifications
Appendix H — TalkSwitch and Power Interruptions


89Appendices
Appendix A — Help & Troubleshooting
If you are having problems with the configuration or operation of TalkSwitch, pleasecheck the Troubleshooting section starting on this page. If you don’t find the solutionto your problem, next try checking the FAQ section located under the Support area atour website: www.talkswitch.com/support. There is a vast amount of informationavailable on the website.
If you cannot resolve your problem and require further assistance, you can do one ofthe following:
1. Contact your TalkSwitch reseller.
2. Contact our Customer Support department by e-mail:[email protected].
3. Ask for a ‘Technical Support Specialist’. If you would like to speak with a Technical Support Specialist, call TalkSwitch at 1-866-393-9960 or (613) 725-2466 weekdays between 9:00 a.m. and 5:00 p.m. EST.
Please have the following information available when you call:
a) Your e-mail address and telephone number.
b) The serial number located on the bottom of TalkSwitch and your date of purchase.
c) The number of telephone lines that you have connected to TalkSwitch.
d) The telephone company services that you are using with TalkSwitch.
e) Your PC’s operating system (e.g.Windows 95, 98, ME, 2000, XP)
Troubleshooting
This section of the manual is designed to help you quickly resolve problems thatcan be experienced by new TalkSwitch users. The problems and their correspondingsolutions are organized in the following manner.
1. Problems that can occur when installing the Configuration software.
2. Problems that can occur during Configuration.
3. Problems that can occur while using TalkSwitch's features.
Before examining the ‘Problems’, review these common installation checks first!

90 TalkSwitch User Guide
The first things you should check
1. Check that your telephone cables are connected to a wall jack at one end andTalkSwitch at the other. Ensure the devices you are using as TalkSwitch exten-sions (phones, faxes, etc.) are plugged into the extension jacks located on theback panel of TalkSwitch. (Do not plug your extensions directly into a walljack unless that jack is wired to a TalkSwitch extension jack.)
2. Check the Serial or USB connection between TalkSwitch and your PC.
3. Ensure that TalkSwitch’s power adapter is plugged into a working power outlet and that TalkSwitch is turned on. Please make sure that you are usingthe power adapter that was provided with TalkSwitch. This is a uniqueadapter and it cannot be substituted with any other adapter. If your adapterappears to be defective, please contact your reseller to order the properreplacement adapter.
Diagnostic codes for the lights flasing on the front panel of TalkSwitch
Line 1,2,3,4 lights flashing simultaneously: The Unit ID of this TalkSwitch is inconflict with another TalkSwitch unit on the same LAN. Make sure you assign adifferent Unit ID to each TalkSwitch unit.
Line 2 and 3 lights flashing simultaneously: There is a file system error. To fixthe problem, reboot TalkSwitch. It will do a file system check and fix any problemsencountered. If this does not resolve the problem, contact your reseller.
Line 1 and 4 lights flashing simultaneously: There is a voice mailbox error. To fixthe problem, reboot TalkSwitch. It will do a file system check and fix any problemsencountered.
Line 3 and 4 lights flashing simultaneously: Firmware not loaded or corruptederror. To fix the problem, reload the TalkSwitch firmware. Make sure you updatewith the last version you updated with. Do not use an old version off the installCD if you have updated your system at least once.
Line 1 and 4 then Line 2 and 3 lights flashing alternately: System prompts notloaded or corrupted error. To fix the problem, reload the TalkSwitch firmware.Make sure you update with the last version you updated with. Do not use an oldversion off the install CD if you have updated your system at least once.

91Appendices
Problems that may occur during Configuration
Problem: I am not able to “Retrieve settings” from my TalkSwitch.
• Make sure your TalkSwitch is turned on and plugged into a working poweroutlet. Then select “Retrieve settings”, available under the File menu in theConfiguration Software.
• From the Control Center, choose ‘PC Connection’ and then select COM Port.Ensure that the Configuration Software is using the correct port to commu-nicate with TalkSwitch. Then select "Retrieve settings", available under theFile menu in the Configuration Software.
• Try ‘resetting’ TalkSwitch (turn the power off and then back on). Then select“Retrieve settings”, available under the File menu in the ConfigurationSoftware. This will often correct any ‘miscommunication’ that may haveoccurred between TalkSwitch and your PC.
• Make sure you do not have any other communications programs running atthe same time you want to use the TalkSwitch configuration software. Thesemay include Palm Pilot, Hot Sync, TalkWorks, Digital Camera software.These programs tend to ‘hold’ onto COM ports and not make them availablefor any other programs.
Problem: I am unable to configure TalkSwitch using a touchtone phone and theKeypad Commands.
• TalkSwitch cannot be configured using a phone connected in parallel toTalkSwitch.
• If you are trying to configure TalkSwitch using an Out-of-Office phone, youmust first enter Command Mode. If you have enabled password protection,you must also first enter the correct password.
• If you are trying to configure TalkSwitch using a Local Extension, make surethe extension has not been given 'Direct Access' to your telephone lines. If so,you will have to dial ‘Flash’ to receive internal dialtone.
• If the TalkSwitch configuration software is open, you cannot configureTalkSwitch using DTMF. If the software is closed and you continue to get theprompt “I’m sorry, TalkSwitch is currently being configured.” Try resettingTalkSwitch. It is possible that the software did not close properly and as aresult TalkSwitch still thinks it is in ‘configuration mode’.

92 TalkSwitch User Guide
Problems that may occur while using TalkSwitch’s features
The Auto Attendant:
Problem: The Auto Attendant does not play when calls come in.
• Make sure you have recorded the Auto Attendant message.
• Check your Call Handling settings for the ‘Auto Attendant answers’ numberof rings. It may be that the number of rings after which the Auto Attendant isset to answer calls is set too high.
• Check what mode TalkSwitch is currently running. It is possible that you arein Mode 2 and have not configured TalkSwitch properly for this mode. Checkwhat you have programmed for Mode 2 in the Telephone Lines section under‘Call Handling’.
• The line is not connected properly to TalkSwitch. Check to see that the linelight associated to the line ringing in is flickering. If not try replacing thephone cord.
Problem: The Auto Attendant message is broken up or very faint.
• Adjust the line volume control in the Audio Controls page. Ensure the actualrecording is comparable to the prompts already on the system.
• The quality of the microphone in the telephone handset that you are using torecord your Auto Attendant also affects the quality of your recording. Tryrecording the Auto Attendant using another extension/telephone.
Problem: The Auto Attendant answers calls before any of the extensions ring.
This is a problem for those TalkSwitch users who wish to have their LocalExtensions ring before the Auto Attendant picks up incoming calls.
• Check the ‘Extensions to ring’ column in the Telephone Lines tab in the ‘CallHandling’ folder. It may be that the number of rings after which the AutoAttendant is set to answer calls is set too low.
Problem: The Auto Attendant is transferring calls to the wrong extension.
• Verify which extension jacks your devices (phones, faxes) are attached to.
Problem: The Auto Attendant answers calls, but does not transfer them to the extensions.
• Make sure your extensions are plugged into the extension jacks on the backpanel of TalkSwitch (instead of your telephone wall jacks).
• Check your settings in the Auto Attendant page. Are all the options pointingto the correct extensions or other options?
93Appendices
Music-on-Hold:
Problem: Callers hear music and 'ringing' when the Auto Attendant transfers theircall to an extension.
• You have an audio device plugged into TalkSwitch, but have not enabled(turned on) the Music-on-Hold feature found on the On-Hold/Ringback tabin the System Information folder.
Problem: Callers hear music and a beeping sound when put on hold at an extension.
• You have an audio device plugged into TalkSwitch, but have not enabled(turned on) the Music-on-Hold feature found on the On-Hold/Ringback tabin the System Information folder.
Problem: Callers hear ‘One moment please’ message and then total silence whenthe Auto Attendant transfers their call to an extension.
• You have enabled (turned on) the Music-on-Hold feature, but have notattached an audio device to the MUSIC jack on TalkSwitch.
• There is a problem with the music source. Check all connections and power.
Problem: Callers hear only silence when put on hold at an extension.
• You have enabled (turned on) the Music-on-Hold feature, but have notattached an audio device to the MUSIC jack on TalkSwitch.
• Make sure you use the ‘Flash’ or ‘Link’ button to put callers on hold. If youuse the ‘Hold’ button on a regular phone, callers will be placed on hold at thephone and since TalkSwitch didn’t receive a signal to indicate a caller is to beplaced on hold, no music can be played.
Call Routing with Local Extensions and Home Phones (Transfer and Intercom):
Problem: Callers are disconnected when transferring calls from one extension toanother.
• It is possible that if you are using the hookswitch to put callers on hold ratherthan a Flash button, you may be holding the hookswitch down too long, andas a result are actually hanging up on the caller.
Problem: I can’t use my Conference/3-Way Calling feature from the phone company.
• You need to make sure you have checked the box indicating that you have 3-Way Calling or Transfer and clear on the appropriate lines. This option islocated on the Telephone Lines page in the ‘System Information’ folder of theconfiguration.

94 TalkSwitch User Guide
Problem: Unable to place intercom calls from a Local Extension.
• If the Local Extension has been given ‘Direct Access’ to your telephone lines,then you need to press ‘Flash’ before intercom calling.
Answering and Fax Machines:
Problem: The answering machine and/or fax machine picks up calls before theycan be answered by telephone extensions.
• Check your settings in the Telephone Lines tab in the ‘Call Handling’ sectionin the Software Configuration. The problem may be that your faxmachine/answering machine extension is set to answer calls at the same timeas your telephone extensions. To fix this problem, remove the fax or answer-ing machine extension from the list of extensions to ring on an incoming call.
Problem: Incoming faxes are not automatically detected and routed to the faxmachine.
On the Auto Attendant tab of the configuration software, check to ensure that youhave chosen the appropriate extension for the field labeled ‘if a fax call isdetected’.
• Not all fax machines emit a CNG tone that TalkSwitch can detect and route.Therefore, it is wise to consider incorporating an additional method of faxrouting. This may include the use of a distinctive ring number or giving thecaller the option to select the fax extension.
• On average, fax machines/modems will ‘time out’ or disconnect after 25 sec-onds if they have not connected with another fax machine/modem. If you areusing the ‘User does not make a selection’ option to route incoming faxes, thefax call may ‘time out’ before it reaches your fax extension. If your AutoAttendant is lengthy, you may want to shorten it or use another fax routingoption.
• The level of the Auto Attendant is too loud and as a result is overpowering theCNG tone effecting detection. You may want to lower the volume level of theAuto Attendant.
Other Possible Local Extension Problems:
Problem: I am unable to access TalkSwitch's Lines with a Local Extension.
• Check your ‘Direct Line Access’ settings on the Local Extension page under‘System Information’ of the Software Configuration. If a Local Extension hasnot been given ‘Direct Access’ to your telephone lines, you must dial (81-88or 9) to access one of TalkSwitch’s Lines.

95Appendices
Problem: My PC attached (Internal or External) Modem cannot dial out.
• If the extension to which your Modem is attached has not been given ‘DirectAccess’ to telephone lines, you will have to include a Line Hunt Group prefix(81-88 or 9) before the number you are dialing. For more information aboutDial Out Access and changing your Modem's dial properties, see section 3.2.9,“External modem telephone line access”.
• You may have to change your Modem's properties so that it waits for a ‘dial-tone’ before it begins dialing your Dial Up Networking number. For moreinformation about changing your Modem's properties, see section 3.2.9,“External modem telephone line access”.
Problem: One of the Local Extensions (telephones) does not ring.
• Some telephones require more ‘voltage’ in order to ring. These phones areusually the older 'Bell' phones that have mechanical ringers. These phonesare simply too much of a load for TalkSwitch and should not be used as anextension.
• Make sure the telephone cord you are using between the phone andTalkSwitch is working properly. Also, check to make sure the ringer is turnedon for your phone.
Problem: Extension(s) ring, but there is no caller.
• This can occur when a caller hangs up after the Auto Attendant has begun toplay. In some areas, the Telephone Company's ‘disconnect/clear’ signal isweak. This is the reason the Auto Attendant may not pick up the disconnectsignal right away when a caller hangs up. Because the Auto Attendant willreceive no response after playing its message, the call will fall through to yoursettings for the 'User does not make a selection' option associated with thatAuto Attendant.
Problem: When I try to access voicemail, I hear a busy tone.
• Check your ‘Direct Line Access’ settings on the Local Extensions page under'System Information’ of the Software Configuration. If a Local Extension hasbeen given ‘Direct Access’ to your telephone lines, you must first dial ‘Flash’before dialing the mailbox. The same applies for dialing other extensions toinitiate intercom calls.


97Appendices
Appendix B — Using TalkSwitch with Telephone Company Calling Services
Many of the calling services offered by your local telephone company are compatiblewith and enhanced by TalkSwitch's capabilities.
Caller ID (Call Display) — Displays the telephone number and name associatedwith an incoming call.
TalkSwitch is capable of regenerating the Caller ID and passing the informationto its Local Extensions when incoming calls are transferred by the Auto Attendant.TalkSwitch regenerates the Caller ID and passes it only to the selected LocalExtension. If a Local Extension is configured to ring at least twice before the AutoAttendant answers, TalkSwitch will pass the Caller ID information to thatextension. If a call is transferred from one extension to another, the Caller IDinformation will also be passed. TalkSwitch can also use the Caller ID’s timestamp to set it’s internal clock.
Distinctive Ring — The ability to have more than one telephone number that callerscan dial to reach the same telephone line. (Distinctive Ring is also referred to as:Ident-A-Ring, Ident-A-Call, Ring Master, Teen Service, Double Number, PersonalRinging, Ring Plus, Smart Ring Service, Special Ring or Customized Ringing.)
TalkSwitch can detect Distinctive Ring telephone numbers and use them to routeincoming calls automatically. TalkSwitch gives you the ability to use twoDistinctive Ring telephone numbers on all lines. Distinctive Ring numbers onTalkSwitch's Lines also have access to the Auto Attendant and all of TalkSwitch'sother call routing features.
TalkSwitch’s Distinctive Ring call routing features can be used a number of ways.Routing fax/modem calls, routing voice messaging, separating home/officecalls, and making use of TalkSwitch's Auto Call Back feature. Each DistinctiveRing number has a ‘distinctive’ ring cadence or ring sequence, which allows youto identify the telephone number that was dialed.
Voicemail (Call Answer) — A service which gives callers the opportunity to leave amessage when your phone line is busy or unanswered.
TalkSwitch can work in conjunction with your telephone company's VoicemailService.
Call Waiting — If you are already on the phone, the Call Waiting service will emit asoft beeping sound to let you know you have another call waiting to be answered.
To talk to the other caller when you hear a Call Waiting beep, press the Flash buttontwice. To return to the other caller, you will need to press the Flash button twiceagain. This service is not recommended since TalkSwitch cannot handle thesecond call while the first call is already being routed by the Auto Attendant.

98 TalkSwitch User Guide
3-Way Calling/Conference — The 3-Way Calling/Conference service allows you toadd a third party to a call already in progress.
The 3-Way Calling/Conference service enhances TalkSwitch’s capabilitieswhether you have 1 or more telephone lines. Using only one telephone line with 3-Way Calling/Conference service, gives you access to TalkSwitch’s CallForwarding, Call Back and Call Bridge features.
Centrex/Plexar Transfer — The Centrex Transfer service is similar in function to the3-Way Calling/Conference service. The primary difference is that two external parties can still remain in conversation even after you hang up. TalkSwitch candisconnect after the transfer if you have this service and have enabled the ‘Transferand clear’ option on the Miscellaneous page located under ‘Options’.
Using only one telephone line with Centrex Transfer service gives you access toTalkSwitch’s Call Forwarding, Call Back and Call Bridge features.
Hunt or Rollover — When using two or more lines, calls coming in on a busy linecan be “rolled over” to an available line in a “hunt” pattern that you can set. Thereare two types of hunting — Sequential and Circular. Sequential hunting starts at thenumber dialed and ends in the last number in the assigned group. Circular huntinghunts all the lines in the hunting group, regardless of the starting point. (It will onlycircle once through the Hunt Group).
TalkSwitch has the same functionality available on all lines and therefore canwork in conjunction with the Hunt and Rollover services.
Call Hold and Flash
TalkSwitch uses ‘Flash’ to put calls on hold. A Flash signal is produced by pressingthe ‘Flash’ or ‘Link’ button on your telephone (Link is another name for Flash). Ifyou do not have these buttons on your telephone, you can produce a ‘Flash’ byquickly depressing and releasing the telephone’s ‘Hangup Hook’ or ‘Hook Switch’.
Single Flash — is pressing the ‘Flash’ or ‘Link’ button once. You can also depressand release the telephone’s ‘Hangup Hook’ or ‘Hook Switch’ once.
Double Flash — is pressing the ‘Flash’ or ‘Link’ button twice. You can also depressand release the telephone’s ‘Hangup Hook’ or ‘Hook Switch’ twice. When using yourtelephone’s ‘Hangup Hook’ to initiate a ‘Double Flash’, do not try to initiate thesecond Flash too quickly or you may lose or ‘disconnect’ your caller. Press and releasethe ‘Hangup Hook’ once, count to ‘2’, then initiate the second Flash.

99Appendices
When would you use double flash?
1. If TalkSwitch is connected to any other system/service that uses ‘Flash’ toactivate its features (e.g. a Key Telephone System, PBX, or telephone line withthe Centrex service from your phone company).
2. If you are using any of your local telephone company services that are activated with ‘Flash’ (e.g. Call Waiting, 3-Way Calling/Conference, etc.).
What does Single and Double Flash do?
TalkSwitch and the above-mentioned systems/services use ‘Flash’ to activate theircalling features. TalkSwitch therefore needs a way to tell which (or whose)features you want to access when you press the ‘Flash’ button.
Using a ‘Single Flash’: places the caller on hold. (The Flash is not passed to the CO line, solving problems associated with Flash causing a hang-up at some COs).
Using a ‘Double Flash’: first Flash places the caller on hold, and the second Flash(if pressed within 2 seconds) tells TalkSwitch to pass a Flash to the CO line toactivate the CO or PBX intended feature.

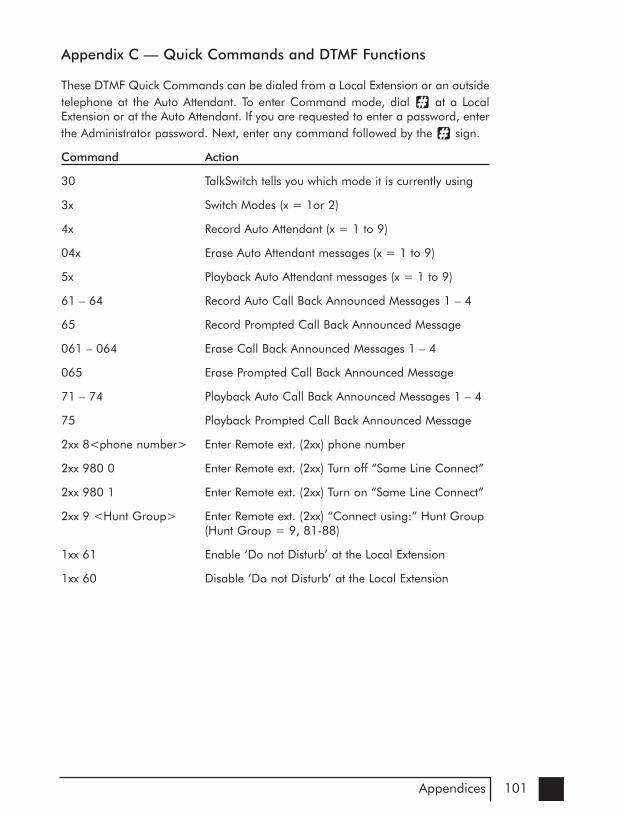
101Appendices
Appendix C — Quick Commands and DTMF Functions
These DTMF Quick Commands can be dialed from a Local Extension or an outsidetelephone at the Auto Attendant. To enter Command mode, dial at a LocalExtension or at the Auto Attendant. If you are requested to enter a password, enterthe Administrator password. Next, enter any command followed by the sign.
Command Action
30 TalkSwitch tells you which mode it is currently using
3x Switch Modes (x = 1or 2)
4x Record Auto Attendant (x = 1 to 9)
04x Erase Auto Attendant messages (x = 1 to 9)
5x Playback Auto Attendant messages (x = 1 to 9)
61 – 64 Record Auto Call Back Announced Messages 1 – 4
65 Record Prompted Call Back Announced Message
061 – 064 Erase Call Back Announced Messages 1 – 4
065 Erase Prompted Call Back Announced Message
71 – 74 Playback Auto Call Back Announced Messages 1 – 4
75 Playback Prompted Call Back Announced Message
2xx 8<phone number> Enter Remote ext. (2xx) phone number
2xx 980 0 Enter Remote ext. (2xx) Turn off “Same Line Connect”
2xx 980 1 Enter Remote ext. (2xx) Turn on “Same Line Connect”
2xx 9 <Hunt Group> Enter Remote ext. (2xx) “Connect using:” Hunt Group(Hunt Group = 9, 81-88)
1xx 61 Enable ‘Do not Disturb’ at the Local Extension
1xx 60 Disable ‘Do not Disturb’ at the Local Extension

102 TalkSwitch User Guide
DTMF descriptions dialed from a Local Extension.
DTMF
111-114
211-218
300-309
<flash> if connected to acaller
<flash> at internal dialtone
<flash> at external dialtone
111-114
211-218
410-419
1x1-1x8
2x1-2x8
4x0-4x9
<flash>4
0
Function performed
Intercoms a Local Extension
Dials a Remote Extension (associatedwith an external phone number).
Dials an Extension Ring Group - 10 intotal for the entire system. Mapped tolocal extension(s), with specific fallthrough options.
Puts caller on hold.
It retrieves the most recent caller put onhold.
Switches to internal dialtone. Usedmainly when an extension has DirectLine Access enabled.
Dials into a voice mailbox.
Internal voicemail retrieval/access.
accesses the mailbox associ-
ated to that extension.
Completes a transfer and returns to internal dialtone
External P.A. Access
Notes
Direct dial from dialtone.x represents the Unit ID
Direct dial from internal dialtone.x represents the Unit ID
Direct dial from internal dialtone.
After putting a caller on hold, you receiveinternal dialtone.
To retrieve the caller on hold for the mosttime, dial 7 at internal dialtone
Dialed when connected to an outside line.
To transfer a caller to a mailbox, press
'flash' to place a call on hold, then 111-
114, 211-218, or 410-419 andhang up.x represents the Unit ID
Direct dial 111-114, 211-218,
or 410-419 from internal dialtone to
retrieve voicemail.x represents the Unit ID
Action performed after putting a caller onHold then dialing an indented destination.
Direct dial 0 at dial tone to make anannouncement through the attached external P.A. system.

103Appendices
DTMF
<flash>5
500-509
510
500-509
<flash>6
61
60
7 + 1xx
<flash>7
80
81-88, 9
8
9
Function performed
Disconnects current caller and reconnects immediately to the lastcaller put on hold.
Call Parking Spots - 10 in total for theentire system.
Auto Park a call
Parked Call Retrieval
Conference Call for 3 parties.
Enables 'Do Not Disturb' at the current extension
Disables 'Do Not Disturb' at the current extension.
Call Pick up - Extension Specific
Hold Retrieve - used for retrieving anycalls placed on hold at that extension.
Accesses Same Line Connect whentransferring an outside caller to another outside number.
Line Hunt Groups used to access aline.
Play music source through PA output
Call Pick up
Enters command mode
Notes
Action performed after putting a caller on Holdand dialing an intended destination.
Press 'flash' to place a call on hold, then assign
a parking spot (park orbit) 500-509.
Press ‘flash’, then 510 to place a caller inthe next available parking spot (park orbit).
Direct dial 500-509 from dial tone to pickup a parked call.
Press 'flash' to put the first caller on hold, dialanother extension or external number, thenpress 'flash' 6.
Direct Dial 61 at a local extension. User willhear confirmation. Reminder is played every time the extension is picked up.
Direct Dial 60 at a local extension. User will
hear confirmation. 62 toggles DND on/off.
Direct dial from dial tone to pick up a call ringing at another extension at anytime includ-ing after the Auto Attendant answers.
Direct dial from dial tone or by pressing ‘flash’then 7 to cycle through on a first in / first outbasis.
Put the caller on Hold, dial 80, and then dialthe outside number. Hang up to complete thetransfer. Can only be used when the line has 3-Way Calling/Conference or Transfer(Centrex/Plexar) service.
Direct dial from dial tone.
Direct dial from dial tone to toggle on or offmusic through the PA port. Useful for officebackground music.
Direct dial from dial tone to pick up a call ringing at any other extension.
Direct dial at a Local Extension
If you have Direct Line Access enabled at your Local Extension, then you must first press ‘flash’before using most of the functions listed.

104 TalkSwitch User Guide
DTMF descriptions dialed at the Auto Attendant message
Digit dialed
0
111-114
211-218
300-309
1,2,3,4,5
6
7(xxx...)
81-88, 9
80
111-114211-218 410-419 410-419
111-114211-218410-419
Function performed
User Defined — Mapped to an Extension, Ring Group, AutoAttendant, Voice mailbox, Announcement or perform noaction.
Dials Local Extensions
Dials Remote Extensions associated with an external phonenumber. Functionality similar to a Local Extension. x representsthe Unit ID number (1-4).
Dials Extension Ring Groups — 10 in total for the entire system. Mapped to Local Extensions(s), with specific fallthrough options.
User Defined — Mapped to an Extension, Ring Group, AutoAttendant, Voice mailbox, Announcement or Perform noaction.
Enters Call Back configuration.
PBX Transfer — A flash hook transfer with disconnect afterdialed.
Access to line Hunt Groups for Call Bridge — Password protected at the Auto Attendant.
Call Bridge using Same Line Connect. Requires 3-WayCalling/Conference on the line.
Enter Internal voicemail to leave a message or listen to anannouncement. If you press 8 during the greeting, you canaccess messages. x represents the Unit ID number.
Callers can directly also dial 400 series mailboxes
Internal voicemail retrieval/access. x represents the Unit ID number.

105Appendices
Appendix D — Safety Precautions and Regulatory Information
Safety Precautions
Before using TalkSwitch, please review and ensure the following safety instructionsare adhered to:
1. Read, Follow and Retain Instructions — All safety and operating instructionsshould be read before operating the equipment, followed and retained forfuture reference.
2. Heed Warnings — All warnings on the equipment and in the operatinginstructions should be adhered to.
3. Do not operate in environments where the temperature is below 0 degreesCelsius or 32 degrees Fahrenheit. If the product was shipped in cold weather,please let the system warm up at room temperature for at least 2 hoursbefore plugging it in to a power outlet.
4. Moisture — Do not place TalkSwitch in a high humidity environment.
5. Heat — Never place TalkSwitch near heat sources such as radiators, floor registers or direct sunlight.
6. Power Supply — The equipment should only be connected to an approvedpower supply of the type described in the operating instructions or markedon the equipment. Use only the power adapter supplied with TalkSwitch.
7. Damage requiring service — Do not attempt to service the TalkSwitch yourself. Unplug TalkSwitch and refer servicing to a licensed technicianwhen:
• The plug or power cord has been damaged.
• TalkSwitch has been exposed to moisture.
• TalkSwitch does not appear to be operating properly or exhibits amarked change in performance.

106 TalkSwitch User Guide
Important Notices
FFCCCC aanndd IICC WWaarrnniinnggss
This equipment complies with ACTA TIA/EIA/IS-968A and Part 68 of the FederalCommunications Commission (FCC) rules in the United States. It also complieswith regulations RSS210 and CS-03 of Industry Canada and Science Canada.This equipment also complies with Part 15 of the FCC Rules, as well as ICES003of Industry Canada. Operation is subject to the following two conditions: (1) thisdevice may not cause harmful interference, and (2) this device must accept anyinterference received, including interference that may cause undesiredoperation of the device.
FFCCCC PPaarrtt 1155::
NOTE: This equipment has been tested and found to comply with the limits fora “CLASS B” Digital Device pursuant to Part 15 of the FCC rules. These limitsare designed to provide a reasonable protection against harmful interference ina residential installation. This equipment generates, uses and can radiate radiofrequency energy, and if not installed and used in accordance with theseinstructions, may cause harmful interference to radio communications.However, there is no guarantee that interference will not occur in a particularinstallation. If this equipment does cause harmful interference to radio ortelevision reception, which can be determined by turning the equipment off andon, the user is encouraged to try to correct the interference by one or more ofthe following measures:
• Reorient or relocate the receiving antenna.
• Increase the separation between the equipment and receiver.
• Connect the equipment to an outlet on a circuit different to that which thereceiver is connected.
• Consult the dealer or an experienced Radio/TV technician for help.
This CLASS B Digital apparatus meets all requirements of the Canadian interference-causing equipment regulations.
Changes or modifications not expressly approved by TalkSwitch could void the user’sauthority to operate the equipment.

107Appendices
AACCTTAA TTIIAA//EEIIAA//IISS--996688AA,, FFCCCC PPaarrtt 6688 aanndd IICC CCSS--0033::
Notice: The Industry Canada label identifies certified equipment. This certificationmeans that the equipment meets telecommunications network protective,operational and safety requirements as prescribed in the appropriate TerminalEquipment Technical Requirements document(s). The Department does notguarantee that the equipment will operate to the user's satisfaction.
Before installing this equipment, users should ensure that it is permissible to beconnected to the facilities of the local Telecommunications Company. Theequipment must also be installed using an acceptable method of connection. Thecustomer should be aware that compliance with the above conditions may notprevent degradation of service in some situations.
Repairs to certified equipment should be coordinated by a representative designatedby the supplier. Any repairs or alterations made by the user to this equipment, orequipment malfunctions, may give the telecommunications company cause torequest the user to disconnect the equipment.
Users should ensure, for their own protection, that the electrical ground connectionsof the power utility, telephone lines and internal metallic water pipe system, ifpresent, are connected together. This precaution may be particularly important inrural areas.
Caution: Users should not attempt to make such connections themselves, but shouldcontact the appropriate electric inspection authority, or electrician, as appropriate.
A label is located on the underside of the base unit containing both the FCCregistration number and Ringer Equivalency Number (REN) or the IC registrationnumber and Load Number. You must, upon request, provide this information to yourlocal telephone company.
The REN is used to determine the quantity of devices that may be connected to thetelephone line. Excessive RENs on the telephone line may result in the devices not ringing in response to an incoming call. In most, but not all areas, the sum of RENs should not exceed five (5.0). To be certain of the number of devices that may be connected to a line, as determined by the total RENs, contact the localTelephone Company.
This equipment is compatible with inductively coupled hearing aids.

108 TalkSwitch User Guide
Service
Should you experience trouble with this telephone equipment, Model: CT-TS01, forrepair or warranty information please contact your reseller. See Appendix E,“TalkSwitch One Year Limited Warranty”, for more information.
If the equipment is causing harm to the telephone network, the Telephone Companymay request that you disconnect the equipment until the problem is corrected.
This equipment cannot be used on public coin telephone services provide by thetelephone company. Connection to party line service is subject to state tariffs.
The FCC requires that you connect your cordless telephone to the nation-widetelephone network through a modular telephone jack (USOC, RF11C, RJ11W, or RJ14).
Your telephone company may discontinue your service if your equipment causesharm to the telephone network. They will notify you in advance of disconnection, ifpossible. During notification, you will be informed of your right to file a complaintto the FCC.
Occasionally, your telephone company may make changes in its facilities, equipment,operation, or procedures that could affect the operation of your equipment. If so, youwill be given advance notice of the change to give you an opportunity to maintainuninterrupted service.
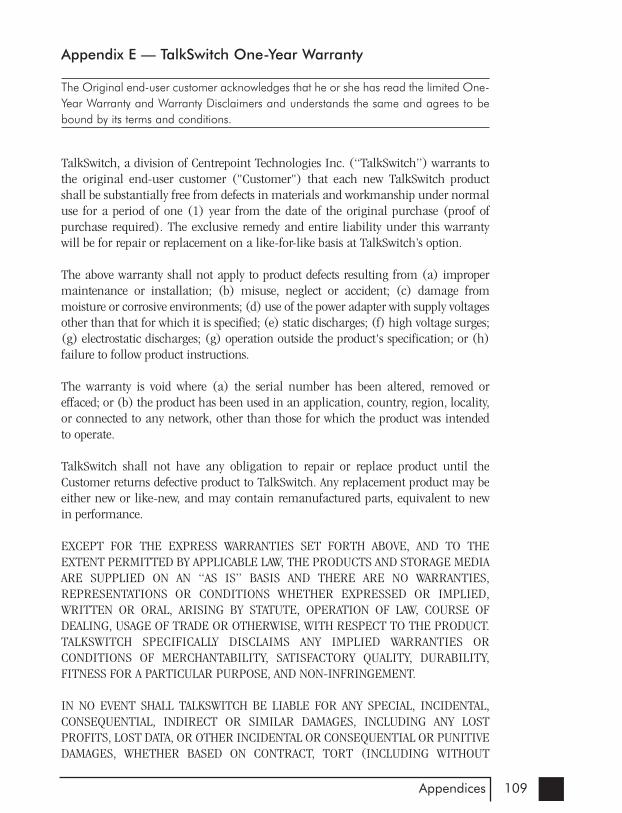
109Appendices
Appendix E — TalkSwitch One-Year Warranty
The Original end-user customer acknowledges that he or she has read the limited One-Year Warranty and Warranty Disclaimers and understands the same and agrees to bebound by its terms and conditions.
TalkSwitch, a division of Centrepoint Technologies Inc. (“TalkSwitch”) warrants tothe original end-user customer ("Customer") that each new TalkSwitch productshall be substantially free from defects in materials and workmanship under normaluse for a period of one (1) year from the date of the original purchase (proof ofpurchase required). The exclusive remedy and entire liability under this warrantywill be for repair or replacement on a like-for-like basis at TalkSwitch’s option.
The above warranty shall not apply to product defects resulting from (a) impropermaintenance or installation; (b) misuse, neglect or accident; (c) damage frommoisture or corrosive environments; (d) use of the power adapter with supply voltagesother than that for which it is specified; (e) static discharges; (f) high voltage surges;(g) electrostatic discharges; (g) operation outside the product's specification; or (h)failure to follow product instructions.
The warranty is void where (a) the serial number has been altered, removed oreffaced; or (b) the product has been used in an application, country, region, locality,or connected to any network, other than those for which the product was intended to operate.
TalkSwitch shall not have any obligation to repair or replace product until theCustomer returns defective product to TalkSwitch. Any replacement product may beeither new or like-new, and may contain remanufactured parts, equivalent to new in performance.
EXCEPT FOR THE EXPRESS WARRANTIES SET FORTH ABOVE, AND TO THEEXTENT PERMITTED BY APPLICABLE LAW, THE PRODUCTS AND STORAGE MEDIAARE SUPPLIED ON AN “AS IS” BASIS AND THERE ARE NO WARRANTIES,REPRESENTATIONS OR CONDITIONS WHETHER EXPRESSED OR IMPLIED,WRITTEN OR ORAL, ARISING BY STATUTE, OPERATION OF LAW, COURSE OFDEALING, USAGE OF TRADE OR OTHERWISE, WITH RESPECT TO THE PRODUCT.TALKSWITCH SPECIFICALLY DISCLAIMS ANY IMPLIED WARRANTIES ORCONDITIONS OF MERCHANTABILITY, SATISFACTORY QUALITY, DURABILITY,FITNESS FOR A PARTICULAR PURPOSE, AND NON-INFRINGEMENT.
IN NO EVENT SHALL TALKSWITCH BE LIABLE FOR ANY SPECIAL, INCIDENTAL,CONSEQUENTIAL, INDIRECT OR SIMILAR DAMAGES, INCLUDING ANY LOSTPROFITS, LOST DATA, OR OTHER INCIDENTAL OR CONSEQUENTIAL OR PUNITIVEDAMAGES, WHETHER BASED ON CONTRACT, TORT (INCLUDING WITHOUT

110 TalkSwitch User Guide
LIMITATION, NEGLIGENCE), OR ANY OTHER LEGAL THEORY, WHETHER OR NOTADVISED OF THE POSSIBILITY OF SUCH DAMAGES, OR WHETHER SUCH DAMAGESARE FORSEEABLE. IN ANY EVENT, THE TOTAL AGGREGATE LIABILITY OFTALKSWITCH FOR DIRECT DAMAGES SHALL NOT EXCEED THE PURCHASE PRICEOF THE PRODUCT.
This warranty gives specific rights, and Customer may have other rights subject tojurisdiction. To the extent any part of this limited warranty statement is inconsistentwith such local law, that part shall be deemed modified to be consistent with suchlocal law.
DDOOCC CCoommpplliiaannccee
This digital apparatus does not exceed the Class B limits for radio noise emissions fordigital apparatus as set out in the Radio Interference Regulations of the CanadianDepartment of Communications.
The FCC Statement is located in Appendix D, “Safety Precautions and RegulatoryInformation”.
Warranty Service
To be eligible to obtain warranty service you must retain proof of purchase and contactyour reseller for warranty details. If you fail to provide proof of purchase, your resellerand TalkSwitch, a division of Centrepoint Technologies Inc. (“TalkSwitch”) will notbe able to provide you with any kind of warranty service.
To obtain warranty service, products must be sent to your reseller or a service facilitydesignated by TalkSwitch. The original end-user purchaser shall pay all shippingcharges, duties and taxes for products sent to TalkSwitch for warranty service.TalkSwitch shall pay for return of the product to the end-user purchaser.

111Appendices
TToo oobbttaaiinn WWaarrrraannttyy sseerrvviiccee::
IIff ppuurrcchhaasseedd ffrroomm aa rreesseelllleerr::Contact your reseller and obtain a Warranty Return Authorization (WRA) number if required.
IIff ppuurrcchhaasseedd ffrroomm TTaallkkSSwwiittcchh:: Please contact the Technical Support department atTalkSwitch to obtain an WRA number — (866) 393-9960 toll free in continentalNorth America or (613) 725-2466. Please have your model and serial numberavailable when you call.
If the product is being shipped from outside of Canada, the following statement mustbe included on the package. ‘‘CCaannaaddiiaann GGooooddss BBeeiinngg RReettuurrnneedd ttoo CCaannaaddaa’’..
FFaaiilluurree ttoo oobbttaaiinn aa WWRRAA nnuummbbeerr aanndd iinncclluuddee tthhee nneecceessssaarryy iinnffoorrmmaattiioonn wwiillll rreessuulltt iinntthhee ppaacckkaaggee bbeeiinngg rreeffuusseedd..


113Appendices
Appendix F — Return Policy
PPrroodduuccttss ppuurrcchhaasseedd ffrroomm aa rreesseelllleerr::Check with your reseller on the specific details regarding their return policy.
PPrroodduuccttss ppuurrcchhaasseedd ddiirreeccttllyy ffrroomm TTaallkkSSwwiittcchh::Contact TalkSwitch, a division of Centrepoint Technologies Inc. (“TalkSwitch”) fordetails regarding the return policy. TalkSwitch will provide you with a ReturnMerchandise Authorization (RMA) number and all the necessary instructions forreturning the product.
TalkSwitch will not accept product returns outside of its return policy.
If the product is being shipped from outside of Canada, the following statement mustbe included on the package. ''CCaannaaddiiaann GGooooddss BBeeiinngg RReettuurrnneedd ttoo CCaannaaddaa''..
FFaaiilluurree ttoo oobbttaaiinn aann RRMMAA nnuummbbeerr ffrroomm TTaallkkSSwwiittcchh aanndd iinncclluuddee tthhee nneecceessssaarryyiinnffoorrmmaattiioonn wwiillll rreessuulltt iinn tthhee ppaacckkaaggee bbeeiinngg rreeffuusseedd..
IImmppoorrttaanntt:: The TalkSwitch Return Policy applies only for products purchased directlyfrom TalkSwitch. The Return Policy for products purchased from an authorizedTalkSwitch dealer is determined by the dealer (the retail outlet where the product waspurchased). Please contact your retailer for information regarding their return policy;do not return the product directly to TalkSwitch
For information regarding product servicing, please refer to the TalkSwitch One YearLimited Warranty.

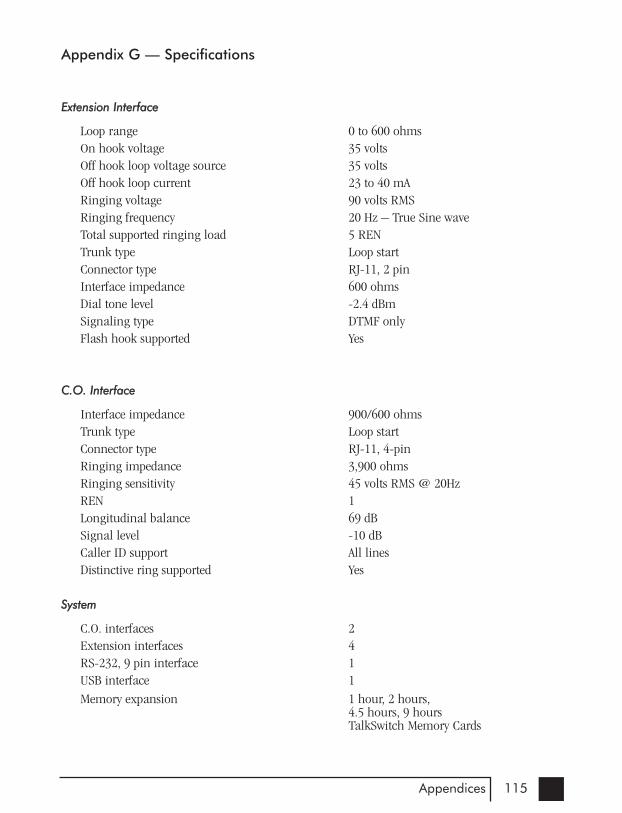
115Appendices
Appendix G — Specifications
EExxtteennssiioonn IInntteerrffaaccee
Loop range 0 to 600 ohmsOn hook voltage 35 voltsOff hook loop voltage source 35 voltsOff hook loop current 23 to 40 mARinging voltage 90 volts RMSRinging frequency 20 Hz – True Sine waveTotal supported ringing load 5 RENTrunk type Loop startConnector type RJ-11, 2 pinInterface impedance 600 ohmsDial tone level -2.4 dBmSignaling type DTMF onlyFlash hook supported Yes
CC..OO.. IInntteerrffaaccee
Interface impedance 900/600 ohmsTrunk type Loop startConnector type RJ-11, 4-pinRinging impedance 3,900 ohmsRinging sensitivity 45 volts RMS @ 20HzREN 1Longitudinal balance 69 dBSignal level -10 dBCaller ID support All linesDistinctive ring supported Yes
SSyysstteemm
C.O. interfaces 2 Extension interfaces 4 RS-232, 9 pin interface 1USB interface 1
Memory expansion 1 hour, 2 hours, 4.5 hours, 9 hours TalkSwitch Memory Cards
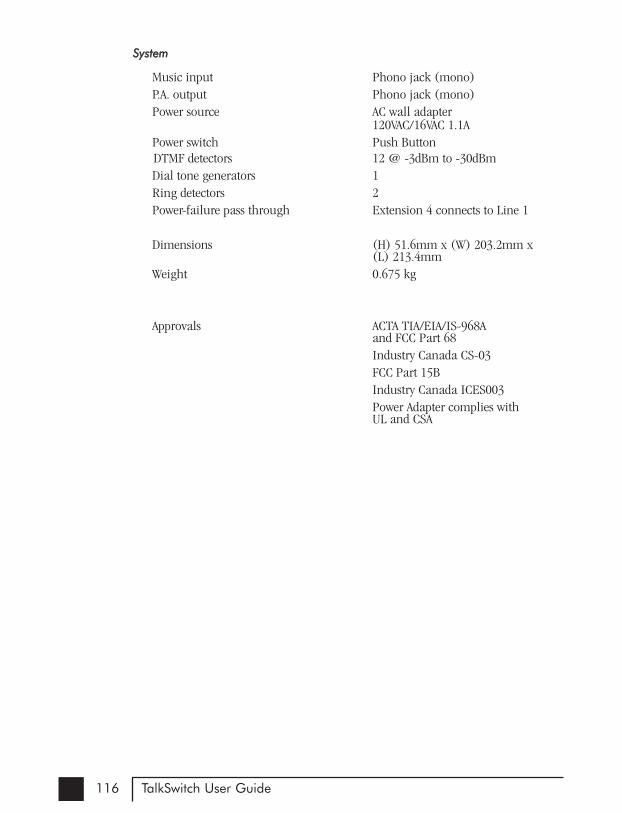
116 TalkSwitch User Guide
SSyysstteemm
Music input Phono jack (mono)P.A. output Phono jack (mono)Power source AC wall adapter
120VAC/16VAC 1.1APower switch Push ButtonDTMF detectors 12 @ -3dBm to -30dBmDial tone generators 1Ring detectors 2Power-failure pass through Extension 4 connects to Line 1
Dimensions (H) 51.6mm x (W) 203.2mm x (L) 213.4mm
Weight 0.675 kg
Approvals ACTA TIA/EIA/IS-968A and FCC Part 68Industry Canada CS-03FCC Part 15BIndustry Canada ICES003Power Adapter complies with UL and CSA

117Appendices
Appendix H — TalkSwitch and Power Interruptions
TTaallkkSSwwiittcchh sseettttiinnggss aanndd ccoonnffiigguurraattiioonnss::
In the event of a power failure, your TalkSwitch settings and configurations will notbe lost.
TalkSwitch’s feature settings (configuration) are stored in an EEPROM. An EEPROMis a form of non-volatile memory. Non-volatile memory means that your featuresettings (configurations) remain in TalkSwitch’s memory despite interruptions inTalkSwitch’s power supply.
CCaalllliinngg FFeeaattuurreess::
In the event of a power failure, no TalkSwitch features or capabilities will be availableother than:
• Local Extension 114 can make or receive calls on Line 1
In the event of a power return, all TalkSwitch features and capabilities will be re-established.
MMooddee SScchheedduulliinngg aanndd PPoowweerr IInntteerrrruuppttiioonnss::
When the power supply to TalkSwitch has been interrupted, TalkSwitch’s internalclock will continue to run for up to 12 hours. If you have enabled TalkSwitch’sAutomatic Mode Scheduling feature and it has been longer than 12 hours,TalkSwitch will not function properly until the internal clock is reset via a Caller IDcall or with the TalkSwitch configuration software. When power is restored toTalkSwitch, TalkSwitch will check the time and determine the mode it should be inaccording to the configuration and set itself to that mode.
To check the current mode of operation, dial at a Local Extension to enter
command mode then enter a password if required. Next, dial 30 then . TalkSwitchwill report the current mode.


119Glossary
* (Star/Asterisk Sign)The character on the bottom left of yourtouchtone telephone keypad.
# (Pound Sign)The character on the bottom right ofyour touchtone telephone keypad. It isalso commonly called the number sign.
3-Way Calling/ConferenceA service provided by telephone companies which allows you to connectparties on three different telephone linestogether for one conversation.
3-Way Conference CallConnecting three parties together for onetelephone conversation. TalkSwitch offersits own 3-Way Conference feature andalso allows you to use the 3-WayConference (Calling) service provided bylocal telephone companies.
AnalogAll sound actually begins in the form ofsine waves and must be in this form to beheard by the human ear. Analog devices(phones, answering machines, etc.)transmit and receive sound in the formof ‘sine waves’. The telephone lines inyour home are also designed to carryanalog signals (sine waves). TalkSwitchis an analog device and will work withany other analog device or telephone system.
Auto Attendant MessageTalkSwitch’s electronic attendant. A self-recorded message that greets anddirects callers to select an extensionnumber based on information providedin the message.
Call BackA TalkSwitch feature which, once activated, instructs TalkSwitch to call youback at a preset Out-of-Office telephonenumber. You can then access TalkSwitch’sCall Bridge feature. TalkSwitch offers twoways to activate Call Back — Promptedand Auto.
Call BridgeA TalkSwitch feature which ‘bridges’together calls from two different remotelocations. Call Bridge allows you to placelong distance calls from your office telephone lines even when you are out of the office.
Call ForwardA TalkSwitch feature which forwards callsto one of 10 or more Remote Extensions.
Caller IDA service provided by telephone companies which transmits informationabout incoming calls (callers name andtelephone number). The Caller ID information is transmitted between thefirst and second ring.
Call WaitingA service provided by telephone companies which allows you to accept asecond incoming call on a telephone linethat is already in use. Call Waiting allowsyou to 'toggle' from one caller to theother.
Glossary

120 TalkSwitch User Guide
Central OfficeYour local telephone company or publicexchange network.
Centrex/PlexarCentral Office Exchange Service. A type ofPBX service offered by the telephonecompany on a ‘pay per service’ basis. Allcall switching occurs at a local telephonestation instead of a company's premises.
CNGA ‘chirping’ tone emitted by fax modemsand most fax machines to initiate contactwith another fax machine/modem.
COM PortCommunications Port. Internal virtualpathways used to transmit data to andfrom a PC's exterior Serial Port and software running on the PC. The majorityof PCs have four Com Ports: COM1,COM2, COM3, and COM4. Most softwareprograms gain access to the Com Portsvia system interrupts (IRQs) and onlytwo IRQs are reserved for the four ports.If you have two devices using Com Portsthat share an IRQ, you cannot use thedevices simultaneously. Typically, COM1and COM3 use IRQ4, while COM2 andCOM4 use IRQ3.
Communications SoftwareSoftware that makes it possible to sendand receive data over telephone lines viamodems.
Computer Telephony IntegrationRefers to systems that enable a computerto act as a call center, accepting incoming calls and routing them to theappropriate device or person. Today's CTIsystems, like TalkSwitch, are quitesophisticated and can handle all sorts of incoming and outgoing communications, including phone calls, faxes, and Internet messages.
Conference CallConnecting three or more parties together for one conversation.
ConfigurationThe way a system is setup. For TalkSwitchthe configuration is the collection of values or options you have chosen foreach of TalkSwitch’s features. Together,the settings for each of these features(The configuration) determine whatTalkSwitch will do. TalkSwitch can beconfigured using the Configuration software or Telephone Keypad Commands.
ConnectorThe part of a cable that plugs into a portor interface to connect one device toanother. Most connectors are either maleor female.
CTIComputer Telephony Integration.
DialtoneA tone used by the telephone company toindicate to the user that the line is ‘free’and available for making calls.
Dial Up NetworkingA component in Microsoft Windows thatenables you to connect your computer toa network via a modem.
DigitAny whole number from 0 to 9. Thenumbers on your telephone keypad canalso be referred to as digits.
Distinctive RingThe ability to have more than one telephone number that callers can dial toreach the same telephone line. EachDistinctive Ring number has a distinctivering cadence or ring sequence.TalkSwitch recognizes Distinctive Ring 1as 2 short rings. Distinctive Ring 2 is

121Glossary
identified as 3 short rings. (DistinctiveRing is also referred to as: Ident-A-Ring,Ident-A-Call, Ring Master, Teen Service,Double Number, Personal Ringing, RingPlus, Smart Ring Service, Special Ring orCustomized Ringing).
DriverA program that controls a device. Everydevice, whether it is a printer, disk drive,or keyboard, must have a driver program.A driver acts like a translator between thedevice and programs that use the device.
DTMFDual Tone Multi-Frequency. The systemused by touchtone telephones. DTMFassigns a specific frequency, or tone, toeach key so that it can easily be identifiedby a microprocessor.
Extension (Local)A Local Extension is any telephone oranalog device (answering machine, fax,etc.) that is plugged into one of the‘Extensions’ jacks located on the backpanel of your TalkSwitch.
Extension (Remote)A call forwarding number that can beany telephone number, in any location.
FCCFederal Communications Commission.The FCC is the United States federal regulatory agency responsible for the regulation of interstate and internationalcommunications by radio, television,wire, satellite and cable.
FirmwareFirmware is a combination of softwareand hardware. More precisely, it is software (programs or data) that has beenwritten onto hardware (micro-chips).Micro-chips (ROMs, PROMs andEPROMs) that have data or programsrecorded on them are called firmware.
Flash buttonA button on your telephone. Pressing the Flash button has the same effect aspressing the Link button or depressingand releasing the ‘hang up’ (switch)hook on a telephone. All of these actionswill send a signal to TalkSwitch to putcalls on or off hold.
Home phoneA home phone is any telephone using thesame telephone line as one of TalkSwitch’sLines, but is not plugged directly into theback of TalkSwitch as an extension.
Auto Call BackAllows you to activate Call Back by dialing one of TalkSwitch’s telephonenumbers, letting the call ring at leastonce and then hanging up.
IntercomA dedicated voice service within a specified user environment. TalkSwitchoffers intercom capabilities between itsLocal Extensions.
InterfaceSomething that connects two separateentities. A user interface is the part of aprogram that connects the computer witha human operator (user).
Keypad CommandsCombinations of digits that are used toconfigure TalkSwitch from a touchtonetelephone.
Keypad (Telephone)The push buttons on a telephone.
Key Telephone SystemWith Key Telephone Systems, access totelephone lines and calling features iscontrolled internally within each tele-phone unit. Users can gain direct accessto telephone lines, etc. by pressing a key(or button) on their telephone.

122 TalkSwitch User Guide
LEDLight Emitting Diode. An electronic devicethat lights up when electricity is passedthrough it. LEDs are used in displays onelectronic devices such as computers.TalkSwitch has five LEDs on its frontpanel. They show which telephone is inuse, whether data is being transferred to orreceived from an attached PC, and whichMode setting is in use.
Link buttonOn most telephones, pressing the Linkbutton has the same effect as pressing theFlash button or depressing and releasingthe ‘hang up’ (switch) hook. However, on some telephones, the function of theLink button is internal to the telephoneand pressing it will have no effect onTalkSwitch.
Modem (voice/fax/data)A modem which supports a switch tochange between voice and data modes.In data mode, the modem acts like a regular modem. In voice mode, themodem acts like a regular telephone.Modems that support a voice/data switchhave a built-in loudspeaker and microphone for voice communication.
ModesA TalkSwitch feature which allows you tostore two distinct incoming call handlingconfigurations (Mode 1 and Mode 2).
Monitor (TalkSwitch Monitor)A feature included with the SoftwareConfiguration package. The Monitor provides a graphical representation oftelephone traffic as it flows through theTalkSwitch system.
NetworkA group of two or more computer systems linked together.
PBXPrivate Branch Exchange. A PBX is a private telephone network used within anEnterprise. Access to telephone lines andservices are controlled by the PBX. A PBXallows many users (extensions) to sharea smaller number of telephone lines andhave access to additional call handlingbenefits (call hold, intercom calling, etc.).TalkSwitch is a ‘mini’ or ‘micro’ PBX.
Phone LoadSee Ringing Equivalency.
PromptRecorded instructions delivered by voiceprocessing units. TalkSwitch providesprompts for you when using such features as Call Back, Call Bridge andSelective Call Forward. Prompts are alsoprovided when configuring TalkSwitchusing a telephone Keypad and for callersbeing put ‘on hold’.
Ringing Equivalency(Ringer Equivalency Number [REN]) Anumber, determined in accordance withthe US Code of Federal Regulations,which represents the ringer loading effecton a line. A ringer equivalency numberof 1 represents the loading effect of a traditional telephone set ringing circuit.
RJ-11Registered Jacks 11 is the most commonmodular jack in the world. It is usuallyused to connect ‘single line’ telephonicdevices such as telephones, fax machinesand modems. It supports 2 conductors.
RJ-45Registered Jacks 45 is a technical termfor a telephone jack that supports 8 conductors and is used generally forNetworking applications.
123Glossary
Prompted Call BackAllows you to activate Call Back by dialingone of TalkSwitch's telephone numbers,letting the Auto Attendant answer andthen entering the Call Back settings.
Serial CommunicationA type of electronic communication that,unlike parallel communication, requiresthat data bits be sent one after the other.Modems rely on serial communication tosend data over telephone lines.
Serial Port
Serial Ports are physical ‘plug-ins’. They allow two devices to exchangeinformation or data. A Serial Cable isused to connect the two Serial Ports together.
TelephonyThe science of translating sound intoelectrical signals, transmitting them, andthen converting them back to sound; thatis, the science of telephones. The term isused frequently to refer to computerhardware and software that performsfunctions traditionally performed by telephone equipment.
Tel Lines 1, 2, 3, or 4A jack or plug-in on the back panel ofTalkSwitch which can accept a RJ-11plug from either a telephone line or PBXsystem. A single line telephone cable canbe plugged into this jack and willbecome a usable TalkSwitch Line.
Telephone KeypadThe collection of push buttons on atouchtone telephone.
Telephone Wall JackA wall outlet for a standard telephonejack.
Touchtone telephoneA push-button telephone which emits distinctive (DTMF) tones as different buttons on the keypad are pressed.
Two Line TelephoneA telephone which allows you to makeand receive calls on two separate telephone lines.
USBShort for Universal Serial Bus, the USBconnection supports more bandwidththan a serial or parallel connection.
Virtual ExtensionA telephone or other communicationsdevice not physically connected toTalkSwitch as an extension, but whichprovides the same functionality. In general, the term ‘virtual’ distinguishessomething that is merely conceptualfrom something that has physical reality.TalkSwitch’s Remote Extensions are virtual extensions.
Voicemail (Call Answer)A service provided by TalkSwitch or telephone companies which gives callersthe opportunity to leave a message whenyour extension or telephone line is busyor unanswered.