table of contents - whitecanyon...
TRANSCRIPT


2
Table of Contents
IMPORTANT! PLEASE READ CAREFULLY: ........................................................................................................ 4
General Information ...................................................................................................................................... 4
WipeDrive Enterprise .................................................................................................................................... 4
Overview ................................................................................................................................................................... 4
Key Features .................................................................................................................................................. 4
Secure Removal of HPA and DCO .............................................................................................................................. 5
Secure Erase Option .................................................................................................................................................. 5
Detailed Audit Logging .............................................................................................................................................. 5
Running WipeDrive Enterprise ...................................................................................................................... 6
Wiping Remote Computers Via WipeDrive .EXE ........................................................................................... 7
Overview ................................................................................................................................................................... 7
Required for Remote Desktop Connection: .............................................................................................................. 7
Remote Desktop Connection Walkthrough .............................................................................................................. 8
WipeDrive Boot Via CD ............................................................................................................................... 13
Overview ................................................................................................................................................................. 13
System Requirements ............................................................................................................................................. 13
BIOS Settings ........................................................................................................................................................... 13
Wipe Process via CD .................................................................................................................................... 14
Configuration Settings ................................................................................................................................. 16
WipeDrive Boot Via PXE .............................................................................................................................. 19
Setup Diagram......................................................................................................................................................... 20
Wipe Process Via PXE .................................................................................................................................. 21
WipeDrive Boot Via .EXE ............................................................................................................................. 24
Overview ................................................................................................................................................................. 24
System Requirements ............................................................................................................................................. 24
Setup Diagram......................................................................................................................................................... 24
Wipe Process Via .EXE ................................................................................................................................. 25
Overwrite Patterns ...................................................................................................................................... 28
Log Format Types ........................................................................................................................................ 29
Plain Text Log File Option ........................................................................................................................................ 29
Extensible Markup Language (XML) Log File Option............................................................................................... 31
Comma Delimited (CSV) Log File Option ................................................................................................................. 33
PDF Log File Option ................................................................................................................................................. 35
Audit Log Destination Options .................................................................................................................... 37

3
USB Drive Option .................................................................................................................................................... 37
Local File System Option ......................................................................................................................................... 37
Network File System Option ................................................................................................................................... 37
Email Option ........................................................................................................................................................... 37
MySQL/MS SQL Audit Logging Option .................................................................................................................... 38
Addendum 1 - Setting Up SQL Logging ....................................................................................................... 39
SQL Database Viewer (Audit Tool) .............................................................................................................. 39
Addendum 2 - Wipe Process TUI (Text User Interface) ............................................................................... 41
Addendum 3 - Command Line Parameters ................................................................................................. 43
Wiping and Verifying ............................................................................................................................................... 44
Logging .................................................................................................................................................................... 44
Logging to FTP ......................................................................................................................................................... 44
Logging to Email ...................................................................................................................................................... 45
Logging to SQL Database ......................................................................................................................................... 45
Addendum 4 – Drive Verification ................................................................................................................ 45

4
IMPORTANT! PLEASE READ CAREFULLY:
Thank you for choosing WipeDrive Enterprise. Before running WipeDrive, please make sure that any
files, folders, and any other information you wish to preserve is backed up on another media device (CD/DVD/EXT HD). WipeDrive will securely delete all information on the hard drive(s); the information
will NOT be recoverable by any means including forensic recovery tools.
General Information
WipeDrive Enterprise will not be able to access the drive's previously allocated drive letter (c: d:
etc.). Details such as the drive size, serial number and manufacturer will be displayed in the
drive selection menu to help identify individual drives.
While wiping a hard drive on a laptop it is recommended that it remain plugged-in to a power
source as the wiping process can take an extended amount of time. (Factors such as hard drive
size and wiping methods determine this amount of time.)
WipeDrive Enterprise
OVERVIEW
When a Windows or Linux system saves a file, it does two things: it creates an entry for the file in the Master File Table, which functions as a sort of ‘table of contents’ for the drive, and it saves the file data
itself onto sectors of the hard drive. If a file is deleted using the Recycle Bin, the file is not actually deleted. The file’s entry in the Master File Table is deleted, but the data itself still remains intact on the
hard drive, while the space that it occupies is marked for use, letting the system know that the space is available for new files to be written to. Unless new data is written to the space held by the deleted file,
the original file still exists on the drive in its original state.
Any number of file recovery programs can easily look through the drive and find remnants of the file’s entry in the Master File Table and put the file back together, making it as if it was never deleted in the
first place. The only way to truly delete a file is to overwrite it with other information.
The primary purpose of WipeDrive is to securely overwrite all data to make any type of data recovery
impossible and document the process to comply with all applicable corporate and government
regulations.
Key Features

5
SECURE REMOVAL OF HPA AND DCO
A host protected area, sometimes referred to as hidden protected area, is an area of a hard drive that is
not normally visible to an operating system. A Device configuration overlay (DCO) is a hidden area on
many of today’s hard disk drives (HDDs). Usually when information is stored in either the DCO or host
protected area (HPA), it is not accessible by the BIOS, OS, or the user.
As part of the wipe process WipeDrive securely removes and overwrites all data contained in HPA’s and
DCO’s.
SECURE ERASE OPTION
A modern hard drive comes with many spare sectors. When a sector is found to be bad by the firmware of a disk controller, the disk controller remaps the logical sector to a different physical sector.
The ANSI T-13 committee which oversees the ATA (also known as IDE) interface specification and the ANSI T-10 committee which governs the SCSI interface specification have incorporated into their
standards a command feature known as Secure Erase (SE). It completely erases all reallocated disk
sectors (sectors that the drive no longer uses because they have hard errors in them).
WipeDrive uses the SecureErase command as part of its DoD approved wipe process, to ensure the
removal of remapped drive sectors.
DETAILED AUDIT LOGGING
Documenting the secure data destruction process is requirement for most Government agencies,
companies involved in health care and the financial sector.
WipeDrive creates an audit log documenting every necessary detail to comply with all major regulations including DoD 5220.22-M, HIPAA, SOX and others.

6
Running WipeDrive Enterprise
Because organizations can be large or small, centralized or with thousands of locations WipeDrive
Enterprise has multiple implementation options. Each option has its strengths; all are available to you under your license agreement. WipeDrive Enterprise can be implemented and run in three different ways.
For specific instructions and details please see the corresponding section. The three options are:
Target System
Designated
ServerWipeDrive
Enterprise
PXE Software
Client
Computers
Hard
Drives
Network
Switch
Administrator
System
Client
Computers
Hard
Drives
WipeDrive
Executable
Application
Via PXE network booting (see page 15)
Normally the best method when many computers are
brought to a central location.
Via .EXE (see page 22)
Normally the best method when many computers are on the same network. This option allows systems to
be wiped remotely.
Booting from the CD (see page 3)
Normally the best method when wiping a small number of systems.

7
Wiping Remote Computers Via WipeDrive .EXE
OVERVIEW
This method is best if wanting to securely wipe a computer not readily accessible. Using the WipeDrive
application you can wipe a computer remotely one of two ways; through Remote Desktop Connection or through PsExec. This walkthrough will cover both. Before proceeding with this option please note the
required criteria necessary for this to work.
REQUIRED FOR REMOTE DESKTOP CONNECTION:
Computer Name
User
User Password (a password MUST exist)
Microsoft provides a thorough FAQ sheet about using this program at the following location:
http://windows.microsoft.com/en-US/windows-vista/Remote-Desktop-Connection-frequently-asked-questions
Required for PSExec:
PsExec: http://technet.microsoft.com/en-us/sysinternals/bb897553.aspx
Grant permissions through Regedit (See PSExec setup page 10)
Computer Name
User
User Password (a password MUST exist)

8
REMOTE DESKTOP CONNECTION WALKTHROUGH
Before using this option make sure the client computer either already has the WipeDrive executable
program or has access to it via a download or network. If you are unable to place the WipeDrive wizard from your location onto the client computer refer to the PsExec remote wiping option.
Step 1:
The Remote Desktop Connection program is included in the
Windows program so no install is necessary. It can be found under ‘Start’ - ‘All Programs’ - ‘Accessories’ Running the
program will reveal the following window.
Step 2:
Next enter the Computer name of the machine you wish to
access as well as the user.
If it doesn’t ask for a user at this point just enter the Computer name and click ‘Connect.’
Step 3:
Once the program connects to the machine it will require you enter the login credentials.
This will not work if the computer you are attempting to
access isn’t password protected, there must be a password.
Once the User name and Password are entered click ’OK.’
9
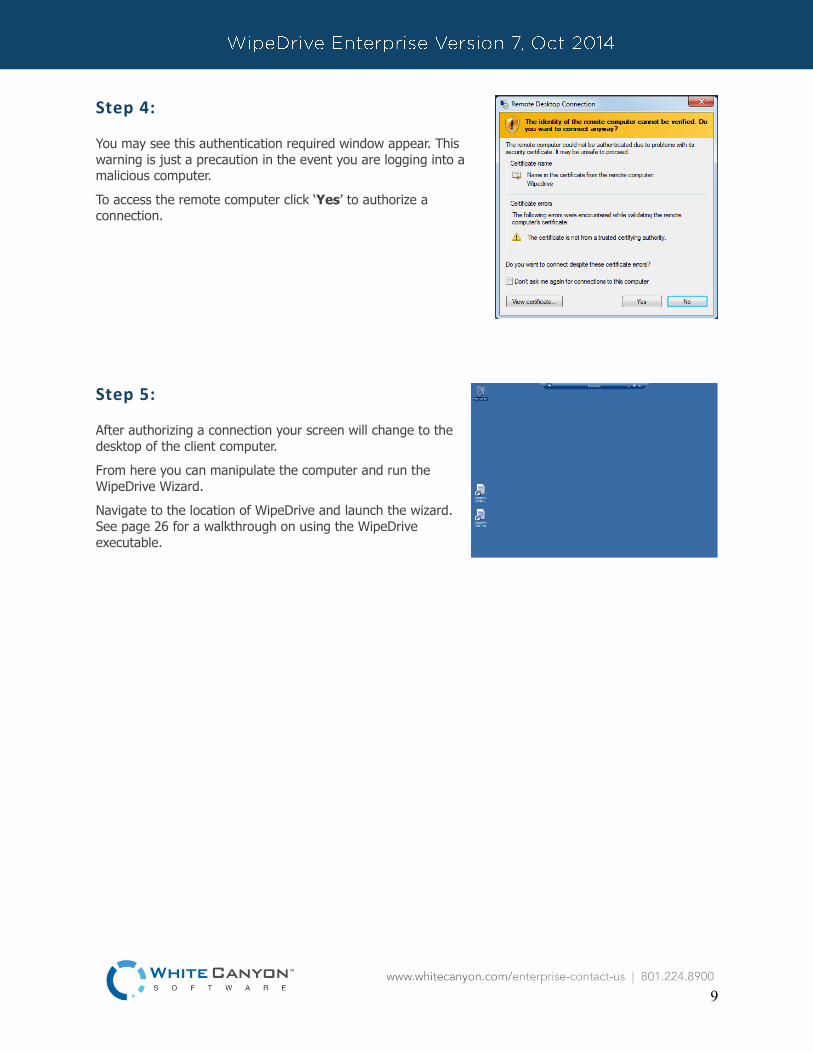
Step 4:
You may see this authentication required window appear. This
warning is just a precaution in the event you are logging into a malicious computer.
To access the remote computer click ‘Yes’ to authorize a connection.
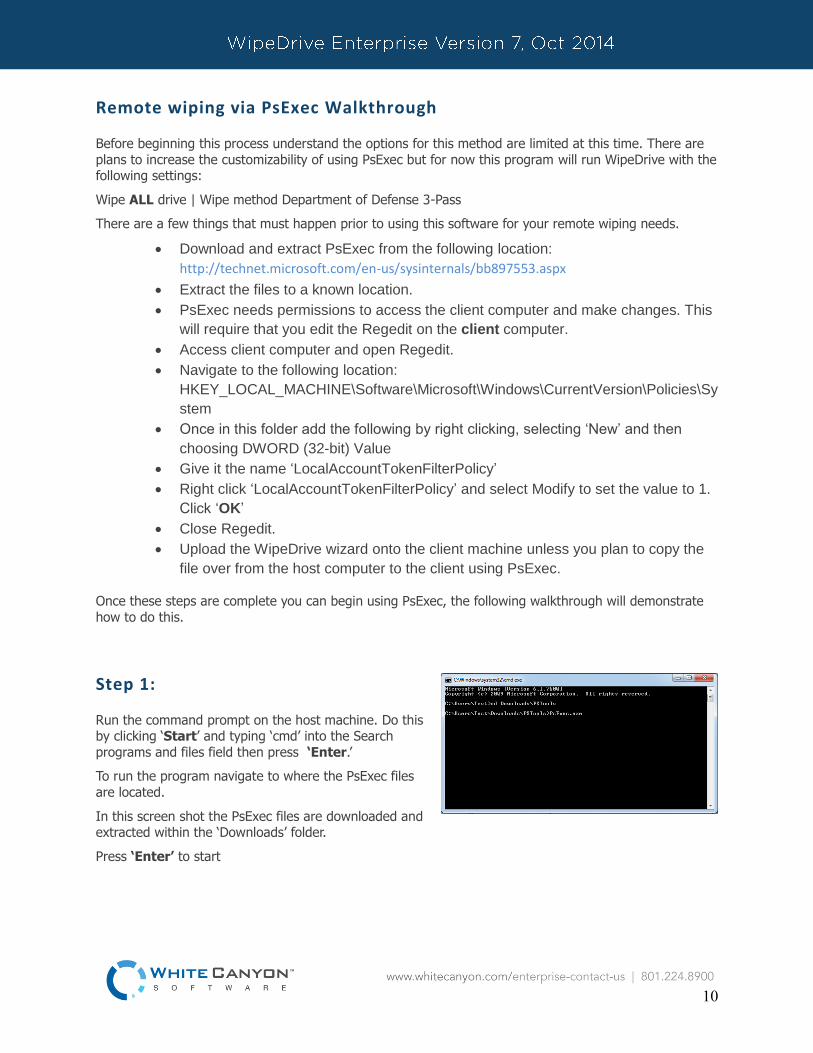
Step 5:
After authorizing a connection your screen will change to the
desktop of the client computer.
From here you can manipulate the computer and run the
WipeDrive Wizard.
Navigate to the location of WipeDrive and launch the wizard.
See page 26 for a walkthrough on using the WipeDrive
executable.
10
Remote wiping via PsExec Walkthrough
Before beginning this process understand the options for this method are limited at this time. There are
plans to increase the customizability of using PsExec but for now this program will run WipeDrive with the following settings:
Wipe ALL drive | Wipe method Department of Defense 3-Pass
There are a few things that must happen prior to using this software for your remote wiping needs.
Download and extract PsExec from the following location:
http://technet.microsoft.com/en-us/sysinternals/bb897553.aspx
Extract the files to a known location.
PsExec needs permissions to access the client computer and make changes. This
will require that you edit the Regedit on the client computer.
Access client computer and open Regedit.
Navigate to the following location:
HKEY_LOCAL_MACHINE\Software\Microsoft\Windows\CurrentVersion\Policies\Sy
stem
Once in this folder add the following by right clicking, selecting ‘New’ and then
choosing DWORD (32-bit) Value
Give it the name ‘LocalAccountTokenFilterPolicy’
Right click ‘LocalAccountTokenFilterPolicy’ and select Modify to set the value to 1.
Click ‘OK’
Close Regedit.
Upload the WipeDrive wizard onto the client machine unless you plan to copy the
file over from the host computer to the client using PsExec.
Once these steps are complete you can begin using PsExec, the following walkthrough will demonstrate
how to do this.
Step 1:
Run the command prompt on the host machine. Do this by clicking ‘Start’ and typing ‘cmd’ into the Search
programs and files field then press ‘Enter.’
To run the program navigate to where the PsExec files
are located.
In this screen shot the PsExec files are downloaded and extracted within the ‘Downloads’ folder.
Press ‘Enter’ to start

11
Step 2:
This step is split into two parts: running WipeDrive from
the WipeDrive application already on the client computer and using PsExec to copy the WipeDrive
executable to the client machine and then running it.
Part 1: Running WipeDrive from the executable already
located on the client.
This screen shot shows an example of how to use PsExec to run WipeDrive from
an executable that already exists on the client.
The following is an explanation of each command being passed to PsExec:
Psexec: runs the program
\\Test: This is the name of the client machine
–u: Username of account on client computer
–p: Password of user account on client computer
–h: This command is required for clients running Windows Vista or higher.
C:\WipeDriveWizard.exe : This is the location of the WipeDrive executable. In this
example the program is located on the root of the C drive.
--remote: Allows you to remotely start the program (Be sure to use double dashes)
--cli: must have so program knows to run in console form (Be sure to use double
dashes)
If all parameters are valid and PsExec can find the location of WipeDrive the following screen will appear:
As you can see PsExec found the WipeDrive Wizard and began installing the necessary tools to remotely run the software.
At this point the client machine will reboot into WipeDrive and begin wiping ALL drives using the Department of Defense 3-Pass wipe method.
12
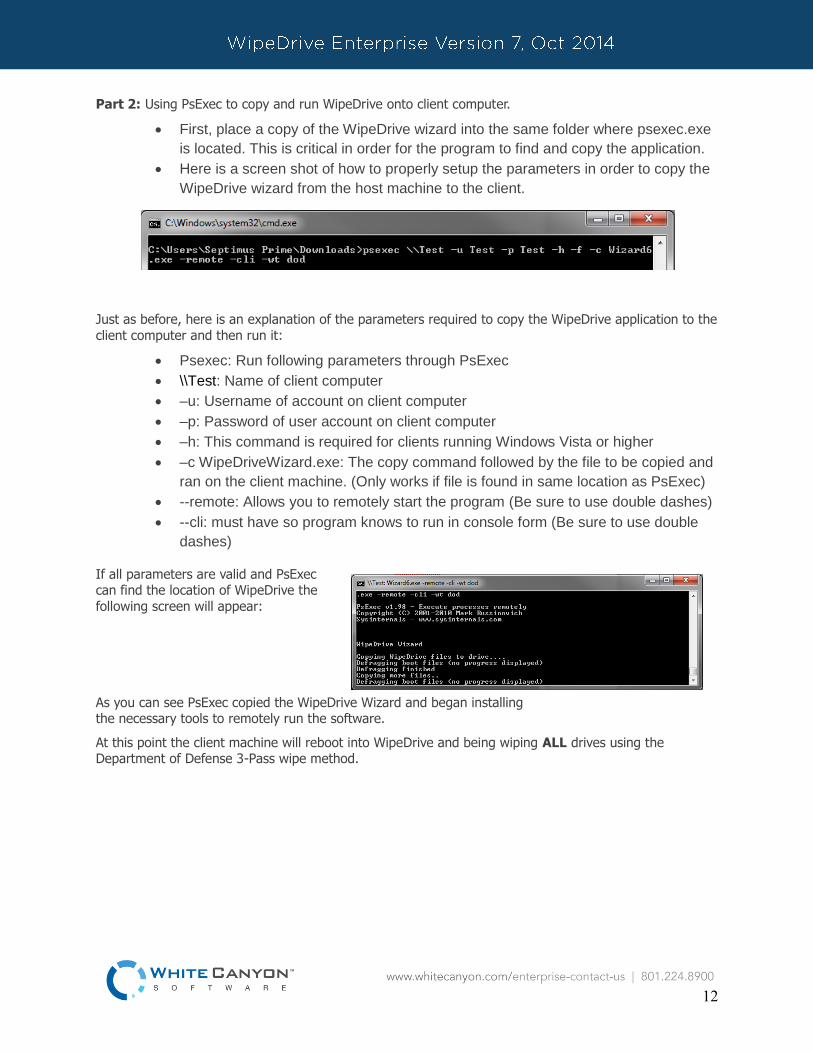
Part 2: Using PsExec to copy and run WipeDrive onto client computer.
First, place a copy of the WipeDrive wizard into the same folder where psexec.exe
is located. This is critical in order for the program to find and copy the application.
Here is a screen shot of how to properly setup the parameters in order to copy the
WipeDrive wizard from the host machine to the client.
Just as before, here is an explanation of the parameters required to copy the WipeDrive application to the
client computer and then run it:
Psexec: Run following parameters through PsExec
\\Test: Name of client computer
–u: Username of account on client computer
–p: Password of user account on client computer
–h: This command is required for clients running Windows Vista or higher
–c WipeDriveWizard.exe: The copy command followed by the file to be copied and
ran on the client machine. (Only works if file is found in same location as PsExec)
--remote: Allows you to remotely start the program (Be sure to use double dashes)
--cli: must have so program knows to run in console form (Be sure to use double
dashes)
If all parameters are valid and PsExec can find the location of WipeDrive the
following screen will appear:
As you can see PsExec copied the WipeDrive Wizard and began installing the necessary tools to remotely run the software.
At this point the client machine will reboot into WipeDrive and being wiping ALL drives using the Department of Defense 3-Pass wipe method.
13
WipeDrive Boot Via CD
OVERVIEW
Running WipeDrive via CD is normally a good choice when then number of computers to be wiped are
small as the CD must be inserted and booted on each system.
SYSTEM REQUIREMENTS
All versions of DOS, Windows 3.x, 9x, NT, 2000, XP, Vista, 7, OS/2, PC-based, 8 with disabled
UEFI
Linux, Unix and Intel-based Mac systems.
Any type of hard drive (IDE, SCSI, SATA, SSD).
CD-ROM Drive
64 MB RAM
BIOS SETTINGS
To run WipeDrive Enterprise via CD insert the disk into the computer and check that the BIOS is set to first boot from the CD drive. To change the boot sequence, access the BIOS of the computer during the
initial start-up of the system. When the computer first turns on/restarts a screen will flash with options to enter either ‘Setup’ or ‘Boot,’ as well as a key to press for each corresponding option. See table below
for known BIOS keys based on system manufacturer. The key must be pressed quickly, otherwise the
computer will continue with its usual booting routine.
Manufacturer BIOS Key
Acer®
Compaq®
Dell®
eMachine®
Gateway®
HP®
IBM®
Lenovo®
Apple®
Micron®
Sony®
Toshiba®
F1, F2, CTRL+ALT+ESC
F10
F2, DEL
DEL, F2
F1, F2
F1, F2, ESC
F1
F1, F2
Hold down Option
F1, F2, or DEL
F2, F3
ESC, F1
NOTE: If your particular computer or manufacturer is not displayed, the BIOS keys are normally either DEL or F2.
14
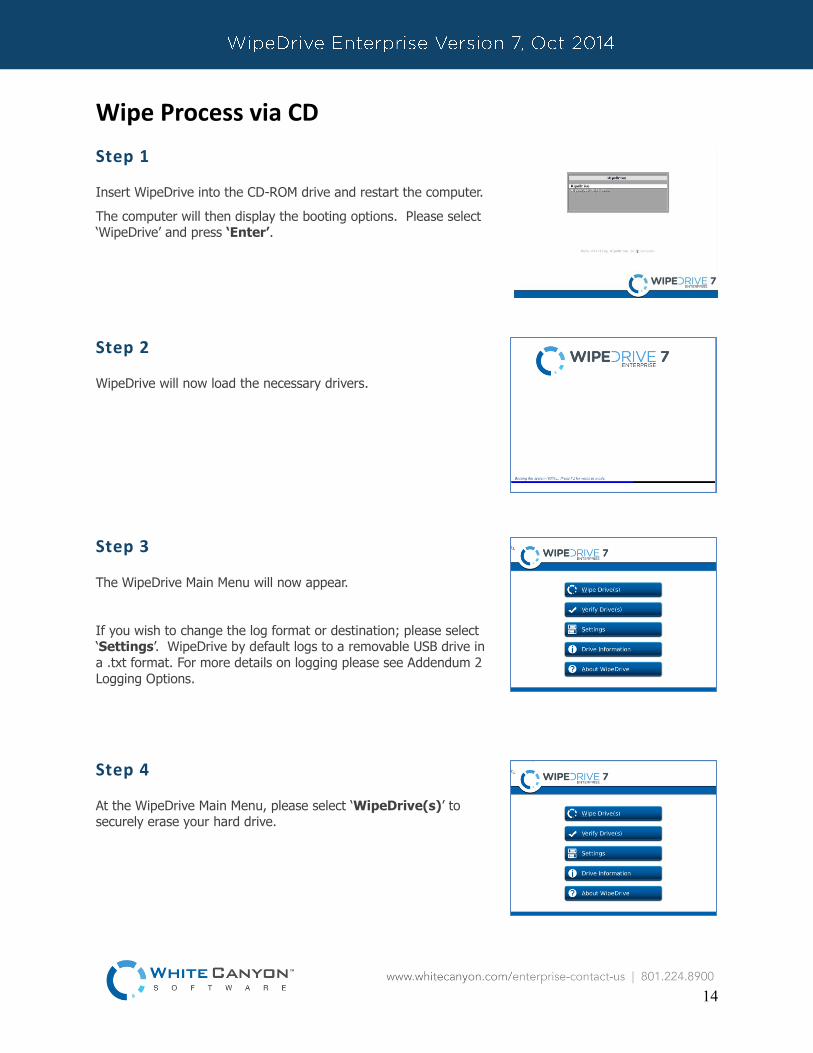
Wipe Process via CD
Step 1
Insert WipeDrive into the CD-ROM drive and restart the computer.
The computer will then display the booting options. Please select ‘WipeDrive’ and press ‘Enter’.
Step 2
WipeDrive will now load the necessary drivers.
Step 3
The WipeDrive Main Menu will now appear.
If you wish to change the log format or destination; please select ‘Settings’. WipeDrive by default logs to a removable USB drive in
a .txt format. For more details on logging please see Addendum 2
Logging Options.
Step 4
At the WipeDrive Main Menu, please select ‘WipeDrive(s)’ to securely erase your hard drive.

15
Step 5
WipeDrive will now display all attached hard drives. Please select the
drives you wish to securely erase.
The overwrite pattern can be changed on this screen. WhiteCanyon
recommends either the Standard Overwrite or the DoD 5220.22-M Overwrite Pattern.
Please see page 32 for more details on wipe patterns.
Select ‘Next’ to continue.
Step 6
WipeDrive will warn that this process is irreversible. Select ‘Wipe’ to continue.
Step 7
WipeDrive will now begin wiping the hard drive.
Warning: If you cancel the wipe before completion there may still be
recoverable data left on the drive.
Step 8
When the process is completed WipeDrive will display the Wiping
Results screen and save the log file if applicable.
Click Reboot or Shut Down to exit WipeDrive.
16
Configuration Settings
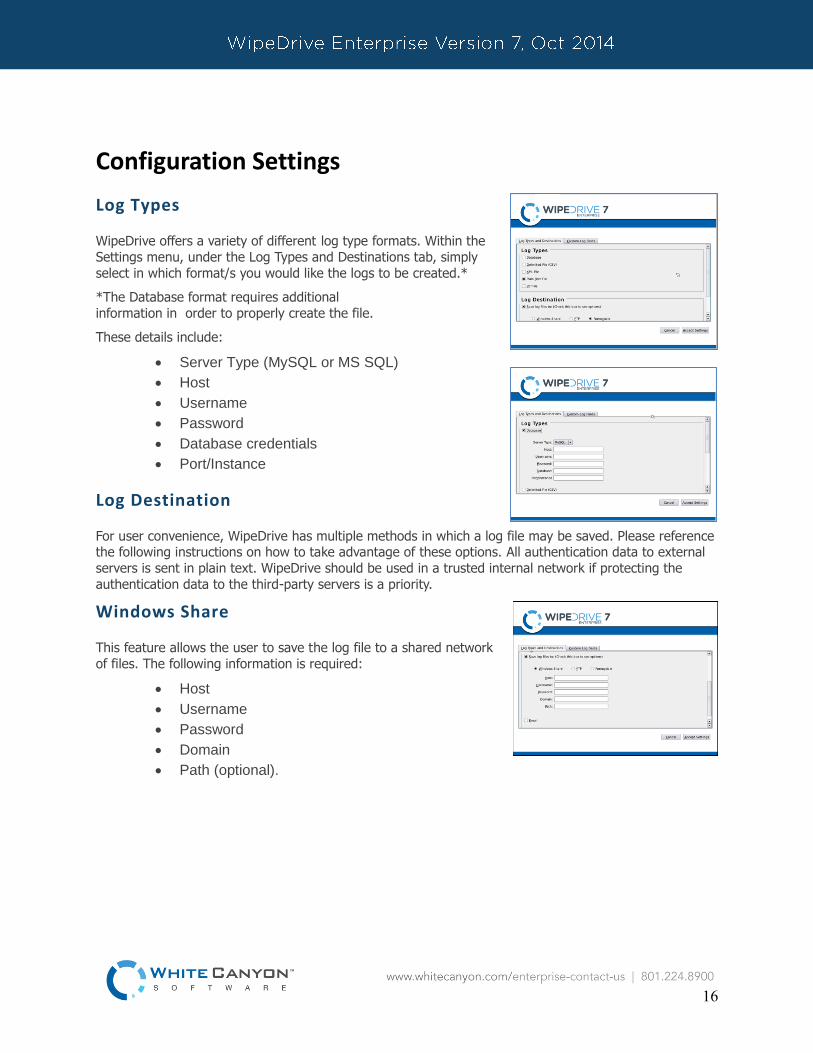
Log Types
WipeDrive offers a variety of different log type formats. Within the
Settings menu, under the Log Types and Destinations tab, simply
select in which format/s you would like the logs to be created.*
*The Database format requires additional
information in order to properly create the file.
These details include:
Server Type (MySQL or MS SQL)
Host
Username
Password
Database credentials
Port/Instance
Log Destination
For user convenience, WipeDrive has multiple methods in which a log file may be saved. Please reference the following instructions on how to take advantage of these options. All authentication data to external
servers is sent in plain text. WipeDrive should be used in a trusted internal network if protecting the
authentication data to the third-party servers is a priority.
Windows Share
This feature allows the user to save the log file to a shared network
of files. The following information is required:
Host
Username
Password
Domain
Path (optional).

17
FTP
The FTP option allows the user to save the log file to an FTP server.
This requires the following information:
Host,
Username
Password
Path (optional)
Removable
By default WipeDrive will try to log to a removable USB drive. In
order to ensure the logging process is a
success, make sure a USB drive is plugged into the computer running
WipeDrive.
WipeDrive also allows the user to send the log file to a specific email.
The user must enter the following information:
Host
Username
Password
From (sending email)
To (receiving email)
CC
Subject
Note: The sending party will be labeled as root.
Custom Log Fields
The Custom Log Fields tab under Settings allows the user to add
additional information to the log file. Information such as the Computer ID, a Username, as well as any other custom information
the user wishes include in the file.

18
Computer ID
This feature allows the user to give the computer being wiped a
specific identification label. WipeDrive will prompt the user to enter the Computer ID after the warning page prior to the initiation of the
wiping process.
Username
The username feature works the same way as the Computer ID. The user will be prompted to enter a
username prior to the wiping process.
Custom Fields
A user can add up to 10 custom log fields. Each field can be selected to prompt the User either before or
after the wiping process to enter a value or enter the default value at this screen.
19
WipeDrive Boot Via PXE
Overview
Running WipeDrive via PXE is normally a good choice when then number of computers to be wiped is
large.
Because the server controls the process, it is not necessary to attach monitors, mice or keyboards to
workstations. The progress for each individual system is displayed on the server, the only requirement is
that the boot priority for the system be set to ‘Network Boot’.
Although there is not a cap on the number of systems that can be run at once, we recommend doing no
more than 100 simultaneously on each server.
System Requirements
Computer designated to be the server (will not be wiped) with at least the following hardware:
Pentium III-class processor or better
1 GB RAM
CD-ROM drive
Network card
If using Cloud activation or logging outside the PXE network a second network
card is required.
One or more machines, referred to as the ‘clients’, with at least the following hardware:
Pentium-class processor or better
64MB RAM
Network card
Network switches and cabling to configure all of the machines (server and clients)
to be in the same network.

20
SETUP DIAGRAM
Designated
ServerWipeDrive
Enterprise
PXE Software
Client
Computers
Hard
Drives
Network
Switch

21
Wipe Process Via PXE
Step 1
Insert the WipeDrive PXE CD into the CD-ROM drive and restart the Server.
Please Note: The Server must have at least 1 GB of RAM.
The computer will then display the WipeDrive Client Screen. To edit the type of wipe, please select ‘Change Client Settings’.
Step 2
WipeDrive will now list the Wipe Settings that can be adjusted. Please select the necessary options then select the ‘Log Types and
Destinations’ tab.
Step 3
The Log Types and Log Destinations menu will allow the User to
adjust these settings. Select the necessary options and select the ‘Custom Log Fields’ tab.
Step 4
The Custom Log Fields menu will allow the User to include specific
fields in the Log File. WipeDrive will prompt for these fields prior to
running the deletion.
Please select the ‘Dongle Server’ tab.
22
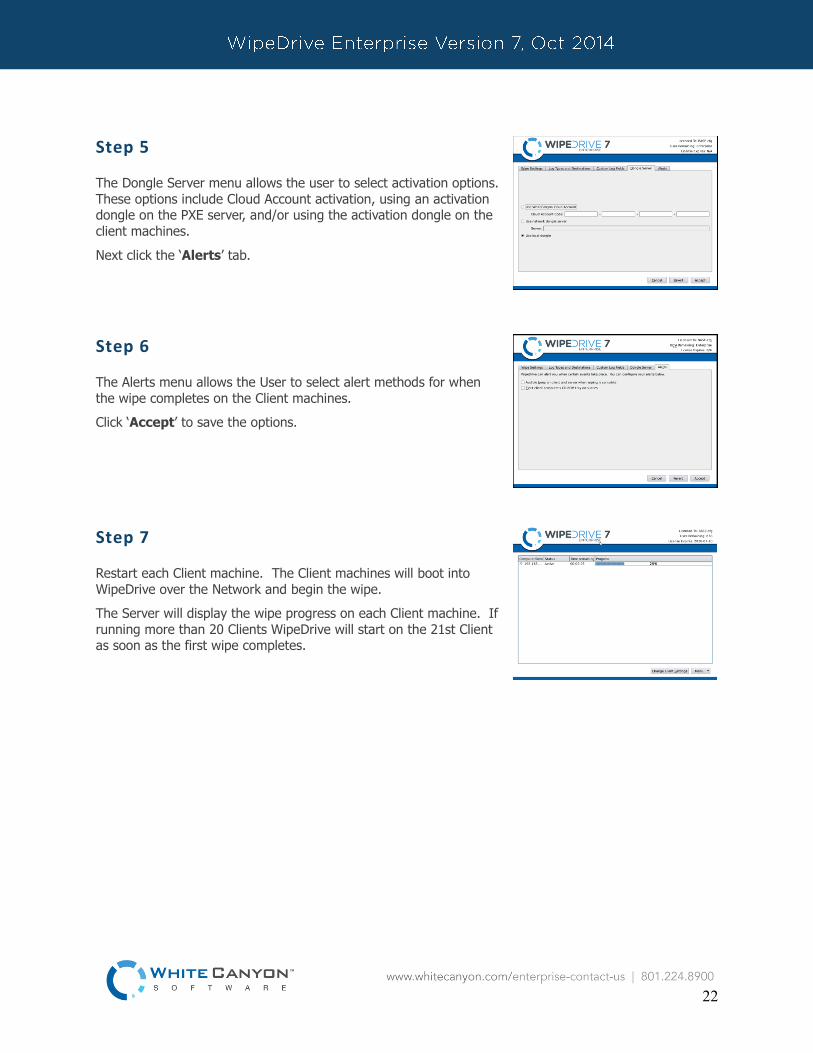
Step 5
The Dongle Server menu allows the user to select activation options.
These options include Cloud Account activation, using an activation dongle on the PXE server, and/or using the activation dongle on the
client machines.
Next click the ‘Alerts’ tab.
Step 6
The Alerts menu allows the User to select alert methods for when
the wipe completes on the Client machines.
Click ‘Accept’ to save the options.
Step 7
Restart each Client machine. The Client machines will boot into
WipeDrive over the Network and begin the wipe.
The Server will display the wipe progress on each Client machine. If
running more than 20 Clients WipeDrive will start on the 21st Client as soon as the first wipe completes.

23
Install the PXE Server
OVERVIEW
If you prefer not to boot from any bootable media each time you run the PXE server, it is possible to
install PXE to the server instead. It does not make any difference on how the software runs however, and is solely based on preference.
Step 1
Insert the WipeDrive PXE CD into the CD-ROM drive and restart the Server.
Please Note: The Server must have at least 1 GB of RAM.
The computer will then display the WipeDrive Client Screen.
Step 2
Type ‘exit’ anywhere on the screen and select yes to go to the command prompt.
From here, type the following without quotations and press enter: “cd /hard_drive_install”
Now type the following without quotations and press enter to install to the hard drive: “./hdinstall.sh”
Step 3
PXE is not installed on the machine. You can now eject the CD and restart the computer to continue PXE
as normal.

24
WipeDrive Boot Via .EXE
OVERVIEW
Running WipeDrive via EXE is normally a good choice when then number of computers to be wiped is
large and the systems are spread out over multiple locations.
The .EXE build is a scripted build of WipeDrive that can be run over a network on any x86 system to
which you have administrative rights. The system will wipe remotely and send a log file for confirmation
when the process is complete.
SYSTEM REQUIREMENTS
Computer running Windows 98, NT, 2000, 2003, XP, Vista and 7, 8 with disabled
UEFI
256 MB Free Hard Drive Space
128 MB RAM
SETUP DIAGRAM

25
Wipe Process Via .EXE
Step 1
Place WipeDrive on to the Client’s desktop. Please double click and run WipeDrive.
Step 2
Windows will now ask if you would like to run this program. Please
select Yes.
Step 3
WipeDrive may ask for an activation code, please entered the provided code given you once the purchase was made.
Most Enterprise licenses will skip this step.
In order to move forward a valid activation code is required. After
the code is entered the ‘Next’ button will activate.
Click Next to proceed to the next screen.

26
Step 4
Click on the drop down list to select which drive to wipe. There are
only two options when selection hard drives to be wiped, ‘All Drives’ or a single individual drive.
After selecting a drive click ‘Next’ to continue.
Step 5
At the Wipe Selection menu, select the required wipe and select
‘Next’.
Step 6
WipeDrive will now verify that you wish to securely overwrite the
hard drive(s). Select ‘Next’ to continue.
Step 7
Before beginning the wiping process WipeDrive will first install the required files.
Step 8
In order to overwrite the entire hard drive WipeDrive runs outside of
Windows within a Linux kernel. For this to happen the computer must restart and boot into the WipeDrive program.
Click ‘Restart’ to begin this process.

27
Step 9
Once the computer restarts you will see a ‘Boot Manager’ window.
Make sure to select WipeDrive Enterprise otherwise the computer will boot back into Windows.
Press ‘Enter’ to continue.
Step 10
At this point WipeDrive will immediately begin wiping the drive(s)
selected during setup.
This screen will provide some useful information such as ‘Time
Remaining’ and if any disk errors are detected.
Step 11
After WipeDrive finishes it will display a screen stating whether or
not the hard drive was successfully overwritten.
This concludes the WipeDrive process, you can now click either ‘Reboot’ to restart the computer and reinstall an operating system.
Or choose ‘Shut Down’ to turn the computer off.

28
Overwrite Patterns
WipeDrive Enterprise provides specific overwrite patterns in compliance with various government
agencies. The supported overwrite patterns are listed and described in detail below:
Standard Single Pass - One overwrite (0’s)
DoD 5220.22-M - Three overwrites with one verification. (0’s, 1’s, Random)
HMG IS5 Baseline - One overwrite with verification. (0’s)
HMG IS5 Enhanced - Three overwrites with verification. (0’s, 1’s, Random)
Canadian OPS-II - Seven overwrites with verification.
Canadian CSEC ITSG-06 – Three overwrites with single end verification.
US Army AR380-19 – Three overwrites with single end verification.
US AFSSI 5020 – Three overwrites with single end verification.
US AFSSI 8580
German VSITR - Seven overwrites.
NAVSO P-5239-26 - Three overwrites with verification.
NCSC-TG-025 - Three overwrites with verification.
Russian GOST P50739-95 - One overwrite.
Australian DSD ACSI-33 (XO-PD) - Three overwrites with two verifications.
SecureErase + 1 overwrite with verify or NNSA NAP 15.1-C
Custom Overwrite - User defined overwrite pattern.

29
Log Format Types
PLAIN TEXT LOG FILE OPTION
WipeDrive by default uses a plain text file format which can be saved to any destination option. A sample
plain text log file is shown below:
The text file records the following:
1. Drive information
o MANUFACTURER
o SERIAL NUMBER
o DRIVE SIZE

30
2. Settings
o User (Only applies when username prompting is selected in ‘Settings’)
o Computer ID (Only applies when Computer ID prompting is selected in ‘Settings’)
o Custom Field (Only applied when custom fields are created in ‘Setttings’)
3. Wiping Method
o Operation (Either overwrite or verify)
o Wipe Type
4. Dates and Time
o Date & Time operation started
o Date & Time operation finished
o Total elapsed time
o Result of operation
5. Hard Drive Results
o Disk sector read/write errors
o Dirty/Unreadable disk sectors
o HPA Detected
o HPA Erased
o Secure Erase Utilized

31
EXTENSIBLE MARKUP LANGUAGE (XML) LOG FILE OPTION
WipeDrive Enterprise can create an XML log file, which is a one page certificate detailing the system
hardware and wipe process. The log file type can be changed under ‘Settings.’
A sample XML file is shown below:
The XML log file contains the following information if applicable:
1. Hardware Information
o Computer Vendor
o Computer Model

32
o Computer Serial Number
o Motherboard Vendor
o Motherboard Model
o Processor
o RAM
o NIC
o Hard Drive
o Display Adapter
o Multimedia Adapter
o Number of USB ports
o Number of USB2 ports
2. Hardware Tests
o Motherboard
o Processor
o Memory
o Display
o Keyboard
3. Wipe Information
o Number of Target Drive
o Manufacturer of Hard Drive
o Drive Model
o Drive Serial Number
o Hard Drive Size
o Time Operation Began
o Result of Operation
o Username (Only applies if Username prompt is selected under ‘Settings.’)
o Computer ID (Only applies if Computer ID prompt is selected under ‘Settings.’)
o Custom Field (Only applied if custom fields are created under ‘Settings.’)
o Duration
o Wipe Method
o Dirty Sectors
o Drive Errors Detected
o HPA Found
o HPA removed
o Secure Erase Passes
33
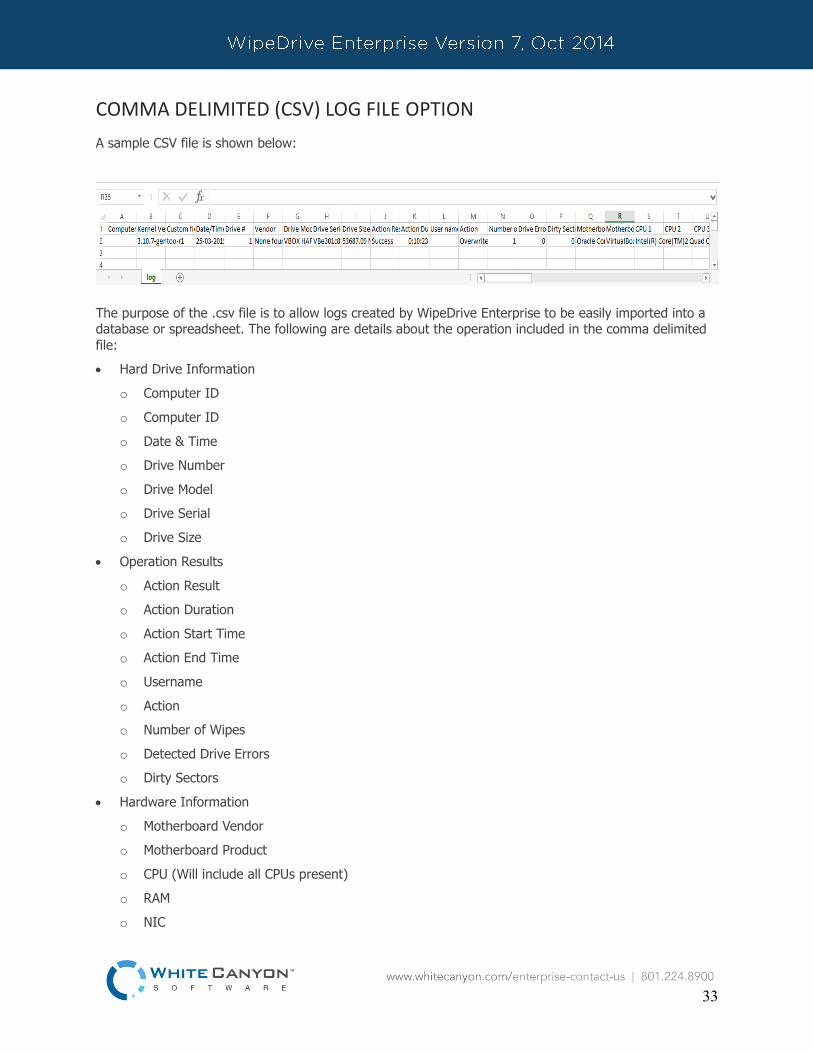
COMMA DELIMITED (CSV) LOG FILE OPTION
A sample CSV file is shown below:
The purpose of the .csv file is to allow logs created by WipeDrive Enterprise to be easily imported into a database or spreadsheet. The following are details about the operation included in the comma delimited
file:
Hard Drive Information
o Computer ID
o Computer ID
o Date & Time
o Drive Number
o Drive Model
o Drive Serial
o Drive Size
Operation Results
o Action Result
o Action Duration
o Action Start Time
o Action End Time
o Username
o Action
o Number of Wipes
o Detected Drive Errors
o Dirty Sectors
Hardware Information
o Motherboard Vendor
o Motherboard Product
o CPU (Will include all CPUs present)
o RAM
o NIC

34
o Optical Drive
o Hard Drive(s)
o Video Card
o Multimedia Card
o Number of USB ports
o Number of USB2 ports
o Hardware Test Results
o Motherboard Test
o Processor Test
o Memory Test
o Display Test
o Keyboard Test
Computer Information
o Computer Vendor
o Computer Model
o Computer Serial
Hard Drive Security Features
o HPA Detected
o HPA Removed
o DCO Detected
o DCO Removed
o Secure Erase Passes
o Secure Erase Enhanced Passes
o User Number
o Username

35
PDF LOG FILE OPTION
WipeDrive includes the option to log a report in PDF format which can be saved to any destination option.
An example can be seen below:
This report includes the following details:
Hardware Information
o Computer Vendor
o Computer Model
o Computer Serial
o Motherboard Vendor
o Motherboard Model
o Processor
o RAM
o NIC
o Which includes: Vendor and Mac Address
o DVD Writer
o Drive(s)
o Which includes: Vendor, Product, Serial, and Size
o Display Adapter
o Multimedia Adapter
o USB Ports
36
Hardware Tests (Pass/Fail)
o Motherboard
o Processor
o Memory
Wipe Information
o Software Version
o Target Drive
o Wipe Method
o Action Result
o Time
o Duration
o Vendor
o Drive Model
o Drive Serial
o Drive Size
o Dirty Sectors
o Drive Errors Detected
o DCO Found
o DCO Removed
o HPA Found
o HPA Removed
o Secure Erase Passes
37
Audit Log Destination Options
USB DRIVE OPTION
Any log file type can be sent to a USB drive connected to the wipe machine. The USB drive must meet
the following criteria:
1. The USB size must be less than 16 GB otherwise WipeDrive see it as an external HDD.
2. Formatted in Fat 32; Linux prefers this type of format.
3. The USB drive must be formatted and connected prior to booting into WipeDrive.
LOCAL FILE SYSTEM OPTION
WipeDrive Enterprise will write any of the log file types to a local location on the current machine. This
option requires the user to designate the file system location within the Linux kernal.
NETWORK FILE SYSTEM OPTION
WipeDrive Enterprise will write any of the log file types to a location on the local network. This log option requires a network connection for the PC and permission to access the designated folder. It also needs
the following information:
1. Protocol – Samba/rsync(SSH)/FTP
2. Server Name
3. User Name
4. Password
5. Path
EMAIL OPTION
WipeDrive Enterprise will send any of the log file types to a specific email address. This log location
requires the following information:
1. Server Name
2. From
3. To
4. CC
5. SMTP Username
6. SMPT Password
38
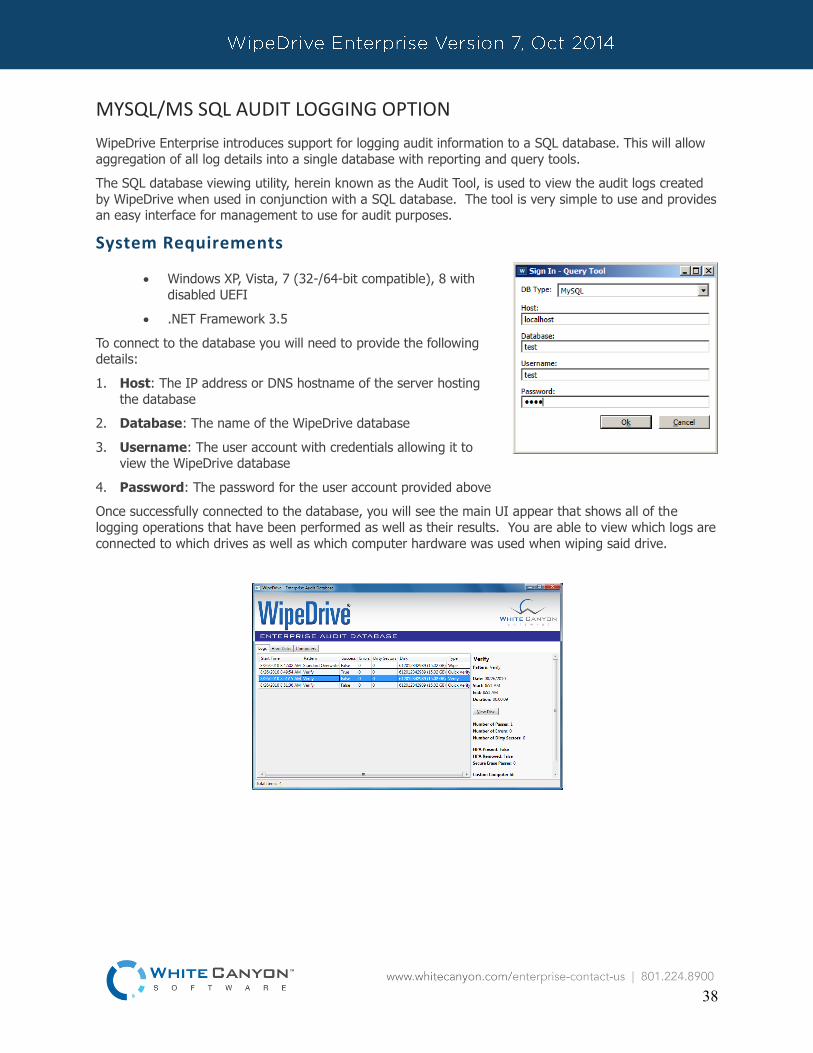
MYSQL/MS SQL AUDIT LOGGING OPTION
WipeDrive Enterprise introduces support for logging audit information to a SQL database. This will allow
aggregation of all log details into a single database with reporting and query tools.
The SQL database viewing utility, herein known as the Audit Tool, is used to view the audit logs created
by WipeDrive when used in conjunction with a SQL database. The tool is very simple to use and provides an easy interface for management to use for audit purposes.
System Requirements
Windows XP, Vista, 7 (32-/64-bit compatible), 8 with
disabled UEFI
.NET Framework 3.5
To connect to the database you will need to provide the following details:
1. Host: The IP address or DNS hostname of the server hosting
the database
2. Database: The name of the WipeDrive database
3. Username: The user account with credentials allowing it to view the WipeDrive database
4. Password: The password for the user account provided above
Once successfully connected to the database, you will see the main UI appear that shows all of the
logging operations that have been performed as well as their results. You are able to view which logs are
connected to which drives as well as which computer hardware was used when wiping said drive.

39
Addendum 1 - Setting Up SQL Logging
System Requirements (Server)
MySQL Server 5.0 (or newer)
MS SQL Server 2008 (or newer)
Any operating system that supports a MySQL/MS SQL installation
System Requirements (Workstation/Client)
Windows XP, Vista, or 7, 8 with disabled UEFI
.NET Framework 2.0 (or newer)
Preparation
Before the database can be initialized, you will need to create a new blank database. This step must be
performed by hand. For security purposes, it is also highly recommended to create a new user who only
has access to this database. Please consult the MySQL/MS SQL documentation or your systems administrator if you need assistance creating the database or new user.
Initialization
Once the database has been created, launch the WipeDrive Database Initializer. A screenshot of the user
interface:
Please fill in all provided fields:
1. Database Name: The name of the newly created database.
2. Host: The machine hosting the SQL database. This can be either an IP address or a DNS hostname.
3. Username: The name of a SQL user that has sufficient
privileges to create tables in the database you just created.
4. Password: The password for above username.
Click the ‘Populate Database’ button to complete initialization of the database. If there are any errors during the initialization process,
the program will display a message box with debugging information.
Once complete the server is configured for use with WipeDrive
Enterprise.
SQL Database Viewer (Audit Tool)
The SQL database viewing utility, herein known as the Audit Tool, is used to view the audit logs created by WipeDrive when used in conjunction with a SQL database. The tool is very simple to use and provides
an easy interface for management to use for audit purposes.
40
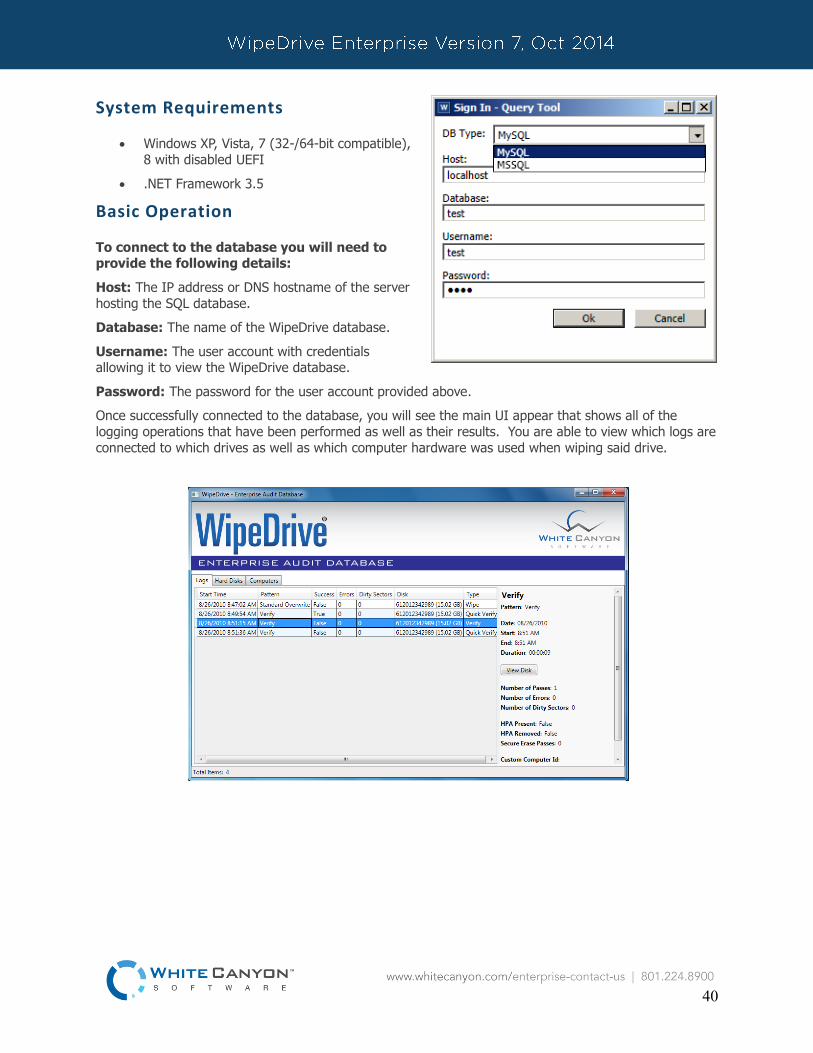
System Requirements
Windows XP, Vista, 7 (32-/64-bit compatible),
8 with disabled UEFI
.NET Framework 3.5
Basic Operation
To connect to the database you will need to provide the following details:
Host: The IP address or DNS hostname of the server
hosting the SQL database.
Database: The name of the WipeDrive database.
Username: The user account with credentials allowing it to view the WipeDrive database.
Password: The password for the user account provided above.
Once successfully connected to the database, you will see the main UI appear that shows all of the
logging operations that have been performed as well as their results. You are able to view which logs are
connected to which drives as well as which computer hardware was used when wiping said drive.

41
Addendum 2 - Wipe Process TUI (Text User Interface)
Step 1
Insert WipeDrive into the CD-ROM drive and restart the computer.
The computer will then display the booting options. Please select ‘WipeDrive – text mode’ and press Enter.
Step 2
WipeDrive will now load.
Step 3
The WipeDrive TUI Main Menu will now appear.
If you wish to change the log format or destination, please type ‘6.’
WipeDrive by default logs to a removable USB Drive in a .txt format.
For more details on logging please see Addendum 2 Logging Options.
Step 4
At the WipeDrive TUI Menu, please key down to whichever option corresponds to the drive you would like to securely erase and press
‘Spacebar’ to select. Press ‘Enter’ to continue.
Step 5

42
The overwrite pattern can be changed on thisscreen. Key to the
method you wish to use to erase the hard drive and press ‘Spacebar’ to select.
WhiteCanyon recommends either the Standard Overwrite or the DoD 5220.22-M Overwrite Pattern. Please see page 32 for more details on
wipe patterns.
Press ‘Enter’ to continue.
Step 6
WipeDrive will warn that this process is irreversible.
Press ‘Enter’ to continue.
Step 7
WipeDrive will now begin wiping the hard drive.
Warning: If you cancel the wipe before completion there may still
be recoverable data left on the drive.
Step 8
When the process is completed WipeDrive will display the Wiping
Results screen and save the log file if applicable.
Press ‘Enter’ to return to TUI Menu.

43
Addendum 3 - Command Line Parameters
Apart from both the TUI and GUI, WipeDrive can be run from the command line using the following
optional parameters below. In order to access the command line, simply press ESC anytime within the TUI.
When at the command prompt, typing ‘wipedrive’ with no parameters will start the standard TUI driven
WipeDrive program.
Command Line Usage:
Example setup:
wipedrive --wipe-level=1 --disk=0 --log-directory=removable --log-file-types=x
This particular command tells WipeDrive to perform a Standard Overwrite on the first hard drive and to record an XML log to an attached USB drive.
Here is a list of each wipe method and its corresponding character:
Wipe Level Name List:
1 = Single Overwrite (RECOMMENDED)
(Recommended for most security needs.)
Note: Overwriting data once will make it impossible for anyone to recover your data using any software program.
2 = DoD 5220.22-M 3-Pass
3 = DoD 5220.22-M 7-Pass
4 = HMG IS5 Baseline
5 = HMG IS5 Enhanced
6 = Canadian OPS-II
7 = US Army AR380-19
8 = US Air Force 5020
9 = German VSITR
a = NAVSO P-5239-26
b = NCSC-TG-025
c = Russian GOST P50739-95
d = Australian ASCI-33 (X0-PD)
e = Australian ASCI-33 (X1-P-PD)
f = Canadian CSEC ITSG-06
g = Air Force 8580
z = Custom Overwrite pattern
Here is a list of commonly used command parameters.
44
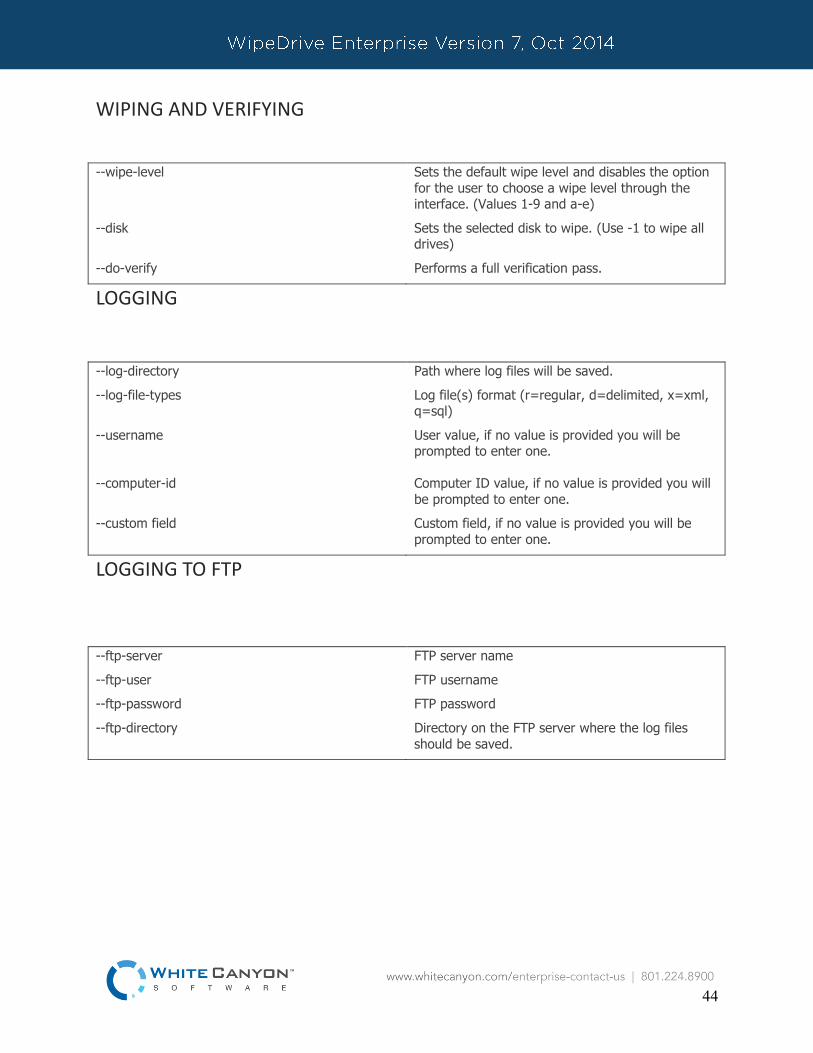
WIPING AND VERIFYING
LOGGING
LOGGING TO FTP
--wipe-level Sets the default wipe level and disables the option
for the user to choose a wipe level through the interface. (Values 1-9 and a-e)
--disk Sets the selected disk to wipe. (Use -1 to wipe all drives)
--do-verify Performs a full verification pass.
--log-directory Path where log files will be saved.
--log-file-types Log file(s) format (r=regular, d=delimited, x=xml, q=sql)
--username
User value, if no value is provided you will be prompted to enter one.
--computer-id Computer ID value, if no value is provided you will
be prompted to enter one.
--custom field Custom field, if no value is provided you will be
prompted to enter one.
--ftp-server FTP server name
--ftp-user FTP username
--ftp-password FTP password
--ftp-directory Directory on the FTP server where the log files
should be saved.
45
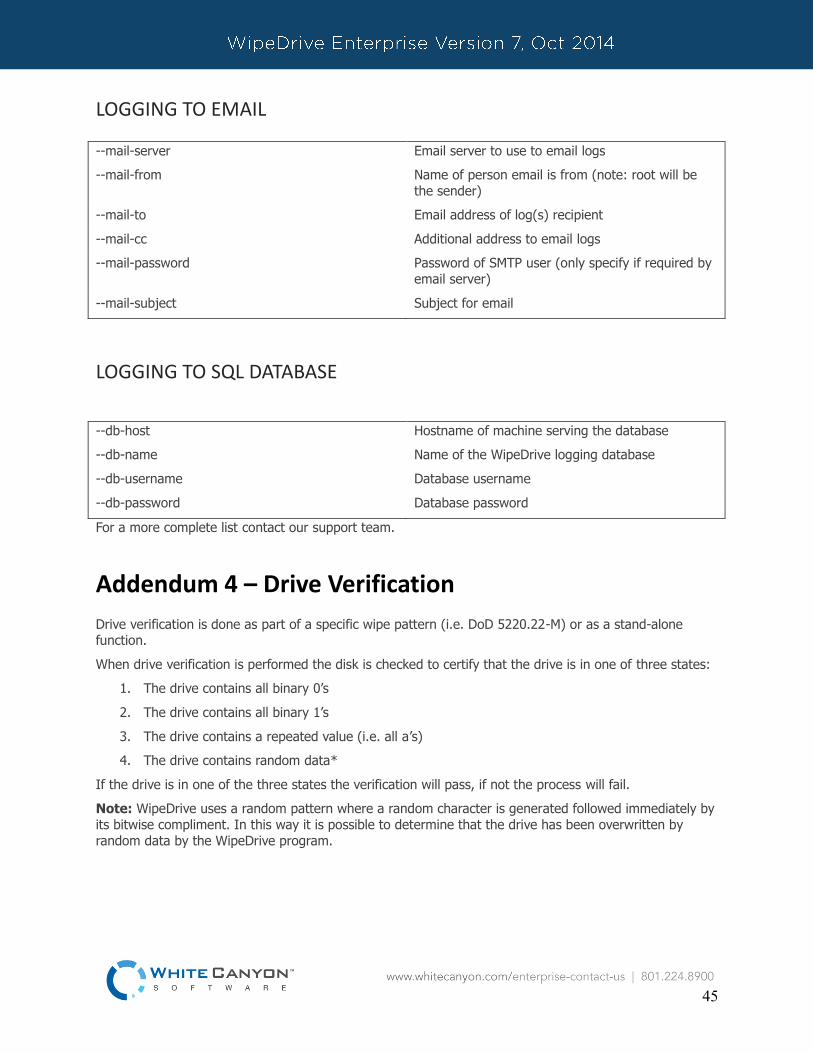
LOGGING TO EMAIL
LOGGING TO SQL DATABASE
For a more complete list contact our support team.
Addendum 4 – Drive Verification
Drive verification is done as part of a specific wipe pattern (i.e. DoD 5220.22-M) or as a stand-alone function.
When drive verification is performed the disk is checked to certify that the drive is in one of three states:
1. The drive contains all binary 0’s
2. The drive contains all binary 1’s
3. The drive contains a repeated value (i.e. all a’s)
4. The drive contains random data*
If the drive is in one of the three states the verification will pass, if not the process will fail.
Note: WipeDrive uses a random pattern where a random character is generated followed immediately by
its bitwise compliment. In this way it is possible to determine that the drive has been overwritten by
random data by the WipeDrive program.
--mail-server Email server to use to email logs
--mail-from Name of person email is from (note: root will be
the sender)
--mail-to Email address of log(s) recipient
--mail-cc Additional address to email logs
--mail-password Password of SMTP user (only specify if required by
email server)
--mail-subject Subject for email
--db-host Hostname of machine serving the database
--db-name Name of the WipeDrive logging database
--db-username Database username
--db-password Database password