table of contents - vtechworks.lib.vt.edu€¦ · web viewthese are motivation, what is it?,...
TRANSCRIPT

Python4MLAn open-source course for everyone
Team: James Hopkins | Brendan Sherman | Zachery Smith | Eric Wynn
Client: Amirsina Torfi
Instructor: Dr. Edward FoxCS 4624: Multimedia, Hypertext, and Information Access
Virginia Tech, Blacksburg VA 240615/12/2019

1
Table of Contents
Table of Contents.....................................................................................................................1
Table of Figures.......................................................................................................................3
Table of Tables.........................................................................................................................4
Executive Summary.................................................................................................................5
Introduction..............................................................................................................................6
Objective.................................................................................................................................6
Deliverables............................................................................................................................6
Client......................................................................................................................................7
Team......................................................................................................................................7
Requirements...........................................................................................................................9
Functional Machine Learning Course.....................................................................................9
Robust Documentation...........................................................................................................9
Sphinx and reStructuredText..................................................................................................9
Design.....................................................................................................................................10
Implementation.......................................................................................................................12
Evaluation...............................................................................................................................13
User Manual............................................................................................................................14
Site Navigation.....................................................................................................................14
Homepage........................................................................................................................15
Introduction.......................................................................................................................17
Cross-Validation...............................................................................................................19
Linear Regression.............................................................................................................20
Overfitting and Underfitting...............................................................................................21
Regularization...................................................................................................................22
Logistic Regression..........................................................................................................23
Naive Bayes Classification...............................................................................................24
Decision Trees..................................................................................................................25
k-Nearest Neighbors.........................................................................................................26
Linear Support Vector Machines......................................................................................27
2
Clustering..........................................................................................................................28
Principal Component Analysis..........................................................................................29
Multi-layer Perceptron.......................................................................................................30
Convolutional Neural Networks........................................................................................31
Autoencoders....................................................................................................................32
Contributing.......................................................................................................................33
Contributor Covenant Code of Conduct............................................................................34
License..............................................................................................................................35
Running the Code................................................................................................................36
Contributing..........................................................................................................................39
Developer Manual..................................................................................................................40
Scripting................................................................................................................................47
Contributing..........................................................................................................................49
General Contribution Guidelines.......................................................................................50
Lessons Learned....................................................................................................................52
Timeline................................................................................................................................52
Problems..............................................................................................................................53
Solutions...............................................................................................................................53
Future Work..........................................................................................................................53
Acknowledgements...............................................................................................................54
References..............................................................................................................................55
Appendices.............................................................................................................................62
Appendix A: User testing feedback......................................................................................62

3
Table of Figures
1. Python4ML VTURCS poster design..........................................................................................72. Course Hierarchy.....................................................................................................................103. Course homepage and table of contents.................................................................................154. Read the Docs menu...............................................................................................................165. Edit on GitHub link...................................................................................................................166. Course Introduction page........................................................................................................177. Links to additional background information.............................................................................188. The Cross-Validation module..................................................................................................199. The Linear Regression module...............................................................................................2010. The Overfitting and Underfitting module................................................................................2111. The Regularization module....................................................................................................2212. The Logistic Regression module...........................................................................................2313. The Naive Bayes Classification module................................................................................2414. The Decision Trees module...................................................................................................2515. The k-Nearest Neighbors module..........................................................................................2616. The Linear Support Vector Machines module.......................................................................2717. The Clustering module..........................................................................................................2818.The Principal Component Analysis module............................................................................2919. The Multi-layer Perceptron module.......................................................................................3020. The Convolutional Neural Networks module.........................................................................3121. The Autoencoders module....................................................................................................3222. The course Contributing page...............................................................................................3323. Contributor Code of Conduct page........................................................................................3424. Course License page.............................................................................................................3525. Full repository tree.................................................................................................................4226.An rST paragraph...................................................................................................................4327. An example of Python syntax highlighting.............................................................................4328. An example of a code output block.......................................................................................4429. An embedded link..................................................................................................................4430. A short script with helpful comments and end-user output....................................................4731. A longer script with comments and explanations..................................................................4832. Projects tab............................................................................................................................51

4
Table of Tables
1. References for each module...................................................................................................112. A simple RST table..................................................................................................................453. A verbose RST table...............................................................................................................464. Project timeline........................................................................................................................52

5
Executive Summary
Our project is a modular, open-source course on machine learning in Python. It was built under the advisement of our client, Amirsina Torfi. It is designed to introduce users to machine learning topics in an engaging and approachable way. The initial release version of the project includes a section for core machine learning concepts, supervised learning, unsupervised learning, and deep learning. Within each section, there are 2-5 modules focused on specific topics in machine learning, including accompanying example code for users to practice with. Users are expected to move through the course section-by-section completing all of the modules within the section, reading the documentation, and executing the supplied sample codes. We chose this modular approach to better guide the users as far as where to start with the course. This is based off of the assumption that users starting with a machine learning overview and the basics will likely be more satisfied with the education they gain than if they were to jump into a deep topic immediately. Alternatively, users can start at their own level within the course by skipping over the topics they already feel comfortable with. The two main components of the project are the course website and Github repository. The course uses reStructuredText for all of its documentation so we are able to use Sphinx to generate a fully functioning website from our repository. Both the website and repository are publicly available for both viewing and suggesting changes. The design of the course facilitates collaboration in the open-source environment, keeping the course up to date and accurate.

6
Introduction
The title of this project is called “Python for Machine Learning - A Course for Everybody. A roadmap on how to start thinking and developing like a machine learning expert without knowing anything about machine learning” and may be referred to as “Python for Machine Learning - A Course for Everybody” or “Python4ML” for short.
ObjectiveOur team set out to create a fully functioning course on machine learning using Python because we noticed a distinct lack in fully-comprehensive, accessible machine learning tutorials. Python was used as the primary tool for developing this course because of its simplicity and prevalence in the machine learning community. The team was involved in different development areas such as code development, documentation, media creation, and web development over the course of this project.
Python4ML is completely open source, and we encourage future developers or other contributors to use open source material for educational purposes. We worked with the Open Source for Science (OSS) organization at Virginia Tech in order to develop course content and our site deliverable. This organization aims to enrich developers using software developed by participants in an open-source community.
Speed of development, flexibility, cost-efficiency, and greater business acceptance makes open-source products extremely important in the fields of research and industry. Currently, however, there is a lack of attention to open-source development in the field of education that we seek to remedy. Our hope is that the code is reliable and understandable so that it can be applicable outside of the project.
DeliverablesThe deliverables for this capstone project are:
1. An open-source repository of topic documentation and associated codehttps://github.com/machinelearningmindset/machine-learning-course
2. A multimedia website created from the repositoryhttps://machine-learning-course.readthedocs.io/en/latest/
7
3. A poster submission and presentation to VTURCS at Virginia Tech
Figure 1. Python4ML VTURCS poster design
4. This final report covering the user and developer manuals and a final presentation
ClientOur client is Amirsina Torfi, a Ph.D student at Virginia Tech and the head of the OSS organization. He has a deep interest in machine learning and deep learning, and is interested in developing software packages and open-source projects. Some of his previous open-source works are “TensorFlow Course” and “Deep Learning Ocean”. At the time of writing, the TensorFlow course is ranked 9th globally on GitHub.
TeamOur team consists of the following students: James Hopkins, Brendan Sherman, Zachery Smith, and Eric Wynn. We are all seniors in computer science, graduating this semester. We are interested in the education focus of this assignment, having learned a lot about computer science from similar tutorials. Each of us have similar roles - we all create tutorials for a specific module and create Python code to go along with it. Each one of us reviews the others’ tutorials and adds suggestions on what to add and elaborate more on. Here’s a short bio from each of us:
Eric Wynn is currently working on an undergraduate research project with the mining department to create VR learning tools. The project's end goal is to help students learn to identify hazards in a mine and take proper steps to fix them. After graduation, he will be working for Google on the Google Ads team, which is a clear use case of machine learning, sparking his interest in this project.

8
James Hopkins is interested in learning more about machine learning through this project. He has a lot of experience with Python, working as a CS/Math tutor for several years as well as developing multiple Python RESTful APIs during a summer internship at Rackspace. After graduation, he will be joining Rackspace as a software developer. James likes to tinker around with his personal server in his free time - he hosts game servers for his friends and he recently set up a web server and website on it.
Brendan Sherman is interested in cybersecurity and machine learning. He has experience in Python and has worked on projects using Python's OpenCV library for image processing. He also has experience with matplotlib and scipy. After graduation, he will be working for Sila Solutions Group as a software engineer.
Zac Smith is interested in learning about machine learning, and has experience in Python. Python was his first language he learned but he has a more experience in Java. He is looking forward to doing more with Python. After graduation, he plans to work as a software developer in the Blacksburg area.

9
Requirements
Based on our objective, we met with our client and agreed on a set of requirements we must meet to bring open-source education about machine learning to users. Our first requirement is to develop a fully functional modularized course, designed to educate people about the topic. With our modules, we want our code and tutorials to be heavily documented. Participants in the course are not expected to have prior knowledge about machine learning and good documentation will help them replicate results. We also are going to have our course website be built through Sphinx and reStructuredText (rST). At the start of this capstone project, the team had very little experience with machine learning. All content created must be original and will be under the assumption that the user has no prior knowledge on the topic.
Functional Machine Learning CourseThe fully developed course will be capable of educating participants in machine learning topics. It will begin with introductory material and make its way to more complicated machine learning topics. Provided with the text of the course will be code examples so that participants can see the material in action. The code will also allow participants to reverse engineer and edit components to get a better understanding of machine learning.
This is a introductory course to machine learning, so we want all content created to educate users that have little to no experience with machine learning. All content needs to be easily understood, even by someone who has little experience with programming.
Robust DocumentationA requirement from our client was that the focus of our effort must be put into documentation and not development. This was seen as a shortfalling of other educational open-source material that should not be present in this project. Because of this, at least 50% of our time should be directed towards documentation. This includes code as well as the actual text of the course.
Sphinx and reStructuredTextWe decided early on to use Sphinx and reStructuredText to write up and display our course materials. Sphinx is a documentation tool that uses the plaintext markup language reStructuredText. Sphinx is a great tool for Python documentation and makes it easy for us to translate tutorials written in the rst format to beautiful web pages.

10
Design
The course is organized in a hierarchical structure. There are general sections related to various types of machine learning that contain modules for specific topics. Figure 2 shows the structure of the module system.
Figure 2. Course Hierarchy
Each module also contains associated Python scripts for users to follow along with. The modules are designed to be easy to follow and focus on need-to-know information for the topic. Calculations involving advanced math topics are largely excluded from the modules in order to keep the course at an entry level.
11
References by Section
Several references were used as background materials for the creation of these modules. They are listed in Table 1 under their appropriate module, and full citations can be found in the References section of this report.
Table 1. References for each module
Topic References
Introduction [1] [2] [3] [4]
Linear Regression [5] [6] [7] [8] [9] [10] [11] [12]
Overfitting / Underfitting [13] [14] [15]
Regularization [16] [17] [18] [19] [20]
Cross-Validation [21] [22] [23] [24]
K-Nearest Neighbors [25] [26] [27] [28]
Decision Trees [29] [30] [31] [32] [33]
Naive Bayes [34] [35] [36] [37]
Logistic Regression [38] [39] [40] [41] [42] [43] [44] [45] [46] [47]
Support Vector Machines [48] [49] [50] [51] [52] [53]
Clustering [54] [55] [56] [57] [58]
Principal Component Analysis [59] [60] [61] [62] [63] [64]
Multi-layer Perceptron [65] [66] [67] [68] [69]
Convolutional Neural Networks [70] [71] [72] [73] [74] [75] [76]
The Autoencoders section was written by our client, and Scikit-learn [77] was also used extensively throughout the course.

12
Implementation
The course is built with Sphinx and reStructuredText (rST), as previously discussed. This allows the project to be built into a professional site, and still be easily editable through simple markup files. In support of maintainability, it is hosted on GitHub as an open-source repository. This allows the course to be worked on at any time, and stay up to date with current trends and methods. An in-depth discussion of rST can be found in the Developer Manual.
Code examples are written entirely in Python because of its ease of use and strong machine learning community. Each code example is made to be visual, either creating a graph shown in the module or a similar one in order to explore the concept further.
Sample code typically uses the scikit-learn, matplotlib, pandas, and numpy Python modules, which provide facilities to keep the code relatively simple in the complex world of machine learning. These libraries were chosen for their popularity and usability, particularly because each is very well documented on their respective site.
The website itself automatically updates when changes are pushed to the master branch. This is done by using a GitHub webhook into the host to automatically pull, build, and publish changes.

13
Evaluation
In order to maintain quality in the modules and code, we established a system for peer reviews through GitHub. With each new module and accompanying code, there must be a peer review done by another member of the team. They review the module for overall understanding, mechanics and grammar, clarity, and thoroughness. The code is also run to make sure that it is functional and that the output and comments are clear. All code must be well-documented to be accepted into the repository. When the reviewer is satisfied, only then can the module be accepted into the main repository. The review process takes place over a wide range of time, from a few hours to a week, depending on the amount and scale of the changes.
The next round of testing was conducted with sample users. We were aware of students who fit our preferred user profile that had expressed interest in viewing the course. These users preferably had little to no machine learning background to better simulate the expected end user’s experience. We assigned testers modules to look at and had them navigate through those parts of the course. After this was completed, we asked them to provide us with feedback for improvement. We wanted to be able to catch any major errors such as broken links before deployment. We also wanted to know if the text of the modules was engaging and easy to understand. This testing phase proved very useful as there were lots of changes that were made to improve navigation and user experience. Full user feedback for each module is included in Appendix A.
Our next step after deployment is for evaluation of the course to be done through outside user feedback. This involves people who are actively using the course providing feedback on their experience. We, the developers, would then review the feedback and identify areas of interest. If there are similar comments about an issue from several users, we will try to put more effort into addressing it. We will also rate issues based on severity and ease of fix so that we can prioritize high-impact issues to best improve the user experience. We don’t expect to catch all the issues with these group evaluations, but we hope to improve the overall user experience of the course. The beauty of open source software is anyone can propose changes to it. In the future, if users can identify areas of improvement, they can act upon them through pull requests and raising issues in the repository.
We are in this last phase of evaluation. This stage is one that is ongoing, even beyond the end of this semester. After deployment, our project quickly picked up followers and began trending on Github. This provided us with plenty of users for feedback. We have already received feedback from users of the course and made changes to improve their experiences. We will continue listening to user feedback in the future to keep the focus of the course on a positive user experience.

14
User Manual
The following sections feature an in-depth discussion of site navigation, how to run the code examples, and how an interested user can help contribute to the project. Because our content is open-source, we expect our target users to not only read our documentation but to also make suggestions or improvements to it - in fact, some users already have!
Site NavigationThe course site and associated GitHub repository will be available for anyone interested in participating in the course. Below, we will illustrate how to navigate through the site’s resources. To effectively use the site, it is important to become familiar with the features of the sidebar and follow the links provided in the modules. Through the use of these facilities, navigation should be clear and easy.

15
Homepage
Figure 3. Course homepage and table of contents
Users can navigate to the website using the following URL: https://machine-learning-course.readthedocs.io/en/latest/index.html
This directs the user to the homepage of the website shown in Figure 3. On the homepage, there is a detailed table of contents on the center of the page. The table of contents is broken down into sections for the major topics, subsections for the modules, and further subsections for module contents. Clicking on a module or a subsection of a module will bring the user to that page on the website.
On the left-hand side of the page, there is a menu system that provides similar navigation options. This is present on all pages of the site so users will always be able to navigate to a specific page. The Deep Learning icon in the top left of the page will redirect users back to the homepage on click. There is also a search bar beneath the icon that users can use to search for topics on the site.

16
Figure 4. Read the Docs menu
At the bottom of the menu system, there is a dropdown menu for Read the Docs related options. This is shown in Figure 4. These include version history and downloads of the course in different formats.
Also included in the top right corner of the page is a link to the page’s location in the GitHub repository, shown in Figure 5. This feature is included on all the pages and allows users to easily report issues that they come across. Clicking on the Introduction link in either the center or left side of the page will bring users to the first page of the course.
Figure 5. Edit on GitHub link

17
Introduction
Figure 6. Course Introduction page
The introduction page for the course, shown in Figure 6, explains the purpose of the course, a brief history of machine learning, a rationale for why machine learning is important, and how machine learning is being used today. Also provided are further readings for users to familiarize themselves with the machine learning background. This is shown in Figure 7.

18
Figure 7. Links to additional background information
Next, we will go through the different modules of the course by using the Next button at the bottom of the page.

19
Cross-Validation
Figure 8. The Cross-Validation module
Figure 8 shows the Cross-Validation module. In the navigation menu to the left, the Cross-Validation link has been expanded to show the module sections. These are Holdout Method, K-Fold Cross Validation, Leave-P-Out / Leave-One-Out Cross Validation, Conclusion, Motivation, Code Examples, and References.
The Python code associated with this module is reachable via hyperlinks on the page or by going to the GitHub repository link: https://github.com/machinelearningmindset/machine-learning-course/tree/master/code/overview/cross-validation

20
Linear Regression
Figure 9. The Linear Regression module
Figure 9 shows the Linear Regression module. In the navigation menu to the left, the Linear Regression link has been expanded to show the module sections. These are Motivation, Overview, When to Use, Cost Function, Methods, Code, Conclusion, and References. The Methods section also includes two subsections: Ordinary Least Squares and Gradient Descent.
The Python code associated with this module is reachable via hyperlinks on the page or by going to the GitHub repository link: https://github.com/machinelearningmindset/machine-learning-course/tree/master/code/overview/linear_regression

21
Overfitting and Underfitting
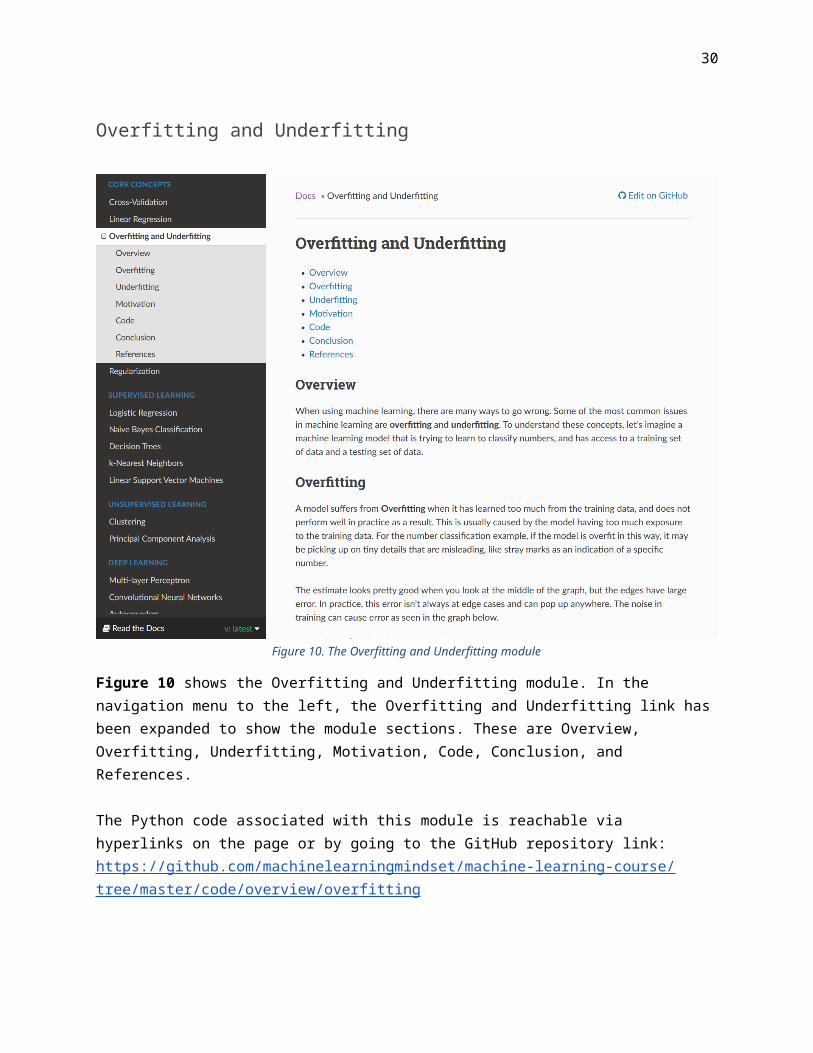
Figure 10. The Overfitting and Underfitting module
Figure 10 shows the Overfitting and Underfitting module. In the navigation menu to the left, the Overfitting and Underfitting link has been expanded to show the module sections. These are Overview, Overfitting, Underfitting, Motivation, Code, Conclusion, and References.
The Python code associated with this module is reachable via hyperlinks on the page or by going to the GitHub repository link: https://github.com/machinelearningmindset/machine-learning-course/tree/master/code/overview/overfitting

22
Regularization
Figure 11. The Regularization module
Figure 11 shows the Regularization module. In the navigation menu to the left, the Regularization link has been expanded to show the module sections. These are Motivation, Overview, Methods, Summary, and References. The Methods section also includes two subsections: Ridge Regression and Lasso Regression.
The Python code associated with this module is reachable via hyperlinks on the page or by going to the GitHub repository link: https://github.com/machinelearningmindset/machine-learning-course/tree/master/code/overview/regularization

23
Logistic Regression
Figure 12. The Logistic Regression module
Figure 12 shows the Logistic Regression module. In the navigation menu to the left, the Logistic Regression link has been expanded to show the module sections. These are Introduction, When to Use, How does it work?, Multinomial logistic regression, Code, Motivation, Conclusion, and References.
The Python code associated with this module is reachable via hyperlinks on the page or by going to the GitHub repository link: https://github.com/machinelearningmindset/machine-learning-course/tree/master/code/supervised/Logistic_Regression

24
Naive Bayes Classification
Figure 13. The Naive Bayes Classification module
Figure 13 shows the Naive Bayes Classification module. In the navigation menu to the left, the Naive Bayes Classification link has been expanded to show the module sections. These are Motivation, What is it?, Bayes’ Theorem, Naive Bayes, Algorithms, Conclusion, and References. The Algorithms section also includes 3 subsections: Gaussian Model (Continuous), Multinomial Model (Discrete), and Bernoulli Model (Discrete).
The Python code associated with this module is reachable via hyperlinks on the page or by going to the GitHub repository link: https://github.com/machinelearningmindset/machine-learning-course/tree/master/code/supervised/Naive_Bayes

25
Decision Trees
Figure 14. The Decision Trees module
Figure 14 shows the Decision Trees module. In the navigation menu to the left, the Decision Trees link has been expanded to show the module sections. These are Introduction, Motivation, Classification and Regression Trees, Splitting (Induction), Cost of Splitting, Pruning, Conclusion, Code Example, and References.
The Python code associated with this module is reachable via hyperlinks on the page or by going to the GitHub repository link: https://github.com/machinelearningmindset/machine-learning-course/tree/master/code/supervised/DecisionTree

26
k-Nearest Neighbors
Figure 15. The k-Nearest Neighbors module
Figure 15 shows the k-Nearest Neighbors module. In the navigation menu to the left, the k-Nearest Neighbors link has been expanded to show the module sections. These are Introduction, How does it work?, Brute Force Method, K-D Tree Method, Choosing k, Conclusion, Motivation, Code Example, and References.
The Python code associated with this module is reachable via hyperlinks on the page or by going to the GitHub repository link: https://github.com/machinelearningmindset/machine-learning-course/tree/master/code/supervised/KNN

27
Linear Support Vector Machines
Figure 16. The Linear Support Vector Machines module
Figure 16 shows the Linear Support Vector Machines module. In the navigation menu to the left, the Linear Support Vector Machines link has been expanded to show the module sections. These are Introduction, Hyperplane, How do we find the best hyperplane/line?, How to maximize the margin?, Ignore Outliers, Kernel SVM, Conclusion, Motivation, Code Example, and References.
The Python code associated with this module is reachable via hyperlinks on the page or by going to the GitHub repository link: https://github.com/machinelearningmindset/machine-learning-course/tree/master/code/supervised/Linear_SVM

28
Clustering
Figure 17. The Clustering module
Figure 17 shows the Clustering module. In the navigation menu to the left, the Clustering link has been expanded to show the module sections. These are Overview, Clustering, Motivation, Methods, Summary, and References. The Methods section also includes two subsections: K-Means and Hierarchical.
The Python code associated with this module is reachable via hyperlinks on the page or by going to the GitHub repository link: https://github.com/machinelearningmindset/machine-learning-course/tree/master/code/unsupervised/Clustering

29
Principal Component Analysis
Figure 18.The Principal Component Analysis module
Figure 18 shows the Principal Component Analysis module. In the navigation menu to the left, the Principal Component Analysis link has been expanded to show the module sections. These are Introduction, Motivation, Dimensionality Reduction, PCA Example, Number of Components, Conclusion, Code Example, and References.
The Python codes associated with this module is reachable via hyperlinks on the page or by going to the GitHub repository link: https://github.com/machinelearningmindset/machine-learning-course/tree/master/code/unsupervised/PCA
30
Multi-layer Perceptron
Figure 19. The Multi-layer Perceptron module
Figure 19 shows the Multi-layer Perceptron module. In the navigation menu to the left, the Multi-layer Perceptron link has been expanded to show the module sections. These are Overview, Motivation, What is a node?, What defines a multilayer perceptron?, What is backpropagation?, Summary, Further Resources, and References.
Similar to the other deep learning modules, the code in this module is more involved than previous sections and included are explanations for how to use each of the different files. The code associated with this module is reachable via hyperlinks on the page or by going to the GitHub repository link: https://github.com/machinelearningmindset/machine-learning-course/tree/master/code/deep_learning/mlp

31
Convolutional Neural Networks
Figure 20. The Convolutional Neural Networks module
Figure 20 shows the Convolutional Neural Networks module. In the navigation menu to the left, the Convolutional Neural Networks link has been expanded to show the module sections. These are Overview, Motivation, Architecture, Training, Summary, and References. The Architecture section also includes three subsections: Convolutional Layers, Pooling Layers, and Fully Connected Layers.
Similar to the other deep learning modules, the code in this module is more involved than previous sections and included are explanations for how to use each of the different files. The code associated with this module is reachable via hyperlinks on the page or by going to the GitHub repository link: https://github.com/machinelearningmindset/machine-learning-course/tree/master/code/deep_learning/cnn

32
Autoencoders
Figure 21. The Autoencoders module
Figure 21 shows the Autoencoders module. In the navigation menu to the left, the Autoencoders link has been expanded to show the module sections. These are Autoencoders and their implementations in TensorFlow, Introduction, and Create an Undercomplete Autoencoder.
The Python code associated with this module is reachable via hyperlinks on the page or by going to the GitHub repository link: https://github.com/machinelearningmindset/machine-learning-course/tree/master/code/deep_learning/autoencoder

33
Contributing
Figure 22. The course Contributing page
In addition to the different course modules, the site also includes a document credentials section with contribution and license information.
Figure 22 shows the Contributing page of the website. This page details how users can contribute to improving the course and provides guidelines for suggested changes.

34
Contributor Covenant Code of Conduct
Figure 23. Contributor Code of Conduct page
Figure 23 shows the Contributor Code of Conduct page of the website. This page covers our pledge to make the course an encouraging environment for contributors and a harassment-free experience for all users.

35
License
Figure 24. Course License page
Figure 24 shows the License page of the website. This page includes the license for the provided course materials, allowing our users to copy or modify any aspect of this open-source project.

36
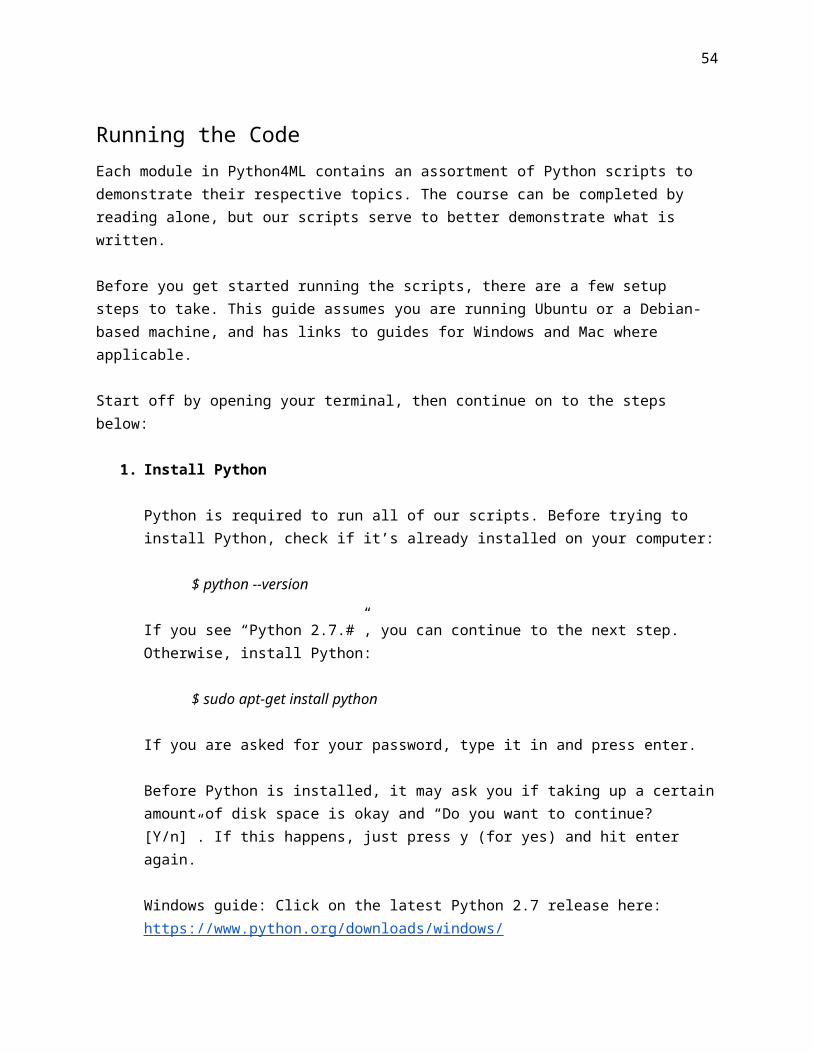
Running the CodeEach module in Python4ML contains an assortment of Python scripts to demonstrate their respective topics. The course can be completed by reading alone, but our scripts serve to better demonstrate what is written.
Before you get started running the scripts, there are a few setup steps to take. This guide assumes you are running Ubuntu or a Debian-based machine, and has links to guides for Windows and Mac where applicable.
Start off by opening your terminal, then continue on to the steps below:
1. Install Python
Python is required to run all of our scripts. Before trying to install Python, check if it’s already installed on your computer:
$ python --version
If you see “Python 2.7.#”, you can continue to the next step. Otherwise, install Python:
$ sudo apt-get install python
If you are asked for your password, type it in and press enter.
Before Python is installed, it may ask you if taking up a certain amount of disk space is okay and “Do you want to continue? [Y/n]”. If this happens, just press y (for yes) and hit enter again.
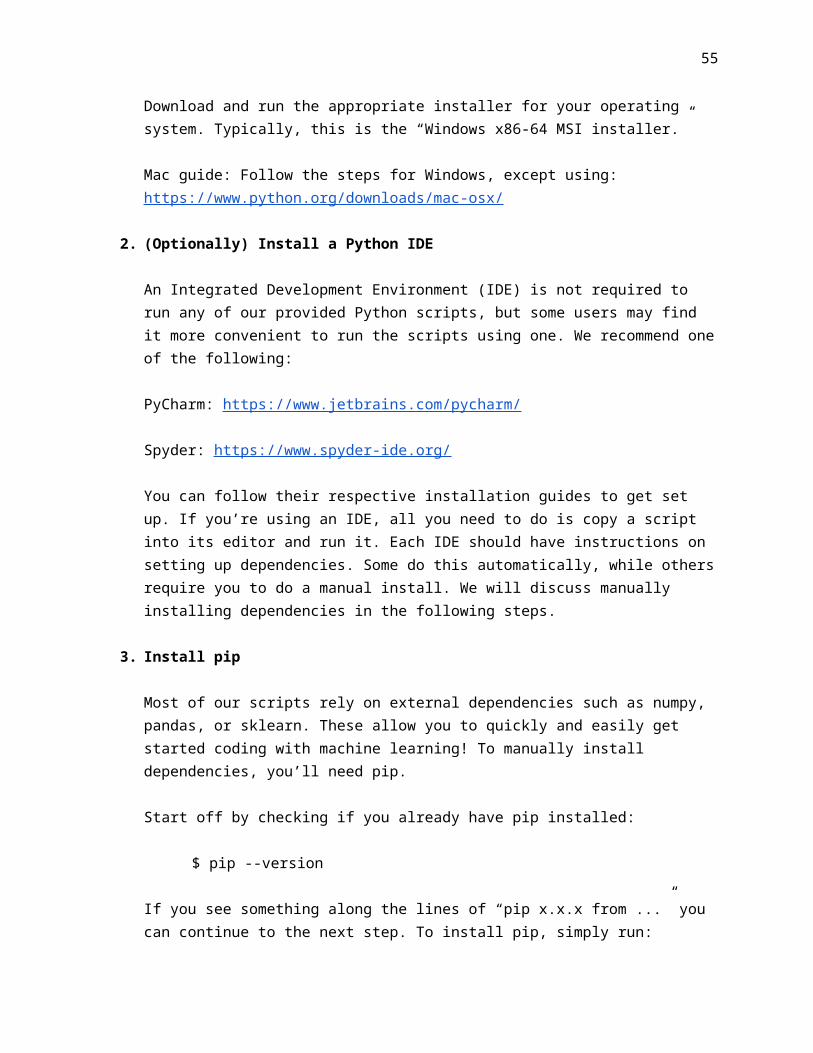
Windows guide: Click on the latest Python 2.7 release here:https://www.python.org/downloads/windows/Download and run the appropriate installer for your operating system. Typically, this is the “Windows x86-64 MSI installer.”
Mac guide: Follow the steps for Windows, except using:https://www.python.org/downloads/mac-osx/
2. (Optionally) Install a Python IDE
An Integrated Development Environment (IDE) is not required to run any of our provided Python scripts, but some users may find it more convenient to run the scripts using one. We recommend one of the following:

37
PyCharm: https://www.jetbrains.com/pycharm/
Spyder: https://www.spyder-ide.org/
You can follow their respective installation guides to get set up. If you’re using an IDE, all you need to do is copy a script into its editor and run it. Each IDE should have instructions on setting up dependencies. Some do this automatically, while others require you to do a manual install. We will discuss manually installing dependencies in the following steps.
3. Install pip
Most of our scripts rely on external dependencies such as numpy, pandas, or sklearn. These allow you to quickly and easily get started coding with machine learning! To manually install dependencies, you’ll need pip.
Start off by checking if you already have pip installed:
$ pip --version
If you see something along the lines of “pip x.x.x from ...” you can continue to the next step. To install pip, simply run:
$ sudo apt-get install python-pip
Enter your password if requested and accept if it asks whether you want to continue.
4. Install required dependencies
Install required dependencies as needed using pip. To install a dependency, use:
$ pip install <dependency name>
We recommend preemptively installing the dependencies sklearn, numpy, pandas, and matplotlib as many of our scripts rely on these packages.
5. Run the scripts!
Now that you have Python and any required dependencies set up, you’re ready to run our scripts. Simply download any of our scripts, then run:
$ python <script name>
If you’re using an IDE, you can either download the script or copy it directly into the

38
editor to run it.
Some of our scripts generate plots through matplotlib, which will automatically pop up once you run them. Otherwise, you’ll see output in the terminal that shows off the related concept in machine learning.

39
ContributingThe best aspect of open-source technology is the ability for end users to contribute to projects they find interesting. We are looking forward to users’ kind feedback - please help us to improve this open source project and make this course better. We are open to feedback, suggestions, and critique submitted on our issue tracker here:
https://github.com/machinelearningmindset/python-machine-learning/issues
If you are interested in contributing to the project, the following is a series of steps to help you get started:
1. Create and setup GitHub account
You can create a GitHub account by going to https://github.com/join. Accounts require an email address, username, and password.
2. Fork and clone the repository
Instructions for forking a repository are available at:https://help.github.com/en/articles/fork-a-repo.
Instructions for cloning a repository are available at:https://help.github.com/en/articles/cloning-a-repository.
3. Make changes
After forking or cloning the repository, contributors can make changes as desired in whatever editors they please.
4. Open a Pull Request
In order for your changes to be accepted into the main repository, you will have to initiate a pull request. The process for initiating a pull request is available here:https://help.github.com/en/articles/creating-a-pull-request-from-a-fork.
Once your Pull Request is successfully created, a member from our developer team will review it and ask for any needed changes to be made. Typically, we prefer contributors commit content using Markdown or Re-Structured Text (though this is not necessary).
Once again, we appreciate your kind feedback and support!

40
Developer Manual
The course files and static website pages are entirely source controlled through git and stored on GitHub. This allows for simple collaboration between team members and offers helpful tools such as pull request reviews or project milestones. Modules are stored in the docs folder, under docs/source/content/<section>. Code for each module is stored in the code/ directory, and is linked from each module using the full GitHub url for easy Sphinx integration. A full tree of the project structure is shown in Figure 25.
├── code│ ├── overview│ │ ├── cross-validation│ │ │ ├── holdout.py│ │ │ ├── k-fold.py│ │ │ └── leave-p-out.py│ │ ├── linear_regression│ │ │ ├── exponential_regression.py│ │ │ ├── exponential_regression_transformed.py│ │ │ ├── linear_regression_cost.py│ │ │ ├── linear_regression_lobf.py│ │ │ ├── linear_regression.py│ │ │ └── not_linear_regression.py│ │ ├── overfitting│ │ │ └── overfitting.py│ │ └── regularization│ │ ├── regularization_lasso.py│ │ ├── regularization_linear.py│ │ ├── regularization_polynomial.py│ │ ├── regularization_quadratic.py│ │ └── regularization_ridge.py│ ├── supervised│ │ ├── DecisionTree│ │ │ └── decisiontrees.py│ │ ├── KNN│ │ │ └── knn.py│ │ ├── Linear_SVM│ │ │ └── linear_svm.py│ │ ├── Logistic_Regression│ │ │ └── logistic_ex1.py

41
│ │ └── Naive_Bayes│ │ ├── bell_curve.py│ │ ├── bernoulli.py│ │ ├── gaussian.py│ │ └── multinomial.py│ └── unsupervised│ └── Clustering│ ├── clustering_hierarchical.py│ └── clustering_kmeans.py├── docs│ ├── build│ │ ├── <Automatically generated static html/css/js files>│ ├── make.bat│ ├── Makefile│ └── source│ ├── conf.py│ ├── content│ │ ├── overview│ │ │ ├── _img│ │ │ │ ├── Cost.png│ │ │ │ ├── Error_Function.png│ │ │ │ ├── ...│ │ │ │ └── Underfit.PNG│ │ │ ├── crossvalidation.rst│ │ │ ├── linear-regression.rst│ │ │ ├── overfitting.rst│ │ │ └── regularization.rst│ │ ├── supervised│ │ │ ├── _img│ │ │ │ ├── Bayes.png│ │ │ │ ├── Bell_Curve.png│ │ │ │ ├── ...│ │ │ │ └── WikiLogistic.svg.png│ │ │ ├── knn.rst│ │ │ ├── bayes.rst│ │ │ ├── decisiontrees.rst│ │ │ ├── linear_SVM.rst│ │ │ └── logistic_regression.rst│ │ ├── unsupervised│ │ │ ├── _img│ │ │ │ ├── Data_Set.png│ │ │ │ ├── Hierarchical.png│ │ │ │ ├── ...│ │ │ │ └── K_Means_Step3.png

42
│ │ │ ├── clustering.rst│ │ │ └── pca.rst│ │ └── deep_learning│ │ ├── _img│ │ │ ├── Convo_Output.png│ │ │ ├── ...│ │ │ └── ae.png│ │ ├── autoencoder.rst│ │ ├── cnn.rst│ │ └── mlp.rst│ ├── credentials│ │ ├── CODE_OF_CONDUCT.rst│ │ ├── CONTRIBUTING.rst│ │ └── LICENSE.rst│ ├── index.rst│ ├── intro│ │ └── intro.rst│ └── logo│ └── logo.png├── conf.py└── README.rst
Figure 25. Full repository tree
Note that some sections of this tree were condensed to save space. Most notably, there are over 20,000 lines of automatically-generated static html files stored under docs/build. As a developer, you should not be altering files under this directory - instead, this section will be automatically populated upon running a Sphinx build. To save headache when opening a pull request, please commit built files separately from content changes.
All content is written in reStructuredText (rST) markup and Python files. We have opted to use rST as our markup language and Python as our programming language for several reasons:
1. rST offers a wider array of markup features, including directives, roles, embeddable LaTeX equations, option lists, and doctest blocks.
2. rST is highly modular and expandable through the use of extensions.3. rST seamlessly integrates with Sphinx, which we use to build the course website.4. Python is incredibly simple to learn and offers extensive machine learning libraries such
as Scikit-Learn.
Some common examples of rST documentation through the repository are listed below:
Paragraphs:
Lorem ipsum dolor sit amet, consectetur adipiscing elit,sed do eiusmod tempor incididunt ut labore et dolore

43
magna aliqua. Ut enim ad minim veniam, quis nostrudexercitation ullamco laboris nisi ut aliquip ex ea commodoconsequat.
Paragraphs written in rST require no special markup to differentiate themselves from other elements in a document. Any line breaks inside a paragraph section will not be displayed in the document itself when viewed on GitHub or on the site, so we recommend keeping line lengths between 80 and 100 characters long. If paragraphs are written without any line breaks, it is difficult for others to comment on specific sections during the pull request process. For example, in the GitHub diff below a reviewer would have much more trouble pointing out grammatical mistakes because the entire section is written on a single line:
Figure 26.An rST paragraph
Code Blocks:
Highlighted:
.. code:: python
categories = [classes['supplies'], classes['weather'], classes['worked?']] encoder = OneHotEncoder(categories=categories)
x_data = encoder.fit_transform(data)
Non-Highlighted:
::
1: [ T T - - ] 2: [ T - T - ] 3: [ T - - T ] 4: [ - T T - ] 5: [ - T - T ] 6: [ - - T T ]
There are two primary types of code blocks in rST: blocks that highlight syntax and others that just display text in a bordered monospaced font. Code highlighting is especially useful for our

44
readers whenever we embed code, and non-highlighted blocks are useful for having examples of code output. A list of all supported languages for syntax highlighting can be found at http://pygments.org/languages/. The sections above render into the following:
Figure 27. An example of Python syntax highlighting
Figure 28. An example of a code output block
Figures:
.. figure:: _img/decision_tree_4.png :alt: Tree 4
**Figure 5. The final decision tree**
Figures are used extensively throughout each document. They involve setting the figure directive followed by a link to the image. Inside each category, we have an _img folder populated with all images used for easy reference, though this can also be a direct link to an outside page. After the figure directive, you can optionally specify figure options and caption text. Here, we specify the alternative text to be displayed if the image cannot be loaded, as well as a short bolded caption of what the image depicts.
Embedded Links:
The provided code, `decisiontrees.py`_, takes the example discussed inthis documentation and creates a decision tree from it. First, eachpossible option for each class is defined. This is used later to fitand display our decision tree:
.. _decisiontrees.py: https://github.com/machinelearningmindset/machine-learning-course/blob/master/code/supervised/DecisionTree/decisiontrees.py

45
As opposed to markdown, rST allows you to define reusable embedded links. In the snippet above, we have a short section discussing the document’s associated code. In order to link to the code, we define a link anywhere on the page using “.. _<name>: <link>”. To use this link, we simply reference it inside paragraphs using two backticks and an underscore: `<name>`_
The name used to define the link will appear inline with the paragraph, like so:
Figure 29. An embedded link
Tables:
There are two ways to define tables with rST, shown below:
Simple:
===== ======= ======= Studying Success-------------- -------Hours Focused Pass?===== ======= =======1 False False3 False True0.5 True False2 False True===== ======= =======
Table 2. A simple RST table

46
Simple tables are great for quickly creating small tables, and allow for basic column spanning. They ignore much of the syntax required for verbose tables.
Verbose:
+-----+----------+----------+----------+----------+| | Supplies | Weather | Worked? | Shopped? |+=====+==========+==========+==========+==========+| D1 | Low | Sunny | Yes | Yes |+-----+----------+----------+----------+----------+| D2 | High | Sunny | Yes | No |+-----+----------+----------+----------+----------+| D3 | Med | Cloudy | Yes | No |+-----+----------+----------+----------+----------+| D4 | Low | Raining | Yes | No |+-----+----------+----------+----------+----------+| D5 | Low | Cloudy | No | Yes |+-----+----------+----------+----------+----------+
Table 3. A verbose RST table

47
Verbose tables give you more control over table dimensions, and allow for both row and column spanning. Overall, the two table styles are used interchangeably through the repository. Pick the style you or your team prefers.
You can find a guide to creating more rST elements here:http://docutils.sourceforge.net/docs/ref/rst/restructuredtext.html

48
ScriptingAll of our scripts are written in Python, and serve to help readers better understand how to actually implement the concepts we discuss inside the text documentation. It’s assumed that future developers working on this project will have some knowledge of Python. For some basic Python tutorials, we recommend the language’s official guide:https://docs.python.org/3/tutorial/
Scripts should contain as little complexity as possible, so that our readers can follow along even without a strong knowledge of the language. This means avoiding extensive inlining, and not defining objects. Your code should also be heavily commented so the reader understands what each line’s purpose is. In general, creating functions is acceptable but should be avoided when possible. Note that with a current coexistence of Python 2 and 3, scripts should be developed in a way that can be ran on both versions. If that isn’t possible, there should be a clear note of which version of Python the script runs in.
Some examples of well-commented code we’ve written is posted below:
Figure 30. A short script with helpful comments and end-user output

49
Figure 31. A longer script with comments and explanations

50
ContributingThis section is for project maintainers with push access to the repo. As a maintainer, you have a different set of guides and responsibilities to follow than user contributors. To get set up, follow these steps:
1. Create a GitHub user
If you don’t already have a GitHub account, go ahead and set one up by following the same step in the User Manual Contributing guide.
2. Install git
For Linux, install git using:
$ sudo apt-get install git
If on Windows or Mac, you’ll need to run the following installer and make sure to also install Git Bash. You will be running any future git commands using Git Bash:
https://git-scm.com/downloads
3. Configure git and setup an SSH key
Follow instructions here to properly configure your account and setup an ssh key. This is required to clone the repository over SSH, as well as to push to the repository under the correct id:
Set up your git username: https://help.github.com/en/articles/setting-your-username-in-git
Set up your git email address (make sure it’s the same as your GitHub account!):https://help.github.com/en/articles/setting-your-commit-email-address-in-git
Generate an SSH key and add it to your SSH agent:https://help.github.com/en/articles/generating-a-new-ssh-key-and-adding-it-to-the-ssh-agent
Add your created SSH key to your GitHub account:https://help.github.com/en/articles/adding-a-new-ssh-key-to-your-github-account

51
Once all of these are completed, you should be able to complete the next step.
4. Clone the main repository
Instead of forking the repository, directly clone the main repo. Make sure to clone using the SSH url, and not the HTTPS one:https://help.github.com/en/articles/cloning-a-repository
The command is listed here for convenience, though the link can also be found by clicking the Clone button on the repository page:
Repository:https://github.com/machinelearningmindset/machine-learning-course
Command using SSH url:$ git clone [email protected]:machinelearningmindset/machine-learning-course.git
5. Create and work in a feature branch
Now that you have the repo cloned, you can start to work. Developers should not commit directly to the master branch. Instead, they should do all work on a feature branch. To create a new branch, use:
$ git checkout -b <branch name>
Make any required changes in this branch, then once you are done commit and push your changes using:
$ git add .$ git commit -m “<Your commit message>”$ git push origin <branch name>
Once pushed, open a Pull Request in GitHub as discussed in the User Manual.
General Contribution GuidelinesThere are some guidelines you should be aware of when developing content for this project. Following these will ensure a smooth, headache-free process for your entire team:Never commit directly to the master branch.Committing to master skips the review process entirely, which prevents teammates from checking any changes you make. Directly making changes on the master branch is also dangerous because if you make a mistake, it either needs to be fixed by more permanent

52
messy changes or the entire repository needs to be rolled back to a fixed state.
Squash / Fixup commits before creating a Pull Request.When you create a Pull Request, the commits should be a short list of descriptive changes you’ve made to the repository. It doesn’t help reviewers understand the changes being made if they see a list of 20 “Update <file>” commits; rather, pull requests should aim for 1-5 descriptive bundled commits. To change your commit history before pushing to the repository, you can run an interactive rebase:
$ git rebase -i master
More information on interactive rebases can be found here: https://git-scm.com/book/en/v2/Git-Tools-Rewriting-History
Don’t merge the master branch into your feature branch.This ends up creating a merge commit inside your feature branch, which can be messy in the project’s commit history. Instead, pull project changes into your master branch and then rebase your branch off of master like above:
$ git checkout master$ git pull$ git checkout <branch>$ git rebase -i master
Update the Projects tab as you work on content.To motivate development, our team utilized the Projects tab on the GitHub page. This is a simple workflow page where you can create cards on a board, assign them to individuals, and move them as work is completed. The page also includes a progress bar so your team can see the portion of work completed and waiting:
Figure 32. Projects tab

53
Lessons Learned
Overall, our team had a great time building Python4ML. We all agree that we’ve produced something we’re proud of. User feedback was better than we expected! As of writing, our repository has over 800 stars and is number 2 on GitHub trending!
TimelineOur timeline was organized into week long sprints with complete sections generally taking 2 weeks to finish. Each of these sprints focused on a single module for the final course. A requirement from our client was to spend at least 50% of the time documenting code so some weeks revolved around documentation.
Table 4. Project timeline
February 28 Overview Linear RegressionOverfittingRegularizationCross ValidationK-Nearest Neighbor
March 14 Supervised Learning Decision TreesNaive BayesLinear RegressionLinear State Vector Machines
March 28 Demo & Review Demo Sphinx siteGet Peer Feedback
April 4 Unsupervised Learning ClusteringPrincipal Components Analysis
April 18 Deep Learning Neural NetworksConvolutional Neural NetworksRecurrent Neural NetworksAutoencoders
May 1 Final Review Full site functionalFinal peer feedback
54
ProblemsOne problem we faced consistently was time management. We found that trying to meet the 1-week sprint goal was pretty demanding with everyone’s busy schedules. This problem compounded and in the final weeks of the project we had to put in a lot of work to finish everything up on time.
A second problem we faced was disorganization especially in regards to submitted files. Originally the text write-ups for the modules were submitted in varying formats. This became an issue when they had to be standardized into .rst format. Before switching to the main site, we also had some issues with the folder hierarchy on the GitHub repository. Sometimes images and code were placed in the same folder as the course documents and at one point all the images shared one folder.
Another issue was GitHub lacking support for certain .rst file displays. We had math equations formatted in LaTeX that would not display properly on GitHub. Certain formatting directives also had different results on GitHub versus the final site.
SolutionsOne way we tried to address the time management problem was increasing communication between each other to boost morale. We also added reviewers to each member’s assignment to help keep everybody on track. During the final couple of weeks, we took on additional tasks and responsibilities to finish the project on time.
We solved the problem with submitted write-ups by only submitting these files as .md or .rst to simplify translation. The folder hierarchy problem was solved by creating a strict hierarchy for images, codes, and write-ups. The improved system was reinforced when we created the final site because the site generator required a strict resource hierarchy system.
Our solution to the LaTeX problem was converting equations into pictures and referencing those pictures within our document. The formatting directive issue required manually checking every page of the site and was tedious to do but fairly easy to check for issues and correct them.
Future WorkFuture work includes improving module documentation and site display. The module system means that additional topics can easily be added in the future to create a more developed course if desired. On top of additional modules to cover more topics, a good area of future work could be integrating the course with Docker. The benefit of a Docker implementation would be that users would not need to set up their own environment, and instead could use the pre-configured environment.
55
Acknowledgements
We would like to acknowledge the following entities for their contributions to this course:
Client: Amirsina Torfi● PhD student in Computer Science● Focused on deep learning, neural networks● Email: [email protected]● GitHub: https://github.com/astorfi● Related website: https://machinelearningmindset.com/
Scikit-Learn● Useful Python machine learning library that we used throughout the course● Website: https://scikit-learn.org/stable/index.html● GitHub: https://github.com/scikit-learn/scikit-learn● Scikit-learn has also requested that we cite [77]

56
References
[1] B. Marr, "A Short History of Machine Learning -- Every Manager Should Read," Forbes, 19 February 2016. [Online]. Available: https://www.forbes.com/sites/bernardmarr/2016/02/19/a-short-history-of-machine-learning-every-manager-should-read/#2787dfa715e7. [Accessed 10 February 2019].
[2] P. Haffner, "What is Machine Learning – and Why is it Important?," 7 July 2016. [Online]. Available: https://www.interactions.com/blog/technology/machine-learning-important/. [Accessed 10 February 2019].
[3] SAS Institute Inc., "Machine Learning," SAS Institute Inc., 2019. [Online]. Available: https://www.sas.com/en_us/insights/analytics/machine-learning.html. [Accessed 10 February 2019].
[4] Priyadharshini, "Machine Learning: What it is and Why it Matters," Simplilearn, 14 February 2019. [Online]. Available: https://www.simplilearn.com/what-is-machine-learning-and-why-it-matters-article. [Accessed 10 February 2019].
[5] D. Venturi, "Every single Machine Learning course on the internet, ranked by your reviews," Medium, 2 May 2017. [Online]. Available: https://medium.freecodecamp.org/every-single-machine-learning-course-on-the-internet-ranked-by-your-reviews-3c4a7b8026c0. [Accessed 10 February 2019].
[6] R. Gandhi, "Introduction to Machine Learning Algorithms: Linear Regression," Medium, 27 May 2018. [Online]. Available: https://towardsdatascience.com/introduction-to-machine-learning-algorithms-linear-regression-14c4e325882a. [Accessed 14 February 2019].
[7] J. Brownlee, "Linear Regression for Machine Learning," 25 March 2016. [Online]. Available: https://machinelearningmastery.com/linear-regression-for-machine-learning/. [Accessed 19 February 2019].
[8] B. Fortuner, "Linear Regression," 22 April 2017. [Online]. Available: https://ml-cheatsheet.readthedocs.io/en/latest/linear_regression.html. [Accessed 14 February 2019].
[9] J. Brownlee, "How To Implement Simple Linear Regression From Scratch With Python," 26 October 2016. [Online]. Available: https://machinelearningmastery.com/implement-simple-linear-regression-scratch-python/. [Accessed 14 February 2019].
[10] N. Khurana, "Linear Regression in Python from Scratch," 6 September 2018. [Online]. Available: https://medium.com/analytics-vidhya/linear-regression-in-python-from-scratch-24db98184276. [Accessed 14 February 2019].
[11] scikit-learn, "Linear Regression Example," scikit-learn, 2007. [Online]. Available: https://scikit-learn.org/stable/auto_examples/linear_model/plot_ols.html. [Accessed 14

57
February 2019].[12] scikit-learn, "sklearn.compose.TransformedTargetRegressor," scikit-learn, 2007.
[Online]. Available: https://scikit-learn.org/stable/modules/generated/sklearn.compose.TransformedTargetRegressor.html. [Accessed 14 February 2019].
[13] J. Brownlee, "Overfitting and Underfitting With Machine Learning Algorithms," 21 March 2016. [Online]. Available: https://machinelearningmastery.com/overfitting-and-underfitting-with-machine-learning-algorithms/. [Accessed 21 February 2019].
[14] A. Bhande, "What is underfitting and overfitting in machine learning and how to deal with it.," Medium, 11 March 2018. [Online]. Available: https://medium.com/greyatom/what-is-underfitting-and-overfitting-in-machine-learning-and-how-to-deal-with-it-6803a989c76. [Accessed 21 February 2019].
[15] W. Koehrsen, "Overfitting vs. Underfitting: A Conceptual Explanation," Medium, 27 January 2018. [Online]. Available: https://towardsdatascience.com/overfitting-vs-underfitting-a-conceptual-explanation-d94ee20ca7f9. [Accessed 21 February 2019].
[16] P. Gupta, "Regularization in Machine Learning," Medium, 15 November 2017. [Online]. Available: https://towardsdatascience.com/regularization-in-machine-learning-76441ddcf99a. [Accessed 21 February 2019].
[17] S. Jain, "An Overview of Regularization Techniques in Deep Learning (with Python code)," Analytics Vidhya, 19 April 2018. [Online]. Available: https://www.analyticsvidhya.com/blog/2018/04/fundamentals-deep-learning-regularization-techniques/. [Accessed 21 February 2019].
[18] P. Goyal, "What is regularization in machine learning?," 29 September 2017. [Online]. Available: https://www.quora.com/What-is-regularization-in-machine-learning. [Accessed 21 February 2019].
[19] scikit-learn, "sklearn.linear_model.Ridge," scikit-learn, 2007. [Online]. Available: https://scikit-learn.org/stable/modules/generated/sklearn.linear_model.Ridge.html. [Accessed 21 February 2019].
[20] scikit-learn, "sklearn.linear_model.Lasso," scikit-learn, 2007. [Online]. Available: https://scikit-learn.org/stable/modules/generated/sklearn.linear_model.Lasso.html. [Accessed 21 February 2019].
[21] P. Gupta, "Cross-Validation in Machine Learning," Medium, 5 June 2017. [Online]. Available: https://towardsdatascience.com/cross-validation-in-machine-learning-72924a69872f. [Accessed 21 February 2019].
[22] J. Brownlee, "A Gentle Introduction to k-fold Cross-Validation," 23 May 2018. [Online]. Available: https://machinelearningmastery.com/k-fold-cross-validation/. [Accessed 21 February 2019].
[23] I. Shah, "What is cross validation in machine learning?," 29 January 2019. [Online]. Available: https://www.quora.com/What-is-cross-validation-in-machine-learning. [Accessed 21 February 2019].
[24] E. Bonada, "Cross-Validation Strategies," 31 January 2017. [Online]. Available: http://www.ebc.cat/2017/01/31/cross-validation-strategies/. [Accessed 21 February

58
2019].[25] S. Patel, "Chapter 4: K Nearest Neighbors Classifier," Medium, 17 May 2017. [Online].
Available: https://medium.com/machine-learning-101/k-nearest-neighbors-classifier-1c1ff404d265. [Accessed 21 February 2019].
[26] T. Srivastava, "Introduction to k-Nearest Neighbors: Simplified (with implementation in Python)," Analytics Vidhya, 26 March 2018. [Online]. Available: https://www.analyticsvidhya.com/blog/2018/03/introduction-k-neighbours-algorithm-clustering/. [Accessed 21 February 2019].
[27] scikit-learn, "sklearn.neighbors.KNeighborsClassifier," scikit-learn, 2007. [Online]. Available: https://scikit-learn.org/stable/modules/generated/sklearn.neighbors.KNeighborsClassifier.html. [Accessed 21 February 2019].
[28] Turi, "Nearest Neighbor Classifier," 2018. [Online]. Available: https://turi.com/learn/userguide/supervised-learning/knn_classifier.html. [Accessed 21 February 2019].
[29] P. Gupta, "Decision Trees in Machine Learning," Medium, 17 May 2017. [Online]. Available: https://towardsdatascience.com/decision-trees-in-machine-learning-641b9c4e8052. [Accessed 28 February 2019].
[30] I. Sharma, "Introduction to Decision Tree Learning," Medium, 26 April 2018. [Online]. Available: https://heartbeat.fritz.ai/introduction-to-decision-tree-learning-cd604f85e236. [Accessed 28 February 2019].
[31] J. Brownlee, "How To Implement The Decision Tree Algorithm From Scratch In Python," 9 November 2016. [Online]. Available: https://machinelearningmastery.com/implement-decision-tree-algorithm-scratch-python/. [Accessed 28 February 2019].
[32] S. Raschka, "Machine Learning FAQ," 2013. [Online]. Available: https://sebastianraschka.com/faq/docs/decision-tree-binary.html. [Accessed 28 February 2019].
[33] B. Raj, "Decision Trees," 2010. [Online]. Available: https://www.cs.cmu.edu/~bhiksha/courses/10-601/decisiontrees/. [Accessed 28 February 2019].
[34] J. Brownlee, "How To Implement Naive Bayes From Scratch in Python," 8 December 2014. [Online]. Available: https://machinelearningmastery.com/naive-bayes-classifier-scratch-python/. [Accessed 28 February 2019].
[35] S. Ray, "6 Easy Steps to Learn Naive Bayes Algorithm (with codes in Python and R)," Analytics Vidhya, 11 September 2017. [Online]. Available: https://www.analyticsvidhya.com/blog/2017/09/naive-bayes-explained/. [Accessed 28 February 2019].
[36] P. Gupta, "Naive Bayes in Machine Learning," Medium, 6 November 2017. [Online]. Available: https://towardsdatascience.com/naive-bayes-in-machine-learning-f49cc8f831b4. [Accessed 28 February 2019].
[37] S. Patel, "Chapter 1 : Supervised Learning and Naive Bayes Classification — Part 1

59
(Theory)," Medium, 29 April 2017. [Online]. Available: https://medium.com/machine-learning-101/chapter-1-supervised-learning-and-naive-bayes-classification-part-1-theory-8b9e361897d5. [Accessed 28 February 2019].
[38] G. Chauhan, "All about Logistic regression in one article," 10 October 2018. [Online]. Available: https://towardsdatascience.com/logistic-regression-b0af09cdb8ad. [Accessed 28 February 2019].
[39] A. Dey, "Machine Learning Model: Logistic Regression," Medium, 14 August 2018. [Online]. Available: https://medium.com/datadriveninvestor/machine-learning-model-logistic-regression-5fa4ffde5773. [Accessed 29 February 2019].
[40] B. Fortuner, "Logistic Regression," 22 April 2017. [Online]. Available: https://github.com/bfortuner/ml-cheatsheet/blob/master/docs/logistic_regression.rst. [Accessed 28 February 2019].
[41] J. Brownlee, "Logistic Regression Tutorial for Machine Learning," 4 April 2016. [Online]. Available: https://machinelearningmastery.com/logistic-regression-tutorial-for-machine-learning/. [Accessed 28 February 2019].
[42] S. Remanan, "Logistic Regression: A Simplified Approach Using Python," Medium, 17 September 2018. [Online]. Available: https://towardsdatascience.com/logistic-regression-a-simplified-approach-using-python-c4bc81a87c31. [Accessed 28 February 2019].
[43] R. Gandhi, "Introduction to Machine Learning Algorithms: Logistic Regression," Medium, 28 May 2018. [Online]. Available: https://hackernoon.com/introduction-to-machine-learning-algorithms-logistic-regression-cbdd82d81a36. [Accessed 28 February 2019].
[44] Wikipedia, "Logistic regression".[45] Wikipedia, "Multinomial logistic regression".[46] scikit-learn, "sklearn.linear_model.LogisticRegression," scikit-learn, 2007. [Online].
Available: https://scikit-learn.org/stable/modules/generated/sklearn.linear_model.LogisticRegression.html. [Accessed 28 February 2019].
[47] D. Shulga, "5 Reasons “Logistic Regression” should be the first thing you learn when becoming a Data Scientist," Medium, 21 April 2018. [Online]. Available: https://towardsdatascience.com/5-reasons-logistic-regression-should-be-the-first-thing-you-learn-when-become-a-data-scientist-fcaae46605c4. [Accessed 28 February 2019].
[48] S. Ray, "Understanding Support Vector Machine algorithm from examples (along with code)," Analytics Vidhya, 13 September 2017. [Online]. Available: https://www.analyticsvidhya.com/blog/2017/09/understaing-support-vector-machine-example-code/. [Accessed 28 February 2019].
[49] U. Malik, "Implementing SVM and Kernel SVM with Python's Scikit-Learn," 17 April 2018. [Online]. Available: https://stackabuse.com/implementing-svm-and-kernel-svm-with-pythons-scikit-learn/. [Accessed 28 February 2019].
[50] J. VanderPlas, Python Data Science Handbook, Sebastopol: O'Reilly Media, 2016.[51] R. Gandhi, "Support Vector Machine — Introduction to Machine Learning Algorithms,"

60
Medium, 7 June 2018. [Online]. Available: https://towardsdatascience.com/support-vector-machine-introduction-to-machine-learning-algorithms-934a444fca47. [Accessed 28 February 2019].
[52] R. Pupale, "Support Vector Machines(SVM) — An Overview," Medium, 16 June 2018. [Online]. Available: https://towardsdatascience.com/https-medium-com-pupalerushikesh-svm-f4b42800e989. [Accessed 21 March 2019].
[53] A. Yadav, "SUPPORT VECTOR MACHINES(SVM)," Medium, 20 October 2018. [Online]. Available: https://towardsdatascience.com/support-vector-machines-svm-c9ef22815589. [Accessed 21 March 2019].
[54] S. Kaushik, "An Introduction to Clustering and different methods of clustering," Analytics Vidhya, 3 November 2016. [Online]. Available: https://www.analyticsvidhya.com/blog/2016/11/an-introduction-to-clustering-and-different-methods-of-clustering/. [Accessed 17 April 2019].
[55] S. Singh, "An Introduction To Clustering," Medium, 5 June 2018. [Online]. Available: https://medium.com/datadriveninvestor/an-introduction-to-clustering-61f6930e3e0b. [Accessed 17 April 2019].
[56] #ODSC - Open Data Science, "Three Popular Clustering Methods and When to Use Each," Medium, 21 September 2018. [Online]. Available: https://medium.com/predict/three-popular-clustering-methods-and-when-to-use-each-4227c80ba2b6. [Accessed 17 April 2019].
[57] G. Seif, "The 5 Clustering Algorithms Data Scientists Need to Know," Medium, 5 February 2018. [Online]. Available: https://towardsdatascience.com/the-5-clustering-algorithms-data-scientists-need-to-know-a36d136ef68. [Accessed 17 April 2019].
[58] scikit-learn, "sklearn.cluster.KMeans," scikit-learn, 2007. [Online]. Available: https://scikit-learn.org/stable/modules/generated/sklearn.cluster.KMeans.html. [Accessed 17 April 2019].
[59] M. Galarnyk, "PCA using Python (scikit-learn)," Medium, 4 December 2017. [Online]. Available: https://towardsdatascience.com/pca-using-python-scikit-learn-e653f8989e60. [Accessed 18 April 2019].
[60] M. Brems, "A One-Stop Shop for Principal Component Analysis," Medium, 17 April 2017. [Online]. Available: https://towardsdatascience.com/a-one-stop-shop-for-principal-component-analysis-5582fb7e0a9c. [Accessed 18 April 2019].
[61] L. I. Smith, "A tutorial on Principal Components Analysis," 26 February 2002. [Online]. Available: http://www.cs.otago.ac.nz/cosc453/student_tutorials/principal_components.pdf. [Accessed 18 April 2019].
[62] Pennsylvania State University, "Lesson 11: Principal Components Analysis (PCA)," Pennsylvania State University, 2018. [Online]. Available: https://newonlinecourses.science.psu.edu/stat505/node/49/. [Accessed 18 April 2019].
[63] S. Raschka, "Implementing a Principal Component Analysis (PCA)," 13 April 2014. [Online]. Available: https://sebastianraschka.com/Articles/2014_pca_step_by_step.html. [Accessed 18 April 2019].

61
[64] K. Baldwin, "Clustering Analysis, Part I: Principal Component Analysis (PCA)," 2016. [Online]. Available: https://www.centerspace.net/clustering-analysis-part-i-principal-component-analysis-pca. [Accessed 18 April 2019].
[65] Stanford Vision and Learning Lab, "CS231n: Convolutional Neural Networks for Visual Recognition," Stanford University, 2019. [Online]. Available: http://cs231n.stanford.edu/. [Accessed 29 April 2019].
[66] M. A. Nielsen, Neural Networks and Deep Learning, Determination Press, 2015.[67] G. Sanderson, "Neural networks," 2017. [Online]. Available:
https://www.youtube.com/playlist?list=PLZHQObOWTQDNU6R1_67000Dx_ZCJB-3pi. [Accessed 29 April 2019].
[68] Wikipedia, "Universal approximation theorem".[69] D. Smilkov and S. Carter, "A Neural Network Playground," 2016. [Online]. Available:
https://playground.tensorflow.org/#activation=tanh&batchSize=10&dataset=circle®Dataset=reg-plane&learningRate=0.03®ularizationRate=0&noise=0&networkShape=4,2&seed=0.29878&showTestData=false&discretize=false&percTrainData=50&x=true&y=true&xTimesY=fal. [Accessed 29 April 2019].
[70] J. Torres, "Convolutional Neural Networks for Beginners," Medium, 23 September 2018. [Online]. Available: https://towardsdatascience.com/convolutional-neural-networks-for-beginners-practical-guide-with-python-and-keras-dc688ea90dca. [Accessed 27 April 2019].
[71] H. Pokharna, "The best explanation of Convolutional Neural Networks on the Internet!," Medium, 28 July 2016. [Online]. Available: https://medium.com/technologymadeeasy/the-best-explanation-of-convolutional-neural-networks-on-the-internet-fbb8b1ad5df8. [Accessed 27 April 2019].
[72] D. Cornelisse, "An intuitive guide to Convolutional Neural Networks," Medium, 24 April 2018. [Online]. Available: https://medium.freecodecamp.org/an-intuitive-guide-to-convolutional-neural-networks-260c2de0a050. [Accessed 27 April 2019].
[73] S. Saha, "A Comprehensive Guide to Convolutional Neural Networks — the ELI5 way," Medium, 15 December 2018. [Online]. Available: https://towardsdatascience.com/a-comprehensive-guide-to-convolutional-neural-networks-the-eli5-way-3bd2b1164a53. [Accessed 29 April 2019].
[74] U. Karn, "An Intuitive Explanation of Convolutional Neural Networks," 11 August 2016. [Online]. Available: https://ujjwalkarn.me/2016/08/11/intuitive-explanation-convnets/. [Accessed 27 April 2019].
[75] D. Becker, "Rectified Linear Units (ReLU) in Deep Learning," Kaggle, 23 January 2018. [Online]. Available: https://www.kaggle.com/dansbecker/rectified-linear-units-relu-in-deep-learning. [Accessed 27 April 2019].
[76] Wikipedia, "Convolutional neural network".[77] F. Pedregosa, G. Varoquaux, A. Gramfort, V. Michel, B. Thirion, O. Grisel, M. Blondel,
P. Prettenhofer, R. Weiss, V. Dubourg, J. Vanderplas, A. Passos, D. Cournapeau, M. Brucher, M. Perrot and E. Duchesnay, "Scikit-learn: Machine Learning in Python,"

62
Journal of Machine Learning Research, vol. 12, pp. 2825-2830, 2011.

63
Appendices
Appendix A: User testing feedback
Cross-Validation
“None of the Python code examples work. All other links, however, do work. The code examples do run successfully though. Each of the sections on holdout, k-fold, and leave-p-out are well explained to a beginner to ML. The explanations in each code example section also help understand what the user can do with each script. Well done overall.”
“All the links work and are good reference readings. The Python code runs with no errors. I don't have any experience with ML but after reading the module, I felt I understood cross-validation pretty well. The visuals that were provided were very helpful in understanding the concepts.”
“The information on the page was very informative. I thought that I gained a better understanding after reading. The links all worked for me but I found it slightly annoying that it didn't open a new tab but instead made me click back if I wanted to return. Also when selecting images the only way to escape the page was by clicking back which I found tedious.”
Linear Regression
“All links on the page worked. Text was well written with appropriate bolding of key terms to help the user focus on the most important aspects of the lesson. Links to outside sources provide helpful additional information in case someone doesn't quite feel comfortable with just the information provided. Graphs of example data were well made for easy comprehension of what type of data it should be representing. Left navigation bar is useful, especially with expanding sections based on user location.”
“The overall page works well, all of the links work as desired. All of the figures and explanations of said figures are well done and well explained. The bolding of the key words and concepts really helps organize the page. When you scroll on the main page, it scrolls for the left navigation bar as well. This is not a problem with this page specifically though. Overall, the page is great and the information makes sense”
“The way that you worded the information was very understandable to someone who has no background or experience in this subject matter. The bolded terms were a good detail because it is easy for students to know what their main take-aways from each paragraph should be. One suggestion I'd have is to center your equations in the middle of the page to kind of set them

64
apart and make the captions smaller and lighter in color so they aren't distracting to the picture or equation (maybe even align the captions to the right side of the page instead). Overall, the navigation was easy to handle and the whole layout of your site looks great. ”
Overfitting and Underfitting
“I thought the concepts of overfitting and underfitting were explained well. When I clicked on an image, I expected it to get bigger but it stayed the same size - do you have the higher resolutions available for the images in this module? The code worked fine, although since I'm a Python newbie I didn't realize that I had to install the matplotlib library before it would run. I don't know if that's something you want to mention in the code sections (eg, dependencies). All the links worked, and I think it's helpful that you have further reading available.”
“I understood the terms of over and underfitting by looking through this module. It was short and easy to learn but also explained the concepts well. The code is simple and provides good plots of overfitted and underfitted models as compared to the real model. The images are also good but I feel that the first one could use the same model comparison as the other two where you have the target model in the same picture in red.”
Regularization
“Not exactly related to this section specifically, but the navigation bar on the side scrolls while I'm scrolling through the content. Other than that the page is easy to navigate and well organized. All of the links in the outline worked and brought me to the correct section in the text. The links to the source code on github all worked as well. I think that the this section covered this topic well and the explanations and analogies were good. The code is also commented well enough to understand everything that is going on.”
“Good navigation of site easy to maneuver around the website. I like how everything is broken down into small sections so users are not overwhelmed. Also I love how there is a summary at the end as well.”
Logistic Regression
“I think the layout of the section is very intuitive. All the sections have appropriate headers and formatting. I found that all links work and have relevant information. If I were to give any picky advice, it would be to make the link formatting more consistent. In the “How does it work” section the link is given as a Ref link. In the other sections, like motivation, it is a hyperlink within a word. It would be nice to have just one of these formats for links to keep consistency.”
Naive Bayes Classification

65
“Overall, the website is very easy to navigate through. It took me no time at all to get ot the section that I needed to. All of the figures show up well on the website, and are properly placed within the website. All of the links to the githubs work. Maybe try putting a section at the bottom (under the references) where you can put all of the links for the githubs you referenced. Other than that, everything looks great.”
“The navigation is easy to use, and it is good to explain the math behind the Naive Bayes. It will be better if you can put some sample code in the documect instead of just put them in the reference. Also, I am wondering why there are so many blank on the right side of the screen.”
Decision Trees
“I agree that the layout is intuitive. The table of contents made it so all sections are easy to navigate. Text and code are easy to understand and separated well. One suggestion I have is to make your pictures within this section have a gray instead of white background. Images seem off with the background of the site and changing the color to gray will further integrate the content within the site.”
“The website is impressively easy to use and navigate. I found it to be simple enough to use without tutorial while being really effective. I really liked how the side bar moves with the scroll feature as well. One point of improvement I would like to see is the current link highlightng which section I am on when I collapse it. Right now when I hit the minus sign the "Decision tree" part also turns dark grey. I would also suggest adding next/previous button on the top of the page and making links in the page go to new tabs by default.”
K-nearest Neighbors
“I have tested every link and added feature under this category and everything was easy to use and navigate. I did not encounter any bugs while trying to view a specific portion of the text. I thought i was good that you placed the code in a green box. The graphs were also very easy to understand as they were large. I tried your link to Github placed under your code exmaple and ran the scrips successfully. ”
Linear Support Vector Machines
“Tested every link and they all worked. The presentation of all the information is very well done from the table of contents, the titles, the information, and the code snippets. Having the actual runnable code being on a github page, however, seems sort of counterintuitive. I don't know how difficult it would be to have an embedded environment to run Python code, but I feel this would be better.”
Clustering

66
“The layout is very intuitive. However, the links to the external files (clustering_hierarchical.py and clustering_kmeans.py) do not work. On a side note, I feel like a better logo would help the site look better.”
“The site is actually laid out very well. It was easy to find the subject. It did take me a bit of time to find the external files. I also was not able to click on them, whether that was an issue on my end or on yours. Overall, I thought the site and the topics and the layout of the website were well done. Biggest concern is that some links were not working. Also was the ad on purpose is this site purely educational? ”