table of contents - viridian weapon technologies and safe firearms handling techniques outlined in...
TRANSCRIPT

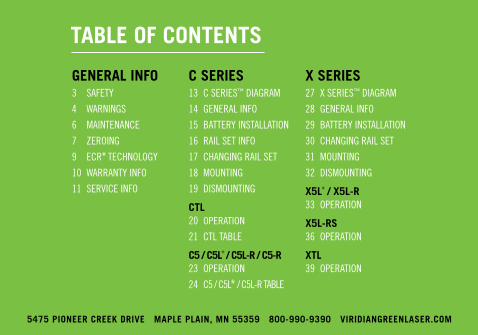
GENERAL INFO 3 SAFETY
4 WARNINGS
6 MAINTENANCE
7 ZEROING
9 ECR® TECHNOLOGY
10 WARRANTY INFO
11 SERVICE INFO
C SERIES13 C SERIES™ DIAGRAM
14 GENERAL INFO
15 BATTERY INSTALLATION
16 RAIL SET INFO
17 CHANGING RAIL SET
18 MOUNTING
19 DISMOUNTING
CTL
20 OPERATION
21 CTL TABLE
C5 / C5L® / C5L-R / C5-R
23 OPERATION
24 C5 / C5L® / C5L-R TABLE
X SERIES27 X SERIES™ DIAGRAM
28 GENERAL INFO
29 BATTERY INSTALLATION
30 CHANGING RAIL SET
31 MOUNTING
32 DISMOUNTING
X5L® / X5L-R
33 OPERATION
X5L-RS
36 OPERATION
XTL39 OPERATION
TABLE OF CONTENTS
5475 PIONEER CREEK DRIVE MAPLE PLAIN, MN 55359 800-990-9390 VIRIDIANGREENLASER.COM

CONGRATULATIONS on your purchase of a Viridian®, the finest and most visible laser sight/tactical light available.
Please read and follow the instructions in this manual to get the most out of your Viridian®.
DO NOT RETURN THIS PRODUCT TO THE STORE! If you experience any problems with your product or are missing parts, please contact us for assistance. We want to help you! [email protected] or call 1-800-990-9390.
2

SAFETY SUMMARY
VIRIDIAN GREEN®
WARNING LABELELITE RED™
WARNING LABELOutput Power: <5 mW Wavelength: 532nm Class lIIa Laser Product
Output Power: <5 mW Wavelength: 635nm Class lIIa Laser Product
DO NOT stare into the laser beam.
DO NOT look into the laser beam through binoculars or telescopes.
DO NOT point the beam at mirror-like surfaces. DO NOT shine the laser beam into or near anyone’s eyes. DO NOT point the laser at any person, animal, or moving vehicle, including aircraft.
3
6 5

WARNINGS1. Before handling any firearm with a Viridian®, read and understand the entire contents of your firearm manual provided as well as the Viridian® manual, especially the safety precautions and procedures for safe firearms handling.
2. Failure to follow the correct safety precautions and safe firearms handling techniques outlined in your firearm and Viridian® operator’s manuals when handling a firearm with the Viridian® can result in serious injury, damage to property, or death.
3. Always practice safe firearms handling techniques when handling a firearm with or without the Viridian®.
4. Never point a firearm, with or without the Viridian® attached, at anything or anyone that you do not intend to shoot. 5. Once the Viridian® is attached to a firearm, the firearm will be pointed at anything to which the Viridian® is directed. Do not point the Viridian® at anything or anyone that you do not intend to shoot. 6. The activation buttons on the Viridian® allow you to operate the laser without placing your finger inside the trigger guard. Always keep your fingers off the trigger and outside the trigger guard until you are ready to fire the weapon. 7. Always verify that the chamber of the weapon is empty or “clear” before attempting to mount or dismount the Viridian®. Follow the “clearing” procedures as set forth in the manual for your firearm.
4

8. Always remove the Viridian® from the firearm when performing maintenance or cleaning of the Viridian®.
9. Always make sure the weapon is “clear” and on safe before making windage / elevation adjustments.
10. Failure to follow any of the safety warnings listed above when handling a firearm and/or the Viridian® can be dangerous and can result in serious injury, damage to property, or death.
11. Do not operate the Viridian® around cleaning solvents or flammable / combustible materials. Avoid use of the Viridian® in environments involving a flammable atmosphere or gasses, such as evaporated gasoline. Do not use the Viridian® in areas where gasoline, paints and solvents or other flammable liquids are stored.
12. The Viridian® should be tested periodically during periods of non-usage to ensure its proper functioning. When anticipating usage of and reliance upon the Viridian®, check the Viridian® before hand to ensure proper working order. 13. Proper functioning of the Viridian® is dependent upon an adequately charged battery. Use care when handling battery. Any battery may leak harmful chemicals which may damage skin, clothing, the Viridian®, or the gun itself. To avoid risk of injury, do not let any material leaked from a battery come in contact with eyes or skin. Do not expose battery to excessive heat. Follow battery manufacturers’ instructions as to proper handling, storage and disposal of battery.
5

XFront Lens Cleaning: Use a moistened cotton swab to periodically clean the front lens of gun powder residue. This step is important to prevent any degradation in the quality of the aiming point and/or beam.
Exterior Of Unit: Clean the Viridian® by wiping with a soft, damp cloth. Standard gun cleaning solvents may be used to clean stubborn areas.
Electrical Contacts: For cleaning of all electrical contacts, use a cotton swab dipped in alcohol. To remove heavy build-up on the contacts, carefully rub with a standard pencil eraser (be sure to thoroughly remove eraser residue).
CAUTION DO NOT USE ACIDIC OR FLAMMABLE CLEANING COMPOUNDS.X
MAINTENANCE
WARNINGS ALWAYS CHECK TO SEE THAT THE CHAMBER OF THE WEAPON IS EMPTY OR “CLEAR”
BEFORE ATTEMPTING TO MOUNT OR DISMOUNT THE VIRIDIAN®. FOLLOW THE “CLEARING” PROCEDURES AS SET FORTH IN THE MANUAL FOR YOUR FIREARM. MAKE SURE THE WEAPON IS CLEAR AND ON SAFE BEFORE PROCEEDING. PRIOR TO CLEANING, DISMOUNT THE VIRIDIAN® FROM YOUR WEAPON AND REMOVE THE BATTERIES. IT IS RECOMMENDED THAT YOU CLEAN YOUR ACCESSORIES PERIODICALLY TO ENSURE PROPER WORKING CONDITION.
6

ZEROING PROCEDURESBE SURE OF YOUR TARGET AND BACKGROUND BEFORE FIRING. WHEN YOU SQUEEZE THE TRIGGER, YOU MUST EXPECT THE PISTOL TO FIRE AND YOU MUST TAKE FULL RESPONSIBILITY FOR FIRING IT.
1. Set up a target with a clearly visible aiming point.
2. Mount the Viridian® onto the weapon’s accessory mounting rail (see “Mounting” procedures for specific unit).
3. Turn ON the Viridian® (see “Operation” procedures for specific unit).
WARNINGS BEFORE HANDLING ANY FIREARM WITH THE VIRIDIAN®, READ
AND UNDERSTAND THE ENTIRE CONTENTS OF YOUR FIREARM MANUAL AND THE VIRIDIAN® MANUAL, ESPECIALLY THE SAFETY PRECAUTIONS AND PROCEDURES FOR SAFE FIREARMS HANDLING.
ALWAYS CHECK TO SEE IF THE CHAMBER OF THE WEAPON IS EMPTY OR “CLEAR” BEFORE ATTEMPTING TO MOUNT OR DISMOUNT THE VIRIDIAN®. FOLLOW THE “CLEARING” PROCEDURES AS SET FORTH IN THE MANUAL FOR YOUR FIREARM.
X
CAUTION DO NOT FORCE WINDAGE AND ELEVATION SCREWS BEYOND THEIR INTENDED TRAVEL.
X7

4. While aiming the pistol through the iron sights, use the provided adjustment tool to change the visible aiming point of the Viridian®. Turn the windage and elevation to superimpose the Viridian’s® aiming point over the weapon’s iron sight aiming point.
5. Aim and fire a three round shot group into the center of the target’s aiming point.
6. Compare the impact point of the shot group to where the Viridian’s® aiming point was on the target to ensure they line up.
7. Make the necessary adjustments to the Viridian® to ensure its aiming point and the shot group are aligned.
8. Turn the unit OFF.
An alternative way to align the Viridian® is to hold the aiming point perfectly fixed to the center of the intended target and then adjust windage and elevation so that your aiming point is brought to the center of your previous shot grouping. The gun and the Viridian® must remain in a fixed position while making these adjustments.
X WARNING NEVER PUT YOUR HAND IN FRONT OF THE MUZZLE OF A FIREARM. ALWAYS KEEP YOUR FINGER AWAY FROM THE TRIGGER UNTIL YOU
ARE READY TO FIRE. ALWAYS MAKE SURE THE WEAPON IS CLEAR AND ON SAFE BEFORE MAKING WINDAGE/ELEVATION ADJUSTMENTS.
8

9
ECR® TECHNOLOGYWith Enhanced CombatReadiness (ECR® Instant-On™ ) now part of every universal Viridian® laser / light and TacLoc® holster, you can achieve inhumanly fast
response to crisis. Just preset the Viridian® laser / taclight mode, slide your gun into your TacLoc® holster, and the ECR® Instant-On™ system is armed and ready. The instant your gun leaves the holster, the laser / light fires a brilliant beam that cuts through daylight or darkness as fast as you can draw.
With virtually unlimited laser and / or taclightmodes, a wide range of TacLoc® holsters, andthe breakthrough ECR® Instant-On™ system, Viridian® has elevated combat readiness to a whole new level. Draw-and-activate is obsolete.

LIMITED WARRANTYViridian® warrants for 7 years after purchase that its products will be free from defects in material and workmanship. Viridian® will repair or replace, at its option, any product or part (with the exception of the battery) which is found to be defective under normal use and service, without charge. Viridian’s® obligation to repair or replace, at Viridian’s® option, shall be the purchaser’s sole and exclusive remedy under this warranty.
Warranty does not cover battery leakage; contact battery manufacturer in this event. This warranty extends only to the original owner.
VIRIDIAN® 7 YEAR LIMITED WARRANTY THERE ARE NO WARRANTIES, EXPRESS OR IMPLIED, OTHER THAN AS SET FORTH ON THIS PAGE, AND VIRIDIAN® DISCLAIMS ANY WARRANTIES OF MERCHANTABILITY OR FITNESS FOR A PARTICULAR PURPOSE. VIRIDIAN® SHALL NOT BE LIABLE FOR INCIDENTAL, CONSEQUENTIAL OR SPECIAL DAMAGES ARISING OUT OF OR IN CONNECTION WITH PRODUCT USE OR PERFORMANCE.
For warranty questions or servicing of your product, please call 800.990.9390 or email customer service at [email protected]
10
Viridian is a registered trademark of Laser Aiming Systems Corporation. Viridian Green, Elite Red, ECR, Enhanced Combat Readiness, TacLoc, Radiance and Reactor are trademarks of Laser Aiming Systems Corporation. All rights reserved. ©2014 Patents Pending.

For service or repair, please call or email before returning unit.
Send to:
SERVICE
VIRIDIAN® 5475 PIONEER CREEK DRIVEMAPLE PLAIN, MN 55359
ATTN: SERVICE / REPAIRS800-990-9390 [email protected] FAX: 763-479-4089
11

FITS ALL PICATINNY RAILED PISTOLS INCLUDING SUBCOMPACTS
12
13 C SERIES™ DIAGRAM
14 GENERAL INFO
15 BATTERY
INSTALLATION
16 RAIL SET INFO
17 CHANGING
RAIL SET 18 MOUNTING
19 DISMOUNTING
CTL 20 OPERATION
21 CTL TABLE
C5 / C5L / C5L- R
23 OPERATION
24 C5 / C5-R / C5L® / C5L-R TABLE
TABLE OF CONTENTSC SERIES™
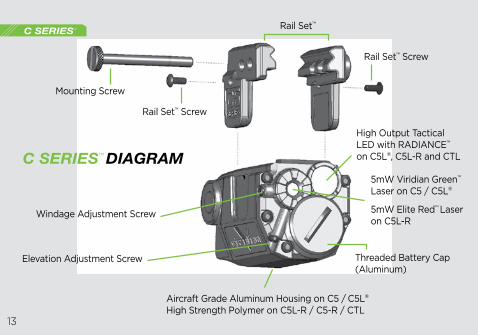
Mounting Screw
Rail Set™ Screw
Rail Set™ Screw
5mW Viridian Green™
Laser on C5 / C5L®
5mW Elite Red™ Laser on C5L-R
Rail Set™
Threaded Battery Cap (Aluminum)
High Output Tactical LED with RADIANCE™ on C5L®, C5L-R and CTL
Windage Adjustment Screw
Elevation Adjustment Screw
Aircraft Grade Aluminum Housing on C5 / C5L®High Strength Polymer on C5L-R / C5-R / CTL
C SERIES™ DIAGRAM
13
C SERIES™

GENERAL INFORMATIONSeparate modes allow for individual laser recognition in tactical team situations.
Constant laser beam mode will give you the maximum laser visibility; however, using one of the laser pulsing modes will maximize battery life.
Battery life on the Viridian Green® models (with laser on only), will increase from approx. 4+ hours in constant to 7+ hours in the pulsing modes. With laser and tactical light on (high output) battery life will be approximately 60 minutes.
Battery life on the Elite Red™ model is 20+ hours in constant laser beam mode, 35+ hours pulsing laser, 75 minutes laser / light.
Your Viridian® is equipped with APC circuitry. This maintains constant laser power output for a consistently bright aiming point.
In the event of excess internal heat buildup you may temporarily experience reduced laser power output. This is by design and will not damage your laser. This condition may be more prevalent with heavy use of the LED while the laser is on or in extremely hot environments.
14
C SERIES™

BATTERY INSTALLATION1. Your Viridian’s® CR2 battery resideswithin the housing located at thebottom front of your Viridian®. Thisbattery design allows you to change your battery without removingyour Viridian® from your firearm. (See Page 13)
2. To access the Battery Compartment simply turn the Threaded Battery Cap (Aluminum) counterclockwise and remove.
3. Slide the CR2 Battery (3 Volt Lithium) into the housing positive side (+) first. Once the battery is in place, the positive side (+) should be to the back, and the negative side (-) to the front of your Viridian®.
4. To secure battery into place, line up the threading of the Battery Cap with the hole in the front of your housing and turn clockwise until the Battery Cap reaches its stopping point, fully seating the O-ring seal.
X CAUTION TEST VIRIDIAN® PERIODICALLY DURING PERIODS OF NON-USAGE TO ENSURE
ADEQUATE BATTERY LEVELS.
X CAUTION TO REMOVE OR INSTALL THE THREADED BATTERY CAP OF THE C SERIES HOUSING
TAKE CARE TO PROPERLY LINE UP THE THREADS SO AS TO NOT DAMAGE THE INTERNAL THREADING OF YOUR VIRIDIAN®. A QUARTER OR PENNY WORKS WELL TO REMOVE OR INSTALL THIS FRONT CAP.
15
C SERIES™

EXAMPLE:
C SERIES™ RAIL SET INFO
R3R2R1
These 3 Rail Sets™ are included with your Viridian® C Series™ and will allow mounting for the vast majority of railed firearms. For handguns, choose the Rail Set™ that will allow the Viridian® to be set back and as close to the trigger guard as possible.
For more information or to purchase Viridian® Rail Sets™ for harder to fit weapons (such as HK USP) please visit us online at www.ViridianGreenLaser.com.
16
SPRINGFIELD XD/XDM GLOCKS WITH RAILS MANY TAURUS MODELS SMITH & WESSON M&P STANDARD PICATINNY
C SERIES™

CHANGING THE RAIL SET 1. Using the adjustment tool, unscrew Rail Set™ Screw on each side of Viridian®
2. Remove each Rail Set™ by pulling upward
3. Insert new Rail Set™ on each side of Viridian®
4. Lightly tighten each Rail Set™ Screw (premature tightening of Rail Set™ Screws may prevent Viridian® installation onto rail of your firearm)
YOU ARE NOW READY TO INSTALL YOUR VIRIDIAN® ONTO THE RAIL OF YOUR FIREARM. Once your Viridian® is properly mounted onto your firearm, full tightening of Rail Set™ Screws will further ensure a rock solid hold. Do not overtighten Rail Set™ Screws.
17
C SERIES™

MOUNTING 1. Align the grooves within the Rail Set™ of your Viridian® with the grooves on the rail of your firearm and slide rearward until your Viridian® reaches the front of your firearm’s trigger guard.
Note: Some rails may require the Rail Set™ screws to be loosened before sliding unit on to rail. Re-tighten screws after placement. 2. If you have the proper Rail Set™ installed for your firearm, one set of holes within the sides of the Rail Set™ should align with the Cross Slot of the accessory rail under your firearm. It is OK to slide your Viridian® slightly forward (away from the trigger guard) to achieve this alignment.
3. Insert the Mounting Screw and turn it clockwise until firmly tightened. A flat head screw driver or coin can be used here.
WARNING NEVER PUT YOUR HAND IN FRONT OF THE MUZZLE OF A FIREARM. ALWAYS KEEP YOUR
FINGER AWAY FROM THE TRIGGER UNTIL YOU ARE READY TO FIRE. ALWAYS MAKE SURE THE WEAPON IS CLEAR AND ON SAFE BEFORE ATTEMPTING TO MOUNT OR DISMOUNT FROM YOUR WEAPON.
X
18
C SERIES™

WARNING NEVER PUT YOUR HAND IN FRONT OF THE MUZZLE OF A FIREARM. ALWAYS KEEP YOUR
FINGER AWAY FROM THE TRIGGER UNTIL YOU ARE READY TO FIRE. ALWAYS MAKE SURE THE WEAPON IS CLEAR AND ON SAFE BEFORE ATTEMPTING TO MOUNT OR DISMOUNT FROM YOUR WEAPON.
X
19
DISMOUNTING 1. To dismount the Viridian® fromyour weapon, turn the Mounting Screw counterclockwise until this screw is removed from your Viridian®. Store your Mounting Screw in a secure place such as your provided Viridian® tool box. 2. Your Viridian® is now ready to be removed from your handgun. Slide the Viridian® forward and away from the trigger guard to remove it from your weapon. Always take great care to NEVER put your hand in front of the muzzle of your firearm.
C SERIES™

CTL OPERATION The Viridian® CTL has unprecedenteduser programmability options. Your CTL’s activation is completelyambidextrous. Simply press either right or left button to activate or deactivate your Viridian® CTL in any of its modes. Holding either button in for longer than3/4 second will activate your Viridian®in momentary mode. In this case yourViridian® will turn off upon release ofthe button.
In the event your Viridian® is accidentallyleft on, it will shut down in approximately10 minutes after a brief warning period.
If you wish to keep the power on, simplypress either button. This will reset the power down timer. The Viridian® CTL has 2 unique user modes (See Page 21). To cycle through these modes simply press and quickly release both right and left buttons at the same time while the unit is on. For those that desire even more userprogrammed versatility, hold down bothbuttons for 3 seconds to engage DeepProgramming Mode. This will allow customized frequencies of tactical light strobe rates as well as adjustable LED lumen output.
20
C SERIES™

MODE* LIGHT DEEP PROGRAMMING**
CTL TABLE
1
Constant
LIGHT DIMMER - Starts at high lumen, steps down to medium, then low, then back to high, each step is approximately ½ second
2
Strobe
LIGHT FREQUENCY OF STROBE - Starts at an ideal 20Hz*** steadily proceeds upward until peak of 40Hz, ½ second pause****, jumps to bottom at 1Hz, ½ second pause, then proceeds up to ideal 20Hz, ½ second pause and then repeats
The Viridian® CTL features a high output strobe mode. This mode is ideal for situations where a disorienting effect is desired. When in strobe mode, the Viridian® CTL’s output boosts from 100 lumens (constant light mode) to 140 lumens.
21
C SERIES™

*To change modes press and release both buttons at the same time while the unit is on. **To enter Deep Programming mode hold down both buttons for greater than 3 seconds. Continue to hold down both buttons to observe these Deep Programming changes. Release both buttons to lock in your Deep Programming change. ***Hz or Hertz is a unit of frequency andis defined as the number of cycles persecond. As referenced here it is the number of light pulses per second. ****The ½ second pause is to allow you a moment to release both buttons so you know you are at either the bottom, ideal, or top frequency.
Your operating mode selections andDeep Programming setting will always bestored for the next use of your Viridian®. Removing the battery will return yourViridian® to factory default settings.(Mode 1 Constant Light Only)
WARNING NEVER PUT YOURHAND IN FRONT OF THE MUZZLEOF A FIREARM. ALWAYS KEEP
YOUR FINGER AWAY FROM THE TRIGGER UNTIL YOU ARE READY TO FIRE. ALWAYS MAKE SURE THE WEAPON IS CLEAR AND ON SAFE BEFORE MOUNTING OR DISMOUNTING ANY ACCESSORY ONTO YOUR FIREARM.
X
22
C SERIES™

C5 / C5-R / C5L /C5L-ROPERATION / SMARTLASER TECHNOLOGY™
The Viridian® C5 / C5L® / C5L-R all have unprecedented user programmability options never seen before in a commercially available weapon mounted device. Your Viridian’s® activation is completely ambidextrous. Simply press either right or left button to activate or deactivate your Viridian® C5 / C5-R / C5L® / C5L-R in any of its modes. Holding either button in for longer than 3/4 second will activate your Viridian® in momentary mode. In this case your Viridian®
will turn off upon release of the button. In the event your Viridian® is accidentally left on, it will shut down in approximately 10 minutes after a brief warning period. If you wish to keep the power on, simply press either button. This will reset the power down timer. The Viridian® C5L® / C5L-R has a total of 6 unique user modes and the Viridian® C5 / C5-R has two unique user modes (See Page 24). To cycle through these modes simply press and quickly release both right and left buttons at the same time while the unit is on. For those that desire even more user programmed versatility, hold down both buttons for 3 seconds to engage Deep Programming Mode. This will allow customized frequencies of pulse rates of both light and laser as well as adjustable LED lumen output.
23
C SERIES™
®

1 Constant NA
2 Constant Constant LIGHT DIMMER - Starts at high lumen, steps down to medium, then low, then back to high, each step is approximately ½ second
3 Constant Strobe LIGHT FREQUENCY OF STROBE - Starts at an ideal 20Hz***steadily proceeds upward until peak of 40Hz, ½ second pause****, jumps to bottom at 1Hz, ½ second pause, then proceeds up to ideal 20Hz, ½ second pause and then repeats
4 PulseLASER FREQUENCY OF PULSE - Starts at ideal 10Hz, steadily proceeds upward until peak of 20Hz, ½ second pause, jumps to bottom at 1Hz, then proceeds up to ideal 10Hz, ½ second pause and then repeats
5 Pulse Constant LIGHT DIMMER - Starts at high lumen, steps down to medium, then low, then back to high, each step is approximately ½ second
6 Constant LIGHT DIMMER - Starts at high lumen, steps down to medium, then low, then back to high, each step is approximately ½ second
MODE* LASER LIGHT DEEP PROGRAMMING**
VIRIDIAN® C5 / C5-R (LASER WITHOUT LIGHT) OPERATION FOLLOWS MODES 1 AND 4 ONLY24
C5 / C5-R / C5L / C5L-RC SERIES™
®
*To change modes press and release both buttons at the same time while the unit is on. **To enter Deep Programming mode hold down both buttons for greater than 3 seconds. Continue to hold down both buttons to observe these Deep Programming changes. Release both buttons to lock in your Deep Programming change. ***Hz or Hertz is a unit of frequency and is defined as the number of cycles per second. As used here it is the number of pulses per second whether light or laser. ****The ½ second pause is to allow you a moment to release both buttons so you know you are at either the bottom, ideal, or top frequency.
Your Laser / Light mode selections and Deep Programming setting will always be stored for the next use of your Viridian®. Removing the battery will return your Viridian® to factory default settings. (Mode 1 Constant Laser Only)
WARNING NEVER PUT YOURHAND IN FRONT OF THE MUZZLEOF A FIREARM. ALWAYS KEEP
YOUR FINGER AWAY FROM THE TRIGGERUNTIL YOU ARE READY TO FIRE. ALWAYSMAKE SURE THE WEAPON IS CLEAR ANDON SAFE BEFORE MOUNTING OR DISMOUNTING ANY ACCESSORY ONTO YOUR FIREARM.
X
25
C SERIES™

/
26
TABLE OF CONTENTSX SERIES™
27 X SERIES™ DIAGRAM
28 GENERAL INFO
29 BATTERY
INSTALLATION30 CHANGING RAIL SET31 MOUNTING32 DISMOUNTING
X5L™ / X5L-R
33 OPERATION
X5L-RS
36 OPERATION
XTL
39 OPERATION
FITS ALL FULL SIZED RAILED PISTOLS

Mounting Screw
Rail Set™ Screw Rail Set™ Screw
5mW Viridian Green™ Laser on X5L® / X5L-RS
5mW Elite Red™
Laser on X5L-R
Rail Set™
Tactical Light Lens (High Output LED)
Windage Adjustment Screw
Elevation Adjustment Screw
27
X SERIES™ DIAGRAM
X SERIES™
Aircraft Grade Aluminum Housing on X5L® / X5L-RSHigh Strength Polymer on X5L-R / XTL

Tactical Light Lens (High Output LED)
Separate modes allow for individual laser recognition in tactical team situations. Constant beam mode will give you the maximum laser visibility; however, using one of the laser pulsing modes will maximize battery life.
Battery life on the Viridian Green™
X5L® / X5L-RS (with laser on only), will increase from approx. 6 hours in constant to 10+ hours in pulsing mode. With laser and tactical light on (high output) battery life will be approximately 60 minutes.
Battery life on the Elite Red™ X5L-R model is 30+ hours in constant laser beam mode, 45+ hours pulsing laser, 90 minutes laser / light.
Battery life on XTL is 60 minutes on constant and 90 minutes on strobe at high power.
Your Viridian® is equipped with APC circuitry. This maintains constant laser power output for a consistently bright aiming point. In the event of excess internal heat buildup you may temporarily experience reduced laser power output. This is by design and will not damage your laser. This condition may be more prevalent with heavy use of the LED while the laser is on or in extremely hot environments.
GENERAL INFORMATION
28
X SERIES™

BATTERY INSTALLATION1. Your Viridian’s® CR123A battery resideswithin the housing located behind the Tactical Light Lens on your Viridian®. This battery design allows you to change your battery without removing your Viridian® from your firearm. (See Page 27)
2. To access the Battery Compartment simply turn the Tactical Light Lens counterclockwise and remove.
3. Slide the CR123A Battery (3 Volt Lithium) into the housing positive side (+) first. Once the battery is in place, the positive side (+) should be to the back, and the negative side (-) to the front of your Viridian®.
4. To secure battery into place, line up the Tactical Light Lens with the Faceplate and turn clockwise until it reaches its stopping point.
X CAUTION TEST VIRIDIAN® PERIODICALLY DURING PERIODS OF NON-USAGE TO ENSURE
ADEQUATE BATTERY LEVELS.
29
X SERIES™
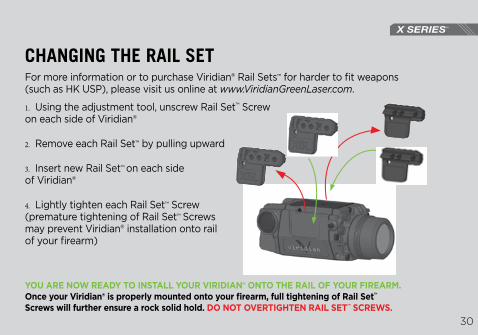
CHANGING THE RAIL SETFor more information or to purchase Viridian® Rail Sets™ for harder to fit weapons (such as HK USP), please visit us online at www.ViridianGreenLaser.com. 1. Using the adjustment tool, unscrew Rail Set™ Screw on each side of Viridian®
2. Remove each Rail Set™ by pulling upward
3. Insert new Rail Set™ on each side of Viridian®
4. Lightly tighten each Rail Set™ Screw (premature tightening of Rail Set™ Screws may prevent Viridian® installation onto rail of your firearm)
YOU ARE NOW READY TO INSTALL YOUR VIRIDIAN® ONTO THE RAIL OF YOUR FIREARM. Once your Viridian® is properly mounted onto your firearm, full tightening of Rail Set™ Screws will further ensure a rock solid hold. DO NOT OVERTIGHTEN RAIL SET™ SCREWS.
30
X SERIES™

31
MOUNTING 1. Align the grooves within the Rail Set™ of your Viridian® with the grooves on the rail of your firearm and slide rearward until your Viridian® reaches the front of your firearm’s trigger guard.
Note: Some rails may require the Rail Set™ screws to be loosened before sliding unit on to rail. Re-tighten screws after placement. 2. Due to multiple hole positions on the pre-installed Rail Set™, one set of holes within the sides of the Rail Set™ should align with the cross slot of the accessory rail under your firearm. It is OK to slide your Viridian® slightly forward (away from the trigger guard) to achieve this alignment.
3. Insert the Mounting Screw and turn it clockwise until firmly tightened. A flat head screw driver or coin can be used here.
WARNING ALWAYS MAKE SURE THE WEAPON IS CLEAR AND ON SAFE BEFORE ATTEMPTING TO MOUNT OR
DISMOUNT VIRIDIAN® FROM YOUR WEAPON. NEVER PUT YOUR HAND IN FRONT OF THE MUZZLE OF A FIREARM. ALWAYS KEEP YOUR FINGER AWAY FROM THE TRIGGER UNTIL YOU ARE READY TO FIRE.
X
X SERIES™

32
DISMOUNTING
1. To dismount the Viridian® from your weapon, loosen and remove the Mounting Screw in a counterclockwise direction. Store your Mounting Screw in a secure place such as the provided Viridian® tool box. 2. Your Viridian® is now ready to be removed from your handgun. Slide the Viridian® forward and away from the trigger guard to remove it from your weapon. Slight loosening of both Rail Set Screws™ may ease removal of unit. Always take great care to NEVER put your hand in front of the muzzle of your firearm.
WARNING ALWAYS MAKE SURE THE WEAPON IS CLEAR AND ON SAFE BEFORE ATTEMPTING TO MOUNT OR
DISMOUNT VIRIDIAN® FROM YOUR WEAPON. NEVER PUT YOUR HAND IN FRONT OF THE MUZZLE OF A FIREARM. ALWAYS KEEP YOUR FINGER AWAY FROM THE TRIGGER UNTIL YOU ARE READY TO FIRE.
X
X SERIES™

X5L / X5L-R OPERATION / SMARTLASER TECHNOLOGY™ The Viridian® X5L® / X5L-R has unprecedented user programmability options never seen before in a commercially available weapon mounted device. Your Viridian’s® activation is completely ambidextrous. Simply press either right or left button to activate or deactivate your Viridian® X5L® / X5L-R in any of its modes. Holding either button in for longer than 3/4 second will activate your Viridian® in momentary mode. In this case your Viridian® will turn off upon release of the button.
In the event your Viridian® is accidentally left on, it will shut down in approximately 10 minutes after a brief warning period. If you wish to keep the power on, simply press either button. This will reset the power down timer. The Viridian® X5L® / X5L-R has a total of 6 unique user modes (See Page 34). To cycle through these modes simply press and quickly release both right and left buttons at the same time while the unit is on. For those that desire even more user programmed versatility, hold down bothbuttons for 3 seconds to engage Deep Programming Mode. This will allow customized frequencies of pulse rates of both light and laser as well as adjustable LED lumen output.
33
X SERIES™
®

1 Constant NA
2 Constant Constant LIGHT DIMMER - Starts at highest lumen, steps down to medium, then low, then back to high, each step is approximately ½ second
3 Constant Strobe
LIGHT FREQUENCY OF STROBE - Starts at an ideal 20Hz*** steadily proceeds upward until peak of 40Hz, ½ second pause****, jumps to bottom at 1Hz, ½ second pause, then proceeds up to ideal 20Hz, ½ second pause and then repeats
4 PulseLASER FREQUENCY OF PULSE - Starts at ideal 10Hz, steadily proceeds upward until peak of 20Hz, ½ second pause, jumps to bottom at 1Hz, then proceeds up to ideal 10Hz, ½ second pause and then repeats
5 Pulse Constant LIGHT DIMMER - Starts at highest lumen, steps down to medium, then low, then back to high, each step is approximately ½ second
6 Constant LIGHT DIMMER - Starts at highest lumen, steps down to medium, then low, then back to high, each step is approximately ½ second
MODE* LASER LIGHT DEEP PROGRAMMING**
34
X5L® / X5L-RX SERIES™

*To change modes press and release both buttons at the same time while the unit is on. **To enter Deep Programming mode hold down both buttons for greater than 3 seconds. Continue to hold down both buttons to observe these Deep Programming changes. Release both buttons to lock in your Deep Programming change. ***Hz or Hertz is a unit of frequency and is defined as the number of cycles per second. As used here it is the number of pulses per second whether light or laser. ****The ½ second pause is to allow you a moment to release both buttons so you know you are at either the bottom, ideal, or top frequency.
Your Laser / Light mode selections and Deep Programming setting will always be stored for the next use of your Viridian®. Removing the battery will return your Viridian® to factory default settings. (Mode 1 Constant Laser Only)
WARNING NEVER PUT YOURHAND IN FRONT OF THE MUZZLEOF A FIREARM. ALWAYS KEEP
YOUR FINGER AWAY FROM THE TRIGGERUNTIL YOU ARE READY TO FIRE. ALWAYSMAKE SURE THE WEAPON IS CLEAR ANDON SAFE BEFORE MOUNTING OR DISMOUNTING ANY ACCESSORY ONTO YOUR FIREARM.
X
35
X SERIES™

X5L-RS OPERATION / SMARTLASER TECHNOLOGY™
The Viridian® X5L-RS has unprecedenteduser programmability options never seen before in a commercially available weapon mounted device.
The Viridian® X5L-RS is controlled using a two-button pressure switch along with a rotary dial for selecting modes.
To install pressure switch take care to line up the flat edge of both the pressure switch plug and main X5L-RS housing.
Also make sure the contact pins in the housing are lined up correctly with holes in the pressure switch plug.
An infinite amount of customizable modes are possible with the unique two-button pressure pad and rotary dial. The rotary dial has 10 positions to select from.
The top position (represented by an “O”) is the master off position. Your unit will not operate if the dial is set to -O-.
36
X SERIES™

X5L-RSLEFT SIDE OF DIALThe left side of the rotary dial represents the users constant-on control settings. All four modes on this side of the dial, once turned on, will remain on until turned off.
RIGHT SIDE OF DIALThe right side of the rotary dial represents the users momentary control. When either button is pressed and held down the unit will activate. When the button is let go, the unit will turn off.
37
X SERIES™
SELECTOR POSITION01234
ABCD
P
BUTTON #1Master off position. Unit will not operate.Laser OnlyLight OnlyLaser / LightLaser Only
Laser OnlyLight OnlyLaser / LightLaser Only
Select betweenConstant or PulsingLASER for all otherSelector Positions
BUTTON #2
Laser OnlyLight OnlyLaser / LightLight Only
Laser OnlyLight OnlyLaser / LightLight Only
Select betweenConstant or PulsingLIGHT for all otherSelector Positions
CONS
TANT
MOM
ENTA
RY
1 2

THE TENTH AND FINAL MODE A USER MAY SELECT IS AT THE BOTTOM OF THE ROTARY DIAL—LABELED MODE “P”. This is a programming mode where a user can switch between constant laser / light and pulsing laser / light.
The default setting of the X5L-RS is constant laser / constant light and that will be how the unit is set when entering mode “P” for the first time. Simply hold down button 1 (closest to the cord) and the laser will begin pulsing.
To set pulse let go of button 1. Once this is done all laser settings on entire unit will be switched to pulsing laser. Use the same technique to set the tactical light strobe, but use button 2.
WARNING NEVER PUT YOUR HAND IN FRONT OF THE MUZZLE OF A FIREARM. ALWAYS KEEP YOUR FINGER AWAY FROM
THE TRIGGER UNTIL YOU ARE READY TO FIRE. ALWAYS MAKE SURE THE WEAPON IS CLEAR AND ON SAFE BEFORE MOUNTING OR DISMOUNTING ANY ACCESSORY ONTO YOUR FIREARM.
X
38
X SERIES™

XTL OPERATION The Viridian® XTL has unprecedenteduser programmability options. Your XTL’s activation is completelyambidextrous. Simply press either right or left button to activate or deactivate your Viridian® XTL in any of its modes. Holding either button in for longer than3/4 second will activate your Viridian®in momentary mode. In this case yourViridian® will turn off upon release ofthe button.
In the event your Viridian® is accidentallyleft on, it will shut down in approximately10 minutes after a brief warning period.
If you wish to keep the power on, simplypress either button. This will reset the power down timer. The Viridian® XTL has 2 unique user modes (See Page 40). To cycle through these modes simply press and quickly release both right and left buttons at the same time while the unit is on. For those that desire even more userprogrammed versatility, hold down bothbuttons for 3 seconds to engage DeepProgramming Mode. This will allow customized frequencies of tactical light strobe rates as well as adjustable LED lumen output.
39
X SERIES™

40
X SERIES™
MODE* LIGHT DEEP PROGRAMMING**
XTL TABLE
1
Constant
LIGHT DIMMER - Starts at high lumen, steps down to medium, then low, then back to high, each step is approximately ½ second
2
Strobe
LIGHT FREQUENCY OF STROBE - Starts at an ideal 20Hz*** steadily proceeds upward until peak of 40Hz, ½ second pause****, jumps to bottom at 1Hz, ½ second pause, then proceeds up to ideal 20Hz, ½ second pause and then repeats
The Viridian® XTL features a high output strobe mode. This mode is ideal for situations where a disorienting effect is desired. When in strobe mode, the Viridian® XTL’s output boosts from 338 lumens (constant light mode) to 418 lumens.

NOTES

VIRIDIAN® IS A REGISTERED TRADEMARK OF LASER AIMING SYSTEMS CORPORATION. VIRIDIAN GREEN®, ELITE RED™, ECR®, ENHANCED COMBAT READINESS, TACLOC®, RADIANCE AND SMARTLASER TECHNOLOGY ARE TRADEMARKS OF LASER AIMING SYSTEMS CORPORATION. ALL RIGHTS RESERVED. © 2014 PATENTS PENDING.
V1412

5475 PIONEER CREEK DRIVE MAPLE PLAIN, MN 55359 800-990-9390 VIRIDIANGREENLASER.COM
DESIGNED & BUILT IN MINNESOTA