table of contents - red hat · table of contents lab overview ... this lab is prepared to run on...
TRANSCRIPT


Table of ContentsLab Overview ........................................................................................... 3
Background ............................................................................................. 3Red Hat Enterprise Linux Identity Management Overview ....................................... 3Red Hat Enterprise Linux Identity Management Benefits: ........................................ 4
Enhances Security ................................................................................................ 4Provides eSSO (enterprise Single Sign-on) ........................................................... 4Centralizes Administration and Control ............................................................... 4Implements Standards-Based, Integrated Components ...................................... 4Reduces costs ...................................................................................................... 4
IdM Features ............................................................................................................ 4
IdM Lab Environment Details ................................................................... 5
IdM Lab objectives ................................................................................... 5
Lab 1: Server Installation ......................................................................... 6
Lab 2: Users and Password Policies ......................................................... 7
Lab 3: Client Installation .......................................................................... 9
Lab 4: User Groups and Host Groups Management ................................ 10
Lab 5: Host Based Access Control – HBAC ............................................. 13
Lab 6: IdM Roles Management ................................................................ 18
LAB 7: IdM Replication ........................................................................... 19
LAB 8: Services and Keytabs ................................................................. 20

Red Hat Summit 2014 – Red Hat Enterprise Linux Identity Management
Lab OverviewThis lab guide assumes that you’re following instructor-led training and that this lab guide is will try to simulate real life tasks and scenarios. It goes through a number of labs that will enable your to create full functional environment using Red Hat Enterprise Linux IdM. Also you will explore IdM features such as users, groups, policies and access control rules management. The purpose is to give you a basic hands-on overview of Red Hat Enterprise Linux Identity Management and how the components are fit together. It will use a combination of command-line tools and the IdM web interface. This lab is prepared to run on environment, the setup is descried in this document on Lab Environment Section.
Your instructor will provide you with any additional information that you will require, primarily
the lab setup and required scenarios.
Background
Red Hat Enterprise Linux Identity Management OverviewRed Hat Enterprise Linux IdM is a way to create identity stores, centralized authentication, domain control for Kerberos and DNS services, and authorization policies — all on Linux systems, using native Linux tools. It is also supports Linux/Unix domains.
3

Red Hat Summit 2014 – Red Hat Enterprise Linux Identity Management
Red Hat Enterprise Linux Identity Management Benefits:
Enhances SecurityCentralizes authentication, authorization and fine-grained access control for UNIX/Linux environments.
Provides eSSO (enterprise Single Sign-on)Enables users to access many different enterprise resources after their initial log-in without having to type user name and password again and again.
Centralizes Administration and ControlAllows administrators to easily consolidate and manage identity servers in a UNIX/Linux environment; with the option to interoperate with Active Directory.
Implements Standards-Based, Integrated ComponentsIntegrates the capabilities of Kerberos, LDAP, DNS and x.509 certificates into a simple identity management solution.
Reduces costsCan replace third party user directories; and if joined with Linux for UNIX/Linux users identity management, can replace Active Directory, saving on client access licenses costs.
IdM Features• Integrated, native user, host, and service authentication and access control.• Consistent and manageable identity management for Linux and Unix systems.• Interoperability with Microsoft Active Directory domains.• Standards-based, trusted technologies.• Easier and clearer to implement, maintain, and understand authentication and
access control policies.• Flexible access control rules based on sudo rules, host-based rules, and other
criteria.• Consistent and universal password policies for users.• Integrate established Linux/Unix services like NFS, automount, NIS, NTP,
Kerberos, and DNS into a single management domain.• Smooth migration paths from NIS and LDAP services.• Scalable operations with up to 20 servers and replicas and an unlimited
number of clients in a single domain.
4
Red Hat Summit 2014 – Red Hat Enterprise Linux Identity Management
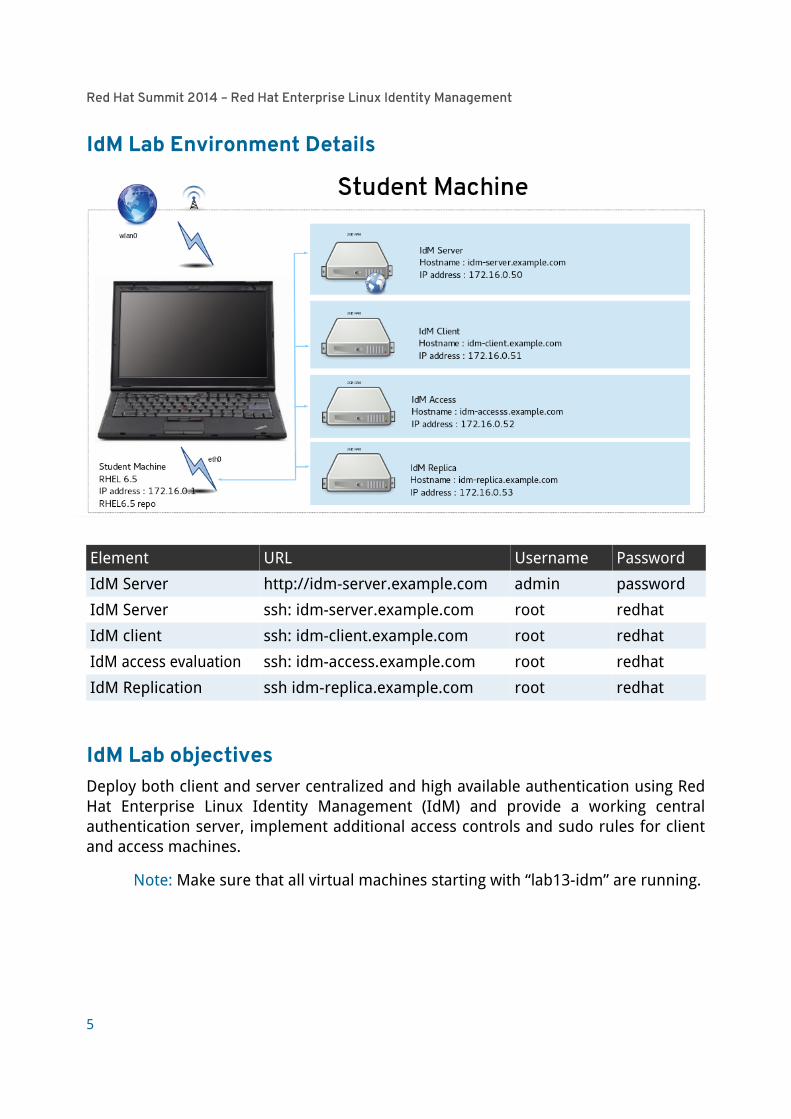
IdM Lab Environment Details
Element URL Username Password
IdM Server http://idm-server.example.com admin password
IdM Server ssh: idm-server.example.com root redhat
IdM client ssh: idm-client.example.com root redhat
IdM access evaluation ssh: idm-access.example.com root redhat
IdM Replication ssh idm-replica.example.com root redhat
IdM Lab objectivesDeploy both client and server centralized and high available authentication using Red Hat Enterprise Linux Identity Management (IdM) and provide a working central authentication server, implement additional access controls and sudo rules for client and access machines.
Note: Make sure that all virtual machines starting with “lab13-idm” are running.
5

Red Hat Summit 2014 – Red Hat Enterprise Linux Identity Management
Lab 1: Server InstallationTarget server: idm-server.example.comAccess: ssh [email protected]
• Log into idm-server.example.com, via ssh.• Make sure that hosts file is properly configured, you should find this line:
cat /etc/hosts
172.16.0.50 idm-server.example.com idm-server
• Install the IdM packages:
yum -y install bind-dyndb-ldap ipa-server
• Run as root:
[root@idm-server ~]# ipa-server-install --setup-dns --ssh-trust-dns
You should get the same information at end of the dialog:
The IPA Master Server will be configured with:
Hostname: idm-server.example.com
IP address: 172.16.0.50
Domain name: example.com
Realm name: EXAMPLE.COM
BIND DNS server will be configured to serve IPA domain with:
Forwarders: 8.8.8.8
Reverse zone: 0.16.172.in-addr.arpa.
After installation: Check the IdM web interface via idm-server.example.com.
6

Red Hat Summit 2014 – Red Hat Enterprise Linux Identity Management
• Check main IPA configuration: /etc/ipa/default.conf base DN, realm.• Obtain a kerberos ticket:
kinit admin
klist
• Check automatically created DNS records (A, SRV):
ipa dnszone-find
ipa dnsrecord-find
• Check IdM server defaults:
ipa config-show
ipa config-mod --defaultshell=/bin/bash
• Then on the idm-server check the logs (Just to know where to start debugging, not needed):
/var/log/pki-ca/debug
/var/log/pki-ca-install.log
/var/log/dirsrv/ (permissions!)
/var/log/messages
• Common install issues:◦ Broken DNS, bad /ect/hosts configuration.◦ Files and certificates remains after the last unsuccessful install.◦ Time synchronization issues.
Lab 2: Users and Password PoliciesTarget server: idm-server.example.comAccess: ssh [email protected]
• Add new users (create a username with your preferences in the prompt mode):
ipa user-add
ipa user-add --first=John --last=Smith jsmith
ipa user-add --first=Matt --last=Well --manager=jsmith [email protected] --homedir=/home/mwell mwell
• Modify User attributes:
ipa user-mod jsmith –addattr=departmentnumber=101
ipa user-show jsmith --all
ipa user-mod mwell --title="System Engineer"
7

Red Hat Summit 2014 – Red Hat Enterprise Linux Identity Management
• Modify Users password as admin:
ipa user-mod mwell --password
ipa user-mod jsmith --password
• Check if the system recognize the users:
id jsmith
getent groups mwell
• Check the default Password Polices:
ipa help pwpolicy
ipa pwpolicy-show
ipa pwpolicy-mod --maxlife=60
◦ As jsmith login via ssh to idm-server, you will be prompted to change the password for first time. Then Change password with:
ipa passwd
it will fail because of min life policy.
◦ As Admin:
ipa pwpolicy-mod --minlife=0 --maxfail=3
ipa pwpolicy-show
◦ As mwell, login to the idm-server, change 1st time password and then, Change password with ipa passwd , it will successed.
• On the Web UI check the following:◦ Add a user.◦ Check password expiry.◦ Edit user details.
Reference: https://access.redhat.com/knowledge/docs/en-US/Red_Hat_Enterprise_Linux/6/html/Identity_Management_Guide/managing-users.html
8

Red Hat Summit 2014 – Red Hat Enterprise Linux Identity Management
Lab 3: Client InstallationTarget server: idm-client.example.com and idm-access.example.comAccess: ssh [email protected]
• Check in both servers resolv.conf point to IPA server:
cat /etc/resolv.conf
nameserver 172.16.0.50dig example.com | grep ^example.com
example.com. 3600 IN SOA idm-server.example.com. hostmaster.example.com. 1396857706 3600 900 1209600 3600
• Install the IdM client (sssd):
yum install ipa-client
• on IdM server, make sure that PRT records are created/updated in new client installations:
ipa dnszone-mod --allow-sync-ptr=TRUE
• Check and flush iptables rules if there are any rules:
iptables -nvL
iptables -F ; iptables -X
• Client installation:
ipa-client-install --enable-dns-updates --mkhomedir --ssh-trust-dns
• Additional options to automate the installation:
ipa-client-install --mkhomedir --ssh-trust-dns --server=idm-server.example.com --domain=example.com -p admin -w 'password' --fixed-primary -U
• Some adjustment.The default shell for new users is /bin/sh, which should probably be changed:
ipa config-mod --defaultshell=/bin/bash
9
Red Hat Summit 2014 – Red Hat Enterprise Linux Identity Management
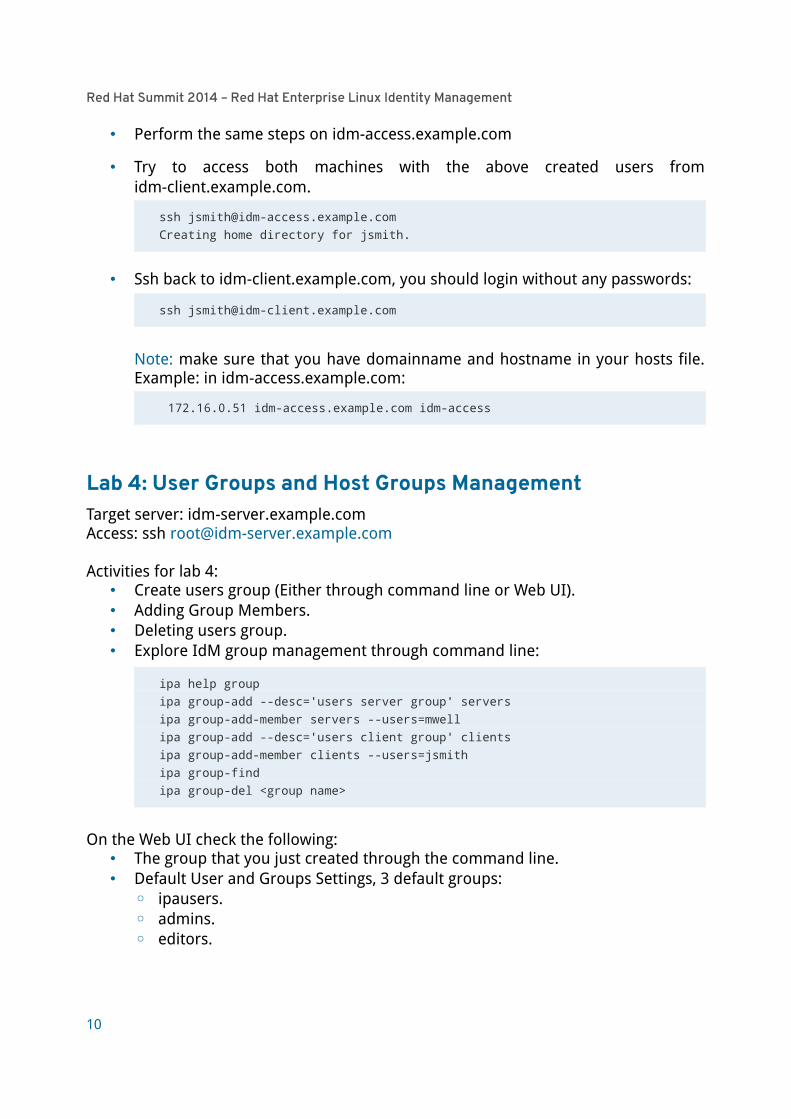
• Perform the same steps on idm-access.example.com
• Try to access both machines with the above created users from idm-client.example.com.
Creating home directory for jsmith.
• Ssh back to idm-client.example.com, you should login without any passwords:
Note: make sure that you have domainname and hostname in your hosts file. Example: in idm-access.example.com:
172.16.0.51 idm-access.example.com idm-access
Lab 4: User Groups and Host Groups ManagementTarget server: idm-server.example.comAccess: ssh [email protected]
Activities for lab 4:• Create users group (Either through command line or Web UI).• Adding Group Members.• Deleting users group.• Explore IdM group management through command line:
ipa help group
ipa group-add --desc='users server group' servers
ipa group-add-member servers --users=mwell
ipa group-add --desc='users client group' clients
ipa group-add-member clients --users=jsmith
ipa group-find
ipa group-del <group name>
On the Web UI check the following:• The group that you just created through the command line.• Default User and Groups Settings, 3 default groups:
◦ ipausers.◦ admins.◦ editors.
10

Red Hat Summit 2014 – Red Hat Enterprise Linux Identity Management
• Check the created groups on the web interface, check also the created users.• Create two host groups:
◦ restricted.◦ access.
Through the web interface access follow Identity -> Host groups -> Add.
11

Red Hat Summit 2014 – Red Hat Enterprise Linux Identity Management
Then you will find a created host group named 'restricted', click on the 'restricted' -> 'Add'.
• Both idm-client and idm-server should be in restricted group.
• Create other host group following the same steps, name this group 'access'.• The idm-access machines should be in 'access' group, follow the same steps in
creating and adding machines to restricted group.
Reference: https://access.redhat.com/knowledge/docs/en-US/Red_Hat_Enterprise_Linux/6/html/Identity_Management_Guide/user-groups.html
12

Red Hat Summit 2014 – Red Hat Enterprise Linux Identity Management
Lab 5: Host Based Access Control – HBACTarget server: idm-server.example.com, idm-client.example.com and idm-access.example.com
Access: ssh [email protected], ssh [email protected] and ssh [email protected]
In this Lab we will restrict/allow access based on host groups that we defined in the previous labs. By default IdM is having allow access permission, we could disable it during the installation time through --no_hbac_allow.
• Disable the default allow_all rule through web interface.
We want to grant access permissions to users in 'servers' group to access all machines considering the following:
• Users in 'servers' group can access 'restricted' host group servers.• Users in client group can access Allow host groups only.
13

Red Hat Summit 2014 – Red Hat Enterprise Linux Identity Management
The HBAC defines who can access which resources within the environment, not the level of access. This is called host-based access control because the rule defines what hosts are allowed to access other hosts within the domain.
Four basic elements to construct HBAC rule:• Who: The rule applies to.• Where: Hosts users can access.• How: What login services can be accessed.• Setting Host-Based Access control Rules.
◦ HBAC Rule with name 'access-rule' through the web interface.
◦ Click on the access-rule HBAC and add users or users groups this rule will be applied on.
14

Red Hat Summit 2014 – Red Hat Enterprise Linux Identity Management
◦ Add 'clients' users group to the access-rule in WHO field.
15

Red Hat Summit 2014 – Red Hat Enterprise Linux Identity Management
◦ Then Add the resources that will have these rules applied either host groups or specific hosts (to access-rule).
16
Red Hat Summit 2014 – Red Hat Enterprise Linux Identity Management
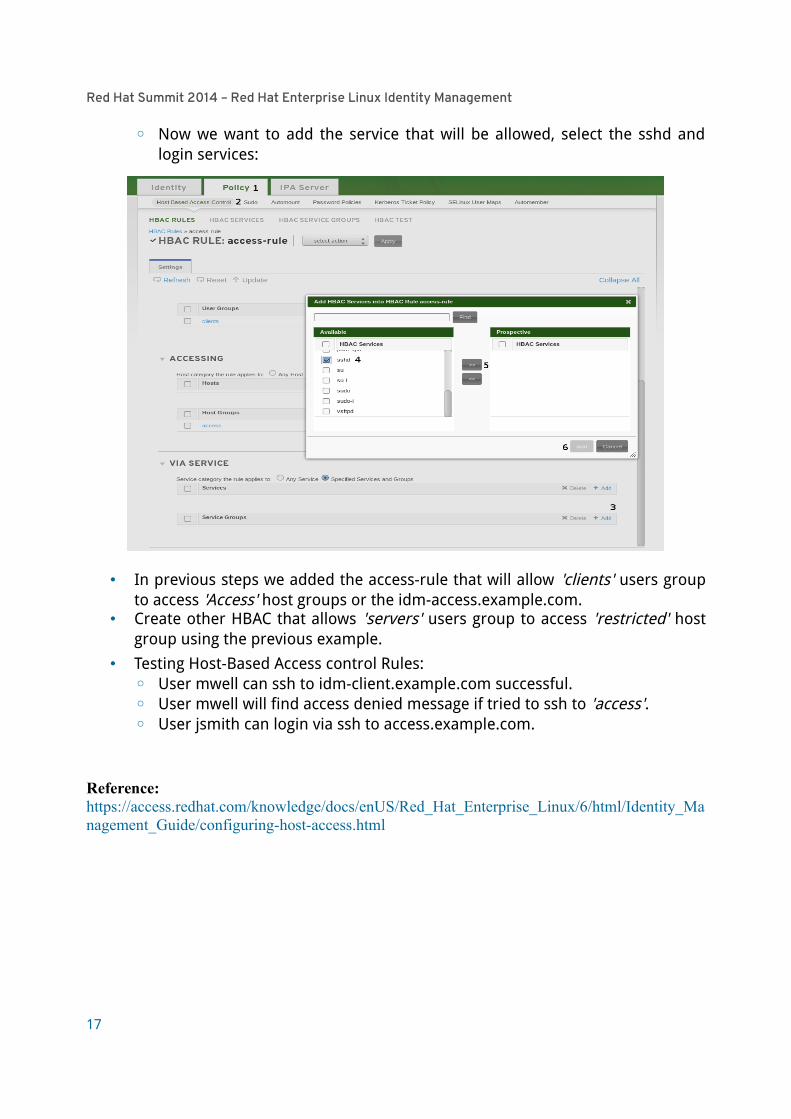
◦ Now we want to add the service that will be allowed, select the sshd and login services:
• In previous steps we added the access-rule that will allow 'clients' users group to access 'Access' host groups or the idm-access.example.com.
• Create other HBAC that allows 'servers' users group to access 'restricted' host group using the previous example.
• Testing Host-Based Access control Rules:◦ User mwell can ssh to idm-client.example.com successful.◦ User mwell will find access denied message if tried to ssh to 'access'.◦ User jsmith can login via ssh to access.example.com.
Reference: https://access.redhat.com/knowledge/docs/enUS/Red_Hat_Enterprise_Linux/6/html/Identity_Management_Guide/configuring-host-access.html
17
Red Hat Summit 2014 – Red Hat Enterprise Linux Identity Management
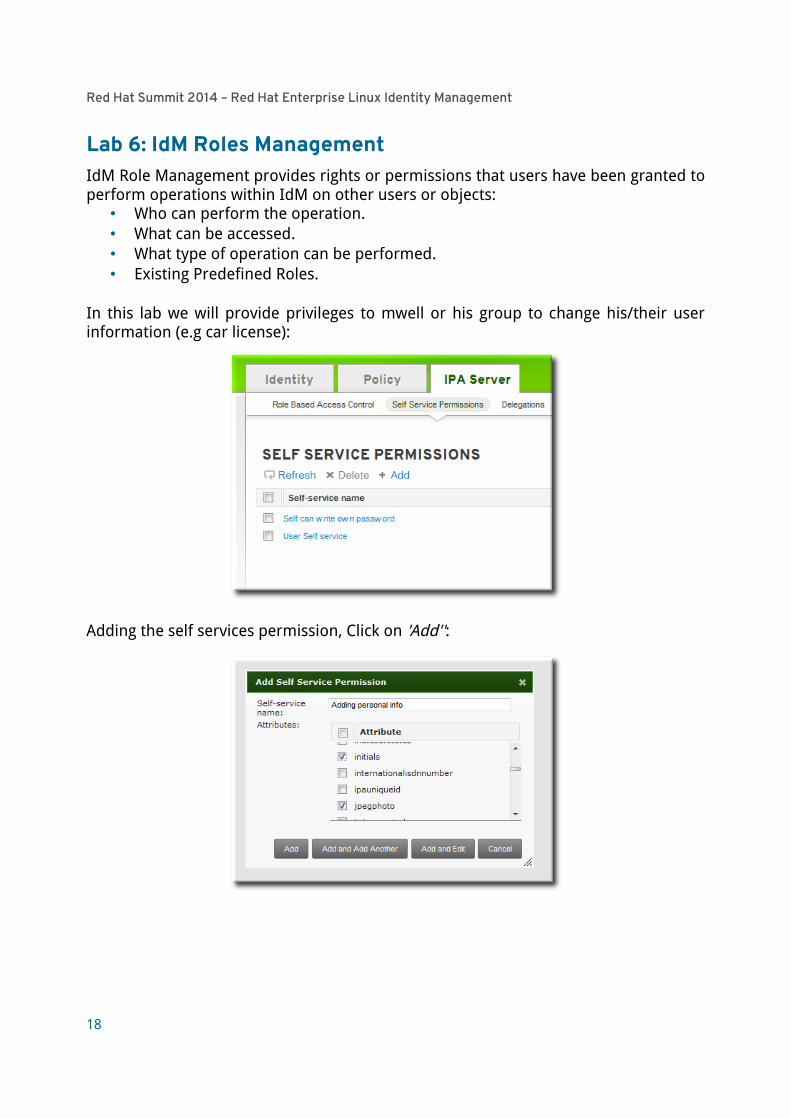
Lab 6: IdM Roles ManagementIdM Role Management provides rights or permissions that users have been granted to perform operations within IdM on other users or objects:
• Who can perform the operation.• What can be accessed.• What type of operation can be performed.• Existing Predefined Roles.
In this lab we will provide privileges to mwell or his group to change his/their user information (e.g car license):
Adding the self services permission, Click on 'Add'':
18

Red Hat Summit 2014 – Red Hat Enterprise Linux Identity Management
Enter the name of the rule in the pop-up window. Spaces are allowed:
Reference: https://access.redhat.com/knowledge/docs/en-US/Red_Hat_Enterprise_Linux/6/html/Identity_Management_Guide/defining-roles.html
LAB 7: IdM ReplicationTarget server: idm-server.example.com and idm-replica.example.comAccess: ssh [email protected] ssh [email protected]
On the idm-replica.example.com run:
yum install ipa-server bind-dyndb-ldap
On The idm-server.example.com run:
ipa-replica-prepare idm-replica.example.com --ip-address 172.16.0.53
Copy the replication info to the replica:
scp /var/lib/ipa/replica-info-idm-replica.example.com.gpg [email protected]:/var
On idm-replica.example.com run:
ipa-replica-install --no-forwarders --setup-dns /var/replica-info-idm-replica.example.com.gpg
19

Red Hat Summit 2014 – Red Hat Enterprise Linux Identity Management
Other options:
ipa-replica-install --forwarder=<our forward DNS> --setup-dns <replica file.gpg>
Replication verification.
ipa-replica-manage list
ipa-replica-conncheck --replica idm-replica.example.com
Issue native LDAP quires to check users and notice changes in both servers:
ldapsearch -h localhost -Y GSSAPI -b cn=config "(objectclass=nsds5ReplicationAgreement)"
ldapsearch -h localhost -Y GSSAPI -b cn=config "(nsDS5ReplicaId=*)"
ldapsearch -x -h localhost -b cn=config -D"cn=Directory Manager" "(objectclass=nsds5ReplicationAgreement)" -LLL -W nsds5replicaLastUpdateStatus
ldapsearch -x -h localhost -b cn=config -D"cn=Directory Manager" "(nsDS5ReplicaId=*)" -LLL -W nsds5replicaLastUpdateStatus
LAB 8: Services and KeytabsTarget server: idm-server.example.com or idm-client.example.comAccess: ssh [email protected] ssh [email protected]
Log in to idm-access machine:
yum install httpd mod_nss mod_wsgi mod_auth_kerb ipa-admintools
Prepare content for idm-access:
cp workshop.conf /etc/httpd/conf.d/workshop.conf
cp workshop.wsgi /var/www/cgi-bin/workshop.wsgi
chmod +x /var/www/cgi-bin/workshop.wsgi
Create the IPA service entry for idm-access:
kinit
Password for [email protected]:
ipa service-add HTTP/`hostname`
ipa service-show HTTP/`hostname`
Retrieve a keytab for httpd service on idm-access:
ipa-getkeytab -p HTTP/`hostname` -k http.keytab -s idm-server.example.com
klist -kt http.keytab
20
Red Hat Summit 2014 – Red Hat Enterprise Linux Identity Management
Configure idm-access to use the keytab:
mv http.keytab /etc/httpd/conf/
chown apache:apache /etc/httpd/conf/http.keytab
chmod 0400 /etc/httpd/conf/http.keytab
service httpd restart
Access idm-client and run:
yum install firefox xorg-x11-xinit.x86_64
exit
ssh root@ idm-client.example.com -X
firefox
In Firefox, access idm-access.example.com/test, when you exit Firefox check:
klist
It might not work as selinux will deny the http-keytab.
Cd /root
grep httpd_t /var/log/audit/audit.log | audit2allow -m http-keytab > http-keytab.te
grep httpd_t /var/log/audit/audit.log | audit2allow -M http-keytab
semodule -i http-keytab.pp
Now, check again Firefox, after authentication it should print:
Hello!
Received connection from 172.16.0.51
YAY! Kerberos authentication works!
Remote user is [email protected]
To Allow authentication for this small web application without password:• In the address bar of Firefox, type 'about:config' to display the list of current
configuration options.• In the Filter field, type negotiate to restrict the list of options.• Double-click the network.negotiate-auth.trusted-uris entry to display the Enter
string value dialog box.• Enter the name of the domain against which you want to authenticate, for
example, example.com.• Repeat the above procedure for the network.negotiate-auth.delegation-uris entry,
using the same domain.• Restart Firefox, you should see the YAY message with no user-name and password.
21