table of contents -...
TRANSCRIPT

Table of Contents
1Table of Contents ............................................................................................................................................................................2Back Cover ...........................................................................................................................................................................................3Beginning Access 2007 VBA ..................................................................................................................................................5Introduction ...........................................................................................................................................................................................6What This Book Covers ..............................................................................................................................................................7How This Book Is Structured ....................................................................................................................................................9What You Need to Use This Book ..........................................................................................................................................
10Conventions ..................................................................................................................................................................................11Source Code .................................................................................................................................................................................12Errata ...............................................................................................................................................................................................13p2p.wrox.com ...............................................................................................................................................................................14Chapter 1: Introduction to Access 2007 VBA ........................................................................................................15What Is Access 2007 VBA? ...................................................................................................................................................16What’s New in Access 2007 VBA? .......................................................................................................................17Access 2007 VBA Programming 101 .................................................................................................................................26Summary ........................................................................................................................................................................................27Exercises ........................................................................................................................................................................................28Chapter 2: The Basics of Writing and Testing VBA Code ...........................................................................29Creating Modules ........................................................................................................................................................................30Standard Modules versus Class Modules ........................................................................................................................32Creating and Calling Procedures .........................................................................................................................................40Using Variables and Constants to Store Values ............................................................................................................43Controlling Program Flow .......................................................................................................................................................47Documenting Your Code ..........................................................................................................................................................48Error Debugging ..........................................................................................................................................................................52Error Handling ..............................................................................................................................................................................55Summary ........................................................................................................................................................................................56Exercises ........................................................................................................................................................................................57Chapter 3: Programming Applications Using Objects ....................................................................................63Viewing Objects Using the Object Browser .....................................................................................................................65Ways to Refer to Objects ........................................................................................................................................................66Using Access Collections and Objects ..............................................................................................................................69Summary ........................................................................................................................................................................................70Exercises ........................................................................................................................................................................................71Chapter 4: Creating Your Own Objects ......................................................................................................................81Create Custom Properties for Existing Objects .............................................................................................................82Create Custom Methods for Existing Objects ................................................................................................................83Summary ........................................................................................................................................................................................84Exercises ........................................................................................................................................................................................85Chapter 5: Interacting with Data Using ADO and SQL ..................................................................................86Using ADODB to Work with Data ........................................................................................................................................
100Introduction to SQL .................................................................................................................................................................109Using ADOX to Manipulate Data Objects .....................................................................................................................111Summary ......................................................................................................................................................................................112Exercises .....................................................................................................................................................................................113Chapter 6: Building Interactive Forms ......................................................................................................................114Form Navigation and Flow ...................................................................................................................................................117Working with Controls ............................................................................................................................................................
121Building User Interaction ......................................................................................................................................................122Adding Polish to Your Forms ..............................................................................................................................................123Summary .....................................................................................................................................................................................124Exercises .....................................................................................................................................................................................125Chapter 7: Importing, Linking, and Exporting Using External Data Sources ...........................126Linking, Importing, and Exporting Overview ...............................................................................................................127Access and Other Databases .............................................................................................................................................129Transferring Complete SQL Server Database ............................................................................................................130Spreadsheets .............................................................................................................................................................................131Text Files .....................................................................................................................................................................................132XML Files ....................................................................................................................................................................................134E-mails and Outlook ...............................................................................................................................................................135Other Ways to Export Data .................................................................................................................................................136Summary .....................................................................................................................................................................................137Exercises .....................................................................................................................................................................................138Chapter 8: Using Access with Web Services and SharePoint Lists ................................................139Introduction to Web Services .............................................................................................................................................140Using Data from Web Services .........................................................................................................................................143Introduction to SharePoint Lists ........................................................................................................................................144Using Data from SharePoint Lists ....................................................................................................................................149Summary .....................................................................................................................................................................................150Exercises .....................................................................................................................................................................................151Chapter 9: Creating Reports and Web-Enabled Output ...........................................................................158Exporting Access Data to Web Formats ........................................................................................................................159Summary .....................................................................................................................................................................................160Exercises .....................................................................................................................................................................................161Chapter 10: Building SQL Server Applications with Access Projects .............................................162Setting Up SQL Server .........................................................................................................................................................164Creating Access Projects (ADPs) .....................................................................................................................................166Working with SQL Server Objects from Access .........................................................................................................172Migrating an Existing Access Database to an Access Project .............................................................................176Summary .....................................................................................................................................................................................177Exercises .....................................................................................................................................................................................178Chapter 11: Advanced Access Programming .....................................................................................................179Using Dynamic Link Libraries (DLLs) .............................................................................................................................183Automation .................................................................................................................................................................................188ActiveX Controls ......................................................................................................................................................................190Libraries .......................................................................................................................................................................................192Add-Ins .........................................................................................................................................................................................193Transactions ...............................................................................................................................................................................194Summary .....................................................................................................................................................................................195Exercises .....................................................................................................................................................................................196Chapter 12: Finishing the Application ......................................................................................................................197Multiuser Considerations ......................................................................................................................................................200Optimizing Your Applications ..............................................................................................................................................203Securing Your Application ....................................................................................................................................................204Distributing Your Application ...............................................................................................................................................205Maintaining the Application .................................................................................................................................................206Summary .....................................................................................................................................................................................207Exercises .....................................................................................................................................................................................208Chapter 13: Case Study 1-Project Tracker Application .............................................................................
209Design Specifications ............................................................................................................................................................212Building the Database ...........................................................................................................................................................214Building the User Interface ..................................................................................................................................................219Building the Class Modules for the Objects .................................................................................................................233Building the Standard Modules ..........................................................................................................................................247Connecting the User Interface to the Code ..................................................................................................................269Touring the Finished Project Tracker Application ......................................................................................................272Summary .....................................................................................................................................................................................273Chapter 14: Case Study 2-Customer Service Application .......................................................................274Design Specifications ............................................................................................................................................................276Building the Database and Database Objects ............................................................................................................281Building the User Interface ..................................................................................................................................................284Building the Class Module for the Objects ...................................................................................................................289Building the Standard Modules ..........................................................................................................................................295Connecting the User Interface to the Code ..................................................................................................................302Touring the Finished Customer Service Application .................................................................................................305Summary .....................................................................................................................................................................................306Index ....................................................................................................................................................................................................308B ......................................................................................................................................................................................................309C ......................................................................................................................................................................................................312D ......................................................................................................................................................................................................314E ......................................................................................................................................................................................................316F ......................................................................................................................................................................................................318G .....................................................................................................................................................................................................319H ......................................................................................................................................................................................................320I ........................................................................................................................................................................................................321J .......................................................................................................................................................................................................322K ......................................................................................................................................................................................................323L .......................................................................................................................................................................................................324M .....................................................................................................................................................................................................325N ......................................................................................................................................................................................................326O .....................................................................................................................................................................................................327P ......................................................................................................................................................................................................329Q .....................................................................................................................................................................................................330R ......................................................................................................................................................................................................332S ......................................................................................................................................................................................................335T ......................................................................................................................................................................................................337U ......................................................................................................................................................................................................338V ......................................................................................................................................................................................................340W ....................................................................................................................................................................................................341X ......................................................................................................................................................................................................342Y ......................................................................................................................................................................................................343List of Try It Outs .......................................................................................................................................................................

Beginning Access 2007 VBA
byDenise Gosnell
Wrox Press 2007 (574 pages)ISBN:9780470046845
If you want to take your Access databases to a more robust level of functionality, this comprehensive guide provides the toolsand techniques you'll need in order to build more sophisticated solutions.
Table of ContentsBeginning Access 2007 VBA
Introduction
Chapter 1 - Introduction to Access 2007 VBA
Chapter 2 - The Basics of Writing and Testing VBA Code
Chapter 3 - Programming Applications Using Objects
Chapter 4 - Creating Your Own Objects
Chapter 5 - Interacting with Data Using ADO and SQL
Chapter 6 - Building Interactive Forms
Chapter 7 - Importing, Linking, and Exporting Using External Data Sources
Chapter 8 - Using Access with Web Services and SharePoint Lists
Chapter 9 - Creating Reports and Web-Enabled Output
Chapter 10 - Building SQL Server Applications with Access Projects
Chapter 11 - Advanced Access Programming
Chapter 12 - Finishing the Application
Chapter 13 - Case Study 1-Project Tracker Application
Chapter 14 - Case Study 2-Customer Service Application
Index
List of Try It Outs
Beginning Access 2007 VBA
1 / 344

Back CoverIf you want to take your Access databases to a more robust level of functionality, then this is the book for you. It provides the tools andtechniques you'll need in order to build more sophisticated solutions. You'll find plenty of source code and fully developed sample applicationsto guide you along the way.
After walking through the features of Access 2007 VBA, you'll learn all about object-oriented programming and ADO. You'll then progress toadvanced VBA concepts such as working with external DLLs and using automation to control external programs. And with the help of twocomprehensive case studies, you'll gain hands-on experience in building real-world solutions using the concepts covered in the book.
From creating custom objects and reports programmatically to integrating Access with web services and SQL Server, this hands-on guide getsyou started quickly.
What you will learn from this book
Techniques for using ActiveX Data Objects (ADO) to retrieve and update data
Steps for building reports and web content from the database
How to develop SQL Server solutions with Access projects
Tips for fine-tuning and distributing your application
Ways to import, link, and export data to and from external data sources
How to send emails programmatically from your database
How to create interactive forms, export data to HTML, enhance security, and much more
Who this book is for
This book is for the Access 2007 user who is just getting started in creating their own applications as well as the programmer who is new toAccess development. No prior experience with VBA is required.
About the Author
Denise Gosnell is a software patent attorney and technology consultant with Gosnell & Associates, Inc., which she founded in 2005. Denisehas a unique background in both technology and law, and presently uses her deep technical and legal expertise to counsel hi-tech clients onintellectual property and technical matters. Denise was recognized in February 2005 with the Indianapolis Business Journal award: “Top 40Under 40,” which recognizes the top up-and-coming professionals under the age of 40 in the city of Indianapolis each year. She also appearedon the Inside Indiana Business with Gerry Dick television show in March 2005 to discuss hi-tech issues facing the business world.
Denise has over 12 years of experience in creating software applications, ranging from standalone and client-server to enterprise-wideapplications. Denise has worked for leading software companies such as Microsoft and EDS, and has earned a worldwide reputation for hertechnology expertise. She received a bachelor of arts degree in Computer Science–Business (summa cum laude) from Anderson University,where she currently serves as an adjunct professor for the Computer Science Department. Denise obtained a doctor of jurisprudence degreefrom Indiana University School of Law in Indianapolis.
Denise has authored and coauthored seven other software development books to date, covering topics such as database development,Access, Visual Basic .NET, and web services. Most recently, Denise authored Professional Development with Web APIs (Wiley 2005) andBeginning Access 2003 VBA (Wiley 2004). Denise was a featured technology speaker at the Microsoft European Professional Developer’sConference in December 2001 and has on numerous occasions assisted Microsoft’s Training and Certification group in creating new exams fortheir MCSD and MCSE certifications.
Beginning Access 2007 VBA
2 / 344

Beginning Access 2007 VBADenise Gosnell
Wiley Publishing, Inc.
Published by
Wiley Publishing, Inc. 10475 Crosspoint Boulevard Indianapolis, IN 46256 www.wiley.com
© 2007 by Wiley Publishing, Inc., Indianapolis, Indiana
ISBN 9780470046845
10 9 8 7 6 5 4 3 2 1
Library of Congress Cataloging-in-Publication Data
Gosnell, Denise. Beginning Access 2007 VBA / Denise Gosnell. p. cm. ISBN-13: 978-0-470-04684-5 (paper/website) ISBN-10: 0-470-04684-8 (paper/website)
1. Microsoft Access. 2. Database management. 3. Microsoft Visual Basic for applications. I. Title. QA76.9.D3G68 2007 005.75'65-dc22 2007004985
No part of this publication may be reproduced, stored in a retrieval system or transmitted in any form or by any means, electronic, mechanical, photocopying, recording, scanning orotherwise, except as permitted under Sections 107 or 108 of the 1976 United States Copyright Act, without either the prior written permission of the Publisher, or authorization throughpayment of the appropriate per-copy fee to the Copyright Clearance Center, 222 Rosewood Drive, Danvers, MA 01923, (978) 750-8400, fax (978) 646-8600. Requests to the Publisher forpermission should be addressed to the Legal Department, Wiley Publishing, Inc., 10475 Crosspoint Blvd., Indianapolis, IN 46256, (317) 572-3447, fax (317) 572-4355, or online athttp://www.wiley.com/go/permissions.
LIMIT OF LIABILITY/DISCLAIMER OF WARRANTY: THE PUBLISHER AND THE AUTHOR MAKE NO REPRESENTATIONS OR WARRANTIES WITH RESPECT TO THE ACCURACY ORCOMPLETENESS OF THE CONTENTS OF THIS WORK AND SPECIFICALLY DISCLAIM ALL WARRANTIES, INCLUDING WITHOUT LIMITATION WARRANTIES OF FITNESS FOR APARTICULAR PURPOSE. NO WARRANTY MAY BE CREATED OR EXTENDED BY SALES OR PROMOTIONAL MATERIALS. THE ADVICE AND STRATEGIES CONTAINED HEREIN MAYNOT BE SUITABLE FOR EVERY SITUATION. THIS WORK IS SOLD WITH THE UNDERSTANDING THAT THE PUBLISHER IS NOT ENGAGED IN RENDERING LEGAL, ACCOUNTING,OR OTHER PROFESSIONAL SERVICES. IF PROFESSIONAL ASSISTANCE IS REQUIRED, THE SERVICES OF A COMPETENT PROFESSIONAL PERSON SHOULD BE SOUGHT.NEITHER THE PUBLISHER NOR THE AUTHOR SHALL BE LIABLE FOR DAMAGES ARISING HEREFROM. THE FACT THAT AN ORGANIZATION OR WEBSITE IS REFERRED TO INTHIS WORK AS A CITATION AND/OR A POTENTIAL SOURCE OF FURTHER INFORMATION DOES NOT MEAN THAT THE AUTHOR OR THE PUBLISHER ENDORSES THEINFORMATION THE ORGANIZATION OR WEBSITE MAY PROVIDE OR RECOMMENDATIONS IT MAY MAKE. FURTHER, READERS SHOULD BE AWARE THAT INTERNET WEBSITESLISTED IN THIS WORK MAY HAVE CHANGED OR DISAPPEARED BETWEEN WHEN THIS WORK WAS WRITTEN AND WHEN IT IS READ.
For general information on our other products and services please contact our Customer Care Department within the United States at (800) 762-2974, outside the United States at (317) 572-3993 or fax (317) 572-4002.
Trademarks: Wiley, the Wiley logo, Wrox, the Wrox logo, Programmer to Programmer, and related trade dress are trademarks or registered trademarks of John Wiley & Sons, Inc. and/or itsaff iliates, in the United States and other countries, and may not be used without written permission. Microsoft and Access are trademarks or registered trademarks of Microsoft Corporationin the United States and/or other countries. All other trademarks are the property of their respective owners. Wiley Publishing, Inc., is not associated with any product or vendor mentioned inthis book.
Wiley also publishes its books in a variety of electronic formats. Some content that appears in print may not be available in electronic books.
Dedication
This book is dedicated to my daughter, Victoria. You are too young to understand this now, but I hope to teach you that you can accomplish anything you set your mind to. The sky is trulythe limit.
About the Author
Denise Gosnell is a software patent attorney and technology consultant with Gosnell & Associates, Inc., which she founded in 2005. Denise has a unique background in both technologyand law, and presently uses her deep technical and legal expertise to counsel hi-tech clients on intellectual property and technical matters. Denise was recognized in February 2005 with theIndianapolis Business Journal award: “Top 40 Under 40,” which recognizes the top up-and-coming professionals under the age of 40 in the city of Indianapolis each year. She also appearedon the Inside Indiana Business with Gerry Dick television show in March 2005 to discuss hi-tech issues facing the business world.
Denise has over 12 years of experience in creating software applications, ranging from standalone and client-server to enterprise-wide applications. Denise has worked for leading softwarecompanies such as Microsoft and EDS, and has earned a worldwide reputation for her technology expertise. She received a bachelor of arts degree in Computer Science–Business (summacum laude) from Anderson University, where she currently serves as an adjunct professor for the Computer Science Department. Denise obtained a doctor of jurisprudence degree fromIndiana University School of Law in Indianapolis.
Denise has authored and coauthored seven other software development books to date, covering topics such as database development, Access, Visual Basic .NET, and web services. Mostrecently, Denise authored Professional Development with Web APIs (Wiley 2005) and Beginning Access 2003 VBA (Wiley 2004). Denise was a featured technology speaker at the MicrosoftEuropean Professional Developer’s Conference in December 2001 and has on numerous occasions assisted Microsoft’s Training and Certif ication group in creating new exams for theirMCSD and MCSE certif ications.
Denise can be reached at [email protected] or [email protected].
Acknowledgments
To my assistant Pam Woodsford, keep up your progress and aim high. You are only limited by your own imagination. I am proud of how fast you have grown in such a short amount of timeand look forward to watching you reach your full potential.
I would like to of fer a special thanks to my friend Jonathon Walsh for helping me update the content in this book for Access 2007, and for contributing the materials on SharePoint Lists. Ialways enjoy working with you and hope to get many more opportunities.
I had a great technical editor on this book too, quite possibly the best one I have ever had to date: Auri Rahimzadeh. Thanks Auri!
Last, but certainly not least, I would like to thank Rosanne Koneval, Chris Webb, and the staf f at Wiley who played such an important role in producing this book. Thanks for putting up withme through all the delays. I hope the end result makes up for it!
Credits
Executive Editor Chris Webb
Development Editor Rosanne Koneval
Beginning Access 2007 VBA
3 / 344

Rosanne Koneval
Technical Editor Auri Rahimzadeh
Production Editor Elizabeth Kuball
Copy Editor Foxxe Editorial Services
Editorial Manager Mary Beth Wakef ield
Production Manager Tim Tate
Vice President and Executive Group Publisher Richard Swadley
Vice President and Executive Publisher Joseph B. Wikert
Graphics and Production Specialists Denny Hager Jennifer Mayberry Barbara Moore Ronald Terry
Quality Control Technicians Laura Albert John Greenough
Project Coordinator Erin Smith
Proofreading Aptara
Indexing Potomac Indexing, LLC
Anniversary Logo Design Richard Pacif ico
Beginning Access 2007 VBA
4 / 344

IntroductionMicrosoft Access 2007 is a powerful database application that allows you to build standalone and client-server database applications. Access applications are widespread in the enterprise.Access has powerful wizards and tools that make it relatively easy for users to build a database application that then grows in popularity and requirements that are beyond the capabilities ofthe relatively simple design. VBA is a powerful programming language that can be used in Access applications to expand the functionality in ways you never imagined. If you are hoping totake your current Access databases or future databases to a more robust level of functionality, then Beginning Access 2007 VBA is the book for you.
Whom This Book Is ForThis book assumes that you have created Access databases in the past that have tables, forms, and possibly macros. You may have even written some VBA code in Access before, oryou may have experience with Visual Basic or VBScript and want to learn how to write VBA code from within Access applications. No prior experience with VBA is required. As long as youhave the ability to create Access tables and forms and the desire to learn VBA, this book will have a lot to of fer you.
It is very possible that you have realized limitations with your current Access applications and now desire to build more sophisticated solutions. For example, your current application mayneed additional features included that must be programmed with VBA. Your current application may need to be improved to support more users or a client-server environment because it hasbeen a great success and has outgrown the current design. Or, you may want to begin creating your new database applications with expanded functionality. The tools and techniquescovered in this book will teach you how to take your Access applications to the next level.
Beginning Access 2007 VBA
5 / 344

What This Book CoversAccess 2007 is vastly dif ferent in many ways from Access 2003, such as the revamped user interface that uses “ribbons,” among other dif ferences. However, Access 2007 VBA has notchanged a whole lot since the prior versions of Access. The VBA interface for Access 2007 still uses the same old user interface as before, not the ribbons that Access 2007 uses. The VBAlanguage syntax has not changed very much either. Even if you are using a prior version of Access, you can still gain a lot f rom this book. However, there will be some examples that dealwith features only supported in Access 2007.
After reading this book, you will learn:
Basic programming life-cycle and architecture concepts
How VBA can be used for professional application development
The basics of programming using VBA
Basic object-oriented programming techniques using VBA
How to use existing objects
How to create custom objects
How to use ActiveX Data Objects (ADO) to retrieve and update data
How to retrieve data from external data sources
How to create reports and web content f rom the database
How to integrate with Off ice applications
How to integrate with SharePoint Lists
How to build SQL Server solutions with Access projects
How to f ine-tune and distribute the application
Beginning Access 2007 VBA
6 / 344

How This Book Is StructuredJust as with the prior edition, the chapters are structured with standalone examples that do not require you to follow the chapters in order. This structure will allow you to go straight to achapter that interests you, or to skip around among chapters as desired. Certainly, there are some chapters that will not make as much sense unless you have read the prior chapters or arealready familiar with the topics covered therein. At least you will not be required to read the prior chapters that cover topics you already know just for the purpose of building parts of asolution that are prerequisites to the chapter you are really interested in.
Chapter 1 will provide an overview of Access 2007 VBA and the programming life cycle, and will introduce the Visual Basic editor environment to you. Chapter 2 teaches you severalimportant VBA programming concepts, such as how to create code procedures, how to control the f low of execution of your code, how to make decisions in your code, how to handle errors,how to debug your application, and so on.
Chapters 3 and 4 will demystify the concept of object-oriented programming and will teach you how to use existing objects and to create your own custom objects. Chapter 5 will illustratehow to use ADO to retrieve and update data in databases. Chapter 5 will also illustrate how to create and execute SQL statements using ADO. Chapter 6 discusses how you can buildinteractive forms.
Chapter 7 covers various ways to import, link, and export data to and from external data sources, such as MDB f iles, SQL Server databases, XML f iles, and other data sources. Chapter 8illustrates how to use VBA with web services and SharePoint Lists. Chapter 9 describes how you can use VBA to create reports programmatically, as well as how to export data in yourAccess 2007 application to various web formats, such as HTML, ASP, and data access pages.
Chapter 10 illustrates how to create a new Access project as a front end to SQL Server for more robust applications, and covers how to migrate an existing Access database to an Accessproject that uses SQL Server.
Chapter 11 covers various advanced VBA topics, such as how to work with external DLLs, how to use automation to control external programs such as Microsoft Word and Excel, as well assecurity, transactions, and multiuser considerations. Chapter 12 then rounds out the prior chapters by covering some f inishing touches that you can apply to prepare your application fordistribution.
Chapters 13 and 14 provide two comprehensive case studies that will give you hands-on experience in building real-world solutions using the concepts covered in the book. Chapter 13focuses on building a standalone project-tracking application. The project-tracking application allows a user to track projects and related details, such as comments, contacts, and f ileattachments. A few examples of the user interface for the project tracking application you will create in Chapter 13 are shown in Figures I-1 and I-2.
Figure I-1
Figure I-2
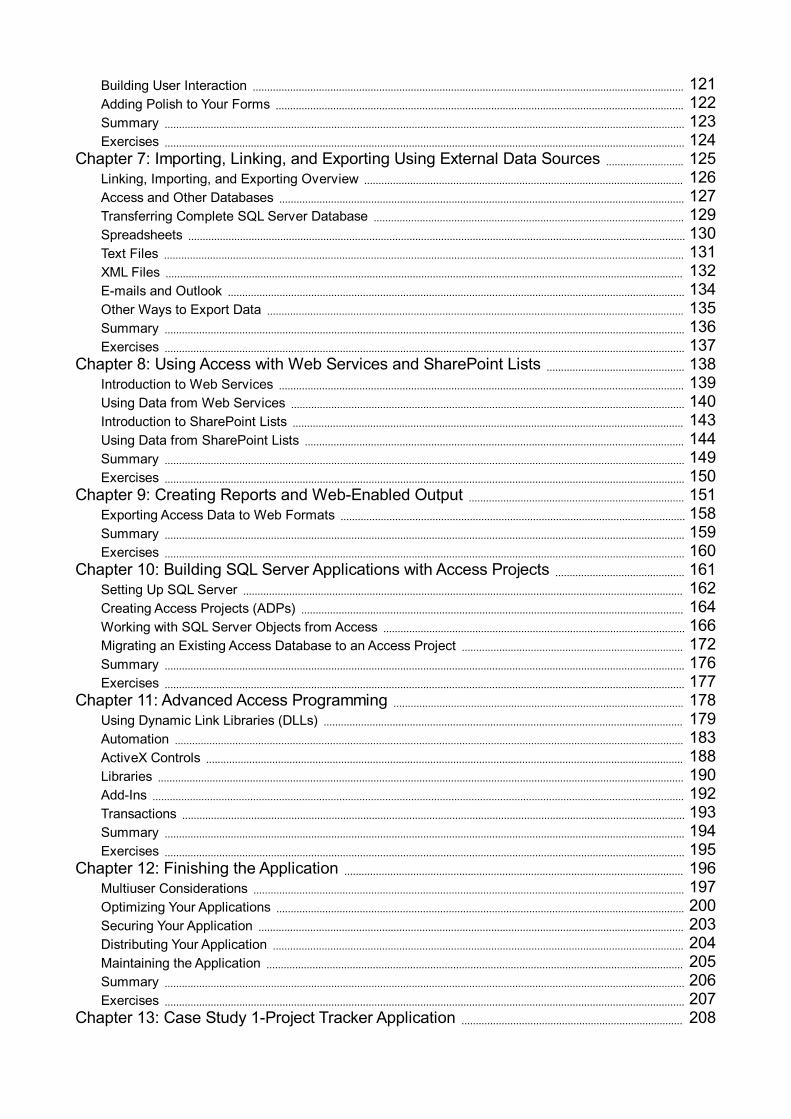
Chapter 14 focuses on building a client-server customer service application that uses SQL Server as the database. The customer service application allows a customer service agent tolocate a customer record based on search criteria and then view and modify the customer record details. An example of the user interface for this customer service application is shown inFigure I-3.
Beginning Access 2007 VBA
7 / 344
Figure I-3
Solutions to the exercises provided at the end of each chapter are provided in the appendix.
Beginning Access 2007 VBA
8 / 344

What You Need to Use This BookAt a minimum, you need Access 2007 in order to implement the examples provided throughout the book. One topic covered in Chapter 8 is how to retrieve data from web services, whichrequires the Off ice Web Services toolkit. The Off ice Web Services toolkit is available for downloading from Microsoft’s web site. Chapters 10 and 14 deal with examples based on SQLServer 2005 as the database, and thus a copy of SQL Server 2005 is needed to implement those examples. A free entry-level version of SQL Server 2005 is available for downloading fromMicrosoft’s web site.
Beginning Access 2007 VBA
9 / 344
ConventionsTo help you get the most f rom the text and keep track of what’s happening, we’ve used a number of conventions throughout the book.
Try It Out
The Try It Out is an exercise you should work through, following the text in the book.1. They usually consist of a set of steps.
2. Each step has a number.
3. Follow the steps through with your copy of the database.
How It Works
After each Try It Out, the code you’ve typed will be explained in detail.
Important Boxes like this one hold important, not-to-be forgotten information that is directly relevant to the surrounding text.
Tip Tips, hints, tricks, and asides to the current discussion are offset and placed in italics like this.
As for styles in the text:
We highlight new terms and important words when we introduce them.
We show keyboard strokes like this: Ctrl+A.
We show f ile names, URLs, and code within the text like this: persistence.properties.We present code in two dif ferent ways:
In code examples we highlight new and important code with a gray background.The gray highlighting is not used for code that's less important in the presentcontext, or has been shown before.
Beginning Access 2007 VBA
10 / 344

Source CodeAs you work through the examples in this book, you may choose either to type in all the code manually or to use the source code f iles that accompany the book. All of the source codeused in this book is available for downloading at http://www.wrox.com. Once at the site, simply locate the book’s title (either by using the Search box or by using one of the title lists) andclick the Download Code link on the book’s detail page to obtain all the source code for the book.
Tip Because many books have similar titles, you may f ind it easiest to search by ISBN; this book’s ISBN is 978-0-470-04684-5.
Once you download the code, just decompress it with your favorite compression tool. Alternately, you can go to the main Wrox code download page atwww.wrox.com/dynamic/books/download.aspx to see the code available for this book and all other Wrox books.
Beginning Access 2007 VBA
11 / 344

ErrataWe make every effort to ensure that there are no errors in the text or in the code. However, no one is perfect, and mistakes do occur. If you f ind an error in one of our books, like a spellingmistake or faulty piece of code, we would be very grateful for your feedback. By sending in errata you may save another reader hours of f rustration and at the same time you will behelping us provide even higher-quality information.
To f ind the errata page for this book, go to www.wrox.com and locate the title using the Search box or one of the title lists. Then, on the book details page, click the Book Errata link. On thispage you can view all errata that has been submitted for this book and posted by Wrox editors. A complete book list including links to each’s book’s errata is also available atwww.wrox.com/misc-pages/booklist.shtml.
If you don’t spot “your” error on the Book Errata page, go to www.wrox.com/contact/techsupport.shtml and complete the form there to send us the error you have found. We’ll check theinformation and, if appropriate, post a message to the book’s errata page and f ix the problem in subsequent editions of the book.
Beginning Access 2007 VBA
12 / 344
p2p.wrox.comFor author and peer discussion, join the P2P forums at p2p.wrox.com. The forums are a Web-based system for you to post messages relating to Wrox books and related technologies andinteract with other readers and technology users. The forums offer a subscription feature to e-mail you topics of interest of your choosing when new posts are made to the forums. Wroxauthors, editors, other industry experts, and your fellow readers are present on these forums.
At http://p2p.wrox.com you will f ind a number of dif ferent forums that will help you not only as you read this book but also as you develop your own applications. To join the forums, justfollow these steps:
1. Go to p2p.wrox.com and click the Register link.
2. Read the terms of use and click Agree.
3. Complete the required information to join as well as any optional information you wish to provide and click Submit.
4. You will receive an e-mail with information describing how to verify your account and complete the joining process.
Tip You can read messages in the forums without joining P2P but in order to post your own messages, you must join.
Once you join, you can post new messages and respond to messages other users post. You can read messages at any time on the Web. If you would like to have new messages from aparticular forum e-mailed to you, click the Subscribe to this Forum icon by the forum name in the forum listing.
For more information about how to use the Wrox P2P, be sure to read the P2P FAQs for answers to questions about how the forum software works as well as many common questionsspecif ic to P2P and Wrox books. To read the FAQs, click the FAQ link on any P2P page.
Beginning Access 2007 VBA
13 / 344

Chapter 1: Introduction to Access 2007 VBA
OverviewThis chapter will provide an introduction to the world of Access 2007 VBA and programming in general. More specif ically, this chapter will cover:
Introduction to Access 2007 VBA and new features
Explanation of the stages in the Systems Development Life Cycle of software development
Techniques for designing applications
Writing and testing VBA code using the Visual Basic Editor
Beginning Access 2007 VBA
14 / 344

What Is Access 2007 VBA?VBA is an acronym that stands for Visual Basic for Applications. VBA is included as part of several Microsoft products, including Access, Word, and Excel. For example, Access 2007 VBAuses VBA version 6.0, which is the same version of VBA used by Word 2007 VBA and Excel 2007 VBA. VBA is a programming language that can be used to add additional features to yourapplications. You are no doubt already aware that Access is a powerful database application that also enables you to create applications that include user interfaces. You can use VBAinstead of or in addition to Access macros to provide advanced functionality to those Access applications. For example, you might use an AutoExec macro to control which form loads whenthe application begins, and then write the business logic that controls how the application works using VBA.
VBA should not be confused with the Microsoft Visual Basic (VB) or Visual Basic .NET (VB.NET) programming products. VB and VB.NET have their own syntaxes for the Visual Basicprogramming language. The VB syntax, the VB.NET syntax, and the VBA syntax are very similar, but they have some dif ferences. Unlike Access, the VB and VB.NET products do nothave a built-in database. The Visual Basic and Visual Basic .NET programming products are typically used in building more complex enterprise applications that use Access, SQL Server, orOracle as the database. Access 2007 VBA is typically used to build small and simple Access database applications designed for a few users. The experience you gain writing VBA code inAccess or other Microsoft Off ice application products will certainly be helpful if you ever decide to use the Microsoft VB or VB.NET programming products. Microsoft has a developmentsolution called Visual Studio Tools for Microsoft Off ice that allows Microsoft Off ice products, including Access 2007, to call code that is written in a .NET programming language.
Beginning Access 2007 VBA
15 / 344
What’s New in Access 2007 VBA?Access 2007, in general, has changed substantially f rom Access 2003, although Access 2007 VBA has not changed much from Access 2003 VBA. One signif icant change with Access 2007is the introduction of a new ACCDB f ile format, instead of the MDB f ile format of the past. Another signif icant change to Access 2007 and all other Off ice 2007 programs in general is thenew user interface design. The new user interface for Access 2007 uses ribbons on the toolbar that replace the layers of menus and toolbars found in earlier releases. Actions or options onthe ribbons are grouped together in a logical fashion based on the task they accomplish. While the user interface for Access 2007 has changed signif icantly, the Visual Basic Editor forAccess 2007 has remained mostly unchanged. The Visual Basic Editor opens in a separate window from Access 2007. In developing a VBA application, you will work with both Access 2007and the Visual Basic Editor.
Some examples of the additional changes to Access 2007 in general (but not Visual Basic for Applications) include:
Templates – Many prebuilt templates are included to get you started quickly with certain common applications.
Rich text in memo fields – Text can now be formatted with options, such as bold, italic, colors, and the like.
Navigation pane – The navigation pane replaces the old database window and contains all of the database objects, such as tables, forms, and so on. What is interestingabout the navigation pane is that it also allows you to create custom groupings of objects, such as tables, forms, reports and so on to a particular meaningful grouping, suchas Products.
Embedded macros – Embedded macros support simple variables, some looping, and even some error handling. You can also embed a macro within a control’s eventproperty. For example, if you need a button to open a form, you can write a one-line embedded macro instead of using VBA code to accomplish this simple task. In otherwords, you can save VBA for the more complex coding tasks and can use macros for some of the simplest tasks.
Custom ribbons – You can create custom ribbons for the toolbar, since ribbons are built dynamically f rom XML contained in hidden system tables in the Access database.
Another change that is likely of interest to an Access VBA developer is the change in user-level security. With the Access 2007 ACCDB f ile format, user-level security is not supported. Adatabase password can still be used to protect the database, but it is no longer stored in the Access data f ile. If more comprehensive security is needed beyond a database password, thenthe ACCDE f ile format (which replaces MDEs) can be used to protect your code, forms, and reports. The ACCDE format, however, does not provide any specif ic security on the data storedin the application. In addition to removed user-level security, replication has also been removed for ACCDB f iles. In other words, you cannot replicate data and design changes betweendatabases using the ACCDB f ile format. A workaround for user-level security and replication is to use the Access 2000 or Access 2002–2003 MDB format when working in Access 2007.
Tip Note that user-level security is not the same concept as the security model you create for your Access applications. You can store user names, passwords, and credentials inyour database and implement a security model for your application that uses these stored values. The prior section on Access security discusses the intrinsic security features ofAccess.
Beginning Access 2007 VBA
16 / 344

Access 2007 VBA Programming 101Many people f irst enter the world of programming by creating simple Access applications that become a success and must be expanded. These programmers typically have little to noformal experience in designing software applications and have taught themselves how to write basic Access applications. They now need to use VBA to extend those applications. You mayvery well fall into this category. The rest of this chapter will provide you with a basic overview of general programming concepts such as the phases of the Systems Development LifeCycle and will explain how Access VBA f its into each of these phases.
All applications should be written according to a development methodology that provides guidelines for developing the application. A commonly followed development methodology is aSystems Development Life Cycle (SDLC), which includes the following phases:
Requirements gathering
Designing
Developing
Testing
Implementing
These phases are discussed in detail below.
Tip Various other types of application development methodologies can be used in addition to, or instead of, the Systems Development Life Cycle as appropriate, such as RapidApplication Design (RAD) techniques, Extreme Programming techniques, and so on.
Requirements-Gathering Phase
In the requirements-gathering phase, your goal is to identify the objectives for the new application. The f inal output of the requirements-gathering phase should be a document describing thepurpose of and features requested for the new application and any other helpful details you gathered during this phase.
You should determine the purpose of the application overall, who will use the application, f rom what locations the application will be accessed, and exactly what features the applicationshould provide. Interview end users and other company employees as appropriate to determine what electronic or paper systems this application will replace. Ask them questions about theproblems with the current systems, so you can better understand what will make your application successful. You should also f ind out f rom the end users what features they would like tosee included in the application, which features they feel are critical, and which are less so. Also obtain copies of any current documents or screens of current applications or processes thatare being used. Reviewing the existing applications that your application will replace is a very helpful strategy.
Interviewing end users is a critical part of developing a software application because if you expect someone to use your application you have to f irst f ind out what he is looking for. If yourapplication does not meet some need he has, he has no incentive to use it. You should also know, however, that end users often ask for many more features than you can or should includein the application. You have to learn how to prioritize the features and implement those that are required or helpful for meeting the needs of most users or that are required in order to complywith management orders.
For purposes of illustrating some concepts in the Systems Development Life Cycle, I use a hypothetical example. Suppose that you have the task of writing a Wrox Auto Sales Applicationthat will be used by sales and other staf f at the auto sales company. Applying these requirements-gathering techniques, you have determined that the application should allow the users tosearch inventory for available and sold cars, to view or edit details about a selected car, and to view or edit customer details. Currently this process is being implemented solely on paperand needs to be automated in an Access application that will be used by a few end users. You have written down extensive details about what data elements need to be tracked, the featuresthat are desired, and other details that you learned in this process. You are ready to move into the design phase.
Design Phase
During the design phase, you analyze the requirements gathered in the prior phase and determine a system design. The f inal output of the design phase should be a written documentdescribing the features your application will provide and, ideally, a prototype of each screen.
You can document your design for the hypothetical Wrox Auto Sales Application and any other application in various ways, but having some type of documentation on paper before writingthe f irst line of code is very important. You will understand why momentarily.
Start the design phase by organizing the requirements into logical groupings and/or steps. They will help you determine the layout for screens and the code. Using the Wrox Auto Salesexample, let’s look at some ways you can use modeling to assist you with your design.
Model the Application DesignModeling is best def ined as the process of documenting one or more parts of an application on paper (or with an electronic tool). A variety of modeling techniques can be used to accomplishthe end result: modeling the f low of activities through the system, modeling the way the code will be structured, and so on.
Regardless of the modeling techniques you decide to use, the objective is to come up with a complete roadmap for building the system before you write a single line of code. If you startcoding a solution without a roadmap, you will f ind that it becomes extremely dif f icult and ineff icient to make major adjustments. Think of the roadmap as a blueprint for building a house.You wouldn’t want to build a house without a blueprint showing how it is supposed to be structured. Suppose that you have someone build a house for you without a blueprint, and you checkup on the progress a few weeks later. When you walk into the house, you notice that it has no basement. The f irst and second f loors have been framed, yet there is no basement (and youwanted one). Think of how much work is involved in having all of the framing for the f irst and second f loors torn down just so the basement can be put in. The rework involved, the cost, andthe delays are enormous.
This same concept applies to designing a computer application. If you plan up front how the application needs to look and what it will do, you have a detailed roadmap. You probably won’tget deep into the process and discover some major unresolved issue. This is not to say that proper modeling will take away all risk of later problems, because that is impossible. However,you will, at least, get the major f ramework of the system (such as whether the house needs a basement) def ined, and you can worry about f inishing the very minor details (like paint colors)later. I hope you now see why documenting the system on paper before writing code is so important. Now you’ll take a look at some of the most commonly used diagramming techniques -Use Case Diagrams and Activity Diagrams - and see how they can be used to help design your applications.
Use Case Diagrams
Use Case Diagrams show the services provided by the system to its users. I like to think of it as the actions a user can take in the system. For example, in the case of the Wrox AutoSales hypothetical application, the auto sales staf f will need some type of Search Inventory Screen to allow them to search the inventory of cars. From that screen, they need to be able torun searches, clear the search results, open a selected car detail record, open the car detail screen (empty), or open the customer screen (empty). Suppose that each of these is an actionthe user can take on the Search Inventory Screen in the system. Thus, each of these actions can map to an action in a Use Case Diagram.
First, let’s look at how such a Use Case Diagram would appear on the screen (see Figure 1-1), and then you can study in more detail how it is structured.
Beginning Access 2007 VBA
17 / 344
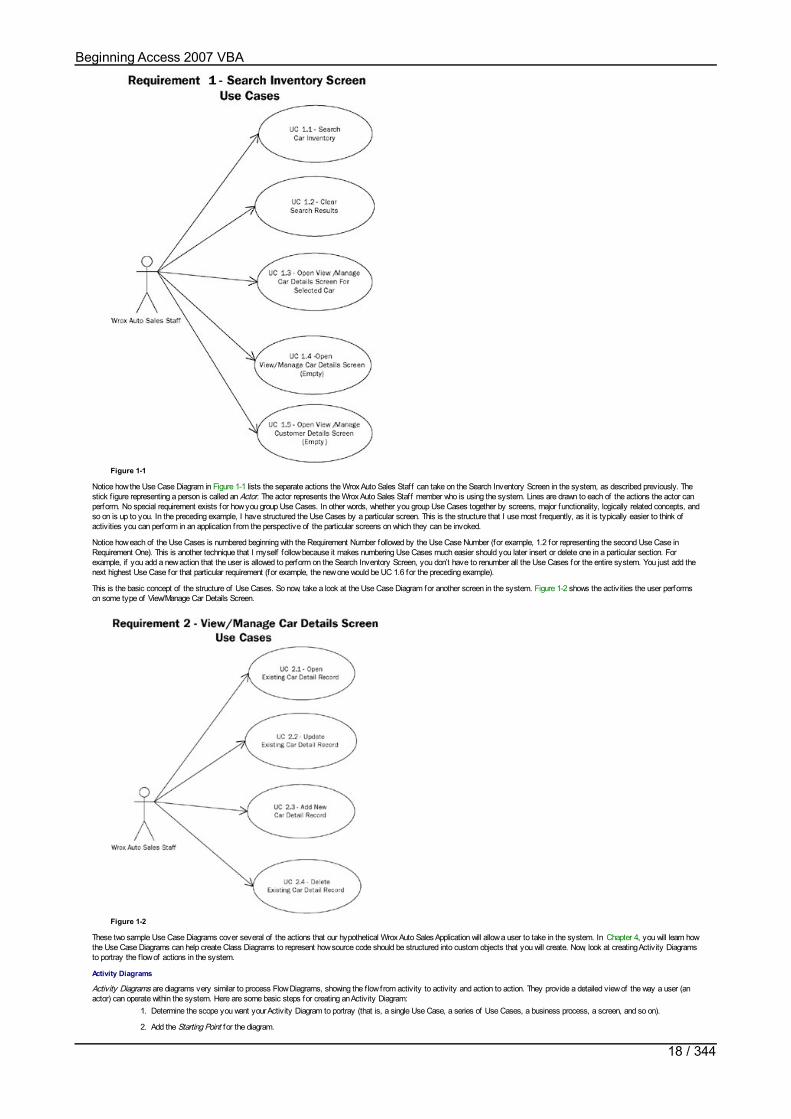
Figure 1-1
Notice how the Use Case Diagram in Figure 1-1 lists the separate actions the Wrox Auto Sales Staff can take on the Search Inventory Screen in the system, as described previously. Thestick f igure representing a person is called an Actor. The actor represents the Wrox Auto Sales Staff member who is using the system. Lines are drawn to each of the actions the actor canperform. No special requirement exists for how you group Use Cases. In other words, whether you group Use Cases together by screens, major functionality, logically related concepts, andso on is up to you. In the preceding example, I have structured the Use Cases by a particular screen. This is the structure that I use most f requently, as it is typically easier to think ofactivities you can perform in an application from the perspective of the particular screens on which they can be invoked.
Notice how each of the Use Cases is numbered beginning with the Requirement Number followed by the Use Case Number (for example, 1.2 for representing the second Use Case inRequirement One). This is another technique that I myself follow because it makes numbering Use Cases much easier should you later insert or delete one in a particular section. Forexample, if you add a new action that the user is allowed to perform on the Search Inventory Screen, you don’t have to renumber all the Use Cases for the entire system. You just add thenext highest Use Case for that particular requirement (for example, the new one would be UC 1.6 for the preceding example).
This is the basic concept of the structure of Use Cases. So now, take a look at the Use Case Diagram for another screen in the system. Figure 1-2 shows the activities the user performson some type of View/Manage Car Details Screen.
Figure 1-2
These two sample Use Case Diagrams cover several of the actions that our hypothetical Wrox Auto Sales Application will allow a user to take in the system. In Chapter 4, you will learn howthe Use Case Diagrams can help create Class Diagrams to represent how source code should be structured into custom objects that you will create. Now, look at creating Activity Diagramsto portray the f low of actions in the system.
Activity Diagrams
Activity Diagrams are diagrams very similar to process Flow Diagrams, showing the f low from activity to activity and action to action. They provide a detailed view of the way a user (anactor) can operate within the system. Here are some basic steps for creating an Activity Diagram:
1. Determine the scope you want your Activity Diagram to portray (that is, a single Use Case, a series of Use Cases, a business process, a screen, and so on).
2. Add the Starting Point for the diagram.
Beginning Access 2007 VBA
18 / 344

3. Add the activities for each step users can take. This includes the initial step (opening the screen, and so on) plus any steps describing what they do next.
4. Add the Connectors from each activity to the next.
5. Label alternative paths appropriately so you can tell that the user can take one or more paths. These are called Decision Points.
6. Add any Parallel Activities, or activities that can happen simultaneously and must both f inish before another action can be taken.
7. Add the Ending Points, which are the one or more points in the f low that the actions may end.
Activity Diagrams are helpful for many reasons, including aiding in structuring your code for the system and aiding in the test cases for the functionality you must ensure the systemprovides.
You will now see how we can apply these concepts to creating an Activity Diagram for the Search Inventory Screen of the hypothetical Wrox Auto Sales application. Based on therequirements you have gathered and analyzed so far, you have enough information to describe the actions a user can take on this screen in plain English. First, the Search InventoryScreen opens. Next, the user can open the View/Manage Car Details Screen, open the View/Manage Customer Details Screen, or run a search against inventory. If she opens theView/Manage Car Details Screen, the f low on this Search screen ends. If she opens the View/Manage Customer Details Screen, the f low on this screen also ends. However, the user canalso run a search, f ill in the search criteria, click the Search button, and view the results. She can then clear the results, run the search again, or open the detail screen for a selected car.After she f inishes searching (or if she opens a car detail record), the f low on this screen ends. Figure 1-3 shows how these steps can be depicted in an Activity Diagram.
Figure 1-3
Notice how the alternative paths the user can take are depicted using OR. Further, notice how each activity is connected with an arrow. The starting and ending circles depict the pointswhere the f low starts and the points where the f low can end. That’s really all there is to creating an Activity Diagram. You simply model the f low of the actions a user takes in the systemelectronically or on paper in the order they happen, indicating any alternative or parallel activities. I used Microsoft Visio to create these diagrams, but you can use various other tools or justdiagrams written on paper. The tool you use is not important, just as long as you document the design in some fashion. Let’s look at an Activity Diagram for another screen in our Wrox AutoSales application.
Figure 1-4 demonstrates the actions a user can take in order on a View/Manage Car Details Screen. Notice how the user can either open a car detail record or add a new car detail recordwhen the screen f irst opens. After a record is opened, it can be viewed, modif ied, or deleted.
Figure 1-4
Screen Prototypes
After creating Use Case and Activity Diagrams (or other appropriate design diagrams), you should also create screen prototypes that illustrate at a basic level how the user interface willlook.
Turning now to the Wrox Auto Sales hypothetical, look at what the Search Inventory and Manage Cars screen prototypes might look like. From the Use Case Diagram for the SearchInventory screen (shown in Figure 1-1), you know there are f ive requirements:
UC 1.1 Search Car Inventory
Beginning Access 2007 VBA
19 / 344
UC 1.2 Clear Search Results
UC 1.3 Open View/Manage Car Details for Selected Car
UC 1.4 Open View/Manage Car Details Screen (Empty)
UC 1.5 Open View/Manage Customer Details Screen (Empty)
Use Cases can translate directly into menu options, buttons, and other controls on corresponding form(s).
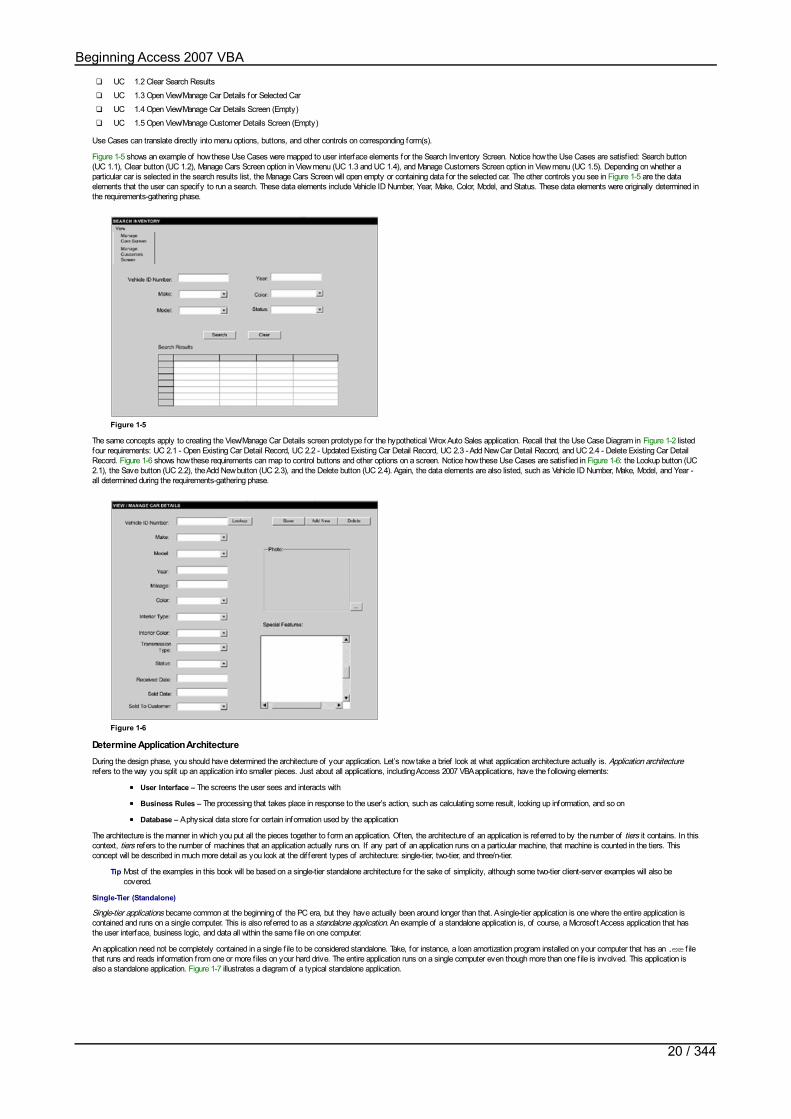
Figure 1-5 shows an example of how these Use Cases were mapped to user interface elements for the Search Inventory Screen. Notice how the Use Cases are satisf ied: Search button(UC 1.1), Clear button (UC 1.2), Manage Cars Screen option in View menu (UC 1.3 and UC 1.4), and Manage Customers Screen option in View menu (UC 1.5). Depending on whether aparticular car is selected in the search results list, the Manage Cars Screen will open empty or containing data for the selected car. The other controls you see in Figure 1-5 are the dataelements that the user can specify to run a search. These data elements include Vehicle ID Number, Year, Make, Color, Model, and Status. These data elements were originally determined inthe requirements-gathering phase.
Figure 1-5
The same concepts apply to creating the View/Manage Car Details screen prototype for the hypothetical Wrox Auto Sales application. Recall that the Use Case Diagram in Figure 1-2 listedfour requirements: UC 2.1 - Open Existing Car Detail Record, UC 2.2 - Updated Existing Car Detail Record, UC 2.3 - Add New Car Detail Record, and UC 2.4 - Delete Existing Car DetailRecord. Figure 1-6 shows how these requirements can map to control buttons and other options on a screen. Notice how these Use Cases are satisf ied in Figure 1-6: the Lookup button (UC2.1), the Save button (UC 2.2), the Add New button (UC 2.3), and the Delete button (UC 2.4). Again, the data elements are also listed, such as Vehicle ID Number, Make, Model, and Year -all determined during the requirements-gathering phase.
Figure 1-6
Determine Application ArchitectureDuring the design phase, you should have determined the architecture of your application. Let’s now take a brief look at what application architecture actually is. Application architecturerefers to the way you split up an application into smaller pieces. Just about all applications, including Access 2007 VBA applications, have the following elements:
User Interface – The screens the user sees and interacts with
Business Rules – The processing that takes place in response to the user’s action, such as calculating some result, looking up information, and so on
Database – A physical data store for certain information used by the application
The architecture is the manner in which you put all the pieces together to form an application. Often, the architecture of an application is referred to by the number of tiers it contains. In thiscontext, tiers refers to the number of machines that an application actually runs on. If any part of an application runs on a particular machine, that machine is counted in the tiers. Thisconcept will be described in much more detail as you look at the dif ferent types of architecture: single-tier, two-tier, and three/n-tier.
Tip Most of the examples in this book will be based on a single-tier standalone architecture for the sake of simplicity, although some two-tier client-server examples will also becovered.
Single-Tier (Standalone)
Single-tier applications became common at the beginning of the PC era, but they have actually been around longer than that. A single-tier application is one where the entire application iscontained and runs on a single computer. This is also referred to as a standalone application. An example of a standalone application is, of course, a Microsoft Access application that hasthe user interface, business logic, and data all within the same f ile on one computer.
An application need not be completely contained in a single f ile to be considered standalone. Take, for instance, a loan amortization program installed on your computer that has an .exe f ilethat runs and reads information from one or more f iles on your hard drive. The entire application runs on a single computer even though more than one f ile is involved. This application isalso a standalone application. Figure 1-7 illustrates a diagram of a typical standalone application.
Beginning Access 2007 VBA
20 / 344

Figure 1-7
With a standalone application, everything is nicely self-contained. If you are the only person who will use the application and data, a standalone architecture is f ine. In the case of Accessapplications, you may also put the single Access f ile containing both the user interface and the database on the network to allow multiple people to access the application. This works f ine inmany situations and also qualif ies as a standalone architecture. As the number of users for a standalone Access application grows, the standalone architecture can become problematicbecause each user is accessing the same f ile on the network for the user interface and database. Many of the Access 2007 VBA examples covered in this book are based on a standalonearchitecture.
As applications grew and had to be shared more often, a client-server architecture was introduced to facilitate sharing. You will see how the client-server architecture can help address someof the limitations of the standalone architecture.
Two-Tier (Client-Server)
Client-server applications (applications that span two-tiers: a client machine and a server machine) solved the problem introduced by standalone applications and allowed multiple people toshare the same data more easily. Client-server applications require a central server to hold the data store in a central location. The database server then processes requests for data fromeach of the client machines. Client-server applications f irst appeared in the early 1990s on the PC platform. A diagram of this architecture is depicted in Figure 1-8.
Figure 1-8
In this architecture, the data store is abstracted from the client. The client machine makes a request f rom the server to add, insert, update, or view data, and the server processes therequest and returns the results to the client. A typical database server in such a scenario might be an Access, SQL Server, or Oracle database. In the case of an Access client-serverapplication, the user interface may reside in one Access f ile, and the database may reside in a separate f ile or database application on a server, such as an Access or SQL Server database.Creating client-server applications using Access or SQL Server databases will be discussed in Chapters 7, 10, and 4.
In a client-server application, the main application is loaded on each client computer. The application includes the user interface and probably most or all of the business logic elements. Inother words, the application contains code to create the user interface, process the user actions, perform any validations or calculations, and look up or modify data in the database. It ispossible, however, to have some of the business logic on the database server, such as in stored procedures that are described in Chapters 10 and 14. For example, if you require a zip codeto be f ive characters in length, you could put that logic in the insert or update stored procedure to raise an error instead of the code on the client. The bottom line with business logic in client-server applications is that it can be entirely on the client, entirely on the server, or you can use a combination of the two.
The advantages of client-server applications are that you can share data across multiple computers more easily than before and also separate the user interface from the database. Eachclient always updates the central repository.
At some point, however, the central database server is limited in terms of how many users it can handle. This might mean that a database server must scale up to a bigger server or beefup the resources of the existing server. To address some of these problems with growth and maintenance, the three-tier/n-tier architecture was introduced.
Three-Tier/N-Tier
The three-tiered architecture addresses the limitations imposed by the client-server architecture and allows you to architect solutions that can grow easily as your needs grow. The three-tiered architecture is sometimes called n-tier because it can have more than three tiers in certain situations. With three-tier and n-tier applications, you can simply add additional servers tohandle the processing. Microsoft Access is not typically used to create three-tier applications, although with some complex coding it can be used as part of a three-tier application design.Access should not be used for three-tier applications because for such a large-scale application, Access is not the best user interface or database to use. It contains serious limitations.
Even though you will not use Access to develop three-tier applications, it is still worthwhile to understand what a three-tier application includes. I discuss this because, at some point, youmay need to migrate your client-server Access application to a three-tier architecture.
So, how does a three-tier architecture create incredible growth potential? The idea is that application elements are physically compiled as separate elements, and they run on dif ferentcomputers. For example, the user interface elements are separate from the middle-layer business logic, which is separate from the database layer. In this case, the application is running onthree dif ferent computers: the client, the middle-tier server, and the database server (hence the name three-tier). Figure 1-9 diagrams this.
Figure 1-9
The three-tier/n-tier architecture takes client-server to the next level by abstracting all the various layers of processing from both the client and the server. It takes some practice to do thiscorrectly. In plain English, what does this mean to you as a programmer? It means that you break the application into isolated pieces that call each other as appropriate. You no longer writea single program with intermixed code that creates the user interface, checks the business rules, performs calculations, and updates the database.
When these actions get split into separate functionalities, they can be thought of as separate source code projects. You create the part of the program that deals specif ically with showingthe graphical user interface in its own project (such as an .exe created using Visual Basic or Visual Basic .NET). You then create the business logic in its own project that will be compiledinto a business logic component (such as a DLL created using Visual Basic or Visual Basic .NET). The business logic component will then be called by the client project to perform anycalculations, business rules checks, and so on. The brief summary below states this idea another way.
Beginning Access 2007 VBA
21 / 344
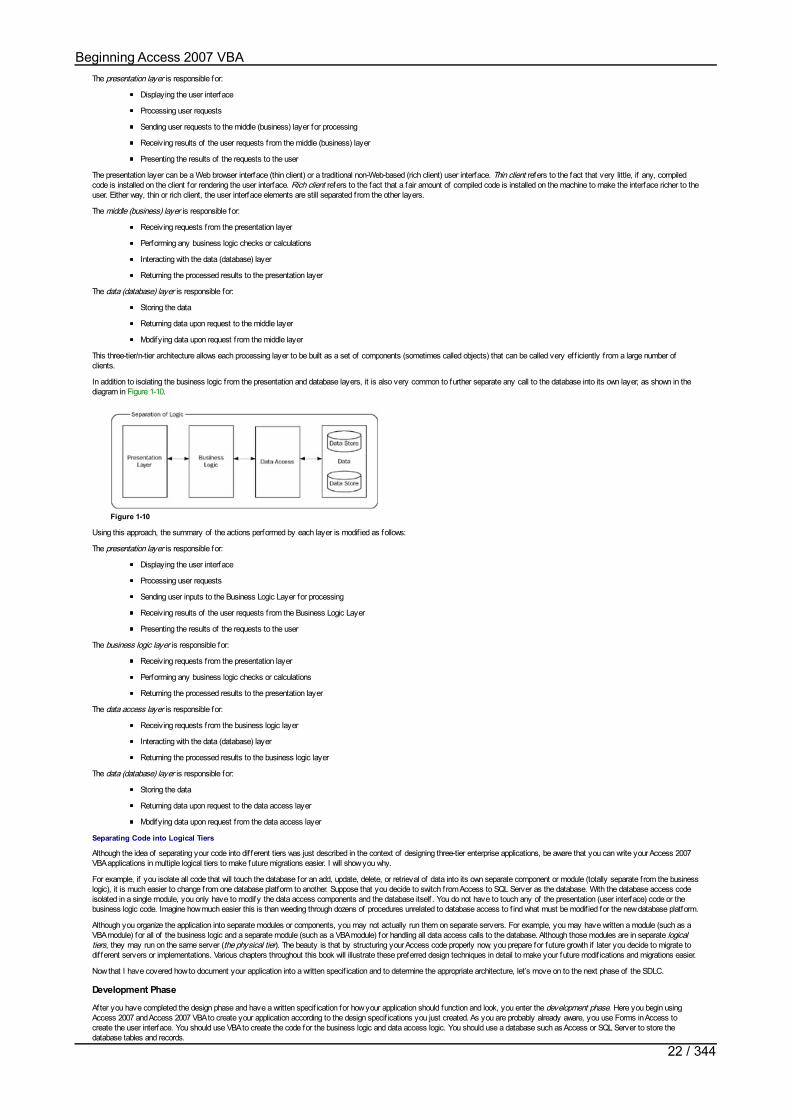
The presentation layer is responsible for:
Displaying the user interface
Processing user requests
Sending user requests to the middle (business) layer for processing
Receiving results of the user requests from the middle (business) layer
Presenting the results of the requests to the user
The presentation layer can be a Web browser interface (thin client) or a traditional non-Web-based (rich client) user interface. Thin client refers to the fact that very little, if any, compiledcode is installed on the client for rendering the user interface. Rich client refers to the fact that a fair amount of compiled code is installed on the machine to make the interface richer to theuser. Either way, thin or rich client, the user interface elements are still separated from the other layers.
The middle (business) layer is responsible for:
Receiving requests from the presentation layer
Performing any business logic checks or calculations
Interacting with the data (database) layer
Returning the processed results to the presentation layer
The data (database) layer is responsible for:
Storing the data
Returning data upon request to the middle layer
Modifying data upon request f rom the middle layer
This three-tier/n-tier architecture allows each processing layer to be built as a set of components (sometimes called objects) that can be called very eff iciently f rom a large number ofclients.
In addition to isolating the business logic f rom the presentation and database layers, it is also very common to further separate any call to the database into its own layer, as shown in thediagram in Figure 1-10.
Figure 1-10
Using this approach, the summary of the actions performed by each layer is modif ied as follows:
The presentation layer is responsible for:
Displaying the user interface
Processing user requests
Sending user inputs to the Business Logic Layer for processing
Receiving results of the user requests from the Business Logic Layer
Presenting the results of the requests to the user
The business logic layer is responsible for:
Receiving requests from the presentation layer
Performing any business logic checks or calculations
Returning the processed results to the presentation layer
The data access layer is responsible for:
Receiving requests from the business logic layer
Interacting with the data (database) layer
Returning the processed results to the business logic layer
The data (database) layer is responsible for:
Storing the data
Returning data upon request to the data access layer
Modifying data upon request f rom the data access layer
Separating Code into Logical Tiers
Although the idea of separating your code into dif ferent tiers was just described in the context of designing three-tier enterprise applications, be aware that you can write your Access 2007VBA applications in multiple logical tiers to make future migrations easier. I will show you why.
For example, if you isolate all code that will touch the database for an add, update, delete, or retrieval of data into its own separate component or module (totally separate from the businesslogic), it is much easier to change from one database platform to another. Suppose that you decide to switch from Access to SQL Server as the database. With the database access codeisolated in a single module, you only have to modify the data access components and the database itself . You do not have to touch any of the presentation (user interface) code or thebusiness logic code. Imagine how much easier this is than weeding through dozens of procedures unrelated to database access to f ind what must be modif ied for the new database platform.
Although you organize the application into separate modules or components, you may not actually run them on separate servers. For example, you may have written a module (such as aVBA module) for all of the business logic and a separate module (such as a VBA module) for handling all data access calls to the database. Although those modules are in separate logicaltiers, they may run on the same server (the physical tier). The beauty is that by structuring your Access code properly now, you prepare for future growth if later you decide to migrate todif ferent servers or implementations. Various chapters throughout this book will illustrate these preferred design techniques in detail to make your future modif ications and migrations easier.
Now that I have covered how to document your application into a written specif ication and to determine the appropriate architecture, let’s move on to the next phase of the SDLC.
Development Phase
After you have completed the design phase and have a written specif ication for how your application should function and look, you enter the development phase. Here you begin usingAccess 2007 and Access 2007 VBA to create your application according to the design specif ications you just created. As you are probably already aware, you use Forms in Access tocreate the user interface. You should use VBA to create the code for the business logic and data access logic. You should use a database such as Access or SQL Server to store thedatabase tables and records.
Beginning Access 2007 VBA
22 / 344

Because this is a book about VBA, I show you how to write VBA code for the business logic and database access logic using the Visual Basic Editor. Let’s take a look at some simpleexamples in the Visual Basic Editor.
The Visual Basic EditorAs previously mentioned, VBA code is written in Access using the Visual Basic Editor. You can get to the Visual Basic Editor in various ways. One way is to select the Database Toolsribbon, and then select the Visual Basic icon in the Macro group, as shown in Figure 1-11.
Figure 1-11
You can also select Alt+F11 to open the Visual Basic Editor. Yet another way to get to the Visual Basic Editor in Access is to select the Create ribbon, select the drop-down list for Macro, andthen select Module from the list. This is shown in Figure 1-12.
Figure 1-12
Figure 1-13 shows an example of what the Visual Basic Editor looks like.
Figure 1-13
Notice that the Visual Basic Editor in Figure 1-13 contains a Code window on the right side, a Project window on the upper-lef t side, and a Properties module on the bottom-lef t side. The waythese windows are arranged can be customized to suit your preferences. Additional windows can also be displayed by using the View menu.
What you see in the Visual Basic Editor depends on how you got there and what objects are part of the Access database already. The concept of Access objects will be described in detail inChapter 3. For now, just think of forms, controls, modules, and examples of potential objects that may have VBA code associated with them. In the Project window of Figure 1-13, a newmodule called Module1 was just inserted. The cursor is f lashing in the code window that is associated with Module1. When other objects are present in the Project window, you can navigatethrough the hierarchy and use the Code window to add or modify code that corresponds to the selected objects.
For example, suppose that you have a form in your Access database called frmMain. You have added a command button called cmdText to your frmMain. You can get to the Visual BasicEditor f rom within frmMain by f irst selecting the cmdText control and then selecting an event, such as On_Click, as shown in Figure 1-14.
Beginning Access 2007 VBA
23 / 344
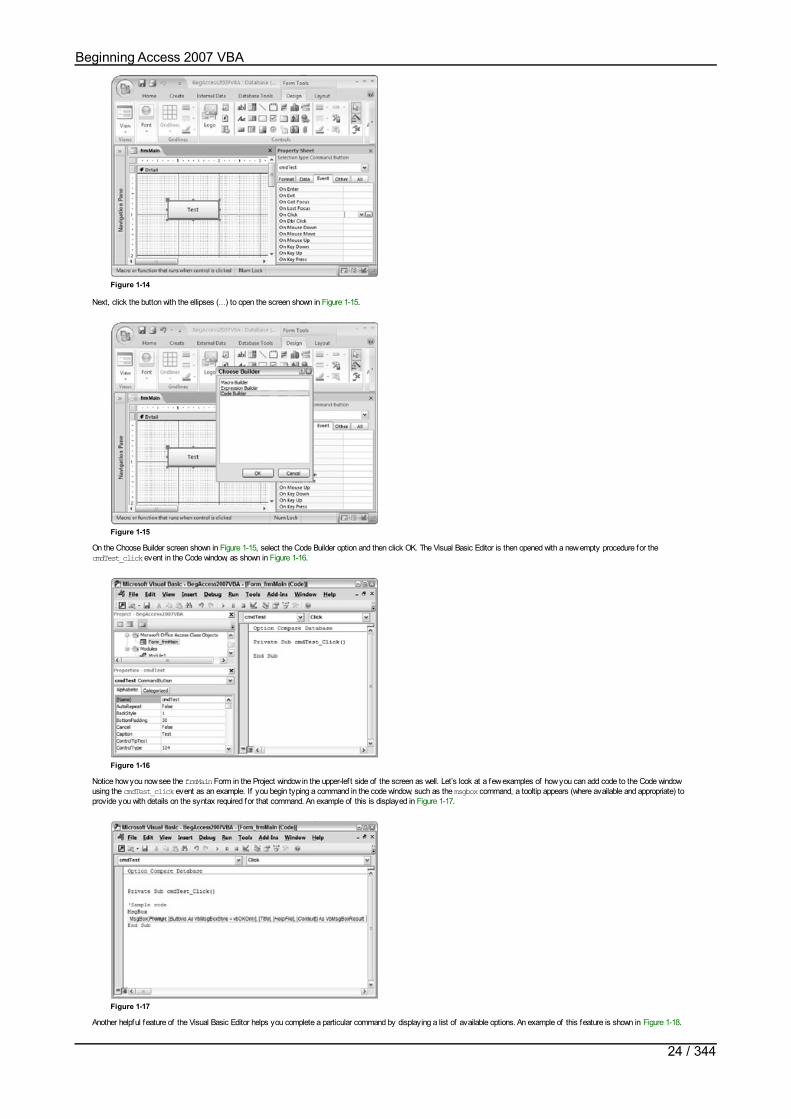
Figure 1-14
Next, click the button with the ellipses (…) to open the screen shown in Figure 1-15.
Figure 1-15
On the Choose Builder screen shown in Figure 1-15, select the Code Builder option and then click OK. The Visual Basic Editor is then opened with a new empty procedure for thecmdTest_click event in the Code window, as shown in Figure 1-16.
Figure 1-16
Notice how you now see the frmMain Form in the Project window in the upper-lef t side of the screen as well. Let’s look at a few examples of how you can add code to the Code windowusing the cmdTest_click event as an example. If you begin typing a command in the code window, such as the msgbox command, a tooltip appears (where available and appropriate) toprovide you with details on the syntax required for that command. An example of this is displayed in Figure 1-17.
Figure 1-17
Another helpful feature of the Visual Basic Editor helps you complete a particular command by displaying a list of available options. An example of this feature is shown in Figure 1-18.
Beginning Access 2007 VBA
24 / 344
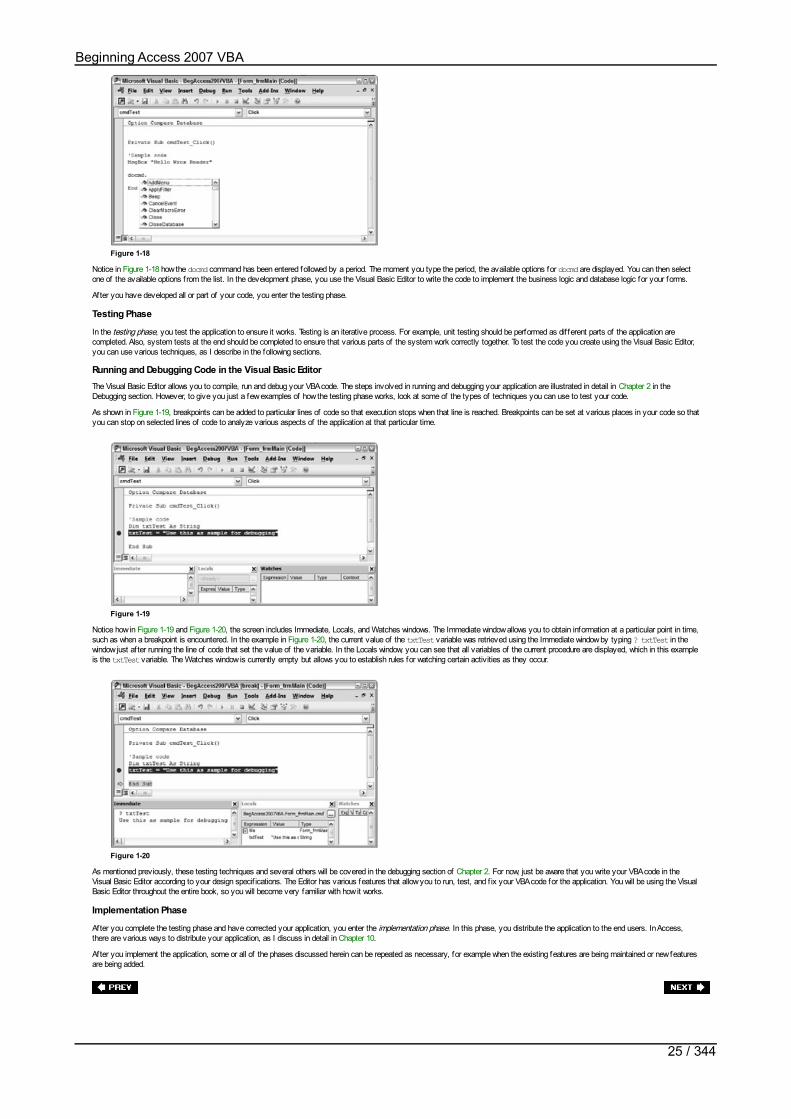
Figure 1-18
Notice in Figure 1-18 how the docmd command has been entered followed by a period. The moment you type the period, the available options for docmd are displayed. You can then selectone of the available options from the list. In the development phase, you use the Visual Basic Editor to write the code to implement the business logic and database logic for your forms.
After you have developed all or part of your code, you enter the testing phase.
Testing Phase
In the testing phase, you test the application to ensure it works. Testing is an iterative process. For example, unit testing should be performed as dif ferent parts of the application arecompleted. Also, system tests at the end should be completed to ensure that various parts of the system work correctly together. To test the code you create using the Visual Basic Editor,you can use various techniques, as I describe in the following sections.
Running and Debugging Code in the Visual Basic EditorThe Visual Basic Editor allows you to compile, run and debug your VBA code. The steps involved in running and debugging your application are illustrated in detail in Chapter 2 in theDebugging section. However, to give you just a few examples of how the testing phase works, look at some of the types of techniques you can use to test your code.
As shown in Figure 1-19, breakpoints can be added to particular lines of code so that execution stops when that line is reached. Breakpoints can be set at various places in your code so thatyou can stop on selected lines of code to analyze various aspects of the application at that particular time.
Figure 1-19
Notice how in Figure 1-19 and Figure 1-20, the screen includes Immediate, Locals, and Watches windows. The Immediate window allows you to obtain information at a particular point in time,such as when a breakpoint is encountered. In the example in Figure 1-20, the current value of the txtTest variable was retrieved using the Immediate window by typing ? txtTest in thewindow just af ter running the line of code that set the value of the variable. In the Locals window, you can see that all variables of the current procedure are displayed, which in this exampleis the txtTest variable. The Watches window is currently empty but allows you to establish rules for watching certain activities as they occur.
Figure 1-20
As mentioned previously, these testing techniques and several others will be covered in the debugging section of Chapter 2. For now, just be aware that you write your VBA code in theVisual Basic Editor according to your design specif ications. The Editor has various features that allow you to run, test, and f ix your VBA code for the application. You will be using the VisualBasic Editor throughout the entire book, so you will become very familiar with how it works.
Implementation Phase
After you complete the testing phase and have corrected your application, you enter the implementation phase. In this phase, you distribute the application to the end users. In Access,there are various ways to distribute your application, as I discuss in detail in Chapter 10.
After you implement the application, some or all of the phases discussed herein can be repeated as necessary, for example when the existing features are being maintained or new featuresare being added.
Beginning Access 2007 VBA
25 / 344

SummaryAccess 2007 VBA is an example of a programming language that can be used to extend your Access applications. As part of developing Access and other applications, you should follow adevelopment methodology such as the Systems Development Life Cycle to facilitate the development process and reduce the amount of rework needed later.
The SDLC includes various phases, including the requirements gathering, design, development, testing, and implementation phases. In the requirements gathering phase, you determine thelist of features that the application must include. In the design phase, you document the application on paper so that you know how to code it. Some examples of how you can documentyour design include using Use Cases, Activity Diagrams, and screen prototypes. As part of the design phase, you determine whether to use the standalone or client-server applicationarchitecture. In the development phase, you use Access to create your forms, and VBA from the Visual Basic Editor to create the business logic and data access code for your application.In the testing phase, you use the Visual Basic Editor to test and f ix your application. In the implementation phase, you prepare and distribute your application to end users.
With this chapter under your belt, you now move on to Chapter 2, where you learn the basics of writing and testing VBA code using the Visual Basic Editor. Before you move on to Chapter2, you may want to try out the exercises below to check your understanding of the concepts in this chapter. All answers to exercise questions can be found in Appendix A.
Beginning Access 2007 VBA
26 / 344

Exercises1. What are the phases of the Systems Development Life Cycle (SDLC) and the purposes of each phase?
2. What are some examples of the ways you can document your design in the design phase of the SDLC?
3. What is the dif ference between a standalone application and a client-server application?
4. What are the advantages of separating your code into logical tiers in your Access applications?
Answers
1. The phases of the System Development Life Cycle methodology include requirements gathering, design, development, testing, and implementation. The purpose of the requirementsgathering phase is to identify a list of features that the application should include. The design phase takes the requirements and determines how to design an application that meets therequirements. The development phase is where you create the application using forms for the screens and VBA code for the business logic and data access logic. The testing phaseallows you to test and f ix your application, and should be performed in various phases as the application is developed. The implementation phase is where you roll out the application toend users.
2. You can use Use Case Diagrams to list the various ways an end user might use the system. You can use Activity or other Flow Diagrams to illustrate the f low of activities in thesystem. You can use prototype screens to model how the user interface should look. These are just a few of numerous other documenting techniques that can be used.
3. A standalone application runs entirely on one computer. All of the user interface, business logic, and database elements run on the same computer. A standalone application in Accesscan be located on a network computer that multiple computers can access, but all computers will be opening the same f ile. A client-server application is one where the user interface isseparated from the database, and the database is located on a server so that it is accessible from multiple computers.
4. By separating your code into dif ferent logical tiers, you can make migrating or improving your application easier in the future. For example, suppose that you include your businesslogic in one Access module and your data access logic in another Access module. If you need to change your data access code, such as to migrate to another database platform, youcan f ind all code that interacts with the database in the data access layer in one place. This makes it much easier to upgrade dif ferent portions of your application without having toweed through the entire application to f ind the affected portions.
Beginning Access 2007 VBA
27 / 344

Chapter 2: The Basics of Writing and Testing VBA Code
OverviewChapter 1 introduced the Access VBA programming environment and some general software development concepts. At this point, you are ready to learn the basics of writing and testingcode using VBA. This chapter will cover:
Creating code modules
Creating and calling procedures
Using variables to store values
Controlling the f low of programs
Debugging and handling errors
This chapter will serve as a building block for the more advanced VBA concepts covered in later chapters. The techniques covered in this chapter and in most of the remaining chapters areused during the development and testing phases of the Systems Development Life Cycle, as def ined in Chapter 1.
Beginning Access 2007 VBA
28 / 344

Creating ModulesModules are best described as containers for holding VBA code. Modules can contain declarations and procedures. VBA code that is placed in one or more modules can be called from anAccess application to perform a specif ied task. I discuss this in greater detail throughout.
Figure 2-1 shows a sample module displayed in the Visual Basic Editor.
Figure 2-1
Note that the previous f igure has four areas labeled. Each one will now be mentioned brief ly.
1. Object navigation box – Use to select the object to work with
2. Declarations/Procedure navigation box – Use to navigate to the general declarations section or to a particular procedure
3. Declarations – Contains the declarations for the module
4. Procedures – Contains the sub procedures and functions for the module
When you select the Declarations/Procedure navigation box, a list appears that displays the existing procedures of the module, as shown in Figure 2-2.
Figure 2-2
Now that you have a basic idea of what a module is (container for code), let’s turn to the dif ferent types of modules.
Beginning Access 2007 VBA
29 / 344
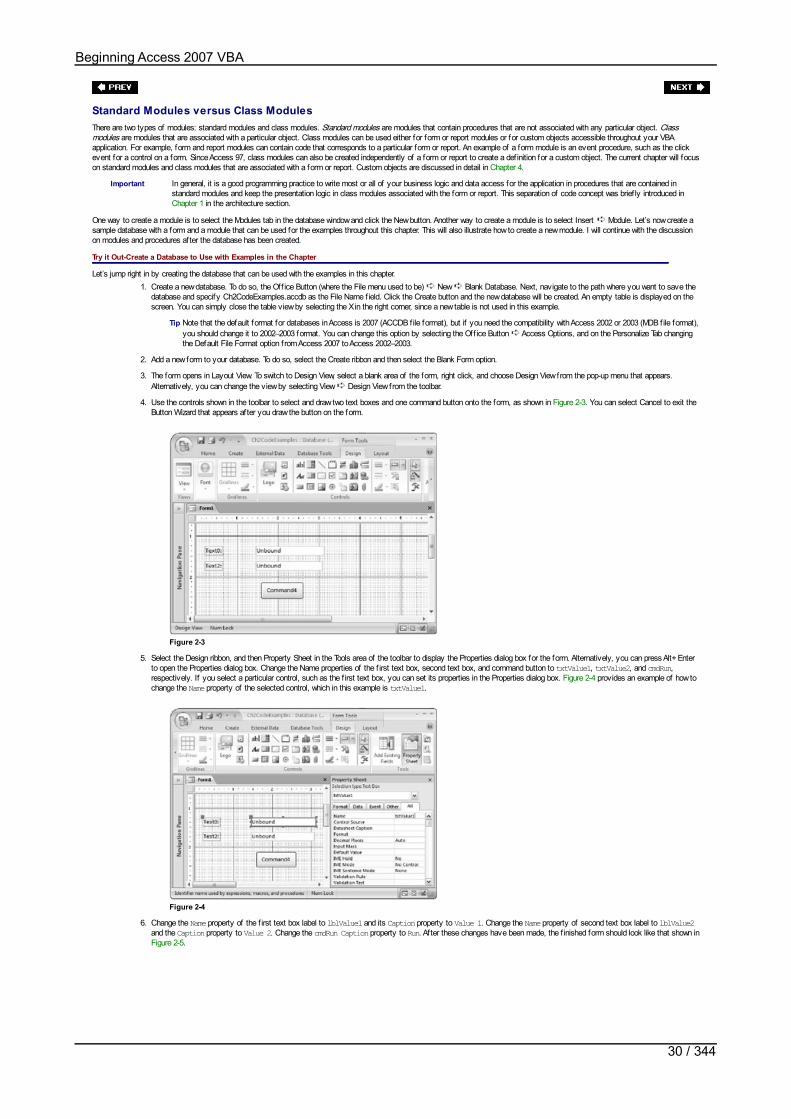
Standard Modules versus Class ModulesThere are two types of modules: standard modules and class modules. Standard modules are modules that contain procedures that are not associated with any particular object. Classmodules are modules that are associated with a particular object. Class modules can be used either for form or report modules or for custom objects accessible throughout your VBAapplication. For example, form and report modules can contain code that corresponds to a particular form or report. An example of a form module is an event procedure, such as the clickevent for a control on a form. Since Access 97, class modules can also be created independently of a form or report to create a def inition for a custom object. The current chapter will focuson standard modules and class modules that are associated with a form or report. Custom objects are discussed in detail in Chapter 4.
Important In general, it is a good programming practice to write most or all of your business logic and data access for the application in procedures that are contained instandard modules and keep the presentation logic in class modules associated with the form or report. This separation of code concept was brief ly introduced inChapter 1 in the architecture section.
One way to create a module is to select the Modules tab in the database window and click the New button. Another way to create a module is to select Insert Module. Let’s now create asample database with a form and a module that can be used for the examples throughout this chapter. This will also illustrate how to create a new module. I will continue with the discussionon modules and procedures after the database has been created.
Try it Out-Create a Database to Use with Examples in the Chapter
Let’s jump right in by creating the database that can be used with the examples in this chapter.1. Create a new database. To do so, the Off ice Button (where the File menu used to be) New Blank Database. Next, navigate to the path where you want to save the
database and specify Ch2CodeExamples.accdb as the File Name f ield. Click the Create button and the new database will be created. An empty table is displayed on thescreen. You can simply close the table view by selecting the X in the right corner, since a new table is not used in this example.
Tip Note that the default format for databases in Access is 2007 (ACCDB f ile format), but if you need the compatibility with Access 2002 or 2003 (MDB f ile format),you should change it to 2002–2003 format. You can change this option by selecting the Off ice Button Access Options, and on the Personalize Tab changingthe Default File Format option from Access 2007 to Access 2002–2003.
2. Add a new form to your database. To do so, select the Create ribbon and then select the Blank Form option.
3. The form opens in Layout View. To switch to Design View, select a blank area of the form, right click, and choose Design View from the pop-up menu that appears.Alternatively, you can change the view by selecting View Design View from the toolbar.
4. Use the controls shown in the toolbar to select and draw two text boxes and one command button onto the form, as shown in Figure 2-3. You can select Cancel to exit theButton Wizard that appears after you draw the button on the form.
Figure 2-3
5. Select the Design ribbon, and then Property Sheet in the Tools area of the toolbar to display the Properties dialog box for the form. Alternatively, you can press Alt+ Enterto open the Properties dialog box. Change the Name properties of the f irst text box, second text box, and command button to txtValue1, txtValue2, and cmdRun,respectively. If you select a particular control, such as the f irst text box, you can set its properties in the Properties dialog box. Figure 2-4 provides an example of how tochange the Name property of the selected control, which in this example is txtValue1.
Figure 2-4
6. Change the Name property of the f irst text box label to lblValue1 and its Caption property to Value 1. Change the Name property of second text box label to lblValue2and the Caption property to Value 2. Change the cmdRun Caption property to Run. After these changes have been made, the f inished form should look like that shown inFigure 2-5.
Beginning Access 2007 VBA
30 / 344
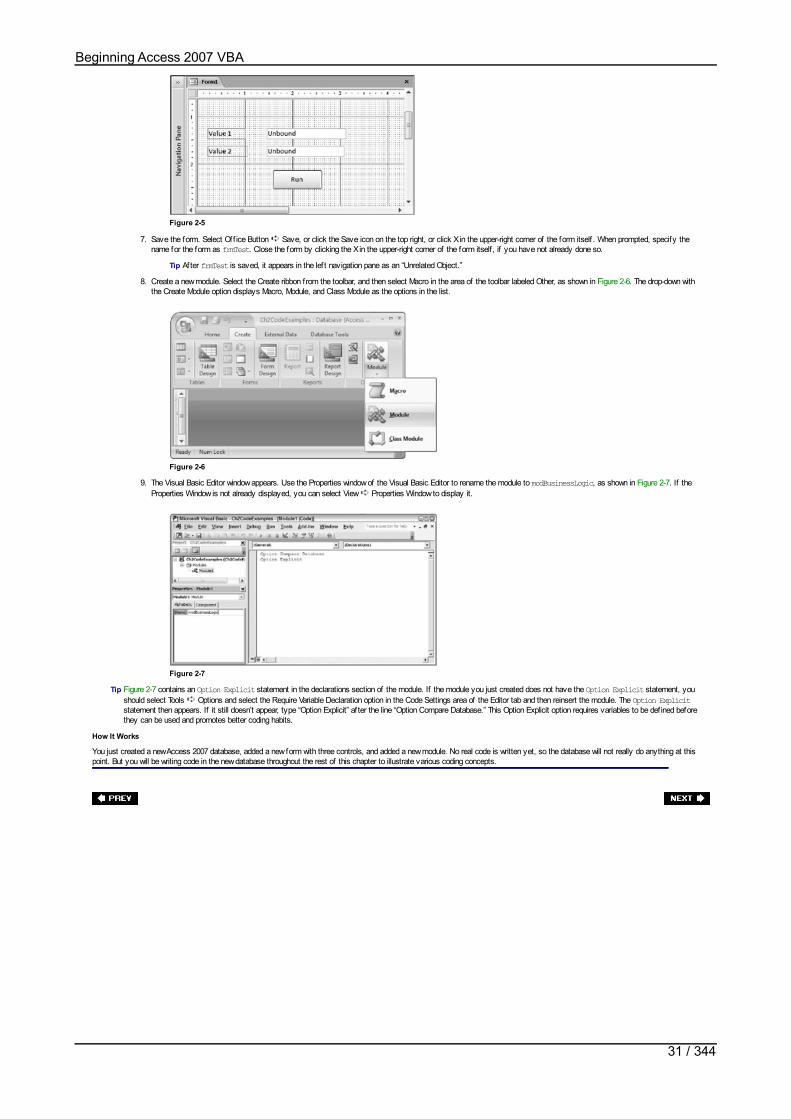
Figure 2-5
7. Save the form. Select Off ice Button Save, or click the Save icon on the top right, or click X in the upper-right corner of the form itself . When prompted, specify thename for the form as frmTest. Close the form by clicking the X in the upper-right corner of the form itself , if you have not already done so.
Tip After frmTest is saved, it appears in the lef t navigation pane as an “Unrelated Object.”
8. Create a new module. Select the Create ribbon from the toolbar, and then select Macro in the area of the toolbar labeled Other, as shown in Figure 2-6. The drop-down withthe Create Module option displays Macro, Module, and Class Module as the options in the list.
Figure 2-6
9. The Visual Basic Editor window appears. Use the Properties window of the Visual Basic Editor to rename the module to modBusinessLogic, as shown in Figure 2-7. If theProperties Window is not already displayed, you can select View Properties Window to display it.
Figure 2-7
Tip Figure 2-7 contains an Option Explicit statement in the declarations section of the module. If the module you just created does not have the Option Explicit statement, youshould select Tools Options and select the Require Variable Declaration option in the Code Settings area of the Editor tab and then reinsert the module. The Option Explicitstatement then appears. If it still doesn’t appear, type “Option Explicit” af ter the line “Option Compare Database.” This Option Explicit option requires variables to be def ined beforethey can be used and promotes better coding habits.
How It Works
You just created a new Access 2007 database, added a new form with three controls, and added a new module. No real code is written yet, so the database will not really do anything at thispoint. But you will be writing code in the new database throughout the rest of this chapter to illustrate various coding concepts.
Beginning Access 2007 VBA
31 / 344

Creating and Calling ProceduresNow that you have a sample database, I return to a discussion of modules and procedures. You already saw a procedure inside the sample module illustrations provided previously, but let’snow analyze what the procedures are and how they can be used.
Procedures are the building blocks of modules. Each module contains one or more sub procedures or functions, and each sub procedure or function contains one or more VBA codestatements.
Sub versus Function Procedure
Procedures can either be sub procedures or function procedures. A sub procedure performs an action but does not return a particular result. A function performs an action and returns aparticular result. I will provide various examples to illustrate these dif ferences. Sub procedures and functions can be called both from within other procedures and functions and when anevent associated with an object is triggered (for example, button_click), as I describe in more detail in Chapter 3.
Create and Call a New Sub ProcedureThe syntax for declaring a new sub procedure without parameters is:
Sub ProcedureName'code for the procedureEnd SubThe syntax for a new sub procedure that contains variables as parameters is:
Sub ProcedureName(Variables)'code for the procedureEnd SubVariables are containers for storing data. If a procedure must use the value stored in a particular variable, that variable can be passed as a parameter to the procedure. Let’s create a newprocedure to see how this works.
Try It Out-Creating the VerifyCreditAvail Procedure
Next, you will create a VerifyCreditAvail procedure that will compare two numbers to see if enough credit is available for the purchase.1. Insert the following code in the modBusinessLogic module underneath the declarations section (underneath Option Explicit statement). See Figure 2-2 for an example if
you are unsure where to put the code.
Sub VerifyCreditAvail(curTotalPrice As Currency, curAvailCredit As Currency)
'inform user if not enough credit for purchase
If curTotalPrice > curAvailCredit Then MsgBox "You do not have enough credit available for this purchase."End IfEnd Sub
2. Run the procedure from the Immediate Window. If the Immediate Window is not already open, select View Immediate Window. Type the command (shown in Figure 2-8)in the Immediate Window and then click Enter.
Figure 2-8
Tip If you receive an error message that says “the Macros in this project are disabled,” then you need to take a few steps to authorize the modules you just createdto run. To do so, close the VBA Editor window you are in and return to Access. Locate the area underneath the ribbon toolbar that says “Security Warning –certain content in the database has been disabled.” Click the Options button to the right of this warning. Select the “Enable this Content” option from the pop-upthat appears, and click OK. Return to the VBA Editor and repeat step 2 above to run the procedure. It should run this time.
3. You should see a message box like the one shown in Figure 2-9.
Figure 2-9
How It Works
The VerifyCreditAvail sub procedure accepts two variables as parameters, curTotalPrice and curAvailCredit:Sub VerifyCreditAvail(curTotalPrice As Currency, curAvailCredit As Currency)The procedure contains an If statement that compares the value of curTotalPrice to curAvailCredit to see if curTotalPrice is larger: 'inform user if not enough credit for purchaseIf curTotalPrice > curAvailCredit Then MsgBox "You do not have enough credit available for this purchase."End IfFrom the Immediate Window, you call the VerifyCreditAvail sub procedure and pass it the values 5.0 and 4.93. The value 5.0 represents curTotalPrice and the value 4.93 representscurAvailCredit. When the preceding If statement was evaluated, Access determined that 5.0 was greater than 4.93, and thus the message box indicating insuff icient available credit wasdisplayed.
Call a Sub Procedure from Another Procedure
After a procedure has been created, it can be called from within another procedure if desired. Here’s a simple example to illustrate the syntax:
Beginning Access 2007 VBA
32 / 344

Sub FirstProcedure 'This code calls a procedure called SecondProcedure SecondProcedureEnd SubNow that you know the syntax for calling a procedure from within another procedure, you can write code to call the VerifyCreditAvail procedure you created previously from anotherprocedure.
Try It Out-Calling VerifyCreditAvail from Another Procedure
You can now create a new procedure, called FinalizeOrder, that will call the VerifyCreditAvail procedure.1. Add the following procedure, called FinalizeOrder, to the modBusinessLogic module underneath VerifyCreditAvail:
Sub FinalizeOrder()
'declare variables for storing Price and Credit AvailDim curPrice As CurrencyDim curCreditAvail As Currency
'give variables values here for illustration purposescurPrice = 4.5curCreditAvail = 3.75
'call VerifyCreditAvail procedureVerifyCreditAvail curPrice, curCreditAvail
End Sub2. Run the FinalizeOrder procedure from the Immediate Window as shown in Figure 2-10.
Figure 2-10
3. The same message box you received earlier is again displayed to indicate that available credit is not suff icient.
How It Works
The FinalizeOrder procedure uses two local variables: curPrice and curCreditAvail.Sub FinalizeOrder()
'declare variables for storing Price and Credit AvailDim curPrice As CurrencyDim curCreditAvail As CurrencyThe variables are then assigned values for illustration purposes. 'give variables values here for illustration purposescurPrice = 4.5curCreditAvail = 3.75Note that, in most cases, you would not hard-code the values in the procedure, but instead you would retrieve them from a database, another variable, or another source. After the variableswere assigned values, you call the VerifyCreditAvail procedure, with those variables passed as parameters: 'call VerifyCreditAvail procedure VerifyCreditAvail curPrice, curCreditAvailYou then run the FinalizeOrder procedure from the Immediate Window to test it. The FinalizeOrder procedure executes the code to declare the variables, assign the variable values, andcall the VerifyCreditAvail procedure. Because the value of 4.5 specif ied for curPrice was greater than the value specif ied for curCreditAvail, the VerifyCreditAvail procedurecaused a message box to be displayed, as in the prior example.
Call a Sub Procedure from an Event
In addition to being called from another procedure, sub procedures can also be called from an event. As discussed in detail in Chapter 4, events occur in response to an action taken by theuser or the system. Recall that earlier I discussed the two types of modules: standard modules and class modules. The code examples you have written so far were written in the standardmodule called modBusinessLogic. You will now write code in a class module associated with a particular form.
Creating a Procedure for an Object Using the Code Builder
The f irst time you write code for a class module of a particular form or report, you must generate the empty procedure using the Code Builder. You may recall that in Chapter 1 there was anexample of creating a new event procedure for cmdTest_Click using the Code Builder. We’ll now revisit the Code Builder idea to further investigate how it works and to let you try it out foryourself . The concept of events and their associated objects is described in greater detail in Chapter 3.
Try It Out-Create New Procedure for frmTest Using Code Builder
Let’s now create a new procedure for frmTest using the Code Builder.1. Return to the database window and open frmTest in design view. To do so, select Object Type Forms from the Objects list, select frmTest, right-click, and then click
the Design View option. Alternatively, select the Home ribbon on the toolbar, and then select View Design View from the drop-down menu.
2. Select the cmdRun button on the form. You should see the Properties window. If the Properties window is not visible, select the Design ribbon, and then Property Sheet inthe Tools area of the toolbar and select the cmdRun button again.
3. Select the Event tab from the cmdRun Properties window. Click the On Click event f rom the list, as shown in Figure 2-11.
Beginning Access 2007 VBA
33 / 344

Figure 2-11
4. Click the ellipsis (…) button in the Event tab, and the screen in Figure 2-12 will appear.
Figure 2-12
5. Select the Code Builder option from the list, as shown in the previous f igure, and click the OK button.
6. The Visual Basic Editor will now be displayed with the cursor f lashing in a newly created empty procedure called cmdRun_Click (see Figure 2-13).
Figure 2-13
7. Add the following code to the newly created procedure:
Private Sub cmdRun_Click()
'declare variables to store price and avail creditDim curPrice As CurrencyDim curCreditAvail As Currency
'assign variables from current values in text boxes on FormcurPrice = txtValue1curCreditAvail = txtValue2
'call VerifyCreditAvail procedureVerifyCreditAvail curPrice, curCreditAvail
End Sub8. After adding the preceding code to the cmdRun_Click procedure, click the Save button in the Visual Basic Editor to make sure all code so far has been saved. It is a good
idea to select the Save option periodically to ensure you do not lose any of your work.9. Return to the frmTest form and open it in View mode to run it. To do so, select the Home ribbon on the toolbar, and then click View Form View from the toolbar menu
with the form open. Input a value of 2000 for Value 1 and 1500 for Value 2, as shown in Figure 2-14.
Beginning Access 2007 VBA
34 / 344

Figure 2-14
10. You should see the same message box that appeared before, indicating that not enough credit is available (see Figure 2-15).
Figure 2-15
How It Works
To create the empty procedure, you used the Code Builder f rom the frmTest form. Because you selected the click Event on the Properties window for the cmdRun button and then chosethe Code Builder option, Access automatically generated an empty event procedure called cmdRun_Click. This event procedure will be called anytime the cmdRun button is clicked when thefrmTest form is running.
When the code in cmdRun_Click runs, it f irst declares some local variables and assigns values to the local variables that the user specif ied in the text boxes. For example, the value of2000 specif ied for the f irst text box is assigned to the curPrice variable. The value of 1500 for the second text box is assigned to the curCreditAvail variable. 'declare variables to store price and avail creditDim curPrice As CurrencyDim curCreditAvail As Currency
'assign variables to current values in text boxes on FormcurPrice = txtValue1curCreditAvail = txtValue2The VerifyCreditAvail procedure is then called using the local variables as parameters. 'call VerifyCreditAvail procedure VerifyCreditAvail curPrice, curCreditAvailWhen the VerifyCreditAvail procedure executed, it evaluated the available credit and displayed the same error message you saw earlier because the value you input for curPrice wasgreater than the value for curCreditAvail.
Creating Additional Procedures for an Object Using the Code Window
After the f irst event procedure is created for a form or report, an associated form or report module is automatically created. You can then create additional procedures for that particularform easily f rom within the code window itself . For example, af ter you added the cmdRun_Click event, the Form_frmTest object appears in the Project window below. When you selectForm_frmTest in the Project window and then the Object navigation drop-down list, all the objects associated with frmTest are displayed (see Figure 2-16).
Figure 2-16
In the preceding example, txtValue1 is selected. This is the name of the f irst text box on the frmTest form. After you select the txtValue1 value from the Object navigation list, thevalues in the declarations/ procedures navigation list are then updated to correspond with those available for the txtValue1. Figure 2-17 displays some of these available procedures thatcan be created for the txtValue1 text box.
Figure 2-17
When you select any of the procedures in the list, such as BeforeUpdate, a corresponding empty procedure will automatically be created with the cursor f lashing, ready for you to inputyour code (see Figure 2-18).
Beginning Access 2007 VBA
35 / 344
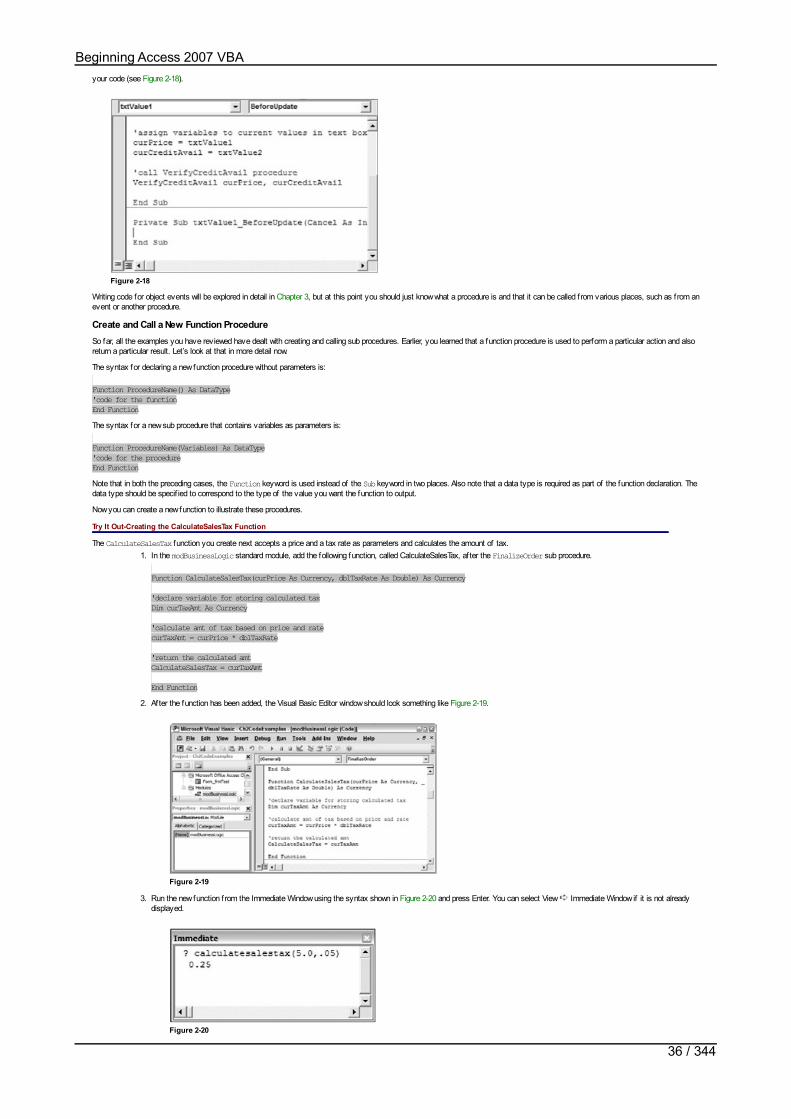
your code (see Figure 2-18).
Figure 2-18
Writing code for object events will be explored in detail in Chapter 3, but at this point you should just know what a procedure is and that it can be called from various places, such as from anevent or another procedure.
Create and Call a New Function ProcedureSo far, all the examples you have reviewed have dealt with creating and calling sub procedures. Earlier, you learned that a function procedure is used to perform a particular action and alsoreturn a particular result. Let’s look at that in more detail now.
The syntax for declaring a new function procedure without parameters is:
Function ProcedureName() As DataType'code for the functionEnd FunctionThe syntax for a new sub procedure that contains variables as parameters is:
Function ProcedureName(Variables) As DataType'code for the procedureEnd FunctionNote that in both the preceding cases, the Function keyword is used instead of the Sub keyword in two places. Also note that a data type is required as part of the function declaration. Thedata type should be specif ied to correspond to the type of the value you want the function to output.
Now you can create a new function to illustrate these procedures.
Try It Out-Creating the CalculateSalesTax Function
The CalculateSalesTax function you create next accepts a price and a tax rate as parameters and calculates the amount of tax.1. In the modBusinessLogic standard module, add the following function, called CalculateSalesTax, af ter the FinalizeOrder sub procedure.
Function CalculateSalesTax(curPrice As Currency, dblTaxRate As Double) As Currency
'declare variable for storing calculated taxDim curTaxAmt As Currency
'calculate amt of tax based on price and ratecurTaxAmt = curPrice * dblTaxRate
'return the calculated amtCalculateSalesTax = curTaxAmt
End Function2. After the function has been added, the Visual Basic Editor window should look something like Figure 2-19.
Figure 2-19
3. Run the new function from the Immediate Window using the syntax shown in Figure 2-20 and press Enter. You can select View Immediate Window if it is not alreadydisplayed.
Figure 2-20
Beginning Access 2007 VBA
36 / 344

4. After you press Enter, the 0.25 value is displayed in the Immediate Window.
How It Works
The CalculateSalesTax function has a declaration containing two variables as parameters. It uses Currency as the return data type.
Function CalculateSalesTax(curPrice As Currency, dblTaxRate As Double) As CurrencyA variable is declared to store the calculated tax value. 'declare variable for storing calculated tax Dim curTaxAmt As CurrencyThe amount of tax is calculated by multiplying the curPrice value by the dblTaxRate value. 'calculate amt of tax based on price and rate curTaxAmt = curPrice * dblTaxRateBecause the procedure is a function procedure, a particular value should be returned. In this case, it is desirable to return the amount of sales tax that was calculated. The name of thefunction is assigned to the curTaxAmt value. This, in ef fect, returns the curTaxAmt value to the calling procedure for further use and processing. 'return the calculated amt CalculateSalesTax = curTaxAmtWhen the function procedure was tested using the Immediate Window, the preceding code was executed using the values 5.0 and .05 you specif ied as the parameters. The value of 5.0was assigned to the curPrice variable, and the value of .05 was assigned to the dblTaxRate variable. The result of 0.25 was then displayed as the result.
Did you happen to notice that this time you had to use a question mark and put the parameters in parentheses? The prior examples did not use the question mark and parenthesis whencalling sub procedures from the Immediate Window. As you just learned, the syntax dif fers slightly depending on whether you want to call a sub procedure or function from the ImmediateWindow.
Call a Function from Another Procedure
Just like sub procedures, functions can be called from other procedures. The procedures you follow are basically the same as those described in the prior example that illustrates calling asub procedure from another sub procedure. The main dif ference is that when you call a function from another function or sub procedure, you typically assign the return value of thefunction to a local variable and then use it appropriately. For example, to call the CalculateSalesTax function from within another function or sub procedure, you could use the followingcode:
Dim curSalesTax As Currency
'call the CalculateSalesTax function and assign the result to the local variablecurSalesTax = CalculateSalesTax(100,.06)Calling a Function from an Event
Again, just as with sub procedures, you can call a function from a class module associated with a form or report. The procedures are basically the same as those described in the priorexample that illustrates calling a sub procedure from an event. A more detailed explanation of events can be found in Chapter 3.
Scope and Lifetime of Sub Procedures and FunctionsSub procedures and functions have a particular life cycle that determines how long they will live. They also have characteristics that determine from where they can be called. This isreferred to as scope. How the procedure is declared determines how long the procedure will live and from where the procedure can be called.
First, let’s look at the procedure life cycle. Traditionally, a procedure executes and then everything it contained - such as the values in the variables - are released from memory. Incircumstances where you must preserve all the values within a procedure after it f inishes executing, you can declare the procedure with the Static keyword.
Using the Static keyword in the declaration will basically keep the procedure in memory from the last time the procedure ran, including all associated values of the variables. As you maybe aware, there are other ways to preserve particular values after a procedure ends. Examples include using public variables or storing certain values in a database for later retrieval.
Let’s now look at how to determine and specify procedure scope from where a procedure is called. Event procedures are private by default, but all other procedures and functions are publicby default. In the examples used so far in this chapter, all the procedures were standard public declarations. The sub and function declaration syntax did not always use the word “Public” perse, but those declarations were indeed private declarations. When a procedure is declared as private, it can only be called from within the same object. The Public keyword can be usedwith to make modules available from outside the same object.
Using Built-In FunctionsYou have looked at some examples of creating your own functions. You should also know that VBA has an extensive list of built-in functions that you can use instead of writing the codeyourself for certain common actions. One example of a built-in function that you have already used is the MsgBox function. You can obtain a complete list of available functions in the VBAHelp documentation, as in the help topic shown in Figure 2-21.
Figure 2-21
Tip You can also view a list of available functions using the Expression Builder. Consult the VBA Help documentation for how to access the Expression Builder.
Macros versus Procedures
Now that you are familiar with procedures and functions, it is worth mentioning that you can use macros instead of procedures for some very basic tasks. Procedures provide you withmuch greater functionality and f lexibility than do macros. Thus, in most cases, you should start using procedures instead of macros. However, with the many improvements in Access 2007for macros, you may want to start using macros for some of the simpler programming-related tasks, and then use VBA for the more complex tasks. With Access 2007, macros now supportsimple variables, limited looping, and even some error handling. The applications you build in later chapters will use both macros and VBA code so you can get a better idea of when to useone versus the other. For now, let’s look at a simple example of a macro.
The AutoExec macro is one example of a macro that you can use to control which form loads when the database opens. Let’s create a new AutoExec macro to open the frmTest form youcreated earlier any time the Ch2CodeExamples.ACCDB f ile is opened. Create a new macro by selecting the Create ribbon on the toolbar, and then selecting Macro from the group called Macro,as shown in Figure 2-22.
Beginning Access 2007 VBA
37 / 344

as shown in Figure 2-22.
Figure 2-22
A new empty macro is displayed. To have a form load, select the OpenForm action from the action list, as shown in Figure 2-23. Next, to specify which form to open, select frmTest f romthe Form Name f ield, as shown in Figure 2-24.
Figure 2-23
Figure 2-24
Finally, you need to save the macro, such as by selecting the Save icon or by selecting the X in the right corner of the macro window (not of Access 2007 overall or you will close Access).You will be prompted to save the macro. Name the macro AutoExec, as shown in Figure 2-25, so it will run when the database opens. Whenever an Access database opens, it looks for amacro named AutoExec, and if one is found, the commands it contains are executed automatically.
Figure 2-25
Now, anytime you open the database, the AutoExec macro will load and open the frmTest form. Other types of macros will be illustrated throughout this book. Give it a try on yourdatabase. Close and reopen the database you created in this chapter and see if the form now loads automatically.
Tip As mentioned earlier in the chapter, if a security warning appears, you may need to enable macros and VBA code when you open Access in order for the code to execute. TheTrust Center can be used to further customize the security settings in Access. To access the Trust Center, click the Off ice Button, and then choose Access Options near the
Beginning Access 2007 VBA
38 / 344

Trust Center can be used to further customize the security settings in Access. To access the Trust Center, click the Off ice Button, and then choose Access Options near thebottom. Select the group called Trust Center f rom the lef t navigation area.
Beginning Access 2007 VBA
39 / 344
Using Variables and Constants to Store ValuesNow that you have a basic understanding of how to create procedures, turn your attention to learning how to use variables and constants in those procedures. Variables and constants canbe used to store values that are used by your Access program. You have already seen a few examples of using variables to store values. This chapter covers variables in a bit more detailbecause they are so important to writing VBA code.
Types of Variables
Various types of variables can be declared and used in your procedures. The most common variables are probably String, Integer, Long, Currency, and Date, although other variables arealso commonly used. The following table illustrates the various data types that are available in VBA and offers an explanation of the type of value each can store.
Open table as spreadsheet
Data Type What It Stores
Attachment File attachment
Boolean True or false
Byte Positive integers from 0 to 255
Currency Positive and negative currency values with four decimal places
Date Date and time from 1/1/0100 to 12/31/9999
Double 8-byte decimal values
Hyperlink URL for a hyperlink
Integer 2-byte integers from –32,768 to +32,768
Long 4-byte integers from –2 billion to +2 billion
Object Access object reference
Single 4-byte decimal values
Open table as spreadsheet
Data Type What It Stores
String (variable length) From 0 to 2 billion characters
String (f ixed length) From 1 to 65,000 characters
User-def ined (with Type) Same as its associated data type
Variant (numbers) Numeric value up to range of Double
Variant (characters) From 0 to 2 billion characters
Note that the VBA data type does not correspond perfectly to the f ield data types listed in database tables you create in Access. The following table shows examples of how each VBA datatype maps to a particular Access f ield data type. This table is presented to help you evaluate which variable data types to use when reading and using values from particular f ields in yourAccess databases.
Open table as spreadsheet
Visual Basic Data Type Corresponding Access Field Data Type
Attachment Attachment
Boolean Yes/No
Byte Number (Byte)
Currency Currency
Date Date/Time
Double Number (Double)
Hyperlink Hyperlink
Integer Number (Integer)
Long Number (Long Integer) or AutoNumber (Long Integer)
Single Number (Single)
String Text or Memo
Declaring and Using Variables
The previous examples brief ly illustrated that variables can be declared using the Dim statement. Here are some additional examples:
Dim strMessage As StringDim rsSales As Adodb.RecordsetDim intCounter As IntegerDim blnResponse As BooleanAfter it is declared, a variable obtains its value (is assigned) by setting the variable equal to a value or to an expression that evaluates to a value. The expression can contain operators(such as = , > , or < ), other variables, constants, key words, formulas, and so on.
Further examples illustrating variable assignments are provided at the end of this chapter.
Declaring and Using ArraysArrays are indexed elements that have the same data type. Each array element has a unique index number. Arrays can be static or dynamic. Static arrays have a f ixed number ofelements, whereas dynamic arrays have the option to grow in size. The lowest index of an array is 0 by default.
Here is an example of how to declare and use an array.
Sub DemoFixedArray()
'declare an array with 5 elementsDim arstrPictureFile(4) As String
'populate each array element with a valuearstrPictureFile(0) = "Christmas.jpg"arstrPictureFile(1) = "Thanksgiving.jpg"
Beginning Access 2007 VBA
40 / 344
arstrPictureFile(1) = "Thanksgiving.jpg"arstrPictureFile(2) = "WinterVacation.jpg"arstrPictureFile(3) = "SummerVacation.jpg"arstrPictureFile(4) = "Anniversary.jpg"
End SubThe preceding array illustrates how to declare a f ixed-size array. In some cases, you may not know exactly how big the array needs to be. In such cases, you use a dynamic array. Adynamic array is declared without an upper bound index, as shown in the following example.
Sub DemoDynamicArray()
'declare an dynamic arrayDim arstrPictureFile() As String
'once you have determined how big the array needs to be'then specify a size'for the arrayReDim arstrPictureFile(50) As String
'populate the first 5 array elements with a valuearstrPictureFile(0) = "Christmas.jpg"arstrPictureFile(1) = "Thanksgiving.jpg"arstrPictureFile(2) = "WinterVacation.jpg"arstrPictureFile(3) = "SummerVacation.jpg"arstrPictureFile(4) = "Anniversary.jpg"
End SubThe ReDim statement is used to def ine the size of the array when it has already been def ined with an unknown size but now is known. Any values stored in the array when the ReDimstatement are used are lost because the array is reset. The Preserve statement can be used in circumstances where you want to preserve the prior values in the array when using theReDim statement.
Declaring and Using User-Defined Data Types
User-def ined types allow you to create your own data types. User-def ined types can contain various pieces of information of the same or varying data types. Here is an example:
Public Type typTripInfo strTripLocation As String dtTripStartDate As Date dtTripEndDate As Date strPhotoPath As StringEnd TypeThe preceding code can be placed in the General Declarations section of the module. Now, let’s look at a sample procedure that uses the typTripInfo user-def ined type.
Sub TestUserDefinedType()
'declare a variable as the user defined type typTripInfoDim typRecentTrip As typTripInfo
'assign values to the typRecentTrip user defined typetypRecentTrip.strTripLocation = "Italy"typRecentTrip.dtTripStartDate = "3-18-04"typRecentTrip.dtTripEndDate = "3-27-04"typRecentTrip.strPhotoPath = "c:\trips\Italy"
End SubIn the preceding procedure, a local variable is declared as the custom data type typTripInfo. Then, values for each of the variables in the user-def ined type are specif ied.
Declaring and Using Object Variables
Object variables are variables that reference objects, such as databases, recordsets, forms, or controls. Object variables allow you to create references with shorter names than the originalobject and to pass objects as parameters to procedures.
Here is an example of how to declare and use a text box object variable from a form module.
Sub TestObjectVariable()
'declare an object variableDim txtPrice As TextBox
'point the object to the txtValue1 text boxSet txtPrice = Me.txtValue1
'set the text value of the text boxtxtPrice.Text = "2000"
End SubThe preceding procedure declares a new variable as a text box object and then points the new variable to the existing txtValue1 text box. A value of 2000 is then assigned to the newvariable, which actually ends up physically setting the value in the original txtValue1 text box on the form to which you have pointed the new variable.
Constants
VBA allows you to create your own constants or use built-in constants.
Declaring and Using ConstantsA constant is a type of variable that maintains a constant value that does not change. Unlike traditional variables, constants are assigned values when you create them. Constants aredeclared with the Const statement instead of the Dim statement. Here are some examples:
Const conWelcomeMessage as String = "Welcome to my first VBA application."Const conRate as Double = 5.5Constants can help improve the readability of your code. For example, a line of code is much cleaner and more understandable if it uses the constant conRate than if it is hard-coded with avalue of 5.5:
dblTotalSales = conRateConstants can also make your code easier to maintain. For example, because the constant is declared in one place, you do not have to search for every instance where the rate with ahard-coded value of 5.5 is used in the code. Instead, you simply use a constant to store the current rate and modify that one item if the rate later changes.
Beginning Access 2007 VBA
41 / 344
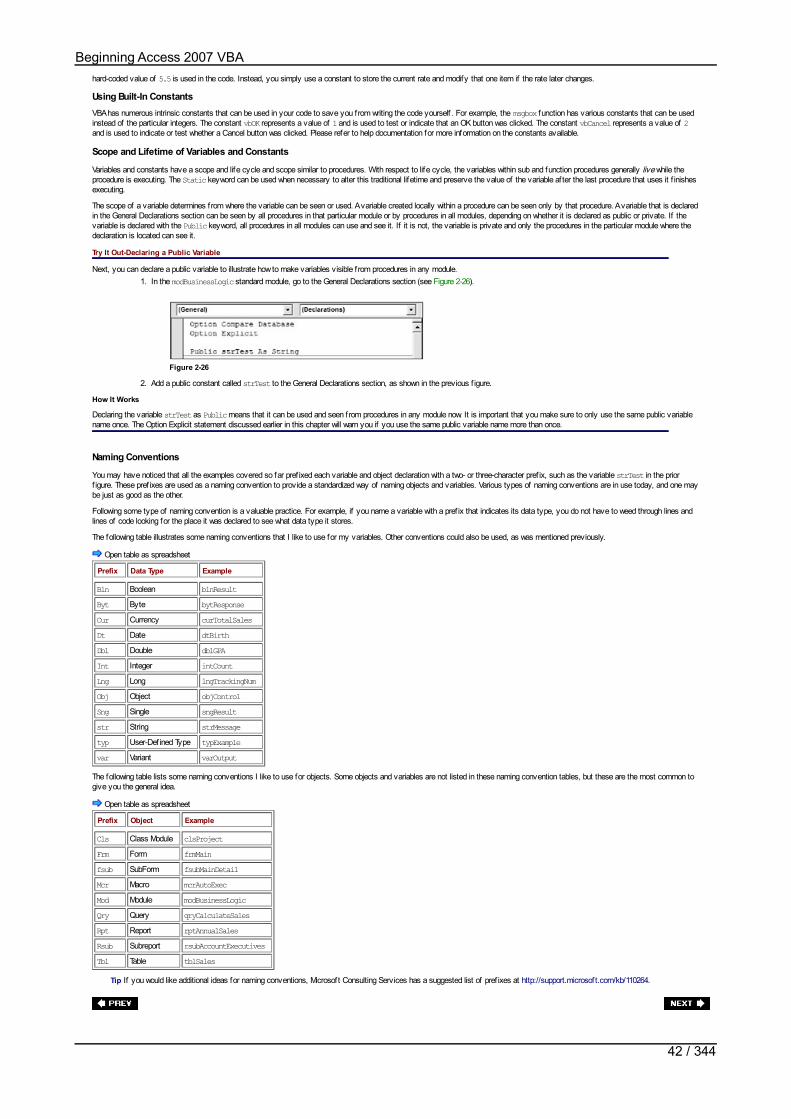
hard-coded value of 5.5 is used in the code. Instead, you simply use a constant to store the current rate and modify that one item if the rate later changes.
Using Built-In ConstantsVBA has numerous intrinsic constants that can be used in your code to save you from writing the code yourself . For example, the msgbox function has various constants that can be usedinstead of the particular integers. The constant vbOK represents a value of 1 and is used to test or indicate that an OK button was clicked. The constant vbCancel represents a value of 2and is used to indicate or test whether a Cancel button was clicked. Please refer to help documentation for more information on the constants available.
Scope and Lifetime of Variables and Constants
Variables and constants have a scope and life cycle and scope similar to procedures. With respect to life cycle, the variables within sub and function procedures generally live while theprocedure is executing. The Static keyword can be used when necessary to alter this traditional lifetime and preserve the value of the variable after the last procedure that uses it f inishesexecuting.
The scope of a variable determines from where the variable can be seen or used. A variable created locally within a procedure can be seen only by that procedure. A variable that is declaredin the General Declarations section can be seen by all procedures in that particular module or by procedures in all modules, depending on whether it is declared as public or private. If thevariable is declared with the Public keyword, all procedures in all modules can use and see it. If it is not, the variable is private and only the procedures in the particular module where thedeclaration is located can see it.
Try It Out-Declaring a Public Variable
Next, you can declare a public variable to illustrate how to make variables visible from procedures in any module.1. In the modBusinessLogic standard module, go to the General Declarations section (see Figure 2-26).
Figure 2-26
2. Add a public constant called strTest to the General Declarations section, as shown in the previous f igure.
How It Works
Declaring the variable strTest as Public means that it can be used and seen from procedures in any module now. It is important that you make sure to only use the same public variablename once. The Option Explicit statement discussed earlier in this chapter will warn you if you use the same public variable name more than once.
Naming Conventions
You may have noticed that all the examples covered so far pref ixed each variable and object declaration with a two- or three-character pref ix, such as the variable strTest in the priorf igure. These pref ixes are used as a naming convention to provide a standardized way of naming objects and variables. Various types of naming conventions are in use today, and one maybe just as good as the other.
Following some type of naming convention is a valuable practice. For example, if you name a variable with a pref ix that indicates its data type, you do not have to weed through lines andlines of code looking for the place it was declared to see what data type it stores.
The following table illustrates some naming conventions that I like to use for my variables. Other conventions could also be used, as was mentioned previously.
Open table as spreadsheet
Prefix Data Type Example
Bln Boolean blnResultByt Byte bytResponseCur Currency curTotalSalesDt Date dtBirthDbl Double dblGPAInt Integer intCountLng Long lngTrackingNumObj Object objControlSng Single sngResultstr String strMessagetyp User-Def ined Type typExamplevar Variant varOutput
The following table lists some naming conventions I like to use for objects. Some objects and variables are not listed in these naming convention tables, but these are the most common togive you the general idea.
Open table as spreadsheet
Prefix Object Example
Cls Class Module clsProjectFrm Form frmMainfsub SubForm fsubMainDetailMcr Macro mcrAutoExecMod Module modBusinessLogicQry Query qryCalculateSalesRpt Report rptAnnualSalesRsub Subreport rsubAccountExecutivesTbl Table tblSales
Tip If you would like additional ideas for naming conventions, Microsoft Consulting Services has a suggested list of pref ixes at http://support.microsoft.com/kb/110264.
Beginning Access 2007 VBA
42 / 344

Controlling Program FlowSo far, you have learned how to create one or more modules to contain your code as well as how to create procedures within those modules. Now you will see how to write commands withinprocedures that control the f low of the program. The f low of a program can be controlled through decision-making, loops, and in other ways. We’ll start by looking at writing decision-makingcode.
Decision Making
VBA has various statements you can use to make decisions in your code and then take an appropriate action depending on the result. The following gives you several decision-makingexamples to illustrate this concept.
If …… ThenIf...Then statements can be used to make decisions and perform certain actions depending on whether the conditions are met.
The syntax for an If...Then statement is:
If CONDITION Then'code if the condition is metEnd If
The syntax for an If…Then…Else statement is:
If CONDITION Then'code if the condition is metElse'code if the condition is not metEnd If
The syntax for an If…Then…ElseIf statement is:
If CONDITION Then'code if the condition is metElseIf CONDITION Then'code if the ElseIf condition is metEnd If
ElseIf and Else can be used together as part of the same If...Then statement, or they can be used separately, as illustrated in the previous example. If…Then statements can also benested within each other, as shown in the following example:
If intCounter < 0 Then 'reset intCounter to 0 intCounter = 0
ElseIf intCounter > 0 and intCounter < 50 Then If intCounter = 50 Then Msgbox "The maximum number of sessions has been reached." Else Msgbox "There are still sessions remaining." End If
intCounter = intCounter + 1
End IfTry It Out-Creating TestIfStatement Procedure
Now, it’s your turn to create a new procedure and makes uses of If…Then statements.1. In the modBusinessLogic standard module, add the following TestIfStatement procedure:
Sub TestIfStatement()
'declare variable to store sales tax valueDim curSalesTax As Currency 'call function to calculate sales taxcurSalesTax = CalculateSalesTax(500, 0.05)
'evaluate sales tax and write proper message'to debug windowIf curSalesTax <= 10 Then Debug.Print "You are lucky - the amount of tax is nominal."ElseIf curSalesTax > 10 And curSalesTax <= 50 Then Debug.Print "The amount of sales tax could have bought you a nice meal."Else Debug.Print "You bought a really nice item for that tax amount."End If
End Sub2. From the Immediate Window, run the new TestIfStatement procedure. The result is displayed in Figure 2-27, in the Immediate Window.
Figure 2-27
How It Works
The TestIfStatement procedure calls the CalculateSalesTax function that you created previously and evaluates the result in an If...Then statement to determine which message todisplay in the Immediate Window. The procedure begins by declaring a variable to store the calculated sales tax value.Sub TestIfStatement()
'declare variable to store sales tax value
Beginning Access 2007 VBA
43 / 344
'declare variable to store sales tax valueDim curSalesTax As CurrencyThe curSalesTax variable is assigned to the result of the CalculateSalesTax function. In other words, the CalculateSalesTax procedure is called with the hard-coded values, and theresulting value is placed in the curSalesTax variable. 'call function to calculate sales tax curSalesTax = CalculateSalesTax(500, 0.05)An If... statement is then used to evaluate the curSalesTax value and write a particular message to the Immediate Window, depending on how the expression is evaluated. 'evaluate sales tax and write proper message'to debug windowIf curSalesTax <= 10 Then Debug.Print "You are lucky - the amount of tax is nominal."ElseIf curSalesTax > 10 And curSalesTax <= 50 Then Debug.Print "The amount of sales tax could have bought you a nice meal."Else Debug.Print "You bought a really nice item for that tax amount."End IfEnd SubIn the current example, because a value of 500 is specif ied for the sales amount parameter of the CalculateSalesTax function and .05 is specif ied for the tax rate parameter, the resultingtax amount is 25. Thus, when you run the procedure, the Immediate Window displays the corresponding message.
IIfThe IIf function can be used to return one of two possible values depending on whether the condition being tested is true or false. The syntax for the IIf function is:
IIf(expr, truepart, falsepart)Here is an example:
strResult = IIf(intWeight > 25, "Heavy", "Light")If the intWeight value is greater than 25, then the IIF function will return the value "Heavy" and assign it to the strResult variable. Otherwise, the strResult variable will be assigned tothe value "Light".
Conditional If
Conditional If…Then statements enable you to selectively compile and execute certain blocks of code. Conditional If statements can be used in various scenarios, such as when you wantcertain blocks of code to execute during testing but not in the release version, or when you’re distributing your application in dif ferent regions and want certain code to apply in some regionsbut not others. The following is an example of the general syntax:
#If conLanguage = "English" Then 'The code specific to the English version of the software goes here.#ElseIf conLanguage = "Spanish" Then 'The code specific to the Spanish version of the software goes here.#Else 'The code specific to the remaining versions of the software goes here.#End If
Select…… Case
Another way to implement decision making in your VBA code is to use a Select...Case statement. Select…Case statements can be used to easily evaluate the same variable multipletimes and then take a particular action depending on the evaluation.
The syntax for a Select…Case statement is:
Select Case VARIABLECase VALUE1 'code to run if VARIABLE equals Value1Case VALUE2 'code to run if VARIABLE equals Value2Case Else 'code to run for remaining casesEnd SelectTry It Out-Create the TestCaseStatement Procedure
Let’s create a new procedure that makes use of a Select...Case statement to illustrate this in further detail.1. Add the following TestCaseStatement procedure to the modBusinessLogic standard module.
Sub TestCaseStatement(strCountry As String)
'evaluate the value of strCountry and display applicable result in debug windowSelect Case strCountryCase "Italy" Debug.Print "The buildings dating back to 400 BC are incredible."Case "China" Debug.Print "Great bargains for shoppers."Case "Russia" Debug.Print "A beautiful country with a growing democracy."Case "Germany" Debug.Print "Fantastic food - you will not starve there."Case Else Debug.Print "You should travel more when you have the chance."End Select
End Sub2. Run the TestCaseStatement procedure from the Immediate Window and specify "Italy" as the parameter, as shown in Figure 2-28. Click Enter to run the procedure. The
resulting value is then displayed in the Immediate Window.
Beginning Access 2007 VBA
44 / 344

Figure 2-28
How It Works
The TestCaseStatement procedure accepts a string variable called strCountry as a parameter.
Sub TestCaseStatement(strCountry As String)The strCountry variable is evaluated in the Select...Case statement to determine which one of a variety of messages should be displayed. 'evaluate the value of strCountry and display applicable result in debug windowSelect Case strCountryCase "Italy" Debug.Print "The buildings dating back to 400 BC are incredible."Case "China" Debug.Print "Great bargains for shoppers."Case "Russia" Debug.Print "A beautiful country with a growing democracy."Case "Germany" Debug.Print "Fantastic food - you will not starve there."Case Else Debug.Print "You should travel more when you have the chance."End Select
Because you ran the procedure using "Italy" as the value for Country, the message for Italy was displayed in the Immediate Window. Try running the procedure with dif ferent values forCountry and see how the results dif fer.
Loops
Various types of loops can be used to iterate through a particular action until a particular scenario occurs. For example, loops can be used to run particular code a specif ied number of times.Now you will learn about a few dif ferent ways to declare loops using VBA code.
For …… Next and For Each …… Next
For…Next loops can be used to run the same code a particular number of times. For Each...Next loops can be used to run the same code for each object in a particular collection, suchas for each form in the Forms collection. The basic syntax for a For…Next loop is shown here.
For counter = start To end 'statements go hereNext [counter]The basic syntax for a For Each...Next loop is shown here.
For Each element In Collection 'statements go hereNext [element]
Try It Out-Creating a For …… Next Loop
Let’s jump right in by creating our own For…Next loop to see how this works.1. Place this code for the TestLoop procedure in the modBusinessLogic standard module.
Sub TestLoop()
'declare variable to store CounterDim intCounter As Integer
'increment intCounter from 1 to 5 and'display output in debug windowFor intCounter = 1 To 5 Debug.Print intCounterNext intCounter
End Sub2. Run the TestLoop procedure from the Immediate Window. The results of running the procedure are shown in Figure 2-29.
Figure 2-29
How It Works
The TestLoop procedure begins by declaring an intCounter variable to store the number of times the loop has been iterated.Sub TestLoop()
'declare variable to store CounterDim intcounter As IntegerThe For...Next statement comes next, with code specifying that the loop should run with intCounter starting at 1 and repeat multiple times until intCounter reaches 5. The Nextstatement increments the intCounter value by one. When intCounter reaches 5, the Debug.Print statement will execute for the last time and then the loop is exited. 'increment intCounter from 1 to 5 and'display output in debug windowFor intCounter = 1 To 5 Debug.Print intCounter Next intCounter
Beginning Access 2007 VBA
45 / 344
Do …… Loop
The Do…Loop statement can be used instead of For...Next to accomplish the same purpose. The two types of Do…Loops are Do…While and Do...Until. Do…While may never run anystatements if the condition is not initially true, while Do…Until will always run at least once.
The generic syntax for Do…Loop is shown here.
Do [{While | Until} condition] 'statements go hereLoopOr, you can use this syntax:
Do 'statements go hereLoop [{While | Until} condition]
The following code uses a Do…While statement to accomplish the same result as the For…Next loop described previously.
Do While intCounter <= 5 Debug.Print intCounter intCounter = intCounter + 1LoopAn example of a Do Until loop is shown here.
Do Until intCounter = 6 Debug.Print intCounter intCounter = intCounter + 1Loop
Tip If the condition in a Do Until statement is never met, then the loop is known as an inf inite loop, which will execute indef initely.
While …… Wend
The While…Wend statement executes repeatedly while a certain condition is met. When the condition is no longer met, the loop terminates. Here is an example:
intCounter = 1While intCounter <= 5 Debug.Print intCounter intCounter = intCounter + 1Wend
Beginning Access 2007 VBA
46 / 344
Documenting Your CodeIt is a good idea to document your code very well so that you and others will be able to understand the purpose of each procedure and why it was written in a certain way. You can documentyour code in several ways. The ideal way to document your code is to use a general comment section at the beginning of each procedure and to use in-line comments to describe eachsegment of code. Here is an example of such a general comment section. '*****************************************************************'*'* Procedure Name: TestProcedure'*'* Purpose: The purpose of this procedure is to illustrate why'* documenting your code is so important.'*'* Parameters: None.'*'* Date Created: September 4, 2006'* By: Denise M. Gosnell'*'* Modification Log:'* Date Explanation of Modification Modified By'* ------------ ---------------------------------- ---------------------'*'******************************************************************The preceding documentation style may be overkill if the procedure itself is only a few lines of code. Some type of general comment section should be used with all procedures, even if it isnot as detailed as the one in the preceding code.
You have seen in-line comments in all the code examples throughout this chapter. Here is another example:
'display a message to the userMsgbox "Demonstration of In-Line commenting"It is always better to write too many comments than too few. As you gain more experience writing VBA code, you will see how dif f icult it can be to follow what is happening in a particularprocedure. This is especially true if you go back to the code at a later date and no longer remember the details about why you wrote it a particular way, or if you are reviewing code thatsomeone else wrote. Code comments make this process much easier.
Beginning Access 2007 VBA
47 / 344

Error DebuggingNow that I have covered several basic ways to write VBA code and to control the f low of the program, let’s look at the types of errors you may encounter, how to debug them, and how towrite error handlers to handle them.
Types of Errors
The types of errors include: syntax errors, compile errors, runtime errors, and logic errors, each of which will be discussed in turn.
Syntax ErrorsSyntax errors are errors that occur because the code you wrote does not comply with the required syntax. Figure 2-30 illustrates a syntax error that occurred because the As part of the Dimstatement is missing.
Figure 2-30
Compile ErrorsCompile errors are errors discovered on compilation that may have a correct code syntax, but for some reason will not compile. Figure 2-31 illustrates a compiler error that has occurredbecause a CalculateTax function cannot be located. In this particular example, the reason for the compile error is that the function is incorrectly listed as CalculateTax instead ofCalculateSalesTax.
Figure 2-31
Runtime ErrorsRuntime errors occur at runtime when the code executes. Runtime errors can include errors that occur because of something that it not allowed or supposed to happen. For example, a lineof code that tries to assign a variable of one data type to an incompatible value could result in a runtime error. The example in Figure 2-32 runs the CalculateSalesTax function and passesstring values as parameters, instead of the required currency and double values. The result is a runtime error, which in this example is a Type Mismatch error.
Figure 2-32
Logic ErrorsLogic errors are f laws in the logic of your code. Logic errors can be the hardest to f ind because they are syntactically correct but can only be discovered by testing your code and ensuringit produces the desired and appropriate result.
Beginning Access 2007 VBA
48 / 344

Debugging Your Code
You certainly need the capability to debug and correct your VBA code as you encounter errors. As you may recall f rom Chapter 1, the Visual Basic Editor provides several ways to help youdebug and correct your code. Now we’ll look at some of these methods in more detail.
Using Breakpoints to Step through CodeBreakpoints can be set on one or more lines of code. When a line of code that has an associated breakpoint is reached, code execution stops and you can then choose to Step Into, StepOver, or Step Out of the code. Selecting the Step Into option from the Debug menu will run the current line of code at the breakpoint. The Step Over option will skip the current line of codeat the breakpoint and move on to the next line of code.
Try It Out-Setting and Using Breakpoints
It’s your turn to set a breakpoint and use it to step through code.1. Navigate to the TestLoop procedure you created previously in the modBusinessLogic standard module.
2. Set a breakpoint on the Debug.Print and the Next intCounter lines of code, as shown in Figure 2-33. You can set a breakpoint by pointing and clicking the cursor just tothe lef t of the line of code where you want to add a breakpoint.
Figure 2-33
3. Next, open the Immediate Window and run the TestLoop procedure. The code will stop execution at the f irst breakpoint, as shown in Figure 2-34.
Figure 2-34
4. While at the breakpoint, use the Immediate Window to inquire about the current value of the intCounter variable. To do so, type ? intCounter and press Enter, as shownin Figure 2-35.
Figure 2-35
5. The current value of intCounter is displayed in the Immediate Window. You should press F5 or select Run Continue to keep executing the lines of code. Execution willstop on each breakpoint.
How It Works
The breakpoint enables you to closely monitor and determine the values of variables and take other actions that will allow you to test and review your code most ef fectively. This exampleallows you to see how the value of intCounter increments as the loop repeats.
Using the Immediate WindowAs you are well aware at this point, you can use the Immediate Window to call procedures and to display the results of a line of code. You can also use the Immediate Window to assign newvalues to variables. You have already learned that the Debug.Print statement writes output directly to the Immediate Window. The Debug.Print statement can be used for your testingpurposes.
Using the Locals WindowThe Locals Window can be used to see a list of all the objects and variables that are used in the current procedure. The values in the list are updated every time you suspend execution witha breakpoint or step through code.
Try It Out-Using the Locals Window
Now, let’s walk through an example of using the Locals Window.1. Display the Locals Window by selecting View Locals Window.
2. Run the TestLoop procedure again from the Immediate Window.
3. The code execution will again stop when the f irst breakpoint is reached. Notice that the values in the Locals Window are updated with the current value of intCounter.
Beginning Access 2007 VBA
49 / 344

3. The code execution will again stop when the f irst breakpoint is reached. Notice that the values in the Locals Window are updated with the current value of intCounter.4. Press F5 or select Run Continue to keep executing the lines of code. You should see that the values of intCounter in the Locals window change as you walk through
the code, as shown in Figure 2-36.
Figure 2-36
How It Works
The Locals Window allows you to closely monitor and determine values of variables. This example allows you to see how the value of intCounter increments as the loop repeats.
Using the Watch WindowThe Watch Window can be used to see a list of objects and variables in the current procedure. The Watch Window can be used to monitor the value of variables as breakpoints areencountered, just as the Immediate and Locals Windows can. The Watch Window also provides additional features, such as allowing you to add a Watch that will cause the code executionto break when a certain event or value occurs. This enables you to have the system break for you automatically when the certain event occurs without having to set a predeterminedbreakpoint.
Try It Out-Adding a Watch
Let’s look at an example of adding a watch using the Watch Window.1. From the Debug menu in the Visual Basic Editor, choose Add Watch, as shown in Figure 2-37.
Figure 2-37
2. On the Add Watch dialog box, specify intCounter as the Expression, TestLoop as the procedure, and modBusinessLogic as the Module.
3. Click the OK button on the Add Watch dialog box, and a Watch Window will appear.
4. Run the TestLoop procedure again from the Immediate Window. You should see the values in the Watch Window change when the f irst breakpoint is encountered.
How It Works
The Watch Window allows you to closely monitor and determine values of variables and also to cause code to automatically enter a break mode when certain events happen. The exampleshown in Figures 2-38, 2-39, and 2-40 illustrates how the value of intCounter increments as the loop repeats, just as the prior examples did.
Figure 2-38
Figure 2-39
Beginning Access 2007 VBA
50 / 344
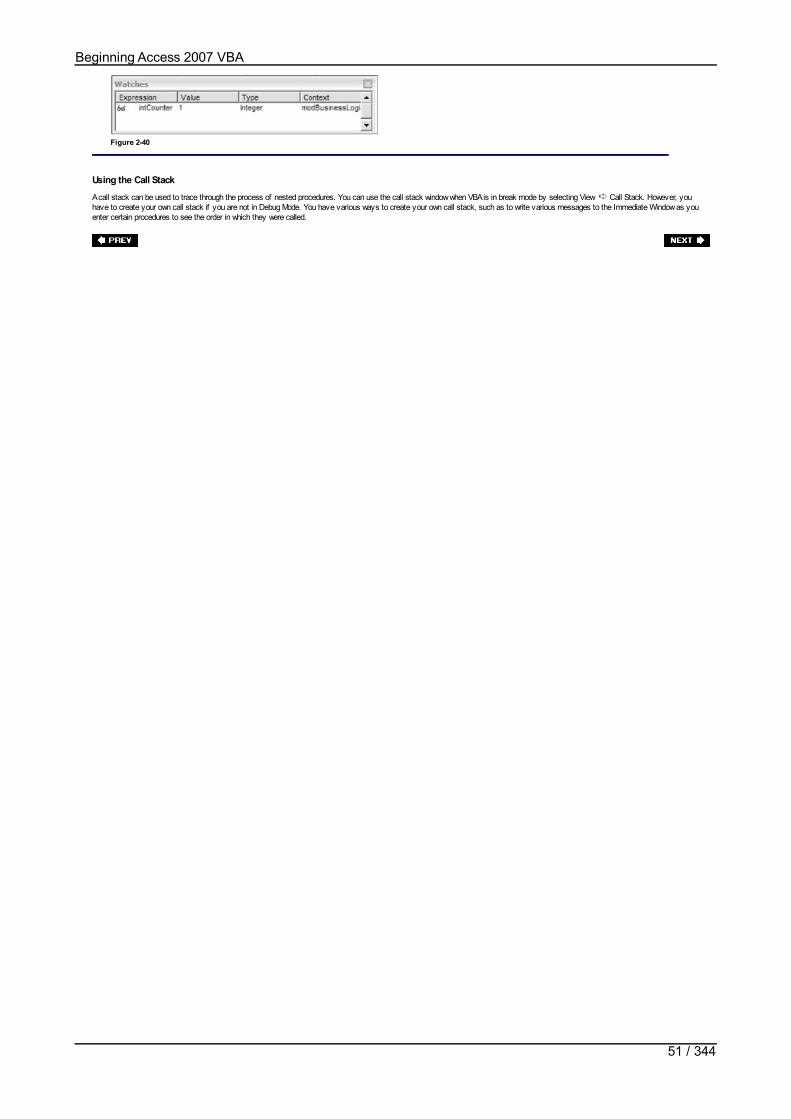
Figure 2-40
Using the Call Stack
A call stack can be used to trace through the process of nested procedures. You can use the call stack window when VBA is in break mode by selecting View Call Stack. However, youhave to create your own call stack if you are not in Debug Mode. You have various ways to create your own call stack, such as to write various messages to the Immediate Window as youenter certain procedures to see the order in which they were called.
Beginning Access 2007 VBA
51 / 344

Error HandlingNow that you are familiar with various types of errors that can occur in your VBA code and how to debug them, it’s time to look at how to write error-handling code in your procedures so thatyour application performs well for users.
Default Error Messages
You have all used applications that did not have very good error handling and found yourself getting booted out of the application without warning or faced with unfriendly messages like theones you saw earlier in this chapter. You do not want such problems to happen when users interact with your application. Errors will always occur, but if you design error handlers correctly, atleast they can be handled reasonably well.
Handling Errors with an On Error Statement
Errors can be handled in VBA procedures using the On Error statement, as I show you next.
On Error StatementThe On Error statement can be placed on your procedure to specify a section in the procedure to which the execution should jump when an error occurs. Here is an example:Sub Test()On Error GoTo HandleError'normal code for the procedure goes hereExit SubHandleError:'code for handling the error goes hereExit SubEnd Sub
Tip If you want to make sure your own error handler doesn’t kick in when you’re debugging your code, select Tools Options General and enable the Break On All Errors option.This will allow you to see the root of the error and not your own error handler.
Resume StatementThe Resume and Resume Next statements can be used with the On Error statement. The Resume statement will cause code execution to resume at the line that caused the error, and theResume Next statement will cause code execution to resume at the line following the one that caused the error. Resume statements are commonly added within the error-handler routines,such as the one shown here.Sub Test()
On Error GoTo HandleError'normal code for the procedure goes hereExit Sub
HandleError:'code for handling the error goes here
Resume NextExit SubEnd SubTry It Out-Creating an Error Handler
It is your turn to try your hand at creating an error handler.1. Place the following code for a new procedure called TestError in the modBusinessLogic standard module:
Sub TestError(intValue1 As Integer, intValue2 As Integer)
On Error GoTo HandleError
'declare variable to store result Dim intResult As Integer
'calculate result by dividing first value by second value intResult = intValue1 / intValue2
Exit Sub
HandleError: MsgBox "An error has occurred in your application: " & Err.Description Exit SubEnd Sub
2. Run the TestError procedure from the Immediate Window, as shown in Figure 2-41.
Figure 2-41
3. The following error message (shown in Figure 2-42) is displayed.
Figure 2-42
How It Works
The TestError procedure accepts two variables as parameters.
Sub TestError(intValue1 As Integer, intValue2 As Integer)
Beginning Access 2007 VBA
52 / 344
The On Error statement indicates that the HandleError section of code should execute when an error occurs.
On Error GoTo HandleErrorA variable is declared that will be used to store the result of an upcoming mathematical calculation. 'declare variable to store result Dim intResult As IntegerThe intValue1 value is then divided by the intValue2 value. 'calculate result by dividing first value by second value intResult = intValue1 / intValue2Because the intValue2 value you specif ied when calling the procedure was set to 0, a divide by 0 error occurs when the preceding line of code executes. Thus, the execution of code thenjumps to the error handler HandleError at the bottom of the procedure.HandleError: MsgBox "An error has occurred in your application: " & Err.Description Exit Sub End SubA message box is then displayed to indicate that an error has occurred and to provide a description of the error.
The Err Object
The Err object contains information about runtime errors that occur when your code executes. Error handlers can use it to provide useful information to users or to the system to helpdetermine what action should be taken. For example, in the error-handling example you just looked at, the Description property of the Err object (Err.Description) was used to include adescription of the error to the user.
The Err object has a global scope. You need not declare it. Some examples of the properties available for the Err object include Number, Description, HelpContext, HelpFile, andSource. Number and Description are the most commonly used properties of the Err object.
Raising an ErrorThe Err object has a Raise method that allows runtime errors to be raised when necessary. Here is the syntax:
Err.Raise number, source, description, helpfile, helpcontextThe number argument is required for raising an error, but the other arguments are optional. Here’s an example to illustrate how you can raise an error in your code.
Sub TestErrRaise(intValue1 As Integer, intValue2 As Integer)
On Error GoTo HandleError
'declare variable to store result Dim intResult As Integer
If intValue2 <> 0 Then 'calculate result by dividing first value by second value intResult = intValue1 / intValue2 ElseIf intValue2 = 0 Then 'raise a custom divide by 0 error Err.Raise vbObjectError + 513, "TestErrRaise", _ "The second value cannot be 0." End IfExit Sub
HandleError: MsgBox "An error has occurred in your application: " & Err.Description Exit Sub
End SubWhen the error is raised, the code then jumps to the error handler just as if the error had occurred in the traditional fashion.
Using the Errors Collection
The Errors collection stores the most recent ActiveX Data Objects (ADO) database errors that have occurred. Chapter 5 covers ADO in detail. For now, just be aware that the Errorscollection can be used to loop through each error that was generated by one database operation. Only a few instances require that you implement such an error-handling feature.
Creating a Generic Error Handler
One way of handling errors is to create a generic error handler that gets called from every sub procedure or function.
Try It Out-Creating a Generic Error Handler
Create a generic error handler now.1. Add the GeneralErrorHandler procedure that follows to the modBusinessLogic standard module:
Public Sub GeneralErrorHandler(lngErrNumber As Long, strErrDesc As String,strModuleSource As String, strProcedureSource As String)Dim strMessage As String
'build the error message string from the parameters passed instrMessage = "An error has occurred in the application."strMessage = strMessage & vbCrLf & "Error Number: " & lngErrNumberstrMessage = strMessage & vbCrLf & "Error Description: " & strErrDescstrMessage = strMessage & vbCrLf & "Module Source: " & strModuleSourcestrMessage = strMessage & vbCrLf & "Procedure Source: " & strProcedureSource
'display the message to the userMsgBox strMessage, vbCritical
End Sub2. Add the procedure TestError2 to the modBusinessLogic standard module:
Sub TestError2(intValue1 As Integer, intValue2 As Integer)On Error GoTo HandleError
'declare variable to store result
Beginning Access 2007 VBA
53 / 344

Dim intResult As Integer
'calculate result by dividing first value by second value intResult = intValue1 / intValue2
Exit Sub
HandleError: GeneralErrorHandler Err.Number, Err.Description, "modBusinessLogic", _ "TestError2" Exit SubEnd Sub
3. Call the TestError2 procedure from the Immediate Window with the values shown in Figure 2-43.
Figure 2-43
4. The message box shown in Figure 2-44 is displayed.
Figure 2-44
How It Works
The TestError2 procedure operates nearly identically to the TestError procedure. TestError2 has two parameter variables.
Sub TestError2(intValue1 As Integer, intValue2 As Integer)An On Error statement specif ies that the HandleError section of code should be executed when an error occurs.
On Error GoTo HandleErrorA variable is declared to store the result of the division, and then the values that were passed in as parameters to the procedure are used for the division. Because the values passed incause a divide by 0 error, the code execution skips down to the HandleError section of code. 'declare variable to store resultDim intResult As Integer
'calculate result by dividing first value by second valueintResult = intValue1 / intValue2This time, the HandleError section includes a call to the GeneralErrorHandler procedure you just added. The error number, error description, module name, and procedure name arepassed as parameters to the GeneralErrorHandler procedure.HandleError: GeneralErrorHandler Err.Number, Err.Description, "modBusinessLogic", _ "TestError2"Now let’s turn to the GeneralErrorHandler procedure, since it runs next to handle the error. The GeneralErrorHandler procedure accepts the Error Number, Error Description, ModuleSource, and Procedure Source as parameters.
Public Sub GeneralErrorHandler(lngErrNumber As Long, strErrDesc As String,strModuleSource As String, strProcedureSource As String)A variable is declared to store the error message, and the error message is created based on the various values passed in to the procedure.Dim strMessage As String
'build the error message string from the parameters passed instrMessage = "An error has occurred in the application."strMessage = strMessage & vbCrLf & "Error Number: " & lngErrNumberstrMessage = strMessage & vbCrLf & "Error Description: " & strErrDescstrMessage = strMessage & vbCrLf & "Module Source: " & strModuleSourcestrMessage = strMessage & vbCrLf & "Procedure Source: " & strProcedureSourceThe error message is then displayed to the user: 'display the message to the user MsgBox strMessage, vbCriticalThis generic error handler can be called from every procedure you write, changing only those variables that specify the current module and procedure. Errors can also be logged to a table,written to a f ile, or e-mailed, but those options are beyond the scope of this book.
Beginning Access 2007 VBA
54 / 344

SummaryThis chapter covered the basic VBA programming concepts. You learned that code can be placed in standard modules or class modules and that various coding statements can be placed inthe modules for controlling the f low of execution, storing values, and so on. You also learned how to test and run your VBA code and to capture errors. These basic VBA coding techniqueswill serve as a foundation for all remaining chapters in the book. Now that you have a basic understanding of how to write VBA code statements, let’s move on to Chapter 3, where you willexplore the world of object-oriented programming.
Beginning Access 2007 VBA
55 / 344

Exercises1. What is a module, and what are the dif ferent types of modules?
2. What is the dif ference between a sub procedure and a function? When should you use each one?
3. Describe at least three ways you can control the f low of code execution. Also describe how variables f it into controlling the f low of code execution.
4. Implementing naming conventions and code documentation are both good habits to practice. What value do they provide?
5. Describe the types of errors that you might encounter in your application and how to resolve them so that the program will operate and will provide users withinformative error messages.
Answers
1. A module is a storage container for your VBA code. Modules can either be standard modules or class modules. Standard modules are not associated with a particular object. Classmodules can either be associated with forms or reports or be based on custom-def ined objects.
2. A sub procedure performs a particular action. A function performs a particular action and also returns a particular result. When you need to obtain some type of result based on theaction, such as a value that was calculated, you should use a function. An example of a function is one that calculates sales tax and returns the sales tax amount. An example of aprocedure is one that displays a message to the user or runs a database update.
3. You can control the f low of code execution using If … Then statements, Select …Case statements, loops, conditional If statements, and IIf statements, as a few examples.Variables can be declared to store various values. Variables can then be used as part of the statements that control code execution to determine if certain conditions are met or whethercertain actions should be taken.
4. Naming conventions involve naming your variables and objects in a particular way, such as with pref ixes, which makes them easier to understand without tracking down the declarationor f irst use in code. Code documentation is important to illustrate how your program works and makes it much easier for you and others to debug and maintain the program in thefuture. Ideally, your code should be documented at the procedure level to describe how the procedure works, as well as with inline comments that explain how segments of codeoperate.
5. When writing VBA code, you will encounter various types of errors, such as syntax errors, runtime errors, compile errors, and logic errors. Syntax errors occur when you have notspecif ied the correct language syntax. Compile errors occur when the program will not compile for some reason, although the syntax may be correct. Runtime errors occur when theprogram runs and encounters a scenario that is not allowed or expected. Logic errors are mistakes that are made in the logic itself such that the code does not perform the operation asintended. You can use various techniques from the Visual Basic Editor to eliminate most of these errors. A well-designed application should also include error handling that will captureand display informative error messages to users of the program so they do not get those nasty error messages.
Beginning Access 2007 VBA
56 / 344
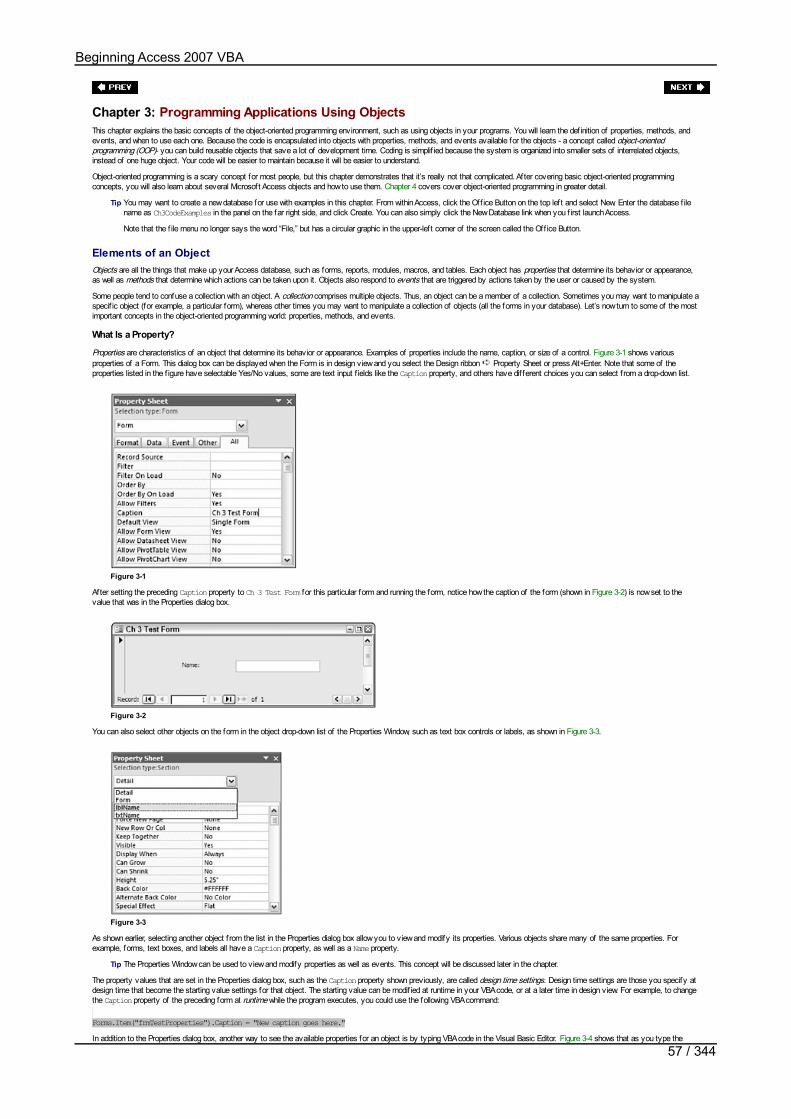
Chapter 3: Programming Applications Using ObjectsThis chapter explains the basic concepts of the object-oriented programming environment, such as using objects in your programs. You will learn the def inition of properties, methods, andevents, and when to use each one. Because the code is encapsulated into objects with properties, methods, and events available for the objects - a concept called object-orientedprogramming (OOP)- you can build reusable objects that save a lot of development time. Coding is simplif ied because the system is organized into smaller sets of interrelated objects,instead of one huge object. Your code will be easier to maintain because it will be easier to understand.
Object-oriented programming is a scary concept for most people, but this chapter demonstrates that it’s really not that complicated. After covering basic object-oriented programmingconcepts, you will also learn about several Microsoft Access objects and how to use them. Chapter 4 covers cover object-oriented programming in greater detail.
Tip You may want to create a new database for use with examples in this chapter. From within Access, click the Off ice Button on the top lef t and select New. Enter the database f ilename as Ch3CodeExamples in the panel on the far right side, and click Create. You can also simply click the New Database link when you f irst launch Access.
Note that the f ile menu no longer says the word “File,” but has a circular graphic in the upper-lef t corner of the screen called the Off ice Button.
Elements of an ObjectObjects are all the things that make up your Access database, such as forms, reports, modules, macros, and tables. Each object has properties that determine its behavior or appearance,as well as methods that determine which actions can be taken upon it. Objects also respond to events that are triggered by actions taken by the user or caused by the system.
Some people tend to confuse a collection with an object. A collection comprises multiple objects. Thus, an object can be a member of a collection. Sometimes you may want to manipulate aspecif ic object (for example, a particular form), whereas other times you may want to manipulate a collection of objects (all the forms in your database). Let’s now turn to some of the mostimportant concepts in the object-oriented programming world: properties, methods, and events.
What Is a Property?
Properties are characteristics of an object that determine its behavior or appearance. Examples of properties include the name, caption, or size of a control. Figure 3-1 shows variousproperties of a Form. This dialog box can be displayed when the Form is in design view and you select the Design ribbon Property Sheet or press Alt+Enter. Note that some of theproperties listed in the f igure have selectable Yes/No values, some are text input f ields like the Caption property, and others have dif ferent choices you can select f rom a drop-down list.
Figure 3-1
After setting the preceding Caption property to Ch 3 Test Form for this particular form and running the form, notice how the caption of the form (shown in Figure 3-2) is now set to thevalue that was in the Properties dialog box.
Figure 3-2
You can also select other objects on the form in the object drop-down list of the Properties Window, such as text box controls or labels, as shown in Figure 3-3.
Figure 3-3
As shown earlier, selecting another object f rom the list in the Properties dialog box allow you to view and modify its properties. Various objects share many of the same properties. Forexample, forms, text boxes, and labels all have a Caption property, as well as a Name property.
Tip The Properties Window can be used to view and modify properties as well as events. This concept will be discussed later in the chapter.
The property values that are set in the Properties dialog box, such as the Caption property shown previously, are called design time settings. Design time settings are those you specify atdesign time that become the starting value settings for that object. The starting value can be modif ied at runtime in your VBA code, or at a later time in design view. For example, to changethe Caption property of the preceding form at runtime while the program executes, you could use the following VBA command:
Forms.Item("frmTestProperties").Caption = "New caption goes here."In addition to the Properties dialog box, another way to see the available properties for an object is by typing VBA code in the Visual Basic Editor. Figure 3-4 shows that as you type the
Beginning Access 2007 VBA
57 / 344
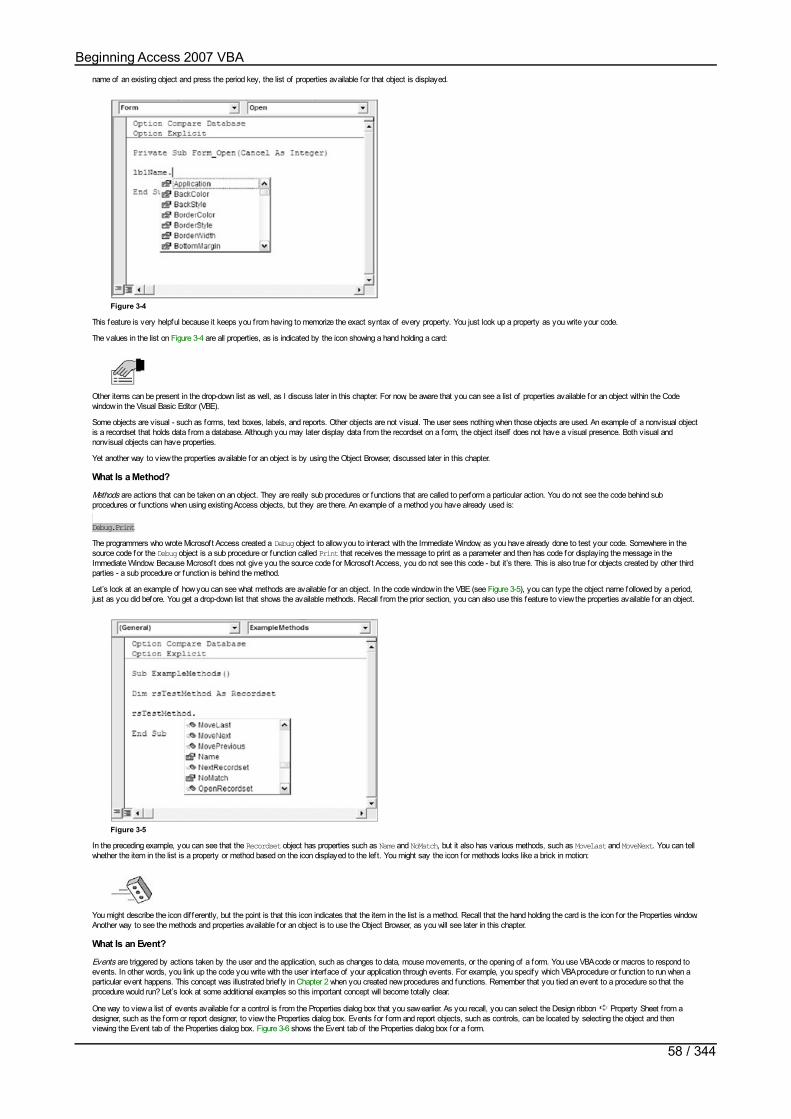
name of an existing object and press the period key, the list of properties available for that object is displayed.
Figure 3-4
This feature is very helpful because it keeps you from having to memorize the exact syntax of every property. You just look up a property as you write your code.
The values in the list on Figure 3-4 are all properties, as is indicated by the icon showing a hand holding a card:
Other items can be present in the drop-down list as well, as I discuss later in this chapter. For now, be aware that you can see a list of properties available for an object within the Codewindow in the Visual Basic Editor (VBE).
Some objects are visual - such as forms, text boxes, labels, and reports. Other objects are not visual. The user sees nothing when those objects are used. An example of a nonvisual objectis a recordset that holds data from a database. Although you may later display data from the recordset on a form, the object itself does not have a visual presence. Both visual andnonvisual objects can have properties.
Yet another way to view the properties available for an object is by using the Object Browser, discussed later in this chapter.
What Is a Method?
Methods are actions that can be taken on an object. They are really sub procedures or functions that are called to perform a particular action. You do not see the code behind subprocedures or functions when using existing Access objects, but they are there. An example of a method you have already used is:
Debug.PrintThe programmers who wrote Microsoft Access created a Debug object to allow you to interact with the Immediate Window, as you have already done to test your code. Somewhere in thesource code for the Debug object is a sub procedure or function called Print that receives the message to print as a parameter and then has code for displaying the message in theImmediate Window. Because Microsoft does not give you the source code for Microsoft Access, you do not see this code - but it’s there. This is also true for objects created by other thirdparties - a sub procedure or function is behind the method.
Let’s look at an example of how you can see what methods are available for an object. In the code window in the VBE (see Figure 3-5), you can type the object name followed by a period,just as you did before. You get a drop-down list that shows the available methods. Recall f rom the prior section, you can also use this feature to view the properties available for an object.
Figure 3-5
In the preceding example, you can see that the Recordset object has properties such as Name and NoMatch, but it also has various methods, such as MoveLast and MoveNext. You can tellwhether the item in the list is a property or method based on the icon displayed to the lef t. You might say the icon for methods looks like a brick in motion:
You might describe the icon dif ferently, but the point is that this icon indicates that the item in the list is a method. Recall that the hand holding the card is the icon for the Properties window.Another way to see the methods and properties available for an object is to use the Object Browser, as you will see later in this chapter.
What Is an Event?
Events are triggered by actions taken by the user and the application, such as changes to data, mouse movements, or the opening of a form. You use VBA code or macros to respond toevents. In other words, you link up the code you write with the user interface of your application through events. For example, you specify which VBA procedure or function to run when aparticular event happens. This concept was illustrated brief ly in Chapter 2 when you created new procedures and functions. Remember that you tied an event to a procedure so that theprocedure would run? Let’s look at some additional examples so this important concept will become totally clear.
One way to view a list of events available for a control is f rom the Properties dialog box that you saw earlier. As you recall, you can select the Design ribbon Property Sheet f rom adesigner, such as the form or report designer, to view the Properties dialog box. Events for form and report objects, such as controls, can be located by selecting the object and thenviewing the Event tab of the Properties dialog box. Figure 3-6 shows the Event tab of the Properties dialog box for a form.
Beginning Access 2007 VBA
58 / 344

Figure 3-6
Notice how various types of events are listed. These events allow you to specify when the VBA code you write should execute. You actually have three options for how the event canexecute. When you select a particular event f rom the list and click the Ellipsis button (…), a dialog box appears that gives you the option to use the Expression Builder, the Macro Builder, orthe Code Builder.
In all the examples so far, you have used the Code Builder because this is a book about VBA code. If you choose Expression Builder, the value displayed in the Properties dialog box will be"=expression", where expression is the expression that was entered in the Expression Builder window. If Macro Builder is chosen, the value is the name of the macro. If Code Builder ischosen, the value will be "[Event Procedure]".Like properties, various objects of ten have many or all the same events in common. For example, suppose that you have a form with a text box named txtName (that is, with the Nameproperty set to txtName) that you will use to display a message to the user anytime the On Key Press event occurs. First, select the txtName text box on the form, and then select theEvent tab of the Properties dialog box for the text box. Because you want to create an event procedure, select the Event Procedure option from the list that is shown in Figure 3-7 and thenclick the Ellipsis (…) button. If you click the Ellipsis (…) button without selecting the Event Procedure option, you will be prompted to select Code Builder f rom the list of three options.
Figure 3-7
When you click the Ellipsis button (…), the VBE opens with a new empty procedure created for the KeyPress event. Suppose that the following code is added to the KeyPress event for thetxtName text box object:
Private Sub txtName_KeyPress(KeyAscii As Integer)
MsgBox "The KeyPress event just fired"End SubWhen the form runs and something is typed into the txtName f ield, the message in Figure 3-8 is displayed.
Figure 3-8
Notice that the event f ires before you see the value in the text box on the form. Other examples of events commonly used are On Click, On Double Click, and On Open. So many typesof events are available for a particular object that it is impossible to cover them all in this chapter. However, I hope you understand that an event allows you to hook up your forms andreports with the VBA code that you write based on certain events that occur in the application. I present another example momentarily, just to make sure you are clear on the dif ferencebetween properties, methods, and events.
Try It Out-Using Properties, Methods, and Events
It’s your turn now to try your hand at an example that uses properties, methods, and events. As you work, try to keep track of which items are properties, which are methods, and which areevents. You can check your answers when I explain the example.
1. If you have not already done so, create a new database for use with examples in this chapter. To do so, select Off ice Button New Blank Database. Specify the f ilename as Ch3CodeExamples and click the Create button. You can close the empty table that opens by default, as you will not be using a table in this example.
2. Add a new form to the database. Select the Create ribbon and then the Blank Form icon to create a new form. To switch to design view, select the Format ribbon, and thenDesign View from the View list.
3. On the new form, use the ToolBox to select and draw a text box control and a command button on the form, as shown in Figure 3-9. The ToolBox is displayed on theDesign ribbon, in the Controls area. You can select Cancel to the wizard dialog boxes that appear.
Beginning Access 2007 VBA
59 / 344
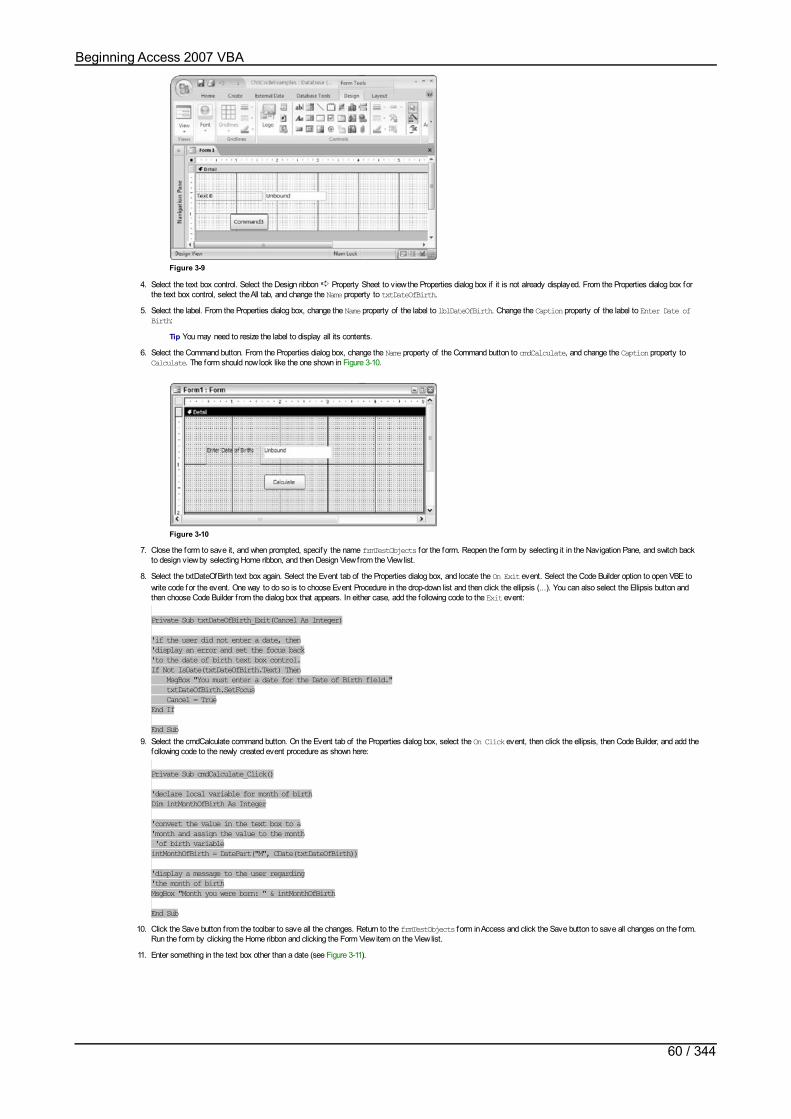
Figure 3-9
4. Select the text box control. Select the Design ribbon Property Sheet to view the Properties dialog box if it is not already displayed. From the Properties dialog box forthe text box control, select the All tab, and change the Name property to txtDateOfBirth.
5. Select the label. From the Properties dialog box, change the Name property of the label to lblDateOfBirth. Change the Caption property of the label to Enter Date ofBirth:
Tip You may need to resize the label to display all its contents.
6. Select the Command button. From the Properties dialog box, change the Name property of the Command button to cmdCalculate, and change the Caption property toCalculate. The form should now look like the one shown in Figure 3-10.
Figure 3-10
7. Close the form to save it, and when prompted, specify the name frmTestObjects for the form. Reopen the form by selecting it in the Navigation Pane, and switch backto design view by selecting Home ribbon, and then Design View from the View list.
8. Select the txtDateOfBirth text box again. Select the Event tab of the Properties dialog box, and locate the On Exit event. Select the Code Builder option to open VBE towrite code for the event. One way to do so is to choose Event Procedure in the drop-down list and then click the ellipsis (…). You can also select the Ellipsis button andthen choose Code Builder f rom the dialog box that appears. In either case, add the following code to the Exit event:
Private Sub txtDateOfBirth_Exit(Cancel As Integer)
'if the user did not enter a date, then'display an error and set the focus back'to the date of birth text box control.If Not IsDate(txtDateOfBirth.Text) Then MsgBox "You must enter a date for the Date of Birth field." txtDateOfBirth.SetFocus Cancel = TrueEnd If
End Sub9. Select the cmdCalculate command button. On the Event tab of the Properties dialog box, select the On Click event, then click the ellipsis, then Code Builder, and add the
following code to the newly created event procedure as shown here:
Private Sub cmdCalculate_Click()
'declare local variable for month of birthDim intMonthOfBirth As Integer
'convert the value in the text box to a'month and assign the value to the month 'of birth variableintMonthOfBirth = DatePart("M", CDate(txtDateOfBirth))
'display a message to the user regarding'the month of birthMsgBox "Month you were born: " & intMonthOfBirth
End Sub10. Click the Save button from the toolbar to save all the changes. Return to the frmTestObjects form in Access and click the Save button to save all changes on the form.
Run the form by clicking the Home ribbon and clicking the Form View item on the View list.
11. Enter something in the text box other than a date (see Figure 3-11).
Beginning Access 2007 VBA
60 / 344
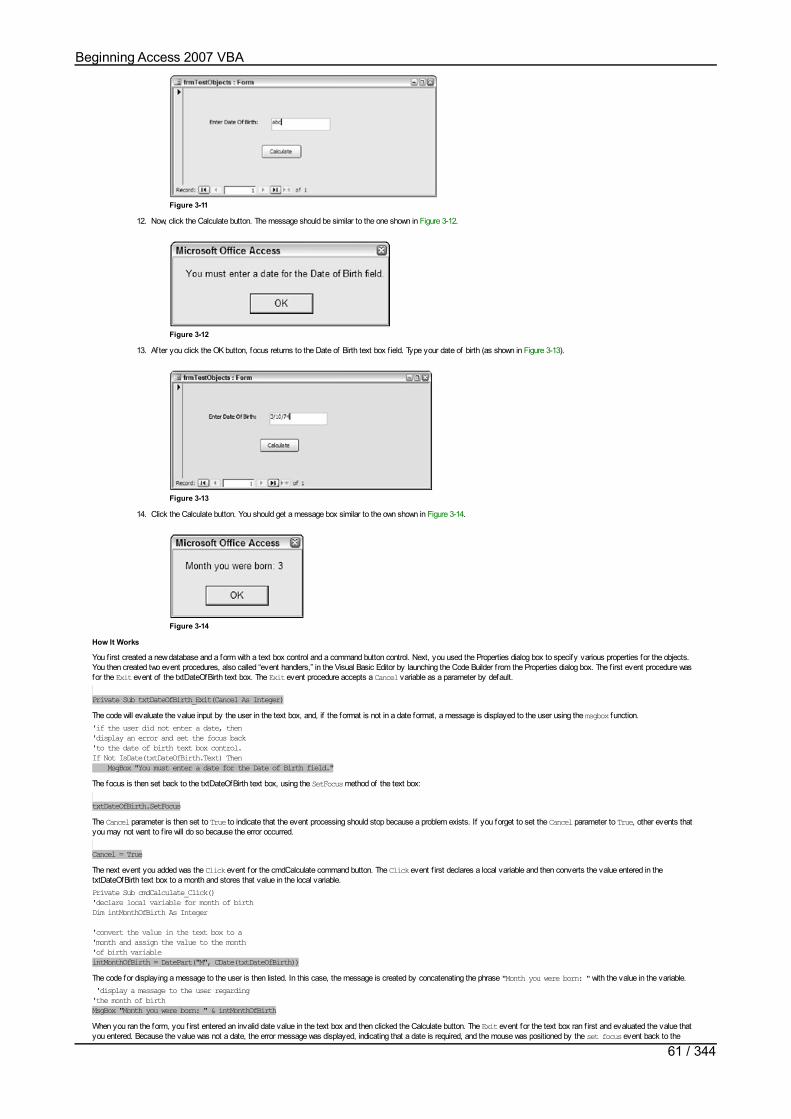
Figure 3-11
12. Now, click the Calculate button. The message should be similar to the one shown in Figure 3-12.
Figure 3-12
13. After you click the OK button, focus returns to the Date of Birth text box f ield. Type your date of birth (as shown in Figure 3-13).
Figure 3-13
14. Click the Calculate button. You should get a message box similar to the own shown in Figure 3-14.
Figure 3-14
How It Works
You f irst created a new database and a form with a text box control and a command button control. Next, you used the Properties dialog box to specify various properties for the objects.You then created two event procedures, also called “event handlers,” in the Visual Basic Editor by launching the Code Builder f rom the Properties dialog box. The f irst event procedure wasfor the Exit event of the txtDateOfBirth text box. The Exit event procedure accepts a Cancel variable as a parameter by default.
Private Sub txtDateOfBirth_Exit(Cancel As Integer)The code will evaluate the value input by the user in the text box, and, if the format is not in a date format, a message is displayed to the user using the msgbox function.'if the user did not enter a date, then'display an error and set the focus back'to the date of birth text box control.If Not IsDate(txtDateOfBirth.Text) Then MsgBox "You must enter a date for the Date of Birth field."The focus is then set back to the txtDateOfBirth text box, using the SetFocus method of the text box:
txtDateOfBirth.SetFocusThe Cancel parameter is then set to True to indicate that the event processing should stop because a problem exists. If you forget to set the Cancel parameter to True, other events thatyou may not want to f ire will do so because the error occurred.
Cancel = TrueThe next event you added was the Click event for the cmdCalculate command button. The Click event f irst declares a local variable and then converts the value entered in thetxtDateOfBirth text box to a month and stores that value in the local variable.Private Sub cmdCalculate_Click()'declare local variable for month of birthDim intMonthOfBirth As Integer
'convert the value in the text box to a'month and assign the value to the month'of birth variableintMonthOfBirth = DatePart("M", CDate(txtDateOfBirth))The code for displaying a message to the user is then listed. In this case, the message is created by concatenating the phrase "Month you were born: " with the value in the variable. 'display a message to the user regarding'the month of birthMsgBox "Month you were born: " & intMonthOfBirthWhen you ran the form, you f irst entered an invalid date value in the text box and then clicked the Calculate button. The Exit event for the text box ran f irst and evaluated the value thatyou entered. Because the value was not a date, the error message was displayed, indicating that a date is required, and the mouse was positioned by the set focus event back to thetxtDateOfBirth text box.
Beginning Access 2007 VBA
61 / 344

txtDateOfBirth text box.
The second time, you entered a correct date value in the text box f ield and clicked the Calculate button. This time, the Exit event for the text box ran again but did not have any problems,so the application continued and processed the Click event for the Calculate button. The Click event procedure extracted the month from the date value you entered and then displayedthat month to you in a message box.
It’s now time for the quiz. Did you keep track of all the properties, methods, and events used in the example? If so, compare your list to the one that follows.
Open table as spreadsheet
Type Object Property, Method, or Event
Property txtDateOfBirth (text box) NameProperty lblDateOfBirth (label) NameProperty lblDateOfBirth (label) CaptionProperty cmdCalculate (command button) NameProperty cmdCalculate (command button) CaptionEvent txtDateOfBirth (text box) On ExitEvent cmdCalculate (command button) On ClickMethod txtDateOfBirth (text box) Set Focus
See, that wasn’t so dif f icult, was it?
Beginning Access 2007 VBA
62 / 344

Viewing Objects Using the Object BrowserNow that you understand what objects and their respective properties, methods, and events are, let’s look at another way to view objects. The Object Browser is a tool that allows you toview and manage the objects in your application. You can use the Object Browser to learn about the objects available in Access 2007 as well as objects available from almost any Windowsprogram.
The Object Browser can be opened from the Visual Basic Editor in one of three ways: by choosing the Object Browser button on toolbar, by selecting View Object Browser, or by pressingF2. Any of these will result in a screen such as the one shown in Figure 3-15.
Figure 3-15
Notice how the Libraries drop-down list currently displays All Libraries. The values displayed in the Classes list are for the Classes of All Libraries. You can select a particular Library, suchas Access, to limit the list of Classes and corresponding Class Members that are displayed (see Figure 3-16).
Figure 3-16
Notice how you can drill down into the Classes and view the properties, methods, and events available for the selected class. In the previous example, the Access Form class is selected,and you can see MouseUp and MouseWheel events (as indicated by the lightening bolt icon), various properties such as MouseWheel, and various methods such as Move. Notice how in thisexample the MouseUp event is selected, and you can see the syntax for the event in the bottom portion of the display. You can see why the Object Browser is a very useful tool for viewingand working with objects.
If you change the Libraries list to the current project (such as Ch3CodeExamples), you see the frmTestObjects form (see Figure 3-17).
Beginning Access 2007 VBA
63 / 344

Figure 3-17
Double-click on the Form_frmTestObjects class name to display a Code window showing the sub procedures and functions for that class module. In this example, you see the eventprocedures you created earlier in this chapter for the frmTestObjects form.
Beginning Access 2007 VBA
64 / 344
Ways to Refer to ObjectsYou should also know the various ways to refer to an object. Here are some examples:
Forms.frmTestObjectsForms!frmTestObjectsForms("frmTestObjects")Forms(0)Using the period (Forms.frmTestObjects) is my personal preference for most situations because you can see the list of available properties, methods, events, and constants as you type.You already saw this used with objects earlier in this chapter.
You can also refer to objects using the Me keyword as a shortcut. Me refers to the current object. So if you use Me in a form module, it refers to the form. Here is an example:
Me.txtDateOfBirthAn equivalent, but longer, version of the same statement is:
Forms.frmTestObjects.txtDateOfBirthOnly use the Me keyword when you want to refer to the existing object (not to a totally dif ferent object).
Beginning Access 2007 VBA
65 / 344

Using Access Collections and ObjectsEarlier in this chapter, you brief ly explored the dif ference between an object and a collection. To recap, collections can contain multiple objects. For example, you might use a formscollection to loop through all forms in the project, whereas you would refer to a particular form object when you wanted to deal with that specif ic form only.
Now that you have mastered the basic concepts of object-oriented programming and understand that objects are dif ferent f rom collections, let’s look at some of the most useful collectionsand objects that come with Access. The examples in this section are by no means an exhaustive list, but they provide you with the most common collections. A complete list can beobtained in the Visual Basic help documentation from the Visual Basic Editor.
The Application object is at the top of the Access object model and refers to the active Access application. It contains all other objects and collections. The Application object containsseveral child objects that are very useful. Several Application object examples will now be described.
The Forms Collection and Form Object
The Forms collection of the Application object contains all forms in the application. A Form object refers to a specif ic form in the Forms collection. Let’s look at an example.
Try It Out-Using the Forms Collection and Form Object
You can use the Forms collection and Form object to obtain a list of all the open forms in the application.1. Create a new form for your database and switch to design view. Use the ToolBox shown in the Controls area of the Design ribbon to drag a list box control and a command
button control onto the new form. You can select Cancel to any wizards that appear when you draw the controls.
2. Change the Name property of the list box control to lstForms.3. Select the label for the list box. Set the Name property of the list box to lblForms and the Caption property to All forms in project:. Set the RowSourceType property
of the list box to Value List.4. Next, select the command button control. Set the Name property to cmdGetForms and the Caption property to Get List of Forms.5. At this point, the form should look similar to the one shown in Figure 3-18.
Figure 3-18
6. Make sure to save the form by clicking the Save button and, when prompted, give the form the name frmTestForms.7. Select the cmdGetForms command button and view the Properties dialog box. Select the Design ribbon Property Sheet if the Properties dialog box is not already
displayed. Select the Events tab of the Properties dialog box, and select the Code Builder option to add the new On Click event. Add the code below to the newly createdOn Click event procedure.
Private Sub cmdGetForms_Click()
Dim frmForms As Form
'loop through forms collection and'add name of each open form to list boxFor Each frmForms In Forms Me.lstForms.AddItem (frmForms.Name)Next frmFormsEnd Sub
8. Save the code in the Visual Basic Editor and return to the design view of the form.
9. Run the form by selecting View from the toolbar. Click the Get List of Forms command button. You should see the names of all open forms displayed in the list boxcontrol, as shown in Figure 3-19.
Figure 3-19
How It Works
First, you created a new form and added a list box object and a command button object to the form. You then set several properties of the list box and command button objects using theProperties dialog box. Next, you created an event procedure to run whenever the user clicks the cmdGetForms command button. The event procedure looped through the Forms collection toobtain a list of all open forms in the application and added the name of any open form to the list box.Private Sub cmdGetForms_Click()
Dim frmForms As Form
'loop through forms collection and'add name of each open form to list boxFor Each frmForms In Forms Me.lstForms.AddItem (frmForms.Name)Next frmForms
Beginning Access 2007 VBA
66 / 344
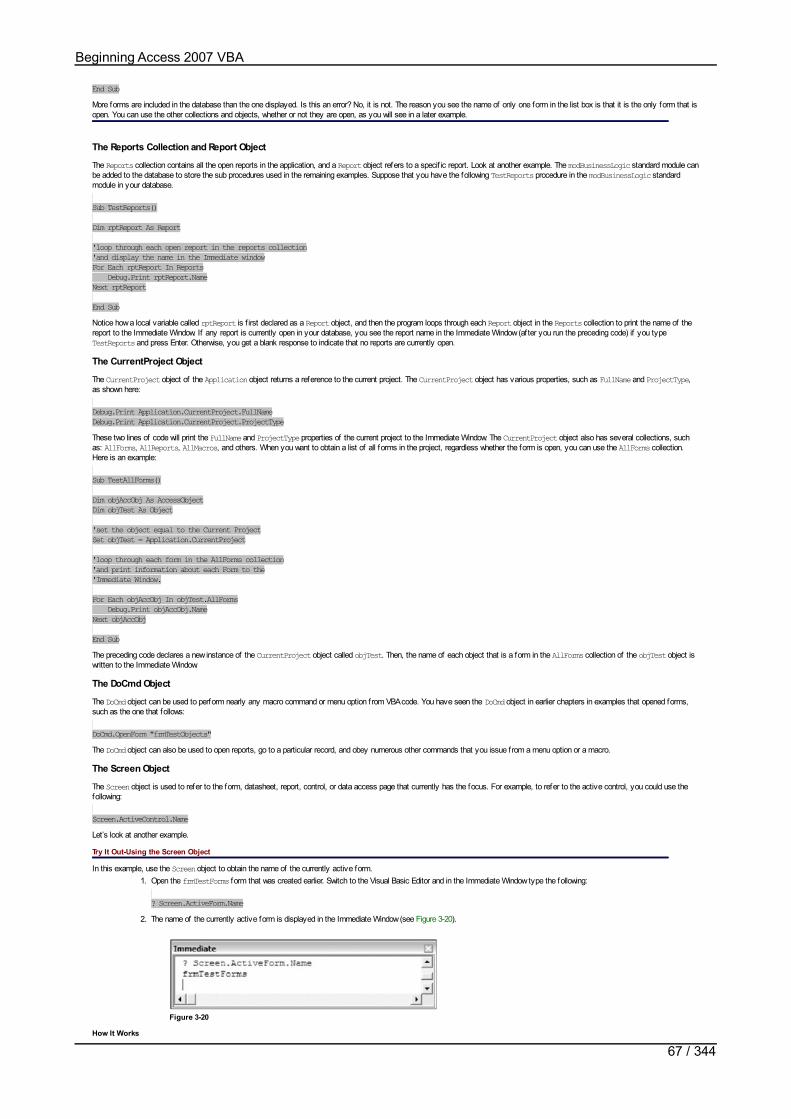
End SubMore forms are included in the database than the one displayed. Is this an error? No, it is not. The reason you see the name of only one form in the list box is that it is the only form that isopen. You can use the other collections and objects, whether or not they are open, as you will see in a later example.
The Reports Collection and Report Object
The Reports collection contains all the open reports in the application, and a Report object refers to a specif ic report. Look at another example. The modBusinessLogic standard module canbe added to the database to store the sub procedures used in the remaining examples. Suppose that you have the following TestReports procedure in the modBusinessLogic standardmodule in your database.
Sub TestReports()
Dim rptReport As Report
'loop through each open report in the reports collection'and display the name in the Immediate windowFor Each rptReport In Reports Debug.Print rptReport.NameNext rptReport
End SubNotice how a local variable called rptReport is f irst declared as a Report object, and then the program loops through each Report object in the Reports collection to print the name of thereport to the Immediate Window. If any report is currently open in your database, you see the report name in the Immediate Window (after you run the preceding code) if you typeTestReports and press Enter. Otherwise, you get a blank response to indicate that no reports are currently open.
The CurrentProject Object
The CurrentProject object of the Application object returns a reference to the current project. The CurrentProject object has various properties, such as FullName and ProjectType,as shown here:
Debug.Print Application.CurrentProject.FullNameDebug.Print Application.CurrentProject.ProjectTypeThese two lines of code will print the FullName and ProjectType properties of the current project to the Immediate Window. The CurrentProject object also has several collections, suchas: AllForms, AllReports, AllMacros, and others. When you want to obtain a list of all forms in the project, regardless whether the form is open, you can use the AllForms collection.Here is an example:
Sub TestAllForms()
Dim objAccObj As AccessObjectDim objTest As Object
'set the object equal to the Current ProjectSet objTest = Application.CurrentProject
'loop through each form in the AllForms collection'and print information about each Form to the'Immediate Window.
For Each objAccObj In objTest.AllForms Debug.Print objAccObj.NameNext objAccObj
End SubThe preceding code declares a new instance of the CurrentProject object called objTest. Then, the name of each object that is a form in the AllForms collection of the objTest object iswritten to the Immediate Window.
The DoCmd Object
The DoCmd object can be used to perform nearly any macro command or menu option from VBA code. You have seen the DoCmd object in earlier chapters in examples that opened forms,such as the one that follows:
DoCmd.OpenForm "frmTestObjects"The DoCmd object can also be used to open reports, go to a particular record, and obey numerous other commands that you issue from a menu option or a macro.
The Screen Object
The Screen object is used to refer to the form, datasheet, report, control, or data access page that currently has the focus. For example, to refer to the active control, you could use thefollowing:
Screen.ActiveControl.NameLet’s look at another example.
Try It Out-Using the Screen Object
In this example, use the Screen object to obtain the name of the currently active form.1. Open the frmTestForms form that was created earlier. Switch to the Visual Basic Editor and in the Immediate Window type the following:
? Screen.ActiveForm.Name2. The name of the currently active form is displayed in the Immediate Window (see Figure 3-20).
Figure 3-20
How It Works
Beginning Access 2007 VBA
67 / 344

In the current example, you used the Immediate Window to f ind the name of the active form on the screen, using the ? Screen.ActiveForm.Name command.
The Printers Collection and Printer Object
Another useful collection in the Application object is the Printers collection. The Printers collection is a collection of Printer objects and contains all printers available to an application.You can walk through an example to see how this works.
Try It Out-Using the Printers Collection and Printer Object
In this example, you use the Printers collection and Printer object to display the name of each printer device in the Debug window.1. Add the following procedure to the modBusinessLogic standard module. If you have not yet created modBusinessLogic, do so by inserting a new module. Then add the
following code to the new module:
Sub TestPrinter()
Dim prtAvailPrinters as Printer
For Each prtAvailPrinters In Application.Printers With prtAvailPrinters Debug.Print "Printer name: " & .DeviceName & "Printer driver: " & _ .DriverName End WithNext prtAvailPrinters
End Sub2. Run the TestPrinter procedure from the Immediate Window, and you will see a list of printers available on your computer, similar to Figure 3-21.
Figure 3-21
How It Works
In this example, you created a new procedure to output a list of all printers on your computer. You started by creating a TestPrinter sub procedure in modBusinessLogic module.
Sub TestPrinter()Next, you declared a local variable as a Printer object.
Dim prtAvailPrinters as PrinterThen, you used a For Each loop to iterate through all the Printer objects in the Printers collection and printed the device name and driver name of each Printer object to the ImmediateWindow.For Each prtAvailPrinters In Application.Printers With prtAvailPrinters Debug.Print "Printer name: " & .DeviceName & "Printer driver: " & _ .DriverName End With Next prtAvailPrintersThe results of all printers on your computer were then displayed in the Immediate Window when you executed the procedure from the Immediate Window. It may take a few seconds for thecomplete list of printers to appear.
Other Objects
At this point, you should have an idea of the various ways you can use objects in your Access applications to perform various tasks. The Application objects that you are most likely touse as a beginning VBA programmer were illustrated. However, other Application objects in Access were not described in this chapter. Consult the Visual Basic help documentation from theVisual Basic Editor for more information.
Furthermore, numerous other libraries that contain useful objects are available for use in your Access applications. One example in Chapter 10 includes using Microsoft Off ice objects (suchas the CommandBar object) that are common to all Microsoft Off ice programs. Chapter 10’s example uses the Microsoft Off ice CommandBar object to customize the command bar you see inyour applications. If you want to learn more about the objects that are available for use in your applications, consult the Object Browser to view them or review the Help documentation.
Beginning Access 2007 VBA
68 / 344

SummaryIn the world of object-oriented programming, objects refer to all the things that make up your database, such as forms, reports, controls, and so on. By encapsulating code into objects, youmake programs easier to maintain and code easier to reuse. Microsoft Access has several collections and objects that can be used to manipulate the objects contained in your database. Forexample, you can determine all the forms in your project for some useful purpose, or you can work with a particular form. With these object-oriented concepts in mind, turn to Chapter 4,where you will create custom objects.
Beginning Access 2007 VBA
69 / 344

Exercises1. What are properties, methods, and events?
2. Name at least two ways that you can view the properties, methods, or events available for a given object.
3. What is the dif ference between the Forms collection and the AllForms collection?
Answers
1. Properties are characteristics of the object, such as the caption, name, or size. Methods are actions that are taken upon an object, such as setting the focus to the object. Events aretriggered by actions taken by the user and the application, such as changes to data, mouse movements, a form opening, and so on. Events allow you to link up your forms andreports with the VBA code that you write so that the code will execute at the appropriate time.
2. You can set properties and events for a given object f rom the Properties dialog box in the form or report designer. You can view and manipulate properties, methods, and events fromwithin the code window in the Visual Basic Editor as you type the object name followed by the period. The Object Browser also allows you to view the properties, methods, and eventsavailable for a selected object.
3. The Forms collection of the Application object only works with currently open forms. The AllForms collection of the Application.CurrentProject object allows you to work with allforms in the application.
Beginning Access 2007 VBA
70 / 344
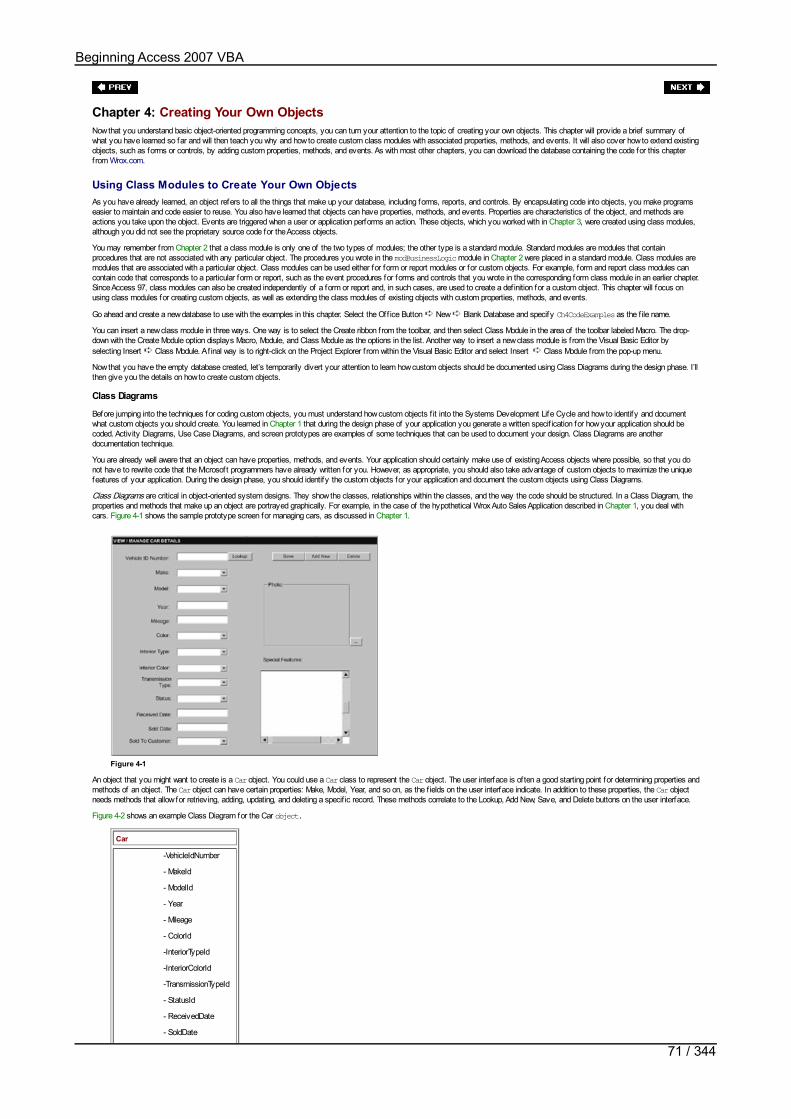
Chapter 4: Creating Your Own ObjectsNow that you understand basic object-oriented programming concepts, you can turn your attention to the topic of creating your own objects. This chapter will provide a brief summary ofwhat you have learned so far and will then teach you why and how to create custom class modules with associated properties, methods, and events. It will also cover how to extend existingobjects, such as forms or controls, by adding custom properties, methods, and events. As with most other chapters, you can download the database containing the code for this chapterfrom Wrox.com.
Using Class Modules to Create Your Own ObjectsAs you have already learned, an object refers to all the things that make up your database, including forms, reports, and controls. By encapsulating code into objects, you make programseasier to maintain and code easier to reuse. You also have learned that objects can have properties, methods, and events. Properties are characteristics of the object, and methods areactions you take upon the object. Events are triggered when a user or application performs an action. These objects, which you worked with in Chapter 3, were created using class modules,although you did not see the proprietary source code for the Access objects.
You may remember from Chapter 2 that a class module is only one of the two types of modules; the other type is a standard module. Standard modules are modules that containprocedures that are not associated with any particular object. The procedures you wrote in the modBusinessLogic module in Chapter 2 were placed in a standard module. Class modules aremodules that are associated with a particular object. Class modules can be used either for form or report modules or for custom objects. For example, form and report class modules cancontain code that corresponds to a particular form or report, such as the event procedures for forms and controls that you wrote in the corresponding form class module in an earlier chapter.Since Access 97, class modules can also be created independently of a form or report and, in such cases, are used to create a def inition for a custom object. This chapter will focus onusing class modules for creating custom objects, as well as extending the class modules of existing objects with custom properties, methods, and events.
Go ahead and create a new database to use with the examples in this chapter. Select the Off ice Button New Blank Database and specify Ch4CodeExamples as the f ile name.
You can insert a new class module in three ways. One way is to select the Create ribbon from the toolbar, and then select Class Module in the area of the toolbar labeled Macro. The drop-down with the Create Module option displays Macro, Module, and Class Module as the options in the list. Another way to insert a new class module is f rom the Visual Basic Editor byselecting Insert Class Module. A f inal way is to right-click on the Project Explorer f rom within the Visual Basic Editor and select Insert Class Module from the pop-up menu.
Now that you have the empty database created, let’s temporarily divert your attention to learn how custom objects should be documented using Class Diagrams during the design phase. I’llthen give you the details on how to create custom objects.
Class Diagrams
Before jumping into the techniques for coding custom objects, you must understand how custom objects f it into the Systems Development Life Cycle and how to identify and documentwhat custom objects you should create. You learned in Chapter 1 that during the design phase of your application you generate a written specif ication for how your application should becoded. Activity Diagrams, Use Case Diagrams, and screen prototypes are examples of some techniques that can be used to document your design. Class Diagrams are anotherdocumentation technique.
You are already well aware that an object can have properties, methods, and events. Your application should certainly make use of existing Access objects where possible, so that you donot have to rewrite code that the Microsoft programmers have already written for you. However, as appropriate, you should also take advantage of custom objects to maximize the uniquefeatures of your application. During the design phase, you should identify the custom objects for your application and document the custom objects using Class Diagrams.
Class Diagrams are critical in object-oriented system designs. They show the classes, relationships within the classes, and the way the code should be structured. In a Class Diagram, theproperties and methods that make up an object are portrayed graphically. For example, in the case of the hypothetical Wrox Auto Sales Application described in Chapter 1, you deal withcars. Figure 4-1 shows the sample prototype screen for managing cars, as discussed in Chapter 1.
Figure 4-1
An object that you might want to create is a Car object. You could use a Car class to represent the Car object. The user interface is of ten a good starting point for determining properties andmethods of an object. The Car object can have certain properties: Make, Model, Year, and so on, as the f ields on the user interface indicate. In addition to these properties, the Car objectneeds methods that allow for retrieving, adding, updating, and deleting a specif ic record. These methods correlate to the Lookup, Add New, Save, and Delete buttons on the user interface.
Figure 4-2 shows an example Class Diagram for the Car object.
Car
-VehicleIdNumber
- MakeId
- ModelId
- Year
- Mileage
- ColorId
-InteriorTypeId
-InteriorColorId
-TransmissionTypeId
- StatusId
- ReceivedDate
- SoldDate
Beginning Access 2007 VBA
71 / 344
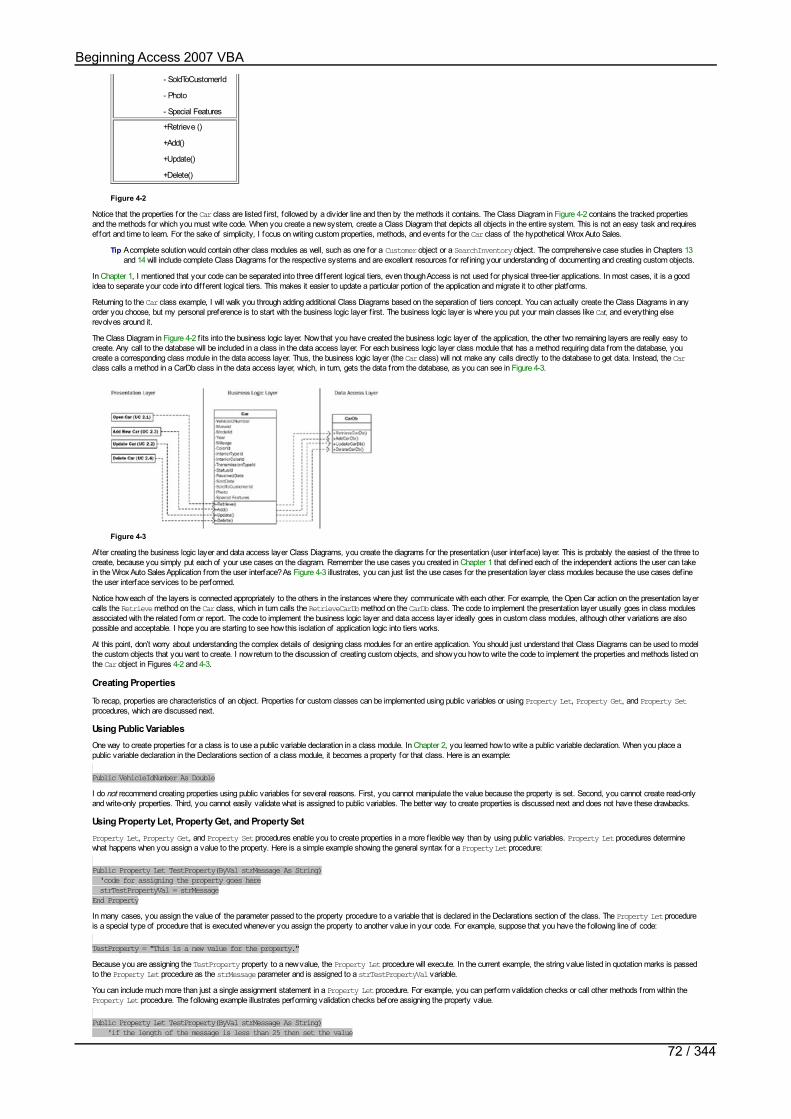
- SoldToCustomerId
- Photo
- Special Features
+Retrieve ()
+Add()
+Update()
+Delete()
Figure 4-2
Notice that the properties for the Car class are listed f irst, followed by a divider line and then by the methods it contains. The Class Diagram in Figure 4-2 contains the tracked propertiesand the methods for which you must write code. When you create a new system, create a Class Diagram that depicts all objects in the entire system. This is not an easy task and requireseffort and time to learn. For the sake of simplicity, I focus on writing custom properties, methods, and events for the Car class of the hypothetical Wrox Auto Sales.
Tip A complete solution would contain other class modules as well, such as one for a Customer object or a SearchInventory object. The comprehensive case studies in Chapters 13and 14 will include complete Class Diagrams for the respective systems and are excellent resources for ref ining your understanding of documenting and creating custom objects.
In Chapter 1, I mentioned that your code can be separated into three dif ferent logical tiers, even though Access is not used for physical three-tier applications. In most cases, it is a goodidea to separate your code into dif ferent logical tiers. This makes it easier to update a particular portion of the application and migrate it to other platforms.
Returning to the Car class example, I will walk you through adding additional Class Diagrams based on the separation of tiers concept. You can actually create the Class Diagrams in anyorder you choose, but my personal preference is to start with the business logic layer f irst. The business logic layer is where you put your main classes like Car, and everything elserevolves around it.
The Class Diagram in Figure 4-2 f its into the business logic layer. Now that you have created the business logic layer of the application, the other two remaining layers are really easy tocreate. Any call to the database will be included in a class in the data access layer. For each business logic layer class module that has a method requiring data from the database, youcreate a corresponding class module in the data access layer. Thus, the business logic layer (the Car class) will not make any calls directly to the database to get data. Instead, the Carclass calls a method in a CarDb class in the data access layer, which, in turn, gets the data from the database, as you can see in Figure 4-3.
Figure 4-3
After creating the business logic layer and data access layer Class Diagrams, you create the diagrams for the presentation (user interface) layer. This is probably the easiest of the three tocreate, because you simply put each of your use cases on the diagram. Remember the use cases you created in Chapter 1 that def ined each of the independent actions the user can takein the Wrox Auto Sales Application from the user interface? As Figure 4-3 illustrates, you can just list the use cases for the presentation layer class modules because the use cases def inethe user interface services to be performed.
Notice how each of the layers is connected appropriately to the others in the instances where they communicate with each other. For example, the Open Car action on the presentation layercalls the Retrieve method on the Car class, which in turn calls the RetrieveCarDb method on the CarDb class. The code to implement the presentation layer usually goes in class modulesassociated with the related form or report. The code to implement the business logic layer and data access layer ideally goes in custom class modules, although other variations are alsopossible and acceptable. I hope you are starting to see how this isolation of application logic into tiers works.
At this point, don’t worry about understanding the complex details of designing class modules for an entire application. You should just understand that Class Diagrams can be used to modelthe custom objects that you want to create. I now return to the discussion of creating custom objects, and show you how to write the code to implement the properties and methods listed onthe Car object in Figures 4-2 and 4-3.
Creating Properties
To recap, properties are characteristics of an object. Properties for custom classes can be implemented using public variables or using Property Let, Property Get, and Property Setprocedures, which are discussed next.
Using Public VariablesOne way to create properties for a class is to use a public variable declaration in a class module. In Chapter 2, you learned how to write a public variable declaration. When you place apublic variable declaration in the Declarations section of a class module, it becomes a property for that class. Here is an example:
Public VehicleIdNumber As DoubleI do not recommend creating properties using public variables for several reasons. First, you cannot manipulate the value because the property is set. Second, you cannot create read-onlyand write-only properties. Third, you cannot easily validate what is assigned to public variables. The better way to create properties is discussed next and does not have these drawbacks.
Using Property Let, Property Get, and Property SetProperty Let, Property Get, and Property Set procedures enable you to create properties in a more f lexible way than by using public variables. Property Let procedures determinewhat happens when you assign a value to the property. Here is a simple example showing the general syntax for a Property Let procedure:
Public Property Let TestProperty(ByVal strMessage As String) 'code for assigning the property goes here strTestPropertyVal = strMessageEnd PropertyIn many cases, you assign the value of the parameter passed to the property procedure to a variable that is declared in the Declarations section of the class. The Property Let procedureis a special type of procedure that is executed whenever you assign the property to another value in your code. For example, suppose that you have the following line of code:
TestProperty = "This is a new value for the property."Because you are assigning the TestProperty property to a new value, the Property Let procedure will execute. In the current example, the string value listed in quotation marks is passedto the Property Let procedure as the strMessage parameter and is assigned to a strTestPropertyVal variable.
You can include much more than just a single assignment statement in a Property Let procedure. For example, you can perform validation checks or call other methods from within theProperty Let procedure. The following example illustrates performing validation checks before assigning the property value.
Public Property Let TestProperty(ByVal strMessage As String) 'if the length of the message is less than 25 then set the value
Beginning Access 2007 VBA
72 / 344
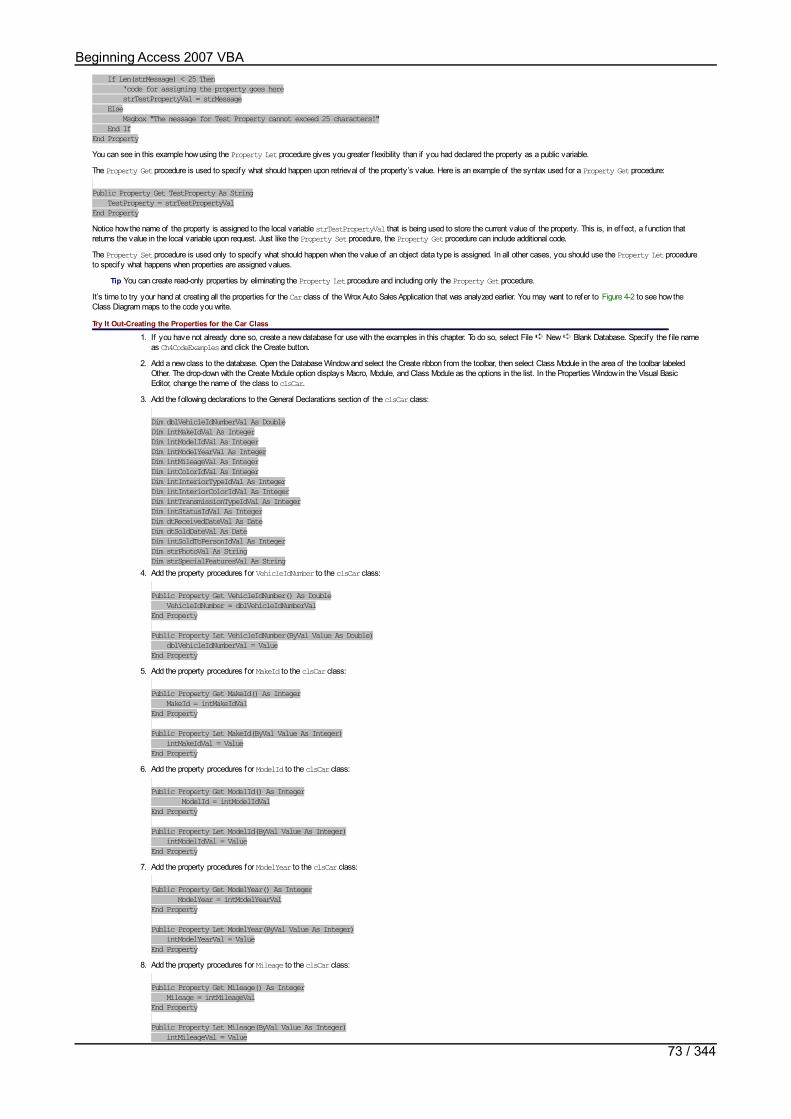
If Len(strMessage) < 25 Then 'code for assigning the property goes here strTestPropertyVal = strMessage Else Msgbox "The message for Test Property cannot exceed 25 characters!" End IfEnd PropertyYou can see in this example how using the Property Let procedure gives you greater f lexibility than if you had declared the property as a public variable.
The Property Get procedure is used to specify what should happen upon retrieval of the property’s value. Here is an example of the syntax used for a Property Get procedure:
Public Property Get TestProperty As String TestProperty = strTestPropertyValEnd PropertyNotice how the name of the property is assigned to the local variable strTestPropertyVal that is being used to store the current value of the property. This is, in ef fect, a function thatreturns the value in the local variable upon request. Just like the Property Set procedure, the Property Get procedure can include additional code.
The Property Set procedure is used only to specify what should happen when the value of an object data type is assigned. In all other cases, you should use the Property Let procedureto specify what happens when properties are assigned values.
Tip You can create read-only properties by eliminating the Property Let procedure and including only the Property Get procedure.
It’s time to try your hand at creating all the properties for the Car class of the Wrox Auto Sales Application that was analyzed earlier. You may want to refer to Figure 4-2 to see how theClass Diagram maps to the code you write.
Try It Out-Creating the Properties for the Car Class
1. If you have not already done so, create a new database for use with the examples in this chapter. To do so, select File New Blank Database. Specify the f ile nameas Ch4CodeExamples and click the Create button.
2. Add a new class to the database. Open the Database Window and select the Create ribbon from the toolbar, then select Class Module in the area of the toolbar labeledOther. The drop-down with the Create Module option displays Macro, Module, and Class Module as the options in the list. In the Properties Window in the Visual BasicEditor, change the name of the class to clsCar.
3. Add the following declarations to the General Declarations section of the clsCar class:
Dim dblVehicleIdNumberVal As DoubleDim intMakeIdVal As IntegerDim intModelIdVal As IntegerDim intModelYearVal As IntegerDim intMileageVal As IntegerDim intColorIdVal As IntegerDim intInteriorTypeIdVal As IntegerDim intInteriorColorIdVal As IntegerDim intTransmissionTypeIdVal As IntegerDim intStatusIdVal As IntegerDim dtReceivedDateVal As DateDim dtSoldDateVal As DateDim intSoldToPersonIdVal As IntegerDim strPhotoVal As StringDim strSpecialFeaturesVal As String
4. Add the property procedures for VehicleIdNumber to the clsCar class:
Public Property Get VehicleIdNumber() As Double VehicleIdNumber = dblVehicleIdNumberValEnd Property
Public Property Let VehicleIdNumber(ByVal Value As Double) dblVehicleIdNumberVal = ValueEnd Property
5. Add the property procedures for MakeId to the clsCar class:
Public Property Get MakeId() As Integer MakeId = intMakeIdValEnd Property
Public Property Let MakeId(ByVal Value As Integer) intMakeIdVal = ValueEnd Property
6. Add the property procedures for ModelId to the clsCar class:
Public Property Get ModelId() As Integer ModelId = intModelIdValEnd Property
Public Property Let ModelId(ByVal Value As Integer) intModelIdVal = ValueEnd Property
7. Add the property procedures for ModelYear to the clsCar class:
Public Property Get ModelYear() As Integer ModelYear = intModelYearValEnd Property
Public Property Let ModelYear(ByVal Value As Integer) intModelYearVal = ValueEnd Property
8. Add the property procedures for Mileage to the clsCar class:
Public Property Get Mileage() As Integer Mileage = intMileageValEnd Property
Public Property Let Mileage(ByVal Value As Integer) intMileageVal = ValueEnd Property
Beginning Access 2007 VBA
73 / 344

End Property9. Add the property procedures for ColorId to the clsCar class:
Public Property Get ColorId() As Integer ColorId = intColorIdValEnd Property
Public Property Let ColorId(ByVal Value As Integer) intColorIdVal = ValueEnd Property
10. Add the property procedures for InteriorTypeId to the clsCar class:
Public Property Get InteriorTypeId() As Integer InteriorTypeId = intInteriorTypeIdValEnd Property
Public Property Let InteriorTypeId(ByVal Value As Integer) intInteriorTypeIdVal = ValueEnd Property
11. Add the property procedures for InteriorColorId to the clsCar class:
Public Property Get InteriorColorId() As Integer InteriorColorId = intInteriorColorIdValEnd Property
Public Property Let InteriorColorId(ByVal Value As Integer) intInteriorColorIdVal = ValueEnd Property
12. Add the property procedures for TransmissionTypeId to the clsCar class:
Public Property Get TransmissionTypeId() As Integer TransmissionTypeId = intTransmissionTypeIdValEnd Property
Public Property Let TransmissionTypeId(ByVal Value As Integer) intTransmissionTypeIdVal = ValueEnd Property
13. Add the property procedures for StatusId to the clsCar class:
Public Property Get StatusId() As Integer StatusId = intStatusIdValEnd Property
Public Property Let StatusId(ByVal Value As Integer) intStatusIdVal = ValueEnd Property
14. Add the property procedures for ReceivedDate to the clsCar class:
Public Property Get ReceivedDate() As Date ReceivedDate = dtReceivedDateValEnd Property
Public Property Let ReceivedDate(ByVal Value As Date) dtReceivedDateVal = ValueEnd Property
15. Add the property procedures for SoldDate to the clsCar class:
Public Property Get SoldDate() As Date SoldDate = dtSoldDateValEnd Property
Public Property Let SoldDate(ByVal Value As Date) dtSoldDateVal = ValueEnd Property
16. Add the property procedures for SoldToPersonId to the clsCar class:
Public Property Get SoldToPersonId() As Integer SoldToPersonId = intSoldToPersonIdValEnd Property
Public Property Let SoldToPersonId(ByVal Value As Integer) intSoldToPersonIdVal = ValueEnd Property
17. Add the property procedures for Photo to the clsCar class:
Public Property Get Photo() As String Photo = strPhotoValEnd Property
Public Property Let Photo(ByVal Value As String) strPhotoVal = ValueEnd Property
18. Add the property procedures for SpecialFeatures to the clsCar class:
Public Property Get SpecialFeatures() As String SpecialFeatures = strSpecialFeaturesValEnd Property
Public Property Let SpecialFeatures(ByVal Value As String) strSpecialFeaturesVal = Value
Beginning Access 2007 VBA
74 / 344

strSpecialFeaturesVal = ValueEnd Property
19. Click the Save button on the toolbar to save your changes to the class.
How It Works
First, you created a new class module in the database and named it clsCar. You then added the local variables that are used later by the Property Get and Property Set procedures foreach property, as shown in the following code.Dim dblVehicleIdNumberVal As DoubleDim intMakeIdVal As IntegerDim intModelIdVal As IntegerDim intModelYearVal As IntegerDim intMileageVal As IntegerDim intColorIdVal As IntegerDim intInteriorTypeIdVal As IntegerDim intInteriorColorIdVal As IntegerDim intTransmissionTypeIdVal As IntegerDim intStatusIdVal As IntegerDim dtReceivedDateVal As DateDim dtSoldDateVal As DateDim intSoldToPersonIdVal As IntegerDim strPhotoVal As StringDim strSpecialFeaturesVal As StringNext, you added Property Get and Property Let procedures for each property in the class. For example, you added Property Get and Property Let procedures to theVehicleIdNumber property to specify what happens whenever the property value is retrieved or assigned, respectively.Public Property Get VehicleIdNumber() As Double VehicleIdNumber = dblVehicleIdNumberValEnd Property
Public Property Let VehicleIdNumber(ByVal Value As Double) dblVehicleIdNumberVal = ValueEnd PropertyYou can use this class later on in the chapter to see one or more of these properties in action.
Creating Methods
As you are aware, methods are actions that can be taken on an object. Methods for custom classes are implemented using public sub procedures and functions.
Using Public Sub Procedures and FunctionsTo implement a method for a custom class, you simply add a public sub procedure or function to the class itself . You are already familiar with creating new procedures, so creating acustom method will be really easy for you. To add a method called TestMethod to a class module, you simply add the following code:
Public Sub TestMethod() 'code for the method goes hereEnd SubNow, create the four methods for the clsCar class: Retrieve, Add, Update, and Delete. You may wish to refer to Figure 4-2 to see how the Class Diagram maps to the code you write.
Try It Out-Creating the Methods for the Car Class1. Add the Retrieve method to the clsCar class:
Public Function Retrieve(ByVal VehicleId As Integer) As Recordset
'Retrieve the detail record for the car from the database 'code to call the data access layer that retrieves the record from 'the database Debug.Print "clsCar.Retrieve method" Debug.Print "VehicleID: " & VehicleId & " will be retrieved from the database."
End Function2. Add the Add method to the clsCar class:
Public Sub Add()
'Add the current values in the Car object to the database
'code to call the data access layer that adds the record to the database
Debug.Print "clsCar.Add method" Debug.Print "New record being added for VehicleId: " & Me.VehicleIdNumberEnd Sub
Tip Did you notice that when you typed Me and a period, all of your properties, class variables, and functions appeared? This command completion feature inAccess and other Microsoft programming products is called Microsoft IntelliSense.
3. Add the Update method to the clsCar class.
Public Sub Update()
'Update the database with the current contents of the Car object
'Code to call the data access layer that updates the existing 'record in the database Debug.Print "clsCar.Update method"
Debug.Print "Record being updated for VehicleId: " & Me.VehicleIdNumber
End Sub4. Add the Delete method to the clsCar class:
Public Sub Delete()
'Delete the Car record from the database
Beginning Access 2007 VBA
75 / 344

'Code to call the data access layer that deletes the record from the 'database. Pass the VehicleId value as a parameter. Debug.Print "clsCar.Delete method" Debug.Print "Record being deleted for VehicleId: " & Me.VehicleIdNumberEnd Sub
5. Click the Save button on the toolbar to save your changes to the class.
How It Works
First, you created the Retrieve method of the clsCar class. The Retrieve method is responsible for calling the data access layer to look up a particular car record.Public Function Retrieve(ByVal VehicleId As Integer) As Recordset 'Retrieve the detail record for the car 'from the database
'code to call the data access layer that retrieves the record from 'the databaseFor illustration purposes, the method includes code to print a message to the Immediate Window to let you know that the method executed. Debug.Print "clsCar.Retrieve method" Debug.Print "VehicleID: " & VehicleId & " will be retrieved from the database."
End FunctionNext, you created the Add method to handle adding a new car record to the database.Public Sub Add()
'Add the current values in the Car object to the database 'code to call the data access layer that adds the record to the databaseAgain, the method includes code to print a message to the Immediate Window to let you know that the method executed. Debug.Print "clsCar.Add method" Debug.Print "New record being added for VehicleId: " & Me.VehicleIdNumber
End SubThe Update and Delete methods are created in similar ways. One or more of these methods will be used in later examples. Now turn your attention to events.
Creating Events
Events occur in response to an action taken by the user or the system. Custom events can be created in class modules, but they must also be raised (f ired) in code or the event will neverhappen.
Declaring and Raising EventsFirst, you must declare and raise the event. An event declaration can be added to the General Declarations section of the class module as shown here:
Public Event EventName(VariableName As DataType)After the event has been declared, you add code to a procedure in your class module to raise the event when a certain action happens. Events are raised with the RaiseEvent statement. Tosee how this works, create an event for the Car class.
Try It Out-Creating an Event for the Car Class1. Declare the event with the PublicEvent statement in the General Declarations section of the clsCar class module.
Public Event ActionSuccess(strMessage As String)2. Modify the existing Update method in clsCar to include the following additional code:
Public Sub Update() 'Update the database with the current contents of the Car object
'Code to call the data access layer that updates the existing 'record in the database
Debug.Print "clsCar.Update method" Debug.Print "Record being updated for VehicleId: " & Me.VehicleIdNumber
'raise the ActionSuccess event RaiseEvent ActionSuccess("Updates to existing record saved successfully!")End Function
How It Works
First, the event was declared in the class module by using the Public Event statement. Next, code was added to the existing Update method to raise the event. At this point, the code willnot result in any action when the event f ires. To create the action, take the following additional steps.
Creating the Event Sub Procedure or FunctionYou must write code that executes when an event is raised. In Chapter 3, you had to create event procedures to specify what should happen when an event occurs. You now use the sameprocess for custom objects.
In the General Declarations section of the object where you wish to handle the event, you declare the object variable for the class that causes the event using the WithEvents keyword:
Dim WithEvents objCar As clsCarAfter the object has been declared using WithEvents, the Visual Basic Editor displays the object in the list of objects and displays the event in the procedure drop-down list, just as it wouldfor any other object. You can select the object and event f rom the list, and the code template is automatically specif ied. You then add the code that you want to run when the event occurs.
Private Sub objCar_ActionSuccess(strMessage As String)
'code to execute when event occurs goes here
End SubYou will actually create the event in the sample database momentarily, but f irst I want to cover a few other topics necessary to write the sample code to handle the event.
Using the Class
Beginning Access 2007 VBA
76 / 344

After writing the code for the class module, you can use the class from other places in your application.
Instantiating the ClassTo use a class module in your application, you f irst must use the Dim statement to declare the class and a Set statement to create a new instance of the class, as shown here:
Dim objCar As clsCar
Set objCar = New clsCarAs you will see in a moment, the preceding lines of code do not have to be contained in the same procedure. After the class has been instantiated, it becomes an object in memory.
Initialize and Terminate EventsEach class has Initialize and Terminate events that can be used. These events should be used when you want certain code to run each time the class is created or destroyed. Nowreturn to the hypothetical Wrox Auto Sales application example and try out the properties, methods, and event of the clsCar class.
Try It Out-Using the Properties, Methods, and Events of the Car Class1. Return to the database window and create a new form. To do so, select the Create ribbon, and then New Form. Switch to design view by selecting the Home ribbon, and
then Design View from the View drop-down list. Use the controls on Design ribbon to select and draw one text box and four command buttons on the new form, as shownin Figure 4-4. Click cancel on the wizards that open as you draw the buttons on the form, as you do not need them.
Figure 4-4
2. Change the Name property of the text box to txtVehicleId. Change the Name property of the label to lblVehicleId and the Caption property to Vehicle Id:. Changethe Name properties of the command buttons to cmdLookup, cmdSave, cmdAddNew, and cmdDelete, respectively. Change the Caption properties of the command buttons toLookup, Save, Add New, and Delete, respectively. Figure 4-5 shows how the form should look at this point.
Figure 4-5
3. Select the Save button on the Toolbar of the Form Designer to save the form. Name the form frmCarDetails.4. From the Properties dialog box of the Form, select the On Load event on the Events tab. Use the Code Builder to add an empty event procedure for the On Load event,
as shown here:
Private Sub Form_Load()End Sub
5. For the moment, leave the Form_Load event empty and add the following code to the General Declarations section of the frmCarDetails class:
Dim WithEvents objCar As clsCar6. Return to the Form_Load event and add the following code:
Private Sub Form_Load()
'create a new instance of the car class to use while the form is openSet objCar = New clsCar
End Sub7. Add the following Click event to the frmCarDetails class:
Private Sub cmdLookup_Click()
'set the value of the VehicleId in the car object'to the current value in the text box on the formobjCar.VehicleIdNumber = txtVehicleId
'call the Retrieve methodobjCar.Retrieve (objCar.VehicleIdNumber)
End Sub8. Add the following Save event to the frmCarDetails class:
Beginning Access 2007 VBA
77 / 344
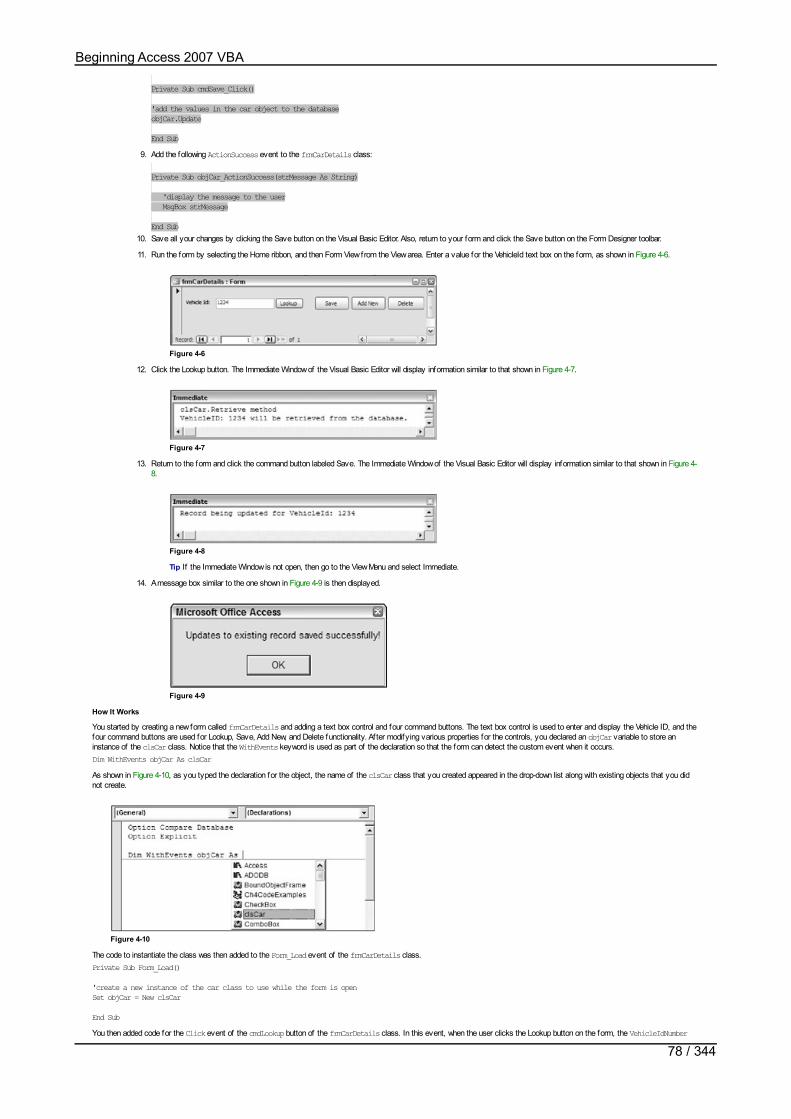
Private Sub cmdSave_Click()
'add the values in the car object to the databaseobjCar.Update
End Sub9. Add the following ActionSuccess event to the frmCarDetails class:
Private Sub objCar_ActionSuccess(strMessage As String)
'display the message to the user MsgBox strMessage
End Sub10. Save all your changes by clicking the Save button on the Visual Basic Editor. Also, return to your form and click the Save button on the Form Designer toolbar.
11. Run the form by selecting the Home ribbon, and then Form View from the View area. Enter a value for the VehicleId text box on the form, as shown in Figure 4-6.
Figure 4-6
12. Click the Lookup button. The Immediate Window of the Visual Basic Editor will display information similar to that shown in Figure 4-7.
Figure 4-7
13. Return to the form and click the command button labeled Save. The Immediate Window of the Visual Basic Editor will display information similar to that shown in Figure 4-8.
Figure 4-8
Tip If the Immediate Window is not open, then go to the View Menu and select Immediate.
14. A message box similar to the one shown in Figure 4-9 is then displayed.
Figure 4-9
How It Works
You started by creating a new form called frmCarDetails and adding a text box control and four command buttons. The text box control is used to enter and display the Vehicle ID, and thefour command buttons are used for Lookup, Save, Add New, and Delete functionality. After modifying various properties for the controls, you declared an objCar variable to store aninstance of the clsCar class. Notice that the WithEvents keyword is used as part of the declaration so that the form can detect the custom event when it occurs.Dim WithEvents objCar As clsCarAs shown in Figure 4-10, as you typed the declaration for the object, the name of the clsCar class that you created appeared in the drop-down list along with existing objects that you didnot create.
Figure 4-10
The code to instantiate the class was then added to the Form_Load event of the frmCarDetails class.Private Sub Form_Load()
'create a new instance of the car class to use while the form is openSet objCar = New clsCar
End SubYou then added code for the Click event of the cmdLookup button of the frmCarDetails class. In this event, when the user clicks the Lookup button on the form, the VehicleIdNumber
Beginning Access 2007 VBA
78 / 344

property of the objCar class is assigned the value from the text box on the form. The Retrieve method is then called.Private Sub cmdLookup_Click()
'set the value of the VehicleId in the car object'to the current value in the text box on the formobjCar.VehicleIdNumber = txtVehicleId
'call the Retrieve methodobjCar.Retrieve (objCar.VehicleIdNumber)End SubAs you entered the code to set the VehicleIdNumber property, a drop-down list (as shown in Figure 4-11) appeared and displayed all the properties and methods for your custom class.Pretty cool, huh? Those are properties and methods that you created.
Figure 4-11
You then added the Save event to the frmCarDetails class to call the Update method when you click the Save button on the form.Private Sub cmdSave_Click()
'add the values in the car object to the databaseobjCar.Update
End SubNext, you added the ActionSuccess event to the frmCarDetails class. This is a custom event that is raised in the clsCar class from the Update method. After the event is raised, thefollowing code runs:Private Sub objCar_ActionSuccess(strMessage As String)
'display the message to the userMsgBox strMessageEnd SubNext, you ran the form, entered a value for the VehicleId text box on the form, and selected the Lookup button. The Immediate Window then displayed the messages indicating that theRetrieve method of the clsCar object had executed. After you clicked the Save button on the form, the Immediate Window displayed messages indicating the Update method hadexecuted, and displayed a message box indicating that the record was successfully updated. Remember that this is the code you previously added to the Update method to raise thecustom event ActionSuccess. In just these few steps, you not only tested the properties, methods, and event for your custom object, but you also used several properties, methods, andevents for the existing objects.
Tip Note that the example used for the frmCarDetails form illustrated just a partial set of the controls that would be included on the production version of the Manage Cars screen.Only the VehicleIdNumber f ield was used for sake of simplicity.
Advanced Techniques
Now that you have a basic idea of how to use class modules to create your own objects with properties, methods, and events, you can delve into some advanced techniques.
Creating Multiple Instances of the ClassYou already learned how to declare and create an instance of a class using the Dim and Set statements. The following example illustrates how you can create multiple instances of the sameclass when adding this code to the class module for frmCarDetails.
Public Sub TestMultipleInstances()
'declare both clsCar objectsDim objCar1 As clsCarDim objCar2 As clsCar
'instantiate new instances for eachSet objCar1 = New clsCarSet objCar2 = New clsCar'set the VehicleId property for the first instance'of clsCar and then call the previously created'update method as an exampleobjCar1.VehicleIdNumber = "98765"objCar1.Update
'set the VehicleId property for the second instance'of clsCar and then call the previously created'update method as an exampleobjCar2.VehicleIdNumber = "12345"objCar2.Update
End SubNotice how two dif ferent clsCar objects are declared and instantiated. The VehicleIdNumber property of each instance of the class is assigned, and the Update method of each instance ofthe class is called.
As shown in Figure 4-12, the Immediate Window displays the messages generated from the Update method indicating that the record was being updated for each respective instance of theclass.
Beginning Access 2007 VBA
79 / 344
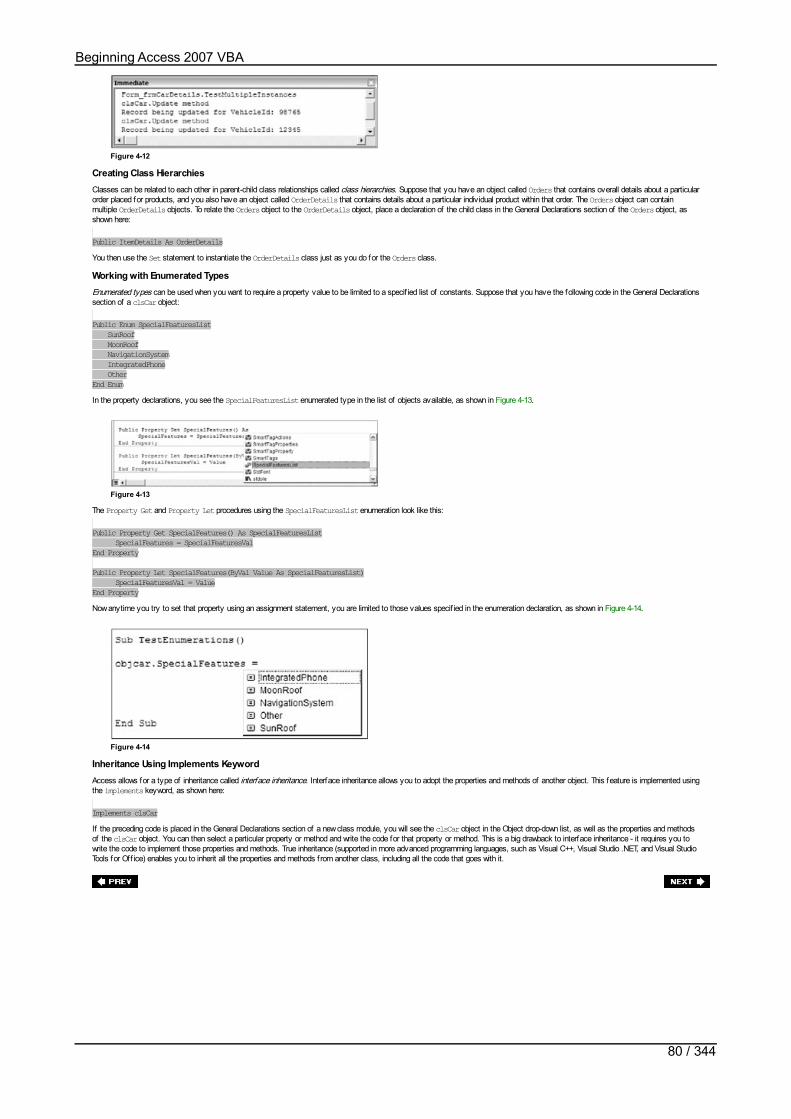
Figure 4-12
Creating Class HierarchiesClasses can be related to each other in parent-child class relationships called class hierarchies. Suppose that you have an object called Orders that contains overall details about a particularorder placed for products, and you also have an object called OrderDetails that contains details about a particular individual product within that order. The Orders object can containmultiple OrderDetails objects. To relate the Orders object to the OrderDetails object, place a declaration of the child class in the General Declarations section of the Orders object, asshown here:
Public ItemDetails As OrderDetailsYou then use the Set statement to instantiate the OrderDetails class just as you do for the Orders class.
Working with Enumerated TypesEnumerated types can be used when you want to require a property value to be limited to a specif ied list of constants. Suppose that you have the following code in the General Declarationssection of a clsCar object:
Public Enum SpecialFeaturesList SunRoof MoonRoof NavigationSystem IntegratedPhone OtherEnd EnumIn the property declarations, you see the SpecialFeaturesList enumerated type in the list of objects available, as shown in Figure 4-13.
Figure 4-13
The Property Get and Property Let procedures using the SpecialFeaturesList enumeration look like this:
Public Property Get SpecialFeatures() As SpecialFeaturesList SpecialFeatures = SpecialFeaturesValEnd Property
Public Property Let SpecialFeatures(ByVal Value As SpecialFeaturesList) SpecialFeaturesVal = ValueEnd PropertyNow anytime you try to set that property using an assignment statement, you are limited to those values specif ied in the enumeration declaration, as shown in Figure 4-14.
Figure 4-14
Inheritance Using Implements KeywordAccess allows for a type of inheritance called interface inheritance. Interface inheritance allows you to adopt the properties and methods of another object. This feature is implemented usingthe implements keyword, as shown here:
Implements clsCarIf the preceding code is placed in the General Declarations section of a new class module, you will see the clsCar object in the Object drop-down list, as well as the properties and methodsof the clsCar object. You can then select a particular property or method and write the code for that property or method. This is a big drawback to interface inheritance - it requires you towrite the code to implement those properties and methods. True inheritance (supported in more advanced programming languages, such as Visual C++, Visual Studio .NET, and Visual StudioTools for Off ice) enables you to inherit all the properties and methods from another class, including all the code that goes with it.
Beginning Access 2007 VBA
80 / 344

Create Custom Properties for Existing ObjectsNow that you have worked with existing objects and created your own objects, you will see a few ways to extend existing objects, giving them additional properties, methods, or events.Start by looking at how to create custom properties for existing objects.
Using Existing Tag Property
One way to create a custom property for an existing object is to use the Tag property. The Tag property is only used when you write code to set the value and then use that value later forsome specif ied purpose. For example, you might use the Tag property to hold a value and then retrieve that value at a later time.
Using Public Variables
As described earlier, when you create properties for your custom objects, you can also create properties for existing objects, using public variables. To do so, just add the public variabledeclaration to the class module of the existing object, such as an existing class for a form. Again, this is not the recommended way to create properties. As discussed previously, I do notrecommend this approach for three primary reasons. First, you cannot manipulate the value because the property is set; second, you cannot create read-only and write-only properties;third, you cannot easily validate what is assigned to public variables. A better way to create properties, discussed next, does not have these drawbacks.
Using Property Let, Property Get, and Property Set Routines
You can use the Property Let, Property Get, and Property Set procedures to create properties for existing objects. Again, you can do this just as you did for your own objects, only youadd the PropertyLet and PropertyGet procedure to the existing object. Now add a new property to the frmCarDetails form to see how this works.
Try It Out-Adding New Property for frmCarDetails Form1. From the Visual Basic Editor, select the frmCarDetails class module. Add the following declaration to the General Declarations section of the class:
Dim strTestPropertyVal As String2. Also from the frmCarDetails class module, add the following property procedures:
Public Property Get TestProperty() As String TestProperty = strTestPropertyValEnd Property
Public Property Let TestProperty(ByVal Value As String) strTestPropertyVal = ValueEnd Property
3. In the frmCarDetails class module, add a new procedure called ShowTestProperty and type the Me keyword followed by a period, as shown in Figure 4-15. Note that theTestProperty that you just added in Step 2 now appears, and you can select it f rom the list and assign it a value if desired. You can delete the ShowTestPropertyprocedure, as it was just used to show you that the new property you just added is now available.
Figure 4-15
How It Works
First, you added the property procedures to the existing frmCarDetails form. Then, when you referred to frmCarDetails in code, you saw that the custom property you just added was inthe drop-down list along with the other original properties.
Properties can be added to nearly any existing object. Custom properties that you add are not illustrated in the Properties panel, but are visible in the Code window as shown in Figure 4-15.
Beginning Access 2007 VBA
81 / 344

Create Custom Methods for Existing ObjectsIn addition to custom procedures, custom methods can also be created for existing objects by using public sub procedures or functions.
Using Public Sub Procedures and Functions
Custom methods can be created just as you created methods for your own objects, only you add a public sub procedure or function to the existing object. Now add a new method for thefrmCarDetails form to see how this works.
Try It Out-Adding New Method for the frmCarDetails Form1. From the Visual Basic Editor, select the frmCarDetails class module. Add the following method to the class:
Public Sub TestMethod()
MsgBox "This is a test method added to an existing object"
End Sub2. From the frmCarDetails class module, add a new procedure called DemonstrateCustomMethods and type the me keyword followed by a period, as shown in Figure 4-16.
Figure 4-16
How It Works
First, you added the new method to the existing frmCarDetails form. Then, when you referred to frmCarDetails in code using the me keyword, you saw that the custom method you justadded was in the drop-down list along with the custom property you just created and the original properties and methods. Just like properties, methods can be added to nearly any existingobject.
Beginning Access 2007 VBA
82 / 344

SummaryIn this chapter, you learned how to create a Class Diagram to model the classes and their relationships. Class diagrams provide a roadmap of your code structure. Ideally, Class Diagramsshould be separated into a presentation layer, business logic layer, and data access layer. The presentation layer can map to your Use Case Diagrams. The business logic layer is the heartof your Class Diagram and contains the class modules that are the heart of your application. The business logic layer calls the data access layer for any activities that need communicationwith the database.
You then looked at several examples of how to create properties, methods, and events for custom objects. Custom properties can be created using public variable declarations in a classmodule. A preferred way of creating custom properties is to write public Property Get and Property Let procedures in the class module. Property Get procedures determine whathappens when the property value is retrieved, and Property Let procedures determine what happens when the property is assigned. After you write the code for a custom object, the objectcan be used from other class modules or procedures by declaring the object and instantiating the object. The properties, methods, and events can be accessed in the custom object f romthe Visual Basic Editor Code window just like existing objects. You create custom methods by adding public procedures or functions to the class module. You can also add additionalproperties and methods to existing objects in the same way that you create your own properties and methods for objects. The only dif ference is that you place the code in the class modulefor the existing object, such as a form.
Now that you have learned how to work with existing objects and how to create your own objects, it’s time to learn how ActiveX Data Objects (ADO) can be used in your applications tointeract with data in your database.
Beginning Access 2007 VBA
83 / 344
Exercises1. What is a Class Diagram and why is it useful?
2. Explain how you can create custom properties and methods.
3. How can you add additional properties and methods to existing objects?
Answers
1. A class diagram is a diagram that shows the classes and their relationships and how they should be structured in your application. The complete class diagram model for your systemis critical to create, as it provides you with a roadmap for what your code structure needs to look like.
2. Custom properties can be created using public variable declarations in a class module. Or, a preferred way is to implement public Property Get and Property Let procedures in theclass module. Property Get procedures specify what should happen when the property value is retrieved. Property Let procedures specify what should happen when the property isassigned. Custom methods can be created by adding public procedures or functions to the class module.
3. You can add additional properties and methods to existing objects in the same way that you create your own properties and methods for your own objects. The only dif ference is thatyou place the code in the class module for the existing object, such as a form.
Beginning Access 2007 VBA
84 / 344

Chapter 5: Interacting with Data Using ADO and SQLIn this chapter, you turn your attention to one of the most important concepts in Access programming: working with data in databases. Data is, af ter all, at the heart of almost everyapplication. Programmers typically write applications to enable users to interact with data in meaningful ways. You have probably created Access applications yourself that retrieve datausing forms that are bound directly to tables.
This chapter expands your knowledge of working with data by covering the basics of retrieving and modifying data from VBA code using ActiveX Data Objects (ADO). You will create thesame contact form in three dif ferent ways so that you can see the various approaches to interaction with the same underlying data source. I will also cover the basics of writing SQLstatements to interact with the database. The chapter ends with a brief section on the ADOX object model that can be used to manage database objects such as tables, users, and groups.
Introduction to Data AccessADO is an acronym for ActiveX Data Objects. DAO stands for Data Access Objects. Both ADO and DAO allow you to manipulate databases from your Access 2007 VBA code.
The prior editions of this book with Access 2002 and earlier covered DAO in detail. DAO has been around since the earliest versions of Access and has always been an excellent dataaccess method for working with native Access data.
ADO is a better choice for building sophisticated, multiuser applications or applications that interact with databases other than Access. It appears that DAO is being phased out, and mostbooks and other resources you f ind on the topic recommend that ADO be used for all new development. I agree with this recommendation and have, therefore, in both the prior 2003 editionof the book and now with this 2007 edition continued to focus the examples on ADO. If you are dealing with older Access applications that have DAO code, consult the 2002 or prior editionsof this book for a comprehensive explanation of DAO, or the online help documentation built into Access and the VBA Editor.
Tip ADO should not be confused with ADO.NET. ADO.NET is a version of ADO that is designed to work with the Microsoft Visual Studio .NET development environment. Although ADOand ADO.NET have a lot of features in common, they are also dif ferent in numerous ways. In the future, it is possible that Microsoft will integrate the ADO.NET functionality intoMicrosoft Access to replace ADO, but such integration is not a certainty. Visual Studio Tools for Off ice (VSTO) uses ADO.NET. If you plan to use .NET in the future for yourdevelopment or are already a .NET developer, then you should concentrate on ADO.NET.
Beginning Access 2007 VBA
85 / 344

Using ADODB to Work with DataIn this section, you will explore the ADO object model and how to use the objects therein to work with data in underlying databases.
The ADO Object Model
Figure 5-1 provides an overview of the ADO object model. At the highest level of the object model, several collections exist: Connection, Recordset, Command, Record, and Stream.
Figure 5-1
The ADO object library is sometimes referred to as the ADODB library. In order to use the features of ADO, you must have a reference to one of the ADO library versions in your project.You can add a reference to an ADO library by selecting Tools References from Visual Basic Editor and choosing a library from the list. Figure 5-2 shows an example with a reference setto version ADO version 2.7.
Figure 5-2
Several versions of ADO may exist on your computer, such as 2.1, 2.5, 2.7, and 2.8. The version you choose for your project depends on the version of Access that others in yourorganization are using.
If everyone is using Access 2007 or higher, you should use version 2.8. If everyone is using Access 2002 or higher, you should use version 2.7. If some people are using Access 2000,then you may want to use ADO version 2.5. If some are using Access 97, you may want to use ADO version 2.1.
Tip The examples in this book use ADO 2.8 and earlier. There may be other releases of ADO that come with later versions of Windows and/or Off ice in the near future. The codeexamples used herein should still work in the same or similar fashion if you are using one of these later releases.
The Connection Object
The Connection object is the highest level of the ADO object model. The Connection object allows you to establish a connection to a data source. You must declare a Connection objectbefore you can use it, as shown here:
Dim cnConnection as ADODB.ConnectionAfter declaring a Connection object, you must then instantiate a new Connection object, as follows:
Set cnConnection = New ADODB.ConnectionOnce instantiated, a Connection object can be opened to connect to Access and other databases. You open a connection by using the Open method of the Connection object. The Openmethod accepts various parameters, including a connection string, user id, password, and options.
Connecting to Access DatabasesYou specify the data source for the connection using a connection string. The connection string is then used in the Open method to open the data source. In the following example, theconnection string connects to the Microsoft Access database for the current project called Ch5CodeExamples.mdb:
Dim strConnection As StringstrConnection = "Provider=Microsoft.ACE.OLEDB.12.0;" & _ "Data Source=" & CurrentProject.Path & "\Ch5CodeExamples.accdb;"cnConnection.Open strConnection
Connecting to Other DatabasesAccess can be used as a front end to various other databases, such as SQL Server. The example that follows shows a connection string that you might use to connect to a SQL Serverdatabase called Pubs on an instance named SQLServerName using integrated Windows security:
Dim strConnection As String
strConnection = "Provider=sqloledb;Data Source=SQLServerName;" & _ "Integrated Security=SSPI;Initial Catalog=Pubs" cnConnection.Open strConnection
The Command Object
Beginning Access 2007 VBA
86 / 344
The Command object represents a SQL statement, query, or stored procedure that is executed against a data source. Just like a Connection object, you must declare and instantiate aCommand object before you can use it:
Dim cmdCommand As ADODB.CommandSet cmdCommand = New ADODB.CommandAfter a new Connection object is instantiated, you can assign the Command object to an open connection and call the Execute method to execute a SQL statement, query, or storedprocedure against the data source. This concept will be illustrated in more detail later in this chapter when you create SQL statements and use ADO to execute them. In addition, thecomprehensive case study in Chapter 14 that deals with SQL Server will illustrate how to use the Command object to pass parameters to SQL Server stored procedures.
The Recordset Object
The Recordset object allows you to retrieve a set of records from a data source based on specif ied criteria. Recordsets can either be connected or disconnected. With connectedrecordsets, a connection to the database is maintained, and changes to the recordset are made to the underlying data source. With disconnected recordsets, the connection from thedatabase is closed, and you work with a local copy of the information. You can use both connected and disconnected recordsets to display data to a user on a form, for example. Exampleslater in this chapter will illustrate the dif ference between connected and disconnected recordsets.
Creating a RecordsetAs you did with a Connection object, you have to declare and instantiate a Recordset object before you can use it:
Dim rsRecordset As ADODB.RecordsetSet rsRecordset = New ADODB.RecordsetNext, you use the Open method to populate the recordset with a particular set of records:
rsRecordset.Open "SELECT * FROM tblSupplier", cnConnectionThe Open method has various parameters that determine how the recordset will be created, such as CursorType, CursorLocation, LockType, and Options. These parameters must be setprior to opening the recordset for them to be effective.
CursorType Property
The CursorType property of the Recordset object indicates what type of movement you can take within a recordset. By default, the CursorType property is set to adOpenForwardOnly,which means that you can only move forward through the records. A forward-only cursor does not allow you to count how many records are in the recordset or navigate back and forththrough the recordset. The following code is an example of setting the CursorType property:
rsRecordset.CursorType = adOpenStaticThe following table summarizes the four possible choices for the CursorType property.
Open table as spreadsheet
Value Explanation
adOpenForwardOnly This cursor is read-only and is the fastest type of cursor. However, it allows only for forward movement through the records.
adOpenStatic This cursor allows forward and backward movement through the records and also allows bookmarks. It doesn’t show changes made by other users. This is aclient-side cursor.
adOpenKeyset This cursor allows forward and backward movement through the records and also allows bookmarks. It does not show new or deleted records. It points backto the original data.
adOpenDynamic This cursor provides complete access to a set of records by showing additions and deletions. It also allows for forward and backward movement through therecords.
The CursorLocation Property
The CursorLocation property of the Recordset object specif ies where the set of records or record pointers are returned when you open a recordset. ADO supports two values for theCursorLocation property: adUseServer and adUseClient. These return records to the server and client, respectively.
You should generally use server cursors except when client cursors are specif ically needed. An example of the syntax of this property is shown below:
rsRecordset.CursorLocation = adUseServerThe LockType Property
The LockType property of the Recordset object is what determines whether a recordset is updatable. The following table summarizes the four possible choices for the LockType property.
Open table as spreadsheet
Value Explanation
adLockReadOnly The recordset is read-only and no changes are allowed.
adLockPessimistic The record in the recordset will be locked as soon as editing begins.
adLockOptimistic The record in the recordset will be locked when the Update method is issued.
adLockBatchOptimistic The records will not be locked until a batch update of all records is performed.
An example of the syntax of this property is shown in the following code:
rsRecordset.LockType = adLockReadOnlyThe Options Parameter
The Options parameter of the Recordset object allows you to specify how the provider should evaluate the source argument. If the Options property is not specif ied, it will be determinedat runtime, which is slower. Here is an example showing how to specify the Options parameter:
rsRecordset.Open "SELECT * FROM tblSupplier", cnConnection, _Options:=adCmdTextTry It Out-Building a Contacts Form Bound to a Recordset
Now that you have a basic idea of various ADO settings, you can put the concepts into practice by building a contacts form that connects to and displays data from a recordset. Assumethat the contacts form will be used by a U.S. company that does not deal with foreign addresses.
1. Create a new database by selecting Off ice Button New Blank Database and specifying Ch5CodeExamples as the f ile name.
2. Create a new table in the database by selecting the Create ribbon on the toolbar and then choosing Table from the Tables grouping. The table should be namedtblContacts and should have the f ields illustrated in Figure 5-3. Note that the f ield sizes are listed as part of the description for convenience purposes only, so that, whencreating the table, you can see what size to set for each f ield.
Beginning Access 2007 VBA
87 / 344

Figure 5-3
3. Open the table from the Database Window and add at least one record to the table.4. Create a new Blank Form named frmContactsBound. Use the ToolBox to drag and drop 12 text box controls onto the form. Modify the Name property for each text box to
the following: txtLastName, txtFirstName, txtMiddleName, txtTitle, txtAddress1, txtAddress2, txtCity, txtState, txtZip, txtWorkPhone, txtHomePhone, andtxtCellPhone, respectively. Also rename the Caption property for the corresponding label of each text box, as shown in Figure 5-4.
Figure 5-4
5. Add the following code to the Form_Load procedure of the frmContactsBound form. You can do so by selecting the form in the Designer Window, viewing the Propertiesdialog box for the form, selecting the Events tab, and then selecting the Code Builder option from the On Load event. Make sure that you also add the reference to ADOfrom the Tools, References menu option in the VB Editor.
Private Sub Form_Load()
Dim cnCh5 As ADODB.ConnectionDim rsContacts As ADODB.RecordsetDim strConnection As String
'specify the connection string for connecting to the databasestrConnection = "Provider=Microsoft.ACE.OLEDB.12.0;" & _ "Data Source=" & CurrentProject.Path & "\Ch5CodeExamples.accdb;"'create a new connection instance and open it using the connection stringSet cnCh5 = New ADODB.ConnectioncnCh5.Open strConnection
'create a new instance of a recordsetSet rsContacts = New ADODB.Recordset'set various properties of the recordsetWith rsContacts
'specify a cursortype and lock type that will allow updates .CursorType = adOpenKeyset .CursorLocation = adUseClient .LockType = adLockOptimistic 'open the recordset based on tblContacts table using the existing connection .Open "tblContacts", cnCh5End With
'if the recordset is emptyIf rsContacts.BOF And rsContacts.EOF Then MsgBox "There are no records in the database." Exit Sub'if the recordset is not empty, then bind the'recordset property of the form to the rsContacts recordsetElse Set Me.Recordset = rsContactsEnd If
'bind the controls of the form to the proper field in the recordset (which has'the same field names as the tblContacts table from which it was generated)Me.txtLastName.ControlSource = "txtLastName"Me.txtFirstName.ControlSource = "txtFirstName"Me.txtMiddleName.ControlSource = "txtMiddleName"Me.txtTitle.ControlSource = "txtTitle"Me.txtAddress1.ControlSource = "txtAddress1"Me.txtAddress2.ControlSource = "txtAddress2"Me.txtCity.ControlSource = "txtCity"Me.txtState.ControlSource = "txtState"Me.txtZip.ControlSource = "txtZip"Me.txtWorkPhone.ControlSource = "txtWorkPhone"Me.txtHomePhone.ControlSource = "txtHomePhone"Me.txtCellPhone.ControlSource = "txtCellPhone"
End Sub
Beginning Access 2007 VBA
88 / 344

6. Save the VBA code from the Visual Basic Editor by selecting the Save button from the toolbar.
7. Save the form from the Form Designer by selecting the Save button from the toolbar.
8. Open the form. You should see a screen similar to Figure 5-5.
Figure 5-5
9. Modify one of the existing records.
10. Click the Add New navigation button (right arrow with asterisk) to add a new record similar to the one shown in Figure 5-6.
Figure 5-6
How It Works
This example binds the frmContactsBound form to an ADO recordset. Now I will show you how it works. All the code to make this application work is in the Form_Load event.Private Sub Form_Load()First, you declared new Connection and Recordset objects, along with a variable to store the connection string:
Dim cnCh5 As ADODB.ConnectionDim rsContacts As ADODB.RecordsetDim strConnection As StringNext, you specif ied a value for the connection string that points to the current Access database:'specify the connection string for connecting to the databasestrConnection = "Provider=Microsoft.ACE.OLEDB.12.0;" & _ "Data Source=" & CurrentProject.Path & "\Ch5CodeExamples.accdb;"At this point, you created a new connection instance and opened the connection:'create a new connection instance and open it using the connection stringSet cnCh5 = New ADODB.ConnectioncnCh5.Open strConnectionThe next set of code instantiated a new Recordset object and sets various properties that af fect how the Recordset is populated:'create a new instance of a recordsetSet rsContacts = New ADODB.Recordset'set various properties of the recordsetWith rsContacts 'specify a cursortype and lock type that will allow updates .CursorType = adOpenKeyset .CursorLocation = adUseClient .LockType = adLockOptimistic 'open the recordset based on tblContacts table using the existing connection .Open "tblContacts", cnCh5End WithAfter you set the CursorType, CursorLocation, and LockType properties, the recordset was opened with the contents of the tblContacts table, using the existing connection. If therecordset did not contain any records, a message would be displayed.'if the recordset is emptyIf rsContacts.BOF And rsContacts.EOF Then MsgBox "There are no records in the database." Exit SubIf the recordset was not empty, the next set of code bound the Recordset property of the form to the ADO recordset called rsContacts:'if the recordset is not empty, then bind the'recordset property of the form to the rsContacts recordsetElse
Set Me.Recordset = rsContactsEnd IfWhen you bound the recordset to the form, all the f ields in the recordset became available for binding to the appropriate controls. However, the form does not know which controls should bebound to which recordset f ields until you set the ControlSource property of the applicable controls. The next set of code assigned the ControlSource property of each text box to therespective f ield in the recordset, which was generated from the underlying tblContacts table:'bind the controls of the form to the proper field in the recordset (which has'the same field names as the tblContacts table from which it was generated)Me.txtLastName.ControlSource = "txtLastName"Me.txtFirstName.ControlSource = "txtFirstName"Me.txtMiddleName.ControlSource = "txtMiddleName"
Beginning Access 2007 VBA
89 / 344
Me.txtMiddleName.ControlSource = "txtMiddleName"Me.txtTitle.ControlSource = "txtTitle"Me.txtAddress1.ControlSource = "txtAddress1"Me.txtAddress2.ControlSource = "txtAddress2"Me.txtCity.ControlSource = "txtCity"Me.txtState.ControlSource = "txtState"Me.txtZip.ControlSource = "txtZip"Me.txtWorkPhone.ControlSource = "txtWorkPhone"Me.txtHomePhone.ControlSource = "txtHomePhone"Me.txtCellPhone.ControlSource = "txtCellPhone"End SubNext, you opened the form in View mode and updated and added records. If you open the underlying tblContacts table, you will see that the changes you made were correctly saved, asshown in Figure 5-7.
Figure 5-7
Did you notice that you did not have to write any of the code for the navigation and update features? Access handled this code for you automatically because the form was bound to therecordset. Binding a form to a recordset is a very quick and easy way to implement a basic user interface and does not require you to write code for navigation and database updates.
However, using bound forms presents some serious drawbacks. One drawback is that a database connection remains open the entire time you are working with the application. Inapplications with multiple users but limited licenses, this can be a problem. Another drawback is that records may remain locked longer than necessary because you are always maintainingthe open database connection. If you walk away from your desk with the program open to a particular record, you might keep someone else from updating that same record because youhave it locked. In a later example, you will explore how to create a disconnected recordset to help eliminate some of these problems.
You also need to make sure to close the table and form views before working on other portions of code because those views hold an exclusive lock on the database. You will receive anAccess Denied error if you try to perform an operation needing to access the database when the database is locked by another operation.
Counting Records in a RecordsetThe RecordCount property of the Recordset object returns the number of records in the recordset. Suppose that you have the following procedure:
Sub TestRecordCount()
Dim cnCh5 As ADODB.ConnectionDim rsContacts As ADODB.RecordsetDim strConnection As String
'specify the connection string for connecting to the databasestrConnection = "Provider=Microsoft.ACE.OLEDB.12.0;" & _ "Data Source=" & CurrentProject.Path & "\Ch5CodeExamples.accdb;"
'create a new connection instance and open it using the connection stringSet cnCh5 = New ADODB.ConnectioncnCh5.Open strConnection
'create a new instance of a recordsetSet rsContacts = New ADODB.Recordset'set various properties of the recordsetWith rsContacts
.CursorType = adOpenStatic 'open the recordset based on tblContacts table using the existing connection .Open "tblContacts", cnCh5End With
'print the number of records to the Immediate WindowDebug.Print "The total number of records is: " & rsContacts.RecordCount
'close the database connectioncnCh5.Close
'set the recordset and connection to nothingSet rsContacts = NothingSet cnCh5 = Nothing
End SubAfter the recordset is created, the code determines how many records are in the recordset using the RecordCount property. The number of records is then displayed in the ImmediateWindow, as shown in Figure 5-8.
Figure 5-8
Tip If you remove the line specifying the CursorType, then a -1 will be returned as the record count since the recordset will default to a forward-only recordset.
Navigating through a RecordsetThe Recordset object has various methods that allow you to navigate among the records, assuming of course that the recordset is set to a CursorType that can be navigated. The followinglist contains four methods for navigation that can be used:
rsRecordset.MoveFirstrsRecordset.MoveLastrsRecordset.MoveNextrsRecordset.MovePrevious
Beginning Access 2007 VBA
90 / 344
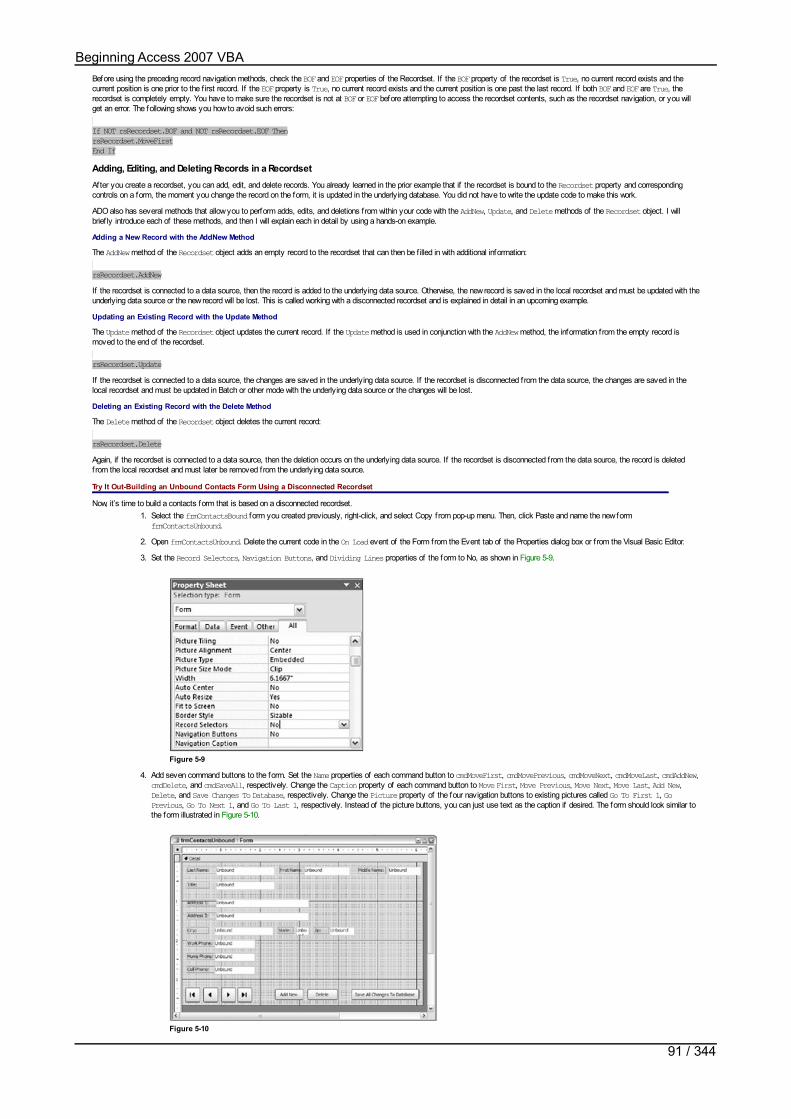
Before using the preceding record navigation methods, check the BOF and EOF properties of the Recordset. If the BOF property of the recordset is True, no current record exists and thecurrent position is one prior to the f irst record. If the EOF property is True, no current record exists and the current position is one past the last record. If both BOF and EOF are True, therecordset is completely empty. You have to make sure the recordset is not at BOF or EOF before attempting to access the recordset contents, such as the recordset navigation, or you willget an error. The following shows you how to avoid such errors:
If NOT rsRecordset.BOF and NOT rsRecordset.EOF ThenrsRecordset.MoveFirstEnd If
Adding, Editing, and Deleting Records in a RecordsetAfter you create a recordset, you can add, edit, and delete records. You already learned in the prior example that if the recordset is bound to the Recordset property and correspondingcontrols on a form, the moment you change the record on the form, it is updated in the underlying database. You did not have to write the update code to make this work.
ADO also has several methods that allow you to perform adds, edits, and deletions from within your code with the AddNew, Update, and Delete methods of the Recordset object. I willbrief ly introduce each of these methods, and then I will explain each in detail by using a hands-on example.
Adding a New Record with the AddNew Method
The AddNew method of the Recordset object adds an empty record to the recordset that can then be f illed in with additional information:
rsRecordset.AddNewIf the recordset is connected to a data source, then the record is added to the underlying data source. Otherwise, the new record is saved in the local recordset and must be updated with theunderlying data source or the new record will be lost. This is called working with a disconnected recordset and is explained in detail in an upcoming example.
Updating an Existing Record with the Update Method
The Update method of the Recordset object updates the current record. If the Update method is used in conjunction with the AddNew method, the information from the empty record ismoved to the end of the recordset.
rsRecordset.UpdateIf the recordset is connected to a data source, the changes are saved in the underlying data source. If the recordset is disconnected from the data source, the changes are saved in thelocal recordset and must be updated in Batch or other mode with the underlying data source or the changes will be lost.
Deleting an Existing Record with the Delete Method
The Delete method of the Recordset object deletes the current record:
rsRecordset.DeleteAgain, if the recordset is connected to a data source, then the deletion occurs on the underlying data source. If the recordset is disconnected from the data source, the record is deletedfrom the local recordset and must later be removed from the underlying data source.
Try It Out-Building an Unbound Contacts Form Using a Disconnected Recordset
Now, it’s time to build a contacts form that is based on a disconnected recordset.1. Select the frmContactsBound form you created previously, right-click, and select Copy from pop-up menu. Then, click Paste and name the new form
frmContactsUnbound.2. Open frmContactsUnbound. Delete the current code in the On Load event of the Form from the Event tab of the Properties dialog box or f rom the Visual Basic Editor.
3. Set the Record Selectors, Navigation Buttons, and Dividing Lines properties of the form to No, as shown in Figure 5-9.
Figure 5-9
4. Add seven command buttons to the form. Set the Name properties of each command button to cmdMoveFirst, cmdMovePrevious, cmdMoveNext, cmdMoveLast, cmdAddNew,cmdDelete, and cmdSaveAll, respectively. Change the Caption property of each command button to Move First, Move Previous, Move Next, Move Last, Add New,Delete, and Save Changes To Database, respectively. Change the Picture property of the four navigation buttons to existing pictures called Go To First 1, GoPrevious, Go To Next 1, and Go To Last 1, respectively. Instead of the picture buttons, you can just use text as the caption if desired. The form should look similar tothe form illustrated in Figure 5-10.
Figure 5-10
Beginning Access 2007 VBA
91 / 344
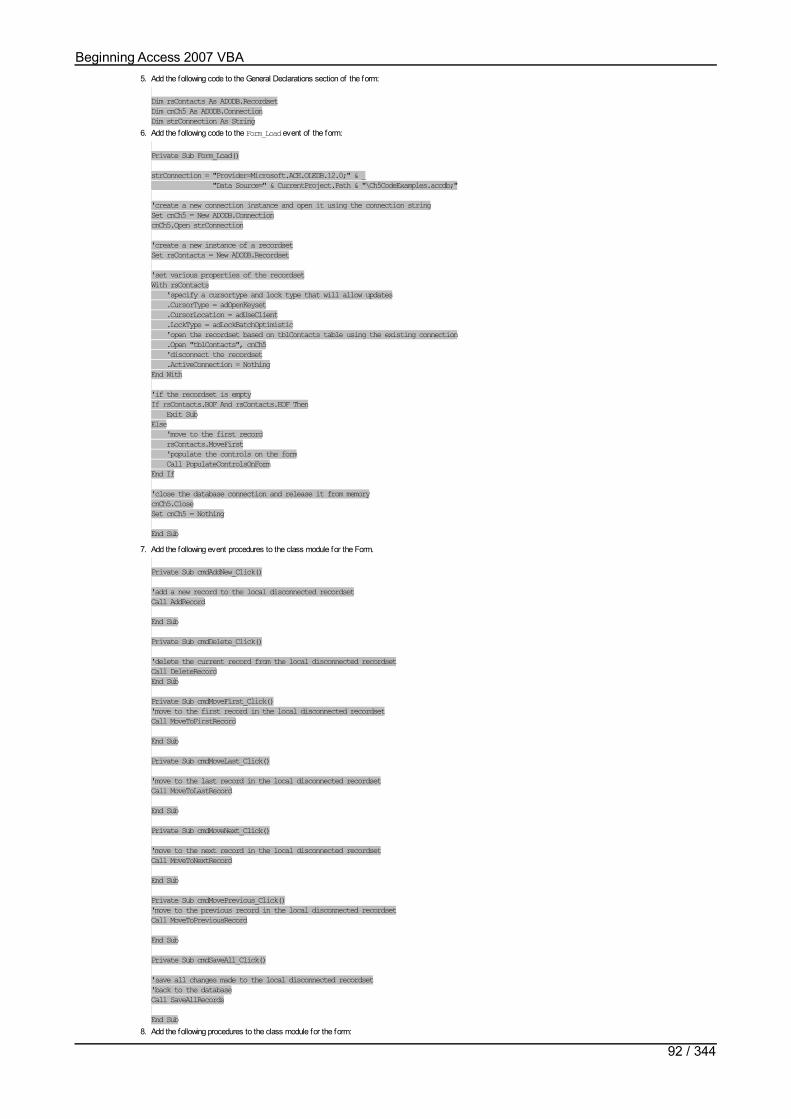
5. Add the following code to the General Declarations section of the form:
Dim rsContacts As ADODB.RecordsetDim cnCh5 As ADODB.ConnectionDim strConnection As String
6. Add the following code to the Form_Load event of the form:
Private Sub Form_Load()
strConnection = "Provider=Microsoft.ACE.OLEDB.12.0;" & _ "Data Source=" & CurrentProject.Path & "\Ch5CodeExamples.accdb;"
'create a new connection instance and open it using the connection stringSet cnCh5 = New ADODB.ConnectioncnCh5.Open strConnection
'create a new instance of a recordsetSet rsContacts = New ADODB.Recordset
'set various properties of the recordsetWith rsContacts 'specify a cursortype and lock type that will allow updates .CursorType = adOpenKeyset .CursorLocation = adUseClient .LockType = adLockBatchOptimistic 'open the recordset based on tblContacts table using the existing connection .Open "tblContacts", cnCh5 'disconnect the recordset .ActiveConnection = NothingEnd With
'if the recordset is emptyIf rsContacts.BOF And rsContacts.EOF Then Exit SubElse 'move to the first record rsContacts.MoveFirst 'populate the controls on the form Call PopulateControlsOnFormEnd If
'close the database connection and release it from memorycnCh5.CloseSet cnCh5 = Nothing
End Sub7. Add the following event procedures to the class module for the Form.
Private Sub cmdAddNew_Click()
'add a new record to the local disconnected recordsetCall AddRecord
End Sub
Private Sub cmdDelete_Click()
'delete the current record from the local disconnected recordsetCall DeleteRecordEnd Sub
Private Sub cmdMoveFirst_Click()'move to the first record in the local disconnected recordsetCall MoveToFirstRecord
End Sub
Private Sub cmdMoveLast_Click()
'move to the last record in the local disconnected recordsetCall MoveToLastRecord
End Sub
Private Sub cmdMoveNext_Click()
'move to the next record in the local disconnected recordsetCall MoveToNextRecord
End Sub
Private Sub cmdMovePrevious_Click()'move to the previous record in the local disconnected recordsetCall MoveToPreviousRecord
End Sub
Private Sub cmdSaveAll_Click()
'save all changes made to the local disconnected recordset'back to the databaseCall SaveAllRecords
End Sub8. Add the following procedures to the class module for the form:
Beginning Access 2007 VBA
92 / 344
Sub AddRecord()
'add a new record to the local disconnected recordsetrsContacts.AddNew
'commit the new empty record to the local disconnected recordsetrsContacts.Update
'clear the current controls on the form so the'user can fill in values for the new recordCall ClearControlsOnForm
End Sub
Sub DeleteRecord()
'delete the record from the local disconnected recordsetrsContacts.Delete
'commit the deletion to the local disconnected recordsetrsContacts.Update
'move to the first record since the current one has been deletedrsContacts.MoveFirst
'populate the controls on the formCall PopulateControlsOnForm
End Sub9. Add the following navigation procedures to the class module for the form:
Sub MoveToFirstRecord()
'before performing move operation, save the current recordCall SaveCurrentRecord
'move to the first record in the local disconnected recordsetIf Not rsContacts.BOF And Not rsContacts.EOF Then rsContacts.MoveFirst 'populate the controls on the form with the current record Call PopulateControlsOnForm
End If
End Sub
Sub MoveToLastRecord()
'before performing move operation, save the current recordCall SaveCurrentRecord
'move to the last record in the local disconnected recordsetIf Not rsContacts.BOF And Not rsContacts.EOF Then rsContacts.MoveLast 'populate the controls on the form with the current record Call PopulateControlsOnForm
End If
End Sub
Sub MoveToPreviousRecord()
'before performing move operation, save the current recordCall SaveCurrentRecord
'move to the previous record in the local disconnected recordset'if not already at the beginningIf Not rsContacts.BOF Then rsContacts.MovePrevious 'populate the controls on the form with the current record Call PopulateControlsOnFormEnd If
End Sub
Sub MoveToNextRecord()
'before performing move operation, save the current recordCall SaveCurrentRecord
'move to the next record in the local disconnected recordset'if not already at the endIf Not rsContacts.EOF Then rsContacts.MoveNext 'populate the controls on the form with the current record Call PopulateControlsOnFormEnd If
End Sub10. Add the following procedures to the class module for the form:
Sub PopulateControlsOnForm()
'Populate the controls on the form with the values of the 'current record in the local disconnected recordset.
Beginning Access 2007 VBA
93 / 344

'current record in the local disconnected recordset. 'Use the same field names as the tblContacts table from 'which it was generated. If Not rsContacts.BOF And Not rsContacts.EOF Then Me.txtLastName = rsContacts!txtLastName Me.txtFirstName = rsContacts!txtFirstName Me.txtMiddleName = rsContacts!txtMiddleName Me.txtTitle = rsContacts!txtTitle Me.txtAddress1 = rsContacts!txtAddress1 Me.txtAddress2 = rsContacts!txtAddress2 Me.txtCity = rsContacts!txtCity Me.txtState = rsContacts!txtState Me.txtZip = rsContacts!txtZip Me.txtWorkPhone = rsContacts!txtWorkPhone Me.txtHomePhone = rsContacts!txtHomePhone Me.txtCellPhone = rsContacts!txtCellPhone ElseIf rsContacts.BOF Then 'past beginning of recordset so move to next record rsContacts.MoveNext ElseIf rsContacts.EOF Then 'past end of recordset so move back to previous record rsContacts.MovePrevious
End If
End Sub
Sub ClearControlsOnForm()
'clear the values in the controls on the formMe.txtLastName = ""Me.txtFirstName = ""Me.txtMiddleName = ""Me.txtTitle = ""Me.txtAddress1 = ""Me.txtAddress2 = ""Me.txtCity = ""Me.txtState = ""Me.txtZip = ""Me.txtWorkPhone = ""Me.txtHomePhone = ""Me.txtCellPhone = ""
End Sub
Sub SaveCurrentRecord()
'save the values in the controls on the form to the current record'in the local disconnected recordset.If Not rsContacts.BOF And Not rsContacts.EOF Then rsContacts!txtLastName = Me.txtLastName rsContacts!txtFirstName = Me.txtFirstName rsContacts!txtMiddleName = Me.txtMiddleName rsContacts!txtTitle = Me.txtTitle rsContacts!txtAddress1 = Me.txtAddress1 rsContacts!txtAddress2 = Me.txtAddress2 rsContacts!txtCity = Me.txtCity rsContacts!txtState = Me.txtState rsContacts!txtZip = Me.txtZip rsContacts!txtWorkPhone = Me.txtWorkPhone rsContacts!txtHomePhone = Me.txtHomePhone rsContacts!txtCellPhone = Me.txtCellPhoneEnd If
End Sub
Sub SaveAllRecords()
'Save current record to local disconnected recordsetCall SaveCurrentRecord
'create a new connection instance and open it using the connection stringSet cnCh5 = New ADODB.ConnectioncnCh5.Open strConnection
'set the disconnected recordset to the reopened connectionSet rsContacts.ActiveConnection = cnCh5
'save all changes in the local disconnected recordset back'to the databasersContacts.UpdateBatch
'disconnect the recordset againSet rsContacts.ActiveConnection = Nothing
'close the database connection and release it from memorycnCh5.CloseSet cnCh5 = Nothing
End Sub11. Add the following event procedure to the form:
Private Sub Form_Unload(Cancel As Integer)
Dim intResponse As Integer
'prompt the user to save changes
Beginning Access 2007 VBA
94 / 344
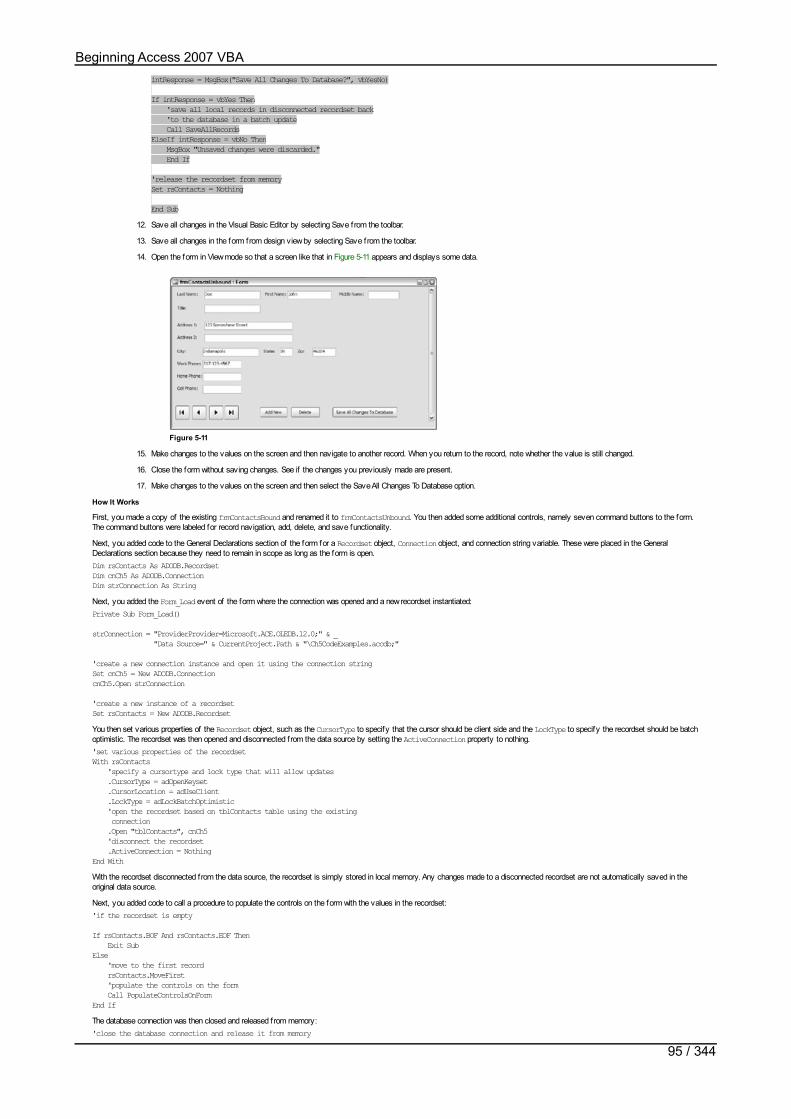
intResponse = MsgBox("Save All Changes To Database?", vbYesNo)
If intResponse = vbYes Then 'save all local records in disconnected recordset back 'to the database in a batch update Call SaveAllRecordsElseIf intResponse = vbNo Then MsgBox "Unsaved changes were discarded." End If
'release the recordset from memorySet rsContacts = Nothing
End Sub12. Save all changes in the Visual Basic Editor by selecting Save from the toolbar.
13. Save all changes in the form from design view by selecting Save from the toolbar.
14. Open the form in View mode so that a screen like that in Figure 5-11 appears and displays some data.
Figure 5-11
15. Make changes to the values on the screen and then navigate to another record. When you return to the record, note whether the value is still changed.
16. Close the form without saving changes. See if the changes you previously made are present.
17. Make changes to the values on the screen and then select the Save All Changes To Database option.
How It Works
First, you made a copy of the existing frmContactsBound and renamed it to frmContactsUnbound. You then added some additional controls, namely seven command buttons to the form.The command buttons were labeled for record navigation, add, delete, and save functionality.
Next, you added code to the General Declarations section of the form for a Recordset object, Connection object, and connection string variable. These were placed in the GeneralDeclarations section because they need to remain in scope as long as the form is open.Dim rsContacts As ADODB.RecordsetDim cnCh5 As ADODB.ConnectionDim strConnection As StringNext, you added the Form_Load event of the form where the connection was opened and a new recordset instantiated:Private Sub Form_Load()
strConnection = "ProviderProvider=Microsoft.ACE.OLEDB.12.0;" & _ "Data Source=" & CurrentProject.Path & "\Ch5CodeExamples.accdb;"
'create a new connection instance and open it using the connection stringSet cnCh5 = New ADODB.ConnectioncnCh5.Open strConnection
'create a new instance of a recordsetSet rsContacts = New ADODB.RecordsetYou then set various properties of the Recordset object, such as the CursorType to specify that the cursor should be client side and the LockType to specify the recordset should be batchoptimistic. The recordset was then opened and disconnected from the data source by setting the ActiveConnection property to nothing.'set various properties of the recordsetWith rsContacts 'specify a cursortype and lock type that will allow updates .CursorType = adOpenKeyset .CursorLocation = adUseClient .LockType = adLockBatchOptimistic 'open the recordset based on tblContacts table using the existing connection .Open "tblContacts", cnCh5 'disconnect the recordset .ActiveConnection = NothingEnd WithWith the recordset disconnected from the data source, the recordset is simply stored in local memory. Any changes made to a disconnected recordset are not automatically saved in theoriginal data source.
Next, you added code to call a procedure to populate the controls on the form with the values in the recordset:'if the recordset is empty
If rsContacts.BOF And rsContacts.EOF Then Exit SubElse 'move to the first record rsContacts.MoveFirst 'populate the controls on the form Call PopulateControlsOnFormEnd IfThe database connection was then closed and released from memory:'close the database connection and release it from memory
Beginning Access 2007 VBA
95 / 344
cnCh5.CloseSet cnCh5 = NothingEnd SubYou then added various event procedures to call the rest of the code when the user selects dif ferent options on the form. For example, the cmdAddNew_Click event was added to call theAddRecord procedure when the user clicks the Add New button on the form. A similar procedure was added for Delete.Private Sub cmdAddNew_Click()'add a new record to the local disconnected recordsetCall AddRecordEnd SubVarious event procedures were added to handle navigation through the recordset. For example, the cmdMoveFirst_Click event was added to call the procedure to move to the f irst record:Private Sub cmdMoveFirst_Click()
'move to the first record in the local disconnected recordsetCall MoveToFirstRecord
End SubOther similar procedures were added for Move Last, Move Next, and Move Previous. An event procedure was also added for Save to cause the SaveAllRecords procedure to execute whenthe Save button on the form is clicked:Private Sub cmdSaveAll_Click()
'save all changes made to the local disconnected recordset'back to the databaseCall SaveAllRecords
End SubNext, you added the procedures that really implement the heart of the functionality for the unbound form. The AddRecord procedure is called from the button’s OnClick event af ter the userclicks the Add New button on the form. The AddRecord procedure uses the AddNew method to add a new record to the local disconnected recordset and then commits the new empty recordto the local disconnected recordset using the Update method.Sub AddRecord()
'add a new record to the local disconnected recordsetrsContacts.AddNew
'commit the new empty record to the local disconnected recordsetrsContacts.UpdateThe controls on the form are then cleared so that the user can enter values for the new record:'clear the current controls on the form so the'user can fill in values for the new recordCall ClearControlsOnForm
End SubThe DeleteRecord procedure is called when the Click event of the cmdDelete button runs. This procedure deletes the current record in the local recordset using the Delete method andthen commits the change to the local recordset using the Update method.Sub DeleteRecord()
'delete the record from the local disconnected recordsetrsContacts.Delete
'commit the deletion to the local disconnected recordsetrsContacts.UpdateThe procedure then repositions the recordset to the f irst record and displays that record on the form to the user:'move to the first record since the current one has been deletedrsContacts.MoveFirst
'populate the controls on the formCall PopulateControlsOnForm
End SubVarious navigation procedures were then added to handle moving through the disconnected recordset. For example, the MoveToFirstRecord gets called when the Click event of thecmdMoveFirst button is f ired. This procedure saves the current record in the local recordset before moving to the f irst record.Sub MoveToFirstRecord()
'before performing move operation, save the current recordCall SaveCurrentRecord
'move to the first record in the local disconnected recordsetIf Not rsContacts.BOF And Not rsContacts.EOF Then rsContacts.MoveFirst
'populate the controls on the form with the current record Call PopulateControlsOnForm
End If
End SubAgain, remember that the saves so far are just updating the local copy of the recordset but not the underlying database table that the records came from. You will see in a moment how theupdates can be saved back to the original data source.
The PopulateControlsOnForm procedure set the text box controls on the form to the current values in the recordset. In other words, this code displays the values in the recordset to theuser on the form:Sub PopulateControlsOnForm()
'Populate the controls on the form with the values of the 'current record in the local disconnected recordset. 'Use the same field names as the tblContacts table from 'which it was generated. If Not rsContacts.BOF And Not rsContacts.EOF Then Me.txtLastName = rsContacts!txtLastName Me.txtFirstName = rsContacts!txtFirstName Me.txtMiddleName = rsContacts!txtMiddleName
Beginning Access 2007 VBA
96 / 344

Me.txtTitle = rsContacts!txtTitle Me.txtAddress1 = rsContacts!txtAddress1 Me.txtAddress2 = rsContacts!txtAddress2 Me.txtCity = rsContacts!txtCity Me.txtState = rsContacts!txtState Me.txtZip = rsContacts!txtZip Me.txtWorkPhone = rsContacts!txtWorkPhone Me.txtHomePhone = rsContacts!txtHomePhone Me.txtCellPhone = rsContacts!txtCellPhone ElseIf rsContacts.BOF Then 'past beginning of recordset so move to next record rsContacts.MoveNext ElseIf rsContacts.EOF Then 'past end of recordset so move back to previous record rsContacts.MovePrevious End If
End SubThe ClearControlsOnForm empties out the data entry controls to allow a user to add a new record:Sub ClearControlsOnForm()
'clear the values in the controls on the formMe.txtLastName = ""Me.txtFirstName = ""Me.txtMiddleName = ""Me.txtTitle = ""Me.txtAddress1 = ""Me.txtAddress2 = ""Me.txtCity = ""Me.txtState = ""Me.txtZip = ""Me.txtWorkPhone = ""Me.txtHomePhone = ""Me.txtCellPhone = ""End SubThe SaveCurrentRecord procedure saves the values that are in the controls on the form into the current record in the local disconnected recordset.Sub SaveCurrentRecord()
'save the values in the controls on the form to the current record'in the local disconnected recordset.If Not rsContacts.BOF And Not rsContacts.EOF Then rsContacts!txtLastName = Me.txtLastName rsContacts!txtFirstName = Me.txtFirstName rsContacts!txtMiddleName = Me.txtMiddleName rsContacts!txtTitle = Me.txtTitle rsContacts!txtAddress1 = Me.txtAddress1 rsContacts!txtAddress2 = Me.txtAddress2 rsContacts!txtCity = Me.txtCity rsContacts!txtState = Me.txtState rsContacts!txtZip = Me.txtZip rsContacts!txtWorkPhone = Me.txtWorkPhone rsContacts!txtHomePhone = Me.txtHomePhone rsContacts!txtCellPhone = Me.txtCellPhoneEnd If
End SubThe SaveAllRecords procedure is executed from the Click event of the cmdSaveAll button on the form. This procedure is responsible for updating the database with the current version ofall records in the disconnected recordset. First, changes are saved to the current record in the local recordset, and a connection is reestablished with the database:Sub SaveAllRecords()
'Save current record to local disconnected recordsetCall SaveCurrentRecord
'create a new connection instance and open it using the connection stringSet cnCh5 = New ADODB.ConnectioncnCh5.Open strConnectionTo reconnect the recordset to the underlying data source, the ActiveConnection property is assigned to the current open connection:'set the disconnected recordset to the reopened connectionSet rsContacts.ActiveConnection = cnCh5After it is reconnected to the underlying data source, the UpdateBatch method is executed to cause all the local changes to be updated in the original data source:'save all changes in the local disconnected recordset back'to the databasersContacts.UpdateBatchWith the updates completed, the recordset is again disconnected to save an open connection and the database connection is again released:'disconnect the recordset againSet rsContacts.ActiveConnection = Nothing
'close the database connection and release it from memorycnCh5.CloseSet cnCh5 = Nothing
End SubAs an additional feature, code was placed under the Form_Unload event to make sure that the reader knows to save changes before closing the form:Private Sub Form_Unload(Cancel As Integer)
Dim intResponse As Integer
'prompt the user to save changesintResponse = MsgBox("Save All Changes To Database?", vbYesNo)
If intResponse = vbYes Then
Beginning Access 2007 VBA
97 / 344
'save all local records in disconnected recordset back 'to the database in a batch update Call SaveAllRecordsElseIf intResponse = vbNo Then MsgBox "Unsaved changes were discarded." End If
'release the recordset from memorySet rsContacts = Nothing
End SubNotice how in this instance, you had to write the code to perform record navigation and record updates because the recordset was disconnected from the underlying data source. This iscertainly more time-consuming than the prior bound recordset example, which handled record navigation and record updates automatically. However, I recommend that you use disconnectedrecordsets and handle data interaction without keeping a connection open to the database. This helps you write an application that can support more users and that can more easily migrateto more advanced databases like SQL Server. Later in this chapter, you will see another example of using a disconnected recordset as well as SQL statements to handle unbound forms.
Sorting, Finding, and Filtering Records in a RecordsetThe Recordset object has various properties and methods that allow you to sort, f ilter, and f ind records. Some examples of these properties will now be discussed.
The Sort Property
The Sort property allows you to modify the order in which the records appear in the recordset.
Try It Out-Sorting Records for the Unbound Contacts Form
Look at an example of how to sort the rsContacts recordset that you used previously.1. In the code for the Form_Load event procedure of frmContactsUnbound, immediately following the line setting the ActiveConnection property, add the following Sort
command:With rsContacts 'specify a cursortype and lock type that will allow updates .CursorType = adOpenKeyset .CursorLocation = adUseClient .LockType = adLockBatchOptimistic 'open the recordset based on tblContacts table using the existing connection .Open "tblContacts", cnCh5 'disconnect the recordset .ActiveConnection = Nothing
'sort the recordset
.Sort = "txtLastName, txtFirstName, txtMiddleName"
End With2. Now reopen the form and navigate through the records.
How It Works
The Sort method of the Recordset object allows you to specify one or more f ields by which to sort the recordset. The preceding example sorts the contacts by last name, f irst name, andmiddle name. I hope you noticed that when you ran the form again, the order of the records was now alphabetical based on those three f ields.
The Find Method
The Find method of the Recordset object allows you to navigate to a particular record that matches certain criteria. Here is a sample procedure that uses the Find method to locate arecord that has a value for intContactId of 2.Sub TestFind()
Dim rsContacts As ADODB.Recordset
'create a new instance of a recordsetSet rsContacts = New ADODB.Recordset'set various properties of the recordsetWith rsContacts .CursorType = adOpenStatic 'open the recordset based on tblContacts table using the existing connection .Open "tblContacts", CurrentProject.ConnectionEnd With
'find a contact with the intContactId value of 2
rsContacts.Find "[intContactId] = 2"
'output a message to the Immediate Window regarding find resultsIf rsContacts.EOF Then Debug.Print "Specified record not found"Else'record was found - display some info Debug.Print "Contact Id: " & rsContacts!intContactId & _ " Last Name: " & rsContacts!txtLastName & _ " First Name: " & rsContacts!txtFirstName
End If
'close the recordsetrsContacts.Close
'set the recordset and connection to nothingSet rsContacts = Nothing
End SubThe Find method does not remove any records from the database, but instead just navigates you to a dif ferent record. Notice how the preceding example does not use a separateconnection object but uses the existing connection for the project to create the recordset. This is an acceptable approach if you will always be working with the same database of yourcurrent project.
Beginning Access 2007 VBA
98 / 344
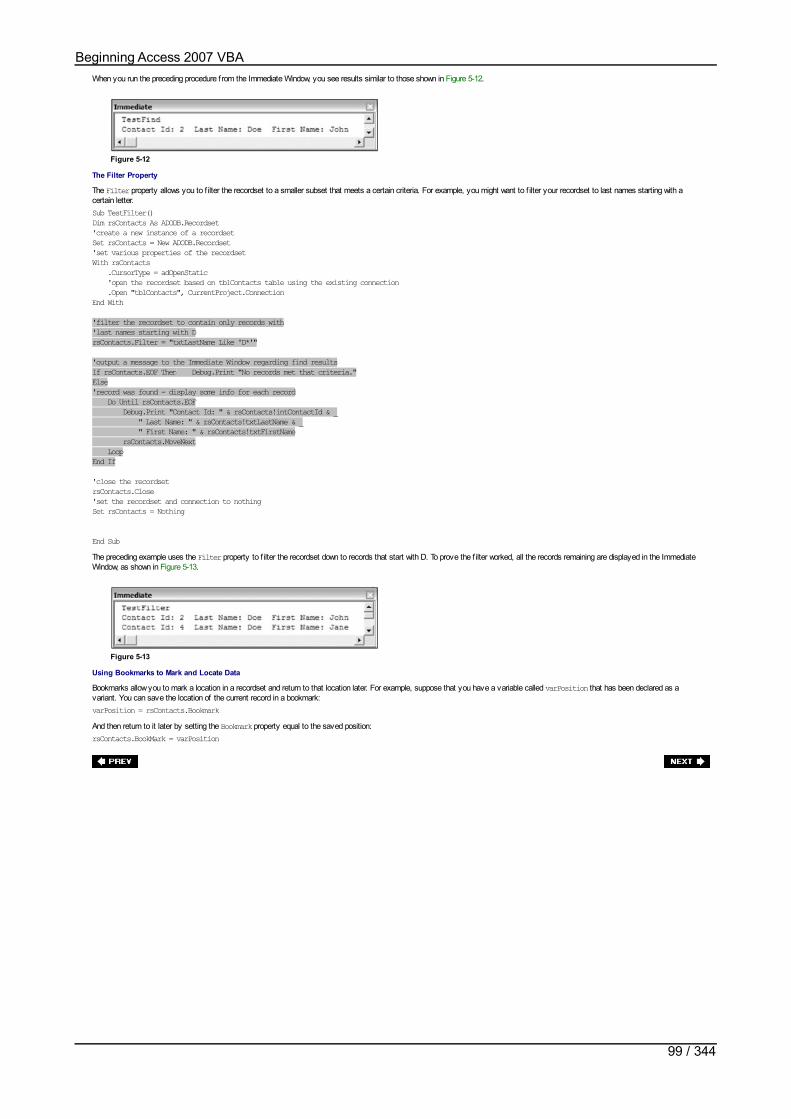
When you run the preceding procedure from the Immediate Window, you see results similar to those shown in Figure 5-12.
Figure 5-12
The Filter Property
The Filter property allows you to f ilter the recordset to a smaller subset that meets a certain criteria. For example, you might want to f ilter your recordset to last names starting with acertain letter.Sub TestFilter()Dim rsContacts As ADODB.Recordset'create a new instance of a recordsetSet rsContacts = New ADODB.Recordset'set various properties of the recordsetWith rsContacts .CursorType = adOpenStatic 'open the recordset based on tblContacts table using the existing connection .Open "tblContacts", CurrentProject.ConnectionEnd With
'filter the recordset to contain only records with'last names starting with DrsContacts.Filter = "txtLastName Like 'D*'"
'output a message to the Immediate Window regarding find resultsIf rsContacts.EOF Then Debug.Print "No records met that criteria."Else'record was found - display some info for each record Do Until rsContacts.EOF Debug.Print "Contact Id: " & rsContacts!intContactId & _ " Last Name: " & rsContacts!txtLastName & _ " First Name: " & rsContacts!txtFirstName rsContacts.MoveNext LoopEnd If
'close the recordsetrsContacts.Close'set the recordset and connection to nothingSet rsContacts = Nothing
End SubThe preceding example uses the Filter property to f ilter the recordset down to records that start with D. To prove the f ilter worked, all the records remaining are displayed in the ImmediateWindow, as shown in Figure 5-13.
Figure 5-13
Using Bookmarks to Mark and Locate Data
Bookmarks allow you to mark a location in a recordset and return to that location later. For example, suppose that you have a variable called varPosition that has been declared as avariant. You can save the location of the current record in a bookmark:varPosition = rsContacts.BookmarkAnd then return to it later by setting the Bookmark property equal to the saved position:rsContacts.BookMark = varPosition
Beginning Access 2007 VBA
99 / 344

Introduction to SQLStructured Query Language (SQL) is a special language for structuring commands that can communicate with databases. Various dialects of SQL statements include Jet SQL, ANSI SQL,and the vendor specif ic implementations of ANSI SQL such as T-SQL for SQL Server. The syntax of SQL you use varies slightly depending on underlying database. In this section, I coverSQL that is common to most databases.
SQL statements can be used with and without ADO. For example, a SQL statement can be specif ied as the RecordSource property to which a form can be bound. The examples in thissection will illustrate using SQL statements with ADO.
Note that you can also view SQL statements in the Query Designer and have the Query Designer help you create SQL. If you select View SQL View from within a Query window, youcan see the SQL statement that Access created for your statement. You’ll learn how to write SQL statements without using a designer.
Retrieving Data Using SQL Select Statements
The Select statement allows you to retrieve records from one or more tables in a database and has a basic syntax as follows:
SELECT columns FROM tables WHERE where-clause ORDER BY columns
Select ClauseThe Select clause specif ies what columns in the underlying table or tables you want to retrieve. To retrieve all records in a certain table, use:
SELECT *To select particular columns in a table, such as txtLastName and txtFirstName, list each name separated by commas:
SELECT txtLastName, txtFirstNamePredicates can also be used as part of the Select statement to further restrict what records get returned. For example, you can use the DISTINCT predicate to limit the results to uniquerecords:
SELECT DISTINCT txtLastNameThe TOP predicate allows you to restrict the number of records returned to a certain number or percent. For example, the following statement limits the number of records to be returned tof ive:
SELECT TOP 5 intSalesAmt from tblOrders
From ClauseThe FROM clause specif ies the tables from which the records should be selected. A basic FROM clause is:
FROM tblContactsYou can also specify a new name for the table, or a table alias, using the AS predicate, as shown here:
FROM tblContacts As ContactsTo retrieve data from more than one table, you use an Inner, Left, or Right Join to join the tables together. Here is the basic join syntax:
FROM <left table name> <join type> <right table name> ON <left join field name> =<right join field name>The following shows the dif ferences in each type of join:
INNER JOIN – Combines the records from the two tables where the joined values in both tables match.
LEFT JOIN – Includes all records from the table on the lef t side of the clause even if there are no matching records from the table on the right side.
RIGHT JOIN – Includes all records from the table on the right side of the clause even if there are no matching records from the table on the lef t side.
An example of an inner join is:
FROM tblContacts INNER JOIN tblSuppliers ON tblContacts.LastName =tblSuppliers.LastNameThe previous example returns records from the tblContacts table and from the tblSuppliers table where a match exists on the joined values in both tables.
An example of a lef t join is:
FROM tblContacts LEFT JOIN tblSuppliers ON tblContacts.LastName =tblSuppliers.LastNameThe lef t join example above returns all records from the tblContacts table, even if there are no matching records in the tblSuppliers table.
Where ClauseThe Where clause is used to limit the rows the SQL Statement will retrieve. The Where clause is optional. If the Where clause is included, it can be followed by comparison operators, such as=, >, <, BETWEEN, IN, and string expressions such as Is Null. What follows is an example of a Where clause that uses comparison operators:
WHERE LastName = 'Doe' AND FirstName = 'John'Expressions in a Where clause are separated by And statements. If the Where clause is omitted, you will get all records in the select without restriction. There are times when this is exactlywhat you want.
Order By ClauseThe Order By clause allows you to specify in what order the records should be sorted when they are retrieved. For example, suppose that you want to sort the results by last name andthen f irst name. You could use the following Order By clause:
ORDER BY txtLastName, txtFirstNameThe previous example will return records in ascending order, which is the default. To return the records in descending order, use the DESC keyword:
ORDER BY txtLastName, txtFirstName DESC
SubqueriesSubqueries enable you to nest one Select statement within another Select statement. The following example selects those records in tblContacts that do not have the same last name inthe tblContactsArchive table:
Beginning Access 2007 VBA
100 / 344

SELECT txtLastName, txtFirstName FROM tblContacts WHERE txtLastName Not In (SELECTtxtLastName FROM tblContactsArchive)
UnionThe Union statement allows you to combine data from two tables that have similar structures into the output. For example, suppose that you have a tblContacts table containing activecontacts and a tblContactsArchive table that contains archived contacts. To retrieve a set of records that combines data from both of these tables, you use the Union statement:
SELECT txtLastName, txtFirstNameFROM tblContactsUNION ALL SELECT txtLastName, txtFirstNameFROM tblContactsArchive
Using SQL and ADO to Populate a RecordsetNow that you have learned the basic syntax for Select statements, let’s look at an example that uses a SQL statement along with ADO. The following example opens a new recordset anduses a SQL statement as the source for the Open method:
Sub TestSQLSelect()
Dim rsContacts As ADODB.Recordset
'create a new instance of a recordsetSet rsContacts = New ADODB.Recordset'set various properties of the recordsetWith rsContacts .CursorType = adOpenStatic 'open the recordset based on SQL statement using the existing connection .Open "SELECT * FROM tblContacts", CurrentProject.ConnectionEnd With
'loop through the recordset and display some info for'each recordDo Until rsContacts.EOF Debug.Print "Contact Id: " & rsContacts!intContactId & _ " Last Name: " & rsContacts!txtLastName & _ " First Name: " & rsContacts!txtFirstName rsContacts.MoveNextLoop
'close the recordsetrsContacts.Close
'set the recordset and connection to nothingSet rsContacts = Nothing
End SubA portion of each record that is returned in the recordset is then printed in the Immediate Window, as shown in Figure 5-14 to demonstrate that the SQL statement selected what youexpected it to select.
Figure 5-14
The prior example retrieves data from a common data source: a database table. However, ADO enables you to connect to various data sources, and it can treat those data sources asvirtual tables. For example, you can connect to Microsoft Outlook using a SQL statement and ADO to populate a recordset. Here is an example of how you can retrieve data from anOutlook Calendar on Microsoft Exchange and print the results to the Immediate Window:
Sub RetrieveCalendar()
Dim strConnection As String Dim cnConn As ADODB.Connection Dim rsCalendar As ADODB.Recordset
Set cnConn = New ADODB.Connection Set rsCalendar = New ADODB.Recordset
With cnConn .Provider = "Microsoft.ACE.OLEDB.12.0" .ConnectionString = "Exchange 4.0;" _ & "MAPILEVEL=Mailbox - Gosnell, Denise|;" _ & "PROFILE=DMG;" _ & "TABLETYPE=0;DATABASE=C:\WINDOWS\TEMP\;" .Open End With
With rsCalendar .Open "Select * from Calendar", cnConn, adOpenStatic, _ adLockReadOnly 'print all records in calendar Do While Not rsCalendar.EOF Debug.Print rsCalendar(3).Name & ": " & rsCalendar(3).Value Debug.Print rsCalendar(10).Name & ": " & rsCalendar(10).Value Debug.Print vbCrLf rsCalendar.MoveNext Loop .Close End With
Set rsCalendar = Nothing cnConn.Close
Beginning Access 2007 VBA
101 / 344
cnConn.Close Set cnConn = Nothing
End SubIn the preceding example, the Mailbox and Prof ile as used by your Outlook database should be specif ied. When you run the preceding code with a valid Mailbox and Prof ile, you see resultssimilar to the following in the Immediate Window:
Subject: Doctor's AppointmentReceived: 5/24/2004 2:30:18 PM
Subject: Meet Benita for lunchReceived: 5/25/2004 10:06:52 AM
Subject: Jazz Fest Training MeetingReceived: 6/10/2004 2:28:51 PM
Inserting Data Using SQL Insert Statements
The Insert statement is used to insert data into a table. The syntax for an Insert statement is:
INSERT INTO tablename (fieldname1, fieldname2, ... fieldnameN) VALUES (value1,value2, ... valueN)The Insert clause can be used to insert all or part of a record into the database. For example, suppose that the tblContacts table only has txtLastName, txtFirstName, txtWorkPhone,and txtHome Phone f ields. To insert all of the record into the database in such a scenario, you could use the following:
INSERT INTO tblContacts (txtLastName, txtFirstName, txtWorkPhone, txtHomePhone)VALUES ('Doe', 'Jane', '317-123-4567', '317-987-6543')When adding a partial row for a table, you must specify at least the required f ields in the table. Otherwise, the syntax is the same as the example shown previously.
As I will illustrate in detail in a later example, you can use SQL statements as part of a Command object that gets executed against the database to insert new records.
Inserting Results of a Select into a TableSometimes you must insert the results f rom a Select statement into an existing table. As long as the data types correspond to each other, data from one or more tables can easily beinserted into another table. The basic syntax is shown here:
INSERT INTO destination (fieldname1, fieldname2, ... fieldnameN)SELECT fieldname1, fieldname2, ... fieldnameNFROM source[WHERE criteria]If you wanted to insert the entire contents of the tblContacts table into a tblContactsArchive table, you could use the following statement:
INSERT INTO tblContactsArchiveSELECT * FROM tblContactsAlternatively, you could list each f ield.
Updating Data Using SQL Statements
Update statements can be used to update existing records in the database. The basic syntax for Update statements is:
UPDATE tablenameSET column = valueWHERE criteriaSuppose, for example, that Jane Doe got married again and must now update her last name to Dawson. You could issue the following Update statement to update her existing record:
UPDATE tblContactsSET txtLastName = 'Dawson'WHERE txtLastName = 'Doe' AND txtFirstName = 'Jane'As I will illustrate in detail in a later example, you can use SQL statements as part of a Command object that gets executed against the database to update existing records.
Deleting Data Using SQL Statements
Delete statements can be used to delete existing records from the database. The basic syntax for Delete statements is:
DELETEFROM tablenameWHERE criteriaTo delete Jane Doe’s record from the database altogether, you could use the following statement:
DELETE from tblContacts WHERE txtLastName = 'Doe' AND txtFirstName = 'Jane'As I will illustrate in the following example, you can use SQL statements as part of a Command object that gets executed against the database to delete existing records.
Try It Out-Modify the Unbound Contacts Form to Use SQL
Now turn your attention to the f inal example of working with disconnected recordsets. In this case, you will modify our existing Contacts form to use SQL statements.1. Select frmContactsUnbound and right-click and select Copy. Select the Paste option, and name the new copy of the form frmContactsUnboundSQL.2. Modify the cmdSaveAll Caption property to Save Current Record. The form should look similar to the one shown in Figure 5-15.
Beginning Access 2007 VBA
102 / 344

Figure 5-15
3. Add an additional variable declaration to the General Declarations section of the form, as shown here:Dim rsContacts As ADODB.RecordsetDim cnCh5 As ADODB.ConnectionDim strConnection As StringDim blnAddMode As Boolean
4. Delete the existing SaveAllRecords procedure.
5. Delete the existing Form_Unload procedure.
6. Replace the existing AddRecord procedure with the following:
Sub AddRecord()
'set add mode to trueblnAddMode = True'clear the current controls on the form so the
'user can fill in values for the new recordCall ClearControlsOnFormEnd Sub
7. Replace the existing DeleteRecord procedure with the following:
Sub DeleteRecord()
'don't let the user issue a delete command if in add modeIf blnAddMode = True Then
Exit SubEnd If
Dim intResponse As Integer
'confirm that user really wants to delete recordintResponse = MsgBox("Are you sure you want to delete this record?", vbYesNo)
'if the user cancels delete, then exit this procedureIf intResponse = vbNo Then Exit SubEnd If
'declare and create new command objectDim cmdCommand As ADODB.CommandSet cmdCommand = New ADODB.Command
'create a new connection instance and open it using the connection stringSet cnCh5 = New ADODB.ConnectioncnCh5.Open strConnection
'declare variable to store current contactDim intCurContact As IntegerintCurContact = 0
'generate SQL command to delete current recordDim strSQL As StringstrSQL = "DELETE FROM tblContacts WHERE intContactId = "& rsContacts!intContactId
'set the command to the current connectionSet cmdCommand.ActiveConnection = cnCh5'set the delete SQL statement to the command textcmdCommand.CommandText = strSQL'execute the delete command against the databasecmdCommand.Execute
'move to the next record in the local recordset since the'current one is being deletedIf Not rsContacts.EOF Then rsContacts.MoveNext 'save the id of the current (next) record intCurContact = rsContacts!intContactIdEnd If
'while connected to the database, go ahead and'repopulate the recordset to make sure it contains'the most current values from the database.Set rsContacts.ActiveConnection = cnCh5
Beginning Access 2007 VBA
103 / 344

Set rsContacts.ActiveConnection = cnCh5rsContacts.RequerySet rsContacts.ActiveConnection = Nothing
'move back to the contact that was current before the'requery
rsContacts.Find "[intContactId] = " & intCurContact
'populate the controls on the formCall PopulateControlsOnForm
End Sub8. Replace the existing SaveCurrentRecord procedure with the following:
Sub SaveCurrentRecord()
Dim cmdCommand As ADODB.CommandSet cmdCommand = New ADODB.CommandDim strSQL As String
If Not rsContacts.BOF And Not rsContacts.EOF Then
'create a new connection instance and open it using the connection string Set cnCh5 = New ADODB.Connection cnCh5.Open strConnection
Dim intCurContact As Integer intCurContact = 0
'if adding a new record If blnAddMode = True Then
'create SQL to insert a new record into the database 'containing the values on the form strSQL = "INSERT INTO tblContacts(" & _ "txtLastName, txtFirstName, txtMiddleName, " & _ "txtTitle, txtAddress1, txtAddress2, " & _ "txtCity, txtState, txtZip, " & _ "txtWorkPhone, txtHomePhone, txtCellPhone) " & _ "VALUES (" & _ "'" & Me.txtLastName & "', " & _ "'" & Me.txtFirstName & "', " & _ "'" & Me.txtMiddleName & "', " & _ "'" & Me.txtTitle & "', " & _ "'" & Me.txtAddress1 & "', " & _ "'" & Me.txtAddress2 & "', " & _ "'" & Me.txtCity & "', " & _ "'" & Me.txtState & "', " & _ "'" & Me.txtZip & "', " & _ "'" & Me.txtWorkPhone & "', " & _ "'" & Me.txtHomePhone & "', " & _ "'" & Me.txtCellPhone & "') "
Else 'create SQL to update the existing record in the 'database with the values on the form strSQL = "UPDATE tblContacts SET " & _ "txtLastName = '" & Me.txtLastName & "', " & _ "txtFirstName = '" & Me.txtFirstName & "', " & _ "txtMiddleName = '" & Me.txtMiddleName & "', " & _ "txtTitle = '" & Me.txtTitle & "', " & _ "txtAddress1 = '" & Me.txtAddress1 & "', " & _ "txtAddress2 = '" & Me.txtAddress2 & "', " & _ "txtCity = '" & Me.txtCity & "', " & _ "txtState = '" & Me.txtState & "', " & _ "txtZip = '" & Me.txtZip & "', " & _ "txtWorkPhone = '" & Me.txtWorkPhone & "', " & _ "txtHomePhone = '" & Me.txtHomePhone & "', " & _ "txtCellPhone = '" & Me.txtCellPhone & "' " & _ "WHERE intContactId = " & rsContacts!intContactId
'save the id of the current record intCurContact = rsContacts!intContactId
End If
'set the command to the current connectionSet cmdCommand.ActiveConnection = cnCh5'set the insert or update SQL statement to the command textcmdCommand.CommandText = strSQL'execute the delete command against the databasecmdCommand.Execute
'while connected to the database, go ahead and'repopulate the recordset to make sure it contains'the most current values from the database.Set rsContacts.ActiveConnection = cnCh5rsContacts.RequerySet rsContacts.ActiveConnection = Nothing
'move back to the contact that was current before the'requeryIf intCurContact > 0 Then 'move back to the contact that was just updated rsContacts.Find "[intContactId] = " & intCurContactElse
Beginning Access 2007 VBA
104 / 344

'if just added new record, move to the beginning of 'the recordset rsContacts.MoveFirstEnd If
'reset add mode flag to falseblnAddMode = False
'populate the controls on the formCall PopulateControlsOnForm
End If
End Sub9. Replace the existing MoveToFirstRecord, MoveToNextRecord, MoveToPreviousRecord, and MoveToLastRecord procedures with the following:
Sub MoveToFirstRecord()
'move to the first record in the local disconnected recordsetIf Not rsContacts.BOF And Not rsContacts.EOF Then rsContacts.MoveFirst 'populate the controls on the form with the current record Call PopulateControlsOnForm blnAddMode = FalseEnd If
End Sub
Sub MoveToLastRecord()'move to the last record in the local disconnected recordsetIf Not rsContacts.BOF And Not rsContacts.EOF Then rsContacts.MoveLast 'populate the controls on the form with the current record Call PopulateControlsOnForm blnAddMode = False
End If
End Sub
Sub MoveToPreviousRecord()'move to the previous record in the local disconnected recordset'if not already at the beginningIf Not rsContacts.BOF Then rsContacts.MovePrevious 'populate the controls on the form with the current record Call PopulateControlsOnForm blnAddMode = FalseEnd If
End Sub
Sub MoveToNextRecord()
'move to the next record in the local disconnected recordset'if not already at the endIf Not rsContacts.EOF Then rsContacts.MoveNext 'populate the controls on the form with the current record Call PopulateControlsOnForm blnAddMode = FalseEnd If
End Sub10. Run the form and you should see a screen similar to Figure 5-16.
Figure 5-16
11. Select the Delete button on the form, and you should see a screen similar to Figure 5-17.
Beginning Access 2007 VBA
105 / 344
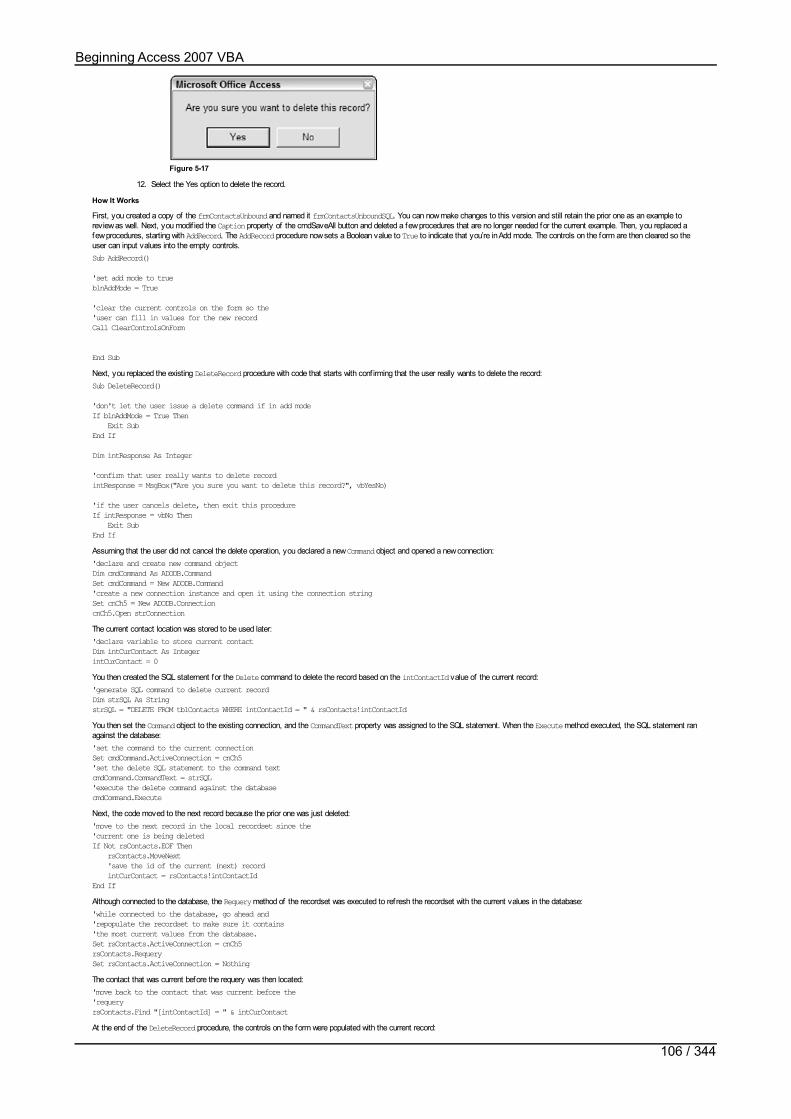
Figure 5-17
12. Select the Yes option to delete the record.
How It Works
First, you created a copy of the frmContactsUnbound and named it frmContactsUnboundSQL. You can now make changes to this version and still retain the prior one as an example toreview as well. Next, you modif ied the Caption property of the cmdSaveAll button and deleted a few procedures that are no longer needed for the current example. Then, you replaced afew procedures, starting with AddRecord. The AddRecord procedure now sets a Boolean value to True to indicate that you’re in Add mode. The controls on the form are then cleared so theuser can input values into the empty controls.Sub AddRecord()
'set add mode to trueblnAddMode = True
'clear the current controls on the form so the'user can fill in values for the new recordCall ClearControlsOnForm
End SubNext, you replaced the existing DeleteRecord procedure with code that starts with conf irming that the user really wants to delete the record:Sub DeleteRecord()
'don't let the user issue a delete command if in add modeIf blnAddMode = True Then Exit SubEnd If
Dim intResponse As Integer
'confirm that user really wants to delete recordintResponse = MsgBox("Are you sure you want to delete this record?", vbYesNo)
'if the user cancels delete, then exit this procedureIf intResponse = vbNo Then Exit SubEnd IfAssuming that the user did not cancel the delete operation, you declared a new Command object and opened a new connection:'declare and create new command objectDim cmdCommand As ADODB.CommandSet cmdCommand = New ADODB.Command'create a new connection instance and open it using the connection stringSet cnCh5 = New ADODB.ConnectioncnCh5.Open strConnectionThe current contact location was stored to be used later:'declare variable to store current contactDim intCurContact As IntegerintCurContact = 0You then created the SQL statement for the Delete command to delete the record based on the intContactId value of the current record:'generate SQL command to delete current recordDim strSQL As StringstrSQL = "DELETE FROM tblContacts WHERE intContactId = " & rsContacts!intContactIdYou then set the Command object to the existing connection, and the CommandText property was assigned to the SQL statement. When the Execute method executed, the SQL statement ranagainst the database:'set the command to the current connectionSet cmdCommand.ActiveConnection = cnCh5'set the delete SQL statement to the command textcmdCommand.CommandText = strSQL'execute the delete command against the databasecmdCommand.ExecuteNext, the code moved to the next record because the prior one was just deleted:'move to the next record in the local recordset since the'current one is being deletedIf Not rsContacts.EOF Then rsContacts.MoveNext 'save the id of the current (next) record intCurContact = rsContacts!intContactIdEnd IfAlthough connected to the database, the Requery method of the recordset was executed to refresh the recordset with the current values in the database:'while connected to the database, go ahead and'repopulate the recordset to make sure it contains'the most current values from the database.Set rsContacts.ActiveConnection = cnCh5rsContacts.RequerySet rsContacts.ActiveConnection = NothingThe contact that was current before the requery was then located:'move back to the contact that was current before the'requeryrsContacts.Find "[intContactId] = " & intCurContactAt the end of the DeleteRecord procedure, the controls on the form were populated with the current record:
Beginning Access 2007 VBA
106 / 344

'populate the controls on the formCall PopulateControlsOnForm
End SubAfter replacing the DeleteRecord procedure, you next replaced the SaveCurrentRecord procedure. The procedure began by declaring a Command object and a variable for the SQLstatement:Sub SaveCurrentRecord()
Dim cmdCommand As ADODB.CommandSet cmdCommand = New ADODB.CommandDim strSQL As StringIf records existed in the recordset, the connection was opened:If Not rsContacts.BOF And Not rsContacts.EOF Then
'create a new connection instance and open it using the connection string Set cnCh5 = New ADODB.Connection cnCh5.Open strConnection
Dim intCurContact As Integer intCurContact = 0If the SaveAll procedure was being called because you’re in Add New Record mode, you created a SQL statement that inserted the current values on the form into the database:'if adding a new recordIf blnAddMode = True Then
'create SQL to insert a new record into the database 'containing the values on the form strSQL = "INSERT INTO tblContacts(" & _ "txtLastName, txtFirstName, txtMiddleName, " & _ "txtTitle, txtAddress1, txtAddress2, " & _ "txtCity, txtState, txtZip, " & _ "txtWorkPhone, txtHomePhone, txtCellPhone) " & _ "VALUES (" & _ "'" & Me.txtLastName & "', " & _ "'" & Me.txtFirstName & "', " & _ "'" & Me.txtMiddleName & "', " & _ "'" & Me.txtTitle & "', " & _ "'" & Me.txtAddress1 & "', " & _ "'" & Me.txtAddress2 & "', " & _ "'" & Me.txtCity & "', " & _ "'" & Me.txtState & "', " & _ "'" & Me.txtZip & "', " & _ "'" & Me.txtWorkPhone & "', " & _ "'" & Me.txtHomePhone & "', " & _ "'" & Me.txtCellPhone & "') "If , however, you were in update mode in order to save changes to an existing record, you must create the SQL statement that will update the existing record in the database with the valuesin the controls on the form:Else 'create SQL to update the existing record in the 'database with the values on the form strSQL = "UPDATE tblContacts SET " & _ "txtLastName = '" & Me.txtLastName & "', " & _ "txtFirstName = '" & Me.txtFirstName & "', " & _ "txtMiddleName = '" & Me.txtMiddleName & "', " & _ "txtTitle = '" & Me.txtTitle & "', " & _ "txtAddress1 = '" & Me.txtAddress1 & "', " & _ "txtAddress2 = '" & Me.txtAddress2 & "', " & _ "txtCity = '" & Me.txtCity & "', " & _ "txtState = '" & Me.txtState & "', " & _ "txtZip = '" & Me.txtZip & "', " & _ "txtWorkPhone = '" & Me.txtWorkPhone & "', " & _ "txtHomePhone = '" & Me.txtHomePhone & "', " & _ "txtCellPhone = '" & Me.txtCellPhone & "' " & _ "WHERE intContactId = " & rsContacts!intContactId 'save the id of the current record intCurContact = rsContacts!intContactIdEnd IfWhether you were in Add New or Update mode, you were now ready to execute the SQL statement against the database by assigning the CommandText property to the SQL statement andexecuting the Execute method:'set the command to the current connectionSet cmdCommand.ActiveConnection = cnCh5'set the insert or update SQL statement to the command textcmdCommand.CommandText = strSQL'execute the delete command against the databasecmdCommand.ExecuteWhile still connected to the database, you repopulated the recordset with the most current values and then disconnected the recordset again:'while connected to the database, go ahead and'repopulate the recordset to make sure it contains'the most current values from the database.Set rsContacts.ActiveConnection = cnCh5rsContacts.RequerySet rsContacts.ActiveConnection = NothingNext, you moved back to the current record if you were in Update mode:'move back to the contact that was current before the'requeryIf intCurContact > 0 Then 'move back to the contact that was just updated rsContacts.Find "[intContactId] = " & intCurContactElse 'if just added new record, move to the beginning of 'the recordset rsContacts.MoveFirstEnd If
Beginning Access 2007 VBA
107 / 344
End IfFinally, you reset the Add mode f lag to False because you were no longer in Add mode under any circumstance. You set the controls on the form to display the values in the current recordof the recordset.'reset add mode flag to falseblnAddMode = False
'populate the controls on the formCall PopulateControlsOnForm
End If
End SubYou made a few minor changes to the MoveToFirstRecord, MoveToNextRecord, MoveToPreviousRecord, and MoveToLastRecord procedures to remove calls to SaveCurrentRecord and toadd a statement setting the blnAddMode f lag to False. These procedures were just replaced again for simplicity, but not a lot changed.Sub MoveToFirstRecord()
'move to the first record in the local disconnected recordsetIf Not rsContacts.BOF And Not rsContacts.EOF Then rsContacts.MoveFirst 'populate the controls on the form with the current record Call PopulateControlsOnForm blnAddMode = FalseEnd If
End SubYou then ran the form and manipulated the database, including deleting an existing record. These procedures ran to issue SQL statements against the database to insert, update, and deleterecords, and then the disconnected recordset was repopulated with the current values in the database. This is yet another way to write code that allows your forms to interact with data inunderlying data sources in a disconnected fashion.
Beginning Access 2007 VBA
108 / 344

Using ADOX to Manipulate Data ObjectsThe ADOX library has an object model that allows you to create database objects such as tables, indexes, and keys, as well as to control security, establish referential integrity in adatabase, and perform cascade updates and deletions. The Catalog object is at the top of the ADOX object model, with Tables, Groups, Users, Procedures, and Views collections. Pleaseconsult the online help for the complete ADOX object model.
Just as with the ADODB library, if you want to make use of the ADOX library in your Access solutions, you must add a reference. You can add references by selecting Tools Referencesin the Visual Basic Editor. Figure 5-18 shows a reference to the ADOX library as part of the current project.
Figure 5-18
Let’s look at a few examples of what you can do with the ADOX library.
Creating a Table with ADOX
For starters, you can create new databases, tables, and other objects using the ADOX library. The following procedure is an example of how you can create a new table in an existingdatabase.
Sub TestCreateTable()
Dim catCatalog As ADOX.Catalog Dim tblSupplier As ADOX.Table
Set catCatalog = New ADOX.Catalog Set catCatalog.ActiveConnection = CurrentProject.Connection
' Create and name the new table Set tblSupplier = New ADOX.Table With tblSupplier .Name = "tblSupplier" .Columns.Append "CompanyName", adVarWChar, 50 .Columns.Append "CompanyPhone", adVarWChar, 12 End With
'append the new table to the database catCatalog.Tables.Append tblSupplier
'release memory Set catCatalog.ActiveConnection = Nothing Set catCatalog = Nothing Set tblSupplier = Nothing
End SubFirst, a new Catalog object is declared and is assigned to the current open connection. Then, a new table called tblSupplier is created, and a name and new columns are assigned to it.The new table is then appended to the Catalog.Tables collection, which added it to the database. After running the preceding procedure, you can see (in Figure 5-19) that a new table calledtblSupplier has been added to the database.
Figure 5-19
These and many other features can be manipulated using the ADOX library. This section is not meant to be exhaustive, but just to provide you with a few examples of how you might usethe ADOX library.
Beginning Access 2007 VBA
109 / 344

Beginning Access 2007 VBA
110 / 344

SummaryThis chapter covered one of the most important concepts in Access programming - working with data in databases. You should now understand the basics of retrieving and modifying datafrom VBA code using ActiveX Data Objects (ADO) and using the ADO object model - namely the Connection, Command, and Recordset objects. You also learned how to work with recordsetsthat are bound to the form and maintain an open connection and those that are disconnected. When recordsets are disconnected from the data source, changes made locally are not savedto the underlying database unless you take additional steps. You also learned how to use Select, Insert, Update, and Delete statements in the SQL language to interact with the database.Finally, you learned that the ADOX object model allows you to manipulate database tables and so on.
The next chapter discusses various techniques you can use to build interactive forms. It provides you with some useful approaches for improving user interaction.
Beginning Access 2007 VBA
111 / 344

Exercises1. What is ADO, and why do you use it?
2. Why should you use a disconnected (unbound) recordset instead of a connected (bound) recordset?
3. What is SQL, and why do you use it?
4. What is the ADOX object model? Give some examples of what it will allow you to do.
Answers
1. ADO stands for ActiveX Data Objects and is a data access methodology that allows you to manipulate data in underlying data sources for VBA code. You use ADO to insert, update,delete, and retrieve data in databases that you want to interact with in your Access applications.
2. A disconnected (unbound) recordset does not maintain a connection to the database like a connected (bound) recordset does. Disconnected recordsets are typically better for reducingthe number of open connections and record locks in your application. Disconnected recordsets are typically better because the data is cached locally until an update is made to thedatabase. Disconnected recordsets require a little extra ef fort because you have to write code to handle navigation and updates to the data. Connected recordsets maintain a constantconnection to the database, and Access has a lot of navigation features built-in for working with connected recordsets.
3. SQL stands for Structured Query Language and is a language that you can use to retrieve, add, update, and delete data in databases. SQL can be used in conjunction with ADO, orseparately f rom ADO as part of your Access solutions.
4. The ADOX object model provides a library of features that you can use to manipulate databases, tables, users, groups, and security f rom your VBA code. The Catalog object is at thehighest level of the object model.
Beginning Access 2007 VBA
112 / 344

Chapter 6: Building Interactive Forms
OverviewChapter 5 covered the basics of using ADO and SQL to work with data sources and showed you how to display the data retrieved from the database on a form. In this chapter, you willexplore ways to build interactive forms and to control the operation of those forms programmatically using VBA code. Many of the topics covered in this chapter are illustrated in variousexamples throughout the book, but some also deserve a separate discussion.
The chapter will cover:
Navigating between forms
Opening, closing, and hiding forms
Choosing the right type of control to use for data
Populating controls
Displaying messages to the user
Validating data entered into controls
Setting control alignment and tab stops
Beginning Access 2007 VBA
113 / 344

Form Navigation and FlowYou can control the order and manner in which forms can be opened within your Access applications in various ways. For example, you can design switchboard forms that allow the user toselect which form to open. Another option is to open a main form and allow a user to open separate forms from the main form. The style of navigation you choose depends on the type ofsystem and the manner in which users will interact with the various forms.
During the design phase, you should consider the f low of forms and how users will navigate from one form to the next. It is very simple to control how forms are displayed. The following isan example that illustrates how to open, hide, minimize, and close forms.
'open a formDoCmd.OpenForm "FormName"'close a form
DoCmd.Close acForm, "FormName"
'minimize the current formDoCmd.Minimize
'hide a formFormName.Visible = False
'make the form visible againFormName.Visible = TrueA well-designed application allows a user to interact with the application without having to use Access to open the form manually f rom the database window. An easy way to have a formopen automatically is to use the AutoExec macro to specify which form should open automatically when the application opens.
Try It Out-Building a Switchboard Form
In this example, you will build a simple switchboard form that opens automatically when the application opens. The switchboard form enables the user to open multiple forms from a menu ofchoices.
1. Create a new database by selecting the Off ice Button New Blank Database. Specify Ch6CodeExamples for the f ile name and click the Create button.
2. Add four new forms to the application. Name the forms frmMain, frmAccounts, frmPayments, and frmRegister, respectively.
3. Open frmMain in design view and add three command buttons. Name the command buttons cmdAccounts, cmdPayments, and cmdRegister. Set the caption of thecommand buttons to View/Manage Accounts, Make Payments, and View/Manage Register, respectively. Also, set the Record Selectors, Navigation Buttons, andDividing Lines properties of the form to No. An example of the form at this point is shown in Figure 6-1.
Figure 6-1
4. Select the cmdAccounts command button and add the following code to the Click event.
Private Sub cmdAccounts_Click()
'open the Accounts formDoCmd.OpenForm "frmAccounts"
'hide the main switchboard formForms.Item("frmMain").Visible = False
End Sub5. Select the cmdPayments command button and add the following code to the Click event:
Private Sub cmdPayments_Click()
'open the Accounts formDoCmd.OpenForm "frmPayments"
'hide the main switchboard formForms.Item("frmMain").Visible = False
End Sub6. Select the cmdRegister command button and add the following code to the Click event:
Private Sub cmdRegister_Click()
'open the Accounts formDoCmd.OpenForm "frmRegister"
'hide the main switchboard formForms.Item("frmMain").Visible = False
End Sub7. Open the frmAccounts form. Add a command button to the form. Change the Name property of the command button to cmdMenu and change the Caption property to Menu.
Add a label to the form and type View/Manage Accounts in the label. The form should be similar to that shown in Figure 6-2.
Beginning Access 2007 VBA
114 / 344
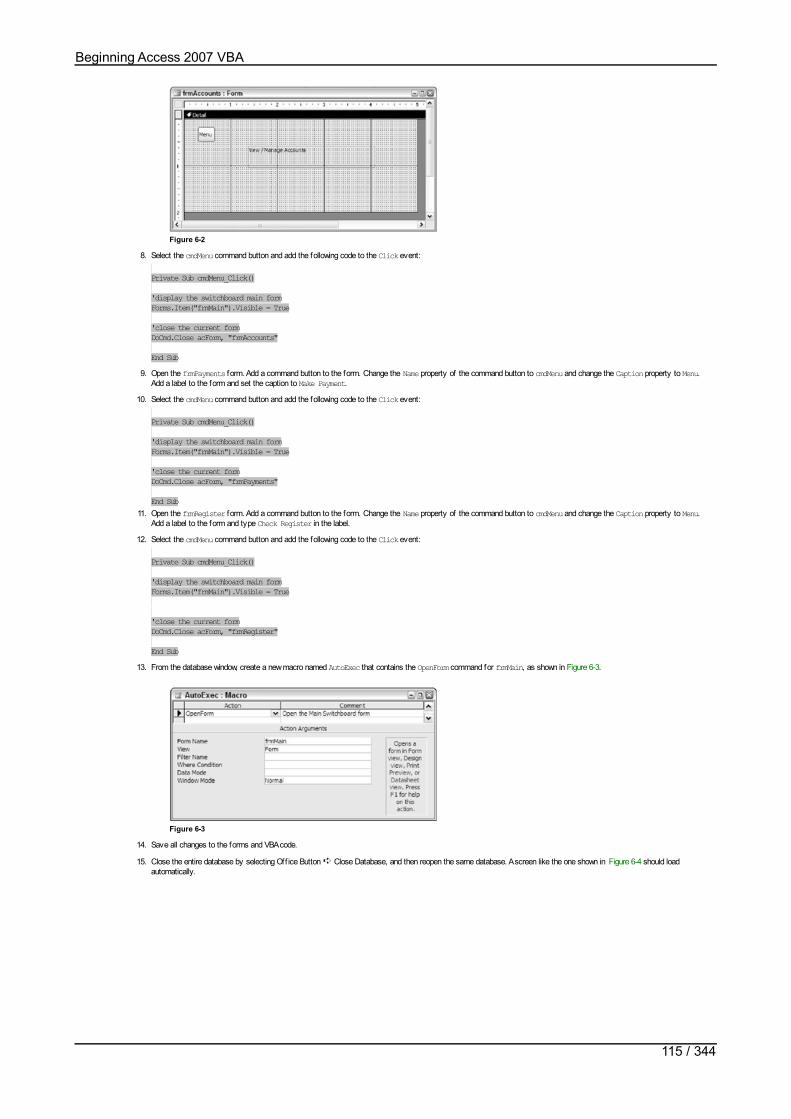
Figure 6-2
8. Select the cmdMenu command button and add the following code to the Click event:
Private Sub cmdMenu_Click()
'display the switchboard main formForms.Item("frmMain").Visible = True
'close the current formDoCmd.Close acForm, "frmAccounts"
End Sub9. Open the frmPayments form. Add a command button to the form. Change the Name property of the command button to cmdMenu and change the Caption property to Menu.
Add a label to the form and set the caption to Make Payment.10. Select the cmdMenu command button and add the following code to the Click event:
Private Sub cmdMenu_Click()
'display the switchboard main formForms.Item("frmMain").Visible = True
'close the current formDoCmd.Close acForm, "frmPayments"
End Sub11. Open the frmRegister form. Add a command button to the form. Change the Name property of the command button to cmdMenu and change the Caption property to Menu.
Add a label to the form and type Check Register in the label.
12. Select the cmdMenu command button and add the following code to the Click event:
Private Sub cmdMenu_Click()
'display the switchboard main formForms.Item("frmMain").Visible = True
'close the current formDoCmd.Close acForm, "frmRegister"
End Sub13. From the database window, create a new macro named AutoExec that contains the OpenForm command for frmMain, as shown in Figure 6-3.
Figure 6-3
14. Save all changes to the forms and VBA code.
15. Close the entire database by selecting Off ice Button Close Database, and then reopen the same database. A screen like the one shown in Figure 6-4 should loadautomatically.
Beginning Access 2007 VBA
115 / 344

Figure 6-4
16. Select the View/Manage Accounts button, and a screen like the one shown in Figure 6-5 should open.
Figure 6-5
How It Works
In this example, you created a switchboard form with three command buttons. Under each command, you added code to open the respective form, using the OpenForm method, and thenyou hid the switchboard form by setting its Visible property to False.Private Sub cmdAccounts_Click()
'open the Accounts formDoCmd.OpenForm "frmAccounts"
'hide the main switchboard formForms.Item("frmMain").Visible = False
End SubYou also created the three forms that can be opened from the switchboard. On each of those forms, a command button was added to allow the user to return to the switchboard menu. Codewas then added to the Click event of each menu button to unhide the switchboard form by setting the Visible property to True, and to close the current form by using the Close methodof the DoCmd object:Private Sub cmdMenu_Click()
'display the switchboard main formForms.Item("frmMain").Visible = True
'close the current formDoCmd.Close acForm, "frmAccounts"
End SubYou then added an AutoExec macro to cause the switchboard form to open when the database opens. When the database opens, Access automatically runs any commands in the macronamed AutoExec.From the switchboard, any one of the three other forms can be opened. You can then return to the switchboard to select a dif ferent form by using the Menu button on the respective form.Although this is a simple example, you can apply the concepts to any application for navigating among forms.
Beginning Access 2007 VBA
116 / 344
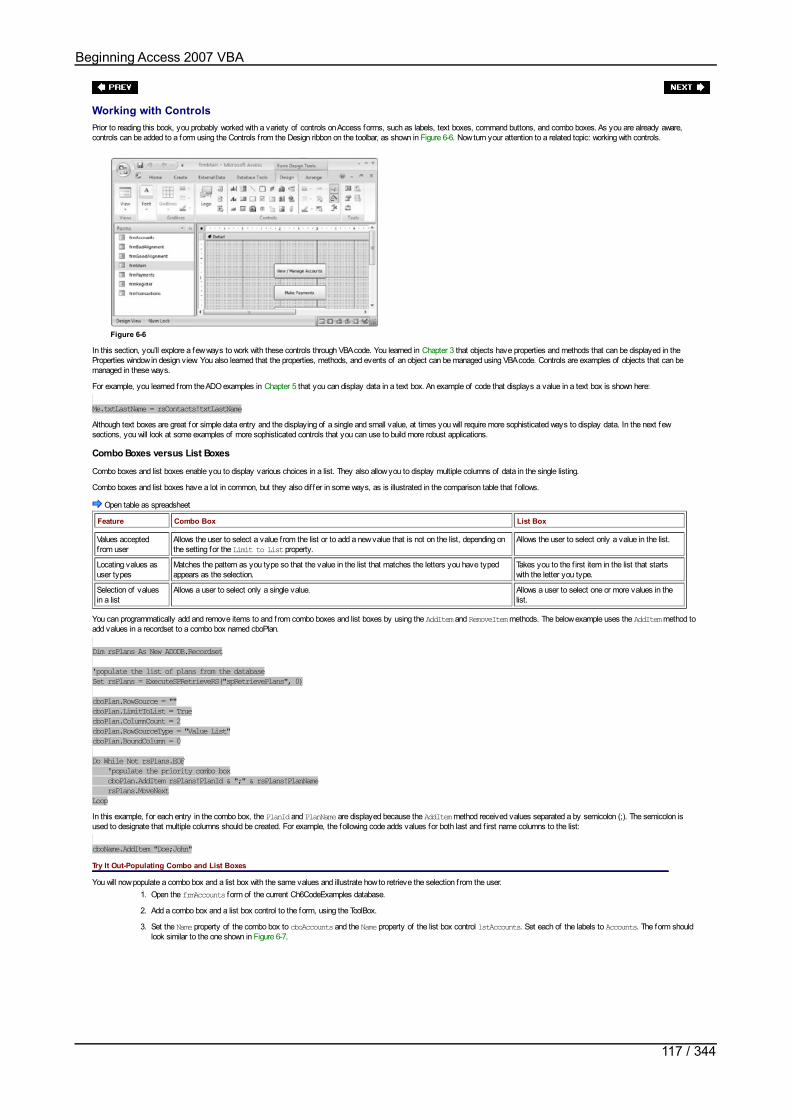
Working with ControlsPrior to reading this book, you probably worked with a variety of controls on Access forms, such as labels, text boxes, command buttons, and combo boxes. As you are already aware,controls can be added to a form using the Controls f rom the Design ribbon on the toolbar, as shown in Figure 6-6. Now turn your attention to a related topic: working with controls.
Figure 6-6
In this section, you’ll explore a few ways to work with these controls through VBA code. You learned in Chapter 3 that objects have properties and methods that can be displayed in theProperties window in design view. You also learned that the properties, methods, and events of an object can be managed using VBA code. Controls are examples of objects that can bemanaged in these ways.
For example, you learned from the ADO examples in Chapter 5 that you can display data in a text box. An example of code that displays a value in a text box is shown here:
Me.txtLastName = rsContacts!txtLastNameAlthough text boxes are great for simple data entry and the displaying of a single and small value, at times you will require more sophisticated ways to display data. In the next fewsections, you will look at some examples of more sophisticated controls that you can use to build more robust applications.
Combo Boxes versus List Boxes
Combo boxes and list boxes enable you to display various choices in a list. They also allow you to display multiple columns of data in the single listing.
Combo boxes and list boxes have a lot in common, but they also dif fer in some ways, as is illustrated in the comparison table that follows.
Open table as spreadsheet
Feature Combo Box List Box
Values acceptedfrom user
Allows the user to select a value from the list or to add a new value that is not on the list, depending onthe setting for the Limit to List property.
Allows the user to select only a value in the list.
Locating values asuser types
Matches the pattern as you type so that the value in the list that matches the letters you have typedappears as the selection.
Takes you to the f irst item in the list that startswith the letter you type.
Selection of valuesin a list
Allows a user to select only a single value. Allows a user to select one or more values in thelist.
You can programmatically add and remove items to and from combo boxes and list boxes by using the AddItem and RemoveItem methods. The below example uses the AddItem method toadd values in a recordset to a combo box named cboPlan.
Dim rsPlans As New ADODB.Recordset
'populate the list of plans from the databaseSet rsPlans = ExecuteSPRetrieveRS("spRetrievePlans", 0)
cboPlan.RowSource = ""cboPlan.LimitToList = TruecboPlan.ColumnCount = 2cboPlan.RowSourceType = "Value List"cboPlan.BoundColumn = 0
Do While Not rsPlans.EOF 'populate the priority combo box cboPlan.AddItem rsPlans!PlanId & ";" & rsPlans!PlanName rsPlans.MoveNextLoopIn this example, for each entry in the combo box, the PlanId and PlanName are displayed because the AddItem method received values separated a by semicolon (;). The semicolon isused to designate that multiple columns should be created. For example, the following code adds values for both last and f irst name columns to the list:
cboName.AddItem "Doe;John"Try It Out-Populating Combo and List Boxes
You will now populate a combo box and a list box with the same values and illustrate how to retrieve the selection from the user.1. Open the frmAccounts form of the current Ch6CodeExamples database.
2. Add a combo box and a list box control to the form, using the ToolBox.
3. Set the Name property of the combo box to cboAccounts and the Name property of the list box control lstAccounts. Set each of the labels to Accounts. The form shouldlook similar to the one shown in Figure 6-7.
Beginning Access 2007 VBA
117 / 344

Figure 6-7
4. Add the following code to the Load event for the form:
Private Sub Form_Load()
'populate the combo box with values from a 'specified list With cboAccounts .RowSource = "" .ColumnCount = 2 .RowSourceType = "Value List" .LimitToList = True .BoundColumn = 0 .AddItem "Old National Bank;Car Payment" .AddItem "Chase Manhattan;MasterCard" .AddItem "Countrywide Home Loans;House Payment" End With
'populate the list box with values from a 'specified list
With lstAccounts .RowSource = "" .ColumnCount = 2 .RowSourceType = "Value List" .BoundColumn = 0 .AddItem "Old National Bank;Car Payment" .AddItem "Chase Manhattan;MasterCard" .AddItem "Countrywide Home Loans;House Payment" End With
End Sub5. Add the following code to the Change event of the combo box:
Private Sub cboAccounts_Change()
'display a message to the user of the selected valueMsgBox cboAccounts.Text
End Sub6. Add the following code to the Click event of the list box:
Private Sub lstAccounts_Click()
'display a message to the user of the first value in'the selected columnMsgBox lstAccounts.Column(0)
End Sub7. Open the form in view mode to run the form. You should see a screen similar to Figure 6.8.
Figure 6-8
8. Type the letter C in the combo box. The text should jump to Chase Manhattan. Then, type an O in the combo box, and the text should jump to Countrywide Home Loans(because it starts with a CO). Repeat these steps for the list box. You should f ind that when you type C, Chase Manhattan is selected, and when you type O, OldNational Bank is selected.
9. You should see message boxes displaying the value selected.
How It Works
Using the AddItem method, you added the same values to the combo box and the list box so that you could see the dif ferences between the two controls side by side:Private Sub Form_Load()
'populate the combo box with values from a 'specified list With cboAccounts .RowSource = "" .ColumnCount = 2 .RowSourceType = "Value List" .LimitToList = True .BoundColumn = 0
Beginning Access 2007 VBA
118 / 344
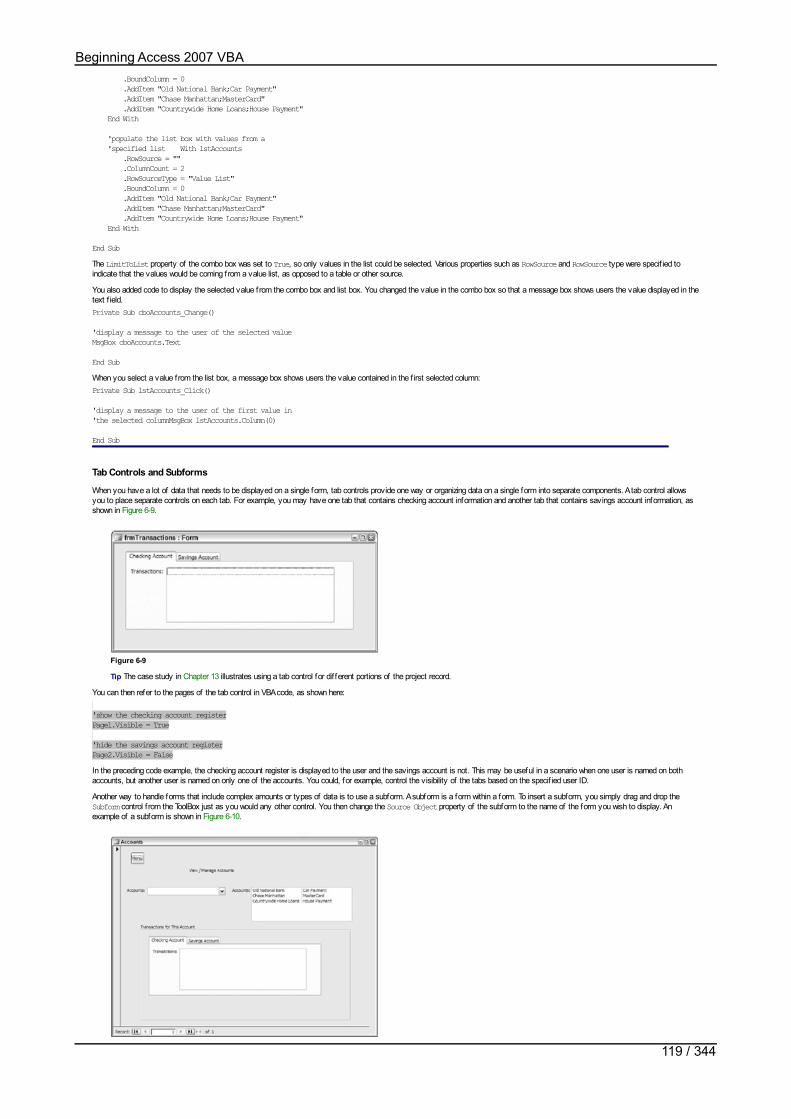
.BoundColumn = 0 .AddItem "Old National Bank;Car Payment" .AddItem "Chase Manhattan;MasterCard" .AddItem "Countrywide Home Loans;House Payment" End With
'populate the list box with values from a 'specified list With lstAccounts .RowSource = "" .ColumnCount = 2 .RowSourceType = "Value List" .BoundColumn = 0 .AddItem "Old National Bank;Car Payment" .AddItem "Chase Manhattan;MasterCard" .AddItem "Countrywide Home Loans;House Payment" End With
End SubThe LimitToList property of the combo box was set to True, so only values in the list could be selected. Various properties such as RowSource and RowSource type were specif ied toindicate that the values would be coming from a value list, as opposed to a table or other source.
You also added code to display the selected value from the combo box and list box. You changed the value in the combo box so that a message box shows users the value displayed in thetext f ield.Private Sub cboAccounts_Change()
'display a message to the user of the selected valueMsgBox cboAccounts.Text
End SubWhen you select a value from the list box, a message box shows users the value contained in the f irst selected column:Private Sub lstAccounts_Click()
'display a message to the user of the first value in'the selected columnMsgBox lstAccounts.Column(0)
End Sub
Tab Controls and Subforms
When you have a lot of data that needs to be displayed on a single form, tab controls provide one way or organizing data on a single form into separate components. A tab control allowsyou to place separate controls on each tab. For example, you may have one tab that contains checking account information and another tab that contains savings account information, asshown in Figure 6-9.
Figure 6-9
Tip The case study in Chapter 13 illustrates using a tab control for dif ferent portions of the project record.
You can then refer to the pages of the tab control in VBA code, as shown here:
'show the checking account registerPage1.Visible = True
'hide the savings account registerPage2.Visible = FalseIn the preceding code example, the checking account register is displayed to the user and the savings account is not. This may be useful in a scenario when one user is named on bothaccounts, but another user is named on only one of the accounts. You could, for example, control the visibility of the tabs based on the specif ied user ID.
Another way to handle forms that include complex amounts or types of data is to use a subform. A subform is a form within a form. To insert a subform, you simply drag and drop theSubform control f rom the ToolBox just as you would any other control. You then change the Source Object property of the subform to the name of the form you wish to display. Anexample of a subform is shown in Figure 6-10.
Figure 6-10
Beginning Access 2007 VBA
119 / 344

Figure 6-10
Figure 6-10 shows a transactions form displayed within an accounts form. Any form that you create can be displayed within another form. You then tie the subform to the parent form sothat the data it displays relates to the data on the parent form (for example, for the same account). One way to tie a subform to a parent form is using the Link Child Fields and LinkMaster Fields properties.
Tip Whenever you make changes to a subform you are changing the original form, so be careful.
Beginning Access 2007 VBA
120 / 344
Building User InteractionAfter you have chosen the right controls, you must program ways for users to interact with those controls. You can program the application to interact with a user in various ways. Forexample, you have already learned how to write event procedure code that executes when the user takes a particular action on the form. In this section, you will look at a couple ofadditional examples of how you can improve user interaction in your applications. You will look at using the MsgBox function for more complex scenarios and at validating user input.
The MsgBox Function
You have already seen examples of the MsgBox function to display a message. The MsgBox function is a lot more powerful than the simple examples I have illustrated so far. You canactually ask questions with multiple-choice answers and then process those choices to take the appropriate action.
For example, to ask the user a Yes/No question and then take a dif ferent action depending on the response, you can specify the vbYesNo value for the message box style parameter. Thefollowing example prompts the user to conf irm that the deletion should be processed:
Dim intResponse As Integer
'display a Yes/No message box to the userintResponse = MsgBox("Are you sure you want to delete this record?", vbYesNo,"Delete?")
'determine how the user responded and act accordinglyIf intResponse = vbYes Then MsgBox "Delete confirmed."ElseIf intResponse = vbNo Then MsgBox "Delete cancelled."End If
Validating User Input
Another way to build user interaction is to provide feedback to the user when the data entered into a control is not of the correct data type. By correcting the data error up front, you canavoid a database error later or avoid a data integrity problem caused by invalid values. One way to implement data validation in Access is to set the ValidationRule and ValidationTextproperties for the control to specify the type of data that is valid and the message that should be displayed when the data does not conform to the rule.
You can also handle data validation from VBA code, such as in the BeforeUpdate event or AfterUpdate event of the control.
Try It Out-Adding Data Validation to the frmPayments Form
Here you modify the sample application to implement a validation event for the frmPayments form.1. Open frmPayments in design view.
2. Add a text box control to the form and name it txtValue.3. In the BeforeUpdate event for the text box, add the following code:
Private Sub txtValue_BeforeUpdate(Cancel As Integer)
If txtValue = "" Or IsNull(txtValue) Then MsgBox "You must specify a value for this field." Cancel = TrueElseIf Len(txtValue) > 10 Then MsgBox "The value for this field must be 10 characters or less." Cancel = TrueEnd If
End Sub4. Run the form, select the f ield and enter a value with more than 10 characters, and then press the tab key to leave the f ield. You should see a message indicating that the
value must be 10 characters or less.
5. Delete the value entirely so that the f ield is blank. Then tab to another f ield. You should see a message indicating that a value must be specif ied for the f ield.
How It Works
In this example, you added a text box control to the form. You then added code for the BeforeUpdate event to make sure that the user entered a valid value in this required f ield.
Beginning Access 2007 VBA
121 / 344
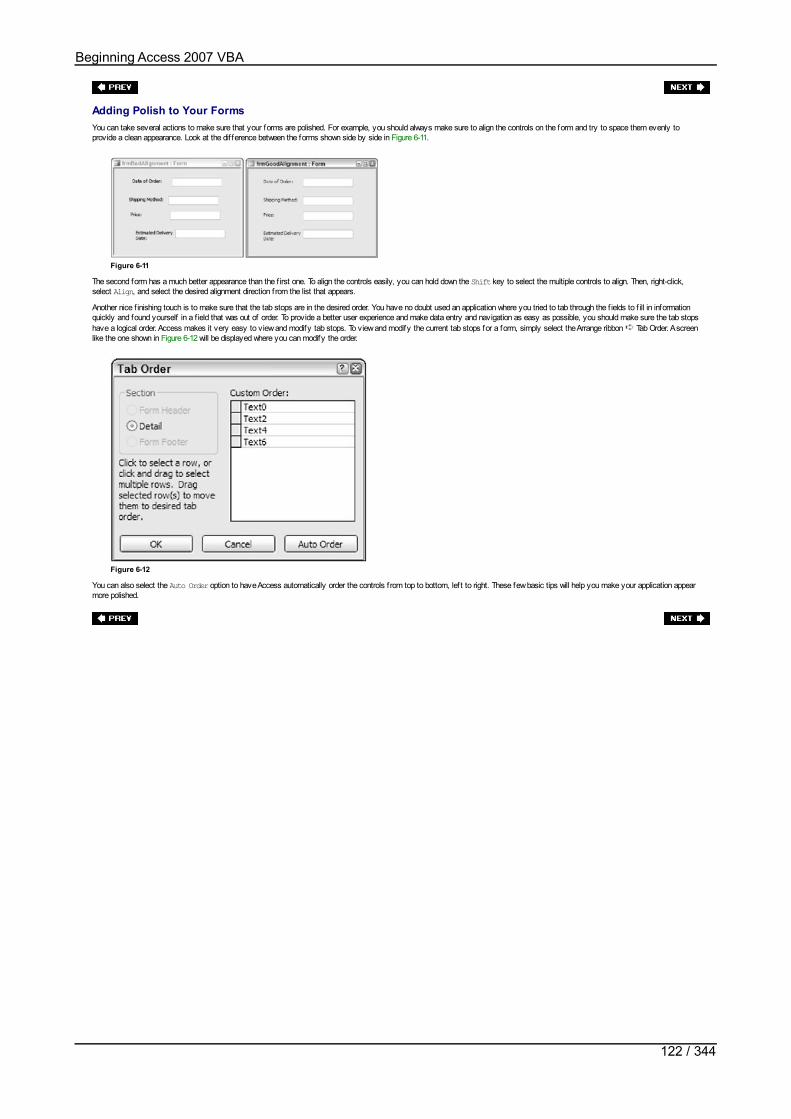
Adding Polish to Your FormsYou can take several actions to make sure that your forms are polished. For example, you should always make sure to align the controls on the form and try to space them evenly toprovide a clean appearance. Look at the dif ference between the forms shown side by side in Figure 6-11.
Figure 6-11
The second form has a much better appearance than the f irst one. To align the controls easily, you can hold down the Shift key to select the multiple controls to align. Then, right-click,select Align, and select the desired alignment direction from the list that appears.
Another nice f inishing touch is to make sure that the tab stops are in the desired order. You have no doubt used an application where you tried to tab through the f ields to f ill in informationquickly and found yourself in a f ield that was out of order. To provide a better user experience and make data entry and navigation as easy as possible, you should make sure the tab stopshave a logical order. Access makes it very easy to view and modify tab stops. To view and modify the current tab stops for a form, simply select the Arrange ribbon Tab Order. A screenlike the one shown in Figure 6-12 will be displayed where you can modify the order.
Figure 6-12
You can also select the Auto Order option to have Access automatically order the controls f rom top to bottom, lef t to right. These few basic tips will help you make your application appearmore polished.
Beginning Access 2007 VBA
122 / 344

SummaryThis chapter covered the basics of building interactive applications, including how to navigate among forms using VBA code and how to use some of the more complex controls to displaydata and receive user input. At this point, you have a basic understanding of how to design forms to display and manage data from a database. Chapter 7 covers the various ways to useVBA code to link, import, and export data to and from external data sources.
Beginning Access 2007 VBA
123 / 344
Exercises1. What is the AutoExec macro, and why should you use it?
2. Describe at least two dif ferences between combo boxes and list boxes.
3. What is the MsgBox function, and how can you use it?
Answers
1. The AutoExec macro is a macro that runs each time a particular database opens. This macro is a good place to add an Open Form command to specify which form shouldautomatically open when the database opens. For example, you may want a switchboard form to open so the user can navigate among the available forms.
2. Combo boxes and list boxes both allow you to display data with single or multiple columns. Combo boxes can be programmed to allow a user to select a value from the drop-down listor to type in a new value. List boxes, on the other hand, require a user to select a value from the list. Combo boxes use pattern matching to f ind the record matching the values asyou type one or more letters. List boxes jump to the f irst item that starts with each value that you type. List boxes allow a user to select multiple items from the list, while comboboxes only allow selection of a single item.
3. You can use the MsgBox function to display a message box to the user. Message boxes are useful to inform the user of some error or other event, and also to ask the user questions,such as to conf irm a delete action.
Beginning Access 2007 VBA
124 / 344
Chapter 7: Importing, Linking, and Exporting Using External Data Sources
OverviewChapter 5 covered the basics of using ADO and SQL to work with data sources. All the ADO and SQL examples dealt with data stored in tables in a database. However, in today’s world oftechnology, you will of ten work with data and applications in a variety of formats, such as text f iles and spreadsheets. You may need to import or link data from various sources into yourdatabase to avoid having to retype all the information that is already stored electronically in another format. At some point, another application might need the data in your application or youmay want to get data out of your application for another reason. In that case, you can export information from your application into another format.
In this chapter, you will explore the various ways to use VBA code to link, import, and export to external data sources. The chapter will cover:
The dif ference between linking, importing, and exporting
Linking, importing, and exporting to external Access databases (MDB f iles)
Linking, importing, and exporting to SQL Server databases
Linking, importing, and exporting to other f iles such as spreadsheets and text f iles
Creating and sending an e-mail programmatically
These techniques will enable you to build robust applications that interact with various applications and formats.
Beginning Access 2007 VBA
125 / 344
Linking, Importing, and Exporting OverviewLinking to external data means creating a pointer to an external data source that allows you to interact directly with the underlying data. Importing external data literally imports a copy of thedata into your application. Exporting data refers to the idea of extracting data from your application to an external f ile or format.
Here are some situations when you should consider linking:
The data resides on a database server that your application and others can use.
The data is used by another program that requires the native f ile format.
The underlying data needs to be updated on a regular basis in its native format.
Here are some instances when you should consider importing:
An existing system is being migrated to a new application and the data from the old system will be used in the new application. (In some cases, you may be able to migrateto another system but keep the data on a database server without needing to import the data.)
Numerous data operations must be run against the data from another source. You can obtain performance improvements by importing the data, but the underlying data will beout of sync if you make any changes to the data after it is imported.
Access allows you to link to and import f rom data sources such as Access (Jet) databases, SQL Server databases, other ODBC databases, dBase, Paradox, Microsoft Sharepoint, XMLdocuments, HTML documents, text f iles, Microsoft Exchange, Microsoft Outlook, and spreadsheets such as Microsoft Excel and Lotus.
Tip Many of the techniques covered in this chapter can also be implemented using menus and wizards in Access. To import or link data using the menus and wizards, select theExternal Data tab and then select the type of data you would like to use from the available options. You can export data by selecting a particular object (table, for example) in theDatabase Window, right-clicking, and selecting the Export option from the pop-up box.
Now that you understand the high-level concept of importing, linking, and exporting, you can jump right in to learning the techniques that will allow you to work with some of these supporteddata sources.
Create a blank database to use for the examples in this chapter. To do so, select the Off ice Button New. From the list of available templates, select “Blank Database,” provide the f ilename Ch7CodeExamples.accdb and path, and press the Create button.
Beginning Access 2007 VBA
126 / 344

Access and Other DatabasesYou can use the TransferDatabase method of the DoCmd object to import f rom, link to, and export data to Access and several other databases, including SQL Server and Oracle. The basicsyntax of the TransferDatabase method is shown in the following code:
DoCmd.TransferDatabase TransferType, DatabaseType, DatabaseName, ObjectType,Source, Destination, StructureOnly, StoreLoginVarious parameters are used to specify how the method should execute. The following table explains the use of each parameter.
Open table as spreadsheet
Parameter Description
TransferType Type of transfer to be performed. Valid choices are acImport (default), acLink, and acExport.DatabaseType Type of database being used. Access is the default. See the help documentation for a complete list and for the exact syntax for a particular database.
DatabaseName The full name, including the path, of the database being used.
ObjectType The type of object that has data you want to work with. The default is acTable.Source Name of the object whose data you want to work with.
Destination Name of the object in the destination database.
StructureOnly Use True to work with the structure only and False to work with the structure and data. False is the default.
StoreLogin Whether to store the login and password. False is the default.
Let’s look at an example. Suppose that you want to import data from an Access database called SampleDb. The data you want to import is in a table called Sales, and you want it to beimported to your current database under the name tblSales. You could run the following command from your current Access application:
DoCmd.TransferDatabase acImport, "Microsoft Access",_ "SampleDb.mdb", acTable, "Sales", "tblSales"Here’s an example that shows linking to a table called Sales in an ODBC database called Wrox:
DoCmd.TransferDatabase acLink, "ODBC Database", _ "ODBC;DSN=DataSourceName;UID=username;PWD=pwd; LANGUAGE=us_english;" _ & "DATABASE=Wrox", acTable, "Sales", "dboSales"The ODBC data source name can point to any database that ODBC supports, including SQL Server and Oracle, to name a few examples. As with any linking operation, you see the table ortables from the Database Window in Access.
Warning There is no Undo option for database transfers. Make sure that you have a current backup of both databases before you begin. Furthermore, be very sure to verify thecorrectness of the Source and Destination parameters.
Try It Out-Importing Data from the Sample Northwind Database
Now it’s your turn to try this out. Let’s import data from the sample Northwind database that comes with Access.1. Insert a new module into your Ch7CodeExamples database.
2. Add the following code to the module:
Sub TestTransferDatabase()
'import from Northwind
DoCmd.TransferDatabase acImport, "Microsoft Access", _ "C:\Program Files\Microsoft Office\OFFICE12\SAMPLES\Northwind.accdb", __acTable, "Employees", "tblEmployees"
End Sub3. Modify the preceding path to the location on your hard drive where Northwind.mdb is located. If you do not have the sample Northwind database installed, change the
previous parameters to reference the Access database that you do have.
4. From the Immediate Window in the Visual Basic Editor, type TestTransferDatabase and press Enter to run the procedure. You may receive a warning message similar tothat in Figure 7-1, in which case you should click the Open button.
Figure 7-1
5. Open the Database Window and you should see a screen similar to Figure 7-2.
Beginning Access 2007 VBA
127 / 344

Figure 7-2
How It Works
In this example, you used the TransferDatabase method to import data from the Northwind sample database. The parameters of the TransferDatabase method specif ied the various bitsof information Access needed to perform the import:Sub TestTransferDatabase()
'import from NorthwindDoCmd.TransferDatabase acImport, "Microsoft Access", _ "C:\Program Files\Microsoft Office\OFFICE12\SAMPLES\Northwind.accdb", _ acTable, "Employees", "tblEmployees"
End SubAfter you ran the procedure, you should have noticed in the Database Window that the new table was inserted into your database.
Beginning Access 2007 VBA
128 / 344
Transferring Complete SQL Server DatabaseThe TransferSQLDatabase method allows you to transfer an entire SQL Server database to another database. In ef fect, this method imports the entire SQL Server database into yourAccess database. Here is the basic syntax:
DoCmd.TransferSQLDatabase Server, Database, UseTrustedConnection, Login, Password,TransferCopyDataVarious parameters are used to specify how the method should execute. The following table explains the use of each parameter.
Open table as spreadsheet
Parameter Description
Server Name of the SQL Server.
Database Name of new database on specif ied SQL Server.
UseTrustedConnection True if account has Administrator privileges, False otherwise and must specify Login and Password.Login Login name. Ignored if UseTrustedConnection is True.Password Login password. Ignored if UseTrustedConnection is True.TransferCopyData Use True to work with the data and schema and False to work with the schema only.
For example, to transfer the entire contents of a database called Pubs to the current database, you can use a command similar to the following:DoCmd.TransferSQLDatabase _ Server:="ServerName", _ Database:="Pubs", _ UseTrustedConnection:=True, _ TransferCopyData:=False
Beginning Access 2007 VBA
129 / 344

SpreadsheetsThe TransferSpreadsheet method is very similar to the TransferDatabase method in that it enables you to import, link, and export, only in this case it deals with spreadsheets. Thesyntax is shown in the following code:
DoCmd.TransferSpreadsheet TransferType, SpreadsheetType, TableName, FileName,HasFieldNames, Range, UseOAVarious parameters are used to specify how the method should execute. The following table explains the use of each parameter.
Open table as spreadsheet
Parameter Description
TransferType Type of transfer to be performed. Valid choices are acImport (default), acLink, and acExport.SpreadsheetType Type of spreadsheet. The default is acSpreadsheet TypeExcel12Xml. See the help documentation for a complete list and explanation.
TableName String expression that contains a table name or a SQL statement if you want to export data based on a SQL statement.
FileName File name and path of your spreadsheet.
HasFieldNames Use True to use the f irst row of the spreadsheet as f ield names and False to treat the f irst row as data. False is the default.
Range Valid range of cells or named range in the spreadsheet that you want to import f rom. Leave blank to import an entire spreadsheet. Using with Export will causean error.
UseOA Optional variant.
Now we’ll walk through an example of how you might use the TransferSpreadsheet method to export data to a spreadsheet. Suppose that you want to export the contents of the Employeestable you just imported from Northwind into a spreadsheet so that you can e-mail or send it to a colleague. The following code will create a new spreadsheet called Employees.xls in thetemp directory.DoCmd.TransferSpreadsheet acExport, acSpreadsheetTypeExcel12Xml, _ "tblEmployees", "C:\Temp\Employees.xlsx"An example of the spreadsheet created from the preceding command might look like the one shown in Figure 7-3.
Figure 7-3
Tip You can also use ADO to select, insert, update, and delete the underlying data in most of the data sources in this chapter by specifying the correct ADO provider (in this caseExcel).
Beginning Access 2007 VBA
130 / 344

Text FilesThe TransferText method allows you to import f rom, link to, and export to text f iles. It has the following syntax:DoCmd.TransferText TransferType, SpecificationName, TableName, FileName,HasFieldNames, HTMLTableName, CodePageAs you would expect, various parameters can be used to specify how the method should execute. These parameters are similar to the TransferDatabase and TransferSpreadsheetmethods you have already seen. The following table explains the use of each parameter.
Open table as spreadsheet
Parameter Description
TransferType Type of transfer to be performed. The default is acImportDelim. See the Access help documentation for a complete list and explanation.
SpecificationName Name of import or export specif ication you have saved in the current database. This argument can be lef t blank for text f iles that are delimited with certaincharacters or spacing to indicate the location of the f ields. The example text f ile in the next section is a comma-delimited f ile.
TableName String expression that contains a table name you want to work with or a query you want to export.
FileName File name and path of the text f ile you want to work with.
HasFieldNames Use True to use the contents of f irst row of the spreadsheet as f ield names and False to treat the f irst row as data. False is the default.
HTMLTableName Use with acImportHTML or acLinkHTML. Name of table or list in HTML f ile you want to work with. If blank, the f irst one is assumed.
CodePage Long value indicating the character set of the code page.
Next, we’ll jump right into importing data from a text f ile.
Try It Out-Importing Data from a Text File
Now, you import data from a text f ile into a new table, called tblEmails, in your Access database.1. Create a text f ile as shown in Figure 7-4 and save it in C:\temp.
Figure 7-4
2. Add the following procedure to the module in your database:
Sub TestTransferText()
DoCmd.TransferText acImportDelim, , _ "tblEmails", "C:\Temp\emails.txt", True
End Sub3. Run the procedure from the Immediate Window in Visual Basic Editor.
4. Return to the database window and you should see a screen similar to that shown in Figure 7-5.
Figure 7-5
How It Works
First, you created a text f ile that contained comma-delimited records. You then created a procedure to import the comma-delimited f ile to your database:Sub TestTransferText()
DoCmd.TransferText acImportDelim, , _ "tblEmails", "C:\Temp\emails.txt", True
End SubThe TransferText method imported the comma-delimited f ile into a new table called tblEmails, as shown in Figure 7-5. Note that the parameter for the SpecificationName was lef t blankbecause it is not required when working with delimited f iles.
Beginning Access 2007 VBA
131 / 344

XML FilesXML stands for eXtensible Markup Language. You have likely heard the XML buzzword, but you may not know what XML f iles really are. XML is a syntax that enables systems to createsimple text documents with various tags that identify how the text should be interpreted. At the end of this section, you will create an XML document from a table so that you can see whatone looks like.
The idea behind XML is to give various types of operating systems on dif ferent platforms a meaningful way of communicating with one another. As the use of XML has grown in popularity,the need to write Access applications that can import and export to XML text f iles has increased. Recent versions of Microsoft products incorporate extended XML functionality, including theImportXML and ExportXML methods that Access provides to enable users to import f rom and export to XML databases. You will now look at each of these in turn.
The syntax for the ImportXML method is:
Application.ImportXML DataSource, ImportOptionsThe DataSource is the name and path of the XML f ile to import. The ImportOptions parameter can be acStructureAndData (default), acAppendData, or acStructureOnly. Thus, to importan XML document into a table in your Access database, you might use the following code:
Application.ImportXML "employees.xml", acStructureAndDataThe ExportXML method allows you to export data in your Access database to XML f iles to exchange data with other applications. Here is the syntax:
Application.ExportXML ObjectType, DataSource, DataTarget, SchemaTarget,PresentationTarget, ImageTarget, Encoding, OtherFlags, WhereCondition,AdditionalDataThe following table explains what the various parameters of the ExportXML object are used for.
Open table as spreadsheet
Parameter Description
ObjectType The type of Access object to export
DataSource The name of the Access object to export
DataTarget The f ile name and path for the exported data
SchemaTarget The f ile name and path for the exported schema
PresentationTarget The f ile name and path for the exported target information
ImageTarget The path for exported images
Encoding The text encoding to use
OtherFlags Additional f lags that can be used
WhereCondition Subset of records to be exported
AdditionalData Additional tables to export
I said earlier that I would provide a sample XML f ile so that you could see what it looks like. Well, it’s now time to use the ExportXML method to export one of your tables to XML so that youcan see how it works.
Suppose that you have the following procedure:
Sub TestExportXML()
Application.ExportXML acExportTable, "tblEmployees", _ "c:\Temp\Employees.xml", _ "c:\Temp\EmployeesSchema.xml"
End SubThe procedure uses the ExportXML method to export the Employees table in your database to an XML f ile called Employees.xml. After you run the preceding procedure, you create the XMLfile that looks similar to the one shown in Figure 7-6.
Figure 7-6
Notice in Figure 7-6 how the tags describe the data in detailed ways. This is a more detailed and structured way of organizing and describing data than HTML, which is just designed fordisplaying data.
That’s all it takes to export data from your Access application to another system. You’re now ready to learn how to send an e-mail f rom VBA code.
Beginning Access 2007 VBA
132 / 344

Beginning Access 2007 VBA
133 / 344

E-mails and OutlookOne way you can send an e-mail f rom VBA code is using the SendObject method, as shown here:
DoCmd.SendObject ObjectType, ObjectName, OutputFormat, To, Cc, Bcc, Subject,MessageText, EditMessage, TemplateFileThe ObjectType, ObjectName, and OutputFormat parameters are used to specify a f ile created from the database to include as an attachment. Remember that earlier I said you hadexported the tblEmployees table to Excel so that you could e-mail it to a coworker. The SendObject method allows you to attach certain database objects in one of a variety of formats aspart of the e-mail. Thus, to generate a new e-mail that also attaches the tblEmployees table as an Excel attachment, you could use something similar to the following:
'Send the Employees fileDoCmd.SendObject acSendTable, "tblEmployees", acFormatXLS, _ "[email protected]", , , "Employee List", "For your review.", FalseIf you do not want to send an attachment, but just want to send an e-mail telling me how much you like the book so far, you can use the following command. Please do this - I would love toget this test e-mail f rom you!
'Send the author of this book an emailDoCmd.SendObject acSendNoObject, , , "[email protected]", , , _ "This is cool!", _ "I just sent an email from VBA. Really am enjoying your book.", FalseIf you want to learn more about controlling Outlook from your VBA applications, consult Chapter 11, where I cover automation with various Off ice programs such as Outlook. TheSendObject method I just discussed is not specif ic to any e-mail program.
Beginning Access 2007 VBA
134 / 344

Other Ways to Export DataYet another way to export data can be implemented using the OutputTo method. The OutputTo method can export data to various formats: ASP, DAP, HTML, IIS, RTF, SNP, TXT, and XLS.The syntax for OutputTo is shown here:
DoCmd.OutputTo(ObjectType, ObjectName, OutputFormat, OutputFile, AutoStart,TemplateFile, Encoding)Please consult Chapter 9 for more information on the OutputTo method, as the entire chapter is dedicated to creating reports and Web-enabled output, including those created with theOutputTo method.
In addition to all the ways you can integrate with external data sources discussed so far, there are two more technologies that have not been touched on. Those two technologies are webservices and the SharePoint product family. These two topics will be covered in Chapter 8.
Beginning Access 2007 VBA
135 / 344

SummaryIn today’s world of technology, it has become commonplace for companies to expect systems to communicate with each other in ways that were not possible just a decade ago. In thischapter, you explored ways to work with external data to facilitate communications between various systems. You learned VBA techniques for linking, importing, and exporting data tovarious sources, such as databases, spreadsheets, and text f iles. You also learned how to handle more advanced scenarios, such as sending e-mails programmatically with and withoutattachments.
Chapter 8 will build on this chapter by exploring some advanced linking and importing techniques using web services and the SharePoint product family.
Beginning Access 2007 VBA
136 / 344
Exercises1. What are some reasons you would choose linking versus importing?
2. What is the dif ference between the TransferDatabase and TransferSQLDatabase methods?
3. How can you programmatically generate an e-mail to send to someone?
Answers
1. Linking stores only a pointer to the location of the underlying data source, and updates are made to the original data itself . Linking is a good idea when the data resides on a databaseserver that your application and others can use, the data is used by another program that requires the native f ile format, or the underlying data needs to be updated on a regular basisin its native format. Importing data actually brings a copy of the data into your Access database. Reasons for importing data include moving an existing system that is being migratedto a new application, and having numerous data operations that need to be run against the data from another source in a speedy fashion when you do not need to change that data.
2. TransferDatabase allows you to import, export, and link to various types of databases, such as Access and SQL Server. You specify various parameters to indicate which type ofaction should be performed. TransferSQLDatabase transfers the entire contents of a particular SQL Server database to your application.
3. You can use the SendObject method to generate an e-mail programmatically using VBA. This method allows you to generate an e-mail with or without attachments. You can use thismethod to create just one e-mail, or multiple e-mails, such as for a mailing list.
Beginning Access 2007 VBA
137 / 344

Chapter 8: Using Access with Web Services and SharePoint Lists
OverviewIn Chapter 5, I covered the basics of using ADO and SQL to work with data sources. All the ADO and SQL examples dealt with data stored in tables in a database. However, in today’s worldof technology, you often work with data and applications in a variety of formats, such as text f iles and spreadsheets. You may need to import or link data from various sources into yourdatabase to avoid having to retype all the information that is already stored electronically in another format. At some point, another application might need the data in your application or youmay want to get data out of your application for another reason. In that case, you can export information from your application into another format.
In this chapter, you will explore the various ways to use VBA code to consume web services, as well as to link to and import SharePoint Lists. The chapter will cover:
The def inition of a web service and how you can use data returned from a web service
The def inition of SharePoint and SharePoint Lists
Linking to SharePoint Lists
Linking and importing SharePoint Lists using VBA
Creating SharePoint list entries from VBA
These techniques will enable you to build applications that can interact with other systems throughout your organization and beyond.
Beginning Access 2007 VBA
138 / 344

Introduction to Web ServicesA common topic of discussion in the high-tech sector these days is web services. Web services are reusable components that are based on standard Internet protocols. They enablesystems on dif ferent platforms to talk to each other. In the simplest terms, I like to describe a web service as some procedure or function that someone has made available over Internetprotocols so that you can use it for f ree or for a cost. Web services can be called (consumed) by Web and non-Web-based applications as long as the application can communicate usingstandard Internet protocols. Web services typically return a response in XML format that can then be used appropriately in the consuming program.
Although web services communicate using Internet protocols, you can still use web services for private purposes within a company. For example, some companies are better integratinglegacy mainframe and other applications into their current environment by exposing parts of the old application as a web service. After the old application is made accessible using a webservice, it can be called from other platforms that, traditionally, could not communicate easily. Although I could write a whole chapter or even a book on web services alone, I want you, atleast, to learn the basic concept of what a web service is. I also want to give you a simple example of how you can use someone else’s web service in your Access applications. The f irstpart of this chapter will show you how to locate and consume web services from Access.
Beginning Access 2007 VBA
139 / 344
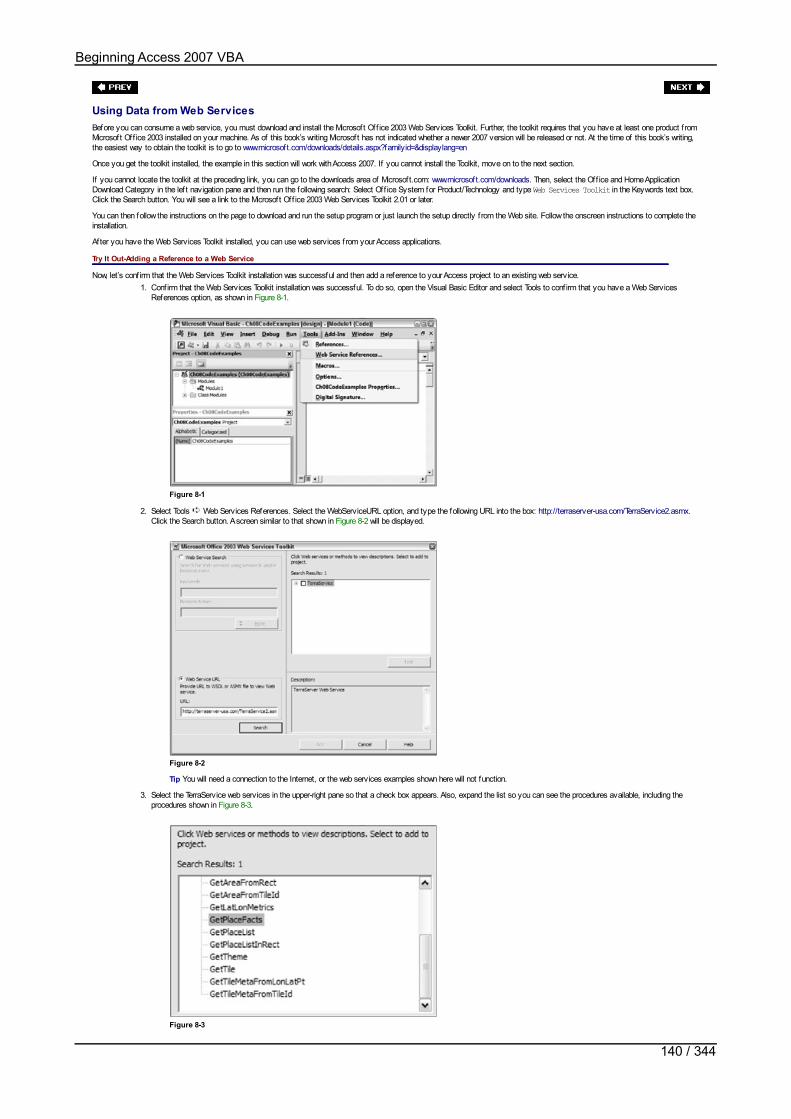
Using Data from Web ServicesBefore you can consume a web service, you must download and install the Microsoft Off ice 2003 Web Services Toolkit. Further, the toolkit requires that you have at least one product f romMicrosoft Off ice 2003 installed on your machine. As of this book’s writing Microsoft has not indicated whether a newer 2007 version will be released or not. At the time of this book’s writing,the easiest way to obtain the toolkit is to go to www.microsoft.com/downloads/details.aspx?familyid=&displaylang=en
Once you get the toolkit installed, the example in this section will work with Access 2007. If you cannot install the Toolkit, move on to the next section.
If you cannot locate the toolkit at the preceding link, you can go to the downloads area of Microsoft.com: www.microsoft.com/downloads. Then, select the Off ice and Home ApplicationDownload Category in the lef t navigation pane and then run the following search: Select Off ice System for Product/Technology and type Web Services Toolkit in the Keywords text box.Click the Search button. You will see a link to the Microsoft Off ice 2003 Web Services Toolkit 2.01 or later.
You can then follow the instructions on the page to download and run the setup program or just launch the setup directly f rom the Web site. Follow the onscreen instructions to complete theinstallation.
After you have the Web Services Toolkit installed, you can use web services from your Access applications.
Try It Out-Adding a Reference to a Web Service
Now, let’s conf irm that the Web Services Toolkit installation was successful and then add a reference to your Access project to an existing web service.1. Conf irm that the Web Services Toolkit installation was successful. To do so, open the Visual Basic Editor and select Tools to conf irm that you have a Web Services
References option, as shown in Figure 8-1.
Figure 8-1
2. Select Tools Web Services References. Select the WebServiceURL option, and type the following URL into the box: http://terraserver-usa.com/TerraService2.asmx.Click the Search button. A screen similar to that shown in Figure 8-2 will be displayed.
Figure 8-2
Tip You will need a connection to the Internet, or the web services examples shown here will not function.
3. Select the TerraService web services in the upper-right pane so that a check box appears. Also, expand the list so you can see the procedures available, including theprocedures shown in Figure 8-3.
Figure 8-3
Beginning Access 2007 VBA
140 / 344
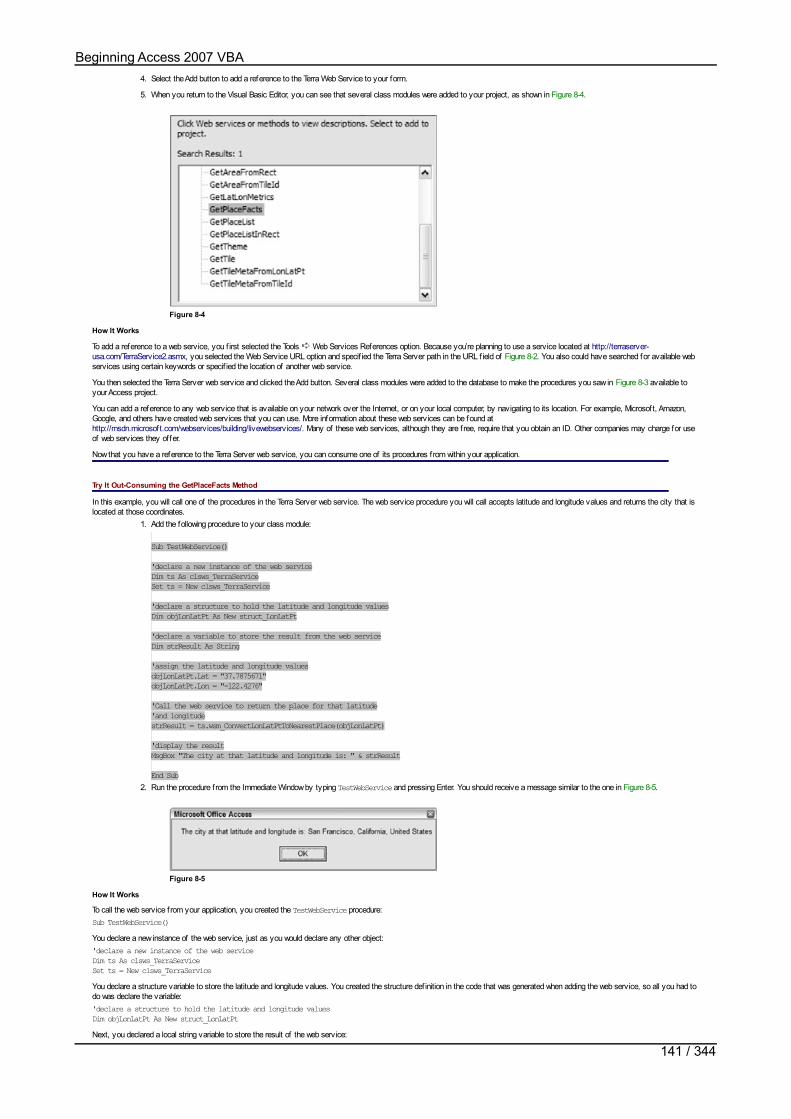
4. Select the Add button to add a reference to the Terra Web Service to your form.
5. When you return to the Visual Basic Editor, you can see that several class modules were added to your project, as shown in Figure 8-4.
Figure 8-4
How It Works
To add a reference to a web service, you f irst selected the Tools Web Services References option. Because you’re planning to use a service located at http://terraserver-usa.com/TerraService2.asmx, you selected the Web Service URL option and specif ied the Terra Server path in the URL f ield of Figure 8-2. You also could have searched for available webservices using certain keywords or specif ied the location of another web service.
You then selected the Terra Server web service and clicked the Add button. Several class modules were added to the database to make the procedures you saw in Figure 8-3 available toyour Access project.
You can add a reference to any web service that is available on your network over the Internet, or on your local computer, by navigating to its location. For example, Microsoft, Amazon,Google, and others have created web services that you can use. More information about these web services can be found athttp://msdn.microsoft.com/webservices/building/livewebservices/. Many of these web services, although they are free, require that you obtain an ID. Other companies may charge for useof web services they offer.
Now that you have a reference to the Terra Server web service, you can consume one of its procedures from within your application.
Try It Out-Consuming the GetPlaceFacts Method
In this example, you will call one of the procedures in the Terra Server web service. The web service procedure you will call accepts latitude and longitude values and returns the city that islocated at those coordinates.
1. Add the following procedure to your class module:
Sub TestWebService()
'declare a new instance of the web serviceDim ts As clsws_TerraServiceSet ts = New clsws_TerraService
'declare a structure to hold the latitude and longitude valuesDim objLonLatPt As New struct_LonLatPt
'declare a variable to store the result from the web serviceDim strResult As String
'assign the latitude and longitude valuesobjLonLatPt.Lat = "37.7875671"objLonLatPt.Lon = "-122.4276"
'Call the web service to return the place for that latitude'and longitudestrResult = ts.wsm_ConvertLonLatPtToNearestPlace(objLonLatPt)
'display the resultMsgBox "The city at that latitude and longitude is: " & strResult
End Sub2. Run the procedure from the Immediate Window by typing TestWebService and pressing Enter. You should receive a message similar to the one in Figure 8-5.
Figure 8-5
How It Works
To call the web service from your application, you created the TestWebService procedure:Sub TestWebService()You declare a new instance of the web service, just as you would declare any other object:'declare a new instance of the web serviceDim ts As clsws_TerraServiceSet ts = New clsws_TerraServiceYou declare a structure variable to store the latitude and longitude values. You created the structure def inition in the code that was generated when adding the web service, so all you had todo was declare the variable:'declare a structure to hold the latitude and longitude valuesDim objLonLatPt As New struct_LonLatPtNext, you declared a local string variable to store the result of the web service:
Beginning Access 2007 VBA
141 / 344
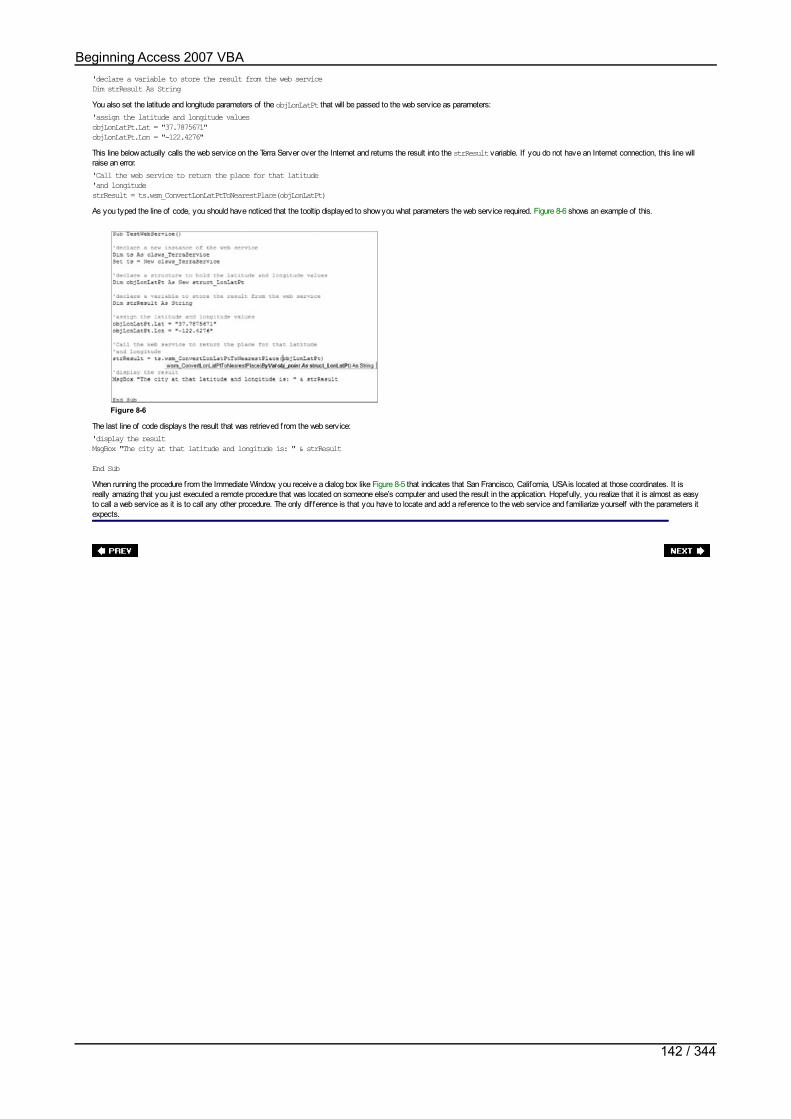
'declare a variable to store the result from the web serviceDim strResult As StringYou also set the latitude and longitude parameters of the objLonLatPt that will be passed to the web service as parameters:'assign the latitude and longitude valuesobjLonLatPt.Lat = "37.7875671"objLonLatPt.Lon = "-122.4276"This line below actually calls the web service on the Terra Server over the Internet and returns the result into the strResult variable. If you do not have an Internet connection, this line willraise an error.'Call the web service to return the place for that latitude'and longitudestrResult = ts.wsm_ConvertLonLatPtToNearestPlace(objLonLatPt)As you typed the line of code, you should have noticed that the tooltip displayed to show you what parameters the web service required. Figure 8-6 shows an example of this.
Figure 8-6
The last line of code displays the result that was retrieved from the web service:'display the resultMsgBox "The city at that latitude and longitude is: " & strResult
End SubWhen running the procedure from the Immediate Window, you receive a dialog box like Figure 8-5 that indicates that San Francisco, California, USA is located at those coordinates. It isreally amazing that you just executed a remote procedure that was located on someone else’s computer and used the result in the application. Hopefully, you realize that it is almost as easyto call a web service as it is to call any other procedure. The only dif ference is that you have to locate and add a reference to the web service and familiarize yourself with the parameters itexpects.
Beginning Access 2007 VBA
142 / 344

Introduction to SharePoint ListsWith Access 2007 you are now able to interact with SharePoint functionality; you can link, import, and export data to and from Off ice SharePoint Server 2007. Off ice SharePoint Server2007 is built on Windows SharePoint Services 3.0 and brings together several products into one platform, including Microsoft SharePoint Portal Server 2003 and Microsoft ContentManagement Server 2002. This section will focus only on SharePoint functionality, specif ically working with lists.
SharePoint lists are collections of items that are grouped together in a logical fashion. These items are then available to other SharePoint users to view. You can also create new lists basedon an existing list type. The following are the dif ferent types of lists that can be created:
Announcements – Used to broadcast short pieces of information to the rest of the SharePoint site users and can include an expiration date when the announcement willcease to be displayed.
Contacts – A list of people and typical contact information including name, e-mail address, various phone numbers, address, and other miscellaneous information.
Events – Used to capture specif ic point-in-time occurrences like meetings and deadlines. Information that can be captured with an event includes beginning date and time,ending date and time, descriptive information, and recurrence settings.
Issues – Used to manage problems and issues. Information that can be captured with an issue includes name, to whom the issue is assigned, priority, status, and othermiscellaneous information.
Links – Used to capture links to network, intranet, and Internet resources.
Tasks – Used to manage work assignments. Information that can be captured with an issue includes name, to whom the task is assigned, priority, status, and othermiscellaneous information.
In addition to the built-in types, you can create custom lists. When creating custom lists you may use several dif ferent data types. The follow table is a list of the SharePointdata types and the corresponding Access data type.
Open table as spreadsheet
SharePoint Column Type Access Data Type Comments
ID AutoNumber Read-only
Single line of text Text
Multiple lines of text Memo
Number Number
Currency Currency
Date or Time Date/Time
Lookup and Person or Group Number or Memo When importing, data type will be determined by retrieving IDs or display values. When linking, Number willbe used.
Choice (single) Text
Choice (multiple) Text
Yes/No Yes/No
Hyperlink Hyperlink
Attachment Attachment
Calculated Determined by the resultingvalue
Read-only, formula is ignored
Rich Text Memo Displays only the f irst 64K of text
Enhanced Rich Text Memo Read-only
Displays only the f irst 64K oftext
Beginning Access 2007 VBA
143 / 344
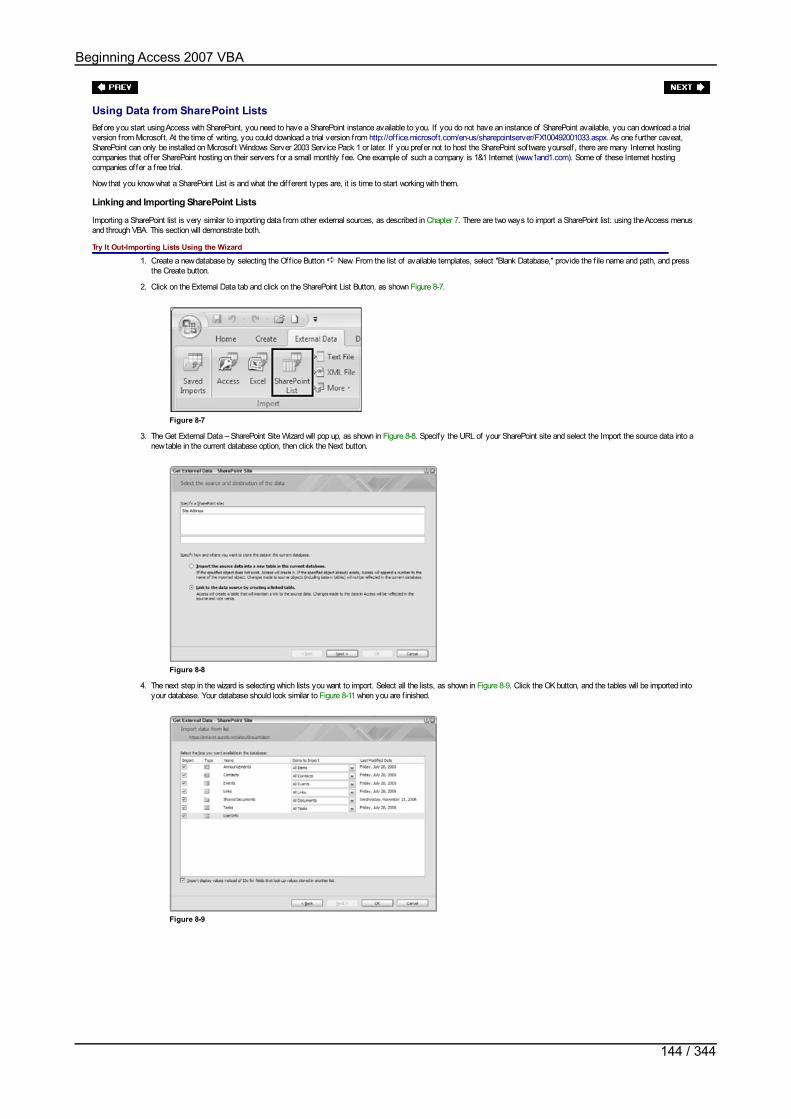
Using Data from SharePoint ListsBefore you start using Access with SharePoint, you need to have a SharePoint instance available to you. If you do not have an instance of SharePoint available, you can download a trialversion from Microsoft. At the time of writing, you could download a trial version from http://of f ice.microsoft.com/en-us/sharepointserver/FX100492001033.aspx. As one further caveat,SharePoint can only be installed on Microsoft Windows Server 2003 Service Pack 1 or later. If you prefer not to host the SharePoint software yourself , there are many Internet hostingcompanies that of fer SharePoint hosting on their servers for a small monthly fee. One example of such a company is 1&1 Internet (www.1and1.com). Some of these Internet hostingcompanies offer a free trial.
Now that you know what a SharePoint List is and what the dif ferent types are, it is time to start working with them.
Linking and Importing SharePoint Lists
Importing a SharePoint list is very similar to importing data from other external sources, as described in Chapter 7. There are two ways to import a SharePoint list: using the Access menusand through VBA. This section will demonstrate both.
Try It Out-Importing Lists Using the Wizard
1. Create a new database by selecting the Off ice Button New. From the list of available templates, select "Blank Database," provide the f ile name and path, and pressthe Create button.
2. Click on the External Data tab and click on the SharePoint List Button, as shown Figure 8-7.
Figure 8-7
3. The Get External Data – SharePoint Site Wizard will pop up, as shown in Figure 8-8. Specify the URL of your SharePoint site and select the Import the source data into anew table in the current database option, then click the Next button.
Figure 8-8
4. The next step in the wizard is selecting which lists you want to import. Select all the lists, as shown in Figure 8-9. Click the OK button, and the tables will be imported intoyour database. Your database should look similar to Figure 8-11 when you are f inished.
Figure 8-9
Beginning Access 2007 VBA
144 / 344
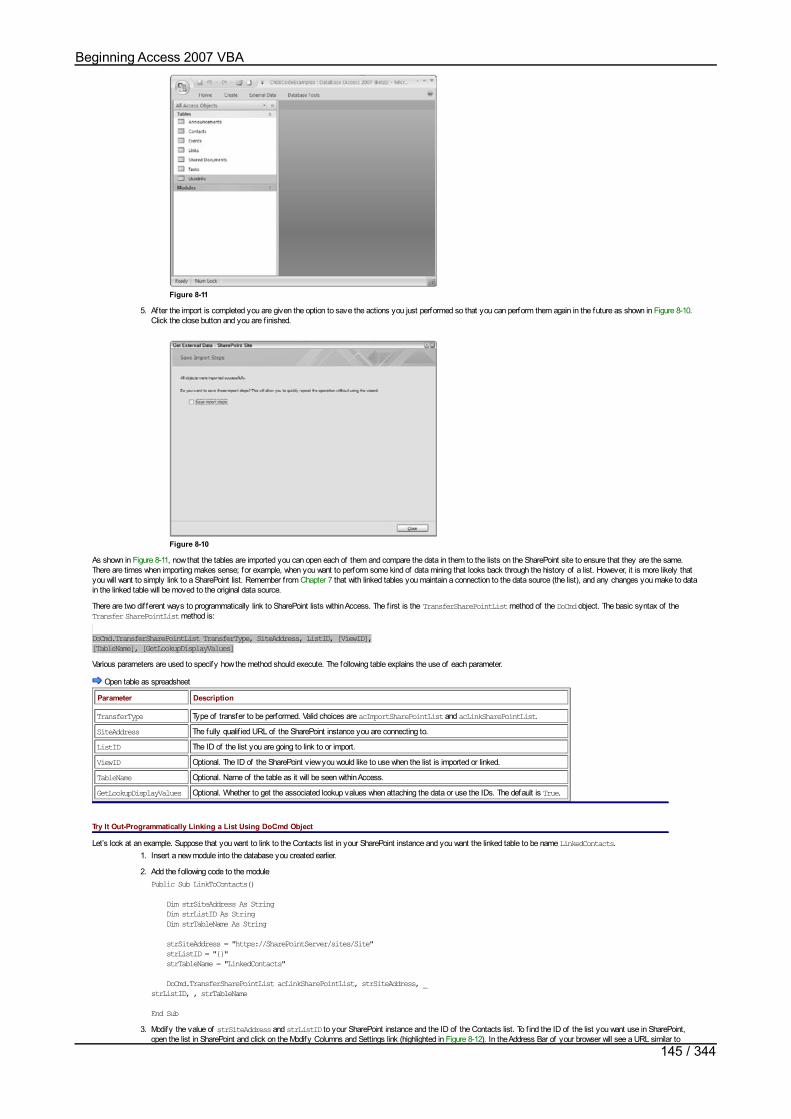
Figure 8-11
5. After the import is completed you are given the option to save the actions you just performed so that you can perform them again in the future as shown in Figure 8-10.Click the close button and you are f inished.
Figure 8-10
As shown in Figure 8-11, now that the tables are imported you can open each of them and compare the data in them to the lists on the SharePoint site to ensure that they are the same.There are times when importing makes sense; for example, when you want to perform some kind of data mining that looks back through the history of a list. However, it is more likely thatyou will want to simply link to a SharePoint list. Remember from Chapter 7 that with linked tables you maintain a connection to the data source (the list), and any changes you make to datain the linked table will be moved to the original data source.
There are two dif ferent ways to programmatically link to SharePoint lists within Access. The f irst is the TransferSharePointList method of the DoCmd object. The basic syntax of theTransfer SharePointList method is:
DoCmd.TransferSharePointList TransferType, SiteAddress, ListID, [ViewID],[TableName], [GetLookupDisplayValues]Various parameters are used to specify how the method should execute. The following table explains the use of each parameter.
Open table as spreadsheet
Parameter Description
TransferType Type of transfer to be performed. Valid choices are acImportSharePointList and acLinkSharePointList.SiteAddress The fully qualif ied URL of the SharePoint instance you are connecting to.
ListID The ID of the list you are going to link to or import.
ViewID Optional. The ID of the SharePoint view you would like to use when the list is imported or linked.
TableName Optional. Name of the table as it will be seen within Access.
GetLookupDisplayValues Optional. Whether to get the associated lookup values when attaching the data or use the IDs. The default is True.
Try It Out-Programmatically Linking a List Using DoCmd Object
Let’s look at an example. Suppose that you want to link to the Contacts list in your SharePoint instance and you want the linked table to be name LinkedContacts.1. Insert a new module into the database you created earlier.
2. Add the following code to the modulePublic Sub LinkToContacts()
Dim strSiteAddress As String Dim strListID As String Dim strTableName As String
strSiteAddress = "https://SharePointServer/sites/Site" strListID = "{}" strTableName = "LinkedContacts"
DoCmd.TransferSharePointList acLinkSharePointList, strSiteAddress, _strListID, , strTableName
End Sub3. Modify the value of strSiteAddress and strListID to your SharePoint instance and the ID of the Contacts list. To f ind the ID of the list you want use in SharePoint,
open the list in SharePoint and click on the Modify Columns and Settings link (highlighted in Figure 8-12). In the Address Bar of your browser will see a URL similar to
Beginning Access 2007 VBA
145 / 344
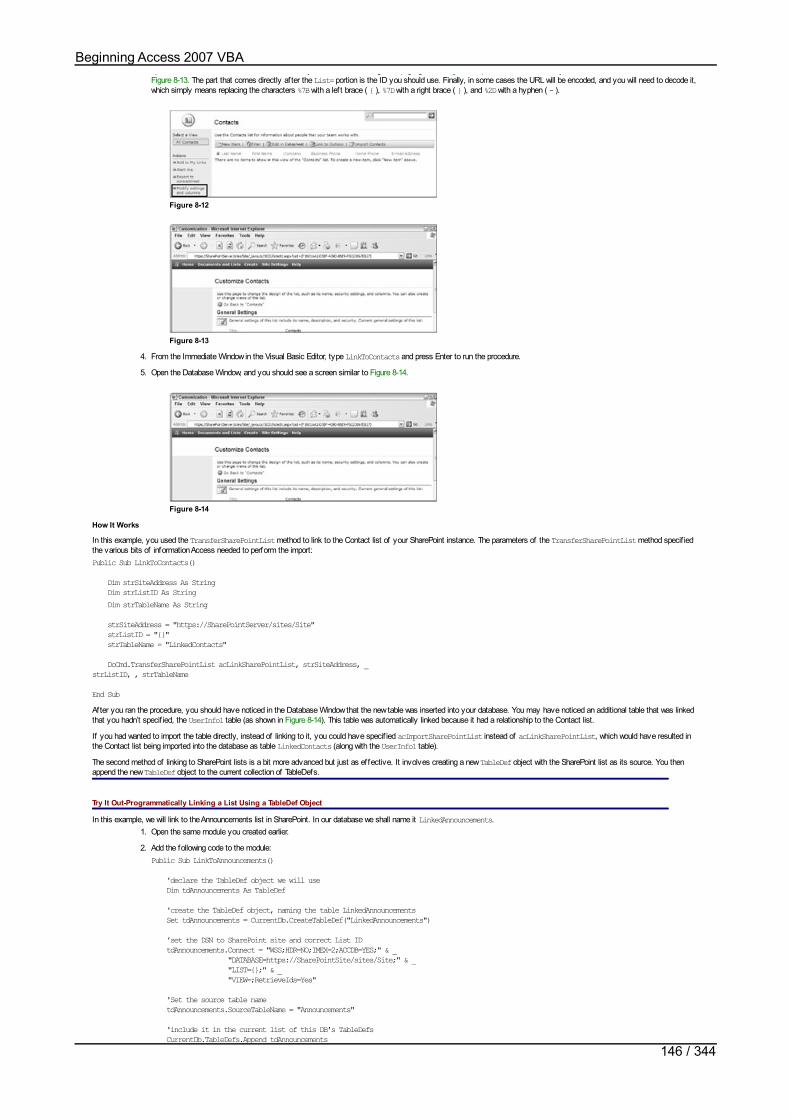
open the list in SharePoint and click on the Modify Columns and Settings link (highlighted in Figure 8-12). In the Address Bar of your browser will see a URL similar toFigure 8-13. The part that comes directly af ter the List= portion is the ID you should use. Finally, in some cases the URL will be encoded, and you will need to decode it,which simply means replacing the characters %7B with a lef t brace ( { ), %7D with a right brace ( } ), and %2D with a hyphen ( - ).
Figure 8-12
Figure 8-13
4. From the Immediate Window in the Visual Basic Editor, type LinkToContacts and press Enter to run the procedure.
5. Open the Database Window, and you should see a screen similar to Figure 8-14.
Figure 8-14
How It Works
In this example, you used the TransferSharePointList method to link to the Contact list of your SharePoint instance. The parameters of the TransferSharePointList method specif iedthe various bits of information Access needed to perform the import:Public Sub LinkToContacts()
Dim strSiteAddress As String Dim strListID As String Dim strTableName As String
strSiteAddress = "https://SharePointServer/sites/Site" strListID = "{}" strTableName = "LinkedContacts"
DoCmd.TransferSharePointList acLinkSharePointList, strSiteAddress, _strListID, , strTableName
End SubAfter you ran the procedure, you should have noticed in the Database Window that the new table was inserted into your database. You may have noticed an additional table that was linkedthat you hadn’t specif ied, the UserInfo1 table (as shown in Figure 8-14). This table was automatically linked because it had a relationship to the Contact list.
If you had wanted to import the table directly, instead of linking to it, you could have specif ied acImportSharePointList instead of acLinkSharePointList, which would have resulted inthe Contact list being imported into the database as table LinkedContacts (along with the UserInfo1 table).
The second method of linking to SharePoint lists is a bit more advanced but just as effective. It involves creating a new TableDef object with the SharePoint list as its source. You thenappend the new TableDef object to the current collection of TableDefs.
Try It Out-Programmatically Linking a List Using a TableDef Object
In this example, we will link to the Announcements list in SharePoint. In our database we shall name it LinkedAnnouncements.1. Open the same module you created earlier.
2. Add the following code to the module:Public Sub LinkToAnnouncements()
'declare the TableDef object we will use Dim tdAnnouncements As TableDef
'create the TableDef object, naming the table LinkedAnnouncements Set tdAnnouncements = CurrentDb.CreateTableDef("LinkedAnnouncements")
'set the DSN to SharePoint site and correct List ID tdAnnouncements.Connect = "WSS;HDR=NO;IMEX=2;ACCDB=YES;" & _ "DATABASE=https://SharePointSite/sites/Site;" & _ "LIST={};" & _ "VIEW=;RetrieveIds=Yes"
'Set the source table name tdAnnouncements.SourceTableName = "Announcements"
'include it in the current list of this DB's TableDefs CurrentDb.TableDefs.Append tdAnnouncements
Beginning Access 2007 VBA
146 / 344

CurrentDb.TableDefs.Append tdAnnouncements
End Sub3. This method of linking to tables requires that we use a DSN. Although it looks quite a bit dif ferent than other DSNs it holds the same basic information. Replace the value
of the DATABASE portion to your SharePoint instance and replace the value for List with the correct ID from your Announcement list.
4. From the Immediate Window in the Visual Basic Editor, type LinkToAnnouncements and press Enter to run the procedure.
5. Open the Database Window, and you should see a screen similar to Figure 8-15. (It may take a few minutes for the table to appear as Access refreshes its tabledef initions and attaches to the data source.)
Figure 8-15
How It Works
In this example, you created a TableDef to connect to the SharePoint instance. The f irst thing you need to do is to create a TableDef object to use. The two code bits below do just that.The f irst code line declares an object of type TableDef. The second code line instantiates that variable and sets the name to LinkedAnnouncements.'declare the TableDef object we will useDim tdAnnouncements As TableDef
'create the TableDef object, naming the table LinkedAnnouncementsSet tdAnnouncements = CurrentDb.CreateTableDef("LinkedAnnouncements")The next thing to do is to tell the TableDef object where to get the object. This is done by setting the Connect property of the TableDef object to the DSN of the Announcement list. TheSharePoint DSN looks a bit like other types of DSNs discussed in earlier chapters but with some dif ferences.'set the DSN to SharePoint site and correct List IDtdAnnouncements.Connect = "WSS;HDR=NO;IMEX=2;ACCDB=YES;" & _ "DATABASE=https://SharePointSite/sites/Site;" & _ "LIST={};" & _ "VIEW=;RetrieveIds=Yes"Note that the DSN for this example begins with WSS, which indicates that a SharePoint instance will be used. The DATABASE portion is the fully qualif ied URL to the SharePoint site. The LISTportion is the ID of the list to connect to. The last bit of the DSN is some options relating to using a view and whether to retrieve lookup IDs or not.
Next, the SourceTableName property is set to the name of the list:'Set the source table nametdAnnouncements.SourceTableName = "Announcements"Finally, we append the new TableDef object to the current database’s collection of TableDefs. This action is what initiates the link between the Access database and SharePoint, thus makingit appear in the Database Window.'include it in the current list of this DB's TableDefsCurrentDb.TableDefs.Append tdAnnouncementsThe previous two examples accomplish the same thing in that both attach a SharePoint list to your database. The f irst is easier than the second, so why would you want to use the second?Imagine a scenario where you did not want to keep the link open, but rather you wanted to connect brief ly to insert some entries and then disconnect. The second method makes this a fairlypainless process. Consider the following example:Public Sub InsertAnnouncements()
'declare the TableDef object we will use Dim tdAnnouncements As TableDef
'create the TableDef object, naming the table LinkedAnnouncements Set tdAnnouncements = CurrentDb.CreateTableDef("LinkedAnnouncements")
'set the DSN to SharePoint site and correct List ID tdAnnouncements.Connect = "WSS;HDR=NO;IMEX=2;ACCDB=YES;" & _ "DATABASE=https://SharePointSite/sites/Site;" & _ "LIST={};" & _ "VIEW=;RetrieveIds=Yes"
'Set the source table name tdAnnouncements.SourceTableName = "Announcements"
'include it in the current list of this DB's TableDefs CurrentDb.TableDefs.Append tdAnnouncements
'create the sql to create an entry Dim sql As String sql = "INSERT INTO LinkedAnnouncements ( Title, Body, Expires )" sql = sql & " VALUES ( 'Access 2007 Released!', " sql = sql & "'Access 2007 has been released...', '2/1/2007')"
'execute the sql DoCmd.RunSQL sql
'now we detatch the linked table, we do not need it anymore CurrentDb.TableDefs.Delete "LinkedAnnouncements"
End Sub
Beginning Access 2007 VBA
147 / 344

The f irst part of this method is exactly the same as the second example. You will notice though that once the table has been attached we insert a new announcement and then remove thelinked table from the database. If you open the target SharePoint instance, you will see that the new entry is there, as shown in Figure 8-16.
Figure 8-16
Beginning Access 2007 VBA
148 / 344

SummaryIn today’s world of technology, it has become commonplace for companies to expect systems to communicate with each other in ways that were not possible just a decade ago. In thischapter, you explored ways to work with external data to facilitate communications between various systems. You learned VBA techniques for consuming web services from yourapplication. Web services allow applications on various platforms to exchange data upon request and have become an increasingly popular communication technique between systems. Youlearned how to import and link to SharePoint lists by using both the built-in wizard and using VBA. Chapter 9 will build on this chapter by explaining how to export data in your application toreports and Web-enabled output.
Beginning Access 2007 VBA
149 / 344
Exercises1. What is a web service, and how do you use one?
2. What is the dif ference between the acImportSharePointList and acLinkSharePointList parameters when using the TransferSharePointList method?
3. Under what circumstances would you want to link to a SharePoint list by creating a TableDef object?
Answers
1. A web service is an HTTP-based method for communicating with other applications. To consume a web service, you must create a reference to it, and then you can use it as you wouldany other object.
2. The acImportSharePointList actually imports the table and severs the link, whereas acLinkSharePointList creates a linked table.
3. You would use this method when you needed to connect only brief ly and then needed to disconnect f rom the SharePoint instance.
Beginning Access 2007 VBA
150 / 344

Chapter 9: Creating Reports and Web-Enabled OutputChapter 8 explored techniques to consume information from web services and the SharePoint product family. This chapter covers:
Creating reports programmatically and how to output data from Access databases in ways that can be used over the Web. For example, you will explore how to set the recordsource for a report dynamically, so you can use the same report across dif ferent data sources.
Using the OutputTo method to export data to various formats, such as HTML.
Working with Reports from VBAReports can be manipulated in numerous ways from VBA code. For example, you can change the data source on which the report is based from within VBA code. You can also createreports f rom scratch or modify existing reports f rom within VBA code. Let’s look at a few examples to further illustrate these concepts.
Tip Many of the examples in this chapter that deal with manipulating existing reports use the Northwind database. If you want to create those particular examples yourself , open theNorthwind database and add a new module. Only the code for the Try It Out examples is included in the sample code available on Wrox.com for this chapter. If you do not havethe Northwind database installed, you can install it and the other sample databases from the Microsoft Access setup program, or you can download it f rom Microsoft’s web site inthe Microsoft Off ice section that contains Access sample databases.
Setting the Report Data Source
The DataSource property of a Report object can be specif ied as a SQL statement. Suppose that you have an existing report called Alphabetical List of Products. The followingprocedure illustrates one way you can modify the DataSource of the report:
Sub ModifyExistingReport()
'declare a variable to store the SQL stringDim strSQL As String
'set the SQL statement value to show only the top 5 ordersstrSQL = "SELECT DISTINCTROW TOP 5 Orders.[Order ID], Orders.[Order Date]," & _ "[Order Subtotals].Subtotal AS SaleAmount, " & _ "[Customers Extended].Company AS CompanyName, Orders.[Shipped Date] " & _ "FROM [Customers Extended] " & _ "INNER JOIN (Orders INNER JOIN [Order Subtotals] ON " & _ "Orders.[Order ID] = [Order Subtotals].[Order ID]) " & _ "ON [Customers Extended].ID = Orders.[Customer ID] " & _ "ORDER BY [Order Subtotals].Subtotal DESC;"
'access the report's design (hidden from the user)DoCmd.Echo FalseDoCmd.OpenReport "Top Ten Biggest Orders", acViewDesign
'set the source of the report to the SQL statementReports("Top Ten Biggest Orders").RecordSource = strSQL
'close the report's design and save changesDoCmd.Close , , acSaveYes
'now open the report for the user in preview modeDoCmd.OpenReport "Top Ten Biggest Orders", acViewPreviewDoCmd.Echo True
End SubNotice f irst how a SQL statement is created to specify which f ields the report should be based upon. The report’s design view is then accessed in hidden mode (DoCmd.Echo False) so thatthe user does not see the modif ications. The RecordSource is then assigned to the strSQL variable. The report is then closed and the changes saved. Finally, the report is opened inpreview mode, so you can see the changes.
Important When you make changes to report properties (such as the RecordSource property), you actually permanently change the report to those settings, just as if youhad done so in the designer. You don’t just make a temporary change that is undone after the code executes.
You can also specify an ADO recordset as a report’s data source. You could modify the prior example as follows:
Sub ModifyExistingReport()
'declare a variable to store the SQL stringDim strSQL As String
'set the SQL statement value to show only the top 5 ordersstrSQL = "SELECT DISTINCTROW TOP 5 Orders.[Order ID], Orders.[Order Date]," & _ "[Order Subtotals].Subtotal AS SaleAmount, " & _ "[Customers Extended].Company AS CompanyName, Orders.[Shipped Date] " & _ "FROM [Customers Extended] " & _ "INNER JOIN (Orders INNER JOIN [Order Subtotals] ON " & _ "Orders.[Order ID] = [Order Subtotals].[Order ID]) " & _ "ON [Customers Extended].ID = Orders.[Customer ID] " & _ "ORDER BY [Order Subtotals].Subtotal DESC;"'declare and instantiate a new recordsetDim rsDiscontinued As ADODB.RecordsetSet rsDiscontinued = New ADODB.Recordset
'open the recordset based on the SQL statementrsDiscontinued.Open strSQL, CurrentProject.Connection
'access the report's design (hidden from the user)DoCmd.Echo FalseDoCmd.OpenReport "Top Ten Biggest Orders", acViewDesign
'set the source of the report to the recordset sourceReports("Top Ten Biggest Orders").RecordSource = rsDiscontinued.Source
'close the report's design and save changesDoCmd.Close , , acSaveYes
'now open the report for the user in preview mode
Beginning Access 2007 VBA
151 / 344
'now open the report for the user in preview modeDoCmd.OpenReport "Top Ten Biggest Orders", acViewPreviewDoCmd.Echo True
'close the recordset and free the memoryrsDiscontinued.CloseSet rsDiscontinued = Nothing
End SubNotice how this example uses the SQL statement to create the ADO recordset and then assigns the RecordSource property of the report to the recordset’s Source property.
Creating Reports Programmatically
Just as you can work with forms and other Access objects programmatically, you can also work with reports programmatically. You can create reports f rom scratch and modify existingreports. Let’s look at how to create a report f rom scratch.
Creating an Empty ReportTo create a new report, you use the CreateReport method. Here is the basic syntax:
Dim rptReport as Access.ReportSet rptReport = CreateReportBelow is an example that creates a new empty report and deletes any existing report with the same name before creating the new report:
Sub CreateNewReport()
Dim rptCustomers As Access.ReportDim strReportName As StringDim aoAccessObj As AccessObject
'set the name of the new reportstrReportName = "Customers"
'delete any existing report with that nameFor Each aoAccessObj In CurrentProject.AllReports If aoAccessObj.Name = strReportName Then DoCmd.DeleteObject acReport, strReportName End If Next aoAccessObj
'create a new Customers ReportSet rptCustomers = CreateReport
'save and close the new reportDoCmd.Save , strReportNameDoCmd.Close
End SubFirst, the code loops through the AllReports collection to delete any existing report with the same name. Then, the Access report object rptCustomers is assigned to the CreateReportmethod. The report is then saved with the name specif ied. At this point, the report is empty and contains no controls. Let’s look at how to add controls to the report.
Adding Controls to the ReportThe CreateReportControl method allows you to add new controls to a report. The CreateReport Control method has the following basic syntax:
Set Object = CreateReportControl(ReportName, ControlType, Section, Parent,ColumnName, Left, Top, Width, Height)This procedure is called with parentheses because a value, which in this case is a new control, is returned. Now, let’s modify the prior code to add four f ields to the report: CompanyName,ContactName, Title, and Phone. Each f ield needs a corresponding text box and label. The following modif ied procedure is one way to accomplish this:
Sub CreateNewReport()
Dim rptCustomers As Access.ReportDim strReportName As String Dim aoAccessObj As AccessObject
Dim txtTextBox As Access.TextBox Dim lblLabel As Access.Label
Dim strSQL As String Dim intPosition As Integer
'set the name of the new report strReportName = "Customers"
'set the source of the report to this SQL strSQL = "SELECT Customers.Company, " & _ "Customers.[First Name] & ' ' & Customers.[Last Name] AS ContactName, " & _ "Customers.[Job Title], Customers.[Business Phone] FROM Customers;"
'delete any existing report with that name For Each aoAccessObj In CurrentProject.AllReports If aoAccessObj.Name = strReportName Then DoCmd.DeleteObject acReport, strReportName End If Next aoAccessObj
'create a new Customers Report and set properties Set rptCustomers = CreateReport
'set the report record source to the SQL Statement rptCustomers.RecordSource = strSQL
'set the height, caption, and other report options
Beginning Access 2007 VBA
152 / 344

'set the height, caption, and other report options rptCustomers.Section("Detail").Height = 500 rptCustomers.Caption = "Client Contact List"
'add a Company Name label and text box to the report intPosition = 0 Set txtTextBox = CreateReportControl(rptCustomers.Name, acTextBox, _ acDetail, , "Company", intPosition)
txtTextBox.Name = "txtCompanyName" txtTextBox.Width = 1800
Set lblLabel = CreateReportControl(rptCustomers.Name, acLabel, _ acPageHeader, , , intPosition)
lblLabel.Name = "lblCompanyName"lblLabel.Caption = "Company Name"lblLabel.Height = txtTextBox.HeightlblLabel.Width = txtTextBox.WidthlblLabel.FontBold = True
'add a Contact Name label and text box to the reportintPosition = txtTextBox.Width + txtTextBox.Left + 350Set txtTextBox = CreateReportControl(rptCustomers.Name, acTextBox, _ acDetail, , "ContactName", intPosition)
txtTextBox.Name = "txtContactName"txtTextBox.Width = 1800
Set lblLabel = CreateReportControl(rptCustomers.Name, acLabel, _ acPageHeader, , , intPosition)
lblLabel.Name = "lblContactName"lblLabel.Caption = "Contact Name"lblLabel.Height = txtTextBox.HeightlblLabel.Width = txtTextBox.WidthlblLabel.FontBold = True
'add a Contact Title label and text box to the reportintPosition = txtTextBox.Width + txtTextBox.Left + 500
Set txtTextBox = CreateReportControl(rptCustomers.Name, acTextBox, _ acDetail, , "Job Title", intPosition)
txtTextBox.Name = "txtTitle"txtTextBox.Width = 1800
Set lblLabel = CreateReportControl(rptCustomers.Name, acLabel, _ acPageHeader, , , intPosition)
lblLabel.Name = "lblTitle"lblLabel.Caption = "Title"lblLabel.Height = txtTextBox.HeightlblLabel.Width = txtTextBox.WidthlblLabel.FontBold = True
'add a Contact Phone label and text box to the reportintPosition = txtTextBox.Width + txtTextBox.Left + 1000
Set txtTextBox = CreateReportControl(rptCustomers.Name, acTextBox, _ acDetail, , "Business Phone", intPosition)
txtTextBox.Name = "txtPhone"
Set lblLabel = CreateReportControl(rptCustomers.Name, acLabel, _ acPageHeader, , , intPosition)
lblLabel.Name = "lblPhone" lblLabel.Caption = "Phone" lblLabel.Height = txtTextBox.Height lblLabel.Width = txtTextBox.Width lblLabel.FontBold = True
'save and close the new reportDoCmd.Save , strReportNameDoCmd.Close
End SubIn the code example shown again in the following section, notice how a text box and label control are declared and then used to create each of the f ields on the report. For example,txtTextBox is assigned to the result of the CreateReportControl method, which specif ies the report name, type of control, section to add the control, name of the control, and the positionin which to place the control. Various other properties of the text box control are specif ied, such as the Name and Width properties. The corresponding label control is also created and varioussettings specif ied.'add a Company Name label and text box to the reportintPosition = 0Set txtTextBox = CreateReportControl(rptCustomers.Name, acTextBox, _ acDetail, , "Company", intPosition)txtTextBox.Name = "txtCompanyName"txtTextBox.Width = 1800Set lblLabel = CreateReportControl(rptCustomers.Name, acLabel, _ acPageHeader, , , intPosition)lblLabel.Name = "lblCompanyName"lblLabel.Caption = "Company Name"lblLabel.Height = txtTextBox.HeightlblLabel.Width = txtTextBox.WidthlblLabel.FontBold = True
Beginning Access 2007 VBA
153 / 344
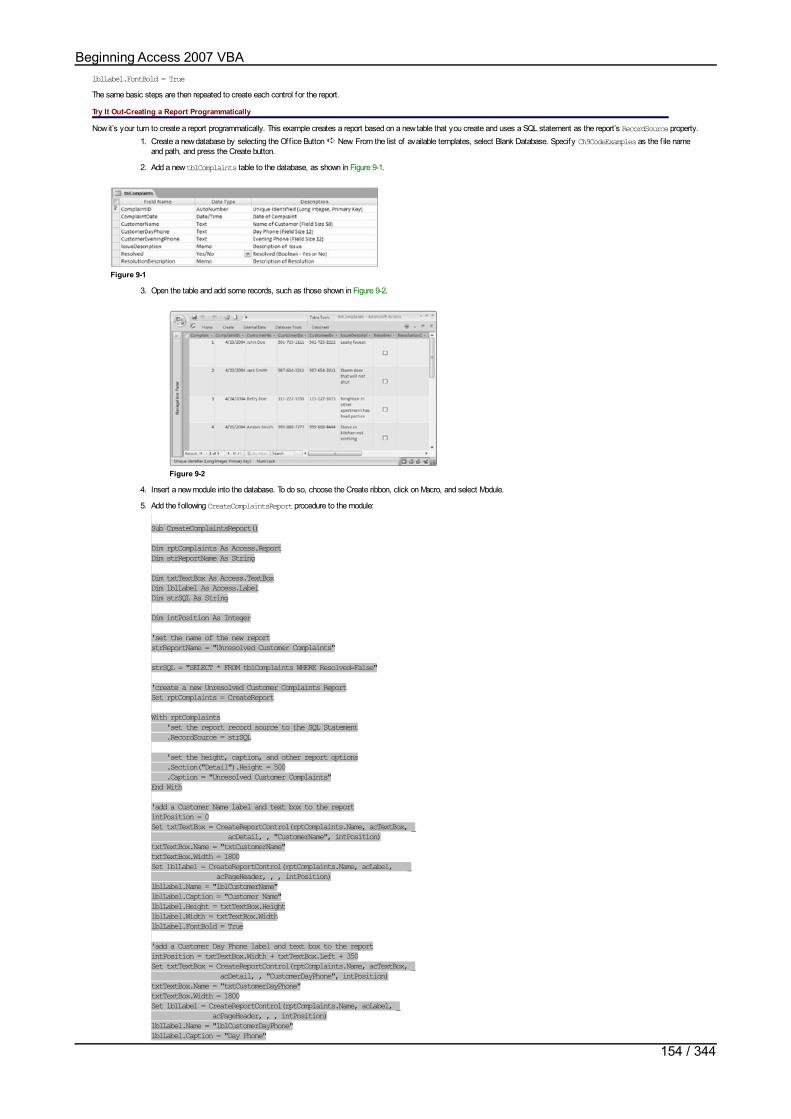
lblLabel.FontBold = TrueThe same basic steps are then repeated to create each control for the report.
Try It Out-Creating a Report Programmatically
Now it’s your turn to create a report programmatically. This example creates a report based on a new table that you create and uses a SQL statement as the report’s RecordSource property.1. Create a new database by selecting the Off ice Button New. From the list of available templates, select Blank Database. Specify Ch9CodeExamples as the f ile name
and path, and press the Create button.
2. Add a new tblComplaints table to the database, as shown in Figure 9-1.
Figure 9-1
3. Open the table and add some records, such as those shown in Figure 9-2.
Figure 9-2
4. Insert a new module into the database. To do so, choose the Create ribbon, click on Macro, and select Module.
5. Add the following CreateComplaintsReport procedure to the module:
Sub CreateComplaintsReport()
Dim rptComplaints As Access.ReportDim strReportName As String
Dim txtTextBox As Access.TextBoxDim lblLabel As Access.LabelDim strSQL As String
Dim intPosition As Integer
'set the name of the new reportstrReportName = "Unresolved Customer Complaints"
strSQL = "SELECT * FROM tblComplaints WHERE Resolved=False"
'create a new Unresolved Customer Complaints ReportSet rptComplaints = CreateReport
With rptComplaints 'set the report record source to the SQL Statement .RecordSource = strSQL
'set the height, caption, and other report options .Section("Detail").Height = 500 .Caption = "Unresolved Customer Complaints"End With
'add a Customer Name label and text box to the reportintPosition = 0Set txtTextBox = CreateReportControl(rptComplaints.Name, acTextBox, _ acDetail, , "CustomerName", intPosition)txtTextBox.Name = "txtCustomerName"txtTextBox.Width = 1800Set lblLabel = CreateReportControl(rptComplaints.Name, acLabel, _ acPageHeader, , , intPosition)lblLabel.Name = "lblCustomerName"lblLabel.Caption = "Customer Name"lblLabel.Height = txtTextBox.HeightlblLabel.Width = txtTextBox.WidthlblLabel.FontBold = True
'add a Customer Day Phone label and text box to the reportintPosition = txtTextBox.Width + txtTextBox.Left + 350Set txtTextBox = CreateReportControl(rptComplaints.Name, acTextBox, _ acDetail, , "CustomerDayPhone", intPosition)txtTextBox.Name = "txtCustomerDayPhone"txtTextBox.Width = 1800Set lblLabel = CreateReportControl(rptComplaints.Name, acLabel, _ acPageHeader, , , intPosition)lblLabel.Name = "lblCustomerDayPhone"lblLabel.Caption = "Day Phone"lblLabel.Height = txtTextBox.Height
Beginning Access 2007 VBA
154 / 344

lblLabel.Height = txtTextBox.HeightlblLabel.Width = txtTextBox.WidthlblLabel.FontBold = True
'add a Customer Evening Phone label and text box to the reportintPosition = txtTextBox.Width + txtTextBox.Left + 500Set txtTextBox = CreateReportControl(rptComplaints.Name, acTextBox, _ acDetail, , "CustomerEveningPhone", intPosition)txtTextBox.Name = "txtCustomerEveningPhone"txtTextBox.Width = 1800Set lblLabel = CreateReportControl(rptComplaints.Name, acLabel, _ acPageHeader, , , intPosition)lblLabel.Name = "lblCustomerEveningPhone"lblLabel.Caption = "Evening Phone"lblLabel.Height = txtTextBox.HeightlblLabel.Width = txtTextBox.WidthlblLabel.FontBold = True
'add an Issue Description label and text box to the reportintPosition = txtTextBox.Width + txtTextBox.Left + 1000Set txtTextBox = CreateReportControl(rptComplaints.Name, acTextBox, _ acDetail, , "IssueDescription", intPosition)txtTextBox.Name = "txtIssueDescription"txtTextBox.Width = 2000txtTextBox.Height = 750Set lblLabel = CreateReportControl(rptComplaints.Name, acLabel, _ acPageHeader, , , intPosition)lblLabel.Name = "lblIssueDescription"lblLabel.Caption = "Issue Description"lblLabel.Height = txtTextBox.HeightlblLabel.Width = txtTextBox.WidthlblLabel.FontBold = True
'save and close the new reportDoCmd.Save , strReportNameDoCmd.Close
End Sub6. Run the procedure from the Immediate Window by typing the procedure name.
How It Works
First, you created a new database and a table called tblComplaints. You then added some sample data to the tblComplaints table so the report would have data to display. Next, youcreated a new module and added the CreateComplaintsReport procedure to the module.Sub CreateComplaintsReport()The procedure declares some variables for use in the procedure, such as a Report object for creating the new report and the text box and label controls for adding to the report:Dim rptComplaints As Access.ReportDim strReportName As String
Dim txtTextBox As Access.TextBoxDim lblLabel As Access.LabelDim strSQL As StringDim intPosition As Integer
'set the name of the new reportstrReportName = "Unresolved Customer Complaints"
strSQL = "SELECT * FROM tblComplaints WHERE Resolved=False"The new report was created using the CreateReport method, and properties such as RecordSource, Height, and Caption were specif ied. The RecordSource property assigned the sourceof data to the SQL statement. The Detail section’s Height property specif ied the size of the report’s detail section.'create a new Unresolved Customer Complaints ReportSet rptComplaints = CreateReport
With rptComplaints 'set the report record source to the SQL Statement .RecordSource = strSQL
'set the height, caption, and other report options .Section("Detail").Height = 500 .Caption = "Unresolved Customer Complaints"End WithNext, you added code to create the report controls. For example, to create a new Customer Name label and text box, you used the CreateReportControl method. The parameters ofCreateReportControl specif ied, among other things, where to include the f ield (in the report or detail section), what data source f ield the new f ield should be based on, and what position itshould start in.'add a Customer Name label and text box to the reportintPosition = 0Set txtTextBox = CreateReportControl(rptComplaints.Name, acTextBox, _ acDetail, , "CustomerName", intPosition)txtTextBox.Name = "txtCustomerName"txtTextBox.Width = 1800Set lblLabel = CreateReportControl(rptComplaints.Name, acLabel, _ acPageHeader, , , intPosition)lblLabel.Name = "lblCustomerName"lblLabel.Caption = "Customer Name"lblLabel.Height = txtTextBox.HeightlblLabel.Width = txtTextBox.WidthlblLabel.FontBold = TrueThe same basic code was repeated for each of the remaining controls on the report, namely the labels and text boxes for Customer Day Phone, Customer Evening Phone, and IssueDescription. The f inal lines of the procedure saved and closed the report.'save and close the new reportDoCmd.Save , strReportNameDoCmd.Close
End Sub
Beginning Access 2007 VBA
155 / 344

When you ran the new procedure, the report was created and appeared in the Database Window, as shown in Figure 9-3. The report was then opened in preview mode, as shown in Figure 9-4, so you could see the f inal result of your ef forts.
Figure 9-3
Figure 9-4
Using the Printer Object to Designate Printing OptionsIn Chapter 3, you learned about the Printers collection and Printer object. This collection and object are again important if you want to modify the margins or other printer characteristicsof a report. For example, if you wanted to modify the margins and number of copies for the f irst printer, you could use code similar to the following:
Dim prtPrinter As Printer
Set prtPrinter = Application.Printers(0)
prtPrinter.TopMargin = 500prtPrinter.BottomMargin = 250prtPrinter.LeftMargin = 500prtPrinter.RightMargin = 500prtPrinter.Copies = 5The example shown above for setting printer margins and copies is just a simple example for illustration purposes. In order to follow good programming practices, you would typically want toavoid hard-coding such values into the code. You would instead allow these values to be set by a user in a user interface or in a settings f ile and then set the values in the code above tothe user-specif ied settings.
As another printer example, you could use the AllPrinters collection to loop through all printers on the computer and take some particular action, such as displaying the printer name in aprinter dialog box. See Chapter 3 for additional examples.
Working with Report EventsAt this point, you should be very familiar with how to add events to forms, such as the Click event of a button. Reports have events just as forms do, but not as many, as you can see inFigure 9-5.
Beginning Access 2007 VBA
156 / 344
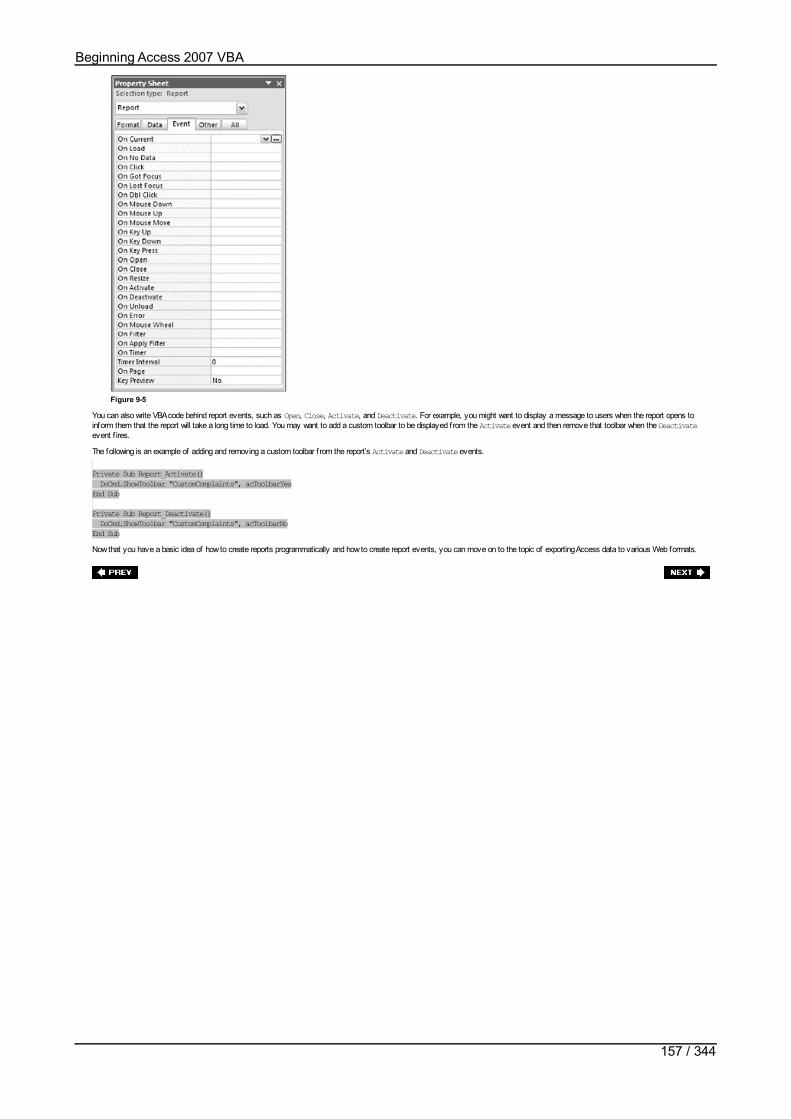
Figure 9-5
You can also write VBA code behind report events, such as Open, Close, Activate, and Deactivate. For example, you might want to display a message to users when the report opens toinform them that the report will take a long time to load. You may want to add a custom toolbar to be displayed from the Activate event and then remove that toolbar when the Deactivateevent f ires.
The following is an example of adding and removing a custom toolbar f rom the report’s Activate and Deactivate events.
Private Sub Report_Activate() DoCmd.ShowToolbar "CustomComplaints", acToolbarYesEnd Sub
Private Sub Report_Deactivate() DoCmd.ShowToolbar "CustomComplaints", acToolbarNoEnd SubNow that you have a basic idea of how to create reports programmatically and how to create report events, you can move on to the topic of exporting Access data to various Web formats.
Beginning Access 2007 VBA
157 / 344

Exporting Access Data to Web FormatsAs you learned in Chapter 7, you have various ways to export data from Access to other formats. The OutputTo method allows exporting to various formats: HTML, RTF, TXT, XLS, andXLSB. The examples in this section will focus on a Web-centric example using HTML, but you could also use the OutputTo method to export to text f iles or other supported formats. Consultthe Access Help documentation for additional information on these formats. The basic syntax for the OutputTo method is shown in the following code:DoCmd.OutputTo ObjectType, ObjectName, OutputFormat, OutputFile, AutoStart,TemplateFile, EncodingVarious parameters can specify how the method should execute. The following table explains the use of each parameter.
Open table as spreadsheet
Parameter Description
ObjectType Type of object to be exported. See the help documentation for the complete list of objects.
ObjectName Name of the object being exported.
OutputFormat The format to which the object should be exported.
OutputFile The full name, including the path, of the f ile to which the object should be exported.
AutoStart Indication of whether the destination program is to start immediately. False is the default.
TemplateFile The full name, including the path, of the f ile to use as a template.
Encoding The type of character encoding format to use when outputting the text or HTML data.
OutputQuality Type of output device to optimize for. The AcExportQuality constant specif ies the type, and the default value is acExportQualityPrint.
Now that you are familiar with the basic syntax of the OutputTo method, let’s look at how to use it to export data to HTML.
Creating Static HTML Pages
You have no doubt heard of HTML pages and are probably aware that they are typically used to display Web pages. You can use the OutputTo method to export a database table, query,results of a SQL statement, or other data to a static HTML document. A static HTML document is disconnected from the original data source and does not change as the underlying datachanges - hence the name static.
To export the results of a report to an HTML document, you might use a statement similar to the following:
DoCmd.OutputTo acOutputReport, "ReportName", acFormatHTML,"c:\temp\tempReportName.html"Now, try it out so you can see how this works.
Try It Out-Exporting the tblComplaints Table to HTML
This example will export the data contained in the tblComplaints table you created earlier in the chapter to an HTML f ile.1. Add the following procedure to the module you created earlier:
Sub OutputToHTML()
DoCmd.OutputTo acOutputTable, "tblComplaints", acFormatHTML,"c:\temp\tempcomplaints.html", True
End Sub2. Run the OutputToHTML procedure from the Immediate Window by typing OutputToHTML and then pressing Enter.
3. The exported HTML document should open automatically in a Web browser, as shown in Figure 9-6.
Figure 9-6
How It Works
The OutputToHTML procedure uses the OutputTo method with various parameters that indicate what should be exported, in what format, and to where. In this example, the tblComplaintstable is exported to an HTML format into a new f ile called tempcomplaints.html. The True parameter at the end of the statement that follows is for the AutoStart parameter to indicatethat the Web browser should automatically launch to display the f ile.Sub OutputToHTML()
DoCmd.OutputTo acOutputTable, "tblComplaints", acFormatHTML,"c:\temp\tempcomplaints.html", True
End SubAfter you run the preceding procedure, the Web browser does indeed launch and displays the newly created HTML f ile in a screen similar to Figure 9-6.
Beginning Access 2007 VBA
158 / 344

SummaryIn this chapter, you learned various ways to display data programmatically f rom Access. You looked at several examples, such as creating new reports programmatically and exporting datato various formats. I hope you are beginning to see that there is much more to Access than just tables, forms, and reports. You have seen in this and prior chapters how to work with data invarious sources, and to perform many advanced operations using VBA code.
I have talked a lot so far about SQL Server, but you have not seen any examples. The next chapter will focus on building Access solutions that use SQL Server as the database. You willlearn that Access has many features that make working with SQL Server databases much easier.
Beginning Access 2007 VBA
159 / 344

Exercises1. What is the dif ference between the CreateReport method and the CreateReportControl method?
2. How do report events dif fer f rom form events?
3. What is the purpose of the AutoStart parameter of the OutputTo method?
Answers
1. The CreateReport method is used to create a new report object. The CreateReportControl method is used to create new controls on a new or existing report. Using these twomethods, you can create a new report f rom scratch.
2. Report events are basically the same as form events, except that there are fewer of them. As with form events, you can write VBA code that should execute when a particular reportevent occurs.
3. The AutoStart parameter is used to indicate whether the particular program associated with that type of f ile should be launched immediately af ter performing the OutputTo method.For example, if you are creating a web page, you could use this parameter to specify that a web browser should launch after the web page is output.
Beginning Access 2007 VBA
160 / 344

Chapter 10: Building SQL Server Applications with Access ProjectsSo far, all the examples in this book have dealt with standard Access database f iles (ACCDB f iles). An Access Project (ADP f ile) is another type of Access database f ile that is designedspecif ically for working with SQL Server databases. In this chapter, you will explore how to create and manage SQL Server databases using Access Projects. You’ll learn how to create newAccess Projects from scratch and explore the various SQL Server objects that you can create and manage from an Access Project, such as tables, stored procedures, views, andfunctions. You will also migrate an existing Access database to SQL Server and provide guidelines for resolving any problems that occur during the migration.
Tip This chapter focuses on using Access Projects to work with features that are specif ic to SQL Server, but it does not cover forms and modules. You still write forms and modules inAccess Projects as you have done in prior chapters.
Access Projects - Using Access as a Front End to SQL serverAs a quick recap, you are already familiar with standard Access database f iles: the ACCDB f iles. The ACCDB f ile is typically used in a standalone manner, meaning that all the tables,forms, modules, macros, and reports for the application are stored within the single f ile. In Chapter 7, you learned that it is also possible to use a standard Access ACCDB f ile in a client-server environment by linking to external database tables such as SQL Server. An example of a client-server architecture is shown in Figure 10-1, which illustrates a case where the userinterface resides on the client and the database resides on the server.
Figure 10-1
When linking to a SQL Server database from a standard Access database, you can only work graphically with SQL Server tables from the Access environment. You cannot view and modifystored procedures, views, and functions from within the Access environment.
Access Projects are a special type of Access f ile designed to work specif ically with SQL Server databases. Access Projects provide you with additional graphical tools for manipulatingvarious SQL Server objects - not just the tables. When you are designing client-server applications that use SQL Server as the database, you should consider using an Access Projectinstead of a standard database so that you will have these additional design features.
The following table shows where the various objects that you can see from within the Access Project are actually stored.
Open table as spreadsheet
Object Location Comments
Tables SQL Server SQL Server uses dif ferent data types.
Queries SQL Server These can be stored as stored procedures, views, or functions.
Database Diagrams SQL Server
Forms Access f ile
Reports Access f ile
Macros Access f ile
Modules Access f ile
Beginning Access 2007 VBA
161 / 344

Setting Up SQL ServerNow that you are aware that you can use Access Projects to work with SQL Server databases, I will take a moment to cover the dif ferent versions of SQL Server and explain how to installSQL Server. You must install one of the versions of SQL Server in order to perform the examples used throughout this chapter.
SQL Server Versions
As you are probably aware by now, Microsoft SQL Server is a relational database management system for storing, analyzing, and reporting data. Currently, seven versions of MicrosoftSQL Server are available with SQL Server 2005. Each is brief ly described here:
SQL Server 2005 Enterprise Edition – This is the most comprehensive version of SQL Server 2005 and supports all the SQL Server 2005 features. This version is mostappropriate for large organizations that are required to manage immense amounts of data quickly and eff iciently.
SQL Server 2005 Standard Edition – This version of SQL Server 2005 supports many of the available features, but it doesn’t support the features that enable managementof immense amounts of data quickly and eff iciently. This version is primarily for small or medium-sized organizations that do not have the complex database requirements ofa large organization. SQL Server 2005 Standard Edition is still an extremely powerful version of SQL Server and supports Analysis Services (with a few exceptions),Replication, Full-Text Search, Integration Services (Basic Transforms only), the Common Language Runtime and .NET Integration, and other advanced SQL Server features.
SQL Server 2005 Workgroup Edition – This version of SQL Server 2005 supports basically the same features as the Standard Edition with some exceptions, most notablyNotif ication Services and Integration Services. Additionally, Analysis Services and Full-Text Search are only available on certain operating systems with this edition. Thisversion is most appropriate for small organizations or small business units.
SQL Server 2005 Mobile Edition – This version of SQL Server 2005 runs on mobile devices - Windows CE. This compact version of SQL Server 2005 allows relationaldatabases to be stored and managed on Windows CE devices for later synchronization. Plus, it gives users the capability to manage a SQL Server database remotely overthe Internet f rom their CE devices.
SQL Server 2005 Developer Edition – This version of SQL Server 2005 supports all the available features (just like the Enterprise Edition), except it prohibits deploymenton production servers. This version is designed for developers, consultants, and solution providers to use while developing and testing their applications.
SQL Server 2005 Evaluation Edition – This version is a fully functional version of SQL Server 2005 Enterprise Edition, but it will stop working after 120 days. It is availableas a free trial to give organizations a chance to try out SQL Server 2005 Enterprise Edition before purchasing it.
SQL Server 2005 Express Edition (formerly called “Desktop Edition”) – This version is a free and redistributable version of the SQL Server database engine. This meansthat you can include it in your setup programs for applications that use SQL Server to store data. This release of Express Edition is similar to prior releases in that graphicaluser interface tools to manipulate the database are not included, thus, other products (such as Access or SQL Server 2005 APIs) must be used to manage data stored in thisversion of SQL Server. Also, Microsoft has created an Express Edition of its new database management tool, SQL Server Management Studio. Finally, please note thatExpress Edition requires that .NET Framework Version 2.0 be installed.
Obtaining and Installing SQL Server Express Engine
If you do not have SQL Server already installed, you should obtain a copy. You have a couple of options to get it up and running. You can download or order a free trial version of SQLServer (that expires after a trial period) f rom Microsoft. Another option is to install SQL Server 2005 Express Edition, which is f ree. The setup program for the Express Edition is on theMicrosoft Off ice CDs, as I will explain momentarily.
The Benefits of SQL Server Express EditionYou may be wondering why Microsoft would offer a free version of SQL Server. Express Edition was introduced by Microsoft to bridge the gap between Microsoft Access and Microsoft SQLServer. A large segment of existing applications use Microsoft Access as both the front end and the database platform. As those applications become increasingly popular, they startoutgrowing the capabilities of Access. Many people may f ind themselves modifying code to port the applications to a SQL Server database. This can be a monumental task in manyinstances, with several data type and SQL syntax dif ferences.
Express Edition is actually a small-scale version of SQL Server, with a 4GB limitation. If your application does not need the capability to handle large databases or many users, the ExpressEdition version of SQL Server is a good choice. Some exceptions to this f ree licensing rule can be found in the licensing agreement that accompanies Express Edition and other versions ofSQL Server.
Express Edition allows companies to create demo CDs of their products much more easily. In the past, many companies had to write an Access version of their SQL Server application toinclude on the demo CD so that they would not violate the licensing agreement of SQL Server. Alternatively, they included links or f iles to download trial versions of SQL Server in order fortheir demo to work. Because Express Edition is a free distribution version of SQL Server, you can now easily create CDs for demonstration purposes without rewriting any code.
The biggest advantage of using Express Edition is that you don’t have to make any modif ications to your code (SQL statements, table structures, and so on) when you upsize later becauseof an increase in database size or concurrent users. You just purchase the more powerful version of SQL Server and import the prior database to the new installation without modif ication.Thus, when your application becomes extremely popular and needs the power of the higher, nonfree versions of SQL Server, you will be ready.
Installing SQL Server Express EditionYou can obtain the setup program for Express Edition from the Microsoft web site. At the time of publication, the URL for download ishttp://msdn.microsoft.com/vstudio/express/sql/download/. Further, if service packs are available it is wise to download and install them as well.
1. Download the installer program to a location on your hard drive. The download gives you an option of saving the f ile to your local hard drive or simply running it. It isrecommended that you save it to disk. The f ile is in excess of 50MB, so it may take a while depending on your Internet connection.
2. Launch the Express Edition Setup Program. Navigate to the folder on your hard drive where you saved the download. From that folder, double-click on the setup programto launch the setup program. You may be prompted to update some f iles on your system before setup can continue. If so, follow the prompts on the screen to updateyour system with the necessary f iles. This may require that you reboot your machine and restart the setup program again.
3. The Windows Installer or some other such program will f lash for a few seconds to let you know that it is launching the setup program. After you double-click on the setupprogram, it should just automatically install Express Edition with all the default settings. If any prompts appear on the screen, follow the instructions to complete the setup.
4. It is also a good idea to download and install the latest service pack for whatever version of SQL Server you are running.
Now that you have successfully installed SQL Server Express Edition, take a look at what actually got installed.
Understanding What Was InstalledUnlike previous versions which installed three services, SQL Server 2005 Express Edition installs two services on your machine: SQL Server Agent and SQL Server browser.
The SQL Server Conf iguration Manager is installed with Express Edition to enable you to manage these two services. The SQL Server Conf iguration Manager window, shown in Figure 10-2,displays the settings for Server, Services, and the status of the Service
Beginning Access 2007 VBA
162 / 344
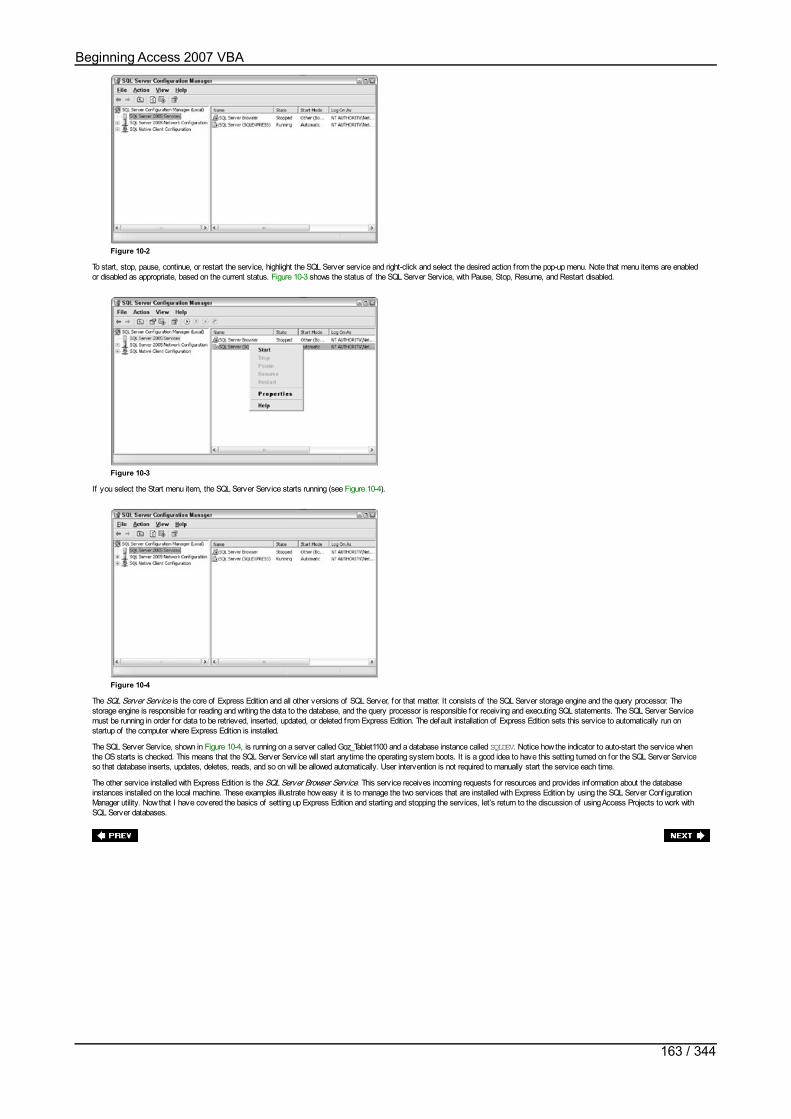
Figure 10-2
To start, stop, pause, continue, or restart the service, highlight the SQL Server service and right-click and select the desired action from the pop-up menu. Note that menu items are enabledor disabled as appropriate, based on the current status. Figure 10-3 shows the status of the SQL Server Service, with Pause, Stop, Resume, and Restart disabled.
Figure 10-3
If you select the Start menu item, the SQL Server Service starts running (see Figure 10-4).
Figure 10-4
The SQL Server Service is the core of Express Edition and all other versions of SQL Server, for that matter. It consists of the SQL Server storage engine and the query processor. Thestorage engine is responsible for reading and writing the data to the database, and the query processor is responsible for receiving and executing SQL statements. The SQL Server Servicemust be running in order for data to be retrieved, inserted, updated, or deleted from Express Edition. The default installation of Express Edition sets this service to automatically run onstartup of the computer where Express Edition is installed.
The SQL Server Service, shown in Figure 10-4, is running on a server called Goz_Tablet1100 and a database instance called SQLDEV. Notice how the indicator to auto-start the service whenthe OS starts is checked. This means that the SQL Server Service will start anytime the operating system boots. It is a good idea to have this setting turned on for the SQL Server Serviceso that database inserts, updates, deletes, reads, and so on will be allowed automatically. User intervention is not required to manually start the service each time.
The other service installed with Express Edition is the SQL Server Browser Service. This service receives incoming requests for resources and provides information about the databaseinstances installed on the local machine. These examples illustrate how easy it is to manage the two services that are installed with Express Edition by using the SQL Server Conf igurationManager utility. Now that I have covered the basics of setting up Express Edition and starting and stopping the services, let’s return to the discussion of using Access Projects to work withSQL Server databases.
Beginning Access 2007 VBA
163 / 344
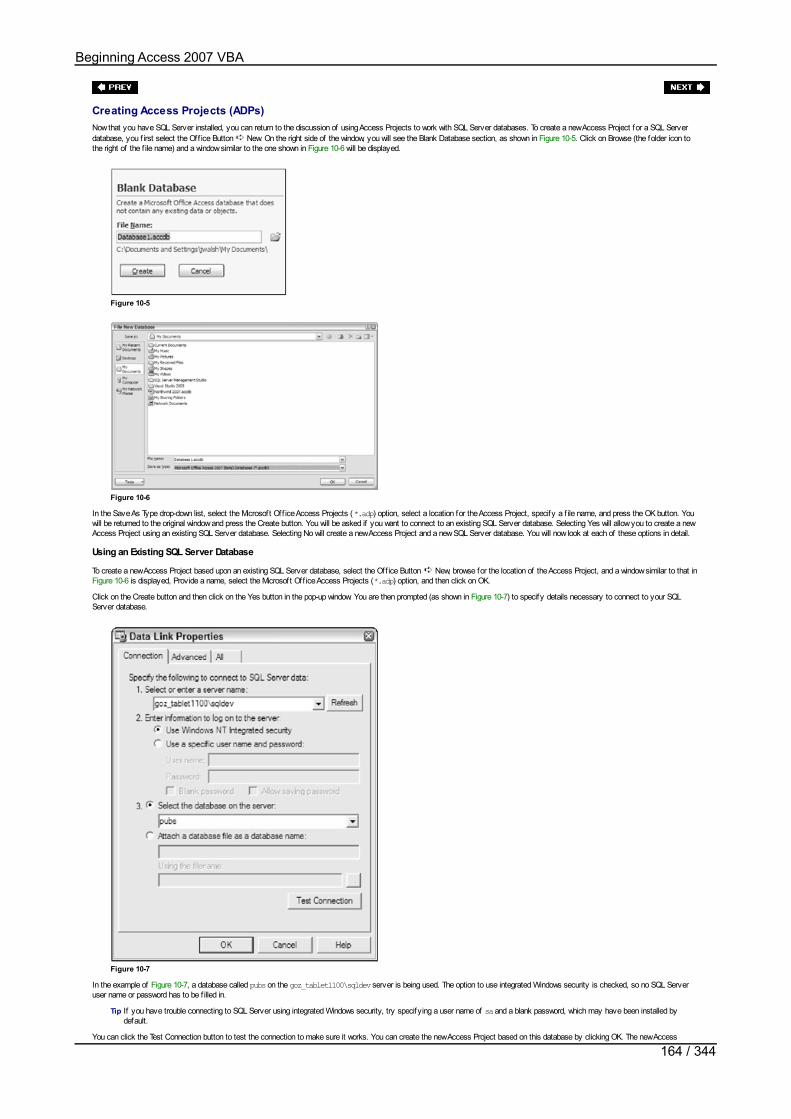
Creating Access Projects (ADPs)Now that you have SQL Server installed, you can return to the discussion of using Access Projects to work with SQL Server databases. To create a new Access Project for a SQL Serverdatabase, you f irst select the Off ice Button New. On the right side of the window, you will see the Blank Database section, as shown in Figure 10-5. Click on Browse (the folder icon tothe right of the f ile name) and a window similar to the one shown in Figure 10-6 will be displayed.
Figure 10-5
Figure 10-6
In the Save As Type drop-down list, select the Microsoft Off ice Access Projects (*.adp) option, select a location for the Access Project, specify a f ile name, and press the OK button. Youwill be returned to the original window and press the Create button. You will be asked if you want to connect to an existing SQL Server database. Selecting Yes will allow you to create a newAccess Project using an existing SQL Server database. Selecting No will create a new Access Project and a new SQL Server database. You will now look at each of these options in detail.
Using an Existing SQL Server Database
To create a new Access Project based upon an existing SQL Server database, select the Off ice Button New, browse for the location of the Access Project, and a window similar to that inFigure 10-6 is displayed, Provide a name, select the Microsoft Off ice Access Projects (*.adp) option, and then click on OK.
Click on the Create button and then click on the Yes button in the pop-up window. You are then prompted (as shown in Figure 10-7) to specify details necessary to connect to your SQLServer database.
Figure 10-7
In the example of Figure 10-7, a database called pubs on the goz_tablet1100\sqldev server is being used. The option to use integrated Windows security is checked, so no SQL Serveruser name or password has to be f illed in.
Tip If you have trouble connecting to SQL Server using integrated Windows security, try specifying a user name of sa and a blank password, which may have been installed bydefault.
You can click the Test Connection button to test the connection to make sure it works. You can create the new Access Project based on this database by clicking OK. The new AccessProject will look similar to the screen shown in Figure 10-8.
Beginning Access 2007 VBA
164 / 344

Project will look similar to the screen shown in Figure 10-8.
Figure 10-8
Using a New SQL Server Database
Let’s now take a look at how to create a new Access Project based on a new SQL Server database. For your convenience, I included a text f ile for download from Wrox.com that containsthe code for the SQL Server objects created in the following Try It Out sections.
Try It Out-Creating an Access Project Using a New SQL Server Database
1. Select the Off ice Button New, browse for the location of the Access Project and a window similar to that in Figure 10-6 is displayed, Specify Ch10CodeExamples for thef ile name, select the Microsoft Off ice Access Projects (*.adp) option, and then click on OK. Click on the Create button and then click on the No button in pop-up window. Ascreen similar to the one shown in Figure 10-9 then appears.
Figure 10-9
2. Specify the name of your SQL Server instance, or select one from the list. Specify whether to use a Trusted Connection or a specif ic SQL Server login account,depending on how security for your SQL Server instance is set up. Also, specify the name for the new SQL Server database as Ch10CodeExamplesSQL. Click the Nextbutton.
3. A screen similar to Figure 10-10 will appear. Click the Finish button to create the new SQL Server database.
Figure 10-10
How It Works
The wizard walked you through the steps of creating a new Access Project and a new SQL Server database. The end result of performing the preceding steps is that you now have anAccess Project (Ch10CodeExamples.ADP) on your hard drive, and you have a new database called Ch10CodeExamplesSQL in your SQL Server database. At this point, the SQL Serverdatabase and Access Project are both empty. Let’s look at some examples of how to work with SQL Server objects from within Access so your project does not remain empty.
Beginning Access 2007 VBA
165 / 344

Working with SQL Server Objects from AccessThe advantage of using an Access Project to work with SQL Server is that you can use various graphical designer tools from within Access to manipulate SQL Server objects. For example,you can view and create SQL Server tables, stored procedures, views, and functions. You’ll look at each of these in detail in the sections that follow.
SQL Server Tables
You can view and manage SQL Server tables from the Tables category of the Navigation Pane in your Access Project. Figure 10-11 is an example of a SQL Server table opened from withinAccess.
Figure 10-11
From looking at the data in Figure 10-11, you would not know that it physically resides in a SQL Server database. This screen looks very similar to the other screens you have seen beforewith local Access tables. Now, if you open a SQL Server table in design view, a screen similar to the one shown in Figure 10-12 appears.
Figure 10-12
The table designer is a bit dif ferent f rom the one you have worked with before. Notice how some additional columns for Length and Allow Nulls have been added. SQL Server also has somedata types other than the standard Access tables.
Try It Out-Creating a New SQL Server Table
It’s your turn to try your hand at creating a new SQL Server table.1. Create a new table, named tblProducts. To do so, select the Create tab and click on Table Design in the Tables ribbon. Fill in the table elements as shown in Figure 10-13.
Figure 10-13
2. After adding all the table columns and their respective data types, set the ProductId to the primary key. To set the primary key, select the ProductId f ield, right-click,and select the Primary Key option in the pop-up list.
3. Now, add some data to the table, such as that shown in Figure 10-14.
Beginning Access 2007 VBA
166 / 344

Figure 10-14
How It Works
The preceding example illustrates how to create a new table from the Access table designer that physically resides in the SQL Server database. You will now learn how to create storedprocedures.
SQL Server Stored Procedures
Stored procedures are procedures that are stored in the SQL Server database. Their purpose is to enable you to take frequently used SQL statements and save them for reuse. You canthen execute a stored procedure when you need it. A stored procedure is similar in concept to the VBA procedures and SQL statements you have written so far in this book. However, storedprocedures (stored in the SQL Server database) are more eff icient than passing SQL statements to the database on the f ly because they are pre-compiled.
You can view stored procedures from the Queries category in the Navigation Pane. In fact, the Queries node will display all stored procedures, views, and functions that are stored in theSQL Server database. Figure 10-15 illustrates several stored procedures, as well as one view called titleview.
Figure 10-15
When you open the byroyalty stored procedure in Figure 10-15, a designer window like the one shown in Figure 10-16 appears.
Figure 10-16
Notice how a table is displayed as well as a grid showing the columns to be output when the stored procedure executes. You can view the SQL code for the stored procedure by clicking theSQL button in the lower right-hand corner of the window; a screen similar to the one shown Figure 10-17 will appear.
Figure 10-17
In the example of Figure 10-17, the stored procedure accepts a parameter called @percentage. When you call the stored procedure from VBA code, you must specify the parameter. Youmight call the stored procedure using the following code:
Dim cmdCommand As ADODB.CommandDim prmPercent As ADODB.Parameter
Beginning Access 2007 VBA
167 / 344

'Create a new command objectSet cmdCommand = New ADODB.CommandcmdCommand.ActiveConnection = CurrentProject.Connection
'Specify the stored procedure to runcmdCommand.CommandType = adCmdStoredProccmdCommand.CommandText = "byroyalty"
'Create the percentage parameterSet prmPercent = cmdCommand.CreateParameter("@percentage", adInteger, adParamInput)prmPercent.Value = 100cmdCommand.Parameters.Append prmPercent
'execute the Stored ProcedurecmdCommand.ExecuteIn the preceding example, notice how the ADO Command object is used to specify that a stored procedure should be executed. The ADO Parameter object is used to specify the parametersthat should be passed to the stored procedure. The Execute method of the Command object is then executed to run the stored procedure.
Try It Out-Creating a New SQL Server Stored Procedure
Let’s create a new stored procedure in your Ch10CodeExamples Access Project.1. Select the Create tab and then click on the Stored Procedure button on the Other ribbon.
2. Select the Add button on the Add Table window to add tblProducts. Click the Close button.
3. Fill in the columns and values as shown in Figure 10-18. The stored procedure outputs all but the discontinued column based on criteria where discontinued equals 1.
Figure 10-18
4. Save the stored procedure, and name it spDiscontinuedProducts.5. Click on the SQL button to see the SQL statement for the procedure. A screen similar to the one shown in Figure 10-19 is displayed.
Figure 10-19
6. To run the stored procedure, select the View icon on the toolbar. A screen similar to the one shown in Figure 10-20 is displayed.
Figure 10-20
How It Works
In this example, you created a new stored procedure using the Access designer to specify the criteria for the procedure. You then viewed the SQL statement that Access createdautomatically f rom the criteria specif ied in the designer. You could have alternatively started with the SQL statement and Access would have generated the table and grid elementsautomatically f rom the SQL statement. You will see how to create a view in this manner momentarily.
SQL Server Views
Views are virtual tables that allow you to view information in a dif ferent way than you see it in the underlying tables. They are really just queries that have been saved to the SQL Serverdatabase that can be accessed in the same way as you would a table - only by specifying the view name instead of the table name. The capability to create an easily retrievable virtualtable out of your most commonly used SQL statements is one advantage to using views.
Another advantage of views is that they provide the capability to implement row- and column-level security. Row-level security means restricting the values that a particular user can seedown to the record level. Column-level security means restricting which f ields a user can see. A common example of row-level security is the case where an employee can see his ownpersonal information but not anyone else’s. A common example of column-level security is a case where no one outside of the Personnel Department is permitted to see any columns that
Beginning Access 2007 VBA
168 / 344

personal information but not anyone else’s. A common example of column-level security is a case where no one outside of the Personnel Department is permitted to see any columns thatcontain personal information, such as salary, but employees can see the nonpersonal information, such as job title.
Figure 10-21 illustrates the design view that retrieves data from multiple tables in a database.
Figure 10-21
To view all three portions of the display shown in Figure 10-21, you must f irst click on the Design tab and select enable the Diagram, Grid, and SQL statement icons in the tool ribbon.
After a view has been created, you can reference it in all the places where you could otherwise use a table. For example, you could have an ADO recordset that is based on a SQLstatement such as the following:
SELECT * FROM titleviewThe previous SQL statement causes the SQL behind the view (as shown in Figure 10-21) to run and to return the various columns selected. The view of Figure 10-21 will be similar to thescreen shown in Figure 10-22 if opened in view mode from within Access.
Figure 10-22
Try It Out-Creating a New View
It’s your turn to create a view.1. From the Database Window, click on the Create tab and then click on Query Wizard in the Other ribbon. Select Design View and click OK. Select the Close button to close
the Add Tables dialog. Click the Design tab and select the SQL button on the tool ribbon to ensure that the SQL view is displayed. Add the following SQL statement:
SELECT ProductName, ProductDesc, UnitPriceFROM dbo.tblProducts
2. Select the Save button on the toolbar to save the view and name it vwProductPrice. Close and reopen the view in design view. Notice that f rom the SQL statement youtyped that Access determines and displays the table diagram and column grid that corresponds to the SQL statement, as shown in Figure 10-23.
Figure 10-23
3. Select the Save button on the toolbar to save the view. Name the view vwProductPrice.4. Select the View button on the toolbar to execute the view. A screen similar to that shown in Figure 10-24 is displayed to show you the result of running the SQL statement
behind the view.
Beginning Access 2007 VBA
169 / 344

Figure 10-24
Tip Do not confuse the View button on the toolbar with the concept of a view. The View button on the toolbar allows you to open various objects, including storedprocedures, tables, and views to see the data. This is a dif ferent concept than a view itself .
How It Works
In the preceding example, you created a new view by starting with a SQL statement. Microsoft Access then updated the designer to display the table and grid to graphically represent theSQL statement. The SQL statement selects the ProductName, ProductDesc, and UnitPrice f ields from the tblProducts table.
SQL Server Functions
SQL Server comes with many built-in functions such as RTrim, GetDate, and many others. You can also create user-def ined functions and call those functions as if they were built-infunctions of SQL Server. User-def ined functions can return a single value, such as the result of a calculation, or they can return an entire table of results.
You may be wondering how functions dif fer f rom stored procedures. User-def ined functions have a lot in common with stored procedures because both are just SQL statements stored onthe SQL Server. However, a user-def ined function, unlike a stored procedure, can be embedded within a basic SQL statement, such as the following:
SELECT FormatDescription(ProductDesc) FROM tblProductsIn this instance, the function is called FormatDescription and will be called for each record selected in the SQL statement. If this code were contained in a stored procedure, a loop wouldhave to be executed to call the stored procedure for each record.
When you open the designer from Access to add a Function, the Add Table dialog box appears, as shown in Figure 10-25. In this example, the function is based on the vwProductPrice viewthat you created in the prior example.
Figure 10-25
A designer similar to the other designers you have seen so far appears, as shown in Figure 10-26. In this example, the function will select the products that have a unit price greater than$500.
Figure 10-26
When you run the preceding function, all products that are greater than $500 are displayed, as shown in Figure 10-27.
Beginning Access 2007 VBA
170 / 344

Figure 10-27
At this point, you do not have to be an expert on determining when to use SQL Server stored procedures, view, or functions. It is a complicated topic that is beyond the scope of thisintroductory chapter. However, if you want to see more examples of how to use stored procedures, views, and functions in your applications, please consult the comprehensive case studyin Chapter 14 that uses an Access Project with a SQL Server database.
Now that you have a basic familiarity of Access Projects, you can walk through the several steps involved in upsizing an existing Access database to an Access Project and SQL Serverdatabase.
Beginning Access 2007 VBA
171 / 344

Migrating an Existing Access Database to an Access ProjectMicrosoft Access has an Upsizing Wizard to help you migrate existing Access databases to SQL Server. In this section, I cover some tips for making the migration smoother. You will thenupsize the Northwind sample database that comes with Microsoft Access so you can see how the process works.
Changes to an Existing Database
Before migrating your existing Access application to an Access Project that uses SQL Server, here are some tips that will make the migration go more smoothly:
Consider removing any spaces in your table names and, of course, if you change the name, also change all the places that reference the table name. If you do not removethem, you will later have to use brackets to refer to SQL Server tables with spaces in their names (for example, [Table Name]).Make sure that each table has a unique index. If you have established primary keys, that should be suff icient.
Make a backup copy of the ACCDB f ile in case things go wrong.
Check the dates in your Access tables. Most problems with upsizing occur with date conversions. For example, Access and SQL Server have dif ferent date ranges that areacceptable. SQL Server covers only the period from Jan 1, 1753 to Dec 31, 9999. Access allows dates in the range from Jan 1, 100 to Dec 31, 9999.
With these tips in mind, let’s walk through using the Upsizing Wizard to see how this works.
Using the Upsizing Wizard
As previously mentioned, you can use the Upsizing Wizard to convert an existing Access database to an Access Project for the client and SQL Server for the database. You’ll walk throughthe numerous steps involved in this process to upsize the sample Northwind database to a SQL Server database.
1. Open the d5atabase you want to upsize, which in this example is the Northwind database in the Samples directory of Off ice. To start the Wizard, click on Database Toolsand then click on SQL Server on the Move Data ribbon. A screen similar to that shown in Figure 10-28 will appear.
Figure 10-28
2. Select the option Create New Database and click the Next button.
3. A screen similar to the one shown in Figure 10-29 appears next. Specify the SQL Server instance that should hold the new database. Also, f ill in the security information,such as whether to use a trusted connection or a login and password. Then, provide the name of the new SQL Server database. Click Next.
Figure 10-29
4. As shown in Figure 10-30, you are then prompted to specify which tables to upsize. Figure 10-30 has selected all tables in the database, and they appear in the Export toSQL Server area of the screen. After selecting the tables to be upsized, click the Next button.
Figure 10-30
Beginning Access 2007 VBA
172 / 344

5. A screen similar to Figure 10-31 appears, allowing you to specify which table attributes to upsize. Select the options that you want included and click Next.
Figure 10-31
6. A screen, like the one shown in Figure 10-32, allows you to specify the name of the new Access Project f ile that should store the client user interface and business logic.After specifying the ADP f ile name, click Next.
Figure 10-32
7. The f inal screen of the wizard, as shown in Figure 10-33, allows you to specify whether to open the new ADP f ile or keep the ACCDB f ile open. After selecting yourpreference, click the Finish button.
Figure 10-33
8. The Upsizing Wizard then displays a progress bar and works its way through each object in the database that is being converted.
9. As shown in Figure 10-34, a report is displayed when the Upsizing Wizard completes. The report provides numerous details about exactly which objects were upsized, anyerrors that were encountered, and so on.
Figure 10-34
Beginning Access 2007 VBA
173 / 344
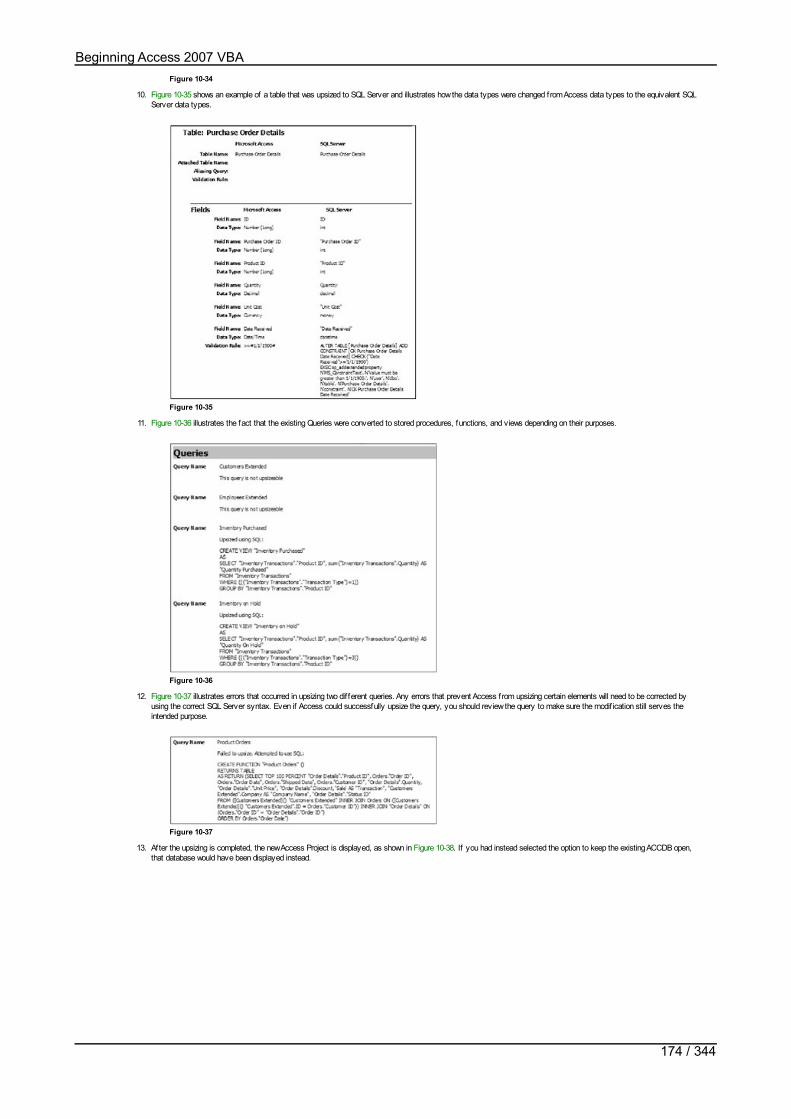
Figure 10-34
10. Figure 10-35 shows an example of a table that was upsized to SQL Server and illustrates how the data types were changed from Access data types to the equivalent SQLServer data types.
Figure 10-35
11. Figure 10-36 illustrates the fact that the existing Queries were converted to stored procedures, functions, and views depending on their purposes.
Figure 10-36
12. Figure 10-37 illustrates errors that occurred in upsizing two dif ferent queries. Any errors that prevent Access from upsizing certain elements will need to be corrected byusing the correct SQL Server syntax. Even if Access could successfully upsize the query, you should review the query to make sure the modif ication still serves theintended purpose.
Figure 10-37
13. After the upsizing is completed, the new Access Project is displayed, as shown in Figure 10-38. If you had instead selected the option to keep the existing ACCDB open,that database would have been displayed instead.
Beginning Access 2007 VBA
174 / 344

Figure 10-38
14. If you navigate to the Queries objects in the Database Window, you can see that the previous queries were upsized to various stored procedures, views, and functions.This is illustrated in Figure 10-39.
Figure 10-39
After the database has been upsized, you must correct any errors that were encountered and retest the functionality of the database to ensure that the objects were converted correctly.After these issues have been resolved and the application has been tested, you are ready to let your users work with your new SQL Server application from the Access Project.
Beginning Access 2007 VBA
175 / 344

SummaryIn this chapter, you explored how to use Access Projects to work with SQL Server databases. SQL Server is a very powerful enterprise database tool that should be used for moresophisticated applications. You can start with a free version of SQL Server called SQL Server 2005 Express Edition if you want to write your Access application using SQL Server to beginwith. If you do so, you will not have to make extensive changes at a later date when your application has become successful and must be migrated to a more powerful database thanAccess. Access Projects allow you to create client-server applications with Access as the front end and SQL Server as the database. Access includes an Upsizing Wizard to help youtransition an existing Access database to SQL Server. If you want more information on using Access Projects to work with SQL Server databases, consult the comprehensive case study inChapter 14.
In prior chapters, you have learned how to create code in VBA, such as code that executes when certain events happen. You have also learned how to retrieve and export data fromdatabases in various formats. In this chapter, you expanded your knowledge of working with other data sources by learning about Access Projects and SQL Server. In the next chapter, I willcover some advanced techniques to use in your Access applications.
Beginning Access 2007 VBA
176 / 344
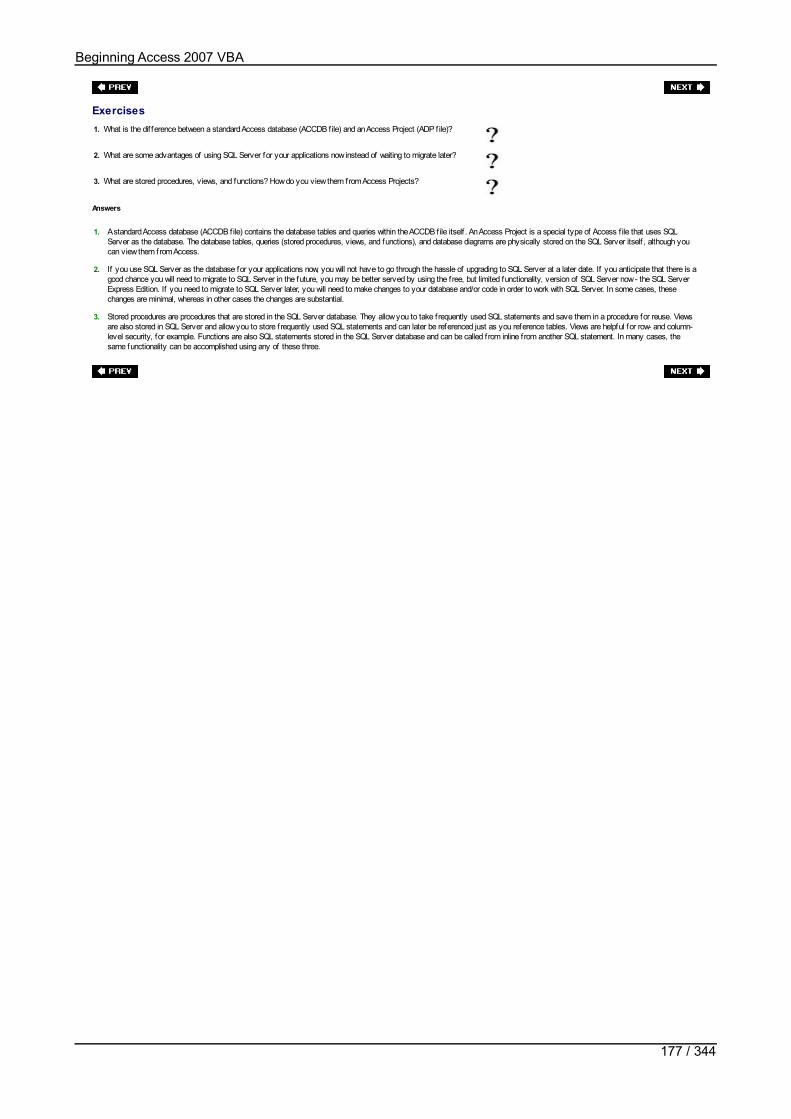
Exercises1. What is the dif ference between a standard Access database (ACCDB f ile) and an Access Project (ADP f ile)?
2. What are some advantages of using SQL Server for your applications now instead of waiting to migrate later?
3. What are stored procedures, views, and functions? How do you view them from Access Projects?
Answers
1. A standard Access database (ACCDB f ile) contains the database tables and queries within the ACCDB f ile itself . An Access Project is a special type of Access f ile that uses SQLServer as the database. The database tables, queries (stored procedures, views, and functions), and database diagrams are physically stored on the SQL Server itself , although youcan view them from Access.
2. If you use SQL Server as the database for your applications now, you will not have to go through the hassle of upgrading to SQL Server at a later date. If you anticipate that there is agood chance you will need to migrate to SQL Server in the future, you may be better served by using the free, but limited functionality, version of SQL Server now - the SQL ServerExpress Edition. If you need to migrate to SQL Server later, you will need to make changes to your database and/or code in order to work with SQL Server. In some cases, thesechanges are minimal, whereas in other cases the changes are substantial.
3. Stored procedures are procedures that are stored in the SQL Server database. They allow you to take frequently used SQL statements and save them in a procedure for reuse. Viewsare also stored in SQL Server and allow you to store frequently used SQL statements and can later be referenced just as you reference tables. Views are helpful for row- and column-level security, for example. Functions are also SQL statements stored in the SQL Server database and can be called from inline from another SQL statement. In many cases, thesame functionality can be accomplished using any of these three.
Beginning Access 2007 VBA
177 / 344

Chapter 11: Advanced Access Programming
OverviewWe covered a lot of ground in prior chapters exploring how to use VBA to extend your Access applications. This chapter will discuss some advanced programming techniques, but it is notmeant to provide exhaustive coverage. This chapter covers the following techniques:
Declaring and using standard and external DLLs
Using automation to control Excel, Word, and Outlook from your Access applications
Adding ActiveX controls to your forms
Creating custom code libraries
Using add-ins
Implementing transactions in your code
For your convenience, I have included the database f ile and code generated during this chapter for download from Wrox.com.
Beginning Access 2007 VBA
178 / 344

Using Dynamic Link Libraries (DLLs)Dynamic Link Libraries (DLLs) are simply compiled code libraries. You already used a DLL when adding a reference to the ADO library (Chapter 5) so that you could work with the ADOobject model and the properties, methods, and events for the objects it contains. In this section, you will look at another example of how to use a standard DLL by just adding a reference inyour project. You will also look at how to manually declare an external DLL and use it within your code.
Standard DLLs
You can reference libraries such as DLLs by selecting Tools References from the Visual Basic Editor and then selecting the particular library that you want to work with. After a referencehas been added, you can then manipulate the functionality contained in the library from within your VBA code.
Try It Out-Using the Microsoft Office Object Library to Create a Custom Command Bar
Let’s look at an example of creating custom command bars for your application using the Microsoft Off ice 12.0 Object Library. The CommandBars property of the Application object allowsyou to access the CommandBars collection. The CommandBars collection enables you to manage and create toolbars, menu bars, and shortcut menus.
1. Create a new database. Select the Off ice Button New. From the list of available templates, select "Blank Database." Name the database Ch11CodeExamples and clickthe Create button.
2. Set a reference to Microsoft Off ice 12.0 Object Library in the References dialog box, if one is not already set. From the Visual Basic Editor, select Tools Referencesand scroll down the list. Select Microsoft Off ice 12.0 Object Library, as shown in Figure 11-1. Click the OK button to add the reference.
Figure 11-1
3. Add a new module to your database.
4. Add the following procedures to your module:
Sub CreateCommandBar()
Dim cbReport As CommandBarDim btnButton As CommandBarButton'delete the command bar and continue if it does not existOn Error Resume NextCommandBars("Wrox Report").DeleteOn Error GoTo 0'add the new command bar to the collectionSet cbReport = CommandBars.Add("Wrox Report", msoBarFloating)
'add Zoom button to the toolbarSet btnButton = cbReport.Controls.Add(msoControlButton, _ CommandBars("Print Preview") _ .Controls("Zoom").Id)
'add 2 pages button to the toolbarSet btnButton = cbReport.Controls.Add(msoControlButton, _ CommandB ars("Print Preview") _ .Controls("Two Pages").Id)
'add copy button to the toolbarSet btnButton = cbReport.Controls.Add(msoControlButton, _ CommandBars("Database") _ .Controls("Copy").Id)
'add a custom button to the toolbarSet btnButton = cbReport.Controls.Add(msoControlButton)btnButton.Caption = "Test Button"btnButton.Style = msoButtonCaption
'list the name of the procedure to call when the button is clickedbtnButton.OnAction = "DisplayMessage"'display the new command bar by setting visiblecbReport.Visible = True
End Sub
Sub DisplayMessage()
MsgBox "The new button was clicked."
End Sub5. From the Immediate Window, execute the CreateCommandBar function by typing CreateCommandBar and pressing Enter. A new toolbar (as shown in Figure 11-2) is added
to the Add-Ins tab on the Custom Toolbars ribbon.
Beginning Access 2007 VBA
179 / 344

Figure 11-2
6. Click Test Button on the toolbar. You should see a screen similar to the one shown in Figure 11-3.
Figure 11-3
How It Works
After adding a reference to the Microsoft Off ice 12.0 Object Library, you created two new procedures to make use of the CommandBar and CommandBarButton objects that are contained inthe library. The CreateCommandBar procedure creates a new section in the Add-Ins tab on the Custom Toolbars ribbon.Sub CreateCommandBar()
Dim cbReport As CommandBarDim btnButton As CommandBarButton
'delete the command bar and continue if it does not exist
On Error Resume NextCommandBars("Wrox Report").DeleteOn Error GoTo 0
'add the new command bar to the collectionSet cbReport = CommandBars.Add("Wrox Report", msoBarFloating)After creating the new command bar, you can add various buttons with predef ined functionality to it, including Zoom, 2page, and Copy buttons:'add Zoom button to the toolbarSet btnButton = cbReport.Controls.Add(msoControlButton, _ CommandBars("Print Preview") _ .Controls("Zoom").Id)
'add 2 pages button to the toolbarSet btnButton = cbReport.Controls.Add(msoControlButton, _ CommandBars("Print Preview") _ .Controls("Two Pages").Id) 'add copy button to the toolbarSet btnButton = cbReport.Controls.Add(msoControlButton, _ CommandBars("Database") _ .Controls("Copy").Id)A custom button called "Test Button" is then added, which calls the DisplayMessage procedure when clicked:'add a custom button to the toolbarSet btnButton = cbReport.Controls.Add(msoControlButton)btnButton.Caption = "Test Button"btnButton.Style = msoButtonCaption
'list the name of the procedure to call when the button is clickedbtnButton.OnAction = "DisplayMessage"The new command bar is displayed by setting the Visible property to True: 'display the new command bar by setting visiblecbReport.Visible = True
End SubThe DisplayMessage procedure was also created and gets called when the new Test Button is clicked because it is assigned to the OnAction property of the Test Button:Sub DisplayMessage()
MsgBox "The new button was clicked."
End SubWhen you run the DisplayMessage procedure from the Immediate Window, the custom command bar is displayed. When you click the Test button, a message box is displayed to indicatethat the new button was clicked. You could, for example, assign this command bar to display when a report opens by setting the Visible property to True in the OnOpen event of thedesired report.
This is just one of numerous examples of how you can work with functionality provided by various libraries. You will look at some additional examples of working with other standard librarieslater in this chapter in the discussion on automation.
Using External DLLs
In the prior section, you looked at how to add a reference to an existing library and then to use the features provided by the library from VBA code. By adding an explicit reference as youdid before, you were able to see the available properties, methods, and events for each object as you typed code in the code window.
At times, however, you need to reference external DLLs from within your code. External DLLs do not provide the help feature that allows you to see what properties, methods, and eventsare available. You have to know the object and how to work with it. To use an external DLL, you must declare the function in VBA, call the function, and use the result.
Try It Out-Using an External DLL to Get System Information
Let’s walk through an example of referencing an external DLL to get information about your system.1. First, declare the external DLL. To do so, add the following code to the General Declarations section of your module:
Private Declare Sub GetSystemInfo Lib "kernel32" (lpSystemInfo As SYSTEM_INFO)
Beginning Access 2007 VBA
180 / 344

Private Declare Sub GetSystemInfo Lib "kernel32" (lpSystemInfo As SYSTEM_INFO)2. Next, add the SYSTEM_INFO type def inition to the General Declarations section of the module:
Type SYSTEM_INFO dwOemID As Long dwPageSize As Long lpMinimumApplicationAddress As Long lpMaximumApplicationAddress As Long dwActiveProcessorMask As Long dwNumberOfProcessors As Long dwProcessorType As Long dwAllocationGranularity As Long dwReserved As LongEnd Type
3. Add the following procedure to the module:
Sub DisplaySystemInfo()
Dim strMessage As StringDim lpSysInfo As SYSTEM_INFO
'call the external function and populate the SYSINFO user defined type'with the resultsGetSystemInfo lpSysInfo
'use the results from the function to build a stringstrMessage = "Number of processors: " & lpSysInfo.dwNumberOfProcessors & vbCrLfstrMessage = strMessage & "Processor type: " & lpSysInfo.dwProcessorType
'display the number of processors and processor type to the userMsgBox strMessage
End Sub4. From the Immediate Window, execute the DisplaySystemInfo procedure by typing DisplaySystemInfo and pressing Enter.
5. You should see a message similar to the one shown in Figure 11-4.
Figure 11-4
How It Works
First, you added a declaration for the external library to the General Declarations section of the module. The declaration is case-sensitive and must be typed exactly as shown below.Private Declare Sub GetSystemInfo Lib "kernel32" (lpSystemInfo As SYSTEM_INFO)Next, you added the SYSTEM_INFO type declaration to the General Declarations section of the module. This data type contains the parameters in the exact format expected by theGetSystemInfo external library.Type SYSTEM_INFO dwOemID As Long dwPageSize As Long lpMinimumApplicationAddress As Long lpMaximumApplicationAddress As Long dwActiveProcessorMask As Long dwNumberOfProcessors As Long dwProcessorType As Long dwAllocationGranularity As Long dwReserved As LongEnd TypeYou then added the DisplaySystemInfo procedure to call the external procedure and use the result:Sub DisplaySystemInfo()The procedure f irst declared a string variable and a variable to hold the result of the external function call:Dim strMessage As StringDim lpSysInfo As SYSTEM_INFOThe external function was then called and passed the local variable to hold the results:'call the external function and populate the SYSINFO user defined type'with the resultsGetSystemInfo lpSysInfoPart of the values returned from the function were added to the string variable:'use the results from the function to build a stringstrMessage = "Number of processors: " & lpSysInfo.dwNumberOfProcessors & _ vbCrLfstrMessage = strMessage & "Processor type: " & lpSysInfo.dwProcessorTypeThe msgbox function then displayed the contents of the string variable to the user:'display the number of processors and processor type to the userMsgBox strMessage
End SubUpon executing the DisplaySystemInfo procedure from the Immediate Window, you called the external function, which retrieved information about the current system, and displayed thenumber of processors and the processor type for the current system in a message box on the screen. As you can see, working with external DLLs is a bit more complicated than adding areference using the Tools Add References feature. Working with external DLLs requires you to be very precise in your syntax or the function will not operate.
Beginning Access 2007 VBA
181 / 344

Beginning Access 2007 VBA
182 / 344
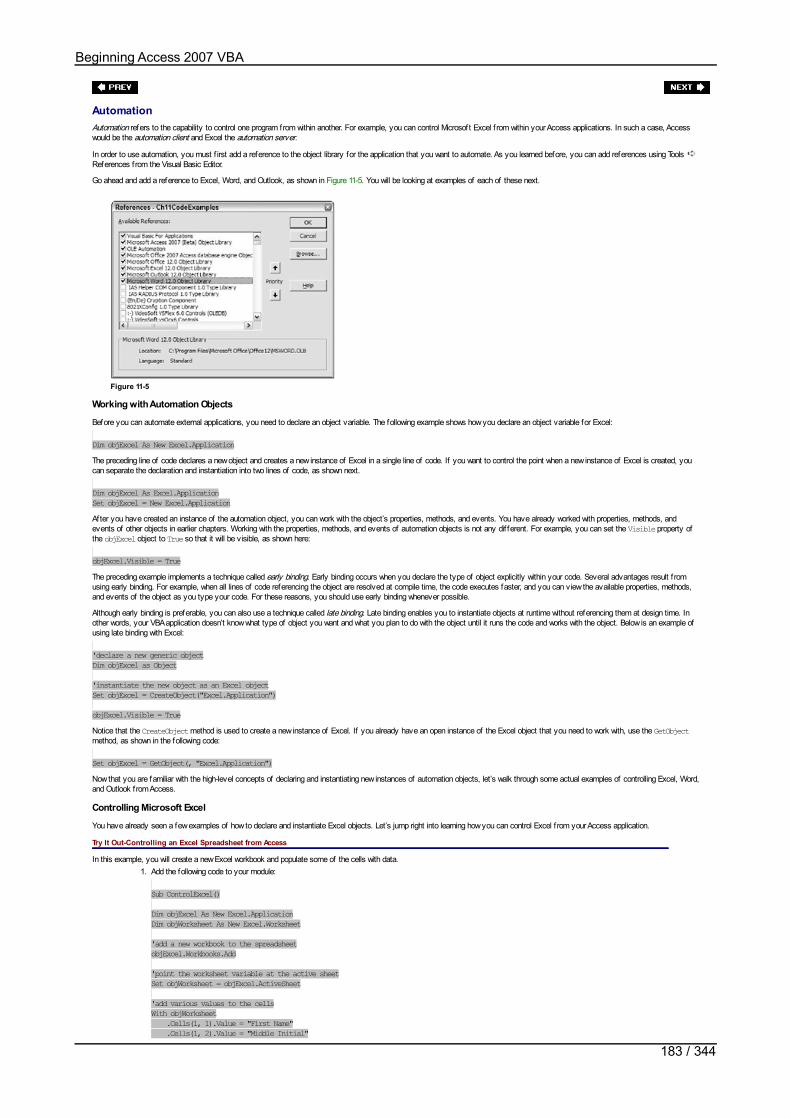
AutomationAutomation refers to the capability to control one program from within another. For example, you can control Microsoft Excel f rom within your Access applications. In such a case, Accesswould be the automation client and Excel the automation server.
In order to use automation, you must f irst add a reference to the object library for the application that you want to automate. As you learned before, you can add references using Tools References from the Visual Basic Editor.
Go ahead and add a reference to Excel, Word, and Outlook, as shown in Figure 11-5. You will be looking at examples of each of these next.
Figure 11-5
Working with Automation Objects
Before you can automate external applications, you need to declare an object variable. The following example shows how you declare an object variable for Excel:
Dim objExcel As New Excel.ApplicationThe preceding line of code declares a new object and creates a new instance of Excel in a single line of code. If you want to control the point when a new instance of Excel is created, youcan separate the declaration and instantiation into two lines of code, as shown next.
Dim objExcel As Excel.ApplicationSet objExcel = New Excel.ApplicationAfter you have created an instance of the automation object, you can work with the object’s properties, methods, and events. You have already worked with properties, methods, andevents of other objects in earlier chapters. Working with the properties, methods, and events of automation objects is not any dif ferent. For example, you can set the Visible property ofthe objExcel object to True so that it will be visible, as shown here:
objExcel.Visible = TrueThe preceding example implements a technique called early binding. Early binding occurs when you declare the type of object explicitly within your code. Several advantages result f romusing early binding. For example, when all lines of code referencing the object are resolved at compile time, the code executes faster, and you can view the available properties, methods,and events of the object as you type your code. For these reasons, you should use early binding whenever possible.
Although early binding is preferable, you can also use a technique called late binding. Late binding enables you to instantiate objects at runtime without referencing them at design time. Inother words, your VBA application doesn’t know what type of object you want and what you plan to do with the object until it runs the code and works with the object. Below is an example ofusing late binding with Excel:
'declare a new generic objectDim objExcel as Object
'instantiate the new object as an Excel objectSet objExcel = CreateObject("Excel.Application")
objExcel.Visible = TrueNotice that the CreateObject method is used to create a new instance of Excel. If you already have an open instance of the Excel object that you need to work with, use the GetObjectmethod, as shown in the following code:
Set objExcel = GetObject(, "Excel.Application")Now that you are familiar with the high-level concepts of declaring and instantiating new instances of automation objects, let’s walk through some actual examples of controlling Excel, Word,and Outlook from Access.
Controlling Microsoft Excel
You have already seen a few examples of how to declare and instantiate Excel objects. Let’s jump right into learning how you can control Excel f rom your Access application.
Try It Out-Controlling an Excel Spreadsheet from Access
In this example, you will create a new Excel workbook and populate some of the cells with data.1. Add the following code to your module:
Sub ControlExcel()
Dim objExcel As New Excel.ApplicationDim objWorksheet As New Excel.Worksheet
'add a new workbook to the spreadsheetobjExcel.Workbooks.Add
'point the worksheet variable at the active sheetSet objWorksheet = objExcel.ActiveSheet
'add various values to the cellsWith objWorksheet .Cells(1, 1).Value = "First Name" .Cells(1, 2).Value = "Middle Initial" .Cells(1, 3).Value = "Last Name"
Beginning Access 2007 VBA
183 / 344

.Cells(1, 3).Value = "Last Name" .Cells(2, 1).Value = "John" .Cells(2, 2).Value = "A." .Cells(2, 3).Value = "Doe" .Cells(3, 1).Value = "Jack" .Cells(3, 2).Value = "D." .Cells(3, 3).Value = "Smith"End With
'show Excel to the userobjExcel.Visible = True
End Sub2. Execute the ControlExcel procedure from the Immediate Window by typing ControlExcel and pressing Enter.
3. You should see an Excel screen similar to that shown in Figure 11-6.
Figure 11-6
How It Works
The ControlExcel procedure uses an Excel Application object and an Excel Worksheet object:Sub ControlExcel()
Dim objExcel As New Excel.ApplicationDim objWorksheet As New Excel.WorksheetAfter you declare the objects, a new workbook is added to the Excel object:'add a new workbook to the spreadsheetobjExcel.Workbooks.AddThe new workbook is then pointed to the active sheet: 'point the worksheet variable at the active sheetSet objWorksheet = objExcel.ActiveSheetUsing the Cells property of the Worksheet object, you assign values to various cells:'add various values to the cellsWith objWorksheet .Cells(1, 1).Value = "First Name" .Cells(1, 2).Value = "Middle Initial" .Cells(1, 3).Value = "Last Name" .Cells(2, 1).Value = "John" .Cells(2, 2).Value = "A." .Cells(2, 3).Value = "Doe" .Cells(3, 1).Value = "Jack" .Cells(3, 2).Value = "D." .Cells(3, 3).Value = "Smith"End WithThe last line of code displays the Excel instance to the user:'show Excel to the userobjExcel.Visible = True
End SubWhen you run the procedure from the Immediate Window, you see an instance of Excel with the values populated in the cells as specif ied in the preceding code.
Controlling Microsoft Word
You can control Word from Access in the same way you can control Excel. The Word object model is, of course, dif ferent because you are working with documents instead ofspreadsheets. Let’s walk through how this works.
Try It Out-Creating Word Letters from Access
In this example, you will create a contacts table and then a Word document that contains a letter to be sent to each of the contacts in the contacts table.1. In your Ch11CodeExamples database, create a new table, as shown in Figure 11-7.
Figure 11-7
2. Next, add some sample data to the table, such as the data shown in Figure 11-8.
Beginning Access 2007 VBA
184 / 344
Figure 11-8
3. Add the following ControlWord procedure to the existing module:
Sub ControlWord()
Dim objWord As New Word.ApplicationDim rsContacts As New ADODB.Recordset
Dim strLtrContent As String
rsContacts.ActiveConnection = CurrentProject.ConnectionrsContacts.Open "tblContacts"
objWord.Documents.Add
'for each record in the tblContacts table, create a letter in WordDo While Not rsContacts.EOF
strLtrContent = rsContacts("FirstName") & " " & rsContacts("LastName") strLtrContent = strLtrContent & vbCrLf & rsContacts("Address") & vbCrLf strLtrContent = strLtrContent & rsContacts("City") & ", " & rsContacts("Region") strLtrContent = strLtrContent & " " & rsContacts("PostalCode") & vbCrLf & vbCrLf strLtrContent = strLtrContent & "Dear " & rsContacts("FirstName") & " " strLtrContent = strLtrContent & rsContacts("LastName") & ":" & vbCrLf & vbCrLf strLtrContent = strLtrContent & "Please note we have moved to a new " & _ "location. " strLtrContent = strLtrContent & "Our new address is 4 Somewhere, Avon, " & _ "IN 46060." strLtrContent = strLtrContent & vbCrLf & vbCrLf & "Sincerely," & vbCrLf &strLtrContent = strLtrContent & vbCrLf & "Your Favorite Store"
'insert the content at the end of the document (which is the beginning 'if it is the first one) objWord.Selection.EndOf objWord.Selection.Text = strLtrContent
'insert a page break objWord.Selection.EndOf objWord.Selection.InsertBreak
'get the next contact record
rsContacts.MoveNext
Loop
'show word in Print Preview modeobjWord.Visible = TrueobjWord.PrintPreview = True
End Sub4. Run the ControlWord procedure from the Immediate Window by typing ControlWord and pressing Enter. A screen similar to the one shown in Figure 11-9 should be
displayed.
Figure 11-9
How It Works
First, you created a table called tblContacts and populated the table with some records. Next, you initiated a new procedure that created a new Word document and then you populated thedocument with specif ied text. The procedure began by declaring a new Word Application object and an ADO recordset.Sub ControlWord()
Dim objWord As New Word.ApplicationDim rsContacts As New ADODB.Recordset
Dim strLtrContent As String
Beginning Access 2007 VBA
185 / 344
The ADO recordset was opened and populated with the tblContacts table:rsContacts.ActiveConnection = CurrentProject.ConnectionrsContacts.Open "tblContacts"A new document was then added to the Word object:objWord.Documents.AddFor each contact record in the ADO recordset, a string containing the contents of the letter was populated. Each string contained the contents of the letter to the particular contact.'for each record in the tblContacts table, create a letter in WordDo While Not rsContacts.EOF
strLtrContent = rsContacts("FirstName") & " " & rsContacts("LastName") strLtrContent = strLtrContent & vbCrLf & rsContacts("Address") & vbCrLf strLtrContent = strLtrContent & rsContacts("City") & ", " & rsContacts("Region") strLtrContent = strLtrContent & " " & rsContacts("PostalCode") & vbCrLf & vbCrLf strLtrContent = strLtrContent & "Dear " & rsContacts("FirstName") & " "strLtrContent = strLtrContent & rsContacts("LastName") & ":" & vbCrLf & vbCrLf strLtrContent = strLtrContent & "Please note we have moved to a new " & _ "location. " strLtrContent = strLtrContent & "Our new address is 4 Somewhere, Avon, " & _ "IN 46060." strLtrContent = strLtrContent & vbCrLf & vbCrLf & "Sincerely," & vbCrLf &strLtrContent = strLtrContent & vbCrLf & "Your Favorite Store"""",,"","Content & "Your Favorite Store"The contents were then placed at the end of the Word document:'insert the content at the end of the document (which is the beginning'if it is the first one)objWord.Selection.EndOfobjWord.Selection.Text = strLtrContentA page break was then inserted into the Word document so the next letter appeared on a separate page:'insert a page breakobjWord.Selection.EndOfobjWord.Selection.InsertBreakThe next record in the recordset was retrieved: 'get the next contact record rsContacts.MoveNext
LoopAfter all the records in the recordset were processed, the following code displayed Word in Print Preview mode:'show word in Print Preview modeobjWord.Visible = TrueobjWord.PrintPreview = True
End SubWhen you run the procedure from the Immediate Window, the Print Preview Mode of the newly created Word document is displayed, and a letter addressed to each contact f rom thetblContacts table is displayed.
Controlling Microsoft Outlook
You can control Microsoft Outlook in various ways in order to manipulate contacts, e-mails, or calendar appointments. In this section, you will look at an example of sending an e-mailthrough Outlook from Access.
Try It Out-Sending an Outlook E-mail from Access
Using the tblContacts table that was created in the prior example, you will now walk through how to send an Outlook e-mail f rom Access.1. Revise the data in the tblContacts table so that only one record exists and the record points to your e-mail address. This ensures that you do not send e-mails to people
by mistake based on the dummy data that you typed in the table.2. Add the following ControlOutlook procedure to your module.
Sub ControlOutlook()
Dim objOutlook As New Outlook.ApplicationDim objEmail As Outlook.MailItem
Dim strLtrContent As StringDim rsContacts As New ADODB.Recordset
rsContacts.ActiveConnection = CurrentProject.ConnectionrsContacts.Open "tblContacts"
'for each record in the tblContacts table, send an emailDo While Not rsContacts.EOF
strLtrContent = "Dear " & rsContacts("FirstName") & " " strLtrContent = strLtrContent & rsContacts("LastName") & ":" & vbCrLf & vbCrLf strLtrContent = strLtrContent & "Please note we have moved to a new location. " strLtrContent = strLtrContent & "Our new address is 4 Somewhere, Avon, IN 46060." strLtrContent = strLtrContent & vbCrLf & vbCrLf & "Sincerely," & vbCrLf &vbCrLf strLtrContent = strLtrContent & "Your Favorite Store"
'create an email regarding the new business location Set objEmail = objOutlook.CreateItem(olMailItem) objEmail.Recipients.Add rsContacts("Email") objEmail.Subject = "Our address has changed." objEmail.Body = strLtrContent
'send the message objEmail.Send
'move to the next contacts record
Beginning Access 2007 VBA
186 / 344
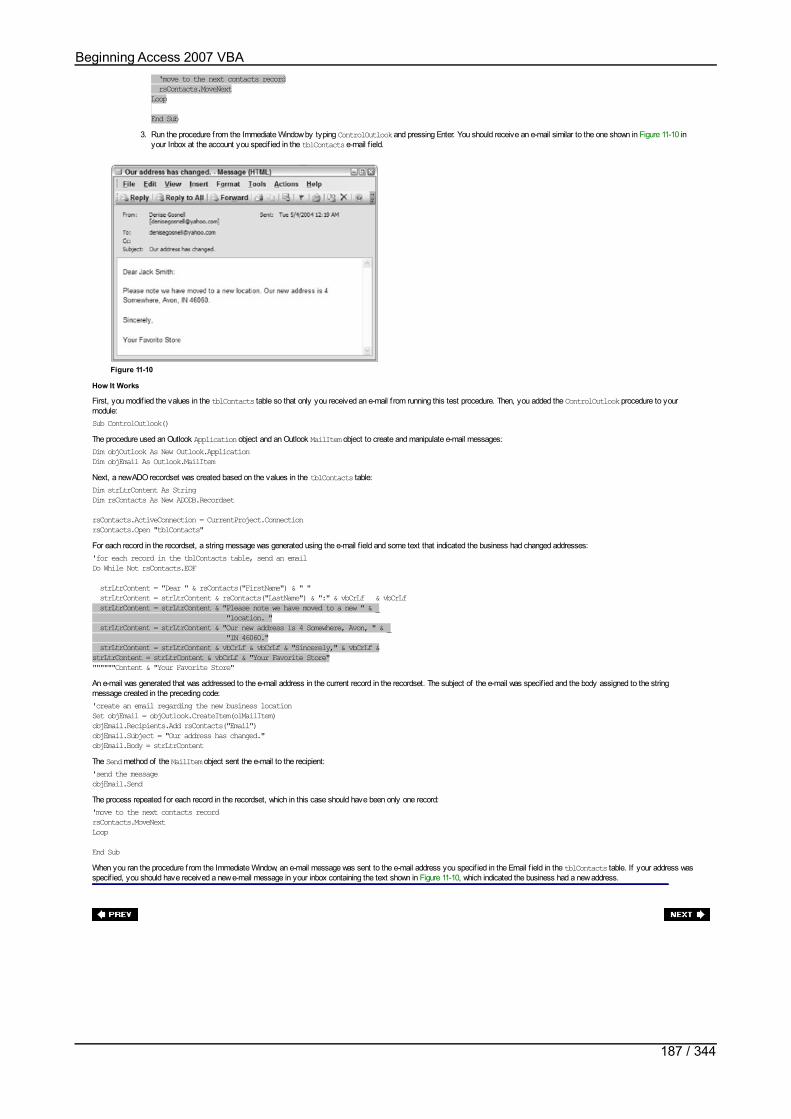
'move to the next contacts record rsContacts.MoveNextLoop
End Sub3. Run the procedure from the Immediate Window by typing ControlOutlook and pressing Enter. You should receive an e-mail similar to the one shown in Figure 11-10 in
your Inbox at the account you specif ied in the tblContacts e-mail f ield.
Figure 11-10
How It Works
First, you modif ied the values in the tblContacts table so that only you received an e-mail f rom running this test procedure. Then, you added the ControlOutlook procedure to yourmodule:Sub ControlOutlook()The procedure used an Outlook Application object and an Outlook MailItem object to create and manipulate e-mail messages:Dim objOutlook As New Outlook.ApplicationDim objEmail As Outlook.MailItemNext, a new ADO recordset was created based on the values in the tblContacts table:Dim strLtrContent As StringDim rsContacts As New ADODB.Recordset
rsContacts.ActiveConnection = CurrentProject.ConnectionrsContacts.Open "tblContacts"For each record in the recordset, a string message was generated using the e-mail f ield and some text that indicated the business had changed addresses:'for each record in the tblContacts table, send an emailDo While Not rsContacts.EOF
strLtrContent = "Dear " & rsContacts("FirstName") & " " strLtrContent = strLtrContent & rsContacts("LastName") & ":" & vbCrLf & vbCrLf strLtrContent = strLtrContent & "Please note we have moved to a new " & _ "location. " strLtrContent = strLtrContent & "Our new address is 4 Somewhere, Avon, " & _ "IN 46060." strLtrContent = strLtrContent & vbCrLf & vbCrLf & "Sincerely," & vbCrLf &strLtrContent = strLtrContent & vbCrLf & "Your Favorite Store"""""""Content & "Your Favorite Store"An e-mail was generated that was addressed to the e-mail address in the current record in the recordset. The subject of the e-mail was specif ied and the body assigned to the stringmessage created in the preceding code:'create an email regarding the new business locationSet objEmail = objOutlook.CreateItem(olMailItem)objEmail.Recipients.Add rsContacts("Email")objEmail.Subject = "Our address has changed."objEmail.Body = strLtrContentThe Send method of the MailItem object sent the e-mail to the recipient:'send the messageobjEmail.SendThe process repeated for each record in the recordset, which in this case should have been only one record:'move to the next contacts recordrsContacts.MoveNextLoop
End SubWhen you ran the procedure from the Immediate Window, an e-mail message was sent to the e-mail address you specif ied in the Email f ield in the tblContacts table. If your address wasspecif ied, you should have received a new e-mail message in your inbox containing the text shown in Figure 11-10, which indicated the business had a new address.
Beginning Access 2007 VBA
187 / 344

ActiveX ControlsActiveX controls are additional controls that you can use in your Access forms. You have already worked with built-in controls such as text boxes and command buttons. What if you need acontrol that is not listed in the standard ToolBox? Numerous additional controls are available, including those already installed on your computer, f rom Microsoft and other vendors. You cantake advantage of them by adding a reference to the control and using the control in your application.
For example, to use a Calendar control, create a new form and, with the form still open, select the Design tab and then click on the ActiveX Controls button on the Controls ribbon. A screensimilar to the one shown in Figure 11-11 is displayed. To add the Calendar Control or any other desired control, simply select it in the list of controls and click OK.
Figure 11-11
When you click OK, the Calendar Control is automatically placed on the new form, as shown in Figure 11-12.
Figure 11-12
The Calendar Control has properties and events just like any other control, as you can see from the Properties Window shown in Figure 11-13.
Figure 11-13
Suppose that you want to use the value of the selected date in the calendar, inserting the value into a f ield in order to spare the user f rom having to type out the date. Assume in this casethat your form contains a text box control.
The following code example illustrates how you would display the selected date in the calendar control in the text box control when the calendar control loses the focus (such as when youclick in the text box):
Private Sub Calendar0_LostFocus()
'set the text box value to the selected calendar valuetxtSelectedDate = Calendar0.Value
End SubWhen you run the form and select a date in the calendar control, the value in the text box is updated. This is illustrated in Figure 11-14.
Beginning Access 2007 VBA
188 / 344

Figure 11-14
You can apply these concepts to any other ActiveX control that you want to work with. You simply add a reference to the control and then drag and drop the control onto the form if Accessdoes not do so for you automatically. You can then work with the control just as you do with any other standard control.
Beginning Access 2007 VBA
189 / 344
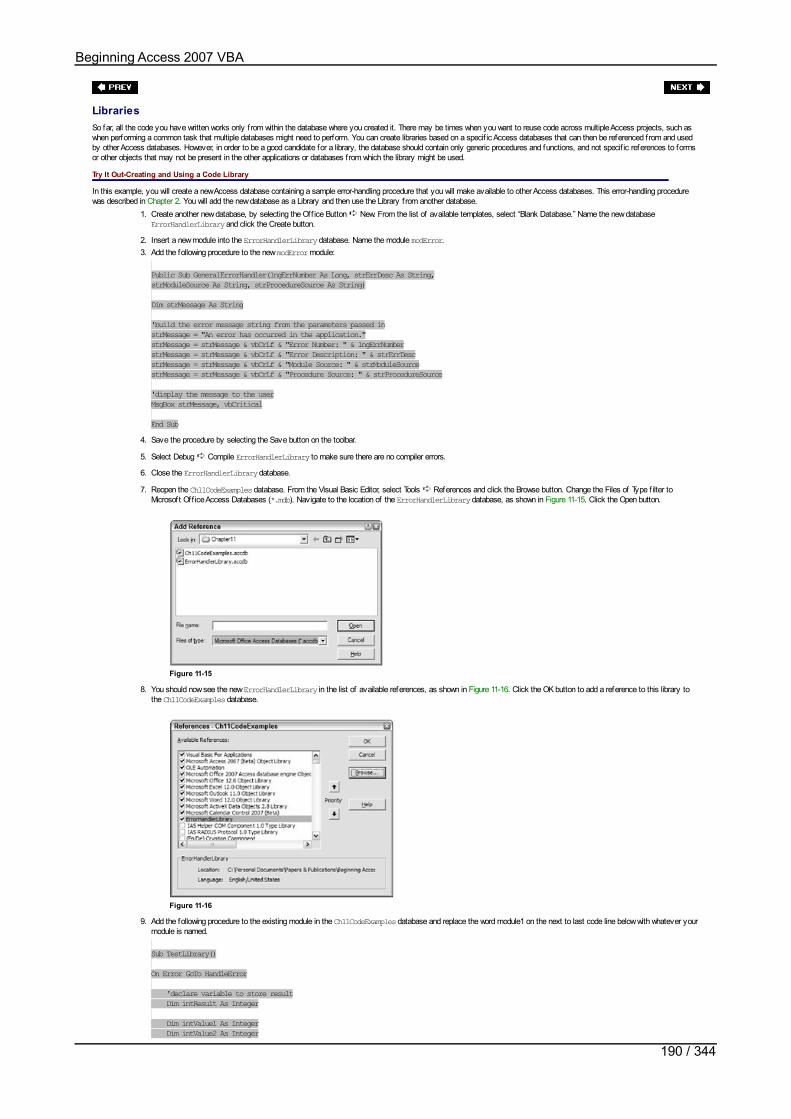
LibrariesSo far, all the code you have written works only from within the database where you created it. There may be times when you want to reuse code across multiple Access projects, such aswhen performing a common task that multiple databases might need to perform. You can create libraries based on a specif ic Access databases that can then be referenced from and usedby other Access databases. However, in order to be a good candidate for a library, the database should contain only generic procedures and functions, and not specif ic references to formsor other objects that may not be present in the other applications or databases from which the library might be used.
Try It Out-Creating and Using a Code Library
In this example, you will create a new Access database containing a sample error-handling procedure that you will make available to other Access databases. This error-handling procedurewas described in Chapter 2. You will add the new database as a Library and then use the Library from another database.
1. Create another new database, by selecting the Off ice Button New. From the list of available templates, select “Blank Database.” Name the new databaseErrorHandlerLibrary and click the Create button.
2. Insert a new module into the ErrorHandlerLibrary database. Name the module modError.3. Add the following procedure to the new modError module:
Public Sub GeneralErrorHandler(lngErrNumber As Long, strErrDesc As String,strModuleSource As String, strProcedureSource As String)
Dim strMessage As String
'build the error message string from the parameters passed instrMessage = "An error has occurred in the application."strMessage = strMessage & vbCrLf & "Error Number: " & lngErrNumberstrMessage = strMessage & vbCrLf & "Error Description: " & strErrDescstrMessage = strMessage & vbCrLf & "Module Source: " & strModuleSourcestrMessage = strMessage & vbCrLf & "Procedure Source: " & strProcedureSource
'display the message to the userMsgBox strMessage, vbCritical
End Sub4. Save the procedure by selecting the Save button on the toolbar.
5. Select Debug Compile ErrorHandlerLibrary to make sure there are no compiler errors.
6. Close the ErrorHandlerLibrary database.
7. Reopen the Ch11CodeExamples database. From the Visual Basic Editor, select Tools References and click the Browse button. Change the Files of Type f ilter toMicrosoft Off ice Access Databases (*.mdb). Navigate to the location of the ErrorHandlerLibrary database, as shown in Figure 11-15. Click the Open button.
Figure 11-15
8. You should now see the new ErrorHandlerLibrary in the list of available references, as shown in Figure 11-16. Click the OK button to add a reference to this library tothe Ch11CodeExamples database.
Figure 11-16
9. Add the following procedure to the existing module in the Ch11CodeExamples database and replace the word module1 on the next to last code line below with whatever yourmodule is named.
Sub TestLibrary()
On Error GoTo HandleError
'declare variable to store result Dim intResult As Integer
Dim intValue1 As Integer Dim intValue2 As Integer
Beginning Access 2007 VBA
190 / 344
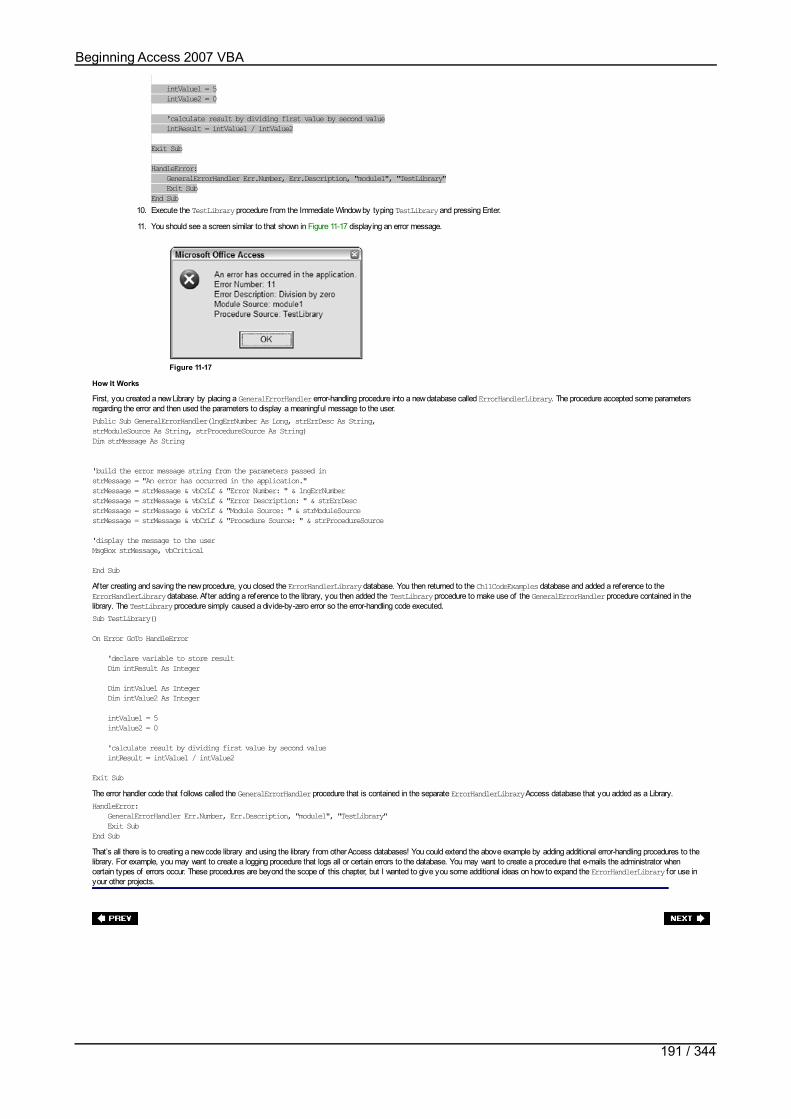
intValue1 = 5 intValue2 = 0
'calculate result by dividing first value by second value intResult = intValue1 / intValue2
Exit Sub
HandleError: GeneralErrorHandler Err.Number, Err.Description, "module1", "TestLibrary" Exit SubEnd Sub
10. Execute the TestLibrary procedure from the Immediate Window by typing TestLibrary and pressing Enter.
11. You should see a screen similar to that shown in Figure 11-17 displaying an error message.
Figure 11-17
How It Works
First, you created a new Library by placing a GeneralErrorHandler error-handling procedure into a new database called ErrorHandlerLibrary. The procedure accepted some parametersregarding the error and then used the parameters to display a meaningful message to the user.Public Sub GeneralErrorHandler(lngErrNumber As Long, strErrDesc As String,strModuleSource As String, strProcedureSource As String)Dim strMessage As String
'build the error message string from the parameters passed instrMessage = "An error has occurred in the application."strMessage = strMessage & vbCrLf & "Error Number: " & lngErrNumberstrMessage = strMessage & vbCrLf & "Error Description: " & strErrDescstrMessage = strMessage & vbCrLf & "Module Source: " & strModuleSourcestrMessage = strMessage & vbCrLf & "Procedure Source: " & strProcedureSource
'display the message to the userMsgBox strMessage, vbCritical
End SubAfter creating and saving the new procedure, you closed the ErrorHandlerLibrary database. You then returned to the Ch11CodeExamples database and added a reference to theErrorHandlerLibrary database. After adding a reference to the library, you then added the TestLibrary procedure to make use of the GeneralErrorHandler procedure contained in thelibrary. The TestLibrary procedure simply caused a divide-by-zero error so the error-handling code executed.Sub TestLibrary()
On Error GoTo HandleError
'declare variable to store result Dim intResult As Integer
Dim intValue1 As Integer Dim intValue2 As Integer
intValue1 = 5 intValue2 = 0
'calculate result by dividing first value by second value intResult = intValue1 / intValue2
Exit SubThe error handler code that follows called the GeneralErrorHandler procedure that is contained in the separate ErrorHandlerLibrary Access database that you added as a Library.HandleError: GeneralErrorHandler Err.Number, Err.Description, "module1", "TestLibrary" Exit SubEnd SubThat’s all there is to creating a new code library and using the library from other Access databases! You could extend the above example by adding additional error-handling procedures to thelibrary. For example, you may want to create a logging procedure that logs all or certain errors to the database. You may want to create a procedure that e-mails the administrator whencertain types of errors occur. These procedures are beyond the scope of this chapter, but I wanted to give you some additional ideas on how to expand the ErrorHandlerLibrary for use inyour other projects.
Beginning Access 2007 VBA
191 / 344

Add-InsAdd-ins are tools that provide additional functionality but are not part of the standard Microsoft Access product. Add-ins are provided with Access, obtained from third parties, or are customdesigned. Several add-ins come with Access, such as the Performance Analyzer, Linked Table Manager, control wizards, and various others.
Three examples of some types of add-ins are menu add-ins, wizards, and builders. Menu add-ins can be accessed by selecting the Add-ins button on the Database Tools ribbon and generallyoperate on Access itself or multiple objects. You can use the existing menu add-ins, such as the Database Splitter, or create your own custom add-ins.
Wizard add-ins consist of a series of modal dialog boxes that walk you step by step through a particular process. You have, no doubt, used wizards in Access before to perform varioustasks. In Chapter 10, you used the Upsizing Wizard to upsize the Northwind database to SQL Server. You can also create your own custom wizards.
Builder add-ins can help users construct a data element such as a SQL expression. Again, you can create your own custom builder add-ins or use the existing ones.
After you create one of these types of add-ins, you then register the add-in so that your application can use it. One way to register an add-in is using the Add-in Manager in Access. Anotherway is to have the setup program register the add-in automatically. Yet another way to register an add-in is directly, using the Windows Registry.
Beginning Access 2007 VBA
192 / 344

TransactionsThis section details what a transaction is and how to implement a transaction from VBA code.
A transaction implements a series of changes in a single batch. The entire batch of changes either succeeds or fails as a group. Here is a simple example. Suppose that you want to make aseries of updates to the database. You are updating a person’s records because of a name and address change due to marriage. You may need to update two or more tables with the newinformation. If one or more of the updates fails, you want the entire set of updates to fail as a group. Otherwise, you might have an incomplete set of data in the database.
The ADO Connection object allows you to implement transactions. The BeginTrans method of the Connection object begins the transaction, whereas the CommitTrans method commits thetransaction to make the changes f inal. If the transaction fails, the RollbackTrans method of the Connection object rolls back all the changes to the underlying data that were made as partof the transaction.
Here is an example of some code you could use to implement a transaction:
Sub TestTransaction()
Dim cnConnection As New ADODB.ConnectionDim cmdCommand As New ADODB.Command
'set the connection and command objects to the current connectionSet cnConnection = CurrentProject.ConnectioncmdCommand.ActiveConnection = cnConnection
On Error GoTo HandleError
'begin the transactioncnConnection.BeginTrans
'specify the first SQL Statement to execute that should not cause an errorcmdCommand.CommandText = _ "UPDATE tblContacts SET FirstName = 'Test' WHERE ContactId = 1"
'execute the first SQL Statement which should not cause an errorcmdCommand.Execute
'specify the second SQL Statement to execute that will cause an errorcmdCommand.CommandText = _ "UPDATE tblContacts SET ContactId = 'A' WHERE ContactId = 1"
'execute the second SQL Statement which should cause an errorcmdCommand.Execute
'commit the transaction if both updates were successfulcnConnection.CommitTrans
Exit Sub
HandleError:
'rollback the transaction so all updates fail cnConnection.RollbackTrans
MsgBox "An error occurred: " & Err.Description
End SubThe preceding procedure uses the ADO Command and Connection object to execute a series of SQL statements against the database. The BeginTrans method indicates the beginning of thetransaction. The CommitTrans method indicates that the transaction was processed without errors, and thus all the changes should be committed in the underlying data source. TheRollbackTrans method is in the error handler and will roll back all changes in the event of an error, so all the updates fail together. In the previous example, the f irst SQL statementexecuted successfully, whereas the second one caused an error. The result is that the f irst successful change is rolled back because the second one failed.
Beginning Access 2007 VBA
193 / 344

SummaryThis chapter introduced several advanced topics, including declaring and using standard and external DLLs, using automation to control other applications, and adding ActiveX controls toforms. I also covered how to create custom code libraries, how to use add-ins, and how to implement transactions in your code. Each one of these topics could warrant an entire chapter. Formore information on these topics, please consult Access 2007 VBA Programmer’s Reference (Wiley, 2007). In this chapter, I just wanted to provide you with some ideas of the advancedfeatures available to your Access applications without giving you a detailed tutorial on how to actually implement each of them.
At this point you’re ready to move on to Chapter 12, which covers various steps you should take to f inish up your Access application, including improving performance and multiuserconsiderations, adding security to the application, and distributing the application. I will then f inish the book with two comprehensive case studies that will bring all the concepts discussedthroughout the book together into two real-world applications.
Beginning Access 2007 VBA
194 / 344

Exercises1. What is the dif ference between a standard library and an external library?
2. What is automation, and what are some examples of ways to use automation?
3. How do you create a code library, and what are some advantages of doing so?
4. What is a transaction, and how do you implement one?
Answers
1. A standard library can be added using Tools References. You can then work with the objects of that library from within your code and have full access to the available properties,methods, and events as you type your code. An external library is more complicated to work with and requires an explicit declaration in the General Declarations section, as well as aprocedure call f rom within your VBA code. External libraries must be declared with the exact syntax, or an error will occur.
2. Automation allows one application to control another application, such as Access controlling Word. You can use automation to create new Excel spreadsheets, to create new Worddocuments, or to manipulate Outlook objects such as e-mails, contacts, and calendar entries. These are just a few examples of using automation. In order to use automation, you mustadd a reference to the library that corresponds to the application you want to control.
3. A code library can be created by simply creating a new Access database that contains the code you want to have reused by other applications. Code libraries are a good idea forstoring generic code that multiple applications might want to take advantage of, such as error-handling routines. Instead of copying the same procedures into every application and thenhaving to update multiple locations, you can simply point each application to a single Access database. To add a reference to a library, you simply select Tools References and thenbrowse to the location of the Access database you want to use as a library. After the reference has been added, you can call the functions and sub procedures in the library just as if itwere contained in your local module.
4. A transaction is a group of database actions that should succeed or fail together. You can use the BeginTrans, CommitTrans, and RollbackTrans methods of the ADO Connectionobject to implement transactions. If the updates all succeed, then all of the updates can be committed to the underlying database using the CommitTrans method. If any one of theupdates fails, then all of the changes can be rolled back using the RollbackTrans method.
Beginning Access 2007 VBA
195 / 344

Chapter 12: Finishing the Application
OverviewAfter working so hard to develop an advanced Access application using VBA, it is important to make sure that the application is capable of performing well and handling the number of usersyou expect. You also want to make sure that the end users are not able to modify the database source code and design without the proper permission. After you have f ine-tuned, secured,and tested the application, you are ready to implement the application by distributing it to end users. However, af ter you distribute the application to end users, your job is still not f inished.Access applications need to be backed up and compacted periodically to ensure that they remain in good working order and that they can be recovered from a backup if corruption ordeletion occurs.
This chapter covers:
Writing applications to handle multiple users
Improving actual and perceived performance of the application
Using the Performance Analyzer to help improve performance
Adding security to prevent unauthorized access or modif ication
Distributing applications to end users
Backing up, compacting, and repairing applications
Beginning Access 2007 VBA
196 / 344

Multiuser ConsiderationsVarious coding approaches can affect how well your application will handle multiple users. For example, the type of record lock that is used on records retrieved from the database will af fectwhat happens when multiple users try to access the same record. When the application does not handle the scenario correctly, update conf licts can occur because one user overwrites thechanges made by another user. If your application uses the proper type of record lock and handles update conf licts, it will be more capable of supporting multiple users. Another way to helpyour application better handle multiple users is to separate the data tables from the other objects by using two separate Access database f iles. Both of these techniques are discussed in thesections that follow.
Record Locking and Update Conflicts
Prior to reading this book, you likely worked with bound forms in your Access applications. Bound forms are connected directly to a table and keep an open connection to the database so allchanges are made at that moment. Then, in Chapter 5, you learned how to populate an ADO recordset with data from a database and how to display records from the recordset on bothbound and unbound forms.
Let’s now look at how record locking is handled on bound and unbound forms and the ways you can modify record-locking settings to better handle multiple users.
Record Locking on Bound FormsThe type of record locking that is used for bound forms is determined by the Options settings. To modify the record locking options for bound forms, select the Off ice button, and at thebutton on the pop-up menu click on Access Options, and the select Advanced on the lef t menu. A dialog box like the one shown in Figure 12-1 is displayed. You may have to scroll down tosee the options shown in Figure 12-1.
Figure 12-1
The three options for default record locking are No Locks, All Records, and Edited Record. If the No Locks option is selected, no records will be locked and all users will be able to makeedits. This can result in one user stepping on the toes of another user by overwriting his changes without realizing it. If the All Records option is selected, all records in the underlying table ofthe form you’re editing will be locked. This option is generally not good for multiuser applications except for the specif ic situations where you want to keep everyone else out while one userhas the table open. A third option is to select the Edited Record option. This option locks only the specif ic record that the user is editing and is the preferred setting for most multiuserinstances. However, it is not the default setting in Access. If the Open Databases Using Record-Level Locking option is enabled, record locking will be the default for the current database.If the option is unchecked, then page-level locking will be the default for the current database.
Tip Your code will always override Access’s default settings.
Record Locking on Unbound FormsWith unbound forms, the type of locking used depends on locking the source where the data comes from. For example, if your form is based on an ADO recordset, the lock type of therecordset is what determines locking. As you may recall f rom Chapter 5, the LockType property of the Recordset object can be one of four settings, shown in the following table.
Open table as spreadsheet
Value Explanation
adLockReadOnly The recordset is read-only, and no changes are allowed.
adLockPessimistic The record in the recordset will be locked as soon as editing begins.
adLockOptimistic The record in the recordset will be locked when the Update method is issued.
adLockBatchOptimistic The records will not be locked until a batch update of all records is performed.
An example of the syntax of this property is shown here:
rsRecordset.LockType = adLockReadOnlyRead-only locks should be used whenever the users do not need to update the data because they are faster and do not lock records unnecessarily. For multiuser applications, pessimisticand optimistic options are the best when users must update the data. With pessimistic locking, the record in the record-set is locked as soon as editing begins. This prevents any other userfrom changing that record until the f irst user has f inished editing it.
With optimistic locking, the record is not locked until the very moment that the update command is processed. This option allows all users to interact with the same record even if someoneelse has it open. However, optimistic locking also presents the potential problem of having update conf licts. By default, you should use pessimistic locking when editing records in code,unless otherwise necessary.
Update Conflicts
An update conf lict can occur when a f irst user is updating a record while a second user still has the old data on the screen. When the second user saves the changes to the database, someof the values being updated are old values that overwrite the changes made by the f irst user.
If you want to use optimistic locking, you should write code to handle update conf licts. You do so to avoid the possibility of one user overwriting another user’s changes. One way to handleupdate conf licts in VBA code is to add a timestamp or version number value to each table so that you can tell the last time a record was updated. If you use this approach, you must keeptrack of the original value of the version number or timestamp when the record is f irst open, and then before updating the database you must check to see if the version number ortimestamp has changed. Another way to handle update conf licts is to check for changes on a f ield-by-f ield basis and then notify the user of exactly which f ields changed so that he candecide whether to overwrite the record.
The topic of update conf licts could take an entire chapter, but you should at least be aware of what it means and some ways to handle it. You can obtain more information about handlingupdate conf licts by searching the articles on msdn.microsoft.com. Let’s turn now to another consideration for improving multiuser applications.
Multiuser Architecture Considerations
Beginning Access 2007 VBA
197 / 344
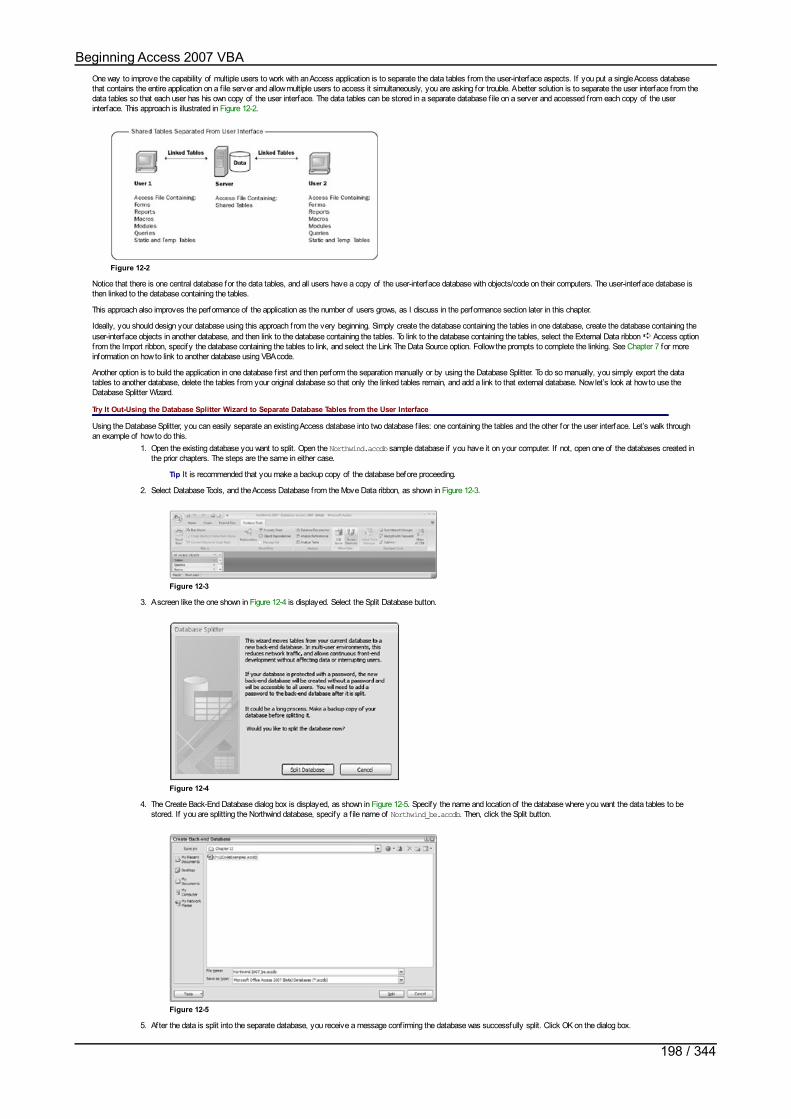
One way to improve the capability of multiple users to work with an Access application is to separate the data tables from the user-interface aspects. If you put a single Access databasethat contains the entire application on a f ile server and allow multiple users to access it simultaneously, you are asking for trouble. A better solution is to separate the user interface from thedata tables so that each user has his own copy of the user interface. The data tables can be stored in a separate database f ile on a server and accessed from each copy of the userinterface. This approach is illustrated in Figure 12-2.
Figure 12-2
Notice that there is one central database for the data tables, and all users have a copy of the user-interface database with objects/code on their computers. The user-interface database isthen linked to the database containing the tables.
This approach also improves the performance of the application as the number of users grows, as I discuss in the performance section later in this chapter.
Ideally, you should design your database using this approach from the very beginning. Simply create the database containing the tables in one database, create the database containing theuser-interface objects in another database, and then link to the database containing the tables. To link to the database containing the tables, select the External Data ribbon Access optionfrom the Import ribbon, specify the database containing the tables to link, and select the Link The Data Source option. Follow the prompts to complete the linking. See Chapter 7 for moreinformation on how to link to another database using VBA code.
Another option is to build the application in one database f irst and then perform the separation manually or by using the Database Splitter. To do so manually, you simply export the datatables to another database, delete the tables from your original database so that only the linked tables remain, and add a link to that external database. Now let’s look at how to use theDatabase Splitter Wizard.
Try It Out-Using the Database Splitter Wizard to Separate Database Tables from the User Interface
Using the Database Splitter, you can easily separate an existing Access database into two database f iles: one containing the tables and the other for the user interface. Let’s walk throughan example of how to do this.
1. Open the existing database you want to split. Open the Northwind.accdb sample database if you have it on your computer. If not, open one of the databases created inthe prior chapters. The steps are the same in either case.
Tip It is recommended that you make a backup copy of the database before proceeding.
2. Select Database Tools, and the Access Database from the Move Data ribbon, as shown in Figure 12-3.
Figure 12-3
3. A screen like the one shown in Figure 12-4 is displayed. Select the Split Database button.
Figure 12-4
4. The Create Back-End Database dialog box is displayed, as shown in Figure 12-5. Specify the name and location of the database where you want the data tables to bestored. If you are splitting the Northwind database, specify a f ile name of Northwind_be.accdb. Then, click the Split button.
Figure 12-5
5. After the data is split into the separate database, you receive a message conf irming the database was successfully split. Click OK on the dialog box.
Beginning Access 2007 VBA
198 / 344

6. You are then returned to the original database, which in this case is Northwind.accdb. As shown in Figure 12-6, you now see that the tables are linked to the newly createdNorthwind_be.accdb.
Figure 12-6
How It Works
The Database Splitter Wizard allowed you to convert a single Access database into two separate databases: one with the user interface and the other with the data tables. After you ran theDatabase Splitter, the data tables were moved to a new database and a link was added to the original database to point to the tables in the new database.
After the split is completed, you can copy the new database with the tables to a f ile server or other location where multiple client computers can access it. You can then copy the user-interface database to each user workstation.
Tip Make sure that the links that are created will work from each computer where you plan to load the user-interface database. For example, if the tables are linked as the C: drive,that same location may be a dif ferent drive letter on a dif ferent client computer. If that is the case, you need to modify the links from the second computer so that it f inds thedata.
Now that you have a few ideas on how to improve the multiuser capabilities of your application, let’s turn to the various ways you can optimize your application.
Beginning Access 2007 VBA
199 / 344
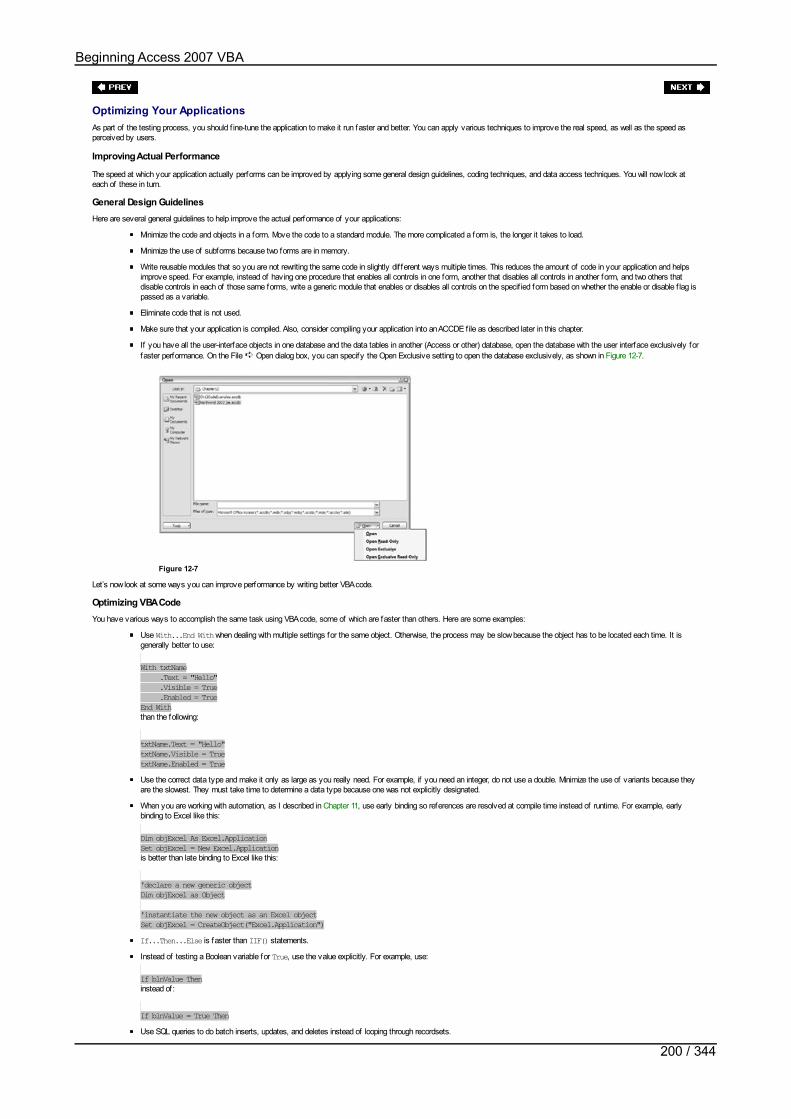
Optimizing Your ApplicationsAs part of the testing process, you should f ine-tune the application to make it run faster and better. You can apply various techniques to improve the real speed, as well as the speed asperceived by users.
Improving Actual Performance
The speed at which your application actually performs can be improved by applying some general design guidelines, coding techniques, and data access techniques. You will now look ateach of these in turn.
General Design GuidelinesHere are several general guidelines to help improve the actual performance of your applications:
Minimize the code and objects in a form. Move the code to a standard module. The more complicated a form is, the longer it takes to load.
Minimize the use of subforms because two forms are in memory.
Write reusable modules that so you are not rewriting the same code in slightly dif ferent ways multiple times. This reduces the amount of code in your application and helpsimprove speed. For example, instead of having one procedure that enables all controls in one form, another that disables all controls in another form, and two others thatdisable controls in each of those same forms, write a generic module that enables or disables all controls on the specif ied form based on whether the enable or disable f lag ispassed as a variable.
Eliminate code that is not used.
Make sure that your application is compiled. Also, consider compiling your application into an ACCDE f ile as described later in this chapter.
If you have all the user-interface objects in one database and the data tables in another (Access or other) database, open the database with the user interface exclusively forfaster performance. On the File Open dialog box, you can specify the Open Exclusive setting to open the database exclusively, as shown in Figure 12-7.
Figure 12-7
Let’s now look at some ways you can improve performance by writing better VBA code.
Optimizing VBA CodeYou have various ways to accomplish the same task using VBA code, some of which are faster than others. Here are some examples:
Use With...End With when dealing with multiple settings for the same object. Otherwise, the process may be slow because the object has to be located each time. It isgenerally better to use:
With txtName .Text = "Hello" .Visible = True .Enabled = TrueEnd Withthan the following:
txtName.Text = "Hello"txtName.Visible = TruetxtName.Enabled = TrueUse the correct data type and make it only as large as you really need. For example, if you need an integer, do not use a double. Minimize the use of variants because theyare the slowest. They must take time to determine a data type because one was not explicitly designated.
When you are working with automation, as I described in Chapter 11, use early binding so references are resolved at compile time instead of runtime. For example, earlybinding to Excel like this:
Dim objExcel As Excel.ApplicationSet objExcel = New Excel.Applicationis better than late binding to Excel like this:
'declare a new generic objectDim objExcel as Object
'instantiate the new object as an Excel objectSet objExcel = CreateObject("Excel.Application")If...Then...Else is faster than IIF() statements.
Instead of testing a Boolean variable for True, use the value explicitly. For example, use:
If blnValue Theninstead of:
If blnValue = True ThenUse SQL queries to do batch inserts, updates, and deletes instead of looping through recordsets.
Beginning Access 2007 VBA
200 / 344
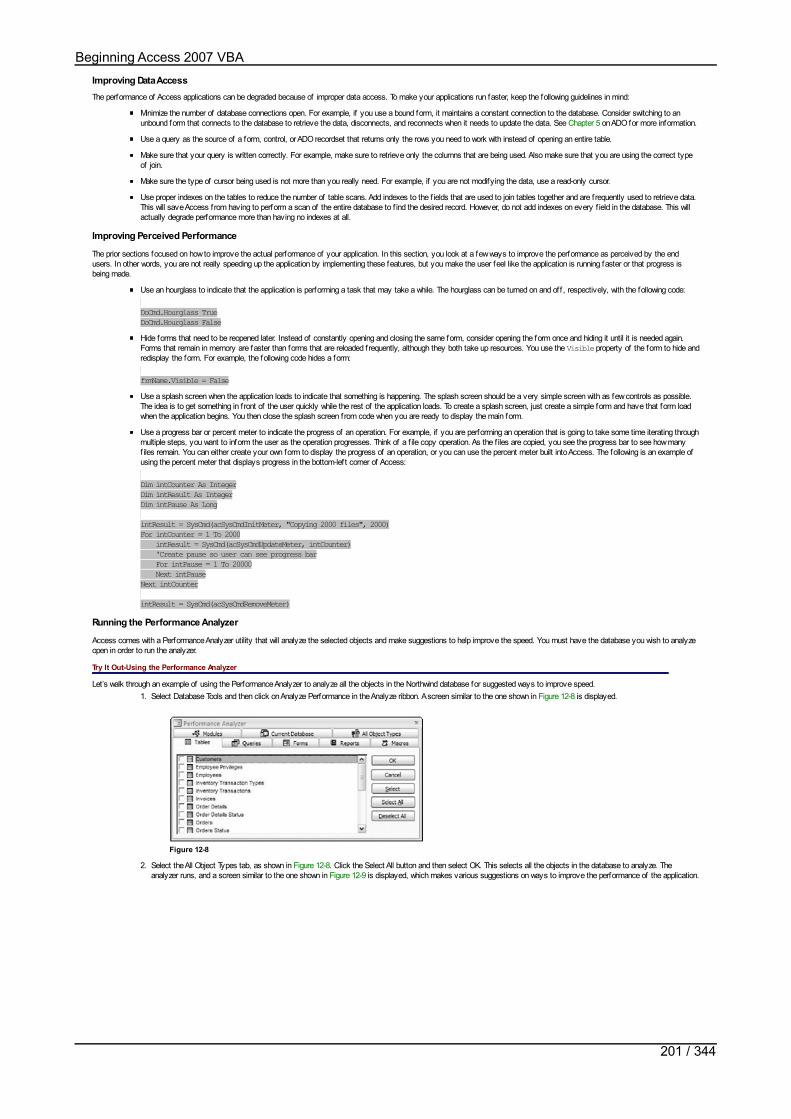
Improving Data AccessThe performance of Access applications can be degraded because of improper data access. To make your applications run faster, keep the following guidelines in mind:
Minimize the number of database connections open. For example, if you use a bound form, it maintains a constant connection to the database. Consider switching to anunbound form that connects to the database to retrieve the data, disconnects, and reconnects when it needs to update the data. See Chapter 5 on ADO for more information.
Use a query as the source of a form, control, or ADO recordset that returns only the rows you need to work with instead of opening an entire table.
Make sure that your query is written correctly. For example, make sure to retrieve only the columns that are being used. Also make sure that you are using the correct typeof join.
Make sure the type of cursor being used is not more than you really need. For example, if you are not modifying the data, use a read-only cursor.
Use proper indexes on the tables to reduce the number of table scans. Add indexes to the f ields that are used to join tables together and are frequently used to retrieve data.This will save Access from having to perform a scan of the entire database to f ind the desired record. However, do not add indexes on every f ield in the database. This willactually degrade performance more than having no indexes at all.
Improving Perceived Performance
The prior sections focused on how to improve the actual performance of your application. In this section, you look at a few ways to improve the performance as perceived by the endusers. In other words, you are not really speeding up the application by implementing these features, but you make the user feel like the application is running faster or that progress isbeing made.
Use an hourglass to indicate that the application is performing a task that may take a while. The hourglass can be turned on and off , respectively, with the following code:
DoCmd.Hourglass TrueDoCmd.Hourglass FalseHide forms that need to be reopened later. Instead of constantly opening and closing the same form, consider opening the form once and hiding it until it is needed again.Forms that remain in memory are faster than forms that are reloaded frequently, although they both take up resources. You use the Visible property of the form to hide andredisplay the form. For example, the following code hides a form:
frmName.Visible = FalseUse a splash screen when the application loads to indicate that something is happening. The splash screen should be a very simple screen with as few controls as possible.The idea is to get something in front of the user quickly while the rest of the application loads. To create a splash screen, just create a simple form and have that form loadwhen the application begins. You then close the splash screen from code when you are ready to display the main form.
Use a progress bar or percent meter to indicate the progress of an operation. For example, if you are performing an operation that is going to take some time iterating throughmultiple steps, you want to inform the user as the operation progresses. Think of a f ile copy operation. As the f iles are copied, you see the progress bar to see how manyf iles remain. You can either create your own form to display the progress of an operation, or you can use the percent meter built into Access. The following is an example ofusing the percent meter that displays progress in the bottom-lef t corner of Access:
Dim intCounter As IntegerDim intResult As IntegerDim intPause As Long
intResult = SysCmd(acSysCmdInitMeter, "Copying 2000 files", 2000)For intCounter = 1 To 2000 intResult = SysCmd(acSysCmdUpdateMeter, intCounter) 'Create pause so user can see progress bar For intPause = 1 To 20000 Next intPauseNext intCounter
intResult = SysCmd(acSysCmdRemoveMeter)
Running the Performance Analyzer
Access comes with a Performance Analyzer utility that will analyze the selected objects and make suggestions to help improve the speed. You must have the database you wish to analyzeopen in order to run the analyzer.
Try It Out-Using the Performance Analyzer
Let’s walk through an example of using the Performance Analyzer to analyze all the objects in the Northwind database for suggested ways to improve speed.1. Select Database Tools and then click on Analyze Performance in the Analyze ribbon. A screen similar to the one shown in Figure 12-8 is displayed.
Figure 12-8
2. Select the All Object Types tab, as shown in Figure 12-8. Click the Select All button and then select OK. This selects all the objects in the database to analyze. Theanalyzer runs, and a screen similar to the one shown in Figure 12-9 is displayed, which makes various suggestions on ways to improve the performance of the application.
Beginning Access 2007 VBA
201 / 344

Figure 12-9
How It Works
The Performance Analyzer is a wizard you can use to let Access provide some suggestions on how to improve the performance of the application. In the example, you ran the wizard againstthe Northwind database and discovered that some additional improvements can still be made to make the application run even faster.
Beginning Access 2007 VBA
202 / 344

Securing Your ApplicationYou have various ways to add security to your application. You can implement one or more of these techniques, depending on the type of security that is required for your application. Forexample, you can assign passwords to the database and/or to the code, and you can encrypt the database. Let’s look at each of these concepts in more detail.
Adding a Database Password
One way to add security to your database is to require a user to input a password before the database can be opened. This is called f ile-level security. After the database f ile has beenopened by specifying the correct password, the user can do anything to the database unless the other security features are implemented.
You have at least two ways to set a database password. One way is to select the Database Tools ribbon Encrypt with Password option. You will be prompted to enter a password for thedatabase. Another way to set a database password is programmatically using VBA code. For example, you can execute SQL statements against the database to set, change, and remove adatabase password. Here are sample SQL statements for each of these options:
'SQL statement for setting password for first time (from NULL to some value)strSQL = "ALTER DATABASE PASSWORD [newpassword] NULL"
'SQL statement for changing the database passwordstrSQL = "ALTER DATABASE PASSWORD [anotherpassword] [newpassword]"
'SQL statement for setting password back to NULL (no password)strSQL = "ALTER DATABASE PASSWORD NULL [anotherpassword]"
'For any of these statements, would also need code to execute the SQL statement'against the database. For example, you could use ADO to execute these statements'against the database.After a database password has been assigned, whenever any user tries to open the database, a dialog similar to the one shown in Figure 12-10 is displayed. Before the database can beopened, the user must specify the correct database password.
Figure 12-10
Adding a Password for VBA Code
Adding a password to the database as described in the prior section does not keep the user f rom seeing your source code. Since Access 2000, you have to secure the VBA source codeseparately by locking the project f rom viewing and providing a password. To add a password for the VBA code, open the Visual Basic Editor. Then, select Tools ProjectName Properties.Select the Protection tab, as shown in Figure 12-11.
Figure 12-11
Specify the Lock Project For Viewing option, and f ill in a password that must be specif ied in order to view the source code. After you click OK, the specif ied password will be required in thefuture before the source code can be viewed or modif ied.
Another way to improve security through various f ile security features includes creating an ACCDE f ile. Please see the section later in this chapter that discusses ACCDE f iles.
Encrypting a Database
Even after you add to your application the security features discussed so far, your application is still not totally secure. Someone could still view the contents of the database with a toolthat can view partitions on disk and decipher data. If you are worried about someone being able to decipher the data from a disk utility, you should consider encrypting the database.
To do so, select the Database Tools ribbon and then Encode Database in the Database Tools group. Access then prompts you to specify a password. After you click OK, the entire databasewill be encrypted. In order for you to use the application after it has been encrypted, Access will have to decrypt the information. This means that encrypting the database will slow downperformance as much as 20%. If this performance degradation is a problem for your application, decryption is not a good option.
Beginning Access 2007 VBA
203 / 344

Distributing Your ApplicationNow that you have tested and optimized your application, you are ready to compile and distribute the application to end users. You have various distribution options, such as distributing thedatabase to users with the full-blown version of Access, distributing the application using the Access runtime, and distributing ACCDE f iles. Each of these will now be discussed.
Tip Before distributing your application, you should f irst compile the application. You do not want end users dealing with compiler errors that could have been avoided by compiling priorto deployment. Compiling will also help the application run faster. One way to compile an application is f rom the Visual Basic Editor, by selecting the Debug CompileDatabaseName option.
Distributing the Application to Users with the Full Version of Access
In some cases, you may be distributing the application to users who already have the full version of Access installed. Other than making the ACCDB f ile(s) accessible to each user, you donot have to take any other steps in order to deploy the application to those users.
Distributing the Application with the Access Runtime
If you have end users who do not have Access installed, you can distribute the application to them using the Access runtime. The runtime is a limited feature version of Access that has thefollowing limitations:
You cannot view or modify the object designs.
The database window is hidden.
Built-in toolbars and some menu items are not supported, so you may have to include your own menus in your application.
Some keys are disabled.
You can create a setup program using the Packaging Wizard that will enable you to deploy your application with the Access runtime. In order to use the Packaging Wizard, you f irst have tohave the Off ice Access 2007 Developer Extensions installed. Contact Microsoft for more information on how to obtain this extension. At the time of this book’s writing, the developerextensions were only available as part of the Visual Studio Tools for the Microsoft Off ice System.
After you have installed a copy of the developer extensions, you must load the Packaging Wizard to your project. From the Visual Basic Editor, select Add-Ins Add-In Manager Packaging Wizard and check the Loaded/Unloaded box. Click OK. The wizard should now appear under the Add-In menu.
After it is installed, the wizard can be used to help you build a distribution solution based on the Access runtime. If you want to test your application to see how it will look in the Accessruntime, you can open the database by using the /runtime switch, as shown in the following code:
msaccess.exe c:\bstempbsnorthwind.accdb /runtimeIf you plan to distribute your application using the Access runtime, you should test it in this manner to ensure your users will be able to navigate correctly. You should also test the installerin the various environments to which you will be distributing your application to make sure the install goes smoothly.
Note that if you are using any third-party ActiveX controls in your application, you will need to include the installer for those before you distribute the application. Many computers youdistribute to will not have the third-party components you have on your development machine.
Distributing an Execute-Only Application
An ACCDE is a compiled and compacted database f ile that has all editable source code removed. Because the source code is removed, additional security is provided for your application.Furthermore, because the code is removed, the size of the application is smaller and thus performance is improved. Because of the limitations of ACCDE f iles, you should keep the originaldatabase with the source code so that you will be able to make changes later.
To create an ACCDE f ile, open the database from which you want to create the ACCDE f ile. Select the Database Tools tab, and then click on the Make ACCDE icon in the Database Toolsribbon. Specify a name for the ACCDE f ile on the dialog box that appears, and click the OK button.
Beginning Access 2007 VBA
204 / 344
Maintaining the ApplicationJust because you have deployed your application to end users does not mean that your job is f inished. It is important that you periodically compact the database to keep it in good workingorder and that you make periodic backup copies.
Compacting and Repairing the Database
You can compact and repair Access databases to reduce the amount of space they take up and to repair problems if Access discovers any. Because Access databases are f ile-based,records are being deleted and added to the system over time. A large amount of space may have been taken up by an operation that has already been completed or by database recordsthat were already deleted. Compacting the database will recover that space and reduce the f ile size.
To compact and repair an Access database, select the Off ice Button Manage Compact and Repair Database. If you have the database open that you want to compact, selecting thisoption will automatically compact that one. If no databases are open, you will be prompted to specify the name and location of the database to compact.
Making Backup Copies of the Database
If you are like most people, you have probably lost data from some program before. It was certainly f rustrating to lose the data and have to recreate it again. The same concept holds truefor your Access applications. Access databases are f ile-based, which means that a lot of the information is contained in the single ACCDB f ile. Because so much is contained in a singlef ile, and because it would be easy for a user to delete the database f ile f rom the network, it is extremely important that you make periodic backups of both the database tables and the userinterface. The concept of backups is important for any application, but it is especially true for f ile-based applications like Access.
To back up an Access database, select the Off ice Button Manage Backup Database. You will be prompted to specify a f ile name and path where you want the backup saved. ClickOK, and the backup copy will be created.
Beginning Access 2007 VBA
205 / 344

SummaryIn this chapter, I discussed several techniques that will help ensure that your Access applications are capable of handling multiple users and performing well. You also explored various waysto f ine-tune, secure, and test Access applications. You looked at various implementation options, as well as some maintenance issues that should be addressed to ensure that your hardwork in building the application is not wasted. The concepts covered up to this point have illustrated the basics of building applications and have prepared you for the f inal two chapters.Chapters 13 and 14 are hands-on case studies that will allow you to build real-world applications, while solidifying the concepts covered in all the prior chapters.
Beginning Access 2007 VBA
206 / 344

Exercises1. Describe two ways you can improve support for multiple users in your application.
2. Describe two ways you can improve the performance of your application.
3. What is involved in building a help system for your application?
4. Describe some ways you can add security to your application.
5. What is an ACCDE f ile? How does deploying your application using an ACCDE f ile dif fer f rom using the Access runtime version?
Answers
1. One way to improve support for multiple users is to ensure that the proper type of record locking is being used. If your application is using page or table locks, for example, then morerecords than the one being accessed will be locked and other users will be unable to modify them. With bound forms, you can modify table locks in Tools Options on the Advancedtab. With unbound forms, you specify the lock type in your code, for example by setting the lock type of your ADO recordset. Another way to improve support for multiple users is toseparate standalone Access databases into two separate f iles: one database f ile that contains the tables and is shared on a network and another database f ile with the user-interfaceobjects that is loaded onto each user’s computer.
2. There are various ways to improve the performance of your Access applications. One way is to optimize the queries that retrieve data to ensure that they use the correct syntax, jointo the correct tables, and use indexes so the retrieval will be faster. Another way to improve performance is to reduce the complexity of your forms, for instance by eliminatingunnecessary controls and moving some code from forms to standard modules. Improving the code itself is another way to improve performance. For example, make sure to use thesmallest data type you really need, make your procedures reusable to eliminate redundant code, and replace slower types of code statements with faster statements. If the userinterface is separated into a separate database f ile than the tables, open the user-interface f ile exclusively to improve performance. Finally, the Performance Analyzer can help toidentify areas for improvement.
3. To build a help system, you f irst create the content for the help system using any tool that can create HTML documents, such as Microsoft Word. You specify identif iers for thevarious topics so they can be retrieved later. After the help topics have been created and assigned identif iers, you then compile the help system into a help f ile and hook up the helpsystem to your application. You assign your application to the help f ile just created. You then can set various properties in your application, for example at the form level or at aparticular control level to point to a related help topic.
4. There are various ways to add security to your applications. For example, you can add a password to the database and a separate one to the source code. You can also add users andgroups that have various security settings. For example, some users may have the ability to modify source code and data, while other users only have access to the data through theforms. By creating an ACCDE f ile, you can compile your application into a f ile that removes all source code. This is another way to add security to your application because it ensuresthat no one who opens that f ile can view or modify the source code.
5. ACCDE f iles are a special type of Access f ile that can be created to compile the database and remove all source code. An ACCDE f ile is one way you can distribute the application toend users. The Access runtime allows you to distribute your application to users who do not have a full version of Access installed on their computer. The Access runtime hides thedatabase window from the users so they cannot modify the objects, such as the forms and reports. Built-in toolbars are not supported, so you have to build your own toolbars for theusers. However, unlike ACCDE f iles, Access databases distributed with the runtime version still contain all of the code and could be opened by someone with the full version ofAccess.
Beginning Access 2007 VBA
207 / 344
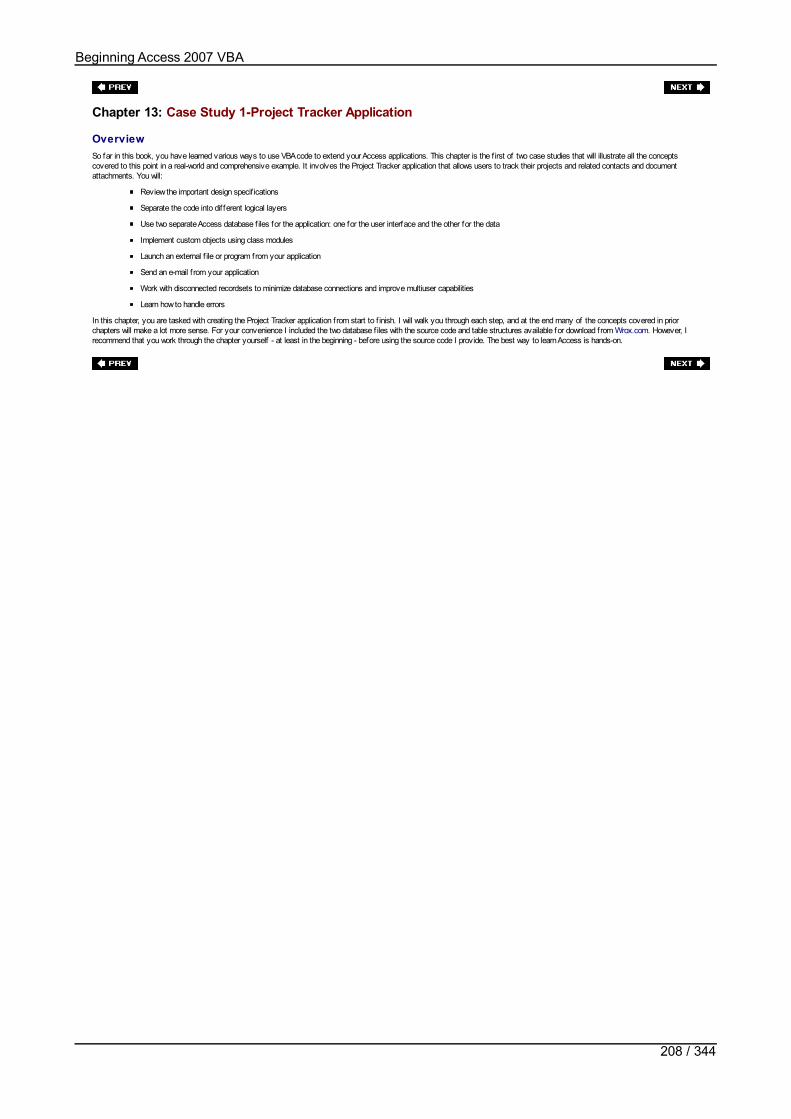
Chapter 13: Case Study 1-Project Tracker Application
OverviewSo far in this book, you have learned various ways to use VBA code to extend your Access applications. This chapter is the f irst of two case studies that will illustrate all the conceptscovered to this point in a real-world and comprehensive example. It involves the Project Tracker application that allows users to track their projects and related contacts and documentattachments. You will:
Review the important design specif ications
Separate the code into dif ferent logical layers
Use two separate Access database f iles for the application: one for the user interface and the other for the data
Implement custom objects using class modules
Launch an external f ile or program from your application
Send an e-mail f rom your application
Work with disconnected recordsets to minimize database connections and improve multiuser capabilities
Learn how to handle errors
In this chapter, you are tasked with creating the Project Tracker application from start to f inish. I will walk you through each step, and at the end many of the concepts covered in priorchapters will make a lot more sense. For your convenience I included the two database f iles with the source code and table structures available for download from Wrox.com. However, Irecommend that you work through the chapter yourself - at least in the beginning - before using the source code I provide. The best way to learn Access is hands-on.
Beginning Access 2007 VBA
208 / 344
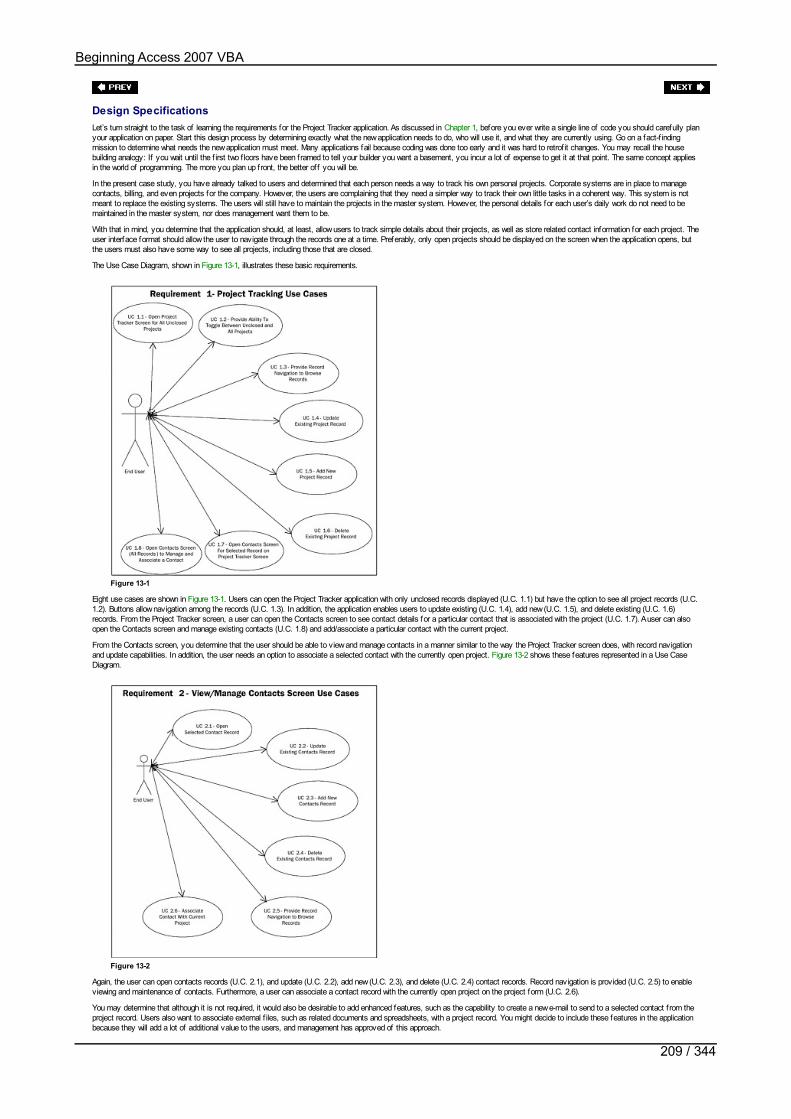
Design SpecificationsLet’s turn straight to the task of learning the requirements for the Project Tracker application. As discussed in Chapter 1, before you ever write a single line of code you should carefully planyour application on paper. Start this design process by determining exactly what the new application needs to do, who will use it, and what they are currently using. Go on a fact-f indingmission to determine what needs the new application must meet. Many applications fail because coding was done too early and it was hard to retrof it changes. You may recall the housebuilding analogy: If you wait until the f irst two f loors have been framed to tell your builder you want a basement, you incur a lot of expense to get it at that point. The same concept appliesin the world of programming. The more you plan up front, the better of f you will be.
In the present case study, you have already talked to users and determined that each person needs a way to track his own personal projects. Corporate systems are in place to managecontacts, billing, and even projects for the company. However, the users are complaining that they need a simpler way to track their own little tasks in a coherent way. This system is notmeant to replace the existing systems. The users will still have to maintain the projects in the master system. However, the personal details for each user’s daily work do not need to bemaintained in the master system, nor does management want them to be.
With that in mind, you determine that the application should, at least, allow users to track simple details about their projects, as well as store related contact information for each project. Theuser interface format should allow the user to navigate through the records one at a time. Preferably, only open projects should be displayed on the screen when the application opens, butthe users must also have some way to see all projects, including those that are closed.
The Use Case Diagram, shown in Figure 13-1, illustrates these basic requirements.
Figure 13-1
Eight use cases are shown in Figure 13-1. Users can open the Project Tracker application with only unclosed records displayed (U.C. 1.1) but have the option to see all project records (U.C.1.2). Buttons allow navigation among the records (U.C. 1.3). In addition, the application enables users to update existing (U.C. 1.4), add new (U.C. 1.5), and delete existing (U.C. 1.6)records. From the Project Tracker screen, a user can open the Contacts screen to see contact details for a particular contact that is associated with the project (U.C. 1.7). A user can alsoopen the Contacts screen and manage existing contacts (U.C. 1.8) and add/associate a particular contact with the current project.
From the Contacts screen, you determine that the user should be able to view and manage contacts in a manner similar to the way the Project Tracker screen does, with record navigationand update capabilities. In addition, the user needs an option to associate a selected contact with the currently open project. Figure 13-2 shows these features represented in a Use CaseDiagram.
Figure 13-2
Again, the user can open contacts records (U.C. 2.1), and update (U.C. 2.2), add new (U.C. 2.3), and delete (U.C. 2.4) contact records. Record navigation is provided (U.C. 2.5) to enableviewing and maintenance of contacts. Furthermore, a user can associate a contact record with the currently open project on the project form (U.C. 2.6).
You may determine that although it is not required, it would also be desirable to add enhanced features, such as the capability to create a new e-mail to send to a selected contact f rom theproject record. Users also want to associate external f iles, such as related documents and spreadsheets, with a project record. You might decide to include these features in the applicationbecause they will add a lot of additional value to the users, and management has approved of this approach.
Beginning Access 2007 VBA
209 / 344

As discussed in Chapter 1, you have various other ways to document the application, including activity diagrams, other f low charts, network diagrams, object diagrams, and so on. Exactlywhat you do is not so important, as long as you arrive at a coherent design on paper before you begin writing the application. In Access, I typically generate prototype screens by usingAccess forms, because the work of drawing the forms can be reused when you actually start coding the forms. I sometimes use Visio to generate prototype screens as well. In any event,when you analyze the requirements previously discussed, you might determine that two main screens make sense: a Project Tracker screen and a Contacts screen. The Project Trackerscreen can be further divided into tabs, such as a f irst tab for Comments/Tasks, a second tab for related contacts, and a third tab for f ile attachments. This design is illustrated in Figures13-3, 13-4, and 13-5.
Figure 13-3
Figure 13-4
Figure 13-5
Figure 13-3 shows the general information for the project as well as the Comments tab where the user can enter tasks or comments about the project. The user can enter a comment or taskin the Comment/Task Text f ield and then click the Add Comment button to add it to the project. Because you are planning to implement a disconnected recordset scenario as described indetail in Chapter 5 on ADO, you will not actually be saving the changes to the underlying database until the user clicks the Save Changes button. The Delete Comment button removes thecomment from the list on the form but does not remove the comment from the database until the Save Changes button is later clicked.
Figure 13-4 shows the same general project information at the top portion of the screen and has a Contacts tab where related contact records can be managed. Notice the button with themail icon on the right of the contact list. You intend for a button such as this to enable a user to generate an e-mail to the currently selected contact in the list. This tab is where users launchthe Contacts screen to view more information about the selected contact, manage existing contacts, and associate them with the current contact. The Delete Selected Contact buttonsimply removes the contact f rom this project but not f rom the database until Save Changes is clicked.
Figure 13-5 includes a File Attachments tab where users can associate separate f iles with the current project. The Preview button to the right of the list will allow a user to open a selected f ileattachment in a separate window in its native application. A File Open button allows a user to search on the f ile system for an attachment and includes any selected f ile name in the FileName f ield to be added to the project. After the user f ills in a f ile description and f ile name and selects the Add File Attachment button, the f ile is added to the list.
Figure 13-6 is a prototype screen for Contacts. Notice how various data elements related to the contact are included, as well as navigation buttons and buttons for saving changes torecords. The Add Current Contact To Project button allows a user to put the current contact back on the project form for the currently open project. Now that you have a written plan detailingwhat you want the application to do, it’s time to get your hands dirty creating the database and the code!
Beginning Access 2007 VBA
210 / 344

Figure 13-6
Beginning Access 2007 VBA
211 / 344

Building the DatabaseIn this section, you will build the database in an Access f ile separately f rom the user interface. You learned in Chapter 11 that you can realize performance improvements by separating theuser interface from the underlying data. The database containing the data tables can be placed on the same or a dif ferent computer than the one containing the user interface. If you are theonly user, then having both f iles on the same computer is f ine. If you have others with whom you must share the application, then putting the database with the data tables on a f ile serverand the user interface on each user’s workstation makes the most sense. In either case, you can make the database location conf igurable, so you can change the setup as your needsscale. This chapter will not discuss this option, but it is easily implemented in VBA.
Try It Out-Building the ProjectTrackerDb Database
Let’s now build the database that will store the data tables.1. Create a new database by selecting the Off ice Button New. From the list of available templates, select "Blank Database." Specify ProjectTrackerDb for the f ile
name, and click the Create button.2. The tables for this database are shown in Figures 13-7 through 13-11. Note that for each table, the f ield size is specif ied in the Description f ield for your convenience. You
also need to add primary keys as indicated in each table by the key icon.
Figure 13-7
Figure 13-8
Figure 13-9
Figure 13-10
Figure 13-11
3. Add the tblProjects table as shown in Figure 13-7. This table is the master project table for storing project information. Note that the f ields in this table map to the f ieldson the prototype screen that are not on the tabs.
4. Add the tblContacts table as shown in Figure 13-8. This table maps to the f ields on the Contacts prototype form.5. Add the tblProjectsComments table as shown in Figure 13-9. This table is used to store the multiple comments that can be entered for a given project. This table maps to
the f irst tab of the Project Tracker screen prototype. The reason a separate table has to be used for the tabs is that multiple entries can be included. You cannot simplyput a f ield in the main table that holds multiple contacts. In the world of database design; you illustrate these relationships (one to many, many to many, and so on) inseparate tables for various reasons.
6. Add the tblProjectsContacts table as shown in Figure 13-10. This table maps to the second tab of the Project Tracker screen prototype.
7. Add the tblProjectsFileAttachments table as shown in Figure 13-11. This table maps to the third tab of the Project Tracker screen prototype.8. At this point, your ProjectTrackerDb database should look like the one shown in Figure 13-12.
Beginning Access 2007 VBA
212 / 344

Figure 13-12
How It Works
You created f ive tables that will store the data for the Project Tracker application. These tables were created in a separate database from the user interface database to provide bettersupport for multiple users. The tblContacts table is used to store data about each individual contact. The tblProjects table stores data about each project record. ThetblProjectsComments, tblProjectsContacts, and tblProjectsFileAttachments tables can store multiple records for a particular project record.
Beginning Access 2007 VBA
213 / 344
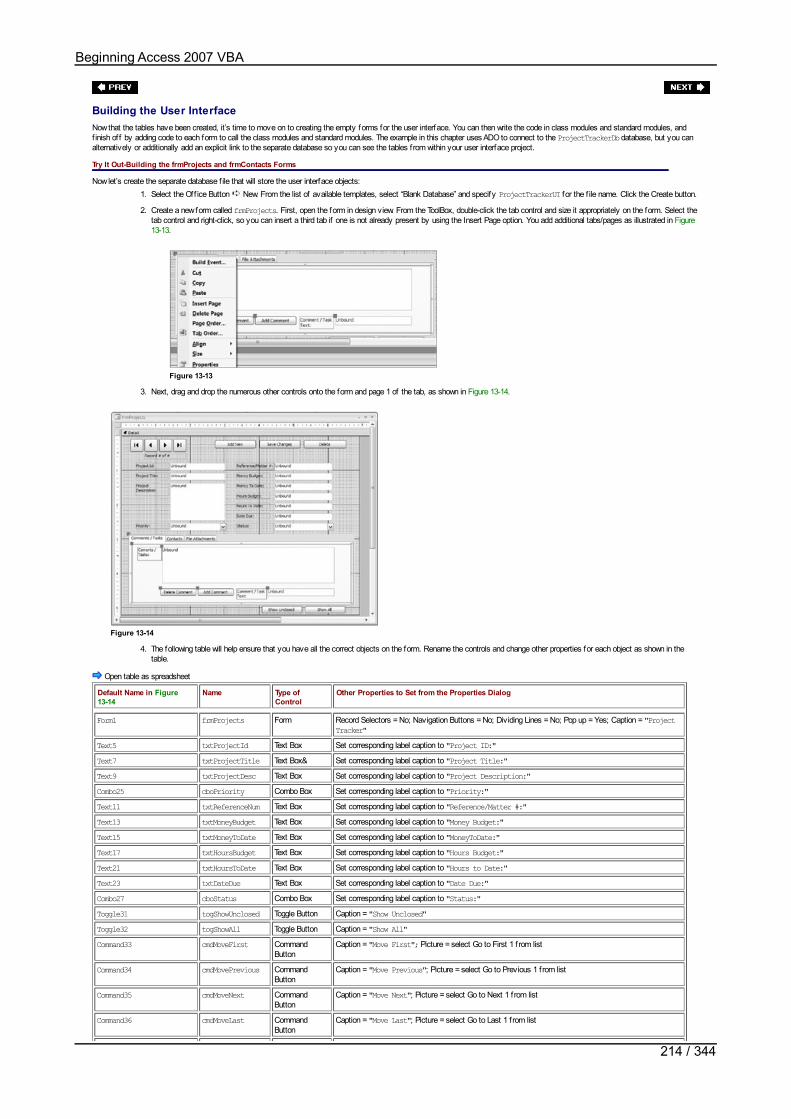
Building the User InterfaceNow that the tables have been created, it’s time to move on to creating the empty forms for the user interface. You can then write the code in class modules and standard modules, andf inish off by adding code to each form to call the class modules and standard modules. The example in this chapter uses ADO to connect to the ProjectTrackerDb database, but you canalternatively or additionally add an explicit link to the separate database so you can see the tables from within your user interface project.
Try It Out-Building the frmProjects and frmContacts Forms
Now let’s create the separate database f ile that will store the user interface objects:1. Select the Off ice Button New. From the list of available templates, select “Blank Database” and specify ProjectTrackerUI for the f ile name. Click the Create button.
2. Create a new form called frmProjects. First, open the form in design view. From the ToolBox, double-click the tab control and size it appropriately on the form. Select thetab control and right-click, so you can insert a third tab if one is not already present by using the Insert Page option. You add additional tabs/pages as illustrated in Figure13-13.
Figure 13-13
3. Next, drag and drop the numerous other controls onto the form and page 1 of the tab, as shown in Figure 13-14.
Figure 13-14
4. The following table will help ensure that you have all the correct objects on the form. Rename the controls and change other properties for each object as shown in thetable.
Open table as spreadsheet
Default Name in Figure13-14
Name Type ofControl
Other Properties to Set from the Properties Dialog
Form1 frmProjects Form Record Selectors = No; Navigation Buttons = No; Dividing Lines = No; Pop up = Yes; Caption = "ProjectTracker"
Text5 txtProjectId Text Box Set corresponding label caption to "Project ID:"Text7 txtProjectTitle Text Box& Set corresponding label caption to "Project Title:"Text9 txtProjectDesc Text Box Set corresponding label caption to "Project Description:"Combo25 cboPriority Combo Box Set corresponding label caption to "Priority:"Text11 txtReferenceNum Text Box Set corresponding label caption to "Reference/Matter #:"Text13 txtMoneyBudget Text Box Set corresponding label caption to "Money Budget:"Text15 txtMoneyToDate Text Box Set corresponding label caption to "MoneyToDate:"Text17 txtHoursBudget Text Box Set corresponding label caption to "Hours Budget:"Text21 txtHoursToDate Text Box Set corresponding label caption to "Hours to Date:"Text23 txtDateDue Text Box Set corresponding label caption to "Date Due:"Combo27 cboStatus Combo Box Set corresponding label caption to "Status:"Toggle31 togShowUnclosed Toggle Button Caption = "Show Unclosed"Toggle32 togShowAll Toggle Button Caption = "Show All"Command33 cmdMoveFirst Command
ButtonCaption = "Move First"; Picture = select Go to First 1 from list
Command34 cmdMovePrevious CommandButton
Caption = "Move Previous"; Picture = select Go to Previous 1 from list
Command35 cmdMoveNext CommandButton
Caption = "Move Next"; Picture = select Go to Next 1 from list
Command36 cmdMoveLast CommandButton
Caption = "Move Last"; Picture = select Go to Last 1 from list
Beginning Access 2007 VBA
214 / 344

Command37 cmdAddNew CommandButton
Caption = "Add New"
Command38 cmdSave CommandButton
Caption = "Save Changes"
Command39 cmdDelete CommandButton
Caption = "Delete"
Page1 pgComments Page of Tab Control Caption = "Comments/Tasks"List41 lstComments List Box Set corresponding label caption to "Comments/Tasks:"Command47 cmdDeleteComment Command
ButtonCaption = "Delete Comment"
Command48 cmAddComment CommandButton
Caption = "Add Comment"
Text45 txtAddComment Text Box Set corresponding label caption to "Comment/Task Text:"Label66 lblRecordNum Label Caption = "Record # of #"
5. Next, select Page 2 of the tab control and drag the additional controls onto that tab, as shown in Figure 13-15.
Figure 13-15
6. The following table will help ensure that you have all the correct objects on Page 2 of the tab control on frmProjects. Rename the controls and change other properties foreach object as shown in the table.
Open table as spreadsheet
Default Name on Figure 13-15 Name Type of Control Other Properties to Set from the Properties Dialog
Page2 pgContacts Page of Tab Control Caption = "Contacts"List49 lstContacts List Box Set corresponding label caption to "Related Contacts:"Command53 cmdViewContact Command Button Caption = "View Details for Selected Contact"Command54 cmdManageContacts Command Button Caption = "Add/Manage Contacts"Command59 cmdDeleteContact Command Button Caption = "Delete Selected Contact"Command60 cmdEmailContact Command Button Caption = "Email Selected Contact"; Picture = select Mailbox from list of pictures
7. Next, select Page 3 of the tab control and drag the additional controls onto that tab, as shown in Figure 13-16.
Figure 13-16
8. The following table will help ensure you have all the correct objects on Page 3 of the tab control on frmProjects. Again, rename the controls and change other propertiesfor each object as shown in the table that follows.
Open table as spreadsheet
Default Name on Figure 13-16
Name Type of Control Other Properties to Set from the Properties Dialog
Page3 pgFileAttachments Page of TabControl
Caption = "File Attachments"
List55 lstFileAttachments List Box Set corresponding label caption to "Related File Attachments:"Command61 cmdRemoveAttachment Command Button Caption = "Remove File Attachment"
Beginning Access 2007 VBA
215 / 344

Command64 cmdAddAttachment Command Button Caption = "Add File Attachment"Text57 txtFileDesc Text Box Set corresponding label caption to "File Description:"Text 62 txtFileName Text Box Set corresponding label caption to "File Name:"Command65 cmdOpenFile Command Button Caption = "Open Selected File"; Picture = select Preview Document from
list
Command67 cmdFileBrowse Command Button Caption = "File Browse"; Picture = select Open Folder f rom list
9. Verify that each control on frmProjects has the correct name and other property settings as listed in the prior tables. If any of these are misspelled, later codereferencing them will produce an error you will need to f ix. The form should now appear similar to those shown in Figures 13-17 to 13-19.
Figure 13-17
Figure 13-18
Figure 13-19
10. Make sure to save all your changes to frmProjects.11. Next, create a new form called frmContacts. Drag and drop the controls onto the form, as shown in Figure 13-20.
Beginning Access 2007 VBA
216 / 344
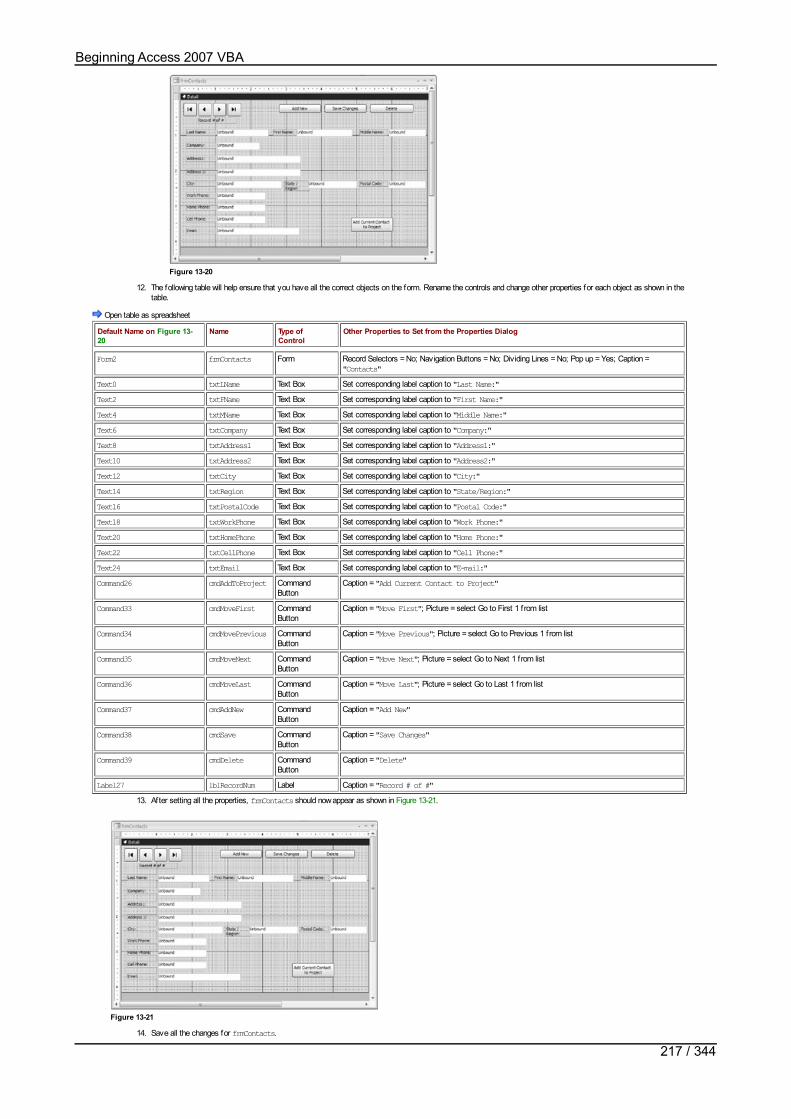
Figure 13-20
12. The following table will help ensure that you have all the correct objects on the form. Rename the controls and change other properties for each object as shown in thetable.
Open table as spreadsheet
Default Name on Figure 13-20
Name Type ofControl
Other Properties to Set from the Properties Dialog
Form2 frmContacts Form Record Selectors = No; Navigation Buttons = No; Dividing Lines = No; Pop up = Yes; Caption ="Contacts"
Text0 txtLName Text Box Set corresponding label caption to "Last Name:"Text2 txtFName Text Box Set corresponding label caption to "First Name:"Text4 txtMName Text Box Set corresponding label caption to "Middle Name:"Text6 txtCompany Text Box Set corresponding label caption to "Company:"Text8 txtAddress1 Text Box Set corresponding label caption to "Address1:"Text10 txtAddress2 Text Box Set corresponding label caption to "Address2:"Text12 txtCity Text Box Set corresponding label caption to "City:"Text14 txtRegion Text Box Set corresponding label caption to "State/Region:"Text16 txtPostalCode Text Box Set corresponding label caption to "Postal Code:"Text18 txtWorkPhone Text Box Set corresponding label caption to "Work Phone:"Text20 txtHomePhone Text Box Set corresponding label caption to "Home Phone:"Text22 txtCellPhone Text Box Set corresponding label caption to "Cell Phone:"Text24 txtEmail Text Box Set corresponding label caption to "E-mail:"Command26 cmdAddToProject Command
ButtonCaption = "Add Current Contact to Project"
Command33 cmdMoveFirst CommandButton
Caption = "Move First"; Picture = select Go to First 1 from list
Command34 cmdMovePrevious CommandButton
Caption = "Move Previous"; Picture = select Go to Previous 1 from list
Command35 cmdMoveNext CommandButton
Caption = "Move Next"; Picture = select Go to Next 1 from list
Command36 cmdMoveLast CommandButton
Caption = "Move Last"; Picture = select Go to Last 1 from list
Command37 cmdAddNew CommandButton
Caption = "Add New"
Command38 cmdSave CommandButton
Caption = "Save Changes"
Command39 cmdDelete CommandButton
Caption = "Delete"
Label27 lblRecordNum Label Caption = "Record # of #"13. After setting all the properties, frmContacts should now appear as shown in Figure 13-21.
Figure 13-21
14. Save all the changes for frmContacts.
Beginning Access 2007 VBA
217 / 344

15. A Database Window showing how the ProjectTrackerUI database should appear at this point is illustrated in Figure 13-22.
Figure 13-22
How It Works
The frmProjects form will be used to display project records. You added various controls to this form, including several text boxes and other controls that will be used to display data andaccept input f rom a user. The primary data for the frmProjects form will come from the tblProjects table. Additional data for the tabs on the tab control will come from thetblProjectsComments, tblProjectsContacts, and tblProjectsFileAttachments tables.
The frmContacts form will be used to display contact records for all contacts or for a selected contact. You also added various controls to this form that will be used to display the contactdata and accept input f rom a user. The data for the frmContacts form will come from the tblContacts table.
Beginning Access 2007 VBA
218 / 344

Building the Class Modules for the ObjectsThroughout this book you learned that VBA code can be written in various places, such as class modules that are independent or associated with a form, as well as in standard modules.Next, you turn your attention to writing the code that will implement the desired features of the Project Tracker application. You will be creating the custom class modules f irst, then thestandard modules, and f inally the code for the forms to call the other modules. An example of how the Project Explorer will look in the Visual Basic Editor when you’re f inished is shown inFigure 13-23.
Figure 13-23
Chapter 4 introduced the idea of creating custom classes. In the current application, you will create two logical custom class modules. One is a class for a Project object that will representthe current project in memory on the Project Tracker screen. The other will be a Contact object that will represent any current contact in memory from the Contacts screen.
The Project Class
An object diagram for the Project class is shown in Figure 13-24.
Tip The Contact class will be illustrated later in this chapter.
Project
- ProjectID
- ProjectTitle
- ProjectDescription
- Priority
- ReferenceNum
- MoneyBudget
- MoneytoDate
- HoursBudget
- HourstoDate
- DateDue
- Status
+ Save ()
+ Delete ()
+ RetrieveProjects ()
+ RetrieveComments ()
+ RetrieveContacts ()
+ RetrieveAttachments ()
+ PopulatePropertiesFromRecordset ()
+ PopulatePropertiesFromForm ()
+ ClearObject ()
Figure 13-24
The properties are represented in the top portion of the diagram, and the methods are shown in the bottom section. These correspond to the data elements on the form for the most part,except that the tabs with multiple records are not listed here. The methods represent various actions that you must take on the object. You will also write numerous other procedures that arenot in the class module, as you will see later.
Try It Out-Building the clsProjects Class
Let’s begin building the clsProjects class module that will implement the object illustrated in Figure 13-24.1. Before building the class, you f irst need to add a reference to ADO (preferably 2.6 or higher) by selecting Tools, References, and then selecting ADO 2.6 from the list.
2. Add a new class module called clsProjects. In the General Declarations section of the class, add the following code:
Option Compare DatabaseOption Explicit
Const CLS_PROJECTS As String = "clsProjects"
Dim intProjectIdVal As IntegerDim strProjectTitleVal As StringDim strProjectDescriptionVal As StringDim strPriorityVal As StringDim strReferenceNumVal As StringDim curMoneyBudgetVal As CurrencyDim curMoneyToDateVal As CurrencyDim intHoursBudgetVal As IntegerDim intHoursToDateVal As Integer
Beginning Access 2007 VBA
219 / 344

Dim intHoursToDateVal As IntegerDim dtDateDueVal As DateDim strStatusVal As String
3. Add the various property procedures shown in the following code to clsProjects class module:
Public Property Get ProjectId() As Integer On Error Resume Next ProjectId = intProjectIdVal End Property
Public Property Let ProjectId(ByVal Value As Integer) On Error Resume Next intProjectIdVal = Value End Property
Public Property Get ProjectTitle() As String On Error Resume Next ProjectTitle = strProjectTitleVal End Property
Public Property Let ProjectTitle(ByVal Value As String) On Error Resume Next strProjectTitleVal = Value End PropertyPublic Property Get ProjectDescription() As String On Error Resume Next ProjectDescription = strProjectDescriptionVal End Property
Public Property Let ProjectDescription(ByVal Value As String) On Error Resume Next strProjectDescriptionVal = Value End Property
Public Property Get Priority() As String On Error Resume Next Priority = strPriorityValEnd Property
Public Property Let Priority(ByVal Value As String) On Error Resume Next strPriorityVal = Value End Property
Public Property Get ReferenceNum() As String On Error Resume Next ReferenceNum = strReferenceNumVal End Property
Public Property Let ReferenceNum(ByVal Value As String) On Error Resume Next strReferenceNumVal = Value End Property
Public Property Get MoneyBudget() As Currency On Error Resume Next MoneyBudget = curMoneyBudgetVal End Property
Public Property Let MoneyBudget(ByVal Value As Currency) On Error Resume Next curMoneyBudgetVal = Value End Property
Public Property Get MoneyToDate() As Currency On Error Resume Next MoneyToDate = curMoneyToDateVal End Property
Public Property Let MoneyToDate(ByVal Value As Currency) On Error Resume Next curMoneyToDateVal = Value End Property
Public Property Get HoursBudget() As Integer On Error Resume Next HoursBudget = intHoursBudgetVal End Property Public Property Let HoursBudget(ByVal Value As Integer) On Error Resume Next intHoursBudgetVal = Value End Property
Public Property Get HoursToDate() As Integer On Error Resume Next HoursToDate = intHoursToDateVal End Property
Public Property Let HoursToDate(ByVal Value As Integer) On Error Resume Next intHoursToDateVal = Value End Property
Public Property Get DateDue() As Date On Error Resume Next DateDue = dtDateDueVal
Beginning Access 2007 VBA
220 / 344

DateDue = dtDateDueVal End Property
Public Property Let DateDue(ByVal Value As Date) On Error Resume Next dtDateDueVal = Value End Property
Public Property Get Status() As String On Error Resume Next Status = strStatusVal End Property
Public Property Let Status(ByVal Value As String) On Error Resume Next strStatusVal = Value End Property
4. Add the RetrieveProjects function shown in the following code to the clsProjects class module:
Function RetrieveProjects(blnAllRecords As Boolean) As ADODB.Recordset
On Error GoTo HandleError
Dim strSQLStatement As String Dim rsProj As New ADODB.Recordset
'build the SQL statement to retrieve data strSQLStatement = BuildSQLSelectProjects(blnAllRecords)
'generate the recordset Set rsProj = ProcessRecordset(strSQLStatement)
'return the populated recordset
Exit Function
HandleError: GeneralErrorHandler Err.Number, Err.Description, CLS_PROJECTS, _ "RetrieveProjects"
Exit Function
End Function5. Add the RetrieveComments function shown in the following code to the clsProjects class module:
Function RetrieveComments(intId As Integer) As ADODB.Recordset
On Error GoTo HandleError
Dim rsComments As New ADODB.Recordset Dim strSQL As String strSQL = "SELECT txtComment FROM tblProjectsComments WHERE " & _ "intProjectId = " &_intId
'retrieve the comments for tab 1 from the database Set rsComments = ProcessRecordset(strSQL)
Set RetrieveComments = rsComments
Exit Function
HandleError: GeneralErrorHandler Err.Number, Err.Description, CLS_PROJECTS, _ "RetrieveComments" Exit Function
End Function6. Add the RetrieveContacts function shown in the following code to the clsProjects class module:
Function RetrieveContacts(intId As Integer) As ADODB.Recordset
On Error GoTo HandleError
Dim rsContacts As New ADODB.Recordset Dim strSQL As String strSQL = "SELECT txtFirstName, txtLastName, txtWorkPhone, txtHomePhone, " & "txtCellPhone, txtEmail, tblcontacts.intContactId FROM tblContacts " & _ "INNER JOIN tblProjectsContacts ON " & _ "tblContacts.intContactId = tblProjectsContacts.intContactId " & _ "WHERE tblProjectsContacts.intProjectId = " & intId
'retrieve the comments for tab 2 from the database Set rsContacts = ProcessRecordset(strSQL)
Set RetrieveContacts = rsContacts
Exit Function HandleError: GeneralErrorHandler Err.Number, Err.Description, CLS_PROJECTS, _
"RetrieveContacts"
Exit Function
End Function
Beginning Access 2007 VBA
221 / 344
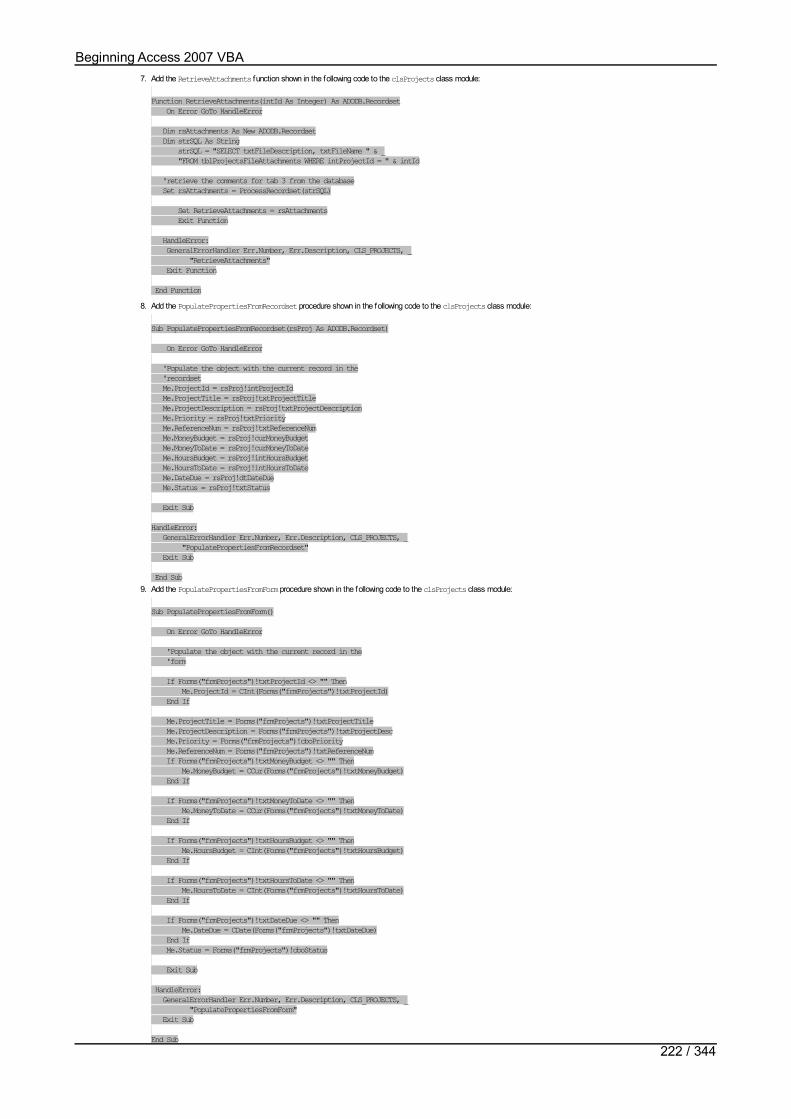
7. Add the RetrieveAttachments function shown in the following code to the clsProjects class module:
Function RetrieveAttachments(intId As Integer) As ADODB.Recordset On Error GoTo HandleError
Dim rsAttachments As New ADODB.Recordset Dim strSQL As String strSQL = "SELECT txtFileDescription, txtFileName " & _ "FROM tblProjectsFileAttachments WHERE intProjectId = " & intId
'retrieve the comments for tab 3 from the database Set rsAttachments = ProcessRecordset(strSQL)
Set RetrieveAttachments = rsAttachments Exit Function
HandleError: GeneralErrorHandler Err.Number, Err.Description, CLS_PROJECTS, _ "RetrieveAttachments" Exit Function
End Function8. Add the PopulatePropertiesFromRecordset procedure shown in the following code to the clsProjects class module:
Sub PopulatePropertiesFromRecordset(rsProj As ADODB.Recordset)
On Error GoTo HandleError
'Populate the object with the current record in the 'recordset Me.ProjectId = rsProj!intProjectId Me.ProjectTitle = rsProj!txtProjectTitle Me.ProjectDescription = rsProj!txtProjectDescription Me.Priority = rsProj!txtPriority Me.ReferenceNum = rsProj!txtReferenceNum Me.MoneyBudget = rsProj!curMoneyBudget Me.MoneyToDate = rsProj!curMoneyToDate Me.HoursBudget = rsProj!intHoursBudget Me.HoursToDate = rsProj!intHoursToDate Me.DateDue = rsProj!dtDateDue Me.Status = rsProj!txtStatus
Exit Sub
HandleError: GeneralErrorHandler Err.Number, Err.Description, CLS_PROJECTS, _ "PopulatePropertiesFromRecordset" Exit Sub
End Sub9. Add the PopulatePropertiesFromForm procedure shown in the following code to the clsProjects class module:
Sub PopulatePropertiesFromForm()
On Error GoTo HandleError
'Populate the object with the current record in the 'form
If Forms("frmProjects")!txtProjectId <> "" Then Me.ProjectId = CInt(Forms("frmProjects")!txtProjectId) End If
Me.ProjectTitle = Forms("frmProjects")!txtProjectTitle Me.ProjectDescription = Forms("frmProjects")!txtProjectDesc Me.Priority = Forms("frmProjects")!cboPriority Me.ReferenceNum = Forms("frmProjects")!txtReferenceNum If Forms("frmProjects")!txtMoneyBudget <> "" Then Me.MoneyBudget = CCur(Forms("frmProjects")!txtMoneyBudget) End If
If Forms("frmProjects")!txtMoneyToDate <> "" Then Me.MoneyToDate = CCur(Forms("frmProjects")!txtMoneyToDate) End If
If Forms("frmProjects")!txtHoursBudget <> "" Then Me.HoursBudget = CInt(Forms("frmProjects")!txtHoursBudget) End If
If Forms("frmProjects")!txtHoursToDate <> "" Then Me.HoursToDate = CInt(Forms("frmProjects")!txtHoursToDate) End If
If Forms("frmProjects")!txtDateDue <> "" Then Me.DateDue = CDate(Forms("frmProjects")!txtDateDue) End If Me.Status = Forms("frmProjects")!cboStatus
Exit Sub
HandleError: GeneralErrorHandler Err.Number, Err.Description, CLS_PROJECTS, _ "PopulatePropertiesFromForm" Exit Sub
End Sub
Beginning Access 2007 VBA
222 / 344

End Sub10. Add the ClearObject procedure shown in the following code to the clsProjects class module:
Sub ClearObject()
On Error GoTo HandleError
'clear the values in the projects object Me.ProjectId = 0 Me.ProjectTitle = "" Me.ProjectDescription = "" Me.Priority = 0 Me.ReferenceNum = "" Me.MoneyBudget = 0 Me.MoneyToDate = 0 Me.HoursBudget = 0 Me.HoursToDate = 0 Me.DateDue = "01-01-1900" Me.Status = 0
Exit Sub
HandleError: GeneralErrorHandler Err.Number, Err.Description, CLS_PROJECTS, "ClearObject" Exit Sub
End Sub11. Add the Delete procedure shown in the following code to the clsProjects class module:
Sub Delete(intCurProjId As Integer, blnAddMode As Boolean, rsProj As _ ADODB.Recordset)
On Error GoTo HandleError
Dim strSQLStatement As String Dim intResponse As Integer
'make sure delete should be processed If Not ProceedWithDelete(blnAddMode) Then Exit Sub End If
'build the SQL statement to delete the project strSQLStatement = BuildSQLDeleteProjects(intCurProjId)
'perform the delete Call ProcessUpdate(strSQLStatement, rsProj)
Exit Sub
HandleError: GeneralErrorHandler Err.Number, Err.Description, CLS_PROJECTS, "Delete" Exit Sub
End Sub12. Add the Save procedure shown in the following code to the clsProjects class module:
Sub Save(blnAddMode As Boolean, rsProj As ADODB.Recordset)
On Error GoTo HandleError
Dim strSQLStatement As String 'if adding a new record If blnAddMode = True Then strSQLStatement = BuildSQLInsertProjects(Me) Else 'if updating a record strSQLStatement = BuildSQLUpdateProjects(Me) End If
'perform the insert or update Call ProcessUpdate(strSQLStatement, rsProj)
Exit Sub
HandleError: GeneralErrorHandler Err.Number, Err.Description, CLS_PROJECTS, "Save" Exit Sub
End SubHow It Works
To build the clsProjects class module that implements the object illustrated in Figure 13-24, you f irst added code to the General Declarations section of the new class. For example, youdeclared various local variables for storing the current value of each property:Dim intProjectIdVal As IntegerDim strProjectTitleVal As StringDim strProjectDescriptionVal As StringDim strPriorityVal As StringDim strReferenceNumVal As StringDim curMoneyBudgetVal As CurrencyDim curMoneyToDateVal As CurrencyDim intHoursBudgetVal As IntegerDim intHoursToDateVal As IntegerDim dtDateDueVal As DateDim strStatusVal As String
Beginning Access 2007 VBA
223 / 344
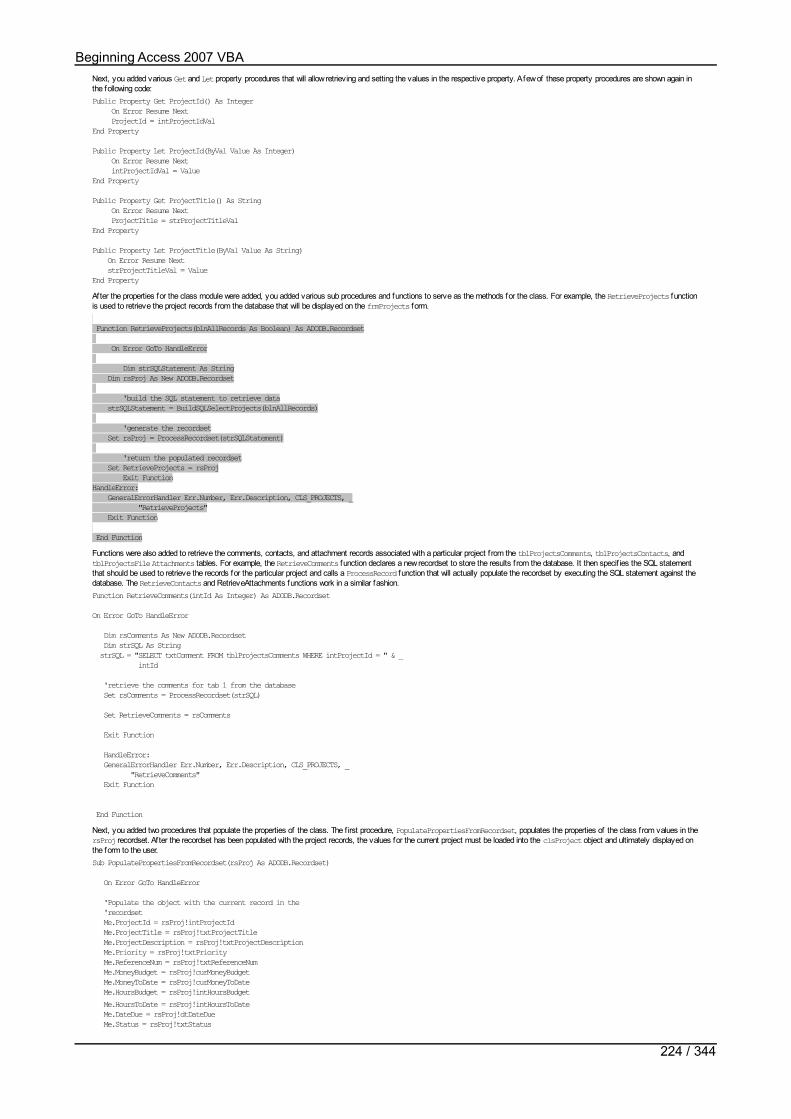
Next, you added various Get and Let property procedures that will allow retrieving and setting the values in the respective property. A few of these property procedures are shown again inthe following code:Public Property Get ProjectId() As Integer On Error Resume Next ProjectId = intProjectIdValEnd Property
Public Property Let ProjectId(ByVal Value As Integer) On Error Resume Next intProjectIdVal = ValueEnd Property
Public Property Get ProjectTitle() As String On Error Resume Next ProjectTitle = strProjectTitleValEnd Property
Public Property Let ProjectTitle(ByVal Value As String) On Error Resume Next strProjectTitleVal = ValueEnd PropertyAfter the properties for the class module were added, you added various sub procedures and functions to serve as the methods for the class. For example, the RetrieveProjects functionis used to retrieve the project records from the database that will be displayed on the frmProjects form.
Function RetrieveProjects(blnAllRecords As Boolean) As ADODB.Recordset On Error GoTo HandleError Dim strSQLStatement As String Dim rsProj As New ADODB.Recordset 'build the SQL statement to retrieve data strSQLStatement = BuildSQLSelectProjects(blnAllRecords) 'generate the recordset Set rsProj = ProcessRecordset(strSQLStatement) 'return the populated recordset Set RetrieveProjects = rsProj Exit FunctionHandleError: GeneralErrorHandler Err.Number, Err.Description, CLS_PROJECTS, _ "RetrieveProjects" Exit Function
End FunctionFunctions were also added to retrieve the comments, contacts, and attachment records associated with a particular project f rom the tblProjectsComments, tblProjectsContacts, andtblProjectsFile Attachments tables. For example, the RetrieveComments function declares a new recordset to store the results f rom the database. It then specif ies the SQL statementthat should be used to retrieve the records for the particular project and calls a ProcessRecord function that will actually populate the recordset by executing the SQL statement against thedatabase. The RetrieveContacts and RetrieveAttachments functions work in a similar fashion.Function RetrieveComments(intId As Integer) As ADODB.Recordset
On Error GoTo HandleError
Dim rsComments As New ADODB.Recordset Dim strSQL As String strSQL = "SELECT txtComment FROM tblProjectsComments WHERE intProjectId = " & _ intId
'retrieve the comments for tab 1 from the database Set rsComments = ProcessRecordset(strSQL)
Set RetrieveComments = rsComments
Exit Function
HandleError: GeneralErrorHandler Err.Number, Err.Description, CLS_PROJECTS, _ "RetrieveComments" Exit Function
End FunctionNext, you added two procedures that populate the properties of the class. The f irst procedure, PopulatePropertiesFromRecordset, populates the properties of the class from values in thersProj recordset. After the recordset has been populated with the project records, the values for the current project must be loaded into the clsProject object and ultimately displayed onthe form to the user.Sub PopulatePropertiesFromRecordset(rsProj As ADODB.Recordset)
On Error GoTo HandleError
'Populate the object with the current record in the 'recordset Me.ProjectId = rsProj!intProjectId Me.ProjectTitle = rsProj!txtProjectTitle Me.ProjectDescription = rsProj!txtProjectDescription Me.Priority = rsProj!txtPriority Me.ReferenceNum = rsProj!txtReferenceNum Me.MoneyBudget = rsProj!curMoneyBudget Me.MoneyToDate = rsProj!curMoneyToDate Me.HoursBudget = rsProj!intHoursBudget Me.HoursToDate = rsProj!intHoursToDate Me.DateDue = rsProj!dtDateDue Me.Status = rsProj!txtStatus
Exit Sub
Beginning Access 2007 VBA
224 / 344

Exit Sub
HandleError: GeneralErrorHandler Err.Number, Err.Description, CLS_PROJECTS, _ "PopulatePropertiesFromRecordset"
Exit Sub
End SubSimilarly, the PopulatePropertiesFromForm procedure populates the properties of the object with the values currently in the controls on the form. To avoid a data conversion error, somestatements f irst test to make sure the f ield on the form is not blank before assigning a value.Sub PopulatePropertiesFromForm()
On Error GoTo HandleError
'Populate the object with the current record in the 'form
If Forms("frmProjects")!txtProjectId <> "" Then Me.ProjectId = CInt(Forms("frmProjects")!txtProjectId) End If
Me.ProjectTitle = Forms("frmProjects")!txtProjectTitle Me.ProjectDescription = Forms("frmProjects")!txtProjectDesc Me.Priority = Forms("frmProjects")!cboPriority Me.ReferenceNum = Forms("frmProjects")!txtReferenceNum
If Forms("frmProjects")!txtMoneyBudget <> "" Then Me.MoneyBudget = CCur(Forms("frmProjects")!txtMoneyBudget) End If
If Forms("frmProjects")!txtMoneyToDate <> "" Then Me.MoneyToDate = CCur(Forms("frmProjects")!txtMoneyToDate) End If
If Forms("frmProjects")!txtHoursBudget <> "" Then Me.HoursBudget = CInt(Forms("frmProjects")!txtHoursBudget) End If
If Forms("frmProjects")!txtHoursToDate <> "" Then Me.HoursToDate = CInt(Forms("frmProjects")!txtHoursToDate) End If If Forms("frmProjects")!txtDateDue <> "" Then Me.DateDue = CDate(Forms("frmProjects")!txtDateDue) End If
Me.Status = Forms("frmProjects")!cboStatus
Exit Sub
HandleError: GeneralErrorHandler Err.Number, Err.Description, CLS_PROJECTS, _ "PopulatePropertiesFromForm" Exit Sub
End SubIn addition to adding procedures that populate the object, you also added a procedure that clears all of the values in the object. The ClearObject procedure changes all the values in theobject to initialization values so that the object can be reused for another project record.Sub ClearObject()
On Error GoTo HandleError
'clear the values in the projects object Me.ProjectId = 0 Me.ProjectTitle = "" Me.ProjectDescription = "" Me.Priority = 0 Me.ReferenceNum = "" Me.MoneyBudget = 0 Me.MoneyToDate = 0 Me.HoursBudget = 0 Me.HoursToDate = 0 Me.DateDue = "01-01-1900" Me.Status = 0
Exit Sub
HandleError: GeneralErrorHandler Err.Number, Err.Description, CLS_PROJECTS, "ClearObject" Exit Sub
End SubThe f inal two procedures you added to the clsProjects class module included the Delete and Save procedures. The Delete procedure is responsible for deleting a particular project recordfrom the database after conf irming the user wishes to continue.Sub Delete(intCurProjId As Integer, blnAddMode As Boolean, rsProj As _ ADODB.Recordset)
On Error GoTo HandleError Dim strSQLStatement As String Dim intResponse As Integer 'make sure delete should be processed If Not ProceedWithDelete(blnAddMode) Then
Beginning Access 2007 VBA
225 / 344
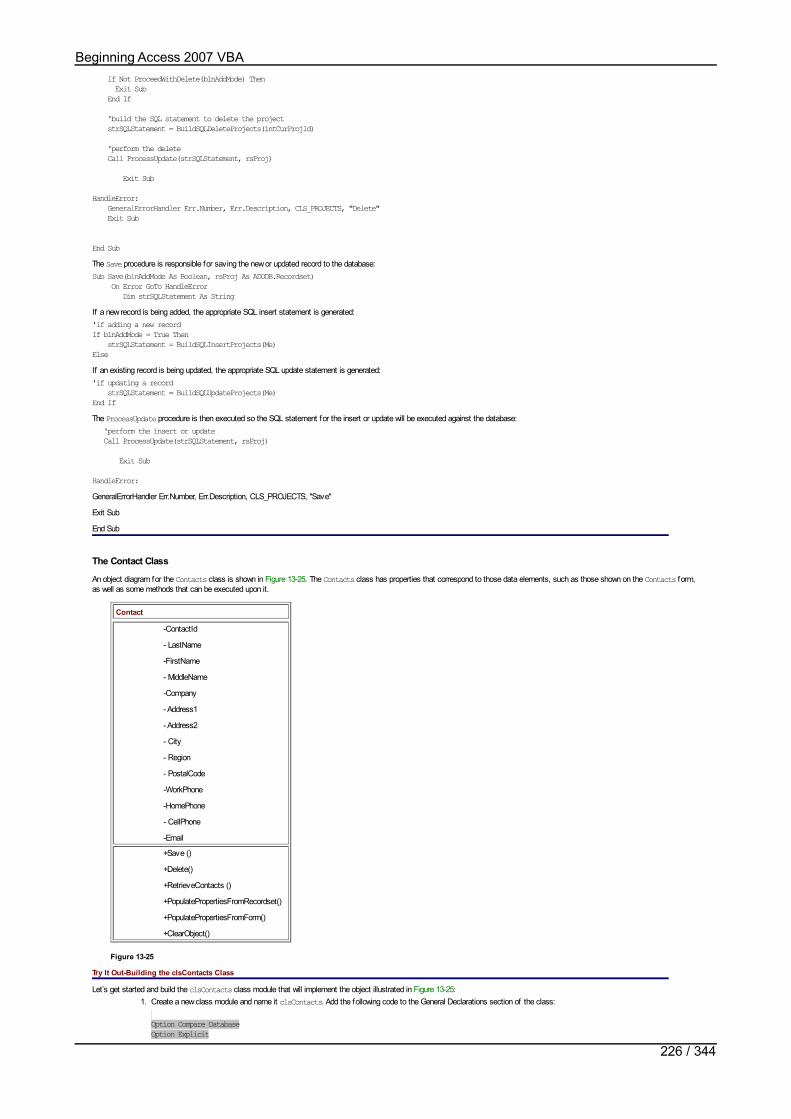
If Not ProceedWithDelete(blnAddMode) Then Exit Sub End If
'build the SQL statement to delete the project strSQLStatement = BuildSQLDeleteProjects(intCurProjId)
'perform the delete Call ProcessUpdate(strSQLStatement, rsProj)
Exit Sub
HandleError: GeneralErrorHandler Err.Number, Err.Description, CLS_PROJECTS, "Delete" Exit Sub
End SubThe Save procedure is responsible for saving the new or updated record to the database:Sub Save(blnAddMode As Boolean, rsProj As ADODB.Recordset) On Error GoTo HandleError Dim strSQLStatement As StringIf a new record is being added, the appropriate SQL insert statement is generated:'if adding a new recordIf blnAddMode = True Then strSQLStatement = BuildSQLInsertProjects(Me)ElseIf an existing record is being updated, the appropriate SQL update statement is generated:'if updating a record strSQLStatement = BuildSQLUpdateProjects(Me)End IfThe ProcessUpdate procedure is then executed so the SQL statement for the insert or update will be executed against the database: 'perform the insert or update Call ProcessUpdate(strSQLStatement, rsProj)
Exit Sub
HandleError:GeneralErrorHandler Err.Number, Err.Description, CLS_PROJECTS, "Save"
Exit Sub
End Sub
The Contact Class
An object diagram for the Contacts class is shown in Figure 13-25. The Contacts class has properties that correspond to those data elements, such as those shown on the Contacts form,as well as some methods that can be executed upon it.
Contact
-ContactId
- LastName
-FirstName
- MiddleName
-Company
- Address1
- Address2
- City
- Region
- PostalCode
-WorkPhone
-HomePhone
- CellPhone
+Save ()
+Delete()
+RetrieveContacts ()
+PopulatePropertiesFromRecordset()
+PopulatePropertiesFromForm()
+ClearObject()
Figure 13-25
Try It Out-Building the clsContacts Class
Let’s get started and build the clsContacts class module that will implement the object illustrated in Figure 13-25:1. Create a new class module and name it clsContacts. Add the following code to the General Declarations section of the class:
Option Compare DatabaseOption Explicit
Beginning Access 2007 VBA
226 / 344
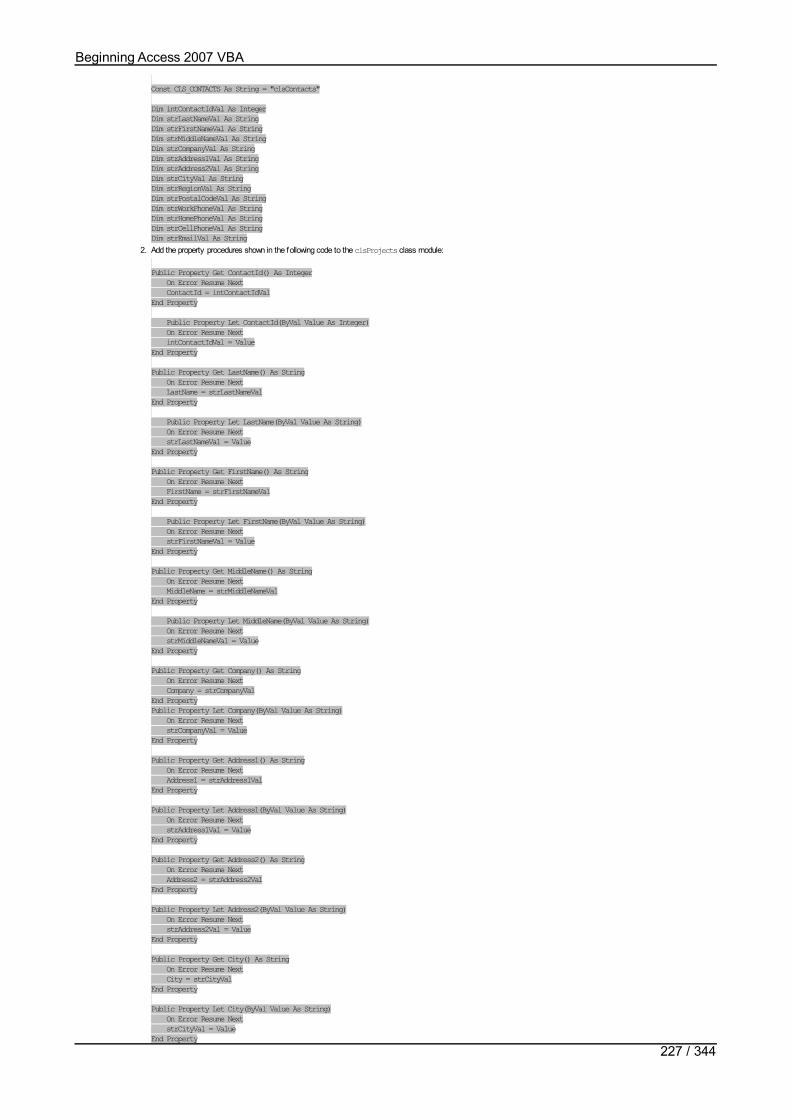
Const CLS_CONTACTS As String = "clsContacts"
Dim intContactIdVal As IntegerDim strLastNameVal As StringDim strFirstNameVal As StringDim strMiddleNameVal As StringDim strCompanyVal As StringDim strAddress1Val As StringDim strAddress2Val As StringDim strCityVal As StringDim strRegionVal As StringDim strPostalCodeVal As StringDim strWorkPhoneVal As StringDim strHomePhoneVal As StringDim strCellPhoneVal As StringDim strEmailVal As String
2. Add the property procedures shown in the following code to the clsProjects class module:
Public Property Get ContactId() As Integer On Error Resume Next ContactId = intContactIdValEnd Property
Public Property Let ContactId(ByVal Value As Integer) On Error Resume Next intContactIdVal = ValueEnd Property
Public Property Get LastName() As String On Error Resume Next LastName = strLastNameValEnd Property
Public Property Let LastName(ByVal Value As String) On Error Resume Next strLastNameVal = ValueEnd Property
Public Property Get FirstName() As String On Error Resume Next FirstName = strFirstNameValEnd Property
Public Property Let FirstName(ByVal Value As String) On Error Resume Next strFirstNameVal = ValueEnd Property
Public Property Get MiddleName() As String On Error Resume Next MiddleName = strMiddleNameValEnd Property
Public Property Let MiddleName(ByVal Value As String) On Error Resume Next strMiddleNameVal = ValueEnd Property
Public Property Get Company() As String On Error Resume Next Company = strCompanyValEnd PropertyPublic Property Let Company(ByVal Value As String) On Error Resume Next strCompanyVal = ValueEnd Property
Public Property Get Address1() As String On Error Resume Next Address1 = strAddress1ValEnd Property
Public Property Let Address1(ByVal Value As String) On Error Resume Next strAddress1Val = ValueEnd Property
Public Property Get Address2() As String On Error Resume Next Address2 = strAddress2ValEnd Property
Public Property Let Address2(ByVal Value As String) On Error Resume Next strAddress2Val = ValueEnd Property
Public Property Get City() As String On Error Resume Next City = strCityValEnd Property
Public Property Let City(ByVal Value As String) On Error Resume Next strCityVal = ValueEnd Property
Beginning Access 2007 VBA
227 / 344

Public Property Get Region() As String On Error Resume Next Region = strRegionValEnd Property
Public Property Let Region(ByVal Value As String) On Error Resume Next strRegionVal = ValueEnd Property
Public Property Get PostalCode() As String On Error Resume Next PostalCode = strPostalCodeValEnd Property
Public Property Let PostalCode(ByVal Value As String) On Error Resume Next strPostalCodeVal = ValueEnd PropertyPublic Property Get WorkPhone() As String On Error Resume Next WorkPhone = strWorkPhoneValEnd Property
Public Property Let WorkPhone(ByVal Value As String) On Error Resume Next strWorkPhoneVal = ValueEnd Property
Public Property Get HomePhone() As String On Error Resume Next HomePhone = strHomePhoneValEnd Property
Public Property Let HomePhone(ByVal Value As String) On Error Resume Next strHomePhoneVal = ValueEnd Property
Public Property Get CellPhone() As String On Error Resume Next CellPhone = strCellPhoneValEnd Property
Public Property Let CellPhone(ByVal Value As String) On Error Resume Next strCellPhoneVal = ValueEnd Property
Public Property Get Email() As String On Error Resume Next Email = strEmailValEnd Property
Public Property Let Email(ByVal Value As String) On Error Resume Next strEmailVal = ValueEnd Property
3. Add the RetrieveContacts function shown in the following code to the clsProjects class module:
Function RetrieveContacts() As ADODB.Recordset
On Error GoTo HandleError
Dim strSQLStatement As String Dim rsCont As New ADODB.Recordset
'build the SQL statement to retrieve data strSQLStatement = BuildSQLSelectContacts
'generate the recordset Set rsCont = ProcessRecordset(strSQLStatement)
'return the populated recordset Set RetrieveContacts = rsCont
Exit Function
HandleError: GeneralErrorHandler Err.Number, Err.Description, CLS_CONTACTS, _ "RetrieveContacts" Exit Function
End Function4. Add the PopulatePropertiesFromRecordset procedure shown in the following code to the clsProjects class module:
Sub PopulatePropertiesFromRecordset(rsCont As ADODB.Recordset)
On Error GoTo HandleError
'Populate the object with the current record in the 'recordset Me.ContactId = rsCont!intContactId Me.LastName = rsCont!txtLastName Me.FirstName = rsCont!txtFirstName
Beginning Access 2007 VBA
228 / 344

Me.MiddleName = rsCont!txtMiddleName Me.Company = rsCont!txtCompany Me.Address1 = rsCont!txtAddress1 Me.Address2 = rsCont!txtAddress2 Me.City = rsCont!txtCity Me.Region = rsCont!txtRegion Me.PostalCode = rsCont!txtPostalCode Me.WorkPhone = rsCont!txtWorkPhone Me.HomePhone = rsCont!txtHomePhone Me.CellPhone = rsCont!txtCellPhone Me.Email = rsCont!txtEmail Exit Sub
HandleError: GeneralErrorHandler Err.Number, Err.Description, CLS_CONTACTS, _ "PopulatePropertiesFromRecordset" Exit Sub
End Sub5. Add the PopulatePropertiesFromForm procedure shown in the following code to the clsProjects class module:
Sub PopulatePropertiesFromForm()
On Error GoTo HandleError
'Populate the object with the current record in the 'form
Me.LastName = Forms("frmContacts")!txtLName Me.FirstName = Forms("frmContacts")!txtFName Me.MiddleName = Forms("frmContacts")!txtMName Me.Company = Forms("frmContacts")!txtCompany Me.Address1 = Forms("frmContacts")!txtAddress1 Me.Address2 = Forms("frmContacts")!txtAddress2 Me.City = Forms("frmContacts")!txtCity Me.Region = Forms("frmContacts")!txtRegion Me.PostalCode = Forms("frmContacts")!txtPostalCode Me.WorkPhone = Forms("frmContacts")!txtWorkPhone Me.HomePhone = Forms("frmContacts")!txtHomePhone Me.CellPhone = Forms("frmContacts")!txtCellPhone Me.Email = Forms("frmContacts")!txtEmail
Exit Sub
HandleError: GeneralErrorHandler Err.Number, Err.Description, CLS_CONTACTS, _ "PopulatePropertiesFromForm"
Exit Sub
End Sub6. Add the ClearObject procedure shown in the following code to the clsProjects class module:
Sub ClearObject()
On Error GoTo HandleError
'clear the values in the contacts object Me.ContactId = 0 Me.LastName = "" Me.FirstName = "" Me.MiddleName = "" Me.Company = "" Me.Address1 = "" Me.Address2 = "" Me.City = "" Me.Region = "" Me.PostalCode = "" Me.WorkPhone = "" Me.HomePhone = "" Me.CellPhone = "" Me.Email = ""
Exit Sub
HandleError: GeneralErrorHandler Err.Number, Err.Description, CLS_CONTACTS, "ClearObject" Exit Sub
End Sub7. Add the Delete procedure shown in the following code to the clsProjects class module:
Sub Delete(intCurContId As Integer, blnAddMode As Boolean, rsCont As _ ADODB.Recordset)
On Error GoTo HandleError
Dim strSQLStatement As String Dim intResponse As Integer
'make sure delete should be processed If Not ProceedWithDelete(blnAddMode) Then Exit Sub End If
Beginning Access 2007 VBA
229 / 344

'build the SQL statement to delete the contact strSQLStatement = BuildSQLDeleteContacts(intCurContId)
'perform the delete Call ProcessUpdate(strSQLStatement, rsCont) Exit Sub
HandleError: GeneralErrorHandler Err.Number, Err.Description, CLS_CONTACTS, "Delete" Exit Sub
End Sub8. Add the Save procedure shown in the following code to the clsProjects class module:
Sub Save(blnAddMode As Boolean, rsCont As ADODB.Recordset)
On Error GoTo HandleError
Dim strSQLStatement As String
'if adding a new record If blnAddMode = True Then strSQLStatement = BuildSQLInsertContacts(Me) Else 'if updating a record strSQLStatement = BuildSQLUpdateContacts(Me) End If
'perform the insert or update Call ProcessUpdate(strSQLStatement, rsCont) Exit Sub
HandleError: GeneralErrorHandler Err.Number, Err.Description, CLS_CONTACTS, "Save" Exit Sub
End Sub9. Make sure to keep saving your changes periodically so they are not lost.
How It Works
The design of the clsContacts class module is similar to that of the clsProjects class module. You f irst added various local variables to the General Declarations section of the class forstoring various property values:Dim intContactIdVal As IntegerDim strLastNameVal As StringDim strFirstNameVal As StringDim strMiddleNameVal As StringDim strCompanyVal As StringDim strAddress1Val As StringDim strAddress2Val As StringDim strCityVal As StringDim strRegionVal As StringDim strPostalCodeVal As StringDim strWorkPhoneVal As StringDim strHomePhoneVal As StringDim strCellPhoneVal As StringDim strEmailVal As StringNext, you added various Get and Let property procedures that are used to retrieve and assign values to the properties of the class:Public Property Get ContactId() As Integer On Error Resume Next ContactId = intContactIdValEnd Property
Public Property Let ContactId(ByVal Value As Integer) On Error Resume Next intContactIdVal = ValueEnd Property
Public Property Get LastName() As String On Error Resume Next LastName = strLastNameValEnd Property
Public Property Let LastName(ByVal Value As String) On Error Resume Next strLastNameVal = ValueEnd PropertyNext, various sub procedures and functions were added to serve as methods for the object. For example, the RetrieveContacts function retrieves the contacts records from the database:Function RetrieveContacts() As ADODB.Recordset
On Error GoTo HandleError Dim strSQLStatement As String Dim rsCont As New ADODB.Recordset
'build the SQL statement to retrieve data strSQLStatement = BuildSQLSelectContacts
'generate the recordset Set rsCont = ProcessRecordset(strSQLStatement)
'return the populated recordset Set RetrieveContacts = rsCont Exit Function
HandleError:
Beginning Access 2007 VBA
230 / 344

HandleError: GeneralErrorHandler Err.Number, Err.Description, CLS_CONTACTS, _ "RetrieveContacts" Exit Function
End FunctionThe PopulatePropertiesFromRecordset procedure populated the properties of the object f rom the values in the rsCont recordset:Sub PopulatePropertiesFromRecordset(rsCont As ADODB.Recordset)
On Error GoTo HandleError 'Populate the object with the current record in the 'recordset Me.ContactId = rsCont!intContactId Me.LastName = rsCont!txtLastName Me.FirstName = rsCont!txtFirstName Me.MiddleName = rsCont!txtMiddleName Me.Company = rsCont!txtCompany Me.Address1 = rsCont!txtAddress1 Me.Address2 = rsCont!txtAddress2 Me.City = rsCont!txtCity Me.Region = rsCont!txtRegion Me.PostalCode = rsCont!txtPostalCode Me.WorkPhone = rsCont!txtWorkPhone Me.HomePhone = rsCont!txtHomePhone Me.CellPhone = rsCont!txtCellPhone Me.Email = rsCont!txtEmail
Exit Sub
HandleError: GeneralErrorHandler Err.Number, Err.Description, CLS_CONTACTS, _ "PopulatePropertiesFromRecordset" Exit Sub
End SubSimilarly, the PopulatePropertiesFromForm procedure populated the contacts object with the values currently displayed in the controls on the form:Sub PopulatePropertiesFromForm()
On Error GoTo HandleError 'Populate the object with the current record in the 'form
Me.LastName = Forms("frmContacts")!txtLName Me.FirstName = Forms("frmContacts")!txtFName Me.MiddleName = Forms("frmContacts")!txtMName Me.Company = Forms("frmContacts")!txtCompany Me.Address1 = Forms("frmContacts")!txtAddress1 Me.Address2 = Forms("frmContacts")!txtAddress2 Me.City = Forms("frmContacts")!txtCity Me.Region = Forms("frmContacts")!txtRegion Me.PostalCode = Forms("frmContacts")!txtPostalCode Me.WorkPhone = Forms("frmContacts")!txtWorkPhone Me.HomePhone = Forms("frmContacts")!txtHomePhone Me.CellPhone = Forms("frmContacts")!txtCellPhone Me.Email = Forms("frmContacts")!txtEmail Exit Sub
HandleError: GeneralErrorHandler Err.Number, Err.Description, CLS_CONTACTS, _ "PopulatePropertiesFromForm" Exit Sub
End SubA ClearObject procedure was added to reset the values in the object to the initial values so that a new contact record could be stored in the object:Sub ClearObject()
On Error GoTo HandleError
'clear the values in the contacts object Me.ContactId = 0 Me.LastName = "" Me.FirstName = "" Me.MiddleName = "" Me.Company = "" Me.Address1 = "" Me.Address2 = "" Me.City = "" Me.Region = "" Me.PostalCode = "" Me.WorkPhone = "" Me.HomePhone = "" Me.CellPhone = "" Me.Email = "" Exit Sub
HandleError: GeneralErrorHandler Err.Number, Err.Description, CLS_CONTACTS, _ "ClearObject" Exit Sub
End SubFinally, Delete and Save procedures were added so that the user can delete and save contact records in the database. The Delete procedure f irst conf irms that the user wishes to proceedwith the deletion, and then, upon conf irmation, proceeds with the delete:
Beginning Access 2007 VBA
231 / 344
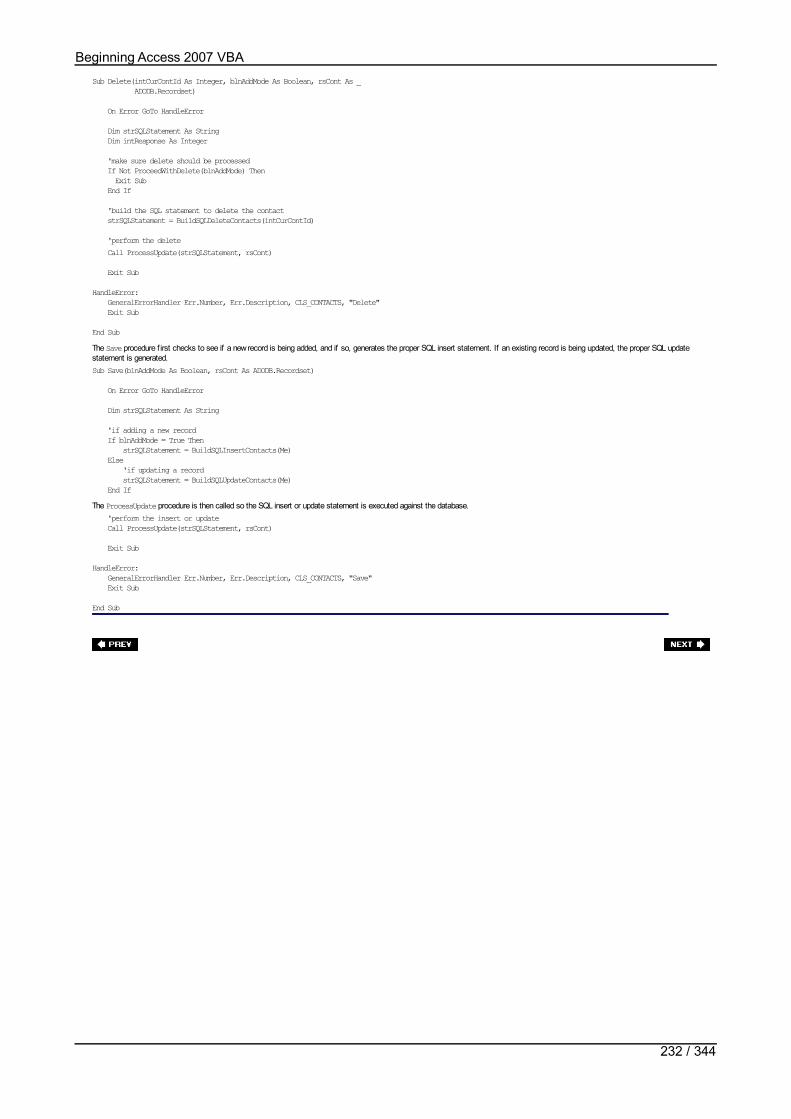
Sub Delete(intCurContId As Integer, blnAddMode As Boolean, rsCont As _ ADODB.Recordset)
On Error GoTo HandleError
Dim strSQLStatement As String Dim intResponse As Integer
'make sure delete should be processed If Not ProceedWithDelete(blnAddMode) Then Exit Sub End If
'build the SQL statement to delete the contact strSQLStatement = BuildSQLDeleteContacts(intCurContId)
'perform the delete Call ProcessUpdate(strSQLStatement, rsCont)
Exit Sub
HandleError: GeneralErrorHandler Err.Number, Err.Description, CLS_CONTACTS, "Delete" Exit Sub
End SubThe Save procedure f irst checks to see if a new record is being added, and if so, generates the proper SQL insert statement. If an existing record is being updated, the proper SQL updatestatement is generated.Sub Save(blnAddMode As Boolean, rsCont As ADODB.Recordset)
On Error GoTo HandleError
Dim strSQLStatement As String
'if adding a new record If blnAddMode = True Then strSQLStatement = BuildSQLInsertContacts(Me) Else 'if updating a record strSQLStatement = BuildSQLUpdateContacts(Me) End IfThe ProcessUpdate procedure is then called so the SQL insert or update statement is executed against the database. 'perform the insert or update Call ProcessUpdate(strSQLStatement, rsCont)
Exit Sub
HandleError: GeneralErrorHandler Err.Number, Err.Description, CLS_CONTACTS, "Save" Exit Sub
End Sub
Beginning Access 2007 VBA
232 / 344

Building the Standard ModulesIn the previous section, you created the properties and methods for the Project and Contact objects. In this section, you begin writing the code in the standard modules that conduct a lotof the business logic and data access features for the application. Let’s start with building the standard modules.
Try It Out-Building the modBusinessLogic and modDatabaseLogic Modules
The modBusinessLogic module is one of two standard modules you will be creating. The other one is the modDatabaseLogic that will contain calls that are specif ic to the database. ThemodBusinessLogic module will not contain any database access calls because you want to keep the data access code in a separate module to make maintenance and future growth easier.You will now turn to the task of creating these modules.
1. Insert a new standard module called modBusinessLogic. Add the following code to the General Declarations of the module:
Option Compare DatabaseOption Explicit
Public intContactProjectLookup As IntegerPublic intContactProjectAdd As Integer
Const BUS_LOGIC As String = "modBusinessLogic"
Private Declare Function GetOpenFileName Lib "comdlg32.dll" Alias _"GetOpenFileNameA" (pOpenfilename As OPENFILENAME) As Long
Private Type OPENFILENAME lStructSize As Long hwndOwner As Long hInstance As Long lpstrFilter As String lpstrCustomFilter As String nMaxCustFilter As Long nFilterIndex As Long lpstrFile As String nMaxFile As Long lpstrFileTitle As String nMaxFileTitle As Long lpstrInitialDir As String lpstrTitle As String flags As Long nFileOffset As Integer nFileExtension As Integer lpstrDefExt As String lCustData As Long lpfnHook As Long lpTemplateName As StringEnd TypePublic Declare Function ShellExecute _ Lib "shell32.dll" _ Alias "ShellExecuteA" ( _ ByVal hwnd As Long, _ ByVal lpOperation As String, _ ByVal lpFile As String, _ ByVal lpParameters As String, _ ByVal lpDirectory As String, _ ByVal nShowCmd As Long) _ As Long
2. Add the following OpenFileAttachment procedure to the modBusinessLogic module:
Sub OpenFileAttachment(strFile As String)
On Error GoTo HandleError
Dim strAction As String Dim lngErr As Long
'open the file attachment strAction = "OPEN" lngErr = ShellExecute(0, strAction, strFile, "", "", 1)
Exit Sub
HandleError: GeneralErrorHandler Err.Number, Err.Description, BUS_LOGIC, _ "OpenFileAttachment" Exit SubEnd Sub
3. Add the following GetFileNameBrowse function to the modBusinessLogic module:
Function GetFileNameBrowse() As String
On Error GoTo HandleError
Dim OpenFile As OPENFILENAME Dim lReturn As Long Dim sFilter As String OpenFile.lStructSize = Len(OpenFile) OpenFile.hwndOwner = Forms("frmProjects").hwnd
sFilter = "All Files (*.*)" & Chr(0) & "*.*" & Chr(0) OpenFile.lpstrFilter = sFilter OpenFile.nFilterIndex = 1 OpenFile.lpstrFile = String(257, 0) OpenFile.nMaxFile = Len(OpenFile.lpstrFile) - 1 OpenFile.lpstrFileTitle = OpenFile.lpstrFile OpenFile.nMaxFileTitle = OpenFile.nMaxFile
Beginning Access 2007 VBA
233 / 344

OpenFile.nMaxFileTitle = OpenFile.nMaxFile OpenFile.lpstrInitialDir = "C:" OpenFile.lpstrTitle = "Browse for an attachment" OpenFile.flags = 0 lReturn = GetOpenFileName(OpenFile) If lReturn = 0 Then GetFileNameBrowse = "" Else 'return the selected filename GetFileNameBrowse = Trim(OpenFile.lpstrFile) End If Exit Function
HandleError: GeneralErrorHandler Err.Number, Err.Description, BUS_LOGIC, _ "GetFileNameBrowse" Exit Function
End Function4. Add the following four recordset navigation procedures to the modBusinessLogic module:
Sub MoveToFirstRecord(intRecCounter As Integer, rsRecordset As ADODB.Recordset, _ objObject As Object, blnAddMode As Boolean)
On Error GoTo HandleError
'move to the first record in the local disconnected recordset If Not rsRecordset.BOF And Not rsRecordset.EOF Then rsRecordset.MoveFirst intRecCounter = 1 'add code to populate object with new current record objObject.PopulatePropertiesFromRecordset rsRecordset blnAddMode = False End If Exit Sub
HandleError: GeneralErrorHandler Err.Number, Err.Description, BUS_LOGIC, _ "MoveToFirstRecord" Exit Sub
End Sub
Sub MoveToLastRecord(intRecCounter As Integer, rsRecordset As ADODB.Recordset, _ objObject As Object, blnAddMode As Boolean)
On Error GoTo HandleError 'move to the last record in the local disconnected recordset If Not rsRecordset.BOF And Not rsRecordset.EOF Then rsRecordset.MoveLast intRecCounter = rsRecordset.RecordCount 'add code to populate object with new current record objObject.PopulatePropertiesFromRecordset rsRecordset blnAddMode = False
End If
Exit Sub
HandleError: GeneralErrorHandler Err.Number, Err.Description, BUS_LOGIC, "MoveToLastRecord" Exit Sub
End Sub
Sub MoveToPreviousRecord(intRecCounter As Integer, rsRecordset As _ ADODB.Recordset, objObject As Object, blnAddMode As Boolean) On Error GoTo HandleError 'move to the previous record in the local disconnected recordset 'if not already at the beginning If Not rsRecordset.BOF Then rsRecordset.MovePrevious intRecCounter = intRecCounter - 1
blnAddMode = False
'make sure not past beginning of recordset now If Not rsRecordset.BOF Then 'add code to populate object with new current record objObject.PopulatePropertiesFromRecordset rsRecordset
Else 'at beginning of recordset so move to next record rsRecordset.MoveNext intRecCounter = intRecCounter + 1 End If
End If Exit Sub
HandleError: GeneralErrorHandler Err.Number, Err.Description, BUS_LOGIC, _ "MoveToPreviousRecord" Exit Sub
End Sub
Beginning Access 2007 VBA
234 / 344

Sub MoveToNextRecord(intRecCounter As Integer, rsRecordset As ADODB.Recordset, _ objObject As Object, blnAddMode As Boolean)
On Error GoTo HandleError 'move to the next record in the local disconnected recordset 'if not already at the end If Not rsRecordset.EOF Then rsRecordset.MoveNext intRecCounter = intRecCounter + 1 blnAddMode = False
'make sure not past end of recordset If Not rsRecordset.EOF Then 'add code to populate object with new current record objObject.PopulatePropertiesFromRecordset rsRecordset Else
'at end of recordset so move back one rsRecordset.MovePrevious intRecCounter = intRecCounter - 1 End If
End If
Exit Sub
HandleError: GeneralErrorHandler Err.Number, Err.Description, BUS_LOGIC, "MoveToNextRecord" Exit Sub
End Sub5. Add the following ProceedWithDelete function to the modBusinessLogic module:
Function ProceedWithDelete(blnAddMode As Boolean) As Boolean
On Error GoTo HandleError Dim blnProceed As Boolean Dim intResponse As Integer
blnProceed = True
'don't let the user issue a delete command if in add mode If blnAddMode = True Then blnProceed = False ProceedWithDelete = blnProceed Exit Function End If
'confirm that user really wants to delete record intResponse = MsgBox("Are you sure you want to delete this record?", vbYesNo)
'if the user cancels delete, then exit this procedure If intResponse = vbNo Then blnProceed = False
ProceedWithDelete = blnProceed
Exit Function End If
ProceedWithDelete = blnProceed
Exit Function
HandleError: ProceedWithDelete = False GeneralErrorHandler Err.Number, Err.Description, BUS_LOGIC, _ "ProceedWithDelete" Exit Function
End Function6. Add the following GeneralErrorHandler procedure to the modBusinessLogic module. This module will handle all errors for the application and will be referenced in each
procedure or function:
Public Sub GeneralErrorHandler(lngErrNumber As Long, strErrDesc As String, _ strModuleSource As String, strProcedureSource As String)
On Error Resume Next Dim strMessage As String
'build the error message string from the parameters passed in strMessage = "An error has occurred in the application." strMessage = strMessage & vbCrLf & "Error Number: " & lngErrNumber strMessage = strMessage & vbCrLf & "Error Description: " & strErrDesc strMessage = strMessage & vbCrLf & "Module Source: " & strModuleSource strMessage = strMessage & vbCrLf & "Procedure Source: " & strProcedureSource
'display the message to the user MsgBox strMessage, vbCritical
Exit Sub
End Sub7. Save your changes to the modBusinessLogic module.
Beginning Access 2007 VBA
235 / 344
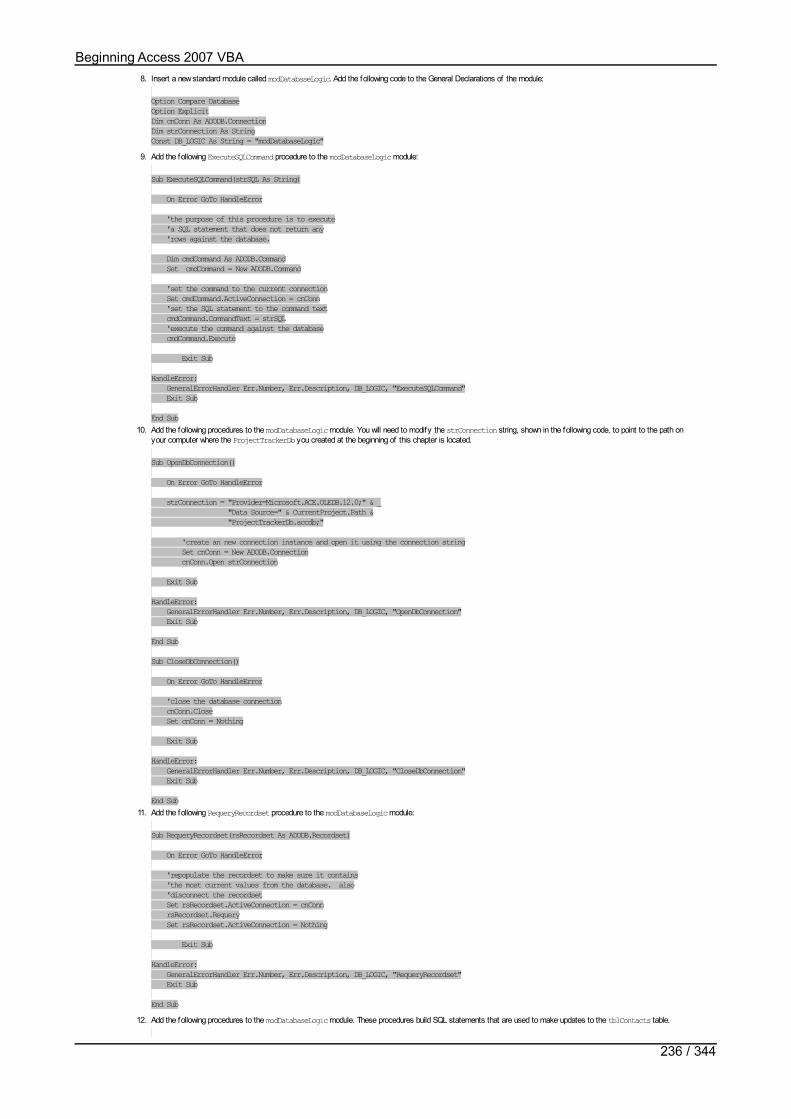
8. Insert a new standard module called modDatabaseLogic. Add the following code to the General Declarations of the module:
Option Compare DatabaseOption ExplicitDim cnConn As ADODB.ConnectionDim strConnection As StringConst DB_LOGIC As String = "modDatabaseLogic"
9. Add the following ExecuteSQLCommand procedure to the modDatabaseLogic module:
Sub ExecuteSQLCommand(strSQL As String)
On Error GoTo HandleError
'the purpose of this procedure is to execute 'a SQL statement that does not return any 'rows against the database.
Dim cmdCommand As ADODB.Command Set cmdCommand = New ADODB.Command
'set the command to the current connection Set cmdCommand.ActiveConnection = cnConn 'set the SQL statement to the command text cmdCommand.CommandText = strSQL 'execute the command against the database cmdCommand.Execute
Exit Sub
HandleError: GeneralErrorHandler Err.Number, Err.Description, DB_LOGIC, "ExecuteSQLCommand" Exit Sub
End Sub10. Add the following procedures to the modDatabaseLogic module. You will need to modify the strConnection string, shown in the following code, to point to the path on
your computer where the ProjectTrackerDb you created at the beginning of this chapter is located.
Sub OpenDbConnection()
On Error GoTo HandleError
strConnection = "Provider=Microsoft.ACE.OLEDB.12.0;" & _ "Data Source=" & CurrentProject.Path & "ProjectTrackerDb.accdb;"
'create an new connection instance and open it using the connection string Set cnConn = New ADODB.Connection cnConn.Open strConnection
Exit Sub
HandleError: GeneralErrorHandler Err.Number, Err.Description, DB_LOGIC, "OpenDbConnection" Exit Sub
End Sub
Sub CloseDbConnection()
On Error GoTo HandleError
'close the database connection cnConn.Close Set cnConn = Nothing
Exit Sub
HandleError: GeneralErrorHandler Err.Number, Err.Description, DB_LOGIC, "CloseDbConnection" Exit Sub
End Sub11. Add the following RequeryRecordset procedure to the modDatabaseLogic module:
Sub RequeryRecordset(rsRecordset As ADODB.Recordset)
On Error GoTo HandleError
'repopulate the recordset to make sure it contains 'the most current values from the database. also 'disconnect the recordset Set rsRecordset.ActiveConnection = cnConn rsRecordset.Requery Set rsRecordset.ActiveConnection = Nothing
Exit Sub
HandleError: GeneralErrorHandler Err.Number, Err.Description, DB_LOGIC, "RequeryRecordset" Exit Sub
End Sub12. Add the following procedures to the modDatabaseLogic module. These procedures build SQL statements that are used to make updates to the tblContacts table.
Function BuildSQLInsertContacts(objCurrContact As clsContacts) As String
Beginning Access 2007 VBA
236 / 344

Function BuildSQLInsertContacts(objCurrContact As clsContacts) As String
On Error GoTo HandleError
Dim strSQLInsert As String
'create SQL to insert a new record into the database 'containing the values in the Contacts object strSQLInsert = "INSERT INTO tblContacts(" & _ "txtLastName, txtFirstName, txtMiddleName, " & _ "txtCompany, txtAddress1, txtAddress2, " & _ "txtCity, txtRegion, txtPostalCode, " & _ "txtWorkPhone, txtHomePhone, txtCellPhone, " & _ "txtEmail) VALUES (" & _ "'" & objCurrContact.LastName & "', " & _ "'" & objCurrContact.FirstName & "', " & _ "'" & objCurrContact.MiddleName & "', " & _ "'" & objCurrContact.Company & "', " & _ "'" & objCurrContact.Address1 & "', " & _ "'" & objCurrContact.Address2 & "', " & _ "'" & objCurrContact.City & "', " & _ "'" & objCurrContact.Region & "', " & –_ "'" & objCurrContact.PostalCode & "', " & _ "'" & objCurrContact.WorkPhone & "', " & _ "'" & objCurrContact.HomePhone & "', " & _ "'" & objCurrContact.CellPhone & "', " & _ "'" & objCurrContact.Email & "') " BuildSQLInsertContacts = strSQLInsert
Exit Function
HandleError: GeneralErrorHandler Err.Number, Err.Description, DB_LOGIC,"BuildSQLInsertContacts" Exit Function
End FunctionFunction BuildSQLUpdateContacts(objCurrContact As clsContacts) As String
On Error GoTo HandleError
Dim strSQLUpdate As String
'create SQL to update the existing record in the 'database with the values in the contact object strSQLUpdate = "UPDATE tblContacts SET " & _ "txtLastName = '" & objCurrContact.LastName & "', " & _ "txtFirstName = '" & objCurrContact.FirstName & "', " & –_ "txtMiddleName = '" & objCurrContact.MiddleName & "', " & _ "txtcompany = '" & objCurrContact.Company & "', " & _ "txtAddress1 = '" & objCurrContact.Address1 & "', " & _ "txtAddress2 = '" & objCurrContact.Address2 & "', " & _ "txtCity = '" & objCurrContact.City & "', " & _ "txtRegion = '" & objCurrContact.Region & "', " & _ "txtPostalCode = '" & objCurrContact.PostalCode & "', " & _ "txtWorkPhone = '" & objCurrContact.WorkPhone & "', " & _ "txtHomePhone = '" & objCurrContact.HomePhone & "', " & _ "txtCellPhone = '" & objCurrContact.CellPhone & "', " & _ "txtEmail = '" & objCurrContact.Email & "' " & –_ "WHERE intContactId = " & objCurrContact.ContactId
BuildSQLUpdateContacts = strSQLUpdate Exit Function
HandleError: GeneralErrorHandler Err.Number, Err.Description, DB_LOGIC, _ "BuildSQLUpdateContacts" Exit Function
End Function
Function BuildSQLDeleteContacts(intId As Integer) As String
On Error GoTo HandleError 'generate SQL command to delete current record Dim strSQLDelete As String strSQLDelete = "DELETE FROM tblContacts WHERE intContactId = " & intId BuildSQLDeleteContacts = strSQLDelete
Exit Function
HandleError: GeneralErrorHandler Err.Number, Err.Description, DB_LOGIC, _ "BuildSQLDeleteContacts" Exit Function
End Function
Function BuildSQLSelectContacts() As String
On Error GoTo HandleError Dim strSQLRetrieve As String 'if the intId is not included, retrieve all contacts If intContactProjectLookup = 0 Then 'generate SQL command to retrieve contacts records strSQLRetrieve = "SELECT * FROM tblContacts " & _ "ORDER BY txtLastName, txtFirstName, txtMiddleName" Else
Beginning Access 2007 VBA
237 / 344

Else 'look up particular contacts record strSQLRetrieve = "SELECT * FROM tblContacts " & _ "WHERE intContactId = " & intContactProjectLookup & _ " ORDER BY txtLastName, txtFirstName, txtMiddleName" End If
BuildSQLSelectContacts = strSQLRetrieve Exit Function
HandleError: GeneralErrorHandler Err.Number, Err.Description, DB_LOGIC, _ "BuildSQLSelectContacts" Exit Function
End Function13. Add the following procedures to the modDatabaseLogic module. These procedures build SQL statements that are used to make updates to the tblProjects table.
Function BuildSQLInsertProjects(objCurrProject As clsProjects) As String
On Error GoTo HandleError
Dim strSQLInsert As String 'create SQL to insert a new record into the database 'containing the values in the Projects object strSQLInsert = "INSERT INTO tblProjects(" & _ "txtProjectTitle, txtProjectDescription, txtPriority, " & _ "txtReferenceNum, curMoneyBudget, curMoneyToDate, " & _ "intHoursBudget, intHoursToDate, dtDateDue, " & _ "txtStatus) VALUES (" & _ "'" & objCurrProject.ProjectTitle & "', " & _ "'" & objCurrProject.ProjectDescription & "', " & _ "'" & objCurrProject.Priority & "', " & _ "'" & objCurrProject.ReferenceNum & "', " & _ objCurrProject.MoneyBudget & ", " & _ objCurrProject.MoneyToDate & ", " & _ "" & objCurrProject.HoursBudget & ", " & _ "" & objCurrProject.HoursToDate & ", " & _ "'" & objCurrProject.DateDue & "', " & _ "'" & objCurrProject.Status & "') "
BuildSQLInsertProjects = strSQLInsert
Exit Function
HandleError: GeneralErrorHandler Err.Number, Err.Description, DB_LOGIC, _ "BuildSQLInsertProjects" Exit Function
End Function
Function BuildSQLUpdateProjects(objCurrProject As clsProjects) As String
On Error GoTo HandleError
Dim strSQLUpdate As String
'create SQL to update the existing record in the 'database with the values in the Project object
strSQLUpdate = "UPDATE tblProjects SET " & _ "txtProjectTitle = '" & objCurrProject.ProjectTitle & "', " & _ "txtProjectDescription = '" & objCurrProject.ProjectDescription & "', " & _ "txtPriority = '" & objCurrProject.Priority & "', " & _ "txtReferenceNum = '" & objCurrProject.ReferenceNum & "', " & _ "curMoneyBudget = '" & objCurrProject.MoneyBudget & "', " & _ "curMoneyToDate = '" & objCurrProject.MoneyToDate & "', " & _ "intHoursBudget = " & objCurrProject.HoursBudget & ", " & _ "intHoursToDate = " & objCurrProject.HoursToDate & ", " & _ "dtDateDue = '" & objCurrProject.DateDue & "', " & _ "txtStatus = '" & objCurrProject.Status & "' " & _ "WHERE intProjectId = " & objCurrProject.ProjectId BuildSQLUpdateProjects = strSQLUpdate Exit Function
HandleError: GeneralErrorHandler Err.Number, Err.Description, DB_LOGIC, _ "BuildSQLUpdateProjects" Exit Function
End Function
Function BuildSQLDeleteProjects(intId As Integer) As String
On Error GoTo HandleError 'generate SQL command to delete current record Dim strSQLDelete As String strSQLDelete = "DELETE FROM tblProjects WHERE intProjectId = " & intId BuildSQLDeleteProjects = strSQLDelete Exit Function
HandleError: GeneralErrorHandler Err.Number, Err.Description, DB_LOGIC, _ "BuildSQLDeleteProjects" Exit Function
Beginning Access 2007 VBA
238 / 344

End Function
Function BuildSQLSelectProjects(blnAllRecords As Boolean) As String
On Error GoTo HandleError 'generate SQL command to retrieve projects records Dim strSQLRetrieve As String 'if option to display all records is selected in toggle button If blnAllRecords Then
strSQLRetrieve = "SELECT * FROM tblProjects " & _ "ORDER BY intProjectId"
Else 'show only the unclosed projects strSQLRetrieve = "SELECT * " & _ "FROM tblProjects WHERE txtStatus <> 'Closed’ " & _ "ORDER BY intProjectId " End If BuildSQLSelectProjects = strSQLRetrieve Exit Function
HandleError: GeneralErrorHandler Err.Number, Err.Description, DB_LOGIC, _ "BuildSQLSelectProjects" Exit Function
End Function
Function BuildSQLSelectAll(strTableName) As String
On Error GoTo HandleError
Dim strSQLSelect As String
'use this for selecting all records in a table strSQLSelect = "SELECT * FROM " & strTableName
BuildSQLSelectAll = strSQLSelect Exit Function
HandleError: GeneralErrorHandler Err.Number, Err.Description, DB_LOGIC, "BuildSQLSelectAll" Exit Function
End Function14. Add the following ProcessRecordset procedure to the modDatabaseLogic module:
Function ProcessRecordset(strSQLStatement As String) As ADODB.Recordset
On Error GoTo HandleError
'open the connection to the database Call OpenDbConnection
'create a new instance of a recordset Dim rsCont As New ADODB.Recordset
'set various properties of the recordset With rsCont 'specify a cursortype and lock type that will allow updates
.CursorType = adOpenKeyset .CursorLocation = adUseClient .LockType = adLockBatchOptimistic 'populate the recordset based on SQL statement .Open strSQLStatement, cnConn 'disconnect the recordset .ActiveConnection = Nothing 'sort the recordset End With
'close the connection to the database Call CloseDbConnection
'return the recordset Set ProcessRecordset = rsCont Exit Function
HandleError: GeneralErrorHandler Err.Number, Err.Description, DB_LOGIC, "ProcessRecordset" Exit Function
End Function15. Add the following ProcessUpdate procedure to the modDatabaseLogic module:
Sub ProcessUpdate(strSQLStatement As String, Optional rsRecordset AsADODB.Recordset)
On Error GoTo HandleError
'This procedure is used to handle updates to the database
'open the connection to the database Call OpenDbConnection
Beginning Access 2007 VBA
239 / 344
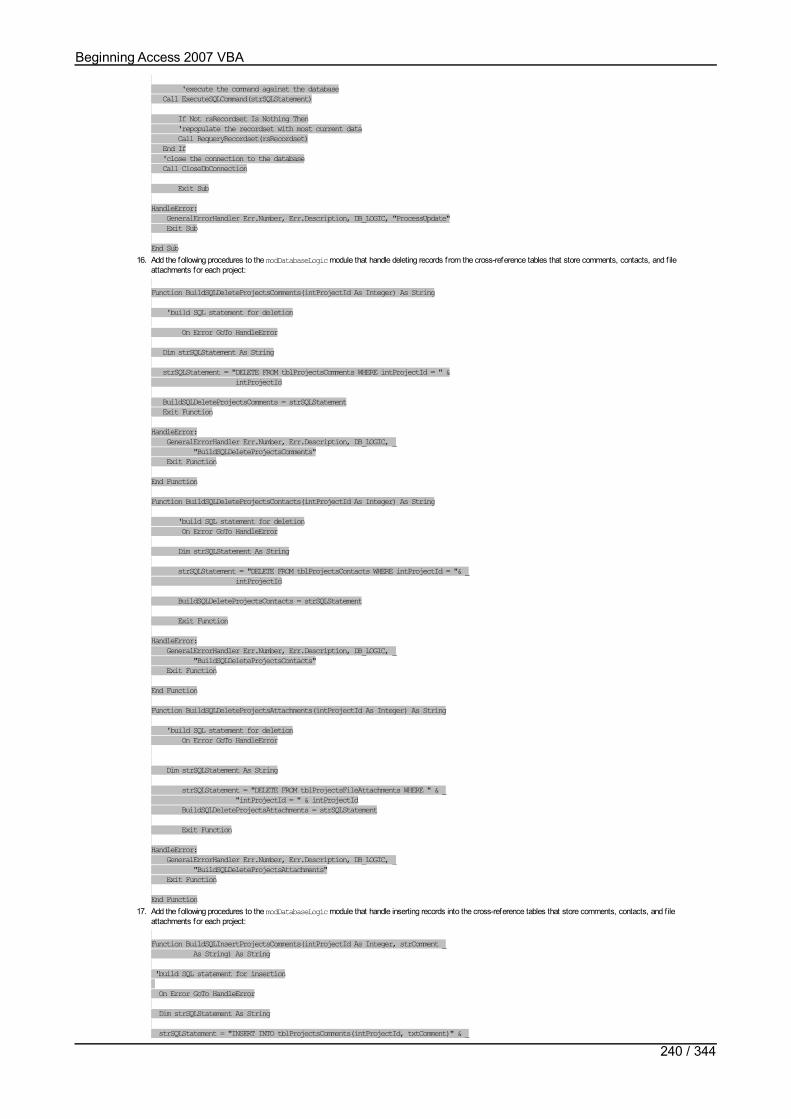
'execute the command against the database Call ExecuteSQLCommand(strSQLStatement)
If Not rsRecordset Is Nothing Then 'repopulate the recordset with most current data Call RequeryRecordset(rsRecordset) End If 'close the connection to the database Call CloseDbConnection
Exit Sub
HandleError: GeneralErrorHandler Err.Number, Err.Description, DB_LOGIC, "ProcessUpdate" Exit Sub
End Sub16. Add the following procedures to the modDatabaseLogic module that handle deleting records from the cross-reference tables that store comments, contacts, and f ile
attachments for each project:
Function BuildSQLDeleteProjectsComments(intProjectId As Integer) As String
'build SQL statement for deletion
On Error GoTo HandleError
Dim strSQLStatement As String
strSQLStatement = "DELETE FROM tblProjectsComments WHERE intProjectId = " & intProjectId
BuildSQLDeleteProjectsComments = strSQLStatement Exit Function
HandleError: GeneralErrorHandler Err.Number, Err.Description, DB_LOGIC, _ "BuildSQLDeleteProjectsComments" Exit Function
End Function
Function BuildSQLDeleteProjectsContacts(intProjectId As Integer) As String
'build SQL statement for deletion On Error GoTo HandleError
Dim strSQLStatement As String
strSQLStatement = "DELETE FROM tblProjectsContacts WHERE intProjectId = "& _ intProjectId
BuildSQLDeleteProjectsContacts = strSQLStatement
Exit Function
HandleError: GeneralErrorHandler Err.Number, Err.Description, DB_LOGIC, _ "BuildSQLDeleteProjectsContacts" Exit Function
End Function
Function BuildSQLDeleteProjectsAttachments(intProjectId As Integer) As String
'build SQL statement for deletion On Error GoTo HandleError
Dim strSQLStatement As String
strSQLStatement = "DELETE FROM tblProjectsFileAttachments WHERE " & _ "intProjectId = " & intProjectId BuildSQLDeleteProjectsAttachments = strSQLStatement
Exit Function
HandleError: GeneralErrorHandler Err.Number, Err.Description, DB_LOGIC, _ "BuildSQLDeleteProjectsAttachments" Exit Function
End Function17. Add the following procedures to the modDatabaseLogic module that handle inserting records into the cross-reference tables that store comments, contacts, and f ile
attachments for each project:
Function BuildSQLInsertProjectsComments(intProjectId As Integer, strComment _ As String) As String
'build SQL statement for insertion On Error GoTo HandleError
Dim strSQLStatement As String
strSQLStatement = "INSERT INTO tblProjectsComments(intProjectId, txtComment)" & _
Beginning Access 2007 VBA
240 / 344

"VALUES(" & intProjectId & ", '" & strComment & "')"
BuildSQLInsertProjectsComments = strSQLStatement Exit Function HandleError: GeneralErrorHandler Err.Number, Err.Description, DB_LOGIC, _ "BuildSQLInsertProjectsComments" Exit Function
End Function
Functionn BuildSQLInsertProjectsContacts(intContactId As Integer,intProjectId _ As Integer) As String
'build SQL statement for insertion On Error GoTo HandleError
Dim strSQLStatement As String
strSQLStatement = "INSERT INTO tblProjectsContacts(intContactId, " & _ "intProjectId) VALUES(" & intContactId & ", " & intProjectId & ")"
BuildSQLInsertProjectsContacts = strSQLStatement Exit Function
HandleError: GeneralErrorHandler Err.Number, Err.Description, DB_LOGIC, _ "BuildSQLInsertProjectsContacts" Exit Function
End Function
Function BuildSQLInsertProjectsAttachments(intProjectId As Integer, _ strFileDescription As String, strFileName As String) As String
'build SQL statement for insertion On Error GoTo HandleError Dim strSQLStatement As String strSQLStatement = "INSERT INTO tblProjectsFileAttachments(intProjectId," & _ "txtFileDescription, txtFileName) VALUES (" & _ intProjectId & ", '" & strFileDescription & "', '" & strFileName & "')" BuildSQLInsertProjectsAttachments = strSQLStatement Exit Function
HandleError: GeneralErrorHandler Err.Number, Err.Description, DB_LOGIC, _ "BuildSQLInsertProjectsAttachments" Exit Function
End Function18. Save your changes to the modDatabaseLogic module.
How It Works
You created the modBusinessLogic module for processing the business logic for the application, and the modDatabaseLogic module for communicating with the database. In the GeneralDeclarations section of the modBusinessLogic module, you added some declarations to external functions. The GetOpenFileName external function is used to display the File Open dialogbox that allows you to browse the f ile system and select a f ile. This function is called later in the code to open the dialog box for selecting an attachment to associate with a particularproject record.Private Declare Function GetOpenFileName Lib "comdlg32.dll" Alias __"GetOpenFileNameA" (pOpenfilename As OPENFILENAME) As Long
Private Type OPENFILENAME lStructSize As Long hwndOwner As Long hInstance As Long lpstrFilter As String lpstrCustomFilter As String nMaxCustFilter As Long nFilterIndex As Long lpstrFile As String nMaxFile As Long lpstrFileTitle As String nMaxFileTitle As Long lpstrInitialDir As String lpstrTitle As String flags As Long nFileOffset As Integer nFileExtension As Integer lpstrDefExt As String lCustData As Long lpfnHook As Long lpTemplateName As StringEnd TypeThe ShellExecute external function is used to launch an external program:Public Declare Function ShellExecute _ Lib "shell32.dll" _ Alias "ShellExecuteA" ( _ ByVal hwnd As Long, _ ByVal lpOperation As String, _ ByVal lpFile As String, _ ByVal lpParameters As String, _ ByVal lpDirectory As String, _ ByVal nShowCmd As Long) _ As LongThe OpenFileAttachment procedure calls the ShellExecute external function in order to preview a particular attachment in its native application:
Beginning Access 2007 VBA
241 / 344
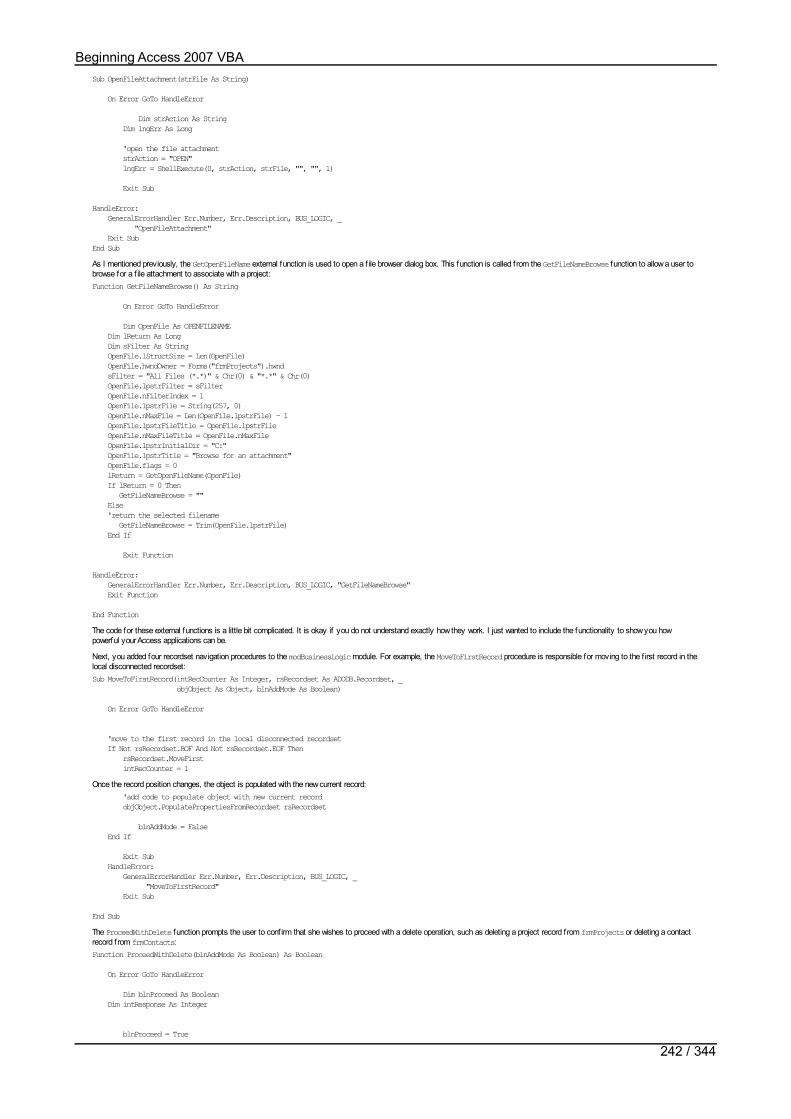
Sub OpenFileAttachment(strFile As String)
On Error GoTo HandleError
Dim strAction As String Dim lngErr As Long
'open the file attachment strAction = "OPEN" lngErr = ShellExecute(0, strAction, strFile, "", "", 1)
Exit Sub
HandleError: GeneralErrorHandler Err.Number, Err.Description, BUS_LOGIC, _ "OpenFileAttachment" Exit SubEnd SubAs I mentioned previously, the GetOpenFileName external function is used to open a f ile browser dialog box. This function is called from the GetFileNameBrowse function to allow a user tobrowse for a f ile attachment to associate with a project:Function GetFileNameBrowse() As String
On Error GoTo HandleError
Dim OpenFile As OPENFILENAME Dim lReturn As Long Dim sFilter As String OpenFile.lStructSize = Len(OpenFile) OpenFile.hwndOwner = Forms("frmProjects").hwnd sFilter = "All Files (*.*)" & Chr(0) & "*.*" & Chr(0) OpenFile.lpstrFilter = sFilter OpenFile.nFilterIndex = 1 OpenFile.lpstrFile = String(257, 0) OpenFile.nMaxFile = Len(OpenFile.lpstrFile) - 1 OpenFile.lpstrFileTitle = OpenFile.lpstrFile OpenFile.nMaxFileTitle = OpenFile.nMaxFile OpenFile.lpstrInitialDir = "C:" OpenFile.lpstrTitle = "Browse for an attachment" OpenFile.flags = 0 lReturn = GetOpenFileName(OpenFile) If lReturn = 0 Then GetFileNameBrowse = "" Else 'return the selected filename GetFileNameBrowse = Trim(OpenFile.lpstrFile) End If
Exit Function
HandleError: GeneralErrorHandler Err.Number, Err.Description, BUS_LOGIC, "GetFileNameBrowse" Exit Function
End FunctionThe code for these external functions is a little bit complicated. It is okay if you do not understand exactly how they work. I just wanted to include the functionality to show you howpowerful your Access applications can be.
Next, you added four recordset navigation procedures to the modBusinessLogic module. For example, the MoveToFirstRecord procedure is responsible for moving to the f irst record in thelocal disconnected recordset:Sub MoveToFirstRecord(intRecCounter As Integer, rsRecordset As ADODB.Recordset, _ objObject As Object, blnAddMode As Boolean)
On Error GoTo HandleError
'move to the first record in the local disconnected recordset If Not rsRecordset.BOF And Not rsRecordset.EOF Then rsRecordset.MoveFirst intRecCounter = 1Once the record position changes, the object is populated with the new current record: 'add code to populate object with new current record objObject.PopulatePropertiesFromRecordset rsRecordset
blnAddMode = False End If
Exit Sub HandleError: GeneralErrorHandler Err.Number, Err.Description, BUS_LOGIC, _ "MoveToFirstRecord" Exit Sub
End SubThe ProceedWithDelete function prompts the user to conf irm that she wishes to proceed with a delete operation, such as deleting a project record from frmProjects or deleting a contactrecord from frmContacts:Function ProceedWithDelete(blnAddMode As Boolean) As Boolean
On Error GoTo HandleError
Dim blnProceed As Boolean Dim intResponse As Integer
blnProceed = True
Beginning Access 2007 VBA
242 / 344
If the user is in add mode, that user cannot issue a delete command because the record has not even been added yet:'don't let the user issue a delete command if in add modeIf blnAddMode = True Then blnProceed = False ProceedWithDelete = blnProceed Exit FunctionEnd IfThen, the user is prompted to conf irm that she wishes to proceed with the delete operation:'confirm that user really wants to delete recordintResponse = MsgBox("Are you sure you want to delete this record?", vbYesNo)The value returned from the MsgBox function is then analyzed to determine whether the user chose the option to proceed with the delete: 'if the user cancels delete, then exit this procedure If intResponse = vbNo Then blnProceed = False ProceedWithDelete = blnProceed Exit Function End If
ProceedWithDelete = blnProceed
Exit Function
HandleError: ProceedWithDelete = False GeneralErrorHandler Err.Number, Err.Description, BUS_LOGIC, "ProceedWithDelete" Exit Function
End FunctionThe last procedure added to the modBusinessLogic module was the GeneralErrorHandler procedure. This module handles all errors for the application and is referenced in each procedureor function, as you have probably noticed by now.Public Sub GeneralErrorHandler(lngErrNumber As Long, strErrDesc As String, _ strModuleSource As String, strProcedureSource As String)
On Error Resume Next
Dim strMessage As String 'build the error message string from the parameters passed in strMessage = "An error has occurred in the application." strMessage = strMessage & vbCrLf & "Error Number: " & lngErrNumber strMessage = strMessage & vbCrLf & "Error Description: " & strErrDesc strMessage = strMessage & vbCrLf & "Module Source: " & strModuleSource strMessage = strMessage & vbCrLf & "Procedure Source: " & strProcedureSource
'display the message to the user MsgBox strMessage, vbCritical Exit Sub
End SubNext, you created a standard module called modDatabaseLogic. You added various procedures to the module for interacting with the database. For example, the ExecuteSQLCommandprocedure is responsible for executing a SQL statement against the database that does not return any rows. Examples of these types of statements include insert, update, and deletestatements.Sub ExecuteSQLCommand(strSQL As String)
On Error GoTo HandleError
'the purpose of this procedure is to execute 'a SQL statement that does not return any 'rows against the database.
Dim cmdCommand As ADODB.Command Set cmdCommand = New ADODB.Command
'set the command to the current connection Set cmdCommand.ActiveConnection = cnConn 'set the SQL statement to the command text cmdCommand.CommandText = strSQL 'execute the command against the database cmdCommand.Execute
Exit Sub
HandleError: GeneralErrorHandler Err.Number, Err.Description, DB_LOGIC, _ "ExecuteSQLCommand"
Exit Sub
End SubNext, you added the OpenDbConnection and CloseDbConnection procedures for opening and closing database connections. In the OpenDbConnection procedure, you may have had tomodify the strConnection string to point to the path where the ProjectTrackerDb, which you created at the beginning of this chapter, is located.Sub OpenDbConnection()
On Error GoTo HandleError
strConnection = "Provider=Microsoft.ACE.OLEDB.12.0;" & _ "Data Source=" & CurrentProject.Path &"ProjectTrackerDb.accdb;"
'create a new connection instance and open it using the connectionstring Set cnConn = New ADODB.Connection cnConn.Open strConnection
Beginning Access 2007 VBA
243 / 344

Exit Sub
HandleError: GeneralErrorHandler Err.Number, Err.Description, DB_LOGIC, "OpenDbConnection" Exit Sub
End SubThe RequeryRecordset procedure was then added to the modDatabaseLogic module to repopulate the values in the recordset with the current data in the underlying database:Sub RequeryRecordset(rsRecordset As ADODB.Recordset)
On Error GoTo HandleError
'repopulate the recordset to make sure it contains 'the most current values from the database. also 'disconnect the recordset Set rsRecordset.ActiveConnection = cnConn rsRecordset.Requery Set rsRecordset.ActiveConnection = Nothing
Exit Sub
HandleError: GeneralErrorHandler Err.Number, Err.Description, DB_LOGIC, "RequeryRecordset" Exit Sub
End SubNext, you added various procedures for creating SQL statements for inserting, updating, deleting, and selecting records from the tblContacts table. For example, theBuildSQLInsertContacts procedure creates a SQL statement f rom the values in the objCurrContact object:Function BuildSQLInsertContacts(objCurrContact As clsContacts) As String
On Error GoTo HandleError
Dim strSQLInsert As String
'create SQL to insert a new record into the database 'containing the values in the Contacts object strSQLInsert = "INSERT INTO tblContacts(" & _ "txtLastName, txtFirstName, txtMiddleName, " & _ "txtCompany, txtAddress1, txtAddress2, " & _ "txtCity, txtRegion, txtPostalCode, " & _ "txtWorkPhone, txtHomePhone, txtCellPhone, " & _ "txtEmail) VALUES (" & _ "'" & objCurrContact.LastName & "', " & _ "'" & objCurrContact.FirstName & "', " & _ "'" & objCurrContact.MiddleName & "', " & _ "'" & objCurrContact.Company & "', " & _ "'" & objCurrContact.Address1 & "', " & _ "'" & objCurrContact.Address2 & "', " & _ "'" & objCurrContact.City & "', " & _ "'" & objCurrContact.Region & "', " & _ "'" & objCurrContact.PostalCode & "', " & _ "'" & objCurrContact.WorkPhone & "', " & _ "'" & objCurrContact.HomePhone & "', " & _ "'" & objCurrContact.CellPhone & "', " & _ "'" & objCurrContact.Email & "') "
BuildSQLInsertContacts = strSQLInsert Exit Function
HandleError: GeneralErrorHandler Err.Number, Err.Description, DB_LOGIC, _
"BuildSQLInsertContacts" Exit Function
End FunctionSimilarly, you added various procedures for creating SQL statements. You created procedures for inserting, updating, and deleting project records, for selecting unclosed project records,and for selecting all project records. For example, the BuildSQLInsertProjects procedure creates a SQL statement f rom the values in the objCurrProject object:Function BuildSQLInsertProjects(objCurrProject As clsProjects) As String
On Error GoTo HandleError
Dim strSQLInsert As String
'create SQL to insert a new record into the database 'containing the values in the Projects object strSQLInsert = "INSERT INTO tblProjects(" & _ "txtProjectTitle, txtProjectDescription, txtPriority, " & _ "txtReferenceNum, curMoneyBudget, curMoneyToDate, " & _ "intHoursBudget, intHoursToDate, dtDateDue, " & _ "txtStatus) VALUES (" & _ "'" & objCurrProject.ProjectTitle & "', " & _ "'" & objCurrProject.ProjectDescription & "', " & _ "'" & objCurrProject.Priority & "', " & _ "'" & objCurrProject.ReferenceNum & "', " & _ objCurrProject.MoneyBudget & ", " & _ objCurrProject.MoneyToDate & ", " & _ "" & objCurrProject.HoursBudget & ", " & _ "" & objCurrProject.HoursToDate & ", " & _ "'" & objCurrProject.DateDue & "', " & _ "'" & objCurrProject.Status & "') "
BuildSQLInsertProjects = strSQLInsert Exit Function
Beginning Access 2007 VBA
244 / 344
Exit Function
HandleError: GeneralErrorHandler Err.Number, Err.Description, DB_LOGIC, _ "BuildSQLInsertProjects" Exit Function
End FunctionThe ProcessRecordset procedure accepted a SQL statement as a parameter and executed that statement against the database. The database connection was opened, the SQL statementwas executed, and the database connection was then closed. The recordset that was populated from the results of the SQL statement was returned to the calling function.Function ProcessRecordset(strSQLStatement As String) As ADODB.Recordset
On Error GoTo HandleError
'open the connection to the database Call OpenDbConnection
'create a new instance of a recordset Dim rsCont As New ADODB.Recordset
'set various properties of the recordset With rsCont 'specify a cursortype and lock type that will allow updates .CursorType = adOpenKeyset .CursorLocation = adUseClient .LockType = adLockBatchOptimistic 'populate the recordset based on SQL statement .Open strSQLStatement, cnConn 'disconnect the recordset .ActiveConnection = Nothing End With
'close the connection to the database Call CloseDbConnection
'return the recordset Set ProcessRecordset = rsCont
Exit Function
HandleError: GeneralErrorHandler Err.Number, Err.Description, DB_LOGIC, "ProcessRecordset" Exit Function
End FunctionNext, the ProcessUpdate procedure was added to the modDatabaseLogic module for processing various updates to the database. This procedure is similar to ProcessRecordset, only itdoes not return any values after executing the SQL statement.Sub ProcessUpdate(strSQLStatement As String, Optional rsRecordset AsADODB.Recordset)
On Error GoTo HandleError
'This procedure is used to handle updates to the database
'open the connection to the database Call OpenDbConnection
'execute the command against the database Call ExecuteSQLCommand(strSQLStatement)
If Not rsRecordset Is Nothing Then 'repopulate the recordset with most current data Call RequeryRecordset(rsRecordset) End If
'close the connection to the database Call CloseDbConnection Exit Sub
HandleError: GeneralErrorHandler Err.Number, Err.Description, DB_LOGIC, "ProcessUpdate" Exit Sub
End SubNext, various functions were added to handle deleting records from the cross-reference tables that store comments, contacts, and f ile attachments for each project. For example, theBuildSQLDelete ProjectsComments function is responsible for creating the SQL statement used to delete comment records for a given project:Function BuildSQLDeleteProjectsComments(intProjectId As Integer) As String
'build SQL statement for deletion
On Error GoTo HandleError
Dim strSQLStatement As String
strSQLStatement = "DELETE FROM tblProjectsComments WHERE intProjectId = " & intProjectId
BuildSQLDeleteProjectsComments = strSQLStatement
Exit Function
HandleError: GeneralErrorHandler Err.Number, Err.Description, DB_LOGIC, _ "BuildSQLDeleteProjectsComments"
Beginning Access 2007 VBA
245 / 344

Exit Function
End FunctionVarious procedures were also added to handle inserting records into the cross-reference tables that store comments, contacts, and f ile attachments for each project. For example, theBuildSQLInsertProject Comments function is responsible for creating the SQL statement that inserts a new comment into the tblProjectsComments table in the database:Function BuildSQLInsertProjectsComments(intProjectId As Integer, strComment _ As String) As String
'build SQL statement for insertion
On Error GoTo HandleError Dim strSQLStatement As String
strSQLStatement = "INSERT INTO tblProjectsComments(intProjectId, txtComment)" & _ "VALUES(" & intProjectId & ", '" & strComment & "')"
BuildSQLInsertProjectsComments = strSQLStatement Exit Function
HandleError: GeneralErrorHandler Err.Number, Err.Description, DB_LOGIC, _ "BuildSQLInsertProjectsComments"
Exit Function
End Function
Beginning Access 2007 VBA
246 / 344

Connecting the User Interface to the CodeSo far, your application will probably not compile because some features used in the code have not been written yet. You’re almost f inished with the application anyway. You are now readyto tie everything together by adding the VBA code to the Project Tracker and Contacts forms. Most of this code will be event procedures that f ire, for example, when certain buttons areclicked. Some of the code will be local procedures in the form that deal with user-interface-specif ic features that would not make sense to put in a standard or class module.
The Projects Form
An example of the Project Tracker form, called frmProjects, is shown in Figure 13-26 with some sample data populated. You will revisit this form in more detail at the end of the chapter,where you will explore its cool features. For now, just keep this form in mind to help you understand the purpose of the code that you are about to write (and have already written).
Figure 13-26
Try It Out-Writing Code for the frmProjects Form
As previously mentioned, you are now ready to write the VBA code that will f inish up the application. You will start with the frmProjects form and will f inish with the frmContacts form.1. Open the frmProjects form and select the Form_Load event for the form to bring up the Visual Basic editor. Add the following code to the form:
Private Sub Form_Load()
On Error GoTo HandleError
Set objProjects = New clsProjects Set rsProjects = New ADODB.Recordset
'load non-closed projects as default (open, on hold, etc.) blnAllRecords = False
'make sure unclosed is enabled by default so only unclosed records load first togShowUnclosed.Value = True togShowAll.Value = False
'lock project id field so no edits allowed (primary key assigned by database) txtProjectId.Locked = True
'load the records in the recordset and display the first one on the form Call LoadRecords
Exit Sub
HandleError: GeneralErrorHandler Err.Number, Err.Description, PROJECTS_FORM, "Form_Load" Exit Sub
End Sub2. Add the following code to the General Declarations section of the form:
Option Compare DatabaseOption ExplicitDim blnAddMode As BooleanDim blnAllRecords As BooleanDim rsProjects As ADODB.RecordsetDim objProjects As clsProjectsDim rsComments As ADODB.RecordsetDim rsContacts As ADODB.RecordsetDim rsAttachments As ADODB.RecordsetConst PROJECTS_FORM As String = "frmProjects"Dim intCurrProjectRecord As Integer
3. Add Click event procedures to the form for making updates to the data:
Private Sub cmdAddNew_Click()
On Error GoTo HandleError
'clear the current controls to enable adding a new 'Project record Call AddEmptyProjectRecord
Exit Sub
HandleError: GeneralErrorHandler Err.Number, Err.Description, PROJECTS_FORM, _
Beginning Access 2007 VBA
247 / 344

GeneralErrorHandler Err.Number, Err.Description, PROJECTS_FORM, _ "cmdAddNew_Click"
Exit Sub
End Sub
Private Sub cmdSave_Click()
On Error GoTo HandleError
Dim intCurProject As Integer
'save the id of the current record if in update mode If Not blnAddMode Then intCurProject = objProjects.ProjectId Else intCurProject = 0 End If
'populate object with current info on form objProjects.PopulatePropertiesFromForm
'save all changes to current record objProjects.Save blnAddMode, rsProjects
'save changes in list boxes in tabs 1-3 Call SaveComments Call SaveContacts Call SaveAttachments
'move back to the project that was current before the requery If intCurProject > 0 Then
'move back to the project that was just updated rsProjects.Find "[intProjectId] = " & intCurProject Else 'if just added new record, move to the beginning of 'the recordset Call MoveToFirstRecord(intCurrProjectRecord, rsProjects, objProjects, _ blnAddMode) End If
Exit Sub
HandleError: GeneralErrorHandler Err.Number, Err.Description, PROJECTS_FORM, "cmdSave_Click" Exit SubEnd Sub
Private Sub cmdDelete_Click()
On Error GoTo HandleError
'delete the current record from the local disconnected recordset objProjects.Delete objProjects.ProjectId, blnAddMode, rsProjects
'move to the first record in the recordset after the delete Call MoveToFirstRecord(intCurrProjectRecord, rsProjects, objProjects, _ blnAddMode)
'populate the controls on the form with the current record Call PopulateProjectsControls Exit Sub
HandleError: GeneralErrorHandler Err.Number, Err.Description, PROJECTS_FORM, _ "cmdDelete_Click" Exit SubEnd Sub
4. Add the following Click event procedures to the form for navigating through the data:
Private Sub cmdMoveFirst_Click()
On Error GoTo HandleError
'move to the first record in the local disconnected recordset Call MoveToFirstRecord(intCurrProjectRecord, rsProjects, objProjects, _ blnAddMode)
'populate the controls on the form with the current record Call PopulateProjectsControls
Exit Sub
HandleError: GeneralErrorHandler Err.Number, Err.Description, PROJECTS_FORM, _ "cmdMoveFirst_Click" Exit Sub
End Sub
Private Sub cmdMoveLast_Click()
On Error GoTo HandleError
'move to the last record in the local disconnected recordset
Beginning Access 2007 VBA
248 / 344
Call MoveToLastRecord(intCurrProjectRecord, rsProjects, objProjects, _ blnAddMode)
'populate the controls on the form with the current record Call PopulateProjectsControls
Exit Sub
HandleError: GeneralErrorHandler Err.Number, Err.Description, PROJECTS_FORM, _ "cmdMoveLast_Click"
Exit Sub
End Sub
Private Sub cmdMoveNext_Click()
On Error GoTo HandleError
'move to the next record in the local disconnected recordset Call MoveToNextRecord(intCurrProjectRecord, rsProjects, objProjects, _ blnAddMode)
'populate the controls on the form with the current record Call PopulateProjectsControls
Exit Sub
HandleError: GeneralErrorHandler Err.Number, Err.Description, PROJECTS_FORM, _ "cmdMoveNext_Click" Exit Sub
End Sub
Private Sub cmdMovePrevious_Click()
On Error GoTo HandleError
'move to the previous record in the local disconnected recordsetCall MoveToPreviousRecord(intCurrProjectRecord, rsProjects, objProjects, _ blnAddMode)
'populate the controls on the form with the current record Call PopulateProjectsControls Exit Sub
HandleError: GeneralErrorHandler Err.Number, Err.Description, PROJECTS_FORM, _ "cmdMovePrevious_Click" Exit Sub
End Sub5. Add the following Click event procedures to the form for managing the contacts associated with a given project:
Private Sub cmdDeleteContact_Click()
On Error GoTo HandleError
'delete the selected contact from the list (not the database, 'just the screen) If lstContacts.ListIndex >= 0 Then lstContacts.RemoveItem (lstContacts.ListIndex) End If
Exit Sub
HandleError: GeneralErrorHandler Err.Number, Err.Description, PROJECTS_FORM, _ "cmdDeleteContact_Click" Exit Sub
End Sub
Private Sub cmdManageContacts_Click()
On Error GoTo HandleError
'store the current projectid so a contact can be added intContactProjectAdd = objProjects.ProjectId
'open contacts form so user can add contact to existing project DoCmd.OpenForm "frmContacts"
Exit Sub
HandleError: GeneralErrorHandler Err.Number, Err.Description, PROJECTS_FORM, _ "cmdManageContacts_Click" Exit Sub
End Sub
Private Sub cmdEmailContact_Click()
On Error GoTo HandleError
Beginning Access 2007 VBA
249 / 344

On Error GoTo HandleError
'create a new email to the selected contact using the email column DoCmd.SendObject acSendNoObject, , , lstContacts.Column(5), , , , , True, False Exit Sub
HandleError: GeneralErrorHandler Err.Number, Err.Description, PROJECTS_FORM, _ "cmdEmailContact_Click" Exit Sub
End Sub
Private Sub cmdViewContact_Click()
On Error GoTo HandleError
'if there is a selected record in the list If lstContacts.ListIndex <> -1 Then
'store the current projectid so a contact can be added intContactProjectAdd = objProjects.ProjectId 'store the current contact so it can be retrieved 'from the contacts form
intContactProjectLookup = lstContacts.Column(6) DoCmd.OpenForm "frmContacts" intContactProjectLookup = 0
End If
Exit Sub
HandleError: GeneralErrorHandler Err.Number, Err.Description, PROJECTS_FORM, _ "cmdViewContact_Click" Exit SubEnd Sub
6. Add the following Click event procedures to the form for managing the comments associated with a given project:
Private Sub cmdAddComment_Click()
On Error GoTo HandleError
'add comment/task to list box lstComments.AddItem (txtAddComment)
'clear AddComment box since you just added it txtAddComment = ""
Exit Sub
HandleError: GeneralErrorHandler Err.Number, Err.Description, PROJECTS_FORM, _ "cmdAddComment_Click" Exit Sub
End Sub
Private Sub cmdDeleteComment_Click()
On Error GoTo HandleError
'remove the selected item from the list If lstComments.ListIndex >= 0 Then lstComments.RemoveItem (lstComments.ListIndex) End If Exit Sub
HandleError: GeneralErrorHandler Err.Number, Err.Description, PROJECTS_FORM, _ "cmdDeleteComment_Click" Exit Sub
End Sub7. Add the following Click event procedures to the form for managing the f ile attachments associated with a given project:
Private Sub cmdAddAttachment_Click()
On Error GoTo HandleError 'add file attachment to list box lstFileAttachments.AddItem (txtFileDesc & ";" & txtFileName)
'clear text boxes since info was added to list txtFileDesc = "" txtFileName = ""
Exit Sub
HandleError: GeneralErrorHandler Err.Number, Err.Description, PROJECTS_FORM, _ "cmdAddAttachment_Click" Exit Sub
End Sub
Private Sub cmdFileBrowse_Click()
Beginning Access 2007 VBA
250 / 344

On Error GoTo HandleError 'show the open dialog and load 'selected file name in text box txtFileName = GetFileNameBrowse
Exit Sub
HandleError: GeneralErrorHandler Err.Number, Err.Description, PROJECTS_FORM, _ "cmdFileBrowse_Click" Exit Sub
End Sub
Private Sub cmdOpenFile_Click()
On Error GoTo HandleError
Dim RetVal As Variant Dim strFile As String 'if the user selected a value
If lstFileAttachments.ListIndex >= 0 Then
'retrieve the file name from the list box strFile = lstFileAttachments.Column(1)
'open the selected file Call OpenFileAttachment(strFile)
End If
Exit Sub
HandleError: GeneralErrorHandler Err.Number, Err.Description, PROJECTS_FORM, _ "cmdOpenFile_Click"
Exit Sub
End Sub
Private Sub cmdRemoveAttachment_Click()
On Error GoTo HandleError
'remove the selected item from the list (if an item has been selected) If lstFileAttachments.ListIndex >= 0 Then lstFileAttachments.RemoveItem (lstFileAttachments.ListIndex) End If
Exit Sub
HandleError: GeneralErrorHandler Err.Number, Err.Description, PROJECTS_FORM, _ "cmdRemoveAttachment_Click" Exit Sub
End Sub8. Add the following AddEmptyProject procedure:
Sub AddEmptyProjectRecord()
On Error GoTo HandleError 'set add mode to true blnAddMode = True 'clear the current values in the Projects object objProjects.ClearObject 'clear the current controls on the form so the 'user can fill in values for the new record Call ClearProjectsControls Exit Sub
HandleError: GeneralErrorHandler Err.Number, Err.Description, PROJECTS_FORM, _ "AddEmptyProjectRecord" Exit Sub
End Sub9. Add the following PopulateProjectsControls procedure:
Sub PopulateProjectsControls()
On Error GoTo HandleError
'Populate the controls on the Projects form with the values of the 'current record in the Projects object. If Not rsProjects.BOF And Not rsProjects.EOF Then Me.txtProjectId = objProjects.ProjectId Me.txtProjectTitle = objProjects.ProjectTitle Me.txtProjectDesc = objProjects.ProjectDescription Me.cboPriority = objProjects.Priority Me.txtReferenceNum = objProjects.ReferenceNum Me.txtMoneyBudget = objProjects.MoneyBudget Me.txtMoneyToDate = objProjects.MoneyToDate Me.txtHoursBudget = objProjects.HoursBudget
Beginning Access 2007 VBA
251 / 344

Me.txtHoursBudget = objProjects.HoursBudget Me.txtHoursToDate = objProjects.HoursToDate If objProjects.DateDue = "1/1/1900" Then Me.txtDateDue = "" Else Me.txtDateDue = objProjects.DateDue End If Me.cboStatus = objProjects.Status
'populate the recordset for tab 1 Set rsComments = New ADODB.Recordset
Set rsComments = objProjects.RetrieveComments(objProjects.ProjectId) PopulateListFromRecordset Me.lstComments, rsComments, 1 rsComments.Close
'populate the recordset for tab 2 Set rsContacts = New ADODB.Recordset Set rsContacts = objProjects.RetrieveContacts(objProjects.ProjectId) PopulateListFromRecordset Me.lstContacts, rsContacts, 7 rsContacts.Close
'populate the recordset for tab 3 Set rsAttachments = New ADODB.Recordset Set rsAttachments = _ objProjects.RetrieveAttachments(objProjects.ProjectId) PopulateListFromRecordset Me.lstFileAttachments, rsAttachments, 2 rsAttachments.Close
'display the record count on the form lblRecordNum.Caption = "Record " & intCurrProjectRecord & " Of " & _ rsProjects.RecordCount ElseIf rsProjects.BOF Then 'past beginning of recordset so move to first record Call MoveToFirstRecord(intCurrProjectRecord, rsProjects, _ objProjects, blnAddMode)
ElseIf rsProjects.EOF Then 'past end of recordset so move back to last record Call MoveToLastRecord(intCurrProjectRecord, rsProjects, _ objProjects, blnAddMode) End If Exit Sub
HandleError: GeneralErrorHandler Err.Number, Err.Description, PROJECTS_FORM, _ "PopulateProjectsControls" Exit Sub
End Sub10. Add the following ClearProjectControls procedure:
Sub ClearProjectsControls()
On Error GoTo HandleError
'clear the values in the controls on the form Me.txtProjectId = "" Me.txtProjectTitle = "" Me.txtProjectDesc = "" Me.cboPriority = 0 Me.txtReferenceNum = "" Me.txtMoneyBudget = "" Me.txtMoneyToDate = ""
Me.txtHoursBudget = "" Me.txtHoursToDate = "" Me.txtDateDue = "" Me.cboStatus = 0 'clear the values in the text box controls on the tab control pages Me.txtAddComment = "" Me.txtFileName = "" Me.txtFileDesc = "" Exit Sub
HandleError: GeneralErrorHandler Err.Number, Err.Description, PROJECTS_FORM, _ "ClearProjectsControls" Exit Sub
End Sub11. Add the following PopulateComboBoxes procedure:
Sub PopulateComboBoxes()
On Error GoTo HandleError
'populate the priority combo box cboPriority.RowSource = "" cboPriority.LimitToList = True cboPriority.ColumnCount = 1 cboPriority.RowSourceType = "Value List" cboPriority.AddItem ("Normal") cboPriority.AddItem ("High") cboPriority.AddItem ("Low")
'populate the status combo box
Beginning Access 2007 VBA
252 / 344

'populate the status combo box cboStatus.RowSource = "" cboStatus.LimitToList = True cboStatus.ColumnCount = 1 cboStatus.RowSourceType = "Value List" cboStatus.AddItem ("Open") cboStatus.AddItem ("Closed") cboStatus.AddItem ("On Hold") Exit Sub
HandleError: GeneralErrorHandler Err.Number, Err.Description, PROJECTS_FORM, _ "PopulateComboBoxes" Exit Sub
End Sub12. Add the following PopulateListFromRecordset procedure:
Sub PopulateListFromRecordset(lstList As ListBox, rsRecordset As _ ADODB.Recordset, intNumCols As Integer)
On Error GoTo HandleError Dim intCounter As Integer Dim strItem As String
With lstList .RowSource = "" .ColumnCount = intNumCols .RowSourceType = "Value List" End With
'add all of the values in the recordset to the list box
Do Until rsRecordset.EOF 'for each item in the current record, build string For intCounter = 0 To intNumCols - 1 strItem = strItem & rsRecordset(intCounter).Value & ";" Next intCounter lstList.AddItem (strItem) strItem = "" rsRecordset.MoveNext Loop Exit Sub
HandleError: GeneralErrorHandler Err.Number, Err.Description, PROJECTS_FORM, _ "PopulateListFromRecordset" Exit Sub
End Sub13. Add the Form_Unload procedure for frmProjects:
Private Sub Form_Unload(Cancel As Integer)
On Error GoTo HandleError
'close the recordset and free the memory
rsProjects.Close Set rsProjects = Nothing
Exit Sub
HandleError: GeneralErrorHandler Err.Number, Err.Description, PROJECTS_FORM, "Form_Unload" Exit Sub
End Sub14. Add the LoadRecords procedure:
Sub LoadRecords()
On Error GoTo HandleError
intCurrProjectRecord = 0
blnAddMode = False
'populate the main recordset Set rsProjects = objProjects.RetrieveProjects(blnAllRecords)
'if the recordset is empty If rsProjects.BOF And rsProjects.EOF Then Exit Sub Else
'populate the status and priority combo boxes Call PopulateComboBoxes
'populate the object with values in the recordset objProjects.PopulatePropertiesFromRecordset rsProjects
Call MoveToFirstRecord(intCurrProjectRecord, rsProjects,objProjects, _ blnAddMode)
Beginning Access 2007 VBA
253 / 344

blnAddMode)
'populate the controls on the form with the current record Call PopulateProjectsControls
End If Exit Sub
HandleError: GeneralErrorHandler Err.Number, Err.Description, PROJECTS_FORM, "LoadRecords" Exit Sub
End Sub15. Add the following procedures for dealing with the toggle button allowing the user to switch from unclosed projects to all projects:
Private Sub togShowAll_Click()
On Error GoTo HandleError
If togShowAll.Value = True Then
blnAllRecords = True
'make sure Show Unclosed is not checked any more togShowUnclosed.Value = False
'now, populate the form with all projects records LoadRecords
End If
Exit Sub
HandleError: GeneralErrorHandler Err.Number, Err.Description, PROJECTS_FORM, _ "togShowAll_Click" Exit Sub
End Sub
Private Sub togShowUnclosed_Click()
On Error GoTo HandleError
If togShowUnclosed.Value = True Then
blnAllRecords = False
'make sure Show All is not checked any more togShowAll.Value = False
'now, populate the form with all unclosed projects records LoadRecords
End If
Exit Sub
HandleError: GeneralErrorHandler Err.Number, Err.Description, PROJECTS_FORM, _ "togShowUnclosed_Click" Exit Sub
End Sub16. Add the following procedures that deal with saving the records displayed on the tabs of the form to the database:
Sub SaveComments()
On Error GoTo HandleError
Dim strSQLStatement As String Dim intId As Integer Dim strComment As String Dim intCounter
'remove all current comments in database for this project strSQLStatement = BuildSQLDeleteProjectsComments(objProjects.ProjectId)
ProcessUpdate (strSQLStatement)
'add back all comments based on current list (easier than tracking 'changes, inserts, and deletes) For intCounter = 0 To lstComments.ListCount - 1 intId = objProjects.ProjectId strComment = lstComments.Column(0, intCounter) strSQLStatement = BuildSQLInsertProjectsComments(intId, strComment) ProcessUpdate (strSQLStatement) Next intCounter
Exit Sub
HandleError: GeneralErrorHandler Err.Number, Err.Description, PROJECTS_FORM, "SaveComments" Exit Sub
End Sub
Beginning Access 2007 VBA
254 / 344

Sub SaveContacts()
On Error GoTo HandleError
Dim strSQLStatement As String Dim intContId As Integer Dim intProjId As Integer Dim intCounter As Integer
'remove all current contacts in database for this project strSQLStatement = BuildSQLDeleteProjectsContacts(objProjects.ProjectId) ProcessUpdate (strSQLStatement)
'add back all contacts based on current list (easier than tracking 'changes, inserts, and deletes) For intCounter = 0 To lstContacts.ListCount - 1 intContId = lstContacts.Column(6, intCounter) intProjId = objProjects.ProjectId strSQLStatement = BuildSQLInsertProjectsContacts(intContId, intProjId) ProcessUpdate (strSQLStatement) Next intCounter
Exit Sub
HandleError: GeneralErrorHandler Err.Number, Err.Description, PROJECTS_FORM, "SaveContacts" Exit Sub
End Sub
Sub SaveAttachments()
On Error GoTo HandleError
Dim strSQLStatement As String Dim intId As Integer Dim strDesc As String Dim strFile As String Dim intCounter As Integer
'remove all current file attachments in database for this project strSQLStatement = BuildSQLDeleteProjectsAttachments(objProjects.ProjectId) ProcessUpdate (strSQLStatement)
'add back all file attachments based on current list (easier than tracking 'changes, inserts, and deletes) For intCounter = 0 To lstFileAttachments.ListCount - 1 intId = objProjects.ProjectId strDesc = lstFileAttachments.Column(0, intCounter) strFile = lstFileAttachments.Column(1, intCounter) strSQLStatement = BuildSQLInsertProjectsAttachments(intId, strDesc, _ strFile) ProcessUpdate (strSQLStatement) Next intCounter
Exit Sub
HandleError: GeneralErrorHandler Err.Number, Err.Description, PROJECTS_FORM, _ "SaveComments" Exit Sub
End Sub17. Add the following RefreshContacts procedure to frmProjects. This procedure gets called whenever the user clicks to add the contact to the current project.
Sub RefreshContacts()
On Error GoTo HandleError
'populate the recordset for tab 2
Set rsContacts = New ADODB.Recordset Set rsContacts = objProjects.RetrieveContacts(objProjects.ProjectId) PopulateListFromRecordset Me.lstContacts, rsContacts, 7 rsContacts.Close
Exit Sub
HandleError: GeneralErrorHandler Err.Number, Err.Description, PROJECTS_FORM, _ "RefreshContacts" Exit Sub
End SubHow It Works
First, you added the code to the frmProjects form to tie it to the rest of the code created earlier in this chapter. As you have learned throughout this book, you typically tie the userinterface to the rest of the code through various event procedures on the form. In the Form_Load event for the frmProjects form, you added a few startup settings, such as locking theProjectId f ield to prevent editing and to load a project record onto the form.Private Sub Form_Load()
On Error GoTo HandleError Set objProjects = New clsProjects Set rsProjects = New ADODB.Recordset
'load non-closed projects as default (open, on hold, etc.)
Beginning Access 2007 VBA
255 / 344
'load non-closed projects as default (open, on hold, etc.) blnAllRecords = False
'make sure unclosed is enabled by default so only unclosed records loadfirst togShowUnclosed.Value = True togShowAll.Value = False
'lock project id field so no edits allowed (primary key assigned bydatabase) txtProjectId.Locked = True
'load the records in the recordset and display the first one on the form Call LoadRecords
Exit Sub
HandleError: GeneralErrorHandler Err.Number, Err.Description, PROJECTS_FORM, "Form_Load" Exit Sub
End SubNext, you added various declarations to the General Declarations section of the form, in order to declare various recordsets that will store the projects and related records. You then addedClick events for the cmdAddNew, cmdSave, and cmdDelete controls that f ire when the user selects the respective button on the form. For example, the cmdAddNew_Click event procedurecalls a procedure that adds an empty project record to allow the user to begin adding a new project record.Private Sub cmdAddNew_Click()
On Error GoTo HandleError
'clear the current controls to enable adding a new 'Project record Call AddEmptyProjectRecord
Exit Sub
HandleError: GeneralErrorHandler Err.Number, Err.Description, PROJECTS_FORM, _ "cmdAddNew_Click" Exit Sub
End SubThe cmdSave_Click event saves a new or modif ied record to the database. When you click the cmdSave button, the ID of the current record is saved if the mode is Update Mode.Private Sub cmdSave_Click()
On Error GoTo HandleError
Dim intCurProject As Integer
'save the id of the current record if in update mode If Not blnAddMode Then intCurProject = objProjects.ProjectId Else intCurProject = 0 End IfThe objProjects object (created based upon the clsProject that you created earlier) is then populated with the values on the form:'populate object with current info on formobjProjects.PopulatePropertiesFromFormThe changes to the current record are then saved to the database:'save all changes to current recordobjProjects.Save blnAddMode, rsProjects
'save changes in list boxes in tabs 1-3Call SaveCommentsCall SaveContactsCall SaveAttachmentsIf an existing record was updated, the updated record is reset to the current record. If Add Mode was activated, the f irst record now becomes the current record: 'move back to the project that was current before the requery If intCurProject > 0 Then 'move back to the project that was just updated rsProjects.Find "[intProjectId] = " & intCurProject Else 'if just added new record, move to the beginning of 'the recordset Call MoveToFirstRecord(intCurrProjectRecord, rsProjects, objProjects, _ blnAddMode) End IfExit Sub
HandleError: GeneralErrorHandler Err.Number, Err.Description, PROJECTS_FORM, _"cmdSave_Click" Exit SubEnd SubVarious Click event procedures were added to each of the command buttons to be used for record navigation. For example, the cmdMoveFirst_Click procedure calls a procedure to moveto the f irst record and then populates the controls on the form with the data of the newly current record:Private Sub cmdMoveFirst_Click()
On Error GoTo HandleError
'move to the first record in the local disconnected recordset Call MoveToFirstRecord(intCurrProjectRecord, rsProjects, objProjects, _ blnAddMode)
Beginning Access 2007 VBA
256 / 344
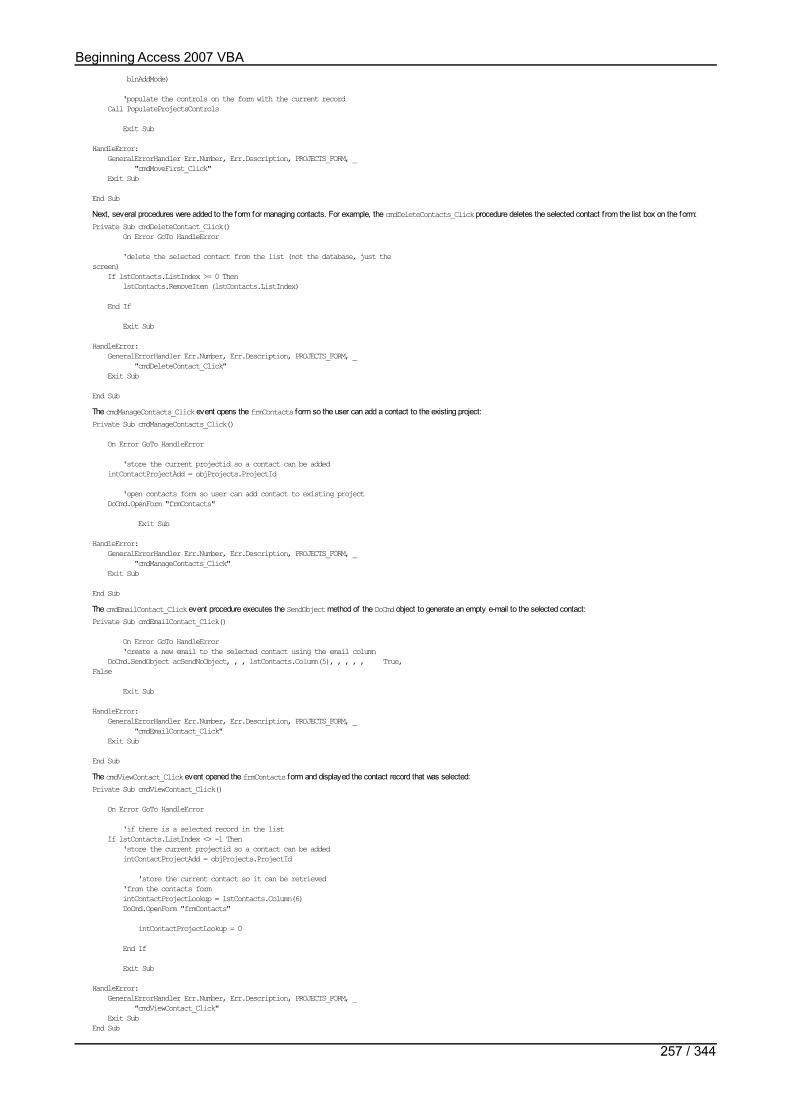
blnAddMode)
'populate the controls on the form with the current record Call PopulateProjectsControls
Exit Sub
HandleError: GeneralErrorHandler Err.Number, Err.Description, PROJECTS_FORM, _ "cmdMoveFirst_Click" Exit Sub
End SubNext, several procedures were added to the form for managing contacts. For example, the cmdDeleteContacts_Click procedure deletes the selected contact f rom the list box on the form:Private Sub cmdDeleteContact_Click() On Error GoTo HandleError
'delete the selected contact from the list (not the database, just thescreen) If lstContacts.ListIndex >= 0 Then lstContacts.RemoveItem (lstContacts.ListIndex)
End If
Exit Sub
HandleError: GeneralErrorHandler Err.Number, Err.Description, PROJECTS_FORM, _ "cmdDeleteContact_Click" Exit Sub
End SubThe cmdManageContacts_Click event opens the frmContacts form so the user can add a contact to the existing project:Private Sub cmdManageContacts_Click()
On Error GoTo HandleError
'store the current projectid so a contact can be added intContactProjectAdd = objProjects.ProjectId
'open contacts form so user can add contact to existing project DoCmd.OpenForm "frmContacts"
Exit Sub
HandleError: GeneralErrorHandler Err.Number, Err.Description, PROJECTS_FORM, _ "cmdManageContacts_Click" Exit Sub
End SubThe cmdEmailContact_Click event procedure executes the SendObject method of the DoCmd object to generate an empty e-mail to the selected contact:Private Sub cmdEmailContact_Click()
On Error GoTo HandleError 'create a new email to the selected contact using the email column DoCmd.SendObject acSendNoObject, , , lstContacts.Column(5), , , , , True,False
Exit Sub
HandleError: GeneralErrorHandler Err.Number, Err.Description, PROJECTS_FORM, _ "cmdEmailContact_Click" Exit Sub
End SubThe cmdViewContact_Click event opened the frmContacts form and displayed the contact record that was selected:Private Sub cmdViewContact_Click()
On Error GoTo HandleError
'if there is a selected record in the list If lstContacts.ListIndex <> -1 Then 'store the current projectid so a contact can be added intContactProjectAdd = objProjects.ProjectId
'store the current contact so it can be retrieved 'from the contacts form intContactProjectLookup = lstContacts.Column(6) DoCmd.OpenForm "frmContacts"
intContactProjectLookup = 0
End If
Exit Sub
HandleError: GeneralErrorHandler Err.Number, Err.Description, PROJECTS_FORM, _ "cmdViewContact_Click" Exit SubEnd Sub
Beginning Access 2007 VBA
257 / 344

Next, Click event procedures were created for adding and deleting comments from the lstComments list box. Event procedures were then added for managing f ile attachments associatedwith a given project. For example, the cmdAddAttachment_Click event added the value in the txtFileDesc and txtFileName f ields to the lstFileAttachments list box:Private Sub cmdAddAttachment_Click()
On Error GoTo HandleError
'add file attachment to list box lstFileAttachments.AddItem (txtFileDesc & ";" & txtFileName)
'clear text boxes since info was added to list txtFileDesc = "" txtFileName = ""
Exit Sub
HandleError: GeneralErrorHandler Err.Number, Err.Description, PROJECTS_FORM, _ "cmdAddAttachment_Click" Exit Sub
End SubThe cmdFileBrowse_Click event called the GetFileNameBrowse function, which then called the external function to open the File Browse dialog box:Private Sub cmdFileBrowse_Click()
On Error GoTo HandleError
'show the open dialog and load
'selected file name in text box txtFileName = GetFileNameBrowse
Exit Sub
HandleError: GeneralErrorHandler Err.Number, Err.Description, PROJECTS_FORM, _ "cmdFileBrowse_Click"
Exit Sub
End SubThe cmdOpenFile_Click event allows a user to preview a selected attachment in the native application. If the user selects an attachment from the list, the OpenFileAttachment procedureis executed to call the external function for opening another program associated with the attachment.Private Sub cmdOpenFile_Click()
On Error GoTo HandleError
Dim RetVal As Variant Dim strFile As String 'if the user selected a value If lstFileAttachments.ListIndex >= 0 Then
'retrieve the file name from the list box strFile = lstFileAttachments.Column(1)
'open the selected file Call OpenFileAttachment(strFile)
End If
Exit Sub
HandleError: GeneralErrorHandler Err.Number, Err.Description, PROJECTS_FORM, _ "cmdOpenFile_Click"
Exit Sub
End SubAn AddEmptyProjectRecord procedure was added to clear the values in the object:Sub AddEmptyProjectRecord()
On Error GoTo HandleError
'set add mode to true blnAddMode = True
'clear the current values in the Projects object objProjects.ClearObject 'clear the current controls on the form so the 'user can fill in values for the new record Call ClearProjectsControls Exit Sub
HandleError: GeneralErrorHandler Err.Number, Err.Description, PROJECTS_FORM, _ "AddEmptyProjectRecord" Exit Sub
End SubThe PopulateProjectsControls procedure populated the controls on the frmProjects form with the values of the current record in the objProjects object:Sub PopulateProjectsControls()
On Error GoTo HandleError
Beginning Access 2007 VBA
258 / 344
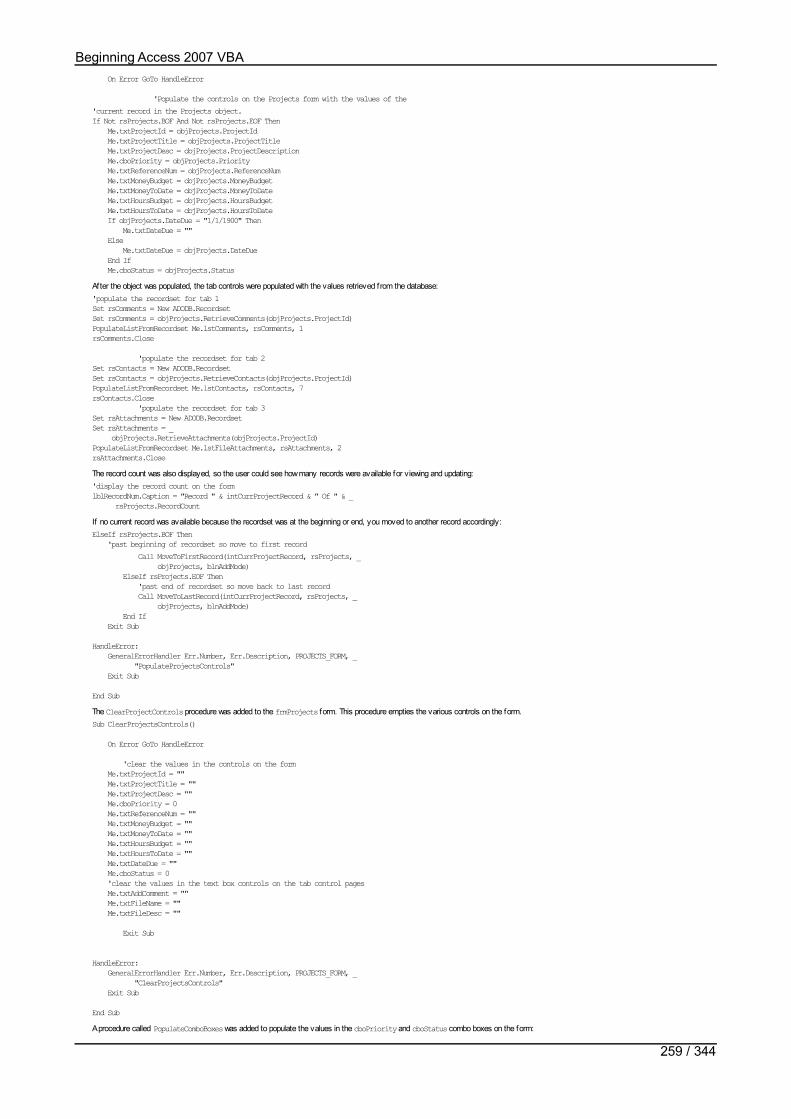
On Error GoTo HandleError
'Populate the controls on the Projects form with the values of the'current record in the Projects object.If Not rsProjects.BOF And Not rsProjects.EOF Then Me.txtProjectId = objProjects.ProjectId Me.txtProjectTitle = objProjects.ProjectTitle Me.txtProjectDesc = objProjects.ProjectDescription Me.cboPriority = objProjects.Priority Me.txtReferenceNum = objProjects.ReferenceNum Me.txtMoneyBudget = objProjects.MoneyBudget Me.txtMoneyToDate = objProjects.MoneyToDate Me.txtHoursBudget = objProjects.HoursBudget Me.txtHoursToDate = objProjects.HoursToDate If objProjects.DateDue = "1/1/1900" Then Me.txtDateDue = "" Else Me.txtDateDue = objProjects.DateDue End If Me.cboStatus = objProjects.StatusAfter the object was populated, the tab controls were populated with the values retrieved from the database:'populate the recordset for tab 1Set rsComments = New ADODB.RecordsetSet rsComments = objProjects.RetrieveComments(objProjects.ProjectId)PopulateListFromRecordset Me.lstComments, rsComments, 1rsComments.Close
'populate the recordset for tab 2Set rsContacts = New ADODB.RecordsetSet rsContacts = objProjects.RetrieveContacts(objProjects.ProjectId)PopulateListFromRecordset Me.lstContacts, rsContacts, 7rsContacts.Close 'populate the recordset for tab 3Set rsAttachments = New ADODB.RecordsetSet rsAttachments = _ objProjects.RetrieveAttachments(objProjects.ProjectId)PopulateListFromRecordset Me.lstFileAttachments, rsAttachments, 2rsAttachments.CloseThe record count was also displayed, so the user could see how many records were available for viewing and updating:'display the record count on the formlblRecordNum.Caption = "Record " & intCurrProjectRecord & " Of " & _ rsProjects.RecordCountIf no current record was available because the recordset was at the beginning or end, you moved to another record accordingly:ElseIf rsProjects.BOF Then 'past beginning of recordset so move to first record Call MoveToFirstRecord(intCurrProjectRecord, rsProjects, _ objProjects, blnAddMode) ElseIf rsProjects.EOF Then 'past end of recordset so move back to last record Call MoveToLastRecord(intCurrProjectRecord, rsProjects, _ objProjects, blnAddMode) End If Exit Sub
HandleError: GeneralErrorHandler Err.Number, Err.Description, PROJECTS_FORM, _ "PopulateProjectsControls" Exit Sub
End SubThe ClearProjectControls procedure was added to the frmProjects form. This procedure empties the various controls on the form.Sub ClearProjectsControls()
On Error GoTo HandleError
'clear the values in the controls on the form Me.txtProjectId = "" Me.txtProjectTitle = "" Me.txtProjectDesc = "" Me.cboPriority = 0 Me.txtReferenceNum = "" Me.txtMoneyBudget = "" Me.txtMoneyToDate = "" Me.txtHoursBudget = "" Me.txtHoursToDate = "" Me.txtDateDue = "" Me.cboStatus = 0 'clear the values in the text box controls on the tab control pages Me.txtAddComment = "" Me.txtFileName = "" Me.txtFileDesc = ""
Exit Sub
HandleError: GeneralErrorHandler Err.Number, Err.Description, PROJECTS_FORM, _ "ClearProjectsControls" Exit Sub
End SubA procedure called PopulateComboBoxes was added to populate the values in the cboPriority and cboStatus combo boxes on the form:
Beginning Access 2007 VBA
259 / 344

Sub PopulateComboBoxes()
On Error GoTo HandleError
'populate the priority combo box cboPriority.RowSource = "" cboPriority.LimitToList = True cboPriority.ColumnCount = 1 cboPriority.RowSourceType = "Value List" cboPriority.AddItem ("Normal") cboPriority.AddItem ("High") cboPriority.AddItem ("Low")
'populate the status combo box cboStatus.RowSource = "" cboStatus.LimitToList = True cboStatus.ColumnCount = 1 cboStatus.RowSourceType = "Value List" cboStatus.AddItem ("Open") cboStatus.AddItem ("Closed") cboStatus.AddItem ("On Hold")
Exit Sub
HandleError: GeneralErrorHandler Err.Number, Err.Description, PROJECTS_FORM, _ "PopulateComboBoxes" Exit Sub
End SubThe PopulateListFromRecordset procedure populated a list box control with the values in a record-set. This procedure was used to populate the list boxes on the tab controls with thevalues from the database (for example, the comments, contacts, and attachments).Sub PopulateListFromRecordset(lstList As ListBox, rsRecordset As _ ADODB.Recordset, intNumCols As Integer) On Error GoTo HandleError Dim intCounter As Integer Dim strItem As String
With lstList .RowSource = "" .ColumnCount = intNumCols .RowSourceType = "Value List" End With
'add all of the values in the recordset to the list box
Do Until rsRecordset.EOF 'for each item in the current record, build string For intCounter = 0 To intNumCols - 1 strItem = strItem & rsRecordset(intCounter).Value & ";" Next intCounter lstList.AddItem (strItem) strItem = "" rsRecordset.MoveNext Loop
Exit Sub
HandleError: GeneralErrorHandler Err.Number, Err.Description, PROJECTS_FORM, _ "PopulateListFromRecordset" Exit Sub
End SubThe Form_Unload procedure for frmProjects closed the recordset and freed the memory associated with the recordset:Private Sub Form_Unload(Cancel As Integer)
On Error GoTo HandleError
'close the recordset and free the memory rsProjects.Close Set rsProjects = Nothing
Exit Sub
HandleError: GeneralErrorHandler Err.Number, Err.Description, PROJECTS_FORM, "Form_Unload" Exit Sub
End SubNext, you added the LoadRecords procedure, which is responsible for retrieving the project records from the database and displaying a record on the form:Sub LoadRecords()
On Error GoTo HandleError
intCurrProjectRecord = 0
blnAddMode = False
'populate the main recordset Set rsProjects = objProjects.RetrieveProjects(blnAllRecords) 'if the recordset is empty
If rsProjects.BOF And rsProjects.EOF Then
Beginning Access 2007 VBA
260 / 344
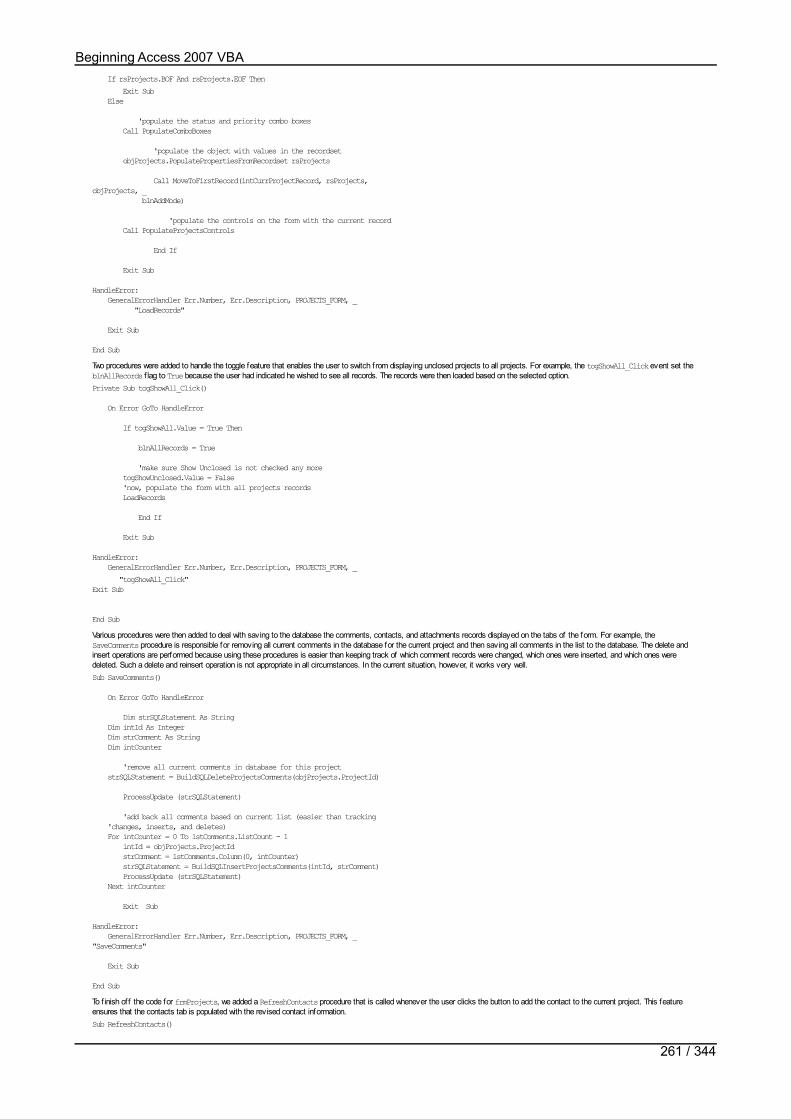
If rsProjects.BOF And rsProjects.EOF Then Exit Sub Else
'populate the status and priority combo boxes Call PopulateComboBoxes
'populate the object with values in the recordset objProjects.PopulatePropertiesFromRecordset rsProjects
Call MoveToFirstRecord(intCurrProjectRecord, rsProjects,objProjects, _ blnAddMode)
'populate the controls on the form with the current record Call PopulateProjectsControls
End If
Exit Sub
HandleError: GeneralErrorHandler Err.Number, Err.Description, PROJECTS_FORM, _ "LoadRecords"
Exit Sub
End SubTwo procedures were added to handle the toggle feature that enables the user to switch from displaying unclosed projects to all projects. For example, the togShowAll_Click event set theblnAllRecords f lag to True because the user had indicated he wished to see all records. The records were then loaded based on the selected option.Private Sub togShowAll_Click()
On Error GoTo HandleError
If togShowAll.Value = True Then
blnAllRecords = True
'make sure Show Unclosed is not checked any more togShowUnclosed.Value = False 'now, populate the form with all projects records LoadRecords
End If
Exit Sub
HandleError: GeneralErrorHandler Err.Number, Err.Description, PROJECTS_FORM, _ "togShowAll_Click"Exit Sub
End SubVarious procedures were then added to deal with saving to the database the comments, contacts, and attachments records displayed on the tabs of the form. For example, theSaveComments procedure is responsible for removing all current comments in the database for the current project and then saving all comments in the list to the database. The delete andinsert operations are performed because using these procedures is easier than keeping track of which comment records were changed, which ones were inserted, and which ones weredeleted. Such a delete and reinsert operation is not appropriate in all circumstances. In the current situation, however, it works very well.Sub SaveComments()
On Error GoTo HandleError
Dim strSQLStatement As String Dim intId As Integer Dim strComment As String Dim intCounter
'remove all current comments in database for this project strSQLStatement = BuildSQLDeleteProjectsComments(objProjects.ProjectId)
ProcessUpdate (strSQLStatement)
'add back all comments based on current list (easier than tracking 'changes, inserts, and deletes) For intCounter = 0 To lstComments.ListCount - 1 intId = objProjects.ProjectId strComment = lstComments.Column(0, intCounter) strSQLStatement = BuildSQLInsertProjectsComments(intId, strComment) ProcessUpdate (strSQLStatement) Next intCounter
Exit Sub
HandleError: GeneralErrorHandler Err.Number, Err.Description, PROJECTS_FORM, _"SaveComments"
Exit Sub
End SubTo f inish off the code for frmProjects, we added a RefreshContacts procedure that is called whenever the user clicks the button to add the contact to the current project. This featureensures that the contacts tab is populated with the revised contact information.Sub RefreshContacts()
On Error GoTo HandleError
Beginning Access 2007 VBA
261 / 344

On Error GoTo HandleError
'populate the recordset for tab 2 Set rsContacts = New ADODB.Recordset Set rsContacts = objProjects.RetrieveContacts(objProjects.ProjectId) PopulateListFromRecordset Me.lstContacts, rsContacts, 7 rsContacts.Close
Exit Sub
HandleError: GeneralErrorHandler Err.Number, Err.Description, PROJECTS_FORM, _ "RefreshContacts"
Exit Sub
End Sub
The Contacts Form
The Contacts form, called frmContacts, is shown in Figure 13-27, so you can refresh your memory as to what it looks like. You are now going to add the code to implement thefunctionality of this form.
Figure 13-27
Try It Out-Writing Code for the frmContacts Form
You’re in the home stretch now. This is the last part of the application. You will now write the code behind the frmContacts form to f inish the application.1. Open the frmContacts form and select the Form_Load event for the form to bring up the Visual Basic Editor. Add the following code to the form:
Private Sub Form_Load()
On Error GoTo HandleError
Set objContacts = New clsContacts Set rsContacts = New ADODB.Recordset
'not in add mode blnAddMo de = False
intCurrContactRecord = 0
Set rsContacts = objContacts.RetrieveContacts 'if the recordset is empty
If rsContacts.BOF And rsContacts.EOF Then Exit Sub Else 'populate the object with values in the recordset objContacts.PopulatePropertiesFromRecordset rsContacts Call MoveToFirstRecord(intCurrContactRecord, rsContacts, _ objContacts, blnAddMode) 'populate the controls on the form with the current record Call PopulateContactsControls End If Exit Sub
HandleError: GeneralErrorHandler Err.Number, Err.Description, CONTACTS_FORM, "Form_Load" Exit Sub
End Sub2. Add the following to the General Declarations section of the frmContacts form:
Option Compare DatabaseOption ExplicitDim blnAddMode As BooleanDim rsContacts As ADODB.RecordsetDim objContacts As clsContactsConst CONTACTS_FORM As String = "frmContacts"Dim intCurrContactRecord As Integer
3. Add the following event procedure to the frmContacts form:
Private Sub cmdAddToProject_Click()
On Error GoTo HandleError
Dim strSQLStatement As String
Beginning Access 2007 VBA
262 / 344
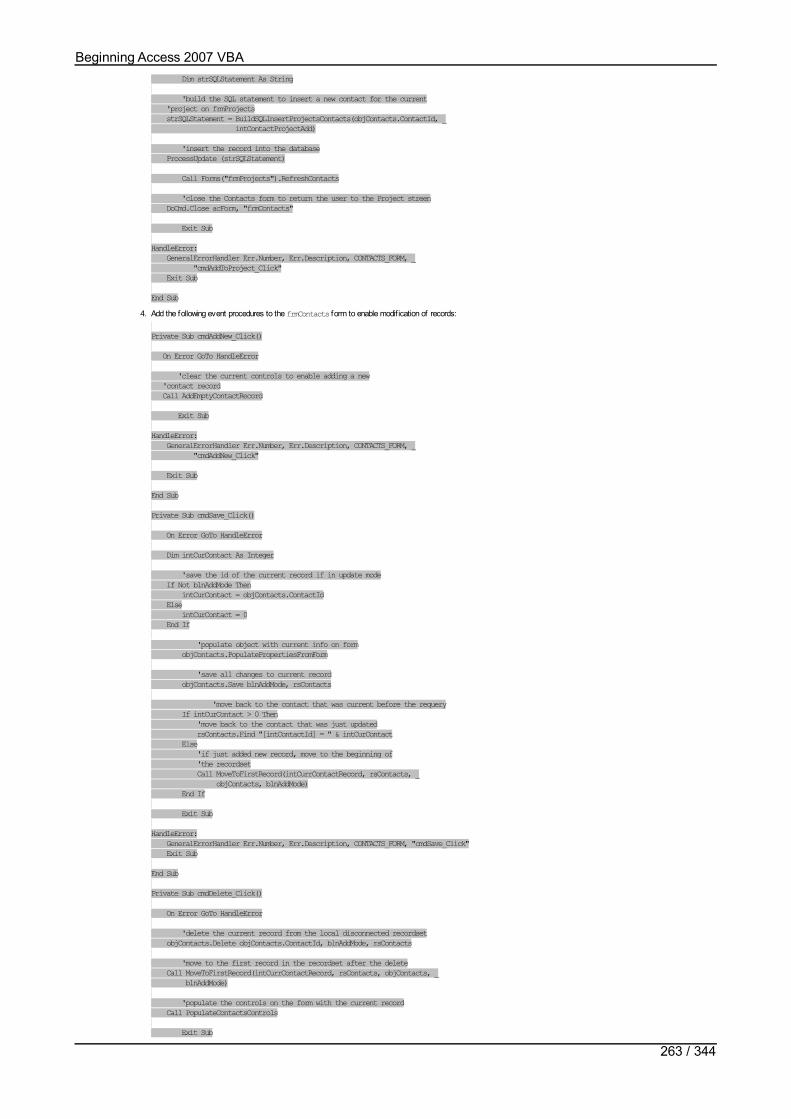
Dim strSQLStatement As String
'build the SQL statement to insert a new contact for the current 'project on frmProjects strSQLStatement = BuildSQLInsertProjectsContacts(objContacts.ContactId, _ intContactProjectAdd)
'insert the record into the database ProcessUpdate (strSQLStatement)
Call Forms("frmProjects").RefreshContacts
'close the Contacts form to return the user to the Project streen DoCmd.Close acForm, "frmContacts"
Exit Sub
HandleError: GeneralErrorHandler Err.Number, Err.Description, CONTACTS_FORM, _ "cmdAddToProject_Click" Exit Sub
End Sub4. Add the following event procedures to the frmContacts form to enable modif ication of records:
Private Sub cmdAddNew_Click()
On Error GoTo HandleError
'clear the current controls to enable adding a new 'contact record Call AddEmptyContactRecord
Exit Sub
HandleError: GeneralErrorHandler Err.Number, Err.Description, CONTACTS_FORM, _ "cmdAddNew_Click"
Exit Sub
End Sub
Private Sub cmdSave_Click()
On Error GoTo HandleError
Dim intCurContact As Integer
'save the id of the current record if in update mode If Not blnAddMode Then intCurContact = objContacts.ContactId Else intCurContact = 0 End If
'populate object with current info on form objContacts.PopulatePropertiesFromForm
'save all changes to current record objContacts.Save blnAddMode, rsContacts
'move back to the contact that was current before the requery If intCurContact > 0 Then 'move back to the contact that was just updated rsContacts.Find "[intContactId] = " & intCurContact Else 'if just added new record, move to the beginning of 'the recordset Call MoveToFirstRecord(intCurrContactRecord, rsContacts, _ objContacts, blnAddMode) End If
Exit Sub
HandleError: GeneralErrorHandler Err.Number, Err.Description, CONTACTS_FORM, "cmdSave_Click" Exit Sub
End Sub
Private Sub cmdDelete_Click()
On Error GoTo HandleError
'delete the current record from the local disconnected recordset objContacts.Delete objContacts.ContactId, blnAddMode, rsContacts
'move to the first record in the recordset after the delete Call MoveToFirstRecord(intCurrContactRecord, rsContacts, objContacts, _ blnAddMode)
'populate the controls on the form with the current record Call PopulateContactsControls
Exit Sub
Beginning Access 2007 VBA
263 / 344

HandleError: GeneralErrorHandler Err.Number, Err.Description, CONTACTS_FORM, _ "cmdDelete_Click" Exit Sub
End Sub5. Add the following event procedures to the frmContacts form that navigates through the records:
Private Sub cmdMoveFirst_Click()
On Error GoTo HandleError
'move to the first record in the local disconnected recordset Call MoveToFirstRecord(intCurrContactRecord, rsContacts, _ objContacts, blnAddMode)
'populate the controls on the form with the current record Call PopulateContactsControls
Exit Sub
HandleError: GeneralErrorHandler Err.Number, Err.Description, CONTACTS_FORM, _ "cmdMoveFirst_Click"
Exit Sub
End Sub
Private Sub cmdMoveLast_Click()
On Error GoTo HandleError
'move to the last record in the local disconnected recordset Call MoveToLastRecord(intCurrContactRecord, rsContacts, _ objContacts, blnAddMode)
'populate the controls on the form with the current record Call PopulateContactsControls
Exit Sub
HandleError: GeneralErrorHandler Err.Number, Err.Description, CONTACTS_FORM, _ "cmdMoveLast_Click"
Exit Sub
End Sub
Private Sub cmdMoveNext_Click()
On Error GoTo HandleError
'move to the next record in the local disconnected recordset Call MoveToNextRecord(intCurrContactRecord, rsContacts, objContacts, _ blnAddMode)
'populate the controls on the form with the current record Call PopulateContactsControls
Exit Sub
HandleError: GeneralErrorHandler Err.Number, Err.Description, CONTACTS_FORM, _ "cmdMoveNext_Click" Exit Sub
End Sub
Private Sub cmdMovePrevious_Click()
On Error GoTo HandleError
'move to the previous record in the local disconnected recordset Call MoveToPreviousRecord(intCurrContactRecord, rsContacts, _ objContacts, blnAddMode)
'populate the controls on the form with the current record Call PopulateContactsControls Exit Sub
HandleError: GeneralErrorHandler Err.Number, Err.Description, CONTACTS_FORM, _ "cmdMovePrevious_Click" Exit Sub
End Sub6. Add the following AddEmptyContactRecord procedure to the frmContacts form:
Sub AddEmptyContactRecord()
On Error GoTo HandleError
'set add mode to true blnAddMode = True
Beginning Access 2007 VBA
264 / 344

blnAddMode = True
'clear the current values in the contacts object objContacts.ClearObject
'clear the current controls on the form so the 'user can fill in values for the new record Call ClearContactsControls
Exit Sub
HandleError: GeneralErrorHandler Err.Number, Err.Description, CONTACTS_FORM, _ "AddEmptyContactRecord" Exit Sub
End Sub7. Add the following PopulateContactsControls procedure to the frmContacts form:
Sub PopulateContactsControls()
On Error GoTo HandleError
'Populate the controls on the Contacts form with the values of the 'current record in the contacts object. If Not rsContacts.BOF And Not rsContacts.EOF Then Me.txtLName = objContacts.LastName Me.txtFName = objContacts.FirstName Me.txtMName = objContacts.MiddleName Me.txtCompany = objContacts.Company Me.txtAddress1 = objContacts.Address1 Me.txtAddress2 = objContacts.Address2 Me.txtCity = objContacts.City Me.txtRegion = objContacts.Region Me.txtPostalCode = objContacts.PostalCode Me.txtWorkPhone = objContacts.WorkPhone Me.txtHomePhone = objContacts.HomePhone Me.txtCellPhone = objContacts.CellPhone Me.txtEmail = objContacts.Email
'display the record count on the form lblRecordNum.Caption = "Record " & intCurrContactRecord & " Of " & _ rsContacts.RecordCount
ElseIf rsContacts.BOF Then 'past beginning of recordset so move to first record Call MoveToFirstRecord(intCurrContactRecord, rsContacts, _ objContacts, blnAddMode) ElseIf rsContacts.EOF Then 'past end of recordset so move back to last record Call MoveToLastRecord(intCurrContactRecord, rsContacts, _ objContacts, blnAddMode)
End If
Exit Sub
HandleError: GeneralErrorHandler Err.Number, Err.Description, CONTACTS_FORM, _ "PopulateContactsControls" Exit Sub
End Sub8. Add the following ClearContactsControls procedure to the frmContacts form:
Sub ClearContactsControls()
On Error GoTo HandleError
'clear the values in the controls on the form
Me.txtLName = "" Me.txtFName = "" Me.txtMName = ""
Me.txtCompany = "" Me.txtAddress1 = "" Me.txtAddress2 = "" Me.txtCity = "" Me.txtRegion = "" Me.txtPostalCode = "" Me.txtWorkPhone = "" Me.txtHomePhone = "" Me.txtCellPhone = "" Me.txtEmail = ""
Exit Sub
HandleError: GeneralErrorHandler Err.Number, Err.Description, CONTACTS_FORM, _ "ClearContactsControls" Exit Sub
End Sub9. Add the following Form_Unload event to the frmContacts form:
Beginning Access 2007 VBA
265 / 344
Private Sub Form_Unload(Cancel As Integer)
On Error GoTo HandleError
'close the recordset and free the memory rsContacts.Close Set rsContacts =Nothing
Exit Sub
HandleError: GeneralErrorHandler Err.Number,Err.Description,CONTACTS_FORM,_"Form_Unload" Exit Sub
End Sub
10. Congratulations - that’s all the code! Now take time to resolve any typographical errors, if you have not done so already. The next section will give you a tour of the mostinteresting features of the application.
How It Works
The last set of code you added for the project was for the frmContacts form. In the Form_Load event, you added code to initialize the form, for example, populating the contacts recordsetwith one or all contacts records:Private Sub Form_Load()
On Error GoTo HandleError
Set objContacts =New clsContacts Set rsContacts =New ADODB.Recordset
'not in add mode blnAddMode =False intCurrContactRecord =0
Set rsContacts =objContacts.RetrieveContacts
'if the recordset is empty If rsContacts.BOF And rsContacts.EOF Then Exit Sub Else 'populate the object with values in the recordset objContacts.PopulatePropertiesFromRecordset rsContacts
Call MoveToFirstRecord(intCurrContactRecord,rsContacts,_
objContacts, blnAddMode)
'populate the controls on the form with the current record Call PopulateContactsControls End If Exit Sub
HandleError: GeneralErrorHandler Err.Number, Err.Description, CONTACTS_FORM, "Form_Load" Exit Sub
End SubYou also added the cmdAddToProject_Click event that is responsible for adding the selected contact to the current project record:Private Sub cmdAddToProject_Click()
On Error GoTo HandleError
Dim strSQLStatement As String 'build the SQL statement to insert a new contact for the current 'project on frmProjects strSQLStatement = BuildSQLInsertProjectsContacts(objContacts.ContactId, _ intContactProjectAdd)
'insert the record into the database ProcessUpdate (strSQLStatement)
Call Forms("frmProjects").RefreshContacts
'close the Contacts form to return the user to the Project streen DoCmd.Close acForm, "frmContacts"
Exit SubHandleError: GeneralErrorHandler Err.Number, Err.Description, CONTACTS_FORM, _ "cmdAddToProject_Click"
Exit Sub
End SubSimilarly to what you did with frmProjects, you also added event procedures for the cmdAddNew, cmdSave, and cmdDelete buttons. For example, you added the cmdAddNew_Click eventto put the form in add mode to allow the user to add a new contact to the database:Private Sub cmdAddNew_Click()
On Error GoTo HandleError
'clear the current controls to enable adding a new 'contact record Call AddEmptyContactRecord
Beginning Access 2007 VBA
266 / 344

Call AddEmptyContactRecord
Exit Sub
HandleError: GeneralErrorHandler Err.Number, Err.Description, CONTACTS_FORM, _ "cmdAddNew_Click"
Exit Sub
End SubJust as you did with the frmProjects form, you also added event procedures for navigating through the records. For example, the cmdMoveFirst_Click event moves to the f irst record inthe local disconnected recordset and populates the controls on the form with the current record:Private Sub cmdMoveFirst_Click()
On Error GoTo HandleError
'move to the first record in the local disconnected recordset Call MoveToFirstRecord(intCurrContactRecord, rsContacts, _ objContacts, blnAddMode)
'populate the controls on the form with the current record Call PopulateContactsControls
Exit Sub
HandleError: GeneralErrorHandler Err.Number, Err.Description, CONTACTS_FORM, _ "cmdMoveFirst_Click" Exit Sub
End SubYou also created procedures for adding an empty contact record and for clearing the contacts controls on the form. Similarly, you added a procedure called PopulateContactsControls topopulate the controls on the frmContacts form with the values of the current record in the objContacts object.Sub PopulateContactsControls()
On Error GoTo HandleError
'Populate the controls on the Contacts form with the values of the 'current record in the contacts object. If Not rsContacts.BOF And Not rsContacts.EOF Then Me.txtLName = objContacts.LastName Me.txtFName = objContacts.FirstName Me.txtMName = objContacts.MiddleName Me.txtCompany = objContacts.Company Me.txtAddress1 = objContacts.Address1 Me.txtAddress2 = objContacts.Address2 Me.txtCity = objContacts.City Me.txtRegion = objContacts.Region Me.txtPostalCode = objContacts.PostalCode Me.txtWorkPhone = objContacts.WorkPhone Me.txtHomePhone = objContacts.HomePhone Me.txtCellPhone = objContacts.CellPhone Me.txtEmail = objContacts.Email
'display the record count on the form lblRecordNum.Caption = "Record " & intCurrContactRecord & " Of " & _ rsContacts.RecordCount
ElseIf rsContacts.BOF Then 'past beginning of recordset so move to first record Call MoveToFirstRecord(intCurrContactRecord, rsContacts, _ objContacts, blnAddMode)
ElseIf rsContacts.EOF Then 'past end of recordset so move back to last record Call MoveToLastRecord(intCurrContactRecord, rsContacts, _ objContacts, blnAddMode)
End If
Exit Sub
HandleError: GeneralErrorHandler Err.Number, Err.Description, CONTACTS_FORM, _ "PopulateContactsControls" Exit Sub
End SubFinally, the Form_Unload event was added to the frmContacts form to close the rsContacts recordset and free the memory taken up by the recordset.Private Sub Form_Unload(Cancel As Integer)
On Error GoTo HandleError
'close the recordset and free the memory rsContacts.Close Set rsContacts = Nothing Exit Sub
HandleError: GeneralErrorHandler Err.Number, Err.Description, CONTACTS_FORM, "Form_Unload" Exit Sub
End Sub
Beginning Access 2007 VBA
267 / 344

Beginning Access 2007 VBA
268 / 344

Touring the Finished Project Tracker ApplicationNow comes the fun part. You get to see the benef it of that hard work. Let’s quickly look at each screen just to point out the most interesting features. You have already seen the screens inthe design process, but it is always fun to see them working with real data in them.
Tip You will have to click the Options button next to the security warning when you open the database and enable macros in the database, or none of the code you wrote will be allowedto execute.
For starters, Figure 13-28 illustrates a sample project record on the Project Tracker screen. It shows details about this sample Project Tracking project and also comments that have beenentered into the list on the f irst tab.
Figure 13-28
Figure 13-29 shows some contacts for the current project. You can view information such as name, phone numbers, and e-mail address. If you click the e-mail button, you will see a screensimilar to that shown in Figure 13-30 with the e-mail address of the selected contact already f illed in. The capability to integrate e-mail into your applications is really slick and will impressmany users. You can also consult Chapter 7 on exporting and Chapter 10 on automation for more information on e-mail integration, for example, through Outlook.
Figure 13-29
Figure 13-30
On the other hand, if you select the View Details for Selected Contact button, the Contacts screen opens with the record f iltered to only the current one. This is shown in Figure 13-31.
Beginning Access 2007 VBA
269 / 344

Figure 13-31
If you want to manage contacts in general, add a contact to the existing project, or delete contacts from the database altogether, you should select the Add/Manage Contacts button shownin Figure 13-29. Figure 13-30 illustrates opening the Contacts form in general and, as you can see, more than just the one record was in the f iltered version of Figure 13-31.
If you wish to add the current contact to the current project, select the Add Current Contact to Project button. You should not select this button if the current contact has already been addedto the current project. If you do, you will receive a database error message indicating the change could not be made because of a duplicate value problem.
Figure 13-32
Returning now to the Project Tracker form, if you click on the third tab that contains f ile attachment information, you can manage f ile attachments. The example screen in Figure 13-33shows two attachments that have been linked to the current project. One of them is a PDF document and the other is another Access database.
Figure 13-33
If you select a f ile attachment in the list and then select the Preview button, Access will actually open the f ile in the appropriate program. This feature is implemented using an external DLLfunction call to SHELLEXECUTE. Figure 13-34 shows what happens when you select the option to preview the example selected in the list shown in Figure 13-33.
Figure 13-34
Beginning Access 2007 VBA
270 / 344
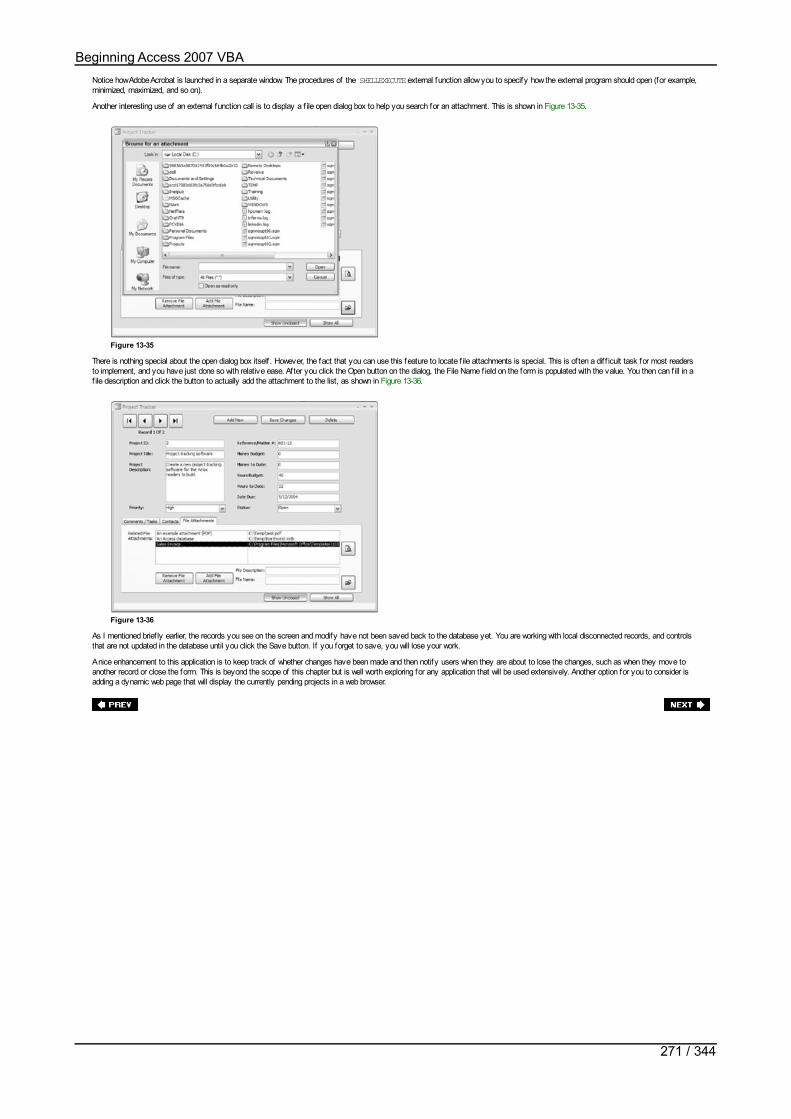
Notice how Adobe Acrobat is launched in a separate window. The procedures of the SHELLEXECUTE external function allow you to specify how the external program should open (for example,minimized, maximized, and so on).
Another interesting use of an external function call is to display a f ile open dialog box to help you search for an attachment. This is shown in Figure 13-35.
Figure 13-35
There is nothing special about the open dialog box itself . However, the fact that you can use this feature to locate f ile attachments is special. This is of ten a dif f icult task for most readersto implement, and you have just done so with relative ease. After you click the Open button on the dialog, the File Name f ield on the form is populated with the value. You then can f ill in af ile description and click the button to actually add the attachment to the list, as shown in Figure 13-36.
Figure 13-36
As I mentioned brief ly earlier, the records you see on the screen and modify have not been saved back to the database yet. You are working with local disconnected records, and controlsthat are not updated in the database until you click the Save button. If you forget to save, you will lose your work.
A nice enhancement to this application is to keep track of whether changes have been made and then notify users when they are about to lose the changes, such as when they move toanother record or close the form. This is beyond the scope of this chapter but is well worth exploring for any application that will be used extensively. Another option for you to consider isadding a dynamic web page that will display the currently pending projects in a web browser.
Beginning Access 2007 VBA
271 / 344

SummaryThe fact that you have made it to the end of the chapter is worth a pat on the back. This was the most complicated chapter so far, both in topic and in sheer volume. Building Accessapplications in many ways can be quite complex. I hope you have also realized just how powerful Access can be as a development tool and how using it to implement some really slickfeatures is easier than you thought.
At this point, you should have a much better understanding of the concepts presented in earlier chapters, especially the more complicated ones. Having a practical example is alwaysuseful. Just to make sure you get the full value out of the hard-earned money you spent on this book, I’m also including a second case study that deals with SQL Server so that you canget some experience with Access projects and SQL Server itself . Although the second case study uses SQL Server as the database, you can learn much that you can apply to otherdatabases as well. Even if you are not a SQL Server database user, you will still solidify your understanding of the many programming concepts you’ve explored throughout the book.
Beginning Access 2007 VBA
272 / 344

Chapter 14: Case Study 2-Customer Service Application
OverviewThis chapter is the second of two case studies that will illustrate all the concepts covered to this point using a comprehensive real-world example. With the f irst case study under your belts,you now build a client-server customer service application with SQL Server storing the database and Access providing the user interface and business logic. This process includes:
Using Access data projects with SQL Server databases
Creating and executing stored procedures with and without parameters
Creating search screens that dynamically build SQL statements from criteria entered by the user
You will create the customer service application from start to f inish. For your convenience, I have included the Access project f ile and a text f ile containing the SQL stored procedures sothat you can download all the source code from wrox.com. As in the earlier case study, I recommend that you work through the chapter yourself before using the source code I haveprovided.
For the sake of clarity, a “How It Works” section for the entire application is included at the end of this chapter.
Beginning Access 2007 VBA
273 / 344
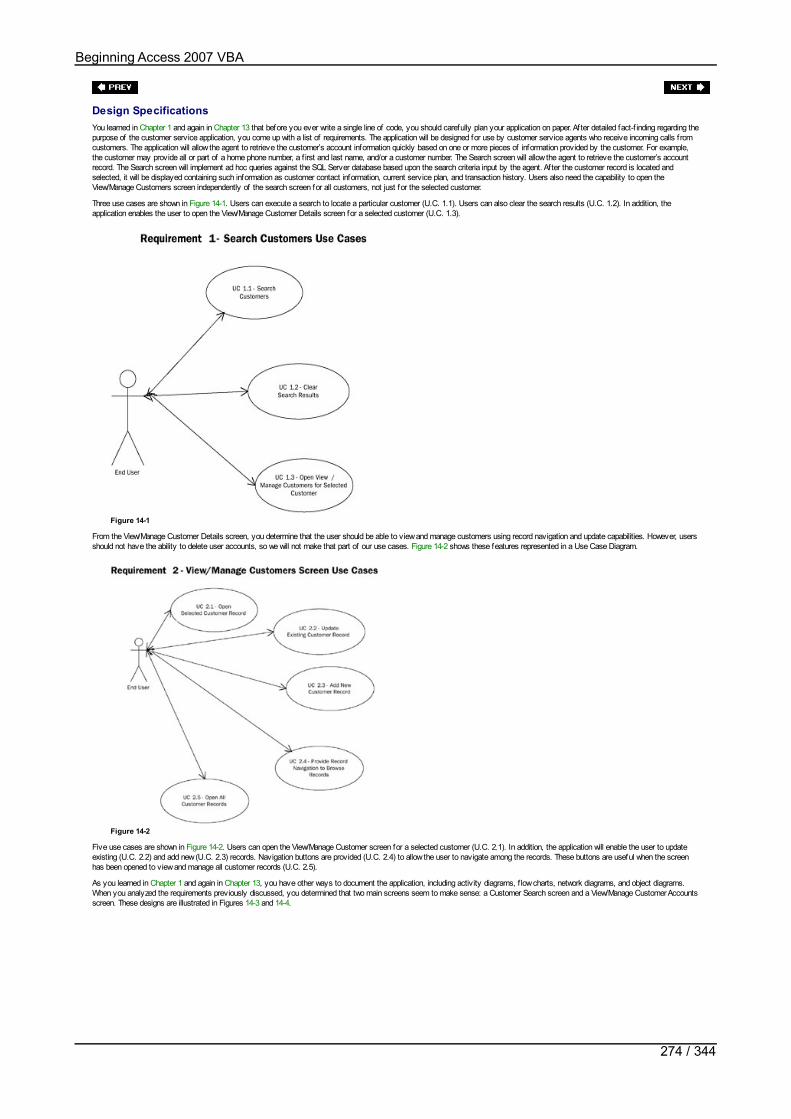
Design SpecificationsYou learned in Chapter 1 and again in Chapter 13 that before you ever write a single line of code, you should carefully plan your application on paper. After detailed fact-f inding regarding thepurpose of the customer service application, you come up with a list of requirements. The application will be designed for use by customer service agents who receive incoming calls f romcustomers. The application will allow the agent to retrieve the customer’s account information quickly based on one or more pieces of information provided by the customer. For example,the customer may provide all or part of a home phone number, a f irst and last name, and/or a customer number. The Search screen will allow the agent to retrieve the customer’s accountrecord. The Search screen will implement ad hoc queries against the SQL Server database based upon the search criteria input by the agent. After the customer record is located andselected, it will be displayed containing such information as customer contact information, current service plan, and transaction history. Users also need the capability to open theView/Manage Customers screen independently of the search screen for all customers, not just for the selected customer.
Three use cases are shown in Figure 14-1. Users can execute a search to locate a particular customer (U.C. 1.1). Users can also clear the search results (U.C. 1.2). In addition, theapplication enables the user to open the View/Manage Customer Details screen for a selected customer (U.C. 1.3).
Figure 14-1
From the View/Manage Customer Details screen, you determine that the user should be able to view and manage customers using record navigation and update capabilities. However, usersshould not have the ability to delete user accounts, so we will not make that part of our use cases. Figure 14-2 shows these features represented in a Use Case Diagram.
Figure 14-2
Five use cases are shown in Figure 14-2. Users can open the View/Manage Customer screen for a selected customer (U.C. 2.1). In addition, the application will enable the user to updateexisting (U.C. 2.2) and add new (U.C. 2.3) records. Navigation buttons are provided (U.C. 2.4) to allow the user to navigate among the records. These buttons are useful when the screenhas been opened to view and manage all customer records (U.C. 2.5).
As you learned in Chapter 1 and again in Chapter 13, you have other ways to document the application, including activity diagrams, f low charts, network diagrams, and object diagrams.When you analyzed the requirements previously discussed, you determined that two main screens seem to make sense: a Customer Search screen and a View/Manage Customer Accountsscreen. These designs are illustrated in Figures 14-3 and 14-4.
Beginning Access 2007 VBA
274 / 344
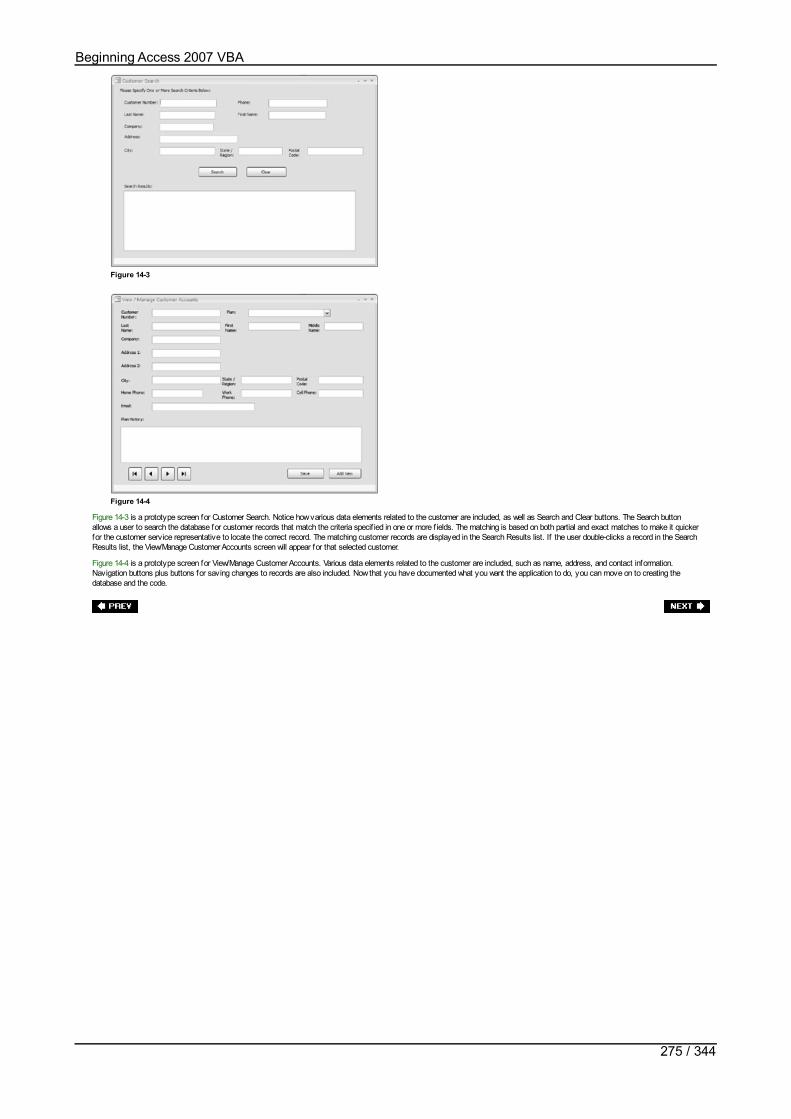
Figure 14-3
Figure 14-4
Figure 14-3 is a prototype screen for Customer Search. Notice how various data elements related to the customer are included, as well as Search and Clear buttons. The Search buttonallows a user to search the database for customer records that match the criteria specif ied in one or more f ields. The matching is based on both partial and exact matches to make it quickerfor the customer service representative to locate the correct record. The matching customer records are displayed in the Search Results list. If the user double-clicks a record in the SearchResults list, the View/Manage Customer Accounts screen will appear for that selected customer.
Figure 14-4 is a prototype screen for View/Manage Customer Accounts. Various data elements related to the customer are included, such as name, address, and contact information.Navigation buttons plus buttons for saving changes to records are also included. Now that you have documented what you want the application to do, you can move on to creating thedatabase and the code.
Beginning Access 2007 VBA
275 / 344

Building the Database and Database ObjectsIn this section, you will build the database in an Access project, which stores the data tables in SQL Server, and the user interface in the Access project itself .
Tip You should have a version of Microsoft SQL Server installed in order to create this application. Please refer to Chapter 10 for more information on obtaining and setting up SQLServer.
Try It Out-Building the CustomerServiceSQL Database
Now, let’s build the Access Project and SQL Server database that will store the data tables. You will also build the SQL Server stored procedures used by your application.1. Create a new Access project and SQL Server database by selecting the Off ice Button New. Click on the Browse button. Specify a f ile name of CustomerService, in
the Save As type drop-down list select the Microsoft Off ice Access Projects (*.adp) option, and press the OK button. You will be returned to the original window; press theCreate button.
2. Select “No” when Access asks you if you want to connect to an existing database.3. The Microsoft SQL Server Database Wizard will appear, as shown in Figure 14-5. Specify the name of the SQL Server database on your computer. Also, identify whether
Windows integrated security (Use Trusted Connection) should be used. If your SQL Server database is not set up for Windows integrated security, you must specify avalid SQL Server login ID and password. Finally, specify that the name of the SQL Server database is CustomerServiceSQL.
Figure 14-5
4. Click the Next button, and then the Finish button. The wizard shows a dialog box detailing its progress for a few seconds while it creates the new database and then returnsto the newly created Access project f ile.
5. The tables for this database are shown in Figures 14-6 through 14-9. Note that, for your convenience, some details about the primary key for each table are specif ied inthe Description f ield. In each table, you also need to add primary keys as indicated by the key icon.
Figure 14-6
Figure 14-7
Figure 14-8
Figure 14-9
6. Add the tblCustomers table, as shown in Figure 14-6. This table is the master customers table for storing customer information. Note that the f ields in this table map tothe f ields on the prototype screen for View/Manage Customer Accounts.
7. Add the tblCustomersPlanHistory table as shown in Figure 14-7. This table maps to the plan history f ields on the View/Manage Customer Accounts.
8. Add the tblPlans table, as shown in Figure 14-8.
9. Add the tblPlansStatus table, as shown in Figure 14-9.
10. Add the data shown in Figure 14-10 to the tblPlans table. To do so, open the Database window, and select the table from the list of tables.
Beginning Access 2007 VBA
276 / 344
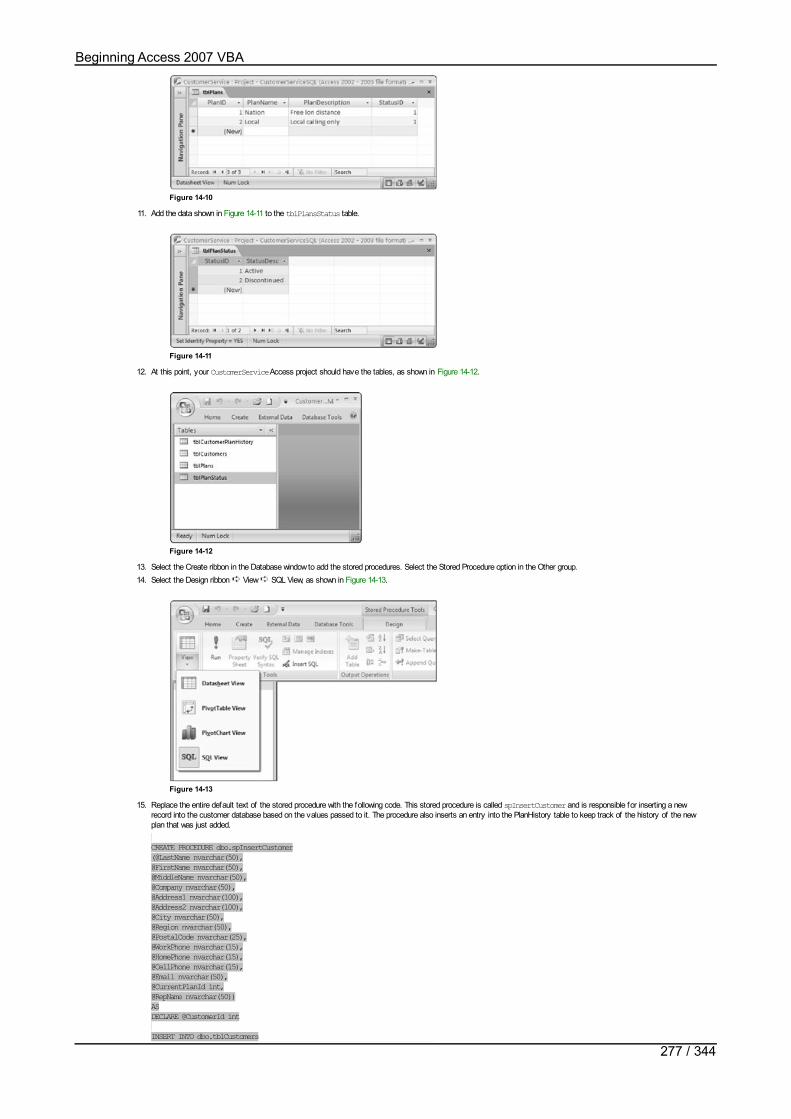
Figure 14-10
11. Add the data shown in Figure 14-11 to the tblPlansStatus table.
Figure 14-11
12. At this point, your CustomerService Access project should have the tables, as shown in Figure 14-12.
Figure 14-12
13. Select the Create ribbon in the Database window to add the stored procedures. Select the Stored Procedure option in the Other group.14. Select the Design ribbon View SQL View, as shown in Figure 14-13.
Figure 14-13
15. Replace the entire default text of the stored procedure with the following code. This stored procedure is called spInsertCustomer and is responsible for inserting a newrecord into the customer database based on the values passed to it. The procedure also inserts an entry into the PlanHistory table to keep track of the history of the newplan that was just added.
CREATE PROCEDURE dbo.spInsertCustomer(@LastName nvarchar(50),@FirstName nvarchar(50),@MiddleName nvarchar(50),@Company nvarchar(50),@Address1 nvarchar(100),@Address2 nvarchar(100),@City nvarchar(50),@Region nvarchar(50),@PostalCode nvarchar(25),@WorkPhone nvarchar(15),@HomePhone nvarchar(15),@CellPhone nvarchar(15),@Email nvarchar(50),@CurrentPlanId int,@RepName nvarchar(50))ASDECLARE @CustomerId int
INSERT INTO dbo.tblCustomers (LastName, FirstName, MiddleName, Company, Address1,
Beginning Access 2007 VBA
277 / 344

(LastName, FirstName, MiddleName, Company, Address1,Address2, City, Region, PostalCode, WorkPhone, HomePhone, CellPhone, Email, CurrentPlanID)VALUES (@LastName, @FirstName, @MiddleName, @Company, @Address1, @Address2,@City, @Region, @PostalCode, @WorkPhone, @HomePhone, @CellPhone, @Email, @CurrentPlanId)
SELECT @CustomerId = CustomerId FROM dbo.tblCustomers WHERE LastName = @LastNameand FirstName = @FirstName and CurrentPlanId = @CurrentPlanId
INSERT INTO tblCustomersPlanHistory (CustomerId, PlanId, RepName,DateChanged) VALUES (@CustomerId, @CurrentPlanId, @RepName, CURRENT_TIMESTAMP)
Tip Because there are multiple statements in the spInsertCustomer stored procedure, you will not be able to view the stored procedure graphically f rom the AccessDesigner.
16. The next time you open the procedure, the CREATE PROCEDURE statement will be changed to an ALTER PROCEDURE statement, as shown in Figure 14-14.
Figure 14-14
17. Add a stored procedure called spRetrieveAllCustomers. To do so, you can use either the designer or the SQL View. This procedure retrieves all customers from thedatabase, such as when the View/Manage Customer Accounts is opened independently of the Customer Search screen.
18. To use the designer to create spRetrieveAllCustomers, f rom the Add Tables dialog box, select the tblCustomers table and click the Add button. Then, f ill in the storedprocedure design as illustrated in Figure 14-15.
Figure 14-15
19. To specify the SQL code in Design ribbon View SQL View, add the following code:
CREATE PROCEDURE dbo.spRetrieveAllCustomersASSELECT dbo.tblCustomers.*FROM dbo.tblCustomers
20. Add the stored procedure spRetrieveCustomerHistory, as shown in the Designer window of Figure 14-16 or in the code listing that follows. This procedure retrieves thecustomer history record that will be displayed on the View/Manage Customer Account screen in the Plan History list box.
Figure 14-16
CREATE PROCEDURE dbo.spRetrieveCustomerHistory(@CustomerID int)ASSELECT dbo.tblCustomersPlanHistory.PlanID, dbo.tblPlans.PlanName,dbo.tblPlans.PlanDescription, dbo.tblCustomersPlanHistory.DateChanged, dbo.tblCustomersPlanHistory.RepNameFROM dbo.tblCustomersPlanHistory INNER JOIN dbo.tblPlans ON dbo.tblCustomersPlanHistory.PlanID =dbo.tblPlans.PlanIDWHERE (dbo.tblCustomersPlanHistory.CustomerID = @CustomerId)
Beginning Access 2007 VBA
278 / 344
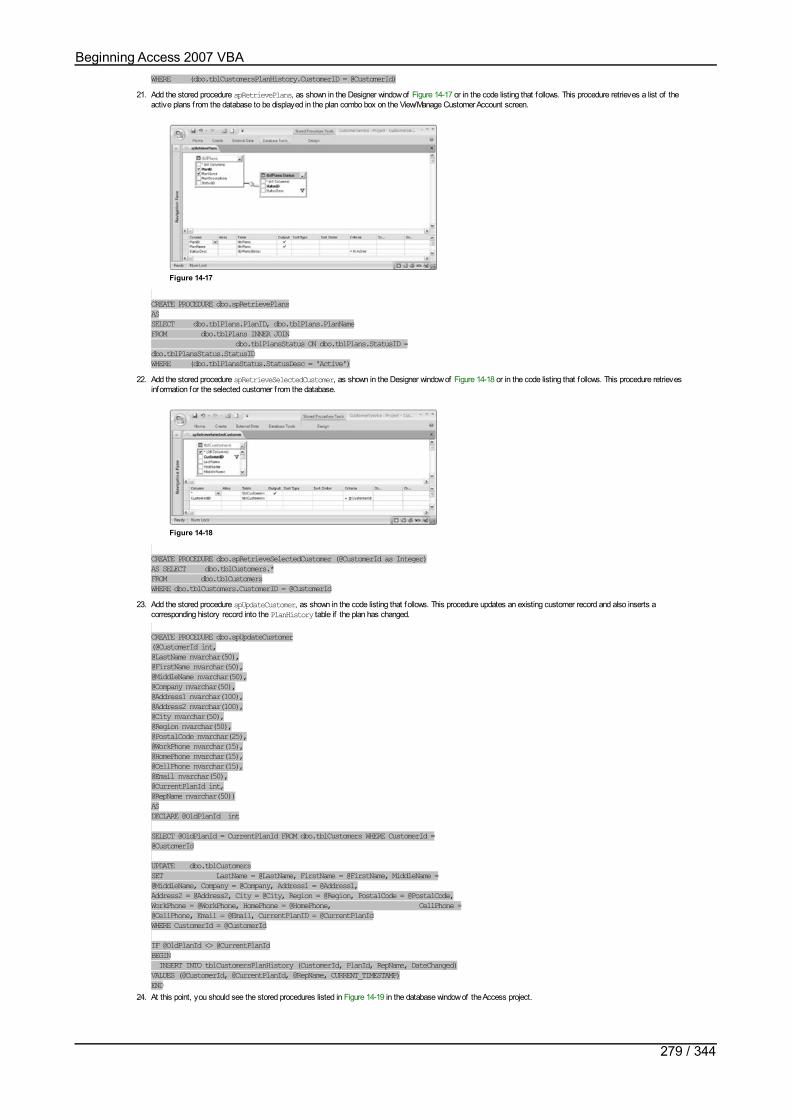
WHERE (dbo.tblCustomersPlanHistory.CustomerID = @CustomerId)21. Add the stored procedure spRetrievePlans, as shown in the Designer window of Figure 14-17 or in the code listing that follows. This procedure retrieves a list of the
active plans from the database to be displayed in the plan combo box on the View/Manage Customer Account screen.
Figure 14-17
CREATE PROCEDURE dbo.spRetrievePlansASSELECT dbo.tblPlans.PlanID, dbo.tblPlans.PlanNameFROM dbo.tblPlans INNER JOIN dbo.tblPlansStatus ON dbo.tblPlans.StatusID =dbo.tblPlansStatus.StatusIDWHERE (dbo.tblPlansStatus.StatusDesc = 'Active')
22. Add the stored procedure spRetrieveSelectedCustomer, as shown in the Designer window of Figure 14-18 or in the code listing that follows. This procedure retrievesinformation for the selected customer from the database.
Figure 14-18
CREATE PROCEDURE dbo.spRetrieveSelectedCustomer (@CustomerId as Integer)AS SELECT dbo.tblCustomers.*FROM dbo.tblCustomersWHERE dbo.tblCustomers.CustomerID = @CustomerId
23. Add the stored procedure spUpdateCustomer, as shown in the code listing that follows. This procedure updates an existing customer record and also inserts acorresponding history record into the PlanHistory table if the plan has changed.
CREATE PROCEDURE dbo.spUpdateCustomer(@CustomerId int,@LastName nvarchar(50),@FirstName nvarchar(50),@MiddleName nvarchar(50),@Company nvarchar(50),@Address1 nvarchar(100),@Address2 nvarchar(100),@City nvarchar(50),@Region nvarchar(50),@PostalCode nvarchar(25),@WorkPhone nvarchar(15),@HomePhone nvarchar(15),@CellPhone nvarchar(15),@Email nvarchar(50),@CurrentPlanId int,@RepName nvarchar(50))ASDECLARE @OldPlanId int
SELECT @OldPlanId = CurrentPlanId FROM dbo.tblCustomers WHERE CustomerId =@CustomerId
UPDATE dbo.tblCustomersSET LastName = @LastName, FirstName = @FirstName, MiddleName =@MiddleName, Company = @Company, Address1 = @Address1,Address2 = @Address2, City = @City, Region = @Region, PostalCode = @PostalCode,WorkPhone = @WorkPhone, HomePhone = @HomePhone, CellPhone =@CellPhone, Email = @Email, CurrentPlanID = @CurrentPlanIdWHERE CustomerId = @CustomerId
IF @OldPlanId <> @CurrentPlanIdBEGIN INSERT INTO tblCustomersPlanHistory (CustomerId, PlanId, RepName, DateChanged)VALUES (@CustomerId, @CurrentPlanId, @RepName, CURRENT_TIMESTAMP)END
24. At this point, you should see the stored procedures listed in Figure 14-19 in the database window of the Access project.
Beginning Access 2007 VBA
279 / 344
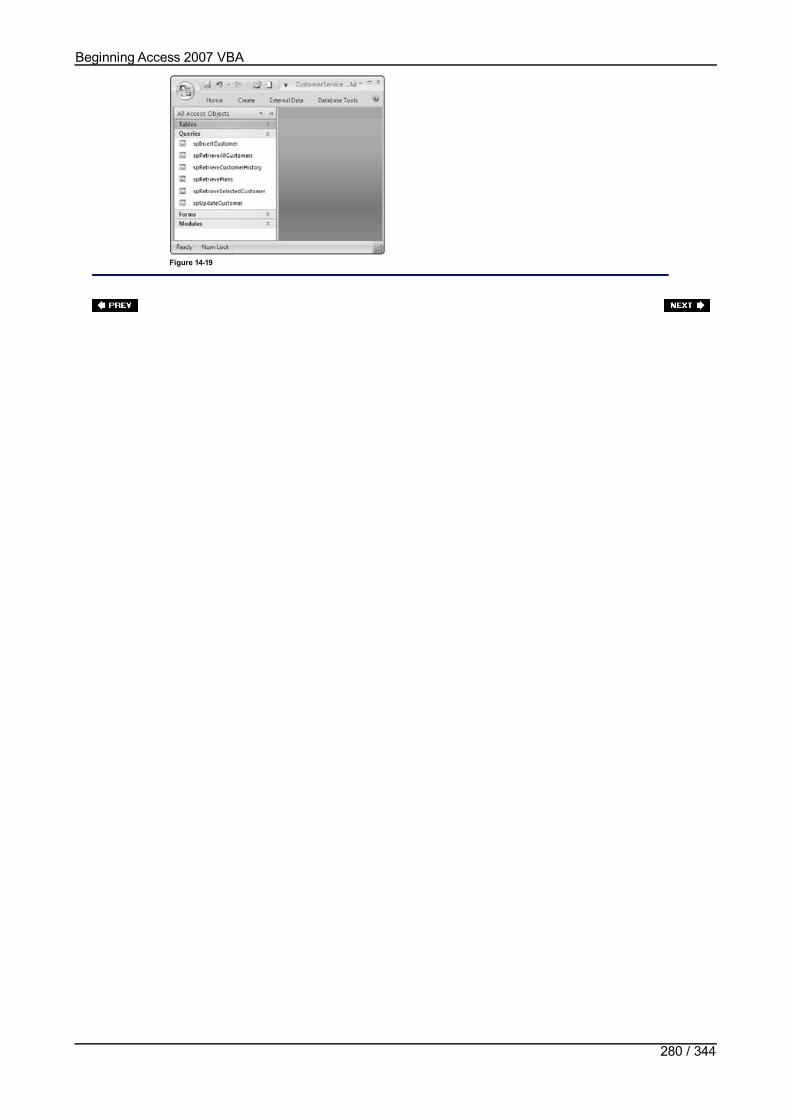
Figure 14-19
Beginning Access 2007 VBA
280 / 344
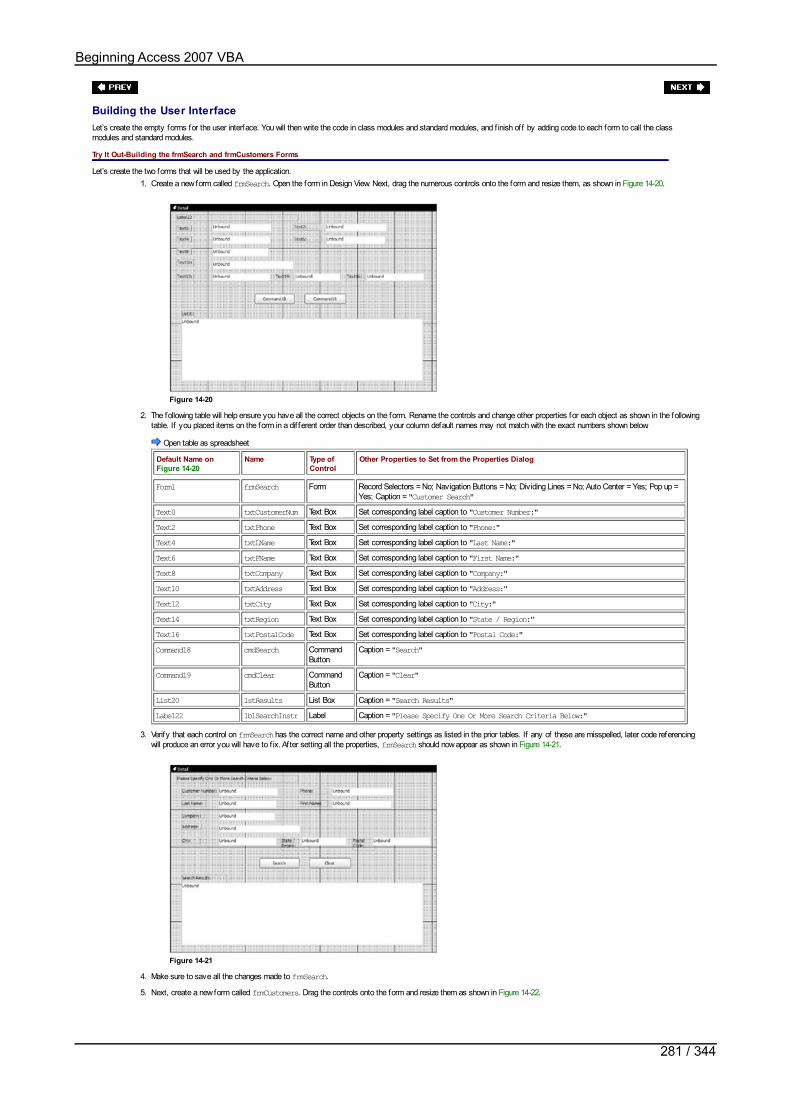
Building the User InterfaceLet’s create the empty forms for the user interface. You will then write the code in class modules and standard modules, and f inish off by adding code to each form to call the classmodules and standard modules.
Try It Out-Building the frmSearch and frmCustomers Forms
Let’s create the two forms that will be used by the application.1. Create a new form called frmSearch. Open the form in Design View. Next, drag the numerous controls onto the form and resize them, as shown in Figure 14-20.
Figure 14-20
2. The following table will help ensure you have all the correct objects on the form. Rename the controls and change other properties for each object as shown in the followingtable. If you placed items on the form in a dif ferent order than described, your column default names may not match with the exact numbers shown below.
Open table as spreadsheet
Default Name onFigure 14-20
Name Type ofControl
Other Properties to Set from the Properties Dialog
Form1 frmSearch Form Record Selectors = No; Navigation Buttons = No; Dividing Lines = No; Auto Center = Yes; Pop up =Yes; Caption = "Customer Search"
Text0 txtCustomerNum Text Box Set corresponding label caption to "Customer Number:"Text2 txtPhone Text Box Set corresponding label caption to "Phone:"Text4 txtLName Text Box Set corresponding label caption to "Last Name:"Text6 txtFName Text Box Set corresponding label caption to "First Name:"Text8 txtCompany Text Box Set corresponding label caption to "Company:"Text10 txtAddress Text Box Set corresponding label caption to "Address:"Text12 txtCity Text Box Set corresponding label caption to "City:"Text14 txtRegion Text Box Set corresponding label caption to "State / Region:"Text16 txtPostalCode Text Box Set corresponding label caption to "Postal Code:"Command18 cmdSearch Command
ButtonCaption = "Search"
Command19 cmdClear CommandButton
Caption = "Clear"
List20 1stResults List Box Caption = "Search Results"Labe122 1b1SearchInstr Label Caption = "Please Specify One Or More Search Criteria Below:"
3. Verify that each control on frmSearch has the correct name and other property settings as listed in the prior tables. If any of these are misspelled, later code referencingwill produce an error you will have to f ix. After setting all the properties, frmSearch should now appear as shown in Figure 14-21.
Figure 14-21
4. Make sure to save all the changes made to frmSearch.5. Next, create a new form called frmCustomers. Drag the controls onto the form and resize them as shown in Figure 14-22.
Beginning Access 2007 VBA
281 / 344

Figure 14-22
6. The following table will help ensure you have all the correct objects on the form. Rename the controls and change other properties for each object as shown in the table. Ifyou placed items on the form in a dif ferent order than described, your default names may not match exactly as shown below.
Open table as spreadsheet
Default Name (onFigure 14-22)
Name Type ofControl
Other Properties to Set from the Properties Dialog
Form2 frmCustomers Form Record Selectors = No; Navigation Buttons = No; Dividing Lines = No; Auto Center = Yes; Pop up =Yes; Caption = "View / Manage Customer Accounts"
Text0 txtCustomerNum Text Box Set corresponding label caption to "Customer Number:"Text2 txtLName Text Box Set corresponding label caption to "Last Name:"Text4 txtFName Text Box Set corresponding label caption to "First Name:"Text6 txtMName Text Box Set corresponding label caption to "Middle Name:"Text8 txtCompany Text Box Set corresponding label caption to "Company:"Text10 txtAddress1 Text Box Set corresponding label caption to "Address 1:"Text12 txtAddress2 Text Box Set corresponding label caption to "Address 2:"Text14 txtCity Text Box Set corresponding label caption to "City:"Text16 txtRegion Text Box Set corresponding label caption to "State / Region:"Text18 txtPostalCode Text Box Set corresponding label caption to "Postal Code:"Text20 txtHomePhone Text Box Set corresponding label caption to "Home Phone:"Text22 txtWorkPhone Text Box Set corresponding label caption to "Work Phone:"Text24 txtCellPhone Text Box Set corresponding label caption to "Cell Phone:"Text26 txtEmail Text Box Set corresponding label caption to "Email:"Combo28 cboPlan Combo
BoxSet corresponding label caption to "Plan:"
List30 1stPlanHistory List Box Set corresponding label caption to "Plan History:"Command32 cmdSave Command
ButtonCaption = "Save"
Command33 cmdAddNew CommandButton
Caption = "Add New"
Command34 cmdMoveFirst CommandButton
Caption = "Move First"; Picture = select Go To First 1 from list
Command35 cmdMovePrevious CommandButton
Caption = "Move Previous"; Picture = select Go To Previous 1 from list
Command36 cmdMoveNext CommandButton
Caption = "Move Next"; Picture = select Go To Next 1 from list
Command37 cmdMoveLast CommandButton
Caption = "Move Last"; Picture = select Go To Last 1 from list
7. After setting all the properties, frmCustomers should now appear as shown in Figure 14-23.
Figure 14-23
Beginning Access 2007 VBA
282 / 344
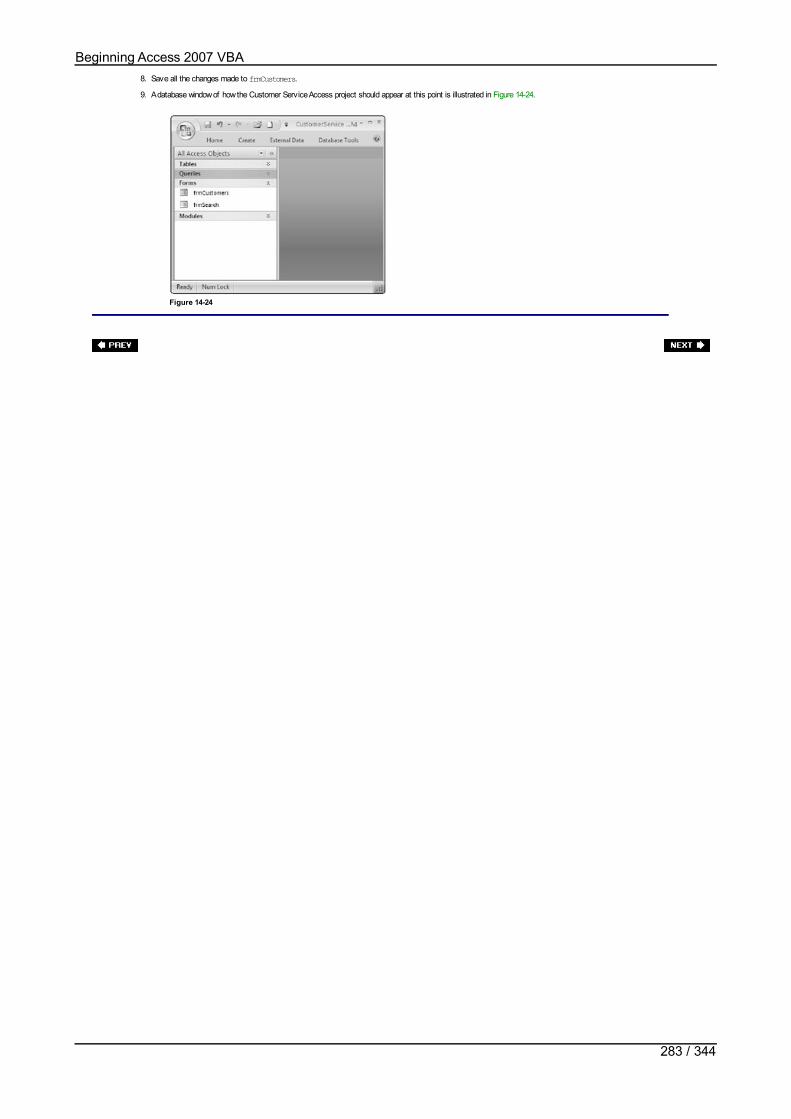
8. Save all the changes made to frmCustomers.9. A database window of how the Customer Service Access project should appear at this point is illustrated in Figure 14-24.
Figure 14-24
Beginning Access 2007 VBA
283 / 344
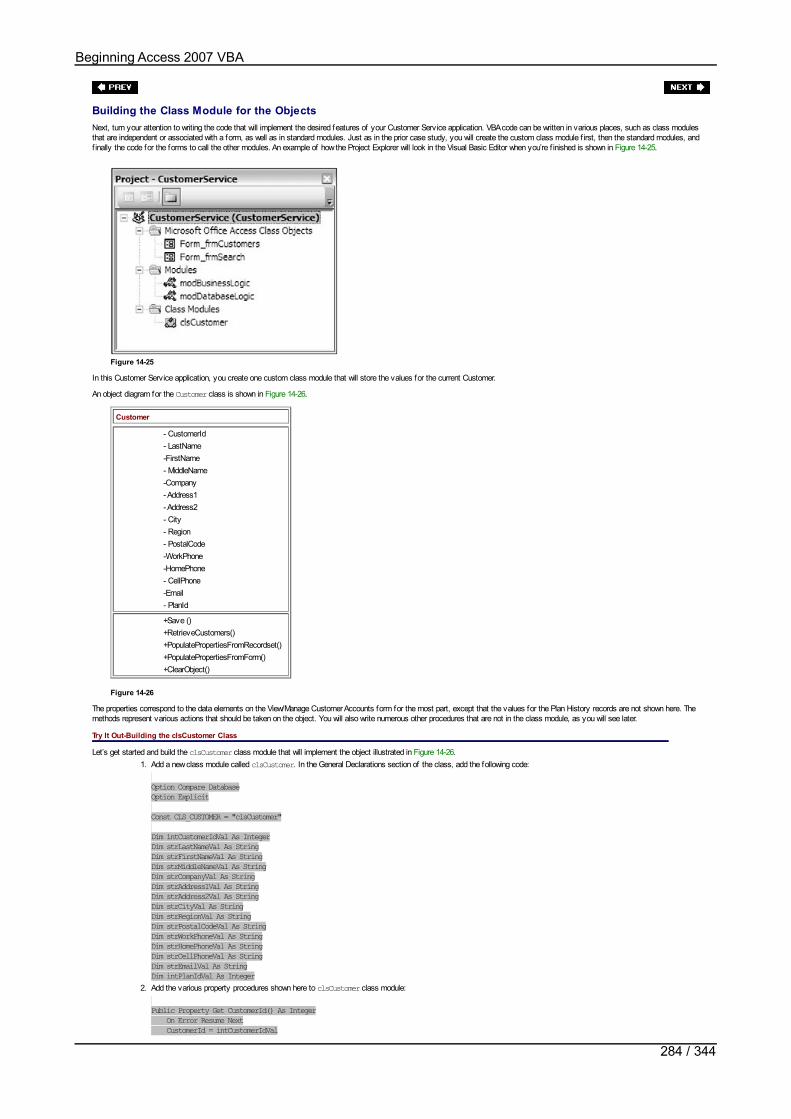
Building the Class Module for the ObjectsNext, turn your attention to writing the code that will implement the desired features of your Customer Service application. VBA code can be written in various places, such as class modulesthat are independent or associated with a form, as well as in standard modules. Just as in the prior case study, you will create the custom class module f irst, then the standard modules, andf inally the code for the forms to call the other modules. An example of how the Project Explorer will look in the Visual Basic Editor when you’re f inished is shown in Figure 14-25.
Figure 14-25
In this Customer Service application, you create one custom class module that will store the values for the current Customer.
An object diagram for the Customer class is shown in Figure 14-26.
Customer
- CustomerId- LastName-FirstName- MiddleName-Company- Address1- Address2- City- Region- PostalCode-WorkPhone-HomePhone- CellPhone-Email- PlanId
+Save ()+RetrieveCustomers()+PopulatePropertiesFromRecordset()+PopulatePropertiesFromForm()+ClearObject()
Figure 14-26
The properties correspond to the data elements on the View/Manage Customer Accounts form for the most part, except that the values for the Plan History records are not shown here. Themethods represent various actions that should be taken on the object. You will also write numerous other procedures that are not in the class module, as you will see later.
Try It Out-Building the clsCustomer Class
Let’s get started and build the clsCustomer class module that will implement the object illustrated in Figure 14-26.1. Add a new class module called clsCustomer. In the General Declarations section of the class, add the following code:
Option Compare DatabaseOption Explicit
Const CLS_CUSTOMER = "clsCustomer"
Dim intCustomerIdVal As IntegerDim strLastNameVal As StringDim strFirstNameVal As StringDim strMiddleNameVal As StringDim strCompanyVal As StringDim strAddress1Val As StringDim strAddress2Val As StringDim strCityVal As StringDim strRegionVal As StringDim strPostalCodeVal As StringDim strWorkPhoneVal As StringDim strHomePhoneVal As StringDim strCellPhoneVal As StringDim strEmailVal As StringDim intPlanIdVal As Integer
2. Add the various property procedures shown here to clsCustomer class module:
Public Property Get CustomerId() As Integer On Error Resume Next CustomerId = intCustomerIdValEnd Property
Beginning Access 2007 VBA
284 / 344

End PropertyPublic Property Let CustomerId(ByVal Value As Integer) On Error Resume Next intCustomerIdVal = ValueEnd Property
Public Property Get LastName() As String On Error Resume Next LastName = strLastNameValEnd PropertyPublic Property Let LastName(ByVal Value As String) On Error Resume Next strLastNameVal = ValueEnd Property
Public Property Get FirstName() As String On Error Resume Next FirstName = strFirstNameValEnd PropertyPublic Property Let FirstName(ByVal Value As String) On Error Resume Next strFirstNameVal = ValueEnd Property
Public Property Get MiddleName() As String On Error Resume Next MiddleName = strMiddleNameValEnd PropertyPublic Property Let MiddleName(ByVal Value As String) On Error Resume Next strMiddleNameVal = ValueEnd Property
Public Property Get Company() As String On Error Resume Next Company = strCompanyValEnd Property
Public Property Let Company(ByVal Value As String) On Error Resume Next strCompanyVal = ValueEnd Property
Public Property Get Address1() As String On Error Resume Next Address1 = strAddress1ValEnd PropertyPublic Property Let Address1(ByVal Value As String) On Error Resume Next strAddress1Val = ValueEnd Property
Public Property Get Address2() As String On Error Resume Next Address2 = strAddress2ValEnd PropertyPublic Property Let Address2(ByVal Value As String) On Error Resume Next strAddress2Val = ValueEnd Property
Public Property Get City() As String On Error Resume Next City = strCityValEnd PropertyPublic Property Let City(ByVal Value As String) On Error Resume Next strCityVal = ValueEnd Property
Public Property Get Region() As String On Error Resume Next Region = strRegionValEnd PropertyPublic Property Let Region(ByVal Value As String) On Error Resume Next strRegionVal = ValueEnd Property
Public Property Get PostalCode() As String On Error Resume Next PostalCode = strPostalCodeValEnd PropertyPublic Property Let PostalCode(ByVal Value As String) On Error Resume Next strPostalCodeVal = ValueEnd Property
Public Property Get WorkPhone() As String On Error Resume Next WorkPhone = strWorkPhoneValEnd PropertyPublic Property Let WorkPhone(ByVal Value As String) On Error Resume Next strWorkPhoneVal = ValueEnd Property
Beginning Access 2007 VBA
285 / 344

End PropertyPublic Property Get HomePhone() As String On Error Resume Next HomePhone = strHomePhoneValEnd PropertyPublic Property Let HomePhone(ByVal Value As String) On Error Resume Next strHomePhoneVal = ValueEnd Property
Public Property Get CellPhone() As String On Error Resume Next CellPhone = strCellPhoneValEnd PropertyPublic Property Let CellPhone(ByVal Value As String) On Error Resume Next strCellPhoneVal = ValueEnd Property
Public Property Get Email() As String On Error Resume Next Email = strEmailValEnd PropertyPublic Property Let Email(ByVal Value As String) On Error Resume Next strEmailVal = ValueEnd Property
Public Property Get PlanId() As Integer On Error Resume Next PlanId = intPlanIdValEnd PropertyPublic Property Let PlanId(ByVal Value As Integer) On Error Resume Next intPlanIdVal = ValueEnd Property
3. Add the RetrieveCustomers function shown here to the clsCustomer class module:
Function RetrieveCustomers() As ADODB.Recordset
On Error GoTo HandleError
Dim rsCust As New ADODB.Recordset
If intCustomerLookupId > 0 Then 'if form is being opened for selected customer from frmSearch Set rsCust = ExecuteSPRetrieveRS("spRetrieveSelectedCustomer", _ intCustomerLookupId) Else 'if form is being opened for all customer records Set rsCust = ExecuteSPRetrieveRS("spRetrieveAllCustomers") End If 'return the populated recordset Set RetrieveCustomers = rsCust Exit Function
HandleError: GeneralErrorHandler Err.Number, Err.Description, CLS_CUSTOMER, _ "RetrieveCustomers" Exit Function
End Function4. Add the PopulatePropertiesFromRecordset procedure shown here to the clsProjects class module:
Sub PopulatePropertiesFromRecordset(rsCust As ADODB.Recordset)
On Error GoTo HandleError 'Populate the object with the current record in the 'recordset Me.CustomerId = rsCust!CustomerId Me.LastName = FixNull(rsCust!LastName) Me.FirstName = FixNull(rsCust!FirstName) Me.MiddleName = FixNull(rsCust!MiddleName) Me.Company = FixNull(rsCust!Company) Me.Address1 = FixNull(rsCust!Address1) Me.Address2 = FixNull(rsCust!Address2) Me.City = FixNull(rsCust!City) Me.Region = FixNull(rsCust!Region) Me.PostalCode = FixNull(rsCust!PostalCode) Me.WorkPhone = FixNull(rsCust!WorkPhone) Me.HomePhone = FixNull(rsCust!HomePhone) Me.CellPhone = FixNull(rsCust!CellPhone) Me.Email = FixNull(rsCust!Email) Me.PlanId = rsCust!currentplanid Exit Sub
HandleError: GeneralErrorHandler Err.Number, Err.Description, CLS_CUSTOMER, _ "PopulatePropertiesFromRecordset" Exit Sub
End Sub5. Add the PopulatePropertiesFromForm procedure shown here to the clsCustomer class module:
Beginning Access 2007 VBA
286 / 344

Sub PopulatePropertiesFromForm()
On Error GoTo HandleError 'Populate the object with the current record in the 'form 'if the customernum field is not empty (e.g. updating record) If Forms("frmCustomers")!txtCustomerNum <> "" Then Me.CustomerId = Forms("frmCustomers")!txtCustomerNum Else 'adding new record so id not assigned yet Me.CustomerId = 0 End If Me.LastName = Forms("frmCustomers")!txtLName Me.FirstName = Forms("frmCustomers")!txtFName Me.MiddleName = Forms("frmCustomers")!txtMName Me.Company = Forms("frmCustomers")!txtCompany Me.Address1 = Forms("frmCustomers")!txtAddress1 Me.Address2 = Forms("frmCustomers")!txtAddress2 Me.City = Forms("frmCustomers")!txtCity Me.Region = Forms("frmCustomers")!txtRegion Me.PostalCode = Forms("frmCustomers")!txtPostalCode Me.WorkPhone = Forms("frmCustomers")!txtWorkPhone Me.HomePhone = Forms("frmCustomers")!txtHomePhone Me.CellPhone = Forms("frmCustomers")!txtCellPhone Me.Email = Forms("frmCustomers")!txtEmail Me.PlanId = Forms("frmCustomers")!cboPlan Exit Sub
HandleError: GeneralErrorHandler Err.Number, Err.Description, CLS_CUSTOMER, _ "PopulatePropertiesFromForm" Exit SubEnd Sub
6. Add the ClearObject procedure shown here to the clsCustomer class module:
Sub ClearObject()
On Error GoTo HandleError 'clear the values in the customer object Me.CustomerId = 0 Me.LastName = "" Me.FirstName = "" Me.MiddleName = "" Me.Company = ""
Me.Address1 = "" Me.Address2 = "" Me.City = "" Me.Region = "" Me.PostalCode = "" Me.WorkPhone = "" Me.HomePhone = "" Me.CellPhone = "" Me.Email = "" Me.PlanId = 0 Exit Sub
HandleError: GeneralErrorHandler Err.Number, Err.Description, CLS_CUSTOMER, _ "ClearObject" Exit Sub
End Sub7. Add the Save procedure shown here to the clsCustomer class module:
Sub Save(blnAddMode As Boolean, rsCust As ADODB.Recordset)
On Error GoTo HandleError
Dim strSPname As String
'if adding a new record If blnAddMode = True Then strSPname = "spInsertCustomer" Else 'if updating a record strSPname = "spUpdateCustomer" End If
'perform the insert or update Call ProcessUpdate(strSPname, Me, rsCust)
Exit Sub
HandleError: GeneralErrorHandler Err.Number, Err.Description, CLS_CUSTOMER, "Save" Exit Sub
End Sub8. Make sure to keep saving your changes periodically so they are not lost.
Beginning Access 2007 VBA
287 / 344

Beginning Access 2007 VBA
288 / 344

Building the Standard ModulesNow that you have created the properties and methods for the Customer objects, you are ready to begin writing the code in the standard modules.
Try It Out-Building the modBusinessLogic and modDatabaseLogic Modules
The modBusinessLogic module will contain business logic but will not contain any database access calls. The modDatabaseLogic module will contain calls that are specif ic to the database.Let’s create these modules.
1. Insert a new standard module called modBusinessLogic. Add the following code to the General Declarations of the module:
Option Compare DatabaseOption ExplicitConst BUS_LOGIC = "modBusinessLogic"Public intCustomerLookupId As Integer
2. Add the following FixNull function to the modBusinessLogic module:
Function FixNull(varIn As Variant) As String
'this procedure sets null values in the recordset'to a null string so an error does not occur when'trying to assign the value to a control for display
'if the value is null If IsNull(varIn) Then FixNull = "" Else 'return the value passed in FixNull = varIn End If
End Function3. Add the following PopulateListFromRecordset procedure to the modBusinessLogic module:
Sub PopulateListFromRecordset(lstList As ListBox, rsRecordset As _ ADODB.Recordset, intNumCols As Integer)
On Error GoTo HandleError
Dim intCounter As Integer Dim strItem As String
With lstList
.RowSource = "" .ColumnCount = intNumCols .RowSourceType = "Value List" End With
'add all of the values in the recordset to the list box
Do Until rsRecordset.EOF 'for each item in the current record, build string
For intCounter = 0 To intNumCols - 1 strItem = strItem & rsRecordset(intCounter).Value & ";" Next intCounter lstList.AddItem (strItem) strItem = "" rsRecordset.MoveNext Loop
Exit Sub
HandleError: GeneralErrorHandler Err.Number, Err.Description, BUS_LOGIC, _ "PopulateListFromRecordset" Exit SubEnd Sub
4. Add the following MoveToFirstRecord procedure to the modBusinessLogic module:
Sub MoveToFirstRecord(rsRecordset As ADODB.Recordset, objObject As Object, _ blnAddMode As Boolean)
On Error GoTo HandleError 'move to the first record in the local disconnected recordset If Not rsRecordset.BOF And Not rsRecordset.EOF Then rsRecordset.MoveFirst 'add code to populate object with new current record objObject.PopulatePropertiesFromRecordset rsRecordset blnAddMode = False End If Exit Sub HandleError: GeneralErrorHandler Err.Number, Err.Description, BUS_LOGIC, _ "MoveToFirstRecord" Exit Sub
End Sub5. Add the following MoveToLastRecord procedure to the modBusinessLogic module:
Sub MoveToLastRecord(rsRecordset As ADODB.Recordset, objObject As Object, _
Beginning Access 2007 VBA
289 / 344

Sub MoveToLastRecord(rsRecordset As ADODB.Recordset, objObject As Object, _ blnAddMode As Boolean)
On Error GoTo HandleError 'move to the last record in the local disconnected recordset If Not rsRecordset.BOF And Not rsRecordset.EOF Then rsRecordset.MoveLast
'add code to populate object with new current record objObject.PopulatePropertiesFromRecordset rsRecordset blnAddMode = False End If Exit Sub
HandleError: GeneralErrorHandler Err.Number, Err.Description, BUS_LOGIC, _ "MoveToLastRecord" Exit Sub
End Sub6. Add the following MoveToPreviousRecord procedure to the modBusinessLogic module:
Sub MoveToPreviousRecord(rsRecordset As ADODB.Recordset, objObject As Object, _ blnAddMode As Boolean) On Error GoTo HandleError 'move to the previous record in the local disconnected recordset 'if not already at the beginning If Not rsRecordset.BOF Then rsRecordset.MovePrevious blnAddMode = False 'make sure not past beginning of recordset now If Not rsRecordset.BOF Then 'add code to populate object with new current record objObject.PopulatePropertiesFromRecordset rsRecordset Else 'at beginning of recordset so move to next record rsRecordset.MoveNext End If End If Exit Sub
HandleError: GeneralErrorHandler Err.Number, Err.Description, BUS_LOGIC, _
"MoveToPreviousRecord" Exit Sub
End Sub7. Add the following MoveToNextRecord procedure to the modBusinessLogic module:
Sub MoveToNextRecord(rsRecordset As ADODB.Recordset, objObject As Object, _ blnAddMode As Boolean)
On Error GoTo HandleError 'move to the next record in the local disconnected recordset 'if not already at the end If Not rsRecordset.EOF Then rsRecordset.MoveNext blnAddMode = False 'make sure not past end of recordset If Not rsRecordset.EOF Then 'add code to populate object with new current record objObject.PopulatePropertiesFromRecordset rsRecordset Else 'at end of recordset so move back one rsRecordset.MovePrevious End If End If Exit Sub
HandleError: GeneralErrorHandler Err.Number, Err.Description, BUS_LOGIC, _ "MoveToNextRecord" Exit Sub
End Sub8. Add the following GeneralErrorHandler procedure to the modBusinessLogic module:
Public Sub GeneralErrorHandler(lngErrNumber As Long, strErrDesc As String, _ strModuleSource As String, strProcedureSource As String)
On Error Resume Next Dim strMessage As String 'build the error message string from the parameters passed in strMessage = "An error has occurred in the application." strMessage = strMessage & vbCrLf & "Error Number: " & lngErrNumber strMessage = strMessage & vbCrLf & "Error Description: " & strErrDesc strMessage = strMessage & vbCrLf & "Module Source: " & strModuleSource strMessage = strMessage & vbCrLf & "Procedure Source: " &strProcedureSource 'display the message to the user MsgBox strMessage, vbCritical Exit Sub
End Sub
Beginning Access 2007 VBA
290 / 344

End Sub9. Save your changes to the modBusinessLogic module.
10. Insert a new standard module called modDatabaseLogic. Add the following code to the General Declarations of the module:
Option Compare DatabaseOption ExplicitDim cnConn As ADODB.ConnectionDim strConnection As StringConst DB_LOGIC = "modDatabaseLogic"
11. Add the following OpenDbConnection procedure to the modDatabaseLogic module. You will need to modify the strConnection string to point to your SQL Serverdatabase. If you are not using integrated security, you must specify the user ID and password (User Id=sa; Password=password;) in place of the Integrated Securityoption (Integrated Security=SSPI;).
Sub OpenDbConnection()
On Error GoTo HandleError strConnection = "Provider=sqloledb;Data Source=goz_tablet1100\sqldev;" & _ "Integrated Security=SSPI;Initial Catalog=CustomerServiceSQL"
'create a new connection instance and open it using the connection string Set cnConn = New ADODB.Connection cnConn.Open strConnection Exit Sub
HandleError: GeneralErrorHandler Err.Number, Err.Description, DB_LOGIC, _ "OpenDbConnection" Exit Sub
End Sub12. Add the following CloseDbConnection procedure to the modDatabaseLogic module:
Sub CloseDbConnection() On Error GoTo HandleError 'close the database connection cnConn.Close Set cnConn = Nothing Exit Sub
HandleError: GeneralErrorHandler Err.Number, Err.Description, DB_LOGIC, _ "CloseDbConnection" Exit Sub
End Sub13. Add the following ProcessRecordset function to the modDatabaseLogic module:
Function ProcessRecordset(strSQLStatement As String) As ADODB.Recordset
On Error GoTo HandleError 'open the connection to the database Call OpenDbConnection 'create a new instance of a recordset Dim rsCont As New ADODB.Recordset 'set various properties of the recordset With rsCont 'specify a cursortype and lock type that will allow updates .CursorType = adOpenKeyset .CursorLocation = adUseClient .LockType = adLockBatchOptimistic 'populate the recordset based on SQL statement .Open strSQLStatement, cnConn 'disconnect the recordset .ActiveConnection = Nothing End With 'close the connection to the database Call CloseDbConnection 'return the recordset Set ProcessRecordset = rsCont Exit Function
HandleError: GeneralErrorHandler Err.Number, Err.Description, DB_LOGIC, _ "ProcessRecordset" Exit Function
End Function14. Add the following BuildSQLSelectFrom function to the modDatabaseLogic module:
Function BuildSQLSelectFrom() As String
On Error GoTo HandleError 'create SELECT FROM part of SQL Statement BuildSQLSelectFrom = "SELECT CustomerID, FirstName, LastName, " & _ " Company, Address1, City, Region, PostalCode, " & _ " HomePhone, WorkPhone, CellPhone FROM tblCustomers " Exit Function
HandleError: GeneralErrorHandler Err.Number, Err.Description, DB_LOGIC, _ "BuildSQLSelectFrom" Exit Function
Beginning Access 2007 VBA
291 / 344

End Function15. Add the following BuildSQLWhere function to the modDatabaseLogic module:
Function BuildSQLWhere(blnPriorWhere As Boolean, strPriorWhere As String, _ strValue As String, strDbFieldName As String) As String
On Error GoTo HandleError Dim strWhere As String If blnPriorWhere Then 'add to the existing where clause strWhere = strPriorWhere & " AND " Else 'create the where clause for the first time strWhere = " WHERE " End If If strDbFieldName = "Phone" Then 'search each of phone fields in the db for this value to see 'if exact match or starts with this value for any one of the 'phone fields strWhere = strWhere & "(HomePhone LIKE '" & PadQuotes(strValue) & "%'" & _ " OR WorkPhone LIKE '" & PadQuotes(strValue) & "%'" & _ " OR CellPhone LIKE '" & PadQuotes(strValue) & "%')" Else 'build where clause using LIKE so will find both exact 'matches and those that start with value input by user strWhere = strWhere & strDbFieldName & " LIKE '" & PadQuotes(strValue) & _ "%' " End If blnPriorWhere = True 'return where clause BuildSQLWhere = strWhere Exit Function
HandleError: GeneralErrorHandler Err.Number, Err.Description, DB_LOGIC, "BuildSQLWhere" Exit Function
End Function16. Add the following PadQuotes function to the modDatabaseLogic module:
Function PadQuotes(strIn As String) As String
'This function replaces the occurrence of single 'quotes with two single quotes in a row. 'This is to eliminate errors in SQL Server and other 'databases when a user includes an apostrophe in the 'data value, and helps to enhance application security. On Error GoTo HandleError PadQuotes = Replace(strIn, "'", "''") Exit Function
HandleError: GeneralErrorHandler Err.Number, Err.Description, DB_LOGIC, "PadQuotes" Exit Function
End Function17. Add the following ExecuteSPRetrieveRS function to the modDatabaseLogic module:
Function ExecuteSPRetrieveRS(strSPname As String, Optional intCustomerId _ As Integer) As ADODB.Recordset On Error GoTo HandleError Dim parCustId As ADODB.Parameter Dim cmdCommand As ADODB.Command Dim rsCustomers As ADODB.Recordset 'set up the command object for executing stored procedure Set cmdCommand = New ADODB.Command cmdCommand.CommandType = adCmdStoredProc Set rsCustomers = New ADODB.Recordset 'if the customer id is specified and greater than 0 If Not IsMissing(intCustomerId) And intCustomerId > 0 Then 'Add parameter to be passed to stored procedure Set parCustId = cmdCommand.CreateParameter("CustomerId", _ adInteger, adParamInput) parCustId.Value = intCustomerId cmdCommand.Parameters.Append parCustId End If 'set stored procedure name cmdCommand.CommandText = strSPname 'open the database connection Call OpenDbConnection 'set the command object to the current connection Set cmdCommand.ActiveConnection = cnConn
'Create recordset by executing the command With rsCustomers .CursorLocation = adUseClient .CursorType = adOpenStatic .LockType = adLockBatchOptimistic Set .Source = cmdCommand .Open End With Set rsCustomers.ActiveConnection = Nothing 'close the database connection
Beginning Access 2007 VBA
292 / 344
'close the database connection Call CloseDbConnection 'return the recordset Set ExecuteSPRetrieveRS = rsCustomers Exit Function
HandleError: GeneralErrorHandler Err.Number, Err.Description, DB_LOGIC, _ "RetrieveCustomersDb" Exit Function
End Function18. Add the following ProcessUpdate procedure to the modDatabaseLogic module:
Sub ProcessUpdate(strSPname As String, objCust As clsCustomer, Optional _ rsCust As ADODB.Recordset)
On Error GoTo HandleError 'This procedure is used to handle updates to the database 'open the connection to the database Call OpenDbConnection 'execute the stored procedure Call ExecuteStoredProcedure(strSPname, objCust) 'close the connection to the database Call CloseDbConnection Exit Sub
HandleError: GeneralErrorHandler Err.Number, Err.Description, DB_LOGIC, "ProcessUpdate" Exit Sub
End Sub19. Add the following ExecuteStoredProcedure procedure to the modDatabaseLogic module:
Sub ExecuteStoredProcedure(strSPname As String, objCust As clsCustomer)
On Error GoTo HandleError 'the purpose of this procedure is to execute 'a stored procedure that does not return any 'rows against the database. Dim cmdCommand As ADODB.Command Set cmdCommand = New ADODB.Command
'set up the command object for executing stored procedure cmdCommand.CommandType = adCmdStoredProc Call AddParameters(strSPname, cmdCommand, objCust)
'set the command to the current connection Set cmdCommand.ActiveConnection = cnConn
'set the SQL statement to the command text cmdCommand.CommandText = strSPname
'execute the command against the database cmdCommand.Execute Exit Sub
HandleError: GeneralErrorHandler Err.Number, Err.Description, DB_LOGIC, _ "ExecuteStoredProcedure" Exit Sub
End Sub20. Add the following AddParameters procedure to the modDatabaseLogic module:
Sub AddParameters(strSPname As String, cmdCommand As ADODB.Command, objCust _ As clsCustomer)
On Error GoTo HandleError Dim parParm As ADODB.Parameter
'if updating existing record If strSPname = "spUpdateCustomer" Then 'Add parameter for existing Customer Id to be passed to stored procedure Set parParm = cmdCommand.CreateParameter("CustomerId", adInteger, _ adParamInput) cmdCommand.Parameters.Append parParm parParm.Value = objCust.CustomerId End If
'Add parameter for Last Name to be passed to stored procedure Set parParm = cmdCommand.CreateParameter("LastName", adVarChar, _ adParamInput, 50)
parParm.Value = objCust.LastName cmdCommand.Parameters.Append parParm 'Add parameter for First Name to be passed to stored procedure Set parParm = cmdCommand.CreateParameter("FirstName", adVarChar, _ adParamInput, 50) parParm.Value = objCust.FirstName cmdCommand.Parameters.Append parParm 'Add parameter for Middle Name to be passed to stored procedure Set parParm = cmdCommand.CreateParameter("MiddleName", adVarChar, _ adParamInput, 50)
Beginning Access 2007 VBA
293 / 344

parParm.Value = objCust.MiddleName cmdCommand.Parameters.Append parParm 'Add parameter for Company Name to be passed to stored procedure Set parParm = cmdCommand.CreateParameter("Company", adVarChar, _ adParamInput, 50) parParm.Value = objCust.Company cmdCommand.Parameters.Append parParm 'Add parameter for Address1 to be passed to stored procedure Set parParm = cmdCommand.CreateParameter("Address1", adVarChar, _ adParamInput, 100) parParm.Value = objCust.Address1 cmdCommand.Parameters.Append parParm 'Add parameter for Address2 to be passed to stored procedure Set parParm = cmdCommand.CreateParameter("Address2", adVarChar, _ adParamInput, 100) parParm.Value = objCust.Address2 cmdCommand.Parameters.Append parParm 'Add parameter for City to be passed to stored procedure Set parParm = cmdCommand.CreateParameter("City", adVarChar, _ adParamInput, 50) parParm.Value = objCust.City cmdCommand.Parameters.Append parParm 'Add parameter for Region to be passed to stored procedure Set parParm = cmdCommand.CreateParameter("Region", adVarChar, _ adParamInput, 50) parParm.Value = objCust.Region cmdCommand.Parameters.Append parParm 'Add parameter for Postal Code to be passed to stored procedure Set parParm = cmdCommand.CreateParameter("PostalCode", adVarChar, _ adParamInput, 25) parParm.Value = objCust.PostalCode cmdCommand.Parameters.Append parParm 'Add parameter for Work Phone to be passed to stored procedure Set parParm = cmdCommand.CreateParameter("WorkPhone", adVarChar, _ adParamInput, 15)
parParm.Value = objCust.WorkPhone cmdCommand.Parameters.Append parParm
'Add parameter for Home Phone to be passed to stored procedure Set parParm = cmdCommand.CreateParameter("HomePhone", adVarChar, _ adParamInput, 15) parParm.Value = objCust.HomePhone cmdCommand.Parameters.Append parParm
'Add parameter for Cell Phone to be passed to stored procedure Set parParm = cmdCommand.CreateParameter("CellPhone", adVarChar, _ adParamInput, 15) parParm.Value = objCust.CellPhone cmdCommand.Parameters.Append parParm
'Add parameter for Email to be passed to stored procedure Set parParm = cmdCommand.CreateParameter("Email", adVarChar, _ adParamInput, 50) parParm.Value = objCust.Email cmdCommand.Parameters.Append parParm
'Add parameter for Current Plan Id to be passed to stored procedure Set parParm = cmdCommand.CreateParameter("CurrentPlanId", adInteger, _ adParamInput) parParm.Value = objCust.PlanId cmdCommand.Parameters.Append parParm 'Add parameter for RepName to be passed to stored procedure Set parParm = cmdCommand.CreateParameter("RepName", adVarChar, _ adParamInput, 50) parParm.Value = Application.CurrentUser cmdCommand.Parameters.Append parParm
Exit Sub
HandleError: GeneralErrorHandler Err.Number, Err.Description, DB_LOGIC, "AddParameters" Exit Sub
End Sub21. Save your changes to the modDatabaseLogic module.
Beginning Access 2007 VBA
294 / 344

Connecting the User Interface to the CodeYou are now ready to tie everything you have done so far together by adding the VBA code to the Customer Search and View/Manage Customer Accounts forms. Most of this code will beevent procedures that f ire when dif ferent buttons are clicked. Some of the code will also be local procedures that deal with user-interface-specif ic features. It just did not make sense to putthese in a standard or class module.
The Customer Search Form
An example of the Customer Search form, called frmSearch, is shown in Figure 14-27 with some sample data populated. Keep it in mind as you write the code for the form.
Figure 14-27
Try It Out-Writing Code for the frmSearch
As previously mentioned, you are now ready to write the VBA code that will f inish up the application. Start with the frmSearch form, and f inish with the frmCustomers form.1. Open the frmSearch form and select the Form_Load event for the form to bring up the Visual Basic Editor. Add the following code to the form:
Private Sub Form_Load()
On Error GoTo HandleError 'create new recordset Set rsSearch = New ADODB.Recordset Exit Sub
HandleError: GeneralErrorHandler Err.Number, Err.Description, SEARCH_FORM, "Form_Load" Exit Sub
End Sub2. Add the following code to the General Declarations section of the form:
Option Compare DatabaseOption ExplicitConst SEARCH_FORM = "frmSearch"Dim rsSearch As ADODB.Recordset
3. Add the following Click event procedures for running the search:
Private Sub cmdSearch_Click()
On Error GoTo HandleError 'run the search Call RunSearch Exit Sub
HandleError: GeneralErrorHandler Err.Number, Err.Description, SEARCH_FORM, _ "cmdSearch_Click" Exit Sub
End Sub
Sub RunSearch()
On Error GoTo HandleError Dim strSQL As String 'get the SQL statement for the search strSQL = GetSQL 'if the SQL statement was generated successfully If strSQL <> "ERROR" Then 'execute the SQL statement against the 'database and put results in recordset Set rsSearch = ProcessRecordset(strSQL) 'load the search results into the list on the form PopulateListFromRecordset lstResults, rsSearch, 11 End If Exit Sub
HandleError: GeneralErrorHandler Err.Number, Err.Description, SEARCH_FORM, "RunSearch" Exit Sub
End Sub
Beginning Access 2007 VBA
295 / 344

Function GetSQL() As String
On Error GoTo HandleError
Dim strSQL As String Dim strSQLWhereClause As String Dim blnPriorWhere As Boolean blnPriorWhere = False 'generate the first part of the SQL Statement strSQL = BuildSQLSelectFrom() 'build the where criteria based on the criteria filled in 'by the user in one or more of the search fields on the form If txtCustomerNum <> "" Then strSQLWhereClause = BuildSQLWhere(blnPriorWhere, strSQLWhereClause, _ txtCustomerNum, "CustomerID") End If If txtPhone <> "" Then strSQLWhereClause = BuildSQLWhere(blnPriorWhere, strSQLWhereClause, _ txtPhone, "Phone") End If If txtLName <> "" Then strSQLWhereClause = BuildSQLWhere(blnPriorWhere, strSQLWhereClause, _ txtLName, "LastName") End If If txtFName <> "" Then strSQLWhereClause = BuildSQLWhere(blnPriorWhere, strSQLWhereClause, _ txtFName, "FirstName") End If If txtCompany <> "" Then strSQLWhereClause = BuildSQLWhere(blnPriorWhere, strSQLWhereClause, _ txtCompany, "Company") End If If txtAddress <> "" Then strSQLWhereClause = BuildSQLWhere(blnPriorWhere, strSQLWhereClause, _ txtAddress, "Address1") End If
If txtCity <> "" Then
strSQLWhereClause = BuildSQLWhere(blnPriorWhere, strSQLWhereClause, _ txtCity, "City") End If If txtRegion <> "" Then strSQLWhereClause = BuildSQLWhere(blnPriorWhere, strSQLWhereClause, _ txtRegion, "Region") End If If txtPostalCode <> "" Then strSQLWhereClause = BuildSQLWhere(blnPriorWhere, strSQLWhereClause, _ txtPostalCode, "PostalCode") End If If blnPriorWhere Then 'build the final SQL statement with the Select…From…and 'Where clause strSQL = strSQL & strSQLWhereClause Else MsgBox "You must enter at least one search criteria!" strSQL = "ERROR" End If 'return the SQL statement GetSQL = strSQL
Exit Function
HandleError: GeneralErrorHandler Err.Number, Err.Description, SEARCH_FORM, "GetSQL" Exit Function
End Function4. Add the following procedures for clearing the search results:
Private Sub cmdClear_Click()
On Error GoTo HandleError 'clear the search fields Call ClearFields Exit Sub
HandleError: GeneralErrorHandler Err.Number, Err.Description, SEARCH_FORM, _ "cmdClear_Click" Exit Sub
End Sub
Sub ClearFields()
On Error GoTo HandleError 'clear fields txtCustomerNum = "" txtLName = "" txtF Name = "" txtCompany = "" txtAddress = ""
Beginning Access 2007 VBA
296 / 344

txtCity = "" txtRegion = "" txtPostalCode = "" txtPhone = ""
Exit Sub
HandleError: GeneralErrorHandler Err.Number, Err.Description, SEARCH_FORM, "ClearFields" Exit Sub
End Sub
Private Sub Form_Unload(Cancel As Integer)
On Error GoTo HandleError 'reset lookup id to 0 intCustomerLookupId = 0 If Not rsSearch Is Nothing Then 'close recordset rsSearch.Close Set rsSearch = Nothing End If Exit Sub
HandleError: GeneralErrorHandler Err.Number, Err.Description, SEARCH_FORM, "Form_Unload" Exit Sub End Sub
Private Sub 1stResults_DblClick(Cancel As Integer)
On Error GoTo HandleError
'store the value of the selected customer id to be 'used later by frmCustomers to open selected record intCustomerLookupId = lstResults.Column(0) 'open frmCustomers DoCmd.OpenForm "frmCustomers"
Exit Sub
HandleError: GeneralErrorHandler Err.Number, Err.Description, SEARCH_FORM, _ "lstResults_DblClick" Exit Sub
End Sub
The View/Manage Customer Accounts Form
An example of the View/Manage Customer Accounts form, called frmCustomers, is shown in Figure 14-28 with some sample data populated. Keep this form in mind as you write the code.
Figure 14-28
Try It Out-Writing Code for the frmCustomers
Now that you have f inished with the VBA code for the frmSearch form, you can turn to the frmCustomers form.1. Open the frmCustomers form and select the Form_Load event for the form to bring up the Visual Basic Editor. Add the following code to the form:
Private Sub Form_Load()
On Error GoTo HandleError Set objCustomer = New clsCustomer Set rsCustomer = New ADODB.Recordset 'lock the customer number field so user cannot modify it '(since assigned by the database) txtCustomerNum.Locked = True 'set addmode to false since not adding yet blnAddMode = False 'load the records from the database Call LoadRecords 'populate plans combo box Call PopulatePlans Exit Sub
Beginning Access 2007 VBA
297 / 344
Exit Sub
HandleError: GeneralErrorHandler Err.Number, Err.Description, CUSTOMERS_FORM, _ "Form_Load" Exit Sub
End Sub2. Add the following code to the General Declarations section of the form:
Option Compare DatabaseOption ExplicitConst CUSTOMERS_FORM = "frmCustomers"Dim objCustomer As clsCustomerDim rsCustomer As ADODB.RecordsetDim rsHistory As ADODB.RecordsetDim blnAddMode As Boolean
3. Add the following code behind the form for adding a new customer record:
Private Sub cmdAddNew_Click()
On Error GoTo HandleError 'clear the current controls to enable adding a new 'customer record Call AddEmptyCustomerRecord Exit Sub
HandleError: GeneralErrorHandler Err.Number, Err.Description, CUSTOMERS_FORM, _ "cmdAddNew_Click" Exit Sub
End Sub
Sub AddEmptyCustomerRecord()
On Error GoTo HandleError 'set add mode to true blnAddMode = True 'clear the current values in the contacts object objCustomer.ClearObject 'clear the current controls on the form so the 'user can fill in values for the new record Call ClearCustomerControls Exit Sub
HandleError: GeneralErrorHandler Err.Number, Err.Description, CUSTOMERS_FORM, _ "AddEmptyCustomerRecord" Exit Sub
End Sub
Sub ClearCustomerControls()
On Error GoTo HandleError 'clear the values in the controls on the form Me.txtCustomerNum = "" Me.txtLName = "" Me.txtFName = "" Me.txtMName = "" Me.txtCompany = "" Me.txtAddress1 = "" Me.txtAddress2 = "" Me.txtCity = "" Me.txtRegion = "" Me.txtPostalCode = "" Me.txtWorkPhone = "" Me.txtHomePhone = "" Me.txtCellPhone = "" Me.txtEmail = "" Me.cboPlan = "" 'clear the plan history list box lstPlanH istory.RowSource = "" Exit Sub
HandleError: GeneralErrorHandler Err.Number, Err.Description, CUSTOMERS_FORM, _ "ClearCustomerControls" Exit Sub
End Sub4. Add the following procedures to the form for making updates to the data:
Private Sub cmdSave_Click()
On Error GoTo HandleError Dim intCurCustomer As Integer 'save the id of the current record if in update mode If Not blnAddMode Then intCurCustomer = objCustomer.CustomerId Else intCurCustomer = 0 End If 'populate object with current info on form
Beginning Access 2007 VBA
298 / 344

'populate object with current info on form objCustomer.PopulatePropertiesFromForm 'save all changes to current record objCustomer.Save blnAddMode, rsCustomer 'move back to the customer that was current before the requery If intCurCustomer > 0 Then 'move back to the contact that was just updated rsCustomer.Find "[CustomerId] = " & intCurCustomer 'refresh the history list box for the record Call RefreshHistory Else 'if just added new record, move to the beginning of 'the recordset Call MoveToFirstRecord(rsCustomer, objCustomer, blnAddMode) 'populate the controls on the form with the current record Call PopulateCustomerControls End If Exit Sub
HandleError: GeneralErrorHandler Err.Number, Err.Description, CUSTOMERS_FORM, _ "cmdSave_Click" Exit Sub
End Sub5. Add the following code to the form for navigating through the customer records:
Private Sub cmdMoveFirst_Click()
On Error GoTo HandleError 'move to the first record in the local disconnected recordset Call MoveToFirstRecord(rsCustomer, objCustomer, blnAddMode) 'populate the controls on the form with the current record Call PopulateCustomerControls Exit Sub
HandleError: GeneralErrorHandler Err.Number, Err.Description, CUSTOMERS_FORM, _ "cmdMoveFirst_Click" Exit Sub
End Sub
Private Sub cmdMoveLast_Click()
On Error GoTo HandleError 'move to the last record in the local disconnected recordset Call MoveToLastRecord(rsCustomer, objCustomer, blnAddMode) 'populate the controls on the form with the current record Call PopulateCustomerControls Exit Sub
HandleError: GeneralErrorHandler Err.Number, Err.Description, CUSTOMERS_FORM, _ "cmdMoveLast_Click" Exit Sub
End Sub
Private Sub cmdMoveNext_Click()
On Error GoTo HandleError 'move to the next record in the local disconnected recordset Call MoveToNextRecord(rsCustomer, objCustomer, blnAddMode) 'populate the controls on the form with the current record Call PopulateCustomerControls Exit Sub
HandleError: GeneralErrorHandler Err.Number, Err.Description, CUSTOMERS_FORM, _ "cmdMoveNext_Click" Exit Sub
End Sub
Private Sub cmdMovePrevious_Click() On Error GoTo HandleError 'move to the previous record in the local disconnected recordset Call MoveToPreviousRecord(rsCustomer, objCustomer, blnAddMode) 'populate the controls on the form with the current record Call PopulateCustomerControls Exit Sub
HandleError:
GeneralErrorHandler Err.Number, Err.Description, CUSTOMERS_FORM, _ "cmdMovePrevious_Click" Exit Sub
End Sub6. Add the following code to the form for populating the f ields on the form with the current customer record:
Sub PopulatePlans() On Error GoTo HandleError
Beginning Access 2007 VBA
299 / 344

'populate the Plans combo box with values from the database Dim rsPlans As New ADODB.Recordset 'populate the list of plans from the database Set rsPlans = ExecuteSPRetrieveRS("spRetrievePlans", 0)
cboPlan.RowSource = "" cboPlan.LimitToList = True cboPlan.ColumnCount = 2 cboPlan.RowSourceType = "Value List" cboPlan.BoundColumn = 0 Do While Not rsPlans.EOF 'populate the plans combo box cboPlan.AddItem rsPlans!PlanId & ";" & rsPlans!PlanName rsPlans.MoveNext Loop Exit Sub
HandleError: GeneralErrorHandler Err.Number, Err.Description, CUSTOMERS_FORM, _ "PopulatePlans" Exit Sub
End Sub
Sub LoadRecords()
On Error GoTo HandleError 'load the customer recordset Set rsCustomer = objCustomer.RetrieveCustomers 'if the recordset is empty If rsCustomer.BOF And rsCustomer.EOF Then Exit Sub Else 'populate the object with values in the recordset objCustomer.PopulatePropertiesFromRecordset rsCustomer
Call MoveToFirstRecord(rsCustomer, objCustomer, blnAddMode) 'populate the controls on the form with the current record Call PopulateCustomerControls End If Exit Sub
HandleError: GeneralErrorHandler Err.Number, Err.Description, CUSTOMERS_FORM, "LoadRecords" Exit Sub
End Sub
Sub PopulateCustomerControls() On Error GoTo HandleError 'Populate the controls on the Customers form with the values of the 'current record in the contacts object. If Not rsCustomer.BOF And Not rsCustomer.EOF Then Me.txtCustomerNum = objCustomer.CustomerId Me.txtLName = objCustomer.LastName Me.txtFName = objCustomer.FirstName Me.txtMName = objCustomer.MiddleName Me.txtCompany = objCustomer.Company Me.txtAddress1 = objCustomer.Address1 Me.txtAddress2 = objCustomer.Address2 Me.txtCity = objCustomer.City Me.txtRegion = objCustomer.Region Me.txtPostalCode = objCustomer.PostalCode Me.txtWorkPhone = objCustomer.WorkPhone Me.txtHomePhone = objCustomer.HomePhone Me.txtCellPhone = objCustomer.CellPhone Me.txtEmail = objCustomer.Email Me.cboPlan = objCustomer.PlanId 'refresh the history list box Call RefreshHistory
ElseIf rsCustomer.BOF Then 'past beginning of recordset so move to first record Call MoveToFirstRecord(rsCustomer, objCustomer, blnAddMode) ElseIf rsCustomer.EOF Then 'past end of recordset so move back to last record Call MoveToLastRecord(rsCustomer, objCustomer, blnAddMode) End If Exit Sub
HandleError: GeneralErrorHandler Err.Number, Err.Description, CUSTOMERS_FORM, _ "PopulateCustomerControls" Exit Sub
End Sub7. Add the following RefreshHistory procedure:
Sub RefreshHistory()
On Error GoTo HandleError
'populate the recordset for plan history list Set rsHistory = New ADODB.Recordset
Beginning Access 2007 VBA
300 / 344

Set rsHistory = New ADODB.Recordset 'get plan history for current customer Set rsHistory = ExecuteSPRetrieveRS("spRetrieveCustomerHistory", _ objCustomer.CustomerId)
'Set rsHistory = objCustomer.RetrieveHistory(objCustomer.CustomerId) PopulateListFromRecordset Me.lstPlanHistory, rsHistory, 5 rsHistory.Close Exit Sub
HandleError: GeneralErrorHandler Err.Number, Err.Description, CUSTOMERS_FORM, _ "RefreshHistory" Exit Sub
End Sub8. Add the following code to the Form_Unload event procedure:
Private Sub Form_Unload(Cancel As Integer)
On Error GoTo HandleError 'reset lookup id to 0 intCustomerLookupId = 0 If Not rsCustomer Is Nothing Then 'close recordset
rsCustomer.Close Set rsCustomer = Nothing End If Exit Sub
HandleError: GeneralErrorHandler Err.Number, Err.Description, CUSTOMERS_FORM, "Form_Unload" Exit Sub End Sub
9. That is all the code for the application. So, it’s time now to resolve any typographical errors if you have not done so already.
Beginning Access 2007 VBA
301 / 344
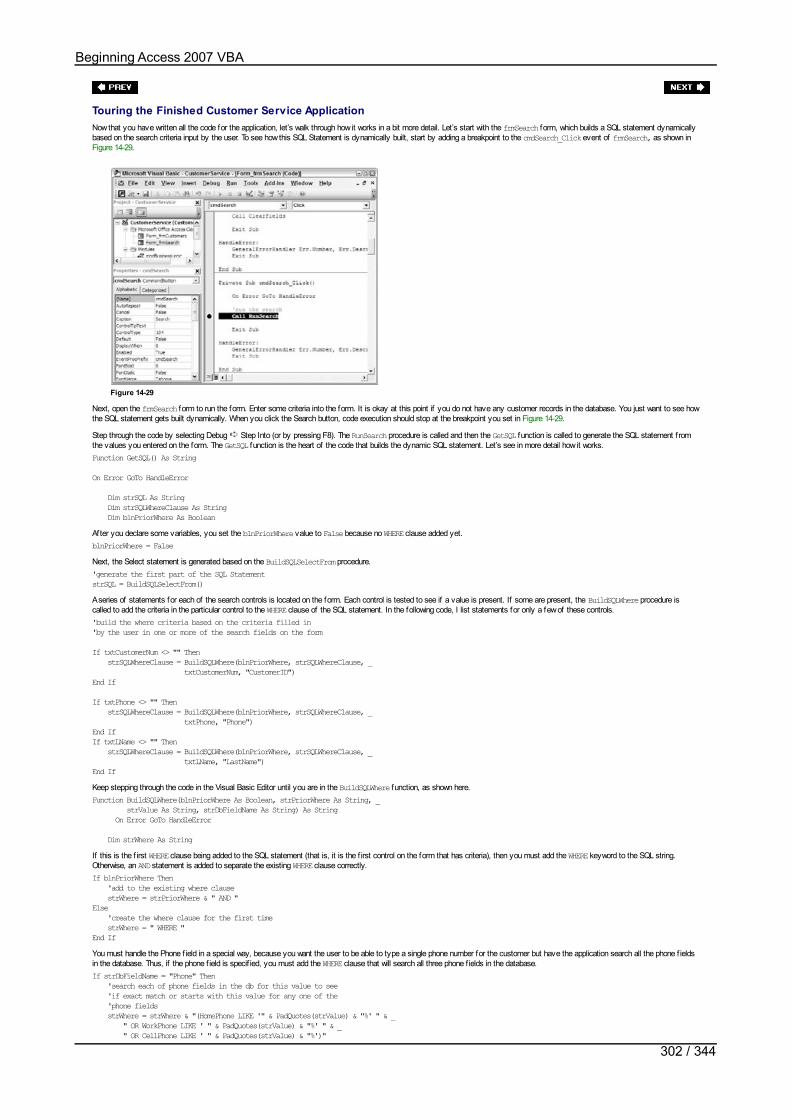
Touring the Finished Customer Service ApplicationNow that you have written all the code for the application, let’s walk through how it works in a bit more detail. Let’s start with the frmSearch form, which builds a SQL statement dynamicallybased on the search criteria input by the user. To see how this SQL Statement is dynamically built, start by adding a breakpoint to the cmdSearch_Click event of frmSearch, as shown inFigure 14-29.
Figure 14-29
Next, open the frmSearch form to run the form. Enter some criteria into the form. It is okay at this point if you do not have any customer records in the database. You just want to see howthe SQL statement gets built dynamically. When you click the Search button, code execution should stop at the breakpoint you set in Figure 14-29.
Step through the code by selecting Debug Step Into (or by pressing F8). The RunSearch procedure is called and then the GetSQL function is called to generate the SQL statement f romthe values you entered on the form. The GetSQL function is the heart of the code that builds the dynamic SQL statement. Let’s see in more detail how it works.Function GetSQL() As String
On Error GoTo HandleError
Dim strSQL As String Dim strSQLWhereClause As String Dim blnPriorWhere As BooleanAfter you declare some variables, you set the blnPriorWhere value to False because no WHERE clause added yet.blnPriorWhere = FalseNext, the Select statement is generated based on the BuildSQLSelectFrom procedure.'generate the first part of the SQL StatementstrSQL = BuildSQLSelectFrom()A series of statements for each of the search controls is located on the form. Each control is tested to see if a value is present. If some are present, the BuildSQLWhere procedure iscalled to add the criteria in the particular control to the WHERE clause of the SQL statement. In the following code, I list statements for only a few of these controls.'build the where criteria based on the criteria filled in'by the user in one or more of the search fields on the form
If txtCustomerNum <> "" Then strSQLWhereClause = BuildSQLWhere(blnPriorWhere, strSQLWhereClause, _ txtCustomerNum, "CustomerID")End If
If txtPhone <> "" Then strSQLWhereClause = BuildSQLWhere(blnPriorWhere, strSQLWhereClause, _ txtPhone, "Phone")End IfIf txtLName <> "" Then strSQLWhereClause = BuildSQLWhere(blnPriorWhere, strSQLWhereClause, _ txtLName, "LastName")End IfKeep stepping through the code in the Visual Basic Editor until you are in the BuildSQLWhere function, as shown here.Function BuildSQLWhere(blnPriorWhere As Boolean, strPriorWhere As String, _ strValue As String, strDbFieldName As String) As String On Error GoTo HandleError
Dim strWhere As StringIf this is the f irst WHERE clause being added to the SQL statement (that is, it is the f irst control on the form that has criteria), then you must add the WHERE keyword to the SQL string.Otherwise, an AND statement is added to separate the existing WHERE clause correctly.If blnPriorWhere Then 'add to the existing where clause strWhere = strPriorWhere & " AND "Else 'create the where clause for the first time strWhere = " WHERE "End IfYou must handle the Phone f ield in a special way, because you want the user to be able to type a single phone number for the customer but have the application search all the phone f ieldsin the database. Thus, if the phone f ield is specif ied, you must add the WHERE clause that will search all three phone f ields in the database.If strDbFieldName = "Phone" Then 'search each of phone fields in the db for this value to see 'if exact match or starts with this value for any one of the 'phone fields strWhere = strWhere & "(HomePhone LIKE '" & PadQuotes(strValue) & "%' " & _ " OR WorkPhone LIKE ' " & PadQuotes(strValue) & "%' " & _ " OR CellPhone LIKE ' " & PadQuotes(strValue) & "%')"
Beginning Access 2007 VBA
302 / 344
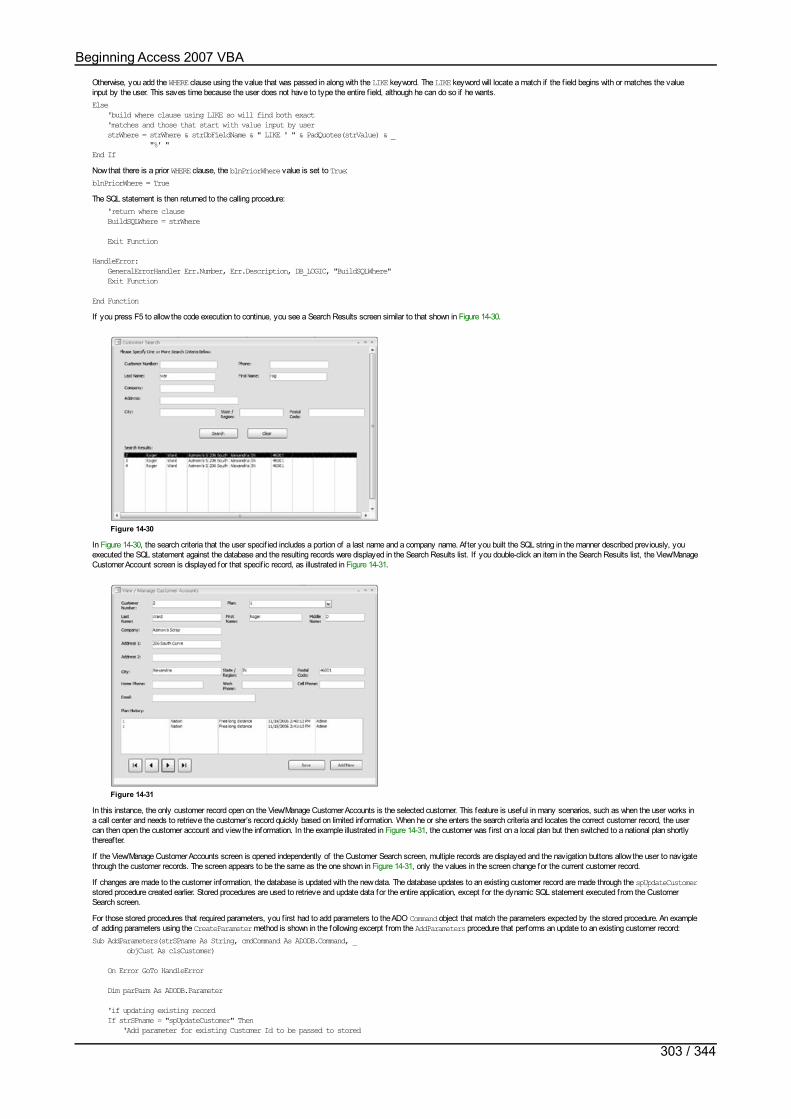
Otherwise, you add the WHERE clause using the value that was passed in along with the LIKE keyword. The LIKE keyword will locate a match if the f ield begins with or matches the valueinput by the user. This saves time because the user does not have to type the entire f ield, although he can do so if he wants.Else 'build where clause using LIKE so will find both exact 'matches and those that start with value input by user strWhere = strWhere & strDbFieldName & " LIKE ' " & PadQuotes(strValue) & _ "%' "End IfNow that there is a prior WHERE clause, the blnPriorWhere value is set to True:blnPriorWhere = TrueThe SQL statement is then returned to the calling procedure: 'return where clause BuildSQLWhere = strWhere
Exit Function
HandleError: GeneralErrorHandler Err.Number, Err.Description, DB_LOGIC, "BuildSQLWhere" Exit Function
End FunctionIf you press F5 to allow the code execution to continue, you see a Search Results screen similar to that shown in Figure 14-30.
Figure 14-30
In Figure 14-30, the search criteria that the user specif ied includes a portion of a last name and a company name. After you built the SQL string in the manner described previously, youexecuted the SQL statement against the database and the resulting records were displayed in the Search Results list. If you double-click an item in the Search Results list, the View/ManageCustomer Account screen is displayed for that specif ic record, as illustrated in Figure 14-31.
Figure 14-31
In this instance, the only customer record open on the View/Manage Customer Accounts is the selected customer. This feature is useful in many scenarios, such as when the user works ina call center and needs to retrieve the customer’s record quickly based on limited information. When he or she enters the search criteria and locates the correct customer record, the usercan then open the customer account and view the information. In the example illustrated in Figure 14-31, the customer was f irst on a local plan but then switched to a national plan shortlythereafter.
If the View/Manage Customer Accounts screen is opened independently of the Customer Search screen, multiple records are displayed and the navigation buttons allow the user to navigatethrough the customer records. The screen appears to be the same as the one shown in Figure 14-31, only the values in the screen change for the current customer record.
If changes are made to the customer information, the database is updated with the new data. The database updates to an existing customer record are made through the spUpdateCustomerstored procedure created earlier. Stored procedures are used to retrieve and update data for the entire application, except for the dynamic SQL statement executed from the CustomerSearch screen.
For those stored procedures that required parameters, you f irst had to add parameters to the ADO Command object that match the parameters expected by the stored procedure. An exampleof adding parameters using the CreateParameter method is shown in the following excerpt f rom the AddParameters procedure that performs an update to an existing customer record:Sub AddParameters(strSPname As String, cmdCommand As ADODB.Command, _ objCust As clsCustomer)
On Error GoTo HandleError
Dim parParm As ADODB.Parameter
'if updating existing record If strSPname = "spUpdateCustomer" Then 'Add parameter for existing Customer Id to be passed to stored
Beginning Access 2007 VBA
303 / 344

procedure Set parParm = cmdCommand.CreateParameter("CustomerId", adInteger, _ adParamInput) cmdCommand.Parameters.Append parParm parParm.Value = objCust.CustomerId End If
'Add parameter for Last Name to be passed to stored procedure Set parParm = cmdCommand.CreateParameter("LastName", adVarChar, _ adParamInput, 50) parParm.Value = objCust.LastName cmdCommand.Parameters.Append parParm
'Add parameter for First Name to be passed to stored procedure Set parParm = cmdCommand.CreateParameter("FirstName", adVarChar, _ adParamInput, 50) parParm.Value = objCust.FirstName cmdCommand.Parameters.Append parParmAfter all the required parameters are added, or if none is required for the stored procedure, the stored procedure can be executed using the Execute method of the Command object. Thefollowing example illustrates a portion of code from the ExecuteStoredProcedure procedure that runs the stored procedure after calling the AddParameters procedure:'set the command to the current connectionSet cmdCommand.ActiveConnection = cnConn'set the SQL statement to the command textcmdCommand.CommandText = strSPname'execute the command against the databasecmdCommand.ExecuteAfter specifying any required parameters for the stored procedure, you just assign the CommandText property of the Command object to the name of the stored procedure and then run theExecute method. Learning how to retrieve data from SQL server databases and how to correctly execute SQL Server stored procedures from your VBA code are probably the two hardestparts of working with SQL Server f rom Access. You have just learned how to do so.
Beginning Access 2007 VBA
304 / 344

SummaryCongratulations! You have made your way through the entire book. This chapter is the most complicated in the entire book, so you deserve a special pat on the back for f inishing itcompletely. You have no doubt learned from this book that Access is a powerful tool for building sophisticated applications. Some of the really cool features in Access enable you toimplement using VBA code. You can even work with SQL Server databases from your Access applications today so that you can build interactive, multiuser applications that can serve allyour multiuser purposes, or that may prepare you well for a future migration to another f ront-end language.
Beginning Access 2007 VBA
305 / 344
Index
AACCDB file format, 2, 29ACCDB files, 253, 278, 281ACCDE file format, 2ACCDE files, 331Access 2007
changes from Access 2003, 2as a front end to other databases, 132three-tiered applications and, 15
Access 2007 VBAchanges from Access 2003, 2–3programming concepts, 3–25uses of, 1
Access database files. See ACCDB filesAccess databases
attaching SharePoint lists to, 231changes to existing prior to migration, 277connecting to, 132importing a SQL Server database, 203–204importing data from, 201separating into two database f iles, 319–322upsizing, 277–284
Access designer, 271Access field data types. See field data typesAccess forms, generating prototype screens, 336–340Access macros, VBA instead of or with, 1Access Options, Advanced, 316–317Access Project file, 278, 281Access Projects
based on SQL Server databases, 260, 262–263creating, 259–263described, 253displaying new, 278, 284as a front end to SQL Server, 253–254migrating existing Access databases to, 277–284reusing code across multiple, 308storage locations for objects seen from, 254working with SQL Server objects, 264–277
Access runtime, 330Access tables
checking dates in, 277exporting contents to a spreadsheet, 205, 206
ActionSuccess event, 116, 120–121Activate event, 247active plans, retrieving, 472ActiveConnection property, 143, 147, 151, 155ActiveX controls, 305–308ActiveX Data Objects. See ADOActivity Diagrams, 7–8, 9, 10actor in a Use Case Diagram, 5Add Comment button, 337Add Current Contact To Project button, 339, 340Add method, 112, 113add mode, 442–443, 449–450Add mode flag, 169, 176Add New navigation button, 137Add Table dialog box, 275Add Watch dialog box, 69, 71AddEmptyProjectRecord procedure, 419, 433Add-in Manager, 313add-ins, 312–313Add-Ins tab, 289AddItem method, 189, 190–191, 192–193AdditionalData parameter, 209Add/Manage Contacts button, 453, 455AddNew method, 141–142AddParameters procedure, 497–499, 517AddRecord procedure
calling from OnClick, 144, 152indicating Add mode, 166, 172
adLockBatchOptimistic value for the LockType property, 134, 317adLockOptimistic value for the LockType property, 134, 317adLockPessimistic value for the LockType property, 134, 317adLockReadOnly value for the LockType property, 134, 317ADO (ActiveX Data Objects)
adding a reference to, 358connecting to the ProjectTrackerDb, 344described, 129–130storing database errors, 75treating data sources as virtual tables, 163versions of, 130–131
ADO Command object, 269
Beginning Access 2007 VBA
306 / 344

ADO Connection object, 313ADO object library, 130ADO object model, 130–131ADO Parameter object, 269ADO recordsets
based on SQL statements, 272binding a form to, 138specifying as a report’s data source, 236–237
Adobe Acrobat, launching, 457ADODB library. See ADO object libraryADO.NET, 130adOpenDynamic value for the CursorType property, 133adOpenForwardOnly value for the CursorType property, 133adOpenKeyset value for the CursorType property, 133adOpenStatic value for the CursorType property, 133ADOX library, 177–178ADP file, opening, 278ADPs. See Access ProjectsAll Object Types tab, 326All Records option, 317AllForms collection, 97AllPrinters collection, 247AllReports collection, 238Analyze Performance, 326And statements in a Where clause, 161announcements in SharePoint, 221, 229–232ANSI SQL, 159application(s)
determining the purpose of, 3distributing, 329–331elements of, 11–12exposing as a web service, 214f inishing, 315–332identifying the objectives of, 3maintaining, 331modeling the design of, 4–11optimizing, 322–327securing, 327–329writing to handle multiple users, 315–322
application architecture, 11–18application design, 4–11application logic, 104Application object, 94architecture for applications, 11–18arrays, 51–53arrows in an Activity Diagram, 8, 9, 10AS predicate, 160ascending order, 162Attachment data type, 50, 222attachments
database objects as, 210–211procedure for previewing, 385, 401procedures for saving, 439
Auto Order option, 198AutoExec macro
creating, 46–47, 185opening a switchboard form, 187specifying form to open, 182
automation, 294–305automation client, 294automation objects, 294–295automation server, 294AutoNumber (Long Integer) field data type, 51AutoStart parameter, 249
Beginning Access 2007 VBA
307 / 344
Index
Bbackup copies of databases, 331batch optimistic recordset, 151BeforeUpdate event, 196BeforeUpdate procedure, 40, 41BeginTrans method, 313, 314Blank Database section, 259bln (Boolean) prefix, 55BOF property of a recordset, 141Bookmark property, 159bookmarks, 159Boolean data type, 50bound forms, 139, 316–317break mode, 70, 71breakpoints
adding to code, 24adding to frmSearch, 512, 513stepping through code, 66–68
builder add-ins, 313BuildSQLDeleteProjectsComments function, 397–398, 409BuildSQLInsertContacts procedure, 391–392, 406BuildSQLInsertProjectComments function, 398–399, 409BuildSQLSelectFrom function, 494BuildSQLSelectFrom procedure, 513BuildSQLWhere function, 494–495, 514BuildSQLWhere procedure, 513–514built-in constants, 54built-in functions, 45–46business logic, 14business logic layer, 17, 104business rules, 12buttons, adding to a command bar, 290byt (Byte) prefix, 55Byte data type, 50
Beginning Access 2007 VBA
308 / 344

Index
CCalculated data type, 222CalculateSalesTax function, 43–45Calendar control, 306, 307call stack, 70Cancel parameter, 90Caption properties for command buttons, 115, 118Caption property
changing at runtime, 81changing for a label, 115, 118changing for command buttons, 142of a command button, 86of a command button control, 95of a list box, 95setting for a form, 80
Catalog object, 177CE devices, managing a SQL Server database, 255cells, assigning values to, 298Cells property, 298child class, 122Choice data types, 222Choose Builder screen, 21, 22, 38class, 115, 121–122class diagrams, 102–105class hierarchies, 122class modules
advanced techniques, 121–123building for objects in Project Tracker, 357creating custom objects, 101creating objects, 101–123for Customer Service application, 481–488def ined, 101described, 29inserting new, 102public variable declarations, 105writing code in, 37–42
Classes list, limiting, 91, 92ClearContactsControls procedure, 447ClearControlsOnForm procedure, 146–147, 154ClearObject procedure
adding to clsCustomer class module, 487–488adding to clsProjects class module, 365, 370, 377–378, 382–383
ClearProjectControls procedure, 420–421, 435Click event
adding code for, 120adding to a class, 116for a command button, 90
Click event proceduresadding to command buttons, 413–414, 429–431adding to frmProjects, 411–413, 428extracting data, 91managing comments, 416–417, 431managing contacts, 415–416, 430–431running a search, 501–503
client cursors, 134client machine, 13client-server applications, 13–14client-server architecture, example of, 253, 254CloseDbConnection procedure, 390, 405, 493cls prefix, 56clsCar class
methods for, 112–113properties for, 107–111
clsContacts class module, 372–383clsCustomer class module, 482–488clsProjects class module, 358–372cmdAddAttachment_Click event, 417–418, 431–432cmdAddNew_Click event, 442–443, 449–450cmdAddNew_Click event procedure, 411–412, 428cmdAddToProject_Click event, 442, 449cmdDeleteContacts_Click procedure, 415, 430cmdEmailContact_Click procedure, 415–416, 431cmdFileBrowse_Click event, 417–418, 432cmdManageContacts_Click procedure, 415, 430cmdMoveFirst_Click event, 444–445, 450cmdMoveFirst_Click procedure, 413, 429–430cmdOpenFile_Click event, 418, 432–433cmdRun_Click event procedure, 40cmdRun_Click procedure, 37, 39cmdSave_Click event procedure, 412, 428cmdViewContact_Click procedure, 416, 431
Beginning Access 2007 VBA
309 / 344

codedebugging, 66–71documenting, 63–64encapsulating into objects, 101running and debugging, 24–25separating into logical tiers, 18, 103stepping through, 66–68, 512
Code Builderchoosing, 84creating a procedure for an object, 37–40selecting, 95writing code for an event, 86–87
Code Builder option, 21, 22code execution, 69code library, 308–312code modules. See modulesCode window
adding code to, 21, 23creating additional procedures, 40–42in Visual Basic Editor, 19, 20
CodePage parameter, 206collections, 80, 94–100, 130column-level security, 271columns, selecting in a table, 160combo boxes, 188–193comma-delimited records, 207–208command(s)
displaying options for, 21, 23typing in the Code window, 21, 23writing within procedures, 56
command bar, creating a custom, 288–291command button control, 94, 95Command button, properties of, 86command buttons
adding to a form, 142, 150Click event for, 90creating a switchboard form, 186drawing on a form, 29, 30
command completion feature, 112Command object
assigning to an open connection, 132declaring and instantiating, 132declaring a new, 167, 173setting to the existing connection, 167, 173
CommandBar object, 100CommandBars collection, 288CommandBars property, 288CommandText property
assigning to a SQL statement, 167, 173assigning to the SQL statement, 169, 175of the Command object, 518
comments, saving to the database, 439Comments/Tasks tab, 336, 337CommitTrans method, 314compacting Access databases, 331comparison operators in a Where clause, 161compile errors, 64, 65compiling applications, 330conditional If statements, 59connected recordsets, 132Connection object
adding code for, 150in the ADO object model, 131declaring, 131, 138instantiating, 131opening, 131
connection string, 132, 138connection string variable, 150connections, opening, 138, 167, 173.
See also database connectionsConnectors in an Activity Diagram, 7Const statement, 53constants
built-in, 54creating in VBA, 53–54declaring and using, 53def ined, 53limiting a property value to, 122scope and lifetime of, 54–55
consuming program for web services, 214Contact object, class for, 357contacts
adding to project records, 442, 449displaying, 452–453procedures for saving to the database, 439sending a letter to, 298–302as a SharePoint list, 221
Contacts class, 372–383Contacts form
Beginning Access 2007 VBA
310 / 344

building for Project Tracker, 440–451to connect and display data from a recordset, 134–140opening, 453, 455
Contacts list, 227–229Contacts prototype form, 341Contacts screen
designing, 335–336with one f iltered record, 453, 455prototype for, 339–340
Contacts tab, 338ControlExcel procedure, 296, 297ControlOutlook procedure, 303–304controls
adding to forms, 344–357adding to reports, 238–241aligning on forms, 197creating for reports, 245populating with the current record, 167, 174working with, 187–195
Controls ribbon, 306ControlSource property, 139ControlWord procedure, 299–300copies, number for printing, 247Create Back-End Database dialog box, 320, 321Create New Database option, 277, 279CREATE PROCEDURE statement, 470Create ribbon
Create Module option, 30, 32selecting Macro, 46, 47selecting Module, 19, 20
CreateCommandBar function, 289CreateCommandBar procedure, 290CreateComplaintsReport procedure, 242–244CreateObject method, 295CreateParameter method, 517CreateReport method, 238, 245CreateReportControl method, 238–241, 245cross-reference tables
deleting records from, 397–398, 409inserting records into, 398–399, 409
cur (Currency) prefix, 55Currency data type, 43, 50, 221CurrentProject object, 97cursor, type of, 325CursorLocation property, 133–134CursorType property, 133, 143, 151custom button, adding to a command bar, 291custom class modules, 357, 482custom event, 120–121custom groupings, 2custom lists in SharePoint, 221custom methods, 125–126custom objects, 102custom properties, 124–125custom ribbons, 2custom toolbar, 247Customer class, 482customer history record, 471–472customer records
code for adding, 506–507code for navigating, 508–509code for populating, 509–511updating an existing, 473–474
Customer Search form, 500Customer Search screen, prototype for, 464Customer Service application
building the class module for objects, 481–488building the database and database objects, 465–475connecting the user interface to the code, 499–512design specif ications, 461–465standard modules, 488–499touring the f inished, 512–518user interface, 475–480
customers, retrieving information on, 473
Beginning Access 2007 VBA
311 / 344
Index
DDAO (Data Access Objects), 129data
deleting using SQL statements, 165–166exporting from Access to other formats, 248exporting to a spreadsheet, 205, 206exporting using OutputTo, 211importing from a text f ile, 206–208importing from the Northwind database, 202–203retrieving using SQL Select statements, 160–164updating using SQL statements, 165using from SharePoint lists, 222–232using from web services, 214–220
data accessimproving, 324–325introduction to, 129–130
data access layer, 17, 104, 105Data Access Objects (DAO), 129data elements, determining, 11data entry controls, emptying, 146–147, 154data error, correcting up front, 196data objects, manipulating, 177–178data sources
linking to and importing from, 200retrieving a set of records from, 132specifying for a connection, 132
data tables, 318data types
Access compared to SharePoint, 221available in VBA, 49–50changing from Access to equivalent SQL Server, 278, 282user-def ined, 52–53
data validation, adding, 196–197database(s)
building for the Customer Service application, 465–475building for the Project Tracker application, 340–343compacting and repairing, 331connecting to, 132creating, 29–31default format for, 29encrypting, 329making backup copies of, 331updating from a disconnected recordset, 147, 155
database access code, isolating, 18database calls, layer for, 16–17database connections.
See also connections, openingclosing and releasing from memory, 143, 151maintaining open, 139–140minimizing open, 324
database element, 12database layer
in n-tier architecture, 17in three-tier architecture, 15, 16
database location, making configurable, 340database objects
attaching to an e-mail, 210for the Customer Service application, 465–475
Database parameter for the TransferSQLDatabase method, 204database password, 327–328database server, 14Database Splitter, 319Database Splitter Wizard, 319–322database tables
retrieving data from, 163separating from the user interface, 319–322
Database Tools ribbon, 18, 19database transfers, 201database updates, 517database window, replaced by the navigation pane, 2DatabaseName parameter, 201DatabaseType parameter, 201DataSource parameter, 209DataSource property, 236DataTarget parameter, 209Date data type, 50Date of Birth text box, 87, 89Date or Time data type, 221dates, checking, 277dbl (Double) prefix, 55Deactivate event, 247Debug object, 82debugging
Beginning Access 2007 VBA
312 / 344

code, 66–71errors, 64–71
Debug.Print method, 82Debug.Print statement, 68decision making in code, 56–61Decision Points in Activity Diagrams, 8Declarations/Procedure navigation box, 27, 28default error messages, 72Default File Format option, 29default record locking, 317Delete command, 167, 173Delete Comment button, 337Delete method
adding to the clsCar class, 112–113of the Recordset object, 142
delete operation, prompting the user to proceed, 388, 403Delete procedure, 365–366, 370–371, 378, 382–383Delete Selected Contact button, 338Delete statements, 165–166DeleteRecord procedure, 144, 152, 166–167, 172delimited files, 208demo CDs, creating, 256descending order, 162Description property of the Err object, 74design guidelines, 322–323design phase of SDLC, 4–18Design ribbon
adding controls to a form, 187, 188selecting and drawing controls, 115, 117SQL View, 468, 469ToolBox displayed on, 86
design specificationsfor the Customer Service application, 461–465for the Project Tracker application, 334–340
Design tab, enabling icons, 272design time settings, 81Design View
accessing in hidden mode, 236retrieving data from multiple tables, 271, 272switching to from Layout View, 29
designer window for a stored procedure, 267, 268Desktop Edition. See SQL Server 2005 Express EditionDestination parameter, 201detail section of a report, 245developer extensions, 330development methodology, 3development phase of SDLC, 18–23diagramming techniques, 5Dim statement
declaring a class, 115declaring variables, 51
disconnected recordsetsbuilding unbound forms, 142–156described, 132navigation procedures for, 145, 153as recommended, 156saving control values in, 147, 154–155updating databases from, 147, 155working with, 142
DisplayMessage procedure, 291DisplaySystemInfo procedure, 292, 293, 294DISTINCT predicate, 160distribution options for applications, 329divide by 0 error, 74Dividing Lines property, 142, 149DLLs (Dynamic Link Libraries)
referencing external, 291–294standard, 287–291using, 287–294
Do...Loop statement, 62–63Do...Until loop, 62, 63Do...While loop, 62Do...While statement, 63docmd command, 21, 23DoCmd object
performing macro commands or menu options, 97–98programatically linking a list, 227–229TransferDatabase method, 200–203
documenting code, 63–64Double data type, 50DSN, 230dt (Date) prefix, 55dynamic arrays, 51, 52Dynamic Link Libraries. See DLLs
Beginning Access 2007 VBA
313 / 344
Index
Eearly binding, 295, 324Edited Record option, 317elements
of applications, 11–12running on dif ferent computers, 15
e-mailsgenerating empty, 415–416, 431integrating into applications, 453, 454sending from VBA code, 210–211sending through Outlook from Access, 302–305
embedded macros, 2empty forms for a user interface, 344, 475–481empty record, adding to a recordset, 141–142Enable this Content option, 34Encode Database, 329Encoding parameter
for the ExportXML method, 209for the OutputTo method, 249
Encrypt with Password option, 327encrypting a database, 329end users, interviewing, 3–4Ending Points in Activity Diagrams, 8Enhanced Rich Text data type, 222enumerated types, 122–123EOF property of a recordset, 141error handler, 73–74error messages, 72, 77–78ErrorHandlerLibrary database, 308, 311error-handling code, writing, 71–78error-handling procedure, 308errors
debugging, 64–71raising in code, 75types of, 64–66
Errors collection, 75event(s)
calling functions from, 45calling sub procedures from, 36common to objects, 84creating, 113–115declaring and raising, 114def ined, 79described, 84–86example using, 86–91initializing and terminating, 115as a SharePoint list, 221
event handlers. See event proceduresEvent Procedure option, 85event procedures
adding to a form, 143, 151adding to handle recordset navigation, 144, 152creating, 90navigating through records, 444–445, 450
event sub procedures, 114–115Event tab
f rom the cmdRun Properties window, 37of the Properties dialog box, 84, 95
Excelcontrolling from Access, 295–298creating a new instance of, 295
Execute method, 132, 269, 517execute-only applications, 331ExecuteSPRetrieveRS function, 495–496ExecuteSQLCommand procedure, 389–390, 404–405ExecuteStoredProcedure procedure, 497ExecuteStoreProcedure procedure, 517–518Exit event, 86–87Exit event procedure, 90exporting
data using OutputTo, 211def ined, 200
ExportXML method, 208–209Express Edition. See SQL Server 2005 Express EditionExpression Builder, 84eXtensible Markup Language. See XMLexternal applications, automating, 294–295external data sources, 199–211External Data tab, 200, 222, 223external DLLS, 291–294external function calls, 456–458external functions
Beginning Access 2007 VBA
314 / 344

calling, 293declarations to, 400
external library, 293Extreme Programming, 3
Beginning Access 2007 VBA
315 / 344
Index
Ffield data types, 50–51fields
specifying for sorting, 157viewing for a table, 134
file attachments, 456.See also attachments
File Attachments tab, 339File Open button, 339file-level security, 327FileName parameter
for the TransferSpreadsheet method, 205for the TransferText method, 206
Filter property, 158–159FinalizeOrder procedure, 35, 36Find method, 157–158firing events. See raising eventsfixed-size array, 52FixNull function, 489For Each...Next loops, 61For Each loops, 99–100For...Next loops, 61–62For...Next statement, 62form(s)
adding to a database, 29binding to ADO recordsets, 138creating the user interface, 18getting to the Visual Basic Editor f rom, 21hiding to be reopened later, 325loading, 47, 48navigation and f low of, 181–187obtaining a list of all open, 94–96obtaining currently active, 98opening from a switchboard form, 187polishing, 197–198properties of, 80saving, 30, 87
form modules, 29Form object, 94Form_frmText object, 40, 41Form_Load event
adding code to, 116, 119adding to a form, 143, 150code in, 138ensuring changes are saved, 148, 156for frmCustomers form, 505–506for the frmProjects form, 410, 427initializing frmContacts form, 441, 448–449
Form_Load event procedure, 511–512Form_Load procedure, 135–136Form_Unload event, 448, 451Form_Unload procedure, 422–423, 437Forms collection, 94forward-only cursor, 133frm (Form) prefix, 56frmContacts form
building for Project Tracker, 440–451creating, 351, 354–356, 357writing code for, 441–451
frmCustomers form, 477–480, 504–512frmProjects form
creating, 344–353, 357example of, 410, 411writing code for, 410–440
frmSearch formadding a breakpoint to, 512, 513creating, 475–477writing code for, 500–504
frmTest formCode Builder f rom, 40creating a new procedure for, 37–40displaying objects associated with, 40, 41opening in View mode, 38selecting from the Form Name f ield, 47, 48
FROM clause, 160–161fsub (SubForm) prefix, 56FullName property, 97Function keyword, 42function procedures, 42–44functions
behind methods, 82–83built-in, 45–46built-in SQL Server, 275–277
Beginning Access 2007 VBA
316 / 344

calling from events, 45calling from other procedures, 44–45creating, 43–44, 114–115def ined, 33scope and lifetime of, 45
Beginning Access 2007 VBA
317 / 344
Index
Ggeneral comment section, 63–64General Declarations section, 54GeneralErrorHandler procedure
adding, 75–76adding to modBusinessLogic, 492adding to the modBusinessLogic module, 389, 404calling, 77placing into a new database, 311
generic error handler, 75–78Get External Data - SharePoint Site Wizard, 222–226GetFileNameBrowse function, 385–386, 401–402GetLookupDisplayValues parameter, 226GetOpenFileName external function, 384, 400GetPlaceFacts method, 218–220GetSQL function, 512GetSystemInfo external library, 293global scope of the Err object, 74
Beginning Access 2007 VBA
318 / 344

Index
HHandleError section, 74, 77HasFieldNames parameter
for TransferSpreadsheet method, 205for TransferText method, 206
hidden mode, 236hourglass, 325HTML pages, creating static, 249–251HTMLTableName parameter, 206Hyperlink data type, 50, 222
Beginning Access 2007 VBA
319 / 344
Index
Iicon
for events, 92, 93for a method, 83for a property, 81, 82
ID data type, 221ID of a SharePoint list, 227If statement, 34If...Then statements, 56–59If...Then...Else statement
as faster than IIF statements, 324syntax for, 57
If...Then...ElseIf statement, 57IIf function, 59ImageTarget parameter, 209Immediate window
calling TestError2, 76displaying the currently active form, 98running a new function in, 43running a procedure from, 34running the new TestIfStatement procedure, 58running the TestCaseStatement procedure, 60running the TestError procedure, 73running the TestLoop procedure, 62, 67, 68, 69seeing report names in, 97using, 68in the Visual Basic Editor, 24, 25
implementation phase of SDLC, 25implements keyword, 123importing
def ined, 200SharePoint lists, 222–226situations for, 200
ImportOptions parameter, 208ImportXML method, 208indexes, 325infinite loop, 63Initialize event, 115in-line comments, 63, 64inner join, 161Insert ActiveX Control window, 306Insert statement, 164–165int (Integer) prefix, 55intCounter variable, 67Integer data type, 50IntelliSense, 112interactive forms, 181–198interface inheritance, 123interviewing end users, 3–4intrinsic constants. See built-in constantsissues in SharePoint, 221iterative process, testing as, 24
Beginning Access 2007 VBA
320 / 344

Index
JJet SQL, 159join syntax, 161
Beginning Access 2007 VBA
321 / 344

Index
KKeyPress event, 85–86
Beginning Access 2007 VBA
322 / 344

Index
Llabel
changing properties of, 86selecting for a list box, 95
late binding, 295, 324left join, 161letters, creating Word from Access, 298–302libraries
available for use in Access applications, 100based on specif ic Access databases, 308–312
Libraries list, 93life cycle
of a procedure, 45of variables, 54
LIKE keyword, 515LimitToList property, 193LinkChildFields property, 194linking
to SharePoint lists within Access, 225–232situations for, 200
LinkMasterFields property, 194links in SharePoint, 221list box control
dragging onto a new form, 94, 95populating, 422, 436–437
list boxes, versus combo boxes, 188–193ListID parameter, 226lists, choices in, 188lng (Long) prefix, 55LoadRecords procedure, 423, 437–438local string variable, declaring, 219local variables
adding for clsProjects, 372–373, 379adding for Property Get and Property Set, 111declaring and assigning values to, 40declaring as Report objects, 97declaring for clsProjects, 359, 366–367in a procedure, 36
Local window, 24, 25Locals Window, 68–69Lock Project For Viewing option, 328LockType property
of the Recordset object, 134, 317setting, 143, 151
logic errors, 66logical tiers, 18Login parameter, 204Long data type, 50loops, declaring, 61–63
Beginning Access 2007 VBA
323 / 344

Index
MMacro Builder, 84macros
embedded in Access 2007, 2examples of, 46–48, 49instead of procedures, 46naming, 47, 49versus procedures, 46–48, 49responding to events, 84saving, 47
“the Macros in this project are disabled” error message, 34mcr (Macro) prefix, 56MDB file format, 2Me keyword, 94, 125, 126Memo field data type, 51memo fields, 2menu add-ins, 312menus, importing or linking data, 200methods
adding to a class module, 111adding to a form, 126calling from within Property Let, 106in a Class Diagram, 103creating, 111–113def ined, 79described, 82–83example using, 86–91implementing with interface inheritance, 123
Microsoft Access. See Access 2007Microsoft Content Management Server 2002, 221Microsoft Excel. See ExcelMicrosoft IntelliSense, 112Microsoft Office 12.0 Object Library, 288–291Microsoft Office 2003 Web Services Toolkit, 214Microsoft Outlook. See OutlookMicrosoft SharePoint Portal Server 2003, 221Microsoft SQL Server. See SQL ServerMicrosoft SQL Server Database Wizard, 262–263, 466Microsoft Visio. See VisioMicrosoft Visual Basic, 1Microsoft Word. See Wordmiddle (business) layer in three-tier architecture, 15, 16mod (Module) prefix, 56modBusinessLogic module, 384–389, 400–404, 489–499modDatabaseLogic module, 384, 389–399, 400, 404–408modeling, 4modError module, 308, 311Modify Columns and Settings link, 227modules
authorizing to run, 34creating, 27–28, 29def ined, 27inserting into databases, 242types of, 29, 101
Modules tab, 29MouseUp event, 92, 93MouseWheel event, 92, 93Move Data ribbon, 319MoveToFirstRecord procedure, adding to modBusinessLogic, 490MoveToLastRecord procedure, adding to modBusinessLogic, 490–491MoveToNextRecord procedure, adding to modBusinessLogic, 491–492MoveToPreviousRecord procedure, adding to modBusinessLogic, 491msgbox command, 21, 23msgbox function, 195–196, 293Multiple lines of text data type, 221multiuser architecture considerations, 318–322multiuser considerations for applications, 315–322
Beginning Access 2007 VBA
324 / 344

Index
NName properties
changing for command buttons, 115, 118changing for controls, 30, 31setting for command buttons, 142
Name propertychanging for a label, 115, 118changing for a text box, 86, 115, 118of a command button, 86, 95of a label, 86of a list box, 95modifying for text boxes, 135
naming conventionsfor objects, 55–56pref ixes used as, 55–56
navigating through a recordset, 141Navigation Buttons property, 142, 149navigation pane, 2navigation procedures, 145, 153No Locks option, 317nonvisual objects, 82Northwind database, 202–203, 235n-tier architecture. See three-tiered architectureNumber (Byte) field data type, 50Number data type, 221Number (Double) field data type, 50Number (Integer) field data type, 51Number (Long Integer) field data type, 51Number (Single) field data type, 51
Beginning Access 2007 VBA
325 / 344

Index
Oobj (Object) prefix, 55object(s)
building class modules for Project Tracker, 357characteristics of , 80class module for in Customer Service, 481–488creating custom methods for existing, 125–126creating custom properties for existing, 124–125creating your own, 101–127def ined, 79elements of, 79–91instantiating at runtime, 295referring to, 93–94seeing methods available for, 83standardized way of naming, 55using, 94–100using class modules to create, 101–123viewing using the Object Browser, 91–93
Object Browseropening, 91, 92viewing objects using, 91–93
Object data type, 50Object navigation box, 27, 28object variables
declaring and using, 53declaring for Excel, 294def ined, 53
ObjectFormat parameter, 210ObjectName parameter
for OutputTo, 249for SendObject, 210
object-oriented programming. See OOPobject-oriented programming environment, 79–100ObjectType parameter
for the ExportXML method, 209for the OutputTo method, 249for SendObject, 210for the TransferDatabase method, 201
objProjects object, populating, 412, 428–429ODBC database, importing data from, 201ODBC data source name, 201Office and Home Application Download Category, 214Office Button, 79Office SharePoint Server 2007, 221On Click event, 37, 38, 87On Click event procedure, 95On Error statement, 72, 77On Exit event, 86–87On Load event, 1161&1 Internet, 222OOP (object-oriented programming), 79Open Databases Using Record-Level Locking option, 317Open Exclusive setting, 323Open method
of the Connection object, 131populating a recordset, 133
OpenDbConnection procedureadding to modDatabaseLogic module, 492–493adding to open database connections, 390, 405
OpenFileAttachment procedure, 385, 401OpenForm action, 47, 48optimistic locking, 317, 318Option Explicit statement, 31, 32Options parameter of the Recordset object, 134OR, in an Activity Diagram, 8, 9, 10Order By clause, 161–162OtherFlags parameter, 209Outlook, 302–305Outlook Calendar, 163–164OutputFile parameter for the OutputTo method, 249OutputFormat parameter for the OutputTo method, 249OutputQuality parameter for the OutputTo method, 249OutputTo method, 211, 248–251OutputToHTML procedure, 250
Beginning Access 2007 VBA
326 / 344

Index
PPackaging Wizard, 330PadQuotes function, 495page break, inserting into a Word document, 302Parallel Activities in Activity Diagrams, 8parameters, 33parent-child class relationships, 122password, 328–329Password parameter, 204Password Required dialog, 328perceived performance, 325–326percent meter, 325–326performance
improving actual for applications, 322–325improving perceived, 325–326slowed by encryption, 329
Performance Analyzer, 326–327period (.), referring to objects, 94pessimistic locking, 317Phone field, 514–515physical tier, 18Picture property, 142PopulateComboBoxes procedure, 421, 435–436PopulateContactsControls procedure, 446–447, 450–451PopulateControlsOnForm procedure, 146, 153–154PopulateListFromRecordset procedure, 422, 436–437, 489–490PopulateProjectsControls procedure, 419–420, 433–434PopulatePropertiesFromForm procedure
adding to clsCustomer class module, 487adding to clsProjects class module, 364–365, 369–370, 377, 381
PopulatePropertiesFromRecordset procedure, 363–364, 368–369, 376, 380–381, 486populating combo boxes and list boxes, 190–193predicates, restricting records returned, 160prefixes, as naming conventions, 55–56presentation (user interface) layer
creating diagrams for, 104, 105in n-tier architecture, 17in three-tier architecture, 15, 16
PresentationTarget parameter, 209Preserve statement, 52Preview button, 339preview mode, 245, 246primary key for a SQL Server table, 265printer devices, displaying in the Debug window, 98–100printer margins, setting, 247Printer object, 98, 246–247Printers collection, 98–100, 246–247private declarations of procedures, 45private variable, 54procedures
calling sub procedures from, 35–36creating and calling, 33–46declaring as private, 45def ined, 33versus macros, 46–48, 49for making updates to data, 507–508making use of If...Then statements, 57–58retrieving values for, 36variables and constants in, 49
ProceedWithDelete function, 388, 403process Flow Diagrams, 7ProcessRecordset function, 493–494ProcessRecordset procedure, 396, 407–408ProcessUpdate procedure, 396–397, 408, 496program flow, controlling, 56–63progress bar, 325–326Project class, 358–372Project Explorer, 357Project object, class for, 357project records, creating procedures for, 393–395, 406–407Project Tracker application
building class modules for objects, 357–383building the database, 340–343building the user interface, 344–357connecting the user interface to the code, 410–451Contacts class, 372–383design specif ications, 334–340opening, 335Project class, 358–372standard modules, 383–409touring the f inished, 452–459
Beginning Access 2007 VBA
327 / 344

Project Tracker screendividing into tabs, 336–339prototype, 342sample project record on, 452
Project window, 19, 20ProjectId field, 410, 427Projects form, 410–440ProjectTrackerDb database, 340–343ProjectTrackerUI database, 344ProjectType property, 97properties
adding to forms, 124–125in a Class Diagram, 103creating, 105–111creating custom, 124–125creating for a class, 105creating for the Car class, 107–111described, 80–82of the Err object, 74example using, 86–91with interface inheritance, 123listing for an object, 81of objects, 79shared by objects, 81
Properties dialog boxdisplaying for a form, 30Event tab, 84, 86, 116for a form, 80for a text box control, 86
Properties module, 19, 20Properties window, 30, 32Property Get procedure
adding, 111creating properties for existing objects, 124syntax for, 106–107using, 106using SpecialFeaturesList enumeration, 122–123
Property Let procedureadding, 111creating properties for existing objects, 124general syntax for, 106using, 106using SpecialFeaturesList enumeration, 122–123
property proceduresadding to clsCustomer class module, 483–485adding to clsProjects class module, 359–361, 367, 373–375, 380
Property Set procedure, 106, 107, 124property value, limiting to specified constants, 122Protection tab, selecting, 328, 329prototype screens
for the Customer Service application, 464–465generating with Access forms, 336–340generating with Visio, 336, 337for managing cars, 102, 103
public functions, 111Public keyword, 45, 54public sub procedures
adding to a class, 111creating custom methods, 125–126
public variablescreating properties for existing objects, 124declaring, 54–55implementing properties for custom classes, 105using, 105
PublicEvent statement, 114purpose of an application, 3
Beginning Access 2007 VBA
328 / 344
Index
Qqry (Query) prefix, 56queries
errors in upsizing, 278, 283returning rows, 325
Queries category in the Navigation Pane, 267Queries objects, 278, 284Query Designer, 160query processor for SQL Server, 259
Beginning Access 2007 VBA
329 / 344

Index
RRaise method of the Err object, 74–75RaiseEvent statement, 114raising events, 113Range parameter, 205Rapid Application Design (RAD), 3read-only locks, 317read-only properties, 107record count, 434record locking
on bound forms, 316–317on unbound forms, 317–318
record navigation methods, 141Record Selectors property, 142, 149Recordcount property, 140–141records
adding to a table, 242counting in a recordset, 140–141deleting current f rom the recordset, 142deleting from cross-reference tables, 397–398, 409event procedures for navigating, 444–445, 450inserting into cross-reference tables, 398–399, 409navigating to particular, 157–158procedures for saving displayed, 425–426, 439sorting for the unbound contacts form, 156–157updating the current in a recordset, 142
recordset navigation procedures, 386–388, 402Recordset object
adding code for, 142, 150creating, 133–140declaring a new, 138instantiating a new, 138navigation methods, 141properties and methods of, 83, 156–159retrieving a set of records from a data source, 132setting properties of, 143, 151
Recordset property, 138–139recordsets
adding, editing, and deleting records in, 141–156counting records in, 140–141declaring in frmProjects, 428f iltering to smaller subsets, 158–159navigating through, 141populating controls on a form, 143, 151procedures for navigating through, 144, 152reconnecting to underlying data sources, 147, 155repopulating values in, 405repopulating with the most current values, 169, 175sorting, f inding, and f iltering records in, 156–159storing in local memory, 143, 151using SQL and ADO to populate, 162–164
RecordSource propertyof CreateReport, 245of a report, 236specifying a SQL statement as, 160
ReDim statement, 52references
adding to the ADOX library, 177adding to web services, 215–218
References dialog box, 288RefreshContacts procedure, 426–427, 439–440RefreshHistory procedure, 511registering add-ins, 313repairing Access databases, 331replication, removed for ACCDB files, 2report events, 247–248Report object, 96–97report properties, changing, 236reports
adding controls to, 238–241creating programmatically, 237–248designating printing options for, 246–247manipulating from VBA code, 235–248opening in preview mode, 245, 246setting the data source for, 236–237
Reports collection, 96–97Requery method, 167, 173RequeryRecordset procedure, 391, 405–406Require Variable Declaration option, 31Requirement Number for a Use Case, 5Resume Next statement, 72Resume statement, 72Retrieve method, 112, 113
Beginning Access 2007 VBA
330 / 344

RetrieveAttachments function, 363, 368RetrieveComments function, 362, 367–368RetrieveContacts function, 362–363, 368, 375–376, 380RetrieveCustomers function, 485–486RetrieveProjects function, 361–367reusable modules, writing, 322ribbons, 2rich client, 16Rich Text data type, 222rich text in memo fields, 2right join, 161roadmap for building a system, 4–5RollbackTrans method, 313, 314row-level security, 271RowSourceType property, 95rpt (Report) prefix, 56rsub (Subreport) prefix, 56RunSearch procedure, 512runtime, 330runtime errors, 64, 66, 74/runtime switch, 330
Beginning Access 2007 VBA
331 / 344

Index
SSave Changes button, 337Save event, 116, 120Save procedure
adding to clsCustomer class module, 488adding to clsProjects class module, 366, 371, 378–379, 383
SaveAllRecords procedure, 144, 147, 152, 155SaveCurrentRecord procedure, 147, 154–155, 168, 174scaling up a database server, 14SchemaTarget parameter, 209scope
of an Activity Diagram, 7def ined, 45global, 74of a procedure, 45of a variable, 54
Screen object, 98screen prototypes, 8–11SDLC (Systems Development Life Cycle), 3Search Inventory Screen
Activity Diagram for, 8, 9designing for Wrox Auto Sales, 5mapping Use Cases to, 10–11prototype for, 11separate actions on, 5, 6Use Case Diagram requirements, 8
search results, clearing, 503–504Search Results screen, 515, 516securing applications, 327–329security information, specifying, 278, 279security model, 3Select clause, 160Select statements, 160–164
Select…Case statements, 59–61, 60–61Send method, 305SendObject method, 210–211separation of tiers concept, 103–104server cursors, 134server machine, 13Server parameter, 204services, installed with SQL Server 2005 Express Edition, 257–259Set statement, 115SharePoint data types, 221SharePoint DSN, 229, 230–231SharePoint hosting, 222SharePoint lists
importing, 222–226introduction to, 221–222linking to, 225–232types of, 221using data from, 222–232
SHELLEXECUTE, external DLL function call to, 456, 457ShellExecute external function, 384, 400Shift key, selecting multiple controls to align, 197Single data type, 50Single line of text data type, 221single-tier applications, 12–13SiteAddress parameter, 226sng (Single) prefix, 55sort order, 161–162Sort property, 156–157source argument, 134Source parameter, 201SourceObject property of a subform, 194SourceTableName property, 229, 231SpecialFeaturesList enumerated type, 122, 123SpecificationName parameter, 206spInsertCustomer stored procedure, 469–470splash screen, 325Split Database button, 320spreadsheets, importing, linking, and exporting, 204–205SpreadsheetType parameter, 205spRetrievalAllCustomers stored procedure, 470, 471spRetrieveCustomerHistory stored procedure, 471–472spRetrievePlans stored procedure, 472spRetrieveSelectedCustomer stored procedure, 473spUpdateCustomer stored procedure, 473–474, 517SQL (Structured Query Language)
introduction to, 159–164
Beginning Access 2007 VBA
332 / 344
syntax of, 159–160SQL code
adding, 470for a stored procedure, 268
SQL Insert statements, 164–165SQL queries, 324SQL Server
Access as a front end to, 132Access Projects as a front end to, 253–254built-in functions, 275–277setting up, 254–259stored procedures, 267–271versions of, 255views, 271–274
SQL Server Browser Service, 259SQL Server Configuration Manager, 257–258SQL Server database
linking to, 253modifying strConnection string to point to, 492–493specifying, 466specifying details necessary to connect to, 260, 261transferring a complete, 203–204using a new, 262–263using an existing, 260–262
SQL Server Mobile Edition, 255SQL Server objects, 264–277SQL Server Service, 259SQL Server storage engine, 259SQL Server tables, 264–267SQL Server 2005 Developer Edition, 255SQL Server 2005 Enterprise Edition, 255SQL Server 2005 Evaluation Edition, 255SQL Server 2005 Express Edition, 255–259SQL Server 2005 Standard Edition, 255SQL Server 2005 Workgroup Edition, 255SQL statements
adding procedures for creating, 391–393, 406–408with and without ADO, 160building dynamic, 512deleting data using, 165–166dialects of , 159inserting current values on a form, 168, 174–175modifying the unbound contacts form, 166–176as a report’s RecordSource property, 241running against a database, 167, 173setting changes and removing passwords, 327–328as the source for the Open method, 162specifying the DataSource of a report, 236for stored procedures, 269updating an existing record, 168–169, 175updating data using, 165updating tables, 393–395, 406–407viewing in Query Designer, 160
SQL View on the Design ribbon, 468, 469standalone application, 13standard DLLs, 287–291standard modules
building for Project Tracker, 383–409for the Customer Service application, 488–499def ined, 101described, 29
Starting Point for an Activity Diagram, 7static arrays, 51static HTML pages, 249–251Static keyword, 45, 54Step Into option, 66Step Over option, 66storage engine for SQL Server, 259stored procedures
adding to the Customer Service application, 467calling, 269creating for SQL Server, 269–271described for SQL Server, 267running, 269, 271
StoreLogin parameter, 201str (String) prefix, 55String data type, 50string variable, 60structure variable, declaring, 219Structured Query Language. See SQLStructureOnly parameter, 201sub procedures
behind methods, 82–83calling from events, 36calling from other procedures, 35–36creating and calling new, 33–35def ined, 33scope and lifetime of, 45
Subform control, 194subforms
Beginning Access 2007 VBA
333 / 344

described, 194example of, 194, 195minimizing the use of, 322tying to a parent form, 194
subqueries, 162switchboard forms, 182–187syntax errors, 64, 65system information, from an external DLL, 292–294SYSTEM_INFO type declaration, 293Systems Development Life Cycle. See SDLC
Beginning Access 2007 VBA
334 / 344

Index
Ttab controls, 193–195, 434Tab Order screen, 197–198tab stops, order of, 197table(s)
adding to the Customer Service application, 466–467adding to databases, 241–242combining data from two, 162creating in a database, 134creating with ADOX library, 177–178exporting to XML, 209inserting results f rom a Select statement, 165for Project Tracker, 341–343retrieving data from more than one, 161specifying to upsize, 278, 280
table alias, 160table attributes, specifying to upsize, 278, 280table names, removing spaces in, 277table scans, reducing, 325table view, 140TableDef object
creating, 229, 230programmatically linking a list, 229–232with a SharePoint list as its source, 229
TableName parameterfor the TransferSharePointList method, 226for the TransferSpreadsheet method, 205for the TransferText method, 206
Tables category in Access Projects, 264tabs
controlling the visibility of , 194for the Project Tracker screen, 336–339
Tag property, 124tags in an XML file, 209tasks in SharePoint, 221tbl (Table) prefix, 56tblComplaints table, exporting to HTML, 249–251tblContacts table, mapping to fields on, 341, 343tblCustomers table, adding to the Customer Service application, 466tblCustomersPlanHistory table, adding to the Customer Service application, 467tblPlans table, adding to the Customer Service application, 467tblPlansStatus table, adding to the Customer Service application, 467tblProjects table, adding, 341, 343tblProjectsComments table, adding to Project Tracker, 342, 343tblProjectsContacts table, adding to Project Tracker, 342, 343tblProjectsFileAttachments table, 342, 343TemplateFile parameter for the OutputTo method, 249templates, prebuilt, 2Terminate event for a class, 115TerraService web services, 215–216, 218–220Test Connection button, 261TestCaseStatement procedure, 60–61TestError procedure, 73–74TestError2 procedure, 76TestIfStatement procedure, 57–58testing phase of SDLC, 24–25TestLibrary procedure, 311–312TestLoop procedure, 61TestMethod method, 111TestPrinter procedure, 99TestPrinter sub procedure, 99–100TestTransferDatabase procedure, 202–203TestWebService procedure, 218, 219text box controls
displaying a selected date, 307setting to current values, 146, 153–154
text boxesadding to a form, 135code displaying values in, 188drawing on a form, 29, 30
text box object variable, 53Text field data type, 51text files, 205–208thin client, 16three-tiered architecture, 15–17tiers of an application architecture, 12toggle button, 438–439togShowAll_Click event, 424, 438–439ToolBox, 86, 88tooltip, 220
Beginning Access 2007 VBA
335 / 344

TOP predicate, 160transactions, 313–314transactions form, displaying, 194, 195TransferCopyData parameter, 204TransferDatabase method, 200–203TransferSharePointList method, 225–229TransferSpreadsheet method, 204–205, 206TransferSQLDatabase method, 203–204TransferText method, 205–208TransferType parameter
for the TransferDatabase method, 201for the TransferSharePointList method, 226for the TransferSpreadsheet method, 205for the TransferText method, 206
Trust Center, accessing, 47T-SQL, 159two-tier applications. See client-server applicationstyp (User-Defined Type) prefix, 55Type Mismatch error, 64, 66typTripInfo user-defined type, 52–53
Beginning Access 2007 VBA
336 / 344
Index
Uunbound contacts form
building using a disconnected recordset, 142–156modifying to use SQL, 166–176sorting records for, 156–157
unbound formsbetter than bound, 324record locking on, 317–318
unhiding the switchboard form, 187Union statement, 162unique index number of each array element, 51updatable, recordsets as, 134update conflicts, 318Update method
adding the clsCar class, 112calling, 120committing a new empty record to the local disconnected recordset, 144, 152modifying in clsCar, 114of the Recordset object, 142
Update statements, 165Upsizing Wizard, 277–284URL, decoding, 227Use Case Diagrams
for the Customer Service application, 462–463for the Project Tracker application, 334, 335–336using, 5–7
Use Case Numbers, 5Use Cases, 5, 8–11UseOA parameter, 205user ID, 194user input, validating, 196–197user interaction, 195–197user interface
of an application, 12building for Project Tracker, 344–357building for the Customer Service application, 475–480connecting to code, 410–451, 499–512determining properties and methods of an object, 102, 103implementing a basic, 139separating from the data tables, 318
user interface database, opening exclusively, 323user interface elements, mapping Use Cases to, 10–11user interface objects, 344user-defined data types, 50, 52–53user-defined functions
described, 275embedding within a basic SQL statement, 275
user-interface database, 322user-interface objects, 319user-level security, 2users, interacting with controls, 195UseTrustedConnection parameter, 204
Beginning Access 2007 VBA
337 / 344

Index
Vvalidation checks, 106ValidationRule property, 196ValidationText property, 196values
calling a procedure with hard-coded, 58preserving after a procedure ends, 45returning from function procedures, 44using variables and constants to store, 49–56
var (Variant) prefix, 55variables
declaring and using, 51–53declaring in functions, 44def ined, 33evaluating multiple times, 59making visible in any module, 54–55naming conventions for, 55–56scope and lifetime of, 54–55standardized way of naming, 55storing the number of loop iterations, 62types of, 49–51
Variant data type, 50variants, minimizing the use of, 324VB (Visual Basic), 1VBA (Visual Basic for Applications), 1VBA code
adding a password for, 328–329basics of writing and testing, 27–78handling data validation from, 196linking to another database, 319optimizing to improve performance, 323–324responding to events, 84sending an e-mail f rom, 210–211using to link, import, and export, 199–211working with controls, 187–195working with reports f rom, 235–248writing behind report events, 247writing for the business logic and database access logic, 18
VBA data types, correspondence to field data types, 50–51VBA Help documentation, obtaining a list of available functions, 45VBA source code, securing separately, 328VBA version 6.0, 1VB.NET, 1VerifyCreditAvail procedure
calling from another procedure, 35–36creating, 33–35
View button, 273View Details for Selected Contact button, 453View mode, 139ViewID parameter for the TransferShare-PointList method, 226View/Manage Car Details Screen
Activity Diagram for, 8, 10prototype for, 11, 12Use Case Diagram for, 5, 7
View/Manage CustomerAccounts form, 504–505View/Manage Customer Accounts screen
displaying a customer record on, 515, 516opening independently of the Customer Search screen, 517prototype for, 464–465
View/Manage Customer Details screen, 462–463views
advantages of, 271creating, 273–274
Views tab of the Add Table dialog box, 275virtual tables, 163Visible property
hiding and redisplaying forms, 325of the objExcel object, 295setting to False, 186setting to True, 291
Visiocreating Activity Diagrams, 8generating prototype screens, 336
Visual Basic, 1Visual Basic Editor (VBE)
for Access 2007, 2display of, 19, 20opening, 37, 38opening with a new empty procedure, 85running and debugging code in, 24–25sample module displayed, 27–28writing VBA code in, 18–23
Visual Basic for Applications, 1Visual Basic .NET, 1visual objects, 82
Beginning Access 2007 VBA
338 / 344

Visual Studio Tools for Microsoft Office, 2Visual Studio Tools for Office (VSTO), using ADO.NET, 130
Beginning Access 2007 VBA
339 / 344
Index
WWatch window, 69–70, 71Watches window, 24, 25Web browser interface. See thin clientWeb formats, exporting Access data to, 248–251web services
adding references to, 215–218consuming, 214others available, 218using data from, 214–220
Web Services References option, 215Web Services Toolkit, 214Where clause, 161Where keyword, 514WhereCondition parameter, 209While...Wend statement, 63Windows integrated security, 466With...EndWith, 323–324WithEvents keyword
declaring an object variable, 114as part of a declaration, 119
wizard add-ins, 312Word
controlling from Access, 298–302displaying in Print Preview mode, 302
Word Application object, 301workstations in client-server architecture, 14Wrox Auto Sales Application, 4
Beginning Access 2007 VBA
340 / 344

Index
XXML (eXtensible Markup Language), 208XML files, importing and exporting, 208–210
Beginning Access 2007 VBA
341 / 344

Index
YYes/No data type in SharePoint, 222Yes/No field data type, 50
Beginning Access 2007 VBA
342 / 344

List of Try It Outs
IntroductionTry It Out
Chapter 2: The Basics of Writing and Testing VBA CodeTry it Out-Create a Database to Use with Examples in the Chapter
Try It Out-Creating the VerifyCreditAvail Procedure
Try It Out-Calling VerifyCreditAvail f rom Another Procedure
Try It Out-Create New Procedure for f rmTest Using Code Builder
Try It Out-Creating the CalculateSalesTax Function
Try It Out-Declaring a Public Variable
Try It Out-Creating TestIfStatement Procedure
Try It Out-Create the TestCaseStatement Procedure
Try It Out-Creating a For … Next Loop
Try It Out-Setting and Using Breakpoints
Try It Out-Using the Locals Window
Try It Out-Adding a Watch
Try It Out-Creating an Error Handler
Try It Out-Creating a Generic Error Handler
Chapter 3: Programming Applications Using ObjectsTry It Out-Using Properties, Methods, and Events
Try It Out-Using the Forms Collection and Form Object
Try It Out-Using the Screen Object
Try It Out-Using the Printers Collection and Printer Object
Chapter 4: Creating Your Own ObjectsTry It Out-Creating the Properties for the Car Class
Try It Out-Creating the Methods for the Car Class
Try It Out-Creating an Event for the Car Class
Try It Out-Using the Properties, Methods, and Events of the Car Class
Try It Out-Adding New Property for f rmCarDetails Form
Try It Out-Adding New Method for the frmCarDetails Form
Chapter 5: Interacting with Data Using ADO and SQLTry It Out-Building a Contacts Form Bound to a Recordset
Try It Out-Building an Unbound Contacts Form Using a Disconnected Recordset
Try It Out-Sorting Records for the Unbound Contacts Form
Try It Out-Modify the Unbound Contacts Form to Use SQL
Chapter 6: Building Interactive FormsTry It Out-Building a Switchboard Form
Try It Out-Populating Combo and List Boxes
Try It Out-Adding Data Validation to the frmPayments Form
Chapter 7: Importing, Linking, and Exporting Using External Data SourcesTry It Out-Importing Data from the Sample Northwind Database
Try It Out-Importing Data from a Text File
Chapter 8: Using Access with Web Services and SharePoint ListsTry It Out-Adding a Reference to a Web Service
Try It Out-Consuming the GetPlaceFacts Method
Try It Out-Importing Lists Using the Wizard
Try It Out-Programmatically Linking a List Using DoCmd Object
Try It Out-Programmatically Linking a List Using a TableDef Object
Chapter 9: Creating Reports and Web-Enabled OutputTry It Out-Creating a Report Programmatically
Try It Out-Exporting the tblComplaints Table to HTML
Chapter 10: Building SQL Server Applications with Access Projects
Beginning Access 2007 VBA
343 / 344

Try It Out-Creating an Access Project Using a New SQL Server Database
Try It Out-Creating a New SQL Server Table
Try It Out-Creating a New SQL Server Stored Procedure
Try It Out-Creating a New View
Chapter 11: Advanced Access ProgrammingTry It Out-Using the Microsoft Off ice Object Library to Create a Custom Command Bar
Try It Out-Using an External DLL to Get System Information
Try It Out-Controlling an Excel Spreadsheet f rom Access
Try It Out-Creating Word Letters from Access
Try It Out-Sending an Outlook E-mail f rom Access
Try It Out-Creating and Using a Code Library
Chapter 12: Finishing the ApplicationTry It Out-Using the Database Splitter Wizard to Separate Database Tables from the User Interface
Try It Out-Using the Performance Analyzer
Chapter 13: Case Study 1-Project Tracker ApplicationTry It Out-Building the ProjectTrackerDb Database
Try It Out-Building the frmProjects and frmContacts Forms
Try It Out-Building the clsProjects Class
Try It Out-Building the clsContacts Class
Try It Out-Building the modBusinessLogic and modDatabaseLogic Modules
Try It Out-Writing Code for the frmProjects Form
Try It Out-Writing Code for the frmContacts Form
Chapter 14: Case Study 2-Customer Service ApplicationTry It Out-Building the CustomerServiceSQL Database
Try It Out-Building the frmSearch and frmCustomers Forms
Try It Out-Building the clsCustomer Class
Try It Out-Building the modBusinessLogic and modDatabaseLogic Modules
Try It Out-Writing Code for the frmSearch
Try It Out-Writing Code for the frmCustomers
Beginning Access 2007 VBA
344 / 344