table of contents - connection · ipecs attendant simplifies call handling for attendant s with a...
TRANSCRIPT

User Guide
Please read this manual carefully before operating your set. Retain it for future reference.
Attendant LIK

iPECS Attendant LIK User Guide Issue 1.2
2
Revision History
Issue Date Change of Contents 1.0 May, 2013 Initial Release 1.1 Nov, 2013 Added Section 1.2 and 1.3 in the iPECS Attendant Introduction 1.2 Jan, 2014 Applied new BI

iPECS Attendant LIK User Guide Issue 1.2
3
Table of Contents
1 IPECS ATTENDANT INTRODUCTION .................................................................................................... 5 1.1 IPECS ATTENDANT, SOFTWARE IP ATTENDANT CONSOLE .................................................................................. 5 1.2 RECOMMENDED SPECIFICATIONS ................................................................................................................... 5 1.3 PROGRAM INSTALLATION ............................................................................................................................. 6
2 USER LOG IN ....................................................................................................................................... 7 2.1 IMPORTANT INFORMATION ........................................................................................................................... 7
3 BASIC CALL HANDLING FUNCTIONS ................................................................................................. 8 3.1 ANSWERING A CALL ..................................................................................................................................... 8 3.2 MAKING A CALL .......................................................................................................................................... 8 3.3 VIDEO ....................................................................................................................................................... 9 3.4 CALL RECORD ............................................................................................................................................. 9 3.5 CALL TRANSFER ........................................................................................................................................ 10 3.6 CONFERENCE ............................................................................................................................................ 11 3.7 MUTE ..................................................................................................................................................... 13 3.8 HOLD/CONNECT ....................................................................................................................................... 13 3.9 CALL PICK UP ........................................................................................................................................... 13 3.10 CALL PARK ............................................................................................................................................... 14
4 IP ATTENDANT PROGRAM MENU ...................................................................................................... 15 4.1 FILE MENU .............................................................................................................................................. 15
4.1.1 Import DB(Phone Book Data) ...................................................................................................... 15 4.1.2 Export DB(Phone Book Data) ....................................................................................................... 17
4.2 TOOLS ..................................................................................................................................................... 19 4.2.1 Phone Book .................................................................................................................................. 19 4.2.2 Phone book Search Window ........................................................................................................ 20 4.2.3 LDAP ............................................................................................................................................. 20 4.2.4 Account ........................................................................................................................................ 22 4.2.5 Call Log ......................................................................................................................................... 24 4.2.6 Call History ................................................................................................................................... 25 4.2.7 Call Statistics ................................................................................................................................ 26 4.2.8 Call Record Report ....................................................................................................................... 27 4.2.9 Change Station Name .................................................................................................................. 28 4.2.10 Preselected Message (Absend Message) .................................................................................... 29 4.2.11 Paging........................................................................................................................................... 30 4.2.12 Music Selection ............................................................................................................................ 30 4.2.13 Date/Time .................................................................................................................................... 32 4.2.14 SMS .............................................................................................................................................. 33 4.2.15 Conference ................................................................................................................................... 34
4.3 SETTING MENU ........................................................................................................................................ 36 4.3.1 Custom Setting [Environment Setting] ........................................................................................ 36 4.3.2 Flex Button Setting....................................................................................................................... 38 4.3.3 Customized Message Setting ....................................................................................................... 40 4.3.4 Wakeup Setting ............................................................................................................................ 41 4.3.5 Group Setting ............................................................................................................................... 42 4.3.6 Code Setting ................................................................................................................................. 43 4.3.7 Speed Dial .................................................................................................................................... 44
5 IP ATTENDANT MAIN WINDOW ......................................................................................................... 45 5.1 LOGOUT .................................................................................................................................................. 45 5.2 WAIT/HOLD WINDOW .............................................................................................................................. 45

iPECS Attendant LIK User Guide Issue 1.2
4
5.3 MONITORING WINDOW ............................................................................................................................. 46 5.4 DIAL PAD WINDOW .................................................................................................................................. 48 5.5 ALARM DISPLAY LED ................................................................................................................................. 49
6 INSTALLER’S SECTION ........................................................................................................................ 50 6.1 IP ATTENDANT. PROGRAM INSTALLATION .................................................................................................. 50 6.2 IP ATTENDANT LOGIN ................................................................................................................................ 51
6.2.1 iPECS-LIK Setting .......................................................................................................................... 51 6.2.2 Program Basic Setting .................................................................................................................. 51 6.2.3 Program Start ............................................................................................................................... 56
7 PMS FOR HOTEL VERSION ................................................................................................................. 57 7.1 ABOUT PMS ............................................................................................................................................ 57 7.2 PMS MAIN WINDOW ............................................................................................................................... 57 7.3 DATABASE SYNCRONIZATION WITH SYSTEM AND PMS .................................................................................... 59 7.4 HOTEL INFORMATION ................................................................................................................................ 59 7.5 GROUP .................................................................................................................................................... 59 7.6 GUEST SEARCH ......................................................................................................................................... 60 7.7 PMS CONFIG ........................................................................................................................................... 60 7.8 CHECK - IN ............................................................................................................................................... 61 7.9 CHECK - OUT ............................................................................................................................................ 63 7.10 ROOM STATUS ......................................................................................................................................... 65 7.11 ROOM CHANGE ........................................................................................................................................ 66 7.12 COS ....................................................................................................................................................... 66 7.13 MEMO .................................................................................................................................................... 66 7.14 DND ...................................................................................................................................................... 67 7.15 WAKE UP ................................................................................................................................................ 67

iPECS Attendant LIK User Guide Issue 1.2
5
1 iPECS Attendant Introduction 1.1 iPECS Attendant, Software IP Attendant Console
iPECS Attendant is the new software based IP Attendant console that extends the features of ez-
Attendant with embedded soft phone function, hotel features and an improved user interface.
The powerful Attendant capabilities and superb GUI are designed to improve Attendant functions
for the user.
iPECS Attendant simplifies call handling for Attendants with a simple click of a mouse on a PC and
may operate without the need for desktop hard phone. iPECS Attendant links to local and
corporate databases (MS Outlook, Excel, ACT and Goldmine) so the answering position is able to
greet callers knowing who is calling. From a glance at the iPECS Attendant Monitoring Window,
the receptionist views the status of users idle, busy, etc.
iPECS-LIK supports up to 5 Attendant Stations, each of which can be IP Attendant (with or without
the associates desk ‘hard phone’), for larger or high call-volume environments and can be used
as a Centralized Attendant in networked environment.
iPECS Attendant is supported for LIK Hospitality Software, as a separate product ‘PMS Attendant’
(Proprietary Management System). This application requires iPECS-LIK Hotel SW for connection.
1.2 Recommended Specifications Description iPECS Attendant installation will be done easily through the installation wizard. Therefore the installer is requested to consider just few conditions describred below. Installation PC Environment is recommened like below.
1) Hardware: Minimum Specification CPU 1GHz, Main Memory 1GB, HDD 100GB 2) Operating System: Windows XP with Service pack2 and later, Windows Vista, Windows 7 3) Window Resolution 1280 x 1024 Window Resolution is considered (1920 x 1080 Statistics Window)

iPECS Attendant LIK User Guide Issue 1.2
6
1.3 Program Installation
Description The initial program installation shall take the following steps. Procedure
1) Select the iPECS_Setup.exe file to operate. 2) Install the program according to the procedure. 3) Install additional programs such as WinPcap 4.1.1 and FireBird 2.1, which are necessary to
operate the iPECS Attendant. 4) Once installation precedure is completed, operate the program by selecting the icon on
the wallpaper. Notice
1) In case WinPCap program is not be installed properly, communication with IP-PBX cannot be done.
2) In case FireBird 2.1 is not be installed properly, the iPECS Attendant Local or a Remote DB cannot be operated.

iPECS Attendant LIK User Guide Issue 1.2
7
2 User log in 2.1 Important information
The IP Attendant Program uses login information, in the form of User ID and Password, created during the application’s initial setup. This data should be recorded in a safe place, to protect against lost or forgotten passwords. If this data is lost the IP Attendant program cannot be started. In such a situation, the iPECS ATD will need to be uninstalled and reinstalled to the desired PC, in order to create a new ID and password. Even if the application is set to auto login, it can be deselected during start-up of the application. If your IP Attendant does not have a user log in, refer to the Installers Section for instructions regarding the initial log in and creating IP ATTENDANT ID and Password details (i.e. creating IP ATTENDANT accounts).

iPECS Attendant LIK User Guide Issue 1.2
8
3 Basic Call Handling Functions 3.1 Answering a call
Description An IP Attendant operator may answer internal (other stations on the system) or external (outside line) calls. Procedure
1) When an incoming call presents, it will pop a call alert and will displayed in the Wait window, as well as ring the PC speakers (or headset – as configured within the IP ATTENDANT).If the IP ATTENDANT is not focussed in the foreground of windows, you will still see the pop-up alert. But the ringing information in the ‘Wait’ window of the main application may not be visible until the IP ATTENDANT application is presented to the foreground of windows.)
Station Answer
2) Either Click the Speaker key in the Dial Pad window, Or double click the station number in the Wait window, Or click anywhere on the pop up alert Or (when IP ATTENDANT is the active window) press the ‘Enter’ or ‘Space Bar’
To hang up a current call click the Speaker key
Hanging up a call
in the Dial Pad window. The current call is terminated and the IP ATTENDANT returns to an idle state.
Or when IP ATTENDANT is the active window – press ‘Esc’ key on the PC keyboard or press
‘Space Bar’ to hang up the current call.
When IP ATTENDANT program is active window, The ‘Space Bar’is worked as toggle – On-Hook / Off-Hook.
3.2 Making a call Description An IP Attendant may generate ICM (‘intercom – a.k.a Station to Station call) as well as outside line calls.
Procedure
1) Dial the Station number at the IP ATTENDANT key pad using the PC mouse, Station Calling
Or Double Click the station icon in the Group Information window, Or with IP ATTENDANT focussed to the foreground of windows (ie the active window), use the PC Key Pad to dial the Station number, Or Drag from Station Info window and Drop to Dial Pad window.

iPECS Attendant LIK User Guide Issue 1.2
9
Line (external) Calling
1) Dial the Line access code, followed by the PSTN number (at the Application key pad, or PC key pad)
Note
1) Other methods for outbound calling are given in this user guide. For details see the feature in use (eg dialling from the phone book).
2) When IP ATTENDANT is active window, IP ATTENDANT Flex button 1 to Flex button 12 is working together with PC’s Keyboard Function Key F1 to F12.
3.3 Video Description In an IP Attendant, Video Call is allowed.
Procedure
On talking with other Video Device, press
Station Calling
button. Video Call is established as below.
Note
1) Video call is only allowed in talking state. 2) If associated device is not video station, it is not allowed.
3.4 Call Record Description

iPECS Attendant LIK User Guide Issue 1.2
10
In an IP Attendant, Call Record is allowed.
Procedure
On talking with other Device, press
Station Calling
button. Record List can be checked at Call Record Report.
Note
1) Call Record is only allowed in talking state.
3.5 Call Transfer
Description The IP Attendant operator may transfer various types of incoming/outgoing calls.
Procedure
1) While a call is connected, click the "TRANS" button , and then dial the station number (via the PC mouse on the Dial Pad, or the PC keypad).
2) The caller will hear “holding tone" while at the same time the called station will receive ring signalling. 3) When the called station answers the ring, the held caller remains in the "holding" state until the
transferring station (IP ATTENDANT) hangs up the call using the speaker key . This procedure allows for an announced transfer, or without announcing the call, a ‘blind’ transfer is accomplished.
4) When the transferring station (the IP ATTENDANT) hangs up and withdraws from the transfer, the phone call between the line caller and transferred station is connected. The IP ATTENDANT station returns to idle.
5) To use Call Transfer feature, Drag & Drop feature is allowed in below cases. A. Call Redirect : Drag from Wait Window and Drop to Station Info another station. B. Blind Transfer : Drag from Hold Window and Drop to Station Info another station. C. Blind Transfer : Drag from Dial Pad Window and Drop to Station Info another station.

iPECS Attendant LIK User Guide Issue 1.2
11
3.6 Conference Description The iPECS-ATD operator can create a conference call.
Procedure 1) The iPECS-ATD operator can make a Add On Conference / Conference Room / Conference Group
by using Dial Pad as normal hard phone. 2) The iPECS-ATD operator can make a Add On Conference / Conference Room / Conference Group
by using Conference Menu or Conference Button. 3) In Conference window, there are 4 tab – Add On, Room, Station Conference Group, System
Conference Group. 4) There are Member List, and notepad that is used for brief memo for the conferece. 5) In Member List, member number, phonebook name, each member’s state are shown.
6) In Add On Tab, Conference member is added, Conference member is deleted, current Conference is
ended. 7) If a conference member state is Talk(C/A), then this member can be joined at this conference.
8) In Room Tab, Conference Room list is displayed. 9) Total current member count, room status is displayed. 10) IP ATTENDANT itself can enter or exit Room In / Room Out button.

iPECS Attendant LIK User Guide Issue 1.2
12
11) In Group(Station or System) Tab, Conference Group list is displayed. 12) Total current member count, group status is displayed. 13) If IP ATTENDANT is conference state, new member can be added. 14) If a member is conference state, the member can be deleted in thg conference.
Note In the case of a conference call for more than 3 people, repeat 2) in the above procedure. MCIM is needed in the iPECS system if more than 3 party conferencing is required.

iPECS Attendant LIK User Guide Issue 1.2
13
3.7 Mute
Description During the phone call, the iPECS-ATD operator activates the "Mute" function so that the other party cannot hear the iPECS-LIK operator's voice path.
Procedure
1) During the phone call, click the "Mute" button in the Dial Pad window. 2) The connected party will not hear the voice path from the iPECS-LIK Attendant 3) Click the "Mute" button for deactivation.
Note
3.8 Hold/Connect Description The iPECS-Attendant operator may place and retrieve a station or trunk (outside line) caller from hold.
Procedure
1) Click the
Hold
button during the phone call between the iPECS-Attendant operator and a caller. 2) The caller will hear "holding tone" and the relevant caller's information will be displayed in the
"Wait/Hold" window. And the number of call count will increase.
1) Click the
Holding Answer (Retrieve from Hold)
button 2) Double click the caller’s information displayed in the Hold window.
3) The phone call with the caller will be restored.
4) Drag from Hold window, Drop to Station Info window station. Hold Transfer
3.9 Call Pick Up Description By using the "Call Pick Up", the iPECS-Attendant operator is able to pick up calls that ring to other stations. This function is applicable for station, trunk and recall.
Procedure 1) Double click the station icon that is ringing state for call pick up.
2) In order to disconnect the phone, click the "ESC" key or the button.
Note Call pick up function cannot be used when the iPECS-LIK operator is busy or in the middle of PGM setting.

iPECS Attendant LIK User Guide Issue 1.2
14
3.10 Call Park Description The iPECS-LIK operator performs "Call Park" operations so that users of other station may retrieve the caller from the park location (a.k.a Park Orbits).
Procedure
1) Choose the "Call Park" menu in setting or press
Call Park
button in the main window. 2) The caller will be heard MOH, while waiting at the Call Park location. 3) Call Park list is displayed when clicking the tap on the right side of "Wait/Hold".
4) A call can also be parked by pressing the "Transfer" button followed by the available Park Location
number (ex. 601), or use the PC Key pad.
1) To retrieve a Parked call, press Call Park number using the Dial Pad, or use the PC Key pad, Call Park Answer
Or double click the call in the Call Park list.
Note Call Park answer is recommended to be done when the IP ATTENDANT is "IDLE". Call Park is only available for external (outside line) callers.
iPECS Attendant LIK User Guide Issue 1.2
15
4 IP Attendant Program Menu 4.1 File Menu
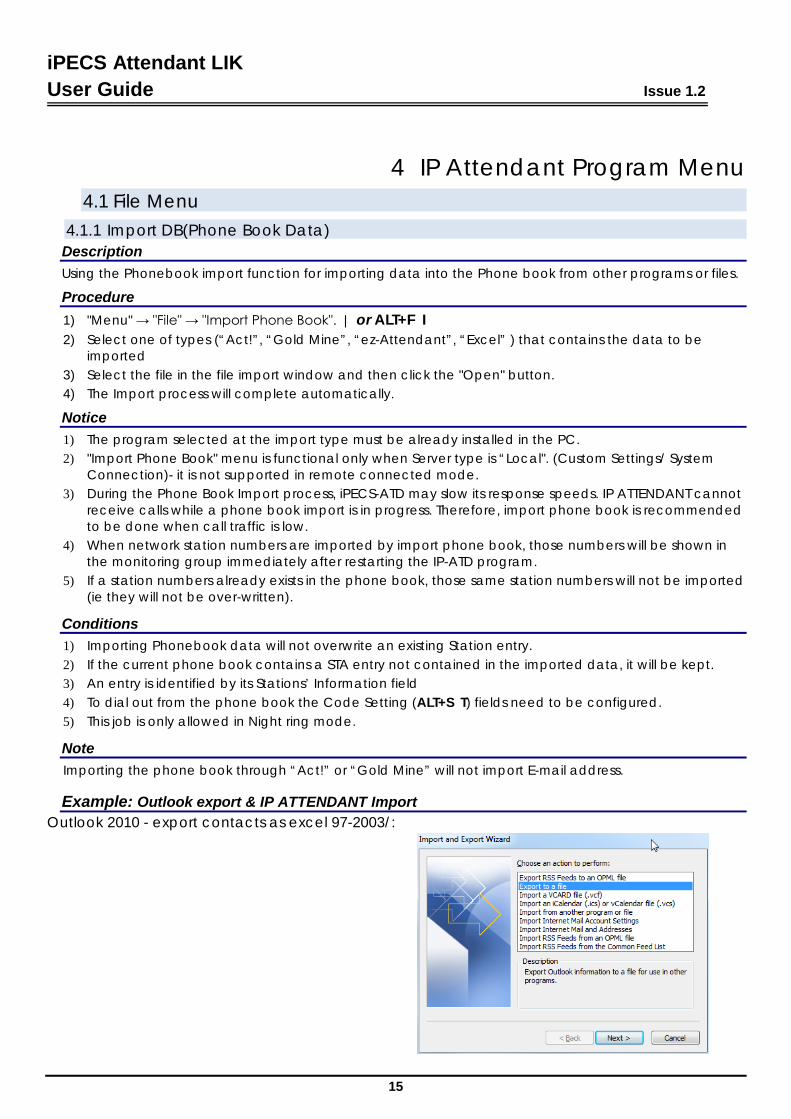
4.1.1 Import DB(Phone Book Data) Description Using the Phonebook import function for importing data into the Phone book from other programs or files.
Procedure 1) "Menu" → "File" → "Import Phone Book". | or ALT+F I 2) Select one of types (“Act!”, “Gold Mine”, “ez-Attendant”, “Excel” ) that contains the data to be
imported 3) Select the file in the file import window and then click the "Open" button. 4) The Import process will complete automatically.
Notice 1) The program selected at the import type must be already installed in the PC. 2) "Import Phone Book" menu is functional only when Server type is “Local". (Custom Settings/ System
Connection)- it is not supported in remote connected mode. 3) During the Phone Book Import process, iPECS-ATD may slow its response speeds. IP ATTENDANT cannot
receive calls while a phone book import is in progress. Therefore, import phone book is recommended to be done when call traffic is low.
4) When network station numbers are imported by import phone book, those numbers will be shown in the monitoring group immediately after restarting the IP-ATD program.
5) If a station numbers already exists in the phone book, those same station numbers will not be imported (ie they will not be over-written).
Conditions 1) Importing Phonebook data will not overwrite an existing Station entry. 2) If the current phone book contains a STA entry not contained in the imported data, it will be kept. 3) An entry is identified by its Stations’ Information field 4) To dial out from the phone book the Code Setting (ALT+S T) fields need to be configured. 5) This job is only allowed in Night ring mode.
Note Importing the phone book through “Act!” or “Gold Mine” will not import E-mail address.
Example: Outlook export & IP ATTENDANT Import Outlook 2010 - export contacts as excel 97-2003/:

iPECS Attendant LIK User Guide Issue 1.2
16

iPECS Attendant LIK User Guide Issue 1.2
17
Open the spread sheet - change the Sheet name from 'Contacts' to 'PhoneBook'
Then rearrange the columns to suit IP ATTENDANT database: IP ATTENDANT Database:
4.1.2 Export DB(Phone Book Data) Description IP-ATD can export its Phone Book data in MS Excel format.
Procedure 1) "Menu" → "File" → "Export Phone Book" → "Excel". | or ALT+F E E 2) Input the file name in the file export window and then save it. 3) After the window that shows progress disappears, export phone book will be completed.
Column Headings: 1. STATION 2. FIRSTNAME 3. LASTNAME 4. COMPANY 5. HOUSEPHONE 6. MOBILEPHONE 7. JOB 8. FAX 9. COMPANYPHONE 10. ADDRESS1 11. ADDRESS2 12. ADDRESS3 13. CITY 14. STATE 15. ZIP 16. EMAIL 17. NICKNAME 18. SPEEDNO 19. COUNTRY 20. MEMO 21. DEPARTMENT 22. ACCOUNTNO 23. PHYSICALSTATION 24. PHONE_LEVEL
Column Headings: Title FirstName 2 MiddleName LastName 3 Suffix Company 4 Department 21 JobTitle 7 BusinessStreet 10 BusinessStreet2 11 BusinessStreet3 12 BusinessCity 13 BusinessState 14 BusinessPostalCode 15 BusinessCountryRegion 19 HomeStreet HomeStreet2 HomeStreet3 HomeCity HomeState HomePostalCode HomeCountryRegion OtherStreet OtherStreet2 OtherStreet3 OtherCity OtherState OtherPostalCode OtherCountryRegion AssistantsPhone BusinessFax 8 BusinessPhone 9 BusinessPhone2 Callback CarPhone CompanyMainPhone 1 HomeFax HomePhone 5 HomePhone2 ISDN MobilePhone 6 OtherFax OtherPhone Pager PrimaryPhone RadioPhone
Column Headings: TTYTDDPhone Telex Account 22 Anniversary AssistantsName BillingInformation Birthday BusinessAddressPOBox Categories Children DirectoryServer EmailAddress 16 EmailType EmailDisplayName Email2Address Email2Type Email2DisplayName Email3Address Email3Type Email3DisplayName Gender GovernmentIDNumber Hobby HomeAddressPOBox Initials InternetFreeBusy Keywords Language1 Location ManagersName Mileage Notes 20 OfficeLocation OrganizationalIDNumber OtherAddressPOBox Priority Private Profession ReferredBy Sensitivity Spouse User1 User2 User3 User4 WebPage
An Outlook 2010 export example:
The columns of the Outlook exported file need to be rearranged to match the IP ATTENDANT order, many are deleted. The column headings do not require editing. Save the spread sheet Use the IP ATTENDANT Import function to browser to the saved spread sheet and import it to IP ATTENDANT.
Usage example of Outlook exported data: Used Not used

iPECS Attendant LIK User Guide Issue 1.2
18
Notice 1) "Export Phone Book" menu is functional only when Server type is "Local". (Custom Settings/ System
Connection) 2) During export phone book, iPECS-LIK might get slower and receiving calls is impossible as long as
import phone book is in progress. Therefore, export phone book is recommended to be done when call traffic is low.
3) This job is only allowed in Night ring mode.

iPECS Attendant LIK User Guide Issue 1.2
19
4.2 Tools 4.2.1 Phone Book
Description Phone book operation includes number registration, creation, editing and deletion.
Window
Editing Procedure 1) "Menu" → "Tools" → "Phone Book". | or ALT+T P 2) To create a new record, click the "Add" button. 3) In the new Phone Book window edit values as required and then click the "Save" button. 4) If it is necessary to change the information in a record, use the "Modify" button. 5) To delete a group of records, select the relevant records (use Shift or CTRL keys) and then click the
"Delete" button.
Notice 1) Numbers that have been newly registered in the phone book will be applied Station Info, but details
such as the Station name will be applied after IP ATTENDANT restarts. 2) Program restart is required if network station is registered by importing phone book data. 3) Calls can be made from this window of the Phonebook by using the right click menu. The call-able
record fields containing data are made available for calling (empty fields are not offered). 4) Note 1) The information that has been newly registered in the Phone Book will be displayed in the all
subscriber information display part of the program. 2) A network station number can be registered similar as normal station number. 3) A maximum of 30,000 phone numbers is recommended. A phonebook of over 30,000 phone numbers
might result in slow search speed. 4) LDAP is allowed.

iPECS Attendant LIK User Guide Issue 1.2
20
4.2.2 Phone book Search Window Description The Phonebook can be searched for Station users who are registered at the Phone Book.
Window & Procedure
1) The Phone book search function searches "Station", "Name", "Company", "Department" and "Mobile
Phone number" fields simultaneously to the search term. 2) Click the right button of the mouse on the selected subscriber. "Mobile" is for calling selected
subscriber's mobile & "Call" is for calling the station & "Email" is for sending an email & "SMS" is for sending a text message".
Note 1) "Menu" → "Tools" → "Phone Book" for "registration" & "Modification" & "Deletion" of subscriber
information | or ALT+T P 2) Currently the Search facility is NOT case sensitive. Eg search LAB and Lab is same result.
4.2.3 LDAP Description LDAP Server Information can be connected with IP ATTENDANT.
Window & Procedure 1) LDAP Setting is as below.
Menu Setting Custom Setting Phone Book Enable LDAP Enter Information

iPECS Attendant LIK User Guide Issue 1.2
21
2) After enable LDAP, LDAP button is activated in main window as below.
3) This is LDAP information window.
Note 1) After LDAP enable, IP ATTENDANT should be restarted again to apply it correctly.

iPECS Attendant LIK User Guide Issue 1.2
22
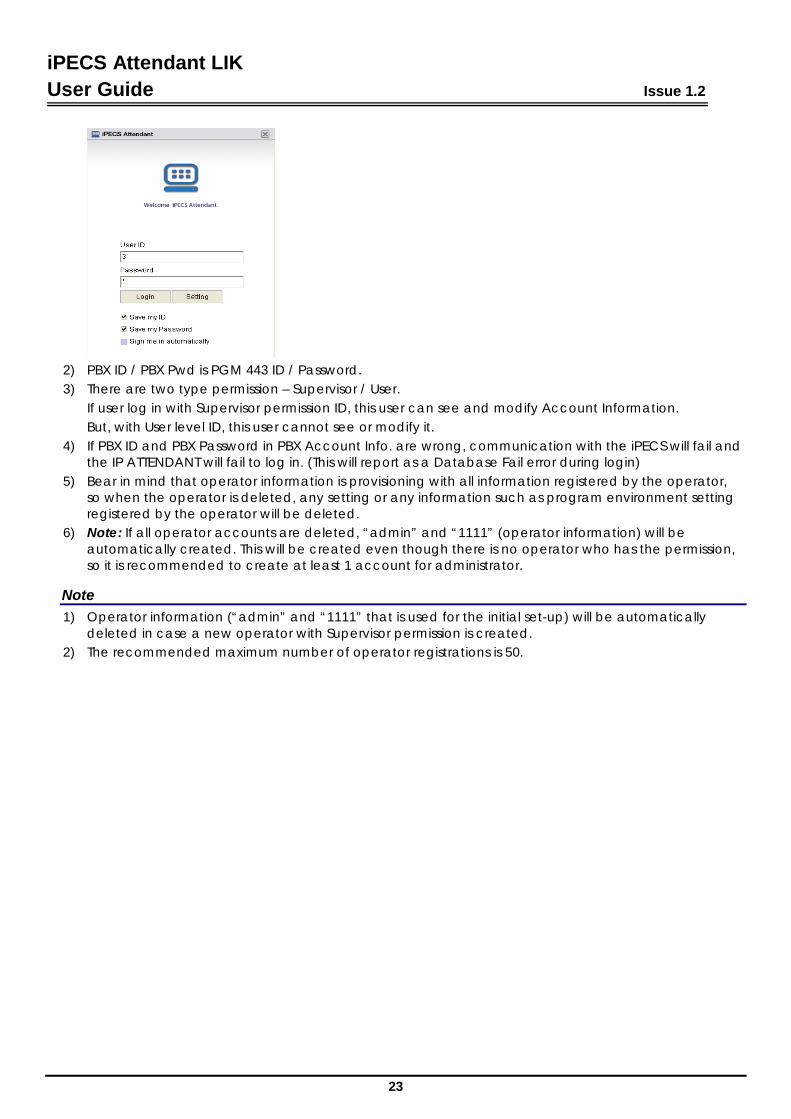
4.2.4 Account Description Account information is the IP ATTENDANT account data (including the IP ATTENDANT log in credentials).
Window
Procedure 1) "Menu" → "Tools" → "Account". | or ALT+T A 2) To create new operator registration information click the "Add" button. 3) In the Account Info. window, input the relevant information such as ID, Password, Name, Department,
Perm (Permission), PBX ID and PBX Password, and then click the "Save" button. 4) If it is necessary to change the information of the registered operator, select the relevant operator
and then click the "Modify" button. Then in the Account Info. window [Modification], change the information and then click the "Save" button.
5) If it is necessary to delete the information of the registered operator, select the relevant operator and then click the "Delete" button.
Notice 1) ID / Password is log in User ID / Password to IP Attendant Application.
iPECS Attendant LIK User Guide Issue 1.2
23
2) PBX ID / PBX Pwd is PGM 443 ID / Password. 3) There are two type permission – Supervisor / User.
If user log in with Supervisor permission ID, this user can see and modify Account Information. But, with User level ID, this user cannot see or modify it.
4) If PBX ID and PBX Password in PBX Account Info. are wrong, communication with the iPECS will fail and the IP ATTENDANT will fail to log in. (This will report as a Database Fail error during login)
5) Bear in mind that operator information is provisioning with all information registered by the operator, so when the operator is deleted, any setting or any information such as program environment setting registered by the operator will be deleted.
6) Note: If all operator accounts are deleted, “admin” and “1111” (operator information) will be automatically created. This will be created even though there is no operator who has the permission, so it is recommended to create at least 1 account for administrator.
Note 1) Operator information (“admin” and “1111” that is used for the initial set-up) will be automatically
deleted in case a new operator with Supervisor permission is created. 2) The recommended maximum number of operator registrations is 50.

iPECS Attendant LIK User Guide Issue 1.2
24
4.2.5 Call Log Description The call Log provides a list and search facility for the history of incoming calls and outgoing calls through the iPECS-LIK.
Window
Procedure 1) "Menu" → "Tools" → "Call Log". | or ALT+T C 2) Period Search or Condition Search is allowed. 3) In the Call Log Window, all system call log is remained. 4) In the Call History of IP ATTENDANT Main window, call log that is related with Attendant is displayed.
Note 1) The information of called name, caller name, department and mobile phone will be displayed on the
basis of incoming number to the operaor/outgoing number by the operator.

iPECS Attendant LIK User Guide Issue 1.2
25
4.2.6 Call History Description The call history window is located in main window of IP Attendant. In this window, call logs that is related with IP Attendant are displayed. By double click each history, or drag & Drop, call can be established.
Window

iPECS Attendant LIK User Guide Issue 1.2
26
4.2.7 Call Statistics Description
By using button, call statistic window can be activated. This statistics are made by call log(4.2.5).
Window
Procedure
1) In Period, date and time can be assigned, and statistics is shown as Yearly, Monthly, Daily, Hourly. 2) In Condition, Call type can be devided as All call / Incoming call / Outgoing call / ICM call.
Answer type also can be devided as All / Answered / Unanswered. Call type and Answer type relation is AND, that means if user choose incoming and answered, then incoming call and also answered call statistics is displayed.
3) In Diagram, graph type can be choosen – Column type or Line type. 4) Call Duration(call time) and Call Count graph is supported.

iPECS Attendant LIK User Guide Issue 1.2
27
4.2.8 Call Record Report Description
During conversation, call record is allowed by using button. After record is end, Call Recording List can be checked this Call Record Report. .
Window
Procedure 1) Each recorded record can be played, can be deleted. 2) In Phone No field, Callre ID is displayed.
Note 1) The recorded file location is C:\Program Files\iPECS Attendant.

iPECS Attendant LIK User Guide Issue 1.2
28
4.2.9 Change Station Name Description IP Attendant can change the Station name of stations connected to the LIK.
Window
Procedure 1) "Menu" → "Tools" → "Change Station Name". | or ALT+T N 2) Select the station number in the list or input the station number directly. 3) Input the new station name to be displayed. 4) Click the "OK" button.
Note 1) If the station being edited has a Name already registered, that name will be displayed in the Station
Name.

iPECS Attendant LIK User Guide Issue 1.2
29
4.2.10 Preselected Message (Absend Message) Description iPECS-LIK is able to send Preselected message or Customized message to the other stations (as well as to callers as an audio message – when this feature is supported). Station subscribers can send a message to LCD of the other station telephone Depending on type or feature of Preselected message, additional time and date can be set. The audio reply based on Preselected message is called “Preselected Message with VSF Group”, and is supported in iPECS (subject to conditions – see the 5.6 Release document) from 5.6 Software release.
Window
Procedure 1) "Menu" → "Tools" → "Select Message Type". | or ALT+T M 2) Select Preselected or Customised. (‘Preselected message with VSF Group’ is not supported for
customised type) 3) Select a message or Remove Message. 4) Set the station range in the station input fields. 5) Click the "Apply" button or "OK" button. 6) If Remove Message is set, and applied, the current message will be disabled.
Note 1) In order to change the message in the Customised, input the message in Customised message setting
("Setting" → "Customized")

iPECS Attendant LIK User Guide Issue 1.2
30
4.2.11 Paging Description The LG-Ericsson iPECS-LIK system can perform various "Paging" functions to stations as well as to external paging solutions. The paging options within the selection window are defined within the iPECS system.
Window
Procedure 1) "Menu" → "Tools" → "Paging". | or ALT+T G 2) Select the appropriate paging option in the paging selection window.
3) The IP ATTENDANT operator presses the speaker button to make the page call.
Notice 1) In order to do paging, the operator's telephone must be permitted to do paging. 2) iPECS-LIK only supports one type of speaker mode for paging.
4.2.12 Music Selection Description Background music can be selected for use by the iPECS-LIK.
Window
Procedure 1) "Menu" → "Tools" → "Background Music". | or ALT+T U 2) Select the one of background music options and then click the "OK" button.

iPECS Attendant LIK User Guide Issue 1.2
31
3) To disable the background music, select the No BGM and then click the "OK" button.
Note 1) Individual iPECS Stations may select their own BGM source

iPECS Attendant LIK User Guide Issue 1.2
32
4.2.13 Date/Time Description IP-ATD can control the iPECS system Date and time.
Window
Procedure 1) "Menu" → "Tools" → "Date/Time". | or ALT+T D 2) Select the display type of date and time. 3) Change date and time and then click the "OK" button.
Note 1) The display type of time shown in all telephone LCDs will be changed. 2) The date may be changed without changing the time, and vice versa.
iPECS Attendant LIK User Guide Issue 1.2
33
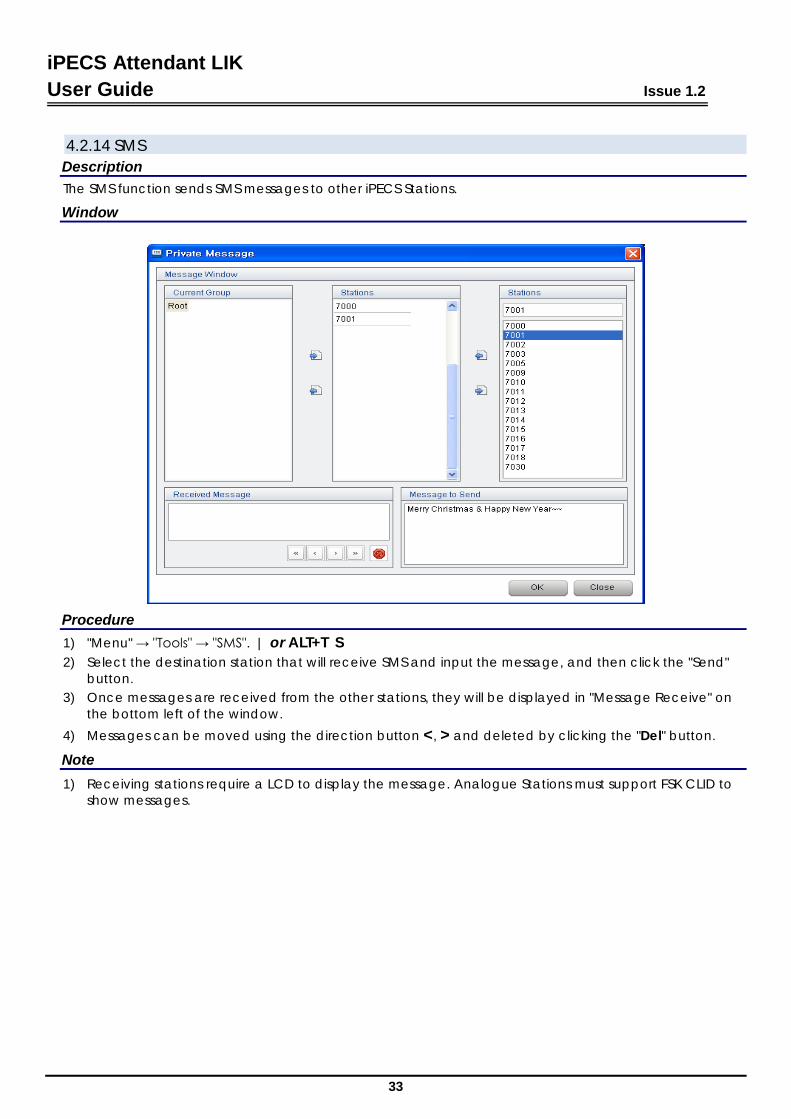
4.2.14 SMS Description The SMS function sends SMS messages to other iPECS Stations.
Window
Procedure 1) "Menu" → "Tools" → "SMS". | or ALT+T S 2) Select the destination station that will receive SMS and input the message, and then click the "Send"
button. 3) Once messages are received from the other stations, they will be displayed in "Message Receive" on
the bottom left of the window. 4) Messages can be moved using the direction button <, > and deleted by clicking the "Del" button.
Note
1) Receiving stations require a LCD to display the message. Analogue Stations must support FSK CLID to show messages.

iPECS Attendant LIK User Guide Issue 1.2
34
4.2.15 Conference Description When iPECS has the use of a MCIM module, it supports Multiparty conferencing solutions. IP Attendant is designed to efficiently manage the status of iPECS conference feature – Add On Conference, Conference Room, Conference Group.
Window

iPECS Attendant LIK User Guide Issue 1.2
35
Procedure 1) About Conference Procedure, refer to the chapter 3.6 Conference.

iPECS Attendant LIK User Guide Issue 1.2
36
4.3 Setting Menu 4.3.1 Custom Setting [Environment Setting]
Description This is for custom setting for program operation.
Window
Procedure 1) "Menu" → "Setting" → "Custom Setting". | or ALT+S C 2) In the "System Connection", system information such as "PBX Type", "System IP", "Connection Mode",
"Connection ID" and "Password" can be set. If IP Bridge is checked at Use, Linked Pair is used as IP Bridge feature with Hard Phone.
3) In the "Audio Setting", settings for microphone & speaker can be done and bells for station incoming & PBX incoming can be set.
4) In the "Display Option", the size of monitoring group display icon can be set by Station Type & the position of window at the time when the program is operated can be set by Window Position & Program language (Language Select) can be set by Language Select. Font Size can be set.
5) In the “Message Trace”, the history of communication with the PBX can be saved as either "Detail" or "Summary".
6) In the “Call Recording”, recording file location can be set. 7) In the “Phone Book”, phone book type can be set between Database and Outlook.
If the Outlook is chosen, Outlook information is applied to IP Attendant Phone Book. If Synchronize Phonebook is checked, when user modify some information from IP Attendant, this modification is applied to Outlook.

iPECS Attendant LIK User Guide Issue 1.2
37
When double Click from Phonebook list or Drag & Drop from Phonebook in Main Window, or Call Priority can be set Station number or Mobile number. If LDAP option is set, LDAP information can be used in IP Attendant as below.
After enable LDAP, LDAP button is activated in main window as below.
This is LDAP information window.
8) In the "Headset Setting", Headset type can be chosen. If Headset type is not normal, each driver file should be installed ahead. The driver file location is C:\Program Files\iPECS Attendant\Drivers.

iPECS Attendant LIK User Guide Issue 1.2
38
9) In the "Database Setting", DB operation mode can be set. A. DB type is Firebird.
In case of "Remote" as the server, IP address of the relevant PC and “DB\iPECS_DB.DFB” file located in iPECS-LIK installation folder in the relevant PC must be accurately set for DB connection. In case of "Local" as the Server, “DB\iPECS_DB.DFB”file located in iPECS-LIK installation folder of the relevant PC must be accurately set.
B. DB type is another(MySQL, Oracle, MS-SQL). Database IP address, Database Name, User Name, User Password should be entered.
10) In the "iPECS Attendant Info", Program information / System version is displayed.
Notice 1) "Window Position" varies with operators. 2) In case of using devices such as USB speaker & microphone (headset), these devices must be
installed prior to program start. 3) Bear in mind that if "Include system mode and link test" in Message Trace, program speed will be
down and the size of log file will be bigger. 4) After "Database Setting", connection test by using the "Test" button is strongly recommended. 5) When modifying custom setting fields, It’s recommended the IP Attendant be restarted. Note Some settings such as language selection and PBX information are applied, once the program is restarted.
4.3.2 Flex Button Setting Description The IP Attendant may edit the functions of its own Flex buttons as well as those of other Stations.
Window

iPECS Attendant LIK User Guide Issue 1.2
39
Procedure
1) Click the "PGM" button.
IP-ATD Flex Key Registration by using the Dial Pad
2) Click the "Flex" button that needs to be registered. 3) Dial the station number that needs to be set at the "Flex" button.
4) Click the button, The new assignment for the IP ATTENDANT flex button is saved and automatically labelled
5) The label may be edited by right clicking the flex key and editing the label name directly.
1) "Tools" → "Setting" → "Flex button setting". | or ALT+S F Registration by using Flex button setting menu
2) Set the range of the stations to be edited. 3) Display the existing flex button programming by executing the ‘Read’ button. 4) Select the flex key to be changed and select the relevant function. After that, input the necessary
value and then click the "Save" button.
Note
1) If another button is selected without applying the "Save" button after the setting change, the changes will not be applied.
iPECS Attendant LIK User Guide Issue 1.2
40
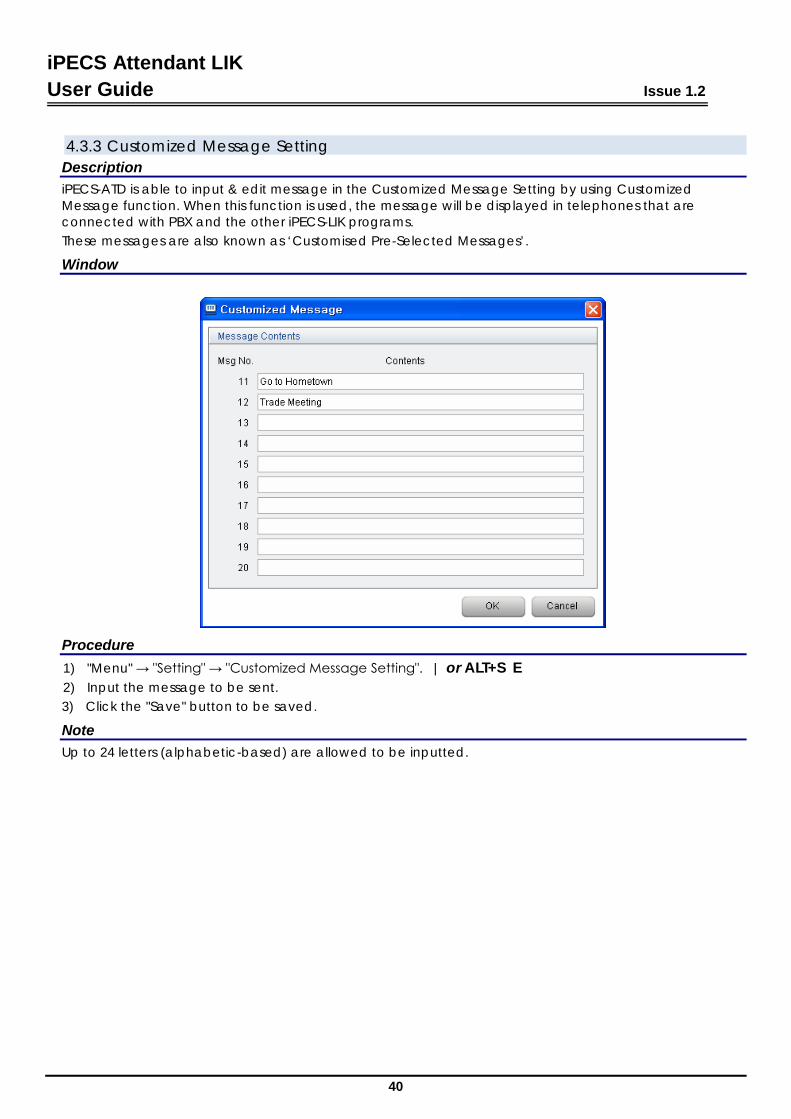
4.3.3 Customized Message Setting Description iPECS-ATD is able to input & edit message in the Customized Message Setting by using Customized Message function. When this function is used, the message will be displayed in telephones that are connected with PBX and the other iPECS-LIK programs. These messages are also known as ‘Customised Pre-Selected Messages’.
Window
Procedure 1) "Menu" → "Setting" → "Customized Message Setting". | or ALT+S E 2) Input the message to be sent. 3) Click the "Save" button to be saved.
Note Up to 24 letters (alphabetic-based) are allowed to be inputted.

iPECS Attendant LIK User Guide Issue 1.2
41
4.3.4 Wakeup Setting Description This feature creates a wakeup call at the specified time.
Window
Procedure
1) "Tools" → "Setting" → "Wake Up Setting". | or ALT+S W Old Wake Up Setting
2) Select the station that needs to be set with Morning Call. 3) In Time Setting, input the time in Time Setting and select the relevant option in Alarm Option. 4) Click the "Apply" button.
1) "Tools" → "Setting" → "Wake Up Setting". | or ALT+S W New Wake Up Setting (5 wake up calls per station)
2) Select the station that needs to be set with Morning Call. 3) Select the relevant Wake Up option next to the numbers between 1 and 5 4) Input date and time that are suitable for the selected option and click the "Apply" button. 5) The history of Morning Call that has been set at the station can be checked by clicking the "Read"
button. In case of selecting many stations, the history will be displayed with reading the first station. 6) The history of Morning Call that has been set can be deleted by clicking the "Clear" button. Bear in
mind that all Morning Calls set at all stations can be deleted by "Clear" button.
Note
For the New wake up settings to be applied, System Attribute “New 5 Wake Up Usage’ must be enabled.

iPECS Attendant LIK User Guide Issue 1.2
42
4.3.5 Group Setting Description Stations can be managed or viewed as a group of specified stations. The group that has been added here can be easily used for SMS or Morning Call.
Window
Procedure 1) "Menu" → "Setting" → "Group Setting". | or ALT+S G 2) To create a new group registration, click the "Add" button after inputting the group name. 3) A new group will be created on the "Current Group" window. 4) Select a group at the "Current Group" window, select a station or stations (use ‘Ctrl’ key to add more
selected stations) at the "Stations" window, and then click the button. The new stations will be added to the group.
5) If it is necessary to delete a station from a group, select the relevant group and click the button. 6) To perform a group deletion, select the relevant group and click the right button of the mouse, and
then click the "Delete". Another way of deletion is to click the button.

iPECS Attendant LIK User Guide Issue 1.2
43
4.3.6 Code Setting Description The code setting applied number handling to CO Access Code from IP Attendant. Window
Procedure 1) "Menu" → "Setting" → "Code Setting". | or ALT+S T 2) Set the code and then click the "OK" button.
Note
Set the outside line access code (default is 1) to ‘CO Access Code’

iPECS Attendant LIK User Guide Issue 1.2
44
4.3.7 Speed Dial Description System Speed Dials are designed to manage numbers that are in frequent use. Window
Procedure 1) "Menu" → "Setting" → "Speed Dial Setting". | or ALT+S S 2) Select the speed dial that needs to be set. 3) To check the iPECS setting for a given speed dial, select the speed dial & click the "Download" button. 4) On editing a speed dial, click the "Apply" button to save the data (it must still be uploaded). 5) When editing a speed dial, set the trunk type as well as the other relevant information. 6) Click the "Upload" button to apply the changed information into iPECS’s database. 7) If it is necessary to download all speed dials that have been saved in PBX, click the "Down All" button.
This function can use a lot of system resources, so downloading of all speed dials can take a long time. Therefore, this should be done at the time when the other operators do not use the program. Also during a database download, the downloading or uploading speed dials cannot be performed.
Note In case of uploading or downloading a lot of speed dials, press the “Ctrl" key and click the speed dials that need to be uploaded or downloaded. Another way is to press the “Shift" key and click the "↑" button or "↓" button. After that, click the "Upload" button or "Download" button.

iPECS Attendant LIK User Guide Issue 1.2
45
5 IP Attendant Main Window 5.1 Logout
Description For IP Attendant logout.
Window
Procedure 1) Click the "Logout" button in the main window. 2) Once IP ATTENDANT is logged Out, the Log In window will be offered.
5.2 Wait/Hold Window Description This window displays information for incoming, queued and held calls to the IP ATTENDANT.
Window
Procedure 1) In the "Wait" window, the incoming call information such as TRUNK, Station and Recall is displayed.
2) In case a call come in, clicks the button or hit the “Space Bar” on the keyboard for call response. In case of using the mouse, double click the displayed incoming information for call connection
3) The information of holding calls during phone call will be displayed in the Hold window. 4) If it is necessary to make a phone call with a station in the wait/hold list, double click the relevant
station when the status is "on hook". 5) By using Drag & Drop action, waiting call or holding call transfer is allowed to another station.
Notice The display order in the Wait/Hold window is basically determined according to incoming order or order of pressing the "Hold" button, however, in case priority has been assigned in the phone book, top priority will be displayed on the top.

iPECS Attendant LIK User Guide Issue 1.2
46
Note The number of queuing calls are displayed (after being summarized) on the top right of the Wait window. The number of station calls is summarized to be displayed like "STA:” the number of trunk calls is summarized to be displayed like "CO:” the number of recalls is summarized to be displayed like "RECALL:” However, the recalls from stations is added in the number of STA calls (not in the number of RECALLs).
5.3 Monitoring Window Description The Monitoring window shows the real-time status of iPECS stations and trunks (lines). The default views are Station Info (all registered stations) and CO Line Info (all registered Lines). Other views are added as New Groups are created (ALT+S G).
Window
Procedure 1) A call to a station can be made by Double click the icon or Drag & Drop to the Dial Pad during the
"IDLE" status. 2) If the relevant station number has been registered in the Phone Book, it will be displayed as the
registered name. 3) The Station Info screen can be displayed several views: large icon, small icon, or list. To set a different
view, right click on any station and select. 4) The Station info screen can also be sorted in two ways – either by system port (basic sort) or by logical
station number (Number sort). Again just right click a station and select. 5) The window view has a short cut to the two default groups.
When viewing any group, right clicking any of the window’s group titles will offer CO Line Info and Station Info view.

iPECS Attendant LIK User Guide Issue 1.2
47
Note 1) Any changed information of monitoring group is displayed as soon as the changes are saved. 2) Status Icon (The below icons are for status display. There are no additional icons).
BUSY IDLE CFWD DND PRESELECT Station icons:
IP (IPLKTS, SIP, WIT-400H, iPECS Cmmunicator) Stations
SLT (Analogue) Phones
Cordless Phone (eg DECT phone)
Networked Station

iPECS Attendant LIK User Guide Issue 1.2
48
5.4 Dial Pad Window
Description In this Dial Pad window, "connection", "answer", "holding", "conference", "redial" and "Mute" can be done and this window displays subscribers' numbers, date and time.
Window
Procedure 1) The way of using the dial pad is same as the way of using the station dial pad. 2) Because the PC Keyboard can be used for dialling, the IP ATTENDANT dial function can operate in
more than one way: A. When IP ATTENDANT is focused in the foreground, you can dial the number at the PC keyboard (it
appears in the Dial Pad screen – as above), and press “Enter” key to ‘go off hook’ and send the ‘pre-dialed’ digits.
B. A mouse can select the digits at the IP ATTENDANT keypad – the IP ATTENDANT ‘goes off hook’ and sends the digits as they are dialed.
3) Receiving calls are possible (When the IP ATTENDANT window is focused in the foreground) by clicking the "Enter" key or hitting the space bar while the bell is ringing.
4) In order to hang up (When the IP ATTENDANT window is focused in the foreground), click the "ESC" button or press “Space Bar”.
5) In order to adjust the received volume during a call, use the slide button below the headset icon.
6) By using button, Dial Pad and Fixed Button Pad can be hidden.
Note 1) Adjusting the volume cannot be done at IDLE status. 2) Microphone volume above the "Mute" button & next to headset icon can be only display the current
volume status (cannot be adjusted – it is a function of the PC Operating system).

iPECS Attendant LIK User Guide Issue 1.2
49
5.5 Alarm Display LED Description This is for displaying the status of connection between iPECS-LIK & PBX and alarm.
Window
Note 1) In case of emergency calling or system warning(ex : Interface between LIK system and IP Attendant is
disconnected, PRIB board goes to Line Out), the red light on the left LED(IF LED) will go on. 2) Right LED(DB LED) displays the status of database connection. 3) In case there is a request to restart the program or exit the program, the red light on the left and the
green light on the right will flash in turn.

CONNECTION A/S • LOKESVEJ 8 • 3400 HILLERØD • WWW.CONNECTION.DK • TELEFON 7010 6600
www.ericssonlg-enterprise.com© Ericsson-LG Enterprise Co.,Ltd. 2013Posted In Korea
The contents of this document are subject to revision without notice due to continued progress in methodology design and manufacturing. Ericsson-LG Enterprise shall have no liability for any error or damage of any kind resulting from the use of this document.