t3x motor w fan installation - productload.johnsonfit.com
TRANSCRIPT

1
Rev. A
Control Number FWC-T3XAL-0010
Effective Date 06/12/2007
Field Work Instructions for Replacing the Motor on T3X or T3xi to Motor with Built in
Fan.
Page 1/5
Revised Date 06/12/2007
Approved by Bill Baier
Prepared by Kevin Oeltjenbruns
PURPOSE
Explains how to change the motor on a T3X or T3xi treadmill to one with a built in fan.
RE-WORK PARTS REQUIRED (included with the motor – p# 053418-Z)
1. New DC 3.2 HP Motor (includes fan). 2. Fan control board. 3. Cable ties (quantity 5). 4. AC fan power line.
PROCEDURE
Step 1
• Remove the tension wheel set Step 2
• Remove the old DC motor
2 1
3 4

2
Step 3 • Remove pulley and motor bracket from old DC motor, attach to new DC motor with fan attached.
Step 4 • Install new DC motor in treadmill. Reinstall tension wheel set.
Step 5 • Remove old AC Fan Power Line, and connect with new AC Fan Power Line (see pictures below). Remove Old AC Fan Power Line (seen below).
Attach New AC Fan Power Line (seen below).
Ste
To Fan
To Switch
To MCB
To MCB
To Fan
To Switch
To Fan To MCB
To Switch
To Fan Control Board
To Fan
To Fan Control Board
To MCB To Switch

3
Step 6 � Use cable ties to fix Fan wiring (one wire is not used, see picture).
Step 7
� Take off the protective diaphragm of twin adhesive on the fan board and fix it on chassis about 10 mm from the elevation motor.
Step 8 � Plug in fan power and control lines
About 10 mm
Horizontal
Power Line AC1 = Black AC2 = White
Control Line JP1 on Board
This Wire is not used

4
Final After unit looks like picture above, auto calibrate (see procedure below). 1. Hold down the � & + keys for 3 seconds to enter Engineer mode.
2. Use the �� arrows to select the Auto Check value.
3. To run Auto Check press the SELECT key 4. The AUTO CHECK will first calibrate the minimum and maximum elevation.
Once the values are stored the speed calibration will start.
5. The console will now find .5 mph (shown below) or 1.0 on newer units, 6.0 mph, & 12.0 mph.
5
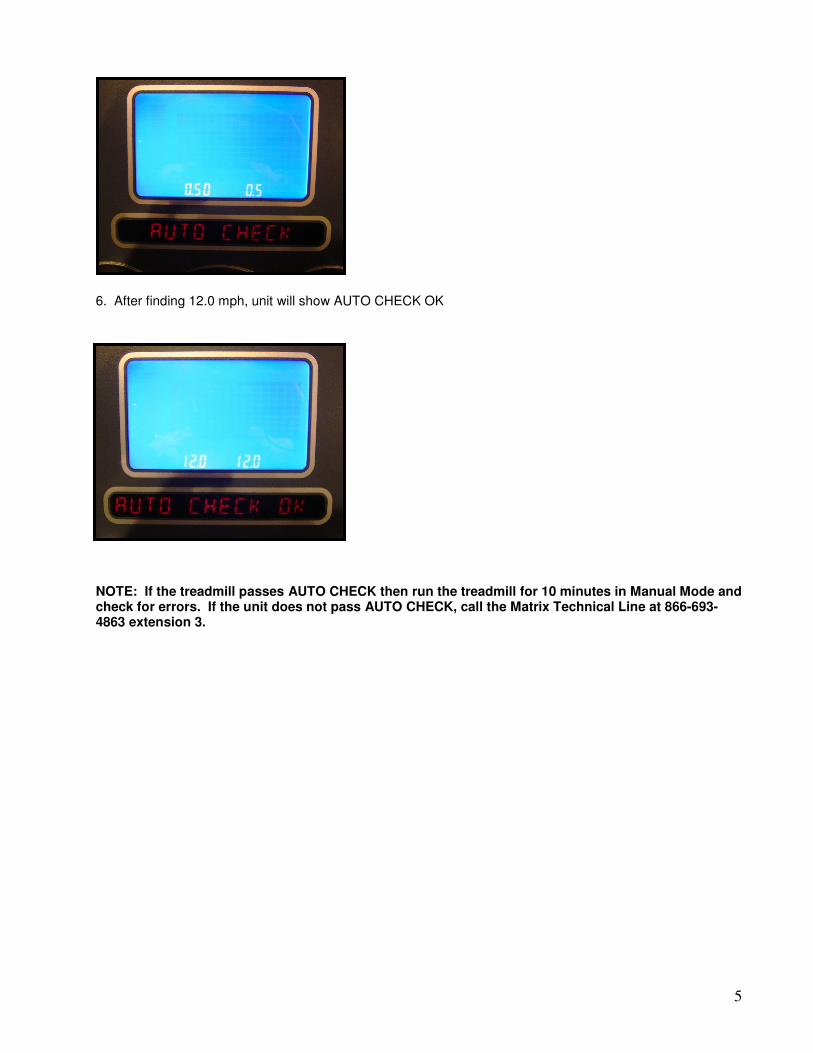
6. After finding 12.0 mph, unit will show AUTO CHECK OK NOTE: If the treadmill passes AUTO CHECK then run the treadmill for 10 minutes in Manual Mode and check for errors. If the unit does not pass AUTO CHECK, call the Matrix Technical Line at 866-693-4863 extension 3.