t-bucket upholstery b - speedway motors upholstery adhesive on the back of the carpet and on ......
TRANSCRIPT

116 • 800.979.0122 • www.SpeedwayMotors.com
UPHOLSTERYSpeedway Motors offers attractive, affordable, pre-sewn upholstery kits that are designed
for easy do-it-yourself installation. This is a great alternative to the time and expense re-
quired to have an upholstery shop put a custom interior in your car. The Speedway uphol-
stery kit contains a pre-covered bench seat base, padded seat back, side panels and carpet
for the floor and firewall.

.800.979.0122 • www.SpeedwayMotors.com • 117
UPHOLSTERY
Here is the Speedway Motors T-bucket interior kit. It includes stitched side panels, a seat bottom cushion and riser,
padded seat back, a wood support kit, plus floor and firewall carpeting. It’s available in black or brown for both channeled
and un-channeled floors.
Interior kit installation can be performed with simple hand tools, plus a staple gun and upholstery adhesive you can pur-
chase at your local home improvement store or auto parts retailer. We recommend 3M Super 77 Multipurpose Adhesive
— available in aerosol cans — or an equivalent for use on the carpet and upholstery. You will also need an adhesive
such as 3M Auto Glass Urethane Windshield Adhesive for installing the wood support pieces to which the upholstery
panels attach.
You may want to install the wood prior to having your body painted.

118 • 800.979.0122 • www.SpeedwayMotors.com
UPHOLSTERY
Begin installation by applying two beads of adhesive
around the perimeter of the body, approximately 1''
below the body flange.
The wood blocks can then be attached. You
may need to use clamps to temporarily hold
them as the adhesive sets up. Start with a
3'' block placed approximately 1'' behind the
dash, and then two 6'' blocks behind it.
Each block should be spaced about 1⁄2''
apart.
Continue with a 12'' block followed by five 2'' blocks where the body curves up and around toward the back. A 3'' block
and a 12'' block will come next. Repeat the process on the other side of the body.
6 6 3
32 2
2
22
12
12
12
3 2 2 22 2
126 6
3

800.979.0122 • www.SpeedwayMotors.com • 119
UPHOLSTERY
Before installing carpet, make sure all wiring is taped
down as flat as possible where it runs along the firewall
or floor.
The carpet for the firewall comes trimmed to fit, but it’s a good
idea to trial fit it in your car before gluing. This will allow you
to make any additional alterations that may be necessary.
Spray upholstery adhesive on the back of the carpet and on
the firewall. Allow it a minute or two to get tacky before at-
taching the carpet.

120 • 800.979.0122 • www.SpeedwayMotors.com
UPHOLSTERY
The side and back panels are secured to the body
using the supplied hook-and-loop material. One
side of the material is already attached to your pan-
els; the other will need to be attached to the wood
support pieces. Two 1'' strips are applied approxi-
mately 1'' below the body flange as shown.
It’s a good idea to use a staple gun to attach the hook-and-
loop strips more securely, especially in the corners.
You will also need to put vertical strips of hook-and-loop
material at the front of the body, right next to the corner
of the firewall. This will support the front edge of the side
panels.

800.979.0122 • www.SpeedwayMotors.com • 121
UPHOLSTERY
Set the side panel in place and attach it to the body using the hook-and-loop material. You may need to apply extra
pressure to contour the panel to the curve of the body.
For a more permanent and secure installation, we rec-
ommend gluing the lower carpet section to the side of
the body.
The carpet on the side panels is intentionally left long. Use a
utility knife or razor blade to trim off the excess material
where the side of the body meets the floor.
After attaching the side panels, you can trial fit the floor carpet. Before gluing the carpet down, you will need to trim a
small access opening for the brake pedal.

The rear half of the carpet can then be glued down in the same manner as the front. On channeled-floor bodies, you will
need to trim out small pieces to clear the frame kick up as shown.
122 • 800.979.0122 • www.SpeedwayMotors.com
UPHOLSTERY
Next, fold the front half of the carpet back and apply glue to
the floor and the underside of the carpet.
Give the glue a minute or two to get tacky, then slowly
roll the front half of the carpet back down, using your
hands to keep it smooth and flat as it adheres to the floor.
Be sure to trim any necessary shifter access holes - and
route any electrical wires - before gluing down the rear
half of the carpet.

800.979.0122 • www.SpeedwayMotors.com • 123
UPHOLSTERY
The seat back section is installed in the same manner as the side panels. You may need to make a couple of relief cuts
on the bottom for the panel to fit flat on channeled-floor cars.
If you are building a T with an un-channeled body, you will probably want to use the supplied seat riser under your seat
cushion. It can be attached to the seat bottom using 11⁄2'' wood screws. Channeled cars will not need this riser.
124 • 800.979.0122 • www.SpeedwayMotors.com
UPHOLSTERY
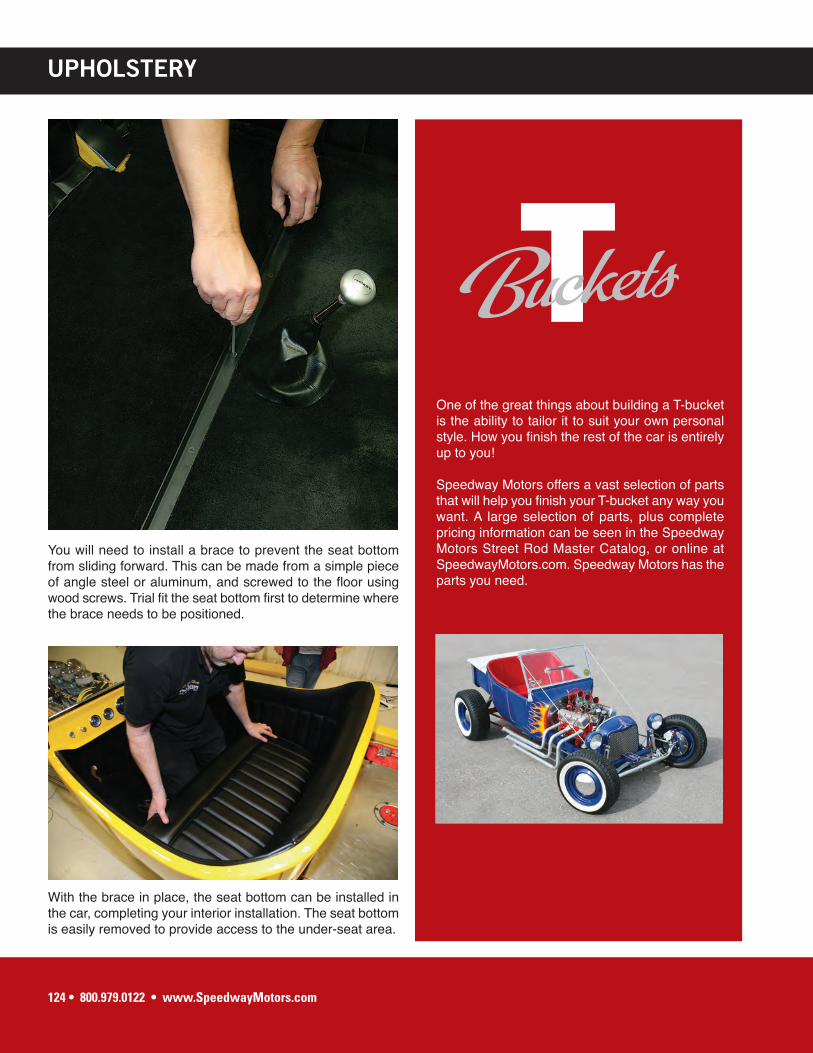
You will need to install a brace to prevent the seat bottom
from sliding forward. This can be made from a simple piece
of angle steel or aluminum, and screwed to the floor using
wood screws. Trial fit the seat bottom first to determine where
the brace needs to be positioned.
With the brace in place, the seat bottom can be installed in
the car, completing your interior installation. The seat bottom
is easily removed to provide access to the under-seat area.
One of the great things about building a T-bucket
is the ability to tailor it to suit your own personal
style. How you finish the rest of the car is entirely
up to you!
Speedway Motors offers a vast selection of parts
that will help you finish your T-bucket any way you
want. A large selection of parts, plus complete
pricing information can be seen in the Speedway
Motors Street Rod Master Catalog, or online at
SpeedwayMotors.com. Speedway Motors has the
parts you need.
TBuckets

800.979.0122 • www.SpeedwayMotors.com • 125
REFERENCE CHART
Speedway Motors T-Bucket Reference ChartThis specification chart can serve as helpful reference during final assembly of your T-bucket, or when
performing future maintenance or updates.
Torque SpecificationsFront Suspension
Front hairpin to frame 150 ft. lbs.
Front hairpin clevis to axle 20 ft. lbs.
Front four bar to frame 75 ft. lbs.
Front four bar to axle 35 ft. lbs.
Front spring U-bolts 40 ft. lbs.
Spring pivot to batwing 75 ft. lbs.
Front spring shackle 25 ft. lbs.
Front shocks 60 ft. lbs.
Front panhard bar to batwing 35 ft. lbs.
Front panhard bar to center bracket 60 ft. lbs.
Steering
Steering box to frame 55 ft. lbs.
Steering arm to spindle 75 ft. lbs.
Steering arm to tie rod/drag link 125 ft. lbs.
Pitman arm to steering box 200 ft. lbs.
Drag link to pitman arm 150 ft. lbs.
Rear Suspension
Rear hairpin to frame 150 ft. lbs.
Rear hairpin to axle bracket (coilover) 75 ft. lbs.
Rear hairpin to axle bracket (coil) 20 ft. lbs.
Rear four bar to frame 75 ft. lbs.
Rear four bar to axle 75 ft. lbs.
Rear shocks 60 ft. lbs.
Panhard bar 60 ft. lbs.
Other Chassis Components
Engine mount bolts 35 ft. lbs.
Transmission mount bolts 30 ft. lbs.
Alignment
Final front end alignment
Caster 4° - 6° positive
Thrust alignment
1⁄16'' to 1⁄8'' toe-in
+/- 1⁄16''