system operating manual for pension voucher auditing software
TRANSCRIPT

PVA Software User Manual

- 2 -
PVA user manual
Table of Contents
1. PVA Software interface ..................................................................................................... - 5 - 1.1 Scope ..............................................................................................................................................................- 5 -
1.2 System Requirements .....................................................................................................................................- 5 -
1.2.1 Hardware Requirements (Minimum Configuration required to run the Application) .........................................- 5 -
1.2.2 Software Requirement ...........................................................................................................................- 5 -
1.3 The Pension Audit Interface ...........................................................................................................................- 6 -
1.4 Logging into the Pension Audit application ....................................................................................................- 6 -
1.5 PVA Dash Board ..............................................................................................................................................- 7 -
1.5.1 General Navigation ................................................................................................................................- 8 -
1.5.2 To Add New Record ...............................................................................................................................- 9 -
1.5.3 Standard Buttons .................................................................................................................................- 10 -
1.6 Common Controls .........................................................................................................................................- 10 -
To create New records ..............................................................................................................................- 10 -
To perform Search ....................................................................................................................................- 10 -
To Modify a record ...................................................................................................................................- 10 -
1.6.1 To Search Records from the Grid .........................................................................................................- 11 -
2. Module Description ........................................................................................................ - 13 - 2.1 Module wise Menu Description ....................................................................................................................- 13 -
3. Maintaining Masters ....................................................................................................... - 18 - 3.1 Pension Class Master ....................................................................................................................................- 18 -
3.2 CDA Rate Master ...........................................................................................................................................- 19 -
3.3 IDA Rate Master ............................................................................................................................................- 20 -
3.4 CDA Pay scale ................................................................................................................................................- 21 -
3.5 IDA Pay scale .................................................................................................................................................- 22 -
3.6 Designation Master.......................................................................................................................................- 23 -
3.7 Division Master .............................................................................................................................................- 24 -
3.8 SSA Unit Master ............................................................................................................................................- 25 -
3.9 Title of Respect Master .................................................................................................................................- 26 -
3.10 Relationship Master ......................................................................................................................................- 27 -
3.11 District Master ..............................................................................................................................................- 28 -
3.12 State Master .................................................................................................................................................- 29 -
3.13 Objection Master ..........................................................................................................................................- 30 -
4. Maintaining Bank/Post Office Details .............................................................................. - 31 - 4.1 Bank Master ..................................................................................................................................................- 31 -
4.2 CPPC Branch Master .....................................................................................................................................- 32 -
4.3 District wise CPPC Branch Setting .................................................................................................................- 33 -
4.4 Bank Branch Master......................................................................................................................................- 34 -
4.5 Paying Bank Master ......................................................................................................................................- 35 -
4.7 Post Office Master ........................................................................................................................................- 36 -
4.8 Head Post Office Master ...............................................................................................................................- 37 -
4.9 Sub Post Office Master .................................................................................................................................- 38 -

- 3 -
PVA user manual
5. Maintaining Pensioner Details ........................................................................................ - 39 - 5.1 Pensioner Details ..........................................................................................................................................- 39 -
5.1.1 Regular Pension Data Entry Screen......................................................................................................- 40 -
5.1.2 Pension Details: ...................................................................................................................................- 42 -
5.1.3 Nominee Details: .................................................................................................................................- 43 -
5.1.4 Family Pension Details: ........................................................................................................................- 44 -
5.1.5 Pensioner PDA Details .........................................................................................................................- 45 -
5.1.6 Pensioner Ledger Card .........................................................................................................................- 46 -
5.2 Family Pensioner Details ...............................................................................................................................- 47 -
5.2.1 Deceased Employee Details / Pensioner Details .................................................................................- 48 -
5.2.2 Nominee Details: .................................................................................................................................- 50 -
5.2.3 Family Pension Details: ........................................................................................................................- 51 -
5.2.4 Pension Details ....................................................................................................................................- 52 -
5.2.5 Pensioner PDA Details .........................................................................................................................- 53 -
5.2.6 Pensioner Ledger Card .........................................................................................................................- 54 -
5.3 Illustration of Pensioner details bulk upload ................................................................................................- 55 -
5.3.1 Step wise illustration of Data Uploading from Excel. ...........................................................................- 57 -
5.4 Pension Conversion ......................................................................................................................................- 61 -
5.5 Pension conversion screen ...........................................................................................................................- 62 -
5.6 Transfers .......................................................................................................................................................- 63 -
6 Auditing ......................................................................................................................... - 64 - 6.1 Monthly Pension Statement .........................................................................................................................- 66 -
6.2 MPS Status ....................................................................................................................................................- 67 -
6.3 Scroll Details Entry ........................................................................................................................................- 68 -
6.4 General Audit ................................................................................................................................................- 69 -
6.4.1 Regular Auditing ..................................................................................................................................- 69 -
6.4.2 Auditing with raising Objections ..........................................................................................................- 70 -
Audit Objections ..................................................................................................................................- 71 -
6.4.3 Auditing with Breakup posting ............................................................................................................- 73 -
Breakup posting ...................................................................................................................................- 74 -
6.4.4 Auditing with Other Location and Transfers ........................................................................................- 75 -
6.4.5 Auditing with Suspense Audit ..............................................................................................................- 77 -
Suspense Audit ....................................................................................................................................- 78 -
6.4.6 Auditing as Bulk Audit / E-Scroll Audit. ................................................................................................- 79 -
6.5 Suspense Audit .............................................................................................................................................- 84 -
6.6 Suspense Audit Reply....................................................................................................................................- 86 -
6.7 Objection Reply.............................................................................................................................................- 87 -
7 Objection Reports ........................................................................................................... - 88 - 7.1 Bank Objections Report ................................................................................................................................- 88 -
7.1.1 Objection report Covering Letter for Bank ..........................................................................................- 89 -
7.1.2 Objection report Annexure Page Print for Bank ..................................................................................- 90 -
7.2 Post Office Objections Report ......................................................................................................................- 91 -
7.2.1 Objection report Covering Letter for Post Office .................................................................................- 92 -
7.2.2 Objection report Annexure Page Print for Post Office ........................................................................- 93 -
7.3 Scroll Wise Objection Status Report .............................................................................................................- 94 -
Scroll Wise Objection Status Report ....................................................................................................- 95 -

- 4 -
PVA user manual
8 Audit Reports ................................................................................................................. - 96 - 8.1 General Audit Report ....................................................................................................................................- 96 -
8.2 Suspense Audit Report .................................................................................................................................- 97 -
8.3 Excess / Short payment Report ....................................................................................................................- 98 -
8.4 Monthly Audit/Un-Audit Report ...................................................................................................................- 99 -
8.5 Consolidated Audit/Un-Audit Report .........................................................................................................- 100 -
8.6 CPPC Wise Consolidated Report .................................................................................................................- 101 -
8.7 CPPC Wise Scroll Report .............................................................................................................................- 102 -
8.8 Pay Bank wise Consolidated Report ...........................................................................................................- 103 -
8.9 Pay Bank wise Reconciled Report ...............................................................................................................- 104 -
8.10 Pay Bank Wise Scroll Report .......................................................................................................................- 105 -
8.11 Scroll Analysis Report .................................................................................................................................- 106 -
9 Post Office Reports ....................................................................................................... - 107 -
9.1 HPO wise consolidated Report ...................................................................................................................- 107 -
9.2 HPO wise Scroll Report ...............................................................................................................................- 108 -
9.3 SPO wise Consolidated Report ...................................................................................................................- 109 -
9.4 SPO wise Reconciled Report .......................................................................................................................- 110 -
9.5 SPO wise Scroll Report ................................................................................................................................- 111 -
10 Utilities ......................................................................................................................... - 112 - 10.1 Database Backup ........................................................................................................................................- 112 -
11 Admin .......................................................................................................................... - 113 - 11.1 User Master and User Rights ......................................................................................................................- 113 -
11.2 User Rights Setting ......................................................................................................................................- 114 -
11.3 Audit Trial ...................................................................................................................................................- 115 -

- 5 -
PVA user manual
1. PVA Software interface
1.1 Scope
The scopes of the proposed application in terms of functionalities are as below:
Processing of pensioner details entry as per PPO register authorized by the Pension Section.
Maintaining and Updating the Pensioner Master and Ledgers.
Maintaining and updating the DA rate masters on a regular basis.
Maintaining and updating of PDA (Pension Disbursing Authority) Details on a regular Basis.
Generating Monthly Pension Statement before starting Audit Process.
Inputting Scroll details Summary of a particular CPPC or HPO before starting Auditing
Auditing of Vouchers received as scrolls from PDAs either by soft copy format (e-Scrolls) or by Hard copy
format.
Raising Objections if any irregular payments made by the PDAs.
Correspondences with PDAs about irregular payments and get clarifications
Enter the reply received for an objection from the PDA, update the status as Closed/Pending
Taking reports based on the Scroll Month wise or Pension Month wise and tallying with Scroll details
received from PDAs.
1.2 System Requirements
1.2.1 Hardware Requirements (Minimum Configuration required to run the Application)
Description
Server Intel Xeon X430 Quad Core Processor 2.4 Ghz. Processor, MB L3 cache Memory Or Better Intel 3400 series or equivalent OEM Motherboard, 4GB RAM (Minimum), 500 GB Hard disk, 17” Monitor, DVD Writer, Key board, Optical Scroll Mouse, with Licensed Windows 2008 Server pre-loaded.
Client Intel Pentium-4 Core2 Duo 2.6 GHz Processor, Intel Original Mother Board DG31P, 1GB RAM (Minimum), 250 GB Hard disk, 17” Monitor, DVD Writer (Optional), Key board, Optical Scroll Mouse, with Licensed Windows XP/Windows-7 pre-loaded.
Backup Facility DVD-R disks/External Hard drive for Disasters Management Backup facility
Printer HP Laser Jet printer (Optional)
LAN Local Area Connection from Server to Client i.e 1 Server + 4 Client systems.
Internet Broad band connection with 512 KBPS to the Server & Clients
1.2.2 Software Requirement
Item Description Qty
Server: Windows 2003 / 2008 Server (Installed on Server)
MS SQL Server 2008
Anti Virus software (Server edition)
1 Pack
1 Pack
1 Pack
Client: Windows XP Professional Service Pack 2 (Minimum)
Compatible to Windows Vista, Windows-7
MS Office 2003 or above
Anti Virus software
Multi User
Multi User
Multi User

- 6 -
PVA user manual
1.3 The Pension Audit Interface
The Pension Audit interface makes use of the following design elements to increase usability and help the user
work easily with the system:
With Cyan coloured fields indicates a mandatory field. It is recommended to fill up all the data. However if the
data is not available, you can leave it blank.
Grey indicates display-only fields or Read only Fields. You cannot enter data in these fields. Such fields will be
populated by the application.
The flow of navigation of fields on the screen is from left to right. You can move to the next field by pressing
<Tab>. You can also use the mouse to navigate to a particular field.
There is an option to Delete certain master Records. But before deleting make sure that the Deleting is
appropriate or not. Once any records deleted, it will delete all its historical data which is dependent on that
particular record. So it is advised to contact the administrator before deleting any records.
1.4 Logging into the Pension Audit application
To Login into the application, do the following:
Click on the Pension Audit shortcut icon on the Desktop. The Login Screen appears.
Enter the User Name and Password provided by the system administrator. (Ref. Fig-1)
Fig-1: Login screen
Click on OK button, will login to the Pension Audit Application.
Based on the User Login, the Menu names will be Enabled / Disabled.
The User privileges are set by the Admin or Super user in the User Master screen.

- 7 -
PVA user manual
1.5 PVA Dash Board
On successful Logging into the Application, the General Navigation screen will open to select an appropriate Menu
Names. The menus are arranged in its sequence of operation and the frequency of usage.
Fig-2: Pension Audit Main Screen (Dash Board)
The Main Menus are displayed at the Lower left corner of the of the screen and
The subsequent Sub Menus will be displayed just above the Main Menus.
Clicking on the Sub Menus will open the respective Screens.

- 8 -
PVA user manual
1.5.1 General Navigation
A screen when clicked will open in search mode. When the screen is in this mode, you can directly enter a search
criterion and perform a query. (Refer Fig 1). If no criterion is given, system will display all records by default.
Fig-3: Master Screen for Add/Modify/View/Search
The Master screen will display all the records available in the Database pertaining to the selected Menu.
In the grid only minimum and important information will be displayed in a column wise order.
For all practical purposes like to Add New Record, to Modify Existing Record and To Print a record, you need to use
this screen.
Enter Search
Value
Set Filter
Conditions
Address
Display Area
Pensioner
Pension Details
Column
Chooser

- 9 -
PVA user manual
1.5.2 To Add New Record
To add new records click on Add button on the Master Screen (Ref Fig-3, Page 10). Based on the Main Menu / Sub
Menu selection will open the corresponding new screen to enter New record or Modify the existing records or
View the records without changes.
Fig-4
Clicking on this button will open the corresponding Master Form
Master Form
Open Button
Display Area

- 10 -
PVA user manual
1.5.3 Standard Buttons
The tool bar icons help you perform the following functions when you click on them.
Button/Icon Purpose
Add To Add New Record
Save To Save a New Record
Modify To Edit the Exiting Record
Update To Save the Modified Record
Delete To Delete the record. Deleting the record will delete the entire dependent historical data.
Print To Print the document or consolidated report.
Cancel To Cancel the operation and return to the normal mode
Remove To Remove the entry from the list which has been added to the Grid before Saving. After saving the record, you need to use Delete button for deleting the record, provided the Delete option is provided to that record.
Close To Close the Working screen
View To View the selected record in a Read only mode
To open Master Screen where ever the Drop down text box control is there.
1.6 Common Controls
The Pension Audit application interface is highly standardized and most tasks like adding records, modifying
records, performing searches are common throughout the application, with changes only in module specific terms.
Though the detailed methods and procedures are laid down in subsequent sections, the following is a list of
generic procedures.
To create New records
i. Click on Add button on the Buttons panel at the bottom of the screen
ii. Enter/Select the Data.
iii. Click on Save button on the Buttons panel to save the record.
To perform Search
i. Click on Screen Name / Menu Name on the left hand side panel. Search screen will open (Ref. Fig-3).
ii. Enter the search criteria i.e. the values for which you want the required records into the appropriate
column, below the column heading. The results will be shown in the grid itself. You can scroll Down
or Up or Horizontally Left and Right if necessary.
To Modify a record
i. Click on the appropriate Menu Name on the left hand side panel. Search screen will open (Ref. Fig-
3).
ii. Enter the search criteria i.e. the values for which you would like to search.
iii. Click on Modify button, will load the details into the master details screen for modifications.
iv. Change the relevant Details and click on Update Button (If applicable)
v. Click on Save Button on buttons panel at the Bottom of the screen.

- 11 -
PVA user manual
To choose the column names to be displayed in the grid can be
selected from this Field Chooser option.
Click on the Tick box to show the column name in the grid.
Uncheck the Tick Box to hide the column name.
1.6.1 To Search Records from the Grid
Fig-5: Record Searching from Grid
Field/column
Chooser
Clear Filter
Criteria
Enter
Search/Filter
Criteria
Set Filter
conditions

- 12 -
PVA user manual
Fig-6: Search Row condition setting
To Clear the filter conditions click on this button on left most on the Row.
Set Filter
condition Options Clear Filter
conditions
To Set the Filter Conditions Click on this button on left side of the Column.
This will show the drop down list to select as shown below figure.
Select the Search criteria as Starts with, Containing, Ends with, Equals etc.
Then enter the Search value. It automatically displays the searched values
in the Grid.
You can also enter multiple search conditions in the criteria row.

- 13 -
PVA user manual
2. Module Description
2.1 Module wise Menu Description
Masters
Pension Class Master Allows to enter the Pension Class like Superannuation, Voluntary Retirement,
Compulsory Retirement, Military Pension, Pro-Rata Pension, etc.
CDA Rate Master Allows to enter CDA Rates with effective from Date
IDA Rate Master Allows to enter IDA Rates with effective from Date along with Executive DA Rates.
CDA Pay Scale Allows to enter CDA Pay scales along with Post/Grade, 5th CPC Pay scale, Pay Band,
6th CPC Pay Scale, Grade Pay etc.
IDA Pay Scale Allows to enter IDA Pay scales along with Post/Grade, Pre Revised, Revised Pay
scales etc.
Designation Master Allows to enter Designations which are commonly exist.
Division Master Sets the Division names with Address.
Office /SSA Unit Master Sets the Unit Name where the pensioner is actually worked.
Salutation/
Title of Respect Master Enter the Title of respect as a master data.
Relation Master Enter the Relationship names as master data
District Master Enter all the Districts in a particular sate along with State names
State Master Enter all the State names across India as a Master.
Objection Master Enter the Objection type as a master which will be used in Auditing regularly
Bank/PO Master
Bank Master Store all Nationalized Bank Names across India.
CPPC Branch Master Allows to create the CPPC Branch names
CPPC Branch Setting Will Set the CPPCs Geographical jurisdiction for an individual CCA Offices based on
District wise.
Bank Branch Master Store the Branch Names of the Banks across India. Also it will map automatically
with CPPC names which is set in the Previous Screen.
Paying Bank Master Sets the Paying Bank Names from Branch Names entered in the Bank Branch
Master along with CPPC Names
Post Office Master Stores the Post Office Names for a State.
HPO Master Allow to Set the HPO names out of all the Post offices entered in the Post Office
Master
SPO Master Allow to set Sub Post offices out of all the Post offices entered in the Post office
Master along with Head post office names allotting to it.

- 14 -
PVA user manual
Pensioner Details
Pensioner Details Entry This screen is to Add New Pensioner details and Modify the existing records and
Print the existing records.
Upload Pensioner Details
Facilitates the users to upload the data entered in Excel in a customized manner. It
will allow the users to select the Excel Sheet name, Database Server Name,
Database Name and Table in which the data is stored. all these details are fed in
and upload the data.
Pension Conversion Allows the user to Convert the Pension from Superannuation to Family Pension by
entering a “Date of Death” of the Pensioner.
Pension Transfers
Allows to transfer the PPOs from one PDA to another PDA like Bank to Bank, Bank
to Post Office, Post Office to Post Office, Post Office to Bank within the Circle. If the
PPO is transferred to other Circle, then you need to select the “Other Circle
Transfers”. At this condition the Pensioner Code which is generated by the
originating office will remain as it is.
Ceased Pensioner List Facilitates to see the pensioner details which are Ceased due to no next claimants
or Transferred to Other CCA Circles.
Transfer In Report Will give a detailed report of how many pensioners are Transferred to this circle for
this Financial Year.
Transfer Out Report Will give a detailed report of how many pensioners are Transferred to this circle for
this Financial Year.
CPPC Wise Pensioner Report This report will show the details of the pensioners in a particular CPPC.
Pensioner Bank PO Report
Will give a comprehensive information about how many pensioners exist in Bank
and How many in Post Office. Also it will give a list of Pensioner for whom the Bank
and Post office is not set. Which will be shown as Blank.
Auditing
Monthly Pension Statement
Monthly Pension Statement (MPS) is a generation of Due Statement for a
particular month. Before Auditing it is necessary to generate this statement. This
statement can also be used for a Budgeting purpose.
MPS Status
This report will show the details for which month the MPS is generated and how
much money to be disbursed for that month. This report is for a whole Financial
Year.
Scroll Details Entry
The paid vouchers list will be received from the CPPC/HO is called as Scroll. The
details like CPPC Branch Name, Scroll No. Scroll Month, Scroll Year, Total No. of
Vouchers paid in that scroll and Total Amount Paid, all these details will be written
in a summary sheet attached with the scroll. This data should be entered before
starting the Audit process. The same scroll details should be used by the Audit
Staff and do the Detailed Auditing.

- 15 -
PVA user manual
General Audit
General Audit Form will allow to Audit the Scrolls received from the PDA on
monthly basis. The user can also Audit for different months in the same Scroll
month and Post it as Breakup posting option. If any discrepancy found while
auditing there is a possibility to enter the Objections and the same objections can
be sent to PDAs and get the feedback from them. After getting a feedback the
same can be entered as Objection reply form.
E-Scroll Audit
E-Scroll Audit is an uploading of Scrolls received from the CPPC or HPOs, which will
post the Drawn amount and other transaction details to the appropriate fields and
do the Audit process Electronically. After this we can take a statement of Short and
Excess payment list and Audit the discrepancy cases again and see why the
difference is coming. This will reduce lot of effort from manual auditing for all the
cases which are paid correctly.
Suspense Audit
Suspense Audit screen will facilitates to Audit the Pensioner details not found in
the Database and in case of any scrolls received from the other departments
which, needs to be accounted in the same scroll amount.
Suspense Audit Reply
For any suspense Audits raised, it is considered as an Objection. Until the corrective
action taken, the status will be under Pending. Hence it is necessary to take the
appropriate action and close this Suspense Audit. To facilitate the entry of reason,
this screen is helpful.
Objection Reply
For any objections raised, the PDAs should give explanation and take corrective
action. This screen will facilitate to enter the explanation from the PDAs, and
update the status as Closed or Pending.
Objection Reports
Bank Objection Report
Gives list of Objections raised for a particular CPPC in consolidated format and also
there is a provision to select the Annexure or a calculation sheet along with
Covering letter automatically generated, addressing to the Chef General Manager,
CPPC Branch, with Address.
Post Office Objection Report
Gives list of Objections raised for a particular HPO in consolidated format and also
there is a provision to select the Annexure or a calculation sheet along with
Covering letter automatically generated, addressing to the Head Post Master, HPO,
with Address.
Scroll Wise Objection Status
Report
Gives a list of Objections raised for a particular Scroll Wise along with Pension
Month and Pension Year and Status wise.
Audit Reports
General Audit Reports
This report will facilitates to take the user wise reports after auditing process. Here
we can take Bank Audit wise, Post Office Audit wise, User wise with Between dates
of Audit. Also we can select the Particular Focal Bank wise or HPO wise. A different
combination of reports are available in this section.
Suspense Audit Report Listing all the vouchers Audited under Suspense category and allows to take report
of each or consolidated list.
Excess and Short Payment
List
This Report will give comprehensive information about the Excess and Short
payment made by the PDAs pointed out while auditing.

- 16 -
PVA user manual
Monthly Audit/Un-Audit
Report
This Report will give comprehensive information about how many cases have been
Audited and How many are un-audited based on Bank and Post Office and All
records for comprehensive report.
Consolidated Audit/Un-Audit
Report
This report will give information about Consolidated list of Pensioners whose
Payment is made or not can be viewed for a whole Financial Year in single row.
CPPC wise Consolidated
Report
Gives a consolidated list of Due Drawn Statement for all the CPPC of its Bank with
total No. of Pensioners available in a particular CPPC and for a selected Pension
Month
CPPC Wise Scroll Report
Gives a consolidated list of Due Drawn Statement for those CPPCs for which,
Auditing is done with Total No. of Pensioners existing in a particular CPPC, for a
particular Scroll Month.
Pay Bank Consolidated
Report
This Report will show Audited details of Individual Banks with Total No Of
pensioners exist in the Bank along with How many pensioners have been
audited/Un Audited with Due, Drawn, Difference, Arrears, Recovery details.
Pay Bank Reconciliation
Report
This Reconciliation report will give a detailed report of Audited details of individual
pensioners exist in a particular Bank for a particular Pension Month. You can also
select a Paying Bank wise pensioners list or All.
Pay Bank Scroll Report
This Reconciliation report will give a detailed report of Audited details of individual
pensioners exist in a particular Paying Bank for a particular Scroll Month. It may
differ from “Pension Month wise Reconciliation Report” because in one scroll
there may be a payment for different Months Pension. You can also select a Paying
Bank wise list or All.
Scroll Analysis Report
This is a macro level analysis report of vouchers receiving status which will give
comprehensive picture of Vouchers received in which Pension Month and in which
Scroll month, consecutively in a span of two years.
Post Office Reports
HPO wise Consolidated
Report
Gives a consolidated list of Due Drawn Statement for all the HPOs with total No. of
Pensioners available in a particular HO for a selected Pension Month
HPO wise Reconciliation
Report
Retrieves an Audited data in a reconciled manner for an HPO and its associated
Sub Post Offices for a selected Pension Month.
SPO wise Monthly
Reconciliation Statement
This Reconciliation report will give a detailed report of Audited details of individual
pensioners exist in a particular Sub Post Office for a particular Pension Month. You
can also select a SPO wise pensioners list or All.
SPO Wise Monthly Scroll
Report
This Reconciliation report will give detailed reports of Audited details of individual
pensioners exist in a particular Paying Bank paid in a particular Scroll Month. It
may differ from “Pension Month wise Reconciliation Report” because in one scroll
there may be a payment for different Months Pension. You can also select a SPO
wise list or All.
Audited / Un Audited Report
Lists Audited and Un-Audited Total No of Vouchers, Total No A/c exist in all SPO,
Total No. of Pensioners, Total Pension Due, Total Audited No. of Pensioners, Total
Audited Amount, Total Un-Audited Pensioners and Un-Audited Amount.

- 17 -
PVA user manual
Objection Reports
Bank Objection Report
Gives list of Objections raised for a particular CPPC in consolidated format and also
there is a provision to select the Annexure or a calculation sheet along with
Covering letter automatically generated, addressing to the Chef General Manager,
CPPC Branch, with Address.
Post Office Objection Report
Gives list of Objections raised for a particular HPO in consolidated format and also
there is a provision to select the Annexure or a calculation sheet along with
Covering letter automatically generated, addressing to the Head Post Master, HPO,
with Address.
Utilities
Backup of Data base Allows to take a Back up of Data base with pre defined File name and path.
Restore Data base User can restore the Data base from the Back up file by selecting the Source and
Destination file path.
Admin
User Master
Allows to enter the User names with access password. User Role as an Admin and
User type can be set here. User Access Rights can be set for different privileges like
Data Entry, Viewing records, taking prints and Modification of existing records etc.
Based on these privileges the visibility of Buttons or Menus will be activated.
Audit Trail Tracks all the transactions happened on the application along with Date and user
access details. Allows taking print out of the same.
- 18 -
PVA user manual
3. Maintaining Masters
This section describes the screens in the Masters Menu option. Click on the Masters option from the Menu list at the
Lower left panel and the available sub Menu Names will be listed on upper portion of the panel. Then select the
appropriate Menu Names for Setting Master data.
The following are the detailed description about the Masters forms.
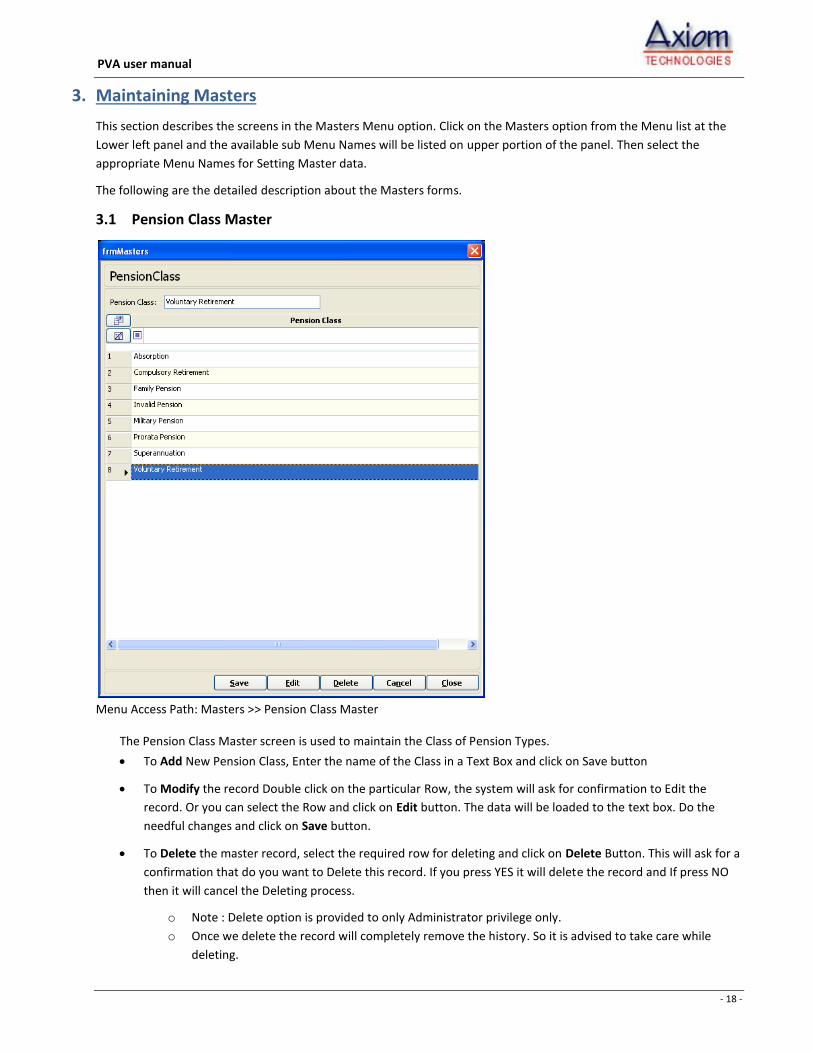
3.1 Pension Class Master
Menu Access Path: Masters >> Pension Class Master
The Pension Class Master screen is used to maintain the Class of Pension Types.
To Add New Pension Class, Enter the name of the Class in a Text Box and click on Save button
To Modify the record Double click on the particular Row, the system will ask for confirmation to Edit the
record. Or you can select the Row and click on Edit button. The data will be loaded to the text box. Do the
needful changes and click on Save button.
To Delete the master record, select the required row for deleting and click on Delete Button. This will ask for a
confirmation that do you want to Delete this record. If you press YES it will delete the record and If press NO
then it will cancel the Deleting process.
o Note : Delete option is provided to only Administrator privilege only.
o Once we delete the record will completely remove the history. So it is advised to take care while
deleting.

- 19 -
PVA user manual
3.2 CDA Rate Master
Menu Access Path: Masters >> CDA Rate Master
The CDA Rate Master screen is used to maintain the DA Rates changes as and when it happens.
To Add New CDA Rate,
o Enter the revised rate in a CDA Rate Text Box
o Enter the Date With effective from and click on Save button
To Modify the record Double click on the particular Row, the system will ask for confirmation to Edit the
record. Or you can select the Row and click on Edit button. The data will be loaded to the text box. Do the
needful changes and click on Save button.
To Delete the master record, select the required row for deleting and click on Delete Button. This will ask for a
confirmation that do you want to Delete this record. If you press YES it will delete the record and If press NO
then it will cancel the Deleting process.
Note: Delete option is provided to only Administrator privilege only.
Once we delete the record will completely remove the history. So it is advised to take care while deleting

- 20 -
PVA user manual
3.3 IDA Rate Master
Menu Access Path: Masters >> IDA Rate Master
The IDA Rate Master screen is used to maintain the DA Rates changes as and when it happens.
To Add New IDA Rate,
o Enter the revised rate for both Executive and Non Executive IDA Rates in its respective fields
o Enter the Date With effective from and click on Save button
To Modify the record Double click on the particular Row, the system will ask for confirmation to Edit the
record. Or you can select the Row and click on Edit button. The data will be loaded to the text box. Do the
needful changes and click on Save button.
To Delete the master record, select the required row for deleting and click on Delete Button. This will ask for a
confirmation that do you want to Delete this record. If you press YES it will delete the record and If press NO
then it will cancel the Deleting process.
Note : Delete option is provided to only Administrator privilege only.
Once we delete the record will completely remove the history. So it is advised to take care while deleting

- 21 -
PVA user manual
3.4 CDA Pay scale
Menu Access Path: Masters >> CDA Rate Master
The CDA Pay Scale Master screen is used to maintain the different Pay scales of different Pay band and Grade Pay as
and when any additions or changes.
To Add New CDA Pay scale,
o Enter the Grade, 5th
CPC Pay scale, 6th
CPC Pay Scale, Pay Band and Grade Pay in the respective fields.
o System will calculate the Revised Original Pension, Revised Enhanced Family Pension and Revised
Normal Family Pension will be calculated automatically. After entering all the required information
click on Save button.
To Modify the record Double click on the particular Row, the system will ask for a confirmation to Edit the
record. Or you can select the Row and click on Edit button. The data will be loaded to the text boxs. Do the
needful changes and click on Save button.
To Delete the master record, select the required row for deleting and click on Delete Button. This will ask for a
confirmation that do you want to Delete this record. If you press YES it will delete the record and If press NO
then it will cancel the Deleting process.
Note : Delete option is provided to Administrator privilege only.
Once you delete, the record will be completely remove the history. So it is advised to take care while
deleting

- 22 -
PVA user manual
3.5 IDA Pay scale
The IDA Pay Scale Master screen is used to maintain the different Pay scales for different Grade. It will be as Pre
Revised and Revised pay scale.
Menu Access Path: Masters >> IDA Pay Scale
To Add New IDA Pay scale,
o Enter the Grade, 5th
CPC Pay scale, 6th
CPC Pay Scale, Pay Band and Grade Pay in the respective fields.
o System will calculate the Revised Original Pension, Revised Enhanced Family Pension and Revised
Normal Family Pension as per the standard formula. After entering all the required information click
Save button.
To Modify the record Double click on the particular Row, the system will ask for a confirmation to Edit the
record. Or you can select the Row and click on Edit button. The data will be loaded to the text boxs. Do the
needful changes and click on Save button.
To Delete the master record, select the required row for deleting and click on Delete Button. This will ask for a
confirmation that do you want to Delete this record. If you press YES it will delete the record and If press NO
then it will cancel the Deleting process.
Note : Delete option is provided to Administrator privilege only.
Once you delete, the record will be completely remove the history. So it is advised to take care while deleting

- 23 -
PVA user manual
3.6 Designation Master
The IDA Pay Scale Master screen is used to maintain the different Pay scales for different Grade. It will be as Pre
Revised and Revised pay scale.
Menu Access Path: Masters >> Designation Master
To Add New Designation, Enter the Designation Name into the control and Click on Save Button
To Modify the record Double click on the particular Row, the system will ask for a confirmation to Edit the
record. Or you can select the Row and click on Edit button. The data will be loaded to the text boxs. Do the
needful changes and click on Save button.
To Delete the master record, select the required row for deleting and click on Delete Button. This will ask for a
confirmation that do you want to Delete this record. If you press YES it will delete the record and If press NO
then it will cancel the Deleting process.
Note: Delete option is provided to Administrator privilege only.
Once you delete, the record will be completely remove the history. So it is advised to take care while deleting

- 24 -
PVA user manual
3.7 Division Master
Menu Access Path: Masters >> Division Master
To Add New Division Name, enter into the Division text box, Enter the Code and Address of the Division and
click on Save button. The address of the Division and Division Codes are not mandatory.
To Modify the record Double click on the particular Row, the system will ask for a confirmation to Edit the
record. Or you can select the Row and click on Edit button. The data will be loaded to the text boxs. Do the
needful changes and click on Save button.
To Delete the master record, select the required row for deleting and click on Delete Button. This will ask for a
confirmation that do you want to Delete this record. If you press YES it will delete the record and If press NO
then it will cancel the Deleting process.
Note : Delete option is provided to Administrator privilege only.
Once you delete, the record will be completely remove the history. So it is advised to take care while deleting

- 25 -
PVA user manual
3.8 SSA Unit Master
Menu Access Path: Masters >> SSA Unit Master
To Add New SSA Unit Name, enter into the Unit text box, Enter the Code and Address of the Unit and Click on
Save button.
To Modify the record Double click on the particular Row, the system will ask for a confirmation to Edit the
record. Or you can select the Row and click on Edit button. The data will be loaded to the text boxs. Do the
needful changes and click on Save button.
To Delete the master record, select the required row for deleting and click on Delete Button. This will ask for a
confirmation that do you want to Delete this record. If you press YES it will delete the record and If press NO
then it will cancel the Deleting process.
Note : Delete option is provided to Administrator privilege only.
Once you delete, the record will be completely remove the history. So it is advised to take care while deleting

- 26 -
PVA user manual
3.9 Title of Respect Master
The Titles which are used commonly in process of entering the pensioner’s details can be entered as a master here.
Menu Access Path: Masters >> Title of Respect Master
To Add New Title of Respect or we can call it as Salutation of a person, Enter the Salutation name and Gender
in the respective fields, click on Save button to add the record
To Modify the record Double click on the particular Row, the system will ask for a confirmation to Edit the
record. Or you can select the Row and click on Edit button. The data will be loaded to the text boxs. Do the
needful changes and click on Save button.
To Delete the master record, select the required row for deleting and click on Delete Button. This will ask for a
confirmation that do you want to Delete this record. If you press YES it will delete the record and If press NO
then it will cancel the Deleting process.
Note : Delete option is provided to Administrator privilege only.
Once you delete, the record will be completely remove the history. So it is advised to take care while deleting

- 27 -
PVA user manual
3.10 Relationship Master
The Relationships which are used commonly in process of entering the pensioners Family details can be entered as a
master here.
Menu Access Path: Masters >> Relationship Master
To Add New Relationships which are commonly used in process of entering the pensioners Family details can
be eneted as master here.Title of Respect or we can call it as Salutation of a person, Enter the Salutation name
and Gender in the respective fields, click on Save button to add the record
To Modify the record Double click on the particular Row, the system will ask for a confirmation to Edit the
record. Or you can select the Row and click on Edit button. The data will be loaded to the text boxs. Do the
needful changes and click on Save button.
To Delete the master record, select the required row for deleting and click on Delete Button. This will ask for a
confirmation that do you want to Delete this record. If you press YES it will delete the record and If press NO
then it will cancel the Deleting process.
Note : Delete option is provided to Administrator privilege only.
Once you delete, the record will be completely remove the history. So it is advised to take care while deleting

- 28 -
PVA user manual
3.11 District Master
Menu Access Path: Masters >> District Master
The Districts of a particular state can be maintained here as a master.
To Add New District enter the Name of the District, then select the appropriate State name from the
Dropdown list, then select the appropriate CCA Circle name in which this district comes under and click on
Save button.
To Modify the record Double click on the particular Row, the system will ask for a confirmation to Edit the
record. Or you can select the Row and click on Edit button. The data will be loaded to the text boxs. Do the
needful changes and click on Save button.
To Delete the master record, select the required row for deleting and click on Delete Button. This will ask for a
confirmation that do you want to Delete this record. If you press YES it will delete the record and If press NO
then it will cancel the Deleting process.
Note : Delete option is provided to Administrator privilege only.
Once you delete, the record will be completely remove the history. So it is advised to take care while deleting

- 29 -
PVA user manual
3.12 State Master
Menu Access Path: Masters >> State Master
The State names can be maintained here as a master.
To Add New State enter the Name of the State into the respective field and Click on Save button.
To Modify the record Double click on the particular Row, the system will ask for a confirmation to Edit the
record. Or you can select the Row and click on Edit button. The data will be loaded to the text boxs. Do the
needful changes and click on Save button.
To Delete the master record, select the required row for deleting and click on Delete Button. This will ask for a
confirmation that do you want to Delete this record. If you press YES it will delete the record and If press NO
then it will cancel the Deleting process.
Note : Delete option is provided to Administrator privilege only.
Once you delete, the record will be completely remove the history. So it is advised to take care while deleting

- 30 -
PVA user manual
3.13 Objection Master
Menu Access Path: Masters >> Objection Master
While Auditing, there may be a Discrepancies in the payments made which, are common in type. These common
differences are can be entered as a master to facilitate the Audit process easy by just selecting these Objections.
To Add New Objection, enter the Name of the Objection type and enter the Description of the Objection like
for Excess Payments due to DA Rate mismatch then enter “Excess Payment” as Objection Type and
appropriate Description of the Objection. Click on the Save button to save the record.
To Modify the record Double click on the particular Row, the system will ask for a confirmation to Edit the
record. Or you can select the Row and click on Edit button. The data will be loaded to the text boxs. Do the
needful changes and click on Save button.
To Delete the master record, select the required row for deleting and click on Delete Button. This will ask for a
confirmation that do you want to Delete this record. If you press YES it will delete the record and If press NO
then it will cancel the Deleting process.
Note : Delete option is provided to Administrator privilege only.
Once you delete, the record will be completely remove the history. So it is advised to take care while deleting

- 31 -
PVA user manual
4. Maintaining Bank/Post Office Details
4.1 Bank Master
Menu Access Path: Bank PO Details >> Bank Master
The Bank Master screen is used to maintain the different Nationalized Bank Names across India. For example there are
27 Nationalized Banks as of now. We need to maintain these names along with the prefix code as an abbreviation.
To Add New Bank Name, enter the Bank Name and Prefix code into the respective fields and Click on Save
button to save the record.
To Modify the record Double click on the particular Row, the system will ask for a confirmation to Edit the
record. Or you can select the Row and click on Edit button. The data will be loaded to the text boxs. Do the
needful changes and click on Save button.
To Delete the master record, select the required row for deleting and click on Delete Button. This will ask for a
confirmation that do you want to Delete this record. If you press YES it will delete the record and If press NO
then it will cancel the Deleting process.
Note : Delete option is provided to Administrator privilege only.
Once you delete, the record will be completely remove the history. So it is advised to take care while deleting
- 32 -
PVA user manual
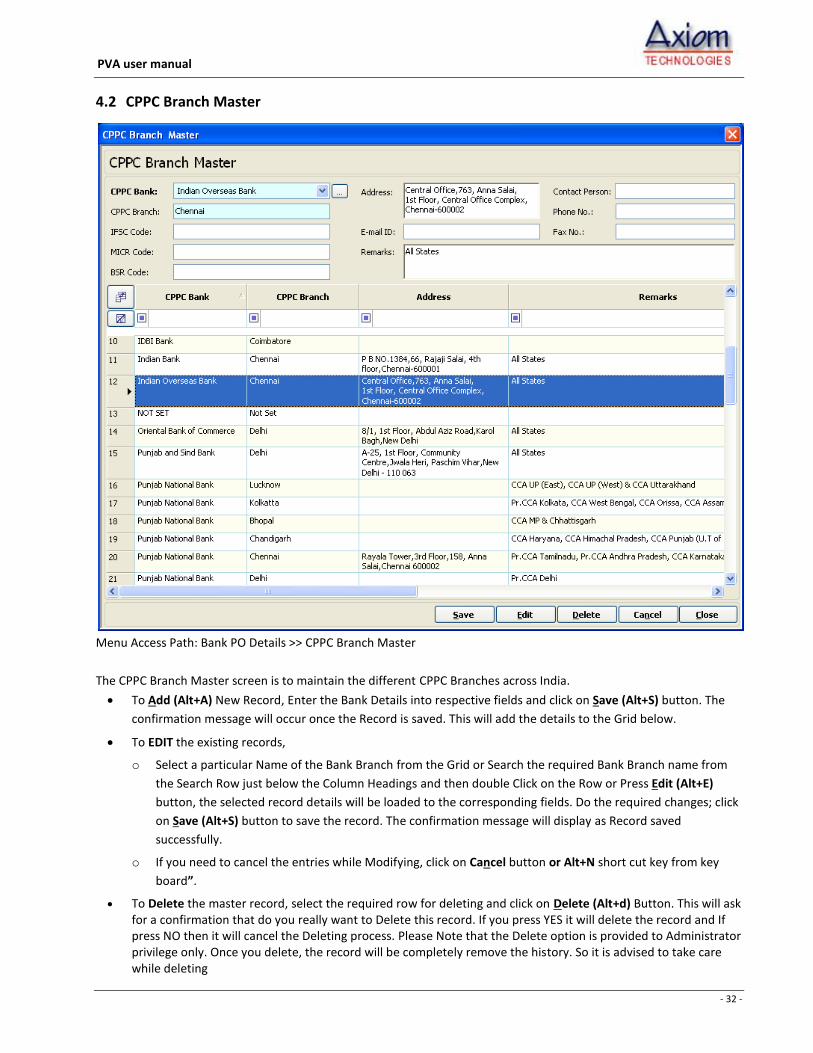
4.2 CPPC Branch Master
Menu Access Path: Bank PO Details >> CPPC Branch Master
The CPPC Branch Master screen is to maintain the different CPPC Branches across India.
To Add (Alt+A) New Record, Enter the Bank Details into respective fields and click on Save (Alt+S) button. The
confirmation message will occur once the Record is saved. This will add the details to the Grid below.
To EDIT the existing records,
o Select a particular Name of the Bank Branch from the Grid or Search the required Bank Branch name from
the Search Row just below the Column Headings and then double Click on the Row or Press Edit (Alt+E)
button, the selected record details will be loaded to the corresponding fields. Do the required changes; click
on Save (Alt+S) button to save the record. The confirmation message will display as Record saved
successfully.
o If you need to cancel the entries while Modifying, click on Cancel button or Alt+N short cut key from key
board”.
To Delete the master record, select the required row for deleting and click on Delete (Alt+d) Button. This will ask for a confirmation that do you really want to Delete this record. If you press YES it will delete the record and If press NO then it will cancel the Deleting process. Please Note that the Delete option is provided to Administrator privilege only. Once you delete, the record will be completely remove the history. So it is advised to take care while deleting

- 33 -
PVA user manual
4.3 District wise CPPC Branch Setting
Menu Access Path: Bank PO Details >> CPPC Branch Setting
The CPPC Branches are allotted to the individual bank branches based on the Geographical jurisdiction of the CCA
Offices in the State and its Districts.
To Add New Record, Select the CPPC Branch, Select State name and CCA Office name from the dropdown list,
and then select the Districts pertaining to that CCA office which are displayed in a dropdown list. Select/tick
the appropriate Districts which are applicable to that CCA office and move on to the next field and fill up the
other details. Click on Save (Alt+S) button, the record will be added to the Grid.
To EDIT the existing records, Select a particular Name of the CPPC Branch from the Grid or Search the required
Branch name from the Search Row just below the Column Headings and then double Click on the Row or Press
Edit (Alt+E) button, the selected record details will be loaded to the corresponding fields. Do the required
changes; click on Save (Alt+S) button to save the record. The confirmation message will display as Record
saved successfully. If you need to cancel the entries while Modifying, click on Cancel button or Alt+N short cut
key from key board”.
To Delete the master record, select the required row for deleting and click on Delete (Alt+d) Button. This will
ask for a confirmation that do you really want to Delete this record. If you press YES it will delete the record
and If press NO then it will cancel the Deleting process. Please Note that the Delete option is provided to
Administrator privilege only. Once you delete, the record will be completely remove the history. So it is
advised to take care while deleting

- 34 -
PVA user manual
4.4 Bank Branch Master
Menu Access Path: Bank PO Details >> Bank Branch Master
The Bank Branch Master screen is to maintain the different Branches of the Banks across India along with CPPC Names
mapped to it.
To Add New Record, select the Bank Name from the dropdown list and Enter the Branch name into the field,
Select the District Name from the list. Once we select the district name, the CPPC Name will be automatically
assigned to that branch. Enter IFSC, MICR code and Other contact details into the appropriate fields and click on
Save (Alt+S) to save the record. The confirmation message will occur once the Record is saved. This will add the
details to the Grid below.
To EDIT the existing records, Select a particular record from the Grid or Search the required detail from the
Search Row just below the Column Headings and then double Click on the Row or Press Edit button, the selected
details will be loaded to the corresponding fields. Do the required changes; click on Save button to save the
record. The confirmation message will display as Record saved successfully.
o If you need to cancel the entries while Modifying, click on Cancel (Alt+N) short cut key from key board”.
To Delete the record, select the required row for deleting and click on Delete (Alt+D) Button. This will ask for a confirmation that do you want to Delete this record. If you press YES it will delete the record and If press NO then it will cancel the Deleting process. Please note that the Delete option is provided to Administrator privilege only. Once you confirm the delete, the record will remove the history completely. So it is advised to take care while deleting.

- 35 -
PVA user manual
4.5 Paying Bank Master
Menu Access Path: Bank PO Details >> Paying Bank Master
After entering the New Branch name, it is necessary to specify the newly added branch as a Paying Branch. Untill the
New Branch added as Paying Branch; the name of the branch will not be displayed in the subsequent forms. To assign
the paying branch into the master, follow the steps.
After entering the New Branch name in Bank Branch Master, select the same name of the Branch in Paying
Branch Master. Once we select the name of the Branch, all the details will be loaded to the corresponding fields.
Recheck all the details and press Save (Alt+S) button. The confirmation message will occur once the Record is
saved. This will add the details to the Grid below.
To EDIT the existing records, Select a particular record from the Grid or Search the required detail from the
Search Row just below the Column Headings and then double Click on the Row or Press Edit button, the selected
details will be loaded to the corresponding fields. Do the required changes; click on Save button to save the
record. The confirmation message will display as Record saved successfully.
o If you need to cancel the entries while Modifying, click on Cancel (Alt+N) short cut key from key board”.
To Delete the record, select the required row for deleting and click on Delete (Alt+D) Button. This will ask for a confirmation that do you want to Delete this record. If you press YES it will delete the record and If press NO then it will cancel the Deleting process. Please note that the Delete option is provided to Administrator privilege only. Once you confirm the delete, the record will remove the history completely. So it is advised to take care while deleting.
- 36 -
PVA user manual
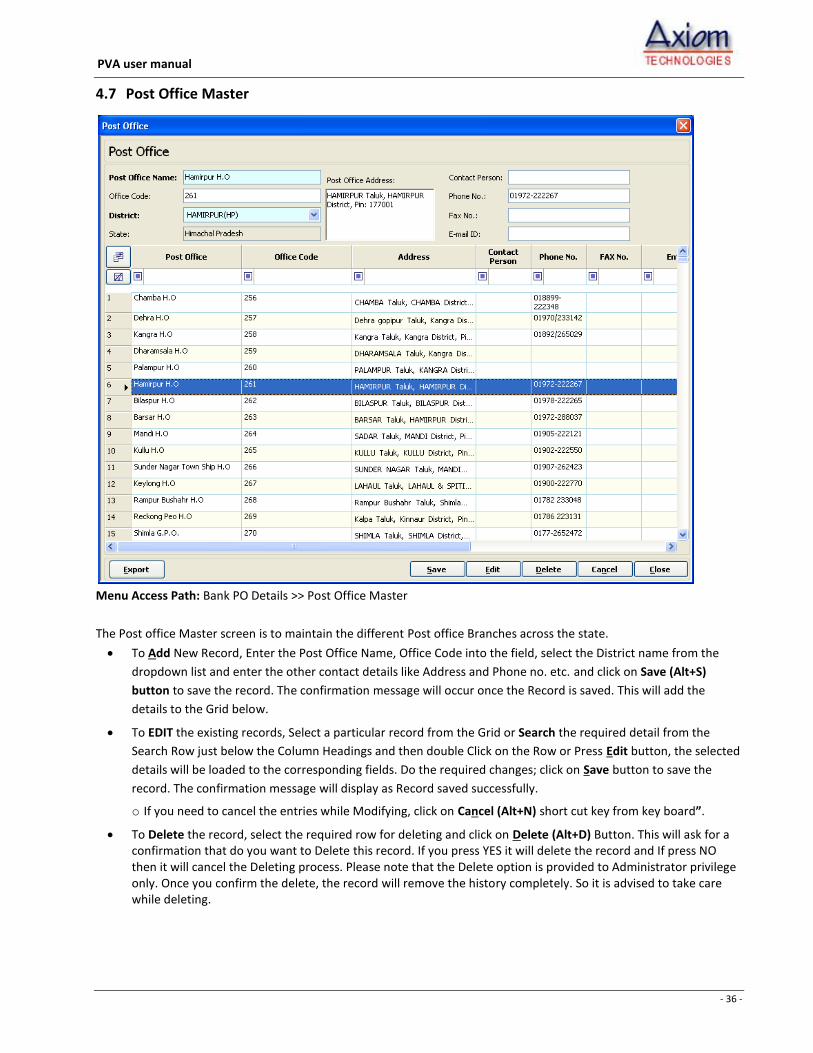
4.7 Post Office Master
Menu Access Path: Bank PO Details >> Post Office Master
The Post office Master screen is to maintain the different Post office Branches across the state.
To Add New Record, Enter the Post Office Name, Office Code into the field, select the District name from the
dropdown list and enter the other contact details like Address and Phone no. etc. and click on Save (Alt+S)
button to save the record. The confirmation message will occur once the Record is saved. This will add the
details to the Grid below.
To EDIT the existing records, Select a particular record from the Grid or Search the required detail from the
Search Row just below the Column Headings and then double Click on the Row or Press Edit button, the selected
details will be loaded to the corresponding fields. Do the required changes; click on Save button to save the
record. The confirmation message will display as Record saved successfully.
o If you need to cancel the entries while Modifying, click on Cancel (Alt+N) short cut key from key board”.
To Delete the record, select the required row for deleting and click on Delete (Alt+D) Button. This will ask for a confirmation that do you want to Delete this record. If you press YES it will delete the record and If press NO then it will cancel the Deleting process. Please note that the Delete option is provided to Administrator privilege only. Once you confirm the delete, the record will remove the history completely. So it is advised to take care while deleting.

- 37 -
PVA user manual
4.8 Head Post Office Master
Menu Access Path: Bank PO Details >> Paying Bank Master
After entering the New Branch name, it is necessary to specify the newly added branch is an HPO or not. Until the New
Branch added as HPO Branch, the name of the branch will not be displayed in the subsequent forms. To assign the Sub
Post office branch into the master, follow the steps.
To Add New Record, Select the Post Office Name from the dropdown list. The corresponding data will be loaded
to the respective fields. Then click on Save (Alt+S) button to save the record. The confirmation message will
occur once the Record is saved. This will add the details to the Grid below.
To EDIT the existing records, Select a particular record from the Grid or Search the required detail from the
Search Row just below the Column Headings and then double Click on the Row or Press Edit button, the selected
details will be loaded to the corresponding fields. Do the required changes; click on Save button to save the
record. The confirmation message will display as Record saved successfully.
o If you need to cancel the entries while Modifying, click on Cancel (Alt+N) short cut key from key board”.
To Delete the record, select the required row for deleting and click on Delete (Alt+D) Button. This will ask for a confirmation that do you want to Delete this record. If you press YES it will delete the record and If press NO then it will cancel the Deleting process. Please note that the Delete option is provided to Administrator privilege only. Once you confirm the delete, the record will remove the history completely. So it is advised to take care while deleting.

- 38 -
PVA user manual
4.9 Sub Post Office Master
Menu Access Path: Bank PO Details >> SPO Master
As like setting the HPO name as master, it is necessary to designate the Post office branch as Sub Post Office by
assigning an HPO to the SPO.
To Add New Record, Select the Post Office Name from the dropdown list. And Select the HPO name under which
this SPO is to be mapped. The corresponding data will be loaded to the respective fields. Then click on Save
(Alt+S) button to save the record. The confirmation message will occur once the Record is saved. This will add
the details to the Grid below.
To EDIT the existing records, Select a particular record from the Grid or Search the required detail from the
Search Row just below the Column Headings and then double Click on the Row or Press Edit button, the selected
details will be loaded to the corresponding fields. Do the required changes; click on Save button to save the
record. The confirmation message will display as Record saved successfully.
o If you need to cancel the entries while Modifying, click on Cancel (Alt+N) short cut key from key board”.
To Delete the record, select the required row for deleting and click on Delete (Alt+D) Button. This will ask for a confirmation that do you want to Delete this record. If you press YES it will delete the record and If press NO then it will cancel the Deleting process. Please note that the Delete option is provided to Administrator privilege only. Once you confirm the delete, the record will remove the history completely. So it is advised to take care while deleting.

- 39 -
PVA user manual
5. Maintaining Pensioner Details
5.1 Pensioner Details The Pensioner Details screen is to set the various details of the pensioner like Pensioner Personal and Employment
details, Pensioner Pension Details, Nominee Details, Family Pension Details, Pensioner PDA details and the
consolidated Ledger Card of the selected Pensioner etc.
Menu Access Path: Pensioner Details >> Pensioner Details
Above is the screen which gives a comprehensive view of the Pensioner details which is already entered. This view
screen is a master navigation screen which facilitates to see all the details about the pensioner in a single row. We can
even perform the search operation over here with multiple search conditions. We can perform Add, Modify and Print
operations from here.
To Add New Pensioner details, Select the Pensioner Details main
menu and click on Pensioner Details Submenu which will open this
pensioner details master view screen.
On the Lower Right corner of the screen you can find the Add
button, clicking on the Add button or Alt+A shortcut key will open
another window called Pension Type selection Screen. Select either
Regular Pension or Family Pension Type and Click on Next button
Clicking on next button will open pensioner details data entry
screen, which is as follows.

- 40 -
PVA user manual
5.1.1 Regular Pension Data Entry Screen.
Pensioner Details screen: In this screen there are 6 different tabbed pages/screens namely Pensioner Details,
Pensioner Pension Details, Nominee Details, Family Pension Details, Pension Through, and Ledge Card of the selected pensioner.
Pensioner Details:
Select Pensioner Details tab, will open Pensioner Personal details.
Select Title of Respect like Sri, Smt. etc. from the dropdown list. If the required option is not available then go to
the master and create new Title of Respect in the Masters menu and select it in this form. (Ref. Managing
Masters details in this help file).
As you select the Title of Respect, the Gender will automatically set as Male or Female.
Enter Pensioner Name.
Enter PPO No. as in the PPO.
Press “Generate Code” button, next to the Pensioner Code Text Box. The system will automatically generate the
code based on the data entered in the respective fields as explained below. The coding format is as follows.
First 2 Digits will represent the ‘Pin Code’ of the CCA office location.
Second 4 Digits will represent the ‘Year of Retirement’ picked by the DOR field.
Third 2 Digits will represent ‘Month of Retirement’ picked by the DOR field.
Fourth 1 Digit will represent ‘Pension Type’ as Superannuation or Family Pension
Fourth 1 Digit will represent ‘DA Type’. In which, 1 represents CDA, 2 represent IDA and 3 represent
Pro-Rata Pension for MTNL absorbers.
Last 5 Digits will be a ‘Continues Serial No.’ filled up when we save the record.
Totally 15 Digit Pensioner Code will be generated automatically by the system.

- 41 -
PVA user manual
If coding system is already in place, then the clicking the Code generation button is not necessary.
System will allow to enter the existing code directly.
You can modify the exiting / system generated Pensioner Code as well
In case of PPO In (Transfer In) cases from other circles, the Pensioner code should be Generated by
the Originating Circle Office only. The same has to be entered manually in this circle. At any point of
time the Pensioner code should not be generated for Foreign PPOs.
Pensioner Code filed will allow only Numerical values and it should be Unique No. Special characters are
not accepted in this text box. For all practical purposes the Pensioner Code is the controlling number. So it is
necessary to enter the Pensioner Code with care.
Select, Class of Pension option like Superannuation, Voluntary Retirement, Pro-Rata Pension, Military
Pension, Invalid Pension, Compulsory Retirement, PSU Absorption etc. from the dropdown list. If the
required option is not available in the list, then click on button, which will open the Master Screen.
Enter the new record Save it and Closing the window will display this newly entered Class of Pension.
Enter ‘Date of Birth’ of the Pensioner. The date can be typed as dd-MM-yyyy format or you can select from
the calendar which opens when you click on dropdown arrow mark.
Enter the contact information like Mobile No, Telephone No; contact Address of the Pensioner etc.
Under Service details section enter the Date of Entry into the service, Date of Retirement. Once DOR is
entered PPO with effective from date will automatically display. This is ideally the next day of DOR or the
same date when it is Voluntary retirement / Invalid Pension cases. You can also modify the date as per PPO.
Select ‘DA Type’ as IDA or CDA. Then select Employee group like Group A, B, C, or D in case of CDA and
Executive / Non Executive in case of IDA.
Select ‘Payment through’ like through as Bank or Post Office.
Select Designation from the dropdown list.
Select ‘Division Name’ from the drop down list.
Select the SSA Unit Name or Office Name from the list. As soon as the unit name is selected, its Address will
automatically display. To modify the Unit master or any masters for that matter, click on button.
Under Pay Scale details section Select ‘Old Pay Scale’ from the drop down list. As soon as you select the Old
Pay scale, the New Pay Scale will automatically filled up or Visa-versa. Either one of them entered, need to
enter both, else both of them should not be entered. Please note that the pay scales are listed based on the
DA Type. IDA Pay scale will be listed if DA type is IDA. CDA pay scale will be listed if the DA type is CDA. Pay
Band and Grade Pay will be automatically filled up in case of CDA.
Enter Last Pay Drawn and Last Basic Drawn.
Enter Total Service, Qualifying Service and Non Qualifying Service as 66 Half Yearly, 33 Yearly etc.
Enter Remarks if any
6. Under Transferred In details section, select Transfer Status Check Box if applicable. once transfer status is
checked, the Date of effect and Transferred from circle fields will enable. Enter the appropriate data and
move to the next fields. If the PPO is a general entry then these fields need not to enter.
7. Pensioner Status details to be as Active or Ceased. If no next claimants are there then the pensioner details
can be Ceased along with Ceasing With effective from Date. Once this is set, the Due for this pensioner will
not be generated and while Auditing the message will be displayed as “This pensioner is ceased”.
After entering all the Mandatory fields, click on Save button to save the record. This will save only the
Pensioner personal Details. The complete record entry is not yet over. Click on Pension Details Tab to set the
Pensioner Pension Details.
Select ‘Pension Details’ Tab to enter the Pensioner Pension Details. The screen looks as below;

- 42 -
PVA user manual
5.1.2 Pension Details:
Enter Original Pension (OP) or Basic Pension.
Enter Commuted Portion (CP). In case of 2nd
Commutation is given then the Commuted portion should be
included with previous commutation. The ‘Pension Commuted’ for the 2nd
Commutation will be a difference
of total Commuted Portion which will calculate automatically and display in the Pension Commuted field.
Ideally, for each pension, there should be a commutation entry. If no commutation has been given for a
particular pension revision, then the Commuted Portion will be the Previous Commutation and Pension
Commuted will be ‘Zero’ for that pension.
If the Commutation is ‘Zero’ for a specific pension revision, The Commutation date and Restoration date to
be considered as the Revision Issue Date for all practical purposes.
The Residual Pension (RP) will automatically calculated with a formula OP-CP=RP. If any changes as per PPO, it can be modified.
Enter Medical Allowance amount, if exist.
Enter the Total sum of Commutation amount paid at the time of Original Pension Settlement or at the time
of subsequent Pension Revision.
Enter the commutation paid date. In case of any variation in date of Pension Payment and commutation
payment, we need to take the exact date of Commutation when it is paid. If the PPO Issue date and
commutation date falls in the same month, the Restoration date will be First of the month after 15 years.
Enter DA Type as CDA or IDA. There may be a possibility that at the time of retirement, pensioner is in CDA,
later he might have opted for IDA. Then we need to take the corresponding DA Type as per the orders.
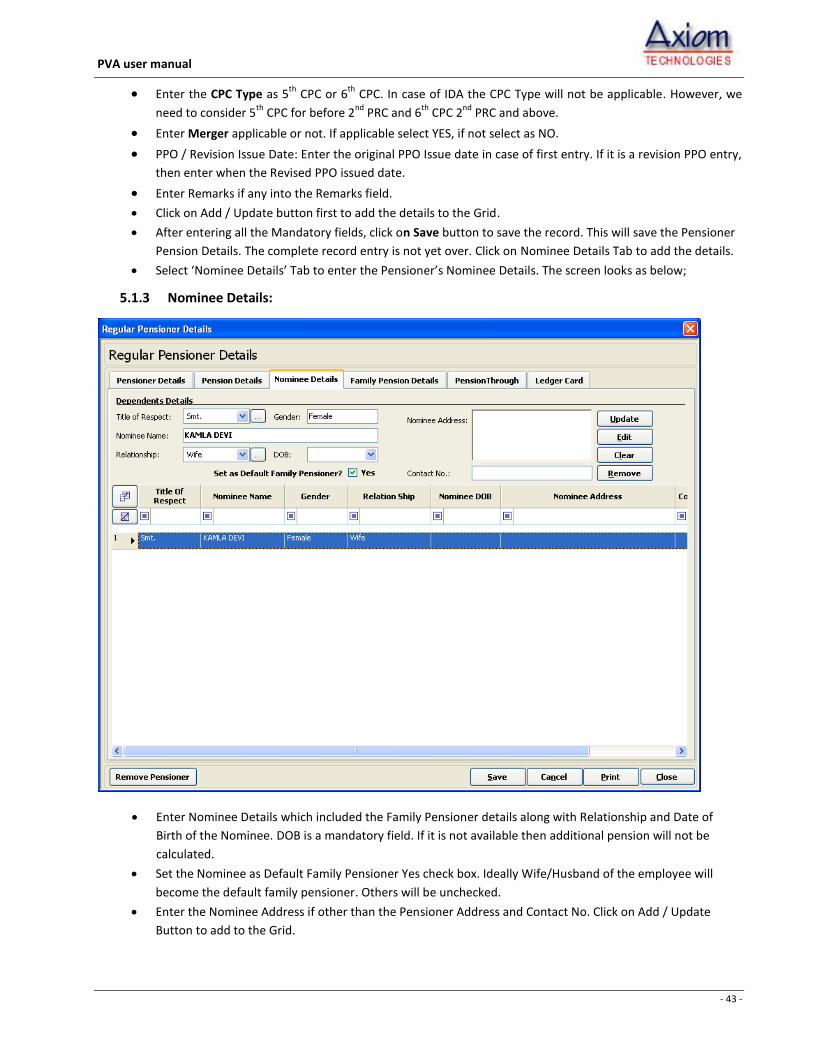
- 43 -
PVA user manual
Enter the CPC Type as 5th
CPC or 6th
CPC. In case of IDA the CPC Type will not be applicable. However, we
need to consider 5th
CPC for before 2nd
PRC and 6th
CPC 2nd
PRC and above.
Enter Merger applicable or not. If applicable select YES, if not select as NO.
PPO / Revision Issue Date: Enter the original PPO Issue date in case of first entry. If it is a revision PPO entry,
then enter when the Revised PPO issued date.
Enter Remarks if any into the Remarks field.
Click on Add / Update button first to add the details to the Grid.
After entering all the Mandatory fields, click on Save button to save the record. This will save the Pensioner
Pension Details. The complete record entry is not yet over. Click on Nominee Details Tab to add the details.
Select ‘Nominee Details’ Tab to enter the Pensioner’s Nominee Details. The screen looks as below;
5.1.3 Nominee Details:
Enter Nominee Details which included the Family Pensioner details along with Relationship and Date of
Birth of the Nominee. DOB is a mandatory field. If it is not available then additional pension will not be
calculated.
Set the Nominee as Default Family Pensioner Yes check box. Ideally Wife/Husband of the employee will
become the default family pensioner. Others will be unchecked.
Enter the Nominee Address if other than the Pensioner Address and Contact No. Click on Add / Update
Button to add to the Grid.

- 44 -
PVA user manual
After entering all the Mandatory fields, click on Save (Alt+S) button to save the record. This will save the
Pensioner Nominee Details. The complete record entry is not yet over. Click on Family Pension Details Tab
to add the details. The screen looks as below;
5.1.4 Family Pension Details:
Enter Enhanced Family Pension Amount and enter the Enhanced Family Pension Up-To Date. This is ideally 7
Years from the Date of Retirement or 10 Years in case of Employee’s death while in service.
Enter Normal Family Pension and NFP with effect from date. Ideally next date of ENFP up-to date is NFP
from date. If any variation in the date, the same can be entered as per the PPO.
Normal Pension Up-To is nothing but, in case of Next Claimants conditional Pension amount is applicable for
Son, Daughter etc, then this restriction date can be entered. From that date, the Pension will be ceased.
Enter DA Type, CPC Type, Merger and Remarks if any. Then click on Add / Update button to add a record to
the Grid. However, while entering Regular Pension Details, the Family Pension Details are not mandatory.
After entering all the Mandatory fields, click on Save button to save the record. This will save the Pensioner
Nominee Details. The complete record entry is not yet over. Click on Pension Through Tab to add the details.
The screen looks as below;

- 45 -
PVA user manual
5.1.5 Pensioner PDA Details
Select the Pension through Option Button as Bank or Post Office. By default it will be selected whichever is
entered in the pensioner details Payment Though field. If not selected then select it appropriately.
Selecting on Bank will display the Bank Branch Details, Selecting Post office will show Sub Post Office details.
Enter the appropriate data into Account No. Date of Account etc. and Click on Add / Update button which
will add to the grid.
Entire PDA history of Pensioner will be shown here, which includes of Transferred details.
If any duplicate entries happened in entering the branches or any mistakes then you can remove the Branch
names from the database. It will permanently delete that branch mapping to this pensioner. But be aware
that Removing the Bank Branch / Post Office name will completely delete the Pensioner Audited Details as
well. So it is advised to see if any Auditing is done or not before Deleting the Bank / PO Details.
Once all the details are saved, this completes the Pensioner details entry.
A Tab called Ledger Card is for viewing the Pensioner Audited details for a selected pensioner for the whole
Financial Year.
The screen Details are as follows.

- 46 -
PVA user manual
5.1.6 Pensioner Ledger Card
Select the required Financial Year from the Dropdown list and Click on Show (Alt+H) button to display the
Ledger Card details of the pensioner.
The ledger card details will contain the following information in a comprehensive manner.
Pension Month, Pension Year
Monthly Pension Due
Gross Pension Paid: In case of multiple months of pension paid at a time, then total amount paid
value will be displayed over here.
Monthly Pension Drawn: actual pension amount paid for a month will be displayed.
Arrears Paid for that month if any
Recovery made for that month if any
Other Arrears Paid for that month if any
Difference with respect to Due – Drawn – Arrears + Recovery.
Cumulative Difference with respect to Opening Balance from the Previous Year + Difference.
Scroll Month and Year in which the Voucher is received
Objections raised while auditing for that particular Pension Month will be displayed here.
Remarks entered while auditing for that particular Pension Month will be displayed in Remarks
column.
Audited By user name will be shown. There are other many columns are available which are hidden. If
any other details are required then Go to the Column chooser and enable the required fields.

- 47 -
PVA user manual
5.2 Family Pensioner Details The Pensioner Details screen is to set the various details of the pensioner like Pensioner Personal and
Employment details, Pensioner Pension Details, Nominee Details, Family Pension Details, Pensioner PDA
details and the consolidated Ledger Card of the selected Pensioner etc.
Menu Access Path: Pensioner Details >> Pensioner Details
Above is the screen which gives a comprehensive view of the Pensioner details which is already entered. This view
screen is a master navigation screen which facilitates to see all the details about the pensioner in a single row. We can
even perform the search operation over here with multiple search conditions. We can perform Add, Modify and Print
operations from here.
5 To Add New Pensioner details, Select the Pensioner Details main menu and click on Pensioner Details Submenu
which will open this pensioner details master view screen.
6 On the Lower Right corner of the screen you can find the Add button,
clicking on the Add button or Alt+A shortcut key will open another
window called Pension Type selection Screen. Select either Regular
Pension or Family Pension Type and Click on Next button
7 Clicking on next button will open pensioner details data entry screen,
which is as follows.

- 48 -
PVA user manual
5.2.1 Deceased Employee Details / Pensioner Details
Select Deceased Employee / Pensioner Details tab, will open Employee Personal details and Office details. Here
many of the details are not mandatory. Based on the applicability, we need to fill up the details appropriately.
Select Title of Respect like Sri, Smt. etc. from the dropdown list. If the required option is not available then go to
the master and create new Title of Respect in the Masters menu and select it in this form. (Ref. Managing
Masters details in this help file).
As you select the Title of Respect, the Gender will automatically set as Male or Female.
Enter the Deceased Employee / Pensioner Name.
Enter PPO No. as in the PPO.
Press “Generate Code” button, next to the Pensioner Code Text Box. The system will automatically generate the
code based on the data entered in the respective fields as explained below. The coding format is as follows.
First 2 Digits will represent the ‘Pin Code’ of the CCA office location.
Second 4 Digits will represent the ‘Year of Retirement’ picked by the DOR field.
Third 2 Digits will represent ‘Month of Retirement’ picked by the DOR field.
Fourth 1 Digit will represent ‘Pension Type’ as Superannuation or Family Pension
Fourth 1 Digit will represent ‘DA Type’. In which, 1 represents CDA, 2 represent IDA and 3 represent
Pro-Rata Pension for MTNL absorbers.
Last 5 Digits will be a ‘Continues Serial No.’ filled up when we save the record.
Totally 15 Digit Pensioner Code will be generated automatically by the system.
If coding system is already in place, then the clicking the Code generation button is not necessary.
System will allow to enter the existing code directly.
You can modify the exiting / system generated Pensioner Code as well
- 49 -
PVA user manual
In case of PPO In (Transfer In) cases from other circles, the Pensioner code should be Generated by
the Originating Circle Office only. The same has to be entered manually in this circle. At any point of
time the Pensioner code should not be generated for Foreign PPOs.
Pensioner Code filed will allow only Numerical values and it should be Unique No. Special characters are
not accepted in this text box. For all practical purposes the Pensioner Code is the controlling number. So it is
necessary to enter the Pensioner Code with care.
Select, Class of Pension option like Family Pension, Superannuation, Voluntary Retirement, Pro-Rata
Pension, Military Pension, Invalid Pension, Compulsory Retirement etc. from the dropdown list. If the
required option is not available in the list, the click on button, which will open the Master Screen.
Enter the new record Save it and Closing the window will display this newly entered Class of Pension.
Enter ‘Date of Birth’ and ‘Date of death’ of the Deceased Employee. The date can be typed as dd-MM-yyyy
format or you can select from the calendar which opens when you click on dropdown arrow mark.
Enter Date of Entry into the service, Date of Retirement. Once DOR is entered PPO with effective from date
will automatically display as the next date of DOR or in case of Direct Family Pension condition, the Next
date of Date of Death will be a PPO Effective from Date.
Select ‘Payment through’ like through as Bank or Post Office.
Under Service details section enter the Select the Designation; Select ‘DA Type’ as IDA or CDA. Then select
Employment group like Group A, B, C, or D in case of CDA and Executive / Non Executive in case of IDA.
Under Pay Scale details section Select ‘Old Pay Scale’ from the drop down list. As soon as you select the Old
Pay scale, the New Pay Scale will automatically filled up or Visa-versa. Either one of them entered, need to
enter both, else both of them should not be entered. Please note that the pay scales are listed based on the
DA Type. IDA Pay scale will be listed if DA type is IDA. CDA pay scale will be listed if the DA type is CDA. Pay
Band and Grade Pay will be automatically filled up in case of CDA.
Enter Last Pay Drawn and Last Basic Drawn.
Enter Total Service, Qualifying Service and Non Qualifying Service as 66 Half Yearly, 33 Yearly etc.
Select ‘Division Name’ from the drop down list.
Select the SSA Unit Name or Office Name from the list. As soon as the unit name is selected, its Address will
automatically display. To modify the Unit master or any masters for that matter, click on button.
Enter Remarks if any
5 Under Transferred In details section, select Transfer Status Check Box if applicable. once transfer status is
checked, the Date of effect and Transferred from circle fields will enable. Enter the appropriate data and
move to the next fields. If the PPO is a general entry then these fields need not to enter.
6 Pensioner Status details to be as Active or Ceased. If no next claimants are there then the pensioner details
can be Ceased along with Ceasing With effective from Date. Once this is set, the Due for this pensioner will
not be generated and while Auditing the message will be displayed as “This pensioner is ceased”.
After entering all the Mandatory fields, click on Save button to save the record. This will save only the
Deceased Employee Details. The complete record entry is not yet over.
Select ‘Nominee Details’ Tab to enter the Dependents Details. The screen looks as below;

- 50 -
PVA user manual
5.2.2 Nominee Details:
Enter Nominee Details which included the Family Pensioner details along with Relationship and Date of
Birth of the Nominee. DOB is a mandatory field. If it is not available then additional pension will not be
calculated.
Set the Nominee as Default Family Pensioner Yes check box. Ideally Wife/Husband of the employee will
become the default family pensioner. Others will be unchecked.
Enter the Nominee Address if other than the Pensioner Address and Contact No. Click on Add / Update
Button to add to the Grid.
After entering all the Mandatory fields, click on Save (Alt+S) button to save the record. This will save the
Pensioner Nominee Details. The complete record entry is not yet over. Click on Family Pension Details Tab
to add the details. The screen looks as below;

- 51 -
PVA user manual
5.2.3 Family Pension Details:
Enter Enhanced Family Pension Amount and enter the Enhanced Family Pension Up-To Date. This is ideally 7
Years from the Date of Retirement or 10 Years in case of Employee’s death while in service.
Enter Normal Family Pension and NFP with effect from date. Ideally next date of ENFP up-to date is NFP
from date. If any variation in the date, the same can be entered as per the PPO.
Enter Fixed Medical Allowance (FMA) of the Family Pensioner.
Normal Pension Up-To is nothing but, in case of Next Claimants conditional Pension amount is applicable for
Son, Daughter etc, then this restriction date can be entered. From that date, the Pension will be ceased.
Enter DA Type, CPC Type, Merger and Remarks if any. Then click on Add / Update button to add a record to
the Grid. However, while entering Regular Pension Details, the Family Pension Details are not mandatory.
After entering all the Mandatory fields, click on Save button to save the record. This will save the Pensioner
Nominee Details. The complete record entry is not yet over. Click on Pensioner “Pension Details” Tab to add
the details. The screen looks as below;

- 52 -
PVA user manual
5.2.4 Pension Details
Enter Original Pension (OP) or Basic Pension.
Enter Commuted Portion (CP). In Direct Family Pension cases the Commutation details are not that
mandatory, but it is necessary to enter the data if available.
The Residual Pension (RP) will automatically calculated with a formula OP-CP=RP. If any changes as per PPO, it can be modified.
Enter Medical Allowance amount, if exist.
Enter the Total sum of Commutation amount paid at the time of Original Pension Settlement or at the time
of subsequent Pension Revision.
Enter the commutation paid date. In case of any variation in date of Pension Payment and commutation
payment, we need to take the exact date of Commutation when it is paid. If the PPO Issue date and
commutation date falls in the same month, the Restoration date will be First of the month after 15 years.
Enter DA Type as CDA or IDA. There may be a possibility that at the time of retirement, pensioner is in CDA,
later he might have opted for IDA. Then we need to take the corresponding DA Type as per the orders.
Enter the CPC Type as 5th
CPC or 6th
CPC. In case of IDA the CPC Type will not be applicable. However, we
need to consider 5th
CPC for before 2nd
PRC and 6th
CPC 2nd
PRC and above.
Enter Merger applicable or not. If applicable select YES, if not select as NO.
Enter Remarks if any into the Remarks field.
Click on Add / Update button first to add the details to the Grid.
After entering all the Mandatory fields, click on Save button to save the record. This will save the Pensioner
Pension Details. The complete record entry is not yet over. Click on Pension Through Tab to add the details.
Select ‘Pension Through’ Tab to enter the Pensioner’s Nominee Details. The screen looks as below;
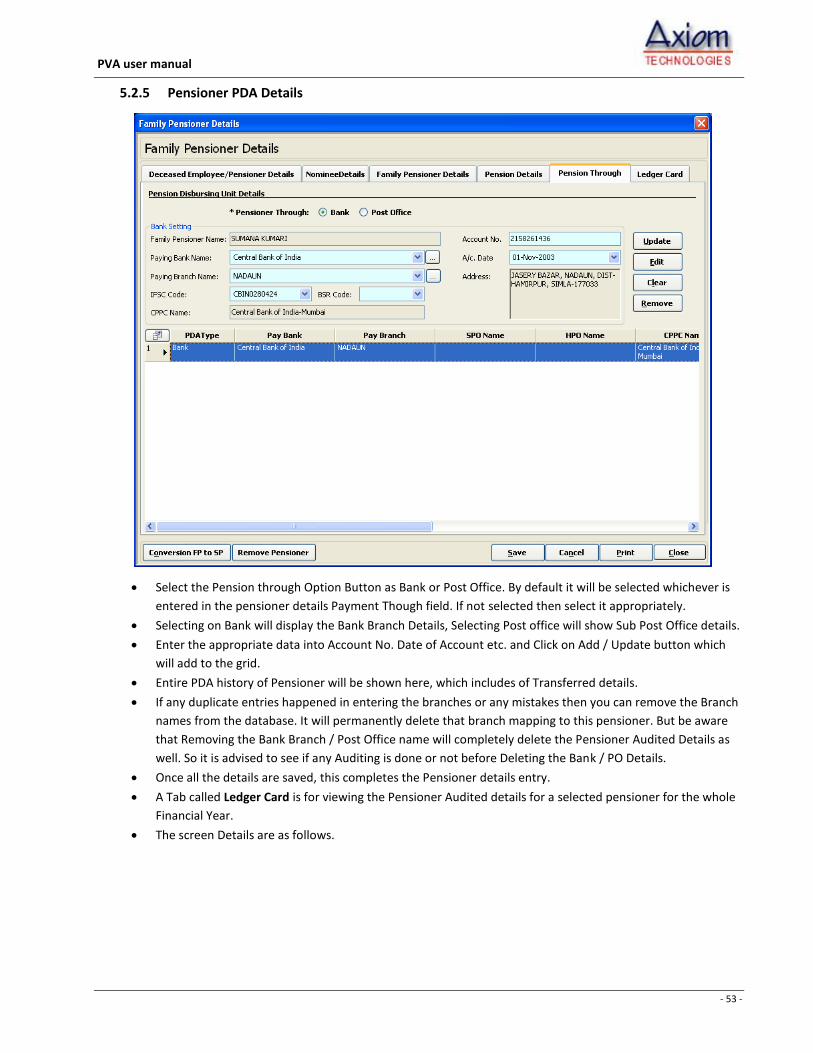
- 53 -
PVA user manual
5.2.5 Pensioner PDA Details
Select the Pension through Option Button as Bank or Post Office. By default it will be selected whichever is
entered in the pensioner details Payment Though field. If not selected then select it appropriately.
Selecting on Bank will display the Bank Branch Details, Selecting Post office will show Sub Post Office details.
Enter the appropriate data into Account No. Date of Account etc. and Click on Add / Update button which
will add to the grid.
Entire PDA history of Pensioner will be shown here, which includes of Transferred details.
If any duplicate entries happened in entering the branches or any mistakes then you can remove the Branch
names from the database. It will permanently delete that branch mapping to this pensioner. But be aware
that Removing the Bank Branch / Post Office name will completely delete the Pensioner Audited Details as
well. So it is advised to see if any Auditing is done or not before Deleting the Bank / PO Details.
Once all the details are saved, this completes the Pensioner details entry.
A Tab called Ledger Card is for viewing the Pensioner Audited details for a selected pensioner for the whole
Financial Year.
The screen Details are as follows.

- 54 -
PVA user manual
5.2.6 Pensioner Ledger Card
Select the required Financial Year from the Dropdown list and Click on Show (Alt+H) button to display the
Ledger Card details of the pensioner.
The ledger card details will contain the following information in a comprehensive manner.
Pension Month, Pension Year
Monthly Pension Due
Gross Pension Paid: In case of multiple months of pension paid at a time, then total amount paid
value will be displayed over here.
Monthly Pension Drawn: actual pension amount paid for a month will be displayed.
Arrears Paid for that month if any
Recovery made for that month if any
Other Arrears Paid for that month if any
Difference with respect to Due – Drawn – Arrears + Recovery.
Cumulative Difference with respect to Opening Balance from the Previous Year + Difference.
Scroll Month and Year in which the Voucher is received
Objections raised while auditing for that particular Pension Month will be displayed here.
Remarks entered while auditing for that particular Pension Month will be displayed in Remarks
column.
Audited By user name will be shown. There are other many columns are available which are hidden. If
any other details are required then Go to the Column chooser and enable the required fields.
This ends detailed entry of Pensioner details as well as Family Pension Details.

- 55 -
PVA user manual
5.3 Illustration of Pensioner details bulk upload In case the Pensioner Details are maintained in Excel Sheet, the Axiom PVA Software has a provision to import the
data by giving minimum details about the Database like Server name and Database name and Table Name.
Before Uploading the Excel file, it is necessary to refine the Excel data as required by the Database table.
The File format is explained as below. For all practical purposes we suggest that the Column names are also
should be as prescribed in this list.
Note: The Red colored fields are mandatory. If the mandatory fields are not entered in the excel sheet also can be
uploaded and it can be updated through the data entry screen.
Column Name Description
Sl.No Serial number of the Pensioner. This number will not be uploaded to the Database but it can be used for Sorting purposes.
Pnr_PPONo Enter PPO No. as mentioned in the file.
Pnr_PensionerCode Enter the Pensioner Code if it is maintained already or you can leave this field Blank
Pnr_Title Enter the Title of Respect of the Pensioner like Mr., Mrs. Sri, Smt., Dr. etc.
Pnr_Gender Enter the Gender of the Pensioner
Pnr_PensionType Enter the Pension Type like Superannuation Pension or Family Pension
Pnr_PensionClass Enter the Pension Class as “Superannuation, Voluntary Retirement, Invalid Pension and Family Pension.
Column Name Description
Pnr_PensionerName Enter the name if the Pensioner
Pnr_Address Enter the Address of the Pensioner. It is non mandatory field.
Pnr_ResPhone Enter the Residence Phone number of the Pensioner
Pnr_MobileNo Enter the Mobile number of the Pensioner
Pnr_EmailID Enter the Email ID if any
Pnr_DOB Enter Date of Birth of the Pensioner. The Date format should be DD-MMM-yyyy. Ex: 25-Jun-2012. Set the Column format as Date in Excel.
Pnr_DOE Enter Date of Entry to the Service
Pnr_RetirementDate Enter Date of Retirement of the Pensioners
Pnr_PPOwef Enter the PPO With effective from date. This is ideally the next date of Date of Retirement but it may not be compulsory.
Pnr_DateofDeath Enter the Date of Death in case of Family Pension cases. Otherwise leave this column as blank.
Pnr_Designation Enter the designation of the Pensioner while in service
Pnr_Division Enter the Division where he/she was working
Pnr_Office Enter the Office where the Pensioner was woring and got retired.
Pnr_PayScale Enter the Pensioner Pay scale. Ideally this will be old pay scale. However this filed can be updated later.
Pnr_LastPayDrawn Enter the Last Payment drawn at the time of retirement. This filed is non mandatory.
Pnr_LastBasicDrawn Enter the Last Baisc salary drawn.
Pnr_DAType Enter the DA Type like IDA / CDA
Pnr_PensionerGroup Enter the Pensioner Group like A,B,C,D in case of CDA Pensioners and Executive and Non Executive in case of IDA pensioners.
Pnr_PensionThrough Enter the Pension paid through with Bank or Post Office.
Pnr_TotalService Enter the Total Service in Half Yearly like 66 Half Yearly
Pnr_QualifyingService Enter the Qualifying Service

- 56 -
PVA user manual
Pnr_MilitaryPensioner Enter YES or NO if the pensioner is a Military Pensioner.
Pnr_Ceased Enter the status of the pensioner like if the pensioner and the Nominee both are not there and there is no other claimants, then the Ceased column should be updated as Ceased Yes else, No.
Pnr_CeasedDate Enter if the PPO gets Ceased then enter the applicable date from which date PPO should get ceases.
DA_OPAmount Enter Pensioner Original Pension or Basic Pension
DA_CPAmount
Enter Pensioner Commuted Portion. If there is no commutation give. Then the enter 0 (Zero). This may vary in case prevision pension commutation is exits and in Excel you are entering the Latest Revision Data, then you need to enter the same amount of CP in the Previous Pension.
DA_RPAmount Enter Residual Pension amount
DA_MedicalAllowance Enter Fixed Medical Allowance if applicable
DA_PPORevisedOn Enter the Date of Pension Revision issue date or if in case of first Pension then enter original PPO Effective date.
DA_CPCType Enter CPC Type as 5th
CPC or 6th
CPC
COMM_CommAmount Enter the Total Commutation Amount taken. If there is no commutation is taken then you can enter 0.
COMM_CommDate Enter the Commutation issue Date in dd-mmm-yyyy format.
Comm_PensionCommuted Enter the Pension commuted for this pension/revision. Ideally, this will be (Commuted Portion – Current Commutation given in this revision)
Column Name Description
COMM_RestorationDate Enter the Commutation Restoration Date. Ideally it is 15 years from the date of Commutation.
Note: In case of multiple Revisions are given you can enter any one pension detail and Upload. If you are entering the latest revised pension, it is necessary to enter the Historical data after uploading, otherwise the Commutation Restoration will not occur if the Historical data is not fed in.
FAM_Title Enter the Family Pensioner Title of Respect.
FAM_Gender Enter Family Pensioner Gender.
Fam_NomineeName Enter the Name of the Family Pensioner.
FAM_DOB Enter Date of Birth of the Family Pensioner. This is a mandatory field but if the Data is not available you can leave it blank. In case of empty, the additional pension will not be calculated after uploading the data.
FAM_Relationship Enter the Relationship of the Family Pensioner.
FAM_Address Enter the Family Pensioner address.
FAM_EnhancedPension Enter the Enhanced Family Pension amount.
FAM_ENFPUptoDate Enter the Enhanced Family Pension up to Date.
FAM_OrdinaryPension Enter Ordinary Pension or Normal Pension.
FAM_MedicalAllowance Enter the Medical Allowance for the Family Pensioner if applicable.
FAM_wefDate Enter Family Pension With Effective from Date. ideally this date would be the next date of Date of Death of the Pensioner.
FAM_PPONo Enter Family Pensioner PPO No. if you are entering the details of Family Pension Directly.
BNK_PayBank Enter the PayBankID which is available from Bank Branch Master screen in PVA Application. Entering the Branch Name is not useful. Otherwise you can leave this field as blank and update the Bank Details after uploading

- 57 -
PVA user manual
BNK_AccountNo Enter Account No.
PO_SubPO Enter the SubPOID, which is available from Sub Post office Master screen in PVA Application. Entering the Name of the PO is not useful. Otherwise you can leave this field as blank and update the PO Details after uploading
PO_AccountNo Enter Account No.
5.3.1 Step wise illustration of Data Uploading from Excel.
Menu Access Path: Pensioner Details >> Upload Pensioner Details
Click on Pensioner Details Main Menu and Select Upload Pensioner Details sub menu. It will open new window
called Import Data from Excel to Database.
Under Select Source File Category, select the Excel file by clicking on Browse button. Once the Excel file is
selected, it will show the file path in the Text box. The Excel file extension should be .xls only. It will not accept
the .xlsx (MS Excel 2007 and above format is not accepted)
After selecting the file, it is necessary to select the Sheet name in the Excel file. Point to the “Excel File
SheetName dropdown box; it will list all the available sheets in the selected Excel file. After selecting a Sheet, the
system will display the No. of Columns exist in the Sheet.
Select Database Table Name from the Drop down list. The system will show only two Table names
“tblUpload_PensionerIncompleteData” & “tblUpload_EScrollData”.
Select tblUpload_PensionerIncompleteData table name to upload the pensioner details.
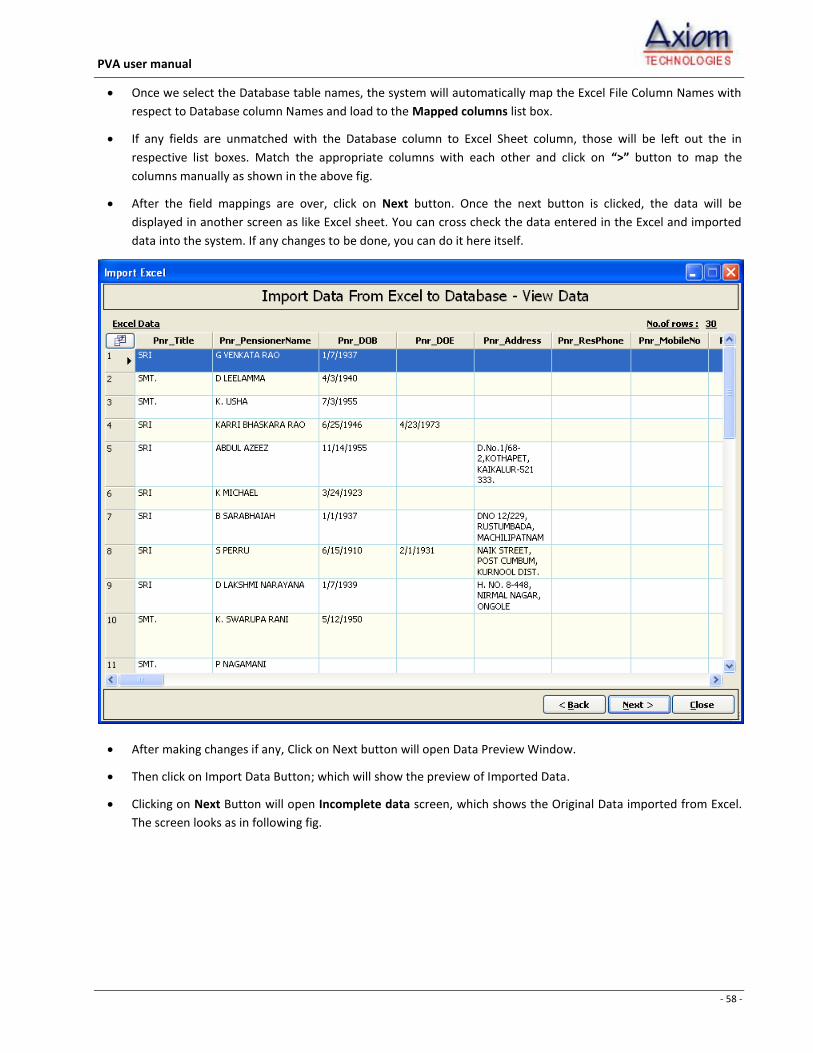
- 58 -
PVA user manual
Once we select the Database table names, the system will automatically map the Excel File Column Names with
respect to Database column Names and load to the Mapped columns list box.
If any fields are unmatched with the Database column to Excel Sheet column, those will be left out the in
respective list boxes. Match the appropriate columns with each other and click on “>” button to map the
columns manually as shown in the above fig.
After the field mappings are over, click on Next button. Once the next button is clicked, the data will be
displayed in another screen as like Excel sheet. You can cross check the data entered in the Excel and imported
data into the system. If any changes to be done, you can do it here itself.
After making changes if any, Click on Next button will open Data Preview Window.
Then click on Import Data Button; which will show the preview of Imported Data.
Clicking on Next Button will open Incomplete data screen, which shows the Original Data imported from Excel.
The screen looks as in following fig.

- 59 -
PVA user manual
Incomplete Data Screen
Click on Bulk Upload Button, which will ask your confirmation as “Do you want to do Bulk Uploading?” If you
click on YES button will verify the data and send for acceptance.

- 60 -
PVA user manual
The approved data will be shown in the Accepted Data tab. The same can be viewed as show in the above fig.
If any rejections in the data will be shown in Rejected Data tabbed page. The rejected data can be Exported
again to the Excel for refining it and can be Re-uploaded the same file.
This ends the process of Uploading the Excel file Data to the Database.
Once we upload the data, it is not considered as final data until someone will verify it.
To do the verification process, you can open the Pensioner details form and select the pensioner name in the
master view screen search options.
Click on Modify button to enter the missing information and Authorize it. For more information on how to
Search the pensioner names and how to Modify the Pensioner details, please refer the section 5.1.

- 61 -
PVA user manual
5.4 Pension Conversion
Pension Conversion is nothing but the PPO conversion from Superannuation Pension to Family Pension by
entering the Date of Death of the Diseased Government Servant.
Menu Access Path: Conversion >> SP to FP Conversion.
Once clicking on the menu SP to FP Conversion opens navigation form to select of Superannuation pensioner name.
Please Observe the list of all the pensioner names are only Superannuation pensioners. Select appropriate name and
Press Convert.
To Convert Superannuation to Family Pension follow the steps.
Select the pensioner name from the list. You can search option for locating pensioner name.
Click on Convert button. It opens a new window by name Pension Conversion.
The Conversion screen looks as in the Fig below.

- 62 -
PVA user manual
5.4.1 Pension conversion screen
Menu Access Path: Conversion >> SP to FP Conversion >> Convert >>Conversion Details
As soon as you click on Convert button, the conversion details window will open with the Pensioner Details.
Pensioner Details are displaying in the first section of the screen which is in Read only mode.
Enter the Date of Death of Pensioner/Deceased Govt. Servant, which is mandatory to Conversion.
Nominee details are be displayed in the other section of Screen. If the Nominee details are not entered, then
you can enter the details.
Enter the Family Pension Details in the next section of the screen and click on the Save button for saving the
record. Once the record is saved, the Pensioner is converted to Family Pension.
If this case is selected for Auditing and Pension with effective from Date is Greater than the Audit Month and
the MPS is generated for this month; then the Due will be calculated as per Family Pension details.
If the Audit Month is lesser than the Pension Effective from Date; then the Due will be calculated as per
Superannuation values.
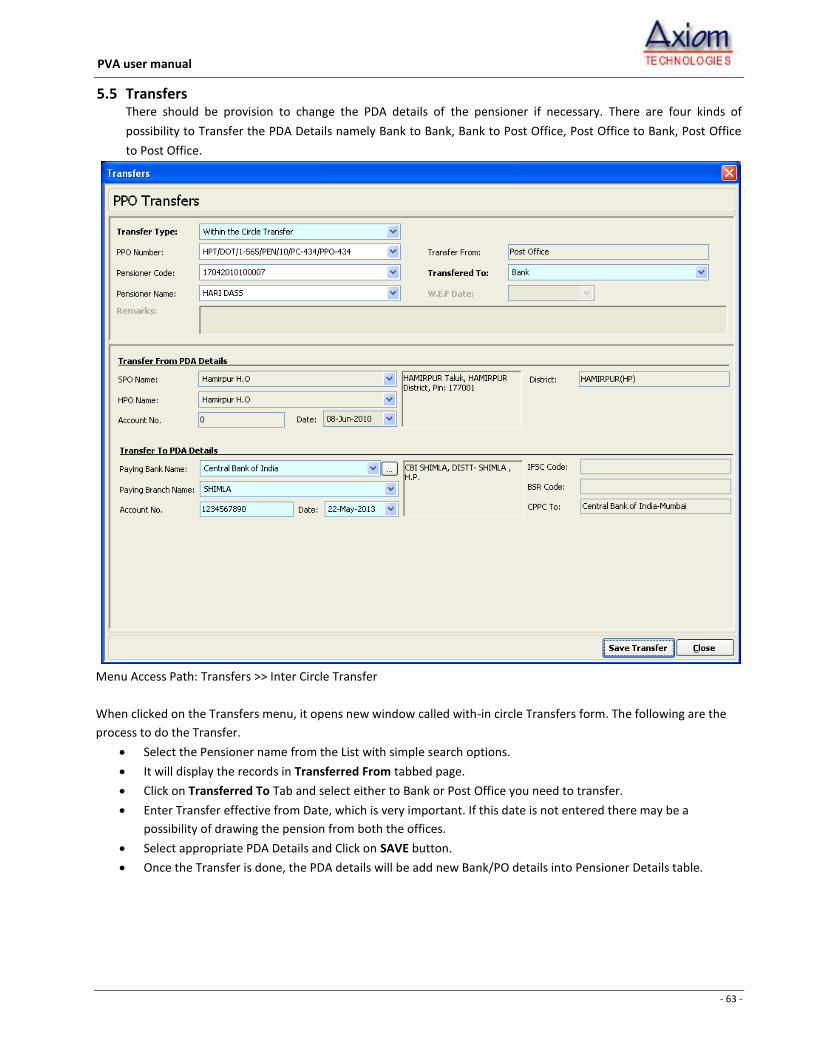
- 63 -
PVA user manual
5.5 Transfers There should be provision to change the PDA details of the pensioner if necessary. There are four kinds of
possibility to Transfer the PDA Details namely Bank to Bank, Bank to Post Office, Post Office to Bank, Post Office
to Post Office.
Menu Access Path: Transfers >> Inter Circle Transfer
When clicked on the Transfers menu, it opens new window called with-in circle Transfers form. The following are the
process to do the Transfer.
Select the Pensioner name from the List with simple search options.
It will display the records in Transferred From tabbed page.
Click on Transferred To Tab and select either to Bank or Post Office you need to transfer.
Enter Transfer effective from Date, which is very important. If this date is not entered there may be a
possibility of drawing the pension from both the offices.
Select appropriate PDA Details and Click on SAVE button.
Once the Transfer is done, the PDA details will be add new Bank/PO details into Pensioner Details table.

- 64 -
PVA user manual
6 Auditing
Auditing Steps under different classifications. While Auditing we can classify there are Five different types, which, are described in the following section.
Common processes before commencement of Auditing:
Generate Monthly Pension Statement for a particular Pension Month.
Enter the Scroll Details which is received from the Bank / Post Office for a particular pension month.
Go to General Audit and select the Scroll particulars for a month which is entered in the Scroll details input screen for a CPPC or HPO.
Select a Pension Month and Year, Pay Branch / HPO for which you need to audit as in the scroll. Auditing Type -1
Select Pensioner Details available for that CPPC / HPO from the dropdown box.
Enter “Gross Pension Drawn” against the Due amount in its particular text box generated by the system.
Enter Arrears, Recovery and Other Arrears payments if any
Verify the Due calculation details as displayed in the Side panel of the Audit Screen and Save the Auditing
considering that there is no Difference in Pension Due and Drawn. This we can call as an Ideal auditing process.
Auditing Type -2
Select Pensioner Details available for that CPPC / HPO from the dropdown box.
Enter “Gross Pension Drawn” against the Due amount in its particular text box generated by the system.
If there is a difference in Pension Due and Pension Drawn amount; raise Objection by cross verifying the
Pensioner details displayed in the Side panel.
Enter Arrears, Recovery and Other Arrears payments if any and Save the Audit record.
This we can call it as Auditing with Objection.
Auditing Type -3
Select Pensioner Details available for which CPPC / HPO from the dropdown box.
If the Pensioner name is not found in the dropdown box; reasons are many, like the entered pensioner PPO
No/Pensioner Code/Pensioner Name is not available in the selected PDA Details. Because the pensioner details are
filtered and shown in the respective fields based on the CPPC/HPO wise. If the pensioner mapping is not done for
that CPPC’s Branch or SPO of the HPO, then that pensioner name will not be displayed here in this selected
Branch/SPO. Hence it has to search in Other than this current location.
The system will facilitate to search the desired pensioner in entire database and give a confirmation message
stating that the “the Pensioner found in other Location; do you want to audit in Other Location or Transfer to
current Location”. If you click on Yes then the system will open the Transfers screen by filling up the necessary
details available and allow you to save the Transfer.
If you click on No button, then you need to change the PDA details on top portion of the Audit Screen where the
pensioner’s actual details are available.
Enter “Gross Pension Drawn” against the Due amount in its particular text box generated by the system.
If there is any difference in Pension Due and Pension Drawn amount; raise Objection by cross verifying the
Pensioner details displayed in the Side panel.
Enter Arrears, Recovery and Other Arrears payments if any and Save the Audit record.
This we can call it as an Auditing with Other Locations Transfers.

- 65 -
PVA user manual
Auditing Type -4
Select Pensioner Details available for which CPPC / HPO from the dropdown box.
If the Pensioner name is not found in the dropdown box; reasons are many, like the entered pensioner PPO
No/Pensioner Code/Pensioner Name is not available in the selected PDA Details. Because the pensioner details are
filtered and shown in the respective fields based on the CPPC/HPO wise. If the pensioner mapping is not done for
that CPPC’s Branch or SPO of the HPO, then that pensioner name will not be displayed here in this selected
Branch/SPO. Hence it has to search in Other than this current location.
The system will facilitate to search the desired pensioner in entire database and give a confirmation message
stating that the “the Pensioner found in other Location; do you want to audit in Other Location or Transfer to
current Location”.
If the desired pensioner details are not available in the other Locations as well, then the Audit process has to go on
because the voucher is received in the Scroll, hence it has to be accounted. So the system facilitate to audit this
unknown voucher in Suspense Audit.
To raise the unknown payments in Suspense Audit, there will be a confirmation message asked as “The selected
pensioner is not even found in Other Locations. Do you want to audit in Suspense Audit?”
If you click on Yes then the system will open the Suspense Audit screen. Enter the available details of the voucher
and save the Suspense Audit by mentioning the proper reason for Auditing under Suspense.
If you click on No button, it can skip the Suspense Audit and left the voucher as unaudited.
Also there is an option to search the pensioner details on advanced searching possibility. In case of any mistake in
mentioning the pensioner details while generating the Voucher statement by the PDAs, you can search with
multiple options based on the available details in the Scroll.
This we can call it as an Auditing with Suspense Audit.
Auditing Type -5
Auditing With E-Scroll as a Bulk Audit / E-Scroll Audit.
Generate Monthly Pension Statement for a particular Pension Month.
Enter the Scroll Details received in Excel format from the Bank / Post Office for a particular pension month.
Go to E-Scroll Audit under Auditing menu and select the Scroll particulars for a month which is entered in the Scroll
details input screen for a CPPC or HPO and Click Next button
It will open the new window to select the Excel file details like File name, Excel Sheet Name and Database table
name. Select appropriate data.
Once the relevant data is entered, the system will automatically map the matching columns comparing with Excel
Column names and SQL Table column names.
Clicking next will show the Original Data as in the Excel and ask you to click on Bulk Audit button
Once confirming the Bulk Auditing option, the Accepted data will post to the Final Audit Tables and
The Rejected data will be shown in another screen. The same can be exported to excel again and re-upload.
After completing the Bulk Auditing process, we can take Excess and short payment report from the Audit screen
and analyze the differences.
To verify the Bulk Audit records, you need to select the General Audit screen, raise objections if any differences.
This we can call it as an E-Scroll Auditing.

- 66 -
PVA user manual
6.1 Monthly Pension Statement
Monthly Pension Statement is a process of calculating the Pension Due for a particular Pension Month by
fetching latest DA Details applicable for that month. This process should be carried out before starting the
Pension Vouching every month. This statement can also be considered as a Budgeting Statement of a Circle, for
a particular Pension Month.
Menu Access Path: Auditing >> Monthly Pension Statement
While generating MPS there are two options available. One is For All pensioners for a Period of Years / Months
and second For Single pensioner for a Period of Years / Months. To Prepare an MPS (Monthly Pension Statement)
following are the steps:
Select option to generate MPS for All pensioners or Single Pensioner.
Select Pension Paid Month and Year from the dropdown list. You can even select multiple months and years at
one go. Depending on the no. of months, the processing time will vary.
Click on Generate MPS (Alt+G) button. The Due will be generated for a selected month/s.
The confirmation message will be shown after Saving the Records as MPS Generated successfully.
You can take a print out of this statement by clicking on PRINT button.
If you want to View the Previously generated MPS statements, on upper right corner, you can see and option
called “View MPS Data portion”, and select the desired month and year and click on Show Button. If the MPS
is generated for that month it will display all the records with Due.

- 67 -
PVA user manual
6.2 MPS Status
After preparing Monthly Pension Statement, it may be necessary to view the status of the MPS generated or not.
To view the status, MPS Status report screen will facilitate to see the information like Status, and Total amount
of Pension Due to pay for the Month and Year. This report can be used for the Total Budgeting for the month as
well as to the whole financial year.
Menu Access Path: Auditing >> MPS Status
To see the report following are the steps;
Select the Financial Year for which you need to seek the report.
Clock on Show button.
The Status shown as True indicates “Generated” and False indicates as “Not Generated”.

- 68 -
PVA user manual
6.3 Scroll Details Entry
The pension payment made by the PDAs will be sent to the CCA office in the form of Scrolls or Schedules which,
contain the Summery of the whole scroll like Total No. of Vouchers paid, Total Amount Disbursed, for which
month and year pension is paid, and Scroll month and from which CPPC or HPO. Along with this summary report,
the scroll contains the Payment Voucher details like Pensioner name, PPO No, Basic Pension paid, Dearness
Relief paid, Arrears paid, Recovery made, Other payments if any, etc. The summarized details of the Scroll should
be maintained for a comparison purpose for further utilization. The Scroll Details screen looks as follows.
Menu Access Path: Auditing >> Scroll Details Entry
To enter the Scroll Details:
Click on Auditing Main Menu and Select Scroll Details Entry Sub menu, which will open this screen.
Select the Audit Type as CPPC Wise or HPO wise from the drop down list.
Select the Financial Year in which this Scroll month falls in.
Select the CPPC / HPO Name from which the scroll is received.
Enter the Scroll Number if available in the scroll otherwise the user can give some reference number to find it
in future easily. Write a number on the scroll for identification purpose.
Select a Scroll Month and Scroll Year for which you have received.
Enter the Total No. of Vouchers containing in the scroll.
Enter the Total Amount Scroll Amount and then click on Save button to save the Scroll details

- 69 -
PVA user manual
6.4 General Audit
Auditing is a process of confirming the Payments made by the PDAs is correct or not as per the standard
calculations applicable. The payment details are received from the PDAs are in the form of Scrolls containing
payment Voucher details. The Auditing process is illustrated in the following steps.
Auditing Type -1
6.4.1 Regular Auditing
Select a Pension Month and Year from the dropdown list. The Scroll Details will be loaded to the other fields.
Select Pay Branch / SPO for which you need to audit as mentioned in the scroll.
Click on Next button, which will enable the Pensioner details fields in the lower section.
Menu Access Path: Auditing >> General Audit >> Select Scroll Details >> General Audit screen
Select Pensioner Details from the dropdown box. If you need to search the pensioner details click on button
adjacent to the PPO No. dropdown box. This will open the Pensioner Details Master View screen for searching the
Pensioner details.
Enter “Gross Pension Drawn” against the Pension Due amount in its particular text box generated by the system.
Enter Arrears, Recovery and Other Arrears payments if any.
Verify the Due calculation details as displayed in the Side panel of the Audit Screen
Click on Save button to save the Audit entry considering that there is no Difference in Pension Due and Drawn. This
we can call as an Ideal auditing process.
If it is necessary to Modify the existing audited details, then select the Audited record from the grid and double
click on selected Row or Click on Edit button, which will load the corresponding details into respective fields.
You can also Delete the Audited Records in case of any duplicate entry or any other mistakes while auditing.

- 70 -
PVA user manual
Note: The audited records should not be edited if it is Authorized. The Deletion of authorized audited record shall
be done by the Administrator only.
Auditing Type -2
6.4.2 Auditing with raising Objections
Select a Pension Month and Year from the dropdown list. The Scroll Details will be loaded to the other fields.
Select Pay Branch / SPO for which you need to audit as mentioned in the scroll.
Click on Next button, which will enable the Pensioner details fields in the lower section.
Menu Access Path: Auditing >> General Audit >> Select Scroll Details >> General Audit screen
Select Pensioner Details from the dropdown box.
If you need to search the pensioner details click on button adjacent to the PPO No. dropdown box. This
will open the Pensioner Details Master View screen for searching the Pensioner details.
Enter “Gross Pension Drawn” against the Pension Due amount in its particular text box generated by the system.
If there is a difference in Pension Due and Pension Drawn amount; the system will popup following message.
Verify the pension due calculation summary as displayed in the side panel of the Audit Screen. If you find any mismatches as compared to the data available in PVA Database and Bank payment details; click on Yes button to raise Objection, which will open new window to enter the Objection as shown in the following fig.
If you click on NO, it will be allowed to continue the audit process without raising Objection.
Pension Due Calculation Summary
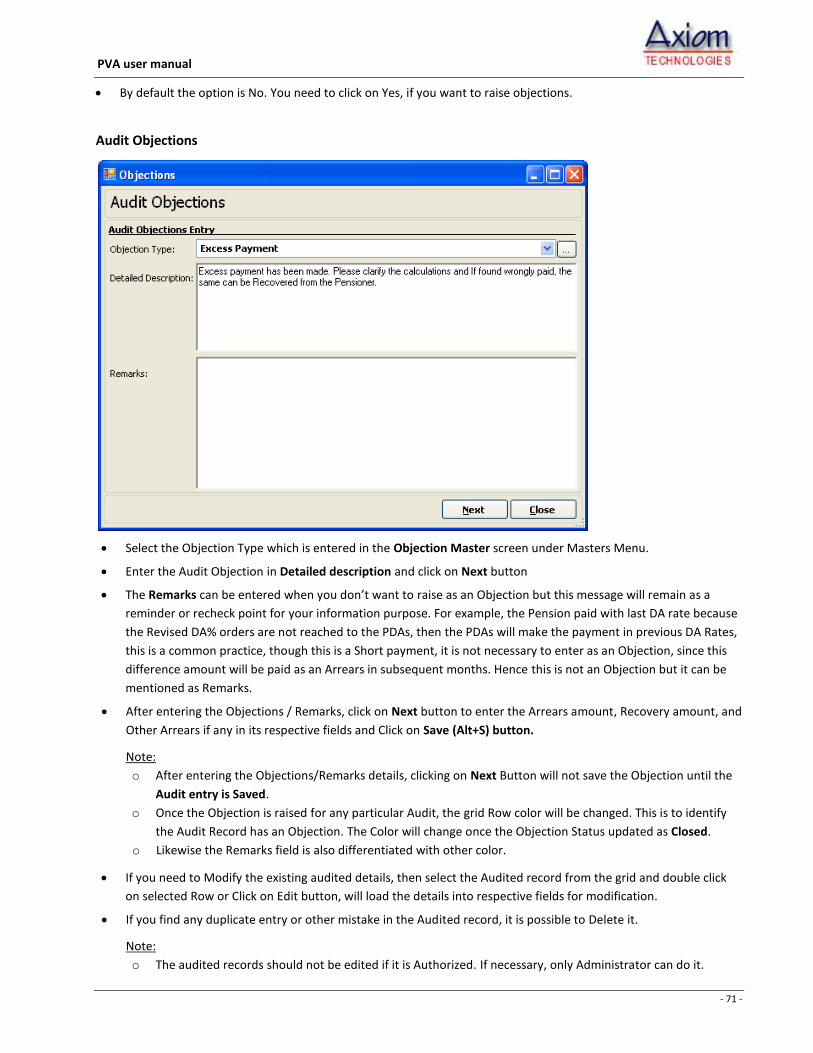
- 71 -
PVA user manual
By default the option is No. You need to click on Yes, if you want to raise objections.
Audit Objections
Select the Objection Type which is entered in the Objection Master screen under Masters Menu.
Enter the Audit Objection in Detailed description and click on Next button
The Remarks can be entered when you don’t want to raise as an Objection but this message will remain as a
reminder or recheck point for your information purpose. For example, the Pension paid with last DA rate because
the Revised DA% orders are not reached to the PDAs, then the PDAs will make the payment in previous DA Rates,
this is a common practice, though this is a Short payment, it is not necessary to enter as an Objection, since this
difference amount will be paid as an Arrears in subsequent months. Hence this is not an Objection but it can be
mentioned as Remarks.
After entering the Objections / Remarks, click on Next button to enter the Arrears amount, Recovery amount, and
Other Arrears if any in its respective fields and Click on Save (Alt+S) button.
Note:
o After entering the Objections/Remarks details, clicking on Next Button will not save the Objection until the
Audit entry is Saved.
o Once the Objection is raised for any particular Audit, the grid Row color will be changed. This is to identify
the Audit Record has an Objection. The Color will change once the Objection Status updated as Closed.
o Likewise the Remarks field is also differentiated with other color.
If you need to Modify the existing audited details, then select the Audited record from the grid and double click
on selected Row or Click on Edit button, will load the details into respective fields for modification.
If you find any duplicate entry or other mistake in the Audited record, it is possible to Delete it.
Note:
o The audited records should not be edited if it is Authorized. If necessary, only Administrator can do it.

- 72 -
PVA user manual
o The Deletion of authorized audited record shall be done by the Administrator only.

- 73 -
PVA user manual
Auditing Type -3
6.4.3 Auditing with Breakup posting
Select a Pension Month and Year from the dropdown list. The Scroll Details will be loaded to the other fields.
Select Pay Branch / SPO for which you need to audit as mentioned in the scroll.
Click on Next button, which will enable the Pensioner details fields in the lower section.
Menu Access Path: Auditing >> General Audit >> Select Scroll Details >> General Audit screen
Select Pensioner Details from the dropdown box.
o If you need to search the pensioner details click on button. This will open the Pensioner Details Master
View screen for searching the Pensioner details.
If the Pension is paid for Multiple months in this scroll, then it has to be posted into respective months of pension
drawn, arrears drawn or any recovery made; To post multiple months’ pension paid in its respective month wise,
you need to select the Breakup Posting button in General Audit Screen, in which you can enter the drawn amount
as a Ledger card format as shown in the following Fig.
The Breakup Posting Audit screen will display the Due details for 12 Months of the Financial year along with
Opening Balance for the year.
Select Pension Month and Pension Year for which the payment is to be posted. If the month comes under the
previous financial year, then the Ledger card format will automatically change the months according to the
respective financial year.
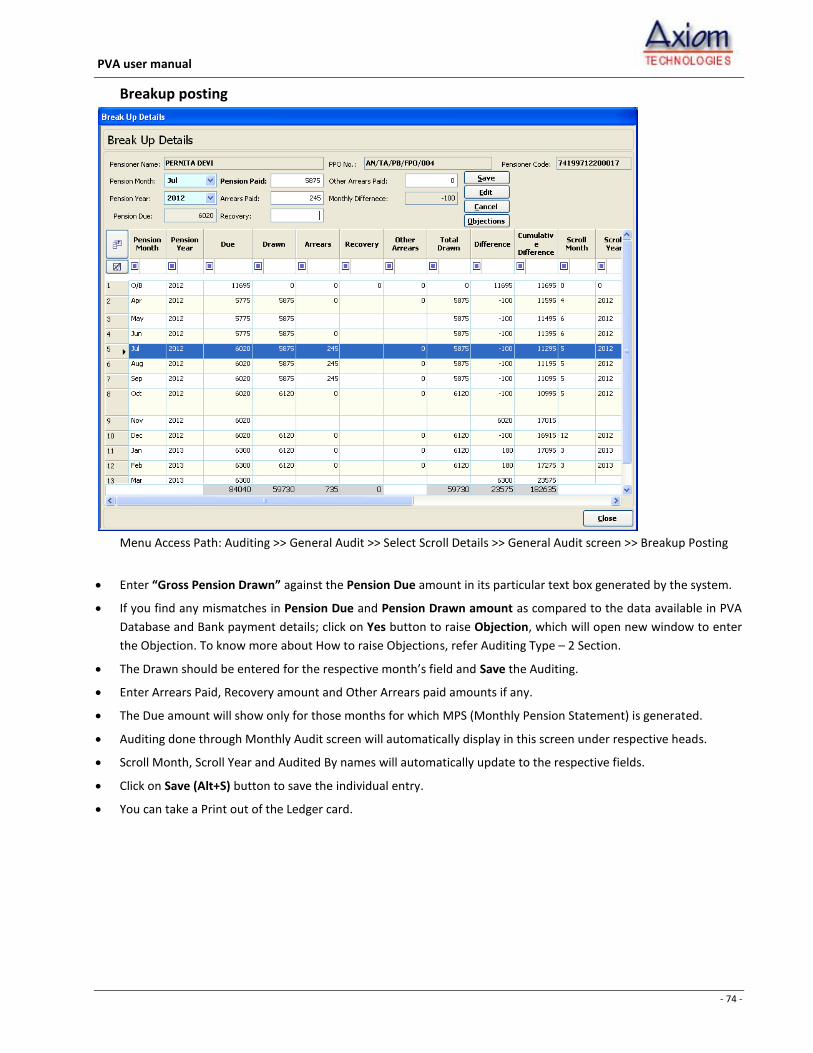
- 74 -
PVA user manual
Breakup posting
Menu Access Path: Auditing >> General Audit >> Select Scroll Details >> General Audit screen >> Breakup Posting
Enter “Gross Pension Drawn” against the Pension Due amount in its particular text box generated by the system.
If you find any mismatches in Pension Due and Pension Drawn amount as compared to the data available in PVA
Database and Bank payment details; click on Yes button to raise Objection, which will open new window to enter
the Objection. To know more about How to raise Objections, refer Auditing Type – 2 Section.
The Drawn should be entered for the respective month’s field and Save the Auditing.
Enter Arrears Paid, Recovery amount and Other Arrears paid amounts if any.
The Due amount will show only for those months for which MPS (Monthly Pension Statement) is generated.
Auditing done through Monthly Audit screen will automatically display in this screen under respective heads.
Scroll Month, Scroll Year and Audited By names will automatically update to the respective fields.
Click on Save (Alt+S) button to save the individual entry.
You can take a Print out of the Ledger card.

- 75 -
PVA user manual
Auditing Type -4
6.4.4 Auditing with Other Location and Transfers
Select a Pension Month and Year from the dropdown list. The Scroll Details will be loaded to the other fields.
Select Pay Branch / SPO for which you need to audit as mentioned in the scroll.
Click on Next button, which will enable the Pensioner details fields in the lower section.
Menu Access Path: Auditing >> General Audit >> Select Scroll Details >> General Audit screen
Select Pensioner Details from the dropdown box. If you need to search the pensioner details; click on button
adjacent to the PPO No. dropdown box. This will open the Pensioner Details Master View screen for searching the
Pensioner details.
If the Pensioner name is not found in the dropdown box, the reason may be;
o The selected pensioner details may not have mapped with any PDA at all. Or
o The pensioner might have been transferred to some other PDA; the same has not been updated into the
System / Files.
Hence the system will facilitate to search the desired pensioner in other than the selected location by taking your
confirmation with the following message.

- 76 -
PVA user manual
Clicking on Yes will search the record in the entire database and display in the respective fields along
with the current Location in specific place as shown in following fig.
If you click on No button, then you need to change the PDA details on top portion of the Audit Screen where the
pensioner’s actual details are available.
If the Pensioner details found in other location, the background colors of the text boxes will change to yellow.
After finding in other location as soon as you come out of the pensioner details field, the system will ask for
another confirmation that the Pension has been found in Other location do you want to Transfer to the current
location?” as show in the following fig.
Clicking on Yes button will take you to the Transfers option in a separate window with all the selected PDA details
filled automatically and allows you to Save Transfers.
For more information on how to Transfer the Pensioner details, please refer the Chapter 5.6.
Click on Save (Alt+S) button to save the Transfer by entering Account No and Date of Effect. The Date of Effect is
automatically displayed as the First of the Auditing Month, since we are getting this payment voucher in this
month scroll we can assume that this is date is the transfer applicable date. However if the exact date is available,
you can modify the date and save the Transfers.
Once we close the Transfers window, the system will automatically select the same pensioner details in current
location and allows to Audit.
Enter “Gross Pension Drawn” against the Pension Due amount in its particular text box generated by the system.
Enter Arrears, Recovery and Other Arrears payments if any.
Verify the Due calculation details as displayed in the Side panel of the Audit Screen and Click on Save button to
save the Audit.
Other Location Detail
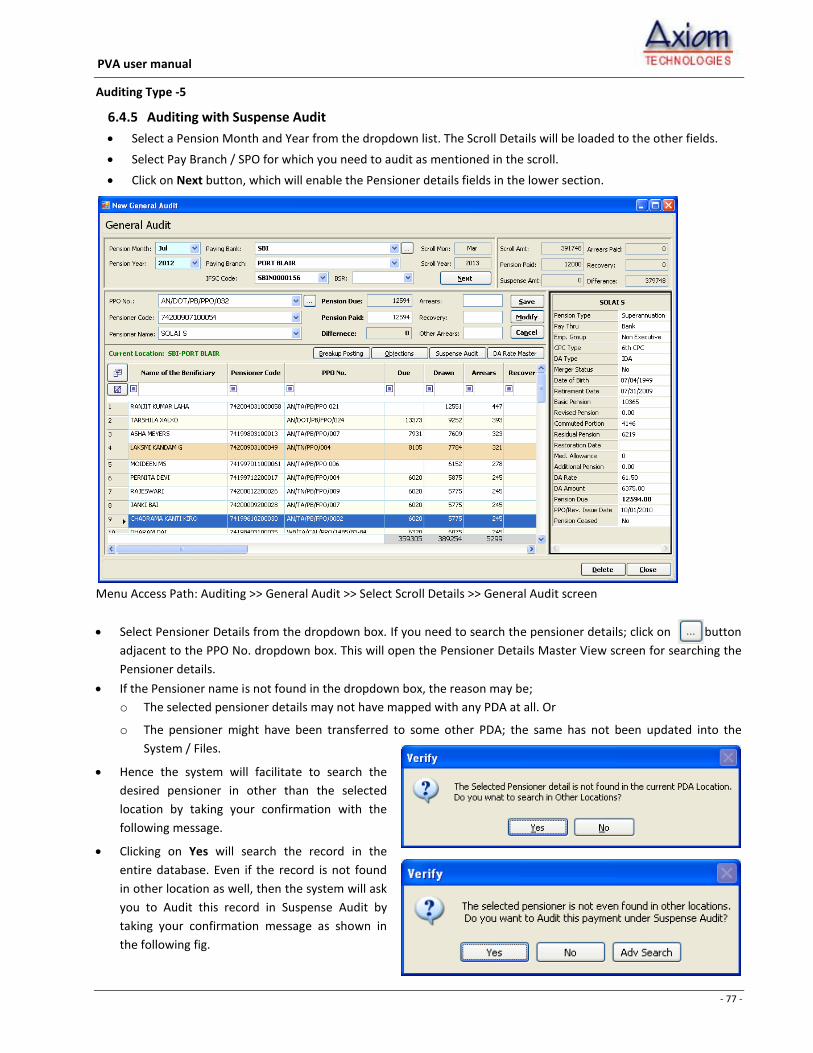
- 77 -
PVA user manual
Auditing Type -5
6.4.5 Auditing with Suspense Audit
Select a Pension Month and Year from the dropdown list. The Scroll Details will be loaded to the other fields.
Select Pay Branch / SPO for which you need to audit as mentioned in the scroll.
Click on Next button, which will enable the Pensioner details fields in the lower section.
Menu Access Path: Auditing >> General Audit >> Select Scroll Details >> General Audit screen
Select Pensioner Details from the dropdown box. If you need to search the pensioner details; click on button
adjacent to the PPO No. dropdown box. This will open the Pensioner Details Master View screen for searching the
Pensioner details.
If the Pensioner name is not found in the dropdown box, the reason may be;
o The selected pensioner details may not have mapped with any PDA at all. Or
o The pensioner might have been transferred to some other PDA; the same has not been updated into the
System / Files.
Hence the system will facilitate to search the
desired pensioner in other than the selected
location by taking your confirmation with the
following message.
Clicking on Yes will search the record in the
entire database. Even if the record is not found
in other location as well, then the system will ask
you to Audit this record in Suspense Audit by
taking your confirmation message as shown in
the following fig.
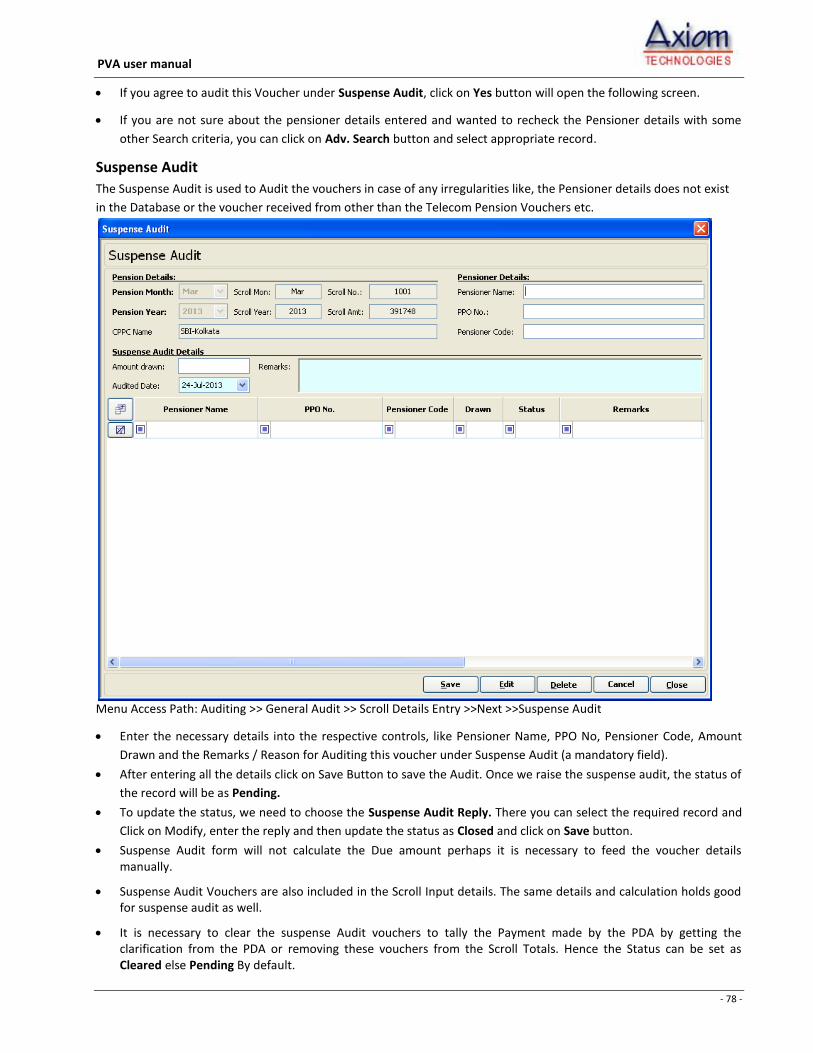
- 78 -
PVA user manual
If you agree to audit this Voucher under Suspense Audit, click on Yes button will open the following screen.
If you are not sure about the pensioner details entered and wanted to recheck the Pensioner details with some
other Search criteria, you can click on Adv. Search button and select appropriate record.
Suspense Audit
The Suspense Audit is used to Audit the vouchers in case of any irregularities like, the Pensioner details does not exist
in the Database or the voucher received from other than the Telecom Pension Vouchers etc.
Menu Access Path: Auditing >> General Audit >> Scroll Details Entry >>Next >>Suspense Audit
Enter the necessary details into the respective controls, like Pensioner Name, PPO No, Pensioner Code, Amount
Drawn and the Remarks / Reason for Auditing this voucher under Suspense Audit (a mandatory field).
After entering all the details click on Save Button to save the Audit. Once we raise the suspense audit, the status of
the record will be as Pending.
To update the status, we need to choose the Suspense Audit Reply. There you can select the required record and
Click on Modify, enter the reply and then update the status as Closed and click on Save button.
Suspense Audit form will not calculate the Due amount perhaps it is necessary to feed the voucher details manually.
Suspense Audit Vouchers are also included in the Scroll Input details. The same details and calculation holds good for suspense audit as well.
It is necessary to clear the suspense Audit vouchers to tally the Payment made by the PDA by getting the clarification from the PDA or removing these vouchers from the Scroll Totals. Hence the Status can be set as Cleared else Pending By default.

- 79 -
PVA user manual
Auditing Type -6
6.4.6 Auditing as Bulk Audit / E-Scroll Audit.
Generate Monthly Pension Statement for which you would like to perform E-Scroll Auditing.
Prepare the Excel file in a required format as prescribed by the PVA Software before uploading the data.
The column headings of the Scroll file should be as mentioned in the following list.
Field Name Description Remarks
PPONo PPO No. as maintained in the File
PensionerName Pensioner Name
PensionerCode Pensioner Code as generated by the PVA Application
AccountNo Pensioner SB Account No.
BasicPension Basic Pension / Original Pension. It may ENFP / NFP in
case of Family Pension
DAPercent DA Percentage for which Bank has calculated
DAAmt DA Amount calculated
MedicalAllowance Medical Allowance paid if any
CommutationAmt Commuted portion as applied
AdditionalQuantum Additional Quantum of Pension is paid if any
ArrearAmt Arrears amount paid if any
RecoveryAmt Recovery amount if any
OtherArrearspaid Other than DR Arrears paid if any
GrossPensionAmt Total Pension amount paid
PensionMonth Pension Paid for the month of
PensionYear Pension paid for the year
Remarks Remarks if any.
Enter the Scroll Details received from the Bank/Post Office in Excel file format for a particular pension month.
Go to E-Scroll Audit under Auditing menu and select the appropriate Scroll details from the list which is entered in
the Scroll details input screen for a CPPC or HPO and Click on Next button It will open the new window called
“Import data from Excel to Database”.
Click on Browse button to Select the Excel source file from the location.
Then select the appropriate Sheet Name as in the Excel file. Like sheet1, sheet2, sheet3 etc.
Then Select the Database Table Name as “tblUpload_EScrollData” from the dropdown list.
Once we select the Database Table name, the system will allow you to Map the column names from Excel columns
to Database table columns as shown in the following fig.

- 80 -
PVA user manual
Clicking on “ >> ” will auto map the column names into Mapped columns section as shown in following fig.

- 81 -
PVA user manual
Click on the Next Button will show the Excel data as in the Original File.
Click on Next button and then Click on Import Data button, which will ask for a confirmation to Save the Record.
Click on OK button.
The system will Import the data and show the message for a confirmation on how many records were imported
into the temporary table of the Database. Click on OK to proceed.
Click on Next Button to continue to import the data to the final tables. This will show data as in the following
screen.

- 82 -
PVA user manual
The Original Data imported into the database will be showing in the first Tab “Original Data”
Click on Bulk Upload button for Auditing process. The Accpted Data will show in the next Tab as shown.

- 83 -
PVA user manual
The Rejected Data will be shown in the other Tab which is as show in this fig.
If necessary to Export the rejected data to the Excel for correction, click on Export to Excel button. You can correct
the data and Re-upload the rejected data again by following the same procedures.
If you find the data is duplicate and unwanted, then you can delete the records by clicking on Delete button.
Finally Save the Records to save the E-scroll Audit process.
After saving the records, you can take Excess and Short Payment report available in Auditing menu, take a print
and do the Auditing for those records which has any difference.
The records which have differences can be viewed from General Audit Screen and make modification into it or
raise the Objections. To know more about “How to use the General Audit screen” please refer the previous
sections of this module.

- 84 -
PVA user manual
6.5 Suspense Audit
If in case of direct Suspense Audit entry instead of going through the General Audit process when you are not
finding the pensioner details, you can do it with the following process.
Select the Audit Type as CPPC wise or HPO wise Audit, then select Scroll Month and Scroll Year.
Click on Show Data button, which will list all the Scroll entries for a selected month as follows.
Menu Access Path: Auditing >> General Audit >> Select Scroll Details >> General Audit screen
Select appropriate Scroll by clicking on the row for which you would like to enter the Suspense Audit.
Click on Next button, which will open the Suspense Audit screen as shown in the following fig.

- 85 -
PVA user manual
Menu Access Path: Auditing >> Suspense Audit
Enter the necessary details into the respective controls, like Pensioner Name, PPO No. and Pensioner Code if
available. If not its Okay, because these details may not be there or which may not be appropriate.
Enter the Amount Drawn and the Remarks / Reason for Auditing this voucher under Suspense Audit which is a
mandatory field.
After entering all the details click on Save (Alt+S) / update Button (Alt+U) to save the Audit. Once we raise the
suspense audit, the status of the record will be set as Pending automatically.
Suspense Audit form will not calculate the Due amount or will not facilitate to select the pensioner details, perhaps
it is necessary to feed these details manually if exists.
Suspense Audit Vouchers are also included in the Scroll Input details. Hence the same details and calculation holds
good for suspense audit as well.
It is necessary to clear the suspense Audit vouchers to tally the Payment made by the PDA by getting the
clarification from the PDA or removing these vouchers from the Scroll Totals. Hence the Status can be set as
Cleared. Else it will be showing as Pending by default.

- 86 -
PVA user manual
6.6 Suspense Audit Reply
Once we audit any voucher under Suspense Audit, the status should be updated as Closed after getting the
satisfactory clarification from the respective PDAs. To enter the Reply received from the PDAs, the Suspense
Audit Reply screen shall be used.
Go to Auditing Main Menu and click on Suspense Reply sub menu name. This will open a window as shown in
the following fig.
Menu Access Path: Auditing >> Suspense Reply
Select Pension Month and Year for which the Suspense Audit has been done and click on Next Button. This will
list all the Audited records into the Grid.
Select the appropriate Audit record for which you need to enter the Reply, either you can click on Edit button or
Double click on the Row will load all the details to the respective fields along with the Suspense Audit Remarks.
Enter the reply and set the Status as Closed if applicable. If the reply is not satisfactory then you can still keep
this auditing as Pending and seek for more clarifications from the PDA.
Closing date will be updated automatically as current date.
Click on Update button to save the record.

- 87 -
PVA user manual
6.7 Objection Reply
Once we raise Objections for any short or excess payment has been detected, the Bank has to give proper
explanation towards the discrepancy and take a corrective action by informing to the CCA office. The Objection
Reply screen will facilitate to enter those Replies from the PDAs and allow to update the status as Pending or
Closed.
Go to Auditing Main Menu and click on Objection Reply sub menu name. This will open a window as shown in
the following fig.
Menu Access Path: Auditing >> Objection Reply
Select Audit type as CPPC Wise Audit or HPO wise Audit
Select Pension Month and Year for which the Objections has been raised and click on Show Button. This will list
all the Objections raised into the Grid.
Select the appropriate record for which you need to enter the Reply, either you can click on Edit button or
Double click on the Row will load all the details to the respective fields along with the Objection raised.
Enter the reply and set the Status as Closed if applicable. If the reply is not satisfactory then you can still keep
this Objection as Pending and seek for more clarifications from the PDA.
Closing date will be updated automatically as current date.
Click on Update button to save the record. And you can take the Print of objection replies by clicking on Print
button.

- 88 -
PVA user manual
7 Objection Reports
7.1 Bank Objections Report
Bank Objection report will give a list of all the objections raised for a particular pension month. You can also take
the list of Objections based on CPPC wise as well. This report screen will facilitate to take the report of Covering
letter to send to CPPC to rectify the issues raised and along with the Actual pension calculation details as an
Annexure. The bank has to see the Calculation details and Objection rose; and can give reply about the Action
taken or justification for the payment made in the same letter and send it back to the CCA Office. Once the Reply
is received the same can be updated into the Objection Reply screen and set the Status.
Menu Access Path: Objection Reports >> Bank Objection
To view and print the reports follow the steps as below.
Select Pension Month and Pension Year and Select CPPC Name for which you would like to take the print and
click on Show button will list all the Objections raised for that month. If you want to take the print as a
consolidated manner, click on the “Consolidated Report” option and Click on Print Button. Likewise if you
want to take a print of Covering Letter to send to CPPC then click on “Cover Page” option and click on Print
Button. In the same way if you want to send an Annexure Report to CPPC, then click on “Annexure” option
and click on Print button.
The system will show the Report Preview window as shown in the following fig.
If you want to Export the consolidated report data into Excel then click on Export to Excel button.

- 89 -
PVA user manual
7.1.1 Objection report Covering Letter for Bank
The cover page is a standard letter format to send it to the CPPC by attaching the necessary supporting
Documents like Calculation Sheet as Annexure report. If the PDA is a Bank, then the CPPC Bank details will be
displayed, addressing to the Chief Manager signed by the CAO, PVA.
Menu Access Path: Objection Reports >> Bank Objection >> Cover Page
To take the print out of objection report cover page, please follow the steps as given below.
Select Pension Month, Pension Year and CPPC name.
Select appropriate option to take a print of Consolidated, Cover page or Annexure click on Print Button which
will give a preview of the Report.
Click on Print button will open Printer selection Dialog box.
Select suitable printer and click on Print button.
If you want to export the report to PDF then click on button, which is available on Top Left corner of
the Print Preview Screen next to the Print Button.
Click on Print Button to get the print.

- 90 -
PVA user manual
7.1.2 Objection report Annexure Page Print for Bank
Annexure for Objection Report is a statement which will give the necessary data of Due calculation along with
Drawn amount and Difference. The Difference may be Short or Excess. For any discrepancies, the objections
raised will be displayed in the separate section. For each objection, there is a provision to enter the reply by the
Bank or Post office (PDA). After receiving the reply from the PDA, the same should be updated into the
application and set the Status as Cleared or Pending in the consolidated list of objections.
Menu Access Path: Objection Reports >> Bank Objection >> Annexure Report
To take the print out of objection report cover page, the following are the steps.
Select Pension Month, Pension Year and CPPC name.
Select appropriate option to take a print of Consolidated, Cover page or Annexure click on Print Button, which
will give a preview of the Report.
Click on Print button will open Printer selection Dialog box.
Select suitable printer and click on Print button.
IF you want to export the report to PDF then click on button, which is available in Top Left corner of
the Print Preview Screen next to the Print Button.
Click on Print Button to get the print.

- 91 -
PVA user manual
7.2 Post Office Objections Report
Post Office Objection report will give a list of all the objections raised for a particular pension month. You can
also take the list of Objections based on HPO wise as well. This report screen will facilitate to take the report of
Covering letter to send to HPO to rectify the issues raised and along with the Actual pension calculation details
as an Annexure. The HPO has to see the Calculation details and Objection rose; and can give reply about the
Action taken or justification for the payment made in the same letter and send it back to the CCA Office. Once
the Reply is received the same can be updated into the Objection Reply screen and set the Status.
Menu Access Path: Objection Reports >> Post Office Objections
To view and print the reports follow the steps as below.
Select Pension Month and Pension Year and Select HPO Name for which you would like to take the print and
click on Show button will list all the Objections raised for that month. If you want to take the print as a
consolidated manner, click on the “Consolidated Report” option and Click on Print Button. Likewise if you
want to take a print of Covering Letter to send to CPPC then click on “Cover Page” option and click on Print
Button. In the same way if you want to send an Annexure Report to HPO, then click on “Annexure” option and
click on Print button.
The system will show the Report Preview window as shown in the following fig.
If you want to Export the consolidated report data into Excel then click on Export to Excel button.

- 92 -
PVA user manual
7.2.1 Objection report Covering Letter for Post Office
The cover page is a standard letter format to send it to the HPO by attaching the necessary supporting
Documents like Calculation Sheet as Annexure report. If the PDA is a Post Office, then the HPO details will be
displayed, addressing to the Head Post Master, signed by the CAO-PVA.
Menu Access Path: Objection Reports >> Post Office Objection >> Cover Page
To take the print out of objection report cover page, please follow the steps as given below.
Select Pension Month, Pension Year and HPO name.
Select appropriate option to take a print of Consolidated, Cover page or Annexure click on Print Button which
will give a preview of the Report.
Click on Print button will open Printer selection Dialog box.
Select suitable printer and click on Print button.
If you want to export the report to PDF then click on button, which is available on Top Left corner of
the Print Preview Screen next to the Print Button.
Click on Print Button to get the print.

- 93 -
PVA user manual
7.2.2 Objection report Annexure Page Print for Post Office
Annexure for Objection Report is a statement which will give the necessary data of Due calculation along with
Drawn amount and Difference. The Difference may be Short or Excess. For any discrepancies, the objections
raised will be displayed in the separate section. For each objection, there is a provision to enter the reply by the
Bank or Post office (PDA). After receiving the reply from the PDA, the same should be updated into the
application and set the Status as Cleared or Pending in the consolidated list of objections.
Menu Access Path: Objection Reports >> Post Office Objection >> Annexure Report
To take the print out of objection report cover page, the following are the steps.
Select Pension Month, Pension Year and HPO name.
Select appropriate option to take a print of Consolidated, Cover page or Annexure click on Print Button, which
will give a preview of the Report.
Click on Print button will open Printer selection Dialog box.
Select suitable printer and click on Print button.
If you want to export the report to PDF then click on button, which is available in Top Left corner of
the Print Preview Screen next to the Print Button.
Click on Print Button to get the print.

- 94 -
PVA user manual
7.3 Scroll Wise Objection Status Report
This report will show the information about the Objections raised for a particular Scroll, either by CPPC wise or
by HPO. This report will helpful in assessing how many objections have been raised for a particular Scroll with its
Total amount.
Menu Access Path: Objection Reports >> Scroll wise Objection Status Report
To take the print out of the list of objections raised for a Scroll, follow the steps as given below.
Select Objection Reports Main menu and Click on Scroll wise Objection Report sub menu, which will open
Scroll selection window.
Select CPPC Wise or HPO Wise Scroll Audit Type and select the Scroll Month and Year.
Clicking on Show Data button will list all the Scroll details entered. Select appropriate Scroll No. from the grid,
for which you would like to take report print and Click on Next button.
Which will open another window called “Scroll Wise Objection Status Report” as shown in the following fig.

- 95 -
PVA user manual
Scroll Wise Objection Status Report
Select Pension Month and Pension Year for which you would like to take print from the list which is already
displaying all the objections raised for a Scroll month selected in before screen.
Select Status as Closed or Pending depending on your need.
Click on Show Data button which will filter the data based on the selection.
Click on Print button to take print.
Click on Export to Excel button to Export.
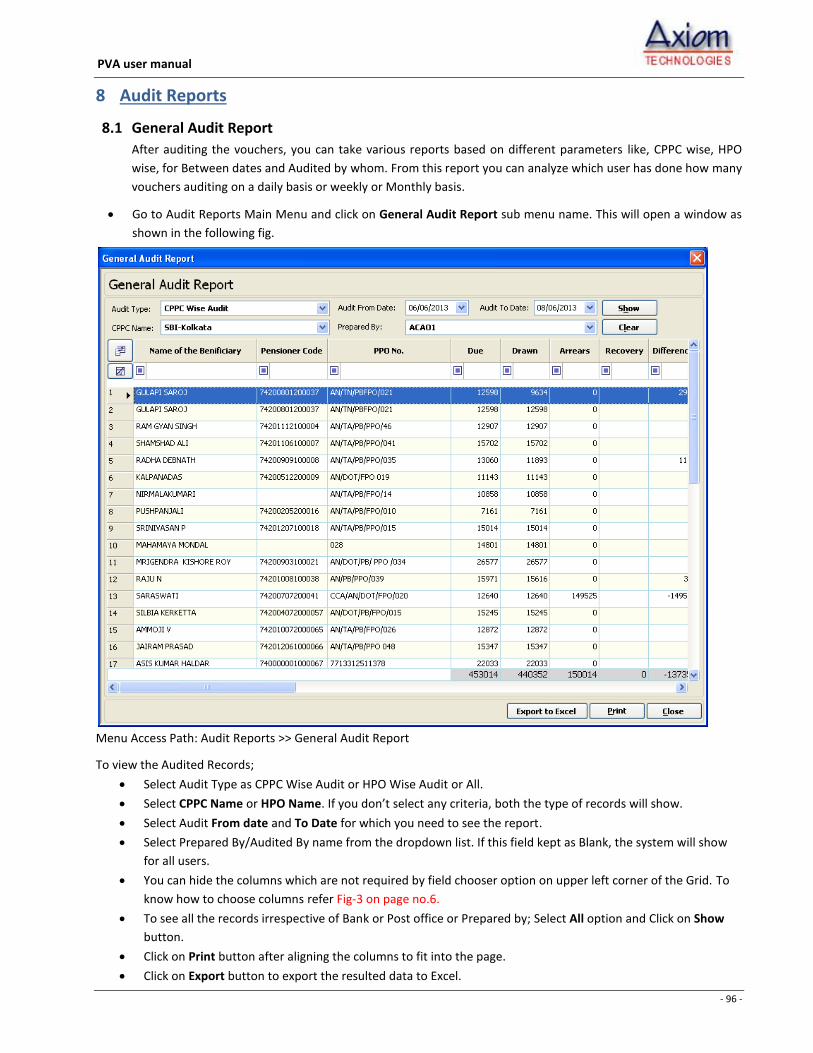
- 96 -
PVA user manual
8 Audit Reports
8.1 General Audit Report
After auditing the vouchers, you can take various reports based on different parameters like, CPPC wise, HPO
wise, for Between dates and Audited by whom. From this report you can analyze which user has done how many
vouchers auditing on a daily basis or weekly or Monthly basis.
Go to Audit Reports Main Menu and click on General Audit Report sub menu name. This will open a window as
shown in the following fig.
Menu Access Path: Audit Reports >> General Audit Report
To view the Audited Records;
Select Audit Type as CPPC Wise Audit or HPO Wise Audit or All.
Select CPPC Name or HPO Name. If you don’t select any criteria, both the type of records will show.
Select Audit From date and To Date for which you need to see the report.
Select Prepared By/Audited By name from the dropdown list. If this field kept as Blank, the system will show
for all users.
You can hide the columns which are not required by field chooser option on upper left corner of the Grid. To
know how to choose columns refer Fig-3 on page no.6.
To see all the records irrespective of Bank or Post office or Prepared by; Select All option and Click on Show
button.
Click on Print button after aligning the columns to fit into the page.
Click on Export button to export the resulted data to Excel.

- 97 -
PVA user manual
8.2 Suspense Audit Report
You can see the Suspense Audited details in this Report for a particular Pension Month and Pension Year along
with Status of the Audit.
Go to Auditing Main Menu and click on Suspense Audit Report sub menu name.
Select the Scroll details like Scroll Month and Year to take a report for CPPC wise Suspense Audited details or
HPO wise Audited details.
Click on Show button will list all the Scrolls available for the selected month. Select appropriate Scroll for which
you need to take the Suspense Audit Report and click on Next button.
This will open a window as shown in the following fig.
Menu Access Path: Auditing >> Suspense Audit Report
To print the list of all Suspense Audited details
Select Pension Month and Pension Year.
Select the Status for which you want to take print like Pending or Cleared. By default it will be as Pending.
Click on Show Data button to display the details.
Align the column width properly to fit the details in one single sheet. Then Click on Print button.
You can also filter records based on your needs and take a print out.
You can Export the data to Excel by clicking on Export to Excel button

- 98 -
PVA user manual
8.3 Excess / Short payment Report
You can see the Excess/Short Payment details in this Report for a particular Pension Month and Pension Year
and Scroll Month and Scroll Year as well.
Go to Auditing Main Menu and click on Excess/Short Payment Report sub menu name which will ask you to
select the Scroll details for which you are taking this report.
Select the Scroll details like Scroll Month and Year to take a report for CPPC wise Suspense Audited details or
HPO wise Audited details.
Click on Show button will list all the Scrolls available for the selected month. Select appropriate Scroll for which
you need to take the Suspense Audit Report and click on Next button.
This will open a window as shown in the following fig.
Menu Access Path: Auditing >> Excess / Short payment Report
To print the list of Excess & Short paid details
Select Pension Month and Pension Year. Click on Show Data button to display the details.
Align the column width properly to fit the details in one single sheet. Then Click on Print button.
You can also filter records based on your needs and take a print out.
You can Export the data to Excel by clicking on Export to Excel button

- 99 -
PVA user manual
8.4 Monthly Audit/Un-Audit Report
You can view or take the report print for an Audited / Un-Audited details for a particular Pension Month and
Pension Year and Scroll Month and Scroll Year as well.
Go to Auditing Main Menu and click on Audited/Un-Audited Report sub menu name which will open the
Report view screen.
This will open a window as shown in the following fig.
Menu Access Path: Audit Reports >> Monthly Audit/Un-Audit Report
To print the list of Audited /Un-Audited details
Select Pension Month and Year for which you wants to take report.
Select Payment Through By Bank or Post Office or All.
Then select the report type as Audited or Unaudited based on your need.
Click on Show button will list all the Audited / Unaudited details based on your selection.
Align the column width properly to fit the details according to the sheet size. Then Click on Print button.
You can also filter records based on your needs and take a print out.
You can Export the data to Excel by clicking on Export to Excel button

- 100 -
PVA user manual
8.5 Consolidated Audit/Un-Audit Report
You can view or take the report print for an Audited / Un-Audited details for a whole Year in a consolidated
manner based on Financial Year wise.
Go to Audit Reports Main Menu and click on Consolidated Audited/Un-Audited Report sub menu name which
will open the Report view screen.
This will open a window as shown in the following fig.
Menu Access Path: Audit Reports >> Consolidated Audit/Un-Audit Report
To print the list of Audited /Un-Audited details
Select Financial Year for which you wants to take report.
Click on Show button will list all the Audited / Unaudited details based on your selection.
Align the column width properly to fit the details according to the sheet size. Then Click on Print button.
You can also filter records based on your needs and take a print out.
You can Export the data to Excel by clicking on Export to Excel button

- 101 -
PVA user manual
8.6 CPPC Wise Consolidated Report
CPPC Wise Consolidated Report will give information about how many pensioners exist in a particular CPPC for
a particular Pension Month and Year. How many pensioners have been paid and what is total amount disbursed
for the CPPC, which includes the Suspense Audited amount etc.
Menu Access Path: Bank Reports >> CPPC Wise consolidated Report
To take print of this report, follow these steps.
Select Bank Reports from Main Menu and Select CPPC Wise Consolidated Report sub menu.
Select the Pension Month and Pension Year for which you need to take a report.
Select CPPC if you need only one CPPC wise details.
Click on SHOW button, the resultant data will be displayed in the Grid.
Align the columns width for better visibility and Click on Print
Print Preview will be shown in a new window. Find the PRINTER Symbol on the upper left corner of
the Preview window and click on it.
The Print sDialog Box will appear. Select the connected printer and select Print Range as All or Selected Page
nos. and then Click on OK.

- 102 -
PVA user manual
8.7 CPPC Wise Scroll Report
CPPC Wise Scroll Report will give information about how many vouchers have been paid in a particular Scroll
for individual CPPC in a consolidated manner. There may be a possibility of paying different Pension month’s
payment in a single scroll. Hence this report may vary from Pension Month wise Report. This report includes
the information about Month wise Pension paid as well as Arrears, Recovery and Suspense Audited amounts.
Menu Access Path: Bank Reports >> CPPC Wise Scroll Report
To take print of this report, follow these steps.
Select Bank Reports from Main Menu and Select CPPC Wise Scroll Report sub menu.
Select the Scroll Month and Scroll Year for which you need to take a report.
Select CPPC if you need only one CPPC wise details.
Click on SHOW button, the resultant data will be displayed in the Grid.
Align the columns width for better visibility and Click on Print
Print Preview will be shown in a new window. Find the PRINTER Symbol on the upper left corner of
the Preview window and click on it.
The Print Dialog Box will appear. Select the connected printer and select Print Range as All or Selected Pages
and then Click on OK.

- 103 -
PVA user manual
8.8 Pay Bank wise Consolidated Report
Pay Bank wise Consolidated Report will give information about Total No of pensioners exists in each Paying
Bank and how many of them have been audited/paid for a particular Pension Month as a consolidated manner.
You can also select Pay bank and Pay Branch only if required. This report will also include the information about
the payment of Arrears, Recovery, Other Arrears, Suspense Audited amount and Difference as well.
Menu Access Path: Bank Reports >> Pay Bank wise Consolidated Report
To take print of this report, follow these steps.
Select Bank Reports from Main Menu and Select Pay Bank wise Consolidated Report sub menu.
Select the Pension Month and Pension Year for which you need to take report.
Select Pay Bank and Branch if you need only those details.
Click on SHOW button, the resultant data will be displayed in the Grid.
Align the columns width for better visibility and Click on Print
Print Preview will be shown in a new window. Find the PRINTER Symbol on the upper left corner of
the Preview window and click on it.
The Print Dialog Box will appear. Select the connected printer and select Print Range as All or Selected Pages
and then Click on OK.

- 104 -
PVA user manual
8.9 Pay Bank wise Reconciled Report
Pay Bank wise Reconciled Report will give information about pensioners list who are taking pension from the
selected Branch and what is their Due, how much they have drawn, Arrears, Recovery etc. for a particular
Pension Month and Year in a detailed manner. If you don’t select any Pay Bank and Branch, the system will list
all the Pensioners from the Pay Banks for the selected Pension Month & Year.
Menu Access Path: Bank Reports >>Pay Bank wise Reconciled Report
To take print of this report, follow these steps.
Select Bank Reports from Main Menu and Select Pay Bank wise Reconciled Report sub menu.
Select the Pension Month and Pension Year for which you need to take report.
Select Pay Bank and Branch if you need only those details. If no bank name is selected then it will display all.
Click on SHOW button, the resultant data will be displayed in the Grid.
Align the columns width for better visibility and Click on Print
Print Preview will be shown in a new window. Find the PRINTER Symbol on the upper left corner of
the Preview window and click on it.
The Print Dialog Box will appear. Select the connected printer and select Print Range as All or Selected Pages
and then Click on OK.

- 105 -
PVA user manual
8.10 Pay Bank Wise Scroll Report
Pay Bank wise Scroll Report will give information about the list of pensioners who are paid in a particular Scroll
Month from the selected Branch and what is their Due, how much they have drawn, Arrears, Recovery etc. in a
detailed manner. If you don’t select any Pay Bank and Branch, the system will show all the Pensioners from the
Pay Banks for the selected Pension Month & Year.
Menu Access Path: Bank Reports >> Pay Bank Wise Scroll Report
To take print of this report, follow these steps.
Select Bank Reports from Main Menu and Select Pay Bank wise Scroll Report sub menu.
Select the Pension Month and Pension Year for which you need to take report.
Select Pay Bank and Branch if you need only those details. If no bank name is selected then it will display all.
Click on SHOW button, the resultant data will be displayed in the Grid.
Align the columns width for better visibility and Click on Print
Print Preview will be shown in a new window. Find the PRINTER Symbol on the upper left corner of
the Preview window and click on it.
The Print Dialog Box will appear. Select the connected printer and select Print Range as All or Selected Pages
and then Click on OK.

- 106 -
PVA user manual
8.11 Scroll Analysis Report
Scroll Analysis report will give a macro level details of audit process. This report is used to know, in which Scroll
month a particular vouchers are received for a Pension Month.
The report will show the total number of pensioners exist in that particular Pension Month. It is also showing
the Total Number of Audited Pensioners of that month. And it will show in which Scroll months the Vouchers
are received and how many vouchers are received. The Line Total will give the total number of vouchers
received from all the Scroll Month. If any difference in Total Pensioners and Line Total, then those many
vouchers are not received or Not Audited for that particular Pension month. There may be a possibility that the
vouchers are not received from the Bank/Post office for more than Six months or even an Year. The report will
carry forward the values from previous year to Next Year if records exist. This is a very useful report to know in
how many months Gap, the vouchers are received.
Menu Access Path: Bank Reports >> Scroll Analysis Report
To take print of this report, follow these steps.
Select Bank Reports from Main Menu and Select Scroll Analysis Report sub menu.
Select the Pension Year and Scroll Year for which you need to take report.
Click on SHOW button, the resultant data will be displayed in the Grid.
Align the columns width for better visibility and Click on Print
Print Preview will be shown in a new window. Find the PRINTER Symbol on the upper left corner of
the Preview window and click on it.
The Print Dialog Box will appear. Select the connected printer and select Print Range as All or Selected Pages
and then Click on OK.

- 107 -
PVA user manual
9 Post Office Reports
9.1 HPO wise consolidated Report
HPO Wise Consolidated Report will give comprehensive information about how many pensioners exist in a
particular HPO for a particular Pension Month and Year. How many pensioners have been paid and what is total
amount disbursed for the HPO, which includes Arrears Amount, Recovery Amount, Difference amount, Other
Arrears amount if paid, Suspense Audited amount etc.
Menu Access Path: Post Office Reports >> HPO Wise consolidated
To take print of this report, follow these steps.
Select Post Office Reports from Main Menu and Select HPO Wise Consolidated Report sub menu.
Select the Pension Month and Pension Year for which you need to take a report.
Select HPO if you need only one CPPC wise details.
Click on SHOW button, the resultant data will be displayed in the Grid.
Align the columns width for better visibility and Click on Print
Print Preview will be shown in a new window. Find the PRINTER Symbol on the upper left corner of
the Preview window and click on it.
The Print sDialog Box will appear. Select the connected printer and select Print Range as All or Selected Page
nos. and then Click on OK.

- 108 -
PVA user manual
9.2 HPO wise Scroll Report
HPO Wise Scroll Report will give information about how many vouchers have been paid in a particular Scroll for
an individual HPO in a consolidated manner. There may be a possibility of paying different Pension month’s
payment in a single scroll. Hence this report may vary from Pension Month wise Report. This report includes
the information about Month wise Pension paid as well as Arrears, Recovery and Suspense Audited amounts.
Menu Access Path: Post Office Reports >> HPO Wise Scroll Report
To take print of this report, follow these steps.
Select Post Office Reports from Main Menu and Select HPO Wise Scroll Report sub menu.
Select the Scroll Month and Scroll Year for which you need to take a report.
Select HPO if you need only one CPPC wise details.
Click on SHOW button, the resultant data will be displayed in the Grid.
Align the columns width for better visibility and Click on Print
Print Preview will be shown in a new window. Find the PRINTER Symbol on the upper left corner of
the Preview window and click on it.
The Print Dialog Box will appear. Select the connected printer and select Print Range as All or Selected Pages and then Click on OK.

- 109 -
PVA user manual
9.3 SPO wise Consolidated Report
SPO wise Consolidated Report will give information about Total No. of pensioners exists in each SPO and how
many of them have been audited/paid for a particular Pension Month in a consolidated manner. You can also
select SPO Name if you need a report for only one SPO. This report will also include the information about the
payment of Arrears, Recovery, Other Arrears, Suspense Audited amount and Difference as well.
Menu Access Path: Post Office Reports >> SPO wise Consolidated Report
To take print of this report, follow these steps.
Select Post Office Reports from Main Menu and Select SPO wise Consolidated Report sub menu.
Select the Pension Month and Pension Year for which you need to take report.
Select an SPO name if you need a report for only one SPO.
Click on SHOW button, the resultant data will be displayed in the Grid.
Align the columns width for better visibility and Click on Print
Print Preview will be shown in a new window. Find the PRINTER Symbol on the upper left corner of
the Preview window and click on it.
The Print Dialog Box will appear. Select the connected printer and select Print Range as All or Selected Pages
and then Click on OK.

- 110 -
PVA user manual
9.4 SPO wise Reconciled Report
SPO wise Reconciled Report will give information about pensioners list who are taking pension from the
selected Branch and what is their Due, how much they have drawn, Arrears, Recovery etc. for a particular
Pension Month and Year in a detailed manner. If you don’t select any SPO, the system will list all the Pensioners
from the SPO for the selected Pension Month & Year.
Menu Access Path: Post Office Reports >>SPO wise Reconciled Report
To take print of this report, follow these steps.
Select Post Office Reports from Main Menu and Select SPO wise Reconciled Report sub menu.
Select the Pension Month and Pension Year for which you need to take report.
Select SPO Name if you need only one SPO wise details. If no SPO name is selected then it will display all.
Click on SHOW button, the resultant data will be displayed in the Grid.
Align the columns width for better visibility and Click on Print
Print Preview will be shown in a new window. Find the PRINTER Symbol on the upper left corner of
the Preview window and click on it.
The Print Dialog Box will appear. Select the connected printer and select Print Range as All or Selected Pages
and then Click on OK.

- 111 -
PVA user manual
9.5 SPO wise Scroll Report
SPO wise Scroll Report will give information about the list of pensioners who are paid in a particular Scroll
Month from the selected SPO and what is their Due, how much they have drawn, Arrears, Recovery etc. in a
detailed manner. If you don’t select any SPO Name, then the system will show all the Pensioners for a selected
Pension Month & Year.
Menu Access Path: Post Office Reports >> SPO Wise Scroll Report
To take print of this report, follow these steps.
Select Post Office Reports from Main Menu and Select SPO wise Scroll Report sub menu.
Select the Scroll Month and Scroll Year for which you need to take report.
Select HPO or SPO if you need only those details. If no HPO/SPO is selected then it will display all.
Click on SHOW button, the resultant data will be displayed in the Grid.
Align the columns width for better visibility and Click on Print
Print Preview will be shown in a new window. Find the PRINTER Symbol on the upper left corner of the Preview window and click on it.
The Print Dialog Box will appear. Select the connected printer and select Print Range as All or Selected Pages and then Click on OK.

- 112 -
PVA user manual
10 Utilities
10.1 Database Backup
Menu Access Path: Utilities >> Backup
The Database automatic Backup can be taken from the application. To perform this operation follow the steps as
stated below.
Select the Utilities Main menu, and select Backup sub menu.
It will open the other window for selecting the File to backup.
Click on Browse button for selecting the File name where we need to store the Backup file.
Once clicking on the Browse Button, new dialog box will open to select the File Path with a automatic file
name as DbBack05Nov11.bak.
Change the Folder name if necessary. Ideally the Backup folder should be kept in where the PVA Application is
installed under Backup Folder.
After filling the Path, Click on Backup button.
The progress bar will show the Backup process. Once it is completed with 100%, the backup file is saved into
the system.
Click on Close button for closing the Backup Process.

- 113 -
PVA user manual
11 Admin
11.1 User Master and User Rights
Menu Access Path: Admin >> User Details
To Add New Users and Set the Usage Privileges, follow the steps as below.
Select the Admin main Menu and then select User Master Sub menu. It opens the new window to enter the
User names.
Click on ADD button to add new records. Once clicking on the Add button all the controls will be enabled to
enter the user details.
Enter the Employee name and Designation
Enter the Login Name. The Log in Name might be a short name which the user can have, since it is used
frequently.
Enter the Password and Confirm the Password.
Select the Role for the entered user name as Admin or User level. Based on this certain privileges are enabled
to the user when they login
Click on Save button to save the records.
For Editing the existing user names follow the steps as mentioned below.
Select the existing record and click on Edit. The details will be loaded to the respective Controls.
Make necessary modifications and Click on Update button to save the records.

- 114 -
PVA user manual
11.2 User Rights Setting
Menu Access Path: Admin >> User Details
To set the User Rights do the following.
Select the User Name for which you need to set the Rights
Once you select the name of the User, User rights tab will be displayed all the available menus.
Set the user wise privileges to whom you need to allow the menus for access.
Click on Check Boxes and Save it.
Once you save these records, the allowed menus are enabled for the particular User. The rest will be disabled.

- 115 -
PVA user manual
11.3 Audit Trial
Access Path: Admin >> Audit Trial
Audit Trial is a consolidated report in which, it stores the changes happened throughout the usage of the application. It
contains the data of modifications with user wise.