swingjet ii™ technical manual - core · pdf file5 swg-1687-029 trigger housing assembly...
TRANSCRIPT

SwingJet II™
Technical Manual
MAN-SWG2-000 (R04)
Owen Oil Tools
12001 CR 1000
Godley, Texas, 76044, USA
Phone: +1 (817) 551-0540
Fax: +1 (817) 551-1674
www.corelab.com/owen
Warning: Use of Owen equipment contrary to manufacturer's specifications or operating instructions may result in property damage, serious injury orfatality. If you are not trained in the handling and use of explosive devices, do not attempt to use or assemble any Owen perforating systems or Owenfiring devices.
This technology is regulated by and, if exported, was exported from the United States in accordance with the Export Administration Regulations (EAR).Diversion contrary to U.S. law is prohibited. Export and/or re-export of this technology may require issuance of a license by the Bureau of Industry andSecurity (BIS), U.S. Department of Commerce. Consult the BIS, the EAR, and/or Owen Compliance Services, Inc. to determine licensing requirementsfor export or re-export of this technology.
This document contains Confidential Information of Owen Oil Tools LP (Owen) and is furnished to the customer for information purposes only. Thisdocument must not be reproduced in any way whatsoever, in part or in whole, or distributed outside the customer organization, without first obtaining theexpress written authorization of Owen. This document is the property of Owen and returnable upon request of Owen.
© 2010 Owen Oil Tools

SwingJet II™
MAN-SWG2-000 (R04)page ii

SwingJet II™
MAN-SWG2-000 (R04) page 1
1-11/16” Bom and SchematicsItem Part No. Description
1 SWG-1687-200 Firing Connection Assy. 1-11/16" Swing Jet II2* SWG-1687-001 Top Sub Adapter (1-3/16" - 12 thd), 1-11/16 - Swing Jet II3* SWG-1687-030 Firing Head Assembly, 1-11/16" - Swing Jet II4* SWG-1687-016 Connector Housing, 1-11/16 - Swing Jet II5 SWG-1687-029 Trigger Housing Assembly
SWG-1687-140 Carrier, 10 foot, 4.4 spf, 1-11/16" x 3-7/8"SWG-1687-136 Carrier, 6 foot, 4.4 spf, 1-11/16" x 3-7/8"SWG-1687-134 Carrier, 4 foot, 4.4 spf, 1-11/16" x 3-7/8"
7 SWG-1687-090 Release Housing 1-11/16" 8 PUR-0504-024 1/4"x20 Socket Head Set Screws (1/4" long)9 DET-0100-072 Rubber End Seal - for 50 or 60 grain Det Cord
10 SWG-1687-120 Charge Deployment Spring, 2 per charge11 PUR-0504-020 #10x32 Socket Head Set Screws (5/16" long) (100 / box)
12 AES-AS50031Double Male Adapter, 1-3/16" - 12 UN Threads, Sealing Type
13 SWG-1687-091 Bull Nose, 1-11/16" Swing Jet14 PUR-0504-020 #10-32 Socket Head Set Screws (5/16" lng.) (100 / box)15 PUR-0504-017 #10-32 Socket Head Set Screws (1/8" lng.)
A574017 Det Cord 60 Grain Round, HMXDET-0412-021 Det Cord 50 Grain Round Lead, HMX
-- DET-0100-018 Det Cord Adapter - 40/60 gr Round to 80 gr. RoundSTK-4250-402SU Un-capped Charge 1-11/16 x3-7/8" Swing Jet II, HMX
STK-4250-402NTX PERF - 1-11/16" X 3-7/8" Raptor NTXD1 DET-3050-115S E-86 SWG Release SJ IID2 -- Resistorized Detonator (Ref. Detonator Sec.)
E PUR-6122-012Sheilded Lead Wire Cable, 22 Ga. Red and Blue, twisted (1000' roll)
F PUR-0210-001 Splice Boots (for wire) (100 qty)G PUR-0600-017 Connector, 317 Scotchlock UYH PUR-6000-005 Seizing CordI SWG-0000-004 Ground WireJ PUR-6100-011 Mocap Rubber TapeK PUR-6100-001 Teflon Tape-- SWG-1687-075 Redress Kit 1-11/16 in. SJ II F.H.-- SWG-1687-077 Redress Kit 1-11/16 in. SJ FH - KemlonL MAN-SWG2-000 Assembly Instructions Swing Jet II
C
A
6
Hole (in)
Penetration Concrete (in)
STK-4250-402NTX DP 151-11/16" X 3-7/8"
4-1/2" 0.30 30.73
Charge P/NPERFORMANCE
Casing Size
Gun Size
Weight (g)
Charge Type
O.D. Before Deployment 1-11/16"
O.D. After Deployment 3-7/8"
Pressure Rating 15,000 psi
Temperature Rating 375° F

SwingJet II™
MAN-SWG2-000 (R04)page 2

SwingJet II™
MAN-SWG2-000 (R04) page 3
1.0 Pre-Assembly
Warning: Explosives are destructive by nature! Do not attemp tto disassemble or alter the detonator in any manner ! Do notcrush, hammer, pinch, impact, pull wires or abuse t he detonatoror any explosive!
Warning: Be sure to follow safe operating practices as found inAPI RP-67 in accordance with governmental regulatio ns,company policies and manufacturer’s recommendations !
Note: Check all items against the parts list to ensure thecomponents and quantities are correct.
Note: Visually inspect the Carrier and components for any defects.Check all remaining components for damage or problems which mayimpede the assembly and function of the gun system.
Note: The following precautions and inspection steps are necessaryto ensure the gun system operates properly.
1.0 Loading
1. Do not puncture the detonating cord. If the det cord is torn or punctured, at any time,replace the det cord with new det cord. Check for any sharp edges the det cord maycontact.
2. Check the firing head circuit prior to each assembly.
3. Trigger must swing all the way out of the Trigger housing, even when released slowly.
4. As the gun is being loaded, check each charge for free pivotal movement to the fullopen position with no amount of drag.
5. Remove the locking pins on the bottom of the last charge so that they cannot interferewith the release squib.
6. If the well is above 310°F (154°C) in temperature , use the lead shielded det cord.

SwingJet II™
MAN-SWG2-000 (R04)page 4
7. Before running the gun in the well, check that all of the pivot screws just slightlyprotrude through the outside of the carrier.
8. Do not over tighten the screw that holds the Release Squib in place.
2.0 Assembly
2.1 Assembly of the Firing Head and Bench Test.
The Firing Head Assembly consists of the Top Sub Adapter, Firing Head, Switch Housingand Trigger Housing Assembly.
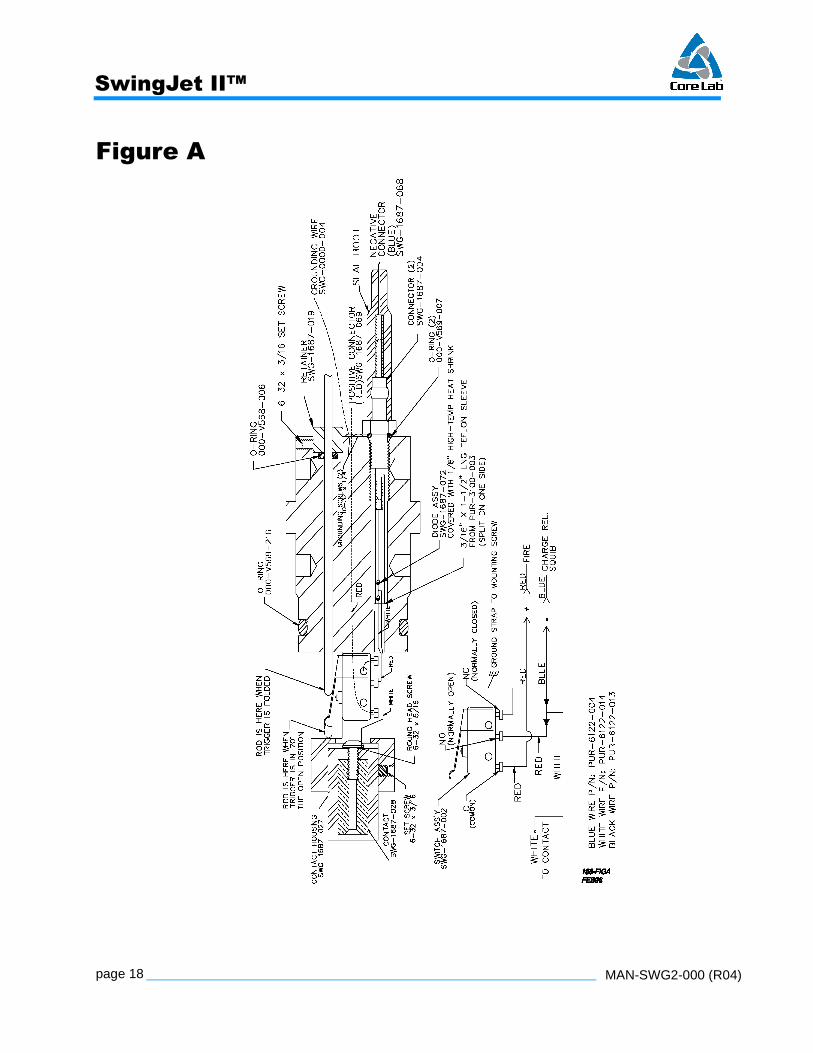
The following steps may be used to check the electrical circuit in the Firing Head. TheSwitch, SWG-1687-002, comes per-wired, see Figure A for wiring diagram. If checkingan assembled Firing Head refer to Figures C and D.
A digital Blaster’s Multimeter is recommended to check the diodes. The meter (1) shownbelow is set to measure continuity. This test measures the voltage drop across a diodejunction. The dial (2) is set to measure continuity of the example diode (3). The displayscreen (4) shows a typical value for this type of test.
SwingJet II™
MAN-SWG2-000 (R04) page 5
A. Set the digital Blaster’s Multimeter to measure continuity (diode test). Connectthe negative lead to the Contact (SWG-1687-028) in the top of the Firing Head.Connect the positive lead to the blue wire that runs to the squib. The meter willread “0.5-.0.6 volts” (if the diode is within specification and the circuit is properlyassembled). Reverse the leads, the meter will read”1.” (no continuity).
B. With the digital Blaster’s Multimeter set the measure continuity (diode test).Connect the positive lead to the Contact (SWG-1687-028) in the top of the FiringHead. Connect the negative lead to the Positive Connector (red wire to thedetonator), the meter will read “1.” (no continuity). Depress the switch by slidingthe rod into the head, the resistance will read “0.5 - 0.6 volts” (if the diode is withinspecification and the circuit is properly assembled). Reverse the leads anddepress the switch by moving the rod and, the meter will read “1.” (no continuity).
Note: Always replace the switch after each run.
2.2 Rebuilding the Firing Head Assembly
It is good practice to send the used Firing Heads back to Owen to be rebuilt. However, ifthe Firing Head is being rebuilt the following steps must be followed:
A. Replace the switch.
B. Replace the O-ring (OOO-V568-006), by loosening the #6-32 Set Screw,removing the retainer and old O-ring. Replace O-ring, Retainer, and Set Screw.Lightly lubricate O-ring deal and grease Rod before insertion.
Caution: If O-ring and Rod are not greased a mis-run may occ ur!
C. Attach two bare ground wires to the two grounding screws on the Firing Head.
D. Replace Red and Blue wires (after firing, the connectors on the wires becomeloose and do not make positive contact).
E. Insert the Switch Rod through the Switch Housing and Firing Head (grease rodfirst), then attach the Trigger housing to the connector with four 1/4-20 SetScrews. The Switch Rod has been pre-assembled to approximately the correct

SwingJet II™
MAN-SWG2-000 (R04)page 6
length, but it is very important that the switch rod be correctly adjusted. See FigureA for the correct setting, for example, with the Trigger in the folded position, therod should be positioned over the red part of the switch. When the rod touches thestop, the Trigger will be in about the 70° position .
F. When the Firing Head is rebuilt it must be checked per step 2.1.
2.3 Loading the Carrier
A. Arrange the four support stands so that both PVC tubes are well supportedallowing approximately 24 in (61 cm) between the tubes. Place the closure tube inthe left hand tube. Slide the gun carrier in the right hand tube (top first) untilapprox. 6 in (15 cm) of carrier extends out of the tube. Measure the det cord to fitthe length of gun being assembled. (12 in plus 4 in (30 cm plus 10 cm) for eachcharge being loaded. Although the det cord may be cut to length before loading, itis common practice to leave the det cord on the spool until the entire gunassembly has been loaded.
B. Push the det cord into one of the aluminum tubes until it just comes out theend. Cut length of lead wire allowing approximately 12 in (30 cm) extra over thelength of the gun. Place the wire in the other aluminum tubes. These tubes can betaped together for easier placement in the carrier. Slide the det cord and wiretubes in the carrier from the bottom end until it comes out the top end of thecarrier. Pull approximately 8-10 in (20-25 cm) of wire and det cord out of thetubes. Place the det cord and wire through the closure tube and slide carrier intothe closure tube leaving the top shot position exposed.
C. Rotate carrier so that the top shot opening faces up. Holding exposed det cordand wire slide the 5/16 in aluminum tubes down, exposing det cord and wire over6 charge positions. Position the first charge in the opening with the pens on thelower end of the charge down. The two pins in the top end of the charge muststraddle the det cord and web of the gun. Insert the #10-32 Set Screw through the

SwingJet II™
MAN-SWG2-000 (R04) page 7
carrier and into the charge holes provided. The charge should be pointing downand the two top pins should be exposed. Place the spring onto each pin with theloop against the charge. The springs should fit into the slots of the carrier.
D. Bend the spring tabs of the carrier down and using the spring loading pliersgrasp the spring from below. Stretch the spring and hook the loop onto the tab.Sometimes the spring tabs may be burned off, in which case the spring hook canbe deformed to hook on the edge of the carrier. With both springs attached foldthe charge into the opening and release ensuring that the charge moves freely.
Caution: It is easy to puncture the det cord when folding in thefirst and/or second charge!
E. Ensure that the det cord is between the pins and springs. Now take secondcharge and install in the same manner. Always ensure that the det cord isbetween the pins and the wire is below the studs. Load the second charge.
F. Now compress the top charge and slide the closure tube down. Repeat thecharge installation procedure until all charges are loaded. Always be sure thateach charge swings freely to the fully opened position as each charge is loaded.As the charges are being compressed into the gun housing, the det cord willweave over the charges. During loading ensure that the det cord is not puncturedor cut by the pins. Do not attempt to pull the det cord against the charges once thecharges are compressed. This could cause damage to the det cord and result in amis-run. Continue the loading procedure until all the charges are installed.Remove cap pins on bottom charge. This drastically reduces the chance of thebottom charge hanging on the release detonator or carrier.
G. Check for continuity and insulation of both red and blue lead wires with anOhmmeter.
2.4 Attachment of the Release Housing
A. Remove the pins from the last charge, as they are not needed and, whenremoved, assures the bottom charge will not be held down.
B. Slide the Release Housing in place and attach with set screws. Insert a 3/16in. brass rod through the Release Housing and into the hole in the bottom of thecharge. This holds all charges in the locked position for transportation in the PVCpipe. With all charges in the closed position, cut the det cord 6 in from the end of

SwingJet II™
MAN-SWG2-000 (R04)page 8
the Release Housing and attach the Bull Nose to protect the det cod and wires ifthe gun is to be transported before further assembly.
2.5 Attaching the Trigger and Firing Head Assembly to the Gun
A. Thread the 8 in (20 cm) of detonating cord between the arms of the Triggershaft. Thread the lead wires to one side of the Trigger and beneath the Triggershaft. This assures that neither the detonator cord nor the lead wires can fowl theTrigger or allow the wires to be cut when the gun is opened. Be sure to pull outany slack in the det cord or wire while the Gun Assembly and Firing Headassembly are joined together.
B. Check to be sure the Trigger moves freely from the closed position to the 70°full open position. Insert the Trigger assembly into the carrier, with the Triggerdepressed. Ensure that the Trigger goes under the top pins on the top charge.Insert the four #10-32 x 5/16 in set screws*. Cut the detonator cord as shown inFigure C, so that the detonator cord is no longer than the slot in the cast ironTrigger Housing.
C. Seal the detonating cord by installing the rubber End Seal and seizing therubber End Seal 3/16 in. from the det cord with the seizing cord, using a clovehitch. Check that the blue and red wires are not shorted or cut. When using thelead ribbon cord, use the Lead Cord End Seal part number DET-0100-058.
D. Attach the lead wires to the blue lead wire from the gun to the blue (-) wirefrom the Firing Head and the red lead wire from the gun to the red (+) lead wirefrom the Firing Head using a UY connector PUR-0600-017 (do not use the UYconnector above 275°F (135°C). Crimp the connector with Connector CrimpingTool PUR-0600-018. Connect the ground wires from the Firing Head to theshielding over the lead wires. Tuck the wires and det cord in the housing and tieseizing cord in the grooves. For temperatures above 275°F (135°C), use spliceboots for sealing the joints instead of the UY connector.
Caution: Keep wires and connectors clear of the Trigger!

SwingJet II™
MAN-SWG2-000 (R04) page 9
2.6 At the Wellsite: Attaching the Gun to the Cabl ehead (refer to Figure “C”)
A. Observe all of your company safety rules before beginning, such as, neverattach a live gun to the cable head. Be sure all Cable Head and insulationcontinuity checks are conducted and satisfactory. Be sure all check fire andCasing Collar Locator checks have been completed and firing circuits are in the“safe” position. After the gun is attached to the tool string, the detonator may beattached. It is recommended that the Owen Sealed Pressure Sub be used ratherthat the standard Double Male Adapter sub. The sealed pressure sub protects theCasing Collar Locator in the event that the SwingJet II™ Subs leak after the gunhas been fired.
2.7 At the Wellsite: Attaching the Release Squib
A. Slide the gun out of the PVC pipe and slide the Closure Sleeve over the end ofthe gun. Remove the brass rod holding the last charge in place. Attach one redlead wire from the E-86 SWG Squib to the blue lead wire and the other blue leadwire to ground with the squib inside a detonator safety shield. Insert the E-86SWG Release Squib through the Release Housing. Sometimes it is easier toinsert the Release Squib into the Charge if the Release Housing is not fully in theup position. insert the brass plug of the squib into the locking hole in the bottom ofthe charge.
Caution: The squib should move freely through the ReleaseHousing hole!
Note: Be sure to remove the locking pins from the bottom of the lastcharge.
B. Screw in the Set Screw that pushes down the squib.
Caution: Tighten the #10-32 Set Screw very lightly, only eno ughto make the bottom charge move very slightly! If th e Set Screw isover-tightened, it could dog the Squib, preventing it fromreleasing the bottom charge and causing a mis-run!

SwingJet II™
MAN-SWG2-000 (R04)page 10
2.8 At the Wellsite: Attaching the Detonator
With the Closure Sleeve still in place, make one last check of the red lead wire to be sureit has continuity (it should be shorted). With the detonator in the detonator safety shield,attach the RED lead wire from the detonator to the red lead wire from the gun. Attach theBLUE detonator lead wire to the lead wire shielding. Remove the detonator from thesafety shield.
• For 50 or 60 grain Det. Cord - Wrap a 3-1/2 in length of 1/2 in wide Teflon© tape ordet cord adaptor, DET-0100-018, on the end of the detonating cord and crimp on thedetonator (preferably with Owen Super Crimpers) along the 1/2 in crimp area.
• Sealing instructions - refer to detonator manual (these recommendations areincluded with all exposed detonators manufactured by Owen). This method seals at475°F (246°C) and 25,000psi).
• For 40 Lead Ribbon Det. Cord - Insert the det cord and det cord adapter (DET-0100-018) into the Unidet detonator and crimp in place, tape as per therecommendations that are included with all exposed detonators manufactured byOwen.
• BHT greater than 310°F (154°C) - use lead cord. You can use 80 grain cord (of anytype) anytime you prefer, but it will cause the gun to swell slightly so that it may notpass thru a small nipple. Anytime you use lead cord you must allow for someshrinkage. To do this, be sure to push down on the lead cord just before you push thecharge down.
Caution: The Closure Sleeve should remain in place over the endof the gun while the detonator is being attached so that even ifsomeone should accidentally apply power to the line , thedetonator would not be connected to the circuit unt il the gun isopened, and the Closure Sleeve will prevent the gun from beingopened!
3.0 Deployment of the Gun System
Note: This gun system must be run in clean fluid.
Note: The cable head / logging cable continuity and insulation checksMUST be performed prior to the run to ensure the wireline string is in optimalcondition to complete the perforating.

SwingJet II™
MAN-SWG2-000 (R04) page 11
Note: When the following recommendations are followed duringSwingJet II™ assembly and usage, the possibility of misruns is greatlyreduced.
1. Always make a gauge run first before running the SwingJet II™ assembly in the well.If a customer insists on running the gun without making the gauge run first - thatcustomer must buy the gun if there is a misrun because of an obstruction.
2. Use good judgement when running in hole - a maximum speed of 50 ft. per minute isrecommended. Care must be taken when running through seating nipples, side pocketmandrels, packers, etc to avoid damaging the gun system.
3. Do not run down into a zone previously perforated with the SwingJet II™. Do not tagbottom. This will cause the gun to bend, which will cause a misrun. If the gun isaccidentally tagged on bottom, the gun must be brought out of the hole and replaced withanother one.
4. It is advisable to be able to check the line with a digital Blaster's Multimeter, as soonas the gun is attached to the wireline, as soon as the gun is in the hole and immediatelybefore firing the squib. After the charges have been deployed, check again. Seeprocedures throughout this manual.
5. Always pick up guns longer than 6 ft. (1.8 m) long in a lubricator. If a gun is bent inany way, DO NOT RUN THE GUN.

SwingJet II™
MAN-SWG2-000 (R04)page 12
3.1 Meter Readings from the Line, Gun On Perforati ng Depth
Caution: The following steps must be followed when the gun i s run toperforating depth.
Note: The following tests must be conducted by connecting the DigitalBlaster’s Meter or Simpson Meter to the Surface Unit Patch Panel.
• The gun circuit may be checked with a digital Blaster’s Multimeter configured asshown. This meter must be set to test continuity, the continuity test measures thevoltage drop across a diode junction.

SwingJet II™
MAN-SWG2-000 (R04) page 13
3.1.1 Before the Gun is Opened (Squib Not Initiated )
Connect the positive lead (red wire) to the wireline and the negative lead (black wire) tothe ground. Measure the continuity, the meter will read about 1.232 volts to confirm theSquib has not been activated. Remove the meter and continue operations as per Section5.0.
3.1.2 Before the Gun is Detonated (Squib Initiated)
After the Squib has been activated the charges will be deployed and the Firing Head willbe activated. Reconnect the Digital Blaster's Meter to the wireline, the positive lead (redwire) to the wireline and the negative lead (black wire) to the ground. Measure thecontinuity, the meter should read a lower value of about 1.048 volts. If the meter stillreads the higher value of about 1.232 volts, the gun has not opened. This change involtage indicates the squib has activated and the gun is ready to fire.
Example of a typical system test with the Blaster’s Multimeter set to test diode;
Wireline setup with an Applied Electronics CCL and 100 Ohm wireline resistance,connect the red wire (positive) to the line and the black wire (negative) to the armor/ground. The following readings will be observed:
1. The meter reads 1.232 volts before the gun is opened (prior to firing squib).
2. The meter reads 1.048 volts before the gun is detonated (the squib has fired andoperator is ready to fire the gun).
3.2 If a digital Blaster’s Multimeter is not available, the gun circuit may be checked with aSimpson Meter as follows:

SwingJet II™
MAN-SWG2-000 (R04)page 14
3.2.1 Before the Gun is Opened (Squib Not Initiated )
Set the Simpson Meter to measure resistance and switch to -DC. Connect the positivelead (red wire) to the wireline and the negative lead (black wire) to the ground. Measurethe resistance, the meter will read as shown to confirm the Squib has not been activated.Remove the meter and continue operations as per Section 5.0.
.
3.2.2 Before the Gun is Detonated (Squib Initiated)
After the Squib has been activated the charges will be deployed and the Firing Head willbe activated. With the Simpson Meter set to measure resistance, set the switch to +DC.Reconnect the Simpson Meter to the wireline, the positive lead (red wire) to the wirelineand the negative lead (black wire) to the ground. Measure the resistance, the metershould read as shown. If the meter reads high, the gun has not opened. This change inresistance indicates the squib has activated and the gun is ready to fire.
Note: Red lead wireshould always be inright plug
Note: Red lead wireshould always be inright plug
SwingJet II™
MAN-SWG2-000 (R04) page 15
Example of a typical system test with the Simpson Meter set to measure resistance.
Wireline setup with an Applied Electronics CCL with a 100 Ohm wireline resistance,connect the red wire (positive) to the line and the black wire (negative) to the armor/ground. The following readings will be observed:
3. The meter reads 2,100 Ohms before the gun is opened (prior to firing squib).
4. The meter reads 1,900 Ohms before the gun is detonated (the squib has fired andoperator is ready to fire the gun).
4.0 Running Guidelines
4.1 Placing the Gun in the Well
A. Do not place the gun in the well unless a gauge run has been previously run. Itcannot be over-stressed that this gun can be easily bent and must be slid from thePVC protective sleeve into the lubricator and must not be allowed to hit bottomanytime, even while in the lubricator, especially if heavy sinker bars are on top ofthe gun. Do not be tempted to try to attach the gun without laying the lubricatordown; the gun is often damaged when trying to attach it in the vertical position.
4.2 Running in the Well
Caution: Do not tag bottom and always make a gauge run first !
4.3 It is recommended that a gauge run be made with a rigid string the same OD and 5ft. (1.5 m) of length before running the first gun in the well.
A. If a gauge run has been made, then the gun can be run in at any reasonablespeed, but run very slowly through packers and nipples.
B. Never run a live Swing Jet into a zone previously perforated with a Swing Jetsystem. The debris previously left in hole may cause damage to the live SwingJet.

SwingJet II™
MAN-SWG2-000 (R04)page 16
C. Never allow the well to flow after the first run. Debris could flow up and cause amis-run on subsequent runs.
5.0 Firing the Gun
A. After the collar check and the gun is correctly positioned in the shooting zone,the gun is opened by applying negative power. Check the line with a meter (referto step 2.0) on negative (-) and (+) positive mid range. Slowly raise the currentuntil one amp is applied. The E-86SWG Squib should fire by 0.4 amps (ahesitation of ammeter is an indication the squib fired).
B. Upon firing the release Squib, check gun with meter as before on positive todetermine if all charges are successively released, followed by the Trigger beingreleased, which activates the switch in the Firing Head. If the truck is equippedwith an Ohm meter to the line, on positive the line will read lower value than thenegative leg, until the gun is opened, the meter will read the same resistance as itdid on the negative, before the gun was opened (refer to step 3.2).
C. Positive current is then slowly applied until the gun fires or until 1.0 amp hasbeen applied. The E-10 or Unidet should fire at about 0.4 amps (the E-86SWG, E-10, and Unidet are 51 Ohm resistorized caps). Observe the weight indicator forloss of weight.
D. It is often difficult to know whether a gun fires (unless you can electricallycheck as above). So it is good practice to drop down just deep enough to check
E. If perforations are not detected, then the gun should be raised about 20 ft. (6.1 m) and quickly dropped several times (while monitoring line Ohm meter). Thismay allow the charges to deploy, in case something has hindered theirdeployment.
F. If the gun does not fire, then bring the gun out of the hole, slowly through theend of the tubing, nipples, and packers. The charges should be folded back intothe folded and locked position when pulling through tubing or a sealing nipple,leaving the last charge to drag. As soon as the gun is removed from the lubricator,place the closure sleeve over the gun, then detach the detonator from the cordthen cut the lead wires.
Note: When retrieving an opened gun, the lubricator must be slid downoff the gun. The gun will not drop out of the lubricator.

SwingJet II™
MAN-SWG2-000 (R04) page 17
G. A fired gun will leave nothing below the Connector Housing (Item 3) orperhaps 1-1/2 in of the cast iron Trigger Housing (item 4).
H. Sometimes the debris will not fall to the bottom, which will prevent a secondrun at or below the same depth where the first gun was fired.
5.1 Using a Cut-Off Carrier
A. Carriers are normally available in lengths of 10, 8, 6, and 4 feet. If the desiredlength if carrier is not available, cut the bottom of the carrier as shown in Figure F.This is just above the two slots so that a full circumference of tubing is left toattach to.
SwingJet II™
MAN-SWG2-000 (R04)page 18
Figure A
SwingJet II™
MAN-SWG2-000 (R04) page 19
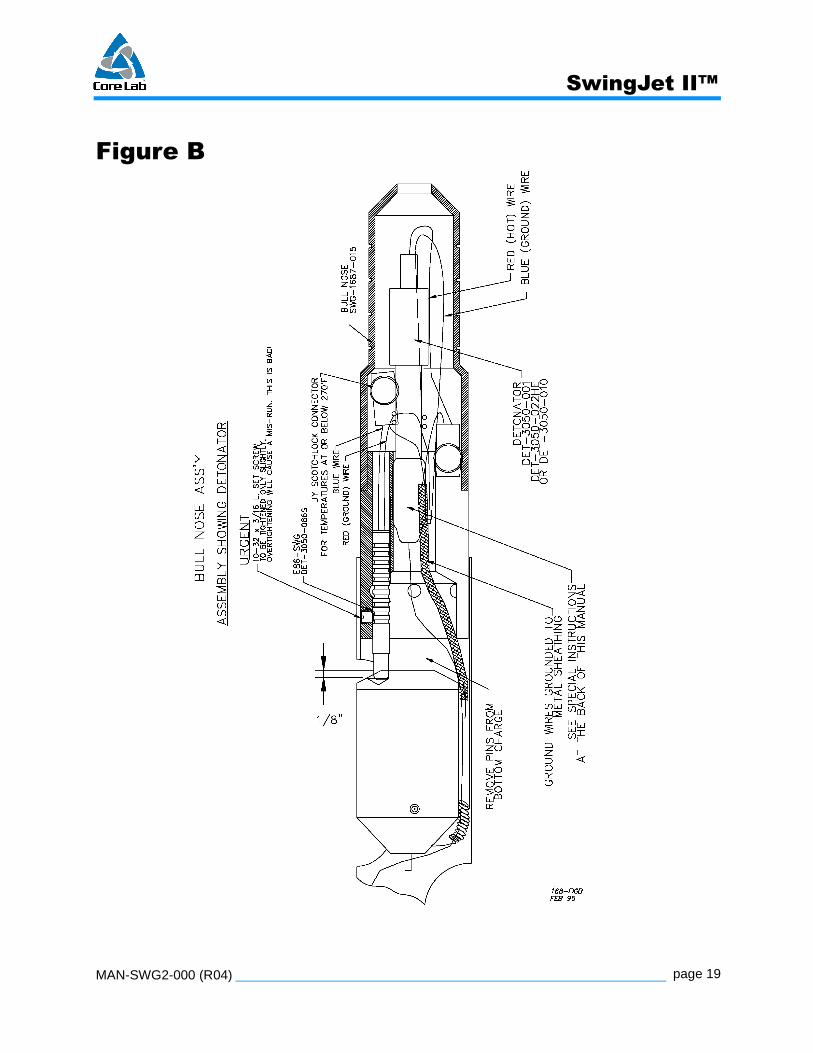
Figure B

SwingJet II™
MAN-SWG2-000 (R04)page 20
Figures C and D

SwingJet II™
MAN-SWG2-000 (R04) page 21
Figure F

SwingJet II™
MAN-SWG2-000 (R04)page 22
Recommended Tools
Part Number Description QtyPUR-0600-049 TOOL BOX - 20IN 1PUR-0600-005 WIRE STRIPPER (AUTOMATIC)IDEAL45097 1PUR-0600-021 WRENCH 1/8IN ALLEN FOR 1/4-20IN SET 2PUR-0600-022 WRENCH 3/32IN ALLEN FOR 10/32IN SET 2PUR-0600-023 WRENCH 1/16IN ALLEN FOR 8/32IN SET 1PUR-0600-024 HAMMER - SMALL - 8OZ. MARTIN 103G 1PUR-0600-025 NEEDLE NOSE PLIERS - SMALL 1PUR-0600-026 HACK SAW 1PUR-0600-027 WIRE CUTTERS 1PUR-0610-003 MULTIMETER BLASTING 1SWG-0000-003 PLIERS - NEEDLE NOSE GROOVED SJ II 2SWG-0000-011 WRENCH ADJUSTABLE 8IN MARTIN A8 2PUR-0600-028 TAPE MEASURE - 16FT 1PUR-0600-045 SCREWDRIVER - MARTIN SDR8 1PUR-0600-030 FILE - 8IN 1TCP-0010-011 KNIFE - RETRACTABLE BLADE UTILITY 1PUR-0600-034 TAP 10-32 2PUR-0600-036 TAP 1/4-20 2PUR-0600-035 WRENCH TAP - SMALL - 0 TO 1/4IN 1PUR-0600-047 PORTABLE DRILL - SKILL SUPER-TWIST 1PUR-0600-018 CRIMPER - 317 SCOTCHLOCK UY E-9Y 1PUR-0600-044 SCREWDRIVER - MARTIN SDR6 1OOO-V568-006 O-RING VITON-90 DURO PC-#006 25OOO-V569-216 O-RING VITON-90 DURO PC-#216 25DET-1687-080 BOOSTER TRANSFER TUBE 5/16INX1IN 10PUR-6000-005 SEIZING CORD NYLON 1SWG-0000-004 GROUND WIRE - SJ II BUS WIRE 500/RL 1PUR-0506-013 ROLL PIN 3/32X1/4IN 200PUR-0600-038 SET SCREWS #10-32X3/16IN 100PUR-0600-017 CONNECTOR - 317 SCOTCHLOCK UY 100SWG-0000-008 PIN TOOL SET 2SWG-1687-075 REDRESS KIT - 1-11/16IN SJ II F.H. 2PUR-0210-001 SPLICE BOOT - LEAD WIRE 100/PK 400D 1SWG-0000-010 VISE & GUIDES - 1-11/16 & 2-1/8 SJ 1PUR-0006-010 SOLDER ALLOY HMP ERSIN MULTI CORE 1PUR-0006-021 TOOL - SOLDERING IRON 45W 1
SWG-0000-005 SLEEVE TO CLOSE & GAUGE GUN 1-11/16 --SWG-0000-008B TOOL 1/8 INSTALL PIN --
SWG-0000-030
Not included in SWG-0000-030