swift user instructions 19.0 user instructions 19.0.pdfafter you obtain an account, enter your email...
TRANSCRIPT
1
Instructions
Version 19.0
Sentencing Worksheets & Interactive File Transfer
2
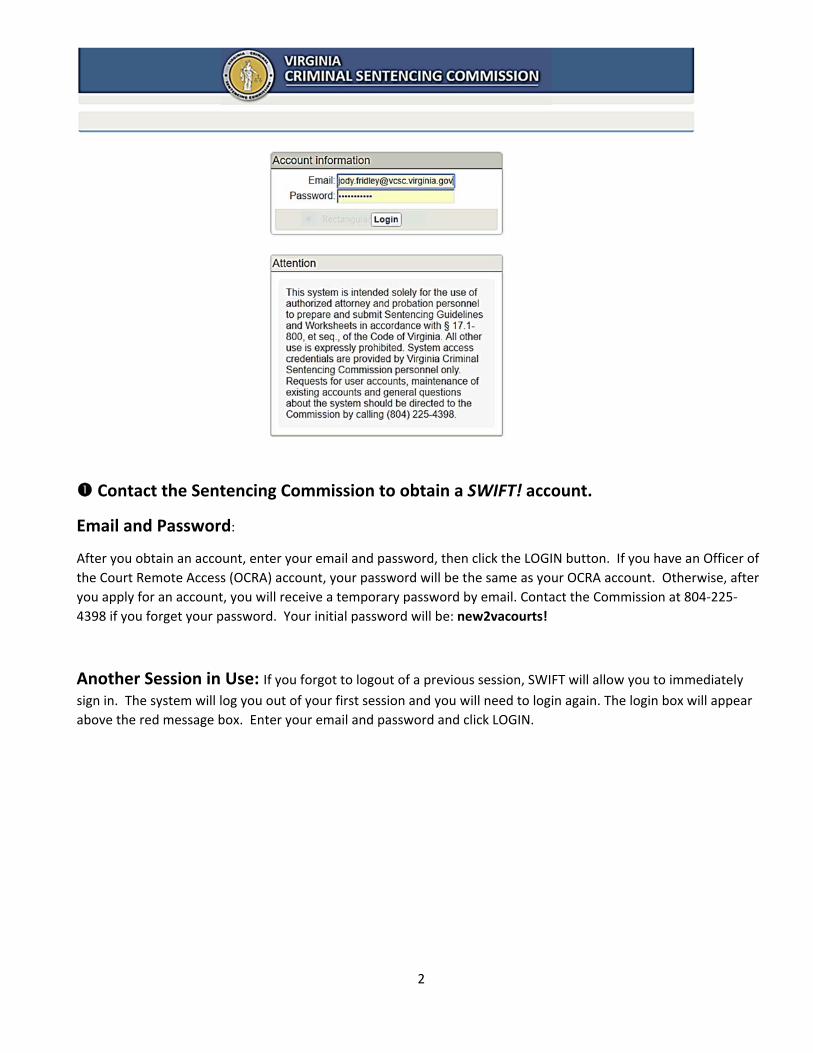
Contact the Sentencing Commission to obtain a SWIFT! account.
Email and Password:
After you obtain an account, enter your email and password, then click the LOGIN button. If you have an Officer of the Court Remote Access (OCRA) account, your password will be the same as your OCRA account. Otherwise, after you apply for an account, you will receive a temporary password by email. Contact the Commission at 804-225-4398 if you forget your password. Your initial password will be: new2vacourts!
Another Session in Use: If you forgot to logout of a previous session, SWIFT will allow you to immediately sign in. The system will log you out of your first session and you will need to login again. The login box will appear above the red message box. Enter your email and password and click LOGIN.

3
Terms of Service: After you have logged into SWIFT!, the Terms of Service screen will appear. Click on the button indicating that you acknowledge the terms and certify that all the information is true.
4
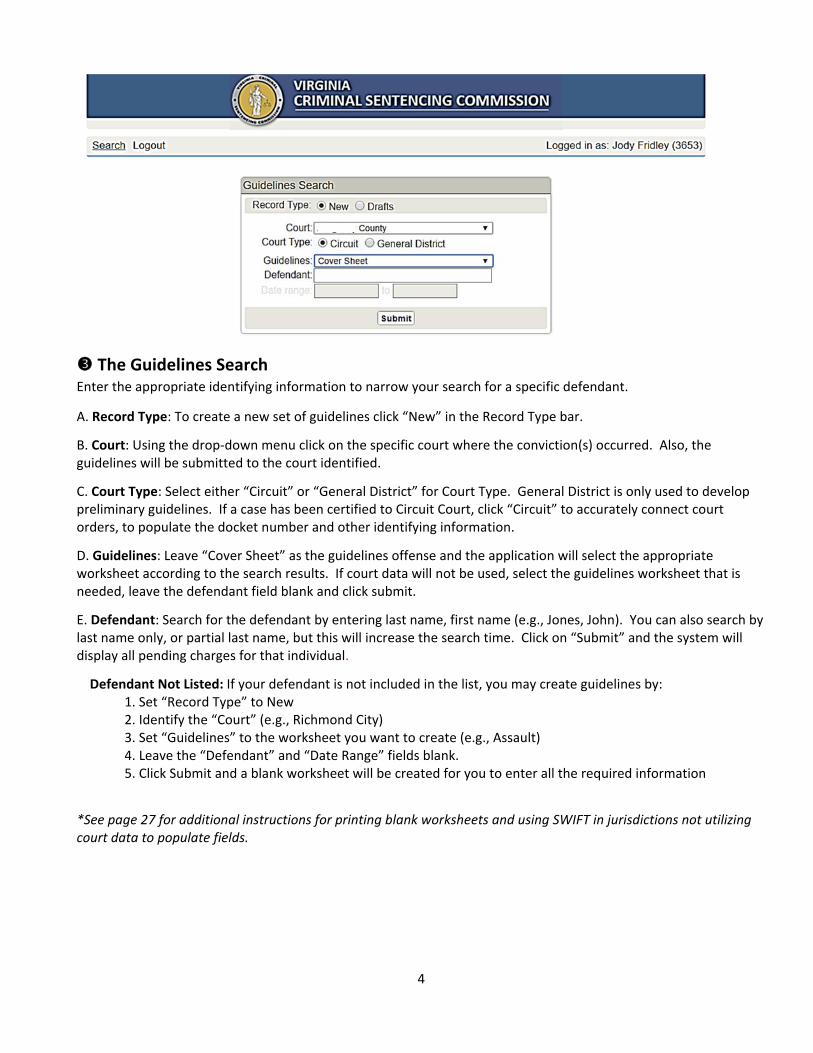
The Guidelines Search Enter the appropriate identifying information to narrow your search for a specific defendant.
A. Record Type: To create a new set of guidelines click “New” in the Record Type bar.
B. Court: Using the drop-down menu click on the specific court where the conviction(s) occurred. Also, the guidelines will be submitted to the court identified.
C. Court Type: Select either “Circuit” or “General District” for Court Type. General District is only used to develop preliminary guidelines. If a case has been certified to Circuit Court, click “Circuit” to accurately connect court orders, to populate the docket number and other identifying information.
D. Guidelines: Leave “Cover Sheet” as the guidelines offense and the application will select the appropriate worksheet according to the search results. If court data will not be used, select the guidelines worksheet that is needed, leave the defendant field blank and click submit.
E. Defendant: Search for the defendant by entering last name, first name (e.g., Jones, John). You can also search by last name only, or partial last name, but this will increase the search time. Click on “Submit” and the system will display all pending charges for that individual.
Defendant Not Listed: If your defendant is not included in the list, you may create guidelines by: 1. Set “Record Type” to New 2. Identify the “Court” (e.g., Richmond City) 3. Set “Guidelines” to the worksheet you want to create (e.g., Assault) 4. Leave the “Defendant” and “Date Range” fields blank. 5. Click Submit and a blank worksheet will be created for you to enter all the required information
*See page 27 for additional instructions for printing blank worksheets and using SWIFT in jurisdictions not utilizing court data to populate fields.

5
Select Defendant and Charge: The system will return a list of all defendants with the identified name who have pending charges in the selected court. To select a specific defendant, click on any pending charge for that person. The charge you select will populate corresponding fields on the cover sheet of the sentencing guidelines. Guidelines offenses will have a check mark () next to them, but all pending charges for the defendant selected will be transferred to the cover page for you to select the primary offense in the sentencing event. Note: When selecting an offense try to select the primary offense based on sentencing guidelines rules. However, you will be able to identify and change the primary or most serious offense as you complete the sentencing guidelines worksheets.
Guidelines Offense
, john
6
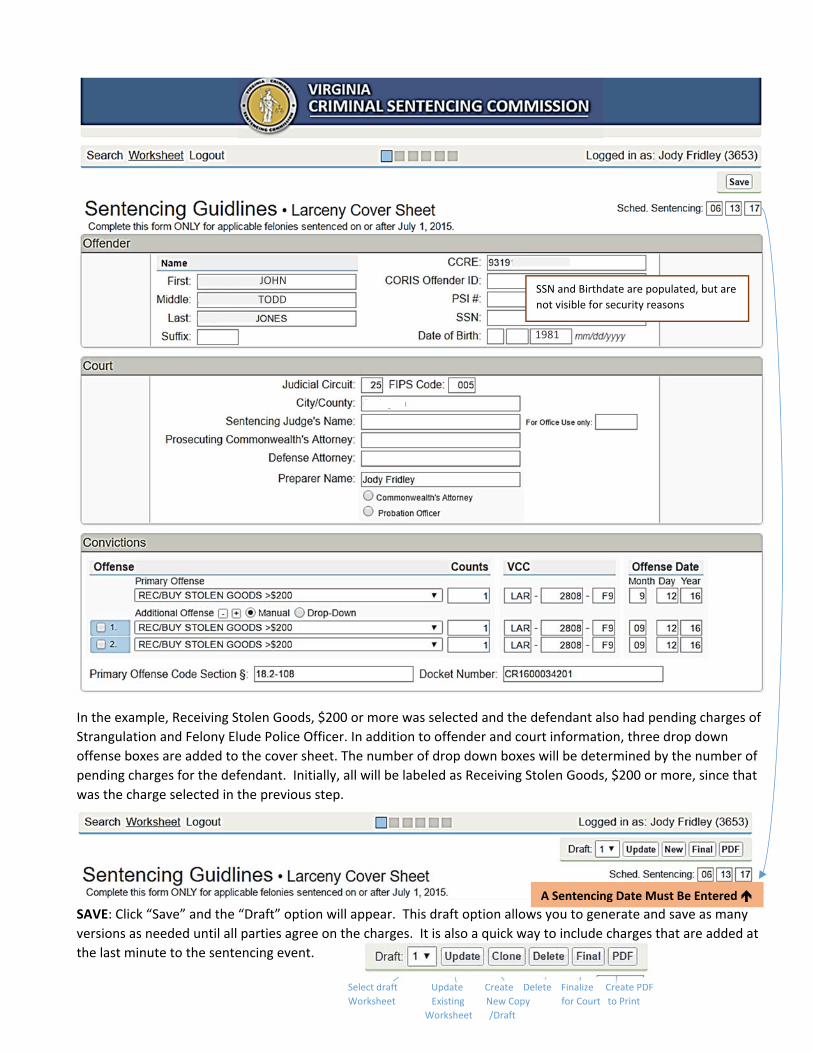
In the example, Receiving Stolen Goods, $200 or more was selected and the defendant also had pending charges of Strangulation and Felony Elude Police Officer. In addition to offender and court information, three drop down offense boxes are added to the cover sheet. The number of drop down boxes will be determined by the number of pending charges for the defendant. Initially, all will be labeled as Receiving Stolen Goods, $200 or more, since that was the charge selected in the previous step.
SAVE: Click “Save” and the “Draft” option will appear. This draft option allows you to generate and save as many versions as needed until all parties agree on the charges. It is also a quick way to include charges that are added at the last minute to the sentencing event.
JOHN
1981
TODD
Select draft Update Create Delete Finalize Create PDF Worksheet Existing New Copy for Court to Print Worksheet /Draft
A Sentencing Date Must Be Entered
SSN and Birthdate are populated, but are not visible for security reasons

7
Use the drop-down menu for each individual offense to select a different charge than the one that is populated. In this example, the primary offense is Receiving Stolen Goods and the additional offenses are Strangulation and Felony Elude. (Note: The VCC and offense dates are populated based on the information entered in the Court Automated Information System. Correct any VCC or date that is not correct. VCCs have no standing in law (§ 19.2-390.01) and must be corrected to reflect sentencing guidelines rules for selecting the primary offense and VCCs.
Manipulate the charges identified in this application to reflect the actual convictions in the sentencing event – add offenses that will be sentenced in the same event, remove offenses that will be nol prossed, etc. There is no continuation sheet, enter all the convictions on this screen.
Offense Not in the Drop-Down List? There are several options:
1. If the charge is not listed in the information populated with court data, manually change the VCC code. Add the correct counts, VCC and offense date and the system will automatically populate the offense description.
2. To Delete charges, check the box next to the charge you would like to delete, and then click on the minus symbol above the offense description.
3. Add additional charges by clicking the plus symbol next to the Additional Offenses field. You can also manually change the number of counts for each offense listed.
Note: The primary offense(s) must be in the first box and the order of additional offenses may be changed by using a series of drop-down boxes and adding new additional offense boxes. The number of counts for each offense listed may be manually changed.
1.

8
Click “Next” to go to Final Disposition: This form will be completed by the court. Jurisdictions that have embraced a paperless system will complete the final disposition on-line and the sentencing guidelines will be electronically transferred by the Circuit Court Clerk. The sentencing judge will fill in the actual sentencing date.
Click “Next” to go to Worksheet A: There are two ways to navigate this system. Clicking “Next” will advance to the next page (e.g., final disposition, worksheet A, etc.,). Click the boxes at the top to go to a specific page. Users may skip the Final Disposition by clicking on the third box. Cover, Final, WS A, WS B, WS C, WS D
9
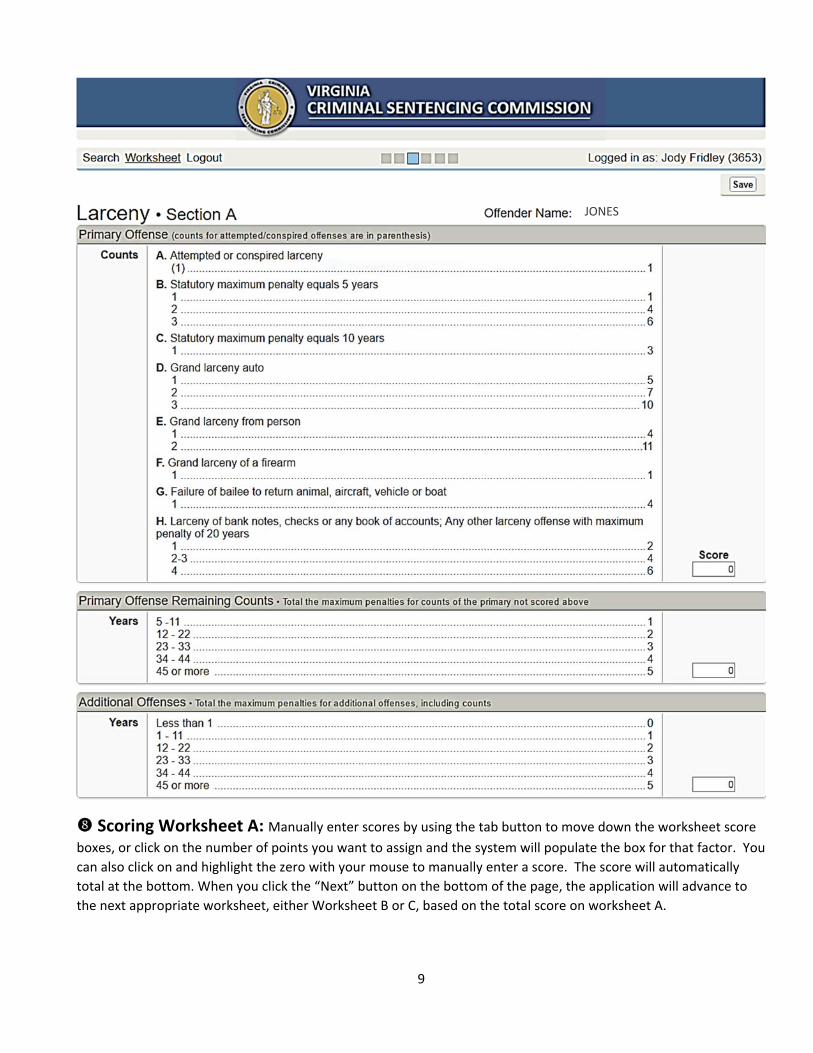
Scoring Worksheet A: Manually enter scores by using the tab button to move down the worksheet score boxes, or click on the number of points you want to assign and the system will populate the box for that factor. You can also click on and highlight the zero with your mouse to manually enter a score. The score will automatically total at the bottom. When you click the “Next” button on the bottom of the page, the application will advance to the next appropriate worksheet, either Worksheet B or C, based on the total score on worksheet A.
JONES
10
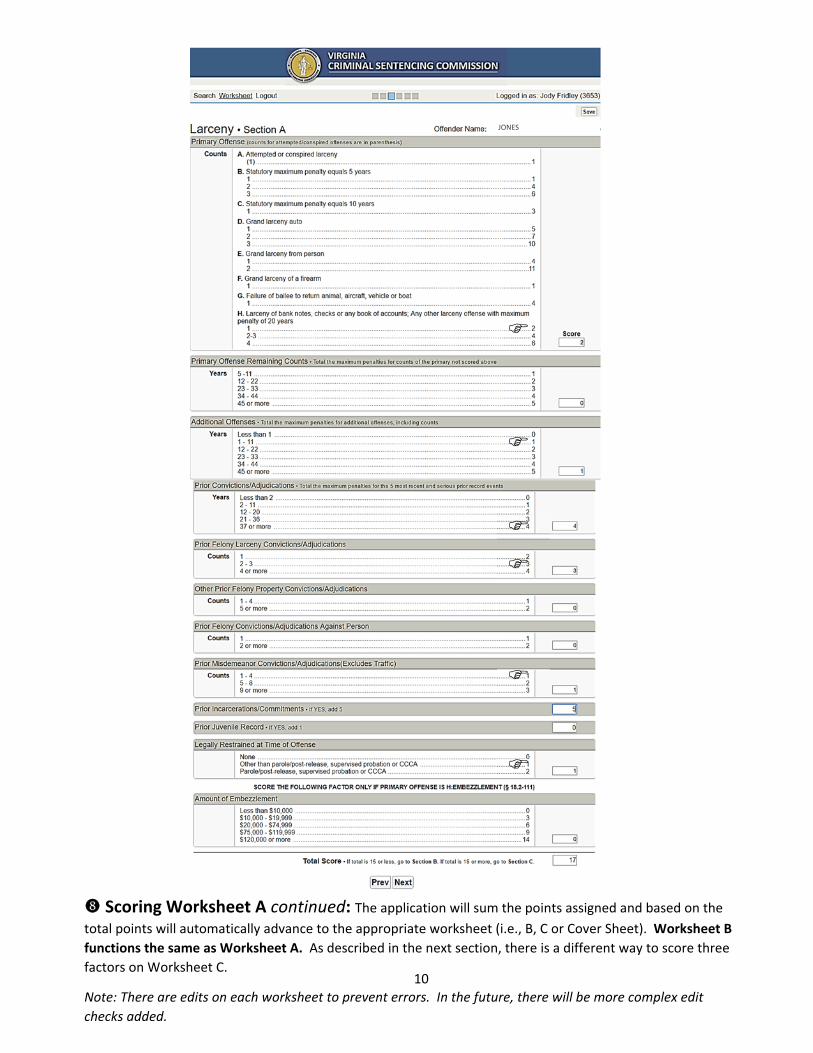
Scoring Worksheet A continued: The application will sum the points assigned and based on the total points will automatically advance to the appropriate worksheet (i.e., B, C or Cover Sheet). Worksheet B functions the same as Worksheet A. As described in the next section, there is a different way to score three factors on Worksheet C.
Note: There are edits on each worksheet to prevent errors. In the future, there will be more complex edit checks added.
JONES

11
Scoring Worksheet C: Worksheet C is scored the same as worksheet A and B, except for Primary Offense Remaining Counts, Additional Offenses, and Prior Convictions. For these factors you must manually enter the total points, because preparers must assign points for each count and total the points.
Fraud, Larceny and Drugs click “Next” to go to Worksheet D, the Nonviolent Risk Assessment. For all other offenses click on the first gray box at the top to return to the cover sheet and to populate the guidelines recommendation. Note: Scoring Sex Offender Risk Assessment functions the same as a Worksheet A.
JONES

12
Nonviolent Risk Assessment: All the “Ineligibility Conditions” must be answered. If the answer to any question is “YES” – the Nonviolent Risk Assessment does not apply. If the answer to all the questions are “NO” – the Nonviolent Risk Assessment will become active and must be completed. Once all the questions are answered, click on the first gray box at the top to return to the cover sheet and to populate the guidelines recommendation.
JONES
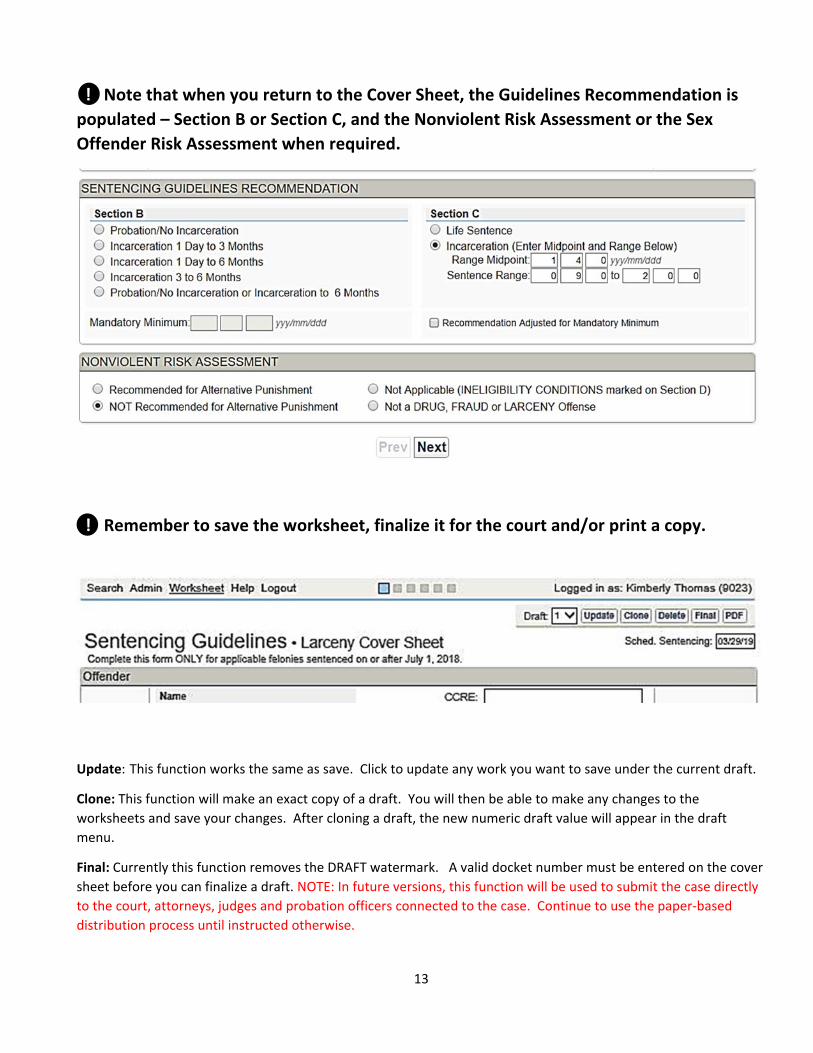
13
! Note that when you return to the Cover Sheet, the Guidelines Recommendation is populated – Section B or Section C, and the Nonviolent Risk Assessment or the Sex Offender Risk Assessment when required.
!
! Remember to save the worksheet, finalize it for the court and/or print a copy.
Update: This function works the same as save. Click to update any work you want to save under the current draft.
Clone: This function will make an exact copy of a draft. You will then be able to make any changes to the worksheets and save your changes. After cloning a draft, the new numeric draft value will appear in the draft menu.
Final: Currently this function removes the DRAFT watermark. A valid docket number must be entered on the cover sheet before you can finalize a draft. NOTE: In future versions, this function will be used to submit the case directly to the court, attorneys, judges and probation officers connected to the case. Continue to use the paper-based distribution process until instructed otherwise.

14
If you are in a court that populates SWIFT! with court data, the docket number should populate for you. If you are not using court data, you will have to enter a correctly formatted docket number for the primary offense. If no docket number is entered when you click on the Final button, you will receive a message indicating that you must enter a valid docket number. NOTE: In future editions of SWIFT you will be able to populate the guidelines with all the associated docket numbers. For now, enter only the docket number for the primary offense (most serious offense).
If you enter an incorrectly formatted docket number, you will receive a message indicating that the docket number is invalid with examples of correct docket number formats.
LOWER COURT: If completing guidelines at the general district court or juvenile court level, use a placeholder circuit court docket number such as CR1900000001. If the case is transferred to circuit court, then the correct docket number would need to be entered to submit the guidelines to the correct judge.
15
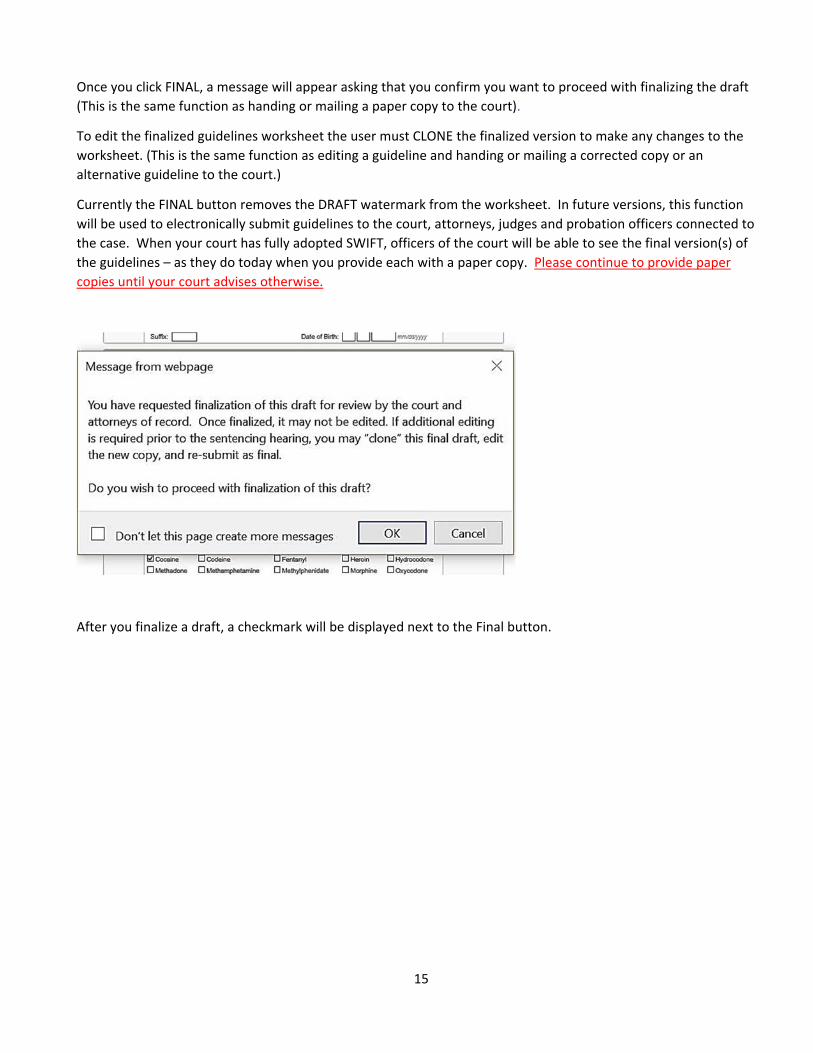
Once you click FINAL, a message will appear asking that you confirm you want to proceed with finalizing the draft (This is the same function as handing or mailing a paper copy to the court).
To edit the finalized guidelines worksheet the user must CLONE the finalized version to make any changes to the worksheet. (This is the same function as editing a guideline and handing or mailing a corrected copy or an alternative guideline to the court.)
Currently the FINAL button removes the DRAFT watermark from the worksheet. In future versions, this function will be used to electronically submit guidelines to the court, attorneys, judges and probation officers connected to the case. When your court has fully adopted SWIFT, officers of the court will be able to see the final version(s) of the guidelines – as they do today when you provide each with a paper copy. Please continue to provide paper copies until your court advises otherwise.
After you finalize a draft, a checkmark will be displayed next to the Final button.

16
You are able to CLONE, edit, then click FINAL to print multiple finalized versions of the guidelines for the court to review. In future editions, the FINAL button will be the same as mailing or handing the guidelines to the court. All finalized guidelines will be available to officers of the court for review, however, for the judge, SWIFT will default to the most recently submitted finalized draft first. Attorneys may advise the judge to review other versions of the guidelines. In the next July 2019 release, a remarks section will be added so the preparer will have the ability to name and identify each individual draft (e.g., Alternative Guidelines #2: Reason - victim is scored as under age 13).
PDF: Use this button to create a draft PDF, with the draft watermark, or a copy of the final guidelines without a draft watermark. Print and deliver or mail hard copies of the PDF to attorneys and the court. If acceptable in your jurisdiction, you may email PDFs. Continue to follow local procedures until advised otherwise by your court.
Sched. Sentencing: Keep this current to allow the courts to better manage documents needed during the sentencing phase. This initial date is populated by court records but is not updated after the initial transfer of data to the sentencing guidelines. (A sentencing date must be entered, or the worksheet will not save.)
17
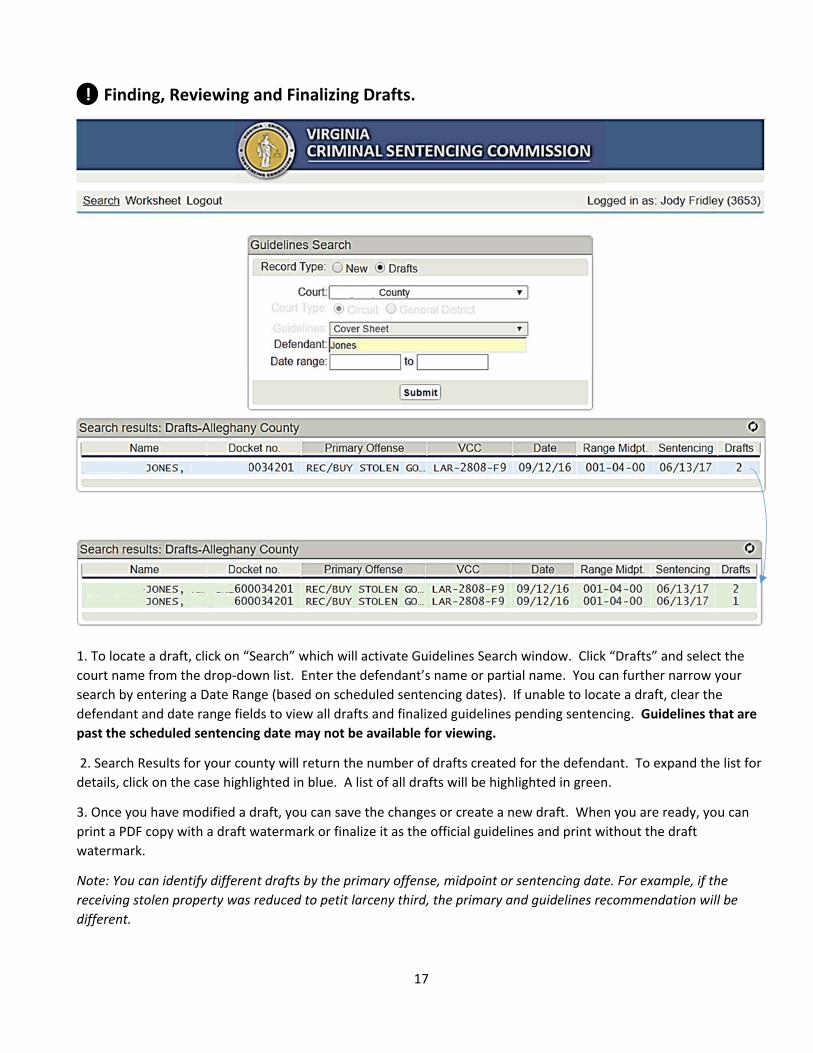
! Finding, Reviewing and Finalizing Drafts.
1. To locate a draft, click on “Search” which will activate Guidelines Search window. Click “Drafts” and select the court name from the drop-down list. Enter the defendant’s name or partial name. You can further narrow your search by entering a Date Range (based on scheduled sentencing dates). If unable to locate a draft, clear the defendant and date range fields to view all drafts and finalized guidelines pending sentencing. Guidelines that are past the scheduled sentencing date may not be available for viewing.
2. Search Results for your county will return the number of drafts created for the defendant. To expand the list for details, click on the case highlighted in blue. A list of all drafts will be highlighted in green.
3. Once you have modified a draft, you can save the changes or create a new draft. When you are ready, you can print a PDF copy with a draft watermark or finalize it as the official guidelines and print without the draft watermark.
Note: You can identify different drafts by the primary offense, midpoint or sentencing date. For example, if the receiving stolen property was reduced to petit larceny third, the primary and guidelines recommendation will be different.

18
Printing out a Copy of Guidelines To print a copy of the Guidelines worksheets, you must first save and select the draft you want to print.
SAVE: Click SAVE and the CLONE option will appear. This CLONE option allows you to generate and save as many versions as needed. Each time you select CLONE, a new draft will be added. UPDATE will overwrite the existing version of the draft. The PDF option also appears at this time, which will allow you to create a PDF (DRAFT or FINAL) that can be printed or emailed.
PRINTING DRAFTS: When you save a guidelines draft and print a PDF copy, the word “DRAFT” will appear on each page.
The word draft appears as a watermark across each worksheet.
To print a PDF copy of your saved draft without the word “DRAFT” on each page, you will need to click the “FINAL” button after you have saved the draft you would like to print. After you have clicked on the “FINAL” button, click on the PDF button. The function of the “FINAL” button is to indicate that the draft is ready for court review and removes the draft watermark. When advised by the VCSC or your court, FINAL will allow you to electronically transfer sentencing guidelines to the court.
Finalized drafts cannot be edited directly. To edit finalized guidelines, clone (i.e., Click on CLONE) and make your changes to the guidelines. You can then click FINAL to remove the draft watermark from the cloned draft. In future versions, the FINAL button will submit the clone to the court for review. For now, continue to print and distribute paper copies.
Select draft Update Create Delete Finalize Create PDF Worksheet Existing New Copy for Court to Print Worksheet /Draft
19
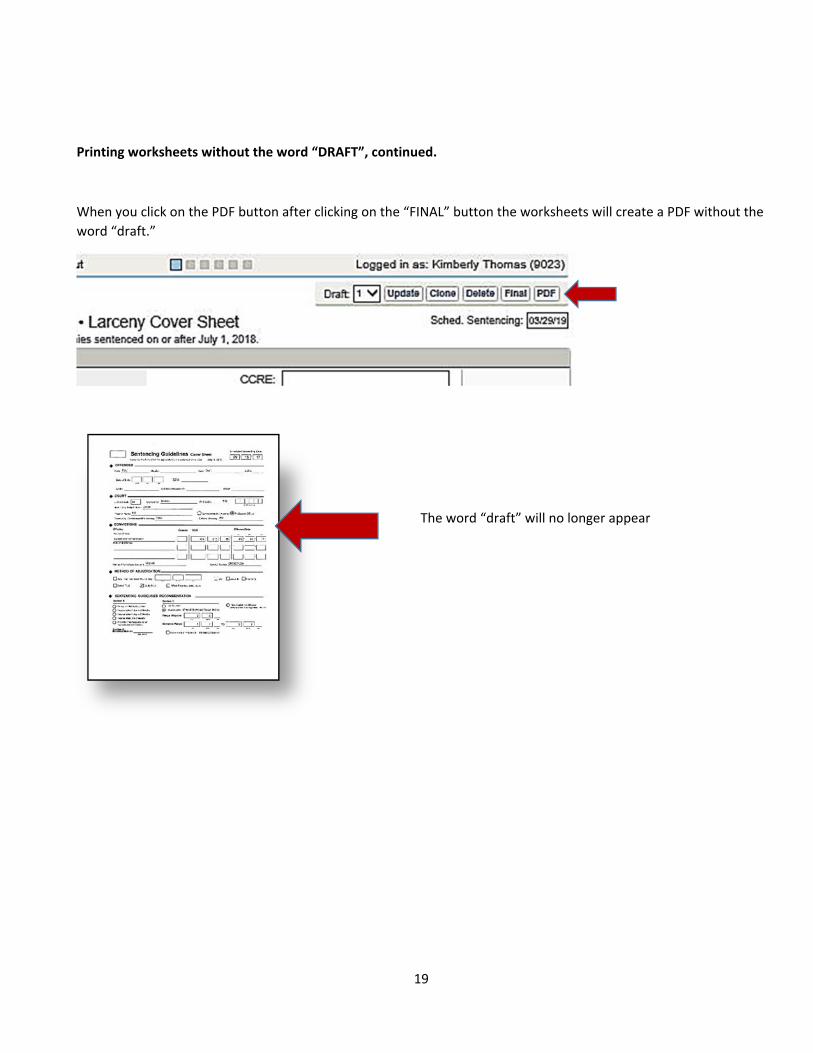
Printing worksheets without the word “DRAFT”, continued.
When you click on the PDF button after clicking on the “FINAL” button the worksheets will create a PDF without the word “draft.”
The word “draft” will no longer appear

20

21
Sentencing Revocation Report & Probation Violation Guidelines
Probation Violation Guidelines should be submitted to the court through locally established procedures, no more than thirty (30) days prior to the violation hearing. The Sentencing Revocation Report (SRR) and probation violation guidelines cannot be prepared outside the 30 days. Any forms prepared in advance are invalid and must be updated and completed within the established time frames before being submitted to the court. In addition, forms being prepared for a case without an established hearing date will not have available court data for use in the SWIFT! application.

22

23
The Guidelines Search Enter the appropriate identifying information to narrow your search for a specific defendant with a scheduled court date.
A. Record Type: To create a new set of guidelines click “New” in the Record Type bar.
B. Court: Using the drop-down menu click on the specific court where the conviction(s) occurred. Also, the guidelines will be submitted to the court identified.
C. Court Type: Select either “Circuit” or “General District” for Court Type. General District is only used to develop preliminary guidelines. If a case has been certified to Circuit Court, click “Circuit” to accurately connect court orders, to populate the docket number and other identifying information.
D. Guidelines: Leave “Cover Sheet” as the guidelines offense and the application will select the appropriate worksheet. You may also select “Probation Violation” as the Guidelines. If court data will not be used, select “Probation Violation.”
E. Defendant: Search for the defendant by entering last name, first name (e.g., Jones, John). You can also search by last name only, or partial last name, but this will increase the search time. Click on “Submit” and the system will display all pending charges for that individual.
Note: The system will identify all pending charges. indicates a new pending guidelines offense and indicates a probation violation. If you select a record that has neither a or a the results will only include the cover sheet and final disposition page. Probation violations are identified if your court follows established docket numbering protocols.
JOHNSON

24
Selecting the Most Serious Offense If your court follows established docket numbering protocols, the system will identify all the original offenses related to the probation violation docket numbers. Select the most serious offense from the drop-down list.
25
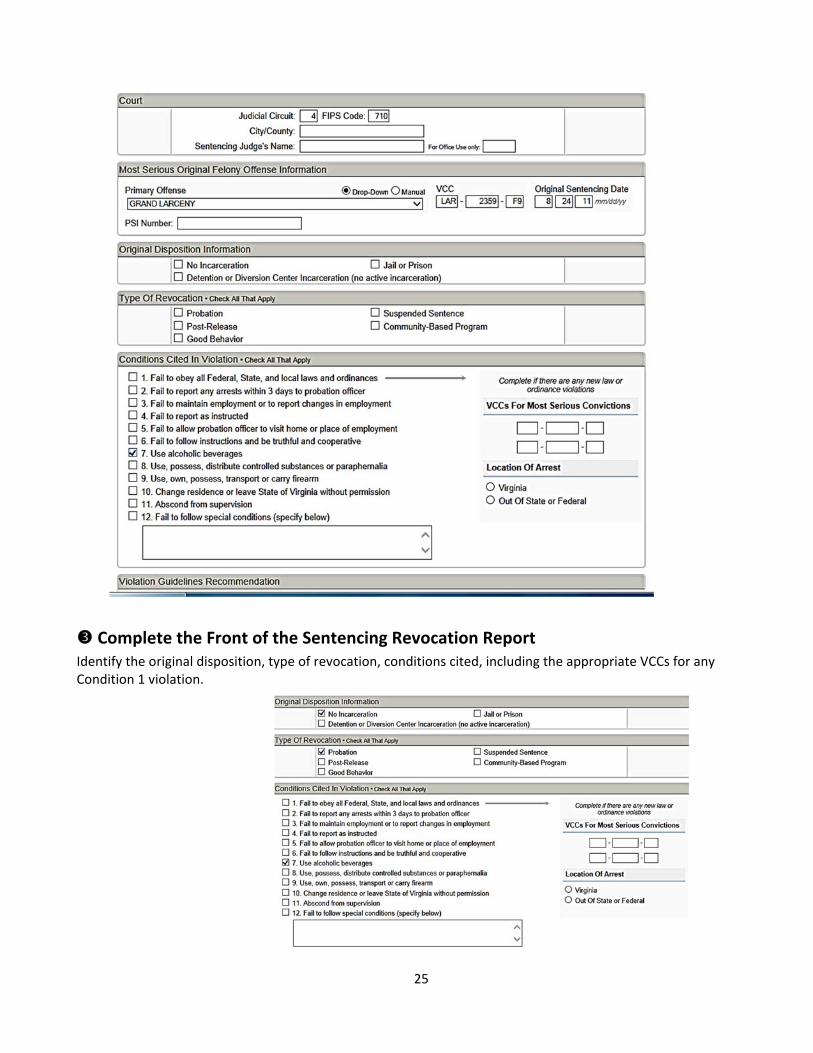
Complete the Front of the Sentencing Revocation Report Identify the original disposition, type of revocation, conditions cited, including the appropriate VCCs for any Condition 1 violation.
26
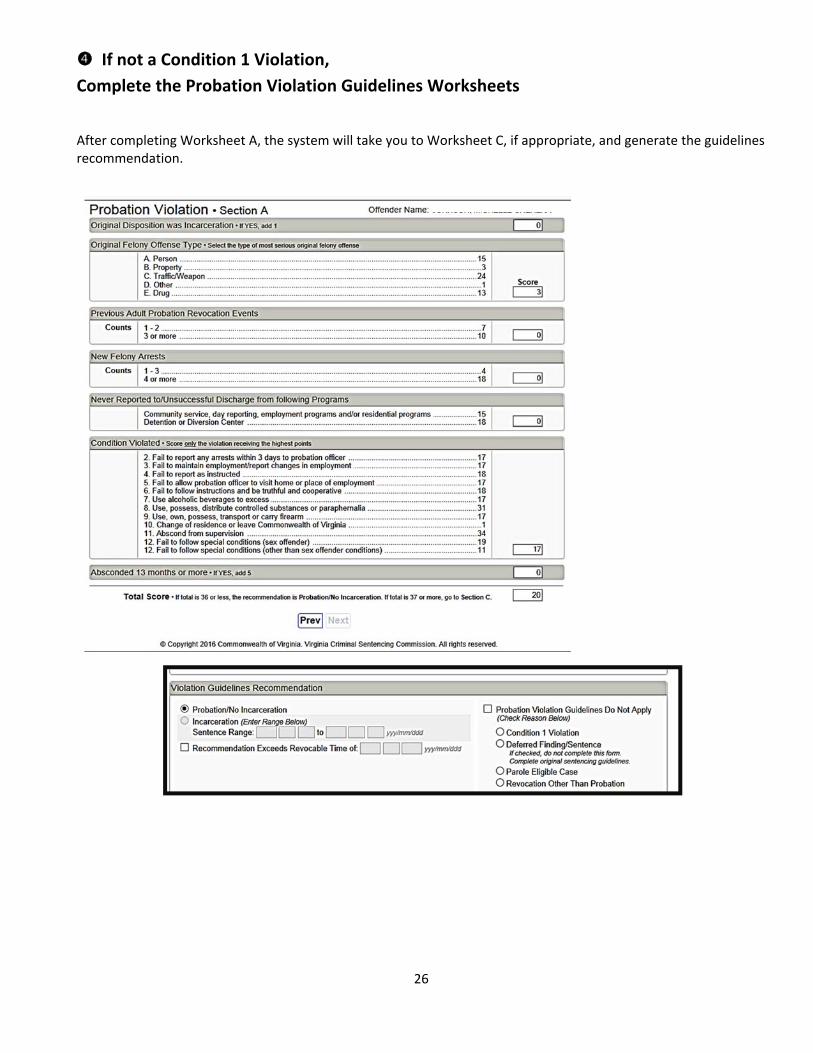
If not a Condition 1 Violation, Complete the Probation Violation Guidelines Worksheets
After completing Worksheet A, the system will take you to Worksheet C, if appropriate, and generate the guidelines recommendation.
27
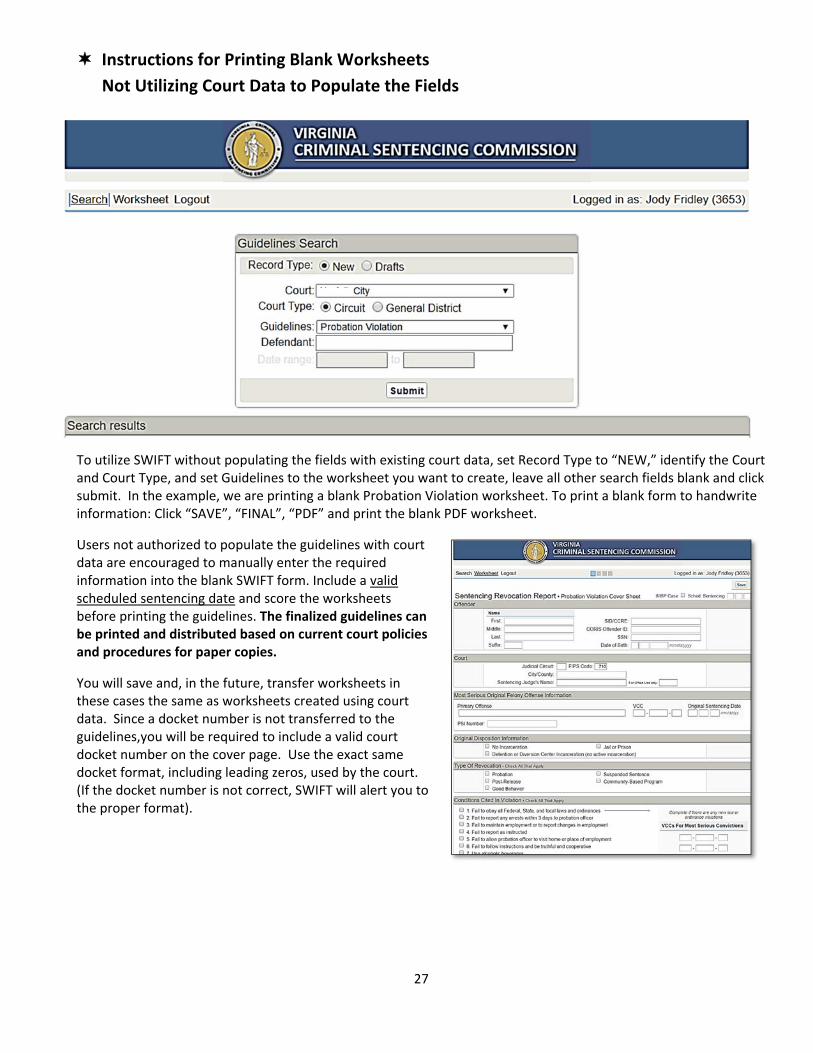
Instructions for Printing Blank Worksheets Not Utilizing Court Data to Populate the Fields
To utilize SWIFT without populating the fields with existing court data, set Record Type to “NEW,” identify the Court and Court Type, and set Guidelines to the worksheet you want to create, leave all other search fields blank and click submit. In the example, we are printing a blank Probation Violation worksheet. To print a blank form to handwrite information: Click “SAVE”, “FINAL”, “PDF” and print the blank PDF worksheet.
Users not authorized to populate the guidelines with court data are encouraged to manually enter the required information into the blank SWIFT form. Include a valid scheduled sentencing date and score the worksheets before printing the guidelines. The finalized guidelines can be printed and distributed based on current court policies and procedures for paper copies.
You will save and, in the future, transfer worksheets in these cases the same as worksheets created using court data. Since a docket number is not transferred to the guidelines,you will be required to include a valid court docket number on the cover page. Use the exact same docket format, including leading zeros, used by the court. (If the docket number is not correct, SWIFT will alert you to the proper format).

28
Contact Information: Establish a SWIFT! Account User Concerns, Technical Issues Dismissed Employees/Suspension of Law License
PHONE: 804-225-4398
EMAIL: [email protected]
TEXT: 804-393-9588
WEBSITES: www.vcsc.virginia.gov (Includes Links to SWIFT! and the Mobile Website) mobile.vcsc.virginia.gov (Mobile Manual, Mobile Website and VCC Search)
Virginia Criminal Sentencing Commission 100 North 9th Street 5th Floor ‒ Supreme Court of Virginia Building ‒
Richmond, VA 23219