surgimate practice - user guide - esrm-support.com
TRANSCRIPT

Surgimate Practice - User Guide

1
CONTENTS Login ................................................................................................................................................... 4
How to Login to Surgimate Practice ............................................................................................. 4 How to Reset Your Password ...................................................................................................... 4
Home .................................................................................................................................................. 5 Agenda ............................................................................................................................................... 6
How to View Tasks ....................................................................................................................... 6 How to Change the Status of a Task ............................................................................................ 7
Overview ............................................................................................................................................. 8 How to Create a Saved View ....................................................................................................... 8 How to Rename, Edit or Delete a Saved View ............................................................................. 9
Reporting ....................................................................................................................................... 10 How to Create a Report.............................................................................................................. 10 How to Export a Report .............................................................................................................. 10
Calendar ........................................................................................................................................... 11 How to Schedule a New Surgery from the Calendar ...................................................................... 11 Monthly, Weekly, Daily, List Views ................................................................................................. 13 Filters ............................................................................................................................................ 15
How to Filter by Surgeon, PA or Coordinator .............................................................................. 15 How to Filter by Facility .............................................................................................................. 15 How to Filter by Appointment Type ............................................................................................ 16 How to Use Multiple Filters ......................................................................................................... 16
Non-Surgical Appointments ........................................................................................................... 17 How to Create a Non-Surgical Appointment ............................................................................... 17 How to Create a Recurring Non-Surgical Appointment ............................................................... 18 How to View Non-Surgical Appointments ................................................................................... 19
Surgeon Templates ........................................................................................................................... 20 How to Apply a Template ............................................................................................................... 20 How to Create a Template ............................................................................................................. 21 How to Edit a Template ................................................................................................................. 23 How to Duplicate a Template ......................................................................................................... 24 How to Delete a Template ............................................................................................................. 25
Scheduling a New Surgery ................................................................................................................ 26 Scheduling Tab .............................................................................................................................. 27 Procedures Tab ............................................................................................................................. 27
How to Add a Procedure ............................................................................................................ 27

2
How to Remove a Procedure ..................................................................................................... 28 How to Edit Procedure Text ........................................................................................................... 28 Diagnoses Tab .............................................................................................................................. 29
How to Add a Diagnosis ............................................................................................................. 29 How to Remove a Diagnosis ...................................................................................................... 29
How to Edit Diagnosis Text ............................................................................................................ 29 Orders Tab .................................................................................................................................... 29 Testing Tab ................................................................................................................................... 30 Medical Hx Tab .............................................................................................................................. 31 Care Team Tab ............................................................................................................................. 31
How to Add a Care Team Member ............................................................................................. 32 How to Remove a Care Team Member ...................................................................................... 32
Appointments Tab ......................................................................................................................... 33 How to Add an Appointment ....................................................................................................... 33 How to Assign an Imported Appointment ................................................................................... 33 How to Remove an Assigned Appointment ................................................................................ 34
Equipment Tab .............................................................................................................................. 34 How to Add an Equipment Item .................................................................................................. 34 How to Remove an Equipment Item ........................................................................................... 35
DME Tab ....................................................................................................................................... 35 How to Add a DME Item ............................................................................................................. 35 How to Remove a DME Item ...................................................................................................... 36
Insurance Tab................................................................................................................................ 36 How to Assign an Insurance Policy ............................................................................................ 36 How to Remove an Insurance Policy .......................................................................................... 38 Financials ................................................................................................................................... 38
Attachments Tab ........................................................................................................................... 38 How to Add an Attachment ......................................................................................................... 38 How to View an Attachment ....................................................................................................... 39 How to Delete an Attachment ..................................................................................................... 39
Notes Tab ...................................................................................................................................... 39 How to Add a Note ..................................................................................................................... 40 How to Edit a Note ..................................................................................................................... 41 How to Delete a Note ................................................................................................................. 41
Print Tab ........................................................................................................................................ 41 How to Print a Form ................................................................................................................... 41 How to Edit a Form .................................................................................................................... 42

3
The Checklist ................................................................................................................................. 43 How to Assign Tasks .................................................................................................................. 44 How to Change a Due Date ....................................................................................................... 44
History Tab .................................................................................................................................... 45 Cancellations and Follow-Ups ........................................................................................................... 46
How to Cancel a Surgery ............................................................................................................... 46 How to Undo a Cancellation .......................................................................................................... 47 How to Mark a Surgery for Follow-Up ............................................................................................ 47 How to Reschedule a Surgery ....................................................................................................... 48
Reschedule a Surgery from the Calendar .................................................................................. 48 Reschedule a Surgery from the Scheduling Tab ........................................................................ 49
Miscellaneous ................................................................................................................................... 50 How to Find a Recent Surgery ....................................................................................................... 50 How to Find a Recent Patient ........................................................................................................ 50
Support Site ...................................................................................................................................... 51 How to Reach the Support Site ...................................................................................................... 51 How to Create an Account on the Support Site .............................................................................. 51 How to Submit a Support Ticket .................................................................................................... 51 Support Submission Guidelines ..................................................................................................... 51
Quick Scheduling from A-Z ............................................................................................................... 53

4
LOGIN
How to Login to Surgimate Practice
Open a Google Chrome browser and visit app.surgimate.com.
How to Reset Your Password
To reset a user’s password, click on Reset Password and enter the correct email address.
Enter your email address and password.

5
HOME
The Surgimate Practice Home screen displays data specific to each user and each practice. The Home screen features graphical reports regarding surgical volume.
Users can view their upcoming tasks for various time frames.

6
AGENDA
The Surgimate Practice Agenda is designed to display users’ Tasks in a clear and organized way. Users can view their own tasks, as well as, tasks assigned to their team.
Items on the Checklist are called Tasks. Tasks are completely customizable to a practice’s specific needs.
How to View Tasks
Users can view their own tasks, as well as, tasks assigned to their team by selecting their name, or team name from the drop down.
Users can customize the Agenda screen to display tasks according to their Due Dates by selecting a time from the drop down.
Users can customize the Agenda screen to display tasks according to their Status by selecting TBD, DONE or N/A.
To sort the Agenda by a specific criterion, click on the double-sided arrow next to the column header.

7
How to Change the Status of a Task
On the Agenda screen users can easily mark multiple tasks as DONE
or N/A.

8
OVERVIEW
The Surgimate Practice Overview is where users can view large sets of data and create relevant reports.
Saved Views
The Surgimate Practice Overview is designed to help users accomplish tasks more efficiently. While Surgimate Practice comes preloaded with standardized Saved Views available to all users, the Overview is also customizable on a per user basis.
How to Create a Saved View Users can create a customized layout on the Overview depending on which task they need to complete. This layout is called a Saved View and it is easily loaded when selected from the drop down.
To add information to the Overview, select which columns to display from the drop down.
To remove a displayed column, click on the ‘x’ next to the column header.
To sort the Overview by a specific criterion, click on the double-sided arrows next to the column header.

9
How to Rename, Edit or Delete a Saved View
To save the view, click on Save and name the Saved View.
To Rename a Saved
View click Edit,
To edit a Saved View, add or remove the relevant columns on the Overview, click Save.
To delete a Saved View, click the trash icon.
Unless there have been changes made on the Saved View, the Save and Edit buttons will not activate and will be grayed out.
Ensure that Update Saved
View is selected and click OK.

10
Reporting
How to Create a Report The Surgimate Practice Overview is not only designed to complete tasks more efficiently, but also to get a “big picture” view of the scheduling process and surgical statistics.
How to Export a Report
To create a report, select which columns to display, from the drop down.
Rearrange columns by dragging them with the to the desired position and releasing when the arrow appears under the column header.
To sort by a specific column, click on the double-sided arrow.
After all data is arranged, click on CSV to export the report to Excel.
To remove a displayed column, click on the ‘x’ next to the column header.

11
CALENDAR
The Surgimate Practice Calendar displays all scheduled surgical appointments. Appointments are color coordinated based on the performing provider. For example, as seen below, all of Dr. Baker’s appointments appear in orange, while all of Dr. King’s appointments appear in yellow and Dr. Murphy’s appointments appear in Teal.
How to Schedule a New Surgery from the Calendar
To schedule a new surgery, click on Calendar. Then click on the day on which the surgery is to be scheduled.

12
When prompted, select Surgery, and then click OK.
Search for the patient by name, account number or date of birth and select the relevant patient.
Enter a time and select a provider from the drop down.
Select a coordinator from the drop down.
If a Template exists for the procedure, select it from the drop down, and then click Create Surgery.
If a Template does not exist, leave the Template field blank and click Create Surgery.
For instructions adding details to a surgery, see the User Guide section called Schedule a New Surgery.

13
Monthly, Weekly, Daily, List Views The Surgimate Practice Calendar can be viewed in several different ways.
To see the Monthly View, select the day to pivot around using the Calendar Navigator, then click Month.
To see the Weekly View, select the day to pivot around using the Calendar Navigator, then click Week.

14
To see the Daily View, select the day to pivot around using the Calendar Navigator, then click Day.
To see surgeries in a list form for a specific day, select the day to pivot around using the Calendar
Navigator, then click List.

15
To filter by surgeon, PA, coordinator, facility or type of appointment, select an option from the drop down. Below, only Dr. Jones’ appointments appear.
Filters
Users can filter the Calendar to only display appointments relevant to them.
How to Filter by Surgeon, PA or Coordinator
How to Filter by Facility
To display appointments at a specific facility, filter the Calendar
by selecting the facility from the drop down. Below, only appointments taking place at the ASC facility appear.

16
How to Filter by Appointment Type
How to Use Multiple Filters
Users can select multiple options within each filter. For example, as seen below, the Calendar is filtered to show surgeries for Dr. Jones, Dr. Williams, and Dr. Thomas.
To display a specific type of appointment only, filter the Calendar by selecting the appointment type from the drop down. Below, only appointments that are Block appointments.
17
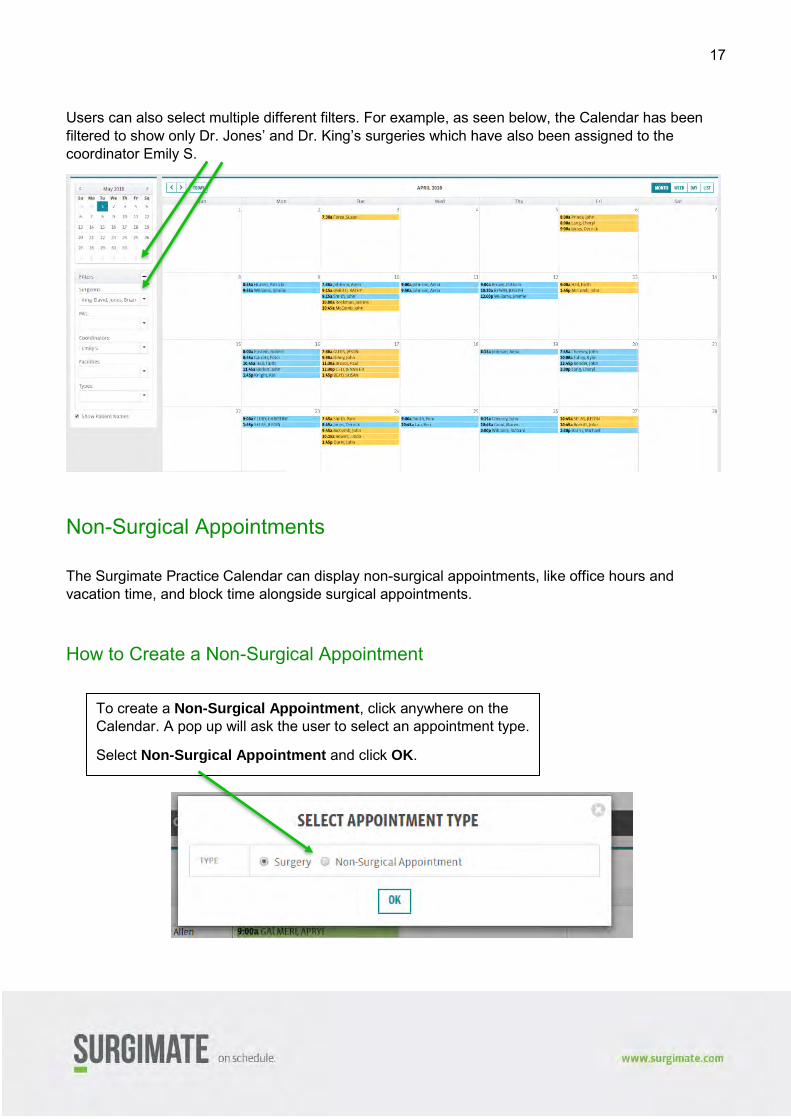
Users can also select multiple different filters. For example, as seen below, the Calendar has been filtered to show only Dr. Jones’ and Dr. King’s surgeries which have also been assigned to the coordinator Emily S.
Non-Surgical Appointments
The Surgimate Practice Calendar can display non-surgical appointments, like office hours and vacation time, and block time alongside surgical appointments.
How to Create a Non-Surgical Appointment
To create a Non-Surgical Appointment, click anywhere on the Calendar. A pop up will ask the user to select an appointment type.
Select Non-Surgical Appointment and click OK.

18
Assign the Non-
Surgical Appointment a subject and then select an appointment type from the drop down.
How to Create a Recurring Non-Surgical Appointment To create a recurring Non-Surgical Appointment, follow the directions above for creating a Non-Surgical Appointment but do not click OK.
Select the surgeon, facility and room, if applicable.
If this is a one-time appointment, ensure the time and date are correct and then click OK.
To create a recurring Non-Surgical
Appointment, check the box that reads Recurring.
Then select a pattern, frequency and range and then click OK.

19
How to View Non-Surgical Appointments
Non-Surgical Appointments will appear on the Calendar along with surgical appointments. You will Dr. Weintraub’s Block at Memorial Hospital is highlighted in yellow.

20
When first creating a surgery, a Template can be selected from the drop down.
When inside a surgery, users can apply a Template to the surgery from any Tab.
To apply a template to a surgery, click Actions for
Surgery and select Apply a Template.
SURGEON TEMPLATES
Commonly performed procedures have the same CPT codes, admission types, case length, equipment, anesthesia, etc. that can be loaded into a Template. By selecting a Template, the user eliminates having to pick these items individually EACH time a commonly performed procedure is scheduled.
How to Apply a Template A Template can be applied at time during the scheduling process.

21
To create a new Template, search for a test patient and click New Surgery.
Select the correct provider for which the Template will be used from the drop down. Templates are surgeon specific but can be easily duplicated so that multiple surgeons can have the same Templates.
Select the scheduler that will typically be associated with this surgeon from the drop down. The coordinator can always be changed later.
How to Create a Template

22
Move between the tabs and select the criteria to add to the template.
After selecting and adding relevant information, click Actions for Surgery on the top right-hand side of the screen.
Choose Create Template.
Create a name for the Template. Then click Show
Summary to view the selected criteria that will be included in the Template.
Click Create Template.
Items that can be included in a template:
• Coordinator • Case Length • Admission Type • Accommodation Type • Anesthesia Type • Special Instructions • Procedure Codes • Diagnosis Codes • Care Team Members • Equipment and DME • Testing Items

23
To edit a template, click on the Overview. Then select the Saved View called Templates from the drop down.
Click on the name of the Template
to edit.
Move between tabs to change or add criteria.
Changes to the Template are saved automatically.
How to Edit a Template

24
To duplicate a Template, click on the Overview. Then select the Saved View called Templates from the drop down.
Click on the name of the Template
to duplicate.
Click Actions for Template on the top right-hand side of the screen and select duplicate Template.
Give the template a name and click Create Template.
How to Duplicate a Template

25
To delete a template, click on the Overview. Then select the Saved View called Templates from the drop down.
Click on the name of the Template to delete.
Click Actions for Template on the top right-hand side of the screen and select delete Template.
Click Yes to confirm the deletion of the Template.
How to Delete a Template

26
To begin scheduling a surgery, search for the relevant patient from the Search Bar.
Then click on New Surgery. Select the performing provider and associated coordinator from the drop down.
Select the relevant Template from the drop down.
If a relevant Template does not exist, continue by clicking Create Surgery.
SCHEDULING A NEW SURGERY

27
Select a facility, admission type and accommodation from the drop downs if relevant.
Enter a case length by typing in numbers or using the double-sided arrow.
To add a procedure, click on the Procedures Tab and search for the relevant procedure by AMA text or CPT code.
Select a body part and modifier from the drop downs, then click Add Procedure.
When a surgery is first created, the Scheduling Tab will automatically be loaded on the screen as the Status of the surgery will be Unscheduled.
For a surgery status to change to Active and therefore appear on the Calendar, users must assign a date.
When the correct diagnosis appears, select it from the drop down.
Scheduling Tab
The Scheduling Tab is where users assign scheduling details to a surgery such as a time and date.
Procedures Tab
The Procedures Tab is where users can add various procedures to a surgical record.
How to Add a Procedure

28
To add additional procedures, repeat the above process.
To remove a procedure, click Remove on the right-hand side of the procedure.
To edit a procedure text, click Details on the right-hand side of the procedure.
Click within the text box and type the relevant text.
The new text will automatically save.
How to Remove a Procedure
How to Edit Procedure Text

29
To add a diagnosis, click on the Diagnoses
Tab and search for the relevant diagnosis by AMA text or CPT code.
When the correct diagnosis appears, select it from the drop down and click the Add Diagnosis.
To add additional diagnoses, repeat the above process.
To add or edit orders, Orders Tab and then click Details on the right-hand side.
To remove a diagnosis, click Remove on the right-hand side of the diagnosis.
Diagnoses Tab
The Diagnoses Tab is where users can add is where users can add various diagnoses to a surgical record.
How to Add a Diagnosis
How to Remove a Diagnosis
How to Edit Diagnosis Text
Orders Tab
The Orders Tab is where users can select the relevant anesthesia type(s) and special instructions for the facility or performing provider.

30
Click the box next to the relevant anesthesia type(s).
To add special instructions, type relevant notes into the textbox.
To add or edit testing items, click on the Testing Tab and then click the box next to the relevant testing items.
Testing Tab The Testing Tab is where users can add relevant testing items to a surgery. These testing items can then be populated on relevant forms.

31
To add or edit a patient’s medical history, click on the Medical Hx Tab.
Navigate through the items and select those applicable.
If a patient has a minimal medical history, users can click Set to No, to mark all items as No and then change relevant items if necessary.
To assign a staff member to a specific role, click on the Care Team Tab and select the relevant name each drop down.
Medical Hx Tab The Medical Hx Tab is designed to record all relevant medical history for a patient.
Care Team Tab The Care Team Tab is where users can assign staff members to their roles.

32
If care team member does not appear in the drop down, users can add it by click New next to the relevant role.
Fill in the relevant details and click OK.
The new care team member will appear in the drop down can then be selected.
Care team members that have been manually added can also be edited by clicking Edit.
To remove a care team member, click Edit and then click the trash icon.
How to Add a Care Team Member
How to Remove a Care Team Member

33
To manually add an appointment, click on the Appointments Tab and select an appointment type from the drop down.
Once an appointment is selected, click on Add Appointment.
The appointment will appear below.
Appointments that are imported from an external system will appear in the drop down as Imported Appointments.
Add the relevant details such as provider, location, date and time.
Appointments Tab The Appointment Tabs is where users can assign associated appointments such as, Post-Ops, Pre-Ops, H&P, to the surgery.
How to Add an Appointment
How to Assign an Imported Appointment

34
Imported Appointments will be automatically populated with the information from the appointment in the external system.
If an Imported Appointment is canceled in the external system, the appointment will automatically be updated to the status canceled in Surgimate Practice.
To remove an assigned appointment from a surgery, click Remove.
To add equipment items, click on the Equipment Tab and search for the item.
How to Remove an Assigned Appointment
Equipment Tab The Equipment Tab is where users can add relevant equipment items to a surgery.
How to Add an Equipment Item

35
Select the relevant equipment item and click Add Equipment.
Fill in the manufacturer, equipment rep, and order details if relevant.
To remove an equipment item, click Remove, on the right-hand side of the item.
To add DME items, click on the DME Tab and search for the item.
How to Remove an Equipment Item
DME Tab
The DME Tab is where users can add relevant DME items to a surgery.
How to Add a DME Item

36
Select the relevant DME item and click Add DME.
Fill in the manufacturer and order details if relevant.
To remove a DME item, click Remove, on the right-hand side of the item.
To assign an imported insurance policy to a surgery, click on the Insurance Tab and then click on the drop down to see available policies.
How to Remove a DME Item
Insurance Tab The Insurance Tab is where users can assign one or more insurance policies to a user, as well as enter relevant benefit and financial information.
How to Add an Insurance Policy
How to Assign an Insurance Policy

37
Select the relevant policy and click Add to Surgery.
Add in the relevant insurance policy details.
Users may assign additional insurance policy, by repeating the above steps. All policies will be show on the Insurance Tab.

38
To remove an insurance policy, click Remove on the right-hand side of the relevant policy.
To add financial information, to a surgery, click on Financials at the top of the Insurance Tab.
Fill in the relevant information and click OK to save.
To add an attachment, click the Attachments Tab and then click Add New.
How to Remove an Insurance Policy
Financials
Attachments Tab
The Attachments Tab is where users can upload relevant documents and photos.
*Note all files must be in one of the following formats: png, jpeg, pdf, docx
How to Add an Attachment

39
Click Choose, to search for the file to upload.
Search and select the relevant file, then click Open. Click Upload, to attach the file.
To view an attachment, click Download on the right-hand side of the relevant attachment.
To remove an attachment, click Delete on the right-hand side of the relevant attachment.
How to View an Attachment
How to Delete an Attachment
Notes Tab

40
A note can be added anywhere the sticky note icon appears.
To view all notes associated with a surgery, click on the Notes Tab.
To add a note, click on the on the stick note icon.
Fill in relevant information and click OK
to save.
The sticky note icon will turn blue and show the number of notes attached to that area. To add another note, click the plus icon.
The Notes Tab is where users can view all notes added throughout a surgery.
How to Add a Note

41
To edit a note, click on the blue sticky note icon.
Select the relevant note by clicking Edit.
Edit the note as necessary.
To remove a note, follow the above steps to edit a note and then click the trash icon.
To print a form, click on the Print Tab. Then check the box next to the relevant form or forms, and click Print on the right-hand side.
.
How to Edit a Note
How to Delete a Note
Print Tab The Print Tab is where users can print forms.
How to Print a Form

42
A preview of the form will appear. Review the form and click the printer icon to print or the download button to download the form to a computer.
.
To edit a form, click on the Print Tab. Check the box next to the relevant form, then click Edit.
How to Edit a Form

43
The form will download and appear at the bottom of the screen. Double click on it to open.
The Checklist
The Checklist is used to keep track of the various tasks associated with scheduling a surgery. The Checklist shows the progress of the scheduling process based on the completed items.
The Checklist shows who a Task is assigned to and when the Task should be completed.
On the Checklist Tab users can assign tasks to specific team members and set due dates for when each task should be completed. When a task is completed, it is marked as done. If a task is not necessary for the specific surgery, it is marked as n/a.

44
To assign a Task, or change who the task is assigned to, click on the Checklist
Tab, and select the relevant team or team member from the drop down.
.
To change a Due Date, click on the Checklist Tab, then click on the Due Date next to the relevant task and select a date from the date picker.
.
How to Assign Tasks
In some cases, Tasks are automatically assigned to a specific user or team.
How to Change a Due Date

45
To view a surgery’s change history, click on the History Tab.
History Tab The History Tab is where users can see the surgery’s audit trail. Every change to the surgery is indicated.

46
To cancel a surgery, click on Actions for
Surgery, located on the upper right-hand side of any tab within the surgery, and select Cancel Surgery.
Select a cancelation reason from the drop down and then click Cancel Surgery.
The status of the surgery will be changed to canceled.
CANCELLATIONS AND FOLLOW-UPS
Surgimate Practice makes it easy to track cancelations and follow-ups.
How to Cancel a Surgery A surgery can be canceled from any tab inside the surgery.

47
To undo a cancellation, click on Actions for
Surgery, located on the upper right-hand side of any tab within the surgery, and select Undo Cancellation.
To mark a surgery for follow-up, click on Actions for Surgery, located on the upper right-hand side of any tab within the surgery, and select Mark as Draft.
Enter a follow-up date and select a follow-up reason. Then click Mark Surgery as Draft.
How to Undo a Cancellation
How to Mark a Surgery for Follow-Up
A surgery can be marked for follow-up from any tab inside the surgery. A surgery is marked for follow-up in Surgimate by saving it as a Draft.

48
To reschedule a surgery from the Calendar, drag and drop the surgery from the old date to the new date.
Select a reschedule reason, then click Reschedule Surgery.
How to Reschedule a Surgery
Reschedule a Surgery from the Calendar

49
To reschedule a surgery from inside a surgery, click on the Scheduling Tab, and then click Reschedule.
Enter a new date and select a reschedule reason, then click Reschedule Surgery.
Reschedule a Surgery from the Scheduling Tab

50
To find a recently viewed surgery, click on Surgeries.
Click on the relevant surgery to reopen.
To find a recently viewed patient, click on Patients.
Click on the relevant patient to reopen their record.
MISCELLANEOUS How to Find a Recent Surgery
How to Find a Recent Patient

51
SUPPORT SITE
How to Reach the Support Site
Support Site is accessed at www.esrm-support.com
How to Create an Account on the Support Site
1. Click “Register”
2. Fill in name, email and create a password
3. Click “Sign Up”
4. An email will be sent to the email address provided. Click on the link to activate the profile
How to Submit a Support Ticket
1. Login using your username and password
2. Click on “Submit a Ticket”
3. Follow the prompts and explain the issue/request. The description should be comprehensive and
include attachments (if applicable) of:
a) A copy of the form(s) with the relevant fields circled. Forms can alternatively be faxed to 917-591-
6614 with reference to the ticket number
b) Relevant screenshots / error messages. If an error message is included, please send the “Details”
of the message (by clicking on “Details”)
4. You will receive an automated response confirming Surgimate’s receipt of your ticket, including a
ticket reference number
5. A Surgimate representative will send you a follow-up email regarding the status of your request
6. You can track the progress of your request(s) by clicking “View Tickets”
7. To respond to an open ticket, select the relevant ticket from “View Tickets”. DO NOT submit a new
ticket
Support Submission Guidelines
The following guidelines must be followed for relevant requests:
52
Bug/Error: Please provide the exact scenario, including all steps and/or relevant screenshots / error
messages versus the desired outcome
Form: Please specify the exact form you are referring to, including the relevant Hospital/Category it is
linked to. Then, either:
o The relevant field should be identified. The problem should be explained, along with the desired
outcome
o If a change needs to be made to a certain field, it should be clearly identified and explained
o If an additional field needs to be added, it should be clearly identified and explained
Printing Issue: Please provide the exact scenario, including all steps and/or relevant screenshots /
error messages. If a specific form is causing issues, this form should be identified
Feature Request: Please be as specific as possible regarding the details of the feature
Suggestion: Surgimate is open to all of your suggestions (Big or small!)

53
QUICK SCHEDULING FROM A-Z