surgical techniques, 2 -...
TRANSCRIPT

Surgical Techniques, 2Advanced Medical Skills
ADVANCED MEDICAL SKILLS 89

PrefaceThe second part of “Surgical Techniques” is the subject-matter of the “Advanced Medical Skills” course. In these mod-ules, the Institute of Surgical Research introduces surgical principles and techniques, and advanced interventions such as surgical operations, e.g. laparotomy, appendectomy, intestinal resection, bowel anastomosis, thoracocentesis and thoracotomy, to interested students. These procedures are taught in simulated real-life, clinical surroundings andcircumstances.
This curricular structure is used to teach and update scientific and medical findings relevant to surgical practice,to enhance clinical reasoning and decision-making, and to provide individual feedback and career advice. Typical fu-ture careers of participants of this course include surgery and surgical specialties, such as gynecology, head and neck surgery, neurosurgery, oncology, ophthalmology, orthopedics, plastic surgery, thoracic surgery, urology, vascular sur-gery, anesthesiology, emergency medicine, critical care and cardiology.
The goals are to foster skills-based decision-making, and to broaden the correlation of physiology, anatomy andpharmacology to acute clinical care. Emphasis is placed on procedures, critical thinking and the assessment of skills, in order to develop the knowledge and skills to support a career choice in those specialties in which expertise in surgi-cal anatomy is critical.
ADVANCED MEDICAL SKILLS90
I. Laparotomy“We took out fifteen pounds of a dirty, gelatinous
looking substance. After which we cut through the fal-lopian tube, and extracted the sac, which weighed sev-
en pounds and one half… In five days I visited her, andmuch to my astonishment found her making up her bed.”
(McDowell E. Three cases of extirpation of diseasedovaria. Eclectic Repertory Anal Rev. 1817; 7:242–244.)
Terms and definitionsLaparo or lapar (Greek: λ α π α ρ α, λ α π α ρ ο σ) means the soft part of the body between the ribs and the hip; itdenotes the flank or loins and the abdominal wall. Thisterm is sometimes used loosely (and incorrectly) in ref-erence to the abdomen in general. Laparotomy therefore means a surgical incision through the flank; less cor-rectly, but more generally, it is an abdominal section at any point to gain access to the peritoneal cavity.
1. History of abdominal surgery
1809 On Christmas morning, Dr. Ephraim McDow-ell (1771–1830) in Danville (Kentucky, USA) successfully removed an ovarian tumor from Mrs. Crawford without anesthetic or antisep-sis. The risk of fatal infection was very high –the operation was bitterly criticized.
1879 Jules Émile Péan (1830–1898) opened the ab-domen of a patient with cancer of the pylorus. The diseased section was cut out; the remain-der was sewn to the duodenum. The patientdied 5 days later.
1880 Ludwig Rydyger (1850–1920) carried out the same procedure, but it had been planned in advance; the patient died within 12 hr, of “exhaustion.”
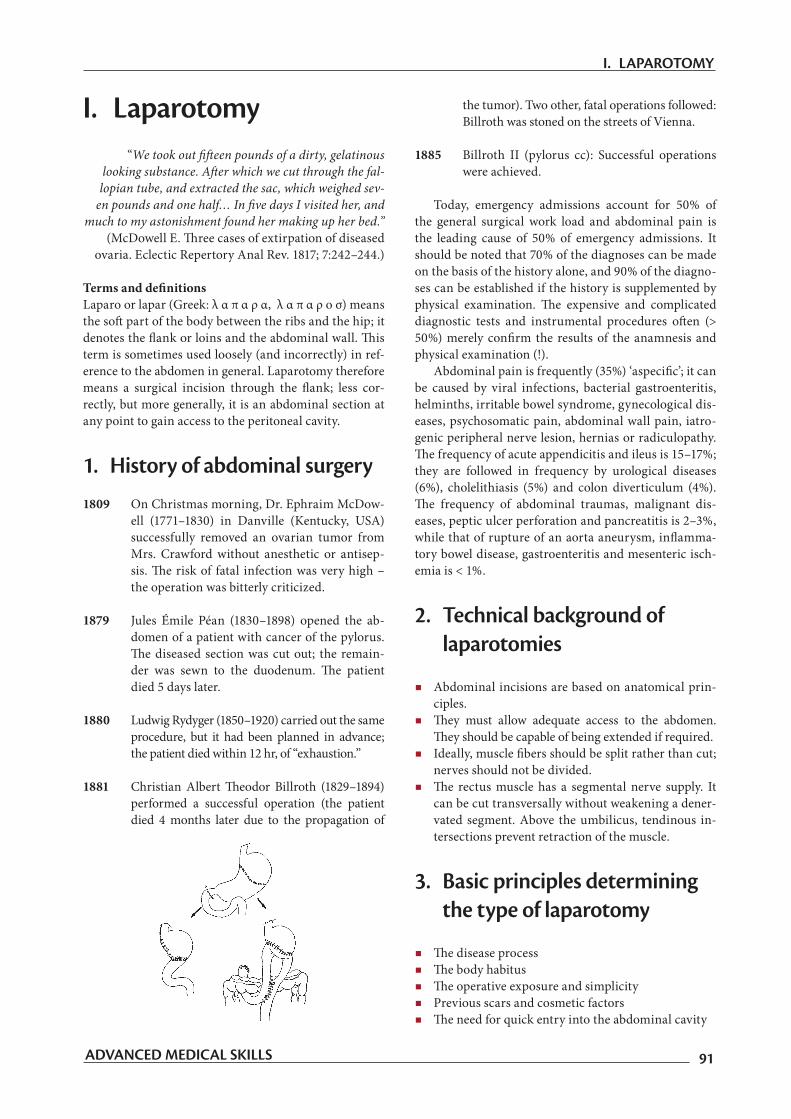
1881 Christian Albert Theodor Billroth (1829–1894)performed a successful operation (the patient died 4 months later due to the propagation of
the tumor). Two other, fatal operations followed: Billroth was stoned on the streets of Vienna.
1885 Billroth II (pylorus cc): Successful operations were achieved.
Today, emergency admissions account for 50% of the general surgical work load and abdominal pain is the leading cause of 50% of emergency admissions. It should be noted that 70% of the diagnoses can be made on the basis of the history alone, and 90% of the diagno-ses can be established if the history is supplemented by physical examination. The expensive and complicateddiagnostic tests and instrumental procedures often (>50%) merely confirm the results of the anamnesis andphysical examination (!).
Abdominal pain is frequently (35%) ‘aspecific’; it canbe caused by viral infections, bacterial gastroenteritis, helminths, irritable bowel syndrome, gynecological dis-eases, psychosomatic pain, abdominal wall pain, iatro-genic peripheral nerve lesion, hernias or radiculopathy. The frequency of acute appendicitis and ileus is 15–17%;they are followed in frequency by urological diseases (6%), cholelithiasis (5%) and colon diverticulum (4%). The frequency of abdominal traumas, malignant dis-eases, peptic ulcer perforation and pancreatitis is 2–3%, while that of rupture of an aorta aneurysm, inflamma-tory bowel disease, gastroenteritis and mesenteric isch-emia is < 1%.
2. Technical background of laparotomies
Abdominal incisions are based on anatomical prin-ciples.
They must allow adequate access to the abdomen.They should be capable of being extended if required.
Ideally, muscle fibers should be split rather than cut;nerves should not be divided.
The rectus muscle has a segmental nerve supply. Itcan be cut transversally without weakening a dener-vated segment. Above the umbilicus, tendinous in-tersections prevent retraction of the muscle.
3. Basic principles determining the type of laparotomy
The disease process The body habitus The operative exposure and simplicity Previous scars and cosmetic factors The need for quick entry into the abdominal cavity
ADVANCED MEDICAL SKILLS 91
I. LAPAROTOMY

4. Recapitulation: Anatomy of the abdominal wall
From left to right: 1. the linea alba; 2. the linea semilu-naris; 3. the lig. arcuatum; and 4. the abdominal projec-tion of the lig. inguinale. During laparotomy, differentanatomic structures are cut in the upper or lower ab-dominal regions at various distances from the midline (anterior vs lateral regions). During a midline incision, the following tissue layers and structures are divided:
the skin, the superficial fascia (Camper’s), the deep fascia (Scarpa’s), the anterior rectus sheath, the rectus abdominis muscle the posterior rectus sheath down to arcuate line, the transversal fascia, the extraperitoneal connective tissue, the peritoneum.
Recapitulation: Important things about nerves Transverse incision is least likely to injure nerves. The iliohypogastric (ih) and ilioinguinal (ii) nerves
are sensory: ih injury leads to a loss of sensation in the skin
over the mons; ii injury leads to a loss of sensation in the labia
majora. Both ih and ii nerves supply the lower fibers of the
internal oblique and transverses; if divided, these fi-bers undergo denervation, which can increase the risk of inguinal hernia.
5. Principles of healing of laparotomy
Patient risk factors that negatively affect woundhealing: Diabetes and obesity Poor nutrition Prior radiation or chemotherapy Age Alcohol Ascites and malignancy Immunosuppression Coughing, retching
Hospital factors that affect wound healing negatively Long operations Along period of hospitalization preoperatively Drains through incision Shaving prior to surgery Type of suture Closure technique
6. Prevention of wound complications
The scalpels should not be the same for the skin anddeep incisions.
A scalpel should be used to cut skin and fascia and not diathermy; the infection rate after diathermy istwice as high.
Deep sc. sutures should be avoided, but absorbable synthetic material (e.g. 4.0 Dexon) may be used sub-cutaneously to decrease tension on the skin.
Use of catgut (for fascia or sc. suturing) should be avoided.
Contaminated or dirty wounds: delayed closure, staples with saline-soaked gauze.
Opening of a bacteria-containing organ: delayed closure, irrigation of all layers, monofilament, nonabsorbable suture, systemic antibiotics 30 min before operation or as
soon as possible, and repeat in a prolonged case.
ADVANCED MEDICAL SKILLS92
I. LAPAROTOMY

II. IncisionsThe term incision originates from the Latin (in + cidere → incisio). An incision can be longitudinal, oblique or transverse. The most important types are demonstrat-ed in association with abdominal operations; the prin-ciples are identical in the other body regions (extremi-ties, chest, neck, etc.).
1. Longitudinal incisions
1. Midline; 2. supraumbilical (upper midline); 3. in-fraumbilical (lower midline); 4. right paramedian; 5. McEvedy preperitoneal approach for inguinal and fem-oral hernia repair (McEvedy PG: Femoral hernia. Ann R Coll Surg Engl, 1950).
1.1. Characteristics of longitudinal incisions
Median incision This was the commonest abdominal intervention be-
fore the era of minimally invasive surgery. The umbi-licus and the falciform ligament above the umbilicus should not be incised. Meticulous, careful handling of bleeding is necessary in the superficial layers beforethe peritoneum is opened. The urinary bladder can bereached through the Retzius space (spatium retropu-bicum Retzii); if there has previously been an opera-tion in this field, a more caudal entry is necessary (thechance of scar formation and adhesions is less).
Advantages: There is excellent exposure to the abdo-men and pelvis, which can easily be extended, and also rapid entry into the abdominal cavity; the mid-line is the least hemorrhagic incision, and is easy to perform; the linea alba is the guide to the midline.
Disadvantages: The scar may be wide and not beau-tiful, with a possible increase in hernias and dehis-cence with the midline.
Paramedian incision The site is parallel to and ~ 3 cm from the midline.
The following structures are divided: skin – anteri-or rectus sheath (the m. rectus is retracted laterally) – posterior rectus sheath (above the arcuate line) – transversalis fascia – extraperitoneal fat – peritone-um. Closure is performed in layers.
Indication: If excellent exposure is needed to one side of the abdomen or pelvis.
Advantages: A lower incidence of incisional hernias. Disadvantages: It takes longer to make and close this
incision, there is an increased risk of infection, and intraoperative bleeding, and a risk of nerve damage; if sited beside the midline, and it can compromise the blood supply in the middle.
2. Oblique incisions
(1). Kocher incision for cholecystectomy (sec. TheodorKocher (1841–1917), Nobel Prize for medicine and physiology in 1909, mainly for thyroid surgery); (2). McBurney incision for appendectomy (after CharlesMcBurney (1845–1913), who performed his first op-eration for appendicitis in 1897); (3). left inguinal; (4).thoraco-abdominal
2.1. The basic type of obliqueincisions
Indications for McBurney muscle-splitting incision (see later): Appendicitis, pelvic abscess and extra-peritoneal drainage.
24
3
1. medián2. fels� medián3. alsó medián4. j.o. paramedián5. McEvedy
1
5
2
4
1. Kocher2. McBurney3. b.o. inguinalis4. thoraco-abdominalis
1
3
ADVANCED MEDICAL SKILLS 93
II. INCISIONS
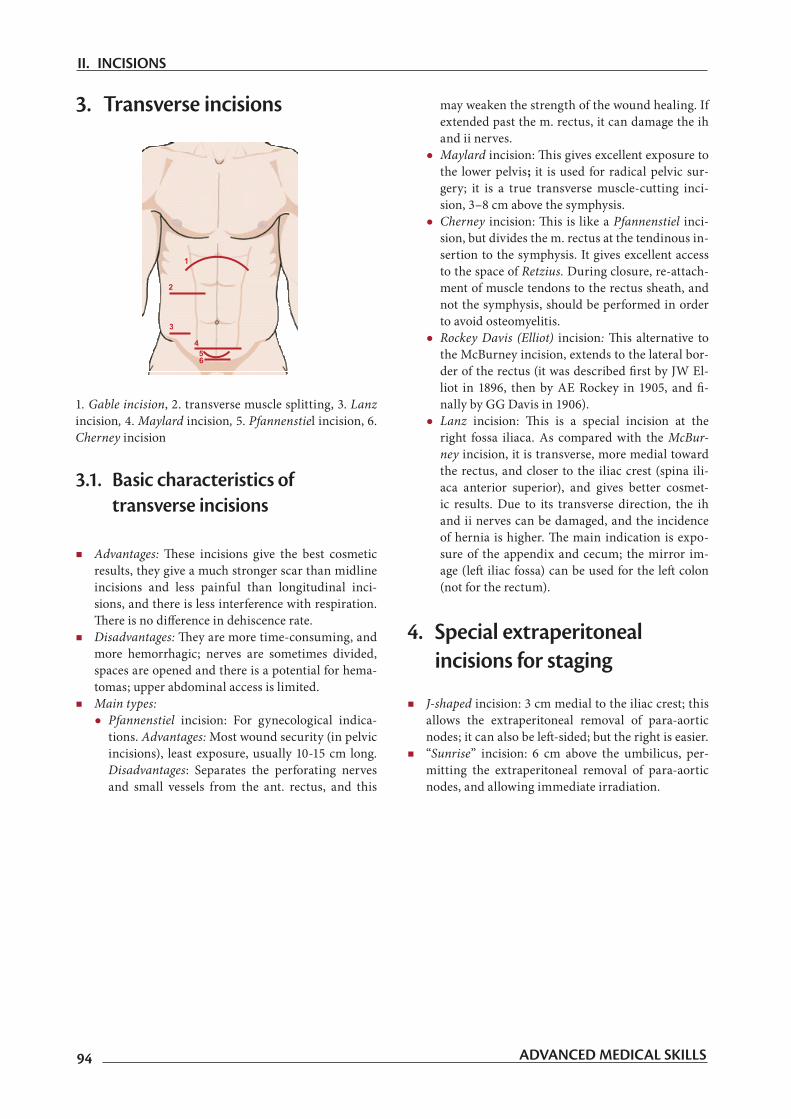
3. Transverse incisions
1. Gable incision, 2. transverse muscle splitting, 3. Lanz incision, 4. Maylard incision, 5. Pfannenstiel incision, 6. Cherney incision
3.1. Basic characteristics of transverse incisions
Advantages: These incisions give the best cosmeticresults, they give a much stronger scar than midline incisions and less painful than longitudinal inci-sions, and there is less interference with respiration. There is no difference in dehiscence rate.
Disadvantages: They are more time-consuming, and more hemorrhagic; nerves are sometimes divided, spaces are opened and there is a potential for hema-tomas; upper abdominal access is limited.
Main types: Pfannenstiel incision: For gynecological indica-
tions. Advantages: Most wound security (in pelvic incisions), least exposure, usually 10-15 cm long. Disadvantages: Separates the perforating nerves and small vessels from the ant. rectus, and this
may weaken the strength of the wound healing. If extended past the m. rectus, it can damage the ih and ii nerves.
Maylard incision: This gives excellent exposure tothe lower pelvis; it is used for radical pelvic sur-gery; it is a true transverse muscle-cutting inci-sion, 3–8 cm above the symphysis.
Cherney incision: This is like a Pfannenstiel inci-sion, but divides the m. rectus at the tendinous in-sertion to the symphysis. It gives excellent access to the space of Retzius. During closure, re-attach-ment of muscle tendons to the rectus sheath, and not the symphysis, should be performed in order to avoid osteomyelitis.
Rockey Davis (Elliot) incision: This alternative tothe McBurney incision, extends to the lateral bor-der of the rectus (it was described first by JW El-liot in 1896, then by AE Rockey in 1905, and fi-nally by GG Davis in 1906).
Lanz incision: This is a special incision at theright fossa iliaca. As compared with the McBur-ney incision, it is transverse, more medial toward the rectus, and closer to the iliac crest (spina ili-aca anterior superior), and gives better cosmet-ic results. Due to its transverse direction, the ih and ii nerves can be damaged, and the incidence of hernia is higher. The main indication is expo-sure of the appendix and cecum; the mirror im-age (left iliac fossa) can be used for the left colon(not for the rectum).
4. Special extraperitoneal incisions for staging
J-shaped incision: 3 cm medial to the iliac crest; this allows the extraperitoneal removal of para-aortic nodes; it can also be left-sided; but the right is easier.
“Sunrise” incision: 6 cm above the umbilicus, per-mitting the extraperitoneal removal of para-aortic nodes, and allowing immediate irradiation.
2
1. Gable2. haránt rácsmetszés3. Lanz4. Maylard5. Pfannenstiel6. Cherney
1
3
456
ADVANCED MEDICAL SKILLS94
II. INCISIONS

III. Laparotomy in surgical training
Median laparotomy is indicated when the whole ab-dominal part of the gastrointestinal tract should be ex-plored. This will be a task in the surgical techniquespracticals (the following operative description is related to animal (e.g. pig) interventions, in which the steps are identical to those of human operations).
1. General rules
Anesthesia Method: General anesthesia. Equipment: Typical monitors, a respirator and a
warming blanket. Insertion of a Foley catheter, and application of an electrodispersive pad. The anesthesi-ologist will insert a nasogastric tube after intubation.
Positioning Supine, with arms on armboards. Special considerations: High-risk areas (for geriatric
patients, particular attention should be paid to the skin and joints).
Skin preparation Method of hair removal: Clippers or wet, with a razor. Anatomic perimeters: Traditionally from the nipple
line across the chest from the table side to the table side to mid-thigh.
Solution options: Betadine (povidone-iodine) or an alternative (e.g. Hibiclens in USA).
Draping/incision In explorations, usually 4 towels (USA: a laparoto-
my T-sheet) are used in the midline (but the isola-tion depends on the location of the lesion; it could be paramedian or oblique, etc; see above).
Supplies General: Blades (3) #10 and (1) #15, scissors, forceps, elec-
tric unit pencil, suction tubing, hemostats (Péan, all sizes), staples (optional), retractors (Gosset) and sutures (ample supply of free ties; sizes 2-0 and 3-0 are most common).
Specific: Catheters, drains, etc.
2. Middle median laparotomy
This can be applied when the diagnosis is uncertain.Its advantages are that a large area can be examined through a small incision and, after the abdomen
has been opened, the incision can be lengthened both cranially and caudally if necessary and can be quickly closed. The disadvantages are that the com-mon aponeurosis of six different strong flat abdom-inal muscles is cut, the statics of the abdominal wall is greatly impaired, and this predisposes to wound disruption and scar hernia often occurs.
The first step is the scrub preparation of the opera-tive field from the xyphoid process to the symphy-sis; draping should be performed as described ear-lier. The midline is shown by the umbilicus; twolaparatomy sponges are placed, one on each side of the planned incision. Generally a short, 10–15-cm-long incision is made, partly above and partly below the umbilicus, going round the umbilicus at a dis-tance of 1–2 cm from the left (not to injure the falci-form ligament and the ligamentum teres hepatis).
In the first phase of the operation, the skin and thesc. fat, and then the aponeurosis of the linea alba are cut. The linea alba is a line-like sheet some tenthsof a mm thick below the umbilicus, while it is wid-er, strong and tendinous above it. The incision cutsthe posterior rectus sheet, transversal fascia, preperi-toneal fat and parietal peritoneum. Below the umbi-licus, the arcuate linea (linea semilunaris Douglasi) borders the area below which there is no rectus sheet.
After the skin incision, Doyen clamps are placed on the wound edges and the wound towels. The sc. fatis usually cut with a diathermy pencil; bleeding can be stopped by compression and, if necessary, by lig-atures and stitches, or the preventive handling of bleeding is used. Recapitulation:
a. A ligature is applied to cuts, or bleeding vessels if the bleeding cannot be stopped by compression. Cut ves-sels are grasped with hemostatic clamps (Péan or mos-quito). The position is checked by wiping off the blood.
ADVANCED MEDICAL SKILLS 95
III. LAPAROTOMY IN SURGICAL TRAINING

If the grasping is not successful, a second hemostat is placed deeper. The vessel is then ligated below theclamp. After the first half-hitch has been tied, the he-mostat is removed and the second half-hitch is tied.
b. Preventive hemostasis: The vessel to be cut is closedwith two hemostats in advance. The vessel is sepa-rated between them, and the two vessel ends are then ligated separately.
c. Suture for hemostasis: A double, 8-form stitch is placed below the bleeding vessel, and the thread is knotted. This suture is applied if a hemostat cannot beused, e.g. in the cases of vessels that are thin-walled or lie in a fascia layer, or retract deep into the tissues.
When the sc. connective tissues are divided, the wound edges are lifted up with two tissue forceps orclamps, and the tissues are cut transversally, layer by layer with Mayo scissors.
During the blunt dissection of tissues, the closed tips of Mayo scissors (or Péan, dissector) are pushed into the tissues. The tissues are dissected by the openingof the instrument with its blunt outer edges. Thesesteps are repeated as necessary.
The incision is deepened until the linea alba is reached,the linea is then picked up with two tissue forceps above the umbilicus and a small incision is made be-tween them (this can be done with Mayo scissors). Theopening is then lengthened cranially and caudally with Mayo scissors while the abdominal wall is lifted up.
If the incision is made exactly in the midline, the rectus sheet will not be opened, and the muscles will not be severed. Above the umbilicus, care should be taken not to injury the ligamentum falciforme hepa-tis. The thick, fatty ligament can be clamped withtwo Péan hemostats and cut between them, a better exploration being achieved in this way.
The peritoneal cavity is isolated from the sc. layer by mak-ing a second draping. Two laparotomy sponges are placed on each side of the incision and fastened to the edges of the peritoneum with Mikulicz clamps on both sides.
The abdominal wall is elevated with the surgeon’s in-dex and middle fingers or with the help of the assis-tant, and the incision of the linea alba is lengthened with Mayo scissors (or a diathermy knife) both cra-nially and caudally to the corners of the skin wound. During this, the peritoneum edges are fixed to thesponges with Mikulicz clamps.
A Gosset self-retaining retractor is placed into the abdominal wound. The greater omentum or intes-tines should not be allowed to come between the jaws of the retractor and the abdominal wall. Theabdominal organs can be moved only with warm sa-line-moistened laparotomy sponges.
After median laparotomy, the following organs canbe examined: 1. the greater omentum; 2. the spleen; 3. the liver, gall bladder and bile ducts; 4. the stomach; 5. the small intestine and mesenteric lymph nodes; 6. the appendix (cecum); 7. the large intestines; 8. the pancreas; 9. the adrenal glands; and 10. the kidneys.
The abdominal wall is closed in layers. Sutures of ap-propriate size should be selected to close the differ-ent layers, and the wound edges should be exactly approximated. It should be checked that no foreign body has been left in the peritoneal cavity. All woundtowels, sponges and instruments should be count-ed. During abdominal operations, sponges clamped with an instrument (a sponge-holding clamp) can be used only for wiping, and instruments are placed on the ends of laparotomy sponges.
The Gosset self-retaining retractor is removed, and the laparotomy sponges isolating the peritoneal cavity are released from the Mikulicz clamps and removed, but the edges of the peritoneum are clamped again.
The wound of the peritoneum is closed with a half-cir-cle muscle needle, with a continuous running suture (in pigs with #40 linen thread). Tissue forceps can be used for the first stitch, but in most cases the wound of theperitoneum can be well explored with Mikulicz clamps. Suturing is usually done towards the umbilicus; the first
ADVANCED MEDICAL SKILLS96
III. LAPAROTOMY IN SURGICAL TRAINING

stitch is inserted at the cranial wound corner, but it can also be performed in the opposite direction, i.e. toward the xyphoid process. If the abdominal wall is closed in multiple layers, the first row of stitches closes the poste-rior rectus sheet together with the peritoneum.
The assistant ties a knot on the short free end ofthe thread. He/she keeps the suture under continu-ous tension with his/her right hand and helps with the closing of the wound edges. When the peritone-um has been closed, only one-third of the thread is pulled through the wound and a doubled thread is left on the other side. The single and double ends ofthe thread are knotted and cut short.
The anterior rectus sheet and sc. wound are closedwith interrupted sutures. The skin is closed with Do-nati stitches, using a skin (1/4 or 3/8) needle and #40 linen thread. The wound is disinfected with Beta-dine and covered with a bandage.
3. Some important details
The principles of closing the fascia The fascia should be closed with the minimum num-
ber of stitches, at least 1 cm from the edges, since ne-crosis may occur (each stitch 1 cm from another and from the edges).
Each stitch should be closed with the same strength; the wound edges should only be approximated (!); sewing in fat or connective tissues should be avoided (except in cases of en masse closure).
The Smead Jones technique involves a “far to far, near to near” suture (en masse far stitches on both sides, then near stitches involving the fascia only). The healing tendency is theoretically good, and thistechnique decreases tension, but it is time-consum-ing and rarely used in clinical practice.
Drainage This may be passive or active (see earlier; the passive
drain is never brought out in the line of the incision (danger of infection!).
The most frequent indications are infection, oozing,and the need to eliminate a cavity.
For clean wounds, the prophylactic use of drainage can be controversial; closed suction can be useful in the case of clean/contaminated wounds (especially if no antibiotics are given).
Wound irrigation Irrigation with physiological saline to prevent infec-
tion (motto: “The solution to pollution is dilution”). Irrigation with antiseptic solution (e.g. 1% povi-
done-iodine) is effective, but can be cytotoxic (e.g.fibroblasts can be damaged).
Closing the skin None of the methods (wound clips, suturing, etc.) is
substantially better than the others. To cover an abdominal skin wound, Opsite, Telfa, etc. can
be applied; the bandage can stay in place for 2–3 days. In the event of irradiation, abdominal clips should
stay in the wound longer.
Special case: the obese patientAccording to international standards, a subject whose body weight exceeds the ideal by 25–30% is overweight; an excess of 30–60% means that the subject is obese; in extreme obesity the body weight exceeds the ideal by 100%. The obesity is “morbid” if the weight excess isgreater than 130%.
The Pickwick syndrome received its name after Joe, thesomnolent, red-faced, fat boy character of Charles Dickens. It was given by Sir William Osler (1918): “A remarkable phe-nomenon associated with excessive fat in young persons is an uncontrollable tendency to sleep like the fat boy in Pickwick.”
Modified routine in operations on obese patients Extensive cleansing of the umbilicus and preopera-
tive bath(s) 5000–8000 U/12 h heparin 2 h before surgery Elastic bandage and stockings Removal of abdominal hair with an electric razor only A very extensive scrub preparation (under skin
wrinkles also), pulling the pannus caudally Transverse incisions should always be made far from
the wet, warm fatty skin wrinkles (duplicates) En masse closure with a continuous running suture Drain and suction bottle over the fascia, removal 72
h later, or if the volume is < 50 mℓ/day Removal of wound clips after 14 days.
ADVANCED MEDICAL SKILLS 97
III. LAPAROTOMY IN SURGICAL TRAINING

McBurney pont (a köldök és a spinailiaca ant. sup. közötti lateralis harmadoló pont)
XX
IV. Basic surgical procedures on the intestines. Appendectomy
Motto: “If in doubt, take it out.”
Open appendectomy was earlier one of the first opera-tions of the young surgeon, but recently it is increasing-ly performed with minimal invasive methods (see lat-er). The intervention is relatively simple in the majorityof the cases; the consecutive steps are built on each other and illustrate the classical, well-planned and safe surgical technique. At present the urgent operation is still the only safe method of treatment of appendicitis (it must be per-formed even if there is only a reasonable suspicion).
1. The history of appendectomy
1521 Jacopo Berengario da Capri (1460–1530) described the appendix as an anatomical structure
1500s Vidus Vidius’s (Guido Guidi, 1500–1569) book of anatomy: the term appendix was in general use
1710 Philippe Verheyen (1648–1710) coined the term appendix vermiformis
1800s “Lower abdominal pain” as a medical di-agnosis
1812 A connection was found between peritonitis and necrotic appendix (John Parkinson).
1824 A connection between periappendicu-lar inflammation and a necrotic appen-dix (Jean Baptiste de Louyer-Villermay)
1827 A connection between a periappendicular abscess and the appendix (François Melier)
1848 Surgical drainage of a periappendicular abscess (Henry Hancock)
1867 Several successful drainages of a periap-pendicular abscess (Willard Parker)
1882 Death of Leon Gambetta, Prime Minis-ter of France. Autopsy proved a periap-pendicular abscess
1886 Reginald H. Fitz (pathologist) suggested that “lower abdominal pain” is “appen-dicitis”, and proposed urgent surgery in the event of signs and symptoms
1887 April 27 George Thomas Morton performed thefirst successful human appendectomy:removal of a perforated appendix
1889 John B. Murphy performed a series of 100 successful appendectomies
1902 A successful operation on the British Crown Prince Edward (VII) before his coronation ceremony.
1.1. Recapitulation: relevant anatomy
The appendix does not elongate as rapidly as the restof the colon, thereby forming a wormlike structure. The average length is 10 cm (2–20) with inner circu-lar and outer longitudinal (continuation of the tae-niae coli) muscle layers. Submucosal lymphoid folli-cles enlarge (peak in 12–20 years) and then decrease in size, correlating with the incidence of appendici-tis. The blood supply is from the appendicular artery(branch of the ileocolic artery).
The location of the base is constant, whereas the po-sition of the tip of the appendix varies: 65% retroce-cal position; 30% at the brim or in the true pelvis; and 5% extraperitoneal, behind the cecum, ascend-ing colon, or distal ileum. The location of the tip ofthe appendix determines early signs and symptoms.
Even in a case of surgically verified appendicitis, theMeckel diverticulum should be looked for at the an-timesenteric edge of the ileum, orally 40–100 cm from the appendix. Both can be considered to be developmental rudiments; their inflammation of-ten develops simultaneously. Meckel diverticulum should be suspected if there is a long-lasting umbili-cal discharge in the anamnesis.
1.2. Open appendectomy
An “RLQ” (right-lower quadrant) incision over the Mc-Burney point (2/3 of the distance between the umbili-cus and the anterior superior iliac spine). The incisionwas described by Lewis L. McArthur in June 1894, but named after Charles McBurney, who presented a casein the July 1894 issue of Annals of Surgery.
ADVANCED MEDICAL SKILLS98
IV. BASIC SURGICAL PROCEDURES ON THE INTESTINES. APPENDECTOMY

The sc. tissue and Scarpa fascia are dissected until the external oblique aponeurosis is identified. This aponeu-rosis is divided sharply along the direction of its fibers.
A muscle-splitting technique is then used to gain ac-cess to the peritoneum.
The peritoneum is lifted up with two forceps or he-mostats in order to avoid damage to the underlying viscera. A small incision is made in the peritoneum and, after entry to the peritoneal cavity (if a purulentfluid sample should be taken for bacteriological di-agnosis), the appendix is sought out.
Retractors are placed into the peritoneum, and the cecum is identified and partially exteriorized, us-ing a moist gauze pad. The taenia coli is followed tothe point where it converges with the other taenia, leading to the base of the appendix. The appendix isbrought into the field of vision. Gentle manipulationmay be required for the blunt dissection of any in-flammatory adhesions.
“Skeletization” includes cutting of the mesoappen-dix and ligation of the appendicular artery (this is the branch of the ileocolic artery originating from the superior mesenteric artery; if it is ligated central-ly, the terminal ileum can be necrotized). The meso-appendix is cut between Péan hemostats in several steps (clamping–cutting–ligating), care being taken that a tissue collar should be left on the remainingproximal stump). Generally 3–0 absorbable thread is used. Finally, the appendix is completely mobi-lized step by step.
The base of the appendix is crushed with a straightKocher clamp (after this step, the operation can-not be regarded as “sterile”), and then ligated with a thin absorbable thread (in animals, #40 linen thread is used).
A seromuscular, purse-string suture is placed around the stump of the appendix, using 3 or 4–0 thread, with a round-bodied serosa needle. Care should be taken as to the depth of the stitches: if they are too deep, the infected bowel content can pass into the abdominal cavity; if they are too superficial, theycan be torn out.
ADVANCED MEDICAL SKILLS 99
IV. BASIC SURGICAL PROCEDURES ON THE INTESTINES. APPENDECTOMY

The appendix is clamped with a Kocher clamp dis-tal to the crushed line and cut above the base tie, just below the Kocher clamp (the scalpel and the appendix should be thrown into the kick bucket). The stump of the appendix is disinfected with po-vidone-iodine and cauterized (to prevent the later secretion of mucus).
The stump of the appendix is buried (the stumpwill be inverted in the lumen of the intestine), and
the purse-string suture is then tied. The buried ap-pendix stump is covered with a serosa layer with a “Z” stitch, i.e. with a zed-like serosa stitch; thin lin-en thread and taper needle are used (this step is not obligatory in humans).
The cecum and appendiceal stump are then placedback into the abdomen. If free perforation is en-countered, thorough irrigation of the abdomen with warm saline solution and drainage of any obvious cavity and well-developed abscesses is required.
The peritoneum is identified, and closed with a continuous 2 or 3–0 suture. The inferior obliquemuscles are re-approximated with a figure-of-eightinterrupted absorbable 0 to 3–0 suture, and the ex-ternal oblique fascia is closed with an interrupted 2–0 PG suture. The skin may be closed with staplesor sc. sutures.
In cases of a perforated appendicitis, the skin should be left open, with delayed primary closure on post-operative day 4 or 5.
ADVANCED MEDICAL SKILLS100
IV. BASIC SURGICAL PROCEDURES ON THE INTESTINES. APPENDECTOMY
V. AnastomosesThe origin of the word is late Latin (by Galen) and Greek(anastomoun = to provide with a mouth; ana + stoma = mouth, orifice). The basic types are side-to-side, end-to-end and end-to-side anastomoses. Anastomoses are applied not only in gastrointestinal surgery, but also in urology and vascular (etc.) surgery. However, the basis of surgical techniques can be best practised in the case of the small intestine. An important general principle is that the techniques (e.g. restoration of the anatomy) serve to restore function (!).
1. Healing of the anastomosis
The most important factors influencing the healing ofthe anastomosis are the good blood supply of the tis-sues, the lack of tension, and an adequate surgical tech-nique, securing the appropriate approximation for the beginning of collagen formation: Early phase (days 0–4): There is an acute inflamma-
tory response, but no intrinsic cohesion. Fibroplasia (days 3–14): Fibroblast proliferation oc-
curs with collagen formation. Maturation stage (>10 days): This is the period of
collagen remodeling, when the stability and strength of the anastomosis increase.
2. Causes of anastomosis insufficiency
Distal obstruction of the lumen Perianastomotic hematoma, infection or sepsis Hypotension or hypoxia Icterus, uremia or diabetes Corticosteroids
3. The characteristics of a good technique
The precise joining of cut tissues results in primarywound healing (per primam intentionem, p.p.).
Placing the lowest possible amount of foreign mate-rial (suture) into the tissues causes the least disrup-tion of the local circulation.
4. Complications Suture insufficiency Stricture
5. Anastomosis techniquesTraditional methods Suturing by hand (there is no evidence that suturing
by hand is better than stapling with staplers) Staplers or clips (the Hungarian surgeon Aladár Petz
(1888–1956) invented the gastric stapler and pio-neered the technique).
New methods Compression (biodegrading) rings Tissue adhesives
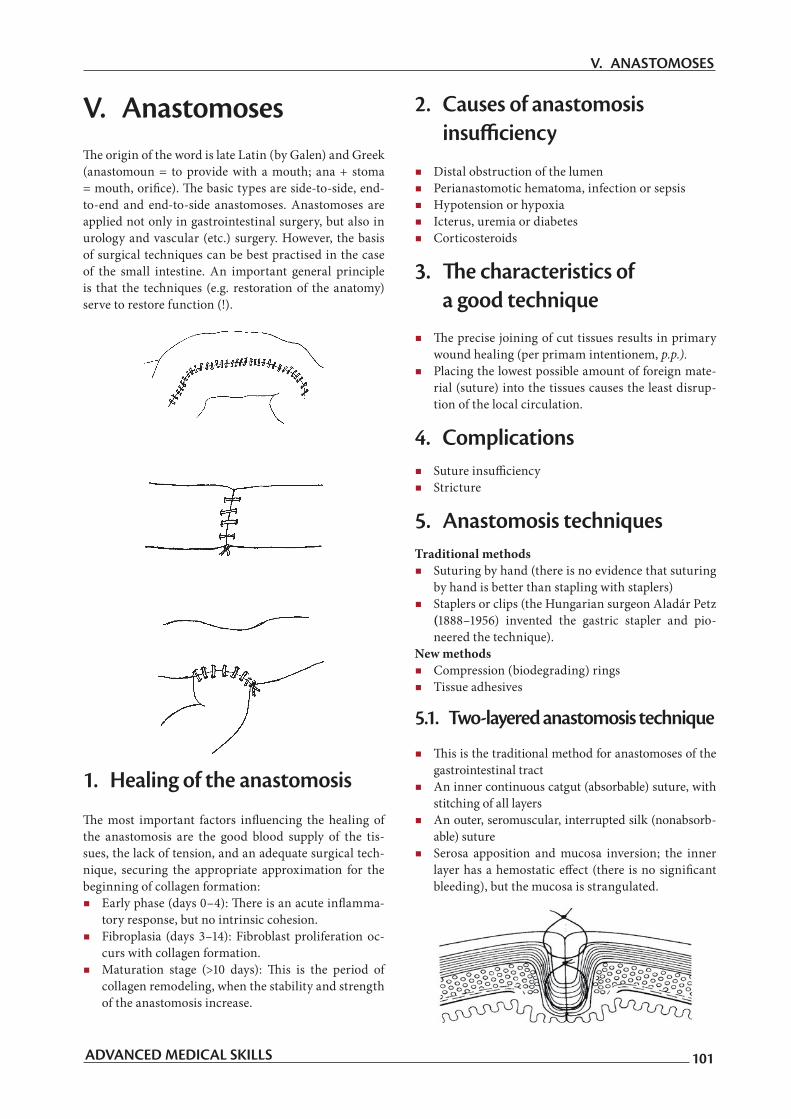
5.1. Two-layered anastomosis technique
This is the traditional method for anastomoses of thegastrointestinal tract
An inner continuous catgut (absorbable) suture, with stitching of all layers
An outer, seromuscular, interrupted silk (nonabsorb-able) suture
Serosa apposition and mucosa inversion; the inner layer has a hemostatic effect (there is no significantbleeding), but the mucosa is strangulated.
ADVANCED MEDICAL SKILLS 101
V. ANASTOMOSES

5.2. Single-layered technique
This is a newer, more up-to-date technique of gastro-intestinal anastomosis
An interrrupted seromuscular suture, with absorbable (e.g. 3/0 Vicryl) thread. The submucosal layer is strongand the blood supply is only minimally damaged.
5.3. Stapler-made anastomosis
This can be a side-to-side anastomosis with a straightsewing machine (e.g. GIA = gastrointestinal anasto-mosis staplers).
It can be an end-to-end anastomosis with a circular machine (e.g. CEEA = circular end-to-end anasto-mosis stapler).
The stapler decreases the frequency of radiologicallydemonstrated anastomosis insufficiency, but the in-cidence of anastomosis stricture is increased.
6. Surgical techniques of intestinal anastomoses
Requirements include a supine position, general an-esthesia, a midline laparotomy and a good exposure; the affected bowel must be mobilized (freed).
The gastrointestinal tract should always be consideredinfected when the intestinal lumen has been closed; new, sterile instruments and draping are necessary.
The pathological tissue must always be excised witha normal intact margin (!); the blood supply of the remaining intestinal tissue is critical.
Relatively equal diameter segments of bowel should be sewn together. The anastomosis should be ten-sion-free and leak-proof.
The mesenteric defect is closed (prevention of inter-nal hernia formation).
7. Closure of enterotomy
After laparotomy, the injured bowel segment isidentified and isolated. The borders are temporar-ily closed (Klammer intestinal clamps) and the de-fect is enlarged/incised, i.e. converted to a surgical incision.
A horizontal suture or end-to-end anastomosis is performed.
Irrigation, handling of bleeding and closure in layers.
ADVANCED MEDICAL SKILLS102
V. ANASTOMOSES

8. Surgical unification of bowelsegments by end-to-end anastomosis
The two bowel ends are put in close approximationand two interrupted, holding sutures are placed. A continuous running suture is applied to close the back, and then the front part of the intestinal wall.
After closure of the deeper layer, the serosa (secondlayer) is closed.
The passage of the anastomosis is checked by exami-nation with the fingers.
1
2
3
4
5
6
7
8
9
10
ADVANCED MEDICAL SKILLS 103
V. ANASTOMOSES

VI. Abdominal drainageThe most frequent causes of surgical diseases of thesmall intestine are mechanical causes (obstruction, strangulation/adhesion, volvulus, intussusception or fe-cal impaction), vascular causes (ischemic colitis, occlu-sion/infarct, or arteriovenous malformations), inflam-mation (diverticulosis/diverticulitis, ulcerative colitis, Crohn’s disease or appendicitis) or traumas (blunt/pen-etrating injuries). Invasive abdominal diagnostic inter-ventions may be needed primarily in these latter cases.
1. Historical background of invasive diagnostic procedures
1950 Four quadrant needle paracentesis.1965 Diagnostic peritoneal lavage (DPL – the term
was coined by Root HD et al. Diagnostic peri-toneal lavage. Surgery. 1965; 57:633–637). Thesensitivity is 98%, but the specificity is only80% (no information is provided on the retro-peritoneum).
1990s Laparoscopy became widespread. It has the ad-vantage of good visualization of the intraab-dominal organs, whereas it is disadvantageous that no information is available on the retro-peritoneum, and the closure is ‘complicated’ as compared with punctures.
2. Indication of diagnostic peritoneal lavage
An equivocal clinical examination and difficulty inassessing a patient.
Persistent hypotension, despite adequate resuscitation. Multiple injuries, or stab wounds where the perito-
neum has been breached. Lack of alternative diagnostic methods (US or CT).
2.1. Open system
After insertion of a urinary catheter and a nasogastrictube, local anesthesia is started. A vertical, ~ 2-cm sub-umbilical incision is made, and the linea alba is divided.
An incision is made in the peritoneum, a peritoneal dialysis catheter is inserted, the free blood or gastric content is aspirated, etc.
If no blood is seen, 1 ℓ of normal saline is infused, a period of 3 min being allowed for equilibration. The drainage bag is placed on the floor and drainageproceeds (motto: “Gravity is our friend”).
A 20-mℓ sample should be sent to the laboratory for the measurement of red blood cells, white blood cells and microbiological examination (DPL is positive if the red cell count is > 100,000 / mm3, the white cell count is > 500 / mm3, or bile, bacteria or fecal mate-rial is present).
In the event of positive results, DPL is continued un-til surgical exposure (laparotomy), and the demon-stration and treatment of the causes.
The peritoneum is closed with a purse-string suture,and the skin and sc. layers are then closed with an interrupted suture.
2.2. Closed system
After insertion of a urinary catheter and nasogas-tric tube, local anesthesia is initiated, after which acatheter is introduced with the aid of a guide wire (a blind technique; the morbidity of 9%, is mostly due to vessel injury).
The routine is modified in obese patients (special in-dication for closed DPL):
Computer tomography is impossible (weight, diam-eter limits, poor image, higher radiation).
Open DPL is contraindicated as the depth of the puncture (peritoneum) can not be judged, and hence the complication rate of the closed technique is much higher. The half-closed/blind Seldinger or modified Seldinger technique is possible.
3. Therapeutic (chronic) lavage:peritoneal dialysis
Dialysate is injected into the peritoneal space through a two-way Tenckhoff catheter, which re-mains permanently in place. The peritoneal dialy-sate, composed mostly of salts and sugar (glucose),
ADVANCED MEDICAL SKILLS104
VI. ABDOMINAL DRAINAGE

encourages ultrafiltration. The peritoneum allowswaste and fluid to pass from the blood into the dial-ysate, which is pumped out.
The catheter exits the skin laterally to the midline.A 20–30 cm long connecting tube (transfer set) can be fastened to this with a screw thread, with the help of which the sacks containing the dialysing solution can be attached. The transfer tube can be closed witha roller-wheel or with a sterile screw stopper.
4. Therapeutic (postoperative)rinsing drainage (see the basics in section IV.10)
The main indication of continuous postoperativedrainage was earlier severe sepsis. Today it is used mostly for intraabdominal abscesses and inflam-matory processes. It is simple and cheap and can be life-saving (see details in Csaba Gaál: Alapvető Se-bésztechnika, Medicina, 1998).
Principle: If a cavity is present, it must be open; pri-mary closure is forbidden.
Problems: Clotting, fibrin plug and cavity compart-ment formation resulting from adherence, which in-creases the risk of bacterial infections.
Main types: Rubber tubes and suction tubes (see sec-tion IV.10).
ADVANCED MEDICAL SKILLS 105
VI. ABDOMINAL DRAINAGE
VII. Basic thoracic surgical practicals
A thoracic trauma is generally sudden and dramatic; it plays a role in 25% of the cases of mortality caused by traumas overall. Two-thirds of the deaths occur af-ter admission to hospital. It has serious complications: hypoxia, hypovolemia, and respiratory and circulato-ry insufficiency are frequent. It can be blunt and non-penetrating (a traffic accident, a direct blow, a fall, ora deceleration and compression injury) or penetrating (shot and stabbed wounds, in which primarily the pe-ripheral lung is affected). The chest wall, pleura, lungparenchyma, upper airways/mediastinum or heart may be injured. If the state of the patient is unstable, tension pneumothorax, pericardial tamponade and massive he-mothorax may be suspected (the route of the trauma may be an indicator). Complementary examinations are often needed (echocardiography, bronchoscopy, esoph-agography, esophagoscopy and aortography). Iatrogen-ic traumas are frequently caused by the introduction of nasogastric tubes (endobronchial introduction), chest tubes (sc., intraparenchymal or intrafissural introduc-tion) or central venous catheters.
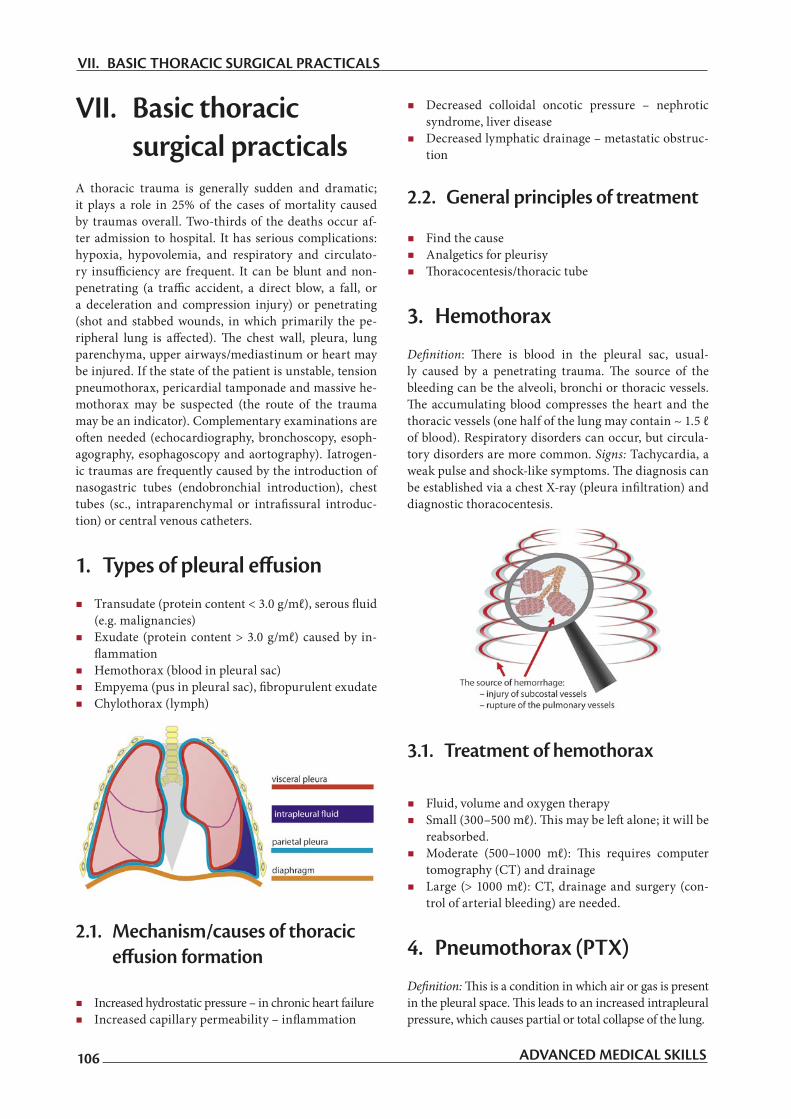
1. Types of pleural effusion
Transudate (protein content < 3.0 g/mℓ), serous fluid(e.g. malignancies)
Exudate (protein content > 3.0 g/mℓ) caused by in-flammation
Hemothorax (blood in pleural sac) Empyema (pus in pleural sac), fibropurulent exudate Chylothorax (lymph)
2.1. Mechanism/causes of thoracic effusion formation
Increased hydrostatic pressure – in chronic heart failure Increased capillary permeability – inflammation
Decreased colloidal oncotic pressure – nephrotic syndrome, liver disease
Decreased lymphatic drainage – metastatic obstruc-tion
2.2. General principles of treatment
Find the cause Analgetics for pleurisy Thoracocentesis/thoracic tube
3. Hemothorax
Definition: There is blood in the pleural sac, usual-ly caused by a penetrating trauma. The source of thebleeding can be the alveoli, bronchi or thoracic vessels. The accumulating blood compresses the heart and thethoracic vessels (one half of the lung may contain ~ 1.5 ℓ of blood). Respiratory disorders can occur, but circula-tory disorders are more common. Signs: Tachycardia, a weak pulse and shock-like symptoms. The diagnosis canbe established via a chest X-ray (pleura infiltration) anddiagnostic thoracocentesis.
3.1. Treatment of hemothorax
Fluid, volume and oxygen therapy Small (300–500 mℓ). This may be left alone; it will be
reabsorbed. Moderate (500–1000 mℓ): This requires computer
tomography (CT) and drainage Large (> 1000 mℓ): CT, drainage and surgery (con-
trol of arterial bleeding) are needed.
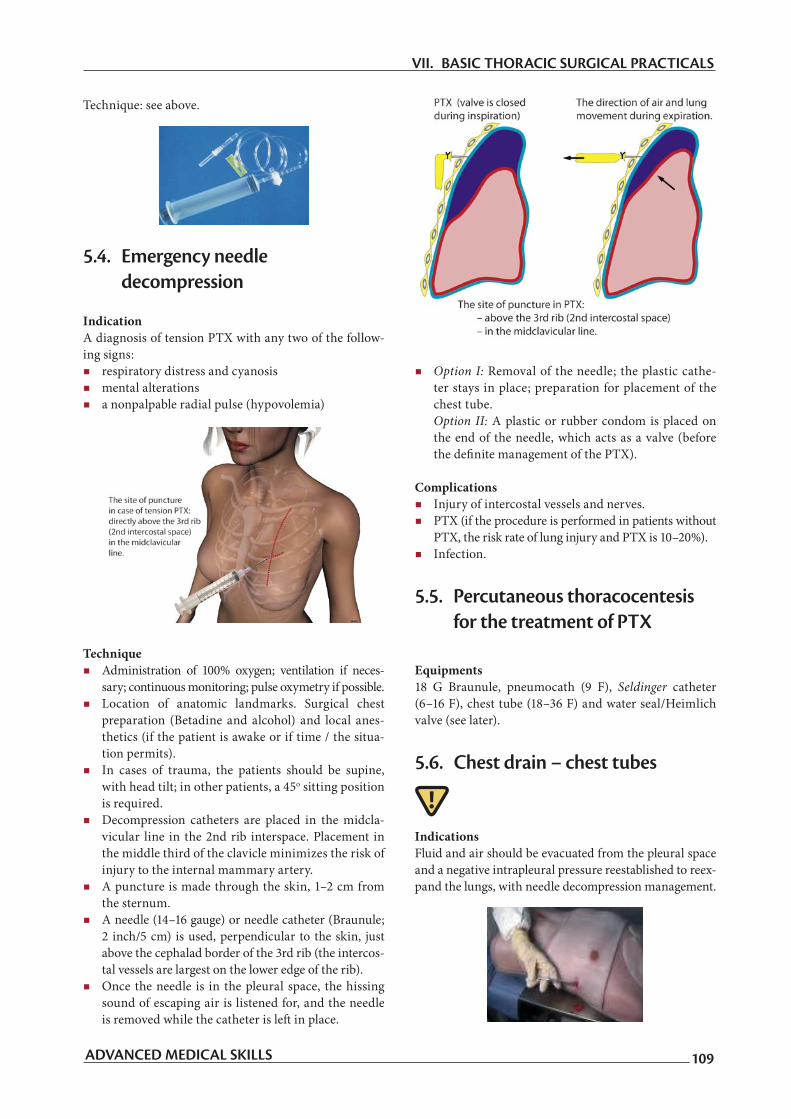
4. Pneumothorax (PTX)
Definition: This is a condition in which air or gas is presentin the pleural space. This leads to an increased intrapleuralpressure, which causes partial or total collapse of the lung.
ADVANCED MEDICAL SKILLS106
VII. BASIC THORACIC SURGICAL PRACTICALS

4.1. Etiology of PTX
Spontaneous, primary PTX Blunt chest traumas (motor vehicle accidents and
falls) Penetrating traumas (gunshot and knife injuries),
rib fractures and flail chest Rib rupture and unstable chest
4.2. Clinical signs of PTX
Tachypnea and tachycardia. Questions: Are there breathing difficulties, or pleurisy? Show its location.
Cyanosis Diminished breath sounds; hyper-resonance on the
affected side Neck vein engorgement Paradoxical movement of the unstable chest; deviat-
ed trachea Cardiogenic shock
4.3. Types of PTX
Closed or open Traumatic or spontaneous Simple or tension Primary or secondary
4.4. Closed PTX
This can occur spontaneously, or it may be a conse-quence of a blunt trauma or an abrupt pressure rise (a blast or diving). It is particularly frequent in thin, 20–40-year-old male smokers. Most cases resolve after 1–2days. Chest tubes and surgical repair are rarely required (< 10%). Treatment: Oxygen, iv. fluid, circulatory moni-toring and a chest tube if needed.
4.5. Open PTX
Definition: A hole in the chest wall allows atmospher-ic air to flow into the pleural space, leading to an in-creased intrapleural pressure, resulting in partial or total collapse of the lung. This can be caused by a pen-etrating injury or be a side-effect of a therapeutic pro-cedure, e.g. the insertion of a central venous or pulmo-nary artery catheter.
4.5.1. Signs of open PTX
A sucking or hissing sound is audible on inspiration as the chest wall rises
Blood, foam and blood clots are coughed up Shortness of breath / difficulty in breathing Pain in the shoulder or chest that increases with
breathing
4.5.2. Treatment of open PTX
Wound toilette: Larger wounds should be treated first.Check for entry and exit wounds (look and feel). An air-tight, complete cover should be provided at least 5 cm beyond the edges of the wound. Three edges of airtightmaterial (the top edge and two sides) are taped down so as to create a “flutter valve” effect that allows air to es-
ADVANCED MEDICAL SKILLS 107
VII. BASIC THORACIC SURGICAL PRACTICALS

cape from, but not enter the chest cavity (in the USA, “Petroleum Gauze” or “Asherman Chest Seal” (flutter-valve seal) can be used).
4.6. Tension PTX
Iatrogenic or traumatic lesions of the visceral or pari-etal pleura (often associated with rib fracture) is respon-sible for one-third of preventable thoracic deaths(!); in these cases, the rupture of the pleura behaves as a one-way valve. Mechanism: A one-way valve allows air to en-ter the pleural space and prevents the air from escaping naturally. The increased thoracic pressure leads to col-lapse of the ipsilateral lung, and pushes the heart, vena cava and aorta out of position (mediastinum shift), lead-ing to a poor venous return to the heart, a decreased CO and hypoxia. Etiology: barotraumas secondary to positive-pressure ventilation (PEEP) complication of enteral venous catheter placement,
usually subclavian or internal jugular conversion of idiopathic, spontaneous, simple PTX
to tension PTX (an occlusive dressing functions as a one-way valve)
chest compressions during cardiopulmonary resus-citation
fiberoptic bronchoscopy with closed-lung biopsy markedly displaced thoracic spine fractures.
4.7. Signs and symptoms of tension PTX
Early findings Chest pain and anxiety Dyspnea, tachypnea and tachycardia Hyper-resonance of the chest wall on the affect-
ed side; diminished breath sounds on the affected side
Late findings A decreased level of consciousness A tracheal deviation toward the contralateral side Hypotension and cyanosis Distension of the neck veins (this may not be present
if the hypotension is severe) and increased CVP
5. Treatment of PTX
5.1. Basic questions
How much air is present? What is its source? What is the general condition of the patient? What is
the severity of other injuries? Are critical care facilities available?
5.2. Treatment of simple PTX
If the size of the PTX is < 20%, bed rest and limited physical activity are called for.
If the size of the PTX is > 20%, thoracocentesis or insertion of a chest tube attached to an underwater seal is necessary.
5.3. Treatment of simple PTX with needle thoracocentesis
RequirementsA 22–20 gauge needle, extension tubing, a three-way stopcock, a 20 to 60 mℓ syringe and supplementary oxy-gen are required, +/- iv. fluids and analgetics.
ADVANCED MEDICAL SKILLS108
VII. BASIC THORACIC SURGICAL PRACTICALS
Technique: see above.
5.4. Emergency needle decompression
IndicationA diagnosis of tension PTX with any two of the follow-ing signs: respiratory distress and cyanosis mental alterations a nonpalpable radial pulse (hypovolemia)
Technique Administration of 100% oxygen; ventilation if neces-
sary; continuous monitoring; pulse oxymetry if possible. Location of anatomic landmarks. Surgical chest
preparation (Betadine and alcohol) and local anes-thetics (if the patient is awake or if time / the situa-tion permits).
In cases of trauma, the patients should be supine, with head tilt; in other patients, a 45o sitting position is required.
Decompression catheters are placed in the midcla-vicular line in the 2nd rib interspace. Placement in the middle third of the clavicle minimizes the risk of injury to the internal mammary artery.
A puncture is made through the skin, 1–2 cm from the sternum.
A needle (14–16 gauge) or needle catheter (Braunule; 2 inch/5 cm) is used, perpendicular to the skin, just above the cephalad border of the 3rd rib (the intercos-tal vessels are largest on the lower edge of the rib).
Once the needle is in the pleural space, the hissing sound of escaping air is listened for, and the needle is removed while the catheter is left in place.
Option I: Removal of the needle; the plastic cathe-ter stays in place; preparation for placement of the chest tube.
Option II: A plastic or rubber condom is placed on the end of the needle, which acts as a valve (before the definite management of the PTX).
Complications Injury of intercostal vessels and nerves. PTX (if the procedure is performed in patients without
PTX, the risk rate of lung injury and PTX is 10–20%). Infection.
5.5. Percutaneous thoracocentesis for the treatment of PTX
Equipments18 G Braunule, pneumocath (9 F), Seldinger catheter (6–16 F), chest tube (18–36 F) and water seal/Heimlich valve (see later).
5.6. Chest drain – chest tubes
IndicationsFluid and air should be evacuated from the pleural space and a negative intrapleural pressure reestablished to reex-pand the lungs, with needle decompression management.
ADVANCED MEDICAL SKILLS 109
VII. BASIC THORACIC SURGICAL PRACTICALS

TechniqueThere are two main methods are: a) with a trocar, or b)a blunt technique (see above): Anatomic landmarks are located, and local anes-
thetic is administered (a 3-cm horizontal incision is made along the midaxillary line over the 5th or 6th rib). Sedation; narcotics; preparation of the area with Betadine. Draping is optional.
A 2–3-cm long transverse incision is made in the skin, followed by the blunt dissection of sc. tissues, exactly over the rib. The parietal pleura should bestabbed with the instrument used for preparation (Péan, dissector).
The rubber-gloved index finger should be introducedthrough the opening (to avoid injuries to the lung, etc. and free adhesion).
The proximal end of the chest tube is introduced tothe appropriate length into the pleural cavity. Thetube is introduced along the inner surface of the chest in the backward and upward direction.
During expiration, vapor can be seen in the tube, or the outflow of the air is audible.
The tube is attached to a suction bottle with an un-derwater seal, and then fixed to the skin with a stitch.
Complications of chest tube placement Mechanical failure of air or fluid drainage due to a
tube obstruction: blood clots or kinks. Placement in a fissure, infradiaphragmatic or extra-
pleural. Infection of the entry site or pleural fluid (a sterile,
aseptic technique is mandatory; the prophylactic use of antibiotics is controversial).
Bleeding is rare (if the tube is placed over the top of the rib to avoid vessels).
6. Chest drainage system
Purpose: Negative pressure is created to facilitate re-ex-pansion of the lungs and to remove air, blood or other fluids from the pleural space or mediastinal space. Theduration is usually 2–3 days (24 h after re-expansion), ifthe drainage is less than 50–70 mℓ/h.
6.1. Indications
Mediastinal, cardiac surgery, chest trauma Traumatic injury, fractured rib (intrapleural fluid,
PTX, hemothorax, pleural effusion) Management of complications (CVC insertion, lung
biopsy)
6.2. Types
Wet suction (Bülau suction or 3-bottle systems). Theair or fluid is removed from the pleural space or me-diastinum. The water-seal acts as one-way valve, al-lowing air to leave pleural space, but not to return, maintaining a negative pressure.
ADVANCED MEDICAL SKILLS110
VII. BASIC THORACIC SURGICAL PRACTICALS

Waterless/dry (Heimlich valve) system. A valve is opened by the pressure of the air or the fluid; afterits closure, no backflow is possible. During the one-way function of the soft rubber valve in the plastichousing, air leaves to the environment. This systemis portable, and can be used for home nursing.
One-piece, three-chamber, disposable plastic systems (USA: Pleurevac, Atrium/Ocean, or Thoraseal).
Autotransfusion: This is a variation of the water-sealsystem, with an attached container so that the blood which drains from the chest can be salvaged for au-totransfusion.
7. Flail chest
Definition: This involves a multiple (three or more) rup-ture of the ribs in two or more areas or/and a fracture of the sternum. Signs: Severe local pain, rapid, superfi-cial breathing, paradoxical chest wall movement (some-times not obvious at the beginning), PTX and lung con-tusion can be present, which causes severe hypoxia. There is paradoxical chest wall movement: the serial rib
fracture leads to chest instability, and the bellows move-ment of the chest ceases. Signs: Superficial asymmet-rical and uncoordinated breathing and crepitus of the ribs. Treatment: Improvement of the respiratory func-tion, administration of humidified oxygen, chest tubes,ventilation (PEEP), circulatory support, fluid therapyand analgetics.
8. Cardiac tamponade
Definition: Blood accumulates in the pericardium. As it has poor compliance, 150–200 mℓ of blood can result in a tamponade, exerting pressure on the heart and limit-ing the cardiac filling and CO. A decreased CO causes
ADVANCED MEDICAL SKILLS 111
VII. BASIC THORACIC SURGICAL PRACTICALS

hypotension. It may occur in patients with either a pen-etrating or a blunt chest trauma. Signs: Shock, increased jugular venous BP, pulsus paradoxus (the systolic BP decreases during inspiration as compared with expira-tion). In classical cases: Beck’s triad: 1. distended neck veins, 2. muffled heart sounds, 3. hypotension. Therapy:Resuscitation and pericardiocentesis.
The technique of pericardiocentesis
Before and during the intervention, the monitoring of vital signs (ECG) is necessary. The xyphoidal andsubxyphoidal area should be surgically prepared (lo-cal anesthesia should be applied if time allows).
A #16–18 G, 6-inch (15-cm) or longer needle cathe-ter attached to a 20-mℓ syringe is necessary.
The skin should be punctured at an angle of ~ 45°, 1–2 cm from the left lower part of the xypho-chondri-al junction, and the needle should then be carefully advanced in the direction of the apex of the scapula.
If the needle goes too deep, lesion potential (neg-ative QRS) can be seen in the ECG: the needle should be withdrawn until normal ECG is restored. When the tip of the needle enters a pericardial cav-ity engorged with blood, as much fluid as possibleshould be aspirated.
During aspiration, the epicardium comes close to the pericardium and at the same time to the tip of the needle, and thus the lesion potential can reap-pear in the ECG. The needle should then be slight-ly withdrawn. After completion of the aspiration thesyringe should be removed, and a closed three-way stopcock should be attached to the needle catheter and fixed.
Option: In the Seldinger technique, a flexible wireis advanced through the needle into the pericardial cavity. The needle is removed, a #14-G flexible cath-eter is then introduced through the wire, the wire is removed, and finally a three-way stopcock is at-tached to the catheter.
ADVANCED MEDICAL SKILLS112
VII. BASIC THORACIC SURGICAL PRACTICALS

VIII. TracheostomyTracheostomy has been applied for centuries for the treatment of upper tracheal obstructions threatening as-phyxia. In recent decades, it has often been used for themanagement of mechanical respiratory insufficiency andfunctional (dynamic) respiratory failure too. In most cases, endotracheal intubation solves the respiratory in-sufficiency and tracheostomy is not required. In emer-gency cases, if the personal and technical conditions of intubation are lacking, conicotomy/cricothyrotomy is performed. Following a skin incision, the ligamentum conicum (lig. crycothyroidum) just underlying the skin is cut transversally between the thyroid and cricoid carti-lages and endotracheal intubation is performed. Trache-ostomy is performed if the airway cannot be held open in any other manner or if the endotracheal intubation (after1 week) or conicostoma (after 48 h) must be terminated,but the airway must be maintained in an open state.
1. States evoking mechanical respiratory insufficiency
Obstruction: e.g. bilateral recurrent nerve paralysis or a severe laryngeal injury.
Obturation: a foreign body, blood, secretion, croup or tumor.
Constriction: edema, inflammation or a scarred stricture. Compression: e.g. struma, lymphoma or other ma-
lignant tumors.
2. States evoking functional respiratory failure/insufficiency
Diseases of the central nervous system: e.g. injuries, tumors or inflammatory states.
Drugs and toxins influencing the function of thecentral nervous system.
Pathological conditions influencing the respiratorymechanism, such as lesions and diseases of the chest wall, respiratory muscles, lungs and their innervations.
An altered cardiopulmonary state/relations, i.e. de-creased oxygenation due to decreased lung perfu-sion and ventillation and impaired diffusion.
3. Advantages of intubation and tracheostomy
The upper airways are open. The anatomic dead space can be decreased by 50%. Reduced airway resistance. Reduced risk of aspiration.
Suctioning of fluids from deeper airways is possible. Possibility of the use of a ventillator.
4. The surgical technique ofintubation – preparation of an upper tracheostomy
In adults, generally an upper tracheostomy is made, ex-cept when the airway stricture is deeper. After the appropriate positioning, the patient is anesthe-
tized and intubated, and the skin is scrubbed and draped. Following palpation of the cricoid cartilage, the first andsecond tracheal cartilages are looked for. Between them, a short transverse cutaneous incision is made.
The white fascia running in the midline (linea medi-ana alba colli) is elevated with dressing forceps and cut with scissors longitudinally.
The longitudinal strap muscles are grasped on bothsides with dressing forceps and separated with blunt dissection in the midline. The wound is exposedwith retractors by the assistant.
The fascia covering the trachea is lifted by dressing for-ceps and divided longitudinally, and the membranous sheet of the trachea then cut transversally with a scal-pel between the first and second tracheal cartilages.
A mosquito Péan hemostat is placed into the opening. The second tracheal cartilage is elevated by this andcut through longitudinally in a downward direction. In this way a T-shaped opening is created/formed.
An atraumatic stitch is placed into both corners of the cut cartilages. The edges can be opened by thestitches like casements. In the opening, the endotra-cheal tube becomes visible.
A trachea cannula of appropriate size is selected. Theballoon of the cannula must be previously tested.
The air is sucked from the balloon of the endotra-cheal tube with a syringe, and the tube is then with-drawn over the stoma.
With the help of the stitches, the opening is ex-plored; and the tube is carefully placed into the opening and introduced into the trachea. The obtu-rator is removed from the tube, and the balloon of the tube is inflated.
The stitches are removed from the cartilage, orare individually knotted and then tied together over and under the tube.
ADVANCED MEDICAL SKILLS 113
VIII. TRACHEOSTOMY

IX. Basics of minimally invasive surgery
Motto: “The future has already started!”
The goal of video-endoscopic minimally invasive sur-gery is to replace conventional/traditional surgical methods, but maintenance of the results and standards achievable by open means is essential. Due to the addi-tional benefits of magnification, better visualization andthe less invasive approach, greater precision and im-proved results are possible. This new technical special-ty has developed its own instrumentation, requirements and a very complex technical background, and thus the topic is discussed in a separate chapter. Nevertheless, it must be borne in mind, that the laparoscopic minimally invasive technique is based on a firm knowledge of tra-ditional surgery. The basis of abdominal (i.e. ”laparo-scopic”) minimally invasive techniques will be surveyed here. Other regions (e.g. the joints and the chest) are the subjects of the relevant specialties.
1. A brief history of minimally invasive surgery
1706 “Trocar” is first mentioned (trois (3) + carre(side), or trois-quarts / troise-quarts – in Old French).
1806 Phillip B. Bozzini (1773–1809) is often creditedwith the use of the first endoscope. He used acandle as a light source to examine the rectum and uterus.
1879 Maximilian Nitze and Josef Leiter invented the Blasenspiegel (i.e. the cystoscope).
1938 A spring-loaded needle was invented by the Hungarian János Veres (1903–1979). Although the “Veress needle” was originally devised to create a PTX, the same design has been in-corporated in the current insufflating needlesfor creating a pneumoperitoneum (J. Veress: Neues instrument zur ausfürung von brust- od-er bauchpunktionen und pneumothoraxbehan-dlung. Aus der Inneren Abteilung des Komita-tsspitals in Kapuvár (Ungarn). Deutsche Med Wochenschr 1938; 64: 1480–1481).
1985 Erich Mühe in Böblingen, West Germany, per-formed the first laparoscopic cholecystectomy(with a “galloscope”). After nearly 100 success-
ful operations, 1 patient died from a compli-cation not related to the procedure itself. TheGerman medical authorities declared that this was the result of “human experimentation”. Mühe was charged with and found guilty of homicide.
1987 Phillipe Mouret, in Lyon, is usually credit-ed with the first successful human laparo-scopic cholecystectomy. Perrisat, Dubois and colleagues in communication with Mouret per-formed laparoscopic cholecystectomies shortly thereafter, and within 10 years, this had becomethe standard technique for cholecystectomy.
2. Present status of minimally invasive surgery
Minimally invasive procedures routinely applied in 2006 are diagnostic laparoscopy, laparoscopic chole-cystectomy and appendectomy, fundoplication, lap-aroscopic splenectomy and adrenalectomy, laparo-scopic Heller’s myotomy, etc.
The “cutting edge” is robotic surgery. The types ofsurgical operation (at present) are fundoplication, cholecystectomy, heart surgery and teleoperation. The greatest advantage is the elimination of the hu-man factor (trembling hands, eye-hand coordina-tion problems, etc.). The two main systems involveDa Vinci and Zeus manipulators (the former are bet-ter manipulators, while the latter are smaller instru-ments).
Fetoscopic surgery (laparoscopic in-utero proce-dures). More frequent operations (at present) are decompression of the bladder, coagulation of ves-sel anomalies (radio-ablation in twin pregnancies), cutting of the amnion bands, hydrothorax drainage, and temporal trachea occlusion (in cases of congeni-tal diaphragm hernia).
3. Advantages of minimal access surgery
Linking diagnostic and therapeutic procedures Better cosmesis Fewer postoperative complications, hernias / infec-
tions Fewer postoperative adhesions: fewer hemorrhagic complications less peritoneal dehydration lower degree of tissue trauma lower amount of foreign material (sutures)
ADVANCED MEDICAL SKILLS114
IX. BASICS OF MINIMALLY INVASIVE SURGERY
Shorter postoperative recovery: less tissue trauma lower stress in general less postoperative pain
Patients are able to resume their normal activi-ties faster (in 6 days on average). The mechanism ofwound healing is identical (!), the recovery depends on the indication (cause of illness) and the healing time of incisions/ports, and the latter depends on the insults of organs and abdominal wall, the stress caused by general anesthesia, and the healing pro-cess of the peritoneal damage
Decreased hospital stay (economic advantage)
4. The technical background ofminimally invasive techniques. The laparoscopic tower
Main parts (in general): 1. monitor (screen), 2. video system (control unit, etc.), 3. light source, 4. insuffla-tor ± carbon dioxide cylinder, 5. suction and irriga-tion, 6. electrocautery device, 7. data storage system.
The endoscope and camera are attached to the units of the tower via cables.
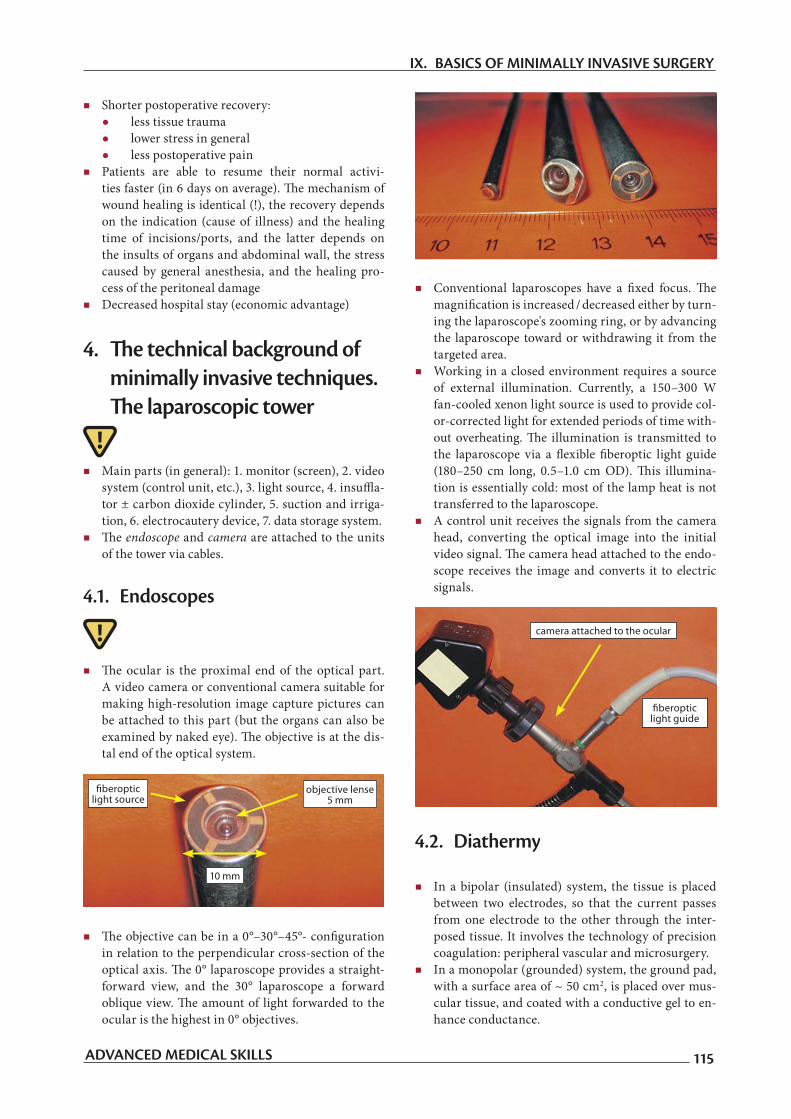
4.1. Endoscopes
The ocular is the proximal end of the optical part.A video camera or conventional camera suitable for making high-resolution image capture pictures can be attached to this part (but the organs can also be examined by naked eye). The objective is at the dis-tal end of the optical system.
The objective can be in a 0°–30°–45°- configurationin relation to the perpendicular cross-section of the optical axis. The 0° laparoscope provides a straight-forward view, and the 30° laparoscope a forward oblique view. The amount of light forwarded to theocular is the highest in 0° objectives.
Conventional laparoscopes have a fixed focus. Themagnification is increased / decreased either by turn-ing the laparoscope's zooming ring, or by advancing the laparoscope toward or withdrawing it from the targeted area.
Working in a closed environment requires a source of external illumination. Currently, a 150–300 W fan-cooled xenon light source is used to provide col-or-corrected light for extended periods of time with-out overheating. The illumination is transmitted tothe laparoscope via a flexible fiberoptic light guide(180–250 cm long, 0.5–1.0 cm OD). This illumina-tion is essentially cold: most of the lamp heat is not transferred to the laparoscope.
A control unit receives the signals from the camera head, converting the optical image into the initial video signal. The camera head attached to the endo-scope receives the image and converts it to electric signals.
4.2. Diathermy
In a bipolar (insulated) system, the tissue is placed between two electrodes, so that the current passes from one electrode to the other through the inter-posed tissue. It involves the technology of precision coagulation: peripheral vascular and microsurgery.
In a monopolar (grounded) system, the ground pad, with a surface area of ~ 50 cm2, is placed over mus-cular tissue, and coated with a conductive gel to en-hance conductance.
fiberopticlight source
10 mm
objective lense5 mm
camera attached to the ocular
fiberopticlight guide
ADVANCED MEDICAL SKILLS 115
IX. BASICS OF MINIMALLY INVASIVE SURGERY

4.3. Suction and irrigation
The rapid removal of abdominal fluid is mandatory.The irrigation and suction functions can not be sep-arated. Central unit: An electric pump with contin-uous 180 mmHg positive pressure and 500 mmHg negative pressure. Fluids: Warm isotonic solutions (saline).
5. Physiology of laparoscopy. The pneumoperitoneum
In the abdominal cavity, a large dome-like space must be created to displace the viscera and enable the sur-geon to see and move the instruments about. This maybe done by instilling gas under pressure (a pneumo-peritoneum is created). This provides a good opera-tive field and helps stop venous and capillary bleed-ing. Historically, this was achieved by the insufflationof free air (in gynecology), but at present it is carried out by introducing carbon dioxide from a closed sys-tem under pressure. Strict control is needed for main-tenance of the pneumoperitoneum. The intraabdomi-nal pressure in adults (Piabd) should be < 15 mmHg; in pediatric surgery < 6 mmHg is proposed. The safetysystem of the insufflator prevents Piabd exceeding theset limit (e.g. 15 mmHg).
Pathological consequences of the pneumoperitoneum Piabd < 12–15 mmHg = a disturbance of the venous
circulation prevails. Piabd > 12–15 mmHg = the cardiac index decreases,
and the gas exchange declines. Constantly high Piabd = organ injuries.
Circulation The venous backflow (preload) is decreasing. CO ↓ HR ↑ MAP ↑ Total peripheral resistance (afterload) ↑ Pulmonary vascular resistance ↑ The hemodynamic changes in the reverse Trendelen-
burg position are more pronounced, venous depres-sion can occur in the lower limbs and the risk of thrombosis increases. The patient should be placedin the Trendelenburg or the reverse Trendelenburg position only if Piabd is stable.
Microcirculation Mechanical compression of the mesenteric vessels;
decreased splanchnic microcirculation.
Neurohormonal system The increased intraabdominal pressure stimulates
the secretion of the renin-angiotensin and renin-al-dosterone-angiotensin systems which causes vaso-constriction.
Respiratory effects The increased intraabdominal pressure increases
the intrathoracal pressure, which decreases the lung compliance.
Compression of the lower lung lobes, caused by the intraabdominal pressure together with the anesthe-sia-induced diaphragm relaxation leading to a de-crease in lung volume while the dead space increases (the Trendelenburg position enhances these effects).
As a possibility to improve gas exchange PEEP can be applied.
Arterial blood gases CO₂ in the systemic circulation causes hypercap-
nia and respiratory acidosis. Insufflation increasesPaCO₂ by 8–10 mmHg, together with a decrease in pH. Equilibration starts 15–20 min after productionof the pneumoperitoneum.
Urinary excretion Piabd < 15 mmHg decreases the kidney perfusion
and the glomerular filtration rate, which causes ol-iguria.
Direct pressure on the kidney parenchyma, renal ar-teries and veins causes the renal function to decrease linearly with pressure (no clinical relevance under 15 mmHg)
Liver function The hepatic and portal circulation progressively de-
crease, while the concentrations of liver enzymes in the plasma increase.
5.1. Complications of pneumoperitoneum
Vessel injury: The most common sites are the epigas-tric vessels, and vessels in the greater omentum. Large veins and arteries are rarely injured (this is rare, but has a mortality of 50%).
Organ injuries: Untreated in 24 h small bowel, large bow-el and liver injuries lead to severe septic complications.
Subcutaneous emphysema: This is caused by CO2 un-der pressure, which dissects tissues. It can be accidental or intentional (extraperitoneal surgery).
ADVANCED MEDICAL SKILLS116
IX. BASICS OF MINIMALLY INVASIVE SURGERY

Air emboli: The complication rate is < 0.6% (rare, butpotentially lethal). Most common: lung emboli; rare: coronary arteries and brain.
Prevention of air emboli Safe trocar use Intraabdominal pressure control with soluble gases
(CO₂)
Diagnosis of air emboli Trans-esophageal Doppler US (not in routine use in
laparoscopic surgery) Capnography (!): detection of end-tidal CO₂, which
decreases as a consequence of decreasing CO₂ + in-creasing dead space. A parallel decrease in PaO₂ is highly suspicious.
ECG changes are late, mainly during large emboli-zation (!)
Therapy of air emboli Stop insufflation; exsufflate pneumoperitoneum; The left Trendelenburg position decreases emboliza-
tion from the right heart to the pulmonary circulation Central venous catheter into the pulmonary artery
for gas aspiration
Pneumothorax: The cause of PTX is an elevated Piabd, which leads to the opening of embryonal peritoneo-pleural channels (this is “spontaneous” PTX). It near-ly always occurs in cases of diaphragmatic preparations (classical case: fundoplication).
Consequences Increased airway pressure, increased pulmonary re-
sistance PaCO₂ ↑, PaO₂ ↓ CO ↓, compensatory HR ↑
Treatment of pneumothorax PEEP is applied (5 cmH₂O) to reinflate the lungs and
remove CO₂. N₂O administration is stopped; FiO₂ is increased;
Piabd should be decreased. Thoracocentesis is usually not necessary; CO₂ will
be absorbed in ~ 30 min and PTX will cease.
Important note: Discernment of CO2-induced PTX and PEEP-induced rupture of alveoli (caused by emphy-sema) is important. In the event of emphysemic rup-ture, PEEP will aggravate the signs and the PTX can not be eliminated “spontaneously”. The therapy is use of achest tube (!)
Increased intraabdominal pressure A “surgical” increase in Piabd is followed by circu-
latory and respiratory changes (see above), but there
are large individual differences in tolerance. A sig-nificant rise will increase the risk of complicationscaused by diffusible gases (air embolus and sc. em-physema).
An “anesthesiology-caused” increase in Piabd is due to an insufficient depth of anesthesia/narcosis/mus-cle relaxation.
A rapid intraabdominal volume load (e.g. suction/irrigation) or simultaneous use of other gases (e.g. argon coagulation) also causes an increased Piabd.
“Laparoscopic” pain The character of this pain differs from that of
open laparotomy. In laparotomy (open surgery), abdominal pain predominates. Laparoscopic pain is a deep visceral pain (this is covered by abdom-inal pain during open surgery). The characteris-tics are pain in the shoulder and in the shoulder-blade (caused by the pneumoperitoneum-induced diaphragm tension and CO₂-induced acidic irri-tation).
The therapy includes the complete removal of CO₂, irrigation with warm saline at the end of the proce-dure, and the subdiaphragmatic use of local anes-thetic solutions (e.g. bupivacaine).
6. Basic instruments for minimally invasive surgery
A Veress needle is currently the device most common-ly used to gain access to the peritoneal cavity before insufflation. This needle has a blunt obturator, whichretracts on contact with solid tissue to reveal a cut-ting tip. A marker on the hand piece moves upward as the obturator retracts to expose the cutting tip. Once the peritoneal cavity is entered, gas may be in-stilled through the hollow shaft of the needle. The nee-dle is then removed, and a trocar/cannula is inserted through the same site. This method of peritoneal ac-cess is referred to as the blind or closed technique.
sharp tip
withdrawn blunt obturator
ADVANCED MEDICAL SKILLS 117
IX. BASICS OF MINIMALLY INVASIVE SURGERY

Trocar: This has a sharply pointed shaft, usually with a three-sided point. A trocar may be used within a can-nula, a hollow tube, designed to be inserted into a body cavity. A trocar is, strictly speaking, the cutting obtu-rator within a cannula. In practice, the term trocar is commonly used by surgeons to describe the whole tro-car-cannula apparatus.
Once the pneumoperitoneum is established, a “port” must be inserted to allow the passage of the laparoscope and operating instruments into the abdomen. The entireapparatus is inserted through the abdominal wall into the abdominal cavity. The pressure of the gas producingthe pneumoperitoneum must be higher then the ambi-ent atmospheric pressure. In order to prevent gas leak-ing from the port sites, the trocar incorporates a valve. This allows the insertion of instruments without the es-cape of gas.
Hand instrumentation: For minimal access surgery, special instrumentation is needed for the remote and closed surgical environment. These instruments havebeen designed to offer a full range of surgical functions(i.e. clamping, grasping, dissecting and cutting and su-turing). Thus, the tips of laparoscopic instruments re-flect those found in open surgery. The instruments pivotabout the fulcrum of the access point with the instru-ment jaws located within the closed environment, the handle external to it, and the shaft between them part-ly in and partly out of the patient. Laparoscopic instru-mentation ranges from 10–50 cm in length (most com-monly 30 cm), depending on the distance of the target tissue from the point of access. They can be disposable(single-use, not safe for resterilization) or reusable (on a long-term basis).
7. Laparoscopic cholecystectomy
The main advantages are a shorter operating time and shorter hospitalization (the patient can leave the hospital 1–2 days following the intervention); less postoperative pain; the structure of the abdominal wall remains intact (the risk of postoperative hernia formation is lower); the patient can easily resume his/her former life-style, and can do physical work within a week; this intervention can be safely performed on elderly patients with a poor cardiorespiratory state (under high epidural anesthe-sia, if necessary); in cases of obesity or in patients with a thick abdominal wall, it is an ideal surgical solution.
8. Laparoscopic appendectomyThe main advantages are a shortened hospital stay (pa-tients can be discharged on the 2nd–3rd postoperative day, and the normal life-style can be resumed ~ 10 days following the operation); there is minimal wound pain (minimal need for pain killer medication); wound sup-
trocar obturator
cannula port
spiral fixing
ADVANCED MEDICAL SKILLS118
IX. BASICS OF MINIMALLY INVASIVE SURGERY

puration does not occur (even in cases of advanced pu-rulent inflammation); in obese patients and those witha thick abdominal wall, it is an ideal surgical interven-tion.
9. Training in a box-trainer
The goal of the training is to adapt the tradition-al open techniques to the laparoscopic setting (this transition is not too simple). Training should begin with exercises in a simulator (suturing trainer box) using inanimate material. This provides an oppor-tunity for the operator to become familiar with the equipment, the instrumentation, and the particulars of intracorporeal suturing and knot tying. In a “box-trainer” (“MAT-trainer”) practice should be per-formed with the same quality optical-video-moni-tor setup as used in the operating room. This createstrue and correct eye-hand coordination.
Training can be as simple as transporting beads from one container to another or threading needles through fixed eyelets. For the exercise, a 30° lapa-roscope (diameter 5-10 mm and length 15-30 cm) is used because this ensures an optimal view with a wider field of vision after it is turned to another po-sition.
The student’s practical training starts with eye-handcoordination exercises to pass needles and suture materials through metal rings.
The precision intracorporal suturing applied in en-doscopic surgery was developed by Alexis Car-rel (1873–1944) and Charles Claude Guthrie (1880–1963) for vascular and microvascular surgery. Theintracorporal tissue-suturing procedures allow for the reconstruction of fine tissue structures, becauseof the higher surgical accuracy. Today, much bet-ter results can be achieved with this technique than with conventional surgical interventions.
Suturing exercises begin with the suturing of a latex glove that has two rows of dots marked on it. A cut made through it facilitates the acquisition of skill in needle handling, precision entrance-exit bites, su-turing, and the knot-tying sequence. It is particu-larly important that a good technique, such as tar-geting entrance and exit points, should be practised early on in training.
1 2
ADVANCED MEDICAL SKILLS 119
IX. BASICS OF MINIMALLY INVASIVE SURGERY

3 4
5
6
7 8
9
ADVANCED MEDICAL SKILLS120
IX. BASICS OF MINIMALLY INVASIVE SURGERY