sureselect rna direct - chemical analysis, life sciences, … · · 2017-08-08this chapter...
TRANSCRIPT

SureSelectXT RNA DirectFor Preparation of Strand-Specific Sequencing Libraries from High-Quality or FFPE-Derived RNA Samples for the Illumina Platform
ProtocolVersion A0, July 2017
SureSelect platform manufactured with Agilent SurePrint Technology
For Research Use Only. Not for use in diagnostic procedures.
Agilent Technologies

Notices© Agilent Technologies, Inc. 2017
No part of this manual may be reproduced in any form or by any means (including elec-tronic storage and retrieval or translation into a foreign language) without prior agree-ment and written consent from Agilent Technologies, Inc. as governed by United States and international copyright laws.
Manual Part NumberG9691-90050
EditionVersion A0, July 2017
Printed in USA
Agilent Technologies, Inc. 5301 Stevens Creek Blvd
WarrantyThe material contained in this document is provided “as is,” and is subject to being changed, with-out notice, in future editions. Fur-ther, to the maximum extent permitted by applicable law, Agi-lent disclaims all warranties, either express or implied, with regard to this manual and any information contained herein, including but not limited to the implied warranties of merchant-ability and fitness for a particular purpose. Agilent shall not be lia-ble for errors or for incidental or consequential damages in con-nection with the furnishing, use, or performance of this document or of any information contained herein. Should Agilent and the user have a separate written agreement with warranty terms covering the material in this doc-ument that conflict with these terms, the warranty terms in the separate agreement shall control.
Technology Licenses The hardware and/or software described in this document are furnished under a license and may be used or copied only in accor-dance with the terms of such license.
Restricted Rights LegendU.S. Government Restricted Rights. Soft-ware and technical data rights granted to the federal government include only those rights customarily provided to end user cus-tomers. Agilent provides this customary commercial license in Software and techni-cal data pursuant to FAR 12.211 (Technical Data) and 12.212 (Computer Software) and, for the Department of Defense, DFARS 252.227-7015 (Technical Data - Commercial Items) and DFARS 227.7202-3 (Rights in Commercial Computer Software or Com-puter Software Documentation).
Notice to Purchaser: Limited LicenseUse of this product is covered by one or more of the following US patents and corre-sponding patent claims outside the US: 6,258,569, 6,171,785, 6,127,155, 6,030,787, 5,994,056, 5,876,930, 5,804,375, 5,789,224, 5,773,258 (claims 1 and 6 only), 5,723,591, 5,677,152 (claims 1 to 23 only), 5,618,711, 5,538,848, and claims outside the US corre-sponding to expired US Patent No. 5,079,352. The purchase of this product includes a limited, non-transferable immu-nity from suit under the foregoing patent claims for using only this amount of product for the purchaser’s own internal research. No right under any other patent claim and no right to perform commercial services of any kind, including without limitation report-ing the results of purchaser’s activities for a fee or other commercial consideration, is conveyed expressly, by implication, or by estoppel. This product is for research use only. Diagnostic uses under Roche patents require a separate license from Roche. Fur-ther information on purchasing licenses may be obtained by contacting the Director of Licensing, Applied Biosystems, 850 Lin-coln Centre Drive, Foster City, California 94404, USA.
Santa Clara, CA 95051 USA
AcknowledgmentOligonucleotide sequences © 2006, 2008, and 2011 Illumina, Inc. All rights reserved. Only for use with the Illumina sequencer systems and associated assays.
Technical SupportFor technical product support, contact your local Agilent Support Services representa-tive.
For US and Canada, call (800) 227-9770 (option 3,4,4). For other countries, find your support center telephone numbers at www.agilent.com/chem/contactus.
Or send an e-mail to: [email protected]
2 SureSelectXT RNA Direct

Safety Notices
CAUTION
A CAUTION notice denotes a hazard. It calls attention to an operating procedure, practice, or the like that, if not correctly performed or adhered to, could result in damage to the product or loss of important data. Do not proceed beyond a CAUTION notice until the indicated conditions are fully understood and met.
WARNING
A WARNING notice denotes a hazard. It calls attention to an operating procedure, practice, or the like that, if not correctly performed or adhered to, could result in personal injury or death. Do not proceed beyond a WARNING notice until the indicated conditions are fully understood and met.
SureSelectXT RNA Direct 3

In this Guide...
4
This guide describes an optimized protocol for preparation of target- enriched, strand- specific RNA sequencing libraries from either high- quality RNA samples or formalin- fixed paraffin- embedded (FFPE) total RNA samples, without initial mRNA purification, using the SureSelectXT RNA Direct Reagent Kit.
This protocol is specifically optimized to enrich targeted regions of the transcriptome from repetitive sequences and sequences unrelated to the research focus prior to Illumina paired- end multiplexed sequencing.
1
Before You BeginThis chapter contains information (such as procedural notes, safety information, required reagents and equipment) that you should read and understand before you start an experiment.
2
Sample PreparationThis chapter describes the steps to prepare cDNA sequencing libraries from total RNA for target enrichment.
3
HybridizationThis chapter describes the target enrichment steps including hybridization and capture of the targeted regions of prepared cDNA.
4
Indexing and Sample Processing for Multiplexed SequencingThis chapter describes the steps to index, purify, and assess quality and quantity of the target- enriched libraries. Samples are pooled by mass prior to sequencing.
5
ReferenceThis chapter contains reference information, including component kit contents and index sequences.
SureSelectXT RNA Direct

Content
1 Before You Begin 7
Procedural Notes 8Safety Notes 8Required Reagents 9Required Equipment 11
2 Sample Preparation 13
Step 1. Prepare and assess quality of total RNA 16Step 2. Fragment total RNA and anneal primers 18Step 3. Synthesize first-strand cDNA 21Step 4. Purify first strand cDNA using AMPure XP beads 23Step 5. Synthesize second-strand cDNA and repair the ends 25Step 6. Purify cDNA using AMPure XP beads 26Step 7. dA-Tail the cDNA 3' ends 27Step 8. Ligate adaptors 29Step 9. Purify adaptor-ligated DNA using AMPure XP beads 30Step 10. Amplify the adaptor-ligated cDNA library 31Step 11. Purify the amplified library with AMPure XP beads 33Step 12. Assess quality and quantity 34
3 Hybridization 39
Step 1: Hybridize the library 40Step 2. Prepare streptavidin beads 45Step 3. Capture hybrids using streptavidin beads 46
SureSelectXT RNA Direct 5

Contents
4 Indexing and Sample Processing for Multiplexed Sequencing 49
Step 1. Amplify the captured libraries to add index tags 50Step 2. Purify the amplified captured libraries using
AMPure XP beads 53Step 3. Assess indexed library DNA quantity and quality 55Step 4. Pool samples for multiplexed sequencing 59Step 5. Prepare and analyze sequencing samples 61
5 Reference 63
Kit Contents 64
Nucleotide Sequences of SureSelectXT Indexes A01 to H12 68
6 SureSelectXT RNA Direct

SureSelectXT RNA Direct Protocol
1Before You Begin
Procedural Notes 8
Safety Notes 8
Required Reagents 9
Required Equipment 11
Make sure you read and understand the information in this chapter and have the necessary equipment and reagents listed before you start an experiment.
Agilent guarantees performance and provides technical support for the SureSelect reagents required for this workflow only when used as directed in this Protocol.
NOTE
7Agilent Technologies
1 Before You Begin Procedural Notes
Procedural Notes
8
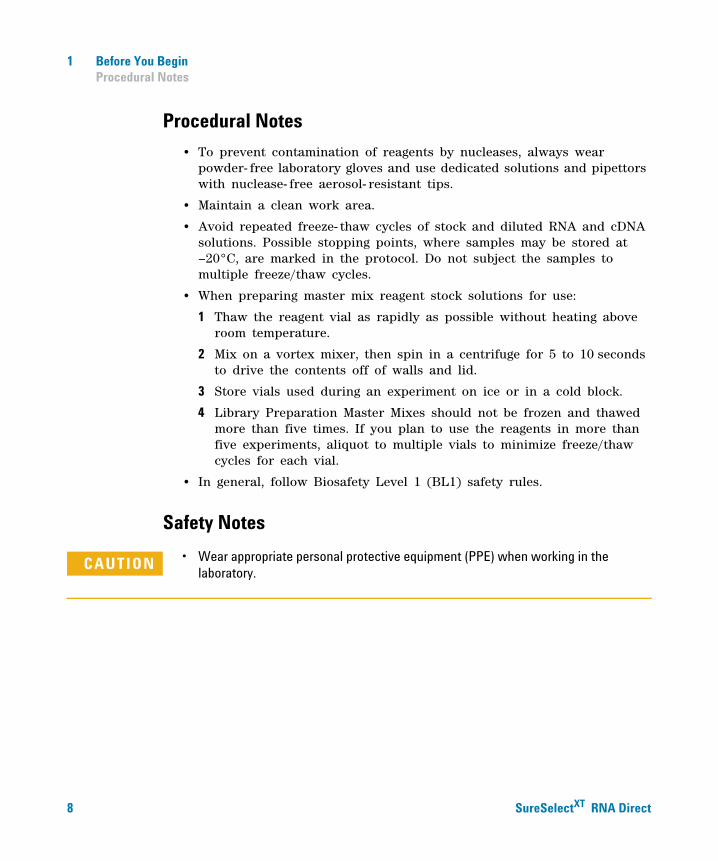
• To prevent contamination of reagents by nucleases, always wear powder- free laboratory gloves and use dedicated solutions and pipettors with nuclease- free aerosol- resistant tips.
• Maintain a clean work area.
• Avoid repeated freeze- thaw cycles of stock and diluted RNA and cDNA solutions. Possible stopping points, where samples may be stored at –20°C, are marked in the protocol. Do not subject the samples to multiple freeze/thaw cycles.
• When preparing master mix reagent stock solutions for use:
1 Thaw the reagent vial as rapidly as possible without heating above room temperature.
2 Mix on a vortex mixer, then spin in a centrifuge for 5 to 10 seconds to drive the contents off of walls and lid.
3 Store vials used during an experiment on ice or in a cold block.
4 Library Preparation Master Mixes should not be frozen and thawed more than five times. If you plan to use the reagents in more than five experiments, aliquot to multiple vials to minimize freeze/thaw cycles for each vial.
• In general, follow Biosafety Level 1 (BL1) safety rules.
Safety Notes
• Wear appropriate personal protective equipment (PPE) when working in the laboratory.
CAUTION
SureSelectXT RNA Direct

Before You Begin 1 Required Reagents
Required Reagents
SureSelectXT RNA
Table 1 Reagents for RNA Direct Target Enrichment
Description Vendor and part number
SureSelect or ClearSeq RNA Capture Library Select one library from Table 2
SureSelectXT RNA Direct Reagent Kit
Illumina platforms (ILM), 16 Samples Illumina platforms (ILM), 96 Samples
Agilent
p/n G7564A p/n G7564B
Actinomycin D*
* Actinomycin D should be obtained as a solid and prepared at 4 g/l concentration in DMSO then stored in single-use aliquots at –20°C, protected from light. The aliquots may be stored for up to one year before use. See page 15 for additional information.
Sigma p/n A1410
DMSO Sigma p/n D8418
Agencourt AMPure XP Kit 5 mL 60 mL 450 mL
Beckman Coulter Genomics p/n A63880 p/n A63881 p/n A63882
Dynabeads M-270 Streptavidin Beads 2 mL 10 mL
Beckman Coulter Genomics p/n 65305 p/n 65306
Buffer EB (10 mM Tris-Cl, pH 8.5) Qiagen p/n 19086
100% Ethanol, molecular biology grade Sigma-Aldrich p/n E7023
Nuclease-free Water (not DEPC-treated) Ambion Cat #AM9930
CAUTION Use only the recommended Dynabeads M-270 Streptavidin Beads for this protocol. Use of other streptavidin bead preparations may adversely affect performance and is not supported by Agilent.
Direct 9
1 Before You Begin Required Reagents
10
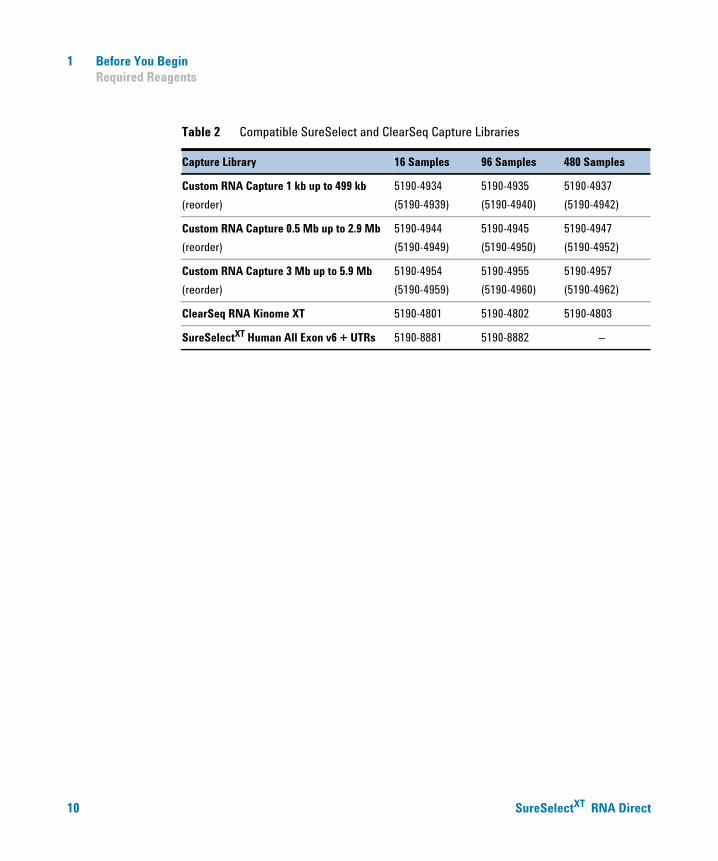
Table 2 Compatible SureSelect and ClearSeq Capture Libraries
Capture Library 16 Samples 96 Samples 480 Samples
Custom RNA Capture 1 kb up to 499 kb
(reorder)
5190-4934
(5190-4939)
5190-4935
(5190-4940)
5190-4937
(5190-4942)
Custom RNA Capture 0.5 Mb up to 2.9 Mb
(reorder)
5190-4944
(5190-4949)
5190-4945
(5190-4950)
5190-4947
(5190-4952)
Custom RNA Capture 3 Mb up to 5.9 Mb
(reorder)
5190-4954
(5190-4959)
5190-4955
(5190-4960)
5190-4957
(5190-4962)
ClearSeq RNA Kinome XT 5190-4801 5190-4802 5190-4803
SureSelectXT Human All Exon v6 + UTRs 5190-8881 5190-8882 –
SureSelectXT RNA Direct

Before You Begin 1 Required Equipment
Required Equipment
SureSelectXT RNA
Table 3 Equipment for RNA Direct Target Enrichment
Description Vendor and part number
SureCycler 8800 Thermal Cycler, or equivalent Agilent p/n G8800A
96 well plate module for SureCycler 8800 Thermal Cycler
Agilent p/n G8810A
SureCycler 8800-compatible plasticware:
96-well plates
OR
8-well strip tubes
Agilent p/n 410088
Agilent p/n 410092
Tube cap strips, domed Agilent p/n 410096
Compression mats Agilent p/n 410187
Low-Adhesion Tubes (RNase, DNase, and DNA-free) 1.5 mL 0.5 mL
USA Scientific p/n 1415-2600 p/n 1405-2600
Centrifuge Eppendorf Centrifuge model 5804 or equivalent
96-well plate mixer Eppendorf ThermoMixer C, p/n 5382 000.015 and Eppendorf SmartBlock 96 PCR, p/n 5306 000.006, or equivalent
Multichannel pipette Pipetman or equivalent
P10, P20, P200 and P1000 pipettes Pipetman P10, P20, P200, P1000 or equivalent
Vacuum concentrator Savant SpeedVac, model DNA120, with 96-well plate rotor, model RD2MP, or equivalent
Vortex mixer
Ice bucket
Powder-free gloves
Sterile, nuclease-free aerosol barrier pipette tips
Direct 11

1 Before You Begin Required Equipment
12
Magnetic separator Thermo Fisher Scientific p/n 12331D or equivalent*
Labnet MPS1000 Mini Plate Spinner (Optional) Labnet International p/n C1000
Nucleic Acid Analysis Platform and Consumables
Agilent 2100 Bioanalyzer Instrument
Agilent 2100 Expert SW Laptop Bundle (optional)
RNA 6000 Pico Kit
DNA 1000 Kit
High Sensitivity DNA Kit
OR
Agilent 4200 TapeStation†
96-well sample plates
96-well plate foil seals
8-well tube strips
8-well tube strip caps
High Sensitivity RNA ScreenTape
High Sensitivity RNA ScreenTape Sample Buffer
High Sensitivity RNA ScreenTape Ladder
D1000 ScreenTape
D1000 Reagents
High Sensitivity D1000 ScreenTape
High Sensitivity D1000 Reagents
Agilent p/n G2939BA
Agilent p/n G2953CA
Agilent p/n 5067-1513
Agilent p/n 5067-1504
Agilent p/n 5067-4626
Agilent p/n G2991AA
Agilent p/n 5042-8502
Agilent p/n 5067-5154
Agilent p/n 401428
Agilent p/n 401425
Agilent p/n 5067-5579
Agilent p/n 5067-5580
Agilent p/n 5067-5581
Agilent p/n 5067-5582
Agilent p/n 5067-5583
Agilent p/n 5067-5584
Agilent p/n 5067-5585
* Select a magnetic separator configured to collect magnetic particles on one side of each well. Do not use a magnetic separator configured to collect the particles in a ring formation.
† DNA samples may also be analyzed using the Agilent 2200 TapeStation, p/n G2964AA or G2965AA. ScreenTape devices and associated reagents listed in this table are compatible with both platforms.
Table 3 Equipment for RNA Direct Target Enrichment
Description Vendor and part number
SureSelectXT RNA Direct

SureSelectXT RNA Direct Protocol
2Sample Preparation
Step 1. Prepare and assess quality of total RNA 16
Step 2. Fragment total RNA and anneal primers 18
Step 3. Synthesize first-strand cDNA 21
Step 4. Purify first strand cDNA using AMPure XP beads 23
Step 5. Synthesize second-strand cDNA and repair the ends 25
Step 6. Purify cDNA using AMPure XP beads 26
Step 7. dA-Tail the cDNA 3' ends 27
Step 8. Ligate adaptors 29
Step 9. Purify adaptor-ligated DNA using AMPure XP beads 30
Step 10. Amplify the adaptor-ligated cDNA library 31
Step 11. Purify the amplified library with AMPure XP beads 33
Step 12. Assess quality and quantity 34
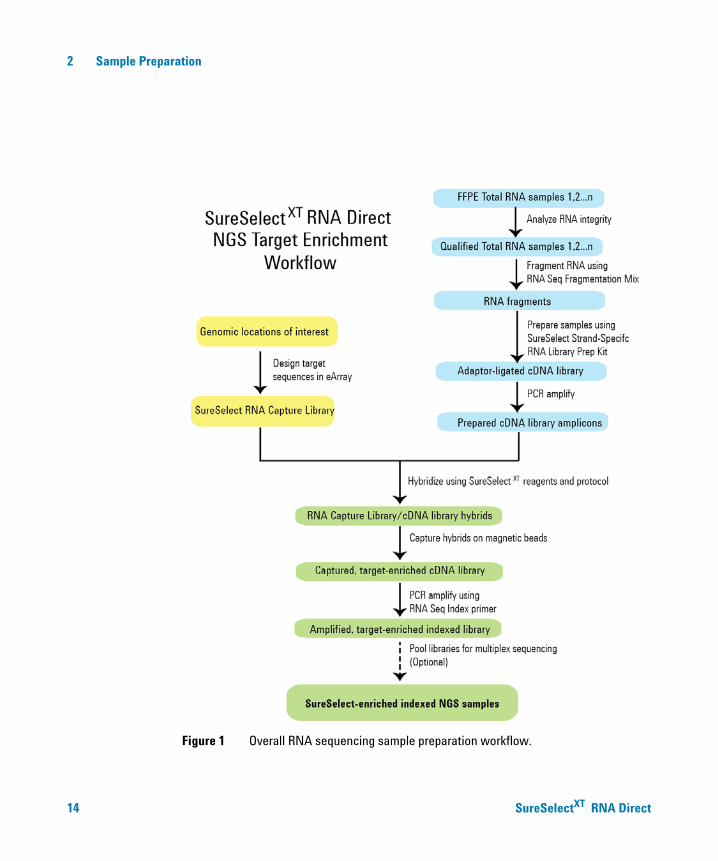
See Figure 1 for a summary of the SureSelectXT RNA Direct target enrichment workflow.
This section contains instructions for strand- specific RNA sequencing cDNA library preparation, without initial mRNA purification. This protocol differs from Agilent’s protocol for RNA sequencing library preparation that includes initial mRNA purification (User Manual p/n G9691- 90000) at several steps.
13Agilent Technologies
2 Sample Preparation
14
Figure 1 Overall RNA sequencing sample preparation workflow.
SureSelectXT RNA Direct

Sample Preparation 2
SureSelectXT RNA
Before you begin, prepare a stock solution of 4 µg/µL Actinomycin D in DMSO. Aliquot the stock solution into single- use volumes (typically 3 µL). Store the aliquots at –20°C, protected from light. Do not subject the aliquots to multiple freeze- thaw cycles. The aliquots may be stored for up to one year before use in the library preparation protocol. During the library preparation protocol, an aliquot of the DMSO stock is diluted with water, immediately before use, to a final Actinomycin D concentration of 120 ng/µL. (See page 21 for more information.)
Just before starting the protocol, thaw the reagents listed in Table 4 on ice.
Table 4 Reagents thawed and held on ice before use in protocol
Kit Component Storage Location Where Used in Protocol
RNA Seq Fragmentation Mix (red cap or bottle)
RNA Library Prep Kit Box 1, –20°C page 19
RNA Seq First Strand Master Mix (orange cap)
RNA Library Prep Kit Box 1, –20°C page 22
RNA Seq Second-Strand + End-Repair Enzyme Mix (blue cap or bottle)
RNA Library Prep Kit Box 1, –20°C page 25
RNA Seq Second-Strand + End-Repair Oligo Mix (yellow cap)
RNA Library Prep Kit Box 1, –20°C page 25
Direct 15

2 Sample Preparation Step 1. Prepare and assess quality of total RNA
Step 1. Prepare and assess quality of total RNA
16
Before you begin, prepare total RNA from each sample in the run in nuclease- free water. The library preparation protocol requires 200 ng FFPE total RNA or 100 ng of intact (non- FFPE) RNA.
For FFPE- derived RNA, you must determine the initial quality of each sample in order to determine the appropriate reaction conditions at several steps in the workflow. Use the steps below to qualify each FFPE total RNA sample. For intact (non- FFPE) RNA samples, proceed to “Step 2. Fragment total RNA and anneal primers” on page 18.
1 Use a small- volume spectrophotometer, such as the NanoDrop instrument, to determine sample absorbance at 260 nm, 280 nm, and 230 nm. Determine the 260/280 and 260/230 absorbance ratio values for the sample.
High- quality RNA samples are indicated by a value close to 2.0 for both ratios. Ratios with significant deviation from 2.0 indicate the presence of organic or inorganic contaminants, which may require further purification or may indicate that the sample is not suitable for use in RNA target enrichment applications.
2 Examine the starting size distribution of RNA in the sample using the 2100 Bioanalyzer instrument or the TapeStation 4200 instrument and the appropriate assay system described in Table 5.
Using either platform, determine the percentage of RNA in the sample that is >200 nt using the analysis mode described in Table 5. RNA molecules must be >200 nt for efficient conversion to cDNA library, and the percent convertible RNA value is used to determine the appropriate conditions at several protocol steps in the workflow.
Table 5 RNA qualification platforms
Analysis Instrument RNA Qualification Assay Analysis to Perform
2100 Bioanalyzer RNA 6000 Pico Chip Smear/Region analysis using 2100 Expert Software
4200 TapeStation OR
2200 TapeStation
High Sensitivity RNA ScreenTape Region analysis using TapeStation Analysis Software
Grading of FFPE RNA quality by RNA Integrity Number (RIN) is not recommended for this application.
NOTE
SureSelectXT RNA Direct
Sample Preparation 2 Step 1. Prepare and assess quality of total RNA
SureSelectXT RNA
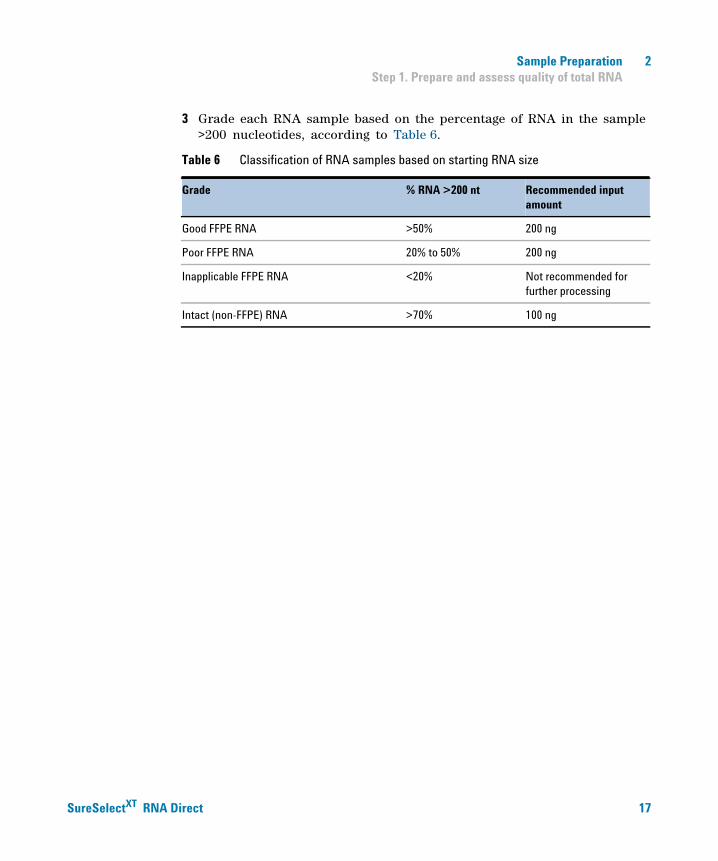
3 Grade each RNA sample based on the percentage of RNA in the sample >200 nucleotides, according to Table 6.
Table 6 Classification of RNA samples based on starting RNA size
Grade % RNA >200 nt Recommended input amount
Good FFPE RNA >50% 200 ng
Poor FFPE RNA 20% to 50% 200 ng
Inapplicable FFPE RNA <20% Not recommended for further processing
Intact (non-FFPE) RNA >70% 100 ng
Direct 17
2 Sample Preparation Step 2. Fragment total RNA and anneal primers
Step 2. Fragment total RNA and anneal primers
18
In this step, total RNA is chemically- fragmented to a size appropriate for RNA sequencing library preparation, and the RNA fragments are bound to random primers included in the RNA Seq Fragmentation Mix.
Fragmentation is achieved by treatment with metal ions at elevated temperature. The recommended fragmentation conditions vary, depending on the initial quality (grade) of the RNA sample, with lower- quality samples subjected to fragmentation at lower temperature and for a shorter duration. Since the fragmentation reaction also allows for binding of random primers supplied in the RNA Seq Fragmentation Mix, this step is required, even for highly degraded FFPE samples.
SureSelectXT RNA Direct

Sample Preparation 2 Step 2. Fragment total RNA and anneal primers
SureSelectXT RNA
1 Preprogram a SureCycler 8800 thermal cycler (with the heated lid ON) with the appropriate program in Table 7, based on the RNA integrity grade for the samples. Start the program, then immediately press the Pause button, allowing the heated lid to reach temperature while you prepare the RNA samples.
Table 7 Thermal cycler program for RNA fragmentation and random primer binding
2 Transfer the appropriate amount of input RNA, in RNase- free water, to wells of a thermal cycler- compatible plate or strip tube.
For FFPE- derived RNA samples, use 200 ng RNA, and for intact RNA samples, use 100 ng RNA.
3 Completely lyophilize the total RNA samples using a plate or strip tube- compatible vacuum concentrator at 45°C. To preserve sample
Step Temperature Time
Good FFPE RNA Samples*
* Due to the variability of FFPE-derived material, optimization of the duration of incubation at each temperature may be required for optimal performance. Use the conditions provided in the table as a starting point for optimization. For example, for certain Good FFPE RNA Samples, performance may be optimized by reducing the incubation time at 94°C and increasing the incubation time at 65°C (retaining a total elevated temperature incubation time of 5 minutes).
Step 1 94°C 3 minutes
Step 2 65°C 2 minutes
Step 3 4°C 1 minute
Step 4 4°C Hold
Poor FFPE RNA Samples*
Step 1 65°C 5 minutes
Step 2 4°C 1 minute
Step 3 4°C Hold
Intact (non-FFPE) RNA Samples
Step 1 94°C 8 minutes
Step 2 4°C 1 minute
Step 3 4°C Hold
Direct 19

2 Sample Preparation Step 2. Fragment total RNA and anneal primers
20
integrity, use the minimum amount of time required to dry each sample.
4 Add 19 µL of RNA Seq Fragmentation Mix (from red capped tube or bottle) to each lyophilized RNA sample well.
5 Seal the wells, then gently vortex the samples for 5 seconds. Briefly spin in a centrifuge or mini- plate spinner to collect the liquid.
6 Place the samples in the SureCycler 8800 thermal cycler, then press the Play button to resume the thermal cycling program in Table 7.
During the thermal cycler incubation steps in Table 7, complete step 1 through step 3 on page 21.
SureSelectXT RNA Direct
Sample Preparation 2 Step 3. Synthesize first-strand cDNA
Step 3. Synthesize first-strand cDNA
SureSelectXT RNA
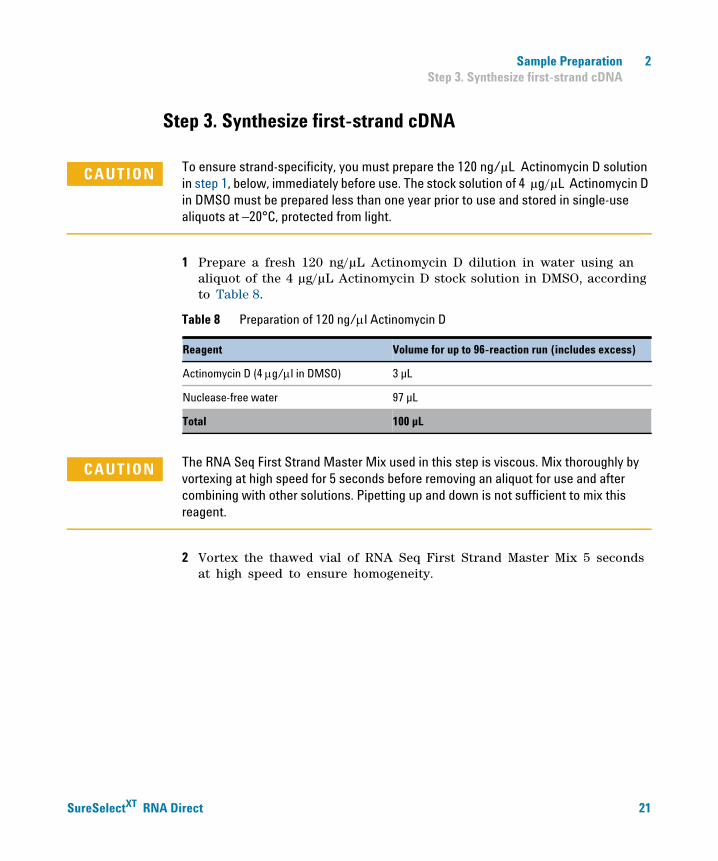
CAUTION To ensure strand-specificity, you must prepare the 120 ng/µL Actinomycin D solution in step 1, below, immediately before use. The stock solution of 4 µg/µL Actinomycin D in DMSO must be prepared less than one year prior to use and stored in single-use aliquots at –20°C, protected from light.
1 Prepare a fresh 120 ng/µL Actinomycin D dilution in water using an aliquot of the 4 µg/µL Actinomycin D stock solution in DMSO, according to Table 8.
Table 8 Preparation of 120 ng/l Actinomycin D
Reagent Volume for up to 96-reaction run (includes excess)
Actinomycin D (4 g/l in DMSO) 3 µL
Nuclease-free water 97 µL
Total 100 µL
CAUTION The RNA Seq First Strand Master Mix used in this step is viscous. Mix thoroughly by vortexing at high speed for 5 seconds before removing an aliquot for use and after combining with other solutions. Pipetting up and down is not sufficient to mix this reagent.
2 Vortex the thawed vial of RNA Seq First Strand Master Mix 5 seconds at high speed to ensure homogeneity.
Direct 21

2 Sample Preparation Step 3. Synthesize first-strand cDNA
22
3 Prepare the appropriate amount of RNA Seq First Strand Master Mix + Actinomycin D mixture, according to Table 9. Mix by vortexing at high speed for 5 seconds, then spin briefly and keep on ice.
Table 9 Preparation of First Strand Master Mix/Actinomycin D mixture
4 Once the thermal cycler program in Table 7 reaches the 4°C Hold step, transfer the fragmented RNA sample plate or strip tube from the thermal cycler to ice or a cold block.
5 Preprogram a SureCycler 8800 thermal cycler (with the heated lid ON) with the program in Table 10. Start the program, then immediately press the Pause button.
6 Add 8.5 µL of First Strand Master Mix/Actinomycin D mixture prepared in step 3 to each RNA sample well.
7 Seal the wells. Mix thoroughly by vortexing the plate or strip tube for 5 seconds or by agitating the plate or strip tube on a plate shaker at approximately 1600 rpm for 5 seconds.
8 Spin the plate or strip tube briefly to collect the liquid.
9 Place the samples in the thermal cycler, then press the Play button to resume the thermal cycling program in Table 10 (with heated lid ON).
Table 10 Thermal cycler program for first-strand cDNA synthesis
Reagent Volume for 1 reaction Volume for 16 reactions (includes excess)
Actinomycin D (120 ng/l in H2O) 0.5 µL 8.5 µL
RNA Seq First Strand Master Mix (orange cap) 8.0 µL 136 µL
Total 8.5 µL 144.5 µL
Step Temperature Time
Step 1 25°C 10 minutes
Step 2 37°C 40 minutes
Step 3 4°C Hold
SureSelectXT RNA Direct

Sample Preparation 2 Step 4. Purify first strand cDNA using AMPure XP beads
Step 4. Purify first strand cDNA using AMPure XP beads
SureSelectXT RNA
1 Let the AMPure XP beads come to room temperature for at least 30 minutes. Do not freeze the beads at any time.
2 Prepare 400 µL of fresh 70% ethanol per sample, plus excess, for use in step 8.
The freshly-prepared 70% ethanol may be used for subsequent purification steps run on the same day. The complete SureSelect RNA Direct Library Preparation protocol requires 1.6 mL of fresh 70% ethanol per sample and the Target Enrichment protocols require an additional 0.8 mL of fresh 70% ethanol per sample.
NOTE
3 Mix the bead suspension well so that the suspension appears homogeneous and consistent in color.
4 Add 48 µL of the homogeneous bead suspension to each 27.5- µL sample in the PCR plate or strip tube. Seal the wells, then vortex for 5 seconds. Briefly spin to collect the liquid.
5 Incubate samples for 5 minutes at room temperature.
6 Put the plate or strip tube on the magnetic stand at room temperature. Wait for the solution to clear (at least 5 minutes).
7 While keeping the samples on the magnetic stand, carefully remove and discard the cleared solution from each well. Do not touch the beads while removing the solution.
8 Continue to keep the plate or strip tube in the magnetic stand while you dispense 200 µL of fresh 70% ethanol in each sample well.
9 Wait for 1 minute to allow any disturbed beads to settle, then remove the ethanol.
10 Repeat step 8 and step 9 once for a total of two washes.
11 After removing the 200 µL ethanol supernatant from the second wash, spin the samples briefly, return the plate or strip tube to the magnetic stand, and then remove any remaining ethanol droplets with a pipette.
12 Dry the samples by placing the unsealed plate or strip tube on the thermal cycler, set to hold samples at 37°C, until the residual ethanol has just evaporated (up to 1 minute). Do not overdry the beads.
13 Add 21 µL nuclease- free water to each sample well.
Direct 23

2 Sample Preparation Step 4. Purify first strand cDNA using AMPure XP beads
24
14 Seal the wells, then vortex the plate or strip tube for 5 seconds. Verify that all beads have been resuspended, with no visible clumps in the suspension or bead pellets retained on the sides of the wells. Briefly spin to collect the liquid.
15 Incubate for 2 minutes at room temperature.
16 Put the plate or strip tube in the magnetic stand and leave for 2 minutes or until the solution is clear.
17 Remove 20 µL of cleared supernatant to a fresh sample well. You can discard the beads at this time.
18 Proceed immediately to “Step 5. Synthesize second- strand cDNA and repair the ends” on page 25.
SureSelectXT RNA Direct

Sample Preparation 2 Step 5. Synthesize second-strand cDNA and repair the ends
Step 5. Synthesize second-strand cDNA and repair the ends
CAUTION The RNA Seq Second Strand + End Repair Master Mix used in this step is viscous. Mix thoroughly by vortexing at high speed for 5 seconds before removing an aliquot for use and after combining with other solutions. Pipetting up and down is not sufficient to mix this reagent.
SureSelectXT RNA
1 Vortex the thawed vials of RNA Seq Second Strand + End Repair Enzyme Mix (blue capped tube or bottle) and RNA Seq Second Strand + End Repair Oligo Mix (yellow capped tube) at high speed for 5 seconds to ensure homogeneity.
2 Add 25 µL of RNA Seq Second Strand + End Repair Enzyme Mix to each 20- µL purified first- strand cDNA sample. Keep on ice.
3 Add 5 µL of RNA Seq Second Strand + End Repair Oligo Mix to each sample well, for a total reaction volume of 50 µL. Keep on ice.
4 Seal the wells. Mix thoroughly by vortexing the plate or strip tube at high speed for 5 seconds or by agitating the plate or strip tube on a plate shaker at approximately 1600 rpm for 5 seconds.
5 Spin the plate or strip tube briefly to collect the liquid.
6 Incubate the plate or strip tube in the thermal cycler and run the program in Table 11. Do not use a heated lid.
Table 11 Thermal cycler program for second-strand synthesis and end repair
Step Temperature Time
Step 1 16°C 1 hour
Step 2 4°C Hold
Direct 25

2 Sample Preparation Step 6. Purify cDNA using AMPure XP beads
Step 6. Purify cDNA using AMPure XP beads
26
1 Let the AMPure XP beads come to room temperature for at least 30 minutes. Do not freeze the beads at any time.
2 Prepare 400 µL of 70% ethanol per sample, plus excess, for use in step 8.
3 Mix the bead suspension well so that the suspension appears homogeneous and consistent in color.
4 Add 90 µL of the homogeneous bead suspension to each 50- µL sample in the PCR plate or strip tube. Seal the wells, then vortex for 5 seconds. Briefly spin to collect the liquid.
5 Incubate samples for 5 minutes at room temperature.
6 Put the plate or strip tube on the magnetic stand at room temperature. Wait for the solution to clear (at least 5 minutes).
7 While keeping the plate or strip tube in the magnetic stand, carefully remove and discard the cleared solution from each well. Do not touch the beads while removing the solution.
8 Continue to keep the plate or strip tube in the magnetic stand while you dispense 200 µL of fresh 70% ethanol in each sample well.
9 Wait for 1 minute to allow any disturbed beads to settle, then remove the ethanol.
10 Repeat step 8 and step 9 once for a total of two washes.
11 Dry the samples by placing the unsealed plate or strip tube on the thermal cycler, set to hold samples at 37°C, until the residual ethanol has just evaporated (up to 3 minutes). Do not overdry the beads.
12 Add 21 µL nuclease- free water to each sample well.
13 Seal the wells, then vortex the plate or strip tube for 5 seconds. Verify that all beads have been resuspended, with no visible clumps in the suspension or bead pellets retained on the sides of the wells. Briefly spin to collect the liquid.
14 Incubate for 2 minutes at room temperature.
15 Put the plate or strip tube in the magnetic stand and leave for 2 minutes or until the solution is clear.
16 Remove 20 µL of cleared supernatant to a fresh sample well. You can discard the beads at this time.
Stopping Point
If you do not continue to the next step, seal the wells and store at –20°C.SureSelectXT RNA Direct

Sample Preparation 2 Step 7. dA-Tail the cDNA 3' ends
Step 7. dA-Tail the cDNA 3' ends
SureSelectXT RNA
Before continuing the protocol, thaw the reagents listed in Table 12 (used for the remainder of library preparation steps) and keep on ice.
Table 12 Reagents thawed and held on ice before use in protocol
Kit Component Storage Location Where Used in Protocol
RNA Seq dA Tailing Master Mix (green cap or bottle)
RNA Library Prep Kit Box 1, –20°C page 27
SureSelect Ligation Master Mix (purple cap) RNA Library Prep Kit Box 1, –20°C page 29
SureSelect Oligo Adaptor Mix (blue cap) RNA Library Prep Kit Box 1, –20°C page 29
RNA Seq ILM Reverse PCR Primer (black cap) RNA Library Prep Kit Box 1, –20°C page 32
RNA Seq PCR Master Mix (red cap or bottle) RNA Library Prep Kit Box 1, –20°C page 32
Uracil DNA Glycosylase (UDG) (yellow cap) RNA Library Prep Kit Box 1, –20°C page 32
SureSelect Primer (brown cap) RNA Library Prep Kit Box 1, –20°C page 32
CAUTION The RNA Seq dA Tailing Master Mix used in this step is viscous. Mix thoroughly by vortexing at high speed for 5 seconds before removing an aliquot for use and after combining with other solutions. Pipetting up and down is not sufficient to mix this reagent.
1 Vortex the thawed vial of RNA Seq dA Tailing Master Mix (green capped tube or bottle) 5 seconds at high speed to ensure homogeneity.
2 Add 20 µL of RNA Seq dA Tailing Master Mix to each 20- µL purified, end- repaired cDNA sample.
Pipette the master mix slowly to ensure that the full volume is dispensed.
3 Seal the wells. Mix thoroughly by vortexing the plate or strip tube for 5 seconds or by agitating the plate or strip tube on a plate shaker at approximately 1600 rpm for 5 seconds.
4 Spin the plate or strip tube briefly to collect the liquid.
Direct 27

2 Sample Preparation Step 7. dA-Tail the cDNA 3' ends
28
5 Incubate the plate or strip tube in the thermal cycler and run the program in Table 13. Do not use a heated lid.
Table 13 Thermal cycler program for dA-tailing
Step Temperature Time
Step 1 37°C 30 minutes
Step 2 4°C Hold
SureSelectXT RNA Direct
Sample Preparation 2 Step 8. Ligate adaptors
Step 8. Ligate adaptors
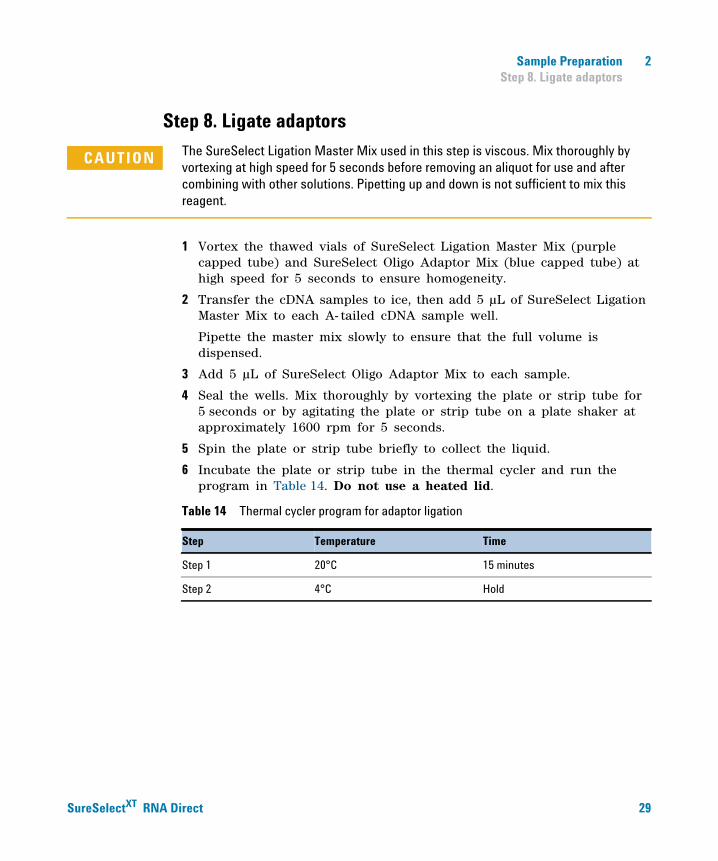
CAUTION The SureSelect Ligation Master Mix used in this step is viscous. Mix thoroughly by vortexing at high speed for 5 seconds before removing an aliquot for use and after combining with other solutions. Pipetting up and down is not sufficient to mix this reagent.
SureSelectXT RNA
1 Vortex the thawed vials of SureSelect Ligation Master Mix (purple capped tube) and SureSelect Oligo Adaptor Mix (blue capped tube) at high speed for 5 seconds to ensure homogeneity.
2 Transfer the cDNA samples to ice, then add 5 µL of SureSelect Ligation Master Mix to each A- tailed cDNA sample well.
Pipette the master mix slowly to ensure that the full volume is dispensed.
3 Add 5 µL of SureSelect Oligo Adaptor Mix to each sample.
4 Seal the wells. Mix thoroughly by vortexing the plate or strip tube for 5 seconds or by agitating the plate or strip tube on a plate shaker at approximately 1600 rpm for 5 seconds.
5 Spin the plate or strip tube briefly to collect the liquid.
6 Incubate the plate or strip tube in the thermal cycler and run the program in Table 14. Do not use a heated lid.
Table 14 Thermal cycler program for adaptor ligation
Step Temperature Time
Step 1 20°C 15 minutes
Step 2 4°C Hold
Direct 29

2 Sample Preparation Step 9. Purify adaptor-ligated DNA using AMPure XP beads
Step 9. Purify adaptor-ligated DNA using AMPure XP beads
30
1 Let the AMPure XP beads come to room temperature for at least 30 minutes. Do not freeze the beads at any time.
2 Prepare 400 µL of 70% ethanol per sample, plus excess, for use in step 8.
3 Mix the bead suspension well so that the suspension appears homogeneous and consistent in color.
4 Add 90 µL of the homogeneous bead suspension to each 50- µL sample in the PCR plate or strip tube. Seal the wells, then vortex the plate or strip tube for 5 seconds. Briefly spin to collect the liquid.
5 Incubate samples for 5 minutes at room temperature.
6 Put the plate or strip tube on the magnetic stand at room temperature. Wait for the solution to clear (at least 5 minutes).
7 While keeping the plate or strip tube in the magnetic stand, carefully remove and discard the cleared solution from each well. Do not touch the beads while removing the solution.
8 Continue to keep the plate or strip tube in the magnetic stand while you dispense 200 µL of fresh 70% ethanol in each sample well.
9 Wait for 1 minute to allow any disturbed beads to settle, then remove the ethanol.
10 Repeat step 8 and step 9 once for a total of two washes.
11 Dry the samples by placing the unsealed plate or strip tube on the thermal cycler, set to hold samples at 37°C, until the residual ethanol has just evaporated (up to 3 minutes). Do not overdry the beads.
12 Add 23 µL nuclease- free water to each sample well.
13 Seal the wells, then vortex the plate or strip tube for 5 seconds. Verify that all beads have been resuspended, with no visible clumps in the suspension or bead pellets retained on the sides of the wells. Briefly spin to collect the liquid.
14 Incubate for 2 minutes at room temperature.
15 Put the plate or strip tube in the magnetic stand and leave for 2 minutes or until the solution is clear
16 Remove 22 µL of cleared supernatant to a fresh sample well and keep on ice. You can discard the beads at this time.
SureSelectXT RNA Direct

Sample Preparation 2 Step 10. Amplify the adaptor-ligated cDNA library
Step 10. Amplify the adaptor-ligated cDNA library
SureSelectXT RNA
In this step, the adaptor ligated cDNA is PCR- amplified using a cycle number appropriate for the initial amount of RNA sample used for library preparation.
CAUTION The RNA Seq PCR Master Mix used at this step is highly viscous and thorough mixing is critical for optimal kit performance. Mix by vortexing at high speed for 5 seconds before removing an aliquot for use and after combining with other solutions in Table 16. Pipetting up and down is not sufficient to mix this reagent.
1 Preprogram a SureCycler 8800 thermal cycler (with the heated lid ON) with the program in Table 15. Start the program, then immediately press the Pause button, allowing the heated lid to reach temperature while you prepare the PCR reactions.
Table 15 Thermal cycler program for pre-capture PCR
Segment Number of Cycles
Temperature Time
1 1 37°C 15 minutes
2 1 95°C 2 minutes
3 14 cycles*
* Cycle number may require optimization. The optimal cycle number depends on the yield of adapter-ligated library fragments and the desired pre-capture library yield (200 ng of the pre-capture library is required to perform target enrichment). If yield is insufficient, repeat library preparation for the sample using up to 16 cycles. Optimization of cycle number may also be required based on duplication rate in the sequencing data generated after enrich-ment. If sequencing results indicate excessive duplicates, repeat library preparation for the sample using 12 or 13 cycles.
95°C 30 seconds
65°C 30 seconds
72°C 1 minute
4 1 72°C 5 minutes
5 1 4°C Hold
Direct 31

2 Sample Preparation Step 10. Amplify the adaptor-ligated cDNA library
32
2 Vortex the thawed vial of RNA Seq PCR Master Mix 5 seconds at high speed to ensure homogeneity.
3 Prepare the appropriate volume of PCR reaction mix, as described in Table 16, on ice. Mix well by vortexing at high speed then spin briefly to collect the liquid.
Table 16 Preparation of pre-capture PCR Reaction Mix
4 Add 28 µL of the pre- capture PCR reaction mix prepared in step 3 to each 22- µL purified, adaptor- ligated cDNA sample.
5 Seal the wells. Mix thoroughly by vortexing the plate or strip tube for 5 seconds or by agitating the plate or strip tube on a plate shaker at approximately 1600 rpm for 5 seconds.
6 Spin the plate or strip tube briefly to collect the liquid.
7 Place the samples in the thermal cycler, then press the Play button to resume the thermal cycling program in Table 15.
Reagent Volume for 1 reaction Volume for 16 reactions(includes excess)
RNA Seq PCR Master Mix (red cap or bottle) 25 µL 425 µL
Uracil DNA Glycosylase (UDG) (yellow cap) 1 µL 17 µL
SureSelect Primer (forward primer) (brown cap)
1 µL 17 µL
RNA Seq ILM Reverse PCR Primer (black cap)
1 µL 17 µL
Total 28 µL 476 µL
SureSelectXT RNA Direct

Sample Preparation 2 Step 11. Purify the amplified library with AMPure XP beads
Step 11. Purify the amplified library with AMPure XP beads
SureSelectXT RNA
1 Let the AMPure XP beads come to room temperature for at least 30 minutes. Do not freeze the beads at any time.
2 Prepare 400 µL of 70% ethanol per sample, plus excess, for use in step 8.
3 Mix the bead suspension well so that the suspension appears homogeneous and consistent in color.
4 Add 90 µL of the homogeneous bead suspension to each 50- µL PCR reaction in the plate or strip tube. Seal the wells, then vortex for 5 seconds. Briefly spin to collect the liquid.
5 Incubate samples for 5 minutes at room temperature.
6 Put the plate or strip tube on the magnetic stand at room temperature. Wait for the solution to clear (at least 5 minutes).
7 While keeping the plate or strip tube in the magnetic stand, carefully remove and discard the cleared solution from each well. Do not touch the beads while removing the solution.
8 Continue to keep the plate or strip tube in the magnetic stand while you dispense 200 µL of fresh 70% ethanol in each sample well.
9 Wait for 1 minute to allow any disturbed beads to settle, then remove the ethanol.
10 Repeat step 8 and step 9 once for a total of two washes.
11 Dry the samples by placing the unsealed plate or strip tube on the thermal cycler, set to hold samples at 37°C, until the residual ethanol has just evaporated (up to 3 minutes). Do not overdry the beads.
12 Add 26 µL nuclease- free water to each sample well.
13 Seal the wells, then vortex the plate or strip tube for 5 seconds. Verify that all beads have been resuspended, with no visible clumps in the suspension or bead pellets retained on the sides of the wells. Briefly spin to collect the liquid.
14 Incubate for 2 minutes at room temperature.
15 Put the plate or strip tube in the magnetic stand and leave for 2 minutes or until the solution is clear.
16 Remove 25 µL of cleared supernatant to a fresh well and keep on ice. You can discard the beads at this time.
Stopping Point
If you do not continue to the next step, seal the wells and store at –20°C.Direct 33

2 Sample Preparation Step 12. Assess quality and quantity
Step 12. Assess quality and quantity
34
Sample analysis can be done with either the 2100 Bioanalyzer instrument or an Agilent TapeStation instrument.
Option 1: Analysis using the 2100 Bioanalyzer and DNA 1000 Assay
See the DNA 1000 Kit Guide at www.agilent.com/genomics/bioanalyzer for more information on doing this step.
1 Check that the 2100 Bioanalyzer electrodes have been cleaned as instructed in the reagent kit guide.
2 Open the 2100 Expert Software (version B.02.02 or higher), turn on the 2100 Bioanalyzer and check communication.
3 Prepare the chip, samples and ladder as instructed in the reagent kit guide, using 1 µL of each sample for the analysis.
4 Load the prepared chip into the 2100 Bioanalyzer. Within the instrument context, choose the DNA 1000 assay from the drop down list. Start the run within five minutes after preparation.
5 Verify that the electropherogram shows the peak of DNA fragment size positioned between 150 to 300 bp. Measure the concentration of the library by integrating under the entire peak. For accurate quantification, make sure that the concentration falls within the linear range of the assay. Sample electropherograms are shown in Figure 2 (library prepared from high- quality RNA) and Figure 3 (library prepared from FFPE RNA).
SureSelectXT RNA Direct

Sample Preparation 2 Step 12. Assess quality and quantity
SureSelectXT RNA
Figure 2 Amplified library DNA prepared from a high-quality RNA sample analyzed us-ing a D1000 Assay.
Figure 3 Amplified library DNA prepared from an FFPE RNA sample analyzed using a D1000 Assay.
Direct 35

2 Sample Preparation Step 12. Assess quality and quantity
36
Option 2: Analysis using an Agilent 4200 TapeStation or 2200 TapeStation and D1000 ScreenTape
For more information to do this step, see the appropriate TapeStation User Manual at www.genomics.agilent.com.
1 Prepare the TapeStation samples as instructed in the instrument user manual. Use 1 µL of each DNA sample diluted with 3 µL of D1000 sample buffer for the analysis.
CAUTION Make sure that you thoroughly mix the combined DNA and sample buffer on a vortex mixer for 5 seconds for accurate quantitation.
2 Load the sample plate or tube strips from step 1, the D1000 ScreenTape, and loading tips into the TapeStation as instructed in the instrument user manual. Start the run.
3 Verify that the electropherogram shows the peak of DNA fragment size positioned between 150 to 300 bp. Determine the concentration of the library DNA by integrating under the entire peak. Sample electropherograms are shown in Figure 4 (library prepared from high- quality RNA) and Figure 5 (library prepared from FFPE RNA).
Figure 4 Amplified library DNA prepared from a high-quality RNA sample analyzed us-ing a D1000 ScreenTape.
SureSelectXT RNA Direct

Sample Preparation 2 Step 12. Assess quality and quantity
SureSelectXT RNA
Figure 5 Amplified library DNA prepared from an FFPE RNA sample analyzed using a D1000 ScreenTape.
Direct 37

2 Sample Preparation Step 12. Assess quality and quantity
38
SureSelectXT RNA Direct
SureSelectXT RNA Direct Protocol
3Hybridization
Step 1. Hybridize the library 40
Step 2. Prepare streptavidin beads 45
Step 3. Capture hybrids using streptavidin beads 46
This chapter describes the steps to hybridize the prepped cDNA library with the SureSelect or ClearSeq Capture Library in combination with the hybridization reagents and blocking agents.
CAUTION The ratio of Capture Library to prepped library is critical for successful capture.
39Agilent Technologies

3 Hybridization Step 1. Hybridize the library
Step 1. Hybridize the library
40
In this step, the prepared cDNA libraries are hybridized to a SureSelect or ClearSeq RNA Capture Library.
Use reagents from SureSelect Target Enrichment Box 1 and Box 2 for this step.
CAUTION You must avoid evaporation from the small volumes of the capture during the 24 hour incubation.
Before processing the first set of samples, first test the combination of thermal cycler, plates or strip tubes, and sealing method (strip caps or sealing tape) to be used in the protocol. Incubate 27 µL of water at 65°C for 24 hours as a test. Include water in each well that you might use, including those in the center and those on the edges. Check that you do not get extensive evaporation. Evaporation should not exceed 4 µL.
The hybridization reaction requires 200 ng of prepared cDNA in a volume of 3.4 µL (initial concentration of 58.8 ng/µL).
1 For prepped libraries with cDNA concentrations above 58.8 ng/µL, prepare 3.4 µL of a 58.8 ng/µL dilution of each library.
2 For prepped libraries with cDNA concentrations below 58.8 ng/µL, use a vacuum concentrator to concentrate the samples at 45°C.
a Add 200 ng of prepped library to an Eppendorf tube. Poke one or more holes in the lid with a narrow gauge needle.
You can also break off the cap, cover with parafilm, and poke a hole in the parafilm.
b Dehydrate using a vacuum concentrator on low heat (less than 45°C).
c Reconstitute with 3.4 µL nuclease- free water. Pipette up and down along the sides of the tube for optimal recovery.
d Mix well on a vortex mixer and spin in a centrifuge for 1 minute.
3 Transfer each 3.4- µL cDNA library sample (200 ng) to a separate well of a 96- well plate or strip tube. Seal the wells and keep on ice.
SureSelectXT RNA Direct

Hybridization 3 Step 1. Hybridize the library
SureSelectXT RNA
4 Preprogram a SureCycler 8800 thermal cycler (with the heated lid ON) with the program in Table 17. Start the program, then immediately press the Pause button, allowing the heated lid to reach temperature while you set up the reactions.
Table 17 Thermal cycler program for DNA + Block Mix prior to hybridization
5 Prepare the Hybridization Buffer by mixing the components in Table 18 at room temperature.
If a precipitate forms, warm the Hybridization Buffer at 65°C for 3 minutes.
Keep the prepared Hybridization Buffer at room temperature until it is used in step 10.
Table 18 Preparation of Hybridization Buffer
Step Temperature Time
Step 1 95°C 5 minutes
Step 2 65°C 5 minutes
Step 3 65°C Hold
Reagent Volume for 1 reaction*
* Prepare Hybridization Buffer for at least 5 reaction equivalents per run to allow accurate pipetting volumes.
Volume for 16 reactions (includes excess)
SureSelect Hyb 1 (orange cap or bottle) 6.63 µL 116 µL
SureSelect Hyb 2 (red cap) 0.27 µL 4.7 µL
SureSelect Hyb 3 (yellow cap) 2.65 µL 46.4 µL
SureSelect Hyb 4 (black cap) 3.45 µL 60.4 µL
Total 13 µL 227.5
Direct 41

3 Hybridization Step 1. Hybridize the library
42
6 Prepare the SureSelect Block Mix by mixing the components in Table 19. Keep the mixture on ice until it is used in step 7.
Table 19 Preparation of SureSelect Block Mix
7 To each cDNA library sample well prepared in step 3 on page 40, add 5.6 µL of the SureSelect Block Mix prepared in Table 19. Pipette up and down to mix.
8 Cap the wells, then transfer the sealed sample plates or strips to the thermal cycler and press the Play button to resume the thermal cycling program in Table 17. Ensure that the heated lid is in use (set at 105°C), to hold the temperature at 65°C.
Complete step 9 and step 10 below while running the thermal cycling program in Table 17. Make sure that the thermal cycler has entered the 65°C Hold step (Segment 3) before adding the remaining hybridization reaction components in step 11.
Reagent Volume for 1 reaction
Volume for 16 reactions (includes excess)
SureSelect Indexing Block 1 (green cap) 2.5 µL 42.5 µL
SureSelect Block 2 (blue cap) 2.5 µL 42.5 µL
SureSelect ILM Indexing Block 3 (brown cap) 0.6 µL 10.2 µL
Total 5.6 µL 95.2 µL
CAUTION The lid of the thermal cycler is hot and can cause burns. Use caution when working near the lid.
9 Prepare the required volume of a 1:4 dilution of SureSelect RNase Block (for a final concentration of 25%), as shown in Table 20. Keep on ice.
Table 20 Preparation of 25% RNase Block solution
Component Volume for 1 reaction Volume for 16 reactions (includes excess)
RNase Block (purple cap) 0.5 µL 8.5 µL
Nuclease-free water 1.5 µL 25.5 µL
Total 2 µL 34 µL
SureSelectXT RNA Direct

Hybridization 3 Step 1. Hybridize the library
SureSelectXT RNA
NOTE Prepare the Capture Library mixture described in step 10, below, near the end of the Segment 2 (5 minutes at 65°C) in Table 17. Keep the mixture at room temperature only briefly, until adding the mixture to sample wells in step 11. Do not keep solutions containing the Capture Library at room temperature for extended periods.
10 Prepare the Capture Library Hybridization Mix by combining the solutions listed in Table 21, in the order listed.
Mix well by vortexing at high speed for 5 seconds then spin down briefly. Keep the mixture at room temperature briefly, until use in step 11.
Table 21 Preparation of Capture Library Hybridization Mix
Reagent Volume for 1 reaction Volume for 16 reactions(includes excess)
Hybridization Buffer mixture from step 5 13 µL 221 µL
25% RNase Block solution from step 9 2 µL 34 µL
Capture Library*
* These conditions are optimal for all Capture Libraries listed in Table 2 on page 10, including Sure-SelectXT Human All Exon v6 + UTRs, which was originally developed for DNA capture applications. Use of other libraries designed for DNA capture requires optimization of Capture Library volume. For DNA capture libraries 3 Mb, begin optimization using 5 µl Capture Library in the hybridization as shown in Table 21. For DNA capture libraries <3 Mb, begin optimization by adding 2 µl Capture Library to the hybridization, and compensate for the volume difference by adding dilute RNase Block as 5 µl of a 10% solution.
5 µL 85 µL
Total 20 µL 340 µL
Direct 43

3 Hybridization Step 1. Hybridize the library
44
11 Maintain the gDNA library + Block Mix plate or strip tube at 65°C while you add 20 µL of the Capture Library Hybridization Mix from step 10 to each sample well. Mix well by pipetting up and down 8 to 10 times.
The hybridization reaction wells now contain approximately 27 to 29 µL, depending on the degree of evaporation during the thermal cycler incubation.
12 Seal the wells with domed strip caps or two layers of adhesive film. Make sure all wells are completely sealed.
CAUTION Wells must be adequately sealed to minimize evaporation, or your results can be negatively impacted.
When using the SureCycler 8800 thermal cycler and sealing with strip caps, make sure to use domed strip caps and to place a compression mat over the PCR plate or strip tubes in the thermal cycler.
13 Incubate the hybridization mixture in the SureCycler thermal cycler, with compression mat, for 24 hours at 65°C with a heated lid at 105°C.
SureSelectXT RNA Direct

Hybridization 3 Step 2. Prepare streptavidin beads
Step 2. Prepare streptavidin beads
SureSelectXT RNA
In this step, Dynabeads M- 270 Streptavidin magnetic beads (see Table 1 on page 9 for ordering information) are prepared for use in capturing the cDNA library/Capture Library hybrids.
The reagents listed in Table 22 are used to prepare the Dynabeads M- 270 Streptavidin magnetic beads and for subsequent steps in the capture protocol.
1 Vigorously resuspend the Dynabeads M- 270 Streptavidin magnetic beads on a vortex mixer. Magnetic beads settle during storage.
2 For each hybridization, add 50 µL of the magnetic bead suspension to wells of a PCR plate or strip tube.
3 Wash the beads:
a Add 200 µL of SureSelect Binding Buffer.
b Mix the beads by pipetting up and down until the beads are fully resuspended.
c Put the plate or strip tube into a magnetic separator device and allow the solution to clear (approximately 5 minutes).
d Remove and discard the supernatant.
e Repeat step a through step d for a total of 3 washes.
4 Resuspend the beads in 200 µL of SureSelect Binding Buffer.
Table 22 Reagents for post-hybridization capture using streptavidin beads
Kit Component Storage Location Where Used in Protocol
SureSelect Binding Buffer (bottle) SureSelect Target Enrichment Box 1, Room Temperature
page 45
SureSelect Wash Buffer 1 (bottle) SureSelect Target Enrichment Box 1, Room Temperature
page 46
SureSelect Wash Buffer 2 (bottle) SureSelect Target Enrichment Box 1, Room Temperature
page 46
Direct 45

3 Hybridization Step 3. Capture hybrids using streptavidin beads
Step 3. Capture hybrids using streptavidin beads
46
In this step, the cDNA library/Capture Library hybrids are captured on the prepared streptavidin magnetic beads.
1 After the 24- hour hybridization, remove samples from the thermal cycler and spin the plate or strip tube at room temperature to collect the liquid.
Estimate and record the volume of hybridization solution that remains after the 24 hour incubation in each well.
2 Use a multichannel pipette to transfer the entire volume (approximately 29 µL) of each hybridization mixture to the plate or strip tube wells containing 200 µL of washed streptavidin beads.
Mix well by slowly pipetting up and down at least 10 times, until beads are fully resuspended.
3 Cap the wells, then incubate the capture plate or strip tube on a 96- well plate mixer, mixing vigorously (1400–1800 rpm) for 30 minutes at room temperature.
Make sure the samples are properly mixing in the wells by inspecting the bottom of the wells for settled beads after 5 minutes.
4 During the 30- minute incubation for capture, prewarm Wash Buffer 2 at 65°C as described below.
a Place 200- µl aliquots of Wash Buffer 2 in wells of a fresh 96- well plate or strip tubes. Aliquot 3 wells of buffer for each DNA sample in the run.
b Cap the wells then incubate in the thermal cycler, with heated lid ON, held at 65°C until used in step 10.
5 At the end of the 30- minute incubation for capture, briefly spin the sample plate or strip tube in a centrifuge or mini- plate spinner.
6 Put the plate or strip tube on the magnetic stand at room temperature for approximately five minutes. Remove and discard the supernatant.
7 Resuspend the beads in 200 µL of SureSelect Wash Buffer 1. Pipette up and down until beads are resuspended. Cap the wells then mix on a vortex mixer for 5 seconds.
8 Incubate the samples for 15 minutes at room temperature.
SureSelectXT RNA Direct

Hybridization 3 Step 3. Capture hybrids using streptavidin beads
SureSelectXT RNA
9 Put the plate or strip tube on the magnetic stand at room temperature for approximately five minutes. Remove and discard the supernatant.
CAUTION It is important to maintain bead suspensions at 65°C during the washing procedure below to ensure specificity of capture.
Make sure that the SureSelect Wash Buffer 2 is pre-warmed to 65°C before use.
Do not use a tissue incubator, or other devices with significant temperature fluctuations, for the incubation steps.
10 Wash the beads with SureSelect Wash Buffer 2:
a Resuspend the beads in 200 µL of 65°C prewarmed SureSelect Wash Buffer 2. Pipette up and down until beads are resuspended.
b Seal the wells with fresh caps and then vortex at high speed for 5 seconds. Spin the plate or strip tube briefly to collect the liquid without pelleting the beads.
Make sure the beads are in suspension before proceeding.
c Incubate the samples for 10 minutes at 65°C on the thermal cycler (with the lid closed and heated lid ON).
d Briefly spin the plate or strip tube in a centrifuge or mini- plate spinner.
e Put the plate or strip tube in the magnetic separator.
f Wait for the solution to clear, then remove and discard the supernatant.
g Repeat step a through step f for a total of 3 washes.
Make sure all of the wash buffer has been removed during the final wash.
11 Add 40 µL of nuclease- free water to each sample well. Pipette up and down to resuspend the beads.
Keep the samples on ice until they are used on page 51.
Captured DNA is retained on the streptavidin beads during the post-capture amplification step.
NOTE
Stopping Point
If you do not continue to the next step, seal the wells and store at 4°C for same- day processing or store at –20°C for up to one month.Direct 47

3 Hybridization Step 3. Capture hybrids using streptavidin beads
48
SureSelectXT RNA Direct
SureSelectXT RNA Direct Protocol
4Indexing and Sample Processing for Multiplexed Sequencing
Step 1. Amplify the captured libraries to add index tags 50
Step 2. Purify the amplified captured libraries using AMPure XP beads 53
Step 3. Assess indexed library DNA quantity and quality 55
Step 4. Pool samples for multiplexed sequencing 59
Step 5. Prepare and analyze sequencing samples 61
This chapter describes the steps to add index tags by amplification, purify, and assess quality and quantity of the captured libraries. Sample pooling instructions are provided to prepare the indexed samples for multiplexed sequencing.
49Agilent Technologies
4 Indexing and Sample Processing for Multiplexed Sequencing Step 1. Amplify the captured libraries to add index tags
Step 1. Amplify the captured libraries to add index tags
50
In this step, the SureSelect- enriched cDNA libraries are PCR amplified. The protocol uses half of the captured library for amplification. The remainder can be saved at –20°C for future use, if needed.
CAUTION To avoid cross-contaminating libraries, set up PCR master mixes in a dedicated clean area or PCR hood with UV sterilization and positive air flow.
Use reagents from the SureSelect Strand Specific RNA Library Prep Kit, Box 1 for this step. Prepare 1 indexing amplification reaction for each cDNA library.
1 Determine the appropriate index assignments for each sample. Use a different index primer for each sample to be sequenced in the same lane.
See Table 32 on page 68 for sequences of the index portion of the indexing primers used to amplify cDNA libraries in this step.
Thaw the appropriate indexing primer vials (white- capped tubes) for 16- reaction kits or the blue indexing primer plate for 96- reaction kits and keep on ice.
SureSelectXT RNA Direct
Indexing and Sample Processing for Multiplexed Sequencing 4 Step 1. Amplify the captured libraries to add index tags
SureSelectXT RNA
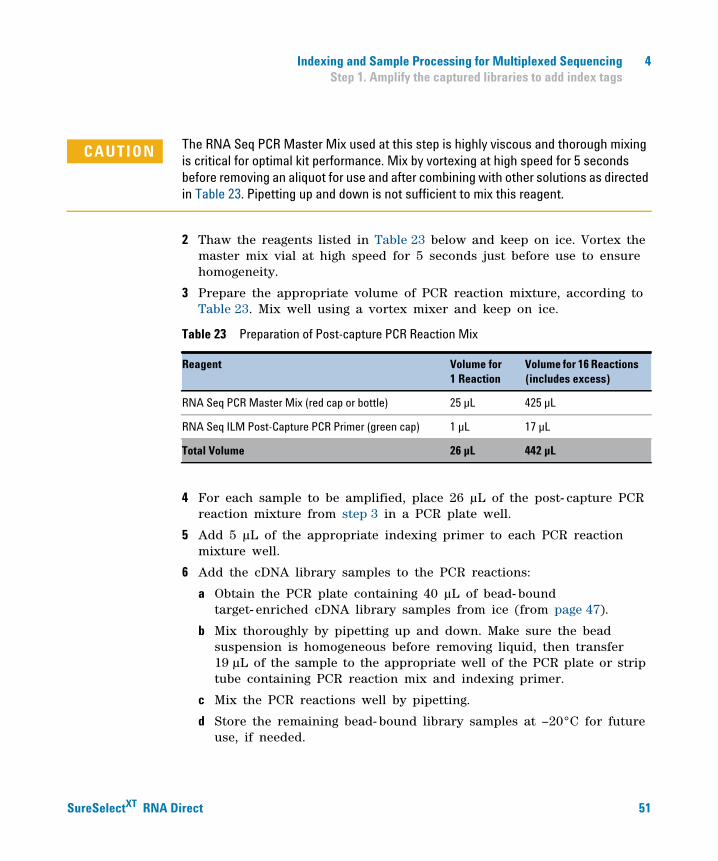
CAUTION The RNA Seq PCR Master Mix used at this step is highly viscous and thorough mixing is critical for optimal kit performance. Mix by vortexing at high speed for 5 seconds before removing an aliquot for use and after combining with other solutions as directed in Table 23. Pipetting up and down is not sufficient to mix this reagent.
2 Thaw the reagents listed in Table 23 below and keep on ice. Vortex the master mix vial at high speed for 5 seconds just before use to ensure homogeneity.
3 Prepare the appropriate volume of PCR reaction mixture, according to Table 23. Mix well using a vortex mixer and keep on ice.
Table 23 Preparation of Post-capture PCR Reaction Mix
4 For each sample to be amplified, place 26 µL of the post- capture PCR reaction mixture from step 3 in a PCR plate well.
5 Add 5 µL of the appropriate indexing primer to each PCR reaction mixture well.
6 Add the cDNA library samples to the PCR reactions:
a Obtain the PCR plate containing 40 µL of bead- bound target- enriched cDNA library samples from ice (from page 47).
b Mix thoroughly by pipetting up and down. Make sure the bead suspension is homogeneous before removing liquid, then transfer 19 µL of the sample to the appropriate well of the PCR plate or strip tube containing PCR reaction mix and indexing primer.
c Mix the PCR reactions well by pipetting.
d Store the remaining bead- bound library samples at –20°C for future use, if needed.
Reagent Volume for 1 Reaction
Volume for 16 Reactions (includes excess)
RNA Seq PCR Master Mix (red cap or bottle) 25 µL 425 µL
RNA Seq ILM Post-Capture PCR Primer (green cap) 1 µL 17 µL
Total Volume 26 µL 442 µL
Direct 51
4 Indexing and Sample Processing for Multiplexed Sequencing Step 1. Amplify the captured libraries to add index tags
52
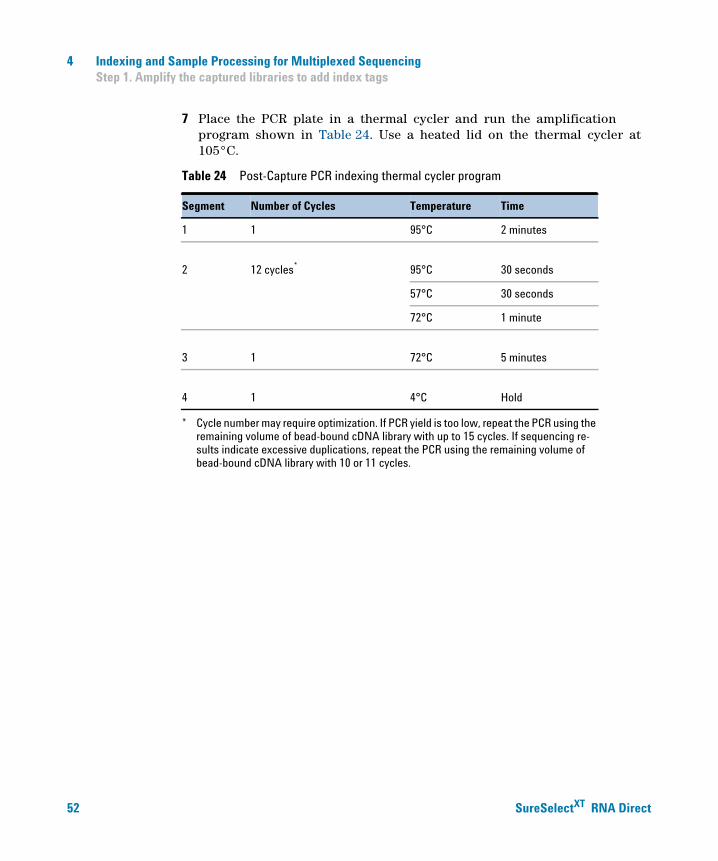
7 Place the PCR plate in a thermal cycler and run the amplification program shown in Table 24. Use a heated lid on the thermal cycler at 105°C.
Table 24 Post-Capture PCR indexing thermal cycler program
Segment Number of Cycles Temperature Time
1 1 95°C 2 minutes
2 12 cycles*
* Cycle number may require optimization. If PCR yield is too low, repeat the PCR using the remaining volume of bead-bound cDNA library with up to 15 cycles. If sequencing re-sults indicate excessive duplications, repeat the PCR using the remaining volume of bead-bound cDNA library with 10 or 11 cycles.
95°C 30 seconds
57°C 30 seconds
72°C 1 minute
3 1 72°C 5 minutes
4 1 4°C Hold
SureSelectXT RNA Direct
Indexing and Sample Processing for Multiplexed Sequencing 4 Step 2. Purify the amplified captured libraries using AMPure XP beads
Step 2. Purify the amplified captured libraries using AMPure XP beads
SureSelectXT RNA
1 Let the AMPure XP beads come to room temperature for at least 30 minutes. Do not freeze the beads at any time.
2 Prepare 400 µL of fresh 70% ethanol per sample, plus excess, for use in step 9.
3 Mix the bead suspension well so that the suspension appears homogeneous and consistent in color.
4 Add 90 µL of the homogeneous AMPure XP bead suspension to each 50- µL amplified DNA sample bead suspension in the PCR plate.
5 Mix thoroughly by pipetting up and down.
Check that the beads are in a homogeneous suspension in the sample wells. Each well should have a uniform color with no layers of beads or clear liquid present.
6 Incubate samples for 5 minutes at room temperature.
7 Put the plate on the magnetic stand at room temperature. Wait for the solution to clear (approximately 5 minutes).
8 While keeping the plate in the magnetic stand, carefully remove and discard the cleared solution from each well. Do not touch the beads while removing the solution.
9 Continue to keep the plate in the magnetic stand while you dispense 200 µL of fresh 70% ethanol in each sample well.
10 Wait for 1 minute to allow any disturbed beads to settle, then remove the ethanol.
11 Repeat step 9 and step 10 once for a total of two washes.
12 Dry the samples by placing the unsealed plate or strip tube on the thermal cycler, set to hold samples at 37°C, until the residual ethanol has just evaporated (up to 3 minutes).
Do not dry the bead pellets to the point that the pellets appear cracked. Elution efficiency is significantly decreased when the bead pellet is excessively dried.
Direct 53

4 Indexing and Sample Processing for Multiplexed Sequencing Step 2. Purify the amplified captured libraries using AMPure XP beads
54
13 Add 30 µL nuclease- free water to each sample well.
If libraries will be stored for an extended period prior to sequencing, instead elute the libraries using 30 µL of Buffer EB (not supplied; see Table 1 on page 9 for ordering information).
NOTE
14 Seal the wells, then vortex the plate or strip tube for 5 seconds. Verify that all beads have been resuspended, with no visible clumps in the suspension or bead pellets retained on the sides of the wells. Briefly spin to collect the liquid.
15 Incubate for 2 minutes at room temperature.
16 Put the plate or strip tube in the magnetic stand and leave for 2 minutes or until the solution is clear.
17 Remove the cleared supernatant (approximately 30 µL) to a fresh well. You can discard the beads at this time.
Stopping Point
If you do not continue to the next step, seal the plate and store at –20°C.SureSelectXT RNA Direct

Indexing and Sample Processing for Multiplexed Sequencing 4 Step 3. Assess indexed library DNA quantity and quality
Step 3. Assess indexed library DNA quantity and quality
SureSelectXT RNA
Option 1: Analysis using the Agilent 2100 Bioanalyzer and High Sensitivity DNA Assay
Use the Bioanalyzer High Sensitivity DNA Assay to analyze the amplified indexed DNA. See the High Sensitivity DNA Kit Guide at www.genomics.agilent.com for more information on doing this step.
1 Set up the 2100 Bioanalyzer as instructed in the reagent kit guide.
2 Prepare the chip, samples and ladder as instructed in the reagent kit guide, using 1 µL of each sample for the analysis.
3 Load the prepared chip into the 2100 Bioanalyzer and start the run within five minutes after preparation.
4 Verify that the electropherogram shows the peak of DNA fragment size positioned between 200 to 350 bp. Sample electropherograms are shown in Figure 6 (library prepared from high- quality RNA) and Figure 7 (library prepared from FFPE RNA).
5 Measure the concentration of each library by integrating under the entire peak. For accurate quantification, make sure that the concentration falls within the linear range of the assay.
Figure 6 Post-capture amplified library DNA prepared from a high-quality RNA sample analyzed using a High Sensitivity DNA Assay.
Direct 55

4 Indexing and Sample Processing for Multiplexed Sequencing Step 3. Assess indexed library DNA quantity and quality
56
Figure 7 Post-capture amplified library DNA prepared from an FFPE RNA sample ana-lyzed using a High Sensitivity DNA Assay.
SureSelectXT RNA Direct

Indexing and Sample Processing for Multiplexed Sequencing 4 Step 3. Assess indexed library DNA quantity and quality
SureSelectXT RNA
Option 2: Analysis using an Agilent 4200 TapeStation or 2200 TapeStation and High Sensitivity D1000 ScreenTape
Use a High Sensitivity D1000 ScreenTape (p/n 5067- 5584) and reagent kit (p/n 5067- 5585) to analyze the amplified indexed DNA. For more information to do this step, see the appropriate TapeStation User Manual at www.genomics.agilent.com.
1 Prepare the TapeStation samples as instructed in the instrument user manual. Use 2 µL of each indexed DNA sample diluted with 2 µL of High Sensitivity D1000 sample buffer for the analysis.
CAUTION Make sure that you thoroughly mix the combined DNA and sample buffer on a vortex mixer for 5 seconds for accurate quantitation.
2 Load the sample plate or tube strips from step 1, the High Sensitivity D1000 ScreenTape, and loading tips into the TapeStation as instructed in the instrument user manual. Start the run.
3 Verify that the electropherogram shows the peak of DNA fragment size positioned between 200 to 350 bp. Sample electropherograms are shown in Figure 8 (library prepared from high- quality RNA) and Figure 9 (library prepared from FFPE RNA).
4 Measure the concentration of each library by integrating under the entire peak.
Direct 57

4 Indexing and Sample Processing for Multiplexed Sequencing Step 3. Assess indexed library DNA quantity and quality
58
Figure 8 Post-capture amplified library DNA prepared from a high-quality RNA sample analyzed using a High Sensitivity D1000 ScreenTape.
Figure 9 Post-capture amplified library DNA prepared from an FFPE RNA sample ana-lyzed using a High Sensitivity D1000 ScreenTape.
SureSelectXT RNA Direct

Indexing and Sample Processing for Multiplexed Sequencing 4 Step 4. Pool samples for multiplexed sequencing
Step 4. Pool samples for multiplexed sequencing
SureSelectXT RNA
The number of indexed libraries that may be multiplexed in a single sequencing lane is determined by the output specifications of the platform used, together with the amount of sequencing data required for each sample based on your research objectives.
1 Combine the libraries such that each index- tagged sample is present in equimolar amounts in the pool. For each library, use the formula below to determine the amount of indexed sample to use.
Volume of Index V f C f # C i
---------------------------------=
where V(f) is the final desired volume of the pool,
C(f) is the desired final concentration of all the DNA in the pool (10 nM for the standard Illumina sequencing protocol)
# is the number of indexes, and
C(i) is the initial concentration of each indexed sample.
Table 25 shows an example of the amount of 4 index- tagged samples (of different concentrations) and Buffer EB needed for a final volume of 20 µL at 10 nM.
2 Adjust the final volume of the pooled library to the desired final concentration.
• If the final volume of the combined index- tagged samples is less than the desired final volume, V(f), add Buffer EB to bring the volume to the desired level.
Table 25 Example of indexed sample volume calculation for total volume of 20 µL
Component V(f) C(i) C(f) # Volume to use (µL)
Sample 1 20 µL 20 nM 10 nM 4 2.5
Sample 2 20 µL 10 nM 10 nM 4 5
Sample 3 20 µL 17 nM 10 nM 4 2.9
Sample 4 20 µL 25 nM 10 nM 4 2
Buffer EB 7.6
Direct 59

4 Indexing and Sample Processing for Multiplexed Sequencing Step 4. Pool samples for multiplexed sequencing
60
• If the final volume of the combined index- tagged samples is greater than the final desired volume, V(f), lyophilize and reconstitute to the desired volume.
The pooled libraries can be stored in a DNA LoBind tube at –20°C for up to six months. Do not subject the libraries to multiple freeze- thaw cycles prior to sequencing.
SureSelectXT RNA Direct
Indexing and Sample Processing for Multiplexed Sequencing 4 Step 5. Prepare and analyze sequencing samples
Step 5. Prepare and analyze sequencing samples
SureSelectXT RNA
Proceed to cluster amplification using the Illumina Paired- End Cluster Generation Kit; refer to the manufacturer’s instructions for this step. The optimal seeding concentration for cluster amplification from SureSelect RNA target- enriched libraries is approximately 8- 10 pM.
NOTE The optimal seeding concentration may vary, depending on the method used for library quantification and fragment size distribution.
This protocol has been validated with 2 x 100- base paired- end reads. However, read length can be adjusted to achieve the desired research goals.
Sequencing run setup guidelines for 8-bp indexes
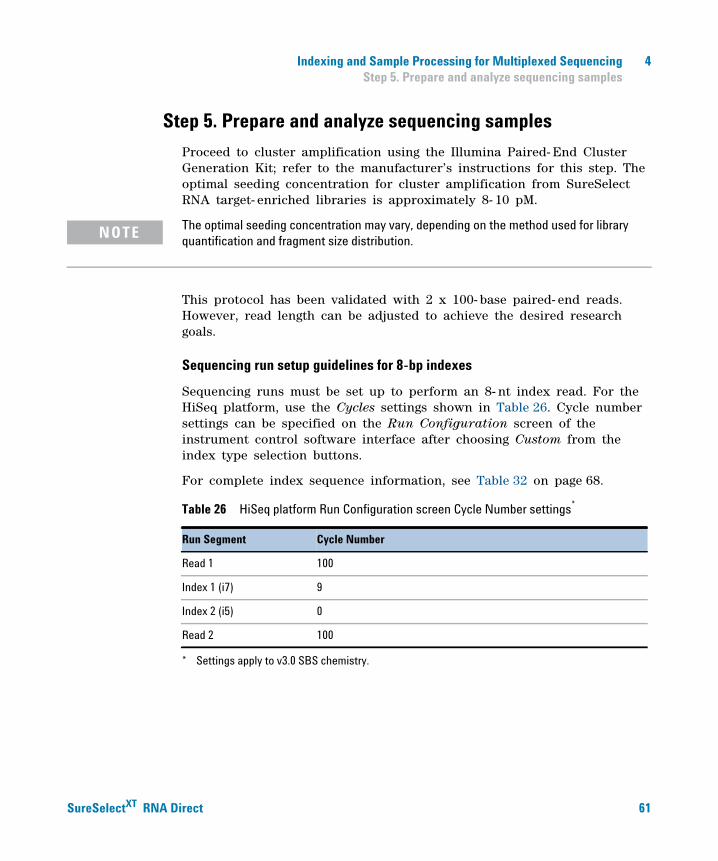
Sequencing runs must be set up to perform an 8- nt index read. For the HiSeq platform, use the Cycles settings shown in Table 26. Cycle number settings can be specified on the Run Configuration screen of the instrument control software interface after choosing Custom from the index type selection buttons.
For complete index sequence information, see Table 32 on page 68.
Table 26 HiSeq platform Run Configuration screen Cycle Number settings*
* Settings apply to v3.0 SBS chemistry.
Run Segment Cycle Number
Read 1 100
Index 1 (i7) 9
Index 2 (i5) 0
Read 2 100
Direct 61

4 Indexing and Sample Processing for Multiplexed Sequencing Step 5. Prepare and analyze sequencing samples
62
Sequence analysis guidelines
The SureSelectXT RNA sequencing library preparation method preserves RNA strandedness as described here. The first strand of cDNA is the reverse complement of the poly(A) RNA transcript strand. Since the second strand of cDNA is eliminated before PCR, the sequence of read 1, which starts at the P5 end, matches only the first strand of cDNA. Read 2, which starts at the P7 end, matches the second strand of cDNA (the poly(A) RNA transcript strand). When running analysis of this data to determine strandedness, it is important to include this information. For example, when using the Picard tools (http://picard.sourceforge.net/) to calculate RNA sequencing metrics, it is important to include the parameter STRAND_SPECIFICITY= SECOND_READ_TRANSCRIPTION_STRAND to correctly calculate the strand specificity metrics.
SureSelectXT RNA Direct
SureSelectXT RNA Direct Protocol
5Reference
Kit Contents 64
Nucleotide Sequences of SureSelectXT Indexes A01 to H12 68
This chapter contains reference information, including component kit contents and index sequences.
63Agilent Technologies

5 Reference Kit Contents
Kit Contents
64
The SureSelectXT RNA Direct Reagent Kits include the following component kits:
Table 27 SureSelectXT RNA Direct Reagent Kit Content
Component Kits Storage Condition 16 Samples 96 Samples
SureSelect Strand Specific RNA Library Prep, ILM, Box 1
–20°C 5500-0134 5500-0135
SureSelect Target Enrichment Box 1 Room Temperature 5190-8645 5190-8646
SureSelect Target Enrichment Box 2 –20°C 5190-6261 5190-6262
SureSelectXT RNA Direct
Reference 5 Kit Contents
SureSelectXT RNA
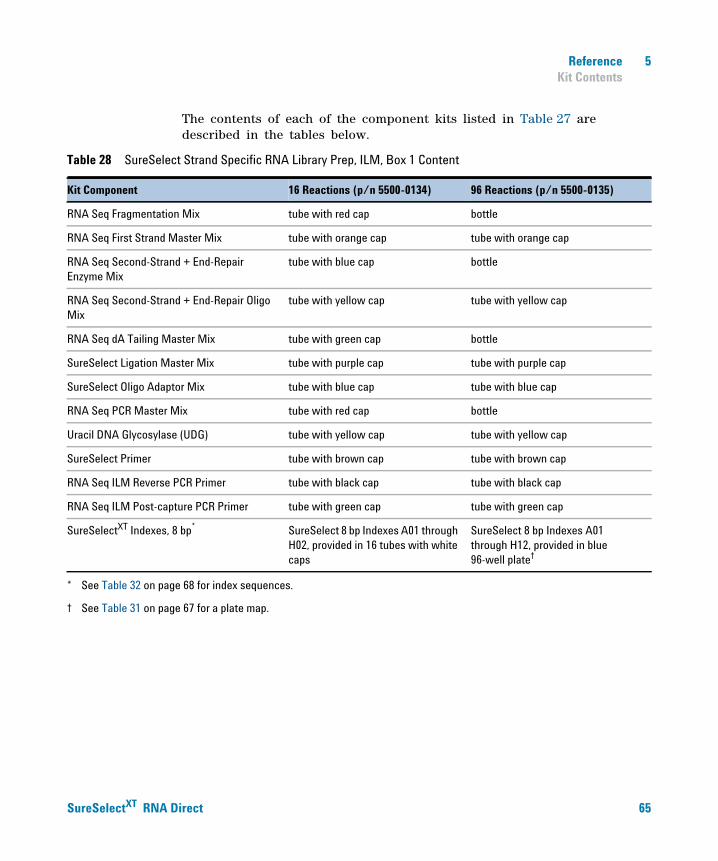
The contents of each of the component kits listed in Table 27 are described in the tables below.
Table 28 SureSelect Strand Specific RNA Library Prep, ILM, Box 1 Content
Kit Component 16 Reactions (p/n 5500-0134) 96 Reactions (p/n 5500-0135)
RNA Seq Fragmentation Mix tube with red cap bottle
RNA Seq First Strand Master Mix tube with orange cap tube with orange cap
RNA Seq Second-Strand + End-Repair Enzyme Mix
tube with blue cap bottle
RNA Seq Second-Strand + End-Repair Oligo Mix
tube with yellow cap tube with yellow cap
RNA Seq dA Tailing Master Mix tube with green cap bottle
SureSelect Ligation Master Mix tube with purple cap tube with purple cap
SureSelect Oligo Adaptor Mix tube with blue cap tube with blue cap
RNA Seq PCR Master Mix tube with red cap bottle
Uracil DNA Glycosylase (UDG) tube with yellow cap tube with yellow cap
SureSelect Primer tube with brown cap tube with brown cap
RNA Seq ILM Reverse PCR Primer tube with black cap tube with black cap
RNA Seq ILM Post-capture PCR Primer tube with green cap tube with green cap
SureSelectXT Indexes, 8 bp* SureSelect 8 bp Indexes A01 through H02, provided in 16 tubes with white caps
SureSelect 8 bp Indexes A01 through H12, provided in blue 96-well plate†
* See Table 32 on page 68 for index sequences.
† See Table 31 on page 67 for a plate map.
Direct 65

5 Reference Kit Contents
66
ct Target Enrichment Box 1 Content
Table 29 SureSeleKit Component 16 Reactions 96 Reactions
SureSelect Hyb 1 tube with orange cap bottle
SureSelect Hyb 2 tube with red cap tube with red cap
SureSelect Hyb 4 tube with black cap tube with black cap
SureSelect Binding Buffer bottle bottle
SureSelect Wash Buffer 1 bottle bottle
SureSelect Wash Buffer 2 bottle bottle
Table 30 SureSelect Target Enrichment Box 2 ContentKit Component 16 Reactions 96 Reactions
SureSelect Hyb 3 tube with yellow cap tube with yellow cap
SureSelect Indexing Block 1 tube with green cap tube with green cap
SureSelect Block 2 tube with blue cap tube with blue cap
SureSelect ILM Indexing Block 3 tube with brown cap tube with brown cap
SureSelect RNase Block tube with purple cap tube with purple cap
SureSelectXT RNA Direct
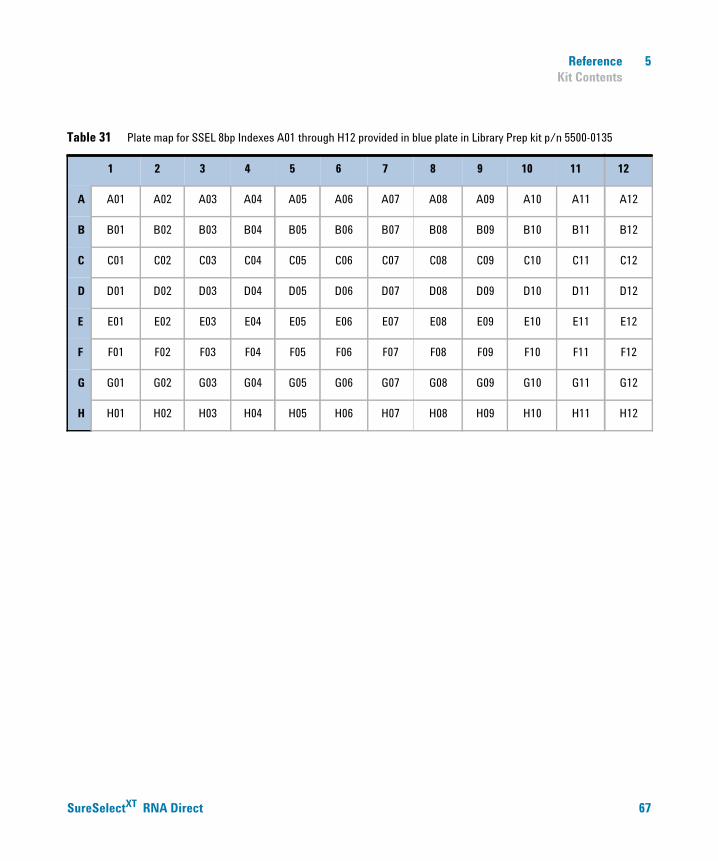
Reference 5 Kit Contents
SureSelectXT RNA
Table 31 Plate map for SSEL 8bp Indexes A01 through H12 provided in blue plate in Library Prep kit p/n 5500-0135
1 2 3 4 5 6 7 8 9 10 11 12
A A01 A02 A03 A04 A05 A06 A07 A08 A09 A10 A11 A12
B B01 B02 B03 B04 B05 B06 B07 B08 B09 B10 B11 B12
C C01 C02 C03 C04 C05 C06 C07 C08 C09 C10 C11 C12
D D01 D02 D03 D04 D05 D06 D07 D08 D09 D10 D11 D12
E E01 E02 E03 E04 E05 E06 E07 E08 E09 E10 E11 E12
F F01 F02 F03 F04 F05 F06 F07 F08 F09 F10 F11 F12
G G01 G02 G03 G04 G05 G06 G07 G08 G09 G10 G11 G12
H H01 H02 H03 H04 H05 H06 H07 H08 H09 H10 H11 H12
Direct 67

5 Reference Nucleotide Sequences of SureSelectXT Indexes A01 to H12
Nucleotide Sequences of SureSelectXT Indexes A01 to H12
68
Each index is 8 nt in length. See page 61 for sequencing run setup requirements for sequencing libraries using 8- bp indexes.
Table 32 SureSelect RNA Seq Indexes, for indexing primers in white-capped tubes or blue 96-well plates
Index Sequence Index Sequence Index Sequence Index Sequence
A01 ATGCCTAA A04 AACTCACC A07 ACGTATCA A10 AATGTTGC
B01 GAATCTGA B04 GCTAACGA B07 GTCTGTCA B10 TGAAGAGA
C01 AACGTGAT C04 CAGATCTG C07 CTAAGGTC C10 AGATCGCA
D01 CACTTCGA D04 ATCCTGTA D07 CGACACAC D10 AAGAGATC
E01 GCCAAGAC E04 CTGTAGCC E07 CCGTGAGA E10 CAACCACA
F01 GACTAGTA F04 GCTCGGTA F07 GTGTTCTA F10 TGGAACAA
G01 ATTGGCTC G04 ACACGACC G07 CAATGGAA G10 CCTCTATC
H01 GATGAATC H04 AGTCACTA H07 AGCACCTC H10 ACAGATTC
A02 AGCAGGAA A05 AACGCTTA A08 CAGCGTTA A11 CCAGTTCA
B02 GAGCTGAA B05 GGAGAACA B08 TAGGATGA B11 TGGCTTCA
C02 AAACATCG C05 CATCAAGT C08 AGTGGTCA C11 CGACTGGA
D02 GAGTTAGC D05 AAGGTACA D08 ACAGCAGA D11 CAAGACTA
E02 CGAACTTA E05 CGCTGATC E08 CATACCAA E11 CCTCCTGA
F02 GATAGACA F05 GGTGCGAA F08 TATCAGCA F11 TGGTGGTA
G02 AAGGACAC G05 CCTAATCC G08 ATAGCGAC G11 AACAACCA
H02 GACAGTGC H05 CTGAGCCA H08 ACGCTCGA H11 AATCCGTC
A03 ATCATTCC A06 AGCCATGC A09 CTCAATGA A12 CAAGGAGC
B03 GCCACATA B06 GTACGCAA B09 TCCGTCTA B12 TTCACGCA
C03 ACCACTGT C06 AGTACAAG C09 AGGCTAAC C12 CACCTTAC
D03 CTGGCATA D06 ACATTGGC D09 CCATCCTC D12 AAGACGGA
E03 ACCTCCAA E06 ATTGAGGA E09 AGATGTAC E12 ACACAGAA
F03 GCGAGTAA F06 GTCGTAGA F09 TCTTCACA F12 GAACAGGC
G03 ACTATGCA G06 AGAGTCAA G09 CCGAAGTA G12 AACCGAGA
H03 CGGATTGC H06 CCGACAAC H09 CGCATACA H12 ACAAGCTA
SureSelectXT RNA Direct
www.agilent.com
In This Book
This guide contains information to run the SureSelectXT RNA Direct protocol.
Agilent Technologies, Inc. 2017
Version A0, July 2017
*G9691-90050*p/n G9691-90050
Agilent Technologies