support for business-managing surface devices in the enterprise
TRANSCRIPT

Managing Surface Devices in the Enterprise – Firmware/Driver Management
with System Center Configuration Manager 2012 This article describes how to deploy enterprise-managed firmware and drivers to Surface Pro devices using
System Center Configuration Manager 2012.It also discusses common troubleshooting and remediation scenarios
specific to driver installation.
You can install firmware and drivers a few ways via System Center Configuration Manager, including installation
during an operating system deployment task sequence and installation via application or package deployment.
Surface Pro Firmware and Driver Pack To deploy firmware and drivers to a Surface device, you must download the Surface firmware and driver pack. The
pack is cumulative, and includes current firmware and drivers for all components in Surface Pro, Surface Pro 2,
Surface Pro 3, and Surface 3 devices, including system firmware updates released via Windows Update.
The drivers are compatible with Surface devices running Windows 8.1 (Pro and Enterprise). Surface Pro is the only
device compatible with Windows 8.0 (Pro and Enterprise).
When Microsoft releases new updates to firmware and drivers, the firmware and driver pack is updated for all
Surface models.
To get the Surface firmware and driver pack, go to http://go.microsoft.com/fwlink/?LinkID=301483&clcid=0x409.
In operating system deployment scenarios, these drivers are required to deploy Surface Pro 3 in the enterprise.
Importing Drivers into System Center Configuration Manager 2012 After you download the drivers, import them into System Center Configuration Manager.
You can install the firmware and drivers in the download pack with System Center Configuration Manager using
either of these methods:
Install during a Windows 8/Windows 8.1 task sequence you create in System Center Configuration
Manager via the driver related tasks
-or-
Deploy as a standard System Center Configuration Manager 2012 package
NOTE: You can’t install the firmware and drivers via the Configuration Manager Software Update Point site
system role.
To import drivers into System Center Configuration Manager 2012 To import drivers for Surface devices into System Center Configuration Manager, follow the same process you
would to import drivers for any other hardware type. This will import the .INF files that you downloaded from the
link above, and will give you the option to create a driver package or multiple driver packages.
NOTE: The following examples reference drivers specific to Surface Pro 3 devices, but the processes are the
same across all Surface devices (excluding Surface RT).

1. In the System Center Configuration Manager console, navigate to Software Library > Operating System
Deployment > Drivers.
2. Press and hold (or right click) the Drivers node, and select Import Drivers.
The first page of the Import New Driver Wizard will open.
3. In the first section in Source Folder, browse to the network share where you downloaded the Surface
drivers.
4. In the dropdown under Specify the option for duplicate drivers, select the most applicable option.
If you want to create a new category for these drivers, select Import the driver and append a new
category to the existing categories.

5. Select Next.
The next page in the wizard will list all the drivers that were pulled from the source location that you
entered on the previous page of the wizard. It will also give you the option to create a new category, or
add the drivers to an existing category. For easier administration of all drivers, we suggest that you create
a driver category for each Surface model.
6. Verify that Enable these drivers and allow computers to install them is selected.
To create a new category, select the Categories button. In the Manage Administrative Categories wizard,
select Create, enter the desired name of the new category, and select OK. In the Manage Administrative
Categories box, select OK.

7. Select Next.
The next page of the wizard will ask you to either add the drivers to an existing package, or create a new
package in which to store the drivers. For easier administration of all driver packages, we suggest that you
create a new driver package for each Surface model.
If you haven’t created a driver package for your Surface device, select New Package.
Select a name for the new package, and add a comment if desired. In the Path box, select Browse and
enter the network share path where this package will be stored. If you’re adding these drivers to an
existing package, select the package from the list. If the Update distribution points when finished box is
checked, the newly added drives will be added to the distribution point automatically once you finish the
‘Import New Driver’ wizard.

8. Select Next.
The next page will prompt you to add these drivers to a Boot Image. In this case, you can skip this option
since not all of the drivers in the package are compatible with a Boot Image. In most cases, you will only
want to add the Ethernet adapter to the Boot Image. You can also add the Surface firmware to the Boot
Image for automatic firmware updating when booting into WinPE (with the exception of the Touch
firmware).

9. Select Next.
The next page will display a summary of all the options you chose in the Import New Driver Wizard.
10. Verify that the information listed under Details is correct, and select Next.
The next page will show the drivers processing while they’re imported. This may take some time
depending on how many drivers you’re importing.

Once System Center Configuration Manager finishes processing the drivers, you’ll see them in the console
under Software Library > Operating System Deployment > Drivers.
The driver package is listed under Software Library > Operating System Deployment > Driver Packages.

Before you can deploy the driver package, you’ll need to distribute it to a distribution point. If you added
the drivers to an existing package, the distribution points updated when you added the new drivers to the
package if you had the Update distribution points when finished box selected.
For new packages, navigate to Software Library > Operating System Deployment > Driver Packages, and
press and hold (or right click) the Surface driver package. Select Distribute Content, and follow the wizard
to distribute the content to the required distribution point(s).

NOTE: Due to a known issue in Configuration Manager, you may need to update distribution points
manually after the content is initially distributed, or you may see a hash error.
To Add the NIC Driver and Firmware to a Boot Image After you’ve imported the Surface firmware and drivers into Configuration Manager, it’s time to add the Surface
Ethernet Adapter and firmware (with the exception of touch firmware) to the boot image. This will allow for
automatic firmware updating while in WinPE. To add the Surface Ethernet Adapter and firmware to the boot
image, do the following:
1. In the Configuration Manager console, navigate to Software Library > Operating Systems > Boot Images.
2. Press and hold (or right click) the x64 Boot Image that you’ll use in the Task Sequence for Surface
Operating System Deployment, and select Properties.
3. When the wizard opens, select the Drivers tab.

4. Select the yellow starburst button towards the top right.
The Select a driver dialog box will display.
5. Select the Surface Ethernet Adapter driver.
If you want to update firmware in WinPE, also select the Surface firmware (with the exception of the
Touch firmware).
6. Select OK.
Configuration Manager will prompt you if you need to update the changes to the boot image on the
distribution point(s). Select Yes to update the distribution point(s) automatically.
Configuration Manager will update the distribution point with the new changes to the boot image. Once
it’s finished, you can add this boot image to a task sequence for operating system deployment. If this boot
image is already included in a task sequence, you don’t need to make changes--the boot image will
update with the changes automatically.
Deploying the Surface Driver and Firmware Package in a Task Sequence Now that you have the firmware and driver package distributed, you can add it to a System Center Configuration
Manager task sequence for use with Operating System Deployment.
To Add the Surface Driver Package to a Task Sequence 1. In the System Center Configuration Manager Console, navigate to Software Library > Operating System
Deployment > Task Sequences.

2. Press and hold (or right click) the task sequence that you’re using for Surface deployments, and select
Edit.
3. At the top of the task sequence, select Add, and select Add > Drivers > Driver Package.
Be sure add this step after you add the ‘Apply Operating System’ and before the ‘Setup Windows and
ConfigMgr’ task runs.
4. Select the driver package that was created specifically for the Surface device.

5. Select the Options tab, and select Add Condition.
Here, select Query WMI. This ensures that these drivers will only run on the specified Surface device.
6. In the window, enter one of the following:
SELECT * FROM Win32_ComputerSystem WHERE Model Like "%Surface Pro X%"
-or-
SELECT * FROM Win32_ComputerSystem WHERE Model Like "%Surface X%"
NOTE: Replace ‘X’ with the Surface model to which you’re associating the deployment package.

7. Use the Test Query option to verify that the query has no errors.
This should return a dialog box with this message:
NOTE: The Test Query dialog box will show a returned result count of 0 if the Configuration Manager console is
not running on a device on which the WMI query is being run. If the Configuration Manager console is running
on a device on which the WMI query is being created for (i.e. Surface Pro 3), the returned result count will show
1.
To Verify Successful Deployment of Drivers and Firmware To verify that the firmware and drivers installed during the task sequence, look to see if they appear in Device
Manager on your Surface device.

Deploying Firmware and Drivers using a System Center Configuration Manager 2012 Application
or Package The above examples apply to Surface devices that are to be imaged and deployed in the enterprise. However, it’s
also possible to deploy firmware and drivers to Surface devices are already deployed to users who are actively
using the devices. You can do this using a System Center Configuration Manager 2012 package deployment.
Surface firmware updates are currently not available via Windows Server Updates Services (WSUS). This means
it’s not possible to include these firmware updates in an organization’s standard patching cycle.
To deploy firmware updates specifically to Surface Pro 3 devices that are already been deployed to end users,
Microsoft has released a Surface MSI that you can use to install updated firmware and drivers (with the exception
of the touch firmware).
For other Surface models, update firmware via Windows Update. For this to be successful, Surface devices need
to have Internet access in order to install updates automatically.
To download the MSI, go to https://www.microsoft.com/en-us/download/details.aspx?id=38826, and select
SurfacePro3_150519.msi.
NOTE: The name of this MSI file will change as newer versions of firmware and drivers are released.
To Deploy Firmware and Drivers to Surface Pro 3 using System Center Configuration Manager 2012
Application To create an application for deployment of firmware and drivers to Surface Pro 3 devices, follow these steps:
1. In the System Center Configuration Manager console, navigate to Software Library > Application
Management > Applications.

2. Press and hold (or right click) Applications, and select Create Application.
This will open the Create Application Wizard.
3. Select Automatically detect information about this application from installation files.
4. Select Browse, and navigate to the location the Surface MSI is saved.
Note that you must enter a UNC path that points to the MSI.
5. Select Next.
Configuration Manager will display successful import of the MSI.
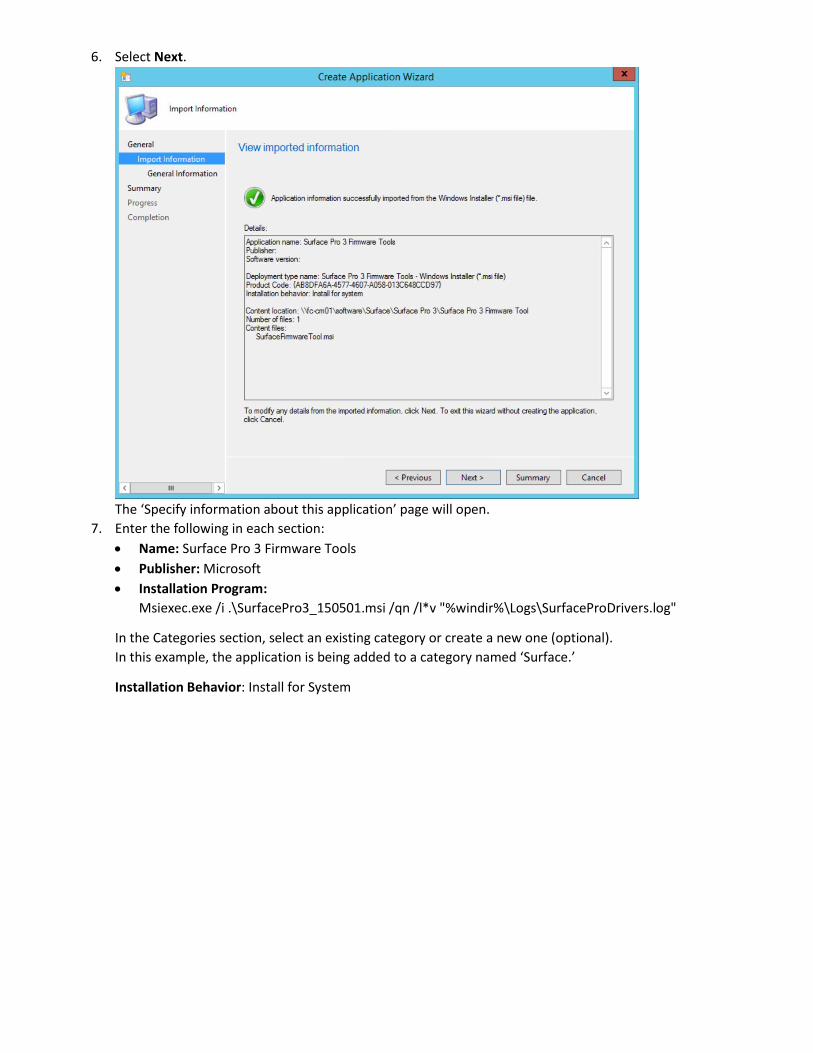
6. Select Next.
The ‘Specify information about this application’ page will open.
7. Enter the following in each section:
Name: Surface Pro 3 Firmware Tools
Publisher: Microsoft
Installation Program:
Msiexec.exe /i .\SurfacePro3_150501.msi /qn /l*v "%windir%\Logs\SurfaceProDrivers.log"
In the Categories section, select an existing category or create a new one (optional).
In this example, the application is being added to a category named ‘Surface.’
Installation Behavior: Install for System

8. Select Next.
The next page will display a summary of all the settings you chose.
9. Under Details, verify that the information listed is correct.

10. Select Next.
Configuration Manager will verify successful application creation. This application can now be distributed
and deployed to a collection, or added to a task sequence for installation during operating system
deployment.

11. To ensure that you can install this application during a Task Sequence, press and hold (or right click) the
application in the Configuration Manager console, and once you’ve created the application, select
Properties.
Select Allow this application to be installed from the Install Application task sequence action without
being deployed if you don’t want to deploy this application to a collection, and you only want to install it
during a Task Sequence.
If you’re deploying the firmware and drivers MSI as an application, the AppEnforce.log and
AppDiscovery.log on the client side will indicate whether the Surface will install the application based on
the requirements set in the application’s properties.
To add requirements to the deployment type, select the Deployment Type tab on the bottom half of the
console, then press and hold (or right click), select Properties, and select the Requirements tab.
You’ll find client side logs at %windir%\CCM\Logs.
To Deploy Firmware and Drivers to Surface Pro 3 using a System Center Configuration Manager 2012
Package Follow these steps to create a package for deployment of firmware and drivers to Surface Pro 3 devices:
1. In the System Center Configuration Manager console, navigate to Software Library > Application
Management > Packages.
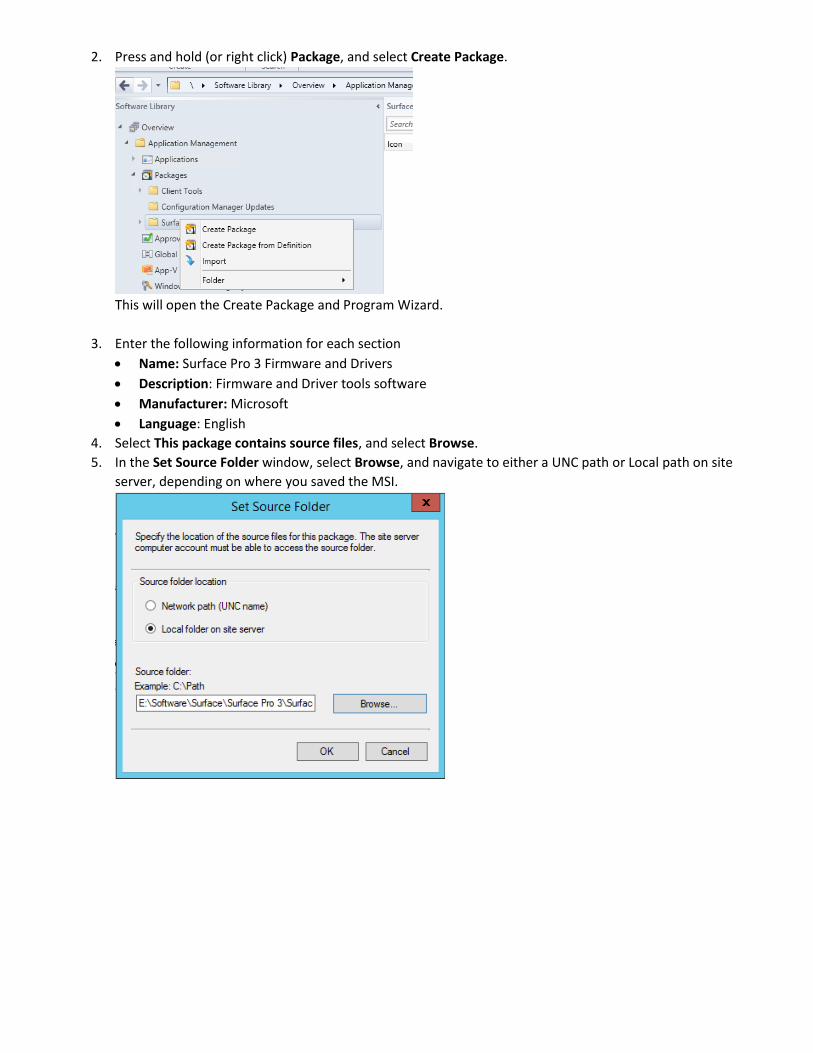
2. Press and hold (or right click) Package, and select Create Package.
This will open the Create Package and Program Wizard.
3. Enter the following information for each section
Name: Surface Pro 3 Firmware and Drivers
Description: Firmware and Driver tools software
Manufacturer: Microsoft
Language: English
4. Select This package contains source files, and select Browse.
5. In the Set Source Folder window, select Browse, and navigate to either a UNC path or Local path on site
server, depending on where you saved the MSI.

6. Select Next.
7. On the next page, select Standard Program, and select Next.

8. Enter the following information on the next page:
Name: Surface Pro 3 Firmware and Driver
Command line: Msiexec.exe /i .\SurfacePro3_150501.msi /qn /l*v
"%windir%\Logs\SurfaceProDrivers.log"
NOTE: The name of this MSI file will change as newer versions of firmware and drivers are released.
Program Can Run: Whether or not a user is logged on
NOTE: Do NOT check the option to Allow users to view and interact with the program installation.
This will allow the program to run during an OSD Task Sequence.
9. Since this package will be deployed to a Surface Pro 3 device, on the next page, select This program can
only run on specified platforms, and select All Windows 8.1 (64-bit).
NOTE: Supported operating systems will change as newer Surface devices and firmware are released.
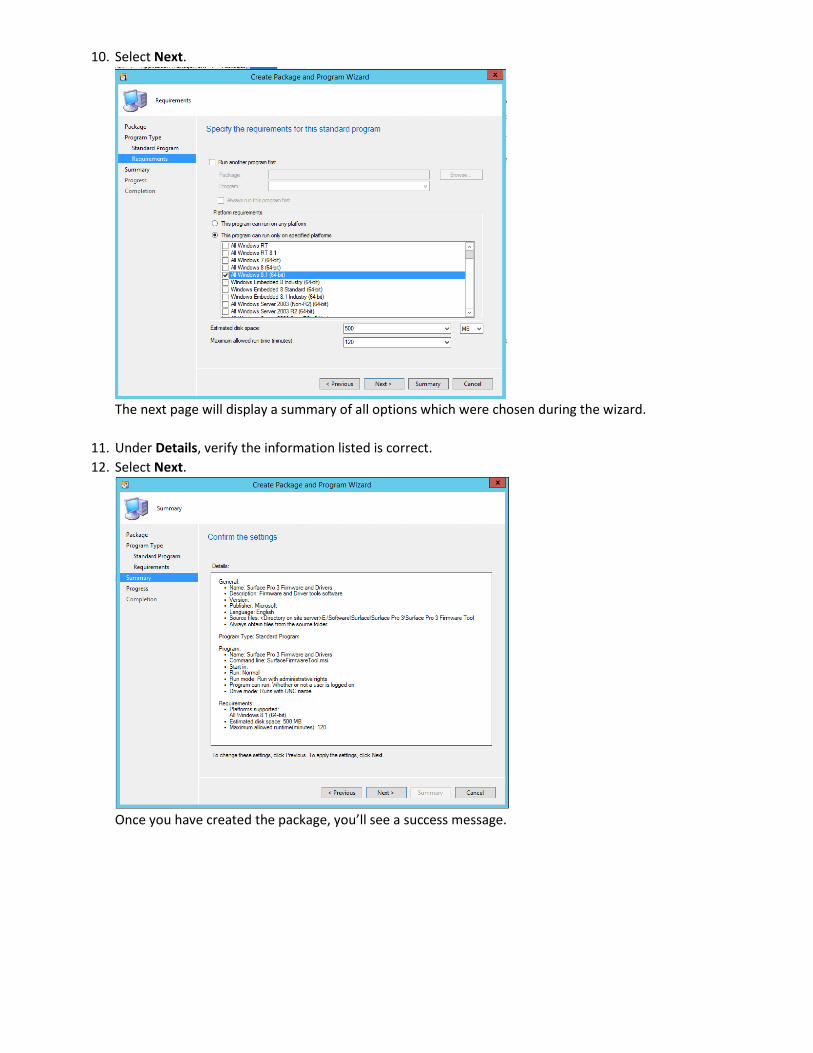
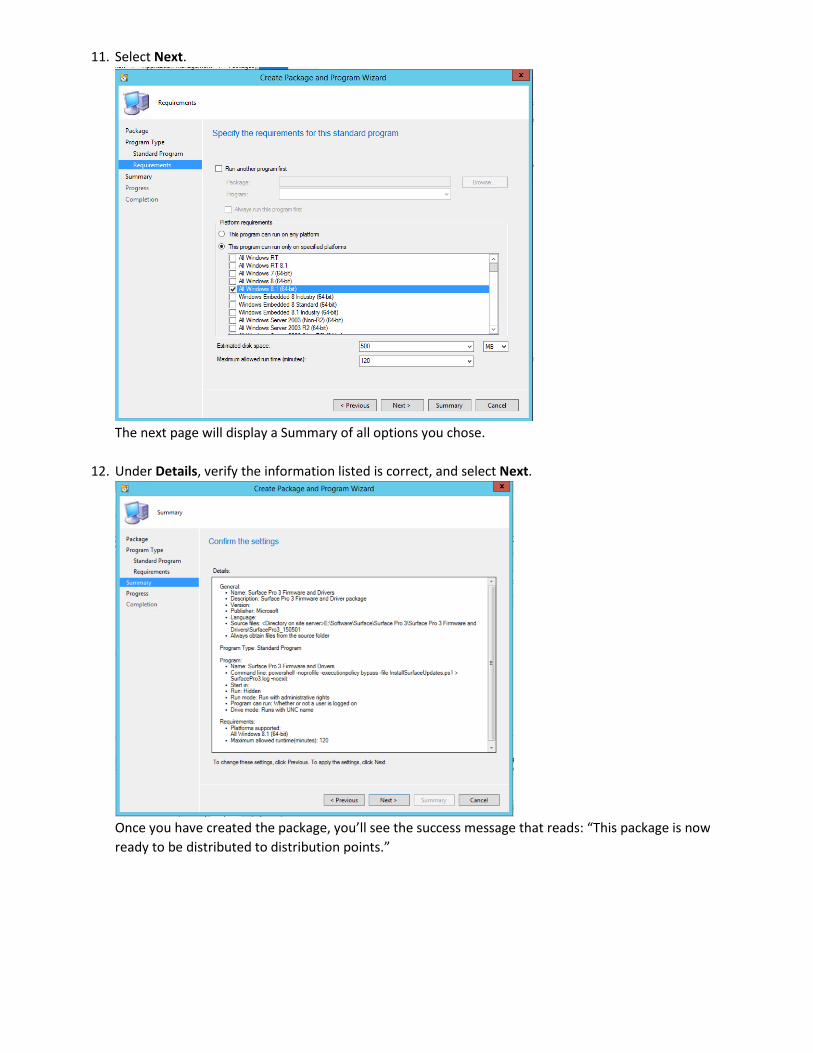
10. Select Next.
The next page will display a summary of all options which were chosen during the wizard.
11. Under Details, verify the information listed is correct.
12. Select Next.
Once you have created the package, you’ll see a success message.
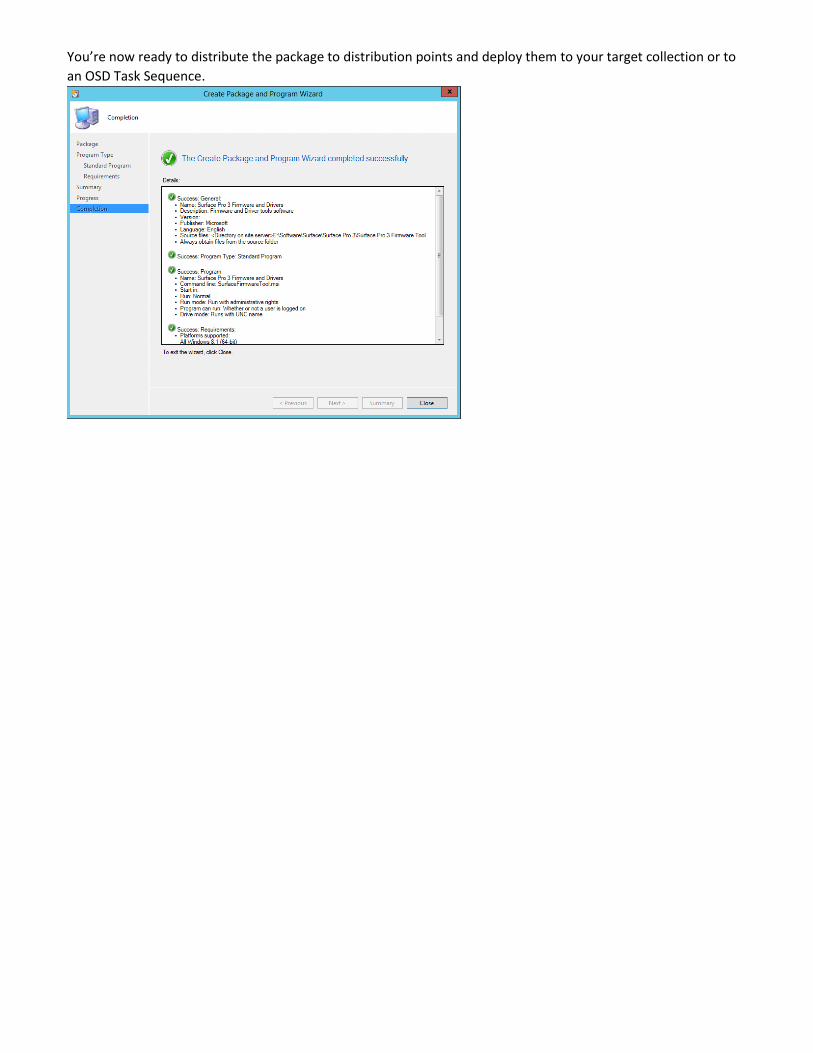
You’re now ready to distribute the package to distribution points and deploy them to your target collection or to
an OSD Task Sequence.

To Verify Successful Deployment of Surface Pro 3 Firmware and Drivers If the firmware and drivers you downloaded from the Surface download center installed correctly from the MSI,
you’ll see the Surface Platform Installer in Control Panel on the Surface device.
To Deploy Firmware and Drivers using a System Center Configuration Manager 2012 Package You can deploy firmware and drivers to other Surface models as a System Center Configuration Manager package.
However, unlike for Surface Pro 3, there aren’t any MSIs for the other Surface models.
To deploy firmware and drivers to non-Surface Pro 3 devices, you will need to use the driver pack downloads
found on https://www.microsoft.com/en-us/download/details.aspx?id=38826.
Depending on which Surface model you’re deploying to, download the appropriate driver pack. Once you’ve done
that, you can create a package in System Center Configuration Manager for deployment.
Follow these steps to create a package for deployment of firmware and drivers to any Surface device:
1. Extract the update for the specific Surface model for which you want to deploy drivers to, and save them
to the local Configuration Manager server or a network share
2. In the root of each expanded folder (each folder per device), create the following PowerShell script, and
name it something like, “InstallSurfaceUpdates.ps1.”
$ScriptPath = Split-Path -parent $MyInvocation.MyCommand.Definition
$files = get-childitem -path $Scriptpath -recurse -filter *.inf
foreach ($file in $files)
{
Write-host "Injecting driver $file"
pnputil -i -a $file.FullName
}
Now, you can use System Center Configuration Manager to create a package

1. In the Configuration Manager console, navigate to Software Library > Application Management >
Packages.
2. Press and hold (or right click) Package, and select Create Package.
This will open the ‘Create Package and Program Wizard.’
3. Enter the following information for each section.
NOTE: This example shows Surface Pro. You should use the name of the package for the Surface model
that you’re deploying to.
Name: Surface Pro 3 Firmware and Drivers
Description: Surface Pro 3 Firmware and Driver Package
Manufacturer: Microsoft
Language: English
4. Select This package contains source files.
5. Select Browse, navigate to the location where you saved the firmware, driver pack, and PowerShell script,
and select the root folder.
6. Select Next.
7. On the next page, select Standard Program.

8. Select Next.
9. Enter the following information for each section.
NOTE: This example shows, Surface Pro 3.You should use the name of the package for the Surface
model that you’re deploying to.
Name: Install Surface Pro 3 Drivers and Firmware
Command Line: powershell -noprofile -executionpolicy bypass -file InstallSurfaceUpdates.ps1 >
SurfacePro3.log –noexit
Run: Hidden
Program Can Run: Whether or not a user is logged on
NOTES:
Replace ‘InstallSurfaceUpdates.ps1’ with the name of the PowerShell script that you saved previously.
You can rename ‘SurfacePro3.log’ as it applies to the specific Surface model firmware and drivers you’re
deploying in the package.
Do NOT check the option to Allow users to view and interact with the program installation. This will
allow the program to run during an OSD Task Sequence.

10. Since this package will be deployed to a Surface Pro 3 device, on the next page, select This program can
only run on specified platforms, and select All Windows 8.1 (64-bit).
NOTE: Supported operating systems will change as Microsoft releases newer Surface devices and
firmware.
11. Select Next.
The next page will display a Summary of all options you chose.
12. Under Details, verify the information listed is correct, and select Next.
Once you have created the package, you’ll see the success message that reads: “This package is now
ready to be distributed to distribution points.”
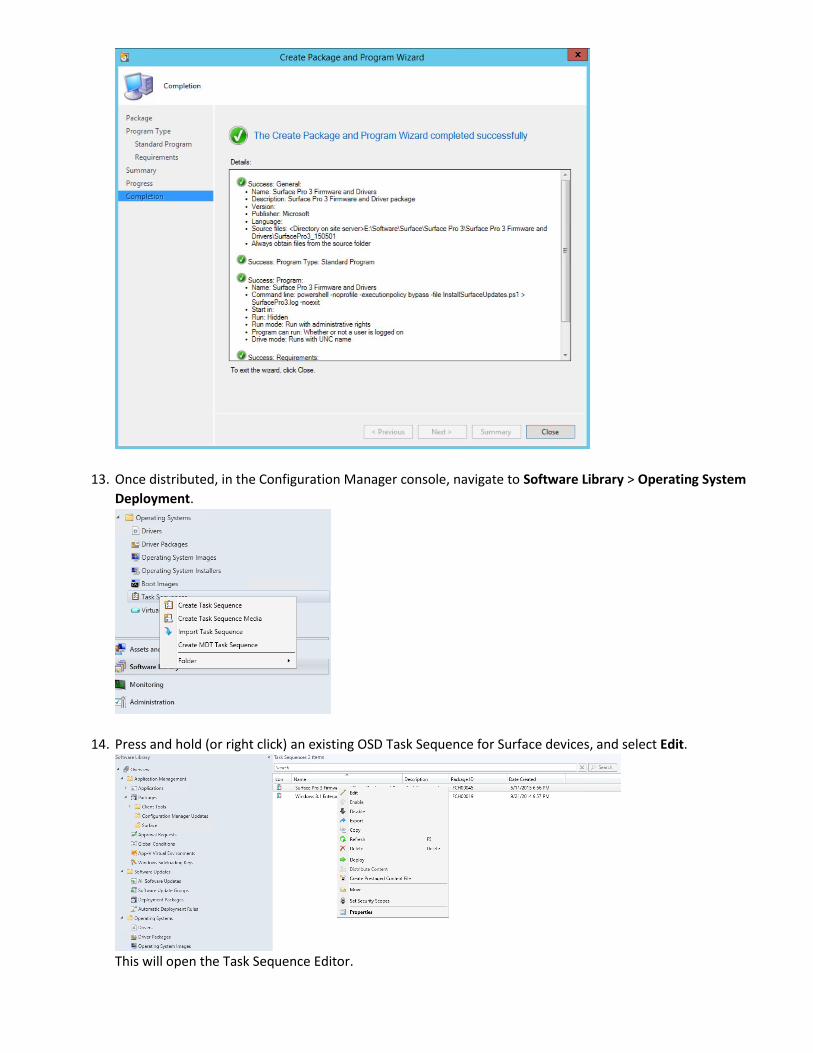
13. Once distributed, in the Configuration Manager console, navigate to Software Library > Operating System
Deployment.
14. Press and hold (or right click) an existing OSD Task Sequence for Surface devices, and select Edit.
This will open the Task Sequence Editor.

15. In the Task Sequence Editor near the top right, select Add, and select the Install Package task.
NOTE: Ensure this step is added after the ‘Apply Operating System’ and before the ‘Setup Windows and
ConfigMgr’ steps.

16. In the Package section, select the package that you created in the previous steps.
17. Select the Options tab, and select Add Condition.
18. Choose Query WMI from the drop down list.
19. In the WMI Query Properties box, enter:
SELECT * FROM Win32_ComputerSystem WHERE Model Like "%Surface Pro 3%"
NOTE: This example shows Surface Pro 3. You should use the Surface model name for the Surface
device you’re deploying to.

20. Use the Test Query button to validate that the WMI query does not have any syntax. The message should
look like this:
21. Select Apply, and close out of the Task Sequence.
NOTE: The ‘Test Query’ dialog box will show a returned result count of 0 if the Configuration Manager
console is not running on a device on which the WMI query is being run. If the Configuration Manager
console is running on a device on which the WMI query is being created for (i.e. Surface Pro 3), the
returned result count will show 1.

This task sequence is now ready to deploy to a test collection.
Once you have verified successful deployment to a test collection, you can install it in production. This package
will install all firmware and drivers.
When deploying firmware and drivers in a task sequence, check the smsts.log on the Surface device for additional
information on why the firmware and drivers did not install.
Troubleshooting Surface Driver and Firmware Deployment Below are some of common troubleshooting scenarios and remediation suggestions for installing Surface
firmware and/or drivers.
Warning Alert on Surface Device Manager
If you are see a warning sign in Device Manager on the Surface similar to the image above, try the following:
From the Desktop, swipe from the right edge of the screen, and select Settings.
1. Select Control Panel.
2. Select Device Manager > Firmware, and press and hold (or right click) the problematic firmware.
3. Select the tab under Driver > Update Driver Software.
4. Select Browse my computer for driver software.
5. Select Let me pick from a list of device drivers on my computer.
6. Select Surface Pro Touch Controller Firmware.
7. Select Next.
Install will start
8. Restart the Surface device.
If you still see the yellow mark under Surface Pro Touch Controller Firmware after you’ve taken these steps:
1. Repeat the steps, and select Uninstall.
2. Restart your Surface and allow Windows to reinstall the driver.
NOTE: DO NOT select Delete the driver software for this device.
Surface Pen isn’t working correctly Some users may experience an issue where Surface Pen stops functioning correctly. The pen is set to disconnect
automatically when it isn’t being used frequently. This is to save power.
To troubleshoot this, first press one of the buttons on the pen to reconnect it to the Surface device.
If that doesn’t work, on the Surface Device, navigate to Settings > Change PC Settings > Control Panel > Device
Manager > Firmware. Check to see if the Surface Touch Controller Firmware is listed. If it’s not, go to
https://www.microsoft.com/en-us/download/details.aspx?id=38826 to install this firmware and driver pack or
MSI.
If that doesn’t fix the issue, on the Surface device, navigate to Settings > Change PC Settings > PC and Devices.
Ensure Bluetooth is enabled, and select Surface Pen. Select Remove Device, and then pair Surface Pen with
Surface device by choosing Pair.

Unable to Import a Driver or Drivers into the Configuration Manager Console
When installing a driver or multiple drivers into Configuration Manager console, you may see an error that states,
“The selected driver is not applicable to any supported platforms.” If you encounter this error, make sure that the
computer account of the Configuration Manager primary site server has the necessary permissions to access the
driver and firmware source location.
There is a known issue when importing newer drivers on Configuration Managers servers which run Windows
Server 2008 R2 or earlier. Check the information in this Microsoft KB and install the suggested hotfixes:
https://support.microsoft.com/en-us/kb/3025419