supplement: san remo (version 1.0)
TRANSCRIPT

Supplement: SAN Remo (Version 1.0)
Documentation for
SAN RemoConfiguration Management
Supplement

Supplement for the "SpycerBox Ultra/Flex" Hardware Guide: “SAN Remo”Document Version 1.0 for the software version 2.0
Copyright © 2013 by Rohde & Schwarz DVS GmbH, Hanover. All rights reserved.
The supplements, manuals as well as the soft- and/or hardware described here and all their constit-uent parts are protected by copyright. Without the express permission of Rohde & Schwarz DVS GmbH any form of use which goes beyond the narrow bounds prescribed by copyright legislation is prohibited and liable to prosecution.
This particularly applies to duplication, copying, translation, processing, evaluation, publishing, and storing and/or processing in an electronic system.
Specifications and data may change without notice. We offer no guarantee that this documentation is correct and/or complete. In no event shall Rohde & Schwarz DVS GmbH be liable for any damages whatsoever (including without limitation any special, indirect or consequential damages, and dam-ages resulting from loss of use, data or profits, or business interruption) arising out of the use of or inability to use the hardware, software and/or manual materials.
Those parts of this documentation that describe optional software or hardware features usually con-tain a corresponding note. Anyway, a lack of this note does not mean any commitment from Rohde & Schwarz DVS GmbH.
DVS and Spycer are either registered trademarks or trademarks of Rohde & Schwarz DVS GmbH. Adobe and Flash Player are either registered trademarks or trademarks of Adobe Sys-tems Incorporated in the United States and/or other countries. Mac OS and Safari are trade-marks of Apple Inc., registered in the U.S. and other countries. iBurst is a trademarks of ArrayComm, Inc. Google and Chrome are trademarks or registered trademarks of Google Inc., used with permission. Mozilla and Firefox are registered trademarks of the Mozilla Foundation. Quantum and StorNext are registered trademarks of Quantum Corporation, registered in the U.S., and other countries.
Any other product names mentioned in this documentation may be trademarks or registered trade-marks of their respective owners and as such are subject to the usual statutory provisions.

1
SAN RemoSupplement
This document describes how to work with SAN Remo, DVS’s new user interface that allows you to configure and monitor your SpycerBox infrastructure. SAN Remo gives you the possibility to configure nodes and obtain an overview of your hardware status as well as of perfor-mance and bandwidth parameters.
The graphical user interface of SAN Remo is layed out to be self-explan-atory. This document provides additional information that makes some aspects of the software more accessible to help you in getting started with the SAN Remo software.
This document contains the following information:
– Important Notes– Structural Concepts– Starting the Software and User Interface Starting the Software in a Web Browser The User Interface
– Working with SAN Remo Features Dashboard Monitoring Clusters Nodes Support Network Rescan
– Miscellaneous Working with Configuration Files Gathering Log Files

2
SAN Remo Supplement
Important Notes
To use the SAN Remo software correctly, please heed the following:
The SAN Remo software version 2.0 is installed on a SpycerBox from hardware revision 4 and upwards as standard.
To view the tachometer in the dashboard view, it is recom-mended to have Adobe Flash Player version 11 or higher in-stalled.
The software is intended to be used with Mozilla Firefox, Inter-net Explorer version 11 and higher, Google Chrome and Safari.
The recommended screen resolution is at least 1024 x 768.
The SAN Remo user interface can be used with several brows-er instances in parallel. Please note that the more user interfac-es are opened, the lower the performance of the SAN Remo user interface could become.
When using the key [Enter] to e.g. submit or save changes of an option or entry, the focus must be in an entry field. The ac-tion shown in the blue-highlighted button will then be carried out.

3
SAN Remo Supplement
Structural Concepts
The integrated WS-DD protocol lays the foundation for the easy han-dling of all systems in the entire network by establishing a stable, de-centralized infrastructure. Thanks to this, new systems can comfortably be integrated into the network – not needing any additional configura-tion processes. Thanks to a Service-Oriented Architecture (SOA), com-municating with other clients is easy using web service interfaces such as SOAP.
SAN Remo follows an easily understandable structural concept. The main parts of the structure are shown in the following figure:
Figure 1-1: Structure of the SAN Remo functionality
SAN Remo allows the management and the monitoring of different nodes i.e. different systems. These nodes are organized in clusters that form an organizational unit indicating the relation of nodes and clus-ters. A node represents a machine (e.g. a SpycerBox) in terms of its monitorable and configurable aspects. The SAN Remo software is in-stalled on the machine and contains the SAN Remo web user interface. It provides all features for the user interaction. Via the web user inter-face you can configure and monitor nodes with other SAN Remo instal-lations as well, as long as the software versions are compatible.
In the node view of the software you see all configurable and monitor-able parts which are represented by plugins in form of icons. Every plugin provides access to certain functions and information of the ma-chine SAN Remo is installed on. Via the plugins you can control e.g. system functions, installed software and services.
Depending on your requirements, different plugins can be in-stalled or uninstalled. Please contact the DVS service depart-ment for further information.
All new plugins of a SAN Remo software release are listed in the respective release note.

4
SAN Remo Supplement
Every plugin represents the configurable parts in terms of properties. There are two kinds of properties:
– The global (plugin) properties such as the hostname of a node. Only one can be assigned to a node.
– The instance properties which may exist more than once such as the network interfaces of a node. Several network interfaces can be configured for a node.
The main differences between the two property types are the cardinal-ity and the way you can access them in the user interface.

5
SAN Remo Supplement
Starting the Software and User Interface
Starting the Software in a Web Browser
The user interface allows monitoring and configuring different nodes which are available in the network. It can be accessed via a web brows-er and is designed for a screen size of at least 1024 × 768.
The web-based user interface can be accessed by typing the machine’s IP address or DNS name into a browser’s address bar and entering a valid user name and password. When you see the SAN Remo user in-terface in its default cluster view (button CLUSTER selected), you have started the software.
The User Interface
When starting the software in a web browser, you will see the SAN Remo user interface in its default cluster view.
Figure 1-2: SAN Remo user interface after starting the software
The user interface consists of the header, the footer and the different views.
The header provides the following buttons and functionalities:
Supported browsers are Mozilla Firefox, Google Chrome, Inter-net Explorer version 11 and higher, Google Chrome and Safari.

6
SAN Remo Supplement
Figure 1-3: Header of the SAN Remo user interface
The header on top of the user interface allows switching the different views. It contains the buttons:
– DASHBOARD (switches to the tachometer showing the data throughput in GB/s)
– MONITORING (switches to monitoring view)– CLUSTER (switches to cluster view)– NODES (switches to nodes view)– SUPPORT (contains the documentation and support contact infor-
mation)– SAN Remo and DVS logos (switches to the default cluster view)
Below the header you find the navigation bar that shows you the view you are currently in:
Figure 1-4: Navigation bar
You can use this navigation to e.g. jump back to a certain view as well. Below it you find further information e.g. about the node like product name, hostname, serial number or total memory.
The footer provides a few information regarding the node which is cur-rently browsed:
Figure 1-5: Footer of the SAN Remo user interface
node and rescansystem informationbuttonsoftware information

7
SAN Remo Supplement
The state of a machine, service or plugin is indicated by icons. Via mouse over you can receive further information. The following icons are to be found:
– Green checkmark indicating the respective option is available,
working or connected correctly
– Yellow exclamation mark indicating a malfunction or warning
– Red ’X’ indicating a stopped service or a disabled network inter-
face
– Down-arrow indicating the state of the Fibre Channel connec-
tion and meaning physically disconnected interfaces
Most of the configuration options of the respective device or plugin can be accessed via the edit buttons to the top right in each view.
State/Item Explanation
’system information’ This area provides you with information regarding the re-spective node (IP address) shown in the ’node and soft-ware information’ field. It shows you the disk capacity, the system load, data throughput in MB/s or KB/s and input/output operations per second (IOPS).
’node and software information’
In this area you see the IP address of the node that is ac-tually shown. Furthermore, you see the software version that is installed on the respective system indicated by the IP address.
’rescan button’ Allows you to perform a network rescan. When pressing this button, the network will be searched for new nodes or plugins.
You can trigger a network rescan via the icon/button on the right. To update only the view in the browser window, press [F5].

8
SAN Remo Supplement
Working with SAN Remo
Features
SAN Remo 2.0 provides many features for viewing and/or configuring the following and more components:
Network Interfaces
SAN Remo allows you to configure DHCP or static IP addresses, net-masks and up to three DNS name servers. It allows you to manage bonded interfaces as well. Furthermore, gateway, hostname, domain and domain search path configurations are possible. The data through-put of the network interfaces can be monitored if available.
Fibre Channel Interfaces
Regarding the Fibre Channel interfaces you can configure the target or initiator mode if the respective system supports this. The speed and status of the link can be monitored.
LUNs (RAID Arrays)
SAN Remo gives you the possibility to locate a certain hard drive. Fur-thermore, you can switch to a list of LUNs/RAID arrays, the related block devices, the LUN’s status, the RAID levels and a list of physical hard drives and their status.
System
With SAN Remo you can reboot and shutdown a machine from the user interface. The monitoring feature gives you an overview of the memory usage, system load, system temperatures, fan speeds, disk IOPS, total disk and network throughput as well as the locally mounted file systems with their total and used disk capacities.
StorNext
In the software you can start and stop the StorNext file system. Further-more, you can view the status of the StorNext file system and its license information.
NFS
Using the SAN Remo software you can start and stop the Network File System (NFS) as well as add and delete NFS exports and permissions. The NFS status can be monitored.

9
SAN Remo Supplement
Samba
With SAN Remo you can start and stop Samba, set workgroup and net-bios names, add and delete shares and its paths to be shared as well as configure read and write permissions. The Samba status can be moni-tored.
NTP
The SAN Remo software allows you to start and stop the Network Time Protocol (NTP), add or remove an NTP server, change iBurst server op-tions or add customized options as well as add and remove access re-strictions. The status of the NTP server can be monitored.
Further Configurations
With the SAN Remo software you can configure IP addresses and the SpycerNet names for the Spycer software. The Spycer license informa-tion can be monitored. Furthermore, you can manage user accounts, configure the IPMI network settings as well as the Standard Network Monitoring Protocol (SNMP).
Dashboard
When pressing the button DASHBOARD in the header (see section “The User Interface” on page 5), you see the tachometer showing the read and write operations in GB/s of the respective node.
Figure 1-6: SAN Remo dashboard view
The respective node will be indicated to the top left in notation <cluster | node/hostname | value>.
The node to be shown in the tachometer can be selected via the edit button to the top right.

10
SAN Remo Supplement
Monitoring
In the monitoring view you can overview certain properties of different nodes. When pressing the MONITORING button in the header (see section “The User Interface” on page 5), you will see four graphs indi-cating e.g. the memory consumption or CPU load. The system informa-tion is updated every 2 seconds.
Figure 1-7: SAN Remo monitoring view
Via the edit button to the top right of each graphs, the respective node to be viewed and further options can be selected. The following prop-erties can be selected from the drop-down list Value:
– Memory overview (total memory and used memory on the respec-tive node)
– Memory used (used memory on the respective node)– Disk IOPS (read and write accesses to the hard disks of a node)– Disk throughput (read (indicated as in) and write (indicated as out)
accesses indicated separately)– System load (CPU load)– Network throughput (network traffic, in and out separately)
When the wanted options are selected, the graph showing the informa-tion will build up in a few seconds. The respective node will be indicat-ed to the top left of the corresponding graph in notation <cluster | node/hostname | value>.
Depending on your selection, the values on the y-axis to the left will change. The time shown on the x-axis is the server time of the respec-tive node.
11
SAN Remo Supplement
Clusters
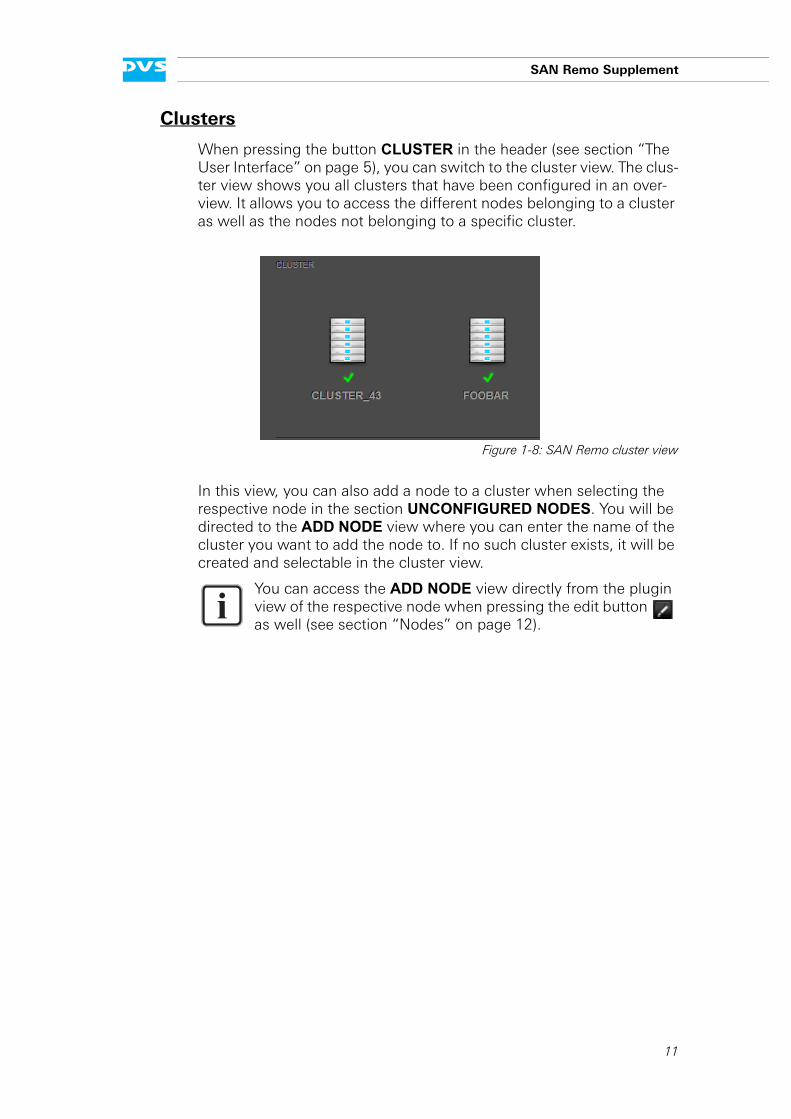
When pressing the button CLUSTER in the header (see section “The User Interface” on page 5), you can switch to the cluster view. The clus-ter view shows you all clusters that have been configured in an over-view. It allows you to access the different nodes belonging to a cluster as well as the nodes not belonging to a specific cluster.
Figure 1-8: SAN Remo cluster view
In this view, you can also add a node to a cluster when selecting the respective node in the section UNCONFIGURED NODES. You will be directed to the ADD NODE view where you can enter the name of the cluster you want to add the node to. If no such cluster exists, it will be created and selectable in the cluster view.
You can access the ADD NODE view directly from the plugin view of the respective node when pressing the edit button as well (see section “Nodes” on page 12).

12
SAN Remo Supplement
Nodes
When pressing the button NODES in the header (see section “The User Interface” on page 5), you can enter the nodes view. This view allows you to access the different nodes (independent of cluster).
Figure 1-9: SAN Remo nodes view
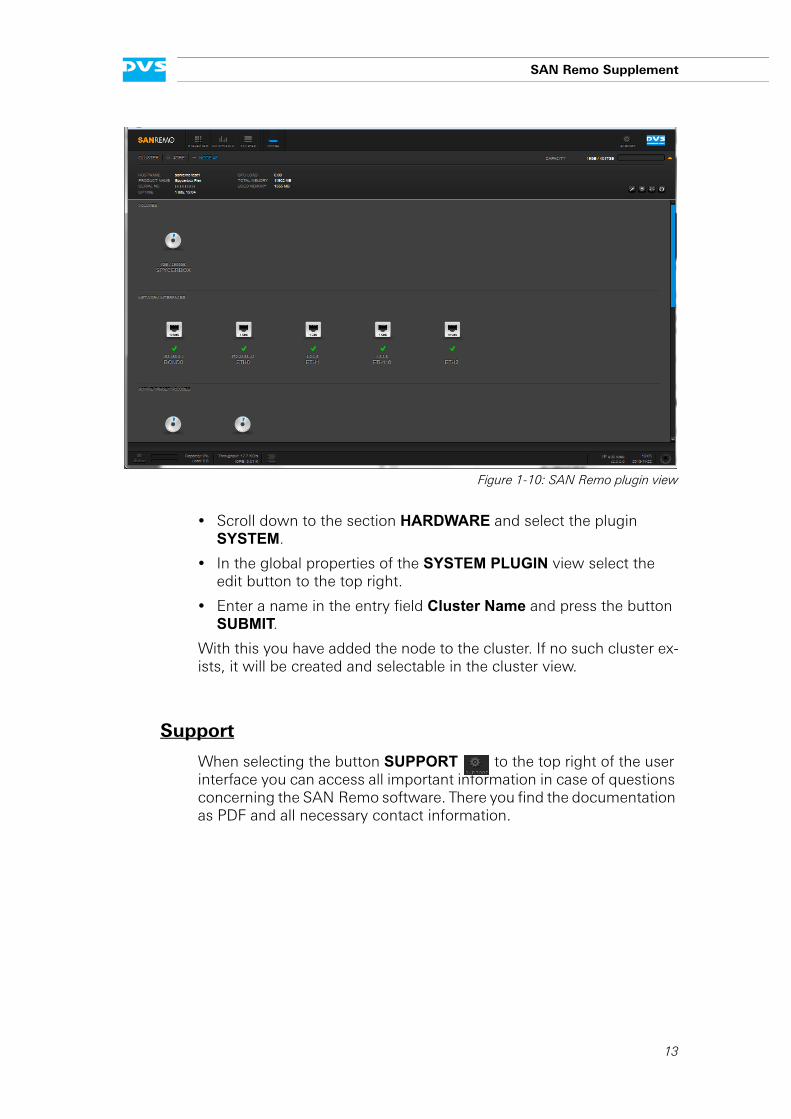
When selecting a node, you can configure its settings via the installed plugins. For this you simply have to select the respective plugin icon and make the wanted settings in the settings view. From the nodes view you can also add unconfigured nodes to a cluster. Perform the fol-lowing:
Select the unconfigured node in the section UNCONFIGURED NODES.
You will be directed to the plugin view as in the following figure:
13
SAN Remo Supplement
Figure 1-10: SAN Remo plugin view
Scroll down to the section HARDWARE and select the plugin SYSTEM.
In the global properties of the SYSTEM PLUGIN view select the edit button to the top right.
Enter a name in the entry field Cluster Name and press the button SUBMIT.
With this you have added the node to the cluster. If no such cluster ex-ists, it will be created and selectable in the cluster view.
Support
When selecting the button SUPPORT to the top right of the user interface you can access all important information in case of questions concerning the SAN Remo software. There you find the documentation as PDF and all necessary contact information.

14
SAN Remo Supplement
Network Rescan
The network discovery is a feature of the user interface that searches for nodes in the network via the WS-discovery protocol. Every browser keeps its own network data. It is possible to trigger a network rescan manually when informations like IP addresses or node names change as well as when new nodes are available in the network. For this you simply have to press the rescan button to the bottom right.
If a node changes its state to offline, it is displayed as such (grayed out and red X) and will not disappear from the views until the network is rescanned.
Depending on your requirements, different plugins can be in-stalled or uninstalled. Please contact the DVS service depart-ment for further information.
All new plugins of a SAN Remo software release are listed in the respective release note.

15
SAN Remo Supplement
Miscellaneous
Working with Configuration Files
A plugin may provide raw access to e.g. configuration or license files. SAN Remo offers the possibility to edit e.g. *.config files directly and to make various changes such as e.g. configuring statistical informa-tion in the NTP settings.
In the following you see an example of how to edit the configuration file of the StorNext plugin. This file contains the license information for the StorNext file system.
To update the license file in the SAN Remo software, perform the fol-lowing:
Open the file with the new license you have received in e.g. a text editor and copy everything by pressing first [Ctrl + A] and then [Ctrl + C].
Return to the SAN Remo user interface and select the respective node in the NODES view (see section “Nodes” on page 12).
Scroll down to the section SOFTWARE and select the plugin STORNEXT.
You will see the settings area showing all information regarding the StorNext file system and the license.
Select the edit button to the top right to access the configuration file.
Click into the entry field and select everything by pressing [Ctrl + A].
Then delete all selected information in the entry field and paste the content from the new license file from the clipboard by pressing [Ctrl + V].
Press the button SUBMIT to save the new license information to the license file.
Editing configuration files can lead to malfunctions of the pl-ugin, the respective service or the whole system. Please per-form the following steps with great care and only when you are sure that you can carry out all tasks correctly.
Editing the configuration files is a feature intended for admin-istrators with advanced knowledge and if the configuration of features that are not part of the SAN Remo user interface is re-quired.
To purchase a new StorNext license, please contact your re-gional DVS sales representative.
16
SAN Remo Supplement
With this you have saved the new license information to the file. The new license information should now be visible in the StorNext settings area.
Gathering Log Files
The log file feature in SAN Remo allows you to create log files from the software which detail the actions performed by and with SAN Remo. You may get asked by the DVS service department to send in these files as well as others in case of problems with the system or the software. To gather log files in the software, perform the following:
Select the respective node in the cluster view (see section “Clus-ters” on page 11).
You will be directed to the plugin view.
Scroll down to the section HARDWARE and select the plugin SYSTEM.
In the global properties of the SYSTEM PLUGIN view select the edit button to the top right.
Select run from the drop-down list Gather logs and press the but-ton SUBMIT.
The system will now collect the logs and store them in an archive file that can be accessed via the link in the line Gather Log URL. You can download them by clicking the link. When gathering log files the next time, you will access the new log files when clicking the link. The older log files will have been stored in the archive file as well.
You can access the gather log feature directly from the plugin view of the respective node when pressing the edit button as well (see section “Nodes” on page 12).