superior drummer fx guide
DESCRIPTION
Superior Drummer FX GuideTRANSCRIPT


NOTICE
The information contained in this document is subject to change without notice.
Toontrack® Music AB makes no warranty of any kind with regard to this material, including, but not limited to, the implied warranties of merchantability and fitness for a particular purpose.
Toontrack® Music AB will not be liable for errors contained herein or for incidental or
consequential damages in connection with the furnishing, performance or use of this material.
No part of this document may be photocopied, reproduced or translated to another language without the prior written consent of Toontrack® Music AB.
Acknowledgements
All trademarks are the property of their respective owners.
Content Copyright © 2008 Toontrack® Music AB. All rights reserved.
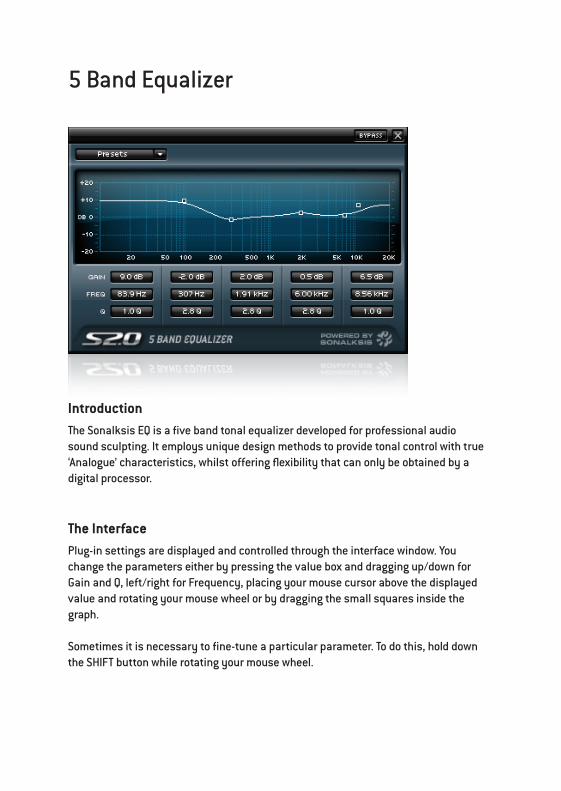
5 Band Equalizer
IntroductionThe Sonalksis EQ is a five band tonal equalizer developed for professional audio sound sculpting. It employs unique design methods to provide tonal control with true ‘Analogue’ characteristics, whilst offering flexibility that can only be obtained by a digital processor.
The Interface Plug-in settings are displayed and controlled through the interface window. You change the parameters either by pressing the value box and dragging up/down for Gain and Q, left/right for Frequency, placing your mouse cursor above the displayed value and rotating your mouse wheel or by dragging the small squares inside the graph.
Sometimes it is necessary to fine-tune a particular parameter. To do this, hold down the SHIFT button while rotating your mouse wheel.

Any control can be set to its default value by holding the ‘Ctrl’ key [PC] or ‘Apple/Command’ key [Mac] before clicking it with the mouse.
Operation The controls:Gain – controls the amount of boost or attenuation of the affected frequencies. Frequency – selects the centre frequency of the band. Q – controls the bandwidth of the band frequency range. Bypass – switches the effect out of circuit.
There are three Bell filter sections in the EQ, one High and one Low Pass Shelf. The range of the ‘Q’ [bandwidth] parameter for the parametric ‘Bell’ filters may seem limited when compared to that offered by other ‘Digital’ plug-in EQ’s. In fact by offering bell filters with ‘Analogue’ gain-bandwidth dependencies, the actual ‘Q’ range is much greater than these figures suggest, as the measure is only applicable at the maximum gain of +18dB. An attractive feature of the analogue parametric EQ styles is that the more extreme - and generally less musical - bandwidths only occur at sonically pleasing gain/attenuation values.
Presets
To save and load your presets click on the preset menu located in the top left corner of the interface.
Default - reset the Equalizer to its original state.User Presets – in this menu you will find your saved presets. Save as – save the changes in a new preset.Save – save the changes in the currently selected preset.Delete – delete the currently selected preset.Manage in Finder/Explorer – opens up the folder that contains the presets.
Specifications
Control Ranges:
Band 1 (low shelf) 20Hz-160Hz, gain ±15, q 0.5 to 5Band 2 (low mid) 20Hz-12kHz, gain ±18, q 0.4 to 4Band 3 (mid) 20Hz-20kHz, gain ±18, q 0.4 to 4Band 4 (hi mid) 270Hz-18kHz, gain ±18, q 0.4 to 4Band 5 (hi shelf) 4kHz-20kHz, gain ±15, q 0.5 to 5

Gate
Introduction
The Sonalksis Gate is an analogue-modeled dynamics processor developed for professional audio applications. Although gates often aren’t the most radical of audio processors, they are an absolutely indispensable tool in much audio production. While a gate is a relatively simple process to implement digitally, the typical analogue gate imparts a subtle character that ubiquitous digital implementations lack. The Gate intimately models the characteristics of a real analogue processor to capture the nuances of an analogue gate, so whether you are after a classic gated drum effect, or are trying to tame a loose tom, this Gate will give noticeably more traditional results.
The Interface Plug-in parameters are displayed, metered and controlled through the interface window. You change the parameters by either clicking and dragging the rotary knobs with your mouse or placing your mouse pointer over a knob and rotate your mouse wheel.

Sometimes it is necessary to fine-tune a particular parameter. To do this, click and hold down your mouse button then move the cursor further away from the knob. Now you can move the mouse in a circular motion and get a higher resolution. You can also hold down the SHIFT button while rotating your mouse wheel to get the same effect.
Any control can be set to its default value by holding the ‘Ctrl’ key [PC] or ‘Apple/Command’ key [Mac] before clicking it with the mouse.
Operation The controls:
Threshold – sets the level above which any processing is applied.Attack – sets the attack time.Release – sets the release time.Hold – sets the time for which the processor ‘holds off’ any gain reduction after attacking, before the gain reduction is ‘released’.Bypass – switches the effect out of circuit.
The Side-chain section
The side-chain signal is the control signal that essentially dictates the amount of processing that takes place. Usually a copy of the input signal is fed into the side-chain section, however this Gate is capable of using another channel as input. This means that potentially a Mic channel or Bus channel can effectively control the way another channel is processed.
In order to route audio signals from a channel into the side-chain input of the Gate, click on the ‘Side Chain’ menu and select which channel you want to use.
Display/Monitor section The main purpose of the graphical display is to provide a clear indication of the processor gain-characteristic.
The meter below the graphical display monitors the total amount of gain reduction applied by the Gate. The meter indicates the reduction applied by the gain reduction elements, and not simply the differential between input and output signals - in other words, the meter may display a gain reduction even when no input signal is applied.

Presets To save and load your presets click on the preset menu located in the top left corner of the interface.
Default - reset the Gate to its original state.User Presets – in this menu you will find your saved presets. Save as – save the changes in a new preset.Save – save the changes in the currently selected preset.Delete – delete the currently selected preset.Manage in Finder/Explorer – opens up the folder that contains the presets.
Specifications Control Ranges:
Threshold -80dB to 0dBAttack 0.01ms to 50msRelease 80ms to 2.5sHold 20ms to 100ms

Highpass & Lowpass Filter
Introduction The Sonalksis Filter is an ‘adaptive resonance’ multimode filter. This is an entirely new generation of filter with automatic resonance adjustment, according to a user selectable ‘feel’. A standard filter will require the alteration of resonance with frequency to maintain stable sonic attributes. This can make setup complex, adjustments difficult, and makes obtaining a good filter sweep extremely demanding. However the ‘adaptive resonance’ system uses a psychoacoustic model to ensure a faultless sound regardless of filter style, frequency settings or sweep motions. The Filter also contains an adaptive distortion algorithm that adjusts with the filter sweep and type, giving saturation when required, but allowing clean sweeps when needed. The Filter is above all efficient, intuitive and direct - and therefore very simple to use, providing great results with minimal effort when for example you want: Slow gentle sweeps - insert on a bus full of drums you want to filter and enjoy instant results! Massive screaming distorted sounds - If you need that edgy distorted sound for a drum, it’s only a couple of clicks away. Everything in between – The Filter is designed to be flexible enough to fulfill your needs whenever you reach for a filter, but without forcing you through a complex interface, or requiring time spent calibrating fine detail.

Adaptive Resonance technology Filters - swept or static - are used both correctively and creatively, and hence perform a vital function in modern sound and music production. ‘Standard’ filters though have drawbacks when circuit resonance or saturation (distortion) levels are elevated, as these features interact in an uncontrollable manner.
In order to develop an enhanced, intuitive filter more appropriate for audio processing, Sonalksis began with the standard and well-loved analogue filter topologies, and a psychoacoustic model of aural sensitivity (amongst other things). Distortion caused through saturation of a filter circuitry cannot normally be treated as an independent parameter, however isolating this distortion is an essential element in creating the enhanced filter model. By decoupling the filter frequency, resonance and circuit saturation, these parameters can be matched independently and dynamically to a suitable psychoacoustic model to obtain better results in a much simpler fashion. Through careful research into the way these parameters interrelate with each other within each circuit, an optimal dynamic relationship between these parameters was calculated according to the psychoacoustic model, and a control model then developed – this is what Sonalksis has named ‘Adaptive Resonance’.
The Interface
Plug-in parameters are displayed and controlled through the interface window. You change the frequency parameters by either clicking and dragging the rotary knobs with your mouse or placing your mouse pointer over a knob and rotate your mouse wheel.To select the Type or Slope just click on the parameter and select the wanted value from the drop down menu.
Sometimes it is necessary to fine-tune a particular parameter. To do this, click and hold down your mouse button then move the cursor further away from the knob. Now you can move the mouse in a circular motion and get a higher resolution. You can also hold down the SHIFT button while rotating your mouse wheel to get the same effect.
Any control can be set to its default value by holding the ‘Ctrl’ key [PC] or ‘Apple/Command’ key [Mac] before clicking it with the mouse.

Operation The controls:
Frequency – controls the filters frequency.Type – sets the filter resonance ‘mode’.Slope – switches between filter gradients.Bypass – switches the effect out of circuit.
All standard filters require the alteration of resonance with frequency to maintain stable sonic attributes: alter the frequency and to achieve the same ‘sound’ the resonance must also be adjusted. However altering the resonance can affect the saturation of the filter circuit in unwanted ways. All this can make accurate adjustments difficult, and makes obtaining effects such as good filter sweeps demanding. By decoupling the filter frequency, resonance and circuit saturation, these parameters can be matched independently and dynamically to a suitable psychoacoustic model to obtain better sounding results in a much simpler fashion. ‘Adaptive Resonance’ is the technology in the Filter that controls the interaction between frequency, resonance and distortion (saturation) with respect to a psychoacoustic model, in order to give an improved sonic aesthetic regardless of filter style, frequency settings or sweep motions.
The ‘Adaptive Resonance’ is an automatic technology, so the Filter interface is made very simple yet very effective. Using the Filter requires nothing more than selecting the severity of the filter slope, and picking the ‘mode’ that feels right. With this done, the cutoff can be set. Sensitive to the many applications of filters, a number of different resonance ‘modes’ have been developed. The four modes available in the Filter, when used in combination with the other settings, enable a large assortment of sounds to be achieved with a minimal set of parameters - all thanks to the ‘adaptive resonance’ technology.
The frequency dial is the primary control for the Filter. At the full counter-clockwise position, it sets the filter to cutoff at 20Hz. The full clockwise position sets to a 20KHz cutoff. The frequency dial determines the point below or above which the filter begins to roll-out frequencies.
The filter resonance mode selects the style or ‘feel’ of the filter resonance. LOW is best for gentle unobtrusive filtering. MED adds a degree of piquancy to the filtering, and reflects the most usual ‘filtered’ sound. HIGH provides a more aggressive effect, typical of an ‘effect’ filter. RUDE provides a massively distorted screaming filter sound, typical to an analogue filter heavily overloading.

The SLOPE switch selects the gradient of filter roll-off away from the cutoff frequency, measured in decibels-per-octave. 12 gives a standard ‘2-pole’ filter. 24 produces an intense rolloff, such as a dedicated analogue filter. 48 provides a very rapid rolloff which can be used for surgical purposes, or in conjunction with high resonance settings to provide extreme emphasis in the filter sound.
Presets To save and load your presets click on the preset menu located in the top left corner of the interface.
Default - reset the Filter to its original state.User Presets – in this menu you will find your saved presets. Save as – save the changes in a new preset.Save – save the changes in the currently selected preset.Delete – delete the currently selected preset.Manage in Finder/Explorer – opens up the folder that contains the presets.
Specifications High-pass filter
frequency range 20Hz to 20kHz, slope 12/24/48dB4 settings for variable resonance Low, Medium, High and Rude
Low-pass filter frequency range 20kHz to 20Hz, slope 12/24/48dB4 settings for variable resonance Low, Medium, High and Rude

Compressor
Introduction The Sonalksis Compressor is a dynamics processor unlike any other. Beneath its simple interface lies a radical analogue modeled compressor that can be pushed much further and harder than you ever imagined possible! In essence the Compressor is analogue compression taken to the extreme. The Compressor takes advantage of the digital domain to extend analogue circuit designs far beyond their normal physical capabilities, enabling a level of creativity not normally associated with this type of processor. Subtlety is definitely not a feature of this compressor!
The Interface
Plug-in parameters are displayed, metered and controlled through the interface window. You change the parameters by either clicking and dragging the rotary knobs with your mouse or placing your mouse pointer over a knob and rotate your mouse wheel.

Sometimes it is necessary to fine-tune a particular parameter. To do this, click and hold down your mouse button then move the cursor further away from the knob. Now you can move the mouse in a circular motion and get a higher resolution. You can also hold down the SHIFT button while rotating your mouse wheel to get the same effect.
Any control can be set to its default value by holding the ‘Ctrl’ key [PC] or ‘Apple/Command’ key [Mac] before clicking it with the mouse.
Operation The controls:
Threshold – sets the level above which compression is appliedRatio – controls the severity of compression applied above the thresholdAttack – sets the compressor attack timeRelease – sets the compressor release timeMakeup Gain – compensates for post-compression level differences.Auto Makeup – toggles the Auto Makeup Gain on or off. Bypass – switches the effect out of circuit. By turning the Ratio clockwise you will eventually come to two fixed settings – Limit and Over. Limit – the compressor will now act as a limiter.Over – an extreme form of compression where the gain reduction is increased to an extent that the overall output is LOWER as the input level rises above the threshold. It can be used to simulate the effects of very loud material on the human ear, and also the effects of overloading a power amplifier with an underrated power supply. It is characterized by its extreme ‘pumping’ sound.
Compression is one of the most commonly used effects in audio processing. Standard compressor designs aim to tame the dynamics of the audio signal while either being as transparent as possible, or adding subtle coloration that improves the character of the audio. The orange indicator bar under the Compressor graph displays the relative amount of gain reduction taking place. Note that due to internal automatic make-up-gain circuitry, this is not a true indication of input/output level differential, but a reference to the amount of ‘effect’ being applied.

The Side-chain section The side-chain signal is the control signal that essentially dictates the amount of processing that takes place. Usually a copy of the input signal is fed into the side-chain section, however this Gate is capable of using another channel as input. This means that potentially a Mic channel or Bus channel can effectively control the way another channel is processed. In order to route audio signals from a channel into the side-chain input of the Gate, click on the ‘Side Chain’ menu and select which channel you want to use.
Presets To save and load your presets click on the preset menu located in the top left corner of the interface.
Default - reset the Compressor to its original state.User Presets – in this menu you will find your saved presets. Save as – save the changes in a new preset.Save – save the changes in the currently selected preset.Delete – delete the currently selected preset.Manage in Finder/Explorer – opens up the folder that contains the presets.
SpecificationsThreshold -48dB to 0dBRatio 1.5:1 to 10:1, Limit, Over-compressAttack 0.1ms to 50msRelease 50ms to 1sMakeup Gain 0dB to 20dBAuto Makeup On/Off

Transient
Introduction With only two knobs the Sonalksis Transient is extremely easy to work with but still powerful enough to let you completely reshape the characteristics of your drums sounds. By using the Attack and Sustain parameters you can easily add attack or sustain to your drums.
The Interface Plug-in parameters are displayed, metered and controlled through the interface window. You change the parameters by either clicking and dragging the rotary knobs with your mouse or placing your mouse pointer over a knob and rotate your mouse wheel.
Sometimes it is necessary to fine-tune a particular parameter. To do this, click and hold down your mouse button then move the cursor further away from the knob. Now you can move the mouse in a circular motion and get a higher resolution. You can also hold down the SHIFT button while rotating your mouse wheel to get the same effect.
Any control can be set to its default value by holding the ‘Ctrl’ key [PC] or ‘Apple/Command’ key [Mac] before clicking it with the mouse.

Operation The controls:
Attack – adds attack to the sound.Sustain – adds sustain to the sound.Bypass – switches the effect out of circuit.
The orange bar between the two knobs indicate the amount of attack and sustain that are applied to the signal.
The Side-chain section The side-chain signal is the control signal that essentially dictates the amount of processing that takes place. Usually a copy of the input signal is fed into the side-chain section, however this Gate is capable of using another channel as input. This means that potentially a Mic channel or Bus channel can effectively control the way another channel is processed. In order to route audio signals from a channel into the side-chain input of the Gate, click on the ‘Side Chain’ menu and select which channel you want to use.
Presets To save and load your presets click on the preset menu located in the top left corner of the interface.
Default - reset the Transient to its original state.User Presets – in this menu you will find your saved presets. Save as – save the changes in a new preset.Save – save the changes in the currently selected preset.Delete – delete the currently selected preset.Manage in Finder/Explorer – opens up the folder that contains the presets.
SpecificationsAttack +6dB to -12dBSustain +6dB to -12dB