$sulo 9huvlrq - worldwidewhiteboardfigure 5 – group notice composition page group administrators...
TRANSCRIPT

April 21, 2016
Version 6.0

P a g e | i
Table of Contents Logging In ....................................................................................................................................... 1
The Dashboard ................................................................................................................................ 2
Group Administrators ..................................................................................................................... 3
Update Group Settings ............................................................................................................. 3
Update Group Notice ............................................................................................................... 4
Manage Group Users ............................................................................................................... 5
View Online Users List ........................................................................................................... 6
All Users ......................................................................................................................................... 7
Creating a New User Account ................................................................................................. 7
Password Reset ........................................................................................................................ 8
Add Access to Other Classes ................................................................................................... 8
Choose Group or Add Access to a Different Group ................................................................ 9
Update User Profile ................................................................................................................. 9
Browser Test .......................................................................................................................... 10
Online Manual ....................................................................................................................... 10
Ask for Support ...................................................................................................................... 11
Leaders .......................................................................................................................................... 12
Live Session ........................................................................................................................... 14
Text to Voice .................................................................................................................. 15
User List ......................................................................................................................... 15
Flash Audio and Video Settings ..................................................................................... 17
Toolbar ........................................................................................................................... 18
Menu bar ......................................................................................................................... 27
Closing and Archiving a Live Session ........................................................................... 32
Closing a Live Session (without Archiving) and Rejoining ........................................... 32
Additional Functionality ................................................................................................. 33
Live Tutorial .......................................................................................................................... 34
Tutorial Queuing ............................................................................................................ 35
Working with a Student .................................................................................................. 35
Ending Student Sessions ................................................................................................. 36
Closing a Live Tutorial Room and Archiving the Session ............................................. 36
Live Study Group .................................................................................................................. 37
Working in a Live Study Group ..................................................................................... 38

WorldWideWhiteboard v6.0 User’s Manual
P a g e | ii
Closing a Live Study Group and Archiving the Session ................................................ 38
Question and Answer Center ................................................................................................. 39
Viewing Questions ......................................................................................................... 39
Answering a Question .................................................................................................... 39
Question and Answer Center’s Session Menu ............................................................... 40
Saved Draft Answers ...................................................................................................... 41
Viewing Answered Questions ........................................................................................ 42
Worksheet Center .................................................................................................................. 43
Worksheet Center Landing Page .................................................................................... 43
Worksheet Template Status ............................................................................................ 44
Creating New Worksheets .............................................................................................. 44
Saved Draft Worksheets ................................................................................................. 45
Worksheet Center’s Session Menu ................................................................................. 46
Grading Worksheets ....................................................................................................... 47
Show Your Work (Note Center) ............................................................................................ 48
Show Your Work Session Menu .................................................................................... 48
Playing Back a Note Session .......................................................................................... 49
Paper Center ........................................................................................................................... 51
Correcting and/or Grading Papers .................................................................................. 51
Proofing Stamps ............................................................................................................. 52
Menu bar ......................................................................................................................... 53
Toolbar ........................................................................................................................... 55
Additional Tools and Buttons ......................................................................................... 59
Sending a Reviewed Paper Back to Its Author .............................................................. 59
Additional Functionality ................................................................................................. 60
Viewing Proofed Papers ................................................................................................. 60
Live Session Archive ............................................................................................................. 61
Viewing a Live Session in Playback Mode .................................................................... 61
Live Tutorial Archive ............................................................................................................ 63
Viewing a Tutorial Session in Playback Mode .............................................................. 63
Live Study Group Archive ..................................................................................................... 65
Viewing a Study Group Session in Playback Mode ....................................................... 65
Math Equation Editor ............................................................................................................ 67
A Note about PDFs ................................................................................................................ 70

WorldWideWhiteboard v6.0 User’s Manual
P a g e | iii
Students ......................................................................................................................................... 71
Accessibility Mode ................................................................................................................ 73
Live Session ........................................................................................................................... 74
Text to Voice .................................................................................................................. 75
User List ......................................................................................................................... 75
Flash Audio and Video Settings ..................................................................................... 77
Toolbar ........................................................................................................................... 78
Menu bar ......................................................................................................................... 84
Answering Polls .............................................................................................................. 87
Leader Desktop Sharing ................................................................................................. 87
Breakout Rooms ............................................................................................................. 87
Closing a Live Session ................................................................................................... 87
Additional Functionality ................................................................................................. 87
Live Tutorial .......................................................................................................................... 89
Live Tutorial Queuing .................................................................................................... 90
Ending a Live Tutorial Session ...................................................................................... 90
Live Study Group .................................................................................................................. 91
Working in a Live Study Group ..................................................................................... 92
Closing a Live Study Group and Archiving the Session ................................................ 92
Question and Answer Center ................................................................................................. 93
Asking a Question .......................................................................................................... 93
Question and Answer Center’s Session Menu ............................................................... 95
Worksheet Center .................................................................................................................. 97
Completing a Worksheet ................................................................................................ 97
Worksheet Center’s Session Menu ................................................................................. 98
Making Changes to a Worksheet after Submission ........................................................ 99
Viewing a Graded Worksheet ........................................................................................ 99
Show Your Work (Note Center) .......................................................................................... 100
Show Your Work Session Menu .................................................................................. 100
Playing Back a Note Session ........................................................................................ 101
Paper Center ......................................................................................................................... 103
Submitting a Paper ....................................................................................................... 103
Viewing a Paper after Review and/or Grading ............................................................. 105
Live Session Archive ........................................................................................................... 106

WorldWideWhiteboard v6.0 User’s Manual
P a g e | iv
Viewing a Live Session in Playback Mode .................................................................. 106
Live Tutorial Archive .......................................................................................................... 108
Viewing a Tutorial Session in Playback Mode ............................................................ 108
Live Study Group Archive ................................................................................................... 110
Viewing a Study Group Session in Playback Mode ..................................................... 110
Math Equation Editor .......................................................................................................... 112
A Note about PDFs .............................................................................................................. 115
Supervisors .................................................................................................................................. 116
Live Tutorial Supervision .................................................................................................... 116
System Requirements.................................................................................................................. 117
WorldWideWhiteboard v6.0 User’s Manual
P a g e | 1
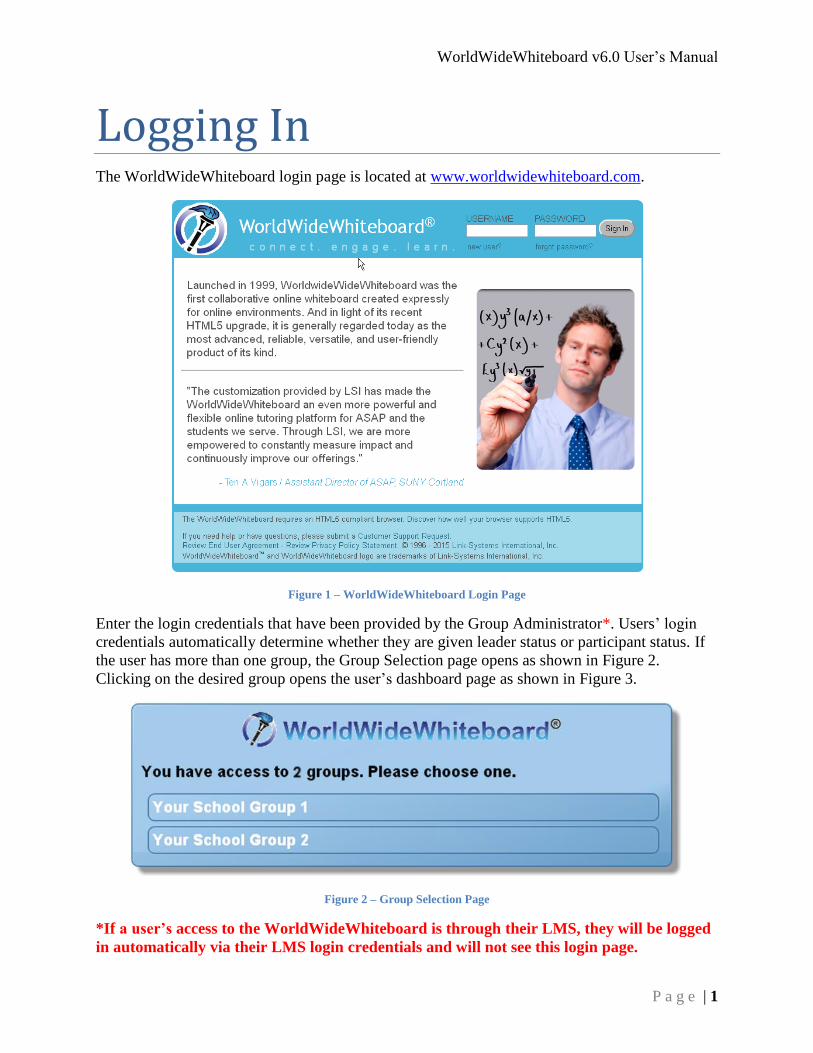
Logging In The WorldWideWhiteboard login page is located at www.worldwidewhiteboard.com.
Figure 1 – WorldWideWhiteboard Login Page
Enter the login credentials that have been provided by the Group Administrator*. Users’ login
credentials automatically determine whether they are given leader status or participant status. If
the user has more than one group, the Group Selection page opens as shown in Figure 2.
Clicking on the desired group opens the user’s dashboard page as shown in Figure 3.
Figure 2 – Group Selection Page
*If a user’s access to the WorldWideWhiteboard is through their LMS, they will be logged
in automatically via their LMS login credentials and will not see this login page.

WorldWideWhiteboard v6.0 User’s Manual
P a g e | 2
The Dashboard
Figure 3 – Administrator Dashboard Page
The icons in the command bar at the top of the dashboard page will vary depending on whether
the user has been given Group Administrator status or not by the Site Administrator. Group
Administrators will have those icons described in both red and blue shown in Figure 3; all others
will have only those icons associated with the descriptions in blue.

WorldWideWhiteboard v6.0 User’s Manual
P a g e | 3
Group Administrators Group Administrators have the ability to update group settings and manage group users. These
abilities are described below.
Update Group Settings
Clicking the Group Settings icon opens the window shown in Figure 4.
Figure 4 – Update Group Settings Page
From here, group administrators can change the group name, turn audio and video on or off in
the synchronous modes, change the Subject Area (to select the appropriate keypad for the Math

WorldWideWhiteboard v6.0 User’s Manual
P a g e | 4
Equation Editor), update/create the group notice, and activate or deactivate the group itself. If
deactivated, the group is not deleted but it will no longer be available to group users.
Update Group Notice
Clicking the Update Group Notice button opens the window shown in Figure 5.
Figure 5 – Group Notice Composition Page
Group administrators can add a message that is displayed when each group member logs in.
Type the text or enter HTML code and click the Update Group Note button to enable the notice.
Clicking the Cancel button will return the group administrator to the Update Group Settings
window.
WorldWideWhiteboard v6.0 User’s Manual
P a g e | 5
Note that the group notice has an option that allows users to not view the group notice every
login. If the Administrator makes a change to the notice, however, it disables that setting such
that all users must see each new notice a minimum of one time.
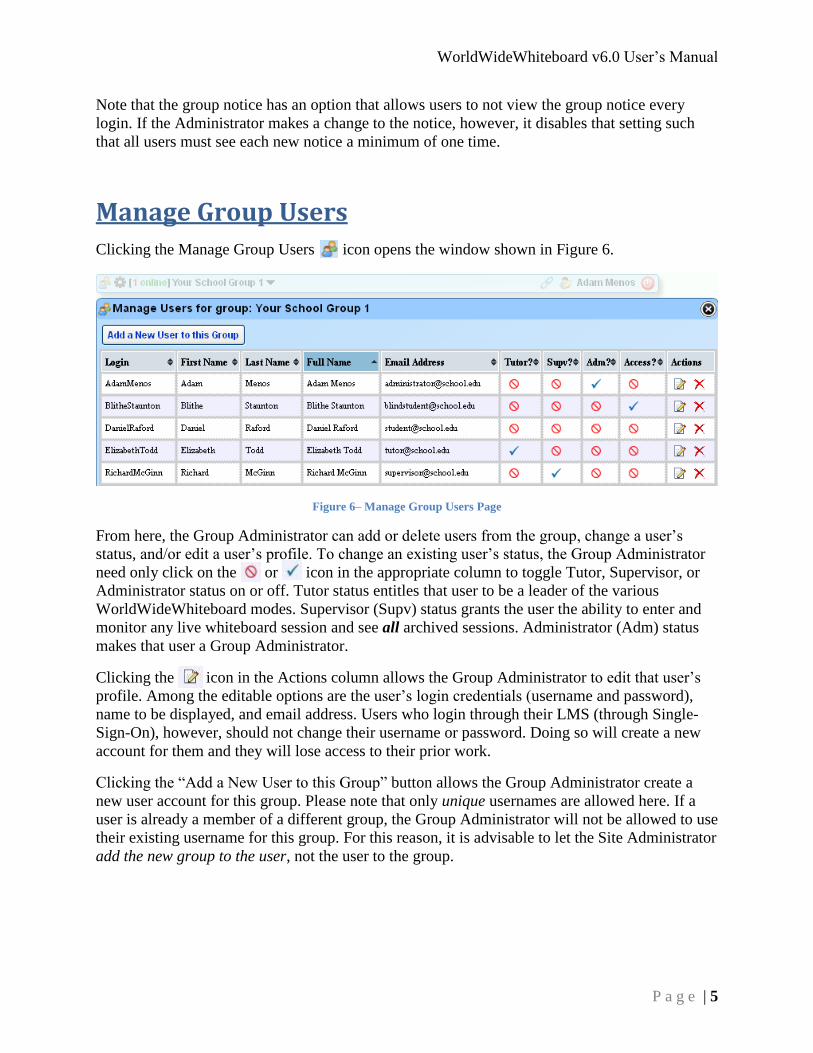
Manage Group Users
Clicking the Manage Group Users icon opens the window shown in Figure 6.
Figure 6– Manage Group Users Page
From here, the Group Administrator can add or delete users from the group, change a user’s
status, and/or edit a user’s profile. To change an existing user’s status, the Group Administrator
need only click on the or icon in the appropriate column to toggle Tutor, Supervisor, or
Administrator status on or off. Tutor status entitles that user to be a leader of the various
WorldWideWhiteboard modes. Supervisor (Supv) status grants the user the ability to enter and
monitor any live whiteboard session and see all archived sessions. Administrator (Adm) status
makes that user a Group Administrator.
Clicking the icon in the Actions column allows the Group Administrator to edit that user’s
profile. Among the editable options are the user’s login credentials (username and password),
name to be displayed, and email address. Users who login through their LMS (through Single-
Sign-On), however, should not change their username or password. Doing so will create a new
account for them and they will lose access to their prior work.
Clicking the “Add a New User to this Group” button allows the Group Administrator create a
new user account for this group. Please note that only unique usernames are allowed here. If a
user is already a member of a different group, the Group Administrator will not be allowed to use
their existing username for this group. For this reason, it is advisable to let the Site Administrator
add the new group to the user, not the user to the group.

WorldWideWhiteboard v6.0 User’s Manual
P a g e | 6
View Online Users List
Administrators, Leaders, and Supervisors may clicking the “X online” link at the top of the
dashboard to open the window shown in Figure 7.
Figure 7– Online Users List
User privileges are indicated by checkmark icons: leader (Tutor?), supervisor (Supv?), and
administrator (Adm?). A checkmark under “IN?” indicates the user is logged into the current
group (Elizabeth in Figure 7), while a checkmark under “ON?” indicates the user is logged into
the WorldWideWhiteboard, possibly in a different group (Daniel in Figure 7).
WorldWideWhiteboard v6.0 User’s Manual
P a g e | 7
All Users
Creating a New User Account
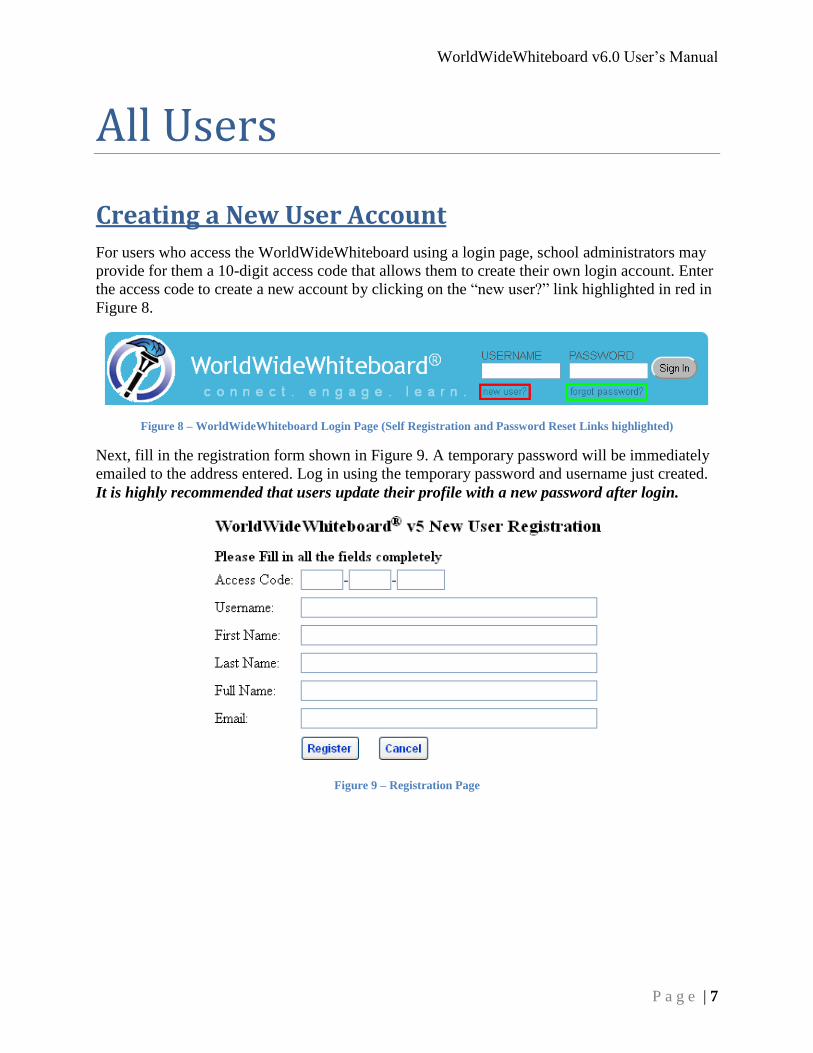
For users who access the WorldWideWhiteboard using a login page, school administrators may
provide for them a 10-digit access code that allows them to create their own login account. Enter
the access code to create a new account by clicking on the “new user?” link highlighted in red in
Figure 8.
Figure 8 – WorldWideWhiteboard Login Page (Self Registration and Password Reset Links highlighted)
Next, fill in the registration form shown in Figure 9. A temporary password will be immediately
emailed to the address entered. Log in using the temporary password and username just created.
It is highly recommended that users update their profile with a new password after login.
Figure 9 – Registration Page

WorldWideWhiteboard v6.0 User’s Manual
P a g e | 8
Password Reset
Clicking on the “forgot password?” link highlighted in green in Figure 9 will open the password
reset page shown in Figure 10. Users enter their username, email address, and CAPTCHA
information provided in the picture, then click the Submit button. An email with instructions to
reset the password is sent if the account is found.
Figure 10– Password Reset Page
Add Access to Other Classes
The school administrator may also provide users with a 10-digit access code that allows them to
enroll in a group or groups in which they are not currently enrolled. Access other classes after
logging in, click the icon at the top of the dashboard shown in Figure 11.
Enter the code and click the Register button in the popup window shown in Figure 12.
Figure 11– Dashboard Command Bar
Figure 12 – Enter Access Code Page

WorldWideWhiteboard v6.0 User’s Manual
P a g e | 9
Choose Group or Add Access to a Different Group
Click the triangle icon to the right of the group name to change groups or add access (via
class access code) as shown in Figure 13.
Figure 13 – Choose Group or Add Access to a Different Group
Update User Profile
All WorldWideWhiteboard users have the ability to update their user profile. However, users
who login through their LMS (through Single-Sign-On) should not change their username or
password. Doing so will create a new account for them and they will lose access to their prior
work.
Update your user profile by clicking the icon in the dashboard command bar.
Figure 14– Update Your User Profile Page
WorldWideWhiteboard v6.0 User’s Manual
P a g e | 10
From the window shown in Figure 14, the user can change his or her login credentials (username
and password), display name, and email address. Passwords must be at least 9 characters long
and have at least 1 uppercase, 1 lowercase, 1 digit, and 1 other special character.
Browser Test
Click the Browser Test button on the dashboard to see how well a particular browser
supports HTML5. It is highly recommended that users employ a browser with a
score of 380 or more when using the WorldWideWhiteboard.
Figure 15 – Browser Test Page
Online Manual
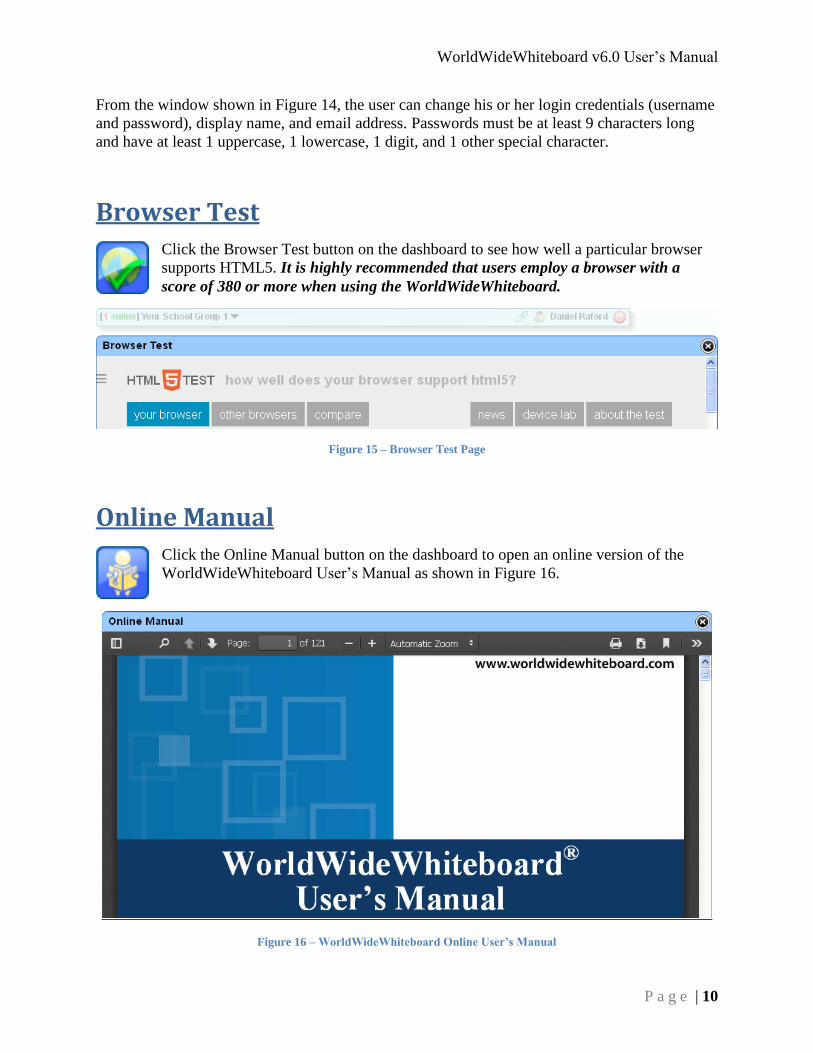
Click the Online Manual button on the dashboard to open an online version of the
WorldWideWhiteboard User’s Manual as shown in Figure 16.
Figure 16 – WorldWideWhiteboard Online User’s Manual
WorldWideWhiteboard v6.0 User’s Manual
P a g e | 11
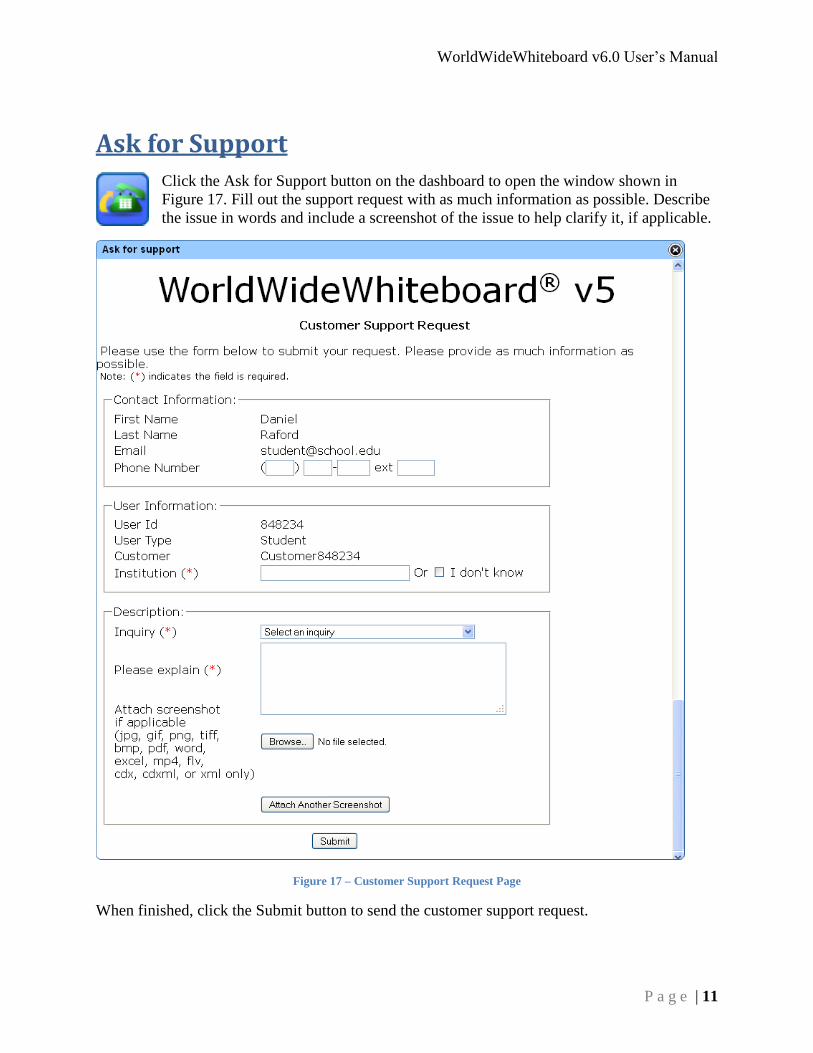
Ask for Support
Click the Ask for Support button on the dashboard to open the window shown in
Figure 17. Fill out the support request with as much information as possible. Describe
the issue in words and include a screenshot of the issue to help clarify it, if applicable.
Figure 17 – Customer Support Request Page
When finished, click the Submit button to send the customer support request.
WorldWideWhiteboard v6.0 User’s Manual
P a g e | 12
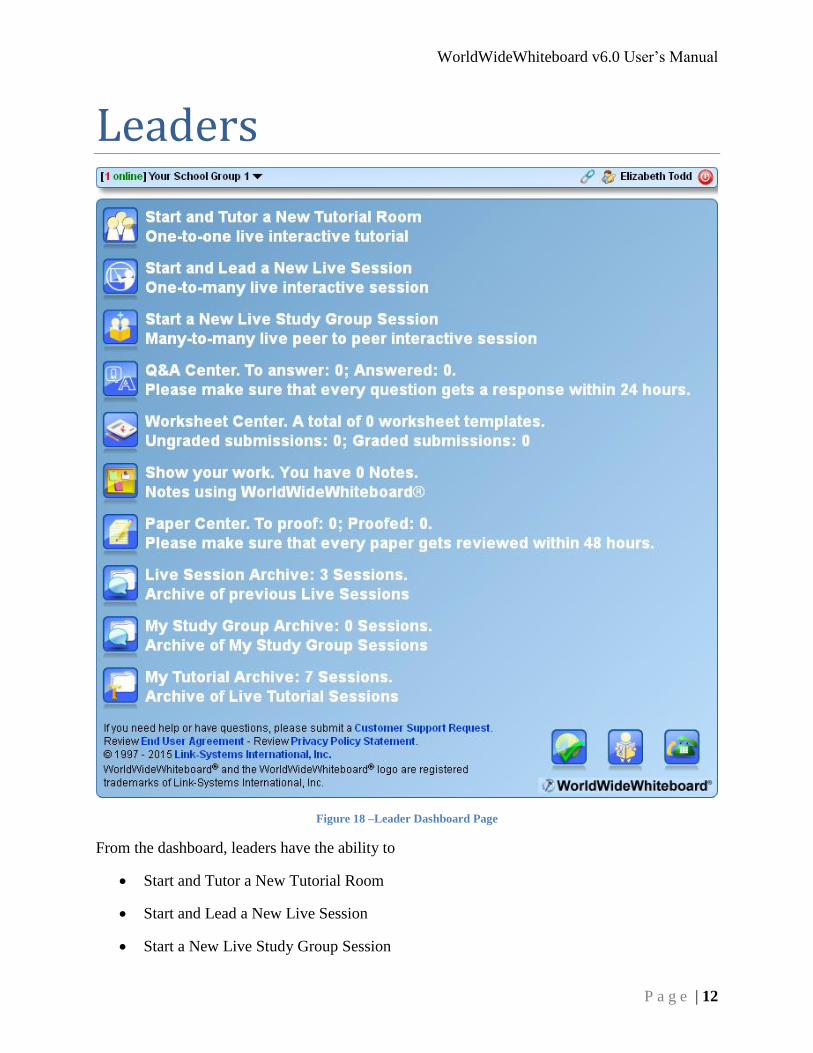
Leaders
Figure 18 –Leader Dashboard Page
From the dashboard, leaders have the ability to
Start and Tutor a New Tutorial Room
Start and Lead a New Live Session
Start a New Live Study Group Session

WorldWideWhiteboard v6.0 User’s Manual
P a g e | 13
Join a Live Study Group Session that has been started by another user
Answer questions submitted to them via the Question and Answer Center
Create new Worksheets or correct and grade those already submitted by users
Create Notes in the Show Your Work area
Proof and/or grade papers or writing assignments submitted to them via the Paper Center
Open an Archive of previous Live Sessions, including any Breakout Rooms
Open an Archive of previous Live Tutorial Sessions
Open an Archive of previous Live Study Group Sessions in which they have participated
(only)
WorldWideWhiteboard v6.0 User’s Manual
P a g e | 14
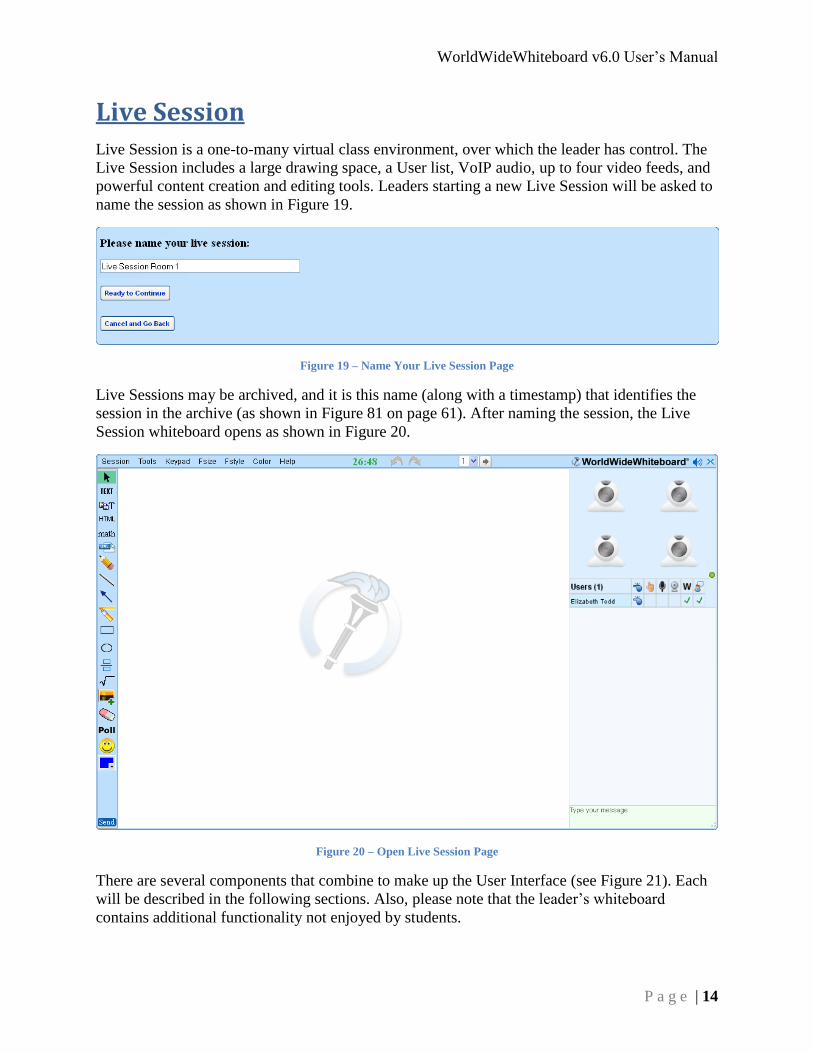
Live Session
Live Session is a one-to-many virtual class environment, over which the leader has control. The
Live Session includes a large drawing space, a User list, VoIP audio, up to four video feeds, and
powerful content creation and editing tools. Leaders starting a new Live Session will be asked to
name the session as shown in Figure 19.
Figure 19 – Name Your Live Session Page
Live Sessions may be archived, and it is this name (along with a timestamp) that identifies the
session in the archive (as shown in Figure 81 on page 61). After naming the session, the Live
Session whiteboard opens as shown in Figure 20.
Figure 20 – Open Live Session Page
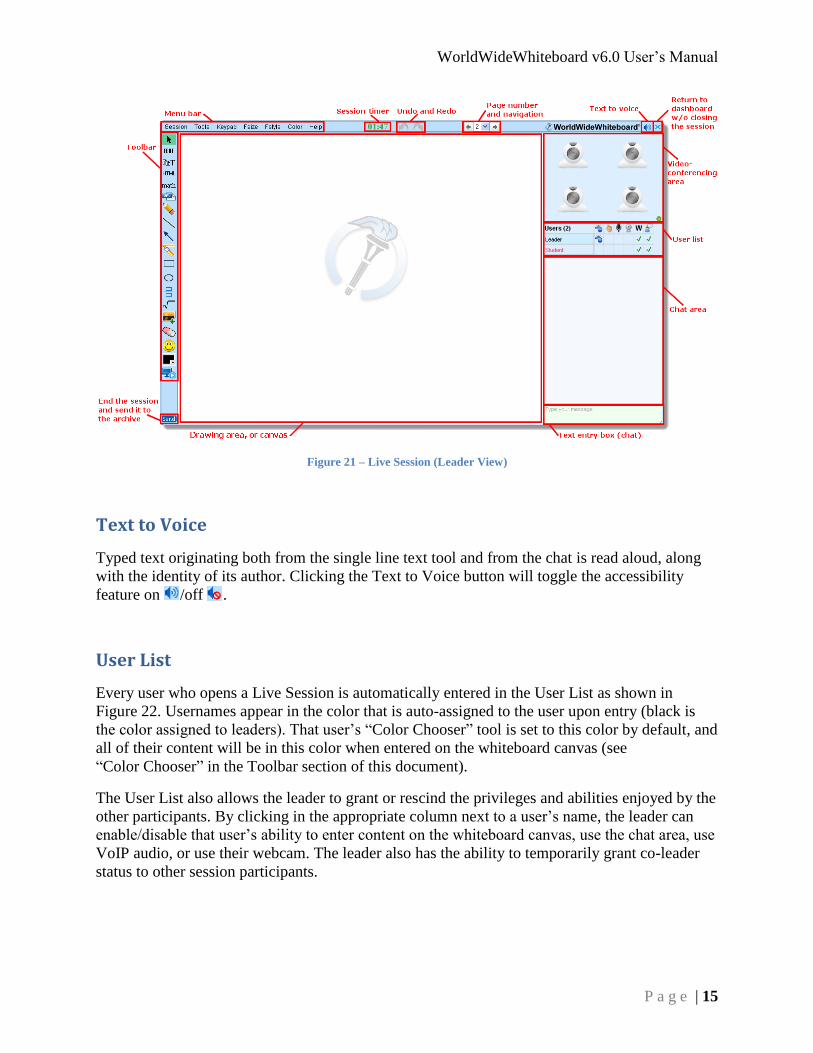
There are several components that combine to make up the User Interface (see Figure 21). Each
will be described in the following sections. Also, please note that the leader’s whiteboard
contains additional functionality not enjoyed by students.
WorldWideWhiteboard v6.0 User’s Manual
P a g e | 15
Figure 21 – Live Session (Leader View)
Text to Voice
Typed text originating both from the single line text tool and from the chat is read aloud, along
with the identity of its author. Clicking the Text to Voice button will toggle the accessibility
feature on /off .
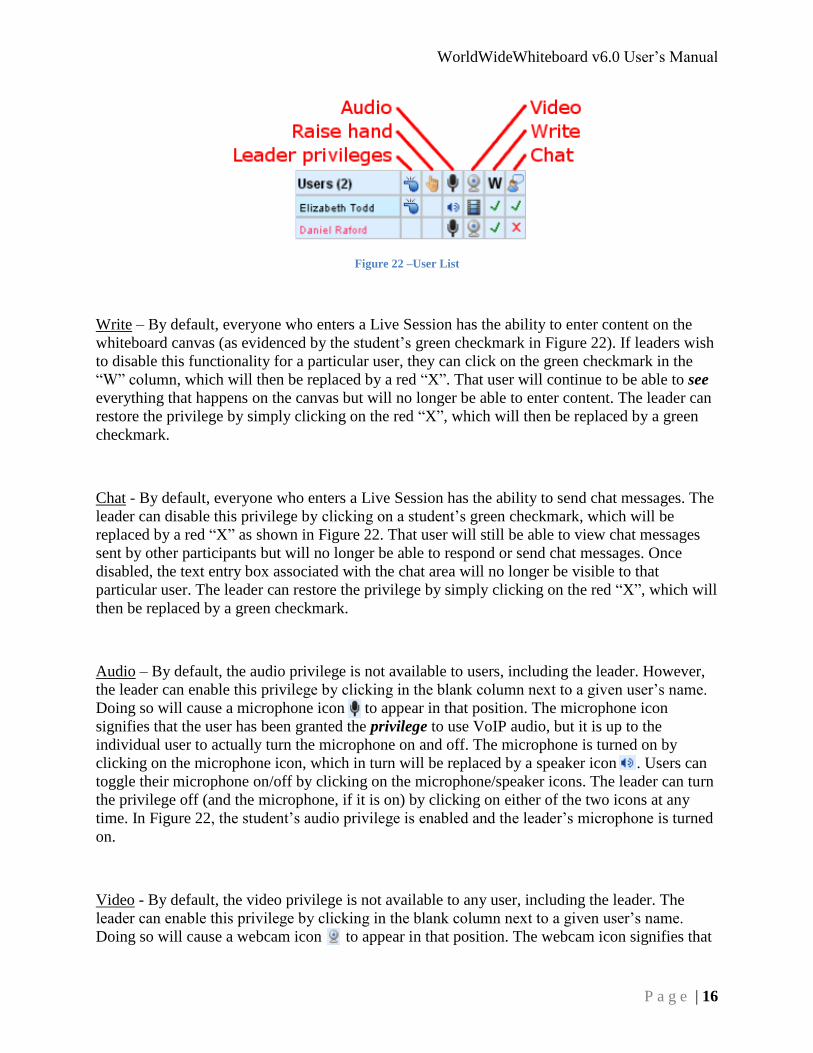
User List
Every user who opens a Live Session is automatically entered in the User List as shown in
Figure 22. Usernames appear in the color that is auto-assigned to the user upon entry (black is
the color assigned to leaders). That user’s “Color Chooser” tool is set to this color by default, and
all of their content will be in this color when entered on the whiteboard canvas (see
“Color Chooser” in the Toolbar section of this document).
The User List also allows the leader to grant or rescind the privileges and abilities enjoyed by the
other participants. By clicking in the appropriate column next to a user’s name, the leader can
enable/disable that user’s ability to enter content on the whiteboard canvas, use the chat area, use
VoIP audio, or use their webcam. The leader also has the ability to temporarily grant co-leader
status to other session participants.
WorldWideWhiteboard v6.0 User’s Manual
P a g e | 16
Figure 22 –User List
Write – By default, everyone who enters a Live Session has the ability to enter content on the
whiteboard canvas (as evidenced by the student’s green checkmark in Figure 22). If leaders wish
to disable this functionality for a particular user, they can click on the green checkmark in the
“W” column, which will then be replaced by a red “X”. That user will continue to be able to see
everything that happens on the canvas but will no longer be able to enter content. The leader can
restore the privilege by simply clicking on the red “X”, which will then be replaced by a green
checkmark.
Chat - By default, everyone who enters a Live Session has the ability to send chat messages. The
leader can disable this privilege by clicking on a student’s green checkmark, which will be
replaced by a red “X” as shown in Figure 22. That user will still be able to view chat messages
sent by other participants but will no longer be able to respond or send chat messages. Once
disabled, the text entry box associated with the chat area will no longer be visible to that
particular user. The leader can restore the privilege by simply clicking on the red “X”, which will
then be replaced by a green checkmark.
Audio – By default, the audio privilege is not available to users, including the leader. However,
the leader can enable this privilege by clicking in the blank column next to a given user’s name.
Doing so will cause a microphone icon to appear in that position. The microphone icon
signifies that the user has been granted the privilege to use VoIP audio, but it is up to the
individual user to actually turn the microphone on and off. The microphone is turned on by
clicking on the microphone icon, which in turn will be replaced by a speaker icon . Users can
toggle their microphone on/off by clicking on the microphone/speaker icons. The leader can turn
the privilege off (and the microphone, if it is on) by clicking on either of the two icons at any
time. In Figure 22, the student’s audio privilege is enabled and the leader’s microphone is turned
on.
Video - By default, the video privilege is not available to any user, including the leader. The
leader can enable this privilege by clicking in the blank column next to a given user’s name.
Doing so will cause a webcam icon to appear in that position. The webcam icon signifies that

WorldWideWhiteboard v6.0 User’s Manual
P a g e | 17
the user has been granted the privilege to broadcast the video, but it is up to the individual user to
actually turn the webcam on and off by clicking on the webcam icon. When the webcam is
turned on, the webcam icon will be replaced by a filmstrip icon . Users can toggle their
webcam on/off by clicking on the webcam/filmstrip icons. The leader can turn the privilege off
(and the webcam, if it is on) by clicking on either of the two icons at any time. In Figure 22, the
student’s video privilege is enabled and the leader’s webcam is broadcasting.
Raise Hand – Participants in a Live Session can get the leader’s attention by raising their hand at
any time. To do so, they simply click in the appropriate column next to their name, causing the
hand icon to appear. Either that user or the leader can lower the hand by clicking on it at any
time. Hands are numbered in the order the participants raise them. The numbers are
automatically updated as hands are lowered.
Leader Control – Leaders have the ability to grant leader privileges to as many participants in a
Live Session as they desire. They do so by simply clicking in the appropriate column next to the
user’s name causing the whistle icon to appear. That user will then enjoy all of the same
privileges that the original leader has, with the exception of being able to give leader privileges
to others. The leader can rescind the privilege by clicking on the whistle icon at any time.
Flash Audio and Video Settings
When a user clicks the webcam or microphone icon, they may be asked to configure their Adobe
Flash Player as shown in Figure 23.
Figure 23 – Flash Player Settings
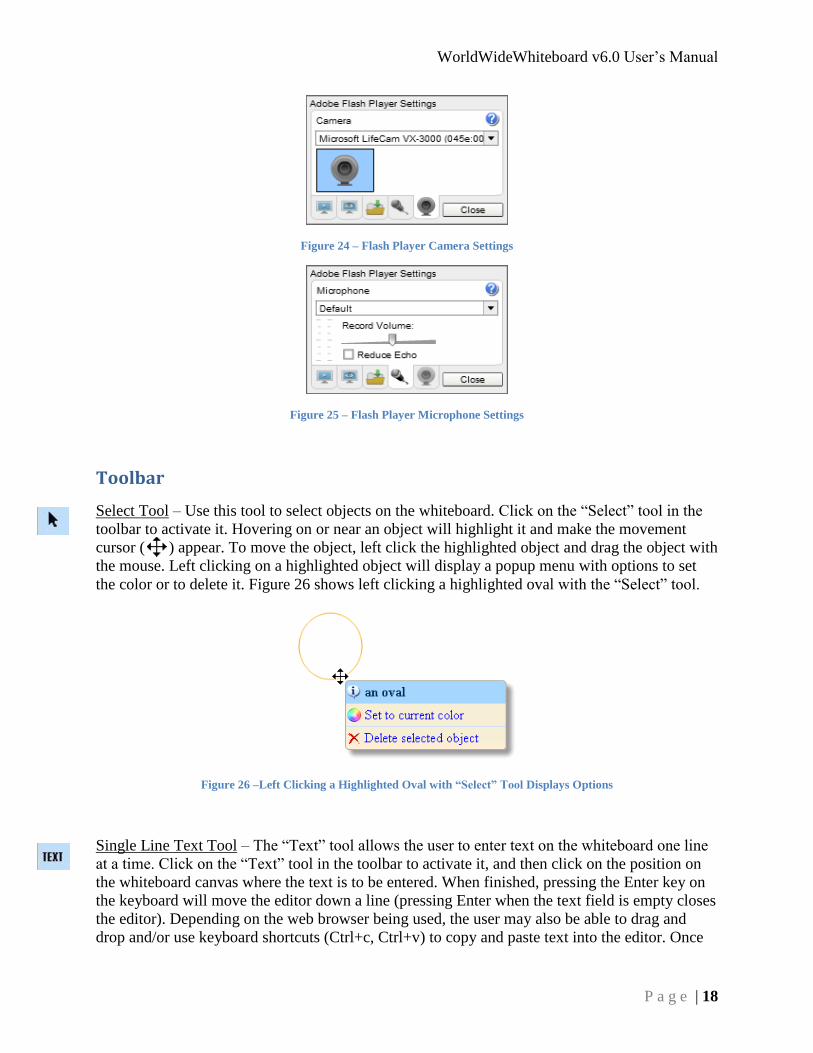
Users should make sure that the correct microphone and webcam have been selected (see
Figure 24 and Figure 25), and then click “Allow” and “Remember” as shown in Figure 23. If
desired, users may also configure local storage settings and hardware acceleration. Click “Close”
to end configuration.
WorldWideWhiteboard v6.0 User’s Manual
P a g e | 18
Figure 24 – Flash Player Camera Settings
Figure 25 – Flash Player Microphone Settings
Toolbar
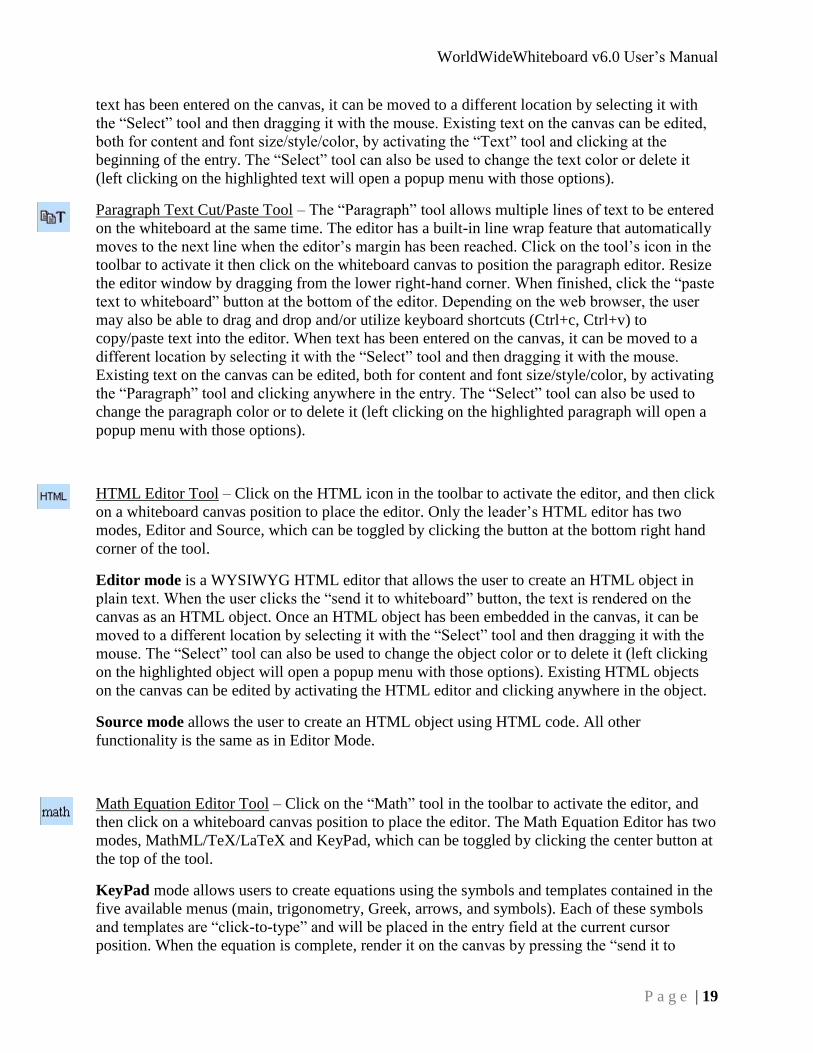
Select Tool – Use this tool to select objects on the whiteboard. Click on the “Select” tool in the
toolbar to activate it. Hovering on or near an object will highlight it and make the movement
cursor ( ) appear. To move the object, left click the highlighted object and drag the object with
the mouse. Left clicking on a highlighted object will display a popup menu with options to set
the color or to delete it. Figure 26 shows left clicking a highlighted oval with the “Select” tool.
Figure 26 –Left Clicking a Highlighted Oval with “Select” Tool Displays Options
Single Line Text Tool – The “Text” tool allows the user to enter text on the whiteboard one line
at a time. Click on the “Text” tool in the toolbar to activate it, and then click on the position on
the whiteboard canvas where the text is to be entered. When finished, pressing the Enter key on
the keyboard will move the editor down a line (pressing Enter when the text field is empty closes
the editor). Depending on the web browser being used, the user may also be able to drag and
drop and/or use keyboard shortcuts (Ctrl+c, Ctrl+v) to copy and paste text into the editor. Once
WorldWideWhiteboard v6.0 User’s Manual
P a g e | 19
text has been entered on the canvas, it can be moved to a different location by selecting it with
the “Select” tool and then dragging it with the mouse. Existing text on the canvas can be edited,
both for content and font size/style/color, by activating the “Text” tool and clicking at the
beginning of the entry. The “Select” tool can also be used to change the text color or delete it
(left clicking on the highlighted text will open a popup menu with those options).
Paragraph Text Cut/Paste Tool – The “Paragraph” tool allows multiple lines of text to be entered
on the whiteboard at the same time. The editor has a built-in line wrap feature that automatically
moves to the next line when the editor’s margin has been reached. Click on the tool’s icon in the
toolbar to activate it then click on the whiteboard canvas to position the paragraph editor. Resize
the editor window by dragging from the lower right-hand corner. When finished, click the “paste
text to whiteboard” button at the bottom of the editor. Depending on the web browser, the user
may also be able to drag and drop and/or utilize keyboard shortcuts (Ctrl+c, Ctrl+v) to
copy/paste text into the editor. When text has been entered on the canvas, it can be moved to a
different location by selecting it with the “Select” tool and then dragging it with the mouse.
Existing text on the canvas can be edited, both for content and font size/style/color, by activating
the “Paragraph” tool and clicking anywhere in the entry. The “Select” tool can also be used to
change the paragraph color or to delete it (left clicking on the highlighted paragraph will open a
popup menu with those options).
HTML Editor Tool – Click on the HTML icon in the toolbar to activate the editor, and then click
on a whiteboard canvas position to place the editor. Only the leader’s HTML editor has two
modes, Editor and Source, which can be toggled by clicking the button at the bottom right hand
corner of the tool.
Editor mode is a WYSIWYG HTML editor that allows the user to create an HTML object in
plain text. When the user clicks the “send it to whiteboard” button, the text is rendered on the
canvas as an HTML object. Once an HTML object has been embedded in the canvas, it can be
moved to a different location by selecting it with the “Select” tool and then dragging it with the
mouse. The “Select” tool can also be used to change the object color or to delete it (left clicking
on the highlighted object will open a popup menu with those options). Existing HTML objects
on the canvas can be edited by activating the HTML editor and clicking anywhere in the object.
Source mode allows the user to create an HTML object using HTML code. All other
functionality is the same as in Editor Mode.
Math Equation Editor Tool – Click on the “Math” tool in the toolbar to activate the editor, and
then click on a whiteboard canvas position to place the editor. The Math Equation Editor has two
modes, MathML/TeX/LaTeX and KeyPad, which can be toggled by clicking the center button at
the top of the tool.
KeyPad mode allows users to create equations using the symbols and templates contained in the
five available menus (main, trigonometry, Greek, arrows, and symbols). Each of these symbols
and templates are “click-to-type” and will be placed in the entry field at the current cursor
position. When the equation is complete, render it on the canvas by pressing the “send it to
WorldWideWhiteboard v6.0 User’s Manual
P a g e | 20
whiteboard” button at the bottom of the editor. The “Preview” button allows the user to see the
rendered result and check it for accuracy before placing it on the whiteboard canvas. When an
equation has been placed on the canvas, it can be moved to a different location by selecting it
with the “Select” tool and then dragging it with the mouse. The “Select” tool can also be used to
change the equation color or to delete it (left clicking on the highlighted object will open a popup
menu with those options). Existing equations on the canvas can be edited by activating the Math
Equation Editor and clicking inside the equation.
MathML/TeX/LaTeX mode allows users to create equations by entering MathML, TeX, or
LaTeX code. Render the coded equation on the canvas by pressing the “send it to whiteboard”
button at the bottom of the editor. The “Preview” button allows the user to see the rendered result
and check it for accuracy before placing it on the whiteboard canvas. When an equation has been
placed on the canvas, it can be moved to a different location by selecting it with the “Select” tool
and then dragging it with the mouse. The “Select” tool can also be used to change the equation
color or to delete it (left clicking on the highlighted object will open a popup menu with those
options). Existing equations on the canvas can be edited by activating the Math Equation Editor
and clicking inside the equation.
See the Math Equation Editor section of this manual (page 67) for more details.
Create a URL Link Tool – Click on the tool’s icon in the toolbar to activate it, and then click on
a whiteboard canvas position to place the hyperlink. Type the full URL in the top field. Clicking
the “paste URL to whiteboard” button will place this textual hyperlink on the canvas. A different
name for the link can be created by entering the desired name into the tool’s Label field before
clicking the “paste URL to whiteboard” button. Once the hyperlink has been placed on the
canvas, left clicking the hyperlink will open its target in a new browser window. A hyperlink can
be moved to a different location by selecting it with the “Select” tool and then dragging it with
the mouse. Existing hyperlinks on the canvas can be edited by activating the “URL Link” tool
and clicking on the hyperlink.
Freehand Drawing Tool – To activate the “Freehand Drawing” tool, click on the pencil icon in
the toolbar. Then move to the whiteboard canvas and hold the left mouse button down while
moving the mouse. Line widths can be selected by opening the “Line Width” command in the
Tools menu in the Menu bar. All drawn objects can be moved individually by selecting them
with the “Select” tool and then dragging them with the mouse. The “Select” tool can also be used
to change the drawing color or to delete it (left clicking on the highlighted object will open a
popup menu with those options).
Straight Line Drawing Tool – To activate the “Straight Line Drawing” tool, click on the tool’s
icon in the toolbar. Then move to the whiteboard canvas and click the left mouse button to place
the beginning point. While holding down the mouse button, move the mouse to the desired
endpoint and release the button. Line widths can be selected by opening the “Line Width”
command in the Tools menu in the Menu bar. Line segments can be moved by selecting them
WorldWideWhiteboard v6.0 User’s Manual
P a g e | 21
with the “Select” tool and then dragging them with the mouse. The “Select” tool can also be used
to change the line segment color or to delete it (left clicking on the highlighted object will open a
popup menu with those options).
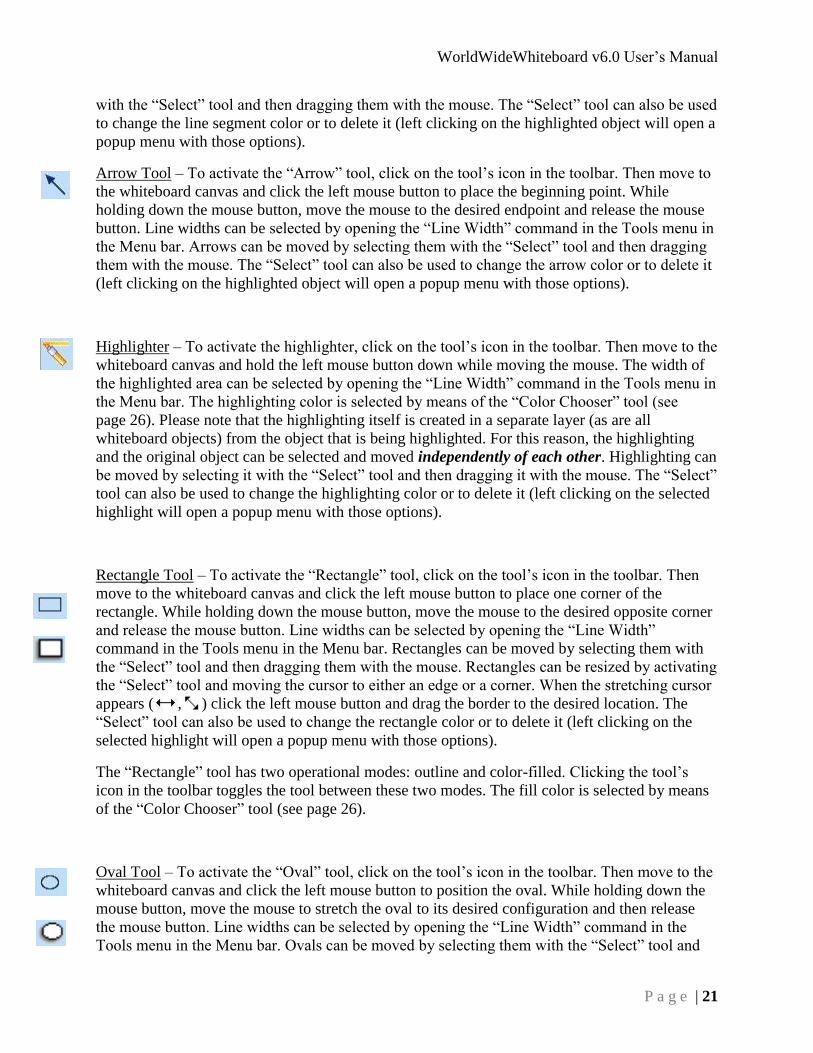
Arrow Tool – To activate the “Arrow” tool, click on the tool’s icon in the toolbar. Then move to
the whiteboard canvas and click the left mouse button to place the beginning point. While
holding down the mouse button, move the mouse to the desired endpoint and release the mouse
button. Line widths can be selected by opening the “Line Width” command in the Tools menu in
the Menu bar. Arrows can be moved by selecting them with the “Select” tool and then dragging
them with the mouse. The “Select” tool can also be used to change the arrow color or to delete it
(left clicking on the highlighted object will open a popup menu with those options).
Highlighter – To activate the highlighter, click on the tool’s icon in the toolbar. Then move to the
whiteboard canvas and hold the left mouse button down while moving the mouse. The width of
the highlighted area can be selected by opening the “Line Width” command in the Tools menu in
the Menu bar. The highlighting color is selected by means of the “Color Chooser” tool (see
page 26). Please note that the highlighting itself is created in a separate layer (as are all
whiteboard objects) from the object that is being highlighted. For this reason, the highlighting
and the original object can be selected and moved independently of each other. Highlighting can
be moved by selecting it with the “Select” tool and then dragging it with the mouse. The “Select”
tool can also be used to change the highlighting color or to delete it (left clicking on the selected
highlight will open a popup menu with those options).
Rectangle Tool – To activate the “Rectangle” tool, click on the tool’s icon in the toolbar. Then
move to the whiteboard canvas and click the left mouse button to place one corner of the
rectangle. While holding down the mouse button, move the mouse to the desired opposite corner
and release the mouse button. Line widths can be selected by opening the “Line Width”
command in the Tools menu in the Menu bar. Rectangles can be moved by selecting them with
the “Select” tool and then dragging them with the mouse. Rectangles can be resized by activating
the “Select” tool and moving the cursor to either an edge or a corner. When the stretching cursor
appears ( , ) click the left mouse button and drag the border to the desired location. The
“Select” tool can also be used to change the rectangle color or to delete it (left clicking on the
selected highlight will open a popup menu with those options).
The “Rectangle” tool has two operational modes: outline and color-filled. Clicking the tool’s
icon in the toolbar toggles the tool between these two modes. The fill color is selected by means
of the “Color Chooser” tool (see page 26).
Oval Tool – To activate the “Oval” tool, click on the tool’s icon in the toolbar. Then move to the
whiteboard canvas and click the left mouse button to position the oval. While holding down the
mouse button, move the mouse to stretch the oval to its desired configuration and then release
the mouse button. Line widths can be selected by opening the “Line Width” command in the
Tools menu in the Menu bar. Ovals can be moved by selecting them with the “Select” tool and

WorldWideWhiteboard v6.0 User’s Manual
P a g e | 22
then dragging them with the mouse. The “Select” tool can also be used to change the oval color
or to delete it (left clicking on the selected highlight will open a popup menu with those options
as shown in Figure 26).
The “Oval” tool has two operational modes: outline and color-filled. Clicking the tool’s icon in
the toolbar toggles the tool between these two modes. The fill color is selected by means of the
“Color Chooser” tool (see page 26).
Fraction Tool – To activate the “Fraction” tool, click on the tool’s icon in the toolbar. The mouse
pointer will be replaced by a fraction template. Position the template on the canvas, and click to
place it. At this point, the fraction template contains two empty boxes, one in the numerator and
one in the denominator. Fill in the numerator and then press either the Tab or Enter key to move
to the denominator. Once the denominator has been entered, press the Enter key to complete the
operation. Existing fractions can be edited, both for content and font size/style/color, by
activating the “Fraction” tool and clicking over the existing entry. Fractions can be moved by
selecting them with the “Select” tool and then dragging them with the mouse. The “Select” tool
can also be used to change the fraction color or to delete it (left clicking on the highlighted
fraction will open a popup menu with those options).
Square Root Tool – To activate the “Square Root” tool, click on the tool’s icon in the toolbar.
The mouse pointer will be replaced by a small square root symbol. Then move to the whiteboard
canvas and click the left mouse button to position the square root symbol. While holding down
the mouse button, move the mouse to stretch the symbol to its desired size and then release the
button. Once the square root has been placed on the canvas, it can be moved by selecting it with
the “Select” tool and then dragging it with the mouse. The “Select” tool can also be used to
change the square root color or to delete it (left clicking on the highlighted fraction will open a
popup menu with those options).
Insert Image/PDF Tool – Click on the tool’s icon in the toolbar to open a Load File window.
Browse the computer for the location of the desired PDF or image file. When the filename has
been entered, clicking the “Open” button will cause a thumbnail image of the file to attach itself
to the mouse cursor. Position the thumbnail image in the whiteboard canvas and click the left
mouse button to place the file on the canvas. Multi-page PDFs will automatically be paginated,
one PDF page per whiteboard page. Once embedded, these objects can be moved by selecting
them with the “Select” tool and then dragging them with the mouse. They can be resized by
activating the “Select” tool and moving the cursor to either an edge or a corner. When the
stretching cursor appears ( , ) click the left mouse button and drag the border to the desired
location. The “Select” tool can also be used to delete these objects (left clicking on the selected
highlight will open a popup menu with that option – note that the command to set the object
color has no effect on the object).

WorldWideWhiteboard v6.0 User’s Manual
P a g e | 23
Eraser – To activate the “Eraser” tool, click on the tool’s icon in the toolbar. The mouse pointer
will be replaced by a small eraser image. Then move to the whiteboard canvas and click the left
mouse button and move the mouse to “erase” existing content. Please note that the content below
is not actually deleted; rather, it is covered over. The “erasure” is an opaque covering that is
created in a separate layer (as are all whiteboard objects) from the object that is being erased. For
this reason, the erasure and the original object can be selected and moved independently of each
other. Once the “erasure” has been placed on the canvas, it can be moved by selecting it with the
“Select” tool and then dragging it with the mouse. The “Select” tool can also be used to change
the “erasure’s” color or to delete it (left clicking on the highlighted fraction will open a popup
menu with those options).
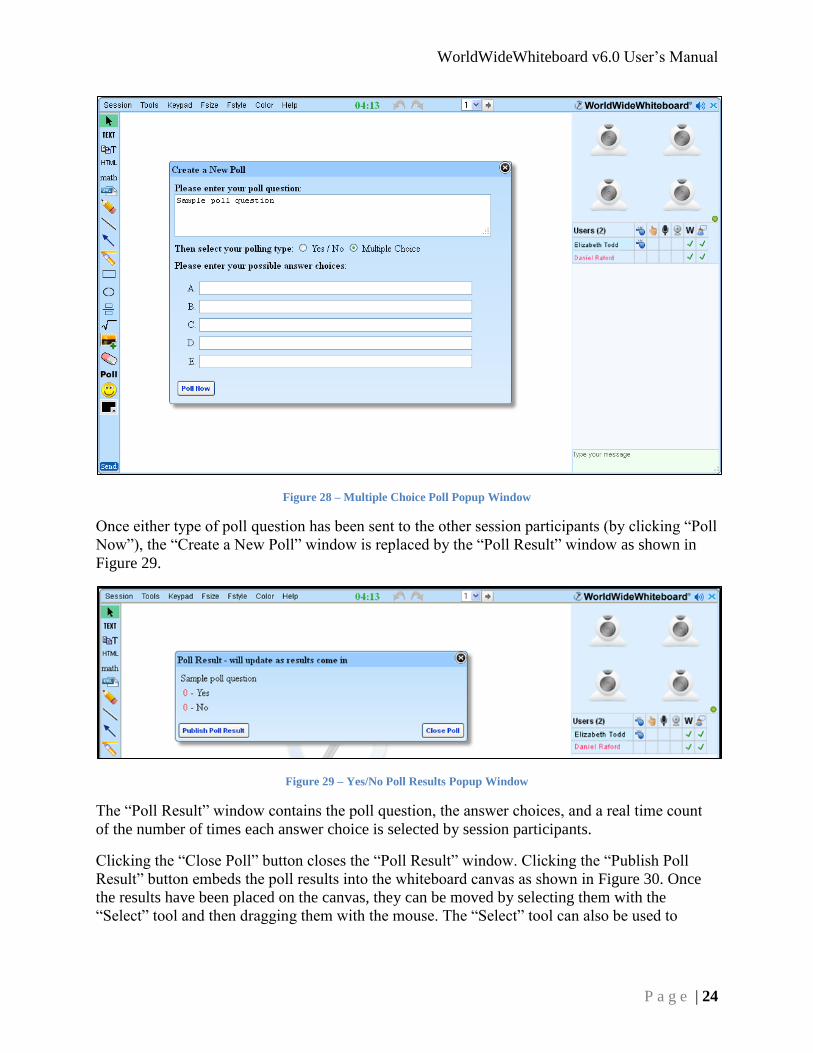
Poll – To author a poll question, click the tool’s icon in the toolbar. This opens the “Create a
New Poll” popup window as shown in Figure 27. After entering the question, click the desired
answer type: Multiple Choice or Yes/No.
Figure 27 – Create a New Poll Popup Window
If the Multiple Choice answer type is selected, the poll window expands to allow the leader to
add up to five answer choices, as shown in Figure 28. After entering the answer selections (at
least two must be entered), clicking the “Poll Now” button sends the poll question to all other
session participants.
If the Yes/No answer type is selected, the popup window refreshes to include the “Poll Now”
button. As with multiple choice polls, clicking “Poll Now” sends the poll question to everyone in
the session.
WorldWideWhiteboard v6.0 User’s Manual
P a g e | 24
Figure 28 – Multiple Choice Poll Popup Window
Once either type of poll question has been sent to the other session participants (by clicking “Poll
Now”), the “Create a New Poll” window is replaced by the “Poll Result” window as shown in
Figure 29.
Figure 29 – Yes/No Poll Results Popup Window
The “Poll Result” window contains the poll question, the answer choices, and a real time count
of the number of times each answer choice is selected by session participants.
Clicking the “Close Poll” button closes the “Poll Result” window. Clicking the “Publish Poll
Result” button embeds the poll results into the whiteboard canvas as shown in Figure 30. Once
the results have been placed on the canvas, they can be moved by selecting them with the
“Select” tool and then dragging them with the mouse. The “Select” tool can also be used to
WorldWideWhiteboard v6.0 User’s Manual
P a g e | 25
change the font color of the results or to delete them (left clicking on the highlighted results will
open a popup menu with those options).
Figure 30 – Published Poll Results
Feedback Icons – Clicking the tool’s icon in the toolbar causes a new tray to open (see
Figure 31), that allows users to display icons next to their name in the User List. The tray can be
closed without selecting a feedback icon by clicking the tool’s icon in the toolbar again.
Figure 31 – Open Feedback Icons Tray
These icons are intended to illustrate how a particular user feels about the ongoing session at a
particular point in time. The available choices include: happy, unhappy, shocked, confused,
LOL, applause, thumbs up, thumbs down, faster, and slower.
Clicking one of the icons places it next to the user’s name in the User List and closes the tray.
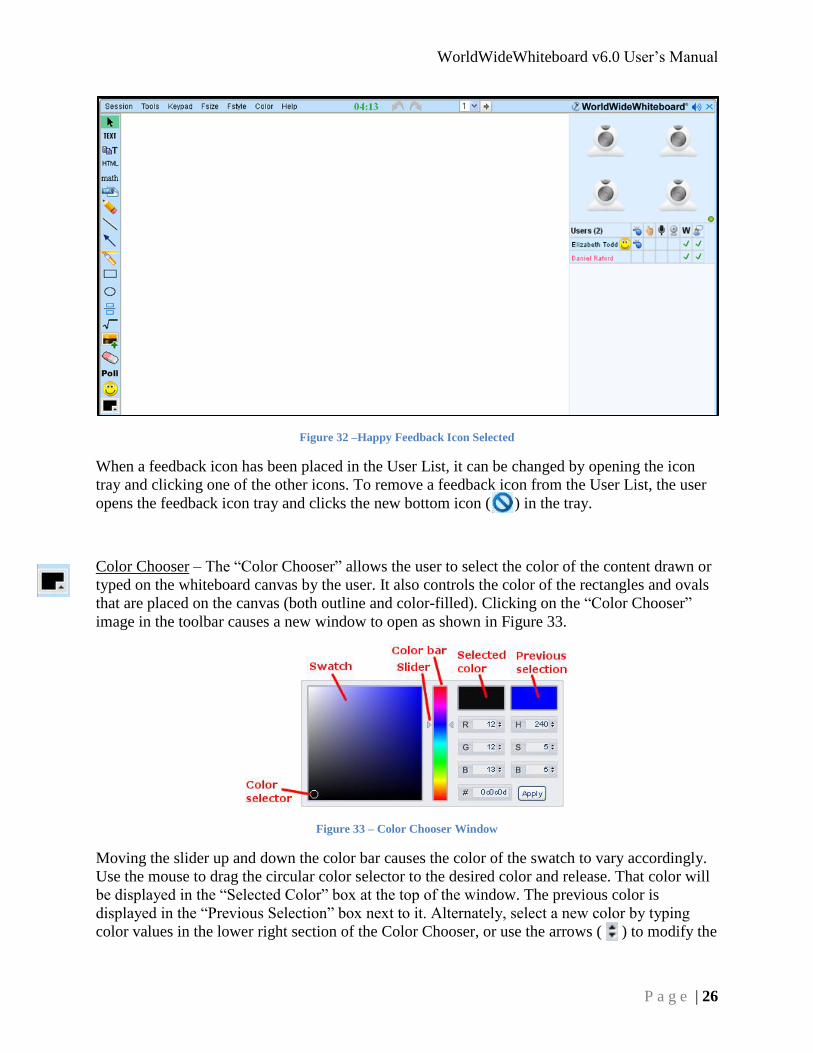
Figure 32 shows the result of the Leader having clicked the “happy” icon.
WorldWideWhiteboard v6.0 User’s Manual
P a g e | 26
Figure 32 –Happy Feedback Icon Selected
When a feedback icon has been placed in the User List, it can be changed by opening the icon
tray and clicking one of the other icons. To remove a feedback icon from the User List, the user
opens the feedback icon tray and clicks the new bottom icon ( ) in the tray.
Color Chooser – The “Color Chooser” allows the user to select the color of the content drawn or
typed on the whiteboard canvas by the user. It also controls the color of the rectangles and ovals
that are placed on the canvas (both outline and color-filled). Clicking on the “Color Chooser”
image in the toolbar causes a new window to open as shown in Figure 33.
Figure 33 – Color Chooser Window
Moving the slider up and down the color bar causes the color of the swatch to vary accordingly.
Use the mouse to drag the circular color selector to the desired color and release. That color will
be displayed in the “Selected Color” box at the top of the window. The previous color is
displayed in the “Previous Selection” box next to it. Alternately, select a new color by typing
color values in the lower right section of the Color Chooser, or use the arrows ( ) to modify the
WorldWideWhiteboard v6.0 User’s Manual
P a g e | 27
current values. Click the “Apply” button to complete the operation. Note that the color of the
icon in the toolbar changes to match the current color selection.
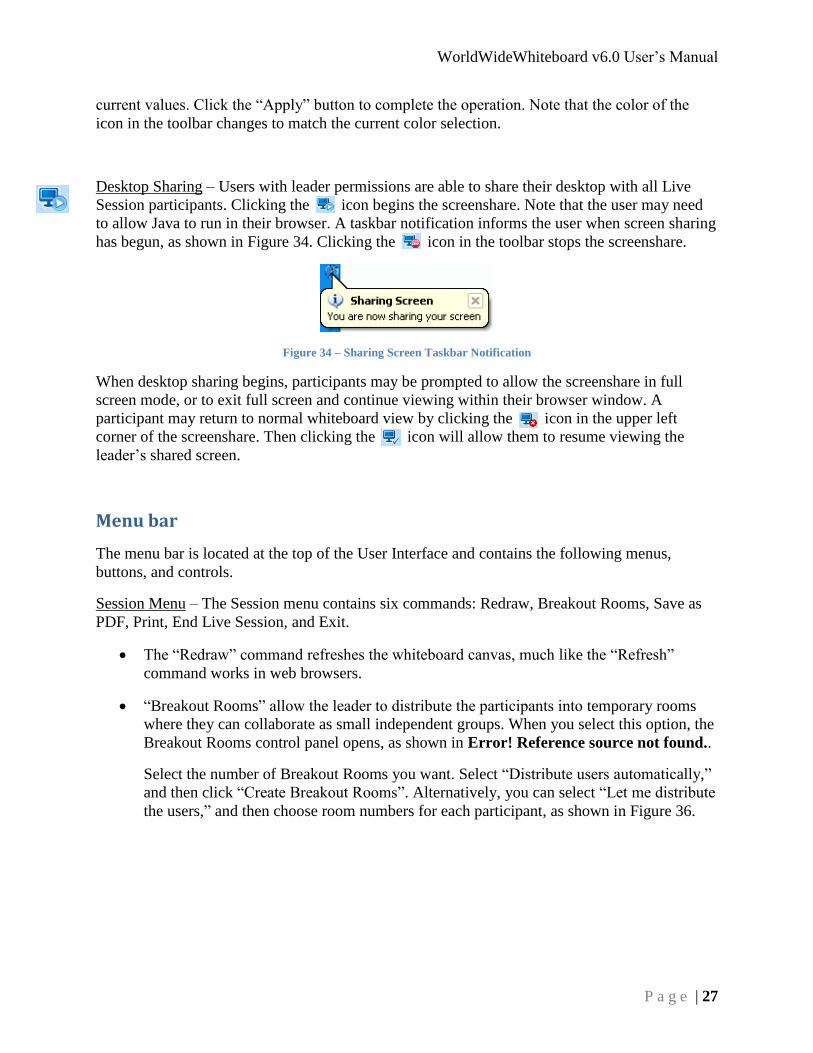
Desktop Sharing – Users with leader permissions are able to share their desktop with all Live
Session participants. Clicking the icon begins the screenshare. Note that the user may need
to allow Java to run in their browser. A taskbar notification informs the user when screen sharing
has begun, as shown in Figure 34. Clicking the icon in the toolbar stops the screenshare.
Figure 34 – Sharing Screen Taskbar Notification
When desktop sharing begins, participants may be prompted to allow the screenshare in full
screen mode, or to exit full screen and continue viewing within their browser window. A
participant may return to normal whiteboard view by clicking the icon in the upper left
corner of the screenshare. Then clicking the icon will allow them to resume viewing the
leader’s shared screen.
Menu bar
The menu bar is located at the top of the User Interface and contains the following menus,
buttons, and controls.
Session Menu – The Session menu contains six commands: Redraw, Breakout Rooms, Save as
PDF, Print, End Live Session, and Exit.
The “Redraw” command refreshes the whiteboard canvas, much like the “Refresh”
command works in web browsers.
“Breakout Rooms” allow the leader to distribute the participants into temporary rooms
where they can collaborate as small independent groups. When you select this option, the
Breakout Rooms control panel opens, as shown in Error! Reference source not found..
Select the number of Breakout Rooms you want. Select “Distribute users automatically,”
and then click “Create Breakout Rooms”. Alternatively, you can select “Let me distribute
the users,” and then choose room numbers for each participant, as shown in Figure 36.
WorldWideWhiteboard v6.0 User’s Manual
P a g e | 28
Figure 36 - Organize Breakout Rooms manually
The leader may monitor any Breakout Room by clicking “Join” for a Breakout Room,
and the leader may end the Breakout Rooms by clicking “Close All Breakout Rooms”
(see Figure 37). When monitoring a Breakout Room, the leader may communicate with
the other participants through text or chat. When Breakout Rooms are closed, the
participants return to the main room automatically. Breakout Room activity can also be
reviewed in the Live Session Archives.
Figure 37 - Join or close Breakout Rooms
Clicking on the “Save as PDF” command will save all existing whiteboard canvases as a
single PDF file (one whiteboard canvas per PDF page). Depending on the user’s web
browser, the user may be prompted to either “Open the file” or “Save the file” (some
browsers automatically download the file to the default download folder). If prompted,
the “Open the file” option will allow the user to view the resulting PDF and then select
Figure 35 - Breakout Rooms controls

WorldWideWhiteboard v6.0 User’s Manual
P a g e | 29
the location in which to save the file, while the “Save the file” option automatically
downloads the file to the user’s default download folder.
The “Print” command opens the browser’s Print window and allows the user to print the
active whiteboard canvas.
The End Live Session command closes the existing Live Session (the whiteboard is
switched to read-only mode for all remaining participants), sends the whiteboard
canvases to the Live Session archive, and returns the user to the dashboard.
The “Exit” command closes the Live Class session and returns the user to the dashboard
page. Note that exiting a session this way will not archive the session. Also, it does not
terminate the session for other participants (resulting in a “leaderless” session). Leaders
who choose to exit in this manner can, however, rejoin the session by clicking its
dashboard icon. To archive the session and close the Live Classroom to all participants,
the “Send” button should be used for exiting (please consult the section “Closing and
Archiving a Live Session” on page 32 for details).
Tools Menu – The Tools menu contains four commands: Clear, Load URL to Whiteboard, Hide
URL Image Border, and Line Width.
The “Clear” command clears the content on the active whiteboard canvas (only). Note
that if the leader uses this command it clears all content (that entered by the leader as well
as that entered by all other users), while other participants can only clear their own entries
with this command. Also note that the Undo/Redo buttons are able to undo/redo the
actions of the “Clear” command.
The “Load URL to Whiteboard” command embeds a webpage into the whiteboard, as
shown in Figure 38. If the page is larger than the canvas, scrollbars will become available
giving access to the entire page. Users can navigate through the page and its links just as
they would in a typical web browser.
Figure 38 – Load URL to Whiteboard
The “Hide URL Image Border” command eliminates the blue border that surrounds
image hyperlinks when they are placed on the whiteboard (default mode).
The “Line Width” command opens a popup window that allows users to select one of the
nine available line widths for their drawing and object tools as shown in Figure 39.
WorldWideWhiteboard v6.0 User’s Manual
P a g e | 30
Figure 39 – Line Width Selection
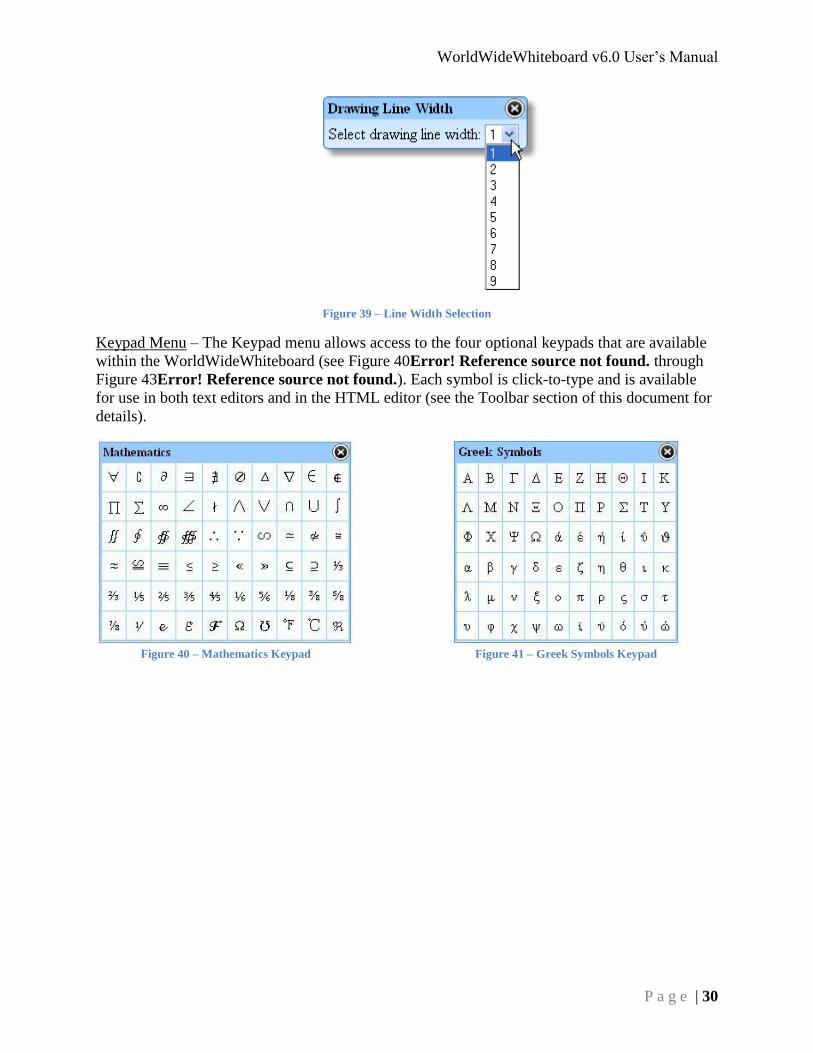
Keypad Menu – The Keypad menu allows access to the four optional keypads that are available
within the WorldWideWhiteboard (see Figure 40Error! Reference source not found. through
Figure 43Error! Reference source not found.). Each symbol is click-to-type and is available
for use in both text editors and in the HTML editor (see the Toolbar section of this document for
details).
Figure 40 – Mathematics Keypad
Figure 41 – Greek Symbols Keypad

WorldWideWhiteboard v6.0 User’s Manual
P a g e | 31
Figure 42 – Foreign Languages Keypad
Figure 43 – Super & Subscript Keypad
Fsize Menu – The Fsize menu allows the user to select from a list of fourteen font sizes ranging
from 08 to 72, with the default value being 14. The selection affects the font size used in both
text editors as well as in the fraction template.
Fstyle Menu – The Fstyle menu contains four selectable font styles from which to choose:
Normal, Bold, Italic, and Bold-Italic (with the default being Normal). The selection affects the
font style used in both text editors as well as in the fraction template.
Color Menu – The Color menu contains eleven selectable colors from which to choose, along
with a “My Color” command and a “Custom Color” command. Clicking “My Color” returns the
user to the default color that they were assigned in the User List when they entered the session
(black for leaders). The “Custom Color” command opens up the “Color Chooser” tool (see that
section in the Toolbar section of this document).
Help Menu – The Help menu contains links to an online version of the WorldWideWhiteboard
User’s Manual, the Customer Support portal, and About WorldWideWhiteboard.
Session Timer – The session timer displays the amount of time the user has been in the room.
Undo/Redo Buttons – Pressing the “Undo” (or “Redo”) button serves to eliminate (or replenish)
the last object that the user entered on the whiteboard canvas. Repeated pressing will eliminate

WorldWideWhiteboard v6.0 User’s Manual
P a g e | 32
(replenish) the objects in the order they were entered, until no further action is possible (in which
case the buttons will appear grayed out – their default state).
Page Navigation – The leader (only) has the ability to create a new whiteboard canvas at any
time by pressing the “Next Page” button. The old page is saved in a queue and a new, blank
whiteboard canvas will appear. When more than one whiteboard canvas has been created, the
leader (only) can navigate through the queue by pressing either the “Next Page” or “Previous
Page” button, or by clicking the desired page number from the Page Number dropdown menu
(see Figure 44).
Figure 44 – Page Navigation Dropdown Menu
Closing and Archiving a Live Session
Clicking the “Send” button at the bottom of the leader’s toolbar (only) will close the existing
Live Session (the whiteboard is switched to read-only mode for all remaining participants), send
the whiteboard canvases to the Live Session archive, and return the user to the dashboard.
Exiting in any other manner (such as closing the window by means of the red X in the upper
right-hand corner or using the Session/Exit command) will not archive the session, and its
contents will be lost. Also, if there are any other participants in the session at the time of closing,
the session will remain open; the existing participants may continue to use the whiteboard and
others may join.
Sessions that have been left open but have no participants will be automatically closed by the
server after approximately 5 minutes (depending on your setup).
Closing a Live Session (without Archiving) and Rejoining
Exiting a Live session by clicking the red “X” in the upper right-hand corner or by using the
Session/Exit command will not archive the session and allows other participants, if any, to
continue to use the whiteboard. It remains listed as an active session in both student and leader
dashboards (including the dashboard of the leader who initiated the session and later exited),
allowing new users to join and the original leader to rejoin the session.

WorldWideWhiteboard v6.0 User’s Manual
P a g e | 33
Additional Functionality
Since the WorldWideWhiteboard is a web application, the functionality that individual users
experience may differ depending on the web browser that they are using. Generally, in addition
to the functions and features described previously, users should enjoy the following capabilities:
Drag and Drop – Highlighted selections from outside applications such as documents and
webpages can be dragged and dropped directly onto the whiteboard canvas. This includes
(but is not limited to) text, hyperlinks, HTML, images, MathML, and LaTeX code. These
selections may also be dragged and dropped into each of the WorldWideWhiteboard text
editors, the HTML editor, and the Math Equation Editor. In addition, entire PDF files can
be dragged and dropped directly onto a whiteboard canvas.
Copy and Paste – Very much like the drag and drop functionality described above, many
browsers allow highlighted selections to be transferred to the various editor tools by
means of the Copy and Paste keyboard shortcuts (Ctrl+c, Ctrl+v).
Alt codes – Windows Alt codes function in both text editors and in the HTML editor, as
do MAC Option codes.
Embedding a Video – Shareable videos can be embedded into a whiteboard canvas by
using the HTML editor. To embed a video, open the HTML editor in Source mode and
copy the “embed” code snippet from a website. Paste it into the editor and send it to the
Whiteboard.
Multiple Open Sessions – More than one leader can open a session at a time. Icons for
each open session will “stack up” on the dashboard page.
Embedding Web Pages – Web pages can be embedded into a whiteboard canvas by using
the HTML editor. To embed a web page, open the HTML editor in Source mode and
create an iframe with the appropriate web page source code.
Audio Alerts – Unique sounds accompany many of the events that occur on the
WorldWideWhiteboard. Among them are: user joining a session, user exiting a session,
new chat message, hand being raised, and navigation to a different page. The particular
sound assigned to the event will vary from browser to browser.

WorldWideWhiteboard v6.0 User’s Manual
P a g e | 34
Live Tutorial
Live Tutorial is a one-to-one virtual class environment, over which the leader has control. When
leaders open a Live Tutorial session, they will be asked to provide a name for the room as shown
in Figure 45. This name (along with the leader’s name) will identify the room in student
dashboards. Also, archived Live Tutorial sessions are identified by this name and a timestamp.
Figure 45 – Name Your Tutorial Room Page
After naming the room, the Live Tutorial whiteboard opens as shown in Figure 46.
Figure 46 – Open Live Tutorial Room

WorldWideWhiteboard v6.0 User’s Manual
P a g e | 35
Tutorial Queuing
If a particular tutorial room is already occupied, participants are able to wait in line (in a queue)
until it becomes available. The leader dashboard displays the number of students waiting in the
queue and the room’s status: open or occupied as shown in Figure 47.
Figure 47 – Tutorial Room Status and Queue Size Displayed in Leader Dashboard
In addition to the features available to a leader in a Live Session, the tutorial whiteboard displays
the number of users waiting in the queue. Figure 48 shows that no users are waiting in the queue
(Q:0) during the current session.
Figure 48 – Live Tutorial (Leader View)
As soon as a session ends, a new tutorial will begin automatically for the next user in the queue.
Working with a Student
When a room has been opened by a leader, it becomes available for students to join. The first
student to click on the Tutorial room’s icon in their dashboard will be admitted into the session
with the leader and the “CLOSE” button in the leader’s toolbar is replaced by a “DONE” button
as shown in Figure 46 and Figure 48.

WorldWideWhiteboard v6.0 User’s Manual
P a g e | 36
Different leaders can have live tutorial sessions open at the same time. Icons for each open
session just “stack up” on the dashboard page.
Live Tutorial makes use of the same whiteboard that is available in Live Sessions. For detailed
instructions on whiteboard usage, please consult the section “Live Session” on page 14.
Ending Student Sessions
When the leader has finished working with a particular student, they can press the “DONE”
button to remove the student from the room. Selecting “Finish Question” from the Session menu
has the same effect. If any students are waiting in the queue, the next session will begin
automatically. When a session ends and the queue is empty, the “DONE” button will be replaced
by a “CLOSE” button and the room becomes available for other students to join. In the Session
menu, “Finish Question” is replaced with the “Close Tutorial Room” option, which has the same
effect as the “CLOSE” button. The cycle of students joining and then the session ending is
repeated until the leader is ready to close the Tutorial room.
Closing a Live Tutorial Room and Archiving the Session
For a leader to close a Live Tutorial room, they must first remove the student and ensure the
queue is empty. Clicking the “CLOSE” button (or selecting “Close Tutorial Room” from the
Session menu) will then close the room and send all existing whiteboard canvases to the Live
Tutorial Archive. Clicking “X” in the upper right-hand corner of the Whiteboard takes the leader
back to the dashboard, but does not close the tutorial room. The student remains in the room and
the room’s status is listed as “Occupied”. The leader may rejoin the room at any time.
WorldWideWhiteboard v6.0 User’s Manual
P a g e | 37
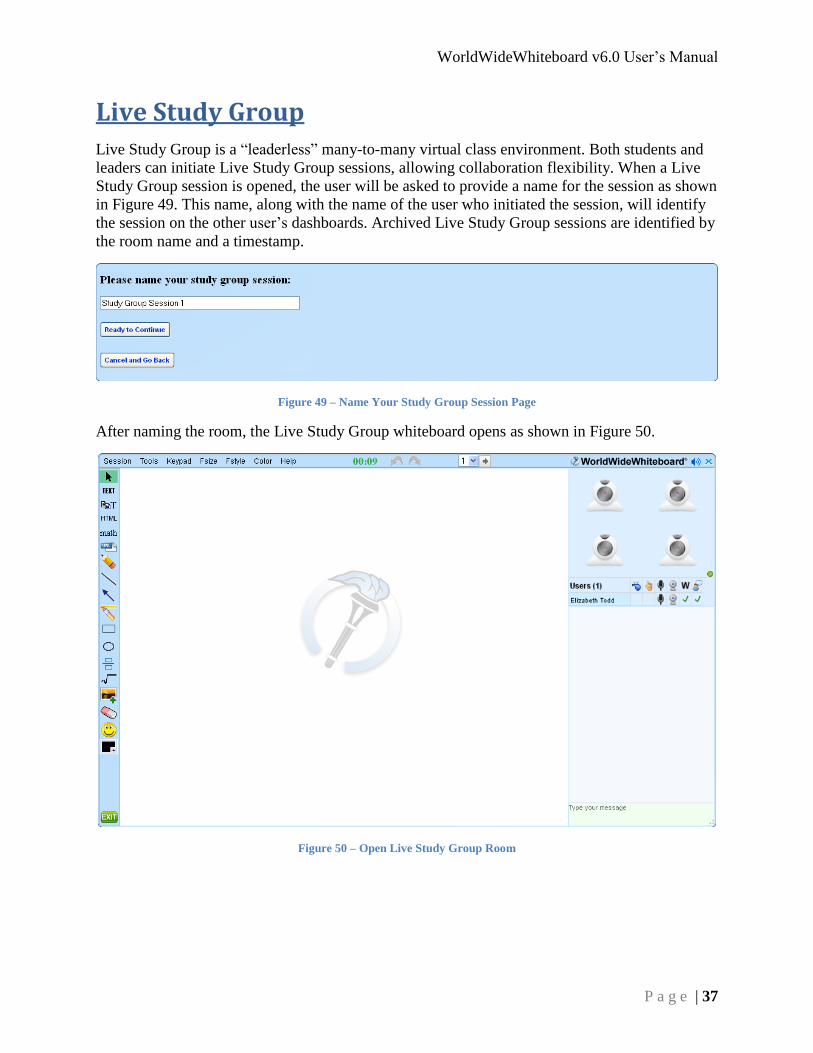
Live Study Group
Live Study Group is a “leaderless” many-to-many virtual class environment. Both students and
leaders can initiate Live Study Group sessions, allowing collaboration flexibility. When a Live
Study Group session is opened, the user will be asked to provide a name for the session as shown
in Figure 49. This name, along with the name of the user who initiated the session, will identify
the session on the other user’s dashboards. Archived Live Study Group sessions are identified by
the room name and a timestamp.
Figure 49 – Name Your Study Group Session Page
After naming the room, the Live Study Group whiteboard opens as shown in Figure 50.
Figure 50 – Open Live Study Group Room
WorldWideWhiteboard v6.0 User’s Manual
P a g e | 38
Working in a Live Study Group
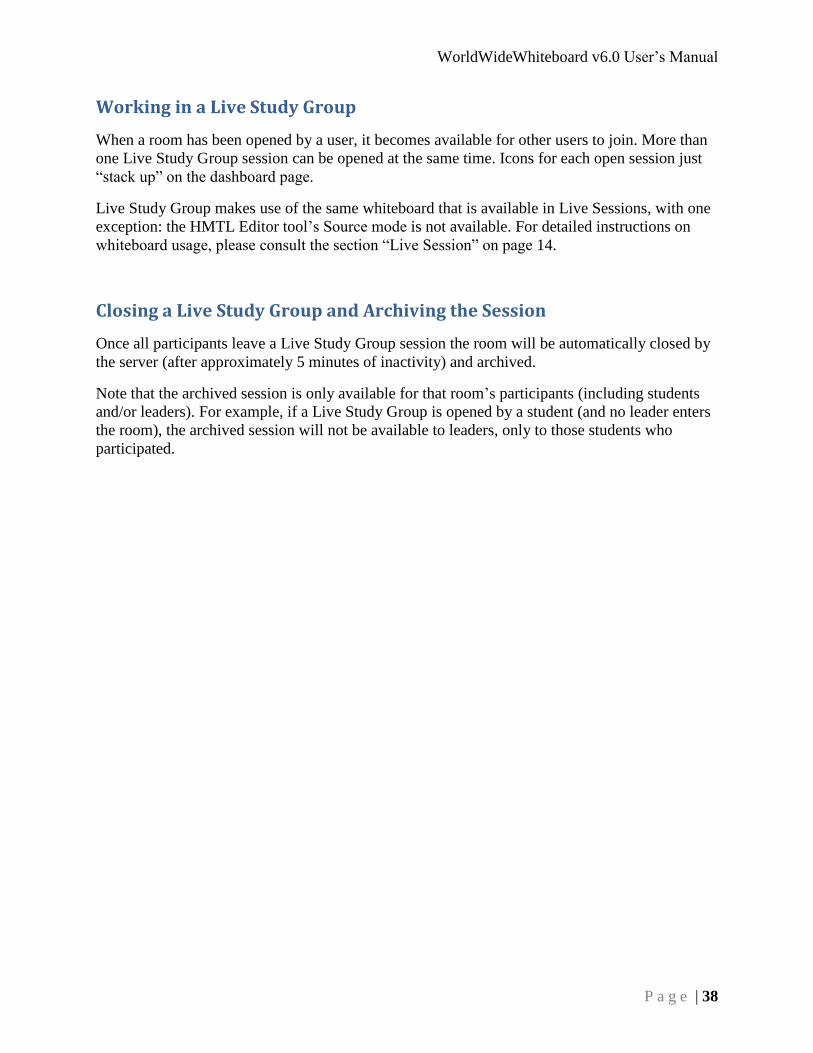
When a room has been opened by a user, it becomes available for other users to join. More than
one Live Study Group session can be opened at the same time. Icons for each open session just
“stack up” on the dashboard page.
Live Study Group makes use of the same whiteboard that is available in Live Sessions, with one
exception: the HMTL Editor tool’s Source mode is not available. For detailed instructions on
whiteboard usage, please consult the section “Live Session” on page 14.
Closing a Live Study Group and Archiving the Session
Once all participants leave a Live Study Group session the room will be automatically closed by
the server (after approximately 5 minutes of inactivity) and archived.
Note that the archived session is only available for that room’s participants (including students
and/or leaders). For example, if a Live Study Group is opened by a student (and no leader enters
the room), the archived session will not be available to leaders, only to those students who
participated.
WorldWideWhiteboard v6.0 User’s Manual
P a g e | 39
Question and Answer Center
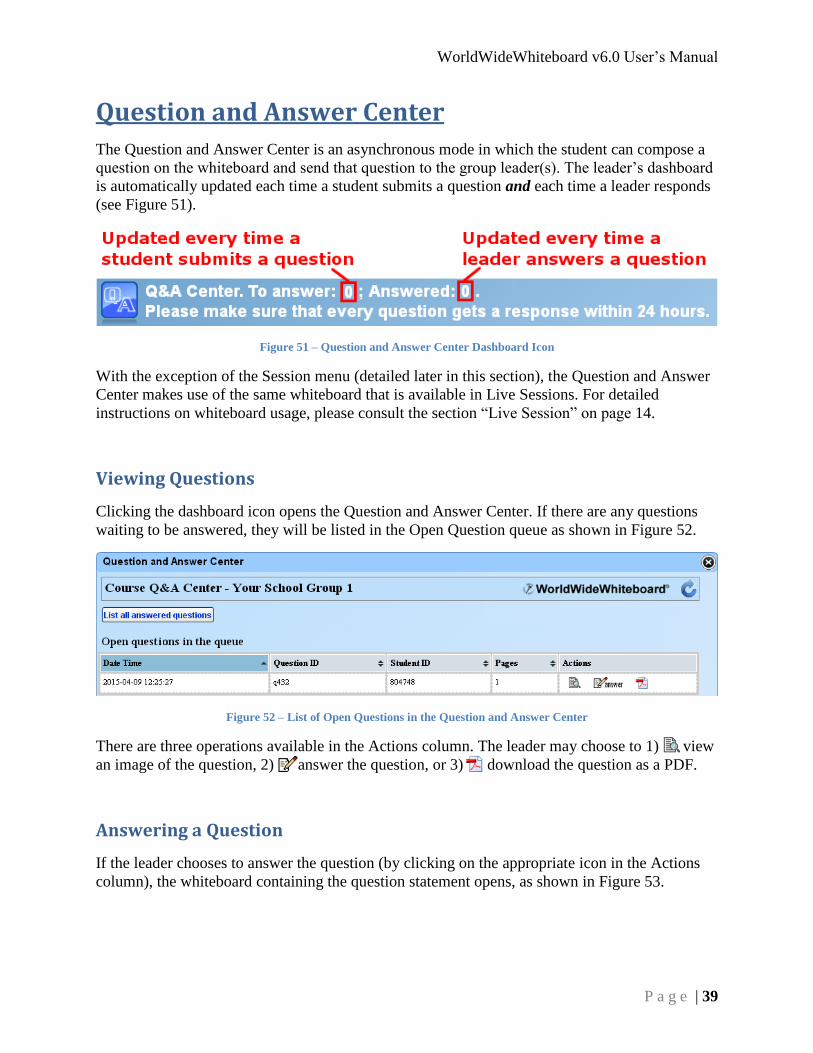
The Question and Answer Center is an asynchronous mode in which the student can compose a
question on the whiteboard and send that question to the group leader(s). The leader’s dashboard
is automatically updated each time a student submits a question and each time a leader responds
(see Figure 51).
Figure 51 – Question and Answer Center Dashboard Icon
With the exception of the Session menu (detailed later in this section), the Question and Answer
Center makes use of the same whiteboard that is available in Live Sessions. For detailed
instructions on whiteboard usage, please consult the section “Live Session” on page 14.
Viewing Questions
Clicking the dashboard icon opens the Question and Answer Center. If there are any questions
waiting to be answered, they will be listed in the Open Question queue as shown in Figure 52.
Figure 52 – List of Open Questions in the Question and Answer Center
There are three operations available in the Actions column. The leader may choose to 1) view
an image of the question, 2) answer the question, or 3) download the question as a PDF.
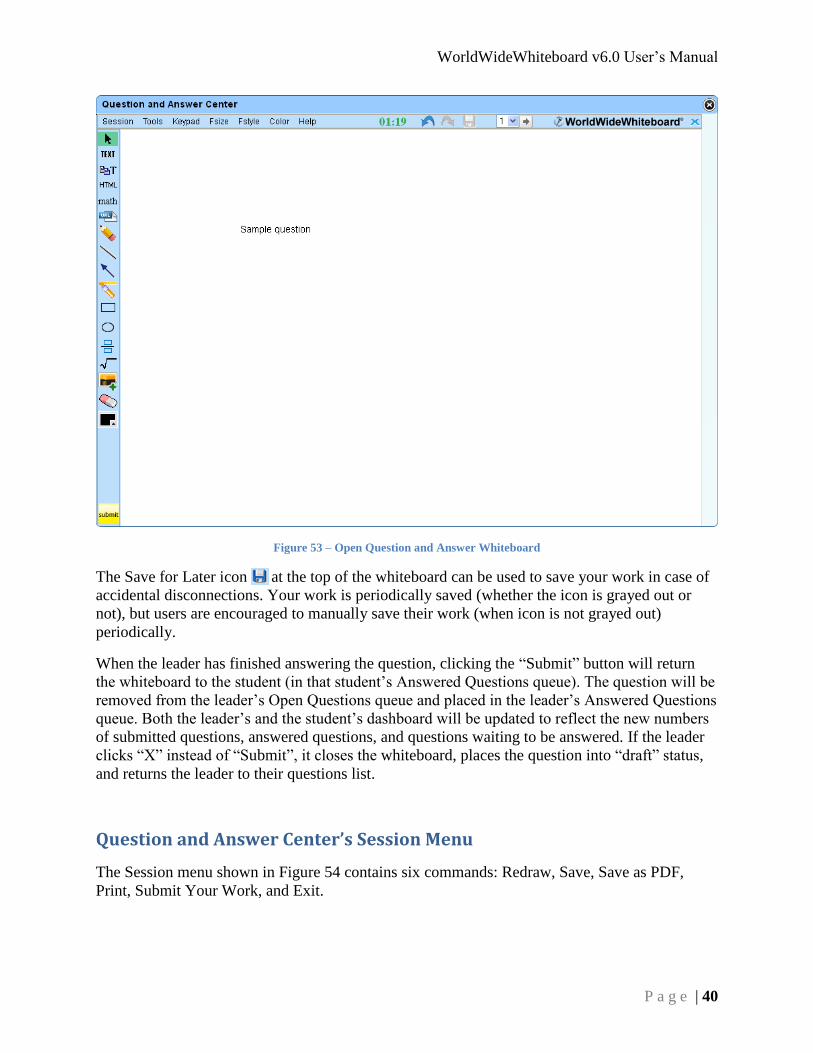
Answering a Question
If the leader chooses to answer the question (by clicking on the appropriate icon in the Actions
column), the whiteboard containing the question statement opens, as shown in Figure 53.
WorldWideWhiteboard v6.0 User’s Manual
P a g e | 40
Figure 53 – Open Question and Answer Whiteboard
The Save for Later icon at the top of the whiteboard can be used to save your work in case of
accidental disconnections. Your work is periodically saved (whether the icon is grayed out or
not), but users are encouraged to manually save their work (when icon is not grayed out)
periodically.
When the leader has finished answering the question, clicking the “Submit” button will return
the whiteboard to the student (in that student’s Answered Questions queue). The question will be
removed from the leader’s Open Questions queue and placed in the leader’s Answered Questions
queue. Both the leader’s and the student’s dashboard will be updated to reflect the new numbers
of submitted questions, answered questions, and questions waiting to be answered. If the leader
clicks “X” instead of “Submit”, it closes the whiteboard, places the question into “draft” status,
and returns the leader to their questions list.
Question and Answer Center’s Session Menu
The Session menu shown in Figure 54 contains six commands: Redraw, Save, Save as PDF,
Print, Submit Your Work, and Exit.

WorldWideWhiteboard v6.0 User’s Manual
P a g e | 41
Figure 54 – Question and Answer Center’s Session Menu
The “Redraw” command refreshes the current whiteboard canvas, which is similar to how the
“Refresh” command works in web browsers.
Clicking on the “Save” command will save the current work on the whiteboard
canvas. It has the same effect as clicking the Save for Later icon . The room
may be closed and work on the canvases can be resumed at a later time.
Clicking on the “Save as PDF” command will save all existing whiteboard
canvases as a single PDF file (one whiteboard canvas per PDF page). Depending
on the user’s web browser, the user may be prompted to either “Open the file” or
“Save the file” (some browsers automatically download the file to the default
download folder). If prompted, the “Open the file” option will allow the user to
view the resulting PDF and then select the location in which to save the file, while
the “Save the file” option auto downloads the file to the user’s default download
folder.
The “Print” command opens the browser’s Print window and allows the user to
print the active whiteboard canvas.
The “Submit Your Work” command sends the whiteboard canvases to the
Submitted Questions queue and returns the user to the Question and Answer
Center Landing Page.
The “Exit” command closes the Question and Answer whiteboard session without
saving and returns the user to the Question and Answer Center Landing Page.
Saved Draft Answers
Any questions waiting in “draft” status will be listed in the Saved Draft Answers queue as shown
in Figure 55. There are four operations available in the Actions column. The leader may choose
to 1) view an image of the draft, 2) edit the draft, 3) delete the draft, or 4) download
the draft as a PDF. Choosing to edit the draft will reopen the whiteboard editor for the question.

WorldWideWhiteboard v6.0 User’s Manual
P a g e | 42
Figure 55 – List of Saved Draft Answers in the Question and Answer Center
Viewing Answered Questions
After a question has been answered, it is automatically transferred to the Answered Questions
queue as shown in Figure 56.
Figure 56 – List of Answered Questions in the Question and Answer Center
There are two operations available in the Actions column. The leader may choose to 1) view
the question and answer or 2) download the question and answer as a PDF.

WorldWideWhiteboard v6.0 User’s Manual
P a g e | 43
Worksheet Center
The Worksheet Center is an asynchronous mode in which the leader can compose a homework
assignment, quiz, or other type of worksheet on the whiteboard and send it to every student in the
group for completion. The leader’s dashboard is automatically updated each time a leader creates
a worksheet template, each time a student submits a completed worksheet, and each time a leader
grades a worksheet as shown in Figure 57.
Figure 57 – Worksheet Center Dashboard Icon
With the exception of the Session menu (which is detailed later in this section), the Worksheet
Center makes use of the same whiteboard that is available in Live Sessions. For detailed
instructions on whiteboard usage, please consult the section “Live Session” on page 14.
Worksheet Center Landing Page
Clicking the dashboard icon opens the Worksheet Center Landing Page. If there are any existing
worksheet templates they will be displayed in the list of templates as shown in Figure 58.
Figure 58 – List of Worksheet Templates
There are three operations available for worksheet templates: 1) view the worksheet template,
2) edit the template draft, and 3) download the worksheet template as a PDF. Editing a draft
is no longer possible after any student submits the completed worksheet.
There are three operations available for completed worksheets: 1) update the worksheet name
and description, 2) delete the worksheet, and 3) “grade” a submitted worksheet, as shown

WorldWideWhiteboard v6.0 User’s Manual
P a g e | 44
in Figure 59. Note that once any student submits a worksheet to be graded, the delete operation is
no longer possible.
Figure 59 – Update Worksheet Name and Description
Worksheet Template Status
The leader has the ability to toggle the status of a worksheet between Open and Closed by
clicking on the Thumbs Up/Thumbs Down icons ( , ) in the Worksheet Status Field as shown
in Figure 58. Open worksheets are available for students to complete; closed worksheets are not
allowed to be completed by students. The leader may use the Status field as a way to define the
timeframe within which students are allowed to complete their work.
Creating New Worksheets
To author a new worksheet, click the “Create a New Worksheet” button. This will open a
window where the worksheet is named and a brief description of the worksheet is supplied. Both
of these fields are mandatory (see Figure 60).
Figure 60 – Create a New Worksheet Page

WorldWideWhiteboard v6.0 User’s Manual
P a g e | 45
Once completed, clicking the “Ready to Continue” button will open a fresh whiteboard where
the worksheet can be created, as shown in Figure 61.
Figure 61 – Open Worksheet Center Whiteboard
The Save for Later icon at the top of the whiteboard can be used to save your work in case of
accidental disconnections. Your work is periodically saved (whether the icon is grayed out or
not) but users are encouraged to manually save their work (when icon is not grayed out)
periodically.
When the worksheet is complete, clicking the “Submit” button (or selecting “Submit Your
Work” in the Session menu) closes the whiteboard and returns the leader to the Worksheet
Center Landing Page. It also places the worksheet in the Open Worksheets queue of every
student in the group. The leader’s dashboard is automatically updated to reflect the new number
of worksheets and all student dashboards are updated to reflect the new number of worksheets in
need of completion. If the leader clicks “X” instead of “Submit”, it places the worksheet into
“draft” status and returns the leader to the Worksheet Center Landing Page as shown in
Figure 62.
Saved Draft Worksheets
There are four operations available in the Actions column. The leader may choose to 1) view
an image of the draft, 2) edit the draft, 3) delete the draft, or 4) download the draft as a
PDF. Choosing to edit the draft will reopen the whiteboard editor for the question.
WorldWideWhiteboard v6.0 User’s Manual
P a g e | 46
Figure 62 – Saved Draft Worksheet Templates
Worksheet Center’s Session Menu
The six commands in the Worksheet Session menu are similar to the commands in the Question
and Answer Session menu, as shown in Figure 63.
Figure 63 – Worksheet Center’s Session Menu
The “Redraw” command refreshes the current whiteboard canvas, which is similar to
how the “Refresh” command works in web browsers.
Clicking on the “Save” command will save the current work on the whiteboard canvas. It
has the same effect as clicking the Save for Later icon . The room may be closed and
work on the canvases can be resumed at a later time.
Clicking on the “Save as PDF” command will save all existing whiteboard canvases as a
single PDF file (one whiteboard canvas per PDF page). Depending on the user’s web
browser, the user may be prompted to either “Open the file” or “Save the file” (some
browsers automatically download the file to the default download folder). If prompted,
the “Open the file” option will allow the user to view the resulting PDF and then select
the location in which to save the file, while the “Save the file” option auto downloads the
file to the user’s default download folder.
The “Print” command opens the browser’s Print window and allows the user to print the
active whiteboard canvas.
The “Submit Your Work” command sends the whiteboard canvases to the Worksheet
Templates list and returns the user to the Worksheet Center Landing Page.

WorldWideWhiteboard v6.0 User’s Manual
P a g e | 47
The “Exit” command closes the Worksheet Center whiteboard session without saving and
returns the user to the Worksheet Center Landing Page.
Grading Worksheets
Once a student has completed a worksheet, it is added to the leader’s queue of Submitted
Worksheets and the leader’s dashboard tallies are updated appropriately as shown in Figure 64.
Figure 64 – List of Submitted Worksheets Waiting to be Graded
There are three operations available in the Actions column for submitted worksheets in the
queue. The leader may choose to 1) view an image of the worksheet, 2) “grade” the
worksheet, or 3) download the worksheet as a PDF. Choosing to grade the worksheet will
open that student’s submitted worksheet. Once open, the leader can correct and/or grade the
worksheet as appropriate. The Save for Later icon at the top of the whiteboard can be used to
periodically save the leader’s progress in case of accidental disconnections.
Clicking the “Submit” button transfers the worksheet from the leader’s queue of ungraded
worksheets to the leader’s queue of graded worksheets. Simultaneously, it sends the graded
worksheet to that student’s view of graded worksheets and updates the leader and student
dashboard tallies appropriately. If the leader clicks “X” instead of “Submit”, it places the
worksheet into “draft” status and returns the leader to the Worksheet Center Landing Page.
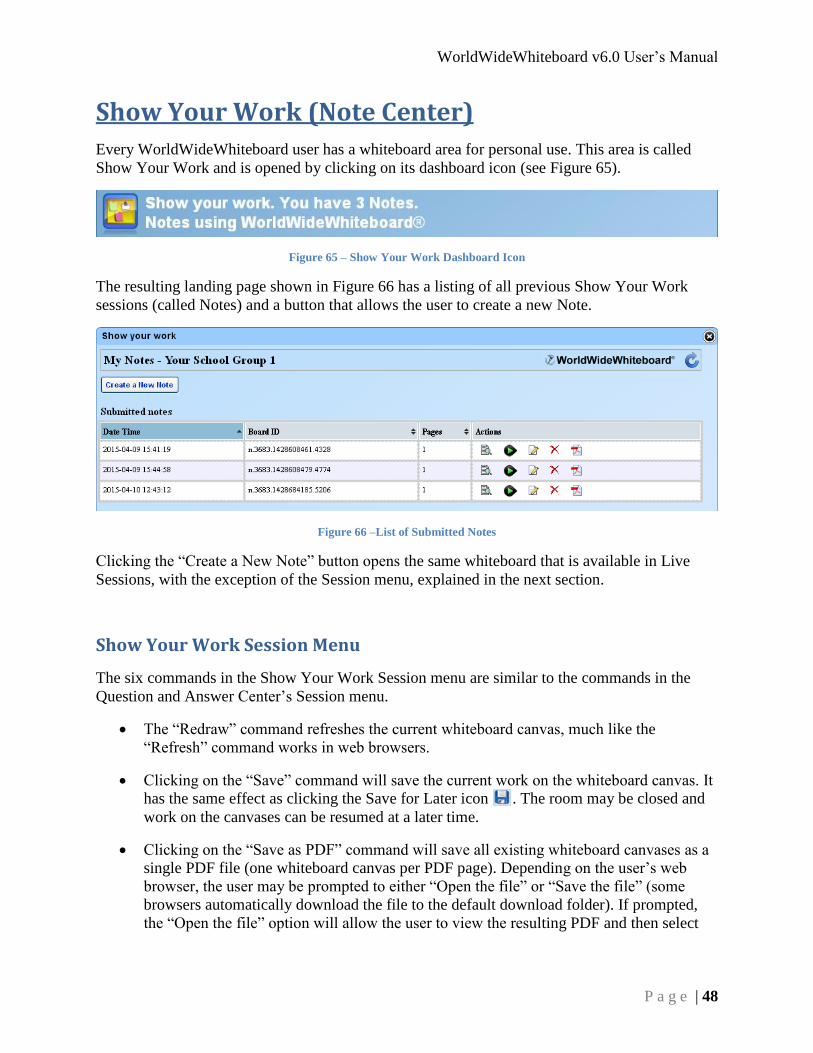
WorldWideWhiteboard v6.0 User’s Manual
P a g e | 48
Show Your Work (Note Center)
Every WorldWideWhiteboard user has a whiteboard area for personal use. This area is called
Show Your Work and is opened by clicking on its dashboard icon (see Figure 65).
Figure 65 – Show Your Work Dashboard Icon
The resulting landing page shown in Figure 66 has a listing of all previous Show Your Work
sessions (called Notes) and a button that allows the user to create a new Note.
Figure 66 –List of Submitted Notes
Clicking the “Create a New Note” button opens the same whiteboard that is available in Live
Sessions, with the exception of the Session menu, explained in the next section.
Show Your Work Session Menu
The six commands in the Show Your Work Session menu are similar to the commands in the
Question and Answer Center’s Session menu.
The “Redraw” command refreshes the current whiteboard canvas, much like the
“Refresh” command works in web browsers.
Clicking on the “Save” command will save the current work on the whiteboard canvas. It
has the same effect as clicking the Save for Later icon . The room may be closed and
work on the canvases can be resumed at a later time.
Clicking on the “Save as PDF” command will save all existing whiteboard canvases as a
single PDF file (one whiteboard canvas per PDF page). Depending on the user’s web
browser, the user may be prompted to either “Open the file” or “Save the file” (some
browsers automatically download the file to the default download folder). If prompted,
the “Open the file” option will allow the user to view the resulting PDF and then select
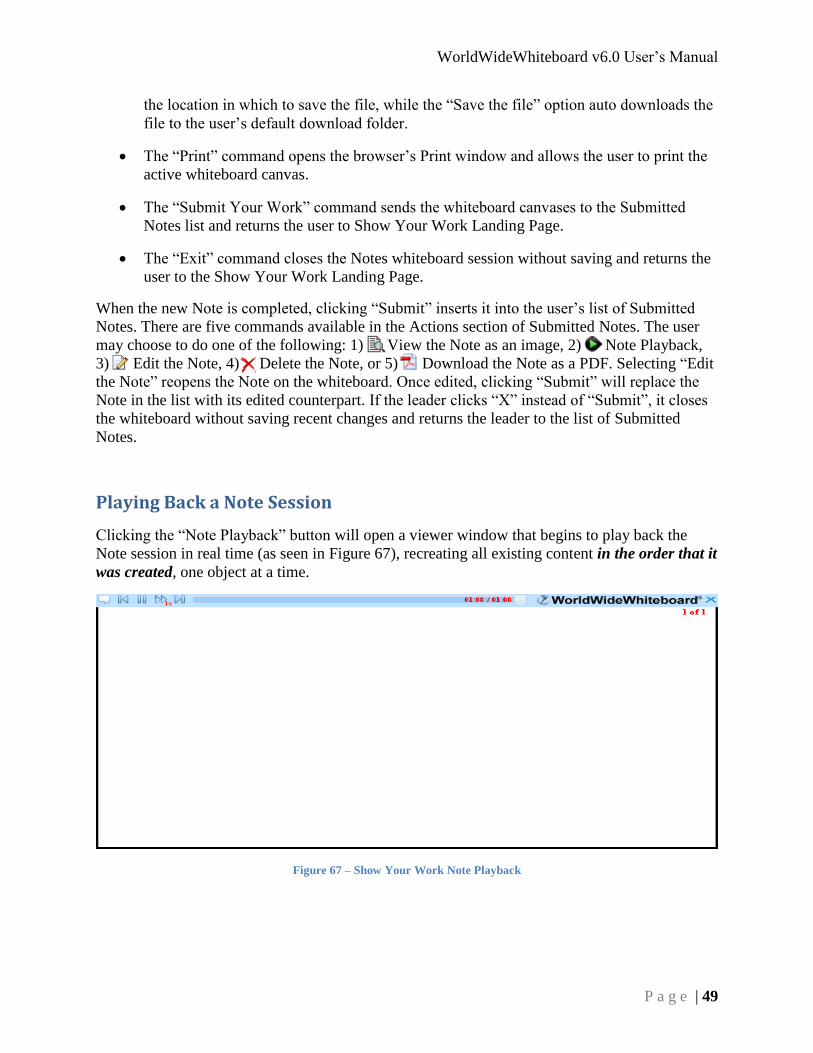
WorldWideWhiteboard v6.0 User’s Manual
P a g e | 49
the location in which to save the file, while the “Save the file” option auto downloads the
file to the user’s default download folder.
The “Print” command opens the browser’s Print window and allows the user to print the
active whiteboard canvas.
The “Submit Your Work” command sends the whiteboard canvases to the Submitted
Notes list and returns the user to Show Your Work Landing Page.
The “Exit” command closes the Notes whiteboard session without saving and returns the
user to the Show Your Work Landing Page.
When the new Note is completed, clicking “Submit” inserts it into the user’s list of Submitted
Notes. There are five commands available in the Actions section of Submitted Notes. The user
may choose to do one of the following: 1) View the Note as an image, 2) Note Playback,
3) Edit the Note, 4) Delete the Note, or 5) Download the Note as a PDF. Selecting “Edit
the Note” reopens the Note on the whiteboard. Once edited, clicking “Submit” will replace the
Note in the list with its edited counterpart. If the leader clicks “X” instead of “Submit”, it closes
the whiteboard without saving recent changes and returns the leader to the list of Submitted
Notes.
Playing Back a Note Session
Clicking the “Note Playback” button will open a viewer window that begins to play back the
Note session in real time (as seen in Figure 67), recreating all existing content in the order that it
was created, one object at a time.
Figure 67 – Show Your Work Note Playback

WorldWideWhiteboard v6.0 User’s Manual
P a g e | 50
The user may perform the following commands by clicking their icons:
1) View/hide information about the recording
2) Go back to the beginning of the recording
3) Pause the recording
4) Adjust the playback speed (1x, 2x, 4x, 8x, and 16x speeds are available)
5) Go to the end of the recording
6) Close the playback window and return to the Show Your Work Center.
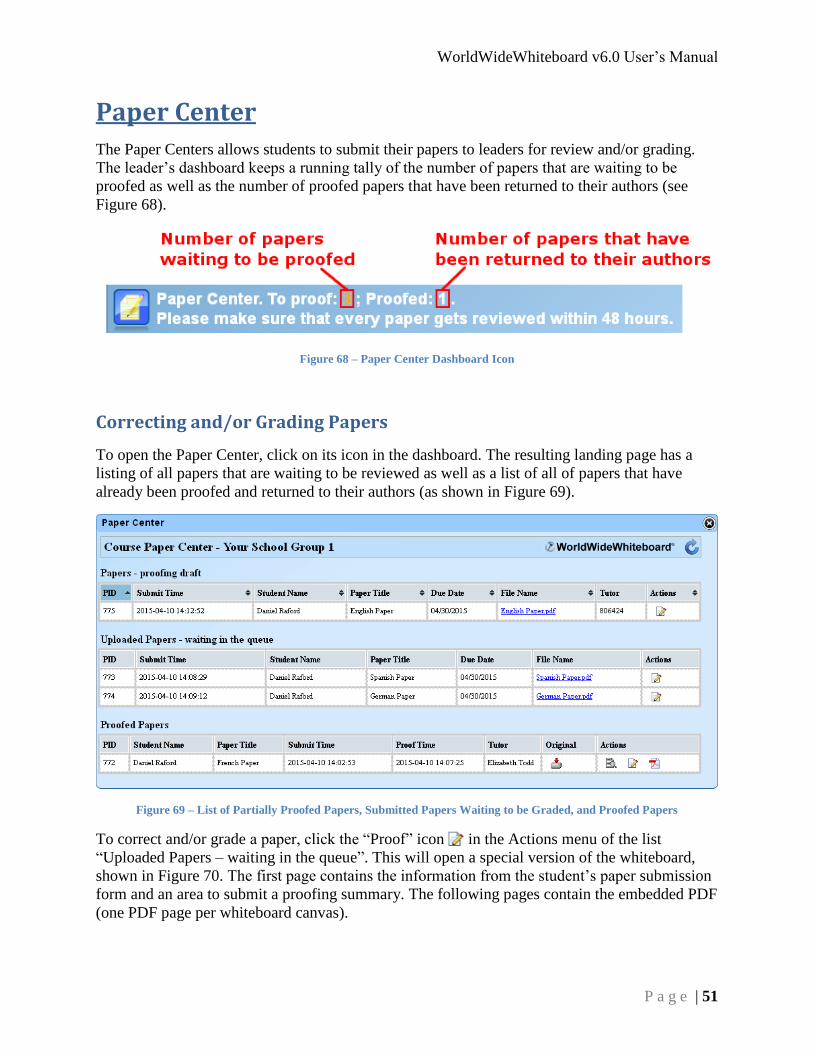
WorldWideWhiteboard v6.0 User’s Manual
P a g e | 51
Paper Center
The Paper Centers allows students to submit their papers to leaders for review and/or grading.
The leader’s dashboard keeps a running tally of the number of papers that are waiting to be
proofed as well as the number of proofed papers that have been returned to their authors (see
Figure 68).
Figure 68 – Paper Center Dashboard Icon
Correcting and/or Grading Papers
To open the Paper Center, click on its icon in the dashboard. The resulting landing page has a
listing of all papers that are waiting to be reviewed as well as a list of all of papers that have
already been proofed and returned to their authors (as shown in Figure 69).
Figure 69 – List of Partially Proofed Papers, Submitted Papers Waiting to be Graded, and Proofed Papers
To correct and/or grade a paper, click the “Proof” icon in the Actions menu of the list
“Uploaded Papers – waiting in the queue”. This will open a special version of the whiteboard,
shown in Figure 70. The first page contains the information from the student’s paper submission
form and an area to submit a proofing summary. The following pages contain the embedded PDF
(one PDF page per whiteboard canvas).

WorldWideWhiteboard v6.0 User’s Manual
P a g e | 52
Figure 70 – Open Paper Center Whiteboard
The paper can now be annotated and marked up using the available whiteboard tools, commands,
and proofing stamps.
Proofing Stamps
The proofing stamps are located in the two columns running down the left-hand side of the
whiteboard/paper. To place a stamp on a paper, simply click on the stamp and then click on a
whiteboard location. The chosen stamp will remain active until another tool or stamp is selected,
allowing placement of the stamp in multiple locations without having to select the stamp each
time. Once a stamp has been placed on a whiteboard/paper, it can be moved to a new location by
activating the “Select” tool and dragging the stamp with the movement cursor. Activating the
“Select” tool and left clicking a stamp will activate a popup menu containing the definition of the
stamp and the “Delete” command which will remove the stamp from the whiteboard/paper.
Figure 71 shows the menu options for the “misplaced modifier” stamp.

WorldWideWhiteboard v6.0 User’s Manual
P a g e | 53
Figure 71 – Misplaced Modifier Stamp Options
Menu bar
The menu bar is located at the top of the User Interface and contains the following menus,
buttons, and controls.
Tools Menu – The Tools menu contains 13 commands (Redraw, Clear, Undo, Save as PDF,
Print, Load URL to Whiteboard, Hide URL Image Border, Line Width, Done Proofing, User
Manual, Contact Support, About WorldWideWhiteboard, and Exit) and four keypads
(mathematics, Greek, foreign languages, and superscripts & subscripts).
The “Redraw” command refreshes the whiteboard, much like the “Refresh” command
works in web browsers.
The “Clear” command clears all stamps, annotations, and markups on the active page
(only), effectively returning that page of the whiteboard/paper to its original state.
The “Undo” command serves to eliminate the last object that the user entered on the
whiteboard/paper. Repeated pressing will eliminate the objects in the order they were
entered, until no further action is possible.
Clicking on the “Save as PDF” command will save the marker-up paper as a PDF file.
Depending on the user’s web browser, the user may be prompted to either “Open the file”
or “Save the file” (some browsers automatically download the file to the default
download folder). If prompted, the “Open the file” option will allow the user to view the
resulting PDF and then select the location in which to save the file, while the “Save the
file” option auto downloads the file to the user’s default download folder.
The “Print” command opens the browser’s Print window and allows the user to print the
active page.
The “Load URL to Whiteboard” command embeds a webpage into the whiteboard, as
shown in Figure 72. If the page is larger than the canvas, scrollbars will become
available, giving access to the entire page. Users can navigate through the page and its
links just as they would in a typical web browser.
Figure 72 – Load URL to Whiteboard
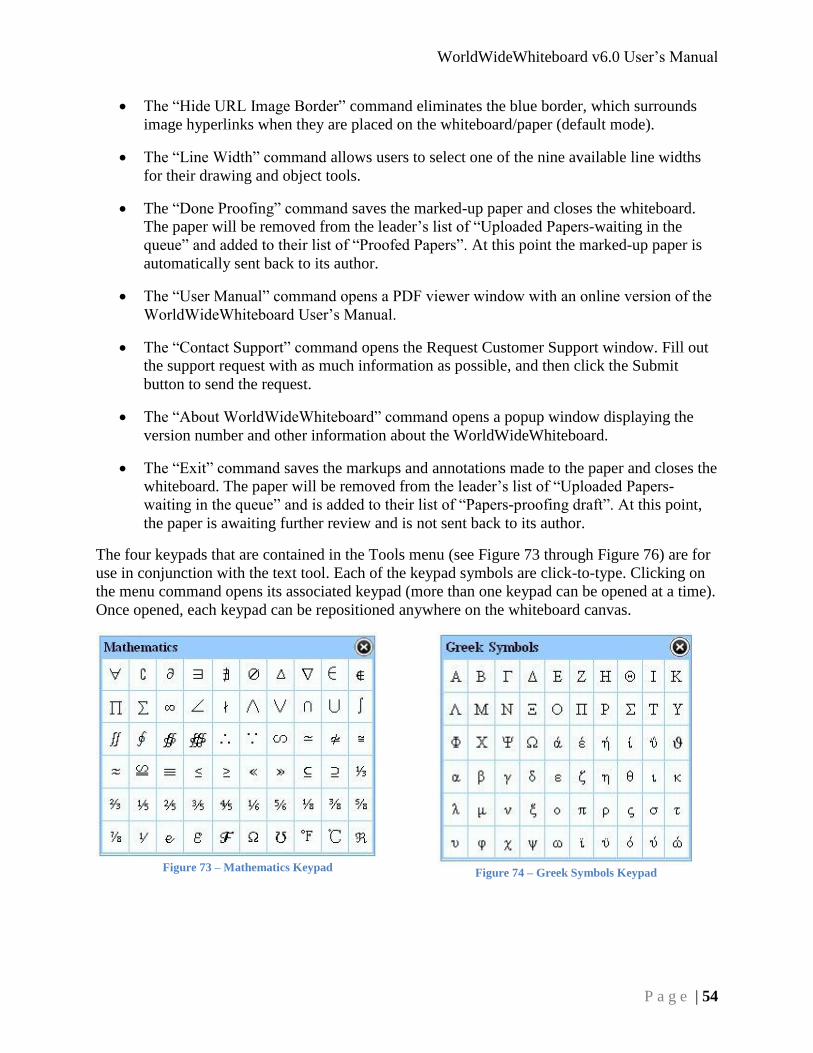
WorldWideWhiteboard v6.0 User’s Manual
P a g e | 54
The “Hide URL Image Border” command eliminates the blue border, which surrounds
image hyperlinks when they are placed on the whiteboard/paper (default mode).
The “Line Width” command allows users to select one of the nine available line widths
for their drawing and object tools.
The “Done Proofing” command saves the marked-up paper and closes the whiteboard.
The paper will be removed from the leader’s list of “Uploaded Papers-waiting in the
queue” and added to their list of “Proofed Papers”. At this point the marked-up paper is
automatically sent back to its author.
The “User Manual” command opens a PDF viewer window with an online version of the
WorldWideWhiteboard User’s Manual.
The “Contact Support” command opens the Request Customer Support window. Fill out
the support request with as much information as possible, and then click the Submit
button to send the request.
The “About WorldWideWhiteboard” command opens a popup window displaying the
version number and other information about the WorldWideWhiteboard.
The “Exit” command saves the markups and annotations made to the paper and closes the
whiteboard. The paper will be removed from the leader’s list of “Uploaded Papers-
waiting in the queue” and is added to their list of “Papers-proofing draft”. At this point,
the paper is awaiting further review and is not sent back to its author.
The four keypads that are contained in the Tools menu (see Figure 73 through Figure 76) are for
use in conjunction with the text tool. Each of the keypad symbols are click-to-type. Clicking on
the menu command opens its associated keypad (more than one keypad can be opened at a time).
Once opened, each keypad can be repositioned anywhere on the whiteboard canvas.
Figure 73 – Mathematics Keypad
Figure 74 – Greek Symbols Keypad
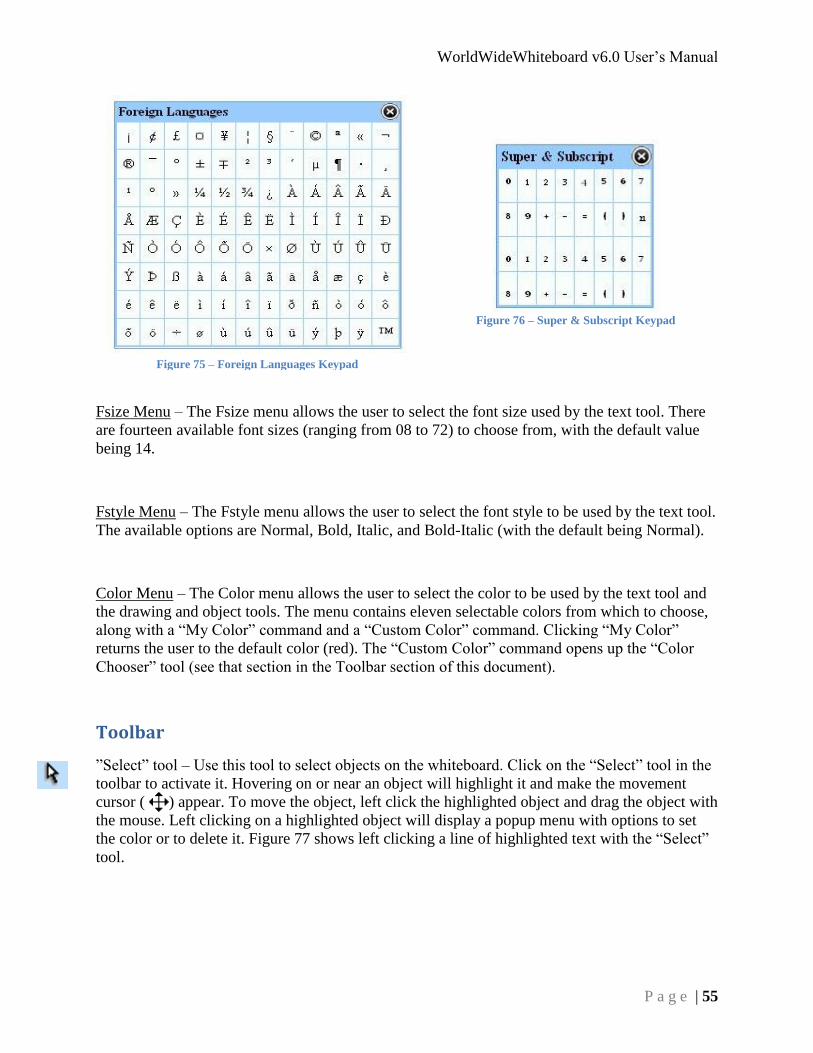
WorldWideWhiteboard v6.0 User’s Manual
P a g e | 55
Figure 75 – Foreign Languages Keypad
Figure 76 – Super & Subscript Keypad
Fsize Menu – The Fsize menu allows the user to select the font size used by the text tool. There
are fourteen available font sizes (ranging from 08 to 72) to choose from, with the default value
being 14.
Fstyle Menu – The Fstyle menu allows the user to select the font style to be used by the text tool.
The available options are Normal, Bold, Italic, and Bold-Italic (with the default being Normal).
Color Menu – The Color menu allows the user to select the color to be used by the text tool and
the drawing and object tools. The menu contains eleven selectable colors from which to choose,
along with a “My Color” command and a “Custom Color” command. Clicking “My Color”
returns the user to the default color (red). The “Custom Color” command opens up the “Color
Chooser” tool (see that section in the Toolbar section of this document).
Toolbar
”Select” tool – Use this tool to select objects on the whiteboard. Click on the “Select” tool in the
toolbar to activate it. Hovering on or near an object will highlight it and make the movement
cursor ( ) appear. To move the object, left click the highlighted object and drag the object with
the mouse. Left clicking on a highlighted object will display a popup menu with options to set
the color or to delete it. Figure 77 shows left clicking a line of highlighted text with the “Select”
tool.

WorldWideWhiteboard v6.0 User’s Manual
P a g e | 56
Figure 77 –Left Click the Highlighted Text to Display Options
Single Line Text Tool – The “Text” tool allows the user to enter text on the whiteboard one line
at a time. Click on the “Text” tool in the toolbar to activate it, and then click on the position on
the whiteboard canvas where the text is to be entered. When finished, pressing the Enter key on
the keyboard will move the editor down a line (pressing Enter when the text field is empty closes
the editor). Depending on the web browser being used, the user may also be able to drag and
drop and/or use keyboard shortcuts (Ctrl+c, Ctrl+v) to copy and paste text into the editor. Once
text has been entered on the canvas, it can be moved to a different location by selecting it with
the “Select” tool and then dragging it with the mouse. Existing text on the canvas can be edited,
both for content and font size/style/color, by activating the “Text” tool and clicking at the
beginning of the entry. The “Select” tool can also be used to change the text color or delete it
(left clicking on the highlighted text will open a popup menu with those options).
Paragraph Text Cut/Paste Tool – The “Paragraph” tool allows multiple lines of text to be entered
on the whiteboard at the same time. The editor has a built-in line wrap feature that automatically
moves to the next line when the editor’s margin has been reached. Click on the tool’s icon in the
toolbar to activate it then click on the whiteboard canvas to position the paragraph editor. Resize
the editor window by dragging from the lower right-hand corner. When finished, click the “paste
text to whiteboard” button at the bottom of the editor. Depending on the web browser, the user
may also be able to drag and drop and/or utilize keyboard shortcuts (Ctrl+c, Ctrl+v) to
copy/paste text into the editor. Once text has been entered on the canvas, it can be moved to a
different location by selecting it with the “Select” tool and then dragging it with the mouse.
Existing text on the canvas can be edited, both for content and font size/style/color, by activating
the “Paragraph” tool and clicking anywhere in the entry. The “Select” tool can also be used to
change the paragraph color or to delete it (left clicking on the highlighted paragraph will open a
popup menu with those options).
Freehand Drawing Tool – To activate the “Freehand Drawing” tool, click on the pencil icon in
the toolbar. Then move to the whiteboard canvas and hold the left mouse button down while
moving the mouse. Line widths can be selected by opening the “Line Width” command in the
Tools menu in the Menu bar. All drawn objects can be moved individually by selecting them
with the “Select” tool and then dragging them with the mouse. The “Select” tool can also be used
to change the drawing color or to delete it (left clicking on the highlighted object will open a
popup menu with those options).

WorldWideWhiteboard v6.0 User’s Manual
P a g e | 57
Highlighter – To activate the highlighter, click on the tool’s icon in the toolbar. Then move to the
whiteboard canvas and hold the left mouse button down while moving the mouse. The width of
the highlighted area can be selected by opening the “Line Width” command in the Tools menu in
the Menu bar. The highlighting color is selected by means of the “Color Chooser” tool (see
page 58). Please note that the highlighting itself is created in a separate layer (as are all
whiteboard objects) from the object that is being highlighted. For this reason, the highlighting
and the original object can be selected and moved independently of each other. Highlighting can
be moved by selecting it with the “Select” tool and then dragging it with the mouse. The “Select”
tool can also be used to change the highlighting color or to delete it (left clicking on the selected
highlight will open a popup menu with those options).
Straight Line Drawing Tool – To activate the “Straight Line Drawing” tool, click on the tool’s
icon in the toolbar. Then move to the whiteboard canvas and click the left mouse button to place
the beginning point. While holding down the mouse button, move the mouse to the desired
endpoint and release the button. Line widths can be selected by opening the “Line Width”
command in the Tools menu in the Menu bar. Line segments can be moved by selecting them
with the “Select” tool and then dragging them with the mouse. The “Select” tool can also be used
to change the line segment color or to delete it (left clicking on the highlighted object will open a
popup menu with those options).
Arrow Tool – To activate the “Arrow” tool, click on the tool’s icon in the toolbar. Then move to
the whiteboard canvas and click the left mouse button to place the beginning point. While
holding down the mouse button, move the mouse to the desired endpoint and release the mouse
button. Line widths can be selected by opening the “Line Width” command in the Tools menu in
the Menu bar. Arrows can be moved by selecting them with the “Select” tool and then dragging
them with the mouse. The “Select” tool can also be used to change the arrow color or to delete it
(left clicking on the highlighted object will open a popup menu with those options).
Rectangle Tool – To activate the “Rectangle” tool, click on the tool’s icon in the toolbar. Then
move to the whiteboard canvas and click the left mouse button to place one corner of the
rectangle. While holding down the mouse button, move the mouse to the desired opposite corner
and release the mouse button. Line widths can be selected by opening the “Line Width”
command in the Tools menu in the Menu bar. Rectangles can be moved by selecting them with
the “Select” tool and then dragging them with the mouse. Rectangles can be resized by activating
the “Select” tool and moving the cursor to either an edge or a corner. When the stretching cursor
appears ( , ) click the left mouse button and drag the border to the desired location. The
“Select” tool can also be used to change the rectangle color or to delete it (left clicking on the
selected highlight will open a popup menu with those options).

WorldWideWhiteboard v6.0 User’s Manual
P a g e | 58
The “Rectangle” tool has two operational modes: outline and color-filled. Clicking the tool’s
icon in the toolbar toggles the tool between these two modes. The fill color is selected by means
of the “Color Chooser” tool (see below).
Oval Tool – To activate the “Oval” tool, click on the tool’s icon in the toolbar. Then move to the
whiteboard canvas and click the left mouse button to position the oval. While holding down the
mouse button, move the mouse to stretch the oval to its desired configuration and then release
the mouse button. Line widths can be selected by opening the “Line Width” command in the
Tools menu in the Menu bar. Ovals can be moved by selecting them with the “Select” tool and
then dragging them with the mouse. The “Select” tool can also be used to change the oval color
or to delete it (left clicking on the selected highlight will open a popup menu with those options).
The “Oval” tool has two operational modes: outline and color-filled. Clicking the tool’s icon in
the toolbar toggles the tool between these two modes. The fill color is selected by means of the
“Color Chooser” tool.
Color Chooser – The “Color Chooser” allows the user to select the color of the content drawn or
typed on the whiteboard/paper by the user. It also controls the color of the rectangles and ovals
that are placed on the whiteboard/paper (both outline and color-filled). Clicking on the “Color
Chooser” image in the toolbar causes a new window to open, as shown in Figure 78.
Figure 78 – Color Chooser Window
Moving the slider up and down the color bar causes the color of the swatch to vary accordingly.
Use the mouse to drag the circular color selector to the desired color and release. That color will
be displayed in the “Selected Color” box at the top of the window. The previous color is
displayed in the “Previous Selection” box next to it. Alternately, select a new color by typing
color values in the lower right section of the Color Chooser, or use the arrows ( ) to modify the
current values. Click the “Apply” button to complete the operation. Note that the color of the
icon in the toolbar changes to match the current color selection.
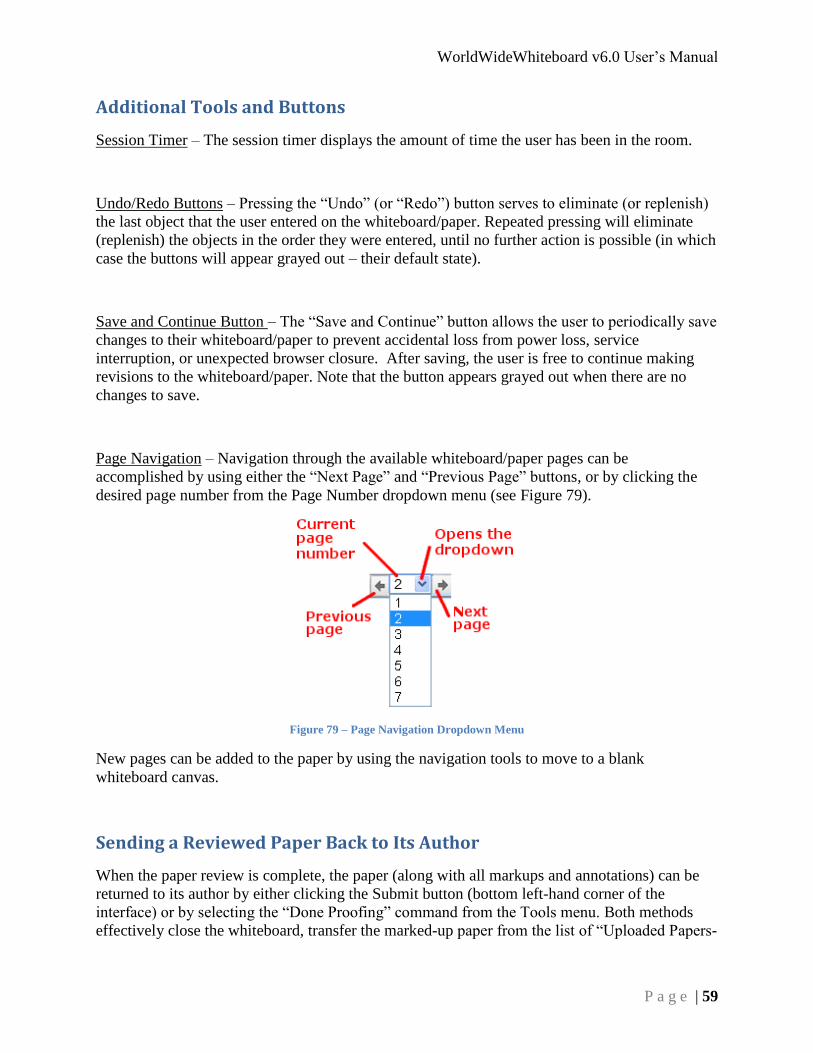
WorldWideWhiteboard v6.0 User’s Manual
P a g e | 59
Additional Tools and Buttons
Session Timer – The session timer displays the amount of time the user has been in the room.
Undo/Redo Buttons – Pressing the “Undo” (or “Redo”) button serves to eliminate (or replenish)
the last object that the user entered on the whiteboard/paper. Repeated pressing will eliminate
(replenish) the objects in the order they were entered, until no further action is possible (in which
case the buttons will appear grayed out – their default state).
Save and Continue Button – The “Save and Continue” button allows the user to periodically save
changes to their whiteboard/paper to prevent accidental loss from power loss, service
interruption, or unexpected browser closure. After saving, the user is free to continue making
revisions to the whiteboard/paper. Note that the button appears grayed out when there are no
changes to save.
Page Navigation – Navigation through the available whiteboard/paper pages can be
accomplished by using either the “Next Page” and “Previous Page” buttons, or by clicking the
desired page number from the Page Number dropdown menu (see Figure 79).
Figure 79 – Page Navigation Dropdown Menu
New pages can be added to the paper by using the navigation tools to move to a blank
whiteboard canvas.
Sending a Reviewed Paper Back to Its Author
When the paper review is complete, the paper (along with all markups and annotations) can be
returned to its author by either clicking the Submit button (bottom left-hand corner of the
interface) or by selecting the “Done Proofing” command from the Tools menu. Both methods
effectively close the whiteboard, transfer the marked-up paper from the list of “Uploaded Papers-

WorldWideWhiteboard v6.0 User’s Manual
P a g e | 60
waiting in the queue” to the list of “Proofed Papers”, and return it to its author. To close the
whiteboard without saving, click the “X” button in the upper right-hand corner.
Additional Functionality
Since the WorldWideWhiteboard is a web application, the functionality that individual users
experience may differ depending on the web browser that they are using. Generally, in addition
to the functions and features described previously, users should enjoy the following capabilities:
Drag and Drop – Highlighted selections from outside applications such as documents and
webpages can be dragged and dropped directly onto the whiteboard/paper. This includes
(but is not limited to) text, hyperlinks, HTML, images, MathML, and LaTeX code. Text
from documents and/or webpages may also be dragged and dropped into the text tool. In
addition, entire PDF files can be dragged and dropped directly onto a whiteboard/paper.
Copy and Paste – Very much like the drag and drop functionality described above, many
browsers allow highlighted selections to be transferred to the text tool by means of the
Copy and Paste keyboard shortcuts (Ctrl+c, Ctrl+v).
Alt codes – Windows Alt codes function in the text tool, as do MAC Option codes.
Viewing Proofed Papers
After a paper has been reviewed and returned to its author, it is listed in the leader’s queue of
Proofed Papers (see Figure 69). By clicking on the appropriate icon in the Actions field, the
leader has the ability to: 1) view the marked-up paper in a whiteboard viewer, 2) open the
paper for further review, or 3) view the marked-up paper as a PDF. Choosing to re-review the
paper will open the previously marked-up paper in a whiteboard again, where further revisions
can be made. From this point forward, the process proceeds identically as it would for original
submissions.

WorldWideWhiteboard v6.0 User’s Manual
P a g e | 61
Live Session Archive
The archive is opened by clicking on the dashboard icon as shown in Figure 80.
Figure 80 – Live Session Archive Dashboard Icon
Group leaders have the choice of whether to archive Live Sessions or not; if archived the
sessions will be displayed in the Sessions list as shown in Figure 81.
Figure 81 – Archived Live Sessions
From the list of available Actions, the leader may choose to view the whiteboard pages , play
the session back , delete the session from the archive , or download the whiteboard pages as
a PDF (one whiteboard canvas per PDF page). The Chat Log displays a record of all chat
messages that were sent during the session. If there were any Breakout Rooms during a Live
Session, you can access their archives by selecting “BR” under Actions.
Note that all group members (not just session participants) have access to any archived live
sessions, including the Breakout Rooms.
Viewing a Live Session in Playback Mode
Clicking the “Live Session Playback” button will open a viewer window that begins to play back
the Live Session in real time, as shown in Figure 82, recreating all existing content in the order
that it was created, one object at a time. A timer displays the current position in the recording
and the total recording time.
The user may perform the following four commands by clicking their icons:
1) View/hide information about the recording
2) Go back to the beginning of the recording
3) Pause the recording
4) Close the playback window and return to the Live Session Archive.

WorldWideWhiteboard v6.0 User’s Manual
P a g e | 62
Additionally, fast-forward and rewind navigation is permitted during archive playback,
excluding sections where audio or video are active. Drag the progress indicator forwards or
backwards, or click anywhere in the seek bar to jump to that playback position.
Figure 82 – Archived Live Session in Playback Mode

WorldWideWhiteboard v6.0 User’s Manual
P a g e | 63
Live Tutorial Archive
The archive is opened by clicking on the dashboard icon as shown in Figure 83.
Figure 83 – Live Tutorial Archive Dashboard Icon
Archived sessions are displayed in the Sessions list as shown in Figure 84.
Figure 84 – Archived Tutorial Sessions
From the list of available Actions, the leader may choose to view the whiteboard pages , view
session playback , or download the whiteboard pages as a PDF (one whiteboard canvas per
PDF page). The Chat Log displays a record of all chat messages that were sent during the
session.
Note that only Supervisors and the two session participants (the tutor and the student) have
access to these archived sessions.
Viewing a Tutorial Session in Playback Mode
Clicking the “Tutorial Session Playback” button will open a viewer window that begins to play
back the Tutorial Session in real time, as shown in Figure 85, recreating all existing content in
the order that it was created, one object at a time. A timer displays the current position in the
recording and the total recording time.
The user may perform the following commands by clicking their icons:
1. View/hide information about the recording
2. Go back to the beginning of the recording
3. Pause the recording
4. Close the playback window and return to the Live Tutorial Archive.

WorldWideWhiteboard v6.0 User’s Manual
P a g e | 64
Additionally, fast-forward and rewind navigation is permitted during archive playback,
excluding sections where audio or video are active. Drag the progress indicator forwards or
backwards, or click anywhere in the seek bar to jump to that playback position.
Figure 85 – Archived Tutorial Session in Playback Mode

WorldWideWhiteboard v6.0 User’s Manual
P a g e | 65
Live Study Group Archive
The archive is opened by clicking on the dashboard icon as shown in Figure 86.
Figure 86 – Live Study Group Archive Dashboard Icon
Archived sessions are displayed in the Sessions list as shown in Figure 87.
Figure 87 – List of Saved Sessions in Live Study Group Archive
From the list of available Actions, the leader may choose to view the whiteboard pages , view
session playback , or download the whiteboard pages as a PDF (one whiteboard canvas per
PDF page). The Chat Log displays a record of all chat messages that were sent during the
session.
Note that only Supervisors and session participants have access to these archived sessions.
Viewing a Study Group Session in Playback Mode
Clicking the “Live Playback” button will open a viewer window that begins to play back the
Study Group Session in real time, as shown in Figure 88, recreating all existing content in the
order that it was created, one object at a time. A timer displays the current position in the
recording and the total recording time.
The user may perform the following commands by clicking their icons:
1. View/hide information about the recording
2. Go back to the beginning of the recording
3. Pause the recording
4. Close the playback window and return to the Study Group Archive.
Additionally, fast-forward and rewind navigation is permitted during archive playback,
excluding sections where audio or video are active. Drag the progress indicator forwards or
backwards, or click anywhere in the seek bar to jump to that playback position.

WorldWideWhiteboard v6.0 User’s Manual
P a g e | 66
Figure 88 – Archived Study Group Session in Playback Mode
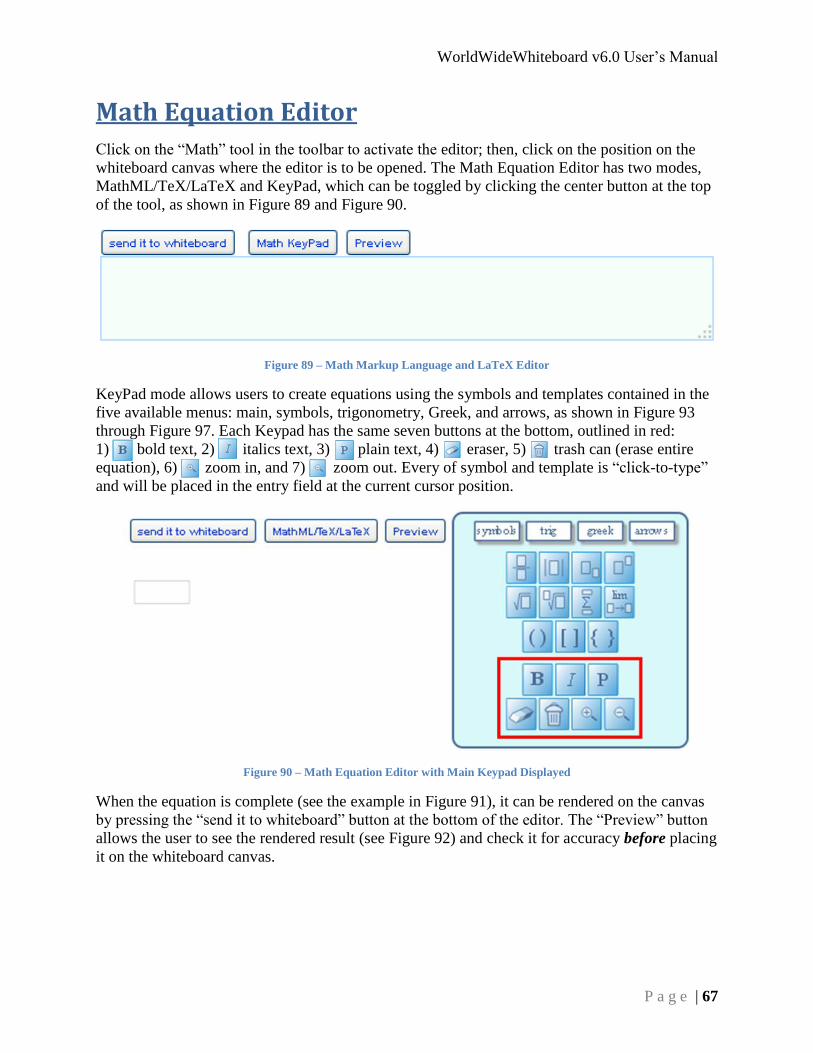
WorldWideWhiteboard v6.0 User’s Manual
P a g e | 67
Math Equation Editor
Click on the “Math” tool in the toolbar to activate the editor; then, click on the position on the
whiteboard canvas where the editor is to be opened. The Math Equation Editor has two modes,
MathML/TeX/LaTeX and KeyPad, which can be toggled by clicking the center button at the top
of the tool, as shown in Figure 89 and Figure 90.
Figure 89 – Math Markup Language and LaTeX Editor
KeyPad mode allows users to create equations using the symbols and templates contained in the
five available menus: main, symbols, trigonometry, Greek, and arrows, as shown in Figure 93
through Figure 97. Each Keypad has the same seven buttons at the bottom, outlined in red:
1) bold text, 2) italics text, 3) plain text, 4) eraser, 5) trash can (erase entire
equation), 6) zoom in, and 7) zoom out. Every of symbol and template is “click-to-type”
and will be placed in the entry field at the current cursor position.
Figure 90 – Math Equation Editor with Main Keypad Displayed
When the equation is complete (see the example in Figure 91), it can be rendered on the canvas
by pressing the “send it to whiteboard” button at the bottom of the editor. The “Preview” button
allows the user to see the rendered result (see Figure 92) and check it for accuracy before placing
it on the whiteboard canvas.

WorldWideWhiteboard v6.0 User’s Manual
P a g e | 68
Figure 91 – Editing an Exponent in the Denominator
Figure 92 – Preview of Equation
When an equation has been placed on the canvas, move it to a different location by activating the
“Select” tool and then dragging it with the mouse. Existing equations on the canvas can be edited
by activating the Math Equation Editor and clicking at the beginning of the equation.
The Main Keypad (see Figure 93) is displayed when the Math Equation Editor opens. It includes
the following buttons: fraction, absolute value, subscript, exponent, square root, nth root,
summation, limit, parentheses, brackets, and braces.
Figure 93 – Math Equation Editor Main Keypad
The Symbols Keypad (see Figure 94) includes the following buttons: divide, not equal to, Real,
gradient, degree, infinity, equivalent, approximately equal to, intersection, union, plus or minus,
less than or equal to, greater than or equal to, cross multiply, empty set, pi, partial derivative,
integral, and tensor product.
Figure 94 – Math Equation Editor Symbols Keypad
The Trigonometric Keypad (see Figure 95) includes the six trigonometric functions and their
inverses:
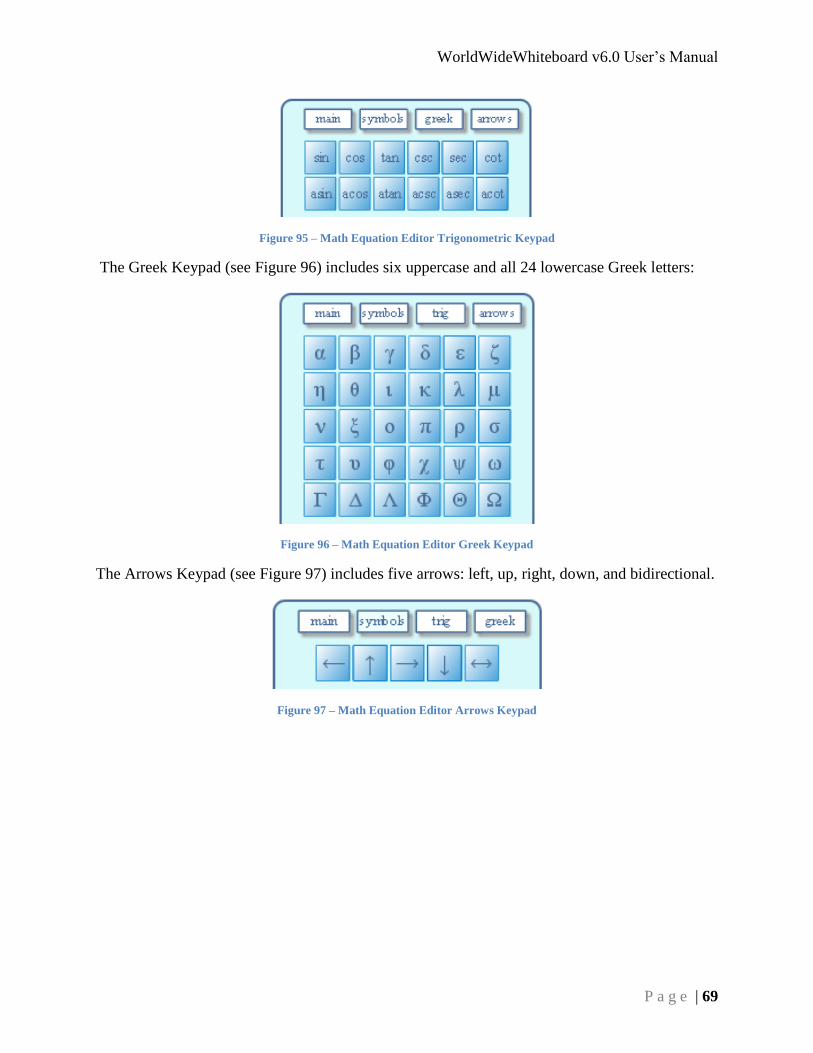
WorldWideWhiteboard v6.0 User’s Manual
P a g e | 69
Figure 95 – Math Equation Editor Trigonometric Keypad
The Greek Keypad (see Figure 96) includes six uppercase and all 24 lowercase Greek letters:
Figure 96 – Math Equation Editor Greek Keypad
The Arrows Keypad (see Figure 97) includes five arrows: left, up, right, down, and bidirectional.
Figure 97 – Math Equation Editor Arrows Keypad

WorldWideWhiteboard v6.0 User’s Manual
P a g e | 70
A Note about PDFs
When whiteboard canvasses are converted to PDFs, the resulting document may not contain all
the content that was on the original canvas. This list includes embedded videos, webpages,
LaTeX code, etc. This is a limitation of the PDF format which does not support these element
types. Since the built-in Math Equation Editor uses LaTeX to create its equations, these will not
be displayed in the PDF.

WorldWideWhiteboard v6.0 User’s Manual
P a g e | 71
Students
Figure 98 – Student Dashboard Page
Students have the ability to
Join a Live Tutorial Room that has been opened by a leader
Join a Live Session that has been opened by a leader
Start a New Live Study Group Session
WorldWideWhiteboard v6.0 User’s Manual
P a g e | 72
Join a Live Study Group Session that has been started by another user
Submit a question to the Group leader, or view the response to previous questions
Submit a Worksheet, or view submissions that have already been graded
Create Notes in the Show Your Work area
Submit a paper or writing assignment, or view paper submissions that have already been
proofed and/or graded
Open an Archive of previous Live Sessions
Open an Archive of previous Live Tutorial Sessions in which they have participated
(only)
Open an Archive of previous Live Study Group Sessions in which they have participated
(only)
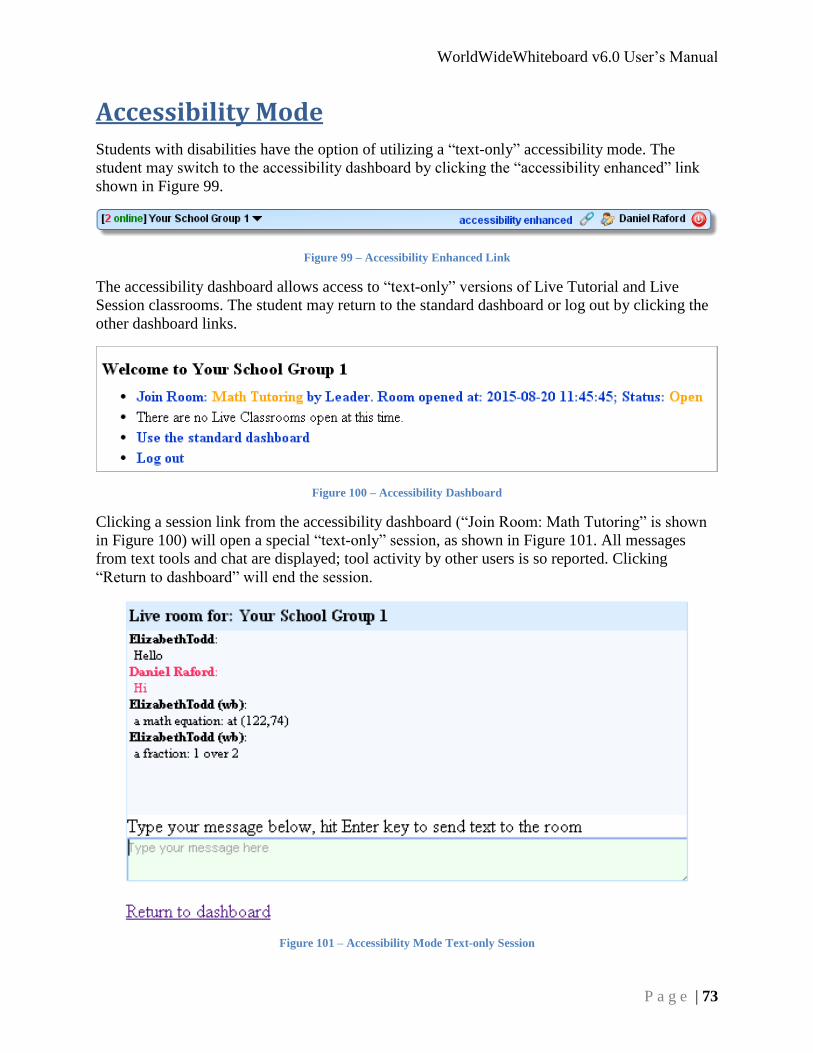
WorldWideWhiteboard v6.0 User’s Manual
P a g e | 73
Accessibility Mode
Students with disabilities have the option of utilizing a “text-only” accessibility mode. The
student may switch to the accessibility dashboard by clicking the “accessibility enhanced” link
shown in Figure 99.
Figure 99 – Accessibility Enhanced Link
The accessibility dashboard allows access to “text-only” versions of Live Tutorial and Live
Session classrooms. The student may return to the standard dashboard or log out by clicking the
other dashboard links.
Figure 100 – Accessibility Dashboard
Clicking a session link from the accessibility dashboard (“Join Room: Math Tutoring” is shown
in Figure 100) will open a special “text-only” session, as shown in Figure 101. All messages
from text tools and chat are displayed; tool activity by other users is so reported. Clicking
“Return to dashboard” will end the session.
Figure 101 – Accessibility Mode Text-only Session

WorldWideWhiteboard v6.0 User’s Manual
P a g e | 74
Live Session
Students may only join Live Sessions that have been opened by group leaders; they cannot open
Live Sessions on their own. If there are no Live Sessions open, the student will see the icon
on their dashboards as shown in Figure 102.
Figure 102 – No Live Sessions Open Icon
If there are open Live Sessions, a list of the open rooms will be displayed in the student’s
dashboard as shown in Figure 103.
Figure 103 – Live Session Available Icon
Each open room will be identified by a separate dashboard icon on the student’s dashboard.
Clicking one of these icons will open the Live Session whiteboard as shown in Figure 104.
Figure 104 – Open Live Session with Leader and Student Participants
There are many components shown in Figure 105 that combine to make up the student’s User
Interface. Each will be described in the sections that follow.

WorldWideWhiteboard v6.0 User’s Manual
P a g e | 75
Figure 105 – Live Session with User Interface Labeled, Student View
Text to Voice
Typed text originating both from the single line text tool and from the chat is read out loud,
along with the identity of its author. Clicking the Text to Voice button will toggle the
accessibility feature on /off .
User List
Every user that opens a Live Session is automatically entered in the User List, as shown in
Figure 106. Usernames appear in the color that is auto-assigned to the user upon entry (black is
the color assigned to leaders). That user’s “Color Chooser” tool is set to this color by default, and
all of their content will be in this color when entered on the whiteboard canvas (see “Color
Chooser” in the Toolbar section of this document).
The User List is also where the leader grants or rescinds the privileges and abilities enjoyed by
students. By clicking in the appropriate column next to a user’s name, the leader can
enable/disable a student’s ability to enter content on the whiteboard canvas, use the chat area, use
VoIP audio, or use their webcam. The leader can also grant students temporary co-leader status,
giving them most of the privileges that they enjoy themselves.

WorldWideWhiteboard v6.0 User’s Manual
P a g e | 76
Figure 106 – User List
Write – By default, everyone who enters a Live Session has the ability to enter content on the
whiteboard canvas (as evidenced by the green checkmark in Figure 106). If a red “X” appears in
this column, it means that the leader has rescinded this privilege.
Chat - By default, everyone who enters a Live Session has the ability to send chat messages (as
evidenced by the green checkmark in Figure 106). If a red “X” appears in this column, it means
that the leader has rescinded this privilege.
Audio – By default, the audio privilege is not available to users. The presence of a microphone
icon in this column means that the student has been granted the privilege to use VoIP audio,
but it is up to that student to actually turn the microphone on and off. The microphone is turned
on by clicking on the microphone icon, which in turn will be replaced by a speaker icon .
Users can toggle their microphone on/off by clicking on the microphone/speaker icons. Note that
the leader can turn the privilege off by clicking on either of the two icons at any time.
Video - By default, the video privilege is not available to users. The presence of a webcam icon
in this column means that the student has been granted the privilege to use video, but it is up to
that student to actually turn the webcam on and off by clicking on the webcam icon. When the
webcam is turned on, the webcam icon will be replaced by an image of a filmstrip . Users can
toggle the webcam on/off by clicking on the webcam/filmstrip icons. Note that the leader can
turn the privilege and/or the webcam off by clicking on either of the two icons at any time.
Raise Hand – Participants in a Live Session can get the leader’s attention by raising their hand at
any time. To do so, they simply click in the appropriate column next to their name, causing the
hand icon to appear. Either that user or the leader can lower the hand by clicking on it at any
time. Hands are numbered in the order the participants raise them. The numbers are
automatically updated as hands are lowered.

WorldWideWhiteboard v6.0 User’s Manual
P a g e | 77
Leader Control – The presence of the whistle icon means that the leader has given that student
leader privileges. That student will then enjoy all of the same privileges that the leader has, with
the exception of being able to give leader privileges to others. Note that the leader can rescind
the privilege at any time.
Flash Audio and Video Settings
When a user clicks the webcam or microphone icon, they may be asked to configure their Adobe
Flash Player as shown in Figure 107.
Figure 107 – Flash Player Settings
Users should make sure that the correct microphone and webcam have been selected (see
Figure 108 and Figure 109), and then click “Allow” and “Remember” as shown in Figure 107. If
desired, users may also configure local storage settings and hardware acceleration. Click “Close”
to end configuration.
Figure 108 – Flash Player Camera Settings
Figure 109 – Flash Player Microphone Settings

WorldWideWhiteboard v6.0 User’s Manual
P a g e | 78
Toolbar
Select Tool – Use this tool to select objects on the whiteboard. Click on the “Select” tool in the
toolbar to activate it. Hovering on or near an object will highlight it and make the movement
cursor ( ) appear. To move the object, left click the highlighted object and drag the object with
the mouse. Left click on the highlighted object and release the mouse button to display a popup
menu with options to set the color or to delete it. Figure 110 shows left clicking a highlighted
oval with the “Select” tool.
Figure 110 –Left Clicking a Highlighted Oval with “Select” Tool Displays Options
Single Line Text Tool – The “Text” tool allows the user to enter text on the whiteboard one line
at a time. Click on the “Text” tool in the toolbar to activate it, and then click on the position on
the whiteboard canvas where the text is to be entered. When finished, pressing the Enter key on
the keyboard will move the editor down a line (pressing Enter when the text field is empty closes
the editor). Depending on the web browser being used, the user may also be able to drag and
drop and/or use keyboard shortcuts (Ctrl+c, Ctrl+v) to copy and paste text into the editor. Once
text has been entered on the canvas, it can be moved to a different location by selecting it with
the “Select” tool and then dragging it with the mouse. Existing text on the canvas can be edited,
both for content and font size/style/color, by activating the “Text” tool and clicking at the
beginning of the entry. The “Select” tool can also be used to change the text color or delete it
(left clicking on the highlighted text will open a popup menu with those options).
Paragraph Text Cut/Paste Tool – The “Paragraph” tool allows multiple lines of text to be entered
on the whiteboard at the same time. The editor has a built-in line wrap feature that automatically
moves to the next line when the editor’s margin has been reached. Click on the tool’s icon in the
toolbar to activate it then click on the whiteboard canvas to position the paragraph editor. Resize
the editor window by dragging from the lower right-hand corner. When finished, click the “paste
text to whiteboard” button at the bottom of the editor. Depending on the web browser, the user
may also be able to drag and drop and/or utilize keyboard shortcuts (Ctrl+c, Ctrl+v) to
copy/paste text into the editor. Once text has been entered on the canvas, it can be moved to a
different location by selecting it with the “Select” tool and then dragging it with the mouse.
Existing text on the canvas can be edited, both for content and font size/style/color, by activating
the “Paragraph” tool and clicking anywhere in the entry. The “Select” tool can also be used to

WorldWideWhiteboard v6.0 User’s Manual
P a g e | 79
change the paragraph color or to delete it (left clicking on the highlighted paragraph will open a
popup menu with those options).
HTML Editor Tool – Click on the HTML icon in the toolbar to activate the editor, and then click
on a whiteboard canvas position to place the editor. The HTML editor allows the user to create
an HTML object in plain text. When the “send it to whiteboard” button is clicked, the text is
rendered on the canvas as an HTML object. Once an HTML object has been embedded in the
canvas, it can be moved to a different location by selecting it with the “Select” tool and then
dragging it with the mouse. The “Select” tool can also be used to change the object color or to
delete it (left clicking on the highlighted object will open a popup menu with those options).
Existing HTML objects on the canvas can be edited by activating the HTML editor and clicking
anywhere in the object.
Math Equation Editor Tool – Click on the “Math” tool in the toolbar to activate the editor, and
then click on a whiteboard canvas position to place the editor. The Math Equation Editor has two
modes, MathML/TeX/LaTeX and KeyPad, which can be toggled by clicking the center button at
the top of the tool.
KeyPad mode allows users to create equations using the symbols and templates contained in the
five available menus (main, trigonometry, Greek, arrows, and symbols). Each of these symbols
and templates are “click-to-type” and will be placed in the entry field at the current cursor
position. When the equation is complete, render it on the canvas by pressing the “send it to
whiteboard” button at the bottom of the editor. The “Preview” button allows the user to see the
rendered result and check it for accuracy before placing it on the whiteboard canvas. Once an
equation has been placed on the canvas, it can be moved to a different location by selecting it
with the “Select” tool and then dragging it with the mouse. The “Select” tool can also be used to
change the equation color or to delete it (left clicking on the highlighted object will open a popup
menu with those options). Existing equations on the canvas can be edited by activating the Math
Equation Editor and clicking inside the equation.
MathML/TeX/LaTeX mode allows users to create equations by entering MathML, TeX, or
LaTeX code. Render the coded equation on the canvas by pressing the “send it to whiteboard”
button at the bottom of the editor. The “Preview” button allows the user to see the rendered result
and check it for accuracy before placing it on the whiteboard canvas. Once an equation has been
placed on the canvas, it can be moved to a different location by selecting it with the “Select” tool
and then dragging it with the mouse. The “Select” tool can also be used to change the equation
color or to delete it (left clicking on the highlighted object will open a popup menu with those
options). Existing equations on the canvas can be edited by activating the Math Equation Editor
and clicking inside the equation.
See the Math Equation Editor section of this manual (page 110) for more details.
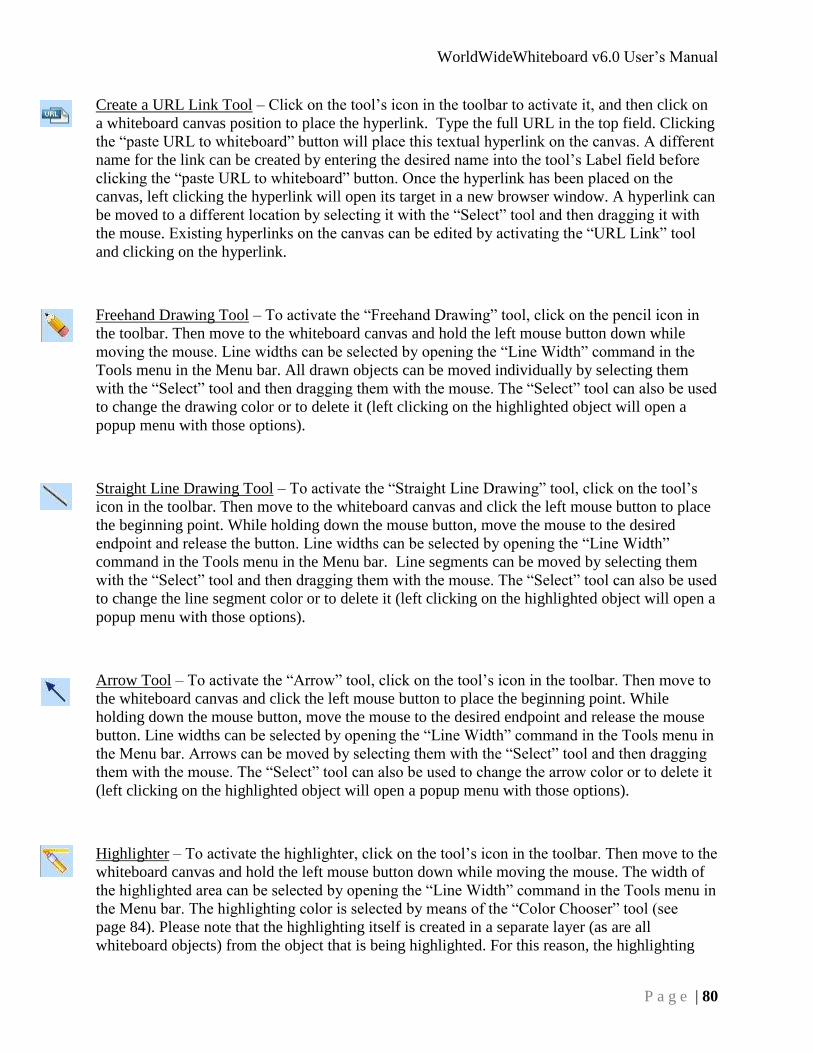
WorldWideWhiteboard v6.0 User’s Manual
P a g e | 80
Create a URL Link Tool – Click on the tool’s icon in the toolbar to activate it, and then click on
a whiteboard canvas position to place the hyperlink. Type the full URL in the top field. Clicking
the “paste URL to whiteboard” button will place this textual hyperlink on the canvas. A different
name for the link can be created by entering the desired name into the tool’s Label field before
clicking the “paste URL to whiteboard” button. Once the hyperlink has been placed on the
canvas, left clicking the hyperlink will open its target in a new browser window. A hyperlink can
be moved to a different location by selecting it with the “Select” tool and then dragging it with
the mouse. Existing hyperlinks on the canvas can be edited by activating the “URL Link” tool
and clicking on the hyperlink.
Freehand Drawing Tool – To activate the “Freehand Drawing” tool, click on the pencil icon in
the toolbar. Then move to the whiteboard canvas and hold the left mouse button down while
moving the mouse. Line widths can be selected by opening the “Line Width” command in the
Tools menu in the Menu bar. All drawn objects can be moved individually by selecting them
with the “Select” tool and then dragging them with the mouse. The “Select” tool can also be used
to change the drawing color or to delete it (left clicking on the highlighted object will open a
popup menu with those options).
Straight Line Drawing Tool – To activate the “Straight Line Drawing” tool, click on the tool’s
icon in the toolbar. Then move to the whiteboard canvas and click the left mouse button to place
the beginning point. While holding down the mouse button, move the mouse to the desired
endpoint and release the button. Line widths can be selected by opening the “Line Width”
command in the Tools menu in the Menu bar. Line segments can be moved by selecting them
with the “Select” tool and then dragging them with the mouse. The “Select” tool can also be used
to change the line segment color or to delete it (left clicking on the highlighted object will open a
popup menu with those options).
Arrow Tool – To activate the “Arrow” tool, click on the tool’s icon in the toolbar. Then move to
the whiteboard canvas and click the left mouse button to place the beginning point. While
holding down the mouse button, move the mouse to the desired endpoint and release the mouse
button. Line widths can be selected by opening the “Line Width” command in the Tools menu in
the Menu bar. Arrows can be moved by selecting them with the “Select” tool and then dragging
them with the mouse. The “Select” tool can also be used to change the arrow color or to delete it
(left clicking on the highlighted object will open a popup menu with those options).
Highlighter – To activate the highlighter, click on the tool’s icon in the toolbar. Then move to the
whiteboard canvas and hold the left mouse button down while moving the mouse. The width of
the highlighted area can be selected by opening the “Line Width” command in the Tools menu in
the Menu bar. The highlighting color is selected by means of the “Color Chooser” tool (see
page 84). Please note that the highlighting itself is created in a separate layer (as are all
whiteboard objects) from the object that is being highlighted. For this reason, the highlighting

WorldWideWhiteboard v6.0 User’s Manual
P a g e | 81
and the original object can be selected and moved independently of each other. Highlighting can
be moved by selecting it with the “Select” tool and then dragging it with the mouse. The “Select”
tool can also be used to change the highlighting color or to delete it (left clicking on the selected
highlight will open a popup menu with those options).
Rectangle Tool – To activate the “Rectangle” tool, click on the tool’s icon in the toolbar. Then
move to the whiteboard canvas and click the left mouse button to place one corner of the
rectangle. While holding down the mouse button, move the mouse to the desired opposite corner
and release the mouse button. Line widths can be selected by opening the “Line Width”
command in the Tools menu in the Menu bar. Rectangles can be moved by selecting them with
the “Select” tool and then dragging them with the mouse. Rectangles can be resized by activating
the “Select” tool and moving the cursor to either an edge or a corner. When the stretching cursor
appears ( , ) click the left mouse button and drag the border to the desired location. The
“Select” tool can also be used to change the rectangle color or to delete it (left clicking on the
selected highlight will open a popup menu with those options).
The “Rectangle” tool has two operational modes: outline and color-filled. Clicking the tool’s
icon in the toolbar toggles the tool between these two modes. The fill color is selected by means
of the “Color Chooser” tool (see page 84).
Oval Tool – To activate the “Oval” tool, click on the tool’s icon in the toolbar. Then move to the
whiteboard canvas and click the left mouse button to position the oval. While holding down the
mouse button, move the mouse to stretch the oval to its desired configuration and then release
the mouse button. Line widths can be selected by opening the “Line Width” command in the
Tools menu in the Menu bar. Ovals can be moved by selecting them with the “Select” tool and
then dragging them with the mouse. The “Select” tool can also be used to change the oval color
or to delete it (left clicking on the selected highlight will open a popup menu with those options
as shown in Figure 110).
The “Oval” tool has two operational modes: outline and color-filled. Clicking the tool’s icon in
the toolbar toggles the tool between these two modes. The fill color is selected by means of the
“Color Chooser” tool (see page 84).
Fraction Tool – To activate the “Fraction” tool, click on the tool’s icon in the toolbar. The mouse
pointer will be replaced by a fraction template. Position the template on the canvas, and click to
place it. At this point, the fraction template contains two empty boxes, one in the numerator and
one in the denominator. Fill in the numerator and then press either the Tab or Enter key to move
to the denominator. Once the denominator has been entered, press the Enter key to complete the
operation. Existing fractions can be edited, both for content and font size/style/color, by
activating the “Fraction” tool and clicking over the existing entry. Fractions can be moved by
selecting them with the “Select” tool and then dragging them with the mouse. The “Select” tool
can also be used to change the fraction color or to delete it (left clicking on the highlighted
fraction will open a popup menu with those options).

WorldWideWhiteboard v6.0 User’s Manual
P a g e | 82
Square Root Tool – To activate the “Square Root” tool, click on the tool’s icon in the toolbar.
The mouse pointer will be replaced by a small square root symbol. Then move to the whiteboard
canvas and click the left mouse button to position the square root symbol. While holding down
the mouse button, move the mouse to stretch the symbol to its desired size and then release the
button. Once the square root has been placed on the canvas, it can be moved by selecting it with
the “Select” tool and then dragging it with the mouse. The “Select” tool can also be used to
change the square root color or to delete it (left clicking on the highlighted fraction will open a
popup menu with those options).
Insert Image/PDF Tool – Click on the tool’s icon in the toolbar to open a Load File window.
Browse the computer for the location of the desired PDF or image file. When has been entered,
clicking the “Open” button will cause a thumbnail image of the file to attach itself to the mouse
cursor. Position the thumbnail image in the whiteboard canvas and click the left mouse button to
place the file on the canvas. Multi-page PDFs will automatically be paginated, one PDF page per
whiteboard page. Once embedded, these objects can be moved by selecting them with the
“Select” tool and then dragging them with the mouse. They can be resized by activating the
“Select” tool and moving the cursor to either an edge or a corner. When the stretching cursor
appears ( , ) click the left mouse button and drag the border to the desired location. The
“Select” tool can also be used to delete these objects (left clicking on the selected highlight will
open a popup menu with that option – note that the command to set the object color has no effect
on the object).
Eraser – To activate the “Eraser” tool, click on the tool’s icon in the toolbar. The mouse pointer
will be replaced by a small eraser image. Then move to the whiteboard canvas and click the left
mouse button and move the mouse to “erase” existing content. Please note that the content below
is not actually deleted; rather, it is covered over. The “erasure” is an opaque covering that is
created in a separate layer (as are all whiteboard objects) from the object that is being erased. For
this reason, the erasure and the original object can be selected and moved independently of each
other. Once the “erasure” has been placed on the canvas, it can be moved by selecting it with the
“Select” tool and then dragging it with the mouse. The “Select” tool can also be used to change
the “erasure’s” color or to delete it (left clicking on the highlighted fraction will open a popup
menu with those options).
Feedback Icons – Clicking the tool’s icon in the toolbar causes a new tray to open that allows
users to display icons next to their name in the User List as shown in Figure 111. Close the tray
without selecting a feedback icon by clicking the tool’s icon in the toolbar again.
These icons are intended to illustrate how a particular user feels about the ongoing session at a
particular point in time. The available choices include: happy, unhappy, shocked, confused,
LOL, applause, thumbs up, thumbs down, faster, and slower.

WorldWideWhiteboard v6.0 User’s Manual
P a g e | 83
Figure 111 – Open Feedback Icons Tray
Clicking one of the icons places it next to the user’s name in the User List and closes the tray.
Figure 112 shows the result of the student having clicked the “happy” icon.
Figure 112 – Happy Feedback Icon Selected
When a feedback icon has been placed in the User List, it can be changed by opening the icon
tray and clicking one of the other icons. To remove a feedback icon from the User List, the user
opens the feedback icon tray and clicks the bottom icon ( ) in the tray.
Color Chooser – The “Color Chooser” allows users to select the color of their content when they
draw or type on the whiteboard canvas. It also controls the color of the rectangles and ovals they
place on the canvas (both outline and color-filled). Clicking on the “Color Chooser” tool in the
toolbar causes a new window to open, as shown in Figure 113.

WorldWideWhiteboard v6.0 User’s Manual
P a g e | 84
Figure 113 – Color Chooser Window
Moving the arrows up and down the slider bar causes the color of the swatch to vary accordingly.
Use the mouse to drag the circular color selector to the desired color and release. That color will
be displayed in the “Selected Color” box at the top of the window. In the box to its right, the
original color is displayed in the “Previous Selection” box. Click the “Apply” button to complete
the operation. Note that the color of the icon in the toolbar changes to match the color selection.
Menu bar
The menu bar is located at the top of the User Interface and contains the following menus,
buttons, and controls:
Session Menu – The Session menu contains five commands: Redraw, Save as PNG, Save as
PDF, Print, and Exit.
The “Redraw” command refreshes the whiteboard canvas, much like the “Refresh”
command works in web browsers.
Clicking on the “Save as PDF” command will save all existing whiteboard canvases as a
single PDF file (one whiteboard canvas per PDF page). Depending on the web browser,
the user may be prompted to either “Open the file” or “Save the file” (some browsers
automatically download the file to the default download folder). If prompted, the “Open
the file” option will allow the user to view the resulting PDF and then select the location
in which to save the file, while the “Save the file” option auto downloads the file to the
default download folder.
The “Print” command opens the browser’s Print window and allows the user to print the
active whiteboard canvas.
The “Exit” command closes the Live Class session and returns the user to the dashboard
page.

WorldWideWhiteboard v6.0 User’s Manual
P a g e | 85
Tools Menu – The Tools menu contains four commands: Clear, Load URL to Whiteboard, Hide
URL Image Border, and Line Width.
The “Clear” command clears the content on the active whiteboard canvas (only). Note
that the leader can use this command to clear all content on the canvas, while students
can only clear their own entries with this command. Also note that the Undo/Redo
buttons are able to undo/redo the actions of the “Clear” command.
The “Load URL to Whiteboard” command embeds a webpage into the whiteboard, as
shown in Figure 114. If the page is larger than the canvas, scrollbars will become
available giving access to the entire page. Users can navigate through the page and its
links just as they would in a typical web browser.
Figure 114 – Load URL to Whiteboard
The “Hide URL Image Border” command eliminates the blue border that surrounds
image hyperlinks when they are placed on the whiteboard (default mode).
The “Line Width” command allows users to select one of the nine available line widths
for their drawing and object tools.
Keypad Menu – The Keypad menu allows access to the four optional keypads that are available
within the WorldWideWhiteboard (see Figure 115 through Figure 118). Each symbol is click-to-
type and is available for use in both text editors and in the HTML editor (see the Toolbar section
of this document for details).
Figure 115 – Mathematics Keypad
Figure 116 – Greek Symbols Keypad

WorldWideWhiteboard v6.0 User’s Manual
P a g e | 86
Figure 117 – Foreign Languages Keypad
Figure 118 – Super & Subscript Keypad
Fsize Menu – The Fsize menu allows the user to select from a list of fourteen font sizes ranging
from 08 to 72, with the default value being 14. The selection affects the font size used in both
text editors as well as in the fraction template.
Fstyle Menu – The Fstyle menu contains four selectable font styles from which to choose:
Normal, Bold, Italic, and Bold-Italic (with the default being Normal). The selection affects the
font style used in both text editors as well as in the fraction template.
Color Menu – The Color menu contains eleven selectable colors from which to choose, along
with a “My Color” command and a “Custom Color” command. Clicking “My Color” assigns
users the default color that they were assigned in the User List when they entered the session.
The “Custom Color” command opens up the “Color Chooser” tool (see that section in the
Toolbar section of this document).
Help Menu – The Help menu contains links to an online version of the User’s Manual, the
Customer Support portal, and About WorldWideWhiteboard.
Session Timer – The session timer displays the amount of time the user has been in the room.
Undo/Redo Buttons – Pressing the “Undo” (or “Redo”) button serves to eliminate (or replenish)
the last object that the user entered on the whiteboard canvas. Repeated pressing will eliminate
(replenish) the objects in the order they were entered, until no further action is possible (in which
case the buttons will appear grayed out – their default state).
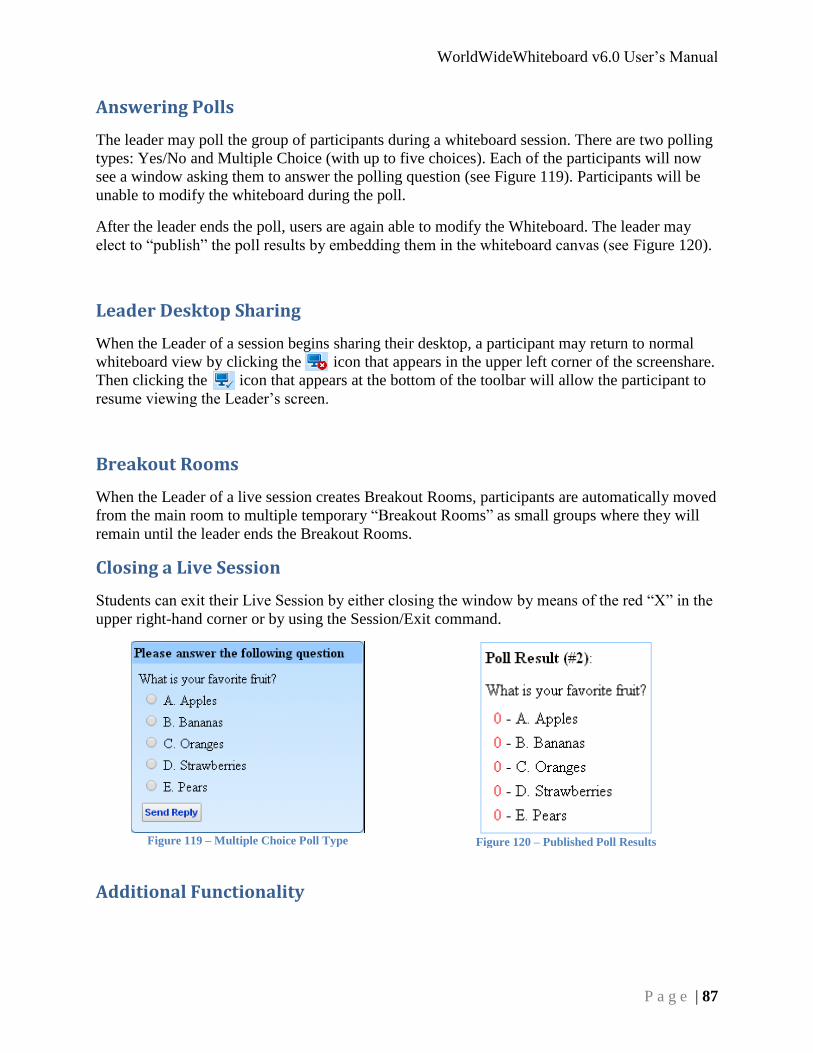
WorldWideWhiteboard v6.0 User’s Manual
P a g e | 87
Answering Polls
The leader may poll the group of participants during a whiteboard session. There are two polling
types: Yes/No and Multiple Choice (with up to five choices). Each of the participants will now
see a window asking them to answer the polling question (see Figure 119). Participants will be
unable to modify the whiteboard during the poll.
After the leader ends the poll, users are again able to modify the Whiteboard. The leader may
elect to “publish” the poll results by embedding them in the whiteboard canvas (see Figure 120).
Leader Desktop Sharing
When the Leader of a session begins sharing their desktop, a participant may return to normal
whiteboard view by clicking the icon that appears in the upper left corner of the screenshare.
Then clicking the icon that appears at the bottom of the toolbar will allow the participant to
resume viewing the Leader’s screen.
Breakout Rooms
When the Leader of a live session creates Breakout Rooms, participants are automatically moved
from the main room to multiple temporary “Breakout Rooms” as small groups where they will
remain until the leader ends the Breakout Rooms.
Closing a Live Session
Students can exit their Live Session by either closing the window by means of the red “X” in the
upper right-hand corner or by using the Session/Exit command.
Figure 119 – Multiple Choice Poll Type
Figure 120 – Published Poll Results
Additional Functionality
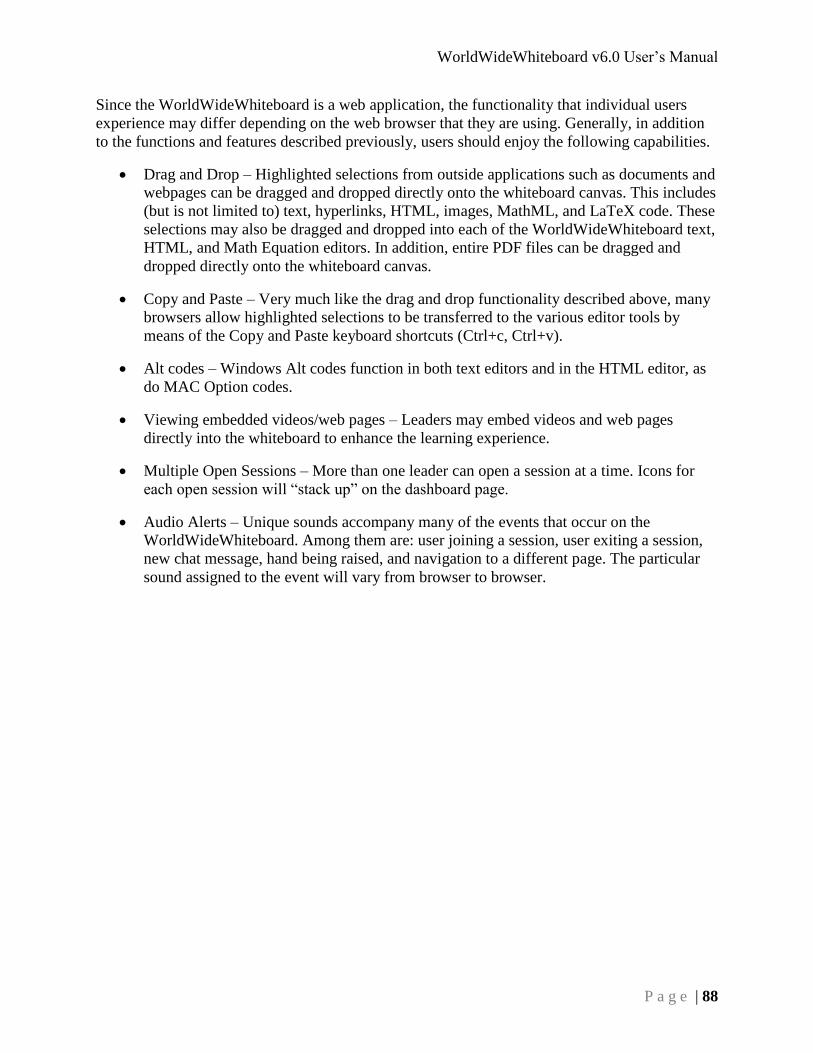
WorldWideWhiteboard v6.0 User’s Manual
P a g e | 88
Since the WorldWideWhiteboard is a web application, the functionality that individual users
experience may differ depending on the web browser that they are using. Generally, in addition
to the functions and features described previously, users should enjoy the following capabilities.
Drag and Drop – Highlighted selections from outside applications such as documents and
webpages can be dragged and dropped directly onto the whiteboard canvas. This includes
(but is not limited to) text, hyperlinks, HTML, images, MathML, and LaTeX code. These
selections may also be dragged and dropped into each of the WorldWideWhiteboard text,
HTML, and Math Equation editors. In addition, entire PDF files can be dragged and
dropped directly onto the whiteboard canvas.
Copy and Paste – Very much like the drag and drop functionality described above, many
browsers allow highlighted selections to be transferred to the various editor tools by
means of the Copy and Paste keyboard shortcuts (Ctrl+c, Ctrl+v).
Alt codes – Windows Alt codes function in both text editors and in the HTML editor, as
do MAC Option codes.
Viewing embedded videos/web pages – Leaders may embed videos and web pages
directly into the whiteboard to enhance the learning experience.
Multiple Open Sessions – More than one leader can open a session at a time. Icons for
each open session will “stack up” on the dashboard page.
Audio Alerts – Unique sounds accompany many of the events that occur on the
WorldWideWhiteboard. Among them are: user joining a session, user exiting a session,
new chat message, hand being raised, and navigation to a different page. The particular
sound assigned to the event will vary from browser to browser.

WorldWideWhiteboard v6.0 User’s Manual
P a g e | 89
Live Tutorial
Live Tutorial is a one-to-one virtual class environment, over which the leader has control.
Students may only join a Live Tutorial session that has been opened by a group leader; they
cannot open a Live Tutorial room on their own. If there are no Live Tutorial rooms open,
students will see the icon shown in Figure 121 on their dashboards.
Figure 121 – No Live Tutorial Rooms Open Icon
If there are Live Tutorial rooms available, a list of the open rooms will be displayed in the
student’s dashboard as shown in Figure 122.
Figure 122 – Live Tutorial Room Open
Each open room will be identified by a separate dashboard icon on the student’s dashboard.
Clicking one of these icons will open the Live Tutorial whiteboard as shown in Figure 123.
Figure 123 – Open Live Tutorial Page with Leader and Student

WorldWideWhiteboard v6.0 User’s Manual
P a g e | 90
Live Tutorial Queuing
If a particular Live Tutorial room is occupied, the student has the option to join that room’s
Tutorial Queue and wait in line for the next available tutor. Figure 124 shows the occupied room
with 1 student in the queue.
Figure 124– Live Tutorial Room Occupied, 1 Student in Queue
Clicking one of these icons places the student in the room’s queue, as shown in Figure 125.
Figure 125 – Live Tutorial Queue Waiting Page
The queuing page informs students on how many users are ahead of them, and is updated in real
time. When it is the student’s turn in line, the Live Tutorial room will automatically open and a
bell will sound. Students may click the “Exit this Tutorial Room Queue” link at any time and
return to the dashboard, forfeiting their position in line.
The Live Tutorial room makes use of the same whiteboard that is available in Live Sessions. For
detailed instructions on whiteboard usage, please consult the section “Live Session” on page 73.
Ending a Live Tutorial Session
The preferred method for ending a Live Tutorial session is for the leader to dismiss the student
from the room. It is possible for the leader to end a session with a student at any time. If they
choose to do so, the student receives a notification in the chat area and the room switches to
read-only mode. The student may exit the room at any time (and return to the dashboard) by
clicking the “X” button in the top right-hand corner of the interface.
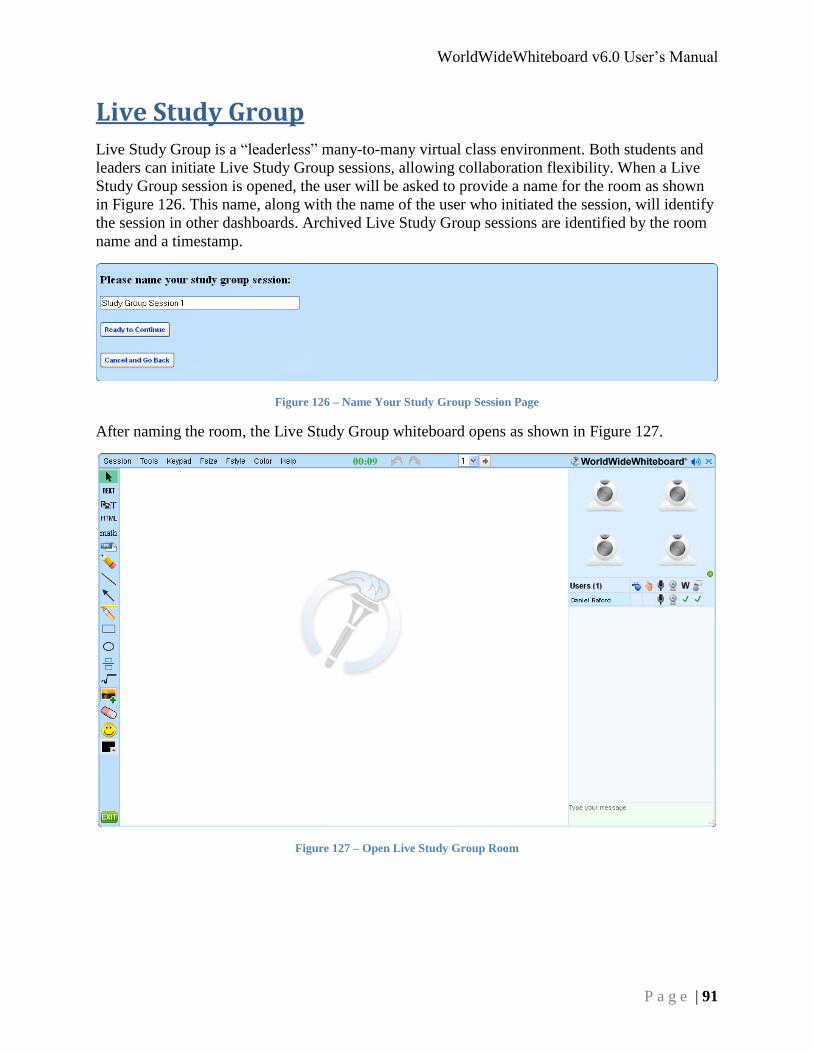
WorldWideWhiteboard v6.0 User’s Manual
P a g e | 91
Live Study Group
Live Study Group is a “leaderless” many-to-many virtual class environment. Both students and
leaders can initiate Live Study Group sessions, allowing collaboration flexibility. When a Live
Study Group session is opened, the user will be asked to provide a name for the room as shown
in Figure 126. This name, along with the name of the user who initiated the session, will identify
the session in other dashboards. Archived Live Study Group sessions are identified by the room
name and a timestamp.
Figure 126 – Name Your Study Group Session Page
After naming the room, the Live Study Group whiteboard opens as shown in Figure 127.
Figure 127 – Open Live Study Group Room

WorldWideWhiteboard v6.0 User’s Manual
P a g e | 92
Working in a Live Study Group
Once a room has been opened by a user, it becomes available for other users to join. More than
one Live Study Group session can be opened at the same time. Icons for each open session just
“stack up” on the dashboard page.
Live Study Group makes use of the same whiteboard that is available to students in Live
Sessions. For detailed instructions on whiteboard usage, please consult the section “Live
Session” on page 78.
Closing a Live Study Group and Archiving the Session
When all participants leave a Live Study Group session the room will be automatically closed by
the server (after approximately 5 minutes of inactivity) and archived.
Note that the archived session is only available for that room’s participants (including students
and/or leaders). For example, if a Live Study Group is opened by a student (and no leader enters
the room), the archived session will not be available to leaders, only to those students who
participated.

WorldWideWhiteboard v6.0 User’s Manual
P a g e | 93
Question and Answer Center
The Question and Answer Center allows students to compose questions on the whiteboard and
send them to the group leader for a response. The student’s dashboard is automatically updated
each time the student submits a question and each time a leader responds (see Figure 128).
Figure 128 – Question and Answer Center Dashboard Icon, Student View
With the exception of the Session menu (which is detailed later in this section), the Question and
Answer Center makes use of the same whiteboard that is available in Live Sessions. For detailed
instructions on whiteboard usage, please consult the section “Live Session” on page 73.
Asking a Question
Clicking the dashboard icon opens the Question and Answer Center, as shown in Figure 129.
Figure 129 – Question and Answer Landing Page
Click the “Ask a New Question” button to compose a question. A new whiteboard will open, as
shown in Figure 130. The Save for Later icon at the top of the whiteboard can be used to save
your work in case of accidental disconnections. Your work is periodically saved (whether the
icon is grayed out or not) but users are encouraged to manually save their work periodically
(when icon is not grayed out).
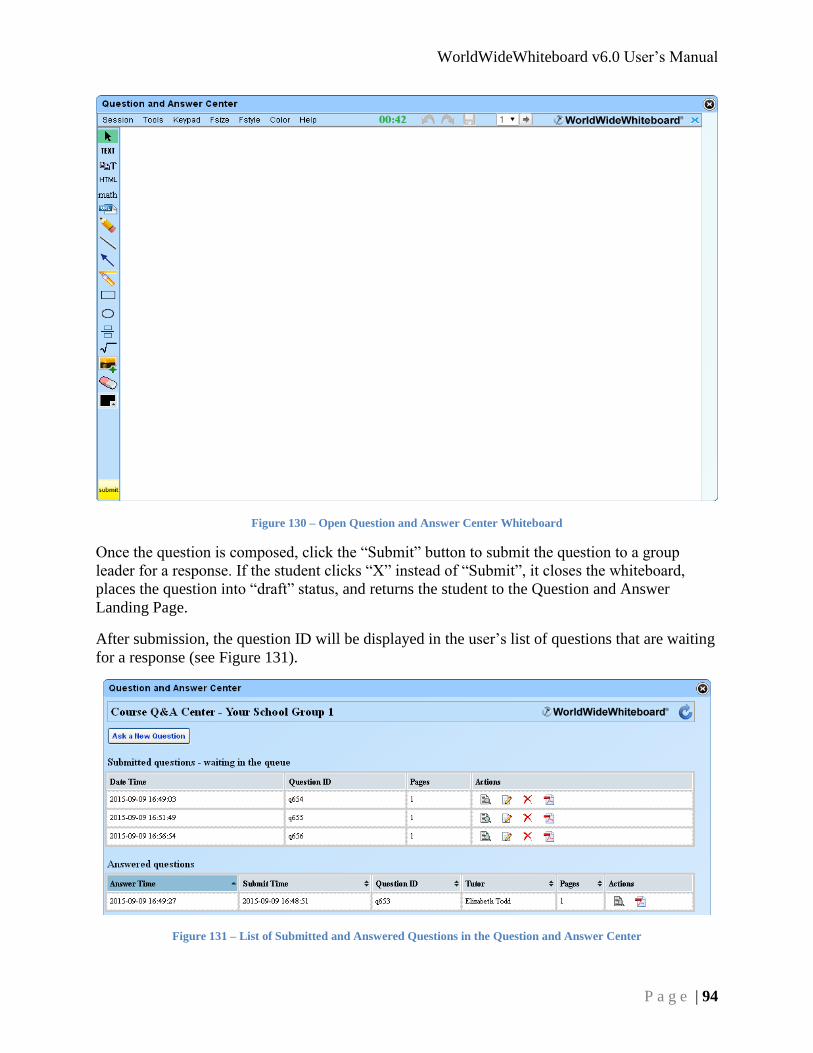
WorldWideWhiteboard v6.0 User’s Manual
P a g e | 94
Figure 130 – Open Question and Answer Center Whiteboard
Once the question is composed, click the “Submit” button to submit the question to a group
leader for a response. If the student clicks “X” instead of “Submit”, it closes the whiteboard,
places the question into “draft” status, and returns the student to the Question and Answer
Landing Page.
After submission, the question ID will be displayed in the user’s list of questions that are waiting
for a response (see Figure 131).
Figure 131 – List of Submitted and Answered Questions in the Question and Answer Center

WorldWideWhiteboard v6.0 User’s Manual
P a g e | 95
The four actions available for submitted questions are as follows: 1) view an image of the
question, 2) edit the question, 3) delete the question, or 4) download the question as a
PDF. Choosing to edit the question opens up the whiteboard upon which the question was
written and allows the contents to be edited. When finished, clicking the “Submit” button once
again places the question in the list of questions that are waiting for a response. If the student
clicks “X” instead of “Submit”, the changes are not saved and the student is returned to the
Question and Answer Center Landing Page.
When a leader has answered the user’s question, the question ID will be removed from the list of
questions that are waiting on a response and added to the user’s list of answered questions. The
user’s dashboard will automatically update to reflect the new numbers for questions in the queue
and for answered questions. A user can 1) view an image of the answered question or 2)
download the answered question as a PDF.
Question and Answer Center’s Session Menu
The Session menu shown in Figure 132 contains six commands: Redraw, Save, Save as PDF,
Print, Submit Your Work, and Exit.
Figure 132 – Question and Answer Center’s Session Menu
The “Redraw” command refreshes the current whiteboard canvas, much like the
“Refresh” command works in web browsers.
Clicking on the “Save” command will save the current work on the whiteboard canvas. It
has the same effect as clicking the Save for Later icon . The room may be closed and
work on the canvases can be resumed at a later time.
Clicking on the “Save as PDF” command will save all existing whiteboard canvases as a
single PDF file (one whiteboard canvas per PDF page). Depending on the user’s web
browser, the user may be prompted to either “Open the file” or “Save the file” (some
browsers automatically download the file to the default download folder). If prompted,
the “Open the file” option will allow the user to view the resulting PDF and then select
the location in which to save the file, while the “Save the file” option auto downloads the
file to the user’s default download folder.

WorldWideWhiteboard v6.0 User’s Manual
P a g e | 96
The “Print” command opens the browser’s Print window and allows the user to print the
active whiteboard canvas.
The “Submit Your Work” command sends the whiteboard canvases to the Submitted
Questions queue and returns the user to the Question and Answer Center Landing Page.
The “Exit” command closes the Question and Answer whiteboard session without saving
and returns the user to the Question and Answer Center Landing Page.
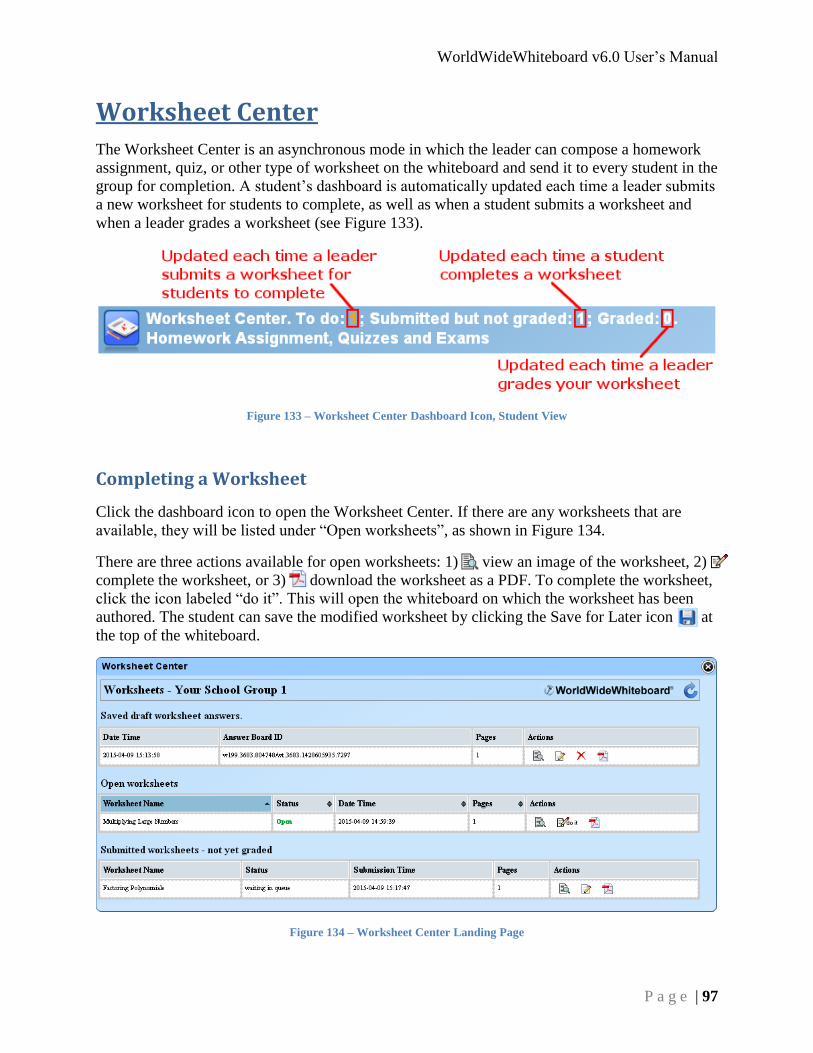
WorldWideWhiteboard v6.0 User’s Manual
P a g e | 97
Worksheet Center
The Worksheet Center is an asynchronous mode in which the leader can compose a homework
assignment, quiz, or other type of worksheet on the whiteboard and send it to every student in the
group for completion. A student’s dashboard is automatically updated each time a leader submits
a new worksheet for students to complete, as well as when a student submits a worksheet and
when a leader grades a worksheet (see Figure 133).
Figure 133 – Worksheet Center Dashboard Icon, Student View
Completing a Worksheet
Click the dashboard icon to open the Worksheet Center. If there are any worksheets that are
available, they will be listed under “Open worksheets”, as shown in Figure 134.
There are three actions available for open worksheets: 1) view an image of the worksheet, 2)
complete the worksheet, or 3) download the worksheet as a PDF. To complete the worksheet,
click the icon labeled “do it”. This will open the whiteboard on which the worksheet has been
authored. The student can save the modified worksheet by clicking the Save for Later icon at
the top of the whiteboard.
Figure 134 – Worksheet Center Landing Page

WorldWideWhiteboard v6.0 User’s Manual
P a g e | 98
When finished, click the “Submit” button to return the worksheet to the leader for correction
and/or grading. If the student clicks “X” instead of “Submit”, it closes the whiteboard without
saving recent changes and returns the student to the Worksheet Center Landing Page.
Worksheets that were saved but not submitted are added to the list of Saved draft worksheet
answers on the landing page. After submitting the completed worksheet, it will be removed from
the list of open worksheets (or from the list of saved drafts) and is added to the list of worksheets
that have been submitted but are yet to be graded (see Figure 134).
There are four actions available for worksheets in draft status: 1) view the worksheet draft as
an image, 2) continue the worksheet draft, 3) delete the worksheet draft, or 4) download
the worksheet draft as a PDF.
There are three actions available for submitted worksheets: 1) view the worksheet as an
image, 2) edit the worksheet, or 3) download the worksheet as a PDF.
Worksheet Center’s Session Menu
The six commands in the Worksheet Session menu are similar to the commands in the Question
and Answer Session menu, as shown in Figure 135.
Figure 135 – Worksheet Center’s Session Menu
The “Redraw” command refreshes the current whiteboard canvas, much like the
“Refresh” command works in web browsers.
Clicking on the “Save” command will save the current work on the whiteboard canvas. It
has the same effect as clicking the Save for Later icon . The room may be closed and
work on the canvases can be resumed at a later time.
Clicking on the “Save as PDF” command will save all existing whiteboard canvases as a
single PDF file (one whiteboard canvas per PDF page). Depending on the user’s web
browser, the user may be prompted to either “Open the file” or “Save the file” (some
browsers automatically download the file to the default download folder). If prompted,
the “Open the file” option will allow the user to view the resulting PDF and then select
the location in which to save the file, while the “Save the file” option auto downloads the
file to the user’s default download folder.

WorldWideWhiteboard v6.0 User’s Manual
P a g e | 99
The “Print” command opens the browser’s Print window and allows the user to print the
active whiteboard canvas.
The “Submit Your Work” command sends the whiteboard canvases to the Worksheet
Templates list and returns the user to the Worksheet Center Landing Page.
The “Exit” command closes the Worksheet Center whiteboard session without saving and
returns the user to the Worksheet Center Landing Page.
Making Changes to a Worksheet after Submission
As long as the completed worksheet has not been opened by the leader for correction/grading, it
is available for the user to make changes. Clicking the Edit icon in the Actions list will open
the whiteboard containing the worksheet. When the changes have been made, either click the
Save for Later icon , click the “Submit” button to return it to the list of submitted worksheets
that are waiting to be graded, or click “X” instead of “Submit” to close the whiteboard without
saving recent changes and return to the Worksheet Center Landing Page.
Viewing a Graded Worksheet
When a leader has corrected and/or graded a worksheet, it is removed from the user’s list of
worksheets that have been submitted but are yet to be graded and added to the user’s list of
graded worksheets (see Figure 136).
Figure 136 – List of Graded Worksheets in Question and Answer Center
There are two actions available now: 1) view an image of the graded worksheet, or 2)
download the graded worksheet as a PDF. As soon as a worksheet is graded, the dashboard will
automatically update to reflect the new numbers for worksheets to do, submitted worksheets, and
graded worksheets.
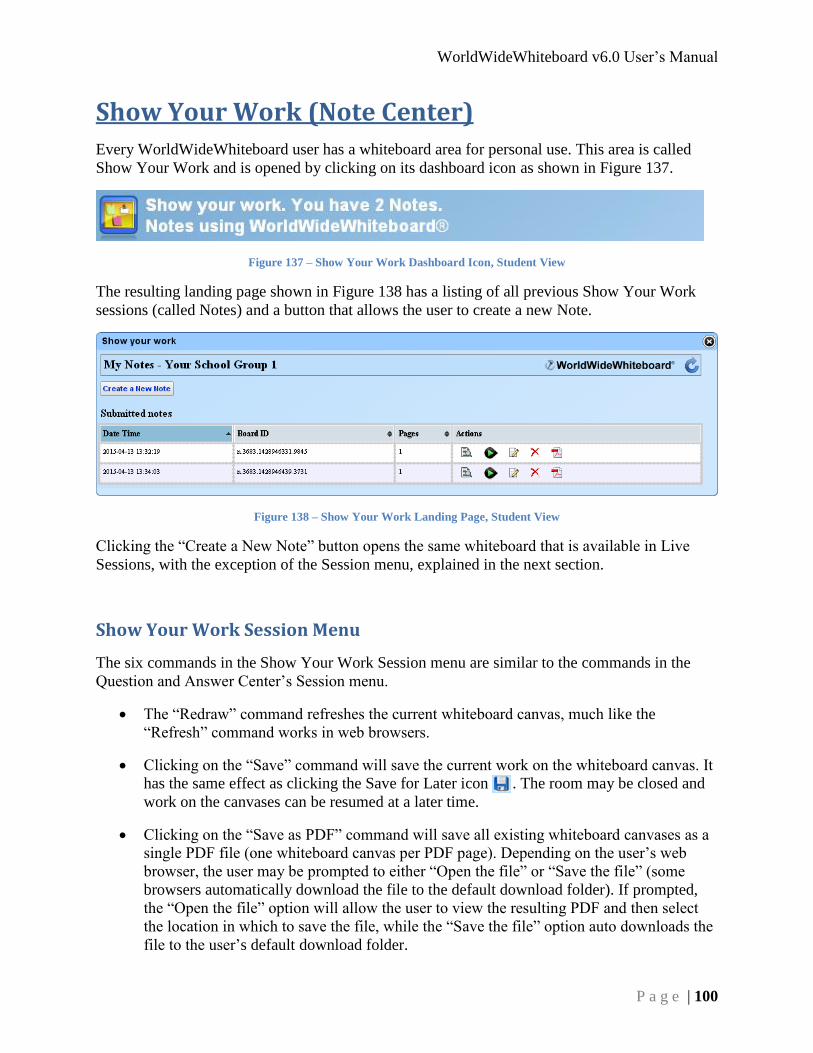
WorldWideWhiteboard v6.0 User’s Manual
P a g e | 100
Show Your Work (Note Center)
Every WorldWideWhiteboard user has a whiteboard area for personal use. This area is called
Show Your Work and is opened by clicking on its dashboard icon as shown in Figure 137.
Figure 137 – Show Your Work Dashboard Icon, Student View
The resulting landing page shown in Figure 138 has a listing of all previous Show Your Work
sessions (called Notes) and a button that allows the user to create a new Note.
Figure 138 – Show Your Work Landing Page, Student View
Clicking the “Create a New Note” button opens the same whiteboard that is available in Live
Sessions, with the exception of the Session menu, explained in the next section.
Show Your Work Session Menu
The six commands in the Show Your Work Session menu are similar to the commands in the
Question and Answer Center’s Session menu.
The “Redraw” command refreshes the current whiteboard canvas, much like the
“Refresh” command works in web browsers.
Clicking on the “Save” command will save the current work on the whiteboard canvas. It
has the same effect as clicking the Save for Later icon . The room may be closed and
work on the canvases can be resumed at a later time.
Clicking on the “Save as PDF” command will save all existing whiteboard canvases as a
single PDF file (one whiteboard canvas per PDF page). Depending on the user’s web
browser, the user may be prompted to either “Open the file” or “Save the file” (some
browsers automatically download the file to the default download folder). If prompted,
the “Open the file” option will allow the user to view the resulting PDF and then select
the location in which to save the file, while the “Save the file” option auto downloads the
file to the user’s default download folder.

WorldWideWhiteboard v6.0 User’s Manual
P a g e | 101
The “Print” command opens the browser’s Print window and allows the user to print the
active whiteboard canvas.
The “Submit Your Work” command sends the whiteboard canvases to the Submitted
Notes list and returns the user to Show Your Work Landing Page.
The “Exit” command closes the Notes whiteboard session without saving and returns the
user to the Show Your Work Landing Page.
When the new Note is completed, clicking “Submit” inserts it into the user’s list of Submitted
Notes. There are five commands available in the Actions section of Submitted Notes. The user
may choose to do one of the following: 1) View the Note (as an image), 2) Note Playback,
3) Edit the Note, 4) Delete the Note, or 5) Download the Note as a PDF. Selecting “Edit
the Note” reopens the Note on the whiteboard. It is recommended that the user periodically save
the work by clicking the Save for Later icon . Once edited, clicking “Submit” will replace the
Note in the list with its edited counterpart. If the leader clicks “X” instead of “Submit”, it closes
the whiteboard without saving recent changes and returns the leader to the list of Submitted
Notes.
Playing Back a Note Session
Clicking the “Note Playback” button will open a viewer window that begins to play back the
Note session in real time (as seen in Figure 139), recreating all existing content in the order that
it was created, one object at a time.
Figure 139 – Show Your Work Note Playback
The user may perform the following commands by clicking their icons:
1) View/hide information about the recording
2) Go back to the beginning of the recording

WorldWideWhiteboard v6.0 User’s Manual
P a g e | 102
3) Pause the recording
4) Adjust the playback speed (1x, 2x, 4x, 8x, and 16x speeds are available)
5) Go to the end of the recording
6) Close the playback window and return to the Show Your Work Center.
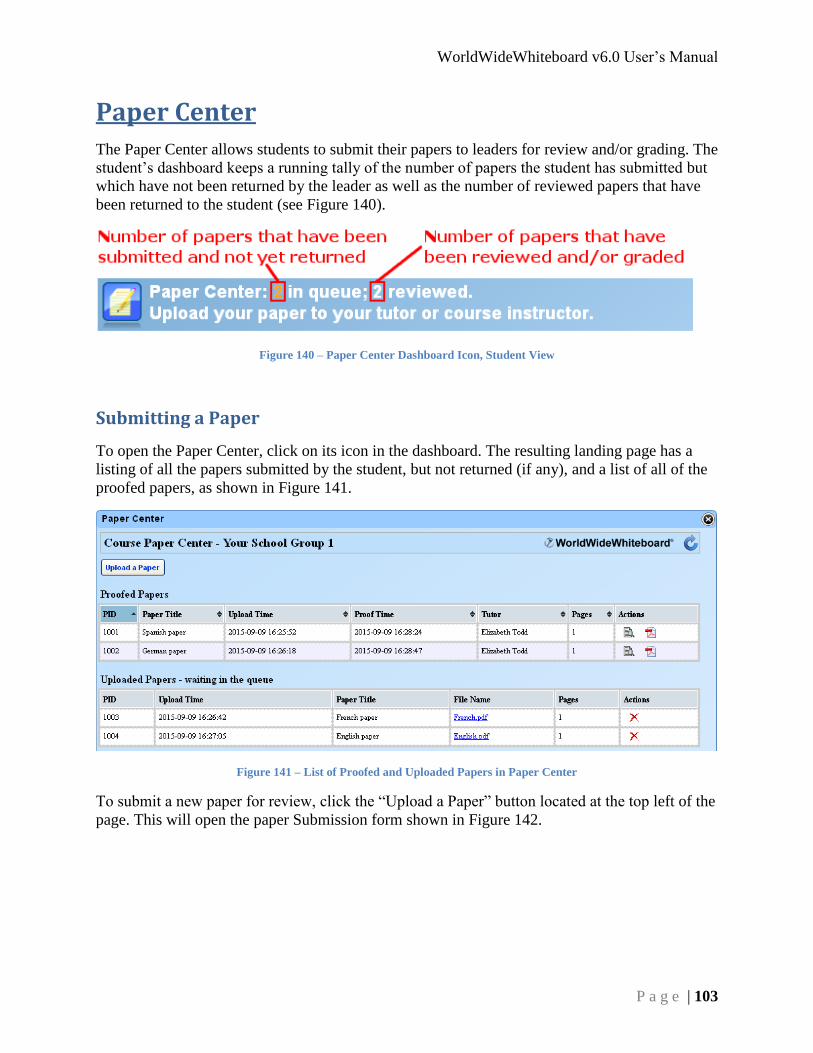
WorldWideWhiteboard v6.0 User’s Manual
P a g e | 103
Paper Center
The Paper Center allows students to submit their papers to leaders for review and/or grading. The
student’s dashboard keeps a running tally of the number of papers the student has submitted but
which have not been returned by the leader as well as the number of reviewed papers that have
been returned to the student (see Figure 140).
Figure 140 – Paper Center Dashboard Icon, Student View
Submitting a Paper
To open the Paper Center, click on its icon in the dashboard. The resulting landing page has a
listing of all the papers submitted by the student, but not returned (if any), and a list of all of the
proofed papers, as shown in Figure 141.
Figure 141 – List of Proofed and Uploaded Papers in Paper Center
To submit a new paper for review, click the “Upload a Paper” button located at the top left of the
page. This will open the paper Submission form shown in Figure 142.

WorldWideWhiteboard v6.0 User’s Manual
P a g e | 104
Figure 142 – Paper Center Submission Form
The choice of which of these fields are mandatory (if any) will be determined by each institution.
When the appropriate fields have been filled out, click the “Choose File” button to search your
computer for the location of your paper. Please note that the paper must be in PDF format
(and portrait orientation). Papers in other formats should be saved as, or converted to, PDFs
before submitting. Once chosen, the paper must be given a name in the “Paper name” field.
Clicking the “Upload” button will send the paper to the leader for review (and update the
dashboard tally of submitted papers). Now that the paper has been sent to the leader it will be
displayed in the student’s list of uploaded papers waiting in the queue (see Figure 143).
Figure 143 – List of Papers waiting for Review in Paper Center
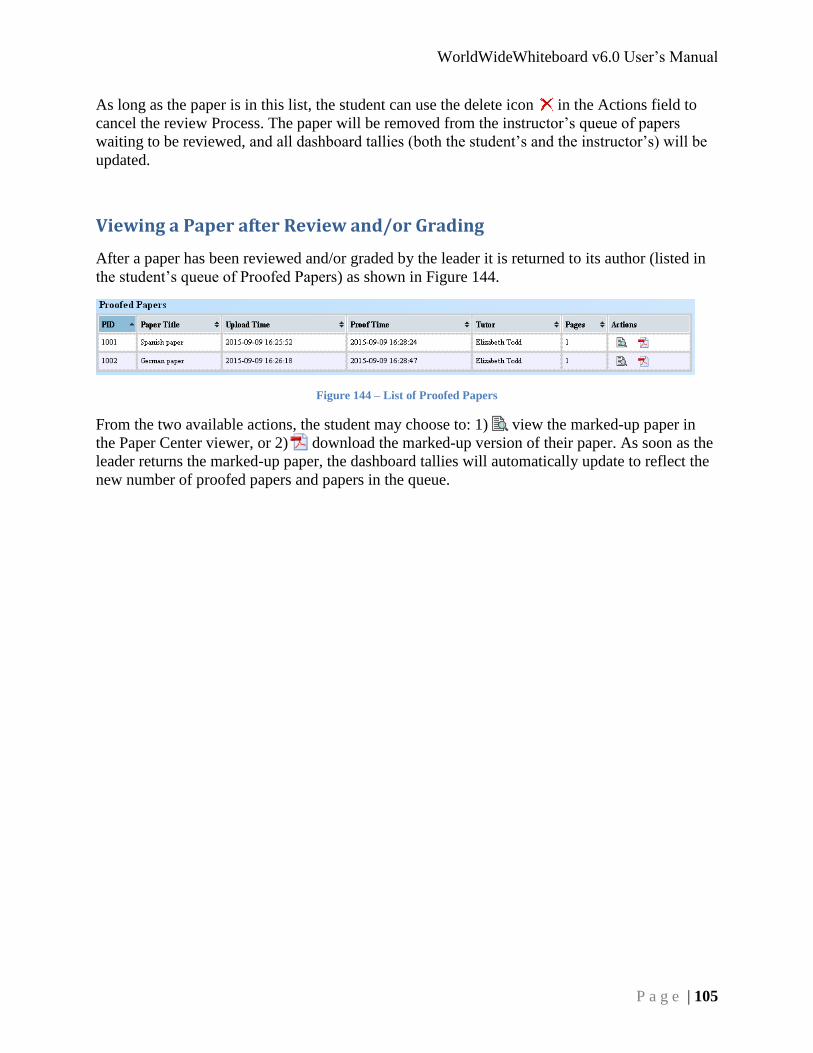
WorldWideWhiteboard v6.0 User’s Manual
P a g e | 105
As long as the paper is in this list, the student can use the delete icon in the Actions field to
cancel the review Process. The paper will be removed from the instructor’s queue of papers
waiting to be reviewed, and all dashboard tallies (both the student’s and the instructor’s) will be
updated.
Viewing a Paper after Review and/or Grading
After a paper has been reviewed and/or graded by the leader it is returned to its author (listed in
the student’s queue of Proofed Papers) as shown in Figure 144.
Figure 144 – List of Proofed Papers
From the two available actions, the student may choose to: 1) view the marked-up paper in
the Paper Center viewer, or 2) download the marked-up version of their paper. As soon as the
leader returns the marked-up paper, the dashboard tallies will automatically update to reflect the
new number of proofed papers and papers in the queue.
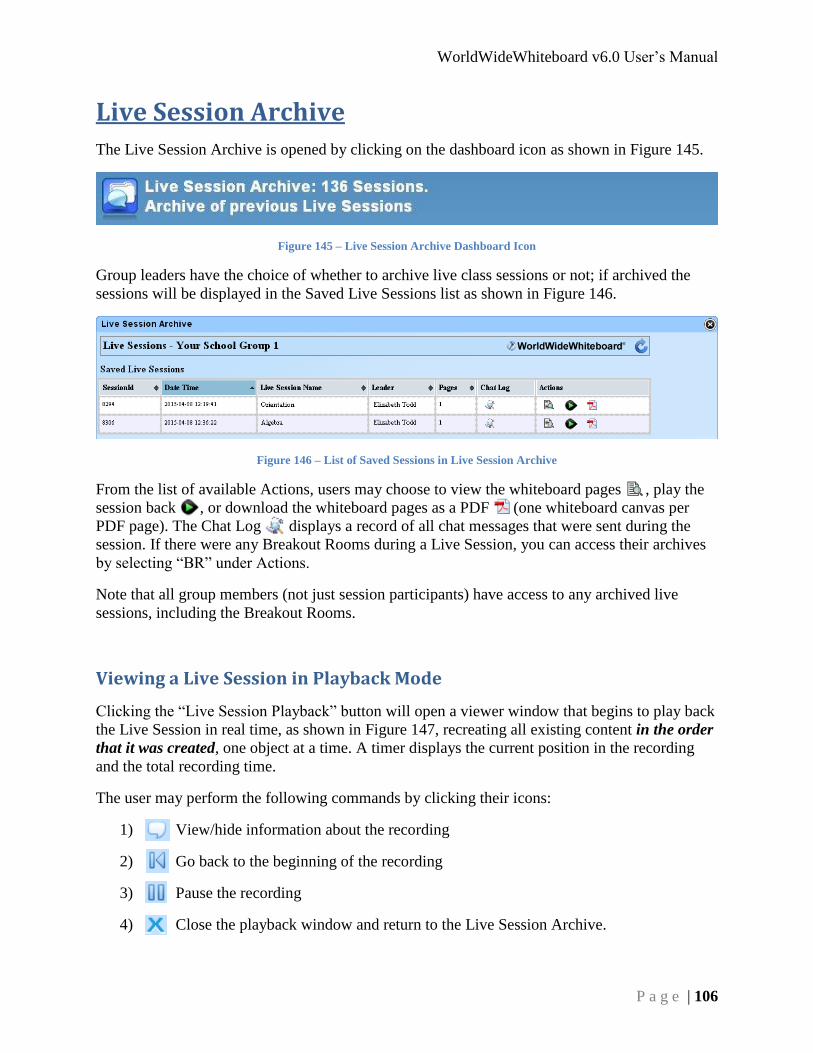
WorldWideWhiteboard v6.0 User’s Manual
P a g e | 106
Live Session Archive
The Live Session Archive is opened by clicking on the dashboard icon as shown in Figure 145.
Figure 145 – Live Session Archive Dashboard Icon
Group leaders have the choice of whether to archive live class sessions or not; if archived the
sessions will be displayed in the Saved Live Sessions list as shown in Figure 146.
Figure 146 – List of Saved Sessions in Live Session Archive
From the list of available Actions, users may choose to view the whiteboard pages , play the
session back , or download the whiteboard pages as a PDF (one whiteboard canvas per
PDF page). The Chat Log displays a record of all chat messages that were sent during the
session. If there were any Breakout Rooms during a Live Session, you can access their archives
by selecting “BR” under Actions.
Note that all group members (not just session participants) have access to any archived live
sessions, including the Breakout Rooms.
Viewing a Live Session in Playback Mode
Clicking the “Live Session Playback” button will open a viewer window that begins to play back
the Live Session in real time, as shown in Figure 147, recreating all existing content in the order
that it was created, one object at a time. A timer displays the current position in the recording
and the total recording time.
The user may perform the following commands by clicking their icons:
1) View/hide information about the recording
2) Go back to the beginning of the recording
3) Pause the recording
4) Close the playback window and return to the Live Session Archive.
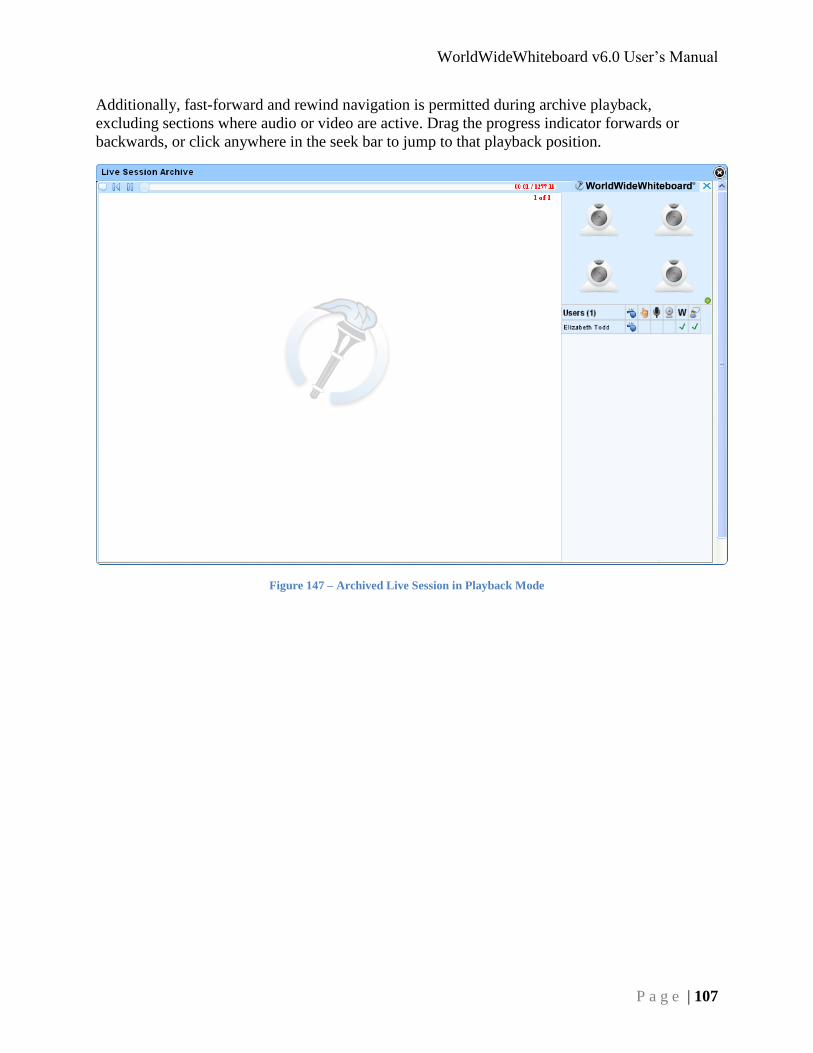
WorldWideWhiteboard v6.0 User’s Manual
P a g e | 107
Additionally, fast-forward and rewind navigation is permitted during archive playback,
excluding sections where audio or video are active. Drag the progress indicator forwards or
backwards, or click anywhere in the seek bar to jump to that playback position.
Figure 147 – Archived Live Session in Playback Mode

WorldWideWhiteboard v6.0 User’s Manual
P a g e | 108
Live Tutorial Archive
The Live Tutorial Archive is opened by clicking on the dashboard icon, as shown in Figure 148.
Figure 148 – Live Tutorial Archive Dashboard Icon
Archived sessions are displayed in the Sessions list, as shown in Figure 149. Only those sessions
that a student participates in are displayed in their archive.
Figure 149 – List of Saved Sessions in Live Tutorial Archive
From the list of available Actions, users may choose to view the whiteboard pages , view
session playback , or download the whiteboard pages as a PDF (one whiteboard canvas
per PDF page). The Chat Log displays a record of all chat messages that were sent during the
session.
Note that only Supervisors and the two session participants (the tutor and the student) have
access to these archived sessions.
Viewing a Tutorial Session in Playback Mode
Clicking the “Tutorial Session Playback” button will open a viewer window that begins to play
back the Tutorial Session in real time, as shown in Figure 150, recreating all existing content in
the order that it was created, one object at a time. A timer displays the current position in the
recording and the total recording time.
The user may perform the following commands by clicking their icons:
1) View/hide information about the recording
2) Go back to the beginning of the recording
3) Pause the recording
4) Close the playback window and return to the Live Tutorial Archive.

WorldWideWhiteboard v6.0 User’s Manual
P a g e | 109
Additionally, fast-forward and rewind navigation is permitted during archive playback,
excluding sections where audio or video are active. Drag the progress indicator forwards or
backwards, or click anywhere in the seek bar to jump to that playback position.
Figure 150 – Archived Tutorial Session in Playback Mode
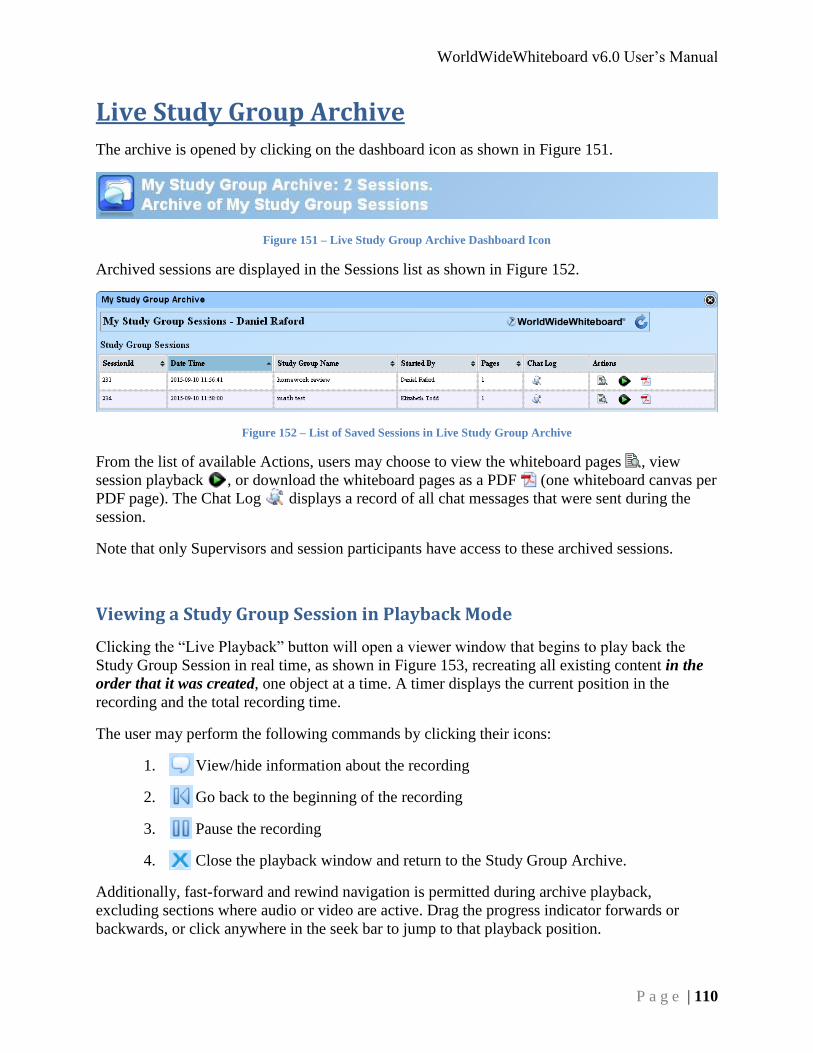
WorldWideWhiteboard v6.0 User’s Manual
P a g e | 110
Live Study Group Archive
The archive is opened by clicking on the dashboard icon as shown in Figure 151.
Figure 151 – Live Study Group Archive Dashboard Icon
Archived sessions are displayed in the Sessions list as shown in Figure 152.
Figure 152 – List of Saved Sessions in Live Study Group Archive
From the list of available Actions, users may choose to view the whiteboard pages , view
session playback , or download the whiteboard pages as a PDF (one whiteboard canvas per
PDF page). The Chat Log displays a record of all chat messages that were sent during the
session.
Note that only Supervisors and session participants have access to these archived sessions.
Viewing a Study Group Session in Playback Mode
Clicking the “Live Playback” button will open a viewer window that begins to play back the
Study Group Session in real time, as shown in Figure 153, recreating all existing content in the
order that it was created, one object at a time. A timer displays the current position in the
recording and the total recording time.
The user may perform the following commands by clicking their icons:
1. View/hide information about the recording
2. Go back to the beginning of the recording
3. Pause the recording
4. Close the playback window and return to the Study Group Archive.
Additionally, fast-forward and rewind navigation is permitted during archive playback,
excluding sections where audio or video are active. Drag the progress indicator forwards or
backwards, or click anywhere in the seek bar to jump to that playback position.
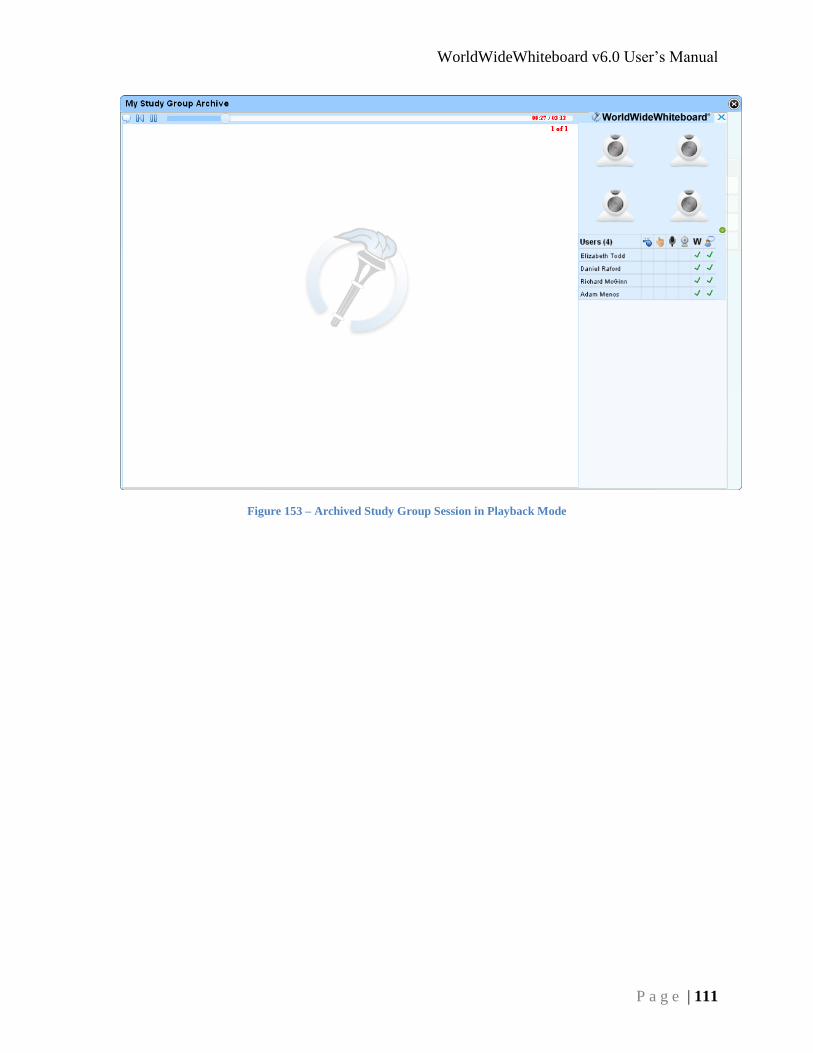
WorldWideWhiteboard v6.0 User’s Manual
P a g e | 111
Figure 153 – Archived Study Group Session in Playback Mode
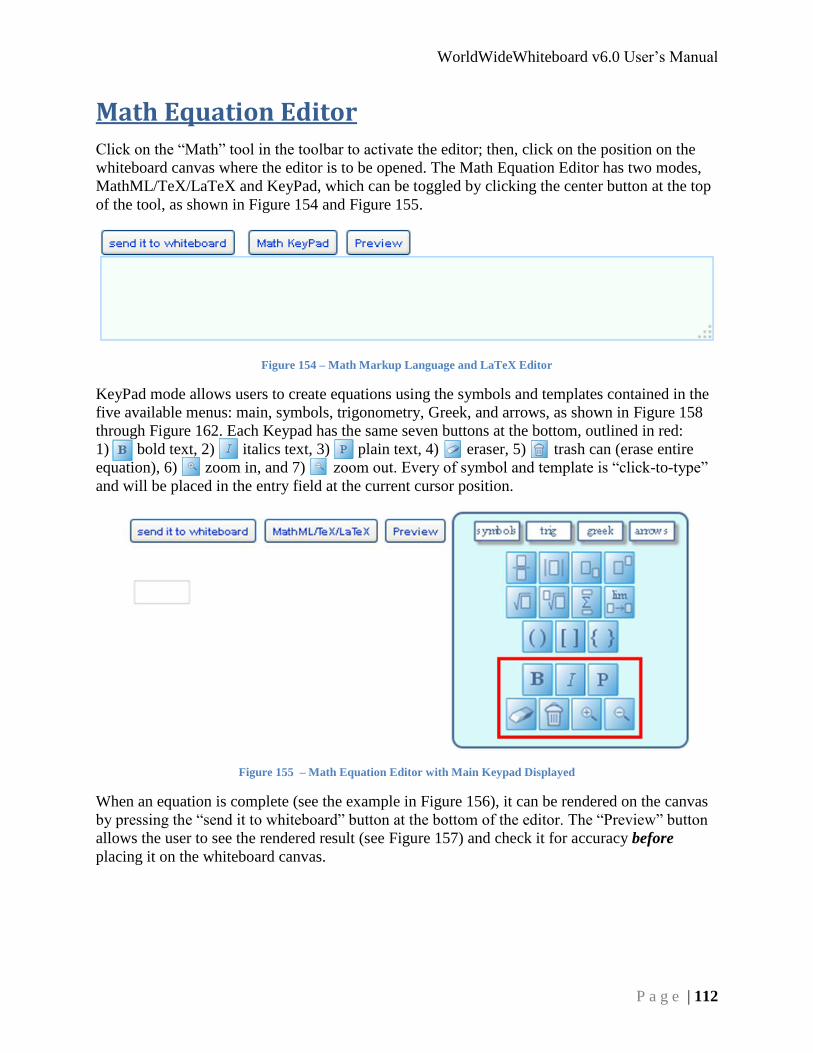
WorldWideWhiteboard v6.0 User’s Manual
P a g e | 112
Math Equation Editor
Click on the “Math” tool in the toolbar to activate the editor; then, click on the position on the
whiteboard canvas where the editor is to be opened. The Math Equation Editor has two modes,
MathML/TeX/LaTeX and KeyPad, which can be toggled by clicking the center button at the top
of the tool, as shown in Figure 154 and Figure 155.
Figure 154 – Math Markup Language and LaTeX Editor
KeyPad mode allows users to create equations using the symbols and templates contained in the
five available menus: main, symbols, trigonometry, Greek, and arrows, as shown in Figure 158
through Figure 162. Each Keypad has the same seven buttons at the bottom, outlined in red:
1) bold text, 2) italics text, 3) plain text, 4) eraser, 5) trash can (erase entire
equation), 6) zoom in, and 7) zoom out. Every of symbol and template is “click-to-type”
and will be placed in the entry field at the current cursor position.
Figure 155 – Math Equation Editor with Main Keypad Displayed
When an equation is complete (see the example in Figure 156), it can be rendered on the canvas
by pressing the “send it to whiteboard” button at the bottom of the editor. The “Preview” button
allows the user to see the rendered result (see Figure 157) and check it for accuracy before
placing it on the whiteboard canvas.
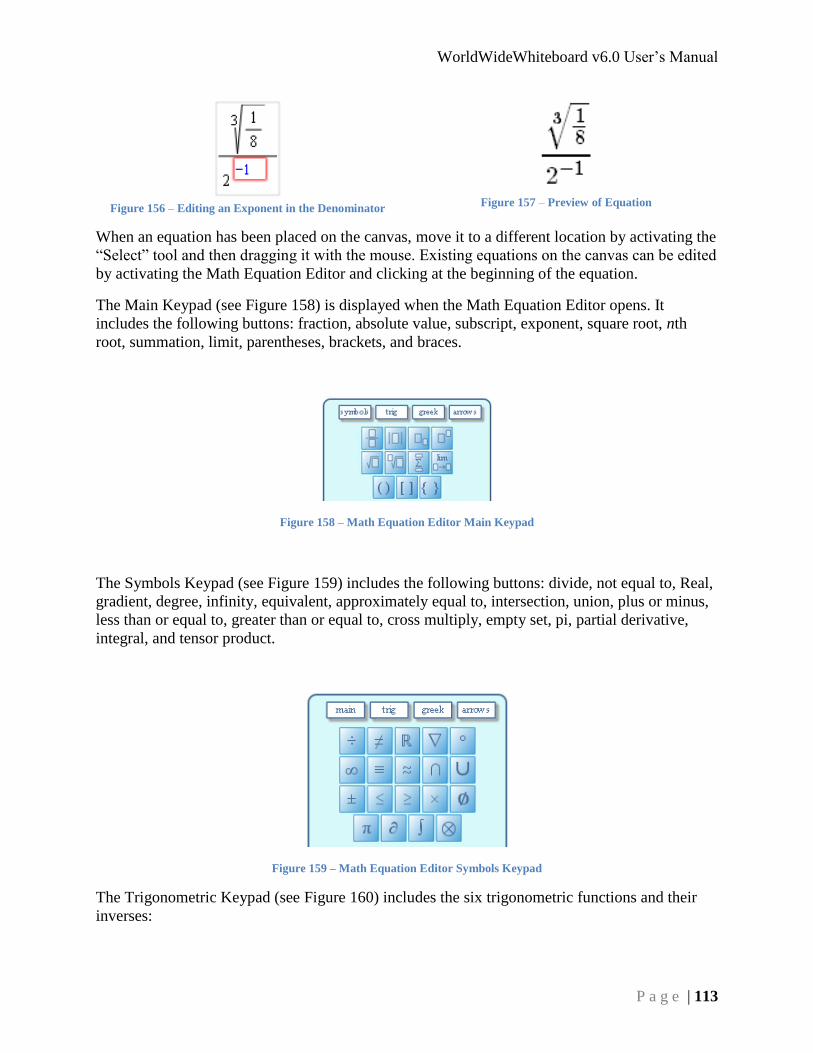
WorldWideWhiteboard v6.0 User’s Manual
P a g e | 113
Figure 156 – Editing an Exponent in the Denominator
Figure 157 – Preview of Equation
When an equation has been placed on the canvas, move it to a different location by activating the
“Select” tool and then dragging it with the mouse. Existing equations on the canvas can be edited
by activating the Math Equation Editor and clicking at the beginning of the equation.
The Main Keypad (see Figure 158) is displayed when the Math Equation Editor opens. It
includes the following buttons: fraction, absolute value, subscript, exponent, square root, nth
root, summation, limit, parentheses, brackets, and braces.
Figure 158 – Math Equation Editor Main Keypad
The Symbols Keypad (see Figure 159) includes the following buttons: divide, not equal to, Real,
gradient, degree, infinity, equivalent, approximately equal to, intersection, union, plus or minus,
less than or equal to, greater than or equal to, cross multiply, empty set, pi, partial derivative,
integral, and tensor product.
Figure 159 – Math Equation Editor Symbols Keypad
The Trigonometric Keypad (see Figure 160) includes the six trigonometric functions and their
inverses:

WorldWideWhiteboard v6.0 User’s Manual
P a g e | 114
Figure 160 – Math Equation Editor Trigonometric Keypad
The Greek Keypad (see Figure 161) includes six uppercase and all 24 lowercase Greek letters:
Figure 161 – Math Equation Editor Greek Keypad
The Arrows Keypad (see Figure 162) includes five arrows: left, up, right, down, and
bidirectional.
Figure 162 – Math Equation Editor Arrows Keypad

WorldWideWhiteboard v6.0 User’s Manual
P a g e | 115
A Note about PDFs
When whiteboard canvasses are converted to PDFs, the resulting document may not contain all
the content that was on the original canvas. This list includes embedded videos, webpages,
LaTeX code, etc. This is a limitation of the PDF format, which does not support these element
types. Since the built-in Math Equation Editor uses LaTeX to create its equations, these will not
be displayed in the PDF.

WorldWideWhiteboard v6.0 User’s Manual
P a g e | 116
Supervisors Supervisor status grants the user the ability to enter, monitor, and participate in ongoing Live
Tutorial sessions.
Live Tutorial Supervision
From the dashboard, a supervisor is able to join a Live Tutorial session in progress and become
the third participant as shown in Figure 163.
Figure 163 – Supervisor Joins a Live Tutorial in Progress with Leader Privileges
Full leader privileges are granted to the supervisor (Richard in Figure 164), as indicated by the
whistle icon.
Figure 164 – Supervisor View of Live Tutorial User List
The supervisor is able to end individual tutorial sessions by clicking the “Done” button and close
the room (if the queue is empty) by clicking the “Close” button.

WorldWideWhiteboard v6.0 User’s Manual
P a g e | 117
System Requirements To view an up-to-date list of system requirements, click on the following link:
http://www.link-systems.com/content/system-requirements