subscriber exclusive • june 2018 celebrate...celebrate a digital supplement to bead&button...
TRANSCRIPT

Celebrate
A DIGITALSUPPLEMENT TO BEAD&BUTTON
MAGAZINE
BBextraSUBSCRIBER EXCLUSIVE • JUNE 2018
BRACELETSEASON!
Make these beachy bangles p.38
Stitch geometric peyote jewelry components p.42
WIRE + BEADSChevron weaveearrings p.49
Create a vibrantloomwoven bracelet p.56
Learn to make a stamped mandala p
end
ant
p. 6
4
TREND ALERT
Carrier Bead mania! p.20
PLUS • HOT NEW PRODUCTS for your studio p.12
• When 4 + 4 = 16 (or more!) p.60
• Braid a 12-strand spiral necklace p. 26
• Stripes, dots, and rings: All about agate p. 62
Fun projects for summer!
4 FABULOUS STYLESFOR SUMMERPapillon bracelet p.3
Pearls & lace bracelet p.6 >>Star struck bracelet p.10
Fancy faux bangle p. 13

Visit Bead&Button online atFacetJewelry.com
This logo is for use on masthead only. Do not use less than 100% of full size.
welcome
Papillon bracelet ............................................................ p. 3
Pearls & lace bracelet .................................................... p. 6
Star struck bracelet .......................................................p. 10
Fancy faux bangle ........................................................p. 13
Editor, Bead&[email protected]
Contents
Editor Julia Gerlach
Senior Art Director Lisa A. Bergman
Associate Editors Connie Whittaker, Diane Jolie
Contributing Editor Cindy Crain Newman
Editorial Assistant Lora Groszkiewicz
Graphic Designer Lisa M. Schroeder
Photographer Bill Zuback
Illustrator Kellie Jaeger
Editorial Director Diane M. Bacha
ADVERTISING
Corporate Advertising Director Ann E. Smith
Advertising Sales Lori Schneider
Ad Services Representatives Melissa Valuch, Nanette Hackbarth
B&B Extra is published bimonthly by Kalmbach Publishing Co., 21027 Crossroads Circle, P.O. Box 1612, Waukesha, WI 53187-1612
© 2018 Kalmbach Publishing Co. All rights reserved. This publication may not be reproduced in part or in whole without written permission from the publisher. The designs in B&B Extra are for your personal enjoyment. They may not be taught or sold without permission.
Subscriber video LEARN TO STITCH a double spiral rope with two-hole beads
Visit Bead&Button online at FacetJewelry.com for free projects,
videos, blogs, galleries, designchallenges, and more, all updated daily.
Bracelet seasonIf there is any such thing as bracelet season, summer is obviously it. Of course you can don your favorite cuffs and bangles any time, but they make the biggest impact when they’re not competing with thick sweaters and fleece jackets. So, be sure to bare your arms this sum-mer — not just to cool off, but also to show off your fabulous beaded creations! In this issue of B&B Extra, we have four designs that are perfect for bracelet season. Deborah Hodoyer’s “Papillon bracelet” (p. 3) is a fun tribute to the butter-flies that make their appearance during the summer months. You may not be able to get a real butterfly to alight on your wrist, but you can make your own! Lorraine Coetzee’s “Pearls & lace bracelet” (p. 6) and Andrea Mazzenga’s “Fancy faux bangle” (p. 13) are unbeatable options for warm weather weddings and parties — light and delicate but also dressy enough for a special occasion. And if you’ve been looking for a patriotic design that you can wear year-round, try Kathy Cook’s “Star struck bracelet” (p. 10). The repeat-ing star pattern is ideal for the 4th of July, of course, but other colorways look great, too, and will let everyone you meet know that you are a superstar beader!
Be sure to bare your
arms this summer
— not just to cool
off, but also to show
off your fabulous
beaded creations!
Hit the beach with easy leather and gemstonebraceletsby Alex Agudo!
Video See the 12-strand chevron spiral braid in action
Stitch delicate feather earrings (or ornaments!) by Diane Hertzler

© 2018 Kalmbach Publishing Co. This material may not be reproduced in any form without permission from the publisher.
June 2018 3
PAPILLON BRACELETdesigned by Debora Hodoyer
DIFFICULTY
bead weaving

ab
c a
b
cd
ab
c
d
ef
ab
c
d
e
f
6 mm fire-polished bead
2.5 x 5 mm SuperDuo bead
3.8 mm O-bead
2 x 4 mm MiniDuo bead
3 mm fire-polished bead
110 seed bead
110 cylinder bead
150 seed bead
June 2018 4
Showcase SuperDuo and MiniDuo beads with thisbutterfly-inspired modular bracelet.materials
yellow/lavender bracelet 61⁄2 in. (16.5 cm)
• 20 6 mm fire-polished beads (opaque
white Picasso)
• 5 g 2.5 x 5 mm SuperDuo beads
(metallic amethyst luster)
• 6 g 3.8 mm O-beads (metallic hematite)
• 3 g 2 x 4 mm MiniDuo beads (opaque
amethyst luster)
• 20 3 mm fire-polished beads (opaque
white Picasso)
• 2 g 110 seed beads (Toho 704,
matte Andromeda)
• 1 g 110 cylinder beads (Miyuki DB0205,
opaque luster dark cream)
• 1 g 150 seed beads (Toho 2608F,
semi-glazed lavender)
• Fireline, 4 lb. test, or beading thread,
size D
• beading needles, #12
• 1 toggle clasp
• 4 4 mm open jump rings
• 2 pairs of chainnose, flatnose, and/or
bentnose pliers.
lavender/blue bracelet colors
• 6 mm fire-polished beads (opaque
amethyst luster)
• 2.5 x 5 mm SuperDuo beads (opaque
blue Picasso)
• 3.8 mm O-beads (opaque jet bronze)
• 2 x 4 mm MiniDuo beads (opaque
blue luster)
• 3 mm fire-polished beads (transparent
amethyst luster)
• 110 seed beads (Toho 82F, matte
metallic nebula)
• 110 cylinder beads (Miyuki 0164, opaque
rainbow sky blue)
• 150 seed beads (Toho PF558F, matte
galvanized aluminum)
basicsFacetJewelry.com/basics
• ending and adding thread
• square knot
• opening and closing jump rings
END COMPONENTS1) On a comfortable length of thread, pick up a repeating pattern of an 110 cylinder bead and a SuperDuo bead four times. Leaving a 6-in. (15 cm) tail, sew through all the beads again to form a ring (figure 1, a–b), and tie the working thread and tail together with a square knot. Sew through the next cylinder and SuperDuo, and then sew through the open hole of the same SuperDuo (b–c).2) Pick up a repeating pattern of an O-bead and a MiniDuo bead three times, and then pick up one more O-bead. Sew through the open hole of the next SuperDuo (figure 2, a–b). Repeat this stitch three times to complete the round (b–c). Retrace the thread path, and step up through the first O-bead and the open hole of the first MiniDuo added in this step (c–d).
3) Pick up an O-bead, a SuperDuo, and an O-bead, and sew through the open hole of the next MiniDuo (figure 3, a–b). Repeat this stitch once more (b–c). Pick up a 3 mm fire-polished bead, and sew through the open hole of the next MiniDuo (c–d). Repeat these three stitches three times (d–e), and step up through the first O-bead added in this round (e–f).4) Pick up two 150 seed beads, and sew through the open hole of the next SuperDuo
(figure 4, a–b). Pick up an O-bead, a 6 mm fire-polished bead, and an O-bead, and sew through the open hole of the next SuperDuo (b–c). Pick up two 150s, and sew through the next O-bead, 3 mm, and O-bead (c–d). Repeat these three stitches three times (d–e), and step up through the first two 150s added in this step (e–f). 5) Pick up three cylinders, and sew through
FIGURE 1 FIGURE 2 FIGURE 3
FIGURE 4
ab
c
d
ef
a
b
c
d
e
June 2018 5
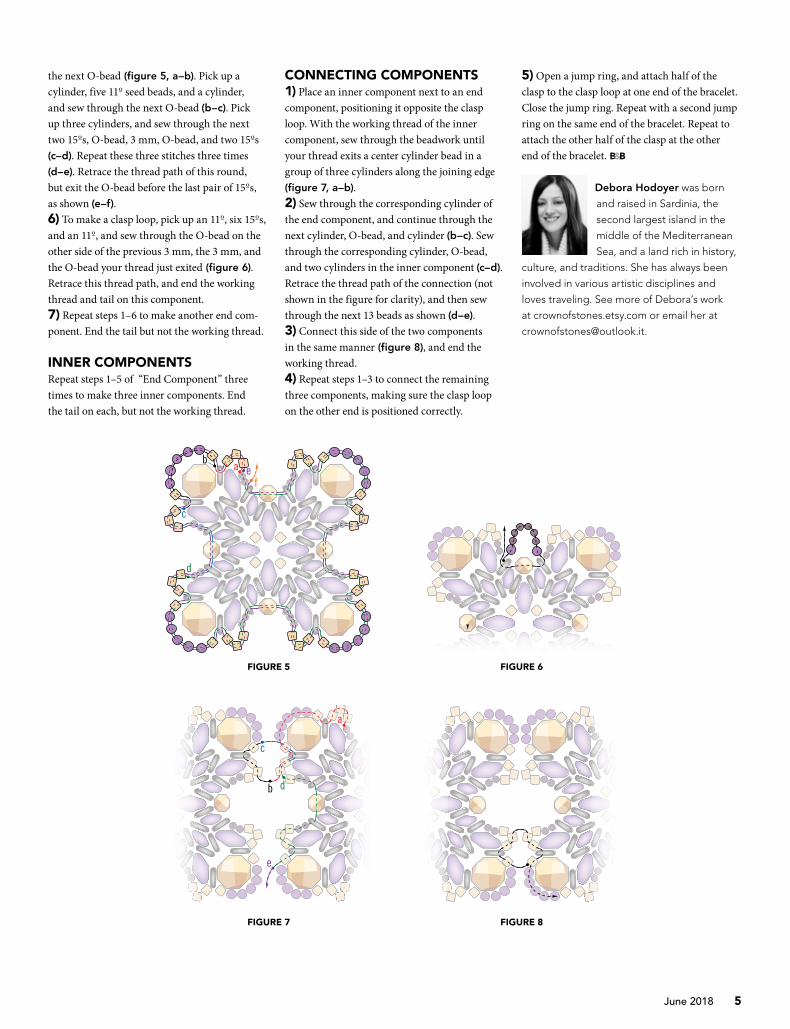
the next O-bead (figure 5, a–b). Pick up a cylinder, five 110 seed beads, and a cylinder, and sew through the next O-bead (b–c). Pick up three cylinders, and sew through the next two 150s, O-bead, 3 mm, O-bead, and two 150s (c–d). Repeat these three stitches three times (d–e). Retrace the thread path of this round, but exit the O-bead before the last pair of 150s, as shown (e–f).6) To make a clasp loop, pick up an 110, six 150s, and an 110, and sew through the O-bead on the other side of the previous 3 mm, the 3 mm, and the O-bead your thread just exited (figure 6). Retrace this thread path, and end the working thread and tail on this component.7) Repeat steps 1–6 to make another end com-ponent. End the tail but not the working thread.
INNER COMPONENTSRepeat steps 1–5 of “End Component” three times to make three inner components. End the tail on each, but not the working thread.
CONNECTING COMPONENTS1) Place an inner component next to an end component, positioning it opposite the clasp loop. With the working thread of the inner component, sew through the beadwork until your thread exits a center cylinder bead in a group of three cylinders along the joining edge
(figure 7, a–b). 2) Sew through the corresponding cylinder of the end component, and continue through the next cylinder, O-bead, and cylinder (b–c). Sew through the corresponding cylinder, O-bead, and two cylinders in the inner component (c–d). Retrace the thread path of the connection (not shown in the figure for clarity), and then sew through the next 13 beads as shown (d–e).3) Connect this side of the two components in the same manner (figure 8), and end the working thread.4) Repeat steps 1–3 to connect the remaining three components, making sure the clasp loop on the other end is positioned correctly.
5) Open a jump ring, and attach half of the clasp to the clasp loop at one end of the bracelet. Close the jump ring. Repeat with a second jump ring on the same end of the bracelet. Repeat to attach the other half of the clasp at the other end of the bracelet. B&B
Debora Hodoyer was born
and raised in Sardinia, the
second largest island in the
middle of the Mediterranean
Sea, and a land rich in history,
culture, and traditions. She has always been
involved in various artistic disciplines and
loves traveling. See more of Debora’s work
at crownofstones.etsy.com or email her at
FIGURE 5
FIGURE 7
FIGURE 6
FIGURE 8

© 2018 Kalmbach Publishing Co. This material may not be reproduced in any form without permission from the publisher.
June 2018 6
PEARLS& LACE BRACELETdesigned by Lorraine Coetzee
DIFFICULTY
bead weaving / peyote stitch
ab c
ab
c
d
6 mm Silky bead
6 mm pearl
2.5 x 5 mm SuperDuo bead
1.5 x 5 mm DragonScale bead
3.8 mm O-bead
3 mm pearl
110 cylinder bead, color A
110 cylinder bead, color B
June 2018 7
A fringe of Dragon Scale beads around Swarovski crystal pearls gives this summery bracelet its lacy look.materials
bracelet 7½ in. (19.1 cm)
• 24 6 mm Silky beads (pastel
light brown/coco)
• Swarovski crystal pearls
- 12 6 mm (light gold)
- 52 3 mm (gold)
• 15 2.5 x 5 mm SuperDuo
beads (metallic suede light
green)
• 2 g 3.8 mm O-beads (crystal
golden rainbow)
• 8 g 1.5 x 5 mm Dragon
Scale beads (Czech, crystal
green rainbow)
• 110 cylinder beads (Miyuki
Delica)
- 1 g color A (DB1845,
Duracoat galvanized
sea green)
- 1 g color B (DB1834F,
Duracoat galvanized matte
champagne)
• Fireline, 6 lb. test
• beading needles, #10 or #12
basics• square knot
• peyote stitch: odd-count
• zipping up or joining
• ending and adding thread
FacetJewelry.com/basics
How to pick up the Silky beads: The top of the two-hole Silky bead is the side with the bump. When picking up a ring of beads includ-ing Silkies, make sure that you’re sewing through the correct hole to ensure that they will be face up.
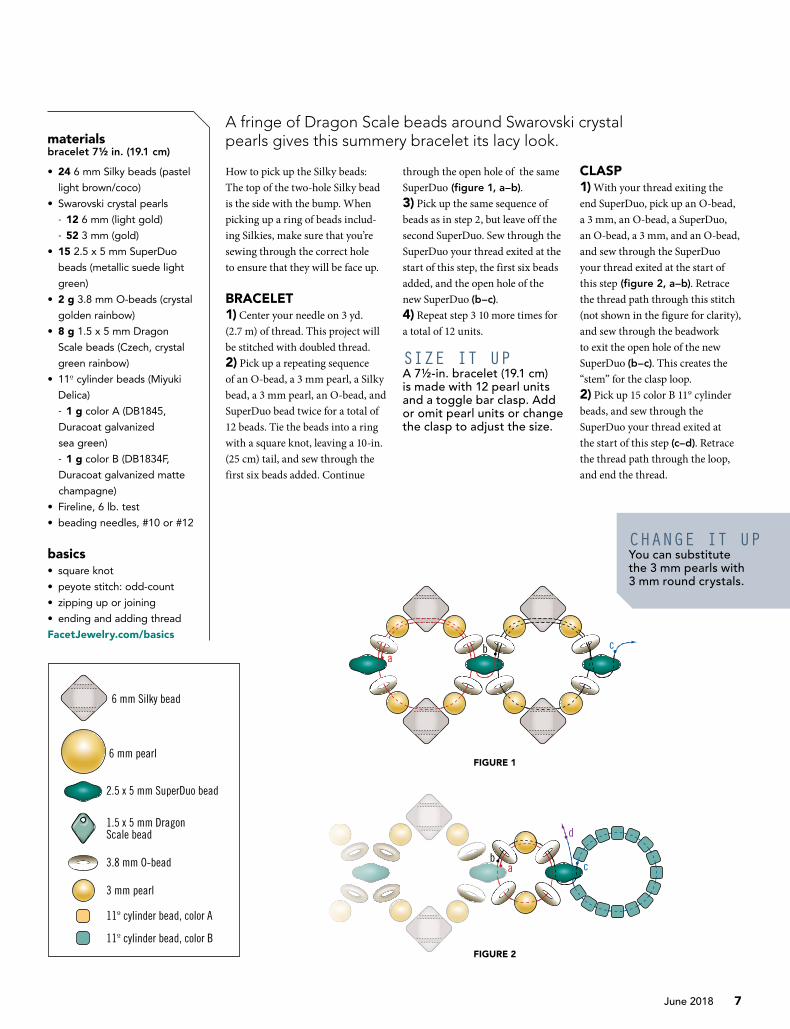
BRACELET1) Center your needle on 3 yd. (2.7 m) of thread. This project will be stitched with doubled thread. 2) Pick up a repeating sequence of an O-bead, a 3 mm pearl, a Silky bead, a 3 mm pearl, an O-bead, and SuperDuo bead twice for a total of 12 beads. Tie the beads into a ring with a square knot, leaving a 10-in. (25 cm) tail, and sew through the first six beads added. Continue
through the open hole of the same SuperDuo (figure 1, a–b). 3) Pick up the same sequence of beads as in step 2, but leave off the second SuperDuo. Sew through the SuperDuo your thread exited at the start of this step, the first six beads added, and the open hole of the new SuperDuo (b–c). 4) Repeat step 3 10 more times for a total of 12 units.
SIZE IT UPA 7½-in. bracelet (19.1 cm) is made with 12 pearl units and a toggle bar clasp. Add or omit pearl units or change the clasp to adjust the size.
CLASP1) With your thread exiting the end SuperDuo, pick up an O-bead, a 3 mm, an O-bead, a SuperDuo, an O-bead, a 3 mm, and an O-bead, and sew through the SuperDuo your thread exited at the start of this step (figure 2, a–b). Retrace the thread path through this stitch (not shown in the figure for clarity), and sew through the beadwork to exit the open hole of the new SuperDuo (b–c). This creates the “stem” for the clasp loop.2) Pick up 15 color B 110 cylinder beads, and sew through the SuperDuo your thread exited at the start of this step (c–d). Retrace the thread path through the loop, and end the thread.
FIGURE 1
FIGURE 2
CHANGE IT UPYou can substitute the 3 mm pearls with 3 mm round crystals.

a
b
cd
a
b
cd
June 2018 8
3) Using the tail, repeat step 1 at the other end of the bracelet to create a stem for the toggle bar. 4) Pick up five Bs, and sew through the SuperDuo your thread exited at the start of this step to form a ring
(figure 3). Retrace the thread path, and end the thread.
TOGGLE BAR 1) On 1 yd. (.9 m) of thread, attach a stop bead, leaving a 6-in. (15 cm) tail. Pick up 13 color B cylinder beads. These beads will form the first two rows of the toggle bar as the next row is added. Using color Bs, work in flat odd-count peyote to make a strip that is 13 beads wide by eight rows long. Roll the strip into a tube, and zip up the first and last rows. End the tail but not the working thread.2) Sew through the beadwork to exit the eighth cylinder from the end (figure 4, a–b). 3) Pick up four Bs, and sew through the middle B in the loop at the end of the bracelet (b–c). Pick up four Bs, and sew through the sixth cylinder from the end of the tube, as shown (c–d). Retrace the thread path, and end the thread.
EMBELLISHMENT1) Add a comfortable length of thread at one end of the bracelet, and exit the inner hole of the second SuperDuo from the end
(figure 5, point a).2) Pick up a color A 110 cylinder bead, a 6 mm pearl, and an A, and sew through the next SuperDuo
(figure 5, a–b). The 6 mm should lie in the opening between two Silky beads. Pick up an A, and sew back through the pearl. Pick up an A, and sew through the SuperDuo your thread exited at the start of this step (b–c). Sew through the first A, pearl, and A picked up, and continue through both holes of the next SuperDuo (c–d).
note As an alternative to a stitched toggle bar and loop, attach a pre-fab clasp to the loops at the ends of the bracelet, but use only five cylinder beads for each loop.
FIGURE 4
FIGURE 5
FIGURE 3

ab
c d
e
a
b
c
June 2018 9
3) Repeat step 2 for the remainder of the bracelet. After adding the last pearl, sew through only the first hole of the next SuperDuo.4) To get your thread into position for adding the Dragon Scale beads, sew through one loop around the last pearl, and sew back through the adjacent A and pearl, as shown
(figure 6).5) Pick up a B, seven Dragon Scale beads, and a B, and sew through the pearl again to form a loop around it (figure 7, a–b). Continue through the first B and the first two Dragon Scales (b–c). Flip the Dragon Scales up to be out of the way, and sew through the nearest hole of the adjacent Silky (c–d). Flip the beads back down over the Silky, and sew through the last two Dragon Scales, the next B, and the pearl (d–e).6) Repeat step 5 to add beads around the other side of the pearl, but do not sew through the pearl at the end of the step (figure 8, a–b). To get into position to embellish around the next pearl, sew through the next A, SuperDuo (both holes), A, and pearl (b–c).7) Repeat steps 5–6 until you reach the end of the bracelet, and end the thread. B&B
Lorraine Coetzee
is a beading artist
from Cape Town,
South Africa.
Her designs have
been featured in South African
and international publications.
She sells patterns, tutorials, and
ready-made jewelry on her Etsy
site. When she is not being cre-
ative, she can be found chasing
after her dog Mishka who loves
stealing her beads. See more
of Lorraine’s designs online at
trinitydj.co.za or trinitydj.etsy.com.
FIGURE 6
FIGURE 7
FIGURE 8

© 2018 Kalmbach Publishing Co. This material may not be reproduced in any form without permission from the publisher.
June 2018 10
STAR STRUCK BRACELETdesigned by Kathy Cook
DIFFICULTY
bead weaving

a
bc b c
a
a
bc
5 x 8 mm DiamonDuobead, color A
5 x 8 mm DiamonDuobead, color B
5 x 8 mm DiamonDuobead, color C
3.4 mm drop bead
110 seed bead
150 seed bead
ab c
de
June 2018 11
Work up a quick, patriotic bracelet for Independence Day, using three colors of DiamondDuos together.materials
red/silver/blue bracelet 7 in. (18 cm)
• 5 x 8 mm DiamonDuo beads
- 40 color A (matte silver)
- 21 color B (coral lumi pecan)
- 20 color C (pastel Montana)
• 30 3.4 mm drop beads (Miyuki
DP181, galvanized silver)
• 1 g 110 seed beads (Miyuki
55006, full Labrador)
• 1 g 150 seed beads (Miyuki
55006, full Labrador)
• 1 ball-and-socket clasp
• Fireline, 6 or 8 lb. test
• beading needles, #11
black/turquoise/grey bracelet colors
• 5 x 8 mm DiamonDuo beads
- color A (turquoise AB)
- color B (jet)
- color C (concrete gray)
• 3.4 mm drop beads (Miyuki
DP401F, black opaque matte)
• 110 seed beads (Miyuki 401F,
black opaque matte)
• 150 seed beads (Miyuki, 401F,
black opaque matte)
red/gold/green bracelet colors
• 5 x 8 mm DiamonDuo beads
- color A (matte gold)
- color B (red Picasso)
- color C (moss green)
• 3.4 mm drop beads (Miyuki
DP457, metallic dark bronze)
• 110 seed beads (Miyuki 457,
metallic dark bronze)
• 150 seed beads (Miyuki 457,
metallic dark bronze)
basicsFacetJewelry.com/basics• square knot
• ending and adding thread
Working with the DiamonDuos: The DiamonDuo beads have a faceted diamond top, a flat back, and two holes. Make sure that both holes are open. When picking up the DiamonDuos to form the stars, it helps to lay them out on your work surface, and then make sure that all beads are picked up at the same end with the facets facing up.
BRACELET1) On 2 yd. (1.8 m) of thread, pick up one color A DiamonDuo bead and five color B DiamonDuo beads. Leaving a 6-in. (15 cm) tail, sew through the beads again (figure 1, a–b), and tie them into a ring with a square knot. Continue through the A and the open hole of the same A (b–c). 2) Pick up two As, one color C DiamonDuo, and two As, and sew through the A your thread exited at the start of this step (figure 2, a–b). Continue through the next two As and the C, and then sew through the open hole of the same C (b–c).3) Pick up two Cs, an A, and two Cs, and sew through the C your thread exited at the start of
this step (figure 3, a–b). Continue through the next two Cs and the new A, and sew through the open hole of the same A (b–c).4) Pick up two As, a B, and two As, and sew through the A your thread exited at the start of this step (figure 4, a–b). Continue through the next two As and the B, and sew through the open hole of the same B (b–c).5) Pick up two Bs, an A, and two Bs, and sew through the B your thread exited at the start of this step (c–d). Continue through the next two Bs and the A, and sew through the open hole of the same A (d–e).6) Repeat steps 2–5 twice for a total of 13 stars.7) Repeat steps 2–4 once more for a total of 16 stars or to the desired length.
FIRST EMBELLISHMENT ROUND When you have reached the desired bracelet length, make sure your thread exits the open hole of the end DiamonDuo. 1) Pick up two 150 seed beads, an 110 seed bead,
FIGURE 1 FIGURE 2
FIGURE 3
FIGURE 4

a
bcd
e f
g
ab
cdefg
June 2018 12
and two 150s, and sew through the open hole of the next DiamonDuo, which forms a single-star point (figure 5, a–b). 2) Pick up two 150s, an 110, and two 150s, and sew through the open holes of the next two DiamonDuos, which form a double-star point (b–c).3) Repeat step 2 until you reach the last star (c–d).4) Repeat step 1 three times around the star at the end of the bracelet (d–e).5) Repeat step 2 along the other edge of the bracelet until you reach the last star (e–f).6) Repeat step 1 two more times to complete the first embellishment round (f–g).
CLASP AND FINISHING 1) Pick up two 150s, an 110, and the loop of a clasp, and sew back through the 110. Pick up two 150s, and sew through the DiamonDuo your thread exited at the start of this step, going in the same direction (figure 6, a–b). Retrace the thread path through the clasp connection two or more times to reinforce (not shown in the figure for clarity). Sew through the next two 150s, 110, two 150s, and DiamonDuo (b–c).2) Pick up five 150s, and sew through the same DiamonDuo (c–d) to form a seed bead picot around the single-star point. Sew through the next two 150s, 110, two 150s, and two DiamonDuos (d–e).3) Pick up an 110, a drop bead, and an 110, and sew through the same two DiamonDuos again to form a drop picot around the double-star
point, an continue through the next two 150s, 110, two 150s, and two DiamonDuos (e–f).4) Repeat step 3 (f–g) to add drop picots around all double-star points to the end of the bracelet. Sew through the next two 150s, 110, two 150s, and one DiamonDuo (single star point). 5) Work as in step 2 to make a seed bead picot around this single-star point. Sew through the next two 150s, 110, two 150s, and the end DiamonDuo.6) Repeat step 1 to add the other end of the clasp.7) Repeat step 2 to add a picot around the next single-star point. 8) Repeat step 4 to add drop picots around all double-star points to the end of the bracelet.9) Work as in step 2 to add a seed bead picot around the final single-star point. End the working thread and tail. B&B
Kathy Cook started beadweav-
ing and looming in the 1970s.
She stopped to raise a family
and started back up in the 1990s
because of a friend and all of the
exciting new beads. She is influenced by bead
colors and textures and by visiting her local
bead shop. She and her husband are retired in
Oklahoma. Contact Kathy at [email protected].
CHANGE IT UP! Our 7-in. (18 cm) bracelet (with clasp) contains 16 star shapes in a repeating pattern of red, silver, blue, and silver. Star units can be omitted or added to change the bracelet’s length. Or change the star colors and color pattern for different seasons or holidays.
FIGURE 5
FIGURE 6

© 2018 Kalmbach Publishing Co. This material may not be reproduced in any form without permission from the publisher.
June 2018 13
FANCY FAUX BANGLEdesigned by Andrea Mazzenga
DIFFICULTY
cubic right-angle weave / bead weaving
June 2018 14
This pretty faux “bangle” is made using cubic right-angle weave and is the perfect solution for people who have a hard time fit-ting a standard bangle over their hand.
materials ivory bracelet 6¾ in. (17.1 cm)
• 116 4 mm crystal pearls
(Swarovski, ivory)
• 83 3 mm bicone crystals
(Swarovski, Jet AB2X)
• 3 g 80 seed beads (Miyuki 94204,
Duracoat galvanized Champagne)
• 3 g 110 seed beads (Miyuki 94204,
Duracoat galvanized Champagne)
• Fireline, 6 or 8 lb. test
• beading needles, #10
• 1 6 mm magnetic clasp
green bracelet colors
• 4 mm round druks (green luster)
• 3 mm bicone crystals (Swarovski,
Jet AB2X)
• 80 seed beads (Miyuki 9311, topaz
gold luster)
• 110 seed beads (Miyuki 462,
metallic gold iris)
bronze bracelet colors
• 4 mm crystal pearls (Swarovski,
bronze)
• 3 mm bicone crystals (Swarovski,
dark amethyst AB)
• 80 seed beads (Miyuki 13F, silver-
lined dark smoky amethyst)
• 110 seed beads (Miyuki 4203,
Duracoat galvanized yellow gold)
silver bracelet colors
• 4 mm crystal pearls (Swarovski,
silver)
• 3 mm bicone crystals (Swarovski,
crystal AB2X)
• 80 seed beads (Miyuki 1051,
galvanized silver)
• 110 seed beads (Miyuki 1051,
galvanized silver)
Kits are available at buttercupbeads.com
basicsFacetJewelry.com/basics• square knot
• ending and adding thread
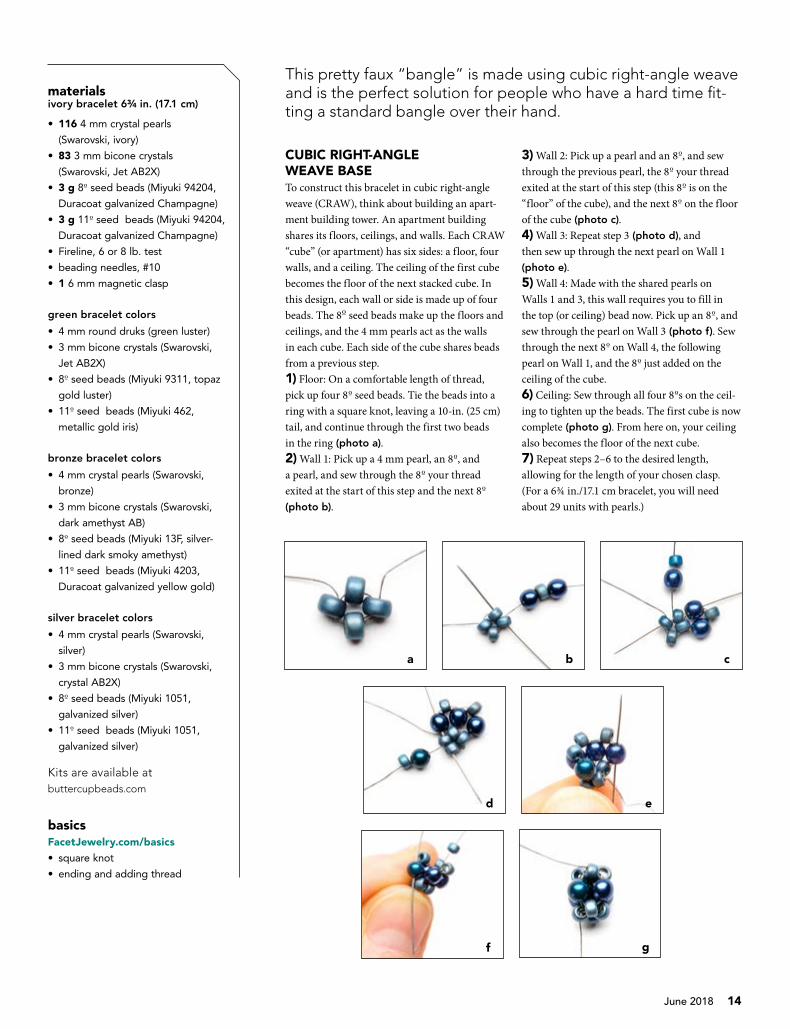
CUBIC RIGHT-ANGLE WEAVE BASETo construct this bracelet in cubic right-angle weave (CRAW), think about building an apart-ment building tower. An apartment building shares its floors, ceilings, and walls. Each CRAW “cube” (or apartment) has six sides: a floor, four walls, and a ceiling. The ceiling of the first cube becomes the floor of the next stacked cube. In this design, each wall or side is made up of four beads. The 80 seed beads make up the floors and ceilings, and the 4 mm pearls act as the walls in each cube. Each side of the cube shares beads from a previous step. 1) Floor: On a comfortable length of thread, pick up four 80 seed beads. Tie the beads into a ring with a square knot, leaving a 10-in. (25 cm) tail, and continue through the first two beads in the ring (photo a).2) Wall 1: Pick up a 4 mm pearl, an 80, and a pearl, and sew through the 80 your thread exited at the start of this step and the next 80 (photo b).
3) Wall 2: Pick up a pearl and an 80, and sew through the previous pearl, the 80 your thread exited at the start of this step (this 80 is on the “floor” of the cube), and the next 80 on the floor of the cube (photo c). 4) Wall 3: Repeat step 3 (photo d), and then sew up through the next pearl on Wall 1
(photo e). 5) Wall 4: Made with the shared pearls on Walls 1 and 3, this wall requires you to fill in the top (or ceiling) bead now. Pick up an 80, and sew through the pearl on Wall 3 (photo f). Sew through the next 80 on Wall 4, the following pearl on Wall 1, and the 80 just added on the ceiling of the cube. 6) Ceiling: Sew through all four 80s on the ceil-ing to tighten up the beads. The first cube is now complete (photo g). From here on, your ceiling also becomes the floor of the next cube.7) Repeat steps 2–6 to the desired length, allowing for the length of your chosen clasp. (For a 6¾ in./17.1 cm bracelet, you will need about 29 units with pearls.)
a
d
b
e
c
f g

June 2018 15
CLASPWith your thread exiting an 80 at the end of the base, pick up an 80, and sew through the loop of the clasp. Sew back through the 80 you just picked, skip an 80 in the end round, and sew through the opposite 80 on the base (photo h). Retrace the thread path three more times so that all the 80s on the end are attached, and the clasp is centered over the base (photo i). Tie a knot, but do not end the thread.
EMBELLISHMENT 1) Sew through an adjacent pearl. Pick up a 3 mm bicone crystal, and sew through the next pearl along this edge (photo j). Repeat
this stitch to add crystals between the pearls along this edge for the remainder of the base 2) Work as in “Clasp” to attach the other half of the clasp.3) Repeat step 1 to embellish along the next edge of the base. Once completed, you should have two rows of crystals along the base of pearls (photo k).4) Sew through the beadwork to exit an end crystal, with your needle pointing toward the opposite end of the beadwork (photo l).5) Pick up an 110 seed bead, a crystal, and an 110. Cross over to the other row of crystals, and sew through the second crystal from the end
(photo m).
h
k
i
l
j
m

June 2018 16
6) Pick up an 110, a crystal, and an 110, and sew through the third crystal in the first row of crystals. Continue adding crystals for the remainder of the base.
supply swap If desired, replace the 110s in steps 6–7 with 150s.
7) When you’ve reached the end, sew through the beadwork to exit the end crystal in the other row, with your needle pointing toward the opposite end of the base. Pick up an 110, and sew back through the last crystal added between the rows (photo n). Pick up an 110, and sew through the next crystal in the other row (photo o). Repeat to add 110s along the
entire length. Tie a knot at the end, but do not end the thread yet.8) Sew through the beadwork to exit an end pearl on the underside of the bracelet, with your needle pointing toward the opposite end. Pick up an 110, and sew through the next pearl (photo p). Repeat this stitch to add 110s between the pearls along this edge for the length of the bracelet, using tight, even tension. The inner edge of the bracelet will start to curl, which gives the faux bangle its structure. 9) Sew through the beadwork to exit the end pearl on the remaining row on the underside of the bracelet. Work as in step 8 to add 110s between the pearls along this edge for the remainder of the bracelet. End the thread. B&B
Andrea Mazzenga, RN, is
a wife, mother, grandmother,
and lampwork artist. She dis-
covered her love of beads with
her first glass bead-making
class more than 15 years ago. In 2007, she left
medicine for sparkly things, and believes that
everyone should take the time to explore and
develop their creative passions. She has owned
Buttercup Beads in Audubon, PA, for 11 years.
Contact Andrea at buttercupbeads.com or
n o p