stud y mater ial bcanewhorizonindia.edu/nhc-marathahalli/wp-content/uploa… · · 2017-04-07stud...
TRANSCRIPT

STUDY MATERIAL
BCA VI SEMESTER
Visual PROGRAMMING (BCA403T)
Prepared by
G.GNANESWARI
Asst. Professor
NHC, Marathalli.

Introduction to Visual Basic 6
1. The concept of computer programming
Programming means designing a set of instructions to instruct the computer to carry out certain jobs that are very much faster than human beings can do. The earliest programming language is called machine language that uses binary codes comprises 0 and 1 to communicate with the computer. Machine language is extremely difficult to learn . Fortunately , scientists have invented high level programming languges that are much easier to master. Some of the high level programming languages are Java, Javascript, C, C++, c# and Visual Basic.
1.2 What is Visual Basic?
VISUAL BASIC is a high level programming language that evolved from the earlier DOS version called BASIC. BASIC means Beginners' All-purpose Symbolic Instruction Code. The code looks a lot like English Language. Now, there are many versions of Visual Basic available in the market, the lastest being Visual Basic 2015 that is bundled with other programming languages such as C#. However, the most popular one and still widely used by many VB programmers is none other than Visual Basic 6. 0.
VISUAL BASIC is a VISUAL Programming Language because programming is done in a graphical environment. In VB6 , you just need to drag and drop any graphical object anywhere on the form and click on the object to enter the code window and start programming.
In addition, Visual Basic 6 is Event-driven because we need to write code that performs some tasks to response to certain events. The events usually comprises but not limited to the user's inputs. Some of the events are load, click, double click, drag and drop, pressing the keys and more. We will learn more about events in later lessons. Besides that, a VB6 Program is made up of many subprograms or modules, each has its own program code, and each can be executed independently; they can also be linked together in one way or another.
1.3 What programs can you create with Visual Basic 6?
In VB 6, you can create any program depending on your objective. For math teachers, you can create mathematical programs such as Geometric Progression, Quadratic Equation Solver, Simultaneous Equation Solver ,Prime Number, Factors

Finder, Quadratic Function Graph Plotter and so on. For science teachers, you can create simulation programs such as Projectile, Simple Harmonic Motion, Star War etc. If you are in business, you can also create business applications such as inventory management system , Amortization Calculator , investments calculator, point-of-sale system, payroll system, accounting program and more to help manage your business and increase productivity. For those of you who like games , you can create programs such as slot machine, reversi, tic tac toe and more. Besides, you can create multimedia programs such as Smart Audio Player, Multimedia Player and more. Indeed, there is no limit to what program you can create ! We offer many sample codes in our tutorial.
1.4 The Visual Basic 6 Integrated Development Environment
Before you can write programs in VB 6, you need to install Visual Basic 6 compiler in your computer. You can purchase a copy of Microsoft Visual Basic 6.0 Learning Edition or Microsoft Visual Basic Professional Edition from Amazon.com, both are vb6 compilers. If you have already installed Microsoft Office in your PC or laptop, you can also use the built-in Visual Basic Application in Excel to start creating Visual Basic programs without having to spend extra cash to buy the VB6 compiler.
You can also install VB6 on Windows 10 but you need to follow certain steps otherwise installation will fail. First, you need to run setup as administrator. Next, you need to use custom installation. Clear the checkbox for Data Access. If you don't, set up will hang at the end of the installation. click next and wait for installation to complete. For complete instructions, please follow this link Install VB6 on Windows 10
After installing vb6 compiler, the icon with appear on your desktop or in your programs menu. Click on the icon to launch the VB6 compiler. On start up, Visual Basic 6.0 will display the following dialog box as shown in Figure 1.1.

Figure 1.1: New Project Dialog
You can choose to either start a new project, open an existing project or select a list of recently opened programs. A project is a collection of files that make up your application. There are various types of applications that we could create, however, we shall concentrate on creating Standard EXE programs (EXE means executable). Before you begin, you must think of an application that might be useful, have commercial values . educational or recreational. click on the Standard EXE icon to go into the actual Visual Basic 6 programming environment.
When you start a new Visual Basic 6 Standard EXE project, you will be presented with the Visual Basic 6 Integrated Development Environment (IDE). The Visual Basic 6 Integrated Programming Environment is show in Figure 1.2. It consists of the toolbox, the form, the project explorer and the properties window.

Figure 1.2: VB6 Programming Environment
Form is the primary building block of a Visual Basic 6 application. A Visual Basic 6 application can actually comprises many forms; but we shall focus on developing an application with one form first. We will learn how to develop applications with multiple forms later. Before you proceed to build the application, it is a good practice to save the project first. You can save the project by selecting Save Project from the File menu, assign a name to your project and save it in a certain folder.
2.1 Creating Your First Application
In this lesson, we will not delve into the technical aspects of Visual Basic programming yet, we just want you to try out the examples below to see how does a Visual Basic program behave.
First of all, launch Microsoft Visual Basic 6 compiler that you
have installed earlier. In the New Project Dailog , choose Standard
EXE to enter Visual Basic 6 integrated development environment.
In the VB6 IDE, a default form with the name Form1 will be
presented to you. Now, double click on Form1 to bring up the
source code window for Form1 as shown in Figure 2.1 . The top of

the source code window consists of a list of objects and their
associated events or procedures. In the source code window, the
object displayed is Form1 and the associated procedure is Load.
Figure 2.1 Source Code Window
When you click on the object box, the drop-down list will display a
list of objects you have inserted into your form as shown in figure
2.2. Here, you can see a form with the name Form1, a command
button with the name Command1, a Label with the name Label1
and a Picture Box with the name Picture1. Similarly, when you
click on the procedure box, a list of procedures associated with
the object will be displayed as shown in Figure 2.3. Some of the
procedures associated with the object Form1 are Activate, Click,
DblClick (which means Double-Click) , DragDrop, keyPress and
more. Each object has its own set of procedures. You can always
select an object and write codes for any of its procedure in order
to perform certain tasks.
You do not have to worry about the beginning and the end statements (i.e. Private Sub Form_Load.......End Sub.); Just key

in the lines in between the above two statements exactly as are shown here. When you press F5 to run the program, you will be surprised that nothing shown up .In order to display the output of the program, you have to add the Form1.show statement like in Example 2.1.1 or you can just use Form_Activate ( ) event procedure as shown in example 2.1.2. The command Print does not mean printing using a printer but it means displaying the output on the computer screen. Now, press F5 or click on the run button to run the program and you will get the output as shown in Figure 2.4.
You can also perform arithmetic calculations as shown in Example 2.1.2. VB uses * to denote the multiplication operator and / to denote the division operator. The output is shown in Figure 2.5, where the results are arranged vertically.
Figure 2.2: List of Objects

Figure 2.3: List of Procedures
Example 2.1.1
Private Sub Form_Load ( )
Form1.show
Print “Welcome to Visual Basic tutorial”
End Sub

Figure 2.4 : The output of Example 2.1.1
Example 2.1.2
Private Sub Form_Activate ( )
Print 20 + 10 Print 20 - 10 Print 20 * 10 Print 20 / 10
End Sub
Figure 2.5: The output of Example 2.1.2
You can also use the + or the & operator to join two or more texts (string) together like in example 2.1.4 (a) and (b)
Example 2.1.4(a)
Private Sub
A = "Tom" B = “likes"

C = “to" D = “eat" E = “burger" Print A + B + C + D + E
End Sub
Example 2.1.4(b)
Private Sub
A = "Tom" B = “likes" C = “to" D = “eat" E = “burger" Print A & B & C & D & E
End Sub
The Output of Example 2.1.4(a) &(b) is as shown in Figure 2.7.
Figure 2.7
2.2 Steps in Building a Visual Basic Application
Step 1 : Design the interface by adding controls to the form and set their properties
Step 2 : Write code for the event procedures
3.1 The Control Properties

Before writing an event procedure for the control to response to an event, you have to set certain properties for the control to determine its appearance and how will it work with the event procedure. You can set the properties of the controls in the properties window or at runtime.
Figure 3.1 on the right is a typical properties window for a form. You can rename the form caption to any name that you like best. In the properties window, the item appears at the top part is the object currently selected (in Figure 3.1, the object selected is Form1). At the bottom part, the items listed in the left column represent the names of various properties associated with the selected object while the items listed in the right column represent the states of the properties. Properties can be set by highlighting the items in the right column then change them by typing or selecting the options available.
For example, in order to change the caption, just highlight Form1 under the name Caption and change it to other names. You may also try to alter the appearance of the form by setting it to 3D or flat. Other things you can do are to change its foreground and background color, change the font type and font size, enable or disable, minimize and maximize buttons and more.
You can also change the properties at runtime to give special effects such as change of color, shape, animation effect and so on. For example the following code will change the form color to red every time the form is loaded. VB uses hexadecimal system to represent the color. You can check the color codes in the properties windows which are showed up under ForeColor and BackColor .

Figure 3.1
Example 3.1: Program to change background color
This example changes the background colour of the form using the BackColor property.
Private Sub Form_Load()
Form1.Show Form1.BackColor = &H000000FF&
End Sub
Example 3.2: Program to change shape
This example is to change the control's Shape using the Shape property. This code will change the shape to a circle at runtime.

Private Sub Form_Load()
Shape1.Shape = 3
End Sub
We are not going into the details on how to set the properties yet. However, we would like to stress a few important points about setting up the properties.
You should set the Caption Property of a control clearly so that a user knows what to do with that command.
Use a meaningful name for the Name Property because it is easier to write and read the event procedure and easier to debug or modify the programs later.
One more important property is whether to make the control enabled or not.
Finally, you must also considering making the control visible or invisible at runtime, or when should it become visible or invisible.
3.2 Handling some of the common controls
Figure 3.2 below is the VB6 toolbox that shows the basic controls.
Figure 3.2: Toolbox
3.2.1 The Text Box

The text box is the standard control for accepting input from the user as well as to display the output. It can handle string (text) and numeric data but not images or pictures. Just like text fields in websites, powered not by Windows, but typically linux web hosting platforms like iPage, these fields collect user input.String in a text box can be converted to a numeric data by using the function Val(text). The following example illustrates a simple program that processes the input from the user.
Example 3.3
In this program, two text boxes are inserted into the form together with a few labels. The two text boxes are used to accept inputs from the user and one of the labels will be used to display the sum of two numbers that are entered into the two text boxes. Besides, a command button is also programmed to calculate the sum of the two numbers using the plus operator. The program use creates a variable sum to accept the summation of values from text box 1 and text box 2.The procedure to calculate and to display the output on the label is shown below. The output is shown in Figure 3.3
Private Sub Command1_Click()
‘To add the values in text box 1 and text box 2
Sum = Val(Text1.Text) + Val(Text2.Text)
‘To display the answer on label 1
Label1.Caption = Sum
End Sub
Figure 3.3
3.2.2 The Label
The label is a very useful control for Visual Basic, as it is not only used to provide instructions and guides to the users, it can also be used to display outputs. One of its most important properties is Caption. Using the syntax label.Caption, it can display text and numeric data . You can change its caption in the properties window and also at runtime. Please refer to Example 3.1 and Figure 3.1 for the usage of label.
3.2.3 The Command Button
The command button is one of the most important controls as it is used to execute commands. It displays an illusion that the button is pressed when the user click on it. The most common event associated with the command button is the Click event, and the syntax for the procedure is
Private Sub Command1_Click ()
Statements
End Sub
3.2.4 The Picture Box
The Picture Box is one of the controls that is used to handle graphics. You can load a picture at design phase by clicking on the picture item in the properties window and select the picture from the selected folder. You can also load the picture at runtime using the LoadPicture method. For example, the statement will load the picture grape.gif into the picture box.
Picture1.Picture=LoadPicture ("C:\VB program\Images\grape.gif")
You will learn more about the picture box in future lessons. The image in the picture box is not resizable.
3.2.5 The Image Box
The Image Box is another control that handles images and pictures. It functions almost identically to the picture box. However, there is one major difference, the image in an Image Box is stretchable, which means it can be resized. This feature is not available in the Picture Box. Similar to the Picture Box, it can also

use the LoadPicture method to load the picture. For example, the statement loads the picture grape.gif into the image box.
Image1.Picture=LoadPicture ("C:\VB program\Images\grape.gif")
3.2.6 The List Box
The function of the List Box is to present a list of items where the user can click and select the items from the list. In order to add items to the list, we can use the AddItem method. For example, if you wish to add a number of items to list box 1, you can key in the following statements
Example 3.4
Private Sub Form_Load ( )
List1.AddItem “Lesson1”
List1.AddItem “Lesson2”
List1.AddItem “Lesson3”
List1.AddItem “Lesson4”
End Sub
The items in the list box can be identified by the ListIndex property, the value of the ListIndex for the first item is 0, the second item has a ListIndex 1, and the third item has a ListIndex 2 and so on
3.2.7 The Combo Box
The function of the Combo Box is also to present a list of items where the user can click and select the items from the list. However, the user needs to click on the small arrowhead on the right of the combo box to see the items which are presented in a drop-down list. In order to add items to the list, you can also use the AddItem method. For example, if you wish to add a number of items to Combo box 1, you can key in the following statements
Example 3.5
Private Sub Form_Load ( )
Combo1.AddItem “Item1”
Combo1.AddItem “Item2”

Combo1.AddItem “Item3”
Combo1.AddItem “Item4”
End Sub
3.2.8 The Check Box
The Check Box control lets the user selects or unselects an option. When the Check Box is checked, its value is set to 1 and when it is unchecked, the value is set to 0. You can include the statements Check1.Value=1 to mark the Check Box and Check1.Value=0 to unmark the Check Box, as well as use them to initiate certain actions. For example, the program will change the background color of the form to red when the check box is unchecked and it will change to blue when the check box is checked. You will learn about the conditional statement If….Then….Elesif in later lesson. VbRed and vbBlue are color constants and BackColor is the background color property of the form.
Example 3.6
Private Sub Command1_Click()
If Check1.Value = 1 And Check2.Value = 0 Then MsgBox "Apple is selected" ElseIf Check2.Value = 1 And Check1.Value = 0 Then MsgBox "Orange is selected" Else MsgBox "All are selected" End If
End Sub
3.2.9 The Option Box
The Option Box control also lets the user selects one of the choices. However, two or more Option Boxes must work together because as one of the Option Boxes is selected, the other Option Boxes will be unselected. In fact, only one Option Box can be selected at one time. When an option box is selected, its value is set to “True” and when it is unselected; its value is set to “False”. In the following example, the shape control is placed in the form together with six Option Boxes. When the user clicks on different option boxes, different shapes will appear. The values of the shape control are 0, 1, and 2,3,4,5 which will make it appear as a

rectangle, a square, an oval shape, a rounded rectangle and a rounded square respectively.
Example 3.7
Private Sub Option1_Click ( )
Shape1.Shape = 0
End Sub
Private Sub Option2_Click()
Shape1.Shape = 1
End Sub
Private Sub Option3_Click()
Shape1.Shape = 2
End Sub
Private Sub Option4_Click()
Shape1.Shape = 3
End Sub
Private Sub Option5_Click()
Shape1.Shape = 4
End Sub
Private Sub Option6_Click()
Shape1.Shape = 5
End Sub
3.2.10 The Drive List Box
The Drive ListBox is for displaying a list of drives available in your computer. When you place this control into the form and run the program, you will be able to select different drives from your computer as shown in Figure 3.4

Figure 3.4 The Drive List Box
3.2.11 The Directory List Box
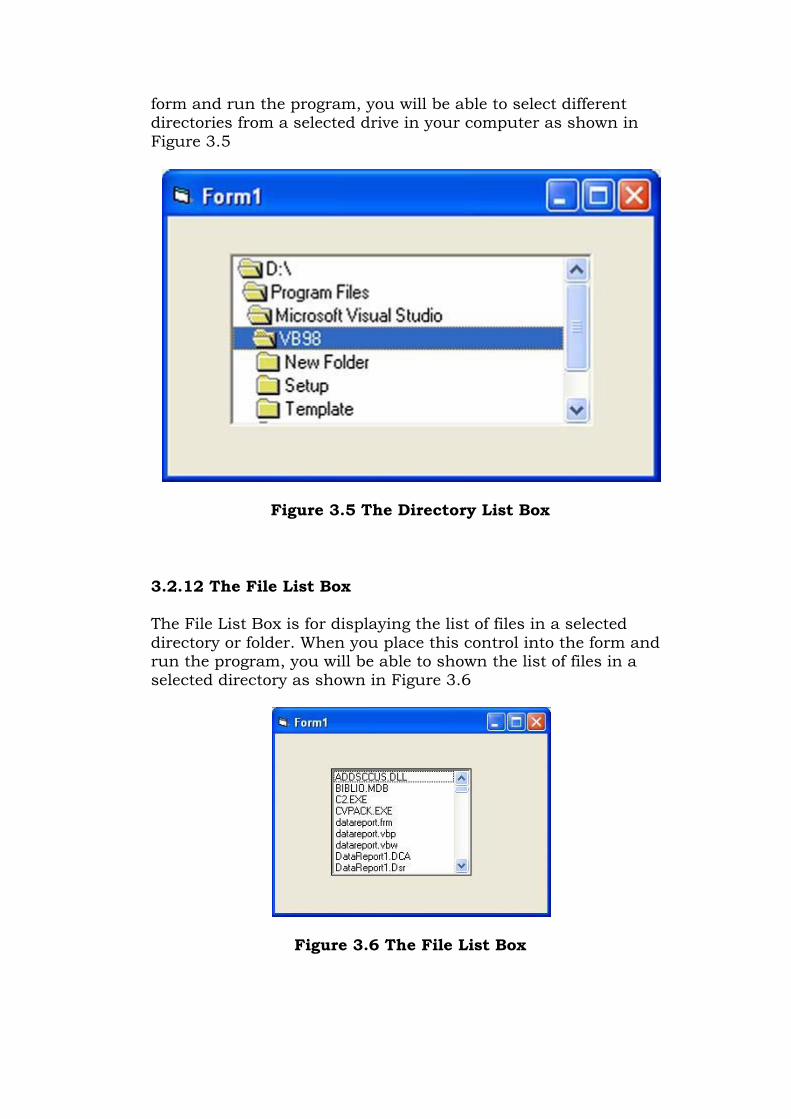
The Directory List Box is for displaying the list of directories or folders in a selected drive. When you place this control into the form and run the program, you will be able to select different directories from a selected drive in your computer as shown in Figure 3.5
Figure 3.5 The Directory List Box

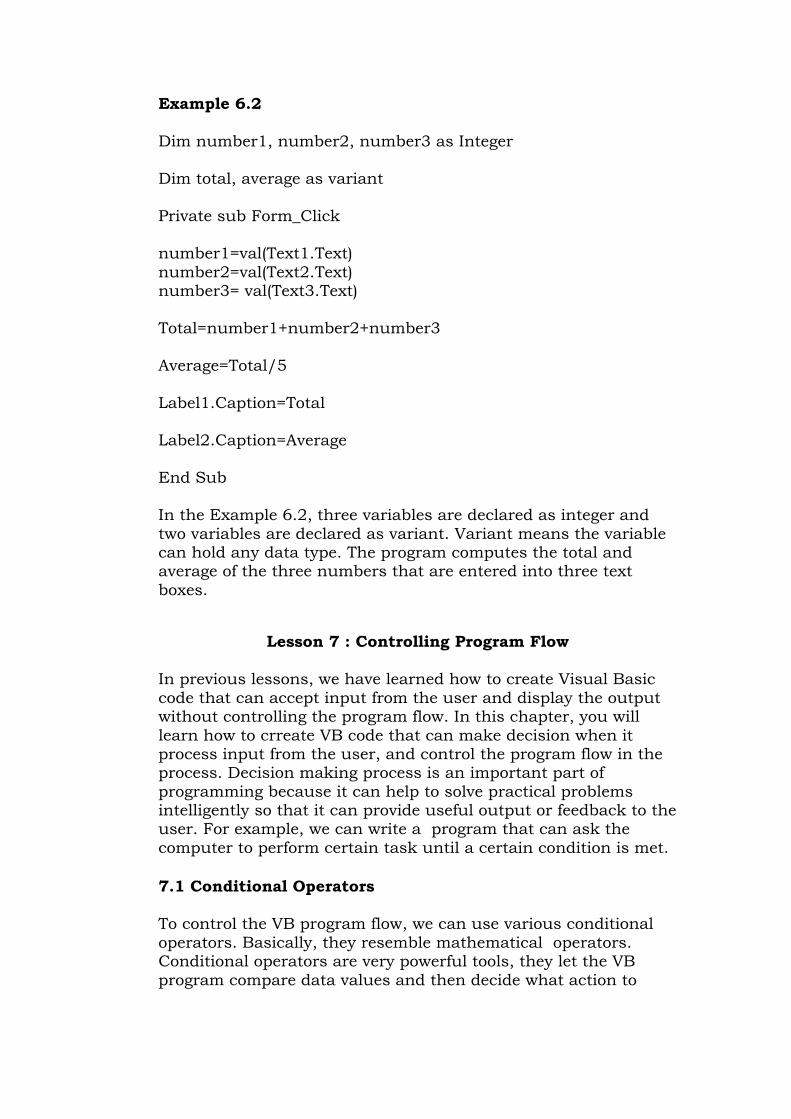
3.2.12 The File List Box
The File List Box is for displaying the list of files in a selected directory or folder. When you place this control into the form and run the program, you will be able to shown the list of files in a selected directory as shown in Figure 3.6
Figure 3.6 The File List Box
You can coordinate the Drive List Box, the Directory List Box and the File List Box to search for the files you want. The procedure will be discussed in later lessons.
3.1 The Control Properties
Before writing an event procedure for the control to response to an event, you have to set certain properties for the control to determine its appearance and how will it work with the event procedure. You can set the properties of the controls in the properties window or at runtime.
Figure 3.1 on the right is a typical properties window for a form. You can rename the form caption to any name that you like best. In the properties window, the item appears at the top part is the object currently selected (in Figure 3.1, the object selected is Form1). At the bottom part, the items listed in the left column represent the names of various properties associated with the selected object while the items listed in the right column represent the states of the properties. Properties can be set by highlighting the items in the right column then change them by typing or selecting the options available.
For example, in order to change the caption, just highlight Form1 under the name Caption and change it to other names. You may also try to alter the appearance of the form by setting it to 3D or

flat. Other things you can do are to change its foreground and background color, change the font type and font size, enable or disable, minimize and maximize buttons and more.
You can also change the properties at runtime to give special effects such as change of color, shape, animation effect and so on. For example the following code will change the form color to red every time the form is loaded. VB uses hexadecimal system to represent the color. You can check the color codes in the properties windows which are showed up under ForeColor and BackColor .
Figure 3.1
Example 3.1: Program to change background color
This example changes the background colour of the form using the BackColor property.
Private Sub Form_Load()

Form1.Show Form1.BackColor = &H000000FF&
End Sub
Example 3.2: Program to change shape
This example is to change the control's Shape using the Shape property. This code will change the shape to a circle at runtime.
Private Sub Form_Load()
Shape1.Shape = 3
End Sub
We are not going into the details on how to set the properties yet. However, we would like to stress a few important points about setting up the properties.
You should set the Caption Property of a control clearly so that a user knows what to do with that command.
Use a meaningful name for the Name Property because it is easier to write and read the event procedure and easier to debug or modify the programs later.
One more important property is whether to make the control enabled or not.
Finally, you must also considering making the control visible or invisible at runtime, or when should it become visible or invisible.
3.2 Handling some of the common controls
Figure 3.2 below is the VB6 toolbox that shows the basic controls.
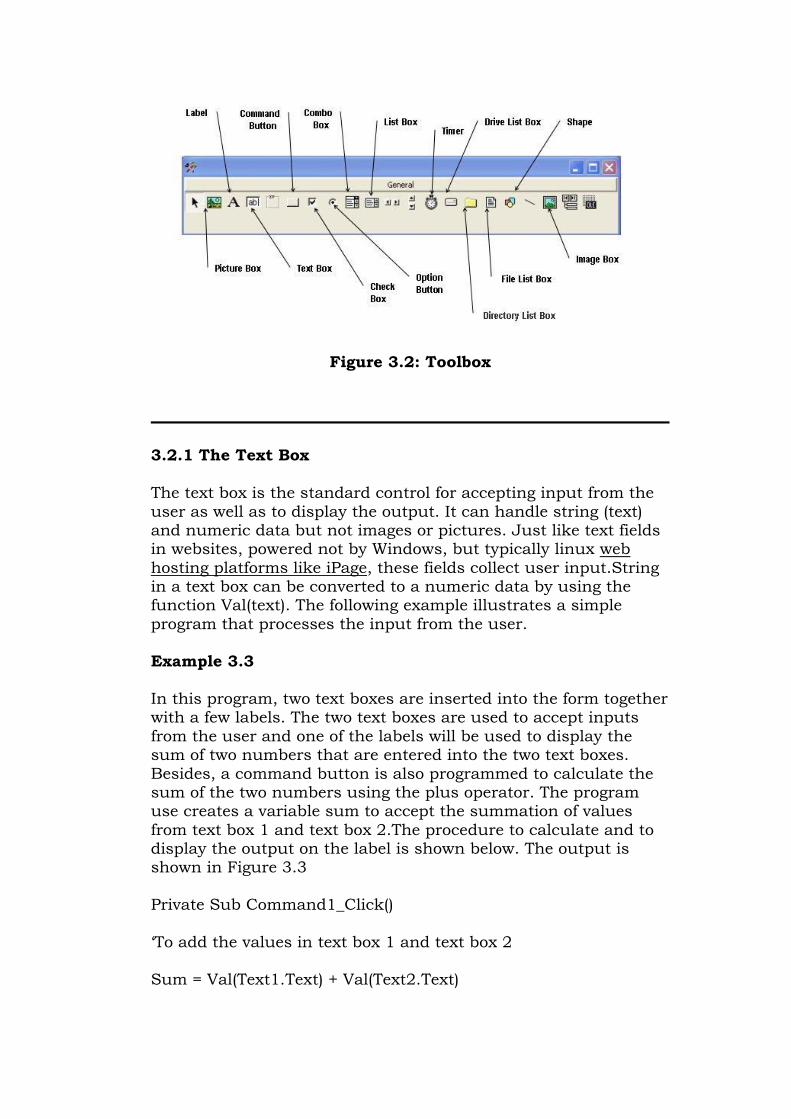
Figure 3.2: Toolbox
3.2.1 The Text Box
The text box is the standard control for accepting input from the user as well as to display the output. It can handle string (text) and numeric data but not images or pictures. Just like text fields in websites, powered not by Windows, but typically linux web hosting platforms like iPage, these fields collect user input.String in a text box can be converted to a numeric data by using the function Val(text). The following example illustrates a simple program that processes the input from the user.
Example 3.3
In this program, two text boxes are inserted into the form together with a few labels. The two text boxes are used to accept inputs from the user and one of the labels will be used to display the sum of two numbers that are entered into the two text boxes. Besides, a command button is also programmed to calculate the sum of the two numbers using the plus operator. The program use creates a variable sum to accept the summation of values from text box 1 and text box 2.The procedure to calculate and to display the output on the label is shown below. The output is shown in Figure 3.3
Private Sub Command1_Click()
‘To add the values in text box 1 and text box 2
Sum = Val(Text1.Text) + Val(Text2.Text)

‘To display the answer on label 1
Label1.Caption = Sum
End Sub
Figure 3.3
3.2.2 The Label
The label is a very useful control for Visual Basic, as it is not only used to provide instructions and guides to the users, it can also be used to display outputs. One of its most important properties is Caption. Using the syntax label.Caption, it can display text and numeric data . You can change its caption in the properties window and also at runtime. Please refer to Example 3.1 and Figure 3.1 for the usage of label.
3.2.3 The Command Button
The command button is one of the most important controls as it is used to execute commands. It displays an illusion that the button is pressed when the user click on it. The most common event associated with the command button is the Click event, and the syntax for the procedure is
Private Sub Command1_Click ()
Statements
End Sub
3.2.4 The Picture Box
The Picture Box is one of the controls that is used to handle graphics. You can load a picture at design phase by clicking on the picture item in the properties window and select the picture from the selected folder. You can also load the picture at runtime using the LoadPicture method. For example, the statement will load the picture grape.gif into the picture box.
Picture1.Picture=LoadPicture ("C:\VB program\Images\grape.gif")
You will learn more about the picture box in future lessons. The image in the picture box is not resizable.
3.2.5 The Image Box
The Image Box is another control that handles images and pictures. It functions almost identically to the picture box. However, there is one major difference, the image in an Image Box is stretchable, which means it can be resized. This feature is not available in the Picture Box. Similar to the Picture Box, it can also use the LoadPicture method to load the picture. For example, the statement loads the picture grape.gif into the image box.
Image1.Picture=LoadPicture ("C:\VB program\Images\grape.gif")
3.2.6 The List Box
The function of the List Box is to present a list of items where the user can click and select the items from the list. In order to add items to the list, we can use the AddItem method. For example, if you wish to add a number of items to list box 1, you can key in the following statements
Example 3.4
Private Sub Form_Load ( )
List1.AddItem “Lesson1”
List1.AddItem “Lesson2”
List1.AddItem “Lesson3”
List1.AddItem “Lesson4”
End Sub
The items in the list box can be identified by the ListIndex property, the value of the ListIndex for the first item is 0, the second item has a ListIndex 1, and the third item has a ListIndex 2 and so on
3.2.7 The Combo Box
The function of the Combo Box is also to present a list of items where the user can click and select the items from the list. However, the user needs to click on the small arrowhead on the right of the combo box to see the items which are presented in a drop-down list. In order to add items to the list, you can also use the AddItem method. For example, if you wish to add a number of items to Combo box 1, you can key in the following statements
Example 3.5
Private Sub Form_Load ( )
Combo1.AddItem “Item1”
Combo1.AddItem “Item2”
Combo1.AddItem “Item3”
Combo1.AddItem “Item4”
End Sub
3.2.8 The Check Box
The Check Box control lets the user selects or unselects an option. When the Check Box is checked, its value is set to 1 and when it is unchecked, the value is set to 0. You can include the statements Check1.Value=1 to mark the Check Box and Check1.Value=0 to unmark the Check Box, as well as use them to initiate certain actions. For example, the program will change the background color of the form to red when the check box is unchecked and it will change to blue when the check box is checked. You will learn about the conditional statement If….Then….Elesif in later lesson. VbRed and vbBlue are color constants and BackColor is the background color property of the form.
Example 3.6

Private Sub Command1_Click()
If Check1.Value = 1 And Check2.Value = 0 Then MsgBox "Apple is selected" ElseIf Check2.Value = 1 And Check1.Value = 0 Then MsgBox "Orange is selected" Else MsgBox "All are selected" End If
End Sub
3.2.9 The Option Box
The Option Box control also lets the user selects one of the choices. However, two or more Option Boxes must work together because as one of the Option Boxes is selected, the other Option Boxes will be unselected. In fact, only one Option Box can be selected at one time. When an option box is selected, its value is set to “True” and when it is unselected; its value is set to “False”. In the following example, the shape control is placed in the form together with six Option Boxes. When the user clicks on different option boxes, different shapes will appear. The values of the shape control are 0, 1, and 2,3,4,5 which will make it appear as a rectangle, a square, an oval shape, a rounded rectangle and a rounded square respectively.
Example 3.7
Private Sub Option1_Click ( )
Shape1.Shape = 0
End Sub
Private Sub Option2_Click()
Shape1.Shape = 1
End Sub
Private Sub Option3_Click()
Shape1.Shape = 2
End Sub
Private Sub Option4_Click()

Shape1.Shape = 3
End Sub
Private Sub Option5_Click()
Shape1.Shape = 4
End Sub
Private Sub Option6_Click()
Shape1.Shape = 5
End Sub
3.2.10 The Drive List Box
The Drive ListBox is for displaying a list of drives available in your computer. When you place this control into the form and run the program, you will be able to select different drives from your computer as shown in Figure 3.4
Figure 3.4 The Drive List Box
3.2.11 The Directory List Box
The Directory List Box is for displaying the list of directories or folders in a selected drive. When you place this control into the
form and run the program, you will be able to select different directories from a selected drive in your computer as shown in Figure 3.5
Figure 3.5 The Directory List Box
3.2.12 The File List Box
The File List Box is for displaying the list of files in a selected directory or folder. When you place this control into the form and run the program, you will be able to shown the list of files in a selected directory as shown in Figure 3.6
Figure 3.6 The File List Box

You can coordinate the Drive List Box, the Directory List Box and the File List Box to search for the files you want. The procedure will be discussed in later lessons.
Lesson 4 : Writing the Code
In this lesson, we shall learn some basic rules about writing the VB program code. Each control or object in VB can run many kinds of events; these events are listed in the dropdown list in the code window that is displayed when you double-click on an object and click on the procedures’ box(refer to Figure 2.3). Among the events are loading a form, clicking on a command button, pressing a key on the keyboard or dragging an object and more. For each event, you need to write an event procedure so that it can perform an action or a series of actions.
To start writing an event procedure, you need to double-click an object. For example, if you want to write an event procedure for clicking a command button, you double-click the command button and an event procedure will appear in the code window, as shown in Figure 2.1. The structure is as follows:
Private Sub Command1_Click
(Key in your program code here)
End Sub
You then need to key-in the procedure in the space between Private Sub Command1_Click............. End Sub. Sub actually stands for sub procedure that made up a part of all the procedures in a program. The program code is made up of a number of statements that set certain properties or trigger some actions. The syntax of Visual Basic’s program code is almost like the normal English language though not exactly the same, so it is very easy to learn.
The syntax to set the property of an object or to pass certain value to it is :
Object.Property
where Object and Property is separated by a period (or dot). For example, the statement Form1.Show means to show the form with the name Form1, Iabel1.Visible=true means label1 is set to be visible, Text1.text=”VB” is to assign the text VB to the text box with the name Text1, Text2.text=100 is to pass a value of 100 to the text box with the name text2, Timer1.Enabled=False is to

disable the timer with the name Timer1 and so on. Let’s examine a few examples below:
Example 4.1
Private Sub Command1_click
Label1.Visible=false
Label2.Visible=True
Text1.Text=”You are correct!”
End sub
Example 4.2
Private Sub Command1_click
Label1.Caption=” Welcome”
Image1.visible=true
End sub
Example 4.3
Private Sub Command1_click
Pictuire1.Show=true
Timer1.Enabled=True
Lable1.Caption=”Start Counting
End sub
In Example 4.1, clicking on the command button will make label1 become invisible and label2 become visible; and the text” You are correct” will appear in TextBox1. In Example 4.2, clicking on the command button will make the caption label1 change to “Welcome” and Image1 will become visible. In Example 4.3 , clicking on the command button will make Picture1 show up, timer starts running and the caption of label1 change to “Start Counting”.This type of operation could be particularly useful in applications such as a website stat counter (most web hosting plans include some analytics or stat package).

Syntaxes that do not involve setting of properties are also English-like, some of the commands are Print, If…Then….Else….End If, For…Next, Select Case…..End Select , End and Exit Sub. For example, Print “ Visual Basic” is to display the text Visual Basic on screen and End is to end the program. Other commands will be explained in details in the coming lessons.
Program code that involves calculations is fairly easy to write,just like what you do in mathematics. However, in order to write an event procedure that involves calculations, you need to know the basic arithmetic operators in VB as they are not exactly the same as the normal operators , except for + and - . For multiplication, we use *, for division we use /, for raising a number x to the power of n, we use x ^n and for square root, we use Sqr(x). VB offers many more advanced mathematical functions such as Sin, Cos, Tan and Log, they will be discussed in lesson 10. There are also two important functions that are related to arithmetic operations, i.e. the functions Val and Str$where Val is to convert text to numerical value and Str$ is to convert numerical to a string (text). While the function Str$ is as important as VB can display a numeric values as string implicitly, failure to use Val will results in wrong calculation. Let’s examine Example 4.4 and example 4.5.
Example 4.4
Private Sub Form_Activate()
Text3.text=text1.text+text2.text
End Sub
Example 4.5
Private Sub Form_Activate()
Text3.text=val(text1.text)+val(text2.text)
End Sub
When you run the program in example 4.4 and enter 12 in textbox1 and 3 in textbox2 will give you a result of 123, which is wrong. It is because VB treat the numbers as string and so it just joins up the two strings. On the other hand, running exampled 4.5 will give you the correct result, i.e., 15.
Lesson 5: Managing Visual Basic Data

5.1 Visual Basic Data Types
There are many types of data that we come across in our daily life. For example, we need to handle data such as names, addresses, money, date, stock quotes, statistics and more everyday. Similarly in Visual Basic, we have to deal with all sorts of of data, some can be mathematically calculated while some are in the form of text or other forms. VB divides data into different types so that they are easier to manage when we need to write the code involving those data.
Visual Basic classifies the information mentioned above into two major data types, they are the numeric data types and the non-numeric data types.
5.1.1 Numeric Data Types
Numeric data types are types of data that consist of numbers that can be computed mathematically with standard operators. Examples of numeric data types are height, weight, share values, price of goods, monthly bills, fees and others. In Visual Basic, numeric data are divided into 7 types, depending on the range of values they can store. Calculations that only involve round figures can use Integer or Long integer in the computation. Programs that require high precision calculation need to use Single and Double decision data types, they are also called floating point numbers. For currency calculation , you can use the currency data types. Lastly, if even more precision is required to perform calculations that involve a many decimal points, we can use the decimal data types. These data types summarized in Table 5.1
5.1.2 Non-numeric Data Types

Nonnumeric data types are data that cannot be manipulated mathematically. Non-numeric data comprises string data types, date data types, boolean data types that store only two values (true or false), object data type and Variant data type .They are summarized in Table 5.2
Table 5.2: Nonnumeric Data Types
Data Type Storage Range
String(fixed length)
Length of string
1 to 65,400 characters
String(variable length)
Length + 10 bytes
0 to 2 billion characters
Date 8 bytes January 1, 100 to December 31, 9999
Boolean 2 bytes True or False
Object 4 bytes Any embedded object
Variant(numeric) 16 bytes Any value as large as Double
Variant(text) Length+22 bytes
Same as variable-length string
5.1.3 Suffixes for Literals
Literals are values that you assign to data. In some cases, we need to add a suffix behind a literal so that VB can handle the calculation more accurately. For example, we can use num=1.3089# for a Double type data. Some of the suffixes are displayed in Table 5.3.
Table 5.3
Suffix Data Type

& Long
! Single
# Double
@ Currency
In addition, we need to enclose string literals within two quotations and date and time literals within two # sign. Strings can contain any characters, including numbers. The following are few examples:
memberName="Turban, John." TelNumber="1800-900-888-777" LastDay=#31-Dec-00# ExpTime=#12:00 am#
5.2 Managing Variables
Variables are like mail boxes in the post office. The contents of the variables changes every now and then, just like the mail boxes. In term of VB, variables are areas allocated by the computer memory to hold data. Like the mail boxes, each variable must be given a name. To name a variable in Visual Basic, you have to follow a set of rules. All modern programming languages such as PHP (PHP runs on hosts like iPage - see hosting review) allow us developers to use variables to store and retrieve data. Each language has its own special syntax to learn.
5.2.1 Variable Names
The following are the rules when naming the variables in Visual Basic
It must be less than 255 characters
No spacing is allowed
It must not begin with a number
Period is not permitted

Cannot use exclamation mark (!), or the characters @, &, $, #
Cannot repeat names within the same level of scope.
Examples of valid and invalid variable names are displayed in Table 5.4
Table 5.4: Examples of Valid and Invalid Variable Names
Valid Name Invalid Name
My_Car My.Car
this year 1NewBoy
Long_Name_Can_beUSE He&HisFather *& is not acceptable
5.2.2 Declaring Variables Explicitly
In Visual Basic, it is a good practice to declare the variables before using them by assigning names and data types. They are normally declared in the general section of the codes' windows using the Dim statement. You can use any variable to hold any data , but different types of variables are designed to work efficiently with different data types . The syantax is as follows:
Dim VariableName As DataType
If you want to declare more variables, you can declare them in separate lines or you may also combine more in one line , separating each variable with a comma, as follows:
Dim VariableName1 As DataType1, VariableName2 As DataType2,VariableName3 As DataType3
Example 5.1
Dim password As String Dim yourName As String Dim firstnum As Integer Dim secondnum As Integer Dim total As Integer Dim doDate As Date Dim password As String, yourName As String, firstnum As Integer

Unlike other programming languages, Visual Basic actually doesn't require you to specifically declare a variable before it's used. If a variable isn't declared, VB willautomatically declare the variable as a Variant. A variant is data type that can hold any type of data.
For string declaration, there are two possible types, one for the variable-length string and another for the fixed-length string. For the variable-length string, just use the same format as example 5.1 above. However, for the fixed-length string, you have to use the format as shown below:
Dim VariableName as String * n, where n defines the number of characters the string can hold.
Example 5.2:
Dim yourName as String * 10
yourName can holds no more than 10 Characters.
5.2.2 Scope of Declaration
Other than using the Dim keyword to declare the data, you can also use other keywords to declare the data. Three other keywords are private ,static and public. The forms are as shown below:
Private VariableName as Datatype Static VariableName as Datatype Public VariableName as Datatype
The above keywords indicate the scope of declaration. Private declares a local variable, or a variable that is local to a procedure or module. However, Private is rarely used, we normally use Dim to declare a local variable. The Static keyword declares a variable that is being used multiple times, even after a procedure has been terminated. Most variables created inside a procedure are discarded by Visual Basic when the procedure is finished, static keyword preserve the value of a variable even after the procedure is terminated. Public is the keyword that declares a global variable, which means it can be used by all the procedures and modules of the whole program.
5.3 Constants
Constants are different from variables in the sense that their values do not change during the running of the program.
5.3.1 Declaring a Constant

The format to declare a constant is
Constant Name As Data Type = Value
Example 5.3
Const Pi As Single=3.142
Const Temp As Single=37
Const Score As Single=100
Lesson 6: Working with Variables
6.1 Assigning Values to Variables
After declaring various variables using the Dim statements, we can assign values to those variables. The syntax of an assignment is
Variable=Expression
The variable can be a declared variable or a control property value. The expression could be a mathematical expression, a number, a string, a Boolean value (true or false) and more.
The following are some examples variable assignment:
firstNumber=100 secondNumber=firstNumber-99 userName="John Lyan" userpass.Text = password Label1.Visible = True Command1.Visible = false Label4.Caption = textbox1.Text ThirdNumber = Val(usernum1.Text) X = (3.14159 / 180) * A
6.2 Operators in Visual Basic
To compute inputs from users and to generate results, we need to use various mathematical operators. In Visual Basic, except for + and -, the symbols for the operators are different from normal mathematical operators, as shown in Table 6.1.

Table 6.1: Arithmetic Operators
Operator
Mathematical function
Example
^ Exponential 2^4=16
* Multiplication 4*3=12,
/ Division 12/4=3
Mod
Modulus (returns the remainder from an integer division)
15 Mod 4=3
\
Integer Division(discards the decimal places)
19\4=4
+ or & String concatenation
"Visual"&"Basic"="Visual Basic"
Example 6.1
Private Sub Command1_Click()
Dim firstName As String Dim secondName As String Dim yourName As String firstName = Text1.Text secondName = Text2.Text yourName = secondName + " " + firstName Label1.Caption = yourName
End Sub
In Example 6.1, three variables are declared as string. For variables firstName and secondName will receive their data from the user’s input into textbox1 and textbox2, and the variable yourName will be assigned the data by combining the first two variables. Finally, yourName is displayed on Label1.
Example 6.2
Dim number1, number2, number3 as Integer
Dim total, average as variant
Private sub Form_Click
number1=val(Text1.Text) number2=val(Text2.Text) number3= val(Text3.Text)
Total=number1+number2+number3
Average=Total/5
Label1.Caption=Total
Label2.Caption=Average
End Sub
In the Example 6.2, three variables are declared as integer and two variables are declared as variant. Variant means the variable can hold any data type. The program computes the total and average of the three numbers that are entered into three text boxes.
Lesson 7 : Controlling Program Flow
In previous lessons, we have learned how to create Visual Basic code that can accept input from the user and display the output without controlling the program flow. In this chapter, you will learn how to crreate VB code that can make decision when it process input from the user, and control the program flow in the process. Decision making process is an important part of programming because it can help to solve practical problems intelligently so that it can provide useful output or feedback to the user. For example, we can write a program that can ask the computer to perform certain task until a certain condition is met.
7.1 Conditional Operators
To control the VB program flow, we can use various conditional operators. Basically, they resemble mathematical operators. Conditional operators are very powerful tools, they let the VB program compare data values and then decide what action to

take, whether to execute a program or terminate the program and more. These operators are shown in Table 7.1.
Table 7.1: Conditional Operators
Operator Meaning
= Equal to
> More than
< Less Than
>= More
than or equal
<= Less
than or equal
<> Not
Equal to
7.2 Logical Operators
In addition to conditional operators, there are a few logical operators that offer added power to the VB programs. They are shown in Table 7.2.
Table 7.2:Logical Operators
Operator Meaning
And Both sides must be true
or One side or other must be true

Xor One side or other must be true but not both
Not Negates truth
You can also compare strings with the operators. However, there are certain rules to follow where upper case letters are less than lowercase letters, and number are less than letters.
7.3 Using If.....Then.....Else Statements with Operators
To effectively control the VB program flow, we shall use If...Then...Else statement together with the conditional operators and logical operators.
If conditions Then
VB expressions
Else
VB expressions
End If
Example 7.1:
Private Sub OK_Click()
firstnum=Val(usernum1.Text) secondnum=Val(usernum2.Text) If total=firstnum+secondnum And Val(sum.Text)<>0 Then correct.Visible = True wrong.Visible = False correct.Visible = False wrong.Visible = True End If
End Sub
LESSON 8 : SELECT CASE CONTROL STRUCTURE
In previous lesson, we have learned how to control the program flow using If...Then...ElseIf control structure. In this lesson, you shall examine another way to control the program flow, that is,

the Select Case control structure. The Select Case control structure is slightly different from the If....ElseIf control structure .The difference is that the Select Case control structure can handle conditions with multiple outcomes in an easier manner than the If...Then...ElseIf control structure. The syntax of the Select Case control structure is show below:
Select Case expression
Case value1 Block of one or more VB statements Case value2 Block of one or more VB Statements . Case Else Block of one or more VB Statements
End Select
Example 8.1
Dim grade As String
Private Sub Compute_Click( )
grade=txtgrade.Text
Select Case grade
Case "A" result.Caption="High Distinction"
Case "A-" result.Caption="Distinction"
Case "B" result.Caption="Credit"
Case "C" result.Caption="Pass"
Case Else result.Caption="Fail"
End Select
End Sub

Example 8.2
Dim mark As Single
Private Sub Compute_Click() 'Examination Marks
mark = mrk.Text Select Case mark
Case Is >= 85 comment.Caption = "Excellence"
Case Is >= 70 comment.Caption = "Good"
Case Is >= 60
comment.Caption = "Above Average"
Case Is >= 50
comment.Caption = "Average"
Case Else
comment.Caption = "Need to work harder"
End Select
End Sub
Example 8.3
Example 8.2 can be rewritten as follows:
Dim mark As Single

Private Sub Compute_Click()
'Examination Marks
mark = mrk.Text
Select Case mark
Case 0 to 49
comment.Caption =" Need to work harder"
Case 50 to 59>/p>
comment.Caption = "Average"
Case 60 to 69
comment.Caption = "Above Average"
Case 70 to 84
comment.Caption = "Good"
Case Else
comment.Caption = "Excellence"
End Select
End Sub
LESSON 9: LOOPING
In lesson 7 and lesson 8, we have learned how to handle decisions making process using If...Then...Else and also Select Case program structures in Visual Basic. Another procedure that involves decisions making is looping. Visual Basic allows a procedure to be repeated many times until a condition or a set of conditions is fulfilled. This is generally called looping . Looping is a very useful feature of Visual Basic because it makes repetitive works easier. There are two kinds of loops in Visual Basic, the Do...Loop and the For.......Next loop.
9.1 Do Loop
The Do Loop statements have three different forms, as shown below:
Do While condition
Block of one or more VB statements
Loop
b) Do Block of one or more VB statements Loop While condition
c) Do Until condition Block of one or more VB statements Loop
d) Do Block of one or more VB statements
Loop Until condition
Example 9.1
Do while counter <=1000
num.Text=counter
counter =counter+1
Loop
The above example will keep on adding until counter >1000.
The above example can be rewritten as
Do

num.Text=counter counter=counter+1
Loop until counter>1000
9.2 Exiting the Loop
Sometime we need exit to exit a loop earlier when a certain condition is fulfilled. The keyword to use is Exit Do. You can examine Example 9.2 for its usage.
Example 9.2
Dim sum, n As Integer
Private Sub Form_Activate()
List1.AddItem "n" & vbTab & "sum"
Do
n = n + 1
Sum = Sum + n
List1.AddItem n & vbTab& Sum
If n = 100 Then
Exit Do
End If
Loop
End Sub
Explanation
In the above example, we compute the summation of 1+2+3+4+……+100. In the design stage, you need to insert a ListBox into the form for displaying the output, named List1. The program uses the AddItem method to populate the ListBox. The statement List1.AddItem "n" & vbTab & "sum" will display the headings in the ListBox, where it uses the vbTab function to create a space between the headings n and sum.

9.3 For....Next Loop
The For....Next Loop event procedure is written as follows:
For counter=startNumber to endNumber (Step increment)
One or more VB statements
Next
Example 9.3 a
For counter=1 to 10
display.Text=counter
Next
Example 9.3 b
For counter=1 to 1000 step 10
counter=counter+1
Next
Example 9.3 c
For counter=1000 to 5 step -5
counter=counter-10
Next
Sometimes the user might want to get out from the loop before the whole repetitive process is executed, the command to use is Exit For. To exit a For….Next Loop, you can place the Exit For statement within the loop; and it is normally used together with the If…..Then… statement. Its usages is shown in Example 9.3 d.
Example 9.3 d
Private Sub Form_Activate( )
For n=1 to 10 If n>6 then Exit For

End If Else Print n End If
End Sub
9.4 Nested For...Next Loop
When you have a loop within a loop, then you have created a nested loop. You can actually have as many loops as you want in a nested loop provided the loops are not the never-ending type. For a nested loop that consists of two loops, the first cycle of the outer loop will be processed first, then it will process the whole repetitive process of the inner loop, then the second cycle of the outer loop will be processed and again the whole repetitive process of the inner loop will be processed. The program will end when the whole cycle of the outer loop is processed.
The Structure of a nested loop is :
For counter1=startNumber to endNumber (Step increment)
For counter2=startNumber to endNumber (Step increment)
One or more VB statements
Next counter2
Next counter1
Example 9.4
Private Sub Form_Activate ( )
For firstCounter= 1to 5
Print “Hello”
For secondCounter=1 to 4
Print “Welcome to the VB tutorial”
Next secondCounter
Next firstCounter

Print” Thank you”
End Sub
Figure 9.1
The output of the above program is shown in Figure 9.1. As the outer loop has five repetitions, it will print the word “Hello” five

times. Each time after it prints the word “Hello”, it will print four lines of the “Welcome to the VB tutorial” sentences as the inner loop has four repetitions.
9.5 The While….Wend Loop
The structure of a While….Wend Loop is very similar to the Do Loop. it takes the following form:
While condition
Statements
Wend
The above loop means that while the condition is not met, the loop will go on. The loop will end when the condition is met. Let’s examine the program listed in example 9.4.
Example 9.5
Dim sum, n As Integer
Private Sub Form_Activate()
List1.AddItem "n" & vbTab & "sum"
While n <> 100
n = n + 1
Sum = Sum + n
List1.AddItem n & vbTab & Sum
Wend
End Sub
LESSON 10: VB BUILT-IN FUNCTIONS
A function is similar to a procedure but the main purpose of the function is to accept a certain input from the user and return a value which is passed on to the main program to finish the execution.
There are two types of functions in VB6, the built-in functions (or internal functions) and the functions created by the programmers.

The syntax of a function is:
FunctionName (arguments)
The arguments are values that are passed on to the function.
In this lesson, you will learn two very basic but useful internal functions of Visual basic , i.e. the MsgBox( ) and InputBox ( ) functions. We shall learn about other built-in functions in coming lessons.
10.1 MSGBOX ( ) FUNCTION
The objective of MsgBox is to produce a pop-up message box that prompt the user to click on a command button before he /she can continues. This format is as follows:
yourMsg=MsgBox(Prompt, Style Value, Title)
The first argument, Prompt, will display the message in the message box. The Style Value will determine what type of command buttons appear on the message box, please refer Table 10.1 for types of command button displayed. The Title argument will display the title of the message board.
Table 10.1: Style Values
Style Value
Named Constant Buttons
Displayed
0 vbOkOnly Ok button
1 vbOkCancel Ok and Cancel buttons
2 vbAbortRetryIgnore
Abort, Retry and Ignore buttons.
3 vbYesNoCancel Yes, No and Cancel buttons

4 vbYesNo Yes and No buttons
5 vbRetryCancel Retry and Cancel buttons
We can use named constant in place of integers for the second argument to make the programs more readable. In fact, VB6 will automatically shows up a list of names constant where you can select one of them.
Example: yourMsg=MsgBox( "Click OK to Proceed", 1, "Startup Menu")
and yourMsg=Msg("Click OK to Proceed". vbOkCancel,"Startup Menu")
are the same.
yourMsg is a variable that holds values that are returned by the MsgBox ( ) function. The values are determined by the type of buttons being clicked by the users. It has to be declared as Integer data type in the procedure or in the general declaration section. Table 10.2 shows the values, the corresponding named constant and buttons.
Table 10.2 : Return Values and Command Buttons
Value Named
Constant Button Clicked
1 vbOk Ok button
2 vbCancel> Cancel button
3 vbAbort Abort button
4 vbRetry Retry button
5 vbIgnore Ignore button
6 vbYes Yes button
7 vbNo No button
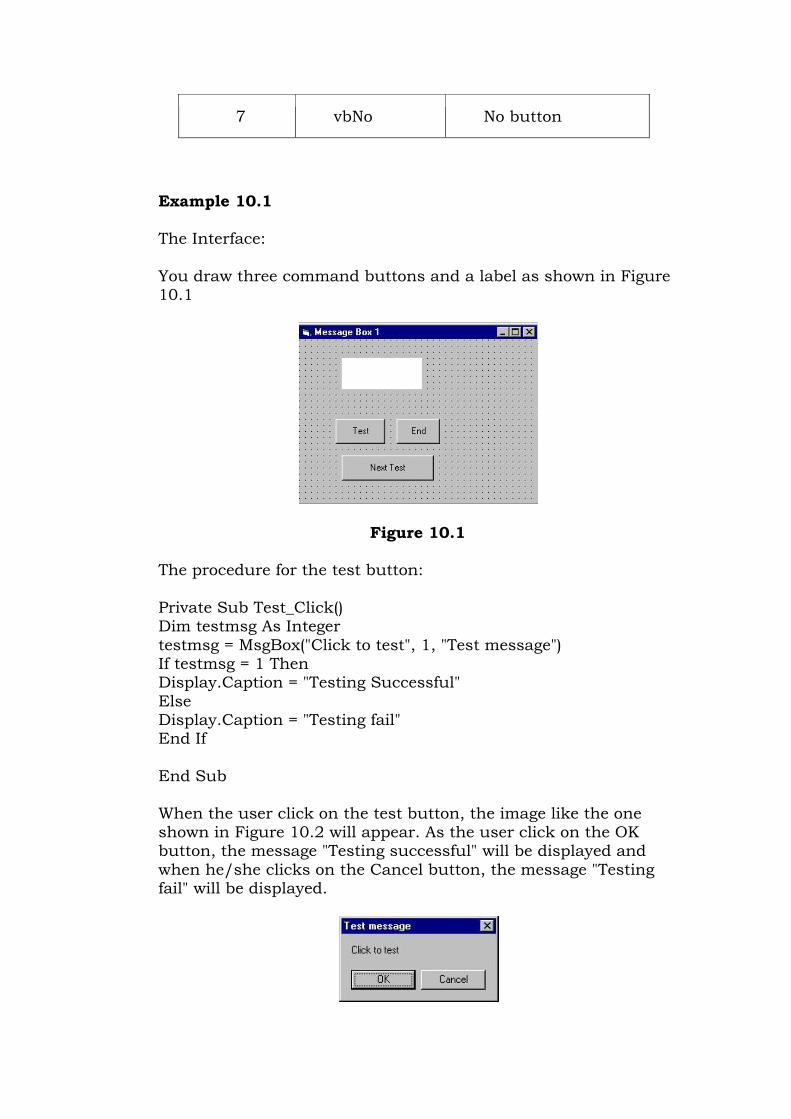
Example 10.1
The Interface:
You draw three command buttons and a label as shown in Figure 10.1
Figure 10.1
The procedure for the test button:
Private Sub Test_Click() Dim testmsg As Integer testmsg = MsgBox("Click to test", 1, "Test message") If testmsg = 1 Then Display.Caption = "Testing Successful" Else Display.Caption = "Testing fail" End If
End Sub
When the user click on the test button, the image like the one shown in Figure 10.2 will appear. As the user click on the OK button, the message "Testing successful" will be displayed and when he/she clicks on the Cancel button, the message "Testing fail" will be displayed.

Figure 10.2
To make the message box looks more sophisticated, you can add an icon besides the message. There are four types of icons available in VB as shown in Table 10.3
Table 10.3
16 vbCritical
32 vbQuestion
48 vbExclamation
64 vbInformation
Example 10.2
You draw the same Interface as in example 10.1 but modify the codes as follows:
Private Sub test2_Click()
Dim testMsg2 As Integer testMsg2 = MsgBox("Click to Test", vbYesNoCancel + vbExclamation, "Test Message") If testMsg2 = 6 Then display2.Caption = "Testing successful" ElseIf testMsg2 = 7 Then display2.Caption = "Are you sure?" Else display2.Caption = "Testing fail" End If
End Sub
In this example, the following message box will be displayed:

Figure 10.3
10.2 THE INPUTBOX( ) FUNCTION
An InputBox( ) function will display a message box where the user can enter a value or a message in the form of text. The format is
myMessage=InputBox(Prompt, Title, default_text, x-position, y-position)
myMessage is a variant data type but typically it is declared as string, which accept the message input by the users. The arguments are explained as follows:
Prompt - The message displayed normally as a question asked.
Title - The title of the Input Box.
default-text - The default text that appears in the input field where users can use it as his intended input or he may change to the message he wish to key in.
x-position and y-position - the position or the coordinate of the input box.
Example 10.3
The Interface
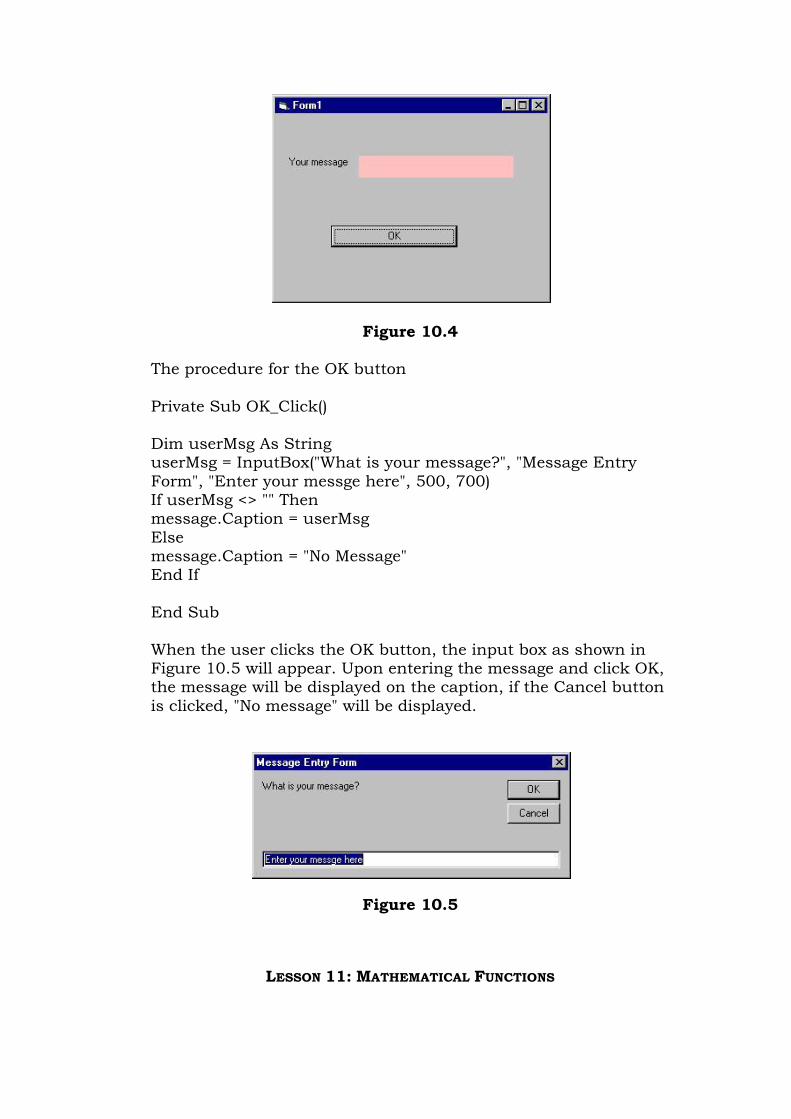
Figure 10.4
The procedure for the OK button
Private Sub OK_Click()
Dim userMsg As String userMsg = InputBox("What is your message?", "Message Entry Form", "Enter your messge here", 500, 700) If userMsg <> "" Then message.Caption = userMsg Else message.Caption = "No Message" End If
End Sub
When the user clicks the OK button, the input box as shown in Figure 10.5 will appear. Upon entering the message and click OK, the message will be displayed on the caption, if the Cancel button is clicked, "No message" will be displayed.
Figure 10.5
LESSON 11: MATHEMATICAL FUNCTIONS

The mathematical functions are very useful and important in programming because very often we need to deal with mathematical concepts in programming such as chance and probability, variables, mathematical logics, calculations, coordinates, time intervals and etc. The common mathematical functions in Visual Basic are Rnd, Sqr, Int, Abs, Exp, Log, Sin, Cos, Tan , Atn, Fix and Round.
11.1 THE RND FUNCTION
Rnd is is very useful function for dealing with the concept of chance and probability. The Rnd function returns a random value between 0 and 1. In Example 11.1. When you run the program, you will get an output of 10 random numbers between 0 and 1. Randomize Timer is to randomize the process.
Example 11.1 Random Number Generation:
Private Sub Form_Activate
Randomize Timer
For x=1 to 10
Print Rnd
Next x
End Sub
Figure 11.1: Runtime Interface of Example 11.1
Random numbers in their original forms are not very useful in programming until we convert them to integers. For example, if we need to obtain a random output of 6 random integers ranging

from 1 to 6, which make the program behaves as a virtual die, we need to convert the random numbers using the format Int(Rnd*6)+1. Let’s study the following example:
In this example, Int(Rnd*6) will generate a random integer between 0 and 5 because the function Int truncates the decimal part of the random number and returns an integer. After adding 1, you will get a random number between 1 and 6 every time you click the command button. For example, let say the random number generated is 0.98, after multiplying it by 6, it becomes 5.88, and using the integer function Int(5.88) will convert the number to 5; and after adding 1 you will get 6.
In this example, you place a command button and change its caption to ‘roll die’. You also need to insert a label into the form and clear its caption at the designing phase and make its font bigger and bold. Then set the border value to 1 so that it displays a border; and after that set the alignment to center. The statement Label1.Caption=Num means the integer generated will be displayed as the caption of the label.
Example 11.2:
Dim num as integer
Private Sub Command1_Click ( )
Randomize Timer
Num=Int(Rnd*6)+1
Label1.Caption=Num
End Sub
Now, run the program and then click on the roll die button, you will get an output like the Figure 11.2 below:

Figure 11.2
11.2 The Numeric Functions
The numeric functions are Int, Sqr, Abs, Exp, Fix, Round and Log.
Int is the function that converts a number into an integer by truncating its decimal part and the resulting integer is the largest integer that is smaller than the number. For example, Int(2.4)=2, Int(4.8)=4, Int(-4.6)= -5, Int(0.032)=0 and so on.
Sqr is the function that computes the square root of a number. For example, Sqr(4)=2, Sqr(9)=2 and etc.
Abs is the function that returns the absolute value of a number. So Abs(-8) = 8 and Abs(8)= 8.
Exp of a number x is the value of ex. For example, Exp(1)=e1 = 2.7182818284590
Fix and Int are the same if the number is a positive number as both truncate the decimal part of the number and return an integer. However, when the number is negative, it will return the smallest integer that is larger than the number. For example, Fix(-6.34)= -6 while Int(-6.34)=-7.
Round is the function that rounds up a number to a certain number of decimal places. The Format is Round (n, m) which means to round a number n to m decimal places. For example, Round (7.2567, 2) =7.26
Log is the function that returns the natural Logarithm of a number. For example,
Log 10= 2.302585

Example 11.3
This example computes the values of Int(x), Fix(x) and Round(x,n) in a table form. It uses the Do Loop statement and the Rnd function to generate 10 numbers. The statement x = Round (Rnd * 7, 7) rounds a random number between 0 and 7 to 7 decimal places. Using commas in between items will create spaces between them and hence a table of values can be created. The program and output are shown below
Private Sub Form_Activate ()
n = 1
Print " n", " x", "Int(x)", "Fix(x)", "Round(x, 4)"
Do While n < 11
Randomize Timer
x = Round (Rnd * 7, 7)
Print n, x, Int(x), Fix(x), Round(x, 4)
n = n + 1
Loop
End Sub
Figure 11.3: The Output Interface

LESSON 12: FORMATTING FUNCTIONS
Formatting output is an important part of programming so that the visual interface can be presented clearly to the users. Data in the previous lesson were presented fairly systematically through the use of commas and some of the functions like Int, Fix and Round. However, to better present the output, we can use a number of formatting functions in Visual basic.
The three most common formatting functions in VB are Tab, Space, and Format
12.1 THE TAB FUNCTION
The syntax of a Tab function is Tab (n); x
The item x will be displayed at a position that is n spaces from the left border of the output form. There must be a semicolon in between Tab and the items you intend to display (VB will actually do it for you automatically).
Example 12.1
.Private Sub Form_Activate
Print "I"; Tab(5); "like"; Tab(10); "to"; Tab(15); "learn"; Tab(20); "VB"
Print Tab(10); "I"; Tab(15); "like"; Tab(20); "to"; Tab(25); "learn"; Tab(20); "VB"
Print Tab(15); "I"; Tab(20); ; "like"; Tab(25); "to"; Tab(30); "learn"; Tab(35); “VB"
End sub

Figure 12.1: Output of Example 12.1
12.2 THE SPACE FUNCTION
The Space function is very closely linked to the Tab function. However, there is a minor difference. While Tab (n) means the item is placed n spaces from the left border of the screen, the Space function specifies the number of spaces between two consecutive items. For example, the procedure
Example 12.2
Private Sub Form_Activate()
Print "Visual"; Space(10); "Basic"
End Sub
Means that the words Visual and Basic will be separated by 10 spaces
12.3 THE FORMAT FUNCTION
The Format function is a very powerful formatting function which can display the numeric values in various forms. There are two types of Format function, one of them is the built-in or predefined format while another one can be defined by the users.
The syntax of the predefined Format function is
Format (n, “style argument”)

where n is a number and the list of style arguments is given in Table 12.1
Table 12.1: List of Style Arguments
General Number To display the number without having separators between thousands.
Format(8972.234, “General Number”)=8972.234
Fixed To display the number without having separators between thousands and rounds it up to two decimal places.
Format(8972.2, “Fixed”)=8972.23
Standard To display the number with separators or separators between thousands and rounds it up to two decimal places.
Format(6648972.265, “Standard”)= 6,648,972.27
Currency To display the number with the dollar sign in front, has separators between thousands as well as rounding it up to two decimal places.
Format(6648972.265, “Currency”)= $6,648,972.27
Percent Converts the number to the percentage form and displays a % sign and rounds it up to two decimal places.
Format(0.56324, “Percent”)=56.32 %
Example 12.3

Private Sub Form_Activate()
Print Format (8972.234, "General Number")
Print Format (8972.2, "Fixed")
Print Format (6648972.265, "Standard")
Print Format (6648972.265, "Currency")
Print Format (0.56324, "Percent")
End Sub
Figure 12.2: Output of Example 12.3
The syntax of the user-defined Format function is
Format (n, “user’s format”)
Although it is known as user-defined format, we still need to follows certain formatting styles. Examples of user-defined formatting style are listed in Table 12.2
Table 12.2: User-Defined Formatting Functions
Format(781234.57,”0”) Rounds to whole number without
781235

separators between thousands.
Format(781234.57,”0.0”) Rounds to 1 decimal place without separators between thousands.
781234.6
Format(781234.576,”0.00”) Rounds to 2 decimal places without separators between thousands.
781234.58
Format(781234.576,”#,##0.00”)
Rounds to 2 decimal places with separators between thousands.
781,234.58
Format(781234.576,”$#,##0.00”)
Shows dollar sign and rounds to 2 decimal places with separators between thousands.
$781,234.58
Format(0.576,”0%”) Converts to percentage form without decimal
58%

places.
Format(0.5768,”0.00%”) Converts to percentage form with 2 decimal places.
57.68%
Example 12.4
Private Sub Form_Activate()
Print Format(781234.57, "0") Print Format(781234.57, "0.0") Print Format(781234.576, "0.00") Print Format(781234.576, "#,##0.00") Print Format(781234.576, "$#,##0.00") Print Format(0.576, "0%") Print Format(0.5768, "0.00%")
End Sub
LESSON 13: STRING MANIPULATION FUNCTIONS
In this lesson, we will learn how to use some of the string manipulation function such as Len, Right, Left, Mid, Trim, Ltrim, Rtrim, Ucase, Lcase, Instr, Val, Str ,Chr and Asc.
13.1 The Len Function
The length function returns an integer value which is the length of a phrase or a sentence, including the empty spaces. The syntax is
Len (“Phrase”)
For example,
Len (VisualBasic) = 11 and Len (welcome to VB tutorial) = 22
The Len function can also return the number of digits or memory locations of a number that is stored in the computer. For example,
X=sqr (16)
Y=1234

Z#=10#
Then Len(x)=1, Len(y)=4, and Len (z)=8
The reason why Len(z)=8 is because z# is a double precision number and so it is allocated more memory spaces.
13.2 The Right Function
The Right function extracts the right portion of a phrase. The syntax is
Right (“Phrase”, n)
Where n is the starting position from the right of the phrase where the portion of the phrase is going to be extracted. For example,
Right(“Visual Basic”, 4) = asic
13.3 The Left Function
The Left$ function extract the left portion of a phrase. The syntax is
Left(“Phrase”, n)
Where n is the starting position from the left of the phase where the portion of the phrase is going to be extracted. For example,
Left (“Visual Basic”, 4) = Visu
12.4 The Ltrim Function
The Ltrim function trims the empty spaces of the left portion of the phrase. The syntax is
Ltrim(“Phrase”)
.For example,
Ltrim (“ Visual Basic”, 4)= Visual basic
13.5 The Rtrim Function
The Rtrim function trims the empty spaces of the right portion of the phrase. The syntax is
Rtrim(“Phrase”)
.For example,
Rtrim (“Visual Basic ”, 4) = Visual basic
13.6 The Trim function
The Trim function trims the empty spaces on both side of the phrase. The syntax is
Trim(“Phrase”)
.For example,
Trim (“ Visual Basic ”) = Visual basic
13.7 The Mid Function
The Mid function extracts a substring from the original phrase or string. It takes the following format:
Mid(phrase, position, n)
Where position is the starting position of the phrase from which the extraction process will start and n is the number of characters to be extracted. For example,
Mid(“Visual Basic”, 3, 6) = ual Bas
13.8 The InStr function
The InStr function looks for a phrase that is embedded within the original phrase and returns the starting position of the embedded phrase. The syntax is
Instr (n, original phase, embedded phrase)
Where n is the position where the Instr function will begin to look for the embedded phrase. For example
Instr(1, “Visual Basic”,” Basic”)=8
13.9 The Ucase and the Lcase functions
The Ucase function converts all the characters of a string to capital letters. On the other hand, the Lcase function converts all the characters of a string to small letters. For example,
Ucase(“Visual Basic”) =VISUAL BASIC

Lcase(“Visual Basic”) =visual basic
13.10 The Str and Val functions
The Str is the function that converts a number to a string while the Val function converts a string to a number. The two functions are important when we need to perform mathematical operations.
13.11 The Chr and the Asc functions
The Chr function returns the string that corresponds to an ASCII code while the Asc function converts an ASCII character or symbol to the corresponding ASCII code. ASCII stands for “American Standard Code for Information Interchange”. Altogether there are 255 ASCII codes and as many ASCII characters. Some of the characters may not be displayed as they may represent some actions such as the pressing of a key or produce a beep sound. The syntax of the Chr function is
Chr(charcode)
and the syntax of the Asc function is
Asc(Character)
The following are some examples:
Chr(65)=A, Chr(122)=z, Chr(37)=% , Asc(“B”)=66, Asc(“&”)=38
LESSON 14: CREATING USER-DEFINED FUNCTIONS
<Previous Lesson> <<Home>> < Next Lesson>
14.1 CREATING YOUR OWN FUNCTION
The structure of a function is as follows:
Public Function functionName (Arg As dataType,..........) As dataType
or
Private Function functionName (Arg As dataType,..........) As dataType

Public indicates that the function is applicable to the whole project and
Example 14.1
In this example, a user can calculate the future value of a certain amount of money he has today based on the interest rate and the number of years from now, supposing he will invest this amount of money somewhere .The calculation is based on the compound interest rate.
The code
Public Function FV(PV As Variant, i As Variant, n As Variant) As Variant
'Formula to calculate Future Value(FV) 'PV denotes Present Value FV = PV * (1 + i / 100) ^ n
End Function
Private Sub compute_Click()
'This procedure will calculate Future Value Dim FutureVal As Variant Dim PresentVal As Variant Dim interest As Variant Dim period As Variant PresentVal = PV.Text interest = rate.Text period = years.Text
'calling the funciton
FutureVal = FV(PresentVal, interest, period) MsgBox ("The Future Value is " & FutureVal)
End Sub

Figure 14.1 The Output Interface
Example 14.2
The following program will automatically compute examination grades based on the marks that a student obtained. The code is shown below:
The Code
Public Function grade(mark As Variant) As String
Select Case mark Case Is >= 80 grade = "A" Case Is >= 70 grade = "B" Case Is >= 60 grade = "C" Case Is >= 50 grade = "D" Case Is >= 40 grade = "E"

Case Else grade = "F" End Select
End Function
Private Sub compute_Click()
grading.Caption = grade(mark)
End Sub
Figure 14.2 The Output Interface
LESSON 16: ARRAYS
<Previous Lesson> <<Home>> < Next Lesson>
16.1 INTRODUCTION TO ARRAYS
By definition, an array is a list of variables with the same data type and name. When we work with a single item, we only need to use one variable. However, if we have a list of items which are of similar type to deal with, we need to declare an array of variables instead of using a variable for each item
For example, if we need to enter one hundred names, it is difficulty to declare 100 different names, this is a waste of time and efforts. So, instead of declaring one hundred different variables, we need to declare only one array. We differentiate each item in the array by using subscript, the index value of each item, for example name(1), name(2),name(3) .......etc. , makes declaring variables more streamline.

16.2 DIMENSION OF AN ARRAY
An array can be one dimensional or multidimensional. One dimensional array is like a list of items or a table that consists of one row of items or one column of items.
A two dimensional array is a table of items that make up of rows and columns. The format for a one dimensional array is ArrayName(x), the format for a two dimensional array is ArrayName(x,y) and a three dimensional array is ArrayName(x,y,z) . Normally it is sufficient to use one dimensional and two dimensional array ,you only need to use higher dimensional arrays if you need to deal with more complex problems. Let me illustrate the the arrays with tables.
Table 16.1. One dimensional Array
Student Name
Name(1) Name(2) Name(3) Name(4)
Table 16.2 Two Dimensional Array
Name(1,1) Name(1,2) Name(1,3) Name(1,4)
Name(2,1) Name(2,2) Name(2,3) Name(2,4)
Name(3,1) Name(3,2) Name(3,3) Name(3,4)
16.2 DECLARING ARRAYS
We can use Public or Dim statement to declare an array just as the way we declare a single variable. The Public statement declares an array that can be used throughout an application while the Dim statement declare an array that could be used only in a local procedure.
The general format to declare a one dimensional array is as follow:
Dim arrayName(subs) as dataType
where subs indicates the last subscript in the array.
Example 16.1
Dim CusName(10) as String
will declare an array that consists of 10 elements if the statement Option Base 1 appear in the declaration area, starting

from CusName(1) to CusName(10). Otherwise, there will be 11 elements in the array starting from CusName(0) through to CusName(10)
CusName(1) CusName(2) CusName(3) CusName(4) CusName(5)
CusName(6) CusName(7) CusName(8) CusName(9) CusName(10)
Example 16.2
Dim Count(100 to 500) as Integer
declares an array that consists of the first element starting from Count(100) and ends at Count(500)
The general format to declare a two dimensional array is as follow:
Dim ArrayName(Sub1,Sub2) as dataType
Example 16.3
Dim StudentName(10,10) will declare a 10x10 table make up of 100 students' Names, starting with StudentName(1,1) and end with StudentName(10,10).
Example 16.3
Dim studentName(10) As String Dim num As Integer
Private Sub addName() For num = 1 To 10 studentName(num) = InputBox("Enter the student name", "Enter Name", "", 1500, 4500) If studentName(num) <> "" Then Form1.Print studentName(num) Else End End If
Next End Sub
**The program accepts data entry through an input box and displays the entries in the form itself.
Example 16.4

Dim studentName(10) As String Dim num As Integer
Private Sub addName( ) For num = 1 To 10 studentName(num) = InputBox("Enter the student name") List1.AddItem studentName(num) Next End Sub Private Sub Start_Click() addName
End Sub
**The program accepts data entries through an InputBox and displays the items in a list box.
LESSON 17: WORKING WITH FILES
17.1 INTRODUCTION
Up until lesson 13 we are only create programs that accepts data at runtime, the data disappears when the program terminates . In this lesson, we shall learn how to create and save files by writing them into a storage device and then retrieve the data by reading the contents of the files using a customized VB program.
17.2 CREATING A FILE
To create a file , we use the following command
Open "fileName" For Output As #fileNumber
Each file created must have a file name and a file number for identification. As for the file name, you must also specify the path where the file will reside. For example:
Open "c:\My Documents\sample.txt" For Output As #1
will create a text file by the name of sample.txt in My Document folder in C drive. The accompanied file number is 1. If you wish to create a HTML file , simply change the extension to .html
Open "c:\My Documents\sample.html" For Output As # 2
17.2.1 Sample Program : Creating a text file
Private Sub create_Click()

Dim intMsg As String Dim StudentName As String
Open "c:\My Documents\sample.txt" For Output As #1 intMsg = MsgBox("File sample.txt opened") StudentName = InputBox("Enter the student Name") Print #1, StudentName intMsg = MsgBox("Writing a" & StudentName & " to sample.txt ")
Close #1
intMsg = MsgBox("File sample.txt closed")
End Sub
The above program will create a file sample.txt in the My Documents folder and ready to receive input from users. Any data input by the user will be saved in this text file.
17.3 READING A FILE
To read a file created in section 17.2, you can use the input # statement. However, we can only read the file according to the format when it was written. You have to open the file according to its file number and the variable that hold the data. We also need to declare the variable using the DIM command.
17.3.1 Sample Program: Reading file
Private Sub Reading_Click()
Dim variable1 As String Open "c:\My Documents\sample.txt" For Input As #1 Input #1, variable1 Text1.Text = variable1 Close #1
End Sub
This program will open the sample.txt file and display its contents in the Text1 textbox.
Example 17.3.2 Creating and Reading files using Common Dialog Box
This example uses the common dialog box to create and read the text file, which is much easier than the previous examples.Many

operations are handled by the common dialog box. The following is the program:<
Dim linetext As String Private Sub open_Click()
CommonDialog1.Filter = "Text files{*.txt)|*.txt" CommonDialog1.ShowOpen If CommonDialog1.FileName <> "" Then Open CommonDialog1.FileName For Input As #1 Do Input #1, linetext Text1.Text = Text1.Text & linetext Loop Until EOF(1) End If Close #1
End Sub
Private Sub save_Click()
CommonDialog1.Filter = "Text files{*.txt)|*.txt" CommonDialog1.ShowSave If CommonDialog1.FileName <> "" Then Open CommonDialog1.FileName For Output As #1 Print #1, Text1.Text Close #1 End If
End Sub
*The syntax CommonDialog1.Filter = "Text files{*.txt)|*.txt" ensures that only the textfile is read or saved .The statement CommonDialog1.ShowOpen is to display the open file dialog box and the statement CommonDialog1.ShowSave is to display the save file dialog box. Text1.Text = Text1.Text & linetext is to read the data and display them in the Text1 textbox
The Output window is shown below:

Figure 17.1
LESSON 23: CREATING DATABASE APPLICATIONS IN VB-PART I
<Previous Lesson><<Home>>< Next Lesson>
23.1 Creating Simple Database Application
Visual basic allows us to manage databases created with different database programs such as MS Access, oracle, MySQL and more. In this lesson, we are not dealing with how to create database files but we will see how we can access database files in the VB environment. In the following example, we will create a simple database application which enables one to browse customers' names. To create this application, select the data control on the toolbox(as shown in Figure 23.1) and insert it into the new form. Place the data control somewhere at the bottom of the form. Name the data control as data_navigator. To be able to use the data control, we need to connect it to any database. We can create a database file using any database application but I suggest we use the database files that come with VB6. Let's select NWIND.MDB as our database file.

Figure 23.1
23.2 Connecting Data Control to Database
To connect the data control to this database, double-click the DatabaseName property in the properties window and then click on the button with three dots on the right(as shown in Figure 23.2) to open a file selection dialog as shown in Figure 23.3. From the dialog, search the folders of your hard drive to locate the databse file NWIND.MDB. It is usually placed under Microsoft Visual Studio\VB98\ folder, Select the aforementioned file and now your data control is connected to this database file.

<="" p="" style="max-width: 80%; height: auto;">
Figure 23.2
<="" p="" style="max-width: 80%; height: auto;">
Figure 23.3
The next step is to double-click on the RecordSource property to select the customers table from the database file NWIND.MDB, as shown in Figure 23.4. You can also change the caption of the data control to anything, we use Click to browse Customers. After that, we will place a label and change its caption to Customer Name. In

addition, insert another label and name it as cus_name and leave the label empty as customers' names will appear here when we click the arrows on the data control. We need to bind this label to the data control for the application to work. To do this, open the label's DataSource and select data_navigator that will appear automatically. One more thing that we need to do is to bind the label to the correct field so that data in this field will appear on this label. To do this, open the DataField property and select ContactName, as shown in Figure 23.5.
Figure 23.4

Figure 23.5
Now, press F5 and run the program. You should be able to browse all the customers' names by clicking the arrows on the data control, as hown in Figure 23.7.
The Design Interface.

Figure 23.6
The Runtime Interface
Figure 23.7
You can also add other fields using exactly the same method. For example, you can add title, company, adress, City, postcode ,telephone number and more to the database browser. Besides, you can design a more professional interface, as shown in Figure 23.8.

Figure 23.8
LESSON 24: CREATING DATABASE APPLICATIONS IN VB-PART II
In Lesson 23, you have learned how to create a simple database application using data control. However, you could only browse the database using the data control. In this lesson, you shall learn how to create your own navigation buttons for browsing the database. Besides that, we shall also learn how to add, save and delete data.The data control support some methods that allows manipulation of database, for example, to move the pointer to a certain location.
The following are some of the commands that you can use to move the pointer around:
' Move to the first record
data_navigator.RecordSet.MoveFirst
' Move to the last record
data_navigator.RecordSet.MoveLast
' Move to the next record

data_navigator.RecordSet.MoveNext
' Move to the first record
data_navigator.RecordSet.Previous
You can also add, save and delete records using the following commands:
data_navigator.RecordSet.AddNew ' Adds a new record
data_navigator.RecordSet.Update ' Updates and saves the new record
data_navigator.RecordSet.Delete ' Deletes a current record
*note: data_navigator is the name of data control
In the following example, you shall insert four commands and label them as First Record, Next Record, Previous Record and Last Record . They will be used to navigator around the database without using the data control. You still need to retain the same data control (from example in lesson 19) but set the property Visible to no so that users will not see the data control but use the button to browse through the database instead. Now, double-click on the command button and key in the codes according to the labels.
Private Sub cmdFirst() data_navigator.Recordset.MoveFirst End Sub
Private Sub cmdFirst_Click() data_navigator.Recordset.MoveNext End Sub
Private Sub cmdPrevious_Click() data_navigator.Recordset.MovePrevious End Sub Private Sub cmdLast_Click() data_navigator.Recordset.MoveLast End Sub

Run the application and you shall obtain the interface as shown in Figure 24.1 below and you will be able to browse the database using the four navigation buttons.
Figure 24.1
LESSON 25: CREATING VB DATABASE APPLICATIONS USING ADO
CONTROL
<Previous Lesson><<Home>>< Next Lesson>
In Lesson 22 and Lesson 23, we have learned how to build VB database applications using data control. However, data control is not a very flexible tool as it could only work with limited kinds of data and must work strictly in the Visual Basic environment.
To overcome these limitations, we can use a much more powerful data control in Visual Basic, known as ADO control. ADO stands for ActiveX data objects. As ADO is ActiveX-based, it can work in different platforms and different programming languages. Besides, it can access many different kinds of data such as data displayed in the Internet browsers, email text and even graphics other than the usual relational and non relational database information.To

be able to use ADO data control, you need to insert it into the toolbox. To do this, simply press Ctrl+T to open the components dialog box and select Microsoft ActiveX Data Control 6. After this, you can proceed to build your ADO-based VB database applications.
The following example will illustrate how to build a relatively powerful database application using ADO data control. First of all, name the new form as frmBookTitle and change its caption to Book Titles- ADO Application. Secondly, insert the ADO data control and name it as adoBooks and change its caption to book. Next, insert the necessary labels, text boxes and command buttons. The runtime interface of this program is shown in Figure 25.1 below, it allows adding and deletion as well as updating and browsing of data.
Figure 25.1: The Runtime Interface
The property settings of all the controls are listed as in Table 25.1 below:
Table 25.1: Property Settings
Control Property
Setting
Form Name frmBookTitle
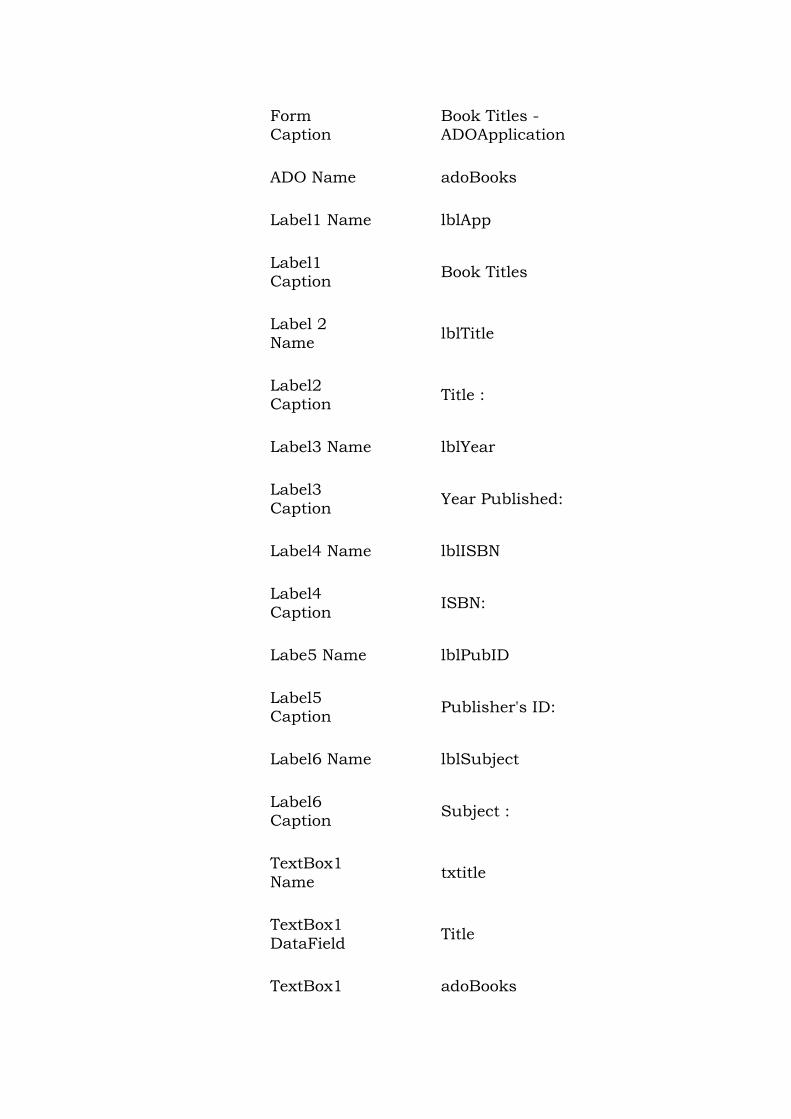
Form Caption
Book Titles -ADOApplication
ADO Name adoBooks
Label1 Name lblApp
Label1 Caption
Book Titles
Label 2 Name
lblTitle
Label2 Caption
Title :
Label3 Name lblYear
Label3 Caption
Year Published:
Label4 Name lblISBN
Label4 Caption
ISBN:
Labe5 Name lblPubID
Label5 Caption
Publisher's ID:
Label6 Name lblSubject
Label6 Caption
Subject :
TextBox1 Name
txtitle
TextBox1 DataField
Title
TextBox1 adoBooks

DataSource
TextBox2 Name
txtPub
TextBox2 DataField
Year Published
TextBox2 DataSource
adoBooks
TextBox3 Name
txtISBN
TextBox3 DataField
ISBN
TextBox3 DataSource
adoBooks
TextBox4 Name
txtPubID
TextBox4 DataField
PubID
TextBox4 DataSource
adoBooks
TextBox5 Name
txtSubject
TextBox5 DataField
Subject
TextBox5 DataSource
adoBooks
Command Button1 Name
cmdSave
Command Button1
&Save

Caption
Command Button2 Name
cmdAdd
Command Button2 Caption
&Add
Command Button3 Name
cmdDelete
Command Button3 Caption
&Delete
Command Button4 Name
cmdCancel
Command Button4 Caption
&Cancel
Command Button5 Name
cmdPrev
Command Button5 Caption
&<
Command Button6 Name
cmdNext
Command Button6 Caption
&>
Command Button7 Name
cmdExit

Command Button7 Caption
E&xit
To be able to access and manage a database, you need to connect the ADO data control to a database file. We are going to useBIBLIO.MDB that comes with VB6. To connect ADO to this database file , follow the steps below:
Click on the ADO control on the form and open up the properties window.
Click on the ConnectionString property, the Property Pages dialog box will appear, as shown in Figure 25.2.
Figure 25.2: Property Pages
When the dialog box appear, select the Use Connection String's Option. Next, click build and at the Data Link dialog box, double-Click the option labeled Microsoft Jet 3.51 OLE DB provider.
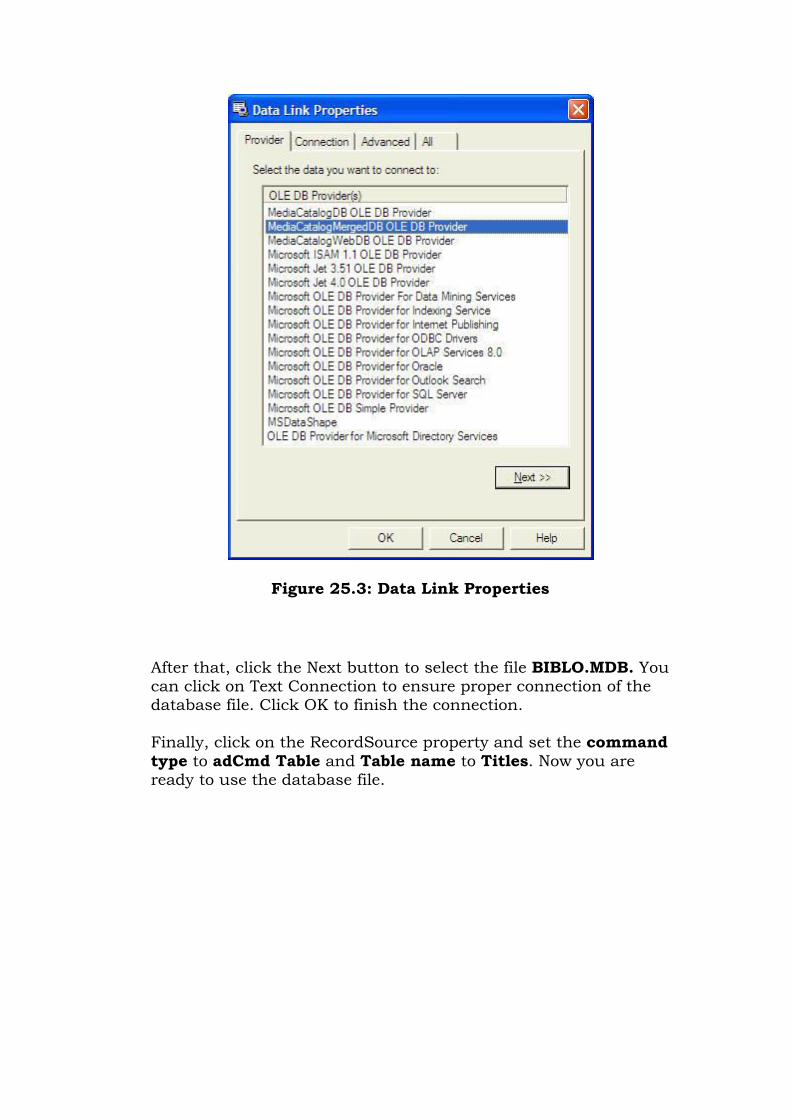
Figure 25.3: Data Link Properties
After that, click the Next button to select the file BIBLO.MDB. You can click on Text Connection to ensure proper connection of the database file. Click OK to finish the connection.
Finally, click on the RecordSource property and set the command type to adCmd Table and Table name to Titles. Now you are ready to use the database file.

Figure 25.4
Now, you need to write code for all the command buttons. After which, you can make the ADO control invisible.
For the Save button, the program codes are as follow:
Private Sub cmdSave_Click()
adoBooks.Recordset.Fields("Title") = txtTitle.Text adoBooks.Recordset.Fields("Year Published") = txtPub.Text adoBooks.Recordset.Fields("ISBN") = txtISBN.Text adoBooks.Recordset.Fields("PubID") = txtPubID.Text adoBooks.Recordset.Fields("Subject") = txtSubject.Text adoBooks.Recordset.Update
End Sub
For the Add button, the program codes are as follow:
Private Sub cmdAdd_Click()
adoBooks.Recordset.AddNew
End Sub
For the Delete button, the program codes are as follow:

Private Sub cmdDelete_Click()
Confirm = MsgBox("Are you sure you want to delete this record?", vbYesNo, "Deletion Confirmation") If Confirm = vbYes Then adoBooks.Recordset.Delete MsgBox "Record Deleted!", , "Message" Else MsgBox "Record Not Deleted!", , "Message" End If
End Sub
For the Cancel button, the program codes are as follow:
Private Sub cmdCancel_Click()
txtTitle.Text = "" txtPub.Text = "" txtPubID.Text = "" txtISBN.Text = "" txtSubject.Text = ""
End Sub
For the Previous (<) button, the program codes are
Private Sub cmdPrev_Click()
If Not adoBooks.Recordset.BOF Then adoBooks.Recordset.MovePrevious If adoBooks.Recordset.BOF Then adoBooks.Recordset.MoveNext End If End If
End Sub For the Next(>) button, the program codes are
Private Sub cmdNext_Click()
If Not adoBooks.Recordset.EOF Then adoBooks.Recordset.MoveNext If adoBooks.Recordset.EOF Then

adoBooks.Recordset.MovePrevious End If End If
End Sub
LESSON 26: USING MICROSOFT DATAGRID CONTROL 6.0
<Previous Lesson> <<Home>>< Next Lesson>
In the previous lesson, we use textboxes or labels to display data by connecting them to a database via Microsoft ADO data Control 6.0. The textbox is not the only control that can display data from a database, many other controls in Visual Basic can display data. One of the them is the DataGrid control. DataGrid control can be used to display the entire table of a recordset of a database. It allows users to view and edit data.
DataGrid control is the not the default item in the Visual Basic control toolbox, you have to add it from the VB6 components. To add the DataGrid control, click on the project on the menu bar and select components to access the dialog box that displays all the available VB6 components, as shown in the diagram below. Select Microsoft DataGrid Control 6.0 by clicking the checkbox beside this item. Before you exit the dialog box, you also need to select the Microsoft ADO data control so that you are able to access the database. Last, click on the OK button to exit the dialog box. Now you should be able to see that the DataGrid control and the ADO data control are added to the toolbox. The next step is to drag the DataGrid control and the ADO data control into the form.
The components dialog box is shown below:

Figure 26.1: The Components Dialog Box

Figure 26.2: The Design Interface
Before you proceed , you need to create a database file using Microsoft Access. Here we create a file to store the information of my books and we namedthe table book. Having created the table, enter a few records, as shown in Figure 26.3 below:
Figure 26.3
Next, you need to connect the database to the ADO data control. To do that, right click on the ADO data control and select the ADODC properties, the following dialog box will appear.
Next click on the Build button and the Data Link Properties dialog box will appear (as shown Figure 26.4). In this dialog box, select the database file you have created, in my case, the file name is books.mdb. Press test connection to see whether the connection is successful. If the connection is successful, click OK

to return to the ADODC property pages dialog box( as shown in Figure 26.4). At the ADODC property pages dialog box, click on the Recordsource tab and select 2-adCmdTable under command type and select book as the table name, then click OK.
Figure 26.4: Data Link Properties
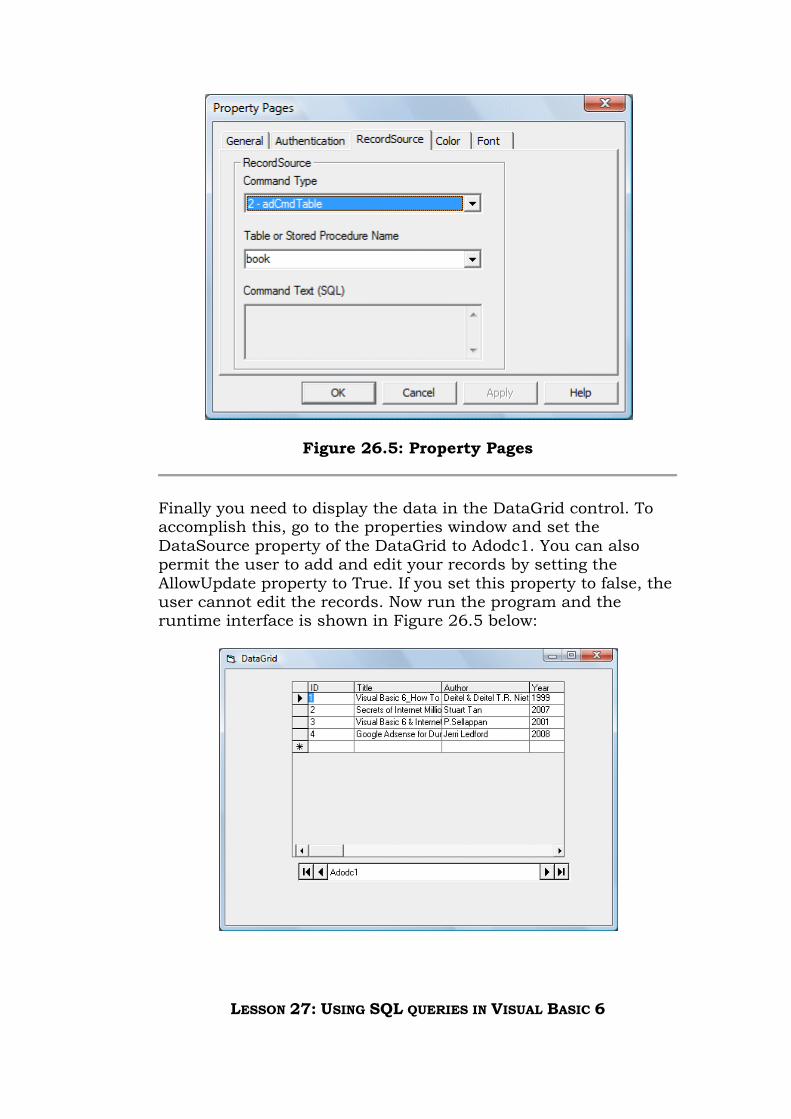
Figure 26.5: Property Pages
Finally you need to display the data in the DataGrid control. To accomplish this, go to the properties window and set the DataSource property of the DataGrid to Adodc1. You can also permit the user to add and edit your records by setting the AllowUpdate property to True. If you set this property to false, the user cannot edit the records. Now run the program and the runtime interface is shown in Figure 26.5 below:
LESSON 27: USING SQL QUERIES IN VISUAL BASIC 6

In the previous lesson, we have learned to use the DataGrid Control to display data from a database in Visual Basic 6 environment. However, it does not allow users to search for and select the information they want to see. In order to search for a certain information, we need to use SQL query. SQL stands for Structures Query Language. Using SQL keywords, we are able to select specific information to be displayed based on certain criteria.
The most basic SQL keyword is SELECT, it is used together with the keyword FROM to select information from one or more tables from a database. The syntax is:
SELECT fieldname1,fieldname2,.....,fieldnameN FROM TableName
fieldname1, fieldname2,......fieldnameN are headings of the columns from a table of a database. You can select any number of fieldname in the query. If you wish to select all the information, you can use the following syntax:
SELECT * FROM TableNam
In order to illustrate the usage of SQL queries, lets create a new database in Microsoft Access with the following fieldsID, Title, Author, Year, ISBN, Publisher, Price and save the table as book and the database as books.mdb in a designated folder.
Next, we will start Visual Basic and insert an ADO control, a DataGrid and three command buttons. Name the three command buttons as cmdAuthor, cmdTitle and cmdAll. Change their captions to Display Author ,Display Book Title and Display Allrespectively. You can also change the caption of the form to My Books. The design interface is shown below:

Figure 27.1: The Design Interface
Now you need to connect the database to the ADO data control. Please refer to lesson 25 for the details. However, you need to make one change. At the ADODC property pages dialog box, click on the Recordsource tab and select 1-adCmdText under command type and under Command Text(SQL) key in SELECT * FROM book.

Figure 27.2: ADODC Property Pages
The Code
Now, click on the command button cmdAuthor and key in the following statements:
Private Sub cmdAuthor_Click()
Adodc1.RecordSource = "SELECT Author FROM book" Adodc1.Refresh Adodc1.Caption = Adodc1.RecordSource End Sub
For the command button cmdTitle, key in
Private Sub cmdTitle_Click()
Adodc1.RecordSource = "SELECT Title FROM book" Adodc1.Refresh Adodc1.Caption = Adodc1.RecordSource End Sub
Finally for the command button cmdAll, key in
Private Sub cmdAll_Click()
Adodc1.RecordSource = "SELECT * FROM book" Adodc1.Refresh Adodc1.Caption = Adodc1.RecordSource End Sub
Now, run the program and when you click on the Display Author button, only the names of authors will be displayed, as shown in Figure 27.3 below:

Figure 27.3
and when you click on the Display Book Title button, only the book titles will be displayed, as shown in Figure 27.4 below:
Figure 27.4

Lastly, click on the Display All button and all the information will be displayed, as shown in Figure 27.5 below:
Figure 27.5
LESSON 28: MORE SQL KEYWORDS
In the previous lesson, we have learned how to use the basic SQL keywords SELECT and FROM to manipulate database in Visual Basic 6 environment. In this lesson, you will learn how to use more SQL keywords. One of the more important SQL keywords is WHERE. This keyword allows the user to search for data that fulfill certain criteria.
The Syntax is as follows:
SELECT fieldname1,fieldname2,.....,fieldnameN FROM TableName WHERE Criteria
The criteria can be specified using operators such as =, >,<, <=, >=, <> and more. Using the database books.mdb created in the previous chapter, we shall show you a few examples. First ,start a new project and insert a DataGrid control and an ADO control into the form. At the ADODC property pages dialog box, click on the Recordsource tab and select 1-adCmdText under command type and under Command Text(SQL) key in SELECT * FROM

book. Next, insert one textbox and place it on top of the DataGrid control for the user can enter SQL query text. Insert one command button and change the caption to Query.
The design interface is shown below in Figure 28.1 below:
Figure 28.1: The Design Interface
Example 28.1: Query based on Author
Run the program and key in the following SQL query statement
SELECT Title, Author FROM book WHERE Author='Liew Voon Kiong'
Where you click on the query button, the DataGrid will display the author name Liew Voon Kiong. as shown in Figure 28.2 below:
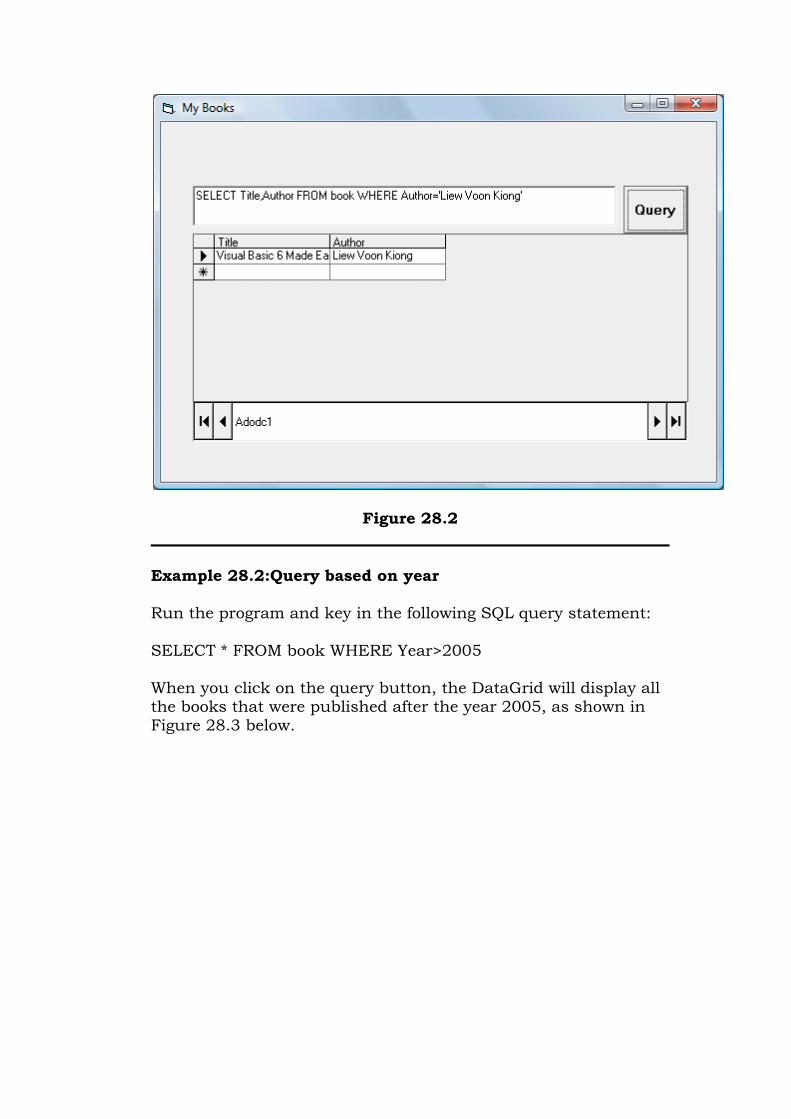
Figure 28.2
Example 28.2:Query based on year
Run the program and key in the following SQL query statement:
SELECT * FROM book WHERE Year>2005
When you click on the query button, the DataGrid will display all the books that were published after the year 2005, as shown in Figure 28.3 below.

Figure 28.3
You can also try following queries:
SELECT * FROM book WHERE Price<=80
SELECT * FROM book WHERE Year=2008
SELECT * FROM book WHERE Author<>'Liew Voon Kiong'
You may also search for data that contain certain characters by pattern matching. It involves using the Like operator and the % symbol(also known as wildcard character). For example, if you want to search for a author name that begins with alphabet J, you can use the following query statement
SELECT * FROM book WHERE Author Like 'J%'>
Where you click on the query command button, the records where authors' name start with the alphabet J will be displayed, as shown in Figure 28.4 below:

Figure 28.4
Next, if you wish to rank order the data, either in ascending or descending order, you can use the ORDER By , ASC (for ascending) and DESC(Descending) SQL keywords.
The general structures are
SELECT fieldname1, fieldname2.....FROM table ORDER BY fieldname ASC
SELECT fieldname1, fieldname2.....FROM table ORDER BY fieldname DESC
Example 28.3:
The following query statement will rank the records according to Author in ascending order.
SELECT Title, Author FROM book ORDER BY Author ASC.
The runtime interafce is as shown in Figure 28.5 below:

Figure 28.5
Example 28.4
The following query statement will rank the records according to price in descending order.
SELECT Title, Price FROM book ORDER BY Price DESC.
The runtime interafce is as shown in Figure 28.6 below:

Figure 28.6
LESSON 37: CREATING MENUS FOR YOUR APPLICATIONS
<Previous Lesson> <<Home>> <Next Lesson>
Menu bar is the standard feature of most windows applications. The main purpose of the menus is for easy navigation and control of an application. Some of the most common menu items are File, Edit, View, Tools, Help and more. Each item on the main menu bar also provide a list of options in the form of a pull-down menu. When you create a Visual Basic 6 program, you need not include as many menu items as a full fledge Windows application. What you need is to include those menu items that can improve the ease of usage by the user. There are two ways to add menus to your application, using the Visual Basic's Application Wizard and or the menu editor.
37.1 ADDING MENU BAR USING VISUAL BASIC'S APPLICATION WIZARD
The easiest way to add menu bar to your application is by using Visual Basic's Application Wizard. This wizard allows the user to insert fully customized standard windows menu into his or her application. To start using Visual Basic's Application Wizard, click on the Application Wizard icon at the Visual Basic new project dialog box, as shown in Figure 37.1 below:

Figure 37.1: New Project Window
When you click on the VB Application wizard, the introduction dialog box will appear, as shown in Figure 37.2. As you are not loading any default setting, just click on the Next button.
Figure 37.2
After clicking the Next button, the interface type dialog box will be displayed, as shown in Figure 37.3. There are three choices of interface available for your project. As we currently not creating a

Multiple Document Interface (MDI), we choose Single Document Interface (SDI). You can also type the project name in the textbox below, here I am using MyFirstMenu.
Figure 37.3
Clicking the Next button wiill bring up a list of menus and submenus that you can add them to your application. Check to select a menu item and uncheck to unselect a menu item as shown in Figure 37.4. Let say we choose all the menus and click next, then you will get an interface comprises File, Edit, View and Help menus, as shown in Figure 37.5

Figure 37.4
Figure 37.5

When you click on any menu item, a list of drop-down submenu items will be displayed. For example, if you click on the File menu, the list of submenu items such as New, Open, Save, Save As and more will be displayed, as shown in Figure 37.6
Figure 37.6
Clicking on any of the dropped down menu item will show the code associated with it, and this is where you can modify the code to suit your programming needs. For example, clicking on the item Open will reveal the following code:

Figure 37.7
Now, I will show you how to modify the code in order to open a graphic file and display it in an image box. For this program, you have to insert a Image box into the form. Next add the following lines so that the user can open graphic files of different formats.
.Filter = "Bitmaps(*.BMP)|*.BMP|Metafiles(*.WMF)|*. WMF|Jpeg Files(*.jpg)|*.jpg|GIF Files(*.gif)|*.gif|Icon Files(*.ico)|*.ico|All Files(*.*)|*.*".
Then, you need to load the image into the Image box with the following code:
Image1.Picture = LoadPicture(.FileName)
Also set the Stretch property of the Image box to true so that the image loaded can resize by itself. Please note that each menu item is a special control, so it has a name too. The name for the menu File in this example is mnuFileOpen.
The Code
Private Sub mnuFileOpen_Click()
Dim sFile As String

With dlgCommonDialog
.DialogTitle = "Open" .CancelError = False
'Set the flags and attributes of the common dialog control .Filter = "Bitmaps(*.BMP)|*.BMP|Metafiles(*.WMF)|*. WMF|Jpeg Files(*.jpg)|*.jpg|GIF Files(*.gif)|*.gif|Icon Files(*.ico)|*.ico|All Files(*.*)|*.*"
.ShowOpen Image1.Picture = LoadPicture(.FileName) If Len(.FileName) = 0 Then Exit Sub End If sFile = .FileName End With End Sub
When you run the program and click on the File menu and then the submenu Open, the following Open dialog box will be displayed, where you can look for graphic files of various formats to load it into the image box.

Figure 37.8
For example, selecting the jpeg file will allow you to choose the images of jpeg format, as shown in Figure 37.9.
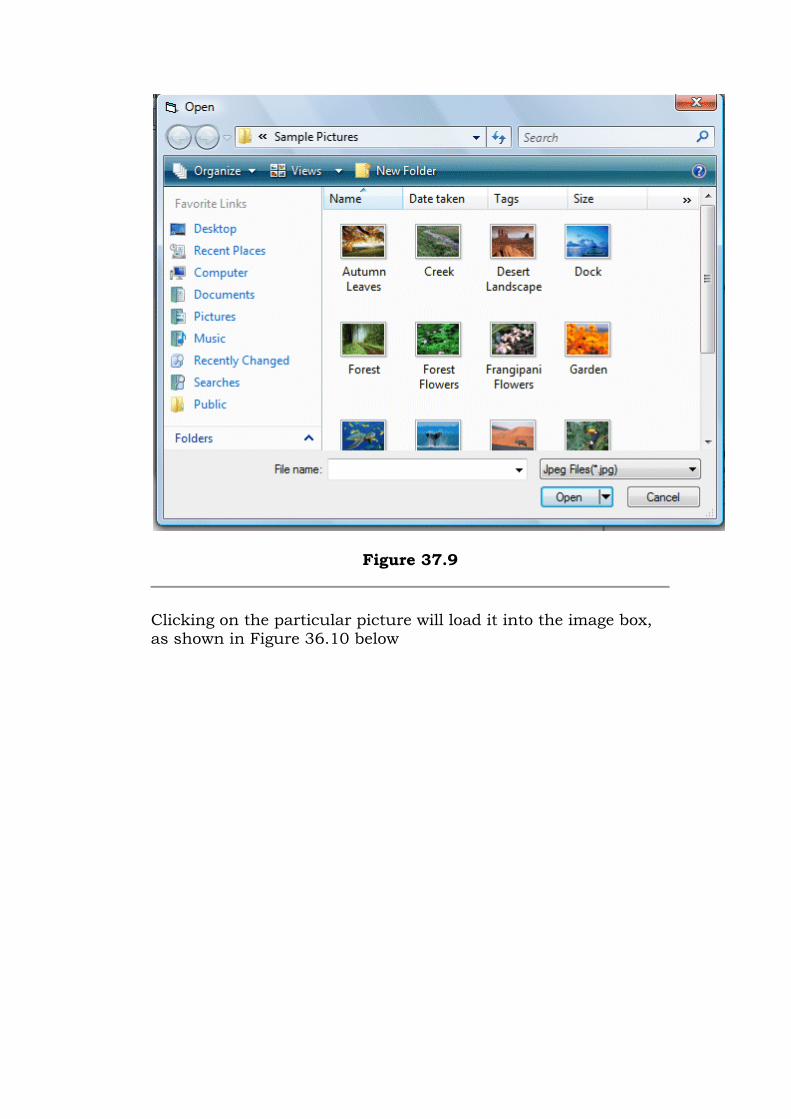
Figure 37.9
Clicking on the particular picture will load it into the image box, as shown in Figure 36.10 below

Figure 37.10
37.2: ADDING MENU BAR USING MENU EDITOR
To start adding menu items to your application, open an existing project or start a new project, then click on Tools in the menu bar of the Visual Basic IDE and select Menu Editor. When you click on the Menu Editor, the Menu Editor dialog will appear. In the Menu Editor dialog , key in the first item File in the caption text box. You can use the ampersand ( & ) sign in front of F so that F will be underlined when it appears in the menu, and F will become the hot key to initiate the action under this item by pressing the Alt key and the letter F. After typing &File in the Caption text box, move to the name textbox to enter the name for this menu item, you can type in mnuFile here. Now, click the Next button and the menu item &File will move into the empty space below, as shown in Figure 37.11:

Figure 37.11
You can then add in other menu items on the menu bar by following the same procedure, as shown in Figure 37.12 below:
Figure 37.12
When you click Ok, the menu items will be shown on the menu bar of the form.

Figure 37.13
Now, you may proceed to add the sub menus. In the Menu Editor, click on the Insert button between File and Exit and then click the right arrow key, and the dotted line will appear. This shows the second level of the menu, or the submenu. Now key in the caption and the name. Repeat the same procedure to add other submenu items. Here, we are adding New, Open, Save, Save As and Exit.
Figure 37.14
Now click the OK button and go back to your form. You can see the dropped down submenus when you click on the item File, as shown.

Figure 37.15
Finally, you can enter the code by clicking on any of the submenu items.
THE MULTIPLE DOCUMENT INTERFACE (MDI) IN VISUAL BASIC 6
The Multiple Document Interface (MDI) was designed to simplify the exchange of information among documents, all under the same roof. With the main application, you can maintain multiple open windows, but not multiple copies of the application. Data exchange is easier when you can view and compare many documents simultaneously.
You almost certainly use Windows applications that can open multiple documents at the same time and allow the user to switch among them with a mouse-click. Multiple Word is a typical example, although most people use it in single document mode. Each document is displayed in its own window, and all document windows have the same behavior. The main Form, or MDI Form, isn't duplicated, but it acts as a container for all the windows, and it is called the parent window. The windows in which the individual documents are displayed are called Child windows.
An MDI application must have at least two Form, the parent Form and one or more child Forms. Each of these Forms has certain properties. There can be many child forms contained within the parent Form, but there can be only one parent Form.
The parent Form may not contain any controls. While the parent Form is open in design mode, the icons on the ToolBox are not displayed, but you can't place any controls on the Form. The parent Form can, and usually has its own menu.
To create an MDI application, follow these steps:

Start a new project and then choose Project >>> Add MDI Form to add the parent Form.
Set the Form's caption to MDI Window
Choose Project >>> Add Form to add a SDI Form.
Make this Form as child of MDI Form by setting the MDI Child property of the SDI Form to True. Set the caption property to MDI Child window.
Visual Basic automatically associates this new Form with the parent Form. This child Form can't exist outside the parent Form; in the words, it can only be opened within the parent Form.
Parent and Child Menus
MDI Form cannot contain objects other than child Forms, but MDI Forms can have their own menus. However, because most of the operations of the application have meaning only if there is at least one child Form open, there's a peculiarity about the MDI Forms. The MDI Form usually has a menu with two commands to load a new child Form and to quit the application. The child Form can have any number of commands in its menu, according to the application. When the child Form is loaded, the child Form's menu replaces the original menu on the MDI Form
Following example illustrates the above explanation.
Open a new Project and name the Form as Menu.frm and save the Project as Menu.vbp
Design a menu that has the following structure.
MDIMenu Menu caption
MDIOpen opens a new child Form

MDIExit terminates the application
Then design the following menu for the child Form
ChildMenu Menu caption
Child Open opens a new child Form
Child Save saves the document in the active child Form
Child Close Closes the active child Form
At design time double click on MDI Open and add the following code in the click event of the open menu.
Form1.Show
And so double click on MDI Exit and add the following code in the click event
End
Double click on Child Close and enter the following code in the click event
Unload Me
Before run the application in the project properties set MDI Form as the start-up Form. Save and run the application. Following output will be displayed.
And as soon as you click MDI Open you can notice that the main menu of the MDI Form is replaced with the Menu of the Child Form. The reason for this behavior should be obvious. The operation available through the MDI Form are quite different from the operations of the child window. Moreover, each child Form shouldn't have it's own menu.
CONTROL ARRAYS IN VISUAL BASIC 6

A control array is a group of controls that share the same name type and the same event procedures. Adding controls with control arrays uses fewer resources than adding multiple control of same type at design time.
A control array can be created only at design time, and at the very minimum at least one control must belong to it. You create a control array following one of these three methods:
You create a control and then assign a numeric, non-negative value to its Index property; you have thus created a control array with just one element.
You create two controls of the same class and assign them an identical Name property. Visual Basic shows a dialog box warning you that there's already a control with that name and asks whether you want to create a control array. Click on the Yes button.
You select a control on the form, press Ctrl+C to copy it to the clipboard, and then press Ctrl+V to paste a new instance of the control, which has the same Name property as the original one. Visual Basic shows the warning mentioned in the previous bullet.
Control arrays are one of the most interesting features of the Visual Basic environment, and they add a lot of flexibility to your programs:
Controls that belong to the same control array share the same set of event procedures; this often dramatically reduces the amount of code you have to write to respond to a user's actions.
You can dynamically add new elements to a control array at run time; in other words, you can effectively create new controls that didn't exist at design time.
Elements of control arrays consume fewer resources than regular controls and tend to produce smaller executables. Besides, Visual Basic forms can host up to 256 different control names, but a control array counts as one against this number. In other words, control arrays let you effectively overcome this limit.
The importance of using control arrays as a means of dynamically creating new controls at run time is somewhat reduced in Visual Basic 6, which has introduced a new and more powerful capability.
Don't let the term array lead you to think control array is related to VBA arrays; they're completely different objects. Control arrays

can only be one-dimensional. They don't need to be dimensioned: Each control you add automatically extends the array. The Index property identifies the position of each control in the control array it belongs to, but it's possible for a control array to have holes in the index sequence. The lowest possible value for the Index property is 0. You reference a control belonging to a control array as you would reference a standard array item:
Text1(0).Text = ""
SHARING EVENT PROCEDURES
Event procedures related to items in a control array are easily recognizable because they have an extra Index parameter, which precedes all other parameters. This extra parameter receives the index of the element that's raising the event, as you can see in this example:
Private Sub Text1_KeyPress(Index As Integer, KeyAscii As Integer) MsgBox "A key has been pressed on Text1(" & Index & ") control" End Sub
The fact that multiple controls can share the same set of event procedures is often in itself a good reason to create a control array. For example, say that you want to change the background color of each of your TextBox controls to yellow when it receives the input focus and restore its background color to white when the user clicks on another field:
Private Sub Text1_GotFocus(Index As Integer) Text1(Index).BackColor = vbYellow End Sub Private Sub Text1_LostFocus(Index As Integer) Text1(Index).BackColor = vbWhite End Sub
Control arrays are especially useful with groups of OptionButton controls because you can remember which element in the group has been activated by adding one line of code to their shared Click event. This saves code when the program needs to determine which button is the active one:
' A module-level variable Dim optFrequencyIndex As Integer
Private Sub optFrequency_Click(Index As Integer) ' Remember the last button selected. optFrequencyIndex = Index End Sub

CREATING CONTROLS AT RUN TIME
Control arrays can be created at run time using the statements
Load object (Index %)
Unload object (Index %)
Where object is the name of the control to add or delete from the control array. Index % is the value of the index in the array. The control array to be added must be an element of the existing array created at design time with an index value of 0. When a new element of a control array is loaded, most of the property settings are copied from the lowest existing element in the array.
Following example illustrates the use of the control array.
Open a Standard EXE project and save the Form as Calculator.frm and save the Project as Calculater.vbp.
Design the form as shown below.
Object Property Setting
Form Caption
Name
Calculator
frmCalculator
CommandButton
Caption
Name
Index
1
cmd
0
CommandButton
Caption
Name
Index
2
cmd
1
CommandButton
Caption
Name
Index
3
cmd
2
CommandButton
Caption
Name
Index
4
cmd
3

CommandButton
Caption
Name
Index
5
cmd
4
CommandButton
Caption
Name
Index
6
cmd
5
CommandButton
Caption
Name
Index
7
cmd
6
CommandButton
Caption
Name
Index
8
cmd
7
CommandButton
Caption
Name
Index
9
cmd
8
CommandButton
Caption
Name
Index
0
cmd
10
CommandButton
Caption
Name
Index
.
cmd
11
CommandButton Caption
Name
AC
cmdAC
CommandButton Caption
Name
+
cmdPlus
CommandButton Caption
Name
-
cmdMinus
CommandButton Caption *

Name cmdMultiply
CommandButton Caption
Name
/
cmdDivide
CommandButton Caption
Name
+/-
cmdNeg
TextBox Name
Text
txtDisplay
( empty )
CommandButton Caption
Name
=
cmdEqual
The following variables are declared inside the general declaration
Dim Current As Double Dim Previous As Double Dim Choice As String Dim Result As Double
The following code is entered in the cmd_Click( ) (Control Array) event procedure
Private Sub cmd_Click(Index As Integer) txtDisplay.Text = txtDisplay.Text & cmd(Index).Caption '&is the concatenation operator Current = Val(txtDisplay.Text) End Sub
The following code is entered in the cmdAC_Click ( ) event procedure
Private Sub cmdAC_Click() Current = Previous = 0 txtDisplay.Text = "" End Sub

The below code is entered in the cmdNeg_Click( ) procedure
Private Sub cmdNeg_Click() Current = -Current txtDisplay.Text = Current End Sub
The following code is entered in the click events of the cmdPlus, cmdMinus, cmdMultiply, cmdDevide controls respectively.
Private Sub cmdDevide_Click() txtDisplay.Text = "" Previous = Current Current = 0 Choice = "/" End Sub
Private Sub cmdMinus_Click() txtDisplay.Text = "" Previous = Current Current = 0 Choice = "-" End Sub
Private Sub cmdMultiply_Click() txtDisplay.Text = "" Previous = Current Current = 0 Choice = "*" End Sub
Private Sub cmdPlus_Click() txtDisplay.Text = "" Previous = Current Current = 0 Choice = "+" End Sub
To print the result on the text box, the following code is entered in the cmdEqual_Click ( ) event procedure.
Private Sub cmdEqual_Click()
Select Case Choice Case "+" Result = Previous + Current txtDisplay.Text = Result Case "-"

Result = Previous - Current txtDisplay.Text = Result Case "*" Result = Previous * Current txtDisplay.Text = Result Case "/" Result = Previous / Current txtDisplay.Text = Result End Select Current = Result End Sub
Save and run the project. On clicking digits of user's choice and an operator button, the output appears.
ITERATING ON THE ITEMS OF A CONTROL ARRAY
Control arrays often let you save many lines of code because you can execute the same statement, or group of statements, for every control in the array without having to duplicate the code for each distinct control. For example, you can clear the contents of all the items in an array of TextBox controls as follows:
For i = txtFields.LBound To txtFields.UBound txtFields(i).Text = "" Next
Here you're using the LBound and UBound methods exposed by the control array object, which is an intermediate object used by Visual Basic to gather all the controls in the array. In general, you shouldn't use this approach to iterate over all the items in the array because if the array has holes in the Index sequence an error will be raised. A better way to loop over all the items of a control array is using the For Each statement:
Dim txt As TextBox For Each txt In txtFields txt.Text = "" Next
A third method exposed by the control array object, Count, returns the number of elements it contains. It can be useful on several occasions (for example, when removing all the controls that were added dynamically at run time):
' This code assumes that txtField(0) is the only control that was ' created at design time (you can't unload it at run time).
Do While txtFields.Count > 1 Unload txtFields(txtFields.UBound) Loop
ARRAYS OF MENU ITEMS
Control arrays are especially useful with menus because arrays offer a solution to the proliferation of menu Click events and, above all, permit you to create new menus at run time. An array of menu controls is conceptually similar to a regular control array, only you set the Index property to a numeric (non-negative) value in the Menu Editor instead of in the Properties window.
There are some limitations, though: All the items in an array of menu controls must be adjacent and must belong to the same menu level, and their Index properties must be in ascending order (even though holes in the sequence are allowed). This set of requirements severely hinders your ability to create new menu items at run time. In fact, you can create new menu items in well-defined positions of your menu hierarchy—namely, where you put a menu item with a nonzero Index value—but you can't create new submenus or new top-level menus.
Now that you have a thorough understanding of how Visual Basic's forms and controls work, you're ready to dive into the subtleties of the Visual Basic for Applications (VBA) language.
USING TEXTBOX CONTROL IN VISUAL BASIC 6
TextBox controls offer a natural way for users to enter a value in your program. For this reason, they tend to be the most frequently used controls in the majority of Windows applications. TextBox controls, which have a great many properties and events, are also among the most complex intrinsic controls. In this section, I guide you through the most useful properties of TextBox controls and show how to solve some of the problems that you're likely to encounter.
SETTING PROPERTIES TO A TEXTBOX
Text can be entered into the text box by assigning the necessary string to the text property of the control
If the user needs to display multiple lines of text in a TextBox, set the MultiLine property to True
To customize the scroll bar combination on a TextBox, set the ScrollBars property.

Scroll bars will always appear on the TextBox when it's MultiLine property is set to True and its ScrollBars property is set to anything except None(0)
If you set the MultilIne property to True, you can set the alignment using the Alignment property. The test is left-justified by default. If the MultiLine property is et to False, then setting the Alignment property has no effect.
RUN-TIME PROPERTIES OF A TEXTBOX CONTROL
The Text property is the one you'll reference most often in code, and conveniently it's the default property for the TextBox control. Three other frequently used properties are these:
The SelStart property sets or returns the position of the blinking caret (the insertion point where the text you type appears). Note that the blinking cursor inside TextBox and other controls is named caret, to distinguish it from the cursor (which is implicitly the mouse cursor). When the caret is at the beginning of the contents of the TextBox control, SelStart returns 0; when it's at the end of the string typed by the user, SelStart returns the value Len(Text). You can modify the SelStart property to programmatically move the caret.
The SelLength property returns the number of characters in the portion of text that has been highlighted by the user, or it returns 0 if there's no highlighted text. You can assign a nonzero value to this property to programmatically select text from code. Interestingly, you can assign to this property a value larger than the current text's length without raising a run-time error.
The SelText property sets or returns the portion of the text that's currently selected, or it returns an empty string if no text is highlighted. Use it to directly retrieve the highlighted text without having to query Text, SelStart, and SelLength properties. What's even more interesting is that you can assign a new value to this property, thus replacing the current selection with your own. If no text is currently selected, your string is simply inserted at the current caret position.
When you want to append text to a TextBox control, you should use the following code (instead of using the concatenation operator) to reduce flickering and improve performance:
Text1.SelStart = Len(Text1.Text) Text1.SelText = StringToBeAdded

One of the typical operations you could find yourself performing with these properties is selecting the entire contents of a TextBox control. You often do it when the caret enters the field so that the user can quickly override the existing value with a new one, or start editing it by pressing any arrow key:
Private Sub Text1_GotFocus() Text1.SelStart = 0 ' A very high value always does the trick. Text1.SelLength = 9999 End Sub
Always set the SelStart property first and then the SelLength or SelText properties. When you assign a new value to the SelStart property, the other two are automatically reset to 0 and an empty string respectively, thus overriding your previous settings.
The selected text can be copied to the Clipboard by using SelText:
Clipboard.SelText text, [format]
In the above syntax, text is the text that has to be placed into the Clipboard, and format has three possible values.
VbCFLink - conversation information 2. VbCFRTF - Rich Text Format 3. VbCFText - Text
We can get text from the clipboard using the GetText() function this way:
Clipboard.GetText ([format])
The following Figure summarizes the common TextBox control's properties and methods.
Property/ Method
Description
Properties
Enabled specifies whether user can interact with this control or not
Index Specifies the control array index
Locked If this control is set to True user can use it else if this control is set to false the control cannot be used

MaxLength
Specifies the maximum number of characters to be input. Default value is set to 0 that means user can input any number of characters
MousePointer Using this we can set the shape of the mouse pointer when over a TextBox
Multiline By setting this property to True user can have more than one line in the TextBox
PasswordChar This is to specify mask character to be displayed in the TextBox
ScrollBars
This to set either the vertical scrollbars or horizontal scrollbars to make appear in the TextBox. User can also set it to both vertical and horizontal. This property is used with the Multiline property.
Text Specifies the text to be displayed in the TextBox at runtime
ToolTipIndex This is used to display what text is displayed or in the control
Visible By setting this user can make the Textbox control visible or invisible at runtime
Method
SetFocus Transfers focus to the TextBox
Event procedures
Change Action happens when the TextBox changes
Click Action happens when the TextBox is clicked
GotFocus Action happens when the TextBox receives the active focus
LostFocus Action happens when the TextBox loses it focus
KeyDown Called when a key is pressed while the TextBox has the focus
KeyUp Called when a key is released while the
TextBox has the focus
VB6 COMMANDBUTTON AND OPTIONBUTTON CONTROLS - VISUAL BASIC 6
When compared to TextBox controls, these controls are really simple. Not only do they expose relatively few properties, they also support a limited number of events, and you don't usually write much code to manage them.
COMMANDBUTTON CONTROLS IN VB6
Using CommandButton controls is trivial. In most cases, you just draw the control on the form's surface, set its Caption property to a suitable string (adding an & character to associate a hot key with the control if you so choose), and you're finished, at least with user-interface issues. To make the button functional, you write code in its Click event procedure, as in this fragment:
Private Sub Command1_Click() ' Save data, then unload the current form. Call SaveDataToDisk Unload Me End Sub
You can use two other properties at design time to modify the behavior of a CommandButton control. You can set the Default property to True if it's the default push button for the form (the button that receives a click when the user presses the Enter key—usually the OK or Save button). Similarly, you can set the Cancel property to True if you want to associate the button with the Escape key.
The only relevant CommandButton's run-time property is Value, which sets or returns the state of the control (True if pressed, False otherwise). Value is also the default property for this type of control. In most cases, you don't need to query this property because if you're inside a button's Click event you can be sure that the button is being activated. The Value property is useful only for programmatically clicking a button:
This fires the button's Click event. Command1.Value = True
The CommandButton control supports the usual set of keyboard and mouse events (KeyDown, KeyPress, KeyUp, MouseDown, MouseMove, MouseUp, but not the DblClick event) and also the GotFocus and LostFocus events, but you'll rarely have to write code in the corresponding event procedures.

Properties of a CommandButton control
To display text on a CommandButton control, set its Caption property.
An event can be activated by clicking on the CommandButton.
To set the background colour of the CommandButton, select a colour in the BackColor property.
To set the text colour set the Forecolor property.
Font for the CommandButton control can be selected using the Font property.
To enable or disable the buttons set the Enabled property to True or False
To make visible or invisible the buttons at run time, set the Visible property to True or False.
Tooltips can be added to a button by setting a text to the Tooltip property of the CommandButton.
A button click event is handled whenever a command button is clicked. To add a click event handler, double click the button at design time, which adds a subroutine like the one given below. Private Sub Command1_Click( ) .................. End Sub
OPTIONBUTTON CONTROLS IN VB6
OptionButton controls are also known as radio buttons because of their shape. You always use OptionButton controls in a group of two or more because their purpose is to offer a number of mutually exclusive choices. Anytime you click on a button in the group, it switches to a selected state and all the other controls in the group become unselected.
Preliminary operations for an OptionButton control are similar to those already described for CheckBox controls. You set an OptionButton control's Caption property to a meaningful string, and if you want you can change its Alignment property to make the control right aligned. If the control is the one in its group that's in the selected state, you also set its Valueproperty to True. (The OptionButton's Value property is a Boolean value because

only two states are possible.) Value is the default property for this control.
At run time, you typically query the control's Value property to learn which button in its group has been selected. Let's say you have three OptionButton controls, named optWeekly, optMonthly, and optYearly. You can test which one has been selected by the user as follows:
If optWeekly.Value Then ' User prefers weekly frequency. ElseIf optMonthly.Value Then ' User prefers monthly frequency. ElseIf optYearly.Value Then ' User prefers yearly frequency. End If
Strictly speaking, you can avoid the test for the last OptionButton control in its group because all choices are supposed to be mutually exclusive. But the approach I just showed you increases the code's readability.
A group of OptionButton controls is often hosted in a Frame control. This is necessary when there are other groups of OptionButton controls on the form. As far as Visual Basic is concerned, all the OptionButton controls on a form's surface belong to the same group of mutually exclusive selections, even if the controls are placed at the opposite corners of the window. The only way to tell Visual Basic which controls belong to which group is by gathering them inside a Frame control. Actually, you can group your controls within any control that can work as a container—PictureBox, for example—but Frame controls are often the most reasonable choice.
Example
Open a new Standard EXE project and the save the Form as Option.frm and save the project as Option.vbp.
Design the Form as per the following specifications table.
Object Property Settings
Label Caption
Name
Enter a Number
Label1
TextBox Text (empty)

Name Text1
CommandButton Caption
Name
&Close
Command1
OptionButton Caption
Name
&Octal
optOct
OptionButton Caption
Name
&Hexadecimal
optHex
OptionButton Caption
Name
&Decimal
optDec
The application responds to the following events
The change event of the TextBox reads the value and stores it in a form-level numeric variable.
The click event of optOct button returns curretval in octal.
The click event of the optHex button curerntval in hexadecimal
The click event of the optDec button returns the decimal equivalent of the value held currentval.
The following code is entered in the general declarations section of the Form.
Dim currentval as variant
The variable is initialized to 0 by default. The change event procedure checks to ascertain the number system (Octal, Hexadecimal) that is in effect and then reads in the number.
Private Sub Text1_Change() If optOct.Value = True Then currentval = Val ("&O" & LTrim (Text1.Text) & "&") Elseif optDec.value = True Then currentval = Val (LTrim (Text1.Text) & "&") Else currentval = Val ("&H" & LTrim (Text1.Text) & "&") End if End Sub
The Val function is used to translate string to a number and can recognize Octal and Hexadecimal strings. The LTrim function

trims the leading blanks in the text. The following code is entered in the click events of the OptionButton controls.
Private Sub optOct_Click() Text1.Text = Oct(currentval) End Sub
Private Sub optHex_Click() Text1.Text = Hex(currentval) End Sub
Private Sub optDec_Click() Text1.Text = Format(currentval) End Sub
The follwoing code is entered in the click event of teh Close button.
Private Sub cmdClose_Click() Unlod Me End Sub
The Application is run by pressing F5 or clicking on the Run icon in the tool bar. By pressing the Exit button the program is terminated.
LABEL AND FRAME CONTROLS IN VISUAL BASIC 6 (VB6)
Label and Frame controls have a few features in common, so it makes sense to explain them together. First they're mostly "decorative" controls that contribute to the user interface but are seldom used as programmable objects. In other words, you often place them on the form and arrange their properties as your user interface needs dictate, but you rarely write code to serve their events, generally, or manipulate their properties at run time.
LABEL CONTROLS
Most people use Label controls to provide a descriptive caption and possibly an associated hot key for other controls, such as TextBox, ListBox, and ComboBox, that don't expose the Caption property. In most cases, you just place a Label control where you need it, set its Caption property to a suitable string (embedding an ampersand character in front of the hot key you want to assign), and you're done. Caption is the default property for Label controls. Be careful to set the Label's TabIndex property so that it's 1 minus the TabIndex property of the companion control.

Other useful properties are BorderStyle(if you want the Label control to appear inside a 3D border) and Alignment (if you want to align the caption to the right or center it on the control). In most cases, the alignment depends on how the Label control relates to its companion control: for example, if the Label control is placed to the left of its companion field, you might want to set its Alignment property to 1-Right Justify. The value 2-Center is especially useful for stand-alone Label controls.
Different settings for the Alignment property of Label controls.
You can insert a literal & character in a Label control's Caption property by doubling it. For example, to see Research & Development you have to type &Research && Development. Note that if you have multiple but isolated &s, the one that selects the hot key is the last one and all others are ignored. This tip applies to all the controls that expose a Caption property. (The & has no special meaning in forms' Caption properties, however.)
If the caption string is a long one, you might want to set the Label's WordWrap property to True so that it will extend for multiple lines instead of being truncated by the right border of the control. Alternatively, you might decide to set the AutoSize property to True and let the control automatically resize itself to accommodate longer caption strings.
You sometimes need to modify the default value of a Label's BackStyle property. Label controls usually cover what's already on the form's surface (other lightweight controls, output from graphic methods, and so on) because their background is considered to be opaque. If you want to show a character string somewhere on the form but at the same time you don't want to obscure underlying objects, set the BackStyle property to 0-Transparent.
If you're using the Label control to display data read from elsewhere—for example, a database field or a text file—you should set its UseMnemonics property to False. In this case, & characters

have no special meaning to the control, and so you indirectly turn off the control's hot key capability. I mention this property because in older versions of Visual Basic, you had to manually double each & character to make the ampersand appear in text. I don't think all developers are aware that you can now treat ampersands like regular characters.
As I said before, you don't usually write code in Label control event procedures. This control exposes only a subset of the events supported by other controls. For example, because Label controls can never get the input focus, they don't support GotFocus, LostFocus, or any keyboard-related events. In practice, you can take advantage only of their mouse events: Click, DblClick, MouseDown, MouseMove, and MouseUp. If you're using a Label control to display data read from a database, you might sometimes find it useful to write code in its Change event. A Label control doesn't expose a specific event that tells programmers when users press its hot keys.
You can do some interesting tricks with Label controls. For example, you can use them to provide rectangular hot spots for images loaded onto the form. To create that context-sensitive ToolTip, I loaded the image on the form using the form's Picture property and then I placed a Label control over the Microsoft BackOffice logo, setting its Caption property to an empty string and the BackStyle property to 0-Transparent. These properties make the Label invisible, but it correctly shows its ToolTip when necessary. And because it still receives all mouse events, you can use its Click event to react to users' actions.
FRAME CONTROLS
Frame controls are similar to Label controls in that they can serve as captions for those controls that don't have their own. Moreover, Frame controls can also (and often do) behave as containers and host other controls. In most cases, you only need to drop a Frame control on a form and set its Caption property. If you want to create a borderless frame, you can set its BorderStyle property to 0-None.
Controls that are contained in the Frame control are said to be child controls. Moving a control at design time over a Frame control—or over any other container, for that matter—doesn't automatically make that control a child of the Frame control. After you create a Frame control, you can create a child control by selecting the child control's icon in the Toolbox and drawing a new instance inside the Frame's border. Alternatively, to make an existing control a child of a Frame control, you must select the control, press Ctrl+X to cut it to the Clipboard, select the Frame

control, and press Ctrl+V to paste the control inside the Frame. If you don't follow this procedure and you simply move the control over the Frame, the two controls remain completely independent of each other, even if the other control appears in front of the Frame control.
Frame controls, like all container controls, have two interesting features. If you move a Frame control, all the child controls go with it. If you make a container control disabled or invisible, all its child controls also become disabled or invisible. You can exploit these features to quickly change the state of a group of related controls.
PICTUREBOX AND IMAGE CONTROLS IN VISUAL BASIC 6
Both PictureBox and Image controls let you display an image, so let's compare them and see when it makes sense to choose one or the other.
THE PICTUREBOX CONTROL
PictureBox controls are among the most powerful and complex items in the Visual Basic Toolbox window. In a sense, these controls are more similar to forms than to other controls. For example, PictureBox controls support all the properties related to graphic output, including AutoRedraw, ClipControls, HasDC, FontTransparent, CurrentX, CurrentY, and all the Drawxxxx, Fillxxxx, and Scalexxxx properties. PictureBox controls also support all graphic methods, such as Cls, PSet, Point, Line, and Circle and conversion methods, such as ScaleX, ScaleY, TextWidth, and TextHeight. In other words, all the techniques that I described for forms can also be used for PictureBox controls (and therefore won't be covered again in this section).
Loading images
Once you place a PictureBox on a form, you might want to load an image in it, which you do by setting the Picture property in the Properties window. You can load images in many different graphic formats, including bitmaps (BMP), device independent bitmaps (DIB), metafiles (WMF), enhanced metafiles (EMF), GIF and JPEG compressed files, and icons (ICO and CUR). You can decide whether a control should display a border, resetting the BorderStyle to 0-None if necessary. Another property that comes handy in this phase is AutoSize: Set it to True and let the control automatically resize itself to fit the assigned image.

You might want to set the Align property of a PictureBox control to something other than the 0-None value. By doing that, you attach the control to one of the four form borders and have Visual Basic automatically move and resize the PictureBox control when the form is resized. PictureBox controls expose a Resize event, so you can trap it if you need to move and resize its child controls too.
You can do more interesting things at run time. To begin with, you can programmatically load any image in the control using the LoadPicture function:
Picture1.Picture = LoadPicture("c:\windows\setup.bmp")
and you can clear the current image using either one of the following statements:
' These are equivalent. Picture1.Picture = LoadPicture("") Set Picture1.Picture = Nothing
The LoadPicture function has been extended in Visual Basic 6 to support icon files containing multiple icons. The new syntax is the following:
LoadPicture(filename, [size], [colordepth], [x], [y])
where values in square brackets are optional. If filename is an icon file, you can select a particular icon using the size or colordepth arguments. Valid sizes are 0-vbLPSmall, 1-vbLPLarge (system icons whose sizes depend on the video driver), 2-vbLPSmallShell, 3-vbLPLargeShell (shell icons whose dimensions are affected by the Caption Button property as set in the Appearance tab in the screen's Properties dialog box), and 4-vbLPCustom (size is determined by x and y). Valid color depths are 0-vbLPDefault (the icon in the file that best matches current screen settings), 1-vbLPMonochrome, 2-vbLPVGAColor (16 colors), and 3-vbLPColor (256 colors).
You can copy an image from one PictureBox control to another by assigning the target control's Picture property:
Picture2.Picture = Picture1.Picture
The PaintPicture method
PictureBox controls are equipped with a very powerful method that enables the programmer to perform a wide variety of graphic

effects, including zooming, scrolling, panning, tiling, flipping, and many fading effects: This is the PaintPicture method. (This method is also exposed by form objects, but it's most often used with PictureBox controls.) In a nutshell, this method performs a pixel-by-pixel copy from a source control to a destination control. The complete syntax of this method is complex and rather confusing:
DestPictBox.PaintPicture SrcPictBox.Picture, destX, destY, [destWidth], _ [destHeight], [srcX], [srcY2], [srcWidth], [srcHeight], [Opcode])
The only required arguments are the source PictureBox control's Picture property and the coordinates inside the destination control where the image must be copied. The destX / destY arguments are expressed in the ScaleMode of the destination control; by varying them, you can make the image appear exactly where you want. For example, if the source PictureBox control contains a bitmap 3000 twips wide and 2000 twips tall, you can center this image on the destination control with this command:
picDest.PaintPicture picSource.Picture, (picDest.ScaleWidth - 3000) / 2, _ (picDest.ScaleHeight - 2000) / 2
In general, Visual Basic doesn't provide a way to determine the size of a bitmap loaded into a PictureBox control. But you can derive this information if you set the control's AutoSize property to True and then read the control's ScaleWidth and ScaleHeight properties. If you don't want to resize a visible control just to learn the dimensions of a bitmap, you can load it into an invisible control, or you can use this trick, based on the fact that the Picture property returns an StdPicture object, which in turn exposes the Height and Width properties:
' StdPicture's Width and Height properties are expressed in ' Himetric units. With Picture1 width = CInt(.ScaleX(.Picture.Width, vbHimetric, vbPixels)) height = CInt(.ScaleY(.Picture.Height, vbHimetric, _ vbPixels)) End With
By the way, in all subsequent code examples I assume that the source PictureBox control's ScaleWidth and ScaleHeight properties match the actual bitmap's size. By default, the PaintPicture method copies the entire source bitmap. But you can copy just a portion of it, passing a value for srcWidth and srcHeight:

' Copy the upper left portion of the source image. picDest.PaintPicture picSource.Picture, 0, 0, , , , , _ picSource.ScaleWidth / 2, picSource.ScaleHeight / 2
If you're copying just a portion of the source image, you probably want to pass a specific value for the srcX and srcY values as well, which correspond to the coordinates of the top-left corner of the area that will be copied from the source control:
' Copy the bottom-right portion of the source image ' in the corresponding corner in the destination. wi = picSource.ScaleWidth / 2 he = picSource.ScaleHeight / 2 picDest.PaintPicture picSource.Picture, wi, he, , , wi, he, wi, he
You can use this method to tile a target PictureBox control (or form) with multiple copies of an image stored in another control:
' Start with the leftmost column. x = 0 Do While x < picDest.ScaleWidth y = 0 ' For each column, start at the top and work downward. Do While y < picDest.ScaleHeight picDest.PaintPicture picSource.Picture, x, y, , , 0, 0 ' Next row y = y + picSource.ScaleHeight Loop ' Next column x = x + picSource.ScaleWidth Loop
Another great feature of the PaintPicture method lets you resize the image while you transfer it, and you can even specify different zoom-in and zoom-out factors for the x- and y-axes independently. You just have to pass a value to the destWidth and destHeight arguments: If these values are greater than the source image's corresponding dimensions, you achieve a zoom-in effect, and if they are less you get a zoom-out effect. For example, see how you can double the size of the original image:
picDest.PaintPicture picSource.Picture, 0, 0, _ picSource.ScaleWidth * 2, picSource.ScaleHeight * 2
As a special case of the syntax of the PaintPicture method, the source image can even be flipped along its x-axis, y-axis, or both by passing negative values for these arguments:

' Flip horizontally. picDest.PaintPicture picSource.Picture, _ picSource.ScaleWidth, 0, -picSource.ScaleWidth ' Flip vertically. picDest.PaintPicture picSource.Picture, 0, _ picSource.ScaleHeight, , -picSource.ScaleHeight ' Flip the image on both axes. picDest.PaintPicture picSource.Picture, picSource.ScaleWidth, _ picSource.ScaleHeight, -picSource.ScaleWidth, -picSource.ScaleHeight
As you might expect, you can combine all these effects together, magnifying, reducing, or flipping just a portion of the source image, and have the result appear in any point of the destination PictureBox control (or form). You should find no problem in reusing all those routines in your own applications.
As if all these capabilities weren't enough, we haven't covered the last argument of the PaintPicture method yet. The opcode argument lets you specify which kind of Boolean operation must be performed on pixel bits as they're transferred from the source image to the destination. The values you can pass to this argument are the same that you assign to the DrawMode property. The default value is 13-vbCopyPen, which simply copies the source pixels in the destination control. By playing with the other settings, you can achieve many interesting graphical effects, including simple animations.
THE IMAGE CONTROL
Image controls are far less complex than PictureBox controls. They don't support graphical methods or the AutoRedraw and the ClipControls properties, and they can't work as containers, just to hint at their biggest limitations. Nevertheless, you should always strive to use Image controls instead of PictureBox controls because they load faster and consume less memory and system resources. Remember that Image controls are windowless objects that are actually managed by Visual Basic without creating a Windows object. Image controls can load bitmaps and JPEG and GIF images.
When you're working with an Image control, you typically load a bitmap into its Picture property either at design time or at run time using the LoadPicture function. Image controls don't expose the AutoSize property because by default they resize to display the contained image (as it happens with PictureBox controls set at AutoSize = True). On the other hand, Image controls support a Stretch property that, if True, resizes the image (distorting it if necessary) to fit the control. In a sense, the Stretch property

somewhat remedies the lack of the PaintPicture method for this control. In fact, you can zoom in to or reduce an image by loading it in an Image control and then setting its Stretch property to True to change its width and height:
' Load a bitmap. Image1.Stretch = False Image1.Picture = LoadPicture("c:\windows\setup.bmp") ' Reduce it by a factor of two. Image1.Stretch = True Image1.Move 0, 0, Image1.Width / 2, Image1.Width / 2
Image controls support all the usual mouse events. For this reason, many Visual Basic developers have used Image controls to simulate graphical buttons and toolbars. Now that Visual Basic natively supports these controls, you'd probably better use Image controls only for what they were originally intended.
THE TIMER, LINE, SHAPE AND OLE CONTROLS IN VISUAL BASIC 6 (VB6)
THE TIMER CONTROL
A Timer control is invisible at run time, and its purpose is to send a periodic pulse to the current application. You can trap this pulse by writing code in the Timer's Timer event procedure and take advantage of it to execute a task in the background or to monitor a user's actions. This control exposes only two meaningful properties: Interval and Enabled. Interval stands for the number of milliseconds between subsequent pulses (Timer events), while Enabled lets you activate or deactivate events. When you place the Timer control on a form, its Interval is 0, which means no events. Therefore, remember to set this property to a suitable value in the Properties window or in the Form_Load event procedure:
Private Sub Form_Load() Timer1.Interval = 500 ' Fire two Timer events per second. End Sub
Timer controls let you write interesting programs with just a few lines of code. The typical (and abused) example is a digital clock. Just to make things a bit more compelling, I added flashing colons:
Private Sub Timer1_Timer() Dim strTime As String strTime = Time$ If Mid$(lblClock.Caption, 3, 1) = ":" Then Mid$(strTime, 3, 1)= " "

Mid$(strTime, 6, 1) = " " End If lblClock.Caption = strTime End Sub
You must be careful not to write a lot of code in the Timer event procedure because this code will be executed at every pulse and therefore can easily degrade your application's performance. Just as important, never execute a DoEvents statement inside a Timer event procedure because you might cause the procedure to be reentered, especially if the Interval property is set to a small value and there's a lot of code inside the procedure.
Timer controls are often useful for updating status information on a regular basis. For example, you might want to display on a status bar a short description of the control that currently has the input focus. You can achieve that by writing some code in the GotFocus event for all the controls on the form, but when you have dozens of controls this will require a lot of code (and time). Instead, at design time load a short description for each control in its Tag property, and then place a Timer control on the form with an Interval setting of 500. This isn't a time-critical task, so you can use an even larger value. Finally add two lines of code to the control's Timer event:
Private Sub Timer1_Timer() On Error Resume Next lblStatusBar.Caption = ActiveControl.Tag End Sub
THE LINE CONTROL
The Line control is a decorative control whose only purpose is let you draw one or more straight lines at design time, instead of displaying them using a Line graphical method at run time. This control exposes a few properties whose meaning should sound familiar to you by now: BorderColor (the color of the line), BorderStyle (the same as a form's DrawStyle property), BorderWidth (the same as a form's DrawWidth property), and DrawMode. While the Line control is handy, remember that using a Line method at run time is usually better in terms of performance.
THE SHAPE CONTROL
In a sense, the Shape control is an extension of the Line control. It can display six basic shapes: Rectangle, Square, Oval, Circle, Rounded Rectangle, and Rounded Square. It supports all the Line control's properties and a few more: BorderStyle (0-Transparent,

1-Solid), FillColor, and FillStyle (the same as a form's properties with the same names). The same performance considerations I pointed out for the Line control apply to the Shape control.
THE OLE CONTROL
When OLE first made its appearance, the concept of Object Linking and Embedding seemed to most developers nothing short of magic. The ability to embed a Microsoft Word Document or a Microsoft Excel worksheet within another Windows application seemed an exciting one, and Microsoft promptly released the OLE control—then called the OLE Container control—to help Visual Basic support this capability.
In the long run, however, the Embedding term in OLE has lost much of its appeal and importance, and nowadays programmers are more concerned and thrilled about Automation, a subset of OLE that lets them control other Windows applications from the outside, manipulating their object hierarchies through OLE. For this reason, I won't describe the OLE control: It's a rather complex object, and a thorough description of its many properties, methods, and events (and quirks) would take too much space.
USING LISTBOX AND COMBOBOX CONTROLS IN VISUAL BASIC 6
ListBox and ComboBox controls present a set of choices that are displayed vertically in a column. If the number of items exceed the value that be displayed, scroll bars will automatically appear on the control. These scroll bars can be scrolled up and down or left to right through the list.
The following Fig lists some of the common ComboBox properties and methods.
Property/Method Description
Properties
Enabled
By setting this property to True or False user can decide whether user can interact with this control or not
Index Specifies the Control array index
List String array. Contains the strings displayed in the drop-down list. Starting array index is 0.
ListCount Integer. Contains the number of drop-down list items
ListIndex Integer. Contains the index of the

selected ComboBox item. If an item is not selected, ListIndex is -1
Locked Boolean. Specifies whether user can type or not in the ComboBox
MousePointer Integer. Specifies the shape of the mouse pointer when over the area of the ComboBox
NewIndex
Integer. Index of the last item added to the ComboBox. If the ComboBox does not contain any items , NewIndex is -1
Sorted Boolean. Specifies whether the ComboBox's items are sorted or not.
Style Integer. Specifies the style of the ComboBox's appearance
TabStop Boolean. Specifies whether ComboBox receives the focus or not.
Text String. Specifies the selected item in the ComboBox
ToolTipIndex String. Specifies what text is displayed as the ComboBox's tool tip
Visible Boolean. Specifies whether ComboBox is visible or not at run time
Methods
AddItem Add an item to the ComboBox
Clear Removes all items from the ComboBox
RemoveItem Removes the specified item from the ComboBox
SetFocus Transfers focus to the ComboBox
Event Procedures
Change Called when text in ComboBox is changed
DropDown Called when the ComboBox drop-down list is displayed
GotFocus Called when ComboBox receives the focus

LostFocus Called when ComboBox loses it focus
ADDING ITEMS TO A LIST
It is possible to populate the list at design time or run time
Design Time : To add items to a list at design time, click on List property in the property box and then add the items. Press CTRL+ENTER after adding each item as shown below.
Run Time : The AddItem method is used to add items to a list at run time. The AddItem method uses the following syntax.
Object.AddItemitem, Index
The item argument is a string that represents the text to add to the list
The index argument is an integer that indicates where in the list to add the new item. Not giving the index is not a problem, because by default the index is assigned.
Following is an example to add item to a combo box. The code is typed in the Form_Load event
Private Sub Form_Load()
Combo1.AddItem 1 Combo1.AddItem 2 Combo1.AddItem 3 Combo1.AddItem 4 Combo1.AddItem 5 Combo1.AddItem 6
End Sub
REMOVING ITEMS FROM A LIST
The RemoveItem method is used to remove an item from a list. The syntax for this is given below.

Object.RemoveItem index
The following code verifies that an item is selected in the list and then removes the selected item from the list.
Private Sub cmdRemove_Click() If List1.ListIndex > -1 Then List1.RemoveItem List1. ListIndex End If End Sub
SORTING THE LIST
The Sorted property is set to True to enable a list to appear in alphanumeric order and False to display the list items in the order which they are added to the list.
USING THE COMBOBOX
A ComboBox combines the features of a TextBox and a ListBox. This enables the user to select either by typing text into the ComboBox or by selecting an item from the list. There are three types of ComboBox styles that are represented as shown below.
Dropdown combo
Simple combo
Dropdown list
Dropdown Combo (style 0)
Simple Combo (style 1)
Dropdown List (style 2)
The Simple Combo box displays an edit area with an attached list box always visible immediately below the edit area. A simple combo box displays the contents of its list all the time. The user can select an item from the list or type an item in the edit box portion of the combo box. A scroll bar is displayed beside the list if there are too many items to be displayed in the list box area.
The Dropdown Combo box first appears as only an edit area with a down arrow button at the right. The list portion stays hidden until the user clicks the down-arrow button to drop down the list

portion. The user can either select a value from the list or type a value in the edit area.
The Dropdown list combo box turns the combo box into a Dropdown list box. At run time , the control looks like the Dropdown combo box. The user could click the down arrow to view the list. The difference between Dropdown combo & Dropdown list combo is that the edit area in the Dropdown list combo is disabled. The user can only select an item and cannot type anything in the edit area. Anyway this area displays the selected item.
Example
This example is to Add , Remove, Clear the list of items and finally close the application.
Open a new Standard EXE project is opened an named the Form as Listbox.frm and save the project as Listbox.vbp
Design the application as shown below.
Object Property Settings
Form Caption
Name
ListBox
frmListBox
TextBox Text
Name
(empty)
txtName
Label Caption
Name
Enter a name
lblName
ListBox Name lstName
Label Caption
Name
Amount Entered
lblAmount
Label
Caption
Name
Border Style
(empty)
lblDisplay
1 Fixed Single
CommandButton Caption Add

Name cmdAdd
CommandButton Caption
Name
Remove
cmdRemove
CommandButton Caption
Name
Clear
cmdClear
CommandButton Caption
Name
Exit
cmdExit
The following event procedures are entered for the TextBox and CommandButton controls.
Private Sub txtName_Change() If (Len(txtName.Text) > 0) Then 'Enabling the Add button 'if atleast one character 'is entered cmdAdd.Enabled = True End If End Sub
Private Sub cmdAdd_Click() lstName.AddItem txtName.Text 'Add the entered the characters to the list box txtName.Text = "" 'Clearing the text box txtName.SetFocus 'Get the focus back to the 'text box lblDisplay.Caption = lstName.ListCount 'Display the number of items in the list box cmdAdd.Enabled = False ' Disabling the Add button

End Sub
The click event of the Add button adds the text to the list box that was typed in the Text box. Then the text box is cleared and the focus is got to the text box. The number of entered values will is increased according to the number of items added to the listbox.
Private Sub cmdClear_Click() lstName.Clear lblDisplay.Caption = lstName.ListCount End Sub
Private Sub cmdExit_Click() Unload Me End Sub
Private Sub cmdRemove_Click() Dim remove As Integer
remove = lstName.ListIndex 'Getting the index
If remove >= 0 Then 'make sure an item is selected 'in the list box
lstName.RemoveItem remove 'Remove item from the list box lblDisplay.Caption = lstName.ListCount 'Display the number of items 'in the listbox
End If
End Sub
Remove button removes the selected item from the list as soon as you pressed the Remove button. The number of items is decreased in the listbox and the value is displayed in the label.
The code for the clear button clears the listbox when you press it. And the number of items shown in the label becomes 0.
VB SCROLLBAR - USING SCROLLBAR CONTROL IN VISUAL BASIC 6 (VB6)
The ScrollBar is a commonly used control, which enables the user to select a value by positioning it at the desired location. It represents a set of values. The Min and Max property represents the minimum and maximum value. The value property of the ScrollBar represents its current value, that may be any integer between minimum and maximum values assigned.

The HScrollBar and the VScrollBar controls are perfectly identical, apart from their different orientation. After you place an instance of such a control on a form, you have to worry about only a few properties: Min and Max represent the valid range of values, SmallChange is the variation in value you get when clicking on the scroll bar's arrows, and LargeChange is the variation you get when you click on either side of the scroll bar indicator. The default initial value for those two properties is 1, but you'll probably have to change LargeChange to a higher value. For example, if you have a scroll bar that lets you browse a portion of text, SmallChange should be 1 (you scroll one line at a time) and LargeChange should be set to match the number of visible text lines in the window.
The most important run-time property is Value, which always returns the relative position of the indicator on the scroll bar. By default, the Min value corresponds to the leftmost or upper end of the control:
' Move the indicator near the top (or left) arrow. VScroll1.Value = VScroll1.Min ' Move the indicator near the bottom (or right) arrow. VScroll1.Value = VScroll1.Max
While this setting is almost always OK for horizontal scroll bars, you might sometimes need to reverse the behavior of vertical scroll bars so that the zero is near the bottom of your form. This arrangement is often desirable if you want to use a vertical scroll bar as a sort of slider. You obtain this behavior by simply inverting the values in the Min and Max properties. (In other words, it's perfectly legal for Min to be greater than Max.)
There are two key events for scrollbar controls: the Change event fires when you click on the scroll bar arrows or when you drag the indicator; the Scroll event fires while you drag the indicator. The reason for these two distinct possibilities is mostly historical. First versions of Visual Basic supported only the Change event, and when developers realized that it wasn't possible to have continuous feedback when users dragged the indicator, Microsoft engineers added a new event instead of extending the Change event. In this way, old applications could be recompiled without unexpected changes in their behavior. At any rate, this means that you must often trap two distinct events:
' Show the current scroll bar's value. Private VScroll1_Change() Label1.Caption = VScroll1.Value End Sub Private VScroll1_Scroll()
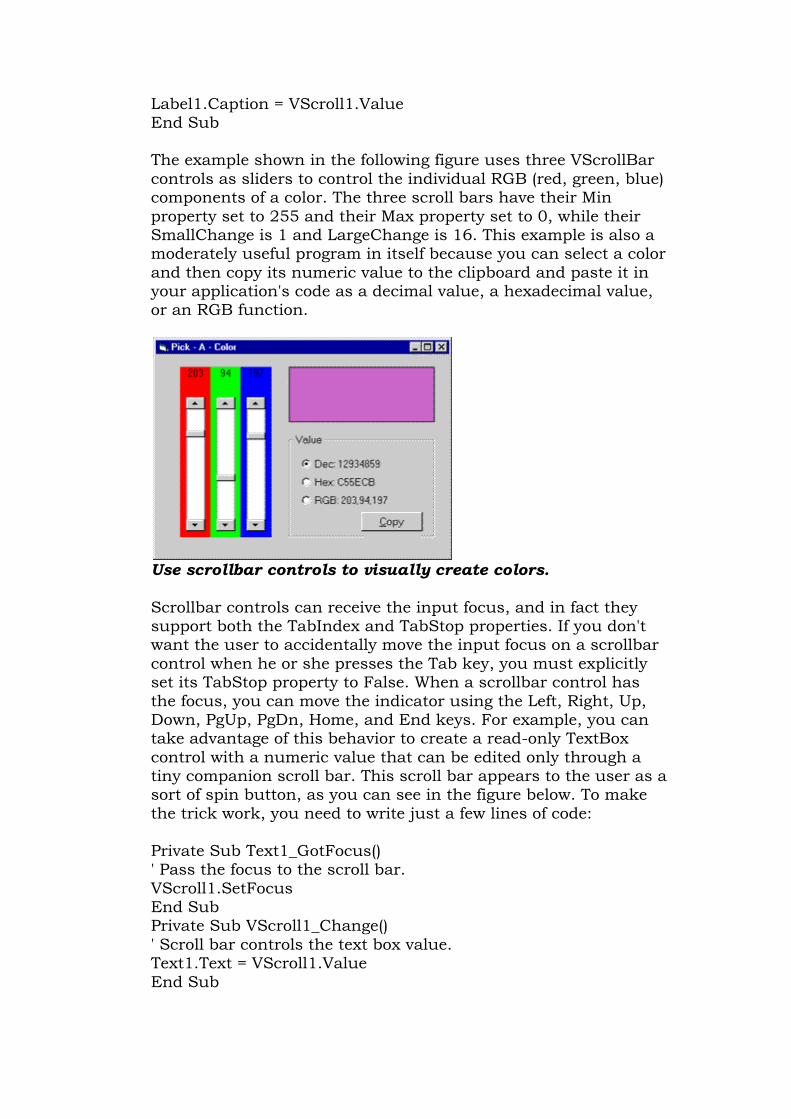
Label1.Caption = VScroll1.Value End Sub
The example shown in the following figure uses three VScrollBar controls as sliders to control the individual RGB (red, green, blue) components of a color. The three scroll bars have their Min property set to 255 and their Max property set to 0, while their SmallChange is 1 and LargeChange is 16. This example is also a moderately useful program in itself because you can select a color and then copy its numeric value to the clipboard and paste it in your application's code as a decimal value, a hexadecimal value, or an RGB function.
Use scrollbar controls to visually create colors.
Scrollbar controls can receive the input focus, and in fact they support both the TabIndex and TabStop properties. If you don't want the user to accidentally move the input focus on a scrollbar control when he or she presses the Tab key, you must explicitly set its TabStop property to False. When a scrollbar control has the focus, you can move the indicator using the Left, Right, Up, Down, PgUp, PgDn, Home, and End keys. For example, you can take advantage of this behavior to create a read-only TextBox control with a numeric value that can be edited only through a tiny companion scroll bar. This scroll bar appears to the user as a sort of spin button, as you can see in the figure below. To make the trick work, you need to write just a few lines of code:
Private Sub Text1_GotFocus() ' Pass the focus to the scroll bar. VScroll1.SetFocus End Sub Private Sub VScroll1_Change() ' Scroll bar controls the text box value. Text1.Text = VScroll1.Value End Sub
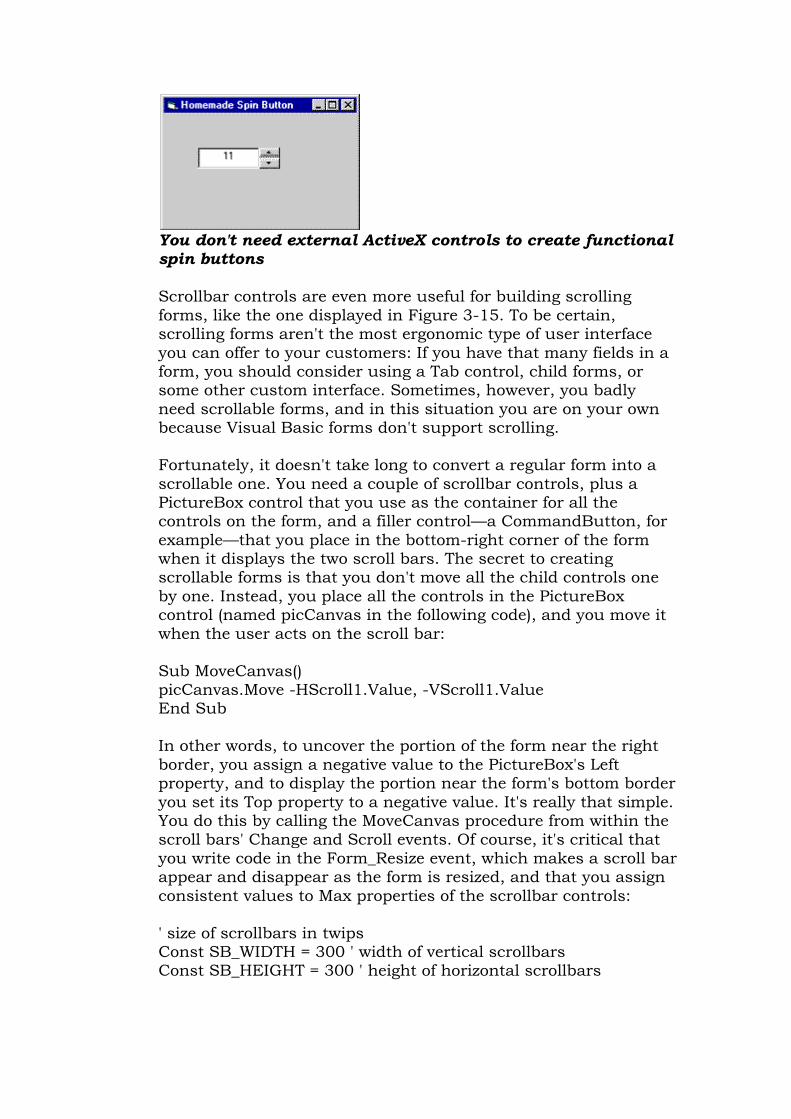
You don't need external ActiveX controls to create functional spin buttons
Scrollbar controls are even more useful for building scrolling forms, like the one displayed in Figure 3-15. To be certain, scrolling forms aren't the most ergonomic type of user interface you can offer to your customers: If you have that many fields in a form, you should consider using a Tab control, child forms, or some other custom interface. Sometimes, however, you badly need scrollable forms, and in this situation you are on your own because Visual Basic forms don't support scrolling.
Fortunately, it doesn't take long to convert a regular form into a scrollable one. You need a couple of scrollbar controls, plus a PictureBox control that you use as the container for all the controls on the form, and a filler control—a CommandButton, for example—that you place in the bottom-right corner of the form when it displays the two scroll bars. The secret to creating scrollable forms is that you don't move all the child controls one by one. Instead, you place all the controls in the PictureBox control (named picCanvas in the following code), and you move it when the user acts on the scroll bar:
Sub MoveCanvas() picCanvas.Move -HScroll1.Value, -VScroll1.Value End Sub
In other words, to uncover the portion of the form near the right border, you assign a negative value to the PictureBox's Left property, and to display the portion near the form's bottom border you set its Top property to a negative value. It's really that simple. You do this by calling the MoveCanvas procedure from within the scroll bars' Change and Scroll events. Of course, it's critical that you write code in the Form_Resize event, which makes a scroll bar appear and disappear as the form is resized, and that you assign consistent values to Max properties of the scrollbar controls:
' size of scrollbars in twips Const SB_WIDTH = 300 ' width of vertical scrollbars Const SB_HEIGHT = 300 ' height of horizontal scrollbars

Private Sub Form_Resize() ' Resize the scroll bars along the form. HScroll1.Move 0, ScaleHeight - SB_HEIGHT, ScaleWidth - SB_WIDTH VScroll1.Move ScaleWidth - SB_WIDTH, 0, SB_WIDTH, _ ScaleHeight - SB_HEIGHT cmdFiller.Move ScaleWidth - SB_WIDTH, ScaleHeight - SB_HEIGHT, _ SB_WIDTH, SB_HEIGHT
' Put these controls on top. HScroll1.ZOrder VScroll1.ZOrder cmdFiller.ZOrder picCanvas.BorderStyle = 0
' A click on the arrow moves one pixel. HScroll1.SmallChange = ScaleX(1, vbPixels, vbTwips) VScroll1.SmallChange = ScaleY(1, vbPixels, vbTwips) ' A click on the scroll bar moves 16 pixels. HScroll1.LargeChange = HScroll1.SmallChange * 16 VScroll1.LargeChange = VScroll1.SmallChange * 16
' If the form is larger than the picCanvas picture box, ' we don't need to show the corresponding scroll bar. If ScaleWidth < picCanvas.Width + SB_WIDTH Then HScroll1.Visible = True HScroll1.Max = picCanvas.Width + SB_WIDTH - ScaleWidth Else HScroll1.Value = 0 HScroll1.Visible = False End If If ScaleHeight < picCanvas.Height + SB_HEIGHT Then VScroll1.Visible = True VScroll1.Max = picCanvas.Height + SB_HEIGHT - ScaleHeight Else VScroll1.Value = 0 VScroll1.Visible = False End If ' Make the filler control visible only if necessary. cmdFiller.Visible = (HScroll1.Visible Or VScroll1.Visible) MoveCanvas End Sub
Working with scrollable forms at design time isn't comfortable. I suggest that you work with a maximized form and with the PictureBox control sized as large as possible. When you're finished with the form interface, resize the PictureBox control to

the smallest area that contains all the controls, and then reset the form's WindowState property to 0-Normal.
DRIVELISTBOX, DIRLISTBOX, AND FILELISTBOX CONTROLS IN VISUAL
BASIC 6
Three of the controls on the ToolBox let you access the computer's file system. They are DriveListBox, DirListBox and FileListBox controls (see below figure) , which are the basic blocks for building dialog boxes that display the host computer's file system. Using these controls, user can traverse the host computer's file system, locate any folder or files on any hard disk, even on network drives. The files are controls are independent of one another, and each can exist on it's own, but they are rarely used separately. The files controls are described next.
In a nutshell, the DriveListBox control is a combobox-like control that's automatically filled with your drive's letters and volume labels. The DirListBox is a special list box that displays a directory tree. The FileListBox control is a special-purpose ListBox control that displays all the files in a given directory, optionally filtering them based on their names, extensions, and attributes.
These controls often work together on the same form; when the user selects a drive in a DriveListBox, the DirListBox control is updated to show the directory tree on that drive. When the user selects a path in the DirListBox control, the FileListBox control is filled with the list of files in that directory. These actions don't happen automatically, however—you must write code to get the job done.
After you place a DriveListBox and a DirListBox control on a form's surface, you usually don't have to set any of their properties; in fact, these controls don't expose any special property, not in the Properties window at least. The FileListBox control, on the other hand, exposes one property that you can set at design time—the Pattern property. This property indicates which files are to be shown in the list area: Its default value is *.* (all files), but you can enter whatever specification you need, and you can also enter multiple specifications using the semicolon as a separator. You can also set this property at run time, as in the following line of code:
File1.Pattern = "*.txt;*.doc;*.rtf"
Following figure shows three files controls are used in the design of Forms that let users explore the entire structure of their hard disks.

DriveListBox : Displays the names of the drives within and connected to the PC. The basic property of this control is the drive property, which set the drive to be initially selected in the control or returns the user's selection.
DirListBox : Displays the folders of current Drive. The basic property of this control is the Path property, which is the name of the folder whose sub folders are displayed in the control.
FileListBox : Displays the files of the current folder. The basic property of this control is also called Path, and it's the path name of the folder whose files are displayed.
The three File controls are not tied to one another. If you place all three of them on a Form, you will see the names of all the folders under the current folder, and so on. Each time you select a folder in the DirlistBox by double clicking its name, its sub folders are displayed. Similarly , the FileListBox control will display the names of all files in the current folder. Selecting a drive in the DriveListBox control, however this doesn't affect the contents of the DirListBox.
To connect to the File controls, you must assign the appropriate values to the properties. To compel the DirListBox to display the folders of the selected drive in the DriveListBox, you must make sure that each time the user selects another drive, the Path property of the DirListBox control matches the Drive property of the DriveListBox.
After these preliminary steps, you're ready to set in motion the chain of events. When the user selects a new drive in the DriveListBox control, it fires a Change event and returns the drive letter (and volume label) in its Drive property. You trap this event and set the DirListBox control's Path property to point to the root directory of the selected drive:

Private Sub Drive1_Change() ' The Drive property also returns the volume label, so trim it. Dir1.Path = Left$(Drive1.Drive, 1) & ":\" End Sub
When the user double-clicks on a directory name, the DirListBox control raises a Change event; you trap this event to set the FileListBox's Path property accordingly:
Private Sub Dir1_Change() File1.Path = Dir1.Path End Sub
Finally, when the user clicks on a file in the FileListBox control, a Click event is fired (as if it were a regular ListBox control), and you can query its Filename property to learn which file has been selected. Note how you build the complete path:
Filename = File1.Path If Right$(Filename, 1) <> "\" Then Filename = Filename & "\" Filename = Filename & File1.Filename
The DirListBox and FileListBox controls support most of the properties typical of the control they derive from—the ListBox control—including the ListCount and the ListIndex properties and the Scroll event. The FileListBox control supports multiple selection; hence you can set its MultiSelect property in the Properties window and query the SelCount and Selected properties at run time.
The FileListBox control also exposes a few custom Boolean properties, Normal, Archive, Hidden, ReadOnly, and System, which permit you to decide whether files with these attributes should be listed. (By default, the control doesn't display hidden and system files.) This control also supports a couple of custom events, PathChange and PatternChange, that fire when the corresponding property is changed through code. In most cases, you don't have to worry about them, and I won't provide examples of their usage.
The problem with the DriveListBox, DirListBox and FileListBox controls is that they're somewhat outdated and aren't used by most commercial applications any longer. Moreover, these controls are known to work incorrectly when listing files on network servers and sometimes even on local disk drives, especially when long file and directory names are used. For this reason, I discourage you from using them and suggest instead that you use the Common Dialog controls for your FileOpen and FileSave dialog boxes. But if you need to ask the user for the
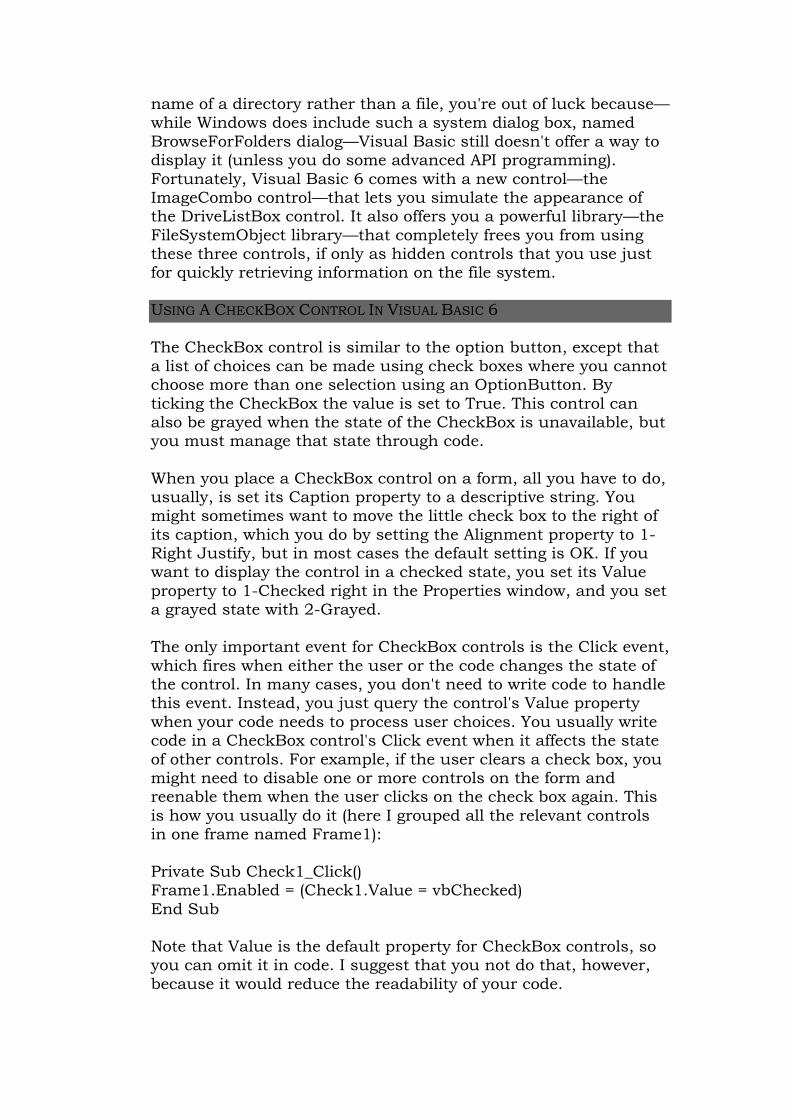
name of a directory rather than a file, you're out of luck because—while Windows does include such a system dialog box, named BrowseForFolders dialog—Visual Basic still doesn't offer a way to display it (unless you do some advanced API programming). Fortunately, Visual Basic 6 comes with a new control—the ImageCombo control—that lets you simulate the appearance of the DriveListBox control. It also offers you a powerful library—the FileSystemObject library—that completely frees you from using these three controls, if only as hidden controls that you use just for quickly retrieving information on the file system.
USING A CHECKBOX CONTROL IN VISUAL BASIC 6
The CheckBox control is similar to the option button, except that a list of choices can be made using check boxes where you cannot choose more than one selection using an OptionButton. By ticking the CheckBox the value is set to True. This control can also be grayed when the state of the CheckBox is unavailable, but you must manage that state through code.
When you place a CheckBox control on a form, all you have to do, usually, is set its Caption property to a descriptive string. You might sometimes want to move the little check box to the right of its caption, which you do by setting the Alignment property to 1-Right Justify, but in most cases the default setting is OK. If you want to display the control in a checked state, you set its Value property to 1-Checked right in the Properties window, and you set a grayed state with 2-Grayed.
The only important event for CheckBox controls is the Click event, which fires when either the user or the code changes the state of the control. In many cases, you don't need to write code to handle this event. Instead, you just query the control's Value property when your code needs to process user choices. You usually write code in a CheckBox control's Click event when it affects the state of other controls. For example, if the user clears a check box, you might need to disable one or more controls on the form and reenable them when the user clicks on the check box again. This is how you usually do it (here I grouped all the relevant controls in one frame named Frame1):
Private Sub Check1_Click() Frame1.Enabled = (Check1.Value = vbChecked) End Sub
Note that Value is the default property for CheckBox controls, so you can omit it in code. I suggest that you not do that, however, because it would reduce the readability of your code.

The following example illustrates the use of CheckBox control
Open a new Project and save the Form as CheckBox.frm and save the Project as CheckBox.vbp
Design the Form as shown below
Object Property Setting
Form Caption
Name
CheckBox
frmCheckBox
CheckBox Caption
Name
Bold
chkBold
CheckBox Caption
Name
Italic
chkItalic
CheckBox Caption
Name
Underline
chkUnderline
OptionButton Caption
Name
Red
optRed
OptionButton Caption
Name
Blue
optBlue
OptionButton Caption
Name
Green
optGreen
TextBox Name
Text
txtDisplay
(empty)
CommandButton Caption
Name
Exit
cmdExit

Following code is typed in the Click() events of the CheckBoxes
Private Sub chkBold_Click() If chkBold.Value = 1 Then txtDisplay.FontBold = True Else txtDisplay.FontBold = False End If End Sub Private Sub chkItalic_Click() If chkItalic.Value = 1 Then txtDisplay.FontItalic = True Else txtDisplay.FontItalic = False End If End Sub Private Sub chkUnderline_Click() If chkUnderline.Value = 1 Then txtDisplay.FontUnderline = True Else txtDisplay.FontUnderline = False End If End Sub
Following code is typed in the Click() events of the OptionButtons
Private Sub optBlue_Click() txtDisplay.ForeColor = vbBlue End Sub Private Sub optRed_Click() txtDisplay.ForeColor = vbRed End Sub Private Sub optGreen_Click() txtDisplay.ForeColor = vbGreen End Sub
To terminate the program following code is typed in the Click() event of the Exit button

Private Sub cmdExit_Click() End End Sub
Run the program by pressing F5. Check the program by clicking on OptionButtons and CheckBoxes.
INPUTBOX FUNCTION IN VISUAL BASIC 6 (VB6)
Displays a prompt in a dialog box, waits for the user to input text or click a button, and returns a String containing the contents of the text box.
Following is an expanded InputBox
Syntax :
memory_variable = InputBox (prompt[,title][,default])
memory_variable is a variant data type but typically it is declared as string, which accept the message input by the users. The arguments are explained as follows:
Prompt - String expression displayed as the message in the dialog box. If prompt consists of more than one line, you can separate the lines using the vbCrLf constant
Title - String expression displayed in the title bar of the dialog box. If you omit the title, the application name is displayed in the title bar
default-text - The default text that appears in the input field where users can use it as his intended input or he may change to the message he wish to key in.
x-position and y-position - the position or the coordinate of the
input box.
Following example demonstrates the use of InputBox function

* Open a new project and save the Form as InputBox.frm and save the Project as InputBox.vbp
Design the application as shown below.
Object Property Setting
Form
Caption
Name
InputBox test
frmInputBox
Label
Caption
Name
You entered
lbl1
Label
Caption
Name
BorderStyle
( empty)
lbl2
1-Fixed Single
CommandButton
Caption
Name
OK
cmdOK
Following code is entered in cmdOK_Click ( ) event
Private Sub cmdok_Click() Dim ans As String ans = InputBox("Enter something to be displayed in the label", "Testing", 0) If ans = "" Then lbl2.Caption = "No message" Else lbl2.Caption = ans

End If End Sub
Save and run the application. As soon as you click the OK button you will get the following InputBox
Here I have entered "Hello World" in text field. As soon as you click OK the output is shown as shown below
MESSAGEBOX FUNCTION IN VISUAL BASIC 6 (VB6)
Displays a message in a dialog box and wait for the user to click a button, and returns an integer indicating which button the user clicked.
Following is an expanded MessageBox
Syntax :
MsgBox ( Prompt [,icons+buttons ] [,title ] )
memory_variable = MsgBox ( prompt [, icons+ buttons] [,title] )

Prompt : String expressions displayed as the message in the dialog box. If prompt consist of more than one line, you can separate the lines using thevbrCrLf constant.
Icons + Buttons : Numeric expression that is the sum of values specifying the number and type of buttons and icon to display.
Title : String expression displayed in the title bar of the dialog box. If you omit title, the application name is placed in the title bar.
Icons
Constant Value Description
vbCritical 16
Display Critical message icon
vbQuestion 32 Display Warning Query icon
vbExclamation 48
Display Warning message icon
vbInformation 64 Display information icon
Buttons
Constant Value Description
vbOkOnly 0 Display OK button only
vbOkCancel 1 Display OK and Cancel buttons
vbAbortRetryIgnore 2
Display Abort, Retry and Ignore buttons
vbYesNoCancel 3
Display Yes, No and Cancel buttons
vbYesNo 4 Display Yes and No buttons
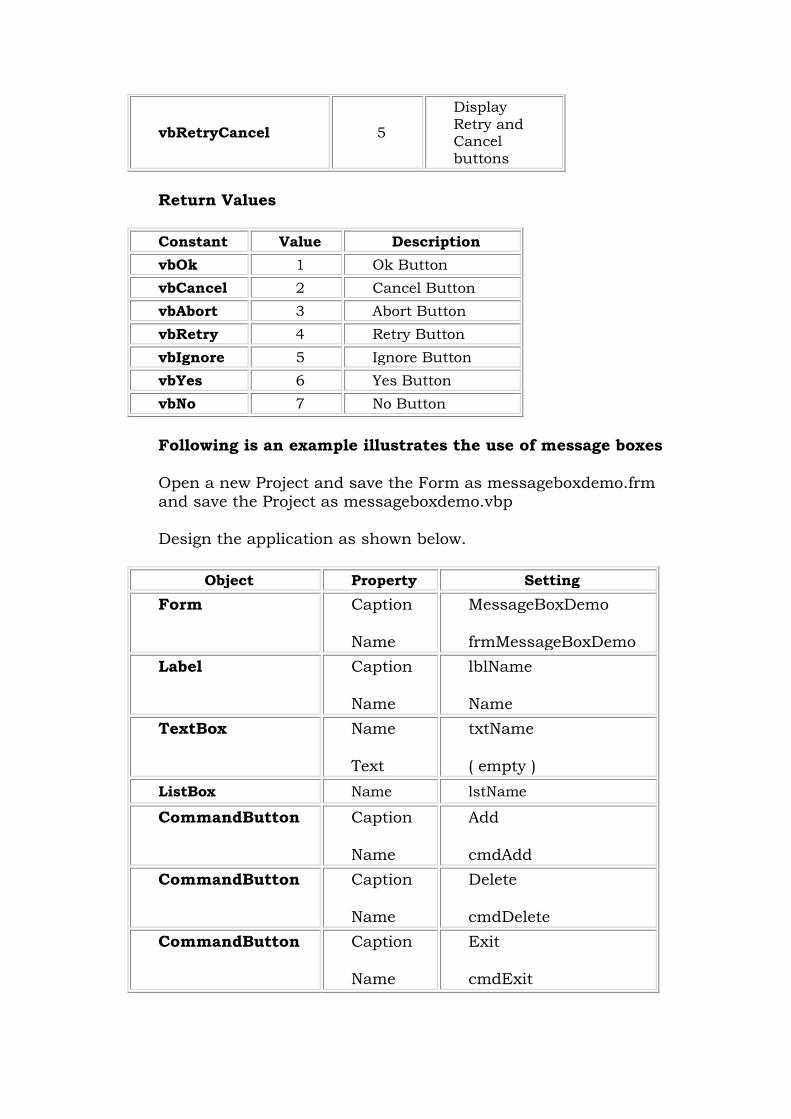
vbRetryCancel 5
Display Retry and Cancel buttons
Return Values
Constant Value Description
vbOk 1 Ok Button
vbCancel 2 Cancel Button
vbAbort 3 Abort Button
vbRetry 4 Retry Button
vbIgnore 5 Ignore Button
vbYes 6 Yes Button
vbNo 7 No Button
Following is an example illustrates the use of message boxes
Open a new Project and save the Form as messageboxdemo.frm and save the Project as messageboxdemo.vbp
Design the application as shown below.
Object Property Setting
Form
Caption
Name
MessageBoxDemo
frmMessageBoxDemo
Label
Caption
Name
lblName
Name
TextBox
Name
Text
txtName
( empty )
ListBox Name lstName
CommandButton
Caption
Name
Add
cmdAdd
CommandButton
Caption
Name
Delete
cmdDelete
CommandButton
Caption
Name
Exit
cmdExit

Following code is entered in the txtName_Change ( ) event
Private Sub txtName_Change() If Len(txtName.Text) > 0 Then cmdAdd.Enabled = True End If End Sub
Following code has to be entered in the cmdAdd_Click ( ) event
Private Sub cmdAdd_Click() answer = MsgBox("Do you want to add this name to the list box?", vbExclamation + vbYesNo, "Add Confirm") If answer = vbYes Then lstName.AddItem txtName.Text txtName.Text = "" txtName.SetFocus cmdAdd.Enabled = False End If End Sub
Following code is entered in the cmdDelete_Click ( ) event
Private Sub cmdDelete_Click() Dim remove As Integer remove = lstName.ListIndex If remove < 0 Then MsgBox "No names is selected", vbInformation, "Error" Else answer = MsgBox("Are you sure you want to delete " & vbCrLf & "the selected name?",_ vbCritical + vbYesNo, "Warning") If answer = vbYes Then If remove >= 0 Then lstName.RemoveItem remove txtName.SetFocus MsgBox "Selected name was deleted", vbInformation, "Delete

Confirm" End If End If End If End Sub
Following code is entered in the cmdExit_Click ( ) event
Private Sub cmdExit_Click() answer = MsgBox("Do you want to quit?", vbExclamation + vbYesNo, "Confirm") If answer = vbYes Then End Else MsgBox "Action canceled", vbInformation, "Confirm" End If End Sub
Save and run the application. You can notice the different type of message box types are used to perform an action
COMMON DIALOGS ALLOW A PROFESSIONAL VB APP Level:
The Common Dialog control provides a standard set of dialog boxes for operations such as opening, saving, and printing files, as well as selecting colors and fonts and displaying help. Any six of the different dialog boxes can be displayed with just one Common Dialog control. A particular dialog box is displayed by using one of the six "Show..." methods of the Common Dialog control: ShowOpen, ShowSave, ShowPrinter, ShowColor, ShowFont, or ShowHelp. The Common Dialog control not an intrinsic control; rather, it is an "Active X" control that must be added to the toolbox via theComponents dialog box, as shown below. This dialog box is accessed via the Project menu, Components item. Once you check "Microsoft Common Dialog Control 6.0" and click OK, the control is added to your toolbox (also shown below, circled). Then you can double-click it to make it appear on your form, as you would with any other control. The Common Dialog control is not visible at run-time.
The Components Dialog Box Common Dialog Control
Added to Toolbox
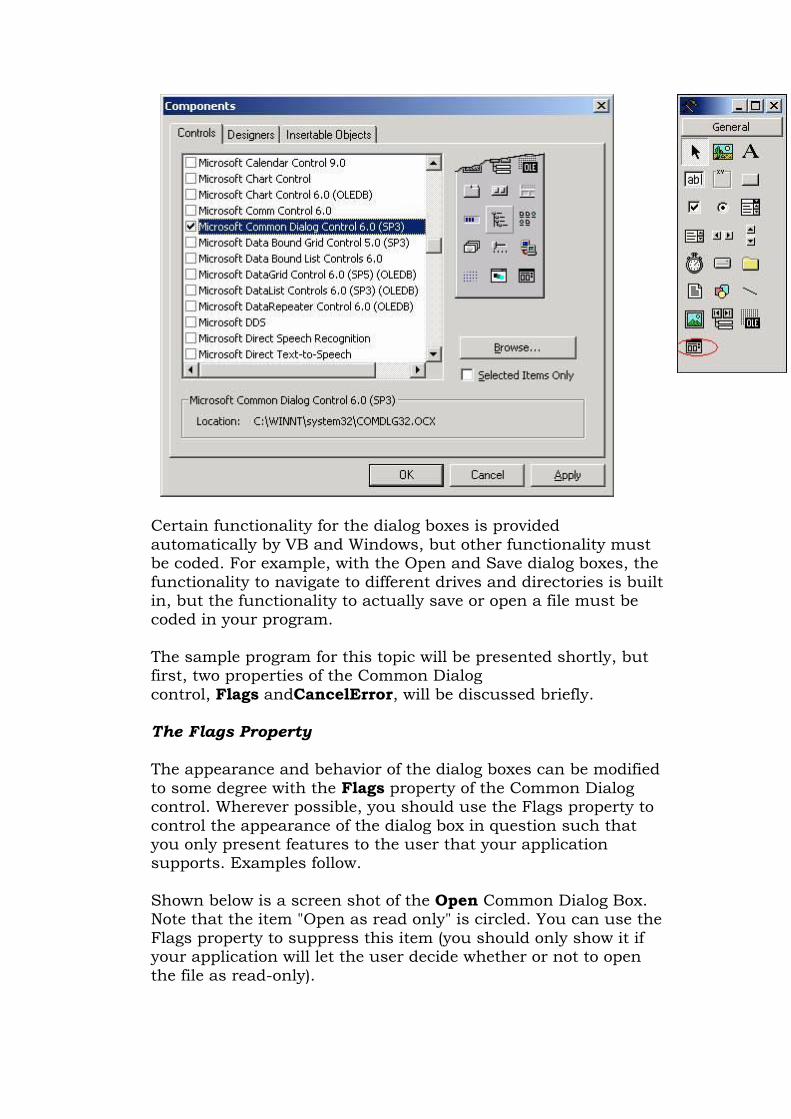
Certain functionality for the dialog boxes is provided automatically by VB and Windows, but other functionality must be coded. For example, with the Open and Save dialog boxes, the functionality to navigate to different drives and directories is built in, but the functionality to actually save or open a file must be coded in your program. The sample program for this topic will be presented shortly, but first, two properties of the Common Dialog control, Flags andCancelError, will be discussed briefly. The Flags Property The appearance and behavior of the dialog boxes can be modified to some degree with the Flags property of the Common Dialog control. Wherever possible, you should use the Flags property to control the appearance of the dialog box in question such that you only present features to the user that your application supports. Examples follow. Shown below is a screen shot of the Open Common Dialog Box. Note that the item "Open as read only" is circled. You can use the Flags property to suppress this item (you should only show it if your application will let the user decide whether or not to open the file as read-only).

Shown below is a screen shot of the Print Common Dialog Box. Note that the circled items in the "Page Range" area (for printing a selection or a specific page range) are grayed out. These items were disabled via Flags property settings. You should only enable such options if your program contains the logic to act on them.

Shown below is a screen shot of the Font Common Dialog Box. The Flags property can control whether or not the "Effects" area (circled) is displayed.
The CancelError Property In order to test whether or not the user clicked the Cancel button on a Common Dialog box, you must set up special error-handling logic. If you don't, VB will treat the clicking of the Cancel button as an unhandled error and will thus cause your program to end abruptly (this will not exactly endear you to your users). You can test to see whether or not the user clicked the Cancel button by setting the CancelError property to True – this causes an error routine you have written (using the "On Error Goto label technique) to be executed when the user clicks Cancel. The basic structure of a VB procedure that displays a Common Dialog box should be as follows: Private Sub WHATEVER() DECLARE LOCAL VARIABLES ON ERROR GOTO CANCELERROR_ROUTINE SET CancelError PROPERTY TO TRUE (e.g., CommonDialog1.CancelError = True) SET Flags AND OTHER PROPERTIES TO APPROPRIATE VALUES SHOW THE COMMON DIALOG (e.g., CommonDialog1.ShowSave)

' When you show the common dialog box, processing is suspending until the ' user performs an action. If they click the Cancel button, VB will jump ' to the error-handling routine you set up (i.e., CANCELERROR_ROUTINE). ' Assuming the user did not click Cancel, continue processing below ... ' Now that the dialog box is done being shown, we can put a "normal" error- ' handling routine in place, if desired ... On Error GoTo NORMAL_ERROR_ROUTINE NORMAL PROCESSING HERE ' Exit here so that you don't fall through to the error-handling logic Exit Sub NORMAL_ERROR_ROUTINE: MsgBox "Err # " & Err.Number & " - " & Err.Description, vbCritical, "Error" Exit Sub CANCELERROR_ROUTINE: ' Do nothing, no problem if user clicks Cancel button ... End Sub COMMON DIALOG DEMO PROGRAM The Common Dialog demo program shows how to use each of the six types of dialog boxes. The design-time form is shown below, with the names and property settings for each control on the form, as well as for the form itself, shown in callouts.

The coding for the demo program is provided below, with explanations. The General Declarations Section In the General Declarations section, a form-level String variable, mstrLastDir, is declared. This variable is used to store the directory of the last file accessed by an Open or Save operation, so it can be subsequently used as the default directory for the next Open or Save operation. Option Explicit Private mstrLastDir As String The Form_Load Event In the Form_Load event, the variable mstrLastDir is initialized to path where the program is running; this will serve as the default directory the first time that an Open or Save operation is performed. Private Sub Form_Load() mstrLastDir = App.Path

End Sub The cmdOpen_Click Event This event fires when the user clicks the Open button. The procedure follows the structure described above in the section discussed the CancelError property. Local variables are declared, an On Error statement is set up as part of the Cancel error handler, and then various properties of the Common Dialog box (dlgDemo) are set. As discussed above, setting the CancelError property to True enables us to handle the run-time error that will occur if the user clicks the dialog's Cancel button. The InitDir property tells the Common Dialog control where to start its navigation of the file system. As discussed above, we are using the form-level variable mstrLastDir to value this property. The Flags property, as discussed earlier, is used to modify the appearance and/or behavior of the dialog boxes. The Flags property is set by assigning one or more predefined VB constants (all beginning with the letters "cdl") to it. If more than one flag is to be assigned to the Flags property, you do so by adding the constants together: CommonDialog1.Flags = cdlThisFlag + cdlThatFlag + cdlTheOtherFlag Multiple flags can also be assigned by joining them together with the logical Or operator: CommonDialog1.Flags = cdlThisFlag Or cdlThatFlag Or cdlTheOtherFlag In this case, we are assigning one flag to the Flags property, cdlOFNHideReadOnly, which tells the Common Dialog control to suppress the "Open as read only" checkbox. The FileName property is initially set to "" so that a filename is not pre-selected when the dialog box is displayed (if we wanted to, we could initialize it with a default filename). After the Common Dialog has been shown and the user has interacted with it, we use the FileName property to determine what file the user has selected. The Filter property is a pipe-delimited string specifying what types of files should be shown in the file list portion of the Common Dialog box. The Filter string specifies a list of file filters that are displayed in the Files of type drop-down box. The Filter property string has the following format: description1 | filter1 | description2 | filter2...
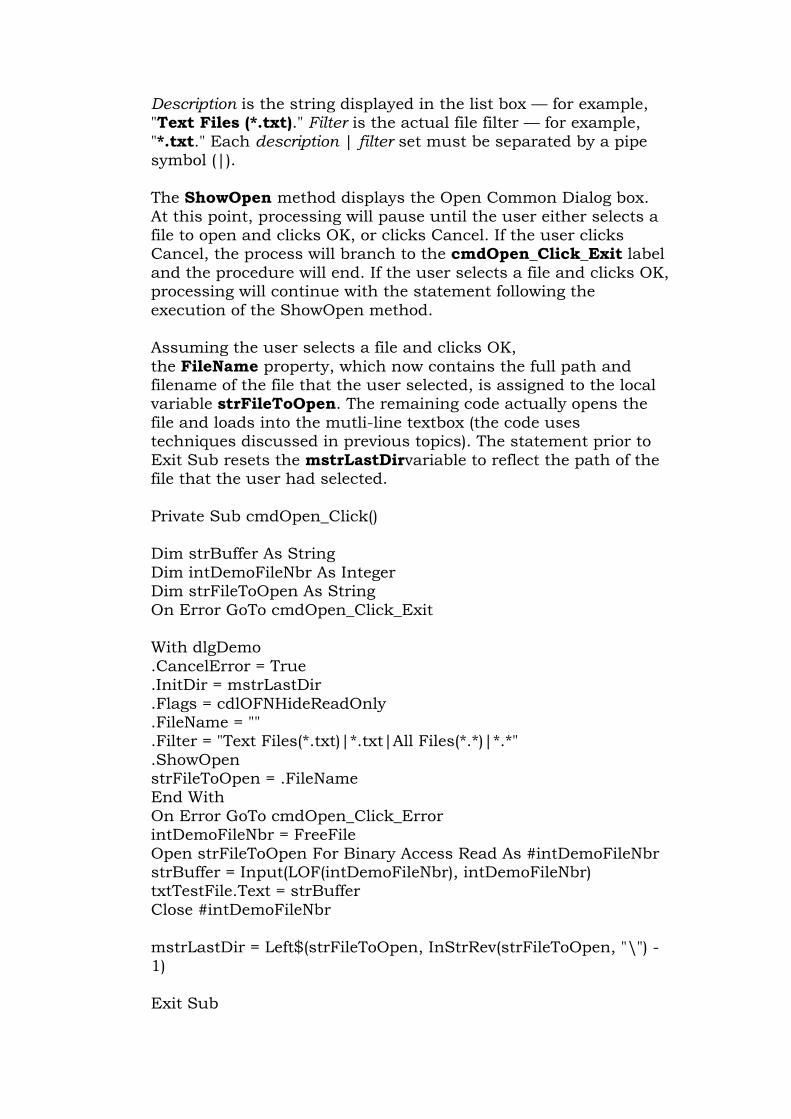
Description is the string displayed in the list box — for example, "Text Files (*.txt)." Filter is the actual file filter — for example, "*.txt." Each description | filter set must be separated by a pipe symbol (|). The ShowOpen method displays the Open Common Dialog box. At this point, processing will pause until the user either selects a file to open and clicks OK, or clicks Cancel. If the user clicks Cancel, the process will branch to the cmdOpen_Click_Exit label and the procedure will end. If the user selects a file and clicks OK, processing will continue with the statement following the execution of the ShowOpen method. Assuming the user selects a file and clicks OK, the FileName property, which now contains the full path and filename of the file that the user selected, is assigned to the local variable strFileToOpen. The remaining code actually opens the file and loads into the mutli-line textbox (the code uses techniques discussed in previous topics). The statement prior to Exit Sub resets the mstrLastDirvariable to reflect the path of the file that the user had selected. Private Sub cmdOpen_Click() Dim strBuffer As String Dim intDemoFileNbr As Integer Dim strFileToOpen As String On Error GoTo cmdOpen_Click_Exit With dlgDemo .CancelError = True .InitDir = mstrLastDir .Flags = cdlOFNHideReadOnly .FileName = "" .Filter = "Text Files(*.txt)|*.txt|All Files(*.*)|*.*" .ShowOpen strFileToOpen = .FileName End With On Error GoTo cmdOpen_Click_Error intDemoFileNbr = FreeFile Open strFileToOpen For Binary Access Read As #intDemoFileNbr strBuffer = Input(LOF(intDemoFileNbr), intDemoFileNbr) txtTestFile.Text = strBuffer Close #intDemoFileNbr mstrLastDir = Left$(strFileToOpen, InStrRev(strFileToOpen, "\") - 1) Exit Sub

cmdOpen_Click_Error: MsgBox "The following error has occurred:" & vbNewLine _ & "Err # " & Err.Number & " - " & Err.Description, _ vbCritical, _ "Open Error" cmdOpen_Click_Exit: End Sub Screen shot of the Open Common Dialog box:
Screen shot of the main form after the user has opened the "CDL_TEST.txt" File:
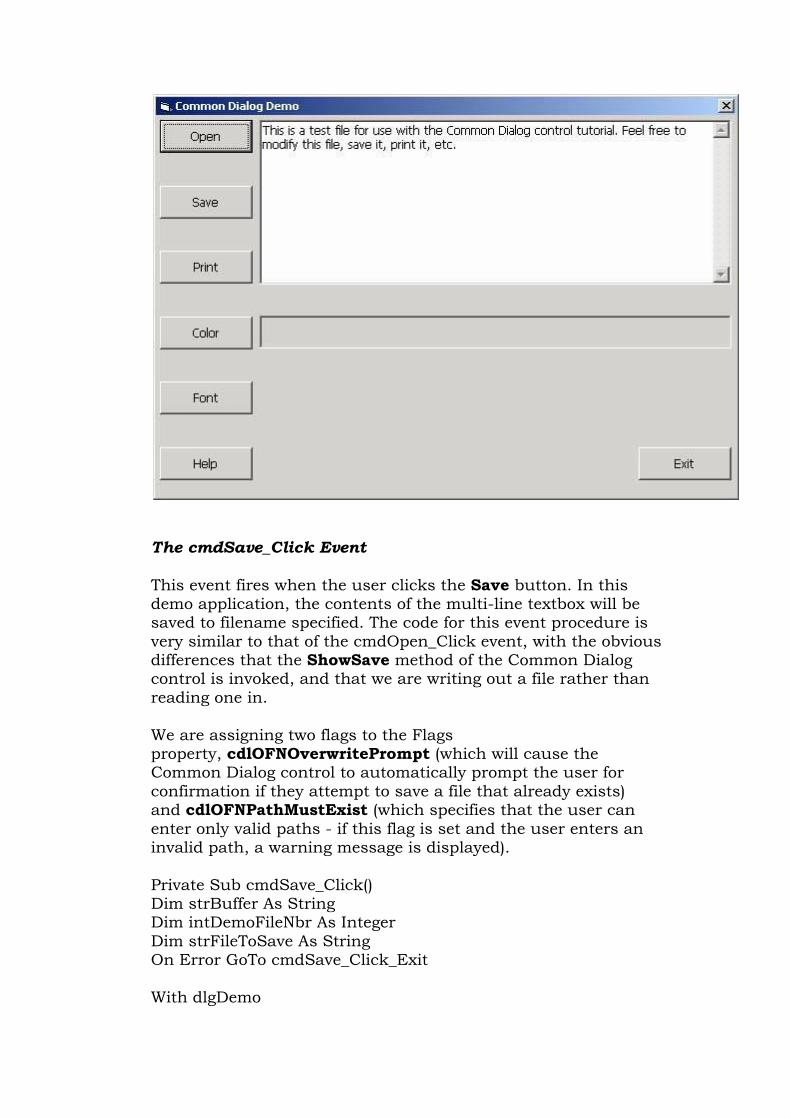
The cmdSave_Click Event This event fires when the user clicks the Save button. In this demo application, the contents of the multi-line textbox will be saved to filename specified. The code for this event procedure is very similar to that of the cmdOpen_Click event, with the obvious differences that the ShowSave method of the Common Dialog control is invoked, and that we are writing out a file rather than reading one in. We are assigning two flags to the Flags property, cdlOFNOverwritePrompt (which will cause the Common Dialog control to automatically prompt the user for confirmation if they attempt to save a file that already exists) and cdlOFNPathMustExist (which specifies that the user can enter only valid paths - if this flag is set and the user enters an invalid path, a warning message is displayed). Private Sub cmdSave_Click() Dim strBuffer As String Dim intDemoFileNbr As Integer Dim strFileToSave As String On Error GoTo cmdSave_Click_Exit With dlgDemo

.CancelError = True
.InitDir = mstrLastDir
.Flags = cdlOFNOverwritePrompt + cdlOFNPathMustExist
.FileName = ""
.Filter = "Text Files(*.txt)|*.txt|All Files(*.*)|*.*"
.ShowSave strFileToSave = .FileName End With On Error GoTo cmdSave_Click_Error intDemoFileNbr = FreeFile Open strFileToSave For Binary Access Write As #intDemoFileNbr strBuffer = txtTestFile.Text Put #intDemoFileNbr, , strBuffer Close #intDemoFileNbr mstrLastDir = Left$(strFileToSave, InStrRev(strFileToSave, "\") - 1) Exit Sub cmdSave_Click_Error: MsgBox "The following error has occurred:" & vbNewLine _ & "Err # " & Err.Number & " - " & Err.Description, _ vbCritical, _ "Save Error" cmdSave_Click_Exit: End Sub The cmdPrint_Click Event This event fires when the user clicks the Print button. In this demo application, this will cause the contents of the multi-line textbox to be printed to the printer specified. We are assigning three flags to the Flags property, cdlPDHidePrintToFile (which suppresses the display of the "Print to file" checkbox), cdlPDNoPageNums (which grays out the "Pages" option of the "Page Range" area) and cdlPDNoSelection (which grays out the "Selection" option of the "Page Range" area). Note that after the ShowPrinter method is executed, we are saving the value of the Copies property, as our program must implement the logic to print multiple copies if the user has selected more than one copy on the "Number of copies" spinner of the Printer Common Dialog box. Following that, various methods and properties of the Printer object are employed to carry out the task of printing the textbox contents. Private Sub cmdPrint_Click()

Dim intX As Integer Dim intCopies As Integer On Error GoTo cmdPrint_Click_Exit With dlgDemo .CancelError = True .Flags = cdlPDHidePrintToFile + cdlPDNoPageNums _ + cdlPDNoSelection .ShowPrinter intCopies = .Copies End With On Error GoTo cmdPrint_Click_Error For intX = 0 To Printer.FontCount - 1 If Printer.Fonts(intX) Like "Courier*" Then Printer.FontName = Printer.Fonts(intX) Exit For End If Next Printer.FontSize = 10 For intX = 1 To intCopies If intX > 1 Then Printer.NewPage End If Printer.Print txtTestFile.Text Next Printer.EndDoc Exit Sub cmdPrint_Click_Error: MsgBox "The following error has occurred:" & vbNewLine _ & "Err # " & Err.Number & " - " & Err.Description, _ vbCritical, _ "Print Error" cmdPrint_Click_Exit: End Sub The cmdColor_Click Event This event fires when the user clicks the Color button. In this demo application, this will cause the BackColor property of the LabellblColor to change to the selected color. In this example, no flags are set for the Color Common Dialog box. After the ShowColormethod has been executed, the selected color is retrieved from the Common Dialog control's Color property. Private Sub cmdColor_Click()

Dim lngColor As Long On Error GoTo cmdColor_Click_Exit With dlgDemo .CancelError = True .ShowColor lngColor = .Color End With On Error GoTo cmdColor_Click_Error lblColor.BackColor = lngColor Exit Sub cmdColor_Click_Error: MsgBox "The following error has occurred:" & vbNewLine _ & "Err # " & Err.Number & " - " & Err.Description, _ vbCritical, _ "Color Error" cmdColor_Click_Exit: End Sub Screen shot of the Color Common Dialog box:
Screen shot of the main form after the user has selected the orange color:

The cmdFont_Click Event This event fires when the user clicks the Font button. In this demo application, this will cause the font-related attributes selected in the Font Common Dialog box to be assigned to the corresponding properties of the Label lblFont. We are assigning three flags to the Flags property, cdlCFBoth (which Causes the dialog box to list the available printer and screen fonts), cdlCFForceFontExist (which specifies that an error message box is displayed if the user attempts to select a font or style that doesn't exist) and cdlCFEffects (which specifies that the dialog box enables strikethrough, underline, and color effects). Private Sub cmdFont_Click() Dim lngFont As Long On Error GoTo cmdFont_Click_Exit With dlgDemo .CancelError = True .Flags = cdlCFBoth + cdlCFForceFontExist + cdlCFEffects .ShowFont On Error GoTo cmdFont_Click_Error

lblFont.FontBold = .FontBold lblFont.FontItalic = .FontItalic lblFont.FontName = .FontName lblFont.FontSize = .FontSize lblFont.FontStrikethru = .FontStrikethru lblFont.FontUnderline = .FontUnderline lblFont.ForeColor = .Color lblFont.Caption = .FontName & ", " & .FontSize & " pt" End With Exit Sub cmdFont_Click_Error: MsgBox "The following error has occurred:" & vbNewLine _ & "Err # " & Err.Number & " - " & Err.Description, _ vbCritical, _ "Font Error" cmdFont_Click_Exit: End Sub Screen shot of the Font Common Dialog box:
Screen shot of the main form after the user has selected the Franklin Gothic Medium font (Bold, Size 24, in Navy color):

The cmdHelp_Click Event This event fires when the user clicks the Help button. In this event, the ShowHelp method of the Common Dialog control is invoked. Unlike the other five "Show" methods, ShowHelp does not display a dialog box per se, but rather it invokes the Windows Help Engine (Winhlp32.exe) to display a help file. ShowHelp can only display help files that are in "classic" WinHelp format (these files normally have the .hlp extension) – the ShowHelp method CANNOT display an HTML-format help file (files that normally have the extension .chm). In order for the Help file to be displayed, the HelpCommand and HelpFile properties of the Common Dialog control must be set to appropriate values. In the demo program, the HelpCommand property is set to cdlHelpForceFile (which ensures WinHelp displays the correct help file), and the HelpFile property is set to the MS-Jet SQL Help file (JETSQL35.HLP).
Private Sub cmdHelp_Click() On Error GoTo cmdHelp_Click_Error With dlgDemo .CancelError = True

.HelpCommand = cdlHelpForceFile
.HelpFile = App.Path & "\JETSQL35.HLP"
.ShowHelp End With Exit Sub cmdHelp_Click_Error: End Sub
Screen shot of the Help File displayed by the demo program when ShowHelp is invoked:
File Manipulation
1.1.1.1 File design
It has been determined that the file will store 7 fields of information. First and last names
could be together and we could have a work phone number but, the Analyst (who gets paid
big bucks to think this stuff up) has determined that 7 is what is required. It has also been
decided that the file will be called "AdrsBook.txt" and will be stored in "C:\VBApps" - we
need to know this for the Open statement.
It must also be determined, before we start to code, what the File mode is going to be when
we output to the file. We could use "Output" but that would mean that every time that we
want to add a new listing, we wipe-out the file. Not very practical! Therefore, we will use

"Append" so that all new entries are added to the end of the existing file.
Finally, once the controls are in place on the form, we have to finalize the order in which we
Tab through them when working from the keyboard. That is called the Tab order. To set the
tab order, we use the TabIndex property for each control. It starts at 0 and goes up for
every control in order. When the form opens, the control with TabIndex=0 gets focus; when
you tab from that, focus goes to TabIndex=1, and so on. Controls that don't get focus -
Labels, Pictures, etc. - do have a TabIndex but their TabStop property is set to False. If
you don't want Tab to stop on a control, set its TabStop to False.
Here is what the Sequential Output form will look like when we use it:
Once the file has been created we can use Notepad to look at it. Notice that the last entry,
the one on the form above, is not yet in the file. It gets written only when you hit the Write
button. Each field entered is stored as a separate line in the file. When we read them, we
read in the same order as that in which they were written.

1.1.1.2 Creating the Sequential Output form
The form SAdresOut is used to capture data from the user and then output that data to the
AdrsBook.txt file. The design of the form is what you see in the diagram above.
As you can see, we need 7 TextBox controls to capture the 7 fields. To simplify the code, we
will use a technique we haven't used before in these lessons: the Control Array. You may
have seen that come up before if you tried to copy and paste controls. What we do is: create
one TextBox control, give it a name - we call it "txt_field" -, and then copy that control and
paste it 6 times on the form. When you paste a control, since it has the same name as the
existing one, the editor asks whether you want to give it a new name or create a control
array. In this case we tell it to create the control array. This means that, instead of 7
different TextBoxes, we will have an array of TextBoxes, named txt_field(0) to txt_field(6).
As you can see from the code, this allows us to use For ... Next loops to do things like clear
the controls and write to the file.
The Cancel button simply clears all the TextBoxes and does not executes a Write operation.
The Exit button closes the open files and unloads the form which returns us automatically to
the Menu form. There is no End statement, as that would cause the program to end.

The code to write to the file is fairly straightforward. Once information has been entered into
the 7 TextBoxes, we use a FOR ... NEXT loop to execute the Write command. The reason for
this is that the Write command outputs only one field at a time. So, we have to do 7 writes
to output the whole record. After the TextBoxes have been written-out, we clear them to
create the next record.

Top
1.1.2 Working with a Random file
For this exercise we will use the same Menu form that we started with but we'll create a new
output file which we will call "PhoneBook.txt". Since this file format is different from the
sequential, we can't use the same file to test the code. The PhoneBook file will have almost
the same content as the AdresBook file. The only difference is that we'll add a field for
PersonId at the beginning of each record. That will allow us to retrieve records using a
record number.
1.1.2.1 User-defined data type
In addition to data types like String, Integer, Date and so on, you can also define your own
data type. This type is called structure or structs in other languages. We will use it in our
application to simplify our I/O operations since our I/O commands, Put and Get only handle
one field at a time. What we do with the user-defined data type is to create a new variable
which contains a whole record.
The user-defined variable must be declared in a module. That's a program at the application
level, not tied to any specific event. To create a module: Menu bar --> Project --> Add
module --> Open. When you save the module, it will take the .BAS extension. The
information contained in modules is available to all the forms in the application. This is what
your first module should contain:
The Type statement creates a new data type; in this case, it's PhoneRec. Once it's been
defined, the new type can be used like any other type, String or Integer, etc. to declare a
variable:
Dim InRecord As PhoneRec

The individual fields in the structured variable can be accessed using dot notation:
Label5.Caption = InRecord.Fname
txt_city.Text = InRecord.City
When you define the fields within the new type, it's important to determine the length of
each string. Random access is sensitive about record lengths. When you define a String field
like: Fname As String * 15 you determine that the size of the field will always be 15
characters. This is important for the processing to work properly! Just make sure that
the size you assign is big enough to handle most situations. You do not have to worry about
the Integer field because its size is standard.
1.1.2.2 Writing and Reading records
The command to write records to the Random file is Put. Its format is:
Put #Filenumber, [RecordNumber], Variable
RecordNumber is optional and, if it's omitted, variable is written in Next record position after
last Put or Get statement.
The command to read records from a Random file is: Get. Its format is:
Get #FileNumber, [RecordNumber], Variable
If RecordNumber is omitted, next record is read from the file.
1.1.2.3 Creating the Random file
To create the PhoneBook file, we will need a new form which is just a copy of the SAdresOut
form with the additional Person number TextBox, which is in fact the record number. Then
we'll write the code, making use of the user-defined data type "PhoneRec" described
earlier. This form, "RAdresOut", obtains the next record number from the file, accepts input
from the user and writes- the record out to the file.


To read records from the file, we have to specify a record number. This number is accepted
into the Person number TextBox and then used to locate the appropriate record in the file.
The error-trapping routine is useful in this procedure because you are almost certain to
encounter the "Reading past End-of-file" error when you enter a Person number that does
not exist.

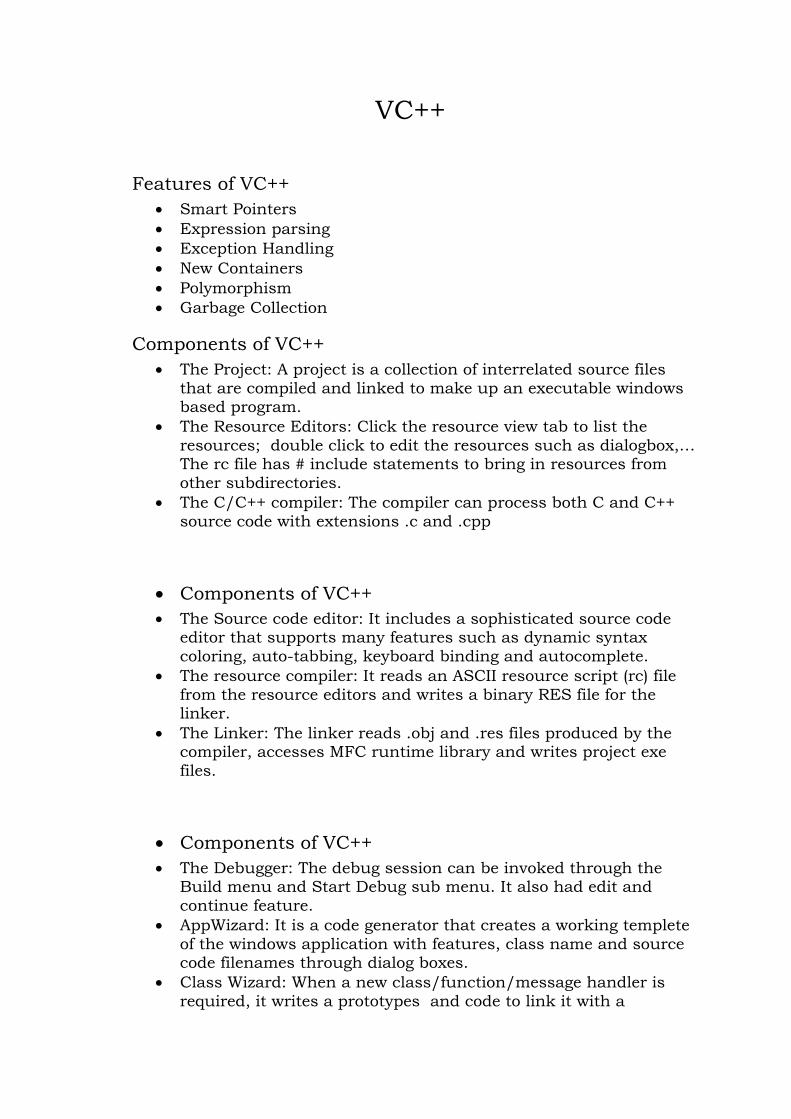
VC++
Features of VC++
Smart Pointers Expression parsing Exception Handling New Containers Polymorphism Garbage Collection
Components of VC++
The Project: A project is a collection of interrelated source files that are compiled and linked to make up an executable windows based program.
The Resource Editors: Click the resource view tab to list the resources; double click to edit the resources such as dialogbox,… The rc file has # include statements to bring in resources from other subdirectories.
The C/C++ compiler: The compiler can process both C and C++ source code with extensions .c and .cpp
Components of VC++
The Source code editor: It includes a sophisticated source code editor that supports many features such as dynamic syntax coloring, auto-tabbing, keyboard binding and autocomplete.
The resource compiler: It reads an ASCII resource script (rc) file from the resource editors and writes a binary RES file for the linker.
The Linker: The linker reads .obj and .res files produced by the compiler, accesses MFC runtime library and writes project exe files.
Components of VC++
The Debugger: The debug session can be invoked through the Build menu and Start Debug sub menu. It also had edit and continue feature.
AppWizard: It is a code generator that creates a working templete of the windows application with features, class name and source code filenames through dialog boxes.
Class Wizard: When a new class/function/message handler is required, it writes a prototypes and code to link it with a

function.
Resources
A resource is a text file that represents data which is included in the executable file of an application.
Graphic objects such as Icons, Cursors, Message Box, Dialog Boxes, Fonts, Bitmaps, Pens, Brushes etc are all resources.
VC++ compiler consists of several Resource editors. A Windows resource can be added to the resource file(.rc) using
the resource editors. These resources are compiled using the resource compiler(rc.exe). A header file “resource.h” is created and included in code.
Menus
Menus allow the users to point and select options that are predefined.
Each item is uniquely identified by a ID and various properties can be set using the property window.

MAKEINTRESOURCE macro has to be used to convert the integer value to a resource type compatible with the Win32 function.
Types are System menu, Popup menu and Drop down menu.
Dialog Box
A dialog box is a window that contains controls to handle user input.
It is the primary user-interface. It is normally displayed in response to the selection of menu item
and appear as a pop-up window to the user. A menu item that is followed by a dialog box has its name ending
with an ellipsis(…).

Dialog Box(contd..)
There are 3 types of dialog boxes.
Modal:
Require the user to respond before continuing with that application.
System Modal:
Similar to modal dialog boxes except that they supersede the entire desktop area.
Modeless:
Stay on the screen and are available for use at any time but permit other user activities.
IMPORTING VBX CONTROLS
ToolBox Controls
Pointer Button CheckBox

EditBox ComboBox ListBox GroupBox RadioButton Static Text Horizontal Scroll Bar
Vertical Scroll Bar Slider Spin Progress Hot Key List Control Tree Tab Animation Rich Edit 2.0
Special controls in VC++
Static text control is read only. Edit box controls is editable. Hot key enables creation of Hot keys. Tree control displays a list of data in tree structure. Animate controls displays .AVI files Custom control allow to create user controls Spin control creates two rectangular areas which function like
thumb wheel control allowing to click selections up or down.
Microsoft foundation Class Library
MFC includes classes that helps to write applications quickly and more easily.
Some of the main category of classes are Applications, Menus, Documents and views, Graphics, Windows, Dialog boxes, etc.
Object class is derived from the Cobject class. Application class derived from CWinApp. Windows class from CWnd base class. Frame Windows from CFrameWnd class. MDI windows from CMDIFrameWnd and Dialog box from Cdialog class which includes CcolorDialog, Cfont
Dialog, ….
Document-Centric Computing Applications on most of the OS require the user to know which
applications must be used to create documents of a specific type. Earlier it was not feasible to create a document with data from different
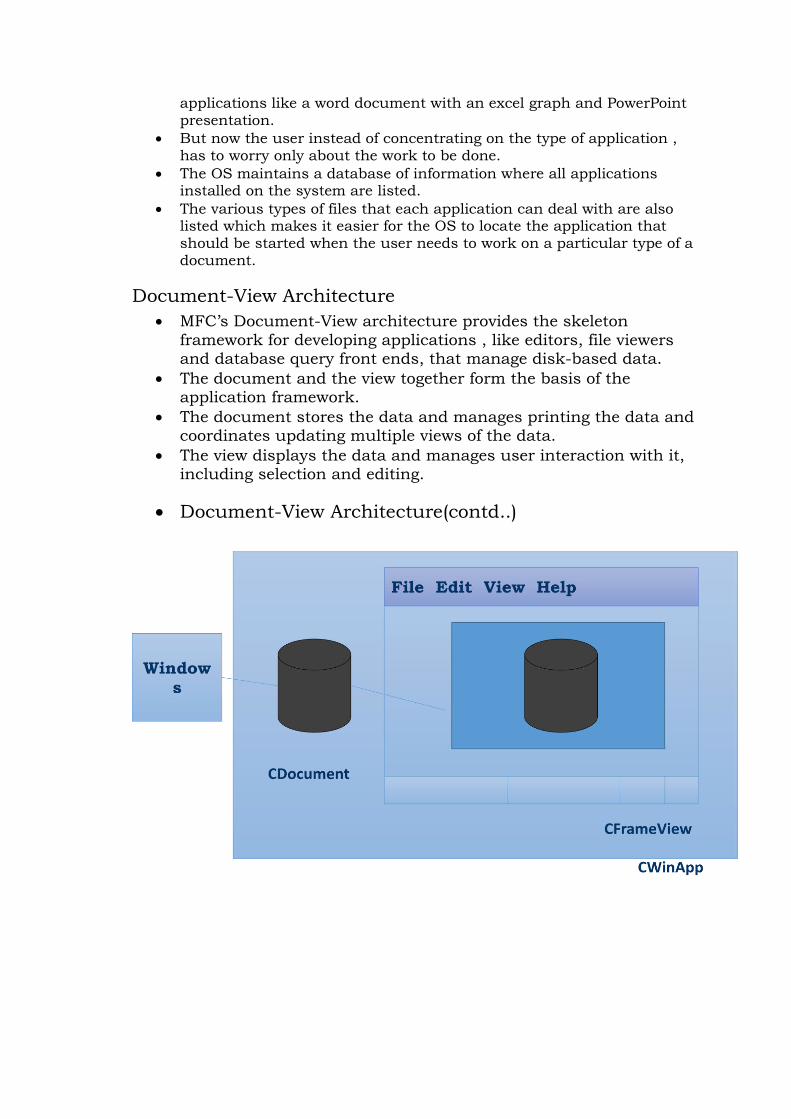
applications like a word document with an excel graph and PowerPoint presentation.
But now the user instead of concentrating on the type of application , has to worry only about the work to be done.
The OS maintains a database of information where all applications installed on the system are listed.
The various types of files that each application can deal with are also listed which makes it easier for the OS to locate the application that should be started when the user needs to work on a particular type of a document.
Document-View Architecture
MFC’s Document-View architecture provides the skeleton framework for developing applications , like editors, file viewers and database query front ends, that manage disk-based data.
The document and the view together form the basis of the application framework.
The document stores the data and manages printing the data and coordinates updating multiple views of the data.
The view displays the data and manages user interaction with it, including selection and editing.
Document-View Architecture(contd..)

As the name suggests the Doc-View architecture adds two new objects to the MFC programs-document and view.
A document class derived from CDocument. A view class derived from CView. A frame class derived from CFrameWnd. A application class derived from CWinApp.
Document
The document is a data object. All user interaction (like in a word processor) is with the
document. The document is a non-visual object, it cannot receive messages
but can respond to the messages. The document is responsible for the application’s data. It is a
data source and is widely used in word processors , spreadsheets and server to networks providing information to programs.
Irrespective of the source, data management is encapsulated within the document object.

View
The view provides a visual display of the data to the user in a window or on a printed page.
It handles the interaction between the document and the user. All user interaction with the data in the document is through the
interface presented by the view. It can receive messages. For eg-word processing.
It can be a simple window, an SDI, an MDI or a class derived from CFormView having the capabilities of a dialog box.
Frame
The frame class contains the view and other user-interface elements like tool bars and menus.
The frame and the view are visual components.
Application It is a non-visual component like the document. It is responsible for starting the application and interacting with the windows.
Document-View Architecture
Document and View
Features of Doc-View Architecture
Data is handled and displayed separately . Multiple views of the same document can be obtained, such as
both a spreadsheet and a chart view. The document/view model lets a separate view object represent each view of the data, while code common to all views (such as a calculation engine) can reside in the document.
The document also takes on the task of updating all views whenever the data changes.
The MFC document/view architecture makes it easy to support multiple views, multiple document types, splitter windows, and other valuable user-interface features.
Types There are two basic types of Document-View applications-
Single Document Interface.

SDI applications support a single type of document and a single view. Only one document can be opened at any point of time. It focuses on a particular task. The frame window is also the main frame window for the application.
Multiple Document Interface Supports multiple documents.
Multiple Document Interface(MDI) The Multiple Document Interface is a design specification of the Windows OS that defines a user interface for applications that enable the user to work with more than one document at the same time. MDI applications allow multiple document frame windows to be open in the same instance of an application. It has a window within which multiple child windows (frame windows themselves) can be opened, each containing a separate document(sometimes of different types)
Differences between MDI and SDI Some fundamental characteristics distinguish MDI applications from SDI applications
Splitter Windows SDI applications do not support multiple views of a document. The best way to present two or more concurrent views of a document is to use a splitter window based on MFC‘s CSplitterWnd class. A splitter window is a window that can be divided into two or more panes horizontally, vertically, or both horizontally and vertically using movable splitter bars. Each pane contains one view of a document's data. In an SDI application, the splitter window is a child of the top-level frame window. In an MDI application, the splitter window is a child of an MDI document frame.

Types of Splitter windows MFC supports two types of splitter windows: static and dynamic.
Exceptions Exceptions occur when a program executes abnormally because of conditions outside the program's control. Exception can be defined as an abnormal event that occurs during the execution of a program and disrupts the normal flow of instructions. The abnormal event can also be an error in the program. Certain operations, including object creation and file input/output, are subject to failures that go beyond errors. Out-of-memory conditions, for example, can occur even when your program is running correctly.
Use of Exceptions The outcome of a function call during a program execution can be categorized as
Normal Execution
Occurs when a function executes normally and returns to a calling program. Some functions return a result code to the caller and indicate success or failure (even a particular type of failure).
Erroneous Execution Occurs when the caller makes a mistake in passing arguments or calls a function out of context.

The error which occurs can be detected by an assertion.
Use of Exceptions(contd..) Abnormal Execution
Includes situations where conditions outside the program’s control, influence the outcome of a function. For eg. Insufficient memory, abnormality in I/O operations-(while opening a file which exists, the device driver for the storage media might fail.)
Exception Handling
Visual C++ supports three kinds of exception handling:
C++ Exception Handling
Although structured exception handling works with C and C++ source files, it is not specifically designed for C++. For C++ programs, C++ exception handling should be used.
Structured Exception Handling Windows supplies its own exception mechanism, called SEH. It is not recommended for C++ or MFC programming. SEH should be used only in non-MFC C programs.
MFC Exceptions Since version 3.0, MFC has used C++ exceptions but still supports its older exception handling macros, which are similar to C++ exceptions in form.
Exception Handling(contd..)
The try, throw, and catch statements implement exception handling. With C++ exception handling, your program can communicate unexpected events to a higher execution context that is better able to recover from such abnormal events. These exceptions are handled by code that is outside the normal flow of control. The C++ Exception Handling mechanism is flexible, since it can handle exceptions of any type. The process of raising an exception is called Throwing an exception. The C++ exception–handling model is non-reusable. Once the

flow of program control has left the try block, it never returns to that block.
Process of Exception Handling The steps involved in the process of handling exceptions :
Control reaches the try statement by normal sequential execution. The guarded section(within the try block) is executed. If exception is not thrown during the execution of the guarded section, the catch clauses that follow the try block are not executed. The statements after the catch block are executed. If an exception is thrown during the execution of the guarded section , a catch clause that can handle the exception is searched. If a matching handler is not found, the predefined run-time function terminate is called. If a matching catch is found, the parameters are initialized, and the instructions in the catch handler are executed.If the program terminates, all the values in the stack are released.
Exception Handling in MFC MFC provides several predefined exception classes that are derived from CException class. MFC functions throw exceptions of types derived from the CException class. To catch an exception thrown by a MFC function, a catch block with an argument that is a pointer to a CException object needs to be created.
Exception Handling in MFC(contd..) Some of the MFC Exception classes are:
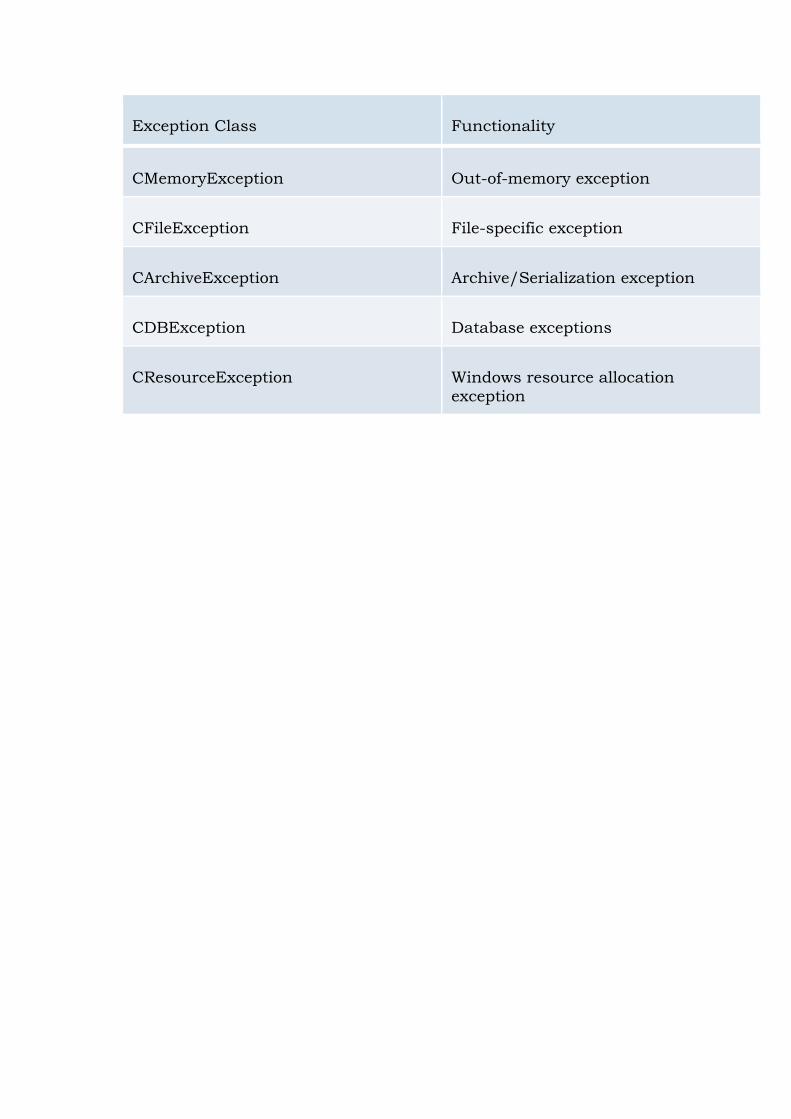
Exception Class Functionality
CMemoryException Out-of-memory exception
CFileException File-specific exception
CArchiveException Archive/Serialization exception
CDBException Database exceptions
CResourceException Windows resource allocation exception

PPRROOGGRRAAMMSS SSIIGGNN
Part – A 1. Design a User Interface (UI) to accept the students details such
as name, department and total marks. Validate the input data and calculate the percentage and division.
2. Design a VB application which has MDI and Child forms. Create a menu having the items such as file (New, Open), Format (Font, Regular, Bold ,Italic) and Exit in the MDI form. Also create a text box and use a Common Dialog Box control for changing the font, fore color and back color of the text box.
3. Design a small alarm clock application.(Using Timer)
4. VB program to create a sequential file containing the fields name, address, city, pin code and phone number. Display the records in a neat format.
5. Design a VB application to record the employee details such as EmpId, EmpName, Designation and Basic pay. Calculate the DA, HRA, Deduction and gross salary. (Make the necessary assumptions). Use Select Case for decision making.
6. Create a vending machine application that displays images for four snacks and corresponding option buttons. When the dispense snack button is clicked, it should display on a label the name of the snack dispensed and print the bill.
7. Write a VB program to validate the username and password from the database and display the appropriate message. (Use ADO Data Control).
8. Create an application which is linked to book database. The application should allow the user to perform a search of the book from the database, when user clicks a button based on its title, ISBN no. or Author name.
9. VC++ program to create a dialog box and display the position of the mouse pointer with the dialog box.
1100.. VC++ program to create and load a simple menu in a window.

2
PPRROOGGRRAAMMSS SSIIGGNN
Part – B
11. VB program to Encrypt and Decrypt a string.
12. Write a VB Program to design a simple calculator to perform
addition, subtraction, multiplication and division. (Use Control Arrays).
13. Design a BMI calculator.
14. Write an application for Airline Reservation System, which allows the user to book ticket on a particular date for a particular type of class. At the end, once the ticket is booked, if should display a boarding pass indication the person’s seat no., type of class and total fare. Input validations should be done properly.
15. Create an application to enter the students details (Name, course, semester, subjects) using option button, checkbox, dropdown list box, nested combobox and print the resume.
16. Design an application using Drive box, File Listbox, Directory listbox for loading the selected image.
17. Design an application using MDI form, menus and common dialog control.
18. Design a VB application to change the backcolor of the textbox using Scroll bar control for selection of colors.
19. Design a VB application to accept the Item Details (ItemID, ItemName, MfdDate, UnitofMeasure and RatePerUnit). ItemId should be a system generated id. The application should allow the operations – Add, Modify, Delete, Update and Navigations of the items. Use ADO Data controls and Grid Controls.
20. VC++ program to create a simple Window using MFC.

3
Part – A
1 Design a VB application which has MDI and Child forms. Create a menu having the items such as file (New, Open), Format (Font, Regular, Bold ,Italic) and Exit in the MDI form. Also create a text box and use a Common Dialog Box control for changing the font, forecolor and backcolor of the text box.
Private Sub Command1_Click() 'cdlCFBoth causes the dialog box to list the available printer and screen fonts. CommonDialog1.Flags = cdlCFBoth CommonDialog1.ShowFont 'The ShowFont method is used to display a list of fonts that are available. Text1.Font = CommonDialog1.FontName Text1.FontSize = CommonDialog1.FontSize Text1.FontItalic = CommonDialog1.FontItalic Text1.FontBold = CommonDialog1.FontBold End Sub Private Sub Command2_Click() CommonDialog1.ShowColor

4
'The ShowColor method is used to display the Colour dialog box. Text1.ForeColor = CommonDialog1.Color End Sub Private Sub Command3_Click() CommonDialog1.ShowColor Text1.BackColor = CommonDialog1.Color End Sub Private Sub Command4_Click() Text1.Text = "" Text1.ForeColor = vbBlack Text1.BackColor = vbWhite Text1.SetFocus End Sub Private Sub Command5_Click() End End Sub
2 Design a small alarm clock application.(Using Timer) AlarmClock
Private Sub Command1_Click() Timer1.Enabled = True End Sub Private Sub Form_Load() Label1.Caption = Time Timer2.Enabled = True For i = 0 To 23 Combo1.AddItem (Format(i, "00")) Next i

5
For i = 0 To 59 Combo2.AddItem (Format(i, "00")) Combo3.AddItem (Format(i, "00")) Next i End Sub Private Sub Timer1_Timer() Dim alarmtime, timenow As String alarmtime = Combo1.Text & ":" & Combo2.Text & ":" & Combo3.Text timenow = Label1.Caption If timenow <> alarmtime Then Exit Sub Else Interaction.Beep MsgBox ("beep beep beep") End End If End Sub Private Sub Timer2_Timer() Label1.Caption = Time End Sub
4 VB program to create a sequential file containing the fields name,
address, city, pin code and phone number. Display the records in a neat format. Sequential Files

6
Option Explicit Private Sub cmd_read_Click() Dim cnt As Integer Dim fname, lname, address, city, pincode, phone As String Open "C:\VB\AddressBook.txt" For Input As #1 Input #1, fname, lname, address, city, pincode, phone txt_fields(0).Text = fname txt_fields(1).Text = lname txt_fields(2).Text = address txt_fields(3).Text = city txt_fields(4).Text = pincode txt_fields(5).Text = phone
End Sub Private Sub cmdcancel_Click() Dim cnt As Integer For cnt = 0 To 5 txt_fields(cnt).Text = "" Next cnt txt_fields(0).SetFocus End Sub

7
Private Sub cmdwrite_Click() Dim cnt As Integer Dim cnt2 As Integer Open "C:\VB\Addressbook.txt" For Append As #1 For cnt = 0 To 5 Write #1, txt_fields(cnt).Text Next cnt 'Write #1, txt_fields(0).Text, txt_fields(1).Text, txt_fields(2).Text, txt_fields(3).Text, txt_fields(4).Text, txt_fields(5).Text For cnt2 = 0 To 5 txt_fields(cnt2).Text = "" Next cnt2 End Sub Private Sub Command1_Click() Close #1 End End Sub Private Sub Form_Load() Dim cnt As Integer For cnt = 0 To 5 txt_fields(cnt).Text = "" Next cnt End Sub
5 Design a VB application to record the employee details such as EmpId EmpName, Designation and Basic pay. Calculate the DA, HRA, Deduction and gross salary. (Make the necessary assumptions). Use Select Case for decision making.

8
Private Sub calculate_Click() bp = Val(bassal.Text) Select Case bp Case 0 To 2000 da.Text = (2 * bp) / 100 hra.Text = (3 * bp) / 100 deduc.Text = 50 gspay.Text = bp + da.Text + hra.Text netsal.Text = (bp + da.Text + hra.Text) - deduc.Text Case 2001 To 5000 da.Text = (4 * bp) / 100 hra.Text = (5 * bp) / 100 deduc.Text = 100 gspay.Text = bp + da.Text + hra.Text netsal.Text = (bp + da.Text + hra.Text) - deduc.Text Case 5001 To 10000 da.Text = (6 * bp) / 100 hra.Text = (7 * bp) / 100 deduc.Text = 1000 gspay.Text = bp + da.Text + hra.Text netsal.Text = (bp + da.Text + hra.Text) - deduc.Text Case Is > 10000 da.Text = (8 * bp) / 100 hra.Text = (9 * bp) / 100 deduc.Text = 1500 gspay.Text = bp + da.Text + hra.Text netsal.Text = (bp + da.Text + hra.Text) - deduc.Text End Select

9
End Sub
6 Create a vending machine application that displays images for four snacks and corresponding option buttons. The GUI should contain a textbox in which the user specifies the quantity of desired snack. When the dispense snack button is clicked, it should display on a label the name of the snack dispensed. At end it should print (display) the bill of the product. Vending Machine
Dim slno As Integer Dim rno As Integer
Dim totalbill As Integer Private Sub Command1_Click() Dim sname As String rno = rno + 1 Label4.Caption = "" If Option1.Value = False And Option2.Value = False And Option3.Value = False And Option4.Value = False Then MsgBox " Select one item"

10
Exit Sub End If If Option1.Value = True Then sname = Option1.Caption sprice = 20 ElseIf Option2.Value = True Then sname = Option2.Caption sprice = 25 ElseIf Option3.Value = True Then sname = Option3.Caption sprice = 30 ElseIf Option4.Value = True Then sname = Option4.Caption sprice = 35 End If Label4.Caption = sname MSFlexGrid1.Rows = MSFlexGrid1.Rows + 1 MSFlexGrid1.TextMatrix(rno, 0) = slno MSFlexGrid1.TextMatrix(rno, 1) = sname MSFlexGrid1.TextMatrix(rno, 2) = sprice MSFlexGrid1.TextMatrix(rno, 3) = Text1.Text MSFlexGrid1.TextMatrix(rno, 4) = Val(Text1.Text) * sprice totalbill = totalbill + Val(MSFlexGrid1.TextMatrix(rno, 4)) Text2.Text = totalbill slno = slno + 1 Text1.Text = "" End Sub Private Sub Command2_Click() End End Sub Private Sub Form_Load() rno = 0 MSFlexGrid1.TextMatrix(rno, 0) = "SNO" MSFlexGrid1.TextMatrix(rno, 1) = "NAME" MSFlexGrid1.TextMatrix(rno, 2) = "PRICE" MSFlexGrid1.TextMatrix(rno, 3) = "QUANTITY" MSFlexGrid1.TextMatrix(rno, 4) = "AMOUNT" End Sub
7 Write a VB program to validate the username and password from the database and display the appropriate message. (Use ADO Data Control).
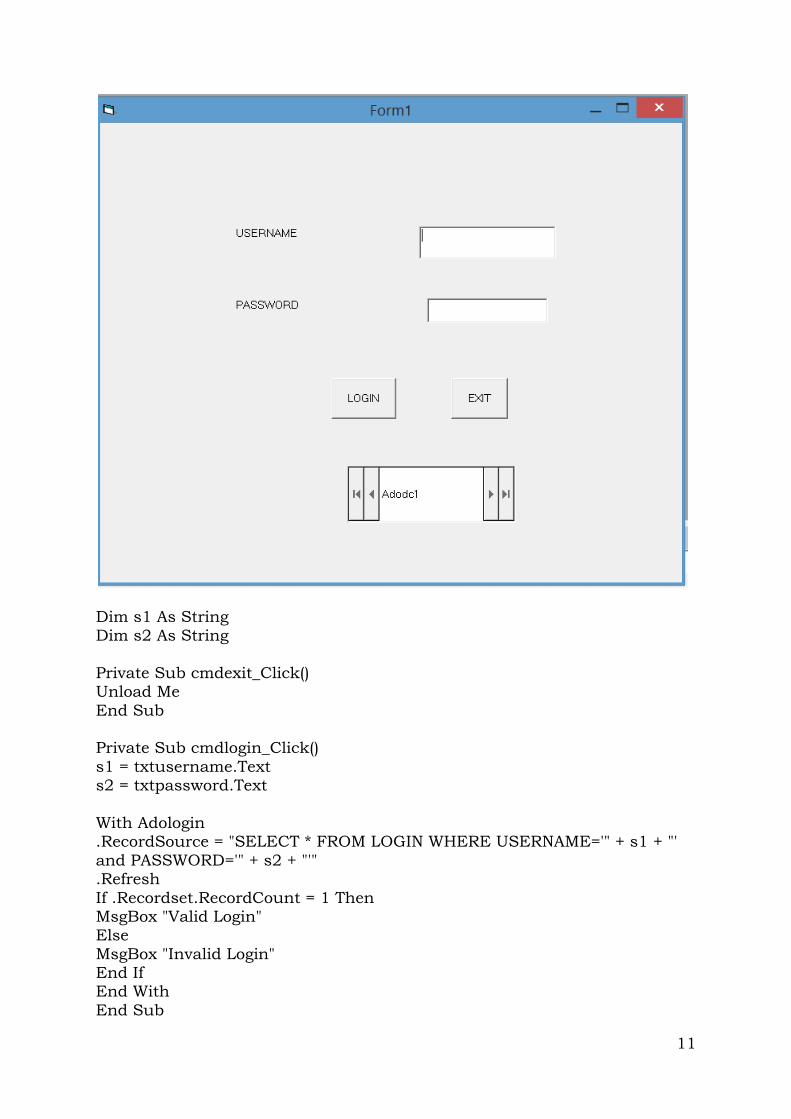
11
Dim s1 As String Dim s2 As String Private Sub cmdexit_Click() Unload Me End Sub Private Sub cmdlogin_Click() s1 = txtusername.Text s2 = txtpassword.Text With Adologin .RecordSource = "SELECT * FROM LOGIN WHERE USERNAME='" + s1 + "' and PASSWORD='" + s2 + "'" .Refresh If .Recordset.RecordCount = 1 Then MsgBox "Valid Login" Else MsgBox "Invalid Login" End If End With End Sub

12
8 Create an application which is linked to book database. The application should allow the user to perform a search of the book from the database, when user clicks a button. User should be able to search any book with its title, ISBN no. or Author name.
Private Sub Command1_Click() End End Sub Private Sub DataCombo1_Click(Area As Integer) If DataCombo1.Text <> "" Then Adodc2.RecordSource = "select * from books where isbn='" & DataCombo1.Text & "'" Adodc2.Refresh DataGrid1.Refresh End If End Sub Private Sub DataCombo2_Click(Area As Integer) If DataCombo2.Text <> "" Then Adodc2.RecordSource = "select * from books where author='" & DataCombo2.Text & "'" Adodc2.Refresh

13
DataGrid1.Refresh End If End Sub Private Sub DataCombo3_Click(Area As Integer) If DataCombo3.Text <> "" Then Adodc2.RecordSource = "select * from books where title='" & DataCombo3.Text & "'" Adodc2.Refresh DataGrid1.Refresh End If End Sub Private Sub Option1_Click() If Option1.Value = True Then DataCombo1.Visible = True DataCombo2.Visible = False DataCombo3.Visible = False End If End Sub Private Sub Option2_Click() If Option2.Value = True Then DataCombo2.Visible = True DataCombo1.Visible = False DataCombo3.Visible = False End If End Sub Private Sub Option3_Click() If Option3.Value = True Then DataCombo3.Visible = True DataCombo2.Visible = False DataCombo1.Visible = False End If End Sub
9. VC++ program to create a dialog box and display the position of
the mouse pointer with the dialog box.

14
voidCMouseposDlg::OnMouseMove(UINT nFlags, CPoint point) { // TODO: Add your message handler code here and/or call default CStringstrMessage; strMessage.Format ("Mouse position = (%d %d)",point.x,point.y); m_strname=strMessage; UpdateData(FALSE); CDialog::OnMouseMove(nFlags, point); }
10. VC++ program to create and load a simple menu in a window.
# include <afxwin.h> # include "resource.h" classmyframe:publicCFrameWnd { public:

15
myframe() { Create(NULL,"MENU PROGRAM", WS_OVERLAPPEDWINDOW,CRect(20,20,400,200),0,MAKEINTRESOURCE(IDR_MENU1)); } }; classMyapp:publicCWinApp { public: BOOL InitInstance() { myframe *bwnd; bwnd=new myframe(); bwnd->ShowWindow(1); m_pMainWnd = bwnd; return 1; } }; MyapptheApp;
Part-B
11 VB program to Encrypt and Decrypt a string. Encryption and Decryption
Private Sub Command1_Click() Dim mainstring, str, ch As String Dim i, c As Integer

16
mainstring = Text1.Text str = "" For i = 1 To Len(mainstring) ch = Mid(mainstring, i, 1) c = Asc(ch) + 20 ch = Chr(c) str = str & ch Next i MsgBox ("The Encrypted Text is " & str) Text2.Text = str End Sub Private Sub Command2_Click() Dim mainstring, str, ch As String Dim i, c As Integer mainstring = Text2.Text str = "" For i = 1 To Len(mainstring) ch = Mid(mainstring, i, 1) c = Asc(ch) - 20 ch = Chr(c) str = str & ch Next i MsgBox ("The Decrypted Text is " & str) End Sub
12 Write a VB Program to design a simple calculator to perform
addition, subtraction, multiplication and division.

17
Dim oper1, oper2, result As Double Dim oper As String Dim cleardisp As Boolean Private Sub cmdadd_Click() oper1 = Val(txtdisplay.Text) oper = "+" txtdisplay.Text = "" cmdequal.Enabled = True End Sub Private Sub cmdclear_Click() txtdisplay.Text = "" End Sub
Private Sub cmdclose_Click() End End Sub Private Sub cmddecimal_Click() If cleardisp = True Then txtdisplay.Text = "" cleardisp = False End If If InStr(txtdisplay.Text, ".") Then
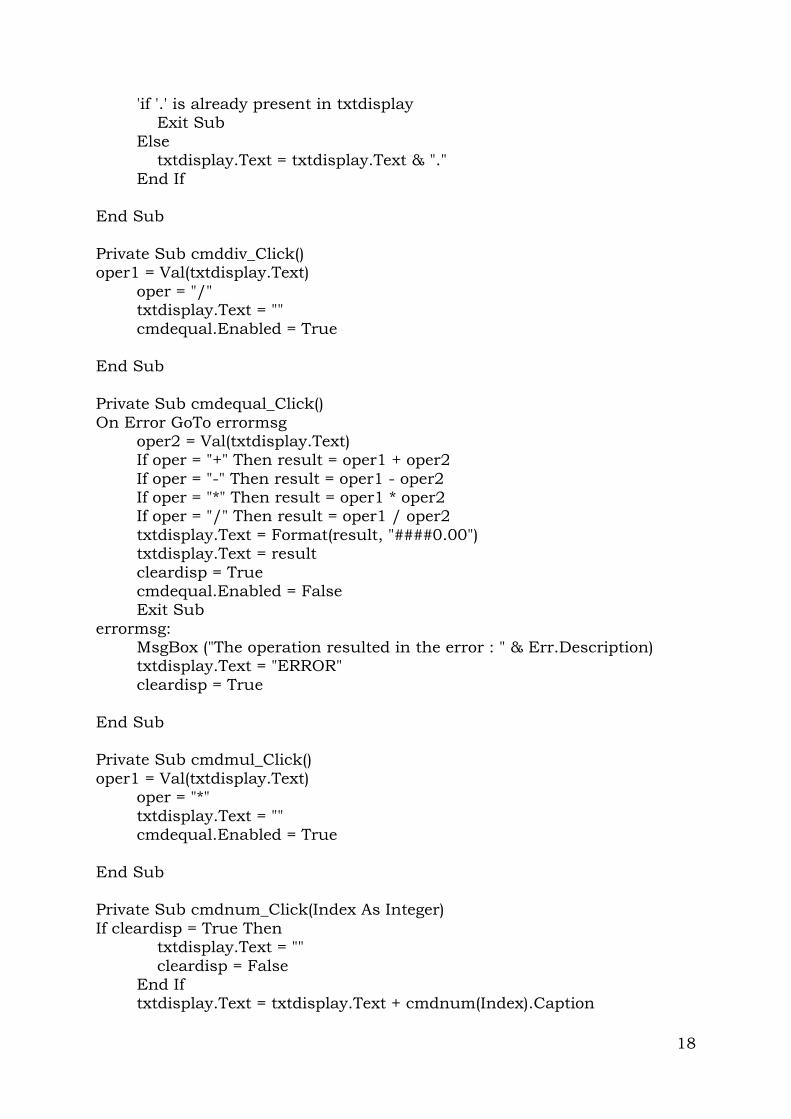
18
'if '.' is already present in txtdisplay Exit Sub Else txtdisplay.Text = txtdisplay.Text & "." End If End Sub Private Sub cmddiv_Click() oper1 = Val(txtdisplay.Text) oper = "/" txtdisplay.Text = "" cmdequal.Enabled = True End Sub Private Sub cmdequal_Click() On Error GoTo errormsg oper2 = Val(txtdisplay.Text) If oper = "+" Then result = oper1 + oper2 If oper = "-" Then result = oper1 - oper2 If oper = "*" Then result = oper1 * oper2 If oper = "/" Then result = oper1 / oper2 txtdisplay.Text = Format(result, "####0.00") txtdisplay.Text = result cleardisp = True cmdequal.Enabled = False Exit Sub errormsg: MsgBox ("The operation resulted in the error : " & Err.Description) txtdisplay.Text = "ERROR" cleardisp = True End Sub Private Sub cmdmul_Click() oper1 = Val(txtdisplay.Text) oper = "*" txtdisplay.Text = "" cmdequal.Enabled = True End Sub Private Sub cmdnum_Click(Index As Integer) If cleardisp = True Then txtdisplay.Text = "" cleardisp = False End If txtdisplay.Text = txtdisplay.Text + cmdnum(Index).Caption
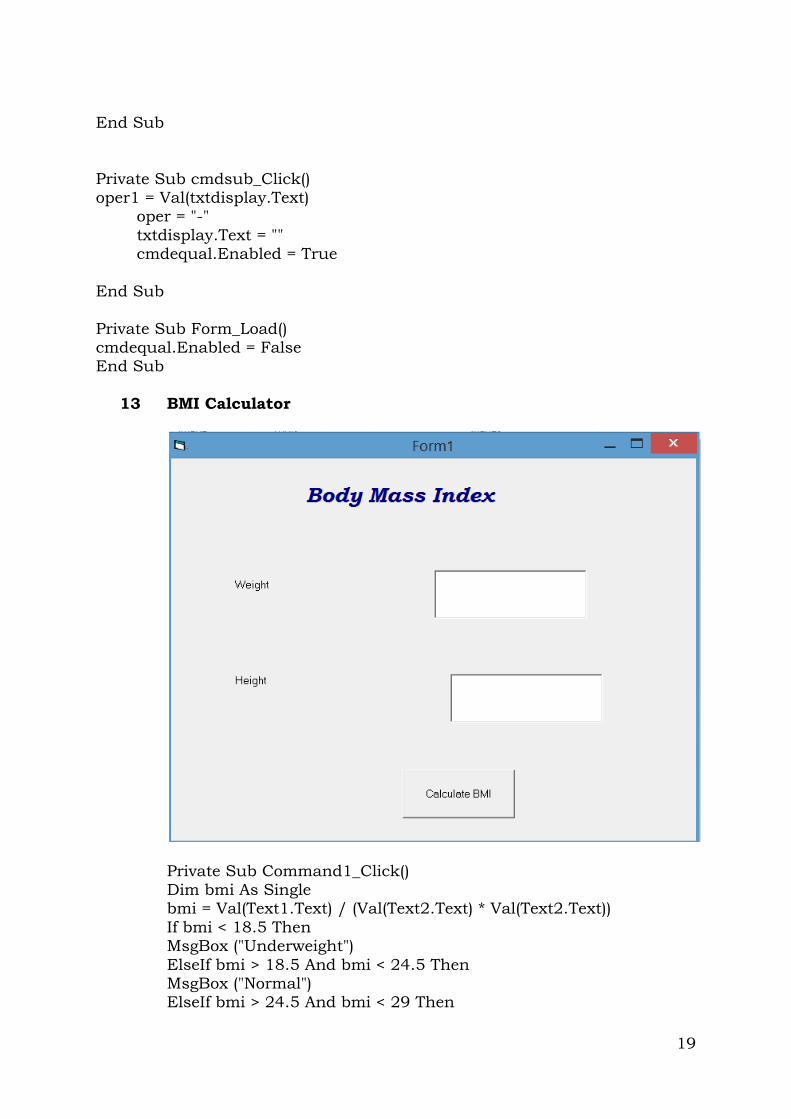
19
End Sub Private Sub cmdsub_Click() oper1 = Val(txtdisplay.Text) oper = "-" txtdisplay.Text = "" cmdequal.Enabled = True End Sub Private Sub Form_Load() cmdequal.Enabled = False End Sub
13 BMI Calculator
Private Sub Command1_Click() Dim bmi As Single bmi = Val(Text1.Text) / (Val(Text2.Text) * Val(Text2.Text)) If bmi < 18.5 Then MsgBox ("Underweight") ElseIf bmi > 18.5 And bmi < 24.5 Then MsgBox ("Normal") ElseIf bmi > 24.5 And bmi < 29 Then

20
MsgBox ("Overweight") Else MsgBox ("Obese") End If End Sub
14 Write an application for Airline Reservation System, which allows the user to book ticket on a particular date for a particular type of class. At the end, once the ticket is booked, if should display a boarding pass indication the person’s seat no., type of class and total fare. Input validations should be done properly.

21
Dim conn As New ADODB.Connection
Dim rs As New ADODB.Recordset Dim rs1 As New ADODB.Recordset Dim str As String Private Sub cboclasstype_LostFocus() If cboclasstype.Text = "ECONOMY" Then txttotamt = txtnoofpassenger * (txtfare + 1000) ElseIf cboclasstype.Text = "BUSINESS" Then txttotamt = txtnoofpassenger * (txtfare + 5000) End If End Sub Private Sub cboflightno_LostFocus() If cboflightno = "1001" Then txtsource = "Bangalore" txtdestination = "Chennai" txtfare = 3000 ElseIf cboflightno = "1002" Then txtsource = "Bangalore" txtdestination = "Delhi" txtfare = 8000 ElseIf cboflightno = "1003" Then txtsource = "Bangalore" txtdestination = "Mangalore" txtfare = 2500 Else txtsource = "Bangalore" txtdestination = "Puducherry" txtfare = 3000 End If End Sub Private Sub cmddelete_Click() rs.Delete rs.MoveNext

22
If rs.EOF Then rs.MoveLast End If cboflightno.Text = rs("fno") txtsource.Text = rs("src") txtdestination.Text = rs("dest") txtfare.Text = rs("fare") txtpnrno.Text = rs("pnr") txttraveldate.Text = rs("fdt") txtnoofpassenger.Text = rs("nopass") cboclasstype.Text = rs("class") txttotamt.Text = rs("tot") rs.Requery End Sub Private Sub cmdnew_Click() cboflightno.Text = "" txtsource.Text = "" txtdestination.Text = "" txtfare.Text = "" txtpnrno.Text = "" txttraveldate.Text = "" txtnoofpassenger.Text = "" cboclasstype.Text = "" txttotamt.Text = "" rs.AddNew rs1.Open "select * from reservation", conn, adOpenDynamic rs1.MoveLast txtpnrno = Val(rs1(4)) + 1 End Sub Private Sub cmdsave_Click() rs("fno") = cboflightno.Text rs("src") = txtsource.Text rs("dest") = txtdestination.Text rs("fare") = txtfare.Text rs("pnr") = txtpnrno.Text rs("fdt") = txttraveldate.Text rs("nopass") = txtnoofpassenger.Text rs("class") = cboclasstype.Text rs("tot") = txttotamt.Text rs.Update MsgBox "Record saved" rs.Requery End Sub Private Sub cmdticket_Click() Frame2.Visible = True Text1.Text = rs("pnr")

23
Text2.Text = rs("fdt") End Sub Private Sub Command1_Click() End End Sub Private Sub Form_Load() conn.Open "Provider=Microsoft.Jet.OLEDB.4.0;Data Source=C:\Users\Gnaneswari\Documents\VBDATA.mdb;Persist Security Info=False" str = "select * from reservation" rs.Open str, conn, adOpenDynamic, adLockOptimistic, adCmdText End Sub
15 Create an application to enter the students details (Name, course, semester, subjects)using the controls such as option button, checkbox, dropdown list box, nested combobox and print (display) the resume.
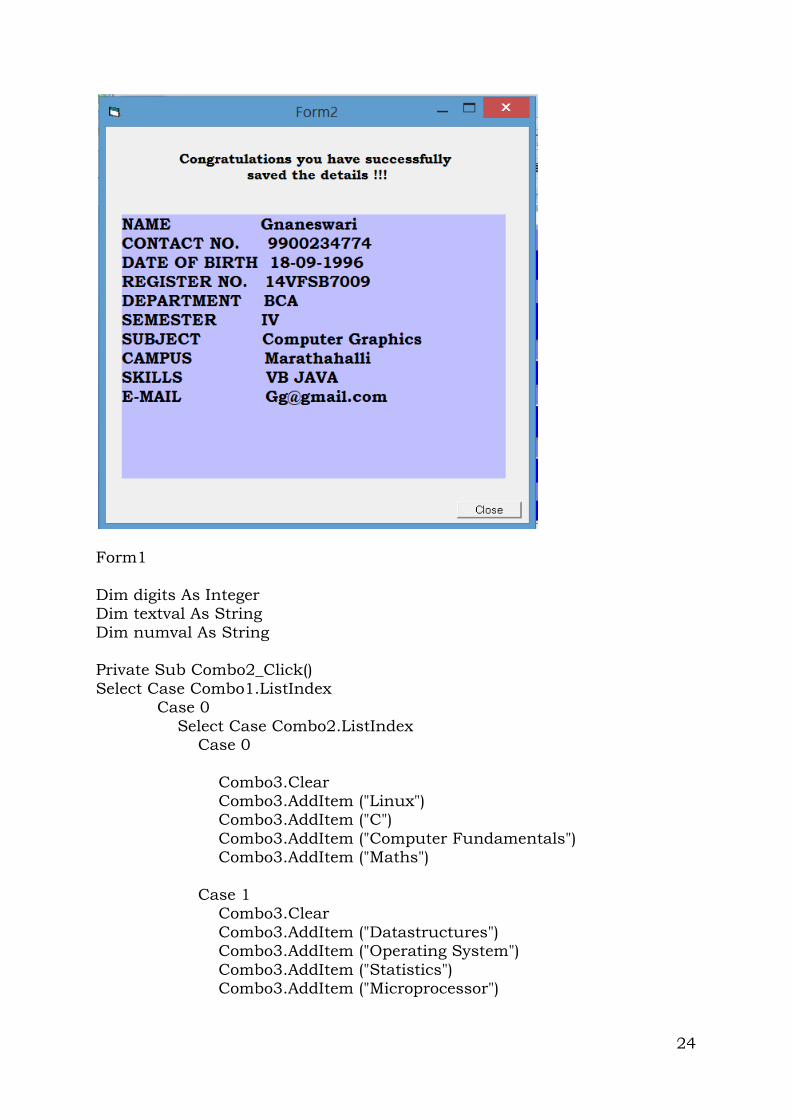
24
Form1 Dim digits As Integer Dim textval As String Dim numval As String Private Sub Combo2_Click() Select Case Combo1.ListIndex Case 0 Select Case Combo2.ListIndex Case 0 Combo3.Clear Combo3.AddItem ("Linux") Combo3.AddItem ("C") Combo3.AddItem ("Computer Fundamentals") Combo3.AddItem ("Maths") Case 1 Combo3.Clear Combo3.AddItem ("Datastructures") Combo3.AddItem ("Operating System") Combo3.AddItem ("Statistics") Combo3.AddItem ("Microprocessor")
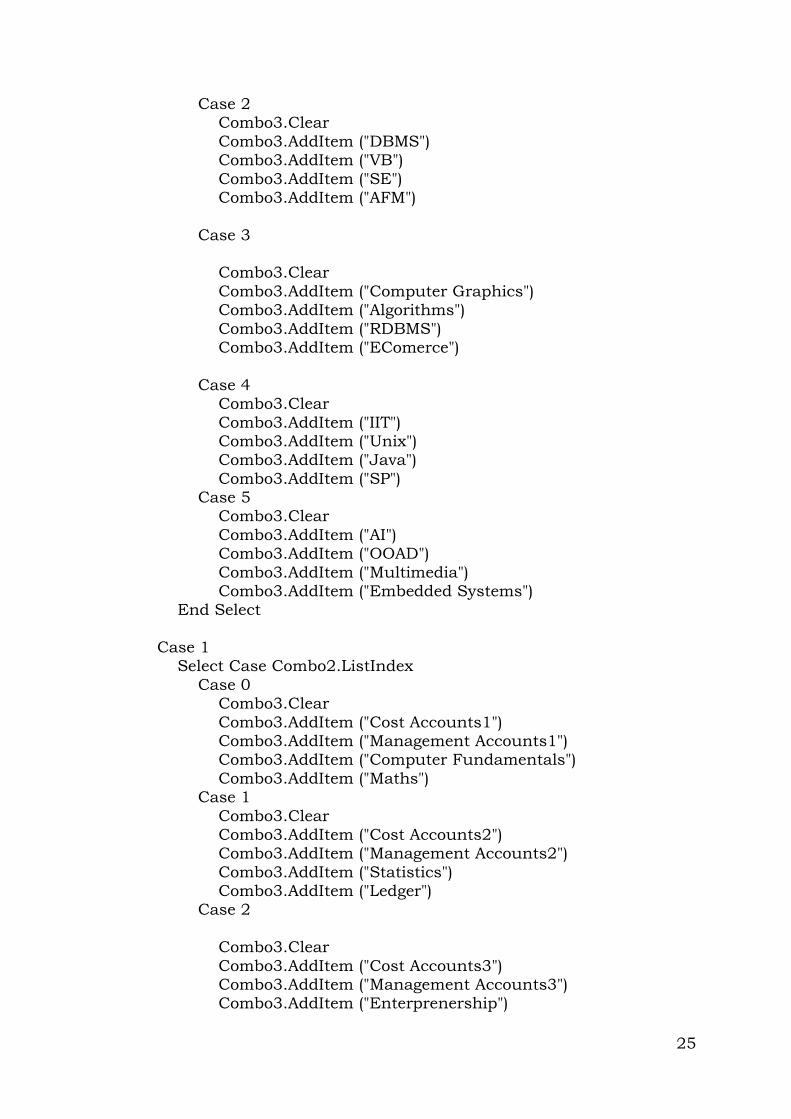
25
Case 2 Combo3.Clear Combo3.AddItem ("DBMS") Combo3.AddItem ("VB") Combo3.AddItem ("SE") Combo3.AddItem ("AFM") Case 3 Combo3.Clear Combo3.AddItem ("Computer Graphics") Combo3.AddItem ("Algorithms") Combo3.AddItem ("RDBMS") Combo3.AddItem ("EComerce") Case 4 Combo3.Clear Combo3.AddItem ("IIT") Combo3.AddItem ("Unix") Combo3.AddItem ("Java") Combo3.AddItem ("SP") Case 5 Combo3.Clear Combo3.AddItem ("AI") Combo3.AddItem ("OOAD") Combo3.AddItem ("Multimedia") Combo3.AddItem ("Embedded Systems") End Select Case 1 Select Case Combo2.ListIndex Case 0 Combo3.Clear Combo3.AddItem ("Cost Accounts1") Combo3.AddItem ("Management Accounts1") Combo3.AddItem ("Computer Fundamentals") Combo3.AddItem ("Maths") Case 1 Combo3.Clear Combo3.AddItem ("Cost Accounts2") Combo3.AddItem ("Management Accounts2") Combo3.AddItem ("Statistics") Combo3.AddItem ("Ledger") Case 2 Combo3.Clear Combo3.AddItem ("Cost Accounts3") Combo3.AddItem ("Management Accounts3") Combo3.AddItem ("Enterprenership")

26
Combo3.AddItem ("Business analytics") Case 3 Combo3.Clear Combo3.AddItem ("Tally") Combo3.AddItem ("Law") Combo3.AddItem ("Marketing") Combo3.AddItem ("EComerce") Case 4 Combo3.Clear Combo3.AddItem ("Accounts1") Combo3.AddItem ("Accounts2") Combo3.AddItem ("Accounts3") Combo3.AddItem ("Accounts4") Case 5 Combo3.Clear Combo3.AddItem ("Accounts5") Combo3.AddItem ("Accounts6") Combo3.AddItem ("Accounts7") Combo3.AddItem ("Accounts8") End Select Case 2 Select Case Combo2.ListIndex Case 0 Combo3.Clear Combo3.AddItem ("BCom Cost Accounts1") Combo3.AddItem ("BComManagement Accounts1") Combo3.AddItem ("BComComputer Fundamentals") Combo3.AddItem ("BComMaths") Case 1 Combo3.Clear Combo3.AddItem ("BComCost Accounts2") Combo3.AddItem ("BComManagement Accounts2") Combo3.AddItem ("BComStatistics") Combo3.AddItem ("BComLedger") Case 2 Combo3.Clear Combo3.AddItem ("BComCost Accounts3") Combo3.AddItem ("BComManagement Accounts3") Combo3.AddItem ("BComEnterprenership") Combo3.AddItem ("BComBusiness analytics") Case 3 Combo3.Clear Combo3.AddItem ("BComTally") Combo3.AddItem ("BComLaw") Combo3.AddItem ("BComMarketing")

27
Combo3.AddItem ("BComEComerce") Case 4 Combo3.Clear Combo3.AddItem ("BComAccounts1") Combo3.AddItem ("BComAccounts2") Combo3.AddItem ("BComAccounts3") Combo3.AddItem ("BComAccounts4") Case 5 Combo3.Clear Combo3.AddItem ("BComAccounts5") Combo3.AddItem ("BComAccounts6") Combo3.AddItem ("BComAccounts7") Combo3.AddItem ("BComAccounts8") End Select End Select End Sub Private Sub Command1_Click() If InStr(Text4.Text, "@") = 0 Then MsgBox ("Email should be in a format of [email protected]") Else Form2.Show Unload Form1 End If End Sub Private Sub Command2_Click() End End Sub Private Sub Form_Load() Dim i As Integer Combo1.AddItem ("BCA") Combo1.AddItem ("BBA") Combo1.AddItem ("B.Com") Combo2.AddItem ("I") Combo2.AddItem ("II") Combo2.AddItem ("III") Combo2.AddItem ("IV") Combo2.AddItem ("V") Combo2.AddItem ("VI") End Sub Private Sub Text1_Change() textval = Text1.Text If IsNumeric(textval) Then numval = textval Else Text1.Text = CStr(numval) End If End Sub

28
Form2 Private Sub Command1_Click() End End Sub Private Sub Form_Load() Text3.Text = "" If Form1.Option1 = True Then Text2.Text = Form1.Option1.Caption Else Text2.Text = Form1.Option2.Caption End If If Form1.Check1 Then Text3.Text = Text3.Text + Form1.Check1.Caption + " " End If If Form1.Check2 Then Text3.Text = Text3.Text + Form1.Check2.Caption + " " End If If Form1.Check3 Then Text3.Text = Text3.Text + Form1.Check3.Caption + " " End If If Form1.Check4 Then Text3.Text = Text3.Text + Form1.Check4.Caption + " " End If Text1.Text = "NAME " & Form1.Text2.Text & vbCrLf & "CONTACT NO. " & Form1.Text1.Text & vbCrLf & "DATE OF BIRTH " & Form1.DTPicker1.Value & vbCrLf & "REGISTER NO. " & Form1.Text3.Text & vbCrLf & "DEPARTMENT " & Form1.Combo1.Text & vbCrLf & "SEMESTER " & Form1.Combo2.Text & vbCrLf & "SUBJECT " & Form1.Combo3.Text & vbCrLf & "CAMPUS " & Text2.Text & vbCrLf & "SKILLS " & Text3.Text & vbCrLf & "E-MAIL " & Form1.Text4.Text End Sub
16 Design an application using Drive box, File Listbox, Directory listbox for loading the selected image.

29
Private Sub Command1_Click() Dim img1 As String If Right(File1.Path, 1) = "\" Then img1 = File1.Path + File1.FileName Else img1 = File1.Path + "\" + File1.FileName End If Label1.Caption = img1 Image1.Picture = LoadPicture(img1) End Sub Private Sub Command2_Click() End End Sub Private Sub Dir1_Change() File1.Path = Dir1.Path End Sub Private Sub Drive1_Change() Dir1.Path = Drive1.Drive End Sub Private Sub File1_DblClick() Dim img1 As String If Right(File1.Path, 1) = "\" Then

30
img1 = File1.Path + File1.FileName Else img1 = File1.Path + "\" + File1.FileName End If Label1.Caption = img1 Image1.Picture = LoadPicture(img1) End Sub
17 Design an application using MDI form, menus and common
dialog control.

31

32
Private Sub mnuarial_Click()
frmch3.txtdemo.FontName = "arial"
End Sub
Private Sub mnubold_Click()
frmch3.txtdemo.FontBold = True
End Sub
Private Sub mnuexit_Click()
Unload Me
End Sub
Private Sub mnuformat_Click()
frmch3.Show
End Sub
Private Sub mnugaramond_Click()
frmch3.txtdemo.FontName = "garamond"
End Sub
Private Sub mnuimpact_Click()
frmch3.txtdemo.FontName = "impact"
End Sub

33
Private Sub mnuitalic_Click()
frmch3.txtdemo.FontItalic = True
End Sub
Private Sub mnulucida_Click()
frmch3.txtdemo.FontName = "lucida sans"
End Sub
Private Sub mnunew_Click()
frmch1.Show
End Sub
Private Sub mnuopen_Click()
frmch2.Show
End Sub
Private Sub mnuregular_Click()
frmch3.txtdemo.FontBold = False
frmch3.txtdemo.FontItalic = False
End Sub
Private Sub Toolbar1_ButtonClick(ByVal Button As ComctlLib.Button)
If Button.Index = 1 Then
frmch2.Show
ElseIf Button.Index = 2 Then
frmch1.Show
Else
Unload Me
End If
End Sub
Form1
Private Sub cmdexit_Click()
Unload Me
End Sub
Private Sub cmdsave_Click()
Dim fileloc As String
If Text1.Text <> "" Then
CommonDialog1.ShowSave
fileloc = CommonDialog1.FileName
Open fileloc For Append As #1
Print #1, Text1.Text

34
Close #1
End If
End Sub
Form2
Private Sub cmdexit_Click()
Unload Me
End Sub
Private Sub cmdopen_Click()
Dim fileloc As String
CommonDialog1.Filter = "Text files{*.txt)|*.txt"
CommonDialog1.ShowOpen
fileloc = CommonDialog1.FileName
Open fileloc For Input As #1
Do Until EOF(1)
Input #1, Data
Text1.Text = Text1.Text + Data + vbNewLine
Loop
Close #1
End Sub
Form3
Private Sub cmdexit_Click()
Unload Me
End Sub
Private Sub cmdsave_Click()
Dim fileloc As String
If txtdemo.Text <> "" Then
CommonDialog1.ShowSave
fileloc = CommonDialog1.FileName
Open fileloc For Append As #1
Print #1, txtdemo.Text
Close #1
End If
End Sub
18 Design a VB application to change the backcolor of the textbox
using Scroll bar control for selection of colors. Horizontal Scroll Bar
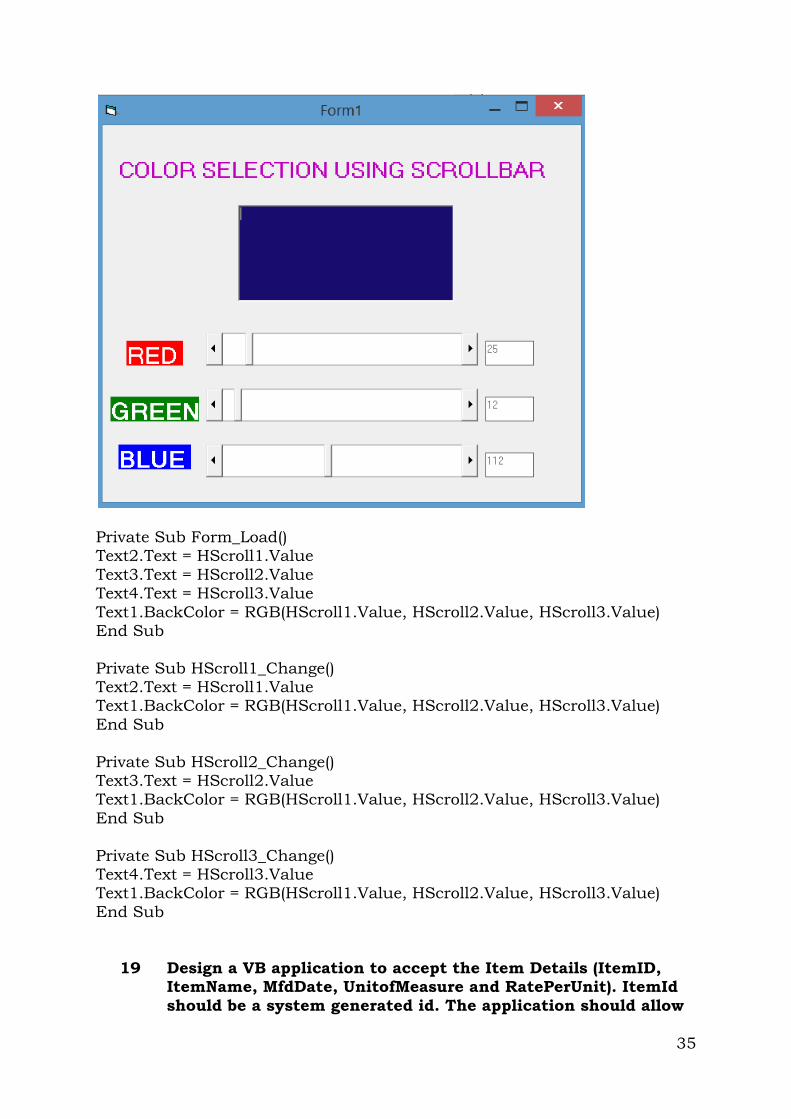
35
Private Sub Form_Load() Text2.Text = HScroll1.Value Text3.Text = HScroll2.Value Text4.Text = HScroll3.Value Text1.BackColor = RGB(HScroll1.Value, HScroll2.Value, HScroll3.Value) End Sub Private Sub HScroll1_Change() Text2.Text = HScroll1.Value Text1.BackColor = RGB(HScroll1.Value, HScroll2.Value, HScroll3.Value) End Sub Private Sub HScroll2_Change() Text3.Text = HScroll2.Value Text1.BackColor = RGB(HScroll1.Value, HScroll2.Value, HScroll3.Value) End Sub Private Sub HScroll3_Change() Text4.Text = HScroll3.Value Text1.BackColor = RGB(HScroll1.Value, HScroll2.Value, HScroll3.Value) End Sub
19 Design a VB application to accept the Item Details (ItemID,
ItemName, MfdDate, UnitofMeasure and RatePerUnit). ItemId should be a system generated id. The application should allow

36
the operations – Add, Modify, Delete, Update and Navigations of the items. Use ADO Data controls and Grid Controls.
Private Sub cmdadd_Click() Dim id As Integer Adodc1.Refresh Adodc1.Recordset.MoveLast id = Adodc1.Recordset("ITEM_ID") + 1 Adodc1.Recordset.AddNew txtitemid.Text = id txtname.SetFocus End Sub Private Sub cmddelete_Click() Adodc1.Recordset.Delete Adodc1.Recordset.MoveNext If Adodc1.Recordset.EOF Then Adodc1.Recordset.MoveLast End If MsgBox "Item Deleted !" End Sub

37
Private Sub cmdexit_Click() Unload Me End Sub Private Sub cmdfirst_Click() Adodc1.Recordset.MoveFirst End Sub Private Sub cmdlast_Click() Adodc1.Recordset.MoveLast End Sub Private Sub cmdnext_Click() Adodc1.Recordset.MoveNext If Adodc1.Recordset.EOF Then Adodc1.Recordset.MoveLast MsgBox "No more records after this !" End If End Sub Private Sub cmdprevious_Click() Adodc1.Recordset.MovePrevious If Adodc1.Recordset.BOF Then Adodc1.Recordset.MoveFirst MsgBox "No more records before this !" End If End Sub Private Sub cmdsave_Click() Adodc1.Recordset.Update MsgBox "Record Saved !" End Sub Private Sub cmdupdate_Click() Adodc1.Recordset.Update MsgBox "Record Modified !" End Sub
20. VC++ program to create a simple Window using MFC.

38
# include <afxwin.h> classmyframe:publicCFrameWnd {
public: myframe() { Create(NULL,"HELLO MFC WINDOW", WS_OVERLAPPEDWINDOW,CRect(20,20,400,200)); } }; classMyapp:publicCWinApp { intInitInstance() { myframe *bwnd; bwnd=new myframe(); bwnd->ShowWindow(1); m_pMainWnd = bwnd; return 1; } }; MyapptheApp;