strawberries for the home garden
TRANSCRIPT

Fact Sheet No. 7.000 Gardening Ser ies|Fruits and Vegetables
©Colorado State University Extension. 2/93. Revised 12/14.
www.ext.colostate.edu
by H. Hughes, J.E. Ells, G. Schweitermann, J. Reich*
Strawberries require at least eight hours of full sun each day of the growing season to produce at their maximum capability. Because a strawberry planting will remain in the same location for multiple years, locate them in an area that does not interfere with the annual garden cultivation.
When strawberries are planted after sod, grubs, which have been feeding undetected on the sod roots, divert their attention to the strawberry roots. Because there are fewer strawberry roots, a sizable grub population may cause severe damage. After removing the sod, wait a year before planting strawberries because the grub population will decline.
The gardener generally has no choice as to soil type; however, a sandy loam soil with a southern exposure is ideal. Strawberries like a loose, moderately fertile soil. Before planting, work in 4 bushels of organic matter, 1 pound of nitrogen (N), 1 pound of phosphate (P2O5) and 1 pound of iron chelate per 1,000 square feet. In general, do not add more than 4 bushels of fresh manure or more than 8 bushels of decayed manure. If you add more than 4 bushels of raw organic matter such as straw and sawdust, also add 1/4 to 1/2 pound of nitrogen for each bushel in excess of four.
VarietiesStrawberry varieties are classified as June
bearing, everbearing or day neutral. June-bearing varieties tend to produce the most flavorful, aromatic berries. However, if their
flowers are damaged by a late spring frost, they will produce a much reduced crop or no crop at all. In most areas of Colorado, June-bearing varieties actually ripen in July. Recommended June bearers (one crop) for this area are Guardian, Kent, Honeoye, Redchief, Delite, Jewel, Mesabi, A.C. Wendy, Cabot and Bloomiden.
Everbearing strawberries typically provide two main crops each year, with small amounts of fruit produced between the main crop in June and a lighter crop in late summer or early fall. For Colorado, everbearing strawberries are recommended for the home gardener because they tend to be very reliable producers. If a late spring frost kills the first flowers, you will still get a crop in late summer or fall. Some of the more common everbearing varieties are Ogallala, Fort Laramie and Ozark Beauty. Ogallala and Fort Laramie are recommended for Colorado because they are more hardy.
Day neutral varieties are similar to everbearers, but flower and fruit more consistently over the summer. Recommended day-neutral varieties include Tribute, Tristar and Fern.
Many gardeners plant everbearing, day-neutral and June-bearing types in order to extend harvest over the longest possible season.
Planting There are two systems used for
strawberry culture: the matted row, used with June-bearing strawberries, and the hill system, used with everbearing or day neutral varieties.
In the matted row system, space the plants 2 feet apart in rows 4 feet apart. These plants are allowed to produce runners to fill in the row. Leave a pathway 1 1/2 feet wide between rows. Remove or relocate runners that root in this pathway or within 5 inches of an established runner.
Quick Facts•Strawberriesareclassifiedas
June bearing, everbearing or day neutral.
•They should receive full sun at least eight hours every day.
•They adapt to nearly all areas of Colorado, even high elevations.
•Strawberry beds generally are kept for three years.
•Having two people plant means less stooping.
•Removethefirstblossomstoproduc e a stronger plant that will bear more fruit.
•Strawberries are remarkably free from most insects and diseases in Colorado.
•Leave the caps on the plant if the berries will be eaten or preserved right away.
•Protect strawberries over the winter, generally with a straw mulch applied about December 1.
Strawberries for the Home Garden
*H. Hughes, Colorado State University professor, horticulture and landscape architecture; J.E. Ells, former Colorado State University Extension vegetable crops specialist and associate professor (retired); and G. Schweitermann, former student, horticulture and landscape architecture.Previously reviewed by J. Reich, former Extension horticulture agent, Boulder County. **L. Langelo, Colorado State University Extension horticulture agent, Golden Plains Area. 12/2014
Revised by L. Langelo**
Nitrogen applied before fruiting results in soft fruit and is not recommended.
Generally, keep a strawberry bed for three years. Remove it as soon as it ceases to bear in the fall, or leave it until spring. If the matted row system is used and the plants are still insect and disease free, plant a new bed in late August by carefully removing good, healthy, rooted runners and using them for planting the new bed. If the hill system is used where no runners are permitted, or if the plants are not healthy, order new plants in time for planting a bed in the spring, preferably in a different location.
Keep the soil damp until the first fall frost, then withhold water to help harden off the plants for winter. A final November watering helps prevent winter-kill from drying out the root system.
Insects and DiseaseStrawberries are remarkably free from
most insects and diseases in Colorado. Occasionally, an insect problem arises, such as crownborers, leafhoppers, aphids, earwigs, slugs or tarnished plant bugs. Malathion is a good standard home insecticide to control aphids, leafhoppers and quite a few other sucking and chewing insects. Use Sevin to control earwigs and beetles. Control crownborers with a soil-applied insecticide. Control slugs with commercially prepared baits available at most garden centers. Do not spray plants when in flower—pollinating insects may be harmed.
Disease problems occur less frequently than insect problems. Usually, the disease is controlled by removing the diseased plant or plant part. However, if it is widespread, other measures must be taken. In the case of systemic diseases, such as yellows (virus) or red stele (vascular), nothing can be done except to remove diseased plants. However, if a fungus develops on the foliage, spray the plants with a fungicide, such as Captan. Bacterial diseases on strawberries are not important in Colorado.
For more information, see fact sheet 2.931, Strawberry Diseases.
HarvestingPick strawberries every other day
during the peak of the season. It is poor practice to let fruit rot on the vine, so pick even the rotted fruit. If berries are eaten or
With the hill system, space plants 1 foot apart in three rows that also are 1 foot apart, with 3 feet between each set of three rows. Remove all runners as they develop.
Select certified plants over non-certified ones. They have been certified to be free from insects and diseases. Unpack plants and plant right away or heel them in a trench as a temporary location until they can be set out in the garden.
Transplant in the late afternoon to reduce wilting due to heat stress. Discard plants with dark roots or unhealthy looking roots. Remove flower buds, runners and damaged leaves before planting. The usual planting method is to drive a spade into the soil, push the handle away to open up the soil, fan out the roots of the plant, and place the plant in the opening so that the soil level is even with the crown. While the plant is held with one hand, remove the spade with the other. Allow the soil to fill in the hole and tamp it down gently. It is important to water each plant immediately after planting. This practice will help avoid transplant shock and water can be used to settle the soil in around the roots without compacting the soil by pushing on it. Much stooping can be avoided if two people are involved in this operation. Watering each plant individually at planting, rather than sprinkling the plants when finished, will help to avoid forcing wilted leaves into the soil.
CultivationAfter planting, keep weeds down by
hoeing. If the planting is large enough, consider an herbicide such as Dacthal. Apply this compound according to label instructions.
Remove the first blossoms that form on a new planting at least once on the hill system and twice on the matted row system. This diverts the resources of the plant into producing a strong plant and, in the case of the matted row system, more runners. Stronger plants bear more fruit than those allowed to fruit early. Later in the season, there will be some fruit to enjoy on the everbearers or day neutral varieties.
About July 1, fertilize the crop with 1 pound of nitrogen per 1,000 square feet. This may be obtained from 5 pounds of a 21-0-0 formulation. If the fertilizer is broadcast, drag the foliage with a sack to dislodge the fertilizer and then water. Repeat this process again in September.
preserved immediately, harvest only red-ripe fruit and leave the caps on the plant. If the fruit will not be used for a few days, harvest the berries, caps and all, while still pink.
MulchingProtect strawberries over the winter,
generally with a straw mulch applied about December 1. By then, cold weather has inhibited growth and the soil is cold. Distribute the mulch over the plants to a depth of 1 to 2 inches. Hold it in place with weighted boards or piles of soil. This mulch prevents the plant from losing moisture to drying winter winds. It also prevents root damage caused by alternate freezing and thawing of the ground.
Leave the mulch on as long as possible to restrain plant growth in the spring. Early spring growth produces early flowers subject to damage by adverse weather. Therefore, check the plants under the mulch in March for new growth. When growth begins, part the mulch to allow sunlight to reach the foliage. As the plants continue to grow, gradually remove the mulch, leaving as much as possible as a soil mulch to keep the fruit off the ground. Rake the mulch back over the plants to protect them in case of a late spring frost. Remove soon after the frost danger is over.
Colorado State University, U.S. Department of Agriculture and Colorado counties cooperating. CSU Extension programs are available to all without discrimination. No endorsement of products mentioned is intended nor is criticism implied of products not mentioned.

Fact Sheet No. 2.931 Gardening Ser ies|Diseases
by C.E. Swift*
Many diseases attack strawberries. Disease-causing organisms may be on plants when they are purchased or in the soil where plants are set. Disease spores also may be carried into strawberry fields by wind, birds, insects, on a workers boots or shoes, and farm implements.
In most areas, losses may be reduced by:• using proper cultural methods to include
crop rotation, • selecting varieties adapted for the area,• selecting disease resistant varieties, and• planting disease-free plants.
For more information on site selection,soil preparation, planting and cultural methods, see fact sheet 7.000, Strawberries for the Home Garden.
Prevent StressStrawberry plants are most susceptible
to disease-causing organisms when stressed. Stress results from planting in clay or high salt soil, incorrect planting depth, too much or too little water, too much shade, winter drying and frost heaving.
Mulching may prevent winter damage and frost heaving. Mulch after the ground freezes (approximately December 1) to reduce excessive dehydration, soil temperature fluctuations, and winter damage and frost heaving. Frost heaving tears roots and severely damages the crown. Plants damaged but not killed by frost heaving are more susceptible to diseases the following growing season.
Red Stele Root RotIdentification
Red stele, caused by Phytophthora fragariae var. fragariae, is a serious disease of strawberries in the United States. This fungal-like organism attacks plants during
late winter and spring. It is most destructive in heavy clay soils saturated with water.
Infected plants appear stunted and lose their shiny green luster. The plant’s younger leaves often have a metallic, bluish-green cast. Older leaves turn prematurely yellow or red. Diseased plants wilt in dry weather and often die before the fruit starts to ripen.
Because pathogen spread is favored by water, red stele may be fairly well distributed throughout an entire strawberry patch during a cool, wet spring. Normally, however, this disease is prevalent only in the poorly drained areas of a field or patch. A well-prepared soil that drains quickly has less problems with the disease. Strawberries grown in raised beds typically have less problems with this disease as long as the soil is well-drained.
Red stele usually does not appear in a new planting until spring of the first bearing year. It is most evident from full bloom to harvest when plants are stressed due to fruit production. Some symptoms, however, may appear in late fall of the first growing season.
To identify the disease, examine the center of the root stele region. In a normal root, both the center (stele) and the part surrounding the stele are yellowish-white. In a plant infected with red stele disease, the stele is a distinctive rusty-red to dark brown. This discoloration may show only near the dead tip, or it may extend the length of the root. This condition is most evident in the spring before fruiting. Later in the season, this discoloration may be less evident as decaying roots are replaced by new roots.
Control
Planting resistant varieties (Table 1) is an effective means of control. Resistance to red stele disease is, however, a relative term. There are at least seven distinct biological races of the causal fungus and not all varieties of strawberries are resistant to all races. No chemical or cultural treatment ensures a normal crop in an infected planting.
Quick Facts• Winterdamageandpoorculturalmanagementpredisposestrawberryplantstodiseases.
• Redstele,blackrootrot,powderymildew,botrytisfruitrot,leafspot,andleafscorcharethemostimportantstrawberrydiseasesinColorado.
• Strawberryplantsaremostsusceptibletodisease-causingorganismswhensubjectedtostress.
• Thebestwaytopreventstrawberrydiseasesistousedisease-resistant,disease-freecertifiedplants,propersoilpreparation,arotationperiodofthreetofiveyearswhenstrawberryplantsarenotgrowninthearea,andproperirrigation.
Strawberry Diseases
*Colorado State University Extension agent emeritus , Reviewed/Revised by T. Blunt, 12/2014
©ColoradoStateUniversity
Extension.1/02.Revised12/14. www.ext.colostate.edu
Upon receiving plants, carefully look roots over to see if any have the rattail appearance that may indicate red stele. Cut open any suspicious roots to see if red stele symptoms are present. Do not plant infected stock.
Select a planting site that has good to excellent soil drainage, no history of red stele, and is located where water from nearby land will not drain through it. Avoid low, wet spots and heavy clay soils. Thoroughly clean soil and plant debris from cultivation equipment before use, especially if borrowing tools.
Soil fumigation is feasible on commercial plantings and may be helpful in situations where resistant varieties are not available or not adapted. Contact a commercial pesticide applicator if fumigation is necessary. In home gardens, chemical soil fumigation is not recommended due to the extreme toxicity of these products. For traditional and organic control options see Table 2.
Black Root RotIdentification
This problem is caused by a complex of soil-inhabiting pathogens, nematodes, drought, winter injury, excessive application of fertilizer, and excessive soil moisture. Symptoms are most often noted in the spring. These include wilted plants, brown and/or distorted leaves, and black roots. Purple leaves with red petioles also have been associated with this problem.
When infected plants are dug up at the time of fruit-coloring, fine lateral roots will be missing or dead and irregular black patches may be visible on the fleshy white roots. On severely diseased plants these black patches grow together and no fleshy white roots will be visible. The interior (stele) of infected roots will be black.
Control
Proper soil preparation to improve organic matter content and drainage, combined with correct fertilization and watering practices, and steps to avoid soil compaction, are necessary to prevent black root rot. Make sure the strawberry bed is moist going into winter. To prevent frost heaving and root damage, mulch after the ground has frozen to a depth of several inches. Mulch applied during the summer helps prevent drought and excessive soil temperature, both associated with plant stress and black root rot.
Leaf SpotIdentification
Leaf spot is caused by the fungus Mycosphaerella fragariae. Also referred to as Ramularia leaf spot, "rust," bird's eye spot, "gray spotness," and white spot, this disease organism can be carried into the field on new plants, from nearby fields by birds or insects, by farm implements, or on hands and clothing of workers.
The fungus overwinters in purple spots on infected plants. These spots on the upper leaf surface produce spores, which start the disease cycle in the spring. Splashing rain helps scatter spores about the field. Damp, humid weather favors spore germination and the development of leaf spot disease.
Centers of spots initially are purple and later become tan or gray, then almost white. Older spots usually are white with a light purple border. Similar spots may appear on leaf stems, fruit stalks, runners and caps. Occasionally, dark spots surrounded by discolored areas about 1/4 inch in size appear on green fruit. This phase of the disease is called “black seed.” The loss of foliage due to this pathogen can stunt the entire plant. Severely infected plants may die. Temperature affects symptom expression. Warm, humid weather results in spots being rusty brown without the reddish purple borders or light colored centers.
Control
Mowing the strawberry bed after the plants have finished fruiting will remove old infected leaves and reduce infectious material. Fertilizing after mowing helps stimulate grown making the plants healthier and less susceptible to many diseases.
The use of resistant varieties is the most practical and effective means to control leaf spot disease. Several strains of the fungus are known. Each affects varieties differently. Varieties that have demonstrated resistance are included in Table 3. Avoid overhead irrigation unless watering between 10 p.m. and 6 a.m. For control options see Table 2.
Fruit Rot and Blossom BlightIdentification
The most serious fruit rot and blossom blight found in Colorado is botrytis (gray mold), caused by the fungus Botrytis cinerea. Infection usually begins on berries touching the soil. However, infection may start in that part of a berry that touches another decayed berry or dead leaf. Gray mold often starts on blossoms and green fruit injured by frost. Sometimes the disease affects flower stalks enough to prevent the development of fruit.
Control
The proper spacing of plants and correct timing of fertilizer applications are the most important preventive measures. Disease is more severe when fertilizer is applied in the spring, when the matted row system is used (e.g. all daughter plants are allowed to take root), or when rows are kept narrow. These cultural practices result in dense, lush foliage that prevents rapid drying of fruit after rains or irrigating. Water on the foliage then results in suitable conditions for development of rot.
A clean straw mulch aids in producing cleaner berries and reduces fruit rot by keeping berries off the ground. Remove overripe or infected berries to help reduce this disease problem. See Table 2 for chemical controls.
Powdery MildewIdentification
Powdery mildew, caused by the fungus Sphaerotheca macularis f.sp. fragariae, results in the rolling of infected leaves in late summer and fall, purplish or reddish blotches on leaves and sometimes a powdery growth. Pepper-like black specks appear on the underside of infected leaves in the fall. Infected flowers and fruit will be covered with a fine white fungal growth.
Table 1. Red stele resistant cultivars.
June-bearing
Allstar Pathfinder
Darrow Redchief
Delite Sparkle
Earliglow Stelemaster
Guardian Sunrise
Joliette Surecrop
Midway
Day neutral
Tribute Tristar
Control
Mowing as suggested above to remove infected tissue, applying protective systemic fungicides as soon as flowering begins, and planting resistant cultivars is recommended. Use resistant cultivars - see Table 3. Table 2 lists synthetic and organic pesticides for control of this disease.
Leaf ScorchIdentification
Symptoms caused by this fungus (Diplocarpon earlianum) include numerous, small, irregular shaped purple spots on leaves. The spots, unlike leaf spot (M. fragariae), are purple throughout (no light centers) and have no well-defined border. Blotches may grow together until the entire leaflet appears purplish or reddish brown.
Control
Watering at the wrong time of day results in tissue that is wet for too long a period and increases the likelihood of this and other disease problems becoming serious. This disease is more problematic when the leaf tissue is wet for 12 hours or longer. Other disease control strategies are similar to those given for leaf spot. Use resistant cultivars (see Table 3).
ReferencesMaas, J.L., ed. 1998. Compendium of
Strawberry Diseases, Second Editions. APS Press, St. Paul, MN. 128 pages.
Nickerson, N.L., and Jamieson, A.R. 1995. Canadian races of the red stele root rot fungus, Phytophthora fragariae var. fragariae. Advances in Strawberry Research 14:31-35.
Pritts, M., and Handley, D. 1998. Strawberry Production Guide. NRAES-88. Cooperative Extension, Ithaca, NY.
Ries, S.M. 1994. Strawberry red stele root rot. Pp. 109-111, in: Proceedings 1994 Illinois Small Fruit and Strawberry Schools. Horticulture Series 96, University of Illinois, Urbana, IL
Wilcox, K.B., and Pritts, M. 1994, Strawberry black root rot: A review. Advances in Strawberry Research, 13:13-19.
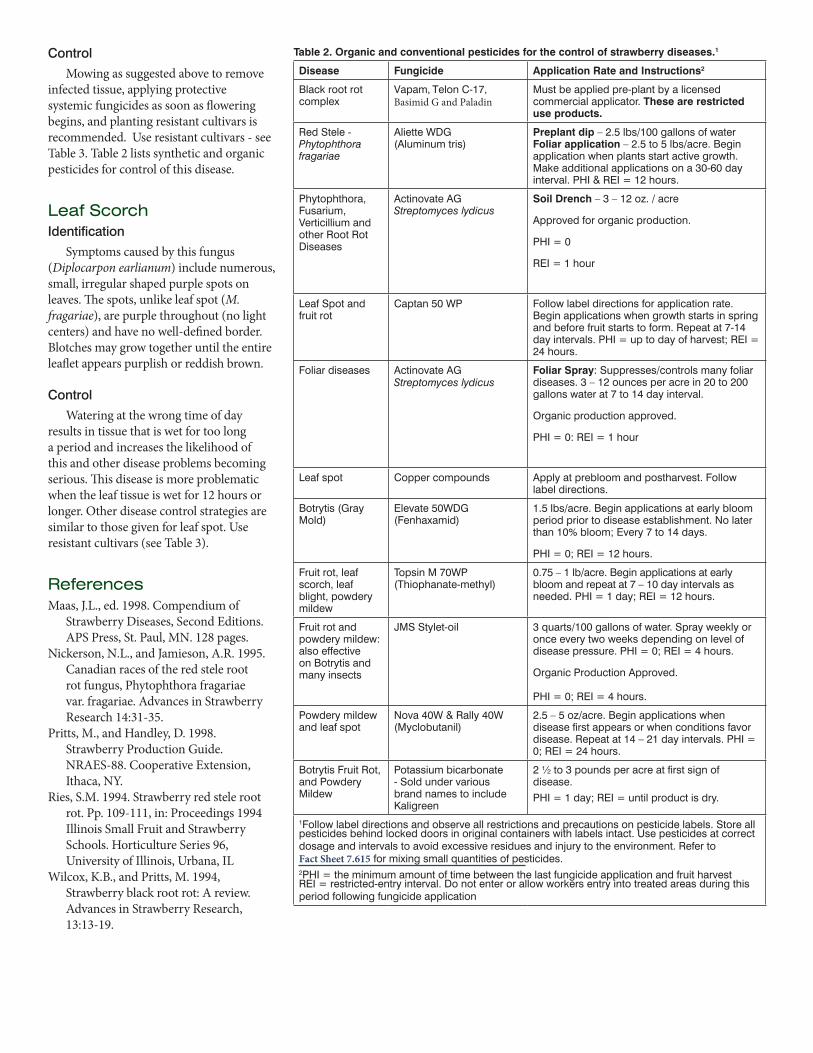
Table 2. Organic and conventional pesticides for the control of strawberry diseases.1
Disease Fungicide Application Rate and Instructions2
Blackrootrotcomplex
Vapam, TelonC-17, Basimid G and Paladin
Mustbeappliedpre-plantbyalicensedcommercialapplicator.These are restricted use products.
RedStele-Phytophthora fragariae
AlietteWDG(Aluminumtris)
Preplant dip–2.5lbs/100gallonsofwaterFoliar application–2.5to5lbs/acre.Beginapplicationwhenplantsstartactivegrowth.Makeadditionalapplicationsona30-60dayinterval.PHI&REI=12hours.
Phytophthora,Fusarium,VerticilliumandotherRootRotDiseases
ActinovateAGStreptomyces lydicus
Soil Drench –3–12oz./acre
Approvedfororganicproduction.
PHI=0
REI=1hour
LeafSpotandfruitrot
Captan50WP Followlabeldirectionsforapplicationrate.Beginapplicationswhengrowthstartsinspringandbeforefruitstartstoform.Repeatat7-14dayintervals.PHI=uptodayofharvest;REI=24hours.
Foliardiseases ActinovateAGStreptomyces lydicus
Foliar Spray:Suppresses/controlsmanyfoliardiseases.3–12ouncesperacrein20to200gallonswaterat7to14dayinterval.
Organicproductionapproved.
PHI=0:REI=1hour
Leafspot Coppercompounds Applyatprebloomandpostharvest.Followlabeldirections.
Botrytis(GrayMold)
Elevate50WDG(Fenhaxamid)
1.5lbs/acre.Beginapplicationsatearlybloomperiodpriortodiseaseestablishment.Nolaterthan10%bloom;Every7to14days.
PHI=0;REI=12hours.
Fruitrot,leafscorch,leafblight,powderymildew
TopsinM70WP(Thiophanate-methyl)
0.75–1lb/acre.Beginapplicationsatearlybloomandrepeatat7–10dayintervalsasneeded.PHI=1day;REI=12hours.
Fruitrotandpowderymildew:alsoeffectiveonBotrytisandmanyinsects
JMSStylet-oil 3quarts/100gallonsofwater.Sprayweeklyoronceeverytwoweeksdependingonlevelofdiseasepressure.PHI=0;REI=4hours.
OrganicProductionApproved.
PHI=0;REI=4hours.
Powderymildewandleafspot
Nova40W&Rally40W(Myclobutanil)
2.5–5oz/acre.Beginapplicationswhendiseasefirstappearsorwhenconditionsfavordisease.Repeatat14–21dayintervals.PHI=0;REI=24hours.
BotrytisFruitRot,andPowderyMildew
Potassiumbicarbonate-SoldundervariousbrandnamestoincludeKaligreen
2½to3poundsperacreatfirstsignofdisease.
PHI=1day;REI=untilproductisdry.
1Followlabeldirectionsandobserveallrestrictionsandprecautionsonpesticidelabels.Storeallpesticidesbehindlockeddoorsinoriginalcontainerswithlabelsintact.Usepesticidesatcorrectdosageandintervalstoavoidexcessiveresiduesandinjurytotheenvironment.RefertoFact Sheet 7.615formixingsmallquantitiesofpesticides.2PHI=theminimumamountoftimebetweenthelastfungicideapplicationandfruitharvestREI=restricted-entryinterval.Donotenterorallowworkersentryintotreatedareasduringthisperiodfollowingfungicideapplication
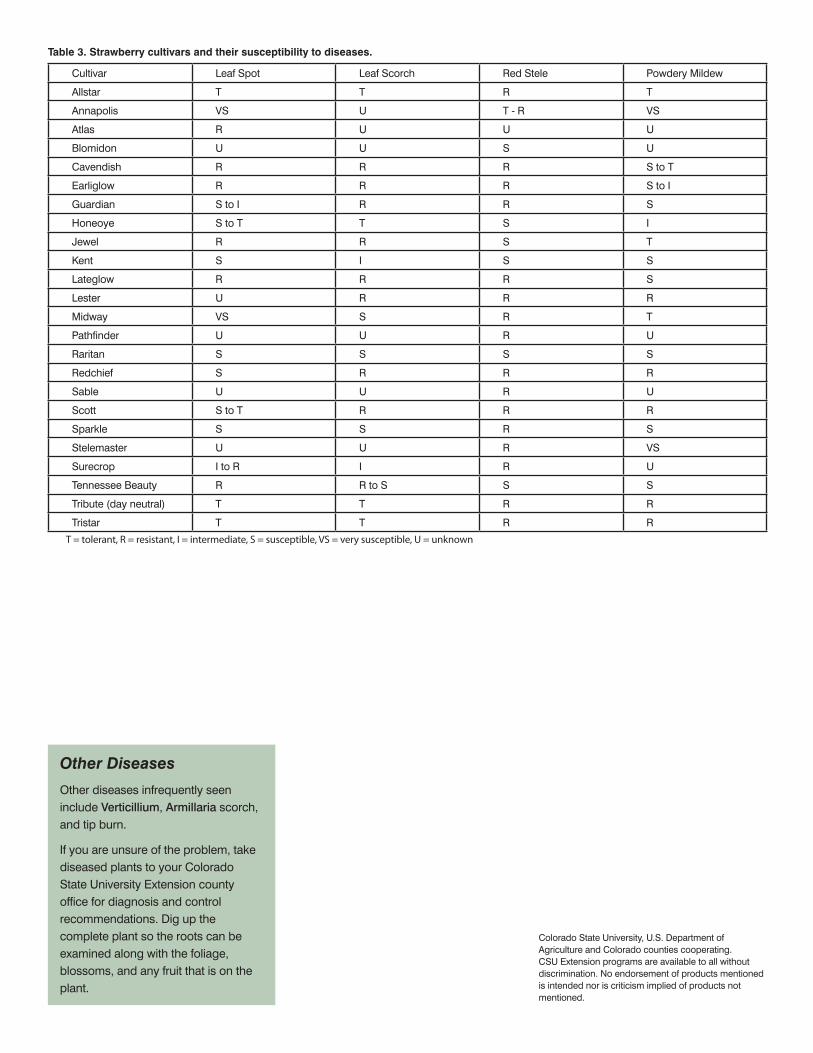
Cultivar LeafSpot LeafScorch RedStele PowderyMildew
Allstar T T R T
Annapolis VS U T-R VS
Atlas R U U U
Blomidon U U S U
Cavendish R R R StoT
Earliglow R R R StoI
Guardian StoI R R S
Honeoye StoT T S I
Jewel R R S T
Kent S I S S
Lateglow R R R S
Lester U R R R
Midway VS S R T
Pathfinder U U R U
Raritan S S S S
Redchief S R R R
Sable U U R U
Scott StoT R R R
Sparkle S S R S
Stelemaster U U R VS
Surecrop ItoR I R U
TennesseeBeauty R RtoS S S
Tribute(dayneutral) T T R R
Tristar T T R R
ColoradoStateUniversity,U.S.DepartmentofAgricultureandColoradocountiescooperating.CSUExtensionprogramsareavailabletoallwithoutdiscrimination.Noendorsementofproductsmentionedisintendednoriscriticismimpliedofproductsnotmentioned.
Table 3. Strawberry cultivars and their susceptibility to diseases.
Other Diseases
OtherdiseasesinfrequentlyseenincludeVerticillium,Armillariascorch,andtipburn.
Ifyouareunsureoftheproblem,takediseasedplantstoyourColoradoStateUniversityExtensioncountyofficefordiagnosisandcontrolrecommendations.Digupthecompleteplantsotherootscanbeexaminedalongwiththefoliage,blossoms,andanyfruitthatisontheplant.
T = tolerant, R = resistant, I = intermediate, S = susceptible, VS = very susceptible, U = unknown

Selected varieties of red and
yellow raspberries (Rubus idaeus)
may be successfully grown in
Colorado. Native raspberries can
grow to 10,000’ elevation. Colo-
rado’s climate is not especially
favorable for bramble fruit produc-
tion, and only red and yellow
raspberries are recommended for
cultivation statewide. Several
varieties of blackberries can be
grown in the lower-elevation areas
of the state. New hardy varieties of
black raspberries including Niwot
and Pequot can work in some
areas of Colorado. Purple
raspberries (see variety table),
boysenberries, loganberries and
dewberries require special winter
protection and are not recom-
mended for Colorado.
Types
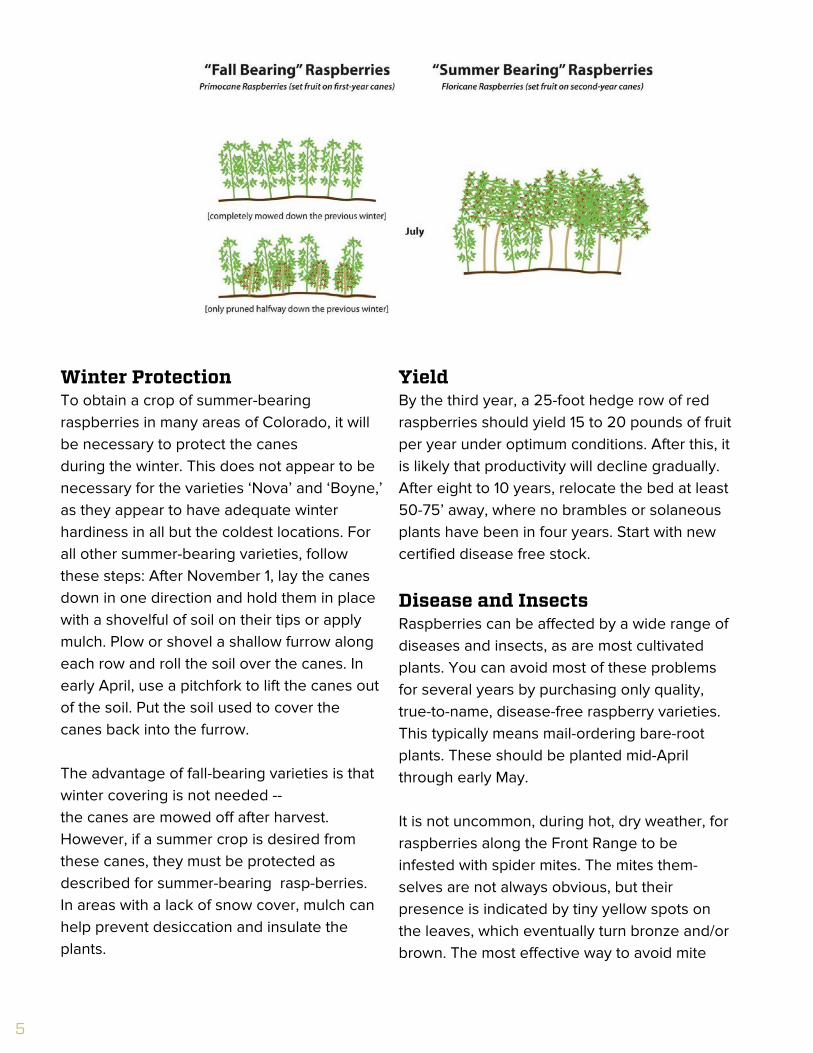
There are two growth-types of
raspberries: “summer-bearing”
(floricane or “June bearing”) and
fall-bearing (Primocane or ever-
bearing”). Summer- bearing
varieties produce flowers and fruit
once per season on second-year
canes. This means that a given
cane will grow vegetatively in its
first year, followed by fruiting on
that cane in its second year. Fall-
bearing raspberries flower and fruit
along the upper portions of canes
that are in their first year of growth.
These canes may overwinter and
produce a light summer crop on
their lower portions, followed by a
second crop on the tips of the
current season’s growth in the
fall (up until freezing temperatures).
Varieties
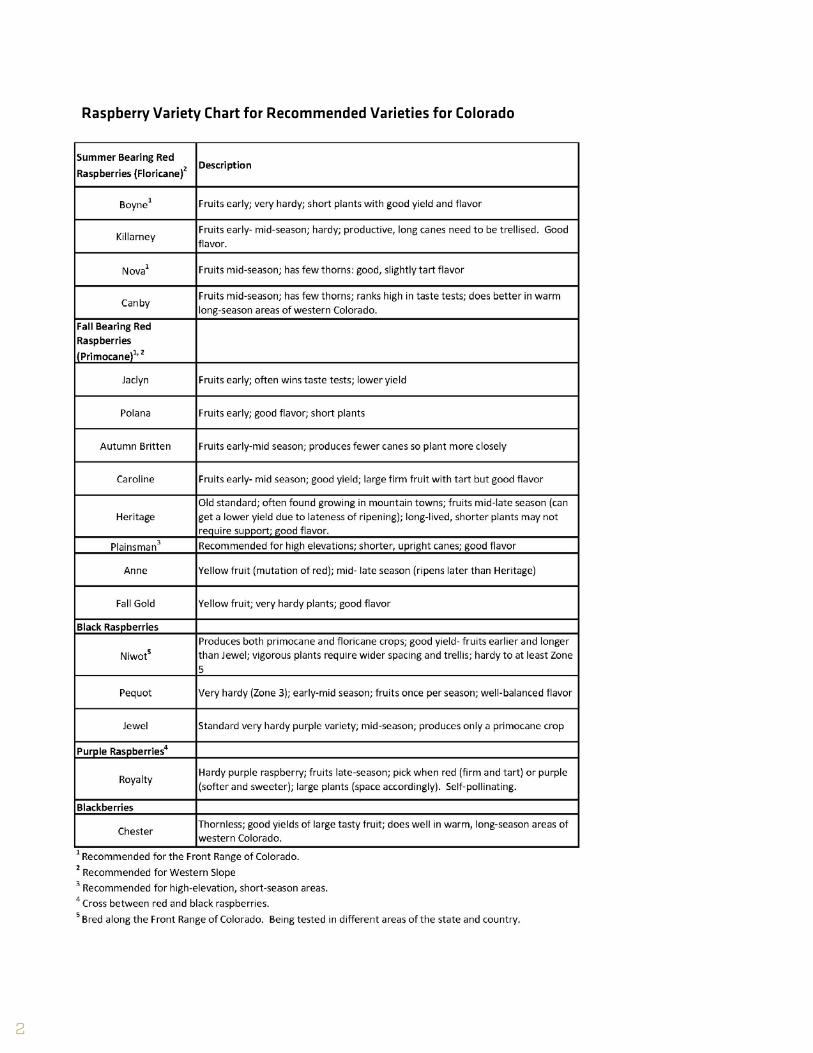
Based on Colorado State University
tests, with a few exceptions, fall-
bearing types seem best adapted
to the Front Range. Both fall-
bearing and summer-bearing
varieties do well on the Western
Slope. Hardy varieties with mid-
season production should be
chosen for short-season, high
elevation areas. Growing a variety
of types may ensure a better crop.
(See the variety chart for recom-
mended varieties for Colorado).
Soil Preparation
Red raspberries grow in most
garden soils if they have ample
organic matter and adequate
drainage. For summer-bearing
raspberries in good garden soil,
apply only a maintenance amount
of fertilizer of a nitrogen fertilizer in
extension.colostate.edu
Of all bramble fruits,
only red and yellow
rasp-berries are
recommended for
general cultivation in
Colorado. There are
now a few hardy
varieties of black
raspberries.
Blackberries are con-
sidered marginal, due to
inadequate hardiness,
but some varieties can
be successful.
Red raspberries grow
well in most garden
soils that are amply
supplied with organic
matter and adequately
drained.
Bramble plants are
perennials, but their
canes are either annual
or biennial structures.
Plant only true-to-name,
disease-free stock from
reputable sources.
Twenty-five feet of row
should produce 15 to 20
pounds of raspberries
per year.
© Colorado State University Extension. 11/12. Revised 4/20.
Raspberries for the Home Garden
Quick Facts
1
Gardening Series | Fruits & VegetablesFact Sheet 7.001
By J. Reich, H. Hughes and J.E. Ells* (4/20)
*J. Reich, Colorado State University
Extension horticulture agent, Boulder
County; H. Hughes, Colorado State
University professor, and J.E. Ells,
Colorado State University Extension
vegetable crop specialist and asso-
ciate professor (retired), horticulture
and landscape architecture. 8/2011
Updated by Yvette Henson and Susan
Carter, CSU Extension Agents, 4/20
2
Raspberry Variety Chart for Recommended Varieties for Colorado

spring. Some areas in CO may require phos-
phate fertilizer. A soil test is recommended to
determine what other nutrients are needed.
Use cane growth to determine if there has
been enough N applied. The space between
the buds (internode) optimally is 4”. Less you
need N, greater the plant is too vigorous so
reduce or skip adding nitrogen. Soils over 7
pH may be low in zinc, iron and manganese. In
general, fall bearing raspberries require 1.5-2
times more nitrogen then summer bearing.
The chart refers to good soil, new bed or
untested refers to the amount of organic
matter. Soils with higher organic matter 5%,
need little to no fertilizer. Test every 3 years.
An application of organic matter will help to
conserve water and reduces N need.
Apply enough water to maintain a moderate
moisture level in the root zone. During
flowering and fruiting, more water is required.
Withhold water after the first frost to help
harden off the plants. A late November water-
ing reduces winter drying.
Planting RaspberriesRed and yellow raspberries are commercially
propagated by rooted suckers. These can
easily be purchased from a variety of online
and mail-order sources. They are typically sold
as “handles.” A handle consists of a 12-18
inch section of a dormant cane with a large
root mass attached. Soak bare-root plants in
a bucket of water 1 hour to help them get
prepared for planting. Plant them in the
spring, 2 to 3 feet apart in rows 5 to 10 feet
apart, depending on the varieties growth
characteristics, how much pathway space
you desire and the width of any cultivating
equipment that may be used. After planting,
cut the tops to within 4 to 6 inches of the
ground.
After one or two years, suckers fill in the row
to form a hedge of canes. During dormant-
season pruning, thin the resulting collection
of canes so that you leave five to six of the
strongest canes per linear foot. The hedge-
row should not be more than 2 feet wide at
ground level. An application of organic
mulch will conserve water and decrease
weed competition.
TrellisingTrellising is advisable for all bramble crops in
Colorado. Without some type of support,
canes will flop and sprawl in such a way as to
make weed control and harvesting much
more difficult (and prickly). Stretch a wire on
3
Figure 1: Raspberry trellis with
dormant canes secured to wires.

4
either side of the hedge row, 3 feet above the
ground depending on the variety and trellis
structure. These wires confine the canes to the
hedge row. To make them stand erect, you may
have to tie the canes to the wire with soft twine.
See Figure 1. For larger fruit size, tip canes at a
convenient height. For larger yield, do not tip
canes.
Pruning For of summer- bearing varieties, remove
the spent floricanes by cutting them off at the
ground after they bear fruit. Dispose of these
canes – they often harbor insects and disease.
In the spring, remove the dead, weak and small
canes. Remove winter- killed tips of the re-
maining canes. There are two methods to
prune fall-bearing varities. The first, and
easiest method is to mow or cut all the canes to
ground level after the fall harvest and before
spring growth. New canes will be produced in
the spring. This eliminates the summer crop
but also eliminates hardiness problems and
cane borers and gives a larger harvest overall,
unless an early frost occurs. The second is to
remove the parts of the canes that fruited the
previous year, which leaves the bottom portion
of the cane to produce the following summer.
New canes that grow from the crowns that
spring will produce a fall crop at the tips. This
method allows for two harvests, giving at least
one harvest in short season areas. The
disadvantage is that it will result in a reduced
fall crop.
5
Winter ProtectionTo obtain a crop of summer-bearing
raspberries in many areas of Colorado, it will
be necessary to protect the canes
during the winter. This does not appear to be
necessary for the varieties ‘Nova’ and ‘Boyne,’
as they appear to have adequate winter
hardiness in all but the coldest locations. For
all other summer-bearing varieties, follow
these steps: After November 1, lay the canes
down in one direction and hold them in place
with a shovelful of soil on their tips or apply
mulch. Plow or shovel a shallow furrow along
each row and roll the soil over the canes. In
early April, use a pitchfork to lift the canes out
of the soil. Put the soil used to cover the
canes back into the furrow.
The advantage of fall-bearing varieties is that
winter covering is not needed --
the canes are mowed off after harvest.
However, if a summer crop is desired from
these canes, they must be protected as
described for summer-bearing rasp-berries.
In areas with a lack of snow cover, mulch can
help prevent desiccation and insulate the
plants.
Yield By the third year, a 25-foot hedge row of red
raspberries should yield 15 to 20 pounds of fruit
per year under optimum conditions. After this, it
is likely that productivity will decline gradually.
After eight to 10 years, relocate the bed at least
50-75’ away, where no brambles or solaneous
plants have been in four years. Start with new
certified disease free stock.
Disease and InsectsRaspberries can be affected by a wide range of
diseases and insects, as are most cultivated
plants. You can avoid most of these problems
for several years by purchasing only quality,
true-to-name, disease-free raspberry varieties.
This typically means mail-ordering bare-root
plants. These should be planted mid-April
through early May.
It is not uncommon, during hot, dry weather, for
raspberries along the Front Range to be
infested with spider mites. The mites them-
selves are not always obvious, but their
presence is indicated by tiny yellow spots on
the leaves, which eventually turn bronze and/or
brown. The most effective way to avoid mite
6
Colorado State University, U.S. Department of Agriculture and
Colorado counties cooperating. CSU Extension programs are
available to all without discrimination. No endorsement of
products mentioned is intended nor is criticism implied of
products not mentioned.
problems is to maintain healthy plants. This
means applying a balanced fertilizer at least
once a year, in May. Many plantings will
benefit from additional fertilizer in June and
July. In addition, make sure plants are
adequately watered. Drought-stressed
raspberry plants are a great place for spider
mites to feed and breed. It is also important
to prevent the planting from becoming too
dense, as an overcrowded planting makes
life easy for mites. This can be achieved
most effectively by removing the thinnest,
weakest canes, thereby allowing more light
and air to reach the center of the planting.
Regularly watering the foliage during hot
weather will also help control mite
populations.
Insecticides tend to be ineffective against
mites, and their use often makes mite
problems worse by killing a variety of
beneficial, predatory arthropods. If a spray
is desired, best results are often achieved
with a “summer weight” (2%) application of
horticultural oil.
Raspberry cane borers can be an important
pest in Colorado. Symptoms of this pest
include a sudden wilting and drooping of
the tops of canes. The white larvae of the
borer, if left uncontrolled, burrow down-
wards through the center of the cane and
kill it.
Management in the garden is best achieved
by removing the affected canes at the first
sign of damage. Depending on location,
mid-May through June is when these pests
tend to do their damage. If caught early
enough, while the larvae is still near the tip
of the cane, the undamaged portion of the
cane may be saved, allowing it to produce
fruit.
Spotted wing drosophila is a newer insect
coming to Colorado around 2013. It is
different from other fruit flies in that its
ovipositor is like a saw so it can penetrate
good fruit and lay eggs. Refrigerate fresh
picked berries, clean up dropped fruit and
trap and monitor to control.
References Lawrence, F. T. Growing Raspberries.
Farmer’s Bulletin 2165, U.S. Government
Printing Office , Washington, D.C. 20402.
1979.
Shoemaker, T.S. Small Fruit Culture, 5th
Edition. AVI Pub. Co. Inc. Westport, Conn.
1977.
Bushway, L., Pritts, M.P. and Handley,
D.T. (eds.) Raspberry and Blackberry
Production Guide for the Northeast, Midwest
and Eastern Canada. NRAES-35. Ithaca, New
York. 2008.
Britney Hunter, Rick Heflebower, Shawn
Olsen, Brent Black, Diane Alston and Thor
Lindstrom. A Comparison of 16 Summer-
Bearing Raspberry Cultivars for Northern
Utah, Utah State University Extension,
January 2015.
233-1
CMG GardenNotes #233
Calculating Fertilizer Application Rates
Outline: Steps to calculating fertilizer application rate, page 1 Fertilizer application rate table, page 3
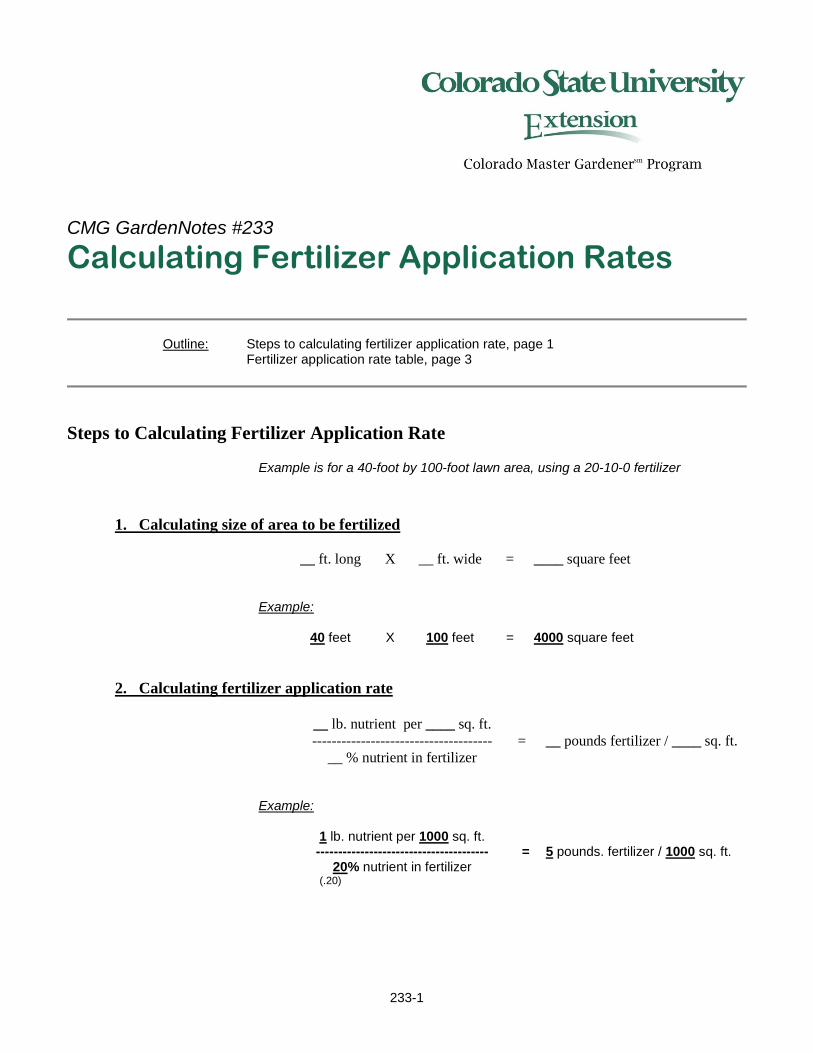
Steps to Calculating Fertilizer Application Rate Example is for a 40-foot by 100-foot lawn area, using a 20-10-0 fertilizer
1. Calculating size of area to be fertilized
__ ft. long X __ ft. wide = ____ square feet Example: 40 feet X 100 feet = 4000 square feet
2. Calculating fertilizer application rate __ lb. nutrient per ____ sq. ft. ------------------------------------- = __ pounds fertilizer / ____ sq. ft. __ % nutrient in fertilizer Example: 1 lb. nutrient per 1000 sq. ft. --------------------------------------- = 5 pounds. fertilizer / 1000 sq. ft. 20% nutrient in fertilizer (.20)
233-2
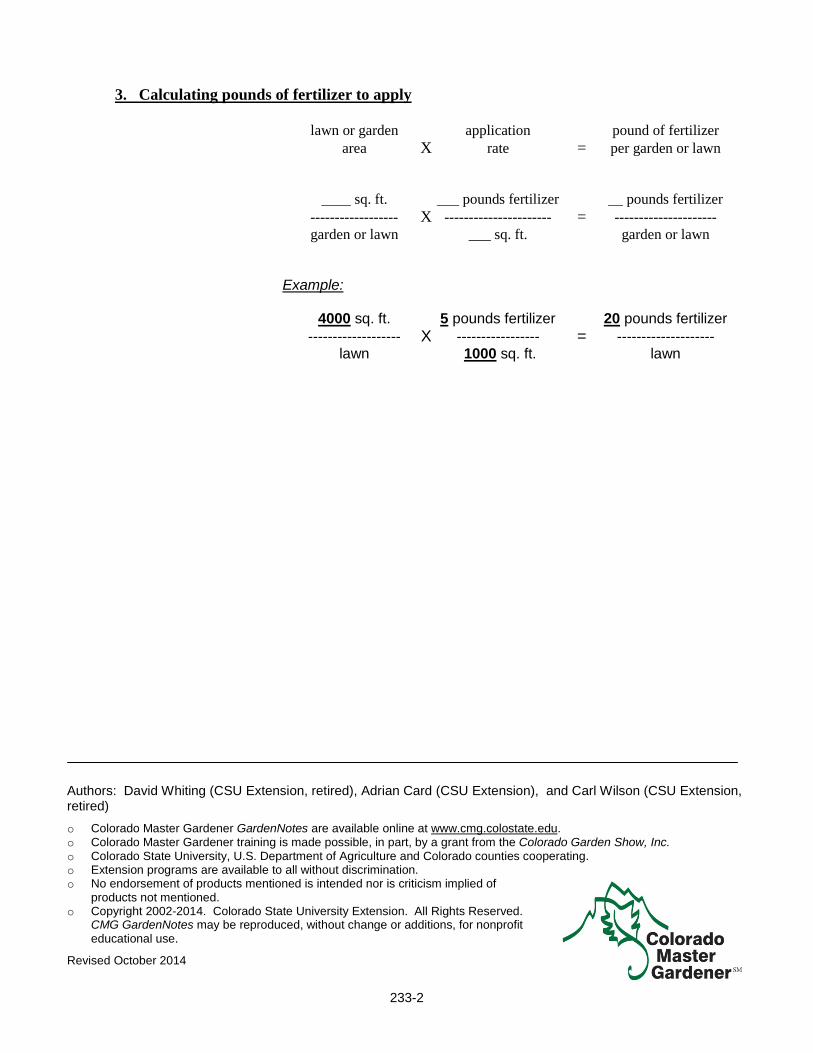
3. Calculating pounds of fertilizer to apply
lawn or garden application pound of fertilizer area X rate = per garden or lawn ____ sq. ft. ___ pounds fertilizer __ pounds fertilizer ------------------ X ---------------------- = --------------------- garden or lawn ___ sq. ft. garden or lawn
Example: 4000 sq. ft. 5 pounds fertilizer 20 pounds fertilizer ------------------- X ----------------- = -------------------- lawn 1000 sq. ft. lawn
Authors: David Whiting (CSU Extension, retired), Adrian Card (CSU Extension), and Carl Wilson (CSU Extension, retired) o Colorado Master Gardener GardenNotes are available online at www.cmg.colostate.edu. o Colorado Master Gardener training is made possible, in part, by a grant from the Colorado Garden Show, Inc. o Colorado State University, U.S. Department of Agriculture and Colorado counties cooperating. o Extension programs are available to all without discrimination. o No endorsement of products mentioned is intended nor is criticism implied of
products not mentioned. o Copyright 2002-2014. Colorado State University Extension. All Rights Reserved.
CMG GardenNotes may be reproduced, without change or additions, for nonprofit educational use.
Revised October 2014

233-3
Table 1. Fertilizer Application Rate Table Because soil test recommendations for any given soil do not exactly match a fertilizer, select a fertilizer that gives comparative amounts of nitrogen, phosphorus and potassium as recommended by the soil test. In fertilizer application, it is most important to match the nitrogen requirement and compromise some for the phosphorus and potassium. The amount of fertilizer to apply that will give the recommended amount of nitrogen can be obtained from the following table:
Amount of Fertilizer to Apply Based on Actual Nitrogen Recommendations
Nitrogen Rate: 0.1 pound nitrogen 0.2 pound nitrogen. 1 pound nitrogen Per 100 square feet per 100 square feet per 1,000 square feet pounds fertilizer to pounds fertilizer to pounds. fertilizer to Fertilizer Grade apply per 100 square feet apply per 100 square feet apply per 1 000 square feet 45-0-0 (urea) 0.2 0.4 2.2 37-3-3 0.3 0.5 2.7 36-6-6 0.3 0.6 2.8 33-0-0 0.3 0.6 3.0 32-4-4 32-3-10 0.3 0.6 3.1 30-4-4 30-0-10 0.3 0.7 3.3 28-3-3 28-4-6 0.4 0.7 3.6 27-7-7 27-3-3 0.4 0.7 3.7 25-5-5 25-3-12 0.4 0.8 4.0 24-8-16 24-0-15 0.4 0.8 4.2 22-4-4 22-6-3 0.5 0.9 4.5 21-0-0 21-3-12 0.5 1.0 4.8 20-20-20 20-4-8 0.5 1.0 5.0 19-19-19 19-11-12 0.5 1.0 5.3 18-6-12 18-3-6 0.6 1.1 5.6 16-8-8 16-4-8 0.6 1.3 6.3 15-15-15 15-5-5 0.7 1.3 6.7 13-3-9 13-25-12 0.8 1.5 7.7 12-12-12 12-4-4 0.8 1.7 8.3 10-10-10 10-20-10 1.0 2.0 10.0 10-5-5 10-10-20 1.0 2.0 10.0 6-12-12 6-2-0 1.7 3.3 16.7 5-10-10 5-10-5 2.0 4.0 20.0
Example: If the N (nitrogen) recommendation is for 0.1 lb. N/100 sq. ft. and the fertilizer grade selected has a ratio of 18-6-12 (column 1), apply 0.6 lb. of this fertilizer per 100 sq. ft.
Note: 2 cups (1 pint) of dry fertilizer weighs about 1 pound.
June 2014 Horticulture/Fruit/2014-02pr
Chokecherry in the Garden
Sky Wiser, Student, Tiffany Maughan, Research Associate, and Brent Black Extension Fruit Specialist
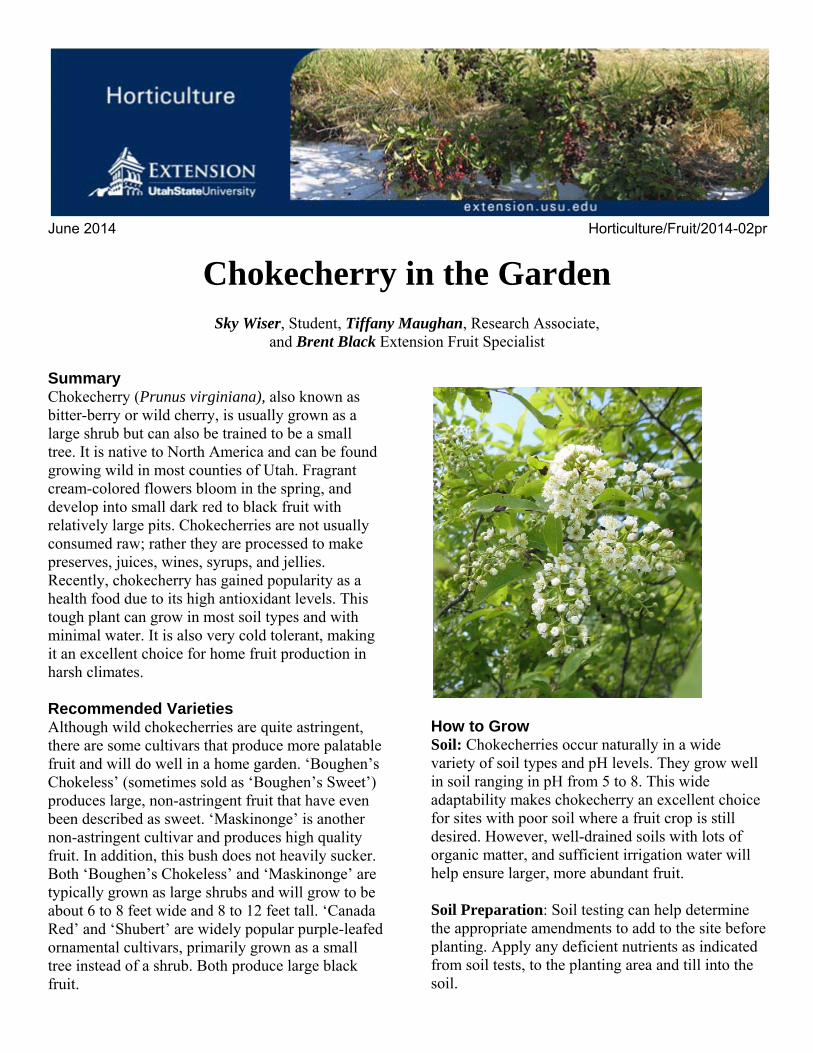
Summary Chokecherry (Prunus virginiana), also known as bitter-berry or wild cherry, is usually grown as a large shrub but can also be trained to be a small tree. It is native to North America and can be found growing wild in most counties of Utah. Fragrant cream-colored flowers bloom in the spring, and develop into small dark red to black fruit with relatively large pits. Chokecherries are not usually consumed raw; rather they are processed to make preserves, juices, wines, syrups, and jellies. Recently, chokecherry has gained popularity as a health food due to its high antioxidant levels. This tough plant can grow in most soil types and with minimal water. It is also very cold tolerant, making it an excellent choice for home fruit production in harsh climates. Recommended Varieties Although wild chokecherries are quite astringent, there are some cultivars that produce more palatable fruit and will do well in a home garden. ‘Boughen’s Chokeless’ (sometimes sold as ‘Boughen’s Sweet’) produces large, non-astringent fruit that have even been described as sweet. ‘Maskinonge’ is another non-astringent cultivar and produces high quality fruit. In addition, this bush does not heavily sucker. Both ‘Boughen’s Chokeless’ and ‘Maskinonge’ are typically grown as large shrubs and will grow to be about 6 to 8 feet wide and 8 to 12 feet tall. ‘Canada Red’ and ‘Shubert’ are widely popular purple-leafed ornamental cultivars, primarily grown as a small tree instead of a shrub. Both produce large black fruit.
How to Grow Soil: Chokecherries occur naturally in a wide variety of soil types and pH levels. They grow well in soil ranging in pH from 5 to 8. This wide adaptability makes chokecherry an excellent choice for sites with poor soil where a fruit crop is still desired. However, well-drained soils with lots of organic matter, and sufficient irrigation water will help ensure larger, more abundant fruit. Soil Preparation: Soil testing can help determine the appropriate amendments to add to the site before planting. Apply any deficient nutrients as indicated from soil tests, to the planting area and till into the soil.
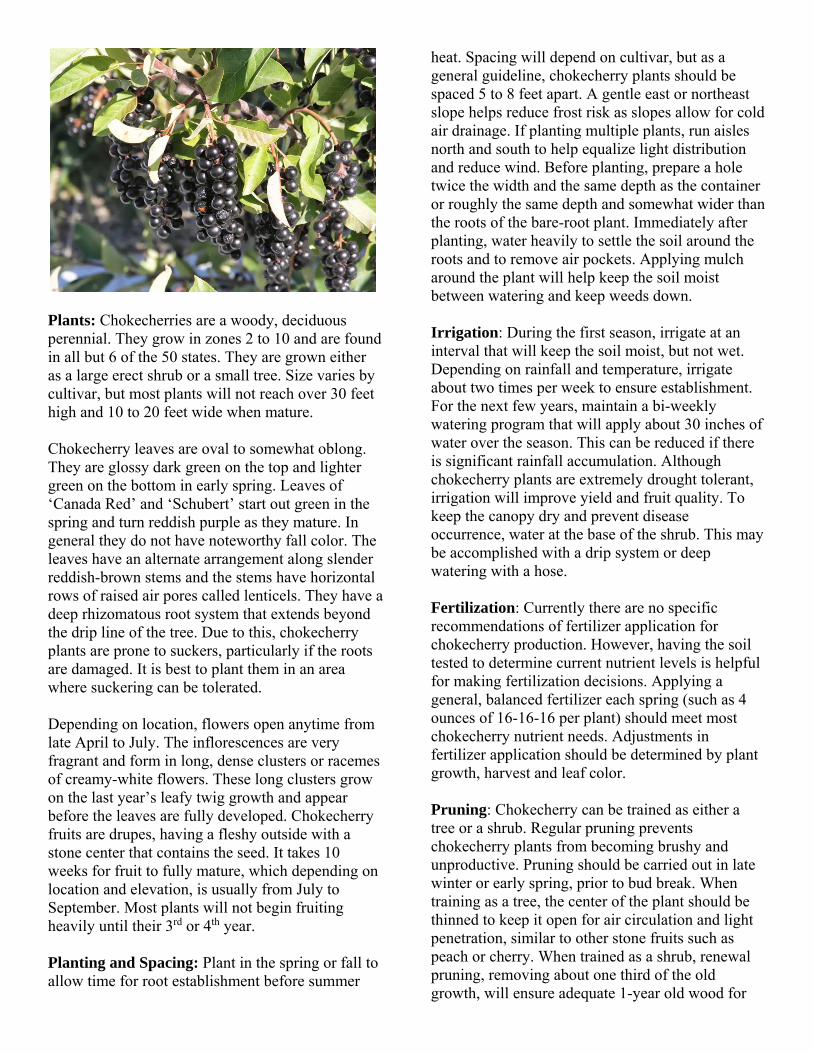
Plants: Chokecherries are a woody, deciduous perennial. They grow in zones 2 to 10 and are found in all but 6 of the 50 states. They are grown either as a large erect shrub or a small tree. Size varies by cultivar, but most plants will not reach over 30 feet high and 10 to 20 feet wide when mature. Chokecherry leaves are oval to somewhat oblong. They are glossy dark green on the top and lighter green on the bottom in early spring. Leaves of ‘Canada Red’ and ‘Schubert’ start out green in the spring and turn reddish purple as they mature. In general they do not have noteworthy fall color. The leaves have an alternate arrangement along slender reddish-brown stems and the stems have horizontal rows of raised air pores called lenticels. They have a deep rhizomatous root system that extends beyond the drip line of the tree. Due to this, chokecherry plants are prone to suckers, particularly if the roots are damaged. It is best to plant them in an area where suckering can be tolerated. Depending on location, flowers open anytime from late April to July. The inflorescences are very fragrant and form in long, dense clusters or racemes of creamy-white flowers. These long clusters grow on the last year’s leafy twig growth and appear before the leaves are fully developed. Chokecherry fruits are drupes, having a fleshy outside with a stone center that contains the seed. It takes 10 weeks for fruit to fully mature, which depending on location and elevation, is usually from July to September. Most plants will not begin fruiting heavily until their 3rd or 4th year.
Planting and Spacing: Plant in the spring or fall to allow time for root establishment before summer
heat. Spacing will depend on cultivar, but as a general guideline, chokecherry plants should be spaced 5 to 8 feet apart. A gentle east or northeast slope helps reduce frost risk as slopes allow for cold air drainage. If planting multiple plants, run aisles north and south to help equalize light distribution and reduce wind. Before planting, prepare a hole twice the width and the same depth as the container or roughly the same depth and somewhat wider than the roots of the bare-root plant. Immediately after planting, water heavily to settle the soil around the roots and to remove air pockets. Applying mulch around the plant will help keep the soil moist between watering and keep weeds down. Irrigation: During the first season, irrigate at an interval that will keep the soil moist, but not wet. Depending on rainfall and temperature, irrigate about two times per week to ensure establishment. For the next few years, maintain a bi-weekly watering program that will apply about 30 inches of water over the season. This can be reduced if there is significant rainfall accumulation. Although chokecherry plants are extremely drought tolerant, irrigation will improve yield and fruit quality. To keep the canopy dry and prevent disease occurrence, water at the base of the shrub. This may be accomplished with a drip system or deep watering with a hose. Fertilization: Currently there are no specific recommendations of fertilizer application for chokecherry production. However, having the soil tested to determine current nutrient levels is helpful for making fertilization decisions. Applying a general, balanced fertilizer each spring (such as 4 ounces of 16-16-16 per plant) should meet most chokecherry nutrient needs. Adjustments in fertilizer application should be determined by plant growth, harvest and leaf color. Pruning: Chokecherry can be trained as either a tree or a shrub. Regular pruning prevents chokecherry plants from becoming brushy and unproductive. Pruning should be carried out in late winter or early spring, prior to bud break. When training as a tree, the center of the plant should be thinned to keep it open for air circulation and light penetration, similar to other stone fruits such as peach or cherry. When trained as a shrub, renewal pruning, removing about one third of the old growth, will ensure adequate 1-year old wood for

continuous production. In either case, low spreading branches should also be removed. Plants should be maintained at about 6 to 10 feet in height to facilitate easy harvest. Since fruit forms on young wood, remove older, weaker wood annually.
‘Canada Red’ chokecherry, trained as a tree (left). Chokecherry trained as a shrub (right).
Problems
Pests and Diseases:
Pest /Disease Identification Control Prairie Tent Caterpillar, Eastern Tent Caterpillar
Mass of webbing on branches. ½ inch light green caterpillars. Defoliation / deformation.
Destroy tents on cool days with larva inside. Foliar insecticides or BT application.
Aphids Black or green soft bodied insects feeding on underside of leaf.
Insecticidal soap, horticultural oil, malathion.
Chokecherry Gall Midge Bright orange larvae feed in infested fruit. Fruit will enlarge and seed aborts.
No registered insecticide for this pest. Remove and destroy damaged fruit in early summer.
Black Knot Fungus (Dibotryon morbosum)
Long, black swellings on tips of branches.
Prune out and burn infected branches. Fungicide.
Bacterial Spot (Xanthomonas prunii)
Leaves with red to purple spots that eventually become small holes. Fruit also develop brown spots.
Sanitation, avoid over-fertilizing with nitrogen.
Canker Fungus (Valsa cincta)
Sunken cankers on branches and trunk that lead to girdling.
Remove and burn infected branches. Fungicide, remove plant.
Toxicity: Wildlife also consume the fruit and help spread the seeds. However, the leaves, stems and pits of chokecherry are toxic. Poisoning generally occurs if an animal consumes over 0.25 percent of its bodyweight in less than an hour. Non-lethal
exposure usually results in a stomach ache. Wilted or stressed leaves are more dangerous due to higher cyanide levels. The fleshy part of the fruit is not toxic. Separate out the pits during processing to avoid contaminating the fruit flesh with the toxin.

Harvesting, Storage and Use For best results, harvest chokecherries once fruit are fully ripe. Typically, this is when they have turned dark purple, black or dark red. Fruit can be dried, used in jams, jellies and syrups or to make wine. Yield Potential The chokecherry has a relatively long lifespan of 20 to 40 years. After a plant has established, some varieties can produce up to 30 to 40 pounds of fruit per plant per year.
References USDA NRCS Plant Fact Sheet. 2009. Black
chokecherry Prunus virginiana L. var. melanocarpa (A. Nelson) Sarg. <plants.usda.gov/factsheet/pdf/fs_prvi.pdf>
Bjerke, M.R. 1999.The chokecherry tree. <ndsu.edu/pubweb/chiwonlee/plsc368/student/papers99/mbjerke/index.htm>
Oregon State University. Common chokecherry. <http://oregonstate.edu/dept/ldplants/prvir.htm>
This project is funded in part by USDA-Risk Management Agency under a cooperative agreement. The information reflects the views of the author(s) and not USDA-RMA. Utah State University is committed to providing an environment free from harassment and other forms of illegal discrimination based on race, color, religion, sex, national origin, age (40 and older), disability, and veteran’s status. USU’s policy also prohibits discrimination on the basis of sexual orientation in employment and academic related practices and decisions. Utah State University employees and students cannot, because of race, color, religion, sex, national origin, age, disability, or veteran’s status, refuse to hire; discharge; promote; demote; terminate; discriminate in compensation; or discriminate regarding terms, privileges, or conditions of employment, against any person otherwise qualified. Employees and students also cannot discriminate in the classroom, residence halls, or in on/off campus, USU-sponsored events and activities. This publication is issued in furtherance of Cooperative Extension work, acts of May 8 and June 30, 1914, in cooperation with the U.S. Department of Agriculture, Kenneth L. White, Vice President for Extension and Agriculture, Utah State University.
January 2014 (updated January 2016) Horticulture/Fruit/2014-01pr
Serviceberry in the Garden Kristan Crouch, Student, Tiffany Maughan, Research Associate, and Brent Black, Extension Fruit Specialist
Summary
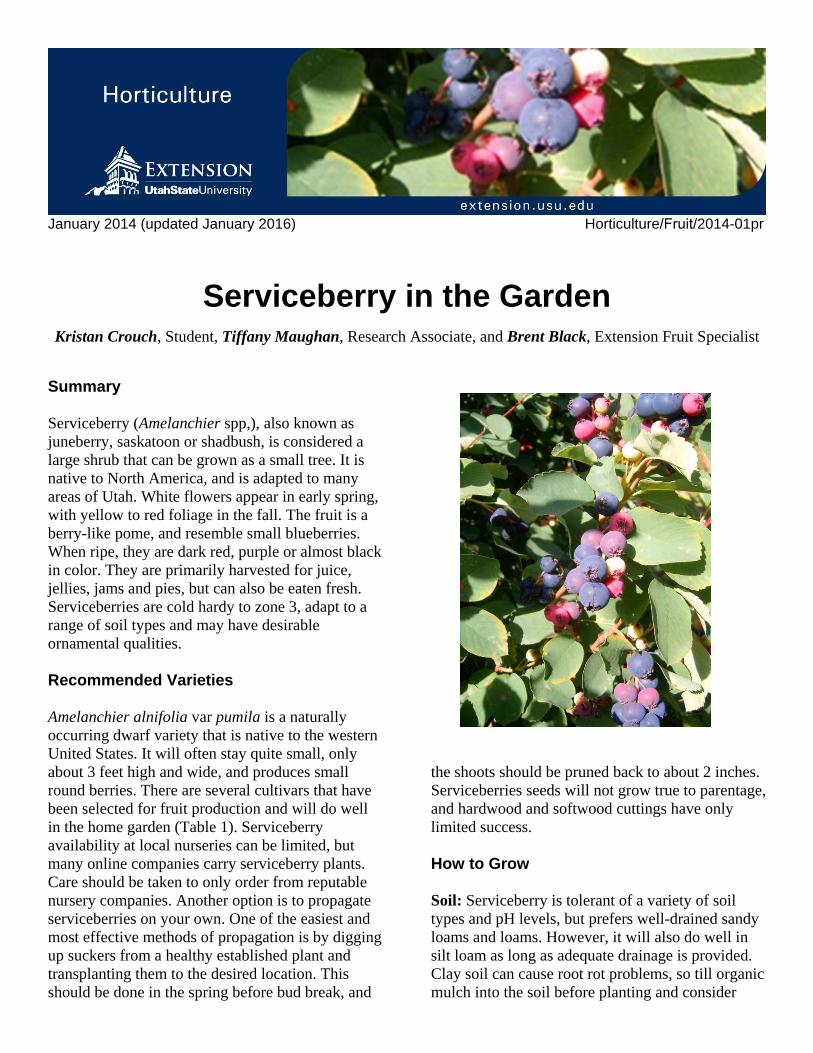
Serviceberry (Amelanchier spp,), also known as juneberry, saskatoon or shadbush, is considered a large shrub that can be grown as a small tree. It is native to North America, and is adapted to many areas of Utah. White flowers appear in early spring, with yellow to red foliage in the fall. The fruit is a berry-like pome, and resemble small blueberries. When ripe, they are dark red, purple or almost black in color. They are primarily harvested for juice, jellies, jams and pies, but can also be eaten fresh. Serviceberries are cold hardy to zone 3, adapt to a range of soil types and may have desirable ornamental qualities.
Recommended Varieties
Amelanchier alnifolia var pumila is a naturally occurring dwarf variety that is native to the western United States. It will often stay quite small, only about 3 feet high and wide, and produces small round berries. There are several cultivars that have been selected for fruit production and will do well in the home garden (Table 1). Serviceberry availability at local nurseries can be limited, but many online companies carry serviceberry plants. Care should be taken to only order from reputable nursery companies. Another option is to propagate serviceberries on your own. One of the easiest and most effective methods of propagation is by digging up suckers from a healthy established plant and transplanting them to the desired location. This should be done in the spring before bud break, and
the shoots should be pruned back to about 2 inches. Serviceberries seeds will not grow true to parentage, and hardwood and softwood cuttings have only limited success.
How to Grow
Soil: Serviceberry is tolerant of a variety of soil types and pH levels, but prefers well-drained sandy loams and loams. However, it will also do well in silt loam as long as adequate drainage is provided. Clay soil can cause root rot problems, so till organic mulch into the soil before planting and consider

Table 1. Recommended serviceberry cultivars.
Cultivar Size at maturity Comments
‘Honeywood’ 12' x 9' Very productive, clusters of medium-large fruit. Minimal suckering. Ripens mid-season.
‘Northline’ 10' x 6'
Heavy producer, medium sized berries with excellent flavor and few seeds. Can produce many suckers. Ripens early to mid-season.
‘Pembina’ 12' x 8' Productive with smaller, very flavorful fruit. Low sucker production but vigorous plant.
‘Thiessen’ 15’ x 12’ .Very high yielding with large fruit. Ripens late-season.
‘Regent’ 6' x 6' Smallest of the recommended varieties, little suckering. Small, mild-flavored fruit.
‘Martin’ 13’ x 9’ High-yielding, large fruit. Ripens late-season.
‘Parkhill’ 12’ x 8’
Well-suited for home growers or you-pick operations because the fruit ripen over a long period. Ripens mid-season. High-yielding
raised beds to avoid these issues. Sandy soils need to be properly irrigated to maintain moisture and nutrient uptake. Soil Preparation: Soil testing can help determine the appropriate amendments to add to the site before planting. Apply any deficient nutrients, as indicated from testing results, to the planting area and till into the soil. Plants: Serviceberry shrubs range in size from 6 feet tall and wide to 30 feet tall by 20 feet wide, depending on the cultivar. It is important to choose the appropriate cultivar to fit the planting site and the desired fruiting requirements. Serviceberry is self-fruitful and bloom typically occurs between early and late May, depending upon the location
and weather. Flowers will appear before or at the same time as leaves. Full sun is required for maximum harvest potential. Serviceberry plants are adaptable to partial shade, but will suffer from reduced yields. Planting and Spacing: Planting in the spring or fall is ideal for serviceberry, as it allows root systems to establish before summer heat becomes an issue. For most online nursery companies, bare-root plants are more commonly available than containerized plants. Both will establish well, but bare-root plants will need more frequent irrigation for the first 2 weeks. Before planting, prepare a hole twice the width and the same depth as the container or roughly the same depth and somewhat wider than the roots of the bare-root plant. Immediately after planting, water heavily to settle the soil around the roots and to remove air pockets. Applying mulch around the plant will help keep the soil moist between watering and keep weeds down. Spacing should be based on the cultivar and should leave sufficient room between shrubs to allow sunlight to penetrate the canopies when full growth has been achieved. Irrigation: During the first season, irrigate at an interval that will keep the soil moist, but not wet. Depending on rainfall and temperature, irrigate about two times per week. For the next few years, maintain a bi-weekly watering program that will apply about 30 inches of water over the season. This can be reduced if there is significant rainfall accumulation. Although established serviceberry plants can survive with little water, to achieve maximum yield and more desirable fruit, irrigation is needed. Additional irrigation may be necessary when hot, dry conditions are prevalent. It is best to water at the base of the shrub, in order to keep the canopy dry and reduce the chance of disease. This may be accomplished with a drip system or deep watering with a hose. It is also advisable to maintain a mulch bed around the base of the shrub instead of sod, as sod has very different watering requirements that conflict with that of serviceberry. Fertilizer: Applying 4 ounces of an all-purpose fertilizer, such as 16-16-16, in the spring as the plant comes out of dormancy, should supply sufficient nutrients for the growing season and will maximize growth. If phosphorus and potassium are

shown to be readily available in a soil test, a nitrogen only fertilizer can be applied instead. Adjustments to a fertilizer program should be determined by plant growth, harvest yield and leaf color. Pruning: Pruning is needed to maintain an open canopy, which allows for sufficient light penetration and air movement. The best time to prune is in the late winter or early spring, before new growth appears. Pruning also helps rejuvenate the shrub and promotes higher fruit yields. For the first 3 years, only prune out weak or damaged branches. After 3 years, when the plant is in production, pruning should become more vigorous to encourage new growth and to keep the plant size manageable. Flowers develop on stems that are 2 to 4 years old, and this should be kept in mind while pruning. Removing about one third of old growth from the shrub yearly will help maintain enough young fruiting wood for good fruit production. Similar to apple, serviceberry plants are prone to biennial bearing. This is when a large crop one year is followed by a very small crop load. If careful crop load management is practiced this effect can be minimized. Problems Pests and Diseases: Birds are probably the worst threat to serviceberry crops, as they seem to enjoy the fruit even more than we do. One of the most effective control options is to drape the branches with bird netting in order to protect ripening fruit. Aphids, spider mites and bark beetles can also be a problem. Dormant oil applied in the spring, just before bud break, can help control overwintering pests. Frequent scouting throughout the year should be done to monitor pest occurrence. Entomosporium leaf and berry spot is one of the most common diseases of serviceberry plants. Symptoms include small, angular brown discolorations on the leaves, often with a yellow ring around the spot. Utah’s low humidity helps keep disease occurrence low, but in rainy years or if over-watered, it can still be a problem. Keeping an open canopy through proper pruning, removing leaf litter in the fall and avoiding irrigation techniques that would wet the leaves will help control for Entomosporium leaf and berry spot. Infected fruit will have gray spots and will be disfigured. Prune
out diseased wood 12 inches below the infected section and sterilize the shears between each cut. Maintain an open canopy to aid in preventing disease occurrence. Saskatoon-Juniper rust can be another problem for serviceberry production. Yellow spots and swellings first develop on leaves and fruit, followed by characteristic yellow, spiky outgrowths from these locations. As the name implies, the life cycle of the rust includes stages on juniper plants. To avoid the disease, it is best to avoid planting serviceberry next to juniper plants. One chemical control option is a broad-spectrum fungicide (ex. Funginex 190 EC). Powdery mildew will also infect serviceberry shrubs. Look for a white dust on the leaves and stems. Early detection and pruning out of diseased shoots as well as planting resistant cultivars are the best control options. USU Extension provides guidelines for home orchard pest management, as well as weekly fruit tree pest advisories that can be helpful in disease and pest identification and management and are available at your county agent’s office or at http://utahpests.usu.edu/ipm/htm/subscriptions. Weeds: Keeping weeds clear from around the serviceberry plant is important for achieving maximum yields. Applying a mulch around the base of the shrub can help keep weeds to a minimum. Another option is shallow cultivation to kill weeds, but care should be taken not to till deeper than a few inches in order to avoid damaging the serviceberry roots. Harvesting, Storage and Use The berry-like pomes usually ripen in late June through July. It is best to wait until two-thirds of the fruit is ripe before harvesting. Serviceberries continue to ripen after harvesting and should be refrigerated quickly to avoid spoilage. Early pickings that are somewhat less ripe are higher in acid and the more mature fruit have a higher sugar content. If using the fruit for jellies, jams and pie fillings, wait until fully ripe to ensure peak flavor and sweetness. However, the fruit is softer at this stage and can be damaged easily during harvest. It is best to pick by hand early in the morning, when the fruit is dry and cool. Remove damaged or diseased fruit and wash to clean. Fruit should be dry before refrigerating or freezing.

Productivity Newly planted serviceberry shrubs will not produce heavily for the first 2 years. They will usually begin to bear fruit when 3 to 5 years old and reach full production at 8 years. Once established, some of the highest yielding cultivars will produce 10 pounds per plant. A well-maintained plant can produce fruit for 20 years. Nutrition Serviceberry fruit are high in fiber, iron, calcium, magnesium and manganese. Resources Alston, D., M. Murray, and C. Nischwitz. 2012.
Utah home orchard pest management guide. Utah State University Extension, Publication HG137.
Barney, D. Growing Saskatoons. University of Idaho. Extension, Apr. 2009. Web. Mar. 2013. <http://www.cals.uidaho.edu/edcomm/pdf/BUL/BUL0866.pdf>
Herman, D.E., C.M. Stange, and V.C. Quam.
Juneberry or Saskatoon serviceberry (Amelanchier alnifolia). p. 33-34. In: North Dakota Tree Handbook. North Dakota State University,
Gough, R.E., and C. Moore-Gough. 2010. Juneberries for Montana gardens. Montana State University Extension. <http://msuextension.org/publications/YardandGarden/MT198806AG.pdf>
St-Pierre, R.G. 2006. Common Disease Problems in Saskatoon Orchards. <http://www.prairie-elements.ca/saskatoon/10.3-disease.pdf>
Utah State Universityis committedto providing an environment free from harassment and other forms of illegal discrimination based on race, color, religion, sex, national origin, age (40 and older), disability, and veteran’s status. USU’s policy also prohibits discrimination on the basis of sexual orientation in employment and academic related practices and decisions. Utah State University employees and students cannot, because of race, color, religion, sex, national origin, age, disability, or veteran’s status, refuse to hire; discharge; promote; demote; terminate; discriminate in compensation; or discriminate regarding terms, privileges, or conditions of employment, against any person otherwise qualified. Employees and students also cannot discriminate in the classroom, residence halls, or in on/off campus, USU-sponsored events and activities. This publication is issued in furtherance of Cooperative Extension work, acts of May 8 and June 30, 1914, in cooperation with the U.S. Department of Agriculture, Kenneth L. White, Vice President for Extension and Agriculture, Utah State University
Plant Guide
Plant Materials <http://plant-materials.nrcs.usda.gov/> Plant Fact Sheet/Guide Coordination Page <http://plant-materials.nrcs.usda.gov/intranet/pfs.html> National Plant Data Center <http://npdc.usda.gov>
GOLDEN CURRANT Ribes aureum Pursh
Plant Symbol = RIAU Contributed by: USDA NRCS National Plant Data Center & the Biota of North America Program
Alternate Names Buffalo currant, fragrant golden currant, golden flowering currant, clove currant, spicebush Uses Wildlife: Fruits of Ribes species, including the golden currant, are a valuable food source for songbirds, chipmunks, ground squirrels, as well as numerous wildlife species and other animals. Ethnobotanic: The sweet and flavorful fruits are full of seeds but are popular for making jam, jelly, pie, and even ice cream. Some western Indian tribes used currants (Ribes species) for making pemmican. The Kiowa Indians believed that snakes were afraid of the
currant bush and used it as a snakebite remedy. Other tribes have used the fruits to color clay pots. Conservation: The fragrant (clove odor), golden-yellow flowers of spring, yellowish to red fall foliage, edible fruits, and wide ecological range make golden currant a valued ornamental shrub for a variety of natural landscapes. Golden currant is easily cultivated from seed or cuttings.
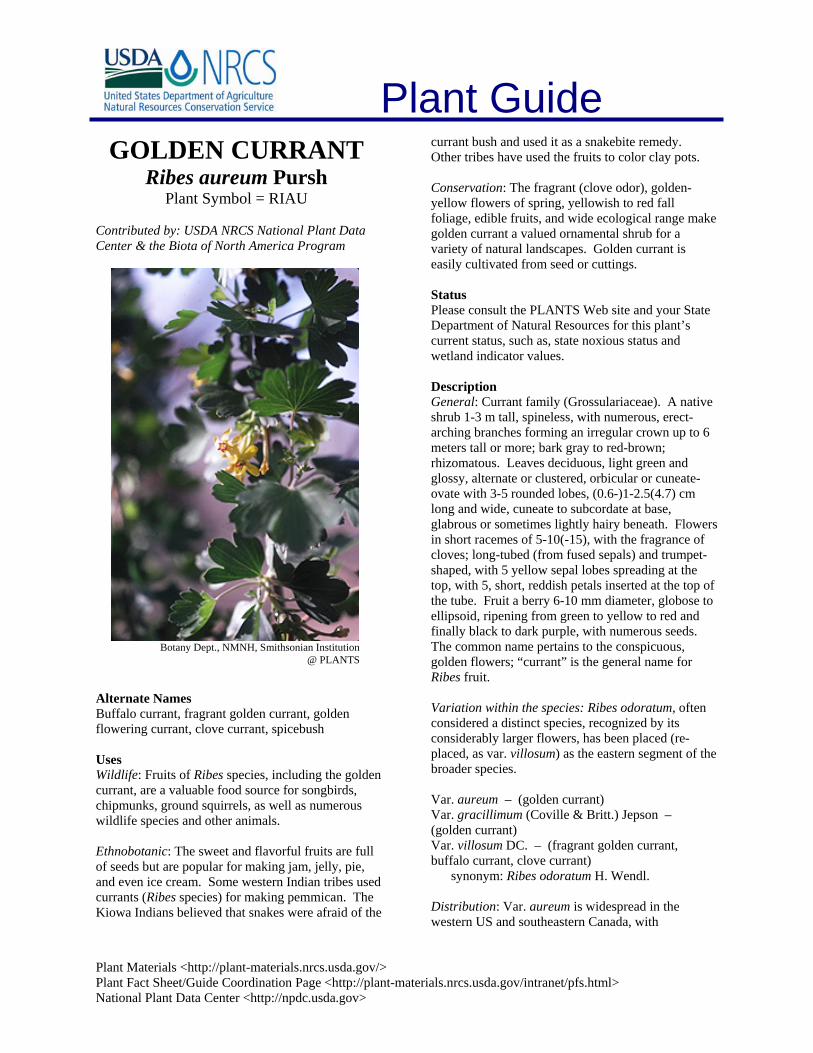
Botany Dept., NMNH, Smithsonian Institution
@ PLANTS
Status Please consult the PLANTS Web site and your State Department of Natural Resources for this plant’s current status, such as, state noxious status and wetland indicator values. Description General: Currant family (Grossulariaceae). A native shrub 1-3 m tall, spineless, with numerous, erect-arching branches forming an irregular crown up to 6 meters tall or more; bark gray to red-brown; rhizomatous. Leaves deciduous, light green and glossy, alternate or clustered, orbicular or cuneate-ovate with 3-5 rounded lobes, (0.6-)1-2.5(4.7) cm long and wide, cuneate to subcordate at base, glabrous or sometimes lightly hairy beneath. Flowers in short racemes of 5-10(-15), with the fragrance of cloves; long-tubed (from fused sepals) and trumpet-shaped, with 5 yellow sepal lobes spreading at the top, with 5, short, reddish petals inserted at the top of the tube. Fruit a berry 6-10 mm diameter, globose to ellipsoid, ripening from green to yellow to red and finally black to dark purple, with numerous seeds. The common name pertains to the conspicuous, golden flowers; “currant” is the general name for Ribes fruit. Variation within the species: Ribes odoratum, often considered a distinct species, recognized by its considerably larger flowers, has been placed (re-placed, as var. villosum) as the eastern segment of the broader species. Var. aureum – (golden currant) Var. gracillimum (Coville & Britt.) Jepson – (golden currant) Var. villosum DC. – (fragrant golden currant, buffalo currant, clove currant) synonym: Ribes odoratum H. Wendl. Distribution: Var. aureum is widespread in the western US and southeastern Canada, with

populations in Ontario and perhaps Quebec, as far south in the US as trans-Pecos Texas. Var. gracillimum is endemic to California. Var. villosum in the central US, from western Texas to Montana and eastward to New York and Vermont; it is absent from the Atlantic seaboard. The species is naturalized in Europe from garden escapes. For current distribution, please consult the Plant Profile page for this species on the PLANTS Web site. Adaptation Golden currant grows in grasslands, coniferous forests and woodlands, and riparian and mountain shrub communities. It occurs on floodplains, along streams, in ravines and washes, by springs, and on mountain slopes, at elevations of about 800–2600 meters. It is generally an early to mid-seral species in western coniferous forests. Var. villosum occurs on cliffs, rocky slopes, ravines, bluffs, open hillside, and thicket margins, often in sandy habitats. Golden currant is somewhat shade tolerant and may grow in open, scattered, and dense pine stands, but it is usually suppressed by a denser canopy. Flowering (March–)April–June, just after appearance of the leaves; fruiting (May–)June–August. Establishment Plants of Ribes generally begin fruiting after 3 years. Seeds may remain viable in the soil and duff for many years. Germination is enhanced by scarification, but relatively good germination of golden currant seeds was obtained by stratification at -2.2–2.2 degrees C for 60 days without scarification. Golden currant transplants well and forms suckers. Plants can also be grown from cuttings. It reproduces vegetatively by rhizomes, sprouting after cutting and fire. Management Golden currant can be used to re-vegetate roadsides and disturbed areas, such as mine spoils and rangeland. It is rated mostly good in initial establishment, growth rate. persistence, germination, seed production, ease of planting, and natural spread. It tolerates shearing and may be used on dry, exposed sites in a range of soil types, and it is a good soil stabilizer. Golden currant is an alternate host for white pine blister rust (Cronartium ribicola); this and other species of Ribes have been targets of various eradication efforts where white pine is of commercial interest. Please check the PLANTS Profile for this plant for links to additional information.
Fire top-kills golden currant, but it can survive low- to moderate-severity fire by sprouting from rhizomes. Such fires also scarify soil-stored seed and enhance germination. Severe fire probably kills golden currant and may destroy soil-stored seeds. Cultivars, Improved and Selected Materials (and area of origin) These plant materials are readily available from commercial sources. One cultivar (‘Crandall’) has been referred to as "the North Country's answer to Forsythia." Other horticultural selections have been made for hardiness, flower color and density, and fruit taste and size. Contact your local Natural Resources Conservation Service (formerly Soil Conservation Service) office for more information. Look in the phone book under ”United States Government.” The Natural Resources Conservation Service will be listed under the subheading “Department of Agriculture.” References Conrad, C. E. 1987. Common shrubs of chaparral and associated ecosystems of southern California. Gen. Tech. Rep. PSW-99. USDA, Forest Service, Pacific Southwest Forest and Range Experiment Station, Berkeley, California. Shaw, N. 1984. Producing bareroot seedlings of native shrubs. IN: P.M. Murphy (compiler). The challenge of producing native plants for the Intermountain area. Proceedings, Intermountain Nurseryman's Association conference; Las Vegas, NV, 1983. Gen. Tech. Rep. INT-168. USDA, Forest Service, Intermountain Forest and Range Experiment Station, Ogden, Utah. Wasser, C.H. 1982. Ecology and culture of selected species useful in revegetating disturbed lands in the West. FWS/OBS-82/56. USDI, Fish and Wildlife Service, Washington, DC. Winkler, G. 1987 (rev. K.A. Marshall 1995) Ribes aureum. IN: W.C. Fischer (compiler). The fire effects information system [Data base]. USDA Forest Service, Intermountain Research Station, Intermountain Fire Sciences Laboratory, Missoula, Montana. Prepared By Guy Nesom Formerly BONAP, North Carolina Botanical Garden, University of North Carolina, Chapel Hill, North Carolina
Species Coordinator M. Kat Anderson USDA, NRCS, National Plant Data Center, c/o Plant Sciences Dept., Davis, California
Edited: 19jun02 jsp; 03jun03 ahv; 060816 jsp For more information about this and other plants, please contact your local NRCS field office or Conservation District, and visit the PLANTS Web site<http://plants.usda.gov> or the Plant Materials Program Web site <http://Plant-Materials.nrcs.usda.gov>
The U.S. Department of Agriculture (USDA) prohibits discrimination in all its programs and activities on the basis of race, color, national origin, sex, religion, age, disability, political beliefs, sexual orientation, and marital or family status. (Not all prohibited bases apply to all programs.) Persons with disabilities who require alternative means for communication of program information (Braille, large print, audiotape, etc.) should contact USDA's TARGET Center at 202-720-2600 (voice and TDD).
To file a complaint of discrimination write USDA, Director, Office of Civil Rights, Room 326-W, Whitten Building, 14th and Independence Avenue, SW, Washington, DC 20250-9410 or call 202-720-5964 (voice or TDD). USDA is an equal opportunity provider and employer.
Read about Civil Rights at the Natural Resources Convervation Service.

June 2017 Horticulture/Grapes/2017-02pr
Grape Trellising and Training Basics Tiffany Maughan, Brent Black and Mike Pace
Grapes are a wonderful addition to the home garden. With proper care and pruning they are long-lived and productive plants. This fact sheet discusses basic pruning information and introduces two common training methods suitable for the Utah home garden. There are many different types of training systems used for grape production throughout the world. The best system for your grape vine depends on the cultivar grown, the climate, soil fertility, and personal preference. This fact sheet details two common systems, the 4-cane single-trunk Kniffin system (cane pruned) and bi-lateral high cordon (spur pruned). Both systems work well for Utah home growers. Other grape systems can be used successfully, but for simplicity only these two systems are discussed here. Planning is one of the most important steps for successfully growing grapes. It can be tempting to simply buy a grape vine and plant it somewhere in the yard with visions of delicious grapes in your future. However, without attention to detail your grape vine may not be very fruitful or long lasting. First, familiarize yourself with what is needed for grape vine management as well as planting basics. The companion fact sheet Grape Vine Management is a helpful resource for understanding what is needed for success. Next, select the grape variety you would like to grow, paying attention to your climate as well as your desired use of the fruit. See the companion fact sheet Grape Varieties for Utah for a list of varieties that can be grown in Utah. Once you know what type of grape you will be planting and have selected a suitable place on your property, it is time to consider your trellising system and how you will train your grape vine.
Trellis Construction For most training systems, grape vines must have support. This can be in the form of a trellis, arbor, or possibly a fence. However, it is important to consider the challenges of pruning when selecting the type of support to use. Chain-link or similar styled fence can present unnecessary challenges as the canes become intertwined in the fencing material making them particularly difficult to remove during pruning. There are many ways to trellis grapes. It is best to choose and construct your trellis before planting. Grape trellises are typically either single posts in a line connected by one to four lines of wire (Fig. 1) or posts with a cross bar at the top with two to four lines of wire running between the horizontal cross bars. Trellis posts should be treated wood (metal posts will also work, but wire attachment is more difficult) and need to be long enough to be firmly anchored and still leave around 6 feet above the ground. Place inline posts about 20 to 25 feet apart. Use heavy galvanized wire (No. 9 or 10 gauge, high tensile) to support the weight of the vine. The number of wires you use will vary by the training system. Pound fencing staples into the windward side of the posts at the desired heights, leaving a space large enough to allow the wire to pass through. Thread the wire through the staples, making sure the wire can still move side to side. Using a turnbuckle or similar device to attach the wire to the post at one end can allow for adjusting the tension of the wire. See Fig. 1 for an example trellis system. Braces are used at the end of the trellis to provide support and anchorage. Note in this example that end braces are constructed by

placing the last two posts closer together with a cross bar between them and twisted wire running diagonally to reinforce the brace. If more than one row is desired, leave 10 to 12 feet between rows to facilitate harvest and maintenance. The distance between plants in a row depends on variety and trellising method, and can range from 6 to 12 feet.
Figure 1. A 2-wire vertical trellis suitable for the Kniffen training system, with wires (white arrows) at 36 and 60 inches above ground level. This view shows the end braces with cross bar and diagonal tensioned wire. A drip irrigation line is suspended approximately 1 foot above the ground. Terminology A basic understanding of grape vine structure and terminology is helpful for understanding pruning and training. The appropriately maintained grape vine consists of both permanent and seasonal wood. The trunk, also called the stem, is permanent wood. A cordon is semi-permanent wood that is trained horizontally along the trellis wire. Succulent new growth arising from a bud on older wood is called a shoot. After the shoot drops its leaves in the fall it is called a cane. A spur is a cane that has been pruned back to one to five buds. The top of the trunk where the vine transitions to cordon, spurs, or canes is called the head. On each shoot or cane there are buds that form at the base of each leaf that will produce the leaves, shoots, and flowers the following season. Pruning Fruiting shoots grow from 1-year old dormant buds. Pruning is done to replace the fruiting wood each year. Grape pruning requires removal of between 80
and 90% of the canes each year. A fully mature, healthy vine can support a total maximum of 40 shoots. Younger vines will need to have fewer shoots until they reach maturity. Limiting the number of shoots is important for good cluster size, root balance, and preparation for winter. Grape pruning is done in one of two ways depending on the variety and training system: cane pruning or spur pruning. In general, American type grapes and many hybrids should be cane pruned because their basal buds are typically only vegetative (leaves but no fruit). This means if you are spur pruning them you would be cutting off the buds that are most likely to produce fruit. European grapes can be cane or spur pruned. If you are not sure which pruning method would be better for your variety, it is best to use cane pruning. Each of the two methods are described below. Cane Pruning Overview: In a cane pruned system, the trunk (permanent wood) is kept each year, along with fruiting canes originating from the trunk. After a cane produces fruit for 1 year, the majority of the cane is removed. A new fruiting cane and a renewal spur, both originating close to the trunk, are kept for regrowth of next year’s fruiting cane. Cane pruning is a good option for cold climates. There are many different cane-pruned systems; the 4-cane single-trunk kniffin system described below is relatively simple and has been used successfully in Utah. Spur Pruning Overview: In a spur pruned system, the permanent trunk and semi-permanent cordons are left from year to year. Along each cordon, multiple canes grow from spurs (two to three buds) spaced every 4 to 6 inches along the cordon. One common spur-pruned system, a bi-lateral high cordon, is detailed below. Cane Pruning: 4-Cane Single-Trunk Kniffin This system needs two strands of wire, one attached to the trellis posts at 36 to 40 inches above the ground and another at the top of the post (60 to 72 inches). By each newly planted vine, secure a garden stake or pole vertically to the bottom and top wire. See Fig. 4 for a visual illustration of this training method. Trunk Establishment: In the weeks following planting, several new shoots will develop. Select the strongest shoot to keep (this will become the trunk)
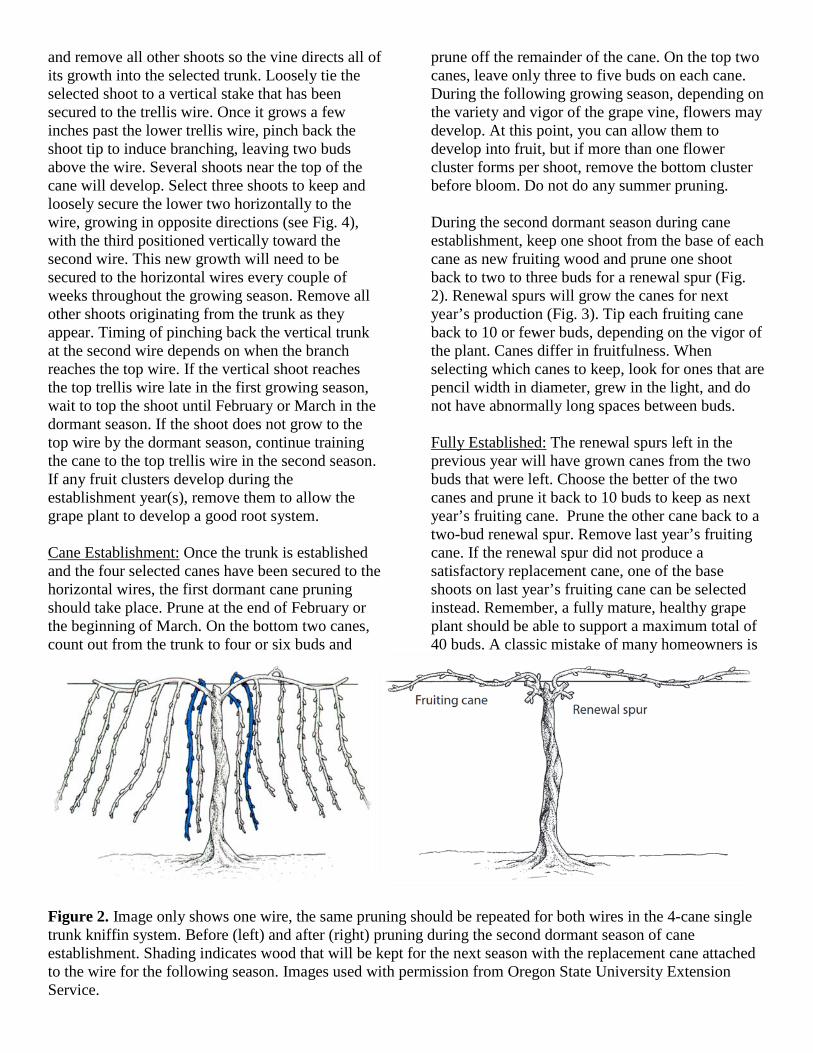
and remove all other shoots so the vine directs all of its growth into the selected trunk. Loosely tie the selected shoot to a vertical stake that has been secured to the trellis wire. Once it grows a few inches past the lower trellis wire, pinch back the shoot tip to induce branching, leaving two buds above the wire. Several shoots near the top of the cane will develop. Select three shoots to keep and loosely secure the lower two horizontally to the wire, growing in opposite directions (see Fig. 4), with the third positioned vertically toward the second wire. This new growth will need to be secured to the horizontal wires every couple of weeks throughout the growing season. Remove all other shoots originating from the trunk as they appear. Timing of pinching back the vertical trunk at the second wire depends on when the branch reaches the top wire. If the vertical shoot reaches the top trellis wire late in the first growing season, wait to top the shoot until February or March in the dormant season. If the shoot does not grow to the top wire by the dormant season, continue training the cane to the top trellis wire in the second season. If any fruit clusters develop during the establishment year(s), remove them to allow the grape plant to develop a good root system. Cane Establishment: Once the trunk is established and the four selected canes have been secured to the horizontal wires, the first dormant cane pruning should take place. Prune at the end of February or the beginning of March. On the bottom two canes, count out from the trunk to four or six buds and
prune off the remainder of the cane. On the top two canes, leave only three to five buds on each cane. During the following growing season, depending on the variety and vigor of the grape vine, flowers may develop. At this point, you can allow them to develop into fruit, but if more than one flower cluster forms per shoot, remove the bottom cluster before bloom. Do not do any summer pruning. During the second dormant season during cane establishment, keep one shoot from the base of each cane as new fruiting wood and prune one shoot back to two to three buds for a renewal spur (Fig. 2). Renewal spurs will grow the canes for next year’s production (Fig. 3). Tip each fruiting cane back to 10 or fewer buds, depending on the vigor of the plant. Canes differ in fruitfulness. When selecting which canes to keep, look for ones that are pencil width in diameter, grew in the light, and do not have abnormally long spaces between buds. Fully Established: The renewal spurs left in the previous year will have grown canes from the two buds that were left. Choose the better of the two canes and prune it back to 10 buds to keep as next year’s fruiting cane. Prune the other cane back to a two-bud renewal spur. Remove last year’s fruiting cane. If the renewal spur did not produce a satisfactory replacement cane, one of the base shoots on last year’s fruiting cane can be selected instead. Remember, a fully mature, healthy grape plant should be able to support a maximum total of 40 buds. A classic mistake of many homeowners is
Figure 2. Image only shows one wire, the same pruning should be repeated for both wires in the 4-cane single trunk kniffin system. Before (left) and after (right) pruning during the second dormant season of cane establishment. Shading indicates wood that will be kept for the next season with the replacement cane attached to the wire for the following season. Images used with permission from Oregon State University Extension Service.

to leave more buds than this because removing so much wood each year is intimidating. Stick to the plan! Leaving more than 40 buds will limit the plant’s ability to build up food reserves and increases the chance of winter injury. It also reduces the quality of the fruit produced.
Cold Climate Adaptation: In areas where spring frosts are common, during pruning growers can choose to leave two canes with one as an “insurance” cane until after spring frosts. In the event one of the canes that was selected is killed by frost and did not make it through the winter, they
Figure 3. Renewal spur with two buds next to fruiting cane. This orchard has a drip irrigation system also attached to the lower wire.
Figure 4. Grape trained to a 4-Cane Single-Trunk Kniffin system. Image used with permission from the University of Idaho, College of Agriculture.

can prune out the dead one and replace it with the insurance cane. It is important that after the danger of spring frosts have past, you go through and remove any extra insurance canes. Spur Pruning: Bi-lateral High Cordon This training system is well suited for varieties with a trailing or downward growth habit. The very similar bi-lateral low cordon system is better suited for varieties with an upright growth habit. This system uses just one strand of wire at 5 to 6 feet to support the cordons, but may also use “catch” wires to hold the shoots. By each newly planted vine, secure a garden stake or pole vertically to the top wire to use as you train the vine to the wire. See Fig. 5 for a visual illustration of this training method. Trunk/Cordon Establishment: Follow the same steps as outlined in the cane-pruning, trunk establishment section to establish a trunk that reaches the top wire. Depending on the vigor of the vine and site conditions, it may take more than one growing season to reach the wire. That is fine, simply continue training the vine to the top wire before beginning to establish the cordons. During the dormant season, top the newly grown trunk at the top wire. Remove any canes that may have grown on the trunk and make sure the trunk is securely tied to the stake. In the following growing season, begin establishing the cordons by selecting two shoots that grow near the wire and train them along the wire. Remove any fruit clusters that develop to encourage strong root and shoot development. First Year Established: Prune back the two canes to 7 to 10 buds each, depending on vigor. Remove any canes that have grown lower on the trunk. During the following growing season, shoots will grow from the buds on the cordons that were trained along the trellis wire. Sometimes, more than one shoot will grow from each bud, with one that is stronger than the other. In the spring, when the longest cane is about 6 inches, remove the shorter canes. This can be done by grasping the extra shoot
at the base and carefully snapping it off. Do not allow more than one grape cluster to develop per shoot to prevent over-bearing on the young plant. Removing any extra clusters at bloom works well. Second Year Established: Begin to establish fruiting spurs by selecting the strongest canes that are in a good position that have grown from the newly established cordon. For most varieties, leave a spur every 4 to 6 inches. Prune back the canes to spurs that have two or three buds. Leave no more than 40 buds per plant (in this case, 10 spurs on each of the two cordons with two buds per spur). At this point the vine should fill its allotted space. Fully Established: When pruning during the dormant season, strive to maintain a balance between vegetative and reproductive growth. Prune the canes that grow from the spurs back to one to three buds. This section of cane left will become part of the spur and is the 2-year-old wood where the next year’s fruiting wood will grow from. Allow all fruit clusters to develop but continue to thin down to one shoot per node in the spring. Remove any suckers that develop on the trunk. Additional References
Colt, M., E. Fallahi, D. Barney and T. Tindall.
1998. Backyard Grapes. University of Idaho, College of Agriculture. http://www.cals.uidaho.edu/edcomm/pdf/cis/cis0790.pdf
Strik, B.C. 2011. Growing table grapes. Oregon State University Extension Service. http://smallfarms.oregonstate.edu/sites/default/files/publications/growing_table_grapes_ec1639_may_2011.pdf
Skinkis, P. 2010. Cane pruning grapevines. Oregon State University Viticulture Extension. https://www.youtube.com/watch?v=mfd2V5DFDo0
Skinkis, P. 2010. Spur pruning grapevines. Oregon State University Viticulture Extension. https://www.youtube.com/watch?v=um9p1eiGiwI

Figure 5. Grape trained to a bi-lateral cordon, spur pruned. Images used with permission from Oregon State University Extension Service. This project is funded in part by USDA-Risk Management Agency under a cooperative agreement. The information reflects the views of the author(s) and not USDA-RMA
Utah State University is committed to providing an environment free from harassment and other forms of illegal discrimination based on race, color, religion, sex, national origin, age (40 and older), disability, and veteran’s status. USU’s policy also prohibits discrimination on the basis of sexual orientation in employment and academic related practices and decisions. Utah State University employees and students cannot, because of race, color, religion, sex, national origin, age, disability, or veteran’s status, refuse to hire; discharge; promote; demote; terminate; discriminate in compensation; or discriminate regarding terms, privileges, or conditions of employment, against any person otherwise qualified. Employees and students also cannot discriminate in the classroom, residence halls, or in on/off campus, USU-sponsored events and activities. This publication is issued in furtherance of Cooperative Extension work, acts of May 8 and June 30, 1914, in cooperation with the U.S. Department of Agriculture, Kenneth L. White, Vice President for Extension and Agriculture, Utah State University.

February 2017 Horticulture/Grapes/2017-01pr
Grape Vine Management Tiffany Maughan, Mike Pace, and Brent Black
Introduction Grapes are the most widely planted fruit crop in the world. They are used for wine, juice, raisins, table fruit, jam and jellies. With careful management, grape plants are long-lived, productive and an excellent addition to home gardens. This fact sheet introduces grape planting and management. The companion factsheets, Grape Varieties for Utah, Grape Training and Trellising Basics and Grape Irrigation provide additional information.
Plants Grapes are vining, woody, long-lived perennial plants. Grape vines are trained to have a permanent “trunk” that, depending on the training style and trellis system used, may also have permanent side branches known as arms or cordons that run along a trellis wire. New growth originates from compound buds and is the main form of vine growth. The new growth, known as the cane, is made up of tendrils for attachment, leaves, and fruit. Grape flowers form on the current year’s new growth (canes) and have non-showy light green/yellow flowers. In order to keep the plant productive, grape vines must be pruned heavily each year to remove excess canes, focus growth in the appropriate number of new canes, and to balance vegetative growth with fruit growth. Grapes are self-fruitful and pollinated by wind. In Utah, fruit harvest of the earliest varieties starts in late summer with later varieties extending the season until a killing frost occurs.
Variety selection is critical for success. There are four types of grapes (listed here from most to least cold tolerant): American, French/American hybrids, European, and Muscadine. Each type has many
different varieties to select from that are adapted for various uses, such as wine or table grapes. For more detailed information on variety selection, see Grape Varieties for Utah. American types are best adapted to colder regions of the state. French/American hybrids and some European types are suitable for warmer areas of the state. Muscadines are typically not hardy enough and require a longer growing season than is available in Utah.
Site Selection Deciding where to plant grapes in the home garden is an important first step. Most likely, no one spot will be perfect and some compromises will be necessary. Grapes need full sunlight to produce the highest yield possible. They are susceptible to late spring freeze damage and benefit from protective measures. If possible, choose a protected spot in the yard. Planting on a slope that allows for cold air drainage can help reduce the risk of freeze damage. Northeastern, and Eastern facing slopes are preferable as they stay cooler and delay spring bud break, which minimizes late spring freeze damage. They also do not get as hot in the summer. However, for many home growers, planting on a slope is not possible.
Planting grapes in a lawn should be avoided if possible. Turfgrass will compete with the grape vines for available water and nutrients, and lawn irrigation frequency is not typically appropriate for grapes. Additionally, grapes are very sensitive to selective herbicides used to control broadleaf weeds in lawns, and application near the vines should be avoided.

Soil While grapes are forgiving of many soils, soil type strongly affects vine productivity and fruit quality. Productivity is increased on a sandy loam soil, and most limited in a heavy clay soil. If planting into clay soil, incorporate copious amounts of organic matter before planting. Raised beds can also improve drainage and aeration. Many Utah soils benefit from amendment. Grape plants do best in soil with a pH between 6 and 7, but can still grow in Utah’s more alkaline soils with appropriate fertilizer application. Grapes grown in soils with higher pH levels often struggle with iron chlorosis. Before planting grapes, it is a good idea to have your soil tested. Soil samples can be submitted to Utah State University Analytical Labs (USUAL). Visit the frequently asked questions section of their website http://usual.usu.edu/ for detailed information on how to collect a soil sample and for pricing. Site Preparation Properly preparing the soil will help ensure success. Remove all weeds and other plants from the planting area to reduce competition for water and nutrients. Grapes are extremely sensitive to some of the herbicides used to control broadleaf weeds in the lawn such as 2,4-D. If hard to kill perennial weeds are in the area, application of some of the most effective herbicides after planting without damaging the grapevines will be much more difficult, if not impossible. Planting cover crops and incorporating green manure is a great option for both controlling weeds and improving soil health prior to planting grape vines. Incorporating organic matter, such as compost or weed-free manure the previous fall, will help to loosen heavy clay soils. If your soil test indicated low phosphorus, it is best to incorporate phosphorus fertilizer during site preparation since it is quite immobile in the soil and surface applications post-planting will not reach the roots quickly. Many composts are good sources of phosphorus. Planting and Spacing Rows should be 10 to 12 feet apart. The distance between plants in a row depends on variety and trellising method, and can range from 6 to 12 feet. See the companion fact sheet, Grape Training and Trellising Basics for different options. Photo 1 shows a commonly used trellis system. An area at
least 4 feet wide that is free of weeds and turf should be maintained around the base of each plant. Mulching around the new planting will help control weeds. Grapes can be planted in the spring or fall, but local nurseries and online sources will have a better selection of plants in the spring of the year. Do not allow young vines to dry out, particularly if planting bare-root stock. For best results, dig a hole twice as wide and as deep as the roots of the grape plant. If planting a bare-root plant, carefully spread the roots out in the hole and cover with soil to the previous soil line that should still be visible on the trunk. For container-grown plants, plant at the same depth as in the nursery pot. It is important to immediately water the plants in after planting to settle the soil around the roots of the plant and add more soil if needed, to bring it up to the correct soil level.
Photo 1. One-year-old grape planting trained to 2-wire Kniffen trellis system. Irrigation Grapes are somewhat drought tolerant once established. However, vines receiving full irrigation are typically more productive. In commercial wine grape production, it is common to drought stress the vines between fruit set and the onset of ripening. Although this stress reduces fruit size, it improves the quality of the fruit for wine making. However, improper timing or excessive drought stress can compromise the health of the plant, and is not recommended for a beginning hobbyist. Vines should be fully irrigated each year for best production and maximum fruit size. In most cases, applying 2 inches of water per week is sufficient. Irrigation frequency should be increased on sandy soils and decreased in heavy clay, and adjusted for
©2017, Utah State Univ., M. Pace

weather conditions. Reduce irrigation in the late summer and early fall to help the plant harden off for winter. Drip irrigation (Photo 2), or furrow irrigation should be used if possible. Using sprinklers to irrigate will wet the leaves and increase the risk of diseases. If late summer and fall precipitation is minimal and soils become dry, irrigate grapes just before the ground freezes to minimize winter injury from drying of the roots. See the companion fact sheet, “Grape Irrigation,” for an in-depth explanation of irrigation amount and timing.
Photo 2. Grape vine irrigated by drip irrigation system. The line is attached to the trellising wire. Fertilization Do not fertilize in the hole/furrow during planting, as doing so can cause injury to the roots. Fertilization is recommended starting in the second season to obtain the highest yield and fruit quality possible. A soil test is helpful in determining what nutrients need to be applied. Visually observing the vines will also help in determining what fertilizer applications may be needed. If the vines are stunted and have reduced canopy vigor they may be nitrogen deficient (Photo 3). This leads to a decrease in overall production. If nitrogen is over-abundant, however, excess vegetative growth will occur which can decrease fruit development and quality. Apply fertilizer, particularly nitrogen, in early spring before the buds start to swell and break dormancy. Application when the plant is actively growing will encourage the plant to grow excess vines with very little fruit. Apply in a 2-foot circle around the trunk of the plant. For established vines, a general recommendation is to apply 4.5 ounces (3/4 cup) of 21-0-0 fertilizer per year. If fertilizer is needed during years 2 and 3, only apply 2 ounces (6 tablespoons) of 34-0-0 per plant.
Photo 3. Left: Nitrogen deficiency in grape characterized by light yellowing of the entire leaf. Right: Top photo is grape vine with N deficiency, bottom photo has no N deficiency. Note the vigor in the top photo. Photos used with permission from Dr. Keven Ker, Brock University, Canada. In Utah’s alkaline soils, grapes are prone to iron deficiency, especially in heavy clay soils or in plants that are being over-irrigated. This is recognized by leaves that have turned yellow but the veins remain green (Photo 4). If left untreated, the leaves may turn completely yellow and eventually brown along the edges. To combat iron deficiency, apply a spring application of iron chelate to the soil around the plant. Spraying a solution of iron chelate on the leaves can be a short-term remedy in severe situations. Excessive irrigation, particularly in the spring, increases the plants risk of iron deficiency. For more information reference USU’s Iron Chlorosis in Berry Crops fact sheet.
Photo 4. Iron deficiency in grape leaves with interveinal yellowing while veins remain green. Photo used with permission from Dr. Keven Ker, Brock University, Canada.
©2017, Utah State Univ., M. Pace

Training and Trellising Proper training and trellising is critical for successful grape production. This can be done on a trellis, arbor, or possibly a fence. However, do not use a chain-link or similar style fence as the canes intertwined within the fence will be very difficult to remove during pruning. There are many ways to trellis grapes. Choose the type of trellis you plan to use before planting, as this will influence appropriate plant spacing. Trellis posts should be treated wood (metal poles can work as well but wire attachment is more difficult) and need to be long enough to be firmly anchored and still leave around 6 feet above the ground. The training and trellising grape fact sheet provides more detailed information. Cluster Thinning Do not over-crop the vines as this monopolizes nutrients needed for vine hardening and also results in small fruit size and poor fruit quality. Crop load is controlled through proper pruning and through post bloom cluster thinning. Thin fruit clusters just after bloom to limit the number of developing clusters to one or sometimes two clusters per cane. Cane numbers per vine are limited through pruning, which is discussed in the companion factsheet “Grape Training and Trellising Basics.” Propagation Grapevines are easily propagated from cuttings. Cuttings can be taken from 1-year-old dormant wood after all the leaves have fallen off and before bud swell in the spring. Choose a cane that is at least pencil sized or larger and cut it into sections with three to four buds each. It is important to keep track of which end of the plant is the bottom (closest to the trunk) and which is the top (closest to the tip). Cuttings can be rooted by burying the bottom two nodes in moist soilless media, loose sawdust or peat moss. Keep them in warm area and check to make sure the medium stays moist. Roots should form in about 1 month. Once a good root system has established, they can be planted into the garden. It is critical that plant material is healthy and disease-free. Unless you know that the source plant is free of any disease, including latent viruses, it is a good idea to purchase plants from a reputable nursery. Additionally, some of the recently released grape varieties are protected by patent law and cannot be propagated.
Problems Winter Injury The risk of winter injury to grape is high, particularly for European and French/American hybrid types. Even the hardiest American varieties may experience some winter die back in certain conditions. Canes need time to harden before cold temperatures. Only apply nitrogen fertilizers before fruit set and reduce irrigation frequency late in the growing season to minimize late-season vegetative growth and allow vines to go dormant. As discussed above, thin grape clusters as needed to maintain balance between nutrients used for fruit production and for vine hardening. One option for protecting cold sensitive vines from winter injury is to place straw bales around the trunk and base of the vines during the winter. This needs to be done prior to experiencing mid-winter cold temperatures but after a killing fall freeze. Another method used in cold climates is to train the vines low to the ground and then mulch the canes with sawdust or straw through the coldest part of the winter. Weeds Weeds compete with grapevines for nutrients and water. To obtain maximum production, weeds must be controlled. Eradicating hard to kill perennial weeds such as dandelions, crabgrass and field bindweed before planting will greatly reduce weed issues in the coming years. Grapes are very susceptible to systemic broadleaf herbicides used in lawns, such as 2,4-D and dicamba. Exposure to herbicides results in stunted cane growth, deformed leaves and non-uniform fruit development (Photo 5). 2,4-D damage may occur from spray applied
Photo 5. Herbicide damage on grape. Note the stunted, twisted growth of the leaves.
©2017, Utah State Univ., M. Pace
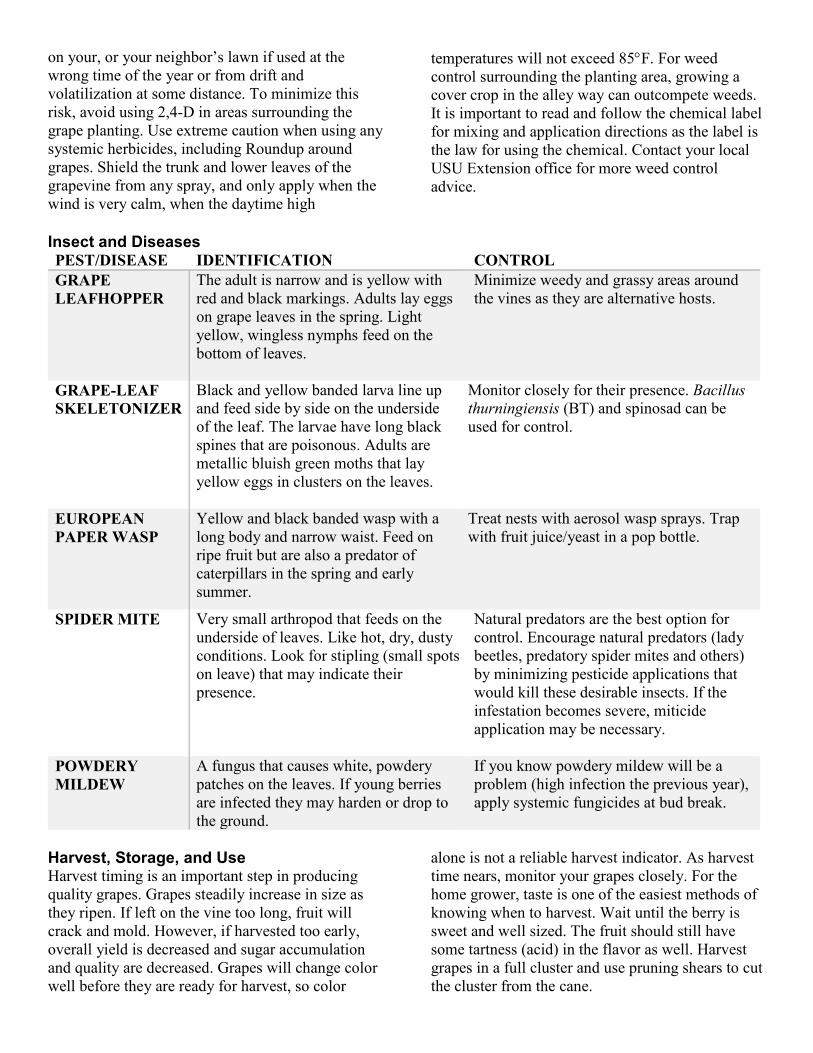
on your, or your neighbor’s lawn if used at the wrong time of the year or from drift and volatilization at some distance. To minimize this risk, avoid using 2,4-D in areas surrounding the grape planting. Use extreme caution when using any systemic herbicides, including Roundup around grapes. Shield the trunk and lower leaves of the grapevine from any spray, and only apply when the wind is very calm, when the daytime high
temperatures will not exceed 85°F. For weed control surrounding the planting area, growing a cover crop in the alley way can outcompete weeds. It is important to read and follow the chemical label for mixing and application directions as the label is the law for using the chemical. Contact your local USU Extension office for more weed control advice.
Insect and Diseases PEST/DISEASE IDENTIFICATION CONTROL GRAPE LEAFHOPPER
The adult is narrow and is yellow with red and black markings. Adults lay eggs on grape leaves in the spring. Light yellow, wingless nymphs feed on the bottom of leaves.
Minimize weedy and grassy areas around the vines as they are alternative hosts.
GRAPE-LEAF SKELETONIZER
Black and yellow banded larva line up and feed side by side on the underside of the leaf. The larvae have long black spines that are poisonous. Adults are metallic bluish green moths that lay yellow eggs in clusters on the leaves.
Monitor closely for their presence. Bacillus thurningiensis (BT) and spinosad can be used for control.
EUROPEAN PAPER WASP
Yellow and black banded wasp with a long body and narrow waist. Feed on ripe fruit but are also a predator of caterpillars in the spring and early summer.
Treat nests with aerosol wasp sprays. Trap with fruit juice/yeast in a pop bottle.
SPIDER MITE Very small arthropod that feeds on the underside of leaves. Like hot, dry, dusty conditions. Look for stipling (small spots on leave) that may indicate their presence.
Natural predators are the best option for control. Encourage natural predators (lady beetles, predatory spider mites and others) by minimizing pesticide applications that would kill these desirable insects. If the infestation becomes severe, miticide application may be necessary.
POWDERY MILDEW
A fungus that causes white, powdery patches on the leaves. If young berries are infected they may harden or drop to the ground.
If you know powdery mildew will be a problem (high infection the previous year), apply systemic fungicides at bud break.
Harvest, Storage, and Use Harvest timing is an important step in producing quality grapes. Grapes steadily increase in size as they ripen. If left on the vine too long, fruit will crack and mold. However, if harvested too early, overall yield is decreased and sugar accumulation and quality are decreased. Grapes will change color well before they are ready for harvest, so color
alone is not a reliable harvest indicator. As harvest time nears, monitor your grapes closely. For the home grower, taste is one of the easiest methods of knowing when to harvest. Wait until the berry is sweet and well sized. The fruit should still have some tartness (acid) in the flavor as well. Harvest grapes in a full cluster and use pruning shears to cut the cluster from the cane.

Grapes do not continue to ripen after they are picked, and quality begins to decline quickly after harvest. Expect to harvest around 8 to 12 pounds of grapes per vine. Yield varies by variety with some yielding up to 25 pounds. For wine and juice processing, have your equipment and ingredients prepared before harvest so you can begin processing as soon as possible. When processing grapes, it is critical to strictly adhere to food safety recommendations and tested recipes.
Additional References Colt, M., E. Fallahi, D. Barney, and T. Tindall.
1998. Backyard Grapes. University of Idaho, College of Agriculture. http://www.cals.uidaho.edu/edcomm/pdf/cis/cis0790.pdf
Growing Grapes in Your Backyard. The California Garden Web. Division of Agriculture and Natural Resources, University of California, n.d. Web. 26 Oct. 2015.
Lombard, K., B. Maier, F. J. Thomas, M. O’Neill, S. Allen, and R. Heyduck. 2013. Wine grape cultivar performance in the Four Corners region of New Mexico in 2010-12. HortTechnology 23(5).
Maughan, T. L., M. Pace, and B. Black. 2016. Grape varieties in Utah. Utah State University Extension. http://digitalcommons.usu.edu/cgi/viewcontent.cgi?article=2661&context=extension_curall
Maughan, T. L., M. Pace, and B. Black. 2016. Grape vine trellising and training. Utah State University Extension. Publication pending
Rosen, C., and J. Crants. Grapevine nutrition and juice quality. Viticulture, enology and marketing for cold-hardy grapes. Northern Grapes Project. http://northerngrapesproject.org/wp-content/uploads/2016/02/Mineral-Nutrition-Year-4.pdf
This project is funded in part by USDA-Risk Management Agency under a cooperative agreement. The information reflects the views of the author(s) and not USDA-RMA Utah State University is committed to providing an environment free from harassment and other forms of illegal discrimination based on race, color, religion, sex, national origin, age (40 and older), disability, and veteran’s status. USU’s policy also prohibits discrimination on the basis of sexual orientation in employment and academic related practices and decisions. Utah State University employees and students cannot, because of race, color, religion, sex, national origin, age, disability, or veteran’s status, refuse to hire; discharge; promote; demote; terminate; discriminate in compensation; or discriminate regarding terms, privileges, or conditions of employment, against any person otherwise qualified. Employees and students also cannot discriminate in the classroom, residence halls, or in on/off campus, USU-sponsored events and activities. This publication is issued in furtherance of Cooperative Extension work, acts of May 8 and June 30, 1914, in cooperation with the U.S. Department of Agriculture, Kenneth L. White, Vice President for Extension and Agriculture, Utah State University.
©2017, Utah State Univ., M. Pace