stone masonry - sjce.ac.ingeneral principles the stones to be used for stone masonry should be hard,...
TRANSCRIPT

STONE MASONRY

Stone Masonry
The construction of stones bonded together with
mortar is termed as stone masonry where the
stones are available in a abundance in nature, on
cutting and dressing to the proper shape, they
provide an economical material for the
construction of various building components such
as walls, columns, footings, arches, lintels, beams
etc.

Uses
1) Building foundations, walls, piers, pillars, and
architectural works.
2) Lintels, Beams, beams Arches, domes etc.,
3) Roofs and Roof coverings.
4) Cladding Works
5) Dams, light houses, monumental structures.
6) Paving jobs
7) Railway, ballast, black boards and electrical switch
boards

Selection of stone for stone
masonry:
1) Availability
2) Ease of working
3) Appearance
4) Strength and stability
5) Polishing characteristics
6) Economy
7) Durability

Through
Stone


General Principles
The stones to be used for stone masonry should
be hard, tough and durable.
The pressure acting on stones should be vertical.
The stones should be perfectly dressed as per
the requirements.
The heads and bond stones should not be of a
dumb bell shape.
In order to obtain uniform distribution of
load, under the ends of girders, roof trusses etc
large flat stones should be used

General Principles
The mortar to be used should be good quality and
in the specified faces.
The construction work of stone masonry should
be raised uniformly.
The plumb bob should be used to check the
verticality of erected wall.
The stone masonry section should always be
designed to take compression and not the tensile
stresses.
The masonry work should be properly cured after
the completion of work, for a period of 2 to 3
weeks.

As far as possible broken stones or small stones
chips should not be used.
Double scaffolding should be used for working at
higher level.
The masonry hearting should be properly packed
with mortar and chips if necessary to avoid
hallows.
The properly wetted stones should be used to
avoid mortar moisture being sucked.
General Principles

Laying The Stone
Decrease the stone thickness from the bottom tothe top of wall.
Ensure that the headers in the heart of the wallare the same size as in the face and extend atleast 12 in (300 mm) into the core or backing.(Avoid Dumb-bell shaped stones)
Ensure that headers in “walls of 2 feet (600 mm)or less in thickness” extend entirely through thewall. The headers shall occupy at least 20percent of the face of the wall.

Lay the masonry in roughly leveled courses. Ensure that the bottom of the foundation is large, with selected stones.
Lay the courses with leaning beds parallel to the natural bed of the material.
Regularly diminish the thicknesses of the courses, if varied, from the bottom to the top of the wall. Keep a surplus supply of stones at the site to select from.
Before laying the stone in the wall, shape and dress it so that it will not loosen after it is placed. No dressing or hammering which will loosen the stone will be permitted after it is placed.
Laying The Stone

Clean each stone and saturate it with water before
setting it. Clean and moisten the bed that will receive
it.
Bed the stones in freshly made mortar with full joints.
Carefully settle the stones in place before the mortar
sets.
Ensure that the joints and beds have an average
thickness of not more than 1 inch. (25 mm).
Ensure that the vertical joints in each course break
with the adjoining courses at least 6 in. (150 mm).
Do not place vertical joints directly above or below a
header joint.

If a stone is moved or if the joint is broken after the
mortar has set, take the stone up and thoroughly
clean the mortar from the bed and joints. Reset the
stone in fresh mortar.
NOTE: Do not lay the masonry in freezing weather
or when the stone contains frost, except with
permission subjected to the required conditions.
Whenever possible, properly point the face joints
before the mortar sets. If joints cannot be pointed,
rake them out to a depth of 1 in (25 mm) before the
mortar sets.
Do not smear the stone face surfaces with the mortar
forced out of the joints or the mortar used in pointing.

Thoroughly wet the joints pointed after the stone is laid with clean water and fill with mortar.
Drive the mortar into the joints and finish with an approved pointing tool.
Keep the wall wet while pointing. In hot or dry weather, protect the pointed masonry from the sun and keep it wet for at least three days after the pointing is finished.
NOTE: Do not perform pointing in freezing weather or when the stone contains frost.
After the pointing is completed and the mortar is set, thoroughly clean the walls and leave them in a neat condition.
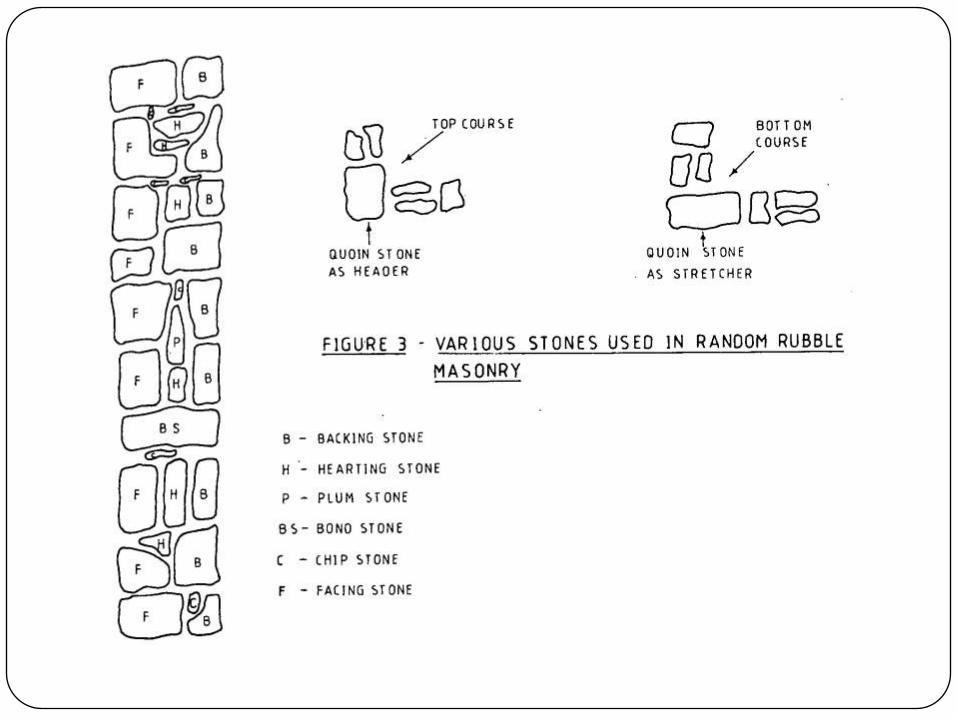
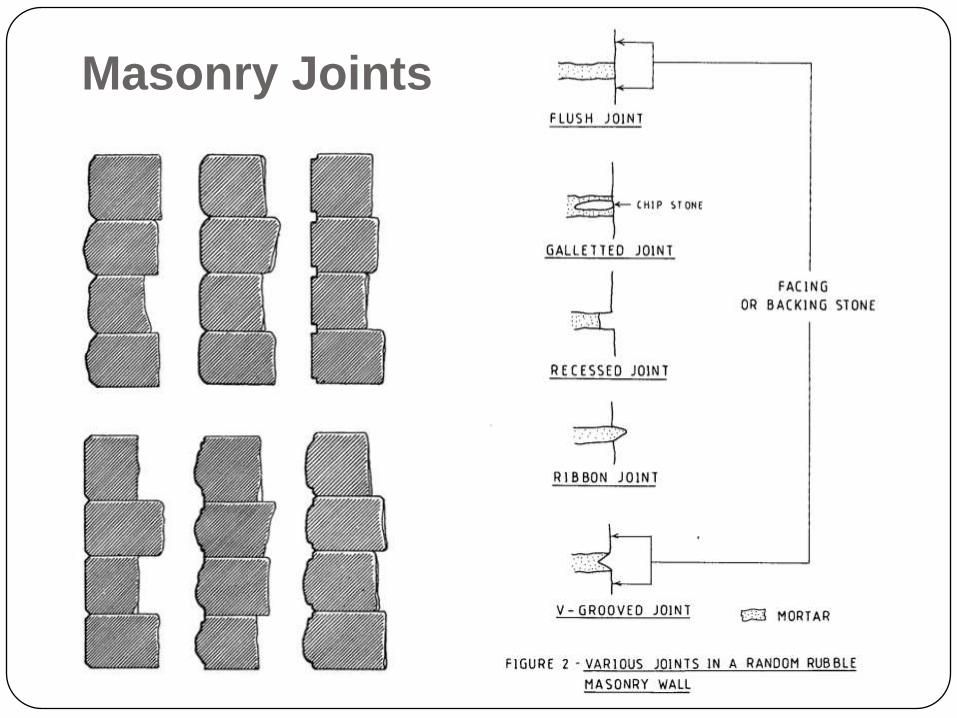
Masonry Joints

Types of Stone Masonry:
Based on the arrangement of the stone in the
construction and degree of refinement in the
surface finish, the stone masonry can be
classified broadly in the following two categories
1. Rubble masonry
2. Ashlar masonry

1) Rubble masonry:
In this category, the stones used are either undressedor roughly dressed having wider joints. This can befurther subdivided asuncoursed, coursed, random, dry, polygonal and bint.
(i) Uncoursed rubble masonry: This is the cheapest, roughest and poorest form of stone masonry. The stones used in this type of masonry very much vary in their shape and size and are directly obtained from quarry. Uncoursed rubble masonry can be divided into the following.
a) Uncoursed random rubbleb) Uncoursed squared rubble

Uncoursed rubble masonry
a) Uncoursed random rubble masonry: The weak
corners and edges are removed with mason’s
hammer. Generally, bigger stone blocks are
employed at quoins and jambs to increase the
strength of masonry.
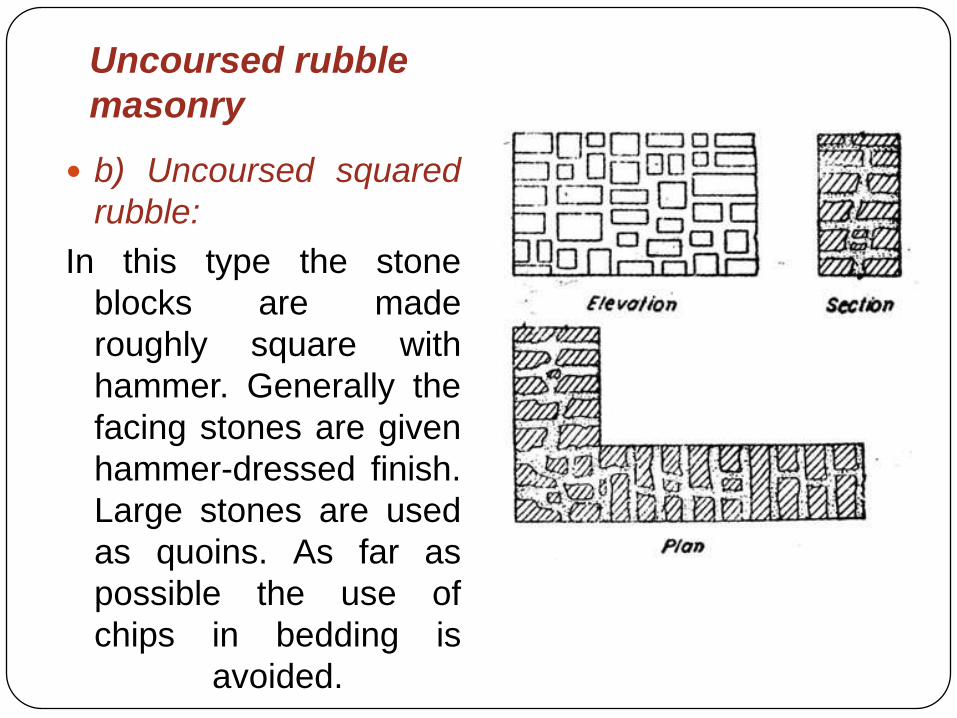
b) Uncoursed squared
rubble:
In this type the stone
blocks are made
roughly square with
hammer. Generally the
facing stones are given
hammer-dressed finish.
Large stones are used
as quoins. As far as
possible the use of
chips in bedding is
avoided.
Uncoursed rubble
masonry

Regular Course
(iv) Built to regular course: In this type of stone
masonry the uniform height stones are used in
horizontal layers not less than 13cm in height.
Generally, the stone beds are hammered or chisel
dressed to a depth of at least 10cm from the face. The
stones are arranged in such a manner so that the
vertical joints of two consecutive curse do not coincide
with each other as shown in figure below.

(v) Polygonal rubble masonry: In this type of
masonry the stones are roughly dressed to an
irregular polygonal shape. The stones should be
so arranged as to avoid long vertical joints in face
work and to break joints as much as possible.
Small stone chips should not be used to support
the stones on the facing as shown in the figure
below.
Quoins

Flint rubble masonry (vi) Flint rubble masonry: This type of masonry is
used in the areas where the flint is available in
plenty.\
The flint stones varying in thickness from 8 to
15cm and in length from 15 to 30cm are arranged
in the facing in the form of coursed or uncoursed
masonry as shown below.

Dry rubble masonry
This type of masonry is
used in the construction of
retaining walls pitching
earthen dams and canal
slopes in the form of
random rubble masonry
without any mortar. The
hallow spaces left around
and stones should be tightly
packed with smaller stone
pieces as shown below.

Ashlar Masonry
This type of masonry is built from accurately
dressed stones with uniform and fine joints of
about 3mm thickness by arranging the stone
blocks in various patterns.
The backing of Ashlar masonry walls may be built
of Ashlar masonry or rubble masonry. The size of
stones blocks should be in proportion to wall
thickness.

The various types of masonry can be classified
under the following categories are
1) Ashlar fine
2) Ashlar rough
3) Ashlar rock or quarry faced
4) Ashlar facing
5) Ashlar chamfered
6) Ashlar block in course
Ashlar Masonry

Ashlar fine Ashlar rough
Ashlar Masonry

Ashlar rock or quarry faced Ashlar block in course
Ashlar Masonry
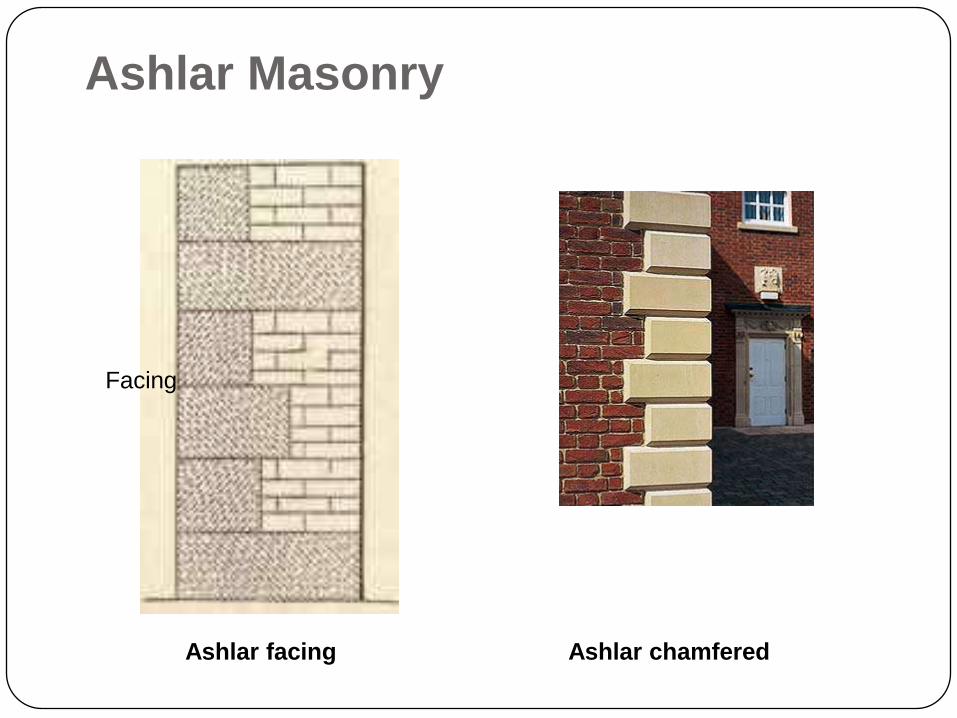
Ashlar facing Ashlar chamfered
Facing
Ashlar Masonry

Cornice
A cornice (from the Italian cornice meaning
"ledge") is generally any horizontal decorative
molding that crowns a building or furniture
element— the cornice over a door or window, for
instance, or the cornice around the top edge of a
pedestal or along the top of an interior wall.
The function of the projecting cornice of a building
is to throw rainwater free of the building’s walls.
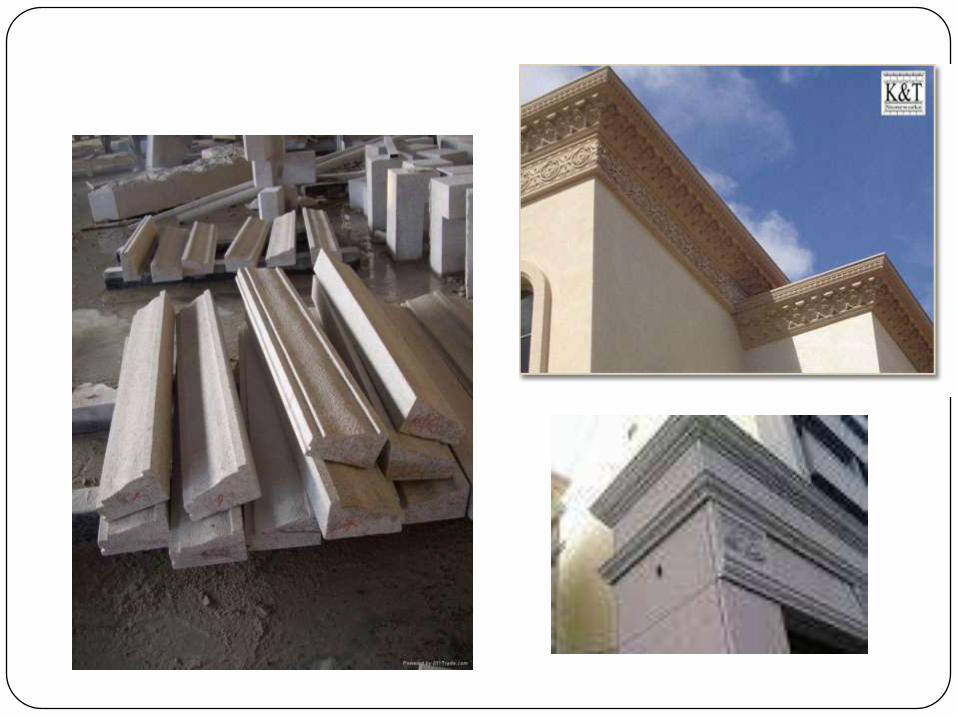


Decorative Cornice
Slope to Drain
off Rain water
Rain water
collection
Channel
over the top
of
Decorative
Cornice

SILLS
Stone SILL
Sloped Outer
REVEAL

Chamfered
Quoins
Stone Sill
Edge Drop
Rubble
Masonry
Wall

Min 25Cm
Overlap into the
abutting masonry


Sill as a Ledge
in the Interior

PLINTHS
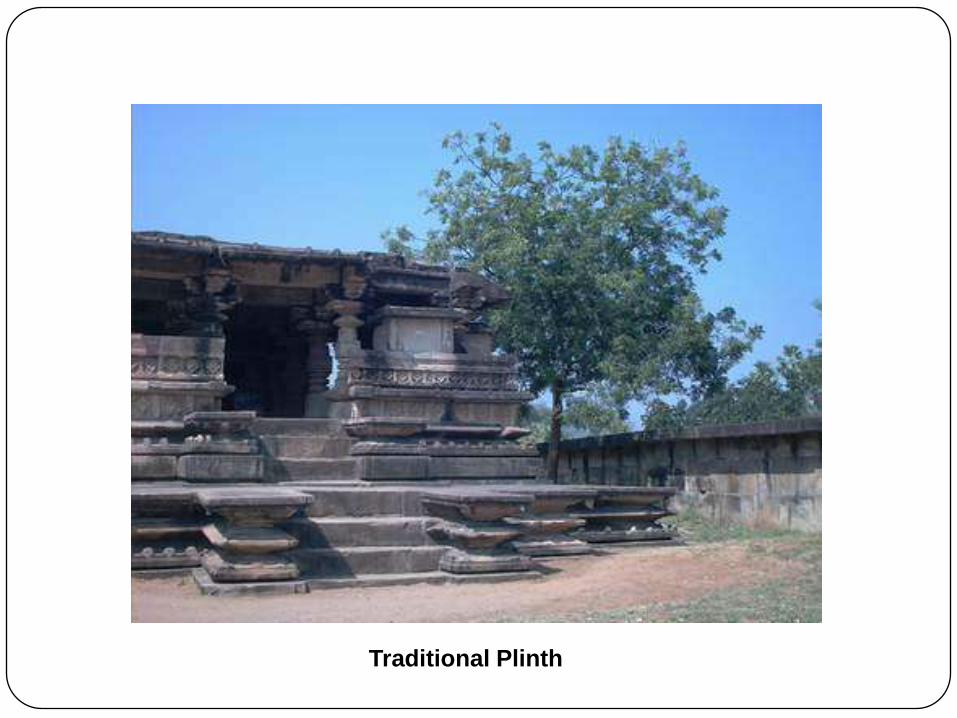
Traditional Plinth
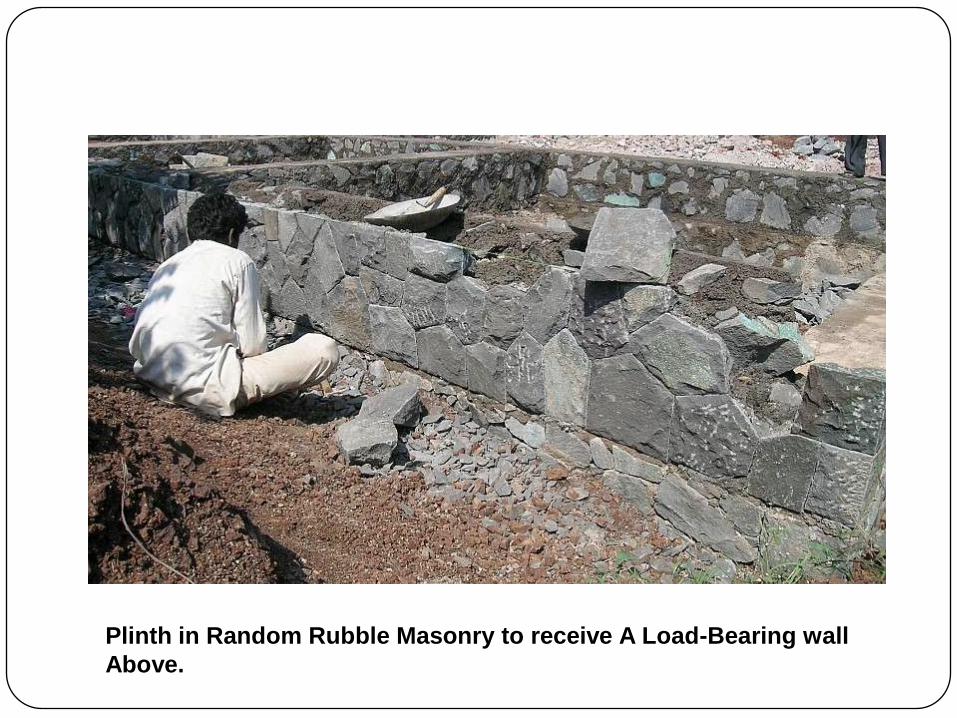
Plinth in Random Rubble Masonry to receive A Load-Bearing wall
Above.

Plinth Platform Conventional Plinth in Rural
Areas


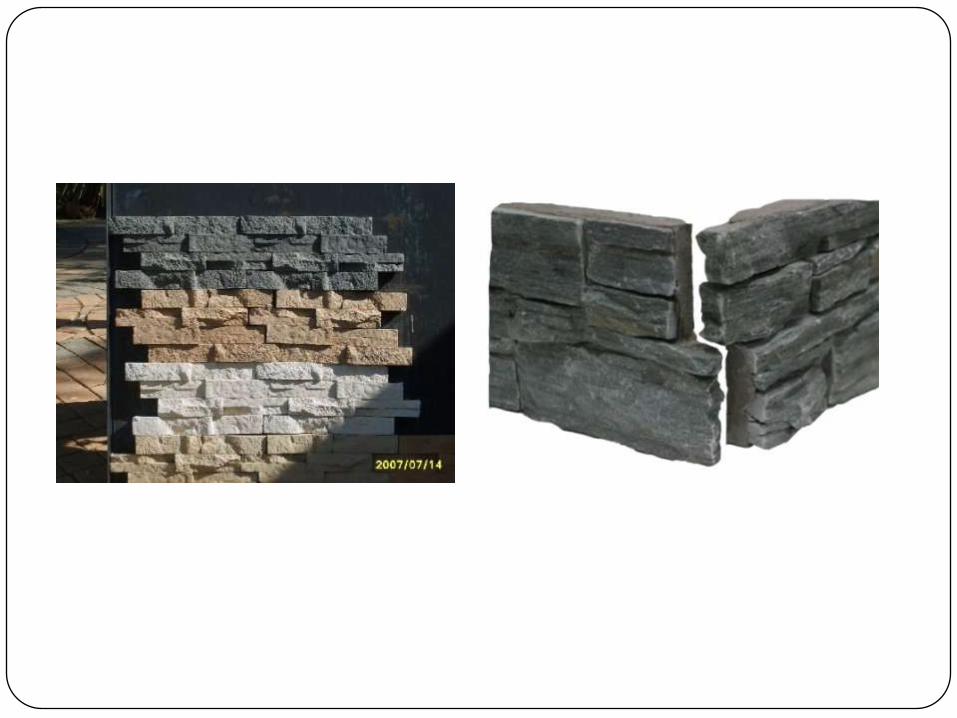
Cladding


Thank You