steps to create and migrate gp rule package to create and migrate gp rule package ... (here cr_xxxx...
TRANSCRIPT
Steps to Create and Migrate GP Rule Package
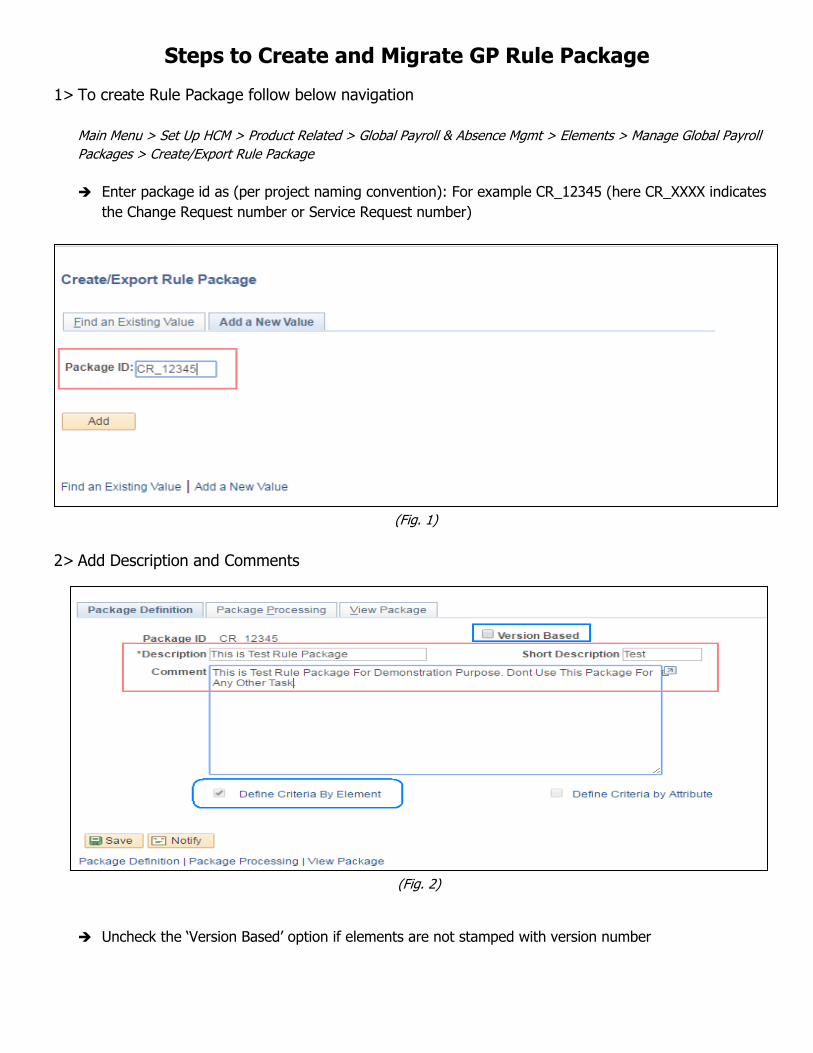
1> To create Rule Package follow below navigation
Main Menu > Set Up HCM > Product Related > Global Payroll & Absence Mgmt > Elements > Manage Global Payroll
Packages > Create/Export Rule Package
Enter package id as (per project naming convention): For example CR_12345 (here CR_XXXX indicates
the Change Request number or Service Request number)
(Fig. 1)
2> Add Description and Comments
(Fig. 2)
Uncheck the ‘Version Based’ option if elements are not stamped with version number

It is helpful to create to Rule package by ‘Define Criteria By Element’ method as it provides an option to
developer to include the dependent elements (in case needed) for which developer doesn’t have to keep
a track of all elements
‘Version Based’ option can be used if developer has made very sure that all the modified elements are
stamped correctly. In case if stamping is not done correctly, there are chance of objects getting missed
from the package leading to out of synch elements between different environments
3> Define Criteria By Element
Click the Link (as highlighted in Fig.2 above) to select elements which are to be moved to target
environment
(Fig.3)
Select the ‘Element Type’ value from ‘Entry Type’ drop down list to define element type
Select the ‘Element Name’ of element which is to be moved to target environment
There are two options available to move these elements as highlight in (Fig.3) above
o Focus Element Only – With this option, only the selected element will be moved to target environment
For example as shown above, only Array element ‘S-AR CHD CARE LV’ will be copied to target
environment. The underlying Record (View) definition or any other elements of this Array will not
be copied to target environment
o Focus Element + Members – With this option, selected element along with all the underlying elements will
be copied to target environment. For example as shown above, Formula ‘S-FM OFFPH FST’, along with all
underlying Date, Duration, Variable, System elements etc. will be copied to target environment.
Note: Focus Element + Members option should be only be selected by developer only when it is confirmed
and made that all underlying elements needs to be overridden in target environment, else this might lead
to complex issues if not done the analysis correctly. Hence it is always suggested to use ‘Focus Element
Only’ to have better control and clarity while migration

4> Package Processing
(Fig.4)
Select ‘Create Package’ and click on ‘Process’ button to create package for the elements selected in
above steps. (GP_PKG_CR process will be triggered)
Once the package is created successfully ‘Created’ check box will be selected.
(Fig.5)
Click on ‘View Package’ tab (as highlighted in Fig.5) to verify the package elements and confirm the list
before creating scripts and data files.

(Fig.6)
Developer must go through the list to make sure that all the desired elements (which are required to be
copied to target environment) are appearing in correctly with ‘Upgrade Flag’ checked
Along with selected elements, there will other elements which would be ‘Action’ as ‘Information Only’,
which can be ignored as system will automatically include these elements for reference.
System will not overwrite Information Only elements in target environment unless modified
5> Creating Package Scripts
(Fig.7)
Select the ‘Create Scripts’ option and enter the file path to generate the scripts
For example, shown in (Fig.7) the scripts will be stored on server of DEV environment
Click ‘Process’ to generate scripts
6> Verify Generate Scripts
To verify the generated scripts, log in to server and navigate to path provide as input parameter for
creating script
For example, in (Fig.7) the path provided was of DEV UNIX server
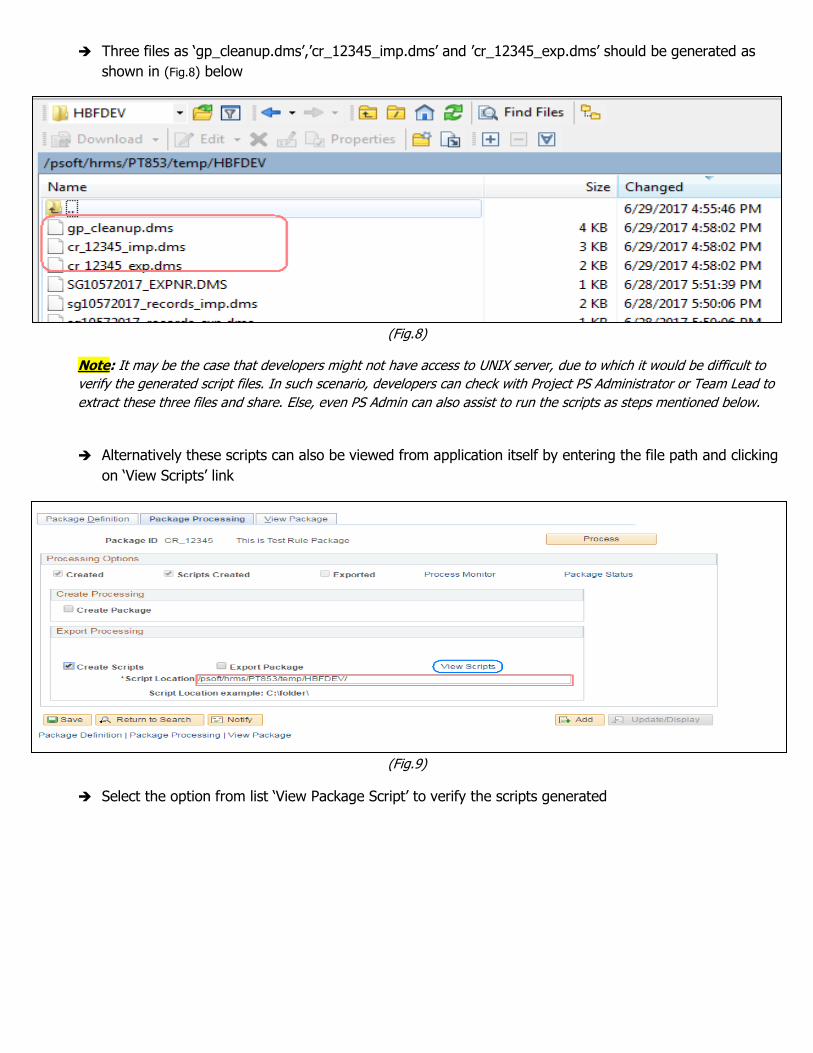
Three files as ‘gp_cleanup.dms’,’cr_12345_imp.dms’ and ’cr_12345_exp.dms’ should be generated as
shown in (Fig.8) below
(Fig.8)
Note: It may be the case that developers might not have access to UNIX server, due to which it would be difficult to
verify the generated script files. In such scenario, developers can check with Project PS Administrator or Team Lead to
extract these three files and share. Else, even PS Admin can also assist to run the scripts as steps mentioned below.
Alternatively these scripts can also be viewed from application itself by entering the file path and clicking
on ‘View Scripts’ link
(Fig.9)
Select the option from list ‘View Package Script’ to verify the scripts generated

(Fig.10)
These scripts can also be copied from application and should be saved with extension as .dms in local
drive as shown below in (Fig.12)
(Fig.11)
(Fig.12)

7> Export Package from source environment
Open Data mover of source (For example, DEV) environment and open file with name having ‘_exp.dms’
from local drive
(Fig.13)
(Fig.14)
Set the path for output ‘.dat’ and ‘.log’ files as shown above in (Fig.14)
Run the script and verify the .dat file is generated at the entered path

(Fig.15)
8> Verify the Package Status in system. Click on ‘Package Status’ link and it should show all the steps
completed till now
Note: This is an optional step; developer can skip this step when all the above steps have been performed correctly
(Fig.16)
(Fig.17)

9> Import package to target (UAT) environment
Open Data Mover of target (For example UAT) environment and open file with name ‘gp_cleanup.dms’
from local drive
Note: Before executing gp_cleanup.dms scripts, developers/PS Admin should confirm that there aren’t any existing
packages present in target environment which are not yet upgraded. In case if there are any packages which not
yet upgrade then this script should only be executed after the existing packages are upgraded. If not followed this
step, gp_cleanup.dms might clean up the existing packages which are not yet upgraded in target environment.
Set the file path shown below (Fig.18). Run the script
(Fig.18)
Open file name with name having ‘_imp.dms’ in target environment Data mover and set the paths
followed by which run the scipt
Note:
o Set file path for ‘.dat’ file as the location of data file generated in Step 7
o Set file path for ‘.log’ file as the normal folder path of target environment
(Fig.19)

10> Verify package in target (UAT) environment
Navigate to: Main Menu > Set Up HCM > Product Related > Global Payroll & Absence Mgmt > Elements > Manage
Global Payroll Packages > Apply Rule Package
Enter the Package Id. Package Processing Options should show ‘imported’ option checked package is
manually imported in Step 9
(Fig.20)
11> Compare package
Select the Compare Processing options as shown in (Fig.20) above. Click Process button. GPCMPRPT PS
Job should run successfully
Compare output result files can be accessed by logging into process monitor, and clicking GPCMPRPT PS
Job

(Fig.21)
Click on ‘Package Compare Audit’ tab to confirm, there are no error during comparing package
12> Upgrade Package in target environment
Once package is compared successfully (as per Step 11). Select ‘Upgrade Processing’ options and click
‘Process’ button. GP_PKG_COPY process should complete successfully.

(Fig.22)
To verify the result select ‘Package Element’ tab and verify if ‘Upgrade’ check box is selected and ‘Result’
shows value ‘Successful’
(Fig.23)

(Fig.24)
(Fig.25)