step two - centenary landscaping · use an extra paver on edge for a feature when using brick...
TRANSCRIPT

This guide has been written and compiled for the home handyperson. Following these instructions will help you achieve an excellent result that you will be proud of.
However, for a truly professional finish, we suggest you contract a professional paver layer or landscaper to do the job for you. The method followed in this guide is used by many professional landscapers but many will have their own individual variations or in some cases completely different approaches. Please remember, this is not the only method for laying pavers, just the method we have found to offer the greatest balance of cost and labour.
DISCLAIMER:The contents of this publication are intended as a general guidance only. Specifications are subject to change without notice. Centenary Landscaping Supplies cannot accept any liability whatsoever in respect to the content of this publication or the work performed using these methods. If you are unsure always seek the advise of professionals.
STEP ONE Choosing the PaversPavers are a perfect option around the home where you need a hard finished, usable surface such as driveways, patios, pathways and steps. Sometimes the hardest part of the job is simply selecting the paver with hundreds of options available both small and large!
The area you are paving in many cases will dictate your paver choice and narrow the selection. For example, if you’re paving a driveway, you may need to consider a smaller ‘brick” sized pavers to offer the strength required. If you’re paving a large expansive area you may need a larger paver to minimise joints and visual complexity.
Have a chat with a member of our friendly Sales Team to discuss all your options.
STEP TWO Area CalculationsMost paved areas are of basic shape or a combination of a number of basic shapes: rectangles, triangles and circles.
The area of a rectangle (or square) = Length x Width
For example: an area 10m long and 5m wide = 10 x 5 = 50m2 (square metres - not to be confused with metres squared which is technically 50m x 50m in this case)
The area of a triangle = Length x Width ÷ 2
For example: a triangle with a base of 20m and a height of 5m = 20 x 5 ÷ 2 = 50m2
The area of a circle = πr2 or Radius x Radius x 3.14. The radius is half of the total distance from one side of the circle to the other (diameter) passing through the centre point.
For example: a circle with a diameter of 5m = 5 x 5 x 3.14 = 78.5m2.
Remember: measure twice and accurately!
www.CentenaryLandscaping.com.au3373 4900
HOW-TO Lay Pavers
Rectangle Square
Triangle
Length
Width
Length
CircleDiameter
Radius
Base
Width
STEP THREE Material EstimatingFor all paving applications, Centenary Landscaping Supplies recommends the use of both Roadbase and Bedding Sand. The Roadbase is laid first and compacted acting as the structural base for under the pavers, the sand is then used to “get the levels” in a thin layer over the top of the Roadbase. We recommend between 75-100mm of Roadbase followed by 25-50mm of Bedding Sand.
Your pavers will also need to be contained around the perimeter to stop them from moving laterally. This can be achieved through the use of pre-manufactured edging products such as timber, aluminum or by using a concrete “haunch”. A haunch is a wedge shaped concrete skirting surrounding your pavers.
STEP FOUR Site Preparation
Roadbase calculations: Area in m2 x 0.1 = Volume m3
Bedding Sand calculations:Area in m2 x 0.05 = Volume m3
Concrete Blend calculations: (for haunching)1m3 of concrete blend & cement mix will build approximately 200 Lm of concrete haunching. For haunching you will need 12 bags of cement per cubic metre of concrete blend to make a suitably strong mix.
Gap Sand: (for filling the joints)1 x 20kg bag per 8m2 of paving area.
Tools:• 2 x Screed Rails (40mm x 25mm x 3m long)• Screed Board• Spirit Level• Rubber Mallet• String Line• Broom• Cutting equipment (if required)
• Plate vibrator/compactor• Hardwood pegs (to level and square the area)• Wheelbarrow• Shovel• Rake• Wooden float (if haunching)• Carton of XXXX
Important: Use a quality Roadbase with a CBR rating of 45+, from Centenary Landscaping Supplies, in all paved areas. You don’t want your pavers to move so compact the roadbase to a depth of at least 75-100mm using a plate compactor.
Dirt has a CBR rating of about 10.
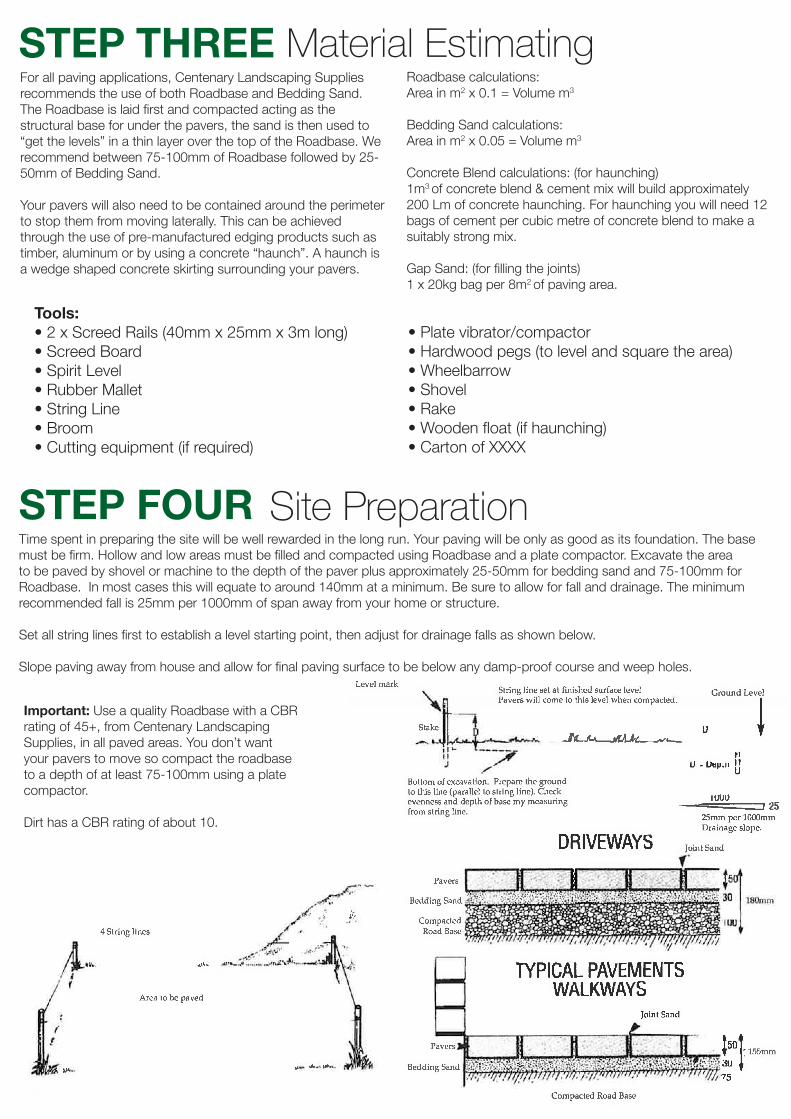
Time spent in preparing the site will be well rewarded in the long run. Your paving will be only as good as its foundation. The base must be firm. Hollow and low areas must be filled and compacted using Roadbase and a plate compactor. Excavate the area to be paved by shovel or machine to the depth of the paver plus approximately 25-50mm for bedding sand and 75-100mm for Roadbase. In most cases this will equate to around 140mm at a minimum. Be sure to allow for fall and drainage. The minimum recommended fall is 25mm per 1000mm of span away from your home or structure.
Set all string lines first to establish a level starting point, then adjust for drainage falls as shown below.
Slope paving away from house and allow for final paving surface to be below any damp-proof course and weep holes.
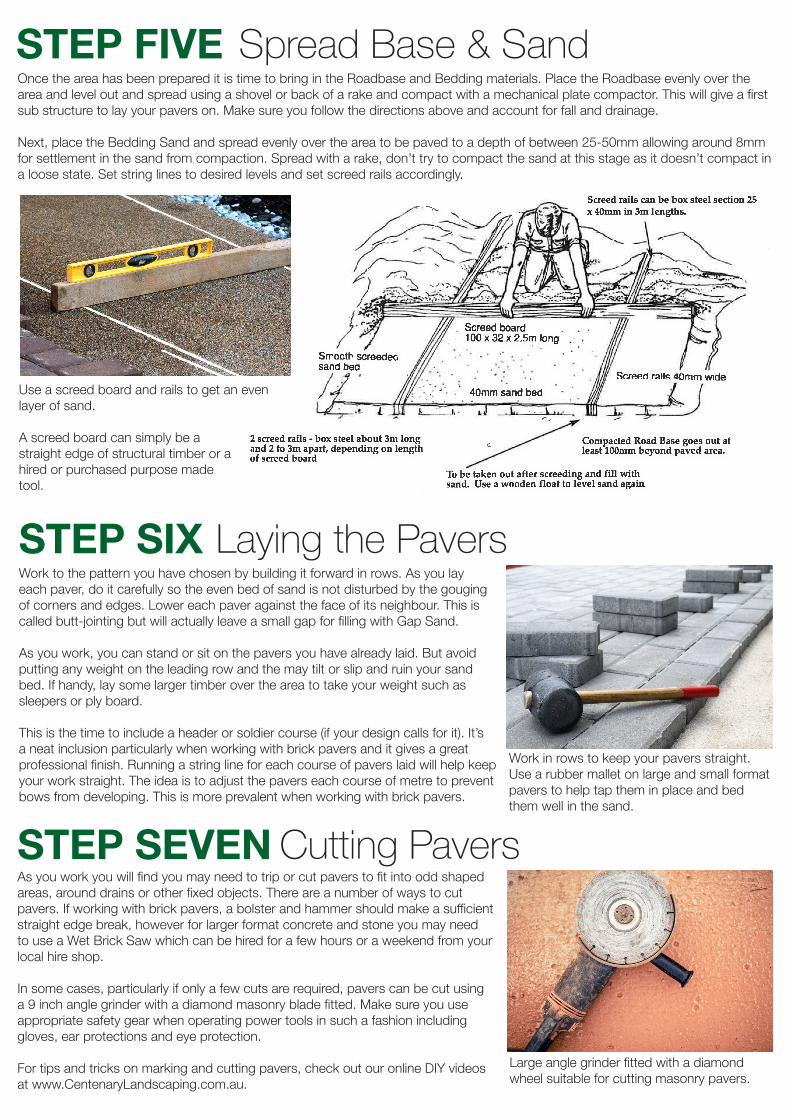
STEP FIVE Spread Base & SandOnce the area has been prepared it is time to bring in the Roadbase and Bedding materials. Place the Roadbase evenly over the area and level out and spread using a shovel or back of a rake and compact with a mechanical plate compactor. This will give a first sub structure to lay your pavers on. Make sure you follow the directions above and account for fall and drainage.
Next, place the Bedding Sand and spread evenly over the area to be paved to a depth of between 25-50mm allowing around 8mm for settlement in the sand from compaction. Spread with a rake, don’t try to compact the sand at this stage as it doesn’t compact in a loose state. Set string lines to desired levels and set screed rails accordingly.
STEP SIX Laying the Pavers
STEP SEVEN Cutting Pavers
Use a screed board and rails to get an even layer of sand.
A screed board can simply be a straight edge of structural timber or ahired or purchased purpose madetool.
Work to the pattern you have chosen by building it forward in rows. As you lay each paver, do it carefully so the even bed of sand is not disturbed by the gouging of corners and edges. Lower each paver against the face of its neighbour. This is called butt-jointing but will actually leave a small gap for filling with Gap Sand.
As you work, you can stand or sit on the pavers you have already laid. But avoid putting any weight on the leading row and the may tilt or slip and ruin your sand bed. If handy, lay some larger timber over the area to take your weight such as sleepers or ply board.
This is the time to include a header or soldier course (if your design calls for it). It’s a neat inclusion particularly when working with brick pavers and it gives a great professional finish. Running a string line for each course of pavers laid will help keep your work straight. The idea is to adjust the pavers each course of metre to prevent bows from developing. This is more prevalent when working with brick pavers.
As you work you will find you may need to trip or cut pavers to fit into odd shaped areas, around drains or other fixed objects. There are a number of ways to cut pavers. If working with brick pavers, a bolster and hammer should make a sufficient straight edge break, however for larger format concrete and stone you may need to use a Wet Brick Saw which can be hired for a few hours or a weekend from your local hire shop.
In some cases, particularly if only a few cuts are required, pavers can be cut using a 9 inch angle grinder with a diamond masonry blade fitted. Make sure you use appropriate safety gear when operating power tools in such a fashion including gloves, ear protections and eye protection.
For tips and tricks on marking and cutting pavers, check out our online DIY videos at www.CentenaryLandscaping.com.au.
Work in rows to keep your pavers straight. Use a rubber mallet on large and small format pavers to help tap them in place and bed them well in the sand.
Large angle grinder fitted with a diamond wheel suitable for cutting masonry pavers.
STEP NINE Final Joint Filling
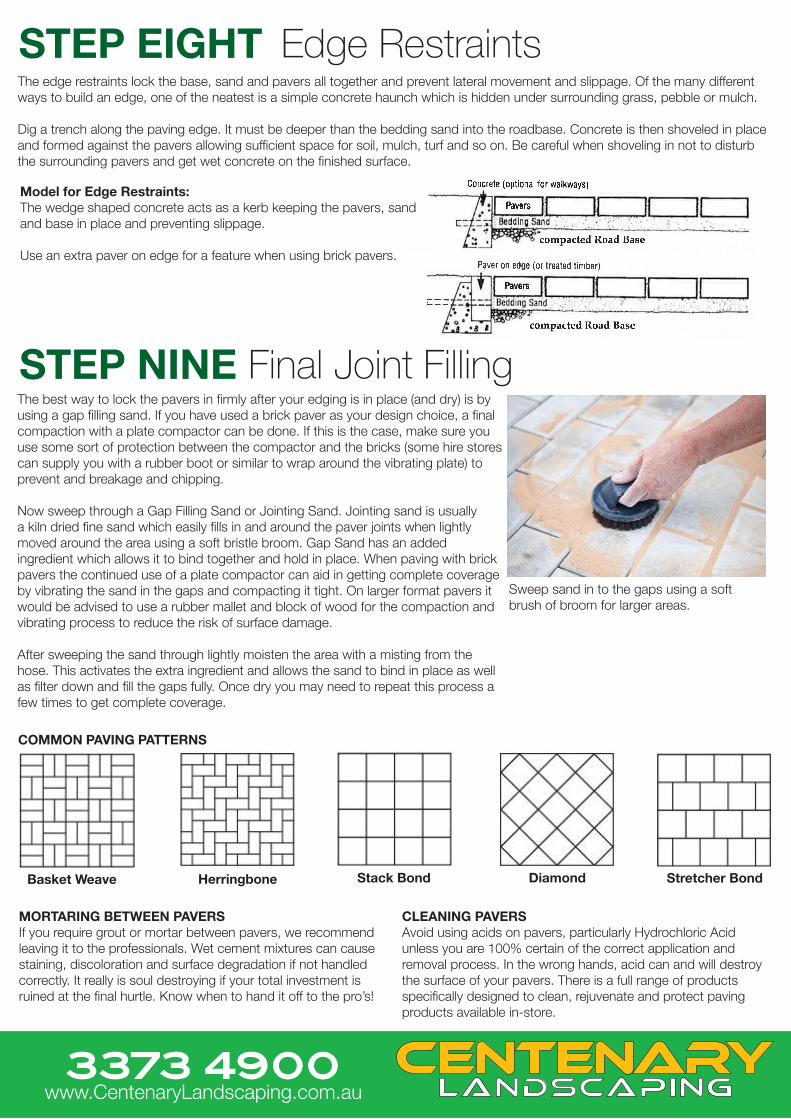
Model for Edge Restraints:The wedge shaped concrete acts as a kerb keeping the pavers, sand and base in place and preventing slippage.
Use an extra paver on edge for a feature when using brick pavers.
www.CentenaryLandscaping.com.au3373 4900
The best way to lock the pavers in firmly after your edging is in place (and dry) is by using a gap filling sand. If you have used a brick paver as your design choice, a final compaction with a plate compactor can be done. If this is the case, make sure you use some sort of protection between the compactor and the bricks (some hire stores can supply you with a rubber boot or similar to wrap around the vibrating plate) to prevent and breakage and chipping.
Now sweep through a Gap Filling Sand or Jointing Sand. Jointing sand is usually a kiln dried fine sand which easily fills in and around the paver joints when lightly moved around the area using a soft bristle broom. Gap Sand has an added ingredient which allows it to bind together and hold in place. When paving with brick pavers the continued use of a plate compactor can aid in getting complete coverage by vibrating the sand in the gaps and compacting it tight. On larger format pavers it would be advised to use a rubber mallet and block of wood for the compaction and vibrating process to reduce the risk of surface damage.
After sweeping the sand through lightly moisten the area with a misting from the hose. This activates the extra ingredient and allows the sand to bind in place as well as filter down and fill the gaps fully. Once dry you may need to repeat this process a few times to get complete coverage.
STEP EIGHT Edge RestraintsThe edge restraints lock the base, sand and pavers all together and prevent lateral movement and slippage. Of the many different ways to build an edge, one of the neatest is a simple concrete haunch which is hidden under surrounding grass, pebble or mulch.
Dig a trench along the paving edge. It must be deeper than the bedding sand into the roadbase. Concrete is then shoveled in place and formed against the pavers allowing sufficient space for soil, mulch, turf and so on. Be careful when shoveling in not to disturb the surrounding pavers and get wet concrete on the finished surface.
Sweep sand in to the gaps using a soft brush of broom for larger areas.
MORTARING BETWEEN PAVERSIf you require grout or mortar between pavers, we recommend leaving it to the professionals. Wet cement mixtures can cause staining, discoloration and surface degradation if not handled correctly. It really is soul destroying if your total investment is ruined at the final hurtle. Know when to hand it off to the pro’s!
COMMON PAVING PATTERNS
Basket Weave Herringbone Stack Bond Diamond Stretcher Bond
CLEANING PAVERSAvoid using acids on pavers, particularly Hydrochloric Acid unless you are 100% certain of the correct application and removal process. In the wrong hands, acid can and will destroy the surface of your pavers. There is a full range of products specifically designed to clean, rejuvenate and protect paving products available in-store.