step by step installation instructions roller shades · installing your new shades is easy. simply...
TRANSCRIPT
Step by Step Installation Instructions
Roller Shades
Customer Service 800.248.8888 or visit us online at smithandnoble.com

1
Thank you for choosing smith+noble. Your new shades have been custom–crafted from the highest quality materials. Once installed, your shades will provide you with a lifetime of beauty and trouble-free use.
InsTallIng your new shades is easy. Simply follow our step-by-step instructions. We recommend that you read through all the instructions before you start. If you have questions, our customer service representatives are available at 800.248.8888.
Do not dispose of packaging until the shades are operating to your satisfaction.
For assistance, call smith+nobleCustomer Service at
800.248.8888
Visit our website atsmithandnoble.com
2
ContentsGetting Started . . . . . . . . . . . . . . . . . . . . . . . . . . . . . . . . 3
Cordless Roller Shade . . . . . . . . . . . . . . . . . . . . . . . . . . 4
Attaching the Brackets . . . . . . . . . . . . . . . . . . . . . . 4-5
Hanging The Shade . . . . . . . . . . . . . . . . . . . . . . . . . . 6
Removing the Shade . . . . . . . . . . . . . . . . . . . . . . . . . . 6
Tension Adjustment . . . . . . . . . . . . . . . . . . . . . . . . . . 7
Upstop Adjustment . . . . . . . . . . . . . . . . . . . . . . . . . . 7
Loop Control Roller Shade . . . . . . . . . . . . . . . . . . . . . 8-9
Attaching the Brackets . . . . . . . . . . . . . . . . . . . . . . . . 8
Hanging the Shade . . . . . . . . . . . . . . . . . . . . . . . . . . 10
Cassette Roller Shade . . . . . . . . . . . . . . . . . . . . . . . . . 11
Attaching the Brackets . . . . . . . . . . . . . . . . . . . . . . . 11
Hanging the Shade . . . . . . . . . . . . . . . . . . . . . . . . . . 12
Removing the Shades . . . . . . . . . . . . . . . . . . . . . . . . 12
Installing Battery for Motorized Shades . . . . . . . . . . . . . 13
Installing Tension Device . . . . . . . . . . . . . . . . . . . . . . . . 13
Hold Down Brackets (optional) . . . . . . . . . . . . . . . . . . . . . . . 14
Skew Adjustment (if necessary) . . . . . . . . . . . . . . . . . . . 14
Safety . . . . . . . . . . . . . . . . . . . . . . . . . . . . . . . . . . . . . . 14
Care + Cleaning . . . . . . . . . . . . . . . . . . . . . . . . . . . . . . 14

3
Remove the shade from the packaging.
Do not dispose of packaging until the shade is operating to your satisfaction.
Check the diagram to make sure you have all the parts indicated for the appropriate type of installation.
NOTE: Do not lower the shade yet.
Tools you will need to install your shade: pencil, screwdriver, 1/4" nut driver, level, pliers and a drill with 1/16" drill bit.
Your brackets must be securely attached to the mounting surface. When screwing into a surface, the included screws must hit wood studs. Otherwise, use a secure fastener as illustrated (not included).
Wallboard Or Plaster: Use a secure fastener designed for hollow wall applications.
Metal: Pre-drill holes and use the included screws.
Concrete, Stone, Brick Or Tile: Use a masonry drill and appropriate , anchors or screws.
When selecting a fastener, make sure it is designed to support the weight of the product being installed. Follow the fastener manufacturer’s instructions for proper installation.
Getting Started
screws(included)
toggle bolt
self drilling anchor
molly bolt
Getting Started
note: When installing screws with a drill, be careful not to over-tighten. This may cause the screw to break off in the wall or window frame.
4Cordless - Attaching the Brackets
Attaching the Brackets
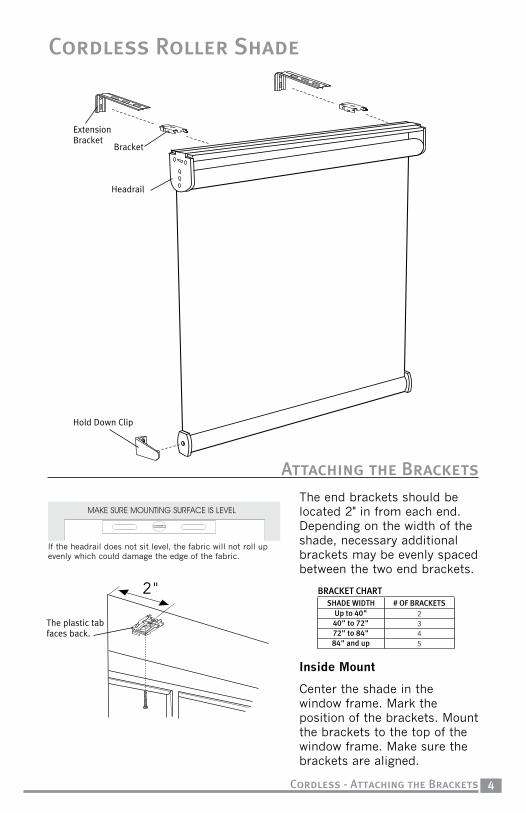
Cordless Roller Shade
2"
The plastic tab faces back.
BRACKET CHARTSHADE WIDTH # OF BRACKETS
Up to 40" 2 40" to 72" 3 72" to 84" 4 84" and up 5
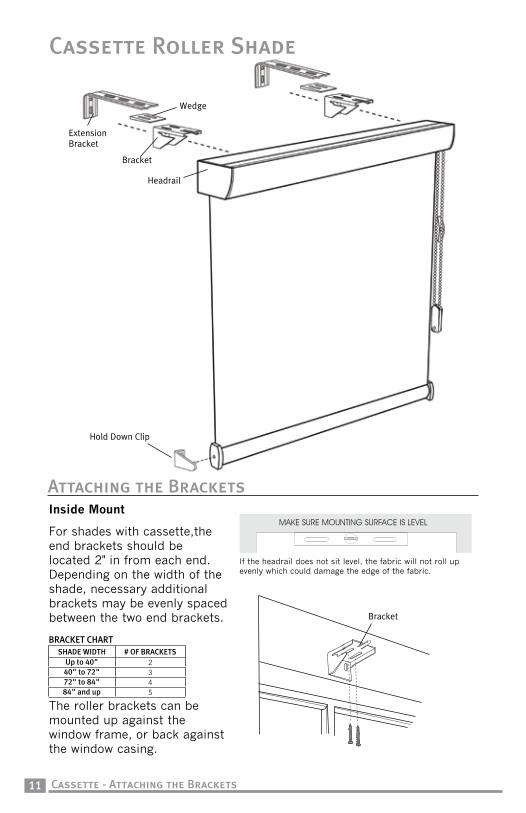
If the headrail does not sit level, the fabric will not roll up evenly which could damage the edge of the fabric.
Headrail
Bracket
Extension Bracket
Hold Down Clip
The end brackets should be located 2" in from each end. Depending on the width of the shade, necessary additional brackets may be evenly spaced between the two end brackets.
Inside Mount
Center the shade in the window frame. Mark the position of the brackets. Mount the brackets to the top of the window frame. Make sure the brackets are aligned.

5 Cordless - Attaching Brackets
The plastic tab faces up.
Extension Bracket
Mounting Bracket
The plastic tab faces back.
The plastic tab faces back.
2"
Outside Mount
Center the shade over the window opening at the desired height. Mark the position of the bracket on the wall. Mount the brackets to the wall. Make sure the mounting brackets are level.
Side Mount (optional)
Position the Extension Brackets up to the desired mounting height on each side of the window frame. Make sure the Extension Brackets are level. Mount Extension Brackets on each side of window frame as shown.
Once Extension Brackets are installed and properly positioned, using the supplied nuts and short bolts, attach the Standard Mounting Bracket to the Extension Brackets as shown.
Extension Brackets (optional)
Extension Brackets are used if you need to project the shade out from the mounting surface. This will allow the shade to avoid window cranks, door knobs, etc. when raised and lowered.
Center the shade over the window opening at the desired height. Mark the position of the Extension Bracket on the wall. Make sure the mounting brackets are level. Mount the Extension Brackets to the wall.
Once Extension Brackets are installed and properly positioned, using the supplied nuts and short bolts, attach the Standard Mounting Bracket to the Extension Brackets as shown.
6Cordless - Hanging the shade + Removing the shade
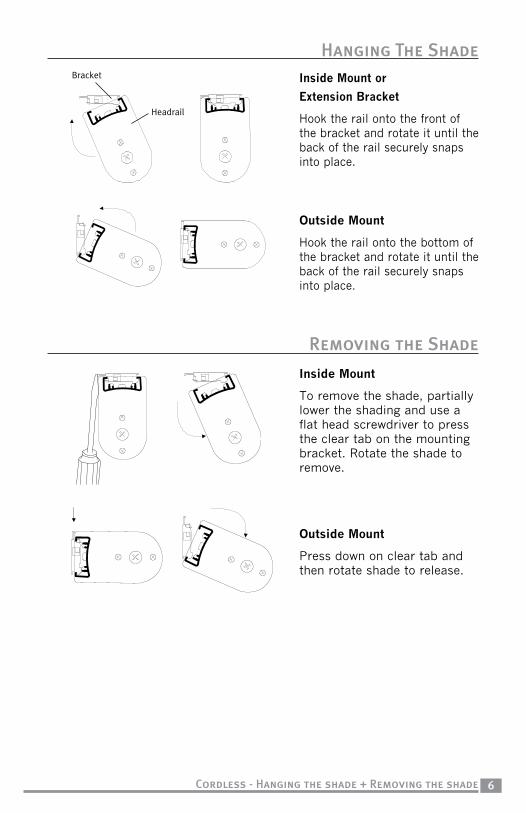
Hanging The Shade
Removing the Shade
Bracket
Headrail
Inside Mount or
Extension Bracket
Hook the rail onto the front of the bracket and rotate it until the back of the rail securely snaps into place.
Outside Mount
Hook the rail onto the bottom of the bracket and rotate it until the back of the rail securely snaps into place.
Inside Mount
To remove the shade, partially lower the shading and use a flat head screwdriver to press the clear tab on the mounting bracket. Rotate the shade to remove.
Outside Mount
Press down on clear tab and then rotate shade to release.
7 Cordless - Tension Adjustment + Upstop Adjustment
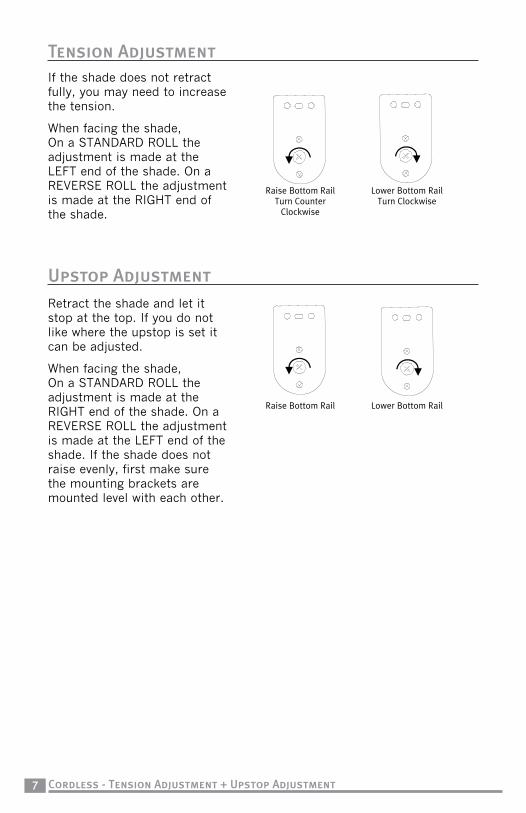
Tension Adjustment
Upstop Adjustment
Raise Bottom RailTurn Counter
Clockwise
Raise Bottom Rail
Lower Bottom RailTurn Clockwise
Lower Bottom Rail
If the shade does not retract fully, you may need to increase the tension.
When facing the shade, On a STANDARD ROLL the adjustment is made at the LEFT end of the shade. On a REVERSE ROLL the adjustment is made at the RIGHT end of the shade.
Retract the shade and let it stop at the top. If you do not like where the upstop is set it can be adjusted.
When facing the shade, On a STANDARD ROLL the adjustment is made at the RIGHT end of the shade. On a REVERSE ROLL the adjustment is made at the LEFT end of the shade. If the shade does not raise evenly, first make sure the mounting brackets are mounted level with each other.
8
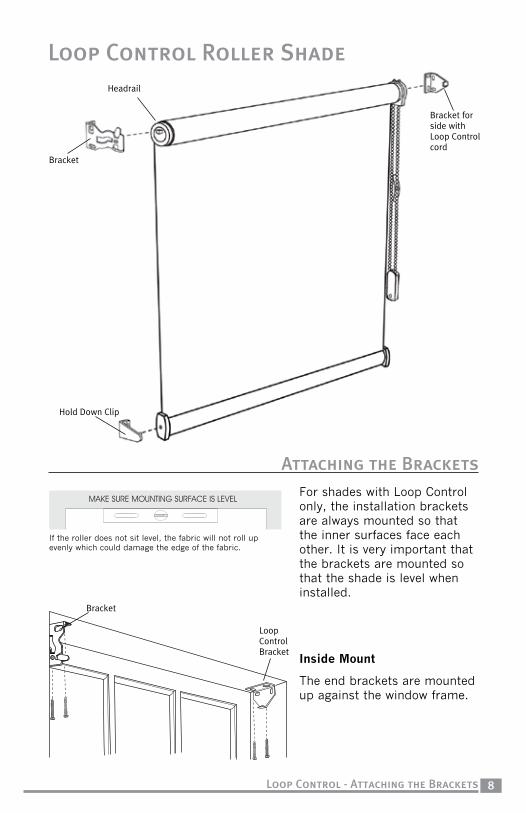
Loop Control Roller Shade
Attaching the Brackets
Loop Control - Attaching the Brackets
If the roller does not sit level, the fabric will not roll up evenly which could damage the edge of the fabric.
Headrail
Bracket
Bracket
Hold Down Clip
Bracket for side with Loop Control cord
Loop Control Bracket
For shades with Loop Control only, the installation brackets are always mounted so that the inner surfaces face each other. It is very important that the brackets are mounted so that the shade is level when installed.
Inside Mount
The end brackets are mounted up against the window frame.
9 Loop Control - Attaching the Brackets
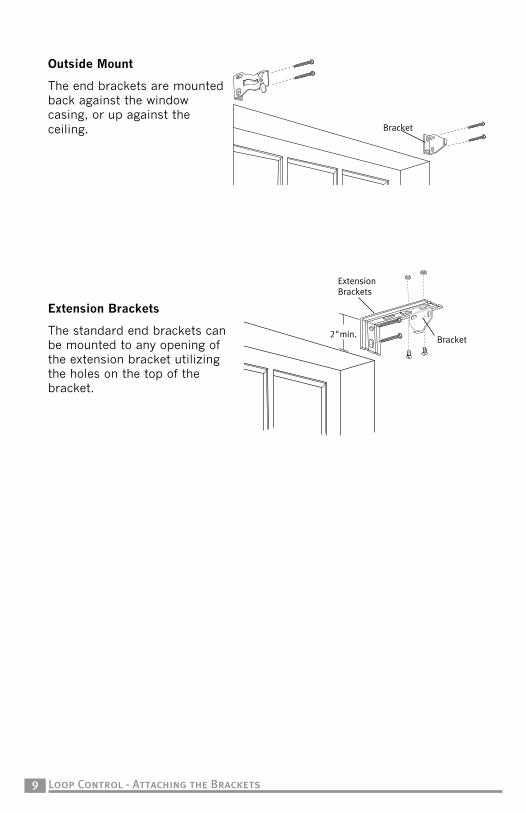
2"min.
Extension Brackets
Bracket
Bracket
Outside Mount
The end brackets are mounted back against the window casing, or up against the ceiling.
Extension Brackets
The standard end brackets can be mounted to any opening of the extension bracket utilizing the holes on the top of the bracket.
10Loop Control - Hanging the Shade
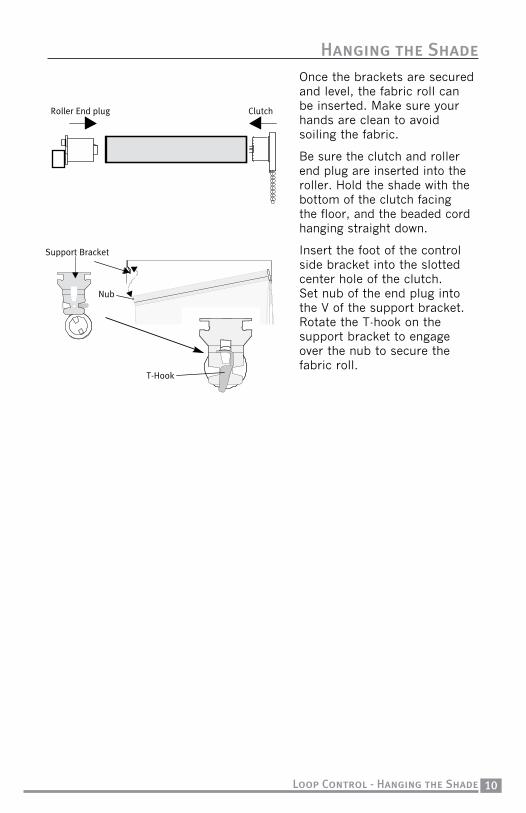
Hanging the Shade
Support Bracket
Nub
ClutchRoller End plug
T-Hook
Once the brackets are secured and level, the fabric roll can be inserted. Make sure your hands are clean to avoid soiling the fabric.
Be sure the clutch and roller end plug are inserted into the roller. Hold the shade with the bottom of the clutch facing the floor, and the beaded cord hanging straight down.
Insert the foot of the control side bracket into the slotted center hole of the clutch. Set nub of the end plug into the V of the support bracket. Rotate the T-hook on the support bracket to engage over the nub to secure the fabric roll.
11 Cassette - Attaching the Brackets
Attaching the Brackets
If the headrail does not sit level, the fabric will not roll up evenly which could damage the edge of the fabric.
Headrail
Bracket
Wedge
Bracket
Extension Bracket
Hold Down Clip
BRACKET CHARTSHADE WIDTH # OF BRACKETS
Up to 40" 2 40" to 72" 3 72" to 84" 4 84" and up 5
Cassette Roller Shade
Inside Mount
For shades with cassette,the end brackets should be located 2" in from each end. Depending on the width of the shade, necessary additional brackets may be evenly spaced between the two end brackets.
The roller brackets can be mounted up against the window frame, or back against the window casing.
12Cassette - Attaching the Brackets + Hanging the Shade + Removing the Shade
Hanging the Shade
Removing the Shades
Headrail
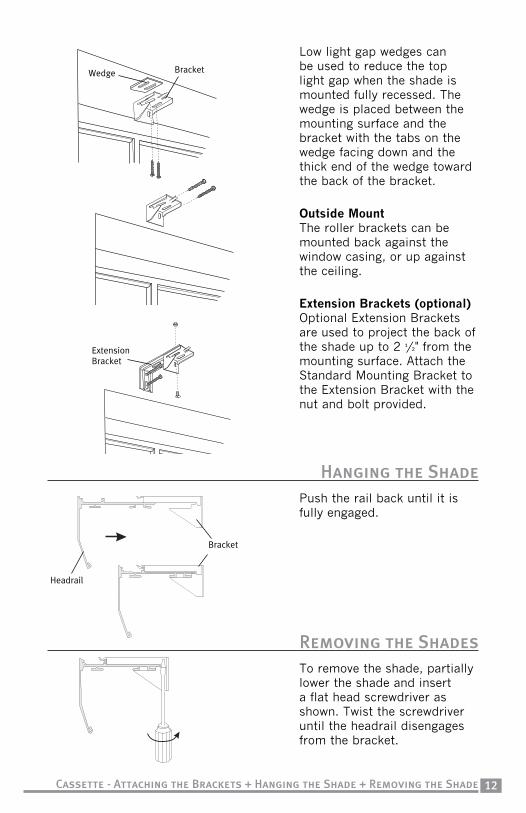
Wedge Bracket
Bracket
Extension Bracket
Low light gap wedges can be used to reduce the top light gap when the shade is mounted fully recessed. The wedge is placed between the mounting surface and the bracket with the tabs on the wedge facing down and the thick end of the wedge toward the back of the bracket.
Outside Mount The roller brackets can be mounted back against the window casing, or up against the ceiling.
Extension Brackets (optional)Optional Extension Brackets are used to project the back of the shade up to 2 1⁄2" from the mounting surface. Attach the Standard Mounting Bracket to the Extension Bracket with the nut and bolt provided.
Push the rail back until it is fully engaged.
To remove the shade, partially lower the shade and insert a flat head screwdriver as shown. Twist the screwdriver until the headrail disengages from the bracket.
13 Install Battery + Tension Device
Installing Tension Device
Installing Battery for Motorized Shades
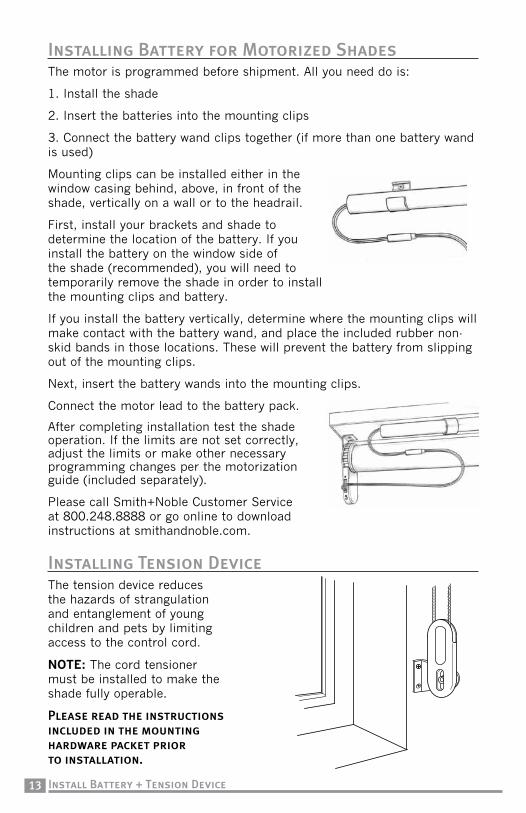
The tension device reduces the hazards of strangulation and entanglement of young children and pets by limiting access to the control cord.
NOTE: The cord tensioner must be installed to make the shade fully operable.
Please read the instructions included in the mounting hardware packet prior to installation.
The motor is programmed before shipment. All you need do is:
1. Install the shade
2. Insert the batteries into the mounting clips
3. Connect the battery wand clips together (if more than one battery wand is used)
Mounting clips can be installed either in the window casing behind, above, in front of the shade, vertically on a wall or to the headrail.
First, install your brackets and shade to determine the location of the battery. If you install the battery on the window side of the shade (recommended), you will need to temporarily remove the shade in order to install the mounting clips and battery.
If you install the battery vertically, determine where the mounting clips will make contact with the battery wand, and place the included rubber non-skid bands in those locations. These will prevent the battery from slipping out of the mounting clips.
Next, insert the battery wands into the mounting clips.
Connect the motor lead to the battery pack.
After completing installation test the shade operation. If the limits are not set correctly, adjust the limits or make other necessary programming changes per the motorization guide (included separately).
Please call Smith+Noble Customer Service at 800.248.8888 or go online to download instructions at smithandnoble.com.
14
Safety
Care + Cleaning
Hold Down Bracket + Skew Adjustment + Safety + Care + Cleaning
Skew Adjustment (if necessary)
Hold Down Brackets (optional)
Hold Down Bracket
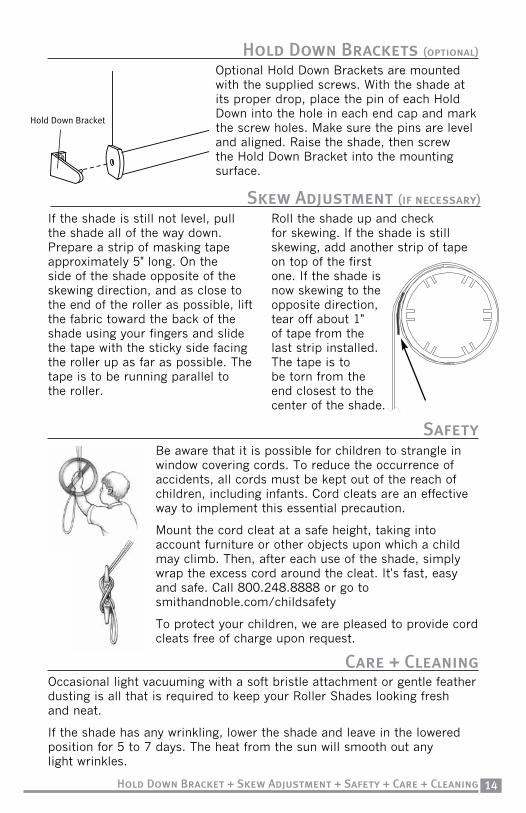
Be aware that it is possible for children to strangle in window covering cords. To reduce the occurrence of accidents, all cords must be kept out of the reach of children, including infants. Cord cleats are an effective way to implement this essential precaution.
Mount the cord cleat at a safe height, taking into account furniture or other objects upon which a child may climb. Then, after each use of the shade, simply wrap the excess cord around the cleat. It's fast, easy and safe. Call 800.248.8888 or go to smithandnoble.com/childsafety
To protect your children, we are pleased to provide cord cleats free of charge upon request.
Occasional light vacuuming with a soft bristle attachment or gentle feather dusting is all that is required to keep your Roller Shades looking fresh and neat.
If the shade has any wrinkling, lower the shade and leave in the lowered position for 5 to 7 days. The heat from the sun will smooth out any light wrinkles.
Optional Hold Down Brackets are mounted with the supplied screws. With the shade at its proper drop, place the pin of each Hold Down into the hole in each end cap and mark the screw holes. Make sure the pins are level and aligned. Raise the shade, then screw the Hold Down Bracket into the mounting surface.
If the shade is still not level, pull the shade all of the way down. Prepare a strip of masking tape approximately 5" long. On the side of the shade opposite of the skewing direction, and as close to the end of the roller as possible, lift the fabric toward the back of the shade using your fingers and slide the tape with the sticky side facing the roller up as far as possible. The tape is to be running parallel to the roller.
Roll the shade up and check for skewing. If the shade is still skewing, add another strip of tape on top of the first one. If the shade is now skewing to the opposite direction, tear off about 1" of tape from the last strip installed. The tape is to be torn from the end closest to the center of the shade.

Warranty
All Smith+Noble shades are designed for a lifetime of trouble-free use and is covered by a limited lifetime warranty. This warranty applies to the original customer/installation with proof of purchase and covers any defects in materials or workmanship provided that the product is
measured and installed according to the product instructions.
In the unlikely event that warranty service is ever needed, simply call Customer Service at 800.248.8888. Our customer service representatives
will arrange for a repair as quickly as possible.
© 2010 Smith+Noble, LLC. All Rights Reserved