step-by-step checklist to flash dd-wrt onto a...
TRANSCRIPT

30/30/30 Reset - The following procedure will clear out the NVRAM and set dd-wrt back to default values:
• With the unit powered on, press and hold the reset button on back of unit for 30 seconds • Without releasing the reset button, unplug the unit and hold reset for another 30 seconds • Plug the unit back in STILL holding the reset button a final 30 seconds (please note that
this step can put Asus devices into recovery mode...see note below!) This procedure should be done BEFORE and AFTER every firmware upgrade/downgrade.
Step-by-step Checklist to Flash DD-WRT onto a Router Pepe Fundora Santiago Hässig Chris Holmes May 26, 2010 Last Revised: June 4, 2010 15:22
1. Downloading DD-WRT Firmware a. Open folder and name it “Firmware” b. Go to http://www.dd-wrt.com/site/support/router-database and type
“WRT160NL” in the search field i. Download “linksys-to-ddwrt-firmware.bin” and save under folder
ii. Download “wrt160nl-firmware.bin” and save under folder 2. (Optional) Confirm a good download by comparing the MD5 hash fingerprint of the firmware
we downloaded with the published checksum a. If using Linux,
i. Open Terminal and type: /usr/bin/openssl md5 /path/to/firmware.bin
ii. Look at the MD5 hash value and compare it to the one shown in http://www.dd-wrt.com/wiki/index.php/Hashes_%26_Checksums
iii. DO NOT flash the firmware until you can verify that the hash is correct! b. Using Windows
i. We can download HashTab (http://beeblebrox.org/hashtab/) ii. Once downloaded, right-click on the downloaded firmware file,
go to Properties > File Hashes tab. c. Look at the MD5 hash value and compare it to the one shown in http://www.dd-
wrt.com/wiki/index.php/Hashes_%26_Checksums 3. Flashing “Killer” with Web GUI
a. Log into the GUI i. To use the Web interface, you will need to have Javascript enabled with any
security restrictions disabled. Use Internet Explorer, preferably. ii. Type in the IP address of the router (typically, the default is 192.168.1.1,
especially with Linksys) into the address bar of your browser. iii. You will be prompted for username and password (If your router already has a
DD-WRT versions starting with 2006-Feb-28, the default username is root. Prior versions have a blank username by default. For Linksys firmware, the default username can be left blank or set to anything. For both DD-WRT and Linksys firmware, the default password is admin. Search online for other defaults on other routers).
b. Upload the “Killer” Firmware i. Do a hard reset aka 30/30/30.
ii. Go to Web GUI.
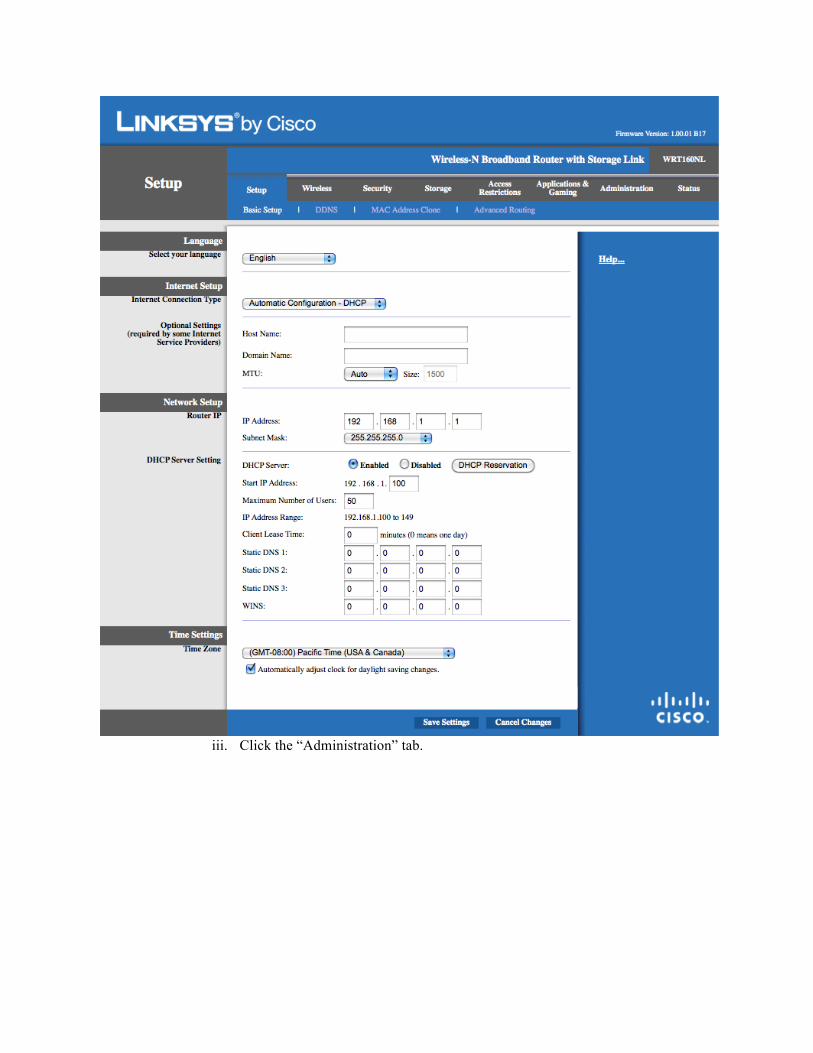
iii. Click the “Administration” tab.
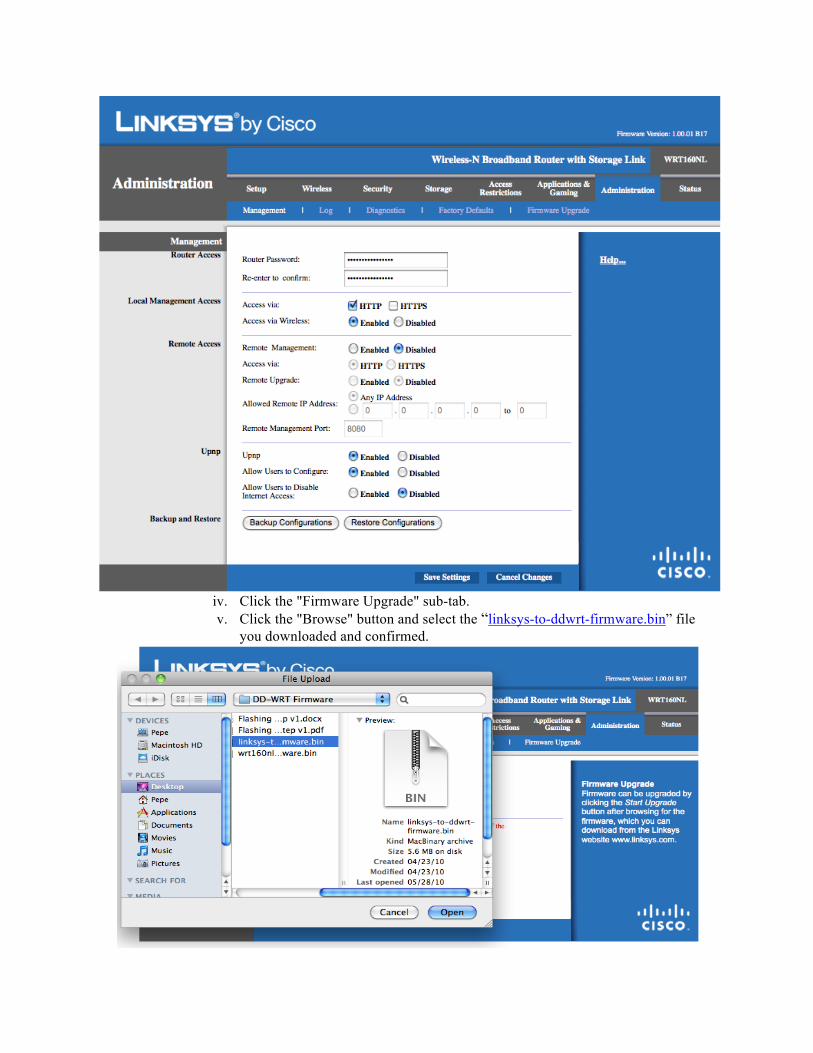
iv. Click the "Firmware Upgrade" sub-tab. v. Click the "Browse" button and select the “linksys-to-ddwrt-firmware.bin” file
you downloaded and confirmed.
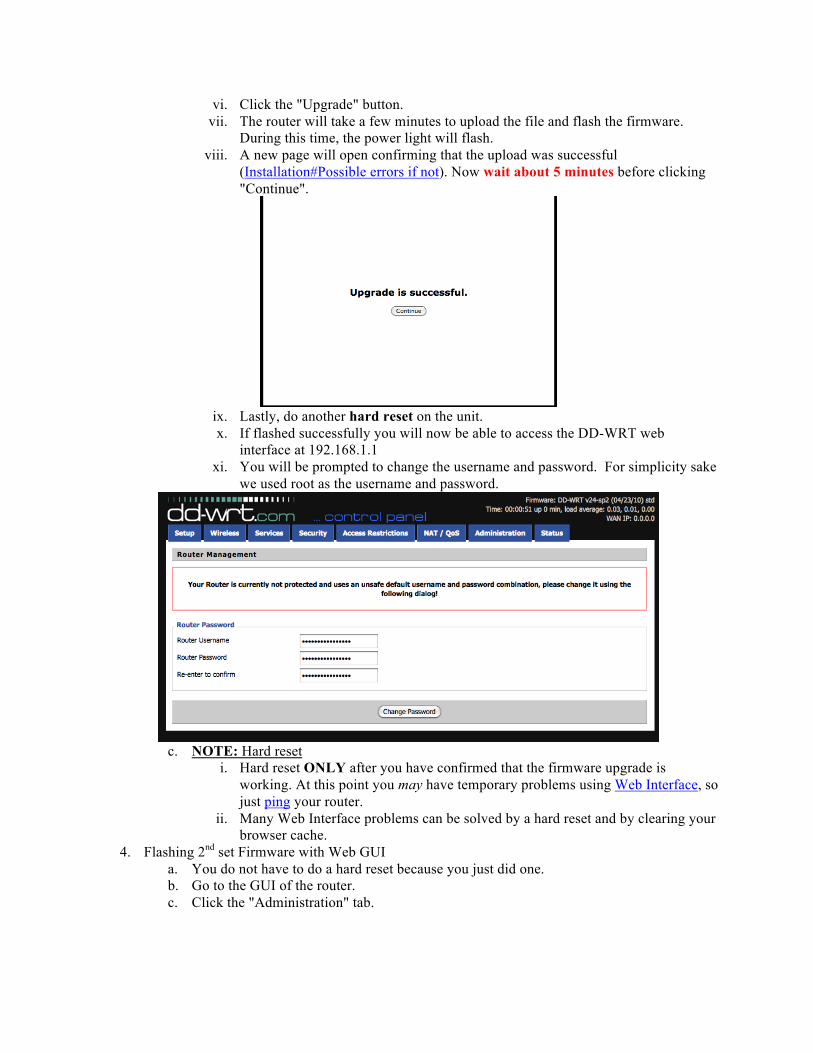
vi. Click the "Upgrade" button. vii. The router will take a few minutes to upload the file and flash the firmware.
During this time, the power light will flash. viii. A new page will open confirming that the upload was successful
(Installation#Possible errors if not). Now wait about 5 minutes before clicking "Continue".
ix. Lastly, do another hard reset on the unit. x. If flashed successfully you will now be able to access the DD-WRT web
interface at 192.168.1.1 xi. You will be prompted to change the username and password. For simplicity sake
we used root as the username and password.
c. NOTE: Hard reset
i. Hard reset ONLY after you have confirmed that the firmware upgrade is working. At this point you may have temporary problems using Web Interface, so just ping your router.
ii. Many Web Interface problems can be solved by a hard reset and by clearing your browser cache.
4. Flashing 2nd set Firmware with Web GUI a. You do not have to do a hard reset because you just did one. b. Go to the GUI of the router. c. Click the "Administration" tab.

d. Click the "Firmware Upgrade" sub-tab. e. Choose the option to Reset to Defaults after flashing.
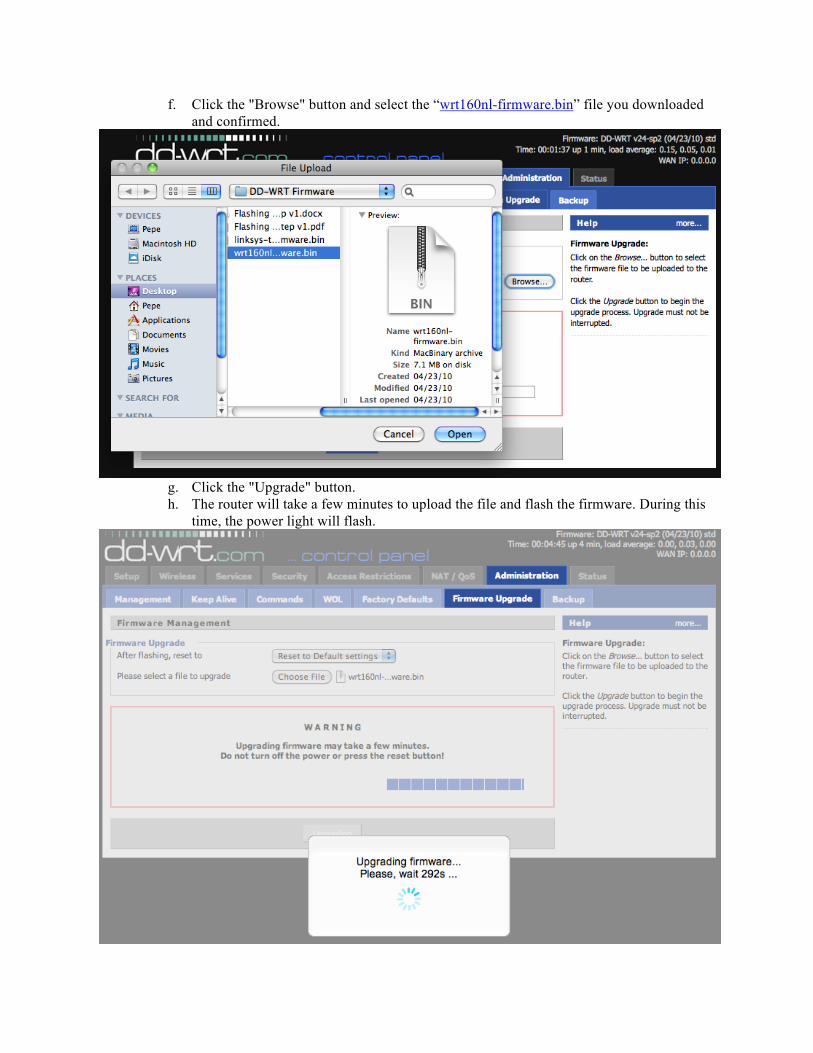
f. Click the "Browse" button and select the “wrt160nl-firmware.bin” file you downloaded and confirmed.
g. Click the "Upgrade" button. h. The router will take a few minutes to upload the file and flash the firmware. During this
time, the power light will flash.
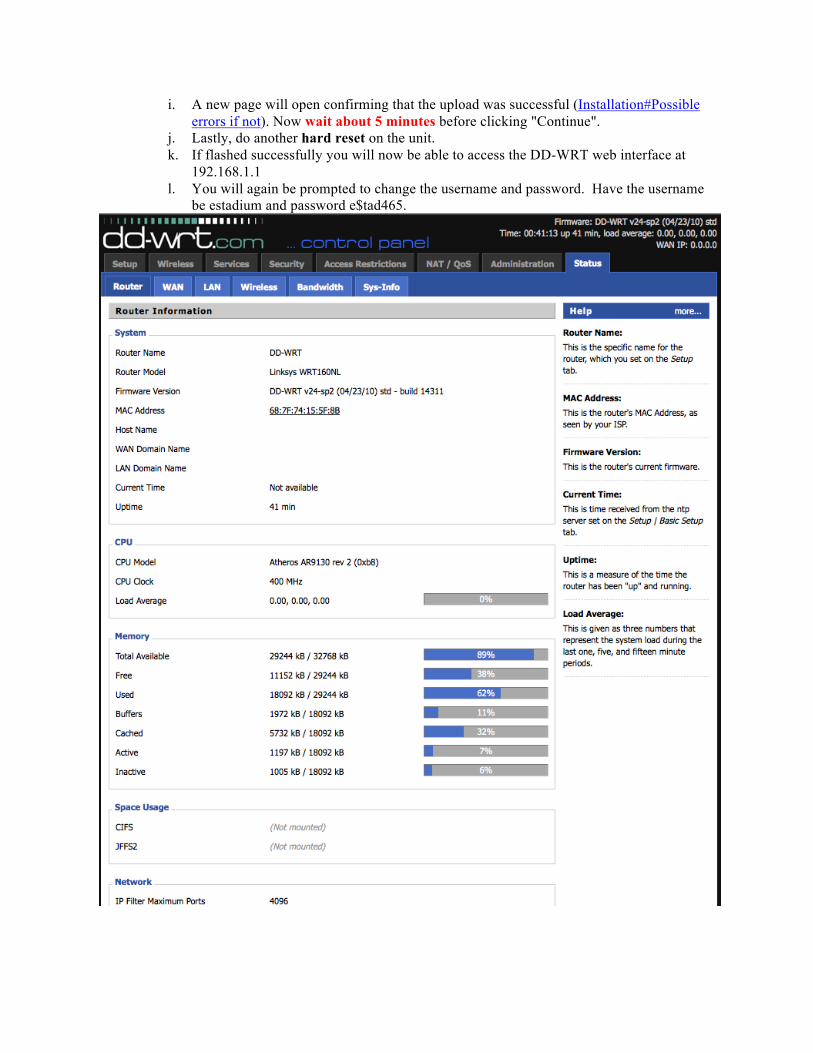
i. A new page will open confirming that the upload was successful (Installation#Possible errors if not). Now wait about 5 minutes before clicking "Continue".
j. Lastly, do another hard reset on the unit. k. If flashed successfully you will now be able to access the DD-WRT web interface at
192.168.1.1 l. You will again be prompted to change the username and password. Have the username
be estadium and password e$tad465.
5. Troubleshooting steps: Possible Errors with Uploading Firmware a. [Comment added 2007/03/27 by staylor] Or, you won't be at the DD-WRT web
interface I have a WRT54g v1.1 (also with WRT54gl v1.1), flashing with DD-WRT v23 sp2. I waited the requisite number of minutes, and my "Wireless-G" badge lit up (a good sign), but when I clicked "Continue" after the upload was successful, I did not get to the DD-WRT web interface. Nor was the device ping-able.
b. [Comment added 1/04/08 by jwebste1] I can confirm Staylor's comment above for a brand new store bought WRT350N (had to soft reset the router to get the mini install to become accessible on 192.168.1.1. Holding down the reset button for 30 seconds (leaving the power cable connected) re-booted the router, and all was fine thereafter. If the above doesn't result in a successful load of the DD-WRT web interface, try a "ipconfig -renew" in a command prompt window.
c. [Comment added 12/22/09 by clock] After initially attempting the install of the "kill" file for my router (as described in my router's Hardware-specific section) my browser kept providing an error message. Finally, I thought the router had been bricked. A quick look at the peacock thread showed that pinging the router and receiving a TTL of 100 meant that, while the router appeared broken, it was ready for the installation of the dd-wrt .bin file for my router. Using the tftp.exe discussed at the peacock and at [[11]], I was able to install the dd-wrt firmware without much more fuss.
d. Again, the best method is to look first at your Hardware-specific guidelines and refer to those instructions, keeping in mind the #Precautions outlined above.
e. During the firmware upload process, if your router says something similar to, "Upload Failed," you may be using the wrong version of DD-WRT. This may occur through the web GUI if you use a *wrt54g.bin version when you should have selected the generic version instead. It may also be that your router requires the mini version to be flashed before the full version. Be sure to double check to make sure you have the right version (as described in the first section of this page - clock). If you are certain that your router is supported and that you have the correct firmware, you may simply need to use a different web browser (e.g. from Firefox to Internet Explorer).
f. After clicking Upgrade when upgrading firmware from one DD-WRT version to another, if you are using Firefox there may be a problem with the upload. In this instance the screen fades to white with a countdown timer and is followed by a Connection Reset message shortly after. After this you cannot access the Web GUI again, and a router reboot will result in a flashing power light (WRT54GL is the case in point). You can recover from this and use a different browser (e.g. Internet Explorer) to upload the firmware.
g. If logging in fails with the default username/password, you can reset the password with a Reset And Reboot.