steel armor: blaze of war - graviteamgraviteam.com/ap-star/tools/tank_manual_(eng).pdf · choose...
TRANSCRIPT
Steel Armor: Blaze of War
User Manualver. 2015.06.18
Graviteam ®
TABLE OF CONTENTS
LIST OF ACRONYMS 4
1 INSTALLATION 5 1.1 System Requirements 5 1.2 Additional Software 5 1.3 Game options 6 1.4 Uninstallation 6 1.5 Technical support 6 1.6 Addons and patches 7 1.7 Saving a game 9
2 GAME DESCRIPTION 10 2.1 Afghanistan 1979-1989 12 2.2 Iran 1980-1988 14 2.3 Angola 1975—2002 18
3 TANKS 21 3.1 T-62 21 3.2 M60A1 28
4 QUICK START 35 4.1 Peculiarities of firing from the T-62 tank 49 4.2 Range determination using the mil-relation formula 51
2
5 COMBAT INTERFACE 53 5.1 Active Defense 60 5.2 Direction indicator 61 5.3 Tank commander 62 5.4 Tank gunner 67 5.5 Tank driver 71 5.6 Tank loader 75 5.7 Tactical elements 76 5.8 Deployment of forces and initial orders 78
6 REFERENCES 85 6.1 The graduation of reticles for optical devices of T-62 tank 85 6.2 The graduation of reticles for optical devices of M60A1 tank 87 6.3 Range estimation tables 90 6.4 Tanks weak spots 92
3

LIST OF ACRONYMS
AA Anti-aircraftAPC Armored Personnel CarrierIFV Infantry Fighting VehicleFAPLA People's Armed Forces for the Liberation of AngolaFCS Fire Control SystemMRLS Multiple Launch Rocket SystemPSM Planetary steering mechanismSADF South African Defense forcesSAR South African RepublicUNITA National Union for the Total Independence of Angola
4
1 INSTALLATION
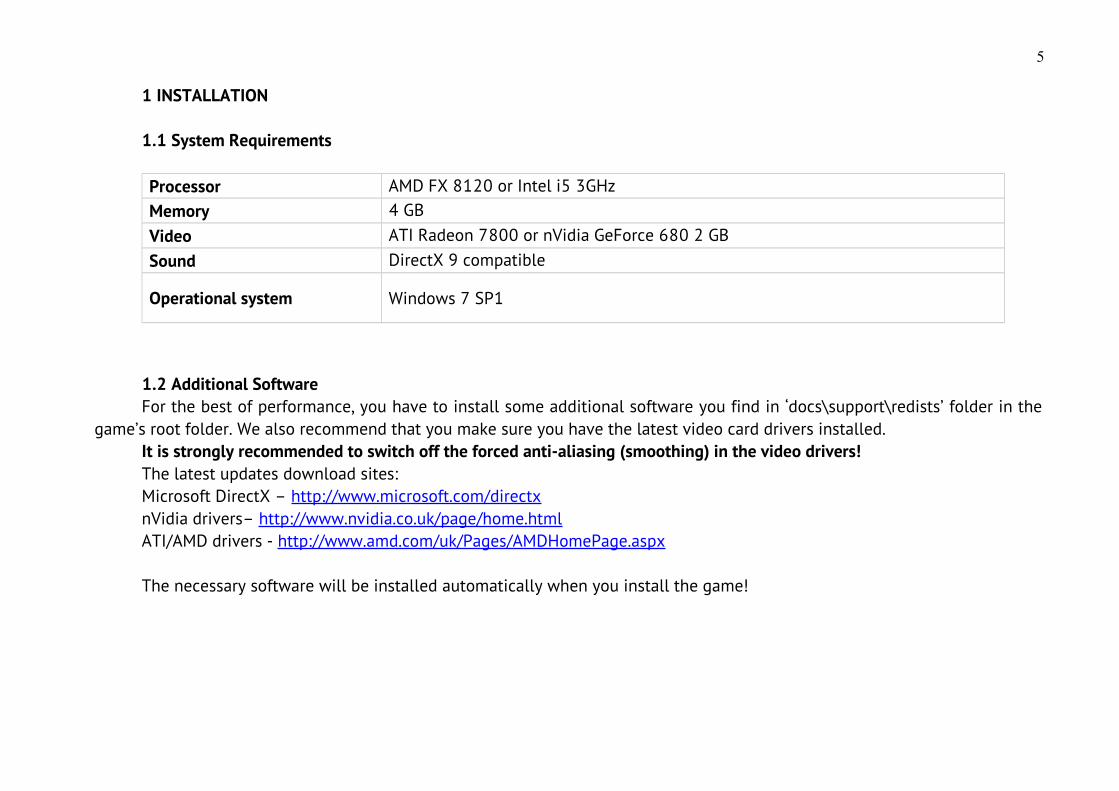
1.1 System Requirements
Processor AMD FX 8120 or Intel i5 3GHzMemory 4 GBVideo ATI Radeon 7800 or nVidia GeForce 680 2 GBSound DirectX 9 compatible
Operational system Windows 7 SP1
1.2 Additional SoftwareFor the best of performance, you have to install some additional software you find in ‘docs\support\redists’ folder in the
game’s root folder. We also recommend that you make sure you have the latest video card drivers installed.It is strongly recommended to switch off the forced anti-aliasing (smoothing) in the video drivers!The latest updates download sites: Microsoft DirectX – http://www.microsoft.com/directxnVidia drivers– http://www.nvidia.co.uk/page/home.htmlATI/AMD drivers - http://www.amd.com/uk/Pages/AMDHomePage.aspx
The necessary software will be installed automatically when you install the game!
5
1.3 Game optionsAntialiasing. 3D rendering method used in the game does not allow HW antialiasing. Please turn off forced antialiasing in
the driver options (set Application Choice). You can turn on in-game antialiasing: choose 2.06 (Smooth Graphics) and 2.16(Sharpness) game options.
With 2.06 option on, the visible edges look a bit smoother. 2.16 option increases the sharpness of the image. Smoothingwill be turned off if option 2.07 (High Dynamic Range) turned off or blocked if the video card doesn’t support Pixel Shadersversion 3.0.
Screen Resolution. 2.01 option allows to set screen resolution* (full screen mode only), with 2.02 option you can set 3D buffer size. Current desktop’s resolution is highlighted with yellow 6.03 option turns on full screen mode*. 3D buffer sizeseriously affects the game performance: for GeForce 7600/6600 and Radeon 1800/1600 cards the buffer size should notexceed 1024-1280 points in width. With buffer size lesser than the screen, the graphics get blurry.
1.4 UninstallationTo uninstall the game, please open Control Panel and find Add\Remove programs. Choose “Steel Armor: Blaze of War”
and click Remove. You also can remove the game through Start\Programs\Steel Armor: Blaze of War\Uninstall.
1.5 Technical support
Developer's website http://graviteam.com
Forum/Support http://graviteam.com/forum/index.php?board=11.0
* Is not recommended
6
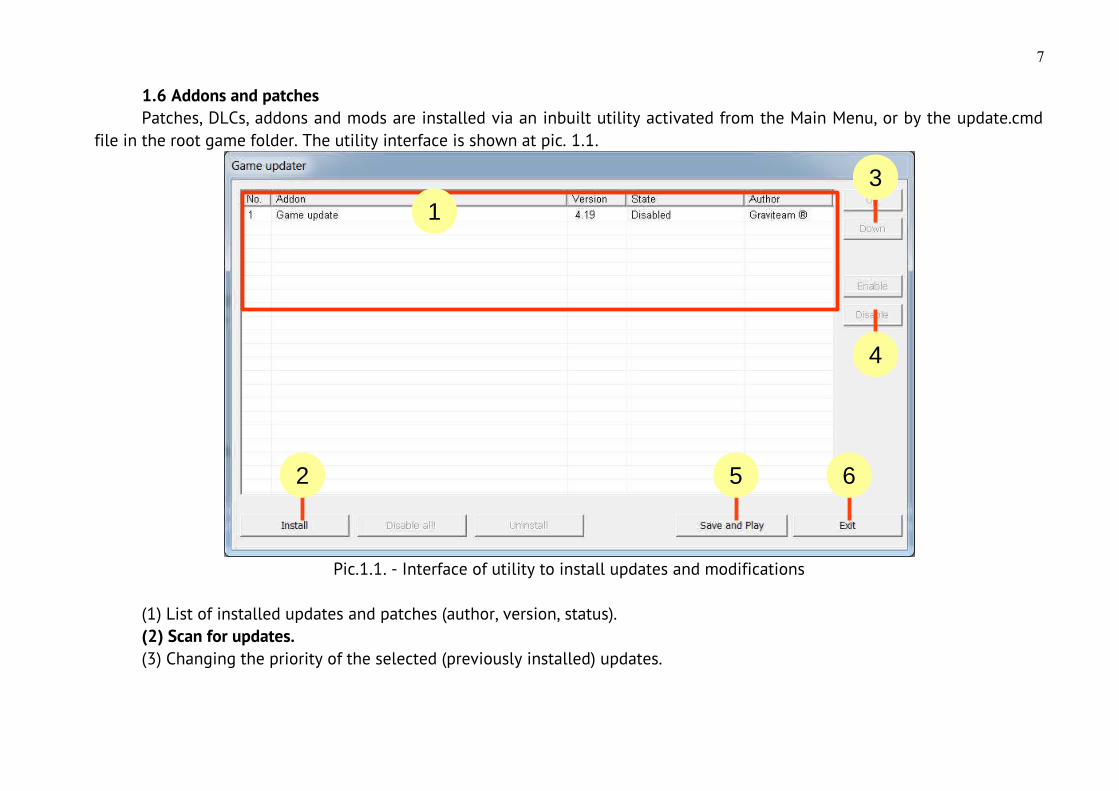
1.6 Addons and patchesPatches, DLCs, addons and mods are installed via an inbuilt utility activated from the Main Menu, or by the update.cmd
file in the root game folder. The utility interface is shown at pic. 1.1.
Pic.1.1. - Interface of utility to install updates and modifications
(1) List of installed updates and patches (author, version, status).(2) Scan for updates.(3) Changing the priority of the selected (previously installed) updates.
7
1
2
3
4
5 6
(4) Disable or enable the previously installed update (without remove).(5) Save all changes and run the game.(6) Exit without saving changes (not recommended).
Update priorities sort from top down. The main game is of the lowest priority. You can use several different updateschanging the same game resources and assets. In case the game can’t work correctly after an update installation, please turnthe update off. Each of the updates has its own folder, and its resources never mix with the core game resources, as well as withother updates’ resources.
Updates are installed into “data\mtc80\<update name>” folder in the root game folder. The user must have the rights tochange the folder.
Please Remember: when you install an update, turn it on/off, or change their order, all profles’ saved battles are deleted! Folder “data\mtc80\dev_updates” in the root folder is for developer’s updates and patches only! Please do not install your
updates into this folder!
NOTE! System updates (published by the game developers) cannot be turned on/off, only removed.
NOTE! Before removing an update, please turn it off and start the Update Utility.
8
1.7 Saving a gameIn Operational Mode, your progress is saved automatically in the “users\profiles\<profile>\<operation name>.opsave”
folder after each phase. The “ .opsave_” file saves the start position of the current turn In Tactical Mode, you can save the gamewhile deploying your troops (as well as in the actual battle). To save during a tactical battle, exit to the Game Menu and pressSave and Exit button. The game will be saved in the “users\profiles” folder. In Quick Battle or Operational mode, you can saveonce for a profile. A diskette icon appears on the Quick Battle button or in the Operations table. To continue your operation (oryour Quick Battle), left-click on the diskette icon. To remove a saved game, right-click the diskette icon. Please notice that anysaved game is deleted when:
- a new operation starts; - you right-click the diskette icon in the Main Menu; - Quick Battle begins; - you save again; - the battle is over (Statistics Mode is turned on).
The save file takes up to 500Mb of free space on HDD/SSD so please make sure you have at least 1Gb free before youstart the game.
9
2 GAME DESCRIPTION
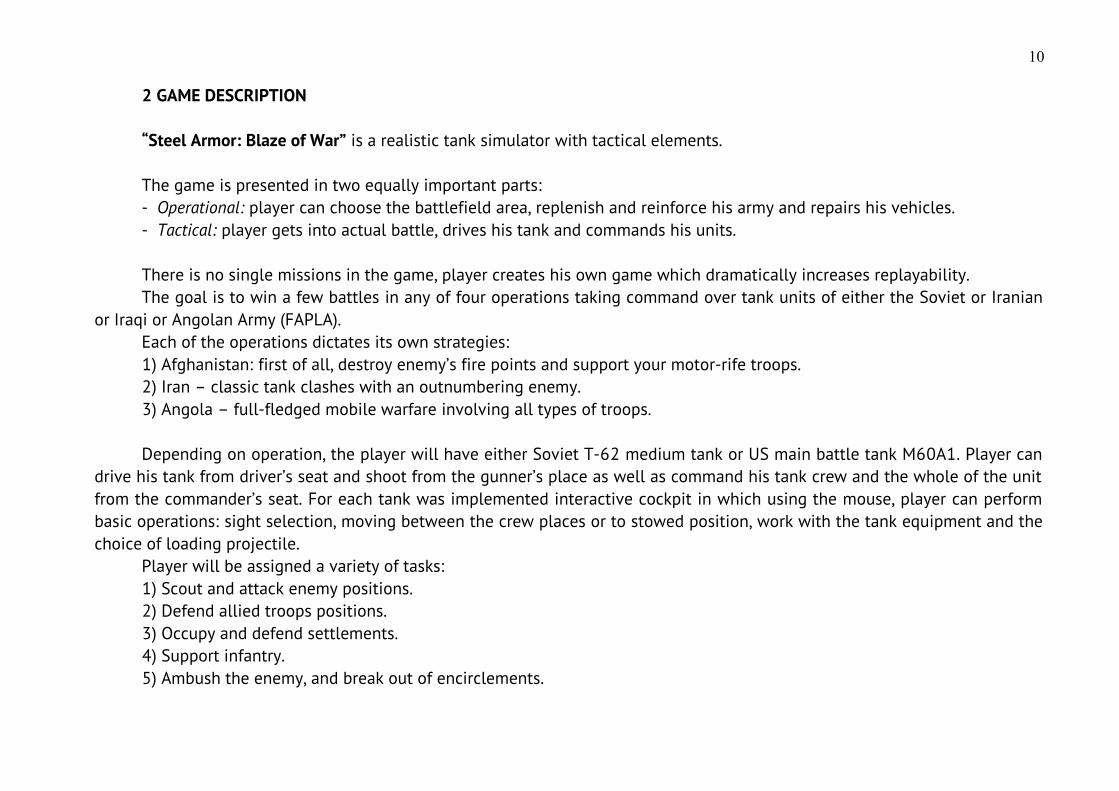
“Steel Armor: Blaze of War” is a realistic tank simulator with tactical elements.
The game is presented in two equally important parts: - Operational: player can choose the battlefield area, replenish and reinforce his army and repairs his vehicles.- Tactical: player gets into actual battle, drives his tank and commands his units.
There is no single missions in the game, player creates his own game which dramatically increases replayability.The goal is to win a few battles in any of four operations taking command over tank units of either the Soviet or Iranian
or Iraqi or Angolan Army (FAPLA).Each of the operations dictates its own strategies: 1) Afghanistan: first of all, destroy enemy’s fire points and support your motor-rife troops.2) Iran – classic tank clashes with an outnumbering enemy.3) Angola – full-fledged mobile warfare involving all types of troops.
Depending on operation, the player will have either Soviet T-62 medium tank or US main battle tank M60A1. Player candrive his tank from driver’s seat and shoot from the gunner’s place as well as command his tank crew and the whole of the unitfrom the commander’s seat. For each tank was implemented interactive cockpit in which using the mouse, player can performbasic operations: sight selection, moving between the crew places or to stowed position, work with the tank equipment and thechoice of loading projectile.
Player will be assigned a variety of tasks: 1) Scout and attack enemy positions.2) Defend allied troops positions.3) Occupy and defend settlements.4) Support infantry.5) Ambush the enemy, and break out of encirclements.
10
Player can complete his tasks either commanding a single tank (tank platoon) or commanding more units in the TacticalMap mode. Each battle brings to player's crew and his troops experience points and (probably) awards after a battle, StatisticsMode turns on, and player can check his results, see detailed report of his tank’s and units’ shooting performance and the list ofsustained hits.
11
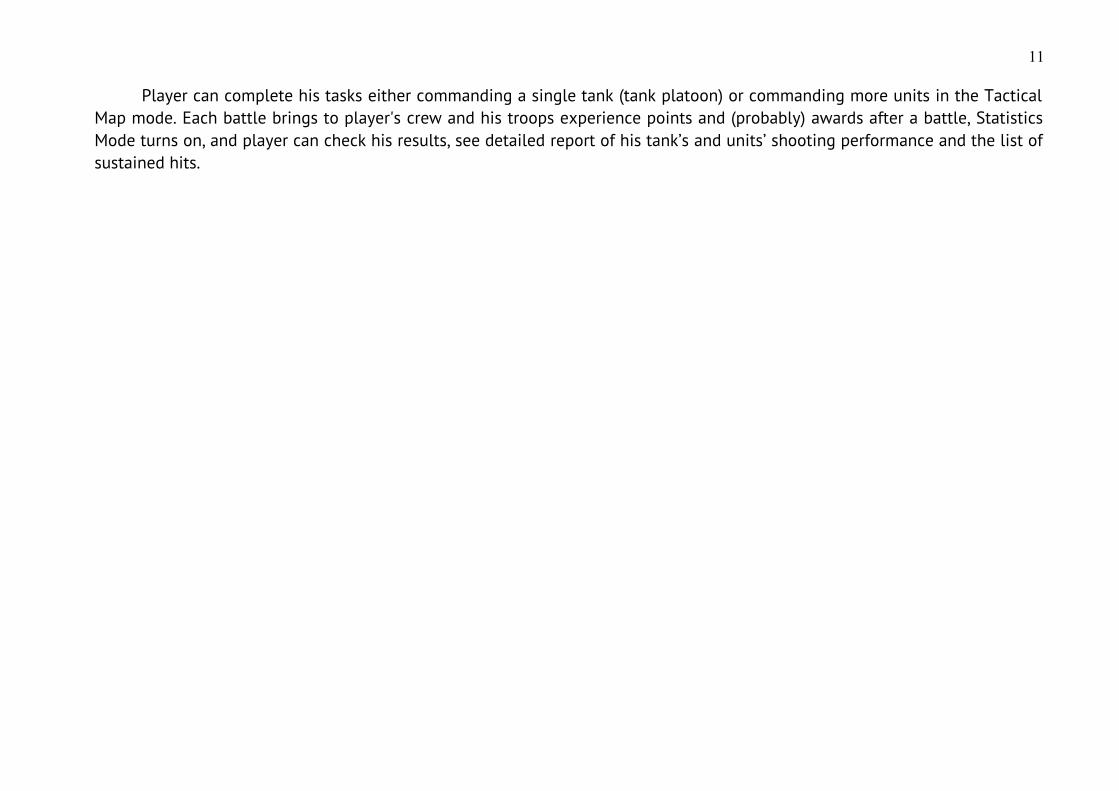
2.1 Afghanistan 1979-1989The 40th Army brought to Afghanistan three motor-rife divisions including following tank corps: the 24th Guard Tank
Regiment of the 5th Guard Motor-Rife Division; 285th Tank Regiment of the 108th Motor-Rife Division, and the 234th TankRegiment of the 201st Motor-Rife Division. Some motor-rife regiments and brigades had T-62 tank battalions of their own.
Tanks had a hard time in Afghanistan: the land was very hard to navigate, and the missions were very much unusual.Tanks served as mobile fire points at block stations, as well as guarded marching columns: a few tanks equipped with mineploughs served as a movement protection unit, and the rest of them moved along the column. If attacked, the tanks left the roadand covered automobiles which drove away from the dangerous place as fast as they could.
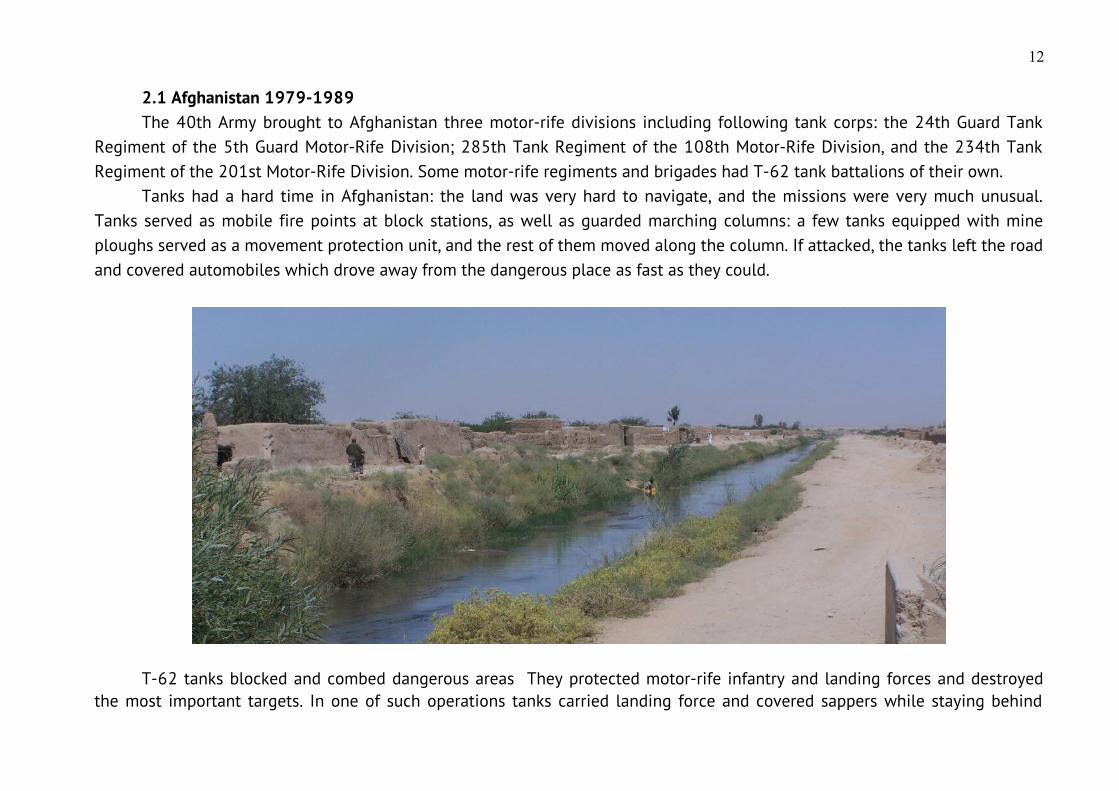
T-62 tanks blocked and combed dangerous areas They protected motor-rife infantry and landing forces and destroyedthe most important targets. In one of such operations tanks carried landing force and covered sappers while staying behind
12
them. The tanks destroyed enemy with guns and machineguns, and after that troopers combed spaces between them. In a fewdays, the whole area was cleared and loads of weapons and ammunition were captured. No vehicle or personnel losses weresustained although the enemy shot dozens of grenades.
13
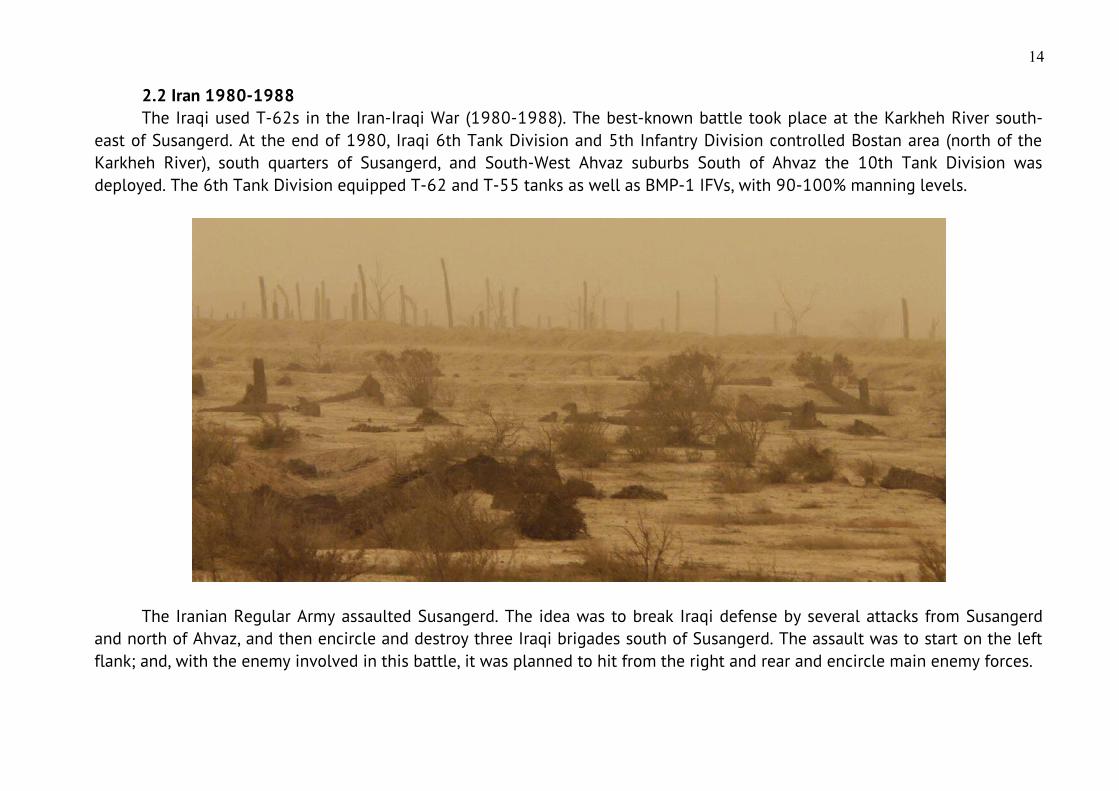
2.2 Iran 1980-1988The Iraqi used T-62s in the Iran-Iraqi War (1980-1988). The best-known battle took place at the Karkheh River south-
east of Susangerd. At the end of 1980, Iraqi 6th Tank Division and 5th Infantry Division controlled Bostan area (north of theKarkheh River), south quarters of Susangerd, and South-West Ahvaz suburbs South of Ahvaz the 10th Tank Division wasdeployed. The 6th Tank Division equipped T-62 and T-55 tanks as well as BMP-1 IFVs, with 90-100% manning levels.
The Iranian Regular Army assaulted Susangerd. The idea was to break Iraqi defense by several attacks from Susangerdand north of Ahvaz, and then encircle and destroy three Iraqi brigades south of Susangerd. The assault was to start on the leftflank; and, with the enemy involved in this battle, it was planned to hit from the right and rear and encircle main enemy forces.
14
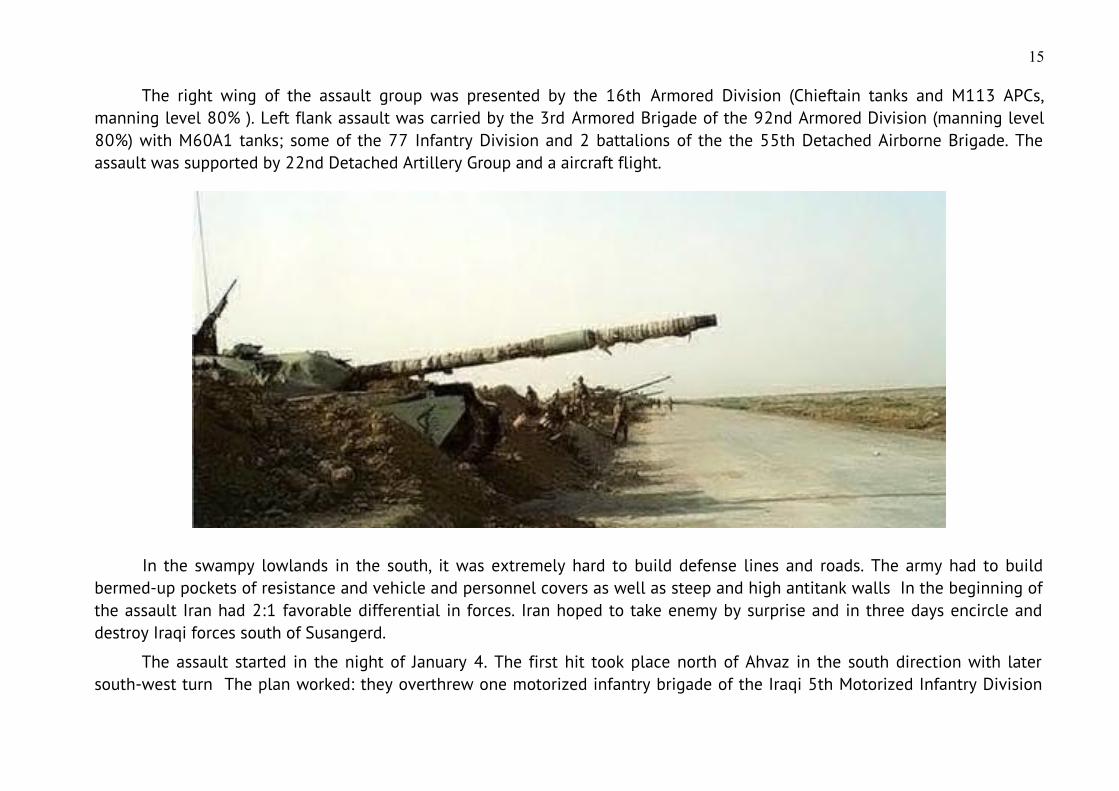
The right wing of the assault group was presented by the 16th Armored Division (Chieftain tanks and M113 APCs,manning level 80% ). Left flank assault was carried by the 3rd Armored Brigade of the 92nd Armored Division (manning level80%) with M60A1 tanks; some of the 77 Infantry Division and 2 battalions of the the 55th Detached Airborne Brigade. Theassault was supported by 22nd Detached Artillery Group and a aircraft flight.
In the swampy lowlands in the south, it was extremely hard to build defense lines and roads. The army had to buildbermed-up pockets of resistance and vehicle and personnel covers as well as steep and high antitank walls In the beginning ofthe assault Iran had 2:1 favorable differential in forces. Iran hoped to take enemy by surprise and in three days encircle anddestroy Iraqi forces south of Susangerd.
The assault started in the night of January 4. The first hit took place north of Ahvaz in the south direction with latersouth-west turn The plan worked: they overthrew one motorized infantry brigade of the Iraqi 5th Motorized Infantry Division
15

and sent to combat a Armored Brigade of the 10th Armored Division. Nevertheless, late on January 6 (after the South-West turnwas made) the 5th Motor-Rife Infantry Division set a fierce defense, and Iranian forces had to stop.
Early on January 7 the Iraqi forces made a heavy counter offensive. They attacked the 16th Armored Brigade on the roadfrom all directions: the 6th Tank Division hit from West and South, and the 10th Detached Tank Brigade of the Republic Guardhit from South-East and East. Two vanguards from Iranian armor brigades tried to form an East to West line but most of thetanks got stuck in the mud and couldn’t take a desired position or avoid fire. Due to the low-visibility conditions (there were rainand fog), tanks opened fire at enemy vehicles from less than 1000 m distance. Such shots were critical for Iranian Chieftains as well as for Iraqi T-62s. Due to the bad weather and the rapid movements of the troops, the aviation was all but useless.
16
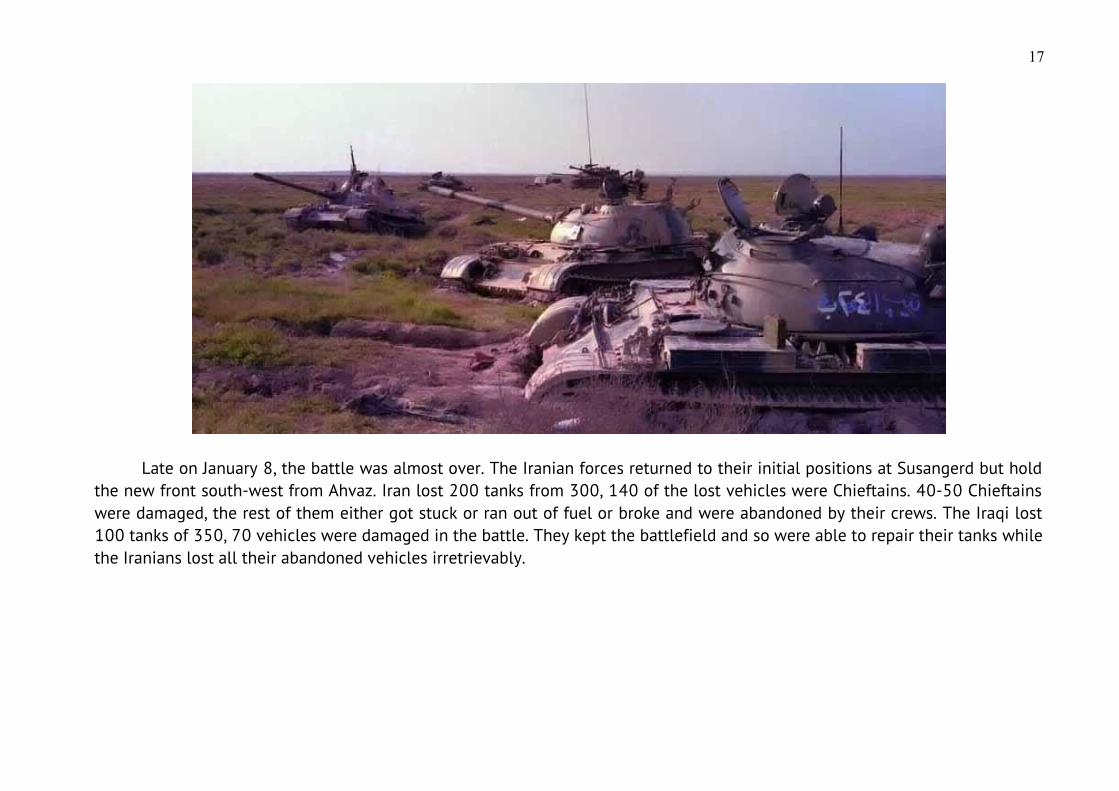
Late on January 8, the battle was almost over. The Iranian forces returned to their initial positions at Susangerd but holdthe new front south-west from Ahvaz. Iran lost 200 tanks from 300, 140 of the lost vehicles were Chieftains. 40-50 Chieftainswere damaged, the rest of them either got stuck or ran out of fuel or broke and were abandoned by their crews. The Iraqi lost100 tanks of 350, 70 vehicles were damaged in the battle. They kept the battlefield and so were able to repair their tanks whilethe Iranians lost all their abandoned vehicles irretrievably.
17
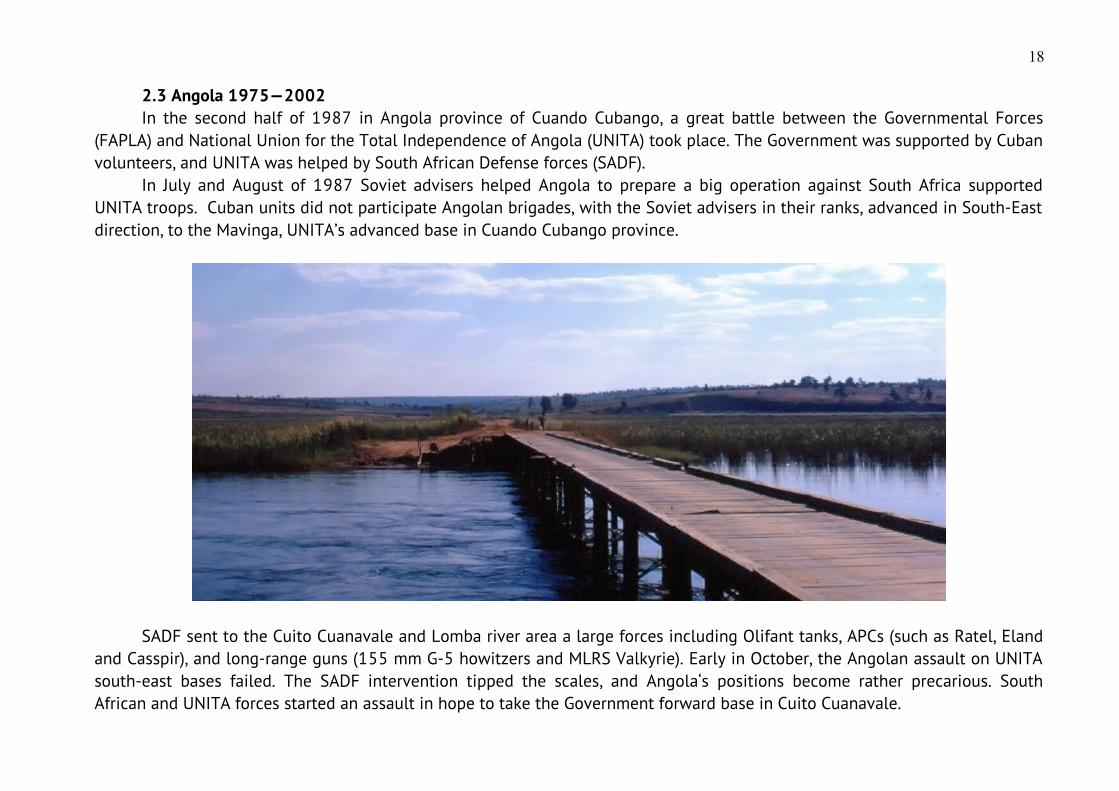
2.3 Angola 1975—2002 In the second half of 1987 in Angola province of Cuando Cubango, a great battle between the Governmental Forces
(FAPLA) and National Union for the Total Independence of Angola (UNITA) took place. The Government was supported by Cubanvolunteers, and UNITA was helped by South African Defense forces (SADF).
In July and August of 1987 Soviet advisers helped Angola to prepare a big operation against South Africa supportedUNITA troops. Cuban units did not participate Angolan brigades, with the Soviet advisers in their ranks, advanced in South-Eastdirection, to the Mavinga, UNITA’s advanced base in Cuando Cubango province.
SADF sent to the Cuito Cuanavale and Lomba river area a large forces including Olifant tanks, APCs (such as Ratel, Elandand Casspir), and long-range guns (155 mm G-5 howitzers and MLRS Valkyrie). Early in October, the Angolan assault on UNITAsouth-east bases failed. The SADF intervention tipped the scales, and Angola‘s positions become rather precarious. SouthAfrican and UNITA forces started an assault in hope to take the Government forward base in Cuito Cuanavale.
18
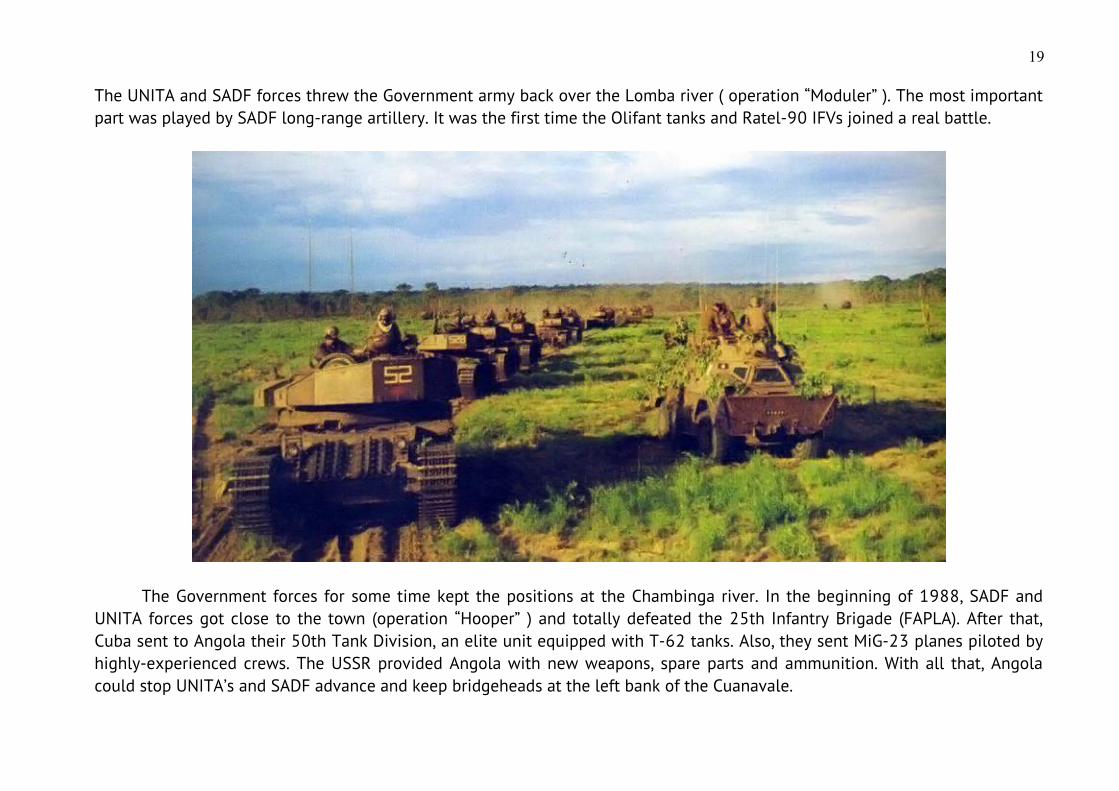
The UNITA and SADF forces threw the Government army back over the Lomba river ( operation “Moduler” ). The most importantpart was played by SADF long-range artillery. It was the first time the Olifant tanks and Ratel-90 IFVs joined a real battle.
The Government forces for some time kept the positions at the Chambinga river. In the beginning of 1988, SADF andUNITA forces got close to the town (operation “Hooper” ) and totally defeated the 25th Infantry Brigade (FAPLA). After that,Cuba sent to Angola their 50th Tank Division, an elite unit equipped with T-62 tanks. Also, they sent MiG-23 planes piloted byhighly-experienced crews. The USSR provided Angola with new weapons, spare parts and ammunition. With all that, Angolacould stop UNITA’s and SADF advance and keep bridgeheads at the left bank of the Cuanavale.
19
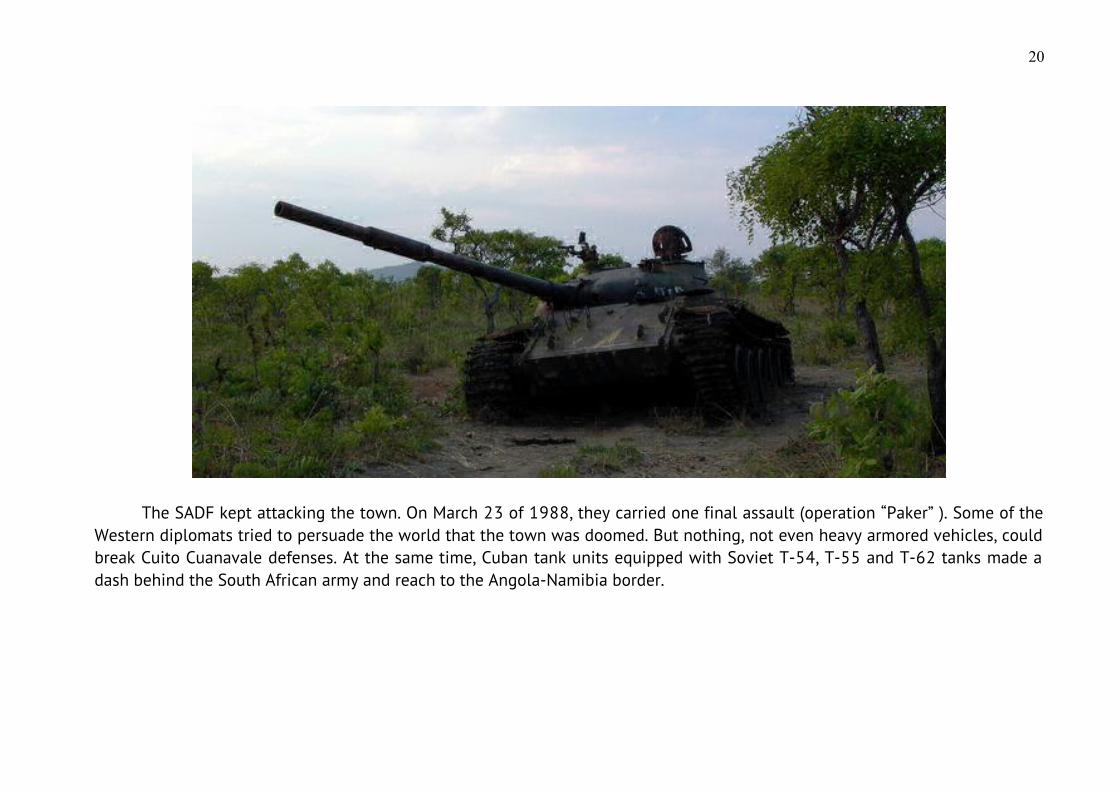
The SADF kept attacking the town. On March 23 of 1988, they carried one final assault (operation “Paker” ). Some of theWestern diplomats tried to persuade the world that the town was doomed. But nothing, not even heavy armored vehicles, couldbreak Cuito Cuanavale defenses. At the same time, Cuban tank units equipped with Soviet T-54, T-55 and T-62 tanks made adash behind the South African army and reach to the Angola-Namibia border.
20
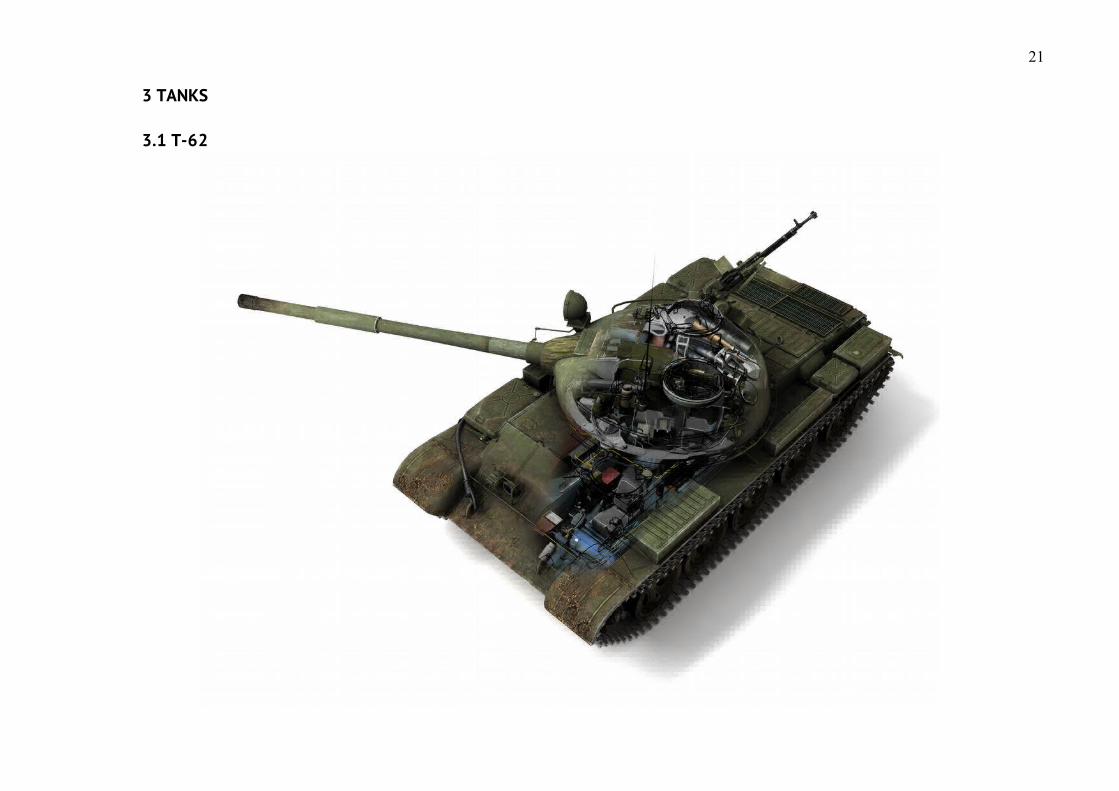
3 TANKS
3.1 T-62
21
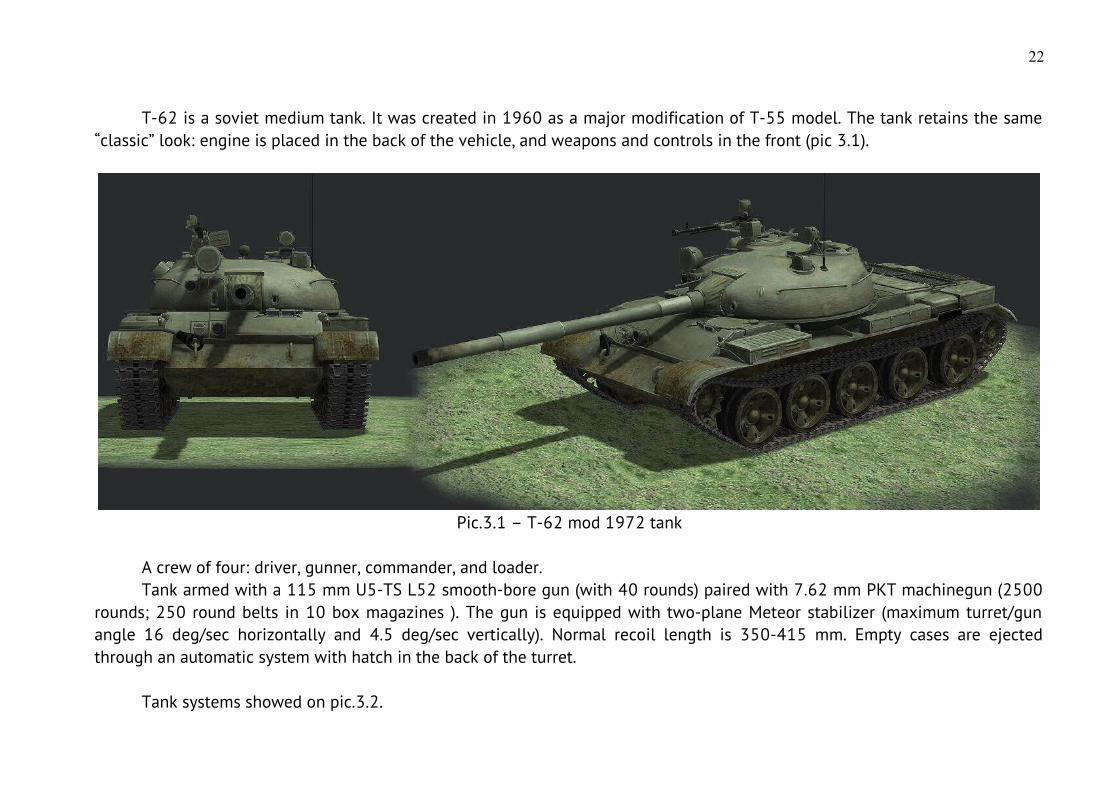
T-62 is a soviet medium tank. It was created in 1960 as a major modification of T-55 model. The tank retains the same“classic” look: engine is placed in the back of the vehicle, and weapons and controls in the front (pic 3.1).
Pic.3.1 – T-62 mod 1972 tank
A crew of four: driver, gunner, commander, and loader.Tank armed with a 115 mm U5-TS L52 smooth-bore gun (with 40 rounds) paired with 7.62 mm PKT machinegun (2500
rounds; 250 round belts in 10 box magazines ). The gun is equipped with two-plane Meteor stabilizer (maximum turret/gunangle 16 deg/sec horizontally and 4.5 deg/sec vertically). Normal recoil length is 350-415 mm. Empty cases are ejectedthrough an automatic system with hatch in the back of the turret.
Tank systems showed on pic.3.2.
22
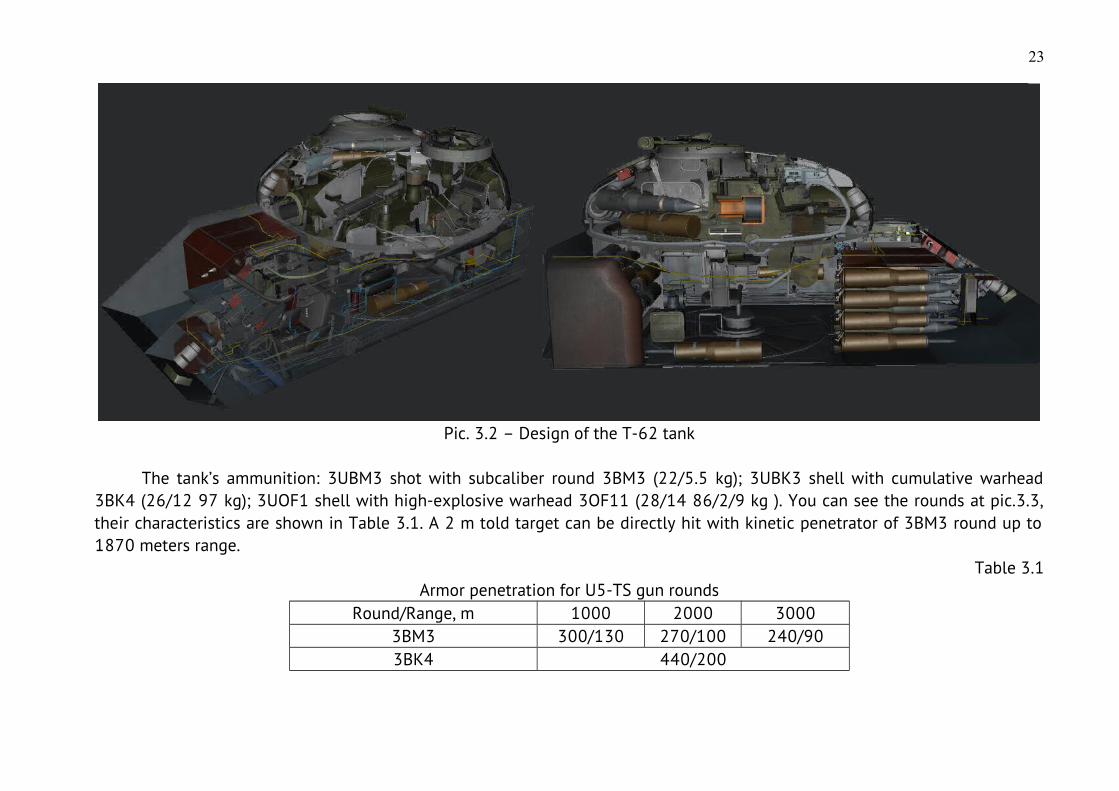
Pic. 3.2 – Design of the T-62 tank
The tank’s ammunition: 3UBM3 shot with subcaliber round 3BM3 (22/5.5 kg); 3UBK3 shell with cumulative warhead3BK4 (26/12 97 kg); 3UOF1 shell with high-explosive warhead 3OF11 (28/14 86/2/9 kg ). You can see the rounds at pic.3.3,their characteristics are shown in Table 3.1. A 2 m told target can be directly hit with kinetic penetrator of 3BM3 round up to1870 meters range.
Table 3.1Armor penetration for U5-TS gun rounds
Round/Range, m 1000 2000 30003BM3 300/130 270/100 240/903BK4 440/200
23
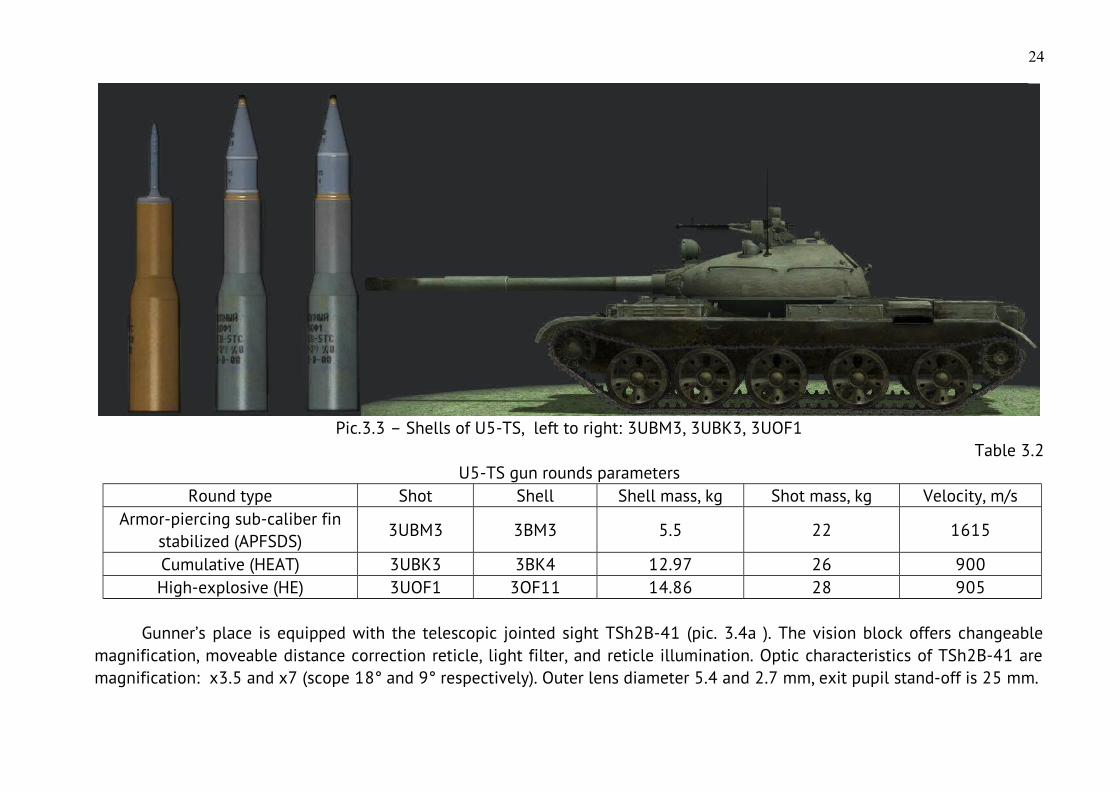
Pic.3.3 – Shells of U5-TS, left to right: 3UBM3, 3UBK3, 3UOF1Table 3.2
U5-TS gun rounds parametersRound type Shot Shell Shell mass, kg Shot mass, kg Velocity, m/s
Armor-piercing sub-caliber finstabilized (APFSDS)
3UBM3 3BM3 5.5 22 1615
Cumulative (HEAT) 3UBK3 3BK4 12.97 26 900High-explosive (HE) 3UOF1 3OF11 14.86 28 905
Gunner’s place is equipped with the telescopic jointed sight TSh2B-41 (pic. 3.4a ). The vision block offers changeablemagnification, moveable distance correction reticle, light filter, and reticle illumination. Optic characteristics of TSh2B-41 aremagnification: x3.5 and x7 (scope 18° and 9° respectively). Outer lens diameter 5.4 and 2.7 mm, exit pupil stand-off is 25 mm.
24
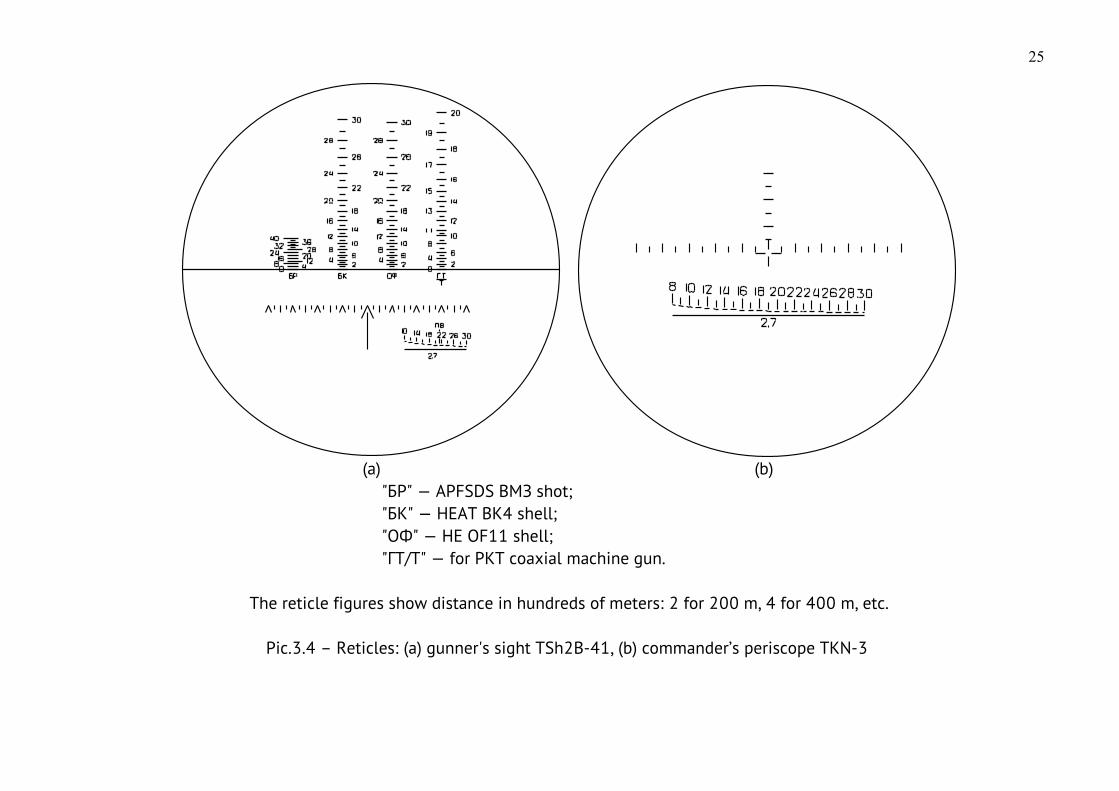
(a) (b)"БР" — APFSDS BMЗ shot;"БК" — HEAT BK4 shell;"ОФ" — HE OF11 shell;"ГТ/Т" — for PKT coaxial machine gun.
The reticle figures show distance in hundreds of meters: 2 for 200 m, 4 for 400 m, etc.
Pic.3.4 – Reticles: (a) gunner's sight TSh2B-41, (b) commander’s periscope TKN-3
25
To fight effectively in low-light conditions, the tank is equipped periscope sight with electro-optical converter TPN-1-41-11 with х5.5 magnifier and scope of 6°. The sight is used along with searchlight L-2G with infrared filter which gives nightvision possibility up to 800 m. The Tank Commander can survey the battlefield through periscope far-range gauge sight TKN-3(pic. 3.4b) as well as use binoculars.
Since 1972, 12.7 mm DShKM machine gun is mounted on the top part of the turret. The machine gun is mounted insidethe turret near the loader’s hatch. It is equipped with optic collimator sight K-10T. The ammunition load is 300 rounds (six 50-round belts in six boxes). DShKM can shoot B-30 armor-piercing bullets, B-32 armor-piercing incendiary bullets, and armor-piercing incendiary tracer BZT bullets. The machinegun is used to destroy enemy personnel and non-armored vehicles. B-32bullet’s armor-piercing ability is 14 mm at 500 m distance (at normal), so the bullet can be used against light-armored vehicles.
The armor is the same for the whole of the turret. The maximum armor thickness (the front of the turret) is 211 mm with17 degrees slope. For T-62 armor details, see Table 3.3 .
Table 3.3T-62 Armor
Part Front, mm Side, mm Back, mm Top/Bottom, mmTurret 211/17° 160-104 65 30/86°
Upper hull 100/30° 80/90° 45/60° 15Lower hull 100/55° 80/90° 45/17° 20
The tank is equipped with target designation gear (commander’s seat), directional gyroscope GPK-59, and R-123 radio.The engine is V-55V 580 hp diesel, the 37.5 ton tank can make up to 50 kmph. The engine gets max 2000 rpm (230kilogrammeter torsion torque under 1200-1400 rpm ). The fuel system consists of four internal tanks (675 l). The consumptionrate is 174 g/hp per hour. The chassis has five road wheels per side. T-62 tanks were equipped with T54/55 tracks with eithersilent blocks or metal hinges. The tracks used pin toothing. The tracks’ were 580 mm in width, track pitch 137 mm. Metal cater-pillar consist from 96 tracks, while rubber block cater-pillar consisted of 97 tracks.
The tank was used in Afghanistan by the Soviet forces (the 5th Guard Motor-Rife Division and 24th Guard Tank regiment)and was as well used by the Angolan Army (the 50th Cuban Tank Division) and the Iraqi forces (the 6th Tank Division and 10thDetached Tank Brigade ).
26
27
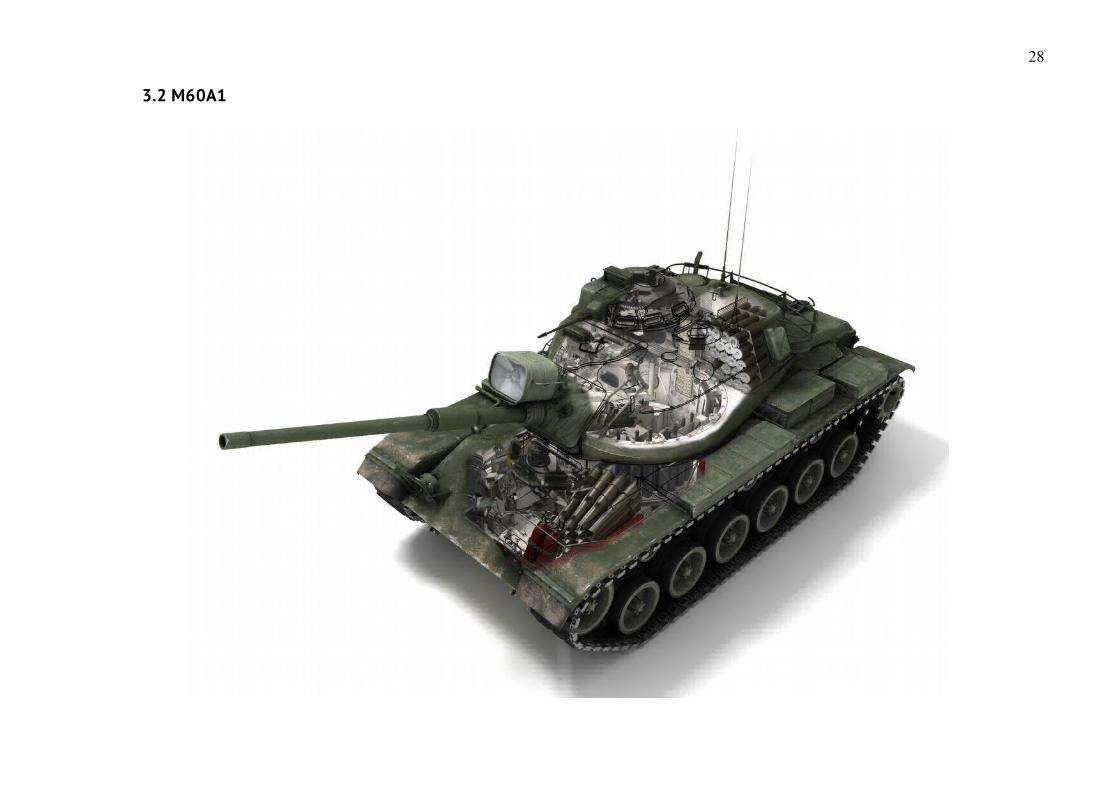
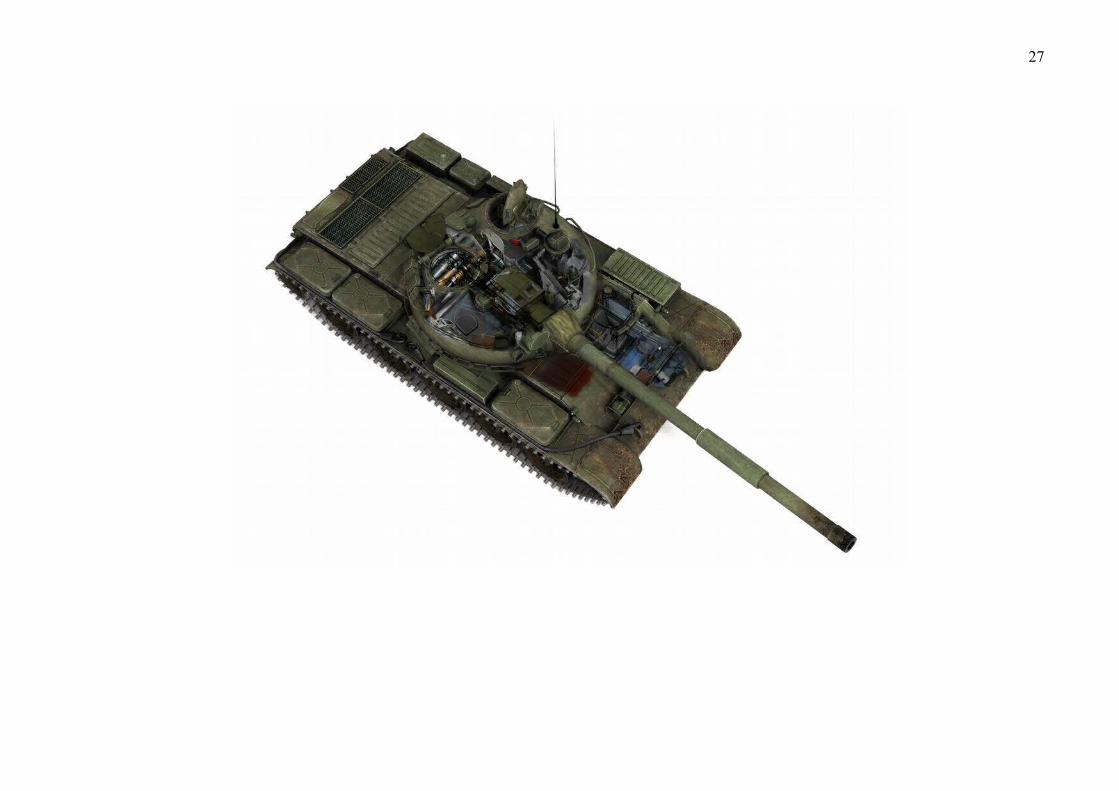
3.2 M60A1
28
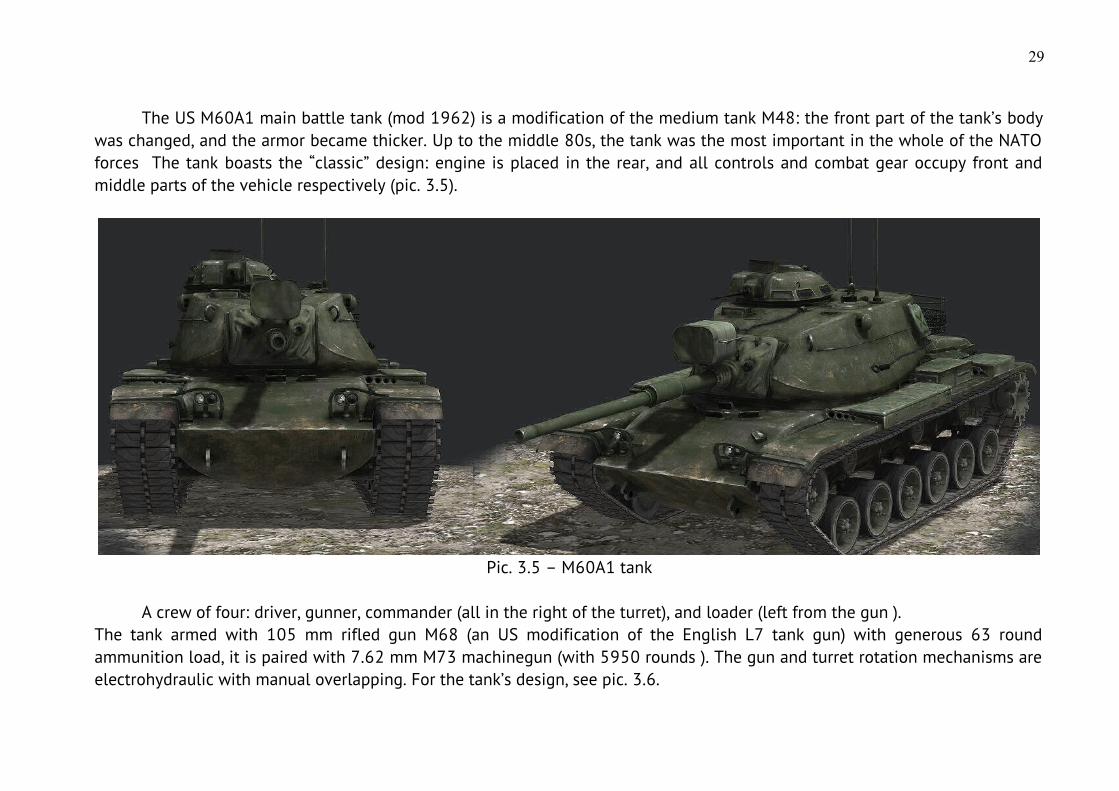
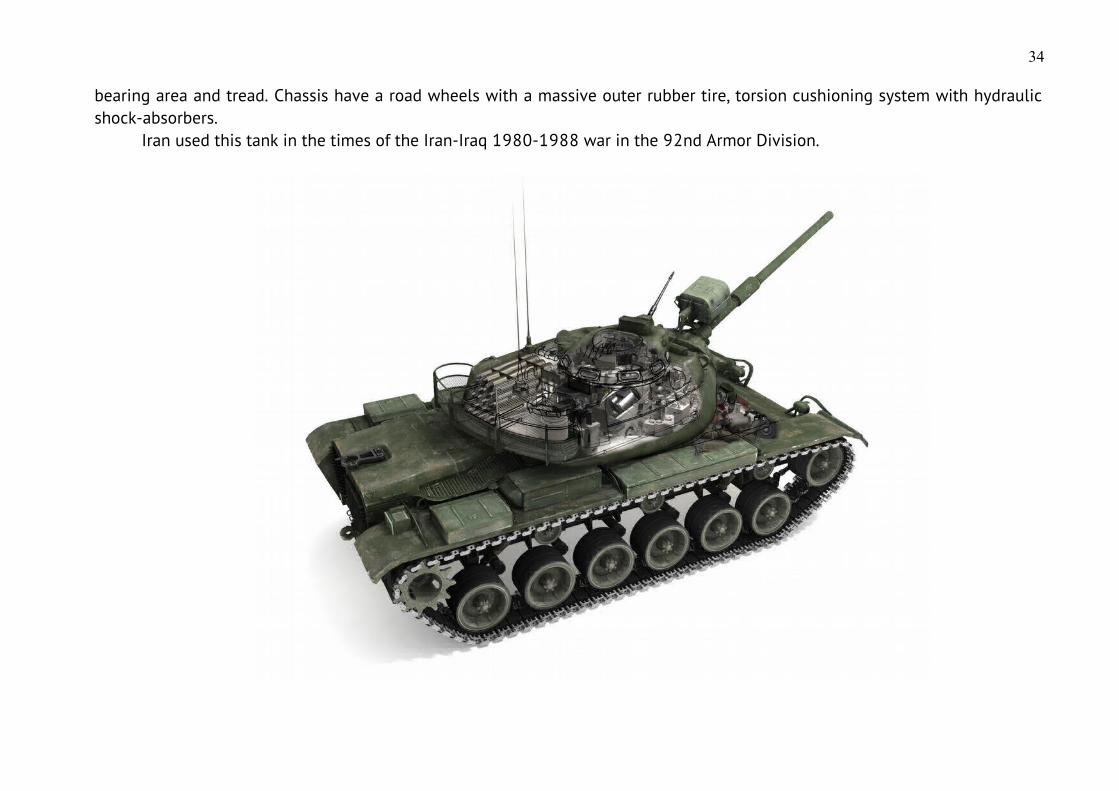
The US M60A1 main battle tank (mod 1962) is a modification of the medium tank M48: the front part of the tank’s bodywas changed, and the armor became thicker. Up to the middle 80s, the tank was the most important in the whole of the NATOforces The tank boasts the “classic” design: engine is placed in the rear, and all controls and combat gear occupy front andmiddle parts of the vehicle respectively (pic. 3.5).
Pic. 3.5 – M60A1 tank
A crew of four: driver, gunner, commander (all in the right of the turret), and loader (left from the gun ).The tank armed with 105 mm rifled gun M68 (an US modification of the English L7 tank gun) with generous 63 roundammunition load, it is paired with 7.62 mm M73 machinegun (with 5950 rounds ). The gun and turret rotation mechanisms areelectrohydraulic with manual overlapping. For the tank’s design, see pic. 3.6.
29
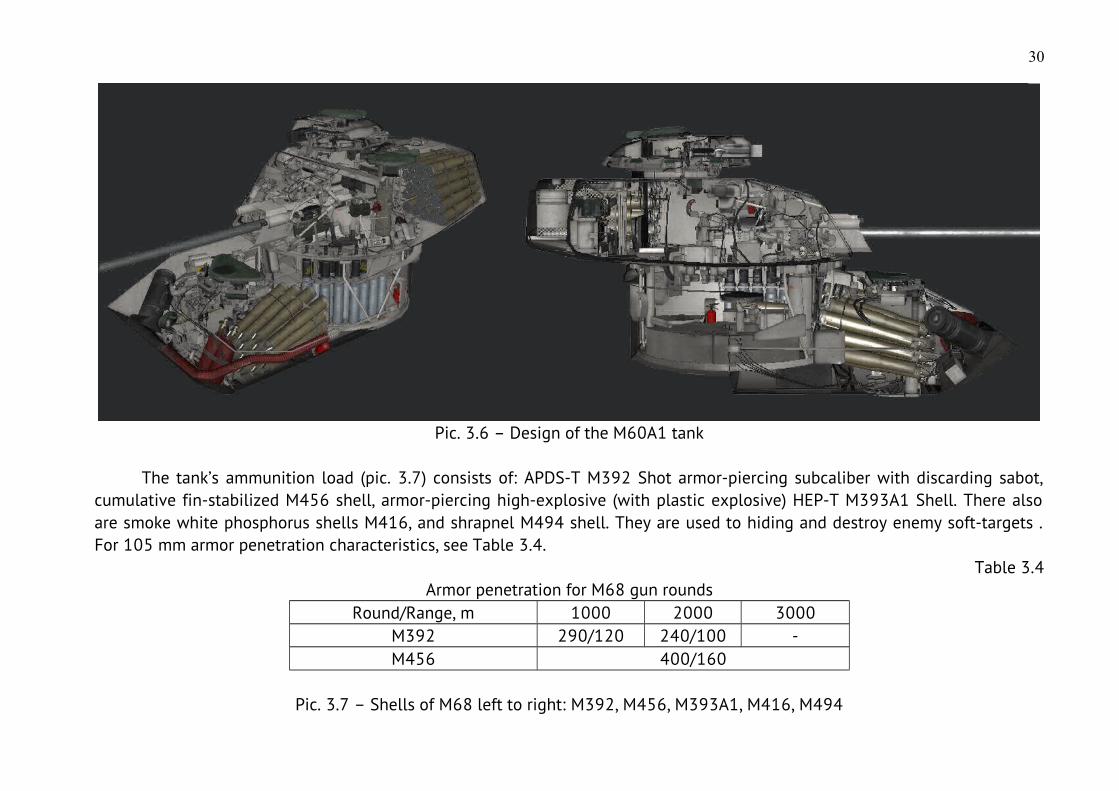
Рic. 3.6 – Design of the M60A1 tank
The tank’s ammunition load (pic. 3.7) consists of: APDS-T M392 Shot armor-piercing subcaliber with discarding sabot,cumulative fin-stabilized M456 shell, armor-piercing high-explosive (with plastic explosive) HEP-T M393A1 Shell. There alsoare smoke white phosphorus shells M416, and shrapnel M494 shell. They are used to hiding and destroy enemy soft-targets .For 105 mm armor penetration characteristics, see Table 3.4.
Table 3.4Armor penetration for M68 gun rounds
Round/Range, m 1000 2000 3000M392 290/120 240/100 -М456 400/160
Pic. 3.7 – Shells of M68 left to right: M392, M456, M393A1, M416, M494
30

Table 3.5M68 gun rounds parameters
Round type Shot Shell Shell mass, kgShot mass,
kgVelocity, m/s
Armor-piercing subcaliber,discarding sabot (APDS)
APDS-T M392 Shot M392 5.78 18.57 1478
Cumulative (HEAT) HEAT-T M456 Shell M456 10.15 21.74 1173Armor-piercing High Explosive,
plastic (HEP)HEP-T M393A1 Shell M393A1 11.23 21.16 732
Smoke WP-T M416 Shell M416 11.40 20.61 732Canister APERS-T M494 Shell М494 14.04 24.92 823
31
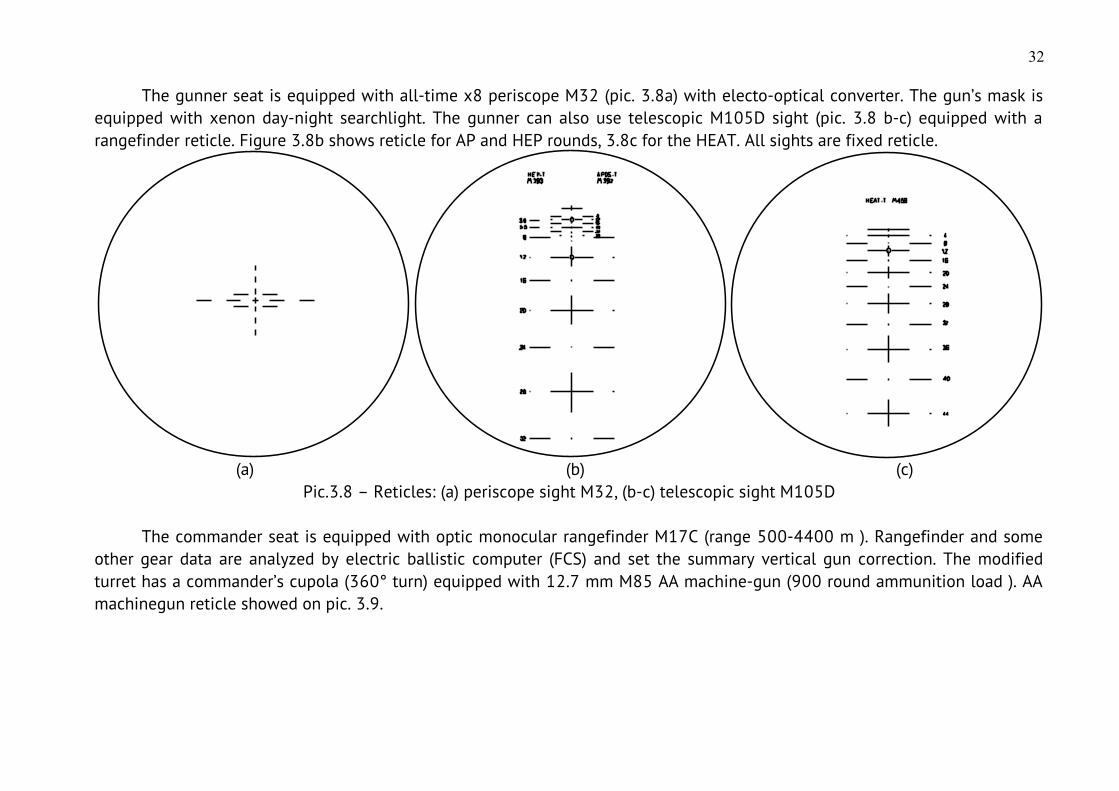
The gunner seat is equipped with all-time x8 periscope M32 (pic. 3.8a) with electo-optical converter. The gun’s mask isequipped with xenon day-night searchlight. The gunner can also use telescopic M105D sight (pic. 3.8 b-c) equipped with arangefinder reticle. Figure 3.8b shows reticle for AP and HEP rounds, 3.8c for the HEAT. All sights are fixed reticle.
(a) (b) (c)Pic.3.8 – Reticles: (a) periscope sight М32, (b-c) telescopic sight M105D
The commander seat is equipped with optic monocular rangefinder M17C (range 500-4400 m ). Rangefinder and someother gear data are analyzed by electric ballistic computer (FCS) and set the summary vertical gun correction. The modifiedturret has a commander’s cupola (360° turn) equipped with 12.7 mm M85 AA machine-gun (900 round ammunition load ). AAmachinegun reticle showed on pic. 3.9.
32
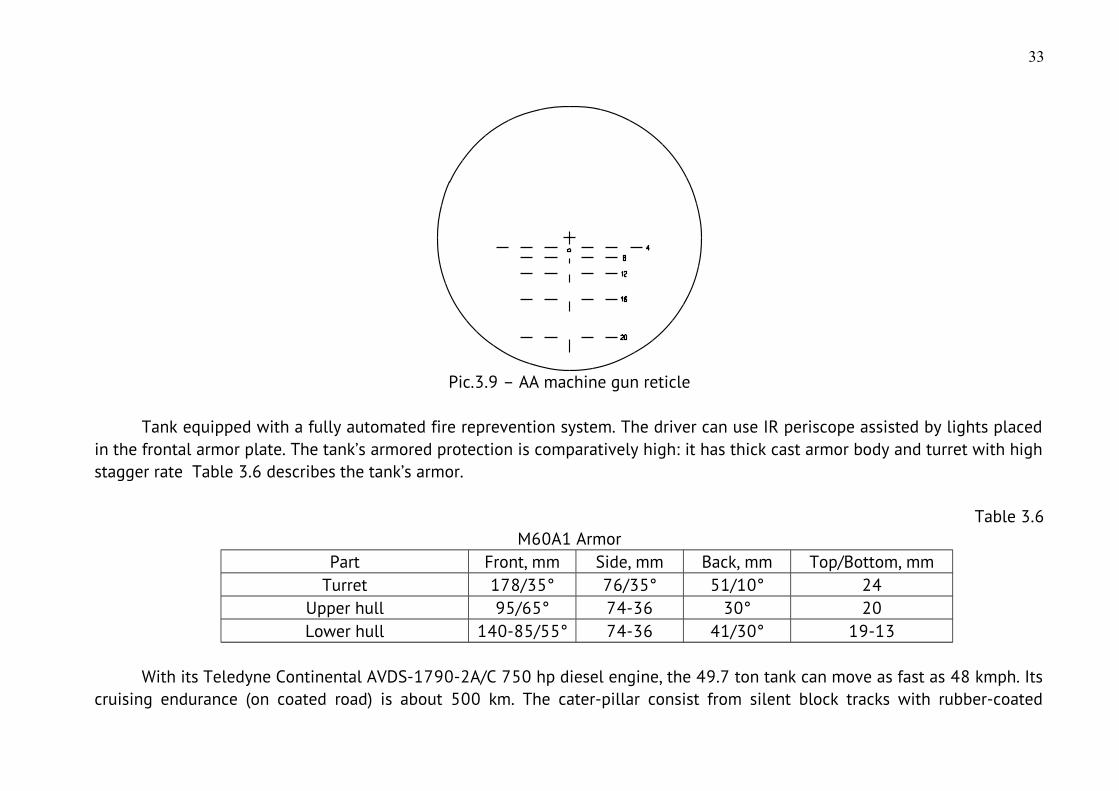
Pic.3.9 – AA machine gun reticle
Tank equipped with a fully automated fire reprevention system. The driver can use IR periscope assisted by lights placedin the frontal armor plate. The tank’s armored protection is comparatively high: it has thick cast armor body and turret with highstagger rate Table 3.6 describes the tank’s armor.
Table 3.6М60А1 Armor
Part Front, mm Side, mm Back, mm Top/Bottom, mmTurret 178/35° 76/35° 51/10° 24
Upper hull 95/65° 74-36 30° 20Lower hull 140-85/55° 74-36 41/30° 19-13
With its Teledyne Continental AVDS-1790-2A/C 750 hp diesel engine, the 49.7 ton tank can move as fast as 48 kmph. Itscruising endurance (on coated road) is about 500 km. The cater-pillar consist from silent block tracks with rubber-coated
33
bearing area and tread. Chassis have a road wheels with a massive outer rubber tire, torsion cushioning system with hydraulicshock-absorbers.
Iran used this tank in the times of the Iran-Iraq 1980-1988 war in the 92nd Armor Division.
34
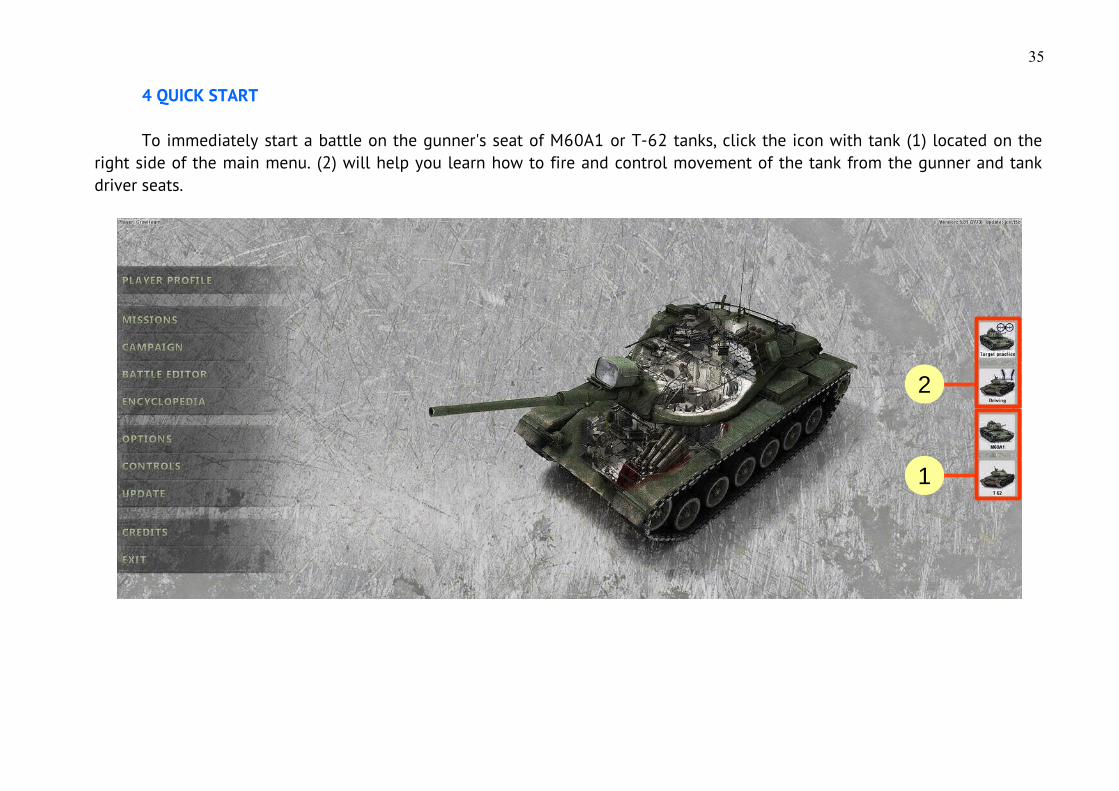
4 QUICK START
To immediately start a battle on the gunner's seat of M60A1 or T-62 tanks, click the icon with tank (1) located on theright side of the main menu. (2) will help you learn how to fire and control movement of the tank from the gunner and tankdriver seats.
35
1
2

To further customize the parameters of the battle: the seat, time, weather conditions, enemy and allies troops, after thestart the game press "BATTLE EDITOR"
In the window that appears, configure the settings as desired.
36

(1) Chose the sides of Iran <1> against Targets <2> (Targets are not return fire).(2) Set the attack behavior <7, 8>.(3) Set Clear weather <11> and Training area “Polygon” <12>.(4) Proceed to the deployment of forces by clicking on the second button from the left on the bottom panel.
37
1
2
3
4
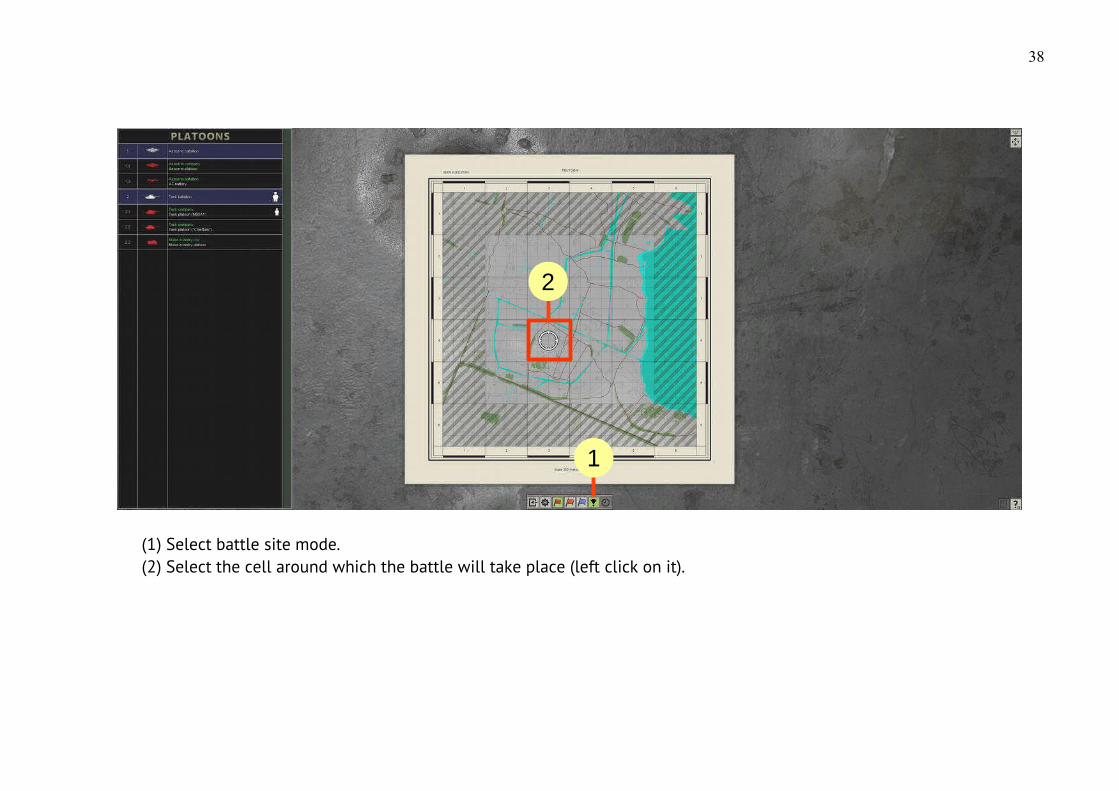
(1) Select battle site mode.(2) Select the cell around which the battle will take place (left click on it).
38
1
2

Place your subordinates.
(1) Select the desired platoon from the list on the left and place it by left-clicking at any point of any green cell.(2) The icon of a man indicates platoons (and divisions), which the player can control.(3) Place three M60 platoons <2.1> in one cell.
39
1
2
3
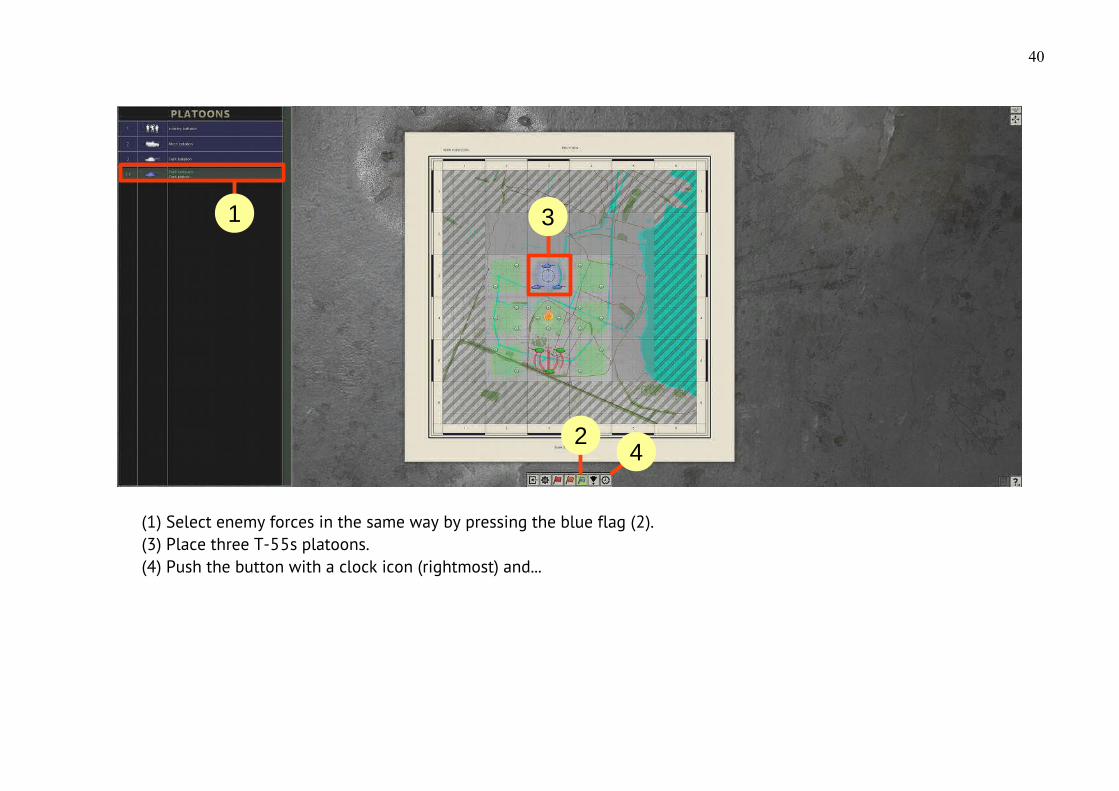
(1) Select enemy forces in the same way by pressing the blue flag (2).(3) Place three T-55s platoons.(4) Push the button with a clock icon (rightmost) and...
40
1 3
24

… start the battle by clicking on the fire icon.
41
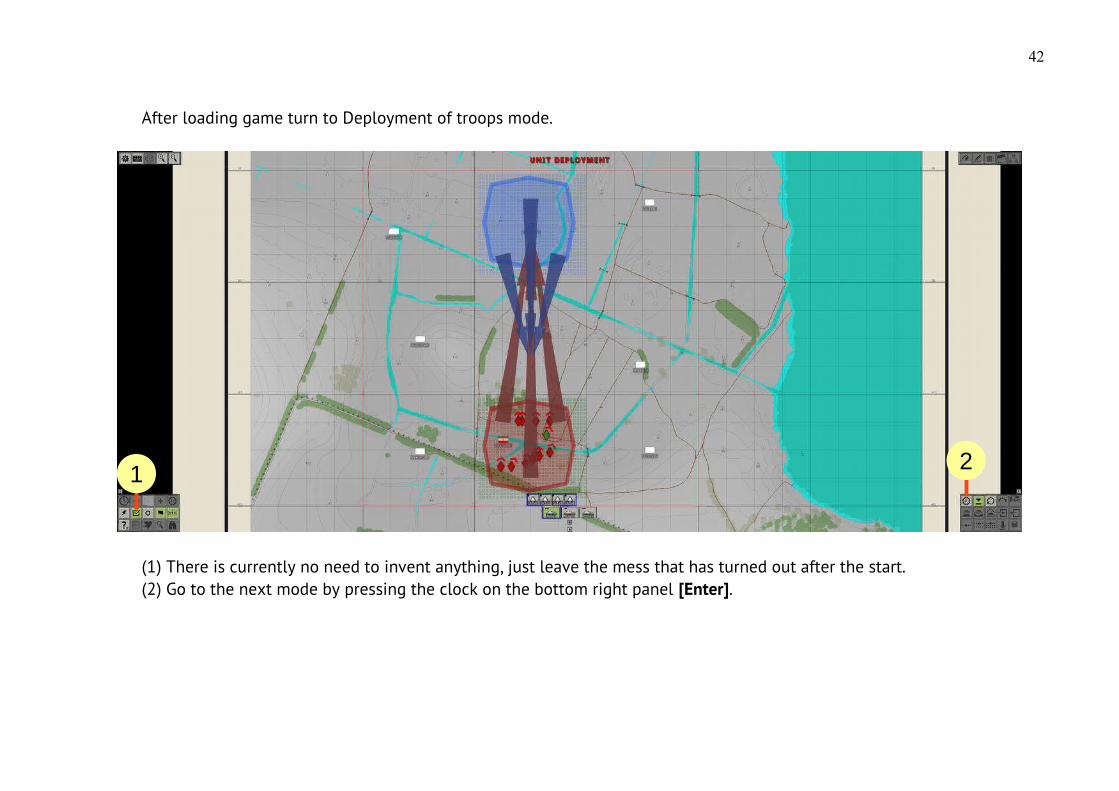
After loading game turn to Deployment of troops mode.
(1) There is currently no need to invent anything, just leave the mess that has turned out after the start.(2) Go to the next mode by pressing the clock on the bottom right panel [Enter].
42
21
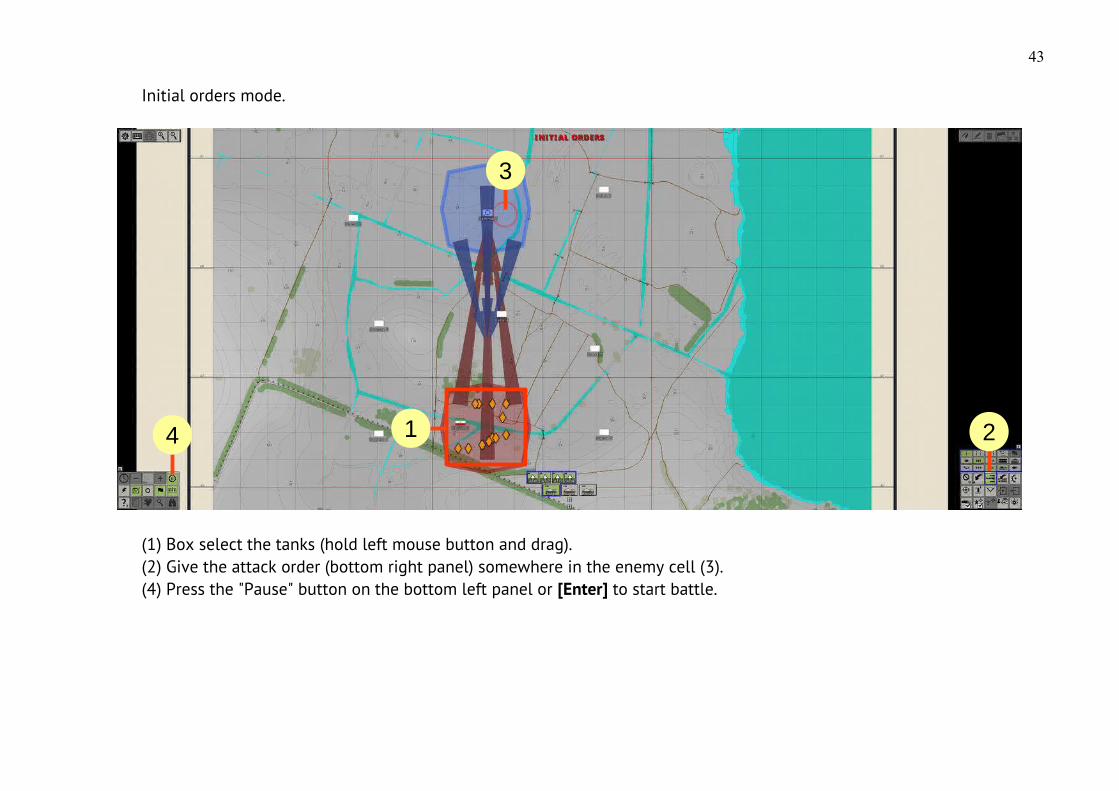
Initial orders mode.
(1) Box select the tanks (hold left mouse button and drag).(2) Give the attack order (bottom right panel) somewhere in the enemy cell (3).(4) Press the "Pause" button on the bottom left panel or [Enter] to start battle.
43
1 2
3
4
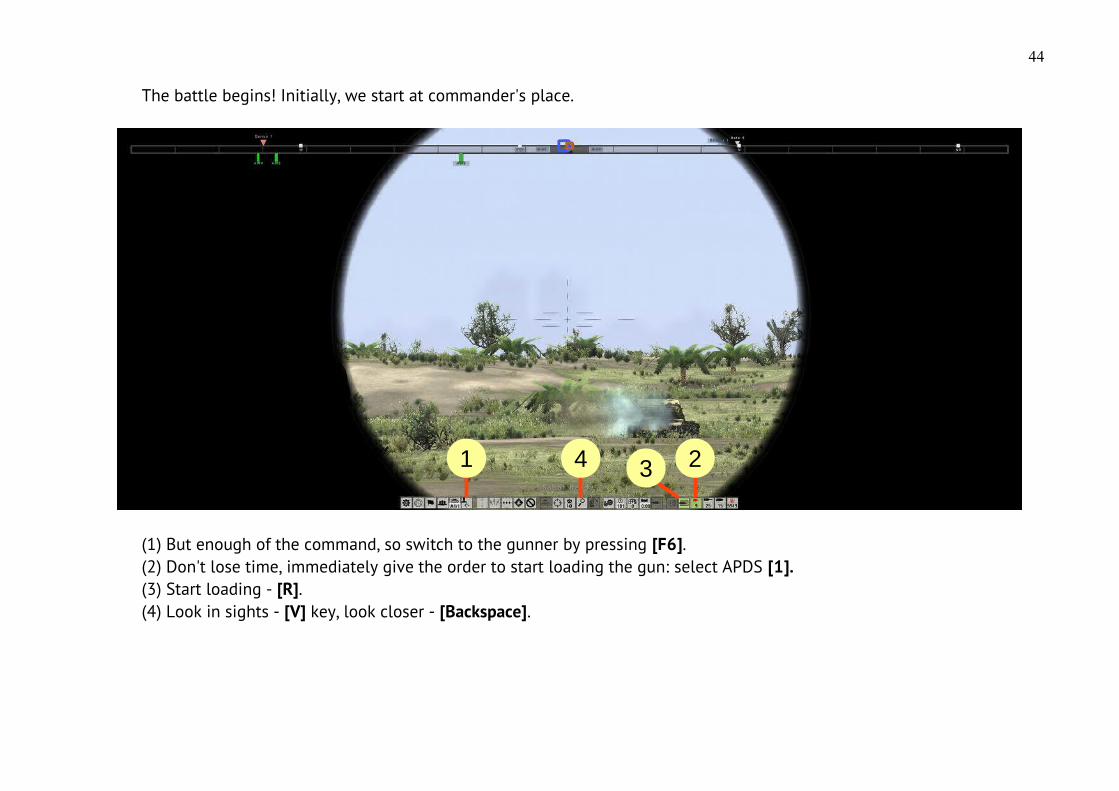
The battle begins! Initially, we start at commander's place.
(1) But enough of the command, so switch to the gunner by pressing [F6].(2) Don't lose time, immediately give the order to start loading the gun: select APDS [1].(3) Start loading - [R].(4) Look in sights - [V] key, look closer - [Backspace].
44
1 234
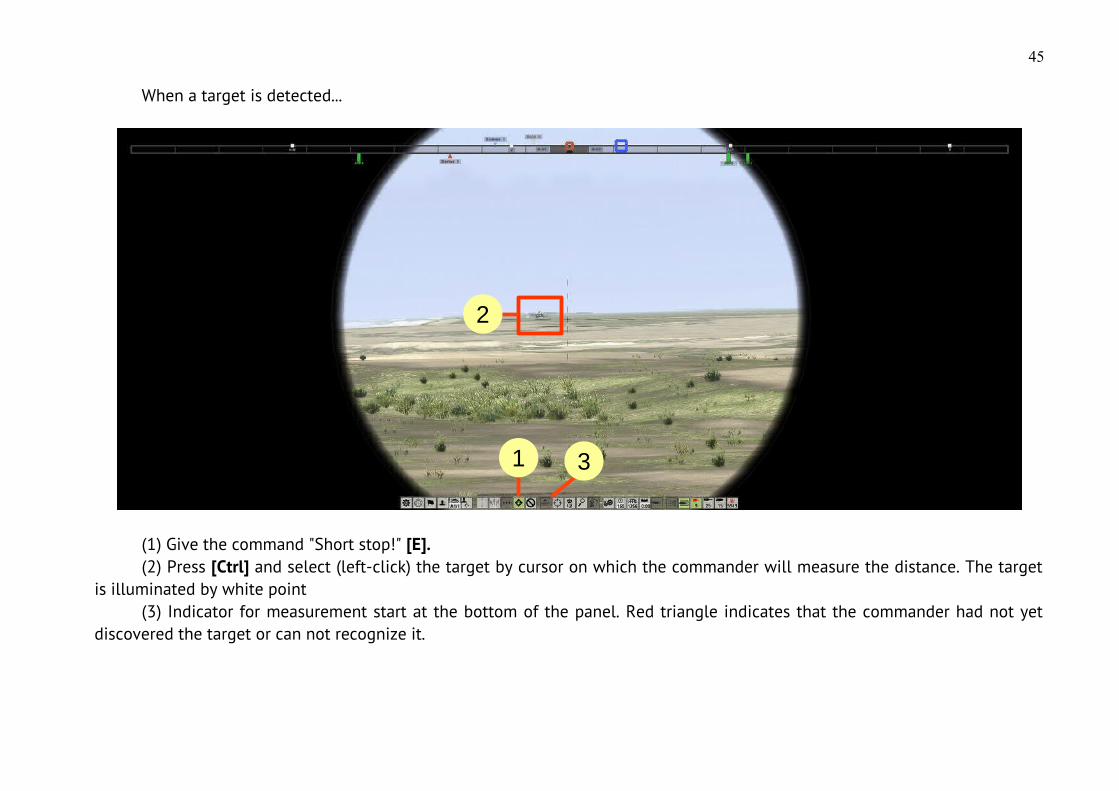
When a target is detected...
(1) Give the command "Short stop!" [E].(2) Press [Ctrl] and select (left-click) the target by cursor on which the commander will measure the distance. The target
is illuminated by white point(3) Indicator for measurement start at the bottom of the panel. Red triangle indicates that the commander had not yet
discovered the target or can not recognize it.
45
1
2
3
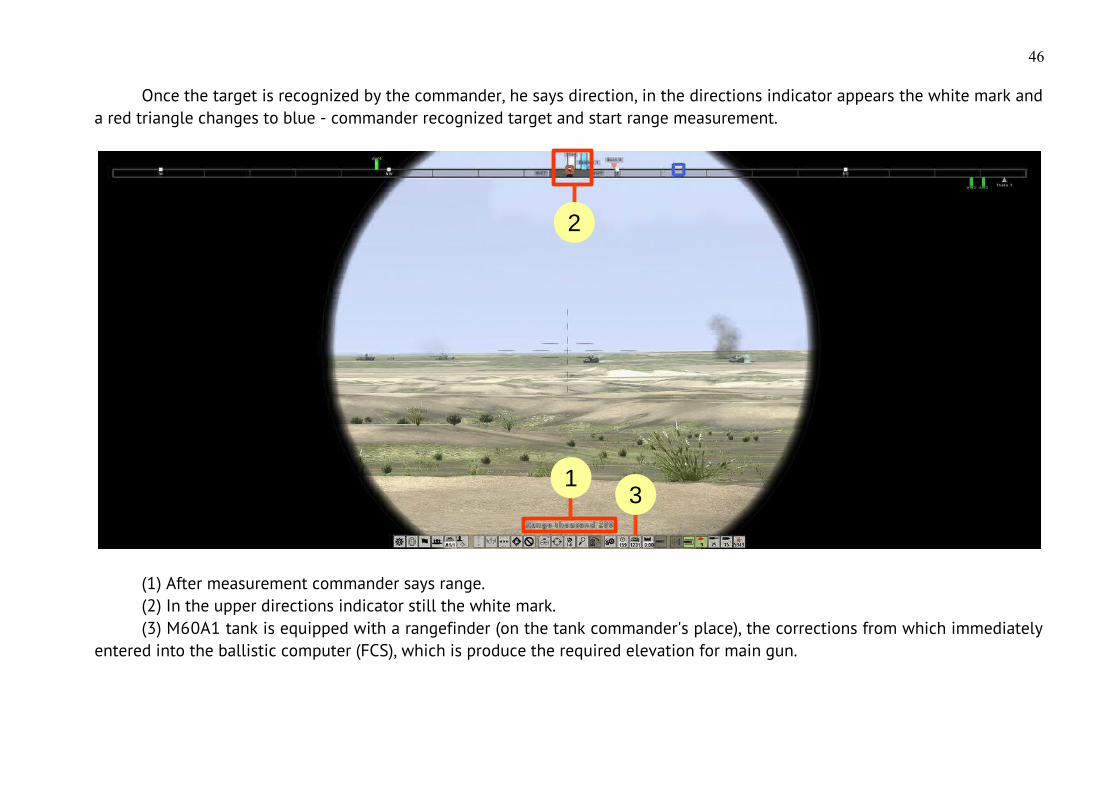
Once the target is recognized by the commander, he says direction, in the directions indicator appears the white mark anda red triangle changes to blue - commander recognized target and start range measurement.
(1) After measurement commander says range.(2) In the upper directions indicator still the white mark.(3) M60A1 tank is equipped with a rangefinder (on the tank commander's place), the corrections from which immediately
entered into the ballistic computer (FCS), which is produce the required elevation for main gun.
46
2
13
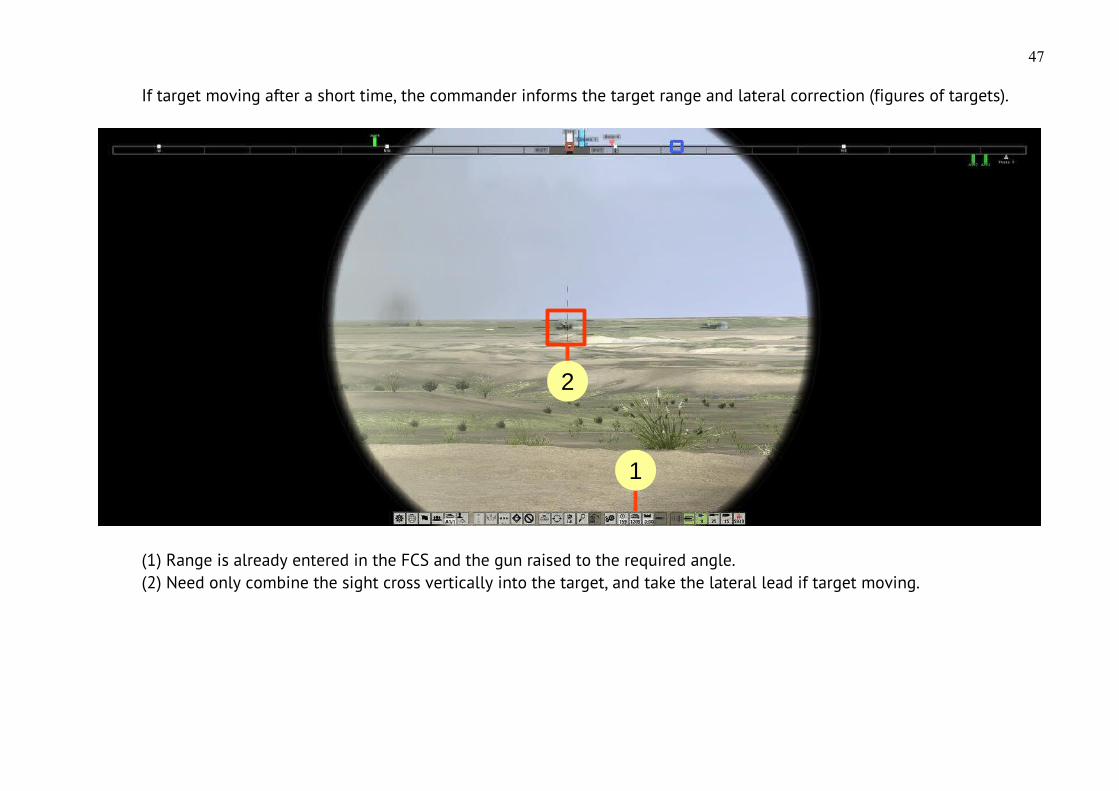
If target moving after a short time, the commander informs the target range and lateral correction (figures of targets).
(1) Range is already entered in the FCS and the gun raised to the required angle.(2) Need only combine the sight cross vertically into the target, and take the lateral lead if target moving.
47
2
1
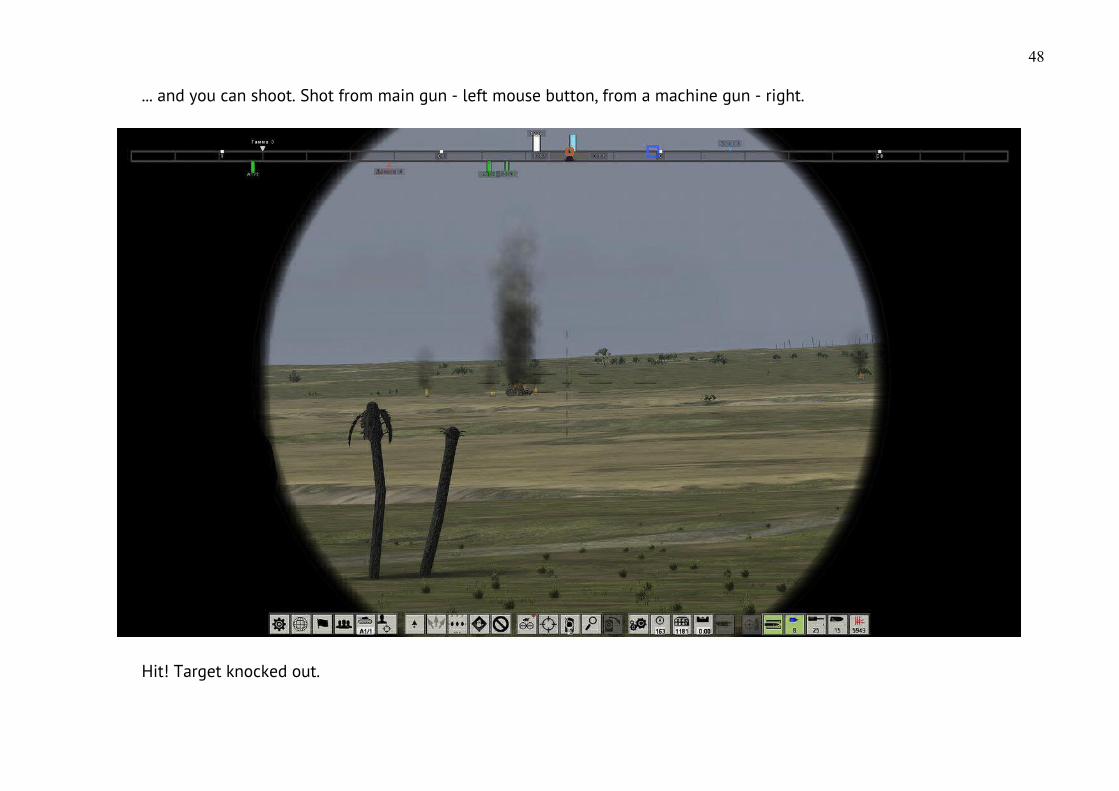
... and you can shoot. Shot from main gun - left mouse button, from a machine gun - right.
Hit! Target knocked out.
48
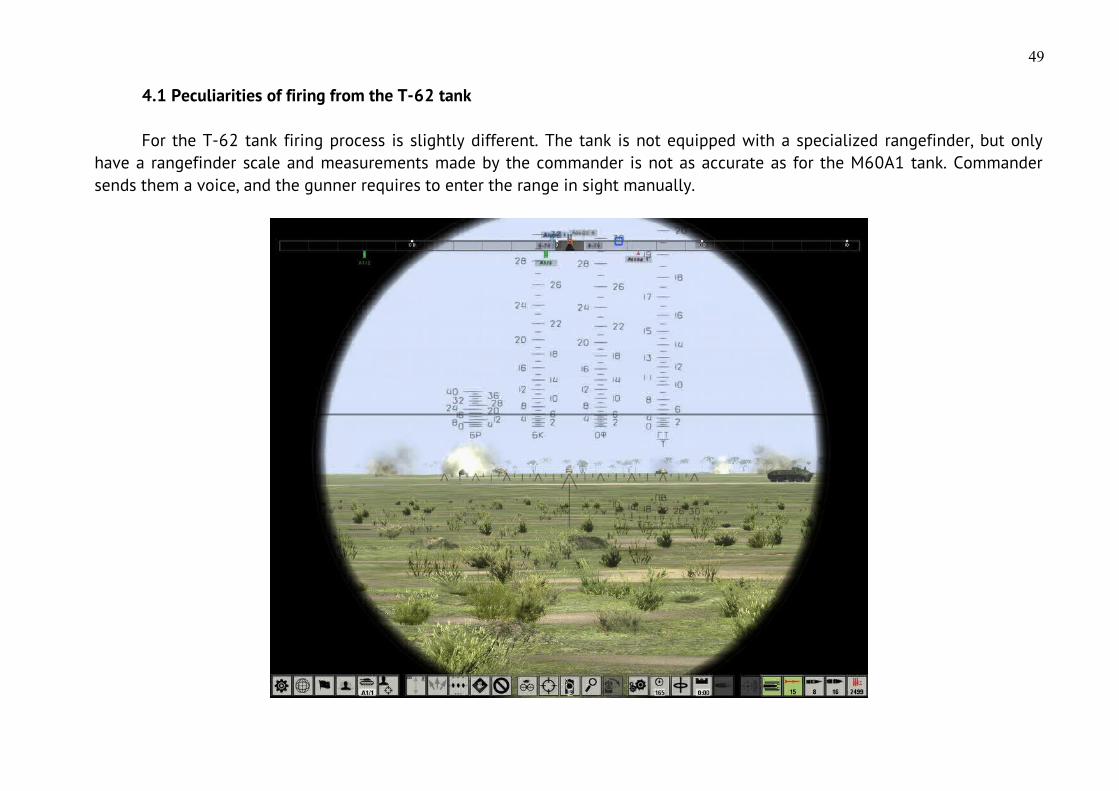
4.1 Peculiarities of firing from the T-62 tank
For the T-62 tank firing process is slightly different. The tank is not equipped with a specialized rangefinder, but onlyhave a rangefinder scale and measurements made by the commander is not as accurate as for the M60A1 tank. Commandersends them a voice, and the gunner requires to enter the range in sight manually.
49
But, SABOT projectiles fired from a gun of this tank have a large blank range (1600 m), and if the target is near this rangeor less, it can be easily hit without prior measurement. Also, the T-62 is equipped with a main gun stabilizer (horizontal andvertical) so it can fire on the move, without stopping.
1) Expose blank range (1600 m at the left-hand scale) in the sight by mouse wheel or [Page Up] and [Page Down].2) Aim the gun with the mouse (fast turret and gun rotation - arrows).3) Since shoot at point-blank range - targeting at lower edge of target.
The figure shows how it should look. Gun shot - left mouse button, a machine gun - right.For more detail about quick start on the T-62, see the following link: Quick Start on T-62 tank
50
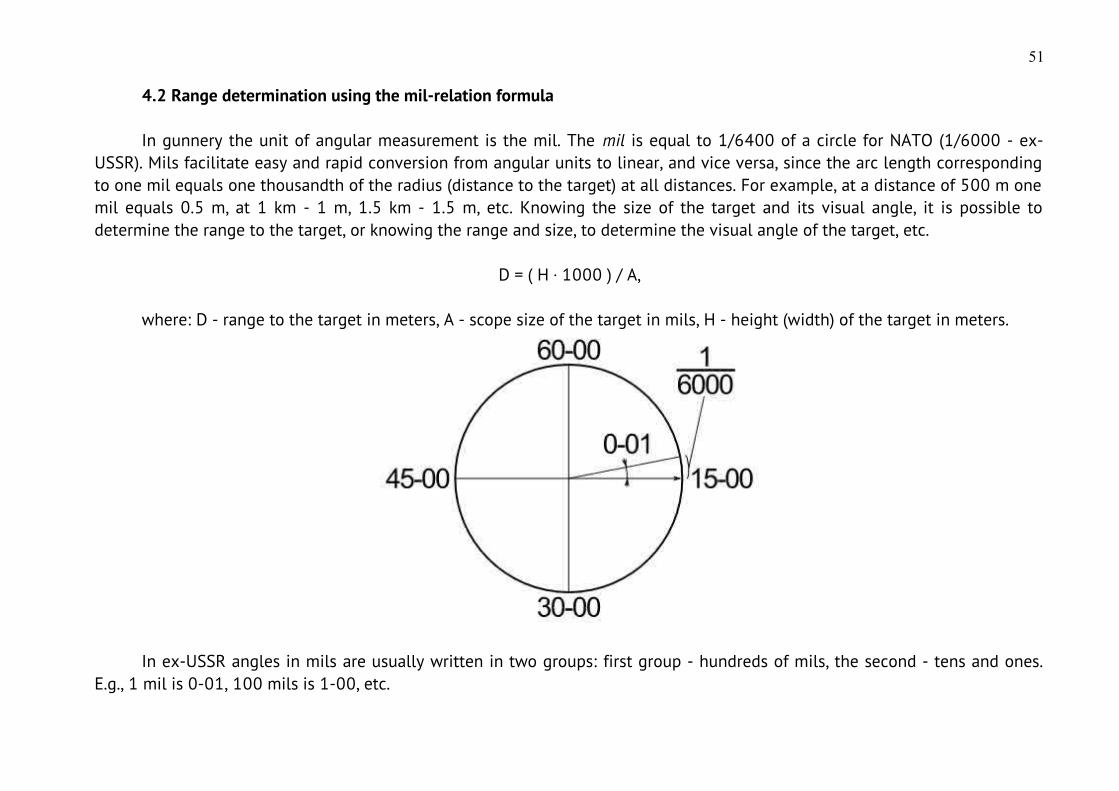
4.2 Range determination using the mil-relation formula
In gunnery the unit of angular measurement is the mil. The mil is equal to 1/6400 of a circle for NATO (1/6000 - ex-USSR). Mils facilitate easy and rapid conversion from angular units to linear, and vice versa, since the arc length correspondingto one mil equals one thousandth of the radius (distance to the target) at all distances. For example, at a distance of 500 m onemil equals 0.5 m, at 1 km - 1 m, 1.5 km - 1.5 m, etc. Knowing the size of the target and its visual angle, it is possible todetermine the range to the target, or knowing the range and size, to determine the visual angle of the target, etc.
D = ( H ∙ 1000 ) / A,
where: D - range to the target in meters, A - scope size of the target in mils, H - height (width) of the target in meters.
In ex-USSR angles in mils are usually written in two groups: first group - hundreds of mils, the second - tens and ones.E.g., 1 mil is 0-01, 100 mils is 1-00, etc.
51

Example:
Enemy tank, width 3.5 m, visible at angle about 0-04. Determine the distance.
Solution:
D = ( H ∙ 1000 ) / A = ( 3,5 ∙ 1000 ) / 4 = 875 m.
52
5 COMBAT INTERFACE
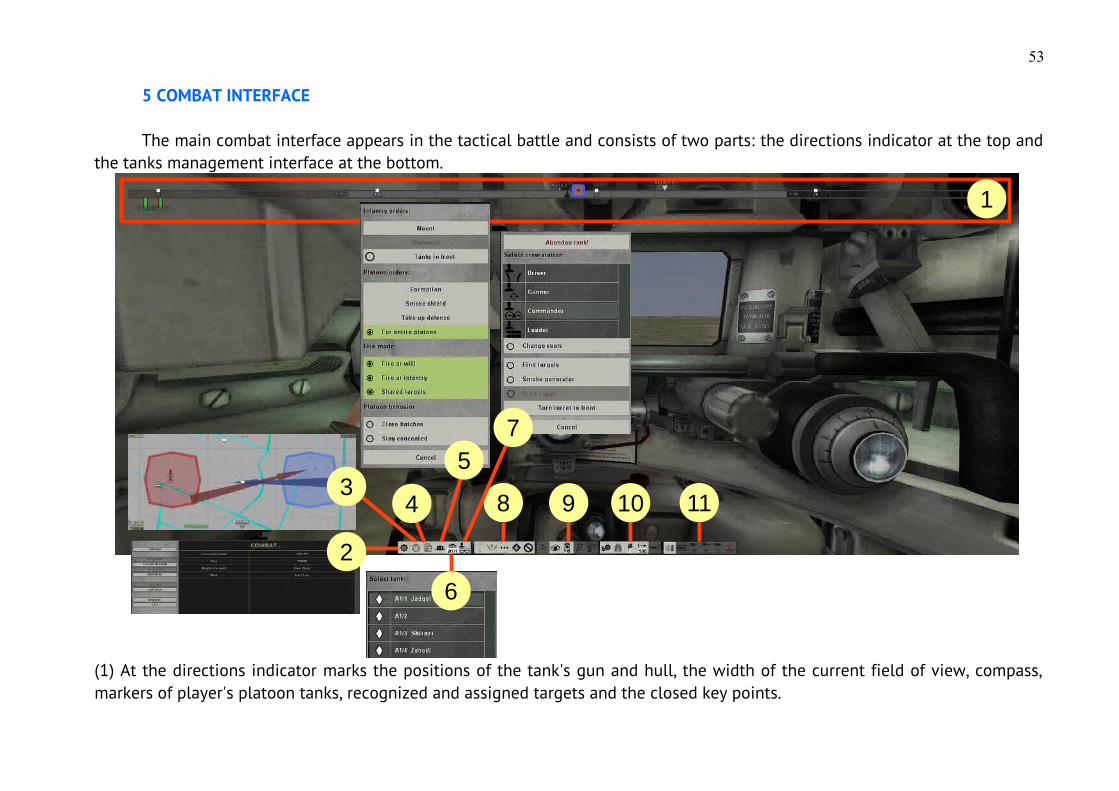
The main combat interface appears in the tactical battle and consists of two parts: the directions indicator at the top andthe tanks management interface at the bottom.
(1) At the directions indicator marks the positions of the tank's gun and hull, the width of the current field of view, compass,markers of player's platoon tanks, recognized and assigned targets and the closed key points.
53
1
8 9 10 11
2
3
6
4
75
(2) Go to the main game menu [Esc].(3) Activate tactical map [F10], allows you to control the Allied units.(4) Receiving a report about of tank equipment status - each crew member will report about damages.(5) Orders for platoon or user tank, depending on the mode selected.(6) Select the current tank.(7) The choice of the seat in the tank and moving (hosting) between them [F5] - [F8], and orders for the tank entire crew.(8) Movement control panel for tank and platoon - allows you to set the direction and speed of movement, formation. Stops themovement permanently or temporarily.(9) Management view, you can select the crew seat or scope for observation, stowed position [O], as well as manage sightoptions: filters, magnification and illumination of sight reticle. Located in the center rotation indicator shows angle relative withrespect to the tank hull.(10) The control panel allows you to select the active equipment [B], [N], [M] for the management settings and indicates theircurrent status.(11) Controls and indicators specific to the selected seat.
The interface can be in 3 states switched by [Ctrl]+[Backspace]: always enabled (default), enabled during the activatedthe selection cursor and is always off. To select the interface elements used cursor, which is activated by the [Ctrl] button.External camera is activated by the [F3] button.When you activate the cursor:
1) In commander's seat, you can specify a point of movement by right-clicking in the 3D view, for a tank platoon or tank(depending on the selected mode platoon/tank). If the distance to the specified point more than 250 meters and the selectedformation is column - the movement is on the roads. The destination point is temporary indicated by a blue flag. 2) On commander's and gunner's seats can be specified by left-clicking target for firing (for the tank or platoon). Thetarget is marked with a white dot and a white line on the directions indicator on the top.
To move a tank platoon used the combination [W], [S] - to set the formation speed and direction, [X] - stop formation.And [A], [D] used to turn formation (or tank), when hold the button, indicator will show angle of rotation in mils. When button isreleased turn to the appropriate angle is begins. Table 5.1 lists the basic commands for tank and platoon movement.
54

Table 5.1Tank and tank platoon movement control
Interface Hotkey Action
Hold [A] or [D]Steer tank or a tank platoon. If you hold down button the rotation angle (in mils) is shown on the arrow. When button is released turn to the appropriate angle is begins.
[W], [S]Setting the speed and direction of movement (forward or backward). Pressing this buttons are changes the speed and direction of movement. With fast movement in the night time tanks enable lights.
The path is blocked by an obstacle. Press [S] to back (only player's tank), press [W] to start maneuver.
Tank maneuvers (moves to bypass obstacles). In order to stop it and return to the movement in the formation press [W].
[Alt+S], [Alt+W] Control the formation density. Works only when managing a platoon.
[Alt+A], [Alt+D] Management of formation type. Works only when managing a platoon.
[X] Stop the tank or platoon.
[~], hold [Shift]
Switching between the control of tank or tank platoon.
55

When driving in formation, player's tank performs the fewest possible maneuvers but when the driver determines that onthe course of the tank is uncrossable (without maneuver) obstacle, it stops. In this case over tank movement indicator appearsred mark which is means that the direct movement is blocked (see table 5.1). When player press forward [W] button, the drivermoves back and will start maneuver (blue mark on indicator). If press the [S] button, player's tank moves back, and press [S] willagain manage the entire formation.
At any time, a player can interrupt the maneuver by pressing [W], in this case, the tank will continue to move to the point,which was blocked by an obstacle.
Table 5.2 shows the basic orders that a player can give to his crew and his platoon (or tank).
Table 5.2Crew orders
Order Action
Abandon tank! The crew will leave the player's tank.
Change seatsThe selected (current) tank crew member moves to a new seat. The process takes time which is shownon the display, and this process is interrupted if a player do any manipulations in the cockpit.
Find targets Gunner will search targets (in attack mode) rotating turret in a particular sector.
Smoke generatorTank driver to turn on the smoke generator for a few minutes, if the tank is equipped with them, and the engine is running.
Start repair Start repairing tracks of the tank. Active only if the crew found that the caterpillar is brought down.
Turn turret to frontGunner turns the gun at the direction of tank movement, and supersedes all previous targets. Fire mode for gunner goes into manual and commander assign a targets, select a shell [1] - [3] to fire and allow shooting [Space] (or disable this mode by pressing the [5]).
56
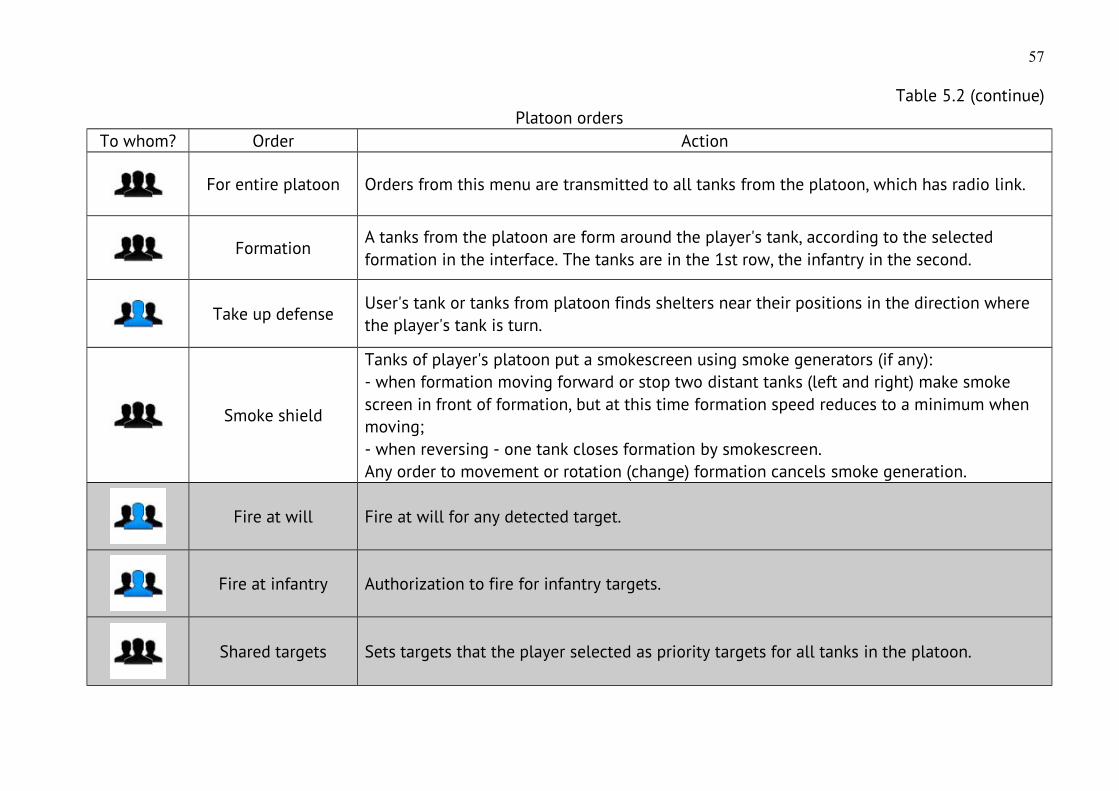
Table 5.2 (continue)Platoon orders
To whom? Order Action
For entire platoon Orders from this menu are transmitted to all tanks from the platoon, which has radio link.
FormationA tanks from the platoon are form around the player's tank, according to the selected formation in the interface. The tanks are in the 1st row, the infantry in the second.
Take up defenseUser's tank or tanks from platoon finds shelters near their positions in the direction where the player's tank is turn.
Smoke shield
Tanks of player's platoon put a smokescreen using smoke generators (if any):- when formation moving forward or stop two distant tanks (left and right) make smoke screen in front of formation, but at this time formation speed reduces to a minimum when moving;- when reversing - one tank closes formation by smokescreen.Any order to movement or rotation (change) formation cancels smoke generation.
Fire at will Fire at will for any detected target.
Fire at infantry Authorization to fire for infantry targets.
Shared targets Sets targets that the player selected as priority targets for all tanks in the platoon.
57
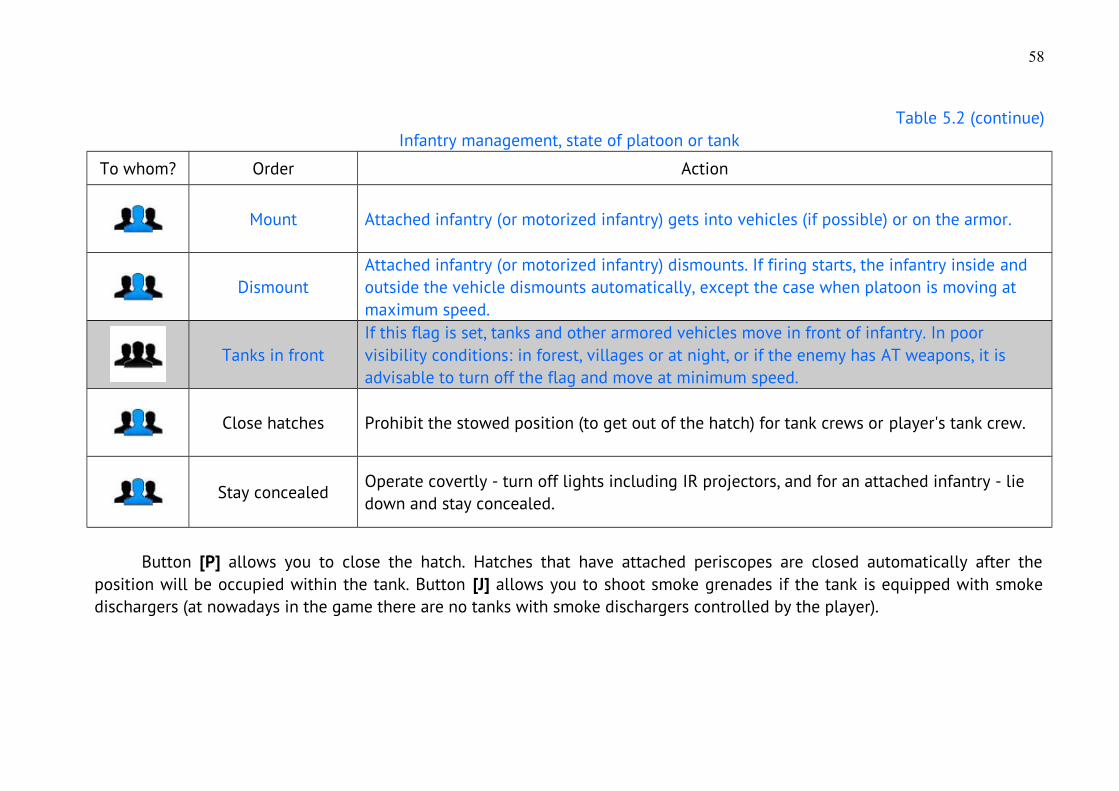
Table 5.2 (continue)Infantry management, state of platoon or tank
To whom? Order Action
Mount Attached infantry (or motorized infantry) gets into vehicles (if possible) or on the armor.
DismountAttached infantry (or motorized infantry) dismounts. If firing starts, the infantry inside and outside the vehicle dismounts automatically, except the case when platoon is moving at maximum speed.
Tanks in frontIf this flag is set, tanks and other armored vehicles move in front of infantry. In poor visibility conditions: in forest, villages or at night, or if the enemy has AT weapons, it is advisable to turn off the flag and move at minimum speed.
Close hatches Prohibit the stowed position (to get out of the hatch) for tank crews or player's tank crew.
Stay concealedOperate covertly - turn off lights including IR projectors, and for an attached infantry - lie down and stay concealed.
Button [P] allows you to close the hatch. Hatches that have attached periscopes are closed automatically after theposition will be occupied within the tank. Button [J] allows you to shoot smoke grenades if the tank is equipped with smokedischargers (at nowadays in the game there are no tanks with smoke dischargers controlled by the player).
58
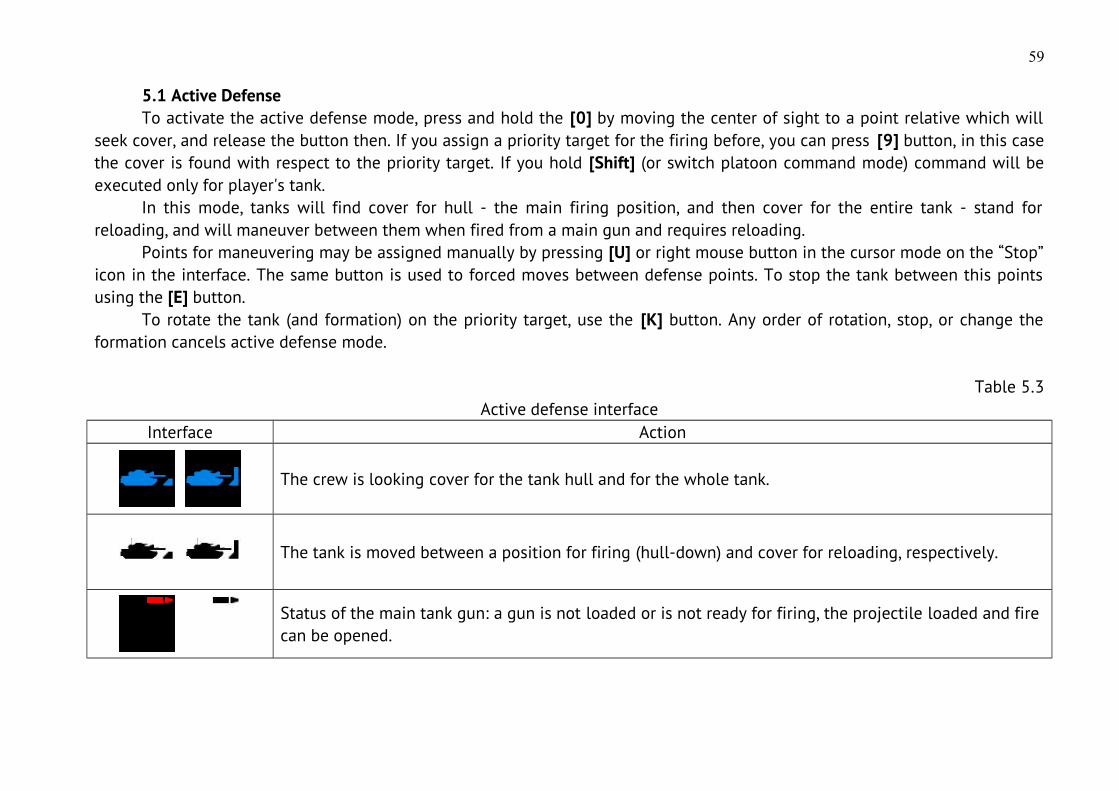
5.1 Active DefenseTo activate the active defense mode, press and hold the [0] by moving the center of sight to a point relative which will
seek cover, and release the button then. If you assign a priority target for the firing before, you can press [9] button, in this casethe cover is found with respect to the priority target. If you hold [Shift] (or switch platoon command mode) command will beexecuted only for player's tank.
In this mode, tanks will find cover for hull - the main firing position, and then cover for the entire tank - stand forreloading, and will maneuver between them when fired from a main gun and requires reloading.
Points for maneuvering may be assigned manually by pressing [U] or right mouse button in the cursor mode on the “Stop”icon in the interface. The same button is used to forced moves between defense points. To stop the tank between this pointsusing the [E] button.
To rotate the tank (and formation) on the priority target, use the [K] button. Any order of rotation, stop, or change theformation cancels active defense mode.
Table 5.3Active defense interface
Interface Action
The crew is looking cover for the tank hull and for the whole tank.
The tank is moved between a position for firing (hull-down) and cover for reloading, respectively.
Status of the main tank gun: a gun is not loaded or is not ready for firing, the projectile loaded and fire can be opened.
59
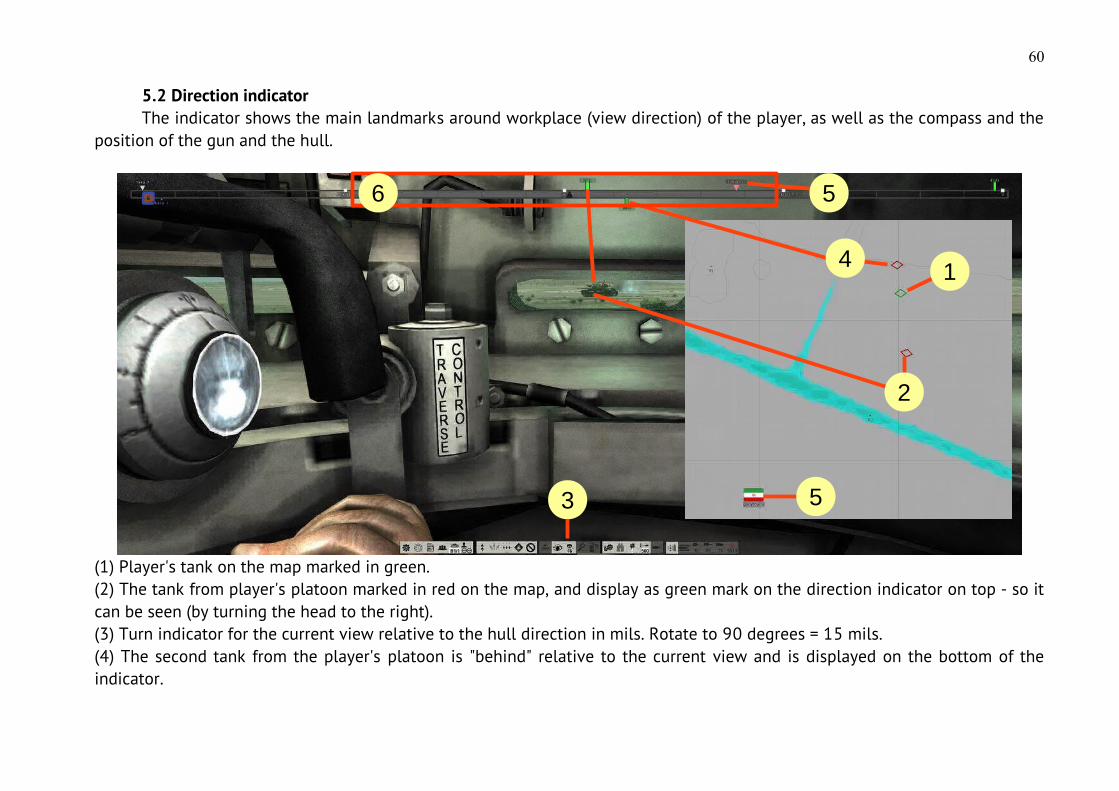
5.2 Direction indicatorThe indicator shows the main landmarks around workplace (view direction) of the player, as well as the compass and the
position of the gun and the hull.
(1) Player's tank on the map marked in green.(2) The tank from player's platoon marked in red on the map, and display as green mark on the direction indicator on top - so itcan be seen (by turning the head to the right).(3) Turn indicator for the current view relative to the hull direction in mils. Rotate to 90 degrees = 15 mils.(4) The second tank from the player's platoon is "behind" relative to the current view and is displayed on the bottom of theindicator.
60
2
1
3
5
5
4
6
(5) The key point on the map and direction indicator. The indicator shows 3 nearby key points controlled by allies, neutral andoccupied by the enemy.(6) The field of view on the indicator. The numbers on the edges shows the FOVs width in mils.
All targets marks on the indicator (vertical strokes of blue and light blue colors) are relevant only at the time of theirappearance and do not move with the times. The larger is a nearer mark. The white color mark on the indicator shows thecurrent (selected) priority target and the distance to it, which measured up by commander - updated after each measurement.
Green markers indicate tanks of the player's platoon updated in real time. If a tank from platoon damaged or destroyed -the color of the mark is changed to orange or red.
Mark of active defense point appears as a small red stroke.
61
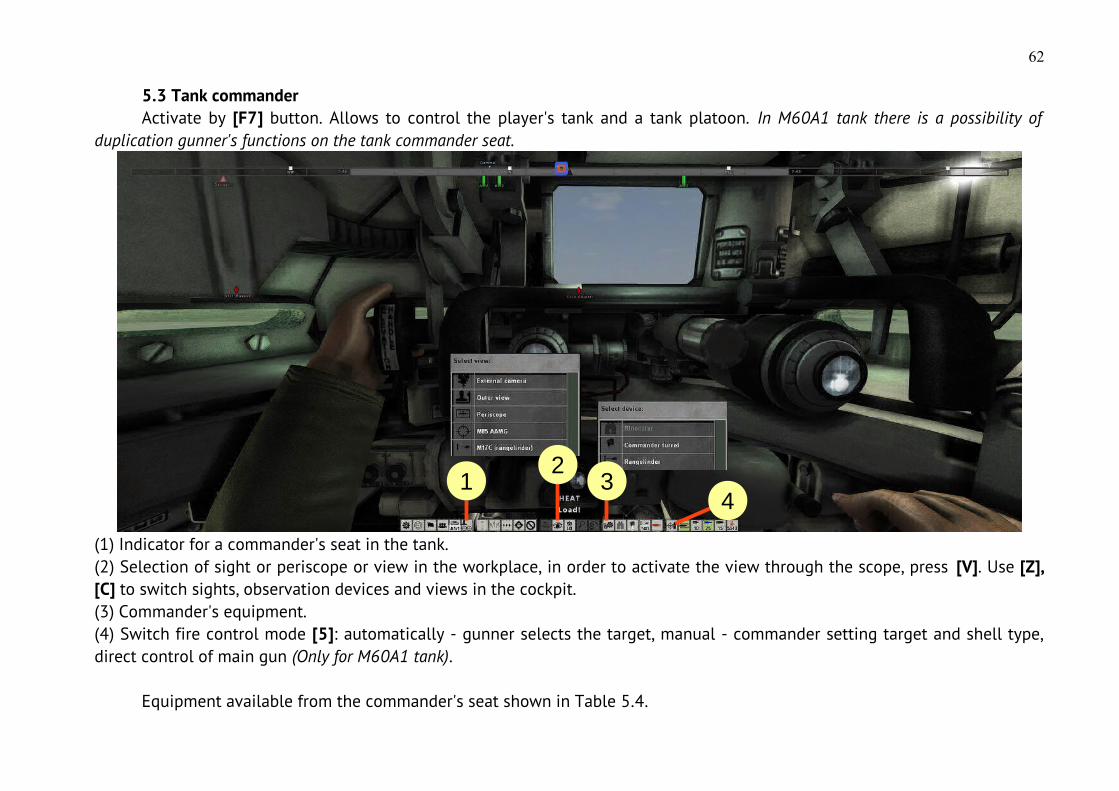
5.3 Tank commanderActivate by [F7] button. Allows to control the player's tank and a tank platoon. In M60A1 tank there is a possibility of
duplication gunner's functions on the tank commander seat.
(1) Indicator for a commander's seat in the tank.(2) Selection of sight or periscope or view in the workplace, in order to activate the view through the scope, press [V]. Use [Z],[C] to switch sights, observation devices and views in the cockpit.(3) Commander's equipment.(4) Switch fire control mode [5]: automatically - gunner selects the target, manual - commander setting target and shell type,direct control of main gun (Only for M60A1 tank).
Equipment available from the commander's seat shown in Table 5.4.
62
231
4
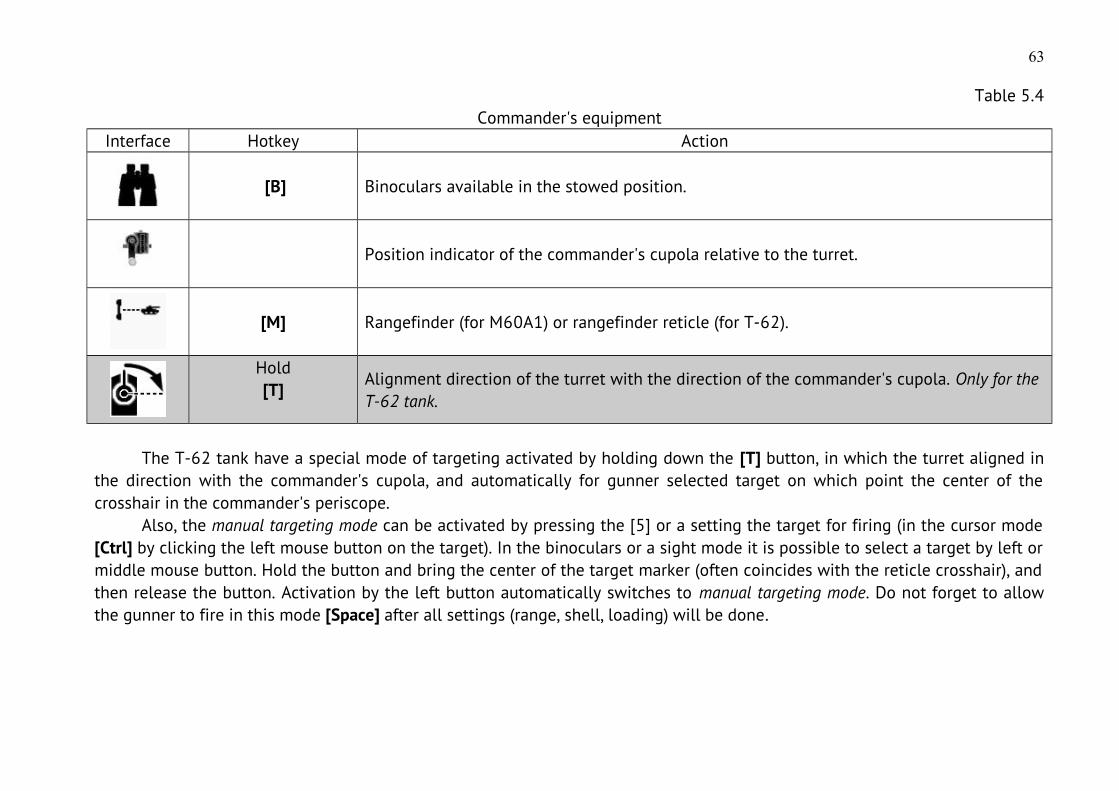
Table 5.4Commander's equipment
Interface Hotkey Action
[B] Binoculars available in the stowed position.
Position indicator of the commander's cupola relative to the turret.
[M] Rangefinder (for M60A1) or rangefinder reticle (for T-62).
Hold[T]
Alignment direction of the turret with the direction of the commander's cupola. Only for theT-62 tank.
The T-62 tank have a special mode of targeting activated by holding down the [T] button, in which the turret aligned inthe direction with the commander's cupola, and automatically for gunner selected target on which point the center of thecrosshair in the commander's periscope.
Also, the manual targeting mode can be activated by pressing the [5] or a setting the target for firing (in the cursor mode[Ctrl] by clicking the left mouse button on the target). In the binoculars or a sight mode it is possible to select a target by left ormiddle mouse button. Hold the button and bring the center of the target marker (often coincides with the reticle crosshair), andthen release the button. Activation by the left button automatically switches to manual targeting mode. Do not forget to allowthe gunner to fire in this mode [Space] after all settings (range, shell, loading) will be done.
63
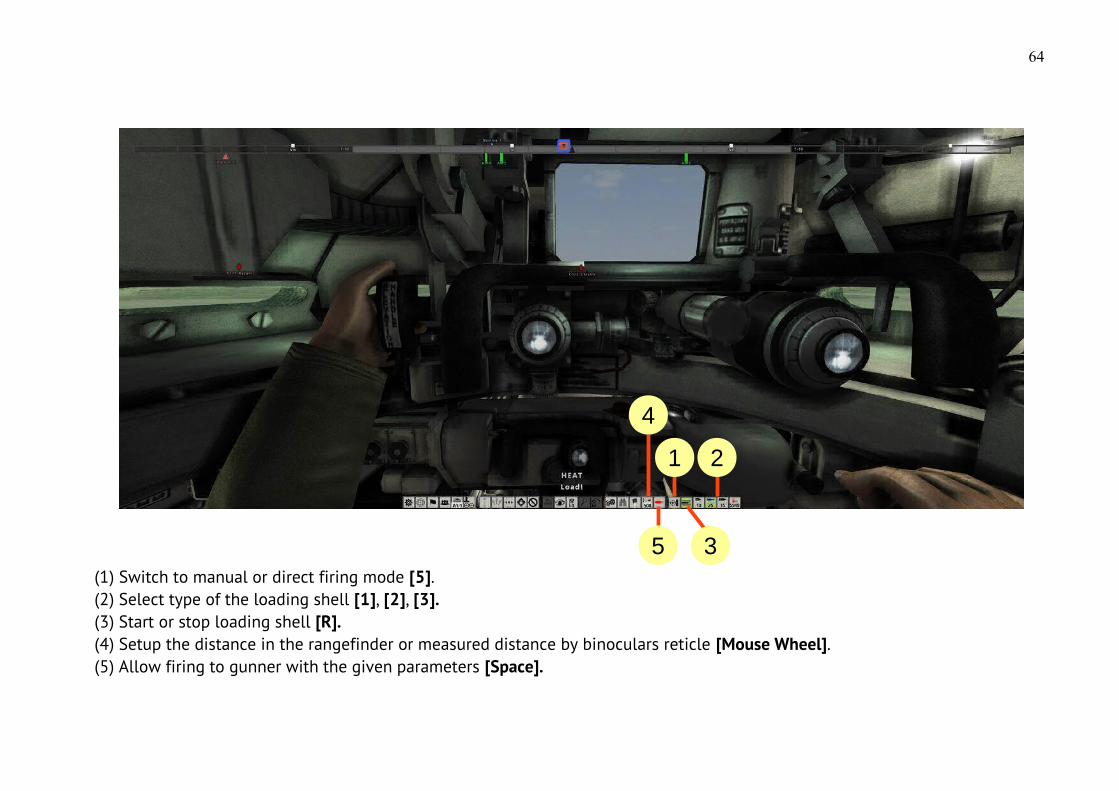
(1) Switch to manual or direct firing mode [5].(2) Select type of the loading shell [1], [2], [3].(3) Start or stop loading shell [R].(4) Setup the distance in the rangefinder or measured distance by binoculars reticle [Mouse Wheel].(5) Allow firing to gunner with the given parameters [Space].
64
1
4
2
35

Stowed position activated by the button [O]. Enable the crew-member to get out of the tank into the hatch if this isavailable by tank design (and not locked by gun or different equipment). In the stowed position on the commander's seat isavailable view through binoculars [B]. For M60A1 tank commander in the stowed position, press and holding the button [Y],allows to rise above the hatch and inspect the rear hemisphere.
(1) Stowed position indicator.(2) Binoculars [B].(3) Display the range setup for the gunner, the range can be entered with the [Mouse Wheel] in the binoculars mode.
Pressing [B] or [O] again removes binoculars and shift crew-member from stowed to combat position, respectively.M60A1 tank commander can control the rotation of the commander's cupola (mouse or arrow keys) and firing from anti-
aircraft machine gun mounted by the right mouse button or [Q]. To switch rate of fire for an anti-aircraft gun press [6] button.
65
1 2 32
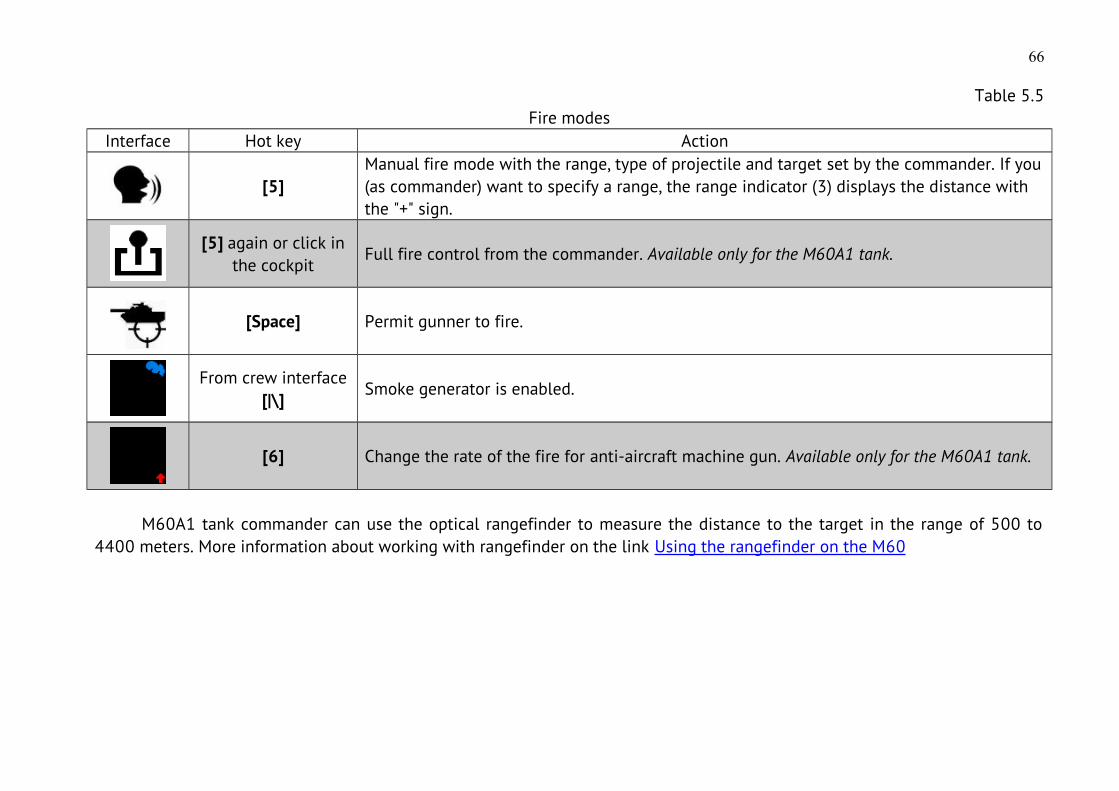
Table 5.5Fire modes
Interface Hot key Action
[5]Manual fire mode with the range, type of projectile and target set by the commander. If you(as commander) want to specify a range, the range indicator (3) displays the distance with the "+" sign.
[5] again or click inthe cockpit
Full fire control from the commander. Available only for the M60A1 tank.
[Space] Permit gunner to fire.
From crew interface[|\]
Smoke generator is enabled.
[6] Change the rate of the fire for anti-aircraft machine gun. Available only for the M60A1 tank.
M60A1 tank commander can use the optical rangefinder to measure the distance to the target in the range of 500 to4400 meters. More information about working with rangefinder on the link Using the rangefinder on the M60
66
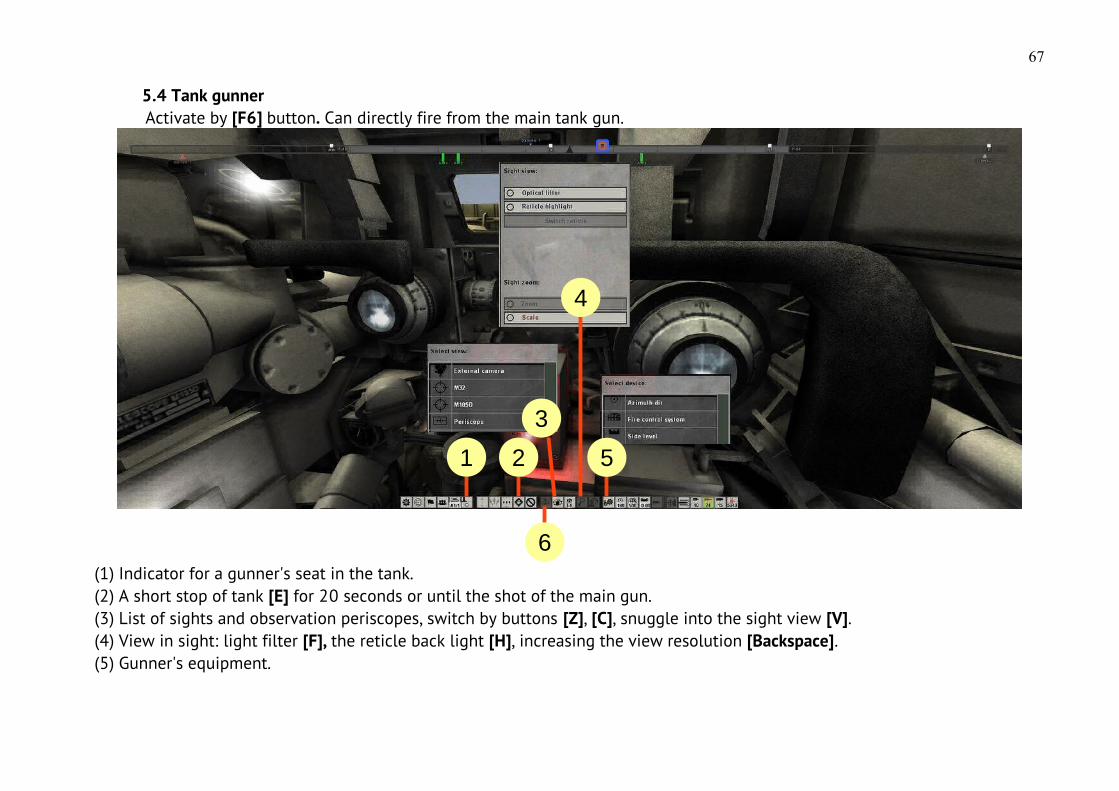
5.4 Tank gunnerActivate by [F6] button. Can directly fire from the main tank gun.
(1) Indicator for a gunner's seat in the tank.(2) A short stop of tank [E] for 20 seconds or until the shot of the main gun.(3) List of sights and observation periscopes, switch by buttons [Z], [C], snuggle into the sight view [V].(4) View in sight: light filter [F], the reticle back light [H], increasing the view resolution [Backspace].(5) Gunner's equipment.
67
1 2
4
3
5
6
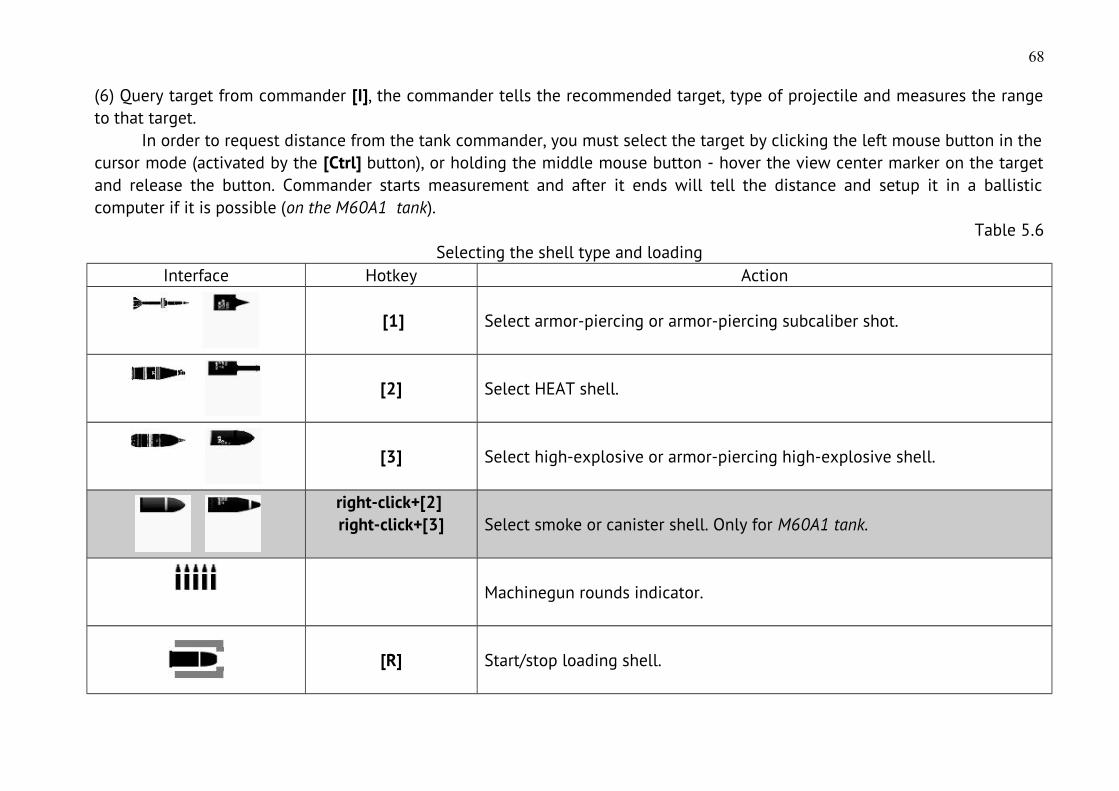
(6) Query target from commander [I], the commander tells the recommended target, type of projectile and measures the rangeto that target.
In order to request distance from the tank commander, you must select the target by clicking the left mouse button in thecursor mode (activated by the [Ctrl] button), or holding the middle mouse button - hover the view center marker on the targetand release the button. Commander starts measurement and after it ends will tell the distance and setup it in a ballisticcomputer if it is possible (on the M60A1 tank).
Table 5.6Selecting the shell type and loading
Interface Hotkey Action
[1] Select armor-piercing or armor-piercing subcaliber shot.
[2] Select HEAT shell.
[3] Select high-explosive or armor-piercing high-explosive shell.
right-click+[2] right-click+[3] Select smoke or canister shell. Only for М60А1 tank.
Machinegun rounds indicator.
[R] Start/stop loading shell.
68
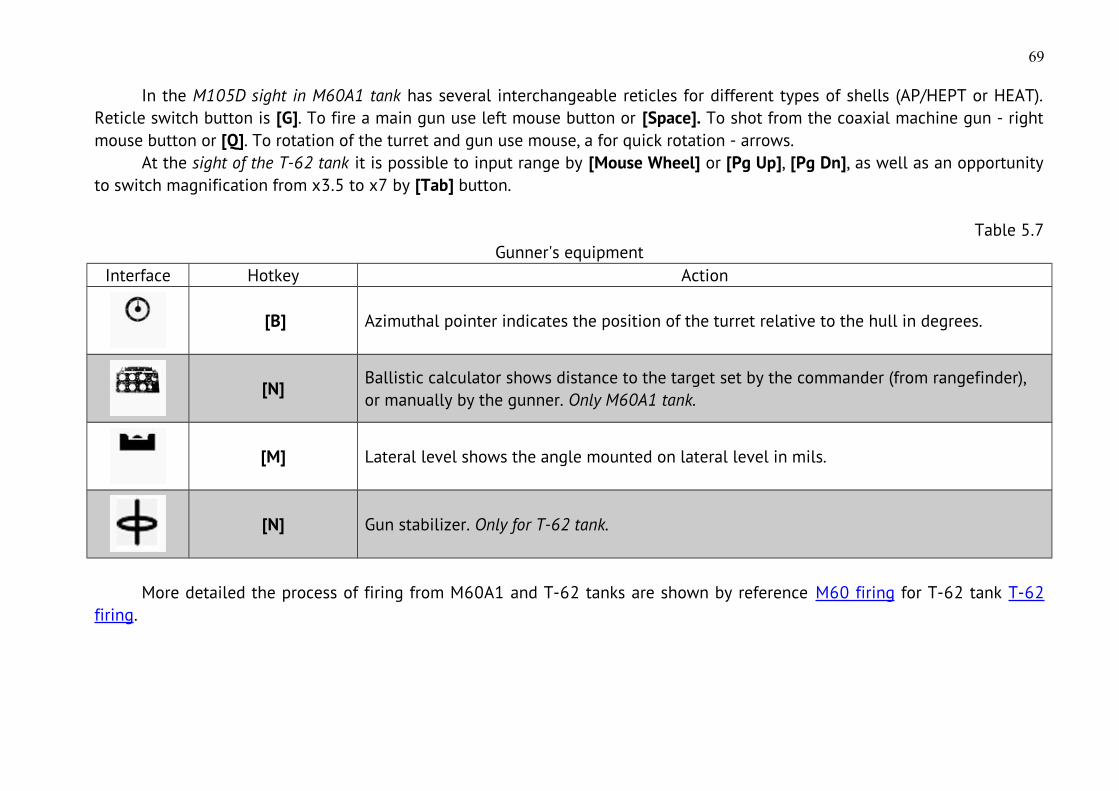
In the M105D sight in M60A1 tank has several interchangeable reticles for different types of shells (AP/HEPT or HEAT).Reticle switch button is [G]. To fire a main gun use left mouse button or [Space]. To shot from the coaxial machine gun - rightmouse button or [Q]. To rotation of the turret and gun use mouse, a for quick rotation - arrows.
At the sight of the T-62 tank it is possible to input range by [Mouse Wheel] or [Pg Up], [Pg Dn], as well as an opportunityto switch magnification from x3.5 to x7 by [Tab] button.
Table 5.7Gunner's equipment
Interface Hotkey Action
[B] Azimuthal pointer indicates the position of the turret relative to the hull in degrees.
[N]Ballistic calculator shows distance to the target set by the commander (from rangefinder), or manually by the gunner. Only M60A1 tank.
[M] Lateral level shows the angle mounted on lateral level in mils.
[N] Gun stabilizer. Only for T-62 tank.
More detailed the process of firing from M60A1 and T-62 tanks are shown by reference M60 firing for T-62 tank T-62firing.
69
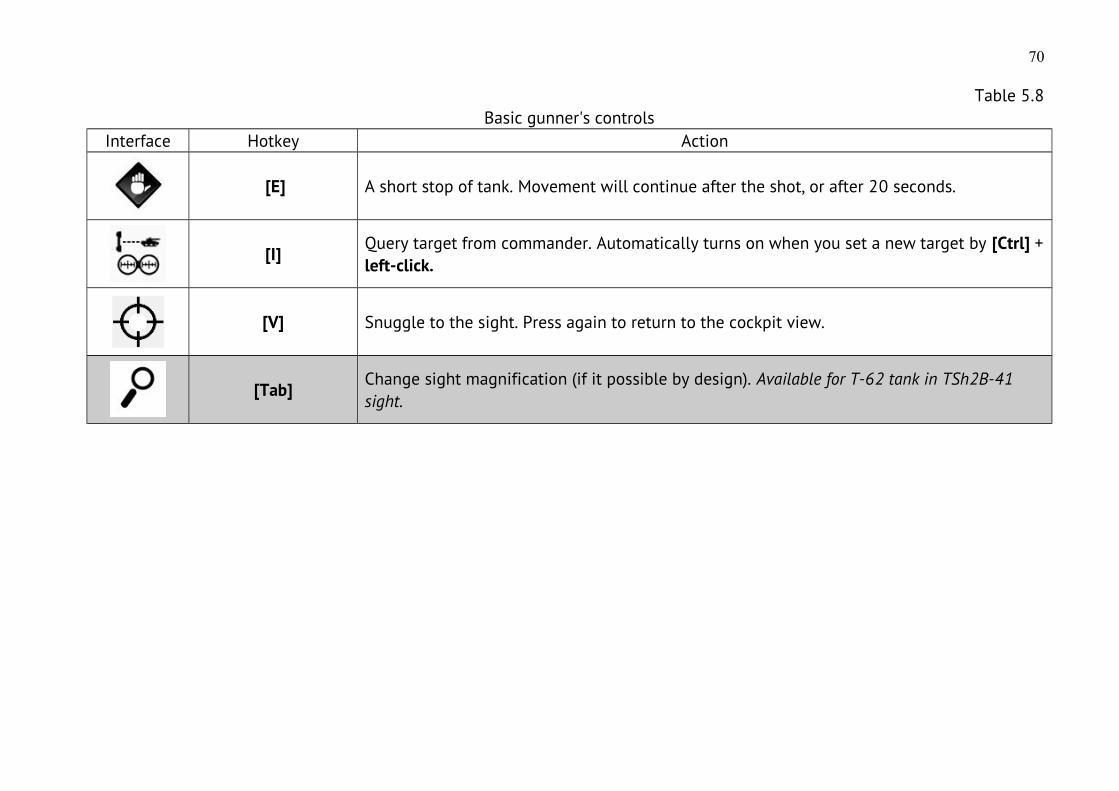
Table 5.8Basic gunner's controls
Interface Hotkey Action
[E] A short stop of tank. Movement will continue after the shot, or after 20 seconds.
[I]Query target from commander. Automatically turns on when you set a new target by [Ctrl] +left-click.
[V] Snuggle to the sight. Press again to return to the cockpit view.
[Tab]Change sight magnification (if it possible by design). Available for T-62 tank in TSh2B-41 sight.
70
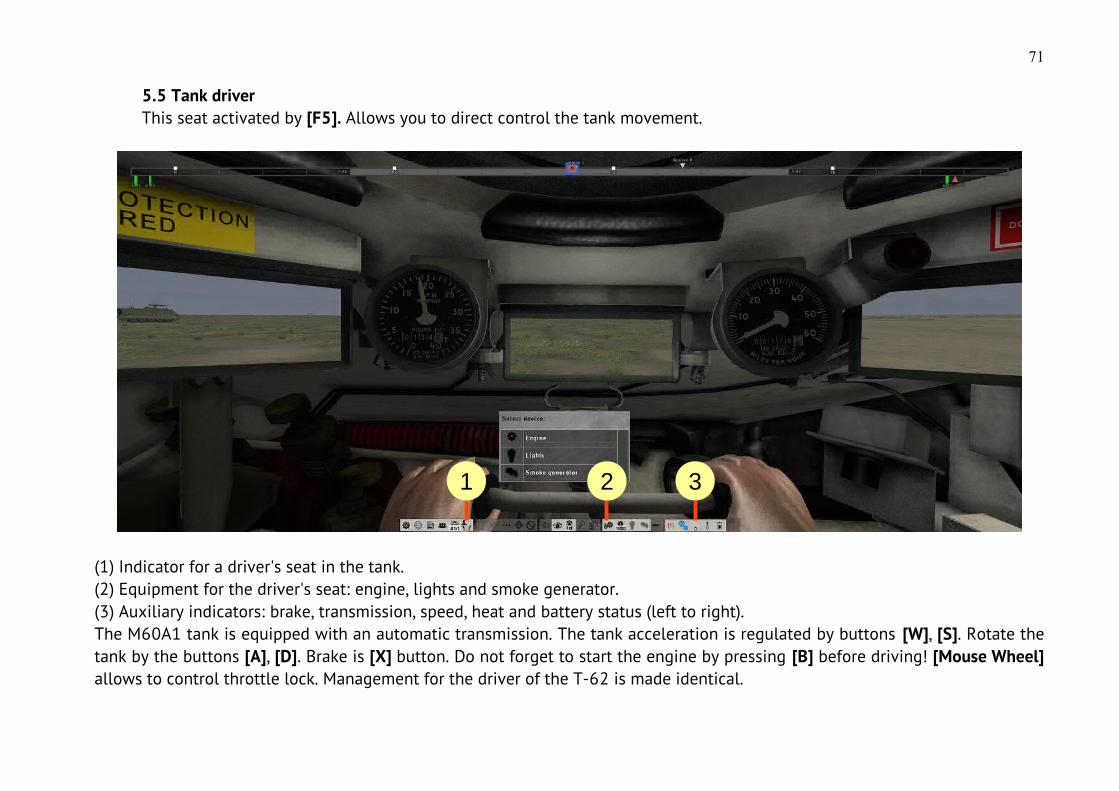
5.5 Tank driverThis seat activated by [F5]. Allows you to direct control the tank movement.
(1) Indicator for a driver's seat in the tank.(2) Equipment for the driver's seat: engine, lights and smoke generator.(3) Auxiliary indicators: brake, transmission, speed, heat and battery status (left to right).The M60A1 tank is equipped with an automatic transmission. The tank acceleration is regulated by buttons [W], [S]. Rotate thetank by the buttons [A], [D]. Brake is [X] button. Do not forget to start the engine by pressing [B] before driving! [Mouse Wheel]allows to control throttle lock. Management for the driver of the T-62 is made identical.
71
1 32
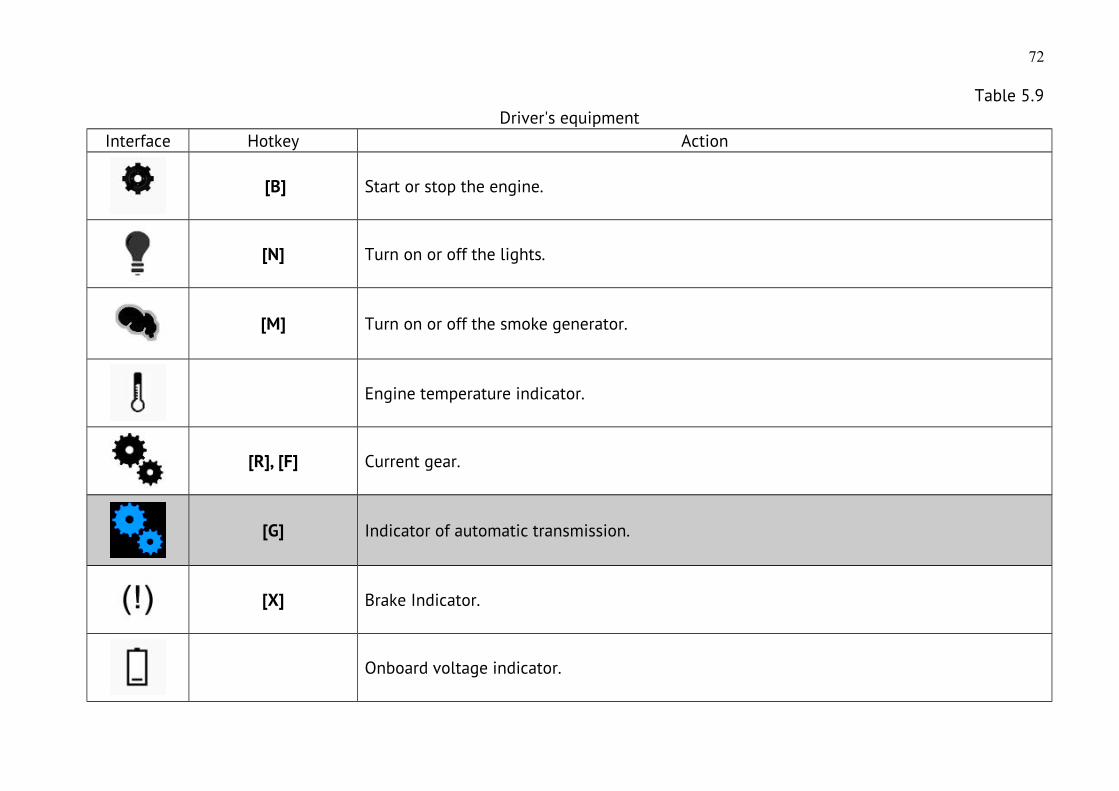
Table 5.9Driver's equipment
Interface Hotkey Action
[B] Start or stop the engine.
[N] Turn on or off the lights.
[M] Turn on or off the smoke generator.
Engine temperature indicator.
[R], [F] Current gear.
[G] Indicator of automatic transmission.
[X] Brake Indicator.
Onboard voltage indicator.
72
To control the movement of the tank with a manual gearbox, press [G]. The blue indicator (automatic transmission) willturn off. Now the buttons [R], [F] will shift gears and [Mouse wheel] will continue to adjust the throttle lock. [W] button ischange purpose, and will be responsible as pressing the gas pedal (and releasing the clutch and brake). Button [S] is equivalentto pressing the clutch and brake pedals at the same time. Press [G] again to enable automatic transmission.
In the addition to the "discrete" tank movement control (by [A], [D] keys) with the driver's seat, you can control themovement of tank by the mouse.
For tanks that have a lever control principle is as follows: the left and right mouse buttons (or hold [Q], [E]) allows you tocapture the left and right levers, and up-down mouse movement allows to move them to pull or push. Releasing the buttonsleave the levers into default positions - rectilinear movement of the tank.
At the same time, for tanks with single-stage PSM or with steering clutch (eg T-34 tank), on the halfway of the levercaterpillar will be detached from gear, and from halfway to full stage - will be inhibited. For tanks with two-stage PSM, forexample T-62 tank, on halfway the caterpillar is switched to a lower gear others the same.
For tanks that are controlled by the steering wheel, such as M60A1 tank, the principle of control somewhat different: theleft or right mouse button (or hold [Q] or [E]) allow to take the steering wheel, and the left-right movement of the mouse turnsit, resulting in a corresponding turn of the tank. Releasing the button, puts the steering wheel to the neutral position -rectilinear motion of the tank.
Table 5.10 shows indicators whats control the tank movement.After releasing the levers or steering wheel, for 2 seconds will block the ability to rotate view inside the cockpit by the
mouse, which will show a view indicator marked in gray color.
73
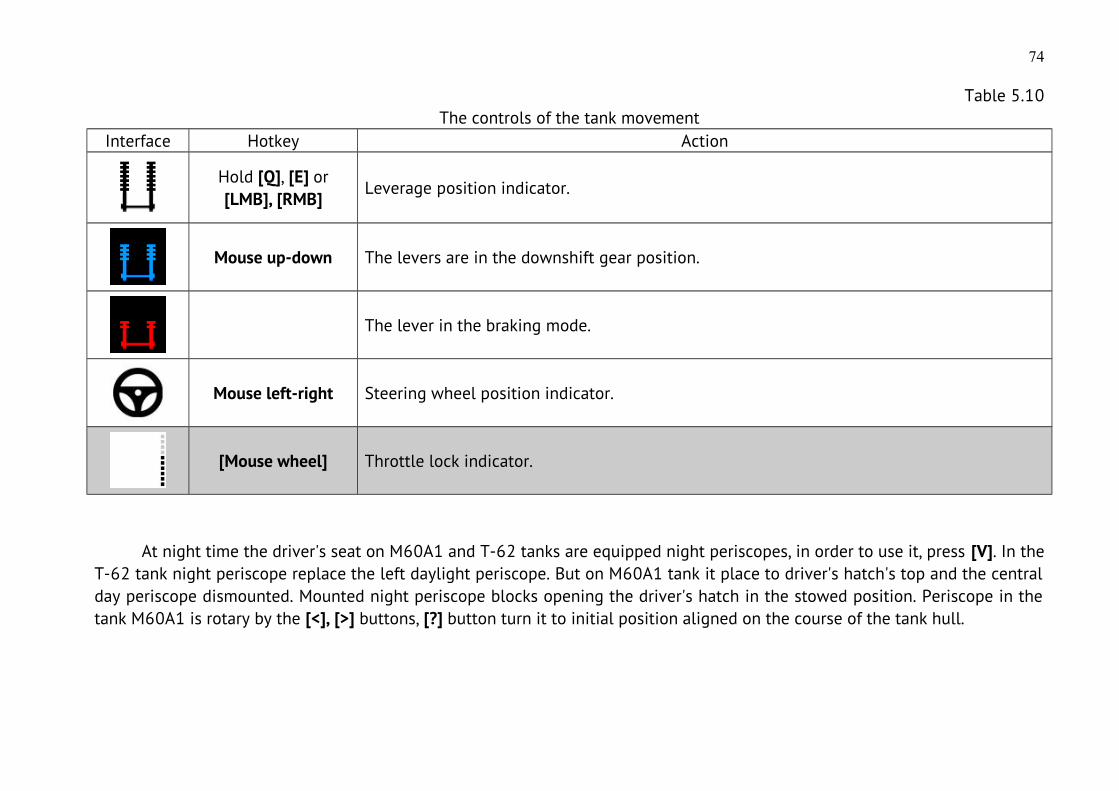
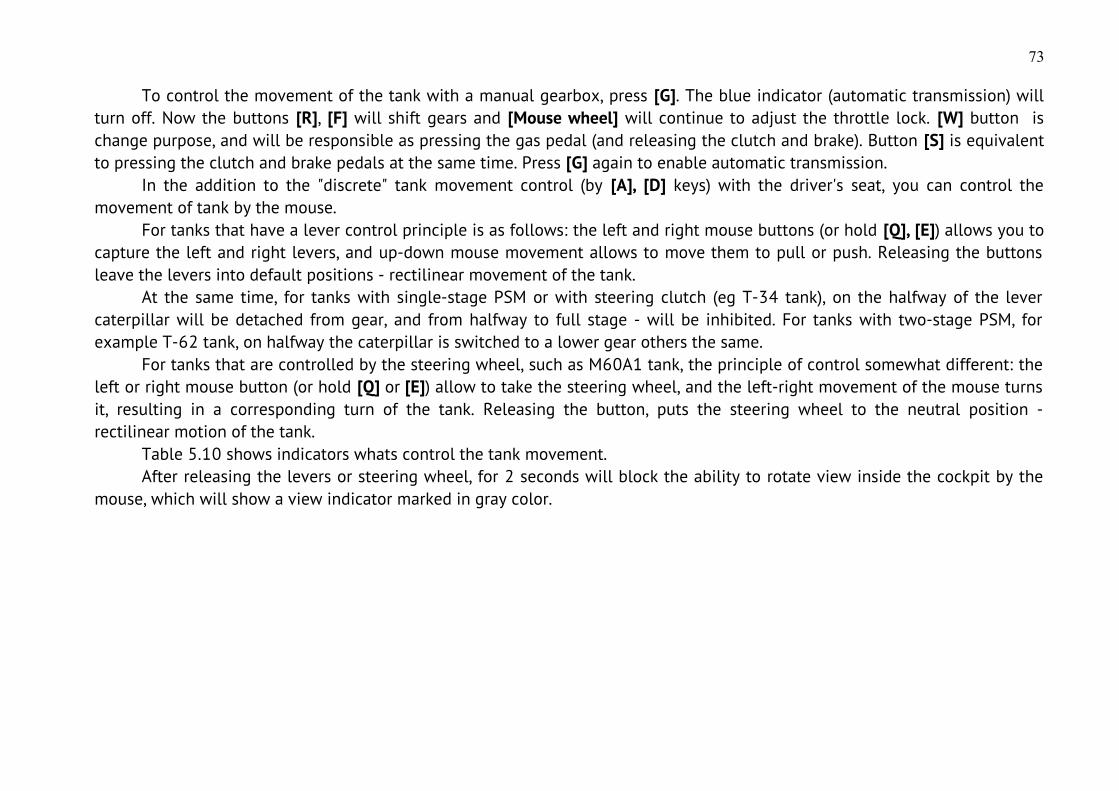
Table 5.10The controls of the tank movement
Interface Hotkey Action
Hold [Q], [E] or [LMB], [RMB]
Leverage position indicator.
Mouse up-down The levers are in the downshift gear position.
The lever in the braking mode.
Mouse left-right Steering wheel position indicator.
[Mouse wheel] Throttle lock indicator.
At night time the driver's seat on M60A1 and T-62 tanks are equipped night periscopes, in order to use it, press [V]. In theT-62 tank night periscope replace the left daylight periscope. But on M60A1 tank it place to driver's hatch's top and the centralday periscope dismounted. Mounted night periscope blocks opening the driver's hatch in the stowed position. Periscope in thetank M60A1 is rotary by the [<], [>] buttons, [?] button turn it to initial position aligned on the course of the tank hull.
74
5.6 Tank loaderThis seat activate by [F8].
For loaders in M60A1 and T-62 tanks are available only rotating periscopes located on the hatch or turret's roof, whichare activated by [V] button. The rotation of the periscope [<] and [>], periscope to the starting position - [?]. Also, loader cantake a stowed position - [O] button. On the T-62 tank loader can fire from anti-aircraft machine gun DShKM mounted on roof ofthe turret, which you need to take a stowed position.
75
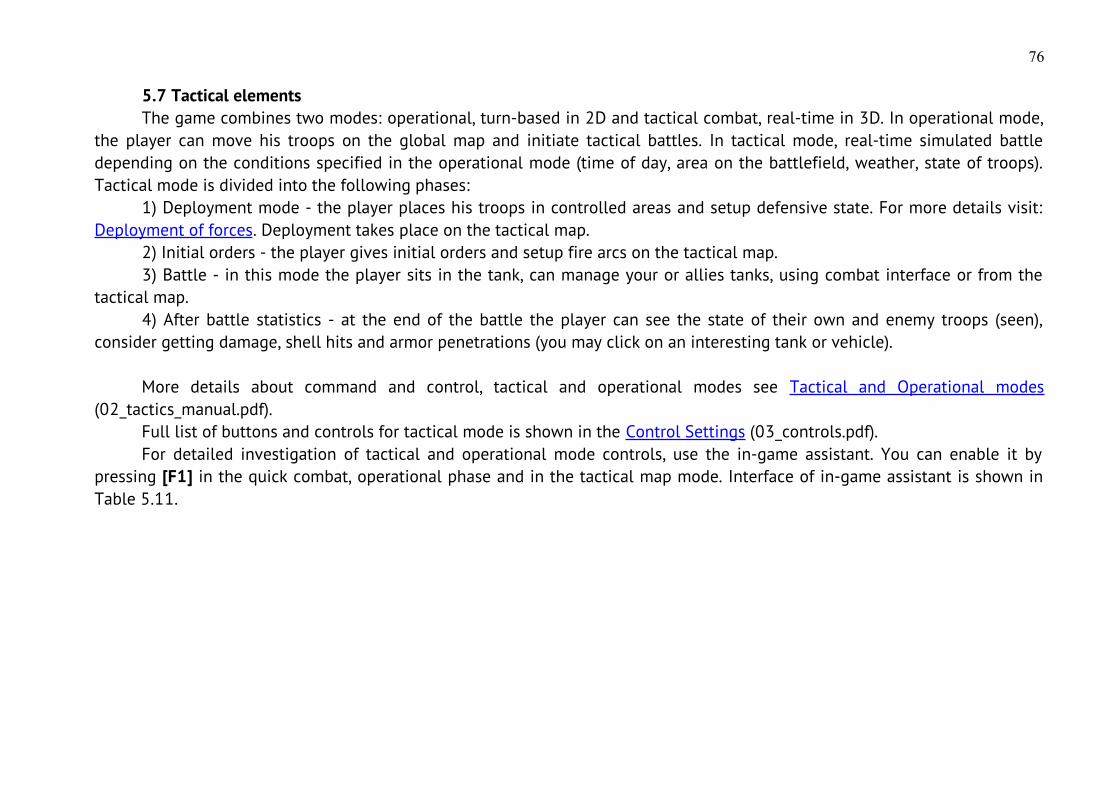
5.7 Tactical elementsThe game combines two modes: operational, turn-based in 2D and tactical combat, real-time in 3D. In operational mode,
the player can move his troops on the global map and initiate tactical battles. In tactical mode, real-time simulated battledepending on the conditions specified in the operational mode (time of day, area on the battlefield, weather, state of troops).Tactical mode is divided into the following phases:
1) Deployment mode - the player places his troops in controlled areas and setup defensive state. For more details visit:Deployment of forces. Deployment takes place on the tactical map.
2) Initial orders - the player gives initial orders and setup fire arcs on the tactical map.3) Battle - in this mode the player sits in the tank, can manage your or allies tanks, using combat interface or from the
tactical map.4) After battle statistics - at the end of the battle the player can see the state of their own and enemy troops (seen),
consider getting damage, shell hits and armor penetrations (you may click on an interesting tank or vehicle).
More details about command and control, tactical and operational modes see Tactical and Operational modes(02_tactics_manual.pdf).
Full list of buttons and controls for tactical mode is shown in the Control Settings (03_controls.pdf).For detailed investigation of tactical and operational mode controls, use the in-game assistant. You can enable it by
pressing [F1] in the quick combat, operational phase and in the tactical map mode. Interface of in-game assistant is shown inTable 5.11.
76

Table 5.11Interface of in-game assistant
Interface Hotkey Action
[F1] Enable or disable an assistant. Right-click allows you to select the level of help details 1-3.
[Alt]+[Space] Select help section from the list. Available when the assistant is enabled.
77

5.8 Deployment of forces and initial ordersPlayers have opportunity to deploy their units on the battlefield before the battle.
(1) Disable briefing [F7], or enable voice instructions for the briefing (right-click).(2) Area for deployment of the player forces.(3) Area where the enemy forces will be deployed (highlighted in blue).(4) Switch to deployment on the 3D battlefield [F10].
Arrows on the map show the estimated (recommended) directions of the offensive or areas for defense. Flags identify thekey points in the area, capturing which helps to ensure control over the square in which they are located. Switch to the 3D viewby pressing [F10].
78
1
2 34
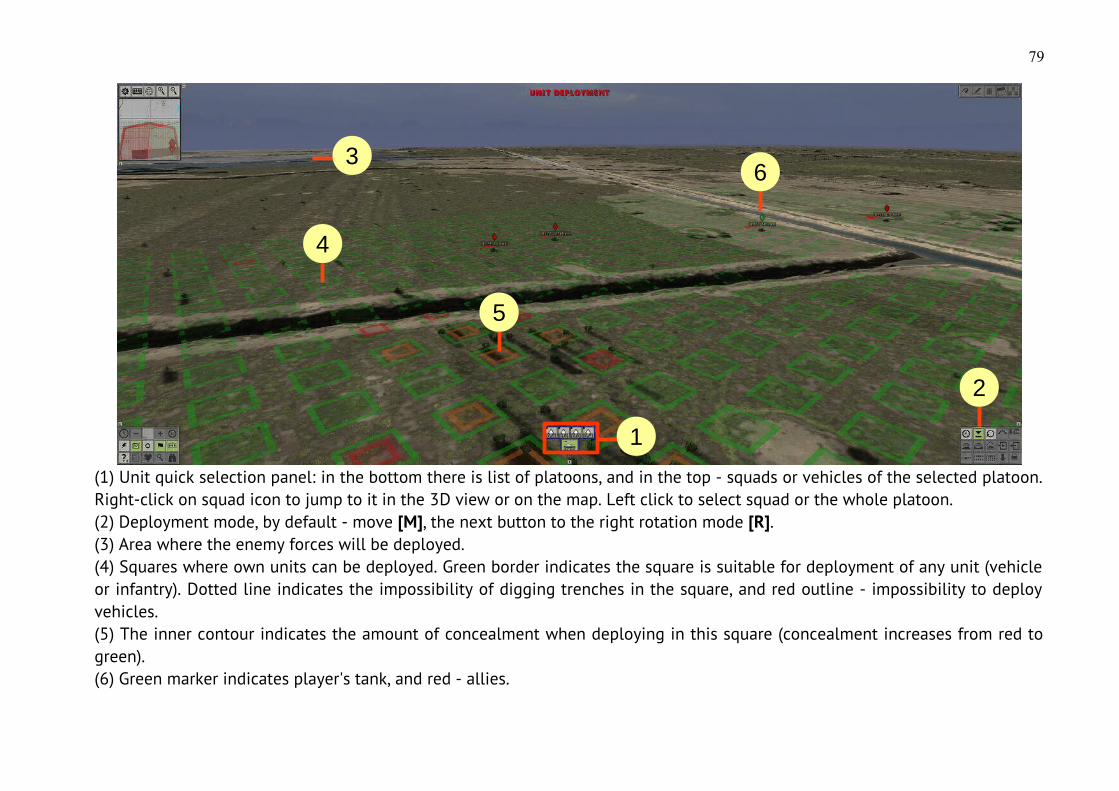
(1) Unit quick selection panel: in the bottom there is list of platoons, and in the top - squads or vehicles of the selected platoon.Right-click on squad icon to jump to it in the 3D view or on the map. Left click to select squad or the whole platoon.(2) Deployment mode, by default - move [M], the next button to the right rotation mode [R].(3) Area where the enemy forces will be deployed.(4) Squares where own units can be deployed. Green border indicates the square is suitable for deployment of any unit (vehicleor infantry). Dotted line indicates the impossibility of digging trenches in the square, and red outline - impossibility to deployvehicles.(5) The inner contour indicates the amount of concealment when deploying in this square (concealment increases from red togreen).(6) Green marker indicates player's tank, and red - allies.
79
2
3
4
1
6
5
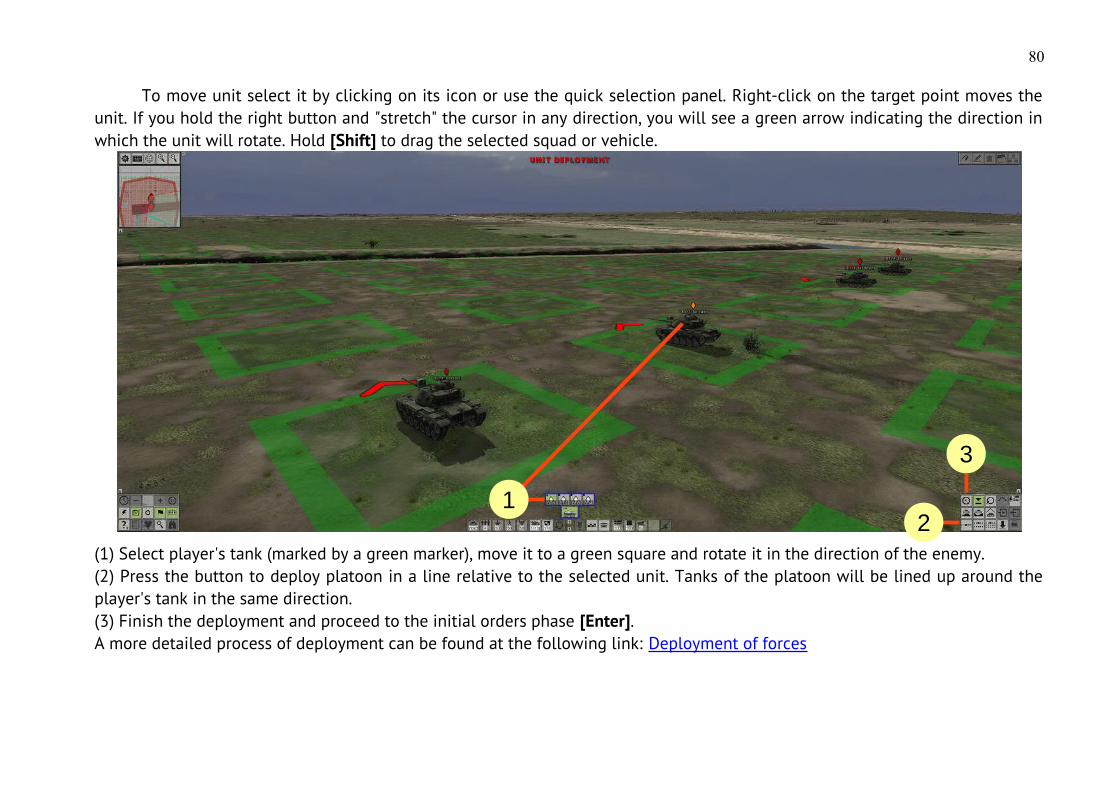
To move unit select it by clicking on its icon or use the quick selection panel. Right-click on the target point moves theunit. If you hold the right button and "stretch" the cursor in any direction, you will see a green arrow indicating the direction inwhich the unit will rotate. Hold [Shift] to drag the selected squad or vehicle.
(1) Select player's tank (marked by a green marker), move it to a green square and rotate it in the direction of the enemy.(2) Press the button to deploy platoon in a line relative to the selected unit. Tanks of the platoon will be lined up around theplayer's tank in the same direction.(3) Finish the deployment and proceed to the initial orders phase [Enter].A more detailed process of deployment can be found at the following link: Deployment of forces
80
1
3
2
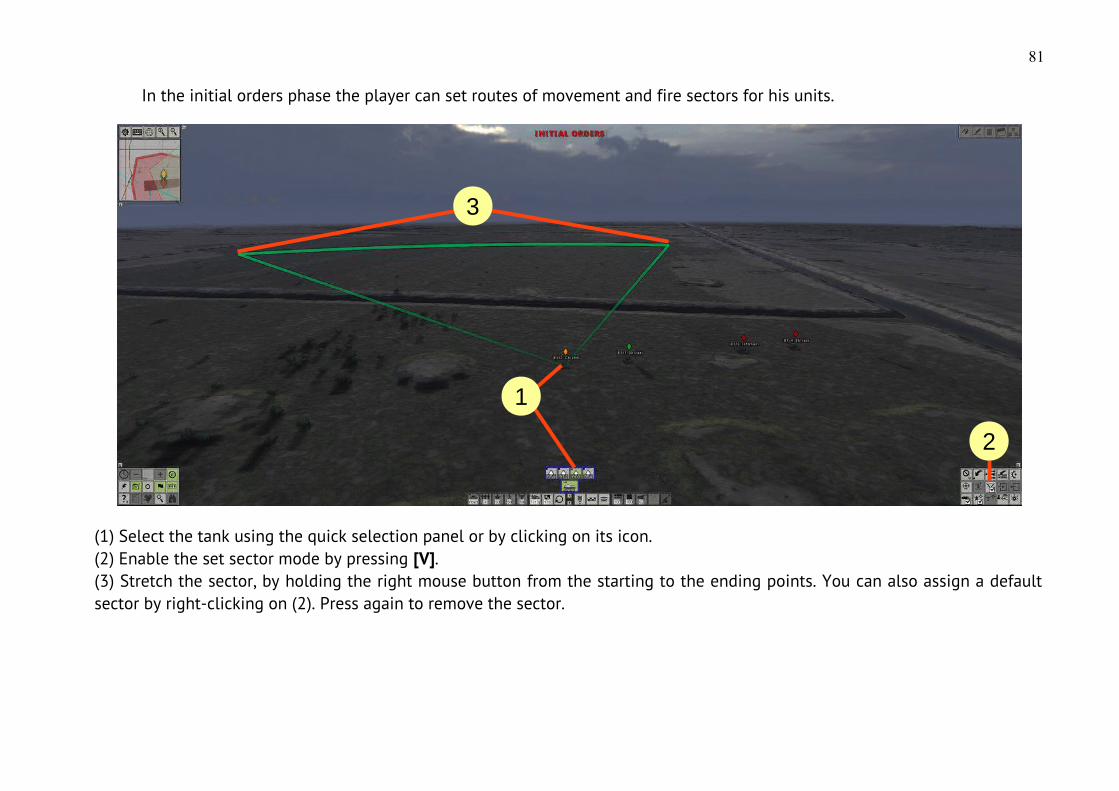
In the initial orders phase the player can set routes of movement and fire sectors for his units.
(1) Select the tank using the quick selection panel or by clicking on its icon.(2) Enable the set sector mode by pressing [V].(3) Stretch the sector, by holding the right mouse button from the starting to the ending points. You can also assign a defaultsector by right-clicking on (2). Press again to remove the sector.
81
2
1
3
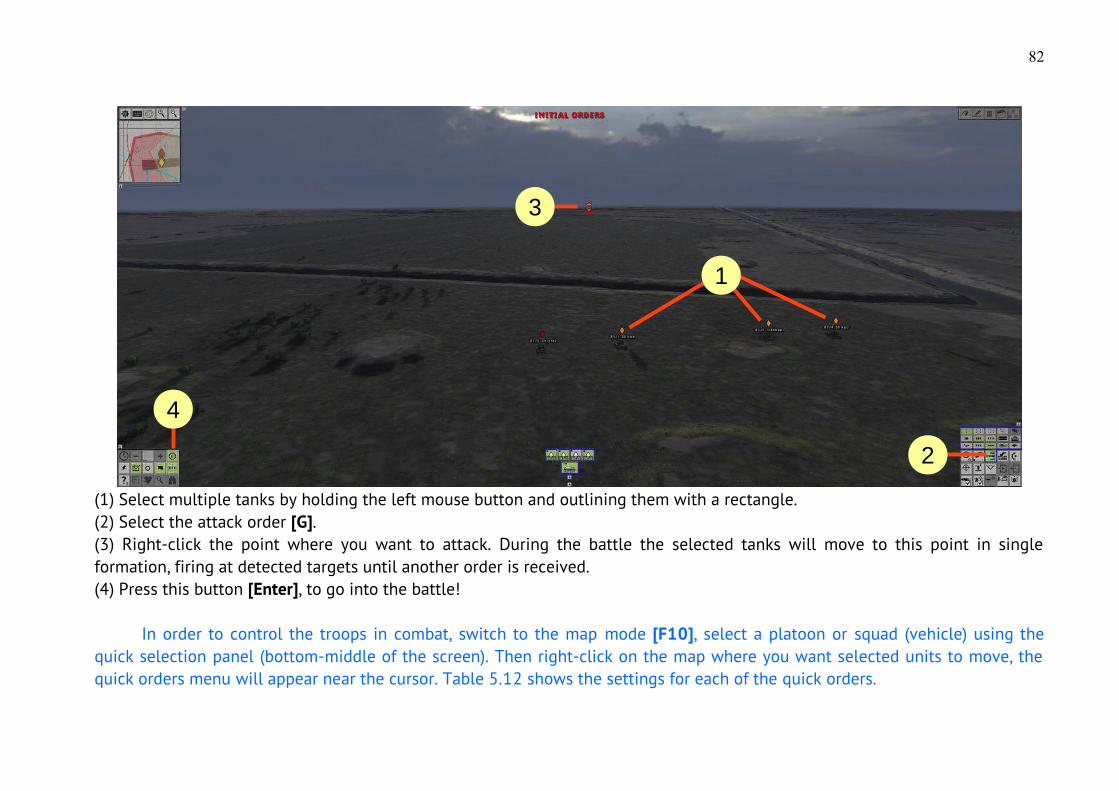
(1) Select multiple tanks by holding the left mouse button and outlining them with a rectangle.(2) Select the attack order [G].(3) Right-click the point where you want to attack. During the battle the selected tanks will move to this point in singleformation, firing at detected targets until another order is received.(4) Press this button [Enter], to go into the battle!
In order to control the troops in combat, switch to the map mode [F10], select a platoon or squad (vehicle) using thequick selection panel (bottom-middle of the screen). Then right-click on the map where you want selected units to move, thequick orders menu will appear near the cursor. Table 5.12 shows the settings for each of the quick orders.
82
2
1
3
4
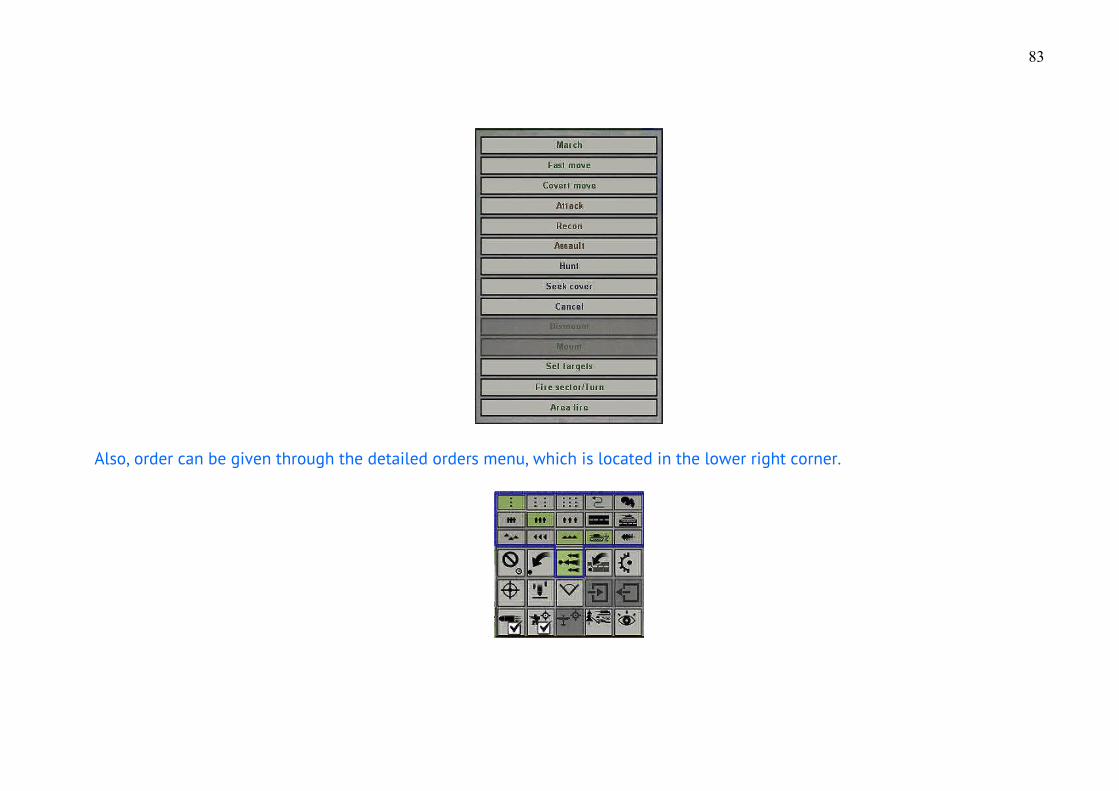
Also, order can be given through the detailed orders menu, which is located in the lower right corner.
83

The upper part (outlined by blue frame) is the formation modifiers that allow you to customize behavior and type offormation. The middle part - movement orders: stop, move, attack, march, and take up defense. Each movement order keeps itsown set of formation settings (modifiers).
Table 5.12Quick orders settings
Name Description and modifiers
MarchFast movement by roads in 3-rows column formation. At the end point troops will take up defense positions.
Fast move Fast movement in 2-rows column formation.Covert move Slow covert movement in column. Infantry crawls.
Attack Attack in line formation. Infantry moves behind tanks.Recon Fast covert moving in compact 1-row column. Infantry begins to crawl when it detects enemy.Assault Attack in dense formation in several rows. Tanks move behind infantry, mostly by road.Hunt Fast movement in sparse line.
Seek cover Take up defense in near positions.Cancel Cancel current order (stop formation).
Dismount Infantry and tank-borne infantry dismount vehicles.Mount Infantry gets inside vehicles or on the armor.
Set targets Set priority targets for firing. Units fire at such targets, even when fire is not permitted.Fire sector/Turn Turn vehicle in the set direction or setup a fire sector.
Area fire Set an area target for firing adjusted by platoon/battery commander.
For more details about controlling own forces in the battle, see Tactical and Operational modes (02_tactics_manual.pdf).
84
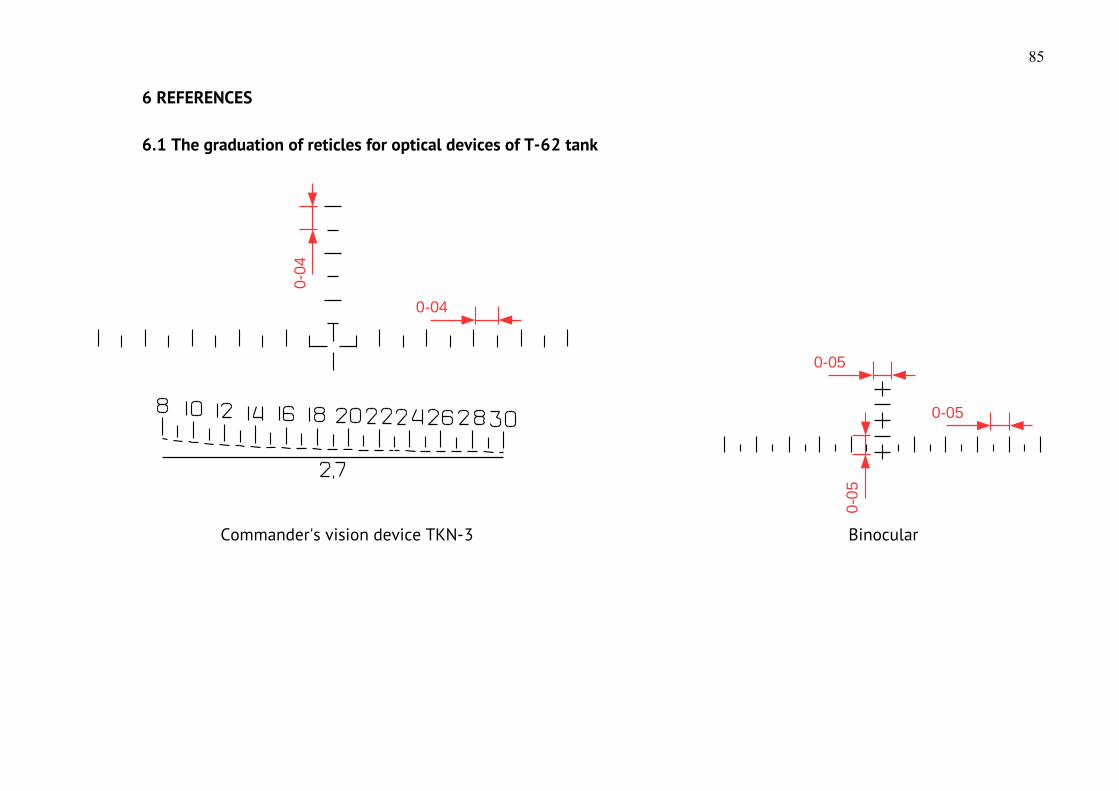
6 REFERENCES
6.1 The graduation of reticles for optical devices of T-62 tank
Commander's vision device TKN-3 Binocular
85
0-040-04
0-05
0-05
0-05
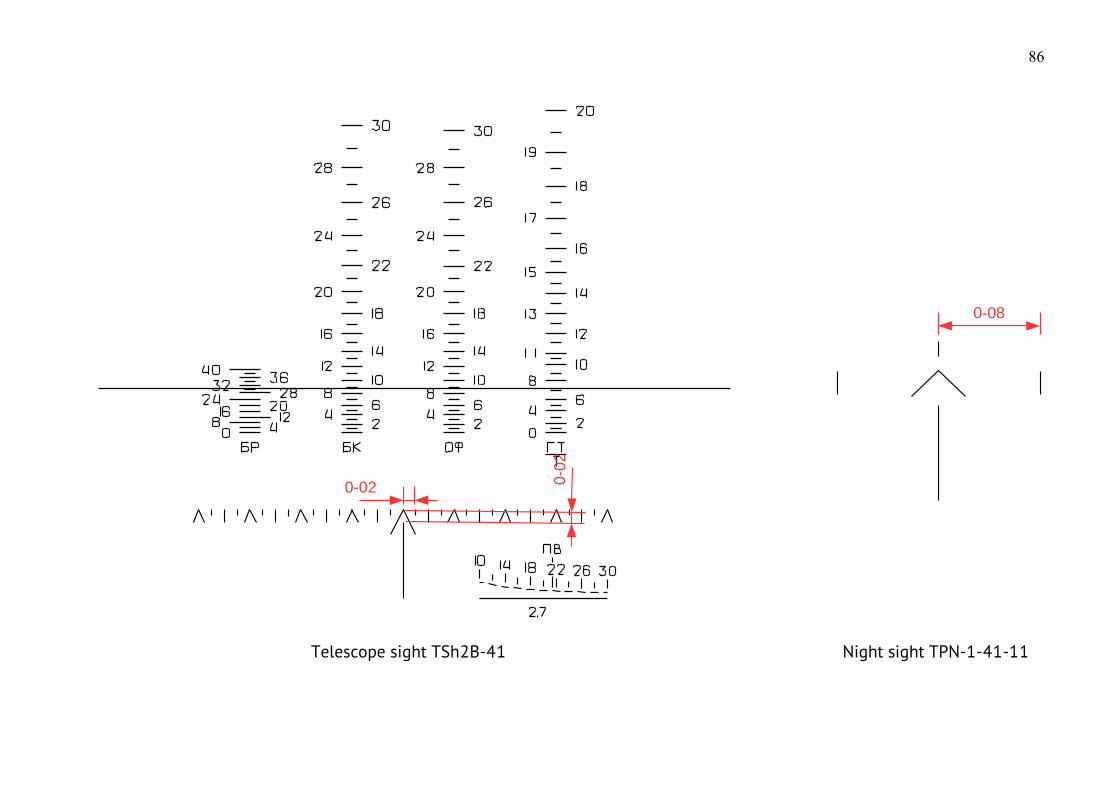
Telescope sight TSh2B-41 Night sight TPN-1-41-11
86
0-02 0-02
0-08

Collimator sight K10-T (DShKM)
87
0-200-80
1-20
0-20
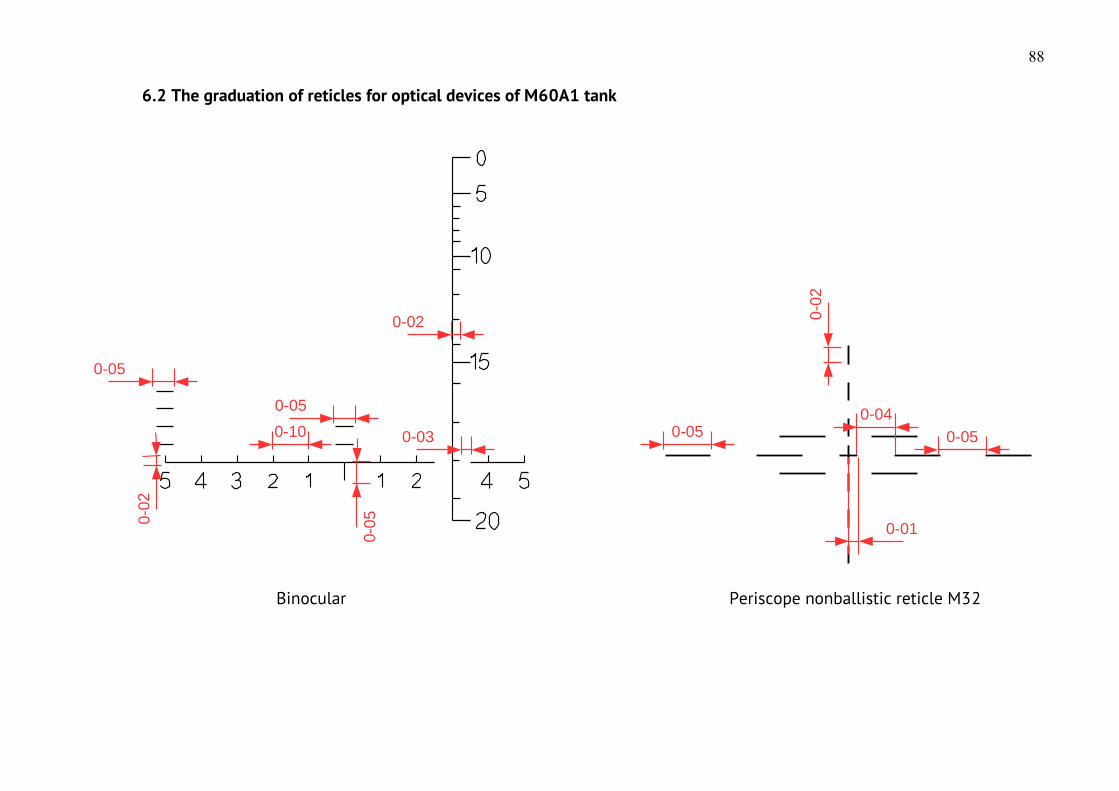
6.2 The graduation of reticles for optical devices of M60A1 tank
Binocular Periscope nonballistic reticle M32
88
0-05
0-10
0-05
0-02
0-03
0-050-02
0-02
0-050-04
0-05
0-01
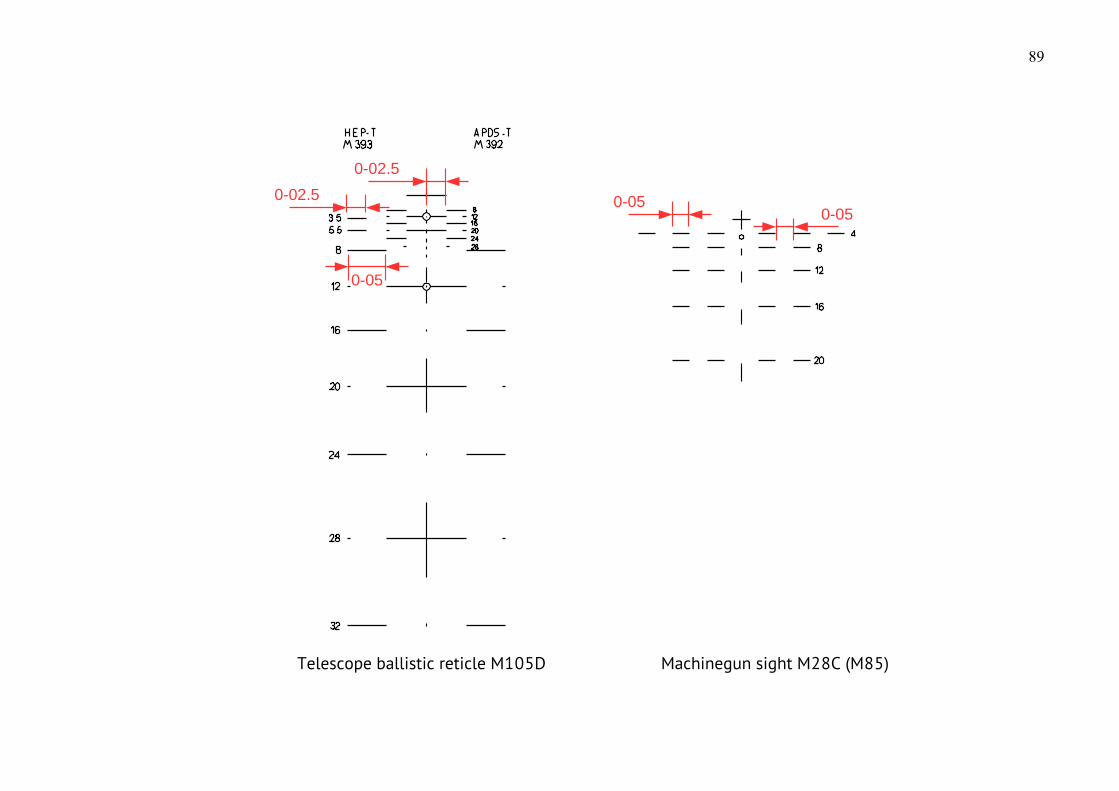
Telescope ballistic reticle M105D Machinegun sight M28C (M85)
89
0-05
0-02.5
0-02.5
0-050-05
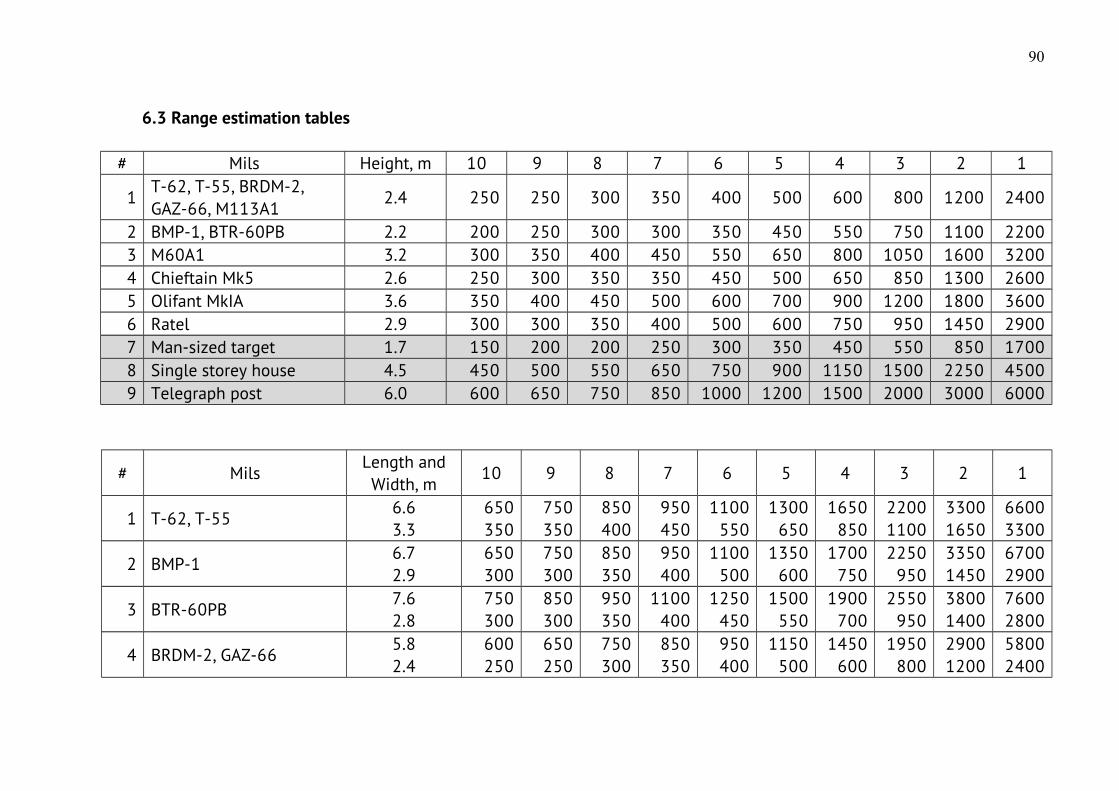
6.3 Range estimation tables
# Mils Height, m 10 9 8 7 6 5 4 3 2 1
1T-62, T-55, BRDM-2, GAZ-66, M113A1
2.4 250 250 300 350 400 500 600 800 1200 2400
2 BMP-1, BTR-60PB 2.2 200 250 300 300 350 450 550 750 1100 22003 M60A1 3.2 300 350 400 450 550 650 800 1050 1600 32004 Chieftain Mk5 2.6 250 300 350 350 450 500 650 850 1300 26005 Olifant MkIA 3.6 350 400 450 500 600 700 900 1200 1800 36006 Ratel 2.9 300 300 350 400 500 600 750 950 1450 29007 Man-sized target 1.7 150 200 200 250 300 350 450 550 850 17008 Single storey house 4.5 450 500 550 650 750 900 1150 1500 2250 45009 Telegraph post 6.0 600 650 750 850 1000 1200 1500 2000 3000 6000
# MilsLength andWidth, m
10 9 8 7 6 5 4 3 2 1
1 T-62, T-556.63.3
650350
750350
850400
950450
1100550
1300650
1650850
22001100
33001650
66003300
2 BMP-16.72.9
650300
750300
850350
950400
1100500
1350600
1700750
2250950
33501450
67002900
3 BTR-60PB7.62.8
750300
850300
950350
1100400
1250450
1500550
1900700
2550950
38001400
76002800
4 BRDM-2, GAZ-665.82.4
600250
650250
750300
850350
950400
1150500
1450600
1950800
29001200
58002400
90
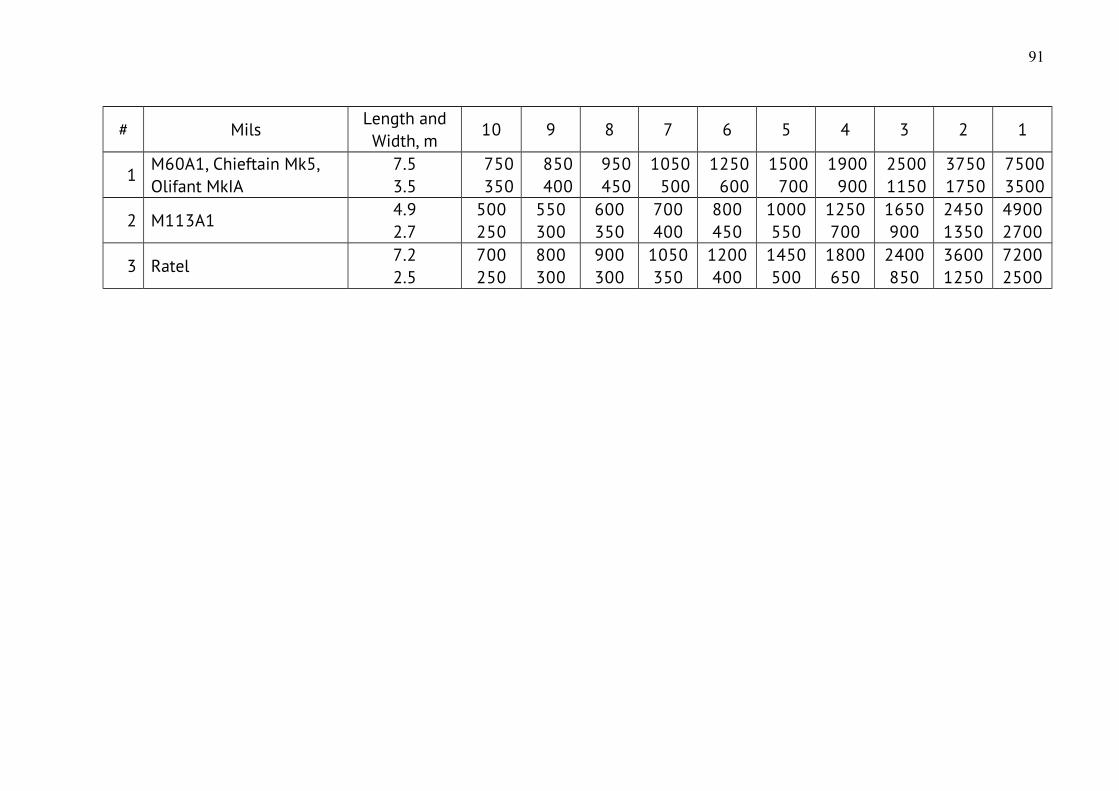
# MilsLength andWidth, m
10 9 8 7 6 5 4 3 2 1
1M60A1, Chieftain Mk5, Olifant MkIA
7.53.5
750350
850400
950450
1050500
1250600
1500700
1900900
25001150
37501750
75003500
2 M113A14.92.7
500250
550300
600350
700400
800450
1000550
1250700
1650900
24501350
49002700
3 Ratel7.22.5
700250
800300
900300
1050350
1200400
1450500
1800650
2400850
36001250
72002500
91
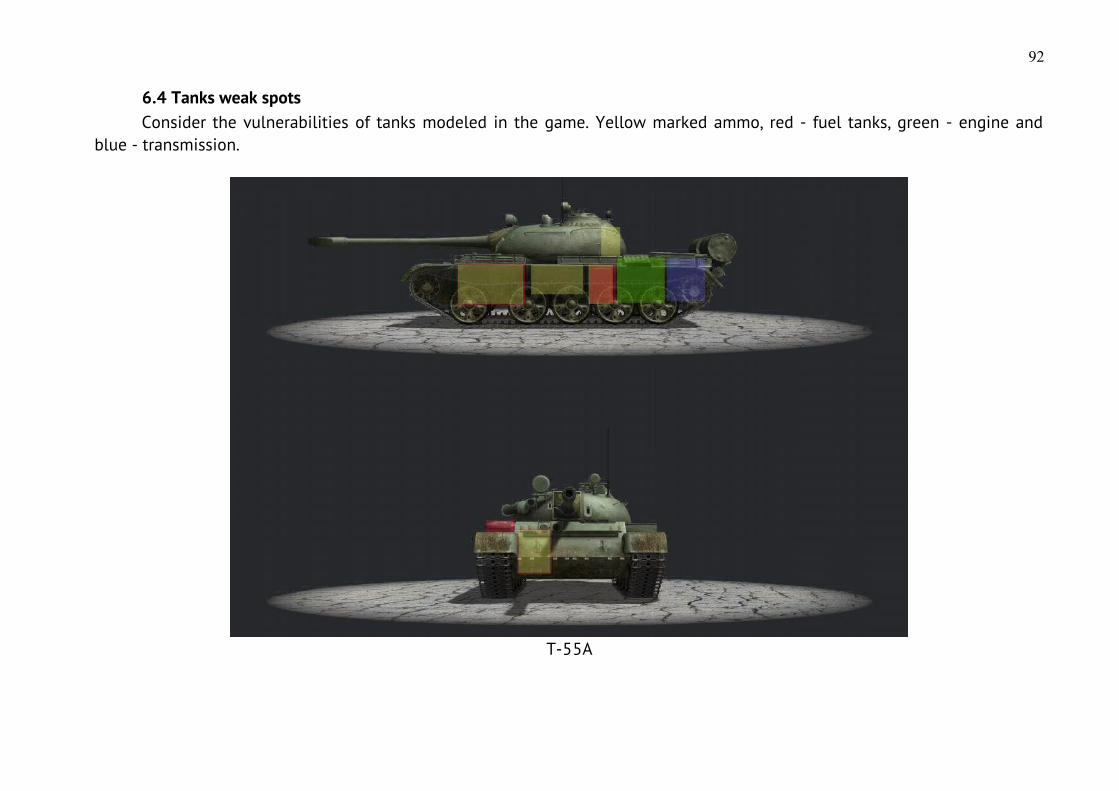
6.4 Tanks weak spotsConsider the vulnerabilities of tanks modeled in the game. Yellow marked ammo, red - fuel tanks, green - engine and
blue - transmission.
T-55A
92
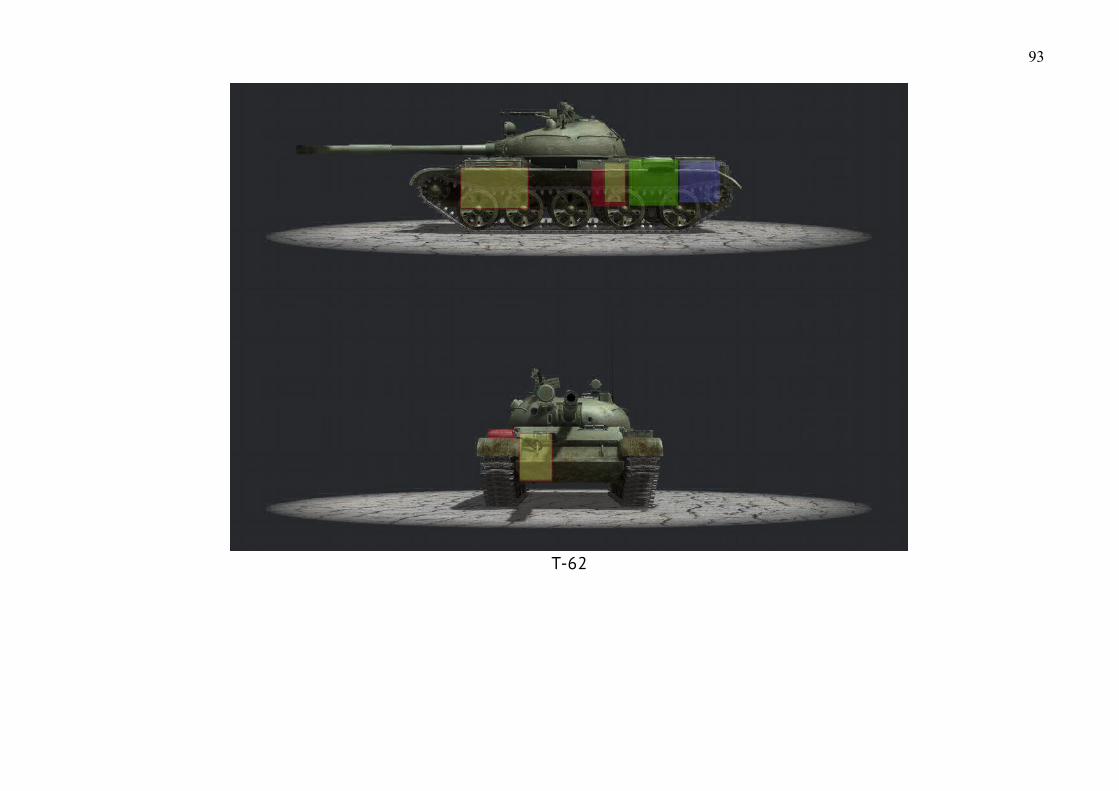
T-62
93
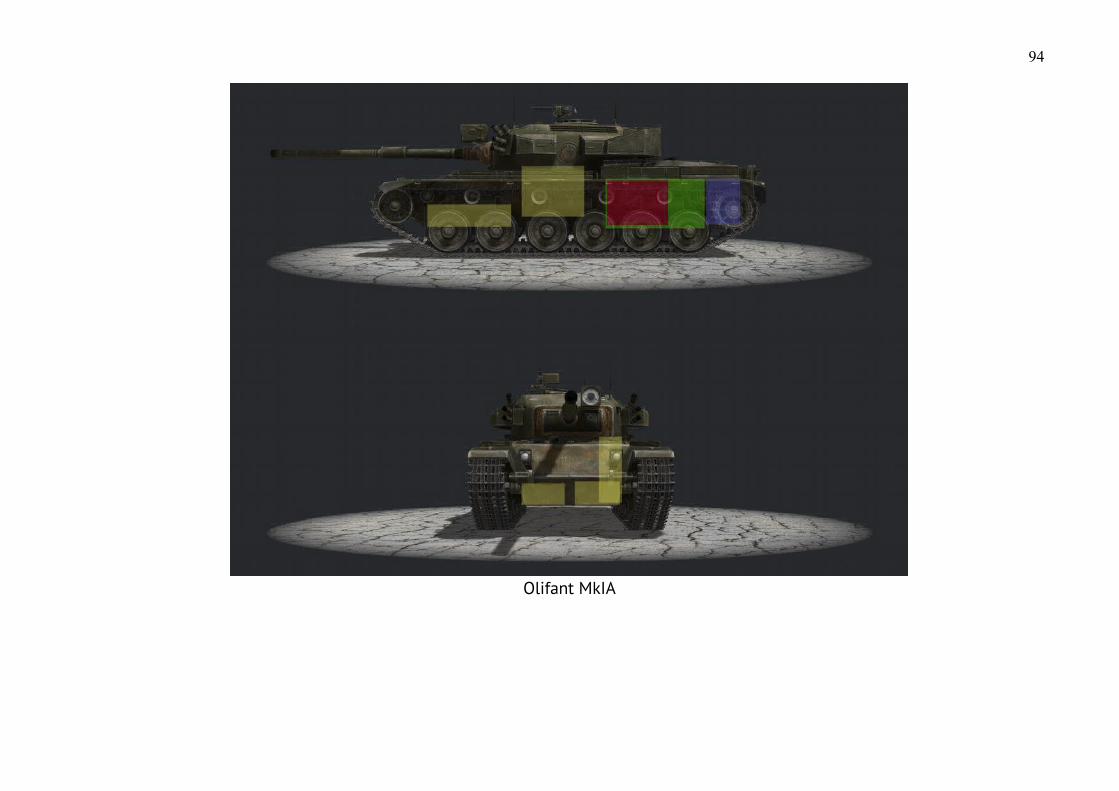
Olifant MkIA
94
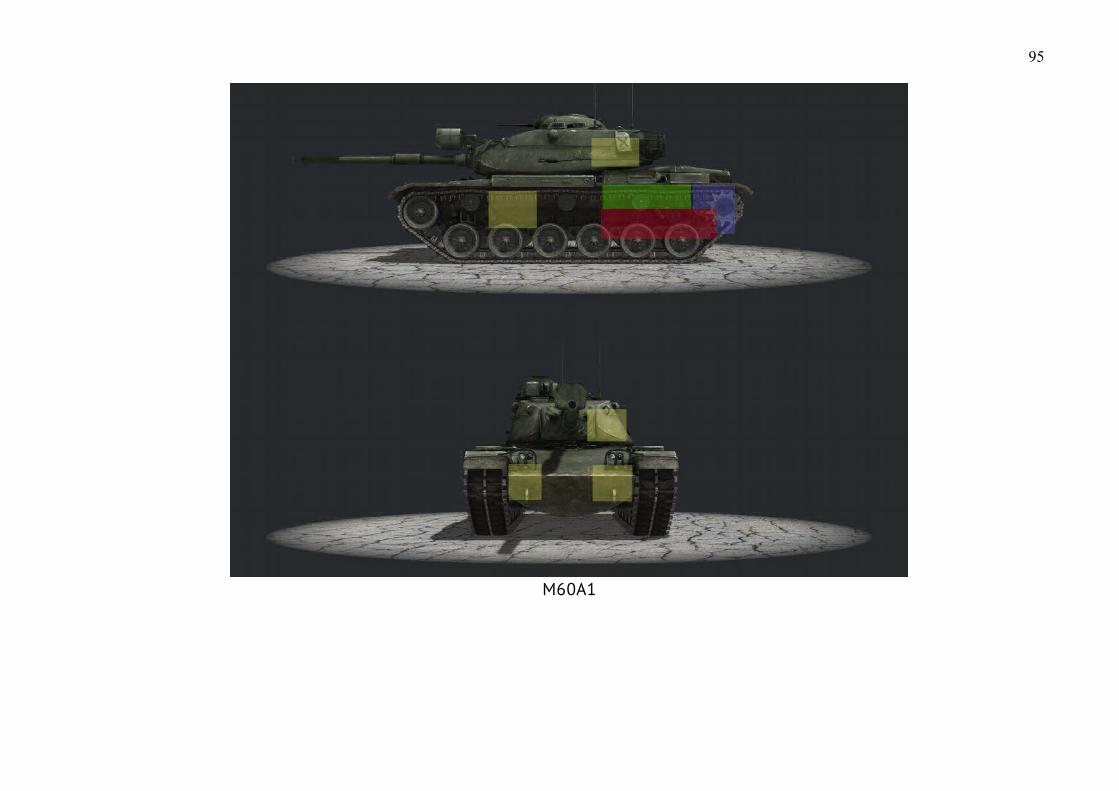
M60A1
95
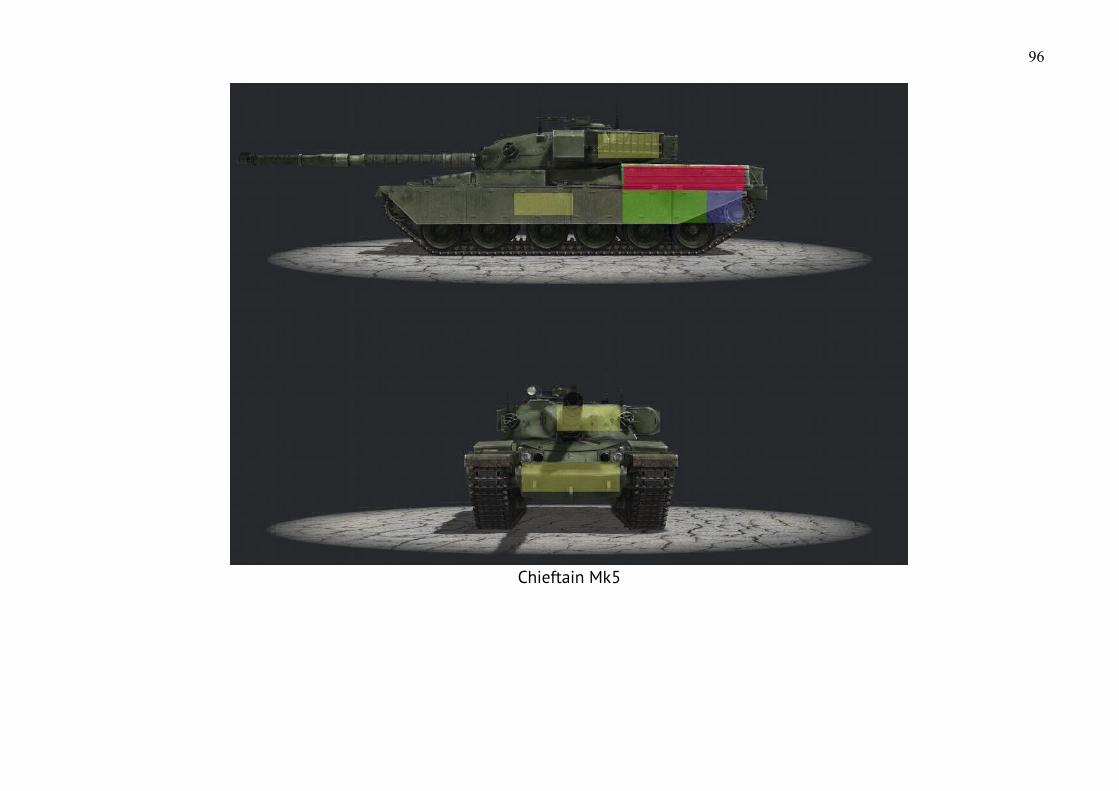
Chieftain Mk5
96

Thank you for purchasing the game!
97