starwind iscsi san software: using starwind with vmware ... · starwind iscsi san software: using...
TRANSCRIPT
StarWind SoftwareTechnical Reference Series
Copyright © StarWind Software 2008-2011. All rights reserved.
StarWind iSCSI SAN Software: Using StarWindwith VMware Workstation Virtual Machines
www.starwindsoftware.com
StarWind SoftwareTechnical Reference Series
COPYRIGHT
Copyright © StarWind Software 2008-2011. All rights reserved. No part of thispublication may be reproduced, stored in a retrieval system, or transmitted in anyform or by any means, electronic, mechanical, photocopying, recording or otherwise,without the prior written consent of StarWind Software.
TRADEMARKS
“StarWind”, “StarWind Software” and the StarWind and the StarWind Software logosare trademarks of StarWind Software which may be registered in some jurisdictions.All other trademarks are owned by their respective owners.
CHANGES
The material in this document is for information only and is subject to change withoutnotice. While reasonable efforts have been made in the preparation of this documentto assure its accuracy, StarWind Software assumes no liability resulting from errors oromissions in this document, or from the use of the information contained herein.StarWind Software reserves the right to make changes in the product design withoutreservation and without notification to its users.
TECHNICAL SUPPORT AND SERVICES
If you have questions about installing or using this software, check this and otherdocuments first - you will find answers to most of your questions here or there. If youneed further assistance, please contact us.
StarWind SoftwareTechnical Reference Series
3Copyright © StarWind Software 2008-2011. All rights reserved.
Table of Contents
....................................................................................................... 4Introduction
....................................................................................................... 6Configuring iSCSI Storage....................................................................................................... 18Configuring VMware Host
................................................................................................................ 19Connecting Remote Device
................................................................................................................ 24Preparing Volume
................................................................................................................ 27Configuring VMware Workstation
................................................................................................................ 35Moving Virtual Machines ....................................................................................................... 36Providing iSCSI Device to Virtual Machine
StarWind SoftwareTechnical Reference Series
4Copyright © StarWind Software 2008-2011. All rights reserved.
Guide
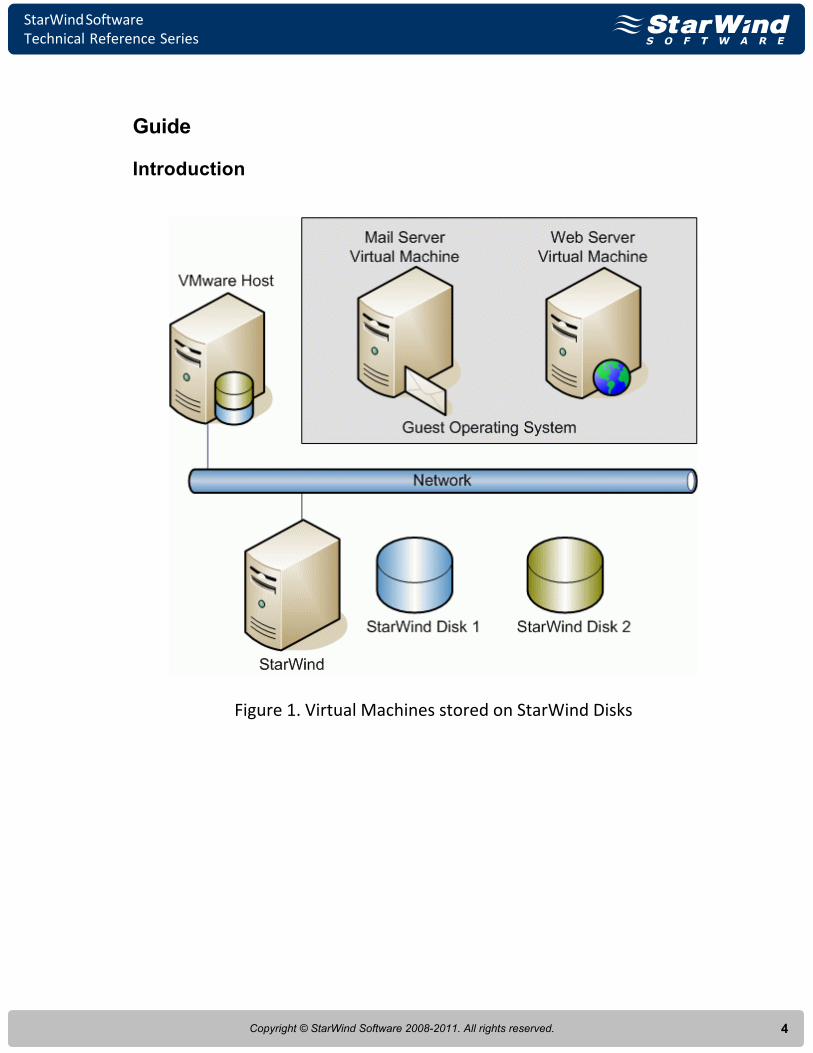
Introduction
Figure 1. Virtual Machines stored on StarWind Disks
StarWind SoftwareTechnical Reference Series
5Copyright © StarWind Software 2008-2011. All rights reserved.
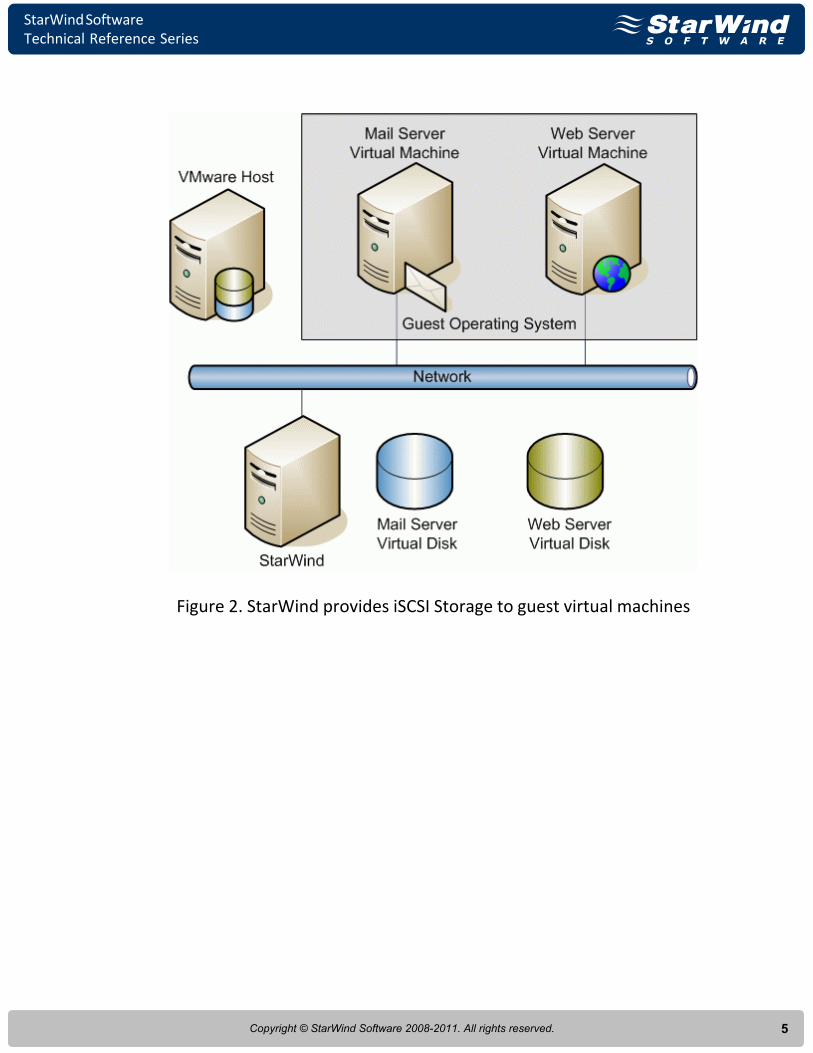
Figure 2. StarWind provides iSCSI Storage to guest virtual machines
StarWind SoftwareTechnical Reference Series
6Copyright © StarWind Software 2008-2011. All rights reserved.
Configuring iSCSI Storage
This session describes configuring process of StarWind. Before you startplease ensure that StarWind is installed on the host that will be providingstorage services to VMware Workstation.
Create StarWind DiskVMware needs a disk to store the settings of the virtual machine and a virtualhard drive to install a guest operating system. With StarWind you can create and export the virtual disk using variousalternative methods. Depending on the physical type of the storage you use,you can create:
o Image File device
o Disk Bridge device
o Snapshot and CDP device
o Mirror (RAID-1) device
Image File device
The Image File device creates a virtual iSCSI drive using the space of a physicalhard disk on the machine where it is created. The resulting iSCSI storage willhave the same structure as a physical hard disk.When the Image File device is mounted (using an iSCSI Initiator), it will appearas standard hard disk to the computer on which it is mounted. All standarddisk operations such as formatting, using a custom file system, copy data to/from it and install applications, etc. are fully supported.There are some limitations for the Image File device usage:As a virtual hard disk uses the space of your physical hard disk, the availablevolume is limited by the free space on that hard drive. If the size of the imagefile is close to the remaining free space of the hard disk on which it is store,you will not be able to store additional files on that disk.You cannot change the volume of the image file whilst it is online (users areconnected to it). However, you can extend the volume.
StarWind SoftwareTechnical Reference Series
7Copyright © StarWind Software 2008-2011. All rights reserved.
Disk Bridge device
The Disk Bridge device is used to export any physical drive. As the Disk Bridgedevice enables you to export a device ‘as is’, no virtual disks are required.The Disk Bridge module provides complete emulation of the SCSI layer thatallows any type of hard drives (PATA/SATA/RAID) to be used by remoteinitiator clients that are strongly demand iSCSI targets to be SCSI-3 compatible. All available space on a device is accessible. A Disk Bridge device, physicallylocated on a remote host, appears as a fully operational local drive on yourcomputer.

StarWind SoftwareTechnical Reference Series
8Copyright © StarWind Software 2008-2011. All rights reserved.
Snapshot and CDP device
The Snapshot and CDP device support is the most advanced and powerfulapproach to creating and exporting virtual drives. In contrast to general ImageFile device, the Snapshot and CDP virtual disk does not allocate all requiredspace on a hard drive at once. Snapshot and CDP virtual disk allocates as muchspace, as it required by the actual data. The allocated space is increased asmore data is being written to the volume.However, a Snapshot and CDP device cannot extend the volume, specified bythe user at the beginning. If you specified 10 GB as the maximal Snapshot andCDP size than the Snapshot and CDP image will grow up to 10 GB but no more.Thus, if you plan to store much data, specify the large volume limit as youcreate a new Snapshot and CDP target. The volume size is limited by 2 TB.The Snapshot and CDP plug-in is not just a virtual storage. It provides you withtools to create a robust solid backup system.The Snapshot and CDP plug-in can operate in one of the following modes:
o Growing Image (Thin Provisioning) creates a basic volume thatallocates as much disk space that is required for storing data. TheGrowing Image volumes use a single journal for all sessions. Thismode is suitable for creating large disks with efficient usage ofphysical disk space, but only support manual snapshot creation.
o Snapshot and CDP (Continuous Data Protection) adds automaticbackup to the basic functionality of Growing Image (ThinProvisioning). Snapshot and CDP uses a new journal for each sessionand creates a new snapshot according to the time period specified inthe Period field. This mode works well for automating yoursnapshots and backups. Manual snapshots are also supported.
o Auto-Restored Snapshot. When this value is set as the OperationMode, all changes written to the Snapshot and CDP device during aninitiator session are discarded at the end of that session. As a result,when the next session is created, it accesses a “blank” Snapshot andCDP device.
o Read-Only image. In this mode Snapshot and CDP images cannot bemodified thereby providing read-only access to all initiators.
StarWind SoftwareTechnical Reference Series
9Copyright © StarWind Software 2008-2011. All rights reserved.
Mirror (RAID-1) device
Mirror (RAID-1) device creates virtual iSCSI target devices based on twosource devices called mirrors. These devices can be local Image File-compatible data files or remote iSCSI targets. The first mirror is the main (orprimary) mirror. The second one is used for failover or backup purposes. Youcan configure mirrors replication during creating new device and selecting thefirst mirror as local image file and the second one as remote iSCSI target. Alsoit is possible to set slow channel caching mode for the remote image toimprove performance in slow networks.

StarWind SoftwareTechnical Reference Series
10Copyright © StarWind Software 2008-2011. All rights reserved.
Configuring StarWind
Launch the StarWind console selecting Start -> All Programs -> StarWindSoftware -> StarWind -> StarWind. After the console is launched its iconappears in the system tray. Double click the icon with the left mouse button orsingle click it with the right and select Start Management pup-up menu item.From the StarWind Servers tree please select the server you want to connectto. Press the right mouse button over the desired host and select the Connectpopup menu item. You will be prompted to enter the login and password.Default ones are: root, starwind. You can always change them later. Press Add Target button to continue.In the Wizard that appears, specify a target name. The name must be a uniquename by which the device will be declared to the iSCSI initiators connecting toStarWind over an IP network.
Press the Next button to continue.
StarWind SoftwareTechnical Reference Series
11Copyright © StarWind Software 2008-2011. All rights reserved.
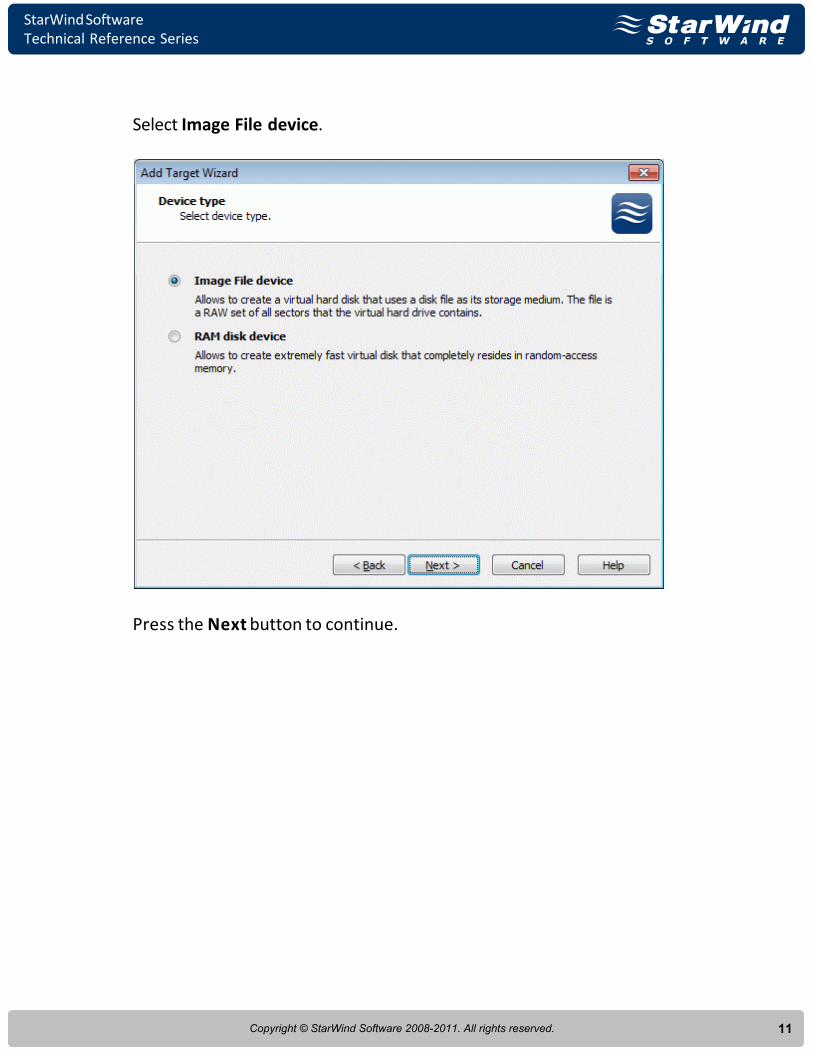
Select Image File device.
Press the Next button to continue.
StarWind SoftwareTechnical Reference Series
12Copyright © StarWind Software 2008-2011. All rights reserved.
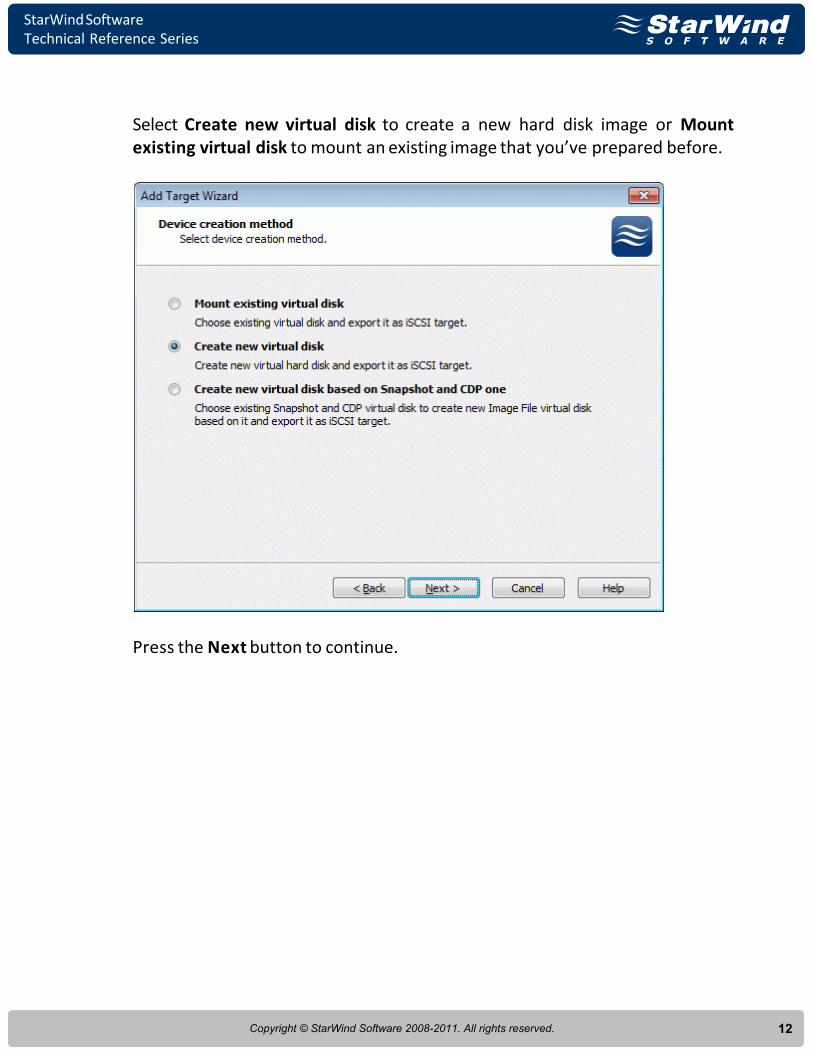
Select Create new virtual disk to create a new hard disk image or Mountexisting virtual disk to mount an existing image that you’ve prepared before.
Press the Next button to continue.
StarWind SoftwareTechnical Reference Series
13Copyright © StarWind Software 2008-2011. All rights reserved.
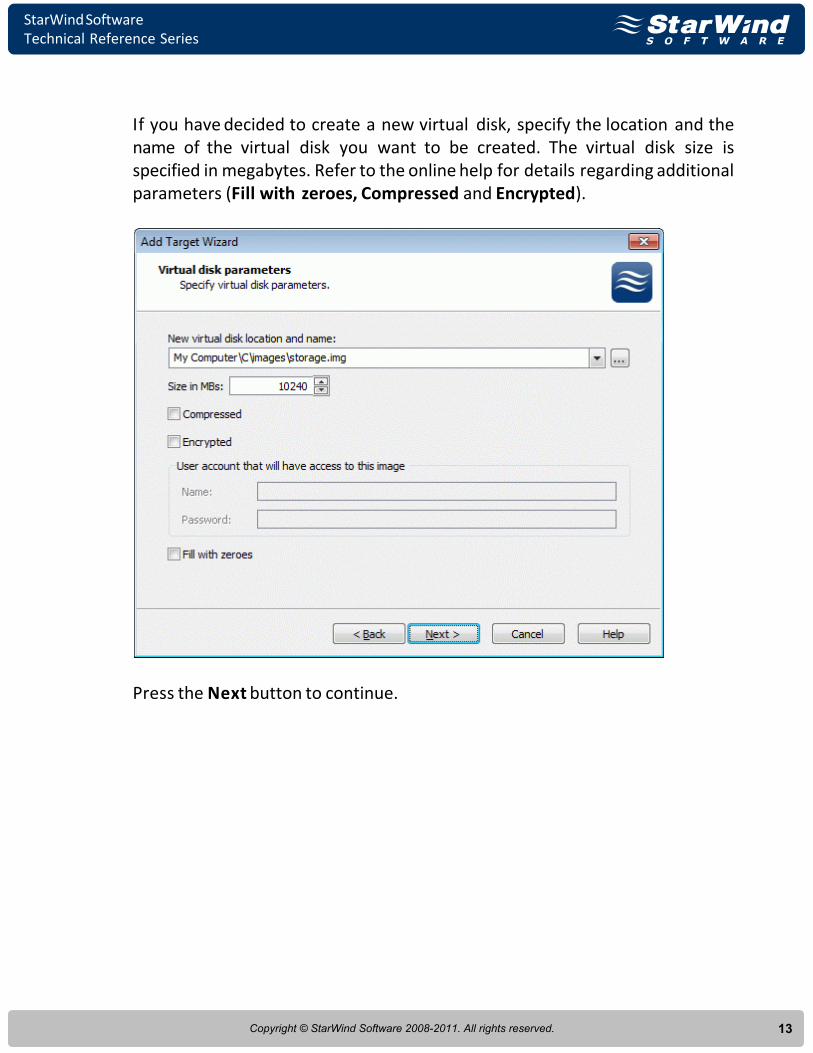
If you have decided to create a new virtual disk, specify the location and thename of the virtual disk you want to be created. The virtual disk size isspecified in megabytes. Refer to the online help for details regarding additionalparameters (Fill with zeroes, Compressed and Encrypted).
Press the Next button to continue.
StarWind SoftwareTechnical Reference Series
14Copyright © StarWind Software 2008-2011. All rights reserved.
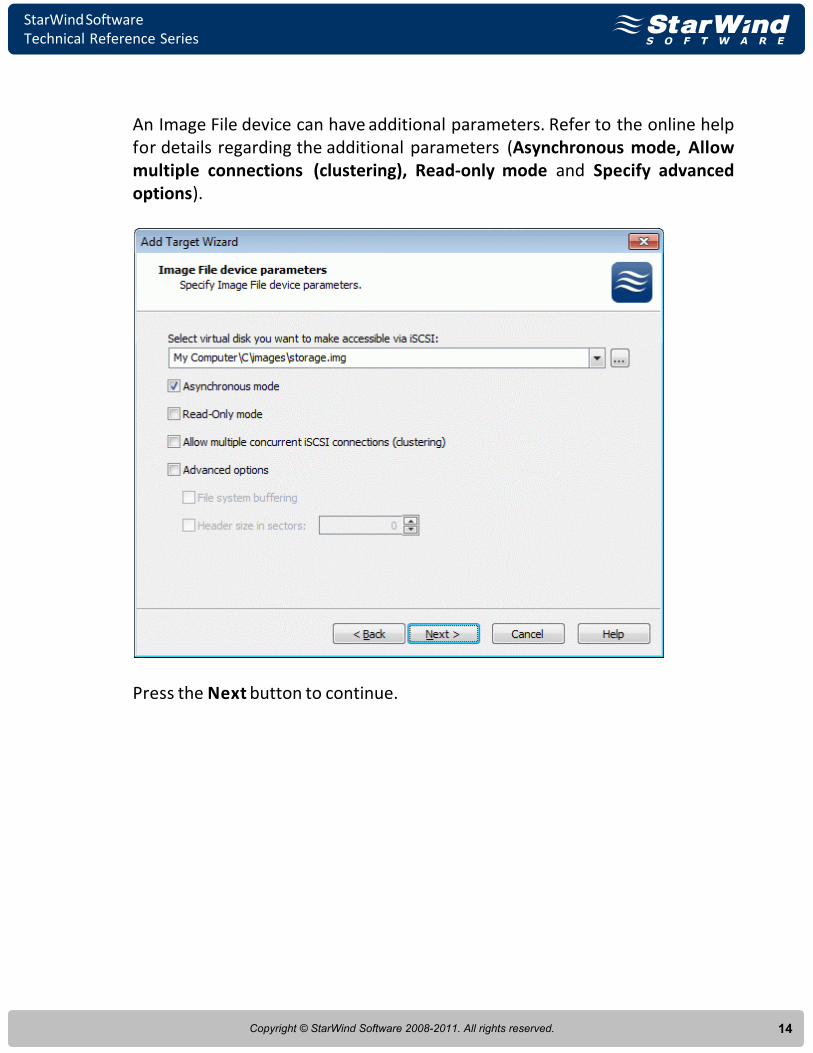
An Image File device can have additional parameters. Refer to the online helpfor details regarding the additional parameters (Asynchronous mode, Allowmultiple connections (clustering), Read-only mode and Specify advancedoptions).
Press the Next button to continue.
StarWind SoftwareTechnical Reference Series
15Copyright © StarWind Software 2008-2011. All rights reserved.
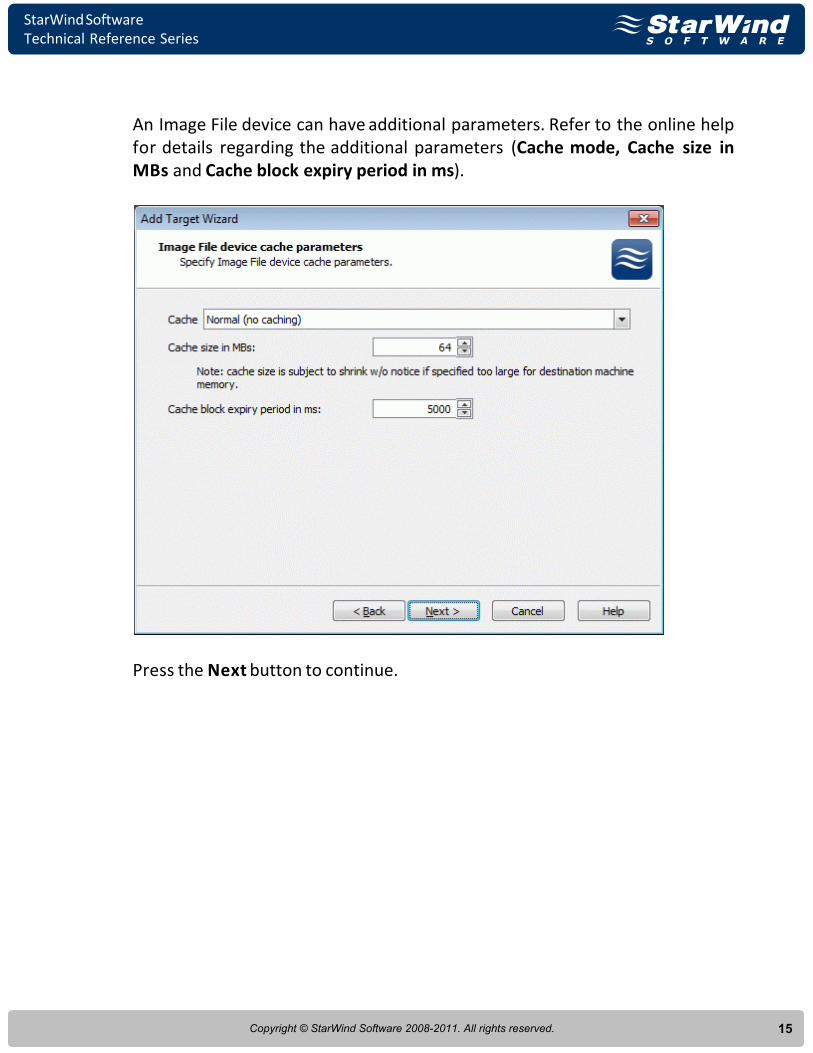
An Image File device can have additional parameters. Refer to the online helpfor details regarding the additional parameters (Cache mode, Cache size inMBs and Cache block expiry period in ms).
Press the Next button to continue.
StarWind SoftwareTechnical Reference Series
16Copyright © StarWind Software 2008-2011. All rights reserved.
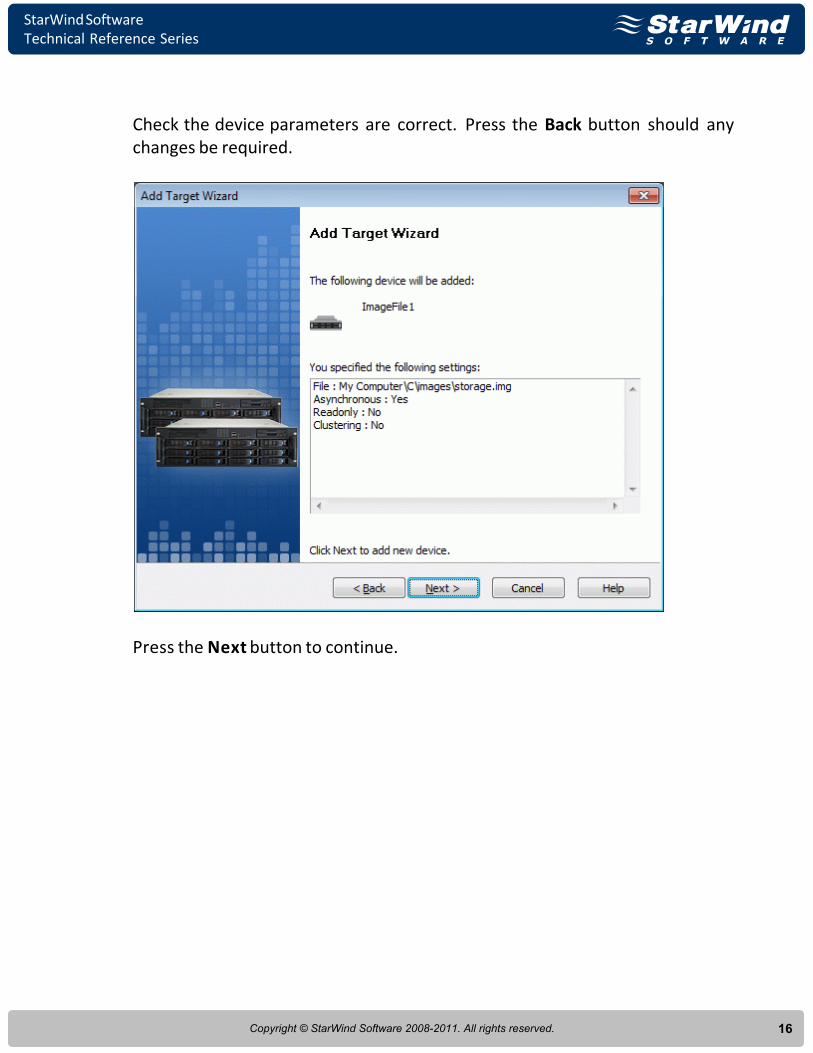
Check the device parameters are correct. Press the Back button should anychanges be required.
Press the Next button to continue.
StarWind SoftwareTechnical Reference Series
17Copyright © StarWind Software 2008-2011. All rights reserved.
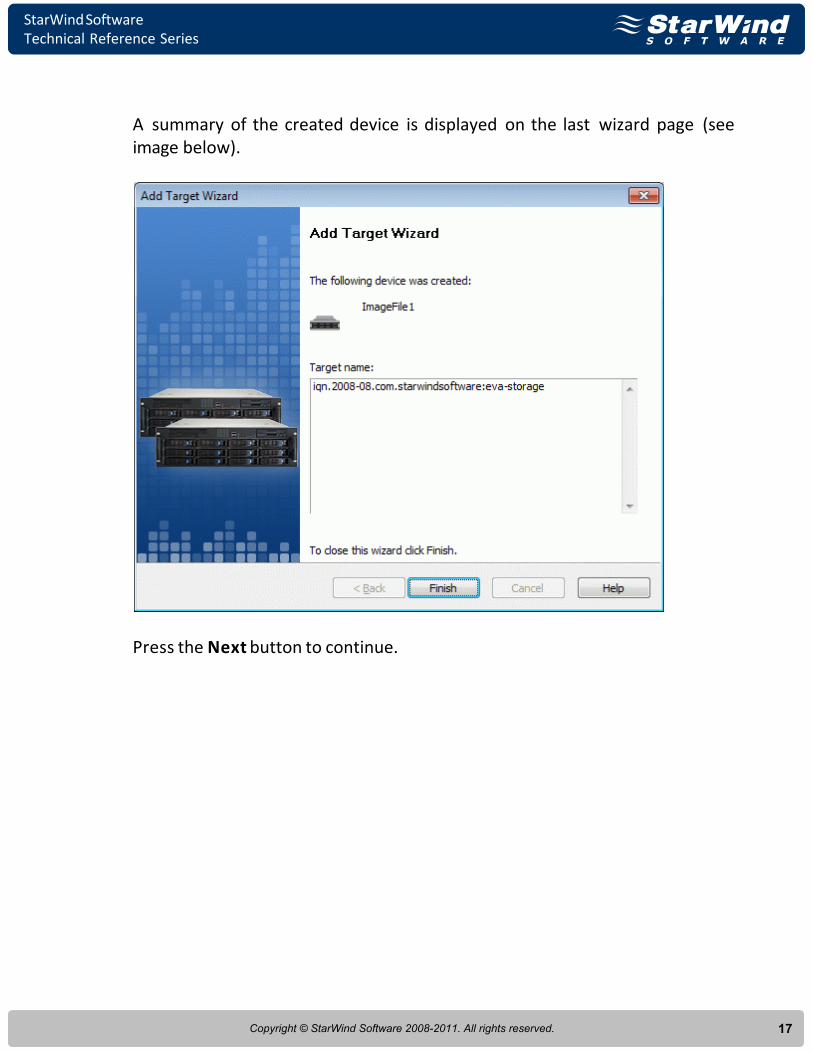
A summary of the created device is displayed on the last wizard page (seeimage below).
Press the Next button to continue.
StarWind SoftwareTechnical Reference Series
18Copyright © StarWind Software 2008-2011. All rights reserved.
Configuring VMware Host
At this step you need to install the software that is required to create thevirtual environment. You will need Microsoft iSCSI Software Initiator andVMware Workstation.
Please complete the following operations:o Install the MS iSCSI Software Initiator on the host that will be
mastering the virtual machines.
o When the installation is complete, install VMware Workstation onthe same host.
o Follow the instructions on the installation wizard to complete theprocess.
After you have created a StarWind iSCSI target, it is ready to serviceconnections. After you'll established a connection to an iSCSI target, it appearsas a new disk resource in the Disk Management Console. This sectiondescribes the operations you need to complete to create and format thepartition in the way that VMware can create and install virtual machines on it.
StarWind SoftwareTechnical Reference Series
19Copyright © StarWind Software 2008-2011. All rights reserved.
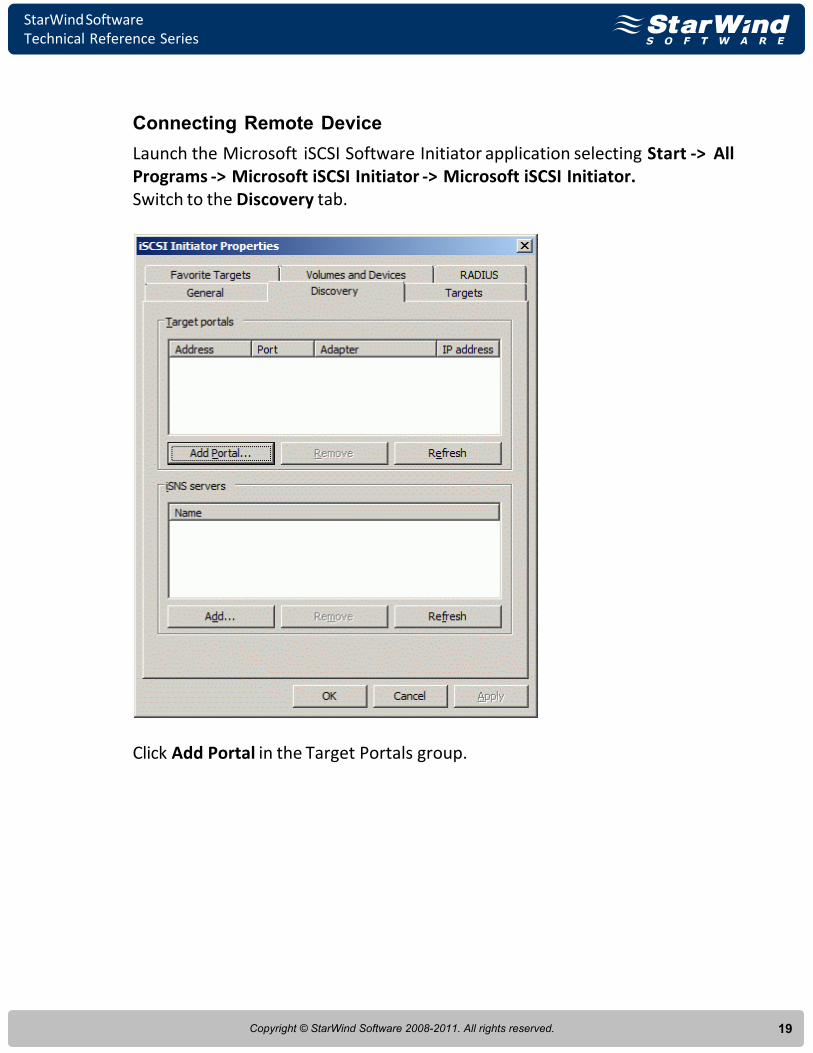
Connecting Remote Device
Launch the Microsoft iSCSI Software Initiator application selecting Start -> AllPrograms -> Microsoft iSCSI Initiator -> Microsoft iSCSI Initiator.Switch to the Discovery tab.
Click Add Portal in the Target Portals group.
StarWind SoftwareTechnical Reference Series
20Copyright © StarWind Software 2008-2011. All rights reserved.
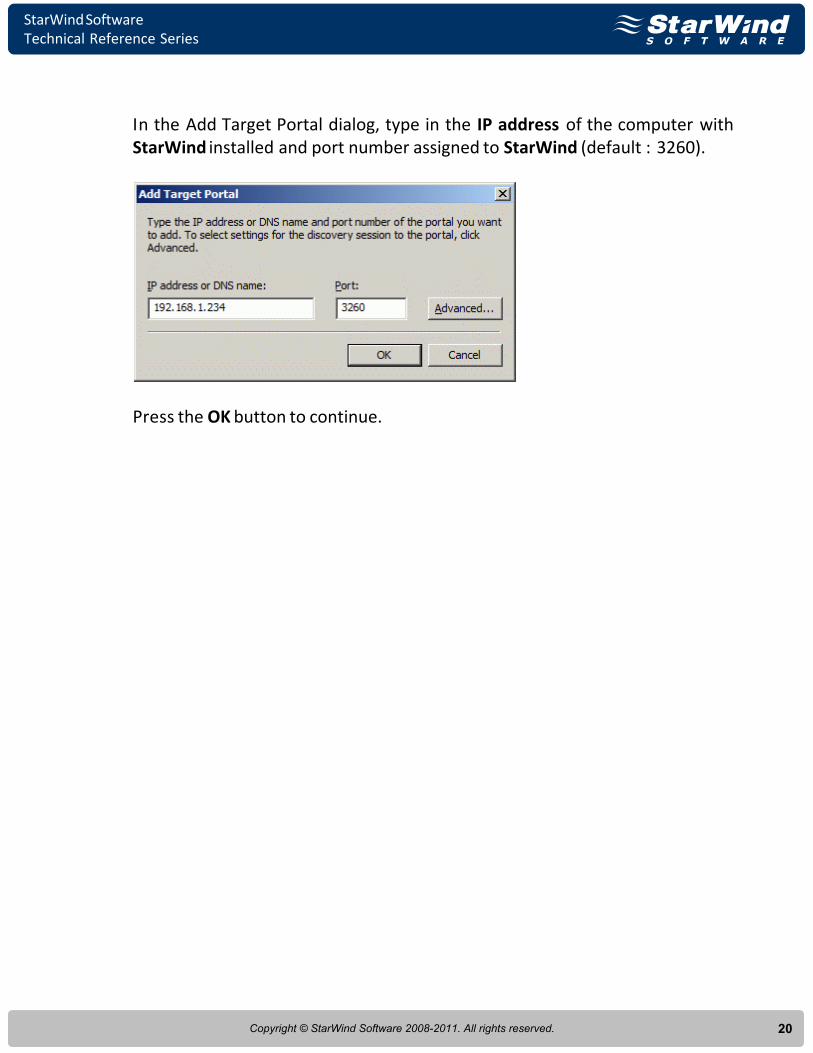
In the Add Target Portal dialog, type in the IP address of the computer withStarWind installed and port number assigned to StarWind (default : 3260).
Press the OK button to continue.
StarWind SoftwareTechnical Reference Series
21Copyright © StarWind Software 2008-2011. All rights reserved.
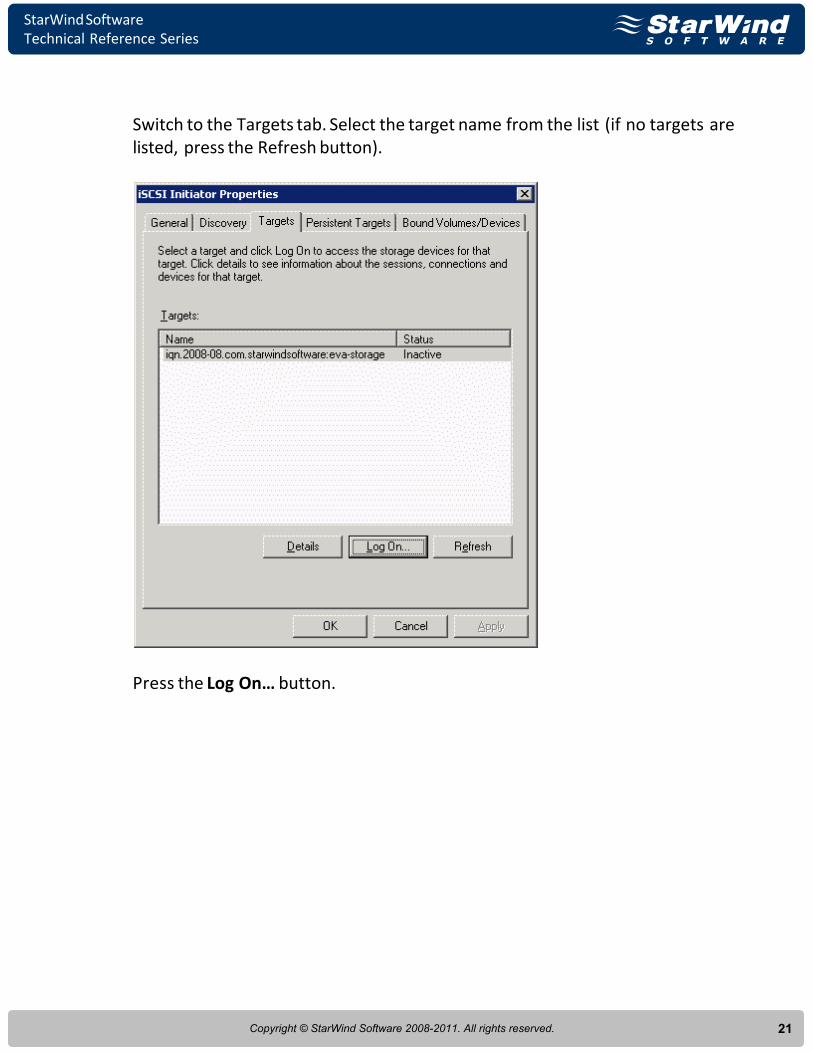
Switch to the Targets tab. Select the target name from the list (if no targets arelisted, press the Refresh button).
Press the Log On… button.

StarWind SoftwareTechnical Reference Series
22Copyright © StarWind Software 2008-2011. All rights reserved.
In the Log On to Target dialog, enable the Automatically restore thisconnection when the system boots checkbox.
Press the OK button to continue.
StarWind SoftwareTechnical Reference Series
23Copyright © StarWind Software 2008-2011. All rights reserved.
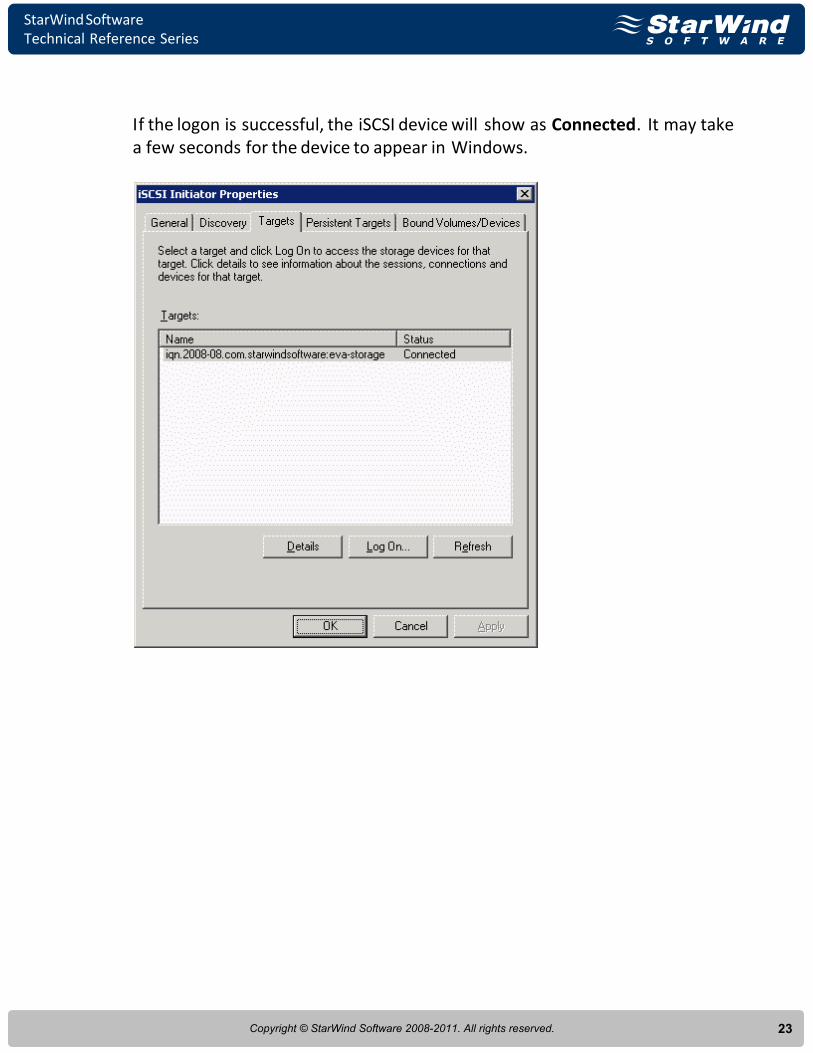
If the logon is successful, the iSCSI device will show as Connected. It may takea few seconds for the device to appear in Windows.
StarWind SoftwareTechnical Reference Series
24Copyright © StarWind Software 2008-2011. All rights reserved.
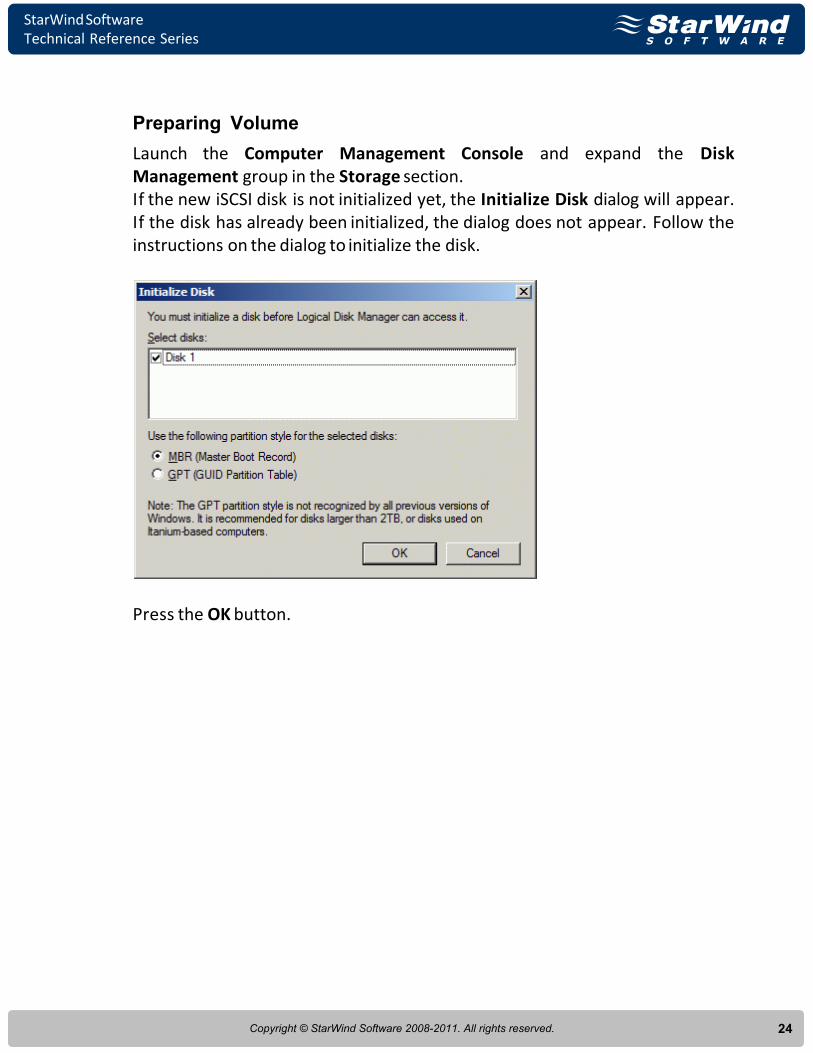
Preparing Volume
Launch the Computer Management Console and expand the DiskManagement group in the Storage section.If the new iSCSI disk is not initialized yet, the Initialize Disk dialog will appear.If the disk has already been initialized, the dialog does not appear. Follow theinstructions on the dialog to initialize the disk.
Press the OK button.
StarWind SoftwareTechnical Reference Series
25Copyright © StarWind Software 2008-2011. All rights reserved.
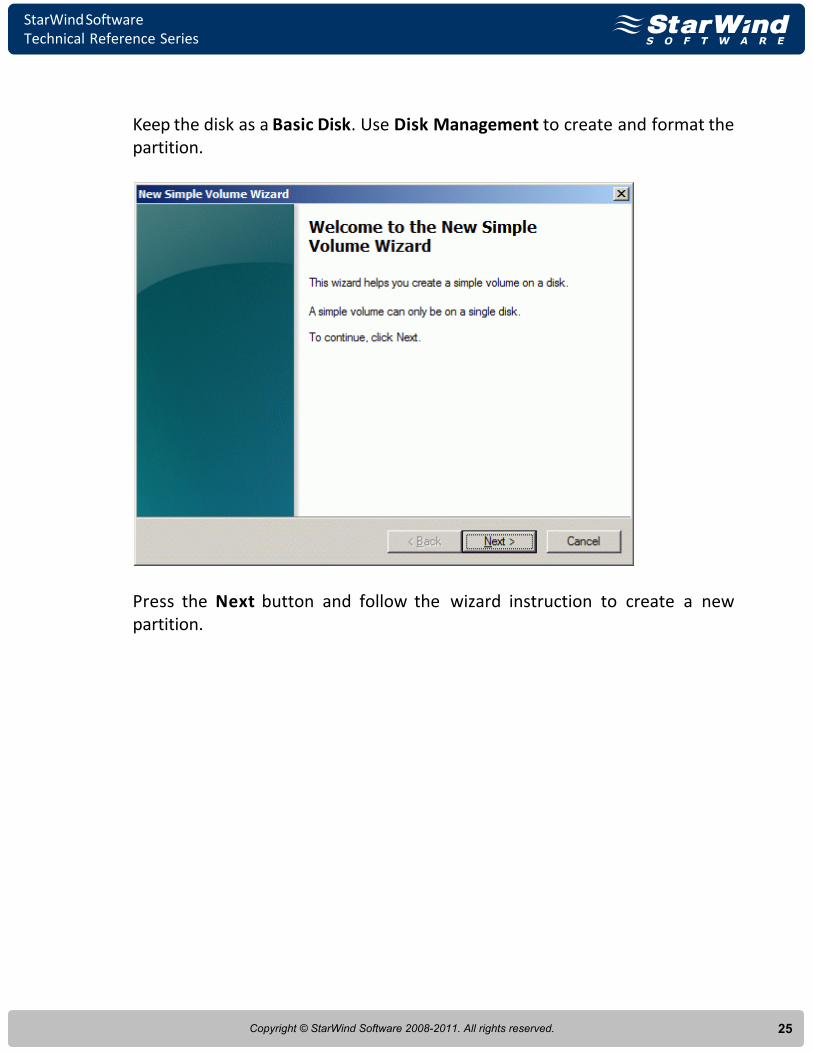
Keep the disk as a Basic Disk. Use Disk Management to create and format thepartition.
Press the Next button and follow the wizard instruction to create a newpartition.
StarWind SoftwareTechnical Reference Series
26Copyright © StarWind Software 2008-2011. All rights reserved.
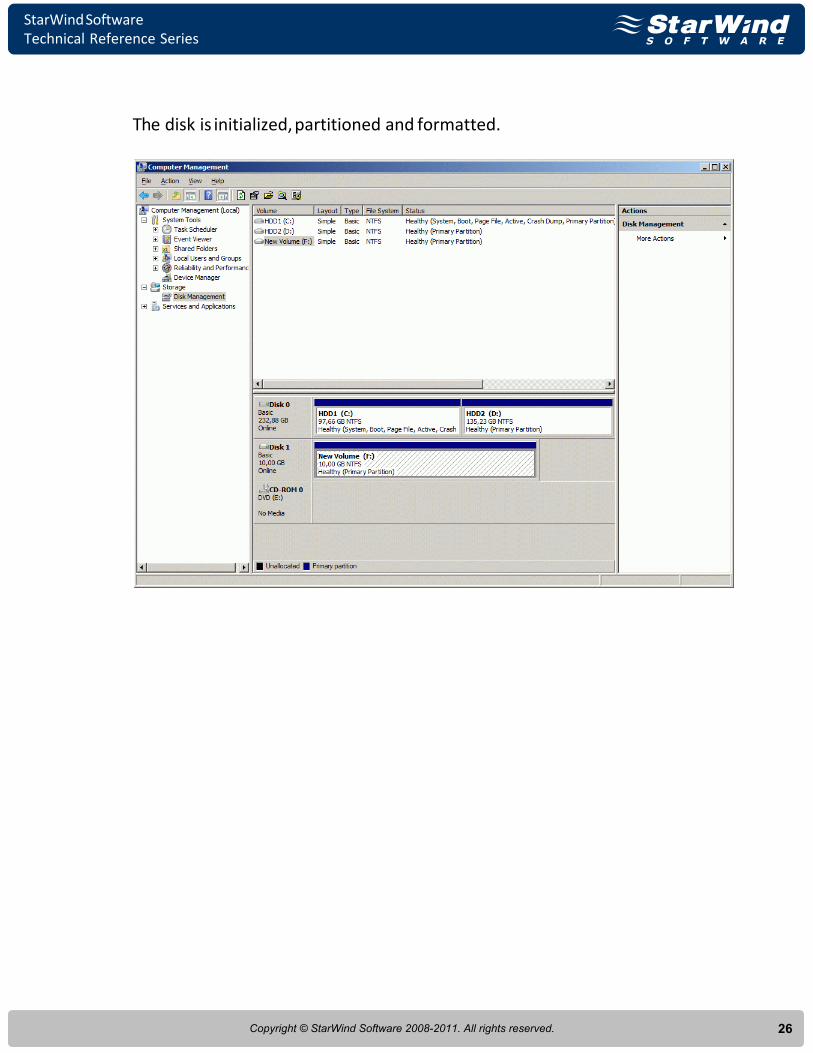
The disk is initialized, partitioned and formatted.
StarWind SoftwareTechnical Reference Series
27Copyright © StarWind Software 2008-2011. All rights reserved.
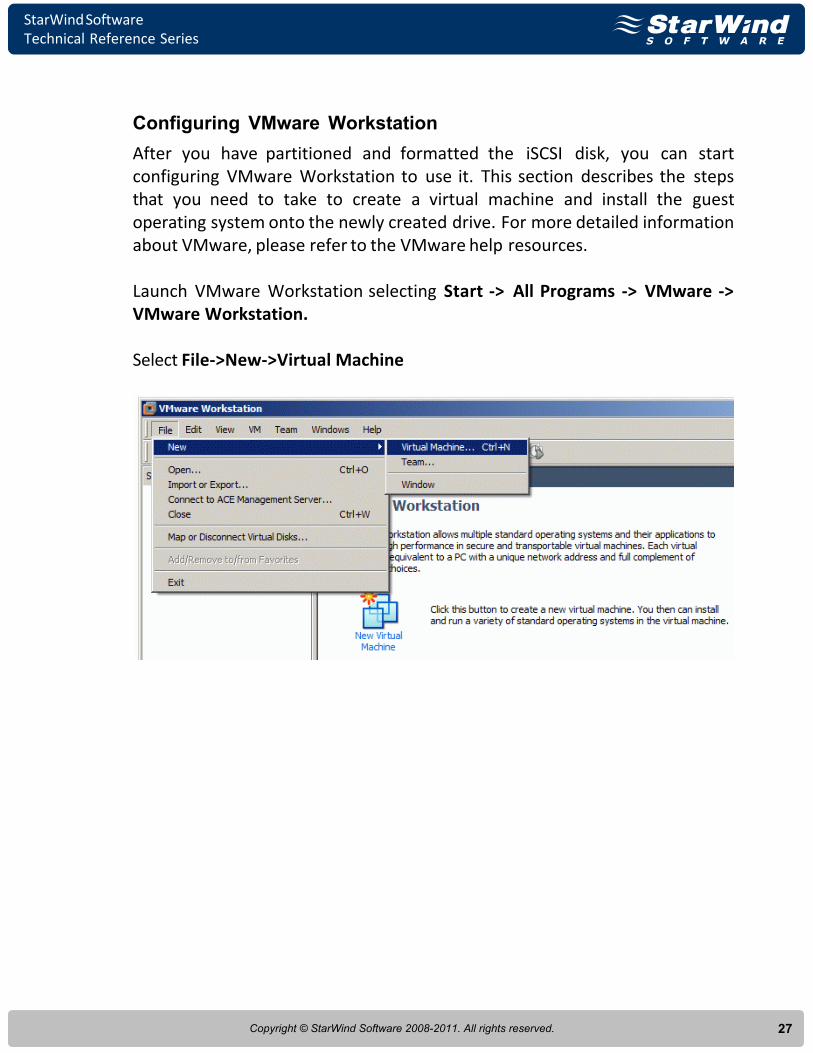
Configuring VMware Workstation
After you have partitioned and formatted the iSCSI disk, you can startconfiguring VMware Workstation to use it. This section describes the stepsthat you need to take to create a virtual machine and install the guestoperating system onto the newly created drive. For more detailed informationabout VMware, please refer to the VMware help resources.
Launch VMware Workstation selecting Start -> All Programs -> VMware ->VMware Workstation.
Select File->New->Virtual Machine
StarWind SoftwareTechnical Reference Series
28Copyright © StarWind Software 2008-2011. All rights reserved.
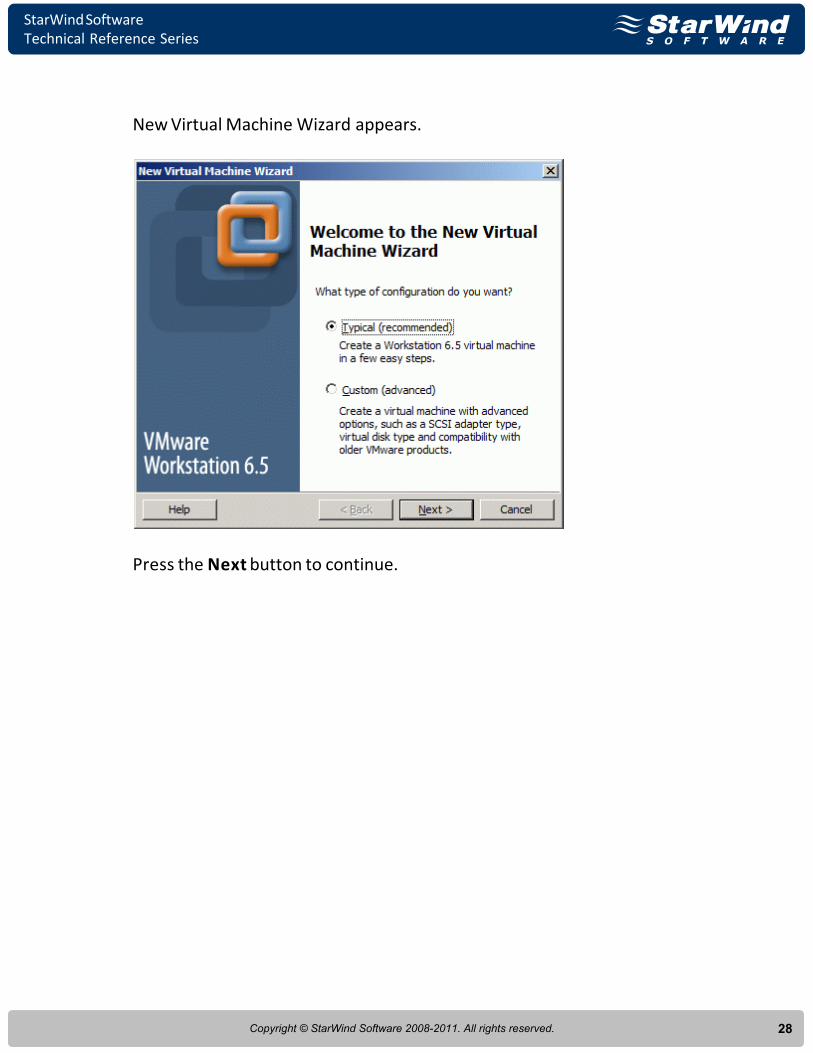
New Virtual Machine Wizard appears.
Press the Next button to continue.
StarWind SoftwareTechnical Reference Series
29Copyright © StarWind Software 2008-2011. All rights reserved.
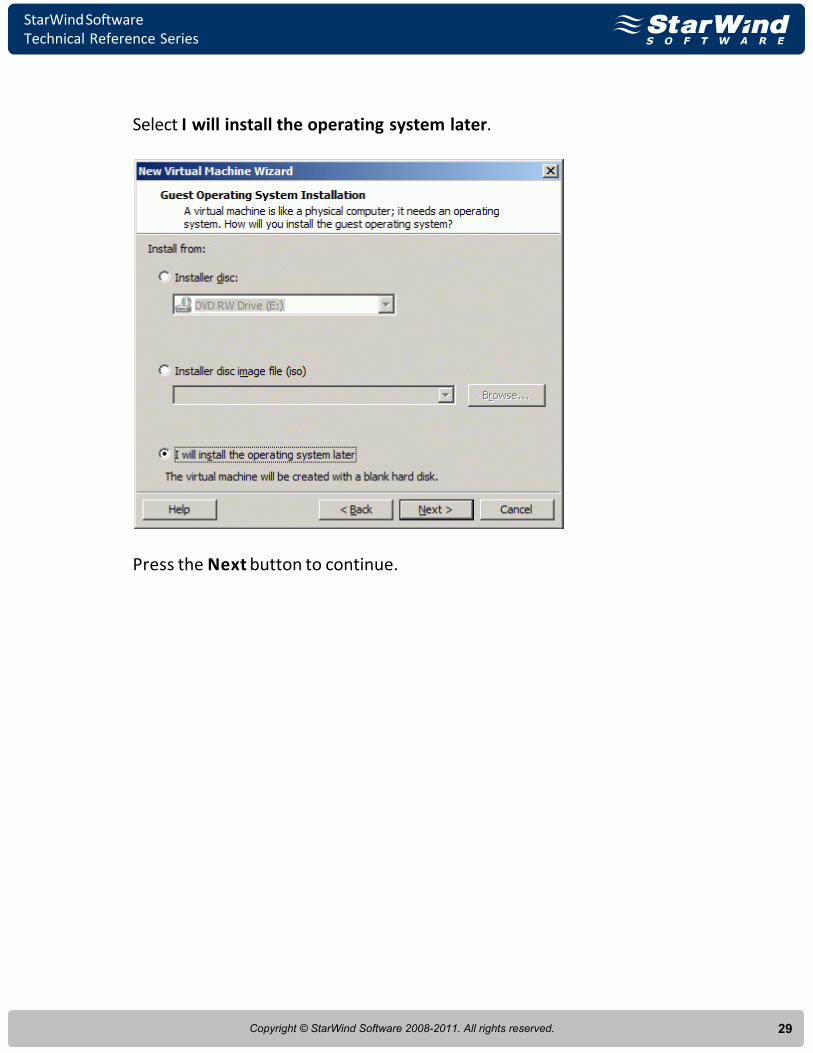
Select I will install the operating system later.
Press the Next button to continue.
StarWind SoftwareTechnical Reference Series
30Copyright © StarWind Software 2008-2011. All rights reserved.
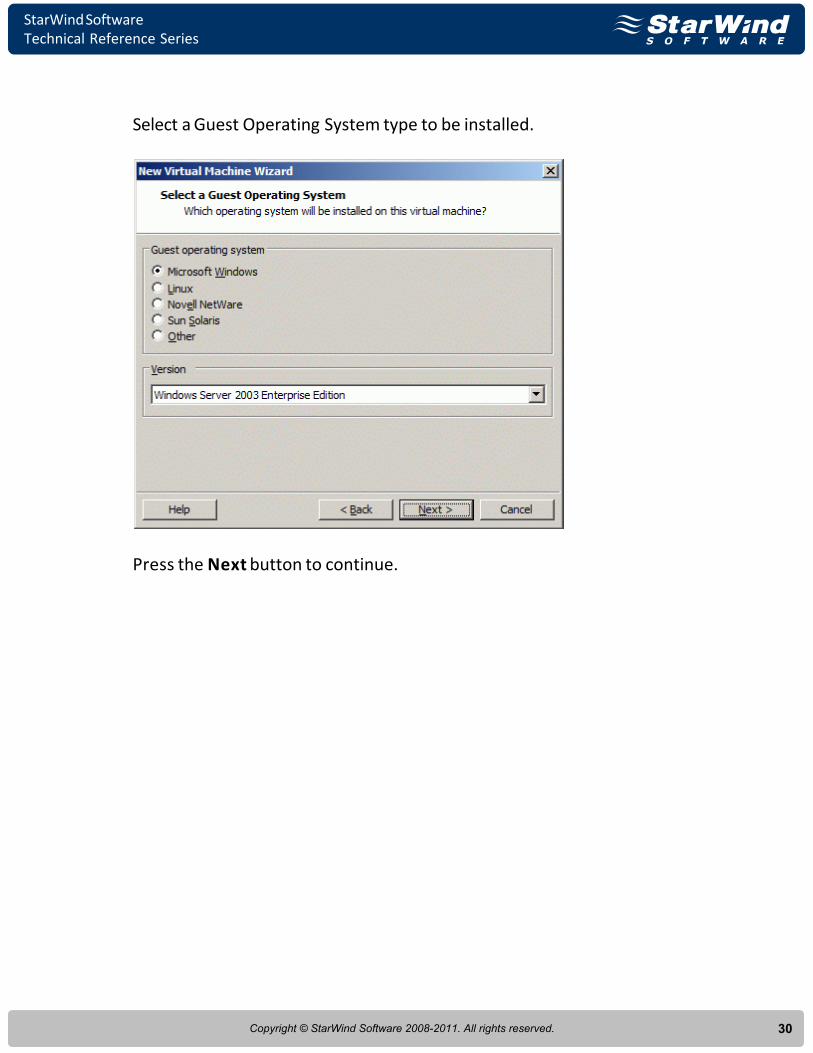
Select a Guest Operating System type to be installed.
Press the Next button to continue.
StarWind SoftwareTechnical Reference Series
31Copyright © StarWind Software 2008-2011. All rights reserved.
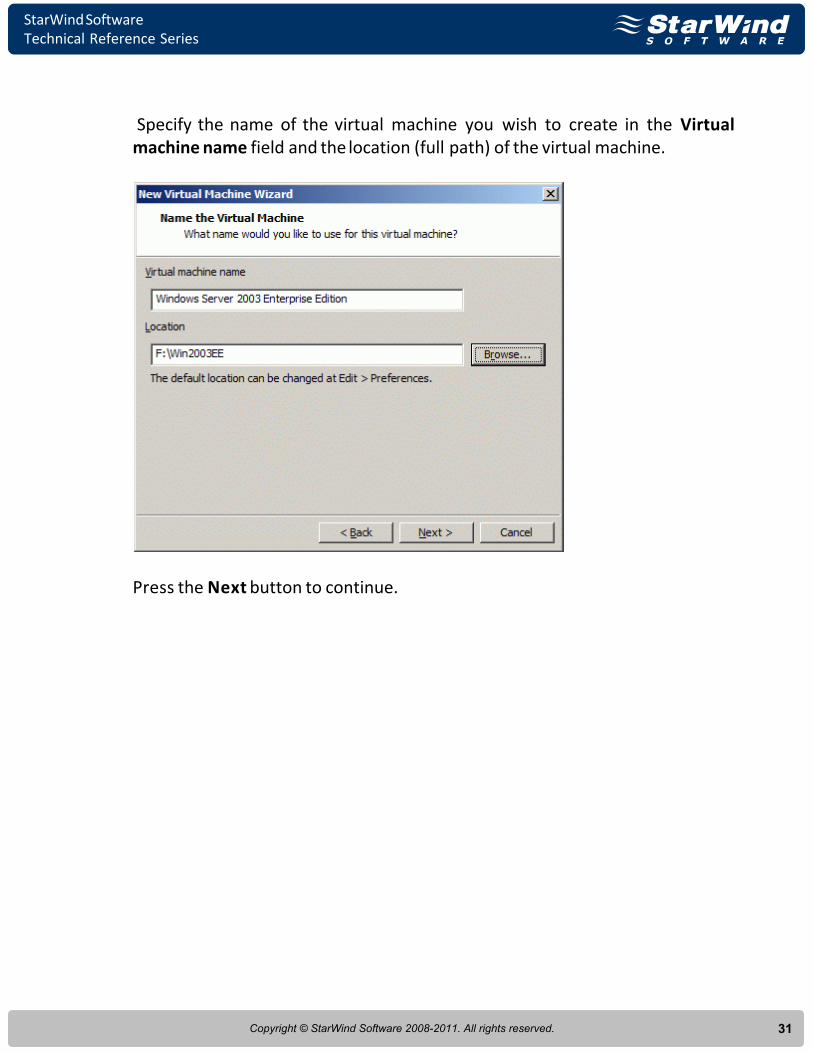
Specify the name of the virtual machine you wish to create in the Virtualmachine name field and the location (full path) of the virtual machine.
Press the Next button to continue.
StarWind SoftwareTechnical Reference Series
32Copyright © StarWind Software 2008-2011. All rights reserved.
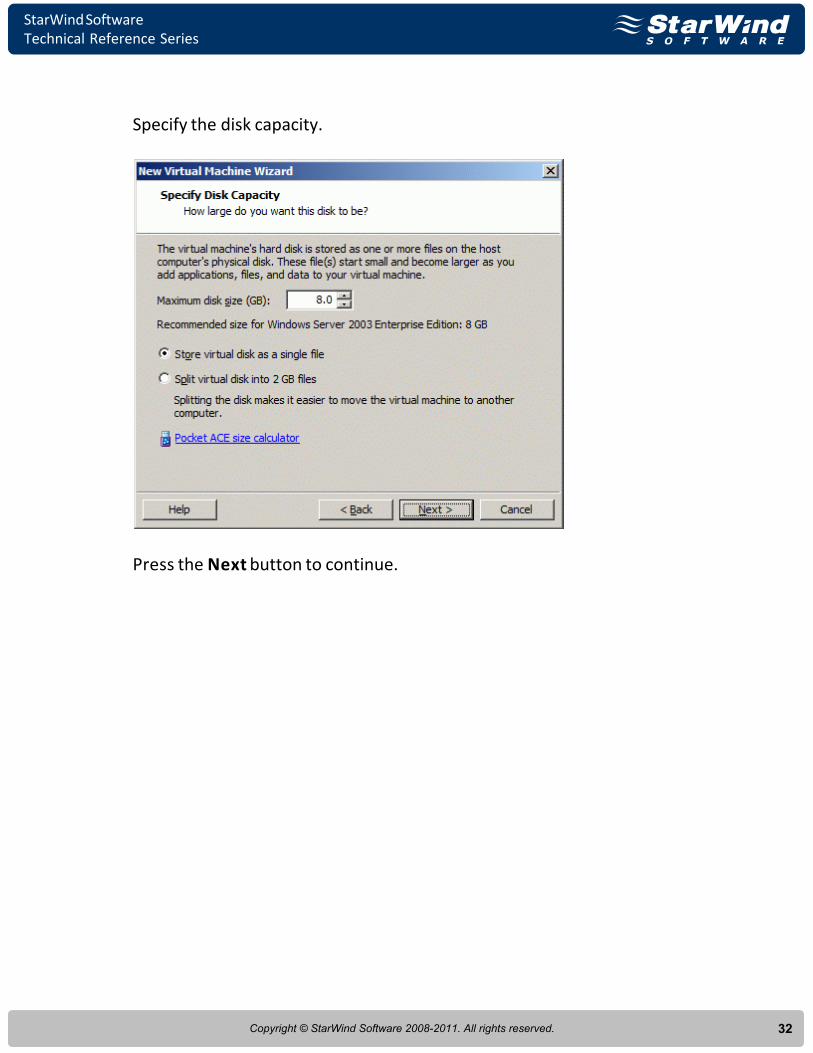
Specify the disk capacity.
Press the Next button to continue.
StarWind SoftwareTechnical Reference Series
33Copyright © StarWind Software 2008-2011. All rights reserved.
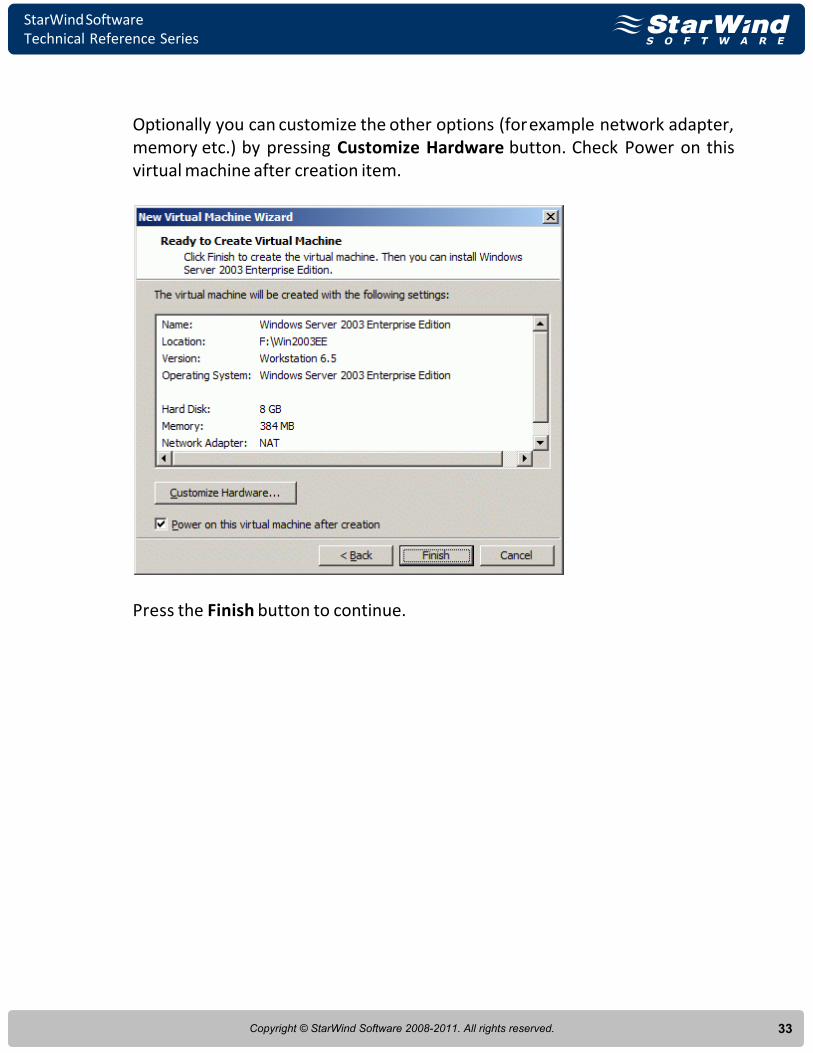
Optionally you can customize the other options (for example network adapter,memory etc.) by pressing Customize Hardware button. Check Power on thisvirtual machine after creation item.
Press the Finish button to continue.
StarWind SoftwareTechnical Reference Series
34Copyright © StarWind Software 2008-2011. All rights reserved.
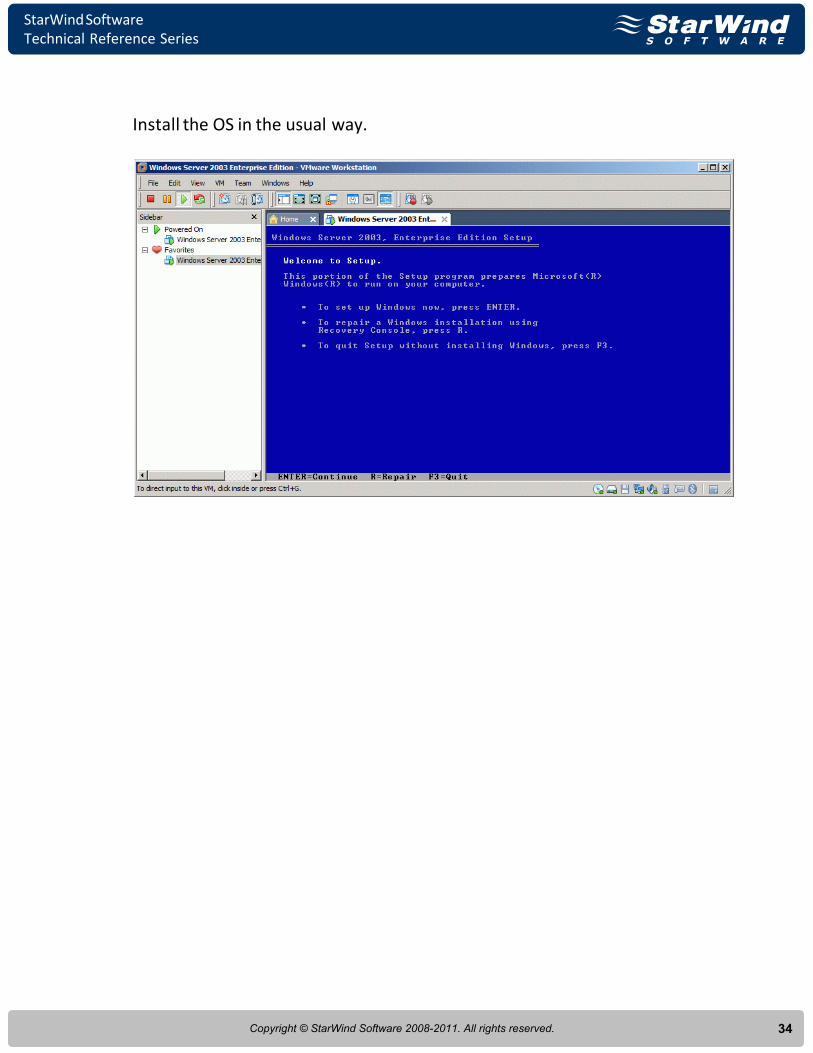
Install the OS in the usual way.
StarWind SoftwareTechnical Reference Series
35Copyright © StarWind Software 2008-2011. All rights reserved.
Moving Virtual Machines
When a physical host is upgraded, taken off for maintenance or upgraded itmay be required to move a virtual machine from one system to another. StarWind enables to reduce the downtime for applications running on thevirtual machine from hours to minutes. This section details the operations that you need to complete to move a virtualmachine to another host.
Re-assign StarWind DiskFollow the instructions given in the Configuring VMware Host section to installthe initiator and VMware Workstation on a new machine.Shutdown the “old” VMware host. Make sure that the services are not runningand the system is off before continuing.
Mount iSCSI Deviceo Run the MS iSCSI Software Initiator on the "new" VMware host.o Add the target portal and logon to StarWind (follow the
instructions detailed in the Connecting Remote Device section).o Open the Computer Management Console and expand the Disk
Management node in the Storage section.o A new physical disk should appear. This is the same disk that was
previously used on the “old” VMware host. The volume on this diskmay or may not have a drive letter assigned to it. If a drive letter isnot assign, use Disk Management to map a drive letter to thevolume. To avoid application paths conflicts, use the same driveletter as on the “old” host.
Add a Virtual Machine This section details the operations that you need to complete to add an existingvirtual machine to VMware. For more information, please refer to VMwarehelp resources.
o Launch VMware Workstation.
o Select File->Open. The Open dialog appears.
o Specify the full path of the virtual machine. Click Open to add thevirtual machine.
StarWind SoftwareTechnical Reference Series
36Copyright © StarWind Software 2008-2011. All rights reserved.
Providing iSCSI Device to Virtual Machine
You also can receive benefits from using StarWind with VMware by providingstorage for a virtual machine.By that it is not needed to create a virtual hard drive. The virtual machine willobtain a block storage device, which is not physically resided on the hostmachine.
o Login to the virtual machine and install the MS iSCSI SoftwareInitiator.
o Follow Configuring iSCSI Storage section.
o Connect the initiator to StarWind. See the Preparing Volume forthe exact steps in this process.
o Once the initiator successfully logs on and the new drive isinitialized and formatted, it is ready for use by this virtualmachine.

StarWind SoftwareTechnical Reference Series
Contacts
StarWind Software Inc.
40 Mall Rd., Burlington
MA 01803, USA
www.starwindsoftware.com
Support:
Support Forum:
Sales E-mail:
US Headquarters
EMEA, APAC
www.starwindsoftware.com/support
www.starwindsoftware.com/forums
Direct phone numbers: +44-0-2071936727
+44-0-2071936350
37Copyright © StarWind Software 2008-2011. All rights reserved.
Voice Mail: 1-866-790-2646
Direct phone number: 1-617-449-7717
Fax: 1-617-507-5845