start using app
TRANSCRIPT


Start using App
These instructions are for the iPhone application and may be similar but not identical to the Android app version.
You should have already done the following before using the App:1. Received a User name & logged in 2. Verified your email on the
website concursolutions.com3. Entered your bank account info in
your profile on the website. (U.S. & Canada only)
4. & either sent a link from the website OR downloaded the app from the app store
If you have not yet done the above please email [email protected]
ASAP.
To start please open the app.
Concur iPhone app instructions 2

Home Screen
After logging in this is the first pageyou’ll see when opening up the ConcurApp
Consider it the “dashboard” for you tocheck your account.
IMPORTANT! EVENTS FOR DIFFERENT DEPARTMENTS (ie: SALES,
EDUCATION, SHOWS, SCHOOLS)
MUST BE SUBMITTED ON SEPARATE REPORTS.
Concur iPhone app instructions 3

Start a ReportOne Event only scenario
Tap Expense Reports Then tap the + sign in the upper right hand corner
Go ahead & Create a New ReportConcur iPhone app instructions 4

Report Header
This is the Header creation screen
If the fields are completed correctlyyou may be prevented from creatingyour report or will cause it to bereturned from the Expense ReportDept.
To edit a field simply tap on it.
The next few pages will walk youthrough the correct formats for eachfield.
Concur iPhone app instructions 5
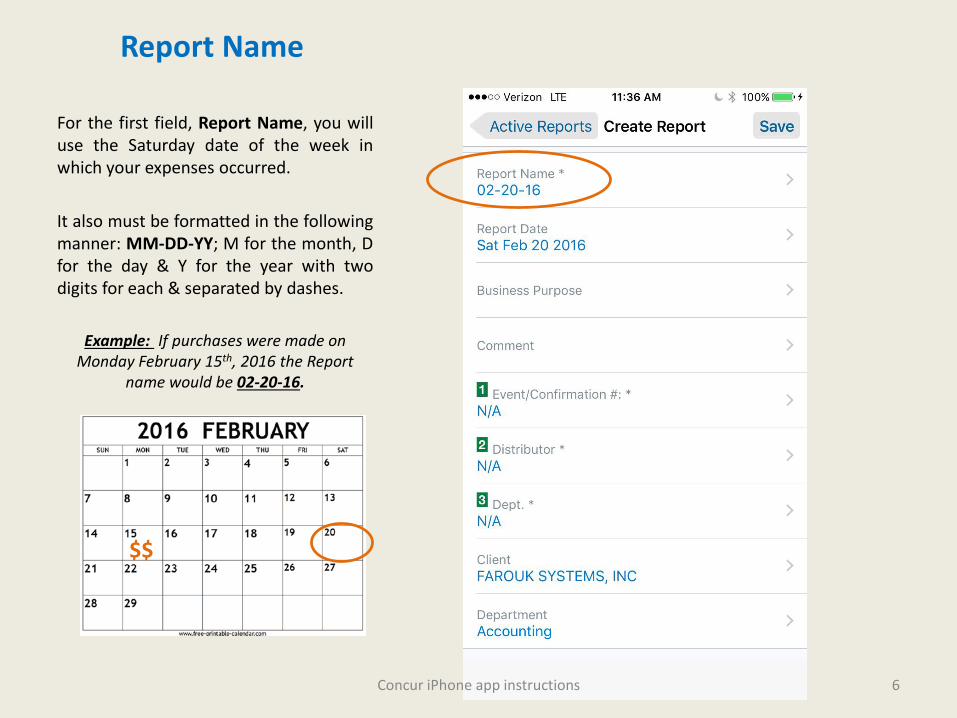
Report Name
For the first field, Report Name, you willuse the Saturday date of the week inwhich your expenses occurred.
It also must be formatted in the followingmanner: MM-DD-YY; M for the month, Dfor the day & Y for the year with twodigits for each & separated by dashes.
Example: If purchases were made on Monday February 15th, 2016 the Report
name would be 02-20-16.
$$
Concur iPhone app instructions 6

Report Date
Do not change this date
This field can be left alone
Move on to the next fields; Business Purpose and Comment
Do not change
Concur iPhone app instructions 7

Business Purpose&
Comment
Business Purpose should be your Confirmation Number. If it’s a Show you may also include the Event Name.
Comment is where you’d leave anote about the event or about yourwhole report . You can also putcomments on individual expenses. Canbe left blank.
Next is Event/Confirmation #
Concur iPhone app instructions 8

Event/Confirmation #
Event/Confirmation # is where you select theevent you worked.
The Event/Confirmation # will be found on theConfirmation Report you received via emailfrom FSI.
Use Search to find your event #Tip: Start typing & it’ll shorten the list.
Or Scroll through the listThis may take some time & may lead you toselect the wrong one. Be careful.
Once it shows up in the list select it & move onto Distributor
If you don’t find the # contact the Expense Report Dept.
Concur iPhone app instructions 9

Distributor
Distributor is the next field that you must complete.
• There will only be ONE 4 digit number to select.
• Select the number • move on to Dept.
Is there more than 1 item?Then you did not select anEvent/Confirmation # &need to return to theprevious step.
Concur iPhone app instructions 10
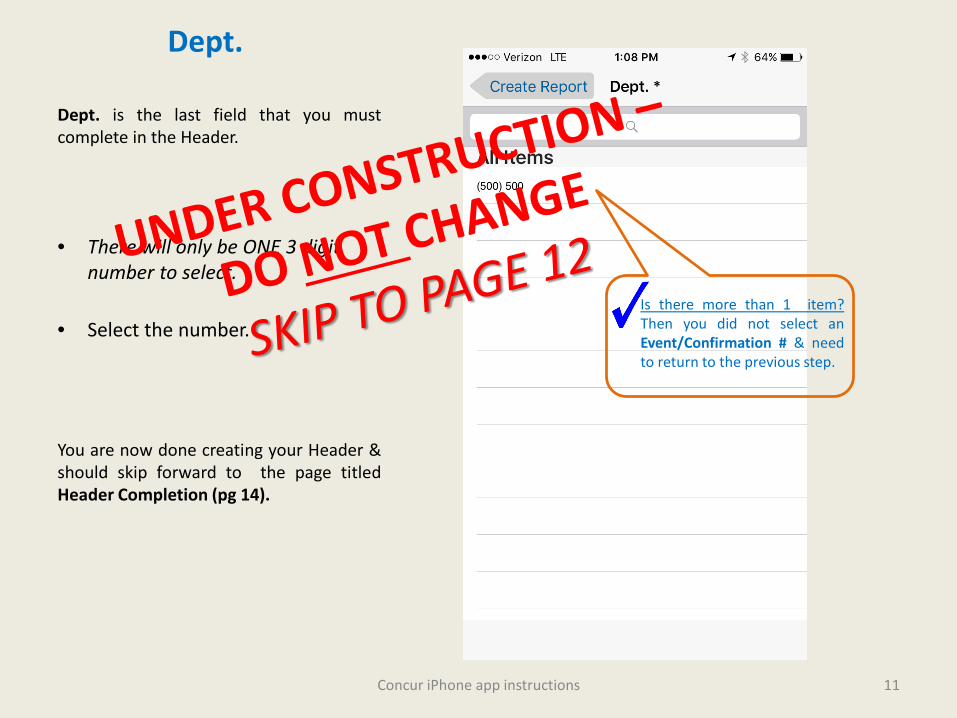
Dept.
Dept. is the last field that you mustcomplete in the Header.
• There will only be ONE 3 digit number to select.
• Select the number.
You are now done creating your Header &should skip forward to the page titledHeader Completion (pg 14).
Is there more than 1 item?Then you did not select anEvent/Confirmation # & needto return to the previous step.
Concur iPhone app instructions 11
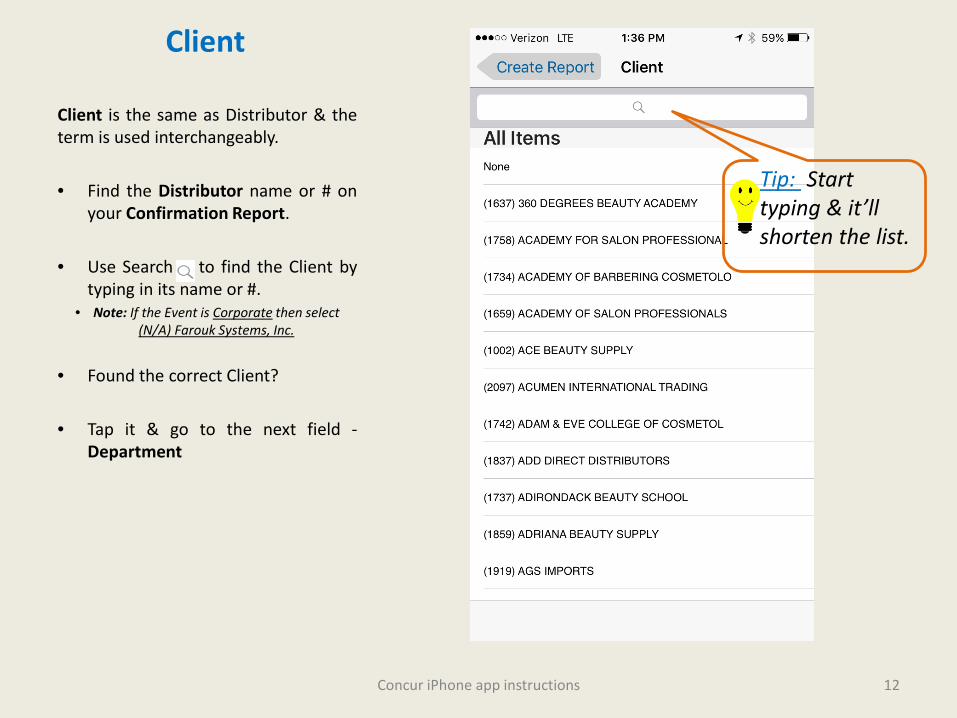
Client
Client is the same as Distributor & theterm is used interchangeably.
• Find the Distributor name or # onyour Confirmation Report.
• Use Search to find the Client bytyping in its name or #.
• Note: If the Event is Corporate then select (N/A) Farouk Systems, Inc.
• Found the correct Client?
• Tap it & go to the next field -Department
Tip: Start typing & it’ll shorten the list.
Concur iPhone app instructions 12
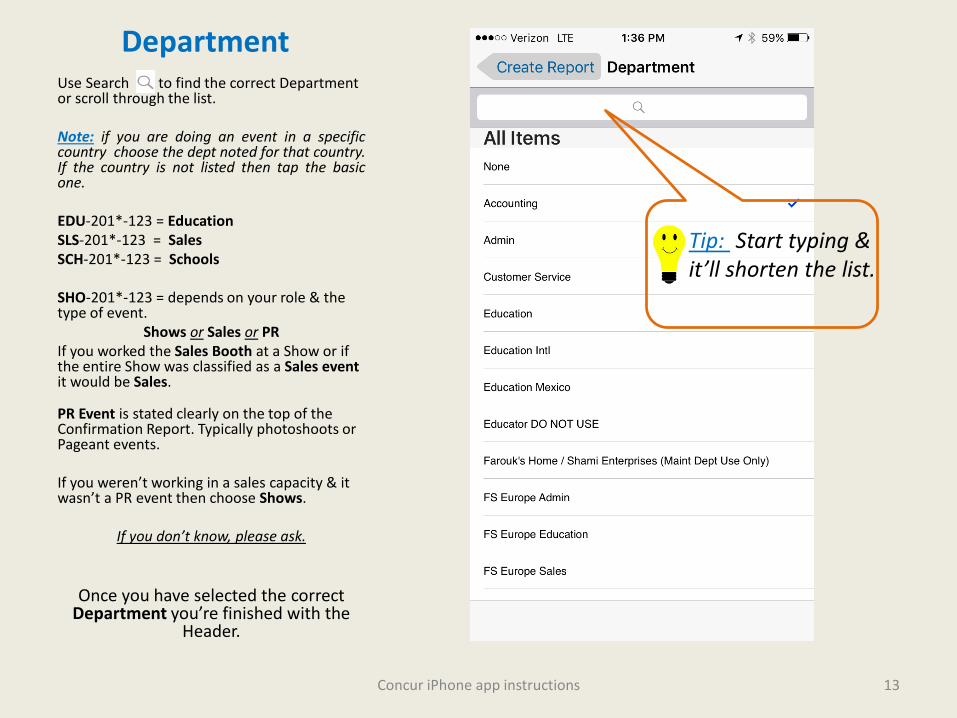
DepartmentUse Search to find the correct Department or scroll through the list.
Note: if you are doing an event in a specificcountry choose the dept noted for that country.If the country is not listed then tap the basicone.
EDU-201*-123 = EducationSLS-201*-123 = SalesSCH-201*-123 = Schools
SHO-201*-123 = depends on your role & the type of event.
Shows or Sales or PRIf you worked the Sales Booth at a Show or if the entire Show was classified as a Sales event it would be Sales.
PR Event is stated clearly on the top of the Confirmation Report. Typically photoshoots or Pageant events.
If you weren’t working in a sales capacity & it wasn’t a PR event then choose Shows.
If you don’t know, please ask.
Once you have selected the correct Department you’re finished with the
Header.
Tip: Start typing & it’ll shorten the list.
Concur iPhone app instructions 13
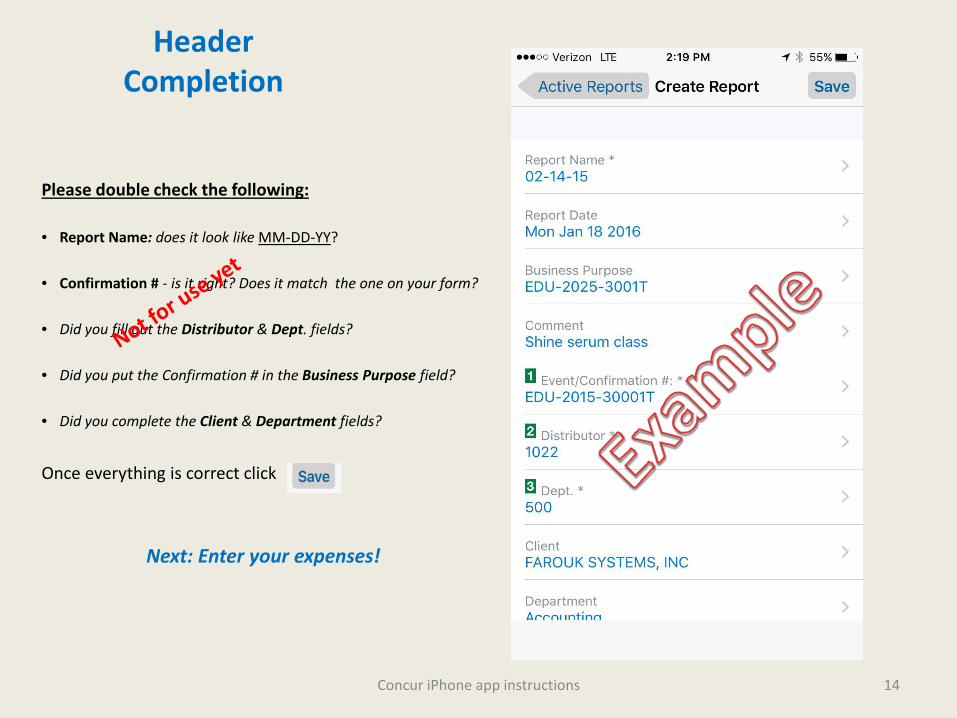
Header Completion
Please double check the following:
• Report Name: does it look like MM-DD-YY?
• Confirmation # - is it right? Does it match the one on your form?
• Did you fill out the Distributor & Dept. fields?
• Did you put the Confirmation # in the Business Purpose field?
• Did you complete the Client & Department fields?
Once everything is correct click
Next: Enter your expenses!
Concur iPhone app instructions 14
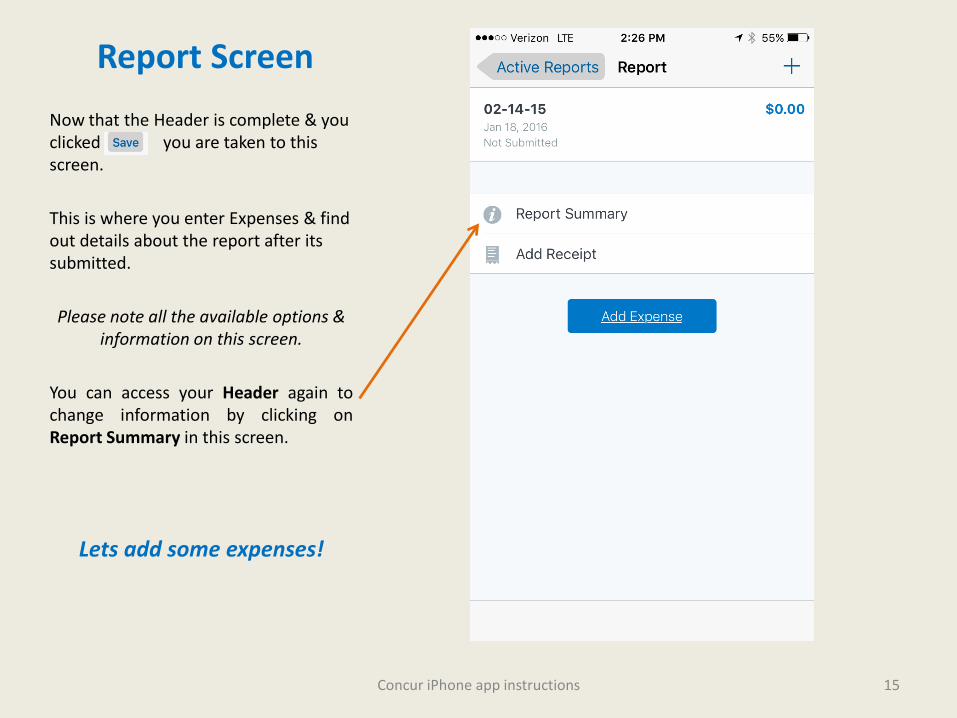
Report ScreenNow that the Header is complete & you clicked you are taken to this screen.
This is where you enter Expenses & find out details about the report after its submitted.
Please note all the available options & information on this screen.
You can access your Header again tochange information by clicking onReport Summary in this screen.
Lets add some expenses!
Concur iPhone app instructions 15
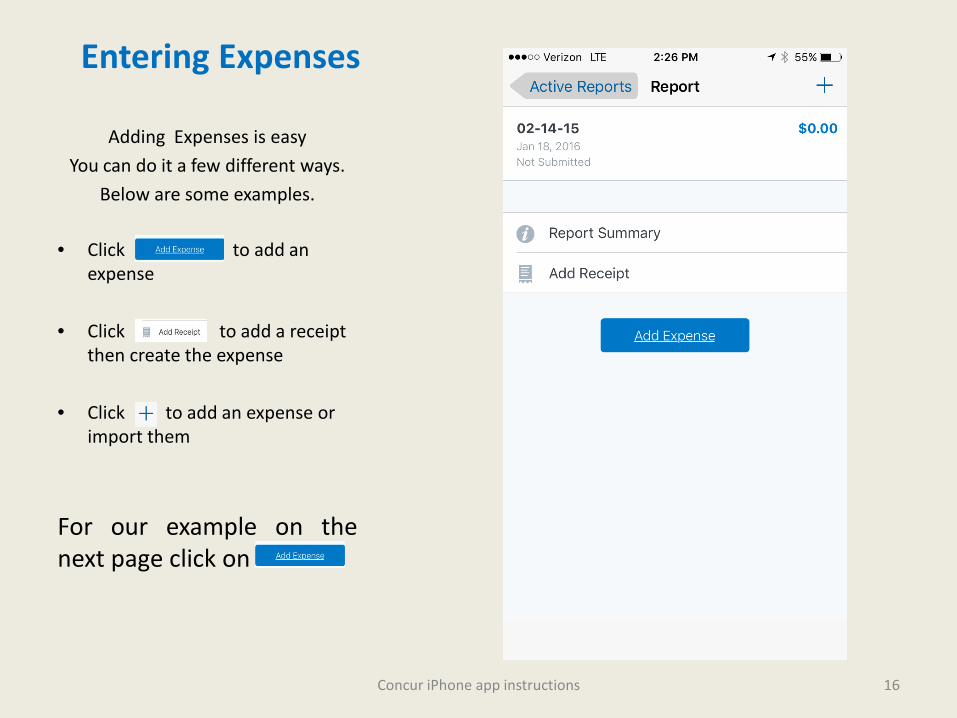
Entering Expenses
Adding Expenses is easyYou can do it a few different ways.
Below are some examples.
• Click to add an expense
• Click to add a receipt then create the expense
• Click to add an expense or import them
For our example on thenext page click on
Concur iPhone app instructions 16
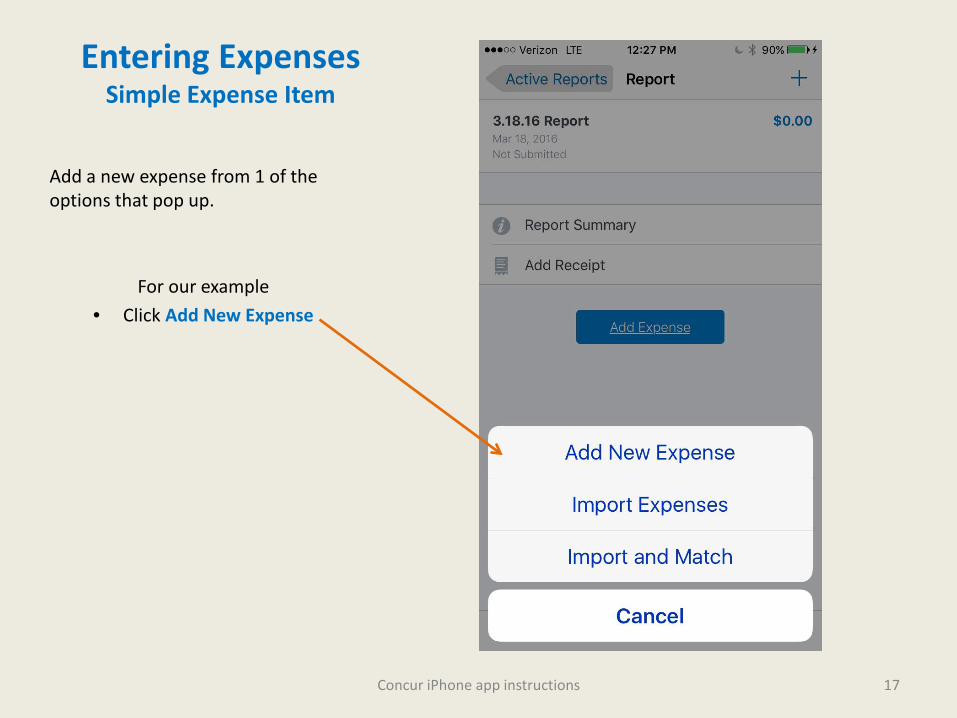
Entering ExpensesSimple Expense Item
Add a new expense from 1 of the options that pop up.
For our example • Click Add New Expense
Concur iPhone app instructions 17

Entering ExpensesSimple Expense Item
Select the Expense Type you are trying to add.
Fees can be found under the Heading Other which you can scroll through the list to find or use to search.
For our example we’ll choose Lunch
The top portion of the screen shows some of the most recently used expense types. This can make it easier for you
to add expenses.
This is a Heading
This is an Expense Type
Concur iPhone app instructions 18

Entering ExpensesSimple Expense Item
For this example we’ve clicked on Lunchunder the Meals & Entertainment Header.
This will bring up the screen on the right.
You will need to change information forsome fields. The fields that are RED mustbe completed or it will not let you moveforward.
If you use ExpenseIt some of this information will already be entered.
Move on to the next page to learn how to complete the fields
Concur iPhone app instructions 19

Entering ExpensesSimple Expense Item cont’d
• Transaction date = Date of purchase on thereceipt. Must match date on receipt or item willbe returned for correction.
• Business Purpose = same as in the Report Header; Confirmation # or Event type/name
• Vendor Description = the name of the place where you made the purchase.
• (ex: McDonalds)
• Payment Type - should always be Cash. Do NOT change this field.
• Currency- only change if the purchase was not in the currency displayed.
• Amount = Amt. from receipt or amount you are requesting to be paid.
All the rest of the fields should auto populatefrom your Header entries. *If a particular expenseis for a different department than what you put inyour header then change the Dept. orDepartment field to the correct department.
Once you’ve completed all necessary fields click
= Receipt Date
Not in the US? Change currency
= Total on Receipt
= Purchase Place
Do not change
Tips not on receipt? Note them in the Comment fieldConcur iPhone app instructions 20
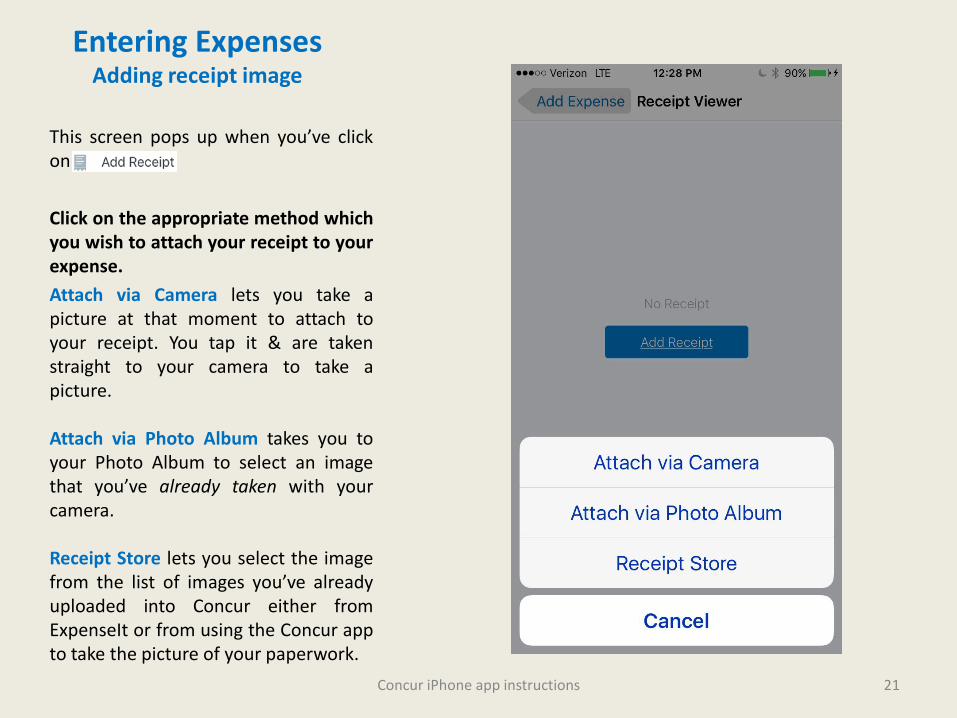
Entering ExpensesAdding receipt image
This screen pops up when you’ve clickon
Click on the appropriate method whichyou wish to attach your receipt to yourexpense.Attach via Camera lets you take apicture at that moment to attach toyour receipt. You tap it & are takenstraight to your camera to take apicture.
Attach via Photo Album takes you toyour Photo Album to select an imagethat you’ve already taken with yourcamera.
Receipt Store lets you select the imagefrom the list of images you’ve alreadyuploaded into Concur either fromExpenseIt or from using the Concur appto take the picture of your paperwork.
Concur iPhone app instructions 21

Entering Expenses -Adding receipt imageReceipt Store
This is where you are taken if youselected Receipt Store from the AddReceipt screen.
Select the receipt image for yourexpense by• Tapping the receipt then• Tap the Select button once it
appears at the bottom of thescreen
If you have numerous receipts scrolldown to find the one you want.
Once a receipt is used from yourReceipt Store it disappears fromthere.
Click Save
NOTE: if you delete an Expense from a Report that has a receipt attached the image returns to your Receipt Store.
Concur iPhone app instructions 22
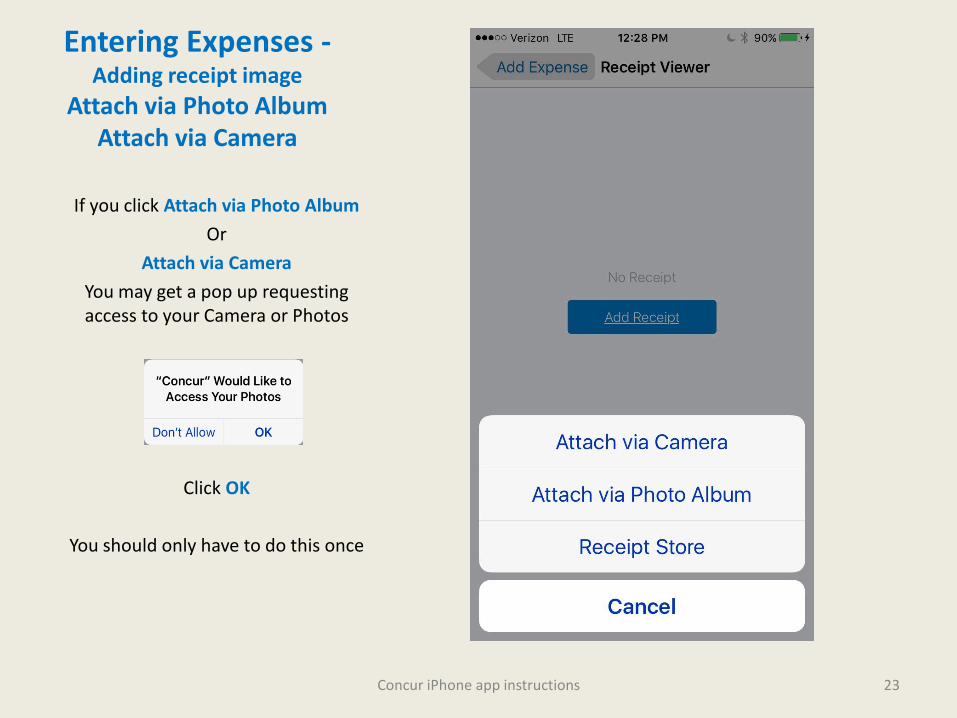
Entering Expenses -Adding receipt image
Attach via Photo AlbumAttach via Camera
If you click Attach via Photo AlbumOr
Attach via CameraYou may get a pop up requesting access to your Camera or Photos
Click OK
You should only have to do this once
Concur iPhone app instructions 23

Entering Expenses -Adding receipt image
Attach via Photo Album
The Receipt images/photos you’ve alreadytaken are in your photo album. One image isdisplayed on the right.
Attach via Photo Album takes you to yourphotos on your phone or device1) Tap the Receipt image you want to add
from your album.2) Tap at the bottom of the screen
If you are successful in attaching the receiptthe Expense item will pop up & you will seeView Receipt in place of Attach Receipt
Click Save
Concur iPhone app instructions 24

Entering Expenses - Adding receipt image Attach via Camera
Attach via Camera takes you to your device’scamera function1) Take a clear picture of the Receipt• Make sure to capture the total paid• The Date of the purchase• The name of the place2) Tap at the bottom
If you are successful in attaching the receiptthe Expense item will pop up & you will seeView Receipt in place of Attach Receipt
Click SaveConcur iPhone app instructions 25

Entering ExpensesSimple Expense Item -Adding Receipt Images
Continue until you’ve added all yourexpenses, with their receipts, for yourevent that you need to be reimbursedfor.
Receipt RequirementsExpenses need itemized receipts
Mileage doesn’t need a receipt
Fees:Education – Confirmation & EventReports must be attached as receiptsSales - Confirmation & Event Report orDetailing Report must be attached asreceiptsSchools - Confirmation & Event Reportsmust be attached as receiptsShows – Confirmation Report in itsentirety; please make sure that if youdon’t get the entire emailed Report thatyou attach the 1st page & the page withyour name on it.
TIP: Email your confirmations to [email protected] & they show up in your Receipt Store. Must confirm your email in your profile on concursolutions.com beforehand.
Concur iPhone app instructions 26

Entering Expenses - Adding receipt image
[email protected] can send an image or email to your ReceiptStore for easy retrieval in Concur by simplyemailing it/forwarding it to [email protected].
Only thing is you MUST have already verifiedyour email address in your profile onconcursolutions.com.
To verify your email address:1. Log on at concursolutions.com2. Open your Concur Profile3. Open Profile Settings4. Scroll down to the box of Email addresses5. Click the Verify button next to the first
email address6. Open your email account, open the email
from Concur7. Copy the code in the email and paste it in
the box next to the email address in your profile on Concur
8. Click OKIf you have additional emails, repeat steps 3 through 6 for each.
Concur iPhone app instructions 27

Entering ExpensesFees
To enter your Fees select the correct Fees Earned fromunder the sub-heading Other under All Expense Types.
The correct Fees Earned can be determined by the prefixon the Confirmation # or if you know the role youworked. (Ex: SLS-2015-**** the prefix is SLS)
• SLS= Sales Events• EDU = Education Events• SCH = School Events• SHO could be Show Events or Sales Events or PR
Events.Shows or Sales or PR
If you worked the Sales Booth at a Show or if the entire Show was classified as a Sales event it would be Sales.
PR Event is stated clearly on the top of the Confirmation for PR. Typically photoshoots or Pageant events.
If you weren’t working in a sales capacity & it wasn’t a PR event then choose Shows.
If you don’t know, please ask.
Concur iPhone app instructions 28
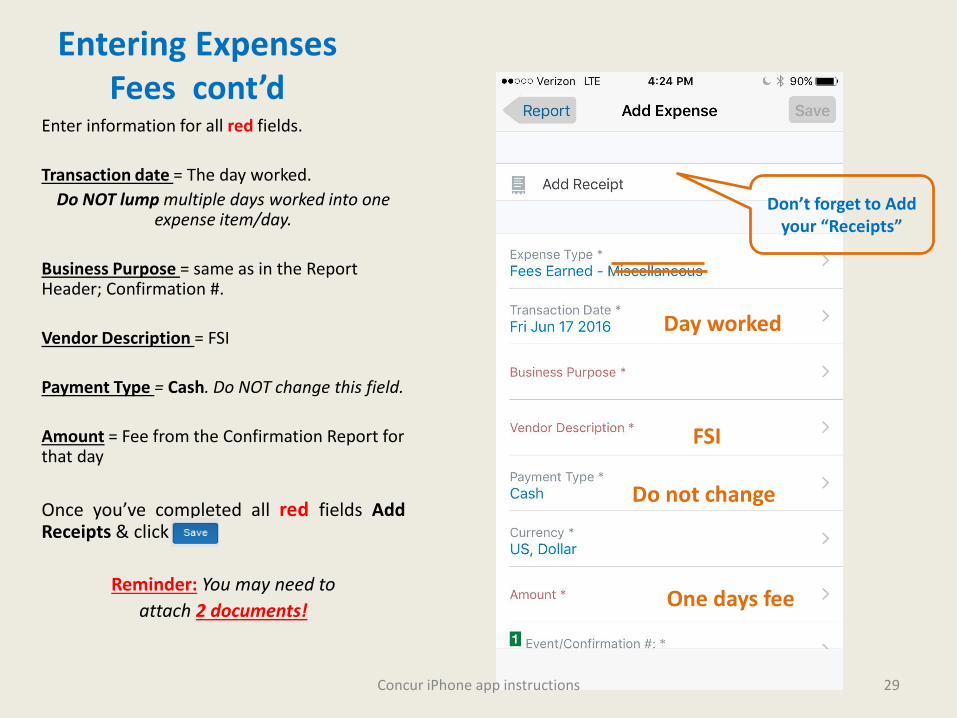
Entering ExpensesFees cont’d
Enter information for all red fields.
Transaction date = The day worked.Do NOT lump multiple days worked into one
expense item/day.
Business Purpose = same as in the Report Header; Confirmation #.
Vendor Description = FSI
Payment Type = Cash. Do NOT change this field.
Amount = Fee from the Confirmation Report for that day
Once you’ve completed all red fields AddReceipts & click
Reminder: You may need to attach 2 documents!
Do not change
One days fee
Day worked
FSI
Don’t forget to Add your “Receipts”
Concur iPhone app instructions 29
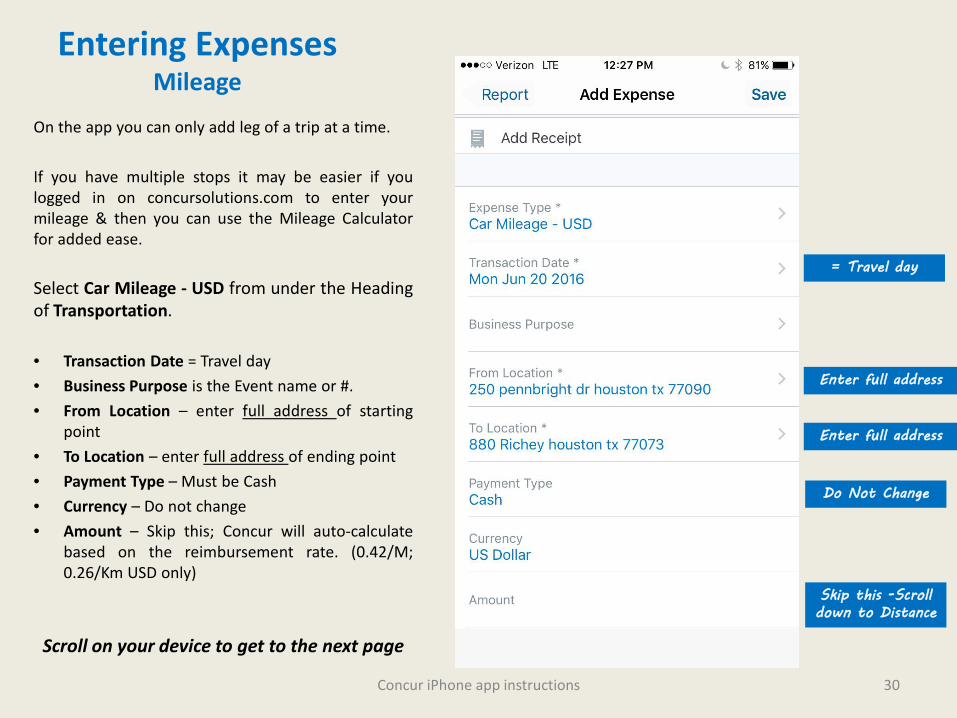
Entering ExpensesMileage
On the app you can only add leg of a trip at a time.
If you have multiple stops it may be easier if youlogged in on concursolutions.com to enter yourmileage & then you can use the Mileage Calculatorfor added ease.
Select Car Mileage - USD from under the Headingof Transportation.
• Transaction Date = Travel day• Business Purpose is the Event name or #.• From Location – enter full address of starting
point• To Location – enter full address of ending point• Payment Type – Must be Cash• Currency – Do not change• Amount – Skip this; Concur will auto-calculate
based on the reimbursement rate. (0.42/M;0.26/Km USD only)
Scroll on your device to get to the next page
= Travel day
Do Not Change
Skip this -Scroll down to Distance
Enter full address
Enter full address
Concur iPhone app instructions 30
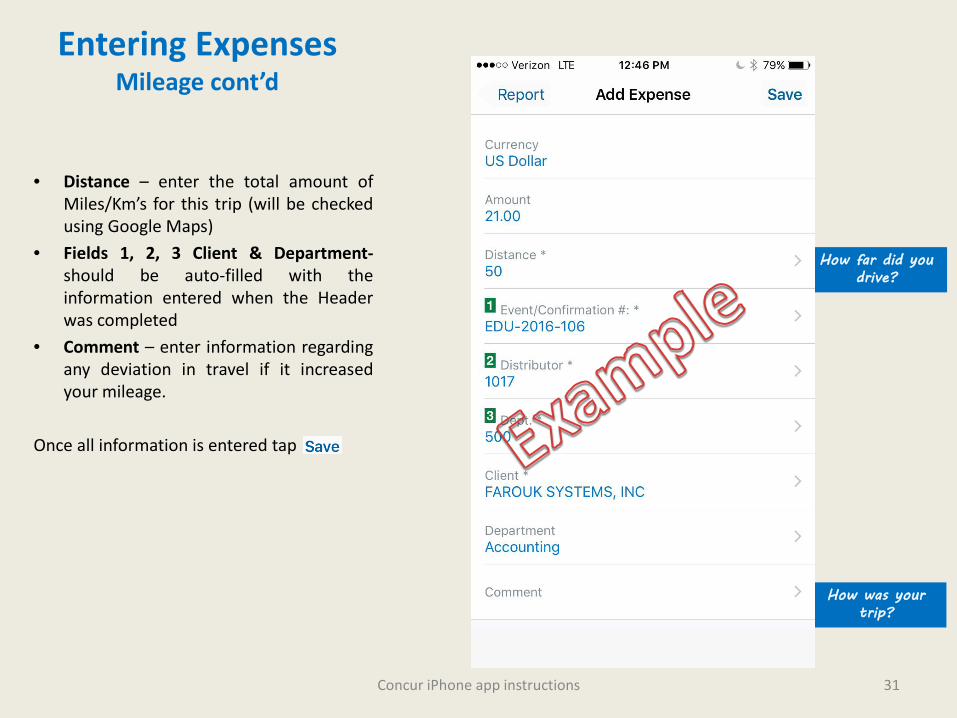
Entering ExpensesMileage cont’d
• Distance – enter the total amount ofMiles/Km’s for this trip (will be checkedusing Google Maps)
• Fields 1, 2, 3 Client & Department-should be auto-filled with theinformation entered when the Headerwas completed
• Comment – enter information regardingany deviation in travel if it increasedyour mileage.
Once all information is entered tap
How far did you drive?
How was your trip?
Concur iPhone app instructions 31
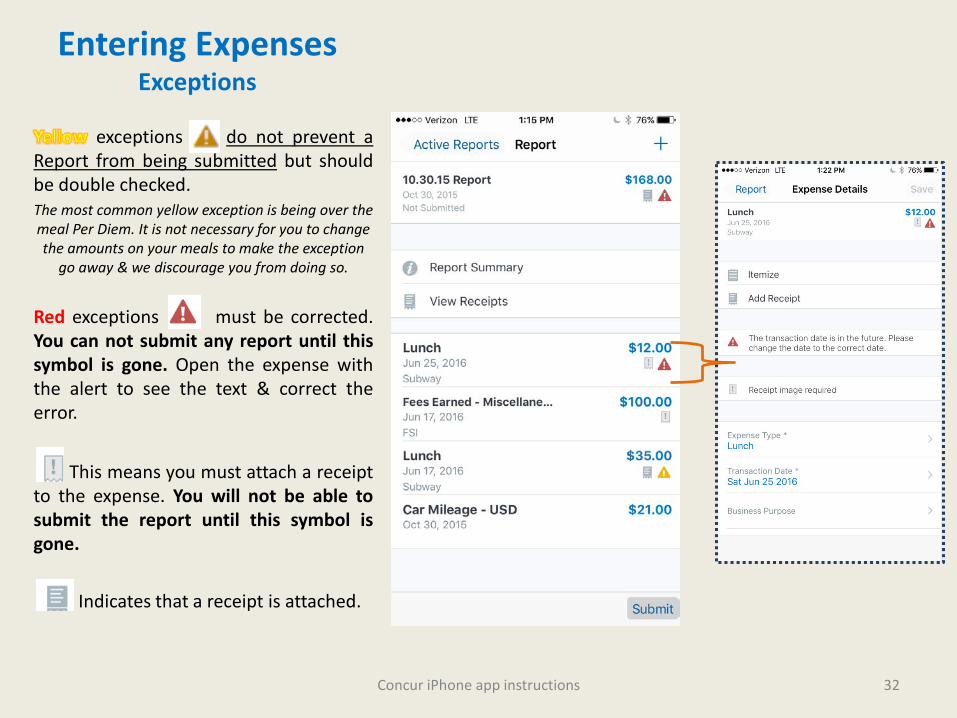
Entering ExpensesExceptions
exceptions do not prevent aReport from being submitted but shouldbe double checked.The most common yellow exception is being over the meal Per Diem. It is not necessary for you to change the amounts on your meals to make the exception
go away & we discourage you from doing so.
Red exceptions must be corrected.You can not submit any report until thissymbol is gone. Open the expense withthe alert to see the text & correct theerror.
This means you must attach a receiptto the expense. You will not be able tosubmit the report until this symbol isgone.
Indicates that a receipt is attached.
Concur iPhone app instructions 32

Finishing Expenses
Once you’ve completed entry of your expenses & fees check the following:
1) All Red exceptions are gone2) All Receipt Images are attached3) All Expense Items are entered
If everything is correct click
After you’ve submitted your expense itgoes to the Expense Report Dept(Educator Approval) for checking before itis sent on to the department for approval.
Once the dept has approved it will besent for final Accounting Review. If itreceives final approval it goes to thestatus of Processing Payment. The nextstatus will be Paid. That is scheduled onWednesdays unless holidays orunforeseen events prevent it.
TIP: You can create Expenses &/or Reports for an upcoming event & save it in Concur
until you’ve worked it.
Concur iPhone app instructions 33

Finishing Expenses
Congratulations! You’ve submitted your report!
You will be sent back to your Active Reports Screen where you can see its progress as it happens.
After you’ve submitted your expense it goes through the following Approval Status’
Payment Status that matches with the above Approval status is:
Payments are scheduled to process on Wednesdays unless holidays or unforeseen events prevent it.
Submitted & Pending Approval – Educator,
Approval
Submitted & Pending Approval – “Deptapprovers name”
Approved & in Accounting Review Approved
Not Paid Not Paid Not Paid Processing Payment Paid
You will see the deposit in your account within 3 business days AFTER the status changes to “Paid”.
Concur iPhone app instructions 34
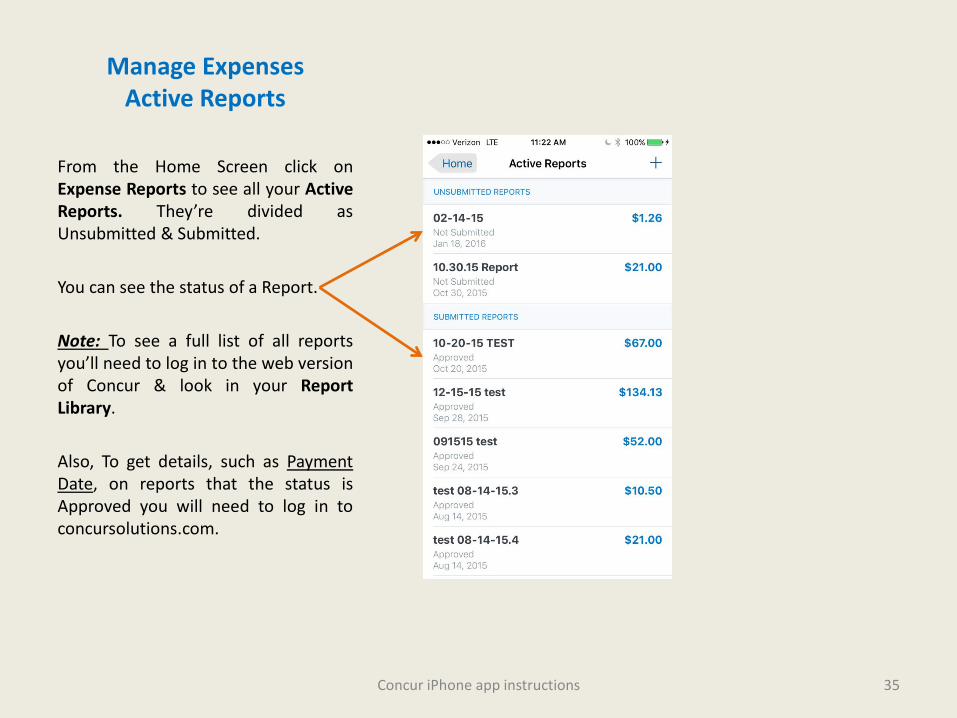
Manage ExpensesActive Reports
From the Home Screen click onExpense Reports to see all your ActiveReports. They’re divided asUnsubmitted & Submitted.
You can see the status of a Report.
Note: To see a full list of all reportsyou’ll need to log in to the web versionof Concur & look in your ReportLibrary.
Also, To get details, such as PaymentDate, on reports that the status isApproved you will need to log in toconcursolutions.com.
Concur iPhone app instructions 35

Manage ExpensesReport Corrections
If you’ve received an email that yourReport was returned for correction:
1. Open Concur App2. Go to Active Reports3. Tap on item returned4. Tap on Comment5. Make noted corrections6. Resubmit
Concur iPhone app instructions 36
Notes
Concur iPhone app instructions 37